

Philips AZ 1011, AZ 1012 User Manual 2
Toll Free Help Line
Ligne d'assistance en service libre
Linea de ayuda telefónica sin cargo
800-531-0039
AZ1008
B
A
S
S
R
E
F
L
E
X
S
P
E
A
K
E
R
S
Y
S
T
E
M
REPEAT
PROGRAM
B
A
T
T
.
L
O
W
T
A
P
O
F
F
M
W
FM
C
D
L
I
F
T
T
O
O
P
E
N
A
Z
1
0
0
8
C
D
R
A
D
I
O
C
A
S
S
E
T
T
E
R
E
C
O
R
D
E
R
C
D
S
Y
N
C
H
R
O
S
T
A
R
T
R
E
C
O
R
D
I
N
G
P
L
A
Y
S
T
O
P
•
O
P
E
N
P
A
U
S
E
S
E
A
R
C
H
S
E
A
R
C
H
S
E
A
R
C
H
S
T
O
P
D
Y
N
A
M
IC BASS
B
O
O
S
T
P
L
A
Y
/
P
A
U
S
E
D
BB
D
BB
P
R
O
G
R
A
M
R
E
P
E
A
T
V
O
L
U
M
E
N
E
P
O
O
T
T
F
I
L
T
U
N
I
N
G
CD
T
RA
C
K
CD Radio
Cassette Recorder
CAUTION
RISK OF ELECTRIC SHOCK
DO NOT OPEN
CAUTION: TO REDUCE THE RISK OF ELECTRIC SHOCK, DO NOT
REMOVE COVER (OR BACK). NO USER-SERVICEABLE PARTS
INSIDE. REFER SERVICING TO QUALIFIED SERVICE PERSONNEL.
Return your Warranty Registration card today to
ensure you receive all the benefits you’re entitled to.
• Once your Philips purchase is registered,
you’re eligible to receive all the privileges
of owning a Philips product.
Warranty
Verification
Registering your product
within 10 days confirms
your right to maximum
protection under the
terms and conditions of
your Philips warranty.
Owner
Confirmation
Your completed Warranty
Registration Card serves as
verification of ownership in
the event of product theft
or loss.
Know these
ssaaffeettyysymbols
• So complete and return the Warranty
Registration Card enclosed with your
purchase at once.And take advantage of
these important benefits.
Model
Registration
Returning your Warranty
Registration Card right away
guarantees you’ll receive all
the information and special
offers which you qualify for
as the owner of your model.
For Customer Use
Enter below the Serial No.which is located
on the bottom of the set. Retain this
information for future reference.
Model No. _________________________
This “bolt of lightning” indicates
uninsulated material within
your unit may cause an
electrical shock. For the safety of
everyone in your household,please do
not remove product covering.
The “exclamation point” calls
attention to features for which
you should read the enclosed
literature closely to prevent operating
and maintenance problems.
2
Serial No. __________________________
WARNING: TO PREVENT FIRE
OR SHOCK HAZARD, DO NOT
EXPOSE THIS EQUIPMENT TO RAIN
OR MOISTURE.
CAUTION: To prevent electric
shock, match wide blade of plug to wide
slot, and fully insert.
R
E
P
E
A
T
PROGRAM
B
A
T
T
.
L
O
W
T
A
P
O
F
F
M
W
F
M
C
D
L
I
F
T
T
O
O
P
E
N
A
Z
1
0
0
8
C
D
R
A
D
I
O
C
A
S
S
E
T
T
E
R
E
C
O
R
D
E
R
C
D
S
Y
N
C
H
R
O
S
T
A
R
T
R
E
C
O
R
D
I
N
G
P
L
A
Y
S
T
O
P
•
O
P
E
N
P
A
U
S
E
S
E
A
R
C
H
S
E
A
R
C
H
S
E
A
R
C
H
S
T
O
P
D
Y
N
A
M
IC BASS
B
O
O
S
T
P
L
A
Y
/
P
A
U
S
E
DBB
P
R
O
G
R
A
M
R
E
P
E
A
T
V
O
L
U
M
E
N
E
P
O
O
T
T
F
I
L
T
U
N
I
N
G
C
D TRA
C
K
A
C
M
A
I
N
S
~
B
A
S
S
R
E
F
L
E
X
S
P
E
A
K
E
R
S
Y
S
T
E
M
12 341 5
67 8 90! #@
$
%
^
3

Contents
English
General information
Warranty . . . . . . . . . . . . . . . . . . . . . . . . . . 2, 7
Safety . . . . . . . . . . . . . . . . . . . . . . . . . . . . . 4, 6
Environmental. . . . . . . . . . . . . . . . . . . . . . . . 5
Controls
Overview illustration . . . . . . . . . . . . . . . . . . 3
Controls on the set . . . . . . . . . . . . . . . . . . . 8
Power Supply
Batteries. . . . . . . . . . . . . . . . . . . . . . . . . . . . . 8
Using AC Power . . . . . . . . . . . . . . . . . . . . . . 9
Switching power on/off . . . . . . . . . . . . . . . . 9
Save energy. . . . . . . . . . . . . . . . . . . . . . . . . . 9
General operation . . . . . . . . . . . . . . . . . . . . 9
Radio
Radio reception . . . . . . . . . . . . . . . . . . . . . 10
CD Player
Display indications . . . . . . . . . . . . . . . . . . . 10
Playing a CD . . . . . . . . . . . . . . . . . . . . . . . . 10
Selecting a different track . . . . . . . . . . . . . 11
Repeat play modes. . . . . . . . . . . . . . . . . . . 11
Programming track numbers . . . . . . . . . . 12
Reviewing your program . . . . . . . . . . . . . . 12
Erasing a program . . . . . . . . . . . . . . . . . . . 12
Cassette Recorder
Cassette playback. . . . . . . . . . . . . . . . . . . . 12
General information on recording . . . . . . 13
Synchro Start CD recording. . . . . . . . . . . 13
Recording from the Radio. . . . . . . . . . . . . 13
Maintenance 14
Troubleshooting 15
CAUTION
Use of controls or adjustments or performance of procedures other than herein may
result in hazardous radiation exposure or other unsafe operation.
The set complies with the FCC-Rules, Part 15 and with 21 CFR 1040.10. Operation is
subject to the following two conditions:
1. This device may not cause harmful interference, and
2. This device must accept any interference received, including interference that
may cause undesired operation.
Canada
English:
This digital apparatus does not exceed the Class B limits for noise emissions from digital
apparatus as set out in the Radio Interference Regulations of the Canadian Department of
Communications.
4

Index
English
Français
Español
Environmental information
All unnecessary packaging material has been omitted.The packaging can be easily
separated into three materials: cardboard, polystyrene and plastic.
Your set consists of materials which can be recycled if disassembled by a specialized
company.Please observe the local regulations regarding the disposal of packing
materials, dead batteries and old equipment.
Informations relatives à l’environnement
Nous n’avons pas utilisé de matériaux d’emballage non nécessaires.Vous pouvez
facilement séparer les matériaux d’emballage en trois éléments principaux:carton,
polystyrène extensible et polyéthylène.
L’appareil est constitué de matériaux qu’il est possible de recycler, s’il est démonté
par une société spécialisée.Veuillez avoir l’obligeance de respecter les
réglementations locales concernant la manière de se débarrasser des matériaux
d’emballage, piles épuisées et matériel usé.
________________________________________________
______________________________________________
______________________________________________
8
EnglishFrançaisEspañol
20
34
Información ambiental
Se ha omitido todo el material de embalaje innecesario. Los materiales de embalaje
se pueden separar fácilmente entre tres tipos: cartón,poliestireno y polietileno.
Su aparato está formado por materiales que pueden reciclarse si pueden ser
desmantelados por una compañía especializada. Observe las normas locales
relacionadas con la eliminación de materiales de embalaje, pilas gastadas y equipo
desechado.
5
IMPORTANT SAFETY INSTRUCTIONS
– Read before operating equipment
This product was designed and
manufactured to meet strict quality and
safety standards.There are, however, some
installation and operation precautions which
you should be particularly aware of.
1. Read these instructions – All the safety
and operating instructions should be read
before the appliance is operated.
2. Keep these instructions – The safety
and operating instructions should be
retained for future reference.
3. Heed all warnings – All warnings on the
appliance and in the operating instructions
should be adhered to.
4. Follow all instructions – All operating
and use instructions should be followed.
5. Do not use this apparatus near
water – for example, near a bathtub,
washbowl, kitchen sink, laundry tub, in a wet
basement or near a swimming pool, etc.
6. Clean only with a damp cloth. The
appliance should be cleaned only as
recommended by the manufacturer.
7. Install in accordance with the
manufacturers instructions. Do not
block any of the ventilation openings.
For example, the appliance should not be
situated on a bed, sofa, rug, or similar
surface or placed in a built-in installation,
such as a bookcase or cabinet that may
impede the flow of air through the
ventilation openings.
8. Do not install near any heat sources
such as radiators, heat registers, stoves, or
other apparatus (including amplifiers) that
produce heat.
9. Do not defeat the
safety purpose of the
polarized or
grounding-type plug.
AC Polarized
Plug
A polarized plug has two blades with one
wider than the other.A grounding type plug has
two blades and a third grounding prong.The
wide blade or the third prong are provided for
your safety.When the provided plug does not
fit into your outlet, consult an electrician for
replacement of the obsolete outlet.
10.
Protect the power cord from being
walked on or pinched particularly at plugs,
convenience receptacles, and the point
where they exit from the apparatus.
Only use attachments/accessories
11.
specified by the manufacturer.
12.
the apparatus.When a cart is used, use
caution when moving the cart/apparatus
combination to avoid injury from tip-over.
13.
Unplug this apparatus during lightning
storms or when unused for long periods of
time.
14.
Refer all servicing to qualified service
personnel. Servicing is required when the
apparatus has been damaged in any way,
such as power-supply cord or plug is
damaged, liquid has been spilled or objects
have fallen into the apparatus, the apparatus
has been exposed to rain or moisture, does
not operate normally, or has been dropped.
15.
Battery usage CAUTION – To prevent
battery leakage which may result in bodily injury
or damage to the unit:
● Install all batteries correctly, + and - as
marked on the unit.
● Do not mix batteries (old and new or
carbon and alkaline, etc.).
● Remove batteries when the unit is not used
for a long time.
Use only with a cart, stand,
tripod, bracket, or table specified
by the manufacturer, or sold with
EL 6475-E001: 00/8
6

LIMITED WARRANTY
TABLE AUDIO
POR
One Year Free Exchange
This product must be carried in for an exchange.
WHO IS COVERED?
You must have proof of purchase to exchange the product.
A sales receipt or other document showing that you
purchased the product is considered proof of purchase.
Attach it to this owner’s manual and keep both nearby.
WHAT IS COVERED?
Warranty coverage begins the day you buy your product.
For one year thereafter, a defective or inoperative product
will be replaced with a new,renewed or comparable
product at no charge to you.A replacement product is
covered only for the original warranty period.When the
warranty on the original product expires,the warranty on
the replacement product also expires.
WHAT IS EXCLUDED?
Your warranty does not cover:
• labor charges for installation or setup of the product,
adjustment of customer controls on the product,and
installation or repair of antenna systems outside of the
product.
• product repair and/or part replacement because of
misuse, accident,unauthorized repair or other cause
not within the control of Philips Consumer Electronics
Company.
• reception problems caused by signal conditions or
cable or antenna systems outside the unit.
• a product that requires modification or adaptation to
enable it to operate in any country other than the
country for which it was designed, manufactured,
approved and/or authorized,or repair of products
damaged by these modifications.
• incidental or consequential damages resulting from the
product. (Some states do not allow the exclusion of
incidental or consequential damages, so the above
exclusion may not apply to you.This includes, but is not
limited to, prerecorded material,whether copyrighted
or not copyrighted.)
• a product used for commercial or institutional
purposes.
WHERE IS EXCHANGE AVAILABLE?
You may exchange the product in all countries where the
product is officially distributed by Philips Consumer
Electronics Company. In countries where Philips Consumer
Electronics Company does not distribute the product,the
local Philips service organization will attempt to provide a
replacement product (although there may be a delay if the
appropriate product is not readily available).
BEFORE REQUESTING EXCHANGE...
Please check your owner’s manual before requesting an
exchange.Adjustments of the controls discussed there may
save you a trip.
EXCHANGING A PRODUCT IN U.S.A.,
PUERTO RICO OR U.S.VIRGIN ISLANDS...
Contact your dealer to arrange an exchange. Or, ship the
product, insured and freight prepaid,and with proof of
purchase enclosed, to the address listed below.
(In U.S.A., Puerto Rico and U.S.Virgin Islands, all implied
warranties, including implied warranties of merchantability and
fitness for a particular purpose, are limited in duration to the
duration of this express warranty. But, because some states do
not allow limitations on how long an implied warranty may
last, this limitation may not apply to you.)
EXCHANGING A PRODUCT IN CANADA...
Please contact Philips at:
(In Canada, this warranty is given in lieu of all other
warranties. No other warranties are expressed or implied,
including any implied warranties of merchantability or
fitness for a particular purpose. Philips is not liable under
any circumstances for any direct,indirect, special,incidental
or consequential damages, howsoever incurred,even if
notified of the possibility of such damages.)
TO GET OUT-OF-WARRANTY EXCHANGE...
In U.S.A., Puerto Rico or U.S.Virgin Islands, contact Philips
Service Company at (800) 531-0039 to obtain the cost of outof-warranty exchange.Then carefully pack the product and
ship it to the Small Product Service Center (address listed
above). In Canada, call the phone number listed above under
“Exchanging a Product in Canada” to obtain the cost of outof-warranty exchange.
REMEMBER...
Please record the model and serial numbers found on the
product below.Also,please fill out and mail your warranty
registration card promptly. It will be easier for us to notify
you if necessary.
MODEL # __________________________________
SERIAL # __________________________________
Small Product Service Center
Philips Service Company
907 Snapps Ferry Road, Plant 2, Building 6
Greeneville,TN 37743
1-800-661-6162 (French Speaking)
1-800-363-7278 (English Speaking)
This warranty gives you specific legal rights.You may have other rights which vary from state/province to state/province.
Philips Service Solutions Group, P.O.Box 2976, Longview,Texas 75606, (903) 242-4800
EL6095T002 / MAC5433 / 1-97
7
Controls Power Supply
A
C
M
A
I
N
S
~
6 x 1.5V R14/ UM2/ C CELL
English
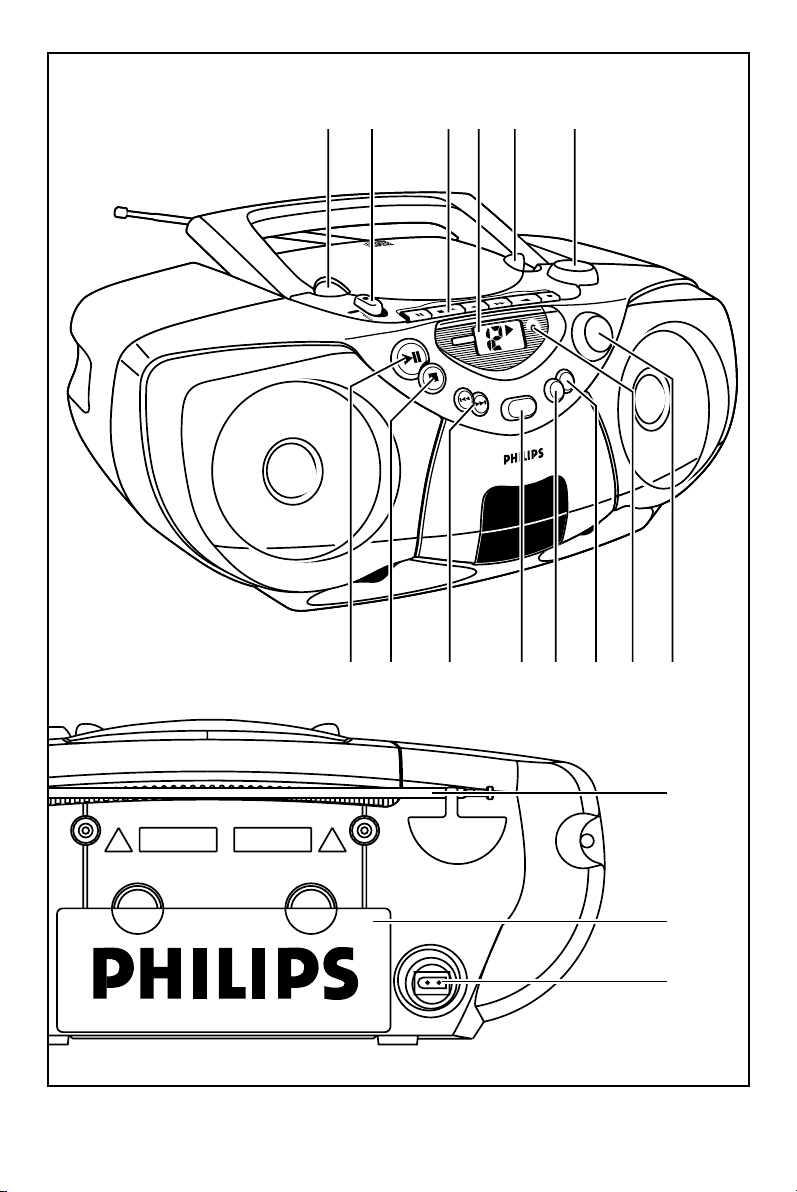
Top and front panels
1 LIFT TO OPEN – opens/ closes the CD
door
2 Source selector:CD, AM, FM,
TAPE/
OFF
– selects CD source of sound, tuner
waveband or tape source of sound
– power on/ off switch
3 CASSETTE RECORDER:
PAUSE ; – pauses recording or playback
STOP•OPEN 9/ – stops the tape; opens
the cassette door
SEARCH 5 or 6 – fast rewinds / winds
the tape
PLAY 1 – starts playback
RECORD 0 – starts recording
4 CD display – shows the CD functions
5 TUNING
6 PLAY•PAUSE 2; – starts or pauses CD
playback
7STOP 9 – stops CD playback; erases a
CD program
8 SEARCH ∞ , §
CD: skips or searches a passage/track
backwards or forward
9 DBB (Dynamic Bass Boost) –
enhances bass response
10 REPEAT – repeats a track/CD/ program
11 PROGRAM – programs and reviews
programmed track numbers;
12 BATT LOW – indicator lights up if
battery power running low
13 VOLUME – adjusts volume level
Back Panel
14 Telescopic antenna – to improve FM
reception
15 Battery door – open to inser t 6 x 1.5V
R14/UM2/ C-cell batteries
16 AC MAINS – inlet for power cord
Power Supply
Whenever convenient, use the power
supply if you want to conserve battery life.
Make sure you remove the plug from the
set and wall outlet before inserting
batteries.
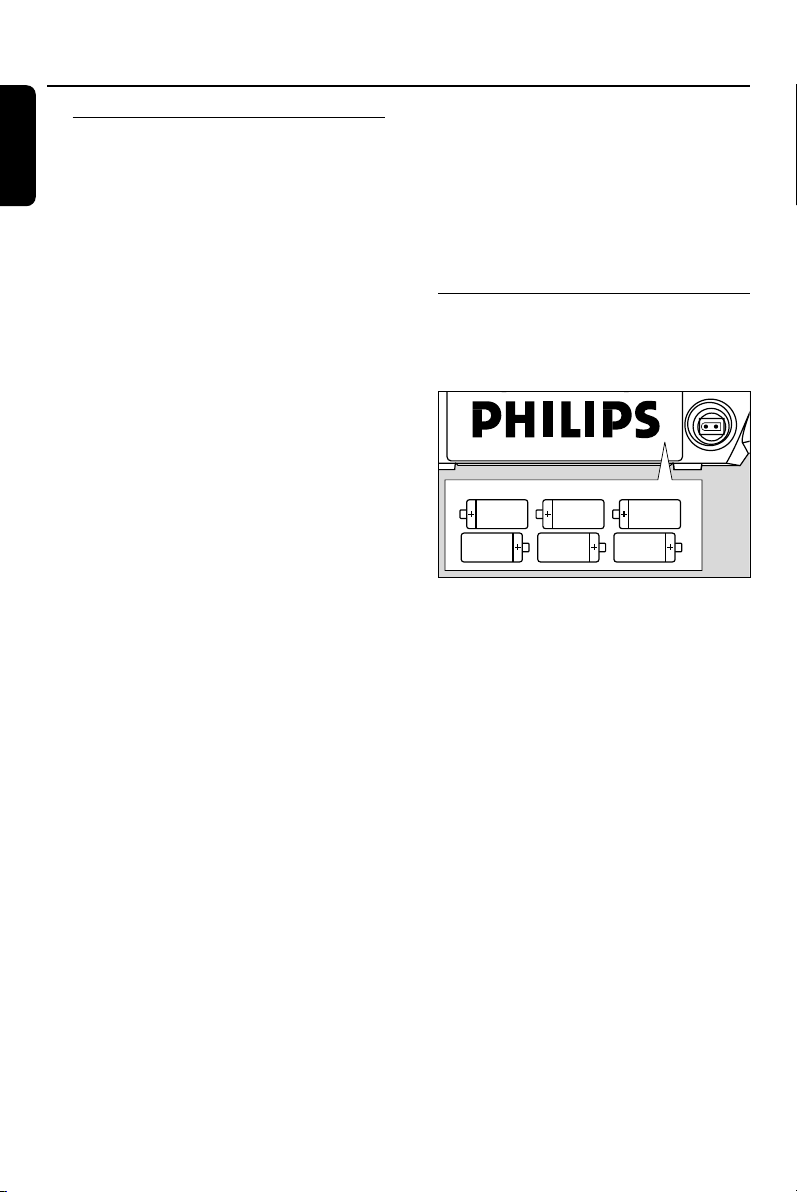
Batteries (not included)
1 Open the batter y compartment and insert
six batteries, type R-14, UM-2 or C-cells,
(preferably alkaline) with the correct
polarity as indicated by the "+" and "–"
symbols inside the compartment.
2 Close the compar tment door,and make
sure the batteries are firmly and correctly in
place.The set is now ready to operate.
➜ If BATT LOW lights up, battery power
is running low.The BATT LOW indicator
eventually goes out if the batteries are
too weak.
8
Power Supply
A
C
M
A
I
N
S
~
Incorrect use of batteries can cause
electrolyte leakage and will corrode the
compartment or cause the batteries to
burst.Therefore:
• Do not mix battery types: e.g. alkaline with
carbon zinc. Only use batteries of the same
type for the set.
• When inserting new batteries, do not try to
mix old batteries with the new ones.
• Remove the batteries if the set is not to be
used for a long time.
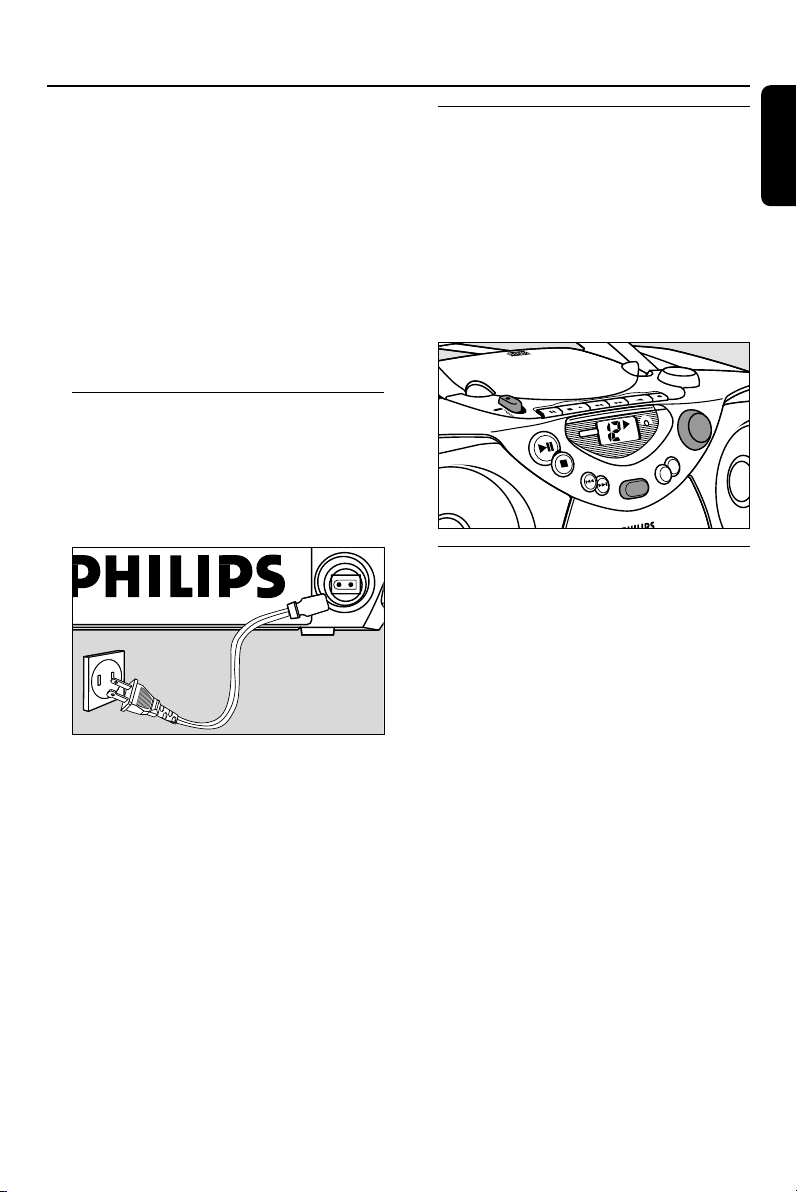
Using AC Power
1 Check if the power voltage, as shown on
the type plate located on the bottom
of the set, corresponds to your local
power supply. If it does not, consult your
dealer or service center.
2 Connect the power cord to the AC MAINS
inlet and the wall outlet.The power supply
is now connected and ready for use.
3 To switch off completely, unplug the power
cord from the wall outlet.
• Unplug the power cord from the wall
outlet to protect your set during heavy
thunderstorms.
The type plate is located on the
bottom of the set.
Switching power on/off:
Save energy
Whether you are using mains or battery
supply, to avoid unnecessary energy
consumption always adjust the source
selector to TAPE/
OFF and check if the
cassette keys are released.
Standby power consumption...................3 W
8
0
0
R
E
1
D
R
O
Z
C
E
R
A
E
T
T
E
S
S
A
C
O
I
D
A
R
D
C
Y
S
D
C
L
I
F
N
T
E
P
T
O
O
D
C
W
M
M
F
P
A
T
F
F
O
G
N
I
D
R
O
C
E
R
T
R
A
T
S
O
R
H
C
N
A
E
S
N
E
P
O
•
P
O
T
S
E
S
U
A
P
K
C
A
R
T
D
C
E
S
U
S
A
T
P
O
P
/
Y
A
L
P
R
C
A
H
E
S
N
E
P
O
O
T
T
F
I
L
G
N
I
N
U
T
Y
A
L
P
H
C
R
A
E
S
H
C
R
REPEAT
O
PR
ICBASS
M
A
N
Y
D
R
G
DBB
V
O
L
U
M
E
L
.
O
T
T
W
A
B
M
A
G
O
R
R
A
P
M
T
A
E
P
E
R
B
O
O
S
T
General operation
1 To select your sound source adjust the
source selector to CD, AM, FM or
TAPE/
OFF.
2 Adjust the sound with the VOLUME and
DBB (Dynamic Bass Boost) controls.
3 To switch off the set,adjust the source
selector to TAPE/
the cassette keys are released.
OFF
position and check
English
9

Radio CD-Player
REPEAT
P
R
O
G
R
AM
B
A
T
T
.
L
O
W
T
A
P
O
F
F
M
W
F
M
C
D
L
I
F
T
T
O
O
P
E
N
A
Z
1
0
0
8
C
D
R
A
D
I
O
C
A
S
S
E
T
T
E
R
E
C
O
R
D
E
R
C
D
S
Y
N
C
H
R
O
S
T
A
R
T
R
E
C
O
R
D
I
N
G
P
L
A
Y
S
T
O
P
•
O
P
E
N
P
A
U
S
E
S
E
A
R
C
H
S
E
A
R
C
H
S
E
A
R
C
H
S
T
O
P
D
Y
N
A
M
ICBASS
B
O
O
S
T
P
L
A
Y
/
P
A
U
S
E
DBB
P
R
O
G
R
A
M
R
E
P
E
A
T
V
O
L
U
M
E
N
E
P
O
O
T
T
F
I
L
T
U
N
I
N
G
C
D
T
R
A
C
K
E
English
Radio reception
1 Adjust the source selector to AM or FM
to select your desired waveband.
2 Tur n TUNING to tune to a radio station.
To improve reception
– For FM, pull out the telescopic antenna.
Incline and turn the antenna. Reduce its length
if the signal is too strong (very close to a
transmitter).
– For AM the set is provided with a built-in
antenna so the telescopic antenna is not
needed. Direct the antenna by turning the
whole set.
3 To switch off the radio,adjust the source
selector to TAPE/
OFF position and check
the cassette keys are released.
CD Player
Display indication for CD functions:
– --: flashes when CD source just selected
– In stop mode: total track number
– During CD playback:2 and current
track number
REPEAT/ REPEAT ALL: when the
respective repeat mode is activated
– PROGRAM: when CD program active
– -- and PROGRAM: flashes when
program memory full
– Er: no disc/ error in CD operation or
with the CD/ CD-(R) is blank or the disc
is not finalized (see Troubleshooting)
10
Playing a CD
8
0
0
R
E
1
D
R
O
Z
C
E
R
A
E
T
T
E
S
S
A
C
O
I
D
A
R
D
C
N
Y
S
D
C
L
I
F
N
T
E
P
T
O
O
D
C
W
M
M
F
P
A
T
F
F
O
G
N
I
D
R
O
C
E
R
T
R
A
T
S
O
R
H
C
A
E
S
N
E
P
O
•
P
O
T
S
E
S
U
A
P
K
C
A
R
T
D
C
E
S
U
S
A
T
P
O
P
/
Y
A
L
P
R
C
A
H
E
S
N
E
P
O
O
T
T
F
I
L
G
N
I
N
U
T
Y
A
L
P
H
C
R
A
E
S
H
C
R
REPEAT
O
PR
ICBASS
M
A
N
Y
D
A
R
G
DBB
V
O
L
U
M
L
.
O
T
T
W
A
B
M
G
O
R
R
A
P
M
T
A
E
P
E
R
B
O
O
S
T
1 Adjust the source selector to CD.
2 To open the CD door, lift the CD door at
the edge marked LIFT TO OPEN.
3 Inser t a CD or CD-(R) with the printed
side facing up and press the CD door gently
close.
4 Press PLAY•PAUSE 2; on the set to
start playback.
5 To pause playback press PLAY•PAUSE
2;.To resume, press PLAY•PAUSE 2;
again.
➜ 2 flashes during pause
6 To stop CD play, press STOP 9.
7 To switch off the set,adjust the source
selector to TAPE/
OFF
position and check
the cassette keys are released.
Note: CD play will also stop when:
– you open the CD compartment;
– you select AM, FM or TAPE sound
source;
– the CD has reached to the end.
CD-Player
REPEAT
P
R
O
G
R
A
M
B
A
T
T
.
L
O
W
T
A
P
O
F
F
M
W
F
M
C
D
L
I
F
T
T
O
O
P
E
N
A
Z
1
0
0
8
C
D
R
A
D
I
O
C
A
S
S
E
T
T
E
R
E
C
O
R
D
E
R
C
D
S
Y
N
C
H
R
O
S
T
A
R
T
R
E
C
O
R
D
I
N
G
P
L
A
Y
S
T
O
P
•
O
P
E
N
P
A
U
S
E
S
E
A
R
C
H
S
E
A
R
C
H
S
E
A
R
C
H
S
T
O
P
D
Y
N
A
M
ICBASS
B
O
O
S
T
P
L
A
Y
/
P
A
U
S
E
DBB
P
R
O
G
R
A
M
R
E
P
E
A
T
V
O
L
U
M
E
N
E
P
O
O
T
T
F
I
L
T
U
N
I
N
G
C
D
T
R
A
C
K
A
S
S
E
T
T
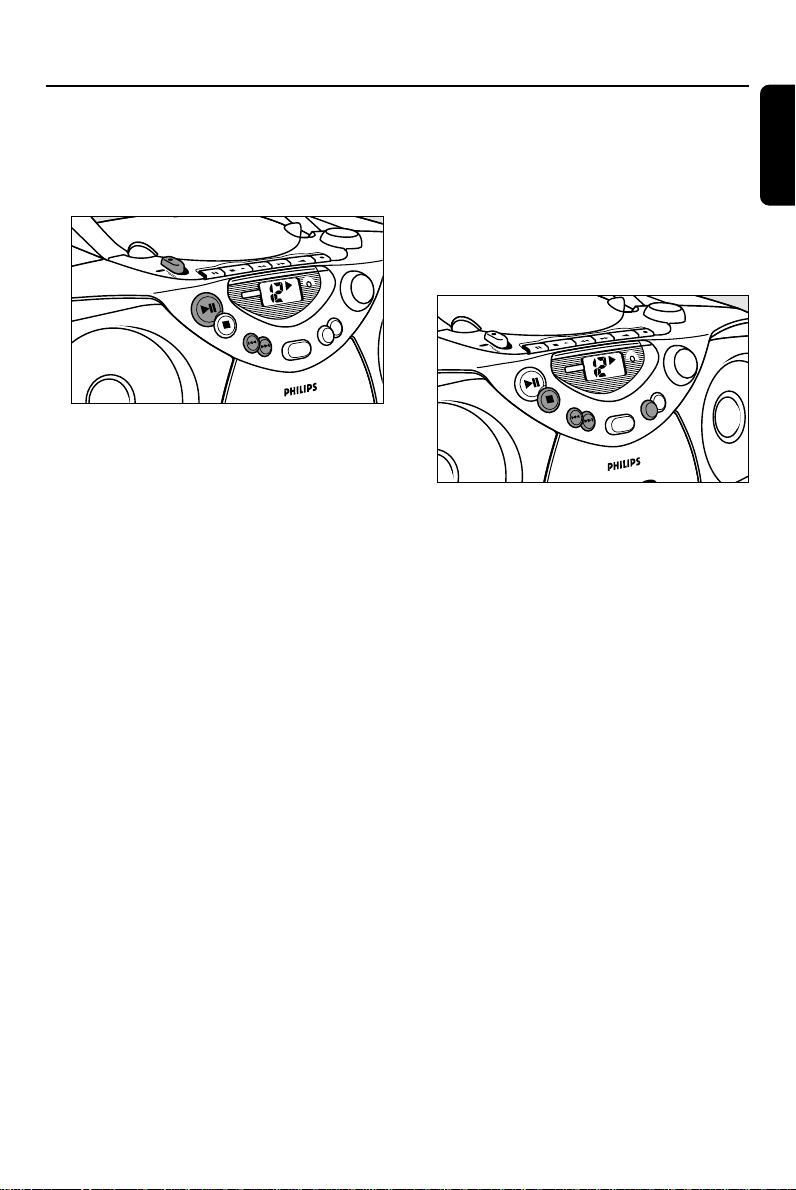
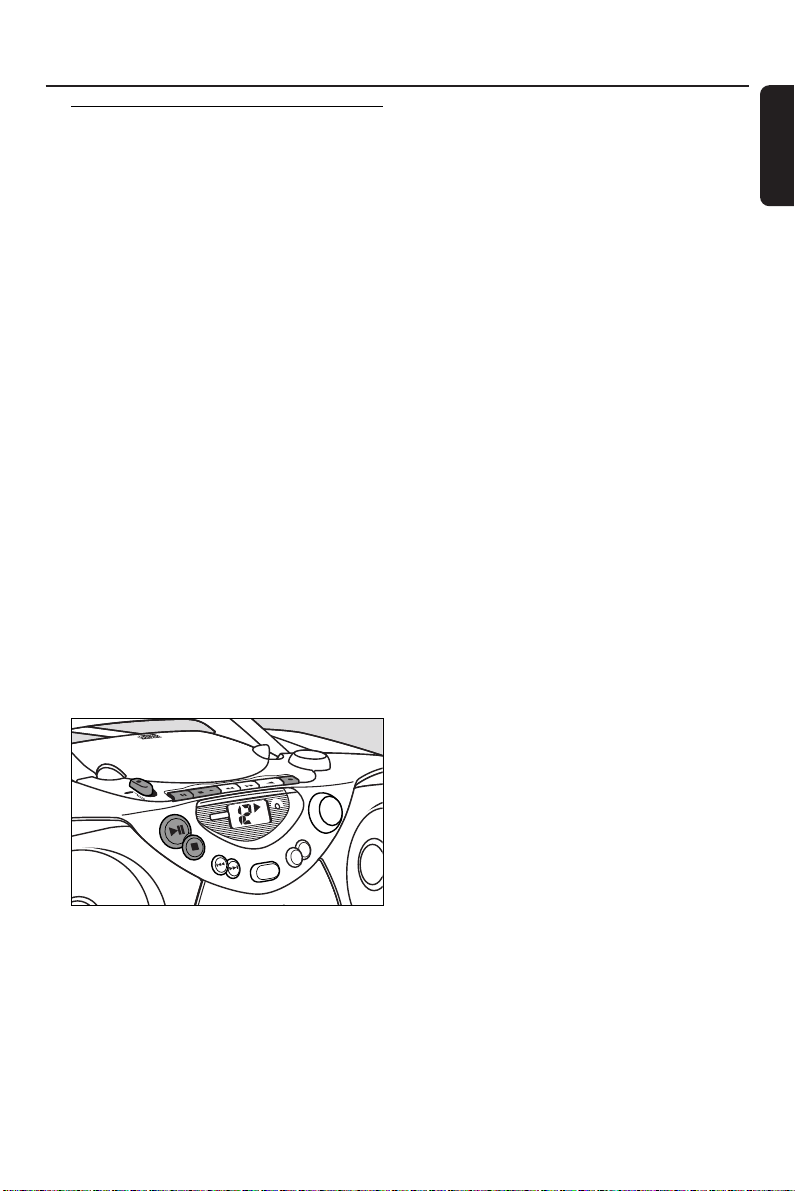
Selecting a different track
During playback you can use the
SEARCH buttons to select a particular
track.
• If you have selected a track number in the
stop or pause position, press
PLAY•PAUSE 2; to star t playback.
• Press SEARCH § once briefly for the
next track, or press repeatedly until the
desired track number appears in the display.
• Press SEARCH ∞ once briefly to return
to the beginning of a current track.
• Press SEARCH ∞ more than once briefly
for a previous track.
Finding a passage within a track
1 During playback, press and hold down
SEARCH ∞ or §.
• The CD is played at high speed and low
volume.
2 When you recognize the passage you want
release the SEARCH button.
➜ Normal playback resumes.
Note:When searching within a final track and
you reach the end of the last track, the CD
goes to stop mode.
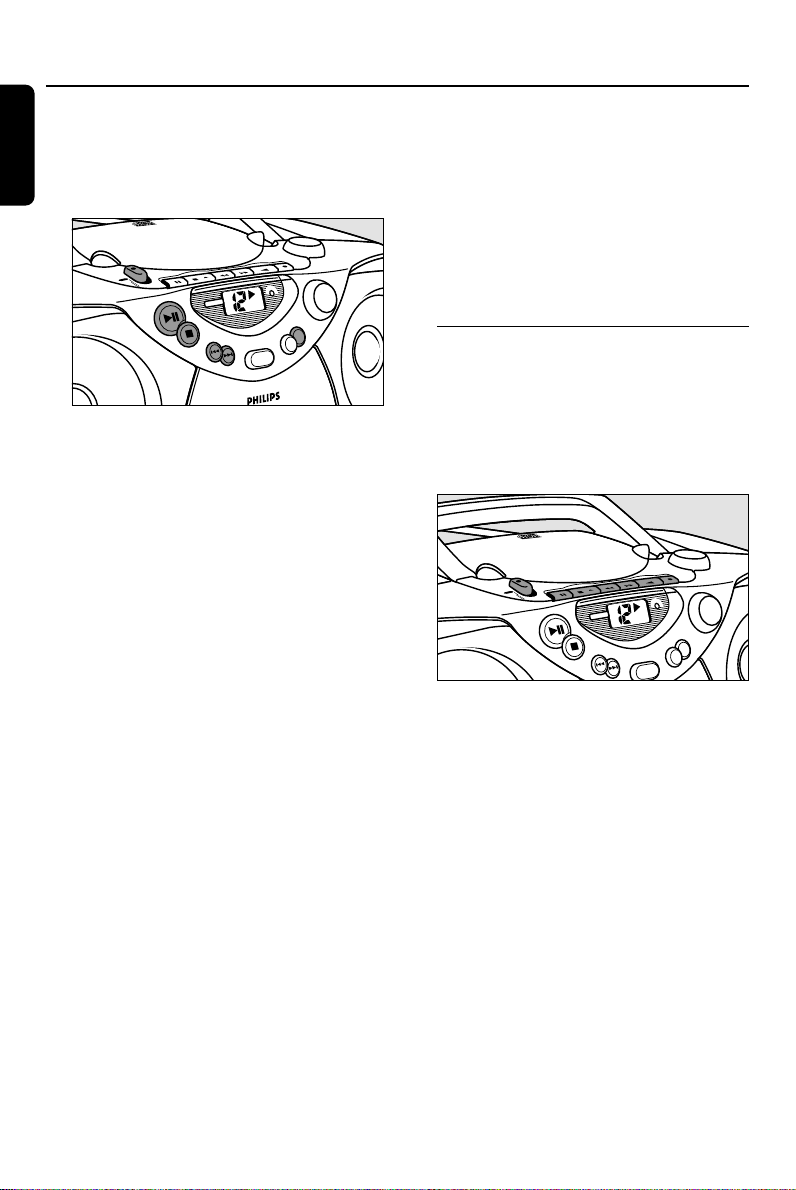
Repeat play modes
REPEAT can be selected or changed
during playback in the following sequence:
REPEAT – plays the current track
continuously
REPEAT ALL – plays the whole CD
continuously
C
O
I
D
A
R
D
C
N
Y
S
D
C
L
I
F
N
T
E
P
T
O
O
D
C
W
M
M
F
P
A
T
F
F
O
G
N
I
D
R
O
C
E
R
T
R
A
T
S
O
R
H
C
R
A
E
S
N
E
P
O
•
P
O
T
S
E
S
U
A
P
K
C
A
R
T
D
C
E
S
U
S
A
T
P
O
P
/
Y
A
L
P
R
C
A
H
E
S
N
E
P
O
O
T
T
F
I
L
G
N
I
N
U
T
Y
A
L
P
H
C
R
A
E
S
H
C
REPEAT
O
PR
ICBASS
M
A
N
Y
D
R
G
DBB
V
O
L
U
M
E
L
.
O
T
T
W
A
B
AM
G
O
R
R
A
P
M
T
A
E
P
E
R
B
O
O
S
T
1 During playback, press REPEAT once or
more until the desired REPEAT mode is
shown.
• You can use SEARCH ∞ or § to skip
tracks during the repeat modes.
• The REPEAT play options can be
combined and used with a program: e.g.
REPEAT ALL
PROGRAM– repeats the
entire CD program.
2 To return to normal playback press
REPEAT until the REPEAT modes are no
longer shown.
• You can also press STOP 9 to quit the
play mode.
English
11
CD-Player Cassette Recorder
REPEAT
P
R
O
G
R
AM
B
A
T
T
.
L
O
W
T
A
P
O
F
F
M
W
F
M
C
D
L
I
F
T
T
O
O
P
E
N
A
Z
1
0
0
8
C
D
R
A
D
I
O
C
A
S
S
E
T
T
E
R
E
C
O
R
D
E
R
C
D
S
Y
N
C
H
R
O
S
T
A
R
T
R
E
C
O
R
D
I
N
G
P
L
A
Y
S
T
O
P
•
O
P
E
N
P
A
U
S
E
S
E
A
R
C
H
S
E
A
R
C
H
S
E
A
R
C
H
S
T
O
P
D
Y
N
A
M
ICBASS
B
O
O
S
T
P
L
A
Y
/
P
A
U
S
E
DBB
P
R
O
G
R
A
M
R
E
P
E
A
T
V
O
L
U
M
E
N
E
P
O
O
T
T
F
I
L
T
U
N
I
N
G
C
D
T
R
A
C
K
English
Programming track numbers
You may store up to 19 tracks in the
desired sequence. If you like, store any track
more than once.
1 In the STOP mode, press PROGRAM to
activate program mode.
➜ 00 and
PROGRAM flashes.
2 Press SEARCH ∞ or § for your desired
track.
➜ Your selected track number and
PROGRAM flashes.
3 Press PROGRAM to store the track.
➜ 00 and
PROGRAM flashes, ready for your
next track selection.
4 Repeat steps 2 to 3 to select and store all
desired tracks in this way.
➜ -- and
PROGRAM flashes in the display
if you attempt to program more than 19
tracks.
5 To play your program,press
PLAY•PAUSE 2; .
Reviewing your program
• In the stop position, press PROGRAM
repeatedly to see your stored track
numbers.
12
Erasing a program
You can erase the contents of the memory
by:
– opening the CD door;
– selecting AM, FM or TAPE sound
source;
– pressing STOP 9 (twice during playback
or once in the stop position.)
➜ Display: PROGRAM disappears.
CASSETTE RECORDER
Cassette playback
1 Adjust the source selector to TAPE/
2 Press STOP•OPEN 9/ to open the
cassette door and insert a recorded
cassette.
8
0
0
R
E
1
D
R
O
Z
C
E
R
A
E
T
T
E
S
S
A
C
O
I
D
A
R
D
C
N
Y
S
D
C
L
I
F
N
T
E
P
T
O
O
D
C
W
M
M
F
P
A
T
F
F
O
G
N
I
D
R
O
C
E
R
T
R
A
T
S
O
R
H
C
H
C
R
A
E
S
H
C
R
A
E
S
N
E
P
O
•
P
O
T
S
E
S
U
A
P
K
REPEAT
C
A
R
T
D
C
R
E
S
U
S
A
P
/
Y
A
L
P
G
O
R
P
T
O
P
R
C
A
H
E
S
ICBASS
M
A
N
Y
D
DBB
3 Close the cassette door.
4 Press PLAY 1 to start playback.
5 To pause playback press PAUSE ;.To
resume, press the key again.
6 By pressing SEARCH 5 or 6, fast
winding of the tape is possible in both
directions.To stop fast winding, press
STOP•OPEN 9/.
7 To stop the tape, press STOP•OPEN 9/.
• The keys are automatically released at the
end of the tape, and the set is switched off,
except if PAUSE ; has been activated.
OFF.
N
E
P
O
O
T
T
F
I
L
G
N
I
N
U
T
Y
A
L
P
V
O
L
U
M
E
L
.
O
T
T
W
A
B
M
A
G
O
R
R
A
P
M
T
A
E
P
E
R
B
O
O
S
T
Recording
REPEAT
PROGRAM
B
A
T
T
.
L
O
W
T
A
P
O
F
F
M
W
F
M
C
D
L
I
F
T
T
O
O
P
E
N
A
Z
1
0
0
8
C
D
R
A
D
I
O
C
A
S
S
E
T
T
E
R
E
C
O
R
D
E
R
C
D
S
Y
N
C
H
R
O
S
T
A
R
T
R
E
C
O
R
D
I
N
G
S
E
A
R
C
H
S
T
O
P
D
Y
N
A
M
ICBASS
B
O
O
S
T
P
L
A
Y
/
P
A
U
S
E
DBB
P
R
O
G
R
A
M
R
E
P
E
A
T
V
O
L
U
M
E
N
E
P
O
O
T
T
F
I
L
T
U
N
IN
G
C
D
T
R
A
C
K
P
L
A
Y
S
T
O
P
•
O
P
E
N
P
A
U
S
E
S
E
A
R
C
H
S
E
A
R
C
H
General information on
recording
• Recording is permissible insofar as copyright or
other rights of third parties are not infringed.
• This deck is not suited for recording on
CHROME (IEC II) or METAL (IEC IV) type
cassettes. For recording, use only NORMAL
type cassettes (IEC type I) on which the
tabs have not been broken.
• The best recording level is set automatically.
Altering the VOLUME and DBB controls
will not affect the recording in progress.
• At the very beginning and end of the tape,
no recording will take place during the
7 seconds when the leader tape passes the
recorder heads.
• To protect a tape from accidental erasure,
have the tape in front of you and break out
the left tab. Recording on this side is no
longer possible.To record over this side
again, cover the tabs with a piece of
adhesive tape.
Synchro Start CD recording
1 Select CD source.
2 Inser t a CD and if desired, program track
numbers.
3 Press STOP•OPEN 9/ to open the
cassette door. Insert a blank tape.
4 Close the cassette door.
5 Press RECORD 0 to start recording.
• Playing of the CD program starts
automatically from the beginning of the
program. It is not necessary to start the
CD player separately.
6 For brief interruptions press PAUSE ;.To
resume recording, press PAUSE ; again.
To stop recording
7 To stop recording,press STOP•OPEN 9/.
➜ The CD player goes to pause mode.
Press PLAY•PAUSE 2; to resume CD
playback, or press STOP 9 to stop CD
play.
Selecting and recording a particular
passage
• During CD playback, press and hold down
the SEARCH buttons ∞ or § on the set
to find your passage.
• Press PLAY•PAUSE 2; to put the CD
player on pause at the selected passage.
➜ Recording will begin from this exact
point in the track when you press
RECORD 0.
Note: If you press RECORD 0 during
playback, recording starts automatically from
the beginning of the current track.
Recording from the Radio
1 Adjust the source selector to AM or FM to
select your desired waveband.
2 Tune to the desired radio station (see
Radio reception).
3 Press STOP•OPEN 9/ to open the
cassette door. Insert a blank tape.
4 Close the cassette door.
5 Press RECORD 0 to start recording.
6 For brief interruptions, press PAUSE ;.To
resume recording, press PAUSE ; again.
7 To stop recording,
press STOP•OPEN 9/ .
English
13
 Loading...