

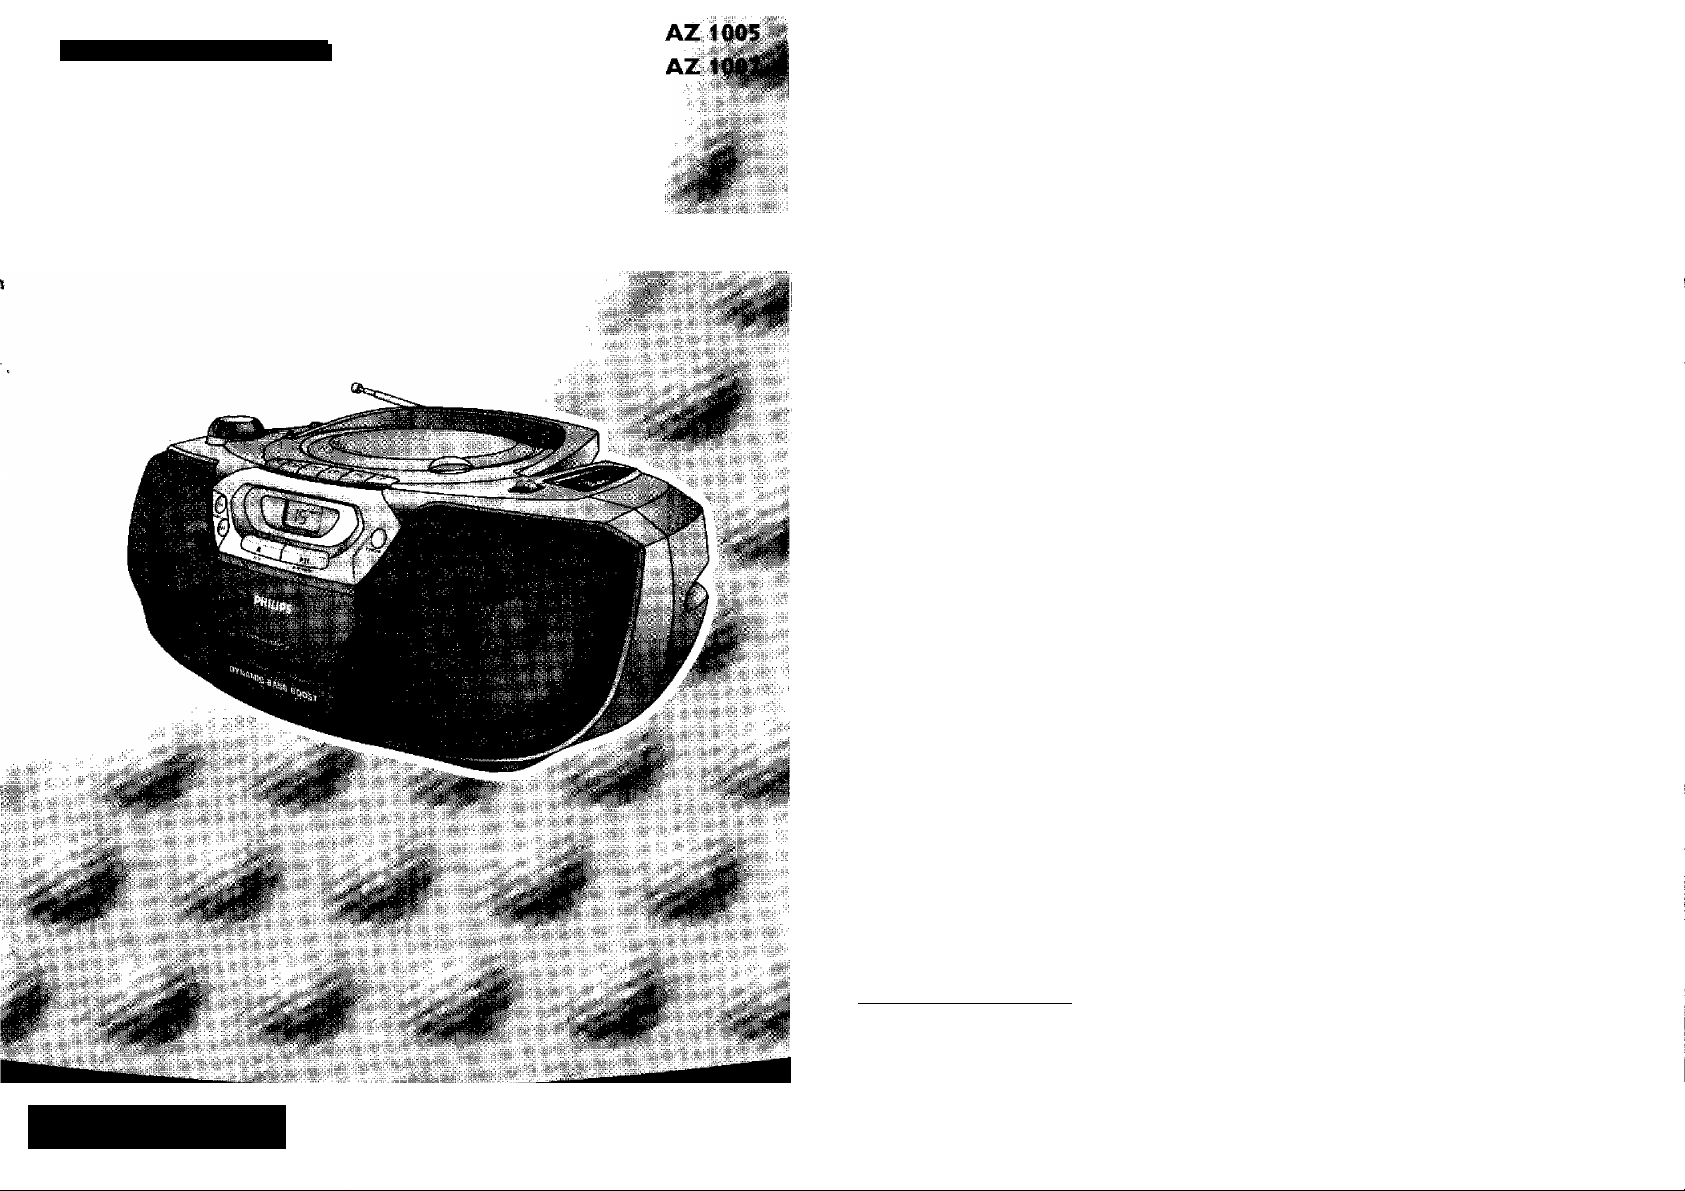
CD Radio Cassette Recorder
Ldi m&h iodk^
Important notes for users in the U.K.
Mates plug
This apparatus is fittad witli an approved .tnautógd , „ .
:J3-Amppltfg:rTD change a fuse in this type of plug
proc ee d..3s-folia ws.
• ..ReiTiove fuse cover and fuse.
• Fi)i new fuse which should be a BSi362 5 Amp,
i: A.S:TA 0^:031 ippE0v№
• Refit the fuse coveii
If the fitted, plug is not suitable for i^ur socket
outlets, it should be; cut:off and-an^appropriate- plug
fitted in its place.
if the mainsplug.;coptamsa.fu^,.-tfiis-should tiayea .
value.of.5:Aínpr-.lf;a::plug.withoüí adpse is used,the .
fuse at.the:distri&.ution .board shoulditat l?P..arGater;.
than b top:
:-Nerte; The:save rad tplug' must he :dis:pQsed tp.avoid a. :
fossible'shock hsrard-shbufd it he inserted into a
i^-Arnp socket elsewhere. ■
Hnw to (MHE№ct a plug
The wires in the mains lead aré coloured with the
toliowTrig cod.e: blue--.fiKJtrai.tfJi, brown = live lU,
As these .colours -may :ti0t.Gdrrespond ■withdhe'coloUr
mattlna.s i-dentifyin@:thi ffirmirfals- irt your plug. ■
proceed as follows:
• Connect.the blue wire-to the: terminal marked N or
coloured bjack.
• Connect the. brown wire to the terminal marked I
. urGoloured red.
• Do. not connect either wire to the earth terminal in
.the plug, marked E (or or coloured green (or
green and yellow).
Before replacing the plug cover,, make certain that the
cord grip is clamped over the sheath of the lead - not
simply.ever the two wnres.Copyright in the U.K.:
Roccrding and playback ot material may require
consent. See Copyrighi Act 1956 and The Performer's
Protection Acts 1968 to 1972.
® Norge
Advarsel: For à redusere faren ‘cr bran eller elektrisk stut;
skal apparatet ikke utsettes fo' regn slier fuctighet.
Typcskilt brines pS apparatens undersice.
Observer: Nettbryterer er sekundert innkuplui. Den
innebygoe retdslen er derfor ik<c frakoplet nettet sa lenge
apparatet er tilsluttet nettccntakten.
English
Français * 4
Español
Deutsch
Neder lands 36
Italiano
Portugués
Dánsk
Svenska
(T) Italia
DICHIARAZIONE DI CONFORMITÀ'
Si dichiara che l'apparecchio AZ 1005 + 1007 Philips
rispende alle prescrizioni deH'art. 2 comma 1 del D. M.
ZB Agosto 1995 n. 54B.
Fatta a Findhnven, il DI,/11/1999
Philips Consumer Electronics
Philips, Glaslaan 2,
5016 JS Eindhoven, The Netherlands
2
Suomi.... ....... 76
^EAXnviKÒ 84
...........
........................
...................................
.....
....................... 52
.............................
....
............
......
..4
12
20
......
28
.....44
.....
60
....... 68
is
S
c
o
û.
o
X
X:
CONTROLS
P WER SUPPLY
(7) '5;
8) O; (no; (11)
[top AND FRONT PANEL
(i) Source selector - tu sel«rt source of sound:
^ CD-RADIO-TAP: and also the POWER OFF
switch.
VOLUME - to adjust volume level.
(3) DBB - Dynamic Bass Boost: for a more vivid
bass response.
CASSETTE RECORDER:
(i' PAUSE II - to interrupt rccordirg or playback.
STOP'OPEN ■ 4 - To strip tlie tape and In
open die cassette holder,
SEARCH or - to fast wind/rewlnd the
tape.
PLAY A - to start playback.
RECORD • - to start recording.
' s) Cassette compartment
CD PLAYER:
(6; CD Display' to sh(jw the CD tunctiens.
(7) PLAY*PAUSE ►!! - To start or interrupt
CD play.
STOP! - to stop playback or erase a
programme.
CD MODE - to select a different play mode,
e.g. SHUFFLE/REPEAT; to programme and
review programmed track numbers
SEARCH or - to skip or search a
passage/track backwards or forward
(e) LIFT TO OPEN - to open/dose the CD door
RADIO:
:is) BAND - to select FM/MW wave band
io) Tuning dial pointer
'll TUNING -totune to radio stations
BACK PANEL
:;í2i Battery door to open the battery
compartment
■:;i3) BEAT CUT switch - To eliminate any w'histle
tones during MW recordings.
;h) Telescopic aerial - to improve FM
reception
(;i5) 0 ■ 3.5 mm stereo headphone socket
fl/ofe;Cannecling headphones will switch otf the
loudspeakers
(Í6j AC MAINS - socket for mains lead
Batteries
Whenever convenient, use the mains supply if you want to
conserve battery life. The battery supply will he switched otf when
the set is connected to the mains. Make sure you remove the plug
from the set and wall outlet before inserting batteries.
Batteries (optional)
1. Open the battery compartment and insert six battorics, type R2Û,
UM1 or D-cells {preferably alkaline) witti tfie correct polarity as
indicated by the (+) and [-) symbols inside the compartment.
2. Replace the compartment door, making sure the batteries are
firmly and correctly in place. The set is now ready to operate.
- Incorrect use of batteries can cause electrolyte leakage and will
corrode the compartment or cause the batteries to burst.
Therefore:
- Do not mix battery types, e.g. alkaline with carbon zinc.
Only use batteries of the same type for the set.
■■■ When inserting new batteries, do not try to mix old batteries
with the new ones.
- Remove the batteries if the set is not to be used for a long
time.
Batteries contain chemical substances, so they should be
disposed of properly
CONTROLS
TOP AND FRONT PANEL
:;i) Source selector - to select source uf sound:
CD-RADIO-TAPE and also the POWER OFF
switch.
(2) VOLUME to adjust volume level.
(3) DBB - Dynamic Bass Boost: for a more vivid
bass response.
CASSETTE RECORDER:
:a) pause II - to Interrupt recording or playback.
STOP'OPEN ■ 4 - lo stop the tape and to
open the cassette nolder
SEARCH or - to fast wind/rewind the
tape.
PLAY‘D-to start playback.
RECORD« - to start recording.
(5) Cassette compartment
CD PLAYER:
(s; CD Display - to show the CD functions.
(t) PLAY'PAUSE hi - To start or interrupt
CD play.
STOP ■ - to stop playback or erase a
programme.
POWERSUPRffi
CD MODE - to select a different play mode,
e.g. SHUFFLE/REPEAT; to programme and
review programmed track numbers
SEARCH or - to skip or search a
passage./track backwards or forward
(r; lift TO OPEN to open/ close the CD door
RADIO:
(9; BAND ■ to select FM/MWwave band
(10/ Tuning dial pointer
■dT: TUNING - to tune to radio stations
BACK PANEL
Battery door - co open tiie battery
:12t
compartment
BEAT CUT switch - To eliminate any whistle
tones during MW recordings.
Telescopic aerial - to improve EM
reception
iff. - 3.5 mm stereo headphone socket
Note: Connecting headphones will switch off fhe
loudspeakers
AC MAINS - socket for mains lead
POWER SUPPLY
GENERAL DPERAFION
AC MAINS
1. Check if the majns'Voltage as shown on the type plate on :he
base of the set, corresponds to your local mains voltage. It it
does not, consult your dealer or service organisation.
2. If your set is equipped with a voltage selector, adjust it so
that it matches with the local mams.
3. Connect the mains lead to the MAINS socket and the wall
socket.
The mains supply is now connected and ready for use.
4. To switch off completely, withdraw the mams lead from the
wall socket.
□
• Disconnect the mains lead from the wall socket to protect
your set during heavy thunderstorms,
IMPORTANT NOTE FOR USERS IN THE U.K.: SEEPAGE2
GENERAL bPÉRATÏON
1. To switch on the set, adjust the source selector.
2. Adjust the sound using the VOLUME and DBB controls.
3 To switch off the radio, adjust the source selector to the
TAPE/power off pos'rtion, with the cassette keys released.
I Batteries
Whenever convenient, use the mains supply if you want to
conserve battery life. The battery supply will be switched off when
the set is connected to the mains. Make sure you remove the plug
from the set and wall outlet before inserting batteries.
Batteries (optional)
J. Open the battery compartment and insert six batteries, type R20,
UM1 or D-cells (preferably alkaline! with the correct polarity as
indicated by the [+) and (-) symbols inside the compartment.
2. Replace the compartment door, making sure the batterios are
firmly and correctly in place. The set is now ready to operate.
- Incorrect use of batteries can cause electrolyte leakage and will
corrode the compartment or cause the batteries to burst.
Therefore:
- Do not mix battery types, e.g. alkaline with carbon zinc.
Only use batteries of the same type (or the set.
- When inserting new batteries, do not try to mix old batteries
with tfie new ones.
- Remove the batteries it the set is not to be used for a long
time.
Batteries contain chemical substances, so they should be
disposed of properly
RADIO RECEPTION
1 Set the source selector to RADIO.
2 Adjust the sound using the VOLUME and DBB controls.
3. Select the wave band.FM/MW using BAND,
4. Tune to a radio station using TUNING.
* •
5. To switch off, set the source selector to the TAPE/pdwer off
position (with the cassette keys released).
To improve radio reception
• For EM, pull out the telescopic aerial.
Incline and turn the aerial. Reduce its length if the signal is
too strong (very close to a transmitterl.
• yarMW(AM), the set is provided with a built-in aerial so
the telescopic aerial is not needed. Direct the aerial by
turning the whole set.

CD PLAYER
CD PLAYER
CD DISPLAY INDICATION
- Cd: CD door open/scanning for CD.
- Total track number: in stop mode.
- Current track number: during CD play.
■ Current track number flashes: in Pause mode.
- shuffle/repeat modes: when the respective mode is activated.
- program: When active. P also appears briefly when you store a
track.
- no: no disc/ error in CD operation or with the CD (see
Troubleshooting)
-- e; error in CD operation.
- f: programme memory full
PLAYING A CD
I. Set the source selector to CD
Z To open the CD door, lift the CD door edge marked LIFT TO OPEN.
3. Insert a CD with the printed side facing up and press the CD door
gently to close.
The CD player scans the contents of the CD and the total number
of tracks IS displayed.
4. Press PLAY*PAUSE Wl to start playback,
5i Adjust the sound using the VOLUME and DBB controls,
6. To interrupt playback press PLAY»PAUSE Ml To resume, press
PIAY»PAUSEMI again
The current track number flashes in the display
7. To stop CD play, press STOP ■.
a To switch off the set, adjust the source selector to TAP|/power off
position [with the cassette keys released)
/Vote: CO playback will also stop when:
-the CD door Is opened;
- the source selector is in the TAPE/RADIO positions;
- the CD has reached the end.
SELECTING A DITFEHENTTRACK
During playback, you can use the SEARCH keys to select a particular
track,
1. Press SEARCH ►w once for the next track, or press repeatedly until
the desired track number appears in the display.
Press SEARCH once to return to the beginning of a current
track. Press SEARCH t** more than once for a previous track.
Z If you have selected a track number in the stop or pause position,
you will need to press PLAY'PAUSEMltostart playback.
Finding a passage within a track
1. Press and hold down SEARCH fm or
— The CD is played at high speed and low volume.
Z When you recognize the passage you want, release the SEARCH
key.
P
lid
Lu
pmvum
Different play madea: SHUFFLEAIEPEAT
The CD MODE button allows you to select 4 different play modes
which can also be combined with a CD program. The modes can
be selected or changed during playback and will flash for two
seconds before playing your selected mode.
1. During playback, select your play mode by pressing
CD MODE once or more until the desired play mode appears
in the display.
SHUFFLE - All tracks or programme are played in random
order.
REPEAT ALL SHUFFLE - Repeats the entire CD or programme
in random order.
REPEAT - Plays the current track continuously.
REPEAT ALL - repeats the entire CD or programme
You can use SEARCH r« or to skip tracks during CO
MODE playback.
Z To return to normal playback press CD MODE until the various
SHUFFLE/ REPEAT modes are no longer shown in the display.
You can also press STOP ■ to quit the play mode.
REPEAT
ALL ""
1C
lU PROGRAM
■iS
“w
Pff@GRWMHHNGT№ff NUMiFl^
You may store up to 20 tracks in the desired sequence. If you
like, store any track more than once.
1. In the STOP position, press SEARCH m or for your
desired track,
Z As soon as your chosen track number is displayed, press
CD MODE once to store the track
The display will show 'P' briefly and 'program', followed by
your selected track number.
3. Select and store all desired tracks in this way.
To review your set programme
• In the stop position, press and hold down CD MODE for more
than two seconds.
The display will show in sequence all your stored track
numbers.
• Start playback of your programme by pressing
PLAY*PAUSE HI
Erasing a programme
9
You can erase the contents of the memory by:
- lifting the CD door open;
- moving the source selector position,
- pressing STOP ■ twice during playback / in stop position,
-* The display will show 'no' briefly and program, which
disappear when the programme is cancelled.
O
PfiOCiRAM :
CASSEHE RECORDER
CASSEHE RECORDER
PtAYING A CASSETTE
1. Set the source selector to TAPE.
2. Press STOP«OPEN ■ A to open the cassette holder and
insert a recorded cassette,
3. Close the cassette holder.
4. Press PLAY A to start playback.
5. Adjust the sound using the VOLUME and DBB controls.
6. To interrupt playback press PAUSE II. To resume, press the
key again.
7. By pressing or ►►,fast winding of the tape is possible in
both directions.To stop fast winding, press STOP"OPEN BA
8. To stop the tape, press STOP«OPEN B A
— Ihe keys are automatically released at the end of the tape,
except if PAUSE II has been activated.
S. With file source selector in TAPE/power off position, the set
is switched off when all the cassette keys are released.
General information on cassette recording
Recording is permissible insofar as copyright or other rights of
third parries are not infringed.
This dock IS not suitable for recording on CHROME (lEC II) or
METAL (lEC IV) lype cassettes. For recording you should use
NORMAL type cassettes (lEC I) on which the tabs have not,
been broken.
The recording level is set automatically. Altering the VOLUME
and DBB controls will not affect the recording in progress.
At the very beginning and end of the tape, no recording will
take place during the 7 seconds, when the leader tape passes
the recorder heads.
To protect a tape from accidental erasure hove the tape m
front of you and break out the left tab. Recording on this side
is no longer pnssible. To record over this side again, cover the
labs with a p'ece of adhesive tape.
START CD RECORDING
1. Set the source selector to CD.
2. Insert a CD and if desired, programme track numbers.
3. Press STOP*OPEN B A to open the cassette holder.
4. Insert a blank tape.
5. Close the cassette holder.
6. Press RECORD • to start recording.
— Playing of the CO programme starts automatically from the
beginning of the programme, it is not necessary to start the
CD player separately.
7. For brief interruptions, press PAUSE II. To resume recording,
press PAUSE II again.
£ To stop recording press STOP»OPEN B A
To select and record a particular passage within a track
1. During playback, press and bold down the SEARCH button kw
or w to find your passage
2. Press PlAY»WUi^Hl to put the CD player on pause at the
selected passage.
— Recording will begin from this exact point in the track when
you press RECORD •.
[йшишшс том m rapio
1. Set the source selector to RADIO.
2. Tune to the desired radio station (See RADIO RECEPTION).
3. Press STOP*OPEN В A to open the cassette holder and
insert a blank tape,
4. Close the cassette holder.
5. Press RECORD • to start recording.
Note: If you are recording on MW (AMj station, adjust the
BEAT CUT switch to eliminate any whistle noises.
ft For brief interruptions, press PAUSE II. To resume recording,
press PAUSE II again.
7 To stop recording, press STOP*OPEN В A
MAINTENANCE
PRECAUTIONS & OENiRAl MiUNTENANCE
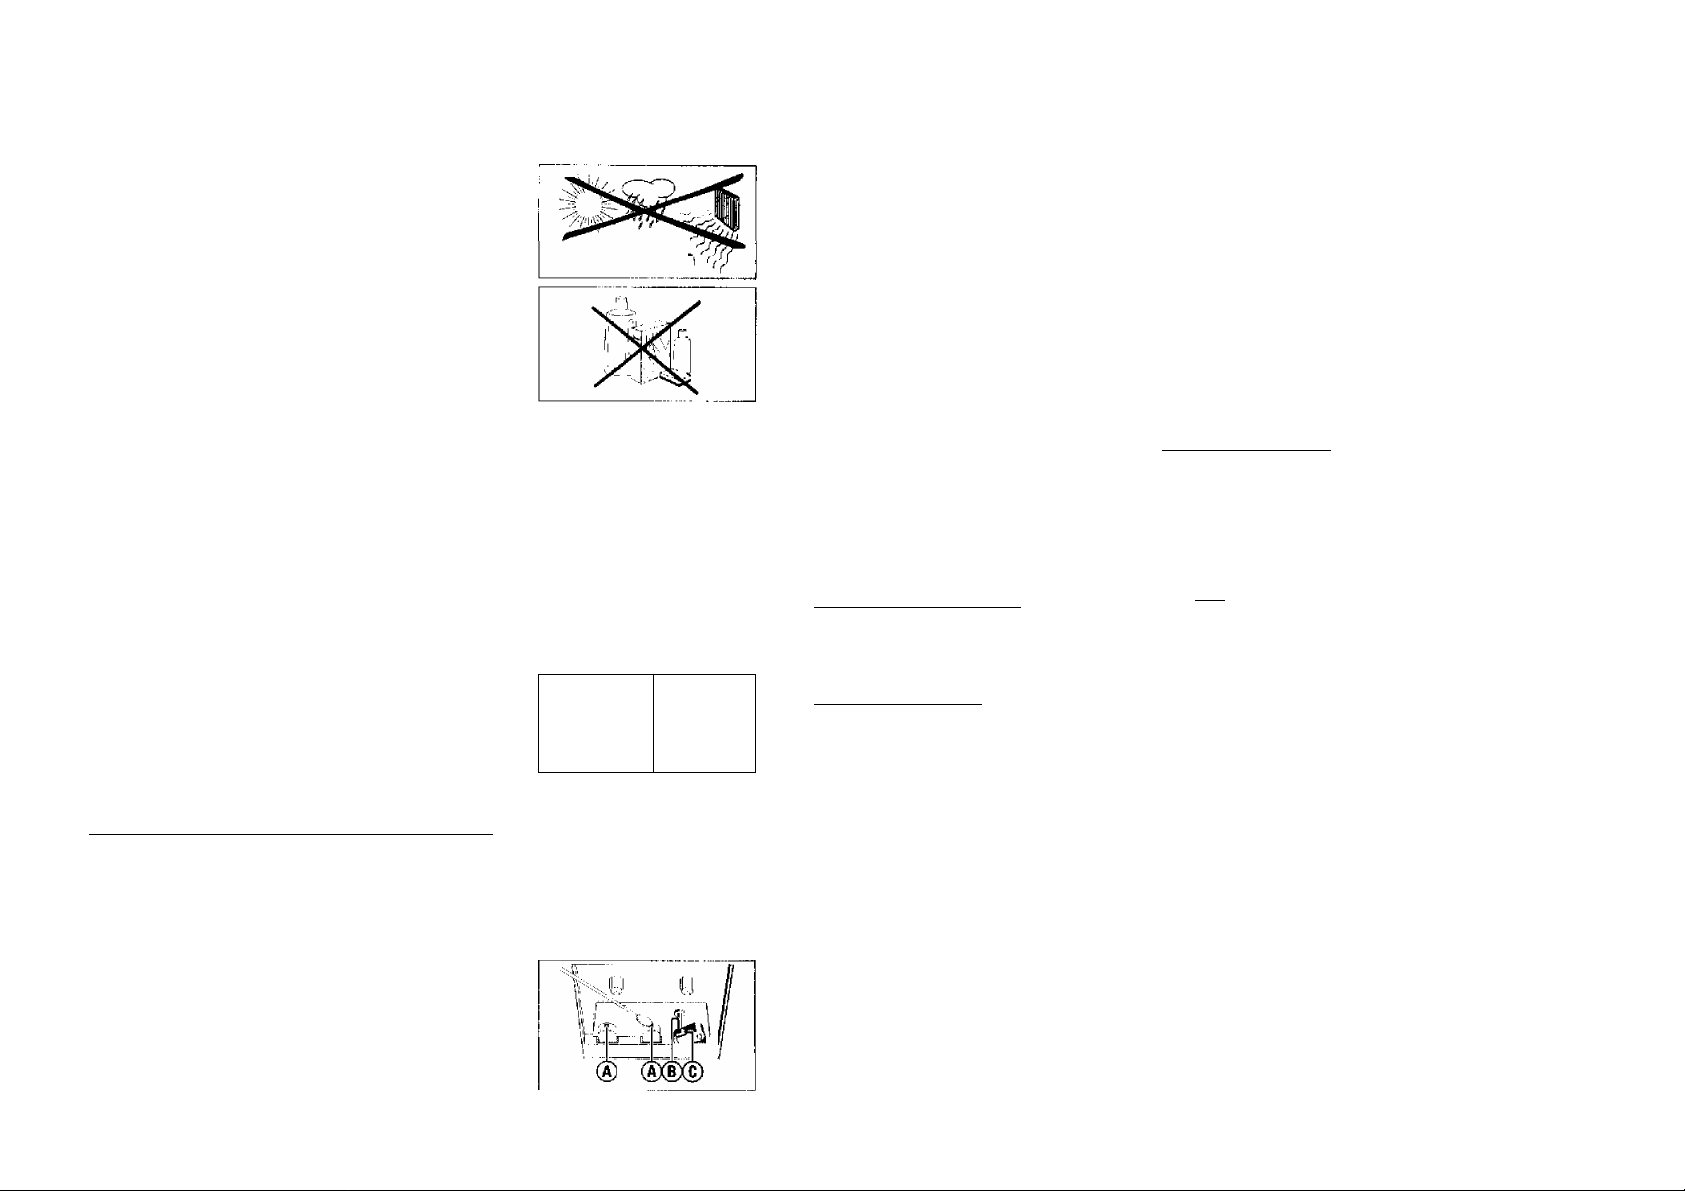
Place the set on a hard, flat surface so that the system does not tilt.
Do not expose the set, CDs, batteries or cassettes to humidity, rain,
sand or excessive heat caused by heating equipment or direct
sunlight
Always shut the CD door to keep the CD compartment dust-free. To
clean, dust the compartment with a soft dry cloth.
Do not cover the set Adequate ventilation with a minimum gap of
15 ems between the ventilation holes and surrounding surfaces is
necessary to prevent heat build-up.
The mechanical parts of the set contain self-lubricating bearings
and must not be oiled or lubricated.
To dean the set, use a soft, slightly dampened chamois leather. Dp
not use any cleaning agents containing alcohol, ammonia, beniene
or abrasives as these may harm the housing.
CO PLAVER AND CO HANOUNC
The lens of the CD player should never be touched
Sudden changes in the surrounding temperature can cause
condensation to form and the lens of your CD player to cloud over.
Playing a CD is then not possible. Do not attempt to clean the lens
but leave the set in a warm environment until the moisture
evaporates.
Use only Digital Audio CDs.
To take a CD out of its box, press the centre spindle while lifling the
CD. Always pick up the CD by the edge and replace the CD hack in
its box after use to avoid scratching and dust.
To clean the CD, wipe in a straight line from the centre towards the
edge using a soft, lint-free cloth. Do not use cleaning agents as
they may damage the disc.
Never write on a CD or attach stickers to it.
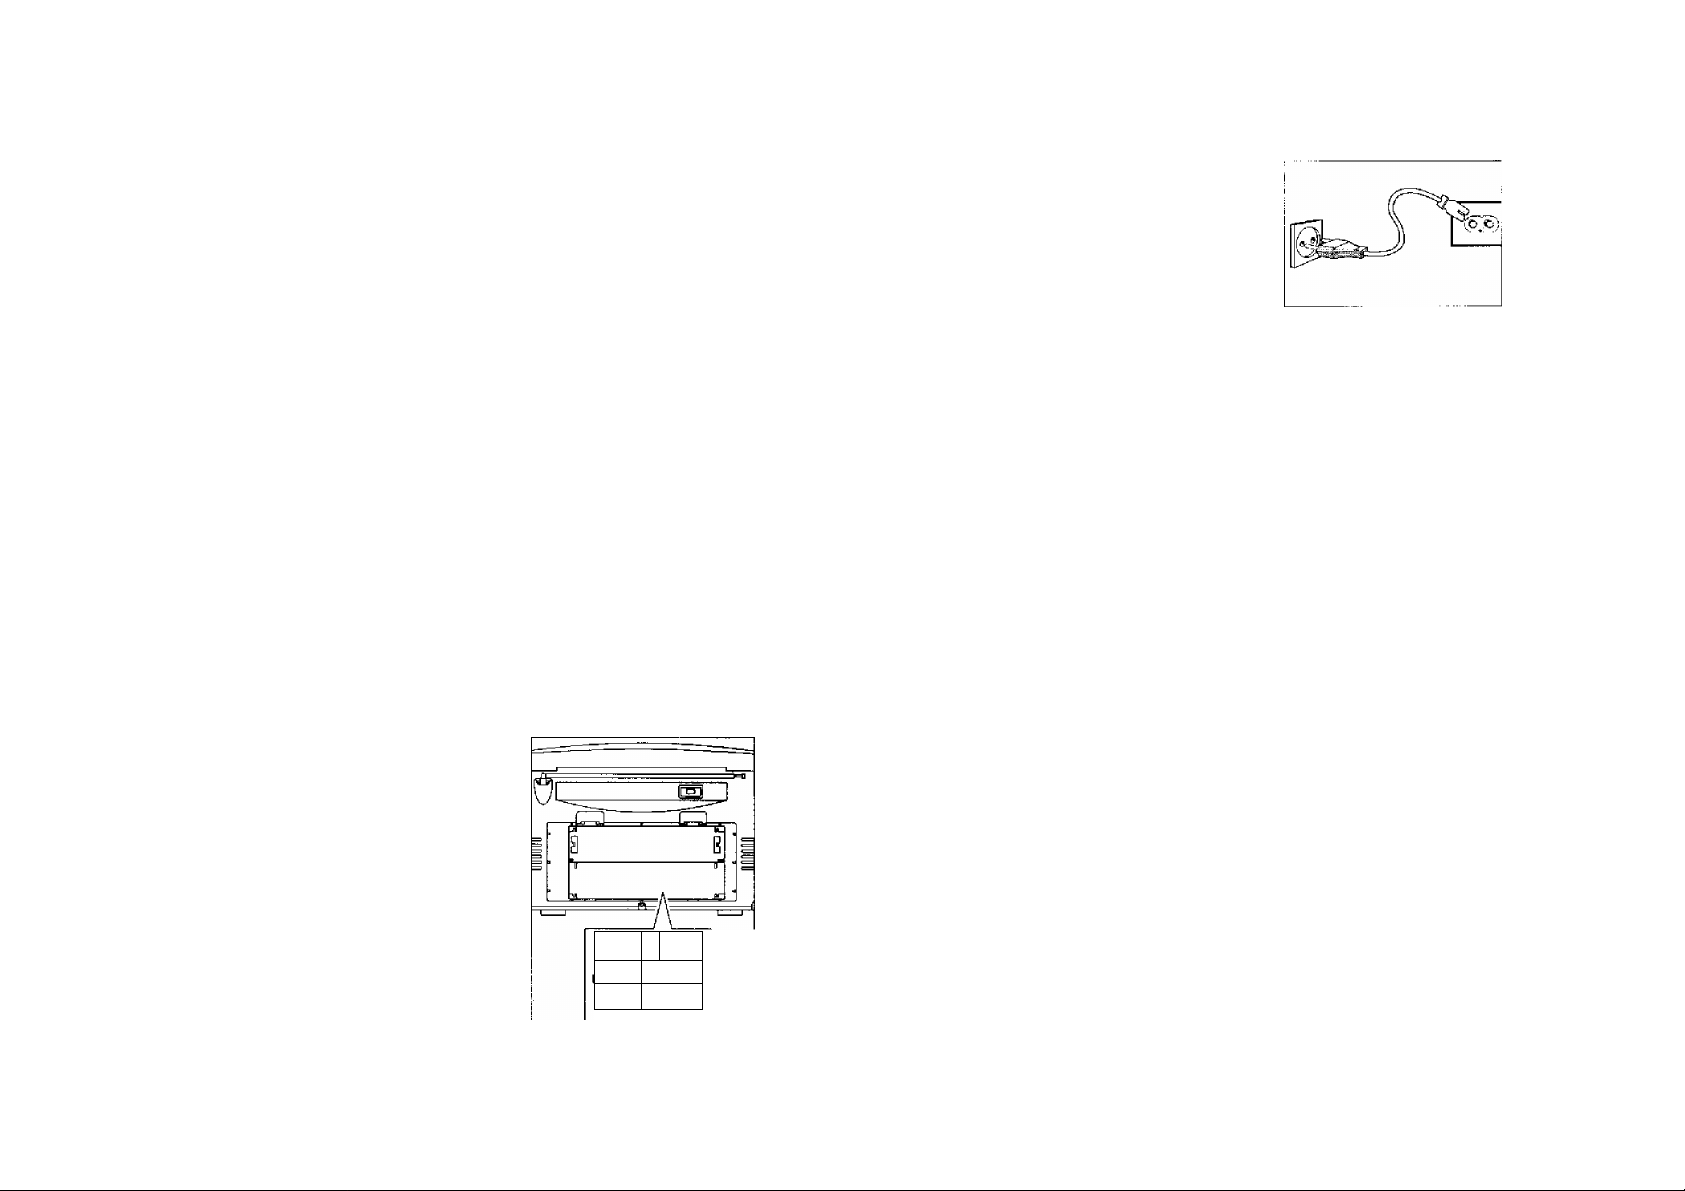
TAPE DECK MAINTENANCE "
To ensure a good recording and playback of the tape deck, clean parts
(a),(b) and :c) show in the diagram below, after approx. BO hours of
operation, or on average once a month. Use a cotton bud slightly
moistened with alcohol or a special head cleaning fluid to clean the
deck.
• Gpen the cassette holder by pressing STOP*OPEN ■ A.
• Press PLAY < and clean the rubber pressure rollers (c;.
• Press PAUSE II and clean the magnetic heads (a; and also the
capstans ■: b).
• After cleaning, press STOP*OPENl A.
Cleaning of the heads can also be done by playing a cleaning cassette
through once.
10
TROUBLESHOOTING
If a fault occurs, first check the points listed below before taking the set for repair. If you are
unable to remedy a problem by following these hints, consult your dealer or service centre.
WARNING: Do not open the set as there is a risk of eiectric shock. Under no circumstances
should you try to repair the set yourself, as this would invalidate the guarantee.
PROBLEM
- POSSIBLE CAUSE
• REMEDY
No s^nd/fkower
- VOLUME is no! adjusted.
• Adjust the VOLUME.
- Headphones are connected.
• Disconnect headphones.
- Mains lead not securely connected.
• Connect the AC mains lead properly.
- Batteries exhausted.
• Insert fresh batteries.
- Batteries incorrectly inserted.
• Insert the batteries correctly.
Display does not tunction properly
- Electrostatic discharge.
• Switch off set, disconnect the mams plug and
reconnect after a few seconds.
CD playback does not work
- CD is badly scratched or dirty.
• Replace or dean the CD, see Maintenance.
- Laser lens steamed up.
• Wait until lens has acclimatized.
_______________
__________________
iHvircrnmental inforliiiatiori
^ All unnecessary packaging material has been omitted. We have done our utmost to make the
pdekagtiig ea#y ^parable into three mono materials: cardboard, poJystyrene and plastic,
Ypyr sNoLooflsjsts of foateriBls which can be recycled if disassembled by a $pectalia:ed
company. Please observe the local regulations regarding the disposal of pi^kaging
materials, exhausted batteries and old ^tiipment.
This product complies with the radio interference requirements of the European Union.
The type plate is located on the bottom of the set.
The CD skips tracks
- CD is damaged or dirty
• Replace or clean the CD.
- SHUFFLE orPBOGFIAM is active.
• Quit SHUFFLE/PROGRAM models).
Poor cassette sound quality
- Dust and dirt on the heads, etc.
• Clean deck parts etc., see maintenance.
- Use of incompatible cassette types (METAL
or CHROME).
• Only use NORMAL (lEC T) for recording.
Recording does not work
- Cassette tab(s) may be broken out.
• Apply a piece of adhesive tape over the
missing tab space.
_____________________
_
__________________
11
COMMANDES
PANNEAU SUPERIEUR ET AVANT
0) Sélecteur de source - pour sélertionrier !a
source de son: CD-RADIO-TAPE et pour éteindre
¡POWER OFF]
(2) VOLUME - pour régler le niveau du volume
@ DBB - Dynamic Bass Boost: pour accentuer les
graves
PLATINE DE CASSETTE:
0 PAUSE II - pour Interrompre l'enregistrement ou
la lecture
ST0P* *0PEN«4-pour arrêter la lecture et
ouvrir le comparEimcnl de la cassette
SEARCH or - pour rembobincr/bobiiier la
bande
PLAY ^ pour commencer la lecture
RECORD • - pour commencer à enregistrer
® Compartiment de la cassette
LECTEURDECD
0) CD Affichage - indique les fonctions du lecteur
de CD
0 PLAY*PAUSE HI - pour démarrer ou
interrompre la lecture du CD
STOP ■ - pour arrêter la lecture ou effacer un
programme
1 PILES
Si possible, utilisez l'alimentation secteur pour garantir la longévité des
piles. Lorsque l'appareil est branché au secteur, l'alimentation par piles
est éteinte. Assurez-vous toujours d'avoir débranché la fiche de
l'équipement et de la prise murale avant d'introduire les piles.
Piles (en option)
1. Ouvrez le compartiment piles et introduisez les six piles, type R20,
UM1 ou cellules D (de préférence alcaline) de polarité correcte
indiquée par les symboles (+) et (-) à l'intérieur du compartiment.
2. Remettez le clapet de compartiment en place, assurez-vous que les
piles soient placées fermement et correctement. L'équipement est
alors prêt à l'emploi.
- L'emploi incorrect des piles peut causer des fuites électrolytiques et,
ce faisant, contaminer le compartiment ou causer l'éclatement
desdites piles. Pour ce faire, procédez comme suit:
- Ne jamais utiliser des types de piles différents: par exemple des
alcalines et des 'zinc carbone'. Utilisez uniquement des piles du
même type pour l'équipement.
- Lorsque vous insérez des nouvelles piles, n'utilisez jamais des
anciennes piles avec des nouvelles.
- Enlevez les plies si i'équipemenl n'est pas utilisé pendant une
période prolongée.
Les piles contiennent des substances chimiques et doivent par
conséquent être rejetées dans les endroits appropriés.
f2
CD MODE - pour sélectionner le mode de
lecture p.ex. shuffle/REPEAT; pour programmer
des plages et examiner le programme
SEARCH m ou - pour sauter ou rechercher
vers l'avant ou vers l'arrière un passage/une
plage
0) LIFT TO OPEN - pour ouvrir/fermer le
compartiment de CD
RADIO:
0) BAND - pour sélectionner la bande d'ondes
' FM/MW
0) Cadran
0) TUNING - pour rechercher des stations radio
PANNEAU ARRIERE
0) Porte de piles - pour ouvrir le compartiment de
pile
0) Commutateur BEAT CUT - pour éliminer tout
sifflement en enregistrement MW
0) Antenne télescopique - pour améliorer la
réception FM
01 iTii - 3.5 mm prise de casque de 3,5 mm
Remarque: Les haut-parleurs sont déconnectés
0 AC MAINS - prise de cordon secteur.
lorsque le casque est relié.
<0
dil
+
t
ALIMENTATION FONCTIONNEMENT GÉNÉRAL RADIO
AUMENTATION
1. Vérifier que la tension d’alimentation indiquée sur la plaque
d'identité [sur la base de l'appareil) correspond à la tension
d'alimentation locale. Dans le cas contraire, consulter votre
concessionnaire ou service d'entretien,
2 Si votre appareil est doté d'un sélecteur de tension, placez ce
dernier en regard de la tension locale.
3. Brancher le cordon d'alimentation dans la prise MAINS de
l'appareil et dans la prise murale.
L’appareil est maintenant prêt à être utilisé.
4. Pour débrancher l'appareil de l'alimentation électrique, retirez le
cordon de la prise murale.
• Débrancher le cordon d'alimentation pour protéger l'appareil
pendant de gros orages.
HNCTI0NNEMËNT GENERAL
1. Pour mettre l'appareil en marche, réglez le sélecteur de
source
2. Ajustez le son à l'aide des commandes VOLUME et DBB
3. Pour éteindre la radio, placez le sélecteur de source sur
TAPE/power off (toutes les touches de la platine de cassette
doivent être relâchées).
BEf^rriÔN RADIO
1. Placez le sélecteur de source sur RADIO.
2. Ajustez le son à l'aide des commandes VOLUME et DBB.
3. Sélectionnez la bande d'ondes FM/MW à l'aide du sélecteur
BAND
4. Recherchez une station radio à l'aide du bouton TUNING
5. Pour éteindre, placez le sélecteur de source sur
TAPE/power off (toutes les touches de la platine de cassette
doivent être relâchées).
Pour améliorer la réception radio
• En mode FM, retirez l’antenne télescopique. Inclinez, puis
tournez l'antenne. Réduisez sa longueur, si le signal est trop
fort (très proche d'un émetteur).
• En modes MW (AM), l'appareil dispose d'une antenne
incorporée, de sorte que vous n'avez pas besoin de l'antenne
télescopique. Dirigez l'antenne dans la direction requise, en
tournant l'appareil.
13

liCTEUR DE CD
INOtCATIONS DE i'AmCHAGE CD
- Cd: clapet CD ouvert/balayage contenu de CD.
- Nombre total de plages: en position d'arrêt.
- Numéro de plage courante: pendant la lecture du CD.
- Numéro de plage courante clignote: en mode PAUSE.
- ¿efí^orfesнum.E^EPEAT. lors de l'activation du mode respectif.
» .
- PBOfîMM; lorsque la fonction est activée, P apparaît brièvement
t i
lorsque vous mémorisez une plage.
- no: pas de CO / erreur d’exploitation CD ou erreur de CD (voir
Dépannage)
- e: erreur d'exploitation CO
- R la mémoire du programme est pleine.
UCTU8E D 'UN CO
/. Placez le sélecteur de source sur CD.
2. Pour ouvrir le clapet de CD, soulevez le rebord portant l'indication
LIRTO OPEN
3. Intrrrduisez le CO. côté imprimé sur le haut, puis appuyez sur le
couvercle du CD pour fermer le compartiment de (io.
Le lecteur de CD explore la table de iriatières et l'affichage
indique le nombre total de plages.
4. Appuyez sur PLAY*PAUSE Hl pour commencer la lecture.
5. Ajustez le son à l'aide des commandes VOLUME et DBS.
6. Pour interrompre la lecture, appuyez sur PLAY»PAUSEHL
Appuyez à nouveau sur PLAY*PAUSE Ml pour continuer la lecture.
Le numéro de la plage courante clignote sur l'affichage.
7. Appuyez sur STOP B.pour arrêter la lecture du CD.
8. Pour éteindre l'appareil, placez le sélecteur de source sur
TAPE/power Off (toutes les touches de la platine de cassette
doivent être relâchées).
Remarque: La lecture du CD s'arrête également lorsque:
-vous ouvrez le compartiment de CD;
- le sélecteur de source se trouve en position
TAPE/RADIO;
-le CD est terminé.
SËtECM D'UNE PLAOE DffTERENTE
Pendant la lecture, vous pouvez sélectionner une plage spécifique à
l'aide des touches SEARCH.
1. Appuyez une fois sur SEARCH pour la plage suivante, ou
appuyez plus d’une fois jusqu'à ce que l'affichage indique le numéro
de plage désiré. Appuyez une fois sur
refaire passer la plage courante depuis le début.
Appuyez plus d'une fois sur SEARCH h« si vous désirez refaire
passer une des plages précédentes.
2. Si vous avez sélectionné un numéro de plage en position d'arrêt ou
de pause, vous devrez appuyer sur PLAY*PAUSE Ml pour
commencer la lecture
Recherche de passage au sein d'une plage
1. Maintenez enfoncée la touche SEARCH v« ou mh.
— Le CD passe à volume réduit et à haute vitesse.
2. Relâchez la touche SEARCH dés gue vous reconnaissez le passage
désiré.
14
SEARCH si vous désirez
P
no
Cd
pqpGRiUl
Les UiHérents modes de lecture; SHUFFLE^EPEAT
La touche CD MODE vous permet de sélectionner 4 modes différents
de lecture qui peuvent aussi être combinés avec un programme de CD.
Les modes peuvent être sélectionnés ou modifiés pendant la lecture et
clignoteront pendant deux secondes avant de démarrer la lecture du
mode séleciionné.
/. Pendant la lecture, sélectionnez le mode de lecture désiré en
appuyant une ou plusieurs fois sur CD MODE, jusqu'à ce que le
mode désiré apparaisse sur l'affichage.
SHUFf LE - Toutes les plages ou le programme sont lues dans un
ordre aléatoire,
REPEAT ALL SHUFFLE - Fait passer le CD complet ou le programme
de manière continue dans un ordre aléatoire.
REPEAT - Fait passer la plage courante de manière continue.
REPEAT ALL - Fait passer le CD complet ou le programme de
manière continue.
-* Lors de ces modes de lecture, vous avez également la possibilité
de sauter des plages à l'aide de SEARCH hm du
2. Pour retourner à la lecture normale, appuyez plusieurs fois sur
CD MODE, jusqu'à ce que les différents modes SHUFFLE/REPEAT
ne soient plus affichés.
Vous pouvez également appuyer sur STOP ■ pour quitter
le mode lecture.
[raOGRAMMOTION DE NUMÉROS OEPIAGE
Vous pouvez mémoriser un maximum de 20 plages selon la séquence
désirée. Il est possible de mémoriser une plage plus d'une fois.
/. Fn position d'arrêt, appuyez sur SEARCH h« ou MH pour
sélectionner (a plage désirée.
2. Dès que l'affichage indique le numéro de plage désiré, appuyez une
fois sur CD MODE pour mettre la plage en mémoire.
-* L'affichage indique brièvement 'P' et 'pbqgram' ainsi que le
numéro de la plage sélectionnée.
3. Sélectionnez et mémorisez de cette manière toutes les plages
désirées.
Vérification d'un programme
• En position d'arrêt, maintenez enfoncée la touche CD MODE pendant
plus de deux secondes.
— L'affichage indique les numéros de plage sélectionnés dans la
séquence sélectionnée.
• Démarrez la lecture du programme, en appuyant sur PLAY*PAUSE Ml,
Effacement de programme
Vous pouvez effacer le contenu de la mémoire en:
- ouvrant le clapet de CD;
- changeant la position du sélecteur de source;
- appuyant deux fois sur STOP ■ pendant la lecture / en position
d'arrêt.
^ L'affichage indique brièvement 'no' et 'program'; ces
indications disparaissent lorsque le programme est effacé.
LECTEUR DE CD
ALL
c
(O
no
1
15

KA1WE № eASSEHE
mmm de cassette
IBnWEMCASSCTTE
1. Placez le sélecteur de source sur TAPE.
2. Appuyez sur STOP* *OPEN ■ à, pour ouvrir le compartiment à
cassette et introduisez une cassette enregistrée.
3. Fermez le compartiment à cassette.
4. Appuyez sur PLAY ■< pour commencer la lecture.
5. Ajustez le son à l'aide des commandes VOLUME et DBB.
6. Pour interrompre la lecture de fa cassette/appuyez sur
PAUSE II. Appuyez à nouveau sur PAUSE II pour
recommencer la lecture.
7. Il est possible d'avancer ou de rembobiner rapidement la
bande en appuyant sur-*4 ou ►►. Pour arrêter le bobinage
rapide de la bande, appuyez sur STOP*OPEN ■ A.
fl. Pour arrêter la lecture, appuyez sur STOP*OPEN ■ A.
Les touches se déclenchent automatiquement à la fin de la
bande, sauf si PAUSE II a été activé.
9. Lorsque vous placez le sélecteur de source sur
TAPE/power off et toutes les touches de la platine de
cassette sont relâchées, l'appareil s'éteint.
|EWfl£<SISTBEM£WT ITUPiE CASSETTE
• Il est possible d'effectuer des enregistrements dans la mesure où
ils ne violent aucun copyright ou autres droits de tout tiers.
• Ce magnétophone ne peut être utilisé pour enregi.strer des
cassettes de type CHROME (IEC Ti) ou METAL (ÎEC LV). Pour
enregistrer, utiliser des cassettes de type NORMAL (IEC I) dont
les languettes de sûreté n'ont pas été cassées.
• Le niveau de l'enregistrement se règle automatiquement.
L'enregistrement en cours ne sera pas affecté par le réglage
des boutons de VOLUME et DBB.
• Aucun enregistrement n'aura lieu pendant les 7 premières
secondes, lorsque la bande amorce passe devant les têtes
d'enregistrement.
• Pour éviter tout effacement accidentel d'un enregistrement,
placer la face de la cassette à sauvegarder devant soi et casser
la languette de sûreté. Il ne sera plus possible d'enregistrer sur
cette face.
CD SYNCBD ' ENmiSTREMENT DEPUIS LE LECTEUR DE CD
1. Placez le sélecteur de source sur CD.
2. Introduisez un CD et, le cas échéant, les numéros de plages
de programme.
3. Appuyez sur STOP*OPEN ■ A pour ouvrir le compartiment à
cassette.
4. Introduisez une cassette vierge.
5. Fermez le compartiment à cassette.
6. Appuyez sur RECORD • pour commencer à enregistrer.
^La lecture du programme CD commence automatiquement
depuis le début du programme. Il n'est pas nécessaire de
démarrer le lecteur de CD séparément.
7. Pour interrompre brièvement l'enregistrement, appuyez sur la
touche PAUSE ll de la platine. Appuyez à nouveau sur
PAUSE II pour recommencer l'enregistrement.
fl. Appuyez sur STOP"OPEN HA pour arrêter l'enregistrement.
Pour sélectionner et enregistrer un passage de plage
spécifique
1. Pendant la lecture, maintenez enfoncée la touch SEARCH
1^ ou pour sélectionner un passage.
2. Appuyez sur PLAY*PAUSE Ml pour mettre le lecteur de CD
en position pause au passage sélectionné.
L'enregistrement commencera à partir de l'endroit exact,
lorsque vous appuyez sur RECORD •.
^REGISlREMENf DEf>UlS LA RADIO
1. Placez le sélecteur de source sur RADIO.
2. Syntonisez sur la station de radio désirée (Voir RECHERCHE
DE STATIONS RADIO).
3. Appuyez sur STOP*OPEN ■ A pour ouvrir le compartiment à
cassette et introduisez une cassette vierge.
4. Fermez le compartiment à cassette
5. Appuyez sur RECORD • pour commencer à enregistrer.
Remarque: Lors d'un enregistrement d'une station de radio
MW (AMI mettez le commutateur BEAT CUT sur
une autre position pour supprimer tout siffiement.
6. Pour interrompre brièvement l'enregistrement, appuyez sur
PAUSE II. Appuyez à nouveau sur PAUSE II pour
recommencer l'enregistrement.
7. Appuyez sur ST0P*0PEN ■ A pour arrêter l'enregistrement.
VJ
16
17

ÊNTfïETIEN
DÉFANNA^E
ШЁштшт ш Ентвпш oeniral
• Placer l'appareil sur une surface dure et plate pour qu'il soit bien droit.
• Ne pas laisser l'appareil, des CD, des piles ou des cassettes en
contact avec l'humidité, la pluie, le sable, à la lumière directe du soleil
où dans des endroits susceptibles de connaître des températures
fla
élevées comme à proximité d'appareils de chauffage ou dans des
voitures garées au soleil.
Ш
• Fermez toujours le clapet pour empêcher la poussière de pénétrer
dans le compartiment. Pour nettoyer le compartiment, utilisez un doux
chiffon sec.
• Ne pas couvrir l'appareil. En effet, l'ampli produit de la chaleur qui
doit pouvoir se dissiper librement; il faut donc s'assurer que l'appareil
est suffisamment ventilé. Un espace minimum de 15 centimètres est
nécessaire.
• Les pièces mécaniques du lecteur CD et du magnétophone
contiennent des paliers aulolubriiiants et ne doivent donc pas être
huilées ou lubrifiées.
• Il est suffisant de nettoyer l'extérieur de l'appareil avec une peau de
chamois légèrement humide. Ne pas utiliser de produits de nettoyage
contenant de l'alcool, de l'ammoniac ou des produits abrasifs qui
pourront endommager l'appareil,
i ENTRETIEM DU UCTEUR CD '
Ne jamais loucher la lentille du lecteur CD,
Si le lecteur CD est déplacé d'un endroit froid à un endroit chaud, la
lentille pourra se couvrir de condensation. Dans ce cas, le lecteur CD
ne fonctionnera pas. Laisser le lecteur s'acclimater à la nouvelle
température pendant quelques temps.
Utilisez uniquement des CO audio numériques.
Pour sortir facilement le CD de sa boîte, appuyer sur l'axe central tout
en soulevant le CD. Manipuler toujours le CD en I0 tenant par les
bords et le ranger toujours dans sa boîte après l'usage, la partie
imprimée tournée vers le haut.
Ne pas utiliser de produits de nettoyage pour nettoyer un CD, cela
pourrait l'endommager. Pour retirer la poussière et la saleté, souffler
sur le CD est l'essuyer avec un tissu doux non pelucheux en ligne
droite, du centre vers l'extérieur.
Ne jamais écrire ou coller une étiquette sur un CD.
ENTRETIEN Ш MAGNETOPHONE
Pour garantir une bonne qualité d'enregistrement et de lecture, nettoyer les
pièces indiquées-(A), ® et ■© toutes les 50 heures de fonctionnement ou,
en moyenne, une fois par mois. Utiliser un Coton-Tige légèrement
humidifié avec de l'alcool ou un nettoyant liquide spécial pour têtes de
lecture.
• Appuyez sur STOP*OPEN ■ 4 pour ouvrir le compartiment à cassette.
• Appuyer sur PLAY -4 et nettoyer le rouleau presseur en caoutchouc :c).
• Puis appuyer sur PAUSE II et nettoyer le galet d'entraînement (bJ'et
les têtes (AJ.
• Après le nettoyage, appuyer sur STOP«OPEN*
Le nettoyage des têtes (a) peut également être effectué à l'aide d'une
cassette autonettoyante.
1S
4
.
En cas de dysfonctionnement, vérifiez tout d'abord les points suivants, avant d'envoyer l'appareil
en vue de réparation. Si vous n'êîes pas en mesure de résoudre le problème en suivant ces
recommandations, contactez votre revendeur ou le service après-ventes,
AVERTISSEMENT: Ne jamais ouvrir vous-même ¡'équipement au risque de recevoir
des chocs électriques. N'essayez, sous aucun prétexte, de
réparer vous-même ¡'appareil, car ceci annulerait la validité de
la garantie.
PROBLÈME
- CAUSE EVENTUELLE
• REMÈDE
Pas de soii/if'ali mentation
- Le VOLUME n'est pas réglé.
• Réglez le VOLUME.
- Le casque est relié.
• Débranchez le casque.
- Le cordon secteur n 'est pas bien relié.
• Reliez correctement le cordon secteur.
- Les piles sont épuisées.
• Introduisez de nouvelles piles.
- Les piles sont insérées incorrectement.
• Insérez tes piles correctement.
L'affichage ne fonctionne pas correctement
- Décharge électrostatique.
• Eteignez l'appareil, débranchez la fiche
secteur, puis rebranchez-la au bout de
quelques secondes.
La lecture de CD ne fonctionne pas.
■ Le CD est rayé ou sale.
• Remplacez ou nettoyez te CD, voir Entretien.
- Lentille de laser embuée.
• Attendez que la lentille s'acclimate.
HiHtrmatiiüiis relatives à renviranneflient
Tous les m:atérraux d'emballage ^pérîtes ont été sup^imés. Nous avons fait de notre mieux
pour que remballage soit facilement séparable en trois, type s de matériaux: carton, polystyrène
expansé, polyéthylène.
Vo^ appareil est composé te matériaux pouvant recyclés s'il est démonté par
une filme spécialisée. VeaiUez observer fes règlements locaux lorsque vous vous
débarrassez d«æ matériaux d'emballage, des piles usagées m; de votoe ancien
appareil.
............
Le CD saute des plages.
- Le CD est endommagé ou sale.
• Remplacez ou nettoyez le CD,
- SHUFELE ou PROGRAM est actif.
• Annulez la fonction SEUJFfLE/PROGRAM.
Mauvaise qualité sonore de la cassette
- Poussière et saleté sur les têtes, etc.
• Nettoyez les têtes, etc, voir Entretien.
- Utilisation de types de ca.ssette
incompatibles (METAL ou CHROME).
• Utilisez uniquement des cassettes de type
NORMAL (IEC U peur l'enregistrement.
L'enregistrement ne fonctionne pas
- Languette(s) de cassette brisée(s).
• Mettez de la bande adhésive sur l'espace où
il manque la languette,
______
Ce matériel satisfait aux impératifs de brouillage radio de la Communauté Européenne.
La plaque signalétique sé trouve sous l'appareil.
19
ES'-
■'et'-
o<

CONTRQliS
SUMINISTRO DE ENERGÍA
SUMINISTRO DE ENERGÍAGE / FUNCIONAMIENTO GENERAL / RADIO
PANELES SUPERIOR ¥ OaANTERQ
:j) Selector de fuente - CD-RADIO-TAPE: para
selenctonar la fuente de sonido y también para
apapar el aparato (POWER OFF)
VOLUME - para ajustar el nivel del volumen
@ DBB - Dynamir; Bass Boost: para seleccionar
una respuesta de tonos bajos más vivida
REPRODUCTORA DE CASSETTES:
® PAUSE II- para interrumpir temporalmente la
ÍT j grabación o reproducción
"p j STOP'OPEN ■ i - para detener la cinta y abrir
SL:: el portacassettes
—SEARCH o - para adelantar o rebobinar
la cinta
PLAY < para comenzar la reproducción
RECORD • - para comenzar la grabación
(gt Compartimiento de cassettes
REPRODUCTORA DE CD:
CD Display - para presentar las funciones de
CD
(V) PLAY*PAUSE Mi - para comenzar o
interrumpir la reproducción de un CD
STOP ■ - para detener la reproducción o borrar
una programa
PILAS
Si prefiere puede utilizar el suministro de la red para ahorrar la energía
de las pilas. La alimentación de las pilas se desconecta cuando el
aparato se conecta a la red eléctrica. Antes de introducir las pilas
asegúrese de que ha desconectado el cable tanto del aparato y como del
suministro de la red.
Pilas (opcionales)
í. Abra el compartimento e inserte seis pilas tipo R20, UM1 o D-cells,
(preferiblemente alcalinas) colocándolas correctamente de acuerdo a
los símbolos (-r) V (-) de polaridad como se indica dentro del
compartimento.
Z Vuelva a colocar la tapa, asegurándose de que las pilas están bien
colocadas y sujetas. Ya puede hacer funcionar el aparato,
- La utilización incorrecta de las pilas puede producir un escape
electrotítico y corroer el compartimento o provocar la ruptura de las
pilas. Por lo tanto:
- No mezcle los tipos de pilas: ej. alcalinas con zinc/carbón. Utilice
pilas del mismo tipo en el aparato.
- Cuando introduzca pilas nuevas, no las mezcle con las viejas.
- Saque las pilas si no va a utilizar el aparato durante mucho tiempo.
Todas las pilas contieoen sustancias guímicasy por ío tanto
deberá tener cuidada al tirarlas.
20
CD MODE - para seleccionar un modo distinto
de reprrjducción, por ejemplo, para mezclar el
orden/repetir; para programar y revisar los
números de pistas programados
SEARCH o - para omitir o buscar un
pasaje o pista, adelante o atrás
(?¡ LIFT TO OPEN -Para abrir/cerrar eì
compartimiento de CD
RADÍO:
0 BAND - para seleccionar la banda de ondas
FM/MW
;io) Cuadrante indicador de sintonización
:íb TUNING Para sintonizar las emisoras de radio
FAMEL TRASERO
@ Puerta de baterías - para abrir el
compartimiento de baterías
® Conmutador BEAT CUT - para eliminar tonos
de silbidos dorante grabaciones MW
fu: Antena telescópica - para mejorar la
recepción de FM
@ íi - enchufe para clavija 3,5 mm del audífono
Nota:A\ conectar el audífono, los altoparlantes
se desconectan aulomátícamente.
pe) AC MAINS - Enchufe para el cable de energía
de la red
AUMENTACION
1. Verifique que el voltaje que se índica en la placa de tipo [en la
base del aparato) corresponde al voltaje de la red. Si no es
así, consulte a su distribuidor u organización de servicio.
2. Si £U aparato está equipado con un selector de voltaje,
ajústelo al voltaje de la red.
5. Conecte el cable de alimentación al enchufe MAINS ya la
toma de la red en la pared.
— El aparato ahora está listo para su uso.
4. Para apagar la alimentación de Corriente Alterna
completamente, saque la clavija del enchufe de la pared.
• Desconecte el cable de alimentación para proteger el aparato
durante tiempo de relámpagos.
EUNCIONAMIENTO GENERAL
1. Ajuste el selector de fuente para encender el aparato,
2. Ajuste el sonido medíante los controles VOLUME y DBB,
3. Para apagar la radio, ajuste eí selector de fuente a la posición
TAPE/power off, con las teclas de la reproductora de
cassettes sueltas.
RECEPCION DE LA RASIO
1. Ajuste el selector de fuente a RADIO.
2 Ajuste el sonido mediante los controles VOLUME y DBB.
3. Seleccione la banda de ondas FMfllflW con el selector BAND.
4. Sintonice una omisora de radio con el botón TUNING.
5. Para apagar, ajuste el selector de fuente a la posición
TAPE/power off (con las teclas de la reproductora de cassettes
sueltas).
Para mejorar la recepción de la radio
• Para FM, extienda la antena telescópica. Incline y gire la
antena. Reduzca su longitud si la señal está demasiado fuerte
[muy cerca a una emisora).
• Para MW (AM) el aparato está provisto de una antena
incorporada, y por lo tanto no es necesario la antena
telescópica. Para dirigir la antena, gire el aparato completo.
21

REPROOUCTOÜA OE ÜD
.iRi^NTACiÓN INDICADORA D£ GO
Cd: tapa del CD abierta /leyendo el contenida del CD.
Número total de pistas: en modo de detenido.
Número de la pista actual: durante le reproducción.
Número de pista actual parpadea: en posición Pause ¡pausa).
Modos de shupíu/rb^t; cuando el modo respectivo esté activado.
program: Cuando esté activo, P aparece brevemente al almacenar
una pista.
no: no hay disco/ error en la operación de CD o en el mismo CD
(véase Solución de Problemas).
e: error en la operación de cd
f: memoria de programa llena.
íefb^ugiendo un cd
1. Ajuste el selector de fuente a CD,
/ Para abrir la tapa del CO, levante el borde de la tapa donde dice
LIFT TO OPEN
3. Inserte un CD con el lado impreso hacia arriba, y pulse la puerta de
CD suavemente para cerrarla.
El reproductora revisa el contenido del CD y presenta el número
total de pistas.
4. Pulse PLAY*PAUSE Hl para comenzar la reproducción.
5. Ajuste el sonido mediante los controles VOLUME y DBB.
6. Para interrumpir la reproducción, pulse PLAY'PAUSE Hl Para
empezar de nuevo, vuelva a pulsar PLAY»PAUSE MI
-* El número de la pista actual parpadea en a presentación.
7. Para detener la reproducción de CD, pulse STOP ■.
8. Para apagar el aparato, ajuste el selector de fuente a la posición
TAPE/power off con las teclas de la reproductora de cassettes
sueltas).
Nota: Reproducción de CD se detiene también cuando:
- se abre la puerta de CD;
- el selector de fuente está en la posición TAPE/RADIO;
- el CD ha llegado al final.
SELECCIONANDO UNA PISTA DIEEHENTE
Durante la reproducción de un CD, se puede usar las teclas SEAflCH
para seleccionar una pista concreta.
1. Pulse SEARCH una vez para la próxima pista, o repetidamente
hasta gue el número de la pista deseada aparezca en la presentación.
Pulse SEARCH r« una vez para volver al comienzo de la pista actual.
Pulse SEARCH t« más de una ve; para una pista anterior.
2. Si ha seleccionado un número de pista en el modo de parada o pausa,
será necesario pulsar PLAY*PAUSE Hl para comenzar la
reproducción.
Buscando un pasaje dentro de una pista
1. Pulse Y mantenga pulsado SEARCH o ►►!.
Se reproduce el CD a alta velocidad y bajo volumen.
Z Cuando reconozca el pasaje que está buscando, suelte el
botón SEABCH.
22
___
f
no
r J
REPRODUCTOHA OE CD
[Dífer0itítes modos de refMrodticcìró: SHUFFLE^EPÉAT Inutzclar/repetir)
El botón CD MODE le permite seleccionar 4 modos diferentes de
reproducción que pueden también combinarse con un programa de CO.
Estos modos pueden ser seleccionados o cambiados durante la
reproducción y parpadearán por dos segundos antes de comenzar la
reproducción en el modo seleccionado.
/. Durante la reproducción, seleccione su modo de reproducción
pulsando CD MODE una o más veces hasta gue el modo
deseado aparezca en la presentación.
SHUFFLE ' Todas las pistas o el programa se reproducen en orden
aleatorio.
REPEAT ALL SHUFFLE - Se repite el CD completo o el programa
en orden aleaLorio.
REPEAT - Se sigue reproduciendo la pista actual en forma
continua.
REPEAT ALL - Se repite el CD completo o el programa.
Puede usar SEARCH r« o »-w para omitir pistas durante
reproducción en CD MODE.
2. Para volver a la reproducción normal pulse CD MODE hasta que
los varios modos de SHUFFLE/ REPEAT ya no aparezcan en la
presentación.
^ También puede pulsar STOP ■ para salir del modo de
reproducción.
PROGRAMANDD LOf NUMÉROS DE PtSIA
Se pueden almacenar hasta 20 pistas en una secuencia preferida. Si
quiere, puede almacenar cualquier pista más de una vez.
1. En la posición de parada, pulse SEARCH kn o mí para la pista
deseada,
Z En el momento que se presente su número escogido,
pulse CD MODE una vez para almacenar la pi,sta.
— La presentación presentará 'P' brevemente y ‘program', seguido
por el número de la pista que usted ha escogido.
3. Seleccione y almacene todas las pistas de este modo
Para revisar el programa seleccionado
• En la posición de parada, pulse y mantenga pulsado CD MODE por
más de dos segundos.
La presentación mostrará todos los números de las pistas
almacenadas en secuencia.
• Comience la reproducción de su programa pulsando
PLAY-PAUSEHl
Borrando un programa
Puede borrar el contenido de la memoria:
- levando la tapa del CD para abrirla;
- moviendo la posición del selector de fuente:
■ ■■ pulsando STOP ■ dos veces durante la reproducción o en
la posición de parada.
La presentación mostrar 'no' brevemente y program, que
desaparecerán cuando el programa esté cancelado
■■ ■
ni
Ul
no
PtKKSFIAM'
23
9;.
'Ck

REPRODUCTORA DE CASSETTES
REPRODUCTORA OE CASSETTES
' REPRODUCCIÓN DE UN CASSETUE
1. Ajuste el selector de fuente a TAPE.
2. Pulse STOP'OPEN ■ 4 para abrir el portacassette e inserte
un cassette grabado.
3. Cierre el portacassette.
4. Pulse PLAY -4 para comenzar la reproducción.
5. Ajuste el sonido mediante los controles VOLUME y DBB
6. Para interrumpir la reproducción, pulse PAUSE II. Para
S!*
■g
empezar de nuevo, pulse la tecla de nuevo.
7 Si pulsa « or ►K,es posible avanzar o retroceder la cinta
rápidamente. Para parar el avance o el retroceso rápido, pulse
STOP*OPENM4
8. Para detener la cinta, pulse STOP*OPEN ■ 4.
— Se sueltan las teclas automáticamente cuando se alcance
el final de la cinta, a menos que PAUSE II haya sido
activado.
3. Con el selector de fuente en la posición TAPE/power off el
aparato está apagado cuando todas las teclas estén sueltas.
|ШВШ0а UHtASSETTE
La grabación es permitida siempre y cuando los derechos de
propiedad y otros derechos de terceros no son infringidos.
Este magnetófono no es apto para la grabación de cassettes
tipo CHROME (lEC 11) o METAL (lEC IV]. Para hacer
grabaciones debe usar cassettes tipo NORMAL (lEC I) en los
cuales las lengüetas no han sido rotas.
El nivel de grabación se ajusta automáticamente. Cambiando
los controles VOLUME o DBB no afectará la grabación actual.
La grabación no se realizará durante los primeros 7 segundos,
mientras la porción delantera de la cinta pase las cabezas de
grabación
Para evitar el borrado accidental de una grabación, coloque el
lado del cassette que quiere conservar hacia arriba y rompa la
lengüeta a la derecha. No es posible grabar en este lado del
cassette.
^ .. i- : ' .. J
L.
----
□
- ■ ■■
■ ... ;
□
¡OBABACIÚM CP eON АЖШШЕ
í. Ajuste el selector de fuente a CD.
2. Inserte un CD y, si lo desea, realice una programación de los
números de pista.
3. Pulse STOP“OPEN ■ 4 para abrir el portacassettes.
4. Inserte un cassette en blanco.
5. Cierre el portacassettes.
6. Pulse RECORD 9 para comenzar la grabación.
La reproducción de un programa de CD empieza
automáticamente al principio del programa. No es
necesario arrancar la reproductora de CD separadamente.
7 Para interrupciones breves, pulse PAUSE II. Para volver a la
grabación, pulse PAUSE II de nuevo.
8. Para parar la grabación pulse STOP*OPEN ■ 4
Para seleccionar y grabar un pasaje concreto denh^o de
una pista
/. Durante la reproducción, pulse y mantenga pulsado el botón
SEARCH button hM о para encontrar e! pasaje,
2. Pulse PLAY*PAUSEHl para detener la reproductora de CD
temporalmente en el pasaje deseado.
La grabación comenzará en este punto preciso de ía pista
al pulsar RECORD#
[GRABANDO DESDE Ei lULOm
1. Ajuste el selector de fuente a RADIO.
2. Sintonice la emisora deseada de radio (según la sección
RECEPCIÓN DE RADIO)
3. Pulse STOP*OPEN ■ 4 para abrir el portacassettes e
inserte un cassette en blanco,
4. Cierre el portacassettes.
5. Pulse RECORD 9 para comenzar ¡a grabación.
Nota: Durante la grabación de una emisora de radio MW
(AM), puede suprimir tonos de silbidos poniendo el
conmutador BEAT CUT en otra posicióm
6. Para interrupciones breves, pulse PAUSE II. Para empezar la
grabación de nuevo, vuelva a pulsar PAUSE II.
7 Para detener la grabación, pulse STOP*OPEN ■ 4.
¡-..
^,
; 7”- .:
1 i ichqn drt'^ ,
24
25

MANTENiMIENTO
PRECAUCIONES & MANTENIMIENTO GENERAL
Ubique ei aparato en una superficie dura y plana de tal manera que
no se incline.
No exponga el aparato, los CD, las pilas ni los cassettes a la
humedad, la lluvia, la arena, o a la luz directa del sol o dejarlos en
lugares donde ocurren altas temperaturas, tales como en las
cercanías de aparatos de calefacción o en automóviles
estacionados en el sol.
Cierre siempre la tapa para evitar la entrada de polvo. Para quitar el
polvo pase un paño suave y seco.
i
No cubra el aparato. El amplificador produce calor que tiene que
disiparse libremente; entonces asegúrese que hay suficiente
ventilación alrededor del aparato. Es necesario dejar un mínimo de
15 cm de espacio.
Las partes mecánicas del reproductor CD y del magnetófono de
cassettes contienen rodamientos autolubricantes, y no deben ser
lubricadas.
Un cuero de gamuza levemente humedecido con agua es suficiente
para limpiar la caja.
[MAMIEmiPtTO DEL REPRODUCTOR SE CD
Nunca toque el lente de la reproductora de CD.
El lente puede anublarse si el reproductor de CD se mueve desde
un ambiente trío hacia uno caliente El reproductor no arrancará.
Déle un poco de tiempo para que se aclimatice.
Utilice sólo discos de audio digitales.
Para sacar un CD de su estuche, apriete el huso mientras levante el
CD. Siempre aguante el CD por el borde y siempre guárdelo en su
estuche después del uso, para evitar que se raye y se ensucie.
Para limpiar el CD, frótelo en una línea recta desde el centro hacia
el borde usando un paño suave y libre de hilacha. No use
sustancias de limpieza, ya que éstas pueden dañar el disco.
Nunca escriba en un CO ni agregue calcomanías.
MANTENIMIENTO DEL COMPARTIMENTO DE LA CASSETTE
Para asegurarse de una buena calidad de grabación y reproducción,
limpie las partes indicadas como (a), (b) y (c) después de cada 50 horas
de operación o, por medio, una vez al mes. Utilice un palillo de algodón
levemente mojado de alcohol o un líquido especial para limpiar las
cabezas.
• Pulse STOP'OPEN ■ 4 para abrir el portacassettes.
• Pulse PLAY ^ Y limpie la rodilla de caucho de presión
• Luegu pulse PAUSE II y limpie el cabrestante (b) y las cabezas
• Después de haberlos limpiado, pulse STOP*OPEN ■ A.
Es posible también limpiar las cabezas (^' pasando un cassette
limpiador por la máquina una sola vez.
26
OIOIO
SOLUCIONES A POSIBLES ANOMALIAS
Si ocurre una anomalía, realice las comprobaciones descritas a continuación antes de llevar el
aparato al taller de reparación. Si no puede remediar el problema siguiendo nuestras
instrucciones, consulte a su proveedor o centro de servicio.
ADÍ/Efírf/VCM ‘ No desmonte el aparato o correrá e) riesgo de recibir una descarga
eléctrica. No intente en ninguna circunstancia reparar Vd. mismo eí
aparato pues esto cancelaría la garantía.
PROBLEMA
• SOLUCIÓN
No hay sonidD/tensión
- El VOLUMEN no está ajustado.
• Ajuste el VOLUMEN.
- La.s auriculares están conectados.
• Desconéctelos.
- El cable de suministro eléctrico no está
• Conéctelo debidamente.
- Las pilas están agotadas.
• Cambíelas.
- Las pilas están mal colocadas
• Colóquelas correctamente.
El visor no funciona correctamente
- Descarga electrostática.
• Desconecte el aparato de la red eléctrica y
La reproducción de CD no funciona
- El CD está muy rayado o .sucio.
• Cambíelo o limpíelo, vea la sección
- Se ha formado condensación en la lente láser
• Espere a que la lente se aclimatice.
Infomiaclón sobre el Cuidado det Ambiente
Se ha eliminado todo materisí redundante de empaque. Hemos hecho todo la posible para que el
material de empaque sea separable en tres materiales primp-ios: cartón, poliestireno ex|^ndÍdo,
poüetil^o.
Su apwiebi está hecho de materiales que pueden reciclanse ei está desarmado per
une compañía especialista. Pe? favor obseive les reglamentos teeales referente al
deseche de materiales de empaque, pilas gastadas y viejas equipos.
______________________
CAUSA POSIBLE "
____________________
.
El CD se salta piezas
_
- EÌ CO está estropeado o sucio.
• Cambíelo o limpíelo.
- ios modos SHUFFLE o PROGRAM están activos.
• Desactívelos.
_________________
El sonido de la cassette es de baja ca|ida^
conectado correctamente.
- Polvo y suciedad en las cabezas, etc.
• Limpie las cabezas etc., consulte la sección
'Mantenimiento'.
- Uso de tipos de cassette incompatibles
(METAL o CHBOMEl
• Para grabación, use solamente NORMAL (lEC 1).
La grabadora no funciona
- Es posible que la lengüeta o lengüetas se
hayan roto.
vuelva a conectarlo a los poens segundos.
____________
'Mantenimiento'.
• Aplique un trozo de cinta adhesiva encima
del agujero.
Este aparato satisface las normas relativas a la interferencia radioiéctrica de la
Comunidad Europea.
La placa de especificaciones eléctrica está situada en la base del aparat.
____________
27

BEPt£N€LEM£NTE
I OBERES ÜHD VORDERES BEPIEHIFELD |
;T; Ouelienwähler - zur Wahl der Quelle:
CO-RADIO-TAPE und dient ferner als Ausschalter
[POWER OFF)
'(2) VOLUME - 7ur Einstellung der Lautstärke
DBB - Dynamic Bass Boost: Auswahl eines
lebhafteren Tieftonverlialtens.
CASSETTENRECORDER:
@ PAUSE II- unterbrechen der Aufnahme oder
des Ahspielens
STOP* *OPEN ■ 4 - anhalten des Bandes und
Öffnen des Cassettonfaclies
SEARCH !•« oder - schnelles Vor-
/Rückspulen des Bandes
PLAY 4 - Beginn des Abspielens
RECORD • - Beginn der Aufnahnne
(&) Cassettenlade
CD-SPIELER:
(e) CD-Anzeige {Display) - Anzeige der CD-
Funktionen
(f) PIAY'PAUSE Ml - Starten oder Unterbrechen
des CD-Abspielens
STOP ■ - Anhalten des Abspielens oder
Löschen eines Programms
STB0MVERS0R0UN6
CD MODE-Wahl eines anderen Abspielmodus,
z,B. SHUFFLEy'REPEAT; Programmieren und
Prüfen von programmierten Titel nummern
SEARCH oder »i - Überspringen oder
Rückwärts-Worwärtssuchen nach einer
Passage/einem Titel
(s) UFT fo OPEN - Öffnen/SchlielJen der CD-Tür
RADIO:
(9) BAND - Wahl des FM/MW-Wellenbereichs
(^) Abstimmskala
(ii) TUNING - Abstimmen auf Radiosender
BUCtCWANO
@ Batterietür - Öffnen des Batteriefaches
03) BEAT CUT Schalter - zur Beseitigung von
Pfeiftonen bei MW-Aufnahmen
(Ti) Teleskopantenne - Verbessern des FM-
Empfangs
(;i5) 0 ' Stereo-Kopfhörerbuchse 3,5 mm
Hinweis: Anschließen von Kopfhörern schaltet
die Lautsprecher ab.
:TS' AC MAINS - Nefzkabel buchse
STROMVERSORGUNG / AU^EMEINE FUNKTIONSWEISE / RMUO
NETZANSCHLUSS
1. Überprüfen Sie, ob die auf dem Typenschild (auf dem
Anlagensockel) angegebene Spannung mit der lokalen
Spannung übereinstimmt. Wenn nicht, wenden Sie sich an
Ihren Fländler oder Kundendienst.
2. Ist Ihr Gerät mit einem Spannungswähier ausgerüstet, stellen
Sie den Spannungswähler auf die örtliche Netzspannung ein.
3. Das Netzkabel in die MAINS-Buchse der Anlage und in die
Wandsteckdose stecken.
— Die Anlage ist jetzt betriebsbereit.
4. Süll die Netzspeisung komplett abgeschaltet werden, den
Netzstecker aus, der Steckdose ziehen.
• Den Netzstecker herausziehen, wenn auf Batteriespeisung
umgeschaltet wird. Den Netzstecker auch bei starkem
Gewitter herausziehen
ALIGEM£IN£ FUNKTIONSWEISE
1. Zum Einschalten des Gerätes den Quellenwähler einstelien.
2. Den Klang mit den Reglern VOLUME und DBB einstellen.
3. Zum Abschalten des Radios den Quellenwähler in die Stellung
TAPE/pgwer off bringen (bei losgelassenen Cassettentasten).
Nach Möglichkeit das Stromnetz benutzen, wenn Sie wollen, daß die
Batterien länger halten. Bei an das Netz angeschlossenem Gerät wird das
Batterienetz abgeschaltet. Vor dem Einsetzen von Batterien sichersteiler,
daß der Netzstecker aus der Steckdose heraus- und vom Gerat
abgezogen ist.
Batterien (optional)
1. Das Batteriefach öffnen und sechs Batterien (Typ R-20, UM-1 oder DZeilen - vorzugsweise Alkalibatterien) It. Darstellung ein-setzen, wobei
die richtige Polarität anhand der Symbole (+} und (-] im Fach zu
beachten ist.
2. Oie Tür des Faches wieder anbringen und sicherstellen, daß die
Batterien fest und richtig eingesetzt sind. Das Gerät ist jetzt
betriebsbereit.
- Die unsachgemäße Benutzung von Batterien führt zu austretendem
Elektrolyt und korrodiert das Fach oder bewirkt Bersten der Batterien.
Des-halb:
- Batterietypen nicht mischen, z.B. Alkali mit Zink-Kohle.
- Nur Batterien vom selben Typ für das Gerät benutzen.
- Beim Einsetzen neuer Batterien alle Batterien gleichzeitig
austauschen (nicht etwa „alt" mit „neu" mischen),
- Die Batterien herausnehmen, wenn das Gerät längere Zeit nicht
benutzt wird.
Alle Arten von Batterien enOialtea chemische Stoffe und sind
deshalb ordnungsgemäß zu entsorgen.
28
RADfölMPFANG
1. Stellen Sie den Quellenwähler auf RADIO.
2. Den Klang mit den Reglern VOLUME und DBB einstellen.
3. Den Wellenbereich FM/MW mit BAND einstellen.
4. Mit TUNING einen Radiosender finden.
5. Zum Abschalten den Quellenwähler in die Stellung
TAPE/power off bringen (bei losgelasscnert Cassettentasten).
Verbesserung des Radioempfangs
• Ziehen Sie für FM Empfang die Teleskopantenne aus. Neigen
und drehen Sie die Antenne. Verkürzen Sie ihre Länge, wenn
das Signal zu stark ist (sehr nahe am Sender).
• Das Gerät ist für den MW {AM} Empfang mit eine
eingebaute Antenne ausgerüstet, weshalb die Teleskop
antenne wird nicht benötigt Richten Sie die Antenne durch
Drehen des Geräts aus
29

0P-SPIELER
CD-SPIELER
[CP-ANZEmi(DISfUY) __
- Cd: CO-Tiir offen/Inhalt der CD wird abgesucht.
- JJtelgesamtzahl: im Stop-Modus.
- Aktuelle Jitölnummer: beim Abspielen der CD..
- Aktuelle Titelnummer blinkt: im Pause-Modus.
- SHUFFif/REPEAT modkvjem der jeweilige Modus aktiviert ist.
- progr«h; Wenn aktiv, P erscheint auch kurz beim Speichern eines
Titels.
- no: keine GD/Fehler heim CD-Betrieb oder CD-Fehler (siehe
Fehlersuche!.
- e: Fehler beim CD-Betrieb.
- f: Programmspeicher voll.
l Den Quellenwähler auf CD einstellen.
2. Zum Öffnen des CD-Faches die mit UFT TO OPEN bezeichnete
Kante der CD-Tür anheben
3. Eine CD einlegen, bedruckte Seite nach oben, und die CD-Tür sachte
drucken, um sie zu schließen.
Der CD-Spieler sucht den Inhalt der CD ab, und die
Titelgesamtzahl wird angezeigt.
4. Mit dem Abspielen durch Drücken von PLAY*PAUSE Wl beginnen.
5. Den Klang mit den Bedienelementen VOLUME und DBB einstelien.
fi Zum Unterbrechen des Abspielens PLAY*PAUSE ►ll drücken.
PLAY'PAUSE Hl erneut drücken, um das Abspielen fortzusetzen.
Die aktuelle Titelnummer blinkt in der Anzeige.
7. STOP Bdrücken, um das CD-Abspielen anzuhalten.
S Zum Abschalten des Gerätes den Quellenwähler auf TAPE/poweh
OF Stellen [bei losgelassenen Cassettentastenl.
Hinweis: das CD-Abspielen wird auch dann angehalten, wenn:
- die CD-Tür geöffnet wird;
- der Quellenwähler auf TAPE/RADIO steht;
- die CD am Ende angelangt ist.
___
__
¡WAHL EINES ANDEREN TITELS _ __
Wahrend des Abspielens können die SEARCH Tasten zur Wahl eines
bestimmten Titels benutzt werden.
/. Durch einmaliges Drücken von SEARCH *♦! für den nächsten Titel
oder wiederholtes Drücken, bis die gewünschte Titelnummer in der
Anzeige erscheint. SEARCH i« einmal drücken, um an den Anfang
eines aktuellen Titels zurückzukehren.
Für einen vorherigen Titel SEARCH hm mehr als einmal drücken.
2 Falls Sie eine Titelnummer in der Position Stop oder Pause gewählt
haben, müssen Sie PLAY»PAUSE Hl drücken, um mit dem
Abspielen zu beginnen.
Auffinden einer Passage inneiiialb eines Titels
J. Die Taste SEARCH oder gedrückt halten.
-* Die CD wird mit hoher Geschwindigkeit und geringer Lautstärke
abgespielt.
2. Die Taste SEARCH loslassen, sobald Sie die gewünschte
Passage erkennen.
P
no.
r J
LU
pfioafw»*
Verschieden Absplelmedi: SHUFFLEyREPEAT
Die CD MODE Taste erlaubt Ihnen die Auswahl von 4 verschiedenen
Abspielmodi, die auch mit einem CD-Programm kombiniert werden
können, Oie Modi können während des Abspielens gewählt oder
geändert werden und blinken für 2 Sekunden vor dem Abspielen des
von Ihnen gewählten Modus,
Während des Abspielens den Abspielmodus durch ein- oder
mehrmaliges Drücken von CD MODE wählen, bis der gewünschte
Abspielmodus in der Anzeige erscheint.
SHUFFLE - Alle Titel werden oder das gesamte Programm wird in
zufälliger Reihenfolge abgespielt.
REPEAT ALL SHUFFLE - Wiederholt die gesamte CD oder das
gesamte Programm in zufälliger Reihenfolge.
REPEAT - Spielt den aktuellen Titel kontinuierlich ab
REPEAT ALL - Wiederholt die gesamte CD oder das gesamte
Programm.
Mit SEARCH h« oder^w können Titel beim Abspielen im CD
MODE übersprungen werden.
2. Zur Rückkehr zum normalen Abspielen CD MODE drücken, bis die
diversen SHUFFLE/REPEAT-Modi nicht mehr in der Anzeige
erscheinen.
Zum Beenden des Abspielmodus kann auch STOP ■ gedrückt
werden,
vHliiilltaMEmr
Bis zu 20 Titel können in der gewünschten Reihenfolge gespeichert
werden. Titel können mehr als einmal gespeichert werden
/. ln der Stop-Position SEARCH i4a oder^w für den gewünschten
Titel drücken.
Z Sobald die ausgewählte Titelnummer angezeigt wird, CD MODE
einmal drücken, um den Titel zu speichern.
— In der Anzeige erscheint kurz 'P' und 'program', gefolgt von der
gewählten Titelnummer.
3, Alle gewünschten Titel auf diese Weise auswählen und speichern.
Überprüfen des eingestellten Programms
• ln der Slop-Position CD MODE drücken und mehr als 2 Sekunden
halten.
In der Anzeige erscheinen der Reihe nach alle gespeicherten
Titelnummem.
• Durch Drücken von PLAY»PAUSEHl mit dem Abspielen des
Programms beginnen.
Löschen eines Programms
Den Speicherinhalt kann man löschen durch:
- Öffnen der CD-Tür (durch Anheben);
- Umstellen des Quellenwählers;
- zweimaliges Drücken von STOP ■ während des Abspielens /
in der Stop-Position.
• In der Anzeige erscheint kurz 'no' und program, dies
verschwindet beim Abbrecfien des Programms.
im>eAr:
AU-."
&
IC
lO
■§
ni
Ul
no
31

CatSSETiIllH№COBPER
GASSETTENRECORDER
lASSPnfMBHBieASSEnr
1. Den üuellenwähler auf TAPE.einstellen.
2. STOP*OPEN ■ 4 drücken, um den Cassettenhalter lu öffnen
und eine bespielte Cassette einzulegen.
3. Das Cassettenfacb schließen.
4. PLAY -4 drücken, um mit dem Abspielen zu beginnen.
5. Den Klang mit den Bedienelementen VOLUME,
INCREDIBLE SURROUND und BASS einstelien
i. Zum Unterbrechen des Abspielens PAUSE II drücken. Taste
erneut drücken, um das Abspielen fortzusetzen.
7. Durch Drücken von r« oder ist das schnelle Spulen des
Bandes in beiden Richtungen möglich. Zum Anhalten des
schnellen Spulens STOP"OPEN ■ A drücken.
ft Zum Anhalten des Bandes STOP«OPEN ■ A drücken.
Die Tasten werden am Ende des Bandes automatisch
freigegeben (Bandendabschaltung), außer beim erfolgten
Aktivieren von PAUSE II.
9. Bei in der Stellung TAPE/power off befindlichem
Queilenwähier wird das Gerät bei Freigabe aller Cassettentasten abgeschaltet.
iA$SlilT£RECiM№NG
* Aufnahmen sind zulässig, wenn Urheber- oder andere Rechte
Dritter nicht verletzt werden.
* Das Kassettendeck ist für das Bespielen von Kassetten der
folgenden Typen geeignet; CFIROME (lEC TI) und METAL (lEC
IV), Zur Aufnahme sollten Kassetten des Typs NORMAL [lEC 1),
bei denen die Zapfen nicht herausgebrochen sind, verwendet
werden.
' Der Aufnahmepegel wird automatisch eingestellt. Durch
Verstellen der Regler VOLUME oder DBB wird die Aufnahme nicht
beeinflußt.
' Am Anfang des Bandes läuft das Führungsband an den
Tonköpfen vorbei, und es erfolgt sieben Selcunden lang keine
Aufnahme,
Um versehentliches Loschen einer Aufnahme zu verhindern,
halten Sie die zu schützende Kassettenseite vor sich und brechen
den linken Zapfen heraus. Diese Seite kann nicht mehr bespielt
werden.
iSVMCHRONSTABT CD-AUFNAHME
f. Den üuellenwähler auf CD einstellen.
2. Eine CD emlegen und ggf. Titelnummern Programmierer!.
3. Zum Öffnen des Cassettenfaches STOP*OPEN ■ A drücken
4. Ein unbespieltes Band einlegen.
5. Das Kassetterifach schließen.
6. RECORD # drücken, um mit der Aufnahme zu beginnen.
Das Abspielen des CD-Programms beginnt automatisch ab
Programmanfang. Der CD-Spieler braucht nicht gesondert
gestartet zu werden.
7. Für kurze Unterbrechungen PAUSE II drücken. PAUSE II
erneut drücken, um mit der Aufnahme fortnifahren.
fl. STOP*OPEN ■ A drücken, um die Aufnahme anzuhalten.
Auswahl und Aufnahme einer bestimmten Passage
innerhalb eines Titels
1. Während dos Abspielens die Taste SEARCH oder ►>!
gedrückt tialten, um die Passage aufzufinden.
2. PLAY*PAUSE Hl drücken, um den CD-Spieler an der
gewählten Passage pausieren zu lassen.
— Die Aufnahme beginnt an genau die.ser Stelle im Titel,
wenn RECORD • gedrückt wird.
AUFNAHME Vp« RADIO
1. Den Üuellenwähler auf RADIO einstelien.
2. Auf den gewünschten Radiosender abstimmen (siehe
RADIOEMPFANG)
3. STOP*OPEN ■ A drücken, um das Cassettenfacb zu öffnen
und ein unbespieltes Band einzulegen.
4. Das Cassettenfach schließen.
5. RECORD • drücken, um mit der Aufnahme zu beginnen.
Hinweis: Wenn Sie einen MW- fAM-} Sender aufnehmen, den
BEAT CUT Schalter emsteilen, um jegliches
Pfeifgerausch zu beseitigen.
6. Für kurze Unterbrechungen PAUSE II drücken. PAUSE II
erneut drücken, um mit der Aufnahme fortzufahren.
7. STOP»OPEN ■ A drücken, um die Aufnahme anzuhalten.
o
d»
32
33

PFLEGE
p)RK£HRUNê£N & ALLGEMErNE PFLEGE
Die Anlage auf eine harte, ebene Fläche stellen, damit sie nicht
umkippen kann.
Die Anlage, CDs, Batterien und Kassetten vor Feuchtigkeit Regen,
Sand und direkter Sonneneinstrahlung schützen und nicht an
anderen Orten, an denen es zu hohen Temperaturen kommen kann
(z. B. in der Nähe von Ffeizungen oder in einem in der Sonne
geparkten Auto), aufbewahren.
Stets die CD-Tür schließen, um das CD-Fach staubfrei zu halten. Zur
Reinigung das CD-Fach mit einem weichen trockenen Tuch
abstaiiben.
Die Anlage nicht abdecken. Der Verstärker erzeugt Wärme, die frei
entweichen können muß. Aus diesem Grund dafür sorgen, daß um
die Anlage genügend Lüitungsmöglichkeit bestoht. Es ist ein
Mindestabstand von 15 cm erfürderlicfi.
Die mechanischen Teile des CD-Spieler und Kassettendocks
enthalten selbstschmierende Fager und brauchen nicht geölt oder
f
geschmiert zu werden.
Zum Reinigen des Gehäuses reicht ein leicht mit Wasser
befeuchtetes Waschleder aus. Keine alkohol-, Spiritus- oder
ammoniakhaltigcn Reinigungsmittel oder Schleifmittel verwenden.
Sie können das Gehäuse beschädigen.
¡PFLEGE OES CO-SPIELERS
Auf keinen Fa//die Linse des CD-Players berühren.
Wird der CD-Spieler vom Kalten ins Warme gebracht, kann die Linse
beschlagen. In diesem Fall geht der CD-Player nicht an. Der CD-Player
braucht einige Zeit, um sich an den Ferrrperaturunterschied zu gewöhnen.
Nur Digital Audio-CDs benutzen.
Zum Fferausnehmen der CD aus der Schachtel auf den Zapfenring in [
der Mitte drücken und die CD hochhebon. Die CD stets am Rand !
halten und nach Gebrauch stets wieder in die Schachtel legen, um sie
vor Zerkratzen und Staub zu schützen. i
Zum Reinigen die CD mit einem weichen, flusenfreien Tuch gerade
von der Mitte zum Rand hin abwischen. Keine Reinigungsmittel
verwenden. Sie konnten die CD beschädigen.
A/;cbf auf eine CD schreiben Keine Aufkleber auf die CD kleben.
PFLEGE DES RECORDERS
Um eine gute Aufnahme- und Wiedergabequalität sicheizustellen, die
Teile itA), Lb) und (c) nach jeweils 50 Betriebsstunden oder durchschnitt
lich einmal im Monat reinigen. Verwenden Sie ein leicht mit Alkohol
oder einer speziellen. TonkopFreinigungs-flüssigkeit getränktes
Baumwolltuch.
• STOP*OPEN ■ A drücken, und das Cassettenfach öffnen
• PlAY < drücken, und die Gummiandruckrolle © reinigen.
• Anschließend PAUSE II drücken, und die Bandantriebsrolle (b) und
die Tonköpfe (Ä) reinigen.
• Nach der Reinigung STOP*OPEN B4 drücken.
Die Tonköpfe können auch gereinigt werden, indem einmal eine
Reinigungskassette durchläuft.
■ 34
L
FEHLERSUCHE
Wenn ein Fehler auftritt, zuerst die nachsteheriden Punkte überprüfen, bevor das Gerät zur
Reparatur gegeben wird. Wenn Sie das Problem nicht durch Befolgen dieser Ratschläge lösen
können sollten Sie sich an Ihren Ftändler oder an Ihr Reparaturzentrum wenden.
WARNHINWEIS: Das fierai nicht öffnen, weil StromcMaggeühr bestellt. Unter gar
keinen Umstätiäan sollteit Sie versuchen, das Gerat selbsi zu reparieren,
weil die Garantie dadurch erlischt
PROBLEM
- MÖGLICHE UHSACHE
• ABHILFE
Kein Ton/Strom
- Lautstärke ist nicht eingestellt.
. * Die Lautstärke (VOLUME) einstellen.
- Kopfhörer sind angeschfossen.
• Kopfhörer abziehen.
- Netzkabel ist nicht fest angeschlossen.
• Das Netzkabel ordnungsgemäß anschließen.
- Batterien sind erschöpft
• Frische Batterien einsetzen.
- Batterien sind falsch eingesetzt.
• Die Batterien richtig einsetzen.
Anzeige funittioiiieit nicht liclitig
- Elektrostatische Entladung.
• Das Gerät abschalten, den Netzstecker ziehen
und nach ein paar Sekunden wieder anschließen
CP-Wiedergabe ist nicht möglich
- CD Ist stark zerkratzt oder verschmutzt.
• Die CD austauschen oder reinigen, siehe FTlege.
- Laserliose ist beschlagen.
• Warten, bis Linse sich akklimatisiert hat.
Umwelt$chu&i!
Auf überflCissiges Verpackungsmaterial wurde verzichtet. Wir haben uns bemüht, die
Verpackung problemlos in drei Materialsorten trennbar zu machen: Pappe, Schaumpolystyrc!l und
Polyethylen.
(hr Gerät besteht aus recvclitigfäh^^ Material, Lassen Sie es von einer SpeziaIfirma
auseinsmdernehmen. Bitte beachten Sie die örtlichen Besttmtnungen für die
Entsorgung von Verpackungsmaterial, verbraiH^n Gatt^ien und alten Geräten.
Dieses Gerät entspricht den Funkentstörvorschriften der Europäischen Union.
______
_________
Das Typenschild befindet sich auf der Geräteanterseite.
_______
Die CD überspringt Titel
- CD ist beschädigt oder verschmutzt.
• Die CD austauschen oder reinigen
- SHUFFLE oder PßOGBAM ist aktiv.
• SHUFKE/PROGRArvi Modus/Modi beenden.
Mangelnde Tonqualität der Cassette
- Staub und Schmutz an den Köpfen usw.
• Deckteile usw. reinigen, siehe Pflege.
-- Verwendung inkompatibler Cassettentypen
(METAL oder CHROME).
• Nur NORMAL [lEC TI für Aufnahme
verwetiden.
Aufnahme ist nicht möglich
Cassettenzunge(n) könnte(n)
herausgebroeben sein.
Ein Stück Klebeband über die fehlende Zunge
kleben.
35

TOETSEN
BOVEN- EN VOORKANT
0 Bronkeuzeschakelaar:
- om de geluidsbron te kiezen: CD-RADiO-TAPE
en om het apparaat uit le schakelen (POWER
OFF)
© VOLUME - om liet volume in te stellen
(3) DBB - Dynamic Bass Boost: voor een meet
levendige basrespons
CÀSSETTEffECOffDER:
0 PAUSE II - om het opnemen of afspelen te
onderbreken
STOP«OPEN ■ À - om het afspelen te
beeindigen en het cassettevak te openen
SEARCH of - om de cassette versneld
vonmit of achteruit te spoelen
PLAY^ - om het afspelen te starten
RECORD • -omeenopnametestarten .
(5; Cassettevak
CB-SPEIIR:
re) CD Display - geeft Infarmatie over de cd-spcicr
.-A"-.
7) PLAY*PAUSEMI - out het afspelen van een cd
■ oT.
te starten of te onderbreken
STOP ■ - am het afspelen te beeindigen of om
een programma te wissen
STROOMVOORZIENING
CD MODE - om een bepaalde manier van
afspelen te kiezen, bijvoorbeeld
3FIUFFLE/REPEAT; om niimmers to
programmcrcn en om het programma te
controleren
SEARCH HM of ►►I - am een varige of volgen-dc
passage/numnrer over te slaan of te zoeken
(3) LIFT TO OPEN - om het cd-vak te openen / te
sluiten
RADIO:
dii BAND - am het golfgebied te kiezen: FM of
MW,
(ip: Afstemschaal
© TUNING - om af le stemmen op een
radiozender.
ACHfTEfiKANT
® Batterijklepie - am het batterijvak te openen
(13) BEAT CUT schakelaar - om eventuele
fluittonen te voorkomen bij het opnemen van
een MW-zender
(i'^i Telescoopantenne - om de FM-ontvangst te
verbeteren
©) 0 - 3.5 mm aansluitbus voor een hoofdtelefoon
Opmerking:- als de hoofdtelefoon aangesloten is
dan worden de luidsprekers
uitgeschgkeld
de) AC MAINS - aansluitbus voor het netsnoer
STROOMVOORZIENING ALGEMENE BEOIENING RADIO
MET$PAN(IIN6
1. Controleer of de aangegeven netspanning [op (let typeplaatje aan
de onderkant van het apparaat) overeenkomt niet uw piaatselijke
netspanning. ts dit niet het geval, raadpleeg d.on uw levemncier of
serviceorganisatie.
2. Eleeft uw apparaat een spanningskiezer, stel deze dan in op
de piaatselijke netspanniog.
3. Verbind het netsnoer met de aansluiting MAINS van het ■
apparaat en steek de netstekker in het stapcuritact.
— Het apparaat is nu klaar voor gebruik.
4. Dm de netvoeding volledig uitte schakelen moet u de
netstekker uit het stopcontact trekken.
• Verwijder het netsnoer om over te schakelen naar
batterijvoeding of om het apparaat te beschermen bij hevig
onweer.
1"
1. Verplaats de bronkeuzeschakelaar om het apparaat aan te
zetten.
2. Stel het geluid in met de knoppen VOLUME en DBB.
3 Wilt u de radio uitzetten, zet dan de bronkeuzeschakelaar op
TAPE/power OFF en let erop dat geen enkele cassettetoets
ingedruktis,
Wilt u de batterijen sparen, gebruik dan zn vaak als u kunt de netvoeding
De batterijen worden uitgeschakeld zodra het apparaat aangesloten .
wordt Dp het lichtnet Let erop dat u het netsnoer uit het apparaat en het
stopcontact haalt voor u de batterijen in het apparaat plaatst.
Batterijen (los verkrijgbaar)
1. Open het batterijvak en plaats er zes batterijen in, type R20, UM1 of
D (bij voorkeur alkaline), met de l-i) en (-j-polen op dezelfde manier als
aangegeven binnenin het batterijvak
2. Controleer of de batterijen correct en stevig op hun plaats zitlen en
plaats het klepje van het batterijvak temg. U kunt het apparaat nu
gebruiken.
Door verkeerd gebruik kunnen batterijen gaan lekken waardoor roest
ontstaat in het batterijvak of waardoor de batterijen kunnen
openbarsten. Daarom:
- Gebruik geen verschillende types batterijen door elkaar,
bijvoorbeeld alkaline met zink-koolstof.
Gebruik voor het apparaat slechts batterijen van hetzelfde type.
-■ Als u de batterijen vervangt, gebruik dan geen oude en nieuwe
batterijen dooreikaar.
- Verwijder de batterijen als u het apparaat längere tijd niet zult
gebruiken.
Batterijen bevatten cbmicßlien en maeten daarom op de juiste
manieringeleverd worden.
36
|RAOIO-ONTVANGST
1. Zet de bronkeuzeschakelaar op RADIO.
2. Stel het geluid in met de knoppen VOLUME en DBB.
3. Kies het golfgebied FM/MW met BAND.
4. Stern af op een radiozender met TUNING,
5. Zet de bronkeuzeschakelaar op TAPE/power off (terwijl geen
enkele cassettetoets ingedrukt is) om de radio uit te zetten.
Verbeteren van de radio-entvangst
• Voor FM moet u de telescoopantenne uittrekken.
Klap de antenne neer en draai deze. Als het signaal te sterk is
[in de buurt van een zender), schuif dan de antenne in.
• Voor MW (AM) heeft het apparaat een ingebouwde antenne
zodat de telescoopantenne niet nodig is. Rieht de antenne
door het hele apparaat te draaien.
6kR2D-UM1-DC«II*
37

m $PELER
CD-SPELER
iOISFUŸ-ttIFOmÂÂîœ V008 OÊ CD^SPELiR
~ Cd: het cd-vak is geopend/de cd wordt gescand
- Het totale aantal nummers: in Stop-stand.
- Het huldige nummer tijdetis het afspelen.
- Het huldige nummer knlppeit: wanneer u het afspelen tijdelijk
onderhrüken heeft [Pause).
- SHUFHi/REPEAT-teüze.' wanneer u de bijbehorende manier van
afspelen gekozen heeft.
- phogram: tijdens het programmeren verschijnt P ook kort als u
eer nummer programmeert.
- no: geen cd/fout bij het gebruik van de cd-speler of probleem met
de cd (zie 'Verhelpen van storingen').
- e: fout bij het gebruik van de cd-speler.
f: programmeergeheugen is vol.
|AF$REUWVAN EENGD
1. Zet de bronkeuzeschakelaar op CD.
Z Open het cd-deksel door de hoek waar UFT TO OPEN Staat omhoog
te tillen
3. Leg de cd in de spelee met de hedrukte kant naar boven en dmk zacht
op het cd-deksel om het cd-vak te sluiten.
-* * De cd-speler leest de inhoud van de :d en in het display verschijnt
het totale aantal nummers.
4. Dmk Dp PLAY«PAUSE HI om het afspelen te starten.
5. Stei het geluid in melde knoppen VOLUME en DBB
6. Wilt u het afspelen tijdelijk onderbreken, druk dan op
PLAY"PAUSE Hl. Dmk opnieuw op PIAY«PAUSE Ml om verder te
gaan met afspelen.
-* In het display knippert het huldige nummer.
7. Druk op STOP ■ om het afspelen van de cd te heëindigen.
a Zet de bronkeuzeschakelaar op TAPE/power off (terwiji geen enkele
cassetteîoets ingedrukt is) om het apparaat uit te zetten.
Opmerk/nff: Het afspelen van de cd sîopt ook:
-wanneer u het cd-vak opent;
-wanneer u de bronkeuzeschakelaaropTAPE/RADIO zet;
- aan heteind van de cd.
KRZEN VAN EEN ANDER NUMMER
Tijdens het afspelen kunt u met de SEARCH-toetsen een bepaald
nummer kiezen.
l Druk eenmaal op SEARCH voor het volgendc nummer, of druk net
zo vaak tot het gewenste nummer in het display verschijnt.
Druk eenmaal op SEARCH om terug te keren naar het begin van
het huidige nummer.
Druk meerdere malen op SEARCH voor een vorig nummer.
2. Heeft u een nummer gekozen in Stop- of Pause-stand dan moet u op
PIAY»PAUSE Ml drukken om het alspelen te starten.
Zoeken van een passage binnen een nummer
1. Houd SEARCH of ingedrukt.
De cd wordt dan zachtjes en versneld afgespeeld.
2. Laal de toets SEARCH los zodra u de gewenste passage herkent.
38
Versctiiltenfte matiierett van afften: $HUF^E/REFEAT
Met de CD MODE -toets kunt u vier verschillende manieren van
O
no
r J
LU
PflOGRil*
afspelen kiezen; deze kiinnen ook gebruikt worden voor een cdprogramma. De manier van afspelen kan tijdens het afspelen gekozen
of gewijzigd worden en knippert dan gedurende twee seconden
vooraleerte beginnen met afspelen op de gekozen manier.
1. Druk tijdens het afspelen één of meerdere keren op
CD MODE tot de gewenste manier in het display verschijnt.
SHUFFLE Alle nummer van de cd of van het programma worden
in willekeurige volgorde afgespeeld.
REPEAT ALL SHUFFLE - De cd of het programma wordt in
willekeurige volgorde herhaatd.
REPEAT - Het huidige nummer wordt telkens opnieuw herhaald.
REPEAT ALL - De hele cd of hei programma wordt herhaald.
Tijdens het afspelen op één van deze 4 manieren kunt u met
SEARCH i+R of ►>! nummers overslaan.
2. Wilt u weer op de normale manier verder gaan met afspelen, druk
dan op CO MODE tot in het display geen snkele manier van
afspelen nog aangegeven wordt.
U kunt ook op STOP ■ drukken om het afspelen te beeindigen.
: ALL
ir
PROQBÂMMËREN \№N GiJ^NOMMERS
U kunt in het totaai ?0 nummers in de gewenste volgorde in het
geheugen programmeren. U kunt elk nummer ook meer dan eens
programmeren.
1. Kies terwijl de speler stilstaat het gewenste nummer met SEARCH
l-*N of
2. Zodra het gekozen nummer in het display verschijnt, drukt u
eenmaal op CD MODE om het nummer vast te ieggen.
'S
In het display verschijnt kort 'P' en 'program', gevolgd door het
gekozen nummer.
3. Kies en programmeer op deze manier alle gewenste nummers.
Cotrtroleren van een programma
• Houd, terwijl de speler stilstaat, de toets CD MODE minstcns 2
seconden ingedrukt.
In het display verschijnen één voor één de nummers die u
gekozen heeft.
• Druk op PLAY-PAUSE Hl om het afspelen van het programma te
starten.
Wissen van een programma
U kunt een programma wissen door:
- het cd-vak te openen;
- de bronkeuzeschakelaar in een andere stand te zetten;
- tweemaal op STOP ■ te drukken tijdens het afspelen/terwijl het
afspelen gestopt is.
—In het display verschijnt kort 'tio’ en 'program'; dii verdwijnt
wanneer het programma gewisl is.
ni
Ul
no
PftOäRAM
39

CASSETTEfìECQRDER
CASSETTERiCORDiR
Afspelen van een cassette
1. Zet de bronkeuzeschakelaar op TAPE.
2. Druk op STOP'OPEN m^omde cassettehouder te openen
en plaats een bespeelde cassette in de houder.
3. Sluit de cassettehouder.
4. Druk op PLAY ^ om het afspelen te starten.
5. Stel het geluid in met de knoppen VOLUME en DBB.
S. Wilt u het afspelen tijdeüjk onderbreken, druk dan op PAUSE II.
Druk opnieuw op PAUSE II om vorder te gaan met afspelen.
7 Met or ►►.kunt u de cassette in beide riehtingen spoelen.
Druk ep STOP*OPEN ■ * om het snelspoelen te beöindigen.
S. Druk op STOP*OPEN ■ 4 om het afspelen te beemdigen
De toetsen worden aan het eine! van de cassette autcmalisch
ontgrendeld behalve als u PAUSE II ingedrukt heeft.
9. Als de bronkeuzeschakelaar op TAPE/power off Staat en alle
cassette-toetsen zijn ontgrendeld dan wordt het apparaat
uitgeschakeld.
¡EEN cassette OPNININ
Opiiemen is slechts geoorloofd als geen inbreuk wordt gemaakt
op auteursrechten of andere rechten van derden.
Deze recorder is niet gescbikt voor het opnemen op CHROME
(lEC 11} üf METAL (lEC IV) cassettes. Gehruik voor opnemen op
deze recorder steeds NORMAL cassettes (lEC I) waarvan de
nokjes nietzijn uitgebroken.
Het regelen van het opnarneniveau gebeurt automatisch. Als u
de instellingen voor VOLUME of DBB verändert, heeft dit geen
invloed op de opname.
Tijdens de eerste en laatste 7 seconden van een cassette wordt
er niets opgenomen, omdat dan de aanloopband de
recorderkoppen passeert.
Om te voorkomen dat u per origeluk een opname wist, houdt u
de cassettekant die u wilt beveiligen naar u toe en breekt u het
linker nokje uit. Nu kunt nu niet meer opnemen op deze
cassettekant.
CO SYNCRO - OPNEMEN VAN EEN CD
1. Zet de bronkeuzeschakelaar op CD.
2. Leg een cd in en stel, indien u dat wilt, een programma
Samen,
3. Druk op STOP*OPEN ■ 4 om de cassettehouder te openen,
4. Plaats een lege cassette in de houder.
5. Sluit de cassettehouder.
ß. Druk op RECORD • om de opname te starten,
Het cd-programma begint automatisch vanaf het begin te
speien, U hoeft de cd-speler niet afzonderlijk te starten,
7. Wilt u het opnemen tijdelijk onderbreken, druk dan op
PAUSE II. Druk opnieuw op PAUSE II om verder te gaan met
opnemen.
8. Druk op STOP-OPEN ■ 4 om het opnemen te beeindigen.
Kiezen en opnemen van een bepaalde passage binnen
een nummer
1. Houd lijdens het afspelen de toets SEARCH of -w
ingedrukt om de gewenste passage te kiezen.
ZDrukop PLAY-PAUSE Ml om het afspelen van de cd bij de
gekozen passage te onderbreken.
-* Het opnemen start vanaf dit punt wannecr u op RECORD •
drukt.
OPNEMEN VAN DE RADIO
1. Zet de bronkeuzeschakelaar op RADIO.
2. Stern af op een radiozender (Zie AFSTEMMEN OP EEN
RADIOZENDER).
Drukop STOP-OPEN ■ 4 om de cassettehouder te openen
en plaats een lege cassette in de houder.
4. Sluit de cassettehouder.
5. Druk op RECORD • om de opname te starten.
Opmerking: Als u een fluittoon boon tijdens het opnemen
van een MW (AM)-zender dan kunl u dit
voorkomen door de BEAT CUT-schakelaar in een
andere stand ie zetten.
6. Wilt u het opnemen tijdelijk onderbreken, druk dan op
PAUSE II. Druk opnieuw op PAUSE II om verder te gaan met
opnemen,
ZDrukop STOP-OPEN ■ 4 om het opnemen te beeindigen.
&
40
41

ONOERHOUD
WAARSCHUWINOEN 8t ALGEMEEN ÖNDERHOUD
Zet het apparaat op een stevige, vlakke nndergmnd ¿odat het iiiet
scheef Staat-
Zet hei apparaat, de CD's, batterijen en casseties nooit in de regen
of in het zand eri nooit in de volle zon of op andere piaatsen waar
hoge Temperaturen können voorkomen, zoals hijv. bij
vcrwarmingsapparaten of in auto's die in de zon staan geparkeerd.
Houd het cd-vak altijd dicht zodat er geen stof in komt. Maak het
cd-vak schoon met een zachte droge doek
Dek het apparaat niet af. Do versterker wärmte produceert die goed
moet können ontsnappen. Zorg dus voor voldoende ventilatieruimte
rond het apparaat, minimaal 15 cm.
De mechanische onderdelen van de CD-speler en het cassettedeck
zijn voorzien van zeltsmerende lagers en hneven daarom niet
geolied of gesmeerd te worden.
Een licht met water bevochtigde zeemlederen lap volstaat voor het
reinigen van de behuizing. Gebruik geen reinigingsmiddel dat
I
alcohol, oplosmiddelen, ammoniak of schuurmiddelen bevat omdat
dit de behuizing kan aantasten.
ONDEHHOIIO VAN BE DD-SPEIEB
Raak nooit de lens van de CD-speler aan.
De lens kan beslaan bij de overgang van een koude naar een
warme ruimte en de CD-speler zai dan even niet starten. Ma enkele
minuten verdwijnt de condens vanzelf.
Gebruik alleen Digitale Audio CD's.
U kunt de CD het eenvoudigst uit het doosje nemen door met een
vinger in het midden te drukken terwijl n de CD optilt. Houd de CD',s
altijd bij de rand vast en berg ze na gebruik weer op in het doosje
om krassen en stof te vermijden.
Maak de CD schoon door met een zachte, pluisvrije doek vanuit het
midden in een rechte lijn naar de rand te wrijven.
Schoonmaakmiddelen kunnen de CD beschädigen,
Schrijf nooit op een CD en plak er geen stickers op.
PNDERHGim VAN DE RECORDER
Om verzekerd te zijn van een goede opname- en weergavekwaliteit
verdient het aanbeveling om na elke 50 uur gebruik, of gemiddeld eens
per maand, de onderdelen (Ä), (b) en (g te reinigen. Gebruik een
wattenstaafje,. licht hevochtigd met wat alcohol, Spiritus of een
speciale reinigingsvloeistof voor de koppen.
• Druk op STOP »OPEN ■ 4 en open de cassettehonder.
• Druk op PLAY 4 en reinig de rubher aandrukrol (c).
• Druk dan op PAUSE II en reinig de toonas (?) en de
recorderkoppen (A).
• DrukdaarnaopSTOP'OPENl 4.
U kunt de recorderkoppen (a; ook reinigen door een reinigingscassette eenmaal als een normale cassette af te speien.
42
fl' i,
VERHELFEN VAN STORfNGEN
Als zieh een probleem voordoet, controleer dan eerst de punten np de onderstaande lijst voor u het
apparaat ter reparatie aanhiedt. Kunt u het probleem niet oplossen aan de hand van deze
aanwijzingen, raadpleeg dan uw leverancier of serviceorganisatie.
WAARSCHUWING; Maak het apßaraat niet open want dan loopt u het risica een
elektrische schak te krijgenl Probeer in geen geval zeit het apparaat
te repararen want dan vervaltde garantie.
PROBLEEM
- MOGELUKE OORZAAK
• OPLOSSING
"1
Geen geluid/voeding
- Hei VOUIME is le laag ingesteld-
• Stelt het VOLUME hoger in.
- De hoofdtelefoon is aangesioten.
• Haal de stekker van de hnofdtelefoon uit het
apparaat.
Het netsnoer is niet goed aangesloîen.
• Sluit het netsnoer op de juiste manier aan.
- De batterijen zijn leeg.
• Vervang de batterijen door nieuwe.
- De batterijen zijn verkeerd geplaatst.
• Plaats de batterijen op de juiste manier.
Het display functioneert niet zoals het
hoort_______________
- Eiektmstsîische ontlading.
• Zet het apparaat uit, haal de stekker uit het
stopcontact en siuit deze enkele seconden
later weer aan.
Het afspeleti van een cd lukt niet
De cd is beschadigd of vuil.
• Vervang de cd of maak deze schoon, zie
Gnderhoud.
- De lens van de laser is hesiagen.
• Wacht tôt de lens geacclimatiseerd is.
________________
De cd-speler slaat nummers over
- De cd is bcschadigd oí vtiü.
• Vervang de cd of maak deze schoon.
- De fiinctie PROGRAM of SHUFFLE is
ingeschakeld.
• Zet de PROGRAM- nf SHUFFLE-functie uit.
_______________
Slecht cassettegeluid__________________________
Stof en veil np de koppen, enzovnort.
• Maak cassetferecorderonderdelen schoon, zie
Onderhoud.
- Het cassettetype dat u gebruikt, is niet
geschikt (METAL of CHROME).
• Gebruik voor opnames een NORMAL-cassette
(lECl).
Hetopnemen lukt niet__________________________
De cassettenokjes zijn uitgehroken.
• Plak een stukje plakband over de opening
been.
HergebfUfk
Wîj hebben de hoeveelbeid verpakkifîgsmateriaal zoveel mogeltjk beperkt en ervoor gezorgd daî
de verpakking gemakkeiijk in drie materialen te scheiden is: karîon, polystyreenschuim en
polyethyfeen.
OfHnerking: Uw apparaat bestaat uit materialen die door een gespecialise«rd kedriff
gi^P(№y0leefit kunnen w^den. Infermeer waar u verpakhtngi^gteriaaL leg« batterijen
en onde apparatujur voor recyclage ktint inleyeren.
Dit apparaat voldoet aan de radio-ontstoringseisen van de Europese Unie.
Het typeplaatje bevindtzich op de onderkant van het apparaat.
M
43

COMANDI
PAI^ELLO SUPERIORE EO ANTERIORE
(V: Selettore sorgente - per selezionare la
sorgente sonora: CD-RADIO-TAPE, ed anche
l'interruttore di disattivazione dell’atimentazione
(POWER OFF)
@ VOLUME - per regolare il livello del volume
(3) DBB - Dynamic Bass Boost: per selezionare una
risposta dei bassi più vivida
REGISTRATORE A CASSETTE:
0 PAUSE II - per interrompere la registrazione o la
riproduzione
STOP*OPEN«4 - per fermare il nastro ed
aprire il comparto cassette
SEARCH or - per avvolgere /riawolgere
velocemente il nastro
PLAY - per avviare la riproduzione
RECORD • - per avviare la registrazione
(e) Comparto cassette
LEnOREDICD:
(s) Display del CD - per indicare le funzioni del CD
0: PLAY*PAUSE Hi - per avviare o interrompere
la riproduzione del CD
STOP ■ - per arrestare la riproduzione o
cancellare un programma
BAHERIE
Se lo si desidera, usare l'alimentazione di rote per non consumare le
batterie. L'alimentazione a batterie viene disinserita quando si collega
l'apparecchio alla rete. Controllare di avere staccato la spina
dalFapparecchio e dalla presa a muro prima di inserire le batterie.
Batterie (opzionali)
1. Aprire il comparto batterie ed inserirvi sei batterie, di tipo R2D, UMl o
D (preferibilmente alcaline], rispettando la giusta polarità indicata dai
simboli (+■) e (-) alFinterno del comparto.
2. Chiudere il comparto, assicurandosi che le batterie siano in posizione
ferme e corrette. A questo punto rapparecchio è pronto a funzionare.
- Un uso errato delle batterie può causare perdite elettrolitiche e
corrodere il comparto, oppure causare lo scoppio delle batterie.
Pertanto:
- Non utilizzare insieme tipi diversi di batterie, ad es. alcaline con zinco
carbone. Usare solo batterie delle stesso tipo per l'apparecchio.
- Quando SI inseriscono le nuove batterie, non cercare di utilizzare le
vecchie insieme ad esse.
- Estrarre le batterie se non si deve utilizzare l'apparecchio per lungo
tempo.
Tutti i tipi batterìe contengono sostanze chimiche e devono
guindi essere dispersi in modo idoneo.
44
CD MODE - per selezionare un modo di
riproduzione diversa, ad es. a riproduzione.
SHUFFLE/REPEAT (casuale/ripetuta): per
program-mare e rivedere i numeri di brano
programmati
SEARCH r« 0 »» - per saltare o ricercare un
passaggio/ un brano verso dietro o verso avanti
(3) LIFT TO OPEN - per aprire/ chiudere il
comparto CD
RADIO:
0; BAND - per selezionare la banda di lunghezze
d'onda FM o MW
10
} Puntatore della scala di sintonia
ilT TUNING - per sintonizzarsi sulle stazioni radio
PANNELLO PWERIO^
;i2) Comparto delle batterie - per migliorare la
ricezione in FM
0) Interruttore BEAT CUT - per eliminare i fischi
durante le registrazioni MW
Aerial telescopica - per migliorare la
ricezione in FM
0; ¡n - Presa per le cuffie stereo 3,bmm
Nota: Se si collegano le cuffie, si disattivano gli
altoparlanti
(is: AC MAINS - presa per il conduttore di rete
ALIMENTAZIONE
ALIMENTAZIONE FUNZIONAMENTO GENERALE RADIO
AUMENTAZIONE ELEHRICA
1. Verificare se il voltaggio indicato sulla piastrina di riconoscimento
(alla base dell'apparBcchio) corrisponde al voltaggio deila rete
locale. Se così non dovesse essere, consultare il rivenditore o
l’assistenza.
2. Se il vostro impianto è dotato di un selezionatore di voltaggio,
posizionatelo sul voltaggio di rete locale.
3. Collegare il cavo di alimentazione alla presa MAINS
dell'apparecchio e alla presa a muro.
^ L'apparecchio è ora pronto all'uso,
4. Per interrompere Talimenlazione elettrica, estrarre la spina dalla
presa a muro.
• Per passare all'alimentazione da batteria, a per proteggere
l'apparecchio in caso di fulmini, scollegare il cavo di alimentazione.
№N2:I0NAM£NT0 generale
1. Per accendere l’apparecchio, regolare il selettore di sorgente.
2. Regolare il sonoro mediante i comandi VOLUME e DBB,
3. Per spegnere la radio, portare il seletture di sorgente sulla
posizione TAPE/pdwer off e controllare che i tasti delle
cassette siano rilasciati.
memmi mio
1. Impostare il selettore di sorgente su RADIO.
2. Regolare il sonoro mediante i comandi VOLUME e DBB.
3. Selezionare la banda di lunghezze d’onda FM/MW con BAND.
4. Sintonizzarsi su una stazione radio mediante la manopola
TUNING
5. Per spegnere la radio, regolare il selettore di sorgente sulla
posizione TAPE/power off (rilasciando i tasti delle cassette).
Per migliorare la ricezione radio
• Per la ricezione in FM, estendere l'antenna estraibile.
Inclinare e ruotare l’antenna. Ridurne la lunghezza se il
segnale è troppo forte (in prossimità di un trasmettitore).
• Per la ricezione in MW (AM), l'apparecchio è dotato di
un'antenna incorporata, pertanto quella estraibile non è
necessaria Dirigere l'antenna ruotando l’apparecchio.
3
1
45

LETTORE DI CD
LETTORE DI CD
INDICAZIONE DEL DISPUY DEL CD
Cd: se è aperto lo sportella CD/scansione del CD
Numero tatnis dei brani: in modo di arresto.
Numero del brano correrrfe.'durantc la riproduzione del CD.
Il numero del brano corrente lampeggia: in posizione Pause.
Modi di riproduzione shuffle/repeat; quando è attivo il rispettivo
modo.
pnoGRJWi: Se attivato. Durante la memorizzazione di un brano, appare
brevemente P
no: nessun disco/ errore ne! funzionamento del CD o rottura del CD
(vedere individuazione dei malfunzionamenti).
e: errore nel funzionamento del CD.
f: memoria di programma piena.
| mPfiODU2l0NE DI UN CD
/. Impostare il selettore di sorgente su CD.
2. Per aprire il compatto CD, sollevare il lato dello sportello dove è
scritto URTO OPEN
3. Inserire un CD con lì lato inciso rivolto verso l'alto, quindi premere lo
sportello CD per chiuderlo.
Il lettore di CD analizza il contenuto del CD, quindi visualizza il
numero totale dei brani.
4. Premere PLAY*PAUSE MI per avviare la riproduzione.
5. Regalare il sonoro mediante i comandi VOLUME e DBB.
6. Per interrompere la riproduzione, premere PLAY»PAUSE MI.
Per riprenderla, premere nuovamente PIAY*PAUSE Hi.
-*■ 11 numero di brano corrente lampeggia sul display.
7. Per interrompere la riproduzione di un CD, premere STOP ■.
8. Per spegnere l'apparecchio, regolare il selettore di sorgente sulla
posizione TAPE/POWH off (con I tasti relativi alle cas,sette rilasciati).
Nota: la riproduzione di un CD si interrompe anche quando:
- il comparto CD è aperto;
- il selettore di sorgente è in posizione TAPE/RADIO.
-il CD è giunto alla fine.
^LEZIONE Ot UN BRANO DIVERSO
Durante la riproduzione, si possono usare I tasti SEARCH per
selezionare un brano particolare.
1. Premere SEARCH una volta sola per il brano successivo, o più
volte sino a fare apparire sul display il numero di brano desiderato.
Premere SEARCH una volta sola per tornare aH’inizio del brano
corrente.
Premere SEARCH m pin volte per ricercare un brano precedente,
it Se si è selezionato un numero di brano in posizione di arresto o di
pausa, premere PLAY*PAUSEHlper avviarne la riproduzione.
Ricerca di un passaggio di un brano
1. Premere e tenere premuto il tasto SEARCH h< o ►►i.
Il CD viene riprodotto ad alta velocità e basso volume.
Z Quando si riconosce il passaggio desiderato, rilasciare il tasto SEARCH
46
1 PROGRAM
1 1 ÍÜ5 PROGRAM
r J
Modi diversi di riproduzione: SHUFRJE/BEPEAT
Il tasto CD MODE consente di selezionare 4 modi di riproduzione
diversi, che possono anche essere utilizzati con un programma di CD. I
modi possono essere selezionati o cambiati durante la riproduzione, e
lampeggieranno per due secondi prima di avviare la riproduzione nel
modo selezionato.
1. Durante la riproduzione, si può selezionare il modo desiderato
premendo CD MODE una o più volte, sino a quando non compare
sul display.
SHUFFLE - Tutti i brani o il programma vengono letti in ordine casuale
REPEATALL SHUFFLE Ripeto tutto il CD 0 il programma in
ì* 1
ordine casuale.
REPEAT - Riproduce continuativamente il brano corrente.
REPEAT ALL - Ripete tutto il CD o il programma.
-'Si può usarjt SEARCH o ►w per saltare i brani durante la
riproduzione in CD MODE.
2. Per tornare al modo di riproduzione normale, premere CD MODE
sino a quando i modi SHUFFLE/ REPEAT scompaiono dal display.
Si può anche premere STOP ■ per abbandonare il modo
riproduzione.
REPEAT
AL.L
IO
PROGRAM
IPRÛaRANffîlAZIONi PÌiW№ DI BRANO
È possibile memorizzare un massimo di 20 brani nella sequenza
desiderata. Se lo si desidera, ogni brano può essere memorizzato più di
una volta.
1. In posizione di arresto, premere SEARCH i-n^ o per il brano
desiderato.
2. Non appena viene visualizzato il numero di brano selezionato,
premere CD MODE una volta per memorizzare il brano.
Il display indicherà brevemente 'P’ e ’program', seguiti dal
numero di brano selezionato.
3. Selezionare e memorizzare in questo modo tutti i brani desiderati.
Per rivedere il programma impostata
• In posizione di arresto, premere e tenere premuto CD MODE per
più di due secondi.
Il display indicherà in sequenza tutti i numeri dei brani
memorizzati.
• Avviare la riproduzione del programma premendo
PLAY*PAUSEMI
0
Cancellazione dì un programma
Si può cancellare il contenuto della memoria:
- sollevando lo sportello del comparto CD,
- spostando la posizione del selettore della sorgente:
- premendo STOP ■ due volte durante la riproduzione / in
posizione di arresto.
• Il display indicherà brevemente 'no' e program, queste
indicazioni scompaiono con la cancollazione del programma.
o
ni
Ul
no
2
47

REGISTRATORE A CASSETTE
REGISTRATORE A CASSETTE
RIPRODUZIONE DI UNA CASSETTA
1. Regolare il selettore della sorgente su TAPE,
2. Premere STOP«OPEN ■ A per aprire il comparto cassette ed
inserirvi una cassetta registrata.
3. Chiudere il comparto cassette,
4. Premere PLAY 4 per avviare la riprodutione.
5. Regolare il sonoro mediante I comandi VOLUME e DBB.
6. Per interrompere la riproduzione, premere PAUSE II, Per
riprenderla, premere nuovamente il tasto.
7. Se si preme or kk.sì può avvolgere velocemente in nastro
in entrambe le direzioni Per arrestare l'avvolgimento veloce,
premere STOP*OPEN ■ A
8. Per fermare il nastro, premere STOP«OPEN K A.
I tasti vengono rilasciati automaticamente alla fine del
nastro, a meno che non si sia attivato PAUSE II
9. Con il selettore della sorgente in posizione TAPE/power off
l'apparecchio si spegne se vengono rilasciati tutti i tasti
relativi alle cassette.
REGISTRAZIONE Di CASSETTE
:"SL
■gv;
La registrazione è permessa purché non si violino i diritti
d'autore о altri diritti di terze persone.
Questo apparecchio non è adatto alla registrazione di cassette
CHROME [lEC II) 0 METAL (lEC IV) Per la registrazione si
consiglia l'uso di cassette del tipo NORMAL [lEC I) con le
linguette di protezione intatte.
Il livello di registrazione è impostato automaticamente. La
modifica dei valori di VOLUME о DBB non influenzerà la
registrazione in atto.
La registrazione non avrà luogo durante i primi 7 secondi,
durante il passaggio della parte iniziale del nastra sulle testine
di registrazione.
Per evitare la cancellazione accidentale di una registrazione,
mantenendo di fronte a se il lato della cassetta da proteggere,
distaccare la linguetta di protezione di sinistra. In questo modo,
non sarà più possibile effettuare registrazioni su questo lato.
É [^SiSTRAZIONE CD ADAWIQ SINCRONIZZATO
Regolare il selettore della sorgente su CD.
2. Inserire un CD e, se lo si desidera, i numeri dei brani del
programma.
3. Premere STOP*OPEN ■ A per aprire il comparto cassette
4. Inserire un nastro vergine.
5. Chiudere il comparto cassette.
8. Premere RECOBD • per avviare la registrazione.
^La riproduzione di un programma CD si avvia
automaticamente dall'inizio. Non è necessario avviare
separatamente il lettore di CD.
7. Per una breve interruzione, premere PAUSE 11. Per riprendere
la registrazione, premere nuovamente PAUSE II.
8. Per fermare la registrazione, premere STOP*QPEN ■ A
Per selezionare e registrare un passaggio particolare di
un brano
J. Durante la riproduzione, premere e mantenere premuto il
tasto SEARCH s« o per individuare il passaggio.
2. Premere PLAY*PAUSEHiper mettere in pausa il lettore di
CD sul passaggio selezionato,
^ La registrazione si avvia da questo punto esatto del brano,
se si preme RECORD •.
«t
!REGÌ5TRAZ№NE DALLA RADIO
J. Regolare il selettore della sorgente su RADIO.
2. Sintonizzarsi sulla stazione radio desiderata
(Vedere RICEZIONE RADIO)
3. Premere STOP*OPEN ■ A per aprire il comparto cassette ed
inserirvi un nastro vergine.
4. Chiudere il comparto cassette.
5. Premere RECORD • per avviare la registrazione.
/Vota: Se si sente un fischio durante la registrazione di una
stazione radio MW (AMI questo può essere eliminato
¥
6. Per una breve interruzione, premere PAUSE II. Per riprendere la
portando su una posizione differente il pulsante
BEAT CUT.
registrazione, promere nuovamente PAUSE II.
7. Per fermare la registrazione, premere STOP*OPEN ■ A,
■ iS:
4B
4Э

MAMUTENZIONE
PRECAUZIONI & MANUTENZIONE OENEBALE
Posizionare l'appareochio su una superficie solida e piana, per evitare
oscillazioni.
Non esporre l'apparecchio, i CD, le batterie o le cassette a umidità,
pioggia, sabbia a luce solare diretta, e .non posizionare in luoghi
dove possono registrarsi temperature elevate, come in vicinanza di
dispositivi di riscaldamento o aH'interno di auto parcheggiate al
sole.
Chiudere sempre il comparto CD, per mantenerlo privo di polvere.
Per pulire il comparto, usare un panno soffice ed asciutto.
Non coprire l'apparecchio, ['amplificatore genera calore che deve
poter essere disperso liberamente, pertanto, assicurarsi che
l'apparecchio sia in un posizione sufficientemente ventilata. È
necessaria una distanza minima di 15 cm.
Le parti meccaniche del lettere CD e della piastra di registrazione
contengono cuscinetti autolubrificanti, e non devono essere oliate o
lubrificate.
Per la pulizia del mobiletto sarà sufficiente una pelle di damo
leggermente inumidita d'acqua.
MANUTENZIONE DEL LEnORE CD
s
Non si deve maftoccare la lente del lettore CD.
Se ¡1 lettore CD dovesse essere spostato da ambienti freddi ad
ambienti caldi, la lente potrebbe appannarsi. In questo caso il
lettore CD non si avvierà. Attendere che il lettore si adatti alla
nuova temperatura
Usare solo CD Audio Digitali.
Per estrarre un CD dalla sua cu.stodia, premete II bottone centrale
sollevando nello stesso tempo il CD. Prendete sempre il CD dagli
orli e rimettete il CD nella sua custodia dopo averlo usato, per
evitare di strisciarlo e sporcarlo.
Per pulire un CD, passate un panno morbido e che non perda fibre
in linea retta dal centro verso i bordi. Non usate agenti chimici che
potrebbero danneggiare il disco.
Non scrivete mainé attaccate mai etichette su un CO.
/Щ.., z'v .
/■■■■■■* If-
INDIVIDUAZIONE DEI MALHINZIONAMENfI
In caso di malfunzionamento, controllare innanzitutto i punti elencati di seguito, prima di richiedere
la riparazione dei l'apparecchio. Se non si è in grado di risolvere il problema seguendo questi
suggerimenti, consultare il rivenditore o il centro assistenza.
ATTENZIONE: Non aprire l'apparecchio per non correre il rischio di scosse elettricheìNon
cercare in alcun caso di riparare da soli l’apparecchio, perchè ciò
invaliderebbe la garanzia.
PROBLEMA
- POSSIBILE CAUSA
• RIMEDIO
Mancanza di sonoro/alìmentazione
VOLUME non è regolato.
• Regolare VOLUME.
- Scollegare le cuffie.
• Disconnect headphones.
- Il conduttore d'alimentazione non è collegato
bene
• Collegare bene il conduttore di
alimentazione.
- Le batterle sono csaunte.
• Sostituire le batterie
- Le batterie sono inserite male.
• Inserire bene le batterio.
Il display non funziona correttamente
- Scarica elettrostatica.
• Spegnere l'apparecchio, scollegare la spina
dell’alimentazione di rete e ricollegarla dopo
pochi secondi.
_____________
La riproduzione del CD non ha luogo
Il CD è molto graffialo o ù sporco.
• Sostituire 0 pulire il CD, vedere
Manutenzione
La lente laser è appannata.
• Attendere che la lente si sia acclimatata.
Il CD salta le tracce
- Il CD è danneggiato о è sparco.
• Sostituire 0 pulire il CD.
- SHUFFLE 0 PROGRAM ò attivo.
• Abbandonare il modo shuffi г/program.
La qualità sonora delle cassette non è
buona______________________________
- Polvere e sporco sulle testine, ecc.
• Pulire le piastre, ecc., vedere Manutenzione.
- I tipi di cassetta usati'non sono compatibili
(METAL 0 CHROME).
• Usare solo NORMAL (lEC T) per la
registrazione.
La registrazione non ha luogo__________
- La linguetta della cassetta è rotta.
• Applicare un pezzo di nastro adesivo sullo
spazio della linguetta mancante.
___________________
Per garantire la buona qualità della registrazione e della lettura, pulire
le parti indicate @, (b) e © ogni 50 ore di funzionamento o, in media,
una volta al mese. Utilizzare del cotone leggermente inumidito di alcool
0 di liquido specifico per la pulizia delle tostine.
• Premere STOP*OPEN ■ à per aprire il comparto cassette.
• Premere PlAY ^ e pulire il rullo di gomma ©.
• Premere PAUSE II c pulire il rullo di trascinamento tB)
eie testine®.
• Dopo la pulizia, premere STOP*OPEN ■ A
La pulizia delle testine (a) può anche essere effettuata mediante
[uro di una cassetta puliscitestine.
50
Infonnazioni iKiìbieirtati
È stato omesso tutto iL materiate d'imballaggio non strettamettte necessario. Abbiamo fatto del nostro
;iineg(Ì0;;p&r rendere l'tmbaltaggio facilmente separabile ir> tre mono-materiali: cartone, polistirolo
espanso, polietilene.
Il vo$№> ifìi|rànto £imslste di materiali che possono venire riciclati se smorMtdt da una
fitta specializzata. Osservate te leggi del v№ho intese in materia dì smaltìmento di
i^oràali d'fflidfallaggio. batterìe scariche e vecchi imputiti.
Questo prodotto è conforme ai requisiti solfe interferenze radio deirUnione Europea.
La piastrina del modello si trova sul fondo dell'apparecchio.
51
 Loading...