

Philips AW 7150-04S User Manual
Instructions for use
Mode d’emploi
Instrucciones de manejo
Bedienungsanleitung
Gebruiksaanwijzing
Istruzioni per l’uso
Manual de utilização
Brugsanvisning
Bruksanvisning
Käyttöohje
Οδηγίεσ χρήσεωσ
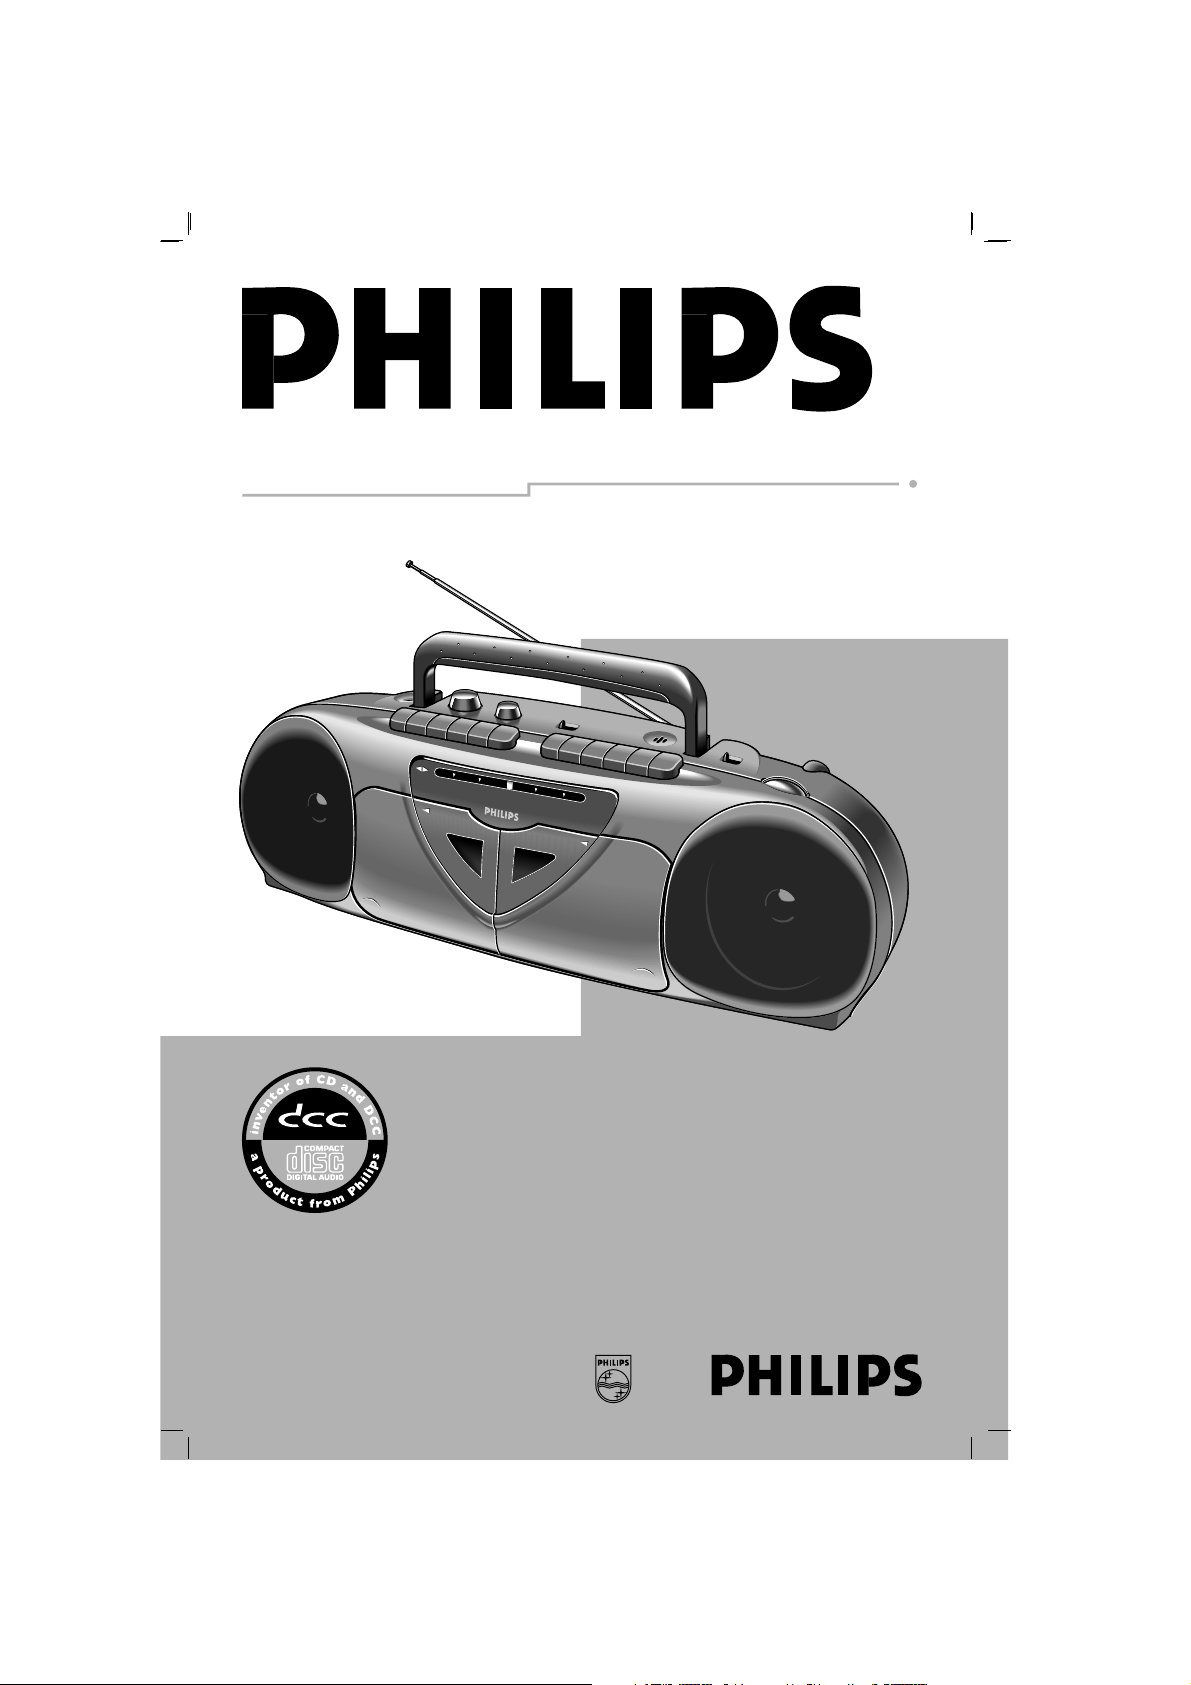
AW 7150 / AW 7250
Radio Cassette Recorder
black film width 138 mm
DIGITAL
COMPACT CAS SETTE
AW 7150/AW 7250/00. page 1
FM 88 • 92 • 96 • 100 • 104 • 108
MHz
MW 530 • 630 • 800 • 1000 • 1300 • 1600
KHz
FM 88 • 92 • 96 • 100 • 104 • 108
MHz
MW 530 • 630 • 800 • 1000 • 1300 • 1600
KHz
HIGH SPEED DUBBING / RECORD
CONTINOUS PLAY
AW 7150
1
RECORD
2
RECORD
HIGH SPEED DUBBING / RECORD
CONTINOUS PLAY
AW 7150
1
RECORD
2
RECORD
S
TEREO
R
ADIO
C
ASSETTE
R
ECORDER
S
TEREO
R
ADIO
C
ASSETTE
R
ECORDER
IOIOIO
O
IOIOI
IOIOI
IO
IOIOO
IOIOIOO
IOIOIOO
IO
IOIO
O
IO
IOIO
O
IOIO
IO
O
IOIO
IOO
IOIOIO
O
IOIOIO
O
IOIOI
IOIOI
IOIOI
IOIOI
IOIOI
IOIOI
IOOIOIIOI IOIOIOOIOOI
IOOIOIIOI IOIOIOOIOOI
IO
O
IO
II
IOOIOII
IO
IOIOIOIO
IO
O
IO
II
IOOIOII
IO
IOIOIOIO

AW 7150/AW 7250/00. page 2

INDEX
3
AW 7150/AW 7250/00. page 3
English
Français
Español
English ............................... 5
Français ........................... 10
Español ............................ 15
Deutsch
Deutsch............................ 20
Nederlands
Italiano
Português
Nederlands ................... 25
Italiano ............................. 30
Português ...................... 35
Dansk
Dansk................................. 40
Svenska
Suomi
Έλληνικά
Svenska .......................... 45
Suomi ............................... 50
Έλληνικά ...................... 55
4
AW 7150/AW 7250/00. page 4
e España
D
eclaración de conformidad con normas
El que suscribe, en nombre y representación de:
Business Unit Portable Audio,
Division of Philips China
Hong Kong Group Company Ltd.
declara, bajo su propia responsabilidad, que el
equipo: Radio casete
fabricado por: BUPA Hong Kong
en: Far East
marca: Philips
modelos: AW 7150/AW 7250
objeto de esta declaración, cumple con la normativa
siguiente: Reglamento sobre Perturbaciones Radioeléctricas, Real Decreto 138/1989, Anexo V.
Hecho en: Hong Kong, 01-12-1994
Firma:
Nombre: T.M. Siu
Cargo: Quality Manager
∂ Danmark
Typeskiltet findes på undersiden af apparaten
.
Dette produkt overholder kravene til radiointerferens af Europæisk Fællesskab.
Bemærk:
Netafbryderen er sekundært inkoblet og afbryder ikke strømmen fra nettet. Den
indbyggede netdel er derfor tilsluttet til lysnettet så længe netstikket sidder i stikkontakten.
n Norge
Typeskilt finnes på apparatens underside.
Observer: Nettbryteren er sekundert
innkoplet. Den innebygde netdelen er derfor
ikke frakoplet nettet så lenge apparatet er
tilsluttet nettkontakten.
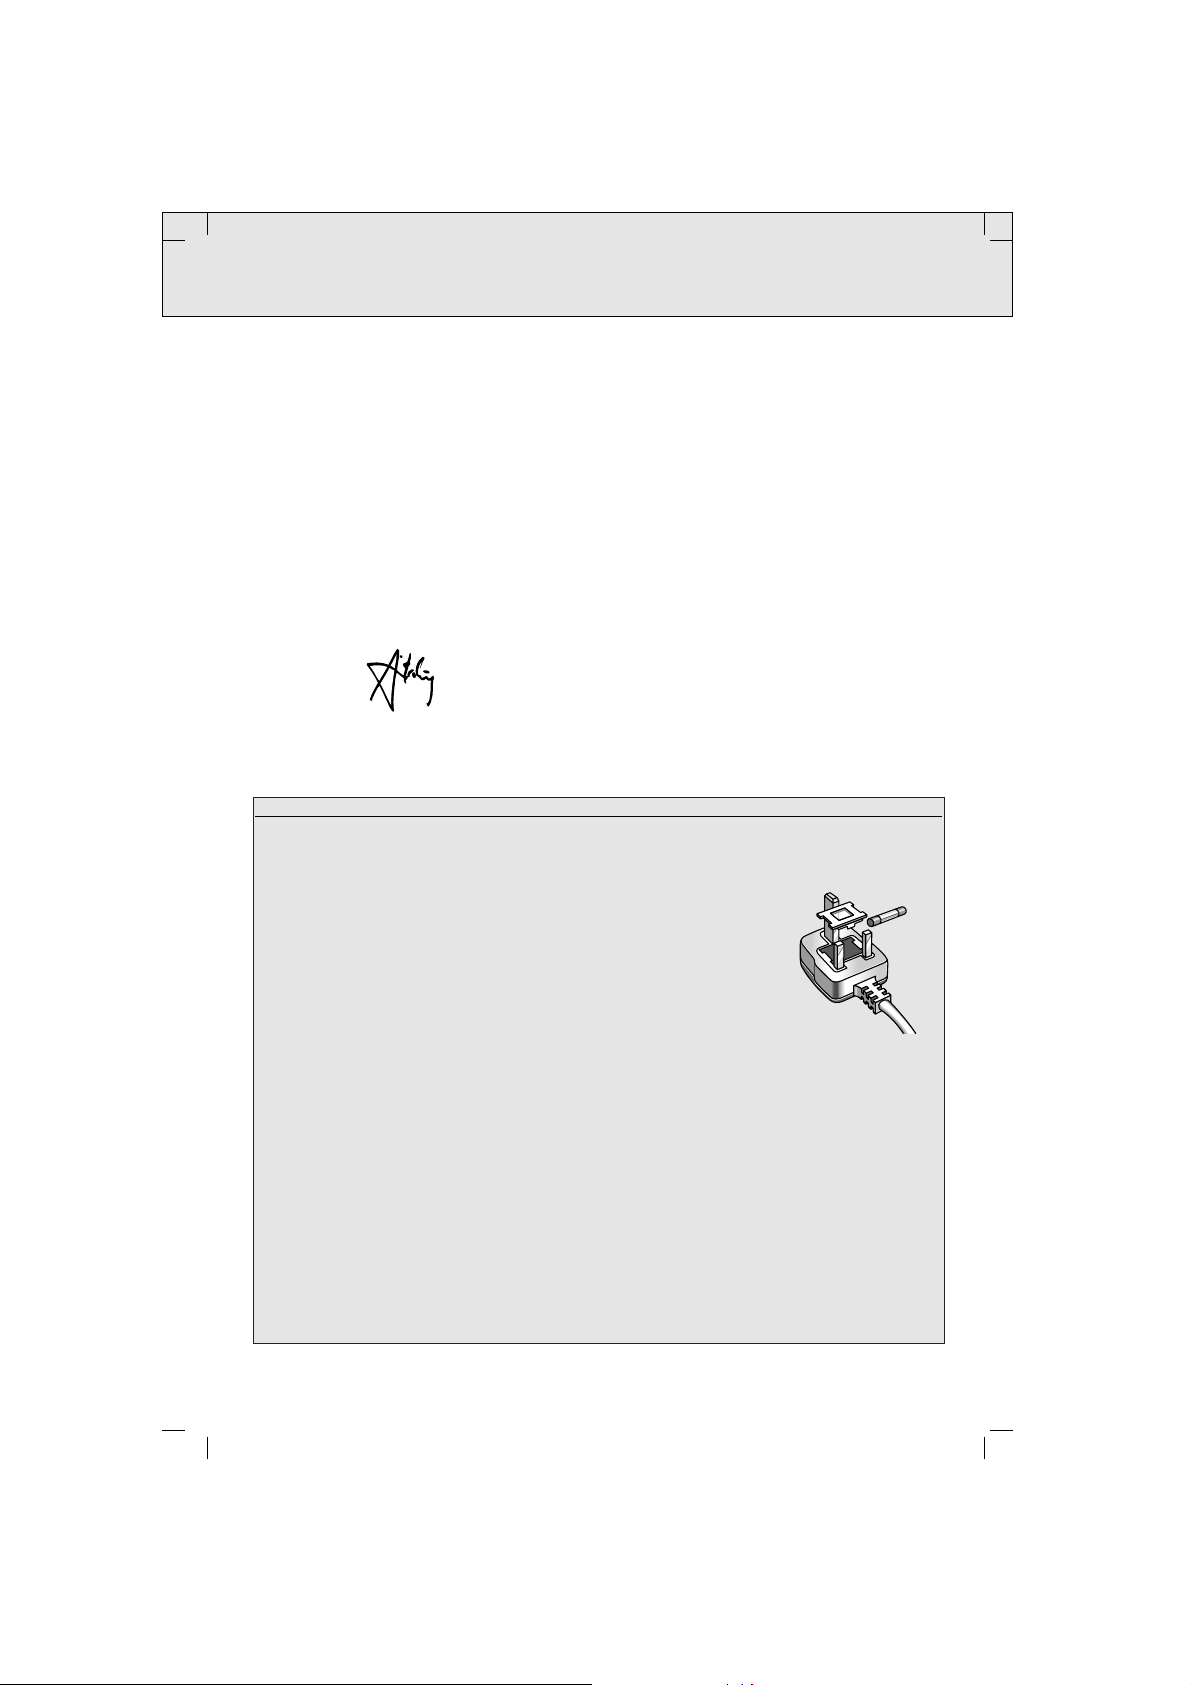
Important notes for users in the U.K.:
Mains plug
This apparatus is fitted with an approved moulded 13 Amp plug. To change a fuse in this type of
plug proceed as follows:
• Remove fuse cover and fuse.
• Fix new fuse (5 Amp) which should be a BS1362, A.S.T.A. or BSI
approved type.
• Refit the fuse cover.
If the fitted plug is not suitable for your socket outlets, it should be cut off
and an appropriate plug fitted in its place.
If the mains plug contains a fuse, this should have a value of 5 Amp. If a
plug without a fuse is used, the fuse at the distribution board should not be
greater than 5 Amp.
Note:
The severed plug must be disposed to avoid a possible shock hazard should it be inserted
into a 13 Amp socket elsewhere.
How to connect a plug
The wires in the mains lead are coloured with the following code: blue = neutral (N), brown =
live (L).
As these colours may not correspond with the colour markings identifying the terminals in your
plug, proceed as follows:
• Connect the blue wire to the terminal marked N or coloured black.
• Connect the brown wire to the terminal marked L or coloured red.
• Do not connect either wire to the earth terminal in the plug, marked E (or e) or coloured green
(or green and yellow).
Before replacing the plug cover, make certain that the cord grip is clamped over the sheath of
the lead - not simply over the two wires
Copyright:
Recording and playback of material may require consent. See Copyright Act 1956 and The Performer’s Protection Acts 1958 to 1972.
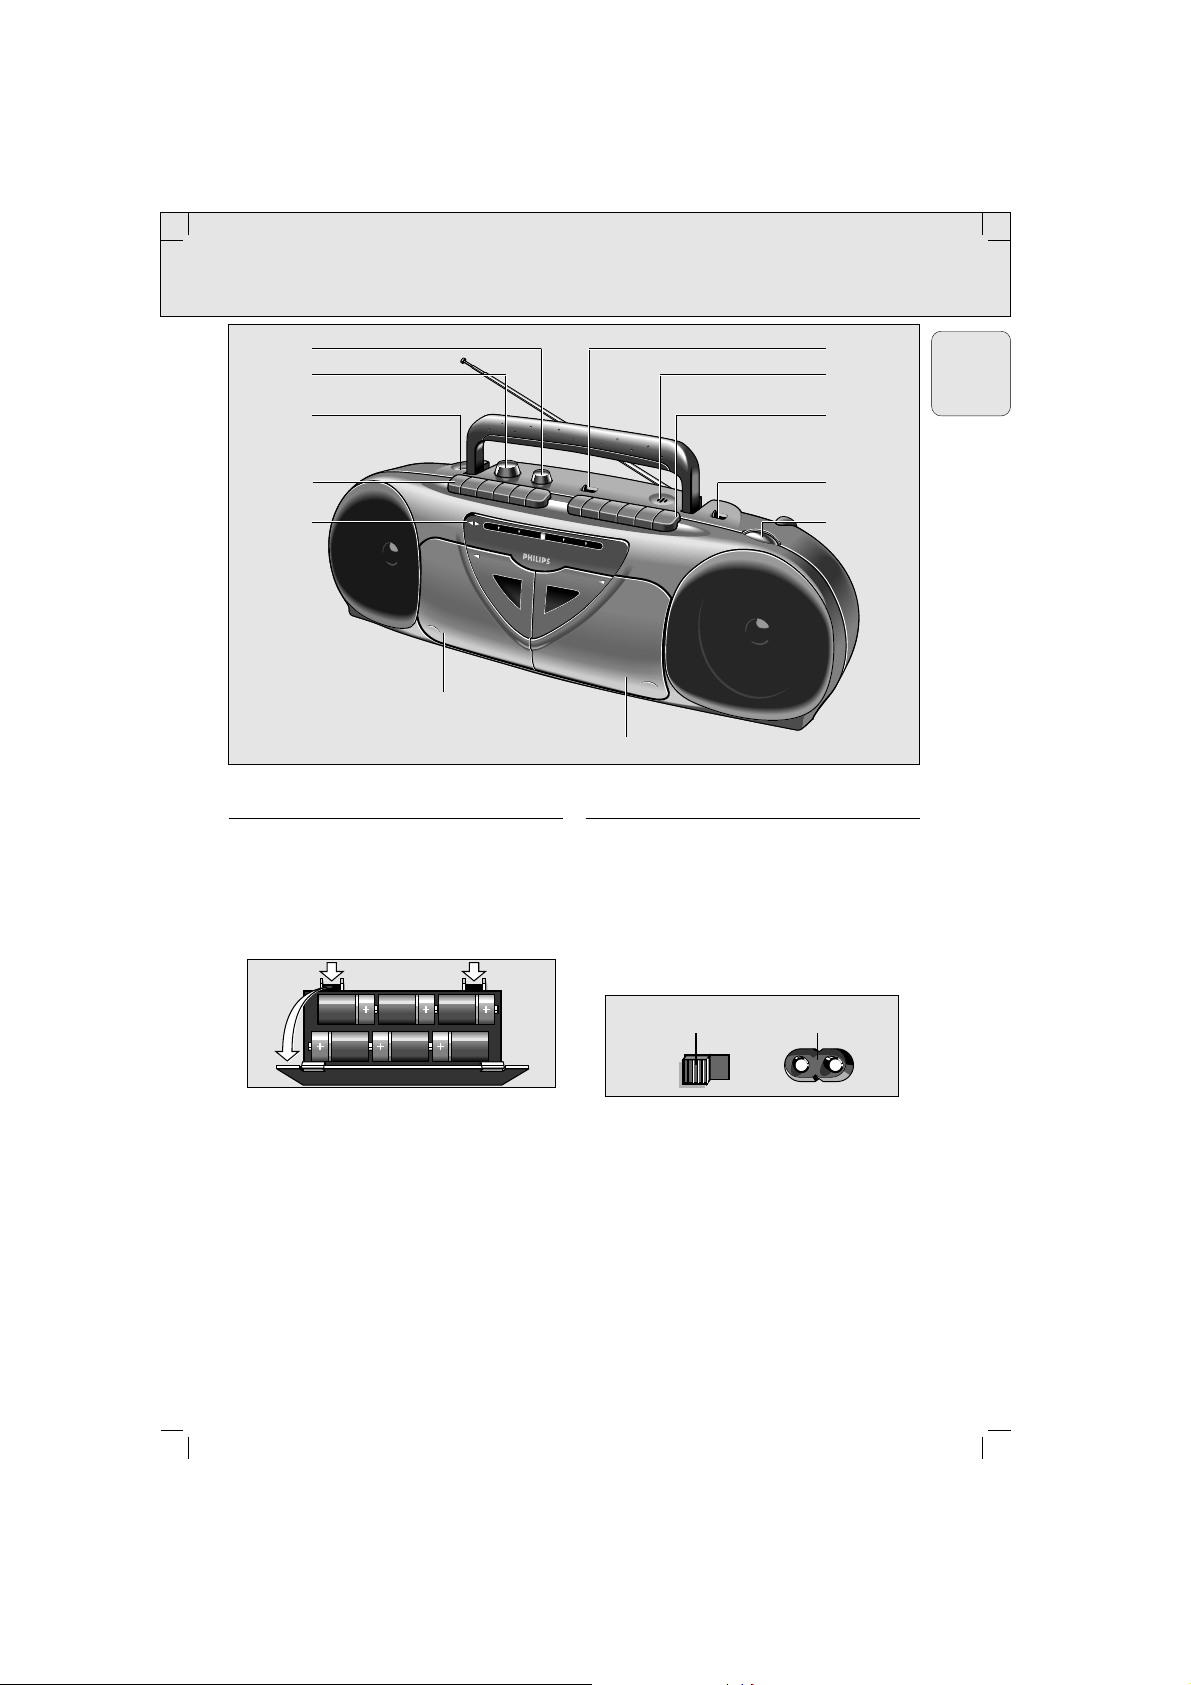
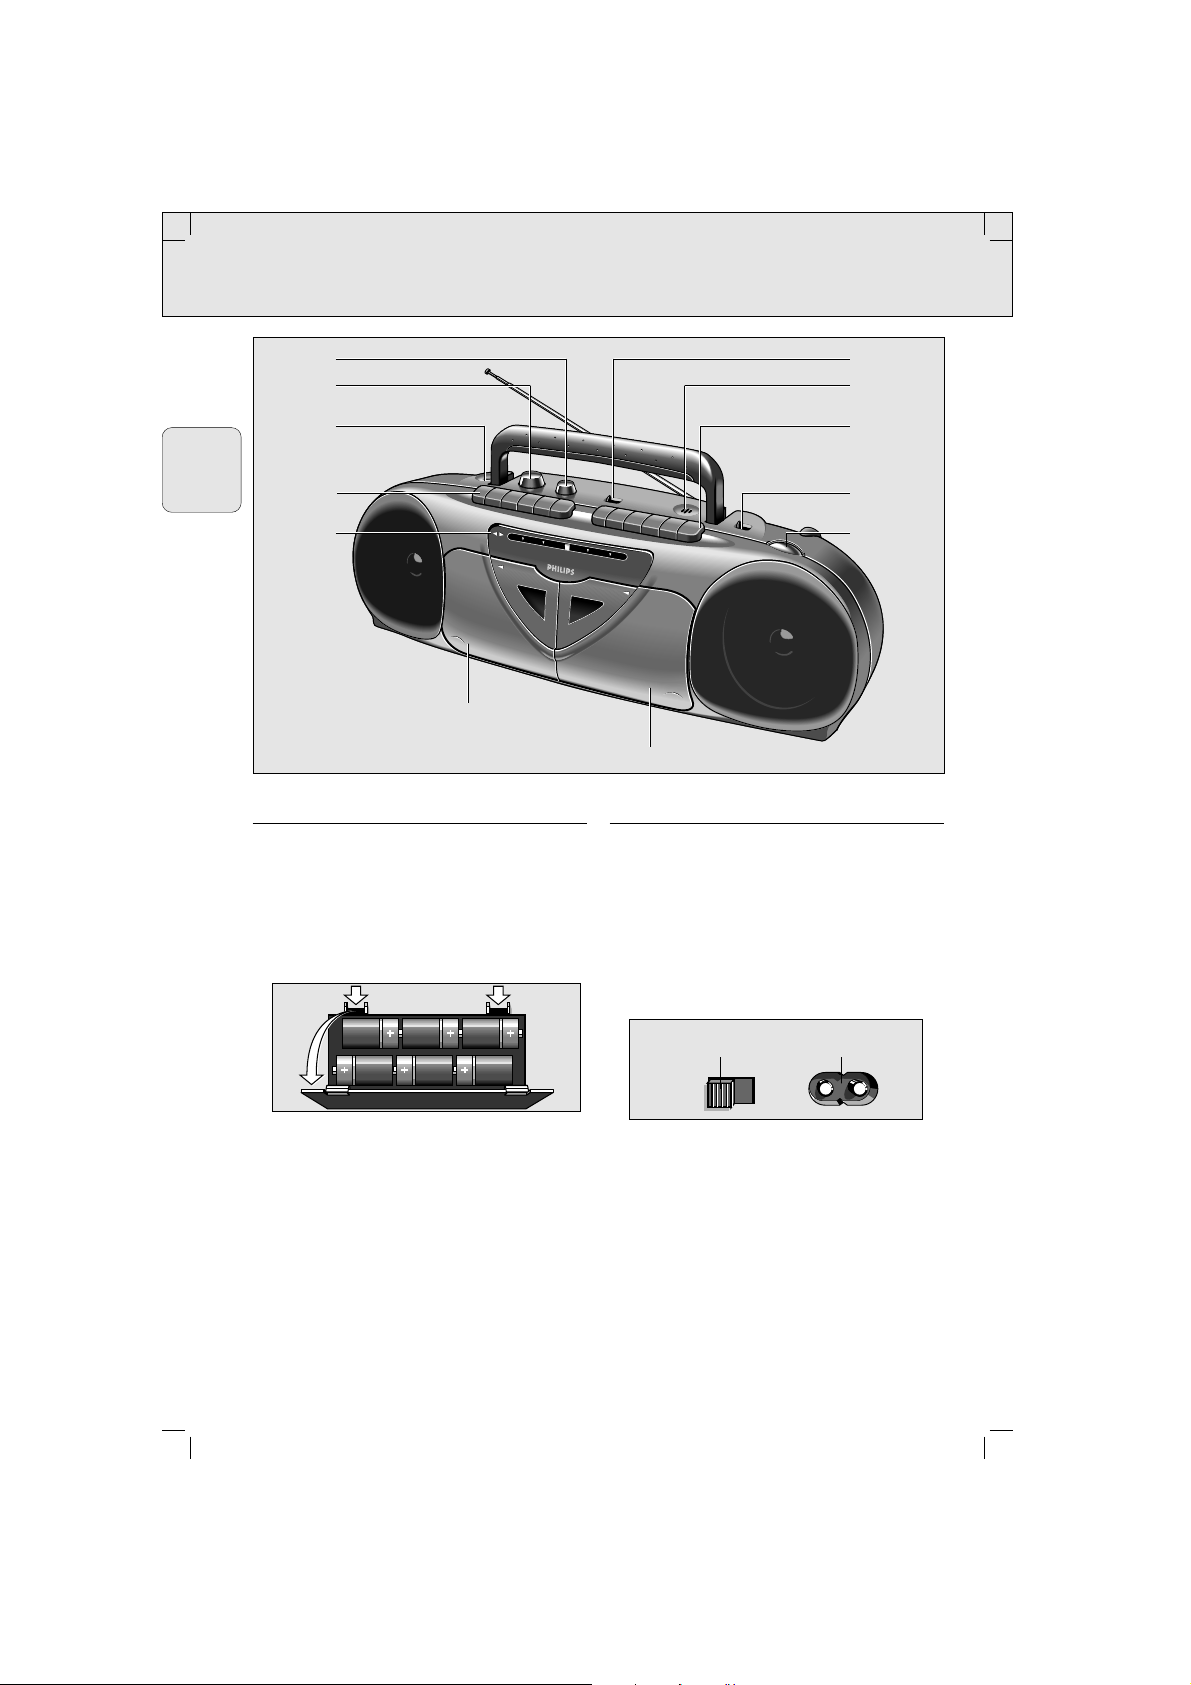
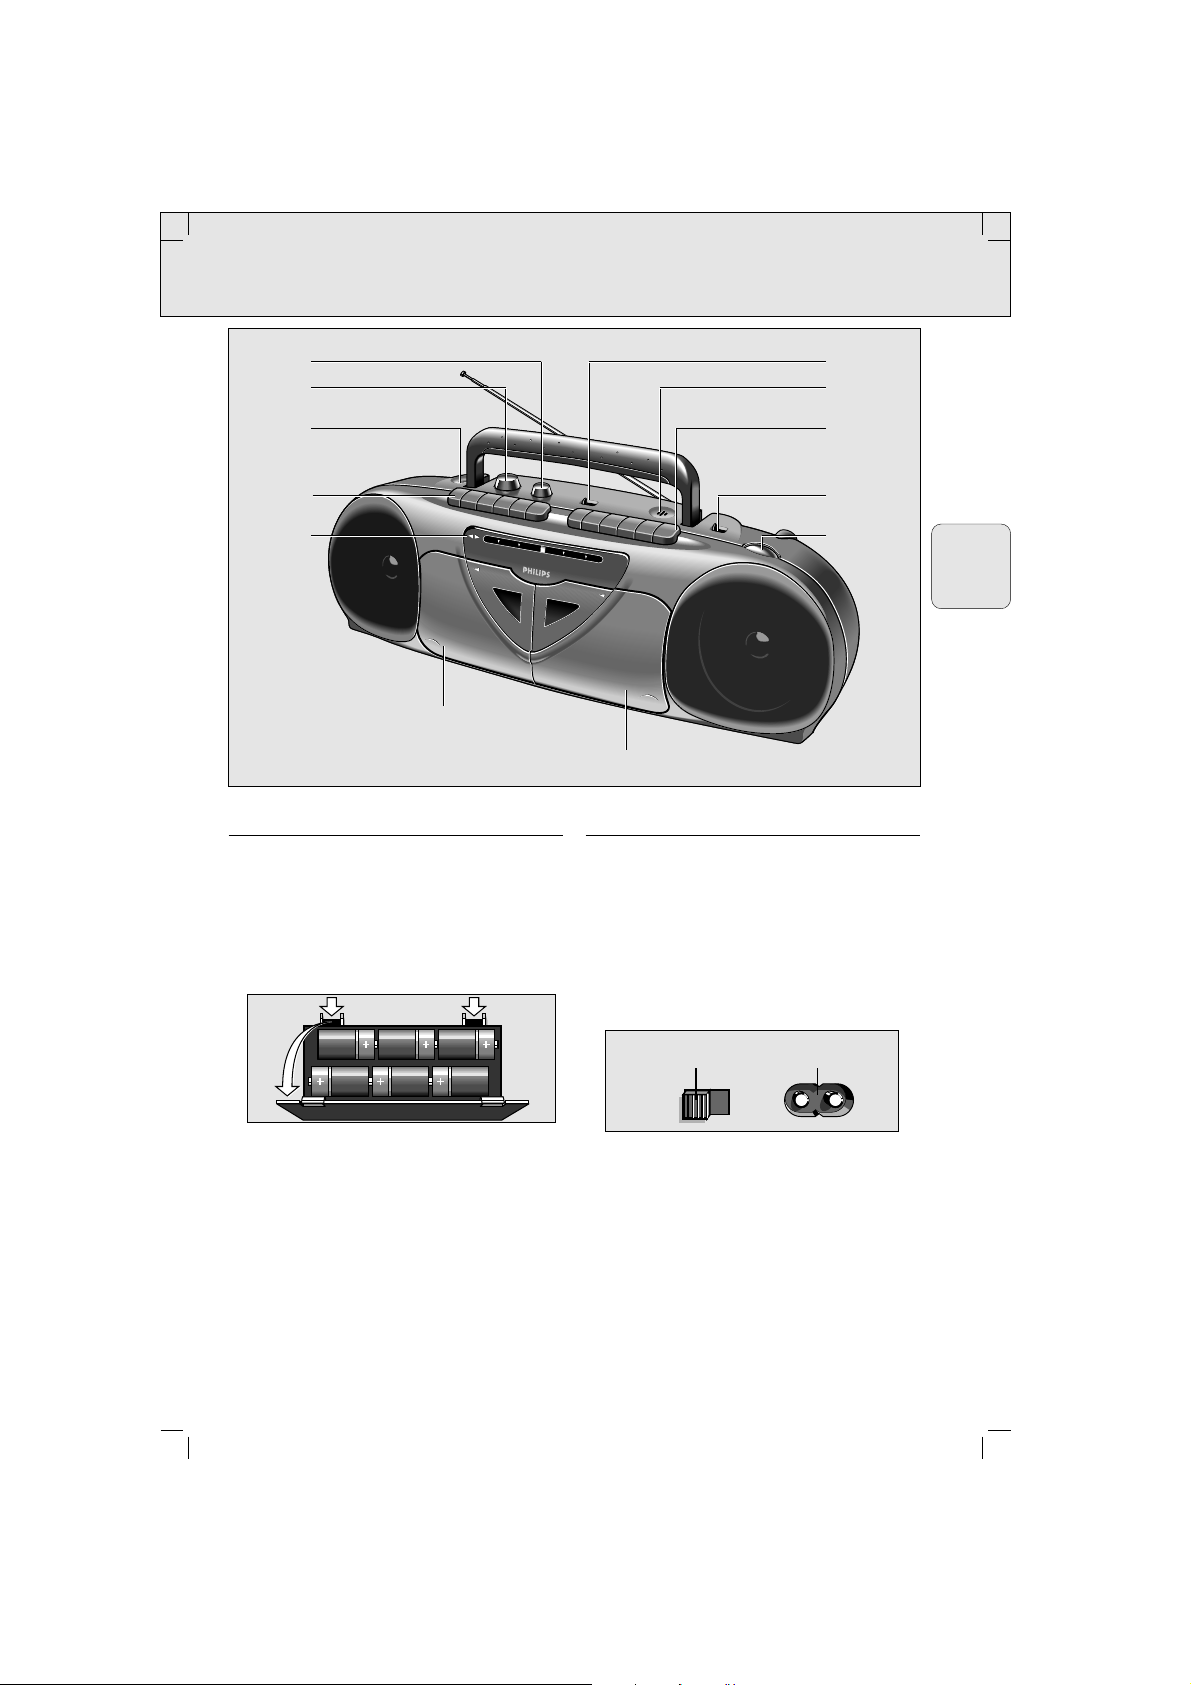
Controls Installation
SUPPLY
Battery supply
• Whenever convenient, use the mains supply
if you want to conserve battery life.
• Open the battery compartment and insert
six batteries as indicated , type R20, UM1 or
D-cells.
• Remove the batteries if they are exhausted
or if they will not be used again for a long
time.
The battery supply is switched off when the
set is connected to the mains supply. To
change over to battery supply, pull out the
plug from the MAINS socket.
mains supply
• Check if the mains voltage as shown on the
type plate (on the base of the set)
corresponds to your local mains voltage. If it
does not, consult your dealer or service
organization.
• If the set is equiped with a voltage selector,
set this selector to the local mains voltage.
• Connect the mains lead to the mains socket
(and plug the wall outlet). The mains supply
is switched on.
• To disconnect the set from the mains
completely, withdraw the mains plug from
the wall socket.
IMPORTANT NOTE FOR USERS IN THE U.K.
See page 4
5
English
AW 7150/AW 7250/00. page 5
TONE
VOLUME
PHONES p
S
S
TEREO
TEREO
R
R
ADIO
ADIO
C
C
IO
ASSETTE
IOIOIO
IOIOO
DECK 1
CASS. KNOB
DIRECTION
INDICATORS
(AW 7250 only)
FM 88 • 92 • 96 • 100 • 104 • 108
FM 88 • 92 • 96 • 100 • 104 • 108
MW 530 • 630 • 800 • 1000 • 1300 • 1600
MW 530 • 630 • 800 • 1000 • 1300 • 1600
1
1
RECORD
RECORD
CONTINOUS PLAY
CONTINOUS PLAY
AW 7150
AW 7150
ASSETTE
O
IO
IO
IOIOO
IOIO
O
IOIOI
IOIOI
IOIOIOO
IOIOIOO
IOIOI
IOIOI
IOIOIOO
IOIOIOO
IOIOI
IOIOI
IOIOI
IOIOI
IOIOIOO
IOIOIOO
HIGH SPEED DUBBING / RECORD
HIGH SPEED DUBBING / RECORD
R
R
ECORDER
ECORDER
IOOIOIIOI IOIOIOOIOOI
IOOIO
IIOI IOIOIOOIOOI
MHz
MHz
KHz
KHz
2
2
RECORD
RECORD
DECK 1
DECK 2
6 x D-cells - R20 - UM1
VOLTAGE
SELECTOR
TAPE/HI-SPEED
DUBBING/RADIO
MIC
DECK 2
CASS. KNOB
BAND
IO
IO
O
O
IO
IO
II
II
IO
IO
IO
IO
IO
IO
IO
IO
IO
IO
IO
IOO
O
IOII
IOII
TUNING
MAINS
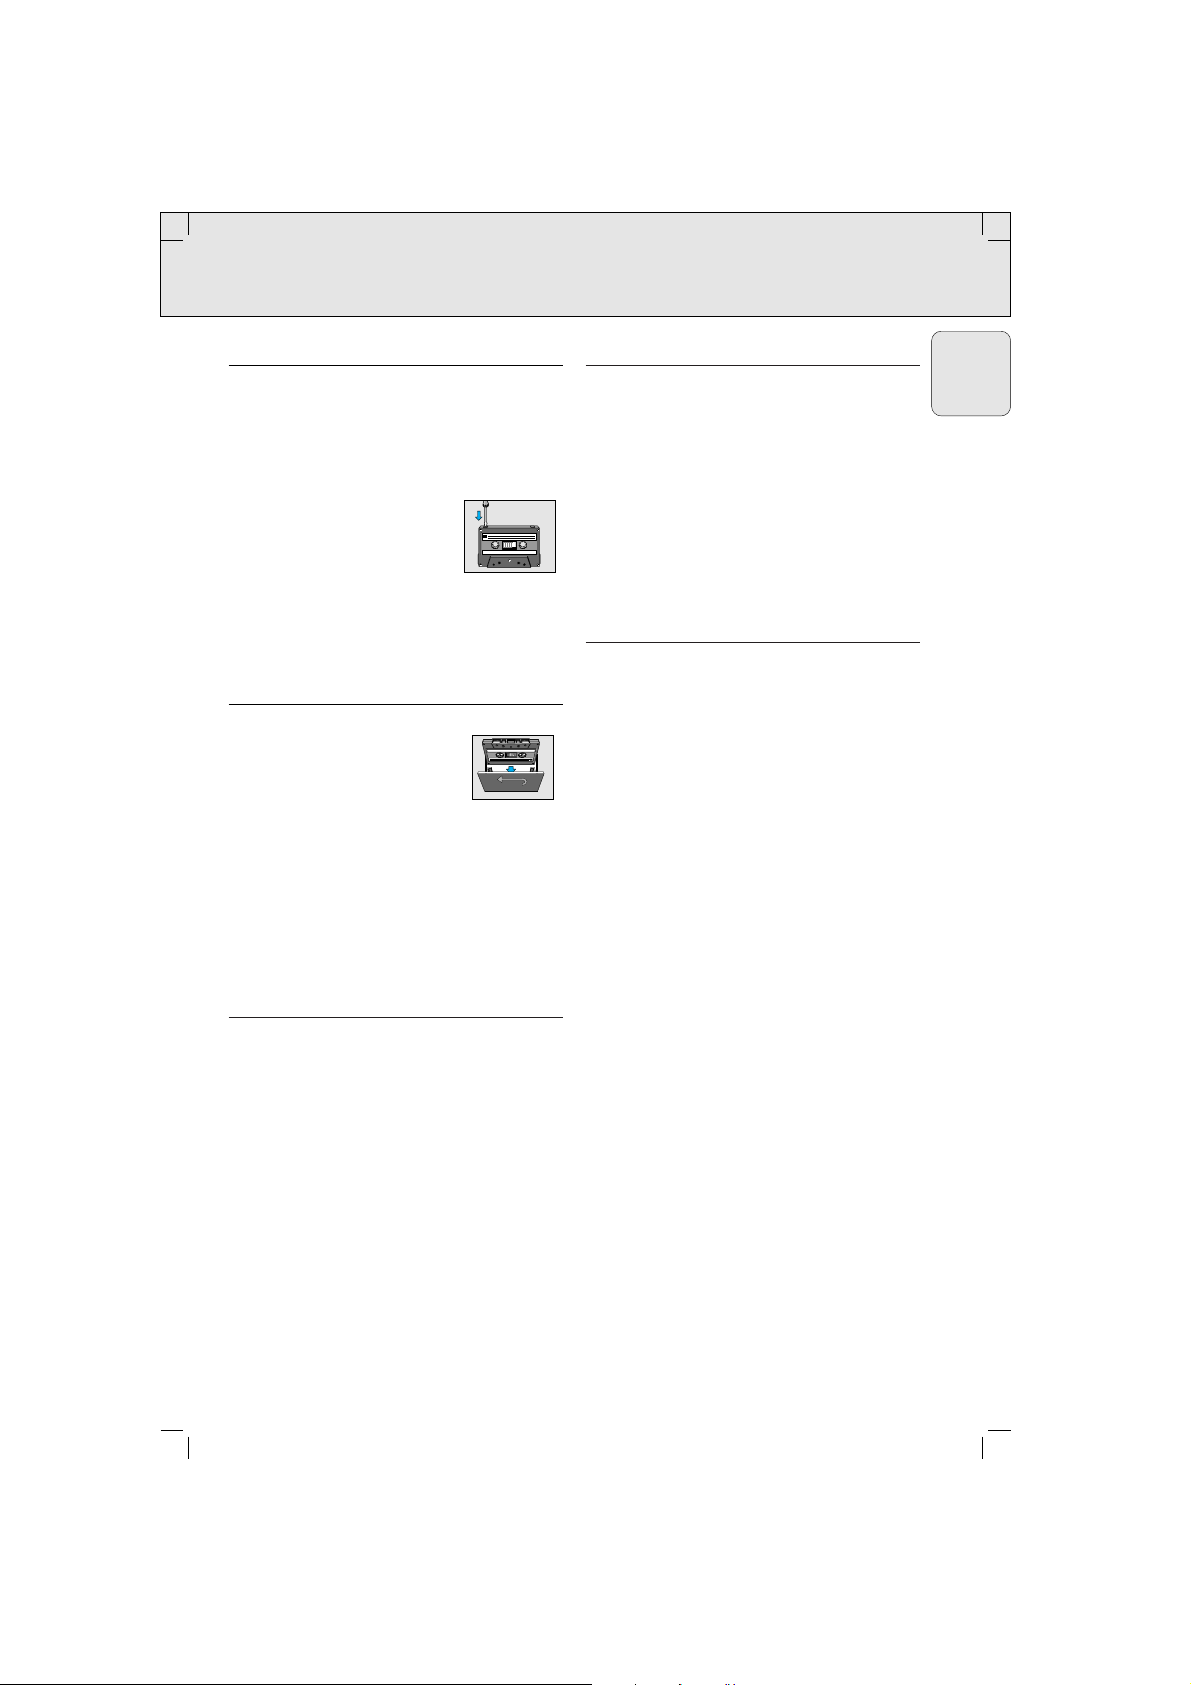
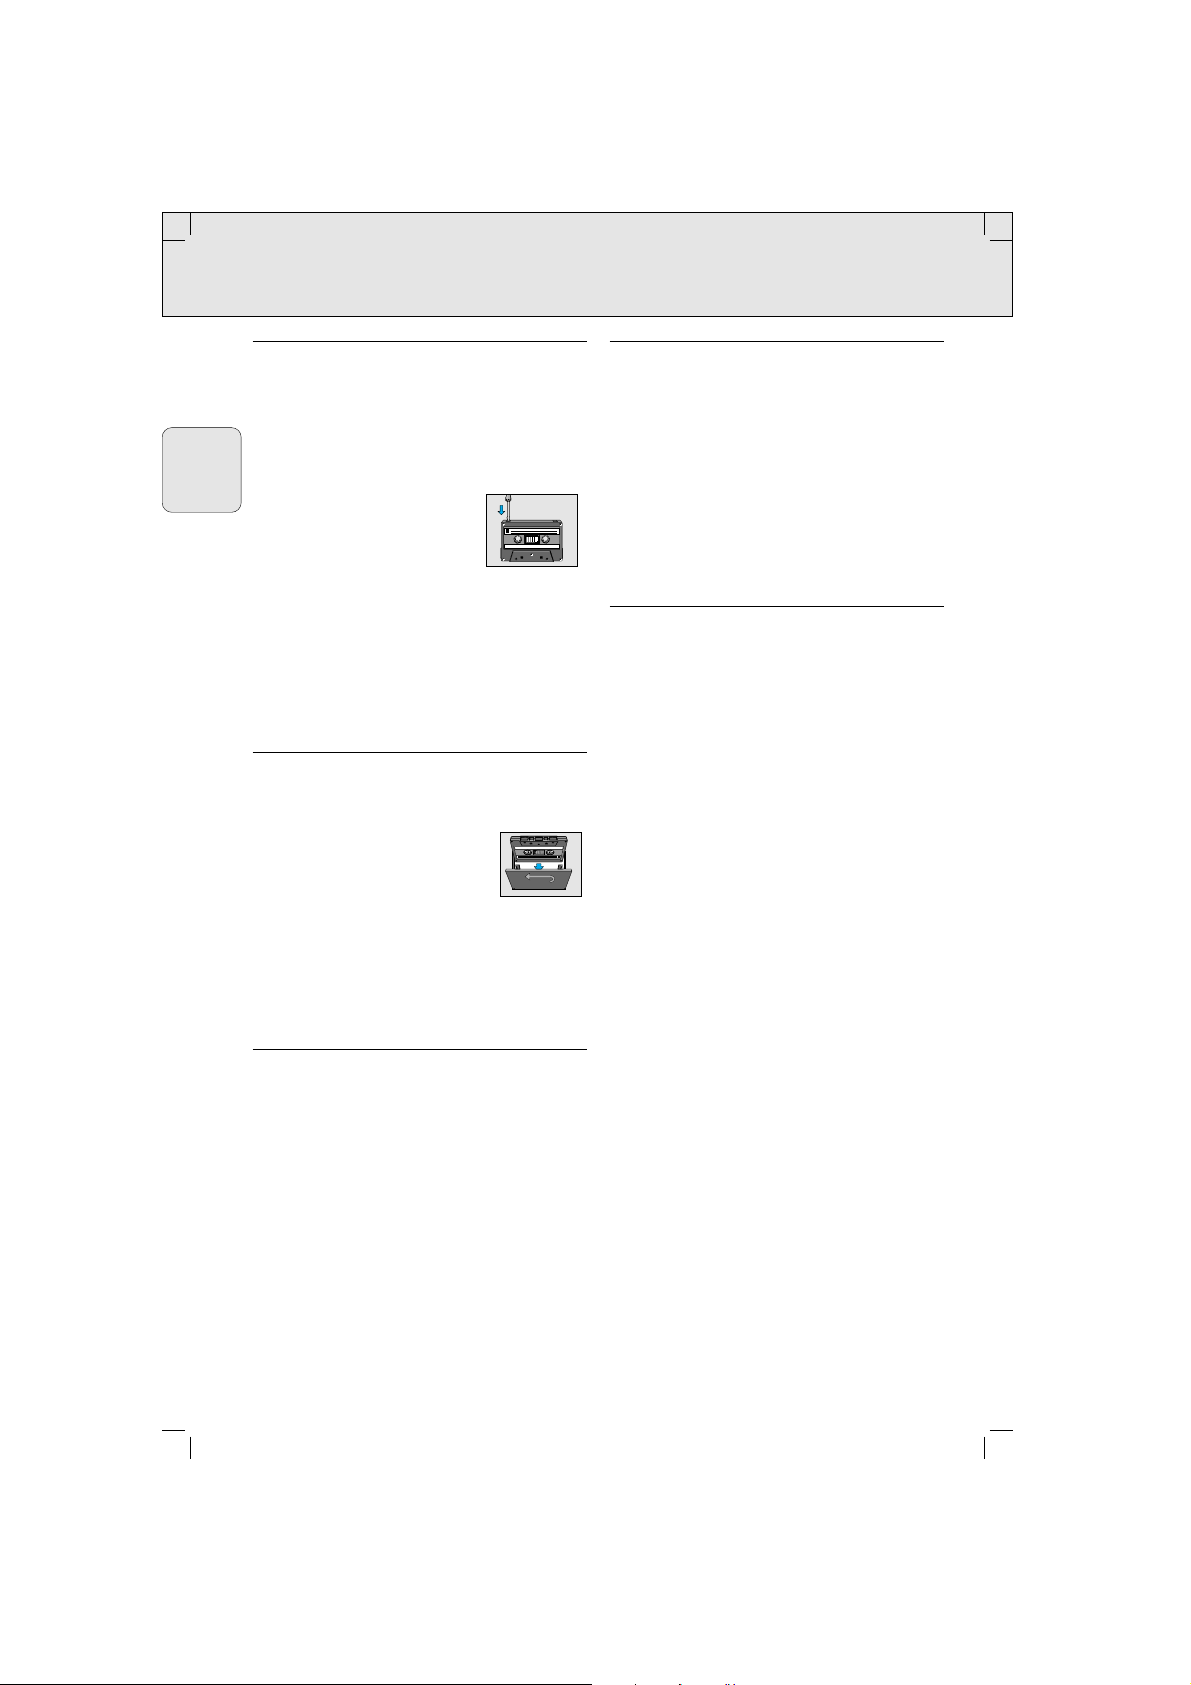
Cassette Playback Recording
CASSETTE PLAYBACK
PLAYBACK ON DECK 1 OR 2
• Set the TAPE/RADIO selector to TAPE.
• Press EJECT / and insert a recorded cassette
• For playback, any cassette
type can be inserted.
• Adjust the sound with the
VOLUME and TONE controls.
You may connect stereo headphones with
3.5 mm plug to socket p PHONES. The
loudspeakers will then be muted.
• Press PLAY 1 and playback will start.
• Press STOP 9 if you want to stop the
playback before the end off the tape. The
set is then switched off. On pressing again,
the cassette holder will open (EJECT).
– When the end of the tape is reached, the
recorder buttons are released.
FOR AW 7250 ONLY
• For playback on deck 1, set the REVERSE
button f to:
–
w d
s
ingle reverse, to play both cassette
sides once. At the end of the first cassette
side, the tape direction is reversed and the
recorder stops at the end of the second
cassette side.
–
x j continuous reverse for non-stop
playback. The recorder reverses the tape
direction whenever reaching the end of the
cassette. To stop, STOP 9 must be
pressed.
– Select the tape direction to start with using
the DIRECTION button W.The DIRECTION
indicators ABshow the actual tape
direction.
• During playback you can reverse the tape
direction at any moment using the
DIRECTION button W
.
CONTINUOUS PLAY - deck 1 followed by
deck 2
• Set the TAPE/RADIO selector to TAPE.
• Press both EJECT / buttons and insert a
recorded cassette into both decks.
• On deck 1, set the REVERSE button f to
w d and select the tape direction using the
DIRECTION button W
.
For AW 7250 only.
• Press PLAY 2 on deck 1 and PAUSE ; and
PLAY 2 on deck 2: deck 1 will play and deck
2 stands still.
As soon as deck 1 stops (at the end of the
cassette or when its STOP 9 button is
pressed), PAUSE ; is released and deck 2
will start playing back.
• To stop, press STOP 9; the set is then
switched off.
6
English
AW 7150/AW 7250/00. page 6
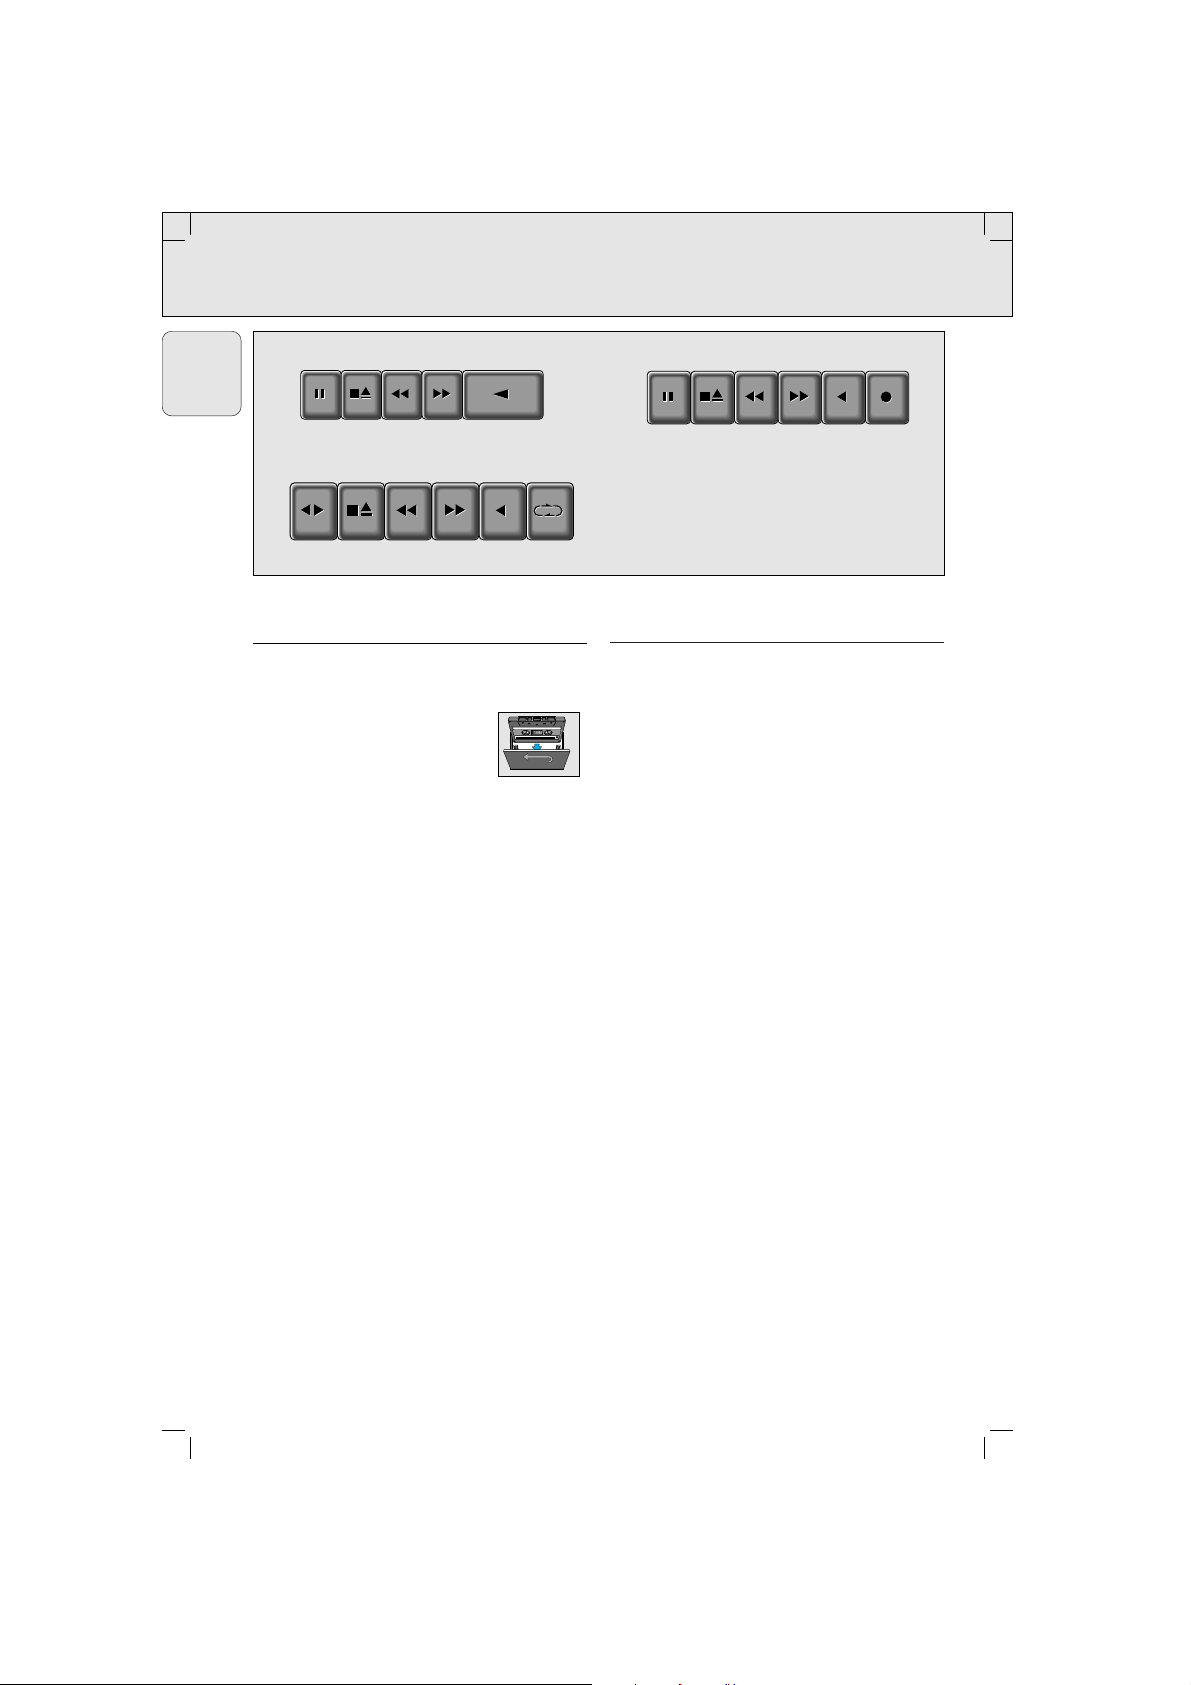
PAUSE STOP
EJECT
F.FWD REWIND PLAY
DECK 1
AW 7150 only
DIRECTION STOP
EJECT
F.FWD REWIND PLAY REVERSE
AW 7250 only
PAUSE STOP
EJECT
F.FWD REWIND PLAY RECORD
DECK 2
Recording
RECORDING
Copyright:
Recording is permissible insofar as copyright
or other rights of third parties are not infringed.
Safeguarding a cassette against erasure:
Accidental erasure can be prevented by
breaking the small tab in the top corner of the
back of the cassette.
This protection can be reversed
with a piece of adhesive tape
placed over the same corner.
Winding the tape
• Press F.FWD 5 to fast forward the tape.
• Press REW 6 to fast rewind the tape.
• Press STOP 9 to stop fast forward or fastrewind, or before the end of the tape.
RECORDING (on deck 2 only)
• Press EJECT / to open the cassette holder.
• Insert the cassette into deck 2.
For recording you must use a
NORMAL cassette (IEC I) on
which the tabs have not been
broken.
At the very beginning of the tape, no
recording will take place during the first
seven seconds when the leader tape passes
the recorder heads.
• When monitoring during recording, adjust
the sound with the controls VOLUME and
TONE. These controls do not affect the
recording.
• To stop, Press STOP 9.
RECORDING FROM THE RADIO
• Set the TAPE/RADIO selector to RADIO.
Mono recording from the built-in
microphone
• Set the TAPE/RADIO selector to TAPE
• Set the VOLUME control to the minimum
volume level (during microphone recordings,
monitoring is not possible)
STARTING AND STOPPING THE
RECORDING
• To start recording, press RECORD 0 and
PLAY 1 is then pressed at the same time.
– When the end of the tape is reached, the
recorder buttons are released.
• To interrupt recording, press PAUSE ;.
• To continue recording, press PAUSE ; again.
• Press STOP 9 if you want to stop the
recording before the end of the tape. On
pressing again, the cassette holder will
open.
• The set is switched off if the TAPE/RADIO
selector is in position TAPE and no buttons
are pressed.
DUBBING – Copying from deck 1 to 2
When dubbing, it is recommended to use
fresh batteries or to connect the set to the
mains supply.
• Set the TAPE/RADIO selector to:
– DUBBING - for normal speed copying
– HI-SPEED DUBBING - for high speed
copying
Do not switch this selector during dubbing.
• Press both EJECT / buttons and insert a
recorded cassette into deck 1 and a
cassette which is suited for recording into
deck 2.
• Press PAUSE ; followed by RECORD 0 on
deck 2.
• To start dubbing, press PLAY 1 on deck 1.
• Press PAUSE ; on deck 2 if you wish to
omit undesired passages and the playback
in deck 1 will continue. To restart dubbing,
press PAUSE ; again.
• By pressing PAUSE ; in deck 1 during
dubbing, a blank part will be recorded in
deck 2.
• To stop dubbing, press both STOP buttons
9. The set is then switched off.
7
English
AW 7150/AW 7250/00. page 7
1

Radio General Recycling
RADIO RECEPTION
• Set the TAPE/RADIO selector to RADIO.
• Adjust the sound with VOLUME and TONE.
You may connect stereo headphones with
3.5 mm plug to the socket p PHONES. The
loudspeakers will then be muted.
• Select the wave band using BAND selector.
• Tune toa radio stationusingtheTUNING
knob.
(SW and LW not all versions).
– For FM, pull out the telescopic aerial. To
improve FM reception, incline and turn the
aerial. Reduce its length if the FM signal is
too strong (usually occurs when very close
to a transmitter).
– For MW/AM or LW, the set is provided with
a built-in aerial, so there is no need to use
the telescopic aerial. The aerial can be
directed by turning the whole set.
– For short wave (SW), the telescopic aerial
must be pulled out and placed in the vertical
position. To improve SW-reception, vary the
lenght of the aerial.
• The set is switched off if the TAPE/RADIO
selector is in position TAPE and no buttons
are pressed.
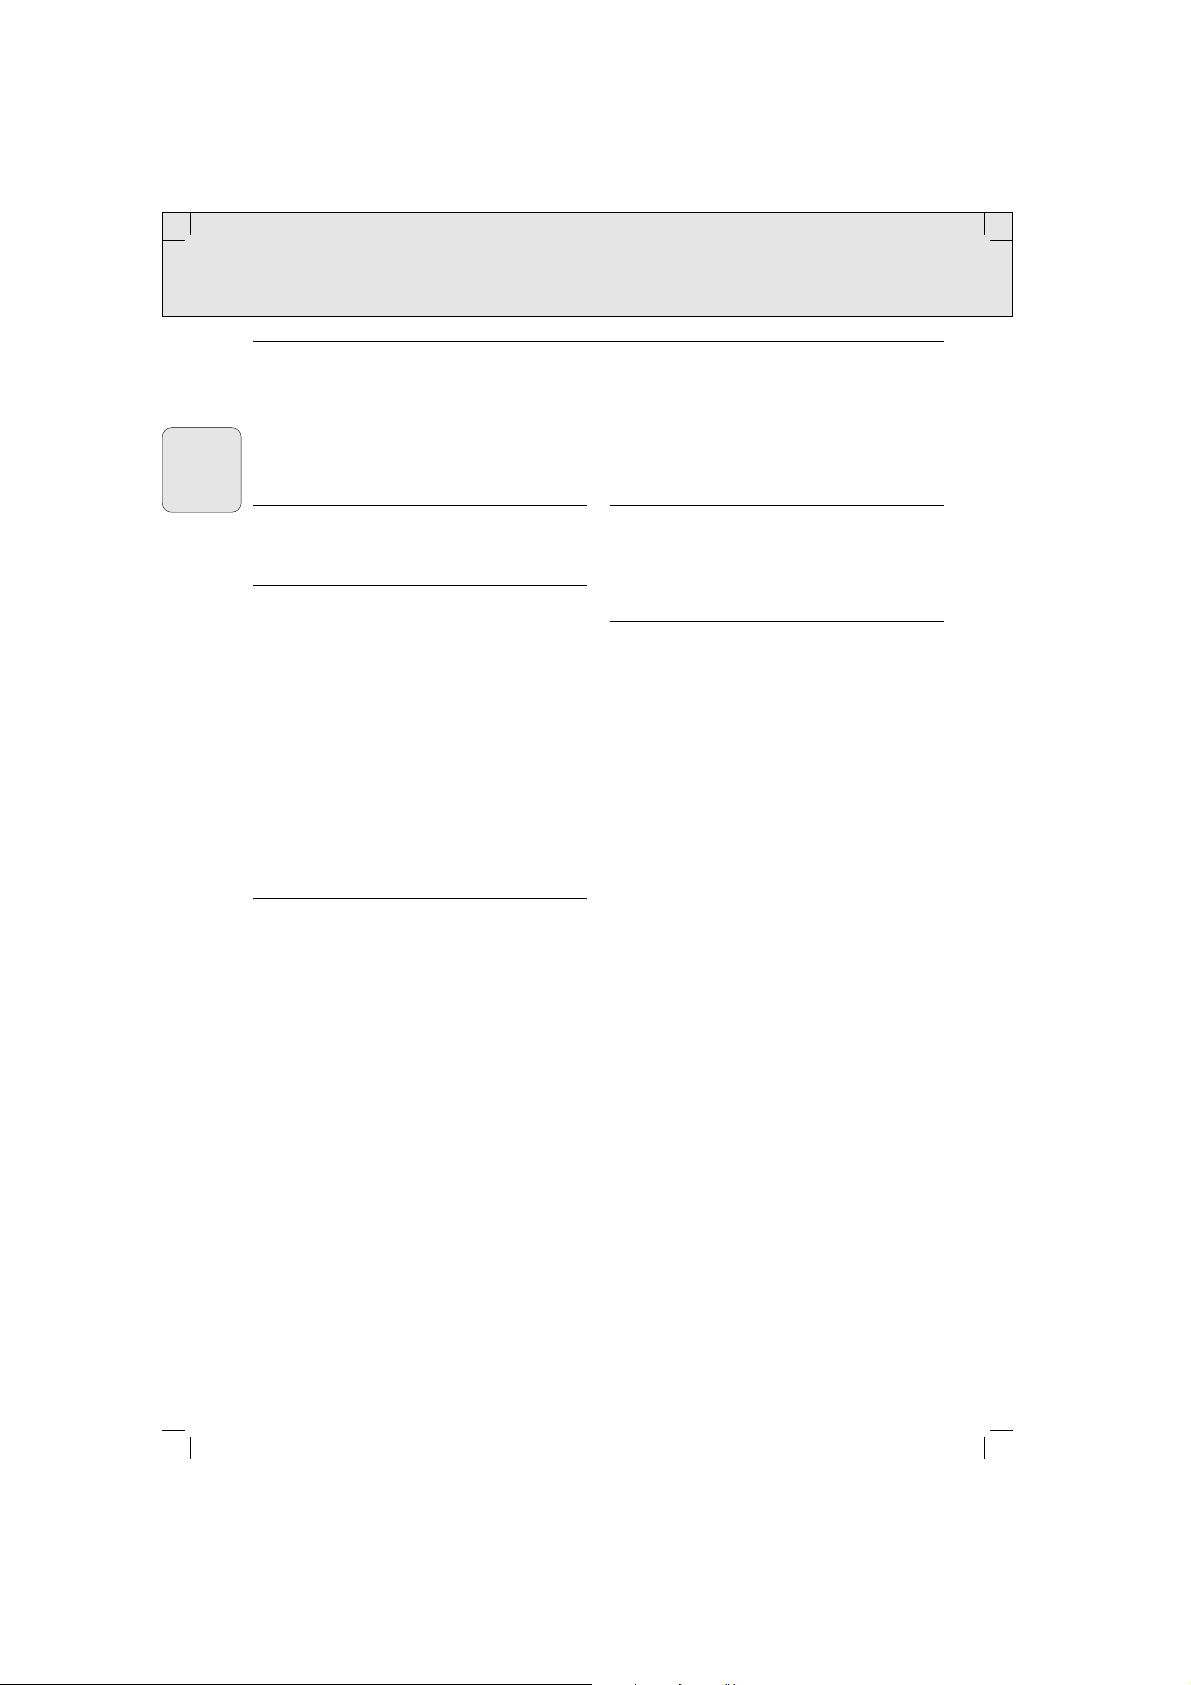
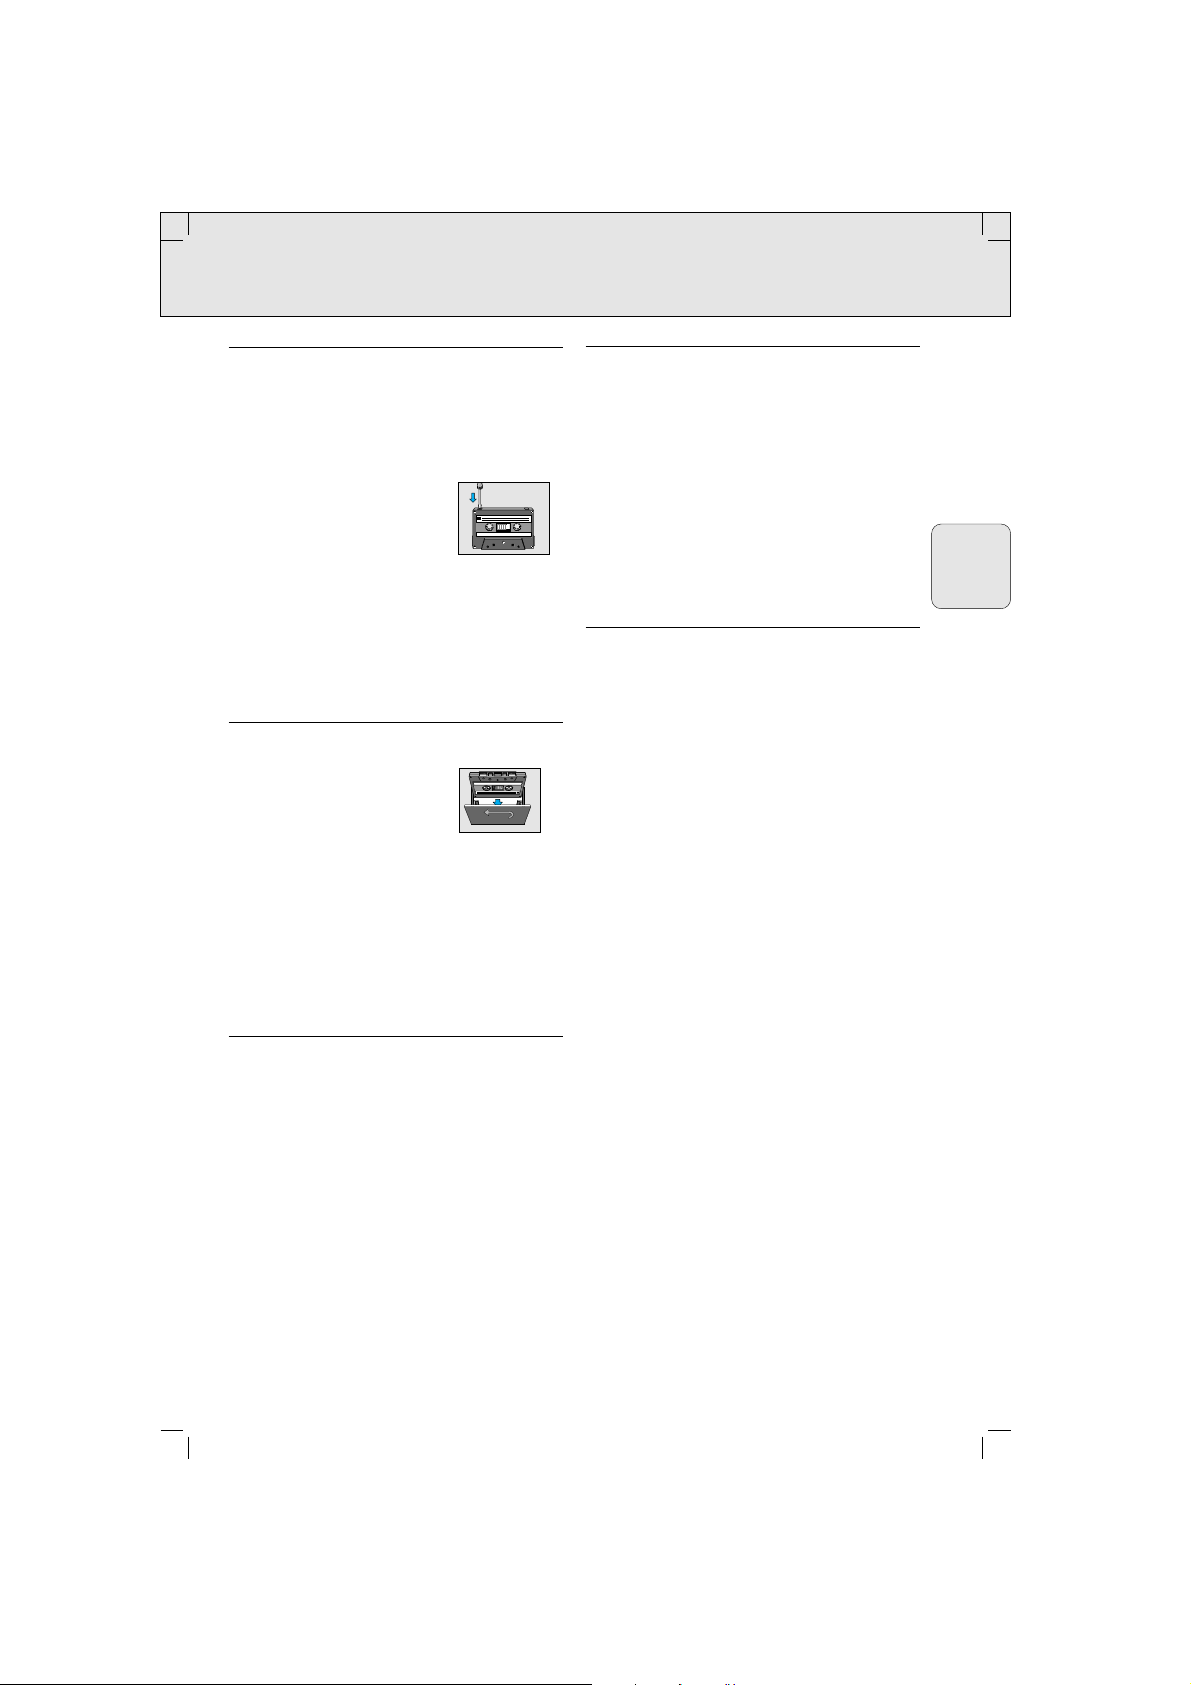
MAINTENANCE
To ensure good recording and playback quality,
clean the parts ABCE indicated after every
50 hours of operation or, on average, once a
month.
• Open the cassette holder by pressing
EJECT / .
• Use a cottonball slightly moistened with
alcohol or a special head cleaning fluid.
• Press PLAY 1 and clean the rubber pressure
roller C.
• Then press PAUSE ; and clean the capstan
B, and recording/playback head A and
erase head E. After cleaning, press STOP 9
Cleaning of the heads A and E can also be
done by playing a cleaning cassette through
once.
Remarks
Fingerprints, dust and dirt on the set can be
removed by using a soft, clean and slightly
damp leather cloth. Do not use any cleaning
agents, since they may damage the cabinet.
Do not expose the set, batteries and cassettes
to rain, moisture, sand, or to excessive heat
e.g. from heating equipment or in motor cars
parked in the sun.
RECYCLING
Please observe the local regulations regarding
the disposal of packing materials, exhausted
batteries and old equipment.
• All redundant packaging material has been
omitted. We have done our utmost to make
the packaging easy separable into three
mono-materials:
– cardboard (box),
– expandable polystyrene (buffer)
– polyethylene (bags, protective foam
sheet)
• Your set consists of materials which can be
recycled if disassembled by a specialized
company.
• Do not dispose of exhausted batteries with
your household waste.
8
English
AW 7150/AW 7250/00. page 8
C
C
C
BA
B
A
B
E
AW 7250
Deck 1
AW 7150
Deck 1 + 2
AW 7250
Deck 2

Troubleshooting
PROBLEM
– POSSIBLE CAUSE
• SOLUTION
No sound
– Volume too soft or too loud
• adjust volume
– Headphones are connected
• Disconnect headphones
– Batteries are exhausted
• Insert fresh batteries
– Batteries are incorrectly inserted
• Insert the batteries correctly
– mains lead is not securely connected
• Connect the mains lead properly
Poor radio reception
– Weak radio aerial signal
• Aim the aerial for best reception:
– FM: incline and rotate telescopic aerial
– AM (MW/LW): rotate the entire set
– Interference caused by closely located
electrical equipment like TVs, video recorders, computers, thermostats,
fluorescent lamps (TL), engines etc.
• Keep the set away from electrical
equipment
Poor cassette sound quality
– Dust and dirt on the heads, capstan or
pressure roller
• Clean the heads etc, (see Maintenance)
Recording does not work
– Cassette tab(s) are removed
• Apply a piece of adhesive tape over the
missing tab space
9
English
AW 7150/AW 7250/00. page 9
If a problem occurs, first check the points listed below before taking the set for repair. If you are
unable to remedy a problem by following these hints, consult your dealer or service center.
Warning: Under no circumstances should you try to repair the set yourself, as this would
invalide the guaranteey.
This unit complies with the radio interference requirements as laid down in EC (European
Commity) regulations
The type plate is located on the bottom of the set.
Commandes Alimentation
ALIMENTATION
Alimentation par piles
• Afin de prolonger la vie des piles, veuillez
utilisez, chaque fois qie convenable, le
courant alternatif.
• Ouvrez le compartiment à piles et
introduisez, comme indiqué, six piles, type
R20, UM1 ou D, (non fournies).
• Enlevez les piles si usées, ou si l’appareil
reste hors usage pour un longue période.
L’alimentation par piles est coupée quand
l’appareil est branché sur le secteur. Pour
revenir à l’alimentation par piles, il faut retirer la fiche de la prise MAINS.
Alimentation par le secteur
• Vérifier si la tension indiquée sur la plaque
signalétique (sous l’appareil) correspond au
secteur local. Si ceci n’est pas le cas,
consulter le revendeur ou l’organisation de
service après-vente.
• Si l’appareil est équipé d’un sélecteur de
tension VOLTAGE, placer ce sélecteur sur la
tension secteur locale.
• Branchez le cordon secteur sur la prise
MAINS et la prise murale. L’alimentation
secteur est alors en service.
• Pour séparer complètement l’appareil du
secteur, il faut retirer la fiche de la prise
murale.
10
Français
AW 7150/AW 7250/00 page 10
TONE
VOLUME
TAPE/HI-SPEED
DUBBING/RADIO
MIC
PHONES p
DECK 1
CASS. KNOB
DIRECTION
INDICATORS
(AW 7250 only)
RECORD
RECORD
6 x D-cells - R20 - UM1
FM 88 • 92 • 96 • 100 • 104 • 108
FM 88 • 92 • 96 • 100 • 104 • 108
MW 530 • 630 • 800 • 1000 • 1300 • 1600
MW 530 • 630 • 800 • 1000 • 1300 • 1600
1
1
CONTINOUS PLAY
CONTINOUS PLAY
AW 7150
AW 7150
DECK 1
DECK 2
CASS. KNOB
S
S
TEREO
TEREO
R
R
ADIO
ADIO
C
C
IOIOIOO
ASSETTE
IOIOIOO
ASSETTE
IOIOIOO
IOIO
IOO
IOIOI
IOIOI
IOIOIO
IOIOIOO
IOIOI
IOIOI
O
IOIOIOO
IOIOIOO
IOIOI
IOIOI
IOIOI
IOIOI
IO
IOIOIO
IOIOO
O
HIGH SPEED DUBBING / RECORD
HIGH SPEED DUBBING / RECORD
R
R
ECORDER
ECORDER
IOO
IOOIOIIOI IOIO
IOIIOI IOIOIO
IOOIOOI
OIOOI
IO
IO
O
O
IO
IO
II
II
IO
IO
IO
IO
IO
IO
IO
IO
IO
IO
IOOIO
IO
OIO
II
II
MHz
MHz
KHz
KHz
2
2
RECORD
RECORD
BAND
TUNING
DECK 2
VOLTAGE
SELECTOR
MAINS

Lecture de cassette
LECTURE DE CASSETTE
LECTURE SUR LA PLATINE 1 OU 2
• Placer le sélecteur TAPE/RADIO sur TAPE.
• Presser EJECT / et introduisez une
cassette enregistrée.
• Pour la lecture, on peut introduire chaque
type de cassette.
• Ajuster le son avec les
réglages VOLUME et TONE.
Sur la prise p on peut
brancher un casque stéréo avec fiche
3,5 mm. Les enceintes acoustiques sont
alors déconnectées.
• Presser PLAY 1 et la lecture commence.
• Arrêter la lecture en pressant STOP 9.
L’appareil est mis hors circuit. En pressant
une seconde fois le porte-cassette
s’ouvrira.(EJECT).
– Lorsque la bande arriva à sa fin, les touches
PLAY 1 de l’enregistreur seront relâchées.
UNIQUEMENT AW 7250
Pour la lecture sur la platine 1, placer la touche
REVERSE f sur:
–
w d inversion une fois,pour la lecture de
toutes les deux faces de la cassette. À la fin
de la première face, le sens le lecture est
inversé et le magnétophone s’arrêtera à la
fin de la deuxième face.
–
x j inversion continue pour la lecture
non-stop. Le magnétophone inversera le
sens de lecture chaque fois en arrivant à la
fin de la cassette. Pour arrêter, presser
STOP 9
.
– Choisir le sens de défilement avec la touche
DIRECTION W. Les voyants DIRECTION A
B indiquent le sens de défilement.
• On peut à chaque moment inverser le sens
de défilement avec la touche DIRECTION
W
.
LECTURE CONTINUE - la platine 1 suivie
par la platine 2
• Placez le bouton TAPE/RADIO sur TAPE
• Pressez les deux boutons EJ / puis insérez
une cassette enregistrée dans chanque
platine .
• Sur la platine 1, placer la touche REVERSE
f sur w d et choisir le sens de défilement avec la touche DIRECTION W.
Uniquement AW 7250
• Presser PLAY 2 de la platine 1 et PAUSE ;
et PLAY 2 de la platine 2: alors la platine 1
commencera la lecture et la platine 2 restera
immobile.
Au moment où la platine 1 s’arrête (à la fin
de la cassette ou si STOP 9 a été pressée),
PAUSE ; se relâche la platine 2
commencera la lecture.
• Pressez STOP 9 si vous désirez arrêter la
lecture avant la fin de la bande dans la
platine 1 ou 2. L’appareil sera alors éteint.
11
Français
AW 7150/AW 7250/00. page 11
DECK 1
AW 7150 only
DECK 2
PAUSE STOP
AW 7250 only
DIRECTION STOP
F.FWD REWIND PLAY
EJECT
F.FWD REWIND PLAY REVERSE
EJECT
PAUSE STOP
F.FWD REWIND PLAY RECORD
EJECT
Enregistrement
ENREGISTREMENT
Droits d’auteurs:
L’enregistrement est permis tant que les
droits d’auteur ou autres droits d’un tiers sont
respectés.
Protéger une cassette contre l’effacement
accidentel de la bande magnétique
Vous pouvez prévenir un effacement
accidentel en brisant le petit
ergot dans le coin supérieur
gauche de la cassette. Cette
protection peut être annullée
par l’application d’un morceau
de ruban adhésif sur le même coin.
Bobinage de la bande magnétique
• Presser la touche de bobinage rapide avant
F.FWD 5 ou arrière REW 6.
• En pressant STOP 9 on arrête le bobinage
ou le réembobinage de la bande, ou avant la
fin de la bande.
ENREGISTREMENT (uniquement platine 2)
• Ouvrir le portecassette en pressant EJECT /.
• Introduire une cassette dans la platine (sur la
platine 2).
Pour enregistrer, il faut utiliser une cassette
NORMAL (IEC I) dont les ergots
ne sont pas cassés. En début
de bande il n’y a pas
d’enregistrement les 7
premières secondes, pendant que l’amorce
passe devant les têtes magnétiques.
• Si l’on écoute pendant l’enregistrement
(monitoring), il faut ajuster le son avec les
réglages VOLUME et TONE. Ces réglages
n’ont aucune influence sur l’enregistrement.
• Pour arrêter presser STOP 9.
ENREGISTREMENT DE LA RADIO
• Placer le sélecteur TAPE/RADIO sur RADIO.
Enregistrement en mono au microphone
incorporé
• Placer le sélecteur TAPE/RADIO sur TAPE.
• Placer le réglage de VOLUME sur zéro
(l’écoute pendant un enregistrement microphonique n’est pas possible).
DÉMARRAGE ET ARRÊT
• Pour démarrer l’enregistrement appuyez RECORD 0; et PLAY 1. est alors appuyé
simultanément. Quand la bande est
entièrement déroulée, les touches sont
relâchées.
• Pour une interruption de courte durée,
presser PAUSE ;. Presser de nouveau pour
reprendre l’enregistrement.
• Pour arrêter, presser STOP 9. En pressant à
nouveau, le porte-cassette s’ouvrira.
• L’appareil est mis hors circuit si le sélecteur
TAPE/RADIO se trouve en position TAPE et
toutes les touches sont relachées.
COPIE - Copier de la platine 1 sur 2
Pour la copie il est recommande d’employer
des piles nouvelles, ou de brancher l’appareil
sur le lecteur
• Placez le bouton TAPE/RADIO sur .
– DUBBING pour une copie à vitesse normale.
– HIGH SPEED DUBBING pour une copie à
vitesse accéléree.
Ne pas placez ce bouton pendant la copie.
• Pressez les deux boutons EJ / puis insèrez
une cassette enregistrée dans la platine 1,
et une cassette à enrigistrer dans la plaine 2.
• Pressez PAUSE ; puis RECORD 0 sur la
platine 2.
• Pour démarrer la copie, pressez PLAY 1 sur
la platine 1.
• Pressez PAUSE ; sur la platine B si vous
voulez omettre un passage non désiré, la
reproduction continue sur la platine 1. Pour
renouveler la copie, pressez PAUSE ; à
nouveau.
• En pressant PAUSE ; sur la platine 1
pendant la copie, un espace blanc sera
enregistré dans la platine 2.
• Pour arrêter la copie, pressez les deux
boutons STOP 9. L’appareil s’éteindra.
12
Français
AW 7150/AW 7250/00 page 12
1

Radio Entretien Récyclage
RÉCEPTION RADIO
• Placer le sélecteur TAPE/RADIO sur RADIO.
• Ajuster le son avec le réglage VOLUME et
TONE. Sur la prise p on peut brancher un
casque avec fiche 3,5 mm. Les enceintes
acoustique sont alors débranchés.
• Choisir la gamme d’ondes à l’aide du
sélecteur BAND.
• Rechercher l’émetteur avec le bouton
TUNING
(SW et LW pas sur tous les
modèles).
– Pour FM, sortez l’antenne télescopique, puis
l’inclinez et l’orientez convenablement. Si le
signal FM est trop fort (proximité d’un
émetteur), réduire la longueur de l’antenne.
– Pour MW/AM ou LW, l’appareil est équipé
d’une antenne incorporé, de sorte qu’il n’est
pas nécessaire d’utiliser l’antenne télescopique. Orienter l’ensemble de l’appareil.
– Pour les ondes courtes (OC ou SW), sortir
l’antenne télescopique et la placer en
position verticale. On peut modifier la
longueur de l’antenne.
• L’appareil est mis hors circuit si le sélecteur
TAPE/RADIO se trouve en position TAPE et
toutes les touches sont relachées.
ENTRETIEN
Pour assurer une bonne qualité
d’enregistrement et de lecture, nettoyez les
pièces A, B, C, E, comme indiquées toutes
les 50 heures environ ou, en moyenne, une
fois par mois.
• Ouvrir le portecassette en pressant EJ /.
• Utilisez un coton tige imbibé légèrement
d’alcool, ou une solution spéciale pour
nettoyage de têtes magnétiques.
•Presser PLAY 1 et nettoyer le galet presseur
E.
• Presser PAUSE ; et nettoyer le cabestan B
et les têtes enregistrement/lecture A et la
tête d'effacement E. Le nettoyage des
têtes A et E peut aussi être fait et faisant
tourner une cassette de nettoyage une fois.
Remarques:
Procedéz au nettoyage des traces de doigt, de
la poussière et des saletés avec un chamois
doux, propre et légèrement humide. N’utilisez
pas de produits de nettoyage car ils peuvent
endommager l’appareil. Ne pas exposer
l’appareil, les piles et les cassettes à la pluie, à
l’humidité, au sable ni à la chaleur excessive,
p.e. près d’un appareil de chauffage ou dans
une voiture garée en plein soleil.
RÉCYCLAGE
Veuillez observer les règlements locaux
lorsque vous vous débarrassez des matériaux
d’emballage, des piles usées et de votre ancien appareil.
• Tous les matériaux d’emballage superflus
ont été supprimés. Nous avons fait notre
possible afin que l’emballage soit facilement
séparable en trois types de matériau: carton
(boîte), polystyrène expansible (matériel
tampon), polyéthylène (sachets, panneau en
matière plastique cellulaire)
• Votre appareil est composé de matériaux
pouvant être récyclés s’il est démonté par
une firme spécialisée.
• Ne jetez pas les piles usées avec vos
déchets ménagers.
13
Français
AW 7150/AW 7250/00. page 13
C
C
C
BA
B
A
B
E
AW 7250
Deck 1
AW 7150
Deck 1 + 2
AW 7250
Deck 2
Dépistage des pannes
PROBLÈME
– CAUSE POSSIBLE
• REMÈDE
Pas de son
– Le VOLUME n’est pas ajusté
• Ajuster le VOLUME
– Le casque est branché
• Débrancher le casque
– Les piles sont vides
• Remplacer-lespiles
– La position des piles est incorrecte
• Replacer les piles correctement.
– Le câble secteur n’est pas correctement
branché
• Brancher le câble secteur correctement
Pauvre réception radio
– Les signaux radio sont faibles
• Orienter l’antenne pour une meilleure réception:
– FM: incliner et tourner l’antenne télescopi-
que
– AM (MW/LW): orienter l’appareil
– L’appareil trop près d’un téléviseur, magné-
toscope, ordinateur, thermostat, lampe
fluorescente, moteur, etc.
• Éloigner l’appareil des équipements électriques perturbateurs
Mauvaise qualité du son de la cassette
– Poussière et impuretés sur les têtes, le
cabestan ou le galet de pression
• Nettoyer les têtes, le cabestan et le galet de
pression, voir ’Entretien’
Pas d’enregistrement
– Les ergots de la cassette sont cassés
• Appliquer un morceau de ruban adhésif sur
l’ouverture
14
Français
AW 7150/AW 7250/00 . page 14
Si une panne se produit, vérifiez d’abord les points mentionnés ci-dessus avant de donner votre
appareil à réparer. Si vous ne pouvez remédier au problème en suivant les suggestions suivantes,
adressez-vous à votre revendeur ou au service d’entretien.
Avertissement: En aucun cas vous ne devez essayer de réparer vous-même l’appareil, car vous
perdriez tout droit en matière de garantie.
Cet appareil satisfait aux prescriptions de la CEE en matière de déparasitage radio
La plaque signalétique se trouve sous l’appareil.
Controles Alimentación
ALIMENTACIÓN
Alimentación con pilas
• Siempre que sea conveniente, utilice el
alimentación de la red eléctrica si desea
conservar la vida de las pilas.
• Abrán el compartimiento de las pilas y
pongan en él seis pilas del tipo R20, UM1 o
D del modo indicado.
• Quiten las pilas si están agotadas o cuando
no se vaya a usar las pilas durante un
tiempo prolongado. La alimentación con
pilas queda fuera de servicio al conectar el
aparato a la red. Para volver a la
alimentación con pilas, saque la clavija del
conector de red MAINS.
Alimentación por la red
• Compruébese si la tensión indicada en la
placa tipo (en la parte trasera del aparato)
coincide con la de su localidad. En caso
contrario consulte a su distribuidor o el local
de servicio.
• Si el aparato va equipado de un selector de
tensión VOLTAGE, ajústelo a la tensión
local.
• Conecten el cordón de red al conector
MAINS y a la toma de red. Con ello queda
aplicada ya la tensión del red al aparato.
• Para desconectar el aparato completamente
de la red, saquen la clavija del enchufe de la
pared.
15
Español
AW 7150/AW 7250/00 . page 15
TONE
VOLUME
TAPE/HI-SPEED
DUBBING/RADIO
MIC
PHONES p
DECK 1
CASS. KNOB
DIRECTION
INDICATORS
(AW 7250 only)
FM 88 • 92 • 96 • 100 • 104 • 108
FM 88 • 92 • 96 • 100 • 104 • 108
MW 530 • 630 • 800 • 1000 • 1300 • 1600
MW 530 • 630 • 800 • 1000 • 1300 • 1600
1
1
RECORD
RECORD
CONTINOUS PLAY
CONTINOUS PLAY
DECK 1
6 x D-cells - R20 - UM1
AW 7150
AW 7150
DECK 2
CASS. KNOB
S
S
TEREO
TEREO
R
R
ADIO
ADIO
C
C
IOIOIOO
ASSETTE
IOIOIOO
ASSETTE
IOIOIOO
IOIOIOO
IOIOI
IOIOI
IOIOIOO
IOIOIOO
IOIOI
IOIOI
IOIO
IOIOIOO
IOIOI
IOIOI
IOIOI
IOIOI
IOIOIO
IO
IOIOO
O
HIGH SPEED DUBBING / RECORD
HIGH SPEED DUBBING / RECORD
R
R
ECORDER
ECORDER
IOO
IOOIOIIOI IOIOIOOIO
IOO
IOIIOI IOIOIO
OIO
OI
OI
IOOIOII
IOOIOII
IO
IO
IOIOIOIO
IOIOIOIO
IOOIOII
IOO
IO
II
MHz
MHz
KHz
KHz
2
2
RECORD
RECORD
BAND
TUNING
DECK 2
VOLTAGE
SELECTOR
MAINS

Reproducción
REPRODUCCIÓN DE CASETES
REPRODUCCIóN EN EL DECK 1 O 2
• Ponga el selector TAPE/RADIO en TAPE.
• Apriete EJ / y coloque una casete ya grabada.
Para la reproducción, cada
tipo de casete puede ser
utilizado.
• Ajuste el sonido con
VOLUME y TONE.
Un auricular estéreo con clavija de 3,5 mm
puede conectarse al borne p. Los altavoces
se desconectarán entonces.
• Apriete PLAY 2 y la reproduccíon empezará
• Pressione STOP 9, si desea parar la
reproducción antes del final de la cinta.
El aparato se desconecta entonces. Si
apriete otra vez se abrirá el portacasetes.
(EJECT).
– Al llegar la cinta a su fin, las teclas se
soltarán.
SóLO AW 7250
Para la reproducción en el deck 2, ponga el
selector REVERSE f en:
– w d inversión una vez para reproducir
ambos lados de la casete sólo una vez. Al
final del primer lado de la casete, el sentido
se invierte y el magnetófono se detiene al
final del segundo lado de la casete.
– x j inversión continua para escuchar
non-stop: el magnetófono invierte el sentido
cada vez que la casete llega a su fin. Para
detener se aprieta STOP 9.
– Seleccione el sentido de la cinta con la tecla
DIRECTION W
.
Los indicadores DIRECTION
ABindicen el sentido de la cinta.
• Puede invertirse en todo momento el
sentido de la cinta con la tecla DIRECTION
.
REPRODUCCIÓN CONTINUA - Copiado
desde el deck 1 al 2
• Ponga el selector TAPE/RADIO en TAPE.
• Oprima las dos teclas EJ / e inserte
casetes en ambos megnetófonos
• En el deck 2, ponga el selector de inversión
REVERSE f en w d y seleccione el
sentido de la cinta con DIRECTION W Sólo
AW 7250.
• Oprima PLAY 2 en el magnetófono 1,
luengo PAUSE ;, y por último PLAY 2 en el
magnetófono 2.
– La reproducción se indica en el
magnetófono 1.
• La reproducción se detiene cuando la cinta
en el magnetófono 1 llega al final.
– La tecla PAUSE ; será automáticamente en
el magnetófono 2.
• Oprima STOP 9 si desea detener la
reproducción antes del final de la cinta en
los magnetófonos 1 o 2. El aparato se
apagará entonces.
MAGNETÓFONO DE CASETE
Derechos de autor:
La grabación sólo está admitida mientras no
lesione derechos de autor o de terceros.
Protección contra el borrado:
El borrado accidental se puede prevenir
rompiendo las peweuñas lengüetas en la
esquina superior izquierda de la parte trasera
del cassette. Esta proteccion puede ser
anulada con un pedazo de cinta adhesiva
colocado en la misma esquina.
Bobinado y Rrebobinado Rápidos
• Aprieten la tecla de bobinado rápido F.FWD
5, o de rebobinado REWIND 6.
• Para detener el avance o retroceso, o antes
del final de la cinta, aprieten la tecla STOP 9.
16
Español
AW 7150/AW 7250/00 . page 16
DECK 1
AW 7150 only
PAUSE STOP
AW 7250 only
DIRECTION STOP
F.FWD REWIND PLAY
EJECT
F.FWD REWIND PLAY REVERSE
EJECT
DECK 2
PAUSE STOP
F.FWD REWIND PLAY RECORD
EJECT
Grabación
MAGNETÓFONO DE CASETE
Derechos de autor:
La grabación sólo está admitida mientras no
lesione derechos de autor o de terceros.
Protección contra el borrado:
El borrado accidental se puede prevenir
rompiendo las peweuñas lengüetas en la
esquina superior izquierda de la
parte trasera del cassette. Esta
proteccion puede ser anulada
con un pedazo de cinta
adhesiva colocado en la misma
esquina.
Bobinado y Rrebobinado Rápidos
• Aprieten la tecla de bobinado rápido F.FWD
5, o de rebobinado REWIND 6.
• Para detener el avance o retroceso, o antes
del final de la cinta, aprieten la tecla STOP 9.
GRABACIÓN (sólo en el deck 2)
• Aprieten la tecla EJ / el portacasetes se
abrirá.
• Ponga la casete en el deck 2.
Para la grabación se utilizará
una casete del tipo NORMAL
(IEC I) en la que no se hayan
roto las pestañas. Durante los primeros y
últimos 7 segundos de una casete no se
graba nada porque la cabecera de la cinta no
es magnética.
• Cuando escuchen durante la grabación
(monitorización), ajusten el sonido con los
controles VOLUME y TONE. La grabación
no es afectada por la posición de eses
controles.
• Para deternerla oprima STOP 9.
GRABACIÓN DE LA RADIO
• Pongan el selector TAPE/RADIO en RADIO.
Grabación mono del micrófono integrado
• Ponga el selector TAPE/RADIO en TAPE.
• Ponga el control VOLUME en cero (la monitorización durante una grabación microfónica
no es posible).
ARRANCAR Y PARAR LA GRABACIÓN
• Empiecen la grabación apretando 0
RECORD. Al hacerlo, PLAY 2 se aprieta
también.
– Cuando se llega al final de la cinta, los
botones de grabación se liberan.
• Para interrupciones breves aprieten PAUSE
;.
• Para continuar la grabación, presione PAUSE
; otra vez.
• Para detener se aprieta STOP 9. Si apriete
otra vez la tecla se abrirá el portacasetes
• El aparato se desconecta si el selector
TAPE/RADIO está en la posición TAPE y
ningún botón esta presionado.
DOBLAJE – Copia del magnetófono 1 al 2
Para el doblaje es recomendable utilizar pilas
nuevas o conectar el aparato a una toma de
salida en la pared.
• Coloque el selector TAPE/RADIO en la
posición:
– DUBBING– para una copia a velocidad
normal.
– HIGH SPEED DUBBING– para una copia a
alta velocidad.
No coloque esta tecla durante el doblaje.
• Oprima las dos teclas EJ / e inserte un
casete grabado en el magnetófono 1 y un
casete para grabar en el magnetófono 2.
• Oprima PAUSE ; y luego RECORD 0 en el
magnetófono 2.
• Para inicar el doblaje, oprima PLAY 2 en el
magnetófono 1.
• Oprima PAUSE ; en el magetófono 2 si
desea omitir algún pasaje no deseado, la
reproducción en el magnetófono 1 sigue.
Para reiniciar el doblaje, oprima PAUSE ;
nuevamente.
• Si oprime PAUSE ; en el magnetófono 1
durante el doblaje, se grabará un espacio en
blanco en el magnetófono 2.
• Para detener el doblaje, oprima ambas
teclas STOP 9. El aparato se apagará.
17
Español
AW 7150/AW 7250/00 page 17
1

Radio Conservación Riciclaje
RECEPCIÓN DE RADIO
• Pongan el selector TAPE/RADIO en RADIO.
• Ajuste el sonido con VOLUME y TONE.
• Un auricular con clavija de 3,5 mm puede
conectarse al borne p. 5. Los altavoces se
desconectarán entonces.
• Elija labanda de onda conel interruptor
BAND.
• Sintonicen la estación con el mando
TUNING (no todos los modelos tienen SW y
LW).
– Para FM hay que sacar la antena
telescópica. Para mejorar la recepción en
FM, incline y oriente la antena. Cuando la intensidad de la señal de FM es demasiado
fuerte (por estar muy cerca de una emisora),
acorte la longitud de la antena.
– Para MW/AM o LW, el aparato lleva
incorporada una antena, por lo que no hay
necesidad de usar la antena telescópica.
Para orientar la antena gire el aparato, hasta
que la recepción sea óptima.
– Para la onda corta SW, saque la antena
telescópica y póngala en posición vertical.
Para mejorar la recepción acorte o alargue la
antena.
• El aparato se desconecta si el selector
TAPE/RADIO está en la posición TAPE con
las teclas del magnetófono sueltas.
CONSERVACIÓN
Para asegurar una buena calidad de grabación
y reproducción, limpie las partes A B C E
indicadas en la después de cada 50 horas de
operación, o en promedio, una vez por mes.
• Abra el portacasetes con la tecla EJ /.
• Use una pelota de algodón empapada en
alcohol o en algún líquido para limpieza de
cabezas.
• Pulse PLAY 2 y limpie el rodillo presor de
goma C.
• Pulse PAUSE ; y limpie el cabrestante B, la
cabeza de grabación/reproducción A y E.
Para la limpieza de las cabezas A y E
puede también pasarse una vez una casete
limpiadora.
Observaciones
Las huellas dactilares , el vpolvo y la mugre del
aparato pueden ser limpiadas con una gamuza
suave, limpia y ligéramente humedecida. No
utilice agentes limpiadores, ya que pueden
dañar la caja. No exponga el aparato, las pilas y
las casetes a la lluvia, humedad, arena ni a una
fuente de calor o por ejemplo en coches aparcados al sol.
RICICLAJE
Observe las disposiciones locales referentes a
la forma de entregar los materiales de
embalaje, las pilas usadas y su antiguo equipo
para el reciclaje.
• Se ha suprimido todo el material de
embalaje innecesario. Hemos hecho todo lo
posible por que el embalaje pueda separarse
fácilmente en tres materiales
independientes:
– cartón (caja)
– poliestireno expandible (amortiguación)
– polietileno (bolsas, plancha de espuma
protectora)
• Los materiales que componen el equipo son
reciclables y reutilizables si son desmontados
por una empresa especializada.
• No tire al cubo de la basura las pilas usadas.
18
Español
AW 7150/AW 7250/00 page 18
C
C
C
BA
B
A
B
E
AW 7250
Deck 1
AW 7150
Deck 1 + 2
AW 7250
Deck 2
 Loading...