

SCD530

2
3
19
1 18
2
12
13
1
2
3
4
5
3
4
5
6
14
9
11
10
9
8
7
15
16
8
7
6 12
10
17
13
14
15
11
20
1
21
16
17
18
1
2
3
4
5
6
7
8
9

4

ENGLISH 6
DANSK 21
DEUTSCH 36
52
ESPAÑOL 74
SUOMI 86
FRANÇAIS 101
ITALIANO 116
NEDERLANDS 131
NORSK 146
PORTUGUÊS 161
SVENSKA 177
TÜRKÇE 192
SCD530

6
ENGLISH
Introduction
Congratulations on your purchase and welcome to Philips AVENT! To fully benet from the support
that Philips AVENT offers, register your product at www.philips.com/welcome.
Philips AVENT is dedicated to producing caring, reliable products that give parents the reassurance
they need. This Philips AVENT baby monitor provides round-the-clock support by ensuring you can
always hear your baby clearly without any distracting noise. The DECT technology guarantees zero
interference from other wireless appliances and a crystal clear signal between the baby unit and the
parent unit. The temperature and humidity sensor enables you to monitor the climate in your baby’s
room, and offers you personalised settings to help keep your baby’s room healthy and comfortable.
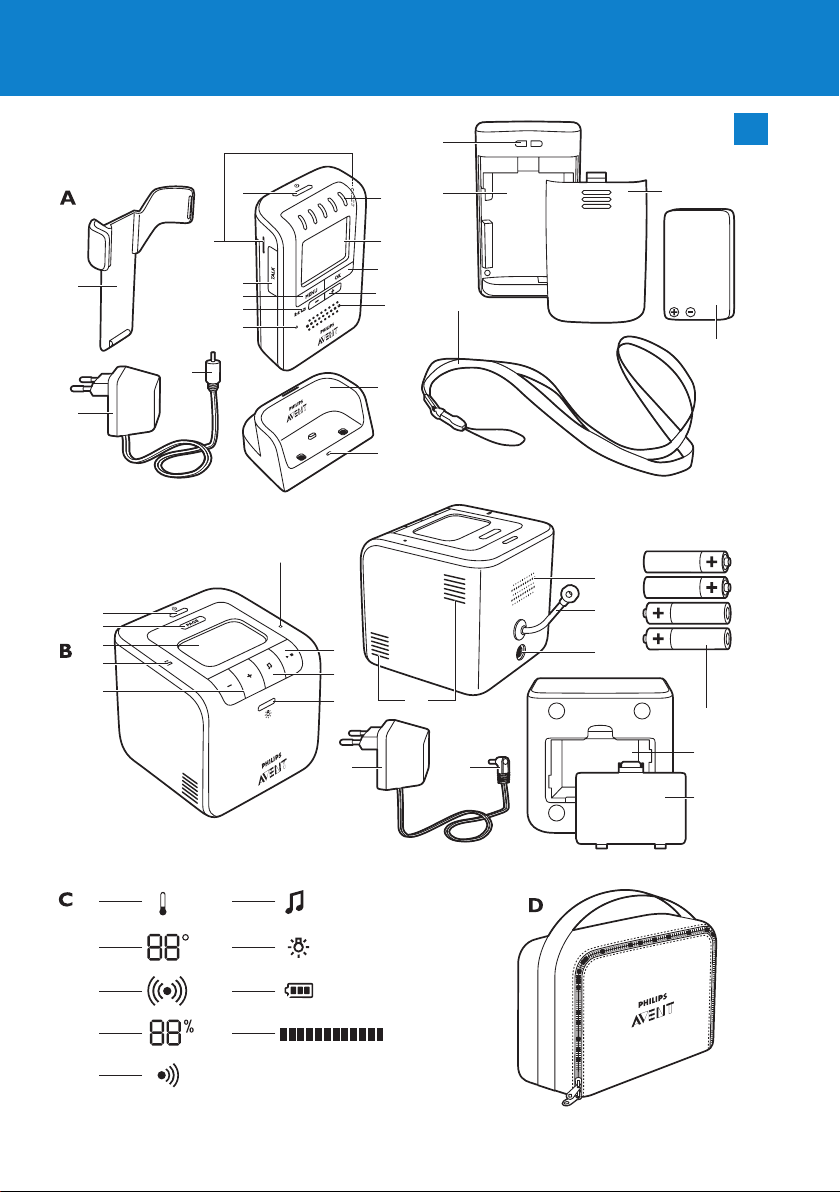
General description (Fig. 1)
A Parent unit
1 On/off button 3
2 Slot for belt clip
3 TALK button
4 MENU button
5 LINK light
6 Microphone
7 Loudspeaker
8 Menu and volume +/– buttons
9 OK button
10 Display
11 Sound level lights
12 Belt clip
13 Adapter
14 Small appliance plug
15 Charger
16 Charging light
17 Neck strap
18 Compartment for rechargeable battery pack
19 Opening for neck strap
20 Lid of compartment for rechargeable battery pack
21 Rechargeable battery pack (included)
B Baby unit
1 On/off button 3
2 PAGE button
3 Display
4 Power-on light
5 Volume +/– buttons
6 Nightlight button Q
7 Lullaby button K
8 Play/stop button E
9 Microphone
10 Adapter
11 Large appliance plug
12 Cooling vents
13 Loudspeaker
14 Temperature and humidity sensor
15 Socket for large appliance plug
16 Non-rechargeable batteries (not included)
17 Compartment for non-rechargeable batteries
18 Lid of compartment for non-rechargeable batteries

ENGLISH 7
C Display
1 $ = temperature alert
2 Ñ° = room temperature indication
3 g = sound alert
4 r = humidity indication
5 s = paging symbo
6 K = lullaby symbol
7 Q = nightlight symbol
8 T = battery symbol
9 Volume/microphone sensitivity indications:
- g = volume off
- h = minimum sensitivity/volume
- i = maximum sensitivity/volume
Other display indications (not shown):
- ’High’ = room temperature above temperature set in menu
- ‘Low’ = room temperature below temperature set in menu
- ‘Not linked’ = no connection between units*
- ’Paused’ = lullaby is interrupted
- ‘Searching’ = units are searching for connection*
- ‘Linked’ = units are linked*
- ’Talk’ = talk function is active
* This is only shown on the display of the parent unit.
D Travel pouch
Important
Read this user manual carefully before you use the appliance and save it for future reference.
Danger
- Never immerse any part of the baby monitor in water or any other liquid.
Warning
- Check if the voltage indicated on the adapters of the baby unit and the charger corresponds to
the local mains voltage before you connect the appliance.
- Only use the adapter supplied to connect the baby unit to the mains.
- Only use the charger and adapter supplied to charge the parent unit.
- The adapters contain a transformer. Do not cut off the adapters to replace them with other
plugs, as this causes a hazardous situation.
- If the adapters are damaged, always have them replaced with one of the original type in order
to avoid a hazard. For the correct type, see chapter ‘Replacement’.
- If the charger of the parent unit is damaged, always have it replaced with one of the original
type.
- Never use the baby monitor in moist places or close to water.
- Except for the battery compartments, do not open the housing of the baby unit and parent unit
in order to prevent electric shock.
- This appliance is not intended for use by persons (including children) with reduced physical,
sensory or mental capabilities, or lack of experience and knowledge, unless they have been given
supervision or instruction concerning use of the appliance by a person responsible for their
safety.
- Children should be supervised to ensure that they do not play with the appliance.
Caution
- Use and store the appliance at a temperature between 10°C and 40°C.
- Do not expose the baby unit and parent unit to extreme cold or heat or to direct sunlight. Do
not put the baby unit and the parent unit close to a heating source.
ENGLISH8
- Make sure the baby unit and the cord are always out of reach of the baby (at least 1 metre/3
feet away).
- Never place the baby unit inside the baby’s bed or playpen.
- Never cover the parent unit and the baby unit with anything (e.g. a towel or blanket). Always
make sure the cooling vents of the baby unit are free.
- Always place non-recheargeable batteries of the correct type in the baby unit.
- Always use the included rechargeable battery pack for the parent unit to avoid a hazard.
- If you place the parent unit next to a transmitter or other DECT appliance (e.g. a DECT
telephone), the connection with the baby unit may be lost.
General
- This baby monitor is intended as an aid. It is not a substitute for responsible and proper adult
supervision and should not be used as such.
- The humidity and temperature sensor only measures the temperature and humidity in the baby
room. It cannot be used to control or adjust the temperature and humidity in the baby room.
This Philips AVENT appliance complies with all standards regarding electromagnetic elds (EMF). If
handled properly and according to the instructions in this user manual, the appliance is safe to use
based on scientic evidence available today.
Preparing for use
Baby unit
You can use the baby unit from the mains or on non-rechargeable batteries. Even if you are going to
use the unit from the mains, we advise you to insert non-rechargeable batteries. This guarantees
automatic back-up in case of mains failure.
Mains operation
1 Put the large appliance plug in the baby unit and put the adapter in a wall socket (Fig. 2).
, The power-on light goes on.
Operation on non-rechargeable batteries
The baby unit runs on four 1.5V R6 AA batteries (not included). We strongly advise you to use
Philips LR6 PowerLife batteries.
Do not use rechargeable batteries, as the baby unit does not have a charging function.
Unplug the baby unit and make sure your hands and the unit are dry when you insert the nonrechargeable batteries.
1 Remove the lid of the compartment for non-rechargeable batteries. (Fig. 3)
2 Insert four non-rechargeable batteries (Fig. 4).
Note: Make sure the + and - poles point in the right direction.
3 Reattach the lid. (Fig. 5)
Parent unit
Operation on rechargeable battery pack
The parent unit comes with a rechargeable Li-ion 1000mAh battery pack.
Charge the parent unit before you use it for the rst time or when the parent unit indicates that the
battery is low (the empty battery symbol ashes on the display and the parent unit beeps). The
parent unit starts indicating that the battery pack is low 30 minutes before the battery pack is
completely empty.

ENGLISH 9
Note: If the rechargeable battery pack is completely empty, the parent unit automatically switches off
and loses contact with the baby unit.
1 Remove the lid of the compartment for the rechargeable battery pack (Fig. 6).
2 Insert the rechargeable battery pack (Fig. 7).
3 Reattach the lid (Fig. 8).
4 Insert the small appliance plug into the charger, put the adapter in a wall socket and place the
parent unit in the charger (Fig. 9).
, The charging light on the charger goes on.
, The display shows a charging battery symbol to indicate that the parent unit is charging.
5 Leave the parent unit in the charger until the battery pack is fully charged.
, During charging, the charging light on the charger lights up continuously.
, When the battery pack is fully charged, the display of the parent unit shows a full battery
symbol T.
- When you charge the parent unit for the rst time or after a long period of disuse, switch it
off and let it charge continuously for at least 10 hours.
- Charging normally takes 4 hours, but it takes longer when the parent unit is switched on while
charging. To keep the charging time as short as possible, switch off the parent unit during
charging.
- When the battery pack is fully charged, the parent unit can be used cordlessly for at least 24
hours.
Note: When the parent unit is charged for the rst time, the operating time is less than 24 hours. The
battery pack only reaches its full capacity after you have charged and discharged it four times.
Note: When the parent unit is not in the charger, the battery pack gradually discharges, even when the
parent unit is switched off.
Using the appliance
1 Place the parent unit and the baby unit in the same room to test the connection (Fig. 10).
Make sure the baby unit is at least 1 metre/3 feet away from the parent unit.
2 Press and hold the on/off button 3 on the baby unit until the green power-on light goes
on. (Fig. 11)
Note: The power-on light always lights up green, even when there is no connection with the parent unit.
, The nightlight lights up briey and then fades out again.
, The display lights up and the battery symbol appears on the display (Fig. 12).
, After 2 seconds the temperature and humidity values are shown on the display (Fig. 13).
3 Press and hold the on/off button 3 on the parent unit until the sound level lights light up
briey. (Fig. 14)
, The display goes on and the battery symbol appears on the display (Fig. 15).
, The LINK light ashes red and the message ‘Searching’ appears on the display. (Fig. 16)
, The LINK light on the parent unit turns green and lights up continuously when a connection
has been established between the baby unit and parent unit. The message ‘Linked’ appears on
the display. (Fig. 17)
, After 2 seconds the message ‘Linked’ disappears and the temperature and humidity values
are shown on the display. (Fig. 18)
, The rst time you switch on the parent unit, the message ‘Language’ appears on the display.
Select the desired language (see chapter ‘Menu options, section ‘Setting display
language’). (Fig. 19)

ENGLISH10
, If no connection is established, the LINK light on the parent unit stops ashing and lights up
red. The parent unit beeps from time to time and the message ‘Not Linked’ appears on the
display. (Fig. 20)
Positioning the baby monitor
1 Place the baby unit at least 1 metre/3 feet away from your baby (Fig. 21).
2 Place the parent unit within the operating range of the baby unit. Make sure it is at least 1
metre/3 feet away from the baby unit to avoid acoustic feedback (Fig. 10).
For more information on the operating range, see section ‘Operating range’ below.
Operating range
The operating range of the baby monitor is 330 metres/1000 feet in open air. Depending on the
surroundings and other disturbing factors, this range may be smaller. Indoors the operating range is
up to 50 metres/150 feet.
Dry materials Material thickness Loss of range
Wood, plaster, cardboard, glass
(without metal, wires or lead)
Brick, plywood < 30cm/12in 5-35%
Reinforced concrete < 30cm/12in 30-100%
Metal grilles or bars < 1cm /0.4in 90-100%
Metal or aluminium sheets < 1cm/0.4in 100%
For wet and moist materials, the range loss may be up to 100%.
Features
The following features are described in chapter ‘Menu options’, as they can only be operated in the
menu of the parent unit:
- Adjusting microphone sensitivity
- Sound alert on/off
- Setting room temperature range (minimum and maximum temperature)
- Temperature alert on/off
- Vibration alert on/off
Adjusting loudspeaker volume
1 Press the volume + or – button on the baby unit until the desired loudspeaker volume for
the baby unit has been reached (Fig. 22).
2 Press the volume + or – button on the parent unit until the desired loudspeaker volume for
the parent unit has been reached (Fig. 23).
, The displays give visual feedback on the volume settings of the units:
- g = parent unit volume switched off/silent baby monitoring
- h = minimum volume (parent unit and baby unit)
- i = maximum volume (parent unit and baby unit)
Note: If the volume is set to a high level, the units consume more power.
Talk function
You can use the TALK button on the parent unit to talk to your baby (e.g. to comfort your baby).
< 30cm/12in 0-10%

ENGLISH 11
1 Press and hold the TALK button and talk clearly into the microphone from a distance of 15-
30cm (Fig. 24).
, The green LINK light starts ashing and the message ‘Talk’ appears on the display.
2 Release the TALK button when you have nished talking.
Sound level lights
The parent unit continuously monitors the sound level in your baby´s room and the sound level
lights let you know if there is any activity. If your baby cries, you see the sound level lights light up on
the parent unit.
- As long as the baby unit does not detect a sound, all sound level lights on the parent unit are
out.
- When the baby unit picks up a sound, one or more sound level lights on the parent unit go on.
The number of lights that go on is related to the loudness of the sound picked up by the baby
unit.
Nightlight
Note: You can also switch the nightlight on and off in the menu of the parent unit (see chapter ‘Menu
options’, section ‘Nightlight’).
1 Press the nightlight button Q on the baby unit to switch on the nightlight. (Fig. 25)
, Q appears on the display of the parent unit.
2 Press the nightlight button Q again to switch off the nightlight.
, The nightlight dims gradually before it goes out completely.
, Q disappears from the display of the parent unit.
Tip: Switch off the nightlight when you operate the baby unit on non-rechargeable batteries. This saves
power.
Paging the parent unit
If you have misplaced the parent unit and its volume is switched off, you can use the PAGE button
on the baby unit to locate the parent unit.
Note: The paging function only works when the parent unit is switched on.
1 Press the PAGE button on the baby unit (Fig. 26).
, The message ‘Paging’ and the paging symbol appear on the displays of the baby unit
and parent unit.
, The parent unit produces a paging alert tone.
2 To stop the paging alert tone, press the PAGE button again or press any button on the parent
unit.
Lullaby function
Note: You can also operate the lullaby function in the menu of the parent unit (see chapter ‘Menu
options’, section ‘Lullaby function’).
1 Press the play/stop button E on the baby unit to play the currently selected
lullaby. (Fig. 27)
2 To select another lullaby, press the lullaby button K on the baby unit within 2 seconds to
toggle through the list of lullabies. (Fig. 28)
Note: If you do not press the lullaby button K for more than 2 seconds, the lullaby shown on the display
starts to play.
, The number of the lullaby appears on the display together with the lullaby symbol K.
, The lullaby repeats continuously.

ENGLISH12
3 To stop the lullaby, press the play/stop button E on the baby unit again. (Fig. 27)
, The number of the lullaby and the lullaby symbol K disappear from the display.
4 To select another lullaby when a lullaby is playing:
- Press the lullaby button K on the baby unit within 2 seconds to toggle through the list of
lullabies.
Note: If you do not press the lullaby button K for more than 2 seconds, the lullaby shown on the display
starts to play.
Humidity
When there is a connection between the baby unit and the parent unit, the humidity level is shown
on the display of both units.
The optimal humidity level is between 40% and 60%. It is very important to maintain the correct
humidity level as it helps to protect your baby from irritation of the mucous membranes, dry and
itchy skin, chapped lips and a dry, sore throat. When the mucous membranes do not function
optimally, they cannot give your baby full protection from all kinds of germs. This increases the
chance of your baby catching a cold or the u, and reduces its resistance to infections from mould
and bacteria.
The Philips AVENT Ultrasonic Humidier can help you improve the air quality and maintain a
comfortable humidity level in your baby’s room. Contact your local Philips Consumer Care Centre
for stockists.
Note: The baby monitor only measures the humidity level. You cannot adjust the humidity level with the
baby monitor.
Out of range alert
When the parent unit is out of range of the baby unit, the parent unit beeps from time to time and
the message ‘Not linked’ appears on the display. The LINK light on the parent unit lights up red.
Note: The message ‘Not Linked’ also appears on the display of the parent unit when the baby unit is
switched off.
Menu options
Most functions can be operated on both the baby unit and the parent unit, but some functions can
only be operated in the menu of the parent unit.
Menu operation - general explanation
Note: Menu functions can only be operated when a connection has been established between the baby
unit and the parent unit.
1 Press the MENU button to open the menu (Fig. 29).
, The rst menu option appears on the display.
2 Use the – and + buttons to select the desired menu option (Fig. 30).
Note: The arrow indicates in which direction you can navigate.
3 Press the OK button to conrm (Fig. 31).
4 Use the + and - buttons to select the desired setting.
5 Press the OK button to conrm.
, The new setting ashes twice and then disappears from the display.
6 Press the MENU button again to exit the menu.
ENGLISH 13
Nightlight on/off
1 Select ‘Light’ with the + and - buttons.
2 Press the OK button to conrm.
3 If the nightlight is off, the display shows ‘On?’. Press the OK button to switch on the
nightlight. If the nightlight is on, the display shows ‘Off?’. Press the OK button to switch off
the nightlight.
Lullaby function
Selecting a lullaby
1 Select ‘Lullaby’ with the + and - buttons.
2 Press the OK button to conrm.
3 Press the + button once or several times to select one of the ve lullabies from the list or to
select ‘Play All’.
4 Press the OK button to conrm.
When you have selected one of the ve lullabies, it plays continuously.
Switching to another lullaby
1 Press the + button to choose another lullaby from the list.
2 Press the OK button to conrm.
Pausing a lullaby
1 Press the OK button.
, The message ‘Paused’ appears on the display.
2 Press the OK button again to continue the lullaby.
If you do not continue the lullaby within 20 seconds, the lullaby function switches off automatically.
The message ‘Paused’ and the lullaby symbol disappear from the display.
Stopping a lullaby
1 Press the + button to select ‘Stop’ from the list.
2 Press the OK button to conrm.
Adjusting microphone sensitivity
Note: You can only adjust the microphone sensitivity in the menu of the parent unit.
You can set the microphone sensitivity of the baby unit to the desired level. You can only change the
microphone sensitivity when a connection between the baby unit and the parent unit has been
established, i.e. when the LINK light on the parent unit lights up green continuously.
1 Select ‘Sensitivity’ with the + and - buttons.
2 Press the OK button to conrm.
3 Select the desired microphone sensitivity level for the baby unit with the + and - buttons.
, h = minimum sensitivity level
, i = maximum sensitivity level
4 Press the OK button to conrm.
, The message ‘Saved’ appears on the display.
Note: When the microphone sensitivity of the baby unit is set to a high level, it picks up more sounds and
therefore transmits more often. As a result, the units consume more power.

ENGLISH14
Sound alert on/off
Note: You can only switch the sound alert on and off in the menu of the parent unit.
This feature allows you to monitor your baby silently. It enables you to switch off the volume on
your parent unit and still be alerted if your baby cries.
If the sound alert is switched on, the parent unit beeps as soon as the fourth sound level light lights
up while the volume is switched off. In addition, the backlight of the parent unit display goes on and
the sound alert symbol ( g) ashes on the display.
1 Select ‘Sound Alert’ with the + and - buttons.
2 Press the OK button to conrm.
3 If the alert is off, the display shows ‘On?’. Press the OK button to switch on the alert. If the
alert is on, the display shows ‘Off?’. Press the OK button to switch off the alert.
, If you have set the sound alert to ‘on’, the sound alert symbol ( g) appears on the display
of the parent unit.
Setting room temperature range
Note: You can only adjust the temperature range in the menu of the parent unit.
A baby will sleep comfortably in a room heated to a temperature between 16°C and 20°C. This is
important, since a baby cannot regulate its body temperature as well as an adult. A baby needs
more time to adjust to temperature changes.
If you do not set a temperature range, the baby monitor alerts you when the temperature in your
baby’s room drops below 14°C or rises above 30°C. In this case, the backlight of the parent unit
display goes on and ‘High’ or ‘Low’ appears on the display. To change the default minimum and
maximum temperature, follow the instructions below.
Note: The temperature of the baby’s room is shown on the display of both units when they are linked.
1 Select ‘Temperature’ with the + and - buttons.
2 Press the OK button to conrm.
3 Select ‘Range’ with the + and - buttons.
4 Press the OK button to conrm.
5 Set the desired minimum temperature with the + and - buttons.
6 Press the OK button to conrm.
7 Set the desired maximum temperature with the + and - buttons.
8 Press the OK button to conrm.
, The message ‘Saved’ appears on the display.
Note: If the temperature in the baby’s room drops below or exceeds the set temperature range, the
display is on continuously. This causes the unit to consume more power.
Temperature alert on/off
Note: You can only switch the temperature alert on and off in the menu of the parent unit.
Note: If the temperature alert is activated too often, reduce the set minimum temperature and/or
increase the set maximum temperature (see ‘Setting room temperature range’).
If the temperature alert is switched on, the parent unit beeps if the actual room temperature
exceeds the set maximum temperature or drops below the set minimum temperature. In addition,
the backlight of the parent unit display goes on, the temperature alert symbol ( t) ashes and ‘High’
or ‘Low’ appears on the display. If no minimum and maximum temperatures have been set, the
temperature alert is given when the room temperature drops below 14°C or rises above 30°C.
ENGLISH 15
1 Select ‘Temperature’ with the + and - buttons.
2 Press the OK button to conrm.
3 Select ‘Alert’ with the + and - buttons.
4 Press the OK button to conrm.
5 If the alert is off, the display shows ‘On?’. Press the OK button to switch on the alert. If the
alert is on, the display shows ‘Off?’. Press the OK button to switch off the alert.
Vibration alert on/off
Note: You can only switch the vibration alert on and off in the menu of the parent unit.
If the vibration alert is switched on, the parent unit vibrates as soon as the fourth sound level light
lights up while the volume is switched off.
1 Select ‘Vibration’ with the + and - buttons.
2 Press the OK button to conrm.
3 If the vibration alert is off, the display shows ‘On?’. Press the OK button to switch on the
vibration alert. If the vibration alert is on, the display shows ‘Off?’. Press the OK button to
switch off the vibration alert.
Setting display language
1 Select ‘Language’ with the + and - buttons.
2 Press the OK button to conrm.
3 Select the desired language with the + and - buttons.
4 Press the OK button to conrm.
Reset function
This function in the menu of the parent unit allows you to reset both the parent unit and the baby
unit to the default settings at the same time. You can use this function if problems occur that you
cannot solve by following the suggestions in chapter ‘Frequently asked questions’.
1 Select ‘Reset’ with the + and - buttons.
2 Press the OK button to conrm.
, The message ‘Conrm?’ appears on the display of the parent unit.
3 Press the OK button to conrm.
, The parent unit switches off and then switches on again.
, The units have now both been reset to the default factory settings.
Default settings
Parent unit
- Vibration alert: off
- Language: English
- Loudspeaker volume: 1
- Microphone sensitivity: 3
- Sound alert: off
- Temperature alert: off
- ‘Temperature low’ alert: 14°C
- ‘Temperature high’ aler t: 30°C

ENGLISH16
Baby unit
- Loudspeaker volume: 3
- Nightlight: off
- Lullaby: 1
Accessories
Belt clip and neck strap
If the battery pack of the parent unit is sufciently charged, you can take the unit with you inside and
outside the house if you attach the unit to your belt or waistband with the belt clip or if you hang it
around your neck with the neck strap. This allows you to monitor your baby while you are moving
around.
Connecting the belt clip
1 Snap the belt clip onto the parent unit (Fig. 32).
Disconnecting the belt clip
1 Pull the belt clip off the parent unit.
Connecting the neck strap
1 Insert the end loop of the neck strap through the hole behind the strap post. Thread the
neck strap through the end loop and pull the neck strap tight (Fig. 33).
Disconnecting the neck strap
1 Pass the neck strip through the end loop and pull the end loop out of the hole behind the
strap post.
Cleaning and maintenance
Do not immerse the parent unit or the baby unit in water and do not clean them under the tap.
Do not use cleaning spray or liquid cleaners.
1 Unplug the baby unit if it is connected to the mains and take the parent unit out of the
charger.
2 Clean the parent unit and the baby unit with a damp cloth.
Make sure the parent unit is dry before you put it back into the plugged-in charger.
3 Clean the charger with a dry cloth.
4 Clean the adapters with a dry cloth.
Storage
- You can use the travel pouch to store the baby monitor while you travel.
- When you are not going to use the baby monitor for some time, remove the non-rechargeable
batteries from the baby unit and remove the rechargeable battery pack from the parent unit.
Store the parent unit, the baby unit, the charger of the parent unit and the adapters in the travel
pouch supplied.

ENGLISH 17
Replacement
Baby unit
Batteries
Only replace the non-rechargeable batteries of the baby unit with four 1.5V R6 AA batteries.
Note: We strongly advise you to use Philips non-rechargeable batteries.
Adapter
Only replace the adapter of the baby unit with an adapter of the original type.You can order a new
adapter from your dealer or a Philips service centre.
- UK only: SSA-5S-09 UK 075040F
- Other countries: SSA-5W-09 EU 075040F
Parent unit
Battery pack
Only replace the battery pack of the parent unit with a Li-ion 1000mAh battery pack.
Adapter
Only replace the adapter of the parent unit charger with an adapter of the original type. You can
order a new adapter from your dealer or a Philips service centre.
- UK only: SSA-5W-09 UK 075050F
- Other countries: SSA-5W-09 EU 075050F
Environment
- Do not throw away the appliance with the normal household waste at the end of its life, but
hand it in at an ofcial collection point for recycling. By doing this, you help to preserve the
environment (Fig. 34).
- Non-rechargeable batteries and battery packs contain substances that may pollute the
environment. Do not throw away non-rechargeable batteries and battery packs with the normal
household waste, but hand them in at an ofcial collection point. Always remove non-
rechargeable batteries and battery packs before you discard and hand in the appliance at an
ofcial collection point.
Guarantee and service
If you need service or information or if you have a problem, please visit the Philips AVENT website
at www.philips.com/AVENT or contact the Philips Consumer Care Centre in your country (you
nd its phone number in the worldwide guarantee leaet). If there is no Consumer Care Centre in
your country, go to your local Philips dealer.
Frequently asked questions
This chapter lists the questions most frequently asked about the appliance. If you cannot nd the
answer to your question, contact the Customer Care Centre in your country.
Question Answer
Why don’t both the
power-on light of the
baby unit and the LINK
light of the parent unit
come on when I press
the on/off buttons of the
units?
Perhaps the rechargeable battery pack of the parent unit is empty and
the parent unit is not in the plugged-in charger. Insert the small
appliance plug into the charger, put the adapter of the charger in a
wall socket and place the parent unit in the charger. Then press the
on/off button to establish connection with the baby unit.

ENGLISH18
Question Answer
Perhaps the non-rechargeable batteries of the baby unit are empty
and the baby unit is not connected to the mains. Replace the nonrechargeable batteries or connect the baby unit to the mains. Then
press the on/off button to establish connection with the parent unit.
The baby unit and the parent unit may be out of range of each other.
Move the parent unit closer to the baby unit, but not closer than 1
metre/3 feet.
If the LINK light on the parent unit still does not start to ash, use the
reset function to reset the units to their default settings.
Why does the LINK light
on the parent unit light
up red continuously and
why is the message
‘Not Linked’ shown on
the display?
Why does the battery
symbol ash on the
display of the baby unit?
Why does the parent
unit beep?
Why does the appliance
produce a high-pitched
noise?
Why don’t I hear a
sound/Why can’t I hear
my baby cry?
The baby unit and the parent unit are out of range of each other.
Move the parent unit closer to the baby unit.
The baby unit may be switched off. Switch on the baby unit.
The non-rechargeable batteries of the baby unit are running low.
Replace the non-rechargeable batteries or connect the baby unit to
the mains (see chapter ‘Preparing for use’).
If the parent unit beeps while the LINK light lights up red continuously
and the message ‘Not Linked’ is shown on the display, the connection
with the baby unit is lost. Move the parent unit closer to the baby unit.
If the parent unit beeps and the battery symbol on the display is
empty, the rechargeable battery pack of the parent unit is running low.
Recharge the rechargeable battery pack.
If you have switched off the volume while the sound alert is on, the
parent unit beeps whenever the fourth sound level light lights
up because the baby unit has picked up a sound.
If you have set the room temperature range on the parent unit and
the temperature alert is on, the parent unit beeps when the
temperature drops below the set level or below 14°C or when the
temperature rises above the set level or above 30°C.
The baby unit may be switched off. Switch on the baby unit.
The units may be too close to each other. Make sure the parent unit
and the baby unit are at least 1 metre/3 feet away from each other.
The volume of the parent unit may be set too high. Decrease the
volume of the parent unit.
The volume of the parent unit may be set too low or may be
switched off. Increase the volume of the parent unit.

Question Answer
The microphone sensitivity level of the baby unit may be set too low.
Set the microphone sensitivity level to a higher level in the menu of
the parent unit.
The baby unit and the parent unit may be out of range of each other.
Reduce the distance between the units.
Why does the parent
unit react too quickly to
other sounds?
Why does the parent
unit react slowly to the
baby’s crying?
Why do the nonrechargeable batteries of
the baby unit run low
quickly?
Why does the charging
time of the parent unit
exceed 4 hours?
The specied operating
range of the baby
monitor is 330
metres/1000 feet. Why
does my baby monitor
manage a much smaller
distance than that?
Why is the
connection lost every
now and then? Why are
there sound
interruptions?
The baby unit also picks up other sounds than those of your
baby. Move the baby unit closer to the baby (but observe the
minimum distance of 1 metre/3 feet).
The microphone sensitivity level of the baby unit may be set too high.
Decrease the microphone sensitivity level in the menu of the parent
unit.
The microphone sensitivity level of the baby unit may be set too low.
Increase the microphone sensitivity level of in the menu of the parent
unit.
The microphone sensitivity level of the baby unit may be set too high,
which causes the baby unit to transmit more often. Decrease the
microphone sensitivity level in the menu of the parent unit.
The volume on the baby unit may be set too high, which causes the
baby unit to consume a lot of energy. Decrease the volume of the
baby unit.
You may have set a maximum room temperature that is lower than
the actual room temperature or a minimum room temperature that is
higher than the actual room temperature. In this case the display is lit
all the time, which increases the power consumption of the baby unit.
This causes the non-rechargeable batteries of the baby unit to run
low quickly.
Perhaps you have switched on the nightlight. If you want to use the
nightlight, we advise you to run the baby unit on mains power.
The parent unit may be switched on during charging. Switch off the
parent unit during charging.
The specied range is only valid outdoors in open air. Inside your
house, the operating range is limited by the number and type of walls
and/or ceilings in between. Inside the house, the operating range is up
to 50 metres/150 feet.
The baby unit and the parent unit are probably close to the outer
limits of the operating range. Try a different location or decrease the
distance between the units. Please note that it takes about 30 seconds
each time before a connection between the units is established.
ENGLISH 19

ENGLISH20
Question Answer
What happens during a
power failure?
Is my baby monitor
secure from
eavesdropping and
interference?
The operating time of
the parent unit is
supposed to be at
least 24 hours. Why is
the operating time of my
parent unit shorter?
Why doesn’t the battery
symbol appear on the
display of the parent unit
when I start to recharge
the parent unit?
If the parent unit is sufciently charged, it continues to operate during
a power failure, both inside and outside the charger. If there are
batteries in the baby unit, it also continues to operate during a power
failure.
The DECT technology of this baby monitor guarantees no
interference from other equipment and no eavesdropping.
When the rechargeable battery pack of the parent unit has been
charged for the rst time, the operating time is less than 24 hours. The
rechargeable battery pack only reaches its full capacity after you have
charged and discharged it at least four times.
The volume of the parent unit may be set too high, which causes the
parent unit to consume a lot of energy. Decrease the volume of the
parent unit
The microphone sensitivity level of the baby unit may be set too high,
which causes the parent unit to consume a lot of energy. Decrease
the microphone sensitivity level in the menu of the parent unit.
It may take a few minutes before the battery symbol appears on the
display of the parent unit when you charge the parent for the rst
time or after a long period of disuse.

DANSK
Introduktion
Tillykke med dit køb og velkommen til Philips AVENT! For at få fuldt udbytte af den support, Philips
AVENT tilbyder, skal du registrere dit produkt på www.philips.com/welcome.
Philips AVENT sætter en ære i at producere pålidelige produkter, der kan give forældre den tryghed,
de har brug for. Denne Philips AVENT-babyalarm hjælper dig døgnet rundt ved at sikre, at du altid
kan høre din baby klart og tydeligt uden forstyrrende støj. DECT-teknologien garanterer, at der ikke
forekommer interferens fra andre trådløse apparater, og den giver et klart signal mellem babyenhed
og forældreenhed. Temperatur- og luftfugtighedssensoren gør det muligt for dig at holde øje med
indeklimaet i børneværelset, og sensorens personlige indstillinger hjælper dig med holde
børneværelset sundt og behageligt.
A Forældreenhed
1 On/Off-knap 3
2 Åbning til bælteclips
3 TALK-tast
4 MENU-tast
5 LINK-lysindikator
6 Mikrofon
7 Højttaler
8 Menu- og lydstyrketaster +/–
9 OK-tast
10 Display
11 Lys, som indikerer lydniveau
12 Bælteclips
13 Adapter
14 Lille apparatstik
15 Oplader
16 Opladeindikator med lys
17 Halsstrop
18 Batterirum til genopladelig batteripakke
19 Åbning til halsstrop
20 Låg til batterirum til genopladelig batteripakke
21 Genopladelig batteripakke (medfølger)
B Babyenhed
1 On/Off-knap 3
2 PAGE-tast
3 Display
4 Lysindikator for tændt
5 Lydstyrke +/– taster
6 Natlystast Q
7 Vuggevise-tast K
8 Play/stop-tast E
9 Mikrofon
10 Adapter
11 Stort apparatstik
12 Ventilationshuller
13 Højttaler
14 Temperatur- og luftfugtighedssensor
15 Tilslutning til stort apparatstik
16 Ikke-genopladelige batterier (medfølger ikke)
17 Rum til ikke-genopladelige batterier
21

DANSK22
18 Låg på rum til ikke-genopladelige batterier
C Display
1 $ = Temperaturalarm
2 Ñ° = Rumtemperatur-indikator
3 g = Lydalarm
4 r = fugtighedsindikator
5 s = søgesymbol
6 K = vuggevisesymbol
7 Q = natlyssymbol
8 T = batterisymbol
9 Indikatorer for lydstyrke/mikrofons følsomhed:
- g = lydstyrke fra
- h = minimum følsomhed/lydstyrke
- i = maksimum følsomhed/lydstyrke
Andre indikatorer i display (ikke vist):
- ”High” = Højere rumtemperatur end indstillet i menuen
- “Low” = Lavere rumtemperatur end indstillet i menuen
- “Not linked” = Ingen forbindelse mellem enhederne*
- ”Paused” = Vuggevise er afbrudt
- “Searching” = Enhederne søger efter forbindelse*
- “Linked” = Enhederne er forbundet med hinanden*
- ”Talk” = Talefunktionen er aktiv
* Dette vises kun i forældreenhedens display.
D Rejseetui
Vigtigt
Læs denne brugsvejledning omhyggeligt igennem, inden apparatet tages i brug, og gem den til
eventuelt senere brug.
Fare
- Babyalarmen (eller dele af den) må aldrig kommes ned i vand eller andre væsker.
Advarsel
- Kontrollér, om den indikerede netspænding på adapteren til babyenheden og til opladeren svarer
til den lokale netspænding, før du tilslutter apparatet.
- Når babyenheden tilsluttes lysnettet, må det kun ske med den medfølgende adapter.
- Benyt kun den medfølgende oplader og adapter til opladning af forældreenheden.
- Begge adaptere indeholder en transformer, som aldrig må klippes af eller udskiftes med andre
stik, da dette kan være meget risikabelt.
- Hvis adapterne er beskadigede, skal de altid udskiftes med en original type for at undgå fare. Se i
kapitlet “Udskiftning” for at nde den korrekte type.
- Skulle forældreenhedens oplader blive beskadiget, skal den altid udskiftes med en original type.
- Babyalarmen må ikke bruges i fugtige omgivelser eller tæt ved vand.
- Forsøg aldrig at åbne andet end baby- eller forældreenhedens batterirum for at undgå elektrisk
stød.
- Dette apparat er ikke beregnet til at blive brugt af personer (herunder børn) med nedsatte
fysiske og mentale evner, nedsat følesans eller manglende erfaring og viden, medmindre de er
blevet vejledt eller instrueret i apparatets anvendelse af en person, der er ansvarlig for deres
sikkerhed.
- Apparatet bør holdes uden for børns rækkevidde for at sikre, at de ikke kan komme til at lege
med det.
Forsigtig
- Apparatet skal opbevares ved temperaturer mellem 10° C og 40° C.

DANSK 23
- Hverken baby- eller forældreenheden må udsættes for ekstrem kulde eller varme eller for
direkte sollys. Anbring aldrig baby- eller forældreenheden i nærheden af en varmekilde.
- Babyenheden og dens ledning skal altid være uden for barnets rækkevidde (mindst 1 meter
væk).
- Anbring ikke babyenheden i barnets seng eller kravlegård.
- Forældre- og babyenheden må aldrig tildækkes (f.eks. med et håndklæde eller et tæppe). Sørg
altid for, at babyenhedens ventilationshuller er frie.
- Benyt altid den korrekte type ikke-genopladelige batterier i babyenheden.
- Benyt kun den medfølgende genopladelige batteripakke til forældreenheden for at undgå farlige
situationer.
- Hvis forældreenheden placeres ved siden af en sender eller andre DECT-apparater (f.eks. en
DECT-telefon), kan forbindelsen til babyenheden forsvinde.
Generelt
- Denne babyalarm er beregnet som et hjælpemiddel. Den kan aldrig erstatte ansvarlig og korrekt
forældreopsyn og -overvågning og må ikke bruges sådan.
- Luftfugtigheds- og temperatursensoren måler kun temperaturen og luftfugtigheden i
børneværelset. Den kan ikke bruges til at styre eller justere temperaturen eller luftfugtigheden i
børneværelset.
Elektromagnetiske felter (EMF)
Dette Philips AVENT-apparat overholder alle standarder for elektromagnetiske felter (EMF). Ved
korrekt anvendelse i overensstemmelse med instruktionerne i denne brugsvejleding er apparatet
sikkert at anvende, ifølge den videnskabelige viden, der er tilgængelig i dag.
Klargøring
Babyenhed
Babyenheden kan enten bruges via lysnettet eller med ikke-genopladelige batterier. Selvom enheden
får strøm fra lysnettet, anbefaler vi, at du isætter ikke-genopladelige batterier. Det garanterer
automatisk back-up i tilfælde af strømsvigt.
Brug via lysnet
1 Sæt det store apparatstik i babyenheden og sæt adapteren i en stikkontakt (g. 2).
, Kontrollampen lyser.
Brug med ikke-genopladelige batterier
Babyenheden benytter re 1,5 V batterier af typen R6 AA (medfølger ikke). Vi anbefaler Philips LR6
PowerLife-batterier.
Anvend ikke genopladelige batterier, da babyenheden ikke har nogen ladefunktion.
Tag babyenheden ud af stikkontakten, og sørg for, at dine hænder og enheden er tørre, når du
isætter de ikke-genopladelige batterier.
1 Fjern låget over rummet til de ikke-genopladelige batterier. (g. 3)
2 Isæt re ikke-genopladelige batterier (g. 4).
Bemærk: Sørg for, at polerne (- og +) vender rigtigt.
3 Sæt låget på igen. (g. 5)
Forældreenhed
Brug via genopladelig batteripakke
Til forældreenheden medfølger en genopladelig Li-ion 1000 mAh-batteripakke.
Oplad forældreenheden, før den tages i brug første gang, eller når forældreenheden angiver, at
batteriet er aadet (symbolet med det tomme batteri blinker i displayet, og forældreenheden

DANSK24
bipper). Forældreenheden begynder at indikere lavt batteriniveau, 30 minutter før batteripakken er
helt aadet.
Bemærk: Hvis den genopladelige batteripakke er fuldstændigt aadt, slukkes forældreenheden
automatisk, og kontakten til babyenheden afbrydes.
1 Fjern låget over rummet til den genopladelige batteripakke (g. 6).
2 Isæt den genopladelige batteripakke (g. 7).
3 Sæt låget på igen (g. 8).
4 Sæt det lille apparatstik i opladeren, sæt adapteren i en stikkontakt, og sæt forældreenheden i
opladeren (g. 9).
, Opladerens ladeindikator tændes.
, I displayet vises et symbol med et ladende batteri for at indikere at forældreenheden lader
op.
5 Lad forældreenheden stå i opladeren, indtil den er fuldt opladt.
, Under opladningen lyser opladeindikatoren på opladeren konstant.
, Når batteripakken er helt opladet, viser displayet i forældreenheden et symbol for fuldt
batteri T.
- Når du oplader forældreenheden for første gang eller efter lang tid uden brug, skal du slukke
den og oplade den uafbrudt i mindst 10 timer.
- En fuld opladning tager normalt 4 timer, men varer længere, hvis forældreenheden er tændt
under opladningen. Sluk derfor altid for forældreenheden under opladning for at gøre
opladningstiden så kort som muligt.
- Når batteripakken er fuldt opladt, kan forældreenheden bruges ledningsfrit i mindst 24 timer.
Bemærk: Efter første opladning af forældreenheden er brugstiden mindre end 24 timer. Batteripakken
når først op på sin fulde kapacitet, når den er blevet opladt og aadt re gange.
Bemærk: Når forældreenheden ikke står i opladeren, aades batterierne gradvist, også selvom
forældreenheden er slukket.
Sådan bruges apparatet
1 Anbring forældreenheden og babyenheden i det samme rum, for at afprøve
forbindelsen (g. 10).
Babyenheden skal stå mindst 1 meter fra forældreenheden.
2 Tryk på On-/Off-tasten 3 på babyenheden, og hold den inde, indtil den grønne On-/Off-
indikator tændes. (g. 11)
Bemærk: On-/Off-indikatoren lyser altid grønt, også selv om der ikke er forbindelse til forældreenheden.
, Natlyset tændes kortvarigt og forsvinder derefter igen.
, Displayet tændes, og batterisymbolet vises i displayet (g. 12).
, Efter 2 sekunder vises temperatur- og luftfugtighedsværdierne i displayet (g. 13).
3 Tryk på On/Off-tasten 3 på forældreenheden, og hold den inde, indtil lydniveauindikatoren
lyser et øjeblik. (g. 14)
, Displayet tænder, og batterisymbolet vises i displayet (g. 15).
, LINK-indikatoren blinker rødt, og meddelelsen “Searching” vises i displayet. (g. 16)
, LINK-indikatoren på forældreenheden bliver grøn og lyser konstant, når der er
etableret forbindelse mellem babyenheden og forældreenheden. Meddelelsen
“Linked” (“Forbundet”) vises i displayet. (g. 17)
, Efter 2 sekunder forsvinder meddelelsen “Linked” (Forbundet), og temperatur- og
luftfugtighedsværdierne vises i displayet. (g. 18)
DANSK 25
, Første gang forældreenheden tændes, vises meddelelsen “Sprog” i displayet. Vælg det ønskede
sprog (se kapitlet “Menuindstillinger”, afsnittet “Indstilling af displaysprog”). (g. 19)
, Hvis der ikke er etableret forbindelse, holder LINK-indikatoren på forældreenheden op med
at blinke og lyser rødt. Forældreenheden bipper fra tid til anden, og meddelelsen “Not linked”
(Ikke forbundne) vises i displayet. (g. 20)
Placering af babyalarmen
1 Anbring babyenheden mindst 1 meter fra barnet (g. 21).
2 Placér forældreenheden inden for babyenhedens senderækkevidde. Den skal stå mindst 1
meter fra babyenheden for at undgå akustisk tilbagekobling (g. 10).
Læs mere om senderens rækkevidde i afsnittet “Senderækkevidde” herunder.
Senderækkevidde
Babyalarmen har en senderækkevidde på 330 meter i fri luft. Rækkevidden kan være kortere
afhængigt af omgivelserne og andre forstyrrende faktorer. Indendørs er rækkevidden op til 50 meter.
Tørre materialer Materialets tykkelse Tab af rækkevidde
Træ, gips, pap, glas (uden metal,
ledninger eller bly)
Mursten, krydsner < 30 cm 5-35 %
Armeret beton < 30 cm 30-100 %
Metalgitter eller -stænger < 1 cm 90-100 %
Metal- eller aluminiumsplader < 1 cm 100 %
Våde og fugtige materialer kan give op til 100 % tab i rækkevidden.
Funktioner
Nedenstående funktioner er beskrevet i kapitlet “Menuindstillinger”, da de kun kan betjenes i
forældreenhedens menu:
- Justering af mikrofonens følsomhed
- Lydalarm tændt/slukket
- Indstilling af rumtemperatur (minimum- og maksimumtemperatur)
- Temperaturalarm tændt/slukket
- Vibrationsalarm tændt/slukket
Justering af højttalerens lydstyrke
1 Tryk på lydstyrketasterne + og - på babyenheden, indtil den ønskede lydstyrke for
babyenheden er nået (g. 22).
2 Tryk på lydstyrketasterne + og - på forældreenheden, indtil den ønskede lydstyrke for
forældreenheden er nået (g. 23).
, Enhedernes displays viser den valgte lydstyrke:
- g = forældreenhedens lyd slået fra/lydløs babyovervågning
- h = minimumlydstyrke (forældreenhed og babyenhed)
- i = maksimumlydstyrke (forældreenhed og babyenhed)
Bemærk: Hvis lydstyrken er indstillet til at være høj, bruger enhederne mere strøm.
Talefunktion
Du kan bruge TALK-tasten på forældreenheden, hvis du vil snakke med barnet (f.eks. for at trøste
det).
< 30 cm 0-10 %

DANSK26
1 Tryk på TALK-tasten, og hold den inde, og tal tydeligt ind i mikrofonen på 15-30 cm
afstand (g. 24).
, Det grønne LINK-lys begynder at blinke, og meddelelsen “Talk” (Tal) vises i displayet.
2 Slip TALK-tasten, når du er færdig med at tale.
Lys, som indikerer lydniveau
Forældreenheden overvåger kontinuerligt lydniveauet i babyens værelse, og vha.
lydniveauindikatorerne kan du se, om der er aktivitet i værelset. Hvis babyen græder, lyser
lydniveauindikatorerne på forældreenheden op.
- Så længe babyenheden ikke registrerer nogle lyde, er alle lydstyrke-indikatorerne på
forældreenheden slukkede.
- Når babyenheden opfanger en lyd, tændes en eller ere lydniveauindikatorer på
forældreenheden. Antallet af lindikatorer, der tændes, hænger sammen med styrken på den lyd,
babyenheden opfanger.
Natlys
Bemærk: Du kan også tænde og slukke natlyset i menuen i forældreenheden (se kapitlet
“Menuindstillinger”, afsnittet “Natlys”).
1 Tryk på natlysknappen Q på babyenheden for at tænde for natlyset. (g. 25)
, Q vises i displayet på forældreenheden.
2 Tryk på natlysknappen Q igen for at slukke natlyset.
, Natlyset dæmpes gradvist, før det slukkes helt.
, Q forsvinder fra displayet på forældreenheden.
Tip: Det anbefales at slukke for natlyset, når babyenheden kører på ikke-genopladelige batterier. Det
sparer på strømmen.
Søgning efter forældreenheden
Hvis forældreenheden er blevet væk, og der er slukket for lyden, kan du søge efter den ved hjælp af
PAGE-tasten på babyenheden.
Bemærk: Søgefunktionen fungerer kun, når forældreenheden er tændt.
1 Tryk på PAGE-tasten på babyenheden (g. 26).
, Meddelelsen “Paging” (Søger) og søgesymbolet vises i displayet på babyenheden
og forældreenheden.
, Forældreenheden laver en søgealarmtone.
2 Tryk på PAGE-tasten igen eller en vilkårlig tast på forældreenheden for at stoppe
søgealarmen.
Vuggevisefunktion
Bemærk: Du kan også vælge vuggevisefunktionen i forældreenhedens menu (se kapitlet
“Menuindstillinger”, afsnittet “Vuggevisefunktion”).
1 Tryk på play/stop-tasten E på babyenheden for at spille den valgte vuggevise. (g. 27)
2 For at vælge en anden vuggevise trykker du på vuggevisetasten K på babyenheden inden for 2
sekunder for at gå gennem listen over vuggeviser. (g. 28)
Bemærk: Hvis du ikke trykker på vuggevisetasten K i mere end 2 sekunder, afspilles den vuggevise, der
vises på displayet.
, Nummeret på vuggevisen vises på displayet sammen med vuggevisesymbolet K.
, Vuggevisen gentages konstant.

DANSK 27
3 Vuggevisen kan stoppes ved at trykke på play/stop-tasten E på babyenheden igen. (g. 27)
, Nummeret på vuggevisen og vuggevisesymbolet K forsvinder fra displayet.
4 Sådan vælges en anden vuggevise, mens en vuggevise afspilles:
- Tryk på vuggevisetasten K på babyenheden inden for 2 minutter for at gå gennem listen over
vuggeviser.
Bemærk: Hvis du ikke trykker på vuggevisetasten K i mere end 2 sekunder, afspilles den vuggevise, der
vises på displayet.
Luftfugtighed
Når der er forbindelse mellem babyenheden og forældreenheden, vises luftfugtigheden i begge
enheders display.
Det optimale luftfugtighedsniveau er mellem 40 % og 60 %. Det er meget væsentligt at bevare det
rette luftfugtighedsniveau, da det er med til at beskytte din baby mod irritation af slimhinder, tør og
kløende hud, sprukne læber og ondt i halsen. Når slimhinderne ikke fungerer optimalt, yder de ikke
optimal beskyttelse mod forskellige bakterier. Dette øger risikoen for, at dit barn bliver forkølet eller
får inuenza og nedsætter dit barns modstandsdygtighed over for bakterieangreb.
Den ultrasoniske Philips AVENT luftfugter kan hjælpe dig med at forbedre luftkvaliteten og
opretholde et behageligt luftfugtighedsniveau i børneværelset. Kontakt dit lokale Philips Kundecenter
for at få oplyst en forhandler.
Bemærk: Babyalarmen kan kun måle fugtigheden og kan ikke bruges til at justere luftfugtighedsniveauet.
Alarm for overskredet rækkevidde
Når forældreenheden er uden for babyenhedens rækkevidde, bipper forældreenheden fra tid til
anden, og meddelelsen “Not linked” (Ikke forbundne) vises i displayet. LINK-indikatoren på
forældreenheden lyser rødt.
Bemærk: Meddelelsen “Not Linked” (Ikke forbundne) vises også på forældreenhedens display, når
babyenheden er slukket.
Menuindstillinger
De este funktioner kan både betjenes på babyenheden og forældreenheden, men visse
funktioner kan kun betjenes i forældreenhedens menu.
Brug af menuen - generel information
Bemærk: Menufunktioner kan kun bruges, når der er etableret forbindelse mellem baby- og
forældreenheden.
1 Tryk på MENU-tasten for at åbne menuen (g. 29).
, Den første menuindstilling ses på displayet.
2 Brug + og - tasterne for at vælge den ønskede menuindstilling (g. 30).
Bemærk: Pilen angiver, hvilken retning, der kan navigeres i.
3 Tryk på OK-tasten for at fortsætte (g. 31).
4 Benyt + og - tasterne til at vælge den ønskede indstilling.
5 Tryk på OK-tasten for at fortsætte.
, Den nye indstilling blinker to gange og forsvinder derefter fra displayet.
6 Tryk på MENU-tasten igen for at gå ud af menuen.
Natlys tændt/slukket
1 Vælg “Light” (Lys) med tasterne + og -.

DANSK28
2 Tryk på OK-tasten for at fortsætte.
3 Hvis natlyset er slukket, vises “On?” (Til) på displayet. Tryk på OK for at tænde natlyset. Hvis
natlyset er tændt, vises “Off?” (Fra) på displayet. Tryk på OK for at slukke for natlyset.
Vuggevisefunktion
Valg af vuggevise
1 Vælg “Lullaby” (Vuggevise) med tasterne + og -.
2 Tryk på OK-tasten for at fortsætte.
3 Tryk på tasten + en eller ere gange for at vælge en af de fem vuggeviser fra listen eller for at
vælge “Play all” (Afspil alle).
4 Tryk på OK-tasten for at fortsætte.
Når du har valgt en af de fem vuggeviser, spiller den uafbrudt.
Skift til en anden vuggevise
1 Tryk på tasten + for at vælge en anden vuggevise fra listen.
2 Tryk på OK-tasten for at fortsætte.
Sæt en vuggevise på pause
1 Tryk OK.
, Meddelelsen “Paused” (Pause) vises i displayet.
2 Tryk på OK igen for at fortsætte afspilningen af vuggevisen.
Hvis du ikke genoptager afspilningen af vuggevisen inden for 20 sekunder, slår vuggevisefunktionen
automatisk fra. Meddelelsen “Paused” (Pause) og vuggevisesymbolet forsvinder fra displayet.
Afbrydelse af vuggevise
1 Tryk på tasten + for at vælge “Stop” fra listen.
2 Tryk på OK-tasten for at fortsætte.
Justering af mikrofonens følsomhed
Bemærk: Det er kun muligt at justere mikrofonfølsomheden i menuen i forældreenheden.
Du kan indstille mikrofonfølsomheden på babyenheden til det ønskede niveau. Du kan kun ændre
mikrofonens følsomhed, når der er etableret forbindelse mellem baby- og forældreenheden, dvs. når
LINK-indikatoren på forældreenheden lyser vedvarende grønt.
1 Vælg “Sensitivity” (Følsomhed) med tasterne + og -.
2 Tryk på OK-tasten for at fortsætte.
3 Vælg det ønskede niveau for mikrofonfølsomhed på babyenheden med tasterne + og -.
, h = minimalt følsomhedsniveau
, i = maksimalt følsomhedsniveau
4 Tryk på OK-tasten for at fortsætte.
, Meddelelsen “Saved” vises i displayet.
Bemærk: Når babyenhedens mikrofonfølsomhed er sat på et højt niveau, registrerer den ere lyde og
transmitterer derfor oftere. Af denne grund bruger enheden mere strøm.
Lydalarm tændt/slukket
Bemærk: Det er kun muligt at tænde og slukke for lydalarmen i menuen i forældreenheden.

DANSK 29
Denne funktion gør det muligt for dig at holde lydløst øje med din baby. Du får mulighed for at
slukke for lyden på forældreenheden samtidig med, at du stadig får besked, hvis din baby græder.
Hvis lydalarmen er tændt, bipper forældreenheden, så snart den fjerde lydniveauindikator lyser, mens
der er slukket for lyden. Desuden tændes baggrundsbelysningen i forældreenhedens display, og
lydalarmsymbolet ( g) blinker i displayet.
1 Vælg “Sound Alert” (Lydalarm) med tasterne + og -.
2 Tryk på OK-tasten for at fortsætte.
3 Hvis alarmen er slået fra, vises “On?” (Til) på displayet. Tryk på OK for at slå alarmen til. Hvis
alarmen er slået til, vises “Off?” (Fra) på displayet. Tryk på OK for at slå alarmen fra.
, Hvis du har indstillet lydalarmen til “On” (Til), vises lydalarmsymbolet ( g) på
forældreenhedens display.
Indstilling af rumtemperatur
Bemærk: Det er kun muligt at justere temperaturniveauet i menuen i forældreenheden.
En baby sover komfortabelt i et rum, som er opvarmet til en temperatur på mellem 16°C og 20°C.
Dette er vigtigt, da en baby ikke er i stand til at regulere sin kropstemperatur så effektivt som en
voksen. En baby kræver længere tid til at tilpasse sig temperaturudsving.
Hvis du ikke indstiller et temperaturniveau, alarmerer babyalarmen dig, hvis temperaturen i babyens
værelse falder til under 14°C eller kommer over 30°C. Hvis det sker, tændes baggrundsbelysningen i
displayet på forældreenheden, og “High” (høj) eller “Low” (lav) vises i displayet. Følg nedenstående
instruktioner for at ændre standardindstillingen for minimum- og maksimumtemperatur.
Bemærk: Temperaturen i babyens værelse vises i displayet på begge enheder , hvis de har forbindelse med
hinanden.
1 Vælg “Temperature” (Temperatur) med tasterne + og -.
2 Tryk på OK-tasten for at fortsætte.
3 Vælg “Range” (Interval) med tasterne + og -.
4 Tryk på OK-tasten for at fortsætte.
5 Indstil den ønskede minimumtemperatur med tasterne + og -.
6 Tryk på OK-tasten for at fortsætte.
7 Indstil den ønskede maksimumtemperatur med tasterne + og -.
8 Tryk på OK-tasten for at fortsætte.
, Meddelelsen “Saved” vises i displayet.
Bemærk: Hvis temperaturen i babyens værelse falder under eller kommer over det indstillede
temperaturniveau, lyser displayet kontinuerligt. Det medfører, at enheden forbruger mere strøm.
Temperaturalarm tændt/slukket
Bemærk: Det er kun muligt at tænde og slukke for temperaturalarmen i menuen i forældreenheden.
Bemærk: Hvis temperaturalarmen aktiveres for ofte, skal du reducere den indstillede minimale
temperatur og/eller øge den indstillede maksimale temperatur (se “Indstilling af rumtemperatur”).
Hvis temperaturalarmen er tændt, bipper forældreenheden, når den faktiske rumtemperatur
kommer over den indstillede maksimale temperatur eller falder under den indstillede minimale
temperatur. Desuden tændes baggrundsbelysningen i forældreenhedens display,
temperaturalarmsymbolet ( t) blinker, og “High” eller “Low” vises i displayet. Hvis der ikke er indstillet
minimale og maksimale temperaturer, går temperaturalarmen i gang, når rumtemperaturen falder
under 14°C eller kommer over 30°C.
DANSK30
1 Vælg “Temperature” (Temperatur) med tasterne + og -.
2 Tryk på OK-tasten for at fortsætte.
3 Vælg “Alert” (Alarm) med tasterne + og -.
4 Tryk på OK-tasten for at fortsætte.
5 Hvis alarmen er slået fra, vises “On?” (Til) på displayet. Tryk på OK for at slå alarmen til. Hvis
alarmen er slået til, vises “Off?” (Fra) på displayet. Tryk på OK for at slå alarmen fra.
Vibrationsalarm tændt/slukket
Bemærk: Det er kun muligt at tænde og slukke for vibrationsalarmen i menuen i forældreenheden.
Hvis vibrationsalarmen er tændt, vibrerer forældreenheden, så snart den fjerde indikator for
lydniveauet lyser, mens der er slukket for lyden.
1 Vælg “Vibration” med tasterne + og -.
2 Tryk på OK-tasten for at fortsætte.
3 Hvis vibrationsalarmen er slået fra, vises “On?” (Til) på displayet. Tryk på OK for at tænde
alarmen. Hvis vibrationsalarmen er slået til, vises “Off?” (Fra) på displayet. Tryk på OK for at
slukke for vibrationsalarmen.
Indstilling af displaysprog
1 Vælg “Language” (Sprog) med tasterne + og -.
2 Tryk på OK-tasten for at fortsætte.
3 Vælg det ønskede sprog med tasterne + og -.
4 Tryk på OK-tasten for at fortsætte.
Reset-funktion
Denne funktion i forældreenhedens menu giver dig mulighed for at nulstille både forældre- og
babyenheden til standardindstillingerne samtidigt. Du kan anvende denne funktion, hvis der opstår
problemer, som du ikke kan løse ved at følge forslagene i kapitlet “Ofte stillede spørgsmål”.
1 Vælg “Reset” (Nulstil) med tasterne + og -.
2 Tryk på OK-tasten for at fortsætte.
, Meddelelsen “Conrm?” (Bekræft) vises på forældreenhedens display.
3 Tryk på OK-tasten for at fortsætte.
, Forældreenheden slukker og tænder så igen.
, Begge enheder er nu blevet nulstillet til standardindstillingerne.
Standardindstillinger
Forældreenhed
- Vibrationsalarm: Fra
- Sprog: Engelsk
- Højttalerlydstyrke: 1
- Mikrofonfølsomhed: 3
- Lydalarm: Slukket
- Temperaturalarm: Slukket
- “Temperature low”-alarm (Lav temperatur): 14°C
- “Temperature high”-alarm (Høj temperatur): 30°C
Babyenhed
- Højttalerlydstyrke: 3
- Natlys: slukket

DANSK 31
- Vuggevise: 1
Tilbehør
Bælteclips og halsstrop
Hvis batteripakken i forældreenheden er tilstrækkeligt opladt, kan du tage enheden med rundt i og
uden for huset ved at sætte enheden fast til dit bælte med bælteclipsen eller hænge den om halsen i
halsstroppen. På den måde kan du holde øje med dit barn, mens du bevæger dig omkring.
Montering af bælteclipsen
1 Sæt bælteclipsen fast i forældreenheden (g. 32).
Afmontering af bælteclipsen
1 Træk bælteclipsen af forældreenheden.
Montering af halsstroppen
1 Før enden af halsstroppen gennem hullet bag stropbøjlen. Før halsstroppen gennem
endekrogen, og stram halsstroppen til (g. 33).
Afmontering af halsstroppen
1 Før halsstroppen gennem endekrogen, og træk endekrogen ud igennem hullet bag
stropbøjlen.
Rengøring og vedligeholdelse
Forældre- eller babyenheden må aldrig kommes ned i vand eller skylles under vandhanen.
Anvend aldrig rengøringsmidler i spraydåse eller ydende rengøringsmidler.
1 Tag babyenheden ud af stikket, hvis den er tilsluttet lysnettet, og tag forældreenheden ud af
opladeren.
2 Rengør forældre- og babyenhed med en fugtig klud.
Kontrollér, at forældreenheden er tør, før du stiller den tilbage i den tilsluttede oplader.
3 Tør opladeren med en tør klud.
4 Tør adapterne med en tør klud.
Opbevaring
- Opbevaringsetuiet er velegnet til opbevaring af babyalarmen under transport.
- Hvis du ikke skal anvende babyalarmen i en periode, skal du fjerne de ikke-genopladelige
batterier fra babyenheden og fjerne den genopladelige batteripakke fra forældreenheden.
Opbevar forældre- og babyenhederne, opladeren til forældreenheden og adapterne i det
medfølgende rejseetui.
Udskiftning
Babyenhed
Batterier
Udskift kun de ikke-genopladelige batterier i babyenheden med re 1,5 V R6 AA-batterier.
Bemærk: Vi anbefaler Philips’ ikke-genopladelige batterier.

DANSK32
Adapter
Udskift kun babyenhedens adapter med en original type. Du kan bestille en ny adapter fra din
forhandler eller et Philips Kundecenter.
- Kun Storbritannien: SSA-5S-09 UK 075040F
- Andre lande: SSA-5W-09 EU 075040F
Forældreenhed
Batteripakke
Udskift kun batteripakken i forældreenheden med en Li-ion 1000 mAh batteripakke.
Adapter
Udskift kun forældreenhedens adapter med en original type. Du kan bestille en ny adapter fra din
forhandler eller et Philips Kundecenter.
- Kun Storbritannien: SSA-5W-09 UK 075050F
- Andre lande: SSA-5W-09 EU 075050F
Miljøhensyn
- Apparatet må ikke smides ud sammen med almindeligt husholdningsaffald, når det til sin tid
kasseres. Aevér det i stedet på en kommunal genbrugsstation. På den måde er du med til at
beskytte miljøet (g. 34).
- Ikke-genopladelige batterier og batteripakker indeholder stoffer, der kan være skadelige for
miljøet. Smid ikke ikke-genopladelige batterier og batteripakker væk sammen med det normale
husholdningsaffald, men aevér det på et ofcielt indsamlingssted. Fjern altid ikke-genopladelige
batterier og batteripakker, før du skiller dig af med apparatet på en genbrugsstation.
Reklamationsret og service
For alle yderligere oplysninger eller ved eventuelle problemer henvises til Philips AVENTs
hjemmeside på adressen www.philips.com/AVENT eller det lokale Philips Kundecenter
(telefonnumre ndes i den vedlagte “WorldWide Guarantee”-folder). Hvis der ikke ndes et
kundecenter i dit land, bedes du kontakte din lokale Philips-forhandler.
Ofte stillede spørgsmål
Dette kapitel indeholder de mest almindeligt forekommende spørgsmål om apparatet. Hvis du ikke
kan nde svar på dit spørgsmål, bedes du kontakte dit lokale Philips Kundecenter.
Spørgsmål Svar
Hvorfor lyser både
strømlampen på
babyenheden og LINKindikatoren på
forældreenheden ikke,
når jeg trykker på
enhedernes on/offtaster?
Det kan evt. skyldes, at forældreenhedens genopladelige batteripakke
er aadet, og at forældreenheden ikke er i den tilsluttede oplader. Sæt
det lille apparatstik i opladeren, sæt opladerens adapter i stikkontakten,
og sæt forældreenheden i opladeren. Tryk herefter på on/off-tasten for
at etablere forbindelse til babyenheden.
Det kan evt. skyldes, at de ikke-genopladelige batterier i babyenheden
er aadede, og babyenheden ikke er sluttet til lysnettet. Udskift de ikke-
genopladelige batterier, eller slut babyenheden til lysnettet. Tryk
derefter på on/off-tasten for at etablere forbindelse til
forældreenheden.

Spørgsmål Svar
Babyenheden og forældreenheden er måske uden for rækkevidde. Flyt
forældreenheden tættere på babyenheden, men ikke tættere end 1
meter.
Hvis LINK-indikatoren på forældreenheden stadig ikke begynder at
blinke, skal du anvende reset-funktionen til at genindstille enhederne til
deres standardindstillinger.
Hvorfor lyser LINKindikatoren på
forældreenheden
konstant rødt, og
hvorfor vises
meddelelsen
“Not linked” (Ikke
forbundne) i displayet?
Hvorfor blinker
batterisymbolet på
displayet på
babyenheden?
Hvorfor bipper
forældreenheden?
Hvorfor afgiver
apparatet en skinger
tone?
Hvorfor hører jeg ingen
lyde/hvorfor kan jeg ikke
høre mit barn græde?
Baby- og forældreenheden er placeret for langt fra hinanden. Flyt
forældreenheden tættere på babyenheden.
Babyenheden er muligvis slukket. Tænd for den.
De ikke-genopladelige batterier i babyenheden er ved at være tomme.
Udskift de ikke-genopladelige batterier, eller slut babyenheden til
lysnettet (se kapitlet “Klargøring”).
Hvis forældreenheden bipper, mens LINK-indikatoren lyser rødt, og
meddelelsen “Not linked” (Ikke forbundne) vises i displayet, er
forbindelsen til babyenheden afbrudt. Flyt forældreenheden tættere på
babyenheden.
Hvis forældreenheden bipper, og batterisymbolet i displayet er tomt,
er den genopladelige batteripakke i forældreenheden ved at være
aadet. Genoplad batteripakken.
Hvis du har slukket for lyden, mens lydalarmen er aktiveret, bipper
forældreenheden, når den fjerde indikator for lydniveauet lyser, fordi
babyenheden har opfanget en lyd.
Hvis du har indstillet rumtemperaturen på forældreenheden, og
temperaturalarmen er aktiveret, bipper forældreenheden, når
temperaturen falder til under det indstillede niveau eller under 14°C,
eller hvis temperaturen stiger til over det indstillede niveau eller over
30°C.
Babyenheden er muligvis slukket. Tænd for den.
Enhederne er muligvis placeret for tæt på hinanden. Kontrollér, at
forældre- og babyenheden er mindst 1 meter fra hinanden.
Lydstyrken på forældreenheden er muligvis indstillet for højt. Skru ned
for lydstyrken på forældreenheden.
Lydstyrken på forældreenheden er muligvis indstillet for lavt eller er
slukket. Skru op for lydstyrken på forældreenheden.
DANSK 33

DANSK34
Spørgsmål Svar
Mikrofonfølsomheden på babyenheden er måske indstillet for lavt.
Indstil mikrofonfølsomheden til et højere niveau på forældreenhedens
menu.
Baby- og forældreenheden er muligvis placeret for langt fra hinanden.
Gør afstanden mellem enhederne mindre.
Hvorfor reagerer
forældreenheden alt for
hurtigt på lyde fra
omgivelserne?
Hvordan kan det være,
at forældreenheden
reagerer så langsomt på
barnets lyde?
Hvorfor løber de ikkegenopladelige batterier i
babyenheden så hurtigt
tør for strøm?
Hvorfor overstiger
opladningstiden på
forældreenheden 4
timer?
Den specicerede
rækkevidde på
babyalarmen er 330
meter. Hvorfor kan min
babyenhed kun klare en
meget kortere afstand?
Hvorfor bliver
forbindelsen afbrudt fra
tid til anden? Hvorfor er
der lydafbrydelser?
Babyenheden opfanger også andre lyde end dem fra dit barn. Flyt
babyenheden tættere på barnet (men vær opmærksom på
minimumsafstanden på mindst 1 meter).
Følsomheden på babyenhedens mikrofon er måske indstillet for lavt.
Indstil mikrofonens følsomhed til et højere niveau i forældreenhedens
menu.
Følsomheden på babyenhedens mikrofon er måske indstillet for lavt.
Indstil mikrofonens følsomhed til et højere niveau i forældreenhedens
menu.
Følsomheden på babyenhedens mikrofon er måske indstillet for højt.
Dette bevirker at babyenheden sender oftere. Nedsæt mikrofonens
følsomhed i forældreenhedens menu.
Lydstyrken på babyenheden er muligvis indstillet for højt, hvilket får
babyenheden til at bruge meget strøm. Nedsæt lydstyrken på
babyenheden.
Du har muligvis indstillet en maksimal rumtemperatur, som er lavere
end den faktiske rumtemperatur, eller en minimal rumtemperatur, som
er højere end den faktiske rumtemperatur. Hvis det er tilfældet,
lyser displayet hele tiden, hvilket forøger babyenhedens strømforbrug.
Det medfører, at babyenhedens ikke-genopladelige batterier bruges
meget hurtigt.
Du har muligvis tændt for natlyset. Hvis du vil bruge natlyset, anbefaler
vi at du forbinder babyenheden til lysnettet.
Forældreenheden er muligvis tændt under opladningen. Sluk for
forældreenheden under opladningen.
Den specicerede rækkevidde gælder kun udendørs under åben
himmel. Inde i huset begrænses rækkevidden af antallet og typen af
vægge og/eller lofter mellem enhederne. Indendørs vil rækkevidden
være op til 50 meter.
Baby- og forældreenheden er sandsynligvis lige på grænsen
af rækkevidden. Forsøg med en anden placering eller gør afstanden
mellem enhederne mindre. Bemærk, at det hver gang tager ca. 30
sekunder, før forbindelsen mellem enhederne genetableres.

Spørgsmål Svar
Hvad sker der
ved strømsvigt?
Er min babyalarm sikret
mod aytning og
interferens?
Brugstiden for
forældreenheden skulle
være mindst 24 timer.
Hvorfor er brugstiden
på min forældreenhed
kortere?
Hvorfor ses
batterisymbolet ikke i
displayet på
forældreenheden, når jeg
begynder at oplade den?
Hvis forældreenheden er tilstrækkeligt opladet, vil den fortsætte med at
fungere under et strømsvigt, både med og uden opladeren. Hvis der er
batterier i babyenheden, vil den automatisk fortsætte med at fungere i
tilfælde af strømsvigt.
DECT-teknologien i denne babyalarm garanterer, at der ikke vil
forekomme interferens fra andet udstyr eller aytning.
Når den genopladelige batteripakke i forældreenheden er blevet
opladt for første gang, vil driftstiden være mindre end 24 timer.
Batteripakken opnår først sin fulde kapacitet, når den har været opladt
og aadt mindst re gange.
Lydstyrken på forældreenheden er muligvis sat for højt, hvilket får
forældreenheden til at bruge meget strøm. Nedsæt lydstyrken på
forældreenheden.
Følsomheden på babyenhedens mikrofon er måske indstillet for højt.
Dette bevirker, at babyenheden sender oftere. Nedsæt mikrofonens
følsomhed i forældreenhedens menu.
Når forældreenheden oplades for første gang eller efter en længere
periode uden at have været i brug, kan der gå et par minutter, inden
batterisymbolet ses i displayet.
DANSK 35

36
DEUTSCH
Einführung
Herzlichen Glückwunsch zu Ihrem Kauf und willkommen bei Philips AVENT! Um den Suppor t von
Philips AVENT optimal zu nutzen, registrieren Sie Ihr Produkt bitte unter www.philips.com/welcome.
Philips AVENT hat es sich zur Aufgabe gemacht, den Eltern von Babys und Kleinkindern zuverlässige
Produkte zu bieten, die ihnen die beruhigende Gewissheit verschaffen, die sie brauchen. Sie können
diesem Babyphone vertrauen – es unterstützt Sie rund um die Uhr und gewährleistet, dass Sie Ihr
Baby stets ohne ablenkende Geräusche hören können. Die DECT-Technologie garantier t absolute
Störungsfreiheit durch andere schnurlose Geräte und ein glasklares Signal zwischen Eltern- und
Babyeinheit. Der Temperatur- und Feuchtigkeitssensor ermöglicht Ihnen die Überwachung der
Raumtemperatur im Zimmer Ihres Babys und bietet Ihnen persönliche Einstellungen, um die
Raumtemperatur im Zimmer Ihres Babys angenehm zu halten.
Allgemeine Beschreibung (Abb. 1)
A Elterneinheit
1 Ein-/Ausschalter 3
2 Schlitz für Gürtel-Clip
3 TALK-Taste
4 MENÜ-Taste
5 LINK-Lampe
6 Mikrofon
7 Lautsprecher
8 Menü- und Lautstärketasten + und 9 OK-Taste
10 Display
11 Geräuschpegelanzeigen
12 Gürtel-Clip
13 Adapter
14 Kleiner Gerätestecker
15 Ladegerät
16 Ladeanzeige
17 Halstrageband
18 Akkufach
19 Öffnung für Halstrageband
20 Akkufachabdeckung
21 Akku (im Lieferumfang enthalten)
B Babyeinheit
1 Ein-/Ausschalter 3
2 PAGE-Taste
3 Display
4 Betriebsanzeige
5 Lautstärketasten +/–
6 Nachtlicht-Taste Q
7 Schlaied-Taste K
8 Wiedergabe-/Stopptaste E
9 Mikrofon
10 Adapter
11 Großer Gerätestecker
12 Lüftungsschlitze
13 Lautsprecher
14 Temperatur- und Feuchtigkeitssensor
15 Buchse für großen Gerätestecker
16 Batterien (nicht im Lieferumfang enthalten)

DEUTSCH 37
17 Batteriefach
18 Batteriefachabdeckung
C Display
1 $ = Temperatursignal
2 Ñ° = Zimmertemperaturanzeige
3 g = Geräuschsignal
4 r = Luftfeuchtigkeitsanzeige
5 s = Rufsignal
6 K = Schlaied-Symbol
7 Q = Nachtlicht-Symbol
8 T = Batteriesymbol
9 Lautstärke/Mikrofonempndlichkeitsanzeigen:
- g = Stummschaltung
- h = niedrigste Empndlichkeit/Lautstärke
- i = höchste Empndlichkeit/Lautstärke
Weitere Display-Anzeigen (nicht dargestellt):
- ”Hoch” = Zimmertemperatur höher als im Menü eingestellt
- “Niedrig” = Zimmertemperatur niedriger als im Menü eingestellt
- “Nicht verbunden” = keine Verbindung zwischen Einheiten*
- “Pause” = Wiedergabe des Schlaieds unterbrochen
- “Suchen” = Einheiten suchen nach Verbindung*
- “Verbunden” = Einheiten sind verbunden*
- ”Sprechen” = Sprechfunktion ist aktiviert
* Dies wird nur auf dem Display der Elterneinheit angezeigt.
D Reisetasche
Wichtig
Lesen Sie diese Bedienungsanleitung vor dem Gebrauch des Geräts aufmerksam durch, und
bewahren Sie sie für eine spätere Verwendung auf.
Gefahr
- Tauchen Sie keinen Teil des Babyphones in Wasser oder andere Flüssigkeiten.
Warnhinweis
- Prüfen Sie vor dem Anschluss des Geräts, ob die auf den Adaptern der Babyeinheit und des
Ladegeräts angegebene Spannung mit der örtlichen Netzspannung übereinstimmt.
- Verwenden Sie zum Anschließen der Babyeinheit an das Stromnetz ausschließlich den
mitgelieferten Adapter.
- Verwenden Sie zum Laden der Elterneinheit ausschließlich das mitgelieferte Ladegerät und den
Adapter.
- Die Adapter enthalten jeweils einen Transformator. Ersetzen Sie die Adapter keinesfalls durch
andere Stecker, da dies den Benutzer gefährden würde.
- Wenn die Adapter beschädigt sind, dürfen sie nur durch Original-Ersatzteile ersetzt werden, um
Gefährdungen zu vermeiden. Informationen zu den richtigen Typen nden Sie im Kapitel “Ersatz”.
- Wenn die Ladestation der Elterneinheit beschädigt ist, darf sie nur durch ein Original-Ersatzteil
ausgetauscht werden.
- Benutzen Sie das Babyphone keinesfalls in feuchter Umgebung oder in der Nähe von Wasser.
- Um Stromschläge zu vermeiden, sollten Sie mit Ausnahme des Batteriefachs das Gehäuse der
Baby- und der Elterneinheit nicht öffnen.
- Dieses Gerät ist für Benutzer (einschl. Kinder) mit eingeschränkten physischen, sensorischen
oder psychischen Fähigkeiten bzw. ohne jegliche Erfahrung oder Vorwissen nur dann geeignet,
wenn eine angemessene Aufsicht oder ausführliche Anleitung zur Benutzung des Geräts durch
eine verantwortliche Person sichergestellt ist.

DEUTSCH38
- Achten Sie darauf, dass Kinder nicht mit dem Gerät spielen.
Achtung
- Benutzen und verwahren Sie das Gerät bei Temperaturen zwischen 10 °C und 40 °C.
- Setzen Sie die Babyeinheit und die Elterneinheit keinen extrem kalten oder heißen
Temperaturen und keinem direkten Sonnenlicht aus. Stellen Sie die Babyeinheit und die
Elterneinheit nicht in der Nähe von Wärmequellen auf.
- Achten Sie darauf, dass sich Babyeinheit und Kabel immer außerhalb der Reichweite Ihres Kindes
benden (Entfernung mindestens 1 Meter).
- Legen Sie die Babyeinheit keinesfalls in das Kinderbett oder in den Laufstall.
- Decken Sie die Elterneinheit und die Babyeinheit niemals ab (z. B. mit einem Handtuch oder
einer Decke). Die Lüftungsschlitze der Babyeinheit müssen immer frei sein.
- Legen Sie immer Batterien des richtigen Typs in die Babyeinheit ein.
- Verwenden Sie stets die im Lieferumfang enthaltenen Akkus für die Elterneinheit, um Gefahren
zu vermeiden.
- Wenn Sie die Elterneinheit neben einem Funksender oder einem anderen DECT-Gerät (z. B.
einem DECT-Telefon) aufstellen, kann die Verbindung mit der Babyeinheit unterbrochen werden.
Allgemeines
- Dieses Babyphone ist als Unterstützung für Sie gedacht und nicht als Ersatz für eine
verantwortungsbewusste und ordnungsgemäße Überwachung durch Erwachsene. Daher sollte
es auch nicht zu diesem Zweck eingesetzt werden.
- Der Feuchtigkeits- und Temperatursensor misst lediglich die Luftfeuchtigkeit bzw. Temperatur im
Kinderzimmer. Er kann nicht dafür verwendet werden, die Temperatur oder die Luftfeuchtigkeit
im Kinderzimmer zu regulieren oder anzupassen.
Elektromagnetische Felder (EMF; Electro Magnetic Fields)
Dieses Philips AVENT Gerät erfüllt sämtliche Normen bezüglich elektromagnetischer Felder (EMF).
Nach aktuellen wissenschaftlichen Erkenntnissen ist das Gerät sicher im Gebrauch, sofern es
ordnungsgemäß und entsprechend den Anweisungen in dieser Bedienungsanleitung gehandhabt
wird.
Für den Gebrauch vorbereiten
Babyeinheit
Sie können die Babyeinheit entweder über die Steckdose oder mit Batterien betreiben. Doch selbst
bei Netzbetrieb empfehlen wir, die Batterien einzusetzen. So bleibt das Gerät auch bei einem
Stromausfall betriebsbereit.
Netzbetrieb
1 Stecken Sie den großen Gerätestecker in die Buchse der Babyeinheit und den Adapter in eine
Steckdose (Abb. 2).
, Die Betriebsanzeige leuchtet auf.
Batteriebetrieb
Die Babyeinheit benötigt vier Batterien vom Typ 1,5 V R6 AA (nicht im Lieferumfang enthalten). Wir
empfehlen den Einsatz von Philips LR6 PowerLife-Batterien.
Verwenden Sie keine Akkus, da die Babyeinheit über keine Ladefunktion verfügt.
Ziehen Sie die Babyeinheit aus der Steckdose, und achten Sie darauf, dass Ihre Hände und die
Einheit beim Einsetzen der Batterien vollkommen trocken sind.
1 Entfernen Sie die Batteriefachabdeckung. (Abb. 3)
2 Setzen Sie vier nicht wiederauadbare Batterien ein (Abb. 4).
Hinweis: Achten Sie darauf, dass die Polung (+ bzw. -) mit der Markierung im Batteriefach übereinstimmt.

DEUTSCH 39
3 Setzen Sie die Akkufachabdeckung wieder auf. (Abb. 5)
Elterneinheit
Akkubetrieb
Im Lieferumfang der Elterneinheit ist ein Pack 1000-mAh-Li-Ionen-Akkus enthalten.
Laden Sie die Elterneinheit vor der ersten Inbetriebnahme, oder wenn die Ladeanzeige an der
Elterneinheit anzeigt, dass die Akkus fast leer sind (das leere Batteriesymbol blinkt auf dem Display
und an der Elterneinheit ertönt ein Signal). 30 Minuten, bevor die Akkus vollständig entleert sind,
beginnt die Elterneinheit anzuzeigen, dass der Akkuladestand niedrig ist.
Hinweis: Wenn die Akkus vollständig entleert sind, schaltet sich die Elterneinheit automatisch aus, und die
Verbindung mit der Babyeinheit wird unterbrochen.
1 Entfernen Sie die Akkufachabdeckung (Abb. 6).
2 Setzen Sie die Akkus ein (Abb. 7).
3 Setzen Sie die Akkufachabdeckung wieder auf (Abb. 8).
4 Schließen Sie den Gerätestecker an das Ladegerät an, stecken Sie den Adapter in eine
Steckdose, und stellen Sie die Elterneinheit in das Ladegerät (Abb. 9).
, Die Ladeanzeige am Ladegerät leuchtet auf.
, Auf dem Display wird über ein Batterieladesymbol angezeigt, dass die Elterneinheit geladen
wird.
5 Lassen Sie die Elterneinheit so lange im Ladegerät, bis die Akkus vollständig geladen sind.
, Während des Ladevorgangs leuchtet die Ladeanzeige am Ladegerät durchgehend.
, Wenn die Akkus vollständig geladen sind, wird auf dem Display der Elterneinheit ein volles
Batteriesymbol T angezeigt.
- Wenn Sie die Elterneinheit vor der ersten Inbetriebnahme oder nach längerem Nichtgebrauch
laden, schalten Sie sie aus, und laden Sie sie mindestens 10 Stunden lang ohne Unterbrechung.
- Wird die Elterneinheit während des Ladens eingeschaltet, dauert der Ladevorgang länger als vier
Stunden. Um die Ladezeit zu verkürzen, schalten Sie die Elterneinheit beim Laden aus.
- Bei vollständig geladenen Akkus kann die Elterneinheit mindestens 24 Stunden lang ohne Kabel
verwendet werden.
Hinweis: Beim erstmaligen Auaden der Elterneinheit reichen die Akkus für weniger als 24 Stunden
Betrieb. Sie erreichen erst nach viermaligem Laden und Entladen ihre volle Kapazität.
Hinweis: Bendet sich die Elterneinheit nicht im Ladegerät, entladen sich die Akkus allmählich, auch wenn
die Einheit ausgeschaltet ist.
Das Gerät benutzen
1 Stellen Sie die Eltern- und die Babyeinheit im selben Raum auf, um die Verbindung zu
überprüfen (Abb. 10).
Die Babyeinheit muss dabei mindestens 1 Meter von der Elterneinheit entfernt sein.
2 Halten Sie den Ein-/Ausschalter 3 an der Babyeinheit gedrückt, bis die Betriebsanzeige
beginnt, grün zu leuchten. (Abb. 11)
Hinweis: Die Betriebsanzeige leuchtet immer grün, auch wenn keine Verbindung mit der Elterneinheit
besteht.
, Das Nachtlicht leuchtet kurz auf und geht dann wieder aus.
, Das Display beginnt zu leuchten, und das Batteriesymbol wird angezeigt (Abb. 12).
, Nach zwei Sekunden werden die Werte für Temperatur und Luftfeuchtigkeit auf dem Display
angezeigt (Abb. 13).

DEUTSCH40
3 Halten Sie den Ein-/Ausschalter 3 an der Elterneinheit gedrückt, bis die
Geräuschpegelanzeigen kurz aueuchten. (Abb. 14)
, Das Display wird eingeschaltet, und das Batteriesymbol wird angezeigt (Abb. 15).
, Die LINK-Lampe blinkt rot, und die Meldung “Suchen” erscheint auf dem Display. (Abb. 16)
, Wenn eine Verbindung zwischen der Eltern- und der Babyeinheit hergestellt wurde, wird die
LINK-Lampe an der Elterneinheit grün und leuchtet konstant. Auf dem Display wird die
Meldung “Verbunden” angezeigt. (Abb. 17)
, Nach zwei Sekunden werden statt der Meldung “Verbunden” die Werte für Temperatur und
Luftfeuchtigkeit auf dem Display angezeigt. (Abb. 18)
, Beim ersten Einschalten der Elterneinheit wird die Meldung “Sprache” angezeigt. Wählen Sie
die gewünschte Sprache aus (siehe Kapitel “Menüoptionen”, Abschnitt “Die Displaysprache
einstellen”). (Abb. 19)
, Wenn keine Verbindung hergestellt werden kann, hört die LINK-Lampe an der Elterneinheit
auf zu blinken und leuchtet rot auf. Von Zeit zu Zeit ertönt an der Elterneinheit ein Signalton,
und die Meldung “Nicht verbunden” wird angezeigt. (Abb. 20)
Aufstellen des Babyphones
1 Stellen Sie die Babyeinheit mindestens einen Meter von Ihrem Kind entfernt auf (Abb. 21).
2 Stellen Sie die Elterneinheit innerhalb des Empfangsbereichs der Babyeinheit auf. Achten
Sie darauf, dass sie im Abstand von mindestens einem Meter zur Babyeinheit steht, um
akustische Rückkopplungen zu vermeiden (Abb. 10).
Weitere Informationen über den Empfangsbereich nden Sie im nachstehenden Abschnitt
“Empfangsbereich”.
Empfangsbereich
Der Empfangsbereich des Babyphones beträgt im Freien 330 Meter. Je nach Umgebung und anderen
Störfaktoren kann die Reichweite auch geringer sein. Im Haus beträgt die Reichweite bis zu 50
Meter.
Trockene Materialien Materialstärke Empfangsverlust
Holz, Gips, Pappe, Glas (ohne
Metall, Drähte oder Blei)
Ziegel, Sperrholz < 30 cm 5 - 35%
Stahlbeton < 30 cm 30 - 100%
Metallgitter oder -stangen < 1 cm 90 - 100%
Metall- oder Aluplatten < 1 cm 100%
Bei nassen und feuchten Materialien kann der Empfangsverlust bis zu 100 % ausmachen.
Produktmerkmale
Die folgenden Funktionen werden im Kapitel “Menüoptionen” beschrieben, da sie nur über das
Menü der Elterneinheit bedient werden können:
- Die Mikrofonempndlichkeit einstellen
- Signalton ein-/ausschalten
- Den Zimmertemperaturbereich einstellen (Mindest- und Höchsttemperatur)
- Das Temperatursignal ein-/ausschalten
- Den Vibrationsalarm ein-/ausschalten
< 30 cm 0 - 10%

DEUTSCH 41
Die Lautsprecherlautstärke einstellen
1 Drücken Sie die Lautstärketasten + oder - an der Babyeinheit, bis die gewünschte
Lautsprecherlautstärke für die Babyeinheit erreicht ist (Abb. 22).
2 Drücken Sie die Lautstärketasten + oder - an der Elterneinheit, bis die gewünschte
Lautsprecherlautstärke für die Elterneinheit erreicht ist (Abb. 23).
, Folgende Anzeigen im Display geben Aufschluss über die Lautstärkeneinstellungen an den
Einheiten:
- g = Lautstärke der Elterneinheit ausgeschaltet/Baby stumm überwachen
- h = Mindestlautstärke (Eltern- und Babyeinheit)
- i = Höchstlautstärke (Eltern- und Babyeinheit)
Hinweis: Je höher die Lautstärkeneinstellung, umso mehr Energie verbrauchen die Einheiten.
Sprechfunktion
Über die TALK-Taste an der Elterneinheit können Sie mit Ihrem Kind sprechen (um es beispielsweise
zu trösten).
1 Halten Sie die TALK-Taste gedrückt, und sprechen Sie aus einer Entfernung von 15-30 cm
deutlich ins Mikrofon (Abb. 24).
, Die grüne LINK-Lampe beginnt zu blinken, und die Meldung “Sprechen” erscheint auf dem
Display.
2 Lassen Sie die TALK-Taste nach dem Sprechen wieder los.
Geräuschpegelanzeigen
Die Elterneinheit überwacht den Geräuschpegel im Kinderzimmer kontinuierlich, und die
Geräuschpegelanzeigen zeigen an, ob sich irgendetwas ändert. Beginnt das Baby zu weinen, so
leuchten die Geräuschpegelanzeigen an der Elterneinheit auf.
- Solange die Babyeinheit kein Geräusch feststellt, leuchten an der Elterneinheit keine
Geräuschpegelanzeigen.
- Wenn die Babyeinheit ein Geräusch wahrnimmt, leuchten eine oder mehrere
Geräuschpegelanzeigen an der Elterneinheit auf. Die Zahl der aueuchtenden Anzeigen ist
abhängig von der Lautstärke des von der Babyeinheit wahrgenommenen Geräuschs.
Nachtlicht
Hinweis: Sie können das Nachtlicht auch über das Menü der Elterneinheit ein- und ausschalten (siehe
Kapitel “Menüoptionen”, Abschnitt “Nachtlicht”).
1 Drücken Sie an der Babyeinheit die Nachtlicht-TasteQ, um das Nachtlicht einzuschalten. (Ab
b. 25)
, Q erscheint auf dem Display der Elterneinheit.
2 Drücken Sie zum Ausschalten des Nachtlichts die Nachtlicht-Taste Q erneut.
, Das Nachtlicht wird langsam dunkler, bevor es sich ganz ausschaltet.
, Q wird nicht mehr auf dem Display der Elterneinheit angezeigt.
Tipp: Schalten Sie das Nachtlicht aus, wenn Sie die Babyeinheit mit Batterien betreiben. Dadurch sparen
Sie Energie!
Die Elterneinheit rufen
Wenn Sie die Elterneinheit verlegt haben und deren Lautstärke vollständig abgeschaltet ist, können
Sie das Gerät mithilfe der PAGE-Taste an der Babyeinheit rufen.
Hinweis: Die Suchfunktion funktioniert nur, wenn die Elterneinheit eingeschaltet ist.
1 Drücken Sie die PAGE-Taste an der Babyeinheit (Abb. 26).

DEUTSCH42
, Auf dem Display der Baby- und der Elterneinheit werden die Meldung “Suchmodus” und das
Suchmodussymbol angezeigt.
, Die Elterneinheit gibt ein akustisches Rufsignal ab.
2 Um dieses zu stoppen, drücken Sie erneut die PAGE-Taste. Sie können aber auch jede
beliebige Taste an der Elterneinheit drücken.
Hinweis: Sie können die Schlaied-Funktion auch über das Menü der Elterneinheit bedienen (siehe
Kapitel “Menüoptionen”, Abschnitt “Schlaied-Funktion”).
1 Drücken Sie die Wiedergabe-/Stopptaste E an der Babyeinheit, um das aktuell ausgewählte
Schlaied wiederzugeben. (Abb. 27)
2 Um ein anderes Schlaied auszuwählen, drücken Sie die Schlaied-Taste K an der Babyeinheit
innerhalb von 2 Sekunden, um durch die Liste der Schlaieder zu navigieren. (Abb. 28)
Hinweis: Wenn Sie die Schlaied-Taste K nicht länger als zwei Sekunden gedrückt halten, beginnt die
Wiedergabe des auf dem Display angezeigten Schlaieds.
, Auf dem Display werden die Nummer des Schlaieds und das Schlaiedsymbol K angezeigt.
, Das Schlaied wird fortlaufend wiederholt.
3 Um das Schlaied zu stoppen, drücken Sie die Wiedergabe-/Stopptaste E an der
Babyeinheit erneut. (Abb. 27)
, Die Nummer des Schlaieds und das Schlaiedsymbol K werden nicht mehr auf dem Display
angezeigt.
4 So wählen Sie ein anderes Schlaied aus, wenn gerade ein Schlaied wiedergegeben wird:
- Drücken Sie die Schlaied-Taste K auf der Babyeinheit innerhalb von 2 Sekunden, um durch die
Schlaiedliste zu navigieren.
Hinweis: Wenn Sie die Schlaied-Taste K nicht länger als zwei Sekunden gedrückt halten, beginnt die
Wiedergabe des auf dem Display angezeigten Schlaieds.
Luftfeuchtigkeit
Wenn eine Verbindung zwischen der Baby- und der Elterneinheit besteht, wird die Luftfeuchtigkeit
auf dem Display beider Geräte angezeigt.
Die optimale Luftfeuchtigkeit liegt zwischen 40 % und 60 %. Daher ist der richtige
Luftfeuchtigkeitsgrad im Kinderzimmer besonders wichtig, um Reizungen der Schleimhäute, trockene
und juckende Haut, rissige Lippen und einen trockenen, gereizten Hals bei Ihrem Kind zu vermeiden.
Wenn die Schleimhäute nicht richtig arbeiten, können sie Ihr Kind nicht wirksam gegen die
unterschiedlichsten Krankheitserreger schützen. Das wiederum erhöht die Gefahr einer Erkältung
oder Grippe und verringert die Widerstandskraft des Kindes gegen Pilz- und Bakterieninfektionen.
Der Philips AVENT Luftbefeuchter mit Schallwellentechnologie verbessert die Luftqualität im
Kinderzimmer, und erzeugt so einen angenehmen Luftfeuchtigkeitsgrad. Wenden Sie sich an das
Philips Service-Center in Ihrem Land, um den Fachhändler vor Ort zu erfahren.
Hinweis: Das Babyphone misst die Luftfeuchtigkeit lediglich. Es kann nicht dafür verwendet werden, die
Luftfeuchtigkeit zu regulieren oder anzupassen.
Alarm bei Reichweitenüberschreitung
Wenn sich die Elterneinheit außerhalb des Empfangsbereichs der Babyeinheit bendet, ertönt an der
Elterneinheit von Zeit zu Zeit ein Signalton, und die Meldung “Nicht verbunden” wird angezeigt. Die
LINK-Lampe an der Elterneinheit blinkt rot.
Hinweis: Die Meldung “Nicht verbunden” wird bei ausgeschalteter Babyeinheit auch auf dem Display der
Elterneinheit angezeigt.

DEUTSCH 43
Menüoptionen
Die meisten Funktionen können von der Baby- und der Elterneinheit aus aktiviert werden. Einige
können jedoch nur über das Menü der Elterneinheit eingestellt werden.
Menübedienung - Allgemeine Erläuterungen
Hinweis: Menüfunktionen können nur genutzt werden, wenn eine Verbindung zwischen der Babyeinheit
und der Elterneinheit hergestellt worden ist.
1 Drücken Sie zum Öffnen des Menüs die MENÜ-Taste (Abb. 29).
, Auf dem Display erscheint die erste Menüoption.
2 Wählen Sie über die Taste + bzw. - die gewünschte Menüoption (Abb. 30).
Hinweis: Der Pfeil zeigt an, in welche Richtung Sie navigieren können.
3 Drücken Sie zur Bestätigung die OK-Taste (Abb. 31).
4 Zur Auswahl der gewünschten Einstellung verwenden Sie die Tasten + bzw. -.
5 Drücken Sie zur Bestätigung die OK-Taste.
, Die neue Einstellung blinkt zweimal und wird dann nicht mehr auf dem Display angezeigt.
6 Drücken Sie die MENÜ-Taste erneut, um das Menü zu verlassen.
Das Nachtlicht ein-/ausschalten
1 Wählen Sie über die Tasten + und - die Option “Licht” aus.
2 Drücken Sie zur Bestätigung die OK-Taste.
3 Bei deaktiviertem Nachtlicht wird auf dem Display “Ein?” angezeigt. Drücken Sie die OK-
Taste, um das Nachtlicht zu aktivieren. Bei aktiviertem Nachtlicht wird auf dem Display
“Aus?” angezeigt. Drücken Sie die OK-Taste, um das Nachtlicht zu deaktivieren.
1 Wählen Sie über die Tasten + und - die Option “Schlaied” aus.
2 Drücken Sie zur Bestätigung die OK-Taste.
3 Drücken Sie die Taste + einmal oder mehrmals, um aus der Liste eines der fünf Schlaieder
oder “Alle spielen” auszuwählen.
4 Drücken Sie zur Bestätigung die OK-Taste.
Nach der Auswahl eines der fünf Schlaieder wird dieses fortlaufend wiedergegeben.
1 Drücken Sie zur Auswahl eines anderen Schlaieds aus der Liste die Taste +.
2 Drücken Sie zur Bestätigung die OK-Taste.
1 Drücken Sie die OK-Taste.
, Die Meldung “Pause” wird auf dem Display angezeigt.
2 Drücken Sie erneut die OK-Taste, um die Wiedergabe des Schlaieds fortzusetzen.
Wenn das Schlaied nicht innerhalb von 20 Sekunden fortgesetzt wird, wird die Schlaiedfunktion
automatisch abgeschaltet. Die Meldung “Pause” und das Schlaiedsymbol werden dann nicht mehr
auf dem Display angezeigt.

DEUTSCH44
1 Drücken Sie die Taste + zur Auswahl von “Stopp” aus der Liste
2 Drücken Sie zur Bestätigung die OK-Taste.
Hinweis: Die Mikrofonempndlichkeit kann nur über das Menü der Elterneinheit angepasst werden.
Sie können die Mikrofonempndlichkeit der Babyeinheit nach Wunsch einstellen. Dazu muss eine
Verbindung zwischen Baby- und Elterneinheit bestehen. Dies ist der Fall, wenn die LINK-Lampe an
der Elterneinheit konstant grün leuchtet.
1 Wählen Sie über die Tasten + und - die Option “Empndlichkeit” aus.
2 Drücken Sie zur Bestätigung die OK-Taste.
3 Wählen Sie über die Tasten + und - die gewünschte Mikrofonempndlichkeit für die
Babyeinheit aus.
, h = niedrigste Empndlichkeitsstufe
, i = höchste Empndlichkeitsstufe
4 Drücken Sie zur Bestätigung die OK-Taste.
, Die Meldung “Gespeichert” wird auf dem Display angezeigt.
Hinweis: Ist die Babyeinheit auf eine hohe Empndlichkeitsstufe eingestellt, nimmt sie mehr Geräusche
auf und überträgt damit auch häuger. Dadurch erhöht sich der Energieverbrauch.
Signalton ein-/ausschalten
Hinweis: Der Signalton kann nur über das Menü der Elterneinheit ein- und ausgeschaltet werden.
Diese Funktion ermöglicht Ihnen die lautlose Überwachung Ihres Babys. Es ermöglicht Ihnen den Ton
an der Elterneinheit abzustellen und dennoch ein Warnsignal zu erhalten, wenn Ihr Baby weint.
Bei eingeschaltetem Signalton ertönt an der Elterneinheit ein akustisches Signal, sobald bei
ausgeschalteter Lautstärke die vierte Geräuschpegelanzeige aueuchtet. Außerdem schaltet sich die
Display-Hintergrundbeleuchtung der Elterneinheit ein, und das Signalton-Symbol (g) blinkt auf
dem Display.
1 Wählen Sie über die Tasten + und - die Option “Geräuschsignal” aus.
2 Drücken Sie zur Bestätigung die OK-Taste.
3 Bei deaktiviertem Signalton wird auf dem Display “Ein?” angezeigt. Drücken Sie die OK-Taste,
um den Signalton zu aktivieren. Bei aktiviertem Signalton wird auf dem Display “Aus?”
angezeigt. Drücken Sie die OK-Taste, um den Signalton zu deaktivieren.
, Bei Auswahl von “Ein” wird das Signalton-Symbol ( g) auf dem Display der Elterneinheit
angezeigt.
Den Zimmertemperaturbereich einstellen
Hinweis: Der Zimmertemperaturbereich kann nur über das Menü der Elterneinheit angepasst werden.
Ein Baby schläft am besten, wenn die Zimmertemperatur zwischen 16 °C und 20 °C beträgt. Dies
ist wichtig, da das Baby seine Körpertemperatur nicht so gut wie ein Erwachsener regulieren kann.
Ein Baby braucht länger, um sich an Temperaturschwankungen anzupassen.
Wenn Sie keinen Temperaturbereich festlegen, gibt das Babyphone eine Warnung aus, falls die
Temperatur im Zimmer Ihres Babys unter 14 °C fällt oder auf über 30 °C steigt. In diesen Fällen
schaltet sich die Display-Hintergrundbeleuchtung der Elterneinheit ein, und auf dem Display wird
“Hoch” bzw. “Niedrig” angezeigt. Um die standardmäßige Mindest- bzw. Höchsttemperatur zu
ändern, gehen Sie wie im Folgenden beschrieben vor.

DEUTSCH 45
Hinweis: Die Temperatur im Kinderzimmer wird auf dem Display beider Einheiten angezeigt, wenn sie
miteinander verbunden sind.
1 Wählen Sie über die Tasten + und - die Option “Temperatur” aus.
2 Drücken Sie zur Bestätigung die OK-Taste.
3 Wählen Sie über die Tasten + und - die Option “Bereich” aus.
4 Drücken Sie zur Bestätigung die OK-Taste.
5 Legen Sie über die Tasten + und - die gewünschte Mindesttemperatur fest.
6 Drücken Sie zur Bestätigung die OK-Taste.
7 Legen Sie über die Tasten + und - die gewünschte Höchsttemperatur fest.
8 Drücken Sie zur Bestätigung die OK-Taste.
, Die Meldung “Gespeichert” wird auf dem Display angezeigt.
Hinweis: Wenn die Temperatur im Kinderzimmer unter der eingestellten Mindesttemperatur oder über
der eingestellten Höchsttemperatur liegt, ist das Display ständig eingeschaltet. Dadurch verbraucht die
Einheit Strom.
Das Temperatursignal ein-/ausschalten
Hinweis: Das Temperatursignal kann nur über das Menü der Elterneinheit ein- und ausgeschaltet werden.
Hinweis: Wenn das Temperatursignal zu oft aktiviert wird, verringern Sie die eingestellte
Mindesttemperatur bzw. erhöhen Sie die eingestellte Höchsttemperatur (siehe “Den
Zimmertemperaturbereich einstellen”).
Bei eingeschaltetem Temperatursignal gibt die Elterneinheit ein akustisches Signal aus, wenn die
tatsächliche Zimmertemperatur die eingestellte Höchsttemperatur übersteigt oder die eingestellte
Mindesttemperatur unterschreitet. Außerdem schaltet sich die Display-Hintergrundbeleuchtung der
Elterneinheit ein, das Temperatursignal-Symbol (t) blinkt, und auf dem Display wird “Hoch” oder
“Niedrig” angezeigt. Wurde keine Mindest- oder Höchsttemperatur eingestellt, ertönt das Signal,
sobald die Zimmertemperatur unter 14 °C fällt oder auf über 30 °C steigt.
1 Wählen Sie über die Tasten + und - die Option “Temperatur” aus.
2 Drücken Sie zur Bestätigung die OK-Taste.
3 Wählen Sie über die Tasten + und - die Option “Alarm” aus.
4 Drücken Sie zur Bestätigung die OK-Taste.
5 Bei deaktiviertem Signalton wird auf dem Display “Ein?” angezeigt. Drücken Sie die OK-Taste,
um den Signalton zu aktivieren. Bei aktiviertem Signalton wird auf dem Display “Aus?”
angezeigt. Drücken Sie die OK-Taste, um den Signalton zu deaktivieren.
Den Vibrationsalarm ein-/ausschalten
Hinweis: Der Vibrationsalarm kann nur über das Menü der Elterneinheit ein- und ausgeschaltet werden.
Bei eingeschaltetem Vibrationsalarm vibriert die Elterneinheit, sobald bei ausgeschalteter Lautstärke
die vierte Geräuschpegelanzeige aueuchtet.
1 Wählen Sie über die Tasten + und - die Option “Vibration” aus.
2 Drücken Sie zur Bestätigung die OK-Taste.
3 Bei deaktiviertem Vibrationsalarm wird auf dem Display “Ein?” angezeigt. Drücken Sie die
OK-Taste, um den Vibrationsalarm zu aktivieren. Bei aktiviertem Vibrationsalarm wird auf
dem Display “Aus?” angezeigt. Drücken Sie die OK-Taste, um den Vibrationsalarm zu
deaktivieren.

DEUTSCH46
Die Displaysprache einstellen
1 Wählen Sie über die Tasten + und - die Option “Sprache” aus.
2 Drücken Sie zur Bestätigung die OK-Taste.
3 Wählen Sie die gewünschte Sprache über die Tasten + und - aus.
4 Drücken Sie zur Bestätigung die OK-Taste.
Reset-Funktion
Mithilfe dieser Funktion im Menü der Elterneinheit können Sie die Eltern- und die Babyeinheit
gleichzeitig auf die Standardeinstellungen zurücksetzen. Dies kann bei Problemen nützlich sein, die
sich anhand der Lösungsvorschläge im Kapitel “Häug gestellte Fragen” nicht beheben lassen.
1 Wählen Sie über die Tasten + und - die Option “Reset” aus.
2 Drücken Sie zur Bestätigung die OK-Taste.
, Auf dem Display der Elterneinheit wird die Meldung “Bestätigen?” angezeigt.
3 Drücken Sie zur Bestätigung die OK-Taste.
, Die Elterneinheit wird aus- und wieder eingeschaltet.
, Damit sind die beiden Einheiten auf die werkseitigen Standardeinstellungen zurückgesetzt.
Standardeinstellungen
Elterneinheit
- Vibrationsalarm: aus
- Sprache: Englisch
- Lautsprecherlautstärke : 1
- Mikrofonempndlichkeit: 3
- Signalton: aus
- Temperatursignal: aus
- Warnsignal “Temperatur zu niedrig”: 14 °C
- Warnsignal “Temperatur zu hoch”: 30°C
Babyeinheit
- Lautsprecherlautstärke: 3
- Nachtlicht: Aus
- Schlaied: 1
Zubehör
Gürtel-Clip und Halstrageband
Sind die Akkus der Elterneinheit ausreichend geladen, können Sie die Einheit überall im und um das
Haus mitnehmen. Befestigen Sie die Elterneinheit dazu entweder mithilfe des Gürtel-Clips an Ihrem
Gürtel oder am Hosen- bzw. Rockbund, oder hängen Sie sie sich am Halstrageband um den Hals. So
können Sie Ihr Kind überwachen und haben dennoch beide Hände frei.
Den Gürtel-Clip anbringen
1 Stecken Sie den Gürtel-Clip auf die Elterneinheit (Abb. 32).
Den Gürtel-Clip abnehmen
1 Ziehen Sie den Gürtel-Clip von der Elterneinheit ab.
Das Halstrageband anbringen
1 Stecken Sie die Endschlaufe des Halstragebands durch die Öffnung hinter der
Riemenbefestigung. Fädeln Sie das Halstrageband durch die Endschlaufe, und ziehen Sie das
Halstrageband fest (Abb. 33).

DEUTSCH 47
Das Halstrageband abnehmen
1 Führen Sie das Halstrageband durch die Endschlaufe, und ziehen Sie die Endschlaufe aus der
Öffnung hinter der Riemenbefestigung.
Reinigung und Wartung
Tauchen Sie die Eltern- oder die Babyeinheit nicht in Wasser ein, und reinigen Sie sie auch nicht
unter ießendem Wasser.
Verwenden Sie weder Reinigungsspray noch üssige Reinigungsmittel.
1 Ziehen Sie den Adapter der Babyeinheit aus der Steckdose, sofern er eingesteckt ist, und
nehmen Sie die Elterneinheit aus dem Ladegerät.
2 Reinigen Sie die Eltern- und die Babyeinheit mit einem feuchten Tuch.
Achten Sie darauf, dass die Elterneinheit trocken ist, bevor Sie sie wieder in das angeschlossene
Ladegerät stellen.
3 Reinigen Sie das Ladegerät mit einem trockenen Tuch.
4 Reinigen Sie die Adapter mit einem trockenen Tuch.
Aufbewahrung
- In der Reisetasche können Sie das Babyphone auf Reisen aufbewahren.
- Wenn Sie vorhaben, das Babyphone längere Zeit nicht zu benutzen, entnehmen Sie die
Batterien aus der Babyeinheit bzw. die Akkus aus der Elterneinheit. Verwahren Sie die
Elterneinheit, die Babyeinheit, das Ladegerät der Elterneinheit und die Adapter in der
mitgelieferten Tasche.
Ersatz
Babyeinheit
Batterien
Ersetzen Sie die Batterien der Babyeinheit ausschließlich durch vier 1,5-V-Batterien des Typs R6 AA.
Hinweis: Wir empfehlen Ihnen, Batterien von Philips zu verwenden.
Adapter
Der Adapter der Babyeinheit darf nur durch einen Adapter des Originaltyps ersetzt werden. Neue
Adapter können Sie bei Ihrem Händler oder bei einem Philips Service-Center bestellen.
- Nur GB: SSA-5S-09 UK 075040F
- Andere Länder: SSA-5W-09 EU 075040F
Elterneinheit
Akkus
Ersetzen Sie die Akkus der Elterneinheit nur durch 1000-mAh-Li-Ionen-Akkus.
Adapter
Der Adapter des Ladegeräts der Elterneinheit darf nur durch einen Adapter des Originaltyps ersetzt
werden. Neue Adapter können Sie bei Ihrem Händler oder bei einem Philips Service-Center
bestellen.
- Nur GB: SSA-5W-09 UK 075050F
- Andere Länder: SSA-5W-09 EU 075050F

DEUTSCH48
Umweltschutz
- Werfen Sie das Gerät am Ende der Lebensdauer nicht in den normalen Hausmüll. Bringen Sie es
zum Recycling zu einer ofziellen Sammelstelle. Auf diese Weise helfen Sie, die Umwelt zu
schonen (Abb. 34).
- Batterien und Akkus enthalten Substanzen, die die Umwelt gefährden können. Entsorgen Sie
Batterien und Akkus nicht im normalen Hausmüll, sondern geben Sie sie an einer ofziellen
Sammelstelle ab. Entfernen Sie in jedem Fall Batterien und Akkus, bevor Sie das Gerät entsorgen
und an einer ofziellen Sammelstelle abgeben.
Garantie und Kundendienst
Benötigen Sie weitere Informationen oder treten Probleme auf, besuchen Sie bitte die Philips
AVENT Website (www.philips.com/AVENT), oder setzen Sie sich mit einem Philips Service-Center
in Ihrem Land in Verbindung (Telefonnummer siehe Garantieschrift). Sollte es in Ihrem Land kein
Service-Center geben, wenden Sie sich bitte an Ihren Philips Händler.
Dieses Kapitel enthält die am häugsten zu diesem Gerät gestellten Fragen. Sollten Sie hier keine
Antwort auf Ihre Frage nden, wenden Sie sich bitte an das Philips Service-Center in Ihrem Land.
Frage Antwort
Warum leuchten die
Betriebsanzeige der
Babyeinheit und die
LINK-Lampe der
Elterneinheit nicht auf,
wenn ich den Ein-/
Ausschalter an den
Einheiten drücke?
Warum leuchtet die
LINK-Lampe an der
Elterneinheit
durchgehend rot, und
warum erscheint die
Meldung “Keine Verb.”
auf dem Display?
Möglicherweise sind die Akkus der Elterneinheit leer, und die
Elterneinheit bendet sich nicht im angeschlossenen Ladegerät.
Schließen Sie den Gerätestecker an das Ladegerät an, stecken Sie den
Adapter des Ladegeräts in eine Steckdose, und stellen Sie die
Elterneinheit in das Ladegerät. Drücken Sie dann den Ein-/Ausschalter,
um eine Verbindung mit der Babyeinheit herzustellen.
Möglicherweise sind die Batterien der Babyeinheit leer, und die
Babyeinheit ist nicht an das Stromnetz angeschlossen. Ersetzen Sie die
Batterien, oder schließen Sie die Babyeinheit an das Stromnetz an.
Drücken Sie dann den Ein-/Ausschalter, um die Verbindung mit der
Elterneinheit herzustellen.
Baby- und die Elterneinheit haben möglicherweise keine Verbindung
zueinander. Verringern Sie den Abstand zwischen Eltern- und
Babyeinheit, beachten Sie dabei jedoch einen Mindestabstand von
1 Meter.
Blinkt die LINK-Lampe an der Elterneinheit noch immer nicht, stellen
Sie die Einheiten über die Reset-Funktion auf die Standardeinstellungen
zurück.
Die Reichweite zwischen Eltern- und Babyeinheit ist überschritten.
Bringen Sie die Elterneinheit näher zur Babyeinheit.

Frage Antwort
Die Babyeinheit wird möglicherweise ausgeschaltet. Schalten Sie sie
wieder ein.
Weshalb leuchtet das
Batterie-Symbol im
Display der Babyeinheit?
Warum ertönt an der
Elterneinheit ein
akustisches Signal?
Warum ertönt aus dem
Gerät ein Pfeifton?
Warum höre ich kein
Geräusch/Warum kann
ich nicht hören, ob
mein Kind weint?
Warum reagiert die
Elterneinheit zu schnell
auf
Umgebungsgeräusche?
Die Batterien der Babyeinheit sind fast leer. Tauschen Sie sie aus, oder
schließen Sie die Babyeinheit an das Stromnetz an (siehe Kapitel “Für
den Gebrauch vorbereiten”).
Ertönt das Signal an der Elterneinheit, während die LINK-Lampe
durchgängig rot leuchtet und die Meldung “Keine Verb.” auf dem Display
angezeigt wird, ist die Verbindung mit der Babyeinheit unterbrochen.
Verringern Sie den Abstand zwischen Eltern- und Babyeinheit.
Wenn das Signal an der Elterneinheit ertönt, und auf dem Display das
leere Batteriesymbol angezeigt wird, sind die Akkus der Elterneinheit
fast leer. Laden Sie sie auf.
Wenn Sie bei eingeschaltetem Signalton die Lautstärke ausgeschaltet
haben, ertönt an der Elterneinheit ein akustisches Signal, wenn die
vierte Geräuschpegelanzeige aueuchtet, weil die Babyeinheit ein
Geräusch festgestellt hat.
Wenn Sie an der Elterneinheit die Zimmertemperatur eingestellt haben
und das Temperatursignal eingeschaltet ist, ertönt an der Elterneinheit
ein akustisches Signal, sobald die Temperatur unter den eingestellten
Wert bzw. unter 14 °C sinkt oder über den eingestellten Wer t bzw. auf
über 30 °C steigt.
Die Babyeinheit wird möglicherweise ausgeschaltet. Schalten Sie sie
wieder ein.
Möglicherweise stehen die beiden Einheiten zu nah beieinander.
Vergewissern Sie sich, dass Sie den Mindestabstand von 1 Meter
zwischen Eltern- und Babyeinheit eingehalten haben.
Möglicherweise ist die Lautstärke der Elterneinheit zu hoch eingestellt.
Verringern Sie die Lautstärke.
Die Lautstärke der Elterneinheit ist möglicherweise zu niedrig
eingestellt oder völlig abgeschaltet. Erhöhen Sie die Lautstärke an der
Elterneinheit.
Die Mikrofonempndlichkeit der Babyeinheit ist möglicherweise zu
niedrig eingestellt. Stellen Sie die Mikrofonempndlichkeit über das
Menü der Elterneinheit auf einen höheren Wert ein.
Baby- und Elterneinheit haben möglicherweise keine Verbindung
zueinander. Verringern Sie den Abstand zwischen den beiden Einheiten.
Die Babyeinheit nimmt auch andere Geräusche als die Ihres Kinds
wahr. Stellen Sie die Babyeinheit näher zum Kind hin auf (achten Sie
dabei aber auf den Mindestabstand von 1 Meter).
Die Mikrofonempndlichkeit der Babyeinheit ist möglicherweise zu
hoch eingestellt. Stellen Sie die Mikrofonempndlichkeit über das Menü
der Elterneinheit auf einen niedrigeren Wer t ein.
DEUTSCH 49

DEUTSCH50
Frage Antwort
Warum reagiert die
Elterneinheit zu
langsam, wenn mein
Kind weint?
Weshalb entleeren sich
die Batterien in der
Babyeinheit so schnell?
Warum braucht die
Elterneinheit länger als
vier Stunden zum
Auaden?
Für das Babyphone wird
ein Empfangsbereich
von 330 Metern
angegeben. Warum
funktioniert mein
Babyphone nur in
einem erheblich
kleineren Bereich?
Warum geht die
Verbindung manchmal
verloren? Warum ist
der Ton hin und wieder
unterbrochen?
Was passiert bei einem
Stromausfall?
Ist mein Babyphone
abhör- und
störungssicher?
Die Mikrofonempndlichkeit der Babyeinheit ist möglicherweise zu
niedrig eingestellt. Stellen Sie die Mikrofonempndlichkeit über das
Menü der Elterneinheit auf einen höheren Wert ein.
Die Mikrofonempndlichkeit der Babyeinheit ist möglicherweise zu
hoch eingestellt, was dazu führt, dass die Babyeinheit häuger sendet.
Stellen Sie die Mikrofonempndlichkeit über das Menü der
Elterneinheit auf einen niedrigeren Wer t ein.
Möglicherweise ist die Lautstärke an der Babyeinheit zu hoch eingestellt,
wodurch die Einheit viel Energie verbraucht. Verringern Sie die
Lautstärke an der Babyeinheit.
Sie haben u. U. eine maximale Zimmer temperatur eingestellt, die
niedriger als die tatsächliche ist, oder eine Mindesttemperatur, die höher
ist als die tatsächliche Raumtemperatur. Dies führt dazu, dass das
Display ununterbrochen leuchtet, wodurch sich der Stromverbrauch
der Babyeinheit erhöht. Aus diesem Grund entleeren sich die Batterien
der Babyeinheit schneller.
Möglicherweise haben Sie das Nachtlicht eingeschaltet. Wenn Sie das
Nachtlicht verwenden möchten, empfehlen wir, die Babyeinheit am
Netz zu betreiben.
Möglicherweise ist die Elterneinheit während des Ladevorgangs
eingeschaltet. Schalten Sie sie während des Ladens aus.
Der angegebene Empfangsbereich gilt nur für den Betrieb im Freien.
Innerhalb des Hauses ist der Empfang durch Anzahl und Beschaffenheit
der Wände bzw. Decken begrenzt, die zwischen den beiden Einheiten
liegen. Daher beträgt der Empfangsbereich im Haus maximal 50 Meter.
Die Baby- und die Elterneinheit stehen möglicherweise nahe an der
äußeren Grenze des Empfangsbereichs. Versuchen Sie es mit einem
anderen Aufstellungsort oder verringern Sie den Abstand zwischen den
Einheiten. Beachten Sie bitte auch, dass die Einheiten immer etwa 30
Sekunden brauchen, um eine Verbindung zueinander herzustellen.
Ist die Elterneinheit ausreichend aufgeladen, funktioniert sie auch bei
Stromausfall, sowohl im Ladegerät als auch außerhalb davon. Benden
sich in der Babyeinheit Batterien, schaltet sie ebenfalls bei Stromausfall
automatisch auf Batteriebetrieb um.
Dank der DECT-Technologie ist dieses Babyphone abhörsicher und
unempndlich gegen Störungen durch andere Geräte.

Frage Antwort
Die Betriebszeit der
Elterneinheit wird mit
mindestens 24 Stunden
angegeben. Warum ist
dieser Zeitraum bei
meiner Elterneinheit
kürzer?
Warum erscheint das
Batteriesymbol nicht auf
dem Display der
Elterneinheit, wenn ich
mit dem Laden der
Elterneinheit beginne?
Nach dem erstmaligen Laden der Akkus in der Elterneinheit beträgt die
Betriebsdauer weniger als 24 Stunden. Die Akkus erreichen ihre volle
Kapazität erst nach mindestens vier Lade- und Entladevorgängen.
Möglicherweise ist die Lautstärke an der Elterneinheit zu hoch
eingestellt, wodurch sie viel Energie verbraucht. Verringern Sie die
Lautstärke an der Elterneinheit.
Die Mikrofonempndlichkeit der Babyeinheit ist möglicherweise zu
hoch eingestellt, wodurch die Elterneinheit viel Energie verbraucht.
Stellen Sie die Mikrofonempndlichkeit über das Menü der
Elterneinheit auf einen niedrigeren Wer t ein.
Beim ersten Auaden bzw. nach einer längeren Pause dauert es ggf.
einige Minuten, bis das Batteriesymbol auf dem Display der
Elterneinheit angezeigt wird.
DEUTSCH 51

52
Συγχαρητήρια για την αγορά σας και καλώς ήρθατε στη Philips AVENT! Για να επωφεληθείτε
πλήρως από την υποστήριξη που παρέχει η Philips AVENT, καταχωρήστε το προϊόν σας στην
ιστοσελίδα www.philips.com/welcome.
Η Philips AVENT είναι αφοσιωμένη στη δημιουργία αξιόπιστων προϊόντων φροντίδας που
προσφέρουν στους γονείς τη σιγουριά που χρειάζονται. Αυτό το βρεφικό μόνιτορ της Philips
AVENT παρέχει διαρκή υποστήριξη, εξασφαλίζοντας ότι μπορείτε πάντα να ακούτε το μωρό
σας καθαρά και χωρίς παρεμβολές. Η τεχνολογία DECT εγγυάται μηδενικές παρεμβολές από
άλλες ασύρματες συσκευές και πεντακάθαρο σήμα ανάμεσα στη μονάδα μωρού και τη μονάδα
γονέα. Ο αισθητήρας θερμοκρασίας και υγρασίας σάς δίνει τη δυνατότητα να παρακολουθείτε
την ατμόσφαιρα στο δωμάτιο του μωρού σας και να ορίζετε προσωπικές ρυθμίσεις έτσι ώστε
να εξασφαλίζετε την άνεση και την υγεία του μωρού σας στο δωμάτιό του.
A
1 Κουμπί on/off 3
2 Υποδοχή για κλιπ ζώνης
3 Κουμπί TALK (Ομιλία)
4 Κουμπί MENU (Μενού)
5 Λυχνία LINK (Σύνδεση)
6 Μικρόφωνο
7 Ηχείο
8 Κουμπιά μενού και έντασης ήχου +/–
9 Κουμπί OK
10 Οθόνη
11 Λυχνίες επιπέδου ήχου
12 Κλιπ ζώνης
13 Μετασχηματιστής
14 Μικρό βύσμα συσκευής
15 Βάση φόρτισης
16 Λυχνία φόρτισης
17 Λουράκι λαιμού
18 Θήκη για σετ επαναφορτιζόμενων μπαταριών
19 Υποδοχή για λουράκι λαιμού
20 Καπάκι θήκης για σετ επαναφορτιζόμενων μπαταριών
21 Σετ επαναφορτιζόμενων μπαταριών (συμπεριλαμβάνεται)
B
1 Κουμπί on/off 3
2 Κουμπί PAGE (Εντοπισμός)
3 Οθόνη
4 Λυχνία λειτουργίας
5 Κουμπιά έντασης ήχου +/–
6 Κουμπί νυχτερινού φωτός Q
7 Κουμπί νανουρίσματος K
8 Κουμπί έναρξης/διακοπής E
9 Μικρόφωνο
10 Μετασχηματιστής
11 Μεγάλο βύσμα συσκευής
12 Οπές ψύξης
13 Ηχείο
14 Αισθητήρας θερμοκρασίας και υγρασίας
15 Υποδοχή για μεγάλο βύσμα συσκευής

53
16 Μη επαναφορτιζόμενες μπαταρίες (δεν περιλαμβάνονται)
17 Θήκη για μη επαναφορτιζόμενες μπαταρίες
18 Καπάκι θήκης για μη επαναφορτιζόμενες μπαταρίες
C
1 $ = ειδοποίηση θερμοκρασίας
2 Ñ° = ένδειξη θερμοκρασίας δωματίου
3 g = ειδοποίηση ήχου
4 r = ένδειξη υγρασίας
5 s = σύμβολο εντοπισμού
6 K = σύμβολο νανουρίσματος
7 Q = σύμβολο νυχτερινού φωτός
8 T = σύμβολο μπαταρίας
9 Ενδείξεις έντασης ήχου/ευαισθησίας μικροφώνου:
- g = ήχος απενεργοποιημένος
- h = ελάχιστη ευαισθησία/ένταση ήχου
- i = μέγιστη ευαισθησία/ένταση ήχου
Άλλες ενδείξεις οθόνης (δεν απεικονίζονται):
- ’High’ (Υψηλή) = θερμοκρασία δωματίου υψηλότερη από τη θερμοκρασία που έχει
ρυθμιστεί στο μενού
- ‘Low’ (Χαμηλή) = θερμοκρασία δωματίου χαμηλότερη από τη θερμοκρασία που έχει
ρυθμιστεί στο μενού
- ‘Not linked’ (Μη συνδεδεμένες) = δεν υπάρχει σύνδεση μεταξύ των μονάδων*
- ’Paused’ (Παύση) = το νανούρισμα έχει διακοπεί
- ‘Searching’ (Αναζήτηση) = οι μονάδες κάνουν αναζήτηση για σύνδεση*
- ‘Linked’ (Πραγματοποιήθηκε σύνδεση) = οι μονάδες έχουν συνδεθεί*
- ’Talk’ (Ομιλία) = η λειτουργία ομιλίας είναι ενεργή
* Εμφανίζεται μόνο στην οθόνη της μονάδας γονέα.
D
Διαβάστε αυτό το εγχειρίδιο χρήσης προσεκτικά πριν χρησιμοποιήσετε τη συσκευή και
φυλάξτε το για μελλοντική αναφορά.
- Μην βυθίζετε ποτέ κανένα μέρος του βρεφικού μόνιτορ σε νερό ή οποιοδήποτε άλλο υγρό.
- Πριν συνδέσετε τη συσκευή, ελέγξετε εάν η τάση που αναγράφεται στους μετασχηματιστές
της μονάδας μωρού και της βάσης φόρτισης αντιστοιχούν στην τοπική τάση ρεύματος.
- Χρησιμοποιείτε μόνο τον μετασχηματιστή που παρέχεται για να συνδέσετε τη μονάδα
μωρού στην πρίζα.
- Χρησιμοποιείτε μόνο τη βάση φόρτισης και τον μετασχηματιστή που παρέχονται για να
φορτίσετε τη μονάδα γονέα.
- Μην κόψετε τα βύσματα των μετασχηματιστών για να τα αντικαταστήσετε με άλλα, καθώς
αυτό θα προκαλέσει επικίνδυνες καταστάσεις.
- Εάν οι μετασχηματιστές υποστούν βλάβη, θα πρέπει να αντικατασταθούν μόνο με γνήσιους
προς αποφυγή κινδύνου. Για πληροφορίες σχετικά με το σωστό τύπο μετασχηματιστών,
ανατρέξτε στο κεφάλαιο ‘Αντικατάσταση’.
- Εάν η βάση φόρτισης της μονάδας γονέα υποστεί βλάβη, θα πρέπει να αντικατασταθεί
μόνο με γνήσια.
- Μην χρησιμοποιείτε ποτέ το βρεφικό μόνιτορ σε υγρά μέρη ή κοντά σε νερό.
- Με εξαίρεση τις θήκες μπαταριών, μην ανοίγετε το περίβλημα της μονάδας μωρού και της
μονάδας γονέα προς αποφυγή κινδύνου ηλεκτροπληξίας.

54
- Αυτή η συσκευή δεν προορίζεται για χρήση από άτομα (συμπεριλαμβανομένων των
παιδιών) με περιορισμένες σωματικές, αισθητήριες ή διανοητικές ικανότητες ή από άτομα
χωρίς εμπειρία και γνώση, εκτός και εάν τη χρησιμοποιούν υπό επιτήρηση ή έχουν λάβει
οδηγίες σχετικά με τη χρήση της συσκευής από άτομο υπεύθυνο για την ασφάλειά τους.
- Τα παιδιά θα πρέπει να επιβλέπονται προκειμένου να διασφαλιστεί ότι δεν θα παίζουν με
τη συσκευή.
- Χρησιμοποιείτε και αποθηκεύετε τη συσκευή σε θερμοκρασίες μεταξύ 10°C και 40°C.
- Μην εκθέτετε τη μονάδα μωρού και τη μονάδα γονέα σε υπερβολικό κρύο ή ζέστη ή σε
άμεσο ηλιακό φως. Μην τοποθετείτε τη μονάδα μωρού και τη μονάδα γονέα κοντά σε
πηγές θερμότητας.
- Φροντίστε ώστε η μονάδα μωρού και το καλώδιο να βρίσκονται πάντα σε σημείο που δεν
μπορεί να φτάσει το μωρό (σε απόσταση τουλάχιστον 1 μέτρου/3 ποδιών).
- Μην τοποθετείτε ποτέ τη μονάδα μωρού στο κρεβάτι ή το πάρκο του μωρού.
- Μην καλύπτετε ποτέ τη μονάδα γονέα και τη μονάδα μωρού με οτιδήποτε (π.χ. πετσέτα ή
κουβέρτα). Φροντίζετε πάντα ώστε οι οπές ψύξης της μονάδας μωρού να είναι ανοιχτές.
- Τοποθετείτε πάντα μη επαναφορτιζόμενες μπαταρίες σωστού τύπου στη μονάδα μωρού.
- Χρησιμοποιείτε πάντα το συμπεριλαμβανόμενο σετ επαναφορτιζόμενων μπαταριών για τη
μονάδα γονέα προς αποφυγή κινδύνου.
- Εάν τοποθετήσετε τη μονάδα γονέα δίπλα σε πομπό ή άλλη συσκευή DECT (π.χ. τηλέφωνο
DECT), η σύνδεση με τη μονάδα μωρού ενδέχεται να χαθεί.
- Αυτό το βρεφικό μόνιτορ προορίζεται για βοήθημα. Δεν αποτελεί υποκατάστατο της
υπεύθυνης και σωστής επιτήρησης ενός ενηλίκου και δεν πρέπει να χρησιμοποιείται ως
τέτοιο.
- Ο αισθητήρας υγρασίας και θερμοκρασίας μετρά μόνο τη θερμοκρασία και την υγρασία
στο δωμάτιο του μωρού. Δεν μπορεί να χρησιμοποιηθεί για έλεγχο ή προσαρμογή της
θερμοκρασίας και της υγρασίας στο δωμάτιο του μωρού.
Η συγκεκριμένη συσκευή της Philips AVENT συμμορφώνεται με όλα τα πρότυπα που αφορούν
τα ηλεκτρομαγνητικά πεδία (EMF). Εάν γίνει σωστός χειρισμός και σύμφωνος με τις οδηγίες
του παρόντος εγχειριδίου χρήσης, η συσκευή είναι ασφαλής στη χρήση βάσει των
επιστημονικών αποδείξεων που είναι διαθέσιμες μέχρι σήμερα.
Μπορείτε να χρησιμοποιήσετε τη μονάδα μωρού είτε με ρεύμα είτε με μη επαναφορτιζόμενες
μπαταρίες. Ακόμα και εάν πρόκειται να χρησιμοποιήσετε τη μονάδα με ρεύμα, σας συνιστούμε
να τοποθετήσετε τις μη επαναφορτιζόμενες μπαταρίες. Έτσι εξασφαλίζεται η αυτόματη
εφεδρική λειτουργία σε περίπτωση διακοπής ρεύματος.
1 Συνδέστε το μεγάλο βύσμα της συσκευής στη μονάδα μωρού και το μετασχηματιστή
στην πρίζα (Εικ. 2).
, Η λυχνία λειτουργίας ανάβει.
Η μονάδα μωρού λειτουργεί με τέσσερις μπαταρίες R6 AA 1,5V (δεν συμπεριλαμβάνονται). Σας
συνιστούμε να χρησιμοποιείτε τις μπαταρίες LR6 PowerLife της Philips.
Μην χρησιμοποιείτε επαναφορτιζόμενες μπαταρίες, καθώς η μονάδα μωρού δεν διαθέτει
λειτουργία φόρτισης.

55
Αποσυνδέστε τη μονάδα μωρού από την πρίζα και βεβαιωθείτε ότι τα χέρια σας και η
μονάδα είναι στεγνά όταν τοποθετείτε τις μη επαναφορτιζόμενες μπαταρίες.
1 Αφαιρέστε το καπάκι της θήκης για μη επαναφορτιζόμενες μπαταρίες. (Εικ. 3)
2 Τοποθετήστε τέσσερις μη επαναφορτιζόμενες μπαταρίες (Εικ. 4).
Σημείωση: Βεβαιωθείτε ότι οι πόλοι + και - δείχνουν προς τη σωστή κατεύθυνση.
3 Επανατοποθετήστε το καπάκι. (Εικ. 5)
Η μονάδα γονέα παρέχεται με ένα σετ επαναφορτιζόμενων μπαταριών Li-ion 1000mAh.
Φορτίστε τη μονάδα γονέα πριν τη χρησιμοποιήσετε για πρώτη φορά ή όταν η μονάδα γονέα
υποδεικνύει ότι η ισχύς της μπαταρίας είναι χαμηλή (το σύμβολο άδειας μπαταρίας
αναβοσβήνει στην οθόνη και ένα ηχητικό σήμα ακούγεται από τη μονάδα γονέα). Η μονάδα
γονέα αρχίζει να υποδεικνύει ότι η ισχύς του σετ μπαταριών είναι χαμηλή 30 λεπτά πριν
αδειάσει εντελώς το σετ μπαταριών.
Σημείωση: Εάν το σετ επαναφορτιζόμενων μπαταριών είναι εντελώς άδειο, η μονάδα γονέα
απενεργοποιείται αυτόματα και χάνει την επαφή με τη μονάδα μωρού.
1 Αφαιρέστε το καπάκι της θήκης για το σετ επαναφορτιζόμενων μπαταριών (Εικ. 6).
2 Τοποθετήστε το σετ επαναφορτιζόμενων μπαταριών (Εικ. 7).
3 Επανατοποθετήστε το καπάκι (Εικ. 8).
4 Εισαγάγετε το μικρό βύσμα της συσκευής στη βάση φόρτισης, συνδέστε
το μετασχηματιστή στην πρίζα και τοποθετήστε τη μονάδα γονέα στη βάση
φόρτισης (Εικ. 9).
, Η λυχνία φόρτισης στη βάση φόρτισης ανάβει.
, Στην οθόνη εμφανίζεται ένα σύμβολο φόρτισης μπαταρίας υποδεικνύοντας ότι η μονάδα
γονέα φορτίζεται.
5 Αφήστε τη μονάδα γονέα στη βάση φόρτισης μέχρι το σετ μπαταριών να
φορτιστεί πλήρως.
, Κατά τη διάρκεια της φόρτισης, η λυχνία φόρτισης της βάσης φόρτισης παραμένει
συνεχώς αναμμένη.
, Όταν το σετ μπαταριών φορτιστεί πλήρως, στην οθόνη της μονάδας γονέα εμφανίζεται
ένα σύμβολο γεμάτης μπαταρίας T.
- Όταν φορτίζετε τη μονάδα γονέα για πρώτη φορά ή μετά από μεγάλο διάστημα μη
χρήσης, απενεργοποιήστε την και αφήστε την να φορτιστεί για τουλάχιστον 10
συνεχόμενες ώρες.
- Η φόρτιση συνήθως διαρκεί 4 ώρες, αλλά θα διαρκέσει περισσότερο εάν η μονάδα γονέα
είναι ενεργοποιημένη κατά τη φόρτιση. Για να διαρκέσει ο χρόνος φόρτισης το λιγότερο
δυνατό, απενεργοποιείτε τη μονάδα γονέα κατά τη φόρτιση.
- Όταν το σετ μπαταριών είναι πλήρως φορτισμένο, η μονάδα γονέα επιτρέπει αυτονομία
χρήσης για τουλάχιστον 24 ώρες.
Σημείωση: Στην πρώτη φόρτιση της μονάδας γονέα, ο χρόνος λειτουργίας είναι μικρότερος από 24
ώρες. Η πλήρης απόδοση του σετ μπαταριών θα είναι διαθέσιμη μετά από τέσσερις φορές φόρτισης
και αποφόρτισης.
Σημείωση: Όταν η μονάδα γονέα δεν είναι τοποθετημένη στη βάση φόρτισης, το σετ μπαταριών
σταδιακά αποφορτίζεται, ακόμη και όταν η μονάδα γονέα είναι απενεργοποιημένη.

56
1 Τοποθετήστε τη μονάδα γονέα και τη μονάδα μωρού στο ίδιο δωμάτιο για να ελέγξετε
τη σύνδεση (Εικ. 10).
Φροντίστε ώστε η μονάδα μωρού να βρίσκεται σε απόσταση τουλάχιστον 1 μέτρου/3 ποδιών
από τη μονάδα γονέα.
2 Πατήστε και κρατήστε πατημένο το κουμπί on/off 3 στη μονάδα μωρού μέχρι να ανάψει
η πράσινη λυχνία λειτουργίας. (Εικ. 11)
Σημείωση: Η λυχνία λειτουργίας ανάβει πάντα πράσινη, ακόμα και όταν δεν υπάρχει σύνδεση με τη
μονάδα γονέα.
, Το νυχτερινό φως ανάβει για λίγο και μετά σβήνει ξανά.
, Η οθόνη φωτίζεται και το σύμβολο μπαταρίας εμφανίζεται στην οθόνη (Εικ. 12).
, Μετά από 2 δευτερόλεπτα οι τιμές θερμοκρασίας και υγρασίας εμφανίζονται στην
οθόνη (Εικ. 13).
3 Πατήστε και κρατήστε πατημένο το κουμπί on/off 3 στη μονάδα γονέα μέχρι να
ανάψουν για λίγο οι λυχνίες επιπέδου ήχου. (Εικ. 14)
, Η οθόνη ανάβει και το σύμβολο μπαταρίας εμφανίζεται στην οθόνη (Εικ. 15).
, Η λυχνία LINK αναβοσβήνει κόκκινη και το μήνυμα ‘Searching’ (Αναζήτηση) εμφανίζεται
στην οθόνη. (Εικ. 16)
, Η λυχνία LINK στη μονάδα γονέα αλλάζει σε πράσινη και ανάβει συνεχόμενα όταν έχει
επιτευχθεί σύνδεση ανάμεσα στη μονάδα μωρού και τη μονάδα γονέα. Το μήνυμα ‘Linked’
(Πραγματοποιήθηκε σύνδεση) εμφανίζεται στην οθόνη. (Εικ. 17)
, Μετά από 2 δευτερόλεπτα, το μήνυμα ‘Linked’ (Πραγματοποιήθηκε σύνδεση)
εξαφανίζεται και οι τιμές θερμοκρασίας και υγρασίας εμφανίζονται στην οθόνη. (Εικ. 18)
, Την πρώτη φορά που θα ενεργοποιήσετε τη μονάδα γονέα, το μήνυμα ‘Language’
(Γλώσσα) θα εμφανιστεί στην οθόνη. Επιλέξτε την επιθυμητή γλώσσα (δείτε το κεφάλαιο
‘Επιλογές μενού’, ενότητα ‘Ρύθμιση γλώσσας προβολής’). (Εικ. 19)
, Εάν δεν έχει επιτευχθεί σύνδεση, η λυχνία LINK στη μονάδα γονέα σταματά να
αναβοσβήνει και ανάβει κόκκινη. Από τη μονάδα γονέα ακούγεται ένα ηχητικό σήμα ανά
διαστήματα και το μήνυμα ‘Not Linked’ (Μη συνδεδεμένες) εμφανίζεται στην
οθόνη. (Εικ. 20)
1 Τοποθετήστε τη μονάδα μωρού σε απόσταση τουλάχιστον 1 μέτρου/3 ποδιών από το
μωρό σας (Εικ. 21).
2 Τοποθετήστε τη μονάδα γονέα εντός της εμβέλειας λειτουργίας της μονάδας μωρού.
Φροντίστε ώστε να βρίσκεται σε απόσταση τουλάχιστον 1 μέτρου/3 ποδιών από τη
μονάδα μωρού προς αποφυγή ακουστικής ανάδρασης (Εικ. 10).
Για περισσότερες πληροφορίες σχετικά με την εμβέλεια λειτουργίας, δείτε παρακάτω την
ενότητα ‘Εμβέλεια λειτουργίας’.
Η εμβέλεια λειτουργίας του βρεφικού μόνιτορ είναι 330 μέτρα/1000 πόδια σε εξωτερικό χώρο.
Ανάλογα με τον περιβάλλοντα χώρο και άλλους παρεμβάλλοντες παράγοντες, αυτή η εμβέλεια
ενδέχεται να είναι μικρότερη. Σε εσωτερικό χώρο η εμβέλεια λειτουργίας φτάνει τα 50
μέτρα/150 πόδια.
Στεγνά υλικά Πάχος υλικών Απώλεια εμβέλειας
Ξύλο, γύψος, χαρτόνι, γυαλί (χωρίς
μέταλλο, καλώδια ή μόλυβδο)
< 30 εκ./12 ίν. 0-10%

57
Στεγνά υλικά Πάχος υλικών Απώλεια εμβέλειας
Τούβλο, κοντραπλακέ < 30 εκ./12 ίν. 5-35%
Ενισχυμένο τσιμέντο < 30 εκ./12 ίν. 30-100%
Μεταλλικές γρίλιες ή μπάρες < 1 εκ./0,4 ίν. 90-100%
Φύλλα μετάλλου ή αλουμινίου < 1 εκ./0,4 ίν. 100%
Για υγρά υλικά, η απώλεια εμβέλειας ενδέχεται να φτάνει το 100%.
Τα ακόλουθα χαρακτηριστικά περιγράφονται στο κεφάλαιο ‘Επιλογές μενού’, καθώς η
λειτουργία τους είναι δυνατή μόνο από το μενού της μονάδας γονέα:
- Ρύθμιση ευαισθησίας μικροφώνου
- Ενεργοποίηση/απενεργοποίηση ειδοποίησης ήχου
- Ρύθμιση εύρους της θερμοκρασίας δωματίου (ελάχιστη και μέγιστη θερμοκρασία)
- Ενεργοποίηση/απενεργοποίηση ειδοποίησης θερμοκρασίας
- Ενεργοποίηση/απενεργοποίηση ειδοποίησης δόνησης
1 Πατήστε το κουμπί έντασης ήχου + ή – στη μονάδα μωρού έως ότου φτάσετε στην
επιθυμητή ένταση ηχείου για τη μονάδα μωρού (Εικ. 22).
2 Πατήστε το κουμπί έντασης ήχου + ή – στη μονάδα γονέα έως ότου φτάσετε στην
επιθυμητή ένταση ηχείου για τη μονάδα γονέα (Εικ. 23).
, Στις οθόνες εμφανίζονται ενδείξεις για τις ρυθμίσεις έντασης ήχου των μονάδων:
-
g = απενεργοποιημένη ένταση ήχου στη μονάδα γονέα/παρακολούθηση μωρού
-
h = ελάχιστη ένταση ήχου (μονάδα γονέα και μονάδα μωρού)
- i = μέγιστη ένταση ήχου (μονάδα γονέα και μονάδα μωρού)
Σημείωση: Εάν η ένταση του ήχου έχει ρυθμιστεί σε υψηλό επίπεδο, οι μονάδες καταναλώνουν
περισσότερη ισχύ.
Μπορείτε να χρησιμοποιήσετε το κουμπί TALK στη μονάδα γονέα για να μιλήσετε στο μωρό
σας (π.χ. για να το ηρεμήσετε).
1 Πατήστε και κρατήστε πατημένο το κουμπί TALK και μιλήστε καθαρά στο μικρόφωνο
από απόσταση 15-30 εκ (Εικ. 24).
, Η πράσινη λυχνία LINK αρχίζει να αναβοσβήνει και το μήνυμα ‘Talk’ (Ομιλία) εμφανίζεται
στην οθόνη.
2 Αφήστε το κουμπί TALK όταν σταματήσετε να μιλάτε.
Η μονάδα γονέα παρακολουθεί συνεχώς το επίπεδο ήχου στο δωμάτιο του μωρού σας και οι
λυχνίες επιπέδου ήχου σας ενημερώνουν για τυχόν δραστηριότητα. Εάν το μωρό σας κλάψει,
θα δείτε τις λυχνίες επιπέδου ήχου να ανάβουν στη μονάδα γονέα.
- Όσο η μονάδα μωρού δεν ανιχνεύει κάποιον ήχο, όλες οι λυχνίες επιπέδου ήχου στη
μονάδα γονέα παραμένουν σβηστές.
- Όταν η μονάδα μωρού ανιχνεύσει έναν ήχο, μία ή περισσότερες λυχνίες επιπέδου ήχου
στη μονάδα γονέα ανάβουν. Ο αριθμός των λυχνιών που ανάβουν σχετίζεται με την
ένταση του ήχου που ανιχνεύεται από τη μονάδα μωρού.
χωρίς ήχο

58
Σημείωση: Μπορείτε επίσης να ανάψετε και να σβήσετε το νυχτερινό φως από το μενού της
μονάδας γονέα (δείτε το κεφάλαιο ‘Επιλογές μενού’, ενότητα ‘Νυχτερινό φως’).
1 Πατήστε το κουμπί νυχτερινού φωτός Q στη μονάδα μωρού για να ανάψετε το νυχτερινό
φως. (Εικ. 25)
, Q εμφανίζεται στην οθόνη της μονάδας γονέα.
2 Πατήστε ξανά το κουμπί νυχτερινού φωτός Q για να σβήσετε το νυχτερινό φως.
, Το νυχτερινό φως εξασθενεί σταδιακά πριν σβήσει εντελώς.
, Q εξαφανίζεται από την οθόνη της μονάδας γονέα.
Συμβουλή: Σβήστε το νυχτερινό φως όταν λειτουργείτε τη μονάδα μωρού με μη
επαναφορτιζόμενες μπαταρίες. Με τον τρόπο αυτό εξοικονομείτε ενέργεια.
Εάν δεν μπορείτε να βρείτε τη μονάδα γονέα και ο ήχος είναι απενεργοποιημένος, μπορείτε να
χρησιμοποιήσετε το κουμπί PAGE στη μονάδα μωρού για να εντοπίσετε τη μονάδα γονέα.
Σημείωση: Η λειτουργία εντοπισμού είναι εφικτή μόνο όταν η μονάδα γονέα είναι ενεργοποιημένη.
1 Πατήστε το κουμπί PAGE στη μονάδα μωρού (Εικ. 26).
, Το μήνυμα ‘Paging’ (Εντοπισμός) και το σύμβολο της λειτουργίας εντοπισμού
εμφανίζονται στις οθόνες της μονάδας μωρού και της μονάδας γονέα.
, Η μονάδα γονέα εκπέμπει ένα ηχητικό σήμα εντοπισμού.
2 Για να διακόψετε το ηχητικό σήμα εντοπισμού, πατήστε ξανά το κουμπί PAGE ή
οποιοδήποτε κουμπί στη μονάδα γονέα.
Σημείωση: Μπορείτε επίσης να λειτουργήσετε τη λειτουργία νανουρίσματος από το μενού της
μονάδας γονέα (δείτε το κεφάλαιο ‘Επιλογές μενού’, ενότητα ‘Λειτουργία νανουρίσματος’).
1 Πατήστε το κουμπί έναρξης/διακοπής E στη μονάδα μωρού για να πραγματοποιήσετε
αναπαραγωγή του νανουρίσματος που έχετε επιλέξει. (Εικ. 27)
2 Για να επιλέξετε διαφορετικό νανούρισμα, πατήστε το κουμπί νανουρίσματος K στη
μονάδα μωρού εντός 2 δευτερολέπτων για να μετακινηθείτε μέσα στη λίστα με τα
νανουρίσματα. (Εικ. 28)
Σημείωση: Εάν δεν πατήσετε το κουμπί νανουρίσματος K για περισσότερα από 2 δευτερόλεπτα, τότε
θα ξεκινήσει η αναπαραγωγή του νανουρίσματος που εμφανίζεται στην οθόνη.
, Ο αριθμός του νανουρίσματος εμφανίζεται στην οθόνη μαζί με το σύμβολο
νανουρίσματος K.
, Το νανούρισμα επαναλαμβάνεται συνεχώς.
3 Για διακοπή του νανουρίσματος, πατήστε ξανά το κουμπί έναρξης/διακοπής E στη
μονάδα μωρού. (Εικ. 27)
, Ο αριθμός του νανουρίσματος και το σύμβολο νανουρίσματος K εξαφανίζονται από την
οθόνη.
4 Για να επιλέξετε διαφορετικό νανούρισμα ενώ πραγματοποιείται αναπαραγωγή κάποιου
νανουρίσματος:
- Πατήστε το κουμπί νανουρίσματος K στη μονάδα μωρού εντός 2 δευτερολέπτων για να
μετακινηθείτε μέσα στη λίστα με τα νανουρίσματα.
Σημείωση: Εάν δεν πατήσετε το κουμπί νανουρίσματος K για περισσότερα από 2 δευτερόλεπτα, τότε
θα ξεκινήσει η αναπαραγωγή του νανουρίσματος που εμφανίζεται στην οθόνη.

59
Όταν υπάρχει σύνδεση ανάμεσα στη μονάδα μωρού και τη μονάδα γονέα, το επίπεδο
υγρασίας εμφανίζεται στην οθόνη και των δύο μονάδων.
Το βέλτιστο επίπεδο υγρασίας είναι μεταξύ 40% και 60%. Είναι πολύ σημαντικό να διατηρείται
σωστό επίπεδο υγρασίας καθώς αυτό συμβάλλει στην προστασία του μωρού σας από
ερεθισμούς των βλεννογόνων, ξηρό και κνησμώδες δέρμα, σκασμένα χείλη και ξηρό και
ερεθισμένο λαιμό. Όταν οι βλεννογόνοι δεν λειτουργούν σωστά, δεν μπορούν να προσφέρουν
στο μωρό σας την πλήρη προστασία ενάντια στα διάφορα μικρόβια. Αυτό αυξάνει την
πιθανότητα να κρυολογήσει ή να κολλήσει γρίπη και μειώνει την αντοχή του μωρού σε
λοιμώξεις από μούχλα και βακτήρια.
Ο υπερηχητικός υγραντήρας Philips AVENT μπορεί να σας βοηθήσει να βελτιώσετε την
ποιότητα του αέρα και να διατηρήσετε ένα ικανοποιητικό επίπεδο υγρασίας στο δωμάτιο του
μωρού σας. Επικοινωνήστε με το Κέντρο Εξυπηρέτησης Καταναλωτών της Philips για
καταστήματα πώλησης χονδρικής.
Σημείωση: Το βρεφικό μόνιτορ μετρά μόνο το επίπεδο υγρασίας. Δεν μπορείτε να προσαρμόσετε το
επίπεδο υγρασίας με το βρεφικό μόνιτορ.
Όταν η μονάδα γονέα βρίσκεται εκτός της εμβέλειας της μονάδας μωρού, από τη μονάδα
γονέα ακούγεται ένα ηχητικό σήμα ανά διαστήματα και το μήνυμα ‘Not linked’ (Μη
συνδεδεμένες) εμφανίζεται στην οθόνη. Η λυχνία LINK στη μονάδα γονέα ανάβει κόκκινη.
Σημείωση: Επίσης, το μήνυμα ‘Not Linked’ (Μη συνδεδεμένες) εμφανίζεται στην οθόνη της μονάδας
γονέα όταν η μονάδα μωρού είναι απενεργοποιημένη.
Οι περισσότερες λειτουργίες μπορούν να πραγματοποιηθούν και από τη μονάδα μωρού και
από τη μονάδα γονέα, όμως ορισμένες λειτουργίες μπορούν να πραγματοποιηθούν μόνο από
το μενού της μονάδας γονέα.
Σημείωση: Οι λειτουργίες του μενού μπορούν να ενεργοποιηθούν μόνο όταν έχει επιτευχθεί σύνδεση
μεταξύ της μονάδας μωρού και της μονάδας γονέα.
1 Πατήστε το κουμπί MENU (Μενού) για να ανοίξετε το μενού (Εικ. 29).
, Στην οθόνη εμφανίζεται η πρώτη επιλογή μενού.
2 Χρησιμοποιήστε τα κουμπιά – και + για να επιλέξετε την επιθυμητή επιλογή
μενού (Εικ. 30).
Σημείωση: Το βέλος υποδεικνύει προς ποια κατεύθυνση μπορείτε να πλοηγηθείτε.
3 Πατήστε το κουμπί OK για επιβεβαίωση (Εικ. 31).
4 Χρησιμοποιήστε τα κουμπιά + και - για να επιλέξετε την επιθυμητή ρύθμιση.
5 Πατήστε το κουμπί OK για επιβεβαίωση.
, Η νέα ρύθμιση αναβοσβήνει δύο φορές και, στη συνέχεια, εξαφανίζεται από την οθόνη.
6 Πατήστε ξανά το κουμπί MENU για να εξέλθετε από το μενού.
1 Επιλέξτε ‘Light’ (Φως) με τα κουμπιά + και -.
2 Πατήστε το κουμπί OK για επιβεβαίωση.

60
3 Εάν το νυχτερινό φως είναι απενεργοποιημένο, στην οθόνη εμφανίζεται η ένδειξη ‘On?’
(Ενεργοποίηση;). Πατήστε το κουμπί OK για να ενεργοποιήσετε το νυχτερινό φως. Εάν
το νυχτερινό φως είναι ενεργοποιημένο, στην οθόνη εμφανίζεται η ένδειξη ‘Off?’
(Απενεργοποίηση;). Πατήστε το κουμπί OK για να απενεργοποιήσετε το νυχτερινό φως.
1 Επιλέξτε ‘Lullaby’ (Νανούρισμα) με τα κουμπιά + και -.
2 Πατήστε το κουμπί OK για επιβεβαίωση.
3 Πατήστε το κουμπί + μία ή περισσότερες φορές για να επιλέξετε ένα από τα πέντε
νανουρίσματα που περιλαμβάνονται στη λίστα ή για να επιλέξετε ‘Play all’ (Αναπαραγωγή
όλων).
4 Πατήστε το κουμπί OK για επιβεβαίωση.
Μόλις επιλεγεί κάποιο από τα πέντε νανουρίσματα, τότε πραγματοποιείται συνεχής
αναπαραγωγή του.
1 Πατήστε το κουμπί + για να επιλέξετε διαφορετικό νανούρισμα από τη λίστα.
2 Πατήστε το κουμπί OK για επιβεβαίωση.
1 Πιέστε το κουμπί OK.
, Το μήνυμα ‘Paused’ (Παύση) εμφανίζεται στην οθόνη.
2 Πατήστε ξανά το κουμπί OK για να συνεχίσετε την αναπαραγωγή του νανουρίσματος.
Εάν δεν συνεχίσετε την αναπαραγωγή του νανουρίσματος εντός 20 δευτερολέπτων, η
λειτουργία νανουρίσματος απενεργοποιείται αυτόματα. Το μήνυμα ‘Paused’ (Παύση) και το
σύμβολο νανουρίσματος εξαφανίζονται από την οθόνη.
1 Πατήστε το κουμπί + για να επιλέξετε ‘Stop’ (Διακοπή) από τη λίστα.
2 Πατήστε το κουμπί OK για επιβεβαίωση.
Σημείωση: Μπορείτε να ρυθμίσετε την ευαισθησία του μικροφώνου μόνο από το μενού της μονάδας
γονέα.
Μπορείτε να ρυθμίσετε την ευαισθησία του μικροφώνου της μονάδας μωρού στο επιθυμητό
επίπεδο. Μπορείτε να αλλάξετε την ευαισθησία του μικροφώνου μόνο όταν έχει επιτευχθεί
σύνδεση μεταξύ της μονάδας μωρού και της μονάδας γονέα, δηλαδή όταν η λυχνία LINK στη
μονάδα γονέα ανάβει συνεχόμενα πράσινη.
1 Επιλέξτε ‘Sensitivity’ (Ευαισθησία) με τα κουμπιά + και -.
2 Πατήστε το κουμπί OK για επιβεβαίωση.
3 Επιλέξτε το επιθυμητό επίπεδο ευαισθησίας μικροφώνου για τη μονάδα μωρού με
τα κουμπιά + και -.
, h = ελάχιστο επίπεδο ευαισθησίας
, i = μέγιστο επίπεδο ευαισθησίας
4 Πατήστε το κουμπί OK για επιβεβαίωση.
, Το μήνυμα ‘Saved’ (Αποθηκεύτηκε) εμφανίζεται στην οθόνη.

61
Σημείωση: Όταν η ευαισθησία του μικροφώνου της μονάδας μωρού έχει ρυθμιστεί σε υψηλό
επίπεδο, ανιχνεύει περισσότερους ήχους, με αποτέλεσμα να εκπέμπει πιο συχνά. Συνεπώς, η μονάδα
καταναλώνει περισσότερη ισχύ.
Σημείωση: Μπορείτε να ενεργοποιήσετε και να απενεργοποιήσετε την ειδοποίηση ήχου μόνο από
το μενού της μονάδας γονέα.
Αυτή η λειτουργία σάς επιτρέπει να παρακολουθείτε το μωρό σας αθόρυβα. Σας δίνει τη
δυνατότητα να απενεργοποιείτε την ένταση ήχου στη μονάδα γονέα διατηρώντας όμως τη
δυνατότητα ειδοποίησης όταν το μωρό σας κλαίει.
Εάν η ειδοποίηση ήχου είναι ενεργοποιημένη, η μονάδα γονέα παράγει ένα ηχητικό σήμα όταν
ανάψει η τέταρτη λυχνία επιπέδου ήχου ενώ η ένταση του ήχου είναι απενεργοποιημένη.
Επιπλέον, ο οπίσθιος φωτισμός της οθόνης της μονάδας γονέα ανάβει και το σύμβολο
ειδοποίησης ήχου ( g) αναβοσβήνει στην οθόνη.
1 Επιλέξτε ‘Sound Alert’ (Ειδοποίηση ήχου) με τα κουμπιά + και -.
2 Πατήστε το κουμπί OK για επιβεβαίωση.
3 Εάν η ειδοποίηση είναι απενεργοποιημένη, στην οθόνη εμφανίζεται η ένδειξη ‘On?’
(Ενεργοποίηση;). Πατήστε το κουμπί OK για να ενεργοποιήσετε την ειδοποίηση. Εάν η
ειδοποίηση είναι ενεργοποιημένη, στην οθόνη εμφανίζεται η ένδειξη ‘Off?’
(Απενεργοποίηση;). Πατήστε το κουμπί OK για να απενεργοποιήσετε την ειδοποίηση.
, Εάν έχετε ρυθμίσει την ειδοποίηση ήχου στο ‘on’ (ενεργοποίηση), το σύμβολο
ειδοποίησης ήχου ( g) εμφανίζεται στην οθόνη στη μονάδας γονέα.
Σημείωση: Μπορείτε να ρυθμίσετε το εύρος της θερμοκρασίας μόνο από το μενού της μονάδας
γονέα.
Ένα μωρό θα κοιμάται άνετα σε ένα δωμάτιο με θερμοκρασία μεταξύ 16°C και 20°C. Αυτό
είναι σημαντικό καθώς ένα μωρό δεν μπορεί να ρυθμίσει τη θερμοκρασία του σώματός του το
ίδιο όπως ένας ενήλικος. Ένα μωρό χρειάζεται περισσότερο χρόνο για να προσαρμοστεί στις
αλλαγές θερμοκρασίας.
Εάν δεν ρυθμίσετε ένα εύρος θερμοκρασίας, το βρεφικό μόνιτορ σάς ειδοποιεί όταν η
θερμοκρασία στο δωμάτιο του μωρού σας πέσει κάτω από τους 14°C ή υπερβεί τους 30°C. Σε
αυτή την περίπτωση, ο οπίσθιος φωτισμός της οθόνης της μονάδας γονέα ανάβει και στην
οθόνη εμφανίζεται η ένδειξη ‘High’ (Υψηλή) ή ‘Low’ (Χαμηλή). Για να αλλάξετε την
προεπιλεγμένη ελάχιστη και μέγιστη θερμοκρασία, ακολουθήστε τις παρακάτω οδηγίες.
Σημείωση: Η θερμοκρασία του δωματίου του μωρού εμφανίζεται στην οθόνη και των δύο
μονάδων όταν είναι συνδεδεμένες.
1 Επιλέξτε ‘Temperature’ (Θερμοκρασία) με τα κουμπιά + και -.
2 Πατήστε το κουμπί OK για επιβεβαίωση.
3 Επιλέξτε ‘Range’ (Εύρος) με τα κουμπιά + και -.
4 Πατήστε το κουμπί OK για επιβεβαίωση.
5 Ρυθμίστε την επιθυμητή ελάχιστη θερμοκρασία με τα κουμπιά + και -.
6 Πατήστε το κουμπί OK για επιβεβαίωση.
7 Ρυθμίστε την επιθυμητή μέγιστη θερμοκρασία με τα κουμπιά + και -.
8 Πατήστε το κουμπί OK για επιβεβαίωση.
, Το μήνυμα ‘Saved’ (Αποθηκεύτηκε) εμφανίζεται στην οθόνη.

62
Σημείωση: Εάν η θερμοκρασία στο δωμάτιο του μωρού πέσει κάτω από ή υπερβεί το εύρος
θερμοκρασίας που έχετε ρυθμίσει, η οθόνη παραμένει συνεχώς αναμμένη. Αυτό έχει ως αποτέλεσμα
η μονάδα να καταναλώνει περισσότερη ενέργεια.
Σημείωση: Μπορείτε να ενεργοποιήσετε και να απενεργοποιήσετε την ειδοποίηση θερμοκρασίας μόνο
από το μενού της μονάδας γονέα.
Σημείωση: Εάν η ειδοποίηση θερμοκρασίας ενεργοποιείται πολύ συχνά, μειώστε την ελάχιστη
θερμοκρασία που έχετε ρυθμίσει ή/και αυξήστε τη μέγιστη θερμοκρασία που έχετε ρυθμίσει (δείτε
‘Ρύθμιση του εύρους της θερμοκρασίας δωματίου’).
Εάν η ειδοποίηση θερμοκρασίας είναι ενεργοποιημένη, από τη μονάδα γονέα ακούγεται ένα
ηχητικό σήμα εάν η πραγματική θερμοκρασία του δωματίου υπερβεί τη μέγιστη θερμοκρασία
που έχετε ρυθμίσει ή εάν πέσει κάτω από την ελάχιστη θερμοκρασία που έχετε ρυθμίσει.
Επιπλέον, ο οπίσθιος φωτισμός της οθόνης της μονάδας γονέα ανάβει, το σύμβολο
ειδοποίησης θερμοκρασίας ( t) αναβοσβήνει και η ένδειξη ‘High’ (Υψηλή) ή ‘Low’ (Χαμηλή)
εμφανίζεται στην οθόνη. Εάν δεν έχει ρυθμιστεί ελάχιστη και μέγιστη θερμοκρασία, η
ειδοποίηση θερμοκρασίας ενεργοποιείται όταν η θερμοκρασία δωματίου πέσει κάτω από τους
14°C ή υπερβεί τους 30°C.
1 Επιλέξτε ‘Temperature’ (Θερμοκρασία) με τα κουμπιά + και -.
2 Πατήστε το κουμπί OK για επιβεβαίωση.
3 Επιλέξτε ‘Alert’ (Ειδοποίηση) με τα κουμπιά + και -.
4 Πατήστε το κουμπί OK για επιβεβαίωση.
5 Εάν η ειδοποίηση είναι απενεργοποιημένη, στην οθόνη εμφανίζεται η ένδειξη ‘On?’
(Ενεργοποίηση;). Πατήστε το κουμπί OK για να ενεργοποιήσετε την ειδοποίηση. Εάν η
ειδοποίηση είναι ενεργοποιημένη, στην οθόνη εμφανίζεται η ένδειξη ‘Off?’
(Απενεργοποίηση;). Πατήστε το κουμπί OK για να απενεργοποιήσετε την ειδοποίηση.
Σημείωση: Μπορείτε να ενεργοποιήσετε και να απενεργοποιήσετε την ειδοποίηση δόνησης μόνο από
το μενού της μονάδας γονέα.
Εάν η ειδοποίηση δόνησης είναι ενεργοποιημένη, η μονάδα γονέα δονείται όταν η τέταρτη
λυχνία επιπέδου ήχου ανάψει, ενώ ο ήχος είναι απενεργοποιημένος.
1 Επιλέξτε ‘Vibration’ (Δόνηση) με τα κουμπιά + και -.
2 Πατήστε το κουμπί OK για επιβεβαίωση.
3 Εάν η ειδοποίηση δόνησης είναι απενεργοποιημένη, στην οθόνη εμφανίζεται η ένδειξη
‘On?’ (Ενεργοποίηση;). Πατήστε το κουμπί OK για να ενεργοποιήσετε την ειδοποίηση
δόνησης. Εάν η ειδοποίηση δόνησης είναι ενεργοποιημένη, στην οθόνη εμφανίζεται η
ένδειξη ‘Off?’ (Απενεργοποίηση;). Πατήστε το κουμπί OK για να απενεργοποιήσετε την
ειδοποίηση δόνησης.
1 Επιλέξτε ‘Language’ (Γλώσσα) με τα κουμπιά + και -.
2 Πατήστε το κουμπί OK για επιβεβαίωση.
3 Επιλέξτε την επιθυμητή γλώσσα με τα κουμπιά + και -.
4 Πατήστε το κουμπί OK για επιβεβαίωση.

63
Η συγκεκριμένη λειτουργία του μενού της μονάδας γονέα σάς δίνει τη δυνατότητα να
επαναφέρετε ταυτόχρονα και τη μονάδα γονέα και τη μονάδα μωρού στις προεπιλεγμένες
ρυθμίσεις. Μπορείτε να χρησιμοποιήσετε αυτή τη λειτουργία εάν παρουσιαστούν προβλήματα
που δεν μπορείτε να επιλύσετε ακολουθώντας τις προτάσεις του κεφαλαίου ‘Συχνές
ερωτήσεις’.
1 Επιλέξτε ‘Reset’ (Επαναφορά) με τα κουμπιά + και -.
2 Πατήστε το κουμπί OK για επιβεβαίωση.
, Το μήνυμα ‘Conrm?’ (Επιβεβαίωση;) εμφανίζεται στην οθόνη της μονάδας γονέα.
3 Πατήστε το κουμπί OK για επιβεβαίωση.
, Η μονάδα γονέα απενεργοποιείται και, στη συνέχεια, ενεργοποιείται ξανά.
, Έχει πλέον ολοκληρωθεί η επαναφορά και των δύο μονάδων στις προεπιλεγμένες
εργοστασιακές ρυθμίσεις.
Μονάδα γονέα
- Ειδοποίηση δόνησης: απενεργοποιημένη
- Γλώσσα: Αγγλικά
- Ένταση ηχείου: 1
- Ευαισθησία μικροφώνου: 3
- Ειδοποίηση ήχου: απενεργοποιημένη
- Ειδοποίηση θερμοκρασίας: απενεργοποιημένη
- Ειδοποίηση ‘χαμηλής θερμοκρασίας’: 14°C
- Ειδοποίηση ‘υψηλής θερμοκρασίας’: 30°C
Μονάδα μωρού
- Ένταση ηχείου: 3
- Νυχτερινό φως: απενεργοποιημένο
- Νανούρισμα: 1
Εάν το σετ μπαταριών της μονάδας γονέα είναι επαρκώς φορτισμένo, μπορείτε να παίρνετε
μαζί σας τη μονάδα εντός και εκτός σπιτιού είτε προσαρτώντας την στη ζώνη σας με το κλιπ
ζώνης είτε κρεμώντας την γύρω από το λαιμό σας με το λουράκι λαιμού. Έτσι μπορείτε να
παρακολουθείτε το μωρό σας ενώ μετακινείστε.
1 Εφαρμόστε το κλιπ ζώνης στη μονάδα γονέα (Εικ. 32).
1 Τραβήξτε το κλιπ ζώνης από τη μονάδα γονέα.
1 Περάστε τη θηλιά που βρίσκεται στο λουράκι λαιμού μέσα από την οπή της υποδοχής
δεσίματος. Περάστε το λουράκι λαιμού μέσα από τη θηλιά και τραβήξτε το μέχρι να
σφίξει (Εικ. 33).
1 Βγάλτε το λουράκι λαιμού από τη θηλιά και τραβήξτε τη θηλιά έξω από την οπή της
υποδοχής δεσίματος.

64
Μην βυθίζετε τη μονάδα γονέα και τη μονάδα μωρού σε νερό και μην τις πλένετε με νερό
βρύσης.
Μην χρησιμοποιείτε σπρέι καθαρισμού ή καθαριστικά υγρά.
1 Αποσυνδέστε τη μονάδα μωρού από την πρίζα, εάν είναι συνδεδεμένη, και αποσύρετε τη
μονάδα γονέα από τη βάση φόρτισης.
2 Καθαρίστε τη μονάδα γονέα και τη μονάδα μωρού με ένα νωπό πανί.
Βεβαιωθείτε ότι η μονάδα γονέα είναι στεγνή πριν την τοποθετήσετε ξανά στη βάση
φόρτισης που είναι συνδεδεμένη στην πρίζα.
3 Καθαρίστε τη βάση φόρτισης με ένα στεγνό πανί.
4 Καθαρίστε τους μετασχηματιστές με ένα στεγνό πανί.
- Μπορείτε να χρησιμοποιήσετε τη θήκη ταξιδίου για να αποθηκεύσετε το βρεφικό μόνιτορ
όταν ταξιδεύετε.
- Όταν δεν πρόκειται να χρησιμοποιήσετε το βρεφικό μόνιτορ για κάποιο χρονικό
διάστημα, αφαιρέστε τις μη επαναφορτιζόμενες μπαταρίες από τη μονάδα μωρού και το
σετ μπαταριών από τη μονάδα γονέα. Αποθηκεύστε τη μονάδα γονέα, τη μονάδα μωρού, τη
βάση φόρτισης της μονάδας γονέα και τους μετασχηματιστές στη θήκη ταξιδιού που
παρέχεται.
Αντικαθιστάτε τις μη επαναφορτιζόμενες μπαταρίες της μονάδας μωρού μόνο με τέσσερις
μπαταρίες R6 AA 1,5V.
Σημείωση: Σας συνιστούμε να χρησιμοποιείτε μη επαναφορτιζόμενες μπαταρίες Philips.
Αντικαθιστάτε τον μετασχηματιστή της μονάδας μωρού μόνο με γνήσιο. Μπορείτε να
παραγγείλετε ένα νέο μετασχηματιστή από τον αντιπρόσωπό σας ή από ένα εξουσιοδοτημένο
κέντρο σέρβις της Philips.
- Μόνο στο Ην.Βασίλειο: SSA-5S-09 UK 075040F
- Υπόλοιπες χώρες: SSA-5W-09 EU 075040F
Αντικαθιστάτε το σετ μπαταριών της μονάδας γονέα μόνο με σετ μπαταριών Li-ion 1000mAh.
Αντικαθιστάτε τον μετασχηματιστή της βάσης φόρτισης της μονάδας γονέα μόνο με γνήσιο.
Μπορείτε να παραγγείλετε ένα νέο μετασχηματιστή από τον αντιπρόσωπό σας ή από ένα
εξουσιοδοτημένο κέντρο σέρβις της Philips.
- Μόνο στο Ην.Βασίλειο: SSA-5W-09 UK 075050F
- Υπόλοιπες χώρες: SSA-5W-09 EU 075050F

65
- Στο τέλος της ζωής της συσκευής μην την πετάξετε μαζί με τα συνηθισμένα απορρίματα
του σπιτιού σας, αλλά παραδώστε τη σε ένα επίσημο σημείο συλλογής για ανακύκλωση.
Με αυτόν τον τρόπο, θα βοηθήσετε στην προστασία του περιβάλλοντος (Εικ. 34).
- Οι μη επαναφορτιζόμενες μπαταρίες καθώς και τα σετ μπαταριών περιέχουν ουσίες που
ενδέχεται να μολύνουν το περιβάλλον. Μην πετάτε τις μη επαναφορτιζόμενες
μπαταρίες και τα σετ μπαταριών μαζί με τα συνηθισμένα απορρίμματα του σπιτιού σας,
αλλά παραδώστε τις σε ένα επίσημο σημείο συλλογής. Αφαιρείτε πάντα τις μη
επαναφορτιζόμενες μπαταρίες και τα σετ μπαταριών πριν απορρίψετε και παραδώσετε τη
συσκευή σε ένα επίσημο σημείο συλλογής.
Εάν χρειάζεστε σέρβις ή πληροφορίες ή εάν αντιμετωπίζετε κάποιο πρόβλημα, παρακαλούμε
επισκεφτείτε την ιστοσελίδα της Philips AVENT στη διεύθυνση www.philips.com/AVENT ή
επικοινωνήστε με το Κέντρο Εξυπηρέτησης Καταναλωτών της Philips στη χώρα σας (θα βρείτε
το τηλέφωνο στο διεθνές φυλλάδιο εγγύησης). Εάν δεν υπάρχει Κέντρο Εξυπηρέτησης
Καταναλωτών στη χώρα σας, απευθυνθείτε στον τοπικό αντιπρόσωπό σας της Philips.
Στο κεφάλαιο αυτό αναγράφονται οι πιο συχνές ερωτήσεις σχετικά με τη συσκευή. Εάν δεν
μπορείτε να βρείτε την απάντηση στην ερώτησή σας, επικοινωνήστε με το Τμήμα
Εξυπηρέτησης Πελατών της χώρας σας.
Ερώτηση Απάντηση
Γιατί η λυχνία
λειτουργίας της
μονάδας μωρού και
η λυχνία LINK της
μονάδας γονέα δεν
ανάβουν όταν πατάω
τα κουμπιά on/off
των μονάδων;
Ενδέχεται το σετ επαναφορτιζόμενων μπαταριών της μονάδας
γονέα να έχει αδειάσει και η μονάδα γονέα να μην είναι
τοποθετημένη στη συνδεδεμένη στην πρίζα βάση φόρτισης. Εισάγετε
το μικρό βύσμα της συσκευής στη βάση φόρτισης, συνδέστε το
μετασχηματιστή της βάσης φόρτισης στην πρίζα και τοποθετήστε τη
μονάδα γονέα στη βάση φόρτισης. Στη συνέχεια, πατήστε το κουμπί
on/off για να πραγματοποιήσετε σύνδεση με τη μονάδα μωρού.
Ενδέχεται οι μη επαναφορτιζόμενες μπαταρίες της μονάδας μωρού
να έχουν αδειάσει και η μονάδα μωρού να μην είναι συνδεδεμένη
στην πρίζα. Αντικαταστήστε τις μη επαναφορτιζόμενες μπαταρίες ή
συνδέστε τη μονάδα μωρού στην πρίζα. Στη συνέχεια, πατήστε το
κουμπί on/off για να πραγματοποιήσετε σύνδεση με τη μονάδα
γονέα.
Ενδέχεται η μονάδα μωρού και η μονάδα γονέα να βρίσκονται εκτός
εμβέλειας η μία από την άλλη. Μετακινήστε τη μονάδα γονέα πιο
κοντά στη μονάδα μωρού, αλλά όχι πιο κοντά από 1 μέτρο/3 πόδια.
Εάν η λυχνία LINK στη μονάδα γονέα δεν έχει αρχίσει ακόμα να
αναβοσβήνει, χρησιμοποιήστε τη λειτουργία επαναφοράς για να
επαναφέρετε τις μονάδες στις προεπιλεγμένες ρυθμίσεις τους.

66
Ερώτηση Απάντηση
Γιατί η λυχνία LINK
στη μονάδα γονέα
ανάβει συνεχώς
κόκκινη και γιατί το
μήνυμα ‘Not Linked’
(Μη συνδεδεμένες)
εμφανίζεται στην
οθόνη;
Γιατί αναβοσβήνει το
σύμβολο μπαταρίας
στην οθόνη στην
οθόνη της μονάδας
μωρού;
Γιατί ακούγεται ένα
ηχητικό σήμα από τη
μονάδα γονέα;
Γιατί η συσκευή
παράγει έναν
διαπεραστικό ήχο;
Η μονάδα μωρού και η μονάδα γονέα είναι εκτός εμβέλειας η μια
από την άλλη. Μετακινήστε τη μονάδα γονέα πιο κοντά στη μονάδα
μωρού.
Ενδέχεται η μονάδα μωρού να είναι απενεργοποιημένη.
Ενεργοποιήστε τη μονάδα μωρού.
Η ισχύς των μη επαναφορτιζόμενων μπαταριών της μονάδας μωρού
είναι χαμηλή. Αντικαταστήστε τις μη επαναφορτιζόμενες μπαταρίες ή
συνδέστε τη μονάδα μωρού στην πρίζα (δείτε το κεφάλαιο
‘Προετοιμασία για χρήση’).
Εάν από τη μονάδα γονέα ακούγεται ένα ηχητικό σήμα ενώ η λυχνία
LINK ανάβει συνεχώς κόκκινη και το μήνυμα ‘Not Linked’ (Μη
συνδεδεμένες) εμφανίζεται στην οθόνη, τότε η σύνδεση με τη
μονάδα μωρού έχει χαθεί. Μετακινήστε τη μονάδα γονέα πιο κοντά
στη μονάδα μωρού.
Εάν από τη μονάδα γονέα ακούγεται ένα ηχητικό σήμα και το
σύμβολο άδειας μπαταρίας εμφανίζεται στην οθόνη, τότε η ισχύς του
σετ επαναφορτιζόμενων μπαταριών της μονάδας γονέα είναι
χαμηλή. Επαναφορτίστε το σετ επαναφορτιζόμενων μπαταριών.
Εάν έχετε απενεργοποιήσει τον ήχο ενώ η ειδοποίηση ήχου είναι
ενεργοποιημένη, από τη μονάδα γονέα ακούγεται ένα ηχητικό σήμα
κάθε φορά που η τέταρτη λυχνία επιπέδου ήχου ανάβει γιατί η
μονάδα μωρού έχει ανιχνεύσει έναν ήχο.
Εάν έχετε ρυθμίσει το εύρος θερμοκρασίας δωματίου στη μονάδα
γονέα και η ειδοποίηση θερμοκρασίας είναι ενεργοποιημένη, από τη
μονάδα γονέα ακούγεται ένα ηχητικό σήμα όταν η θερμοκρασία
πέσει κάτω από το επίπεδο που έχετε ρυθμίσει ή κάτω από τους
14°C ή όταν η θερμοκρασία υπερβεί το επίπεδο που έχετε ρυθμίσει
ή τους 30°C.
Ενδέχεται η μονάδα μωρού να είναι απενεργοποιημένη.
Ενεργοποιήστε τη μονάδα μωρού.
Ενδέχεται οι μονάδες να βρίσκονται πολύ κοντά η μία στην άλλη.
Φροντίστε η μονάδα γονέα και η μονάδα μωρού να βρίσκονται σε
απόσταση τουλάχιστον 1 μέτρου/3 ποδιών η μία από την άλλη.
Ενδέχεται η ένταση του ήχου στη μονάδα γονέα να έχει ρυθμιστεί σε
πολύ υψηλό επίπεδο. Μειώστε την ένταση του ήχου στη μονάδα
γονέα.

Ερώτηση Απάντηση
Γιατί δεν ακούγεται
ήχος/Γιατί δεν
ακούγεται το κλάμα
του μωρού μου;
Γιατί η μονάδα γονέα
αντιδρά τόσο
γρήγορα σε άλλους
ήχους;
Γιατί η μονάδα γονέα
αντιδρά με τόση
καθυστέρηση στο
κλάμα του μωρού;
Γιατί αποφορτίζονται
τόσο γρήγορα οι μη
επαναφορτιζόμενες
μπαταρίες της
μονάδας μωρού;
Ενδέχεται η ένταση του ήχου στη μονάδα γονέα να έχει ρυθμιστεί σε
πολύ χαμηλό επίπεδο ή ο ήχος να έχει απενεργοποιηθεί. Αυξήστε
την ένταση ήχου στη μονάδα γονέα.
Ενδέχεται το επίπεδο ευαισθησίας του μικροφώνου της μονάδας
μωρού να έχει ρυθμιστεί σε πολύ χαμηλό επίπεδο. Ρυθμίστε το
επίπεδο ευαισθησίας του μικροφώνου σε υψηλότερο επίπεδο από το
μενού της μονάδας γονέα.
Ενδέχεται η μονάδα μωρού και η μονάδα γονέα να βρίσκονται εκτός
εμβέλειας η μία από την άλλη. Μειώστε την απόσταση μεταξύ τους.
Η μονάδα μωρού ανιχνεύει και άλλους ήχους εκτός από αυτούς που
ακούγονται από το μωρό σας. Μετακινήστε τη μονάδα μωρού πιο
κοντά στο μωρό (αλλά διατηρήστε την ελάχιστη απόσταση του 1
μέτρου/3 ποδιών).
Ενδέχεται το επίπεδο ευαισθησίας του μικροφώνου της μονάδας
μωρού να έχει ρυθμιστεί σε πολύ υψηλό επίπεδο. Μειώστε το
επίπεδο ευαισθησίας του μικροφώνου από το μενού της μονάδας
γονέα.
Ενδέχεται το επίπεδο ευαισθησίας του μικροφώνου της μονάδας
μωρού να έχει ρυθμιστεί σε πολύ χαμηλό επίπεδο. Αυξήστε το
επίπεδο ευαισθησίας του μικροφώνου από το μενού της μονάδας
γονέα.
Ενδέχεται το επίπεδο ευαισθησίας του μικροφώνου της μονάδας
μωρού να έχει ρυθμιστεί σε πολύ υψηλό επίπεδο, με αποτέλεσμα η
μονάδα μωρού να εκπέμπει πιο συχνά. Μειώστε το επίπεδο
ευαισθησίας του μικροφώνου από το μενού της μονάδας γονέα.
Ενδέχεται η ένταση του ήχου της μονάδας μωρού να έχει ρυθμιστεί
σε πολύ υψηλό επίπεδο, με αποτέλεσμα η μονάδα μωρού να
καταναλώνει πολύ ενέργεια. Μειώστε την ένταση του ήχου της
μονάδας μωρού.
Ενδέχεται να έχετε ρυθμίσει μια μέγιστη θερμοκρασία δωματίου που
είναι χαμηλότερη από την πραγματική θερμοκρασία δωματίου ή μια
ελάχιστη θερμοκρασία δωματίου που είναι υψηλότερη από την
πραγματική θερμοκρασία δωματίου. Σε αυτή τη περίπτωση, η οθόνη
παραμένει συνεχώς αναμμένη, γεγονός που αυξάνει την κατανάλωση
ισχύος της μονάδας μωρού. Αυτό έχει ως αποτέλεσμα τη γρήγορη
αποφόρτιση των μη επαναφορτιζόμενων μπαταριών της μονάδας
μωρού.
Ενδέχεται να έχετε ενεργοποιήσει το νυχτερινό φως. Εάν θέλετε να
χρησιμοποιήσετε το νυχτερινό φως, σας συνιστούμε να
λειτουργήσετε τη μονάδα μωρού με ρεύμα.
67

68
Ερώτηση Απάντηση
Γιατί ο χρόνος
φόρτισης της
μονάδας γονέα
υπερβαίνει τις 4
ώρες;
Η καθορισμένη
εμβέλεια λειτουργίας
του βρεφικού
μόνιτορ είναι 330
μέτρα/1000 πόδια.
Γιατί το δικό μου
βρεφικό μόνιτορ
καλύπτει πολύ
μικρότερη απόσταση
από την καθορισμένη;
Γιατί κατά
διαστήματα χάνεται
η σύνδεση; Γιατί
παρατηρούνται
διακοπές στον ήχο;
Τι συμβαίνει σε
περίπτωση διακοπής
ρεύματος;
Είναι ασφαλές
το βρεφικό μόνιτορ
από τις παρεμβολές
και τη πιθανότητα
κάποιος να
ωτακουστήσει;
Υποτίθεται ότι ο
χρόνος λειτουργίας
της μονάδας
γονέα είναι
τουλάχιστον 24
ώρες. Γιατί ο χρόνος
λειτουργίας της
δικής μου μονάδας
γονέα είναι
μικρότερος;
Ενδέχεται η μονάδα γονέα να έχει ενεργοποιηθεί κατά τη φόρτιση.
Απενεργοποιήστε τη μονάδα γονέα κατά τη διάρκεια της φόρτισης.
Η καθορισμένη εμβέλεια ισχύει μόνο για υπαίθριους εξωτερικούς
χώρους. Μέσα στο σπίτι, η εμβέλεια λειτουργίας περιορίζεται από
τον αριθμό και τον τύπο των τοίχων ή/και ταβανιών που
παρεμβάλλονται. Στο εσωτερικό του σπιτιού, η εμβέλεια λειτουργίας
είναι μέχρι 50 μέτρα/150 πόδια.
Η μονάδα μωρού και η μονάδα γονέα βρίσκονται μάλλον κοντά στα
όρια της εμβέλειας λειτουργίας. Αλλάξτε θέση ή μειώστε την
απόσταση μεταξύ των μονάδων. Σημειώστε ότι κάθε φορά
χρειάζονται περίπου 30 δευτερόλεπτα μέχρι να επιτευχθεί σύνδεση.
Εάν η μονάδα γονέα είναι επαρκώς φορτισμένη, συνεχίζει να
λειτουργεί εάν γίνει διακοπή ρεύματος, είτε βρίσκεται στη βάση
φόρτισης είτε όχι. Εάν υπάρχουν μπαταρίες μέσα στη μονάδα μωρού,
θα συνεχίσει και αυτή να λειτουργεί εάν γίνει διακοπή ρεύματος.
Η τεχνολογία DECT του συγκεκριμένου βρεφικού μόνιτορ εγγυάται
μηδενική παρεμβολή από άλλη συσκευή και προστασία από
ωτακουστές.
Μετά την πρώτη φόρτιση του σετ επαναφορτιζόμενων μπαταριών
της μονάδας γονέα, ο χρόνος λειτουργίας είναι μικρότερος από 24
ώρες. Η πλήρης απόδοση του σετ επαναφορτιζόμενων μπαταριών
θα είναι διαθέσιμη μόνο μετά από τέσσερις τουλάχιστον φορές
φόρτισης και αποφόρτισης.
Ενδέχεται η ένταση του ήχου της μονάδας γονέα να έχει ρυθμιστεί
σε πολύ υψηλό επίπεδο, με αποτέλεσμα να καταναλώνεται
περισσότερη ενέργεια. Μειώστε την ένταση του ήχου στη μονάδα
γονέα.

Ερώτηση Απάντηση
Ενδέχεται το επίπεδο ευαισθησίας του μικροφώνου της μονάδας
μωρού να έχει ρυθμιστεί σε πολύ υψηλό επίπεδο, με αποτέλεσμα η
μονάδα γονέα να καταναλώνει περισσότερη ενέργεια. Μειώστε το
επίπεδο ευαισθησίας του μικροφώνου από το μενού της μονάδας
γονέα.
Γιατί το σύμβολο
μπαταρίας δεν
εμφανίζεται στην
οθόνη της μονάδας
γονέα όταν αρχίζω
να επαναφορτίζω τη
μονάδα γονέα;
Ενδέχεται να χρειαστούν μερικά λεπτά μέχρι να εμφανιστεί το
σύμβολο μπαταρίας στην οθόνη της μονάδας γονέα, όταν φορτίζετε
τη μονάδα για πρώτη φορά ή μετά από μεγάλο διάστημα μη χρήσης.
69

70
ESPAÑOL
Introducción
Enhorabuena por la compra de este producto y bienvenido a Philips AVENT. Para sacar el mayor
partido de la asistencia que Philips AVENT le ofrece, registre su producto en www.philips.com/
welcome.
Philips AVENT se dedica a la fabricación de productos ables para el cuidado del bebé, que
proporcionan a los padres la tranquilidad que necesitan. Este vigilabebés de Philips AVENT permite
vigilar al bebé de forma continua y oírle con claridad sin ruidos que intereran. La tecnología DECT
garantiza la eliminación de interferencias de otros dispositivos inalámbricos, y una señal nítida entre
la unidad del bebé y la unidad de padres. El sensor de temperatura le permite controlar la
temperatura de la habitación del bebé y le ofrece unos ajustes personalizados que le ayudan a
mantener un clima confortable en ésta.
A Unidad de padres
1 Botón de encendido/apagado 3
2 Ranura para la pinza para cinturón
3 Botón del intercomunicador (TALK)
4 Botón MENU
5 Piloto de conexión (LINK)
6 Micrófono
7 Altavoz
8 Botones de menú y volumen +/–
9 Botón OK
10 Pantalla
11 Pilotos de nivel de sonido
12 Pinza para cinturón
13 Adaptador
14 Clavija para el cargador de la unidad de padres
15 Cargador
16 Piloto de carga
17 Cinta para el cuello
18 Compartimento de la batería recargable
19 Oricio para la cinta para el cuello
20 Tapa del compar timento de la batería
21 Batería recargable (incluida)
B Unidad del bebé
1 Botón de encendido/apagado 3
2 Botón de localización (PAGE)
3 Pantalla
4 Piloto de encendido
5 Botones de volumen +/–
6 Botón de luz de compañía Q
7 Botón de nana K
8 Botón de reproducción/parada E
9 Micrófono
10 Adaptador
11 Clavija para la unidad del bebé
12 Rejillas de ventilación
13 Altavoz
14 Sensor de humedad y temperatura
15 Toma para la clavija de la unidad del bebé
16 Pilas no recargables (no incluidas)

ESPAÑOL 71
17 Compartimento para pilas no recargables
18 Tapa del compar timento para pilas no recargables
C Pantalla
1 $ = alerta de temperatura
2 Ñ° = indicador de temperatura de la habitación
3 g = alerta sonora
4 r = indicación de humedad
5 s = símbolo de localización
6 K = símbolo de nana
7 Q = símbolo de luz de compañía
8 T = símbolo de la pila
9 Indicaciones de sensibilidad del micrófono/volumen:
- g = volumen desactivado
- h = nivel de sensibilidad/volumen mínimo
- i = nivel de sensibilidad/volumen máximo
Otras indicaciones de la pantalla (no se muestran):
- ’Alta’ = la temperatura de la habitación es más alta que la temperatura establecida en el menú
- ‘Baja’ = la temperatura de la habitación es más baja que la temperatura establecida en el menú
- ‘Sin conexión’ = no hay conexión entre las unidades*
- ’En pausa’ = interrupción de la nana
- ‘Buscando’ = las unidades están buscando conexión*
- ‘Conectado’ = las unidades están conectadas*
- ’Intercomunicador’ = la función de intercomunicador está activa
* Sólo se muestra en la pantalla de la unidad de padres.
D Estuche de viaje
Importante
Antes de usar el aparato, lea atentamente este manual de usuario y consérvelo por si necesitara
consultarlo en el futuro.
Peligro
- No sumerja nunca ninguna parte del vigilabebés en agua u otros líquidos.
Advertencia
- Antes de enchufarlo, compruebe si el voltaje indicado en los adaptadores de la unidad del bebé
y del cargador se corresponde con el voltaje de la red local.
- Utilice sólo el adaptador que se suministra para conectar la unidad del bebé a la red.
- Utilice únicamente el cargador y el adaptador que se suministran para cargar la unidad de
padres.
- Los adaptadores contienen un transformador. No corte los adaptadores para sustituirlos por
otras clavijas, ya que se producirán situaciones de peligro.
- Si los adaptadores están dañados, sustitúyalos siempre por otros del modelo original para evitar
situaciones de peligro. Para conocer el tipo adecuado, consulte el capítulo “Sustitución”.
- Si el cargador de la unidad de padres está dañado, sustitúyalo siempre por otro del modelo
original.
- No utilice nunca el vigilabebés en lugares húmedos o cerca del agua.
- No abra nunca la carcasa de la unidad del bebé o de la unidad de padres (excepto los
compartimentos de las pilas), con el n de evitar descargas eléctricas.
- Este aparato no debe ser usado por personas (adultos o niños) con su capacidad física, psíquica
o sensorial reducida, ni por quienes no tengan los conocimientos y la experiencia necesarios, a
menos que sean supervisados o instruidos acerca del uso del aparato por una persona
responsable de su seguridad.
- Asegúrese de que los niños no jueguen con este aparato.

ESPAÑOL72
Precaución
- Utilice y guarde el aparato a una temperatura entre 10 °C y 40 °C.
- No exponga la unidad del bebé ni la unidad de padres a temperaturas extremadamente bajas o
altas ni al contacto directo con la luz del sol. No ponga la unidad del bebé ni la unidad de
padres cerca de una fuente de calor.
- Mantenga siempre la unidad del bebé y el cable fuera del alcance del bebé (a 1 metro de
distancia como mínimo).
- No coloque nunca la unidad del bebé en el interior de la cuna o el parque.
- No cubra nunca la unidad de padres ni la unidad del bebé (por ejemplo, con una toalla o una
manta). Asegúrese siempre de que las rejillas de ventilación de la unidad del bebé están
despejadas.
- Inserte siempre pilas no recargables del tipo adecuado en la unidad del bebé.
- Utilice siempre la batería recargable incluida para la unidad de padres con el n de evitar
situaciones de peligro.
- Si coloca la unidad de padres junto a un transmisor u otro aparato DECT (por ejemplo, un
teléfono DECT), se puede perder la conexión con la unidad del bebé.
General
- El objetivo de este vigilabebés es servir de ayuda. En ningún caso sustituye la supervisión
responsable y adecuada por parte de un adulto, y no debe utilizarse como tal.
- El sensor de humedad y temperatura sólo mide la temperatura o la humedad de la habitación
del bebé. No se puede utilizar para controlar o ajustar la temperatura o la humedad de la
habitación.
Campos electromagnéticos (CEM)
Este aparato Philips AVENT cumple todos los estándares sobre campos electromagnéticos (CEM).
Si se utiliza correctamente y de acuerdo con las instrucciones de este manual, el aparato se puede
usar de forma segura según los conocimientos cientícos disponibles hoy en día.
Preparación para su uso
Unidad del bebé
Puede utilizar la unidad del bebé conectada a la red eléctrica o con pilas no recargables.
Recomendamos que utilice pilas no recargables aunque vaya a utilizar la unidad conectada a la red
eléctrica. De esta manera se garantiza una alimentación de reserva que se activa automáticamente
en caso de producirse un corte del suministro eléctrico.
Funcionamiento conectado a la red
1 Enchufe la clavija para la unidad del bebé a ésta, y conecte el adaptador a la red (g. 2).
, El piloto de encendido se ilumina.
Funcionamiento con pilas no recargables
La unidad del bebé funciona con 4 pilas R6 AA de 1,5 V (no incluidas). Recomendamos usar pilas
Philips LR6 PowerLife.
No utilice pilas recargables, ya que la unidad del bebé no tiene una función de carga.
Desenchufe la unidad del bebé y, cuando vaya a poner las pilas no recargables, asegúrese de que
sus manos y la unidad estén secas.
1 Quite la tapa del compartimento para pilas no recargables. (g. 3)
2 Inserte cuatro pilas no recargables (g. 4).
Nota: Asegúrese de que los polos + y - estén en la posición correcta.
3 Vuelva a colocar la tapa. (g. 5)

ESPAÑOL 73
Unidad de padres
Funcionamiento con una batería recargable
La unidad de padres viene con una batería recargable de iones de litio de 1000 mAh.
Cargue la unidad de padres antes de utilizarla por primera vez o cuando ésta indique que tiene
poca carga (el símbolo de la pila vacía parpadea en la pantalla y la unidad de padres emite un
pitido). La unidad de padres comienza a indicar que el nivel de la batería es bajo 30 minutos antes
de que ésta esté completamente descargada.
Nota: Si la batería recargable está completamente descargada, la unidad de padres se apaga
automáticamente y pierde el contacto con la unidad del bebé.
1 Quite la tapa del compartimento de la batería recargable (g. 6).
2 Inserte la batería recargable (g. 7).
3 Vuelva a colocar la tapa (g. 8).
4 Inserte la clavija para el cargador de la unidad de padres en el cargador, enchufe el adaptador
a la toma de corriente y coloque la unidad de padres en el cargador (g. 9).
, El piloto de carga del cargador se enciende.
, La pantalla muestra el símbolo de la pila cargándose para indicar que la unidad de padres se
está cargando.
5 Deje la unidad de padres en el cargador hasta que la batería esté completamente cargada.
, Durante la carga, el piloto de carga permanece encendido de forma continua.
, Cuando la batería esté completamente cargada, en la pantalla de la unidad de padres
aparecerá el símbolo de la pila llena T.
- Cuando cargue la unidad de padres por primera vez o después de no haberla utilizado durante
mucho tiempo, apáguela y cárguela al menos durante 10 horas seguidas.
- La carga tarda normalmente 4 horas, pero podría prolongarse si la unidad de padres está
encendida durante la carga. Para que el tiempo de carga sea lo más breve posible, apague la
unidad de padres durante la carga.
- Cuando la batería esté completamente cargada, la unidad de padres se puede utilizar sin cable
durante al menos 24 horas.
Nota: Al cargar por primera vez la unidad de padres, el tiempo de funcionamiento será inferior a
24 horas. La batería sólo alcanza su capacidad máxima después de haberla cargado y descargado
cuatro veces.
Nota: Cuando la unidad de padres no está en el cargador, la batería se va descargando gradualmente
aun cuando la unidad de padres esté apagada.
Uso del aparato
1 Coloque la unidad de padres y la unidad del bebé en la misma habitación para probar la
conexión (g. 10).
Coloque la unidad del bebé a una distancia de al menos 1 metro de la unidad de padres.
2 Mantenga pulsado el botón de encendido/apagado 3 de la unidad del bebé hasta que el
piloto verde de encendido se ilumine. (g. 11)
Nota: El piloto de encendido siempre se ilumina en verde, aunque no haya conexión con la unidad de
padres.
, La luz de compañía se enciende brevemente y se apaga de nuevo.
, La pantalla se enciende y aparece el símbolo de la batería (g. 12).
, Transcurridos 2 segundos, los valores de temperatura y humedad se muestran en la
pantalla (g. 13).

ESPAÑOL74
3 Mantenga pulsado el botón de encendido/apagado 3 de la unidad de padres hasta que los
pilotos de nivel de sonido se enciendan brevemente. (g. 14)
, La pantalla se ilumina y aparece el símbolo de la pila (g. 15).
, El piloto LINK parpadea en rojo y el mensaje ‘Buscando’ aparece en la pantalla. (g. 16)
, El piloto LINK de la unidad de padres cambia a color verde y se queda encendido de forma
continua cuando se ha establecido una conexión entre la unidad del bebé y la unidad de
padres. El mensaje ‘Conectado’ aparece en la pantalla. (g. 17)
, Después de 2 segundos, el mensaje ‘Conectado’ desaparece y los valores de humedad y
temperatura aparecen en la pantalla. (g. 18)
, La primera vez que encienda la unidad de padres, el mensaje ‘Idioma’ aparece en la pantalla.
Seleccione el idioma que desee (consulte la sección “Ajuste del idioma de la pantalla” del
capítulo “Opciones del menú”). (g. 19)
, Si no se ha establecido conexión, el piloto LINK de la unidad de padres deja de parpadear y
se ilumina en rojo. La unidad de padres emite un pitido cada cierto tiempo y el mensaje ‘Sin
conexión’ aparece en la pantalla. (g. 20)
Colocación del vigilabebés
1 Coloque la unidad del bebé como mínimo a 1 metro de distancia del bebé (g. 21).
2 Coloque la unidad de padres dentro del alcance de funcionamiento de la unidad del bebé.
Compruebe que se encuentra a más de 1 metro de distancia de la unidad del bebé para
evitar la retroalimentación acústica (g. 10).
Si desea obtener más información sobre el alcance de funcionamiento, consulte la sección “Alcance
de funcionamiento”.
Alcance de funcionamiento
El alcance de funcionamiento del vigilabebés es de 330 metros al aire libre. En función del entorno y
de otros factores de interferencia, este alcance puede ser menor. En interiores, el alcance de
funcionamiento es de 50 metros.
Materiales secos Grosor del material Pérdida de alcance
Madera, yeso, cartón, cristal (sin
metal, cables o plomo)
Ladrillo, madera contrachapada < 30 cm 5 - 35%
Hormigón armado < 30 cm 30 - 100%
Rejillas o barras metálicas < 1 cm 90 - 100%
Láminas de metal o aluminio < 1 cm 100%
En el caso de materiales húmedos, la pérdida de alcance puede ser de hasta el 100%.
Características
Las siguientes características se describen en el capítulo “Opciones del menú”, ya que sólo se
pueden seleccionar en el menú de la unidad de padres:
- Ajuste de la sensibilidad del micrófono
- Activación/desactivación de la alerta sonora
- Ajuste del rango de temperaturas de la habitación (temperatura máxima y mínima)
- Activación/desactivación de la alerta de temperatura
- Activación/desactivación de la alerta por vibración
< 30 cm 0 - 10%

ESPAÑOL 75
Ajuste del volumen del altavoz
1 Pulse los botones de volumen + o – de la unidad del bebé hasta alcanzar el nivel
deseado (g. 22).
2 Pulse los botones de volumen + o – de la unidad de padres hasta alcanzar el nivel
deseado (g. 23).
, La pantalla proporciona información visual sobre los ajustes de volumen de las unidades:
- g = el volumen de la unidad de padres está desactivado o en vigilancia silenciosa del
- h = volumen mínimo (unidad de padres y unidad del bebé)
- i = volumen máximo (unidad de padres y unidad del bebé)
Nota: Si el ajuste de volumen es muy alto, las unidades consumen más energía.
Función de intercomunicador
Puede utilizar el botón TALK de la unidad de padres para hablar al bebé (por ejemplo, para
tranquilizarle).
1 Mantenga pulsado el botón TALK y hable por el micrófono con claridad a una distancia de
15-30 cm (g. 24).
, El piloto verde LINK comienza a parpadear y el mensaje ‘Intercomunicador’ aparece en la
pantalla.
2 Cuando haya terminado de hablar, suelte el botón TALK.
Pilotos de nivel de sonido
La unidad de padres controla permanentemente el nivel de sonido de la habitación del bebé y los
pilotos de nivel de sonido le indican si hay alguna actividad. Si el bebé llora, verá que los pilotos de
nivel de sonido se iluminan en la unidad de padres.
- Mientras la unidad del bebé no detecte ningún sonido, todos los pilotos de nivel de sonido de la
unidad de padres permanecerán apagados.
- Cuando la unidad del bebé recoge un sonido, se encienden uno o varios pilotos de nivel de
sonido en la unidad de padres. El número de pilotos que se encienden depende del volumen
del sonido recogido por la unidad del bebé.
Luz de compañía
Nota: También puede encender y apagar la luz de compañía desde el menú de la unidad de padres
(consulte la sección “Luz de compañía” del capítulo “Opciones del menú”).
1 Pulse el botón de luz de compañía Q de la unidad del bebé para encender la luz de
compañía. (g. 25)
, Q aparece en la pantalla de la unidad de padres.
2 Vuelva a pulsar el botón de luz de compañía Q para apagarla.
, La luz de compañía se atenúa gradualmente antes de apagarse por completo.
, Q desaparece de la pantalla de la unidad de padres.
Consejo: Cuando utilice la unidad del bebé con pilas no recargables, apague la luz de compañía. De esta
manera ahorrará energía.
Localización de la unidad de padres
Si no sabe dónde ha dejado la unidad de padres y tiene el volumen apagado, puede utilizar el botón
PAGE (localización) de la unidad del bebé para localizarla.
Nota: La función de localización sólo está disponible si la unidad de padres está encendida.
1 Pulse el botón PAGE de la unidad del bebé (g. 26).
bebé

ESPAÑOL76
, El mensaje ‘Localización’ y el símbolo de localización aparecen en las pantallas de la unidad
del bebé y de la unidad de padres.
, La unidad de padres emite un tono de aviso de localización.
2 Para detener el tono de aviso de localización, vuelva a pulsar el botón PAGE o pulse cualquier
botón de la unidad de padres.
Función de nanas
Nota: También puede utilizar la función de nanas desde el menú de la unidad de padres (consulte la
sección “Función de nanas” del capítulo “Opciones del menú”).
1 Pulse el botón de reproducción/parada E en la unidad del bebé para reproducir la nana
que esté seleccionada en ese momento. (g. 27)
2 Para seleccionar otra nana, alterne entre las nanas de la lista pulsando el botón de nana K de
la unidad del bebé antes de que pasen 2 segundos. (g. 28)
Nota: Si no pulsa el botón de nana K durante más de 2 segundos, la nana que aparece en la pantalla
comienza a reproducirse.
, El número de la nana aparece en la pantalla junto con el símbolo de nana K.
, La nana se repite continuamente.
3 Para detener la nana, pulse de nuevo el botón de reproducción/parada E de la unidad del
bebé. (g. 27)
, El número de la nana y el símbolo de nana K desaparecen de la pantalla.
4 Para seleccionar otra nana cuando ya se está reproduciendo una:
- Pulse el botón de nana K en la unidad del bebé antes de que pasen 2 segundos para alternar
entre las nanas de la lista.
Nota: Si no pulsa el botón de nana K durante más de 2 segundos, la nana que aparece en la pantalla
comienza a reproducirse.
Humedad
Cuando hay una conexión entre la unidad del bebé y la unidad de padres, el nivel de humedad se
muestra en la pantalla de ambas unidades.
El nivel de humedad óptimo está entre el 40% y el 60%. Es muy importante mantener un nivel de
humedad adecuado, ya que ayuda a proteger a su bebé frente a la irritación de las mucosas, la
sequedad de piel, los labios secos y agrietados, y la garganta seca y dolorida. Cuando las mucosas no
funcionan de forma óptima, no pueden proteger bien a su bebé de todo tipo de gérmenes. Esto
aumenta el riesgo de que su bebé coja un resfriado o la gripe, y reduce su resistencia a las
infecciones por hongos o bacterias.
El humidicador ultrasónico Philips AVENT ayuda a mejorar la calidad del aire y a mantener un nivel
de humedad confortable en la habitación del bebé. Póngase en contacto con el Servicio de
Atención al Cliente de Philips de su país.
Nota: El vigilabebés sólo mide el nivel de humedad. Este nivel no se puede ajustar con el vigilabebés.
Alerta de fuera de alcance
Cuando la unidad de padres está fuera del alcance de la unidad del bebé, la unidad de padres emite
un pitido cada cierto tiempo y el mensaje ‘Sin conexión’ aparece en la pantalla. El piloto LINK de la
unidad de padres se ilumina en rojo.
Nota: El mensaje ‘Sin conexión’ también aparece en la pantalla de la unidad de padres cuando la unidad
del bebé está apagada.

ESPAÑOL 77
Opciones del menú
La mayoría de las funciones se pueden seleccionar tanto en la unidad del bebé como en la unidad
de padres, excepto algunas que sólo se pueden utilizar a través del menú de la unidad de padres.
Funcionamiento del menú: descripción general
Nota: Las funciones del menú sólo se pueden utilizar si se ha establecido la conexión entre la unidad del
bebé y la unidad de padres.
1 Pulse el botón MENU para abrir el menú (g. 29).
, La primera opción de menú aparece en la pantalla.
2 Utilice los botones - y + para seleccionar la opción del menú deseada (g. 30).
Nota: La echa indica la dirección en la que puede desplazarse.
3 Pulse el botón OK para conrmar (g. 31).
4 Utilice los botones + y - para seleccionar la opción que desee.
5 Pulse el botón OK para conrmar.
, La nueva opción parpadea dos veces y luego desaparece de la pantalla.
6 Pulse el botón MENU de nuevo para salir del menú.
Encendido/apagado de la luz de compañía
1 Seleccione ‘Luz’ con los botones + y -.
2 Pulse el botón OK para conrmar.
3 Si la luz de compañía está apagada, la pantalla muestra ‘¿Activar?’. Pulse el botón OK para
encender la luz de compañía. Si ésta está encendida, aparece ‘¿Desactivar?’ en la pantalla. Pulse
el botón OK para apagar la luz de compañía.
Función de nanas
Selección de una nana
1 Seleccione ‘Nana’ con los botones + y -.
2 Pulse el botón OK para conrmar.
3 Pulse el botón + una o varias veces para seleccionar una de las cinco nanas de la lista o para
seleccionar ‘Todas’.
4 Pulse el botón OK para conrmar.
Cuando haya seleccionado una de las cinco nanas, ésta se reproducirá continuamente.
Cambio de nana
1 Pulse el botón + para elegir otra nana de la lista.
2 Pulse el botón OK para conrmar.
Cómo poner en pausa una nana
1 Pulse el botón OK.
, El mensaje ‘En pausa’ aparece en la pantalla.
2 Pulse el botón OK de nuevo para reanudar la nana.
Si no reanuda la nana antes de 20 segundos, la función de nana se desactiva automáticamente. El
mensaje ‘En pausa’ y el símbolo de nana desaparecen de la pantalla.

ESPAÑOL78
Cómo detener una nana
1 Pulse el botón + para seleccionar la opción ‘Detener’ de la lista.
2 Pulse el botón OK para conrmar.
Ajuste de la sensibilidad del micrófono
Nota: Sólo puede ajustar la sensibilidad del micrófono en el menú de la unidad de padres.
Puede ajustar la sensibilidad del micrófono de la unidad del bebé al nivel deseado. Sólo puede
cambiar la sensibilidad si hay conexión entre la unidad del bebé y la unidad de padres, es decir,
cuando el piloto LINK de la unidad de padres se enciende en verde de manera continua.
1 Seleccione ‘Sensibilidad’ con los botones + y -.
2 Pulse el botón OK para conrmar.
3 Seleccione el nivel de sensibilidad del micrófono deseado de la unidad del bebé con los
botones + y -.
, h = nivel de sensibilidad mínimo
, i = nivel de sensibilidad máximo
4 Pulse el botón OK para conrmar.
, El mensaje ‘Guardado’ aparece en la pantalla.
Nota: Cuando el nivel de sensibilidad del micrófono de la unidad del bebé es alto, recoge más sonidos y,
por tanto, transmite más frecuentemente. Como resultado, las unidades consumen más energía.
Activación/desactivación de la alerta sonora
Nota: Sólo puede activar y desactivar la alerta sonora en el menú de la unidad de padres.
Esta función le permite vigilar al bebé silenciosamente. Por tanto, podrá desactivar el volumen en la
unidad de padres y, aun así, seguir alerta si el bebé llora.
Si la alerta sonora está activada, la unidad de padres emite un pitido en cuanto el cuarto piloto de
nivel de sonido se ilumina mientras el volumen está desactivado. Además, la pantalla de la unidad de
padres se ilumina y el símbolo de alerta sonora ( g) parpadea en la pantalla.
1 Seleccione ‘Alerta sonora’ con los botones + y -.
2 Pulse el botón OK para conrmar.
3 Si la alerta está desactivada, la pantalla muestra ‘¿Activar?’. Pulse el botón OK para activar la
alerta. Si ésta está activada, aparece ‘¿Desactivar?’ en la pantalla. Pulse el botón OK para
desactivar la alerta.
, Si ha activado la alerta sonora, el símbolo de alerta sonora (g) aparece en la pantalla de la
unidad de padres.
Ajuste del rango de temperaturas de la habitación
Nota: Sólo puede ajustar el rango de temperaturas en el menú de la unidad de padres.
El bebé dormirá más cómodo en una habitación con una temperatura de entre 16 °C y 20 °C. Esto
es muy importante, ya que un bebé no puede regular su temperatura corporal como un adulto. Un
bebé necesita más tiempo para adaptarse a los cambios de temperatura.
Si no ajusta un rango de temperaturas, el vigilabebés le avisa cuando la temperatura de la habitación
del bebé está por debajo de los 14 °C o supera los 30 °C. En ese caso, la pantalla de la unidad de
padres se ilumina y el mensaje ‘Alta’ o ‘Baja’ aparece en la pantalla. Para cambiar la temperatura
máxima y mínima predeterminada, siga las instrucciones que se muestran más abajo.
Nota: La temperatura de la habitación del bebé aparece en la pantalla de ambas unidades cuando están
conectadas.
1 Seleccione ‘Temperatura’ con los botones + y -.

ESPAÑOL 79
2 Pulse el botón OK para conrmar.
3 Seleccione ‘Rango’ con los botones + y -.
4 Pulse el botón OK para conrmar.
5 Establezca la temperatura mínima deseada con los botones + y -.
6 Pulse el botón OK para conrmar.
7 Establezca la temperatura máxima deseada con los botones + y -.
8 Pulse el botón OK para conrmar.
, El mensaje ‘Guardado’ aparece en la pantalla.
Nota: Si la temperatura de la habitación del bebé supera o cae por debajo del rango de temperaturas
establecido, la pantalla se ilumina de forma permanente. Esto hace que la unidad consuma más energía.
Activación/desactivación de la alerta de temperatura
Nota: Sólo puede activar y desactivar la alerta de temperatura en el menú de la unidad de padres.
Nota: Si la alerta de temperatura avisa con demasiada frecuencia, reduzca la temperatura mínima
establecida y/o aumente la temperatura máxima establecida (consulte “Ajuste del rango de temperaturas
de la habitación”).
Si la alerta de temperatura está activada, la unidad de padres emite un pitido si la temperatura real
de la habitación supera la temperatura máxima establecida o cae por debajo de la temperatura
mínima. Además, la retroiluminación de la pantalla de la unidad de padres se activa, el símbolo de la
alerta de temperatura ( t) parpadea y en la pantalla aparece ‘Alta’ o ‘Baja’. Si no se ha establecido
ninguna temperatura máxima ni mínima, la alerta de temperatura se activa cuando la temperatura
de la habitación desciende por debajo de los 14 °C o supera los 30 °C.
1 Seleccione ‘Temperatura’ con los botones + y -.
2 Pulse el botón OK para conrmar.
3 Seleccione ‘Alerta’ con los botones + y -.
4 Pulse el botón OK para conrmar.
5 Si la alerta está desactivada, la pantalla muestra ‘¿Activar?’. Pulse el botón OK para activar la
alerta. Si ésta está activada, aparece ‘¿Desactivar?’ en la pantalla. Pulse el botón OK para
desactivar la alerta.
Activación/desactivación de la alerta por vibración
Nota: Sólo puede activar y desactivar la alerta por vibración en el menú de la unidad de padres.
Si la alerta por vibración está activada, la unidad de padres vibra en cuanto el cuarto piloto de nivel
de sonido se ilumina mientras el volumen está desactivado.
1 Seleccione ‘Vibración’ con los botones + y -.
2 Pulse el botón OK para conrmar.
3 Si la alerta por vibración está desactivada, la pantalla muestra ‘¿Activar?’. Pulse el botón OK
para activar la alerta por vibración. Si ésta está activada, aparece ‘¿Desactivar?’ en la pantalla.
Pulse el botón OK para desactivar la alerta por vibración.
Ajuste del idioma de la pantalla
1 Seleccione ‘Idioma’ con los botones + y -.
2 Pulse el botón OK para conrmar.
3 Seleccione el idioma que desee con los botones + y -.

ESPAÑOL80
4 Pulse el botón OK para conrmar.
Función de reinicio
Esta función del menú de la unidad de padres le permite restablecer los ajustes predeterminados
tanto en la unidad de padres como en la unidad del bebé al mismo tiempo. Puede utilizar esta
función si se produce algún problema que no puede solucionar siguiendo las sugerencias que
aparecen en el capítulo “Preguntas más frecuentes”.
1 Seleccione ‘Reiniciar’ con los botones + y -.
2 Pulse el botón OK para conrmar.
, El mensaje ‘¿Conrmar?’ aparece en la pantalla de la unidad de padres.
3 Pulse el botón OK para conrmar.
, La unidad de padres se apaga y se vuelve a encender.
, Ahora se han restablecido los ajustes predeterminados de fábrica en ambas unidades.
Ajustes predeterminados
Unidad de padres
- Alerta por vibración: desactivada
- Idioma: español
- Volumen del altavoz: 1
- Sensibilidad del micrófono: 3
- Alerta sonora: desactivada
- Alerta de temperatura: desactivada
- Alerta de “Temperatura baja”: 14 °C
- Alerta de “Temperatura alta”: 30 °C
Unidad del bebé
- Volumen de altavoz: 3
- Luz de compañía: apagada
- Nana: 1
Accesorios
Pinza para cinturón y cinta para el cuello
Si la batería de la unidad de padres tiene carga suciente, podrá llevar la unidad consigo dentro y
fuera de la casa jándosela al cinturón con la pinza o colgándosela al cuello con la cinta. Así podrá
vigilar al bebé mientras se desplaza de un lado a otro.
Cómo poner la pinza para cinturón
1 Encaje la pinza para cinturón en la unidad de padres (g. 32).
Cómo quitar la pinza para cinturón
1 Tire de la pinza para sacarla de la unidad de padres.
Cómo poner la cinta para el cuello
1 Introduzca la presilla de la cinta a través del oricio situado en la parte de atrás de la unidad
de padres. Pase la cinta por la presilla y tire de ella para ajustarla (g. 33).
Cómo quitar la cinta para el cuello
1 Pase la cinta por la presilla y saque ésta del oricio de la parte de atrás de la unidad de
padres.

ESPAÑOL 81
Limpieza y mantenimiento
No sumerja la unidad de padres ni la del bebé en agua ni las lave bajo el grifo.
No utilice aerosoles ni líquidos de limpieza.
1 Desenchufe la unidad del bebé si está enchufada a la red y quite la unidad de padres del
cargador.
2 Limpie la unidad de padres y la unidad del bebé con un paño húmedo.
Asegúrese de que la unidad de padres esté seca antes de volver a colocarla en el cargador
enchufado.
3 Limpie el cargador con un paño seco.
4 Limpie los adaptadores con un paño seco.
Almacenamiento
- Puede utilizar la funda para guardar el vigilabebés cuando lo lleve de viaje.
- Si no va a utilizar el vigilabebés durante un periodo de tiempo prolongado, quite las pilas no
recargables de la unidad del bebé y la batería recargable de la unidad de padres. Guarde la
unidad de padres, la unidad del bebé, el cargador de la unidad de padres y los adaptadores en la
funda de viaje que se suministra.
Sustitución
Unidad del bebé
Pilas
Sustituya las pilas no recargables de la unidad del bebé únicamente por cuatro pilas R6 AA de 1,5 V.
Nota: Le recomendamos que utilice pilas no recargables de Philips.
Adaptador
Sustituya el adaptador de la unidad del bebé únicamente por otro del modelo original. Puede
solicitar un adaptador nuevo a su distribuidor o a un centro de servicio Philips.
- Sólo en el Reino Unido: SSA-5S-09 UK 075040F
- En otros países: SSA-5W-09 EU 075040F
Unidad de padres
Batería
Sustituya sólo la batería de la unidad de padres por una batería de iones de litio de 1000 mAh.
Adaptador
Sustituya el adaptador de la unidad de padres únicamente por otro del modelo original. Puede
solicitar un adaptador nuevo a su distribuidor o a un centro de servicio Philips.
- Sólo en el Reino Unido: SSA-5W-09 UK 075050F
- En otros países: SSA-5W-09 EU 075050F
Medio ambiente
- Al nal de su vida útil, no tire el aparato junto con la basura normal del hogar. Llévelo a un
punto de recogida ocial para su reciclado. De esta manera ayudará a conservar el medio
ambiente (g. 34).
- Las pilas no recargables y las baterías recargables contienen sustancias que pueden contaminar
el medio ambiente. No tire las pilas no recargables ni las baterías recargables junto con la basura
normal del hogar; deposítelas en un punto de recogida ocial. Quite siempre las pilas no

ESPAÑOL82
recargables y las baterías recargables antes de deshacerse del aparato y de llevarlo a un punto
de recogida ocial.
Garantía y servicio
Si necesita información o si tiene algún problema, visite la página Web de Philips AVENT en
www.philips.com/AVENT, o póngase en contacto con el Servicio de Atención al Cliente de Philips
en su país (hallará el número de teléfono en el folleto de la garantía mundial). Si no hay Servicio de
Atención al Cliente en su país, diríjase a su distribuidor local de Philips.
Preguntas más frecuentes
En este capítulo se exponen las preguntas más frecuentes sobre el aparato. Si no encuentra la
respuesta a su pregunta, póngase en contacto con el Servicio de Atención al Cliente de su país.
Pregunta Respuesta
¿Por qué no se ilumina
el piloto de encendido
de la unidad del bebé
y el piloto LINK de la
unidad de padres
cuando pulso los
botones de
encendido/apagado?
¿Por qué el piloto
LINK de la unidad de
padres se ilumina en
rojo continuamente y
aparece el mensaje
‘Sin conexión’ en la
pantalla?
¿Por qué el símbolo de
la pila parpadea en la
pantalla de la unidad
del bebé?
Es posible que se haya agotado la batería recargable de la unidad de
padres y no haya colocado la unidad en el cargador enchufado. Inserte la
clavija para el cargador de la unidad de padres en el cargador, enchufe el
adaptador del cargador a una toma de corriente y coloque la unidad de
padres en el cargador. Luego pulse el botón de encendido/apagado para
establecer la conexión con la unidad del bebé.
Es posible que las pilas no recargables de la unidad del bebé estén
descargadas y la unidad no esté conectada a la red. Sustituya las pilas no
recargables o conecte la unidad del bebé a la red. Luego, pulse el botón
de encendido/apagado para establecer la conexión con la unidad de
padres.
Puede que la unidad del bebé y la unidad de padres estén fuera del
alcance de funcionamiento. Acerque la unidad de padres a la de bebé,
pero no a menos de 1 metro.
Si aun así el piloto LINK de la unidad de padres no comienza a
parpadear, utilice la función de reinicio para restablecer los ajustes
predeterminados en ambas unidades.
La unidad del bebé y la unidad de padres están fuera del alcance de
funcionamiento. Acerque la unidad de padres a la del bebé.
Es posible que la unidad del bebé esté apagada. Enciéndala.
Las pilas no recargables de la unidad del bebé se están agotando.
Cambie las pilas no recargables o enchufe la unidad del bebé a la red
eléctrica (consulte el capítulo “Preparación para su uso”).

Pregunta Respuesta
¿Por qué la unidad de
padres emite un
pitido?
¿Por qué emite el
aparato un sonido
agudo?
¿Por qué no se oye
ningún sonido? ¿Por
qué no se oye llorar al
bebé?
¿Por qué la unidad de
padres reacciona tan
rápidamente a otros
sonidos?
¿Por qué la unidad de
padres reacciona tan
lentamente al llanto
del bebé?
Si la unidad de padres emite un pitido mientras el piloto LINK
permanece encendido en rojo y el mensaje ‘Sin conexión’ aparece en la
pantalla, esto indica que se ha perdido la conexión con la unidad del
bebé. Acerque la unidad de padres a la unidad del bebé.
Si la unidad de padres emite un pitido y el símbolo de la pila de la
pantalla está vacío, signica que la batería recargable de la unidad de
padres se está agotando. Recargue la batería.
Si ha desactivado el volumen mientras la alerta sonora está activada, la
unidad de padres emite un pitido en cuanto el cuarto piloto de nivel de
sonido se ilumina, ya que la unidad del bebé ha recogido un sonido.
Si ha establecido el rango de temperaturas de la habitación en la unidad
de padres y la alerta de temperatura está activada, la unidad de padres
emite un pitido si la temperatura desciende por debajo del nivel
establecido o por debajo de 14 °C, o bien si la temperatura supera el
nivel establecido o aumenta a más de 30 °C.
Es posible que la unidad del bebé esté apagada. Enciéndala.
Es posible que las unidades estén demasiado cerca la una de la otra.
Compruebe que la separación entre la unidad de padres y la unidad del
bebé es superior a 1 metro.
Es posible que el ajuste de volumen de la unidad de padres sea
demasiado alto. Baje el volumen de la unidad de padres.
Es posible que el nivel de volumen de la unidad de padres sea
demasiado bajo o que esté apagado. Suba el volumen de la unidad de
padres.
Es posible que el nivel de sensibilidad del micrófono de la unidad del
bebé esté demasiado bajo. Ajuste el nivel de sensibilidad del micrófono a
un nivel más alto desde el menú de la unidad de padres.
Es posible que la unidad del bebé y la unidad de padres estén fuera del
alcance de funcionamiento. Reduzca la distancia entre las unidades.
La unidad del bebé recoge también otros sonidos aparte de los del
bebé. Aproxime la unidad del bebé al bebé (pero manteniendo una
distancia mínima de 1 metro).
Es posible que el nivel de sensibilidad del micrófono de la unidad del
bebé esté demasiado alto. Reduzca el nivel de sensibilidad del micrófono
desde el menú de la unidad de padres.
Es posible que el nivel de sensibilidad del micrófono de la unidad del
bebé esté demasiado bajo. Aumente el nivel de sensibilidad del
micrófono desde el menú de la unidad de padres.
ESPAÑOL 83

ESPAÑOL84
Pregunta Respuesta
¿Por qué se agotan tan
rápidamente las pilas
no recargables de la
unidad del bebé?
¿Por qué la unidad de
padres tarda más de
4 horas en cargarse?
El alcance de
funcionamiento
especicado para el
vigilabebés es de
330 metros. ¿Por qué
el alcance de mi
vigilabebés es mucho
menor?
¿Por qué se pierde la
conexión de vez en
cuando? ¿Por qué hay
interrupciones de
sonido?
¿Qué sucede si hay un
corte en el suministro
eléctrico?
¿Está protegido el
vigilabebés contra
escuchas e
interferencias?
Es posible que el ajuste del nivel de sensibilidad del micrófono de la
unidad del bebé sea demasiado alto y esto hace que la unidad del bebé
transmita más frecuentemente. Reduzca el nivel de sensibilidad del
micrófono desde el menú de la unidad de padres.
Es posible que el ajuste de volumen de la unidad del bebé sea
demasiado alto, y esto hace que la unidad del bebé consuma mucha más
energía. Baje el volumen de la unidad del bebé.
Puede que haya establecido una temperatura máxima de la habitación
que sea inferior a la temperatura real de la misma, o una temperatura
mínima que sea superior a la temperatura real. En ese caso, la pantalla
permanece encendida todo el tiempo, lo que aumenta el consumo de
energía de la unidad del bebé. Esto hace que las pilas no recargables de
la unidad del bebé se agoten rápidamente.
Puede que haya encendido la luz de compañía. Si desea utilizar la luz de
compañía, le recomendamos que utilice la unidad del bebé enchufada a
la red.
Es posible que la unidad de padres esté encendida durante el proceso
de carga. Apáguela durante el proceso de carga.
El alcance especicado es válido sólo en exteriores y al aire libre. En
interiores, el alcance de funcionamiento está limitado por el número y
tipo de paredes y/o techos que se encuentren entre las dos unidades. En
interiores, el alcance puede ser de hasta 50 metros.
Es posible que la unidad del bebé y la unidad de padres estén fuera de
los límites del alcance de funcionamiento. Pruebe en una ubicación
diferente o reduzca la distancia entre las unidades. Tenga en cuenta que
cada conexión entre las unidades tarda 30 segundos en establecerse.
Si la unidad de padres tiene carga suciente, continúa funcionando
durante un corte del suministro eléctrico, tanto en el cargador como
fuera de él. Si la unidad del bebé tiene pilas y se produce un corte del
suministro eléctrico, la unidad seguirá funcionando.
La tecnología DECT de este vigilabebés garantiza la eliminación de
escuchas e interferencias de otros equipos.

Pregunta Respuesta
Se supone que el
tiempo de
funcionamiento de la
unidad de padres es
de 24 horas. ¿Por qué
el de mi unidad de
padres es menor?
¿Por qué no aparece
el símbolo de la pila
en la pantalla de la
unidad de padres
cuando empiezo a
recargarla?
Al cargar por primera vez la batería recargable de la unidad de padres, el
tiempo de funcionamiento será inferior a 24 horas. La batería recargable
sólo alcanza su capacidad máxima después de haberla cargado y
descargado al menos cuatro veces.
Es posible que el ajuste de volumen de la unidad de padres sea
demasiado alto y esto hace que la unidad de padres consuma mucha
energía. Baje el volumen de la unidad de padres.
Es posible que el ajuste del nivel de sensibilidad del micrófono de la
unidad del bebé sea demasiado alto, y esto hace que la unidad de padres
consuma mucha energía. Reduzca el nivel de sensibilidad del micrófono
desde el menú de la unidad de padres.
Es posible que el símbolo de la pila tarde varios minutos en aparecer en
la pantalla de la unidad de padres cuando la cargue por primera vez o
tras un largo periodo sin usarla.
ESPAÑOL 85

86
SUOMI
Johdanto
Onnittelut ostoksestasi ja tervetuloa Philips AVENT -tuotteiden käyttäjäksi! Hyödynnä Philips
AVENTin tuki ja rekisteröi tuotteesi osoitteessa www.philips.com/welcome.
Philips AVENT on sitoutunut valmistamaan turvallisia tuotteita, joihin vanhemmat voivat luottaa.
Tämän Philips AVENT -itkuhälyttimen ansiosta voit olla rauhallisin mielin kellon ympäri, sillä kuulet
lapsesi selvästi ilman häiriöääniä. DECT-tekniikka takaa, ettei laite ota häiriöitä muista langattomista
laitteista, vaan lapsen ja vanhemman yksikön välinen signaali on erittäin selkeä. Lämpötilan ilmaisimella
voit valvoa lapsen huoneen lämpötilaa. Mukautetut asetukset auttavat pitämään huoneen
miellyttävänä..
Laitteen osat (Kuva 1)
A Vanhemman yksikkö
1 Käynnistyspainike 3
2 Vyöpidikkeen paikka
3 TALK-puhepainike
4 MENU-valikkopainike
5 Yhteyden merkkivalo
6 Mikrofoni
7 Kaiutin
8 Valikon ja äänenvoimakkuuden painikkeet + ja –
9 OK-painike
10 Näyttö
11 Äänenvoimakkuuden merkkivalot
12 Vyöpidike
13 Sovitin
14 Pieni liitin
15 Laturi
16 Latauksen merkkivalo
17 Kaulahihna
18 Akkulokero
19 Kaulahihnan kiinnitysaukko
20 Akkulokeron kansi
21 Akku (vakiovaruste)
B Lapsen yksikkö
1 Käynnistyspainike 3
2 PAGE-hakupainike
3 Näyttö
4 Virran merkkivalo
5 Äänenvoimakkuuspainikkeet (+/-)
6 Yövalopainike Q
7 Kehtolaulupainike K
8 Toisto/pysäytyspainike E
9 Mikrofoni
10 Sovitin
11 Suuri liitin
12 Jäähdytysaukot
13 Kaiutin
14 Lämpötilan ja ilmakosteuden tunnistin
15 Liitäntä suurelle liittimelle
16 Paristot (ei mukana)
17 Paristolokero
18 Paristolokeron kansi

SUOMI 87
C Näyttö
1 $ = lämpötilahälytys
2 Ñ° = huonelämpötilan ilmaisin
3 g = äänihälytys
4 r = kosteuden ilmaisin
5 s = hakukuvake
6 K = kehtolaulukuvake
7 Q = yövalokuvake
8 T = akkukuvake
9 Äänenvoimakkuuden/mikrofonin herkkyyden ilmaisimet:
- g = äänetön
- h = pienin herkkyys/äänenvoimakkuus
- i = suurin herkkyys/äänenvoimakkuus
Muut näyttöilmaisimet (ei kuvassa):
- High (Korkea) = huonelämpötila korkeampi kuin valikossa määritetty
- Low (Matala) = huonelämpötila matalampi kuin valikossa määritetty
- Not linked (Ei yhteyttä) = yksiköiden välillä ei ole yhteyttä*
- Paused (Tauko) = kehtolaulu on keskeytetty
- Searching (Haetaan) = yksiköt etsivät yhteyttä*
- Linked (Yhteys muodostettu) = yksiköiden välillä on yhteys*
- Talk (Puhe) = puhetoiminto on käytössä
* Tämä näkyy vain vanhemman yksikössä.
D Matkapussi
Tärkeää
Lue tämä käyttöopas huolellisesti ennen käyttöä ja säilytä se vastaisen varalle.
Vaara
- Älä upota mitään itkuhälyttimen osaa veteen tai muuhun nesteeseen.
Tärkeää
- Tarkista, että lapsen yksikön latauslaitteen pohjassa oleva jännitemerkintä vastaa paikallista
verkkojännitettä, ennen kuin liität laitteen pistorasiaan.
- Kytke lapsen yksikkö verkkovirtaan ainoastaan toimitetulla latauslaitteella.
- Lataa vanhemman yksikön akku ainoastaan toimitetulla laturilla ja sovittimella.
- Latauslaite sisältää jännitemuuntajan. Älä vaihda latauslaitteen tilalle toisenlaista pistoketta, sillä se
saattaa aiheuttaa vaaratilanteen.
- Jos latauslaitteet ovat vioittuneet, vaihda vaaratilanteiden välttämiseksi tilalle aina alkuperäisen
tyyppinen latauslaite. Lisätietoja latauslaitteiden tyypeistä on luvussa Varaosat.
- Jos lapsen tai vanhemman yksikön laturi on vaurioitunut, vaihda tilalle aina alkuperäisen tyyppinen
laturi.
- Älä käytä itkuhälytintä kosteissa paikoissa tai veden lähellä.
- Älä avaa lapsen tai vanhemman yksikön koteloa (paristolokeroa lukuun ottamatta), ettet saa
sähköiskua.
- Laitetta ei ole tarkoitettu lasten tai sellaisten henkilöiden käyttöön, joiden fyysinen tai henkinen
toimintakyky on rajoittunut tai joilla ei ole kokemusta tai tietoa laitteen käytöstä, muuten kuin
heidän turvallisuudestaan vastaavan henkilön valvonnassa ja ohjauksessa.
- Pienten lasten ei saa antaa leikkiä laitteella.
Varoitus
- Käytä ja säilytä laitetta 10 - 40 °C:n lämpötilassa.
- Älä jätä lapsen tai vanhemman yksikköä liian kuumaan tilaan tai suoraan auringonpaisteeseen. Älä
aseta lapsen tai vanhemman yksikköä lämmönlähteen lähelle.

SUOMI88
- Varmista, että lapsen yksikkö ja johto ovat lapsen ulottumattomissa (pidä ne vähintään metrin
etäisyydellä).
- Älä aseta lapsen yksikköä vauvan sänkyyn tai leikkikehään.
- Älä peitä lapsen tai vanhemman yksikköä esimerkiksi pyyheliinalla tai peitteellä. Varmista, että
lapsen yksikön tuuletusaukkojen edessä ei ole mitään.
- Aseta lapsen yksikköön aina oikeanlaiset paristot.
- Käytä aina vanhemman yksikön mukana toimitettua akkua vaaratilanteiden välttämiseksi.
- Jos asetat vanhemman yksikön lähettimen tai jonkin muun DECT-laitteen (kuten DECTpuhelimen) lähelle, yhteys lapsen yksikköön voi kadota.
Yleistä
- Tämä itkuhälytin on tarkoitettu apuvälineeksi. Se ei korvaa vastuuntuntoisen aikuisen valvontaa
eikä sitä saa käyttää tämän korvikkeena.
- Kosteus- ja lämpötilatunnistin mittaa vain lastenhuoneen lämpötilaa tai ilmankosteutta, eikä sillä
voi säätää huoneen lämpötilaa.
Sähkömagneettiset kentät (EMF)
Tämä Philips AVENT -laite vastaa kaikkia sähkömagneettisia kenttiä (EMF) koskevia standardeja. Jos
laitetta käytetään oikein ja tämän käyttöohjeen ohjeiden mukaisesti, sen käyttäminen on tur vallista
tämänhetkisten tieteellisten tutkimusten perusteella.
Käyttöönotto
Lapsen yksikkö
Lapsen yksikkö on verkkovirta- ja paristokäyttöinen. Vaikka aikoisitkin käyttää sitä verkkovirralla,
suosittelemme paristojen asettamista laitteeseen. Tällä tavoin laite on käytössä myös sähkökatkoksen
aikana.
Verkkovirtakäyttö
1 Työnnä suuri liitin lapsen yksikköön ja kytke latauslaite pistorasiaan (Kuva 2).
, Virran merkkivalo syttyy.
Käyttö paristojen kanssa
Lapsen yksikköön tarvitaan neljä 1,5 voltin R6 AA -paristoa (ei toimiteta laitteen mukana).
Suosittelemme Philips LR6 PowerLife -paristoja.
Älä käytä paristokäyttöisessä lapsen yksikössä akkuja.
Irrota lapsen yksikön pistoke pistorasiasta ja varmista, että kätesi ja yksikkö ovat kuivia, kun
asetat paristot laitteeseen.
1 Poista paristolokeron kansi. (Kuva 3)
2 Aseta lokeroon neljä paristoa (Kuva 4).
Huomautus: Varmista, että pariston plus- ja miinusmerkit osoittavat oikeaan suuntaan.
3 Aseta kansi takaisin paikalleen. (Kuva 5)
Vanhemman yksikkö
Käyttö akkujen kanssa
Vanhemman yksikön kanssa toimitetaan Li-ion 1000 mAh -akku.
Lataa vanhemman yksikkö ennen ensimmäistä käyttökertaa tai kun akku on tyhjenemässä (tyhjän
akun symboli vilkkuu, ja kuulet äänimerkin). Vanhemman yksikkö ilmoittaa tyhjenevästä akusta 30
minuuttia ennen akkujen täydellistä tyhjenemistä.
Huomautus: Jos akku on täysin tyhjä, vanhemman yksikön virta katkeaa automaattisesti ja yhteys lapsen
yksikköön katkeaa.

SUOMI 89
1 Poista akkulokeron kansi (Kuva 6).
2 Aseta akku akkulokeroon (Kuva 7).
3 Aseta kansi takaisin paikalleen (Kuva 8).
4 Liitä laitteen pieni liitin laturiin ja laturi pistorasiaan. Laita vanhemman yksikkö
laturiin (Kuva 9).
, Laturin latausvalo syttyy
, Näytön akun lataussymboli osoittaa, että vanhemman yksikköä ladataan.
5 Anna vanhemman yksikön olla laturissa, kunnes akku on latautunut täyteen.
, Laturin valo palaa latauksen aikana.
, Kun akku on ladattu täyteen, vanhemman yksikön näytössä on täyden akun symboli T.
- Kun vanhemman yksikkö ladataan ensimmäisen kerran tai kun se on ollut pitkään käyttämättä,
katkaise siitä virta ja anna sen latautua yhtäjaksoisesti vähintään 10 tuntia.
- Lataaminen kestää tavallisesti yli 4 tuntia, jos vanhemman yksikkö on käynnissä lataamisen ajan.
Voit pitää latausajan mahdollisimman lyhyenä katkaisemalla vanhemman yksiköstä virran
lataamisen ajaksi.
- Kun akku on ladattu täyteen, vanhemman yksikköä voi käyttää langattomasti vähintään 24 tuntia.
Huomautus: Kun vanhemman yksikön akku ladataan ensimmäisen kerran, käyttöaika on alle 24 tuntia.
Akun koko teho on käytettävissä vasta, kun se on ladattu ja lataus on purettu neljä kertaa.
Huomautus: Kun vanhemman yksikkö ei ole laturissa, akun lataus purkautuu vähitellen, vaikka virta olisi
katkaistu.
Käyttö
1 Kokeile vanhemman yksikön ja lapsen yksikön välistä yhteyttä siten, että laitteet ovat samassa
huoneessa (Kuva 10).
Varmista, että lapsen yksikön ja vanhemman yksikön välinen etäisyys on vähintään 1 metri.
2 Paina lapsen yksikön virtapainiketta 3, kunnes vihreä virran merkkivalo syttyy. (Kuva 11)
Huomautus: virran vihreä merkkivalo palaa myös silloin, kun vanhemman yksikköön ei ole muodostettu
yhteyttä.
, Yövalo syttyy hetkeksi ja sammuu sitten hitaasti.
, Näyttövalot syttyvät ja näyttöön tulee akun symboli (Kuva 12).
, Kahden sekunnin kuluttua näytössä näkyvät lämpötila- ja kosteusarvot (Kuva 13).
3 Paina vanhemman yksikön virtapainiketta 3, kunnes äänitason valo syttyy hetkeksi. (Kuva 14)
, Näyttöön tulee akun symboli (Kuva 15).
, LINK-valo vilkkuu punaisena ja näytössä on teksti Searching (Etsitään). (Kuva 16)
, Vanhemman yksikön LINK-valo muuttuu vihreäksi ja palaa jatkuvasti, kun lapsen ja
vanhemman yksiköiden välille on muodostettu yhteys. Näytössä näkyy teksti Linked (Yhteys
muodostettu). (Kuva 17)
, Kahden sekunnin kuluttua teksti Linked (Yhteys muodostettu) poistuu näytöstä ja näytössä
näkyvät lämpötila- ja ilmankosteusarvot. (Kuva 18)
, Kun vanhemman yksikköön kytketään virta ensimmäisen kerran, näytössä on teksti Language
(Kieli). Valitse kieli. (Lisätietoja on luvun Valikkoasetukset kohdassa Näyttökielen määrittämine
n.) (Kuva 19)
, Jos yhteyttä ei ole muodostettu, vanhemman yksikön LINK-valo lakkaa vilkkumasta ja valo
palaa punaisena. Vanhemman yksiköstä kuuluu aika ajoin äänimerkki ja näytössä on teksti Not
Linked (Ei yhteyttä). (Kuva 20)

SUOMI90
Itkuhälyttimen sijoittaminen
1 Aseta lapsen yksikkö vähintään 1 metrin etäisyydelle lapsesta (Kuva 21).
2 Sijoita vanhemman yksikkö lapsen yksikön kuuluvuusalueelle. Varmista, että se on vähintään 1
metrin etäisyydellä lapsen yksiköstä akustisen palautteen välttämiseksi. (Kuva 10)
Lisätietoja kuuluvuusalueesta on jäljempänä kohdassa Kuuluvuusalue.
Kuuluvuusalue
Itkuhälyttimen kuuluvuusalue on enintään 330 metriä avoimessa tilassa. Kuuluvuus saattaa vaihdella
ympäristön ja erilaisten häiriötekijöiden mukaan. Sisätiloissa kuuluvuusalue on enintään 50 metriä.
Huonekalut Seinät ja muut esteet Huono kuuluvuus
Puu, kipsi, pahvi, lasi (ei metallia,
johtoja tai lyijyä)
Tiili, vaneri < 30 cm 5 - 35 %
Vahvistettu betoni < 30 cm 30 - 100 %
Metalliristikot tai -tangot <1 cm 90 - 100 %
Metalli- tai alumiinilevyt <1 cm 100 %
Kosteat ja märät materiaalit saattavat estää kuuluvuuden jopa sataprosenttisesti.
Ominaisuudet
Seuraavat ominaisuudet kuvataan luvussa Valikon asetukset, sillä niitä voi käyttää vain vanhemman
yksikön valikosta:
- Mikrofonin herkkyyden säätäminen
- Äänihälytyksen kytkentä ja sammutus
- Huoneen lämpötilan määrittäminen (ylin ja alin lämpötila)
- Lämpötilahälytyksen kytkentä ja sammutus
- Värinähälytyksen kytkentä ja sammutus
Kaiuttimen äänenvoimakkuuden säätäminen
1 Paina lapsen yksikön äänenvoimakkuuspainikkeita (+/-) kunnes lapsen yksikön kaiuttimen
äänenvoimakkuus on sopiva (Kuva 22).
2 Paina vanhemman yksikön äänenvoimakkuuspainikkeita (+/-) kunnes vanhemman yksikön
kaiuttimen äänenvoimakkuus on sopiva (Kuva 23).
, Näyttöihin tulee palautetta yksiköiden äänenvoimakkuuden asetuksista:
- g = vanhemman yksikkö asetettu äänettömäksi / mykistetty itkuhälytin
- h = pienin äänenvoimakkuus (vanhemman ja lapsen yksiköt)
- i = suurin äänenvoimakkuus (vanhemman ja lapsen yksiköt)
Huomautus: jos äänenvoimakkuus on asetettu korkeaksi, yksiköt kuluttavat enemmän virtaa.
Puhetoiminto
Voit puhua lapselle (esimerkiksi rauhoittaa häntä) käyttämällä TALK-puhepainiketta.
1 Paina TALK-painiketta ja puhu selkeästi mikrofoniin 15–30 cm:n etäisyydeltä (Kuva 24).
, Vihreä LINK-valo alkaa vilkkua, ja näyttöön tulee teksti Talk (Puhe).
2 Vapauta puhepainike puhuttuasi.
< 30 cm 0 - 10 %

SUOMI 91
Äänenvoimakkuuden merkkivalot
Vanhemman yksikkö valvoo lastenhuoneen äänitasoa, ja äänen tasovalo syttyy, jos jotain ääntä kuuluu.
Jos lapsi itkee, äänen tasovalo syttyy vanhemman yksikössä.
- Niin kauan kuin lapsen yksikkö ei havaitse ääntä, vanhemman yksikön äänenvoimakkuuden
merkkivalot eivät pala.
- Kun lapsen yksikkö havaitsee äänen, vanhemman yksilössä palaa yksi äänen tasovalo tai useita
valoja. Palavien valojen määrä määräytyy lapsen yksikön havaitseman äänen voimakkuuden
mukaan.
Yövalo
Huomautus: Vanhemman yksikön valikoista voi myös sytyttää tai sammuttaa yövalon. (Lisätietoja on
luvussa Valikon asetukset kohdassa Yövalo.)
1 Sytytä yövalo painamalla lapsen yksikön yövalopainiketta Q. (Kuva 25)
, Q näkyy vanhemman yksikön näytössä.
2 Sammuta yövalo painamalla yövalopainiketta Q uudelleen.
, Yövalo himmenee vähitellen ja sammuu lopulta kokonaan.
, Q poistuu vanhemman yksikön näytöstä.
Vinkki: Sammuta yövalo, kun lapsen yksikköä käytetään paristovirralla. Näin säästyy virtaa.
Vanhemman yksikön haku
Jos olet kadottanut vanhemman yksikön ja yksikkö on asetettu äänettömäksi, voit etsiä sen
käyttämällä lapsen yksikön hakupainiketta.
Huomautus: Hakutoimintoa voi käyttää vain, kun vanhemman yksikköön on kytketty virta.
1 Paina lapsen yksikön PAGE-hakupainiketta (Kuva 26).
, Lapsen ja vanhemman yksikön näytössä näkyy teksti Paging (Haetaan) ja hakukuvake.
, Vanhemman yksiköstä kuuluu hakuhälytysääni.
2 Lopeta hakuhälytysääni painamalla PAGE-painiketta uudelleen tai painamalla mitä tahansa
vanhemman yksikön painiketta.
Kehtolaulutoiminto
Huomautus: Vanhemman yksikön valikosta voi käyttää myös kehtolaulutoimintoa. (Lisätietoja on luvussa
Valikon asetukset kohdassa Kehtolaulutoiminto.)
1 Toista valittu kehtolaulu painamalla lapsen yksikön toisto/pysäytyspainiketta E. (Kuva 27)
2 Jos haluat valita toisen kehtolaulun, selaa laululuetteloa painamalla lapsen yksikön K-
kehtolaulupainiketta 2 sekunnin kuluessa. (Kuva 28)
Huomautus: Jos painat kehtolaulupainiketta K alle 2 sekuntia, näytössä näkyvä kehtolaulu alkaa soida.
, Näyttöön tulee kehtolaulun numero ja kehtolaulukuvake K.
, Kehtolaulu toistetaan yhtäjaksoisesti.
3 Pysäytä kehtolaulun soittaminen painamalla toisto- ja pysäytyspainiketta E uudelleen lapsen
yksikössä. (Kuva 27)
, Kehtolaulun numero ja kuvake K poistuvat näytöstä.
4 Toisen kehtolaulun valitseminen laulun toiston aikana:
- Selaa lapsen yksikön kehtolaulujen luetteloa painamalla kehtolaulupainiketta K 2 sekunnin
kuluessa.
Huomautus: Jos painat kehtolaulupainiketta K alle 2 sekuntia, näytössä näkyvä kehtolaulu alkaa soida.

SUOMI92
Kosteus
Kun lapsen ja vanhemman yksikön välille on muodostettu yhteys, kosteustaso näkyy kummankin
yksikön näytössä.
Ihanteellinen ilmankosteustaso on 40–60 %. Oikea kosteustaso on tärkeä, koska se estää limakalvojen
ärtymistä sekä ihon, huulten ja kurkun kuivumista ja ärsytystä. Jos lapsen limakalvot eivät toimi, kuten
niiden pitäisi, lapsi on alttiimpi erilaisille bakteereille. Tämä lisää vilustumisriskiä ja heikentää hänen
vastustuskykyään homeille ja bakteereille.
Philips AVENT -ultraääni-ilmankostutin auttaa parantamaan lapsen huoneen ilmanlaatua ja
säilyttämään mukavan ilmankosteustason. Tietoja jälleenmyyjistä saat paikallisesta Philipsin
kuluttajapalvelukeskuksesta.
Huomautus: Itkuhälytin vain mittaa kosteustasoa, eikä kosteustasoa voi säätää itkuhälyttimellä.
Hälytys kuuluvuusalueen ylittämisestä
Kun vanhemman yksikkö on lapsen yksikön kuuluvuusalueen ulkopuolella, vanhemman yksikkö antaa
ajoittain äänimerkin ja näytössä on teksti Not linked (Ei yhteyttä). Vanhemman yksikön LINK-valo
palaa punaisena.
Huomautus: Teksti Not Linked (Ei yhteyttä) näkyy vanhemman yksikön näytössä myös silloin, kun lapsen
yksikön virta on katkaistu.
Valikon asetukset
Useimpia toimintoja voi käyttää sekä vanhemman yksiköstä että lapsen yksiköstä, mutta jotkin
toiminnot voi ottaa käyttöön vain vanhemman yksikön valikosta.
Valikon käyttö - yleisohjeet
Huomautus: Valikkotoimintoja voidaan käyttää vain, kun lapsen ja vanhemman yksikön välinen yhteys on
muodostettu.
1 Avaa valikko painamalla valikkopainiketta (Kuva 29).
, Näytössä näkyy ensimmäinen valikon asetus.
2 Valitse haluamasi asetus plus- ja miinuspainikkeilla (Kuva 30).
Huomautus: nuoli osoittaa liikkumissuunnat.
3 Vahvista OK-painikkeella (Kuva 31).
4 Valitse haluamasi asetus painikkeilla + ja -.
5 Vahvista OK-painikkeella.
, Uusi asetus vilkkuu kahdesti ja poistuu näytöstä.
6 Poistu valikosta painamalla valikkopainiketta uudelleen.
Yövalon sytyttäminen/sammuttaminen
1 Valitse plus- tai miinuspainikkeella Light (Valo).
2 Vahvista OK-painikkeella.
3 Jos yövalo ei ole käytössä, näytössä on teksti On? (Käyttöön?). Ota yövalo käyttöön
painamalla OK-painiketta. Jos yövalo on käytössä, näytössä on teksti Off? (Pois käytöstä?).
Poista yövalo käytöstä painamalla OK-painiketta.

SUOMI 93
Kehtolaulutoiminto
Kehtolaulun valitseminen
1 Valitse plus- tai miinuspainikkeella Lullaby (Kehtolaulu).
2 Vahvista OK-painikkeella.
3 Selaa viiden kehtolaulun luetteloa painamalla +-painiketta tai valitse Play All (Toista kaikki).
4 Vahvista OK-painikkeella.
Kun olet valinnut jonkin viidestä kehtolaulusta, sitä toistetaan yhtäjaksoisesti.
Kehtolaulun vaihtaminen
1 Valitse luettelosta toinen kehtolaulu painamalla +-painiketta.
2 Vahvista OK-painikkeella.
Kehtolaulun toiston keskeyttäminen
1 Paina OK-painiketta.
, Näytössä on teksti Paused (Keskeytetty).
2 Jatka toistoa painamalla OK-painiketta.
Jos et jatka kehtolaulun toistoa 20 sekunnin kuluessa, kehtolaulutoiminto poistuu käytöstä
automaattisesti. Teksti Paused (Keskeytetty) ja kehtolaulukuvake poistuvat näytöstä.
Kehtolaulun toiston pysäyttäminen
1 Paina +-painiketta ja valitse luettelosta Stop (Pysäytä).
2 Vahvista OK-painikkeella.
Mikrofonin herkkyyden säätäminen
Huomautus: voit säätää mikrofonin herkkyyttä vain vanhemman yksikön valikossa.
Voit asettaa lapsen yksikön mikrofonin herkkyyden haluamallesi tasolle. Voit muuttaa mikrofonin
herkkyyttä sen jälkeen, kun yhteys on muodostettu lapsen ja vanhemman yksikön välille, eli kun
vanhemman yksikön yhteyden merkkivalo palaa vihreänä.
1 Valitse plus- tai miinuspainikkeella Sensitivity (Herkkyys).
2 Vahvista OK-painikkeella.
3 Vahvista lapsen yksikön mikrofonin herkkyystaso plus- tai miinuspainikkeella.
, h = pienin herkkyystaso
, i = suurin herkkyystaso
4 Vahvista OK-painikkeella.
, Näytössä on teksti Saved (Tallennettu).
Huomautus: Kun lapsen yksikön mikrofonin herkkyystaso on asetettu korkeaksi, se havaitsee enemmän
ääniä ja on useammin lähettävässä tilassa. Tämän vuoksi yksikkö kuluttaa enemmän virtaa.
Äänihälytyksen kytkentä ja sammutus
Huomautus: voit ottaa äänihälytyksen käyttöön tai poistaa sen käytöstä vain vanhemman yksikön
valikosta.
Tällä toiminnolla valvot lastasi äänettömästi. Voit asettaa vanhemman yksikön äänettömäksi ja silti
saada hälytyksen, jos lapsi itkee.
Äänihälytyksen ollessa käytössä vanhemman yksiköstä kuuluu merkkiääni, kun neljännen
äänenvoimakkuuden merkkivalo syttyy silloin, kun yksikkö on asetettu äänettömäksi. Tämän lisäksi
vanhemman yksikön näytön taustavalo syttyy ja näytössä vilkkuu äänihälytyksen symboli (g).

SUOMI94
1 Valitse plus- tai miinuspainikkeella Sound Alert (Äänihälytys).
2 Vahvista OK-painikkeella.
3 Jos hälytys ei ole käytössä, näytössä on teksti On? (Käyttöön?). Ota hälytys käyttöön
painamalla OK-painiketta. Jos hälytys on käytössä, näytössä on teksti Off? (Pois käytöstä?).
Poista hälytys käytöstä painamalla OK-painiketta.
, Jos olet asettanut äänihälytyksen käyttöön, vanhemman yksikön näyttöön tulee äänihälytyksen
symboli ( g).
Huonelämpötila-alueen asettaminen
Huomautus: voit vain säätää lämpötila-alaa vanhemman yksikön valikossa.
Nukkuvalle lapselle sopiva lämpötila on 16–20 °C. Tämä on tärkeää, sillä lapsi ei voi säädellä
ruumiinlämpöään yhtä hyvin kuin aikuinen. Lapsi tarvitseekin enemmän aikaa lämpötilavaihdoksiin
mukautumiseen.
Jos et määritä lämpötila-aluetta, itkuhälytin ilmoittaa, kun huoneen lämpötila on alhaisempi kuin
14 °C tai ylittää 30 °C. Tässä tapauksessa vanhemman yksikön näytön taustavalo syttyy ja näyttöön
tulee teksti High (Korkea) tai Low (Alhainen). Voit muuttaa vähimmäis- tai enimmäislämpötilan
oletuksia seuraavien ohjeiden mukaan.
Huomautus: lastenhuoneen lämpötila näkyy kummankin yksikön näytössä, kun yksiköiden välillä on
yhteys.
1 Valitse plus- tai miinuspainikkeella Temperature (Lämpötila).
2 Vahvista OK-painikkeella.
3 Valitse plus- tai miinuspainikkeella Range (Alue).
4 Vahvista OK-painikkeella.
5 Määritä vähimmäislämpötila plus- tai miinuspainikkeella.
6 Vahvista OK-painikkeella.
7 Määritä enimmäislämpötila plus- tai miinuspainikkeella.
8 Vahvista OK-painikkeella.
, Näytössä on teksti Saved (Tallennettu).
Huomautus: Jos lastenhuoneen lämpötila alittaa tai ylittää määritetyn lämpötila-alueen, näyttö on päällä
jatkuvasti, jolloin laite kuluttaa enemmän virtaa.
Lämpötilahälytyksen kytkentä ja sammutus
Huomautus: voit ottaa lämpötilahälytyksen käyttöön tai poistaa sen käytöstä vain vanhemman yksikön
valikosta.
Huomautus: jos lämpötilahälytys käynnistyy liian usein, pienennä vähimmäislämpötilaa ja/tai suurenna
enimmäislämpötilaa (katso Huoneen lämpötila-alueen määrittäminen).
Jos lämpötilahälytys on otettu käyttöön, vanhemman yksiköstä kuuluu äänimerkki, jos huoneen
lämpötila ylittää tai alittaa määritetyt lämpötilarajat. Tämän lisäksi vanhemman yksikön taustavalo
syttyy, lämpötilahälytyksen symboli ( t) vilkkuu ja näytössä on teksti High (Korkea) tai Low (Alhainen).
Jos vähimmäis- tai enimmäislämpötilaa ei ole määritetty, lämpötilahälytys laukeaa, kun huoneen
lämpötila alittaa 14 °C tai ylittää 30 °C.
1 Valitse plus- tai miinuspainikkeella Temperature (Lämpötila).
2 Vahvista OK-painikkeella.
3 Valitse plus- tai miinuspainikkeella Alert (Hälytys).

SUOMI 95
4 Vahvista OK-painikkeella.
5 Jos hälytys ei ole käytössä, näytössä on teksti On? (Käyttöön?). Ota hälytys käyttöön
painamalla OK-painiketta. Jos hälytys on käytössä, näytössä on teksti Off? (Pois käytöstä?).
Poista hälytys käytöstä painamalla OK-painiketta.
Värinähälytyksen kytkentä ja sammutus
Huomautus: voit ottaa värinähälytyksen käyttöön tai poistaa sen käytöstä vain vanhemman yksikön
valikosta.
Värinähälytyksen ollessa käytössä vanhemman yksikkö värisee, kun neljännen äänenvoimakkuuden
merkkivalo syttyy silloin, kun yksikkö on asetettu äänettömäksi.
1 Valitse plus- tai miinuspainikkeella Vibration (Värinä).
2 Vahvista OK-painikkeella.
3 Jos värinä ei ole käytössä, näytössä on teksti On? (Käyttöön?). Ota värinä käyttöön painamalla
OK-painiketta. Jos värinä on käytössä, näytössä on teksti Off? (Pois käytöstä?). Poista värinä
käytöstä painamalla OK-painiketta.
Näytön kielen määrittäminen
1 Valitse plus- tai miinuspainikkeella Language (Kieli).
2 Vahvista OK-painikkeella.
3 Valitse kieli plus- tai miinuspainikkeella.
4 Vahvista OK-painikkeella.
Palautustoiminto
Tämä vanhemman yksikön valikkotoiminto mahdollistaa sekä vanhemman että lapsen yksikön
asetusten palauttamisen oletusasetuksiin samanaikaisesti. Käytä tätä toimintoa, jos Tavallisimmat
kysymykset -luvussa annetut vastaukset eivät auta.
1 Valitse plus- tai miinuspainikkeella Reset (Palauta).
2 Vahvista OK-painikkeella.
, Vanhemman yksikön näyttöön tulee teksti Conrm? (Vahvista?).
3 Vahvista OK-painikkeella.
, Vanhemman yksikköä käynnistyy uudelleen.
, Molempien yksikköjen asetukset on palautettu tehdasasetuksiin.
Oletusasetukset
Vanhemman yksikkö
- Värinähälytys: ei käytössä
- Kieli: englanti
- Kaiuttimen äänenvoimakkuus: 1
- Mikrofonin herkkyys: 3
- Äänihälytys: ei käytössä
- Lämpötilan hälytys: ei käytössä
- Matalan lämpötilan hälytys: 14 °C
- Korkean lämpötilan hälytys: 30°C
Lapsen yksikkö
- Kaiuttimen äänenvoimakkuus: 3
- Yövalo: ei käytössä
- Kehtolaulu: 1

SUOMI96
Lisätarvikkeet
Vyöpidike ja kaulahihna
Jos vanhemman yksikön akussa on riittävästi virtaa, voit kuljettaa yksikköä mukanasi kotona niin sisällä
kuin ulkonakin kiinnittämällä sen vyöpidikkeellä vyöhösi tai ripustamalla sen kaulahihnalla kaulaasi.
Näin voit kuunnella lastasi silloinkin, kun olet itse liikkeellä.
Vyöpidikkeen kiinnittäminen
1 Kiinnitä vyöpidike vanhemman yksikköön (Kuva 32).
Vyöpidikkeen irrottaminen
1 irrota vyöpidike vanhemman yksiköstä vetämällä.
Kaulahihnan kiinnittäminen
1 Vie kaulahihnan päässä oleva lenkki hihnan pidikkeen takana olevan aukon läpi. Vie kaulahihna
lenkin läpi ja kiristä kaulahihna (Kuva 33).
Kaulahihnan irrottaminen
1 Vedä kaulahihna hihnan päässä olevan lenkin läpi ja vedä hihna kannattimen takana olevan
reiän läpi.
Puhdistus ja hoito
Älä upota vanhemman tai lapsen yksikköä veteen äläkä puhdista niitä juoksevalla vedellä.
Älä käytä puhdistamiseen puhdistussuihkeita tai nestemäisiä pesuaineita.
1 Jos lapsen yksikkö on liitetty sähköverkkoon, irrota pistoke pistorasiasta, ja irrota vanhemman
yksikkö laturista.
2 Puhdista vanhemman ja lapsen yksikkö kostealla liinalla.
Varmista, että vanhemman yksikkö on kuiva, ennen kuin asetat sen takaisin laturiin.
3 Pyyhi laturi puhtaaksi kuivalla liinalla.
4 Pyyhi sovittimet puhtaiksi kuivalla liinalla.
Säilytys
- Itkuhälytintä voi säilyttää matkoilla pussissa.
- Jos itkuhälytintä ei käytetä vähään aikaan, poista paristot lapsen yksiköstä ja ladattava akku
vanhemman yksiköstä. Säilytä vanhemman ja lapsen yksiköt, laturi ja sovittimet mukana
toimitetussa kantolaukussa.
Varaosat
Lapsen yksikkö
Paristot
Vaihda lapsen yksikön paristot aina neljään 1,5 V:n R6 AA -paristoon.
Huomautus: Suosittelemme Philipsin paristojen käyttämistä
Sovitin
Vaihda lapsen yksikön latauslaite ainoastaan alkuperäisen tyyppiseen latauslaitteeseen. Voit tilata
uuden latauslaitteen jälleenmyyjältä tai Philipsin huoltoliikkeestä.
- Vain Iso-Britannia: SSA-5S-09 UK 075040F
- Muut maat: SSA-5W-09 EU 075040F

SUOMI 97
Vanhemman yksikkö
Akku
Käytä vanhemman yksikön vaihtoakkuna vain Li-ion 1000 mAh -akkua.
Sovitin
Vaihda vanhemman yksikön laturin sovitin ainoastaan alkuperäisen tyyppiseen sovittimeen. Voit tilata
uuden sovittimen jälleenmyyjältä tai Philipsin huoltoliikkeestä.
- Vain Iso-Britannia: SSA-5W-09 UK 075050F
- Muut maat: SSA-5W-09 EU 075050F
Ympäristöasiaa
- Älä hävitä vanhoja laitteita tavallisen talousjätteen mukana, vaan toimita ne valtuutettuun
kierrätyspisteeseen. Näin autat vähentämään ympäristölle aiheutuvia haittavaikutuksia (Kuva 34).
- Akuissa ja paristoissa voi olla ympäristöä saastuttavia aineita. Älä hävitä akkuja ja paristoja
talousjätteen mukana, vaan toimita ne valtuutettuun kierrätyspisteeseen. Poista akut ja paristot
aina ennen laitteen hävittämistä ja vie laite valtuutettuun kierrätyspisteeseen.
Takuu ja huolto
Jos haluat lisätietoja tai laitteen kanssa tulee ongelmia, tutustu Philips AVENT -verkkosivustoon
osoitteessa www.philips.com/AVENT tai kysy neuvoa Philipsin kuluttajapalvelukeskuksesta
(puhelinnumero on kansainvälisessä takuulehtisessä). Jos maassasi ei ole kuluttajapalvelukeskusta, ota
yhteyttä Philipsin jälleenmyyjään.
Tavallisimmat kysymykset
Tässä luvussa on usein kysyttyjä kysymyksiä laitteesta. Jos et löydä vastausta kysymykseesi, ota yhteys
oman maasi asiakaspalveluun.
Kysymys Vastaus
Miksi lapsen yksikön
virran merkkivalo ja
vanhemman yksikön
yhteyden merkkivalo
eivät syty, kun painan
yksiköiden
virtapainikkeita?
Vanhemman yksikön akku voi olla tyhjä, eikä yksikköä ole asetettu
verkkovirtaan liitettyyn laturiin. Liitä laitteen pieni liitin laturiin ja laturi
pistorasiaan. Laita vanhemman yksikkö laturiin. Muodosta sitten yhteys
lapsen yksikköön painamalla virtapainiketta.
Lapsen yksikön paristot voivat olla tyhjiä, eikä yksikkö ole asetettu
verkkovirtaan. Vaihda paristot tai kytke lapsen yksikkö verkkovirtaan.
Muodosta sitten yhteys vanhemman yksikköön painamalla
virtapainiketta.
Lapsen ja vanhemman yksiköt saattavat olla toistensa kuuluvuusalueen
ulkopuolella. Siirrä vanhemman yksikkö lähemmäs lapsen yksikköä,
mutta ei kuitenkaan 1 metriä lähemmäs.
Jos vanhemman yksikön yhteyden merkkivalo ei vieläkään ala vilkkua,
palauta yksiköiden oletusasetukset palautustoiminnon avulla.

SUOMI98
Kysymys Vastaus
Miksi vanhemman
yksikön yhteyden LINKmerkkivalo vilkkuu
punaisena ja näytössä
näkyy viesti Not Linked
(Ei yhteyttä)?
Miksi paristokuvake
vilkkuu lapsen yksikön
näytössä?
Miksi vanhemman
yksiköstä kuuluu
äänimerkki?
Miksi laitteesta kuuluu
kimeä ääni?
Miksi laitteesta ei kuulu
ääntä / miksi lapsen itkua
ei kuulu?
Miksi vanhemman
yksikkö reagoi liian
nopeasti muihin ääniin?
Lapsen yksikkö ja vanhemman yksikkö ovat kuuluvuusalueen
ulkopuolella. Siirrä vanhemman yksikkö lähemmäs lapsen yksikköä.
Lapsen yksikön virta saattaa olla katkaistu. Kytke virta lapsen yksikköön.
Lapsen yksikön paristojen virta on vähissä. Vaihda paristot tai kytke
lapsen yksikkö verkkovirtaan (lisätietoja on kohdassa Käyttöönotto).
Jos vanhemman yksiköstä kuuluu äänimerkki yhteyden LINKmerkkivalon palaessa punaisena ja näytössä on teksti Not Linked (Ei
yhteyttä), yhteyttä lapsen yksikköön ei ole. Siirrä vanhemman yksikkö
lähemmäs lapsen yksikköä.
Jos vanhemman yksiköstä kuuluu äänimerkkejä ja näytön akkusymboli
on tyhjä, vanhemman yksikön akku on tyhjenemässä. Lataa akku.
Jos yksikkö on asetettu äänettömäksi äänihälytyksen ollessa käytössä,
vanhemman yksiköstä kuuluu äänimerkki aina, kun neljäs
äänenvoimakkuuden merkkivalo syttyy, koska lapsen yksikkö on
havainnut äänen.
Jos olet asettanut huonelämpötila-alueen vanhemman yksikköön ja
lämpötilahälytys on käytössä, vanhemman yksiköstä kuuluu äänimerkki,
kun lämpötila laskee alle määritetyn rajan tai alle 14 °C:een, tai
lämpötilan ylittäessä määritetyn rajan tai 30 °C:ta.
Lapsen yksikön virta saattaa olla katkaistu. Kytke virta lapsen yksikköön.
Yksiköt voivat olla liian lähellä toisiaan. Varmista, että lapsen yksikön ja
vanhemman yksikön välinen etäisyys on vähintään 1 metri.
Vanhemman yksikön äänenvoimakkuus voi olla liian korkea. Vähennä
vanhemman yksikön äänenvoimakkuutta.
Vanhemman yksikön äänenvoimakkuus on ehkä asetettu liian matalaksi
tai yksikkö on ehkä asetettu äänettömäksi. Lisää vanhemman yksikön
äänenvoimakkuutta.
Lapsen yksikön mikrofonin herkkyystaso on ehkä asetettu liian
matalaksi. Aseta mikrofonin herkkyystaso korkeammaksi vanhemman
yksikön avulla.
Lapsen yksikkö ja vanhemman yksikkö voivat olla kuuluvuusalueen
ulkopuolella. Siirrä yksiköt lähemmäksi toisiaan.
Lapsen yksikkö havaitsee myös muita ääniä kuin lapsesi itkun. Siirrä
lapsen yksikkö lähemmäs lasta (mutta huomaa, että vähimmäisetäisyys
on 1 metri).
Lapsen yksikön mikrofonin herkkyystaso on ehkä asetettu liian
korkeaksi. Aseta mikrofonin herkkyystaso korkeammaksi vanhemman
yksikön näytön avulla.

Kysymys Vastaus
Miksi vanhemman
yksikkö reagoi liian
hitaasti lapsen ääniin?
Miksi lapsen yksikön
paristot tyhjenevät
nopeasti?
Miksi vanhemman
yksikön lataamiseen
kuluu yli 4 tuntia?
Itkuhälyttimen
kuuluvuusalueeksi on
määritetty 330 metriä.
Miksi itkuhälyttimeni
varsinainen
kuuluvuusalue on paljon
pienempi?
Miksi yhteys katkeaa
välillä? Miksi
ääniyhteydessä on
katkoksia?
Mitä sähkökatkoksen
aikana tapahtuu?
Onko itkuhälytin
turvassa salakuuntelulta
ja häiriöiltä?
Vanhemman yksikön
käyttöajan pitäisi olla
vähintään 24 tuntia. Miksi
vanhemman yksikköni
käyttöaika on paljon
lyhyempi?
Lapsen yksikön mikrofonin herkkyystaso on ehkä asetettu liian
matalaksi. Aseta mikrofonin herkkyystaso korkeammaksi vanhemman
yksikön näytön avulla.
Lapsen yksikön mikrofonin herkkyystaso on ehkä asetettu liian
korkeaksi, jolloin lapsen yksikkö on useammin lähettävässä tilassa. Aseta
mikrofonin herkkyystaso korkeammaksi vanhemman yksikön avulla.
Lapsen yksikön äänenvoimakkuus on ehkä asetettu liian korkeaksi,
jolloin lapsen yksikkö kuluttaa paljon virtaa. Vähennä lapsen yksikön
äänenvoimakkuutta.
Olet ehkä määrittänyt huoneen enimmäislämpötilan huoneen todellista
lämpötilaa alhaisemmaksi tai vähimmäislämpötilan korkeammaksi kuin
huoneen todellinen lämpötila. Tässä tapauksessa näyttö on käytössä
koko ajan, mikä lisää lapsen yksikön virrankulutusta, jolloin paristot
tyhjenevät nopeasti.
Yövalo saattaa olla käytössä. Jos haluat käyttää yövaloa, suosittelemme
lapsen yksikön käyttöä verkkovirralla.
Vanhemman yksikön virta saattaa olla kytkettynä lataamisen aikana.
Katkaise yksikön virtaa lataamisen ajaksi.
Kyseinen kuuluvuusalue koskee vain ulkotiloja. Talon sisällä
kuuluvuusaluetta rajoittavat yksiköiden välissä olevat seinä- ja
kattorakenteet. Sisätiloissa kuuluvuusalue on enintään 50 metriä.
Yksiköt ovat luultavasti lähellä kuuluvuusalueen rajaa. Muuta yksiköiden
paikkaa tai siirrä yksiköitä lähemmäs toisiaan. Huomaa, että yhteyden
muodostaminen yksiköiden välille kestää aina noin 30 sekuntia.
Jos vanhemman yksikön akuissa on riittävästi virtaa, se toimii edelleen
sähkökatkoksen aikana sekä laturissa että poissa laturista. Jos lapsen
yksikössä on paristot, se toimii myös sähkökatkoksen sattuessa.
Itkuhälyttimen DECT-tekniikka takaa, että muut laitteet eivät aiheuta
häiriöitä ja että laitetta ei voi salakuunnella.
Kun vanhemman yksikön akku ladataan ensimmäisen kerran, käyttöaika
on alle 24 tuntia. Akun täysi teho on käytettävissä vasta, kun se on
ladattu ja lataus on purettu vähintään neljä kertaa.
Vanhemman yksikön äänenvoimakkuus on ehkä asetettu liian korkeaksi,
jolloin vanhemman yksikkö kuluttaa paljon virtaa. Vähennä vanhemman
yksikön äänenvoimakkuutta.
SUOMI 99

SUOMI100
Kysymys Vastaus
Lapsen yksikön mikrofonin herkkyystaso on ehkä asetettu liian
korkeaksi, jolloin vanhemman yksikkö kuluttaa enemmän virtaa. Aseta
mikrofonin herkkyystaso matalammaksi vanhemman yksikön avulla.
Miksi vanhemman
yksikön näytössä ei näy
paristokuvaketta, kun
aloitan yksikön
lataamisen?
Kuvake saattaa tulla näkyviin vanhemman yksikössä vasta muutaman
minuutin kuluttua, kun yksikköä ladataan ensimmäistä kertaa tai kun
laite on ollut pitkään käyttämättä.
 Loading...