

Philips AT 620/14 User manual

AT620, AT610
234
5
678
9
101112
13
14
15
2
1
16
17
18
19
20
1
2
21
222324
25
26
27
>75% recycled paper
>75% papier recyclé
© 2017 Koninklijke Philips N.V.
All rights reserved
3000.013.4649.1 (20/11/2017)
English
54
1
2
3
7
6
8
9
10
11
1
Introduction
Congratulations on your purchase and welcome to Philips! To fully benefit
from the support that Philips offers, register your product at
www.philips.com/welcome.
Please read this user manual, as it contains information about the features
of this shaver as well as some tips to make shaving easier and more
enjoyable.
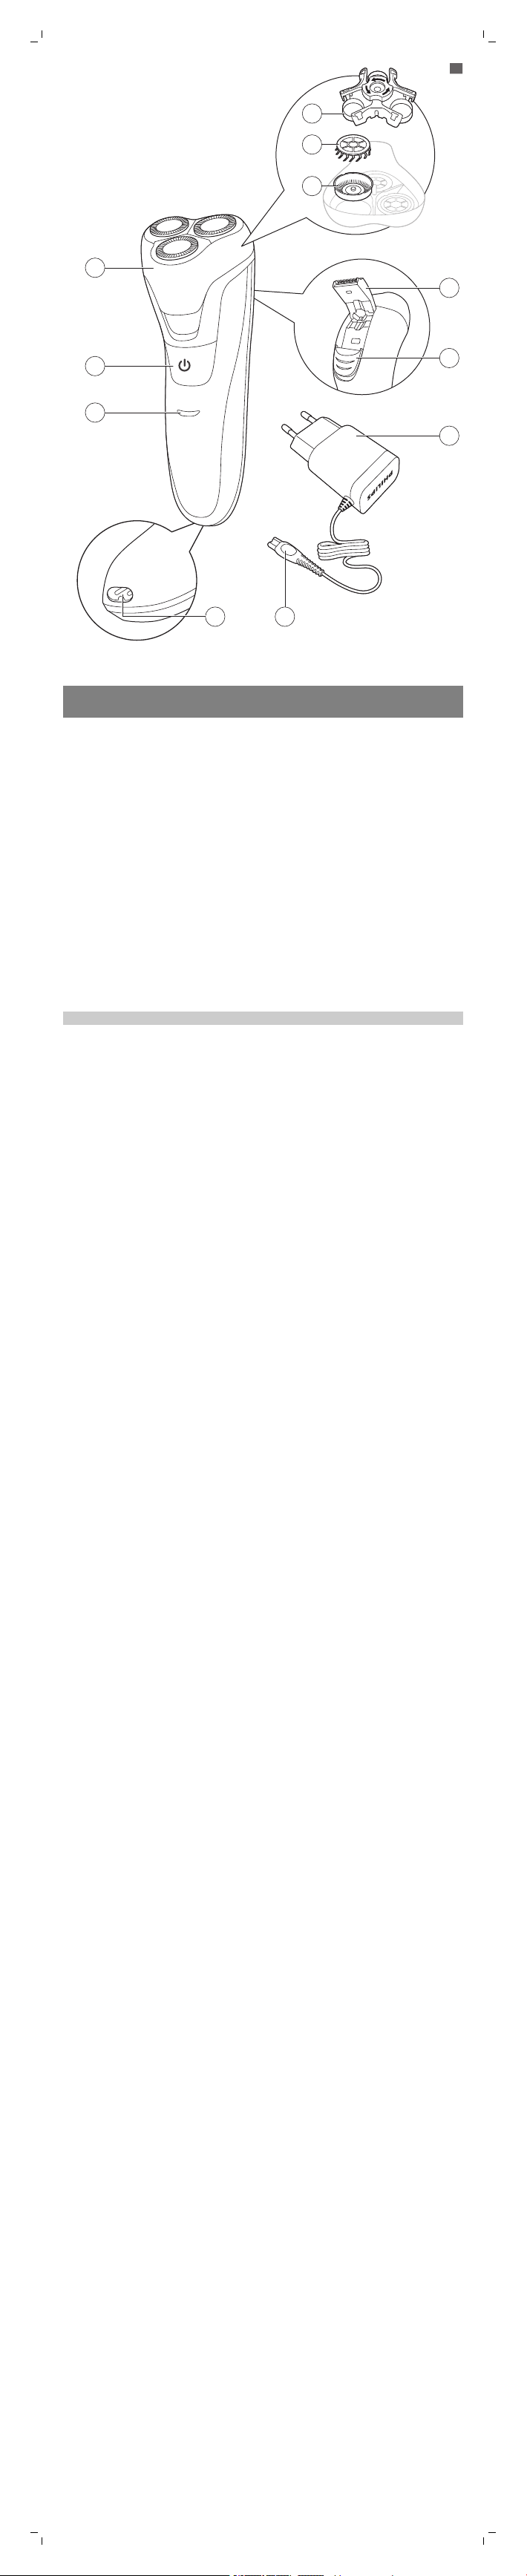
General description (Fig. 1)
1 Shaving unit
2 On/off button
3 Charging light
4 Socket for small plug
5 Small plug
6 Supply unit
7 Trimmer release slide
8 Trimmer
9 Guard
10 Cutter
11 Retaining frame
Note: You can find the type number on the back of the shaver.
Important safety information
Read this important information carefully before you use the appliance and
its accessories and save it for future reference. The accessories supplied
may vary for different products.
Danger
- Keep the supply unit dry (Fig. 2).
Warning
- To charge the battery, only use the
detachable supply unit (HQ850/HQ8505)
provided with the appliance.
- The supply unit contains a transformer. Do
not cut off the supply unit to replace it with
another plug, as this causes a hazardous
situation.
- This appliance can be used by children aged
from 8 years and above and persons with
reduced physical, sensory or mental
capabilities or lack of experience and
knowledge if they have been given
supervision or instruction concerning use of
the appliance in a safe way and understand
the hazards involved. Children shall not play
with the appliance. Cleaning and user
maintenance shall not be made by children
without supervision.
- Always unplug the shaver before you clean it
under the tap.
- Always check the appliance before you use it.
Do not use the appliance if it is damaged, as
this may cause injury. Always replace a
damaged part with one of the original type.
- Do not open the appliance to replace the
rechargeable battery.
Caution
- Never immerse the cleaning system or the
charging stand in water and do not rinse it
under the tap (Fig. 2).
- Never use water hotter than 60°C to rinse the
shaver.
- Only use this appliance for its intended
purpose as shown in the user manual.
- For hygienic reasons, the appliance should
only be used by one person.
- Never use compressed air, scouring pads,
abrasive cleaning agents or aggressive liquids
such as petrol or acetone to clean the
appliance.
- If your shaver comes with a cleaning system,
always use the original Philips cleaning fluid
(cartridge or bottle, depending on the type of
cleaning system).
- Always place the cleaning system on a
stable, level and horizontal surface to
prevent leakage.
- If your cleaning system uses a cleaning
cartridge, always make sure the cartridge
compartment is closed before you use the
cleaning system to clean or charge the
shaver.
- When the cleaning system is ready for use,
do not move it to prevent leakage of cleaning
fluid.
- Water may drip from the socket at the
bottom of the shaver when you rinse it. This
is normal and not dangerous because all
electronics are enclosed in a sealed power
unit inside the shaver.

- Do not use the supply unit in or near wall
sockets that contain an electric air freshener
to prevent irreparable damage to the supply
unit.
Electromagnetic fields (EMF)
This Philips appliance complies with all applicable standards and
regulations regarding exposure to electromagnetic fields.
General
- This shaver is waterproof (Fig. 3). It is suitable for use in the bath or
shower and for cleaning under the tap. For safety reasons, the shaver
can therefore only be used without cord.
- The supply unit is suitable for mains voltages ranging from 100 to 240
volts.
- The supply unit transforms 100-240 volts to a safe low voltage of less
than 24 volts.
- Maximum noise level: Lc = 69dB(A)
Charging
Charge the shaver before you use it for the first time and when the display
indicates that the battery is almost empty. When you charge the shaver for
the first time or after a long period of disuse, let it charge for at least 10
hours.
A fully charged shaver has a shaving time of up 30 minutes.
The shaving time may be less than expected as a result of your shaving
behavior, your cleaning habits or your beard type.
Note: You cannot use the shaver while it is charging.
Charging with the supply unit
1 Make sure the shaver is switched off.
2 Put the small plug in the shaver and put the supply unit in the wall
socket.
The display of the shaver indicates that the shaver is charging.
3 After charging, remove the supply unit from the wall socket and pull the
small plug out of the appliance.
Charge indications
Battery low
When the battery is almost empty (when there are only 5 or fewer shaving
minutes left), the charging light lights up orange (Fig. 4).
- When you switch off the shaver, the charging light continues to light up
orange for a few seconds.
Charging
When the shaver is charging, the charging light lights up green continuously
(Fig. 4).
- The charging light will keep lighting up green when the shaver is fully
charged.
Using the shaver
Always check the shaver and all accessories before use. Do not use the
shaver or any accessory if it is damaged, as this may cause injury. Always
replace a damaged part with one of the original type.
- Use this shaver for its intended household use as described in this
manual.
- For hygienic reasons, the shaver should only be used by one person.
- Trimming is easier when the skin and hair are dry.
Note: This shaver can only be used without cord.
Switching the appliance on and off
1 To switch the appliance on or off, press the on/off button once (Fig. 5).
Shaving
Shaving tips
- Use the shaver with shaving gel or foam for extra skin comfort, or use the
shaver dry for extra convenience.
We advise you to use the shaver with shaving gel or foam when you
-
use it for a wet shave. Do not use thick shaving cream or shaving oil
with this shaver.
When you use the shaver for dry shaving, we advise you to make sure
-
your skin is fully dry so that the shaver glides smoothly over your skin.
- For best results on skin comfort, pre-trim your beard if you have not
shaved for 3 days or longer.
- For optimal shaving results, make circular movements during use.
- The shaver is waterproof and can be used in the bath or shower.
- Your skin may need 2 or 3 weeks to get accustomed to the Philips
shaving system.
Wet shaving
For a more comfortable shave, you can also use this appliance on a wet
face with shaving foam or shaving gel.
To shave with shaving foam or shaving gel, follow the steps below:
1 Apply some water to your skin (Fig. 6).
2 Apply shaving foam or shaving gel to your skin (Fig. 7).
3 Rinse the shaving unit under the tap (Fig. 8) to ensure that the shaving
unit glides smoothly over your skin.
4 Switch on the appliance.
5 Move the shaving heads over your skin in circular movements to catch all
hairs growing in different directions (Fig. 8). Exert gentle pressure for a
close, comfortable shave.
Note: Rinse the shaving unit regularly to ensure that it continues to glide
smoothly over your skin (Fig. 8).
6 Dry your face.
7 Clean the appliance after use.
Note: Make sure you rinse all foam or shaving gel off the appliance.
Dry shaving
1 Switch on the appliance.
2 Move the shaving heads over your skin in circular movements to catch all
hairs growing in different directions (Fig. 8). Exert gentle pressure for a
close, comfortable shave.
Note: Do not press too hard, this can cause skin irritation.
3 Clean the appliance after use.
Trimming
You can use the trimmer to groom your sideburns and moustache.
1 Push the trimmer release slide downwards to open the trimmer (Fig. 10).
2 Switch on the appliance.
3 Hold the trimmer attachment perpendicular to the skin and move the
appliance downwards while you exert gentle pressure.
4 Clean the trimmer after use.
5 Close the trimmer (Fig. 11).
Cleaning and maintenance
Cleaning the shaver under the tap
Clean the shaver after every shave for optimal performance. For the best
cleaning results, we advise you to use Philips Cleaning spray (HQ110).
Always unplug and switch off the shaver before you clean it.
Note: Water may leak from the socket at the bottom of the shaver when you
rinse it. This is normal and not dangerous because all electronics are
enclosed in a sealed power unit inside the shaver.
Be careful with hot water. Always check if the water is not too hot, to
prevent burning your hands.
Never dry the shaving unit with a towel or tissue, as this may damage the
shaving heads.
1 Place your thumb under the shaving unit and push the shaving unit off
the shaver (Fig. 12).
Note: Make sure to hold the shaving unit while doing so.
2 Rinse the hair chamber under the tap (Fig. 13).
3 Rinse the inside of the shaving unit under a warm tap (Fig. 14).
4 Rinse the outside of the shaving unit under a warm tap (Fig. 15).
Thorough cleaning
5 Turn the lock anticlockwise and remove the retaining frame from the
shaving unit (Fig. 16).
6 Remove and clean one shaving head at a time (Fig. 17). Each shaving
head consists of a cutter and a guard.
Note: Do not clean more than one cutter and guard at a time, since they
are all matching sets. If you accidentally mix up the cutters and guards, it
may take several weeks before optimal shaving performance is restored.
7 Remove the cutter from the shaving guard and rinse it with water (Fig.
18).
8 Rinse the inside and outside of the shaving guard with water (Fig. 19).
9 Put the shaving heads back into the shaving unit (Fig. 20). Make sure that
the projections of the shaving heads fit exactly into the recesses.
10 Put the retaining frame back into the shaving unit and turn the lock
clockwise.
11 Reattach the shaving unit (Fig. 22).
Note: If you cannot reattach the shaving unit properly, check if you have
inserted the shaving heads properly and if the retaining frame is locked.
12 Carefully shake off excess water, open the shaving unit again and leave it
open to let the shaving unit dry completely.
Caution: Be careful not to hit the shaving unit against anything while
you shake off excess water.
Cleaning the trimmer
Clean the trimmer every time you have used it.
1 Switch off the shaver.
2 Push the trimmer release slide downwards to open the trimmer (Fig. 10).
3 Rinse the trimmer under a hot tap (Fig. 23).
4 Close the trimmer (‘ click’) (Fig. 11).
Tip: For optimal trimming performance, lubricate the trimmer teeth with
a drop of sewing machine oil every six months (Fig. 24).
Replacement
Replacing the shaving heads
For maximum shaving performance, we advise you to replace the shaving
heads every two years. Replace damaged shaving heads immediately.
Always replace the shaving heads with original Philips shaving heads' (see
'Ordering accessories').
1 Switch off the appliance and disconnect it from the power outlet.
2 Place your thumb under the shaving unit and push the shaving unit off
the shaver (Fig. 12).
Note: Make sure to hold the shaving unit while doing so.

3 Turn the lock anticlockwise and remove the retaining frame.
4 Remove the shaving heads and place new ones in the shaving unit.
Make sure that the projections of the shaving heads fit exactly into the
recesses.
5 Put the retaining frame back into the shaving unit and turn the lock
clockwise.
6 Reattach the shaving unit (Fig. 22).
Note: If you cannot reattach the shaving unit properly, check if you have
inserted the shaving heads properly and if the retaining frame is locked
Ordering accessories
To buy accessories or spare parts, visit www.shop.philips.com/service or go
to your Philips dealer. You can also contact the Philips Consumer Care
Center in your country (see the international warranty leaflet for contact
details).
The following accessories and spare parts are available:
- HQ56 Philips shaving heads
- HQ110 Philips shaving head cleaning spray
Note: Availability of the accessories may differ by country.
Recycling
- This symbol means that this product shall not be disposed of with
normal household waste (2012/19/EU) (Fig. 26).
- This symbol means that this product contains a built-in rechargeable
battery which shall not be disposed of with normal household waste
(Fig. 27) (2006/66/EC). Please take your product to an official collection
point or a Philips service center to have a professional remove the
rechargeable battery.
- Follow your country’s rules for the separate collection of electrical and
electronic products and rechargeable batteries. Correct disposal helps
prevent negative consequences for the environment and human health.
Removing the rechargeable battery
Warning: Only remove the rechargeable battery when you discard the
shaver. Before you remove the battery, make sure that the shaver is
disconnected from the mains and that the battery is completely
empty.
Warning: Take any necessary safety precautions when you handle
tools to open the shaver.
Be careful, the battery strips are sharp.
1 Disconnect the shaver from the mains.
2 Let the shaver operate until it stops.
3 Undo the screws in the back of the shaver and in the hair chamber.
4 Remove the front panel and the back panel.
5 Bend the 6 hooks aside and take out the power unit.
6 Be careful, the hooks are sharp.
7 Remove the rechargeable battery.
Warranty and support
If you need information or support, please visit www.philips.com/support
or read the international warranty leaflet.
Warranty restrictions
The shaving heads (cutters and guards) are not covered by the terms of the
international warranty because they are subject to wear.
Troubleshooting
This chapter summarizes the most common problems you could encounter
with the appliance. If you are unable to solve the problem with the
information below, visit www.philips.com/support for a list of frequently
asked questions or contact the Consumer Care Center in your country.
Problem Possible cause Solution
The shaver does
not shave as well
as it used to.
The shaver does
not work when I
press the on/off
button.
The shaver does
not work, although
it is connected to
the mains.
My skin is slighty
irritated after
shaving.
The shaving heads
are damaged or
worn.
Foam or gel residues
clog up the shaving
heads.
You have not
inserted the shaving
heads properly.
The rechargeable
battery is empty.
The temperature of
the shaver is too
high. In this case, the
shaver does not
work.
This shaver is not
designed to be used
directly from the
mains.
Your skin has not yet
adapted to the new
shaving system.
Your skin is sensitive
to dry shaving.
You are only shaving
with water.
Your skin is irritated
by the type of foam
you use.
Replace the shaving heads
(see 'Replacing the shaving
heads').
Rinse the shaving unit under
a hot tap (see 'Cleaning the
shaver under the tap').
Make sure that the
projections of the shaving
heads fit exactly into the
recesses.
Recharge the battery.
As soon as the temperature
of the shaver has dropped
sufficiently, you can switch on
the shaver again.
Recharge the battery and
disconnect the shaver from
the mains.
Wait at least three weeks to
allow your skin to adapt to
the shaver. Do not use
different shaving methods
during this period, it will be
easier for your skin to adapt.
Use the shaver with shaving
gel or shaving foam and with
plenty of water for extra skin
comfort.
Use the shaver with shaving
gel or shaving foam and with
plenty of water for extra skin
comfort.
Use the shaver with shaving
gel or shaving foam and with
plenty of water for extra skin
comfort
Русский
Введение
Поздравляем с покупкой продукции Philips! Чтобы воспользоваться
всеми преимуществами поддержки Philips, зарегистрируйте изделие
на веб-сайте www.philips.com/welcome.
Прочтите данное руководство, содержащее сведения о возможностях
бритвы, а также некоторые советы, которые сделают использование
бритвы более приятным.
1 Бритвенный блок
2 Кнопка включения/выключения
3 Индикатор зарядки
4 Гнездо для малого штекера
5 Маленький штекер
6 Блок питания
7 Фиксатор триммера
8 Триммер
9 Предохраняющая насадка
10 Нож
11 Крепёжная рамка
Примечание. Номер модели указан на задней панели бритвы.
Важные сведения о безопасности - Дополнение к эксплуатационной документации
Перед началом эксплуатации прибора и аксессуаров к нему
внимательно ознакомьтесь с этой важной информацией и сохраните
ее для дальнейшего использования в качестве справочного
материала. Входящие в комплект аксессуары могут различаться в
зависимости от вида продукта.
Опасно!
- Избегайте попадания жидкости на блок питания (Рис. 2).
Предупреждение
- Для зарядки аккумулятора используйте только съемный блок
питания (HQ850/HQ8505) из комплекта поставки прибора.
- В конструкцию блока питания входит трансформатор. Запрещается
отрезать вилку блока питания и заменять на другую, это опасно.
- Данным прибором могут пользоваться дети старше 8 лет и лица с
ограниченными возможностями сенсорной системы или
ограниченными умственными или физическими способностями, а
также лица с недостаточным опытом и знаниями, но только под
присмотром других лиц или после инструктирования о безопасном
использовании прибора и потенциальных опасностях. Не
позволяйте детям играть с прибором. Дети могут осуществлять
очистку и уход за прибором только под присмотром взрослых.
- Прежде чем промывать электробритву под струей воды, отключите
ее от электросети.
- Перед использованием всегда проверяйте прибор. Не используйте
прибор, если он поврежден. Несоблюдение этого условия может
привести к травме. Для замены поврежденной детали выбирайте
оригинальные комплектующие.
- Не открывайте прибор, чтобы самостоятельно заменить
аккумулятор.
Внимание!
- Запрещается погружать систему очистки и зарядное устройство в
воду и промывать их под струей воды (Рис. 2).
- Запрещается промывать бритву водой, температура которой выше
60 °C.
- Используйте этот прибор только по назначению, как указано в
руководстве пользователя.
- Из гигиенических соображений прибором должен пользоваться
только один человек.
- Запрещается использовать для чистки прибора сжатый воздух,
губки с абразивным покрытием, абразивные чистящие средства или
растворители типа бензина или ацетона.
 Loading...