

Page 1

For internal use only PHILIPS
ISSUE AS98.08 (98-10-30)
Published by:
Service Depar tment Audio Systems
LINE OF BUSINESS AUDIO SYSTEMS
08.01 TYPENUMBER(S): AS660C, AS665C, AS760C, AS765C
INFORMATION : The play button of the tape mechanism can be activated even in
standby mode.If the button is pressed the tape will move, but no
sound is audible via the Loudspeakers.
This problem can be solved by changing resistor 3510 on Front board
from 4,7kΩ to 1kΩ (4822 050 11002).
REMARKS : Above modification has been implemented in production from week
9832 onwards.
08.02 TYPENUMBER(S): CDR538, CDR560, CDR760
SYMPTOM :
Stops recording when connected to CD713, CD723 or CD753 via
digital in/out.
CURE : On manual recordings the digital output signal of the above
mentioned CD players is muted for a short time during star t-up.
The mute causes a stop of the CDR recorder.
The problem can only be solved by a software upgrade for IC7322.
Service codenumber reads 4822 900 11306.
REMARKS : The problem does not occur when using the CD-sync function.
New software has been implemented in production from week 9841
onwards. Software program version reads V2.1 (4822 900 11306) and
can be applied in CDR538, CDR560 and CDR760 recorders.
165FIRIS CODE
SERVICE NEWSLETTER
Service Newsletter 1998 – Audio Systems 1/6
Page 2

08.03 TYPENUMBER(S): CDR538, CDR560, CDR760, CDR765, FW538
SYMPTOM :
Howling occurs during analog recording from FW538 to one of the
above mentioned CDRs when the user has accidentally switched the
source of FW538 to AUX.
CURE : The problem is caused by a “closed loop” which is formed via
CDR line-out → FW538 AUX-IN → FW538 line out → CDR line-in.
When the REC-level is adjusted to above a certain level howling
occurs.This is the same phenomenon as known from recordings via
microphone.
There is no other solution available as to advise the customer:
Do not select the AUX-mode on the FW538 during analog
recording!
REMARKS : An addendum sheet will be added to the Instruction For Use.
08.04 TYPENUMBER(S): CDR538, CDR560, CDR760, CDR765
INFORMATION : Recording from FW538 (CD-Changer)
Customer is advised to apply the following instructions:
To duplicate a CD via [CD SYNCRO] or [CD SYNC] function
Make sure that the digital connection has been completed. Using the
CD SYNCRO button on the CD Recorder it will allow to make a
duplicate of the desired CD.
1 Make sure the CDR- or CDRW-disc is absolutely free of scratches
and dust particles.
2 Load the blank CD Recordable (Digital Audio) disc into the
CD Recorder and the original CD into the mini system FW538.
3 Press SOURCE on the CD Recorder to select DIG OPTICAL
mode.
4 Press CD SYNCRO on the CD Recorder.
• CD SYNC, SYNC appears on the display.
• RECORD starts flashing.
• If now DIG starts flashing, the digital connection is incorrect.
If DIG remains flashing check if there is an input signal or STOP
the CDR-recorder and press OPEN/CLOSE on the CD-changer
and start again at step 3.
5 Press PLAY on the mini system to star t recording.
• RECORD stops flashing.
!! Do not change source on the CD Recorder or mini system
during CD Synchro recording.
!! Do not press PAUSE, PREVIOUS, NEXT or SEARCH button
during CD Synchro recording.
When recording is completed, the display will show UPDATE.
Customer needs to finalise the recorded disc before he can play it on
a regular (no recording) CD player.
655FIRIS CODE
Service Newsletter 1998 – Portable Audio 2/6
Page 3

To record CD tracks one by one
Make sure that the digital connection has been completed.
1 Make sure the CDR- or CDRW-disc is absolutely free of scratches
and dust particles.
2 Load a blank CD Recordable (Digital Audio) disc into the
CD Recorder and the original CD into the mini system.
3 Press SOURCE on the CD Recorder to select DIG OPTICAL
mode.
4 Press AUTO/MANUAL on the CD Recorder to select AUTO.
• The track numbers are increased automatically.
5 Press PLAY on the mini system FW538.
• This is to verify whether the disc and track are correct.
6 Press PREVIOUS on the mini system FW538.
• It will jump to the beginning of the current track.
7 Press PAUSE on the mini system FW538.
• Playing of the track is temporary interrupted.
8 Press RECORD on the CD Recorder
• WAIT appears on the display
• RECORD starts flashing.
9 Press PLAY on the CD Recorder and the mini system
simultaneously to start recording
• RECORD stops flashing.
10 Press STOP on the CD Recorder and the mini system to
stop recording.
• When recording is completed, the display will show UPDATE.
11 Repeat steps 5 to 10 for new tracks.
You need to finalise the recorded disc before you can play it on a
regular (no recording) CD player.
!! Customer can program the track sequence he desires from a
particular disc. Programming of tracks from more than one disc is
not advisable.
REMARKS :
Service Newsletter 1998 – Portable Audio 3/6
Page 4

08.05 TYPENUMBER(S): CDR538, CDR560, CDR760, CDR765
INFORMATION : When an external CD player or CD changer is in PAUSE function and
NEXT or PREVIOUS keys are pressed the CDR recorder can get in a
recording function which records many tracks on a disc with a muted
signal and all tracks are about 3 or 4 seconds long.
In case of recording from CD-changers:
To avoid long pauses or a full recorded disc with silence the
CD-recorders CDR765, CDR760, CDR560 and CDR538 have a 3
seconds auto stop mode built in. As CD changers most often need
more than 3 seconds to start or switch over from one disc to another
the muted input signal is recorded and automatically stopped.
To prevent this fault condition the recording has to be executed in the
following way:
Recording one disc:
Start recording with the CD-sync function, digitally connected.
Recording a program over more than one disc:
Select the analog input with SOURCE and start recording manually
by pushing RECORD & PLAY sequential on the CD-recorder. After
that Start playing the CD-changer.
REMARKS :
08.06 TYPENUMBER(S): CDR765
SYMPTOM :
Shocksensitivity CD Player part
CURE : Under certain conditions it may occur that the CD-Player module is
very sensitive to shocks.This is very annoying in case of recording
discs, because this hick-up will be recorded on the new disc.
By using several separates composed to a tower it is advised to place
the recorder on top of it.
If this does not solve the problem the damping grommets of the
CDM12.4 (items 42, 43, 44, 45 in the exploded view on page 5-3 of
the Service Manual) have to be replaced by 4822 404 10987.
REMARKS : New damping gromments have been implemented in production from
week 9842 onwards.
3557IRIS CODE
Service Newsletter 1998 – Portable Audio 4/6
Page 5

08.07 TYPENUMBER(S): FW306, FW325, FW326, FW52C, FW62C, FW316C, FW318C,
FW338C, FW339C, FW346C, FW356C, FW358C, FW359C
SYMPTOM :
When during High Speed Dubbing (HSD) the volume is adjusted to
“MIN”, the set may become muted permanently.
In this case the volume control will not operate anymore until the set
is unplugged and reconnected to the mains supply.
CURE : The problem can only be solved by a software upgrade of
microprocessor 7401.
The service codenumbers for the new processors are as follows:
a) 4822 900 11282 for FW52C, FW62C, FW316C, FW318C,
FW338C, FW339C
b) 4822 900 11283 for FW306, FW325 and FW326
c) 4822 900 11284 for FW346C, FW356C, FW358C, FW359C
REMARKS :
08.08 TYPENUMBER(S): FW388V
INFORMATION : To solve the problem “No Disc” displayed when a disc is loaded,
following components on the Servo board have to be changed:
a) change 3867 from 22kΩ to 470kΩ (4822 116 52285)
b) replace jumper 9022 with resistor 3880 470Ω (4822 116 83883)
REMARKS : Above modification has been implemented in production from week
9837 onwards.
08.09 TYPENUMBER(S): FW388V
INFORMATION : The solve the problem “CD interrupted due to mains failure”, change
elcap 2232 on the Combi board (Power supply part) to
6800µF 20% 25V (4822 124 11581).
REMARKS : Above modification has been implemented in production from week
9838 onwards.
X152IRIS CODE
Service Newsletter 1998 – Portable Audio 5/6
Page 6
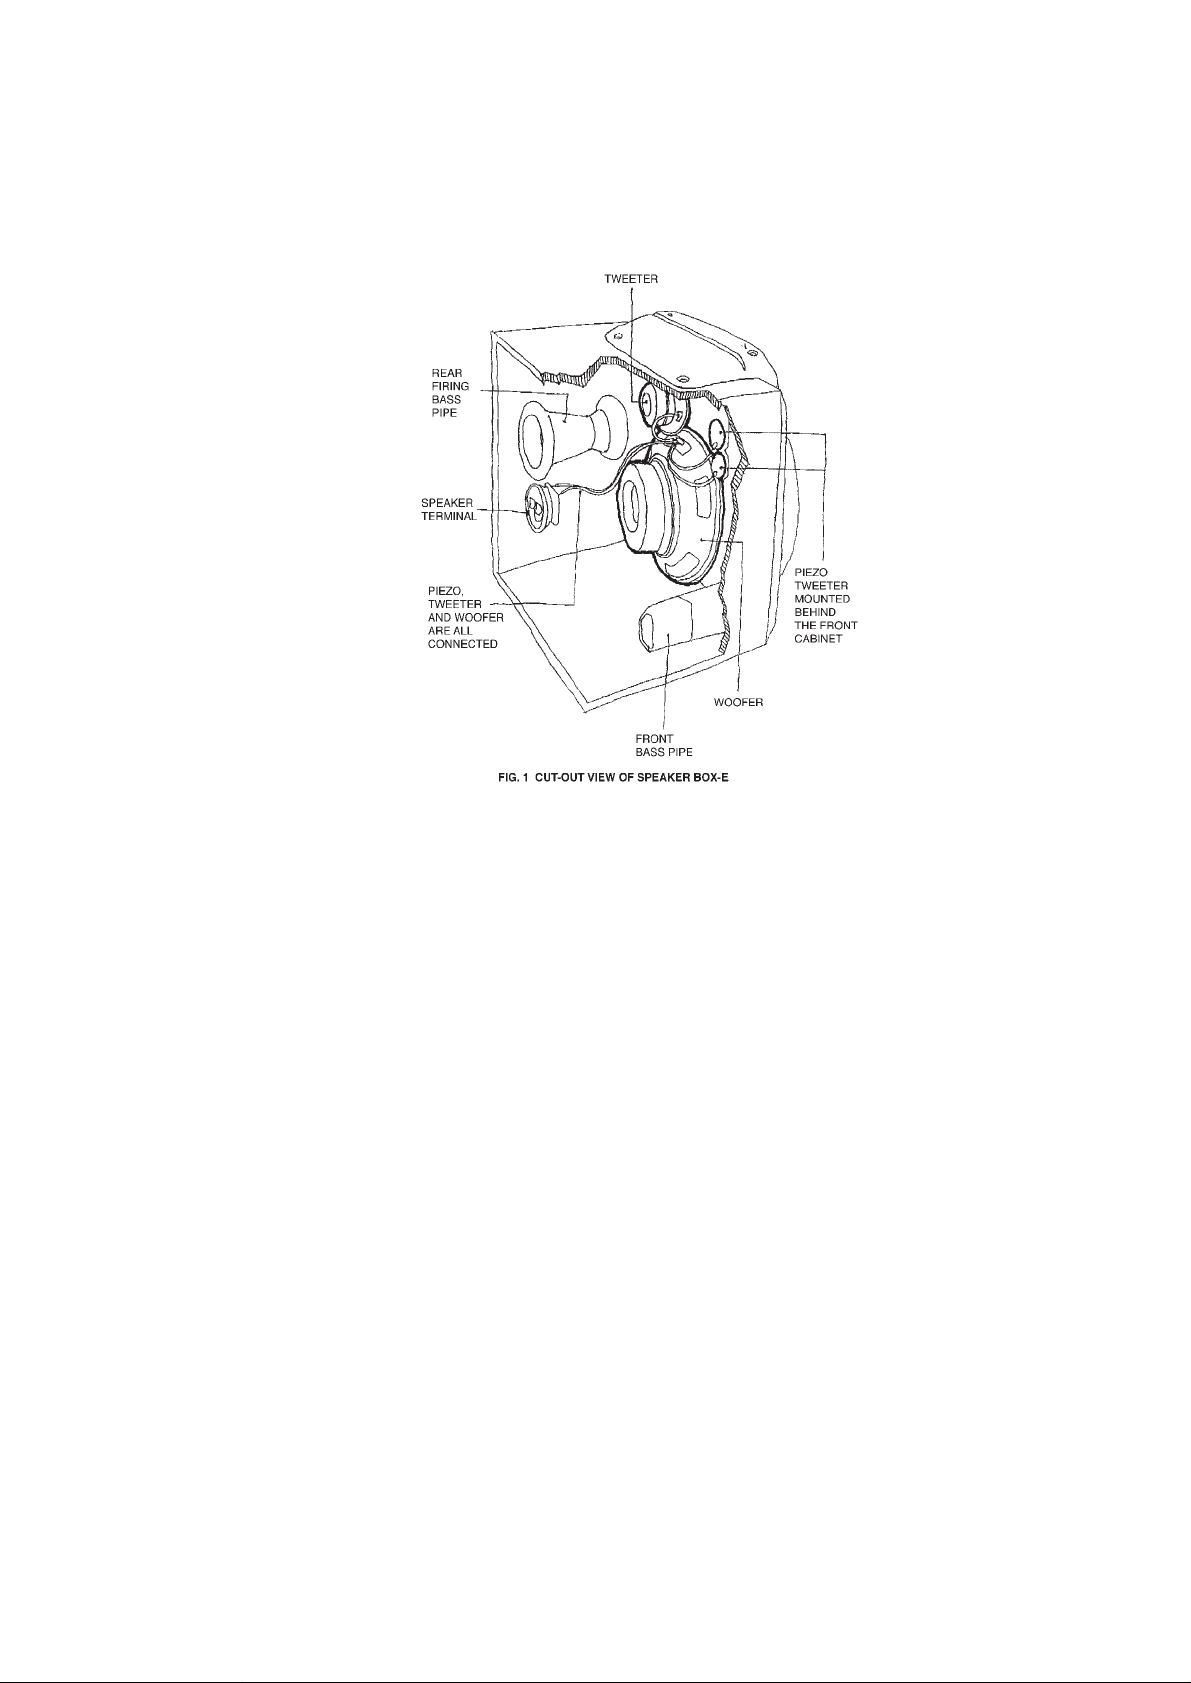
08.10 TYPENUMBER(S): FW570C, FW775P
INFORMATION : The 2 tweeters at the upper part of the 4-way Loudspeaker Box are
dummies and for ornamental reasons only.
The piezo tweeters are mounted behind the Front cabinet (see fig. 1)
instead of the top part. There is no acoustical difference between
mounting piezo tweeters on top or on front.
REMARKS :
08.11 TYPENUMBER(S): FW754P, FW765P, FW775P, FW795W
INFORMATION : Following modification on the Front Display board will increase the
brightness of the DPL LEDs (NORMAL, PHANTOM, 3 STEREO):
Change 3545 from 390Ω to 220Ω (4822 117 11503)
Change 3546 from 390Ω to 220Ω (4822 117 11503)
Change 3591 from 390Ω to 220Ω (4822 117 11503)
REMARKS : Above modification has been implemented in production from week
9844 onwards.
Service Newsletter 1998 – Portable Audio 6/6
 Loading...