

Page 1
www.philips.com/welcome
SNOOZE
BRIGHTNESS
AS141
Dock extension
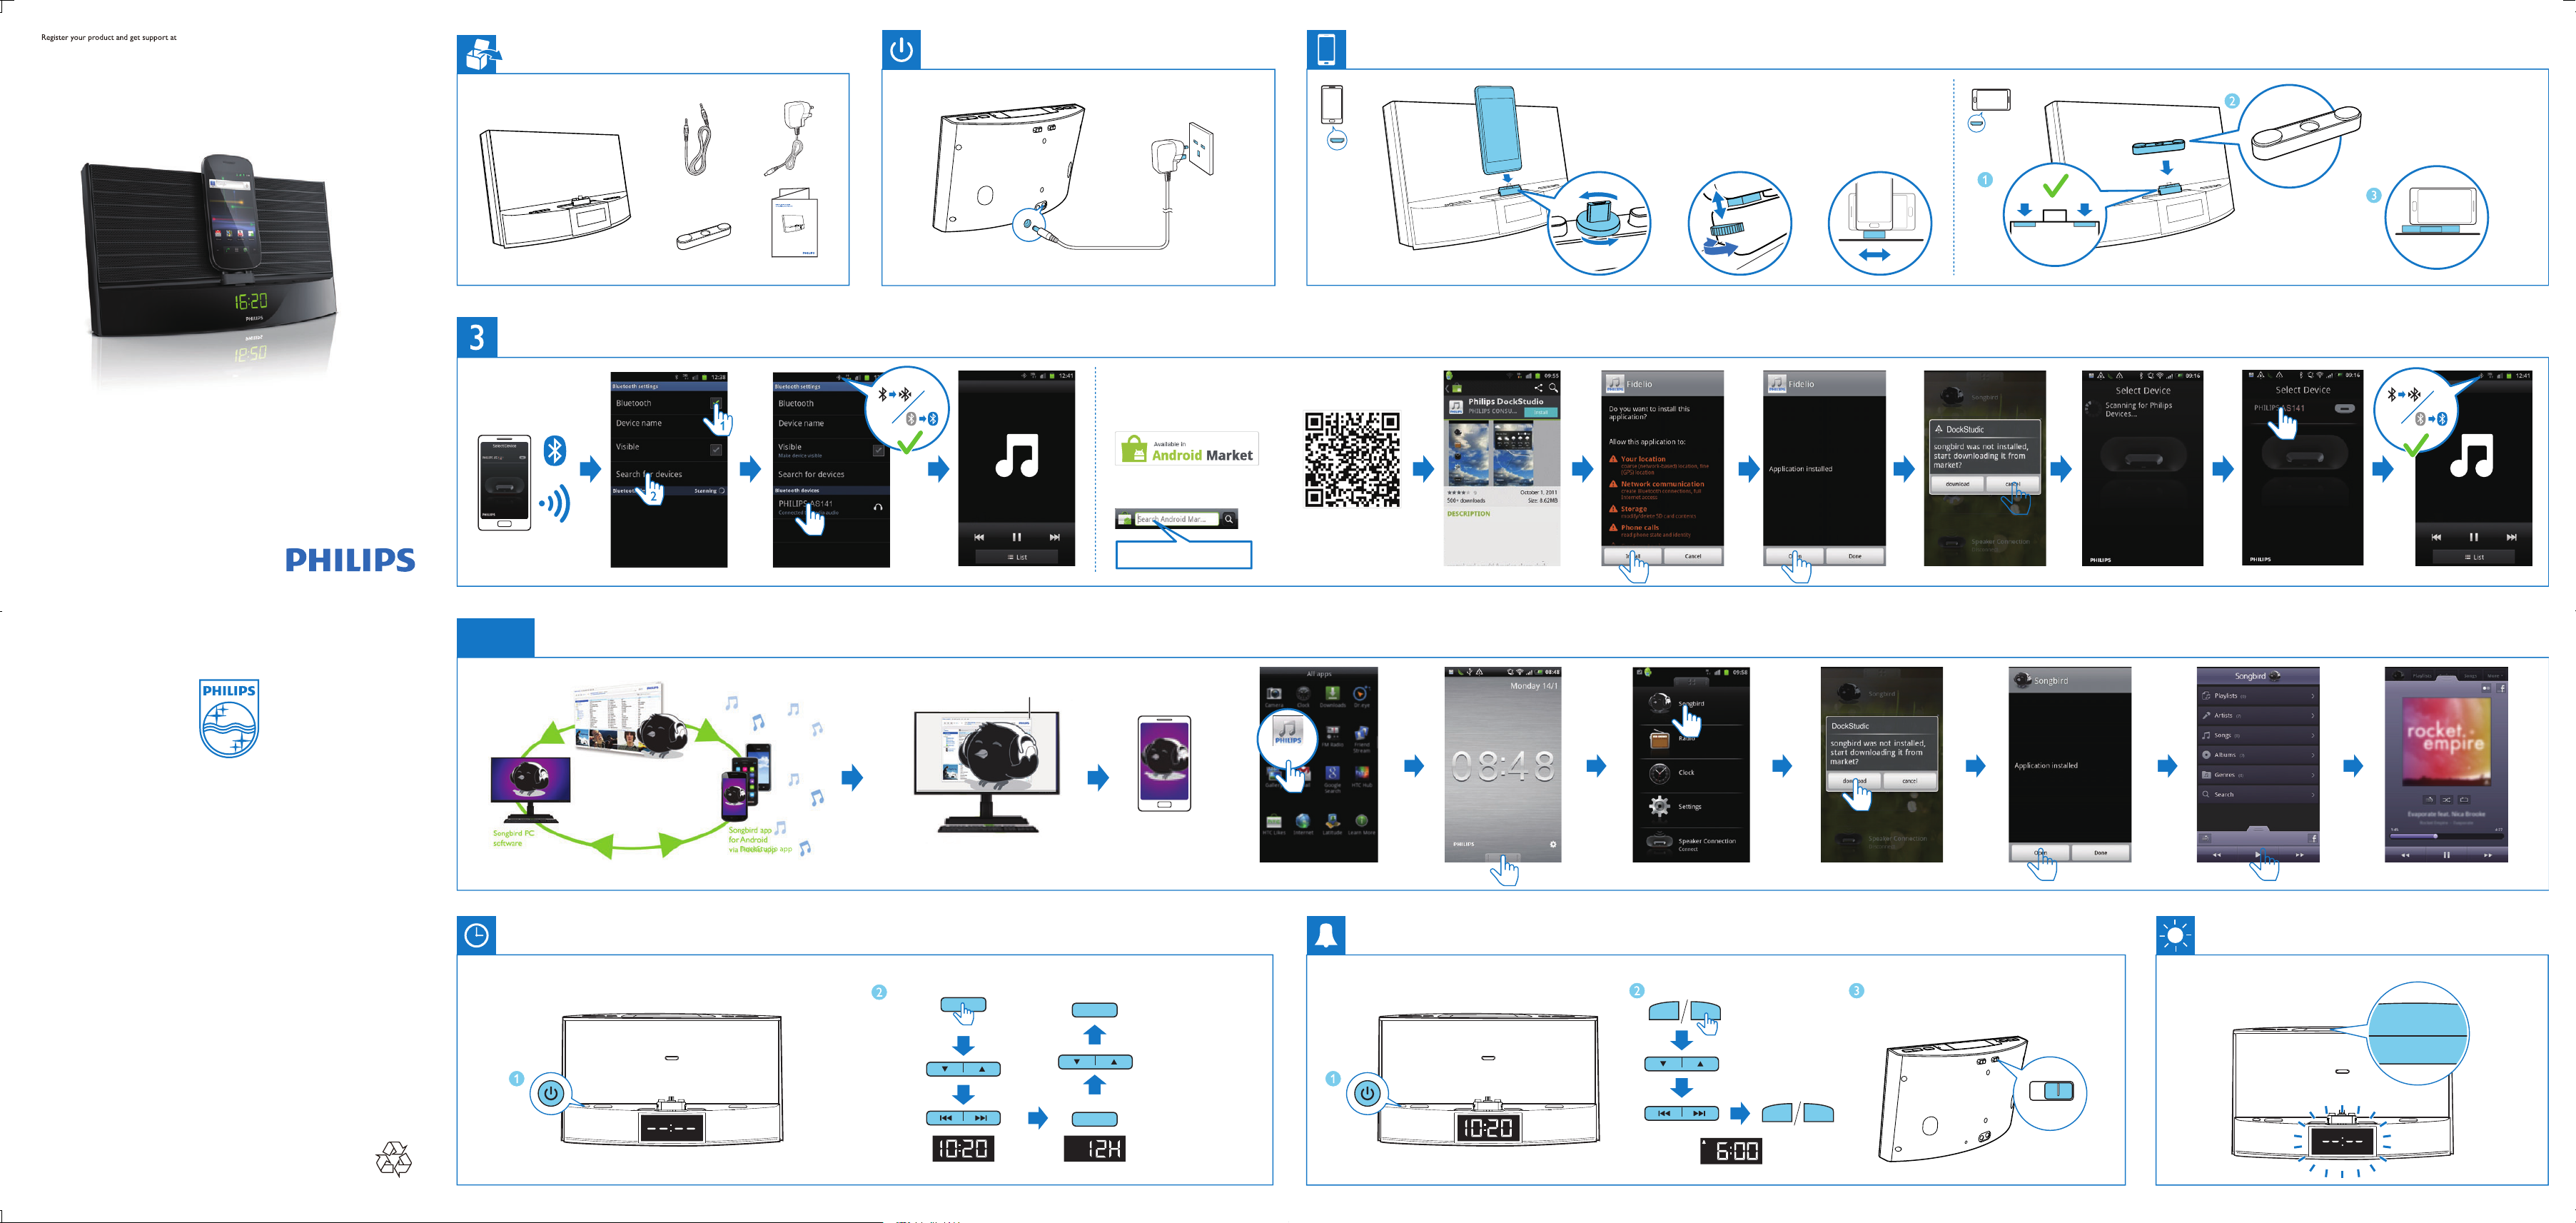
Quick tart gu de
Dock and charge
Play music
Quick start guide
Via Bluetooth
Option
Install Songbird
http://www.philips.com/songbird
Via free DockStudio app
OR
Philips DockStudio
DockStudio
Scan to download
The Philips DockStudio app brings a suite of
cool, new features to your Philips DockStudio
docking speaker, including automatic Bluetooth
connection, Songbird music player,
worldwide Internet radio, sound settings
DockStudioDockStudio
All registered and unregistered trademarks are property of
their respective owners.
© 2012 Koninklijke Philips Electronics N.V.
All rights reserved.
AS141_05_QSG_V4.1
Install Songbird on computer
6(7 7,0(
2 sec.
Install Songbird on
your phone
6(7 7,0(
6(7 7,0(
$/ $/
2 sec.
Select alarm source
AL 1
...
$/ $/
RADIO DOCK
BUZZ
Page 2
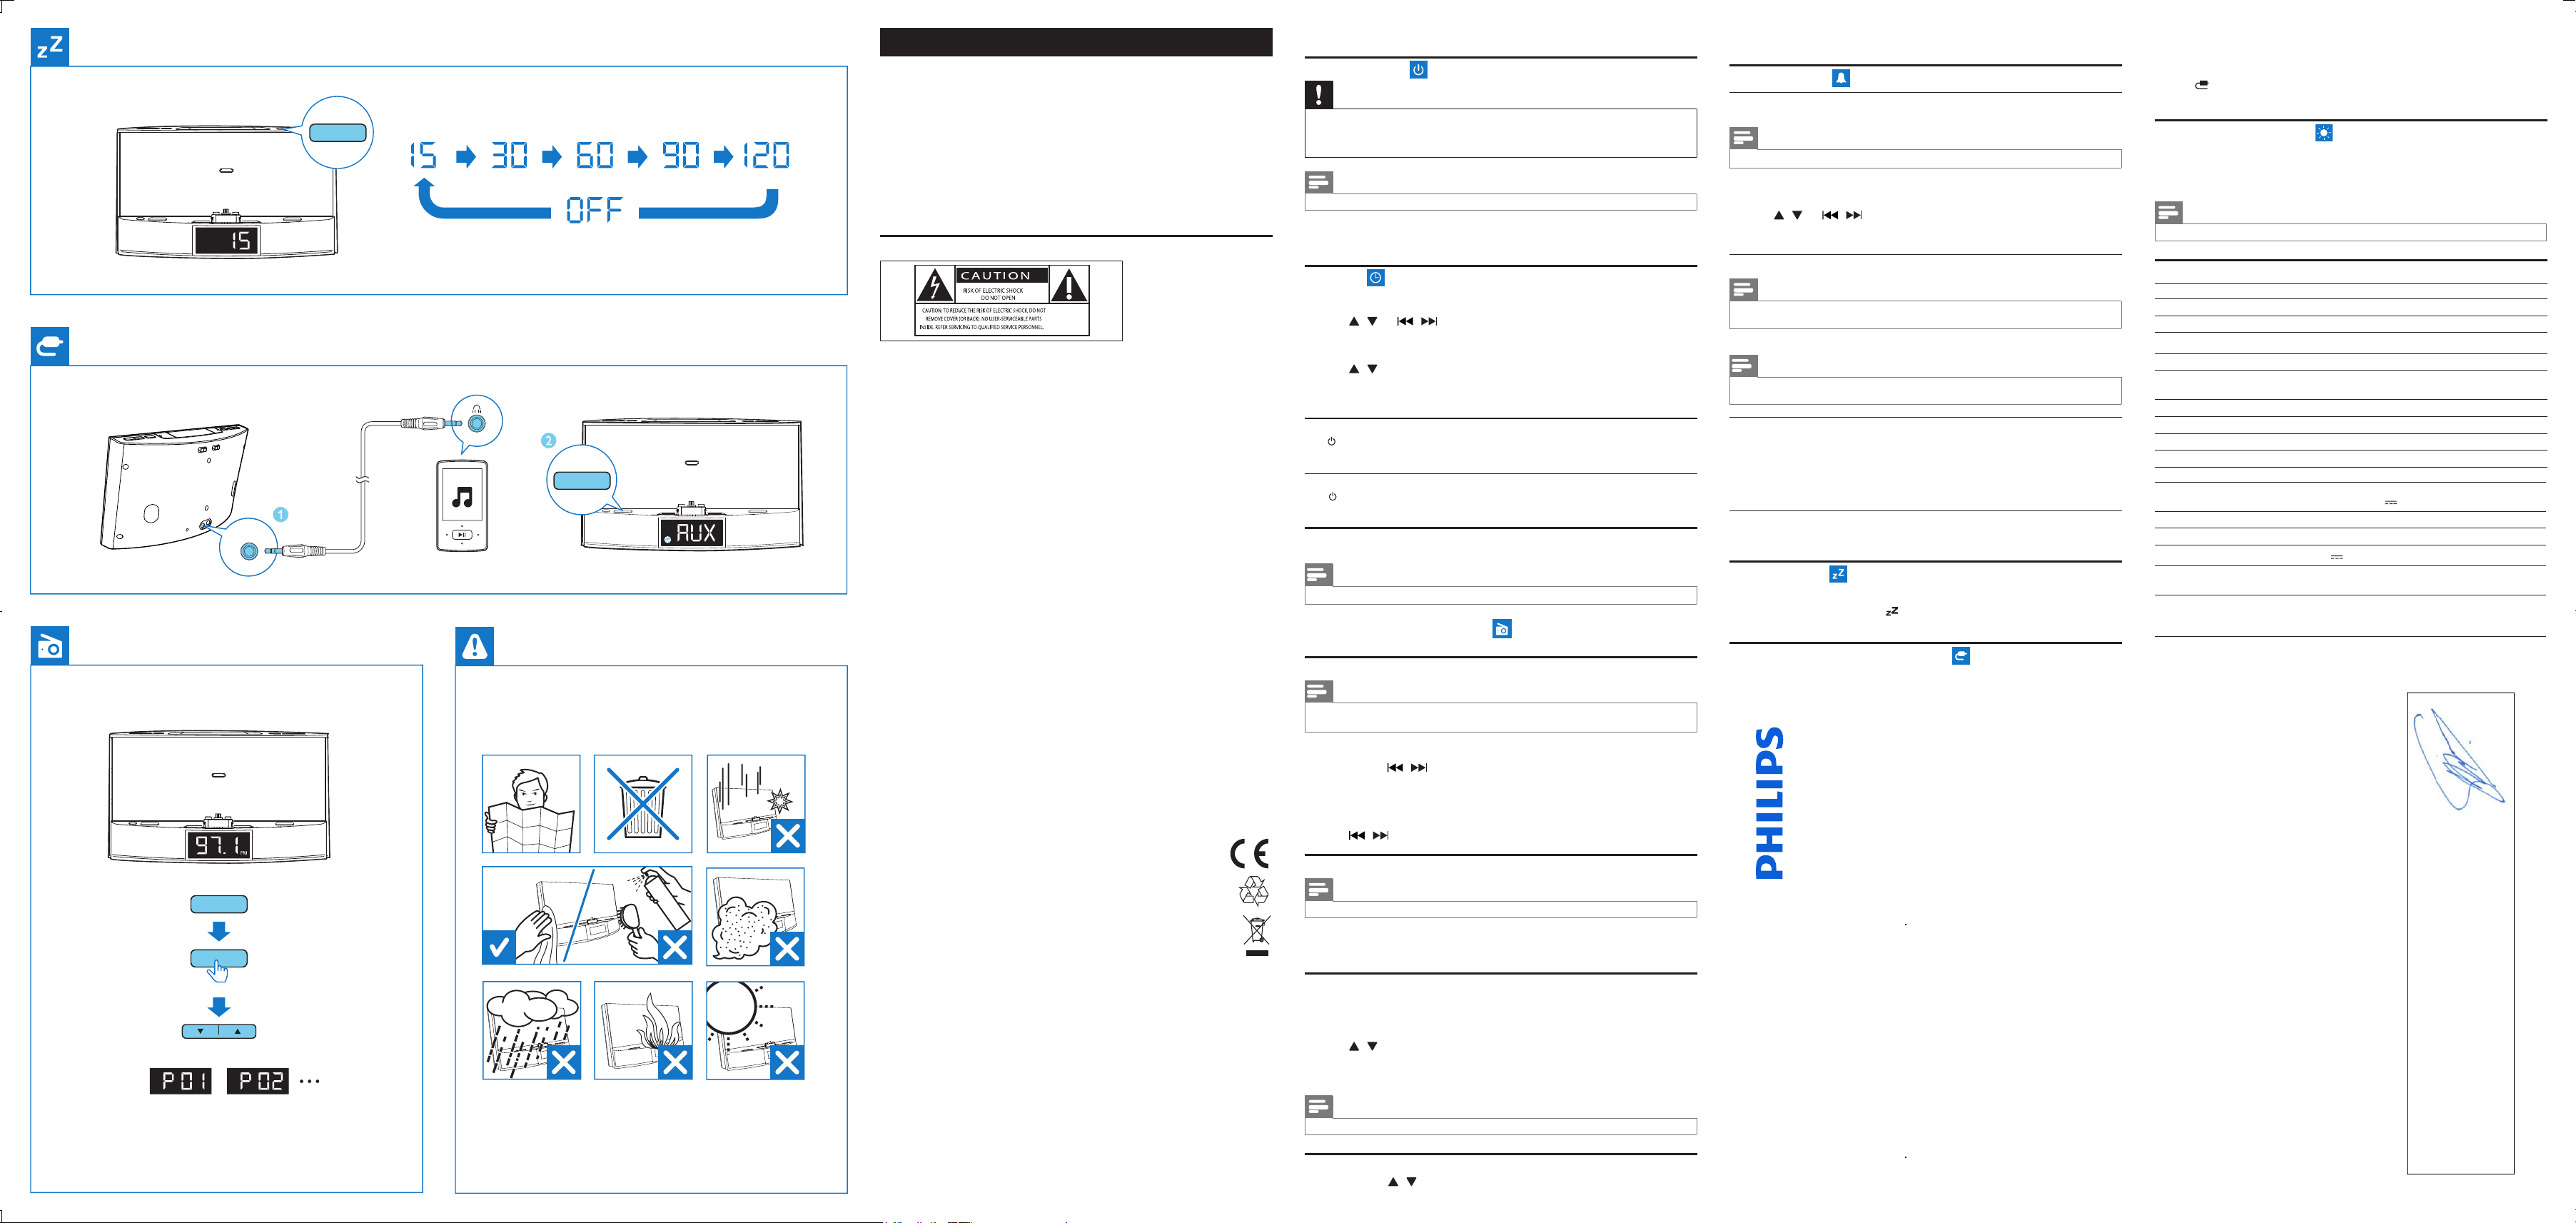
MP3-link
6285&(
352*
2 sec.
MP3 LINK
6/((3
6285&(
EN
1 System requirements:
*
Android system (version 2.1 or above);
Bluetooth 2.1 or above; and
Micro USB connector
Note: If the micro USB connector is located at the top, screen auto-rotation is available for
Android 2.3 or above.
Visit www.philips.com/FlexiDock for more details.
2 To download and install Songbird on your computer, visit www.philips.com/songbird.
*
3 To get the detailed instructions for use, visit www.philips.com/support.
*
1 Important
Know these safety symbols
3 Get started
Connect power
Caution
• R isk of pr oduc t damage! Ensure that the power volt age cor responds to t he volt age pr inted on the
back or u nder side of t he device.
• R isk of electr ic sho ck! When you unplug the power adapter, always pull the plug from the socket.
Never p ull the cord.
Note
• The typ e plate is located on the bottom of the docking s yste m.
Connect the power adapter to:
• the DC IN socket of the docking sys tem.
• the wall socket.
5 Other features
Set alarm timer
Set alarm
In standby mode, you can set two alarms to r ing at differ ent time.
Note
• Make sur e that you have set the clock corre ctly.
1 Press and hold A L1/AL2 for two seconds to activate alarm setting mode.
» The hour and minute digits begin to blink.
2 Press
3 Press A L1/AL2 to conrm.
/ and / repeatedly to set the hour and minute.
Select alarm source
Set clock
1 In standby mode, press and hold SET TIME for two seconds to ac tivate clock setting mode.
» The hour and minute digits begin to blink.
2 Press / and / repeatedly to set the hour and minute.
3 Press SET TIME to conrm.
This ‘bolt of lightning’ indicates uninsulated mater ial wi thin your unit may cause an electrical
shock . For the safet y of ever yone in your household, please do not remove product covering.
The ‘exclamation point’ calls attention to features for which you should read the enclosed
literature closely to prevent operating and maintenance problems.
WARNI NG: To reduce the risk of re or electric shock, this apparatus should not be exposed to
rain or moisture and objects lled with liquids, such as vases, should not be placed on this apparatus.
CAUTION : To prevent electr ic shock, match wide blade of plug to wide slot, fully inser t.
a
Read these instructions.
b Keep these instructions.
c Heed all warnings.
d Follow all instructions.
e Do not use this apparatus near water.
f Clean only with dry cloth.
g Do not block any ventilation openings. Install in accordance with the manufacturer’s
instructions.
h Do not install near any heat sources such as radiators , heat registers, stoves, or other
appar atus (including ampliers) that produce heat.
i Protect the power cord from being walked on or pinched, particularly at plugs,
convenience receptacles, and the point where t hey exit from the apparatus.
j Only use attachments/accessories specied by the manufacturer.
k Unplug this apparatus during lightning storms or when unused for long periods of time.
l Refer all ser vicing to qualied service personnel. Servicing is required when the
appar atus has been damaged in any way, such as power-supply cord or plug is damaged,
liquid has been spilled or objec ts have fallen into the apparatus, the appar atus has been
exposed to rain or moisture, does not operate normally, or has been dropped.
m
Apparatus shall not be exposed to dripping or splashing.
n Do not place any sources of danger on the apparatus (e.g. liquid lled objects, lighted
candles).
o Where the plug of the Direct Plug-in Adapter is used as the disconnect device, the
disconnect device shall remain readily operable.
2 Notice
Any changes or modications made to this device that are not expressly approved by Philips
Consumer Lifestyle may void the user’s au thor ity to oper ate the equipment.
This produc t complies with the r adio inter ference requirements of the European
Community.
Your product is designed and manufac tured with high quality mater ials and
components, which can be recycled and reused.
When t his crossed-out wheeled bin sy mbol is attached to a product it means that the
product is covered by the European Direc tive 2002/96/EC.
Please infor m your self about the local separ ate collection system for elec trical and
electronic products.
Please act according to your local rules and do not dispose of your old produc ts with
your normal household was te. Correct disposal of your old product helps to prevent potential
negative consequences for the environment and human health.
Environmental information
All unnecessary packaging has been omitted. We have tried to make the packaging easy to
separate into three materials: cardboard (box), polyst yrene foam (buffer) and polyethy lene
(bags, protective foam sheet.)
Your system consists of mater ials which can be recycled and reused if disassembled by a
specialized company. Please obser ve the local regulations regarding the disposal of pack aging
materials , exhausted batteries and old equipment.
» [12H] or [24H] begins to blink.
4 Press / to select 12/24 hour format .
5 Press SET TIME to conrm.
» The set time is displayed.
Turn on
Press .
» The docking system switches to the last selected source.
Switch to standby mode
Press again to switch the docking system to standby mode.
» [OFF] appears for one second, then the clock (if set) is displayed.
Select source
Press SOURCE repeatedly to select a source: Bluetooth, FM tuner, or MP3 link.
Note
• When an android phone is docked, the system automatica lly switche s to Bluetooth mode.
4 Listen to FM radio
Tune to FM radio stations
Note
• Pos ition the ant enna as far as possible from T V, VCR, or othe r radiation source .
• For better reception, fully extend and adjus t the pos ition of the antenna .
1 Press SO URCE r epeatedly to selec t FM tuner source.
2 Press and hold
» The docking system tunes to a station with strong reception automatically.
3 Repeat s tep 2 to tune to more radio stations.
To tune to a station manually:
1 Press
Store FM radio stations automatically
Note
• You can store a maximum of 20 FM radio stat ions.
In tuner mode, press an hold PROG for two seconds.
» The docking system stores all the available FM radio stations and broadcasts the rst available
station automatically.
Store FM radio stations manually
1 Tune to an FM radio station.
2 Press PROG.
» The preset number begins to blink.
3 Press
4 Press PROG again to conr m.
5 Repeat s teps 1 to 4 to store other stations.
• To rem ove a pre -stored station, store another s tati on in it s place.
/ repeatedly to select a number.
Note
/ for two seconds.
/ repeatedly until you nd optimal reception.
Note
• For alar m sound, you can selec t buzzer, your la st lis tened radio chanel, or the latest played track in
your An droid phone .
Adjus t AL1/AL2 RADIO·BUZZ·DOCK control to select alar m source for both alarms.
Note
• If DOCK is selec ted as alarm source, make sure that you have docked the phone into the docki ng
system.
Activate/deactivate alarm timer
1 Press A L1/AL2 to view alar m settings .
2 Press A L1/AL2 again to activate or deac tivate the alarm timer.
» The alarm icon appears if alarm timer is on and disappear s if it is off.
• To stop the ringing alarm, press the corresponding AL1/AL2.
• The alar m repeats r inging for the next day.
Snooze alarm
When alarm sounds , press SNOOZE .
» The alarm snoozes and repeats ringing nine minutes later.
Set sleep timer
This docking system can switch to standby mode automatically after a preset period.
Press SLEEP repeatedly to select the sleep timer period (in minutes).
» When the sleep timer is activated,
To deactivate the sleep timer, press SLEEP repeatedly until [OFF] (off) appears.
appears.
Play audio from an external device
You can listen to audio from an external device through this device.
de laquelle le marquage CE a été apposé)
(address / adresse)
(Name / Nom de l’entrepri se)
(DECLARATION DE CONFORMITE CE)
We / Nous, PHILIPS CONSUMER LIFESTYLE B.V.
TUSSENDIEPEN 4, 9206 AD DRACHTEN, THE NETHERLANDS
EC DECLARATION OF CONFORMITY
product description, desc ription du produit)
(
(Report No. / Numéro du Rapport) (Year in which the CE mark is affixed / Année au cours
Philips Consumer Lifestyle
HK-1145-AS141 Year 2011
................ ................... ................... .. ................ ................... ................... ..................... .............
(brand name, nom de la marque) (Type version or model, réf érence ou modèle)
Declare under our responsibility hat the electrical product(s):
(Déclarons sous notre p ropre responsabilité que le(s) produit(s) élect rique(s):)
PHILIPS AS141/12, /05
.................................. .............................................
Docking System for Android
................ ................... ................... ...........
(title, number and date of issue of the standard / titre, numéro et date de parution de la norme)
To which this declaration relates is in conformity with the following harmonized standards:
(Auquel cette déclaration se rapporte, est conforme aux normes harmo nisées suivantes)
EN60065 : 2002 + A1:2006 +A11:2008+A2:2010
1 Connec t the MP3 link cable to:
• the MP3 LINK socket.
• the headphone socket of an external device .
2 Press SO URCE r epeatedly to selec t MP3 link sour ce.
»
is displayed.
3 Play the audio in the external device (see the device’s use r manual).
Adjust display brightness
Press BRIGHTNESS repeatedly to select different brightness levels.
6 Product information
Note
• Produc t infor mation is sub ject to change without prior notice.
Specications
Amplier
Rated Output Power 20W RMS
Tuner
Tuning Range FM: 87.5 - 108 MHz
Sensitivity
- Mono, 26dB S/N R atio FM: <22 dBf
Search Selectivity FM: <28 dBf
Total Har monic Distortion F M: <2%
Signal to Noise Ratio FM: >55 dB
General information
AC Power Model: AS190-100-AI180; Input : 100-240 V ~, 50/60 Hz,
Oper ation Power Consumption <35 W
Standby Power Consumption <2 W
Max. load of Android output
Dimensions
- Main Unit (W x H x D) 290 x 160 x 113 mm
Weig ht
- With Packing
- Main Unit
EN61000-3-2 : 2006 + A1: 2009 + A2: 2009 EN61000-3-3 : 2008
EN61000-6-1:2007 EN61000-6-3:2007
EN301489-1 V1.8.1 : 2008 EN301489-17 V2.1.1 : 2009
EN300328 V1.7.1 : 2006 EN62311:2008
EN62301 : 2005
(Conformément aux exigences essentielles et autres dispositions pertin entes de:)
Following the provisions of :
EN55013:2001+A1:2003+A2:2006 EN55020:2007
- EC/1275/2008
1999/5/EC (R&TTE Directive)
2004/108/EC (EMC Directive)
2009/125/EC (ErP Directive)
- EC/278/2009
And are produced under a quality scheme at least in conformity wi h ISO 9001 or CENELEC
Permanent Documents
0.7A; Output : 10V
5.0 V
1.0 A
2.0 kg
1.4 kg
description de l’intervention)
(Et sont fabriqués conform ément à une qualité au moins conformeàla norme ISO 9 001 ou aux Documents Permanents CENELEC)
SGS Fimko CB
SGS R&TTE
The Notified Body ................................................ performed ....................................................
(L’Organisme Notifié) (Name and number/ nom et numéro) (a effectué) (description of intervention /
1.8A
FI-12908
SZEM1107002287RF
Remarks:
And issued he cer ificate, .......................................................
(et a délivré le certific at) (certificate number / numéro d u certificat)
(Remarques:)
Drachten, The Netherlands, Nov.11, 2011 A.Speelman, CL Compliance Manager
................ ................... ................... ..... ................ ................... ................... ...................... ..................
(place,date / lieu, date) (signature, name and function / signature, nom et fonction)
Select a preset radio station
In tuner mode, press / repeatedly to select a preset number.
 Loading...