

Page 1
Always there to help you
Question?
Contact
Philips
Register your product and get support at
www.philips.com/welcome
AJ7045D
User Manual
Page 2

Contents
1 Important 3
Risk of swallowing batteries 3
2 Your clock radio 4
What's in the box 4
Overview of the main unit 5
Overview of the remote control 6
3 Get started 7
Install remote control battery 7
Connect power 8
Set clock 8
Turn on 9
4 Play from iPod/iPhone 9
Compatible iPod/iPhone 9
Listen to audio from iPod/iPhone 9
Charge the iPod/iPhone 10
Adjust volume 10
5 Listen to FM radio 10
Tune to FM radio stations 10
Store FM radio stations automatically 10
Store FM radio stations manually 11
Select a preset radio station 11
6 Other features 11
Set alarm timer 11
Set sleep timer 12
Play audio from an external device 12
Adjust display brightness 13
7 Product information 13
Specications 13
8 Troubleshooting 14
9 Notice 14
2EN
Page 3

1 Important
Warning
•
Never remove the casing of this clock radio.
• Never lubricate any part of this clock radio.
• Never place this clock radio on other electrical
equipment.
• Keep this clock radio away from direct sunlight, naked
amesorheat.
• Make sure that you always have easy access to the
power cord, plug or adaptor to disconnect the clock
radio from the power.
• Make sure that there is enough free space
around the product for ventilation.
• The clock radio shall not be exposed to
dripping or splashing.
• Do not place any sources of danger on the
clockradio(e.g.liquidlledobjects,lighted
candles).
• Where the plug of the Direct Plug-in
Adapter is used as the disconnect device,
the disconnect device shall remain readily
operable.
• If the battery compar tment cannot be
completely secured, discontinue use of the
product. Keep out of reach of children and
contact the manufacturer.
Risk of swallowing batteries
• The product or remote control may
contain a button cell battery, which is
possible to be swallowed. Keep the battery
out of reach of children at all times! If
swallowed, the battery can cause serious
injury or death. Severe internal burns can
occur within two hours of ingestion.
• If you suspect that a battery has been
swallowed or placed inside any part of the
body, seek immediate medical attention.
• When you change the batteries, always
keep all new and used batteries out of
reach of children. Ensure that the battery
compartment is completely secure after
you replace the battery.
3 EN
Page 4
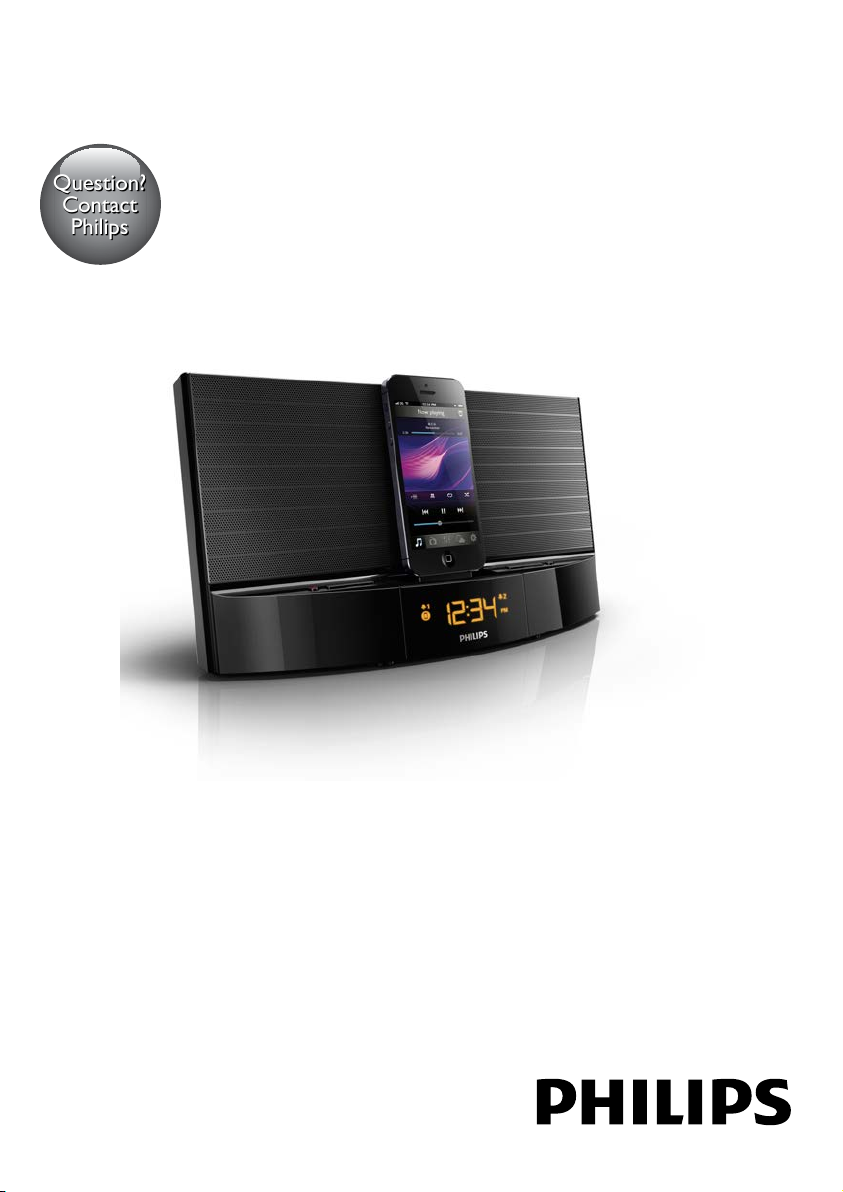
2 Your clock radio
Congratulations on your purchase, and
welcometoPhilips!Tofullybenetfromthe
support that Philips offers, register your product
at www.philips.com/welcome.
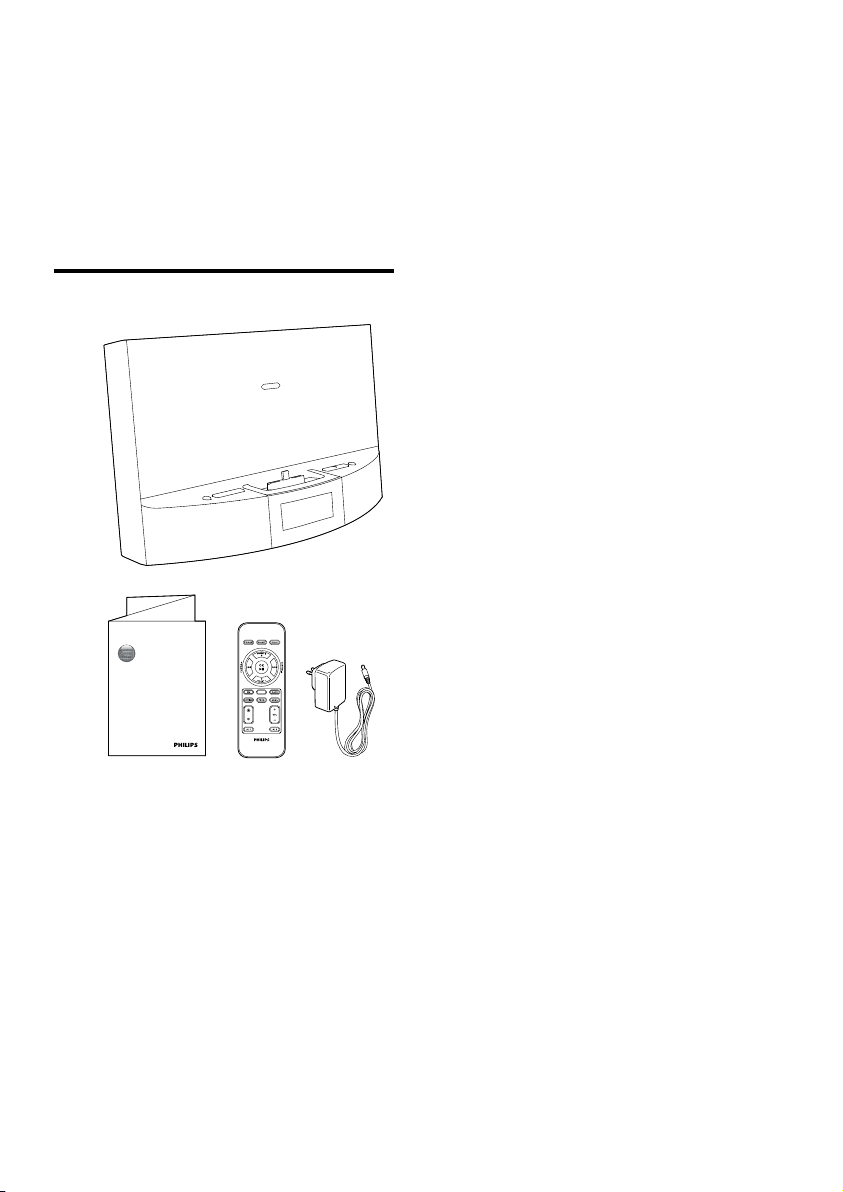
What's in the box
Always there to help you
Register your product and get support at
www.philips.com/welcome
Question?
Contact
Philips
AJ7045D
User Manual
AUDIO IN
4EN
Page 5
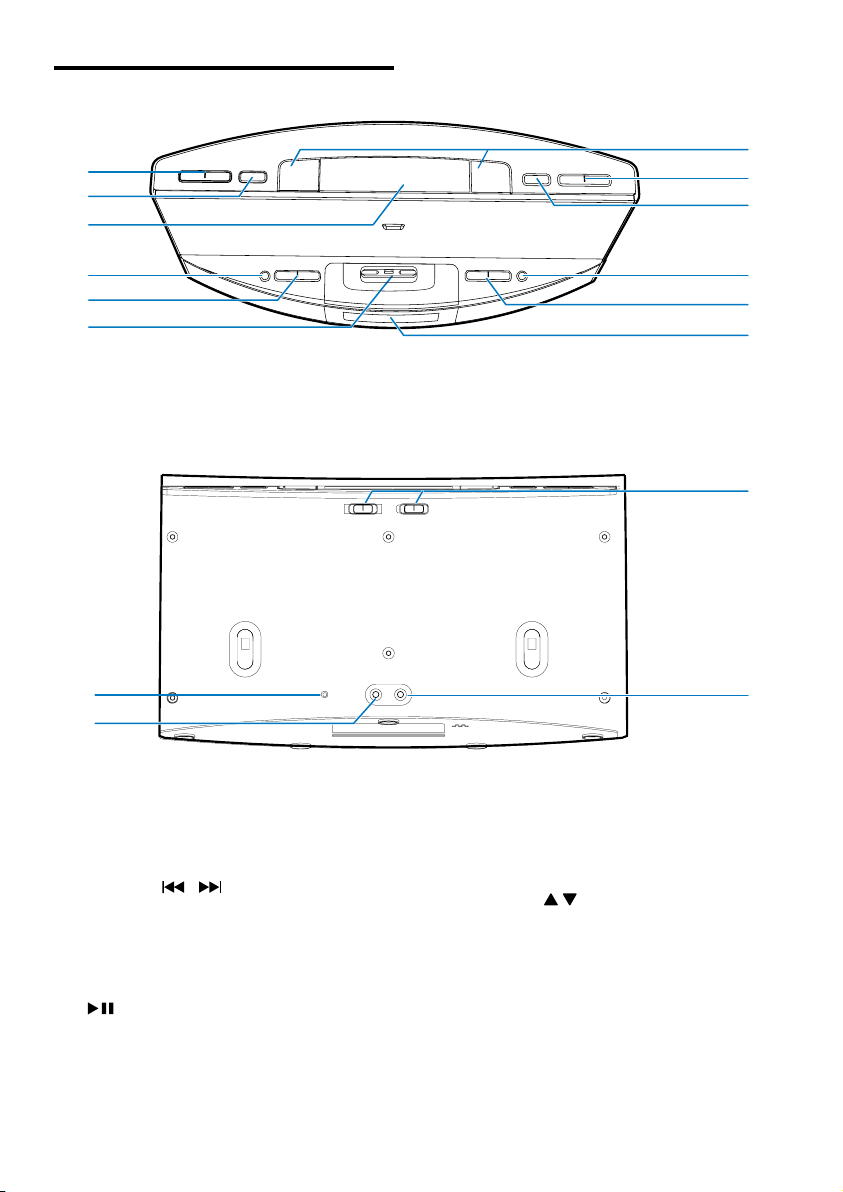
Overview of the main unit
a
b
c
e
f
d
o
p
g
h
i
j
k
l
m
a AL1/AL2
• Set alarm.
• View alarm settings.
• Activate or deactivate alarm timer.
b TUNING
• Tune to an FM radio station.
• Adjust hour, minute and hour format.
• Skip to the previous or next track.
• Search within a track.
c
• Start or pause play.
d SLEEP
• Set sleep timer.
5 EN
n
e VOLUME +/-
• Adjust volume.
f Display panel
• Show current information.
/
g PRESET
• Select a preset radio station.
• Scroll through the iPod/iPhone menu.
h SET TIME/PROG
• Set clock.
• Scan/store FM radio stations.
Page 6

i SNOOZE/BRIGHTNESS
m
l
k
i
g
h
j
f
• Snooze alarm.
• Adjust display brightness.
j
• Turn on the clock radio.
• Switch to standby mode.
k SOURCE
• Select a source.
l Dock for iPod/iPhone
m AL1/AL2 RADIO·BUZZ·DOCK
• Select an alarm source for Alarm 1 or
Alarm 2.
n DC IN
• Connect power.
o FM ANT
• Improve FM reception.
p AUDIO IN
• Connect an external audio device.
Overview of the remote control
a
b
c
d
e
POWER
G
N
I
N
U
T
FM
SET TIME
AL 1 AL 2
SNOOZE
S
S
E
E
R
R
P
P
OK
P
R
E
S
AUDIO IN
PROG
SLEEP
1
E
E
T
T
T
U
N
I
N
G
T
E
DOCK
MENU
VOL
a SNOOZE
• Snooze the alarm.
b POWER
• Turn on the clock radio.
• Switch to standby mode.
c
/ • TUNING +/-
• Tune to an FM radio station.
• Adjust hour, minute and hour format.
• Skip to the previous or next track.
• Search within a track.
d OK/
• Start or pause play.
• Conrmaselection.
e SET TIME
• Set time.
6EN
Page 7

f
• Adjust display brightness.
g AL1/AL2
• Set alarm.
• View alarm settings.
• Activate or deactivate alarm timer.
h VOL +/-
• Adjust volume.
i MENU
• Access iPod/iPhone menu.
j PROG
• Scan/store radio stations.
k Source selection buttons: FM, AUDIO IN,
DOCK
• Select a source.
l PRESET +/-
• Select a preset radio station.
• Scroll through the iPod/iPhone menu.
m SLEEP
• Set sleep timer.
3 Get started
Always follow the instructions in this chapter in
sequence.
Install remote control battery
Caution
Risk of explosion! Keep the battery away from heat,
•
sunshineorre.Neverdiscardthebatteryinre.
• Danger of explosion if battery is incorrectly replaced.
Replace only with the same or equivalent type.
• The battery contains chemical substances, so it should
be disposed of properly.
• Perchlorate Material - special handling may apply. See
www.dtsc.ca.gov/hazardouswaste/perchlorate.
Note
You can only use AC power as power supply. The pre-
•
installed lithium CR2032 battery can only back up time
and alarm settings.
For rst-time use:
Remove the protective tab to activate the
battery.
7 EN
Page 8

To replace the battery
a
c
b
Connect power
Set clock
1
In standby mode, press and hold SET TIME
for two seconds to activate clock setting
mode.
» [12H] (12 hour) or [24H] (24 hour)
blinks.
2 Press / to adjust the hour format.
3 Press SET TIMEtoconrm.
» The hour digits blink.
4 Repeat steps 2-3 to set the hour and
minute.
» The set time is displayed.
Caution
Risk of product damage! Make sure that the power
•
voltage corresponds to the voltage printed on the back
or underside of the clock radio.
• Risk of electric shock! When you unplug the AC
adapter, always pull the plug from the socket. Never
pull the cord.
Note
When an iPod/iPhone is connected, the clock radio
•
synchronizes time from the iPod/iPhone automatically.
8EN
Page 9

Turn on
4 Play from iPod/
Press .
» The clock radio switches to the last
selected source.
• To switch the clock radio to standby mode,
press
again.
iPhone
You can enjoy audio from iPod/iPhone through
this clock radio.
Compatible iPod/iPhone
The clock radio supports these iPod and iPhone
models:
Made for.
• iPod touch (5th generation)
• iPod nano (7th generation)
• iPhone 5
Listen to audio from iPod/ iPhone
1
Place the iPod/iPhone in the dock.
9 EN
Page 10

2 Press SOURCE repeatedly or DOCK on
the remote control to select iPod/iPhone
mode.
3 Play audio on the iPod/iPhone.
• To pause or resume play, press
• To skip to a track, press
• To search during play, press and hold
/ , then release to resume
normal play.
• To navigate the menu: press MENU,
then press
OKtoconrm.
To remove the iPod/iPhone:
Pull the iPod/iPhone out of the dock.
/ to select, and press
.
/ .
5 Listen to FM
radio
Tune to FM radio stations
Tip
Position the antenna as far as possible from TV, VCR, or
•
other radiation source.
• For better reception, fully extend and adjust the
position of the antenna.
Charge the iPod/iPhone
When the clock radio is connected to power,
the docked iPod/iPhone starts charging.
Adjust volume
You can adjust volume by pressing VOL +/-
repeatedly.
1 Press SOURCE repeatedly or FM on the
remote control to select FM tuner source.
2 Press and hold TUNING +/- for two
seconds.
» The clock radio tunes to a station with
strong reception automatically.
3 Repeat step 2 to tune to more radio
stations.
To tune to a station manually:
Press TUNING +/-repeatedlyuntilyound
optimal reception.
Store FM radio stations automatically
Note
You can store a maximum of 20 FM radio stations.
•
In tuner mode, press an hold PROG for two
seconds.
» The clock radio stores all the available
FMradiostations,andbroadcaststherst
available station automatically.
10EN
Page 11

Store FM radio stations manually
1
Tune to an FM radio station.
2 Press PROG.
» The preset number begins to blink.
3 Press PRESET +/- repeatedly to select a
number.
4 Press PROGagaintoconrm.
5 Repeat steps 1-4 to store other stations.
Note
To remove a pre-stored station, store another station
•
in its place.
Select a preset radio station
In tuner mode, press PRESET +/- repeatedly to
select a preset radio station.
6 Other features
Set alarm timer
In standby mode, you can set two alarms to ring
at different time.
Note
Make sure that you have set the clock correctly.
•
1 Press and hold AL1/AL2 for two seconds
to activate alarm setting mode.
» The hour digits blink.
2 Press / repeatedly to adjust the
hour.
3 Press AL1/AL2toconrm.
4 Repeat steps 2-3 to set the minute and
alarm volume.
» The corresponding alarm icon is
displayed.
11 EN
Select alarm source
For alarm sound, you can select buzzer, your last
listened radio chanel, or the latest played audio
on your iPod/iPhone.
Page 12

Tip
If DOCK is selected as the alarm source, yet the audio
•
cannot be played, buzzer will sound when alarm time
comes.
Activate/deactivate alarm timer
1 Press AL1/AL2 to view alarm settings.
2 Press AL1/AL2 again to activate or
deactivate the alarm timer.
» The alarm icon appears if alarm timer
is on and disappears if it is off.
• To stop the ringing alarm, press the
corresponding AL1/AL2.
» The alarm repeats ringing for the next
day.
Snooze the alarm
When alarm sounds, press SNOOZE.
» The alarm snoozes and repeats ringing nine
minutes later.
Play audio from an external device
You can listen to audio from an external device
through this clock radio.
1 Connect an audio cable to:
• the AUDIO IN socket on the clock
radio.
• the headphone socket on an external
device.
Set sleep timer
This clock radio can switch to standby mode
automatically after a preset period.
• Press SLEEP repeatedly to select the sleep
timer period (in minutes).
» When the sleep timer is activated,
appears.
To deactivate the sleep timer:
• Press SLEEP repeatedly until [OFF] (off)
appears.
15 30 60 90 120
OFF
2 Press SOURCE repeatedly or AUDIO IN
on the remote control to select the Audioin source.
3 Play the external device (refer to its user
manual).
12EN
Page 13

Adjust display brightness
SNOOZE
BRIGHTNESS
7 Product
information
Note
Product information is subject to change without prior
•
notice.
Specications
Amplier
Rated Output Power 20W RMS
Tuner
Tuning Range FM: 87.5 - 108 MHz
Sensitivity
- Mono, 26dB S/N Ratio FM: <22 dBf
Search Selectivity FM: <30 dBf
Total Harmonic Distortion FM: <3%
Signal to Noise Ratio FM: >50 dBA
General information
AC Power Model: AS190-100-
AE180; Input: 100-240
V~, 50/60Hz, 0.7A;
Output: 10 V
Operation Power
Consumption
Standby Power
Consumption
Max. load for iPod/
iPhone
Dimensions - Main Unit
(W x H x D)
Weight - Main Unit 1.36 kg
<15 W
<1 W
5 V
290 x 159 x 113 mm
1 A
1.8 A
13 EN
Page 14

8 Troubleshooting
Warning
•
Never remove the casing of this device.
To keep the warranty valid, never try to repair
the system yourself.
If you encounter problems when using this
device, check the following points before
requesting service. If the problem remains
unsolved, go to the Philips Web page
(www.philips.com/support). When you contact
Philips, make sure that the device is nearby
and the model number and serial number are
available.
No power
• Ensure that the AC power plug of the
clock radio is connected properly.
• Ensure that there is power at the AC
outlet.
No response from the clock radio
• Disconnect and reconnect the AC power
plug, then turn on the clock radio again.
Poor radio reception
• Keep the clock radio away from other
electronic devices to avoid radio
interference.
• Fully extend and adjust the position of the
FM antenna.
Alarm does not work
• Set the clock/alarm correctly.
Clock/alarm setting erased
• Power has been interrupted or the power
plug has been disconnected.
• Reset the clock/alarm.
9 Notice
This product complies with the radio
interference requirements of the European
Community.
Anychangesormodicationsmadetothis
device that are not expressly approved by
WOOX Innovations may void the user’s
authority to operate the equipment.
Your product is designed and manufactured
with high quality materials and components,
which can be recycled and reused.
When this crossed-out wheeled bin symbol is
attached to a product it means that the product
is covered by the European Directive 2002/96/
EC.
Please inform yourself about the local separate
collection system for electrical and electronic
products.
Please act according to your local rules and
do not dispose of your old products with your
normal household waste. Correct disposal of
your old product helps to prevent potential
negative consequences for the environment and
human health.
Your product contains batteries covered by
the European Directive 2006/66/EC, which
cannot be disposed with normal household
waste.Please inform yourself about the local
rules on separate collection of batteries
14EN
Page 15

because correct disposal helps to prevent
negative consequences for the environmental
and human health.
Environmental information
All unnecessary packaging has been omitted.
We have tried to make the packaging easy to
separate into three materials: cardboard (box),
polystyrene foam (buffer) and polyethylene
(bags, protective foam sheet.)
Your system consists of materials which can
be recycled and reused if disassembled by
a specialized company. Please observe the
local regulations regarding the disposal of
packaging materials, exhausted batteries and old
equipment.
“Made for iPod” and “Made for iPhone”
mean that an electronic accessory has been
designedtoconnectspecicallytoiPodor
iPhonerespectively,andhasbeencertiedby
the developer to meet Apple performance
standards. Apple is not responsible for the
operation of this device or its compliance with
safety and regulatory standards. Please note that
the use of this accessory with iPod or iPhone
may affect wireless performance.
iPod and iPhone are trademarks of Apple Inc.,
registered in the U.S. and other countries.
Note
The type plate is located on the bottom of the
•
apparatus.
This is CLASS II apparatus with double
insulation, and no protective earth provided.
15 EN
Page 16

Specifications are subject to change without notice
2013 © WOOX Innovations Limited. All rights reserved.
This product was brought to the market by WOOX
Innovations Limited or one of its affiliates, further referred
to in this document as WOOX Innovations, and is the
manufacturer of the product. WOOX Innovations is the
warrantor in relation to the product with which this booklet
was packaged. Philips and the Philips Shield Emblem are
registered trademarks of Koninklijke Philips N.V.
AJ7045D_12_UM_V2.0
 Loading...