

Page 1
Kitchen CD Clock Radio
AJ6110
AJ6111
Thank you for choosing Philips.
Need help fast?
Read your Quick Use Guide and/or
Owner's Manual first for quick tips
that make using your Philips product
more enjoyable.
If you have read your instructions
and still need assistance,
you may access our online help at
www.philips.com/support
1-888-PHILIPS (744-5477)
(and Model / Serial number)
or call
while with your product.
Philips vous remercie de
votre confiance.
Besoin d'une aide
rapide?
Les Guide d'utilisation rapide et Manuel de
l'utilisateur regorgent d'astuces destinées à
simplifier l'utilisation de votre produit Philips.
Toutefois, si vous ne parvenez pas à résoudre
votre probléme, vous pouvez accéder à
notre aide en ligne à l'adresse
www.philips.com/support
ou formez le
1-800-661-6162 (Francophone)
1-888-PHILIPS (744-5477) (English speaking)
Veillez à avoir votre produit à
portée de main.
(et model / serial nombre)
Gracias por escoger Philips
Necesita ayuda
inmediata?
Lea primero la Guía de uso rápido o el
Manual del usuario, en donde encontrará
consejos que le ayudarán a disfrutar
plenamente de su producto Philips.
Si después de leerlo aún necesita ayuda,
consulte nuestro servicio de
asistencia en línea en
www.philips.com/support
o llame al teléfono
1-888-PHILIPS (744-5477)
y tenga a mano el producto.
(y número de model / serial)
Page 2
2
Page 3
1 2 3 4 5 6 7 8 5 9 0 !
#$^&* % @
(
)
¡
™
£
≤
∞
POWER
CD
MUTE
RADIO
VOL
PRESET
≥
§
3
Page 4
IMPORTANT SAFETY INSTRUCTIONS
13 .
1.
Read these instructions.
2.
Keep these instructions.
3.
Heed all warnings.
4.
Follow all instructions.
5.
Do not use this apparatus near
water.
6.
Clean only with dry cloth.
7.
Do not block any ventilation
openings. Install in accordance with
the manufacturer´s instructions.
8.
Do not install near any heat sources
such as radiators, heat registers, stoves, or
other apparatus (including amplifiers) that
produce heat.
9.
Do not defeat the
safety purpose of the
polarized or
grounding-type plug.
A polarized plug has two blades with one
wider than the other. A grounding type plug
has two blades and a third grounding prong.
The wide blade or the third prong are
provided for your safety. If the provided plug
does not fit into your outlet, consult an
electrician for replacement of the obsolete
outlet.
10.
Protect the power cord from being
walked on or pinched, particularly at plugs,
convenience receptacles, and the point
where they exit from the apparatus.
11.
Only use attachments/accessories
specified by the manufacturer.
12 .
Use only with the cart, stand,
tripod, bracket, or table specified
by the manufacturer or sold with
the apparatus. When a car t is
used, use caution when moving
the cart/apparatus combination
to avoid injury from tip-over.
Unplug this apparatus during lightning
storms or when unused for long periods of
time.
14 .
Refer all servicing to qualified service
personnel. Servicing is required when the
apparatus has been damaged in any way,
such as power-supply cord or plug is
damaged, liquid has been spilled or objects
have fallen into the apparatus, the apparatus
has been exposed to rain or moisture, does
not operate normally, or has been dropped.
15.
Battery usage
prevent battery leakage which may result in
bodily injury, property damage, or damage
to the remote control:
Install all batteries correctly, + and - as
marked on the remote control.
Do not mix batteries (old and new or
carbon and alkaline, etc.).
Remove batteries when the unit is not used
for a long time.
16.
Apparatus shall not be exposed to
dripping or splashing.
17.
Do not place any sources of danger
on the apparatus (e.g. liquid filled
objects, lighted candles).
18.
This product may contain lead and mercury.
Disposal of these material may be regulated
due to environment considerations.
For disposal or recycling information,
please contact your local authorities
or the Electronic Industries Alliance :
www.eiae.org.
CAUTION
EL 6475-E004: 03/12
To
4
Page 5

Index
English ------------------------------------------------ 6
Français -------------------------------------------- 19
Español --------------------------------------------- 34
English
Français
Español
5
Page 6

English
General Information
Supplied accessories ............................................ 7
Environmental information ................................ 7
Maintenance .......................................................... 7
Safety information ................................................ 7
Installation
Mounting the set under a cabinet .................... 8
Preparation
Mounting the set
Power supply ......................................................... 8
Backup battery (not included)
AC power
Using the remote control .................................. 9
Setting the clock ................................................... 9
To turn on the Daylight Saving Time (DST) mode
Contents
Mute ...................................................................... 11
Display information............................................ 11
CD
Discs for playback .............................................. 12
Playing discs ......................................................... 12
Selecting and searching ..................................... 12
Selecting a different track
Finding a passage within a track during playback
Different play modes:REPEAT, SHUFFLE ...... 12
Programming tracks ........................................... 13
Erasing the program
Radio
Tuning to radio stations .................................... 14
Storing preset radio stations ........................... 14
Manual programming
To listen to a preset station
Controls
Controls on the set ........................................... 10
Remote control .................................................. 10
Basic Functions
Switching on/ to standby mode and
selecting functions ............................................ 11
Adjusting volume and sound............................ 11
Adjusting volume
DBB
Timer
................................................................................ 15
Specifications
................................................................................ 16
Troubleshooting
................................................................................ 17
6
Page 7

General Information
The set complies with the FCC-Rules,
Part 15 and with RSS-210 of Industry
Canada.
Operation is subject
to the following two conditions:
1. this device may not cause harmful
interference, and
2. this device must accept any interference
received, including interference that may
cause undesired operation.
Supplied accessories
– Remote control (with 1 x CR2025 battery)
– Mounting kit:
1 x template, 4 x spacers, 8 x screws
Environmental information
All unnecessary packaging has been omitted.
We have tried to make the packaging easy to
separate into three materials: cardboard (box),
polystyrene and polyethylene (bags, protective
foam sheet).
Your system consists of materials which can be
recycled and reused if disassembled by a
specialized company. Please observe the local
regulations regarding the disposal of packaging
materials, exhausted batteries and old
equipment.
Cleaning the disc lens
● After prolonged use, dirt or dust may
accumulate at the disc lens. To ensure good
playback quality, clean the disc lens with any
commercially available cleaner. Follow the
instructions supplied with cleaner.
Safety information
● Place the system on a flat, hard and stable
surface.
● Do not expose the system, batteries or discs to
excessive moisture, rain, sand or heat sources
caused by heating equipment or direct sunlight.
● Place the system in a location with adequate
ventilation to prevent internal heat build-up in
your system.
● The ventilation should not be impeded by
covering the ventilation openings with items,
such as newspapers table-cloths, curtains, etc.
● The apparatus shall not be exposed to dripping
or splashing.
● No objects filled with liquids, such as vases, shall
be placed on the apparatus.
● No naked flame sources, such as lighted candles,
should be placed on the apparatus.
● The mechanical par ts of the set contain self-
lubricating bearings and must not be oiled or
lubricated.
English
Maintenance
Cleaning the Cabinet
● Use a soft cloth slightly moistened with a mild
detergent solution. Do not use a solution
containing alcohol, spirits, ammonia or abrasives.
Cleaning Discs
● When a disc becomes dir ty, clean
it with a cleaning cloth. Wipe the
disc from the center out.
● Do not use solvents such as
benzene, thinner, commercially
available cleaners, or antistatic
spray intended for analog records.
CAUTION
Visible and invisible laser radiation. If the
cover is open, do not look at the beam.
High voltage! Do not open. You run the risk
of getting an electric shock.
The machine does not contain any userserviceable parts.
Modification of the product could result in
hazardous radiation of EMC or other
unsafe operation.
7
Page 8

English
– To reduce the risk of fire, do
not place any heating or cooking
appliance beneath the set.
– To prevent obstruction or
danger, use the power cord posts
to wrap the power cord so that
excess cord does not hang down.
Mounting the set under a
cabinet
Preparation
● Ask a friend to help out. An extra hand to hold
the set makes mounting easier and quicker.
● You may install the unit in the kitchen with or
without spacers.
a Find a mounting location near a wall outlet.
Template
a
b
b Use the mounting template to test the design
and thickness of your kitchen cabinet bottom.
Mounting the set
For full details on how to use the Mounting kit,
please refer to the printed instructions in the
Quick Start Guide and Template.
IMPORTANT!
–Never plug in the AC power cord to
the power outlet before installation is
completed.
– Install your set near the AC outlet and
where the AC power plug can be reached
easily
– Do not use a converter or extension
cord.
- Install the set as far as possible from
sources of interference, such as a
refrigerator, microwave oven, fluorescent
lamp, etc.
– There should be at least 2.5" distance
between the unit and the wall.
Installation
Power supply
This set runs on AC power.
We recommend you also inser t a 9V battery for
memory back-up power supply. In the event of a
power interruption, this will help safeguard the
clock, timer settings and preset radio stations. To
save energy, the display switches off and you will
not be able to operate the CD/ Tuner functions.
Backup battery (not included)
● Insert 1 x 9V battery (preferably alkaline) with
the correct polarity
Helpful hints:
– Replace the batteries once a year, or as often
as necessary.
Batteries contain chemical substances, so
they should be disposed of properly
AC power
● Connect the AC power cord to the wall socket.
This switches on the power supply
The type plate is located on the bottom
panel.
8
Page 9

Installation
Using the remote control
IMPORTANT!
– Remove the
protective plastic tab
before using the
remote control.
–Always point the
remote control directly towards IR area .
To replace the battery
1 Press and hold 1 as indicated
2 Simultaneously, pull the battery tray at 4
3 Remove the old battery and put a new CR2025
battery in place
4 Put back the battery tray
1
C
R
2
0
2
5
L
I
3
T
H
I
U
M
C
R
2
L
0
I
2
T
5
H
I
U
M
CAUTION!
– Remove the battery if it is exhausted
or will not be used for a long time.
– Batteries contain chemical substances,
so they should be disposed of properly.
2
Setting the clock
The time is displayed using the 12-hour clock.
1 On the set, press and hold CLOCK
➜ The hour digits star t flashing (AM 12: 00 by
default)
2 Hold down or press ∞ or § repeatedly to set
the hour
3 Press CLOCK to confirm the setting
➜ The minute digits star t flashing
4 Repeat step 3 to set the minute
5 Press CLOCK to confirm the setting
➜ The clock shows the set time
To turn on the Daylight Saving Time
(DST) mode
1 In the standby mode, press and hold DISP on
the set
➜ Current time setting moves ahead by 1 hour.
DSTappears
2 Press DISP again
➜ The set returns to normal time setting.
DSTdisappears
English
9
Page 10

English
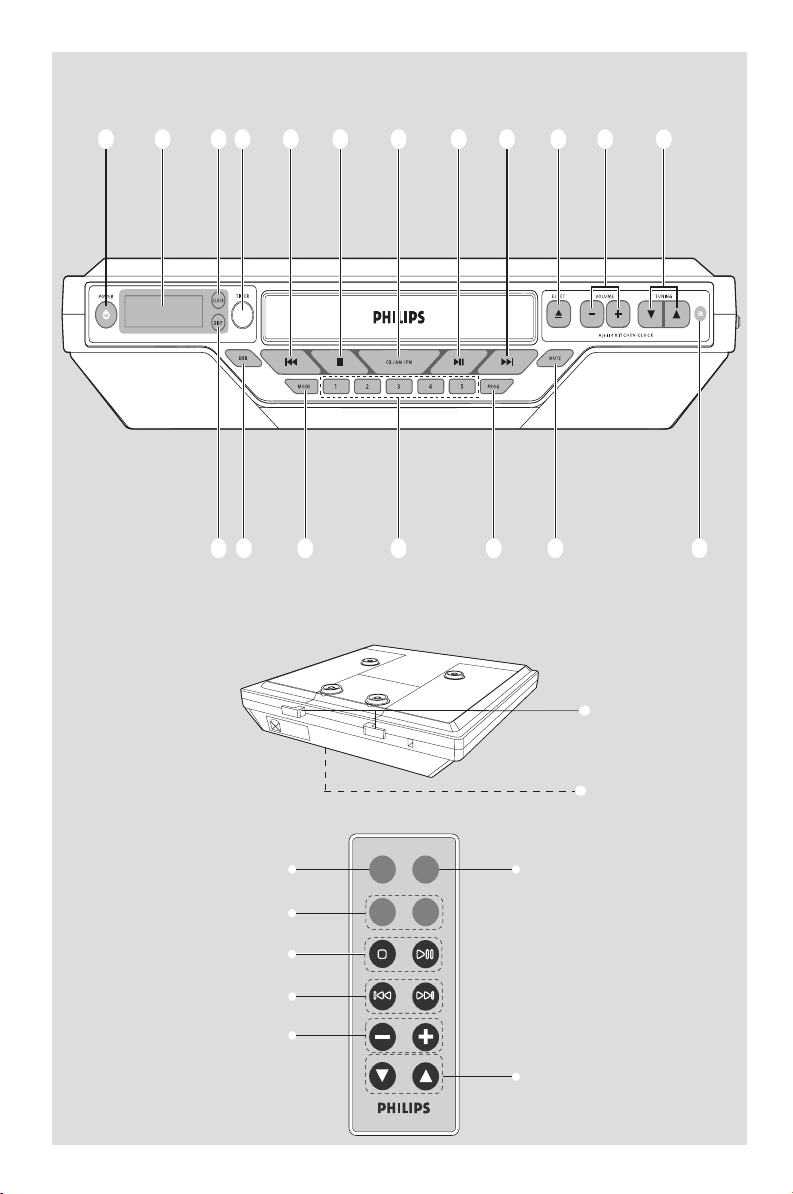
Controls on the set
1 POWER
– switches the set on or to standby mode
2 Display
– shows status of the set
3 CLOCK
– set clock time
4 TIMER
– alarm timer with setting options from 1 to 180
minutes
5 ∞ / §
– CD: skips or searches tracks backwards/forwards
– RADIO: tunes to radio stations
– CLOCK: adjusts the hour/minute
6 Ç
– stops disc playback
– cancels program function
7 CD/AM/FM
– selects functions: CD or radio (AM or FM)
8 ÉÅ
– starts or pauses disc playback.
9 0 EJECT
– opens/closes CD door
0 VOLUME -/+
– adjusts the volume level
! TUNING 4/3
– RADIO: selects a preset radio station
@ IR
– sensor for the infrared remote control
Helpful hints: Always point the remote control
towards this sensor.
# MUTE
– switches the sound off temporarily
$ PROG
– RADIO: programs preset stations
– CD: programs tracks
% Numeric Keypad (1-5)
– RADIO: selects a preset radio station
Controls (illustrations on page 3)
^ MODE
– selects different play modes: e.g. REPEAT or
SHUFFLE (random order)
& DBB (Dynamic Bass Boost)
– turns the bass enhancement on/off
* DISP
– toggles clock (or timer) display and status of the
set
– In standby mode: press and hold the button to
turn on/off Daylight Saving Time (DST) mode
( Power cord posts
– for wrapping the power cord so that excess
cord does not hang down
) battery compartment
– Open to insert 1 x 9V battery (for memor y
backup power supply only)
Remote control
¡ POWER
– switches the set on or to standby mode
™ Source buttons
CD
– selects CD source
RADIO
– selects the radio and toggles between the
wavebands (AM/FM)
£ Ç
– stops disc playback
– cancels program function
ÉÅ
– starts or pauses disc playback
≤ ∞ / §
– CD: skips or searches tracks backwards/forwards
– RADIO: tunes to radio stations
– CLOCK: adjusts the hour/minute
∞ VOL +/-
– adjusts the volume level
§ PRESET 3 / 4
– RADIO: selects a preset radio station
≥ MUTE
– switches the sound off temporarily
10
Page 11

Basic functions
Switching on/ to standby and
selecting functions
1 Press POWER to switch on
➜ The set switches to the last source selected
➜ The display lights up
2 To select your function, press CD/AM/FM once
or more (or CD or RADIO on the remote
control)
3 Press POWER to switch the set to standby
➜ The display dims out
Helpful hints:
– In the standby mode, the tone, sound settings,
tuner presets, and the volume level will be
retained in the set’s memory.
Adjusting volume and sound
Adjusting Volume
● Press VO LUME -/+ to adjust the volume
➜ VOL and the actual value (between 00 and
31) are displayed
MUTE
During playback, you can temporarily switch off
the sound without switching off the set
1 Press MUTE to switch off the sound
➜ MUTE appears. Playback continues without
sound
2 To switch on the sound, press MUTE again or
adjust the volume with VOLUME controls
➜ MUTE disappears
Display information
1 During playback, press DISP to switch between
the clock/timer display and the status of the set
2 In the standby mode, press DISP to lights up
the clock display
➜ 15 seconds later, the display dims out
automatically
English
DBB
● On the set, press DBB (Dynamic Bass Boost)
once or more to switch bass enhancement on
or off.
➜ DBB appears if DBB is activated
11
Page 12

English
Discs for playback
With this system, you can play
– all pre-recorded audio CDs (CDDA)
– all finalized audio CD-Rs and CD-RWs
IMPORTANT!
– This system is designed for regular
discs. Therefore, do not use any
accessories such as disc stabilizer rings or
disc treatment sheets, etc.
Playing discs
1 Press POWER to on, then press CD/AM/FM
once or more to select CD source
2 Press 0 EJECT to open the CD compartment
MP3-CD/CD-R/CD-RW COMPATIBLE
MICRO SYSTEM
MCM760 MICRO SYSTEM
3 Inser t a disc with the printed side facing up.
Pressç again to close the compartment
➜ rEAdis displayed as the CD player scans
the contents of a disc
➜ Playback starts automatically. Display shows
current track number
CD
Selecting and searching
Selecting a different track
1 Press 4 / ¢ once or repeatedly until the
desired track number appears in the display
Finding a passage within a track
during playback
1 During playback, press and hold 4 / ¢
➜ The CD plays at a high speed
2 When you recognize the passage you want,
release 4 or ¢
➜ Normal playback resumes
Different play modes: REPEAT,
SHUFFLE
SHUF – plays all the tracks of the CD in random
order
REP – plays the current track continuously
REP ALL– plays the entire disc/program
continuously
SHUF REP ALL – repeats all the tracks of the
CD in random order
1 During playback, press MODE once or more to
select play modes
2 To return to normal playback, press MODE
repeatedly until the various modes are no longer
displayed
4 To pause playback, pressÉÅ. To resume
playback, press the button again
5 To stop playback, pressÇ
➜ Display shows the total number of tracks
Helpful hints:
CD playwill also stop when
– the CD door is opened
– the disc has reached the end
– you select another source: CD or radio (AM or
FM)
12
Page 13

CD
Programming tracks
You may store up to 20 tracks in the desired
sequence. If you like, store any track more than
once.
1 In the stop position, press PROG to start
programming
➜ Display shows 01 indicating the start of the
program. PROG and current track number flash
2 Press 4 / ¢ once or repeatedly until the
desired track number appears in the display
3 Press PROG to store the desired track.
➜ Display shows 02 (up to 20 in sequence),
indicating the next program location available.
PROG and current track number flash
4 Repeat steps 2-3 to select and store all desired
tracks.
➜ FULL is displayed if you attempt to program
more than 20 tracks
5 Press ÉÅ play the program
English
Erasing the program
You can erase the contents of the memory by:
● Press 9
– once if in the stop position;
– twice during playback
● Open the CD door
13
Page 14

English
Radio
Tuning to radio stations
1 Press POWER to on, then press then press
CD/AM/FM once or more to select radio
source (AM or FM)
or
On the remote control, press POWER to on,
then press RADIO once or more to select your
waveband: FM or AM
➜ Display shows: RADIO, radio station
frequency and waveband
2 Press and hold ∞ / § until the frequency in
the display starts running
➜ The radio automatically tunes to a station of
sufficient reception
3 Repeat step 2 if necessary until you find the
desired radio station
● To tune to a weak station, press ∞ / § briefly
and repeatedly until optimal reception is found
Storing preset radio stations
You can store up to 25 preset r adio stations in
the memory (15 FM and 10 AM).
Manual programming
1 Tune to your desired radio station (see Tuning
to radio stations)
2 Press PROG to store the station
➜ Display shows its preset number. PROG
flashes
3 Press PROG to confirm
➜ PROGdisappears
Helpful hints:
– If you store more than 15 FM stations or 10
AM stations, the new station will replace the 1st
preset station.
To listen to a preset station
● Use the Numeric Keypad (1-5) on the set
to select the desired preset station (1-5)
or
Press TUNING/PRESET 3/ 4 buttons
once or more until the desired preset station is
displayed
➜ Display shows the preset number briefly.
To improve radio reception
● For FM, extend and adjust the AC power cord
14
Page 15

Timer
TIMER
Set the timer period to activate a beeper alarm.
Setting the timer
1 On the set, press TIMER to activate
➜ 015 flashes. TIMER appears
2 Tu rn the TIMER control counter-/clockwise to
adjust your timer period (from 1 to 180
minutes)
➜ Display shows selected timer period
3 Press TIMER to confirm
➜ Timer period starts to count down. TIMER
flashes
To cancel the timer
Press TIMER during the countdown
➜ Display shows the clock time
English
15
Page 16

English
Specifications
Amplifier
Output power ...........................................2 x 2W RMS
Speakers ............................................................................ 4 Ω
signal-to-noise ratio ............................................. ≥ 60dB
Frequency response ..............................125Hz~16kHz
Disc player
Programmable tracks .................................................... 20
Frequency response ..............................80Hz~125kHz
signal-to-noise ......................................................... ≥ 50dB
Audio distortion ......................................................... 1.5%
Channel separation .............................≥ 30dB (1kHz)
Tuner
Frequency range
AM ........................................................... 520~1710 kHz
FM ............................................................ 87.5~108 MHz
Number of presets ........................................................ 25
GENERAL
Power .......................................................... AC120V/60Hz
Power consumption
Max. ......................................................................... 30W
Standby ................................................................. 1.5W
Dimension .... 300mmx67mmx230mm (W/H/D)
..................................... 11.8” x 2.64” x 9.05” (W/H/D)
Weight ............................................................. ............... .2kgs
4.4lbs
Philips reserves the right to make design
and specification changes for product
improvement without prior notice.
16
Page 17

Troubleshooting
WARNING
Under no circumstances should you try to repair the system yourself, as this will
invalidate the warranty. Do not open the system as there is a risk of electric shock.
If a fault occurs, first check the points listed below before taking the system for repair. If
you are unable to remedy a problem by following these hints, consult your dealer or
PHILIPS for help.
English
Problem
nocdor Errindication
No sound
The system does not react when buttons
are pressed.
Remote control does not work
Solution
✔ No disc inserted. Insert a suitable disc
✔ Replace/clean CD
✔ CD-R(W) is blank or the disc is not finalized.
Use a finalized CD-R(W)
✔ Moisture has condensed in the player. Remove
the disc and leave the player power-on until the
moisture evaporates.
✔ Check whether the set is connected securely.
✔ Make sure the set is not in the MUTE mode. If it
is, press MUTE to turn on the speaker.
✔ Check whether the volume on the set has been
set to the lowest level. If it has, turn up the
volume.
✔ CD-ROM disc inserted/CD contains non-audio
files. Use CD Audio discs only.
✔ Remove and reconnect the AC power plug and
switch on the system again.
✔ Remove the protective plastic tab before using
the remote control.
✔ Reduce the distance between the remote
control and the set.
✔ Replace the battery.
✔ Point the remote control directly towards the IR
sensor.
Radio reception is poor ✔ If the signal is too weak, adjust the antenna or
connect an external antenna for better
reception.
✔ Increase the distance between the set and a TV,
VCR or radiation source.
The Clock setting is erased
✔ Power has been interrupted or the power cord
has been disconnected. Reset the clock.
17
Page 18

18
 Loading...