

Page 1
AJ3160AJ3160
Clock Radio
Page 2

1
2
34
5
AJ3160AJ3160
Clock Radio
6
9
7
8
Page 3
1
2
34
5
AJ3160AJ3160
Clock Radio
0
!
@
Page 4

English
FUNTIONAL OVERVIEW
ALARM 2 - adjusts alarm time
1
2
RADIO ON/OFF -switches radio on/off
3
ALARM INDICTOR
4
REPEAT ALARM - LIGHT
- switches off the alarm for a 5 minute period
- switches display backlight on/off
5
ALARM OFF/ON - switches alarm on/off.
6 VOLUME - adjusts the sound level
7 BAND - select FM-MW (or LW) waveband
8 TUNING - tunes to radio stations
9
PULL-TIME SET - adjusts clock time
0
RADIO•ALARM•BUZZ - selects alarm mode
!
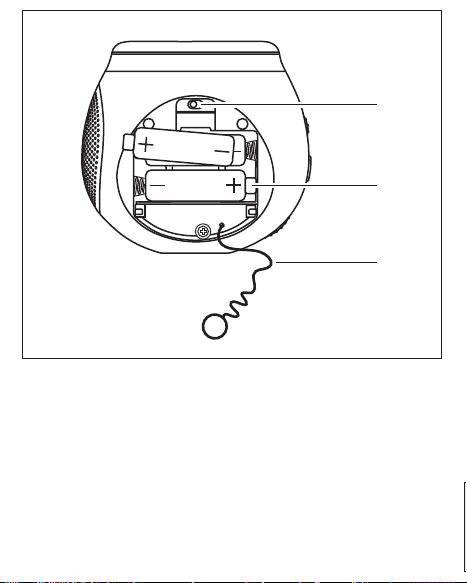
Battery compartment
@
Coil antenna - aerial for FM reception
INSTALLING BATTERIES (not included)
1
Open the battery door and insert 3 batteries (preferably alkaline) type R6, UM3
or AA as indicated in the compartment.
A : One battery for clock
B : Two batteries for radio
2
Pull the FM coil antenna out through the slot in the door.
3
Close the door.
•
Remove the batteries from the set if they are exhausted or not be used for a
long time.
Batteries contain chemical substances, so they should be disposed of
properly.
Page 5

SETTING THE CLOCK
1.
Pull out PULL-TIME SET and turn it to set the clock. Always push PULLTIME SET back after setting the clock.
2.
To read the time in the dark, press REPEAT ALARM - LIGHT. The clock lights
up as long as REPEAT ALARM -
RADIO OPERATION
1
Press RADIO ON/OFF to switch on the radio.
2
Adjust the BAND switch to select your waveband.
3
Use TUNING to find your radio station
To improve reception:
For FM, extend and position the coil antenna fully to obtain optimum reception.
AM (MW or LW)
For
adjusting the position of your clock radio.
4
Adjust the sound using VOLUME
5
Press RADIO ON/OFF to switch off the radio.
USING THE ALARM
1
Set the
™ Important! If you want the radio alarm to wake you up, FIRST CHECK if you
have tuned to a station and adjusted the volume loud enough.
2
Turn
ALARM 2
minutes.)
3
Slide ALARM OFF/ON to switch on the alarm.
™ The alarm indicator is shown on the top
, the set is provided with a built-in aerial. Direct the aerial by
RADIO•ALARM•BUZZ
ring anti-clockwise to set the alarm time (one click of the dial is 10
LIGHT is pressed.
.
.
switch (at the bottom) to RADIO or BUZZ.
Page 6

• The radio or buzzer alarm sounds at the preset time. The alarm stops automatically
after 50 minutes.
• Buzz option - increases its beep tone frequency.
4
To doze for a few more minutes, press
and sounds again after about 5 minutes.
5
To stop the alarm, push ALARM OFF/ONto the OFF position.
MAINTENANCE
•
Do not expose the set to humidity, rain, sand or excessive heat caused by
heating equipment or direct sunlight.
•
To clean your set, use a dry cloth or chamois leather. Do not use cleaning products, which contain benzene, thinner, etc. as these may harm the housing.
ENVIROMENTAL INFORMATION
We have reduced the packaging to its minimum using only paper and cardboard.
Your set consists of materials which can be recycled if disassembled by a
specialized company. Please observe local regulations on the disposal of
packing materials and old equipment.
TROUBLESHOOTING
If a fault occurs, first check the points listed below before taking the set for repair.
If you are unable to remedy a problem by following these hints, consult your dealer or
service centre.
REPEAT ALARM - LIGHT
. The alarm stops
WARNING: Under no circumstances should you try to repair the set yourself, as this
will invalidate the guarantee. Do not open the set as there is a risk of
Problem
–
• Remedy
electric shock!
Possible
Page 7

No sound/power
– Volume not adjusted
• Adjust volume
– Batteries exhausted/wrong battery polarity
• Insert fresh batteries/correctly.
– Radio switches off by itself after 80 minutes.
• This is not a problem, but the power-saving mode. Press the RADIO ON/OFFbutton
again if you want to continue listening to the radio.
Occasional cracking sound during FM broadcast
– Weak signal
• Extend pigtail fully
Occasional cracking/hiss sound during MW (or LW) broadcast
– Electrical interference from TV, computer, fluorescent lamps, mobile phones, etc.
• Move set away from other electrical equipment.
Alarm does not function
– ALARM OFF/ON not set
• Set ALARM OFF/ON to ON.
– Radio not tuned to a radio station
• Tune to a station.
– Volume too low for radio
• Increase the volume.–
– No batteries for radio/alarm is installed
• Insert all batteries
This product complies with the radio interference requirements of the
European Union.
The typeplate and production number are located inside the battery
compartment.
 Loading...