

Page 1
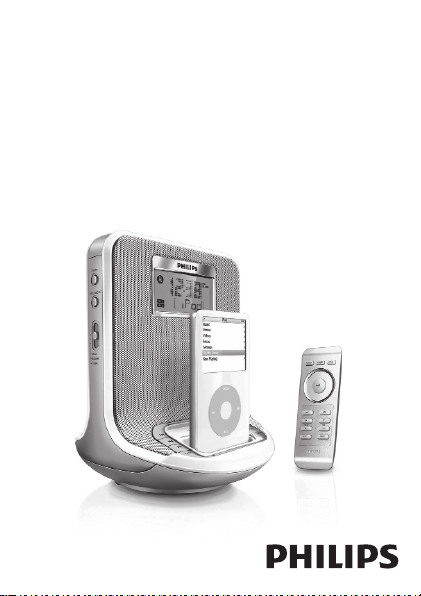
Docking Entertainment System AJ301D
Register your product and get support at
www.philips.com/welcome
User manual
Page 2
DOCK
@
0
7
1
2
3
4
8
9
2
7
5
#
1
&
*
(
$
^
3
POWER
PRESET VOL
MUTE
SLEEP
TUNER
AUX
6
5
!
8
4
6
)
%
1
Page 3
2
3
4
Page 4

English
Congratulations on your purchase, and welcome to Philips! To fully
benefit from the support that Philips offers, register your product at
www.philips.com/welcome.
SUPPLIED ACCESSORIES
– 1 X certified AC/DC adapter: OH-1018A0902000U-SAA
(Input: 100-240V ~ 50/60Hz 650mA, Output: 9V 2A)
– Docking kit
• 1 X Apple iPod dock (pre-installed with AJ301D);
• dock adapters (4 adapters for different iPod types)
– 1 X AUX-IN cable
CONTROLS
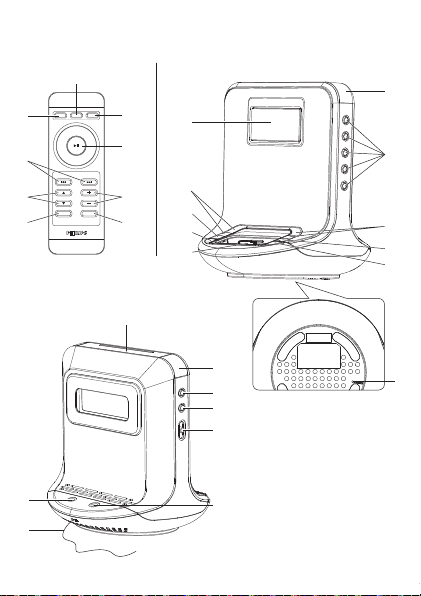
(See 1)
1
POWER
– switches the system on or to standby mode
– stops active alarm for 24 hours
– deactivates the sleep function
2
¡1 / 2™
– adjust clock/alarm time
– selects previous/next tracks in the dock mode
– fast searches forward/backward in the dock mode
3
PRESET 1-5
– stores, recalls and shows radio station
4
SLEEP
– activates the sleep function
–
deactivates the sleep function
5
DOCK
– selects dock mode for Apple iPod
6
TUNER/ AUX
– selects FM radio mode
– selects AUX mode
7
2;
– starts/pauses playback in the dock mode
– selects 12 hour or 24 hour mode
Page 5

8
VOL+/-
–
adjusts the sound level
9
MUTE
– switches playback sound off and on.
0
Display
–
shows clock/alarm times and status of the set
!
Dock connector (30 pins)
–
connects iPod player
@
ALM 2
–
activates/confirm ALARM 2 time setting
– displays ALARM 2 time
– switches off ALARM 2 time
#
REPEAT
ALARM /
BRIGHTNESS CONTROL
– switches off the alarm for a 9 minute period
– changes the brightness of the display illumination
$
POWER jack
–
socket for AC/DC 9V adapter
%
Pigtail – improves FM reception
^
ALM
1
–
activates/confirm ALARM 1 time setting
– displays ALARM 1 time
– switches off ALARM 1 time
&
TIME SET
– activates/confirm clock time/date setting
*
(Wake-up mode) DOCK•BUZZER •TUNER
– selects alarm mode: dock, buzzer or radio
(
AUX IN jack (3.5 mm)
–
connects to external audio source
)
RESET
– clears clock time setting
POWER SUPPLY
Mains adapter
1
Connect the mains adapter to the set's DC 9V socket and to the power socket.
Helpful hints: To avoid damage to the set, use only the adapter supplied!
The type plate is located on the bottom of the set.
Page 6
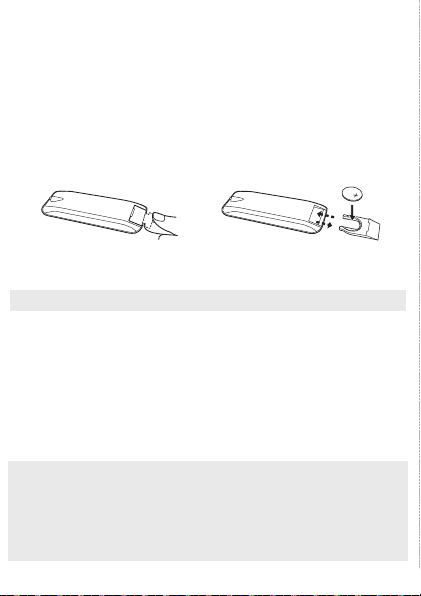
Remote control
Important!
• Before using the remote control, remove the insulation plastic tab as
shown in the figure.
• If the remote control does not function correctly or the operating
range is reduced, replace the battery with a new (CR2025) type
battery.
1.
Pull the battery tray out as shown in the figure.
2.
Replace a new battery according to polarity indication, and fully insert the
battery tray back to the original position.
Batteries contain chemical substances, so they should be disposed of
properly.
SELF-POWERED BACK-UP
The self-powered back-up conveniently allows your preset stations, alarm and clock
time settings to be stored for up to 10 minutes when there is a power interruption
e.g. AC power failure. The complete clock radio and backlight illumination will be
switched off.
If power supply returns after 10 minutes and the display shows:
• clock time blinking - indicates you need to re-adjust the clock time.
– starts/pauses playback in the dock mode
– selects 12 hour or 24 hour mode
2
3
1
CAUTION
High voltage! Do not open.You run the risk of getting an electric
shock. The machine does not contain any user-serviceable parts.
Modification of the product could result in hazardous radiation of
EMC or other unsafe operation.
Page 7

BASIC OPERATION.
Switching on the system
• Press POWER.
™
The system will switch to the last selected source.
• Press TUNER/AUX or DOCK.
™
The system will switch to the selected source.
Switching the system to standby mode
• In any source mode, press POWER.
Switching off the volume temporarily
Press MUTE on the remote control to stop sound play-back instantly.
™
Playback will continue without sound and the display shows MUTE .
• To start sound playback you can:
– press MUTE again;
– adjust the volume controls;
– change source.
Illumination brightness
Press REPEAT
ALARM /
BRIGHTNESS CONTROL once or more.
•
The brightness of the display can be adjusted:
High
� Low � Off � High
.
SETTING THE CLOCK AND DATE
1. In any mode, press and hold TIME SET until clock digits flashes.
2.
Press 2;to select 12 Hours/ 24 Hours mode.
3.
Hold down or press ¡1 / 2™ repeatedly to set and adjust the hours.
4. Press TIME SET
to confirm.
™
The clock digits for the minutes flash.
5.
Repeat the steps 3 - 4 until you complete all the other settings for minutes,
year, month and days.
Page 8

TUNER
1
Press
TUNER/AUX
once to switch on the radio (FM only).
™
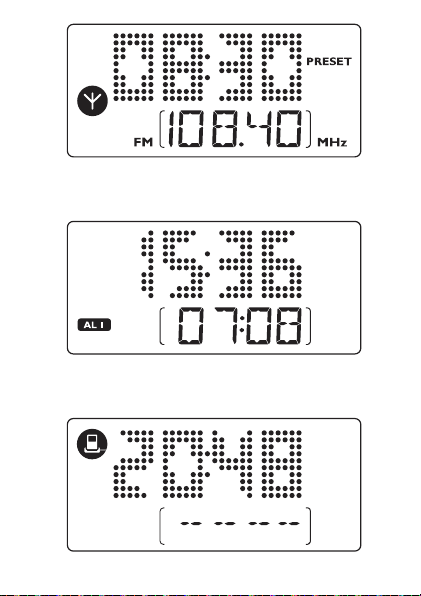
Display shows the radio frequency of the last selected waveband. Your pre-
set station is also shown if you are listening to a preset.
(
See 2
)
2
Adjust the sound using VOL+/-
.
3 To select pres et stations, press the respective PRESET button (1-5).
TUNING TO RADIO STATIONS
1 Press and hold
¡1 / 2™
until the frequency in the display starts changing.
™Display shows “Scrh” during automatic tuning.
™After the system tunes to a station of sufficient reception, display shows its frequency.
• To tune to a weak station, press
¡1 / 2™
briefly and repeatedly until an
optimal reception is found.
To improve reception (FM):
Extend and position the pigtail fully to obtain optimum reception.
STORING AND USING PRESET STATIONS
You can store up to 5 FM radio stations in the memory.
1 Tune to your desired station (see TUNING TO RADIO STATIONS).
2 To store a preset, hold down briefly on a PRESET button 1-5 until you hear a dou-
ble beep.
™
Display shows the preset number of your station.
3 Repea t steps 1 and 2 to store yo ur other stations.
• You can overwrite a preset station by storing another frequency in its place.
4
Press a
PRESET button 1-5 (or PRESET 4 / 3 on the remote control) to listen to
a preset station.
™
To display clock time, press 2;on the set.
USING THE ALARM
GENERAL
Two different alarm times can be set. This can be useful when you need to be
woken up at a different time e.g. during the week and at the weekend, and you
can set different wake-up modes:
• tuner mode.
• buzzer mode. The gentle wake buzzer alarm increases its be ep tone frequency within seconds.
• dock mode
Page 9

SETTING THE ALARM TIM E
(See 3)
1 In any mode, press and hold ALM1 or ALM2 for two seconds.
™
ALM1 / ALM2
icon and the hour digits flash. And the icon for the current
alarm mode also flashes.
2
Hold down or press ¡1 / 2™ repeatedly to set and adjust the hours.
3 Press ALM1 or ALM2
to confirm.
™
ALM1 / ALM2
icon and the minutes digits flash. And the icon for the cur-
rent alarm mode also flashes.
4
Hold down or press ¡1 / 2™ repeatedly to set and adjust the mintues.
5 Press ALM1 or ALM2
to confirm.
SETTING THE ALARM MOD E
1 Press POWER to switch to standby mode.
2
Select your choice of alarm mode: either docked player, buzzer, or radio by
using the DOCK
•BUZZER •TUNER slider.
•
At the set alarm time, the docked player or radio or buzzer will switch on
automatically.
Helpful hints:
–
If you have selected TUNER alarm mode, make sure you have properly tuned to a
station before turning off the set.
–
If you have se lected DOCK alarm mode, make sure you have docked the compatible
player, or the buzzer mode will be selected automatically.
–
To check the alarm time setting for ALM1 or ALM2, press ALM1 or ALM2.
SWITCHING OFF THE ALARM
There are three ways of switching off the alarm. Unless you cancel the alarm
completely, the 24-hour ALARM RESET will be automatically selected after 59
minutes from the time your alarm first goes off.
24 HOUR ALARM RESET
If you want the alarm mode to be stopped immediately but also wish to retain
the same alarm setting for the following day:
•
Press
POWER
.
Page 10

REPEAT ALARM
This repeats your alarm call at 9 minute intervals.
•
During the alarm call, press REPEAT
ALARM /
BRIGHTNESS CONTROL..
™
Display shows
ALM1
or
ALM2
flashing during a repeat alarm.
•
Repeat if desired (up to a maximum of 6 times).
CANCELING THE ALARM COMPLETELY
•
Press
ALM
1 or
ALM
2 button once or more until
ALM1
or
ALM2
disappears.
DOCK (See 4)
By connecting the iPod to your AJ301D, you can listen to the sound of the
docked player through the powerful speakers of the Hi-Fi system.
COMPATIBLE PORTABLE PLAYER
•
Apple iPod models with 30-pin dock connector as follows:
Nano 1st /2nd/3rd generation, iPod 5th generation (video), iPod touch and
iPod classic.
DOCK ADAPTERS
Before plugging your player in the dock, snap the suitable dock adaptor into the
dock to provide a snug fit for the player to be docked.
Selecting the correct dock adaptor
• 4 iPod dock adaptors are included. Each adaptor has indication to match
different iPod types.
ENVIROMENTAL INFORMATION
All unnecessary packaging material has been omitted. The packaging can be
easily separated into three materials: cardboard, polystyrene and plastic.
Your set consists of materials which can be recycled if disassembled by a specialized company. Please observe the local
regulations regarding the disposal of packaging, dead batteries
and old equipment.
Page 11

PLAYING APPLE iPod USING AJ301D
1
Snap the compatible iPod into the dock connector.
2
Press DOCK to switch on the dock mode.
3
The connected player will play automatically.
Notes:
–
In dock mode, if no player is docked for 15 minutes, AJ301D will come to standby.
–
By using the buttons ( 2;, ¡1, 2™ and VOLUME ) on the AJ301D and its
remote control, the following disc playback features are available: Play/Pause,
selecting next/previous track, fast forwarding/rewinding and changing volume.
–
The buttons ( 2; , ¡1 , 2™ and VOLUME ) on the AJ301D and its remote con-
trol can work only with playback of the audio contents stored on the docked player.
CHARGING iPod BATTERY USING THE DOCK
Docking your iPod to AJ301D, you can charge the iPod in the standby mode and
power-on mode of AJ301D.
SLEEP
This set has a built-in sleep timer, which enables the radio to be automatically
switched off after a set period of time. There are five sleep time options.
Setting and switching off SLEEP
1 In the active mode,
set your timer by pressing
SLEEP
repeatedly until the desired
timer option appears.
™
Selections are follows (time in minute):
120=90=60=30=15=OFF=120
2
The set will turn off automatically at the selected time.
3
To cancel sleep, press either:
–
POWER
–
SLEEP
once or more until
SLEEP
disappears from the display.
Page 12

Reset
Should your set receive external interference e.g. static electricity from carpets, thunderstorms, etc. RESET allows you to clear all previous settings and start up again.
• Use a ballpoint pen to press the RESET hole found on the bottom of the set.
CONNECTING AN EXTERNAL DEVIC E
You can listen to the sound of the connected external device through your
AJ301D’s speakers.
1
Press
TUNER/AUX
twice to select AUX mode.
2
Use the supplied AUX-IN cable to connect AJ301D’s AUX IN jack to an AUDIO
OUT or headphone jack on an external equipment (such as CD player, or VCR).
MAINTENANCE & SAFETY
•
Install the unit near the AC outlet and where the AC power plug can be easily
reached.
•
The apparatus shall not be exposed to dripping or splashing.
•
Do not expose the set to humidity, rain, sand or excessive heat caused by
heating equipment or direct sunlight.
•
To clean your set, use a soft damp cloth or chamois leather. Do not use cleaning
products, which contain benzene, t hinner, etc. as these may harm the housing.
•
Where the MAINS plug or an appliance coupler is used as the disconnect
device, the disconnet device shall remain readily operable.
•
Batteries (battery pack or batteries installed) shall not be exposed to
excessive heat such as sunshine, fire or the like.
SPECIFICATIONS
Power Consumption ........................................................................................24 W
Output power .....................................................................................2 x 6 W RMS
Dimensions (w x h x d) .........................................................161 x 191 x 164 (mm)
Weight..........................................................................................................1.34 kg
4
Press a
PRESET button 1-5 (or PRESET 4 / 3 on the remote control) to listen to
a preset station.
™
To display clock time, press 2;on the set.
USING THE ALARM
GENERAL
Two different alarm times can be set. This can be useful when you need to be
woken up at a different time e.g. during the week and at the weekend, and you
can set different wake-up modes:
• tuner mode.
• buzzer mode. The gentle wake buzzer alarm increases its be ep tone frequency within seconds.
• dock mode
Page 13

TROUBLESHOOTING
If a fault occurs, first check the points listed below before taking the set for repair.
If you are unable to remedy a problem by following these hints, consult your dealer or
service centre.
WARNING: Under no circumstances should you try to repair the set yourself, as this
will invalidate the g uarantee. Do not open the set as there is a risk of
electric shock!
No sound
– Volume not adjusted
• Adjust the volume
– The set is muted.
• Press”MUTE” on the remote control to active playback sound.
Display error / no reaction to any controls
– Electrical malfunction
•
Unplug the power cord, then re-plug.
Intermittent crackling sound during FM reception
– Weak signal
•
Extend and position the pigtail aerial
The alarm does not function
–
Alarm time/ mode not set
• See SETTING THE ALARM.
– Volume too low for radio
• Increase the volume
Dock operation
–
The menu navigation or photo playback of the docked player cannot be carried out through the buttons on AJ301D or its remote control.
• The buttons on AJ301D and its remote control c an control playback of audio con-
tents only. To navigate the menu, use t he controls on the docked player.
–
Some buttons on AJ301D and its remote control have no function.
• The buttons ( 2;, ¡1, 2™ and VOLUME ) function only.
the same alarm setting for the following day:
•
Press
POWER
.
Page 14
and old equipment.
Page 15

Page 16

Docking Entertainment System
Meet Philips at the Internet
http://www.philips.com
English
- AJ301D_UM_79_V3.1_1035
 Loading...