

Page 1
Register your product and get support at
www.philips.com/welcome
EN User manual
AJ110
Page 2
English
1 Important
Notice
Any changes or modications made to this device that are not
expressly approved by Philips Consumer Lifestyle may void the user’s
authority to operate the equipment .
Recycling
Your product is designed and manufactured with high
quali ty materials and component s, which can be rec ycled
and reused.
When you see the crossed- out wheel bin symbol at tached
to a product , it means the product is covered by the
European Direc tive 2002 /96/EC:
Never dispose of your product with other household
waste. Please inform yourself about the local rules on the separate
collection of elec trical and electronic products . The correct disposal
of your old product helps prevent potentially negative consequences
on the environment and human health.
Your product contains batteries covered by the European Directive
2006/66/EC, which cannot be disposed of with normal household
waste.
When you see the crossed- out wheel bin symbol with the
chemical symbol ‘Pb’, it means that t he bat ter ies comply
with t he requirement set by the directive for lead:
Page 3

Please inform yourself abou t the local rules on separate collec tion of
batteries. The correct disposal of batte ries helps prevent potentially
negative consequences on the environment and human health.
Environment al information
All unnecessar y packaging has been omitted. We have tried to make
the packaging eas y to separate into three mater ials: cardboard (box),
polystyrene foam (buffer) and polyethylene (bags, protective foam
sheet.)
Your system consists of materials which can be r ecycled and reused
if disassembled by a specialized company. Please observe the local
regulations regarding the disposal of packaging materials, exhaus ted
batteries and old equipment.
Norge
Typeskilt nnes på apparatens underside.
Observer : Nettbryteren er sekundert innkoplet. Den innebygde
netdelen er derfor ikke frakoplet nettet så lenge apparatet er tilsluttet
nettkontakten.
For å redusere faren for brann eller elektrisk støt, skal apparatet ikke
utsettes for regn eller fuktighet.
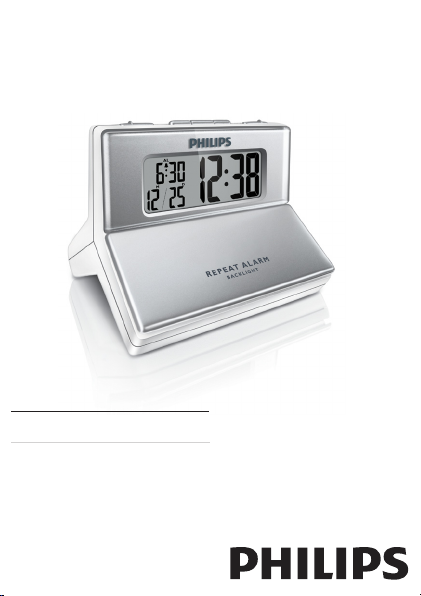
2 Your AJ110
Congratulations on your purchase, and welcome to Philips! To fully
benet from the support that Philips offers, register your product at
www.philips.com/welcome.
Introduction
With this unit, you can:
know the time/date•
set an alarm timer to wake you up•
Page 4

What’s in the box
b
c
d
e
f
g
a
Check and identify the contents of your package:
Main unit•
User manual•
Overview of the main unit
a Function selector
Switch to nor mal mode.•
Set alarm/clock /calendar.•
Page 5

b H R· M ON T H
c M IN· DATE
d 12/24·YEAR
e ON·OFF
f Display panel
g REPE AT ALARM/BACKLIGHT
Set the hour/month .•
Set the minute/date. •
Select 12/24 hour for mat .•
Set the year.•
Turn on/of f the alarm timer.•
Show the time /date/alar m infor mation.•
Repeat the alarm .•
Turn on the backlight .•
3 Get started
Caution
Use of controls or adjustm ents or per for mance of procedures other •
than herei n may result in hazardous radiation exposure or othe r
unsafe oper atio n.
Always follow the instructions in this chapter in sequence.
If you contact Philips, you will be asked for the model and serial number
of this apparatus. The model number and serial number are on the
bottom of the apparatus. Write the numbers here:
Model No. __________________________
Serial No. ___________________________
Page 6

Install battery
Caution
Risk of explosion ! Keep batte ries away fr om heat, sunshine or re . •
Never d iscard bat ter ies in re.
Risk of product damage ! When the appara tus is not used for long •
periods, remove the battery.
1 Open the bat ter y compar tment.
2 Insert 1 A A bat ter y (not supplied) with correc t polarit y (+/-)
as indicated.
3 Close the bat ter y compar tment.
Note
Bat teries contain chemical substances , so they shoul d be disposed •
of prop erl y.
Page 7

Set time
1 Adjus t the function selec tor to .
2 Press H R· M O NT H to set the hour.
3 Press MIN· DAT E to set the minute.
4 Adjus t the function selec tor to .
Time digits begin to blink. »
To select 12 hour or 24 hour format, pr ess • 12/24·YEAR.
Set calendar
1 Adjus t the function selec tor to CALENDAR .
2 Press 12/24·YEAR to set the year.
3 Press H R· M O NT H to set the month.
4 Press MIN· DAT E to set the date.
5 Adjus t the function selec tor to .
Turn on the backlight
1 In dar k environment, press REPEAT ALARM/BACKLIGHT to
turn on the backlight.
4 Set the alarm timer
1 Befor e you star t, e nsur e that t he time is set correctly.
2 Adjus t the function selec tor to .
3 Press H R· M O NT H to set the hour.
4 Press MIN· DAT E to set the minute.
5 Adjus t the function selec tor to .
The alarm time digits begin to blink. »
Page 8

Turn on/off the alarm timer
Note
Ensur e that you alr eady set the alarm successfully. •
1 Adjus t ON· OF F to ON or OFF to turn on or off the alarm
ti me r.
If the alarm timer is turned on, » appears.
If the alarm timer is turned off, » disappears.
Repeat alarm
1 When the alarm sounds, press REPEAT ALARM/BACKLIGHT.
The alarm repeats at 5-minute intervals. »
Note
You can repeat th e alar m for up to 3 times. •
5 Product information
Note
Product inform ation is subject to change without prior notice. •
Page 9

Specications
General information
Power 1xAA battery
Oper ation Power Consumption 30 uW
Dimensions
- Main Unit ( W x H x D) 82 x 66 x 75 mm
Weight
- With Packing
- Main Unit
127 g
87 g
6 Troubleshooting
Warning
Never r emove the ca sing of t his apparatus. •
To keep the warranty valid, never try to repair the system yourself.
If you encounter problems when using this apparatus, check the
following points before requesting service. If the problem remains
unsolved, go to the Philips web site (www.philips.com/welcome). When
you contact Philips, ensure that the apparatus is nearby and the model
number and serial number are available.
No power
Ensur e that the bat ter y is installed properly. •
Replace the exhaus ted battery. •
Page 10

Timer does not work
Set the clock correctly. •
Switch on the timer. •
Clock/timer setting erased
Replace the exhaus ted battery. •
Reset t he clock/ timer. •
Page 11

© 2009 Koninklijke Philips Electronics N.V.
All rights reserved.
AJ110_12_UM_V1.0
 Loading...