

Page 1
Agilent Heartstream FR2
Agilent Technologies
M3860A, M3861A
Page 2

User’s Guide
Agilent M3860A, M3861A
Heartstream FR2
Semi-Automatic External Defibrillator (AED)
Page 3
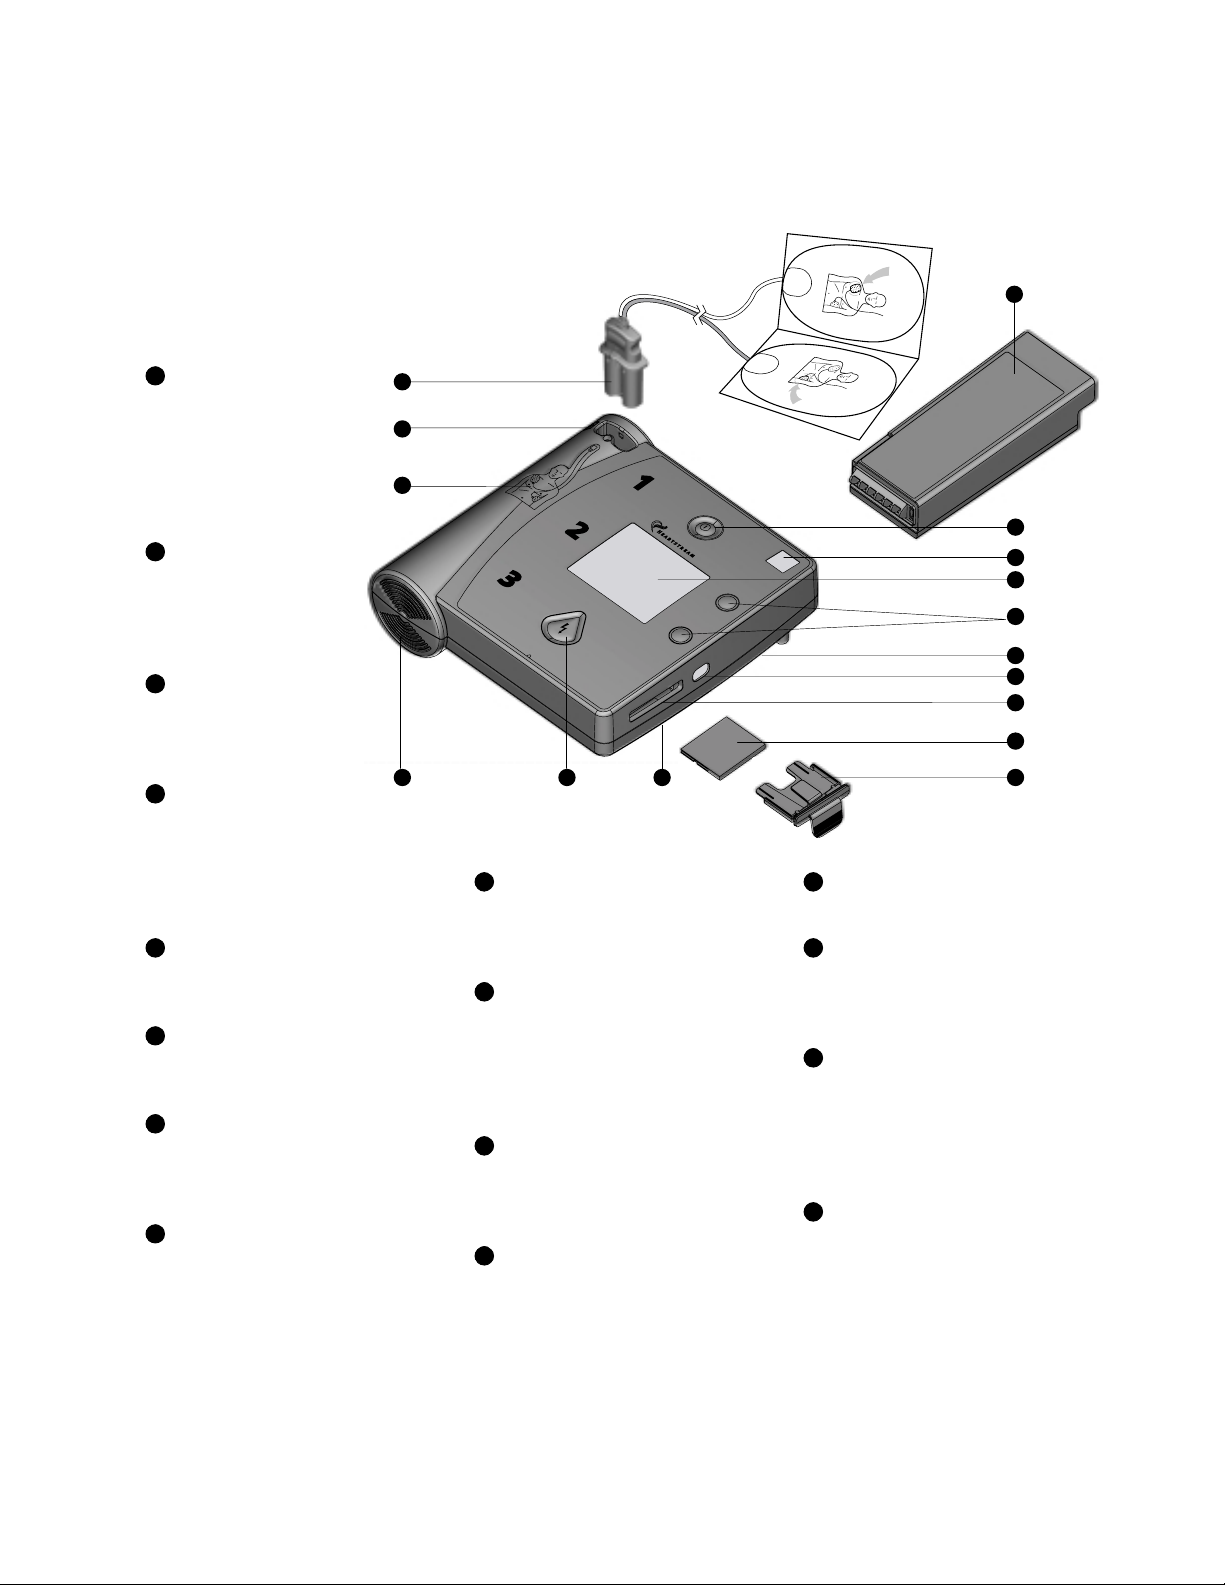
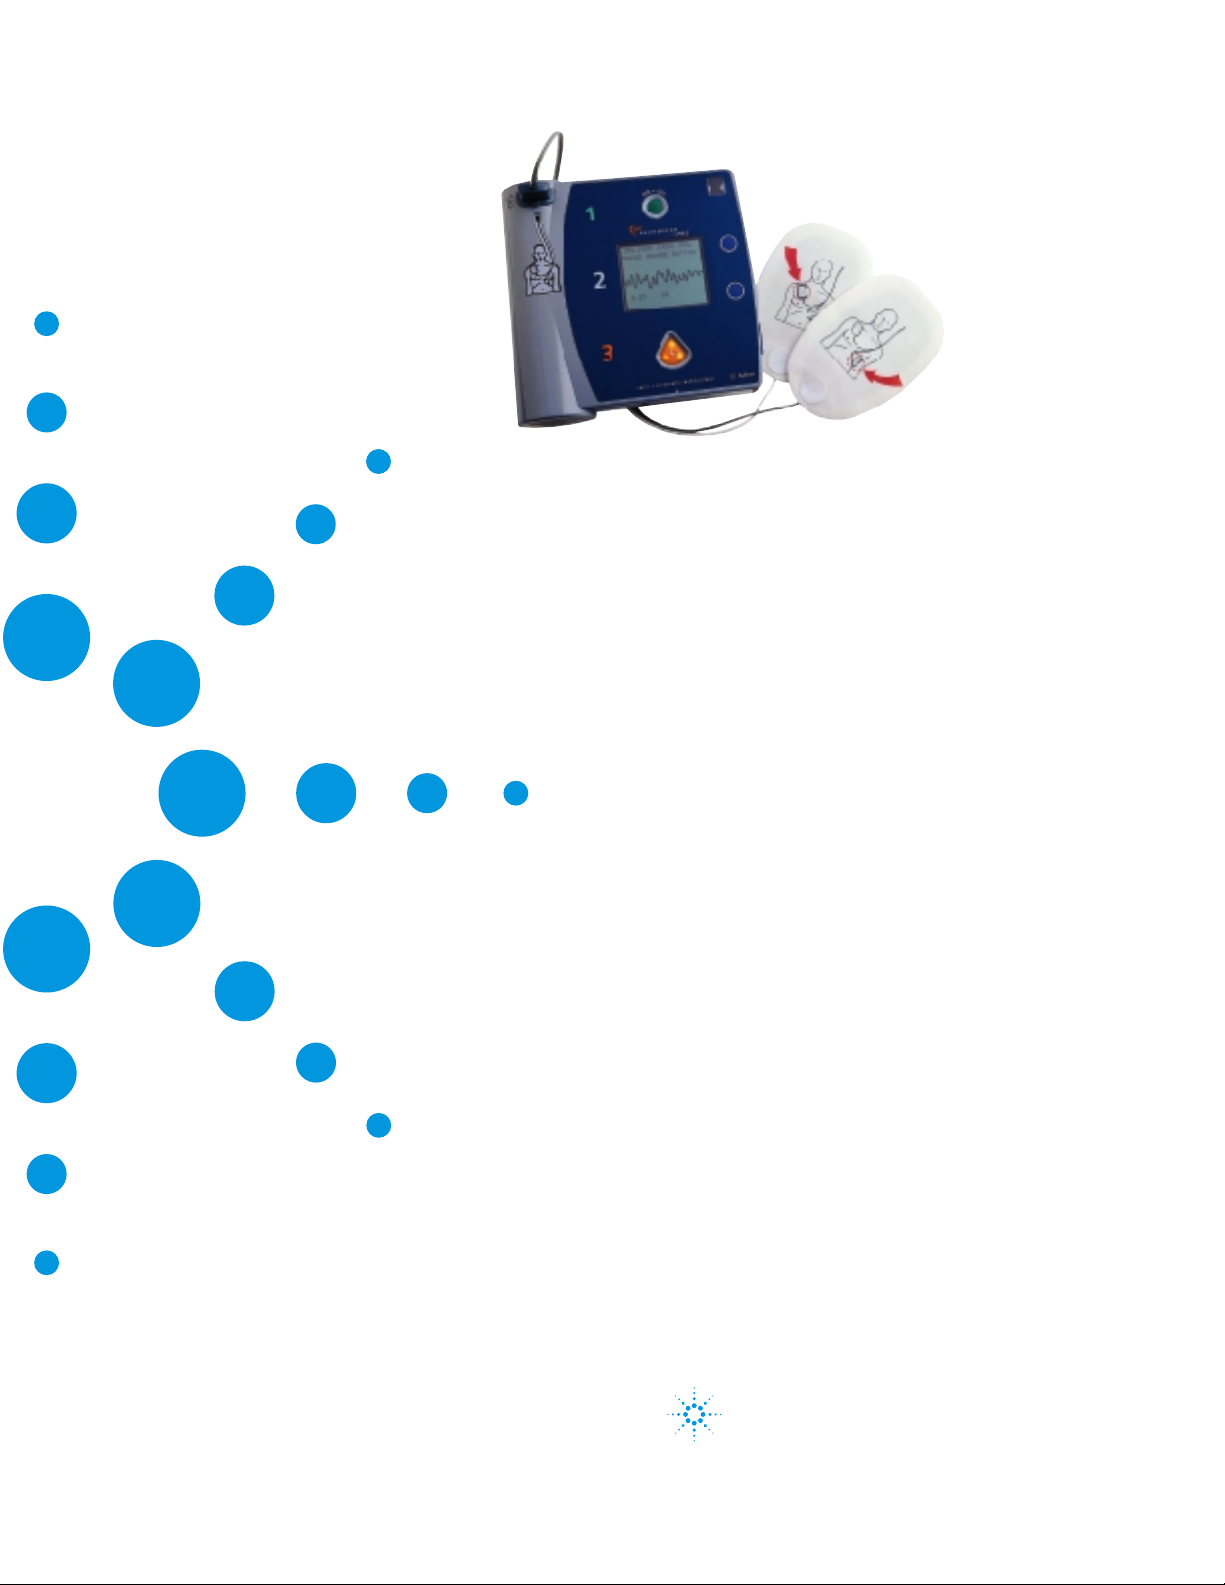
The HEARTSTREAM FR2
AED
Clockwise from top
right.
#
Battery. Disposable
P
battery pack used to
power the H
FR2. (Check local
EARTSTREAM
O
regulations for disposal
and recycling
N
requirements.)
$
On/Off button. Turns
on the FR2 and starts
voice and screen
prompts. Second press
turns off the FR2.
%
Status Indicator.
Shows you the readiness
status of the
EARTSTREAM FR2.
H
&
Display screen.
M
Displays text prompts
and incident data. The
EARTSTREAM FR2
H
M3860A screen also displays the
patient’s ECG.
'
Option buttons. Adjust the
contrast of the screen display and
control special functions.
(
Beeper port. Broadcasts alert
beeps when required. It is located
under the right edge of the FR2.
)
Infrared (IR) communications port.
A special lens, or “eye,” used to
transfer data directly to or from
another device.
*
Data card port. Receptacle for
data card tray.
L
+
Data card (optional). Used to
K
store and review information about
the incident, including ECG and
optional voice recording.
,
Data card tray. Special sleeve
that holds the data card and fits
into the data card port to help seal
the FR2 against fluids. The tray
should be kept installed in the FR2
even if no data card is used.
-
Microphone. Used optionally to
record surrounding audio during an
incident. It is located under the
right edge of the FR2.
.
Shock button. Controls shock
delivery. The button flashes when
EARTSTREAM FR2 is ready to
the H
deliver a shock.
A
B
C
D
E
F
G
H
I
J
/
Speaker. Amplifies voice
prompts during use of the FR2.
0
Pads placement diagram.
Illustrates correct placement of
pads. Diagrams are also shown on
the back of the defibrillation pads.
1
Defibrillator pads connector port.
Receptacle for connector of the
defibrillation pads cable. An
adjacent LED light flashes to show
socket location and is covered when
connector is inserted.
2
Defibrillator pads assembly. Self-
adhesive pads with attached cable
and connector.
Page 4
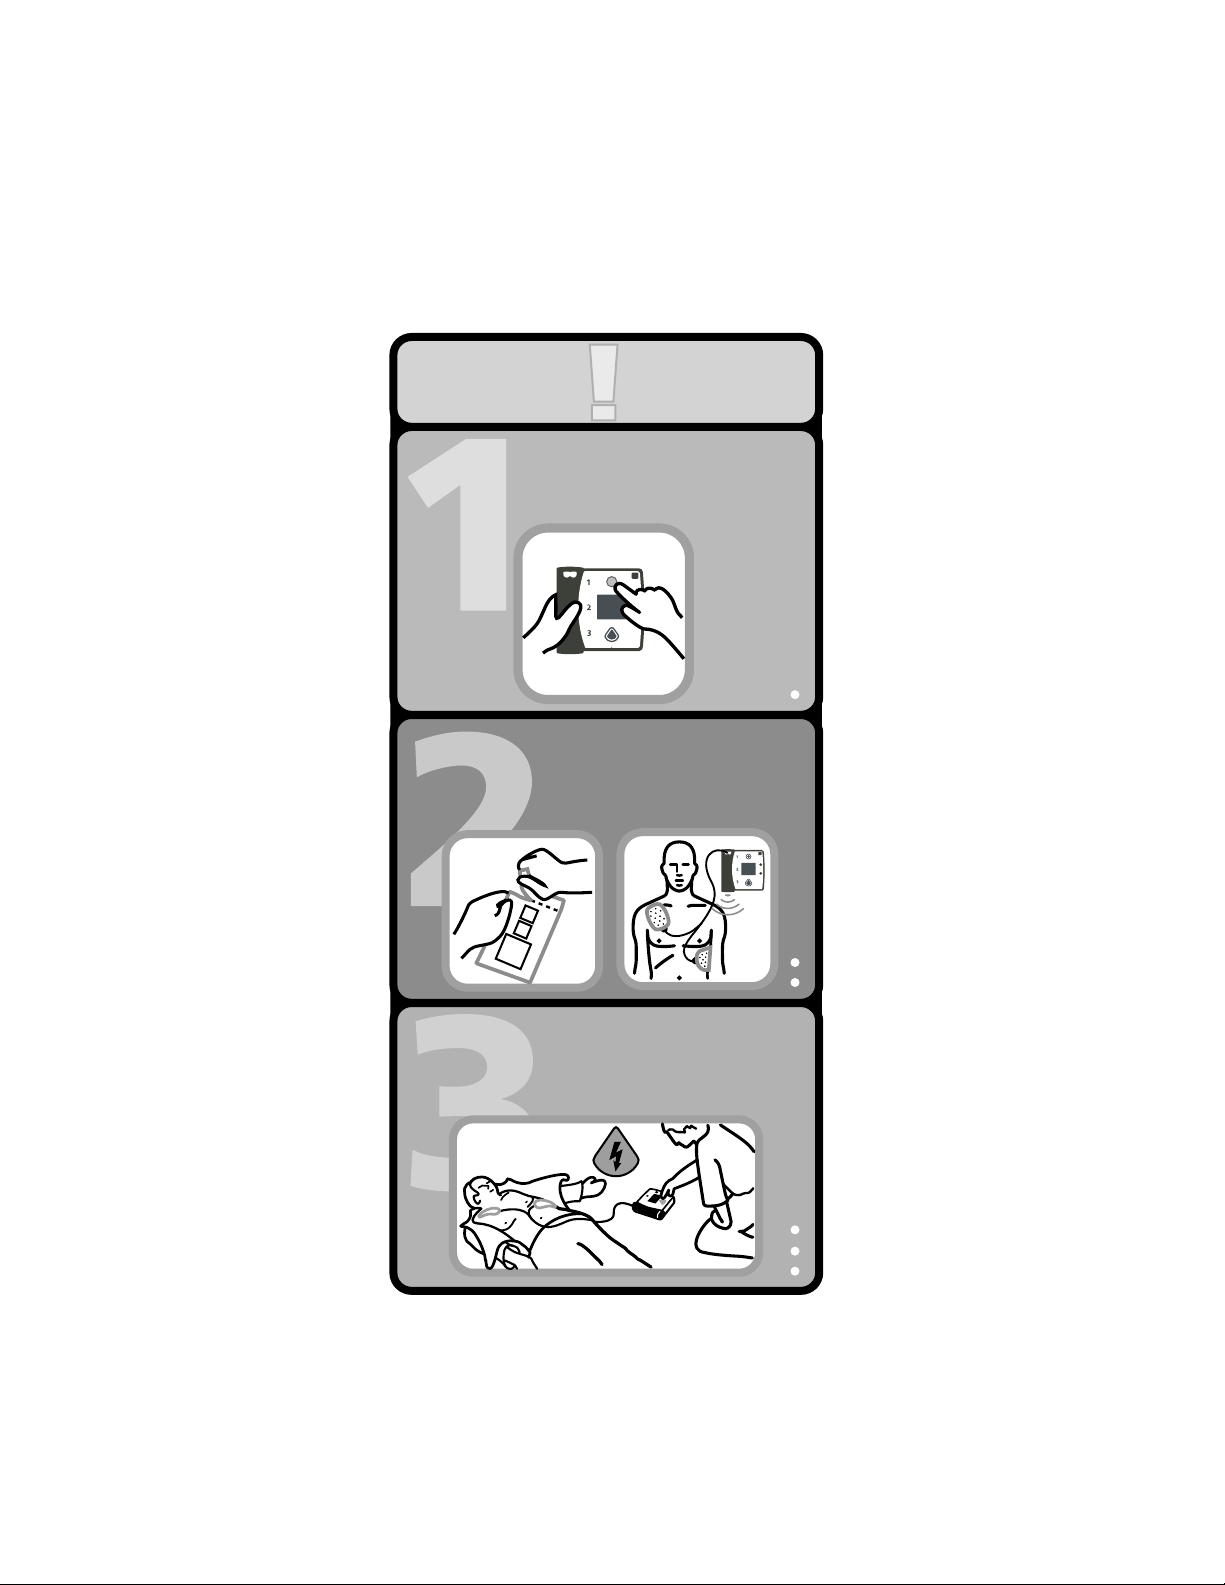
HEARTSTREAM FR2 AED
QUICK REFERENCE GUIDE
PATIENT IS UNRESPONSIVE,
NOT BREATHING, WITHOUT A PULSE
TURN ON
FOLLOW
PROMPTS
PRESS SHOCK BUTTON
IF INSTRUCTED
Page 5

Notice
About This Edition
The information in this guide
applies to the Agilent Technologies
models M3860A and M3861A
EARTSTREAM FR2 semi-automatic
H
external defibrillator. This
information is subject to change
without notice.
Agilent Technologies shall not be
liable for errors contained herein
or for incidental or consequential
damages in connection with the
furnishing, performance, or use of
this material.
Edition History
Edition 5
Publication date: September 2000
Publication number: M3860-91900
Assembly number: 011120-0005
Printed in the U.S.A.
Agilent Technologies, Inc.
Copyright
Copyright © 2000
Agilent Technologies
Heartstream Operation
2401 Fourth Avenue, Suite 500
Seattle, WA 98121, USA
(206) 664-5000
This document may not be
photocopied, reproduced, or
translated to another language
without prior written consent of
Agilent Technologies.
Authorized
EU Representative:
Agilent Technologies
Deutschland GmbH
Health Care Solutions Group
Herrenberg Strasse, 130
D 71034 Boeblingen, Germany
(+49) 7031-14-5151
CAUTION
FEDERAL LAW (USA) RESTRICTS
THIS DEVICE TO SALE BY OR ON
THE ORDER OF A PHYSICIAN.
EARTSTREAM FR2 is designed
The H
to be used only with Agilent
Technologies-approved accessories.
EARTSTREAM FR2 will perform
The H
improperly if non-approved
accessories are used.
United States
Agilent Technologies, Inc.
Healthcare Solutions Group
Heartstream Operation
2401 Fourth Avenue, Suite 500
Seattle, Washington 98121-1436
(206) 664-5000
1-800-263-3342
Canada:
Agilent Technologies, Inc.
5150 Spectrum Way
Mississauga, Ontario L4W 5G1
1-800-291-6743
Europe, Middle East and Africa:
Agilent Technologies
Deutschland GmbH
Healthcare Solutions Group
Sales & Marketing Center
Herrenberg Strasse, 130
D 71034 Boeblingen, Germany
(+49) 7031-14-5151
Australia:
Agilent Technologies Australia Ltd.
(A.C.N. 004 394 763)
1800 033 397
Latin America:
Agilent Technologies Latin America
Montañeses 2140
(1428) Capital Federal
Bs. As, Argentina
54-11-4787-7257
Asia Pacific Headquarters:
Agilent Technologies Asia
Pacific Ltd.
24/F Cityplaza One
1111 King’s Road, Taikoo Shing
Hong Kong
(+852) 2599 7777
www.agilent.com/healthcare/heart
Page 6

Contents
1 Introduction to the HEARTSTREAM FR2
What is the HEAR TSTREAM FR2? ................................................................................................................1-1
When Is the H
How Does the H
How Is the H
2 Preparing Your HEARTSTREAM FR2 for Use
Overview ......................................................................................................................................................2-1
Installing the Battery ................................................................................................................................. 2-1
Setting the Clock ........................................................................................................................................2-2
Running the Battery Insertion Selftest ...................................................................................................2-4
Placing and Securing the H
3 Using Your HEARTSTREAM FR2
Overview ......................................................................................................................................................3-1
Step 1: Preparation .................................................................................................................................... 3-2
Step 2: ECG Analysis and Monitoring .....................................................................................................3-3
Step 3: Shock Delivery ...............................................................................................................................3-4
4 Maintaining, Testing, and Troubleshooting Your HEARTSTREAM FR2
Overview ......................................................................................................................................................4-1
Maintenance ................................................................................................................................................4-1
Maintenance Schedule ....................................................................................................................... 4-1
Cleaning the H
Operator’s Checklist ........................................................................................................................... 4-3
Testing .........................................................................................................................................................4-5
Battery Insertion Selftest ................................................................................................................... 4-5
Periodic Selftests ................................................................................................................................4-9
Device History .....................................................................................................................................4-9
Battery History .................................................................................................................................... 4-9
Troubleshooting Guide ..............................................................................................................................4-10
Status Indicator Summary .................................................................................................................4-11
Status Indicator Details .....................................................................................................................4-12
Battery and Training & Administration Pack .................................................................................4-15
Defibrillation Pads .............................................................................................................................. 4-15
Rhythm Analysis and Defibrillation .................................................................................................4-16
EARTSTREAM FR2 Used? .....................................................................................................1-1
EARTSTREAM FR2 Work? ................................................................................................ 1-2
EARTSTREAM FR2 Supplied? ................................................................................................1-2
EARTSTREAM FR2 ......................................................................................... 2-4
EARTSTREAM FR2 ........................................................................................................ 4-3
i
Page 7

Contents
5 Clinical and Safety Considerations
Clinical Considerations ............................................................................................................................. 5-1
Indications ........................................................................................................................................... 5-1
Contraindications ............................................................................................................................... 5-1
Safety Considerations ............................................................................................................................... 5-2
General Dangers, Warnings, and Cautions ..................................................................................... 5-2
Defibrillation Warnings and Cautions .............................................................................................5-4
Monitoring Cautions ........................................................................................................................... 5-5
Maintenance Cautions ........................................................................................................................ 5-5
6 Setup and Advanced Mode Features
Setup Overview ..........................................................................................................................................6-1
Non-Protocol Parameters ...................................................................................................................6-1
Automatic Protocol Parameters ....................................................................................................... 6-2
Manual Override Parameters ............................................................................................................ 6-4
Using Setup Features ................................................................................................................................ 6-6
Reviewing Current Setup ...................................................................................................................6-6
Revising Setup ..................................................................................................................................... 6-7
Receiving Setup ................................................................................................................................... 6-7
Reading Setup ...................................................................................................................................... 6-8
Sending and Receiving Clock Settings ....................................................................................................6-9
Using Advanced Mode Features ..............................................................................................................6-9
Using the Manual Analyze Feature ..................................................................................................6-11
Using the Manual Charge Feature (M3860A only) .........................................................................6-11
7 Data Management and Review
Overview ......................................................................................................................................................7-1
Recording Incident Data ...........................................................................................................................7-1
Recording Data in Internal Memory ................................................................................................. 7-1
Recording Data on a Data Card ........................................................................................................7-1
Reviewing Incident Data ........................................................................................................................... 7-3
Reviewing Data from Internal Memory ...........................................................................................7-3
Reviewing Data from a Data Card ....................................................................................................7-3
ii
Page 8

A Accessories for the HEARTSTREAM FR2
B Technical Specifications
C Differences between the FORERUNNER and the HEARTSTREAM FR2 AEDs
D Glossary of Symbols and Controls
E Glossary of Terms
F Clinical Summary
Index
Contents
iii
Page 9

Contents
Notes
iv
Page 10

1 Introduction to the HEARTSTREAM FR2
What is the HEARTSTREAM FR2?
The HEARTSTREAM FR2 defibrillator (“FR2”) is a semi-automatic external
defibrillator (AED). It is compact, lightweight, portable, and battery powered. It is
designed for simple and reliable operation by a trained responder.
EARTSTREAM FR2 has a Status Indicator that is always active, so you can tell at
The H
a glance if it is ready for use. The front panel of the FR2 has an On/Off button at the
top and a Shock button at the bottom. A display screen in the center of the panel
provides text prompts and incident information. Voice prompts are provided
through a speaker located at the base of the FR2. (See the diagram on the inside
front cover for details.)
The HEARTSTREAM FR2 is available in two models, the M3860A and the M3861A. They
share a set of basic features. In addition, the M3860A provides optional screen
display of the patient’s electrocardiogram (ECG) and can be programmed to permit
the advanced mode’s manual charge feature.
NOTE: The FR2 comes with a factory default setup that can be modified. (See
Chapter 6, Setup and Advanced Mode Features, for a description of setup defaults
and options.)
When Is the HEARTSTREAM FR2 Used?
The HEARTSTREAM FR2 is used with disposable HEARTSTREAM defibrillation pads
applied to a person who is experiencing the symptoms of sudden cardiac arrest
(SCA): lack of responsiveness, lack of breathing, and lack of detectable pulse.
Defibrillation should not be performed on anyone who is responsive, is breathing,
or has a detectable pulse.
M3860A and M3861A HEARTSTREAM FR2 Defibrillator 1-1
Page 11

How Does the HEARTSTREAM FR2 Work?
The HEARTSTREAM FR2 is intended for use by emergency care personnel who have
been specifically trained in the operation of the H
qualified by training in Basic Life Support (BLS), in Advanced Life Support (ALS),
or in other physician-authorized emergency medical response.
The HEARTSTREAM FR2 is not intended for administration of energy at pediatric
energy settings. In accordance with the recommendations of the American Heart
Association,
but standard operating procedures should be followed in treating children over eight
years of age.
How Does the HEARTSTREAM FR2 Work?
The HEARTSTREAM FR2 is designed to provide external defibrillation therapy to
someone in cardiac arrest. Defibrillation therapy is the best available way to treat a
variety of potentially fatal heart arrhythmias.
The FR2 is extremely easy to use. When connected to defibrillation pads that are
properly applied to the patient’s bare chest, the H
1. prompts you to take specific actions,
2. automatically analyzes the patient's heart rhythm and advises you whether or
3. arms the Shock button, if appropriate, and instructs you to press it to deliver a
Detailed instructions for use are provided in Chapter 3.
EARTSTREAM FR2 or who are
*
the HEARTSTREAM FR2 should not be used to treat infant cardiac arrest,
EARTSTREAM FR2:
not the rhythm is shockable, and
biphasic electric pulse designed to defibrillate the heart.
How Is the HEARTSTREAM FR2 Supplied?
The HEARTSTREAM FR2 is supplied with a battery pack, defibrillation pads with
integrated cable and connector, and a data card tray. Other accessories are available.
See Appendix A for a list of accessories and other recommended supplies.
* Textbook of Advanced Cardiac Life Suppor t. Dallas: AHA, 1997-99.
1-2 Introduction to the H
EARTSTREAM FR2
Page 12
2 Preparing Your HEARTSTREAM FR2 for Use
Overview
There are a few basic steps to preparing your HEARTSTREAM FR2 for use:
Install a battery.
Set the clock in the FR2 (optional).
Run the battery insertion selftest.
Place the FR2 with recommended accessories in a convenient location.
The instructions presented here briefly describe the normal sequence of
preparation. It assumes that you are using a fresh battery, that the selftest passes,
and that the factory default settings will not be changed. Exceptions to this
sequence are provided elsewhere in this User’s Guide.
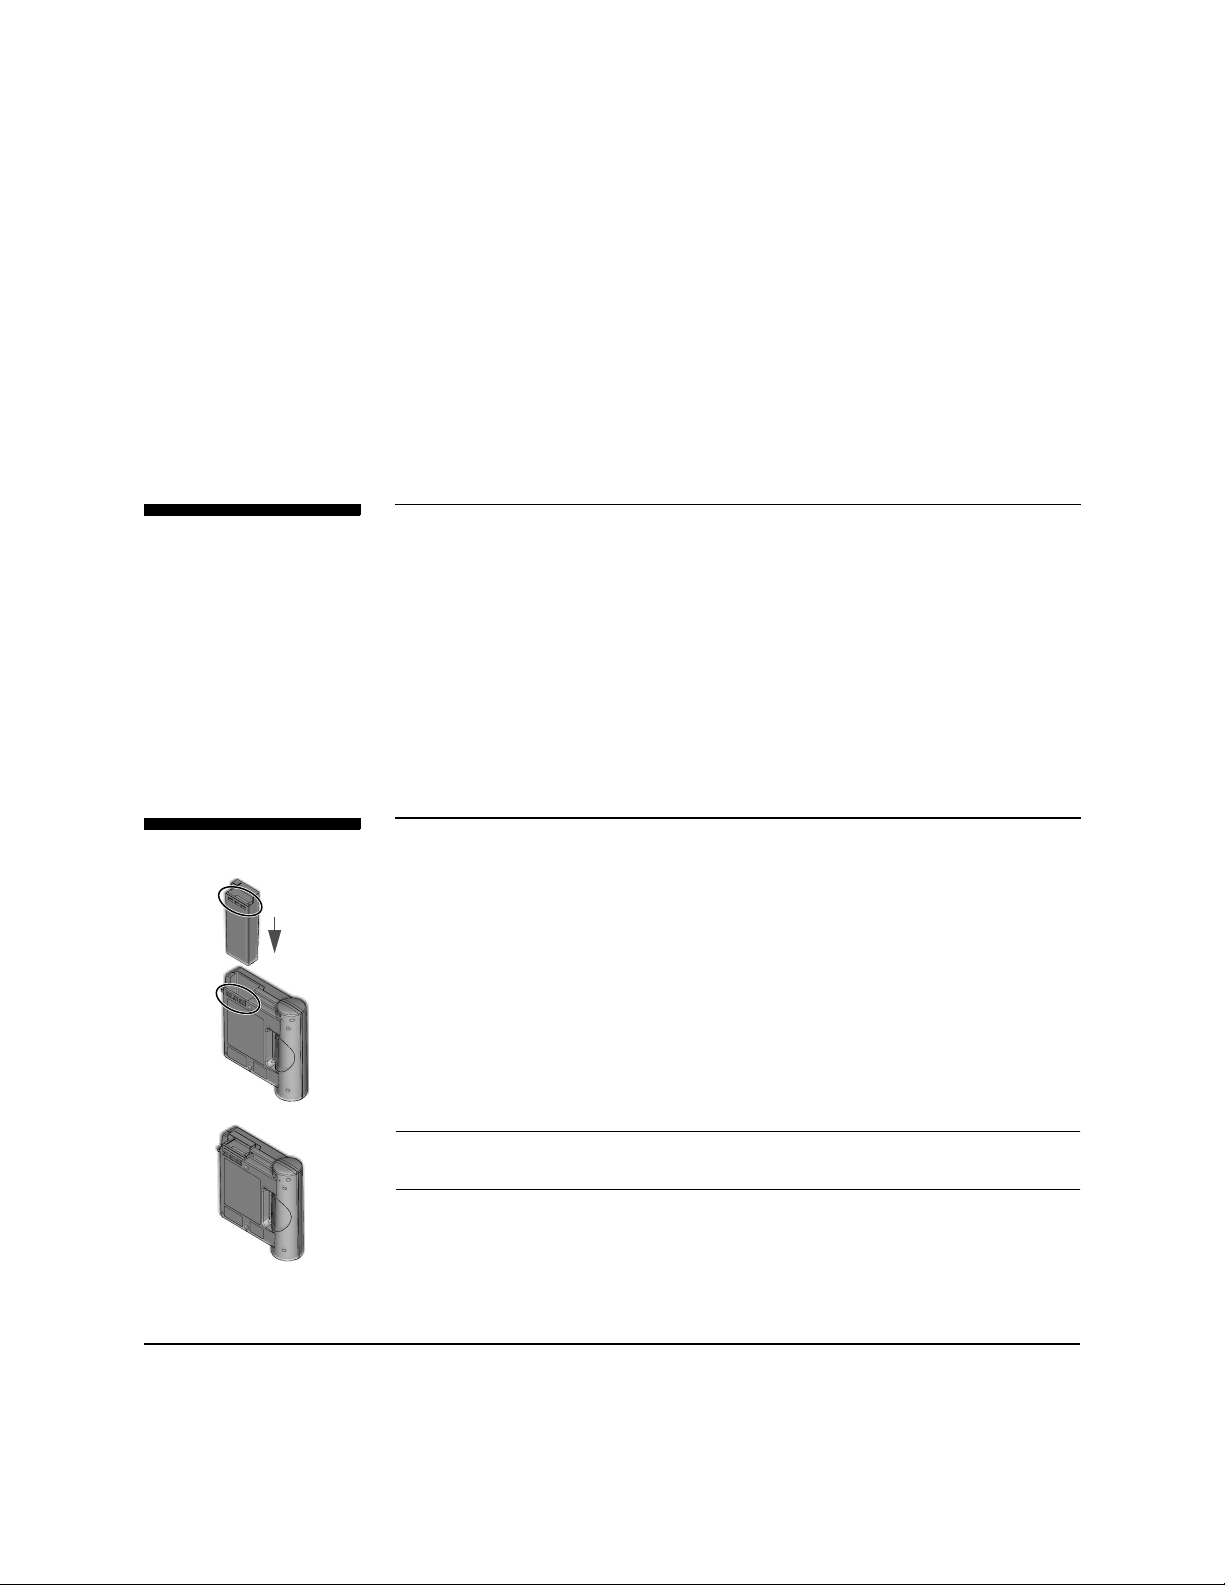
Installing the Battery
The HEARTSTREAM FR2 is shipped with a M3863A battery pack. The battery is
enclosed in a gray plastic case. There is a yellow latch at one end that holds the
battery pack in place when it is correctly installed in the FR2.
Before installing the battery, make sure the defibrillation pads are not connected to
the FR2. To install the battery:
1. Hold the battery pack by the latch end and slide it into the battery compartment
at the top of the H
2. Slide the battery all the way into the opening, until the latch clicks into place.
The latch will click into place only when the battery is inserted correctly.
CAUTION: Follow all instructions supplied with the HEARTSTREAM M3863A battery pack. Install the battery
before the expiration date shown on the battery.
When the battery is installed, the H
Status Indicator displays a flashing black hourglass. The Shock button light and the
indicator light for the defibrillation pads connector port turn on briefly.
M3860A and M3861A HEARTSTREAM FR2 Defibrillator 2-1
EARTSTREAM FR2.
EARTSTREAM FR2 automatically turns on. The
Page 13

Setting the Clock
RUN SELFTEST
REVIEW INCIDENT
NO DATA CARD
GOOD BATTERY
NEXT
IN EMERGENCY
PRESS OFF TO QUIT
DEVICE HISTORY
BATTERY HISTORY
SETUP
CLOCK
RETURN
IN EMERGENCY
PRESS OFF TO QUIT
The display screen brings up the main menu. From this menu, you can start the FR2
battery insertion selftest, review information from the last time the FR2 was used, or
go to the next screen for other options. Information about the optional data card and
the battery status is also provided. (See Chapter 7, Data Management and Review,
for details about reviewing an incident and using a data card.)
NOTE: This screen will not be displayed if the FR2 is connected to defibrillation
pads (that are applied to the patient) when the battery is inserted, and you will not
be able to access the menu items. In addition, the battery insertion selftest and
periodic automatic selftests cannot run while the defibrillation pads are connected.
Be sure to unplug the pads connector from the FR2 after each use. Do not store
the FR2 with the pads connected.
NOTE: To move around the menus displayed, use the Option buttons as follows:
• Press the LOWER Option button to move the highlight bar from one item to
another on the menu.
• Press the UPPER Option button to select the highlighted item or to scroll
through the settings for that item.
If you select NEXT, the menu displayed lets you review the history of the FR2, review
the history of the battery being used, access setup data, set the clock, or return to
the first menu. (See Chapter 4, Maintaining, Testing, and Troubleshooting Your
EARTSTREAM FR2, for details about the review options and Chapter 6, Setup and
H
Advanced Mode Features, for information on the setup option.)
NOTE: If you make no selection for 10 seconds, the selftest will automatically
run. If you want to select something different from either of these menus, you must
do so before the selftest begins, or remove and reinstall the battery to bring up the
main menu. You can press the On/Off button at any time to turn off the FR2 and
return it to standby (ready for use) mode. To use the FR2 when it is in standby mode,
press the On/Off button to turn it on.
Setting the Clock
It is recommended that the first time you prepare your HEARTSTREAM FR2 for use,
RUN SELFTEST
REVIEW INCIDENT
NO DATA CARD
GOOD BATTERY
NEXT
IN EMERGENCY
PRESS OFF TO QUIT
2-2 Preparing Your H
you check the FR2’s internal clock to be sure it is set to the correct date and local
time. You can reset it if necessary.
To see the clock settings, select NEXT from the first menu, within 10 seconds of
installing the battery, and then select CLOCK. To do this:
EARTSTREAM FR2 for Use
Page 14
DEVICE HISTORY
BATTERY HISTORY
SETUP
CLOCK
RETURN
IN EMERGENCY
PRESS OFF TO QUIT
Setting the Clock
1. Press the lower Option button to move the highlight bar to NEXT.
2. Press the upper Option button to bring up the NEXT screen.
3. Press the lower Option button to move the highlight bar to CLOCK.
4. Press the upper Option button to bring up the CLOCK screen.
The CLOCK screen displays the date and time currently set in the internal clock of
the H
EARTSTREAM FR2.
NOTE: The date is displayed as day (DD), month (MM), and year (YY), as shown on
the screen. The time is displayed using the 24-hour international clock.
CLOCK
RETURN
RECEIVE TIME
SEND TIME
07 / 09 / 00
DD / MM / YY
14 : 28
CLOCK
RETURN
RECEIVE TIME
SEND TIME
07 / 09 / 00
DD / MM / YY
14 : 28
If no changes to the clock settings are needed, select RETURN and go back to the
first menu. If the date and time are not correct, there are two ways to set them:
Receive the clock settings from another HEARTSTREAM FR2 or from a computer
using C
ODERUNNER® software, using the RECEIVE TIME option. This may be
used to synchronize the clocks of several FR2s. You can also send the clock
settings from one FR2 to another one, using the SEND TIME option. See Chapter
6, Setup and Advanced Mode Features, for instructions.
Manually set the date and the time.
To manually set the clock:
1. Use the lower Option button to move the highlight bar to the part of the clock
setting you want to change.
2. Press the upper Option button repeatedly to scroll through the settings until you
reach the one you want. If you go past it, keep scrolling until it comes up again.
3. Use the lower Option button to select the next part you want to change, and
repeat the process, until all parts of the date and time have been set.
4. When you have made all the changes, move the highlight bar to RETURN and
press the upper Option button to go back to the main menu screen.
NOTE: New clock settings are used by the FR2 as soon as you set them. The clock
time display is updated each minute this screen is displayed. The clock seconds,
although not displayed, are set to 00 when you move the highlight bar out of the time
settings.
2
M3860A and M3861A H
NOTE: If the battery is removed from the FR2 for more than two hours, the clock
settings will be lost and must be reset.
EARTSTREAM FR2 Defibrillator 2-3
Page 15

Running the Battery Insertion Selftest
RUN SELFTEST
REVIEW INCIDENT
NO DATA CARD
GOOD BATTERY
NEXT
IN EMERGENCY
PRESS OFF TO QUIT
Running the Battery Insertion Selftest
Except in an emergency, it is recommended that you run this selftest every time you
change the battery. Make sure the defibrillation pads are not connected to the FR2
before running the battery insertion selftest.
The selftest has two parts. The first part tests the FR2 circuitry and memory. The
second part is interactive and requires you to respond to prompts in order to make
sure the display, buttons, lights, speaker, and beeper of the H
working properly. (See Chapter 4, Maintaining, Testing, and Troubleshooting Your
EARTSTREAM FR2, for details about this selftest.)
H
To run the selftest:
1. Make sure the FR2 has not been in use for at least 5 minutes, and that the
defibrillation pads are not connected to the device.
2. Insert the battery into the battery port. The first screen displayed has RUN
SELFTEST highlighted.
3. Press the upper Option button to activate the test, OR
4. Make no selection for 10 seconds, and the selftest will start automatically.
EARTSTREAM FR2 are
NOTE: If you connect defibrillation pads (that are applied to the patient) to the FR2
during a battery insertion selftest, the selftest will stop so that the FR2 is in standby
(ready for use) mode.
When the automatic part of the selftest is successfully completed, the screen
displays a message that the test has passed, and then automatically starts the
SELFTEST PASSED
REV: XXX X.X XXXX
NO DATA CARD
SN 000000001
IN EMERGENCY
PRESS OFF TO QUIT
interactive part of the selftest. (See Chapter 4, Maintaining, Testing, and
Troubleshooting Your H
EARTSTREAM FR2, for details about the interactive part of the
test.)
When the selftest is complete, the H
EARTSTREAM FR2 automatically turns off and
returns to standby mode. In the standby mode, the FR2 is ready for use at any time,
simply by pressing the On/Off button to turn it on.
Placing and Securing the HEARTSTREAM FR2
Place the HEARTSTREAM FR2 in an accessible area with the Status Indicator easily
visible. Useful accessories for placing and securing the FR2 include a carrying case,
which is suitable for use with a wall mount bracket. (See Appendix A for a list of
accessories.)
2-4 Preparing Your H
EARTSTREAM FR2 for Use
Page 16

Placing and Securing the HEARTSTREAM FR2
NOTE: Do not store the FR2 with the defibrillation pads attached. Do not open the
pads package until ready for use.
With the battery installed and the FR2 stored in appropriate environmental
conditions, the H
that it remains ready for use. (See Appendix B for the environmental storage
specifications.)
While the FR2 is in the standby mode, the Status Indicator shows the flashing black
hourglass unless the periodic selftests detect a problem. If a problem is detected, the
Status Indicator will show a flashing red X or a solid red X and the FR2 will beep
(“chirp”) to alert you to the need for troubleshooting. (See Chapter 4, Maintaining,
Testing, and Troubleshooting Your H
EARTSTREAM FR2 performs detailed periodic selftests, to make sure
EARTSTREAM FR2, for instructions.)
2
M3860A and M3861A H
EARTSTREAM FR2 Defibrillator 2-5
Page 17

Placing and Securing the HEARTSTREAM FR2
Notes
2-6 Preparing Your H
EARTSTREAM FR2 for Use
Page 18

3 Using Your HEARTSTREAM FR2
Overview
This chapter describes how to use the HEARTSTREAM FR2 in an emergency incident.
Some general things to remember are:
Try to relax and stay calm. The HEARTSTREAM FR2 automatically provides
appropriate voice and display prompts to guide you.
The defibrillation pads must have good contact with the patient’s skin. The
pads have a layer of sticky, conductive gel beneath the protective backing.
To work effectively, the gel must not be dried out.
It may be necessary to dry the patient’s chest or to clip or shave excessive
chest hair to provide good contact between the defibrillation pads and the
patient’s skin.
The following pages provide step-by-step instructions for normal use of the
EARTSTREAM FR2 in an emergency. (See Chapter 4, Maintaining, Testing, and
H
Troubleshooting Your H
the Warnings and Cautions on the last page of this chapter.
EARTSTREAM FR2, for troubleshooting tips.) Be sure to read
NOTE: These directions apply to both the model M3860A and the model M3861A
HEARTSTREAM FR2, except where otherwise noted.
M3860A and M3861A HEARTSTREAM FR2 Defibrillator 3-1
Page 19
Step 1: Preparation
Step 1: Preparation
O
•
F
N
F
O
Press the On/Off button to turn on the HEARTSTREAM FR2. Follow
the instructions provided by the FR2 voice and screen prompts in
the order indicated.
Remove clothing from the patient's chest. Wipe moisture from the patient's chest and
clip or shave excessive chest hair, if necessary.
Open the defibrillation pads package. Check to see that the pads and attached cable
and connector are undamaged. Pull off the protective backing from the defibrillation
pads and check that the gel has not dried out. If the pads are damaged or the gel has
dried out, use a new set of pads.
Place each pad on the patient. The pads must be placed with the sticky side on the
patient’s skin. IMPORTANT: Refer to the drawing on the back of each pad for correct
positioning. One pad goes just below the patient's right collarbone, and the other one
goes over the patient’s ribs in line with the armpit and below the left breast.
Connect the pads to the HEARTSTREAM FR2. Insert the defibrillation pads connector
firmly in the connector socket. A flashing light shows you where the socket is
located, at the top left of the H
EARTSTREAM FR2.
3-2 Using Your H
EARTSTREAM FR2
Page 20
Step 2: ECG Analysis and Monitoring
Step 2: ECG Analysis and Monitoring
Follow the instructions provided by the HEARTSTREAM FR2 voice
and screen prompts in the order indicated.
As soon as the FR2 detects that the defibrillation pads are connected properly, it
automatically begins analyzing the patient’s heart rhythm. The H
model M3860A can display the patient’s ECG on the screen. When the ECG display is
enabled, the patient’s heart rate is also displayed during background
monitoring.ECG and patient heart rate are always displayed when the advanced
mode is entered.
EARTSTREAM FR2
If no shock is advised, the H
tell you so. The FR2 instructs you to perform CPR if needed, and performs
background monitoring of the patient’s ECG while you give appropriate care to the
patient. These instructions are repeated at the programmed Monitor Prompt interval
(the default interval is one minute) while the FR2 is monitoring the patient.
NOTE: CPR may interfere with background monitoring. During CPR, periodically
pause for 15 seconds to check the patient and allow the FR2 to analyze the patient’s
heart rhythm without CPR artifact.
Monitoring continues until and unless the H
patient’s heart rhythm that may be a shockable rhythm, detects interference with
rhythm analysis, or is turned off.
If the HEARTSTREAM FR2 detects a potentially shockable heart rhythm, it
automatically goes back to analyzing the rhythm to see if a shock is advised.
If a shock is advised, the H
gives the voice warnings and screen prompts to tell you that a shock is advised. Make
sure that no one is touching the patient. While the H
continues to analyze the patient’s heart rhythm. If the rhythm changes and a shock
is no longer appropriate, the H
Voice and display prompts advise you what action to take.
NOTE: When the HEARTSTREAM FR2 is fully charged, you can disarm it at any time by
pressing the On/Off button to turn off the FR2 and return it to standby mode. (See
the Defibrillator discussion in Appendix B, Technical Specifications, for details on
disarming the FR2.)
EARTSTREAM FR2 provides voice and screen prompts to
EARTSTREAM FR2 detects a change in the
EARTSTREAM FR2 charges to prepare for shock delivery. It
EARTSTREAM FR2 is charging, it
EARTSTREAM FR2 disarms and dumps the charge.
3
M3860A and M3861A H
EARTSTREAM FR2 Defibrillator 3-3
Page 21

Step 3: Shock Delivery
Step 3: Shock Delivery
Press the Shock button to deliver the shock.
IMPORTANT: You must press the button for a shock to be delivered. The
EARTS TREAM FR2 will not automatically deliver a shock.
H
There are four ways you can tell that the HEARTSTREAM FR2 is ready to deliver a
shock:
you hear a voice prompt telling you to deliver a shock,
you see the Shock button flashing,
you hear a steady tone, and/or
you see a screen prompt telling you to press the orange (Shock) button.
After you press the Shock button, a voice prompt tells you the shock was delivered.
EARTSTREAM FR2 goes back to analyzing the patient’s heart rhythm to see if
Then H
the shock was successful. The H
prompts to guide you through additional shocks, if appropriate.
NOTE: If you do not press the Shock button within 30 seconds of being prompted,
the FR2 will disarm itself and provide a pause for CPR. The device will resume
analyzing at the end of the pause period or when the Resume Analyzing key is
pressed.
EARTSTREAM FR2 continues to provide voice and text
Pause for CPR. After the programmed number of shocks in a shock series are
delivered, the H
EARTSTREAM FR2 automatically pauses for a programmed amount of
time to allow you to perform CPR. After the voice and screen prompts tell you that
the FR2 has paused, there are no further voice prompts during the rest of the pause,
so that you can provide uninterrupted patient care.
During the pause, the FR2 screen shows a bar that fills in as the pause time is used
up. The screen also shows how much time has gone by since the FR2 was turned on,
and how many shocks have been delivered. The H
EARTSTREAM model M3860A
displays the ECG, if enabled, during this period.
3-4 Using Your H
EARTSTREAM FR2
Page 22

Step 3: Shock Delivery
WARNING: Do not place the defibrillation pads on the patient’s chest and back
(anterior-posterior). The algorithm used by the H
anterior-posterior pads placement.
WARNING: Do not let the defibrillation pads touch each other or other ECG electrodes, lead
wires, dressings, transdermal patches, etc. Such contact can cause electrical arcing and
patient skin burns during defibrillation and may divert defibrillating current away from the
heart.
WARNING: During defibrillation, air pockets between the skin and defibrillation pads can cause
patient skin burns. To help prevent air pockets, make sure defibrillation pads completely adhere
to the skin. Do not use dried-out defibrillation pads.
WARNING: Handling or transporting the patient during heart rhythm analysis can cause an
incorrect or delayed diagnosis. If the H
the patient as still as possible for at least 15 seconds so the H
rhythm analysis before a shock is delivered.
EARTSTREAM FR2 gives a SHOCK ADVISED prompt, keep
EARTSTREAM FR2 has not been validated with
EARTSTREAM FR2 can reconfirm the
3
M3860A and M3861A H
WARNING:
compressions per minute can cause incorrect or delayed analysis by the HEARTSTREAM FR2.
WARNING:
patient during defibrillation. Do not allow the defibrillation pads to touch any metal surfaces.
Disconnect the pads connector from the HEARTSTREAM FR2 before using any other defibrillator.
CAUTION:
defibrillation pads if they become damaged.
EARTSTREAM FR2 Defibrillator 3-5
CPR rates significantly above the American Heart Association guidelines of 100
Defibrillation current can cause operator or bystander injury. Do not touch the
: Aggressive handling of the pads in storage or prior to use can damage the pads. Discard the
: :
Page 23

Step 3: Shock Delivery
Notes
3-6 Using Your H
EARTSTREAM FR2
Page 24

4 Maintaining, Testing, and Troubleshooting
Your HEARTSTREAM FR2
Overview
This chapter provides information on HEARTSTREAM FR2 maintenance, detailed
descriptions of the selftests, and a guide to troubleshooting.
Maintenance
Maintenance Schedule
Maintenance of the HEARTSTREAM FR2 is very simple, but it is a very important
factor in its dependability. The H
activities itself. These include daily and weekly selftests to verify readiness for use
and more detailed monthly selftests that also verify the shock waveform delivery
system. In addition, a detailed selftest is run whenever a battery is installed in the
FR2.
EARTSTREAM FR2 requires no calibration or verification of energy delivery. The
The H
EARTSTREAM FR2 has no user-serviceable parts.
H
EARTSTREAM FR2 performs many maintenance
CAUTION:
Maintain the H
Medical Director.
CAUTION: Electrical shock hazard. Dangerous high voltages and currents are present. Do not open the
H
HEARTSTREAM FR2. The HEARTSTREAM FR2 should be returned to an authorized service center for repair.
The following table presents a schedule of suggested maintenance for the
H
M3860A and M3861A HEARTSTREAM FR2 Defibrillator 4-1
: Improper maintenance may damage the HEARTSTREAM FR2 or cause it to function improperly.
: :
EARTSTREAM FR2 only as described in this User's Guide or as designated by your program's
EARTSTREAM FR2, remove its covers, or attempt repair. There are no user-serviceable components in the
EARTSTREAM FR2.
Page 25

Maintenance
Daily
Monthly
✰✰
✰✰
✰✰
After
Each Use
✰
Check the Status Indicator.
If you see the flashing black hourglass:
• The HEARTSTREAM FR2 is ready to use. No action required.
If you see anything other than a flashing black hourglass, remove and reinstall
the battery to run the selftest.
• If the selftest passes and the Status Indicator shows the flashing black
hourglass, the HEARTSTREAM FR2 is ready to use.
• If the selftest fails, install a new battery and run the selftest. If the selftest
passes, the H
Agilent Technologies for technical support.
Check supplies, accessories, and spares for damage and expiration dating.
If a LOW BATTERY or REPLACE BATTERY message is displayed:
• Replace the battery and run the selftests. DO NOT ATTEMPT TO CHARGE
THE M3863A BATTERY. It is not rechargeable.
If supplies, accessories, or spares are damaged or have expired:
• Do not use damaged or expired accessories. Replace them immediately.
Check the operation of the FR2 by removing and reinstalling the battery and
running the battery insertion selftest. Note: Perform also when replacing
expired pads.
Check the outside of the HEARTSTREAM FR2 and the connector socket for cracks
or other signs of damage.
If you see signs of damage:
• Contact Agilent Technologies for technical support.
MAINTENANCE TASK/RESPONSE
EARTSTREAM FR2 is ready to use. If the selftest fails, contact
✰
✰
4-2 Maintaining, Testing, and Troubleshooting Your H
Check the data card if one has been used.
If the data card has been used to record incident data:
• Remove and replace it with a blank data card.
• Deliver the recorded data card to appropriate personnel according to your
local guidelines and medical protocol.
Check the outside of the HEARTSTREAM FR2 and the connector socket for signs of
dirt or contamination.
If the HEARTSTREAM FR2 is dirty or contaminated:
• Clean it according to the guidelines provided in this User’s Guide.
EARTSTREAM FR2
Page 26

Maintenance
Daily
Monthly
After
Each Use
✰
✰
MAINTENANCE TASK/RESPONSE
Check the connector socket to make sure that defibrillation pads are
disconnected from the H
Check to make sure the data card tray is installed, even if a data card is not
being used.
EARTSTREAM FR2 when it is not in use.
Cleaning the HEARTSTREAM FR2
The outside of the HEARTSTREAM FR2, including the defibrillator pads connector
port, can be cleaned with a soft cloth dampened in one of several appropriate
cleaning agents (see list below). The following guidelines include some important
reminders:
Do not immerse the HEARTSTREAM FR2 in fluids.
Make sure a battery (or the Training & Administration Pack) and a data card
tray are installed when cleaning the H
device.
Do not use abrasive materials, cleaners, strong solvents such as acetone or
acetone-based cleaners, or enzymatic cleaners.
Clean the HEARTSTREAM FR2 and the connector socket with a soft cloth
dampened with one of the cleaning agents listed below.
— Isopropyl alcohol (70% solution)
— Soapy water
— Chlorine bleach (30 ml/l water)
— Ammonia-based cleaners
— Glutaraldehyde-based cleaners
— Hydrogen peroxide
CAUTION:::: Do not immerse any portion of the HEARTSTREAM FR2 in water or other fluids. Do not allow fluids
to enter the H
into the H
FR2 or accessories.
EARTSTREAM FR2. Avoid spilling any fluids on the HEARTSTREAM FR2 or accessories. Spilling fluids
EARTSTREAM FR2 may damage it or present a fire or shock hazard. Do not sterilize the HEARTSTREAM
EARTSTREAM FR2, to keep fluids out of the
4
M3860A and M3861A H
Operator’s Checklist
The checklist on the following page is for your reference. You may want to photocopy
it or use it as the basis for creating your own checklist.
Inspect the HEARTSTREAM FR2 as suggested in the maintenance schedule above, or as
specified by your Medical Director. When you use the Checklist, fill in the scheduled
frequency intervals you will be using for your maintenance inspections.
EARTSTREAM FR2 Defibrillator 4-3
Page 27

Maintenance
Check off each requirement as you complete it, make a note of any problems you
found or corrective action you took, and sign the form.
OPERATOR'S CHECKLIST
HEARTSTREAM FR2 Model No.: _________________________Serial No.: ___________________________________________
HEARTSTREAM FR2 Location or Vehicle ID: __________________________________________________________________
DATE
SCHEDULED FREQUENCY
EARTSTREAM FR2
H
Clean, no dirt or contamination; no signs of
damage
Supplies Available
• Two sets defibrillation pads, sealed,
undamaged, within expiration date
• Ancillary supplies (hand towel, scissors,
razor)
• Spare battery, within “Install Before” date
• Data cards, undamaged, and spare data
card tray
Status Indicator
Shows alternating hourglass/square;
selftest passed.
Inspected by
Signature or initials of operator completing
the maintenance inspection
Remarks, Problems,
Corrective Actions
4-4 Maintaining, Testing, and Troubleshooting Your H
EARTSTREAM FR2
Page 28

Testing
Testing
The HEARTSTREAM FR2 has several ways of testing itself and alerting you if it finds a
problem. In addition to the selftest performed each time a battery is installed, the
HEARTSTREAM FR2 also automatically performs periodic selftests daily.
NOTE: The FR2 selftests are designed to check that the HEARTSTREAM FR2 is ready
for use. However, in the event that the FR2 has been dropped or mishandled, it is
recommended that the battery be removed and reinstalled to initiate a selftest. If the
FR2 has visible signs of damage, contact Agilent Technologies for technical support.
Battery Insertion Selftest
As described in Chapter 2, Preparing Your HEARTSTREAM FR2 for Use, when you
insert the battery in the FR2, be sure that the defibrillation pads are not connected
to the device. When you insert the battery, a menu is displayed and a two-part
selftest will run unless you make another selection from the menu within 10
seconds. The selftest includes an automatic part and an interactive part.
NOTE: Under certain circumstances, the behavior of your FR2 will be different. For
example, the menu screen will not appear when a battery is inserted if:
• the defibrillation pads are attached to a patient, indicating that the
EARTSTREAM FR2 is in continued use, or
H
• the battery is completely depleted.
The menu screen will be displayed, but after 10 seconds the FR2 will go to standby
mode if you make no selection and:
• less than five minutes have passed since the FR2 was last used, indicating that
the FR2 is still in use.
RUN SELFTEST
REVIEW INCIDENT
CARD FULL IN XX.XH
GOOD BATTERY
NEXT
IN EMERGENCY
PRESS OFF TO QUIT
M3860A and M3861A H
It is recommended that the full selftest (including the interactive portion) be run
under the following circumstances:
When the FR2 is first put into service and following each use.
Whenever the battery is replaced.
Whenever expired pads are replaced during periodic maintenance.
Whenever the AED may have sustained physical damage.
When you install the battery, the screen tells you whether or not a data card is
installed. If so, a screen message displays how much recording time is left until the
data card is full. (See Chapter 7, Data Management and Review, for how to review the
incident information from the internal memory of the H
EARTSTREAM FR2 or from a
data card, if one is used.)
EARTSTREAM FR2 Defibrillator 4-5
4
Page 29

Testing
RUN SELFTEST
REVIEW INCIDENT
NO DATA CARD
LOW BATTERY
NEXT
SELFTEST MUST
PASS BEFORE USE
NOTE: The data card is typically capable of storing a number of incidents. However,
it is recommended that it be replaced after every use. In the unlikely event that the
card fills up during an incident, no further data can be recorded, so it is important
for you to monitor the CARD FULL IN... information on this screen.
Screen contrast can be adjusted during the battery insertion selftest by using the
Option buttons.
If battery power is low, replace the battery. If a previous selftest has failed, the
screen displays a message that the H
EARTSTREAM FR2 must pass a selftest before
being used.
It is recommended that you always have a spare battery available. However, if a
screen display prompts you to replace the battery or the Status Indicator shows a
flashing red X, but you do not have a spare battery, you can continue to use the
H
EARTSTREAM FR2 until the battery is completely depleted. This may be necessary in
an emergency.
NOTE: If you connect defibrillation pads (that are applied to the patient) to the FR2
during a battery insertion selftest, the selftest will stop so that the FR2 is ready for
use.
During the automatic part of the selftest, the screen displays a bar that fills in as the
test continues. When that part of the test is finished, the H
EARTSTREAM FR2 beeps.
The results of the selftest are automatically recorded on the data card while the tests
are running, if a data card was inserted in the FR2 prior to installing the battery.
SELFTEST FAILED
REV: XXX
NOT READY FOR USE
SN 000000001
X.X XXXX
If the automatic part of the selftest fails:
The screen displays a message that the selftest has failed. After a short time, an
error code is displayed. Write down the error code and contact Agilent
Technologies for technical support.
The Status Indicator shows a flashing or solid red X.
Replace the battery with a new battery and repeat the test. If the second selftest
fails, contact Agilent Technologies for technical support.
SELFTEST PASSED
REV: XXX X.X XXXX
NO DATA CARD
If the automatic part of the selftest passes:
The screen displays a message that the selftest passed, then begins the
interactive part of the test.
SN 000000001
IN EMERGENCY
PRESS OFF TO QUIT
The interactive part of the selftest requires you to respond to prompts in order to
make sure the display, buttons, lights, and speaker on the H
EARTSTREAM FR2 are
working properly.
4-6 Maintaining, Testing, and Troubleshooting Your H
EARTSTREAM FR2
Page 30

Testing
Screen prompts guide you through a series of steps in the interactive part of the
selftest. Some ask you to observe that a feature of the H
EARTSTREAM FR2 works
properly. Others ask you to take certain actions — for example, to press a button. The
screen then displays a message showing that the button’s operation has been
verified. If you do not press the button, or if you do but the button is not working,
the screen displays a message that the button’s function is not verified.
SHOCK BUTTON LIGHT
CHECK
AND
PADS CONNECTOR LIGHT
IN EMERGENCY
PRESS OFF TO QUIT
PRESS THE
SHOCK BUTTON
IN EMERGENCY
PRESS OFF TO QUIT
It is important for you to verify correct operation of each item tested. If something
does not work correctly — for example, if lights do not come on or you do not hear
beeps when expected — make a note of the problem and contact Agilent
Technologies.
NOTE: Do not use the HEARTSTREAM FR2 until all parts of the interactive selftest
verify correct performance. Be sure to note and report any problems you find.
The following table describes the parts of the H
EARTSTREAM FR2 tested in the
interactive part of the selftest and any action you are asked to take.
FEATURE
TEST DESCRIPTION
Speaker/Beeper Screen prompt: CHECK SPEAKER SOUND (2 beeps)
Listen for the two beeps, one from the beeper and then one from the speaker.
SHOCK BUTTON
VERIFIED
IN EMERGENCY
PRESS OFF TO QUIT
4
M3860A and M3861A H
EARTSTREAM FR2 Defibrillator 4-7
Page 31

Testing
FEATURE
TEST DESCRIPTION
Lights Screen prompt: CHECK SHOCK BUTTON LIGHT AND PADS CONNECTOR LIGHT
Check that the lights come on.
Option Buttons Screen prompt: PRESS THE OPTION BUTTONS
Press the upper and lower Option buttons and listen for a beep to confirm each
press. Look at the screen to be sure the button presses have been verified.
Display Screen Screen prompt: CHECK DISPLAY. ADJUST CONTRAST IF NEEDED
Check the test pattern displayed on the screen. Adjust the contrast if desired
using the Option buttons.
NOTE: Screen contrast can be adjusted at any time during the interactive
selftest by repeatedly pressing the appropriate Option button until desired
contrast is achieved.
Shock Button Screen prompt: PRESS THE SHOCK BUTTON
Press the Shock button and listen for a beep to confirm the press.
No shock will be delivered when you press the Shock button during the test.
Look at the screen to be sure the button press has been verified.
On/Off Button Screen prompt: PRESS THE ON/OFF BUTTON
Press the On/Off button and listen for a beep to confirm press.
Look at the screen to be sure the button press has been verified.
The screen then displays a message that the test is complete.
When the interactive part of the battery insertion selftest is complete, the
EARTSTREAM FR2 turns off and goes to standby mode to be ready for use.
H
4-8 Maintaining, Testing, and Troubleshooting Your H
EARTSTREAM FR2
Page 32

Testing
If proper operation of all features has not been verified in the interactive selftest,
you may want to rerun the batter y insertion selftest. If a feature of operation cannot
be verified, contact Agilent for technical support.
Periodic Selftests
In addition to the battery insertion selftest, the FR2 automatically performs periodic
selftests (PSTs). These daily, weekly, and extensive monthly selftests check many
important functions of the FR2, including battery capacity and internal circuitry.
If it detects a problem during one of these periodic selftests, the FR2 beeps and
displays a flashing red X or a solid red X on the Status Indicator.
DEVICE HISTORY
BATTERY HISTORY
SETUP
CLOCK
RETURN
IN EMERGENCY
PRESS OFF TO QUIT
DEVICE HISTORY
RETURN
USES: 12 19
SHOCKS: 17
TRAINING: 25 456
TESTS: 156 22
5 1095
DEVICE HISTORY
BATTERY HISTORY
SETUP
CLOCK
RETURN
IN EMERGENCY
PRESS OFF TO QUIT
BATTERY HISTORY
RETURN
USE MINUTES: 519
CHARGES: 40
GOOD BATTERY
STATUS: 00000000
Device History
The HEARTSTREAM FR2 stores key information about its history in internal memory.
To review the history of your FR2, select NEXT from the menu screen displayed
when you insert the battery, then select DEVICE HISTORY from the next menu
displayed.
The device history information is automatically stored in the internal memory of the
H
EARTSTREAM FR2. It includes:
USES — how many times the HEARTSTREAM FR2 has been used (shown in the left
column of numbers) and the total time in minutes it has been used (shown in
the right column of numbers);
SHOCKS — the total number of shocks it has delivered;
TRAINING — how many times it has been used with the Training &
Administration Pack for training (left column) and the total time in minutes it
has been used for training (right column); and
TESTS — how many tests have been run. Four figures are shown: daily (upper
left), weekly (upper right), and monthly (lower left) periodic selftests, and
battery insertion selftests (lower right).
Battery History
Information about use of the battery currently installed in your HEARTSTREAM FR2 is
also available. To review the history of the battery, select NEXT from the menu
screen displayed when you insert the battery, then select BATTERY HISTORY from
the next menu displayed.
The battery history information is automatically stored in the internal memory of
the battery. It includes:
USE MINUTES — the total operating time (in minutes), including selftest time,
for this battery;
4
M3860A and M3861A H
EARTSTREAM FR2 Defibrillator 4-9
Page 33

Troubleshooting Guide
CHARGES — the total number of full defibrillation charges that have been
provided by this battery, including selftest charges;
BATTERY — a GOOD BATTERY, LOW BATTERY or REPLACE BATTERY
message, as appropriate, and
STATUS — the current status of this battery, displayed in a binary code. Make a
note of this code if technical support is needed.
Troubleshooting Guide
The HEARTSTREAM FR2 has several ways of communicating with you if it detects a
problem during periodic selftesting or use. Depending on the nature of the problem,
the FR2 will use audible beeps (“chirps”), voice prompts, screen prompts, and/or its
Status Indicator.
The following tables describe FR2 responses to problems that may occur during use,
and provide recommendations for how to resolve them. Although there is some
overlap in the information presented, for ease of reference the tables separately
address the following types of issues:
Status Indicator Summary — a basic overview of FR2 usability based on the
states shown by the Status Indicator
Status Indicator Details — possible causes of various Status Indicator and other
signals, and recommended actions
Battery and Training & Administration Pack — possible power-related problems
and recommended actions
Defibrillation Pads — possible defibrillation pads problems and recommended
actions
Analysis and Defibrillation — possible problems with rhythm analysis and
defibrillation and recommended actions
It is important to read this information carefully, so you can act quickly in an
emergency.
NOTE: Perform CPR (if needed) any time there is a delay before the HEARTSTREAM
FR2 can be used.
4-10 Maintaining, Testing, and Troubleshooting Your H
EARTSTREAM FR2
Page 34

Status Indicator Summary
Troubleshooting Guide
STATUS INDICATOR
Flashing black
hourglass
Flashing red X USE THE FR2. Follow the voice and screen prompts.
Solid red X The FR2 may not be usable.
USE THE FR2. Follow the voice and screen prompts.
The FR2 passed the battery insertion selftest or the last periodic selftest and is
ready for use.
1. Turn on the FR2 by pressing the On/Off button.
2. Follow the voice and screen prompts.
If an error message is displayed:
1. Remove pads, if connected, and remove and reinstall the battery.
2. Run the battery insertion selftest. If the selftest passes and the flashing black
hourglass appears, turn off the device by pressing the On/Off button. If the
selftest fails, repeat with a spare battery, if available.
3. Turn on the device by pressing the On/Off button.
4. Follow the voice prompts.
In some instances — for example, if the battery power is low and you do not have a
spare battery available — it may not be possible to clear the flashing red X. How-
ever, the FR2 is designed to continue working in this condition.
Therefore, in an emergency incident when there is no other defibrillator avail-
able, it is recommended that you continue to use the FR2 when the Status Indi-
cator shows a flashing red X.
1. Remove pads, if connected, and remove and reinstall the battery.
2. Run the battery insertion selftest. If the selftest passes and the flashing black
hourglass appears, turn off the device by pressing the On/Off button. If the
selftest fails, repeat with a spare battery, if available.
3. Turn on the device by pressing the On/Off button.
4. Follow the voice prompts.
If the solid red X is not cleared by running the entire battery insertion selftest, DO
NOT USE THE FR2.
RECOMMENDED ACTION DURING EMERGENCY
4
M3860A and M3861A H
EARTSTREAM FR2 Defibrillator 4-11
Page 35

Troubleshooting Guide
STATUS INDICATOR
None of the above The FR2 may not be usable.
1. Remove pads, if connected, and remove and reinstall the battery.
2. Run the battery insertion selftest. If the selftest passes and the flashing black
hourglass appears and/or SELFTEST PASSED is displayed, turn off the device
by pressing the On/Off button. If the selftest fails, repeat with a spare battery, if
available.
3. Turn on the device by pressing the On/Off button.
4. Follow the voice prompts.
In this condition, the FR2 may not perform to its specifications. However, if voice
and screen prompts are present, it is likely that the device is usable despite the
lack of a Status Indicator.
Therefore, in an emergency incident when there is no other defibrillator avail-
able, it is recommended that you continue to use the FR2.
NOTE: After completing emergency use of the FR2, if you are unable to clear the
problem as described in this Troubleshooting section, and the Status Indicator does
not show the flashing black hourglass, contact Agilent for technical support.
Status Indicator Details
STATUS
INDICATOR
OTHER
SIGNAL
POSSIBLE CAUSE
RECOMMENDED ACTION DURING EMERGENCY
RECOMMENDED ACTION
Flashing
black
hourglass
4-12 Maintaining, Testing, and Troubleshooting Your H
Audio signal:
chirping
The Training & Administration Pack
is being used in the TRAINING
function and more than 30 minutes
have passed without a button press.
• To continue using the Training &
Administration Pack, press any
button.
• To return the FR2 to standby mode,
remove the Pack and install a battery.
EARTSTREAM FR2
Page 36

Troubleshooting Guide
STATUS
INDICATOR
Flashing
red X
Solid red X None • The Training & Administration
OTHER
SIGNAL
Audio signal:
chirping
POSSIBLE CAUSE
• Battery power is low.
• The FR2 has been stored outside
the recommended temperature
range.
• An error has been detected as
part of the selftest.
• The FR2 has been unable to
perform its daily selftests.
Pack is being used in the
administration function; solid red
X is normal.
• The battery is missing or
completely depleted.
RECOMMENDED ACTION
• Remove and reinstall the battery and
run a battery insertion selftest. A
screen prompt will tell you if the FR2
has been stored outside the
recommended temperature range. See
Appendix B for recommended range.
• Remove and reinstall the battery and
perform the battery insertion selftest.
If it fails, install a new battery and
repeat the test. If it fails again, contact
Agilent Technologies for technical
support.
• Make sure defibrillation pads are not
attached to the FR2.
• Remove the Training &
Administration Pack and install the
battery.
• Remove and reinstall the battery and
perform the battery insertion selftest.
If it fails, install a new battery and
repeat the test. If it fails again, contact
Agilent Technologies for technical
support.
M3860A and M3861A H
4
EARTSTREAM FR2 Defibrillator 4-13
Page 37

Troubleshooting Guide
STATUS
INDICATOR
OTHER
SIGNAL
Solid red X Audio signal:
chirping
POSSIBLE CAUSE
• A test revealed a failure or error.
(The FR2 performs selftests every
time you turn it on or insert a
battery, and periodically while it
is in standby mode.)
• The Training & Administration
Pack is being used in the
ADMINISTRATION function and
more than 10 minutes have
passed without a button press.
RECOMMENDED ACTION
• Unplug the pads connector from the
FR2, if connected.
• Remove and reinstall the battery and
check the results of the battery
insertion selftest. If it fails, install a
new battery and repeat the test. If it
fails again, contact Agilent
Technologies for technical support. An
error code will be displayed for 10
seconds on completion of a selftest
that fails. The code can be redisplayed
by pressing the On/Off button.
NOTE: You can stop the battery
insertion selftest to use the FR2 as soon
as you see the Status Indicator change
to the flashing black hourglass. Simply
press the On/Off button to stop the
selftest and put the FR2 into standby
mode. To use the FR2, press the On/Off
button again.
• To continue using the Training &
Administration Pack, press any
button.
• To return the FR2 to standby mode,
remove the Pack and install a battery.
None
of the above
Audio signal:
chirping
or: None
The FR2 has been physically
damaged.
• Check for visible damage. Do not use
the FR2 if it appears to be damaged.
• Remove and reinstall the battery to
perform the battery insertion selftest.
If it fails, install a new battery and
repeat the test. If it fails again, contact
Agilent Technologies for technical
support.
4-14 Maintaining, Testing, and Troubleshooting Your H
EARTSTREAM FR2
Page 38

Battery and Training & Administration Pack
Troubleshooting Guide
STATUS
INDICATOR
Flashing
red X
Flashing
red X
OTHER
SIGNAL
Screen and
voice prompts:
LOW
BATTERY
Screen and
voice prompts:
REPLACE
BATTERY
NOW
POSSIBLE CAUSE RECOMMENDED ACTION
• The power remaining in the FR2
battery or Training and
Administration Pack is low.
• The Training & Administration
Pack is being used to run a
scenario that includes a
low-battery condition.
No power remains to continue using
the FR2. If you do not replace the
battery or Training &
Administration Pack, the FR2 turns
off.
• Replace the battery with a new
battery or the Training &
Administration Pack with a fully
charged Pack as soon as possible.
• No action required.
Replace the battery with a new battery
or the Training & Administration Pack
with a fully charged Pack immediately.
Defibrillation Pads
OTHER SIGNAL POSSIBLE CAUSE RECOMMENDED ACTION
Screen and voice prompts:
APPLY PADS
and
PRESS PADS FIRMLY
or
PLUG IN
CONNECTOR
Or voice prompt:
INSERT
CONNECTOR FIRMLY
The defibrillation pads:
• are not properly applied to the
patient, or
• are touching each other, or
• are no longer usable.
The defibrillation pads connector:
• is not firmly inserted in the
connector port.
• Make sure that the defibrillation pads
are sticking completely to the
patient’s skin.
• If the pads are not sticking because of
moisture or excessive hair, dry the
patient's chest and shave or clip any
excessive chest hair.
• Make sure the defibrillation pads
connector is completely inserted in
the connector socket.
• If the prompt continues after you do
these things, replace the defibrillation
pads.
4
M3860A and M3861A H
EARTSTREAM FR2 Defibrillator 4-15
Page 39

Troubleshooting Guide
OTHER SIGNAL POSSIBLE CAUSE RECOMMENDED ACTION
Voice prompts:
PRESS PADS FIRMLY TO
PATIENT'S BARE CHEST
or
POOR PADS CONTACT
Voice and screen prompts:
REPLACE PADS
The defibrillation pads are not
making good contact with the
patient's bare chest.
• The defibrillation pads, cable, or
connector may be damaged.
• The FR2 has detected a possible
defect in the defibrillation pads or
cable.
• Make sure that the defibrillation pads
are sticking completely to the
patient’s skin.
• If the pads are not sticking because of
moisture or excessive hair, dry the
patient's chest and shave or clip off
any excessive chest hair.
• If the prompt continues after you do
these things, replace the defibrillation
pads.
Replace the defibrillation pads with new
EARTSTREAM defibrillation pads.
H
Rhythm Analysis and Defibrillation
OTHER SIGNAL POSSIBLE CAUSE RECOMMENDED ACTION
Voice prompts:
ANALYZING
INTERRUPTED
or
CANNOT
ANALYZE
or
STOP ALL MOTION
• The patient is being moved or
jostled.
• Radio or electrical sources are
interfering with ECG analysis.
• The environment is dry and
movement around the patient is
causing static electricity to
interfere with ECG analysis.
• Stop CPR; do not touch the patient.
Try to minimize patient motion.
• If the patient is being transported,
stop the vehicle if needed.
• Check for possible causes of radio and
electrical interference and remove
them from the area.
• Responders and bystanders should
minimize motion, particularly in dry
environments that can generate static
electricity.
4-16 Maintaining, Testing, and Troubleshooting Your H
EARTSTREAM FR2
Page 40

Troubleshooting Guide
OTHER SIGNAL POSSIBLE CAUSE RECOMMENDED ACTION
Voice and screen prompts:
NO SHOCK DELIVERED
Voice prompt:
SHOCK BUTTON
NOT PRESSED
The patient impedance is not
appropriate for the FR2 to deliver a
biphasic shock.
A shock has been advised but not
delivered within 30 seconds. (The
FR2 has been disarmed.)
• Make sure the defibrillation pads are
correctly positioned on the patient.
• Make sure the defibrillation pads
connector is completely inserted in
the connector socket.
• Press the defibrillation pads firmly to
the patient's chest.
• Replace the defibrillation pads if
necessary.
When next prompted, press the Shock
button to deliver a shock.
M3860A and M3861A H
4
EARTSTREAM FR2 Defibrillator 4-17
Page 41

Troubleshooting Guide
Notes
4-18 Maintaining, Testing, and Troubleshooting Your H
EARTSTREAM FR2
Page 42

5 Clinical and Safety Considerations
Clinical Considerations
Indications
The HEARTSTREAM FR2 is indicated for use on victims of sudden cardiac arrest
exhibiting all of the following signs:
Unresponsiveness
Absence of breathing
Absence of detectable pulse
The HEARTSTREAM FR2 is intended for use by personnel who have been trained in its
operation. The user should be qualified by training in basic life support, advanced
life support, or other physician-authorized emergency medical response.
The H
EARTSTREAM FR2 is not intended for administration of energy at pediatric
energy settings. In accordance with the recommendations of the American Heart
Association, the HEARTSTREAM FR2 should not be used to treat infant cardiac arrest,
but standard operating procedures should be followed in treating children over eight
years of age.
Contraindications
The HEARTSTREAM FR2 is contraindicated for use (should not be used) on patients
who show any of the following signs:
Responsiveness
Presence of breathing
Presence of detectable pulse
M3860A and M3861A HEARTSTREAM FR2 Defibrillator 5-1
Page 43

Safety Considerations
Safety Considerations
You should be aware of the safety concerns listed here when you use the
EARTSTREAM FR2. Read them carefully. You will also see some of these messages in
H
other parts of this User’s Guide. The messages are labeled Danger, Warning, or
Caution.
DANGER — immediate hazards that will result in personal injury or death.
WAR NI NG — conditions, hazards, or unsafe practices that can result in
serious personal injury or death.
CAUTION — conditions, hazards, or unsafe practices that can result in
minor personal injury, damage to the H
stored in the device.
These safety considerations are divided into four groups: safety concerns about the
EARTSTREAM FR2 in general use, defibrillation, monitoring, and maintenance
H
activities.
The dangers, warnings, and cautions listed in the following tables apply to both the
model M3860A and the model M3861A H
General Dangers, Warnings, and Cautions
EARTSTREAM FR2, or loss of data
EARTSTREAM FR2, unless otherwise noted.
SAFETY LEVEL
POSSIBLE SHOCK OR FIRE HAZARD, OR EXPLOSION
DANGER THERE IS A POSSIBILITY OF EXPLOSION IF THE HEARTSTREAM FR2 IS USED IN THE PRESENCE
OF FLAMMABLE ANESTHETICS OR CONCENTRATED OXYGEN.
DANGER THE H
EARTSTREAM FR2 HAS NOT BEEN EVALUATED OR APPROVED FOR USE IN HAZARDOUS
LOCATIONS AS DEFINED IN THE NATIONAL ELECTRICAL CODE (ARTICLES 500-503). IN
ACCORDANCE WITH THE IEC CLASSIFICATIONS (SECTION 5.5.), THE HEARTSTREAM FR2 IS
NOT TO BE USED IN THE PRESENCE OF FLAMMABLE SUBSTANCE/AIR MIXTURES.
DANGER DO NOT RECHARGE THE M3863A BATTERY.
WARNING Use the H
H
EARTSTREAM FR2 only as described in this User’s Guide. Improper use of the
EARTSTREAM FR2 can cause death or injury. Do not press the Shock button if the defibrillation
pads are touching each other or are open and exposed.
CAUTION Hazardous electrical output. The H
EARTSTREAM FR2 is for use only by qualified personnel.
CAUTION Do not immerse any portion of the HEARTSTREAM FR2 in water or other fluids. Do not allow fluids to enter
the H
EARTSTREAM FR2. Avoid spilling any fluids on the HEARTSTREAM FR2 or accessories. Spilling fluids into
EARTSTREAM FR2 may damage it or present a fire or shock hazard. Do not sterilize the HEARTSTREAM
the H
FR2 or accessories.
5-2 Clinical and Safety Considerations
Page 44

Safety Considerations
SAFETY LEVEL
POSSIBLE IMPROPER DEVICE PERFORMANCE
WARNING The HEARTSTREAM FR2 runs a selftest whenever a new battery is installed and automatically
runs periodic selftests. These tests are designed to check that the H
to use. However, the testing cannot assure proper performance if the H
EARTSTREAM FR2 is ready
EARTSTREAM FR2 was
abused or damaged after the last selftest.
WARNING Prolonged or aggressive CPR to a patient with defibrillation pads attached can damage the
pads. Replace the defibrillation pads if they are damaged during use or handling.
WARNING Using damaged or expired equipment or accessories may cause the H
EARTSTREAM FR2 to
perform improperly, and/or injure the patient or the user.
WARNING CPR rates significantly above the American Heart Association guidelines of 100
compressions per minute can cause incorrect or delayed analysis by the H
CAUTION The H
EARTSTREAM FR2 is designed to be used only with Agilent Technologies-approved accessories. The
EARTSTREAM FR2 will perform improperly if non-approved accessories are used.
H
CAUTION Follow all instructions supplied with the H
EARTSTREAM defibrillation pads. Use the defibrillation pads before
EARTSTREAM FR2.
the expiration date shown on the package. Do not reuse the defibrillation pads. Discard them after use.
CAUTION Aggressive handling of the pads in storage or prior to use can damage the pads. Discard the defibrillation
pads if they become damaged.
CAUTION Follow all instructions supplied with the H
EARTSTREAM M3863A battery pack. Install the battery before the
expiration date shown on the battery.
CAUTION The H
EARTSTREAM FR2 was designed to be sturdy and reliable for many different field use conditions.
However, excessively rough handling can result in damage to the H
EARTSTREAM FR2 or its accessories.
Inspect the unit and accessories periodically according to instructions.
CAUTION Alteration of the factory default setup of the FR2 can affect its performance and should be performed
CAUTION Use only Agilent Technologies-approved data cards. The H
SAFETY LEVEL
WARNING Radio-frequency (RF) interference from devices such as cellular phones and two-way radios
M3860A and M3861A H
under the authorization of your Medical Director. Modifications to device operation resulting from changes
to the default settings should be specifically covered in user training.
EARTSTREAM FR2 will perform improperly if
non-approved accessories are used.
POSSIBLE ELECTRICAL INTERFERENCE WITH ECG MONITORING
can cause improper H
least 6 feet (2 meters) away from RF devices, as stated in accordance with EN
61000-4-3:1996.
EARTSTREAM FR2 Defibrillator 5-3
EARTSTREAM FR2 operation. The HEARTSTREAM FR2 should be used at
5
Page 45

Safety Considerations
Defibrillation Warnings and Cautions
SAFETY LEVEL
WARNING Defibrillation current can cause operator or bystander injury. Do not touch the patient during
defibrillation. Do not allow the defibrillation pads to touch any metal surfaces. Disconnect
the pads connector from the HEARTSTREAM FR2 before using any other defibrillator.
SAFETY LEVELS
WARNING Do not place the defibrillation pads on the patient’s chest and back (anterior-posterior). This
pad placement can interfere with correct rhythm analysis and shock/no shock decision. For
correct operation, the HEARTSTREAM FR2 requires that the defibrillation pads be placed on the
chest (anterior-anterior), as shown on the pads.
WARNING For safety reasons, some very low-amplitude or low-frequency heart rhythms may not be
interpreted by the H
not be interpreted as shockable rhythms.
WARNING Handling or transporting the patient during heart rhythm analysis can cause an incorrect or
delayed diagnosis. If the H
as still as possible for at least 15 seconds so the H
analysis before a shock is delivered.
SAFETY LEVELS
WARNING Do not allow the defibrillation pads to touch each other or other ECG electrodes, lead wires,
dressings, transdermal patches, etc. Such contact can cause electrical arcing and patient
skin burns during defibrillation and may also divert the defibrillation current away from the
heart.
EARTSTREAM FR2 as shockable VF rhythms. Also, some VT rhythms may
POSSIBLE BURNS AND INEFFECTIVE ENERGY
POSSIBLE SHOCK HAZARD
POSSIBLE ECG MISINTERPRETATION
EARTSTREAM FR2 gives a SHOCK ADVISED prompt, keep the patient
EARTSTREAM FR2 can reconfirm the rhythm
WARNING During defibrillation, air pockets between the skin and defibrillation pads can cause patient
skin burns. To help prevent air pockets, make sure defibrillation pads completely adhere to
the skin. Do not use dried out defibrillation pads.
SAFETY LEVEL
CAUTION The HEARTSTREAM FR2 advanced mode’s MANUAL CHARGE feature is intended for use only by authorized
operators who have been specifically trained in cardiac rhythm recognition and in defibrillation therapy
using manual charge and shock delivery.
5-4 Clinical and Safety Considerations
POSSIBLE PATIENT INJURY
Page 46

Monitoring Cautions
Safety Considerations
SAFETY LEVEL
CAUTION The LCD screen on the HEARTSTREAM FR2 model M3860A is intended only for basic ECG rhythm
identification. The frequency response of the monitor screen is not intended to provide the resolution
needed for diagnostic and ST segment interpretation.
POSSIBLE MISINTERPRETATION OF ECG RECORDINGS
Maintenance Cautions
SAFETY LEVEL POSSIBLE FIRE OR SHOCK HAZARD
CAUTION Electrical shock hazard. Dangerous high voltages and currents are present. Do not open the H
FR2, remove its covers, or attempt repair. There are no user-serviceable components in the H
FR2. The H
CAUTION Improper maintenance may damage the H
H
Director.
EARTSTREAM FR2 should be returned to an authorized service center for repair.
EARTSTREAM FR2 or cause it to function improperly. Maintain the
EARTSTREAM FR2 only as described in this User's Guide or as designated by your program's Medical
EARTSTREAM
EARTSTREAM
M3860A and M3861A H
5
EARTSTREAM FR2 Defibrillator 5-5
Page 47

Safety Considerations
Notes
5-6 Clinical and Safety Considerations
Page 48

6 Setup and Advanced Mode Features
Setup Overview
The “setup” of the HEARTSTREAM FR2 AED is made up of several programmable
aspects, or parameters, of FR2 operation. Some setup parameters govern specific
features that are not related to the patient care protocol, some are used to define the
automatic patient care protocol used by the FR2, and some provide options for
manual override of the protocol during use.
The FR2 comes with a factory default setup designed to meet the needs of most
users. If desired, your Medical Director can revise the setup. Even if no changes are
made, however, it is a good idea to understand the setup of your FR2 and how the
different parameter settings affect the way the device works.
Non-Protocol Parameters
The parameters listed in the following table enable features of FR2 operation that
are not related to the patient treatment protocol. The table describes each of these
non-protocol parameters, lists the settings available for it, and identifies the default
setting.
PARAMETER
SPEAKER
VOLUME
RECORD VOICE YES, NO NO Enables or disables the audio recording during incident.
ECG DISPLAY
(M3860A only)
M3860A and M3861A HEARTSTREAM FR2 Defibrillator 6-1
SETTINGS DEFAULT DESCRIPTION
1, 2, 3, 4,
5, 6, 7, 8
ON, OFF ON Enables (ON) or disables (OFF) ECG display on the screen.
8 Sets volume of the FR2’s speaker. 1 is lowest; 8 highest. The
speaker is used for voice prompts and the charge-done
tone.
Voice recording requires use of a data card.
FR2 rhythm analysis does not require ECG display to be on.
(ECG display cannot be changed from default OFF for
M3861A.)
Page 49

Setup Overview
PARAMETER
AUTOSEND PST ON, OFF OFF Enables (ON) or disables (OFF) transmission of the results
ECG OUT ON, OFF OFF Enables (ON) or disables (OFF) ECG data transmission
SETTINGS DEFAULT DESCRIPTION
of the FR2’s periodic selftests (PST) from its infrared
communications port.
from the infrared communications port of the FR2.
ECG data can be sent even if ECG display is unavailable or
disabled.
Automatic Protocol Parameters
The HEARTSTREAM FR2 is designed to follow an automatic protocol that guides you
through patient treatment with the AED. The default settings for programmable
parameters used in the automatic protocol can be altered by your Medical Director if
desired.
The setup parameters in the following table are used to define the automatic patient
care protocol used by the FR2. Many of these parameters interact with each other, so
it is very important to understand how each parameter affects the protocol. The
description of each parameter identifies any interacting parameters in boldface
type.
PARAMETER
SHOCK SERIES 1, 2, 3, 4 3 Sets the number of shocks that must be delivered to
SETTINGS DEFAULT DESCRIPTION
activate an automatic CPR pause.
The length of the CPR pause after completion of a Shock
Series is defined by the CPR Timer setting.
A new Shock Series begins when a shock is delivered:
• after the FR2 is turned on
• after the automatic CPR pause, or
• after the Pause Key (if enabled) has been pressed, or
• if the time since the previous shock exceeds the Protocol
Timeout setting.
PROTOCOL
TIMEOUT
(minutes)
6-2 Setup and Advanced Mode Features
0.5, 1.0, 1.5, 2.0,
2.5, 3.0, 3.5,
=(infinite)
1.0 Sets the time interval used to determine if a delivered
shock should be counted as part of the current Shock
Series.
Page 50

Setup Overview
PARAMETER
CPR TIMER
(minutes)
NSA ACTION
(minutes)
SETTINGS DEFAULT DESCRIPTION
0.5, 1.0, 1.5,
2.0, 2.5, 3.0
MONITOR,
0.5, 1.0, 1.5,
2.0, 2.5, 3.0
1.0 Sets the length of the CPR pause period* that automatically
starts when:
• a Shock Series is completed; or
• the Pause Key (if enabled) is pressed; or
• a No Shock Advised (NSA) decision is made, the NSA
CPR pause is enabled, and the conditions for using the
CPR Timer setting for the NSA CPR pause period are met
(see NSA Action); or
• the Shock button is not pressed for 30 seconds after the
FR2 is armed in the AED mode, or
• continuous artifact is encountered during rhythm
analysis.
After the CPR pause, the FR2 returns to automatic rhythm
analysis.
* The CPR pause period starts after the voice prompt
completes.
MONITOR Sets how the FR2 behaves following a NO SHOCK ADVISED
(NSA) decision:
MONITOR — directs the FR2 to monitor the patient’s ECG
following an NSA decision and to prompt the user
periodically to provide CPR. The interval for CPR
prompting is set by the Monitor Prompt Interval.
TIME SETTING — directs the FR2 to provide a CPR pause
period following an NSA decision (NSA CPR Pause).
• If no shocks have been delivered in the current Shock
Series (e.g., the patient’s initial monitored rhythm is
non-shockable), the length of the CPR pause is defined
by the NSA Action time setting.
• If shocks have been delivered in the current Shock
Series (e.g., the NSA decision follows a shock), the length
of the CPR pause is instead defined by the CPR Timer
setting.
6
CPR PROMPT LONG, SHORT LONG Sets the level of detail provided in the CPR reminder voice
prompts provided at the completion of a Shock Series.
LONG — provides detailed coaching to check airway,
breathing, and pulse before beginning CPR.
SHORT — simply directs user to begin CPR if needed.
M3860A and M3861A H
EARTSTREAM FR2 Defibrillator 6-3
Page 51

Setup Overview
PARAMETER
MONITOR
PROMPT
INTERVAL
(minutes)
PARAMETER
ADVANCED OFF,
SETTINGS DEFAULT DESCRIPTION
1.0, 1.5, 2.0,
2.5, 3.0,
=(infinite)
SETTINGS DEFAULT DESCRIPTION
ANALYZE,
CHARGE
1.0 Sets the interval for patient care prompts provided during
FR2 monitoring of the patient’s ECG following an NSA
decision. Selection of (infinite) means that no repeat
prompting will be provided during ECG monitoring.
Manual Override Parameters
The HEARTSTREAM FR2 provides several ways of overriding the automatic protocol.
The parameters in the following table are used to enable different kinds of manual
override. The description of each parameter identifies any interacting parameters in
boldface type.
OFF Enables or disables advanced mode entry for ALS or
tiered-response systems.
OFF — disables advanced mode features.
ANALYZE — enables user-initiated rhythm analysis and
disarm, and (M3860A only) automatically turns on ECG
display when advance mode is entered.
CHARGE (M3860A only) — in addition to enabling the
analyze feature, enables user-initiated charging and
disarming.
6-4 Setup and Advanced Mode Features
Page 52

Setup Overview
PARAMETER
PAUSE KEY OFF,
RESUME KEY ON, OFF OFF Enables (ON) or disables (OFF) user-initiated interruption
SETTINGS DEFAULT DESCRIPTION
OFF Enables or disables user-initiated CPR pause in the
MONITOR,
ALWAYS
automatic protocol. The length of the pause is defined by
the CPR Timer setting. When an Advanced mode feature
(ANALYZE or CHARGE) is enabled and accessed, the Pause
key is disabled.
OFF — disables availability of user-initiated pause.
MONITOR — enables user-initiated pause only during FR2
monitoring of patient rhythm.
ALWAYS — enables user-initiated pause any time except
when the device is already paused.
If enabled, the Pause Key is
accessed by pressing the
lower Option button
indicated by an arrow on the
FR2 display, as shown in the
sample screen:
0:43 2 HR XXX
of the CPR pause and return to analyzing. If either the CPR
Timer or the NSA Action setting is programmed to 1.5
minutes or longer, the Resume Key setting is automatically
enabled (ON).
If enabled, the Resume Key is
accessed by pressing the
lower Option button
indicated by an arrow on the
FR2 display, as shown in the
sample screen:
0:43 2
MONITORING
ATTEND TO PATIENT
PAUSE FOR CPR >
PAUSED
ATTEND TO PATIENT
RESUME ANALYZING >
6
ADVANCED USE
PROMPT
INTERVALS
(minutes)
M3860A and M3861A H
0.5, 1.0, 1.5,
2.0, 2.5, 3.0
EARTSTREAM FR2 Defibrillator 6-5
0.5 Sets the interval for “Press to Analyze” prompts provided
during ADVANCED mode operation.
Page 53

Using Setup Features
RUN SELFTEST
REVIEW INCIDENT
NO DATA CARD
GOOD BATTERY
NEXT
IN EMERGENCY
PRESS OFF TO QUIT
DEVICE HISTORY
BATTERY HISTORY
SETUP
CLOCK
RETURN
IN EMERGENCY
PRESS OFF TO QUIT
SETUP
RETURN
RECEIVE SETUP
READ SETUP
REVIEW SETUP
Using Setup Features
NOTE: To move around the menus displayed, use the Option buttons as follows:
• Press the LOWER Option button to move the highlight bar from one item to
another on the menu.
• Press the UPPER Option button to select the highlighted item or to scroll
through the settings for that item.
EARTSTREAM FR2 comes with a factory default setup designed to meet the
The H
needs of most users. The setup feature of the FR2 lets you review the current setup
of your H
SETUP menu:
1. Remove and reinstall the battery to bring up the first menu on the screen.
NOTE: This screen will not be displayed if the FR2 is connected to defibrillation
pads (that are applied to the patient) when the battery is inserted, and you will not
be able to access the menu items. In addition, the battery insertion selftest and
periodic automatic selftests cannot run while the defibrillation pads are connected.
Be sure to unplug the pads connector from the FR2 after each use. Do not store
the FR2 with the pads connected.
2. Within 10 seconds of installing the battery, press the lower Option button to
3. Press the upper Option button to select NEXT.
4. Press the lower Option button to move the highlight bar to SETUP.
5. Press the upper Option button to bring up the SETUP menu
The SETUP menu allows you to receive setup directly from another H
FR2 or a computer running C
review current setup.
Reviewing Current Setup
A good way to understand the setup of your FR2 is to review the setup it currently
uses.
1. Select REVIEW SETUP from the SETUP menu. The first of a series of REVIEW
2. After reviewing the screen contents, press the upper Option button to select
3. The last screen allows you to select RETURN and go back to the SETUP menu.
EARTSTREAM FR2 or install a revised setup if appropriate. To go to the
move the highlight bar to NEXT.
EARTSTREAM
ODERUNNER software, read setup from a data card, or
SETUP screens is displayed.
NEXT and move to the next screen.
6-6 Setup and Advanced Mode Features
Page 54

Using Setup Features
.
REVIEW SETUP
NEXT
SPEAKER VOLUME 8
RECORD VOICE NO
ECG DISPLAY ON
AUTOSEND PST OFF
ECG OUT OFF
REVIEW SETUP
NEXT
SHOCK SERIES 3
PROTOCOL TIMEOUT 1.0
PAUSE KEY MONITOR
RESUME KEY OFF
CPR TIMER 1.0
NSA ACTION MONITOR
REVIEW SETUP
RETURN
ADVANCED OFF
CPR PROMPT LONG
PROMPT INTERVALS
MONITOR 1.0
ADVANCED USE 0.5
Revising Setup
There are several ways to change the setup of your HEARTSTREAM FR2. All of them
require use of products or accessories available separately from Agilent
Technologies.
Use the M3864A Training & Administration Pack to enable software within the
FR2 to modify its setup. (Instructions are provided with the Pack.)
Read a revised setup from a data card containing the setup. (Instructions are
provided later in this chapter.)
Use the infrared communications feature of the FR2 to receive the revised setup
from another FR2. (Instructions are provided later in this chapter.)
Use the infrared communications feature of the FR2 to receive the revised setup
from a computer running C
with the C
ODERUNNER software.)
CAUTION: Alteration of the factory default setup of the FR2 can affect its performance and should be
performed under the authorization of your Medical Director. Modifications to device operation resulting from
changes to the default settings should be specifically covered in user training.
ODERUNNER software. (Instructions are provided
6
M3860A and M3861A H
See the tables describing the various setup parameters at the beginning of this
chapter. See Appendix E, Glossary of Terms, for definitions of setup items.
Receiving Setup
This method uses the infrared communication feature of the HEARTSTREAM FR2 to
receive setup directly from another H
Training & Administration Pack installed in it) or from a computer running
C
ODERUNNER software. (See instructions provided with CODERUNNER.) To receive
setup from another FR2, follow these steps:
1. Locate the infrared communication port on each H
them up with one another, so that the infrared “eye” in each one has an
uninterrupted view of the “eye” in the other. (See the diagram on the inside
front cover.) The two devices should be no more than 1 meter apart.
EARTSTREAM FR2 Defibrillator 6-7
EARTSTREAM FR2 (which must have the
EARTSTREAM FR2 and line
Page 55

Using Setup Features
SETUP
RETURN
RECEIVE SETUP
READ SETUP
REVIEW SETUP
RECEIVE SETUP
EXIT
READY TO RECEIVE
CHECK SENDER
SETUP
RETURN
RECEIVE SETUP
READ SETUP
REVIEW SETUP
READ SETUP
EXIT
!
NO SETUP FILE
2. Make sure the “sending” HEARTSTREAM FR2 has the Training & Administration
Pack installed and is ready to send. (See the M3864A H
EARTSTREAM FR2
Training & Administration Pack Reference Guide for instructions.)
3. Select RECEIVE SETUP from the setup menu:
4. A new screen comes up. Until the two H
EARTSTREAM FR2 devices are properly
positioned, the screen displays READY TO RECEIVE and prompts you to check
the sending FR2.
5. Setup data are automatically transferred as soon as the infrared ports are
correctly aligned.
6. If you select EXIT before the transfer is complete, the revised setup will not be
received. When the transfer is complete, the screen on the “receiving” FR2
displays a SETUP COMPLETE message. Your H
EARTSTREAM FR2 immediately
uses the new setup.
Receiving setup from a computer running C
directions for use provided with C
ODERUNNER software.
ODERUNNER software is discussed in the
Reading Setup
This method copies setup data from a data card to your HEARTSTREAM FR2. To read
the setup, follow these steps:
1. Insert the data card in the data card tray and install the loaded tray into the
data card slot in the H
2. Remove and reinstall the battery pack to bring up the first menu on the screen.
3. Select NEXT to go to the second menu screen
4. Select SETUP to go to the setup menu screen.
5. Select READ SETUP from the setup menu.
6. A new screen comes up. If the H
cannot find a valid setup on the data card, the screen displays a NO SETUP FILE
error message. Otherwise, the H
information from the data card immediately.
7. If you select EXIT before the transfer is complete, the revised setup will not be
copied. When the transfer is finished, the screen displays a SETUP COMPLETE
message. Your H
EARTSTREAM FR2.
EARTSTREAM FR2 cannot read the data card or
EARTSTREAM FR2 begins reading the setup
EARTSTREAM FR2 immediately uses the revised setup.
6-8 Setup and Advanced Mode Features
Page 56

RUN SELFTEST
REVIEW INCIDENT
NO DATA CARD
GOOD BATTERY
NEXT
IN EMERGENCY
PRESS OFF TO QUIT
CLOCK
RETURN
RECEIVE TIME
SEND TIME
07 / 09 / 00
DD / MM / YY
14 : 28
RECEIVE TIME
EXIT
READY TO RECEIVE
CHECK SENDER
Sending and Receiving Clock Settings
Sending and Receiving Clock Settings
To synchronize the clock settings of your HEARTSTREAM FR2 with the clock of
another FR2 or a computer running C
communication feature.
Instructions for synchronizing clock settings using a computer running CODERUNNER
are provided with the C
ODERUNNER software.
To transfer clock settings from one FR2 to another:
1. Remove and reinstall the battery of both FR2 devices to bring up the first menu
screen.
2. Select NEXT to go to the second menu screen.
3. Select CLOCK from the second menu screen. The CLOCK screen then comes up.
4. Locate the infrared communication port on each H
them up with one another, so that the infrared “eye” in each one has an
uninterrupted view of the “eye” in the other. (See the diagram on the back of the
first page of this manual.) The two devices should be no more than 1 meter
apart.
5. Select SEND TIME from the CLOCK screen on the “sending” H
6. Select RECEIVE TIME from the CLOCK screen of the “receiving” FR2.
7. A new screen comes up. Until the two H
positioned, the screen on the receiving FR2 displays READY TO RECEIVE and
prompts you to check the sending FR2. The screen on the sending FR2 displays
READY TO SEND and prompts you to check the receiving FR2.
8. Clock settings are automatically transferred as soon as the infrared ports are
correctly aligned.
ODERUNNER software, you can use the infrared
EARTSTREAM FR2 and line
EARTSTREAM FR2.
EARTSTREAM FR2 devices are properly
6
M3860A and M3861A H
Using Advanced Mode Features
The HEARTSTREAM FR2 provides an advanced mode that allows responders who are
appropriately trained to override the programmed FR2 protocol and take
responsibility for certain aspects of the operating sequence used by the FR2 to treat
the patient.
As described earlier in this chapter, the factory default setup of the FR2 must be
modified to provide access to advanced mode features. This requires use of the
administration function of the M3864A Training & Administration Pack.
If you are an expert user authorized by your Medical Director to modify setup, hold
down both the Option buttons while installing the Training & Administration Pack
EARTSTREAM FR2 Defibrillator 6-9
Page 57

Using Advanced Mode Features
in the FR2, then select SETUP. Then select MODIFY SETUP from the SETUP menu.
Select ADVANCED from the third menu of the MODIFY SETUP menu.
ADMINISTRATION
SETUP
CLOCK
REMOVE BATTERY
TO QUIT
SETUP
RETURN
RECEIVE SETUP
READ SETUP
MODIFY SETUP
SEND SETUP
WRITE SETUP
MODIFY SETUP
RETURN
ADVANCED OFF
CPR PROMPT LONG
PROMPT INTERVALS
MONITOR 1.0
ADVANCED USE 0.5
Using the upper Option button, scroll through the available settings for ADVANCED.
The advanced mode options available are based on the FR2 model used. For the
M3860A, the user can select ANALYZE or CHARGE. For the M3861A the user can
select only ANALYZE. (Detailed directions for use are supplied with the Pack.)
CAUTION: Alteration of the factory default setup of the FR2 can affect its performance and should be
performed under the authorization of your Medical Director. Modifications to device operation resulting from
changes to the default settings should be specifically covered in user training.
CAUTION: The HEARTSTREAM FR2 advanced mode’s MANUAL CHARGE feature is intended for use only by
authorized operators who have been specifically trained in cardiac rhythm recognition and in defibrillation
therapy using manual charge and shock delivery.
This feature is particularly useful for organizations that include responders who
have Basic Life Support (BLS) training as well as more highly trained responders
who may be certified in Advanced Life Support (ALS). In such situations, the
Medical Director may set up a “tiered-response” system. The H
EARTSTREAM FR2 is
specifically designed to provide different product features appropriate to each tier of
responder.
In a scenario where a BLS responder is the first on the scene of an incident, he or
she is trained to treat the patient immediately — for example, to check for breathing,
responsiveness, and pulse; to apply the defibrillation pads and connect them to the
HEARTSTREAM FR2; and to follow the voice and text prompts provided by the
H
EARTSTREAM FR2 in its AED mode. When an ALS-trained responder arrives, the
BLS responder “hands off” the patient’s care to the more highly trained responder.
Because these second-tier responders have advanced training and developed clinical
skills, they may be authorized to access the advanced mode features of the
EARTSTREAM FR2. These include user-initiated analysis and manual charge and
H
disarm control.
6-10 Setup and Advanced Mode Features
Page 58

0:43 2
ANALYZE >
Using Advanced Mode Features
Using the Manual Analyze Feature
The Manual Analyze feature is available in both the M3860A and the M3861A
models, when enabled in setup.
To enter the advanced mode during use of an FR2 that has this feature enabled,
press both Option buttons simultaneously. This brings up a screen that includes a
highlighted line at the bottom, labeled ANALYZE, with an arrowhead pointing to the
lower Option button.
6
0:43 2 HR XXX
ANALYZE >
PRESS ANALYZE
0:43 2 HR XXX
ANALYZE >
In the M3861A H
the display includes the patient’s ECG and heart rate.
Press the lower Option button (ANALYZE) to initiate rhythm analysis by the FR2. If
a shock is advised, the FR2 automatically charges, and prompts you to press the
Shock button.
After shock delivery, the H
and monitors the patient’s heart rhythm. If a potentially shockable rhythm is
detected, the screen advises you to PRESS ANALYZE.
NOTE: If you do not press the lower Option button (labeled ANALYZE) to initiate
rhythm analysis when prompted, the H
prompt if a shock is advised. It is important that you understand that entering the
advanced mode entails taking responsibility for these functions.
If the rhythm analysis results in a Shock Advised decision, the FR2 begins charging,
prompts you to press the Shock button, and displays a MANUAL DISARM option at
the top of the screen. If for any reason you want to cancel the shock, press the upper
Option button to disarm the FR2.
To return to non-manual, AED mode operation, turn the FR2 off by pressing the
On/Off button. Then turn the FR2 on by pressing the On/Off button again.
EARTSTREAM FR2, the patient’s ECG is not displayed; in the M3860A,
EARTSTREAM FR2 returns to the advanced mode display
EARTSTREAM FR2 does not analyze and
Using the Manual Charge Feature (M3860A only)
The manual charge feature is available only in the M3860A, when enabled in setup.
MANUAL >
0:43 2 HR XXX
ANALYZE >
M3860A and M3861A H
EARTSTREAM FR2 Defibrillator 6-11
To enter the advanced mode during use of an FR2 that has this feature enabled,
press both Option buttons simultaneously. This brings up a screen that includes a
highlighted line at the top, labeled MANUAL, with an arrowhead pointing to the
upper Option button, and another at the bottom, labeled ANALYZE, with an
arrowhead pointing to the lower Option button.
When the advanced mode is entered, display of the patient’s ECG and heart rate is
automatically initiated.
Page 59

Using Advanced Mode Features
MANUAL CHARGE>
0:43 2
MANUAL DISARM >
CHARGING
STAND CLEAR
0:43 2
Pressing the lower Option button (ANALYZE) provides user-initiated rhythm
analysis as described above. Pressing the upper Option button (MANUAL) brings up
a new screen. The highlighted top line is labeled MANUAL CHARGE, with an
arrowhead pointing to the upper Option button.
If the ECG display shows that, in your expert clinical judgment, the patient has a
shockable rhythm, press the upper Option button (MANUAL CHARGE). The
EARTSTREAM FR2 will immediately charge for shock delivery.
H
As soon as charging begins, the screen message changes to CHARGING, STAND
CLEAR, and the label for the arrowhead pointing to the upper Option button
changes to MANUAL DISARM.
The FR2 beeps while it is charging. When the beeping changes to a continuous tone
and the Shock button light flashes, press the Shock button to deliver a shock.
However, if the ECG display shows that the patient’s rhythm has changed to a
non-shockable rhythm, press the upper Option button to disarm the HEARTSTREAM
FR2.
After shock delivery, the H
EARTSTREAM FR2 returns to the initial advanced mode
screen. To return to non-manual, AED mode operation, turn the FR2 off by pressing
the On/Off button. Then turn the FR2 on by pressing the On/Off button again.
6-12 Setup and Advanced Mode Features
Page 60

7 Data Management and Review
Overview
The HEARTSTREAM FR2 is designed to make it easy to manage incident data. Some
information is automatically stored in the internal memory of the H
More detailed data can be stored on a data card if desired. The incident information
stored in the HEARTSTREAM FR2’s internal memory, or a summary of the information
recorded on the data card, can then be displayed on the H
review. In addition, C
store and review the detailed recorded information from a data card.
Recording Incident Data
The HEARTSTREAM FR2 has two ways of recording information about an emergency
incident, so it can be reviewed after the incident: in internal memory and on a data
card.
ODERUNNER software can be used on a personal computer to
EARTSTREAM FR2.
EARTSTREAM FR2 screen for
Recording Data in Internal Memory
Summary data for an incident is automatically recorded in internal memory by the
H
EARTSTREAM FR2 while you are using it.
Recording Data on a Data Card
M3854A data cards can be used to store several hours of detailed incident data,
including events and ECG.
IMPORTANT NOTE: To record incident data on a data card, the data card must
be installed before you turn on the H
CAUTION: The HEARTSTREAM FR2 is designed to be used only with Agilent Technologies-approved
accessories. The HEARTSTREAM FR2 may perform improperly if non-approved accessories are used.
M3860A and M3861A HEARTSTREAM FR2 Defibrillator 7-1
EARTSTREAM FR2.
Page 61

Recording Incident Data
To install a data card:
1. Make sure the data card is clean and dry.
2. Load the data card into its plastic tray, with the tray’s “tongue” fitting over the
matching yellow area on the data card. The label on the card should face up. The
label has an arrow indicating which side to insert into the data card port.
3. Make sure the FR2 is off (in standby mode), or that the battery has been
removed.
4. Hold the loaded tray by its handle and gently insert the tray into the data card
port on the right side of the H
port. Do not force the tray into the port. If the tray is hard to insert, remove it
and make sure that the arrow label is face up and pointing toward the data card
port.
The data card will automatically record incident data the next time the
EARTSTREAM FR2 is turned on.
H
To avoid running out of data card space during an incident, it is recommended that
each data card be used to record the information for only one incident and that it be
replaced after each use of the H
If you record information from more than one incident on a data card, it is
important to review how much time is left on the used data card before recording a
new incident. To do this, load the data card into the data card tray, insert the tray in
the FR2, then remove and reinstall the battery. The first screen displayed shows how
much recording time remains on the card.
EARTSTREAM FR2. Push the tray all the way into the
EARTSTREAM FR2.
NOTE: During an incident, if for any reason you replace the battery or turn off the
H
EARTSTREAM FR2 for less than five minutes, the FR2 considers this to be a
“continued use” situation, and:
• the information stored about the incident is saved,
• any additional events recorded after the battery is reinstalled will be
treated as part of the same incident, and
• the selftest will not automatically run when the battery is reinstalled.
To replace a data card:
IMPORTANT: You must turn the FR2 off (return it to standby mode) before you
remove the data card, to ensure that no incident data are lost.
1. Press the On/Off button to turn off the FR2. Never replace the data card unless
the FR2 is turned off.
2. Remove the loaded data card tray by grasping its handle and pulling it out of the
port.
3. Remove the data card from the tray.
7-2 Data Management and Review
Page 62

RUN SELFTEST
REVIEW INCIDENT
NO DATA CARD
GOOD BATTERY
NEXT
IN EMERGENCY
PRESS OFF TO QUIT
REVIEW INCIDENT
RETURN
SUMMARY INFORMATION
ELAPSED TIME: 3:18
SHOCKS DELIVERED: 6
Reviewing Incident Data
4. Give the data card to the appropriate person in your organization.
5. Because it helps seal the FR2 against moisture, the data card tray should
always be reinserted into the port of the HEARTSTREAM FR2. Either load a new
data card into the tray and insert it, or insert the empty data card tray into the
port.
Reviewing Incident Data
Reviewing Data from Internal Memory
Summary information from the last incident that is stored in the internal memory of
EARTSTREAM FR2 can be displayed on its screen for review. To review this
the H
information:
1. Remove the data card if one is installed and unplug the pads connector.
2. Remove and reinstall the battery. (Make sure you are using the regular gray
battery, not the yellow Training & Administration Pack.)
3. Select REVIEW INCIDENT from the menu. A new screen comes up.
4. Observe and record, if desired, the summary information displayed on the
screen:
how long the incident recorded by the FR2 lasted, and
how many shocks were delivered during the incident.
This information stays in the H
review until the next time the H
from the new incident will be displayed.
EARTSTREAM FR2’s memory and can be displayed for
EARTSTREAM FR2 is used. After that time, the data
7
REVIEW INCIDENT
RETURN
REVIEW EVENTS
REVIEW ECG
ELAPSED TIME: 3:18
SHOCKS DELIVERED 6
FIRST SHOCKS AT:
00:18 01:10 01:49
M3860A and M3861A H
EARTSTREAM FR2 Defibrillator 7-3
Reviewing Data from a Data Card
If a data card is installed when the HEARTSTREAM FR2 is turned on for use during an
incident, the H
data card. To review this information on the H
1. Make sure the Training & Administration Pack is not installed.
2. Make sure the data card is installed. Unplug the pads connector.
3. Remove and reinstall the battery.
4. Select REVIEW INCIDENT from the menu. A new screen comes up. This screen
displays:
ELAPSED TIME — how long the incident recorded by the FR2 lasted,
SHOCKS DELIVERED — how many shocks were delivered during the
EARTSTREAM FR2 automatically records detailed information on the
EARTSTREAM FR2 screen:
incident, and
Page 63

Reviewing Incident Data
FIRST SHOCKS AT — the times at which the first three shocks were
delivered.
NOTE: If the data card does not contain an events file, only the summary
information from FR2 internal memory will be displayed when REVIEW INCIDENT
is selected.
REVIEW EVENTS
RETURN
NEXT EVENTS
POWER ON 0:00
PADS ON 0:04
SHOCK ADVISED 0:13
ARMED 0:18
SHOCKED 0:22
REVIEW INCIDENT
RETURN
REVIEW EVENTS
REVIEW ECG
ELAPSED TIME: 3:18
SHOCKS DELIVERED 6
FIRST SHOCKS AT:
00:18 01:10 01:49
5. To review the events that occurred during the incident, select REVIEW EVENTS.
A new screen comes up. This and following screens, accessed by selecting NEXT
EVENTS, display elapsed time information for critical activities in using the
EARTSTREAM FR2. These include:
H
POWER ON — when the HEARTSTREAM FR2 was turned on,
PADS ON — when the defibrillation pads were connected,
SHOCK ADVISED — when a shock was advised,
ARMED — when the FR2 charged for shock delivery,
SHOCKED — when a shock was delivered,
SHOCK ABORTED — when a shock was aborted,
PAUSE FOR CPR — when a pause occurred
POWER OFF — when the FR2 was turned off
Additional information may be displayed if your H
EARTSTREAM FR2 is using a revised
setup allowing advanced mode operation.
REVIEW EVENTS
RETURN
NEXT EVENTS
NO SHOCK ADVSD 0:31
PAUSE FOR CPR 0:40
ADVANCED USE 1:00
MAN OVERRIDE 1:10
MANUAL CHARGE 1:12
REVIEW EVENTS
RETURN
NEXT EVENTS
ARMED 1:19
SHOCKED 1:21
MANUAL ANALYZE 1:26
NO SHOCK ADVISED 1:38
PADS OFF 1:42
REVIEW EVENTS
RETURN
POWER OFF 1:47
6. To review the first six seconds of the recorded presenting ECG for the incident,
select REVIEW ECG. A new screen comes up. This screen displays a
three-second segment of the presenting ECG from the incident.
NOTE: If the data card does not contain a presenting ECG file, REVIEW ECG will not
REVIEW ECG
RETURN
NEXT ECG SEGMENT
be available.
7. Select NEXT ECG SEGMENT to review the second three-second segment of the
presenting ECG.
Data cards can be reused if desired. Using a personal computer running
ODERUNNER software, you can copy the information from a data card, then erase
C
the card and reuse it in the H
EARTSTREAM FR2.
7-4 Data Management and Review
Page 64

A Accessories for the HEARTSTREAM FR2
HEARTSTREAM Accessories
Accessories for the HEARTSTREAM FR2 available separately from Agilent Technologies
or Laerdal-Agilent Alliance include the following:
Spare M3863A Battery Pack (recommended)
Spare Defibrillation Pads (recommended)
Spare M3853A Data Card Tray
M3854A Data Card, with Data Card Tray
M3868A Carrying Case
M3857A Wall Mount Bracket
M3864A Training & Administration Pack
M3855A Battery Charger, with power cord, for use with M3864A Training &
Administration Pack only
68-PCHAT Fast Response Kit (pouch containing a pocket mask, a disposable
razor, 2 pairs of gloves, a pair of paramedics scissors, and an absorbent wipe)
A
Suggested Additional Items
It may be useful to keep some additional items with your HEARTSTREAM FR2 for use if
needed when an incident occurs. Some suggested supplies include:
a pair of paramedic’s shears or scissors*
a disposable razor designed for removing chest hair*
a pocket mask or face shield*
disposable gloves*
a towel or antiseptic wipes*
Your medical director may have other requirements for supplies.
* Contained in the Fast Response Kit available from Agilent Technologies.
M3860A and M3861A HEARTSTREAM FR2 Defibrillator A-1
Page 65

Accessories
Notes
A-2
Page 66

B Technical Specifications
The specifications for the HEARTSTREAM FR2 provided in this chapter apply to both
the M3860A and M3861A, unless otherwise noted.
HEARTSTREAM FR2 AED Specifications
Physical
CATEGORY
Size 2.6" high x 8.6" wide x 8.6" deep (6.6 cm x 21.8 cm x 21.8 cm).
Weight Approximately 4.7 lbs (2 kg) with battery installed.
NOMINAL SPECIFICATIONS
Environmental
CATEGORY
Operating Temperature
and Humidity
Standby Temperature
and Humidity
Altitude Meets MIL-810E 500.3, Procedure II (-500 feet to 15,000 feet).
Shock/Drop Abuse
Tolerance
Vibration Meets MIL-STD-810E 514.4-17.
Sealing With data card tray and battery installed, meets IEC 529 class IP54.
32° to 122° F (0° to 50° C).
0% to 95% relative humidity (non-condensing).
32° to 109° F (0° to 43° C).
0% to 75% relative humidity (non-condensing).
Applies to H
pads.
Meets MIL-STD-810E 516.4, Procedure IV (after a 1 meter drop to any edge,
corner, or surface, in standby mode).
EARTSTREAM FR2 with battery installed and stored with defibrillation
NOMINAL SPECIFICATIONS
M3860A and M3861A HEARTSTREAM FR2 Defibrillator B-1
Page 67

HEARTSTREAM FR2 AED Specifications
CATEGORY
NOMINAL SPECIFICATIONS
ESD Meets EN 61000-4-2:1998 Severity Level 4.
EMI (Radiated) Meets EN 60601-1-2 limits (1993), method EN 55011:1998 Group 1 Level B.
EMI (Immunity) Meets EN 60601-1-2 limits (1993), method EN 61000-4-3:1998 Level 2.
Aircraft: Method Meets RTCA/DO-160D:1997 Section 21 (Category M - Charging).
Defibrillator
CATEGORY
Wave form Biphasic truncated exponential.
Waveform parameters are automatically adjusted as a function of patient
defibrillation impedance.
In the diagram at left, A is the duration of phase 1 and B is the duration of phase
2 of the waveform, C is the interphase delay, V
final voltage.
The HEARTSTREAM FR2 delivers shocks to load impedances from 25 to 180 ohms.
The duration of each phase of the waveform is dynamically adjusted based on
delivered charge, in order to compensate for patient impedance variations, as
shown in the following examples:
Load Phase 1 Phase 2 Delivered
Resistance (ohms) Duration (ms) Duration (ms) Energy (J)
NOMINAL SPECIFICATIONS
is the peak voltage, and Vf the
p
25 2.8 2.8 140
50 4.09 4.09 150
1009.0 6.0157
125 12.0 8.0 161
150 12.0 8.0 157
Energy 150 J nominal into a 50 ohm load.
Charge Control Controlled by Patient Analysis System for semi-automatic operation. Can be
programmed for manual initiation using advanced mode of the M3860A.
Charge Time
from “Shock Advised”
< 10 s typical, including confirming analysis. Charge time increases near end of
battery service life.
Shock-to-Shock Cycle Time < 20 s typical, including analysis, in AED mode.
B-2
Page 68

HEARTSTREAM FR2 AED Specifications
CATEGORY
“Charge Complete”
Indicator
Disarm (AED mode) Once charged, the H
Disarm (advanced mode) Once charged, the H
Shock button flashes, audio tone sounds.
• if patient’s heart rhythm changes to non-shockable rhythm, OR
• a shock is not delivered within 30 s after the FR2 is armed, OR
• the PAUSE button (if enabled) is pressed, OR
• the On/Off button is pressed to turn off the FR2, OR
• the defibrillation pads are removed from the patient or the pads connector is
disconnected from the FR2.
in advanced mode ANALYZE
• the MANUAL DISARM button is pressed, OR
• if patient’s heart rhythm changes to non-shockable rhythm, OR
• a shock is not delivered within 30 s after the FR2 is armed, OR
• the On/Off button is pressed to turn off the FR2, OR
• the defibrillation pads are removed from the patient or the pads connector
is disconnected from the FR2.
in advanced mode CHARGE (M3860A only)
• the MANUAL DISARM button is pressed, OR
• a shock is not delivered within 30 s after charging , OR
• the On/Off button is pressed to turn off the FR2, OR
• the defibrillation pads are removed from the patient or the pads connector
is disconnected from the FR2.
NOMINAL SPECIFICATIONS
EARTSTREAM FR2 will dump the charge if:
B
EARTSTREAM FR2 will dump the charge if:
Shock Delivery Vector Via defibrillation pads placed in the anterior-anterior (Lead II) position.
ECG Analysis System
CATEGORY
Function Evaluates impedance of defibrillation pads for proper contact with patient skin,
and evaluates the ECG rhythm and signal quality to determine if a shock is
appropriate.
Protocols Follows pre-programmed settings to match local EMS guidelines or medical
protocols. The settings can be modified using the setup options.
M3860A and M3861A HEARTSTREAM FR2 Defibrillator B-3
NOMINAL SPECIFICATIONS
Page 69

HEARTSTREAM FR2 AED Specifications
CATEGORY
Shockable Rhythms Ventricular fibrillation (VF) and certain ventricular tachycardias, including
ventricular flutter and polymorphic ventricular tachycardia (VT). The
HEARTSTREAM FR2 uses multiple parameters to determine if a rhythm is
shockable.
NOTE: For safety reasons, some very low-amplitude or low-frequency rhythms
may not be interpreted as shockable VF rhythms. Also, some VT rhythms may
not be interpreted as shockable rhythms.
Asystole On detection of asystole, provides CPR prompt at programmed interval.
Pacemaker Detection On detection of a pacemaker (in advanced mode only), provides screen display of
PACEMAKER DETECTED alert, and M3860A includes pacemaker artifact in ECG
display. In both models, pacemaker artifact is removed from the signal for rhythm
analysis.
NOMINAL SPECIFICATIONS
ECG Analysis Performance
RHYTHM CLASS
Shockable Rhythm —
ventricular fibrillation
Shockable Rhythm —
ventricular tachycardia
ECG TEST
a
SAMPLE
SIZE
300 Meets AAMI DF39 requirement and AHA recommendationb
(sensitivity >90%) for adult defibrillation
100 Meets AAMI DF39 requirement and AHA recommendation
(sensitivity >75%) for adult defibrillation
NOMINAL SPECIFICATIONS
b
Non-Shockable Rhythm —
Normal Sinus Rhythm
Non-Shockable Rhythm —
Asystole
Non-Shockable Rhythm —
All other non-shockable
rhythms
300 Meets AAMI DF39 requirement (specificity > 95%) and AHA
recommendation
100 Meets AAMI DF39 requirement and AHA recommendation
(specificity >95%) for adult defibrillation
450 Meets AAMI DF39 requirement and AHA recommendation
(specificity >95%) for adult defibrillation
b
(specificity >99%) for adult defibrillation
a. From Agilent Technologies Heartstream Operation ECG rhythm databases.
b. American Heart Association (AHA) AED Task Force, Subcommittee on AED Safety & Efficacy. Auto-
matic External Defibrillators for Public Access Use: Recommendations for Specifying and Reporting
Arrhythmia Analysis Algorithm Performance, Incorporation of New Waveforms, and Enhancing Safety.
American Heart Association (AHA) AED Task Force, Subcommittee on AED Safety & Efficacy. Circu-
lation 1997;95:1677-1682.
B-4
b
b
Page 70

Display
HEARTSTREAM FR2 AED Specifications
CATEGORY
Monitored ECG Lead ECG information is received from defibrillation pads in anterior-anterior (Lead
II) position. (Displayed on M3860A only.)
Display Range
(M3860A only)
Screen Type High-resolution liquid crystal display (LCD) with backlight.
Screen Dimensions 2.8" wide x 2.3" high (70 mm x 58 mm).
Sweep Speed
(M3860A only)
ECG Display 3 second-segments displayed (M3860A only).
Frequency Response
(Bandwidth)
Sensitivity 1.16 cm/mV, nominal.
Heart Rate Displayed
(Normal Sinus Rhythm)
Differential: +/-2 mV full scale, nominal.
23 mm/s nominal.
Nondiagnostic rhythm monitor 1 Hz to 20 Hz (-3 dB), nominal.
30 to 300 bpm, updated each analysis period. Displayed (M3860A only) during
monitoring and advanced modes.
NOMINAL SPECIFICATIONS
Controls and Indicators
CATEGORY
NOMINAL SPECIFICATIONS
B
LCD Screen High-resolution, backlighted LCD screen, displays text messages and, for model
M3860A only, ECG.
Controls On/Off button
Shock button
Option buttons
LED indicators Connector socket LED, flashes to indicate socket location. LED is covered when
defibrillation pad connector is properly inserted.
Shock button LED flashes when defibrillator is armed.
Audio Speaker Provides voice prompts (volume is adjustable via Setup screen).
Beeper Chirps when a self-test has failed.
Provides various warning beeps during normal use.
M3860A and M3861A HEARTSTREAM FR2 Defibrillator B-5
Page 71

Accessories Specifications
CATEGORY
Status Indicator Status indicator LCD displays device readiness for use.
Low Battery Detection Automatic during daily periodic self-testing.
Low Battery Indicator Solid or flashing red X Status Indicator on front panel; screen display LOW
BATTERY or REPLACE BATTERY warning, as appropriate.
NOMINAL SPECIFICATIONS
Accessories Specifications
M3863A Battery Pack Specifications
CATEGORY
Battery Type 12 VDC, 4.2 Ah, lithium manganese dioxide. Disposable, recyclable, long-life
primary cell.
Capacity When new, a minimum of 300 shocks or 12 hours’ operating time at 77° F (25° C).
Shelf Life prior to
Installation
Standby Life after
Installation
Typically, 5 years from date of manufacture when stored under standby
environmental conditions in original packaging.
Typically, 5 years. >4 years when stored under standby environmental conditions
(battery installed, FR2 unused).
NOMINAL SPECIFICATIONS
HEARTSTREAM Defibrillation Pads Specifications
CATEGORY
Pads, Cable, and Connector Disposable and self-adhesive. Defibrillation pads have a nominal active surface
area of 100 cm
cm (48 inch), typical, cable and connector.
Defibrillation Pad
Requirements
Use only H
pads on the patient as illustrated on the back of each pad.
2
each and are provided in a sealed package with an integrated 122
EARTSTREAM defibrillation pads with the HEARTSTREAM FR2. Place the
NOMINAL SPECIFICATIONS
(Optional) M3854A Data Card Specifications
CATEGORY
Capacity 4 hours of event and ECG data, or 30 minutes with voice recording.
B-6
NOMINAL SPECIFICATIONS
Page 72

C Differences between the FORERUNNER
and the H
EARTSTREAM FR2 AEDs
Overview
If your organization is currently using the FORERUNNER AED and has recently
purchased new H
similar, but the FR2 provides additional functionality.
Some of the improvements in the FR2 will be immediately obvious. In comparison to
the original F
a brighter and higher-contrast display screen,
an increased battery capacity and service life, and
an optional Training & Administration pack with an integrated rechargeable
battery, and separate charger.
Other improved features in the FR2 are more subtle, such as:
facilitation of patient hand-off in tiered-response system, including ability to
review presenting ECG;
more detailed voice and text prompts;
more data management options, including infrared communications capability
for data transfer; and
manual (advanced) mode operation remains in effect after entry until the unit is
turned off.
EARTSTREAM FR2 AEDs, you will find that the two devices are very
ORERUNNER, the FR2 has:
Some of the specific differences between the two devices are described in the
following table.
NOTE: In the following table, where the name of a feature has been changed from
the name used in the F
quotation marks.
M3860A and M3861A HEARTSTREAM FR2 Defibrillator C-1
ORERUNNER literature, the new FR2 name is shown in
Page 73

Comparison with ForeRunner
FORERUNNER HEARTSTREAM FR2
THREE MODELS
EM ECG display with optional manual
mode (manual charge and discharge).
E ECG display, no manual mode.
S No ECG display, no manual mode.
BATTERY
Capacity Typically 100 shocks or 5 hours of’
operating time.
Standby Life Typically 1 year.
TRAINING & ADMINISTRATION
Tr ai n in g Requires Training Card; uses standard
battery; provides 8 training scripts.
Administration Requires Setup Card; uses standard
battery.
Setup transfer No transfer of setup data.
PANEL LAYOUT AND CONTROLS
Display LCD display with backlighting.
Contrast buttons Small, close together.
Manual Mode entry
Separate Manual Override button on
front panel (EM only); returns to AED
mode after shock delivery or manual
timeout.
TWO MODELS
M3860A ECG display, programmable
advanced mode options (analysis on
demand, or both analysis and
charge/disarm on demand).
M3861A No ECG display, programmable
advanced mode option (analysis on
demand only).
BATTERY
Capacity Typically 300 shocks or 12 hours of
operating time.
Standby Life Typically 5 years.
TRAINING & ADMINISTRATION
Tr ai n in g Requires Training & Administration
Pack; uses integrated rechargeable
battery;* provides 10 training scripts
Administration Requires Training & Administration
Pack; uses integrated rechargeable
battery.*
* Battery Charger available separately
Setup transfer
PANEL LAYOUT AND CONTROLS
Display Brighter, higher-contrast LCD
“Option” buttons Larger, spaced further apart.
“Advanced” Mode entry
Infrared transfer of setup data.
display.
Uses Option buttons for fast patient
hand-off to ALS responders; remains
in advanced mode until turned off.
DATA REVIEW AND MANAGEMENT
PC cards Three cards of limited capacity (ER1,
typically 15 minutes; EC1, typically
30 minutes; VC1, typically 26
minutes), using clock on card. No
setup data transfer capability.
Data display
C-2
No on-screen review of presenting ECG.
DATA REVIEW AND MANAGEMENT
“Data” card One cost-effective card, with
significantly increased capacity
(approximately 4 hours of event and
ECG data, or 30 minutes with voice,
using FR2’s internal clock.) Setup data
transfer capability.
Data display On-screen review of presenting ECG.
Page 74

D Glossary of Symbols and Controls
HEARTSTREAM FR2 Symbols and Controls
SYMBOL DESCRIPTION
On/Off button. Turns the HEARTSTREAM FR2 on or off; disarms HEARTSTREAM FR2,
stops automatic self-test. When the optional Training & Administration Pack is
being used in the Training function, this button is used to select and exit training
scripts.
Shock button. Delivers shock to patient when the H
Upper and lower Option buttons. Allow you to move around in and select an item from
a display menu; provide adjustment of display screen contrast.
Defibrillation protection. Defibrillation protected, type BF patient connection.
High voltage.
Refer to operating instructions.
EARTSTREAM FR2 is charged.
M3860A and M3861A HEARTSTREAM FR2 Defibrillator D-1
Page 75

Symbols and Controls
SYMBOL DESCRIPTION
HR XXX Heart rate.
XX Number of shocks delivered.
HEARTSTREAM FR2 Display Screen Symbols
XX:XX Time. How much time (minutes:seconds) has passed since the H
was turned on.
TEMPERATURE
!
SETUP
!
Te m p e ra t u r e . Recommended storage temperature range has been exceeded since
the last automatic self-test.
Setup. Setup has been lost from memory; factory default setup is being used.
Contact Medical Director for revised setup.
REV: XXXXXXXXX Software. The version of software and hardware used in your H
Status Indicator Symbols
SYMBOL DESCRIPTION
Flashing black hourglass. Ready for use.
Solid red X. Not ready for use. (See Chapter 4, Maintaining, Testing, and
Troubleshooting Your H
Flashing red X. Troubleshooting required. (See Chapter 4, Maintaining, Testing, and
Troubleshooting Your H
EARTSTREAM FR2.)
EARTSTREAM FR2.)
EARTSTREAM FR2
EARTSTREAM FR2.
D-2
Page 76

M3863A Battery Pack Symbols
SYMBOL DESCRIPTION
Do not crush the battery.
Do not expose the battery to high heat or open flames. Do not incinerate the
battery.
Do not mutilate the battery or open the battery case.
Symbols and Controls
Install
Before
Install the battery in the H
EARTSTREAM FR2 before the date shown on this label.
D
M3860A and M3861A HEARTSTREAM FR2 Defibrillator D-3
Page 77

Symbols and Controls
Notes
D-4
Page 78

E Glossary of Terms
The terms listed in this Glossary are defined in the context of the HEARTST REAM FR2
and its use.
Advanced Mode ................... A programmable treatment mode that permits an authorized user to control when
the FR2 starts rhythm analysis and (model M3860A only) when to begin defibrillator
charging for shock delivery.
AED ...................................... Semi-automatic external defibrillator.
AED Mode ............................ The standard FR2 treatment mode, with voice and screen prompts guiding the
responder through connecting the defibrillation pads, waiting for rhythm analysis,
and delivering a shock if needed. In this mode, heart rhythm analysis and
monitoring, and shock decision and charging for shock delivery are automatically
perfor med by the FR2.
ALS ...................................... Advanced Life Support.
Analysis ............................... See SMART Analysis.
Arrhythmia ........................... An unhealthy, often irregular, beating of the heart.
Battery ................................. The sealed lithium manganese dioxide battery used to power the FR2. It is provided
in a gray pack that fits into a compartment at the top of the FR2.
BLS ...................................... Basic Life Support.
ODERUNNER .......................... A dedicated data management software system from Agilent Technologies for use
C
with the H
Continued Use ...................... A condition in which use of the H
minutes (e.g., for battery replacement). When the battery is reinserted or the unit is
turned on again, the information stored about the interrupted incident is saved, any
additional events recorded after the battery is reinstalled are treated as part of the
same incident, and the selftest does not automatically run when the battery is
reinstalled.
CPR Timer ............................ A programmable period provided by the H
responder can administer CPR.
M3860A and M3861A HEARTSTREAM FR2 Defibrillator E-1
EARTSTREAM FR2.
EARTSTREAM FR2 is interrupted for less than five
EARTSTREAM FR2 during which the
Page 79

Glossary of Terms
Defibrillation ........................ Termination of cardiac fibrillation by applying electrical energy
Defibrillation Charge ............ Electrical energy stored in the capacitor of the H
EARTSTREAM FR2 as it arms for
shock delivery.
Defibrillation Pads ................ The self-adhesive electrode pads applied to the patient’s bare chest and used to
detect the patient’s heart rhythm and transfer the defibrillation shock. Only
EARTSTREAM defibrillation pads can be used with the FR2.
H
Defibrillation Shock .............. See SMART Biphasic Waveform.
ECG ...................................... Electrocardiogram, a display or printout of the electrical rhythm of the heart as
detected through defibrillation electrode pads.
Event .................................... An action recognized or performed by the H
EARTSTREAM FR2 as a step in the
sequence of using the device in an incident. Examples include: applying the pads
and connecting them to the H
EARTSTREAM FR2, analyzing heart rhythm, delivering a
shock, etc.
Fibrillation ............................ A disturbance of the normal heart rhythm that results in chaotic, disorganized
activity that cannot effectively pump blood. Ventricular fibrillation (fibrillation in
the lower chambers of the heart) is associated with sudden cardiac arrest.
Heart Rhythm
(ECG) Analysis ..................... A system used by the FR2 to determine if the patient’s heart rhythm is shockable —
ventricular fibrillation (VF) or certain ventricular tachycardias (VTs). See SMART
Analysis.
Impedance ............................ Electrically, this is the total opposition offered by the body to the flow of the
electrical shock waveform delivered by the H
EARTSTREAM FR2. The FR2
automatically monitors the electrical impedance between the defibrillation pads
placed on the patient’s bare chest, and adjusts the shock waveform appropriately.
Incident ................................ The series of events involved in treating a patient with the H
EARTSTREAM FR2.
Infrared
Communications .................. A method of sending information using a special part of the light spectrum. It is used
to transmit information to and from the H
computer running C
ODERUNNER software.
EARTSTREAM FR2 and another FR2 or a
Manual Charge ..................... A feature of the advanced mode used by an authorized ALS-certified responder that
allows the user to arm the H
EARTSTREAM FR2 for shock delivery.
Manual Disarm .................... A feature of the advanced mode used by an authorized ALS-certified responder that
allows the user to dump the H
EARTSTREAM FR2 charge internally.
Monitoring ........................... A mode of background analysis to determine if patient rhythm has changed to a
shockable rhythm.
E-2
Page 80

Non-Shockable
Rhythm ................................. A heart rhythm that the H
delivery.
Glossary of Terms
EARTSTREAM FR2 determines is not appropriate for shock
NSA ...................................... No Shock Advised decision, made by the H
EARTSTREAM FR2 based on analysis of the
patient’s heart rhythm.
Pacemaker ........................... External or implanted cardiac pulse generator that stimulates the heart
electronically.
Pads ..................................... See Defibrillation Pads.
Pause ................................... A defined period during which the H
EARTSTREAM FR2 does not perform rhythm
analysis.
Periodic Selftests ................. Daily, weekly, and monthly tests automatically conducted by the FR2 when it is in
the standby mode. The tests monitor many key functions and parameters of the FR2,
including battery capacity and the state of its internal circuitry.
Presenting ECG ..................... The heart rhythm seen by the H
EARTSTREAM FR2 when it is first connected to the
patient (via the defibrillation pads) and begins rhythm analysis.
Prompts ................................ The voice commands and screen text used to guide the responder through use of the
H
EARTSTREAM FR2 to treat the patient.
Protocol ................................ A sequence of operations performed by the HEARTSTREAM FR2 to direct patient care
in the AED mode.
Protocol Timeout .................. A programmable interval between shocks, used by the H
EARTSTREAM FR2 to decide if
the shocks are part of the same shock series.
Read (Data) .......................... A feature of the H
H
EARTSTREAM M3854A data card.
EARTSTREAM FR2 that allows it to read setup data from a
Receive (Data) ..................... A feature of the HEARTSTREAM FR2 that allows use of its infrared (IR)
communications port to receive revised setup and clock settings directly from
another device.
Record Voice ........................ An optional feature of the H
EARTSTREAM FR2 that allows sound recording to a data
card during use of the device in an incident. Activation of this feature requires
revision of the H
EARTSTREAM FR2’s default settings.
Rhythm Analysis .................. See SMART Analysis.
Send (Data) .......................... A feature of the H
EARTSTREAM FR2 that allows use of its infrared (IR)
communications port to send data directly to another FR2 or a computer running
ODERUNNER WEB software.
C
Sensitivity ............................ A measure of the ability of the H
EARTSTREAM FR2 to reliably detect and identify
shockable heart rhythms.
M3860A and M3861A HEARTSTREAM FR2 Defibrillator E-3
E
Page 81

Glossary of Terms
Setup .................................... The settings of all programmable operating parameters of the HEARTSTREAM FR2. The
factory default setup can be modified using the H
EARTSTREAM M3864A Training &
Administration Pack.
Shock Series ........................ One or more shocks, each separated by no more than a preset time (programmed
Protocol Timeout). After completion of a shock series, the H
EARTSTREAM FR2
automatically pauses for CPR.
Shockable Rhythm ................ Ventricular fibrillation and certain ventricular tachycardias associated with sudden
cardiac arrest.
Shock Waveform .............. See SMART Biphasic Waveform.
SMART Analysis ....................... The proprietary algorithm used by the FR2 to analyze the patient’s heart rhythm and
determine whether a shock is advised.
SMART Biphasic
Wave form .............................. The patented, low-energy defibrillation shock waveform used by the FR2. It is an
impedance-compensated biphasic waveform with 150 Joules, nominal, delivered to a
50 ohm load.
Specificity ............................ A measure of the ability of the H
EARTSTREAM FR2 to reliably detect and identify
non-shockable heart rhythms.
Standby Mode ...................... The operating mode of the H
EARTSTREAM FR2 when a battery has been installed, and
the unit is turned off and ready for use when needed. Shown by f lashing black
hourglass on the Status Indicator.
Status Indicator .................... This is a special window in the upper right-hand corner of the front panel of the
H
EARTSTREAM FR2 that lets you know the status of the device.
Sudden Cardiac
Arrest ................................... The sudden cessation of the heart’s pumping rhythm, accompanied by loss of
consciousness, absence of breathing, and lack of a pulse.
Trai n i n g &
Administration Pack ............. An optional accessory for the FR2 that enables training and administrative
functions.
Wave form ............................. See SMART Biphasic Waveform
Write (Data) .......................... A feature of the H
EARTSTREAM FR2 that allows it to record setup information on a
data card.
E-4
Page 82

F Clinical Summary
Introduction
The HEARTSTREAM FR2 utilizes the patented SMART Biphasic waveform. This
waveform has been extensively tested in pre-clinical and both electrophysiology
laboratory and out-of-hospital clinical studies. The following information
summarizes the results of a large study comparing the use of SMART Biphasic AEDs
to conventional monophasic in out-of-hospital emergency resuscitation situations.
Background
Agilent Technologies conducted an international, multicenter, prospective,
randomized clinical study to assess the effectiveness of the SMART Biphasic
waveform in out-of-hospital sudden cardiac arrests (SCAs) as compared to
monophasic waveforms. The primary objective of the study was to compare the
percent of patients with ventricular fibrillation (VF) as the initial monitored rhythm
that were defibrillated in the first series of three shocks or fewer.
Methods
Victims of out-of-hospital SCA were prospectively enrolled in four emergency
medical service (EMS) systems. Responders used either 150 J SMART Biphasic
AEDs or 200-360 J monophasic waveform AEDs. A sequence of up to three
defibrillation shocks was delivered. For the biphasic AEDs there was a single energy
output of 150 J for all shocks. For monophasic AEDs, the shock sequence was
200-200-360 J. Defibrillation was defined as termination of VF for at least five
seconds, without regard to hemodynamic factors.
Results
Randomization to the use of monophasic or SMART Biphasic AEDs was done in 338
SCAs from four emergency medical service systems. VF was observed as the first
monitored rhythm in 115 patients. The biphasic and monophasic groups for these
115 patients were similar in terms of age, sex, weight, primary structural heart
disease, cause and location of arrest, and bystanders witnessing the arrest or
performing CPR.
M3860A and M3861A HEARTSTREAM FR2 Defibrillator F-1
Page 83

Clinical Summary
The 150 J SMART Biphasic waveform defibrillated 98% of VF patients in the first
series of three shocks or fewer compared with 69% of patients treated with
monophasic waveform shocks. Outcomes are summarized as follows:
SMART Biphasic Patients
Number (%)
Defibrillation Efficacy
Single shock only
</= 2 shocks
</= 3 shocks
Patients Defibrillated 54/54 (100%) 49/58 (84%) 0.003
ROSC 41/54 (76%) 33/61 (54%) 0.01
Survival to Hospital Admission 33/54 (61%) 31/61 (51%) 0.27
Survival to Hospital Discharge 15/54 (28%) 19/61 (31%) 0.69
CPC = 1 (Good) 13/15 (87%) 10/19 (53%) 0.04
52/54 (96%)
52/54 (96%)
53/54 (98%)
Monophasic Patients
Number (%)
36/61 (59%)
39/61 (64%)
42/61 (69%)
P Value
(chi square)
<0.0001
<0.0001
<0.001
Conclusions
The 150 J SMART Biphasic waveform defibrillated at higher rates than the 200-360 J
monophasic waveforms, resulting in more patients achieving return of spontaneous
circulation (ROSC) (p=0.01). EMS system outcomes of survival discharge were not
significantly different statistically. However, patients resuscitated with the
lower-energy SMART Biphasic waveform were more likely to have good cerebral
performance (CPC, cerebral performance category) (p=0.04).
F-2
Page 84

Index
A
accessories
additional, recommended A-1
available to order A-1
battery A-1
battery charger for Training &
Administration Pack A-1
carrying case A-1
data card A-1
data card tray A-1
defibrillation pads A-1
Fast Response Kit A-1
Training & Administration Pack
A-1
wall mount bracket A-1
advanced mode
definition 6-4, E-1
features 6-9
manual analyze 6-11
manual charge 6-11, 6-12, E-2
manual disarm 6-12, E-2
programmable settings 6-4
tiered-response features 6-9
user qualifications 6-9
AED mode, definition E-1
AED, definition E-1
ALS, definition E-1
arrhythmia, definition E-1
asystole detection B-4
autosend PST
definition 6-2
programmable settings 6-2
B
battery
description 2-1, E-1
insertion selftest 2-4
replacing during use 4-5, 7-2
battery history
description of data 4-9
reviewing 4-9
battery insertion selftest
description 2-4
failure 4-13
interactive 4-6
recording test results 4-6
BLS, definition E-1
C
calibration 4-1
cautions, warnings, and dangers 5-2
charge
disarming B-3
time from Shock Advised B-2
chirping 4-12, 4-13, 4-14
cleaning
agents to use 4-3
guidelines 4-3
clinical summary F-1
clock
receiving settings 2-3, 6-9
sending settings 6-9
setting independently 2-3
synchronizing 2-3
ODERUNNER software E-1
C
continued use 4-5, 7-2, E-1
contrast, adjusting 4-8
controls and indicators
specifications B-5
controls and symbols D-1
CPR prompt
definition 6-3
programmable settings 6-3
CPR timer
definition 6-3, E-1
programmable settings 6-3
D
dangers, warnings, and cautions 5-2
data card
installing 7-2
reading setup 6-8
recommended use 4-6
recording time available 4-5
removing 7-2
replacing 7-2
defibrillation charge E-2
defibrillation pads
applying to patient 3-2
checking before use 3-2
connecting to the FR2 3-2
damage during CPR 3-5
description E-2
positioning correctly 3-2
specifications B-6
defibrillation therapy 1-2
defibrillation, definition E-2
defibrillator
specifications B-2
device history
description of data 4-9
reviewing 4-9
disarming the FR2
in advanced mode B-3
in AED mode B-3
manual 6-12, B-3
display screen
adjusting contrast 4-8
specifications B-5
I-1
Page 85

Index
E
ECG analysis
see SMART analysis
ECG analysis system
description E-2
ECG display
definition 6-1
programmable settings 6-1
specifications B-5
ECG out
definition 6-2
programmable settings 6-2
ECG, definition E-2
event, definition E-2
F
fibrillation, definition E-2
flashing black hourglass
see Status Indicator
flashing red X
see Status Indicator
ForeRunner AED C-1
G
glossary
of terms E-1
of symbols and controls D-1
H
heart rhythms
non-shockable B-4
shockable B-4
hourglass Status Indicator D-2
how to install the battery 2-1
how to install the data card 7-2
how to remove the data card 7-2
how to review battery history 4-9
how to review device history 4-9
how to review the presenting ECG
7-4
how to run the battery insertion
selftest 2-4
how to use the advanced mode 6-9
I
impedance
automatic adjustment of shock
waveform B-2
troubleshooting 4-17
impedance, definition E-2
incident data
definition of data on data card
7-3
definition of internal memory
data 7-3
reviewing from data card 7-3
reviewing from internal memory
7-3
incident, definition E-2
indications and contraindications
1-1, 5-1
infrared communications
description E-2
ECG out 6-2
receiving setup 6-7
installing a data card 7-2
installing the battery 2-1
L
LCD display
see display screen
M
M3854A data card A-1
M3855A battery charger A-1
M3857A wall mount bracket A-1
M3860A FR2, description 1-1
M3861A FR2, description 1-1
M3863A battery
specifications B-6
M3864A Training & Administration
Pack A-1
M3868A carrying case A-1
main menu 2-2
maintenance
cleaning 4-3
daily selftests 4-1
monthly selftests 4-1
operator’s checklist 4-3
recommended schedule 4-1
manual mode
see advanced mode
monitoring, description E-2
N
non-shockable rhythms B-4, E-3
NSA action
definition 6-3
programmable settings 6-3
NSA, definition E-3
O
On/Off button, description of uses
D-1
operating temperature B-1
Option buttons
description of uses D-1
to adjust display screen contrast
4-8
I-2
Page 86

Index
P
pacemaker
definition E-3
detection B-4
patient impedance B-2
pause for CPR, description 3-4
pause key
definition 6-5
programmable settings 6-5
pause, definition E-3
pause, time indication 3-4
pediatric use 1-2, 5-1
periodic selftests
definition E-3
description 4-9
frequency 4-1
Status Indicator alerts 4-9
presenting ECG
definition E-3
description 7-4
prompt interval
monitor settings 6-5
prompt intervals
advanced use settings 6-5
definition 6-5
prompts, definition E-3
protocol timeout
definition 6-2, E-3
programmable settings 6-2
protocol, definition E-3
R
record voice
definition 6-1, E-3
programmable settings 6-1
recording incident data
in internal memory 7-1
replacing battery during use 7-2
replacing data card 7-2
responder
qualifications and training 1-2
resume key
definition 6-5
programmable settings 6-5
reviewing incident data
from data card 7-3
from internal memory 7-3
rhythm analysis
see SMART analysis
S
safety considerations 5-2
selftests
battery insertion 2-4
daily 4-1
monthly 4-1
periodic 2-5, 4-1
sensitivity, definition E-3
setup
definition E-4
reading setup 6-8
receiving setup 6-7
shock
see SMART biphasic waveform
Shock button, description of use
D-1
shock series
definition 6-2, E-4
programmable settings 6-2
shock waveform
see SMART biphasic waveform
shockable rhythms B-4, E-4
S
MART analysis
definition E-4
during CPR 3-5
specifications B-3
SMART biphasic waveform
clinical data F-1
definition E-4
energy delivered B-2
shock delivery vector B-3
shock waveform B-2
specification B-2
solid red X
see Status Indicator
speaker volume
definition 6-1
programmable settings 6-1
specifications
battery B-6
controls and indicators B-5
defibrillation pads B-6
defibrillator B-2
display screen B-5
ECG analysis performance B-4
ECG analysis system B-3
environmental B-1
non-shockable rhythm
specificity B-4
physical B-1
shockable rhythm sensitivity B-4
specificity, definition E-4
standby mode, definition E-4
standby temperature B-1
Status Indicator
description E-4
flashing black hourglass D-2
flashing or solid X 4-14
flashing red X 4-13, D-2
in standby mode 2-5
solid red X 4-13, D-2
sterilization 4-3
storage conditions B-1
sudden cardiac arrest, definition
E-4
I-3
Page 87

Index
symbols
on battery D-3
on display screen D-2
EARTSTREAM FR2 D-1
on H
symbols and controls D-1
T
temperature
operating B-1
standby B-1
tiered-response features 6-9
Training & Administration Pack
battery charger A-1
description E-4
troubleshooting 4-10
U
user, qualifications and training 1-2
W
warnings, cautions, and dangers 5-2
waveform
see SMART biphasic waveform
X
X Status Indicator
flashing 4-13
flashing or solid 4-14
solid 4-13
I-4
 Loading...