

Page 1

Philips
HeartStart FR3
Trainer Manual
Get an original copy of the Philips HeartStart FR3 Trainer
Operators Guide for manufacturer information about service,
available accessories and how to use and maintain your
device.
Page 2
AED Trainer 3
INSTRUCTIONS FOR USE
861467
Edition 1
Page 3
H
G
A
B
E
D
F
C
I
K
J
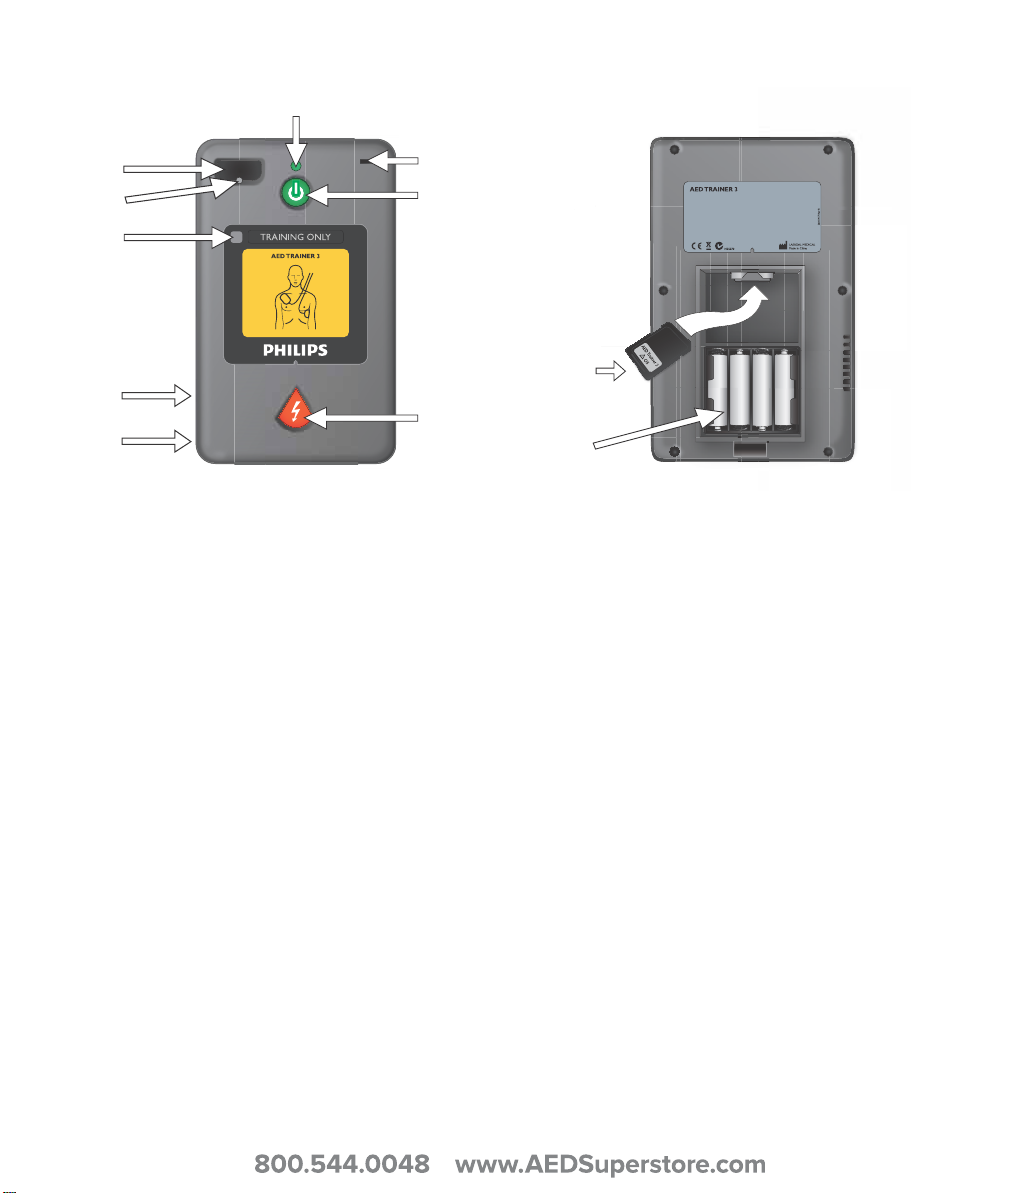
AED TRAINER 3 USER INTERFACE
PHILIPS MEDICAL SYSTEMS
A. Training Pads Connector Socket —
Receptacle for the training pads connector plug.
B. Pads Connector LED — Flashes to indicate
the socket location when device is turned on.
Inserted pads connector plug covers the LED,
which stops flashing when connector plug is
properly seated.
C. Remote Control Receiver Window —
Receives signals from the optional remote
control.
D. Speake r — Delivers voice instructions from
the AED Trainer 3. Speaker volume can be
adjusted with the remote control or set in the
device configuration.
E. Connector — For future use.
F. Green Ready Light — Illuminates when the
AED Trainer 3 is turned on; flashes when device is
receiving commands from the remote control;
stays off when the device is not in use.
G. Infant/Child Key Port — Receptacle for the
Training Infant/Child Key. When Key is inserted,
the AED Trainer 3 operates in Infant/Child mode
to simulate defibrillation of an infant or child
under 8 years old or 25 kg (55 lbs).
H. Green On/Off Button — Turns on the AED
Trainer 3 and starts voice instructions.
I. Orange Shock Button — Controls delivery
of simulated shock. The button flashes when a
shock is advised during a scenario.
J. Battery Compartment — Contains the four
replaceable AA size alkaline batteries (not
provided) used to power the AED Trainer 3.
K. Operating System Card — Contains the
Trainer operating system, all voice commands, and
device configuration. The Operating System Card
must be installed in the AED Trainer 3 to use the
device.
Page 4

PHILIPS MEDICAL SYSTEMS
AED Trainer 3
861467
INSTRUCTIONS FOR USE
Edition 1
Page 5

About this edition
The information in this guide applies to the AED
Trainer 3 model 861467. This information is
subject to change. Please contact Philips at
www.philips.com/productdocs or your local
Philips representative for information on
revisions.
Edition history
Edition 1
Publication date: April 2011
Publication number: 453564269201
Copyright
© 2011 Laerdal Medical AS. All Rights Reserved.
Device Manufacturer
Laerdal Medical AS
Tanke Svilandsgate 30
N-4002 Stavanger, Norway
For Technical Support
If you need technical support, please contact your
local Philips representative or go to
www.philips.com/AEDsupport.
PHILIPS MEDICAL SYSTEMS
Page 6

PHILIPS MEDICAL SYSTEMS
CONTENTS
INTRODUCTION
Description and Intended Use ...................................................... 1
Features .............................................................................................. 1
HOW SUPPLIED
Standard Package Contents ........................................................... 2
Optional Accessories ...................................................................... 3
SETTING UP THE AED TRAINER 3
Checking the Operating System Card ........................................ 4
Installing the batteries ..................................................................... 4
Selecting a Language ........................................................................ 5
Changing the Configuration ........................................................... 6
Connecting the Training Pads ....................................................... 7
Accessing the Training Infa
USING THE AED TRAINER 3
Preparing to use the AED Trainer 3 ........................................... 10
Selecting a training scenario .......................................................... 11
Running a Training Scenario .......................................................... 12
Using the Optional Remote Control .......................................... 12
APPENDICES
Parameter Settings ........................................................................... 15
Training Scenarios ............................................................................ 17
Remote Control ............................................................................... 19
Troubleshooting Tips ...................................................................... 21
Specifications ..................................................................................... 23
Regulatory Information ................................................................... 24
Glossary of Symbols ........................................................................ 25
nt/Child Key ..................................... 9
Page 7

INTENTIONALLY BLANK
PHILIPS MEDICAL SYSTEMS
Page 8

PHILIPS MEDICAL SYSTEMS
INTRODUCTION
DESCRIPTION AND INTENDED USE
The model 861467 AED Trainer 3 is designed to prepare emergency
responders to use the HeartStart FR3 automatic external defibrillator (AED)
and other AEDs. Together with appropriate manikins, the AED Trainer 3 is
intended to give realistic training on delivering correct treatment, including
shock delivery and CPR, to a cardiac arrest victim.
The AED Trainer 3 provides eight training scenarios that simulate realistic
f sudden cardiac arrest (SCA) and help responders become familiar
episodes
with use of the HeartStart FR3 AED in an emergency. These scenarios are
compatible with training programs developed by internationally recognized
responder programs.
The AED Trainer 3 is shipped with a factory default setup that complies with
th
Association) 2010 Guidelines. The device may also be configured to conform
to local protocols or Guideline Updates.
NOTE: Before using the HeartStart FR3 D
have completed an appropriate responder training program, which may
include the use of the AED Trainer 3. Having completed such a course, the
responder should demonstrate a proficiency in assessing the patient for
lack of responsiveness and absence of breathing, cardiopulmonary
resuscitation (CPR), and knowledge of applicable medical protocols and
procedures.
o
C (European Resuscitation Council) and AHA (American Heart
e ER
ef
ibrillator, the responder should
FEATURES
The AED Trainer 3 is designed to replicate the operation of the HeartStart
FR3 AED. However, it has no high-voltage capabilities, ensuring safety during
training. It provides simulated shock delivery.
The AED Trainer 3 can be used to provide training on the following key
atures of the HeartStart FR3 AED:
fe
1
Page 9

• Fast delivery of therapy. The AED Trainer 3 carry case duplicates the
auto-on feature of the FR3 carry case. When the case is opened, the AED
Trainer 3 automatically turns on.
• Pre-connected pads. Like the FR3 AED, the AED Trainer 3 uses preconnected
• Infant/Child Key. The AED Trainer 3 comes with a Training Infant/Child
y to replicate the infant/child mode of the FR3 AED.
Ke
• Voice prompts. The AED Trainer 3 guides you through each step of the
training sc
pads to help op
enario with the same voice prompts as the FR3 AED.
timize response time.
• Extensive configurability. Like the FR3 AED,
configuration can be customized and its operation easily updated as
needed.
NOTE: The Training Infant/Child Key cannot be used with the HeartStart
D
FR3 AE
. An FR3 Infant/Child Key is required for use with the AED.
the AED Trainer 3
HOW SUPPLIED
STANDARD PACKAGE CONTENTS
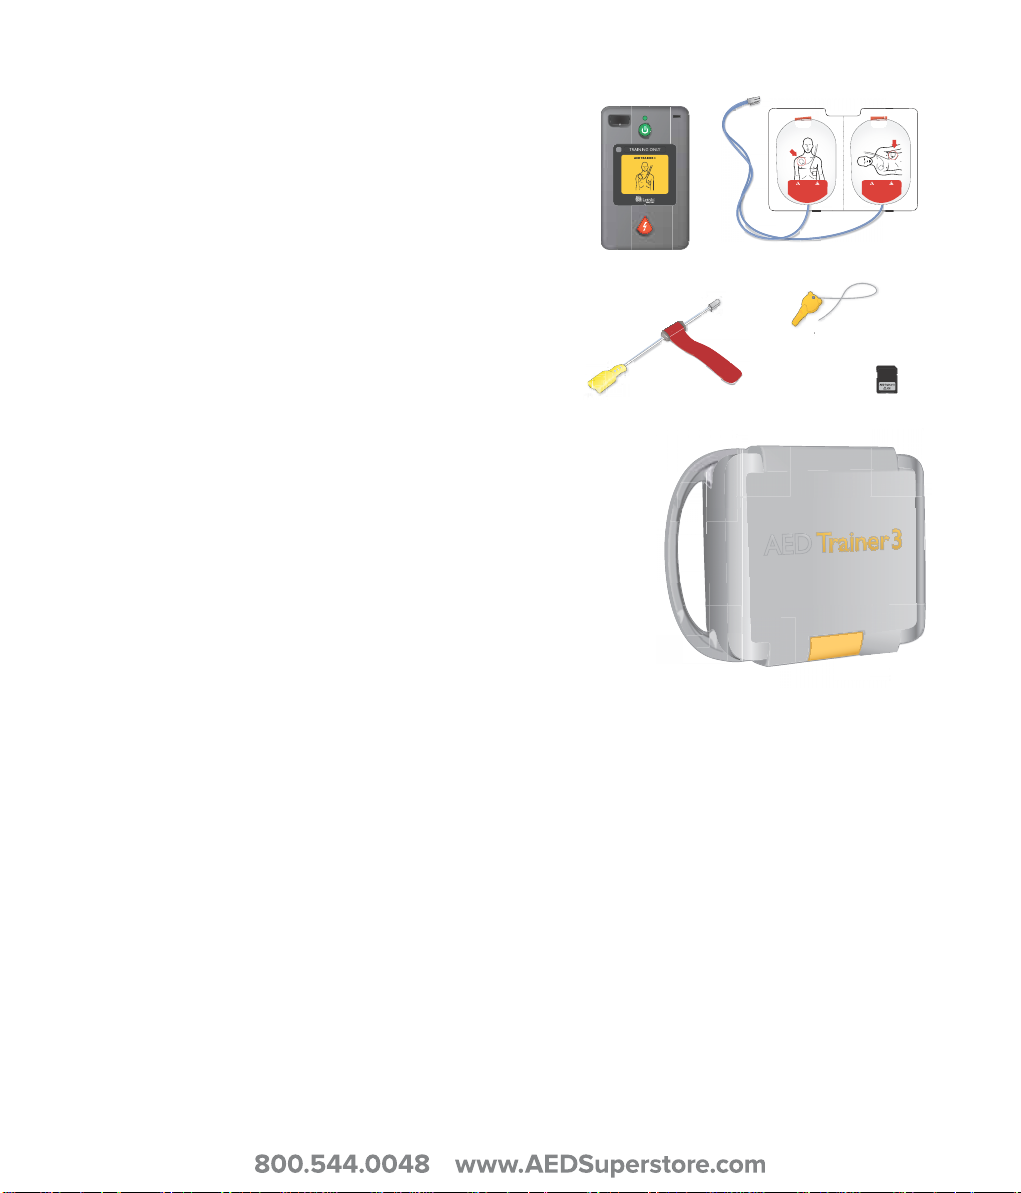
The AED Trainer 3 is shipped with the following items as standard:
• one AED Trainer 3
• one Carry Case
• one Training Infant/Child Key, pre-installed on tether in carry case
• one External Manikin Adapter
• one pre-installed AED Trainer 3 Operating System Card containing the
T
rainer 3 operating system
AED
g
• one reusable HeartStart Trainin
Pads III interconnect cable
PHILIPS MEDICAL SYSTEMS
• one set of reusable HeartStart Training Pads III
2
Page 10
PHILIPS MEDICAL SYSTEMS
TRAINING TRAINING
Carry Case
Philips Training Pads III
NO
T FOR
CLINICAL USE
INIC
Reusable Training Pads III
Interconnect cable
Training infant/child key
with tether
Operating
System Card
AED Trainer 3
•one printed Instructions for
Use in English and Japanese
• one CD-ROM containing
ction
Instru
s for Use in
additional languages
• one multi-language Quick
rt Guide
a
St
• one set of “Training Only”
ick
ers in multiple languages
st
OPTIONAL ACCESSORIES
The following accessories are
available separately for use with
the AED Trainer 3:
• Remote Control, with one
placeable lithium CR2025
e
r
3V battery
[REF: 989803171631]
• Replacement Carry Case for
rainer 3 [REF: 989803171731]
D T
AE
• Replacement AED Trainer 3 Operating System Card
[REF: 989803171641]
Pads II
• Replacement HeartStart Training
989803150201]
[REF:
I Interconnect Cable
• Replacement HeartStart Training Pads III [REF: 989803150181]
• Replacement External Manikin Adapters, set of 5 [REF: M5089A]
• Laerdal LINK Technology Training Pads [REF: M3755A]
3
Page 11
SETTING UP THE AED TRAINER 3
To set up the AED Trainer 3 for operation, you will need to ensure that the
Operating System Card is properly installed, install the batteries (not
provided), select a different language if you do not wish to use U.S. English,
and connect the training pads. Instructions for each of these tasks follow.
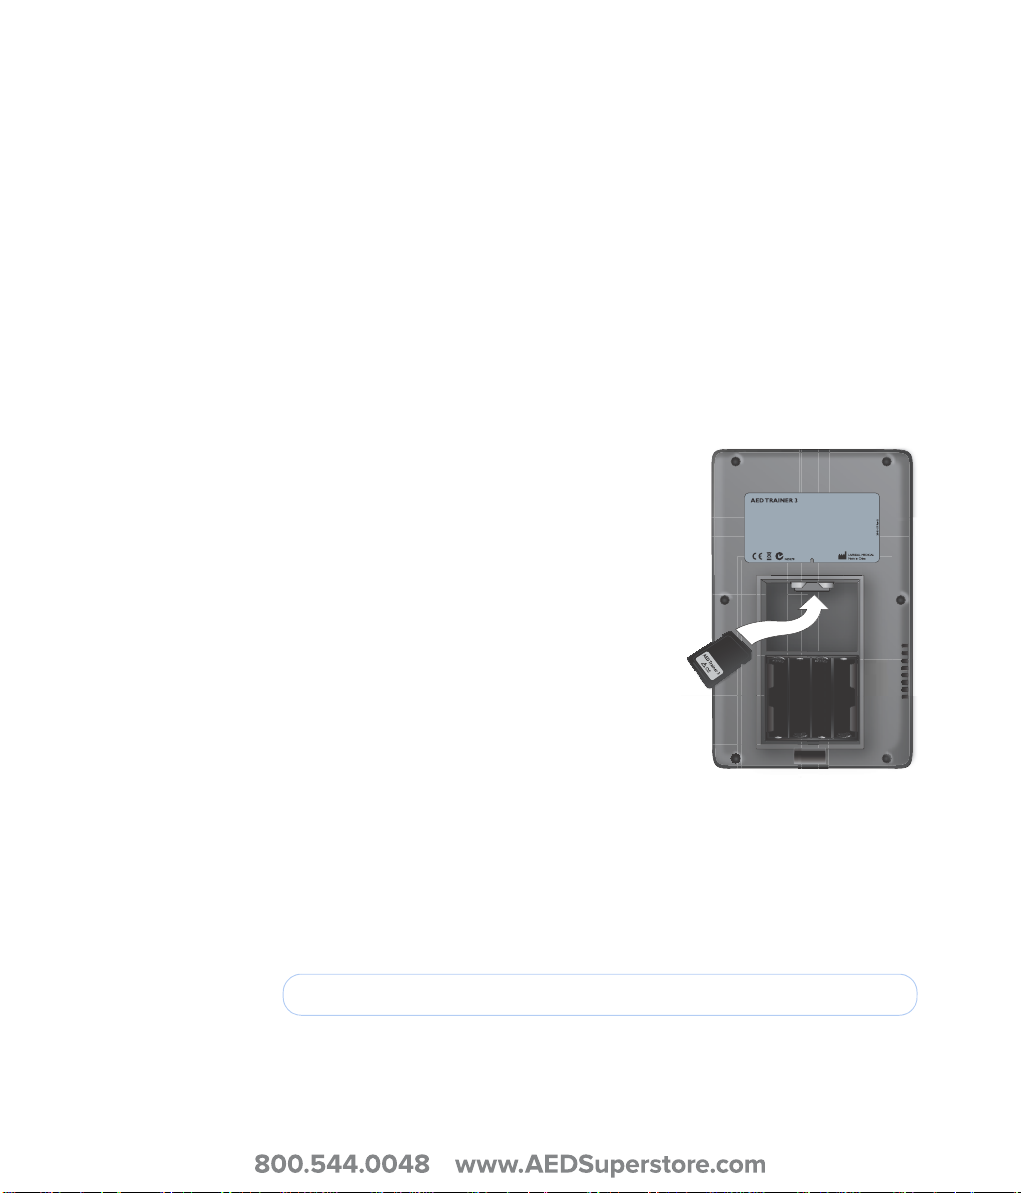
CHECKING THE OPERATING SYSTEM CARD
The AED Trainer 3 Operating System Card contains the operating system for
the AED Trainer 3. The AED Trainer 3 is shipped with the Operating System
Card pre-installed. To remove, re-install, or replace the Operating System
Card, follow the steps below:
1. Squeeze the latch on the battery
tment lid to release the lid. Lift out
r
compa
the lid and set it aside.
2. Check that the Operating System Card is
n
stalled in the slot at the top of the
i
compartment. If not, install the Operating
System Card in the orientation shown.
PHILIPS MEDICAL SYSTEMS
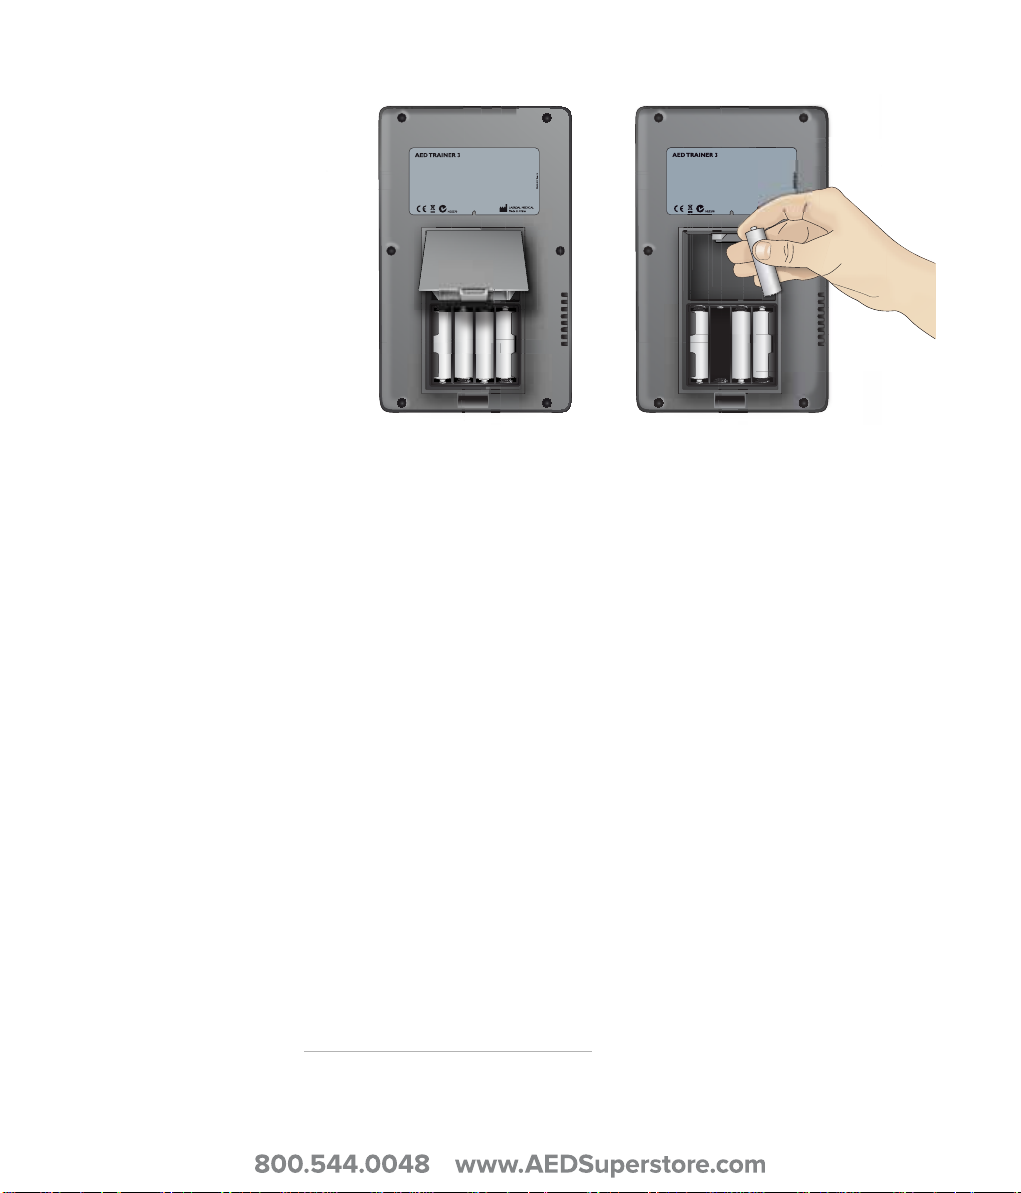
INSTALLING THE BATTERIES
The AED Trainer 3 requires four AA size
alkaline batteries (not included). To install or
replace the batteries in the AED Trainer 3,
follow the steps below:
1. Squeeze the latch on the battery compar
out the lid and set it aside.
2. Install four AA size alkaline batt
oriented as illustrated inside the compartment.
NOTE: Use only fresh batteries of the same type.
3. Replace the battery compartment lid.
4. Return the AED Trainer 3 to its case.
4
eries in the battery compartment
tment li
d to release the lid. Lift
Page 12
PHILIPS MEDICAL SYSTEMS
SELECTING A LANGUAGE
The default language of the AED Trainer 3 is U.S. English. To set up the AED
Trainer 3 for another language, follow the steps below.
e gr
1. Press and hold both th
button for about three seconds. The AED Trainer 3 announces the
default language, “U.S. English.”
2. Release both buttons.
3. Press and hold the orange Shock button to scroll through each available
age
langu
. The AED Trainer 3 announces each new language.
een On/Off button and the orange Shock
4. When the desired language is announced, pr
ess the green On/Off button
to turn off the AED Trainer 3 and store the selected language. The AED
Trainer 3 will use this language when it is next turned on.
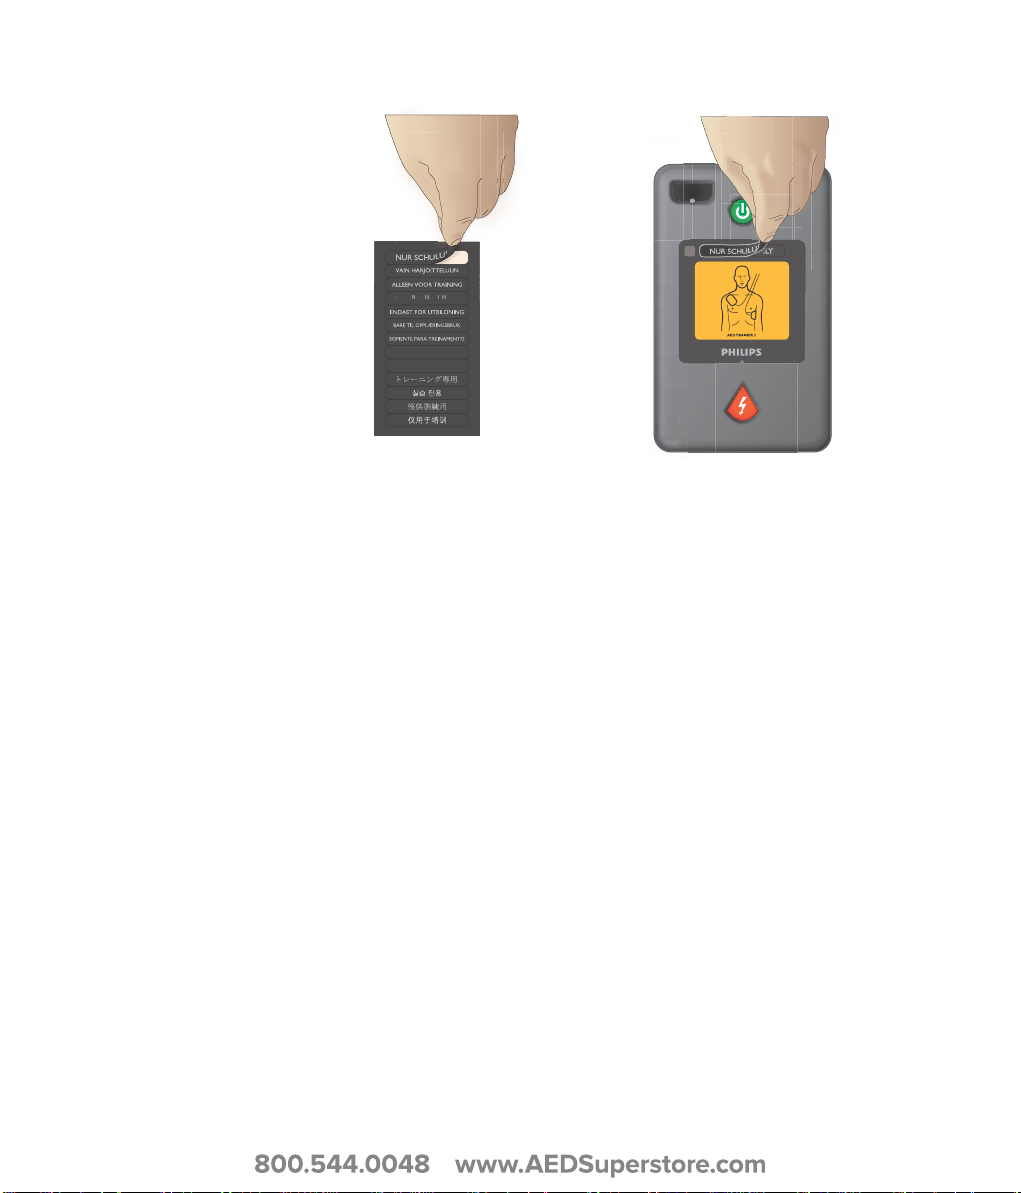
*
5. Apply the appropriate “Training Only” sticker for the language selected,
as illustrated below.
* The AED Trainer 3 can be turned on by pressing either the On/Off button or the
shock button.
5
Page 13
CHANGING THE CONFIGURATION
POUR LA FORMATION UNIQUEMENT
SOLO PER ADDESTRAMENTO
SÓLO ENTRENAMIENTO
ÓLO
ENTRENAMIEN
T
O
The AED Trainer 3 is shipped with a configuration replicating the default
factory settings of the FR3 AED. If you want to change the AED Trainer 3
configuration to match local protocols or for other training purposes, follow
the steps below:
1. Squeeze the latch on the battery compar
tment li
out the lid and set it aside.
2. Remove the Operating System Card from the slot at the top of the
compar
tment.
d to release the lid. Lift
PHILIPS MEDICAL SYSTEMS
6
3. Insert the Operating System Card into th
e card slot of your computer or,
if no slot is available, install the card into a standard card reader and
connect it to your computer.
4. Open the AED Trainer 3 Configuration program and adjust the
parameter settings
as desir
ed. See page 15 for detailed information about
the available settings.
Page 14
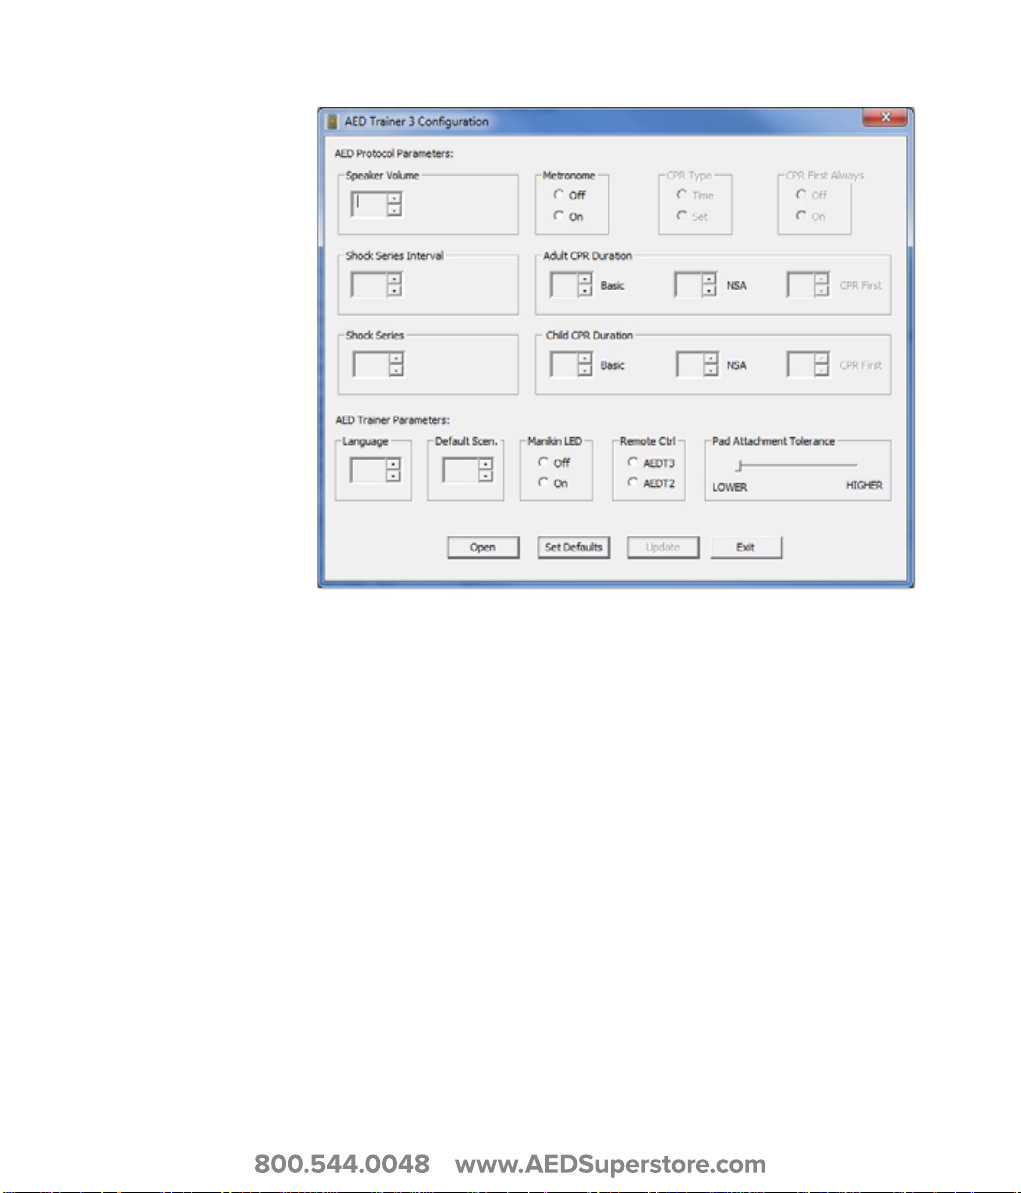
5. After making all desired changes, click on “Update.”
PHILIPS MEDICAL SYSTEMS
6. Click “Exit” to close the configuration program.
7. Remove the Operating System Card from the compute
r or card reader
and replace it in the AED Trainer 3. See page 4 for directions on installing
the card. The AED Trainer 3 configuration will be updated automatically
e
xt time the AED Trainer 3 is turned on.
the n
CONNECTING THE TRAINING PADS
The AED Trainer 3 may be used with either HeartStart Training Pads III or
Laerdal LINK Technology Training Pads.
HEARTSTART TRAINING PADS III
To connect the HeartStart Training Pads III to the AED Trainer 3, follow the
e
steps b
low.
7
Page 15
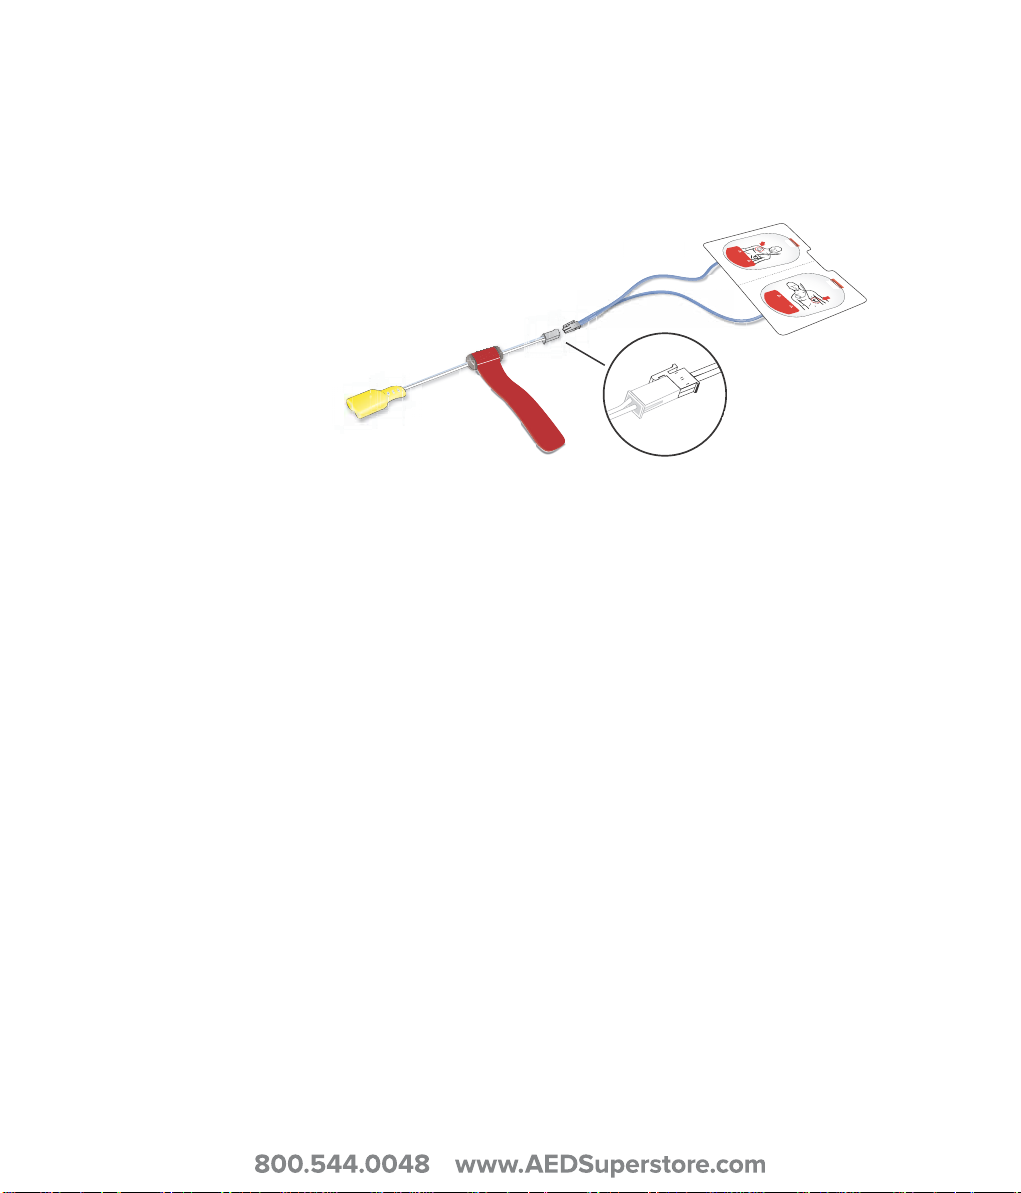
1. Remove the HeartStart Training Pads III from their storage bag, leaving
NOT FOR
C
LINIC
A
L USE
US
E
TRAINING
TRAINI
NG
them on their liner.
2. Remove the interconnect cable from its storage bag. Connect the pads
cable to the inter
3. Plug the interconnect cable’s yellow connector
connect cable.
into the pads connector
socket on the front of the AED Trainer 3. Be sure the connector clicks
into place.
4. Place the AED Trainer 3 with the pre-connected pads in the carry case.
e case is desig
Th
ned to store the AED Trainer 3 with the pads pre-
connected.
PHILIPS MEDICAL SYSTEMS
The HeartStart Training Pads III are designed for up to 100 uses. To help
continued performance, avoid leaving the pads in heat or direct
ensure
sunlight. To replace the pads, disconnect the connector plug from the AED
Trainer 3 and repeat Steps 1 through 3, above.
LAERDAL LINK TECHNOLOGY TRAINING PADS
To connect the Laerdal LINK Technology Training Pads to the AED Trainer 3,
o
llow the steps below.
f
1. Remove the Laerdal LINK Technology Training Pads from their storage
bag, lea
8
v
ing them on their liner.
Page 16
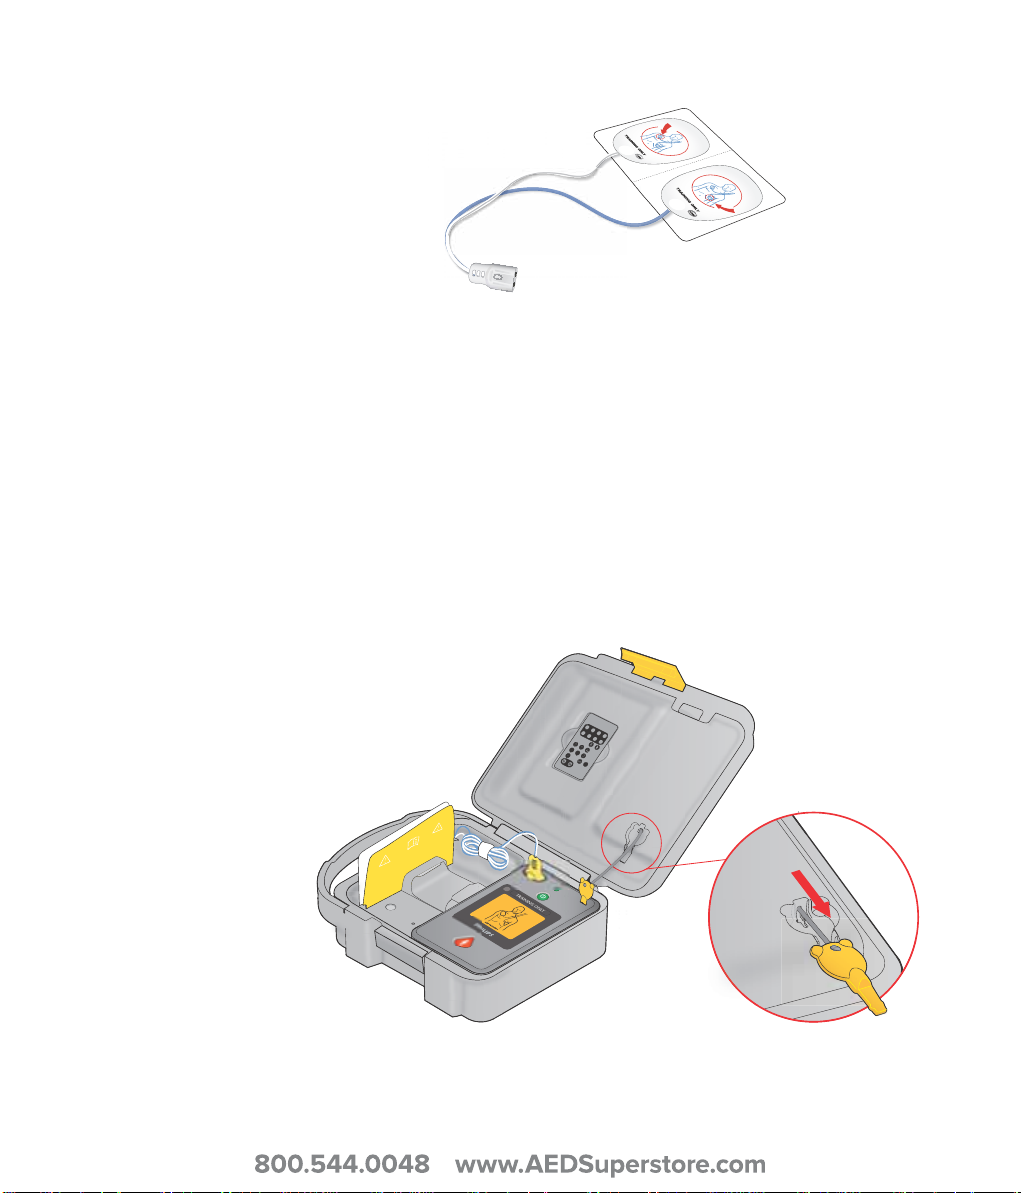
2. Plug the pads connector into the pads connector socket on the front of
OK
%)(8VEMRIV
the AED Trainer 3. Be sure the connector clicks into place.
PHILIPS MEDICAL SYSTEMS
3. Place the AED Trainer 3 with the pre-connected pads in the car
The case is designed to store the AED Trainer 3 with the pads preconnected.
ACCESSING THE TRAINING INFANT/CHILD KEY
The Training Infant/Child Key is supplied on a tether pre-installed in the AED
Trainer 3 carry case. To access the Training Infant/Child Key for use, remove it
from its compartment in the case lid, and extend the tether to insert the Key
into the Infant/Child Key port on the AED Trainer 3.
ry case.
9
Page 17
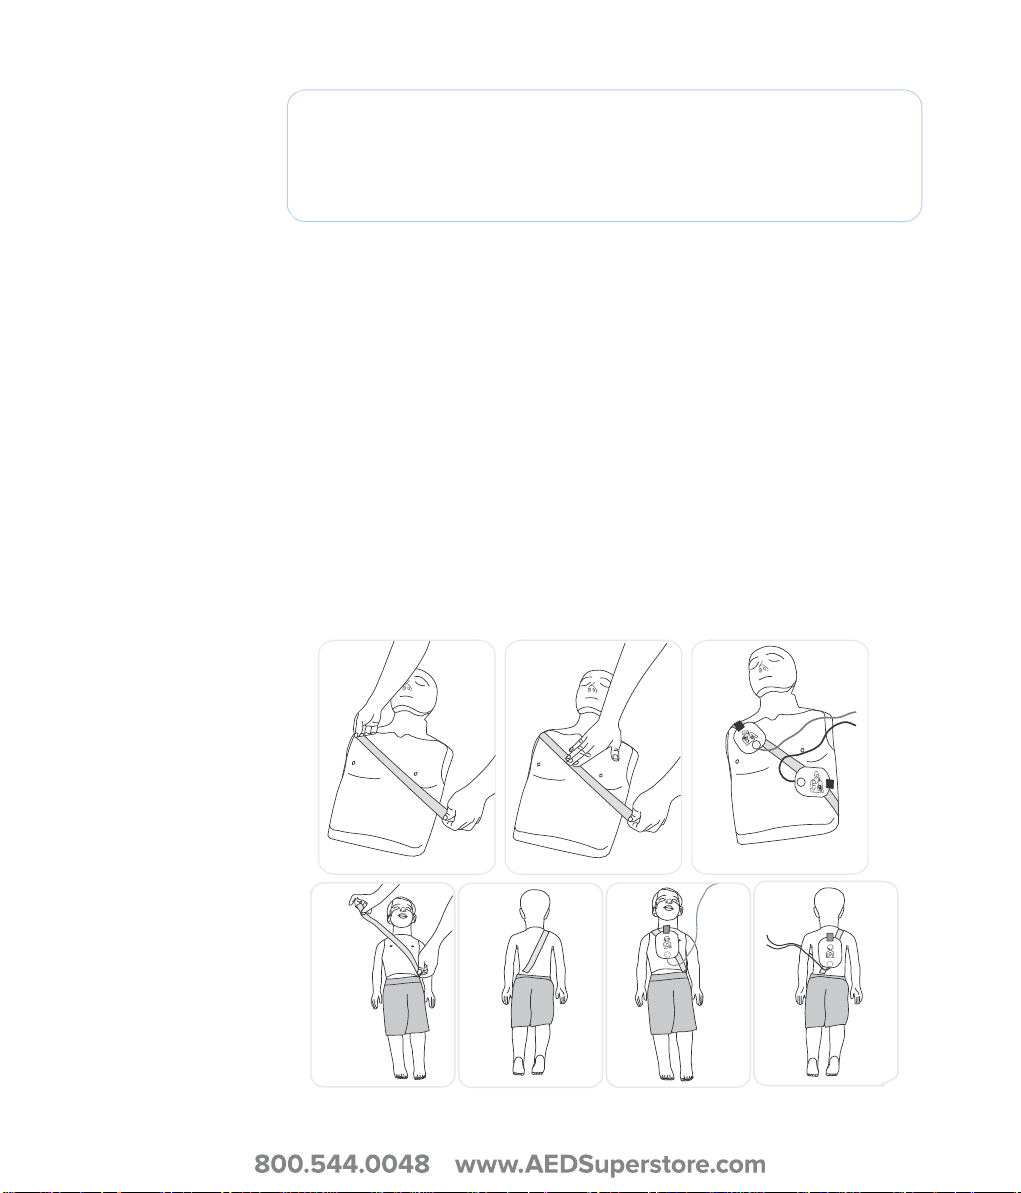
NOTE: Do not store the Training Infant/Child Key installed in the AED
1
234
1
2
Trainer 3. Install the Training Infant/Child Key in the AED Trainer 3 only
when teaching defibrillation of infants or children under 8 years old or
55 lbs (25 kg).
USING THE AED TRAINER 3
PREPARING TO USE THE AED TRAINER 3
Before turning on the AED Trainer 3, follow the steps below:
1. Check that the pads are pre-connected as described on page 7. If no
r
training pads are connected when the AED T
AED Trainer 3 will provide a voice instruction to place the pads on the
patient’s bare chest and then plug in the pads connector by the flashing
light.
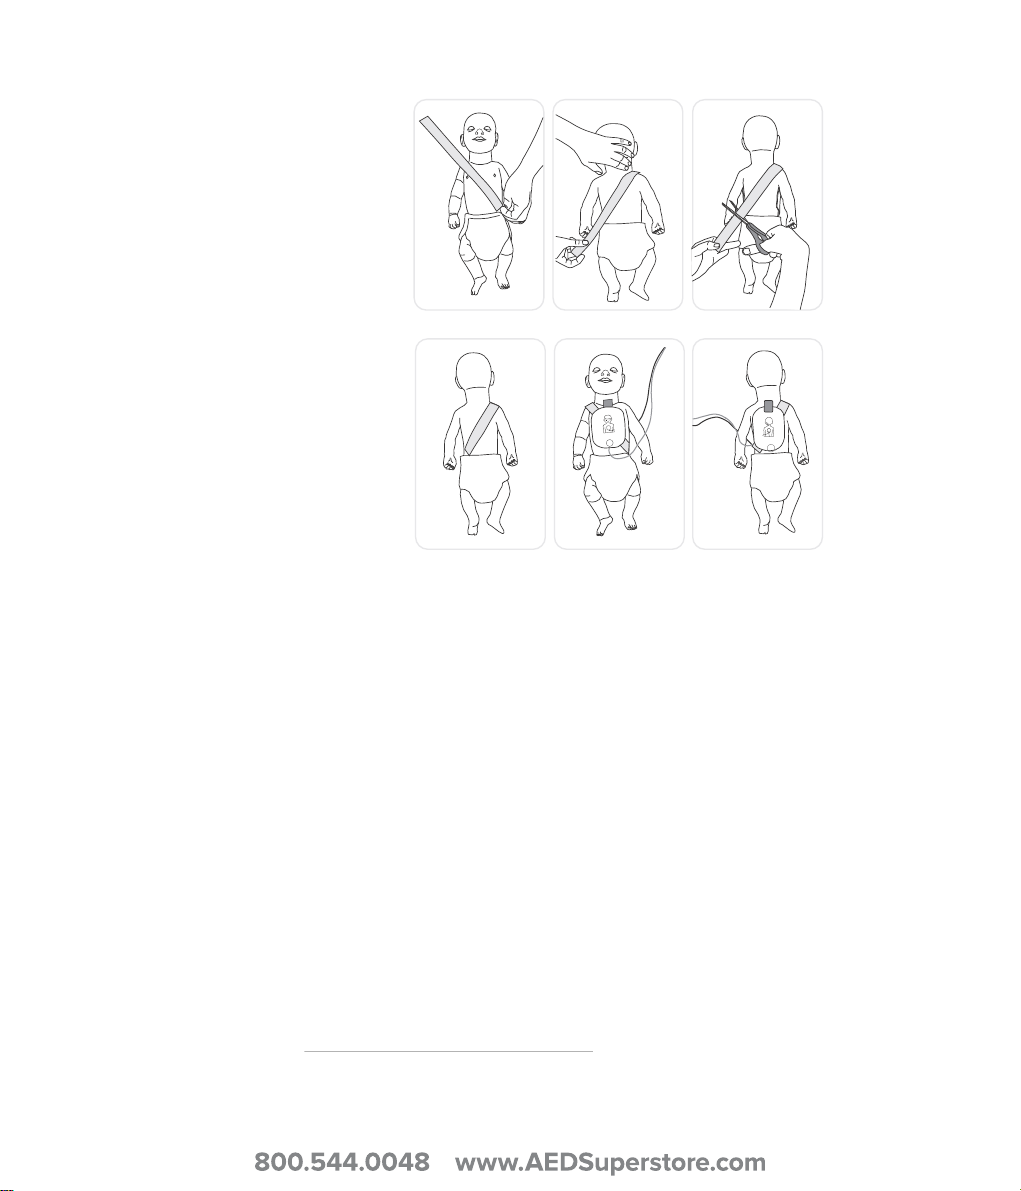
2. If you are using HeartStart Training Pads
adapter provided to the skin of the training manikin as shown below.
3. Place the pads on the adapter as shown.
ainer 3 is turned on, the
II, attach the external manikin
I
PHILIPS MEDICAL SYSTEMS
3
10
Page 18
PHILIPS MEDICAL SYSTEMS
1
23
4
56
4. If you are using Laerdal LINK Technology Training Pads, use any Laerdal
manikin equipped with Laerdal LINK Technology, such as Laerdal AED
Resusci Anne or AED Little Anne. (The Laerdal LINK technology will
indicate correct placement of the pads on the manikin.)
5. If you are training in infant/child defibrillation, insert the training Infant/
Child Key in the port identified on the diagram on the inside front cover
of this manual. The infant/child mode is intended for training in
defibrillation of an infant or child under 8 years old or 55 lbs (25 kg).
*
SELECTING A TRAINING SCENARIO
When you are ready to use the AED Trainer 3, follow the steps below:
1. Press and hold the green On/Off button for approximately six seconds.
The AED Trainer 3 will announce “Training” and instruct you to press the
orange Shock button to select a training scenario.
* The training Infant/Child Key should be kept with the AED Trainer 3, but not
connected until you are ready to use the AED Trainer 3 in a pediatric scenario.
11
Page 19
2. Press the orange Shock button as directed. The AED Trainer 3 announces
OK
1 2 3 4
5 6 7 8
AED Trainer 3
the current training scenario number.
3. To select a different scenario, press and hold the orange Shock button to
scroll through each of the eight scenarios in sequence. The AED Trainer 3
announces each scenario number as it is reached. See page 17 for a
detailed description of each scenario.
4. When you reach the desired scenario, press the On/Off button to turn
off the AED Trainer 3 and store the scenario selection on the Operating
System Card. The selected scenario will be active the next time the AED
Trainer 3 is turned on.
NOTE: The AED Trainer 3 automatically turns off if it is inactive for ten
minutes.
RUNNING A TRAINING SCENARIO
To run a training scenario, press the On/Off button to turn on the AED
Trainer 3, and following the AED Trainer 3’s voice instructions to simulate use
of the FR3 AED in an emergency. For troubleshooting assistance, see page 21.
USING THE OPTIONAL REMOTE CONTROL
PHILIPS MEDICAL SYSTEMS
12
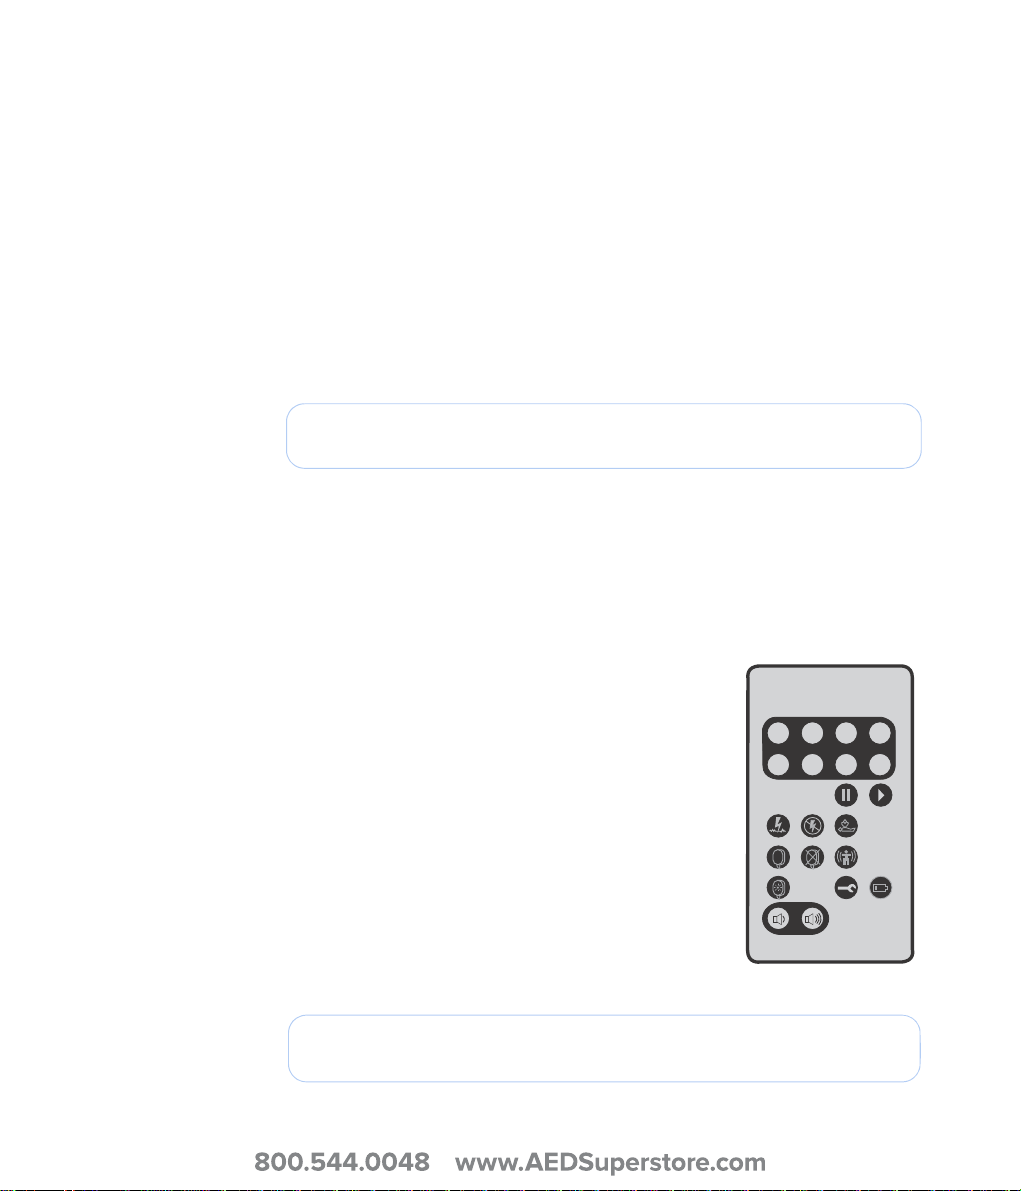
If desired, the AED Trainer 3 can be used with an
optional remote control that allows the instructor to
select and override training scenarios.
The remote control uses infrared light and requires a
direct or indirect light path from the remote control to
the receiver window on the AED Trainer 3. Do not cover
the receiver window when using the remote control. The
location of the receiver window is identified on the
diagram on the inside front cover of this manual.
NOTE: If a direct line is blocked, pointing the remote control at the ceiling
may provide a good indirect light path.
Page 20

See page 19 for a description of the Remote Control operation.
NOTE: The AED Trainer 3 can be configured for use with the AED
Trainer 2 remote control, if desired. See page 6 for directions on changing
the configuration.
PHILIPS MEDICAL SYSTEMS
13
Page 21

APPENDICES
PARAMETER SETTINGS
TRAINING SCENARIOS
REMOTE CONTROL
TROUBLESHOOTING TIPS
SPECIFICATIONS
REGULATORY INFORMATION
GLOSSARY OF SYMBOLS
PHILIPS MEDICAL SYSTEMS
14
Page 22
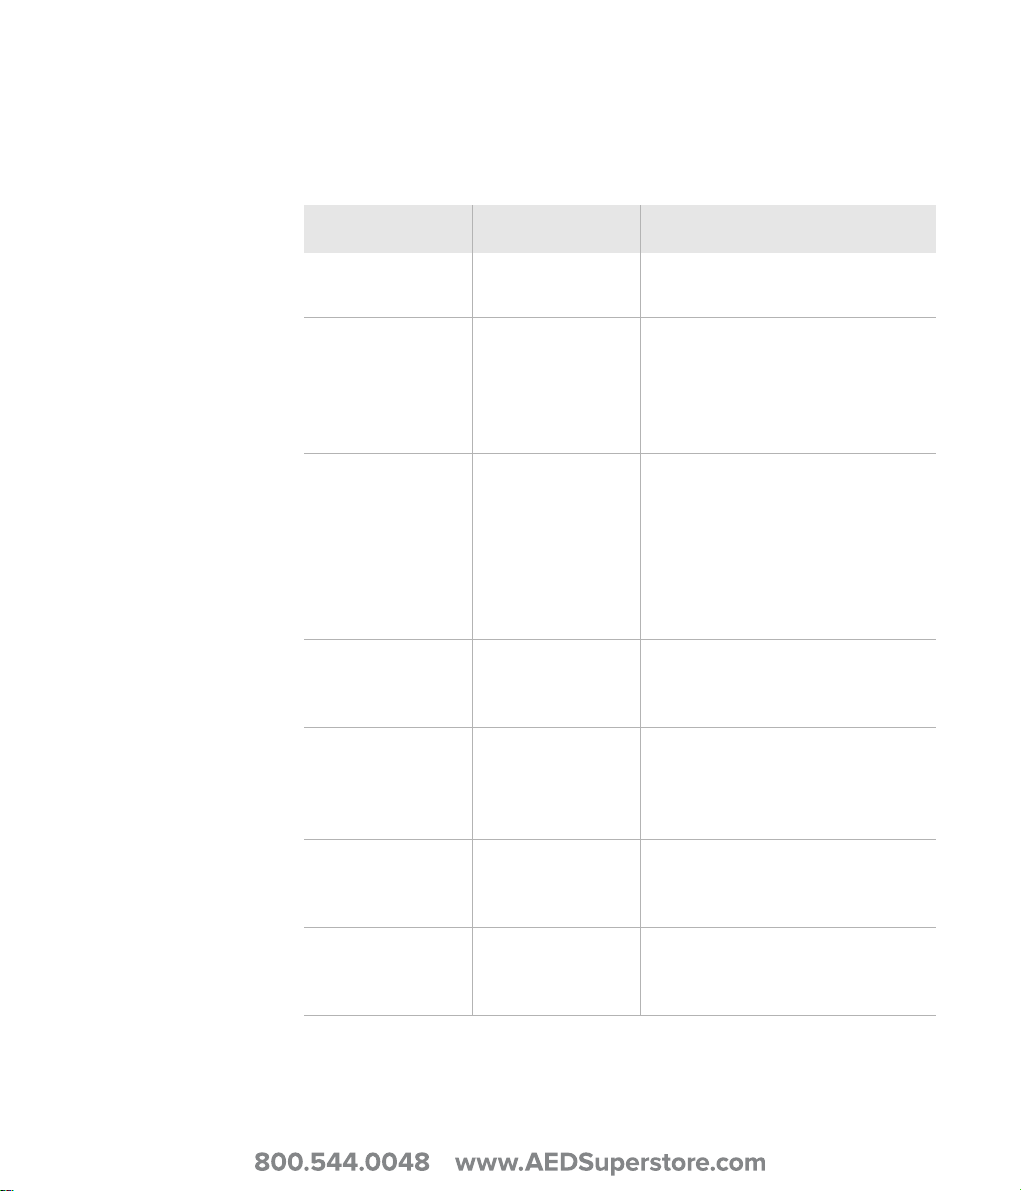
PARAMETER SETTINGS
The following parameter settings are available in the AED Trainer 3. Default
settings are shown in boldface.
PARAMETER SETTINGS DESCRIPTION
PHILIPS MEDICAL SYSTEMS
Vol um e loud, medium,
soft
Shock Series 1, 2, 3, 4 Sets the number of shocks in a
Shock Series
Interval (minutes)
1.0, 2.0, infinite Sets the time interval used to
Sets the AED Trainer 3 speaker
volume.
series that must be delivered
before the AED Trainer 3
automatically activates a Basic
CPR protocol.
determine if a delivered shock
should be counted as part of the
current shock series. This
parameter applies only when the
shock series setting is greater
than 1.
Metronome on, off Enables (ON) and disables (OFF)
audio beats for CPR
compressions
AED Trainer 2
Remote Control
AEDT2 ,
AEDT3
Enables or disables use of the
AED Trainer 2 Remote Control
rather than the AED Trainer 3
Remote Control.
Adult Basic CPR
Duration
(minutes)
Infant/Child Basic
CPR Duration
(minutes)
1.0, 1.5, 2.0,
2.5, 3.0
1.0, 1.5, 2.0,
2.5, 3.0
Sets the length of the CPR
protocol for adult Basic CPR.
Sets the length of the CPR
protocol for infant/child Basic
CPR.
15
Page 23
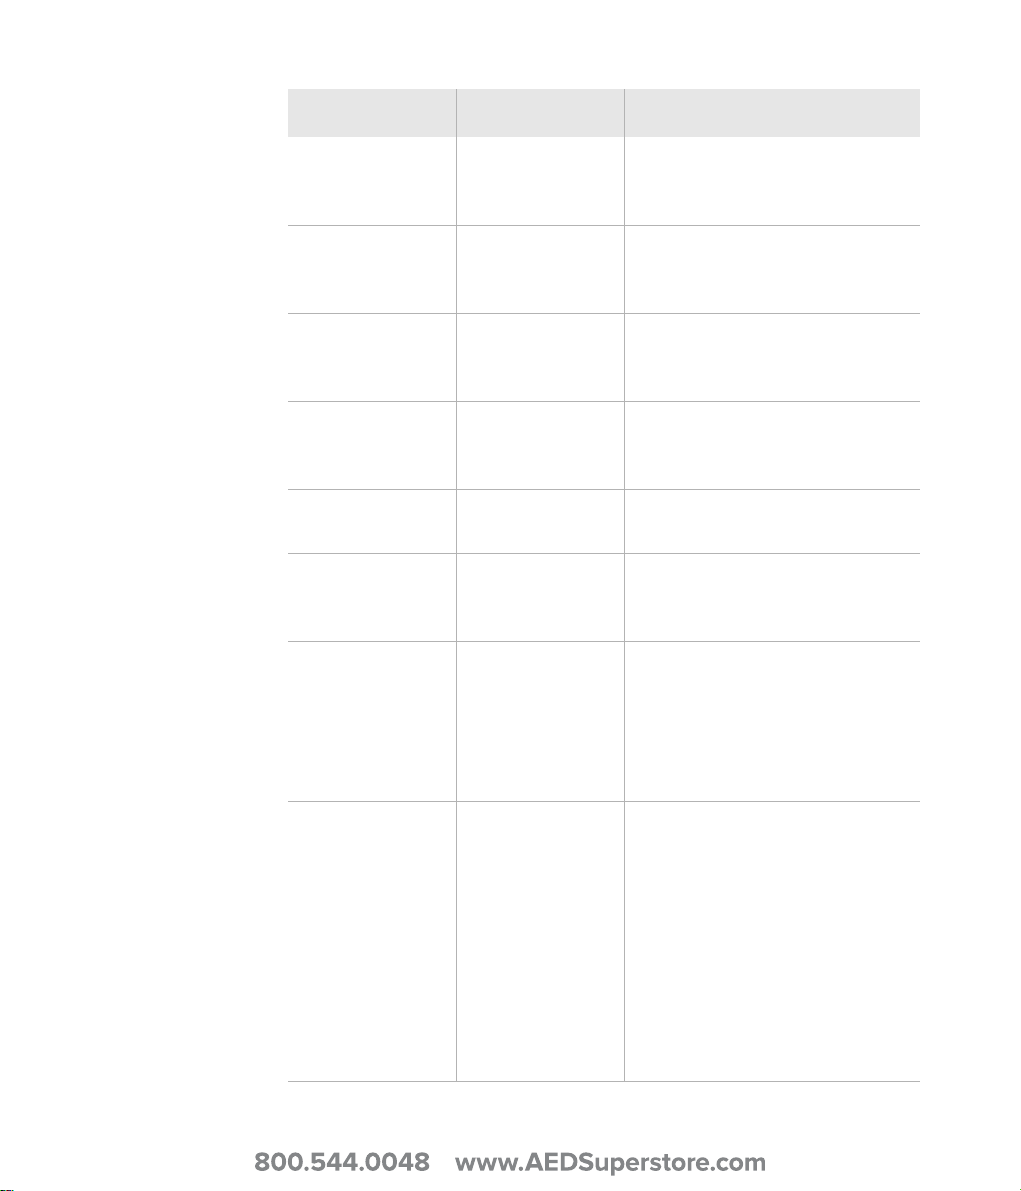
PARAMETER SETTINGS DESCRIPTION
Adult NSA CPR
Duration
1.0, 1.5, 2.0,
2.5, 3.0
Sets the length of the CPR
protocol for adult Basic CPR.
(minutes)
Infant/Child NSA
CPR Duration
(minutes)
Adult CPR First
Duration
1.0, 1.5, 2.0,
2.5, 3.0
Sets the length of the CPR
protocol for infant/child Basic
CPR.
Parameter currently nonfunctional.
(minutes)
Infant/Child CPR
First Duration
Parameter currently nonfunctional.
(minutes)
CPR Type Parameter currently
non-functional
Scenario 1, 2, 3, 4, 5, 6, 7 Sets the training scenario used
when the AED Trainer 3 is
turned on.
LINK Pads
attachment
tolerance
Slide Scale:
Lower to Higher
Determines the required
placement accuracy of training
pads on a Laerdal LINK manikin.
Lower tolerance equates to a
more accurate pad placement
requirement.
PHILIPS MEDICAL SYSTEMS
16
Manikin LED on, off Enables (On) or Disables (Off)
the automatic illumination of the
electrode pad LEDs in the
Manikin Chest Skin indicating
correct pad placement. When
OFF the LEDs may only be
illuminated using the remote
control (Please note this function
is only applicable when using
Laerdal LINK electrodes and a
Laerdal Link Manikin.)
Page 24
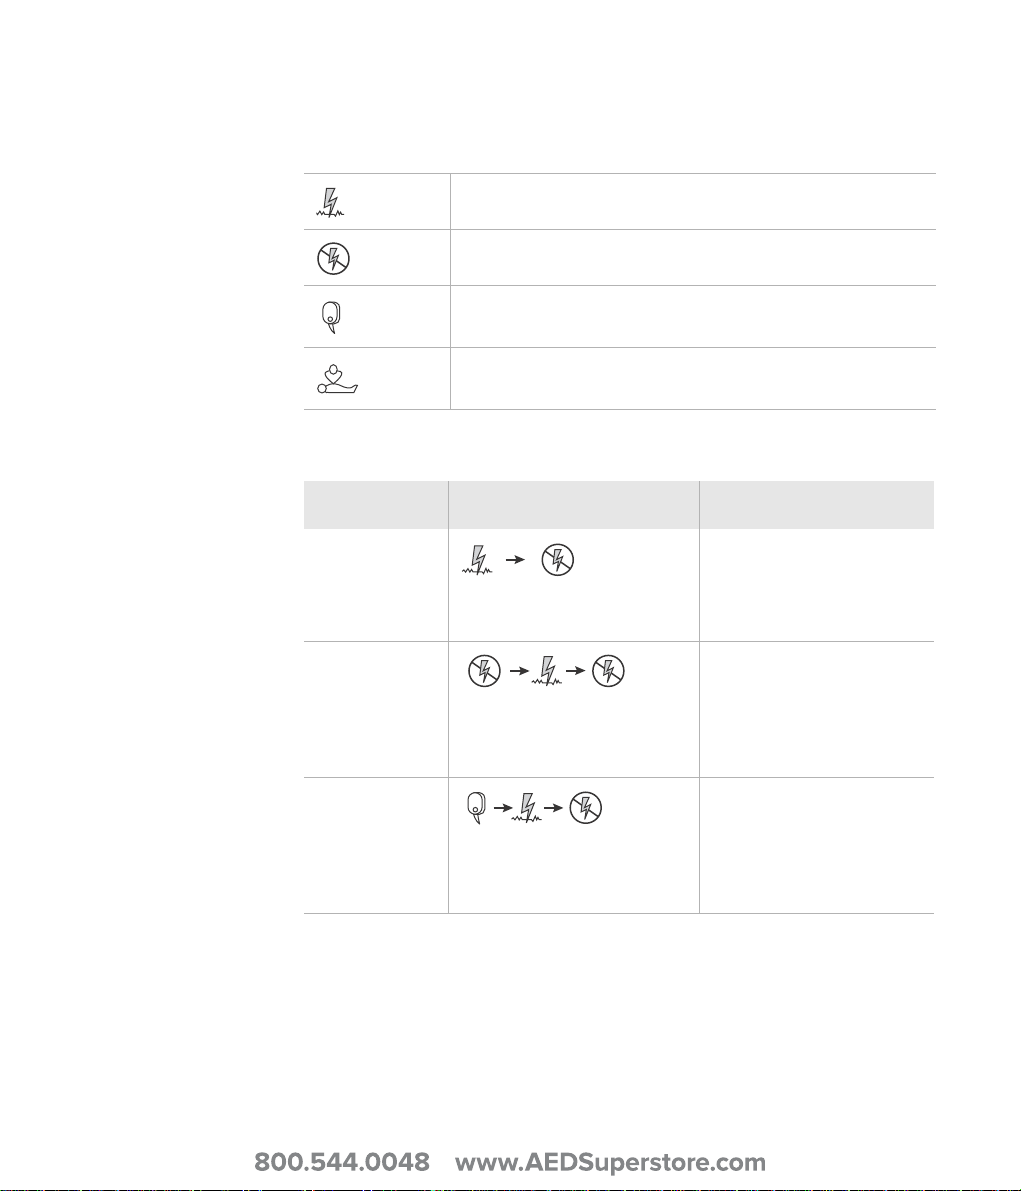
TRAINING SCENARIOS
Shockable rhythm detected by AED Trainer 3.
Non-shockable rhythm detected by AED Trainer 3.
Pads problem detected by AED Trainer 3.
CPR First protocol initiated by AED Trainer 3.
The following training scenarios are available for use with the AED Trainer 3:
SCENARIO SYMBOL DESCRIPTION
PHILIPS MEDICAL SYSTEMS
1
One shock for conversion
2
One shock for conversion
3
Troubleshooting pads, one
shock for conversion
• Shockable rhythm
• One shock needed for
conversion
• Non-shockable rhythm
• Non-shockable rhythm
• Shockable rhythm
• One shock needed for
conversion
• Non-shockable rhythm
• Poor pads contact
• Shockable rhythm
• One shock needed for
conversion
• Non-shockable rhythm
17
Page 25
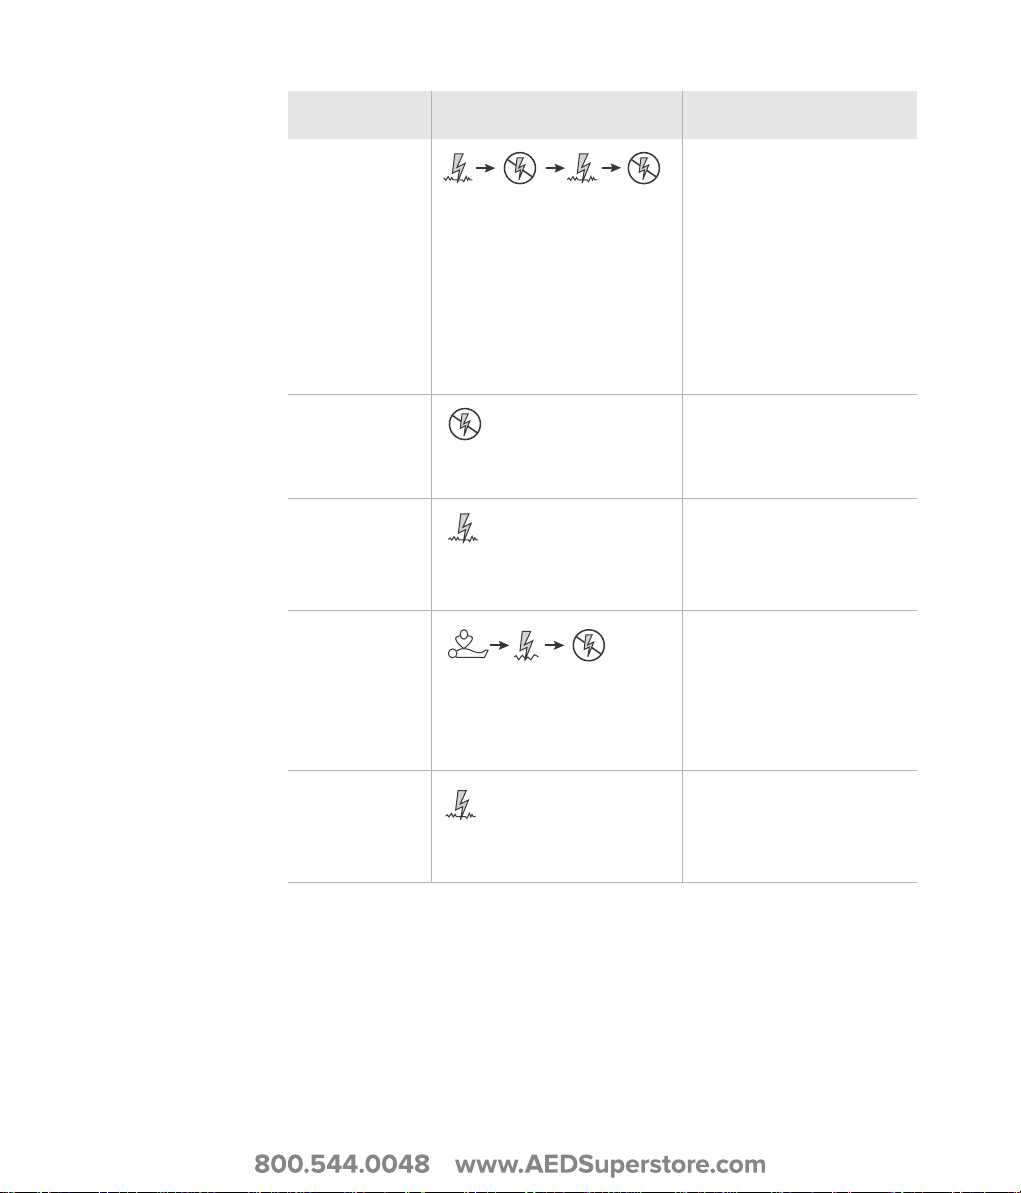
SCENARIO SYMBOL DESCRIPTION
4
• Shockable rhythm
• One shock needed for
ersion
Refibrillation after
ersion
conv
conv
• Non-shockable rhythm
• Return to shockable
ythm after
rh
three
minutes
• One shock needed for
v
ersion
con
• Non-shockable rhythm
5
Non-shockable rhythm
6
• Non-shockable rhythm
ughout
thro
• Shockable rhythm
PHILIPS MEDICAL SYSTEMS
• Two shocks needed for
ersion
Two shocks for conversion
7
conv
• Non-shockable rhythm
• Shockable rhythm
•CPR First
• Shockable rhythm
CPR first, one shock for
conv
ersion
• One shock needed for
v
ersion
con
• Non-shockable rhythm
18
8
Shockable rhythm
• Shockable rhythm
throughout
Page 26
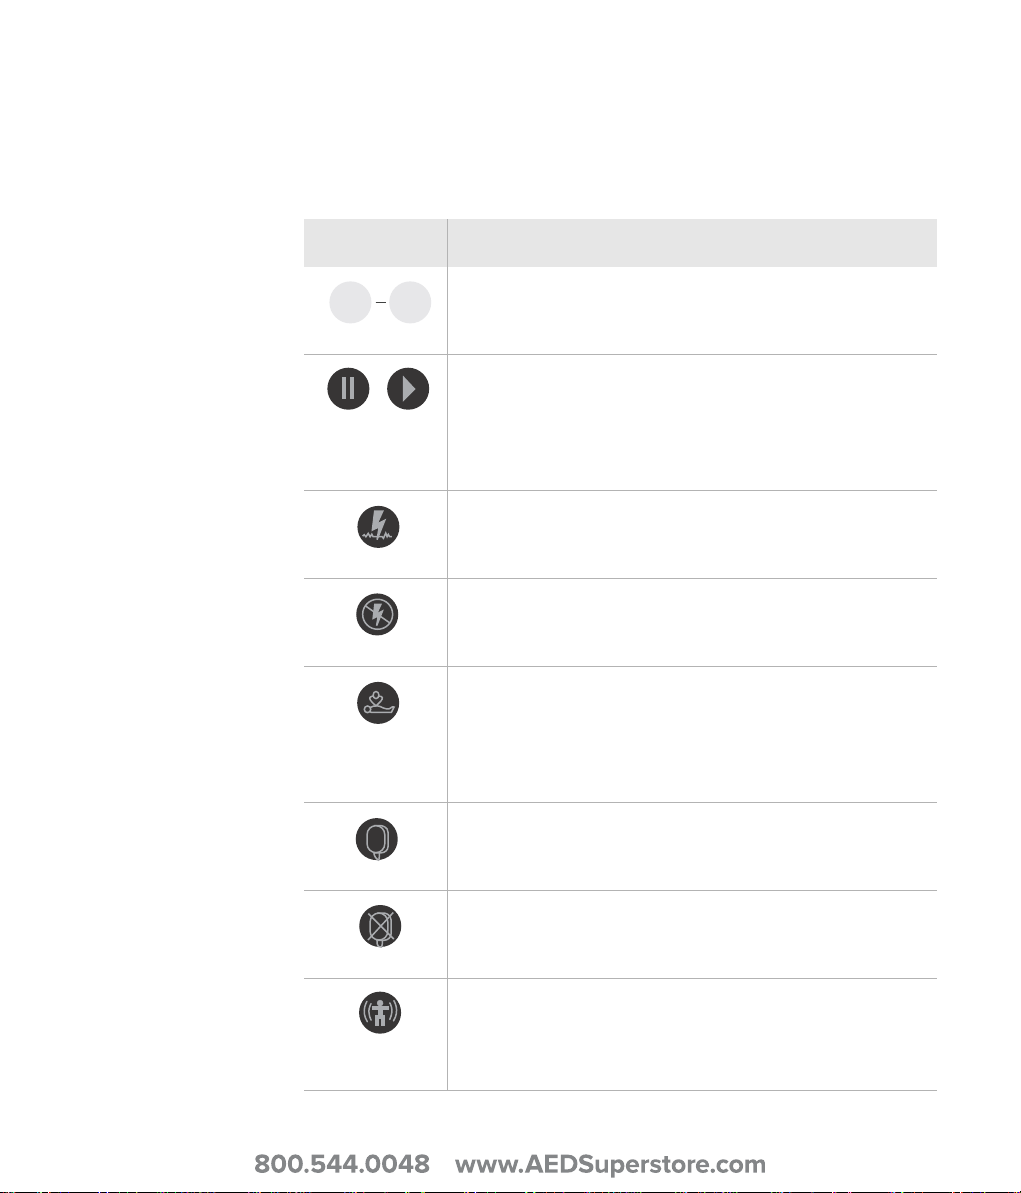
REMOTE CONTROL
1 8
OK
A description of the button functions of the remote control is provided
below.
BUTTON FUNCTION
PHILIPS MEDICAL SYSTEMS
Scenario selection. Press to select
one of the eight
standard scenarios. (The AED Trainer 3 will start the
selected scenario.)
Pause/Resume. Press Pause to
freeze all activity in the
AED Trainer 3. (The AED Trainer 3’s On/Off light will
flash at a slow rate when the AED Trainer 3 is paused.)
Press Resume to continue the activity from the point at
which it was paused.
ess t
Shockable Rhythm. Pr
o initiate simulated
shockable rhythm. (This function overrides the running
scenario.)
Non-Shockable Rhythm. Press to
initiate simulated
non-shockable rhythm. (This function overrides the
running scenario.)
CPR First. Press to sim
ulate a shockable rhythm that
will generate a CPR First decision by the AED Trainer 3
for the first rhythm analysis, and a shock decision for
subsequent rhythm analyses. (This function overrides the
running scenario.)
ess
Good Pads Connection. Pr
to simulate good pads
connection to the AED Trainer 3. (This function
overrides the detection of physical pad placement.)
Poor Pads Connection. Press to sim
ulate poor pads
connection to the AED Trainer 3. (This function
overrides the detection of physical pads connection.)
Motion Artifact. Press
to simulate motion artifact
interference with rhythm analysis. (This function
interrupts analysis and the AED Trainer 3 gives a voice
prompt instructing the trainee to stop all motion.)
19
Page 27
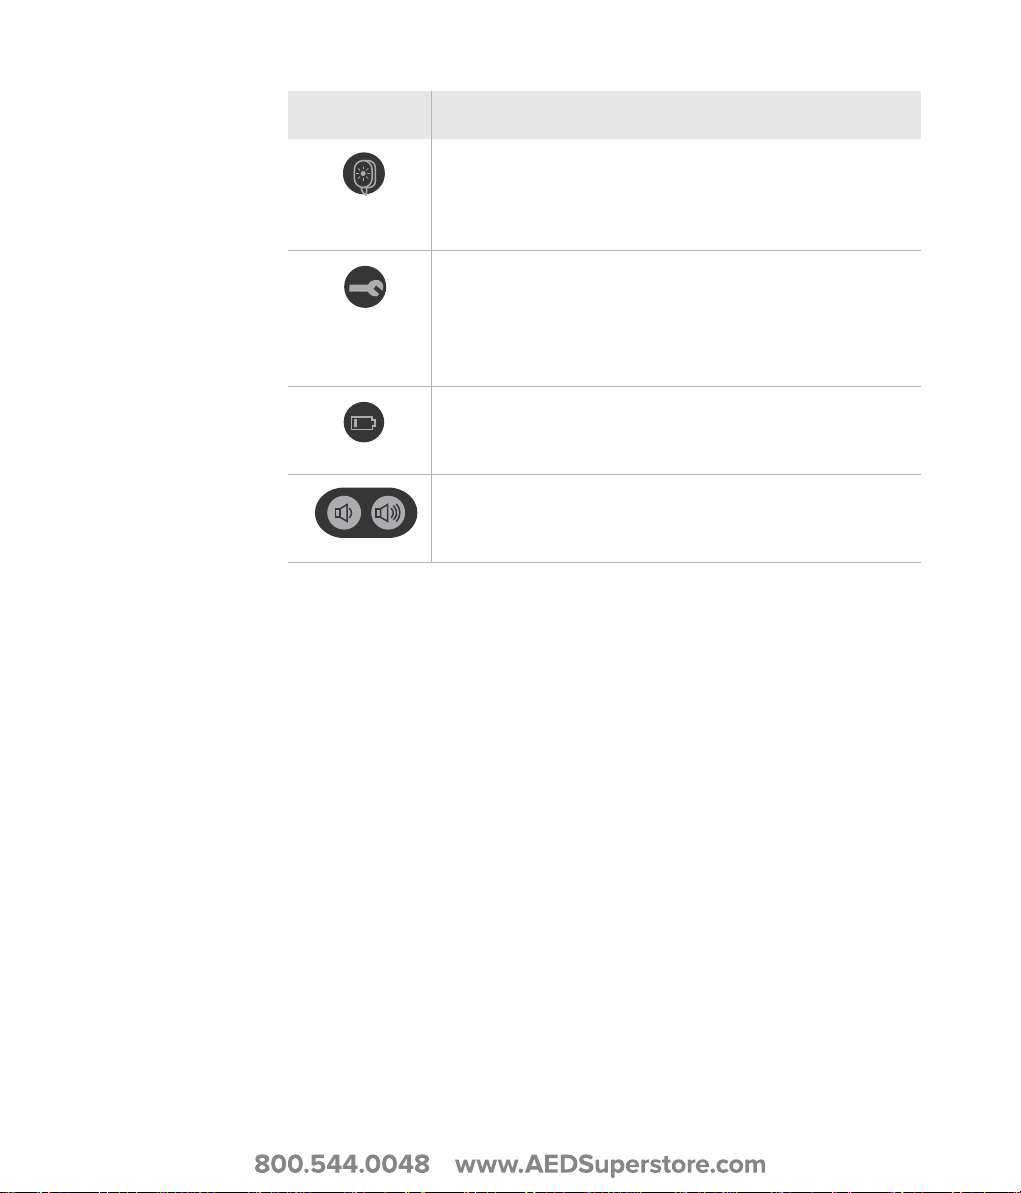
BUTTON FUNCTION
Manikin Pads LEDs. Press to illuminate LEDs for pads
placement on the manikin chest. (Applicable only when
using Laerdal LINK electrodes and a Laerdal LINK
manikin.)
Error Condition. Pr
ess to sim
ulate an AED error
condition in the AED Trainer 3. (The AED Trainer 3 turns
off and chirps every 10 seconds. NOTE: To clear the
error condition and turn on the AED Trainer 3 for
further use, press the green On/Off button twice.)
ess on
AED Low Battery. Pr
ce to simulate a Low
Battery condition in the AED Trainer 3. Press a second
time to initiate a Replace Battery prompt.
Speaker Volume. Press buttons to adjust AED Trainer
3 speaker volume to any of three levels: soft, medium,
and high.
PHILIPS MEDICAL SYSTEMS
20
Page 28
TROUBLESHOOTING TIPS
The following table provides troubleshooting tips for using the AED Trainer 3.
If you need additional assistance, please contact your local Philips
representative or go to www.philips.com/AEDsupport.
ISSUE POSSIBLE CAUSE SUGGESTED ACTION
PHILIPS MEDICAL SYSTEMS
AED Trainer 3 does
not work and gives
beeping signals when
turned on.
AED Trainer 3 gives
“Analyzing” prompt
before pads are
applied to manikin.
• No Operating
System Card is
installed.
• Incorrect card is
installed.
• Operating System
Card has corrupt or
missing files.
• The HeartStart
Training Pads II are
connected; the AED
Trainer 3 senses that
pads are in place as
soon as the pads
connector plug is
inserted.
• Install the Operating
System Card.
• Install the original
Operating System
Card.
• Obtain replacement
Operating System
Card.
• To use HeartStart
Training Pads II, apply
the pads to the
manikin before
connecting them to
the AED Trainer 3.
Alternatively, use
HeartStart Training
Pads III or the
Laerdal LINK
system, so that the
AED Trainer 3
automatically detects
when pads are
correctly placed.
AED Trainer 3 does
not respond when
pads are applied to
manikin.
• Laerdal LINK
Technology Training
Pads are incorrectly
placed on the
Laerdal LINK
Technology manikin.
• Correct the pads
position.
21
Page 29

ISSUE POSSIBLE CAUSE SUGGESTED ACTION
AED Trainer 3
battery depletes
prematurely.
• One or more of the
batteries is
incorrectly oriented.
• Reinstall batteries as
illustrated inside the
battery
compartment.
PHILIPS MEDICAL SYSTEMS
22
Page 30
SPECIFICATIONS
AED TRAINER 3
Size 8.6” x 5.2” x 2.2” (218 mm x 133 mm x 57 mm)
PHILIPS MEDICAL SYSTEMS
Weight (with
batteries)
Battery type and
quantity
Battery capacity > 10 hours
Environmental
specifications
Material Housing: Acrylonitrile butadiene styrene (ABS)
Size 14.3” x 11.2” x 5.2” (362 x 290 x 132 mm)
Weight 10.5 oz (300 g)
Material Nylon
Size 3.8” x 2.1” x 0.2.” (96 mm x 54 mm x 6 mm)
1.3 lb (600 g)
4 AA size alkaline batteries (LR6)
Operating temperature: 50º - 95º F (10º - 35º C)
Storage temperature: 32º - 104º F (0º - 40º C)
Relative humidity: 0 - 90% non-condensing
Control buttons: Silicone
Foot: Polyurethane (PU)
CARRY CASE
REMOTE CONTROL
Battery type Lithium CR2025 3V
TRAINING INFANT/CHILD KEY
Size 1.8” x 1.0” x 0.3” (48 x 25 x 7 mm)
Material Polycarbonate and polybutylene terephthalate
(PC + PBT)
23
Page 31

REGULATORY INFORMATION
The product is in compliance with the essential requirements of Directive
2004/108/EC on electromagnetic compatibility through compliance with:
• IEC 61000-6-3 Electromagnetic Compatibility (EMC) - Par
Standards - Emission standard for residential, commercial and lightindustrial environments(2006)
• IEC 61000-6-1 Electromagnetic Compatib
standards - Immunity for residential, commercial and light-industrial
environments
The product is in compliance with FCC Par
Subpart B - Unintentional Radiators (May 2004). This device complies with
part 15 of the FCC Rules. Operation is subject to the following two
conditions: (1) This device may not cause harmful interference, and (2) this
device must accept any interference received, including interference that may
cause undesired operation.
This equipment has been tested and found to comply with the limits for a
igital device, pursuant to part 15 of the FCC Rules. These limits are
s B d
Clas
designed to provide reasonable protection against harmful interference in a
residential installation. This equipment generates, uses, and can radiate radio
frequency energy and, if not installed and used in accordance with the
instructions, may cause harmful interference to radio communications.
However, there is no guarantee that interference will not occur in a particular
installation. If this equipment does cause harmful interference to radio or
television reception, which can be determined by turning the equipment off
and on, the user is encouraged to try to correct the interference by one or
more of the following measures:
ility (EMC) - Par
15 Radio Frequency Devices,
t
t 6-3: generic
t 6-1: Generic
PHILIPS MEDICAL SYSTEMS
24
• Reorient or relocate the receiving antenna.
• Increase the separation between
• Connect the equipment into an outlet on a circuit different from that to
ich the receiver is connected.
wh
• Consult the dealer or an experienced radio/TV technician
the equipment and
receiver.
f
or help.
Page 32
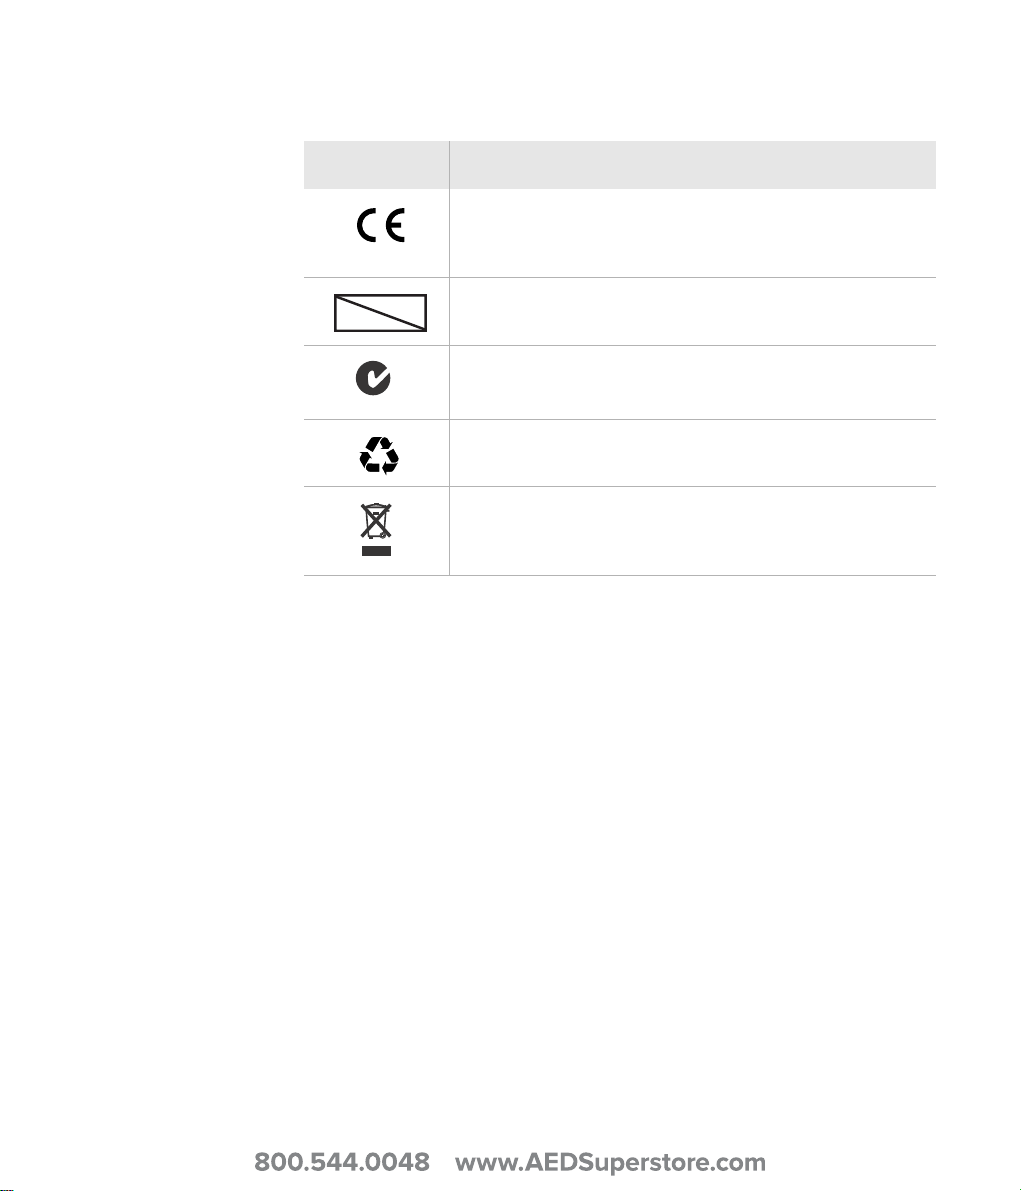
GLOSSARY OF SYMBOLS
LATEX
N25270
SYMBOL DEFINITION
The product is in compliance with the essential
requirements of Directive 2004/108/EC on
electromagnetic compatibility
This product does not contain natural rubber latex.
Australian Communication Authority compliance mark.
Printed on recycled paper.
This appliance is marked according to the European
directive 2002/96/EC on Waste Electrical and Electronic
Equipment (WEEE).
PHILIPS MEDICAL SYSTEMS
25
Page 33

INTENTIONALLY BLANK
PHILIPS MEDICAL SYSTEMS
Page 34

PHILIPS MEDICAL SYSTEMS
INTENTIONALLY BLANK
Page 35

Philips Medical Systems is part of
Royal Philips Electronics
Philips Medical Systems
United States
Philips Medical Systems
2301 Fifth Avenue, Suite 200
Seattle, WA 98121-1825, USA
(800) 263-3342
Canada
Philips Healthcare, a Division of Philips Electronics Ltd.
281 Hillmount Road
Markham, Ontario
L6C 2S3 Canada
(800) 291-6743
Europe, Middle East, and Africa
Philips Medizin Systeme Boeblingen GmbH
Cardiac and Monitoring Systems
Hewlett-Packard Strasse 2
71034 Boeblingen, Germany
(+49) 7031 463-2254
Latin America
Philips Medical Systems Ltda.
Rua Verbo Divino - 1400 - 7o Andar
04719-002 -Sao Paulo, Brazil
0800 7017789
Asia Pacific
Philips Electronics Hong Kong Ltd.
6/F, Core Building 1
1 Science Park East Avenue
Hong Kong Science Park
Shatin. New Territories, Hong Kong
(852) 2821 5888
 Loading...