

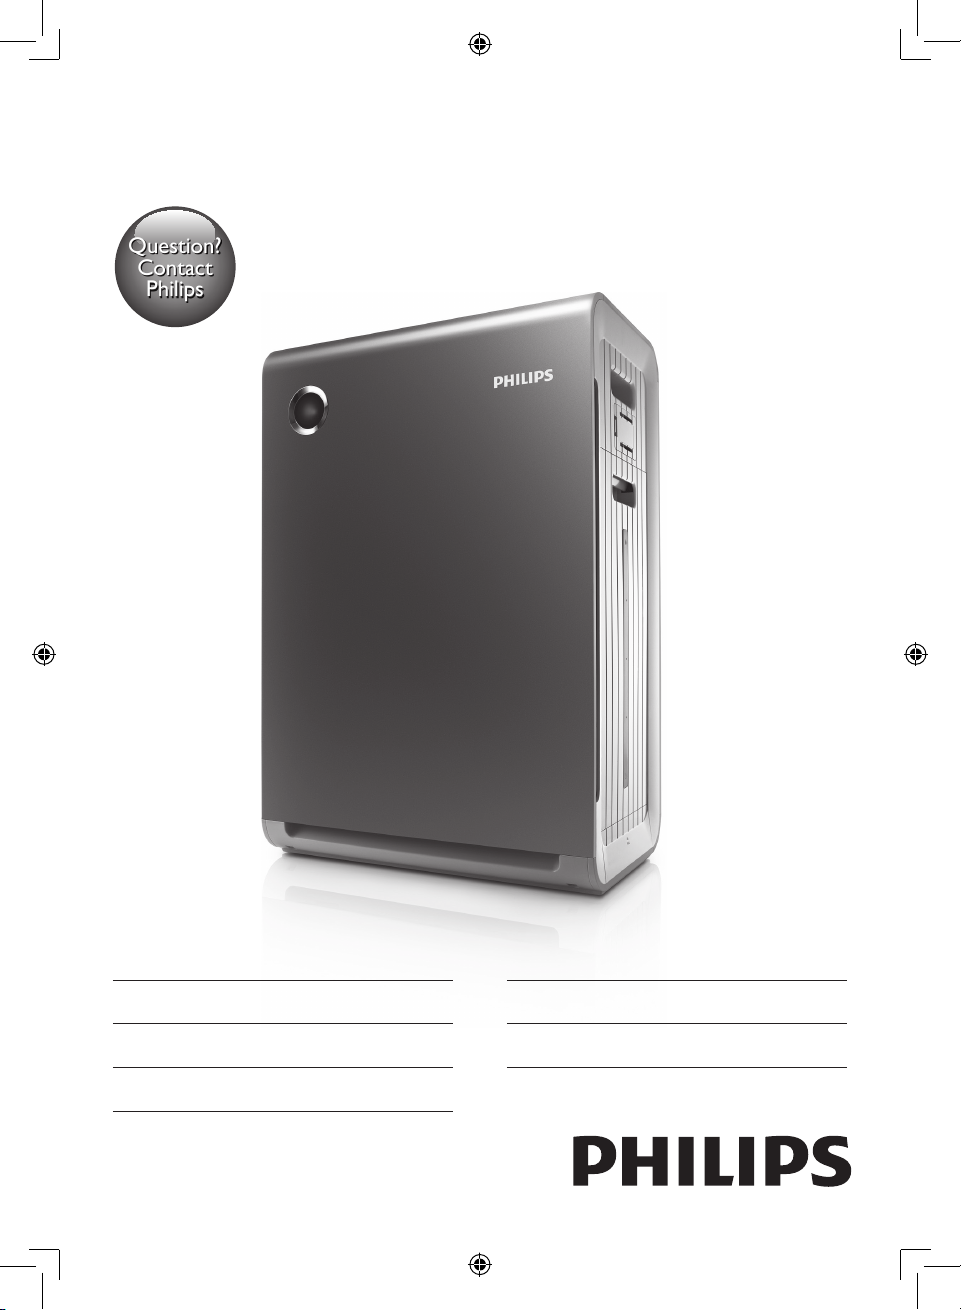
Page 1
Register your product and get support at
www.philips.com/welcome
Always there to help you
Question?
Contact
Philips
AC4086
User manual 3
Benutzerhandbuch 37
Mode d’emploi 75
Қолданушының нұсқасы 111
Руководство пользователя 147
Page 2

Page 3

English
Contents
1 Important 4
Safety 4
2 Your combi air purier and
humidier 7
What’s in the box 7
3 Getting started 8
Install lters 8
Prepare for humidication 9
4
Using the appliance 11
Understand the air quality light 11
Understand the humidity light indicator 11
Understand the auto mode 11
Understand the healthy air protect alert 11
Understand the healthy air protect lock 11
Switch on and off the appliance 12
Set the sensitivity of the air quality
sensor 13
Change the fan speed 14
Auto 14
Manual 14
Silent mode 14
Boost power mode 14
Set the timer 15
Set the humidity level 15
Water level 16
6 Cleaning the pre-lter and
humidication lter 20
Clean the pre-lter 20
Clean the humidication lter 22
Rinse the humidication lter 22
Descale the humidication lter 23
Cleaning schedule 24
7 Replacing the lters 25
Replace the Multi-care lter 25
Replace the activated carbon lter
and the HEPA lter 27
Replace the humidication lter and
water softener 29
Replace the humidication lter 29
Replace the water softener 30
8 Reset the lter lifetime counter 31
9 Troubleshooting 32
10 Guarantee and service 35
Order parts or accessories 35
11 Notices 36
Electomagnetic elds (EMF) 36
Compliance with EMF 36
Recycling 36
5 Cleaning your appliance 17
Clean the body of the appliance 17
Clean the air quality sensor and
humidity sensor 17
Clean the water bucket 18
Clean the humidication lter tray 19
EN
3
Page 4

1 Important
Safety
Read this user manual carefully
before you use the appliance, and
save it for future reference.
Danger
• Do not let water or any other
liquid or ammable detergent
enter the appliance to avoid
electric shock and/or a re
hazard.
• Do not clean the appliance
with water, any other liquid,
or a (ammable) detergent to
avoid electric shock and/or a re
hazard.
• Do not spray any ammable
materials such as insecticides or
fragrance around the appliance.
• The water in the water bucket is
not suitable for drinking. Do not
drink this water and do not use
it to feed animals or to water
plants. When you empty the
water bucket, pour the water
down the drain.
Warning
• Check if the voltage indicated on
the bottom indicated at the rear
of the appliance corresponds to
the local power voltage before
you connect the appliance.
• If the power cord is damaged,
you must have it replaced
by Philips, a service center
authorized by Philips, or similarly
qualied persons in order to
avoid a hazard.
• Do not use the appliance if the
plug, the power cord, or the
appliance itself is damaged.
• This appliance can be used by
children aged from 8 years and
above and persons with reduced
physical, sensory or mental
capabilities or lack of experience
and knowledge if they have been
given supervision or instruction
concerning use of the appliance
in a safe way and understand
the hazards involved. Children
shall not play with the appliance.
Cleaning and maintenance shall
not be made by children without
supervision.
• This appliance is not a toy.
Children should be supervised
to ensure that they do not play
with the appliance.
4
EN
Page 5

English
• Do not block the air inlet and
outlet, e.g. by placing items on
the air outlet or in front of the
air inlet.
Caution
• This appliance is not a substitute
for proper ventilation, regular
vacuum cleaning, or use of an
extractor hood or fan while
cooking.
• If the power socket used to
power the appliance has poor
connections, the plug of the
appliance becomes hot. Make
sure that you plug the appliance
into a properly connected
power socket.
• Always place and use the
appliance on a dry, stable, level,
and horizontal surface.
• Leave at least 20cm free space
behind and on both sides of
the appliance and leave at least
30cm free space above the
appliance.
• Do not place anything on top of
the appliance and do not sit on
the appliance.
• Do not place the appliance
directly below an air conditioner
to prevent condensation from
dripping onto the appliance.
• Make sure all lters are properly
installed before you switch on
the appliance.
• Only use the original Philips
lters specially intended for this
appliance. Do not use any other
lters.
• Avoid knocking against the
appliance (the air inlet and outlet
in particular) with hard objects.
• Always lift or move the
appliance by both handles at the
sides of the appliance.
• Do not insert your ngers or
objects into the air outlet or
the air inlet to prevent physical
injury or malfunctioning of the
appliance.
• Do not use this appliance when
you have used indoor smoketype insect repellents or in
places with oily residues, burning
incense, or chemical fumes.
• Do not use the appliance near
gas appliances, heating devices
or replaces.
• Always unplug the appliance
after use and before you clean it.
• Do not use the appliance in a
room with major temperature
changes, as this may cause
condensation inside the
appliance.
EN
5
Page 6

• To prevent interference, place
the appliance at least 2m away
from electrical appliances that
use airborne radio waves such as
TVs, radios, and radio-controlled
clocks.
• When the appliance is not used
for a long time, bacteria may
grow on the lters. Check the
lters after a long period of
disuse. If the lters are very dirty,
replace them (see the chapter
‘Replace the lters’).
• The appliance is only intended
for household use under normal
operating conditions.
• Do not use the appliance in wet
surroundings or in surroundings
with high ambient temperatures,
such as the bathroom, toilet, or
kitchen.
• The appliance does not remove
carbon monoxide (CO) or
radon (Rn). It cannot be used a
safety device in case of accidents
with combustion processes and
hazardous chemicals.
• Clean the water bucket every
day to keep it clean.
• Only ll the water bucket with
cold tap water. Do not use
ground water or hot water.
• Do not put any substance other
than water in the water bucket.
Do not put fragrance in the
water bucket.
• If you do not use the
humidication function for a long
time, clean the water bucket and
humidication lter tray. Dry the
humidication lter and store
away the water softener.
• If you need to move the
appliance, disconnect the
appliance from the power supply
rst. Then empty the water
bucket. Carry the appliance
horizontally by both handles on
the sides of the appliance.
6
EN
Page 7
English
2 Your combi air purifier and humidifier
Congratulations on your purchase, and welcome to Philips!
To fully benet from the support that Philips offers, register your product at www.philips.com/welcome.
Read this user manual carefully before you install and use the unit. Save it for future reference.
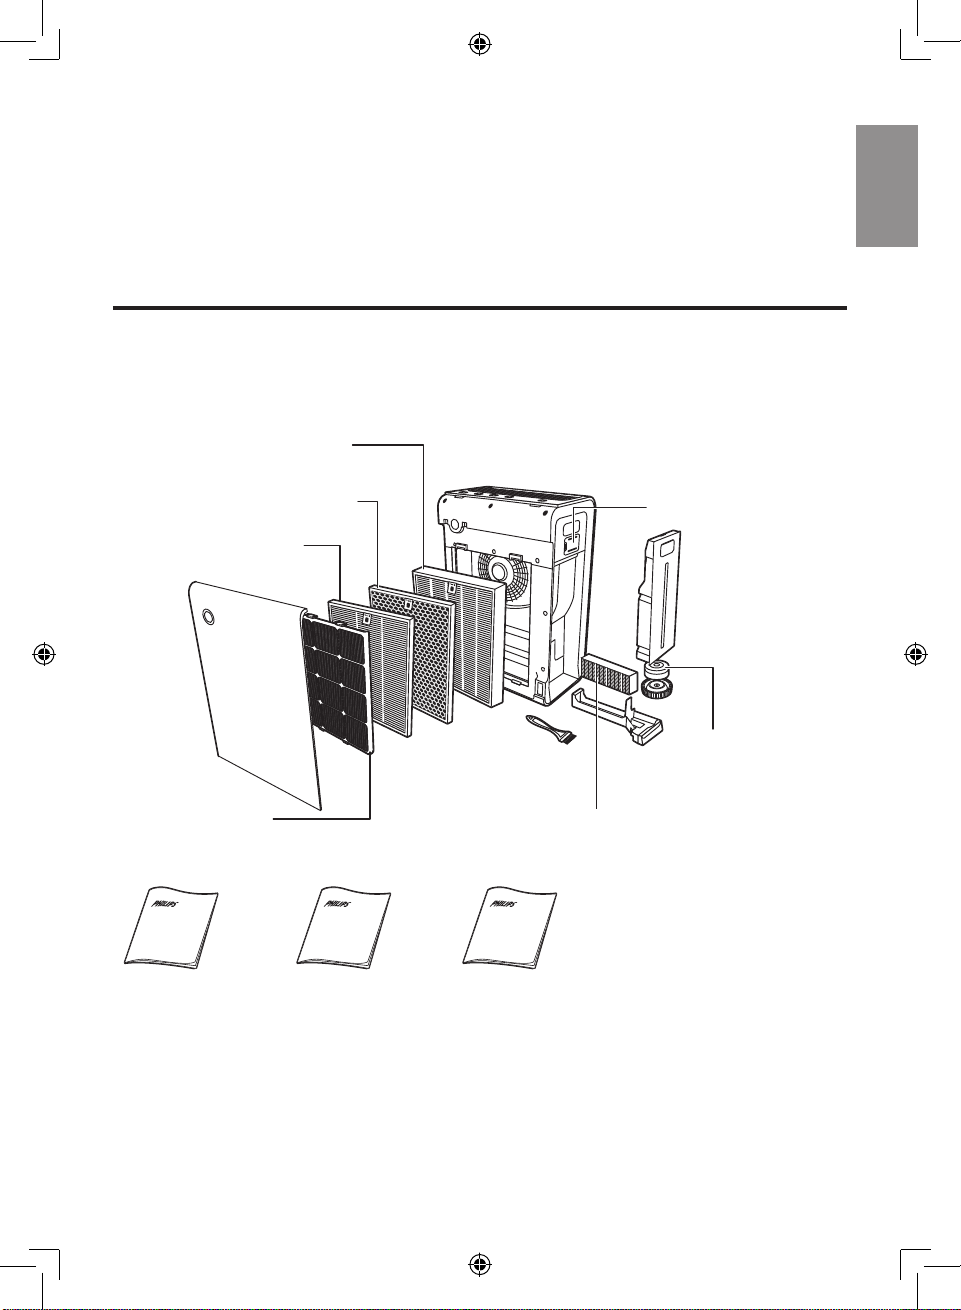
What’s in the box
Check and identify the contents of your package:
Filter 4: HEPA lter (AC4144)
Filter 3: Activated carbon lter
(AC4143)
Filter 2: Multi-care lter
(AC4141)
Filter 1: Pre-lter
User manual
Quick start guide
Air quality sensor
4
3
2
Filter 6: Water softener
(AC4149)
Filter 5: Humidication lter
(AC4148)
Warranty
EN
7
Page 8
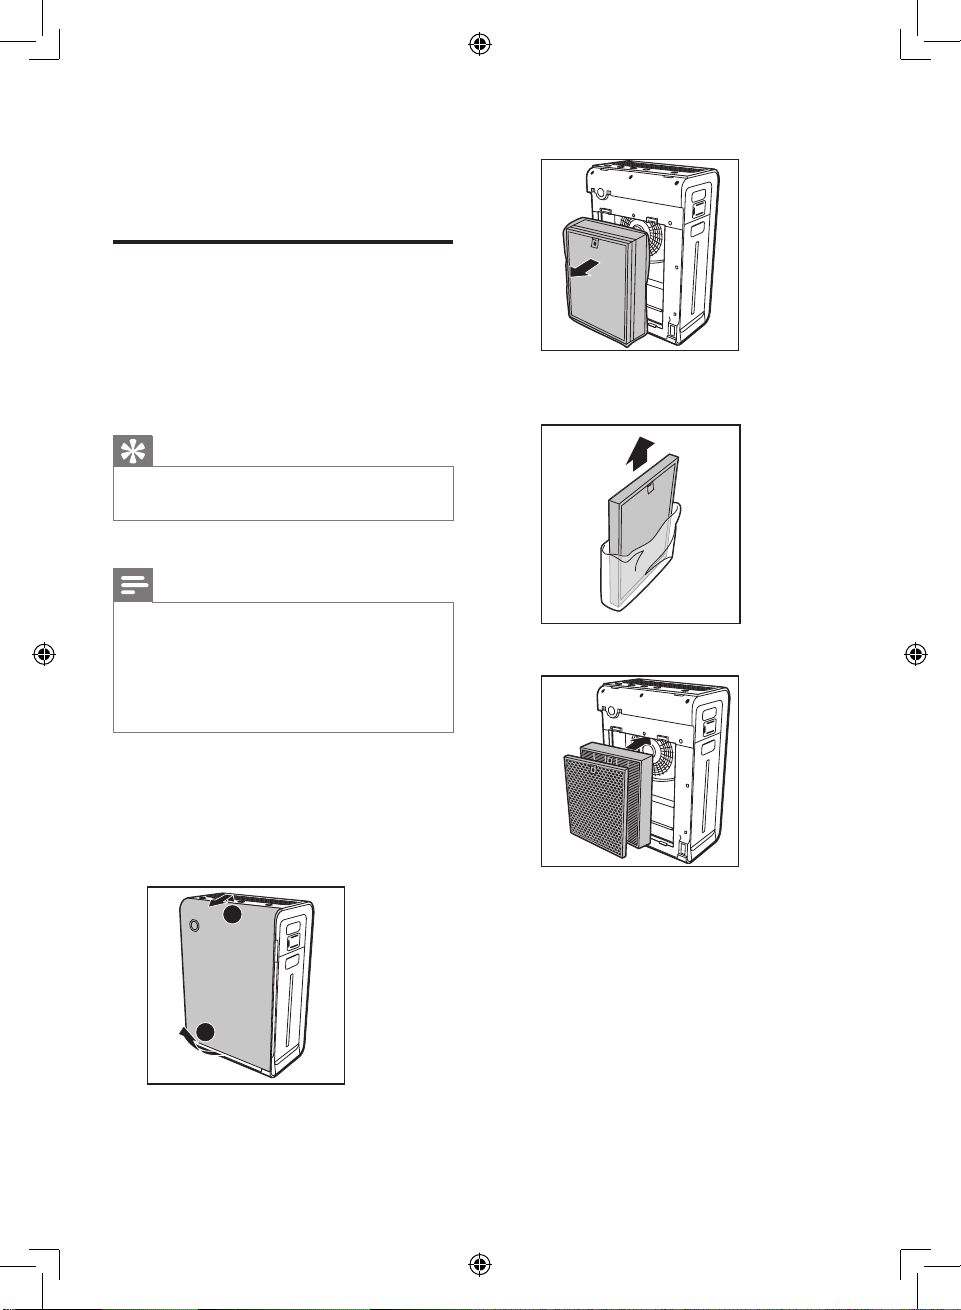
3 Getting started
Install lters
The appliance comes with all lters tted inside.
Remove the packaging of the lters before you
can use the appliance. Remove all lters, unpack
them, and place them back into the appliance
described as follows:
Tip
When you remove or insert lters, place the
•
appliance against a wall for more stability.
Note
• Insert the lters in the correct position.
• Make sure that you place the lters in the order
of HEPA lter, activated carbon lter, Multi-care
lter, and nally the pre-lter.
• Make sure that the side with the tag is pointing
towards you.
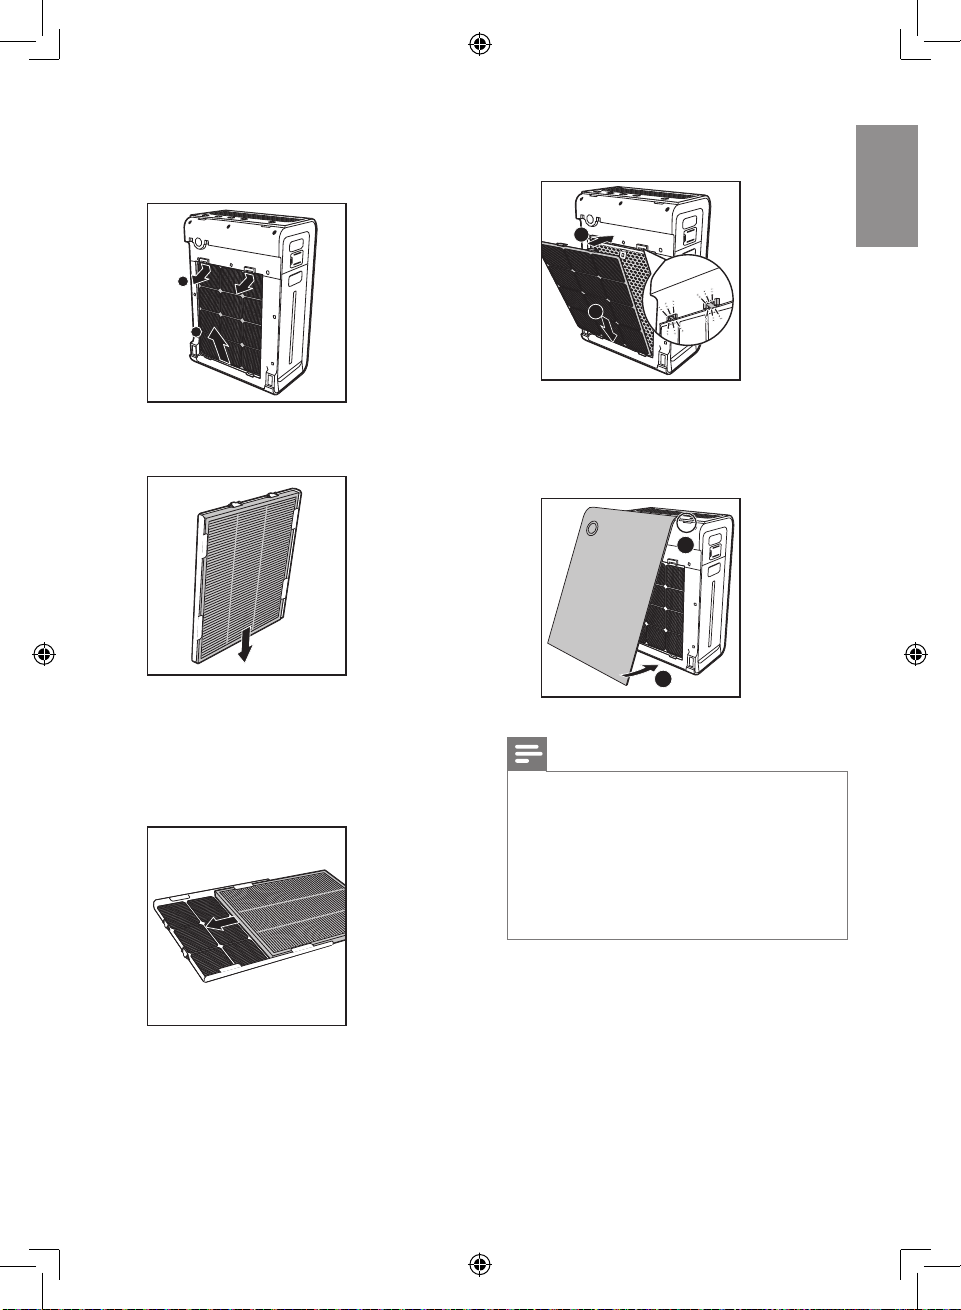
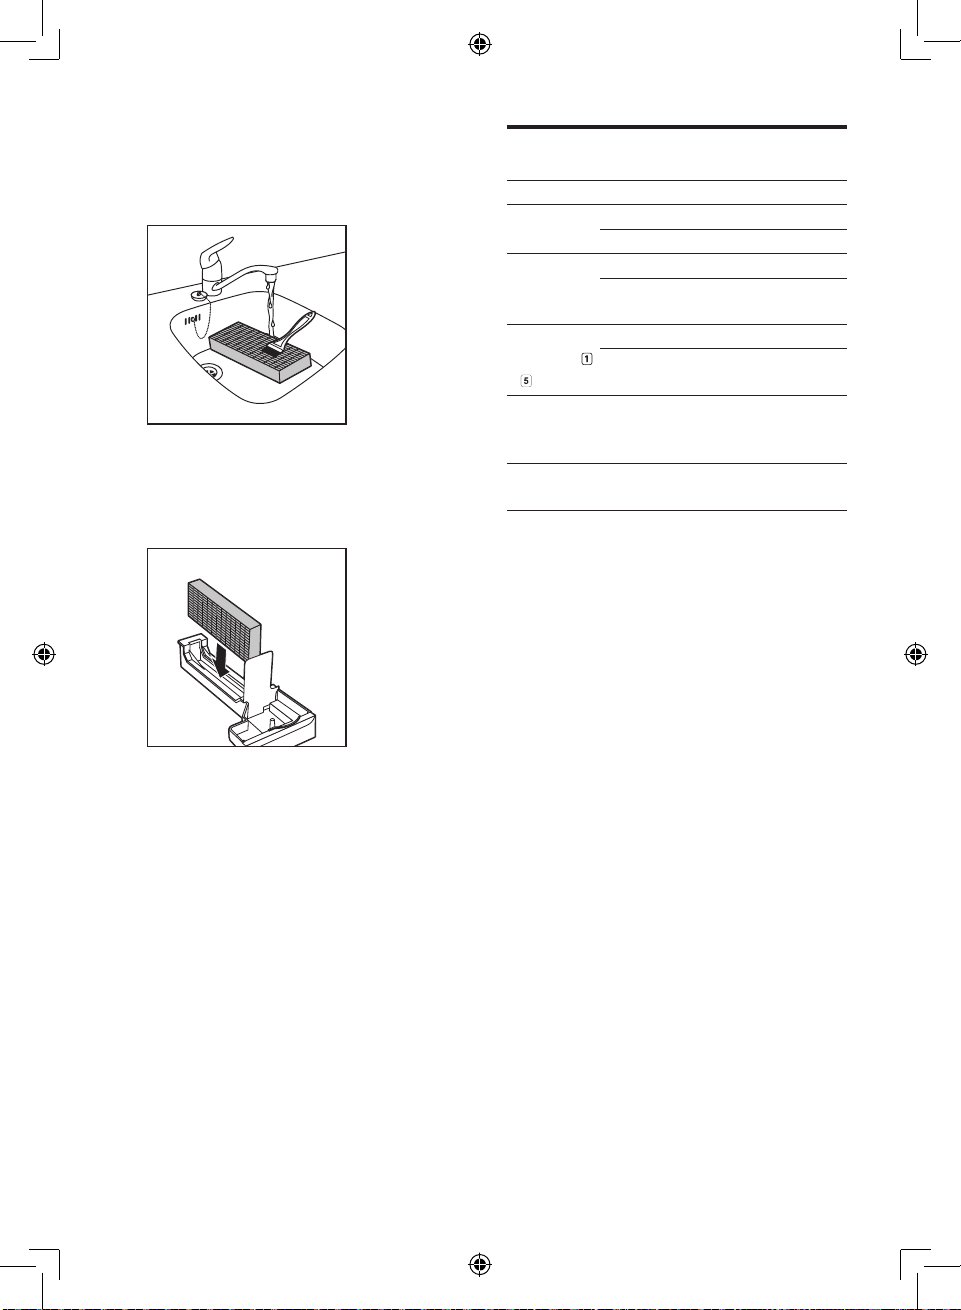
3 Remove all the lters from the appliance.
4 Remove all packaging material from the
lters.
5 Put the lters back into the appliance.
1 Place your ngers in the recesses of the
side panels.
2 Gently pull the bottom part of the front
panel out (1), then lift the top part of the
front panel towards you (2).
2
4
1
8
EN
4
3
Page 9
English
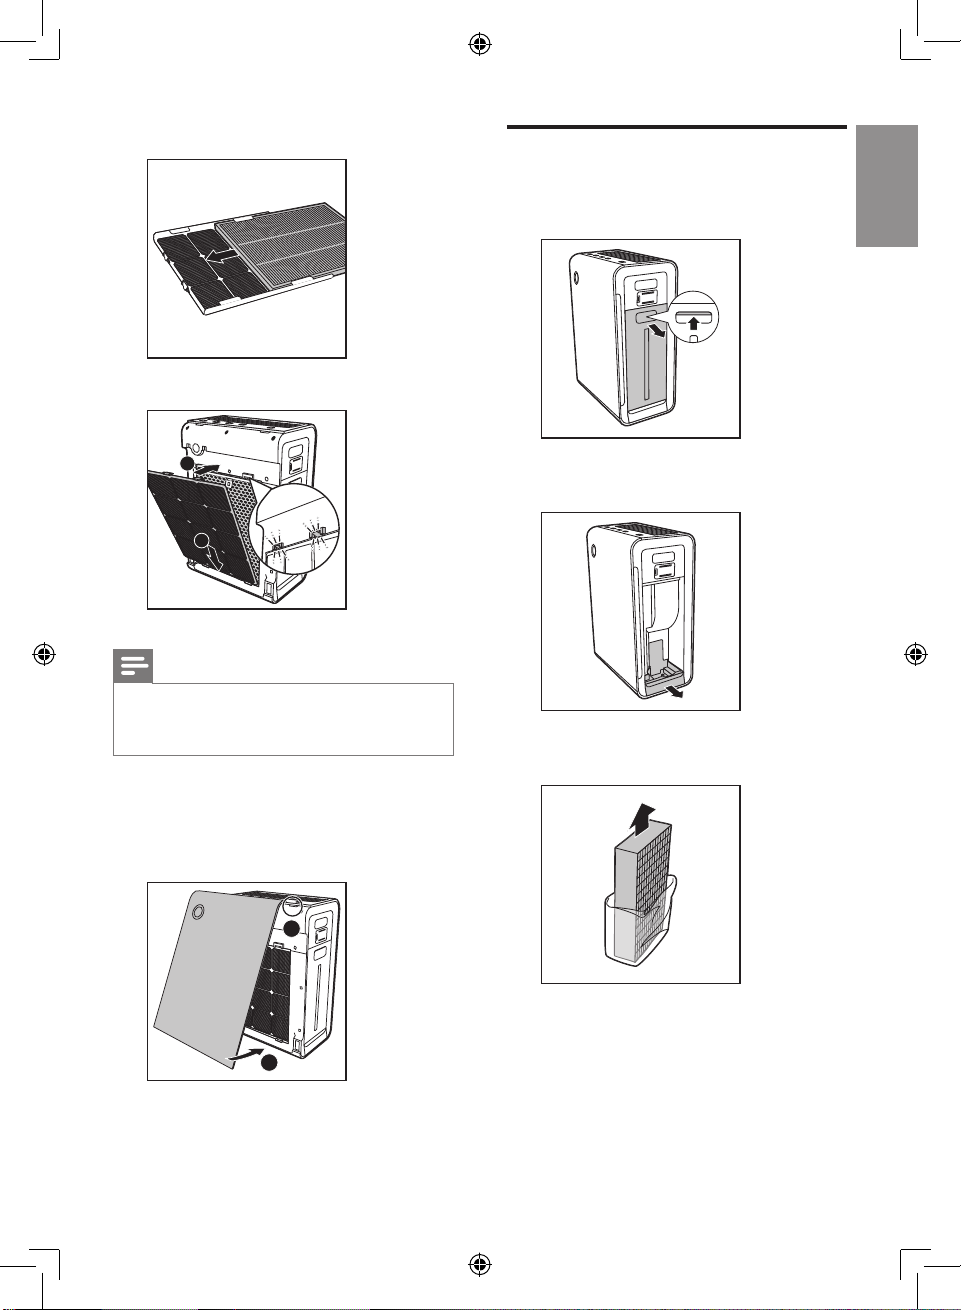
6 Silde the Multi-care lter into the pre-lter.
2
7 Place the pre-lter in the appliance.
Prepare for humidication
Pull the water bucket from the side of the
1
appliance.
2
4
1
Note
• Make sure that the side with the two clips is
pointing towards you, and that all hooks of the
pre-lter are properly attached to the purier.
8 To reattach the front panel, mount the
panel onto the top of the appliance rst
(1). Then, gently place the panel against the
body of the appliance (2).
1
4
2 Pull the humidication lter tray from the
appliance.
3 Remove the packaging material from the
humidication lter.
9
EN
Page 10

4 Put the humidication lter back and slide
the humidication lter tray back to the
appliance.
7 Screw the top cap tightly back onto the
water bucket until you feel and hear a
rattling sound.
5 Unscrew the top cap of the water bucket.
6 Fill the water bucket with cold tap water.
8 Place the water bucket back into the
appliance.
2
1
10
EN
Page 11
English
4
Using the
Understand the auto mode
appliance
Understand the air quality
light
Color of the air quality light Air quality level
Blue Excellent
Deep purple Good
Purple Fair
Red Bad
The air quality light automatically goes on when
the appliance is switched on.
Note
• The built-in air quality sensor measures the air
quality and automatically selects the appropriate
color of the air quality light. When the air is
clean, the color of the air quality light is in
blue or deep purple. When the air quality
deteriorates, the color of the air quality light
changes to purple or red.
The built-in air quality sensor automatically
measures the ambient air quality, and selects the
most appropriate fan speed.
Understand the healthy air
protect alert
The lter lights indicate that the lter has to be
cleaned or be replaced.
Different healthy
air protect alert
lights
Filter light
ashes.
Filter light
ashes.
Filter light
ashes.
Filter light
ashes.
Follow this
/
Clean the pre-lter and
descale the humidication
lter.
Replace the Multi-care lter.
Replace the activated
carbon lter and the HEPA
lter.
/
Replace the humidication
lter and water softener.
Understand the humidity light
indicator
The appliance is equipped with a built-in
humidity sensor. The CURRENT HUMIDITY
lights (30%, 40%, 50% or 60%) show the current
humidity.
Note
• The accuracy of the humidity indication is
approximately plus or minus 5%.
• It takes some time to measure the humidity level
in the room..
Understand the healthy air
protect lock
This appliance is equipped with the Healthy
air protect lock to make sure that the lters
are in optimal condition when the appliance is
operating. When the lter is almost full and has
to be replaced, the specic lter light (
/ ) start to ash.
When you do not replace the lter in time:
» The appliance stops operating and it
is locked.
» The specic lter light (
) illuminate continuously.
/ /
/ / /
EN
11
Page 12
Note
• The appliance is locked after the lter light
ashing for approximately 2 weeks.
• Approximately one day before the appliance
locks, it beeps ever y 30 minutes to inform you
that the lter needs to be replaced.
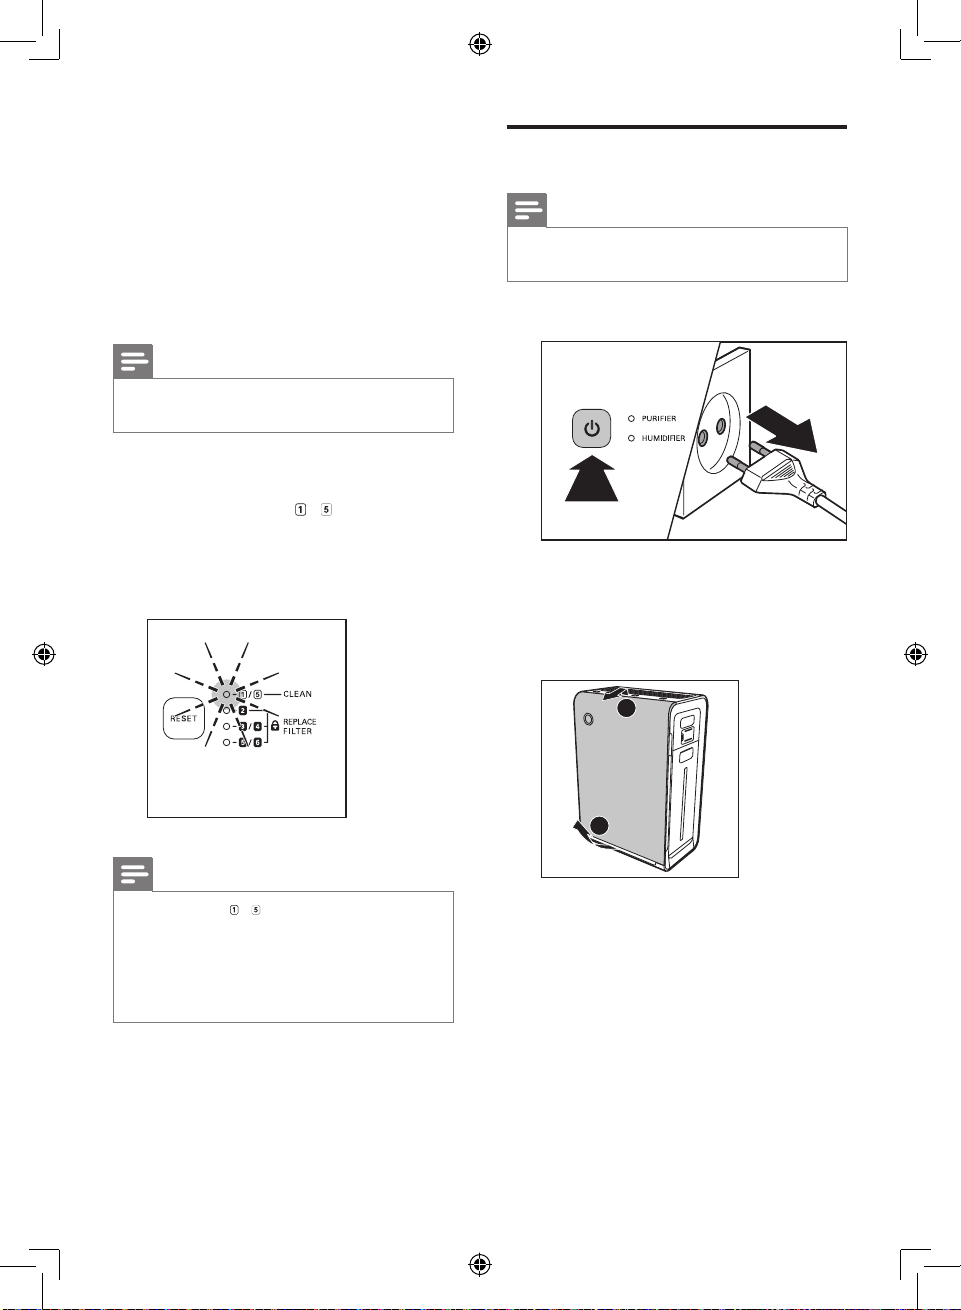
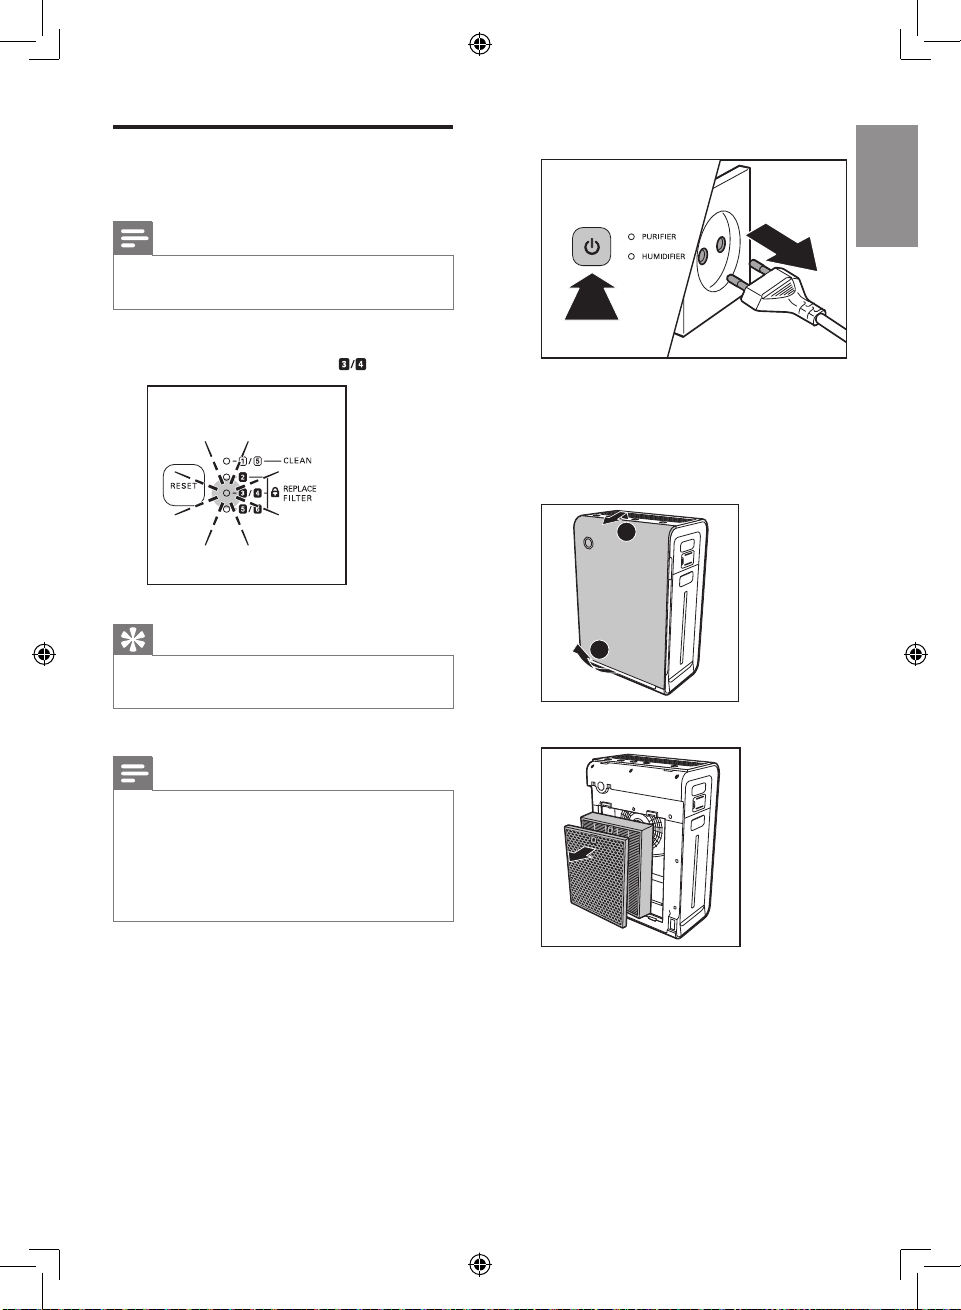
Switch on and off the
appliance
The appliance always operates under air
purication combined with humidication.
If you want to operate the appliance only as an
air purier, you need to empty the water in the
water bucket.
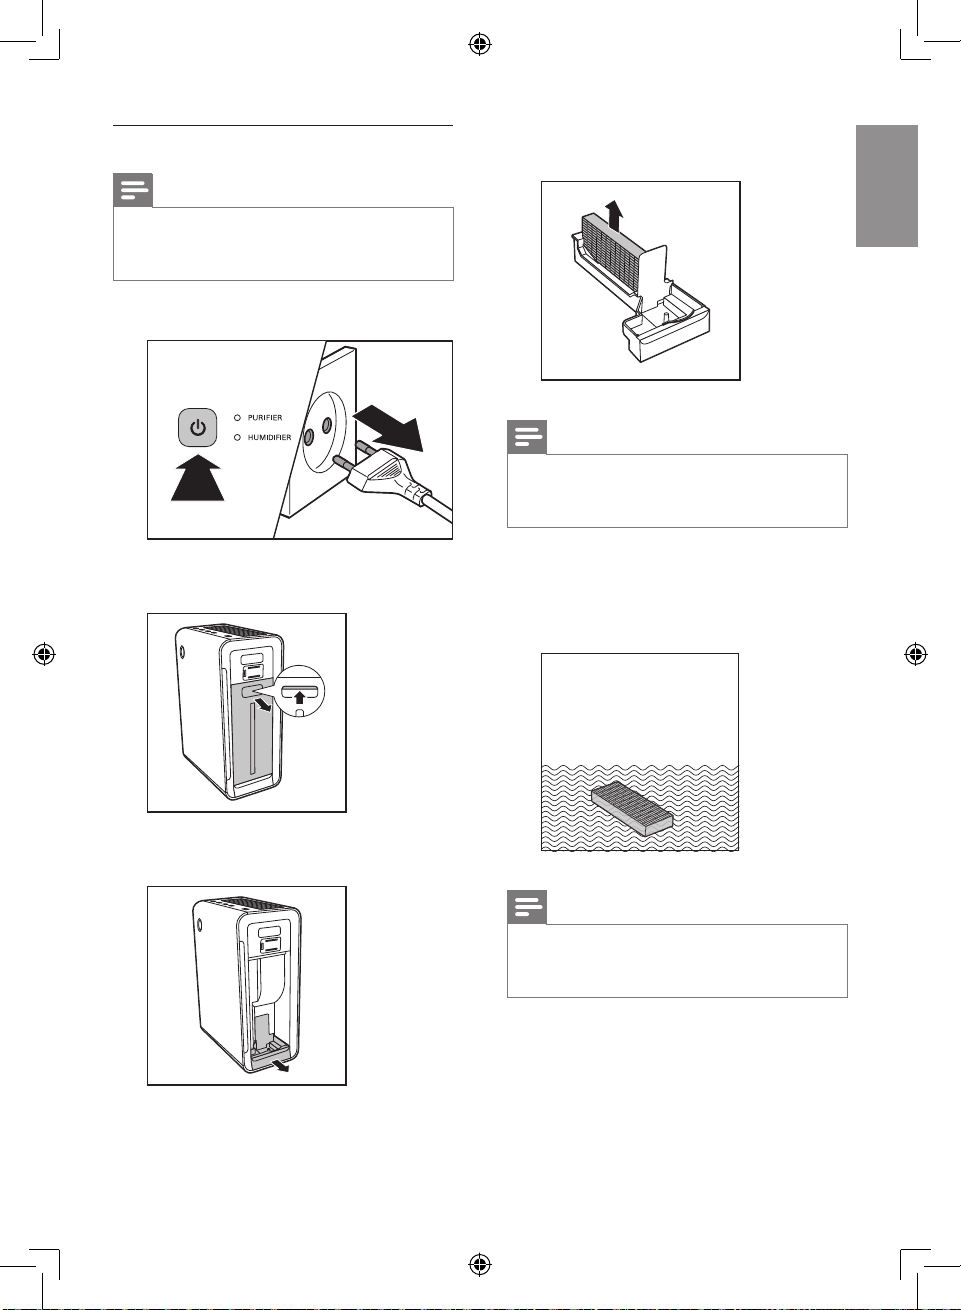
1 Plug the appliance into the power supply.
» The air quality light shows the current
air quality.
» The CURRENT HUMIDITY light
shows the current humidity level.
3 Press the button to switch off the
appliance.
» All lights go on twice and you hear a
beep. Then, the lights go out again.
2 Press the button to switch on the
appliance.
» The PURIFIER and HUMIDIFIER lights
are on.
12
EN
Note
• Humidier cannot be used alone without air
purier operating.
• If the water bucket is empty, the humidier is
switched off, but the air purier still operates. In
this way the appliance operates as an air purier
only (PURIFIER light and REFILL WATER light
are on).
Page 13
English
Set the sensitivity of the air
quality sensor
People with certain health problems (for
example: allergies or asthma) have a greater
need for healthy air. For this reason, the
appliance allows you to adjust the sensitivity
of the air quality sensor. If you set it to higher
sensitivity level, the appliance starts cleaning the
air at lower pollution level.
There are 3 sensitivity levels:
• standard
• sensitive
• extra sensitive
The pollution sensor is set to standard
sensitivity. You can adjust the sensitivity of the air
quality sensor in the following way:
Note
• When it is set to a higher sensitivity, the appliance
starts cleaning the air at lower pollution levels to
make the air even cleaner.
1 Make sure the purier is on.
2 Press the SPEED and the HUMIDITY SET
buttons simultaneously.
» The purier beeps twice and the
fan speed light (
the current sensitivity level of the air
quality sensor.
Fan speed light Sensitivity level
SILENT extra sensitive
) ashes to show
sensitive
standard
3 Press the SPEED button to adjust the
sensitivity level of the air quality sensor.
» One of the SPEED lights ( SILENT,
or
) goes on to show the preferred
sensitivity level of the air quality sensor.
,
4 Press and hold the SPEED and HUMIDITY
SET buttons again to conrm the setting.
Note
• When you change the sensitivity, the appliance
automatically starts operating at the set
sensitivity level whenever you switch on the
appliance.
13
EN
Page 14
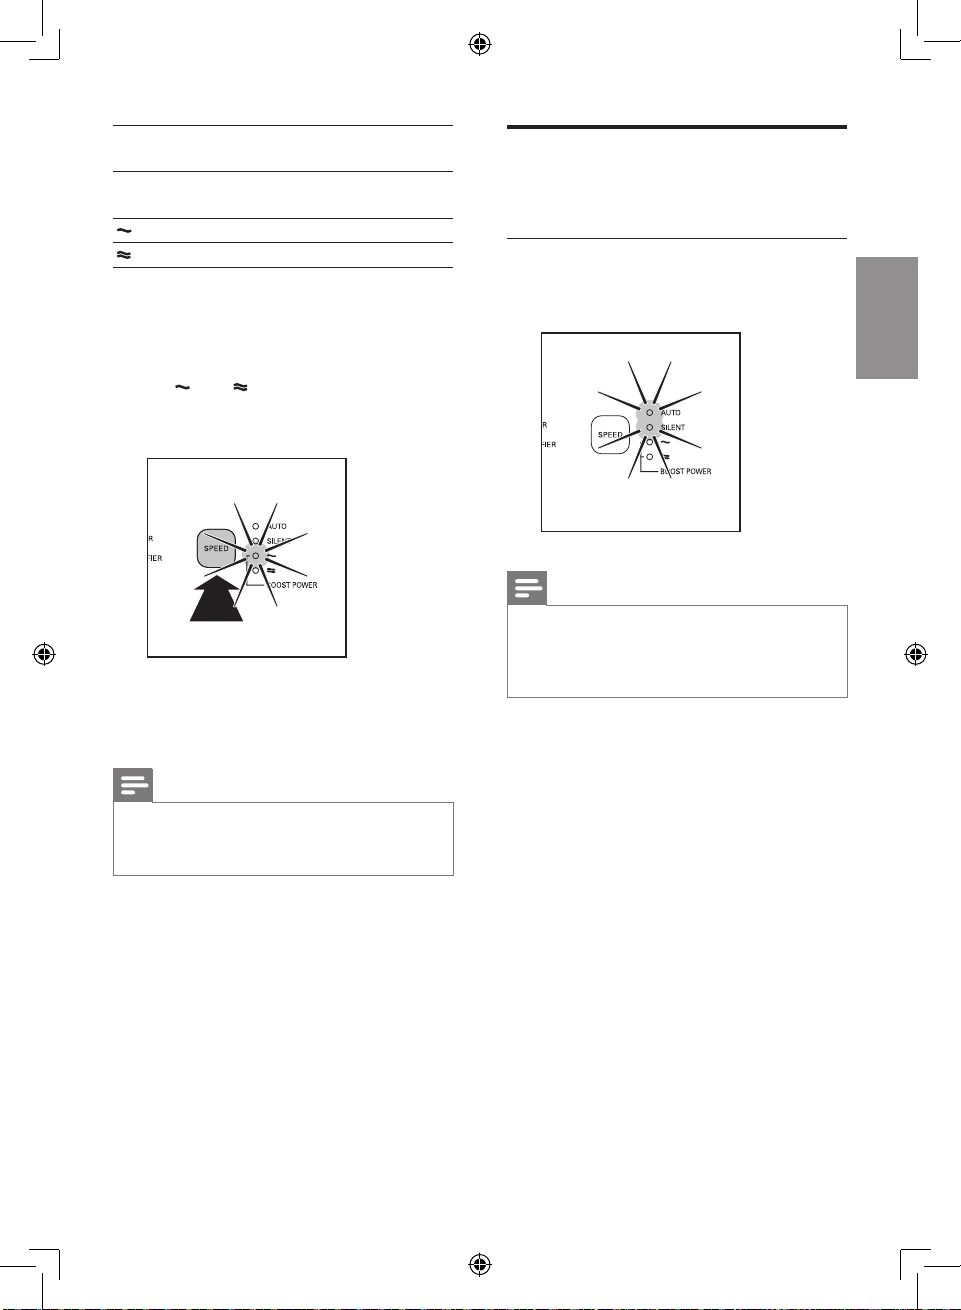
Change the fan speed
Auto
1 Press the SPEED button to select AUTO
mode.
Note
• In auto mode, you can set the desired humidity
level (40%, 50%, 60% in your room (see chapter
‘Set the humidity level’).
Manual
You can manually select the desired fan speed,
which overrides the auto mode.
1 Press the SPEED button once or more
times to select the desired fan speed
(AUTO, SILENT,
POWER).
, or BOOST
Tip
If the air quality light is in blue or in deep purple
•
color, this means the air quality is good or
excellent, and you can select a lower fan speed.
Silent mode
In silent mode, the air lter operates very
quietly.
1 Press the SPEED button to select the silent
mode.
» The SILENT light goes on.
To change to another fan speed, press the
SPEED button.
Boost power mode
If the air quality light is in red or purple color,
this means the air quality is bad or fair. You
can select boost power mode to clean the air
quickly.
1 Press the SPEED button to select the
boost power mode.
» The
and lights are on.
14
EN
Page 15
English
To change to another fan speed, press the
SPEED button.
To deactivate the timer function, press the
TIMER button repeatedly until the TIMER light
(
, , or ) is out.
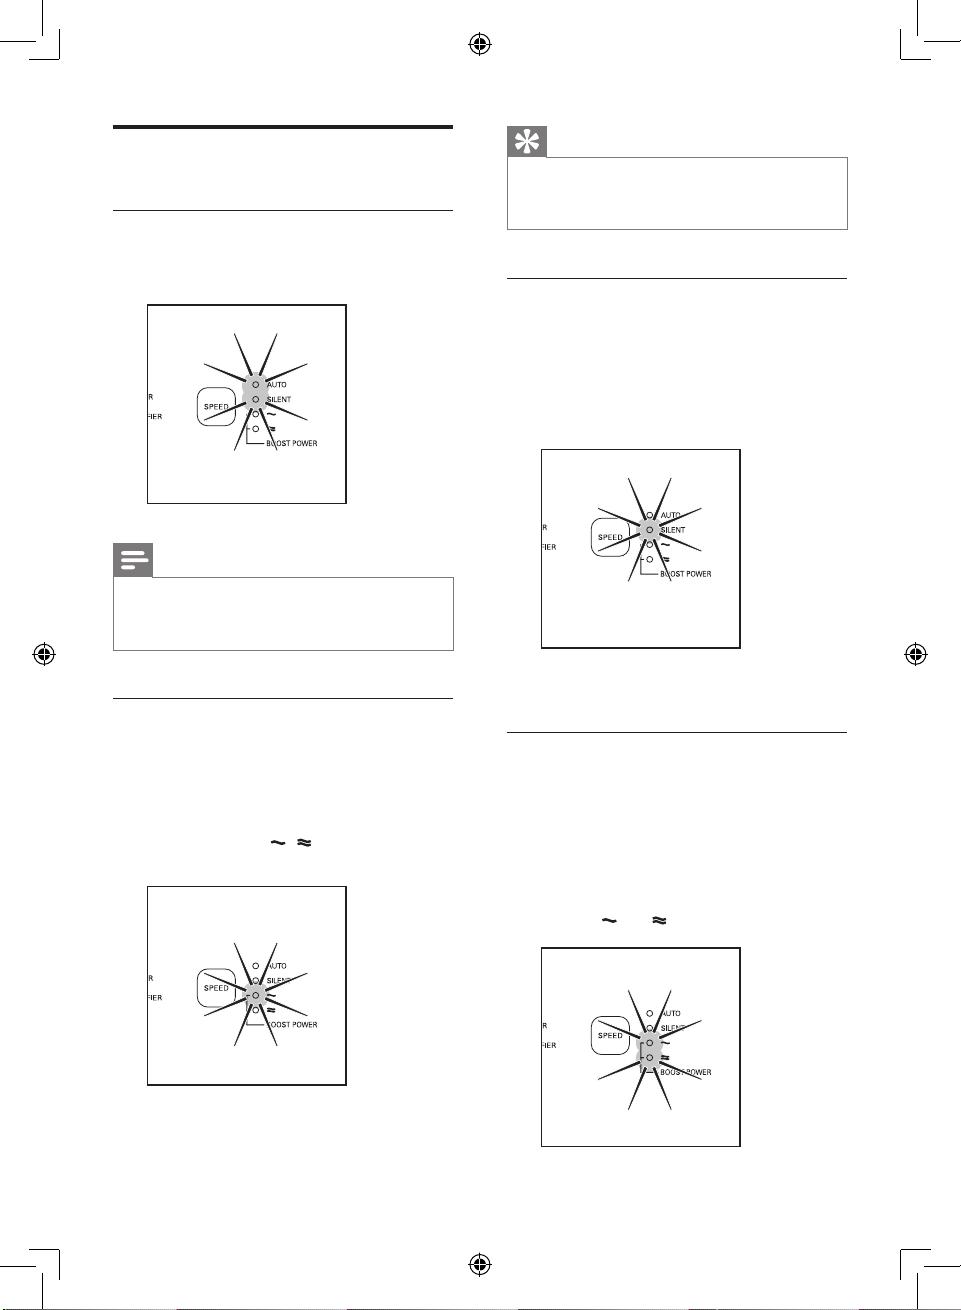
Set the timer
With the timer function, you can let the
appliance operate for a set number of hours.
When the set time has elapsed, the appliance
automatically switches off.
You can use the timer function in the following
situations:
Situations You will see
Choose a fan
speed manually
(see ‘Manual’).
The appliance
is in auto mode
(see ‘Auto’).
The appliance is
in silent mode
(see ‘Silent
mode’).
One of the SPEED lights (
or BOOST POWER) and
one of the TIMER lights (
or
) are on.
The AUTO light is on.
One of the SPEED lights
(SILENT,
POWER), and one of the
TIMER lights (
on.
The SILENT light and one of
the TIMER lights (
are on.
, or BOOST
, , or ) are
, ,
, , or )
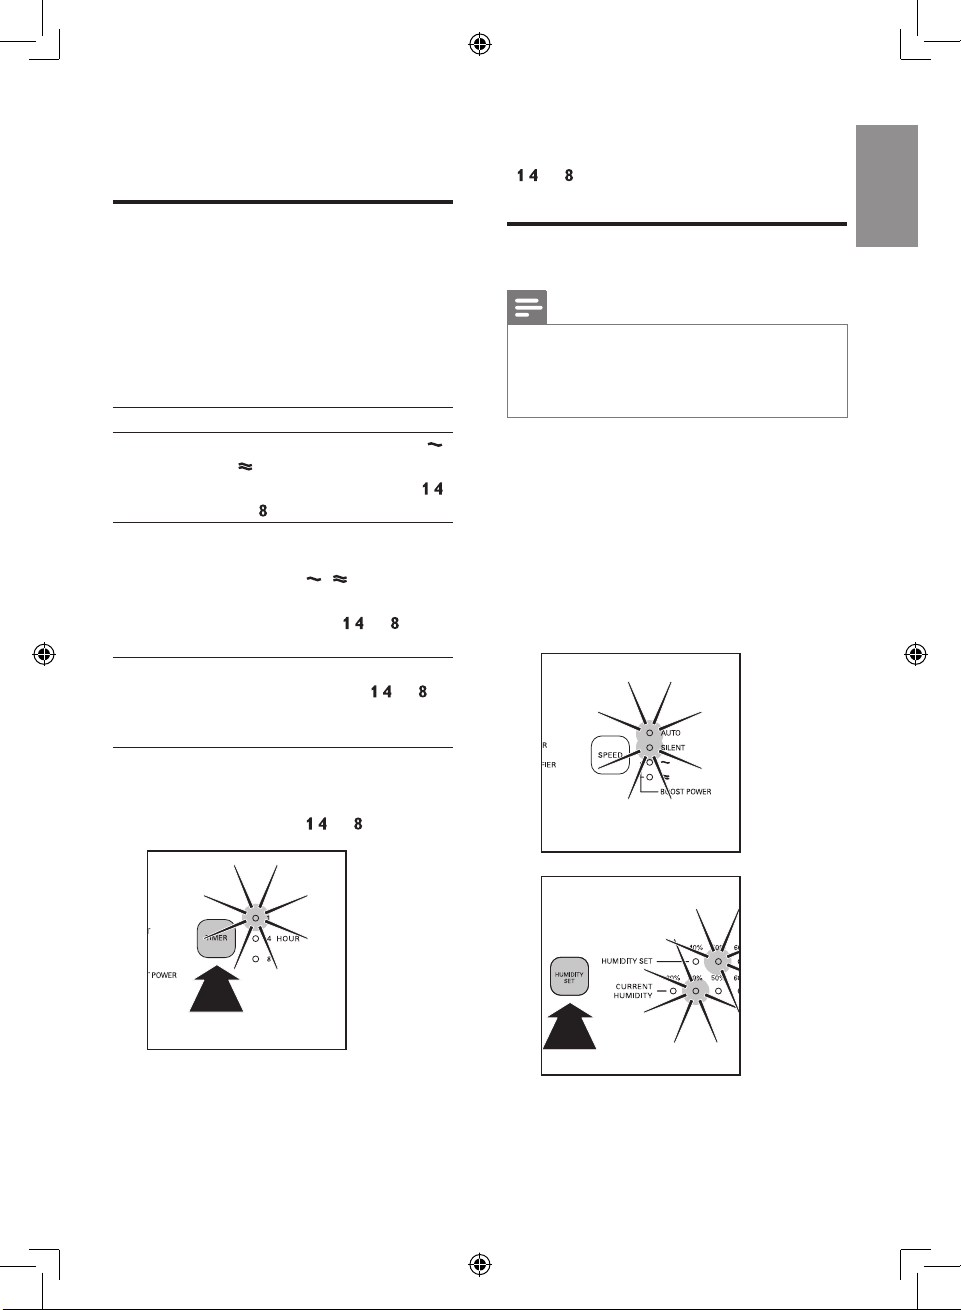
1 Press the TIMER button to activate the
timer.
» The TIMER light (
, , or ) goes on.
Set the humidity level
Note
• Make sure that the water bucket is lled with
water when you want to use the humidication
function (see the chapter ‘Get star ted’, section
‘Prepare for humidication’).
,
You can set the desired humidity level only in
AUTO mode. When the humidity of the room
reaches the desired level, the humidity stays at
this level constantly.
• Press the HUMIDITY SET button once or
more times to set the desired air humidity
to 40%, 50% or 60%.
» The corresponding HUMIDITY SET
light (40%, 50% or 60%) goes on.
2 Press the TIMER button repeatedly to
choose the number of hours you want the
appliance to operate. The corresponding
TIMER light goes on.
EN
15
Page 16
Note
• If you do not set the humidity level, the
HUMIDITY SET light goes off. The humidier
humidies the air under AUTO mode and the
preset humidity level is 50%.
• If you change the fan speed (SILENT, , or
BOOST POWER), the humidier automatically
operates according to the fan speed level and
the AUTO mode deactivates.
• If you want to increase the humidity level in
shorter time, you can select higher fan speed.
• The appliance comes with a smart memor y
function, it can memorize the settings when
the appliance is switched off (e.g. electricity
shortage). When the appliance is plugged in/
switched on again, it automatically star ts at the
previous setting.
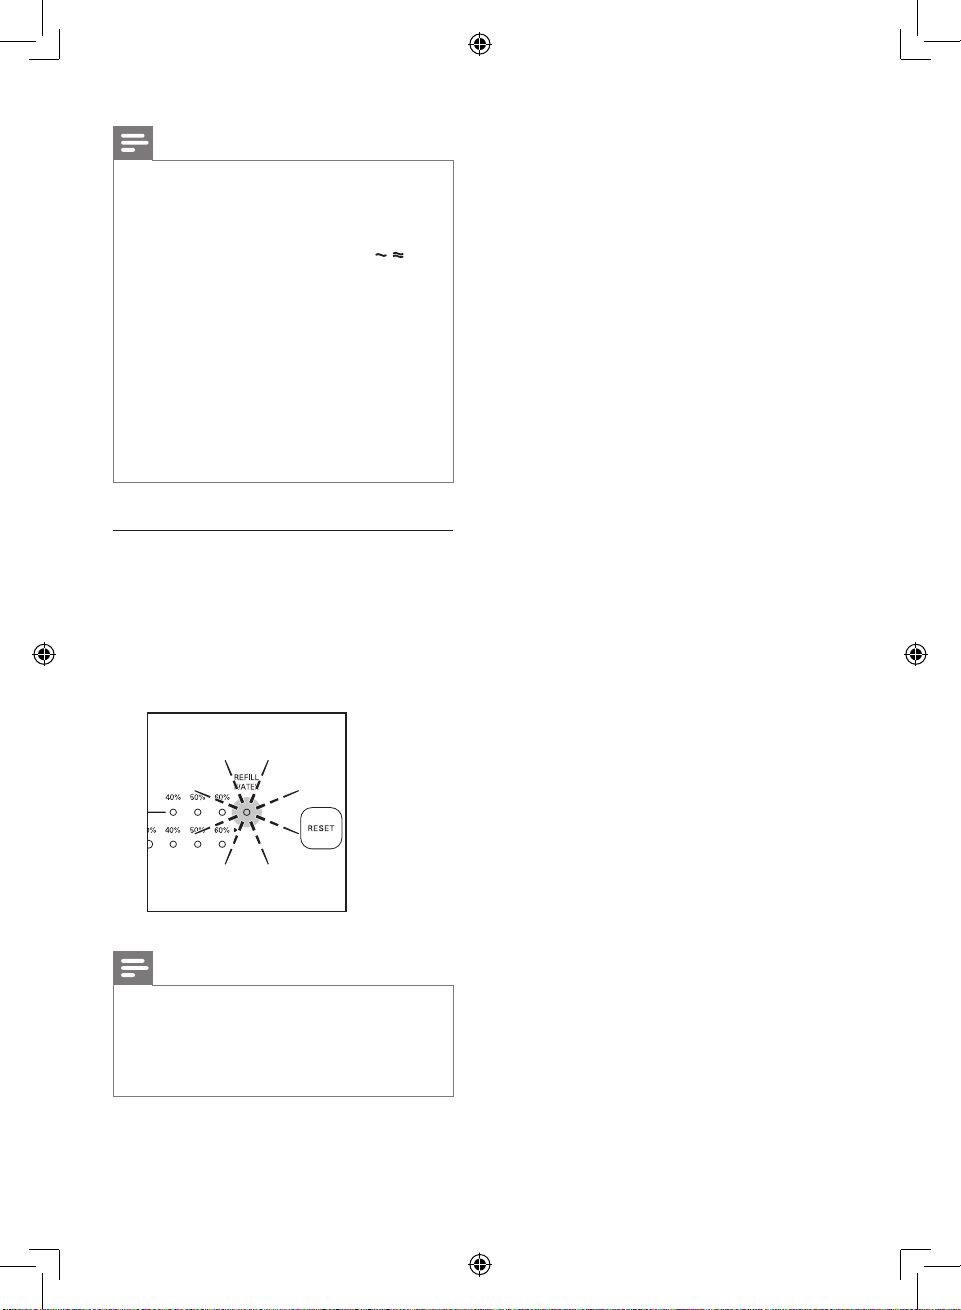
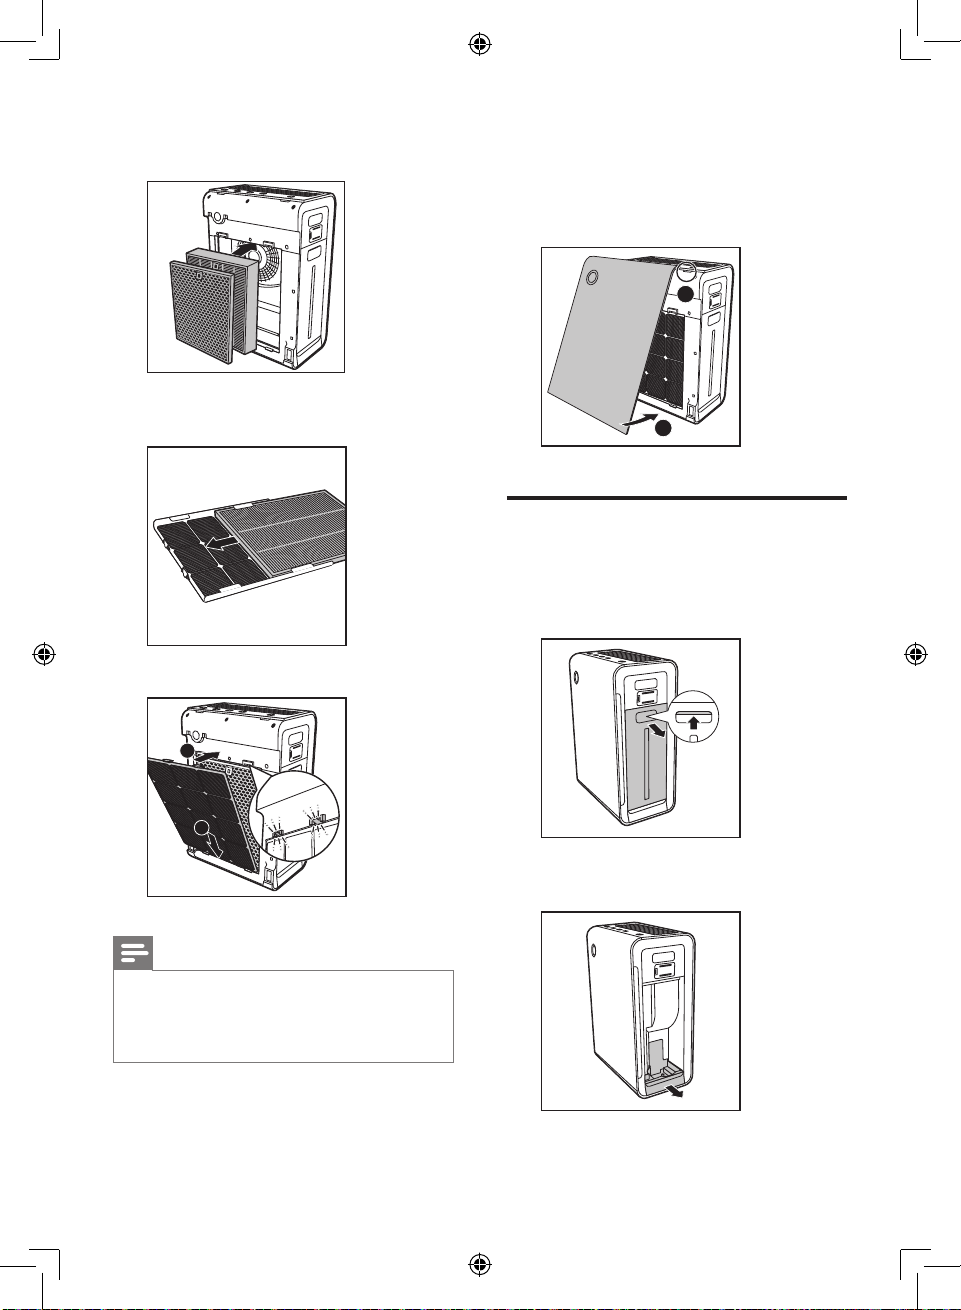
Water level
The water level in the water bucket is visible
through the water level window on the side of
the appliance. When there is not enough water
in the water bucket, the REFILL WATER light
ashes to indicate that you have to rell the
water bucket.
Note
• Appliance can operate under air purication
only when the water in the bucket is out and
the REFILL WATER light ashes. Humidication
function can only be activated when the bucket
is lled with water.
16
EN
Page 17
English
5 Cleaning your
appliance
Note
• Always unplug the appliance before you clean it.
• Never immerse the appliance in water or any
other liquid.
• Never use abrasive, aggressive, or ammable
cleaning agents such as bleach or alcohol to
clean any part of the appliance.
• Only the pre-lter and humidication lter are
washable. Other air purier lters are NOT
washable nor vacuum cleanable.
Clean the body of the
appliance
Regularly clean the inside and outside of the
appliance to prevent dust from collecting.
1 Wipe away dust with a soft dry cloth from
the body of the appliance.
2 Clean the air inlet and the air outlet with a
soft dry cloth.
Note
• When the humidity level in the room is very
high, it is possible that condensation develops on
the air quality sensor. As a result, the air quality
light may indicate that the air quality is bad even
though the air quality is good. In this case you
have to clean the air quality sensor or use one of
the manual speed settings.
1 Clean the inlet and outlet of the air quality
and air humidity sensors with a soft brush.
2 Remove the cover of the air quality and air
humidity sensors.
Clean the air quality sensor
and humidity sensor
Clean the air quality and humidity sensors
every month for optimal functioning of the
appliance. Clean it more frequently if you use
the appliance in a dusty environment.
3 Clean the sensors, the dust inlet and the
dust outlet with a lightly moistened cotton
swab.
EN
17
Page 18
4 Dry them with a dry cotton swab.
5 Reattach the sensor cover.
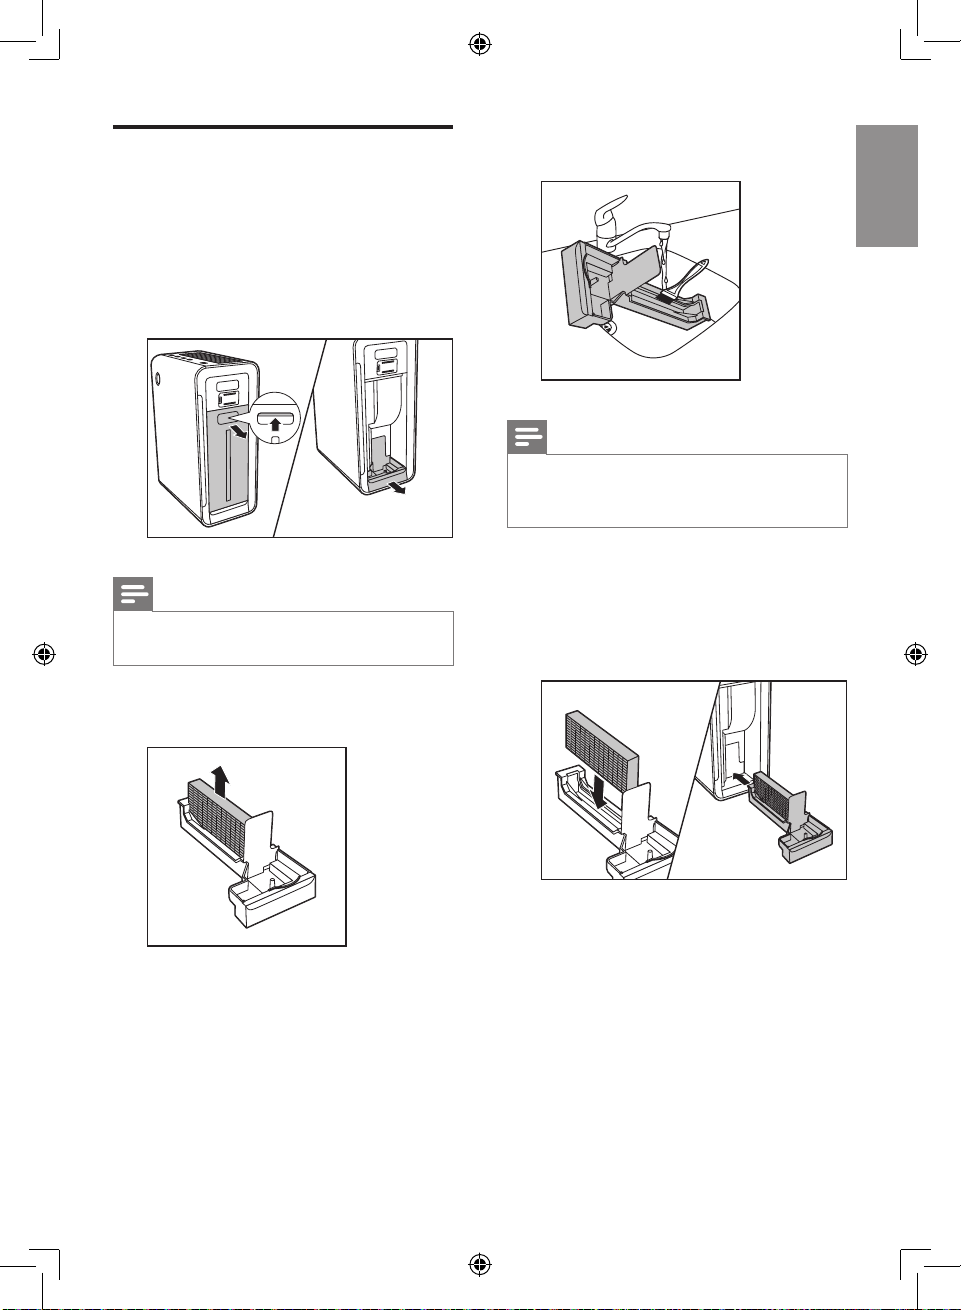
Clean the water bucket
Clean the water bucket every day to keep it
hygienic.
1 Unscrew the top cap of the water bucket.
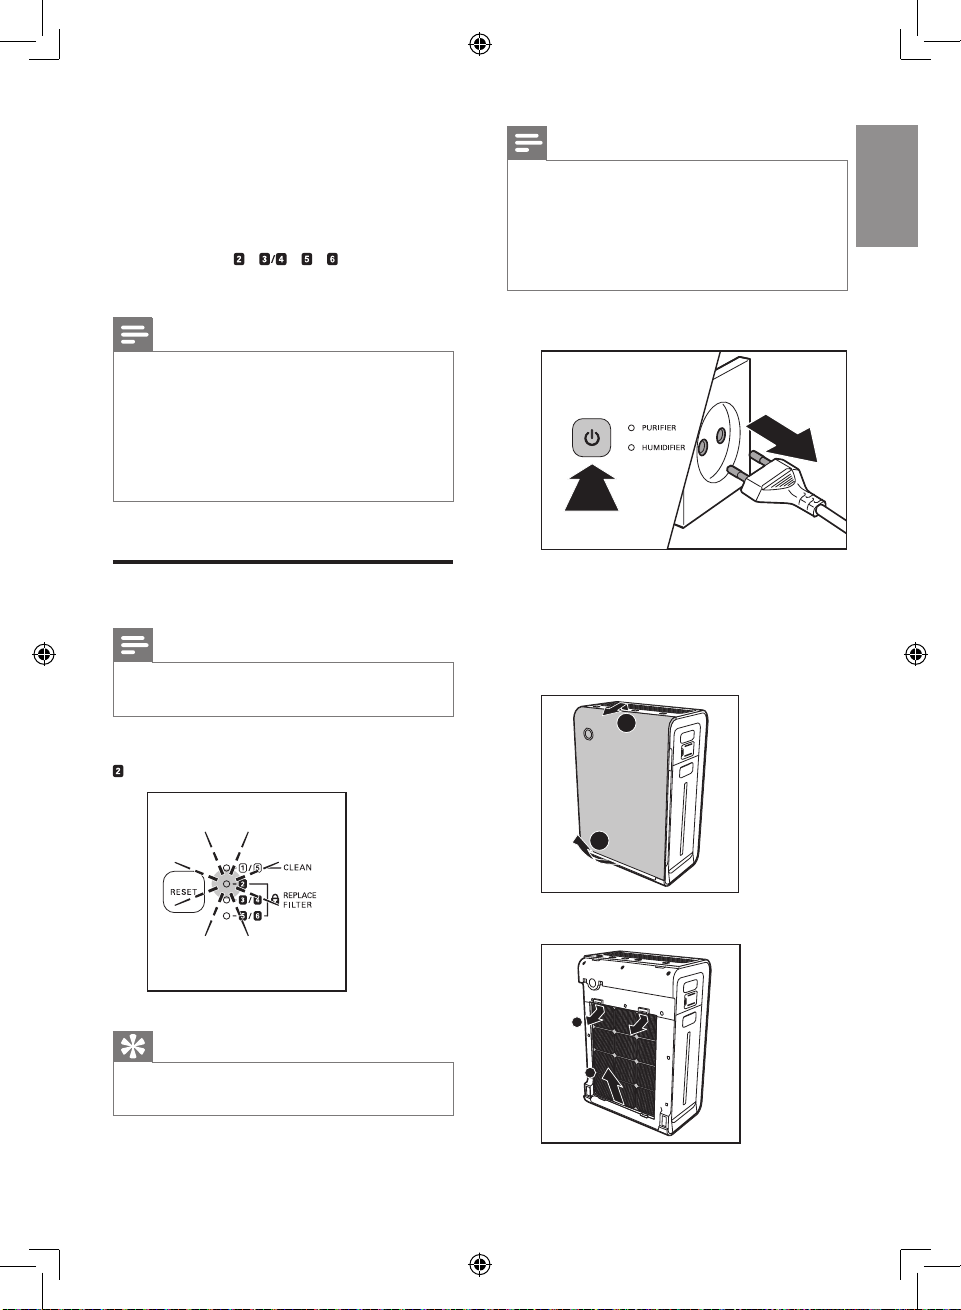
2 Fill the water bucket for 1/3 with water.
5 Shake the bucket to and fro with both
hands to clean the inside of the water
bucket.
6 Unscrew the top cap of the water bucket.
7 Empty the water bucket into a sink.
8 Rinse the inside of the water bucket with
fresh water several times.
9 Screw the top cap tightly back onto the
water bucket.
3 Add some mild washing-up liquid to the
water in the water bucket.
4 Screw the top cap tightly back onto the
water bucket.
18
EN
Page 19
English
Clean the humidication lter
tray
Clean the humidication lter tray every week
to keep them hygienic.
1 Remove the water bucket out of the
appliance. Then remove the humidication
lter tray from the appliance.
Note
• Remove the water bucket rst before you can
remove the humidication lter tray.
2 Take the humidication lter out of the
humidication lter tray.
3 Rinse the humidication lter tray under a
running tap.
Note
• If necessary, use a mild detergent to clean the
humidication lter tray. In this case, rinse the
humidication lter tray thoroughly.
4 Dry the humidication lter tray with a
soft, dry cloth.
5 Place the humidication lter back and
slide the humidication lter tray back to
the appliance.
19EN
Page 20
6 Cleaning the
Clean the pre-lter
pre-filter and
humidification
filter
Note
• Only the pre-lter and humidication lter are
washable. All other lters are not washable.
• Rinse the humidication lter every week
to keep it hygienic.
• When the lter light
have to clean the pre-lter and descale the
humidication lter.
• The light ashes approximately for every
two weeks.
/ ashes, you
Note
• Clean the pre-lter for every two weeks to
ensure optimal functioning of the appliance.
1 Switch off the appliance and unplug it.
2 Place your ngers in the recesses of the
side panels, then lift and detach the bottom
of the font panel towards you (1). Gently
lift the top part of the front panel out of
the appliance (2).
2
4
Note
• The lter light / keeps ashing for 24 hours.
• After you have cleaned the pre-lter and descale
the humidication lter, the light stops ashing
and the lter lifetime is reset automatically.
• When you turn off the appliance, the light stops
ashing.
20
EN
1
Page 21
English
2
3 To remove the pre-lter, press the two
clips down (1) and pull the lter towards
you (2).
8 Put the pre-lter back into the appliance.
Attach all hooks properly to the appliance.
4
1
2
4 Remove the Multi-care lter from the pre-
lter.
5 Wash the pre-lter under a running tap. If
the pre-lter is very dirty, use a soft brush
to brush away the dust.
6 Air dry the pre-lter.
7 Slide the Multi-care lter into the pre-lter.
2
4
1
9 To reattach the front panel, insert the top
hooks into the top of the air appliance rst
(1). Then, push the panel against the body
of the appliance (2).
1
4
Note
• Alternatively, you can clean the pre-lter by
removing the dust with a vacuum cleaner.
• Make sure that the pre-lter is completely dry.
If it is still wet, bacteria may multiply in it and
shorten the lifetime of the pre-lter.
• Make sure that the side with two clips is pointing
towards you, and that all hooks of the pre-lter
are properly attached to the appliance.
21EN
Page 22
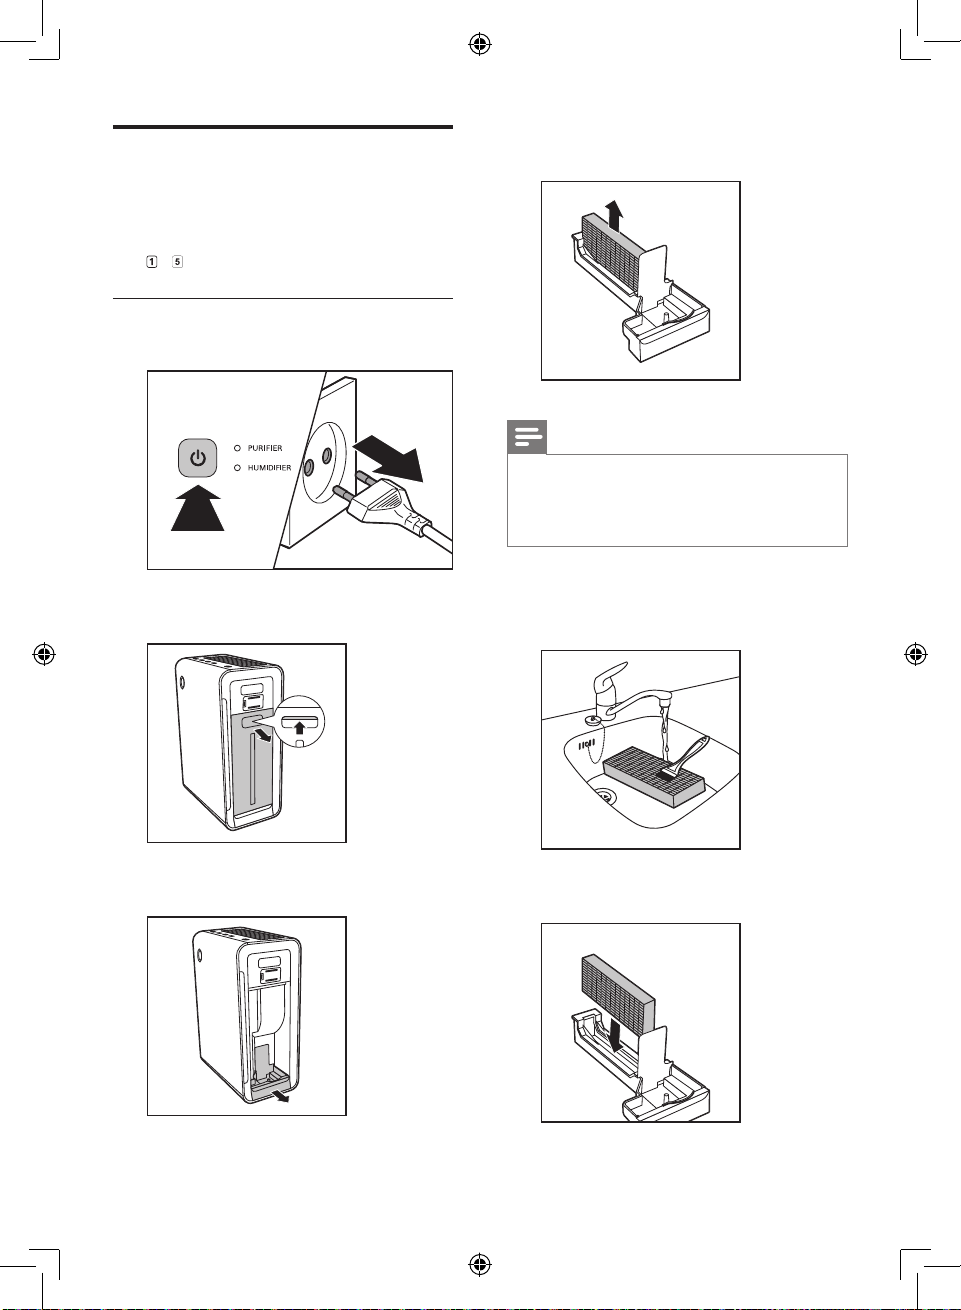
Clean the humidication lter
Rinse the humidication lter every week
to keep it hygienic. In addition, descale the
humidication lter when the lter
light
/ ash.
Rinse the humidication lter
1 Switch off the appliance and unplug it.
4 Remove the humidication lter from the
humidication lter tray.
Note
• You have to remove the water bucket rst
before you can remove the humidication
lter tray (see the chapter ‘Prepare for
humidication’).
2 Remove the water bucket from the
appliance.
3 Remove the humidication lter tray from
the appliance.
5 Clean the humidication lter gently with
the cleaning brush supplied under a slowly
running tap.
6 Put the humidication lter back into the
humidication lter tray.
22
EN
Page 23
English
Descale the humidication lter
Note
• It is important to descale the humidifying lter to
avoid scale build-up, which seriously affects the
humidifying performance.
1 Switch off the appliance and unplug it.
4 Remove the humidication lter from the
humidication lter tray.
Note
• You have to remove the water bucket rst
before you can remove the humidication lter
tray.
2 Remove the water bucket from the
appliance.
3 Remove the humidication lter tray from
the appliance.
5 Mix the white vinegar (5ml/100 ml acetic
acid) with an equal amount of tap water
in a container that is large enough to soak
the humidication lter in.
Water : Vinegar
1 : 1
1 hour
Note
• If there are white deposits (scale) on the lter,
make sure that the side with the white deposits
is immersed in the water.
6 Let the humidication lter soak in the
solution for one hour.
7 Discard the water-vinegar solution.
23EN
Page 24
8 Rinse the humidication lter under the
tap to rinse away vinegar residues. During
rinsing, turn the humidication lter so that
both the front and back sides are rinsed.
9 Let excess water drip off the
humidication lter.
10 Put the humidication lter back into the
humidication lter tray.
Cleaning schedule
Frequency Cleaning method
Every day Rinse the water bucket.
Rinse the water softener.
Every week Rinse the humidication lter.
Clean the humidication lter
tray.
When the
lter light
/
ashes
Every two
months
When
necessary
Clean the pre-lter.
Descale the humidication lter
with the vinegar-water mixture.
Clean the air quality sensor and
air humidity sensor with a dry
cotton swab.
Wipe the surface of the appliance
with a soft dry cloth.
24
EN
Page 25
English
7 Replacing the
filters
The lter lights ( / / / ) indicate
which lter has to be replaced.
Note
• Insert the lters in the correct position.
• Make sure that you place the lters in the order
of HEPA lter, activated carbon lter, Multi-care
lter, and nally the pre-lter.
• Make sure that the side with the tag is pointing
towards you.
Note
• If you remove the front panel for lter changing
while the appliance is switched on, all lights on
the control panel are off and the appliance stops
operating.
• Once the front panel is placed back to the
appliance, all lights ash twice. Then, the
appliance returns to its operating state.
Replace the Multi-care lter
Note
• The Multi-care lter is not washable nor vacuum
cleanable.
Replace the Multi-care lter when the lter light
ashes.
1 Switch off the appliance and unplug it.
2 Place your ngers in the recesses of the
side panels.
3 Gently pull the bottom of the panel out
(1), then lift the top part of the front panel
towards you (2).
2
4
1
Tip
When you remove or insert lters, place the
•
appliance against a wall for more stability.
4 Remove the pre-lter from the appliance.
4
1
2
25EN
Page 26
2
5 Remove the Multi-care lter from the pre-
lter.
8 Slide the new Multi-care lter into the pre-
lter.
6 Take the used lter by both sides and
gently deposit them into the house hold
trash bin.
Note
• Do not touch the pleated lter surface, or smell
the lter as it has collected pollutants from the
air.
• Wash your hands after disposing of the used
lters.
7 Remove all packaging material from the
new Multi-care lter.
9 Place the ler back in the appliance.
2
4
1
Note
• Make sure that the side with two clips is pointing
towards you, and that all hooks of the pre-lter
are properly attached to the appliance.
10 To reattach the front panel, mount the
panel onto the top of the appliance rst
(1). Then, gently place the panel against the
body of the appliance (2).
1
4
11 Reset the Multi-care lter lifetime (see the
chapter ‘Reset the lter lifetime counter’).
26
EN
Page 27
English
Replace the activated carbon
lter and the HEPA lter
1 Switch off the appliance and unplug it.
Note
• The activated carbon and the HEPA lters are
not washable nor vacuum cleanable.
Replace both the activated carbon lter and the
HEPA lter when the lter light
Tip
When you remove or insert lters, place the
•
appliance against a wall for more stability.
ashes.
Note
• Insert the lters in the correct position.
• Make sure that you place the lters in the order
of HEPA lter, activated carbon lter, Multi-care
lter, and nally the pre-lter.
• Make sure that the side with the tag is pointing
towards you.
2 Place your ngers in the recesses of the
side panels.
3 Gently pull the bottom of the panel out
(1), then lift the top part of the front panel
towards you (2).
2
4
1
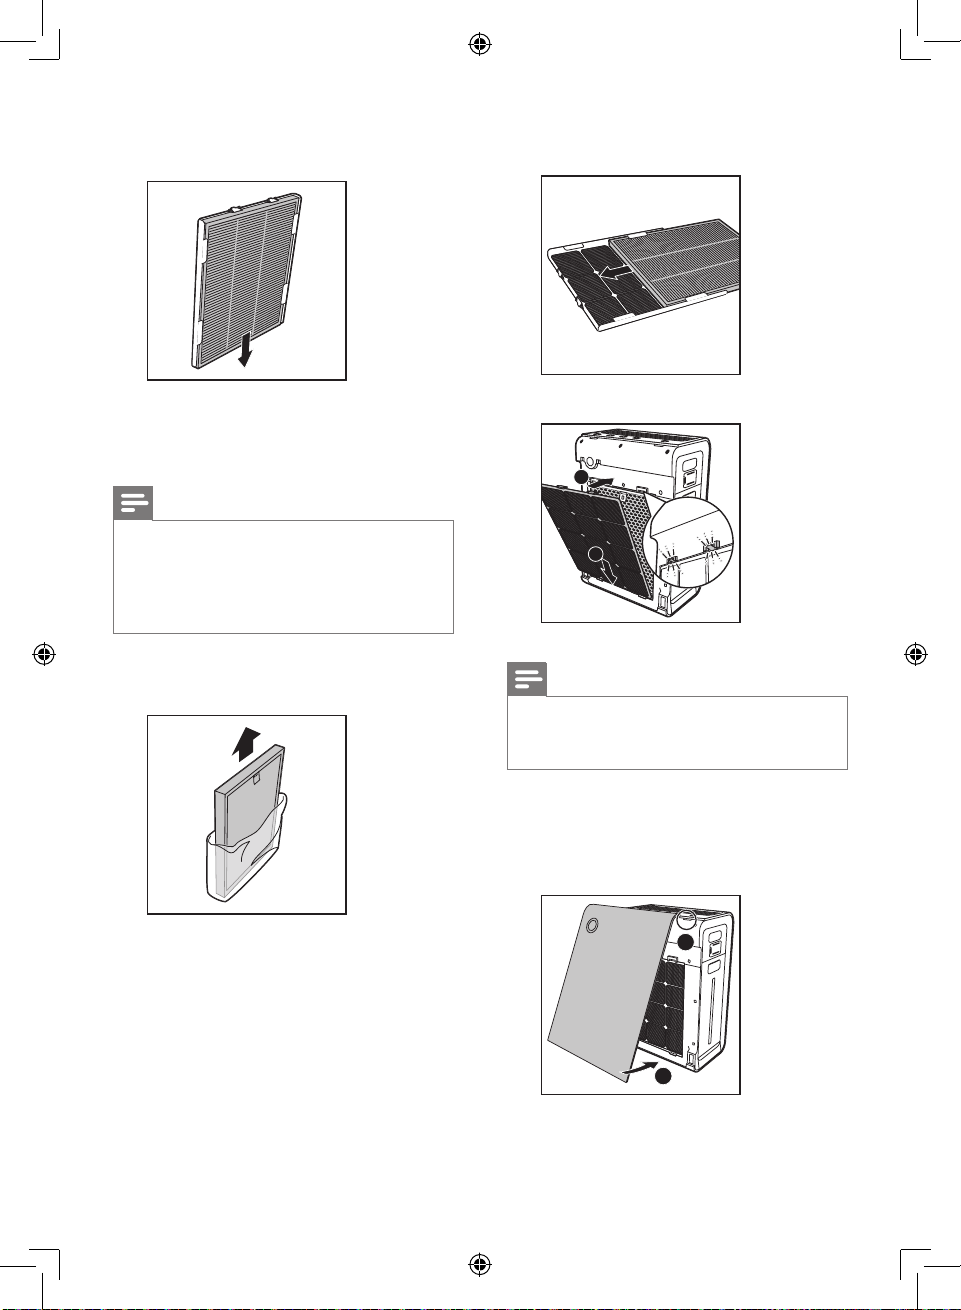
4 Remove all lters from the appliance.
4
3
5 Take the used lters by both sides and
gently deposit them into the house hold
trash bin.
27EN
Page 28
2
Note
• Do not touch the pleated lter surface, or smell
the lter as it has collected pollutants from the
air.
• Wash your hands after disposing of the used
lters.
6 Remove all packaging material from the
new lters.
7 Place the new HEPA lter in the appliance
rst.
4
9 Place the pre-lter in the appliance.
2
4
1
Note
• Make sure that the side with two clips is pointing
towards you, and that all hooks of the pre-lter
are properly attached to the appliance.
10 To reattach the front panel, mount the
panel onto the top of the appliance rst
(1). Then, gently place the panel against the
body of the appliance (2).
1
4
8 Then, place the new activated carbon lter
in the appliance.
4
3
28
EN
11 Reset the activated carbon lter and the
HEPA lter lifetime (see the chapter ‘Reset
the lter lifetime counter’).
Page 29

English
Replace the humidication
lter and water softener
Replace the humidication lter and water
softener when the lter light
/ ashes.
Replace the humidication lter
1 Switch off the appliance and unplug it.
3 Remove the humidication lter tray from
the appliance.
4 Remove the packaging material from the
humidication lter.
5 Put the new humidication lter back and
slide the humidication lter tray back to
the appliance.
2 Remove the water bucket from the
appliance.
29EN
Page 30
Replace the water softener
1 Unscrew the cap of the water bucket and
remove the water softener.
2 Remove the packaging material from the
water softener.
3 Put the new water softener back and
screw the cap back on the water bucket.
30
EN
Page 31

English
8 Reset the filter
lifetime counter
3 Put the plug in the power socket and
switch on the appliance again.
When you replace the lters, it is important
that you also reset the lter lifetime counter
afterwards. This allows the appliance to be in
sync with the lter lifetime.
Note
• Reset the appliance when it is plugged in and
switched on.
• Only replace the respective lters when you see
the respective lter lights ash.
• After replacing the lters, the respective lter
light still ashes or continuous on until you reset
the lter lifetime counter.
After you have replaced the lter, reset the lter
time:
1 Switch off the appliance and unplug it.
4 Press and hold the RESET button for two
seconds.
2 Replace the lter (see the chapter
‘Replacing the lters’).
31EN
Page 32

9 Troubleshooting
This chapter summarizes the most common problems you could encounter with the appliance. If you
are unable to solve the problem with the information below, contact the Consumer Care Center in
your country.
Problem Possible solution
The appliance does not
work.
The appliance does not
work even though it is
switched on.
The water bucket leaks. It is normal that the cap of the water bucket is slightly wet when you
The water level in the
water bucket drops very
quickly after I empty the
humidication lter tray.
I do not see the current
humidity indication
change.
• The lter replacement light has been on continuously but you did
not replace the corresponding lter, it is now locked. In this case,
replace the lter and reset the lter time.
• Make sure that the front panel is closed properly.
The humidication lter tray is not placed properly. In this case the
appliance does not work and the CURRENT HUMIDITY lights (30%,
40%, 50% or 60%) ash. Switch off the appliance. Remove the water
bucket and then remove and slide the humidication lter tray back to
the appliance. Then switch on the appliance and try again.
remove it from the appliance. However, if water drops keep dripping from
the bottom of the water bucket, check if the cap has been screwed onto
the water bucket tightly. If the problem persists, contact the Consumer
Care Center in your country.
This is normal. The water in the water bucket is used to ll the
humidication lter tray the humidication lter also absorbs some of the
water.
• Make sure that you have put the humidication lter in the
humidication lter tray.
• The humidication lter is dirty. Rinse and/or descale the
humidication lter (see the chapter ‘Clean the pre-lter and
humidication lter’, section ‘Clean the humidication lter’).
• Make sure that both the PURIFIER and HUMIDIFIER lights are on.
There are some
white deposits on the
humidication lter.
32
EN
The white deposits are called scale and they consist of minerals from
the water. Scale on the humidication lter affects the humidifying
performance. Therefore you have to descale the humidication lter
when the lter light
and humidication’, section ‘‘Clean the humidication lter’).
/ ashes (See the chapter ‘Clean the pre-lter
Page 33

English
Problem Possible solution
No air comes out of the
air outlet.
The fan speed does not
change when the silent
mode is activated.
The airow that comes
out of the air outlet is
signicantly weaker than
before.
The air quality does not
improve, even though
the appliance has been
operating for a long time.
The color of the air
quality light always stays
the same.
Put the plug of the appliance into the power supply and switch on.
In silent mode, the fan speed is set to a very low level. If you want to
change the fan speed and leave the silent mode, press the SPEED button
once or more times to set the desired fan speed.
• The pre-lter is dirty. Clean the pre-lter (see the chapter ‘Clean
your appliance’, section ‘‘Clean the pre-lter and humidication
lter’).
• Make sure that you have removed all packaging material from the
lters.
• One of the lters has not been placed in the appliance. Make sure
that all lters are properly installed in the following order, starting
with the innermost lter: 1) HEPA lter, 2) activated carbon lter, 3)
Multi-care lter, and 4) pre-lter.
• The air quality sensor is wet. The humidity level in your room is high
and causes condensation. Make sure that the air quality sensor is
clean and dry (see the chapter ‘Clean your appliance’, section ‘‘Clean
the air quality sensor and air humidity sensor’).
• The air quality sensor is dirty. Clean the air quality sensor (see the
chapter “Clean your appliance’, section ‘Clean the air quality sensor
and air humidity sensor’ under).
• There is not enough ventilation in the room. Open a window, to
improve the air circulation.
I do not see water
vapor coming out of the
appliance. Is it working?
I want to check whether
the air humidity sensor
works or not.
When water vapor is very ne, it is invisible. This appliance has a specially
designed humidication lter that produces very ne water vapor.
Therefore, you cannot see the water vapor.
Remove the cover of the air quality/humidity sensors and then
gently blow moist air into the opening. After a while, the CURRENT
HUMIDITY indication changes. Note that if the initial CURRENT
HUMIDITY indication is already 60%, the indication cannot show an even
higher humidity when you blow moist air towards the sensor.
EN
33
Page 34

Problem Possible solution
The appliance produces
a strange smell.
I need cleaner air
because I have an allergy.
The appliance is extra
loud.
The appliance still
indicates that I need
to replace a lter, but I
already did.
The rst few times you use the appliance, it may produce a plastic smell.
This is normal. However, if the appliance produces a burnt smell, contact
your Philips dealer or an authorized Philips service centre. The appliance
may also produce an unpleasant smell when one of the lters is dirty. In
this case, clean or replace the lter concerned.
You can change the air quality sensor sensitivity (see the chapter ‘Use the
appliance, section ‘Set the sensitivity of the air quality sensor’) to make the
appliance clean the air even better.
• Please check if you have removed all the packaging material from the
lters.
• If the appliance is still too loud, you can change the fan speed to a
lower fan speed level.
Perhaps you did not press the RESET button properly. Plug in the
appliance, press the
button to switch on and press the RESET
button for two seconds.
34
EN
Page 35

English
10 Guarantee and
service
If you need information or if you have a
problem, please visit the Philips website at
www.philips.com or contact the Philips
Consumer Care Center in your country (you
will nd its phone number in the worldwide
guarantee leaet). If there is no Consumer Care
Centre in your country, go to your local Philips
dealer.
Order parts or accessories
If you have to replace a part or want to
purchase an additional part, go to your Philips
dealer or visit www.philips.com/support.
If you have problems obtaining the parts, please
contact the Philips Consumer Care Center in
your country (you nd its phone number in the
worldwide guarantee leaet).
EN
35
Page 36

11 Notices
Recycling
Electomagnetic elds (EMF)
This Philips appliance complies with all
applicable standards and regulations regarding
exposure to electromagnetic elds.
Compliance with EMF
Koninklijke Philips N.V. manufactures and sells
many products targeted at consumers, which,
like any electronic apparatus, in general have
the ability to emit and receive electromagnetic
signals.
One of Philips’ leading Business Principles is to
take all necessary health and safety measures
for our products, to comply with all applicable
legal requirements and to stay well within
the EMF standards applicable at the time of
producing the products.
Philips is committed to develop, produce and
market products that cause no adverse health
effects. Philips conrms that if its products are
handled properly for their intended use, they
are safe to use according to scientic evidence
available today.
Philips plays an active role in the development
of international EMF and safety standards,
enabling Philips to anticipate further
developments in standardization for early
integration in its products.
Never dispose of your product with other
household waste. Please inform yourself about
the local rules on the separate collection of
electrical and electronic products. The correct
disposal of your old product helps prevent
potentially negative consequences on the
environment and human health.
36
EN
Page 37

DE
Deutsch
Inhalt
1 Wichtige Hinweise 38
Sicherheit 38
2 Ihr Kombigerät für die
Luftreinigung und -befeuchtung 42
Was ist im Lieferumfang? 42
3 Erste Schritte 43
Einsetzen der Filter 43
Vorbereitungen zur Luftbefeuchtung 44
4
Verwenden des Geräts 46
Informationen zur Luftqualitätsanzeige 46
Informationen zur
Luftfeuchtigkeitsanzeige 46
Informationen zum automatischen
Modus 46
Informationen zur Alarmfunktion
bezüglich der Erhaltung gesunder Luft 46
Informationen zur
Verriegelungsfunktion bezüglich der
Erhaltung gesunder Luft 47
Ein- und Ausschalten des Geräts 47
Einstellen der Empndlichkeit des
Luftqualitätssensors 48
Ändern der Lüftergeschwindigkeit 49
Auto 49
Manuell 50
Ruhemodus 50
Höchstleistungsmodus 50
Einstellen des Timers 50
Einstellen der Luftfeuchtigkeit 51
Wasserstand 52
5 Reinigen des Geräts 53
Reinigen des Gehäuses 53
Reinigen des Luftqualitätssensors und
des Luftfeuchtigkeitssensors 53
Reinigen des Wasserbehälters 54
Reinigen des Filtereinsatzes des
Luftbefeuchters 55
6 Reinigen des Vorlters und des
Luftbefeuchterlters 57
Reinigen des Vorlters 57
Reinigen des Luftbefeuchterlters 59
Abspülen des Luftbefeuchterlters 59
Entkalken des Luftbefeuchterlters 60
Reinigungszeitplan 62
7 Auswechseln der Filter 63
Auswechseln des Multi-care Filters 63
Auswechseln des Aktivkohlelters und
des HEPA-Filters 65
Auswechseln von Luftbefeuchterlter
und Wasserenthärter 67
Auswechseln des
Luftbefeuchterlters 67
Auswechseln des Wasserenthärters 68
8 Zurücksetzen des Zählers für die
Filterstandzeit 69
9 Fehlerbehebung 70
10 Garantie und Kundendienst 73
Bestellen von Ersatz- oder
Zubehörteilen 73
11 Hinweise 74
Elektromagnetische Felder (EMF) 74
Elektromagnetische Verträglichkeit 74
Recycling 74
37
Page 38

DE
1 Wichtige
Hinweise
Sicherheit
Lesen Sie diese
Bedienungsanleitung vor dem
Gebrauch des Geräts aufmerksam
durch, und bewahren Sie sie für
eine spätere Verwendung auf.
Achtung!
• Achten Sie darauf, dass kein
Wasser, andere Flüssigkeiten
oder entzündbare
Reinigungsmittel in das Gerät
gelangen, um das Risiko
eines Stromschlags und/oder
Brandgefahr zu vermeiden.
• Reinigen Sie das Gerät nicht mit
Wasser, anderen Flüssigkeiten
oder (entzündbaren)
Reinigungsmitteln, um das Risiko
eines Stromschlags und/oder
Brandgefahr zu vermeiden.
• Sprühen Sie keine brennbaren
Materialien wie zum Beispiel
Insektengifte oder Duftstoffe um
das Gerät.
• Das Wasser im Wasserbehälter
ist kein Trinkwasser. Trinken
Sie dieses Wasser nicht, und
verwenden Sie es nicht zur
Versorgung von Tieren oder
Panzen. Gießen Sie das
Wasser beim Entleeren des
Wasserbehälters in den Abuss.
Warnung
• Prüfen Sie vor Inbetriebnahme,
ob die Spannungsangabe auf
der Unter- oder Rückseite
des Geräts mit der örtlichen
Netzspannung übereinstimmt.
• Ist das Netzkabel defekt, darf
es nur von einem Philips
Service-Center, einer von Philips
autorisierten Werkstatt oder
einer ähnlich qualizierten
Person durch ein OriginalErsatzkabel ausgetauscht
werden, um Gefährdungen zu
vermeiden.
• Verwenden Sie das Gerät nicht,
wenn der Netzstecker, das
Netzkabel oder das Gerät selbst
defekt oder beschädigt sind.
38
Page 39

DE
Deutsch
• Dieses Gerät kann von Kindern
ab 8 Jahren und Personen
mit verringerten physischen,
sensorischen oder psychischen
Fähigkeiten oder Mangel
an Erfahrung und Kenntnis
verwendet werden, wenn sie bei
der Verwendung beaufsichtigt
wurden oder Anweisung zum
sicheren Gebrauch des Geräts
erhalten und die Gefahren
verstanden haben. Kinder dürfen
nicht mit dem Gerät spielen.
Die Reinigung und Wartung darf
nicht von Kindern ohne Aufsicht
durchgeführt werden.
• Dieses Gerät ist kein Spielzeug.
Achten Sie darauf, dass Kinder
nicht mit dem Gerät spielen.
• Achten Sie darauf, dass Luftein-
und -auslass nicht verdeckt
werden. Legen Sie deshalb keine
Gegenstände auf den Luftausoder vor den Lufteinlass.
Vorsicht
• Das Gerät ist kein Ersatz
für angemessenes Lüften,
regelmäßiges Staubsaugen
oder das Verwenden einer
Dunstabzugshaube oder einer
Lüftung während des Kochens.
• Wenn die zum Betrieb des
Geräts verwendete Steckdose
nicht ordnungsgemäß
angeschlossen ist, wird der
Stecker des Geräts heiß.
Vergewissern Sie sich, dass
Sie für das Gerät eine
ordnungsgemäß angeschlossene
Steckdose verwenden.
• Verwenden Sie das Gerät immer
auf einer trockenen, stabilen,
ebenen und waagerechten
Unterlage.
• Achten Sie darauf, dass hinter
dem Gerät und seitlich davon
mindestens 20 cm Platz ist.
Über dem Gerät muss ein
Abstand von mindestens 30 cm
eingehalten werden.
• Stellen Sie keine Gegenstände
auf das Gerät, und setzen Sie
sich nicht darauf.
• Stellen Sie das Gerät nicht direkt
unter einer Klimaanlage auf,
damit kein Kondenswasser auf
das Gerät tropfen kann.
• Prüfen Sie vor dem Einschalten
des Geräts, ob alle Filter korrekt
eingesetzt sind.
• Verwenden Sie nur Originallter
von Philips, die speziell für dieses
Gerät geeignet sind. Verwenden
Sie keine anderen Filter.
39
Page 40

DE
• Vermeiden Sie es, mit harten
Gegenständen gegen das Gerät
(insbesondere den Lufteinlass
und -auslass) zu stoßen.
• Heben oder bewegen Sie das
Gerät nur anhand der beiden
Griffe an den Seiten des Geräts.
• Achten Sie darauf, dass weder
Ihre Finger noch andere Objekte
in den Luftauslass oder -einlass
gelangen, um Verletzungen oder
Beschädigungen des Geräts zu
verhindern.
• Benutzen Sie das Gerät
nicht nach dem Gebrauch
von Räuchermitteln zum
Insektenschutz oder an Orten,
an denen Ölrückstände oder
chemische Dämpfe vorhanden
sind bzw. Räucherstäbchen
verbrannt werden.
• Verwenden Sie das Gerät nicht
in der Nähe von gasbetriebenen
Vorrichtungen, Heizungen oder
offenen Kaminen.
• Ziehen Sie nach jedem
Gebrauch und vor der Reinigung
des Geräts den Netzstecker aus
der Steckdose.
• Verwenden Sie das Gerät
nicht in Räumen mit starken
Temperaturschwankungen,
da diese zu Kondensation im
Geräteinneren führen können.
• Um elektronische Störungen zu
vermeiden, sollten Sie das Gerät
im Abstand von mindestens
2 Metern zu anderen
Elektrogeräten aufstellen,
die mit Funkwellen arbeiten
(z. B. Fernsehern, Radios und
Funkuhren).
• Wenn das Gerät lange Zeit
nicht verwendet wird, können
sich Bakterien auf den Filtern
bilden. Prüfen Sie die Filter, wenn
Sie das Gerät lange Zeit nicht
benutzt haben. Wenn die Filter
sehr schmutzig sind, wechseln
Sie sie aus (siehe "Auswechseln
der Filter").
• Das Gerät ist ausschließlich
für den Hausgebrauch bei
normalen Betriebsbedingungen
vorgesehen.
• Verwenden Sie es nicht
in feuchter Umgebung
oder in Räumen mit hoher
Umgebungstemperatur, z. B. im
Badezimmer, in der Toilette oder
in der Küche.
• Das Gerät entfernt kein
Kohlenmonoxid (CO) oder
Radon (Rn). Es kann nicht als
Sicherheitsgerät bei Unfällen
mit Verbrennungsvorgängen
und gefährlichen Chemikalien
verwendet werden.
40
Page 41

DE
Deutsch
• Reinigen Sie den Wasserbehälter
täglich.
• Füllen Sie den Wasserbehälter
nur mit kaltem Leitungswasser.
Verwenden Sie kein
Grundwasser oder heißes
Wasser.
• Geben Sie außer Wasser
keine anderen Stoffe in den
Wasserbehälter. Geben Sie keine
Duftstoffe in den Wasserbehälter.
• Wenn Sie die
Luftbefeuchtungsfunktion lange
Zeit nicht verwenden, reinigen
Sie den Wasserbehälter und den
Filtereinsatz des Luftbefeuchters.
Trocknen Sie den Filter des
Luftbefeuchters, und bewahren
Sie den Wasserenthärter auf.
• Wenn Sie das Gerät bewegen
müssen, trennen Sie das Gerät
zuerst von der Stromversorgung.
Leeren Sie anschließend den
Wasserbehälter. Tragen Sie das
Gerät waagerecht an beiden
Griffen, die sich seitlich am Gerät
benden.
41
Page 42

DE
2 Ihr Kombigerät für die Luftreinigung
und -befeuchtung
Herzlichen Glückwunsch zu Ihrem Kauf und willkommen bei Philips!
Um das Kundendienstangebot von Philips vollständig nutzen zu können, registrieren Sie Ihr Produkt
unter www.philips.com/welcome.
Lesen Sie diese Bedienungsanleitung sorgfältig durch, bevor Sie das Gerät aufstellen und verwenden.
Bewahren Sie es zur späteren Verwendung auf.
Was ist im Lieferumfang?
Prüfen Sie zunächst den Verpackungsinhalt:
Filter 4: HEPA-Filter (AC4144)
Filter 3: Aktivkohlelter
(AC4143)
Filter 2: Multi-care Filter
(AC4141)
Filter 1: Vorlter
Bedienungsanleitung
Kurzanleitung
Luftqualitätssensor
4
3
2
Filter 6: Wasserenthär-
ter (AC4149)
Filter 5: Filter für
Luftbefeuchter
(AC4148)
Garantie
42
Page 43

DE
Deutsch
3 Erste Schritte
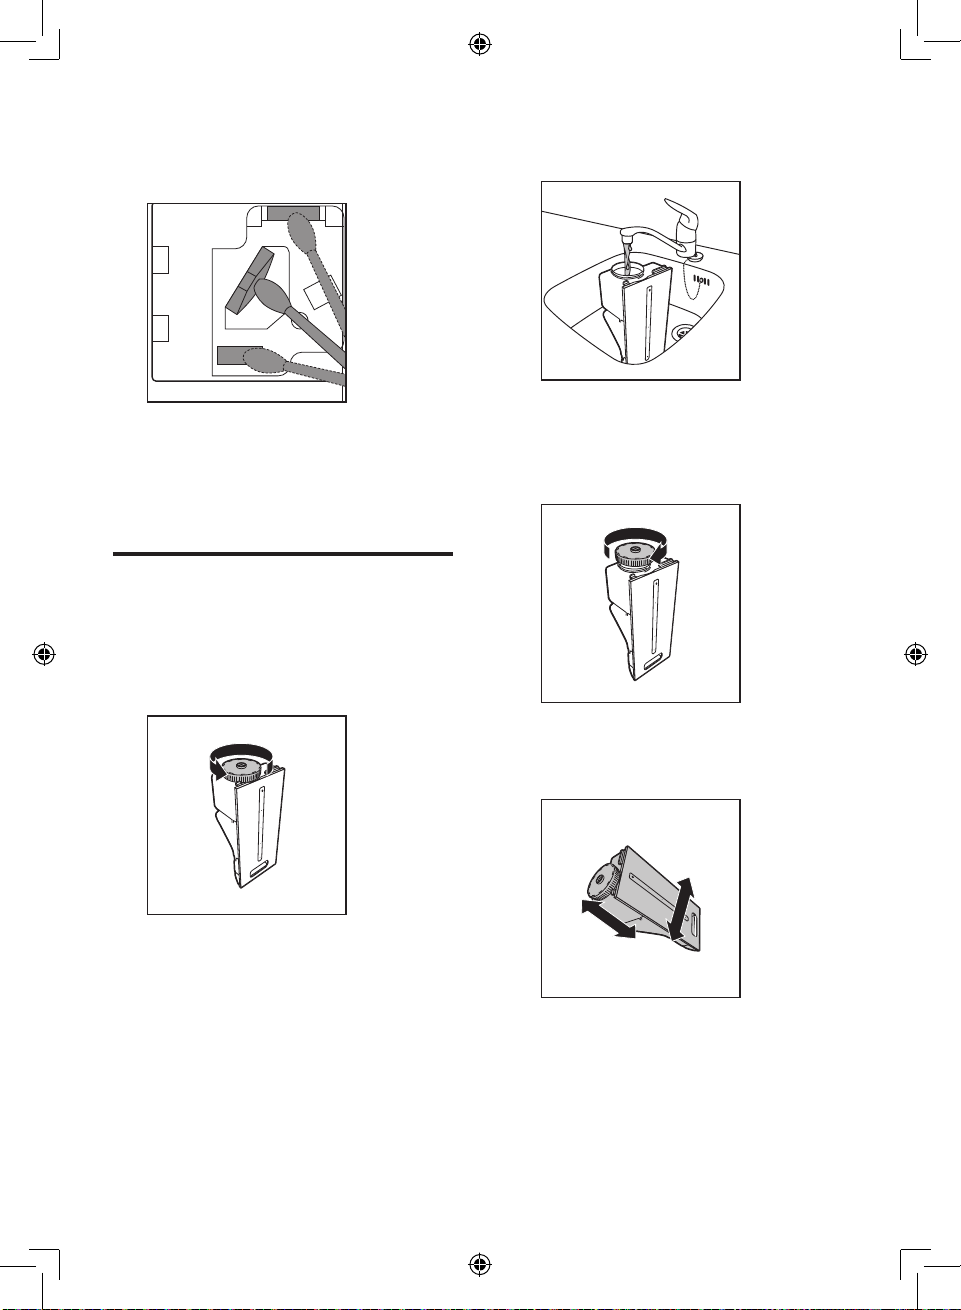
2 Ziehen Sie den unteren Teil der
Frontabdeckung vorsichtig heraus (1),
und heben Sie ihn anschließend in Ihre
Richtung (2).
Einsetzen der Filter
Bei Lieferung sind alle Filter bereits im Gerät
eingesetzt. Entfernen Sie die Verpackung
der Filter, bevor Sie das Gerät verwenden.
Nehmen Sie alle Filter heraus, entfernen Sie
die Verpackung, und setzen Sie sie wie unten
beschrieben wieder in das Gerät ein:
Tipp
Stellen Sie das Gerät beim Herausnehmen oder
•
Einsetzen der Filter an eine Wand, um für mehr
Stabilität zu sorgen.
Anmerkung
• Setzen Sie die Filter ordnungsgemäß ein.
• Vergewissern Sie sich, dass Sie die richtige
Reihenfolge einhalten. Setzen Sie also zunächst
den HEPA-Filter, dann den Aktivkohlelter, den
Multi-care Filter und zuletzt den Vorlter ein.
• Vergewissern Sie sich, dass die Seite mit dem
Etikett zu Ihnen gerichtet ist.
1 Fassen Sie mit den Fingern in die
Griffmulden der seitlichen Blenden.
2
4
1
3 Nehmen Sie alle Filter aus dem Gerät.
4 Entfernen Sie das gesamte
Verpackungsmaterial von den Filtern.
43
Page 44
DE
2
5 Setzen Sie die Filter wieder in das Gerät
ein.
4
3
6 Schieben Sie den Multi-care Filter in den
Vorlter.
7 Setzen Sie den Vorlter in das Gerät ein.
8 Um die Frontabdeckung wieder
anzubringen, befestigen Sie die Abdeckung
zunächst oben am Gerät (1). Drücken Sie
die Abdeckung dann vorsichtig gegen das
Gehäuse des Geräts (2).
1
4
Vorbereitungen zur
Luftbefeuchtung
Ziehen Sie den Wasserbehälter seitlich aus
1
dem Gerät heraus.
2
4
1
Anmerkung
• Vergewissern Sie sich, dass die Seite mit den
beiden Clips in Ihre Richtung zeigt, und dass
alle Haken des Vorlters ordnungsgemäß am
Luftreiniger befestigt sind.
44
2 Nehmen Sie den Filtereinsatz des
Luftbefeuchters aus dem Gerät.
Page 45

DE
Deutsch
3 Entfernen Sie das Verpackungsmaterial vom
Filter des Luftbefeuchters.
4 Setzen Sie den Filter des Luftbefeuchters
wieder ein, und schieben Sie den
Filtereinsatz des Luftbefeuchters in das
Gerät.
5 Schrauben Sie den Deckel vom
Wasserbehälter ab.
6 Füllen Sie den Wasserbehälter mit kaltem
Leitungswasser.
7 Schrauben Sie den Deckel wieder fest auf
den Wasserbehälter, bis Sie ein klapperndes
Geräusch hören.
8 Setzen Sie den Wasserbehälter wieder in
das Gerät ein.
2
1
45
Page 46

DE
4
Verwenden des
Geräts
Informationen zur
Luftqualitätsanzeige
Farbe der
Luftqualitätsanzeige
Blau Exzellent
Dunkelviolett Gut
Lilafarben Mittelmäßig
Rot Sehr schlecht
Luftqualität
Anmerkung
• Die Genauigkeit der Luftfeuchtigkeitsanzeige
beträgt plus oder minus 5 %.
• Es dauert etwas, bis die Luftfeuchtigkeit im Raum
gemessen wird.
Informationen zum
automatischen Modus
Der integrierte Luftqualitätssensor misst
automatisch die Qualität der Umgebungsluft
und wählt die Lüftergeschwindigkeit
entsprechend aus.
Die Luftqualitätsanzeige leuchtet automatisch
auf, wenn das Gerät eingeschaltet wird.
Anmerkung
• Der integrierte Luftqualitätssensor misst
die Luftqualität und wählt automatisch die
entsprechende Farbe für die Luftqualitätsanzeige
aus. Wenn die Luft sauber ist, leuchtet die
Luftqualitätsanzeige blau oder dunkelviolett.
Wenn sich die Luftqualität verschlechtert,
wechselt die Farbe der Luftqualitätsanzeige zu
violett oder rot.
Informationen zur
Luftfeuchtigkeitsanzeige
Das Gerät ist mit einem integrierten
Feuchtigkeitssensor ausgerüstet. Die Anzeigen
CURRENT HUMIDITY (30 %, 40 %, 50 % oder
60 %) geben die aktuelle Luftfeuchtigkeit an.
Informationen zur
Alarmfunktion bezüglich der
Erhaltung gesunder Luft
Die Filteranzeigen geben an, dass der Filter
gereinigt oder ausgewechselt werden muss.
Unterschiedliche
Alarmanzeigen
zur Erhaltung
gesunder Luft
Die Filteranzeige
/ blinkt.
Die Filteranzeige
blinkt.
Die Filteranzeige
blinkt.
Die Filteranzeige
/ blinkt.
Gehen Sie wie folgt vor:
Reinigen Sie den Vorlter,
und entkalken Sie den Filter
des Luftbefeuchters.
Wechseln Sie den Multicare Filter aus.
Wechseln Sie den
Aktivkohlelter und den
HEPA-Filter aus.
Wechseln Sie den Filter des
Luftbefeuchters und des
Wasserenthärters aus.
46
Page 47

DE
Deutsch
Informationen zur
Verriegelungsfunktion
bezüglich der Erhaltung
gesunder Luft
Dieses Gerät ist mit einer Verriegelungsfunktion
zur Erhaltung gesunder Luft ausgestattet,
um sicherzustellen, dass die Filter in einem
idealen Zustand sind, wenn das Gerät in
Betrieb ist. Wenn der Filter beinahe voll ist
und ausgewechselt werden muss, beginnt die
entsprechende Filteranzeige (
blinken.
Wenn Sie den Filter nicht rechtzeitig
auswechseln, geschieht Folgendes:
» Das Gerät stellt den Betrieb ein und
wird verriegelt.
» Die entsprechende Filteranzeige (
/ / ) leuchtet ununterbrochen.
Anmerkung
• Das Gerät wird verriegelt, nachdem die
Filteranzeige ungefähr 2 Wochen lang geblinkt
hat.
• Etwa einen Tag vor Verriegelung des Geräts wird
alle 30 Minuten ein Signalton ausgegeben, der
Sie informiert, dass der Filter ausgewechselt
werden muss.
/ / / ) zu
/
1 Schließen Sie das Gerät an die
Stromversorgung an.
» Alle Anzeigen leuchten zweimal auf,
und Sie hören einen Signalton. Dann
erlöschen die Anzeigen.
2 Drücken Sie die Taste , um das Gerät
einzuschalten.
» Die Anzeigen PURIFIER und
HUMIDIFIER leuchten.
» Die Luftqualitätsanzeige stellt die
aktuelle Luftqualität dar.
Ein- und Ausschalten des
Geräts
Das Gerät wird stets in der Kombifunktion von
Luftreinigung und Luftbefeuchtung betrieben.
Wenn Sie das Gerät nur als Luftreiniger
verwenden möchten, darf sich im
Wasserbehälter kein Wasser benden.
47
Page 48

DE
» Die Anzeige CURRENT HUMIDITY
gibt die aktuelle Luftfeuchtigkeit an.
Der Luftverschmutzungssensor ist auf die
Standardstufe eingestellt. Sie können die
Empndlichkeit des Luftqualitätssensors wie
folgt einstellen:
Anmerkung
• Wenn eine höhere Empndlichkeitsstufe
eingestellt wird, startet das Gerät die
Luftreinigung bei einem niedrigeren
Verschmutzungsgrad, damit die Luft noch
sauberer wird.
3 Drücken Sie die Taste , um das Gerät
auszuschalten.
Anmerkung
• Der Luftbefeuchter kann nicht separat, d. h. ohne
den Luftreiniger, verwendet werden.
• Wenn der Wasserbehälter leer ist, wird der
Luftbefeuchter ausgeschaltet. Der Luftreiniger
läuft jedoch weiter. So wird das Gerät nur als
Luftreiniger betrieben (die Anzeigen PURIFIER
und REFILL WATER leuchten).
Einstellen der Empndlichkeit
des Luftqualitätssensors
Menschen mit bestimmten gesundheitlichen
Problemen (z. B. Allergien oder Asthma)
haben einen großen Bedarf an gesunder
Luft. Aus diesem Grund können Sie
beim Gerät die Empndlichkeit des
Luftqualitätssensors einstellen. Wenn Sie eine
hohe Empndlichkeitsstufe einstellen, startet
das Gerät die Luftreinigung bereits bei einem
niedrigen Verschmutzungsgrad.
Es gibt 3 Empndlichkeitsstufen:
• Norm; Standard
• empndlich
• Besonders hohe Empndlichkeit
1 Vergewissern Sie sich, dass der Luftreiniger
eingeschaltet ist.
2 Drücken Sie gleichzeitig die Tasten SPEED
und HUMIDITY SET.
» Der Luftreiniger gibt zwei Signaltöne
aus, und die Anzeige für die
Lüftergeschwindigkeit (
wird die aktuelle Empndlichkeitsstufe
des Luftqualitätssensors angezeigt.
) blinkt. Damit
48
Page 49
DE
Deutsch
Anzeige für die
Lüftergeschwindigkeit
SILENT Besonders hohe
Empndlichkeitsstufe
Empndlichkeit
empndlich
Norm; Standard
3 Drücken Sie die Taste SPEED,
um die Empndlichkeitsstufe des
Luftqualitätssensors einzustellen.
» Eine der SPEED-Anzeigen (SILENT,
oder ) leuchtet auf und zeigt die
bevorzugte Empndlichkeitsstufe des
Luftqualitätssensors an.
4 Halten Sie die Tasten SPEED und
HUMIDITY SET erneut gleichzeitig
gedrückt, um die Einstellung zu bestätigen.
Ändern der
Lüftergeschwindigkeit
Auto
1 Drücken Sie die Taste SPEED, um den
Automatikmodus AUTO auszuwählen.
Anmerkung
• Im Automatikmodus können Sie die gewünschte
Luftfeuchtigkeit (40 %, 50 %, 60 %) im Raum
einstellen (siehe Kapitel "Einstellen der
Luftfeuchtigkeit").
Anmerkung
• Wenn Sie die Empndlichkeit ändern, startet das
Gerät bei jedem Einschalten automatisch mit der
eingestellten Empndlichkeitsstufe.
49
Page 50

DE
Manuell
Sie können manuell die gewünschte
Lüftergeschwindigkeit auswählen, die den
automatischen Modus aufhebt.
1 Drücken Sie die Taste SPEED einmal
oder mehrmals, um die gewünschte
Lüftergeschwindigkeit auszuwählen (AUTO,
SILENT,
Tipp
Wenn die Luftqualitätsanzeige blau oder
•
dunkelviolett leuchtet, bedeutet dies, dass die
Luftqualität gut oder ausgezeichnet ist und Sie
eine niedrigere Lüftergeschwindigkeit auswählen
können.
, oder BOOST POWER).
Drücken Sie zum Ändern der
Lüftergeschwindigkeit die Taste SPEED.
Höchstleistungsmodus
Wenn die Luftqualitätsanzeige rot oder
violett leuchtet, bedeutet dies, dass die
Luftqualität schlecht oder mittelmäßig ist. Um
die Luft schnell zu reinigen, können Sie den
Höchstleistungsmodus auswählen.
1 Drücken Sie die Taste SPEED, um den
Höchstleistungsmodus auszuwählen.
» Die Anzeigen
Drücken Sie zum Ändern der
Lüftergeschwindigkeit die Taste SPEED.
und leuchten auf.
Ruhemodus
Im Ruhemodus arbeitet der Luftlter sehr leise.
1 Drücken Sie die Taste SPEED, um den
Ruhemodus auszuwählen.
» Die SILENT-Anzeige leuchtet auf.
50
Einstellen des Timers
Mit der Timer-Funktion können Sie das Gerät
eine bestimmte Anzahl an Stunden laufen lassen.
Nach Ablauf der eingestellten Zeit schaltet sich
das Gerät automatisch aus.
Sie können die Timer-Funktion in den folgenden
Situationen verwenden:
Page 51

DE
Deutsch
Situationen Anzeige
Wählen Sie die
Lüftergeschwindigkeit manuell
aus (siehe
"Manuell").
Das Gerät wird
im Automatikmodus ausgeführt (siehe
"Automatisch").
Das Gerät wird
im Ruhemodus
ausgeführt
(siehe
"Ruhemodus").
Eine der SPEED-Anzeigen
(
, oder BOOST
POWER) und eine der
TIMER-Anzeigen (
leuchten auf.
Die AUTO-Anzeige leuchtet
auf.
Eine der SPEED-Anzeigen
(SILENT,
POWER) und eine der
TIMER-Anzeigen (
leuchten auf.
Die Anzeige SILENT und
eine der TIMER-Anzeigen (
oder ) leuchten auf.
, oder )
, oder BOOST
, oder )
1 Drücken Sie die Taste TIMER, um den
Timer zu aktivieren.
» Die TIMER-Anzeige (
leuchtet auf.
, oder )
Einstellen der Luftfeuchtigkeit
Anmerkung
• Vergewissern Sie sich, dass der Wasserbehälter
mit Wasser gefüllt ist, wenn Sie die
Luftbefeuchtungsfunktion verwenden möchten
(siehe Kapitel "Erste Schritte", Abschnitt
"Vorbereitungen zur Luftbefeuchtung").
Sie können die gewünschte Luftfeuchtigkeit nur
im Automatikmodus AUTO einstellen. Wenn
die Luftfeuchtigkeit im Raum die gewünschte
,
Höhe erreicht, wird die Luftfeuchtigkeit konstant
auf dieser Höhe gehalten.
• Drücken Sie die Taste HUMIDITY SET
einmal oder mehrmals, um die gewünschte
Luftfeuchtigkeit einzustellen (40 %, 50 %
oder 60%).
» Die entsprechende HUMIDITY
SET-Anzeige (40 %, 50 % oder 60 %)
leuchtet auf.
2 Drücken Sie mehrmals die Taste TIMER,
bis die Anzahl der Stunden angezeigt wird,
die das Gerät betrieben werden soll. Die
entsprechende TIMER-Anzeige leuchtet
auf.
Um die Timer-Funktion zu deaktivieren, drücken
Sie so oft die Taste TIMER, bis die TIMERAnzeige (
, oder ) erlischt.
51
Page 52

DE
Anmerkung
• Wenn Sie die Luftfeuchtigkeit nicht einstellen,
erlischt die HUMIDITY SET-Anzeige. Der
Luftbefeuchter befeuchtet die Luft im Modus
AUTO, und die voreingestellte Luftfeuchtigkeit
beträgt 50 %.
• Wenn Sie die Lüftergeschwindigkeit (SILENT,
, oder BOOST POWER) ändern, wird
der Luftbefeuchter automatisch gemäß der
Lüftergeschwindigkeitsstufe betrieben, und der
Modus AUTO wird deaktivier t.
• Wenn Sie die Luftfeuchtigkeit kurzzeitig
erhöhen möchten, können Sie eine höhere
Lüftergeschwindigkeit auswählen.
• Das Gerät bietet eine intelligente Memory-
Funktion und kann sich die Einstellungen
merken, wenn das Gerät ausgeschaltet wird (z. B.
bei Stromausfällen). Wenn das Gerät wieder
eingesteckt bzw. eingeschaltet wird, startet
es automatisch mit der zuvor ausgewählten
Einstellung.
Wasserstand
Der Wasserstand im Wasserbehälter ist durch
das Sichtfenster an der Seite des Geräts
sichtbar. Wenn sich nicht ausreichend Wasser
im Wasserbehälter bendet, blinkt die Anzeige
REFILL WATER. Damit wird angezeigt, dass Sie
den Wasserbehälter nachfüllen müssen.
Anmerkung
• Das Gerät funktioniert als Luftreiniger, wenn
sich kein Wasser im Behälter bendet und die
Anzeige REFILL WATER blinkt. Die Funktion der
Luftbefeuchtung kann nur aktiviert werden, wenn
sich Wasser im Behälter bendet.
52
Page 53

DE
Deutsch
5 Reinigen des
Geräts
Anmerkung
• Ziehen Sie vor dem Reinigen des Geräts stets
den Netzstecker aus der Steckdose.
• Tauchen Sie das Gerät niemals in Wasser oder
andere Flüssigkeiten.
• Verwenden Sie keine Scheuermittel oder
aggressive bzw. brennbare Reinigungsmittel wie
zum Beispiel Bleiche oder Alkohol, um die Teile
des Geräts zu reinigen.
• Nur der Vorlter und der Filter des
Luftbefeuchters sind abwaschbar. Die anderen
Luftreinigerlter sind NICHT abwaschbar und
können NICHT mit dem Staubsauger gereinigt
werden.
Reinigen des Gehäuses
Reinigen Sie das Gerät regelmäßig innen und
außen, damit sich kein Staub ansammelt.
1 Wischen Sie Staub mit einem trockenen
weichen Tuch vom Gerätegehäuse ab.
2 Reinigen Sie den Lufteinlass und -auslass
mit einem trockenen weichen Tuch.
Anmerkung
• Wenn die Luftfeuchtigkeit im Zimmer sehr
hoch ist, kann sich Kondenswasser am
Luftqualitätssensor bilden. Infolgedessen kann die
Luftqualitätsanzeige eine schlechte Luftqualität
anzeigen, obwohl diese gut ist. In diesem Fall
müssen Sie den Luftqualitätssensor reinigen
oder eine der manuellen Geschwindigkeitsstufen
verwenden.
1 Reinigen Sie den Ein- und Auslass der
Luftqualitäts- und Luftfeuchtigkeitssensoren
mit einer weichen Bürste.
2 Nehmen Sie die Abdeckung der
Luftqualitäts- und Luftfeuchtigkeitssensoren
ab.
Reinigen des
Luftqualitätssensors und des
Luftfeuchtigkeitssensors
Reinigen Sie die Luftqualität- und
Luftfeuchtigkeitssensoren monatlich, um die
ideale Funktion des Geräts sicherzustellen.
Reinigen Sie ihn öfter, wenn Sie das Gerät in
einer staubigen Umgebung verwenden.
53
Page 54
DE
3 Reinigen Sie die Sensoren sowie den
Lufteinlass und -auslass mit einem leicht
angefeuchteten Wattestäbchen.
4 Trocknen Sie sie mit einem trockenen
Wattestäbchen.
5 Bringen Sie die Sensorenabdeckung wieder
an.
Reinigen des Wasserbehälters
Reinigen Sie den Wasserbehälter aus
Hygienegründen täglich.
1 Schrauben Sie den Deckel vom
Wasserbehälter ab.
2 Füllen Sie den Wasserbehälter zu einem
Drittel mit Wasser.
3 Fügen Sie dem Wasser etwas mildes
Spülmittel hinzu.
4 Schrauben Sie den Deckel des
Wasserbehälters wieder fest zu.
5 Schütteln Sie den Behälter mit beiden
Händen vor und zurück, um den Behälter
innen zu reinigen.
54
Page 55

DE
Deutsch
6 Schrauben Sie den Deckel vom
Wasserbehälter ab.
7 Entleeren Sie den Wasserbehälter in einen
Ausguss.
8 Spülen Sie den Wasserbehälter mehrmals
mit frischem Wasser aus.
9 Schrauben Sie den Deckel des
Wasserbehälters wieder fest zu.
Reinigen des Filtereinsatzes
des Luftbefeuchters
Reinigen Sie den Filtereinsatz des
Luftbefeuchters aus Hygienegründen einmal
wöchentlich.
1 Nehmen Sie den Wasserbehälter aus dem
Gerät. Nehmen Sie dann den Filtereinsatz
des Luftbefeuchters aus dem Gerät.
Anmerkung
• Bevor Sie den Filtereinsatz des Luftbefeuchters
herausnehmen können, müssen Sie zunächst den
Wasserbehälter entfernen.
2 Nehmen Sie den Filter des Luftbefeuchters
aus dem entsprechenden Filtereinsatz.
55
Page 56

DE
3 Spülen Sie den Filtereinsatz des
Luftbefeuchters unter ießendem Wasser
ab.
Anmerkung
• Verwenden Sie (falls notwendig) ein mildes
Reinigungsmittel, um den Filtereinsatz des
Luftbefeuchters zu reinigen. Spülen Sie in
diesem Fall den Filtereinsatz des Luftbefeuchters
gründlich ab.
4 Trocknen Sie den Filtereinsatz des
Luftbefeuchters mit einem trockenen
weichen Tuch.
5 Setzen Sie den Filter des Luftbefeuchters
wieder ein, und schieben Sie den
Filtereinsatz des Luftbefeuchters in das
Gerät.
56
Page 57

DE
Deutsch
6 Reinigen des
Reinigen des Vorlters
Vorfilters und
des Luftbefeuchterfilters
Anmerkung
• Nur der Vorlter und der Filter des
Luftbefeuchters sind abwaschbar. Alle anderen
Filter sind nicht abwaschbar.
• Spülen Sie den Filter des Luftbefeuchters
aus Hygienegründen einmal wöchentlich
ab.
• Wenn die Filteranzeige
der Vorlter gereinigt und der Filter des
Luftbefeuchters entkalkt werden.
• Die Anzeige blinkt etwa alle zwei Wochen.
/ blinkt, muss
Anmerkung
• Reinigen Sie den Vorlter alle zwei Wochen, um
eine ideale Funktion des Geräts sicherzustellen.
1 Schalten Sie das Gerät aus, und ziehen Sie
den Netzstecker aus der Steckdose.
2 Greifen Sie mit den Fingern in die
Aussparungen der Seitenabdeckungen,
heben Sie den unteren Teil der
Frontabdeckung an, und ziehen Sie ihn zu
sich heran (1). Heben Sie den oberen Teil
der Frontabdeckung aus dem Gerät (2).
2
Anmerkung
• Die Filteranzeige / blinkt 24 Stunden lang.
• Nachdem Sie den Vorlter gereinigt und den
Filter des Luftbefeuchters entkalkt haben,
stoppt das Blinken, und die Filterstandzeit wird
automatisch zurückgesetzt.
• Wenn Sie das Gerät ausschalten, wird das
Blinken beendet.
4
1
57
Page 58

DE
2
3 Um den Vorlter zu entfernen, drücken
Sie die beiden Clips nach unten (1), und
ziehen Sie den Filter in Ihre Richtung (2).
4
1
8 Setzen Sie den Vorlter wieder in das
Gerät ein. Befestigen Sie alle Haken
ordnungsgemäß am Gerät.
2
4
2
4 Nehmen Sie den Multi-care Filter aus dem
Vorlter.
5 Waschen Sie den Vorlter unter
ießendem Wasser ab. Wenn der Vorlter
sehr schmutzig ist, verwenden Sie eine
weiche Bürste, um den Staub zu entfernen.
6 Lassen Sie den Vorlter an der Luft
trocknen.
7 Schieben Sie den Multi-care Filter in den
Vorlter.
1
9 Um die Frontabdeckung wieder
anzubringen, setzen Sie die oberen Haken
zuerst in den oberen Teil des Geräts
ein (1). Drücken Sie dann die Abdeckung
gegen das Gehäuse des Geräts (2).
1
4
Anmerkung
• Alternativ können Sie den Vorlter mit einem
Staubsauger reinigen.
• Vergewissern Sie sich, dass der Vorlter
vollständig trocken ist. Wenn er noch nass ist,
können sich darin Bakterien vermehren, und die
Lebensdauer des Vorlters kann sich verkürzen.
• Vergewissern Sie sich, dass die Seite mit den
beiden Clips in Ihre Richtung zeigt, und dass alle
Haken des Vorlters ordnungsgemäß am Gerät
befestigt sind.
58
Page 59

DE
Deutsch
Reinigen des
Luftbefeuchterlters
Spülen Sie den Filter des Luftbefeuchters
aus Hygienegründen einmal wöchentlich ab.
Darüber hinaus muss der Filter entkalkt werden,
wenn die
Filteranzeige
/ blinkt.
3 Nehmen Sie den Filtereinsatz des
Luftbefeuchters aus dem Gerät.
Abspülen des Luftbefeuchterlters
1 Schalten Sie das Gerät aus, und ziehen Sie
den Netzstecker aus der Steckdose.
2 Nehmen Sie den Wasserbehälter aus dem
Gerät.
4 Nehmen Sie den Luftbefeuchterlter aus
dem Filtereinsatz.
Anmerkung
• Bevor Sie den Filtereinsatz des Luftbefeuchters
herausnehmen können, müssen Sie zunächst
den Wasserbehälter entfernen (siehe
"Vorbereitungen zur Luftbefeuchtung").
59
Page 60

DE
5 Reinigen Sie den Filter des Luftbefeuchters
vorsichtig mit der mitgelieferten
Reinigungsbürste unter leicht ießendem
Wasser.
6 Setzen Sie den Filter des Luftbefeuchters
wieder in den Filtereinsatz ein.
1 Schalten Sie das Gerät aus, und ziehen Sie
den Netzstecker aus der Steckdose.
2 Nehmen Sie den Wasserbehälter aus dem
Gerät.
3 Nehmen Sie den Filtereinsatz des
Luftbefeuchters aus dem Gerät.
Entkalken des Luftbefeuchterlters
Anmerkung
• Es ist wichtig, den Luftbefeuchterlter zu
entkalken, um Kalkablagerungen zu vermeiden.
Diese können die Leistung des Luftbefeuchters
stark beeinträchtigen.
60
Page 61

DE
Deutsch
4 Nehmen Sie den Luftbefeuchterlter aus
dem Filtereinsatz.
Anmerkung
• Bevor Sie den Filtereinsatz des Luftbefeuchters
herausnehmen können, müssen Sie zunächst den
Wasserbehälter entfernen.
5 Mischen Sie Haushaltsessig (5 ml/100 ml
Essigsäure) mit der gleichen Menge
Leitungswasser in einem Behälter, der groß
genug ist, um den Filter des Luftbefeuchters
darin einzuweichen.
Wasser : Essig
1:1
1 Stunde
8 Spülen Sie den Luftbefeuchterlter unter
ießendem Wasser ab, um Essigrückstände
zu entfernen. Drehen Sie den Filter, um
beide Seiten unter dem Wasserhahn
abzuspülen.
9 Lassen Sie überschüssiges Wasser vom
Luftbefeuchterlter abtropfen.
10 Setzen Sie den Filter des Luftbefeuchters
wieder in den Filtereinsatz ein.
Anmerkung
• Wenn weiße Ablagerungen (Kalk) auf dem Filter
vorhanden sind, vergewissern Sie sich, dass Sie
die Seite mit den weißen Ablagerungen in das
Wasser eintauchen.
6 Weichen Sie den Luftbefeuchterlter eine
Stunde lang in der Lösung ein.
7 Gießen Sie die Wasser-/Essiglösung ab.
61
Page 62

DE
Reinigungszeitplan
Frequenz Reinigungsmethode
Jeden Tag Spülen Sie den Wasserbehälter
aus.
Spülen Sie den Wasserenthärter
ab.
Jede Woche Spülen Sie den Filter des
Luftbefeuchters ab.
Reinigen Sie den Filtereinsatz des
Luftbefeuchters.
Wenn die
Filteranzeige
blinkt:
Alle zwei
Monate
Bei Bedarf Reinigen Sie das Gehäuse des
Reinigen Sie den Vorlter.
Entkalken Sie den Filter des
/
Luftbefeuchters mit einer
Wasser-/Essigmischung.
Reinigen Sie den
Luftqualitätssensor und den
Luftfeuchtigkeitssensor mit einem
trockenen Wattestäbchen.
Geräts mit einem weichen,
trockenen Tuch.
62
Page 63

DE
Deutsch
7 Auswechseln
der Filter
Die Filteranzeigen ( / / / ) geben zu
erkennen, welcher Filter ausgewechselt werden
muss.
Anmerkung
• Wenn Sie zum Wechseln der Filter die
Frontabdeckung bei eingeschaltetem Gerät
entfernen, erlöschen alle Anzeigen auf dem
Bedienfeld, und das Gerät stellt den Betrieb ein.
• Sobald Sie die Frontabdeckung wieder auf das
Gerät setzen, blinken alle Anzeigen zweimal auf.
Dann kehrt das Gerät in den Betriebsmodus
zurück.
Auswechseln des Multi-care
Filters
Anmerkung
• Der Multi-care Filter ist nicht abwaschbar und
kann nicht mit dem Staubsauger gereinigt
werden.
Wechseln Sie den Multi-care Filter aus, wenn
die Filteranzeige
blinkt.
Tipp
Stellen Sie das Gerät beim Herausnehmen oder
•
Einsetzen der Filter an eine Wand, um für mehr
Stabilität zu sorgen.
Anmerkung
• Setzen Sie die Filter ordnungsgemäß ein.
• Vergewissern Sie sich, dass Sie die richtige
Reihenfolge einhalten. Setzen Sie also zunächst
den HEPA-Filter, dann den Aktivkohlelter, den
Multi-care Filter und zuletzt den Vorlter ein.
• Vergewissern Sie sich, dass die Seite mit dem
Etikett zu Ihnen gerichtet ist.
1 Schalten Sie das Gerät aus, und ziehen Sie
den Netzstecker aus der Steckdose.
2 Fassen Sie mit den Fingern in die
Griffmulden der seitlichen Blenden.
3 Ziehen Sie den unteren Teil der Abdeckung
vorsichtig nach außen (1), und heben Sie
dann den oberen Teil der Frontabdeckung
in Ihre Richtung (2).
2
4
1
63
Page 64

DE
4 Nehmen Sie den Vorlter aus dem Gerät.
4
1
2
5 Nehmen Sie den Multi-care Filter aus dem
Vorlter.
6 Nehmen Sie den gebrauchten Filter an
beiden Seiten, und geben Sie ihn vorsichtig
in den Haushaltsmüll.
7 Entfernen Sie das gesamte
Verpackungsmaterial von dem neuen
Multi-care Filter.
8 Schieben Sie den neuen Multi-care Filter in
den Vorlter.
9 Setzen Sie den Filter wieder in das Gerät
ein.
Anmerkung
• Berühren Sie nicht die plissierte Filteroberäche,
und riechen Sie nicht am Filter, da dieser
Schadstoffe aus der Luft gesammelt hat.
• Waschen Sie sich die Hände, nachdem Sie die
gebrauchten Filter entsorgt haben.
64
2
4
1
Anmerkung
• Vergewissern Sie sich, dass die Seite mit den
beiden Clips in Ihre Richtung zeigt, und dass alle
Haken des Vorlters ordnungsgemäß am Gerät
befestigt sind.
Page 65

DE
Deutsch
10 Um die Frontabdeckung wieder
2
anzubringen, befestigen Sie die Abdeckung
zunächst oben am Gerät (1). Drücken Sie
die Abdeckung dann vorsichtig gegen das
Gehäuse des Geräts (2).
Tipp
Stellen Sie das Gerät beim Herausnehmen oder
•
Einsetzen der Filter an eine Wand, um für mehr
Stabilität zu sorgen.
1
4
11 Setzen Sie die Standzeit des Multi-care
Filters zurück (siehe Kapitel "Zurücksetzen
des Zählers für die Filterstandzeit").
Auswechseln des
Aktivkohlelters und des
HEPA-Filters
Anmerkung
• Der Aktivkohlelter und der HEPA-Filter sind
nicht abwaschbar und können nicht mit dem
Staubsauger gereinigt werden.
Wechseln Sie sowohl den Aktivkohlelter
als auch den HEPA-Filter aus, wenn die
Filteranzeige
blinkt.
Anmerkung
• Setzen Sie die Filter ordnungsgemäß ein.
• Vergewissern Sie sich, dass Sie die richtige
Reihenfolge einhalten. Setzen Sie also zunächst
den HEPA-Filter, dann den Aktivkohlelter, den
Multi-care Filter und zuletzt den Vorlter ein.
• Vergewissern Sie sich, dass die Seite mit dem
Etikett zu Ihnen gerichtet ist.
1 Schalten Sie das Gerät aus, und ziehen Sie
den Netzstecker aus der Steckdose.
2 Fassen Sie mit den Fingern in die
Griffmulden der seitlichen Blenden.
3 Ziehen Sie den unteren Teil der Abdeckung
vorsichtig nach außen (1), und heben Sie
dann den oberen Teil der Frontabdeckung
in Ihre Richtung (2).
2
4
1
65
Page 66

DE
4 Nehmen Sie alle Filter aus dem Gerät.
4
3
5 Nehmen Sie die gebrauchten Filter an
beiden Seiten, und geben Sie sie vorsichtig
in den Haushaltsmüll.
Anmerkung
• Berühren Sie nicht die plissierte Filteroberäche,
und riechen Sie nicht am Filter, da dieser
Schadstoffe aus der Luft gesammelt hat.
• Waschen Sie sich die Hände, nachdem Sie die
gebrauchten Filter entsorgt haben.
6 Entfernen Sie das gesamte
Verpackungsmaterial von den neuen Filtern.
7 Setzen Sie den neuen HEPA-Filter zuerst in
das Gerät ein.
4
8 Setzen Sie dann den neuen Aktivkohlelter
in das Gerät ein.
4
3
9 Setzen Sie den Vorlter in das Gerät ein.
2
4
1
Anmerkung
• Vergewissern Sie sich, dass die Seite mit den
beiden Clips in Ihre Richtung zeigt, und dass alle
Haken des Vorlters ordnungsgemäß am Gerät
befestigt sind.
66
Page 67

DE
Deutsch
10 Um die Frontabdeckung wieder
2
anzubringen, befestigen Sie die Abdeckung
zunächst oben am Gerät (1). Drücken Sie
die Abdeckung dann vorsichtig gegen das
Gehäuse des Geräts (2).
1
4
11 Setzen Sie die Filterstandzeit des
Aktivkohlelters und des HEPA-Filters
zurück (siehe "Zurücksetzen des Zählers
für die Filterstandzeit").
Auswechseln von
Luftbefeuchterlter und
Wasserenthärter
Auswechseln des Luftbefeuchterlters
1 Schalten Sie das Gerät aus, und ziehen Sie
den Netzstecker aus der Steckdose.
2 Nehmen Sie den Wasserbehälter aus dem
Gerät.
Wechseln Sie den Filter des Luftbefeuchters
und den Wasserenthärter aus, wenn die
Filteranzeige
/ blinkt.
3 Nehmen Sie den Filtereinsatz des
Luftbefeuchters aus dem Gerät.
67
Page 68
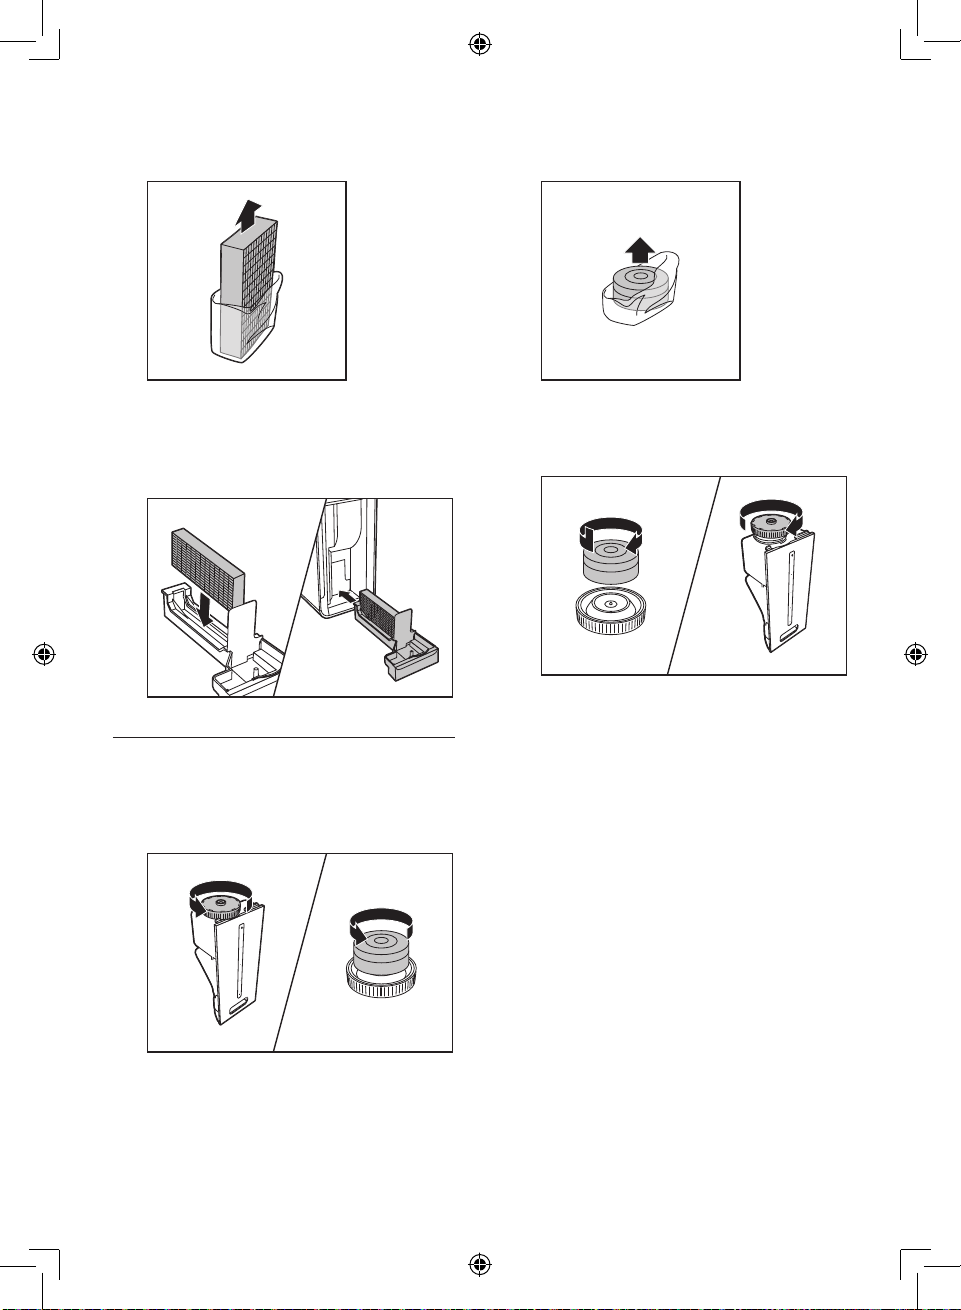
DE
4 Entfernen Sie das Verpackungsmaterial vom
Filter des Luftbefeuchters.
2 Entfernen Sie das Verpackungsmaterial des
Wasserenthärters.
5 Setzen Sie den neuen Luftbefeuchterlter
wieder ein, und schieben Sie den
Filtereinsatz des Luftbefeuchters in das
Gerät.
Auswechseln des Wasserenthärters
1 Schrauben Sie den Deckel vom
Wasserbehälter ab, und nehmen Sie den
Wasserenthärter heraus.
3 Setzen Sie den neuen Wasserenthärter ein,
und schrauben Sie den Deckel wieder auf
den Wasserbehälter.
68
Page 69

DE
Deutsch
8 Zurücksetzen
des Zählers für
die Filterstandzeit
Beim Auswechseln des Filters ist es wichtig,
dass Sie auch den Zähler für die Filterstandzeit
zurücksetzen. So kann das Gerät synchron mit
der Filterstandzeit laufen.
Anmerkung
• Setzen Sie das Gerät zurück, wenn es eingesteckt
und eingeschaltet ist.
• Wechseln Sie die entsprechenden Filter nur aus,
wenn die jeweiligen Filteranzeigen blinken.
• Nach dem Filterwechsel blinkt die
entsprechende Filteranzeige weiter oder
leuchtet ununterbrochen, bis Sie den Zähler für
die Filterstandzeit zurücksetzen.
Setzen Sie nach dem Filterwechsel die Standzeit
des Filters zurück:
1 Schalten Sie das Gerät aus, und ziehen Sie
den Netzstecker aus der Steckdose.
3 Stecken Sie den Stecker in die Steckdose,
und schalten Sie das Gerät wieder ein.
4 Halten Sie die Taste RESET zwei Sekunden
lang gedrückt.
2 Wechseln Sie den Filter aus (siehe Kapitel
"Auswechseln der Filter").
69
Page 70

DE
9 Fehlerbehebung
In diesem Kapitel sind die häugsten Probleme aufgeführt, die beim Gebrauch Ihres Geräts auftreten
können. Sollten Sie ein Problem mithilfe der nachstehenden Informationen nicht beheben können,
wenden Sie sich bitte an das Philips Service-Center in Ihrem Land.
Problem Mögliche Lösung
Das Gerät funktioniert
nicht.
Das Gerät funktioniert
nicht, obwohl es
eingeschaltet ist.
Der Wasserbehälter ist
undicht.
Der Wasserstand im
Wasserbehälter sinkt
rapide, nachdem ich
den Filtereinsatz des
Luftbefeuchters entleert
habe.
• Die Filterwechselanzeige leuchtet bereits seit längerer Zeit
ununterbrochen, und Sie haben den entsprechenden Filter nicht
ausgewechselt. Nun ist das Gerät verriegelt. Wechseln Sie in diesem
Fall den Filter aus, und setzen Sie die Standzeit des Filters zurück.
• Vergewissern Sie sich, dass die Frontabdeckung ordnungsgemäß
geschlossen ist.
Der Filtereinsatz des Luftbefeuchters ist nicht ordnungsgemäß eingesetzt.
In diesem Fall funktioniert das Gerät nicht, und die CURRENT
HUMIDITY-Anzeigen blinken (30 %, 40 %, 50 % oder 60 %). Schalten Sie
das Gerät aus. Nehmen Sie den Wasserbehälter heraus, und schieben Sie
anschließend den Filtereinsatz des Luftbefeuchters wieder in das Gerät.
Schalten Sie dann das Gerät ein, und versuchen Sie es erneut.
Es ist normal, dass der Deckel des Wasserbehälters etwas nass ist, wenn
Sie ihn aus dem Gerät nehmen. Wenn jedoch weiterhin Wasser aus dem
Boden des Wasserbehälters tropft, sollten Sie überprüfen, ob der Deckel
fest auf den Wasserbehälter geschraubt ist. Wenn das Problem weiterhin
auftritt, setzen Sie sich bitte mit einem Philips Service-Center in Ihrem
Land in Verbindung.
Das ist normal. Das Wasser im Wasserbehälter wird zum Füllen des
Filtereinsatzes des Luftbefeuchters verwendet. Außerdem saugt der Filter
des Luftbefeuchters etwas Wasser auf.
Ich kann nicht erkennen,
dass sich die Anzeige der
aktuellen Luftfeuchtigkeit
verändert.
70
• Vergewissern Sie sich, dass Sie den Filter des Luftbefeuchters in den
entsprechenden Filtereinsatz gesetzt haben.
• Der Luftbefeuchterlter ist verschmutzt. Spülen bzw. entkalken Sie
den Filter des Luftbefeuchters (siehe Kapitel "Reinigen des Vor- und
Luftbefeuchterlters", Abschnitt "Reinigen des Luftbefeuchterlters").
• Vergewissern Sie sich, dass die Anzeige PURIFIER und die Anzeige
HUMIDIFIER leuchten.
Page 71

DE
Deutsch
Problem Mögliche Lösung
Auf dem
Luftbefeuchterlter
benden sich einige
weiße Ablagerungen.
Aus dem Luftauslass
kommt keine Luft.
Die
Lüftergeschwindigkeit
ändert sich nicht, wenn
der Ruhemodus aktiviert
ist.
Der Luftstrom, der aus
dem Luftauslass dringt,
ist bedeutend schwächer
als vorher.
Die Luftqualität
verbessert sich nicht,
obwohl der Luftreiniger
eine lange Zeit über in
Betrieb war.
Bei den weißen Ablagerungen handelt es sich um Kalkpartikel, die
sich aus Mineralien aus dem Wasser zusammensetzen. Kalk auf dem
Luftbefeuchterlter beeinträchtigt die Funktion des Luftbefeuchters.
Daher müssen Sie den Filter des Luftbefeuchters entkalken, wenn
die Filteranzeige
/ blinkt (siehe Kapitel "Reinigen des Vor- und
Luftbefeuchterlters", Abschnitt "Reinigen des Luftbefeuchterlters").
Schließen Sie das Gerät an die Stromversorgung an, und schalten Sie es
ein.
Im Ruhemodus ist die Lüftergeschwindigkeit auf eine sehr niedrige
Stufe eingestellt. Wenn Sie die Lüftergeschwindigkeit ändern und den
Ruhemodus verlassen möchten, drücken Sie einmal oder mehrmals die
Taste SPEED, um die gewünschte Lüftergeschwindigkeit einzustellen.
• Der Vorlter ist verschmutzt. Reinigen Sie den Vorlter (siehe
Kapitel "Reinigen des Geräts", Abschnitt "Reinigen des Vor- und
Luftbefeuchterlters").
• Vergewissern Sie sich, dass Sie das gesamte Verpackungsmaterial der
Filter entfernt haben.
• Einer der Filter wurde nicht in das Gerät eingesetzt. Vergewissern Sie
sich, dass alle Filter ordnungsgemäß in der folgenden Reihenfolge von
innen nach außen eingesetzt sind: 1) HEPA-Filter 2) Aktivkohlelter,
3) Multi-care Filter und 4) Vorlter.
• Der Luftqualitätssensor ist nass. Die Luftfeuchtigkeit im Raum ist
hoch und verursacht Kondensation. Vergewissern Sie sich, dass der
Luftqualitätssensor sauber und trocken ist (siehe Kapitel "Reinigen
des Geräts", Abschnitt "Reinigen des Luftqualitätssensors und des
Luftfeuchtigkeitssensors").
Die Farbe der
Luftqualitätsanzeige
ändert sich nicht.
Ich kann nicht erkennen,
dass Wasserdampf aus
dem Gerät austritt.
Funktioniert das Gerät?
• Der Luftqualitätssensor ist verschmutzt. Reinigen Sie den
Luftqualitätssensor (siehe Kapitel "Reinigen des Geräts", Abschnitt
"Reinigen des Luftqualitätssensors und des Luftfeuchtigkeitssensors").
• Der Raum wird nicht ausreichend belüftet. Öffnen Sie ein Fenster,
um die Luftzirkulation zu verbessern.
Sehr feiner Wasserdampf ist unsichtbar. Dieses Gerät hat einen speziell
entwickelten Filter zur Luftbefeuchtung, der sehr feinen Wasserdampf
herstellt. Deshalb können Sie den Wasserdampf nicht sehen.
71
Page 72
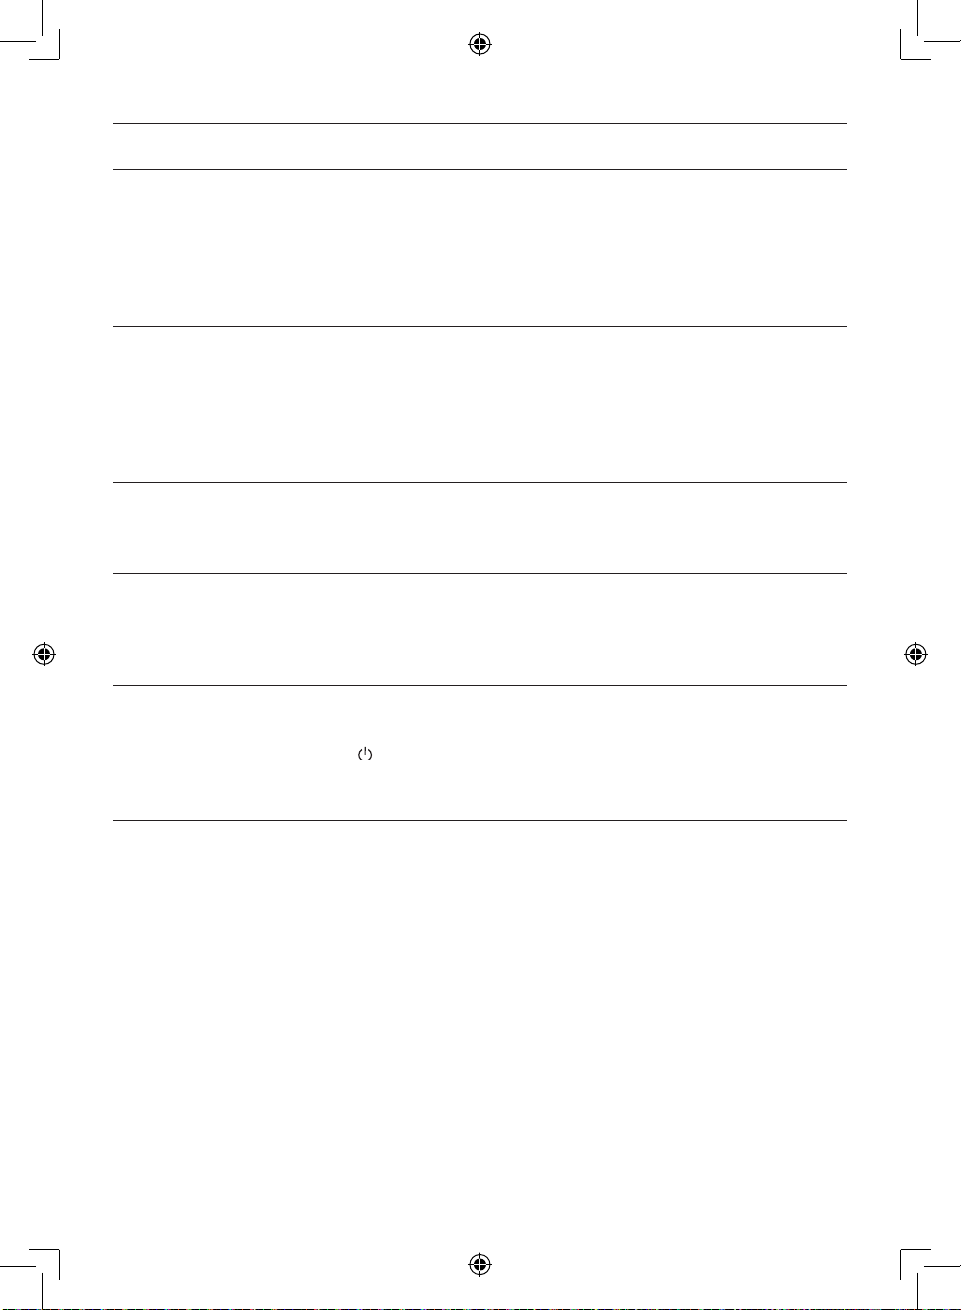
DE
Problem Mögliche Lösung
Ich möchte
prüfen, ob der
Luftfeuchtigkeitssensor
funktioniert.
Nehmen Sie die Abdeckung vom Luftqualitäts-/Feuchtigkeitssensor ab,
und blasen Sie vorsichtig feuchte Luft in die Öffnung. Nach einer Weile
ändert sich die Luftfeuchtigkeitsanzeige CURRENT HUMIDITY. Hinweis:
Wenn die Luftfeuchtigkeitsanzeige CURRENT HUMIDITY ursprünglich
bereits auf 60 % steht, kann die Anzeige keine höhere Feuchtigkeit
anzeigen, wenn Sie feuchte Luft in Richtung des Sensors blasen.
Bei dem Gerät tritt ein
ungewöhnlicher Geruch
auf.
Anfangs kann das Gerät einen leichten Kunststoffgeruch verströmen.
Das ist normal. Wenn das Gerät einen verbrannten Geruch verströmt,
wenden Sie sich an einen Philips Händler oder ein autorisiertes Philips
Service-Center. Das Gerät kann auch einen unangenehmen Geruch
verströmen, wenn einer der Filter schmutzig ist. Reinigen Sie in diesem Fall
den entsprechenden Filter, oder wechseln Sie ihn aus.
Ich benötige sehr
saubere Luft, weil ich
eine Allergie habe.
Sie können die Empndlichkeit des Luftqualitätssensors so ändern (siehe
Kapitel "Verwenden des Geräts", Abschnitt "Einstellen der Empndlichkeit
des Luftqualitätssensors"), dass das Gerät die Luft noch intensiver reinigt.
Das Gerät ist sehr laut. • Überprüfen Sie, ob Sie das gesamte Verpackungsmaterial von den
Filtern entfernt haben.
• Wenn das Gerät weiterhin zu laut ist, können Sie die
Geschwindigkeit des Lüfters auf eine niedrigere Stufe einstellen.
Das Gerät zeigt an,
dass ich einen Filter
auswechseln muss,
obwohl ich dies schon
Vielleicht haben Sie die Rückstelltaste RESET für den Filter nicht
ordnungsgemäß gedrückt. Stecken Sie das Gerät ein, und drücken Sie die
Taste
, um das Gerät einzuschalten. Drücken Sie dann die Taste RESET
zwei Sekunden lang.
gemacht habe.
72
Page 73

DE
Deutsch
10 Garantie und
Kundendienst
Benötigen Sie weitere Informationen oder
treten Probleme auf, besuchen Sie die Philips
Website (www.philips.com), oder setzen Sie
sich mit einem Philips Service-Center in Ihrem
Land in Verbindung (Telefonnummer siehe
Garantieschrift). Sollte es in Ihrem Land kein
Service-Center geben, wenden Sie sich bitte an
Ihren lokalen Philips Händler.
Bestellen von Ersatz- oder
Zubehörteilen
Wenn Sie ein Teil ersetzen müssen oder ein
zusätzliches Teil kaufen möchten, wenden Sie
sich an Ihren Philips Händler, oder besuchen Sie
www.philips.com/support.
Wenn Sie Probleme bei der Beschaffung der
Teile haben, wenden Sie sich bitte an ein Philips
Service-Center in Ihrem Land (Telefonnummer
siehe Garantieschrift).
73
Page 74

DE
11 Hinweise
Elektromagnetische Felder
(EMF)
Recycling
Dieses Philips Gerät erfüllt sämtliche Normen
und Regelungen bezüglich der Exposition in
elektromagnetischen Feldern.
Elektromagnetische Verträglichkeit
Koninklijke Philips N.V. produziert und
vertreibt viele Endkundenprodukte, die, wie
jedes elektronische Gerät im Allgemeinen,
elektromagnetische Signale aussenden und
empfangen können.
Eines der grundsätzlichen
Unternehmensprinzipien von Philips ist es, für
unsere Produkte alle notwendigen Gesundheitsund Sicherheitsmaßnahmen zu ergreifen, um
allen anwendbaren rechtlichen Anforderungen
zu entsprechen und die zum Zeitpunkt der
Herstellung des Produkts anwendbaren EMVNormen in vollem Maße einzuhalten.
Philips hat sich dazu verpichtet, Produkte
zu entwickeln, herzustellen und zu verkaufen,
die sich nicht nachteilig auf die Gesundheit
auswirken. Philips bestätigt, dass seine
Produkte gemäß aktuellen wissenschaftlichen
Erkenntnissen sicher sind, wenn die Produkte
für ihren bestimmungsgemäßen Zweck
verwendet werden.
Philips spielt eine aktive Rolle in der
Entwicklung der internationalen EMF- und
Sicherheitsstandards, sodass Philips auch
weiterhin die neuesten Entwicklungen der
Standardisierung so früh wie möglich in seine
Produkte integrieren kann.
Entsorgen Sie Ihr Produkt niemals zusammen
mit dem normalen Hausmüll. Bitte informieren
Sie sich über die örtlichen Bestimmungen
zur getrennten Entsorgung von elektrischen
und elektronischen Produkten. Die korrekte
Entsorgung des nicht mehr benötigten Produkts
hilft, negative Auswirkungen auf Umwelt und
Gesundheit zu vermeiden.
74
Page 75

FR
Français
Contenu
1 Important 76
Sécurité 76
2 Votre puricateur et
humidicateur d'air 80
Contenu de l'emballage 80
3 Guide de démarrage 81
Installation des ltres 81
Préparation de l'humidication 82
4
Utilisation de l'appareil 84
Signication du voyant de qualité de l'air 84
Signication du voyant d'humidité 84
Fonctionnement du mode automatique 84
Signication de l'alerte de protection
de l'air sain 84
Fonctionnement du verrouillage de
protection de l'air sain 85
Mise sous tension et hors tension de
l'appareil 85
Réglage de la sensibilité du capteur de
qualité de l'air 86
Modication de la vitesse du ventilateur 87
Automatique 87
Manuel 88
Mode silencieux 88
Mode de puissance supplémentaire 88
Réglage du programmateur 88
Réglage du taux d'humidité 89
Niveau d'eau 90
5 Nettoyage de l'appareil 91
Nettoyage du corps de l'appareil 91
Nettoyage du capteur de qualité de
l'air et du capteur d'humidité de l'air 91
Nettoyage du seau d'eau 92
Nettoyage du plateau du ltre
d'humidication 93
6 Nettoyage du préltre et du
ltre d'humidication 95
Nettoyage du préltre 95
Nettoyage du ltre d'humidication 97
Rinçage du ltre d'humidication 97
Détartrage du ltre d'humidication 98
Calendrier de nettoyage 99
7 Remplacement des ltres 100
Remplacement du ltre multisoin 100
Remplacement du ltre à charbon
actif et du ltre HEPA 102
Remplacement du ltre
d'humidication et de l'adoucisseur
d'eau 104
Remplacement du ltre
d'humidication 104
Remplacement de l'adoucisseur
d'eau 105
8 Réinitialisation du compteur de la
durée de vie des ltres 106
9 Dépannage 107
10 Garantie et service 110
Commande de pièces ou d'accessoires 110
11 Mentions légales 111
Champs électromagnétiques (EMF) 111
Conformité aux normes sur les
champs électriques, magnétiques
et électromagnétiques 111
Recyclage 111
75
Page 76

FR
1 Important
vous videz le seau d'eau, versez
l'eau dans l'évier.
Avertissement
Sécurité
Lisez attentivement ce mode
d'emploi avant d'utiliser l'appareil
et conservez-le pour un usage
ultérieur.
Danger
• Veillez à ne pas faire pénétrer
d'eau, de détergent inammable
ou tout autre liquide dans
l'appareil an d'éviter toute
électrocution et/ou tout risque
d'incendie.
• Ne nettoyez pas l'appareil
avec de l'eau, du détergent
(inammable) ou tout autre
liquide an d'éviter toute
électrocution et/ou tout risque
d'incendie.
• Ne pulvérisez pas de produits
inammables tels que de
l'insecticide ou du parfum autour
de l'appareil.
• L'eau du seau d'eau n'est pas
potable. Ne buvez pas cette eau,
ne la donnez pas à boire à des
animaux et ne l'utilisez pas pour
arroser des plantes. Lorsque
• Avant de brancher l'appareil,
vériez que la tension indiquée
sur la base ou à l'arrière de
l'appareil correspond à la
tension secteur locale.
• Si le cordon d'alimentation
est endommagé, il doit être
remplacé par Philips, par un
Centre Service Agréé Philips ou
par un technicien qualié an
d'éviter tout accident.
• N'utilisez jamais l'appareil si la
prise, le cordon d'alimentation
ou l'appareil lui-même est
endommagé.
• Cet appareil peut être utilisé
par des enfants âgés de
8 ans ou plus, des personnes
dont les capacités physiques,
sensorielles ou intellectuelles
sont réduites ou des personnes
manquant d'expérience et de
connaissances, à condition que
ces enfants ou personnes soient
sous surveillance ou qu'ils aient
reçu des instructions quant à
l'utilisation sécurisée de l'appareil
et qu'ils aient pris connaissance
des dangers encourus. Les
enfants ne doivent pas jouer
76
Page 77

FR
Français
avec l'appareil. Le nettoyage et
l'entretien ne doivent pas être
réalisés par des enfants sans
surveillance.
• Cet appareil n'est pas un jouet.
Veillez à ce que les enfants ne
puissent pas jouer avec l'appareil.
• Ne bloquez pas l'entrée et la
sortie d'air (par exemple, en
plaçant des objets sur la sortie
d'air ou devant l'entrée d'air).
Attention
• Cet appareil ne remplace
pas une ventilation correcte,
l'utilisation régulière d'un
aspirateur et l'utilisation d'une
hotte ou d'un ventilateur dans la
cuisine.
• Si la prise secteur utilisée
pour alimenter l'appareil est
en mauvais état, la che de
l'appareil risque de surchauffer.
Veillez à brancher l'appareil sur
une prise secteur en bon état de
marche.
• Placez et utilisez toujours
l'appareil sur une surface sèche,
stable, plane et horizontale.
• Laissez au moins 20 cm d'espace
libre derrière et sur les côtés de
l'appareil et au moins 30 cm audessus de l'appareil.
• Ne placez rien sur l'appareil
et ne vous asseyez pas sur
l'appareil.
• Ne placez pas l'appareil
directement sous un climatiseur
an d'éviter que de la
condensation s'écoule sur
l'appareil.
• Avant de mettre l'appareil en
marche, assurez-vous que tous
les ltres sont correctement
assemblés.
• Utilisez exclusivement les ltres
Philips d'origine spécialement
destinés à cet appareil. N'utilisez
pas d'autres ltres.
• Évitez de heurter l'appareil
(l'entrée et la sortie d'air en
particulier) avec des objets durs.
• Soulevez ou déplacez toujours
l'appareil à l'aide des deux
poignées situées sur les côtés de
l'appareil.
• N'insérez pas vos doigts ou
des objets dans la sortie d'air
ou l'entrée d'air an d'éviter
tout risque de blessure ou de
dysfonctionnement de l'appareil.
• N'utilisez pas l'appareil après
avoir utilisé un insecticide ou à
proximité de résidus huileux,
d'encens se consumant ou de
fumées chimiques.
77
Page 78

FR
• N'utilisez pas l'appareil à
proximité d'un appareil
fonctionnant au gaz, d'une
installation de chauffage ou
d'une cheminée.
• Débranchez toujours l'appareil
après utilisation et avant de le
nettoyer.
• N'utilisez pas l'appareil dans
une pièce soumise à des
changements de température
importants ; de la condensation
pourrait se former à l'intérieur.
• Pour éviter les interférences,
placez l'appareil à une distance
minimale de 2 mètres des
appareils électriques qui
utilisent des ondes radio
(téléviseurs, radios, horloges
radiosynchronisées, etc.,).
• Lorsque l'appareil n'est pas
utilisé pendant longtemps, des
bactéries peuvent se former
sur les ltres. Vériez les ltres
après une longue période de
non-utilisation. Si les ltres sont
très sales, remplacez-les (voir le
chapitre « Remplacement des
ltres »).
• Cet appareil est destiné à un
usage domestique dans des
conditions de fonctionnement
normales.
• N'utilisez jamais l'appareil dans
des environnements humides
ou soumis à des températures
ambiantes élevées (salle de bain,
toilettes, cuisine, etc.,).
• L'appareil n'élimine pas le
monoxyde de carbone (CO)
ni le radon (Rn). Il ne peut pas
être utilisé comme dispositif
de sécurité en cas d'accidents
impliquant des processus de
combustion et des produits
chimiques dangereux.
• Nettoyez le seau d'eau tous les
jours pour le garder propre.
• Remplissez uniquement le seau
d'eau avec de l'eau froide du
robinet. N'utilisez pas de l'eau
des nappes phréatiques, ni de
l'eau chaude.
• Ne mettez aucune autre
substance hormis de l'eau dans
le seau d'eau. Ne mettez pas de
parfum dans le seau d'eau.
• Si vous n'utilisez pas la fonction
d'humidication pendant
longtemps, nettoyez le seau
d'eau et le plateau du ltre
d'humidication. Séchez le
ltre d'humidication et rangez
l'adoucisseur d'eau.
78
Page 79

FR
Français
• Si vous avez besoin de déplacer
l'appareil, commencez par le
débrancher. Videz ensuite le
seau d'eau. Soulevez l'appareil
horizontalement à l'aide des
deux poignées situées sur les
côtés de l'appareil.
79
Page 80

FR
2 Votre purificateur et humidificateur
d'air
Félicitations pour votre achat et bienvenue dans le monde de Philips !
Pour proter pleinement de l'assistance offerte par Philips, enregistrez votre produit à l'adresse
suivante : www.philips.com/welcome.
Lisez ce manuel d'utilisation attentivement avant d'installer et d'utiliser ce produit. Conservez-le pour
un usage ultérieur.
Contenu de l'emballage
Vériez et identiez les différentes pièces contenues dans l'emballage :
Filtre 4 : ltre HEPA (AC4144)
Filtre 3 : ltre à charbon actif
(AC4143)
Filtre 2 : ltre multisoin
(AC4141)
Filtre 1 : préltre
Mode d'emploi
Guide de mise en
route
Capteur de qualité de l'air
4
3
2
Filtre 6 : adoucisseur
d'eau (AC4149)
Filtre 5 : ltre d'humidication
(AC4148)
Garantie
80
Page 81

FR
Français
3 Guide de
démarrage
Installation des ltres
L'appareil est fourni avec tous les ltres
préinstallés. Retirez les ltres de leur emballage
avant d'utiliser l'appareil. Retirez tous les ltres,
déballez-les, puis replacez-les dans l'appareil
comme décrit ci-dessous :
3 Retirez tous les ltres de l'appareil.
4 Retirez les ltres de leur emballage.
Conseil
Lorsque vous retirez ou insérez les ltres, placez
•
l'appareil contre un mur pour plus de stabilité.
Remarque
• Insérez les ltres dans la position correcte.
• Veillez à placer les ltres dans l'ordre suivant :
ltre HEPA, ltre à charbon actif, ltre multisoin
et enn préltre.
• Assurez-vous que le côté étiqueté est orienté
dans votre direction.
1 Placez vos doigts dans les renfoncements
des panneaux latéraux.
2 Tirez doucement la partie supérieure du
panneau avant hors de l'appareil (1), puis
soulevez celle-ci vers vous (2).
2
4
5 Remettez les ltres dans l'appareil.
4
3
1
81
Page 82

FR
6 Faites glisser le ltre multisoin dans le
2
préltre.
7 Placez le préltre dans l'appareil.
Préparation de
l'humidication
Retirez le seau d'eau du côté de l'appareil.
1
2
4
1
Remarque
• Assurez-vous que le côté avec les deux clips est
orienté vers vous et que tous les crochets du
préltre sont correctement xés au puricateur.
8 Pour remettre en place le panneau avant,
commencez par xer le panneau sur la
partie supérieure de l'appareil (1). Placez
doucement le panneau contre le corps de
l'appareil (2).
1
4
2 Retirez le plateau du ltre d'humidication
de l'appareil.
3 Retirez le ltre d'humidication de
l'emballage.
82
Page 83

FR
Français
4 Remettez le ltre d'humidication
en place et glissez le plateau du ltre
d'humidication dans l'appareil.
7 Revissez fermement le couvercle supérieur
sur le seau d'eau jusqu'à ce que vous
entendiez un cliquetis.
5 Dévissez le couvercle supérieur du seau
d'eau.
6 Remplissez le seau d'eau avec de l'eau
froide du robinet.
8 Replacez le seau d'eau dans l'appareil.
2
1
83
Page 84

FR
4
Utilisation de
l'appareil
Signication du voyant de
qualité de l'air
Couleur du voyant de
qualité de l'air
Bleu Excellent
Violet profond Bien
Violet Moyen
Rouge Très mauvais
Niveau de
qualité de l'air
Remarque
• La précision du taux d'humidité est d'environ
plus ou moins 5 %.
• La mesure du taux d'humidité dans la pièce
prendre un certain temps.
Fonctionnement du mode
automatique
Le capteur de qualité de l'air intégré mesure
automatiquement la qualité de l'air ambiant
et sélectionne la vitesse du ventilateur la plus
appropriée.
Le voyant de qualité de l'air s'allume
automatiquement lorsque l'appareil est allumé.
Remarque
• Le capteur intégré de qualité de l'air mesure la
qualité de l'air et sélectionne automatiquement
la couleur appropriée du voyant de qualité de
l'air. Lorsque l'air est propre, le voyant de qualité
de l'air s'allume en bleu ou en violet foncé.
Lorsque la qualité de l'air se détériore, la couleur
du voyant de qualité de l'air passe du violet au
rouge.
Signication du voyant
d'humidité
L'appareil est équipé d'un capteur d'humidité
intégré. Les voyants CURRENT HUMIDITY
(30 %, 40 %, 50 % ou 60 %) indiquent l'humidité
actuelle.
Signication de l'alerte de
protection de l'air sain
Les voyants de ltre indiquent que le ltre doit
être nettoyé ou remplacé.
Différents
voyants d'alerte
de protection de
l'air sain
Le voyant de ltre
/ clignote.
Le voyant de ltre
clignote.
Le voyant de ltre
clignote.
Le voyant de ltre
/ clignote.
Mesure à prendre
Nettoyez le préltre
et détartrez le ltre
d'humidication.
Remplacez le ltre
multisoin.
Remplacez le ltre à
charbon actif et le ltre
HEPA.
Remplacez le ltre
d'humidication et
l'adoucisseur d'eau.
84
Page 85

FR
Français
Fonctionnement du
verrouillage de protection de
l'air sain
Cet appareil est équipé d'un verrouillage de
protection de l'air sain qui garantit que les ltres
sont dans un état optimal lorsque l'appareil
fonctionne. Lorsque le ltre est presque plein et
doit être remplacé, le voyant de ltre spécique
(
/ / / ) commence à clignoter.
Si vous ne remplacez pas le ltre à temps :
» L'appareil arrête de fonctionner et se
verrouille.
» Le voyant de ltre spécique (
/ ) s'allume de manière continue.
Remarque
• L'appareil se verrouille une fois que le voyant de
ltre a clignoté pendant environ 2 semaines.
• Environ un jour avant que l'appareil ne se
verrouille, l'appareil émet un signal sonore toutes
les 30 minutes pour vous informer que le ltre
doit être remplacé.
/ /
Mise sous tension et hors
tension de l'appareil
L'appareil fonctionne toujours en mode
purication et humidication.
Si vous souhaitez utiliser uniquement l'appareil
comme puricateur d'air, videz l'eau du seau
d'eau.
1 Branchez l'appareil.
» Tous les voyants s'allument deux fois et
un signal sonore retentit. Les voyants
s'éteignent de nouveau.
2 Appuyez sur le bouton pour allumer
l'appareil.
» Les voyants PURIFIER et HUMIDIFIER
s'allument.
85
Page 86

FR
» Le voyant de qualité de l'air afche la
qualité de l'air actuelle.
» Le voyant CURRENT HUMIDITY
indique le taux d'humidité actuel.
3 Appuyez sur le bouton pour éteindre
l'appareil.
Remarque
• L'humidicateur ne peut pas être utilisé sans le
puricateur d'air.
• Si le seau d'eau est vide, l'humidicateur s'éteint,
mais le puricateur d'air continue de fonctionner.
L'appareil fonctionne ainsi uniquement comme
puricateur d'air (les voyants PURIFIER et
REFILL WATER sont allumés).
Réglage de la sensibilité du
capteur de qualité de l'air
Les personnes ayant certains problèmes de
santé (allergies, asthme, etc.,) ont davantage
besoin d'un air sain. C'est pourquoi l'appareil
vous permet de régler la sensibilité du capteur
de qualité de l'air. Si vous le réglez sur un niveau
de sensibilité plus élevé, l'appareil commence à
nettoyer l'air à un niveau de pollution plus bas.
Il y a 3 niveaux de sensibilité :
• standard
• sensitive
• ultrasensible
Le capteur de pollution est réglé sur la
sensibilité standard. Vous pouvez régler la
sensibilité du capteur de qualité de l'air comme
suit :
Remarque
• Lorsqu'il est réglé sur une sensibilité plus élevée,
l'appareil commence à nettoyer l'air à des
niveaux de pollution plus bas pour rendre l'air
encore plus sain.
1 Assurez-vous que le puricateur est allumé.
2 Appuyez simultanément sur les boutons
SPEED et HUMIDITY SET.
86
Page 87

FR
Français
» Le puricateur émet deux signaux
sonores et le voyant de vitesse du
ventilateur (
la sensibilité actuelle du capteur de
qualité de l'air.
Voyant de vitesse du
ventilateur
SILENCIEUX ultrasensible
) s'allume pour indiquer
Niveau de sensibilité
sensitive
standard
3 Appuyez sur le bouton SPEED pour régler
la sensibilité du capteur de qualité de l'air.
» L'un des voyants SPEED (SILENT,
, ou ) s'allume, indiquant le niveau de
sensibilité souhaité pour le capteur de
qualité de l'air.
Remarque
• Lorsque vous modiez la sensibilité, l'appareil
démarre automatiquement à la sensibilité dénie
lors de sa mise en marche.
Modication de la vitesse du
ventilateur
Automatique
1 Appuyez sur le bouton SPEED pour
sélectionner le mode AUTO.
Remarque
• En mode automatique, vous pouvez dénir le
taux d'humidité de votre choix (40 %, 50 % ou
60 %) dans la pièce (voir le chapitre « Réglage
du niveau d'humidité »).
4 Maintenez enfoncé les boutons SPEED et
HUMIDITY SET pour conrmer le réglage.
87
Page 88

FR
Manuel
Vous pouvez sélectionner manuellement
la vitesse du ventilateur de votre choix qui
remplace alors le mode automatique.
1 Appuyez sur le bouton SPEED une ou
plusieurs fois pour sélectionner la vitesse
de ventilateur de votre choix (AUTO,
SILENT,
Conseil
Si le voyant de qualité de l'air est bleu ou violet
•
foncé, cela signie que la qualité de l'air est
bonne et vous pouvez sélectionner une vitesse
de ventilateur plus faible.
, ou BOOST POWER).
Pour modier la vitesse du ventilateur, appuyez
sur le bouton SPEED.
Mode de puissance supplémentaire
Si le voyant de qualité de l'air est allumé
en rouge ou en violet, cela signie que la
qualité de l'air est mauvaise ou passable. Vous
pouvez sélectionner le mode de puissance
supplémentaire pour nettoyer l'air rapidement.
1 Appuyez sur le bouton SPEED pour
sélectionner le mode de puissance
supplémentaire.
» Les voyants
Pour modier la vitesse du ventilateur, appuyez
sur le bouton SPEED.
et sont allumés.
Mode silencieux
En mode silencieux, le ltre à air fonctionne très
silencieusement.
1 Appuyez sur le bouton SPEED pour activer
le mode silencieux.
» Le voyant SILENT s'allume.
88
Réglage du programmateur
La fonction de minuterie vous permet de
laisser l'appareil fonctionner pendant un
nombre d'heures déni. L'appareil s'arrête
automatiquement à la n de la durée dénie.
Vous pouvez utiliser le programmateur dans les
situations suivantes :
Page 89

FR
Français
Situations Ce qui s'afche
Choisissez
manuellement
une vitesse de
ventilateur (voir
« Manuelle »).
L'appareil
est en mode
automatique
(voir « Automatique »).
L'appareil
est en mode
silencieux
(voir « Mode
silencieux »).
L'un des voyants SPEED (
, ou BOOST POWER) et
l'un des voyants TIMER (
ou
) sont allumés.
Le voyant AUTO est allumé.
L'un des voyants SPEED
(SILENT,
POWER) et l'un des voyants
TIMER (
allumés.
Le voyant SILENT et l'un des
voyants TIMER (
sont allumés.
, ou BOOST
, , ou ) sont
,
, ou )
1 Appuyez sur le bouton TIMER pour activer
le programmateur.
» Le voyant TIMER correspondant (
ou
) s'allume.
,
Réglage du taux d'humidité
Remarque
• Assurez-vous que le réservoir d'eau est
rempli lorsque vous voulez utiliser la
fonction d'humidication (voir le chapitre
« Mise en route », section « Préparation à
l'humidication »).
Vous pouvez dénir le taux d'humidité
souhaité uniquement en mode AUTO. Lorsque
l'humidité de la pièce atteint le niveau souhaité,
l'humidité maintient en permanence ce niveau.
• Appuyez sur le bouton HUMIDITY SET
à une ou plusieurs reprises pour dénir le
taux d'humidité de l'air souhaité sur 40 %,
50 % ou 60 %.
» Le voyant HUMIDITY SET
correspondant (40 %, 50 % ou 60 %)
s'allume.
2 Appuyez sur le bouton TIMER à plusieurs
reprises pour choisir le nombre d'heures
pendant lesquelles vous souhaitez
que l'appareil fonctionne. Le voyant
correspondant TIMER s'allume.
Pour désactiver le programmateur, appuyez sur
le bouton TIMER à plusieurs reprises jusqu'à ce
que le voyant TIMER (
, ou ) s'éteigne.
89
Page 90

FR
Remarque
• Si vous ne dénissez pas de taux d'humidité, le
voyant HUMIDITY SET s'éteint. L'humidicateur
humidie l'air en mode AUTO et le taux
d'humidité prédéni est de 50 %.
• Si vous modiez la vitesse du ventilateur
(SILENT, , ou BOOST POWER),
l'humidicateur fonctionne automatiquement
conformément au niveau de vitesse du
ventilateur et le mode AUTO est désactivé.
• Si vous souhaitez augmenter le taux d'humidité
plus rapidement, vous pouvez sélectionner une
vitesse de ventilateur plus élevée.
• L'appareil est doté d'une fonction mémoire
intelligente, ce qui lui permet de mémoriser
les réglages lorsque l'appareil est éteint (p.
ex., en cas de panne d'électricité). Lorsque
vous rebranchez/rallumez l'appareil, il démarre
automatiquement sur le réglage précédent.
Niveau d'eau
Le niveau d'eau du seau d'eau est visible à
travers la fenêtre du niveau d'eau située sur le
côté de l'appareil. Lorsqu'il n'y a pas assez d'eau
dans le seau d'eau, le voyant REFILL WATER
clignote pour indiquer que vous devez remplir
le seau d'eau.
Remarque
• L'appareil peut fonctionner en mode purication
de l'air uniquement lorsqu'il n'y a plus d'eau
dans le seau et que le voyant REFILL WATER
clignote. La fonction d'humidication peut
uniquement être activée lorsque le seau est
rempli d'eau.
90
Page 91

FR
Français
5 Nettoyage de
l'appareil
Remarque
• Débranchez toujours l'appareil avant de le
nettoyer.
• N'immergez en aucun cas l'appareil ni dans l'eau
ni dans tout autre liquide.
• N'utilisez jamais de détergents abrasifs, agressifs
ou inammables (eau de javel, alcool, etc.,) pour
nettoyer les différentes parties de l'appareil.
• Seul le préltre et le ltre d'humidication
peuvent être lavés. Les autres ltres du
puricateur d'air NE PEUVENT PAS être lavés
ou aspirés.
Nettoyage du corps de
l'appareil
Nettoyez régulièrement l'intérieur et l'extérieur
de l'appareil pour empêcher que de la
poussière ne s'accumule.
1 Dépoussiérez le corps de l'appareil à l'aide
d'un chiffon doux et sec.
2 Nettoyez la sortie et l'entrée d'air à l'aide
d'un chiffon doux et sec.
Remarque
• Si le taux d'humidité de la pièce est très élevé, il
est possible que de la condensation se forme sur
le capteur de qualité de l'air. Il se peut alors que
le voyant de qualité de l'air indique que la qualité
de l'air est mauvaise alors qu'elle est bonne.
Dans ce cas, vous devez nettoyer le capteur de
qualité de l'air ou utiliser l'un des réglages de
vitesse manuels.
1 Nettoyez l'entrée et la sortie du capteur
de qualité de l'air et du capteur d'humidité
de l'air à l'aide d'une brosse douce.
2 Retirez le couvercle du capteur de qualité
de l'air et du capteur d'humidité de l'air.
Nettoyage du capteur de
qualité de l'air et du capteur
d'humidité de l'air
Nettoyez chaque mois le capteur de qualité de
l'air et le capteur d'humidité de l'air pour un
fonctionnement optimal de l'appareil. Nettoyezle plus fréquemment si vous utilisez l'appareil
dans un environnement poussiéreux.
91
Page 92
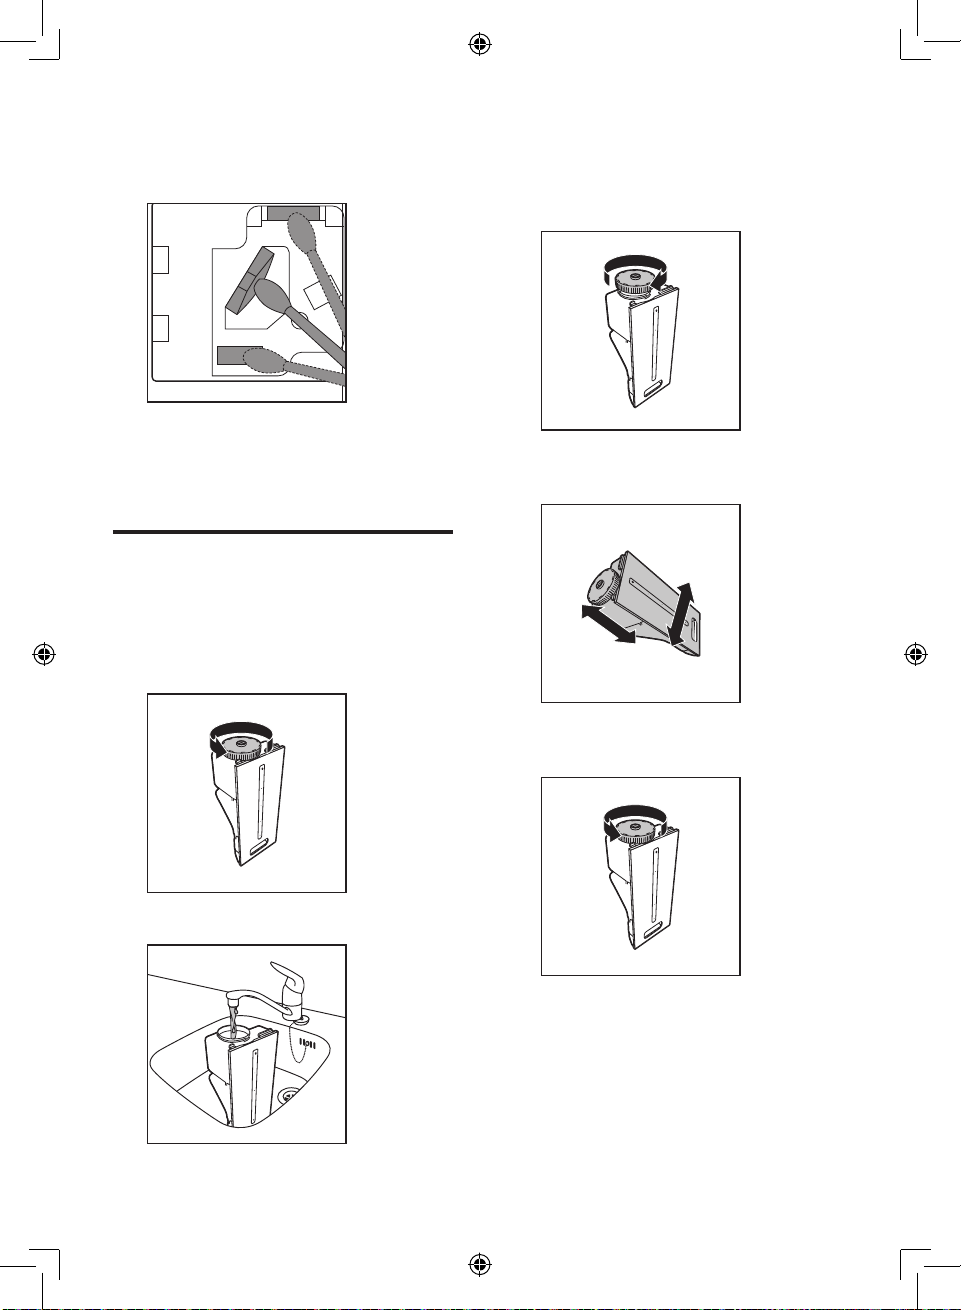
FR
3 Nettoyez les capteurs, l'entrée de
poussière et la sortie de poussière avec un
coton-tige légèrement humidié.
4 Séchez-les avec un coton-tige sec.
5 Remettez en place le couvercle des
capteurs.
Nettoyage du seau d'eau
Nettoyez le seau d'eau tous les jours pour le
garder propre.
1 Dévissez le couvercle supérieur du seau
d'eau.
3 Ajoutez un peu de liquide vaisselle doux à
l'eau du seau d'eau.
4 Revissez le couvercle supérieur sur le seau
d'eau.
5 Secouez le seau avec les deux mains pour
nettoyer l'intérieur du seau d'eau.
2 Remplissez le seau d'eau à environ 1/3.
92
6 Dévissez le couvercle supérieur du seau
d'eau.
7 Videz le seau d'eau dans l'évier.
8 Rincez plusieurs fois l'intérieur du seau à
l'eau claire.
Page 93

FR
Français
9 Revissez le couvercle supérieur sur le seau
d'eau.
Nettoyage du plateau du ltre
d'humidication
Nettoyez le plateau du ltre d'humidication
une fois par semaine pour le garder propre.
1 Retirez le seau d'eau de l'appareil. Retirez
ensuite le plateau du ltre d'humidication
de l'appareil.
2 Retirez le ltre d'humidication du plateau
du ltre d'humidication.
3 Rincez le plateau du ltre d'humidication
sous un robinet.
Remarque
• Si nécessaire, utilisez un détergent doux pour
nettoyer le plateau du ltre d'humidication.
Dans ce cas, rincez abondamment le plateau du
ltre d'humidication.
Remarque
• Retirez le seau d'eau avant de retirer le plateau
du ltre d'humidication.
4 Séchez le plateau du ltre d'humidication
à l'aide d'un chiffon doux et sec.
5 Remettez le ltre d'humidication
en place et glissez le plateau du ltre
d'humidication dans l'appareil.
93
Page 94

FR
6 Nettoyage
Nettoyage du préltre
du préfiltre
et du filtre
d'humidification
Remarque
• Seul le préltre et le ltre d'humidication
peuvent être lavés. Aucun des autres ltres ne
peut être lavé.
• Rincez le ltre d'humidication une fois par
semaine pour le garder propre.
• Lorsque le voyant de ltre
clignoter, vous devez nettoyer le préltre et
détartrer le ltre d'humidication.
• Le voyant clignote environ toutes les deux
semaines.
/ se met à
Remarque
• Nettoyez le préltre toutes les deux semaines
an de garantir le fonctionnement optimal de
l'appareil.
1 Arrêtez l'appareil et débranchez-le.
2 Placez vos doigts dans les renfoncements
des panneaux latéraux, puis soulevez et
tirez la partie inférieure du panneau avant
vers vous (1). Retirez doucement la partie
supérieure du panneau avant de l'appareil
(2).
2
Remarque
• Le voyant de ltre / clignote pendant
24 heures.
• Une fois que vous avez nettoyé le préltre
et détartré le ltre d'humidication, le voyant
arrête de clignoter et la durée de vie du ltre est
automatiquement réinitialisée.
• Lorsque vous éteignez l'appareil, le voyant arrête
de clignoter.
94
4
1
Page 95

FR
Français
2
3 Pour retirer le préltre, baissez les deux
clips (1) et tirez le ltre vers vous (2).
4
1
8 Replacez le préltre dans l'appareil. Fixez
correctement tous les crochets à l'appareil.
2
4
2
4 Retirez le ltre multisoin du préltre.
5 Lavez le préltre sous l'eau du robinet. Si
le préltre est très sale, utilisez une brosse
douce pour éliminer la poussière.
6 Laissez sécher le préltre à l'air libre.
7 Faites glisser le ltre multisoin dans le
préltre.
1
9 Pour remettre le panneau avant en place,
commencez par insérer les crochets
supérieurs dans la par tie supérieure de
l'appareil (1). Poussez le panneau contre le
corps de l'appareil (2).
1
4
Remarque
• Vous pouvez aussi nettoyer le préltre en
enlevant la poussière à l'aide d'un aspirateur.
• Assurez-vous que le préltre est parfaitement
sec. S'il est toujours humide, les bactéries
peuvent s'y multiplier et réduire la durée de vie
du préltre.
• Assurez-vous que le côté avec les deux clips est
orienté vers vous et que tous les crochets du
préltre sont correctement xés à l'appareil.
95
Page 96

FR
Nettoyage du ltre
d'humidication
Rincez le ltre d'humidication une fois par
semaine pour le garder propre. Par ailleurs,
détartrez le ltre d'humidication
lorsque le voyant de ltre
clignoter.
/ se met à
Rinçage du ltre d'humidication
1 Arrêtez l'appareil et débranchez-le.
2 Retirez le réservoir d'eau de l'appareil.
4 Retirez le ltre d'humidication du plateau
du ltre d'humidication.
Remarque
• Retirez le seau d'eau avant de retirer le plateau
du ltre d'humidication (voir le chapitre
« Préparation de l'humidication »).
5 Nettoyez doucement le ltre
d'humidication sous un petit let d'eau du
robinet à l'aide de la brosse de nettoyage
fournie.
3 Retirez le plateau du ltre d'humidication
de l'appareil.
96
6 Replacez le ltre d'humidication dans le
plateau du ltre d'humidication.
Page 97

FR
Français
Détartrage du ltre d'humidication
Remarque
• Il est important de détar trer le ltre
d'humidication pour éviter la formation de
dépôts de calcaire, qui affecte fortement les
performances d'humidication.
1 Arrêtez l'appareil et débranchez-le.
2 Retirez le réservoir d'eau de l'appareil.
4 Retirez le ltre d'humidication du plateau
du ltre d'humidication.
Remarque
• Retirez le seau d'eau avant de retirer le plateau
du ltre d'humidication.
5 Mélangez du vinaigre blanc (5 ml/100 ml
d'acide acétique) avec une quantité égale
d'eau du robinet dans un récipient assez
grand pour y laisser tremper le ltre
d'humidication.
Eau : vinaigre
1:1
1 heure
3 Retirez le plateau du ltre d'humidication
de l'appareil.
Remarque
• S'il y a des dépôts blancs (calcaire) sur le ltre,
assurez-vous que le côté avec les dépôts blancs
est immergé dans l'eau.
6 Laissez le ltre d'humidication tremper
dans la solution pendant une heure.
7 Jetez le mélange eau-vinaigre.
97
Page 98

FR
8 Rincez le ltre d'humidication sous le
robinet an d'éliminer les résidus de
vinaigre. Lors du rinçage, retournez le ltre
d'humidication pour que les côtés avant
et arrière soient rincés.
9 Laissez l'excès d'eau s'égoutter du ltre
d'humidication.
10 Replacez le ltre d'humidication dans le
plateau du ltre d'humidication.
Calendrier de nettoyage
Fréquence Mode de nettoyage
Tous les
jours
Toutes les
semaines
Lorsque le
voyant de
ltre
se met à
clignoter
Tous les
deux mois
Lorsque
nécessaire
Rincer le seau d'eau.
Rincer l'adoucisseur d'eau.
Rincer le ltre d'humidication.
Nettoyer le plateau du ltre
d'humidication.
Nettoyer le préltre.
Détartrer le ltre d'humidication
/
avec le mélange vinaigre-eau.
Nettoyer le capteur de qualité de
l'air et le capteur d'humidité de
l'air à l'aide d'un coton-tige sec.
Nettoyer la surface de l'appareil à
l'aide d'un chiffon doux et sec.
98
Page 99

FR
Français
7 Remplacement
des filtres
Les voyants de ltre ( / / / ) indiquent
quel ltre doit être remplacé.
Remarque
• Insérez les ltres dans la position correcte.
• Veillez à placer les ltres dans l'ordre suivant :
ltre HEPA, ltre à charbon actif, ltre multisoin
et enn préltre.
• Assurez-vous que le côté étiqueté est orienté
dans votre direction.
Remarque
• Si vous retirez le panneau avant pour changer
le ltre alors que l'appareil est allumé, tous les
voyants du panneau de commande s'éteignent
et l'appareil cesse de fonctionner.
• Une fois le panneau avant replacé sur l'appareil,
tous les voyants clignotent deux fois. Puis,
l'appareil revient à son mode de fonctionnement
normal.
Remplacement du ltre
multisoin
Remarque
• Le ltre multisoin ne peut pas être lavé ni aspiré.
Remplacez le ltre multisoin lorsque le voyant
de ltre
se met à clignoter.
1 Arrêtez l'appareil et débranchez-le.
2 Placez vos doigts dans les renfoncements
des panneaux latéraux.
3 Tirez doucement la partie inférieure
du panneau hors de l'appareil (1), puis
soulevez la partie supérieure du panneau
avant vers vous (2).
2
4
1
Conseil
Lorsque vous retirez ou insérez les ltres, placez
•
l'appareil contre un mur pour plus de stabilité.
99
Page 100

FR
2
4 Retirez le préltre de l'appareil.
4
1
2
8 Faites glisser le nouveau ltre multisoin
dans le préltre.
5 Retirez le ltre multisoin du préltre.
6 Tenez les ltres par les deux côtés et
déposez-les délicatement dans la poubelle
ménagère.
Remarque
• Ne touchez pas la surface plissée du ltre et ne
sentez pas le ltre car il contient des polluants
de l'air.
• Lavez-vous les mains après avoir mis les ltres
usagés au rebut.
7 Retirez le nouveau ltre multisoin de
l'emballage.
9 Remettez le préltre dans l'appareil.
2
4
1
Remarque
• Assurez-vous que le côté avec les deux clips est
orienté vers vous et que tous les crochets du
préltre sont correctement xés à l'appareil.
10 Pour remettre en place le panneau avant,
commencez par xer le panneau sur la
partie supérieure de l'appareil (1). Placez
doucement le panneau contre le corps de
l'appareil (2).
1
4
100
 Loading...