

Page 1

Always there to help you
Question?
Contact
Philips
Register your product and get support at
www.philips.com/welcome
AC4012
AC4014
User manual 3
Benutzerhandbuch 23
Mode d’emploi 47
Қолданушының нұсқасы 69
Руководство пользователя 93
Page 2

Page 3

Contents
1 Important 4
10 Guarantee and service 20
Order parts or accessories 20
English
English
Safety 4
2 Your air purier 6
What’s in the box 6
3 Get started 7
Install lters 7
4 Use the air purier 9
Understand the air quality light 9
Understand the healthy air protect alert 9
Switch on 9
Set the sensitivity of the air quality
sensor 10
Change the fan speed 10
Manual 10
Set the timer 12
5 Clean your air purier 13
Clean the air purier 13
Clean the air quality sensor 13
11 Notices 21
Electromagnetic elds (EMF) 21
Compliance with EMF 21
Recycling 21
6 Clean the pre-lter 14
7 Replace the lters 16
Replace the activated carbon lter
and the HEPA lter 16
8 Reset the lter lifetime counter 18
9 Troubleshooting 19
EN
3
Page 4

1 Important
Safety
Read this user manual carefully before you use
the appliance, and save it for future reference.
Danger
• Do not let water or any other
liquid or ammable detergent
enter the appliance to avoid
electric shock and/or a re
hazard.
• Do not clean the appliance
with water, any other liquid,
or a (ammable) detergent to
avoid electric shock and/or a re
hazard.
Warning
• Do not use the appliance if the
plug, the power cord, or the
appliance itself is damaged.
• This appliance can be used by
children aged from 8 years and
above and persons with reduced
physical, sensory or mental
capabilities or lack of experience
and knowledge if they have been
given supervision or instruction
concerning use of the appliance
in a safe way and understand
the hazards involved. Children
shall not play with the appliance.
Cleaning and maintenance shall
not be made by children without
supervision.
• Do not block the air inlet and
outlet, e.g. by placing items on
the air outlet or in front of the
air inlet.
• Check if the voltage indicated
on the bottom or indicated
at the rear of the appliance
corresponds to the local power
voltage before you connect the
appliance.
• If the power cord is damaged,
you must have it replaced
by Philips, a service center
authorized by Philips, or similarly
qualied persons in order to
avoid a hazard.
4
EN
Caution
• This appliance is not a substitute
for proper ventilation, regular
vacuum cleaning, or use of an
extractor hood or fan while
cooking.
• If the power socket used to
power the appliance has poor
connections, the plug of the
appliance becomes hot. Make
sure that you plug the appliance
Page 5

into a properly connected
power socket.
• Always place and use the
appliance on a dry, stable, level,
and horizontal surface.
• Leave at least 20cm free space
behind and on both sides of
the appliance and leave at least
30cm free space above the
appliance.
• Do not place anything on top of
the appliance and do not sit on
the appliance.
• Do not place the appliance
directly below an air conditioner
to prevent condensation from
dripping onto the appliance.
• Make sure all lters are properly
installed before you switch on
the appliance.
• Only use the original Philips
lters specially intended for this
appliance. Do not use any other
lters.
• Avoid knocking against the
appliance (the air inlet and outlet
in particular) with hard objects.
• Always lift or move the
appliance by the handle at the
back of the appliance.
• Do not insert your ngers or
objects into the air outlet.
• Do not use this appliance when
you have used indoor smoke-
type insect repellents or in
places with oily residues, burning
incense, or chemical fumes.
• Do not use the appliance near
gas appliances, heating devices
or replaces.
• Always unplug the appliance
after use and before you clean it.
• Do not use the appliance in a
room with major temperature
changes, as this may cause
condensation inside the
appliance.
• To prevent interference, place
the appliance at least 2m away
from electrical appliances that
use airborne radio waves such as
TVs, radios, and radio-controlled
clocks.
• The appliance is only intended
for household use under normal
operating conditions.
• Do not use the appliance in wet
surroundings or in surroundings
with high ambient temperatures,
such as the bathroom, toilet, or
kitchen.
• The appliance does not remove
carbon monoxide (CO) or
radon (Rn). It cannot be used a a
safety device in case of accidents
with combustion processes and
hazardous chemicals.
English
English
EN
5
Page 6

2 Your air purifier
Congratulations on your purchase, and welcome to Philips!
To fully benet from the support that Philips offers, register your product at www.philips.com/welcome.
Read this user manual carefully before you install and use the unit. Save it for future reference.
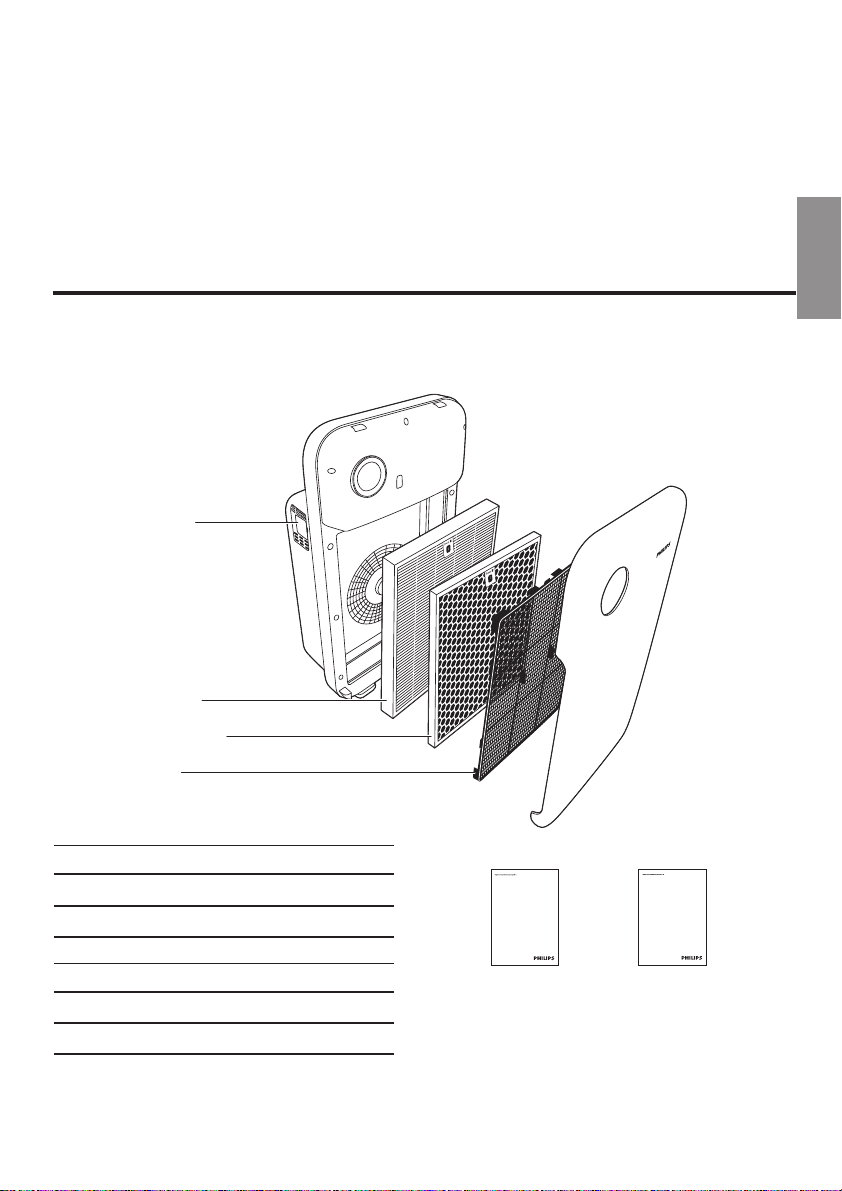
What’s in the box
Check and identify the contents of your package:
Air quality sensor
Filter 4: HEPA lter
AC4124
Filter 3: Activated carbon lter
AC4123
Filter 1: Pre-lter
AC4012
Filter 3 Activated carbon lter AC4123
Filter 4 HEPA lter AC4124
AC4014
Filter 3 Activated carbon lter AC4143
Filter 4 HEPA lter AC4144
6
EN
www.philips.com/welcome
User manual
User manual
www.philips.com/welcome
Warranty
Warranty
Page 7

3 Get started
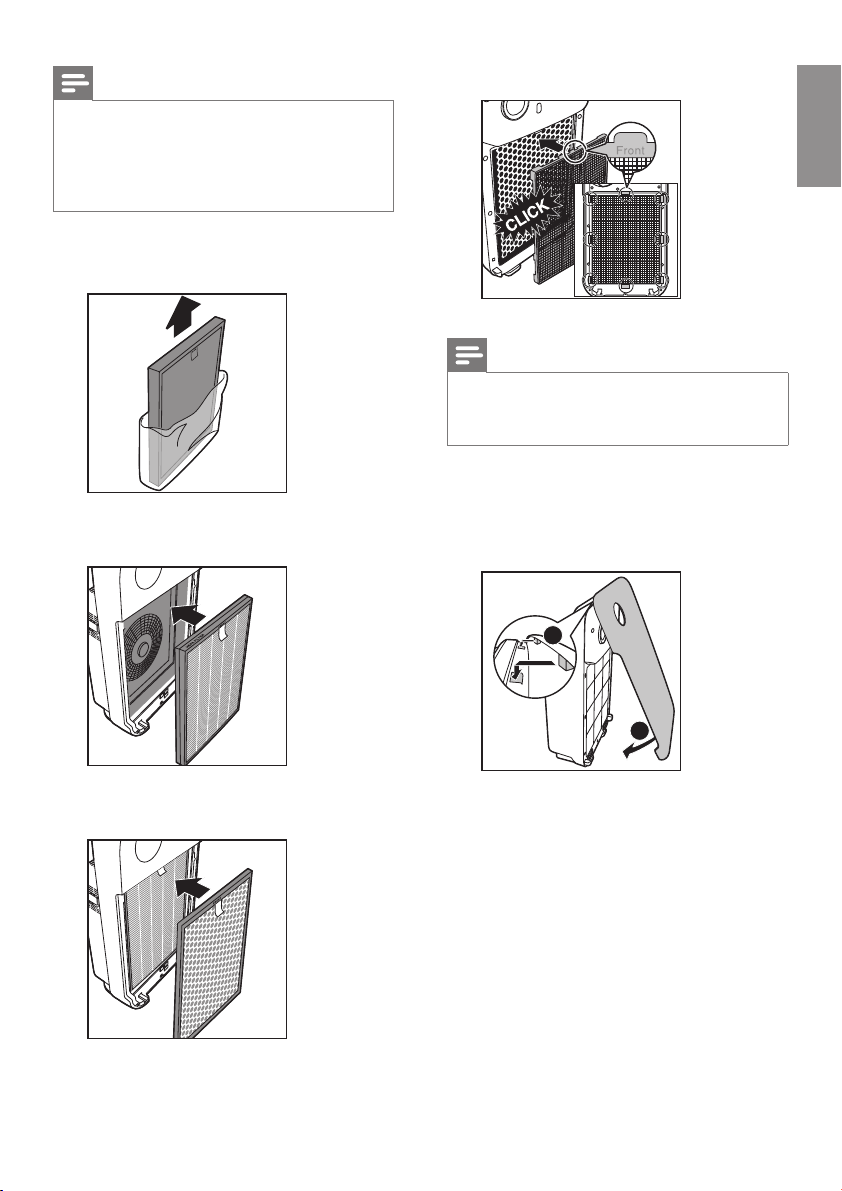
Install lters
The air purier comes with all lters tted
inside, but you have to remove the packaging
of the lters before you can use it. Remove all
lters, unpack them, and place them back into
the air purier as described below.
Tip
• When you remove or insert lters, place the
purier against a wall for more stability.
Note
• Insert the lters in the correct position.
• Make sure you place the lters in the order of
HEPA lter, activated carbon lter, and nally the
pre-lter.
• Make sure that the side with the tag is pointing
towards you.
3 Remove all the lters from the purier.
4 Remove all packaging material from the
lters.
5 Put the lters back into the purier.
English
English
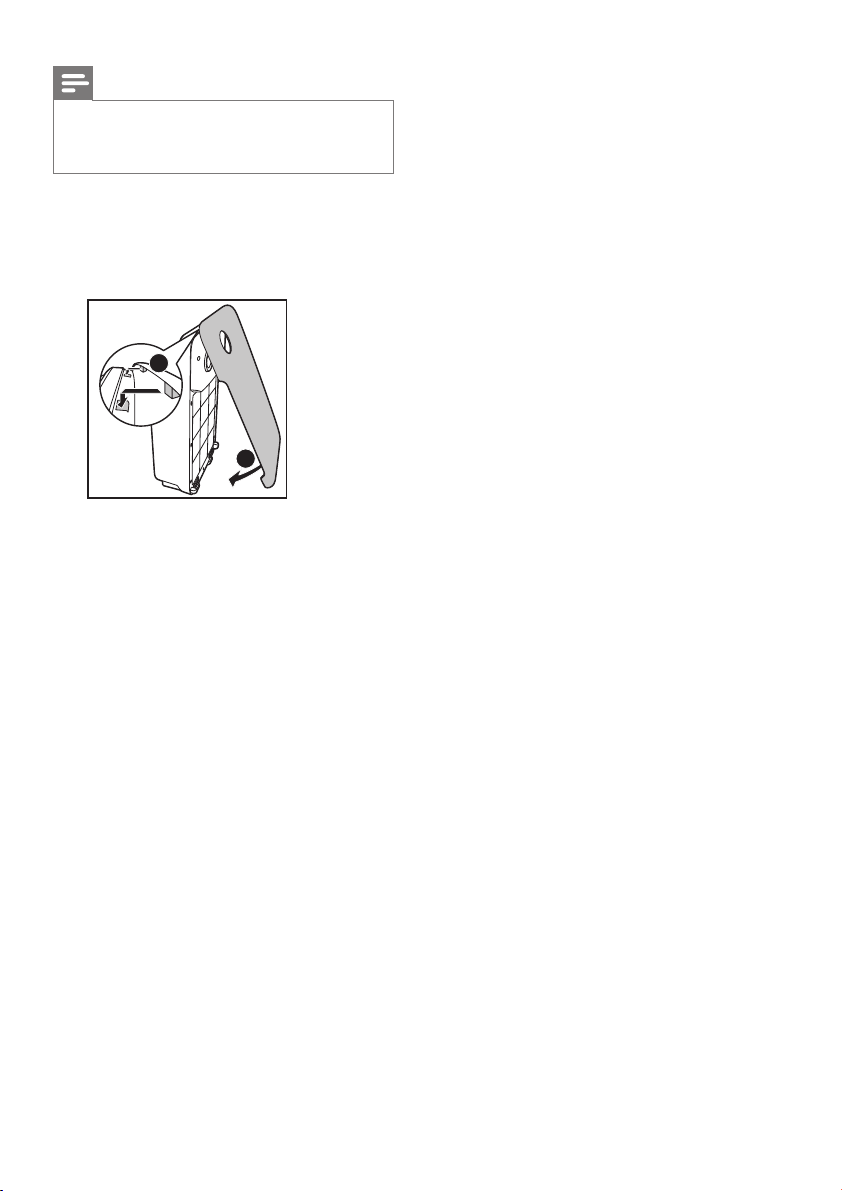
1 Place your ngers in the recesses of the
side panels and gently pull the top part of
the front panel towards you.
2 Gently pull the bottom of the panel out
(1), then lift the top part of the front panel
towards you (2).
2
1
6 Place the pre-ler in the purier.
EN
7
Page 8
Note
• Make sure that the side with the two projections
is pointing towards you, and that all hooks of the
pre-lter are properly attached to the purier.
7 To reattach the front panel, insert the top
hooks into the top of the purier rst (1).
Then, push the panel against the body of
the purier (2).
1
2
8
EN
Page 9
4 Use the air
purifier
Understand the air quality
light
Healthy air protect alert Follow this
Filter replacement light
is on continuously. This lasts
approximately for 2 weeks.
On the last day of 2 weeks,
the purier beeps every 30
minutes to inform you that the
lters need to be replaced.
Replace the
activated
carbon lter
and the HEPA
lter.
English
English
Color of the air quality
light ring
Blue Good
Purple Fair
Red Bad
The air quality light automatically goes on when
the purier is switched on.
Air quality level
Note
• The built-in air quality sensor measures the air
quality and automatically selects the appropriate
color of the air quality light. When the air is
clean, the color of the air quality light is in blue.
When the air quality deteriorates, the color of
the air quality light changes to purple or red.
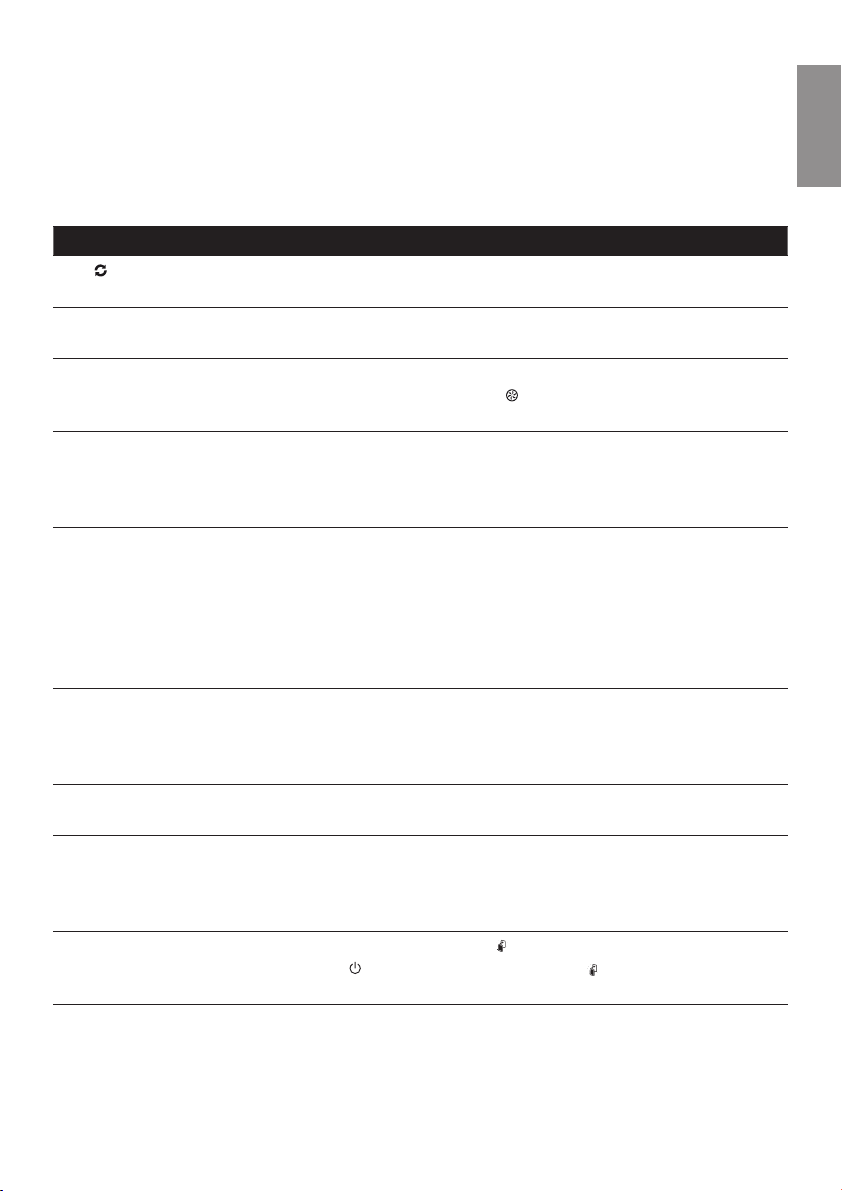
Understand the healthy air
protect alert
The lter replacement light ( ) indicates the
lters have to be replaced.
Switch on
1 Plug the air purier into the power supply.
» All lights go on twice and you hear a
beep. Then, the lights go out again.
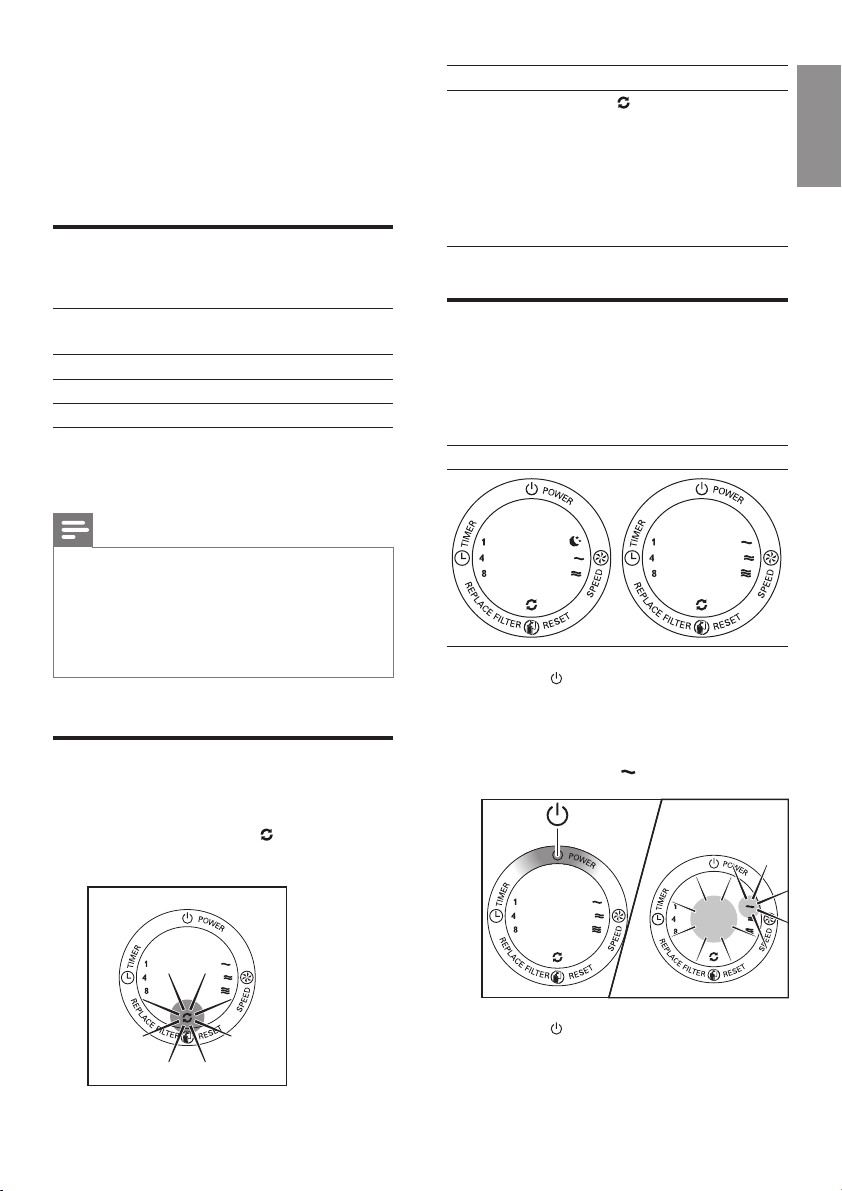
AC4012 Control Panel AC4014 Control Panel
2 Press the
purier.
» The air quality light shows the current
» The fan speed light goes on.
button to switch on the
air quality.
3 Press the
purier.
button to switch off the
EN
9
Page 10

Set the sensitivity of the air
quality sensor
People with cer tain health problems (for example:
allergies or asthma) have a greater need for
healthy air. For this reason, the purier allows you
to adjust the sensitivity of the air quality sensor.
If you set it to higher sensitivity level, the purier
starts cleaning the air at lower pollution level.
There are 3 sensitivity levels:
• standard
• sensitive
• extra sensitive
The pollution sensor is set to standard
sensitivity. You can adjust the sensitivity of
the air quality sensor in the following way.
Note
• When it is set to a higher sensitivity, the purier
starts cleaning the air at lower pollution levels
to make the air even cleaner. Plug the purier
before adjusting the sensitivity of the air quality
sensor.
Timer light Sensitivity level
Extra sensitive
Sensitive
Standard
2 Press the
level of the air quality sensor.
» One of the lights ( , , or ) goes
3 Press the
purier.
button to adjust the sensitivity
on to show the preferred sensitivity
level of the air quality sensor.
button to switch off the
Note
• When you change the sensitivity, the purier
automatically starts operating at the set
sensitivity level whenever you switch on the
purier.
Change the fan speed
1 Press the
the power plug in the power socket.
» The purier beeps twice and one of
10
EN
button and simultaneously put
the lights ( , , or ) goes on to
show the current sensitivity level of
the air quality sensor.
Manual
You can select the desired fan speed.
Note
• When you select a fan speed, you can also use
the timer function (see “Set the timer”). In this
case, one of the lights (AC4012: and )
and the light ( , , or ) are on.
Page 11

1 Press the
purier.
button to switch on the
2 Press the button once or more times to
select the desired fan speed.
» For AC4012 - , , or ; and
» For AC4014 - , , or .
Sleep mode
In sleep mode, the air lter operates very
quietly while all lights are dimmed for your
undisturbed sleep. (AC4012 only)
1 Press the
purier.
button to switch on the
2 Press the button to select sleep mode.
» The light goes on.
English
English
Tip
• If the air quality light is in blue color, this means
the air quality is good, and you can select a
lower fan speed.
To change to another fan speed, press the
button.
EN
11
Page 12

Set the timer
With the timer function, you can let the purier
operate for a set number of hours. When the
set time has elapsed, the purier automatically
switches off.
You can use the timer function in the following
situations:
Situations You will see
Choose a fan
speed (see
‘Change the fan
speed’).
The purier is in
sleep mode (see
‘Sleep mode’).
One of the lights
(AC4012 - , , or ;
AC4014 - , , or )
and one of the lights ( ,
, or ) are on.
The light and one of the
lights ( , , or ) are on
but dimmed.
3 Press the
button repeatedly to choose
the number of hours you want the purier
to operate. The corresponding light ( , ,
or ) goes on.
To deactivate the timer function, press the
button repeatedly until the light ( , , or )
is out.
1 Press the
button to switch on the
purier.
2 Press the
button to activate the timer.
» The light ( , , or ) goes on.
12
EN
Page 13

5 Clean your air
purifier
Note
• Always unplug the purier before you clean it.
• Never immerse the purier in water or any
other liquid.
• Never use abrasive, aggressive, or ammable
cleaning agents such as bleach or alcohol to
clean any part of the purier.
• Only the pre-lter is washable. Other air purier
lters are NOT washable nor vacuum cleanable.
Clean the air purier
Regularly clean the inside and outside of the
purier body to prevent dust from collecting.
1 Wipe away dust with a soft dry cloth from
the body of the purier.
2 Clean the air inlet and the air outlet with a
soft dry cloth.
1 Clean the air quality sensor inlet and the
air quality sensor outlet with a soft brush.
2 Remove the air quality sensor cover.
3 Clean the air quality sensor, the dust inlet
and the dust outlet with a lightly moistened
cotton swab.
English
English
Clean the air quality sensor
Clean the air quality sensor every 2 months for
optimal functioning of the purier. Clean it more
frequently if you use the purier in a dusty
environment.
Note
• When the humidity level in the room is very
high, it is possible that condensation develops on
the air quality sensor. As a result, the air quality
light may indicate that the air quality is bad even
though it is good. In this case you have to clean
the air quality sensor or use one of the manual
speed settings.
4 Dry them with a dry cotton swab.
5 Reattach the air quality sensor cover.
EN
13
Page 14
6 Clean the pre-
filter
Note
• The pre-lter is washable and vacuum cleanable.
• Clean the pre-lter for every two weeks to
ensure optimal functioning of the purier.
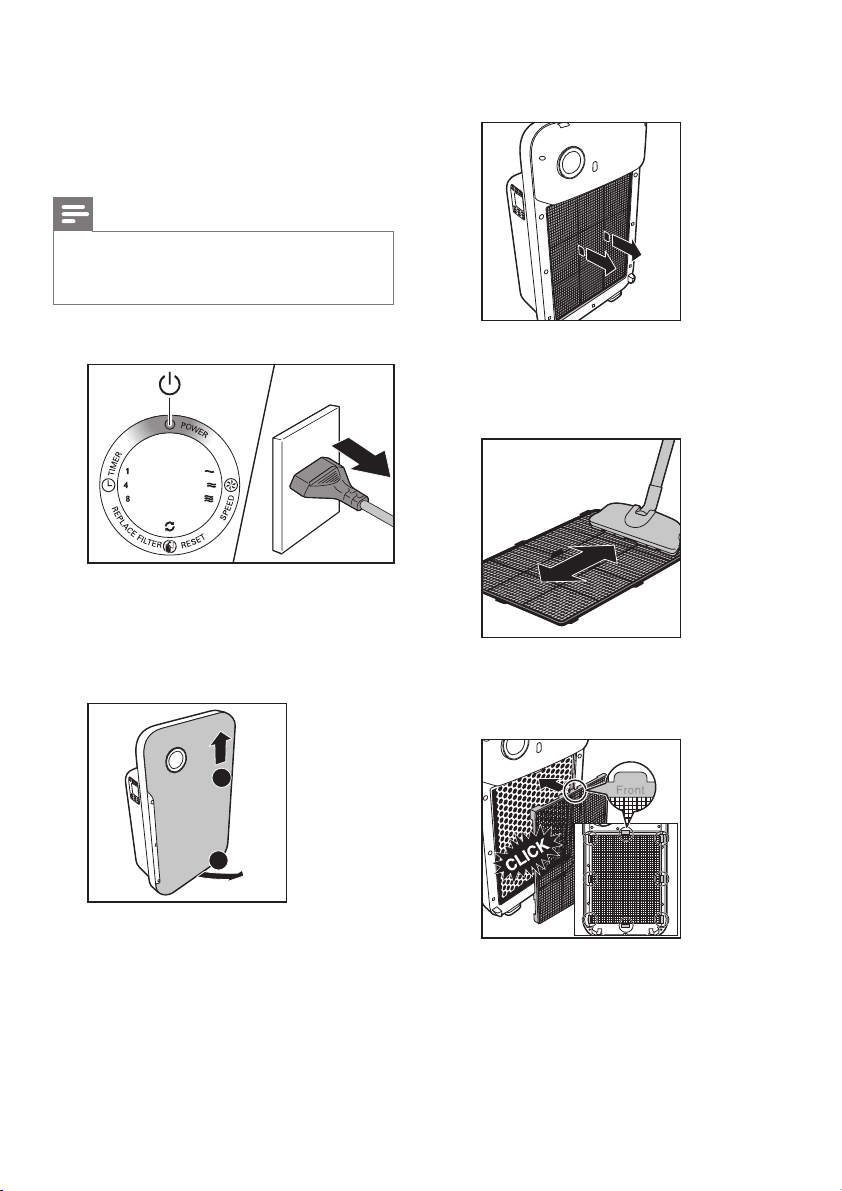
3 To remove the pre-lter, grab the two
projections and pull the lter towards you.
1 Switch off the purier and unplug it.
2 Place your ngers in the recess of the side
panels and gently pull the bottom part of
the front panel towards you (1). Then lift
the hooks at the top of the panel out of
the top of the purier (2).
2
1
4 Use a vacuum cleaner to clean the pre-
lter or wash it under a running tap. If the
pre-lter is very dirty, use a soft brush to
brush away the dust.
5 Air dry the pre-lter.
6 Put the pre-lter back into the purier.
Attach all hooks properly to the purier.
14
EN
Page 15

7 To reattach the front panel, insert the top
hooks into the top of the purier rst (1).
Then, push the panel against the body of
the purier (2).
1
2
Note
• Alternatively, you can clean the pre-lter by
removing the dust with a vacuum cleaner.
• Make sure that the pre-lter is completely dry.
If it is still wet, bacteria may multiply in it and
shorten the lifetime of the pre-lter.
• Make sure that the side with the two projections
is pointing towards you, and that all hooks of the
pre-lter are properly attached to the purier.
English
English
EN
15
Page 16
7 Replace the
filters
The lter replacement light ( ) indicates the
lters have to be replaced.
Note
• Insert the lters in the correct position.
• Make sure you place the lters in the order of
HEPA lter, activated carbon lter, and nally the
pre-lter.
• Make sure that the side with the tag is pointing
towards you.
Note
• If you remove the front panel for lter changing
while the purier is switched on, all lights on the
control panel will be off.
• Once the front panel is placed back to the
purier, all lights ash twice. Then, the purier is
off. Press the button to switch on the purier
again.
Replace the activated carbon
lter and the HEPA lter
Note
• The activated carbon lter and the HEPA lter
are not washable nor vacuum cleanable.
Replace both the activated carbon lter and
HEPA lter when the light goes on. This will
last for approximately 2 weeks.
On the last day of the 2 weeks, the purier
beeps every 30 minutes to inform you that the
lter needs to be replaced.
Tip
• When you remove or insert lters, place the
purier against a wall for more stability.
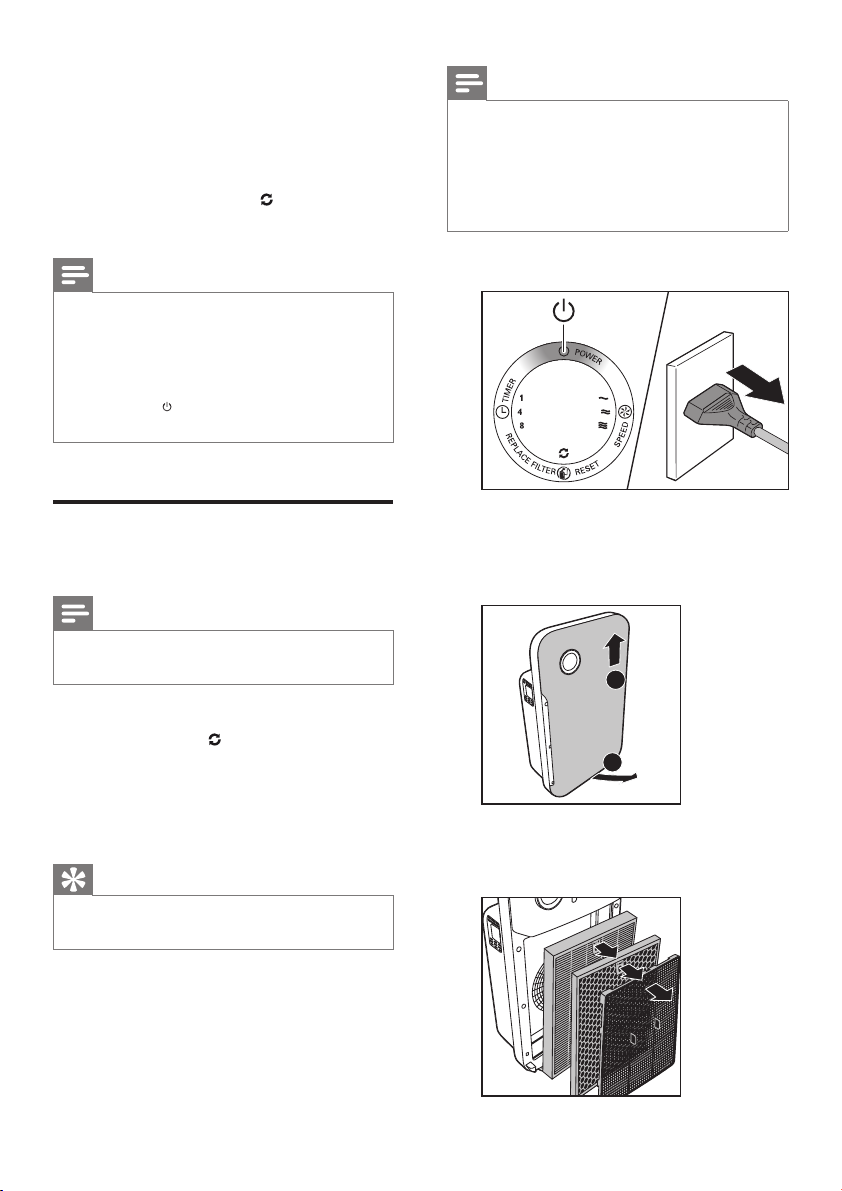
1 Switch off the purier and unplug it.
2 Place your ngers in the recesses of the side
panels and gently pull the bottom part of
the front panel towards you. Lift the panel
out of the hooks at the top of the purier.
2
1
3 Remove the lters using the tag on the lter.
Take the lters by both sides and gently
deposit them into the house hold trash bin.
16
EN
Page 17
Note
• Do not touch the pleated lter surface, or smell
the lter as it has collected pollutants from the
air.
• Wash your hands after disposing of the used
lters.
4 Remove all packaging material from the
new lters.
5 Place the new HEPA lter in the purier
rst.
7 Place the pre-ler in the purier.
Note
• Make sure that the side with the two projections
is pointing towards you, and that all hooks of the
pre-lter are properly attached to the purier.
8 To reattach the front panel, insert the top
hooks into the top of the purier rst (1).
Then, push the panel against the body of
the purier (2).
1
English
English
6 Then, place the new activated carbon lter
in the purier.
2
9 Reset the activated carbon lter and the
HEPA lter lifetime (see ‘Reset the lter
lifetime counter’).
EN
17
Page 18

8 Reset the filter
lifetime counter
When you replace the lters, it is important
that you also reset the lter lifetime counter
afterwards. This allows the purier to be in sync
with the lter lifetime.
After you have replaced the lters, reset the
lter time:
1 Switch off the purier and unplug it.
2 Replace the air purier lters (see ‘Replace
the lters’).
3 Put the plug in the power socket and
switch on the purier again.
4 Press and hold the button for 2 seconds.
Note
• Reset the purier when it is plugged in and
switched on.
• Only replace the lters when you see the light
goes on.
18
EN
Page 19
9 Troubleshooting
This chapter summarizes the most common problems you could encounter with the purier. If you are
unable to solve the problem with the information below, contact the Consumer Care Center in your
country.
Problem Possible solution
The light has been on
continuously.
No air comes out of the air
outlet.
The fan speed does not
change when the sleep
mode is activated.
The airow that comes
out of the air outlet is
signicantly weaker than
before.
The air quality does not
improve, even though the
purier has been operating
for a long time.
The color of the air quality
light always stays the same.
I need cleaner air because I
have an allergy.
The purier is extra loud. • Please check if you have removed all the packaging material from
The purier still indicates
that I need to replace a
lter, but I already did.
The lter is full. Replace the lter and reset the purier.
The purier is not connected to the power supply. Plug the purier
into the power supply and switch on.
In sleep mode, the fan speed is set to a very low level. If you want to
change the fan speed, press the button one or more times to set
the desired fan speed.
• The pre-lter is dirty. Clean the pre-lter (see ‘Clean the pre-
lter’).
• You have not removed all packaging material from the lters.
Make sure that you have removed all packaging material.
• One of the lters has not been placed in the purier. Make sure
that all lters are properly installed in the following order, starting
with the innermost lter: 1) HEPA lter, 2) activated carbon lter,
and 3) pre-lter.
• The air quality sensor is wet. The humidity level in your room
is high and causes condensation. Make sure that the air quality
sensor is clean and dry (see ‘Clean the air quality sensor’).
• The air quality sensor is dir ty. Clean the air quality sensor (see
‘Clean the air quality sensor’).
• There is not enough ventilation in the room. Open a window, to
improve the air circulation.
You can change the air quality sensor sensitivity (see ‘Set the sensitivity
of the air quality sensor’) to make the purier clean the air even better.
the lters.
• If the appliance is still too loud, you can change the fan speed to a
lower fan speed level.
Perhaps you did not press the button properly. Plug in the purier,
press the button and press and hold the button for 2 seconds.
English
English
EN
19
Page 20

10 Guarantee and
service
If you need information or if you have a
problem, please visit the Philips website at
www.philips.com or contact the Philips
Consumer Care Center in your country (you
nd its phone number in the worldwide
guarantee leaet). If there is no Consumer Care
Centre in your country, go to your local Philips
dealer.
Order parts or accessories
If you have to replace a part or want to
purchase an additional part, go to your Philips
dealer or visit www.philips.com/support.
If you have problems obtaining the parts, please
contact the Philips Consumer Care Center in
your country (you nd its phone number in the
worldwide guarantee leaet).
20
EN
Page 21

11 Notices
Electromagnetic elds (EMF)
This Philips appliance complies with all applicable
standards and regulations regarding exposure to
electromagnetic elds.
Compliance with EMF
Koninklijke Philips N.V. manufactures and sells
many products targeted at consumers, which,
like any electronic apparatus, in general have
the ability to emit and receive electromagnetic
signals.
One of Philips’ leading Business Principles is to
take all necessary health and safety measures
for our products, to comply with all applicable
legal requirements and to stay well within
the EMF standards applicable at the time of
producing the products.
Philips is committed to develop, produce and
market products that cause no adverse health
effects. Philips conrms that if its products are
handled properly for their intended use, they
are safe to use according to scientic evidence
available today.
Philips plays an active role in the development
of international EMF and safety standards,
enabling Philips to anticipate further
developments in standardization for early
integration in its products.
Any changes or modications made to this
device that are not expressly approved by
Philips Consumer Lifestyle may void the user’s
authority to operate the equipment.
Recycling
Never dispose of your product with other
household waste. Please inform yourself about
the local rules on the separate collection of
electrical and electronic products. The correct
disposal of your old product helps prevent
potentially negative consequences on the
environment and human health.
English
English
EN
21
Page 22

Page 23

Inhalt
1 Wichtige Hinweise 24
Sicherheit 24
2 Der Luftreiniger 27
Was ist im Lieferumfang? 27
3 Erste Schritte 28
Einsetzen der Filter 28
4 Verwenden des Luftreinigers 30
Informationen zur Luftqualitätsanzeige 30
Informationen zur Alarmfunktion
bezüglich der Erhaltung gesunder Luft 30
Einschalten 31
Einstellen der Empndlichkeit des
Luftqualitätssensors 31
Ändern der Lüftergeschwindigkeit 32
Manuell 32
Einstellen des Timers 33
10 Garantie und Kundendienst 45
Bestellen von Ersatz- oder
Zubehörteilen 45
11 Hinweise 46
Elektromagnetische Felder 46
Elektromagnetische Verträglichkeit 46
Recycling 46
Deutsch
5 Reinigen des Luftreinigers 35
Reinigen des Luftreinigers 35
Reinigen des Luftqualitätssensors 35
6 Reinigen des Vorlters 37
7 Auswechseln der Filter 39
Auswechseln des Aktivkohlelters und
des HEPA-Filters 39
8 Zurücksetzen des Zählers für die
Filterstandzeit 42
9 Fehlerbehebung 43
DE
23
Page 24

1 Wichtige
Hinweise
Sicherheit
Lesen Sie diese Bedienungsanleitung vor dem
Gebrauch des Geräts aufmerksam durch, und
bewahren Sie sie für eine spätere Verwendung
auf.
Achtung!
• Achten Sie darauf, dass kein
Wasser, andere Flüssigkeiten
oder entzündbare
Reinigungsmittel in das Gerät
gelangen, um das Risiko
eines Stromschlags und/oder
Brandgefahr zu vermeiden.
• Reinigen Sie das Gerät nicht mit
Wasser, anderen Flüssigkeiten
oder (entzündbaren)
Reinigungsmitteln, um das Risiko
eines Stromschlags und/oder
Brandgefahr zu vermeiden.
Warnung
• Prüfen Sie vor Inbetriebnahme,
ob die Spannungsangabe auf
der Unter- oder Rückseite
des Geräts mit der örtlichen
Netzspannung übereinstimmt.
• Ist das Netzkabel defekt, darf
es nur von einem Philips
Service-Center, einer von Philips
autorisierten Werkstatt oder
einer ähnlich qualizierten
Person durch ein OriginalErsatzkabel ausgetauscht
werden, um Gefährdungen zu
vermeiden.
• Verwenden Sie das Gerät nicht,
wenn der Netzstecker, das
Netzkabel oder das Gerät selbst
defekt oder beschädigt sind.
• Dieses Gerät kann von Kindern
ab 8 Jahren und Personen
mit verringerten physischen,
sensorischen oder psychischen
Fähigkeiten oder Mangel
an Erfahrung und Kenntnis
verwendet werden, wenn sie bei
der Verwendung beaufsichtigt
wurden oder Anweisung zum
sicheren Gebrauch des Geräts
erhalten und die Gefahren
verstanden haben. Kinder dürfen
nicht mit dem Gerät spielen.
Die Reinigung und Wartung darf
nicht von Kindern ohne Aufsicht
durchgeführt werden.
• Achten Sie darauf, dass Luftein-
und -auslass nicht verdeckt
werden. Legen Sie deshalb keine
Gegenstände auf den Luftausoder vor den Lufteinlass.
24
DE
Page 25

Vorsicht
• Das Gerät ist kein Ersatz
für angemessenes Lüften,
regelmäßiges Staubsaugen
oder das Verwenden einer
Dunstabzugshaube oder einer
Lüftung während des Kochens.
• Wenn die zum Betrieb des
Geräts verwendete Steckdose
nicht ordnungsgemäß
angeschlossen ist, wird der
Stecker des Geräts heiß.
Vergewissern Sie sich, dass
Sie für das Gerät eine
ordnungsgemäß angeschlossene
Steckdose verwenden.
• Verwenden Sie das Gerät immer
auf einer trockenen, stabilen,
ebenen und waagerechten
Unterlage.
• Achten Sie darauf, dass hinter
dem Gerät und seitlich davon
mindestens 20 cm Platz ist.
Über dem Gerät muss ein
Abstand von mindestens 30 cm
eingehalten werden.
• Stellen Sie keine Gegenstände
auf das Gerät, und setzen Sie
sich nicht darauf.
• Stellen Sie das Gerät nicht direkt
unter einer Klimaanlage auf,
damit kein Kondenswasser auf
das Gerät tropfen kann.
• Prüfen Sie vor dem Einschalten
des Geräts, ob alle Filter korrekt
eingesetzt sind.
• Verwenden Sie nur Originallter
von Philips, die speziell für dieses
Gerät geeignet sind. Verwenden
Sie keine anderen Filter.
• Vermeiden Sie es, mit harten
Gegenständen gegen das Gerät
(insbesondere den Lufteinlass
und -auslass) zu stoßen.
• Heben oder bewegen Sie das
Gerät immer mithilfe des Griffs
auf der Rückseite des Geräts.
• Achten Sie darauf, dass Ihre
Finger oder Objekte nicht in den
Luftauslass gelangen.
• Benutzen Sie das Gerät
nicht nach dem Gebrauch
von Räuchermitteln zum
Insektenschutz oder an Orten,
an denen Ölrückstände oder
chemische Dämpfe vorhanden
sind bzw. Räucherstäbchen
verbrannt werden.
• Verwenden Sie das Gerät nicht
in der Nähe von gasbetriebenen
Vorrichtungen, Heizungen oder
offenen Kaminen.
• Ziehen Sie nach jedem
Gebrauch und vor der Reinigung
des Geräts den Netzstecker aus
der Steckdose.
Deutsch
DE
25
Page 26

• Verwenden Sie das Gerät
nicht in Räumen mit starken
Temperaturschwankungen,
da diese zu Kondensation im
Geräteinneren führen können.
• Um elektronische Störungen
zu vermeiden, sollten Sie
das Gerät im Abstand von
mindestens 2 Metern zu anderen
Elektrogeräten aufstellen,
die mit Funkwellen arbeiten
(z. B. Fernsehern, Radios und
Funkuhren).
• Das Gerät ist ausschließlich
für den Hausgebrauch bei
normalen Betriebsbedingungen
vorgesehen.
• Verwenden Sie es nicht
in feuchter Umgebung
oder in Räumen mit hoher
Umgebungstemperatur, z. B. im
Badezimmer, in der Toilette oder
in der Küche.
• Das Gerät entfernt kein
Kohlenmonoxid (CO) oder
Radon (Rn). Es kann nicht als
Sicherheitsgerät bei Unfällen
mit Verbrennungsvorgängen
und gefährlichen Chemikalien
verwendet werden.
26
DE
Page 27
2 Der Luftreiniger
Herzlichen Glückwunsch zu Ihrem Kauf und willkommen bei Philips!
Um das Kundendienstangebot von Philips vollständig nutzen zu können, registrieren Sie Ihr Produkt unter
www.philips.com/welcome.
Lesen Sie diese Bedienungsanleitung sorgfältig durch, bevor Sie das Gerät aufstellen und verwenden.
Bewahren Sie es zur späteren Verwendung auf.
Was ist im Lieferumfang?
Prüfen Sie zunächst den Verpackungsinhalt:
Luftqualitätssensor
Deutsch
Filter 4: HEPA-Filter
Filter 3: Aktivkohlelter
Filter 1: Vorlter
AC4012
Filter 3 Aktivkohlelter AC4123
Filter 4 HEPA-Filter AC4124
AC4014
Filter 3 Aktivkohlelter AC4143
Filter 4 HEPA-Filter AC4144
www.philips.com/welcome
User manual
Bedienungsanleitung
www.philips.com/welcome
Warranty
Garantie
DE
27
Page 28

3 Erste Schritte
Einsetzen der Filter
Bei Lieferung sind alle Filter bereits im
Luftreiniger eingesetzt. Vor dem Gebrauch
müssen Sie jedoch noch die Verpackung der
Filter entfernen. Nehmen Sie alle Filter heraus,
entfernen Sie die Verpackung, und setzen
Sie sie wie unten beschrieben erneut in den
Luftreiniger ein.
Tipp
• Stellen Sie den Luftreiniger beim Herausnehmen
oder Einsetzen der Filter an eine Wand, um für
mehr Stabilität zu sorgen.
Anmerkung
• Setzen Sie die Filter ordnungsgemäß ein.
• Vergewissern Sie sich, dass Sie die richtige
Reihenfolge einhalten. Setzen Sie also zunächst
den HEPA-Filter, dann den Aktivkohlelter und
zuletzt den Vorlter ein.
• Vergewissern Sie sich, dass die Seite mit dem
Etikett zu Ihnen gerichtet ist.
2 Ziehen Sie den unteren Teil der Abdeckung
vorsichtig nach außen (1), und heben Sie
dann den oberen Teil der Frontabdeckung
in Ihre Richtung (2).
2
1
3 Nehmen Sie alle Filter aus dem Luftreiniger.
4 Entfernen Sie das gesamte
Verpackungsmaterial von den Filtern.
1 Greifen Sie mit den Fingern in die
Aussparungen der Seitenabdeckungen,
und ziehen Sie den oberen Teil der
Frontabdeckung vorsichtig zu sich heran.
28
DE
Page 29

5 Setzen Sie die Filter wieder in den
Luftreiniger ein.
7 Um die Frontabdeckung wieder
anzubringen, setzen Sie die oberen
Haken zuerst in den oberen Teil des
Luftreinigers (1) ein. Drücken Sie dann
die Abdeckung gegen das Gehäuse des
Luftreinigers (2).
6 Setzen Sie den Vorlter in den Luftreiniger
ein.
Anmerkung
• Vergewissern Sie sich, dass die Seite mit den
zwei Aussparungen in Ihre Richtung zeigt, und
dass alle Haken des Vorlters ordnungsgemäß
am Luftreiniger befestigt sind.
1
2
Deutsch
DE
29
Page 30

4 Verwenden des
Luftreinigers
Informationen zur
Luftqualitätsanzeige
Informationen zur
Alarmfunktion bezüglich der
Erhaltung gesunder Luft
Die Filterwechselanzeige ( ) zeigt an, dass die
Filter ausgewechselt werden müssen.
Farbe des
Luftqualitätslichtrings
Blau Gut
Lilafarben Mittelmäßig
Rot Sehr schlecht
Die Luftqualitätsanzeige leuchtet automatisch
auf, wenn der Luftreiniger eingeschaltet wird.
Luftqualität
Anmerkung
• Der integrierte Luftqualitätssensor misst
die Luftqualität und wählt automatisch die
entsprechende Farbe für die Luftqualitätsanzeige
aus. Wenn die Luft sauber ist, leuchtet die
Luftqualitätsanzeige blau. Wenn sich die
Luftqualität verschlechtert, wechselt die Farbe
der Luftqualitätsanzeige zu violett oder rot.
Alarmfunktion zur Erhaltung
gesunder Luft
Die Filterwechselanzeige
leuchtet ununterbrochen. Dies
ist ungefähr 2 Wochen lang
der Fall. Am letzten Tag der
2 Wochen gibt der Luftreiniger
alle 30 Minuten einen Signalton
aus, der Sie darüber informiert,
dass die Filter ausgewechselt
werden müssen.
Gehen Sie
wie folgt vor:
Wechseln Sie
den Aktivkoh-
lelter und
den HEPA-
Filter aus.
30
DE
Page 31

Einschalten
1 Schließen Sie den Luftreiniger an die
Stromversorgung an.
» Alle Anzeigen leuchten zweimal auf,
und Sie hören einen Signalton. Dann
erlöschen die Anzeigen.
AC4012 Bedienfeld AC4014 Bedienfeld
2 Drücken Sie die Taste
Luftreiniger einzuschalten.
» Die Luftqualitätsanzeige stellt die
aktuelle Luftqualität dar.
» Die Anzeige für die
Lüftergeschwindigkeit leuchtet auf.
, um den
Einstellen der Empndlichkeit
des Luftqualitätssensors
Menschen mit bestimmten gesundheitlichen
Problemen (z. B. Allergien oder Asthma) haben
einen großen Bedarf an gesunder Luft. Aus
diesem Grund können Sie beim Luftreiniger die
Empndlichkeit des Luftqualitätssensors einstellen.
Wenn Sie eine hohe Empndlichkeitsstufe
einstellen, startet das Gerät die Luftreinigung
bereits bei einem niedrigen Verschmutzungsgrad.
Es gibt 3 Empndlichkeitsstufen:
• Norm; Standard
• empndlich
• Besonders hohe Empndlichkeit
Der Luftverschmutzungssensor ist auf die
Standardstufe eingestellt. Sie können die
Empndlichkeit des Luftqualitätssensors
folgenderweise einstellen.
Anmerkung
• Wenn eine höhere Empndlichkeitsstufe
eingestellt wird, startet das Gerät die
Luftreinigung bei einem niedrigeren
Verschmutzungsgrad, damit die Luft noch
sauberer wird. Schließen Sie den Luftreiniger
an die Stromversorgung an, bevor Sie die
Empndlichkeit des Luftqualitätssensors
einstellen.
Deutsch
3 Drücken Sie die Taste
Luftreiniger auszuschalten.
, um den
1 Drücken Sie die Taste
Sie gleichzeitig den Netzstecker in die
Steckdose.
, und stecken
DE
31
Page 32

» Der Luftreiniger gibt zwei Signaltöne
aus, und eine der -Anzeigen ( ,
oder ) leuchtet auf und zeigt die
aktuelle Empndlichkeitsstufe des
Luftqualitätssensors an.
Timer-Anzeige Empndlichkeitsstufe
Besonders hohe
Empndlichkeit
Sensitive
Standard
Anmerkung
• Wenn Sie eine Lüftergeschwindigkeit auswählen,
können Sie auch die Timer-Funktion verwenden
(siehe "Einstellen des Timers"). In diesem Fall
leuchtet eine der -Anzeigen (AC4012: und
) und die Anzeige ( , oder ) auf.
1 Drücken Sie die Taste
Luftreiniger einzuschalten.
, um den
2 Drücken Sie die Taste
um die Empndlichkeitsstufe des
Luftqualitätssensors einzustellen.
» Eine der -Anzeigen ( , oder )
leuchtet auf und zeigt die
bevorzugte Empndlichkeitsstufe des
Luftqualitätssensors an.
3 Drücken Sie die Taste
Luftreiniger auszuschalten.
,
, um den
Anmerkung
• Wenn Sie die Empndlichkeit ändern, startet der
Luftreiniger bei jedem Einschalten automatisch
mit der eingestellten Empndlichkeitsstufe.
Ändern der
Lüftergeschwindigkeit
Manuell
Sie können die gewünschte
Lüftergeschwindigkeit auswählen.
2 Drücken Sie die Taste einmal
oder mehrmals, um die gewünschte
Lüftergeschwindigkeit auszuwählen.
» Für AC4012: , oder sowie
» Für AC4014: , oder
32
DE
Page 33

Tipp
• Wenn die Luftqualitätsanzeige blau leuchtet,
ist die Luftqualität gut und Sie können eine
niedrigere Lüftergeschwindigkeit auswählen.
SLEEP-Modus
Im SLEEP-Modus verfügt der Luftlter über
eine sehr geringe Betriebslautstärke, und die
Anzeigen werden abgedunkelt, damit Sie
ungestört schlafen können. (Nur AC4012)
1 Drücken Sie die Taste
Luftreiniger einzuschalten.
, um den
Einstellen des Timers
Mit der Timer-Funktion können Sie den
Luftreiniger eine bestimmte Anzahl an Stunden
laufen lassen. Nach Ablauf der eingestellten Zeit
schaltet sich der Luftreiniger automatisch aus.
Sie können die Timer-Funktion in den folgenden
Situationen verwenden:
Situationen Anzeige
Wählen Sie eine
Lüftergeschwin-
digkeit aus (siehe
"Ändern der
Lüftergeschwindig-
keit").
Der Luftreiniger
bendet sich im
SLEEP-Modus
(siehe "SLEEPModus ").
Eine der -Anzeigen
(AC4012: , oder ;
AC4014: , oder )
und eine der -Anzeigen
( , oder ) leuchtet auf.
Die Anzeige und eine
der -Anzeigen ( , oder
) leuchtet gedimmt auf.
Deutsch
2 Drücken Sie die Taste , um den SLEEP-
Modus auszuwählen.
» Die Anzeige leuchtet auf.
Drücken Sie zum Ändern der
Lüftergeschwindigkeit die Taste .
1 Drücken Sie die Taste
Luftreiniger einzuschalten.
, um den
DE
33
Page 34

2 Drücken Sie die Taste
, um den Timer zu
aktivieren.
» Die Anzeige ( , oder ) leuchtet
auf.
3 Drücken Sie so oft die Taste
, bis die
Anzahl der Stunden angezeigt wird, die
der Luftreiniger betrieben werden soll.
Die entsprechende Anzeige ( , oder )
leuchtet auf.
Um die Timer-Funktion zu deaktivieren, drücken
Sie mehrmals die Taste , bis die Anzeige ( ,
oder ) erlischt.
34
DE
Page 35

5 Reinigen des
Luftreinigers
Anmerkung
• Ziehen Sie vor dem Reinigen des Luftreinigers
stets den Netzstecker aus der Steckdose.
• Tauchen Sie den Luftreiniger niemals in Wasser
oder andere Flüssigkeiten.
• Verwenden Sie keine Scheuermittel oder
aggressive bzw. brennbare Reinigungsmittel wie
zum Beispiel Bleiche oder Alkohol, um die Teile
des Luftreinigers zu reinigen.
• Nur der Vorlter ist abwaschbar. Die anderen
Luftreinigerlter sind NICHT abwaschbar und
können NICHT mit dem Staubsauger gereinigt
werden.
Reinigen des Luftreinigers
Anmerkung
• Wenn die Luftfeuchtigkeit im Zimmer sehr
hoch ist, kann sich Kondenswasser am
Luftqualitätssensor bilden. Infolgedessen kann die
Luftqualitätsanzeige eine schlechte Luftqualität
anzeigen, obwohl diese gut ist. In diesem Fall
müssen Sie den Luftqualitätssensor reinigen
oder eine der manuellen Geschwindigkeitsstufen
verwenden.
Deutsch
1 Reinigen Sie Einlass und Auslass des
Luftqualitätssensors mit einer weichen
Bürste.
Reinigen Sie das Luftreinigergehäuse regelmäßig
innen und außen, damit sich kein Staub
ansammelt.
1 Wischen Sie Staub mit einem trockenen
weichen Tuch vom Gerätegehäuse ab.
2 Reinigen Sie den Lufteinlass und -auslass
mit einem trockenen weichen Tuch.
Reinigen des
Luftqualitätssensors
Reinigen Sie den Luftqualitätssensor alle
2 Monate, um die ideale Funktion des
Luftreinigers sicherzustellen. Reinigen Sie ihn
öfter, wenn Sie den Reiniger in einer staubigen
Umgebung verwenden.
2 Nehmen Sie die Abdeckung des
Luftqualitätssensors ab.
DE
35
Page 36

3 Reinigen Sie den Luftqualitätssensor sowie
den Lufteinlass und -auslass mit einem
leicht angefeuchteten Wattestäbchen.
4 Trocknen Sie sie mit einem trockenen
Wattestäbchen.
5 Setzen Sie die Abdeckung des
Luftqualitätssensors wieder auf.
36
DE
Page 37

6 Reinigen des
Vorfilters
Anmerkung
• Der Vorlter ist abwaschbar und kann mit dem
Staubsauger gereinigt werden.
• Reinigen Sie den Vorlter alle zwei Wochen,
um eine ideale Funktion des Luftreinigers
sicherzustellen.
3 Um den Vorlter zu entfernen, fassen Sie
ihn an den beiden Aussparungen, und
ziehen Sie den Filter in Ihre Richtung.
Deutsch
1 Schalten Sie den Luftreiniger aus, und
ziehen Sie den Netzstecker aus der
Steckdose.
2 Greifen Sie mit den Fingern in die
Aussparung an den Seitenabdeckungen,
und ziehen Sie den unteren Teil der
Frontabdeckung vorsichtig zu sich
heran (1). Heben Sie dann die Haken oben
an der Abdeckung aus dem oberen Teil des
Luftreinigers (2).
2
4 Verwenden Sie einen Staubsauger zur
Reinigung des Vorlters, oder reinigen Sie
ihn unter ießendem Wasser. Wenn der
Vorlter sehr schmutzig ist, verwenden
Sie eine weiche Bürste, um den Staub zu
entfernen.
5 Lassen Sie den Vorlter an der Luft
trocknen.
6 Setzen Sie den Vorlter wieder in den
Luftreiniger ein. Befestigen Sie alle Haken
ordnungsgemäß am Luftreiniger.
1
37
DE
Page 38

7 Um die Frontabdeckung wieder
anzubringen, setzen Sie die oberen
Haken zuerst in den oberen Teil des
Luftreinigers (1) ein. Drücken Sie dann
die Abdeckung gegen das Gehäuse des
Luftreinigers (2).
1
2
Anmerkung
• Alternativ können Sie den Vorlter mit einem
Staubsauger reinigen.
• Vergewissern Sie sich, dass der Vorlter
vollständig trocken ist. Wenn er noch nass ist,
können sich darin Bakterien vermehren, und die
Lebensdauer des Vorlters kann sich verkürzen.
• Vergewissern Sie sich, dass die Seite mit den
zwei Aussparungen in Ihre Richtung zeigt, und
dass alle Haken des Vorlters ordnungsgemäß
am Luftreiniger befestigt sind.
38
DE
Page 39

7 Auswechseln
der Filter
Die Filterwechselanzeige ( ) zeigt an, dass die
Filter ausgewechselt werden müssen.
Anmerkung
• Setzen Sie die Filter ordnungsgemäß ein.
• Vergewissern Sie sich, dass Sie die richtige
Reihenfolge einhalten. Setzen Sie also zunächst
den HEPA-Filter, dann den Aktivkohlelter und
zuletzt den Vorlter ein.
• Vergewissern Sie sich, dass die Seite mit dem
Etikett zu Ihnen gerichtet ist.
Anmerkung
• Wenn Sie zum Filterwechseln die
Frontabdeckung abnehmen und der Luftreiniger
eingeschaltet ist, werden alle Anzeigen auf dem
Bedienfeld deaktiviert.
• Sobald Sie die Frontabdeckung wieder
auf den Luftreiniger setzen, leuchten alle
Anzeigen zweimal auf. Dann ist der Luftreiniger
ausgeschaltet. Drücken Sie die Taste , um den
Luftreiniger wieder einzuschalten.
Auswechseln des
Aktivkohlelters und des
HEPA-Filters
Anmerkung
• Der Aktivkohlelter und der HEPA-Filter sind
nicht abwaschbar und können nicht mit dem
Staubsauger gereinigt werden.
Wechseln Sie sowohl den Aktivkohlelter als
auch den HEPA-Filter aus, wenn die Anzeige
aueuchtet. Dies ist ungefähr 2 Wochen lang
der Fall.
Am letzten Tag der 2 Wochen gibt der
Luftreiniger alle 30 Minuten einen Signalton
aus, der Sie darüber informiert, dass der Filter
ausgewechselt werden muss.
1 Schalten Sie den Luftreiniger aus, und
ziehen Sie den Netzstecker aus der
Steckdose.
2 Greifen Sie mit den Fingern in die
Aussparungen der Seitenabdeckungen,
und ziehen Sie den unteren Teil der
Frontabdeckung vorsichtig zu sich heran.
Heben Sie die Abdeckung aus den Haken
oben am Luftreiniger.
2
1
Deutsch
Tipp
• Stellen Sie den Luftreiniger beim Herausnehmen
oder Einsetzen der Filter an eine Wand, um für
mehr Stabilität zu sorgen.
DE
39
Page 40

3 Entfernen Sie die Filter jeweils über die
Lasche auf dem Filter. Nehmen Sie die
Filter an beiden Seiten, und geben Sie sie
vorsichtig in den Haushaltsmüll.
Anmerkung
• Berühren Sie nicht die plissierte Filteroberäche,
und riechen Sie nicht am Filter, da dieser
Schadstoffe aus der Luft gesammelt hat.
• Waschen Sie sich die Hände, nachdem Sie die
gebrauchten Filter entsorgt haben.
4 Entfernen Sie das gesamte
Verpackungsmaterial von den neuen Filtern.
5 Setzen Sie den neuen HEPA-Filter zuerst in
den Luftreiniger ein.
6 Setzen Sie dann den neuen Aktivkohlelter
in den Luftreiniger ein.
7 Setzen Sie den Vorlter in den Luftreiniger
ein.
Anmerkung
• Vergewissern Sie sich, dass die Seite mit den
zwei Aussparungen in Ihre Richtung zeigt, und
dass alle Haken des Vorlters ordnungsgemäß
am Luftreiniger befestigt sind.
40
DE
Page 41

8 Um die Frontabdeckung wieder
anzubringen, setzen Sie die oberen
Haken zuerst in den oberen Teil des
Luftreinigers (1) ein. Drücken Sie dann
die Abdeckung gegen das Gehäuse des
Luftreinigers (2).
1
2
9 Setzen Sie die Filterstandzeit des
Aktivkohlelters und des HEPA-Filters
zurück (siehe "Zurücksetzen des Zählers
für die Filterstandzeit").
Deutsch
DE
41
Page 42

8 Zurücksetzen
des Zählers
für die
Filterstandzeit
Beim Auswechseln des Filters ist es wichtig,
dass Sie auch den Zähler für die Filterstandzeit
zurücksetzen. So kann der Luftreiniger synchron
mit der Filterstandzeit laufen.
Setzen Sie nach dem Filterwechsel die
Filterstandzeit zurück:
1 Schalten Sie den Luftreiniger aus, und
ziehen Sie den Netzstecker aus der
Steckdose.
4 Halten Sie die Taste 2 Sekunden lang
gedrückt.
Anmerkung
• Setzen Sie den Luftreiniger zurück, wenn er
eingesteckt und eingeschaltet ist.
• Wechseln Sie die Filter nur aus, wenn die
Anzeige aueuchtet.
2 Wechseln Sie die Luftreinigerlter aus
(siehe "Auswechseln der Filter").
3 Stecken Sie den Stecker in die Steckdose,
und schalten Sie den Luftreiniger wieder
ein.
42
DE
Page 43

9 Fehlerbehebung
In diesem Kapitel sind die häugsten Probleme aufgeführt, die beim Gebrauch des Luftreinigers
auftreten können. Sollten Sie ein Problem mithilfe der nachstehenden Informationen nicht beheben
können, wenden Sie sich bitte an das Philips Service-Center in Ihrem Land.
Problem Mögliche Lösung
Die Anzeige leuchtet
ununterbrochen.
Aus dem Luftauslass kommt
keine Luft.
Die Lüftergeschwindigkeit
ändert sich nicht, wenn der
SLEEP-Modus aktiviert ist.
Der Luftstrom, der aus
dem Luftauslass dringt, ist
bedeutend schwächer als
vorher.
Die Luftqualität verbessert
sich nicht, obwohl der
Luftreiniger eine lange Zeit
über in Betrieb war.
Die Farbe der
Luftqualitätsanzeige ändert
sich nicht.
Ich benötige sehr saubere
Luft, weil ich eine Allergie
habe.
Der Luftreiniger ist sehr laut. • Überprüfen Sie, ob Sie das gesamte Verpackungsmaterial von den
Der Filter ist voll. Wechseln Sie den Filter aus, und setzen Sie den
Luftreiniger zurück.
Der Luftreiniger ist nicht an die Stromversorgung angeschlossen.
Schließen Sie den Luftreiniger an die Stromversorgung an, und
schalten Sie ihn ein.
Im SLEEP-Modus ist die Lüftergeschwindigkeit auf eine sehr niedrige
Stufe eingestellt. Wenn Sie die Lüftergeschwindigkeit ändern möchten,
drücken Sie die Taste einmal oder mehrmals, um die gewünschte
Lüftergeschwindigkeit einzustellen.
• Der Vorlter ist verschmutzt. Reinigen Sie den Vorlter (siehe
"Reinigen des Vorlters").
• Sie haben nicht das gesamte Verpackungsmaterial der
Filter entfernt. Vergewissern Sie sich, dass Sie das gesamte
Verpackungsmaterial entfernt haben.
• Einer der Filter wurde nicht in den Luftreiniger eingesetzt.
Vergewissern Sie sich, dass alle Filter ordnungsgemäß in der
folgenden Reihenfolge von innen nach außen eingesetzt sind: 1)
HEPA-Filter 2) Aktivkohlelter und 3) Vorlter.
• Der Luftqualitätssensor ist nass. Die Luftfeuchtigkeit im Raum ist
hoch und verursacht Kondensation. Vergewissern Sie sich, dass
der Luftqualitätssensor sauber und trocken ist (siehe "Reinigen
des Luftqualitätssensors").
• Der Luftqualitätssensor ist verschmutzt. Reinigen Sie den
Luftqualitätssensor (siehe "Reinigen des Luftqualitätssensors").
• Der Raum wird nicht ausreichend belüftet. Öffnen Sie ein Fenster,
um die Luftzirkulation zu verbessern.
Sie können die Empndlichkeit des Luftqualitätssensors so ändern
(siehe "Einstellen der Empndlichkeit des Luftqualitätssensors"), dass
der Luftreiniger die Luft noch intensiver reinigt.
Filtern entfernt haben.
• Wenn das Gerät weiterhin zu laut ist, können Sie die
Geschwindigkeit des Lüfters auf eine niedrigere Stufe einstellen.
Deutsch
DE
43
Page 44

Problem Mögliche Lösung
Der Luftreiniger zeigt
an, dass ich einen Filter
auswechseln muss, obwohl
Vielleicht haben Sie die Taste nicht ordnungsgemäß gedrückt.
Schließen Sie den Luftreiniger an die Stromversorgung an, drücken Sie
die Taste , und halten Sie die Taste 2 Sekunden lang gedrückt.
ich dies schon gemacht
habe.
44
DE
Page 45

10 Garantie und
Kundendienst
Benötigen Sie weitere Informationen oder
treten Probleme auf, besuchen Sie die Philips
Website www.philips.com, oder setzen Sie
sich mit einem Philips Service-Center in Ihrem
Land in Verbindung (Telefonnummer siehe
Garantieschrift). Sollte es in Ihrem Land kein
Service-Center geben, wenden Sie sich bitte an
Ihren lokalen Philips Händler.
Bestellen von Ersatz- oder
Zubehörteilen
Wenn Sie ein Teil ersetzen müssen oder ein
zusätzliches Teil kaufen möchten, wenden Sie
sich an Ihren Philips Händler, oder besuchen Sie
www.philips.com/support.
Wenn Sie Probleme bei der Beschaffung der
Teile haben, wenden Sie sich bitte an ein Philips
Service-Center in Ihrem Land (Telefonnummer
siehe Garantieschrift).
Deutsch
DE
45
Page 46

11 Hinweise
Recycling
Elektromagnetische Felder
Dieses Philips Gerät erfüllt sämtliche Normen
und Regelungen bezüglich der Exposition in
elektromagnetischen Feldern.
Elektromagnetische Verträglichkeit
Koninklijke Philips N.V. produziert und
vertreibt viele Endkundenprodukte, die, wie
jedes elektronische Gerät im Allgemeinen,
elektromagnetische Signale aussenden und
empfangen können.
Eines der grundsätzlichen
Unternehmensprinzipien von Philips ist es, für
unsere Produkte alle notwendigen Gesundheits-
und Sicherheitsmaßnahmen zu ergreifen, um
allen anwendbaren rechtlichen Anforderungen
zu entsprechen und die zum Zeitpunkt der
Herstellung des Produkts anwendbaren EMVNormen in vollem Maße einzuhalten.
Philips hat sich dazu verpichtet, Produkte
zu entwickeln, herzustellen und zu verkaufen,
die sich nicht nachteilig auf die Gesundheit
auswirken. Philips bestätigt, dass seine
Produkte gemäß aktuellen wissenschaftlichen
Erkenntnissen sicher sind, wenn die Produkte
für ihren bestimmungsgemäßen Zweck
verwendet werden.
Philips spielt eine aktive Rolle in der
Entwicklung der internationalen EMF- und
Sicherheitsstandards, sodass Philips auch
weiterhin die neuesten Entwicklungen der
Standardisierung so früh wie möglich in seine
Produkte integrieren kann.
Änderungen oder Modizierungen des Geräts,
die nicht ausdrücklich von Philips Consumer
Lifestyle genehmigt wurden, können zum
Erlöschen der Betriebserlaubnis führen.
Entsorgen Sie Ihr Produkt niemals zusammen
mit dem normalen Hausmüll. Bitte informieren
Sie sich über die örtlichen Bestimmungen
zur getrennten Entsorgung von elektrischen
und elektronischen Produkten. Die korrekte
Entsorgung des nicht mehr benötigten Produkts
hilft, negative Auswirkungen auf Umwelt und
Gesundheit zu vermeiden.
46
DE
Page 47

Contenu
9 Dépannage 66
1 Important 48
Sécurité 48
2 Votre puricateur d'air 51
Contenu de l'emballage 51
3 Guide de démarrage 52
Installation des ltres 52
4 Utilisation du puricateur d'air 54
Signication du voyant de qualité de
l'air 54
Signication de l'alerte de protection
de l'air sain 54
Mise en marche 54
Réglage de la sensibilité du capteur de
qualité de l'air 55
Modication de la vitesse du ventilateur 56
anuel 56
Réglage du programmateur 57
5 Nettoyage du puricateur d'air 58
Nettoyage du puricateur d'air 58
Nettoyage du capteur de qualité de
l'air 58
10 Garantie et service 67
Commande de pièces ou d'accessoires 67
11 Mentions légales 68
Champs électromagnétiques (CEM) 68
Conformité aux normes sur les
champs électriques, magnétiques
et électromagnétiques 68
Recyclage 68
Français
6 Nettoyage du préltre 60
7 Remplacement des ltres 62
Remplacement du ltre à charbon
actif et du ltre HEPA 62
8 Réinitialisation du compteur de la
durée de vie des ltres 65
FR
47
Page 48

1 Important
Sécurité
Lisez attentivement ce mode d'emploi avant
d'utiliser l'appareil et conservez-le pour un
usage ultérieur.
Danger
• Veillez à ne pas faire pénétrer
d'eau, de détergent inammable
ou tout autre liquide dans
l'appareil an d'éviter toute
électrocution et/ou tout risque
d'incendie.
• Ne nettoyez pas l'appareil
avec de l'eau, du détergent
(inammable) ou tout autre
liquide an d'éviter toute
électrocution et/ou tout risque
d'incendie.
Avertissement
• Avant de brancher l'appareil,
vériez que la tension indiquée
sur la base ou à l'arrière de
l'appareil correspond à la
tension secteur locale.
• Si le cordon d'alimentation
est endommagé, il doit être
remplacé par Philips, par un
Centre Service Agréé Philips ou
par un technicien qualié an
d'éviter tout accident.
• N'utilisez jamais l'appareil si la
prise, le cordon d'alimentation
ou l'appareil lui-même est
endommagé.
• Cet appareil peut être utilisé
par des enfants âgés de
8 ans ou plus, des personnes
dont les capacités physiques,
sensorielles ou intellectuelles
sont réduites ou des personnes
manquant d'expérience et de
connaissances, à condition que
ces enfants ou personnes soient
sous surveillance ou qu'ils aient
reçu des instructions quant à
l'utilisation sécurisée de l'appareil
et qu'ils aient pris connaissance
des dangers encourus. Les
enfants ne doivent pas jouer
avec l'appareil. Le nettoyage et
l'entretien ne doivent pas être
réalisés par des enfants sans
surveillance.
• Ne bloquez pas l'entrée et la
sortie d'air (par exemple, en
plaçant des objets sur la sortie
d'air ou devant l'entrée d'air).
Attention
• Cet appareil ne remplace
pas une ventilation correcte,
l'utilisation régulière d'un
48
FR
Page 49

aspirateur et l'utilisation d'une
hotte ou d'un ventilateur dans la
cuisine.
• Si la prise secteur utilisée
pour alimenter l'appareil est
en mauvais état, la che de
l'appareil risque de surchauffer.
Veillez à brancher l'appareil sur
une prise secteur en bon état de
marche.
• Placez et utilisez toujours
l'appareil sur une surface sèche,
stable, plane et horizontale.
• Laissez au moins 20 cm d'espace
libre derrière et sur les côtés de
l'appareil et au moins 30 cm audessus de l'appareil.
• Ne placez rien sur l'appareil
et ne vous asseyez pas sur
l'appareil.
• Ne placez pas l'appareil
directement sous un climatiseur
an d'éviter que de la
condensation s'écoule sur
l'appareil.
• Avant de mettre l'appareil en
marche, assurez-vous que tous
les ltres sont correctement
assemblés.
• Utilisez exclusivement les ltres
Philips d'origine spécialement
destinés à cet appareil. N'utilisez
pas d'autres ltres.
• Évitez de heurter l'appareil
(l'entrée et la sortie d'air en
particulier) avec des objets durs.
• Soulevez ou déplacez toujours
l'appareil à l'aide de la poignée
située à l'arrière de l'appareil.
• N'insérez pas vos doigts ou des
objets dans la sortie d'air.
• N'utilisez pas l'appareil après
avoir utilisé un insecticide ou à
proximité de résidus huileux,
d'encens se consumant ou de
fumées chimiques.
• N'utilisez pas l'appareil à
proximité d'un appareil
fonctionnant au gaz, d'une
installation de chauffage ou
d'une cheminée.
• Débranchez toujours l'appareil
après utilisation et avant de le
nettoyer.
• N'utilisez pas l'appareil dans
une pièce soumise à des
changements de température
importants ; de la condensation
pourrait se former à l'intérieur.
• Pour éviter les interférences,
placez l'appareil à une distance
minimale de 2 mètres des
appareils électriques qui
utilisent des ondes radio
(téléviseurs, radios, horloges
radiosynchronisées, etc.,).
Français
FR
49
Page 50

• Cet appareil est destiné à un
usage domestique dans des
conditions de fonctionnement
normales.
• N'utilisez jamais l'appareil dans
des environnements humides
ou soumis à des températures
ambiantes élevées (salle de bain,
toilettes, cuisine, etc.,).
• L'appareil n'élimine pas le
monoxyde de carbone (CO)
ni le radon (Rn). Il ne peut pas
être utilisé comme dispositif
de sécurité en cas d'accidents
impliquant des processus de
combustion et des produits
chimiques dangereux.
50
FR
Page 51

2 Votre purificateur d'air
Félicitations pour votre achat et bienvenue dans le monde de Philips !
Pour proter pleinement de l'assistance offerte par Philips, enregistrez votre produit à l'adresse
suivante : www.philips.com/welcome.
Lisez ce manuel d'utilisation attentivement avant d'installer et d'utiliser ce produit. Conservez-le pour un
usage ultérieur.
Contenu de l'emballage
Vériez et identiez les différentes pièces contenues dans l'emballage :
Capteur de qualité
de l'air
Français
Filtre 4 : ltre HEPA
AC4124
Filtre 3 : ltre à charbon actif
AC4123
Filtre 1 : préltre
AC4012
Filtre 3 ltre à charbon actif AC4123
Filtre 4 ltre HEPA AC4124
AC4014
Filtre 3 ltre à charbon actif AC4143
Filtre 4 ltre HEPA AC4144
www.philips.com/welcome
User manual
Mode d'emploi
www.philips.com/welcome
Warranty
Garantie
FR
51
Page 52

3 Guide de
démarrage
2 Tirez doucement la partie inférieure
du panneau hors de l'appareil (1), puis
soulevez la partie supérieure du panneau
avant vers vous (2).
Installation des ltres
Le puricateur d'air est fourni avec tous
les ltres installés, mais vous devez retirer
l'emballage des ltres avant de pouvoir les
utiliser. Retirez tous les ltres, déballez-les, puis
remettez-les dans le puricateur comme décrit
ci-dessous.
Conseil
• Lorsque vous retirez ou insérez les ltres, placez
le puricateur contre un mur pour plus de
stabilité.
Remarque
• Insérez les ltres dans la position correcte.
• Veillez à placer les ltres dans l'ordre suivant :
ltre HEPA, ltre à charbon actif et enn le
pré-ltre.
• Assurez-vous que le côté étiqueté est orienté
dans votre direction.
1 Placez vos doigts dans le renfoncement des
panneaux latéraux, puis tirez doucement la
partie supérieure du panneau avant dans
votre direction.
2
1
3 Retirez tous les ltres du puricateur.
4 Retirez les ltres de leur emballage.
52
FR
Page 53

5 Remettez les ltres dans le puricateur.
6 Placez le préltre dans le puricateur.
Remarque
• Assurez-vous que le côté avec les deux saillies
est orienté vers vous et que tous les crochets du
pré-ltre sont correctement xés au puricateur.
Français
7 Pour remettre en place le panneau avant,
commencez par insérer les crochets
supérieurs en haut du puricateur (1).
Poussez le panneau contre le corps du
puricateur (2).
1
2
FR
53
Page 54

4 Utilisation du
purificateur d'air
Signication du voyant de
qualité de l'air
Signication de l'alerte de
protection de l'air sain
Le voyant de remplacement du ltre ( )
indique que les ltres doivent être remplacés.
Couleur du voyant de
qualité de l'air
Bleu Bien
Violet Moyen
Rouge Très mauvais
Le voyant de qualité de l'air s'allume
automatiquement lorsque le puricateur est
allumé.
Niveau de qualité
de l'air
Remarque
• Le capteur intégré de qualité de l'air mesure la
qualité de l'air et sélectionne automatiquement
la couleur appropriée du voyant de qualité de
l'air. Lorsque l'air est propre, le voyant de qualité
de l'air est bleu. Lorsque la qualité de l'air se
détériore, la couleur du voyant de qualité de l'air
passe du violet au rouge.
Capteur de qualité de l'air Mesure à
prendre
Le voyant de remplacement du
ltre reste allumé en continu
pendant environ 2 semaines.
Le dernier jour des 2 semaines,
le puricateur émet un signal
sonore toutes les 30 minutes
pour vous informer que les
ltres doivent être remplacés.
Remplacez
le ltre à
charbon actif
et le ltre
HEPA.
Mise en marche
1 Branchez le puricateur d'air.
» Tous les voyants s'allument deux
fois et un signal sonore retentit. Les
voyants s'éteignent de nouveau.
54
FR
Page 55

Panneau de
commande AC4012
2 Appuyez sur le bouton
Panneau de
commande AC4014
pour allumer le
puricateur.
» Le voyant de qualité de l'air afche la
qualité de l'air actuelle.
» Le voyant de vitesse du ventilateur
s'allume.
3 Appuyez sur le bouton
pour allumer le
puricateur.
Le capteur de pollution est réglé sur la
sensibilité standard. Vous pouvez régler la
sensibilité du capteur de qualité de l'air
comme suit.
Remarque
• Lorsqu'il est réglé sur une sensibilité plus élevée,
le puricateur commence à nettoyer l'air à des
niveaux de pollution plus bas pour rendre l'air
encore plus sain. Branchez le puricateur avant
de régler la sensibilité du capteur de qualité de
l'air.
1 Appuyez sur le bouton
branchant le puricateur.
» Le puricateur émet deux signaux
sonores et l'un des voyants ( ,
, ou ) s'allume pour afcher la
sensibilité actuelle du capteur de
qualité de l'air.
tout en
Français
Réglage de la sensibilité du
capteur de qualité de l'air
Les personnes ayant certains problèmes de santé
(allergies, asthme, etc.,) ont davantage besoin d'un
air sain. C'est pour cette raison que le puricateur
vous permet de régler la sensibilité du capteur de
qualité de l'air. Si vous le réglez sur un niveau de
sensibilité plus élevé, le puricateur commence à
nettoyer l'air à un niveau de pollution plus bas.
Il y a 3 niveaux de sensibilité :
• standard
• sensitive
• ultrasensible
Voyant du minuteur Niveau de sensibilité
Ultrasensible
Mode Sensible
Standard
2 Appuyez sur le bouton
pour régler la
sensibilité du capteur de qualité de l'air.
» L'un des voyants ( , , ou )
s'allume pour indiquer le niveau de
sensibilité adéquat du capteur de
qualité de l'air.
3 Appuyez sur le bouton
pour allumer le
puricateur.
FR
55
Page 56

Remarque
• Lorsque vous modiez la sensibilité, le
puricateur démarre automatiquement à la
sensibilité dénie lors de la mise en marche du
puricateur.
Modication de la vitesse du
ventilateur
anuel
Vous pouvez sélectionner la vitesse du
ventilateur de votre choix.
Remarque
• Lorsque vous sélectionnez une vitesse de
ventilateur, vous pouvez également utiliser
le programmateur (voir « Réglage du
programmateur »). Dans ce cas, l'un des voyants
(AC4012 : et ) et le voyant ( , , ou )
sont allumés.
1 Appuyez sur le bouton
puricateur.
pour allumer le
» Pour le modèle AC4012 - , , ou
; et
» Pour le modèle AC4014 - , , ou
.
Conseil
• Si le voyant de qualité de l'air est bleu, cela
signie que la qualité de l'air est bonne ; vous
pouvez donc sélectionner une vitesse de
ventilateur plus faible.
2 Appuyez sur le bouton une ou plusieurs
fois pour sélectionner la vitesse de
ventilateur de votre choix.
56
FR
Page 57

Mode Nuit
En mode veille, le ltre à air fonctionne très
silencieusement et la luminosité des voyants
est réduite pour ne pas vous gêner dans votre
sommeil. (AC4012 uniquement)
1 Appuyez sur le bouton
puricateur.
pour allumer le
Situations Ce qui s'afche
Choisissez
une vitesse de
ventilateur (voir
« Modication
de la vitesse du
ventilateur »).
Le puricateur est
en mode veille
(voir « Mode
veille »).
L'un des voyants
(AC4012 - , , ou ;
AC4014 - , , ou ) et
l'un des voyants ( , , ou
) sont allumés.
Le voyant et l'un des
voyants ( , , ou )
sont allumés mais leur
luminosité est réduite.
2 Appuyez sur le bouton pour
sélectionner le mode veille.
» Le voyant s'allume.
Pour modier la vitesse du ventilateur, appuyez
sur le bouton .
Réglage du programmateur
La fonction de minuterie vous permet de
laisser le puricateur fonctionner pendant un
nombre d'heures déni. L'appareil s'arrête
automatiquement à la n de la durée dénie.
Vous pouvez utiliser le programmateur dans les
situations suivantes :
1 Appuyez sur le bouton
puricateur.
2 Appuyez sur le bouton
programmateur.
» Le voyant ( , , ou ) s'allume.
3 Appuyez sur le bouton
reprises pour choisir le numéro d'heures
pendant lesquelles vous souhaitez que
le puricateur fonctionne. Le voyant
correspondant ( , , ou ) s'allume.
Pour désactiver le programmateur, appuyez sur
le bouton à plusieurs reprises jusqu'à ce que
le voyant ( , , ou ) s'éteigne.
pour allumer le
pour activer le
à plusieurs
Français
57
FR
Page 58

5 Nettoyage du
purificateur d'air
Remarque
• Débranchez toujours le puricateur avant de le
nettoyer.
• N'immergez en aucun cas le puricateur dans de
l'eau ou dans un autre liquide.
• N'utilisez jamais de détergents abrasifs, agressifs
ou inammables (eau de javel, alcool, etc.,) pour
nettoyer les différentes parties du puricateur.
• Seul le préltre peut être lavé. Les autres ltres
du puricateur d'air NE PEUVENT PAS être
lavés ou aspirés.
Nettoyage du puricateur
d'air
Remarque
• Si le taux d'humidité de la pièce est très élevé,
il est possible que de la condensation se forme
sur le capteur de qualité de l'air. Il se peut
alors que le voyant de qualité de l'air indique
une mauvaise qualité de l'air alors que celle-ci
est pourtant bonne. Dans ce cas, vous devez
nettoyer le capteur de qualité de l'air ou utiliser
l'un des réglages de vitesse manuels.
1 Nettoyez l'entrée et la sortie du capteur
de qualité de l'air à l'aide d'une brosse
douce.
Nettoyez régulièrement l'intérieur et l'extérieur
du corps du puricateur pour empêcher que de
la poussière ne s'accumule.
1 Dépoussiérez le corps du puricateur à
l'aide d'un chiffon doux et sec.
2 Nettoyez la sortie et l'entrée d'air à l'aide
d'un chiffon doux et sec.
Nettoyage du capteur de
qualité de l'air
Nettoyez le capteur de qualité de l'air tous
les 2 mois pour un fonctionnement optimal
du puricateur. Nettoyez-le plus fréquemment
si vous utilisez le puricateur dans un
environnement poussiéreux.
58
FR
2 Retirez le couvercle du capteur de qualité
de l'air.
Page 59

3 Nettoyez le capteur de qualité de l'air,
l'entrée de poussière et la sortie de
poussière avec un coton-tige légèrement
humidié.
4 Séchez-les avec un coton-tige sec.
5 Remettez en place le couvercle du capteur
de qualité de l'air.
Français
FR
59
Page 60

6 Nettoyage du
préfiltre
Remarque
• Le préltre est lavable et peut être nettoyé à
l'aspirateur.
• Nettoyez le pré-ltre toutes les 2 semaines
pour garantir le fonctionnement optimal du
puricateur.
3 Pour retirer le préltre, saisissez les
deux saillies, puis tirez le ltre dans votre
direction.
1 Arrêtez le puricateur, puis débranchez-le.
2 Placez vos doigts dans le renfoncement des
panneaux latéraux, puis tirez doucement
la partie inférieure du panneau dans votre
direction (1). Retirez les crochets en haut
du panneau du haut du puricateur (2).
2
1
4 Utilisez un aspirateur pour nettoyer le
préltre ou lavez-le sous l'eau du robinet.
Si le préltre est très sale, utilisez une
brosse douce pour éliminer la poussière.
5 Laissez sécher le préltre à l'air libre.
6 Remettez le préltre dans le puricateur.
Fixez correctement tous les crochets au
puricateur.
60
FR
Page 61

7 Pour remettre en place le panneau avant,
commencez par insérer les crochets
supérieurs en haut du puricateur (1).
Poussez le panneau contre le corps du
puricateur (2).
1
2
Remarque
• Vous pouvez aussi nettoyer le préltre en
enlevant la poussière à l'aide d'un aspirateur.
• Assurez-vous que le préltre est parfaitement
sec. S'il est toujours humide, les bactéries
peuvent s'y multiplier et réduire la durée de vie
du préltre.
• Assurez-vous que le côté avec les deux saillies
est orienté vers vous et que tous les crochets du
pré-ltre sont correctement xés au puricateur.
Français
FR
61
Page 62

7 Remplacement
des filtres
Le voyant de remplacement du ltre ( )
indique que les ltres doivent être remplacés.
Remarque
• Insérez les ltres dans la position correcte.
• Veillez à placer les ltres dans l'ordre suivant :
ltre HEPA, ltre à charbon actif et enn le
pré-ltre.
• Assurez-vous que le côté étiqueté est orienté
dans votre direction.
Remarque
• Si vous retirez le panneau avant pour changer le
ltre alors que le puricateur est encore allumé,
tous les voyants du panneau de commande
s'éteignent.
• Une fois le panneau avant de nouveau en
position sur le puricateur, tous les voyants
clignotent deux fois. Le puricateur s'éteint
ensuite. Appuyez sur le bouton pour rallumer
le puricateur.
Remplacement du ltre à
charbon actif et du ltre
HEPA
Remarque
• Le ltre à charbon actif et le ltre HEPA ne
peuvent pas être lavés ni aspirés.
Remplacez le ltre à charbon actif et le ltre
HEPA lorsque le voyant s'allume. Il restera
allumé pendant environ 2 semaines.
Le dernier jour des 2 semaines, le puricateur
émet un signal sonore toutes les 30 minutes
pour vous informer que le ltre doit être
remplacé.
1 Arrêtez le puricateur, puis débranchez-le.
2 Placez vos doigts dans le renfoncement des
panneaux latéraux, puis tirez doucement
la partie inférieure du panneau avant dans
votre direction. Retirez le panneau des
crochets situés en haut du puricateur.
2
1
Conseil
• Lorsque vous retirez ou insérez les ltres, placez
le puricateur contre un mur pour plus de
stabilité.
62
FR
Page 63

3 Retirez les ltres selon le marquage sur le
ltre. Tenez les ltres par les deux côtés et
déposez-les délicatement dans la poubelle
ménagère.
5 Placez tout d'abord le nouveau ltre HEPA
dans le puricateur.
6 Placez ensuite le nouveau ltre à charbon
actif dans le puricateur.
Remarque
• Ne touchez pas la surface plissée du ltre et ne
sentez pas le ltre car il contient des polluants
de l'air.
• Lavez-vous les mains après avoir mis les ltres
usagés au rebut.
4 Retirez les nouveaux ltres de leur
emballage.
Français
7 Placez le préltre dans le puricateur.
Remarque
• Assurez-vous que le côté avec les deux saillies
est orienté vers vous et que tous les crochets du
pré-ltre sont correctement xés au puricateur.
FR
63
Page 64

8 Pour remettre en place le panneau avant,
commencez par insérer les crochets
supérieurs en haut du puricateur (1).
Poussez le panneau contre le corps du
puricateur (2).
1
2
9 Réinitialisez la valeur de durée de vie du
ltre à charbon actif et du ltre HEPA (voir
« Réinitialisation du compteur de la durée
de vie des ltres »).
64
FR
Page 65

8 Réinitialisation
du compteur de
la durée de vie
des filtres
Lorsque vous remplacez les ltres, il est
important que vous réinitialisiez également leur
durée de vie. Cela permet de synchroniser le
puricateur avec la durée de vie des nouveaux
ltres installés.
Une fois que vous avez remplacé les ltres,
réinitialisez leur durée de vie :
1 Arrêtez le puricateur, puis débranchez-le.
4 Maintenez le bouton enfoncé pendant
2 secondes.
Remarque
• Réinitialisez le puricateur une fois qu'il est
branché et allumé.
• Remplacez uniquement les ltres lorsque vous
voyez le voyant s'allumer.
Français
2 Remplacez les ltres du puricateur d'air
(voir « Remplacement des ltres »).
3 Branchez le puricateur, puis rallumez-le.
FR
65
Page 66

9 Dépannage
Cette rubrique présente les problèmes les plus courants susceptibles de se produire sur le puricateur.
Si vous ne parvenez pas à résoudre le problème à l'aide des informations ci-dessous, contactez le
Service Consommateurs de votre pays.
Problème Solution possible
Le voyant reste allumé en
continu.
Aucun air ne s'échappe de
la sortie d'air.
Lorsque le mode veille
est activé, la vitesse du
ventilateur ne change pas.
Le ux d'air qui s'échappe
de la sortie d'air est
signicativement plus faible
qu'avant.
La qualité de l'air ne
s'améliore pas alors que
le puricateur fonctionne
depuis longtemps.
La couleur du voyant
de qualité de l'air reste
toujours la même.
J'ai besoin d'un air plus
propre parce que je souffre
d'une allergie.
Le puricateur est
extrêmement bruyant.
Le puricateur continue
d'indiquer que je dois
remplacer un ltre alors que
je l'ai déjà fait.
Le ltre est plein. Remplacez le ltre, puis réinitialisez le puricateur.
Le puricateur n'est pas branché. Branchez le puricateur, puis
allumez-le.
En mode veille, la vitesse du ventilateur est réglée sur un niveau très
faible. Si vous souhaitez modier la vitesse du ventilateur, appuyez sur
le bouton une ou plusieurs fois pour régler la vitesse du ventilateur
de votre choix.
• Le préltre est sale. Nettoyez le pré-ltre (voir « Nettoyage du
pré-ltre »).
• Vous n'avez pas enlevé tout le matériau d'emballage des ltres.
Assurez-vous que vous avez enlevé tout le matériau d'emballage.
• L'un des ltres n'a pas été installé dans le puricateur. Vériez que
tous les ltres sont correctement installés dans l'ordre suivant, en
commençant par le ltre le plus à l'intérieur : 1) ltre HEPA, 2)
ltre à charbon actif et 3) préltre.
• Le capteur de qualité de l'air est humide. Le taux d'humidité de
votre pièce est élevé et de la condensation se forme. Assurez-
vous que le capteur de qualité de l'air est propre et sec (voir
« Nettoyage du capteur de qualité de l'air »).
• Le capteur de qualité de l'air est sale. Nettoyez le capteur de
qualité de l'air (voir « Nettoyage du capteur de qualité de l'air »).
• La pièce n'est pas assez ventilée. Ouvrez une fenêtre pour
améliorer la circulation de l'air.
Vous pouvez modier la sensibilité du capteur de qualité de l'air (voir
« Réglage de la sensibilité du capteur de qualité de l'air ») pour que le
puricateur purie encore davantage l'air.
• Vériez si vous avez retiré les ltres de l'emballage.
• Si l'appareil est toujours trop bruyant, vous pouvez diminuer la
vitesse du ventilateur.
Vous n'avez peut-être pas appuyé correctement sur le bouton
. Branchez le puricateur, appuyez sur le bouton , puis maintenez le
bouton enfoncé pendant 2 secondes.
66
FR
Page 67

10 Garantie et
service
Si vous souhaitez obtenir des informations
supplémentaires ou si vous rencontrez un
problème, visitez le site Web de Philips à
l'adresse www.philips.com ou contactez
le Service Consommateurs Philips de
votre pays (vous trouverez le numéro de
téléphone correspondant sur le dépliant de
garantie internationale). S'il n'existe pas de
Service Consommateurs dans votre pays,
adressez-vous à votre revendeur Philips.
Commande de pièces ou
d'accessoires
Si vous devez remplacer une pièce ou tout
simplement en acheter une supplémentaire,
contactez votre revendeur Philips ou rendez-
vous à l'adresse www.philips.com/support.
Si vous avez des problèmes pour obtenir des
pièces, contactez le Service Consommateurs
Philips de votre pays (vous trouverez son
numéro de téléphone dans le dépliant de
garantie internationale).
Français
FR
67
Page 68

11 Mentions légales
Recyclage
Champs électromagnétiques
(CEM)
Cet appareil Philips est conforme à toutes
les normes et à tous les règlements
applicables relatifs à l'exposition aux champs
électromagnétiques.
Conformité aux normes sur les
champs électriques, magnétiques et
électromagnétiques
Koninklijke Philips N.V. fabrique et vend de
nombreux produits de consommation qui
ont, comme tous les appareils électriques, la
capacité d'émettre et de recevoir des signaux
électromagnétiques.
L'un des principes fondamentaux adoptés par
la société Philips consiste à prendre toutes les
mesures qui s'imposent en matière de sécurité
et de santé, conformément aux dispositions
légales en cours, pour respecter les normes
sur les champs électriques, magnétiques et
électromagnétiques en vigueur au moment de
la fabrication de ses produits.
Philips s'est engagé à développer, produire et
commercialiser des produits ne présentant
aucun effet nocif sur la santé. Philips conrme
qu'un maniement correct de ses produits
et leur usage en adéquation avec la raison
pour laquelle ils ont été conçus garantissent
une utilisation sûre et dèle aux informations
scientiques disponibles à l'heure actuelle.
Philips joue un rôle majeur dans le
développement de normes CEM et de sécurité
internationales, ce qui lui permet d'anticiper
leur évolution de les appliquer au plus tôt à ses
produits.
Toute modication apportée à cet appareil
qui ne serait pas approuvée expressément
par Philips Consumer Lifestyle peut invalider
l'habilitation de l'utilisateur à utiliser l'appareil.
Ne jetez pas ce produit avec les ordures
ménagères ordinaires. Renseignez-vous sur
les dispositions en vigueur dans votre région
concernant la collecte séparée des appareils
électriques et électroniques. La mise au rebut
citoyenne de votre ancien produit permet de
protéger l'environnement et la santé.
68
FR
Page 69

Мазмұны
9 Ақауларды жою 88
1 Маңызды ақпарат 70
ауіпсіздік 70
2 Ауа тазартқыш 73
Қораптың құрамы 73
3 Іске қосу 74
Сүзгілерді орнату 74
4 Ауа тазартқышты қолдану 76
Aуа сапасы шамының мағынасы 76
Tаза ауаны сақтау сигналының
мағынасы 76
Қосу 76
Ауа сапасы сенсорының
сезімталдығын орнату 77
Желдеткіш жылдамдығын өзгерту 78
Қолмен 78
Таймерді орнату 79
5 Ауа тазартқышты тазалау 80
Aуа тазартқышты тазалау 80
Aуа сапасы сенсорын тазалау 80
10 Кепілдік және қызмет көрсету 90
Бөлшектерге және қосалқы
құралдарға тапсырыс беру 90
11 Ескертулер 91
Электромагниттік өрістер (ЭМӨ) 91
Электромагниттік өріспен
(ЭМӨ) сәйкестік 91
Өңдеу 91
Қазақша
6 Алдын ала тазалау сүзгісін
тазалаңыз 82
7 Сүзгілерді ауыстыру 84
Белсендірілген көмір сүзгісі мен
HEРA сүзгісін ауыстыру 84
8 Сүзгінің қызмет ету мерзімін
санағышты қалпына келтіру 87
ҚҚ
69
Page 70

1 Маңызды
ақпарат
ауіпсіздік
Құралды қолданбастан бұрын осы
пайдаланушы нұсқаулығын мұқият оқып
шығыңыз да, оны келешекте қарау үшін
сақтап қойыңыз.
Қауіпті
• Ток соғуын немесе өртті
болдырмау үшін құралға су
немесе басқа сұйықтық және
тұтанғыш заттар кірмеуін
қадағалаңыз.
• Ток соғуын және/немесе
өртті болдырмау үшін
құрылғыны сумен немесе басқа
сұйықтықпен және тұтанғыш
заттармен тазаламаңыз.
Ескерту
• Құрылғыны қосар алдында,
құрылғының артында
көрсетілген кернеу жергілікті
қуат кернеуіне сәйкес
келетіндігін тексеріп алыңыз.
• Егер қуат сымы зақымдалған
болса, қауіп-қатердің алдын
алу үшін, оны тек Philips
компаниясына, Philips рұқсат
берген қызмет көрсету
орталығына немесе соған
ұқсас біліктілігі бар мамандарға
алмастыртыңыз.
• Құрылғының ашасы, қуат сымы
немесе өзі зақымданған болса,
оны қолданбаңыз.
• Бақылау астында болса
немесе құралды қауіпсіз түрде
пайдалану туралы нұсқаулар
алған болса және байланысты
қауіптерді түсінсе, бұл құралды
8 және одан жоғары жастағы
балалар және дене, сезу
немесе ақыл-ой қабілеттері
кем я болмаса тәжірибесі
мен білімі жоқ адамдар
пайдалана алады. Балалар
құралмен ойнамауы керек.
Тазалау және қызмет көрсету
жұмысын балалар бақылаусыз
орындамауы керек.
• Ауа кіріс жері мен ауа шығыс
жерін бітеп тастамаңыз,
мәселен ауа шығатын жерге
немесе ауа кіретін жердің
алдына зат қоймаңыз.
Абайлаңыз
• Бұл құрылғыны дұрыс
вентиляция жасау үшін,
әдеттегі шаңсорғыш ретінде
немесе тамақ пісіріп жатқанда
түтін сорғыш не желдеткіш
ретінде қолдануға болмайды.
70
ҚҚ
Page 71

• Егер құрылғыға қуат беру үшін
пайдаланылатын розетканың
байланысы нашар болса,
құрылғының ашасы қызады.
Құралды дұрыстап қосылған
розеткаға қосыңыз.
• Әрқашан құралды құрғақ,
тұрақты, тегіс және көлденең
бетке қойыңыз және
пайдаланыңыз.
• Құрылғының арт жағы мен екі
жанынан кемінде 20 см және
үстіңгі жағынан кемінде 30 см
бос орын қалдырыңыз.
• Құрылғының үстіне ештеңе
қоймаңыз және оның үстіне
отырмаңыз.
• Құралға конденсаттың тамуын
болдырмау үшін құралды
тікелей салқындатқыш астына
қоймаңыз.
• Құралды қоспай тұрып, барлық
сүзгілер дұрыс орнатылғанын
тексеріңіз.
• Тек осы құралға арналған
түпнұсқалық Philips сүзгілерін
пайдаланыңыз. Басқа ешбір
сүзгілерді пайдаланбаңыз.
• Құралды қатты заттармен
соғып алудан сақтаңыз (әсіресе
ауа кірісін және ауа шығысын).
• Құрылғының әрдайым
құрылғының артындағы
тұтқадан ұстап көтеріңіз
немесе жылжытыңыз.
• Ауа шығысына саусақтарды
немесе заттарды салмаңыз.
• Үй ішінде жәндіктерге қарсы
қолданатын түтін тәріздес
шашыратқыш қолданған жерде
немесе майлы қалдықтар,
жанып жатқан фимиам не
болмаса химиялық түтіндер
бар орындарда бұл құралды
қолдануға болмайды.
• Бұл құрылғыны газ
құрылғылары, жылыту
құрылғылары немесе ошақ/
камин жанында қолдануға
болмайды.
• Құралды қолданып болғаннан
соң, және оны тазалар
алдында міндетті түрде тоқтан
суырыңыз.
• Бұл құралды қатты
температура өзгерістері бар
бөлмеде қолдануға болмайды,
себебі бұл жағдайда құрал
ішінде тығыздалу тууы мүмкін.
• Кедергінің алдын алу үшін,
құрылғыны теледидар,
радиолар және радиосағаттар
сияқты ауа арқылы радио
толқындарын пайдаланатын
электр құрылғыларынан кем
дегенде 2м ара қашықтықта
қойыңыз.
Қазақша
ҚҚ
71
Page 72

• Құрылғы тек тұрмыстық
қолданыста қалыпты жұмыс
жағдайларында ғана қолдануға
арналған.
• Құралды ванна, дәретхана
немесе ас үй сияқты дымқыл
немесе температурасы жоғары
бөлмеде қолдануға болмайды.
• Құрылғы көмірқышқыл тотығын
(CO) немесе радонды (Rn)
шығармайды. Оны жану
процестерімен және қауіпті
химикаттармен байланысты
сәтсіз жағдайда қауіпсіздік
құрылғысы ретінде пайдалануға
болмайды.
72
ҚҚ
Page 73

2 Ауа тазартқыш
Сатып алғаныңыз құтты болсын және Philips компаниясына қош келдіңіз!
Philips ұсынатын қолдауды толық пайдалану үшін, өнімді www.philips.com/welcome сайтына тіркеңіз.
Құралды орнату және пайдалану алдында осы пайдаланушы нұсқаулығын мұқият оқып шығыңыз.
Оны болашақта анықтама алу үшін сақтаңыз.
Қораптың құрамы
Қораптың ішіндегілерді тексеріп, түгендеңіз.
Ауа сапасы сенсоры
Қазақша
4-сүзгі: HEPA сүзгісі
3-сүзгі: активтендірілген көмір сүзгі
1-сүзгі: алдын ала тазалау сүзгісі
AC4012
3-сүзгі: активтендірілген көмір сүзгі AC4123
4-сүзгі HEPA сүзгісі AC4124
AC4014
3-сүзгі: активтендірілген көмір сүзгі AC4143
4-сүзгі HEPA сүзгісі AC4144
www.philips.com/welcome
User manual
Пайдаланушы
нұсқаулығыъ
www.philips.com/welcome
Warranty
Кепілдік
ҚҚ
73
Page 74

3 Іске қосу
2 Панельдің төменгі бөлігін ақырын
тартып (1), алдыңғы панельдің жоғарғы
бөлігін өзіңізге қарай көтеріңіз (2).
Сүзгілерді орнату
Ауа тазартқыш барлық сүзгілері ішінде
бекітілген күйінде беріледі, оны пайдаланбас
бұрын сүзгілердің орам материалын алу
керек. Барлық сүзгілерді алып, оларды
қораптан шығарыңыз және төменде
көрсетілгендей етіп ауа тазартқышқа
салыңыз.
Кеңес
• Сүзгілерді алғанда немесе салғанда,
тұрақтырақ болу үшін тазартқышты қабырғаға
сүйеңіз.
Есте сақтаңыз
• Сүзгілерді дұрыс күйде салыңыз.
• Сүзгілерді HEPA сүзгісі, белсендірілген көмір
сүзгісі және алдын ала тазалау сүзгісі ретімен
қойғаныңызды тексеріңіз.
• Белгінің жаны сізге қарап тұрғанын тексеріңіз.
1 Саусағыңызды құрылғы жанындағы
панельдердің кіріңкі жерлеріне салып,
алдыңғы панельдің жоғарғы жағын
өзіңізге қарай ақырын тартыңыз.
2
1
3 Тазартқыштан барлық сүзгілерді алыңыз.
4 Сүзгілерден барлық орауыш
материалдарды алыңыз.
74
ҚҚ
Page 75

5 Сүзгілерді тазартқышқа қайта салыңыз.
6 Алдын ала тазалау сүзгісін тазартқышқа
салыңыз.
Есте сақтаңыз
• Екі шығыңқы жері бар жағы сізге қарап
тұрғанын және алдын ала тазалау сүзгісінің
барлық ілмектері тазартқышқа дұрыс ілінгенін
тексеріңіз.
Қазақша
7 Алдыңғы панельді орнына салу
үшін, алдымен үстіңгі ілмектерді
тазартқыштың үстіне салыңыз (1). Содан
кейін, панельді тазартқыштың корпусына
қарай итеріңіз (2).
1
2
ҚҚ
75
Page 76

4 Ауа
тазартқышты
қолдану
Aуа сапасы шамының
мағынасы
Tаза ауаны сақтау
сигналының мағынасы
Сүзгіні ауыстыру шамы ( ) сүзгілерді
ауыстыру керектігін көрсетеді.
Ауа сапасы шамының
сақинасының түсі
Көк Жақсы
Қызыл күрең Айқын
Қызыл Нашар
Тазартқыш қосылған кезде ауа сапасының
шамы автоматты түрде қосылады.
Есте сақтаңыз
• Бекітілген ауа сапасы сенсоры ауа сапасын
өлшеп, ауа сапасын шамының тиісті түсін
автоматты түрде таңдайды. Ауа таза болған
кезде ауа сапасы шамының түсі көк болады.
Ауа сапасы төмендеген кезде ауа сапасы
шамының түсі күлгін немесе қызыл түске
өзгереді.
Ауа сапасының
деңгейі
Таза ауаны сақтау сигналы Мынаны
бақылайды
Сүзгіні ауыстыру шамы
үздіксіз жанып тұрады. Бұл
шамамен 2 аптаға созылады.
2 аптаның соңғы күнінде
тазартқыш сүзгіні ауыстыру
керектігін хабарлау үшін әрбір
30 минут сайын сигнал береді.
Белсендірілген көмір
сүзгісі мен
HPEA сүзгісін
ауыстырыңыз.
Қосу
1 Ауа тазартқышты қуат көзіне қосыңыз.
» Барлық шамдар екі рет жанады
және сигнал береді. Содан кейін,
шамдар қайтадан өшеді.
AC4012 басқару
панелі
AC4014 басқару
панелі
76
ҚҚ
Page 77

2 Тазартқышты қосу үшін
басыңыз.
» Ауа сапасының шамы ағымдағы ауа
сапасын көрсетеді.
» Желдеткіш жылдамдығының
шамы жанады.
түймесін
Есте сақтаңыз
• Тазартқыш жоғары сезімталдық деңгейіне
қойылса, ол ауаны бұрынғыдан да таза ету
үшін ауа тазалауды ластанудың төменгі
деңгейінен бастайды. Ауа сапасы сенсорының
сезімталдығын реттемес бұрын тазартқышты
жалғаңыз.
1
түймесін басып, сол уақытта қуат
ашасын қуат розеткасына қосыңыз.
3 Тазартқышты өшіру үшін
түймесін
басыңыз.
Ауа сапасы сенсорының
сезімталдығын орнату
Белгілі бір аурумен ауыратын адамға (мысалы:
аллергия немесе демікпе) көп мөлшерде таза
ауа қажет. Сондықтан, тазартқыш ауа сапасы
сенсорының сезімталдығын реттеуге мүмкіндік
береді. Оны жоғары сезімталдық деңгейіне
қойсаңыз, тазартқыш ауаны тазалауды
ластанудың төмен деңгейінен бастайды.
3 сезімталдық деңгейі бар:
• стандартты
• сезімтал
• аса сезімтал
Ластану сенсоры стандартты
сезімталдық деңгейіне орнатылады. Ауа
сапасы сенсорының сезімталдығын келесі
жолмен реттеуге болады.
» Ауа сапасы сенсорының ағымдағы
сезімталдық деңгейін көрсету үшін
тазартқыш екі рет сигнал береді
және шамдарының бірі ( ,
немесе ) жанады.
Таймер жарығы Сезімталдық деңгейі
Аса сезімтал
Сезімтал
Стандартты
2 Ауа сапасы сенсорының сезімталдық
деңгейін реттеу үшін түймесін
басыңыз.
» Ауа сапасы сенсорының қажетті
сезімталдық деңгейін көрсету үшін
шамдарының бірі ( , немесе )
жанады.
3 Тазартқышты өшіру үшін
басыңыз.
түймесін
Қазақша
77
ҚҚ
Page 78

Есте сақтаңыз
• Сезімталдықты өзгерткеннен кейін
тазартқышты қосқан кезде ол орнатылған
сезімталдық деңгейінде автоматты түрде іске
қосылады.
Желдеткіш жылдамдығын
өзгерту
Қолмен
Керекті желдеткіш жылдамдығын
таңдауыңызға болады.
Есте сақтаңыз
• Желдеткіш жылдамдығын таңдағанда, таймер
функциясын да қолдануға болады («Таймерді
орнату» бөлімін қараңыз). Осындай жағдайда
шамдарының бірі (AC4012: және ) және
шамы ( , немесе ) жанады.
» AC4012 үлгісі үшін - , , немесе
; және
» AC4014 үлгісі үшін - , , немесе
.
1 Тазартқышты қосу үшін
түймесін
басыңыз.
2 Керекті желдеткіш жылдамдығын таңдау
үшін түймесін бір немесе бірнеше рет
басыңыз.
78
ҚҚ
Кеңес
• Ауа сапасының шамы көк түсте болса, бұл ауа
сапасының жақсы екенін білдіреді, сондықтан
желдетудің төменірек жылдамдығын таңдауға
болады.
Page 79

Дем алу режимі
Түнгі режимде ұйқыңызға кедергі жасамау
үшін барлық шамдар күңгірттенген кезде
ауа сүзгісі өте тыныш жұмыс істейді. (Тек
AC4012)
1 Тазартқышты қосу үшін
басыңыз.
түймесін
Жағдайлар Көрсеткіш
Желдеткіш
жылдамдығын
таңдаңыз
(«Желдеткіш
жылдамдығын
өзгерту» бөлімін
қараңыз).
Тазартқыш түнгі
режимде («Түнгі
режим» бөлімін
қараңыз).
шамдарының бірі
(AC4012 - , немесе
; AC4014 - ,
немесе ) және
шамдарының бірі ( ,
немесе ) жанады.
шамы және
шамдарының бірі ( ,
немесе ) жанады, бірақ
күңгірт.
2 Түнгі режимді таңдау үшін түймесін
басыңыз.
» шамы жанады.
Басқа желдету жылдамдығына өзгерту үшін
түймесін басыңыз.
Таймерді орнату
Таймер функциясымен тазартқышты
белгіленген сағат бойы жұмыс істейтін
қылуға болады. Орнатылған уақыт өткенде,
тазартқыш автоматты түрде өшеді.
Таймер функциясын келесі жағдайларда
пайдалануға болады:
1 Тазартқышты қосу үшін
басыңыз.
2 Таймерді іске қосу үшін
басыңыз.
» шамы ( , немесе ) жанады.
түймесін
түймесін
3 Тазартқыш жұмыс істейтін сағат санын
таңдау үшін түймесін қайталап баса
беріңіз. Тиісті шамы ( , немесе )
жанады.
Таймер функциясын өшіру үшін түймесін
шамы ( , немесе ) өшкенге дейін
қайталап басыңыз.
Қазақша
79
ҚҚ
Page 80

5 Ауа
тазартқышты
тазалау
Есте сақтаңыз
• Тазалау алдында ауа тазалағышты міндетті
түрде розеткадан ажырату керек.
• Ауа тазалағышты суға немесе басқа
сұйықтыққа батыруға болмайды.
• Тазартқыштың кез келген бөлігін тазалау үшін
ағартқыш немесе алкоголь сияқты абразивті,
агрессивті немесе тұтанғыш тазалағыш
заттарды ешқашан пайдаланбаңыз.
• Алдын ала тазалау сүзгісі ғана жуылады.
Басқа ауа тазартқыш сүзгілерді жууға немесе
шаңсорғышпен тазалауға БОЛМАЙДЫ.
Есте сақтаңыз
• Бөлмедегі ылғалдылық деңгейі өте жоғары
кезде ауа сапасы сенсорындағы конденсат
артуы мүмкін. Нәтижесінде, ауа сапасының
шамы ауа сапасы жақсы болса да, ауа сапасын
нашар деп көрсетуі мүмкін. Осындай
жағдайда ауа сапасының сенсорын тазалау
немесе қолмен реттелетін жылдамдық
параметрлерінің бірін таңдау керек.
1 Ауа сапасы сенсорының ауа кірісін және
шығысын жұмсақ щеткамен тазалаңыз.
Aуа тазартқышты тазалау
Шаңның жиналуын болдырмау үшін ауа
тазалағыш корпусының ішін және сыртын
жүйелі түрде тазалаңыз.
1 Ауа тазартқыш корпусының шаңын
жұмсақ құрғақ шүберекпен сүртіп
алыңыз.
2 Ауа кірісін және шығысын құрғақ, жұмсақ
шүберекпен тазалаңыз.
Aуа сапасы сенсорын
тазалау
Тазартқыш дұрыс жұмыс істеу үшін ауа
сапасы сенсорын 2 ай сайын тазалаңыз.
Тазартқыш шаң ортада пайдаланылатын
болса, оны жиірек тазалаңыз.
80
ҚҚ
2 Ауа сапасы сенсорының қақпағын
алыңыз.
Page 81

3 Ауа сапасы сенсорын, шаң болған кіріс
және шығыс жолын дымқылдау мақта
тампонымен тазалаңыз.
4 Оларды құрғақ мақта тампонымен
құрғатыңыз.
5 Ауа сапасы сенсорының қақпағын
салыңыз.
Қазақша
ҚҚ
81
Page 82

6 Алдын ала
тазалау сүзгісін
тазалаңыз
Есте сақтаңыз
• Алдын ала тазалау сүзгісін жууға және
шаңсорғышпен тазартуға болады.
• Тазартқыш дұрыс жұмыс істеу үшін, алдын ала
тазалау сүзгісін екі апта сайын тазартыңыз.
1 Тазартқышты өшіріп, қуат көзінен
ажыратыңыз.
3 Алдын ала тазалау сүзгісін алу үшін, екі
шығыңқы жерді ұстап, сүзгіні өзіңізге
қарай тартыңыз.
4 Алдын ала тазалау сүзгісін тазарту үшін,
шаңсорғышты пайдаланыңыз немесе
ағын сумен жууыңыз. Алдын ала тазалау
сүзгісі өте лас болса, шаңды кетіру үшін
жұмсақ щетканы пайдаланыңыз.
2 Саусақтарыңызды құрылғы жанындағы
панельдердің кіріңкі жерлеріне салып,
алдыңғы панельдің төменгі бөлігін
өзіңізге қарай ақырын тартыңыз
(1). Панельдің жоғарғы жағындағы
ілмектерді құрылғының үстінен көтеріп
алыңыз (2).
2
1
82
ҚҚ
5 Алдын ала тазалау сүзгісін кептіріңіз.
6 Алдын ала тазалау сүзгісін тазартқышқа
қайта салыңыз. Барлық ілмектерді
тазартқышқа дұрыстар бекітіңіз.
Page 83

7 Алдыңғы панельді орнына салу
үшін, алдымен үстіңгі ілмектерді
тазартқыштың үстіне салыңыз (1). Содан
кейін, панельді тазартқыштың корпусына
қарай итеріңіз (2).
1
2
Есте сақтаңыз
• Сонымен қатар, алдын ала тазалау сүзгісін
шаңсорғышпен тазалауға болады.
• Алдын ала тазалау сүзгісі толықтай құрғақ
екендігін тексеріңіз. Әлі де дымқыл болса,
бактерия көбейіп, алдын ала тазалау сүзгісінің
жарамдылық мерзімін қысқартуы мүмкін.
• Екі шығыңқы жері бар жағы сізге қарап
тұрғанын және алдын ала тазалау сүзгісінің
барлық ілмектері тазартқышқа дұрыс ілінгенін
тексеріңіз.
Қазақша
ҚҚ
83
Page 84

7 Сүзгілерді
ауыстыру
Сүзгіні ауыстыру шамы ( ) сүзгілерді
ауыстыру керектігін көрсетеді.
Есте сақтаңыз
• Тазартқыш қосулы кезде сүзгіні ауыстыру
мақсатында алдыңғы панельді алсаңыз,
басқару тақтасындағы барлық шамдар өшеді.
• Алдыңғы панель тазартқышқа қайта салынған
соң, барлық шамдар екі рет жыпылықтайды.
Сонан соң, тазартқыш өшеді. Тазартқышты
қайта қосу үшін түймесін басыңыз.
Есте сақтаңыз
• Сүзгілерді дұрыс күйде салыңыз.
• Сүзгілерді HEPA сүзгісі, белсендірілген көмір
сүзгісі және алдын ала тазалау сүзгісі ретімен
қойғаныңызды тексеріңіз.
• Белгінің жаны сізге қарап тұрғанын тексеріңіз.
1 Тазартқышты өшіріп, қуат көзінен
ажыратыңыз.
Белсендірілген көмір сүзгісі
мен HEРA сүзгісін ауыстыру
Есте сақтаңыз
• Активтендірілген көмір сүзгі мен HEPA
сүзгісін жууға немесе шаңсорғышпен тазалауға
болмайды.
шамы жанғанда белсендірілген көмір сүзгісі
мен HEPA сүзгісін ауыстырыңыз. Ол шамамен
2 аптаға жетеді.
2 аптаның соңғы күнінде тазартқыш
сүзгілерді ауыстыру керектігін хабарлау үшін
әрбір 30 минут сайын сигнал береді.
Кеңес
• Сүзгілерді алғанда немесе салғанда,
тұрақтырақ болу үшін тазартқышты қабырғаға
сүйеңіз.
2 Саусақтарыңызды бүйір панельдердің
кіріңкі жерлеріне салып, алдыңғы
панельдің жоғарғы жағын өзіңізге
қарай жайлап тартыңыз. Панельді
тазартқыштың жоғарғы жағындағы
ілмектерден көтеріп алыңыз.
2
1
84
ҚҚ
Page 85

3 Сүзгіні жапсырмасынан ұстап алыңыз.
Сүзгілердің екі жағынан ұстап,
тұрмыстық қалдықтарды тастауға
арналған жәшікке салыңыз.
Есте сақтаңыз
• Жәшікке салынған сүзгіге қол тигізуге немесе
оны иіскеуге болмайды, себебі онда ауадағы
ластағыштар жиналған.
• Пайдаланылған сүзгілерді алып тастаған соң
қолыңызды жуыңыз.
4 Жаңа сүзгілерден барлық орауыш
материалдарды алыңыз.
5 Алдымен, тазартқышқа жаңа HEPA
сүзгісін салыңыз.
6 Содан кейін, тазартқышқа жаңа
белсендірілген көмір сүзгісін салыңыз.
Қазақша
7 Алдын ала тазалау сүзгісін тазартқышқа
салыңыз.
Есте сақтаңыз
• Екі шығыңқы жері бар жағы сізге қарап
тұрғанын және алдын ала тазалау сүзгісінің
барлық ілмектері тазартқышқа дұрыс ілінгенін
тексеріңіз.
ҚҚ
85
Page 86

8 Алдыңғы панельді орнына салу үшін,
алдымен үстіңгі ілмектерді тазартқыштың
үстіне салыңыз (1). Содан кейін, панельді
тазартқыштың корпусына қарай итеріңіз
(2).
1
2
9 Белсендірілген көмір сүзгісі мен HEPA
сүзгісінің қызмет ету мерзімін қалпына
келтіріңіз («Сүзгінің қызмет ету мерзімін
санағышты қалпына келтіру» бөлімін
қараңыз).
86
ҚҚ
Page 87

8 Сүзгінің қызмет
ету мерзімін
санағышты
қалпына келтіру
Сүзгілерді алмастырған соң сүзгінің қызмет
ету мерзімін санағышты да қалпына келтіру
керек. Бұл тазартқышқа сүзгінің қызмет ету
мерзіміне сәйкес жұмыс істеу мүмкіндігін
береді.
Сүзгілерді ауыстырғаннан кейін сүзгі уақытын
қалпына келтіріңіз:
1 Тазартқышты өшіріп, қуат көзінен
ажыратыңыз.
4 түймесін 2 секунд басып тұрыңыз.
Есте сақтаңыз
• Тазартқышты қуат желісіне қосылып, жұмыс
істеп тұрған кезде оны бастапқы қалпына
келтіру керек.
• шамы жанған кезде сүзгілерді ауыстырыңыз.
Қазақша
2 Ауа тазартқыш сүзгілерін ауыстырыңыз
(«Сүзгілерді ауыстыру» бөлімін қараңыз).
3 Штепсельді розеткаға жалғап,
тазартқышты қайта іске қосыңыз.
ҚҚ
87
Page 88

9 Ақауларды жою
Бұл тарауда тазартқышта орын алуы мүмкін ең көп кездесетін ақаулар жинақталған. Егер төменде
берілген ақпарат көмегімен ақаулық жойылмаса, еліңіздегі тұтынушыларды қолдау орталығына
хабарласыңыз.
Ақаулық Мүмкін шешімі
шамы үздіксіз жанып
тұрады.
Ауа шығысынан ауа
шықпайды.
Түнгі режим қосылған
кезде желдеткіш
жылдамдығы өзгермейді.
Ауа шығысынан келетін
ауа ағыны алдыңғыдан
әлдеқайда әлсіздеу.
Ауа сапасы тіпті
тазартқыш ұзақ уақыт
жұмыс істеп тұрса да
жақсармайды.
Ауа сапасы шамының түсі
ешқашан өзгермейді.
Аллергиям болғандықтан,
маған таза ауа қажет.
Тазартқыштың дыбысы
өте қатты шығады.
Сүзгі толған. Сүзгіні ауыстырып, тазартқышты қалпына келтіріңіз.
Ауа тазалағыш қуат көзіне қосылмаған. Тазалағышты қуат көзіне
жалғап, қосыңыз.
Түнгі режимде желдеткіш жылдамдығы ең төменгі деңгейге
орнатылады. Желдеткіш жылдамдығын өзгерту қажет болса,
қажетті желдеткіш жылдамдығын орнату үшін түймесін бір
немесе бірнеше рет басыңыз.
• Алдын ала тазалау сүзгісі ластанған. Алдын ала тазалау
сүзгісін тазартыңыз («Алдын ала тазалау сүзгісін тазарту»
бөлімін қараңыз).
• Сүзгілерден барлық орауыш материалдарды алып
тастамағансыз. Барлық орауыш материалдарды алып
тастағаныңызды тексеріңіз.
• Тазартқышқа сүзгілердің бірі салынбаған. Барлық сүзгілер
келесі ретпен ең ішкі сүзгіден бастап дұрыс салынғанын
тексеріңіз: 1) HEPA сүзгісі; 2) белсендірілген көмір сүзгісі; 3)
алдын ала тазалау сүзгісі.
• Ауа сапасы сенсоры дымқыл. Бөлмеңіздегі ылғалдылық
деңгейі жоғары және конденсат түзеді. Ауа сапасы
сенсорының таза әрі құрғақ екенін тексеріңіз («Ауа сапасы
сенсорын тазалау» бөлімін қараңыз).
• Ауа сапасы сенсоры ластанған. Ауа сапасы сенсорын
тазартыңыз («Ауа сапасы сенсорын тазалау» бөлімін қараңыз).
• Бөлмедегі желдету деңгейі жеткіліксіз. Ауа айналымын
жақсарту үшін терезені ашып қойыңыз.
Тазартқыш ауаны жақсырақ тазалау үшін ауа сапасы сенсорының
сезімталдығын өзгертуге болады («Ауа сапасы сенсорының
сезімталдығын орнату» бөлімін қараңыз).
• Сүзгілерден барлық орам материалының алынғанын
тексеріңіз.
• Құрылғы дыбысы әлі де тым жоғары болса, желдеткіш
жылдамдығын төменірек деңгейге өзгертуге болады.
88
ҚҚ
Page 89

Ақаулық Мүмкін шешімі
Тазартқыш әлі де сүзгіні
ауыстыру қажеттігін
көрсетіп тұр, бірақ мен
түймесін дұрыс баспаған шығарсыз. Тазартқышты қуат көзіне
жалғап, түймесін басыңыз және түймесін 2 секунд басып
тұрыңыз.
ауыстырып қойғанмын.
Қазақша
ҚҚ
89
Page 90

10 Кепілдік және
қызмет көрсету
Егер ақпарат қажет болса немесе мәселеңіз
болса,
www.philips.com мекенжайындағы Philips
веб-сайтына кіріңіз, не болмаса еліңіздегі
Philips тұтынушыларды қолдау орталығына
(оның телефон нөмірін дүниежүзілік кепілдік
парақшасынан таба аласыз) хабарласыңыз.
Егер еліңізде тұтынушыларға қолдау көрсету
орталығы болмаса, онда жергілікті Philips
компаниясының дилеріне барыңыз.
Бөлшектерге және қосалқы
құралдарға тапсырыс беру
Егер бөлшекті ауыстырғыңыз келсе не
қосалқы бөлшекті сатып алғыңыз келсе, Philips
сатушысына барыңыз не www.philips.com/
support сайтына кіріңіз.
Егер бөлшектерді алуға қатысты мәселелер
болса, еліңіздегі Philips тұтынушыларды
қолдау орталығына (оның телефон нөмірі
дүниежүзілік кепілдік парақшасында берілген)
хабарласыңыз.
90
ҚҚ
Page 91

11 Ескертулер
Өңдеу
Электромагниттік өрістер
(ЭМӨ)
Осы Philips құралы электромагниттік өрістерге
қатысты барлық қолданыстағы стандарттар
мен ережелерге сәйкес келеді.
Электромагниттік өріспен (ЭМӨ)
сәйкестік
Koninklijke Philips N.V. тұтынушыларға
арналған, басқа электрондық құрылғылар
сияқты, негізінде, электр магнитті сигналдар
шығаратын және қабылдайтын қабілеті бар
көп өнімдер жасайды және сатады.
Philips компаниясының негізгі жұмыс
ұстанымдарының бірі өнімдер үшін бүкіл
қажетті денсаулық және қауіпсіздік
шараларын сақтау, қолданыстағы барлық заң
талаптарына сәйкес болу және өнімді жасау
кезінде қолданылатын ЭМӨ стандарттарын
ұстану болып табылады.
Philips компаниясы денсаулыққа кері
әсерлері жоқ өнімдерді дамыту, жасау және
сату бағытын ұстанады. Өнімдер арналған
мақсаты бойынша дұрыс қолданылғанда,
Philips компаниясы олардың қазіргі таңдағы
ғылыми дәлелдерге сәйкес пайдалануға
қауіпсіз екенін растайды.
Philips компаниясы халықаралық ЭМӨ және
қауіпсіздік стандарттарын дамытуда белсенді
рөл атқарады, сондықтан өз өнімдеріне
бірінші болып енгізу үшін стандартизациядағы
болашақ жетілдірулерді болжауға мүмкіндік
береді.
Philips Consumer Lifestyle тікелей рұқсат
бермеген құрылғыға енгізілген қандай да
бір өзгерістер немесе модификациялар
пайдаланушыны жабдықты пайдалану
құқығынан айыруы мүмкін.
Ешқашан өніміңізді басқа тұрмыстық
қалдықтармен бірге тастамаңыз. Электр және
электрондық өнімдерді бөлек жинау туралы
жергілікті ережелермен танысыңыз. Ескі өнімді
қоқысқа дұрыс тастау қоршаған ортаға және
адам денсаулығына ықтималды кері әсерін
тигізудің алдын алады.
Қазақша
ҚҚ
91
Page 92

Page 93

Содержание
1 Внимание 94
8 Сброс показаний счетчика
срока службы фильтра 111
Безопасность 94
2 Ваш очиститель воздуха 97
Что входит в комплект поставки 97
3 С чего начать 98
Установка фильтров 98
4 Эксплуатация очистителя
воздуха 100
Значение сигналов индикатора
качества воздуха 100
Значение сигналов оповещения
системы контроля качества
воздуха 100
Включение 100
Настройка чувствительности
датчика качества воздуха 101
Изменение скорости работы
вентилятора 102
Ручной 102
Установка таймера 103
9 Устранение неисправностей 112
10 Гарантия и обслуживание 114
Заказ запчастей и аксессуаров 114
11 Примечания 115
Электромагнитные поля (ЭМП) 115
Соответствие стандартам ЭМП 115
Утилизация 115
Русский
5 Очистка очистителя воздуха 104
Очистка очистителя воздуха 104
Очистка датчика качества воздуха 104
6 Очистка фильтра
предварительной очистки 106
7 Замена фильтров 108
Замена угольного фильтра и
фильтра HEPA 108
RU
93
Page 94

1 Внимание
Безопасность
Перед эксплуатацией прибора внимательно
ознакомьтесь с настоящим руководством
и сохраните его для дальнейшего
использования в качестве справочного
материала.
Опасно!
• Во избежание поражения
электрическим током и/или
риска возгорания избегайте
попадания на прибор воды,
других жидкостей или
огнеопасных растворителей.
• Во избежание поражения
электрическим током и/или
риска возгорания запрещается
очищать прибор водой
или другими жидкостями
или (огнеопасными)
растворителями.
Предупреждение
• Перед подключением прибора
убедитесь, что напряжение,
указанное на нижней или
задней панели прибора,
соответствует напряжению
местной электросети.
• В случае повреждения шнура
питания его необходимо
заменить. Чтобы обеспечить
безопасную эксплуатацию
прибора, заменяйте шнур
только в авторизованном
сервисном центре Philips
или в сервисном центре с
персоналом аналогичной
квалификации.
• Запрещено пользоваться
прибором, если сетевая вилка,
сетевой шнур или сам прибор
повреждены.
• Дети старше 8 лет и
лица с ограниченными
возможностями сенсорной
системы или ограниченными
умственными или физическими
способностями, а также
лица с недостаточным
опытом и знаниями могут
пользоваться этим прибором
под присмотром или после
получения инструкций о
безопасном использовании
прибора и потенциальных
опасностях. Не позволяйте
детям играть с прибором.
Дети могут осуществлять
очистку и уход за прибором
только под присмотром
взрослых.
94
RU
Page 95

• Не блокируйте отверстия
для входа и выхода воздуха,
то есть не ставьте предметы
перед этими отверстиями.
Внимание!
• Прибор не заменяет
полноценную систему
вентиляции, регулярную
уборку пылесосом или
кухонную вытяжку.
• В случае если подключение
сетевой розетки произведено
неправильно, сетевая вилка
прибора будет нагреваться.
Прибор следует подключать к
исправной сетевой розетке.
• Используйте и устанавливайте
прибор на сухой,
горизонтальной, ровной и
устойчивой поверхности.
• Между стеной, задней и
боковыми панелями прибора
должно оставаться не
менее 20 см свободного
пространства, а над прибором
— не менее 30 см.
• Не ставьте на прибор
посторонние предметы и не
садитесь на него.
• Во избежание попадания
конденсата на прибор
не устанавливайте его
непосредственно под
кондиционером.
• Перед включением прибора
убедитесь, что все фильтры
установлены правильно.
• Используйте только
оригинальные фильтры Philips,
разработанные для данной
модели. Использование других
фильтров не рекомендуется.
• Оберегайте прибор (в
частности, отверстия для
входа и выхода воздуха) от
ударов твердыми предметами.
• Поднимайте и перемещайте
прибор только за ручку,
расположенную на задней
панели прибора.
• Не вставляйте пальцы и другие
предметы в отверстие для
выхода воздуха.
• Не используйте прибор, если
в помещении применялся
дымовой инсектицид, а также
в местах, где присутствуют
масляный туман, горящие
курильницы и газообразные
химические отходы.
• Не используйте прибор рядом
с газовым оборудованием,
нагревательными
устройствами или каминами.
Русский
RU
95
Page 96

• Обязательно отключайте
прибор от электросети
после использования и перед
очисткой.
• Не используйте прибор
в помещениях с резкими
перепадами температуры,
так как это может вызвать
конденсацию влаги внутри
прибора.
• Для предотвращения помех
устанавливайте прибор на
расстоянии не менее 2 м
от электрооборудования,
в котором используются
радиоволны, например
телевизоров,
радиоприемников или часов с
радиоуправлением.
• Прибор предназначен
исключительно для домашнего
применения при нормальных
условиях эксплуатации.
• Не используйте прибор
в условиях повышенной
влажности или при высоких
температурах, например в
ванной, туалете или на кухне.
• Прибор не нейтрализует
угарный газ (CO) и радон
(Rn). Прибор нельзя
использовать в качестве
защитного устройства в случае
возгорания или аварийного
выброса химических веществ.
96
RU
Page 97

2 Ваш очиститель воздуха
Поздравляем с покупкой и приветствуем вас в клубе Philips!
Чтобы воспользоваться всеми преимуществами поддержки Philips, зарегистрируйте устройство
на веб-сайте www.philips.com/welcome.
Внимательно прочитайте данное руководство пользователя перед установкой и использованием
устройства. Сохраните его для дальнейшего использования.
Что входит в комплект поставки
Проверьте комплектацию упаковки:
Датчик качества воздуха
Фильтр 4: фильтр HEPA
Фильтр 3: угольный фильтр
Фильтр 1: фильтр предварительной очистки
AC4012
Фильтр 3 угольный фильтр AC4123
Фильтр 4 фильтр HEPA AC4124
AC4014
Фильтр 3 угольный фильтр AC4143
Фильтр 4 фильтр HEPA AC4144
www.philips.com/welcome
User manual
Руководство
пользователя
www.philips.com/welcome
Warranty
Гарантия
RU
Русский
97
Page 98

3 С чего начать
Установка фильтров
Очиститель воздуха поставляется с
установленными фильтрами, однако
перед началом эксплуатации с фильтров
необходимо снять упаковку. Извлеките
фильтры, освободите их от упаковки и
установите в очиститель воздуха, как
описано ниже.
Совет
• Во время извлечения или установки фильтров
прислоните прибор к стене так, чтобы его
положение было устойчивым.
Примечание
• Установите фильтры на место.
• Сначала необходимо установить фильтр
HEPA, затем угольный фильтр и, наконец,
фильтр предварительной очистки.
• Сторона с ярлыком должна быть направлена
на вас.
2 Аккуратно потяните за нижнюю часть
панели и снимите ее (1), затем потяните
верхнюю часть передней панели на себя
(2).
2
1
3 Извлеките из очистителя воздуха все
фильтры.
4 Удалите с фильтров весь упаковочный
материал.
1 Возьмитесь за пазы на боковых панелях
и осторожно потяните верхнюю часть
передней панели на себя.
98
RU
Page 99

5 Установите фильтры обратно в
очиститель воздуха.
7 Чтобы установить на место переднюю
панель, сначала вставьте в верхнюю
часть очистителя воздуха верхние
крючки (1). Затем прижмите панель к
корпусу очистителя воздуха (2).
1
6 Установите в очиститель воздуха
фильтр предварительной очистки.
Примечание
• Убедитесь, что панель с двумя выступами
находится перед вами, а все крючки фильтра
предварительной очистки надежно крепятся
к очистителю воздуха.
2
Русский
RU
99
Page 100

4 Эксплуатация
очистителя
воздуха
Значение сигналов
индикатора качества
воздуха
Значение сигналов
оповещения системы
контроля качества воздуха
Индикатор замены ( ) указывает на
необходимость замены фильтров.
Цвет подсветки кольца
индикатора качества
воздуха
Синие Отличное
Фиолетовый Четкий
Красные Плохо
Индикатор качества воздуха загорается
автоматически после включения прибора.
Примечание
• Встроенный датчик качества воздуха
оценивает качество воздуха, после
чего загорается соответствующий цвет
индикатора. Если воздух в помещении чистый,
индикатор качества воздуха горит синим
цветом. Если качество воздуха в помещении
снижается, цвет индикатора качества воздуха
становится фиолетовым или красным.
Качество воздуха
Функция оповещения
системы контроля качества
воздуха
Индикатор замены фильтра
горит постоянно. Это
происходит на протяжении
примерно 2 недель. Спустя
две недели очиститель
воздуха начинает подавать
звуковой сигнал каждые
30 минут, информируя о
необходимости замены
фильтров.
Рекомендации
Замените
угольный
фильтр
и фильтр
HEPA.
Включение
1 Подключите очиститель воздуха к
источнику питания.
» Дважды загорятся все индикаторы,
прозвучит звуковой сигнал. Затем
все индикаторы погаснут.
100
RU
 Loading...