

Page 1
1 2
FDC
E
© 2017 Koninklijke Philips N.V.
All rights reserved.
4241 210 95101
AC3259
H I J K L M N
A
B
G
EN User manual 1
DA Brugervejledning 18
DE Benutzerhandbuch 35
ES Manual del usuario 55
FI Käyttöopas 73
FR Mode d’emploi 91
IT Manuale utente 110
NL Gebruiksaanwijzing 130
NO Brukerhåndbok 149
SV Användarhandbok 166
Page 2
3
4
5
6
23
24
25
26
15
19
7
8
9
10
27
28
29
30
3s
11
12
16
20
13
17
21
14
18
22
31
35
39
32
3s
36
3s
3s
37
33
34
3s
38
3s
3s
3s
3s
3s
3s
Page 3
English
Contents
1 Important 2
Safety 2
2 Your air purier 5
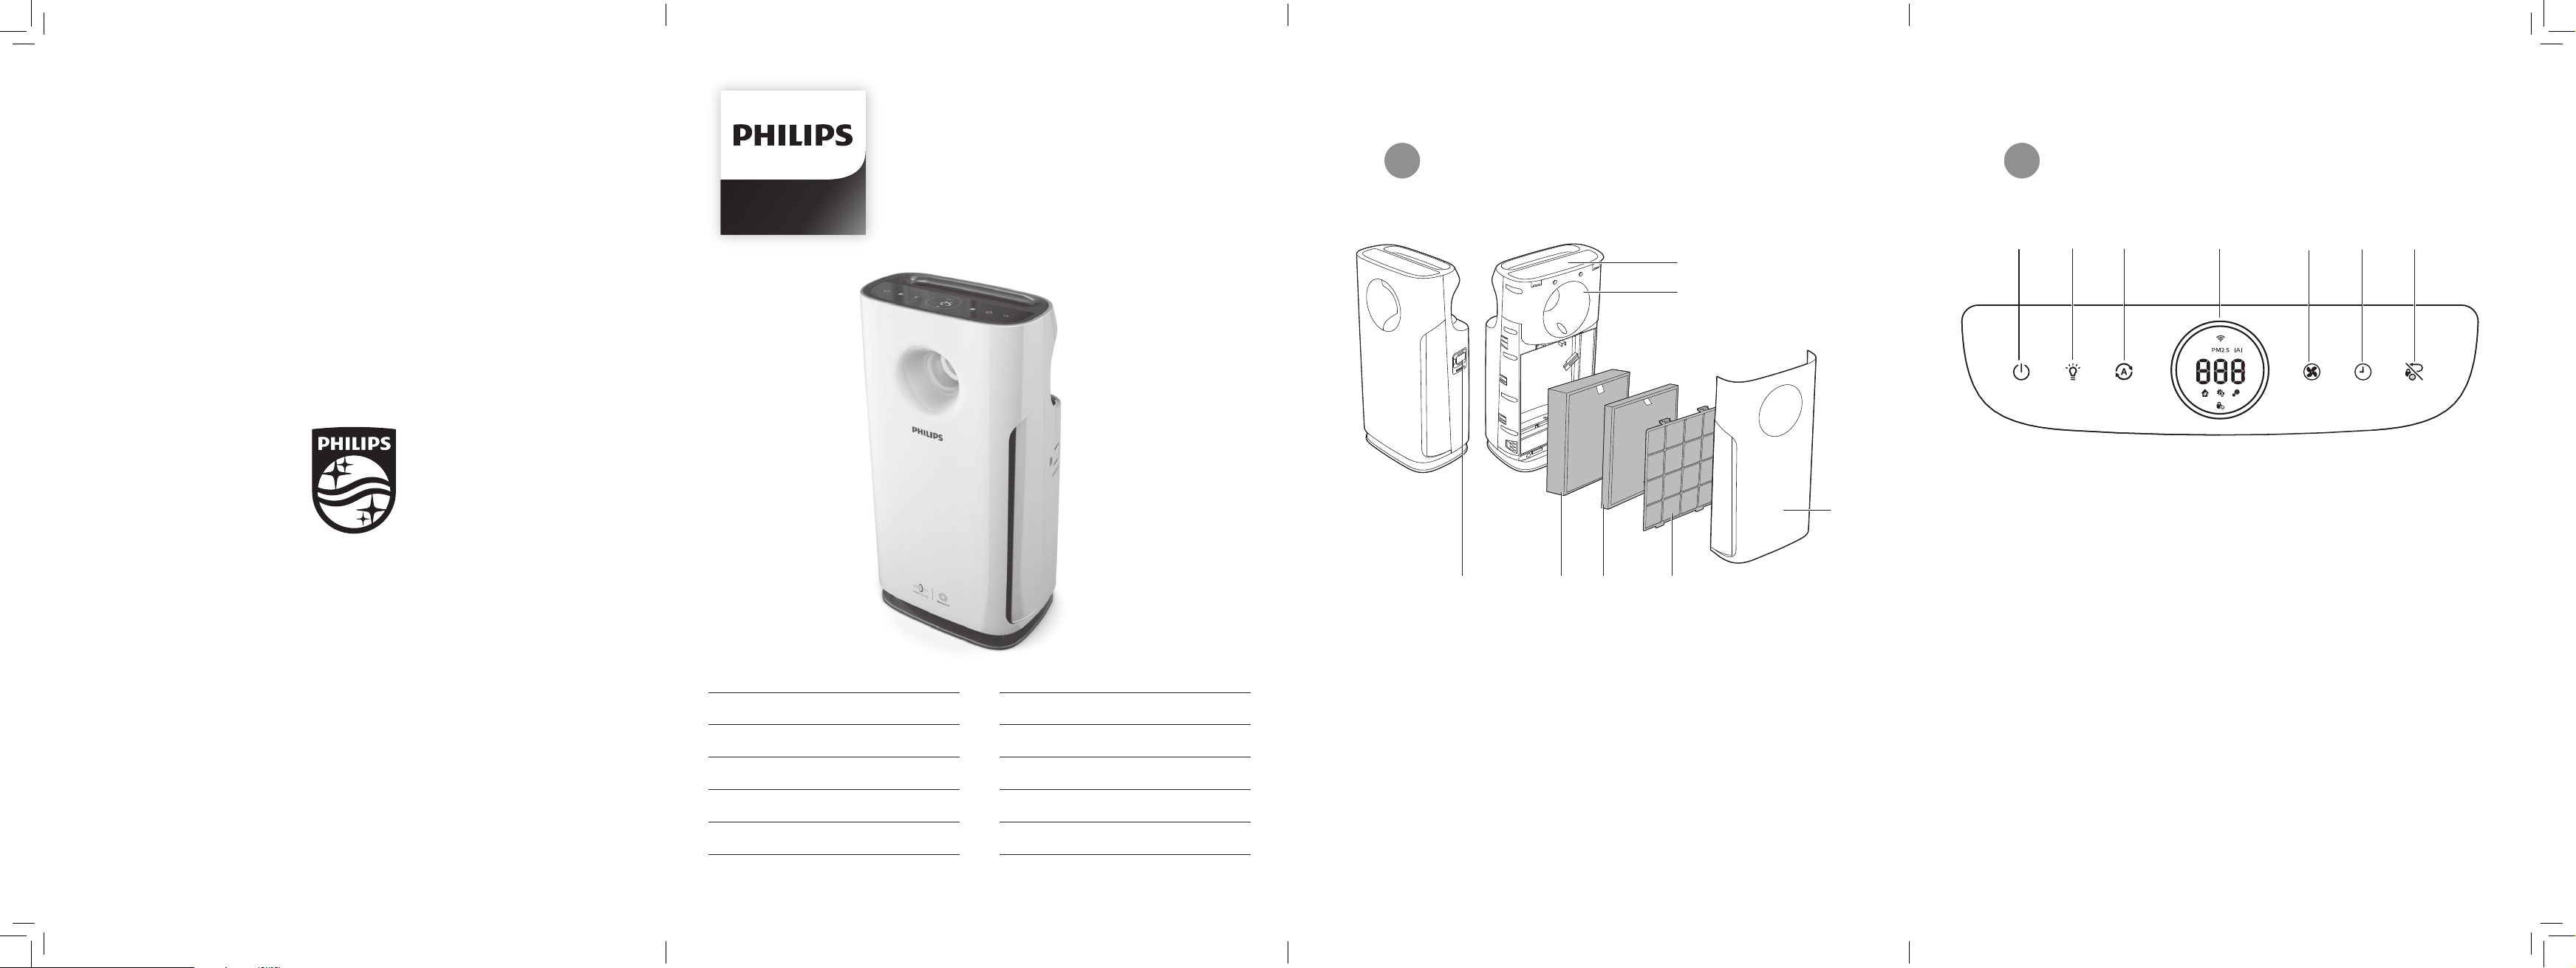
Product overview (g.a) 5
Controls overview (g.b) 5
3 Getting started 5
Installing lters 5
Wi-Fi setup 6
4 Using the appliance 7
Understanding the air
quality light 7
Switching on and o 7
Changing the Auto mode
setting 7
Changing the fan speed 8
Setting the timer 8
Setting the child lock 8
Using the light on/o function 9
Switching the display mode 9
6 Replacing the lter 11
Understanding the healthy
air protect lock 11
Replacing the lters 11
Filter lifetime counter reset 12
Filter type change 12
7 Troubleshooting 13
8 Guarantee and service 16
Order parts or accessories 16
9 Notices 16
Electromagnetic elds (EMF) 16
Recycling 17
Software 17
5 Cleaning 9
Cleaning schedule 9
Cleaning the body of the
appliance 9
Cleaning the air quality
sensor 10
Cleaning the pre-lter 10
Environmental friendly paper used. Thanks for your contribution to save trees.
1EN
Page 4

1 Important
Safety
Read this user manual carefully before
you use the appliance, and save it for
future reference.
Danger
• Do not let water or any
other liquid or flammable
detergent enter the
appliance to avoid electric
shock and/or a fire
hazard.
• Do not clean the
appliance with water,
any other liquid, or a
(flammable) detergent to
avoid electric shock and/
or a fire hazard.
• Do not spray any
flammable materials
such as insecticides or
fragrance around the
appliance.
Warning
• Check if the voltage
indicated on the
appliance corresponds to
the local power voltage
before you connect the
appliance.
• If the power cord is
damaged, you must have
it replaced by Philips, a
service center authorized
by Philips, or similarly
qualified persons in order
to avoid a hazard.
• Do not use the appliance
if the plug, the power
cord, or the appliance
itself is damaged.
• This appliance can be
used by children aged
from 8 years and above
and persons with reduced
physical, sensory or
mental capabilities or
lack of experience and
knowledge if they have
been given supervision or
instruction concerning use
of the appliance in a safe
way and understand the
hazards involved. Child
shall not play with the
appliance. Cleaning and
maintenance shall not be
made by children without
supervision.
• Do not block the air inlet
and outlet, e.g. by placing
items on the air outlet or
in front of the air inlet.
2 EN
Page 5

English
• Make sure that foreign
objects do not fall into the
appliance through the air
outlet.
• Standard WiFi interface
based on 802.11b/g/n at
2.4 GHz with a maximum
output power of 31.62 mW
EIRP.
Caution
• This appliance is not
a substitute for proper
ventilation, regular
vacuum cleaning, or use
of an extractor hood or
fan while cooking.
• If the power socket used
to power the appliance
has poor connections,
the plug of the appliance
becomes hot. Make
sure that you plug the
appliance into a properly
connected power socket.
• Always place and use the
appliance on a dry, stable,
level, and horizontal
surface.
• Leave at least 20cm free
space behind and on both
sides of the appliance
and leave at least 30cm
free space above the
appliance.
• Do not place anything on
top of the appliance.
• Do not sit or stand on
the appliance. Sitting or
standing on the appliance
may lead to potential
injury.
• Do not place the
appliance directly below
an air conditioner to
prevent condensation
from dripping onto the
appliance.
• Make sure all filters
are properly installed
before you switch on the
appliance.
• Only use the original
Philips filters specially
intended for this
appliance. Do not use any
other filters.
• Combustion of the filter
may cause inreversible
human hazard and/or
jeopardize other lives . Do
not use the filter as fuel or
for similar purpose.
• Avoid knocking against
the appliance (the air inlet
and outlet in particular)
with hard objects.
3EN
Page 6

• Always lift or move the
appliance by the handle
on top of the appliance.
• Do not insert your fingers
or objects into the air
outlet or the air inlet to
prevent physical injury
or malfunctioning of the
appliance.
• Do not use this appliance
when you have used
indoor smoke-type insect
repellents or in places
with oily residues, burning
incense, or chemical
fumes.
• Do not use the appliance
near gas appliances,
heating devices or
fireplaces.
• Always unplug the
appliance after use
and before cleaning
or carrying out other
maintenance.
• Do not use the appliance
in a room with major
temperature changes,
as this may cause
condensation inside the
appliance.
• To prevent interference,
place the appliance at
least 2 meters away from
electrical appliances that
use airborne radio waves
such as TVs, radios, and
radio-controlled clocks.
• The appliance is only
intended for household
use under normal
operating conditions.
• Do not use the appliance
in wet surroundings or in
surroundings with high
ambient temperatures,
such as the bathroom,
toilet, or kitchen.
• The appliance does
not remove carbon
monoxide (CO) or radon
(Rn). It cannot be used
as a safety device in
case of accidents with
combustion processes
and hazardous chemicals.
• If you need to move the
appliance, disconnect the
appliance from the power
supply first.
• Do not move the
appliance by pulling its
power cord.
4 EN
Page 7
English
2 Your air purifier
Congratulations on your purchase, and
welcome to Philips!
To fully benefit from the support that
Philips offers, register your product at
www.philips.com/welcome.
Product overview (g.a)
A Control panel
B Air quality light
C Air quality sensors
NanoProtect filter Series 3
D
(FY3433)
E NanoProtect filter AC (FY3432)
F Pre-filter
G Front panel
Controls overview (g.b)
H On/Off button
I Light on/off button
J Auto mode button
K Display screen
L Fan speed button
M Timer button
N Reset/Child lock button
3 Getting started
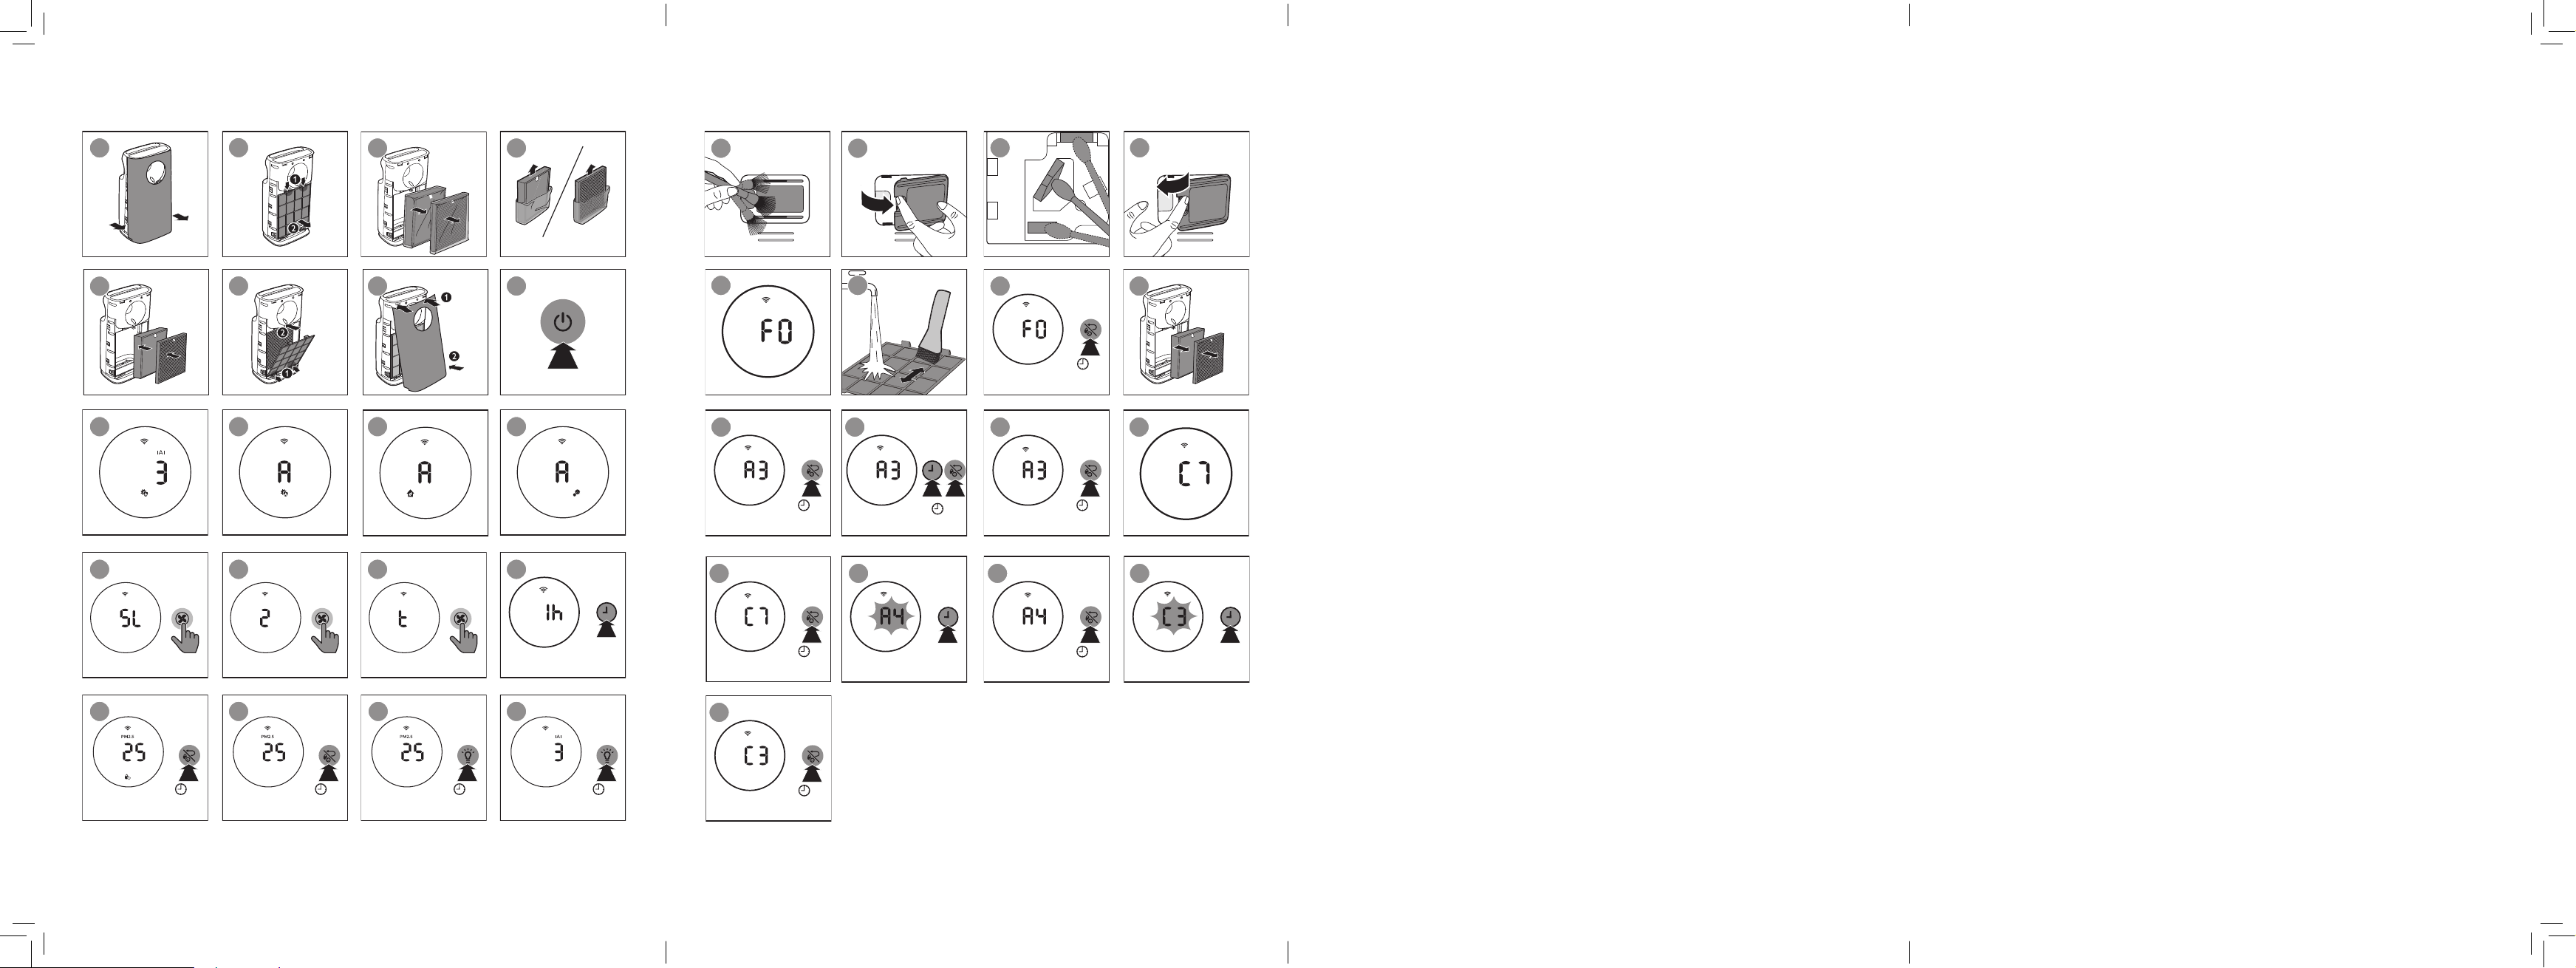
Installing lters
Note
• Make sure the air purifier is unplugged
from the electrical outlet before
installing the filters.
• Make sure that the side with the tag is
pointing towards you when installing
the filter.
1 Pull the bottom part of the front
panel to remove it from the
appliance (fig.c).
2 Press the two clips down and pull
the pre-filter towards you (fig.d).
3 Remove all filters (fig.e).
4 Remove all packaging materials of
the air purification filters (fig.f).
5 Put the unpacked air purification
filters back into the appliance
(fig.g).
6 Put the pre-filter back into the
appliance (fig.h).
Note
• Make sure that all hooks of the
pre-filter are properly attached to the
purifier.
7 To reattach the front panel, mount
the panel onto the top of the
appliance first (1). Then, gently push
the panel against the body of the
appliance (2) (fig.i).
8 Wash your hands thoroughly after
installing filters.
5EN
Page 8

Wi-Fi setup
Setting up the Wi-Fi connection
for the rst time
1 Download and install the 'Air
Matters' app from the App Store or
Google Play.
2 Put the plug of the air purifier in the
power socket and touch to turn
on the air purifier.
» The Wi-Fi indicator blinks
orange for the first time.
3 Make sure that your mobile device
is successfully connected to your
Wi-Fi network.
4 Launch the 'Air Matters' app and
follow the onscreen instructions
to connect the air purifier to your
network.
5 After the successful pairing and
connection, the Wi-Fi indicator
will light up white. If pairing
is not successful, consult the
troubleshooting section, or the
help section in the 'Air Matters'
app for extensive and up-to-date
troubleshooting tips.
Note
• This instruction is only valid when
the air purifier is being set up for the
first time. If the network has changed
or the setup needs to be performed
again, consult section “Setting up the
Wi-Fi connection when the network
has changed” on page 15.
• If you want to connect more than one
air purifier to your smart device, you
have to do this successively. Complete
the set up of one air purifier before you
turn on the other air purifier.
• Make sure that the distance between
your mobile device and the air purifier
is less than 33 ft/10 m without any
obstructions.
• This app supports the latest versions
of Android and iOS. Please check
www.philips.com/purifier-compatibility
for the latest update of supported
operating systems and devices.
Setting up the Wi-Fi connection
when the network has changed
Note
• This applies when the default network
to which your purifier is connected has
changed.
1 Put the plug of the air purifier in the
power socket and touch to turn
on the air purifier.
2 Touch and simultaneously for
3 seconds until you hear a beep.
» The air purifier goes to pairing
mode.
» The Wi-Fi indicator blinks
orange.
3 Follow the steps 4-5 in "Setting up
the Wi-Fi connection for the first
time" section.
6 EN
Page 9
English
4 Using the
appliance
3 Touch and hold for 3 seconds to
switch off the appliance.
Note
Understanding the air
quality light
IAI
level
1-3 Blue
4-6 Blue-Purple
7-9 Purple-Red
10-12 Red
The air quality light automatically goes
on when the appliance is switched on,
and lights up all colors in sequence.
In a short time the air quality sensors
select the color that corresponds to the
ambient air quality.
Air quality
light color
Air quality
level
Good
Fair
Poor
Very poor
Switching on and o
1 Put the plug of the appliance in the
power socket.
2 Touch to switch on the
appliance (fig.j).
» The appliance operates under
the auto mode by default.
» After measuring the air quality
for a short time, the air quality
sensor automatically selects the
color of the air quality light.
» After measuring the particle
matters in the air, the air
purifier shows the IAI level and
operates in the auto mode with
displayed on the screen
(fig.k).
• After the appliance is switched off by
the on/off button , if the plug is still
in the power socket, the appliance will
operate under the previous settings
when it is switched on again.
• If the appliance is connected to
Internet after it's turned off, the sensor
will still measure the indoor air quality
and send this real-time data to the
app.
Changing the Auto mode
setting
You can choose the General mode
( ), the Allergen mode ( ) and the
Bacteria & Virus mode ( ).
Allergen mode
The specially designed Allergen mode
can effectively remove common
allergens such as pollen and pet dander.
• Touch the Auto mode button to
select the Allergen mode (fig.l).
» Auto(A) and display on the
screen.
General mode
A smart auto-setting that automatically
adjusts the air purifier’s settings to the
ideal level.
• Touch the Auto mode button to
select the Genereal mode (fig.m).
» Auto(A) and display on the
screen.
7EN
Page 10
Bacteria/Virus mode
The specially designed Bacteria & Virus
mode can effectively remove bacteria
& viruses such as staphylococcus albus
and H1N1.
• Touch the Auto mode button to
select the Bacteria & Virus mode
(fig.n).
» Auto(A) and display on the
screen.
Changing the fan speed
There are several fan speeds available.
You can choose the sleep mode ( ),
turbo mode ( ) and speed 1, 2, or 3.
Setting the timer
With the timer, you can let the
appliance operate for a set number of
hours. When the set time has elapsed,
the appliance will automatically switch
off.
• Touch the timer button
repeatedly to choose the number
of hours you want the appliance to
operate (fig.r).
» The timer is available from 1 to
12 hours.
To deactivate the timer, touch the timer
button repeatedly until displays
on the screen.
Sleep (SL)
In sleep mode, the appliance operates
quietly under speed 1. One minute into
the sleep mode, the power and light
on/off indicators are dimmed, and all
the other lights are off.
• Touch the fan speed button to
select the sleep mode ( ) (fig.o).
Manual
• Touch the fan speed button
repeatedly to select the fan speed
you need (fig.p).
Turbo (t)
In turbo mode, the appliance operates
under the highest speed.
• Touch the fan speed button to
select the turbo mode ( ) (fig.q).
Setting the child lock
1 Touch and hold the child lock
button for 3 seconds to activate
child lock (fig.s).
» displays on the screen.
» When the child lock is on,
all the other buttons are not
responsive.
2 Touch and hold the child lock
button for 3 seconds again to
deactivate child lock (fig.t).
» disappears from the screen.
Note
• You can still control the air purifier
through the App e ven child lock is
activated.
8 EN
Page 11
English
Using the light on/o
function
5 Cleaning
With the light on/off button, you can
switch on or off the air quality light,
the display screen and the function
indicators if needed.
1 Touch the light on/off button
once, the air quality light, the
display screen and the function
indicators will go off.
2 Touch the light on/off button for
the third time, all lights will be on
again.
Switching the display
mode
The air purifier has two display modes:
Indoor Allergen Index (IAI) display
and PM2.5 display mode. When in IAI
mode, the display shows a number
between 1-12 to indicate the level of
airbone allergens. In PM2.5 mode the
display shows the particulate matter 2.5
concentration in the air in µg/m3.
Note
• The air purifier operates in IAI display
mode by default.
Note
• Always unplug the appliance before
cleaning.
• Never immerse the appliance in water
or any other liquid.
• Never use abrasive, aggressive, or
flammable cleaning agents such as
bleach or alcohol to clean any part of
the appliance.
• Only the pre-filter is washable. The air
purification filter is not washable nor
vacuum cleanable.
Cleaning schedule
Frequency Cleaning method
When necessary Wipe the surface
of the appliance
with a soft dry
cloth
When F0
displays on the
screen
Every two
months
Clean the prefilter
Clean the air
quality sensors
1 Touch the light dimming button
for 3 seconds again to switch to
PM2.5 display mode (fig.u).
» The PM2.5 level displays on the
screen.
2 Touch the light dimming button
for 3 seconds to switch back to IAI
display mode (fig.v).
» The actual IAI level displays on
the screen.
Cleaning the body of the
appliance
Regularly clean the inside and outside
of the appliance to prevent dust from
collecting.
1 Wipe away dust with a soft dry cloth
from the body of the appliance.
2 Clean the air outlet with a soft dry
cloth.
9EN
Page 12
Cleaning the air quality
sensor
Clean the air quality sensor every
2 months for optimal functioning of the
purifier. Clean them more frequently
if you use the purifier in a dusty
environment.
Note
• When the humidity level in the
room is very high, it is possible that
condensation develops on the air
quality sensor. As a result, the air
quality light may indicate that the air
quality is bad even though it is good.
In this case you have to clean the
air quality sensor or use one of the
manual speed settings.
1 Clean the air quality sensor inlet
and outlet with a soft brush (fig.w).
2 Open the air quality sensor cover
(fig.x).
3 Clean the air quality sensor, the
dust inlet and the dust outlet with
a lightly moistened cotton swab
(fig.y).
4 Dry them with a dry cotton swab.
5 Reattach the air quality sensor
cover (fig.z).
Cleaning the pre-lter
Clean the pre-filter when F0 is displayed
on the screen(fig.{).
1 Pull the bottom part of the front
panel to remove it from the
appliance (fig.c).
2 Press the two clips down and pull
the pre-filter towards you (fig.d).
3 Wash the pre-filter under a running
tap. If the pre-filter is very dirty, use
a soft brush to brush away the dust
(fig.|).
4 Air dry the pre-filter.
Note
• Make sure that the pre-filter is
completely dry. If it is still wet, bacteria
may multiply in it and shorten the
lifetime of the pre-filter.
5 Put the pre-filter back into the
appliance (fig.h).
Note
• Make sure that the side with the two
clips is pointing towards you, and that
all hooks of the pre-filter are properly
attached to the purifier.
6 To reattach the front panel, mount
the panel onto the top of the
appliance first (1). Then, gently push
the panel against the body of the
appliance (2) (fig.i).
7 Touch and hold the reset button
for 3 seconds to reset the pre-filter
cleaning time (fig.}).
10 EN
Page 13
English
6 Replacing the
Filter alert chart
filter
Understanding the
healthy air protect lock
This air purifier is equipped with a
filter replacement indicator to make
sure that the air purification filter is in
optimal condition when the air purifier
is operating. When the filters need to be
replaced, the filter code displays on the
screen (see Filter alert chart).
If the filters are not replaced in time,
the air purifier will stop operating and
automatically lock to protect the air
quality in the room. Replace the filters
as soon as possible according to the
filter code.
Replacing the lters
Note
• The air purification filters are not
washable nor vacuum cleanable.
• Always turn off the air purifier and
unplug from the electrical outlet
before replacing the filters.
• Do not clean the filters with a with a
vacuum cleaner.
• If the pre-filter is damaged, worn or
broken, do not use. Visit
www.philips.com/support or contact
the Consumer Care Center in your
country.
Filter alert light
status
A3 displays on the
screen
C7 displays on the
screen
A3 and C7 display
on the screen
alternately
Follow this
Replace
NanoProtect
filter Series 3
(FY3433)
Replace the
NanoProtect
filter AC
(FY3432)
Replace both
filters
1 Take out the used air filters
according to the filter code
displayed on the screen. Discard
used filters (fig.~).
Note
• Do not touch the pleated filter surface,
or smell the filter as it has collected
pollutants from the air.
2 Remove all packaging material of
the new filters (fig.f).
3 Place the new filters into the
appliance (fig.g).
4 Put the plug of the appliance in the
power socket.
5 Touch and hold the reset button
for 3 seconds to reset the filter
lifetime counter (fig.).
Note
• Wash your hands after changing the
filters.
11EN
Page 14
Filter lifetime counter
reset
After replacing a filter, you need to reset
the filter lifetime counter manually.
You can also replace filters even if there
is no filter replacement code displayed
on the screen.
1 Touch and simultaneously for
3 seconds to enter the filter force
reset mode (fig.€).
» Code (A3) of the NanoProtect
filter Series 3 displays on the
screen .
2 Touch and hold for 3 seconds to
force reset the filter lifetime of the
NanoProtect filter Series 3 (fig.).
3 Code (C7) of the Nanoprotect filter
AC displays on the screen after the
lifetime of the NanoProtect filter
Series 3 filter has been reset (fig.‚).
4 Touch and hold for 3 seconds to
force reset the filter lifetime of the
NanoProtect filter AC and exit the
filter force reset mode (fig.ƒ).
Note
• After you have selected the filter code
of the new filter using the button,
if you do not touch any other buttons
in 10 seconds, the appliance will
automatically confirm the filter code of
the new filter.
4 Code (C7) of the Nanoprotect filter
AC displays on the screen after the
first filter type has been changed
(fig.‚).
5 Touch to select the new filter
code of the second filter (fig.†).
6 Touch and hold for 3 seconds
to confirm the filter code of the
second filter and exit the filter type
change mode (fig.‡).
Filter type change
1 Touch and simultaneously for
3 seconds to enter the filter type
change mode (fig.€).
» Code (A3) of the NanoProtect
filter Series 3 displays on the
screen.
2 Touch to select the filter code of
the new filter you will use (fig.„).
3 Touch and hold for 3 seconds to
confirm the filter code of the new
filter (fig.…).
12 EN
Page 15
English
7 Troubleshooting
This chapter summarizes the most common problems you could encounter with the
appliance. If you are unable to solve the problem with the information below, contact
the Consumer Care Center in your country.
Problem Possible solution
• Check if the front cover is properly installed.
The appliance
does not work
even though it is
plugged in.
The appliance
does not work
even though it is
switched on.
The airow that
comes out of
the air outlet
is signicantly
weaker than
before.
• The filter replacement code has been displaying on the
screen but you have not replaced the corresponding filter
yet. The appliance will be locked if you keep using the
expired filter. In this case, replace the filter and reset the
filter lifetime counter.
• The appliance is working but the buttons are not
responsive. Check if the child lock is on.
• The filter replacement code has been on continuously but
you have not replaced the corresponding filter, and the
appliance is now locked. In this case, replace the filter and
reset the filter lifetime counter.
• The pre-filter is dirty. Clean the pre-filter (see chapter
"Cleaning").
The air quality
does not improve,
even though the
appliance has
been operating for
a long time.
The color of the air
quality light always
stays the same.
• Check if the packing material is removed from the filters.
• One of the filters has not been placed in the appliance.
Make sure that all filters are properly installed in the
following order, starting with the innermost filter:
1) NanoProtect filter Series 3; 2) NanoProtect filter AC;
3) pre-filter.
• The air quality sensor is wet. The humidity level in your
room is high and causes condensation. Make sure that the
air quality sensor is clean and dry (see chapter "Cleaning").
• The air quality sensor is dirty. Clean the air quality sensor
(see chapter "Cleaning").
13EN
Page 16
Problem Possible solution
• The filter may produce smell after being used for a
while because of the absorption of indoor gases. It’s
The appliance
produces a strange
smell.
recommended that you reactivate the filter by putting it in
direct sunlight for repeated use. If odor still exists, replace
the filter.
• If the air purifier produces a burnt odor, switch OFF and
unplug from the electrical outlet. Contact Consumer Care
Center in your country.
The appliance is
extra loud.
The appliance still
indicates that I
need to replace a
lter, but I already
did.
Error codes "E1",
or "E2" displays on
the screen.
Which App should
I download?
• If the appliance is too loud, you can change the fan speed
to a lower fan speed level. When using the appliance in a
bedroom at night, choose the sleep mode.
• Perhaps you did not reset the filter lifetime counter. Plug
in the appliance, touch to switch on the appliance, and
touch and hold the reset button for 3 seconds.
• The appliance has malfunctions. Contact the Consumer
Care Center in your country.
• Please download and install the 'Air Matters' app from the
App Store or Google Play.
14 EN
Page 17

English
Problem Possible solution
• If the router your purifier is connected to is dual-band and
currently it is not working on a 2.4GHz network, please
switch to another band of the same router (2.4GHz) and
try to pair your purifier again. 5Ghz networks are not
supported.
• Web authentication networks are not supported.
• Check if the purifier is within range of the Wi-Fi router. You
can try to locate the air purifier closer to the Wi-Fi router.
• Check if the network name is correct. The network name is
case-sensitive.
The Wi-Fi setup is
not successful.
• Check if the Wi-Fi password is correct. The password is
case-sensitive.
• Retry the setup with the instructions in section ‘Set up the
Wi-Fi connection when the network has changed’.
• The Wi-Fi connectivity can be interrupted by electromagnetic
or other interferences. Keep the appliance away from other
electronic devices that may cause interferences.
• Check if the mobile device is in airplane mode. Make sure
to have the airplane mode deactivated when connecting
to the Wi-Fi network.
• Consult the help section in the App for extensive and up-
to-date troubleshooting tips.
15EN
Page 18
8 Guarantee and
service
9 Notices
If you need information or if you have a
problem, please visit the Philips website
at www.philips.com or contact the
Philips Consumer Care Center in your
country (you find its phone number
in the worldwide guarantee leaflet). If
there is no Consumer Care Centre in
your country, go to your local Philips
dealer.
Order parts or
accessories
If you have to replace a part or want to
purchase an additional part, go to your
Philips dealer or visit www.philips.com/
support.
If you have problems obtaining the
parts, please contact the Philips
Consumer Care Center in your country
(you can find its phone number in the
worldwide guarantee leaflet).
Electromagnetic elds
(EMF)
This Philips appliance complies with all
applicable standards and regulations
regarding exposure to electromagnetic
fields.
Compliance with EMF
Koninklijke Philips N.V. manufactures
and sells many products targeted at
consumers, which, like any electronic
apparatus, in general have the ability
to emit and receive electromagnetic
signals.
One of Philips' leading Business
Principles is to take all necessary health
and safety measures for our products,
to comply with all applicable legal
requirements and to stay well within the
EMF standards applicable at the time of
producing the products.
Philips is committed to develop,
produce and market products that
cause no adverse health effects. Philips
confirms that if its products are handled
properly for their intended use, they
are safe to use according to scientific
evidence available today.
Philips plays an active role in the
development of international EMF
and safety standards, enabling Philips
to anticipate further developments in
standardization for early integration in
its products.
16 EN
Page 19
English
Recycling
This symbol means that this product
shall not be disposed of with normal
household waste (2012/19/EU).
Follow your country’s rules for the
separate collection of electrical and
electronic products. Correct disposal
helps prevent negative consequences
for the environment and human health.
Software
App Store is a service mark of Apple Inc.
Google Play is a trademark of Google
Inc.
This Philips appliance and Air Matters
app applied multiple open source
softwares, copies of open source
software license text used in this
product can be derived from website:
www.philips.com/purifier-compatibility.
17EN
Page 20
Indhold
1 Vigtigt 19
Sikkerhed 19
2 Din luftrenser 22
Produktoversigt (g.a) 22
Oversigt over
betjeningsknapper (g.b) 22
3 Kom godt i gang 22
Montering af ltre 22
Opsætning af Wi-Fi 23
4 Sådan bruges apparatet 24
Forklaring af luftkvalitetslyset 24
Tænd/sluk 24
Ændring af indstillingen
Automatisk tilstand 24
Ændring af blæserhastighed 25
Indstilling af timeren 25
Indstilling af børnesikring 25
Sådan bruges tænd/sluk-
lysfunktionen 26
Skift af visningstilstand 26
6 Udskiftning af lteret 28
Sådan virker
beskyttelseslåsen til sund
luft 28
Udskiftning af ltre 28
Nulstilling af lterets
levetidstæller 29
Filtertypeskift 29
7 Fejlnding 30
8 Garanti og service 33
Bestilling af dele eller
tilbehør 33
9 Bemærkninger 33
Elektromagnetiske felter
(EMF) 33
Genbrug 34
Software 34
5 Rengøring 26
Rengøringsskema 26
Rengøring af selve apparatet 26
Rengøring af
luftkvalitetssensoren 27
Rengøring af forlteret 27
Der er anvendt miljøvenligt papir. Tak for dit bidrag til redningen af træerne.
18 DA
Page 21
Dansk
1 Vigtigt
Sikkerhed
Læs denne brugsvejledning
omhyggeligt igennem, inden apparatet
tages i brug, og gem den til eventuelt
senere brug.
Fare
• Lad ikke vand eller
nogen andre væsker
eller brandbare
rengøringsmidler komme
i berøring med apparatet
for at undgå elektrisk stød
og/eller brandfare.
• Undlad at rengøre
apparatet med vand
eller andre væsker
eller (brandbart)
rengøringsmiddel for at
undgå elektrisk stød og/
eller brandfare.
• Sprøjt ikke brændbare
materialer som f.eks.
insektgift eller parfume
omkring apparatet.
Advarsel
• Kontrollér, om den
angivne netspænding
på apparatet svarer til
den lokale netspænding,
før du slutter strøm til
apparatet.
• Hvis netledningen
beskadiges, må den
kun udskiftes af Philips,
et autoriseret Philipsserviceværksted eller en
tilsvarende kvaliceret
fagmand for at undgå
enhver risiko.
• Brug aldrig apparatet,
hvis netstik, netledning
eller selve apparatet er
beskadiget.
• Dette apparat kan bruges
af børn fra 8 år og opefter
og personer med nedsatte
fysiske, sensoriske eller
mentale evner eller
manglende erfaring og
viden, såfremt de er blevet
instrueret i sikker brug
af apparatet og forstår
de medfølgende risici.
Lad ikke børn lege med
apparatet. Rengøring og
vedligeholdelse må ikke
foretages af børn uden
opsyn.
• Luftind- og -udtagene må
ikke blokeres, f.eks. ved at
stille ting på luftudtaget
eller foran luftindtaget.
19DA
Page 22

• Sørg for, at
fremmedlegemer ikke
falder ind i apparatet
gennem luftudgangen.
• Standard Wi-Fi-
grænseade baseret på
802.11b/g/n ved 2,4 GHz
med en maksimal
udgangseekt på
31,62 mW EIRP.
Forsigtig
• Apparatet kan ikke bruges
som erstatning for grundig
udluftning, støvsugning
eller brug af emhætte
eller udsugning under
madlavning.
• Hvis den anvendte
stikkontakt er dårlig, vil
apparatets stik blive
varmt. Sørg for, at du
slutter apparatet til
en ordentlig tilsluttet
stikkontakt.
• Anbring og brug altid
apparatet på et stabilt,
plant og vandret underlag.
• Der skal være mindst
20 cm fri plads bag ved
og på begge sider af
apparatet, og der skal
være mindst 30 cm frirum
over apparatet.
• Placer ikke noget ovenpå
apparatet.
• Du må ikke sidde eller
stå på apparatet. Hvis
du sidder eller står på
apparatet, kan du komme
til skade.
• Placer ikke apparatet
direkte under et
klimaanlæg for at
forhindre, at der drypper
kondensvand på
apparatet.
• Sørg for, at alle ltre er
installeret korrekt, inden
apparatet tændes.
• Brug kun de originale
ltre fra Philips, der er
særligt beregnede til dette
apparat. Anvend ikke
andre ltre.
• Antænding af lteret kan
forårsage alvorlig fare for
mennesker og/eller bringe
andres liv i fare. Brug ikke
lteret som brændsel eller
lignende formål.
• Undgå at støde mod
apparatet (særligt
luftindtag og -udtag) med
hårde genstande.
• Løft eller yt altid
apparatet i håndtaget på
toppen af apparatet.
20 DA
Page 23
Dansk
• Stik aldrig dine ngre eller
genstande ind i luftudtag
eller luftindtaget for at
undgå fysiske skader eller
funktionsfejl af apparatet.
• Brug ikke apparatet, når
du har anvendt et
indendørs, rygende
insektmiddel, eller på
steder med olierester,
brændende røgelse eller
kemiske dampe.
• Brug ikke apparatet
i nærheden af
gasapparater,
varmeapparater
eller brændeovne/
kaminer.
• Tag altid stikket ud af
stikkontakten efter brug
og før rengøring eller
anden vedligeholdelse.
• Brug ikke apparatet
i rum med store
temperatursvingninger, da
det kan skabe kondens
inde i apparatet.
• Undgå interferens ved
at placere apparatet
mindst 2 m fra elektriske
apparater med luftbårne
radiobølger, som f.eks. TV,
radio og radiostyrede ure.
• Apparatet er kun beregnet
til husholdningsbrug
under normale
driftsforhold.
• Brug ikke apparatet i
våde omgivelser eller ved
høje rumtemperaturer,
som f.eks. bad, toilet eller
køkken.
• Apparatet fjerner ikke
kulilte (CO) eller radon
(Rn). Det kan ikke bruges
som en sikkerhedsenhed
i tilfælde af ulykker med
forbrændingsprocesser og
farlige kemikalier.
• Hvis du skal ytte
apparatet, skal du
frakoble apparatet fra
strømforsyningen.
• Flyt ikke apparatet ved at
trække i netledningen.
21DA
Page 24

2 Din luftrenser
Tillykke med dit køb, og velkommen til
Philips!
Du kan få alle fordelene ved den
support, som Philips yder, ved at
registrere dit produkt på
www.philips.com/welcome.
Produktoversigt (g.a)
A Kontrolpanel
B Luftkvalitetslys
C Luftkvalitetssensor
NanoProtect-lter i 3-serien*
D
(FY3433)
E NanoProtect AC-lter* (FY3432)
F Forlter
G Frontpanel
Oversigt over
betjeningsknapper
(g.b)
3 Kom godt i gang
Montering af ltre
Bemærk
• Kontroller, at stikket til luftrenseren er
taget ud af stikkontakten, før ltrene
monteres.
• Sørg for, at siden med etiketten vender
mod dig selv, når lteret monteres.
1 Træk i den nederste del af
frontpanelet for at fjerne det fra
apparatet (g.c).
2 Tryk de to klemmer ned, og træk
forlteret ind mod dig selv (g.d).
3 Fjern alle ltre (g.e).
4 Fjern alle emballagematerialer fra
luftrensningsltrene (g.f).
5 Læg de udpakkede
luftrensningsltre tilbage i apparatet
(g.g).
6 Sæt forlteret tilbage i apparatet
(g.h).
Bemærk
H Afbryderknap
I Knap til lys til/fra
J Knap til automatisk tilstand
K Display
L Blæserhastighedsknap
M Timer-knap
N Nulstillings-/børnesikringsknap
22 DA
• Sørg for, at alle kroge på forlteret er
sat ordentligt i luftrenseren.
7 For at sætte frontpanelet på
igen skal panelet først sættes
på toppen af apparatet (1). Skub
derefter forsigtigt panelet ind mod
apparatets kabinet (2) (g. i).
8 Vask hænderne grundigt efter
montering af ltre.
Page 25
Dansk
Opsætning af Wi-Fi
Opsætning af Wi-Fiforbindelsen første gang
1 Download og installer appen "Air
Matters" fra App Store eller Google
Play.
2 Sæt stikket til luftrenseren i
stikkontakten, og tryk på for at
tænde for luftrenseren.
» Wi-Fi-indikatoren blinker
orange den første gang.
3 Kontroller, at din mobile enhed har
oprettet forbindelse til dit Wi-Finetværk.
4 Start appen "Air Matters", og følg
vejledningen på skærmen for at
slutte luftrenseren til dit netværk.
5 Efter parring og forbindelse er
oprettet, lyser Wi-Fi-indikatoren
hvidt. Hvis parringen ikke lykkes,
skal du se afsnittet om fejlnding
eller afsnittet Hjælp i appen "Air
Matters" for at nde omfattende og
opdaterede tip til fejlnding.
Bemærk
• Denne vejledning gælder kun, når
luftrenseren opsættes første gang.
Hvis netværket er ændret, eller
opsætningen skal foretages igen, skal
du se afsnittet "Opsætning af Wi-Fiforbindelse, når netværket er ændret"
på side 15.
• Hvis du vil slutte mere end én
luftrenser til din smartenhed, skal du
gøre det lige efter hinanden. Fuldfør
opsætningen af én luftrenser, før du
tænder den næste luftrenser.
• Sørg for, at afstanden mellem din
mobile enhed og luftrenseren er
mindre end 10 m uden forhindringer.
• Denne app understøtter de nyeste
versioner af Android og iOS. Gå til
www.philips.com/purier-compatibility
for at få de seneste oplysninger om
understøttede operativsystemer og
enheder.
Opsætning af Wi-Fiforbindelse, når netværket er
ændret
Bemærk
• Dette gælder, når standardnetværket,
som luftrenseren er tilsluttet, er
ændret.
1 Sæt stikket til luftrenseren i
stikkontakten, og tryk på for at
tænde for luftrenseren.
2 Tryk på og samtidigt i 3
sekunder, indtil der lyder et bip.
» Luftrenseren skifter til
parringstilstand.
» Wi-Fi-indikatoren blinker
orange.
3 Følg trin 4-5 i afsnittet "Opsætning
af Wi-Fi-forbindelsen første gang".
23DA
Page 26
4 Sådan bruges
apparatet
Forklaring af
luftkvalitetslyset
IAI-niveau Luftkvali-
tetslysets
farve
1-3 Blå
4-6 Blå-lilla
7-9 Lilla-rød
10-12 Rød
Luftkvalitetslyset tændes automatisk,
når apparatet er tændt, og lyser alle
farver op i rækkefølge. I løbet af kort
tid vil luftkvalitetssensoren vælge den
farve, der svarer til den omgivende
luftkvalitet.
Tænd/sluk
1 Sæt stikket til apparatet i
stikkontakten.
2 Tryk på for at tænde for
apparatet (g.j).
» Apparatet er som standard i
auto-tilstand.
» Efter kortvarig måling
af luftkvaliteten vælger
luftkvalitetssensoren
automatisk farven på
luftkvalitetslyset.
» Efter måling af partikler i
luften angiver luftrenseren
IAI-niveauet, og vises på
skærmen i automatisk tilstand
(g.k).
Luftkvalitetsniveau
God
Fair
Ringe
Meget
dårlig
3 Hold nede i 3 sekunder for at
slukke for apparatet.
Bemærk
• Når apparatet er slukket med on/oknappen , og stikket stadig sidder
i stikkontakten, vil apparatet arbejde
med de forrige indstillinger, når det
tændes igen.
• Hvis apparatet sluttes til internettet,
efter det er slukket, måler sensoren
stadig den indendørs luftkvalitet og
sender disse realtidsdata til appen.
Ændring af indstillingen
Automatisk tilstand
Du kan vælge tilstanden Generel
( ), allergentilstanden ( ) og
bakterie- og virustilstanden ( ).
Allergentilstand
Den specialdesignede allergentilstand
kan eektivt fjerne almindelige
allergener såsom pollen og dyreskæl.
• Tryk på knappen for automatisk
tilstand for at vælge
allergentilstanden (g.l).
» Auto (A) og vises på
skærmen.
Generel tilstand
En intelligent automatisk indstilling,
der automatisk optimerer luftrenserens
indstillinger.
• Tryk på knappen for automatisk
tilstand for at vælge tilstanden
Generel (g.m).
» Auto (A) og vises på
skærmen.
24 DA
Page 27
Dansk
Bakterie-/virustilstand
Den specialdesignede bakterie- og
virustilstand fjerner eektivt bakterier
og vira såsom Staphylococcus Albus og
H1N1.
• Tryk på knappen for automatisk
tilstand for at vælge bakterie- og
virustilstanden (g.n).
» Auto (A) og vises på
skærmen.
Ændring af
blæserhastighed
Der er ere tilgængelige
blæserhastigheder. Du kan vælge
dvaletilstand (SL), turbotilstand (T) og
hastighed 1, 2 eller 3.
Dvale (SL)
I dvaletilstand arbejder apparatet
støjsvagt under hastighed 1. Et minut
inde i dvaletilstanden nedtones
indikatorlamperne for strøm og lys on/
o, og alle de andre lys er slukket.
• Tryk på blæserhastighedsknappen
for at vælge dvaletilstanden (SL)
(g.o).
Manuel
• Tryk på blæserhastighedsknappen
gentagne gange for at vælge den
blæserhastighed, du har brug for
(g.p).
Indstilling af timeren
Med timeren kan du lade apparatet
køre i et indstillet antal timer. Når
den indstillede tid er udløbet, slukker
apparatet automatisk.
• Tryk på timerknappen gentagne
gange for at vælge det antal timer,
du ønsker, apparatet skal køre
(g.r).
» Timeren kan indstilles fra 1 til
12 timer.
For at deaktivere timeren skal du trykke
på timer-knappen gentagne gange,
indtil vises på skærmen.
Indstilling af børnesikring
1 Hold børnesikringsknappen
nede i 3 sekunder for at aktivere
børnesikringen (g.s).
» vises på skærmen.
» Når børnesikringen er aktiveret,
reagerer alle de andre knapper
ikke.
2 Hold børnesikringsknappen
nede i 3 sekunder igen for at
deaktivere børnesikringen (g.t).
» forsvinder fra skærmen.
Bemærk
• Du kan stadig styre luftrenseren via
appen, selvom børnesikringen er
aktiveret.
Turbo (t)
I turbotilstand kører apparatet med den
højeste hastighed.
• Tryk på blæserhastighedsknappen
for at vælge turbotilstanden (t)
(g.q).
25DA
Page 28
Sådan bruges tænd/
sluk-lysfunktionen
5 Rengøring
Med lys on/o-knappen kan du
tænde eller slukke for luftkvalitetslyset,
skærmen og signallamperne, hvis det er
nødvendigt.
1 Tryk på lys on/o-knappen én
gang, så slukkes luftkvalitetslyset,
skærmen og signallamperne.
2 Tryk på lys on/o-knappen for
tredje gang, så tændes alle lys igen.
Skift af visningstilstand
Luftrenseren har to visningstilstande:
Visningstilstandene Indendørs
allergenindeks (IAI) og PM2.5. I IAItilstand viser displayet et tal mellem
1-12 for at angive niveauet af luftbårne
allergener. I PM2.5-tilstand viser
displayet 2.5-partikelkoncentrationen i
luften i µg/m3.
Bemærk
• Luftrenseren er som standard i IAIvisningstilstand.
1 Tryk på knappen til lysdæmpning
i 3 sekunder for at skifte til PM2.5visningstilstand (g.u).
» PM2.5-niveauet vises på
skærmen.
2 Tryk på knappen til lysdæmpning
i 3 sekunder for at skifte tilbage til
IAI-visningstilstand (g.v).
» Det aktuelle IAI-niveau vises på
skærmen.
Bemærk
• Tag altid stikket ud af stikkontakten,
inden rengøringen.
• Apparatet må aldrig kommes ned i
vand eller anden væske.
• Anvend aldrig slibende, aggressive
eller brændbare rengøringsmidler,
f.eks. klor eller sprit, til at rengøre
nogen dele af apparatet.
• Kun forlteret er vaskbart.
Luftrensningslteret kan hverken
vaskes eller støvsuges.
Rengøringsskema
Frekvens
Når det er
nødvendigt
Hvis F0 vises på
skærmen
Hver anden
måned
Rengøringsmetode
Tør apparatets
yderside af med
en blød og fugtig
klud
Rens forlteret
Rengør luftkvalitetssensorerne
Rengøring af selve
apparatet
Rengør regelmæssigt apparatet
indvendigt og udvendigt, så der ikke
samler sig støv.
1 Tør støvet væk fra apparatet med
en tør, blød klud.
2 Rengør luftudtaget med en tør, blød
klud.
26 DA
Page 29
Dansk
Rengøring af
luftkvalitetssensoren
Rengør luftkvalitetssensoren hver 2.
måned for at opnå optimal eekt af
renseren. Rengør dem oftere, hvis du
bruger renseren i støvede omgivelser.
Bemærk
• Når luftfugtigheden i rummet er meget
høj, er det muligt, at der udvikles
kondens på sensoren. Det medfører,
at luftkvalitetslyset kan indikere, at
luftkvaliteten er dårlig, selvom det
ikke er tilfældet. I dette tilfælde skal
du rengøre luftkvalitetssensoren eller
benytte en af de manuelle indstillinger
for hastighed.
1 Rengør luftkvalitetssensorens
indløb og udløb med en blød
børste (g.w).
2 Åbn luftkvalitetssensorens dæksel
(g.x).
3 Rengør luftkvalitetssensoren samt
støvindløbet og -udløbet med en
let fugtet vatpind (g.y).
4 Tør dem af med en tør vatpind.
5 Sæt luftkvalitetssensorens dæksel
på igen (g.z).
Rengøring af forlteret
Rengør forlteret, når F0 vises på
skærmen (g.{).
1 Træk i den nederste del af
frontpanelet for at fjerne det fra
apparatet (g.c).
2 Tryk de to klemmer ned, og træk
forlteret ind mod dig selv (g.d).
3 Vask forlteret under vandhanen.
Hvis forlteret er meget beskidt, kan
du bruge en blød børste til at fjerne
støvet (g.|).
4 Lad forlteret lufttørre.
Bemærk
• Sørg for, at forlteret er helt tørt. Hvis
det stadig er vådt, kan der dannes
bakterier i det, hvilket forkorter
forlterets levetid.
5 Sæt forlteret tilbage i apparatet
(g.h).
Bemærk
• Sørg for, at siden med de to clips
peger ind mod dig, og at alle kroge på
forlteret er korrekt fastgjort i renseren.
6 For at sætte frontpanelet på
igen skal panelet først sættes
på toppen af apparatet (1). Skub
derefter forsigtigt panelet ind mod
apparatets kabinet (2) (g.i).
7 Hold reset-knappen nede i
3 sekunder for at nulstille forlterets
rengøringstid (g.}).
27DA
Page 30
6 Udskiftning af
Filteralarmskema
filteret
Sådan virker
beskyttelseslåsen til
sund luft
Denne luftrenser er udstyret med en
indikator for udskiftning af lteret, der
skal sikre, at luftrensningslteret er
i optimal stand, når luftrenseren er i
brug. Når ltrene skal udskiftes, vises
lterkoden på skærmen (se diagram
over lteradvarsler).
Hvis ltrene ikke udskiftes i tide,
stoppes og låses luftrenseren
automatisk for at beskytte luftkvaliteten
i rummet. Udskift ltrene så hurtigt som
muligt i henhold til lterkoden.
Udskiftning af ltre
Bemærk
• Luftrensningsltre kan ikke vaskes eller
støvsuges.
• Sluk altid for luftrenseren, og tag
stikket ud af stikkontakten, før ltrene
udskiftes.
• Undlad at rengøre ltrene med en
støvsuger.
• Forlteret må ikke bruges, hvis det er
beskadiget, slidt eller gået i stykker.
Gå til www.philips.com/support, eller
kontakt dit lokale kundecenter.
Lysindikator for
lterstatus
A3 vises på
skærmen
C7 vises på
skærmen
A3 og C7 vises på
skærmen skiftevis
Gør følgende
Udskift
NanoProtectlteret i 3-serien
(FY3433)
Udskift
NanoProtect
AC-lteret
(FY3432)
Skift begge ltre
1 Tag de brugte luftltre ud, når
lterkoden vises på skærmen.
Bortskaf brugte ltre (g.~).
Bemærk
• Rør ikke ved den plisserede
lteroverade og lugt ikke til lteret, da
det har samlet forurenende stoer fra
luften.
2 Fjern al emballage fra de nye ltre
(g.f).
3 Sæt de nye ltre i apparatet (g.g).
4 Sæt stikket til apparatet i
stikkontakten.
5 Hold reset-knappen nede i
3 sekunder for at nulstille lterets
levetidstæller (g.).
Bemærk
• Vask hænder efter udskiftning af
ltrene.
28 DA
Page 31

Dansk
Nulstilling af lterets
levetidstæller
Når du har udskiftet et lter, skal du
nulstille lterets levetidstæller manuelt.
Du kan også udskifte ltrene,
selvom der ikke vises nogen kode for
udskiftning af lter på skærmen.
1 Tryk på og samtidigt i 3
sekunder for at aktivere tvungen
nulstilling af lteret (g.€).
» Koden (A3) for NanoProtect-
lteret i 3-serien vises på
skærmen.
2 Hold nede i 3 sekunder for
at gennemtvinge nulstilling af
levetiden for NanoProtect-lteret i
3-serien (g.}).
3 Koden (C7) for NanoProtect AC-
lteret vises på skærmen, når
levetiden for NanoProtect-lteret i
3-serien er blevet nulstillet (g.|).
4 Hold nede i 3 sekunder for
at gennemtvinge nulstilling af
levetiden for NanoProtect AClteret og forlade tilstanden for
tvungen nulstilling af lteret (g.ƒ).
Bemærk
• Når du har valgt lterkoden for det nye
lter med knappen , vil apparatet
automatisk bekræfte lterkoden for
det nye lter, hvis du ikke berører
andre knapper i 10 sekunder.
4 Koden (C7) for NanoProtect AC-
lteret vises på skærmen, når den
første ltertype er blevet ændret
(g..‚).
5 Tryk på for at vælge den nye
lterkode for det andet lter (g.†).
6 Hold nede i 3 sekunder for at
bekræfte lterkoden for det andet
lter og forlade funktionen til
ltertypeskift (g.‡).
Filtertypeskift
1 Tryk på og samtidigt i 3
sekunder for at få adgang til
funktionen for ltertypeskift (g.€).
» Koden (A3) for NanoProtect-
lteret i 3-serien vises på
skærmen.
2 Tryk på for at vælge lterkoden
for det nye lter, du vil bruge (g.„).
3 Hold nede i 3 sekunder for at
bekræfte lterkoden for det nye
lter (g.…).
29DA
Page 32

7 Fejlfinding
I dette kapitel beskrives de mest almindelige problemer, der kan opstå med dit
apparat. Hvis du ikke kan løse problemet ud fra nedenstående oplysninger, skal du
kontakte kundecentret i dit land.
Problem Mulig løsning
• Kontroller, om frontdækslet er korrekt monteret.
Apparatet virker
ikke, selvom
det er tilsluttet
stikkontakten.
Apparatet virker
ikke, selvom det er
tændt.
Den luftstrøm,
der kommer ud
af luftudtaget, er
betydeligt svagere
end før.
• Filterskiftekoden er blevet vist på skærmen, men du
ikke har udskiftet det tilsvarende lter endnu. Apparatet
låses, hvis du bliver ved med at bruge det opbrugte lter.
I dette tilfælde skal du udskifte lteret og nulstille lterets
levetidstæller.
• Apparatet fungerer, men knapperne reagerer ikke.
Kontroller, om børnesikringen er aktiveret.
• Koden for lterskift har været tændt konstant, men du ikke
har udskiftet det tilsvarende lter, og apparatet er nu låst.
I dette tilfælde skal du udskifte lteret og nulstille lterets
levetidstæller.
• Forlteret er snavset. Rengør forlteret (se kapitlet
"Rengøring").
Luftkvaliteten
forbedres ikke,
selvom apparatet
har kørt i lang tid.
Farven på
luftkvalitetslyset er
altid den samme.
30 DA
• Kontroller, om emballagen er fjernet fra ltrene.
• Et af ltrene er ikke sat i apparatet. Sørg for, at alle ltrene
er monteret korrekt i følgende rækkefølge, begyndende
med det inderste lter: 1) NanoProtect-lter i 3-serien,
2) NanoProtect AC-lter, 3) forlter.
• Luftkvalitetssensoren er våd. Luftfugtigheden i rummet er
høj og forårsager kondens. Sørg for, at sensoren er ren og
tør (se afsnittet "Rengøring").
• Luftkvalitetssensoren er snavset. Rengør
luftkvalitetssensoren (se afsnittet "Rengøring").
Page 33

Dansk
Problem Mulig løsning
• Filteret kan afgive lugt, når det har været brugt et stykke
tid, pga. absorptionen af indendørs gasser. Det anbefales,
Apparatet
frembringer en
mærkelig lugt.
at du genaktiverer lteret ved at lægge det i direkte sollys
til gentagen brug. Hvis der stadig forekommer lugtgener,
skal lteret udskiftes.
• Hvis luftrenseren lugter brændt, skal du slukke for den og
tage stikket ud af stikkontakten. Kontakt kundecenteret i
dit land.
Apparatet er ekstra
støjende.
• Hvis apparatet støjer, kan du ændre blæserens hastighed
til en lavere blæserhastighed. Når du bruger apparatet i
soveværelset om natten, skal du vælge dvaletilstanden.
Apparatet viser
stadig, at jeg skal
udskifte et lter,
men det har jeg
• Måske har du ikke nulstillet filterets levetidstæller. Slut
apparatet til stikkontakten, tryk på for at tænde for
apparatet, og hold reset-knappen nede i 3 sekunder.
allerede gjort.
Fejlkoderne "E1"
eller "E2" vises på
• Apparatet er defekt. Kontakt Philips Kundecenter i dit land.
skærmen.
Hvilken app skal
jeg downloade?
• Download og installer appen "Air Matters" fra App Store
eller Google Play.
31DA
Page 34

Problem Mulig løsning
• Hvis luftrenseren er sluttet til en router med Dual Band og
ikke fungerer på et 2,4 GHz netværk, skal du skifte til en
anden kanal på den samme router (2,4 GHz) og prøve at
parre luftrenseren igen. 5 GHz-netværk understøttes ikke.
• Onlinegodkendelsesnetværk understøttes ikke.
• Kontroller, om luftrenseren er inden for Wi-Fi-routerens
rækkevidde. Du kan lede efter luftrenseren tættere på WiFi-routeren.
• Kontroller, om netværksnavnet er korrekt. Netværksnavnet
skelner mellem store og små bogstaver.
Wi-Fi-opsætning
mislykkedes.
• Kontroller, om Wi-Fi-adgangskoden er korrekt.
Adgangskoden skelner mellem store og små bogstaver.
• Gentag opsætningen, og følg instruktionerne i afsnittet
"Opsætning af Wi-Fi-forbindelse, når netværket er ændret".
• Wi-Fi-forbindelsen kan blive afbrudt pga. elektromagnetisk
eller anden interferens. Sørg for, at apparatet ikke står
tæt på andre elektroniske apparater, som vil kunne skabe
interferens.
• Kontroller, om den mobile enhed er i ytilstand. Sørg for, at
ytilstand er deaktiveret ved tilslutning til Wi-Fi-netværket.
• I afsnittet Hjælp i appen kan du få omfattende og helt
friske tip til fejlnding.
32 DA
Page 35

Dansk
8 Garanti og
service
9 Bemærkninger
Hvis du har behov for oplysninger eller
har et problem, kan du besøge Philips'
websted på www.philips.com eller
kontakte Philips Kundecenter i dit land
(telefonnummeret ndes i folderen
"Worldwide Guarantee"). Hvis der
ikke ndes et kundecenter i dit land,
bedes du kontakte din lokale Philipsforhandler.
Bestilling af dele eller
tilbehør
Hvis du skal udskifte en del eller ønsker
at købe en ekstra del, skal du besøge
din Philips-forhandler eller
www.philips.com/support.
Hvis du har problemer med at få fat
i reservedelen, bedes du kontakte
Philips Kundecenter i dit land
(telefonnummeret ndes i folderen
"Worldwide Guarantee").
Elektromagnetiske felter
(EMF)
Dette Philips-apparat overholder
alle branchens gældende standarder
og regler angående eksponering for
elektromagnetiske felter.
Overholdelse af EMF
Koninklijke Philips N.V. producerer og
sælger mange forbrugermålrettede
produkter, der ligesom alle elektroniske
apparater generelt kan udsende og
modtage elektromagnetiske signaler.
Et af Philips’ vigtigste
forretningsprincipper er at træe
alle nødvendige sundheds- og
sikkerhedsmæssige forholdsregler
for vores produkter, at overholde alle
gældende lovkrav og at overholde
de EMF-standarder, der er gældende
på tidspunktet for fremstillingen af
produkterne.
Philips har forpligtet sig til at
udvikle, producere og sende
produkter på markedet, der ikke har
sundhedsskadelige virkninger. Philips
bekræfter, at hvis deres produkter bliver
betjent ordentligt efter deres tilsigtede
formål, er de sikre at bruge ifølge den
videnskabelige viden, der er tilgængelig
i dag.
Philips spiller en aktiv rolle i
udviklingen af internationale EMF- og
sikkerhedsstandarder, hvilket giver os
mulighed for at forudse nye standarder
og hurtigt integrere dem i vores
produkter.
33DA
Page 36

Genbrug
Dette symbol betyder, at produktet
ikke må bortskaes sammen med
almindeligt husholdningsaald
(2012/19/EU).
Følg dit lands regler for særskilt
indsamling af elektriske og elektroniske
produkter. Korrekt bortskaelse er med
til at forhindre negativ påvirkning af
miljøet og menneskers helbred.
Software
App Store er et servicemærke tilhørende
Apple Inc.
Google Play er et varemærke tilhørende
Google Inc.
Dette Philips-apparat og appen "Air
Matters" anvender ere open sourcesoftwareprogrammer. Kopier af open
source-licenstekster, der bruges i dette
produkt, kan hentes fra webstedet:
www.philips.com/purier-compatibility.
34 DA
Page 37

Deutsch
Inhalt
1 Wichtige Hinweise 36
Sicherheit 36
2 Der Luftreiniger 40
Produktübersicht (Abb. a) 40
Übersicht über die
Bedienelemente (Abb. b) 40
3 Erste Schritte 40
Einsetzen der Filter 40
WLAN-Einrichtung 41
4 Verwenden des Geräts 42
Informationen zur
Luftqualitätsanzeige 42
Ein- und Ausschalten 43
Ändern der
Automatikmodus-
Einstellung 43
Ändern der
Lüftergeschwindigkeit 44
Den Timer einstellen 44
Einstellen der
Kindersicherung 44
Nutzen der Funktion "Licht
ein/aus" 45
Wechseln des
Anzeigemodus 45
5 Reinigen 45
Reinigungszeitplan 45
Reinigen des Gehäuses 46
Reinigen des
Luftqualitätssensors 46
Reinigen des Vorlters 46
6 Auswechseln des Filters 47
Informationen zur
Verriegelungsfunktion
bezüglich der Erhaltung
gesunder Luft 47
Auswechseln der Filter 48
Zurücksetzen des
Filterstandzeitzählers 48
Änderung des Filtertyps 49
7 Fehlerbehebung 50
8 Garantie und
Kundendienst 53
Bestellen von Ersatz- oder
Zubehörteilen 53
9 Hinweise 53
Elektromagnetische Felder 53
Recycling 54
Software 54
Es wurde umweltfreundliches Papier verwendet. Vielen Dank für Ihren Beitrag
zur Umwelt.
35DE
Page 38

1 Wichtige
Hinweise
Sicherheit
Lesen Sie diese Bedienungsanleitung
vor dem Gebrauch des Geräts
aufmerksam durch, und bewahren Sie
sie für eine spätere Verwendung auf.
Achtung!
• Achten Sie darauf,
dass kein Wasser,
andere Flüssigkeiten
oder entzündbare
Reinigungsmittel in das
Gerät gelangen, um das
Risiko eines Stromschlags
und/oder Brandgefahr zu
vermeiden.
• Reinigen Sie das Gerät
nicht mit Wasser,
anderen Flüssigkeiten
oder (entzündbaren)
Reinigungsmitteln, um das
Risiko eines Stromschlags
und/oder Brandgefahr zu
vermeiden.
• Sprühen Sie keine
brennbaren Materialien
wie zum Beispiel
Insektengifte oder
Duftstoe um das Gerät.
Achtung
• Bevor Sie das Gerät an
die Stromversorgung
anschließen, prüfen Sie,
ob die Spannungsangabe
auf dem Gerät mit der
örtlichen Netzspannung
übereinstimmt.
• Ist das Netzkabel
defekt, darf es nur von
einem Philips ServiceCenter, einer von
Philips autorisierten
Werkstatt oder einer
ähnlich qualizierten
Person durch ein
Original-Ersatzkabel
ausgetauscht werden,
um Gefährdungen zu
vermeiden.
• Verwenden Sie das
Gerät nicht, wenn
der Netzstecker, das
Netzkabel oder das
Gerät selbst defekt oder
beschädigt sind.
• Dieses Gerät kann von
Kindern ab 8 Jahren
und Personen mit
verringerten physischen,
sensorischen oder
psychischen Fähigkeiten
oder Mangel an Erfahrung
und Kenntnis verwendet
36 DE
Page 39

Deutsch
werden, wenn sie bei der
Verwendung beaufsichtigt
werden oder Anweisung
zum sicheren Gebrauch
des Geräts erhalten und
die Gefahren verstanden
haben. Kinder dürfen
nicht mit dem Gerät
spielen. Die Reinigung
und Wartung darf nicht
von Kindern ohne Aufsicht
durchgeführt werden.
• Achten Sie darauf, dass
Luftein- und -auslass
nicht verdeckt werden.
Legen Sie deshalb keine
Gegenstände auf den
Luftaus- oder vor den
Lufteinlass.
• Stellen Sie sicher, dass
durch den Luftauslass
keine Fremdkörper in das
Gerät fallen.
• Standard-WLAN-
Schnittstelle basierend auf
802.11 b/g/n bei 2,4 GHz
mit einer maximalen
Ausgangsleistung von
31,62 mW EIRP.
Vorsicht
• Das Gerät ist kein Ersatz
für angemessenes
Lüften, regelmäßiges
Staubsaugen oder
das Verwenden einer
Dunstabzugshaube oder
einer Lüftung während
des Kochens.
• Wenn die zum Betrieb
des Geräts verwendete
Steckdose nicht
ordnungsgemäß
angeschlossen ist, wird
der Stecker des Geräts
heiß. Vergewissern Sie
sich, dass Sie für das Gerät
eine ordnungsgemäß
angeschlossene
Steckdose verwenden.
• Verwenden Sie das Gerät
immer auf einer trockenen,
stabilen, ebenen und
waagerechten Unterlage.
• Achten Sie darauf, dass
hinter dem Gerät und
seitlich davon mindestens
20 cm Platz ist. Über dem
Gerät muss ein Abstand
von mindestens 30 cm
eingehalten werden.
• Stellen Sie keine
Gegenstände auf das
Gerät.
37DE
Page 40

• Setzen oder stellen Sie
sich nicht auf das Gerät.
Es kann zu Verletzungen
kommen, wenn Sie sich
auf das Gerät setzen oder
stellen.
• Stellen Sie das Gerät
nicht direkt unter einer
Klimaanlage auf, damit
kein Kondenswasser auf
das Gerät tropfen kann.
• Prüfen Sie vor dem
Einschalten des Geräts,
ob alle Filter korrekt
eingesetzt sind.
• Verwenden Sie nur
Originallter von Philips,
die speziell für dieses
Gerät geeignet sind.
Verwenden Sie keine
anderen Filter.
• Das Verbrennen
des Filters kann
zu irreversiblen
Gesundheitsschäden
führen und/oder andere
Leben gefährden.
Verwenden Sie den Filter
nicht als Brennsto oder
für ähnliche Zwecke.
• Vermeiden Sie es, mit
harten Gegenständen
gegen das Gerät
(insbesondere den
Lufteinlass und -auslass)
zu stoßen.
• Heben oder bewegen
Sie das Gerät immer
mithilfe des Gris auf der
Oberseite des Geräts.
• Achten Sie darauf,
dass weder Ihre Finger
noch andere Objekte
in den Luftauslass oder
-einlass gelangen, um
Verletzungen oder
Beschädigungen des
Geräts zu verhindern.
• Benutzen Sie das Gerät
nicht nach dem Gebrauch
von Räuchermitteln zum
Insektenschutz oder
an Orten, an denen
Ölrückstände oder
chemische Dämpfe
vorhanden sind bzw.
Räucherstäbchen
verbrannt werden.
• Verwenden Sie das
Gerät nicht in der Nähe
von gasbetriebenen
Vorrichtungen, Heizungen
oder oenen Kaminen.
38 DE
Page 41

Deutsch
• Trennen Sie das
Gerät immer von der
Stromversorgung, bevor
Sie es reinigen oder
andere Wartungsarbeiten
durchführen.
• Verwenden Sie das Ge-
rät nicht in Räumen mit
starken Temperaturschwankungen, da diese
zu Kondensation im Geräteinneren führen können.
• Um elektronische
Störungen zu vermeiden,
sollten Sie das Gerät im
Abstand von mindestens
2 Metern zu anderen
Elektrogeräten aufstellen,
die mit Funkwellen
arbeiten (z. B. Fernsehern,
Radios und Funkuhren).
• Das Gerät ist
ausschließlich für
den Hausgebrauch
bei normalen
Betriebsbedingungen
vorgesehen.
• Verwenden Sie es nicht
in feuchter Umgebung
oder in Räumen mit hoher
Umgebungstemperatur,
z. B. im Badezimmer, in
der Toilette oder in der
Küche.
• Das Gerät entfernt kein
Kohlenmonoxid (CO)
oder Radon (Rn). Es kann
nicht als Sicherheitsgerät
bei Unfällen mit
Verbrennungsvorgängen
und gefährlichen
Chemikalien verwendet
werden.
• Wenn Sie das Gerät
bewegen müssen, trennen
Sie das Gerät zuerst von
der Stromversorgung.
• Bewegen Sie das Gerät
nicht, indem Sie am
Netzkabel ziehen.
39DE
Page 42

2 Der Luftreiniger
Herzlichen Glückwunsch zu Ihrem Kauf
und willkommen bei Philips!
Um den Support, den Philips bietet,
vollständig zu nutzen, registrieren Sie
Ihr Produkt unter www.philips.com/
welcome.
Produktübersicht
(Abb. a)
A Bedienfeld
B Luftqualitätsanzeige
C Luftqualitätssensoren
NanoProtect-Filter Serie 3 *
D
(FY3433)
E NanoProtect AC-Filter* (FY3432)
F Vorlter
G Vorderseite
Übersicht über die
Bedienelemente
(Abb. b)
H Ein-/Ausschalter
I Ein-/Ausschalter für die Anzeigen
J Automatikmodus-Taste
K Bildschirm
3 Erste Schritte
Einsetzen der Filter
Hinweis
• Vergewissern Sie sich vor dem
Einsetzen der Filter, dass der
Netzstecker des Luftreinigers aus der
Steckdose gezogen ist.
• Vergewissern Sie sich beim Installieren
des Filters, dass die Seite mit dem
Etikett zu Ihnen gerichtet ist.
1 Ziehen Sie am unteren Teil der
Frontabdeckung, um sie vom Gerät
zu entfernen (Abb. c).
2 Drücken Sie die beiden Clips nach
unten, und ziehen Sie den Vorlter
in Ihre Richtung (Abb. d).
3 Entfernen Sie alle Filter (Abb. e).
4 Entfernen Sie sämtliche
Verpackungsmaterialien von den
Luftreinigungsltern (Abb. f).
5 Setzen Sie die ausgepackten
Luftreinigungslter wieder in das
Gerät ein (Abb. g).
6 Setzen Sie den Vorlter wieder in
das Gerät ein (Abb. h).
Hinweis
• Stellen Sie sicher, dass alle Haken
des Vorlters richtig am Luftreiniger
angebracht sind.
L Lüftergeschwindigkeitstaste
M Timer-Taste
N Reset-/Kindersicherungstaste
40 DE
Page 43

Deutsch
7 Um die Frontabdeckung wieder
anzubringen, befestigen Sie
die Abdeckung zunächst oben
am Gerät (1). Drücken Sie die
Abdeckung dann vorsichtig gegen
das Gehäuse des Geräts (2)
(Abb. i).
8 Waschen Sie sich nach dem
Einsetzen der Filter gründlich die
Hände.
5 Nach erfolgreicher Kopplung
und Verbindung leuchtet die
WLAN-Anzeige weiß. Wenn
die Kopplung nicht erfolgreich
ist, lesen Sie den Abschnitt
zur Fehlerbehebung oder den
Hilfeabschnitt in der App "Air
Matters" für umfassende und
aktuelle Tipps zur Fehlerbehebung.
Hinweis
WLAN-Einrichtung
Erstmalige Einrichtung der
WLAN-Verbindung
1 Laden Sie die App "Air Matters" aus
dem App Store oder von Google
Play herunter, und installieren Sie
sie.
2 Stecken Sie den Stecker des
Luftreinigers in die Steckdose,
und berühren Sie , um den
Luftreiniger einzuschalten.
» Die WLAN-Anzeige blinkt das
erste Mal orange.
3 Vergewissern Sie sich, dass Ihr
mobiles Gerät erfolgreich mit Ihrem
WLAN-Netzwerk verbunden ist.
4 Starten Sie die App "Air Matters",
und folgen Sie den Anweisungen
auf dem Bildschirm, um den
Luftreiniger mit Ihrem Netzwerk zu
verbinden.
• Diese Anweisung ist nur relevant,
wenn der Luftreiniger zum ersten Mal
eingerichtet wird. Wenn das Netzwerk
geändert wurde oder die Einrichtung
erneut durchgeführt werden muss,
beziehen Sie sich auf den Abschnitt
"Einrichten der WLAN-Verbindung bei
einer Netzwerkänderung" auf Seite 15.
• Wenn Sie mehr als einen Luftreiniger
mit Ihrem Endgerät verbinden
möchten, muss dies nacheinander
geschehen. Schließen Sie die
Einrichtung eines Luftreinigers ab,
bevor Sie den nächsten Luftreiniger
einschalten.
• Stellen Sie sicher, dass die Entfernung
zwischen Ihrem Mobilgerät und dem
Luftreiniger weniger als 10 m beträgt
und keine Hindernisse vorhanden sind.
• Diese App unterstützt die neuesten
Versionen von Android und iOS. Unter
www.philips.com/purier-compatibility
nden Sie das neueste Update für
unterstützte Betriebssysteme und
Geräte.
41DE
Page 44

Einrichten der WLANVerbindung bei einer
Netzwerkänderung
Hinweis
4 Verwenden des
Geräts
• Dies trit zu, wenn das
Standardnetzwerk, mit dem Ihr
Luftreiniger verbunden ist, geändert
wurde.
1 Stecken Sie den Stecker des
Luftreinigers in die Steckdose,
und berühren Sie , um den
Luftreiniger einzuschalten.
2 Berühren Sie und gleichzeitig
3 Sekunden lang, bis ein Signalton
zu hören ist.
» Der Luftreiniger wechselt in den
Kopplungsmodus.
» Die WLAN-Anzeige blinkt
orange.
3 Befolgen Sie die Schritte 4 bis 5 im
Abschnitt "Erstmalige Einrichtung
der WLAN-Verbindung".
Informationen zur
Luftqualitätsanzeige
IAIWert
1 bis 3 Blau
4 bis 6 Blau-Violett
7 bis 9 Violett-Rot
10 bis 12Rot
Die Anzeige für die Luftqualität
schaltet sich automatisch ein, wenn
das Gerät eingeschaltet ist, und zeigt
nacheinander alle Farben an. Innerhalb
kürzester Zeit wählen die Sensoren für
die Luftqualität die Farbe aus, die der
Qualität der Umgebungsluft entspricht.
Farbe der
Luftqualitätsanzeige
Luftqualität
Gut
Okay
Schlecht
Sehr
schlecht
42 DE
Page 45

Deutsch
Ein- und Ausschalten
1 Stecken Sie den Stecker des Geräts
in die Steckdose.
2 Berühren Sie , um das Gerät
einzuschalten (Abb. j).
» Das Gerät wird standardmäßig
im automatischen Modus
betrieben.
» Nach einer kurzen Messung
der Luftqualität wählt der
Luftqualitätssensor automatisch
die entsprechende Farbe für die
Luftqualitätsanzeige aus.
» Nach der Messung des
Partikelgehalts in der Luft zeigt
der Luftreiniger den IAI-Wert
an. Der Luftreiniger wird im
Automatikmodus betrieben,
und wird auf dem Bildschirm
angezeigt (Abb. k).
3 Halten Sie 3 Sekunden
lang gedrückt, um das Gerät
auszuschalten.
Hinweis
• Nachdem das Gerät über den Ein-/
Ausschalter ausgeschaltet wurde,
nimmt das Gerät beim nächsten
Einschalten den Betrieb basierend auf
den letzten Einstellungen auf, wenn es
noch an die Steckdose angeschlossen
ist.
• Wenn das Gerät nach dem
Ausschalten mit dem Internet
verbunden ist, wird der Sensor
weiterhin die Qualität der Raumluft
messen und diese Echtzeitdaten an
die App senden.
Ändern der
AutomatikmodusEinstellung
Zur Wahl stehen der allgemeine Modus
( ), der Allergiemodus ( ) und der
Bakterien- und Virenmodus ( ).
Allergiemodus
Der speziell entwickelte Allergiemodus
kann eektiv gängige Allergene wie
Pollen und Hautschuppen von Tieren
entfernen.
• Berühren Sie die Automatikmodus-
Taste , um den Allergiemodus
auszuwählen (Abb. l).
» Auf dem Bildschirm werden
Auto (A) und angezeigt.
Allgemeiner Modus
Ein intelligenter Automatikmodus, der
die Einstellungen des Luftreinigers
automatisch auf den richtigen Wert
anpasst.
• Berühren Sie die Automatikmodus-
Taste , um den allgemeinen
Modus auszuwählen (Abb. m).
» Auf dem Bildschirm werden
Auto (A) und angezeigt.
Bakterien- und Virenmodus
Der speziell entwickelte Bakterien- und
Virenmodus kann Bakterien und Viren
wie Staphylococcus Albus und H1N1
zuverlässig entfernen.
• Berühren Sie die Automatikmodus-
Taste , um den Bakterien- und
Virenmodus auszuwählen (Abb. n).
» Auf dem Bildschirm werden
Auto (A) und angezeigt.
43DE
Page 46

Ändern der
Lüftergeschwindigkeit
Es gibt verschiedene
Lüftergeschwindigkeiten. Sie können
den Ruhemodus (SL), Turbo-Modus
(T) sowie Geschwindigkeit 1, 2 oder 3
auswählen.
Ruhemodus (SL)
Im Ruhemodus wird das Gerät leise mit
Geschwindigkeitsstufe 1 betrieben. Eine
Minute nach Auswahl des Ruhemodus
werden die Betriebsanzeige und die
Lichtanzeige gedimmt, und alle anderen
Lichter erlöschen.
• Berühren Sie die
Lüftergeschwindigkeitstaste , um
den Ruhemodus (SL) auszuwählen
(Abb. o).
Manuell
• Berühren Sie mehrmals die
Lüftergeschwindigkeitstaste
, um die gewünschte
Lüftergeschwindigkeit einzustellen.
(Abb. p).
Turbo (t)
Im Turbo-Modus wird das Gerät mit der
höchsten Geschwindigkeit betrieben.
• Berühren Sie die
Lüftergeschwindigkeitstaste , um
den Turbo-Modus (t) auszuwählen
(Abb. q).
Den Timer einstellen
Mit dem Timer können Sie das Gerät
eine bestimmte Anzahl an Stunden
laufen lassen. Nach Ablauf der
eingestellten Zeit schaltet sich das
Gerät automatisch aus.
• Berühren Sie mehrmals die Timer-
Taste , bis die Anzahl der Stunden
angezeigt wird, die das Gerät
betrieben werden soll (Abb. r).
» Der Timer kann zwischen 1 und
12 Stunden eingestellt werden.
Um den Timer zu deaktivieren, berühren
Sie die Timer-Taste wiederholt, bis
auf dem Bildschirm angezeigt wird.
Einstellen der
Kindersicherung
1 Halten Sie die
Kindersicherungstaste
3 Sekunden lang gedrückt, um
die Kindersicherung zu aktivieren
(Abb. s).
» wird auf dem Bildschirm
angezeigt.
» Wenn die Kindersicherung
aktiviert ist, reagieren alle
anderen Tasten nicht.
2 Halten Sie die
Kindersicherungstaste erneut
3 Sekunden lang gedrückt, um
die Kindersicherung wieder zu
deaktivieren (Abb. t).
» wird nicht mehr auf dem
Bildschirm angezeigt.
44 DE
Hinweis
• Sie können den Luftreiniger auch bei
aktivierter Kindersicherung über die
App steuern.
Page 47

Deutsch
Nutzen der Funktion
"Licht ein/aus"
5 Reinigen
Mit der Taste "Licht an/aus" können
Sie die Anzeige für die Luftqualität, das
Display und die Funktionsanzeige bei
Bedarf ein- oder ausschalten.
1 Wenn Sie die Taste "Licht an/aus"
einmal berühren, erlöschen die
Anzeige für die Luftqualität, das
Display und die Funktionsanzeigen.
2 Wenn Sie die Taste "Licht ein/
aus" zum dritten Mal berühren,
leuchten alle Anzeigen wieder auf.
Wechseln des
Anzeigemodus
Der Luftreiniger verfügt über zwei
Anzeigemodi: "Innenraumallergenindex
(Indoor Allergen Index, IAI) " und "PM2.5".
Im IAI-Modus zeigt das Display eine
Zahl zwischen 1 und 12 an, die auf den
Allergenwert hinweist. Im PM2.5-Modus
zeigt das Display den Feinstaub-2.5Anteil in der Luft in µg/m3 an.
Hinweis
• Der Luftreiniger wird standardmäßig im
IAI-Anzeigemodus betrieben.
1 Berühren Sie die Dimmer-Taste
3 Sekunden lang, um in den
PM2.5-Anzeigemodus (Abb. u) zu
wechseln.
» Der PM2.5-Wert wird auf dem
Bildschirm angezeigt.
2 Berühren Sie die Dimmer-Taste
erneut 3 Sekunden lang, um
wieder in den IAI-Anzeigemodus zu
wechseln (Abb. v).
» Der aktuelle IAI-Wert wird auf
dem Bildschirm angezeigt.
Hinweis
• Ziehen Sie vor dem Reinigen immer
den Netzstecker aus der Steckdose.
• Tauchen Sie das Gerät niemals in
Wasser oder andere Flüssigkeiten.
• Verwenden Sie keine Scheuermittel
oder aggressive bzw. brennbare
Reinigungsmittel wie zum Beispiel
Bleiche oder Alkohol, um die Teile des
Geräts zu reinigen.
• Nur der Vorlter ist abwaschbar.
Der Luftreinigungslter ist nicht
abwaschbar und kann nicht mit dem
Staubsauger gereinigt werden.
Reinigungszeitplan
Frequenz
Bei Bedarf
Bei Anzeige
von F0 auf dem
Display
Alle zwei Monate
Reinigungsmethode
Reinigen des
Gerätegehäuses
mit einem
weichen,
trockenen Tuch.
Reinigen des
Vorlters
Reinigen der Luftqualitätssensoren
45DE
Page 48

Reinigen des Gehäuses
Reinigen Sie das Gerät regelmäßig
innen und außen, damit sich kein Staub
ansammelt.
1 Wischen Sie Staub mit einem
trockenen weichen Tuch vom
Gerätegehäuse ab.
2 Reinigen Sie den Luftauslass mit
einem weichen, trockenen Tuch.
Reinigen des
Luftqualitätssensors
Reinigen Sie den Luftqualitätssensor
alle 2 Monate, um die ideale Funktion
des Luftreinigers sicherzustellen.
Reinigen Sie ihn öfter, wenn Sie den
Reiniger in einer staubigen Umgebung
verwenden.
Hinweis
• Wenn die Luftfeuchtigkeit im
Zimmer sehr hoch ist, kann sich
Kondenswasser am Luftqualitätssensor
bilden. Infolgedessen kann die
Luftqualitätsanzeige eine schlechte
Luftqualität anzeigen, obwohl diese
gut ist. In diesem Fall müssen Sie den
Luftqualitätssensor reinigen oder eine
der manuellen Geschwindigkeitsstufen
verwenden.
4 Trocknen Sie sie mit einem
trockenen Wattestäbchen.
5 Bringen Sie die Abdeckung des
Luftqualitätssensors wieder an
(Abb. z).
Reinigen des Vorlters
Reinigen Sie den Vorlter, wenn F0
auf dem Bildschirm angezeigt wird
(Abb. {).
1 Ziehen Sie am unteren Teil der
Frontabdeckung, um sie vom Gerät
zu entfernen (Abb. c).
2 Drücken Sie die beiden Clips nach
unten, und ziehen Sie den Vorlter
in Ihre Richtung (Abb. d).
3 Waschen Sie den Vorlter unter
ießendem Wasser ab. Wenn
der Vorlter sehr schmutzig ist,
verwenden Sie eine weiche Bürste,
um den Staub zu entfernen
(Abb. |).
4 Lassen Sie den Vorlter an der Luft
trocknen.
Hinweis
• Vergewissern Sie sich, dass der Vorlter
vollständig trocken ist. Wenn er noch
nass ist, können sich darin Bakterien
vermehren, und die Lebensdauer des
Vorlters kann sich verkürzen.
1 Reinigen Sie den Ein- und Auslass
des Luftqualitätssensors mit einer
weichen Bürste (Abb. w).
2 Önen Sie die Abdeckung des
Luftqualitätssensors (Abb. x).
3 Reinigen Sie den
Luftqualitätssensor sowie den
Lufteinlass und -auslass mit
einem leicht angefeuchteten
Wattestäbchen (Abb. y).
46 DE
5 Setzen Sie den Vorlter wieder in
das Gerät ein (Abb. h).
Hinweis
• Vergewissern Sie sich, dass die
Seite mit den beiden Clips in Ihre
Richtung zeigt, und dass alle Haken
des Vorlters ordnungsgemäß am
Luftreiniger befestigt sind.
Page 49

Deutsch
6 Um die Frontabdeckung wieder
anzubringen, befestigen Sie
die Abdeckung zunächst oben
am Gerät (1). Drücken Sie die
Abdeckung dann vorsichtig gegen
das Gehäuse des Geräts (2)
(Abb. i).
7 Halten Sie die Reset-Taste
3 Sekunden lang gedrückt, um
die Reinigungszeit des Vorlters
zurückzusetzen (Abb. }).
6 Auswechseln
des Filters
Informationen zur
Verriegelungsfunktion
bezüglich der Erhaltung
gesunder Luft
Dieser Luftreiniger ist mit einer
Filterwechselanzeige ausgestattet,
um im Betrieb des Luftreinigers
sicherzustellen, dass sich dieser in
einem idealen Zustand bendet. Wenn
die Filter ausgetauscht werden müssen,
wird der Filtercode auf dem Display
angezeigt (siehe Filterwarntabelle).
Wenn die Filter nicht rechtzeitig
ausgewechselt werden, kann der
Luftreiniger nicht mehr betrieben
werden und wird automatisch
gesperrt, um die Luftqualität im Raum
zu schützen. Ersetzen Sie die Filter
so schnell wie möglich gemäß dem
Filtercode.
47DE
Page 50

Auswechseln der Filter
Hinweis
• Die Luftreinigungslter sind nicht
abwaschbar und können nicht mit dem
Staubsauger gereinigt werden.
• Schalten Sie den Luftreiniger stets
aus, und ziehen Sie den Netzstecker
aus der Steckdose, bevor Sie die Filter
auswechseln.
• Reinigen Sie die Filter nicht mit einem
Staubsauger.
• Verwenden Sie den Vorlter nicht,
wenn er beschädigt oder abgenutzt ist.
Rufen Sie bitte die Website
www.philips.com/support auf, oder
kontaktieren Sie ein Philips ServiceCenter in Ihrem Land.
Filterwarntabelle
Status der
Filterwarnanzeige
A3 wird auf dem
Display angezeigt
C7 wird auf dem
Display angezeigt
A3 und C7 werden
abwechselnd
auf dem Display
angezeigt
Gehen Sie wie
folgt vor:
Auswechseln
des
NanoProtectFilters Serie 3
(FY3433)
Auswechseln
des NanoProtect
AC-Filters
(FY3432)
Auswechseln
beider Filter
1 Nehmen Sie die gebrauchten
Luftlter gemäß dem auf dem
Bildschirm angezeigten Filtercode
heraus. Entsorgen Sie gebrauchte
Filter (Abb. ~).
Hinweis
• Berühren Sie nicht die plissierte
Filteroberäche, und riechen Sie nicht
am Filter, da dieser Schadstoe aus
der Luft gesammelt hat.
2 Entfernen Sie das gesamte
Verpackungsmaterial von den
neuen Filtern (Abb. f).
3 Setzen Sie die neuen Filter in das
Gerät ein (Abb. g).
4 Stecken Sie den Stecker des Geräts
in die Steckdose.
5 Halten Sie die Reset-Taste
3 Sekunden lang gedrückt, um
den Zähler für die Filterstandzeit
zurückzusetzen(Abb. ).
Hinweis
• Waschen Sie sich nach dem
Auswechseln der Filter die Hände.
Zurücksetzen des
Filterstandzeitzählers
Nach dem Austauschen eines Filters
müssen Sie den Zähler für die
Filterstandzeit manuell zurücksetzen.
Sie können die Filter auch
dann austauschen, wenn kein
Filterwechselcode auf dem Bildschirm
angezeigt wird.
1 Halten Sie und gleichzeitig
3 Sekunden lang gedrückt, um
in den Modus zum Erzwingen
der Zurücksetzung des Filters zu
wechseln (Abb. €).
» Auf dem Bildschirm wird der
Code (A3) für den NanoProtectFilter der Serie 3 angezeigt.
48 DE
Page 51

Deutsch
2 Halten Sie 3 Sekunden lang
gedrückt, um das Zurücksetzen
des Filterstandzeitzählers für den
NanoProtect-Filter der Serie 3 zu
erzwingen (Abb. ).
3 Der Code (C7) für den NanoProtect
AC-Filter wird auf dem Bildschirm
angezeigt, nachdem die
Filterstandzeit des NanoProtect ACFilters Serie 3 zurückgesetzt wurde
(Abb. ‚).
4 Halten Sie 3 Sekunden lang
gedrückt, um das Zurücksetzen der
Filterstandzeit des NanoProtect
AC-Filters zu erzwingen und
den Modus zum Erzwingen der
Zurücksetzung des Filters zu
beenden (Abb. ƒ).
Änderung des Filtertyps
1 Halten Sie und gleichzeitig
3 Sekunden lang gedrückt, um
in den Modus zum Ändern des
Filtertyps zu wechseln (Abb. €).
» Auf dem Display wird der Code
(A3) für den NanoProtect-Filter
Serie 3 angezeigt.
2 Berühren Sie , um den Filtercode
des neuen, nun verwendeten Filters
auszuwählen (Abb. „).
3 Halten Sie 3 Sekunden lang
gedrückt, um den Filtercode
des neuen Filters zu bestätigen
(Abb. …).
4 Der Code (C7) des NanoProtect
AC-Filters wird angezeigt, nachdem
der erste Filtertyp geändert wurde
(Abb. ‚).
5 Berühren Sie , um den neuen
Filtercode des zweiten Filters
auszuwählen (Abb. †).
6 Halten Sie 3 Sekunden lang
gedrückt, um den Filtercode des
zweiten Filters zu bestätigen
und den Modus zum Ändern des
Filtertyps zu beenden (Abb. ‡).
Hinweis
• Wenn Sie, nachdem Sie den Filtercode
des neuen Filters über die Taste
ausgewählt haben, 10 Sekunden
lang keine andere Taste drücken,
wird der Filtercode des neuen Filters
automatisch vom Gerät bestätigt.
49DE
Page 52

7 Fehlerbehebung
In diesem Kapitel sind die häugsten Probleme aufgeführt, die beim Gebrauch
Ihres Geräts auftreten können. Sollten Sie ein Problem mithilfe der nachstehenden
Informationen nicht beheben können, wenden Sie sich bitte an das Service-Center in
Ihrem Land.
Problem Mögliche Lösung
• Überprüfen Sie, ob die Frontabdeckung ordnungsgemäß
angebracht ist.
Das Gerät
funktioniert nicht,
obwohl es mit der
Stromversorgung
verbunden ist.
Das Gerät
funktioniert
nicht, obwohl es
eingeschaltet ist.
• Der Code zum Auswechseln des Filters wird bereits seit
einiger Zeit auf dem Display angezeigt, Sie haben jedoch
den entsprechenden Filter noch nicht ausgewechselt. Das
Gerät wird gesperrt, wenn Sie weiterhin den alten Filter
verwenden. Wechseln Sie in diesem Fall den Filter aus,
und setzen Sie den Zähler für die Standzeit des Filters
zurück.
• Das Gerät funktioniert, die Tasten reagieren jedoch nicht.
Überprüfen Sie, ob die Kindersicherung aktiviert ist.
• Der Code zum Auswechseln des Filters wird bereits seit
längerer Zeit ununterbrochen angezeigt, Sie haben jedoch
den entsprechenden Filter nicht ausgewechselt, und das
Gerät ist nun gesperrt. Wechseln Sie in diesem Fall den
Filter aus, und setzen Sie den Zähler für die Standzeit des
Filters zurück.
Der Luftstrom,
der aus dem
Luftauslass dringt,
ist bedeutend
schwächer als
vorher.
50 DE
• Der Vorlter ist verschmutzt. Reinigen Sie den Vorlter
(siehe Kapitel "Reinigung").
Page 53

Deutsch
Problem Mögliche Lösung
• Überprüfen Sie, ob das Verpackungsmaterial von den
Filtern entfernt ist.
Die Luftqualität
verbessert sich
nicht, obwohl der
Luftreiniger eine
lange Zeit über in
Betrieb war.
• Einer der Filter wurde nicht in das Gerät eingesetzt.
Vergewissern Sie sich, dass alle Filter ordnungsgemäß
in der folgenden Reihenfolge von innen nach
außen eingesetzt sind: 1) NanoProtect-Filter Serie 3;
2) NanoProtect AC-Filter 3) Vorlter.
• Der Luftqualitätssensor ist nass. Die Luftfeuchtigkeit im
Raum ist hoch und verursacht Kondensation. Stellen Sie
sicher, dass der Luftqualitätssensor sauber und trocken ist
(siehe Kapitel "Reinigung").
Die Farbe der Luftqualitätsanzeige
ändert sich nicht.
Bei dem
Gerät tritt ein
ungewöhnlicher
Geruch auf.
Das Gerät ist sehr
laut.
Das Gerät zeigt
an, dass ich einen
Filter auswechseln
muss, obwohl
ich dies schon
gemacht habe.
• Der Luftqualitätssensor ist verschmutzt. Reinigen Sie den
Luftqualitätssensor (siehe Kapitel "Reinigung").
• Unter Umständen produziert der Filter aufgrund der
Aufnahme von Innenraumgasen einen unangenehmen
Geruch, wenn er längere Zeit verwendet wurde. Es wird
empfohlen, dass Sie ihn reaktivieren, indem Sie ihn bei
regelmäßiger Verwendung in direktes Sonnenlicht stellen.
Wenn der Geruch weiterhin besteht, ersetzen Sie den Filter.
• Wenn der Luftreiniger einen Verbrennungsgeruch
verströmt, schalten Sie ihn aus, und ziehen Sie den
Netzstecker aus der Steckdose. Wenden Sie sich an das
Service-Center in Ihrem Land.
• Wenn das Gerät zu laut ist, können Sie die Geschwindigkeit
des Lüfters auf eine niedrigere Stufe einstellen. Wenn
Sie das Gerät nachts in einem Schlafzimmer verwenden,
wählen Sie den Ruhemodus aus.
• Sie haben möglicherweise den Zähler für die
Filterstandzeit nicht zurückgesetzt. Verbinden Sie das
Gerät mit der Stromversorgung, halten Sie die Taste
gedrückt, um das Gerät einzuschalten, und halten Sie die
Reset-Taste 3 Sekunden lang gedrückt
Der Fehlercode
"E1" oder "E2" wird
auf dem Bildschirm
angezeigt.
• Das Gerät funktioniert nicht ordnungsgemäß. Wenden Sie
sich an das Service-Center in Ihrem Land.
51DE
Page 54

Problem Mögliche Lösung
Welche App soll
ich herunterladen?
Die WLANEinrichtung ist
nicht erfolgreich.
• Laden Sie die App "Air Matters" aus dem App Store oder
von Google Play herunter, und installieren Sie sie.
• Wenn der Router, mit dem Ihr Luftreiniger verbunden ist,
ein Dualband-Router ist und Ihr Luftreiniger aktuell nicht
mit einem 2,4-GHz-Netzwerk arbeitet, wechseln Sie auf ein
anderes Frequenzband desselben Routers (2,4 GHz), und
versuchen Sie dann erneut, Ihren Luftreiniger zu koppeln.
5-GHz-Netzwerke werden nicht unterstützt.
• Web-Authentizierungsnetzwerke werden nicht
unterstützt.
• Überprüfen Sie, ob der Luftreiniger sich innerhalb der
Reichweite des WLAN-Routers bendet. Sie können
versuchen, den Luftreiniger näher am WLAN-Router zu
platzieren.
• Überprüfen Sie, ob der Netzwerkname korrekt ist.
Beachten Sie bei der Eingabe des Netzwerknamens die
Groß- und Kleinschreibung.
• Überprüfen Sie, ob das WLAN-Passwort korrekt ist.
Beachten Sie bei der Eingabe des Passworts die Großund Kleinschreibung.
• Wiederholen Sie die Einrichtung mit den Anweisungen im
Abschnitt "Einrichten der WLAN-Verbindung, wenn das
Netzwerk sich geändert hat".
• Die WLAN-Konnektivität kann von elektromagnetischen
oder anderen Störungen unterbrochen werden. Halten Sie
das Gerät von anderen elektronischen Geräten fern, um
Störsignale zu vermeiden.
• Überprüfen Sie, ob sich das Mobilgerät im Flugmodus
bendet. Stellen Sie sicher, dass der Flugmodus deaktiviert
ist, wenn eine Verbindung mit dem WLAN-Netzwerk
hergestellt wird.
• Im Hilfeabschnitt der App nden Sie umfassende und
aktuelle Tipps zur Fehlerbehebung.
52 DE
Page 55

Deutsch
8 Garantie und
Kundendienst
9 Hinweise
Benötigen Sie weitere Informationen
oder treten Probleme auf, besuchen Sie
die Philips Website www.philips.com,
oder setzen Sie sich mit einem Philips
Service-Center in Ihrem Land in
Verbindung (Telefonnummer siehe
Garantieschrift). Sollte es in Ihrem Land
kein Service-Center geben, wenden
Sie sich bitte an Ihren lokalen Philips
Händler.
Bestellen von Ersatzoder Zubehörteilen
Wenn Sie ein Teil ersetzen müssen oder
ein zusätzliches Teil kaufen möchten,
wenden Sie sich an Ihren Philips
Händler, oder besuchen Sie
www.philips.com/support.
Wenn Sie Probleme bei der
Beschaung der Teile haben, wenden
Sie sich bitte an ein Philips ServiceCenter in Ihrem Land (Telefonnummer
siehe Garantieschrift).
Elektromagnetische
Felder
Dieses Philips Gerät erfüllt sämtliche
Normen und Regelungen bezüglich der
Gefährdung durch elektromagnetische
Felder.
Elektromagnetische
Verträglichkeit
Koninklijke Philips N.V. produziert und
vertreibt viele Endkundenprodukte,
die, wie jedes elektronische Gerät
im Allgemeinen, elektromagnetische
Signale aussenden und empfangen
können.
Einer der wichtigsten
Geschäftsprinzipien von Philips ist
es, alle erforderlichen Maßnahmen
für das Produkt zum Schutz der
Gesundheit und Sicherheit zu ergreifen,
alle entsprechenden gesetzlichen
Richtlinien einzuhalten sowie die
EMF-Standardgrenzwerte nicht zu
überschreiten, die zum Zeitpunkt der
Herstellung des Produkts festgelegt
wurden.
Philips hat sich dazu verpichtet,
Produkte zu entwickeln, herzustellen
und zu verkaufen, die sich nicht
nachteilig auf die Gesundheit
auswirken. Philips bestätigt, dass
seine Produkte gemäß aktuellen
wissenschaftlichen Erkenntnissen
sicher sind, wenn die Produkte für
ihren bestimmungsgemäßen Zweck
verwendet werden.
53DE
Page 56

Philips spielt eine aktive Rolle in der
Entwicklung der internationalen EMFund Sicherheitsstandards, sodass
Philips auch weiterhin die neuesten
Entwicklungen der Standardisierung
so früh wie möglich in seine Produkte
integrieren kann.
Software
App Store ist eine Dienstleistungsmarke
von Apple Inc.
Google Play ist eine Marke von Google
Inc.
Recycling
-Dieses Symbol bedeutet, dass das
Produkt nicht mit dem normalen
Hausmüll entsorgt werden kann
(2012/19/EU).
1. Altgeräte können kostenlos an
geeigneten Rücknahmestellen
abgegeben werden.
2. Diese werden dort fachgerecht
gesammelt oder zur
Wiederverwendung vorbereitet.
Altgeräte können Schadstoffe
enthalten, die der Umwelt und der
menschlichen Gesundheit schaden
können. Enthaltene Rohstoffe
können durch ihre Wiederverwertung
einen Beitrag zum Umweltschutz
leisten.
3. Die Löschung personenbezogener
Daten auf den zu entsorgenden
Altgeräten muss vom Endnutzer
eigenverantwortlich vorgenommen
werden.
4. Hinweise für Verbraucher in
Deutschland: Die in Punkt 1
genannte Rückgabe ist gesetzlich
vorgeschrieben. Sammel- und
Rücknahmestellen in Deutschland:
https://www.stiftung-ear.de/
Dieses Philips Gerät und die App "Air
Matters" nutzen verschiedene Arten von
Open-Source-Software. Kopien des
Open-Source-Software-Lizenztexts,
der bei diesem Produkt verwendet
wird, sind auf der folgenden Website
zu nden: www.philips.com/puriercompatibility.
54 DE
Page 57

Español
Contenido
1 Importante 56
Seguridad 56
2 Puricador de aire 59
Descripción del producto
(g. a) 59
Descripción de los controles
(g. b) 59
3 Introducción 59
Instalación de los ltros 59
Conguración de Wi-Fi 60
4 Uso del aparato 61
Explicación del piloto de
calidad del aire 61
Encendido y apagado 61
Cambio de la conguración
del modo automático 62
Cambio de la velocidad del
ventilador 62
Programación del
temporizador 63
Conguración del bloqueo
infantil 63
Uso de la función de
encendido/apagado del
piloto 63
Cambio del modo de
visualización 64
5 Limpieza 64
Planicación de limpieza 64
Limpieza del cuerpo del
aparato 64
Limpieza del sensor de
calidad del aire 65
Limpieza del preltro 65
6 Sustitución del ltro 66
Explicación del bloqueo
de protección de aire
saludable 66
Sustitución de los ltros 66
Restablecimiento del
contador de vida útil del
ltro 67
Cambio del tipo de ltro 67
7 Solución de problemas 68
8 Garantía y servicio 71
Solicitud de piezas y
accesorios 71
9 Avisos 71
Campos electromagnéticos
(CEM) 71
Reciclaje 72
Software 72
Se usa papel ecológico. Gracias por su contribución para salvar árboles.
55ES
Page 58

1 Importante
Seguridad
Antes de usar el aparato, lea
detenidamente este manual de
usuario y consérvelo por si necesitara
consultarlo en el futuro.
Peligro
• No deje que entre agua
ni cualquier otro líquido
o detergente inflamable
en el aparato para evitar
el riesgo de incendio o de
descargas eléctricas.
• No lave el aparato con
agua ni con cualquier
otro líquido o detergente
(inflamable) para evitar el
riesgo de incendio o de
descargas eléctricas.
• No pulverice materiales
inflamables, como
insecticidas o fragancias
alrededor del aparato.
Advertencia
• Antes de enchufar el
aparato, compruebe que
el voltaje indicado en el
producto se corresponde
con el voltaje de la red
local.
• Si el cable de
alimentación está dañado,
debe ser sustituido por
Philips o por un centro de
servicio autorizado por
Philips u otro personal
cualificado con el fin
de evitar situaciones de
peligro.
• No utilice el aparato si
la clavija, el cable de
alimentación o el propio
aparato están dañados.
• Este aparato puede
ser usado por niños a
partir de ocho años,
por personas con
capacidad física, psíquica
o sensorial reducida y
por quienes no tengan
los conocimientos y la
experiencia necesarios
siempre que lo hagan
bajo supervisión o hayan
recibido instrucciones
sobre cómo utilizar el
aparato de forma segura
y conozcan los riesgos
que conlleva su uso. No
permita que los niños
jueguen con el aparato.
Los niños no deben
llevar a cabo la limpieza
ni el mantenimiento del
producto sin supervisión.
• No bloquee la entrada y
salida de aire con ningún
objeto.
56 ES
Page 59

Español
• Cerciórese de que no
caigan objetos extraños
dentro del aparato a
través de la salida del aire.
• Interfaz Wi-Fi estándar
basada en 802.11b/g/n a
2,4 GHz con una potencia
de salida máxima de
31,62 mW EIRP.
Precaución
• Este aparato no puede
sustituir un sistema de
ventilación, la limpieza
regular con aspirador ni
el uso de una campana
extractora o ventilador al
cocinar.
• Si los conectores de la
toma de alimentación
utilizada para conectar
el aparato están en mal
estado, el enchufe del
aparato se calentará.
Asegúrese de enchufar
el aparato a una toma
de corriente conectada
adecuadamente.
• Coloque y utilice siempre
el aparato sobre una
superficie seca, estable,
plana y horizontal.
• Deje al menos 20 cm de
espacio libre por detrás
y a ambos lados del
aparato, y al menos 30 cm
por encima del aparato.
• No coloque nada sobre el
aparato.
• No se siente ni se pare
sobre el aparato. Si se
sienta o se coloca sobre
el aparato, se pueden
producir lesiones.
• No coloque el aparato
directamente bajo
un sistema de aire
acondicionado para evitar
que el agua condensada
caiga sobre él.
• Antes de encender el
aparato, asegúrese de
que todos los filtros estén
bien montados.
• Utilice solo filtros
originales de Philips
especialmente diseñados
para este aparato. No
utilice otros filtros.
• La combustión del filtro
puede crear riesgos
irreversibles para los seres
humanos o poner en
peligro a otros seres vivos.
No use el filtro como
material combustible ni
con fines similares.
• Evite golpear el aparato
(especialmente la entrada
y la salida de aire) con
objetos duros.
57ES
Page 60

• Levante o mueva siempre
el aparato con ayuda del
asa de la parte superior.
• No introduzca los dedos
ni objetos en la salida o
la entrada de aire para
evitar lesiones físicas o un
funcionamiento incorrecto
del aparato.
• No use este aparato si
ha utilizado insecticidas
domésticos que producen
humo, ni en lugares
donde haya residuos
oleosos, incienso
encendido o gases
químicos.
• No utilice el aparato
cerca de aparatos de gas,
sistemas de calefacción ni
chimeneas.
• Desenchufe siempre
el aparato después de
usarlo y antes de limpiarlo
o realizar otras tareas de
mantenimiento.
• No utilice el aparato en
habitaciones con grandes
cambios de temperatura,
ya que podría producir
condensación dentro del
aparato.
• Para evitar interferencias,
coloque el aparato a una
distancia de al menos dos
metros de otros aparatos
eléctricos que utilicen
ondas radioeléctricas,
como televisores, radios
y relojes controlados por
radio.
• El aparato está diseñado
únicamente para su uso
doméstico en condiciones
de funcionamiento
normales.
• No utilice el aparato en
entornos húmedos o con
elevadas temperaturas
ambiente, como el baño o
la cocina.
• El aparato no elimina el
monóxido de carbono
(CO) ni el radón (Rn). No
puede utilizarse como
dispositivo de seguridad
en caso de accidente
en el que intervienen
procesos de combustión
y productos químicos
peligrosos.
• Si necesita mover el
aparato, desenchúfelo
primero de la fuente de
alimentación.
• No tire del cable de
alimentación para mover
el aparato.
58 ES
Page 61

Español
2 Purificador de
aire
3 Introducción
Le felicitamos por su compra y le
damos la bienvenida a Philips.
Para aprovechar todas las ventajas de
la asistencia que presta Philips, registre
el producto en www.philips.com/
welcome.
Descripción del producto
(g. a)
A Panel de control
B Piloto de calidad del aire
C Sensores de calidad del aire
Filtro NanoProtect serie 3 *
D
(FY3433)
E Filtro AC NanoProtect* (FY3432)
F Prefiltro
G Panel frontal
Descripción de los
controles (g. b)
Instalación de los ltros
Nota
• Asegúrese de que el purificador de
aire esté desenchufado de la toma de
corriente eléctrica antes de instalar los
filtros.
• Asegúrese de que el lateral con la
etiqueta apunte hacia usted al instalar
el filtro.
1 Tire de la parte inferior del panel
frontal para extraerlo del aparato
(fig. c).
2 Presione los dos clips hacia abajo
y tire del prefiltro hacia afuera
(fig. d).
3 Retire todos los filtros (fig. e).
4 Retire todo el embalaje de los filtros
de purificación del aire (fig. f).
5 Vuelva a poner en el aparato los
filtros de purificación del aire sin el
embalaje (fig. g).
6 Vuelva a colocar el prefiltro en el
aparato (fig. h).
H Botón de encendido/apagado
Botón de encendido/apagado
I
del piloto
J Botón de modo automático
K Pantalla de visualización
Botón de velocidad del
L
ventilador
M Botón del temporizador
Botón de reinicio/bloqueo
N
infantil
Nota
• Asegúrese de que todos los ganchos
del prefiltro estén correctamente
colocados en el purificador.
7 Para volver a fijar el panel frontal,
monte el panel en la parte superior
del aparato (1). A continuación,
empuje el panel contra el cuerpo
del aparato con cuidado (2) (fig. i).
8 Lávese muy bien las manos
después de instalar los filtros.
59ES
Page 62

Conguración de Wi-Fi
Conguración de la conexión
Wi-Fi por primera vez
1 Descargue e instale la aplicación
"Air Matters" desde la App Store o
Google Play.
2 Conecte el enchufe del purificador
de aire a la toma de corriente y
toque para encenderlo.
» El indicador Wi-Fi parpadea
en naranja por primera vez.
3 Asegúrese de que su dispositivo
móvil esté correctamente
conectado a su red Wi-Fi.
4 Inicie la aplicación "Air Matters" y
siga las instrucciones que aparecen
en pantalla para conectar el
purificador de aire a la red.
5 Una vez que la conexión y el
emparejamiento se hayan realizado
correctamente, el indicador WiFi se iluminará en blanco. Si
el emparejamiento no se realiza
correctamente, consulte la sección
de solución de problemas o la
sección de ayuda de la aplicación
"Air Matters" para obtener más
información y consejos actualizados
sobre la solución de problemas.
Nota
• Esta instrucción es válida únicamente
cuando el purificador de aire se
configura por primera vez. Si la red ha
cambiado o es necesario realizar la
configuración de nuevo, consulte la
sección "Configuración de la conexión
Wi-Fi cuando la red ha cambiado", en
la página 15.
• Si desea conectar más de un
purificador de aire a su dispositivo
inteligente, tendrá que realizar estos
pasos sucesivamente. Complete la
configuración de un purificador de aire
antes de encender el siguiente.
• Asegúrese de que la distancia entre
su dispositivo móvil y el purificador
de aire sea inferior a 10 m y de que no
haya obstáculos entre ellos.
• Esta aplicación es compatible con las
versiones más recientes de Android e
iOS. Compruebe
www.philips.com/purifier-compatibility
para obtener información sobre la
última actualización de sistemas
operativos y dispositivos compatibles.
60 ES
Page 63

Español
Conguración de la conexión
Wi-Fi cuando la red ha
cambiado
4 Uso del aparato
Nota
• Esto se aplica cuando la red
predeterminada a la que está
conectado el purificador ha cambiado.
1 Conecte el enchufe del purificador
de aire a la toma de corriente y
toque para encenderlo.
2 Toque y simultáneamente
durante tres segundos hasta que
oiga un pitido.
» El purificador de aire inicia el
modo de emparejamiento.
» El indicador Wi-Fi parpadea
en naranja.
3 Siga los pasos cuatro y cinco de
la sección "Configuración de la
conexión Wi-Fi por primera vez".
Explicación del piloto de
calidad del aire
Nivel
IAI
1-3 Azul
4-6 Azul-morado
7-9 Morado-rojo
10-12 Rojo
El piloto de calidad del aire se ilumina
automáticamente cuando se enciende
el aparato y muestra todos los colores
en secuencia. En un tiempo breve, los
sensores de calidad del aire seleccionan
el color que corresponde a la calidad
del aire del ambiente.
Color del
piloto de
calidad del
aire
Nivel de
calidad del
aire
Bueno
Aceptable
Deficiente
Muy malo
Encendido y apagado
1 Enchufe la clavija del aparato a la
toma de corriente.
2 Pulse para encender el aparato
(fig.j).
» De forma predeterminada, el
aparato funciona en el modo
automático.
» Después de medir la calidad
del aire durante un tiempo
breve, el sensor selecciona
automáticamente el color
adecuado del piloto de calidad
del aire.
61ES
Page 64

» Después de medir las partículas
en suspensión en el aire, el
puricador de aire muestra el
nivel de IAI y funciona en el
modo automático mostrando
en la pantalla (g. k).
3 Mantenga pulsado durante tres
segundos para apagar el aparato.
Nota
Modo general
Una opción inteligente que ajusta
automáticamente la configuración del
purificador de aire al nivel ideal.
• Pulse el botón de modo automático
para seleccionar el modo general
(fig. m).
» Aparecen en la pantalla la (A)
de automático y .
• Después de apagar el aparato con
el botón de encendido/apagado
, si la clavija aún está enchufada en la
toma de corriente, el aparato tendrá
configurados los ajustes seleccionados
anteriormente cuando se vuelva a
encender.
• Si el aparato está conectado a Internet
al apagarlo, el sensor seguirá midiendo
la calidad del aire interior y enviará
esta información en tiempo real a la
aplicación.
Cambio de la
conguración del modo
automático
Puede elegir el modo general
( ), el modo para alérgenos ( ) y el
modo para virus y bacterias ( ).
Modo para alérgenos
Especialmente diseñado, el modo para
alérgenos puede eliminar con eficacia
los alérgenos habituales, como el polen
y el pelo de mascotas.
• Pulse el botón de modo automático
para seleccionar el modo para
contaminación (fig. l).
» Aparecen en la pantalla la (A)
de automático y .
Modo para virus y bacterias
Especialmente diseñado, el modo para
virus y bacterias puede eliminar con
eficacia los virus y las bacterias como
los estafilococos albus y el virus de
gripe H1N1.
• Pulse el botón de modo automático
para seleccionar el modo para
virus y bacterias (fig. n).
» Aparecen en la pantalla la (A)
de automático y .
Cambio de la velocidad
del ventilador
El ventilador tiene varias velocidades
disponibles. Puede elegir el modo de
reposo (SL), el modo turbo (T) y las
velocidades 1, 2 o 3.
Reposo (SL)
El modo de reposo hace que el aparato
funcione silenciosamente en el ajuste
de velocidad 1. Trascurrido un minuto
tras entrar en el modo de reposo, el
botón de encendido y el indicador
de encendido/apagado del piloto se
atenuarán, y no se encenderá ninguna
otra luz.
• Pulse el botón de velocidad del
ventilador para seleccionar el
modo de reposo (SL) (fig. o).
62 ES
Page 65

Español
Manual
• Pulse el botón de velocidad del
ventilador varias veces para
seleccionar la velocidad deseada
(fig. p).
Turbo (t)
En el modo turbo, el aparato funciona a
la más alta velocidad.
• Pulse el botón de velocidad del
ventilador para seleccionar el
modo turbo (t) (fig. q).
Programación del
temporizador
Con el temporizador, puede dejar que el
aparato funcione durante un número de
horas establecido. Una vez transcurrido
dicho tiempo, el aparato se apagará
automáticamente.
• Pulse el botón del temporizador
varias veces para establecer
el número de horas que desea
mantener el funcionamiento del
aparato (fig. r).
» El temporizador puede
ajustarse entre 1 y 12 horas.
Para desactivar el temporizador, pulse
el botón correspondiente varias
veces hasta que se muestre en la
pantalla.
Conguración del
bloqueo infantil
1 Mantenga pulsado el botón de
bloqueo infantil durante tres
segundos para activar esta función
(fig. s).
» aparece en la pantalla.
» Cuando el bloqueo infantil
está activado, todos los demás
botones dejan de funcionar.
2 Mantenga pulsado el botón de
bloqueo infantil de nuevo
durante tres segundos para
desactivar esta función (fig. t).
» desaparece de la pantalla.
Nota
• Aunque el bloqueo infantil esté
activado, podrá seguir controlando
el purificador de aire mediante la
aplicación.
Uso de la función de
encendido/apagado del
piloto
El botón de encendido/apagado del
piloto le permite ajustar este indicador
de calidad del aire, la pantalla y los
indicadores de función si es necesario.
1 Toque el botón de encendido/
apagado del piloto una vez para
que se apaguen el piloto de calidad
del aire, la pantalla de visualización
y los indicadores de funciones.
2 Pulse el botón de encendido/
apagado del piloto una tercera
vez para que se enciendan todos
los indicadores.
63ES
Page 66

Cambio del modo de
visualización
5 Limpieza
El purificador de aire cuenta con dos
modos de visualización: modo de
visualización del índice de alérgenos
interiores (IAI) y de visualización de
PM2,5. Cuando se encuentre en el
modo de IAI, la pantalla mostrará
un número entre 1 y 12 para indicar
el nivel de alérgenos en el aire. En el
modo de PM2,5, la pantalla muestra
la concentración de partículas en
suspensión 2,5 en el aire en µg/m3.
Nota
• De forma predeterminada, el
purificador de aire funciona en el
modo de visualización de IAI.
1 Toque el botón de atenuación de
la luz de nuevo durante tres
segundos para cambiar al modo de
visualización de PM2,5 (fig. u).
» El nivel de PM2,5 se muestra en
la pantalla.
2 Toque el botón de atenuación de la
luz durante tres segundos para
volver al modo de visualización de
IAI (fig. v).
» El nivel real de IAI se muestra en
la pantalla.
Nota
• Desenchufe siempre el aparato antes
de limpiarlo.
• No sumerja nunca el aparato en agua
u otros líquidos.
• Nunca utilice productos de limpieza
abrasivos, agresivos o inflamables,
como lejía o alcohol, para limpiar
cualquier parte del aparato.
• Solo el prefiltro puede lavarse. El filtro
de purificación del aire no se puede
lavar ni limpiar con un aspirador.
Planicación de limpieza
Frecuencia
Cuando sea
necesario
Cuando en la
pantalla se
muestra F0
Cada dos meses
Método de
limpieza
Limpie la
superficie del
aparato con un
paño seco suave
Limpie el prefiltro
Limpie los
sensores de
calidad del aire
64 ES
Limpieza del cuerpo del
aparato
Limpie regularmente el interior y el
exterior del aparato para evitar que se
acumule el polvo.
1 Limpie el polvo del humidificador
con un paño seco y suave.
2 Limpie la salida del aire con un
paño suave y seco.
Page 67

Español
Limpieza del sensor de
calidad del aire
Limpie el sensor de calidad del aire
cada dos meses para obtener un
funcionamiento óptimo del purificador.
Limpie estos elementos con más
frecuencia si utiliza el purificador en un
ambiente con mucho polvo.
Nota
• Cuando el nivel de humedad de
la habitación sea muy elevado, es
posible que el agua se condense en
el sensor de calidad del aire. Como
resultado, el piloto de calidad del aire
puede indicar que la calidad del aire
es mala a pesar de que sea buena. En
este caso, debe limpiar el sensor de
calidad del aire o utilizar uno de los
ajustes de velocidad manuales.
1 Limpie la entrada y la salida del
sensor de calidad del aire con un
cepillo suave (fig. w).
2 Abra la cubierta del sensor de
calidad del aire (fig. x).
3 Limpie el sensor de calidad del
aire y la entrada y salida de polvo
con un bastoncillo de algodón
ligeramente humedecido (fig. y).
4 Séquelos con un bastoncillo de
algodón seco.
5 Coloque de nuevo la cubierta del
sensor de calidad del aire (fig. z).
Limpieza del preltro
Limpie el prefiltro cuando F0 se
muestre en la pantalla (fig. {).
1 Tire de la parte inferior del panel
frontal para extraerlo del aparato
(fig. c).
2 Presione los dos clips hacia abajo
y tire del prefiltro hacia afuera
(fig. d).
3 Lave el prefiltro bajo un grifo
abierto. Si el prefiltro está muy
sucio, utilice un cepillo suave para
retirar el polvo (fig. |).
4 Seque el prefiltro al aire.
Nota
• Asegúrese de que el prefiltro esté
completamente seco. Si todavía
está húmedo, las bacterias pueden
multiplicarse y reducir la vida útil del
prefiltro.
5 Vuelva a colocar el prefiltro en el
aparato (fig. h).
Nota
• Asegúrese de que el lateral con dos
clips apunte hacia usted y de que
todos los ganchos del prefiltro estén
correctamente fijados al purificador.
6 Para volver a fijar el panel frontal,
monte el panel en la parte superior
del aparato (1). A continuación,
empuje el panel contra el cuerpo
del aparato con cuidado (2)
(fig. i).
7 Mantenga pulsado el botón de
reinicio durante tres segundos
para reiniciar el tiempo de limpieza
del prefiltro (fig. }).
65ES
Page 68

6 Sustitución del
Gráfico de alertas de filtro
filtro
Explicación del bloqueo
de protección de aire
saludable
Este purificador de aire cuenta con un
indicador de sustitución del filtro para
garantizar que el filtro de purificación
del aire se encuentra en un estado
óptimo cuando el purificador de aire
está en funcionamiento. Si hay que
sustituir los filtros, el código del filtro
se muestra en la pantalla (ver tabla de
alertas de filtros).
Si los filtros no se sustituyen a
tiempo, el purificador de aire
dejará de funcionar y se bloqueará
automáticamente para proteger la
calidad del aire en la habitación.
Sustituya los filtros tan pronto como sea
posible en función del código del filtro.
Sustitución de los ltros
Nota
• Los filtros de purificación del aire no
se pueden lavar ni limpiar con un
aspirador.
• Apague y desenchufe siempre el
purificador de aire de la toma de
corriente antes de sustituir los filtros.
• No limpie los filtros con un aspirador.
• Si el prefiltro está dañado, desgastado
o roto, no lo utilice. Visite
www.philips.com/support o póngase
en contacto con el servicio de atención
al cliente en su país.
Estado del piloto
de alerta del filtro
En la pantalla se
muestra A3
En la pantalla se
muestra C7
En la pantalla se
muestran A3 y C7
alternativamente
Realice esta
acción:
Sustituya el filtro
NanoProtect
serie 3 (FY3433)
Sustituya el filtro
AC NanoProtect
(FY3432)
Cambie ambos
filtros
1 Extraiga los filtros de aire usados de
acuerdo con el código del filtro que
se muestre en la pantalla. Deseche
los filtros usados (fig. ~).
Nota
• No toque la superficie plegada
del filtro ni lo huela, dado que se
ha utilizado para recoger agentes
contaminantes del aire.
2 Retire todos los materiales de
embalaje de los nuevos filtros
(fig. f).
3 Coloque los filtros nuevos en el
aparato (fig. g).
4 Enchufe la clavija del aparato a la
toma de corriente.
5 Mantenga pulsado el botón de
reinicio durante tres segundos
para reiniciar el contador de vida
útil del filtro (fig. ).
Nota
• Lávese las manos después de cambiar
los filtros.
66 ES
Page 69

Español
Restablecimiento del
contador de vida útil del
ltro
Después de sustituir el filtro, debe
restablecer el contador de vida útil del
filtro manualmente.
También puede sustituir los filtros
aunque no se muestre el código de
sustitución del filtro en la pantalla.
1 Pulse y simultáneamente
durante tres segundos para entrar
en el modo de reinicio forzado del
filtro (fig. €).
» En la pantalla se muestra
el código (A3) del filtro
NanoProtect serie 3.
2 Mantenga pulsado durante
tres segundos para forzar el
restablecimiento de la vida útil del
filtro NanoProtect serie 3 (fig. ).
3 En la pantalla se muestra el código
(C7) del filtro AC NanoProtect
después de que se haya
restablecido la vida útil del filtro
NanoProtect serie 3 (fig. ‚).
4 Mantenga pulsado durante tres
segundos para forzar el reinicio de
la vida útil del filtro AC NanoProtect
y salir del modo de reinicio forzado
(fig. ƒ).
Cambio del tipo de ltro
1 Pulse y simultáneamente
durante tres segundos para entrar
en el modo de cambio del tipo de
filtro (fig. €).
» En la pantalla se muestra
el código (A3) del filtro
NanoProtect serie 3.
2 Pulse para seleccionar el código
del nuevo filtro que desea utilizar
(fig. „).
3 Mantenga pulsado durante tres
segundos para confirmar el código
del nuevo filtro (fig. …).
Nota
• Una vez seleccionado el código
del nuevo filtro con el botón , el
aparato confirmará esa selección de
forma automática si no se toca ningún
otro botón en 10 segundos.
4 En la pantalla se muestra el código
(C7) del filtro AC NanoProtect tras
cambiar el tipo del primer filtro
(fig. ‚).
5 Pulse para seleccionar el nuevo
código del segundo filtro (fig. †).
6 Mantenga pulsado durante tres
segundos para confirmar el código
del segundo filtro y salir del modo
de cambio del tipo de filtro (fig. ‡).
67ES
Page 70

7 Solución de problemas
Este capítulo resume los problemas más comunes que podría encontrarse con
el aparato. Si no puede resolver el problema con la información que aparece a
continuación, póngase en contacto con el Servicio de Atención al Cliente en su país.
Problema Solución posible
• Compruebe si la cubierta frontal está instalada
El aparato no
funciona a pesar
de que está
enchufado.
El aparato no
funciona a pesar
de que está
encendido.
El ujo de aire
procedente de la
salida de aire es
mucho más débil
que anteriormente.
correctamente.
• El código de sustitución del filtro se ha estado mostrando
en la pantalla, pero aún no se ha hecho el cambio del
filtro correspondiente. El aparato se bloqueará si se sigue
utilizando el filtro desgastado. En este caso, sustituya el
filtro y restablezca el temporizador del filtro.
• El aparato funciona pero los botones no responden.
Compruebe si el bloqueo infantil está activado.
• El código de sustitución del filtro se ha estado mostrando
continuamente, pero no se ha hecho el cambio del filtro
correspondiente y ahora el aparato está bloqueado. En
este caso, sustituya el filtro y restablezca el temporizador
del filtro.
• El prefiltro está sucio. Limpie el prefiltro (consulte la
sección "Limpieza").
La calidad del aire
no mejora a pesar
de que el aparato
lleva funcionando
bastante tiempo.
68 ES
• Compruebe si se ha retirado el material de embalaje de los
filtros.
• Uno de los filtros no se ha sustituido en el aparato.
Asegúrese de instalar todos los filtros correctamente en
el orden siguiente, empezando por el filtro más interno:
1) filtro NanoProtect serie 3; 2) filtro AC NanoProtect;
3) prefiltro.
• El sensor de calidad del aire está húmedo. El nivel de
humedad de la habitación es elevado y provoca que el
agua se condense. Asegúrese de que el sensor de calidad
del aire esté limpio y seco (consulte la sección "Limpieza").
Page 71

Español
Problema Solución posible
El color del piloto
de calidad del
aire siempre
• El sensor de calidad del aire está sucio. Limpie el sensor de
calidad del aire (consulte la sección "Limpieza").
permanece igual.
• El filtro puede producir olor tras usarlo durante cierto
tiempo debido a la absorción de gases interiores. Se
recomienda volver a activar el filtro colocándolo de cara a
Sale un olor
extraño del
aparato.
la luz solar directa para usarlo de forma continuada. Si el
olor persiste, sustituya el filtro.
• Si el purificador de aire produce un olor a quemado,
apague y desenchufe el aparato de la toma de corriente.
Póngase en contacto con el servicio de atención al cliente
de su país.
• Si el aparato hace demasiado ruido, puede cambiar la
El aparato hace
demasiado ruido.
velocidad del ventilador a un ajuste inferior. Cuando usa
el aparato de noche en un dormitorio, elija el modo de
reposo.
El aparato aún
indica que necesito
sustituir un ltro,
pero ya lo he
hecho.
En la pantalla
se muestran los
códigos de error
"E1" o "E2".
¿Qué aplicación
debo descargar?
• Puede que no haya reiniciado el contador de vida útil
del filtro. Enchufe el aparato, pulse para encenderlo
y mantenga pulsado el botón de reinicio durante tres
segundos.
• El aparato presenta algún defecto. Póngase en contacto
con el servicio de atención al cliente de su país.
• Descargue e instale la aplicación "Air Matters" desde la
App Store o Google Play.
69ES
Page 72

Problema Solución posible
• Si el router al que está conectado su purificador es de
doble banda y en estos momentos no emite una red de
2,4 GHz, intente conectarse a otra banda del mismo router
(2,4 GHz) y vuelva a probar a emparejar el purificador. Las
redes de 5 GHz no son compatibles.
• Las redes de autenticación web no son compatibles.
• Compruebe si el purificador se encuentra dentro del
alcance del router Wi-Fi. Puede tratar de colocar el
purificador de aire más cerca del router Wi-Fi.
• Compruebe si el nombre de la red es correcto. El nombre
de la red distingue entre mayúsculas y minúsculas.
La conguración
de la conexión
Wi-Fi no se
ha realizado
correctamente.
• Compruebe si la contraseña de la conexión Wi-Fi es
correcta. La contraseña distingue entre mayúsculas y
minúsculas.
• Intente realizar la configuración de nuevo con las
instrucciones de la sección "Configuración de la conexión
Wi-Fi cuando la red ha cambiado".
• La conectividad Wi-Fi se puede interrumpir debido a las
interferencias electromagnéticas o de otro tipo. Mantenga
el aparato alejado de otros dispositivos electrónicos que
pueden provocar interferencias.
• Compruebe si el dispositivo se encuentra en modo avión.
Asegúrese de desactivar el modo avión cuando se conecte
a la red Wi-Fi.
• Consulte la sección de ayuda de la aplicación para obtener
más información y consejos actualizados sobre la solución
de problemas.
70 ES
Page 73

Español
8 Garantía y
servicio
9 Avisos
Si necesita información o tiene un
problema, visite el sitio web de Philips
en www.philips.com o póngase en
contacto con el servicio de atención
al cliente de Philips de su país (puede
encontrar el número de teléfono en el
folleto de garantía mundial). Si no hay
servicio de atención al cliente en su
país, diríjase al distribuidor Philips local.
Solicitud de piezas y
accesorios
Si tiene que sustituir una pieza o desea
adquirir una pieza adicional, diríjase a
su distribuidor Philips o visite
www.philips.com/support.
Si tiene problemas para obtener las
piezas, póngase en contacto con el
servicio de atención al cliente de Philips
en su país (puede encontrar el número
de teléfono en el folleto de garantía
mundial).
Campos
electromagnéticos (CEM)
Este aparato de Philips cumple
los estándares y las normativas
aplicables sobre exposición a campos
electromagnéticos.
Conformidad con EMF
Koninklijke Philips N.V. fabrica y
vende muchos productos dirigidos
a consumidores que, al igual que
cualquier aparato electrónico, tienen en
general la capacidad de emitir y recibir
señales electromagnéticas.
Uno de los principios empresariales
más importantes de Philips es adoptar
todas las medidas de seguridad
necesarias para que nuestros productos
cumplan todos los requisitos legales
aplicables y respeten ampliamente
toda normativa aplicable sobre CEM
en el momento de fabricación de los
productos.
Philips se compromete con el
desarrollo, la producción y la
comercialización de productos que
no sean perjudiciales para la salud.
Philips confirma que si los productos
se manipulan de forma correcta para
el uso al que están destinados, su
uso será seguro según las pruebas
científicas de las que se dispone
actualmente.
71ES
Page 74

Philips participa activamente en el
desarrollo de estándares de CEM y
seguridad internacionales, por lo que
se puede anticipar a futuros desarrollos
de estándares para integrarlos en una
etapa temprana en sus productos.
Reciclaje
Este símbolo significa que este
producto no debe desecharse con la
basura normal del hogar (2012/19/UE).
Siga la normativa de su país con
respecto a la recogida de productos
eléctricos y electrónicos. El correcto
desecho de los productos ayuda a
evitar consecuencias negativas para el
medioambiente y la salud humana.
Software
App Store es una marca de servicio de
Apple Inc.
Google Play es una marca comercial de
Google Inc.
Este aparato de Philips y la aplicación
Air Matters utilizan diferentes softwares
de código abierto. Puede acceder a
una copia del texto de las licencias del
software de código abierto que utilizan
estos productos en el sitio web:
www.philips.com/purifier-compatibility.
72 ES
Page 75

Suomi
Sisällys
1 Tärkeää 74
Turvallisuus 74
2 Ilmanpuhdistimesi 77
Tuotteen yleiskuva (kuva a) 77
Säätimien yleiskuvaus
(kuva b) 77
3 Aloittaminen 77
Suodattimien asentaminen 77
Wi-Fi-yhteyden
määrittäminen 78
4 Laitteen käyttö 79
Ilmanlaadun merkkivalojen
selitykset 79
Käynnistys ja sammutus 79
Automaattitilan vaihtaminen 80
Tuulettimen nopeuden
muuttaminen 80
Ajan asettaminen 81
Lapsilukon käyttöönotto 81
Valotoiminnon käyttäminen 81
Näyttötilan vaihto 82
6 Suodattimen vaihto 84
Automaattinen suojalukitus 84
Suodattimien vaihtaminen 84
Suodattimen
käyttöikälaskurin nollaus 85
Suodatintyypin vaihtaminen 85
7 Vianmääritys 86
8 Takuu ja huolto 89
Osien tai tarvikkeiden
tilaaminen 89
9 Lausunnot 89
Sähkömagneettiset kentät
(EMF) 89
Kierrätys 90
Ohjelmisto 90
5 Puhdistaminen 82
Puhdistusaikataulu 82
Laitteen rungon
puhdistaminen 82
Ilmanlaadun tunnistimen
puhdistaminen 83
Esisuodattimen
puhdistaminen 83
Ympäristöystävällistä paperia käytetty. Kiitos valinnastasi ympäristön hyväksi.
73FI
Page 76

1 Tärkeää
Turvallisuus
Lue tämä käyttöopas huolellisesti
ennen käyttöä ja säilytä se myöhempää
tarvetta varten.
Vaara
• Älä päästä vettä tai muuta
nestettä tai tulenarkaa
puhdistusainetta
laitteeseen, sillä se voi
aiheuttaa sähköiskun ja/
tai tulipalon vaaran.
• Älä puhdista laitetta
vedellä tai muulla
nesteellä tai (tulenaralla)
puhdistusaineella, sillä se
voi aiheuttaa sähköiskun
ja/tai tulipalon vaaran.
• Älä suihkuta mitään
tulenarkaa ainetta,
kuten hyönteismyrkkyä
tai hajusteita, laitteen
ympäristöön.
Varoitus
• Tarkista, että laitteeseen
merkitty käyttöjännite
vastaa paikallista
verkkojännitettä, ennen
kuin liität laitteen
pistorasiaan.
• Jos virtajohto on
vahingoittunut,
vaihdata se oman
turvallisuutesi vuoksi
Philipsin valtuuttamassa
huoltoliikkeessä tai
muulla ammattitaitoisella
korjaajalla.
• Älä käytä laitetta, jos
pistoke, johto tai itse laite
on vaurioitunut.
• Laitetta voivat käyttää
myös yli 8-vuotiaat lapset
ja henkilöt, joiden fyysinen
tai henkinen toimintakyky
on rajoittunut tai joilla ei
ole kokemusta tai tietoa
laitteen käytöstä, jos
heitä on neuvottu laitteen
turvallisesta käytöstä
tai tarjolla on turvallisen
käytön edellyttämä
valvonta ja jos he
ymmärtävät laitteeseen
liittyvät vaarat. Lasten
ei pidä leikkiä laitteella.
Lasten ei saa antaa
puhdistaa tai huoltaa
laitetta ilman valvontaa.
• llmanotto- ja
ilmanpoistoaukkoja ei
saa peittää esimerkiksi
asettamalla esineitä
niiden eteen.
74 FI
Page 77

Suomi
• Varmista, että
ilmanpoistoaukosta ei
putoa vieraita esineitä
laitteen sisään.
• Wi-Fi-vakiokäyttöliittymä,
802.11b/g/n, 2,4 GHz,
lähtöteho enintään
31,62 mW (EIRP).
Varoitus
• Tämä laite ei korvaa
kunnollista ilmanvaihtoa,
säännöllistä imurointia tai
liesituulettimen käyttöä
ruoanlaiton aikana.
• Jos laite kytketään
pistorasiaan, jonka
kosketus on huono,
pistoke kuumenee.
Varmista, että kytket
laitteen ehjään
pistorasiaan.
• Säilytä ja käytä laitetta
kuivalla, tukevalla,
tasaisella ja vaakasuoralla
alustalla.
• Jätä vähintään 20 cm
vapaata tilaa laitteen
taakse ja molemmille
sivuille ja vähintään 30 cm
vapaata tilaa laitteen
yläpuolelle.
• Älä aseta mitään laitteen
päälle.
• Älä istu tai seiso
laitteen päällä. Laitteen
päälle istuminen tai
astuminen saattaa johtaa
loukkaantumiseen.
• Älä sijoita laitetta suoraan
ilmastointilaitteen
alapuolelle, jotta
laitteeseen ei valu
kondenssivettä.
• Varmista, että kaikki
suodattimet ovat kunnolla
paikallaan, ennen kuin
käynnistät laitteen.
• Käytä vain alkuperäisiä,
tälle laitteelle tarkoitettuja
Philips-suodattimia. Älä
käytä muita suodattimia.
• Suodattimen syttyminen
tuleen saattaa aiheuttaa
korjaamattomia
terveysvahinkoja ja
olla hengenvaarallista.
Älä käytä suodatinta
polttoaineena tai
vastaaviin tarkoituksiin.
• Älä kolhi laitetta
kovilla esineillä. Vältä
erityisesti ilmanotto- ja
ilmanpoistoaukkojen
kolhimista.
75FI
Page 78

• Nosta tai siirrä laite aina
yläosan kahvasta.
• Älä laita sormiasi tai
mitään esineitä ilmanottotai ilmanpoistoaukkoon
fyysisten vammojen
estämiseksi ja laitteen
toiminnan takaamiseksi.
• Älä käytä laitetta,
kun olet käyttänyt
sisätiloissa savuavia
hyönteiskarkotteita.
Älä myöskään käytä
laitetta paikoissa,
joissa on öljyjäämiä,
palavia suitsukkeita tai
kemikaalihöyryjä.
• Älä käytä laitetta
kaasulaitteiden,
lämmityslaitteiden tai
tulisijojen läheisyydessä.
• Irrota laitteen pistoke
pistorasiasta aina käytön
jälkeen sekä ennen
puhdistusta ja muita
huoltotöitä.
• Älä käytä laitetta
huoneessa,
jossa on suuria
lämpötilanvaihteluita,
koska laitteen sisään voi
kertyä kosteutta.
• Aseta laite vähintään
kahden metrin päähän
muista sähkölaitteista,
jotta se ei aiheuta
häiriöitä radioaaltoja
käyttäviin laitteisiin, kuten
televisioihin, radioihin ja
radio-ohjattuihin kelloihin.
• Laite on tarkoitettu
vain kotitalouksien
normaaleihin
käyttöolosuhteisiin.
• Älä käytä laitetta
kosteissa tiloissa, kuten
kylpyhuoneissa tai
vessoissa, tai paikoissa,
joissa ympäristön
lämpötila on korkea, kuten
keittiöissä.
• Laite ei poista häkää (CO)
eikä radonia (Rn). Sitä ei
voi käyttää turvalaitteena
onnettomuustilanteissa,
joihin liittyy palavaa
materiaalia tai vaarallisia
kemikaaleja.
• Jos laitetta on siirrettävä,
se on ensin irrotettava
pistorasiasta.
• Älä siirrä laitetta
virtajohdosta vetämällä.
76 FI
Page 79

Suomi
2 Ilmanpuhdisti-
mesi
3 Aloittaminen
Olet tehnyt erinomaisen valinnan
ostaessasi Philipsin laitteen.
Saat täyden Philipsin tarjoaman tuen
rekisteröimällä tuotteen osoitteessa
www.philips.com/welcome.
Tuotteen yleiskuva
(kuva a)
A Ohjauspaneeli
B Ilmanlaadun merkkivalo
C Ilmanlaadun tunnistimet
NanoProtect Series 3 -suodatin *
D
(FY3433)
NanoProtect-aktiivihiilisuodatin*
E
(FY3432)
F Esisuodatin
G Etupaneeli
Säätimien yleiskuvaus
(kuva b)
Suodattimien
asentaminen
Huomautus
• Varmista, että ilmanpuhdistin
on irrotettu pistorasiasta ennen
suodattimien asennusta.
• Varmista asentaessasi suodatinta,
että se puoli, jossa on kieleke, osoittaa
itseäsi kohti.
1 Irrota etupaneeli alaosasta
vetämällä (kuva c).
2 Paina kahta kiinnikettä alaspäin
ja vedä esisuodatinta itseäsi kohti
(kuva d).
3 Irrota kaikki suodattimet (kuva e).
4 Irrota ilmanpuhdistussuodattimista
(kuva f) kaikki pakkausmateriaalit.
5 Aseta paljaat
ilmanpuhdistussuodattimet takaisin
laitteeseen (kuva g).
6 Aseta esisuodatin takaisin
laitteeseen (kuva h).
Huomautus
H Virtapainike
I Valopainike
J Automaattitilapainike
K Näyttö
L Tuulettimen nopeuspainike
M Ajastinpainike
N Nollaus-/lapsilukon painike
• Varmista, että kaikki esisuodattimen
koukut ovat kunnolla paikallaan
puhdistimessa.
7 Kiinnitä etupaneeli: Asenna ensin
paneelin yläosa paikalleen (1).
Aseta sitten paneeli varovasti kiinni
laitteen runkoon (2) (kuva i).
8 Pese kätesi huolellisesti
suodattimien vaihdon jälkeen.
77FI
Page 80

Wi-Fi-yhteyden
määrittäminen
Wi-Fi-yhteyden
muodostaminen ensimmäistä
kertaa
1 Lataa ja asenna Air Matters
-sovellus App Storesta tai Google
Play Kaupasta.
2 Kytke ilmanpuhdistin pistorasiaan ja
käynnistä se -painikkeella.
» Wi-Fi-merkkivalo vilkkuu
oranssina ensimmäisellä kerralla.
3 Varmista, että mobiililaite on
yhteydessä Wi-Fi-verkkoon.
4 Käynnistä Air Matters -sovellus
ja liitä ilmanpuhdistin verkkoon
näyttöön tulevien ohjeiden avulla.
5 Kun pariliitos on onnistunut ja
yhteys on muodostettu, Wi-Fimerkkivalo palaa valkoisena.
Jos pariliitos ei onnistu, katso
lisätietoja vianmääritysosiosta tai
tutustu Air Matters -sovelluksen
Ohje-osion kattaviin ja ajantasaisiin
vianmääritysvinkkeihin.
Huomautus
• Tämä ohje koskee vain
ilmanpuhdistimen ensimmäistä
määrityskertaa. Jos verkossa on
tapahtunut muutoksia tai määritys on
suoritettava uudelleen, katso lisätietoja
sivulta 15 kohdasta Wi-Fi-yhteyden
muodostaminen verkon muutosten
jälkeen.
• Jos haluat liittää useamman
kuin yhden ilmanpuhdistimen
älylaitteeseen, puhdistimet on
liitettävä yksi kerrallaan. Määritä
liitettävän ilmanpuhdistimen asetukset
kokonaan ennen kuin käynnistät
seuraavan puhdistimen.
• Varmista, että etäisyys mobiililaitteen
ja ilmanpuhdistimen välillä on alle
10 m eikä niiden välillä ole esteitä.
• Tämä sovellus tukee Android- ja iOSkäyttöjärjestelmien uusimpia versioita.
Lataa sivustosta www.philips.com/
purier-compatibility uusin päivitys
tuetuille käyttöjärjestelmille ja laitteille.
78 FI
Page 81

Suomi
Wi-Fi-yhteyden
muodostaminen verkon
muutosten jälkeen
4 Laitteen käyttö
Huomautus
• Tämä ohje koskee tilannetta, jossa
ilmanpuhdistimen käyttämässä
oletusverkossa on tapahtunut
muutoksia.
1 Kytke ilmanpuhdistin pistorasiaan ja
käynnistä se -painikkeella.
2 Kosketa painikkeita ja
samanaikaisesti 3 sekunnin ajan,
kunnes kuulet äänimerkin.
» Ilmanpuhdistin siirtyy
pariliitostilaan.
» Wi-Fi-merkkivalo vilkkuu
oranssina.
3 Noudata Wi-Fi-yhteyden
muodostaminen ensimmäistä
kertaa -kohdan vaiheissa 4-5
annettuja ohjeita.
Ilmanlaadun
merkkivalojen selitykset
IAI-taso Ilmanlaadun
merkkivalon
väri
1-3 Sininen
4-6 Sininen–
violetti
7-9 Violetti–
punainen
10-12 Punainen
Ilmanlaadun merkkivalo syttyy
automaattisesti, kun laite kytketään
käyttöön. Tällöin kaikki värit syttyvät
vuorotellen. Hetken kuluttua
tunnistimet mittaavat ympäristön
ilmanlaadun ja valitsevat oikean värin.
Ilmanlaatu
Hyvä
Fair
Heikko
Erittäin
heikko
Käynnistys ja sammutus
1 Aseta laitteen pistoke pistorasiaan.
2 Käynnistä laite -painikkeella
(kuva j).
» Laite toimii oletusarvoisesti
automaattitilassa.
» Kun ilmanlaadun tunnistin on
mitannut ilmanlaatua hetken
ajan, se valitsee automaattisesti
ilmanlaadun merkkivalon värin.
» Kun ilmanpuhdistin on
mitannut ilman hiukkastason,
puhdistin näyttää IAI-tason
ja toimii automaattitilassa.
näkyy näytössä (kuva k).
79FI
Page 82

3 Sammuta laite koskettamalla
-painiketta 3 sekunnin ajan.
Huomautus
• Jos laite on sammutettu
virtapainikkeesta mutta sen
virtapistoketta ei ole irrotettu, laite
ottaa käyttöön edelliset asetukset, kun
se käynnistetään seuraavan kerran.
• Jos laite on kytkettynä internetiin
sammuttamisensa jälkeen, anturi
mittaa edelleen sisäilman laatua
ja lähettää tiedon reaaliaikaisena
sovellukseen.
Bakteeri- ja virustila
Erityinen bakteeri- ja virustila poistaa
ilmasta bakteereja ja viruksia, kuten
Staphylococcus albus -bakteereja ja
H1N1-viruksia.
• Voit valita bakteeri- ja virustilan
(kuva n) koskettamalla
automaattitilapainiketta .
» Näytössä näkyvät
automaattitilan merkki (A) ja
-kuvake.
Tuulettimen nopeuden
muuttaminen
Automaattitilan
vaihtaminen
Voit valita yleistilan
( ), allergeenitilan ( ) tai bakteerija virustilan ( ).
Allergeenitila
Erityinen allergeenitila poistaa ilmasta
tavanomaisia allergeeneja, kuten
siitepölyä ja eläinten hilsettä.
• Voit valita allergeenitilan
(kuva l) koskettamalla
automaattitilapainiketta .
» Näytössä näkyvät
automaattitilan merkki (A) ja
-kuvake.
Yleistila
Älykäs automaattiasetus, joka säätää
ilmanpuhdistimen asetukset sopivalle
tasolle automaattisesti.
• Voit valita yleistilan
(kuva m) koskettamalla
automaattitilapainiketta .
» Näytössä näkyvät
automaattitilan merkki (A) ja
-kuvake.
Tuulettimella on useita
nopeusasetuksia. Voit valita lepotilan
(SL), turbo-tilan (t) ja nopeuden 1, 2tai 3.
Lepotila (SL)
Lepotilassa laite toimii hiljaisesti
nopeudella 1. Minuutti lepotilaan
siirtymisen jälkeen virran ja valon
merkkivalot himmenevät. Muut valot
eivät pala.
• Voit valita lepotilan (SL) (kuva o)
koskettamalla tuulettimen
nopeuspainiketta .
Manuaalinen
• Voit valita haluamasi tuulettimen
nopeuden koskettamalla toistuvasti
tuulettimen nopeuspainiketta
(kuva p).
Turbo-tila (t)
Turbo-tilassa laite toimii nopeimmalla
nopeudella.
• Voit valita turbo-tilan (t) (kuva q)
koskettamalla tuulettimen
nopeuspainiketta .
80 FI
Page 83

Suomi
Ajan asettaminen
Ajastimen avulla voit säätää laitteen
toimimaan tietyn ajan. Kun asetettu
aika on kulunut, laitteen virta katkeaa
automaattisesti.
• Valitse, kuinka monta tuntia haluat
laitteen toimivan, koskettamalla
ajastinpainiketta toistuvasti
(kuva r).
» Ajastimen arvoksi voi asettaa
1–12 tuntia.
Ajastimen voi poistaa käytöstä
koskettamalla toistuvasti
ajastinpainiketta , kunnes näytössä
näkyy .
Lapsilukon käyttöönotto
1 Ota lapsilukko käyttöön
koskettamalla lapsilukkopainiketta
3 sekunnin ajan (kuva s).
» näkyy näytössä.
» Kun lapsilukko on käytössä,
muita painikkeita ei voi käyttää.
2 Poista lapsilukko käytöstä
koskettamalla lapsilukkopainiketta
uudelleen 3 sekunnin ajan
(kuva t).
» poistuu näytöstä.
Valotoiminnon
käyttäminen
Valopainikkeen avulla voit tarvittaessa
sytyttää tai sammuttaa ilmanlaadun
merkkivalon, näytön ja toimintojen
merkkivalot.
1 Kun kosketat valopainiketta
kerran, ilmanlaadun merkkivalo,
näyttö ja toimintojen merkkivalot
sammuvat.
2 Kun kosketat valopainiketta
kolmannen kerran, kaikki valot
syttyvät uudelleen.
Huomautus
• Voit hallita ilmanpuhdistinta
sovelluksessa, vaikka lapsilukko on
käytössä.
81FI
Page 84

Näyttötilan vaihto
Ilmanpuhdistimessa on kaksi
näyttötilaa: IAI (sisäilman allergeeniilmaisin) -näyttö ja PM2.5-näyttö. IAItilassa näytössä oleva luku välillä 1–12
ilmaisee ilmassa olevien allergeenien
tason. PM2.5-tilassa näyttö ilmoittaa
ilmassa olevien pienhiukkasten (PM2.5)
pitoisuuden (µg/m3).
Huomautus
• Ilmanpuhdistin toimii oletusarvoisesti
IAI-näyttötilassa.
1 Vaihda PM2.5-näyttötilaan
koskettamalla valon
himmennyspainiketta uudestaan
3 sekunnin ajan (kuva u).
» PM2.5-taso näkyy näytössä.
2 Vaihda takaisin IAI-näyttötilaan
koskettamalla valon
himmennyspainiketta 3 sekunnin
ajan (kuva v).
» Nykyinen IAI-taso näkyy
näytössä.
5 Puhdistaminen
Huomautus
• Irrota aina pistoke pistorasiasta ennen
puhdistusta.
• Älä upota laitetta veteen tai muuhun
nesteeseen.
• Älä koskaan käytä laitteen minkään
osan puhdistamiseen hankaavaa,
syövyttävää tai tulenarkaa
puhdistusainetta, kuten valkaisuainetta
tai alkoholia.
• Vain esisuodattimen voi pestä.
Ilmanpuhdistussuodatinta ei voi pestä
tai imuroida.
Puhdistusaikataulu
Taajuus Puhdistustapa
Puhdista laitteen
Tarpeen mukaan
Kun näytössä
näkyy F0
Kahden
kuukauden välein
pinta kuivalla ja
pehmeällä liinalla.
Puhdista
esisuodatin.
Puhdista
ilmanlaadun
tunnistimet
82 FI
Laitteen rungon
puhdistaminen
Puhdista laite säännöllisesti sisä- ja
ulkopuolelta, jotta pöly ei pääse
kerääntymään laitteeseen.
1 Pyyhi pölyt laitteen rungosta
kuivalla, pehmeällä liinalla.
2 Puhdista ilmanpoistoaukko
pehmeällä, kuivalla liinalla.
Page 85

Suomi
Ilmanlaadun tunnistimen
puhdistaminen
Puhdista ilmanlaadun tunnistimet
2 kuukauden välein laitteen
moitteettoman toiminnan takaamiseksi.
Puhdista ne useammin, jos laitetta
käytetään pölyisessä ympäristössä.
Huomautus
• Jos huoneen kosteustaso on korkea,
ilmanlaadun tunnistimeen saattaa
kertyä kosteutta. Tällöin ilmanlaadun
merkkivalo saattaa näyttää, että
ilmanlaatu on huono, vaikka se
olisikin todellisuudessa hyvä. Tässä
tapauksessa ilmanlaadun tunnistin on
puhdistettava tai käyttöön on otettava
jokin manuaalisista nopeusasetuksista.
1 Puhdista ilmanlaadun tunnistimen
ilmanotto- ja ilmanpoistoaukot
pehmeällä harjalla (kuva w).
2 Avaa ilmanlaadun tunnistimen
suojus (kuva x).
3 Puhdista ilmanlaadun tunnistin
sekä otto- ja poistoaukko kevyesti
kostutetulla vanupuikolla (kuva y).
4 Kuivaa ne toisella vanupuikolla.
5 Kiinnitä ilmanlaadun tunnistimen
suojus uudelleen (kuva z).
Esisuodattimen
puhdistaminen
Puhdista esisuodatin, kun näyttöön
tulee merkintä F0 (kuva {).
1 Irrota etupaneeli alaosasta
vetämällä (kuva c).
2 Paina kahta kiinnikettä alaspäin
ja vedä esisuodatinta itseäsi kohti
(kuva d).
3 Pese esisuodatin juoksevalla
vedellä. Jos esisuodatin on hyvin
likainen, harjaa pöly pois pehmeällä
harjalla (kuva |).
4 Anna esisuodattimen kuivua.
Huomautus
• Varmista, että esisuodatin on täysin
kuiva. Bakteerit voivat lisääntyä
märässä suodattimessa ja lyhentää
sen käyttöikää.
5 Aseta esisuodatin takaisin
laitteeseen (kuva h).
Huomautus
• Varmista, että ulospäin olevalla
puolella on kaksi kiinnikettä ja
että kaikki esisuodattimen koukut
kiinnittyvät kunnolla laitteeseen.
6 Kiinnitä etupaneeli: Asenna ensin
paneelin yläosa paikalleen (1).
Aseta sitten paneeli varovasti kiinni
laitteen runkoon (2) (kuva i).
7 Nollaa esisuodattimen
puhdistusaika koskettamalla
nollauspainiketta 3 sekunnin
ajan (kuva }).
83FI
Page 86

6 Suodattimen
Suodattimen hälytystaulukko
vaihto
Automaattinen
suojalukitus
Ilmanpuhdistimessa on suodattimen
vaihdon ilmaisin, joka varmistaa, että
suodatin toimii moitteettomasti laitteen
ollessa käytössä. Kun suodattimet on
vaihdettava, esiin tulee suodatinkoodi
(katso suodattimen hälytystaulukko).
Jos suodattimia ei vaihdeta ajallaan,
ilmanpuhdistin estää huoneen
ilmanlaadun huononemisen
lakkaamalla toimimasta ja lukittumalla
automaattisesti. Vaihda suodattimet
suodatinkoodin mukaisesti niin pian
kuin mahdollista.
Suodattimien
vaihtaminen
Suodattimen
varoitusvalon tila
Näytössä näkyy A3
Näytössä näkyy C7
A3 ja C7
vuorottelevat
näytössä
Ohje
Vaihda
NanoProtect
Series 3
-suodatin
(FY3433)
Vaihda NanoProtect-aktiivihiilisuodatin
(FY3432)
Vaihda
molemmat
suodattimet
1 Irrota käytetyt suodattimet
näytöllä näkyvän suodattimen
koodin mukaan. Hävitä käytetyt
suodattimet (kuva ~).
Huomautus
• Älä koske suodattimen
suodatuspintaan tai haistele
suodatinta, sillä siihen on kertynyt
epäpuhtauksia ilmasta.
Huomautus
• Ilmanpuhdistussuodattimia ei voi
pestä tai imuroida.
• Sammuta ilmanpuhdistin ja irrota se
pistorasiasta aina ennen suodattimien
vaihtamista.
• Älä puhdista suodattimia pölynimurilla.
• Älä käytä esisuodatinta, jos se on
vahingoittunut, kulunut tai rikki. Katso
lisätietoja osoitteesta
www.philips.com/support
tai ota yhteys oman maasi
kuluttajapalvelukeskukseen.
84 FI
2 Poista uusista suodattimista kaikki
pakkausmateriaalit (kuva f).
3 Aseta uudet suodattimet
laitteeseen (kuva g).
4 Aseta laitteen pistoke pistorasiaan.
5 Nollaa suodattimen
käyttöaikalaskuri koskettamalla
nollauspainiketta 3 sekunnin
ajan (kuva ).
Huomautus
• Pese kädet suodattimien vaihdon
jälkeen.
Page 87

Suomi
Suodattimen
käyttöikälaskurin nollaus
Suodattimen käyttöaikalaskuri on
nollattava manuaalisesti suodattimen
vaihdon jälkeen.
Suodattimet voi myös vaihtaa, vaikka
näytössä ei näkyisikään suodattimen
vaihtamiseen viittaavaa koodia.
1 Ota suodattimen pakkonollaustila
käyttöön koskettamalla yhtä aikaa
painikkeita ja 3 sekunnin ajan
(kuva €).
» Näytössä näkyy NanoProtect
Series 3 -suodattimen koodi
(A3).
2 Pakota NanoProtect Series 3
-suodattimen käyttöajan nollaus
koskettamalla -painiketta
3 sekunnin ajan (kuva ).
3 NanoProtect-aktiivihiilisuodattimen
koodi (C7) tulee esiin, kun
NanoProtect Series 3 -suodattimen
käyttöaika on nollattu (kuva ‚).
4 Pakota NanoProtect-
aktiivihiilisuodattimen käyttöajan
nollaus koskettamalla -painiketta
3 sekunnin ajan. Nollauksen jälkeen
laite poistuu pakkonollaustilasta
(kuva ƒ).
Suodatintyypin
vaihtaminen
1 Ota suodatintyypin vaihtotila
käyttöön koskettamalla yhtä aikaa
painikkeita ja 3 sekunnin ajan
(kuva €).
» Näytössä näkyy NanoProtect
Series 3 -suodattimen koodi
(A3).
2 Valitse uuden suodattimen
suodatinkoodi koskettamalla
-painiketta (kuva „).
3 Vahvista uuden suodattimen
suodatinkoodi koskettamalla
-painiketta 3 sekunnin ajan
(kuva …).
Huomautus
• Kun olet valinnut uuden suodattimen
suodatinkoodin -painikkeella etkä
koske muihin painikkeisiin 10 sekuntiin,
laite vahvistaa automaattisesti uuden
suodattimen suodatinkoodin.
4 Kun ensimmäinen suodatintyyppi
on vaihdettu, näytössä näkyy
Nanoprotect-aktiivihiilisuodattimen
koodi (C7) (kuva ‚).
5 Valitse toisen suodattimen uusi
suodatinkoodi koskettamalla
-painiketta (kuva †).
6 Vahvista toisen suodattimen
suodatinkoodi koskettamalla
-painiketta 3 sekunnin ajan.
Vahvistuksen jälkeen laite poistuu
suodatintyypin vaihtotilasta
(kuva ‡).
85FI
Page 88

7 Vianmääritys
Tämä osio esittää lyhyesti yleisimmät ongelmat, joita saatat kohdata käyttäessäsi
laitetta. Jos ongelma ei ratkea alla olevien ohjeiden avulla, ota yhteyttä maasi
kuluttajapalvelukeskukseen.
Ongelma Mahdollinen ratkaisu
• Tarkista, että etukansi on kunnolla paikallaan.
Laite ei toimi,
vaikka se on liitetty
verkkovirtaan.
Laite ei toimi,
vaikka se
käynnistyy.
Ilmanpoistoaukon
ilmavirta on
selvästi heikompi
kuin ennen.
• Suodattimen vaihtokoodi on näkynyt näytössä, mutta et
ole vaihtanut kyseistä suodatinta. Laite lukittuu, jos jatkat
loppuun kuluneen suodattimen käyttöä. Vaihda suodatin
ja nollaa suodattimen käyttöaikalaskuri.
• Laite toimii, mutta painikkeet eivät ole käytössä. Tarkista,
onko lapsilukko käytössä.
• Suodattimen vaihtokoodi on näkynyt näytössä jatkuvasti,
mutta et ole vaihtanut kyseistä suodatinta, ja laite
on lukittunut. Vaihda suodatin ja nollaa suodattimen
käyttöaikalaskuri.
• Esisuodatin on likainen. Puhdista esisuodatin (katso kohta
Puhdistaminen).
Ilmanlaatu ei
parane, vaikka laite
on ollut käynnissä
pitkään.
Ilmanlaadun
merkkivalon
väri pysyy aina
samana.
86 FI
• Tarkista, että suodattimien pakkausmateriaali on poistettu.
• Jokin suodattimista ei ole paikallaan. Varmista, että
kaikki suodattimet on asennettu kunnolla seuraavassa
järjestyksessä sisimmäisestä suodattimesta alkaen:
1) NanoProtect Series 3 -suodatin, 2) NanoProtectaktiivihiilisuodatin ja 3) esisuodatin.
• Ilmanlaadun tunnistin on märkä. Huoneen kosteustaso on
korkea, ja kosteus tiivistyy laitteen sisään. Varmista, että
ilmanlaadun tunnistin on puhdas ja kuiva (katso kohta
Puhdistaminen).
• Ilmanlaadun tunnistin on likainen. Puhdista ilmanlaadun
tunnistin (katso kohta Puhdistaminen).
Page 89

Suomi
Ongelma Mahdollinen ratkaisu
• Suodatin saattaa tuottaa hajua sisäilman kaasujen
absorption vuoksi, kun sitä on käytetty jonkin aikaa. On
suositeltavaa pidentää suodattimen käyttöikää asettamalla
Laitteesta tulee
epätavallista hajua.
suodatin suoraan auringonpaisteeseen, jolloin se
uudelleenaktivoituu. Jos haju ei häviä, vaihda suodatin.
• Jos ilmanpuhdistimesta tulee palaneen hajua, katkaise
siitä virta ja irrota laite pistorasiasta. Ota yhteys oman
maasi kuluttajapalvelukeskukseen.
Laite pitää kovaa
ääntä.
Laite ilmoittaa,
että suodatin on
vaihdettava, vaikka
se on jo vaihdettu.
Näytössä näkyy
virhekoodi E1 tai
E2.
Mikä sovellus
minun on
ladattava?
• Jos laite on liian äänekäs, voit vaihtaa tuulettimen
nopeuden alhaisemmaksi. Jos käytät laitetta yöllä
makuuhuoneessa, valitse lepotila.
• Olet ehkä jättänyt suodattimen käyttöaikalaskurin
nollaamatta. Liitä laite pistorasiaan, käynnistä laite
-painikkeella ja paina nollauspainiketta 3 sekunnin ajan.
• Laitteessa on toimintahäiriö. Ota yhteys oman maasi
kuluttajapalvelukeskukseen.
• Lataa ja asenna Air Matters -sovellus App Storesta tai
Google Play Kaupasta.
87FI
Page 90

Ongelma Mahdollinen ratkaisu
• Jos ilmanpuhdistin on yhdistetty Dual Band -reitittimeen,
joka ei tällä hetkellä toimi 2,4 GHz:n taajuutta käyttävässä
verkossa, vaihda reitittimen taajuus toiseksi (2,4 GHz) ja
yritä muodostaa pariliitos uudelleen. 5 GHz:n verkkoja ei
tueta.
• Verkkotodennusta käyttäviä verkkoja ei tueta.
• Tarkista, että puhdistin on Wi-Fi-reitittimen toiminta-
alueella. Voit yrittää sijoittaa ilmanpuhdistimen lähemmäs
Wi-Fi-reititintä.
• Tarkista, että verkon nimi on oikea. Verkon nimen
Wi-Fi-yhteyden
määrittäminen ei
onnistu.
kirjainkoko on merkitsevä.
• Tarkista, että Wi-Fi-salasana on oikea. Salasanan
kirjainkoko on merkitsevä.
• Yritä määritystä uudelleen kohdassa Wi-Fi-yhteyden
muodostaminen verkon muutosten jälkeen annettujen
ohjeiden mukaisesti.
• Wi-Fi-yhteys voi katketa sähkömagneettisten tai muiden
häiriöiden takia. Pidä laite etäällä muista sähköisistä
laitteista, jotka saattavat aiheuttaa häiriöitä.
• Tarkista, onko mobiililaite lentokonetilassa. Varmista, että
lentokonetila on poissa käytöstä, kun muodostat yhteyden
Wi-Fi-verkkoon.
• Tutustu sovelluksen Ohje-osion kattaviin ja ajantasaisiin
vianmääritysvinkkeihin.
88 FI
Page 91

Suomi
8 Takuu ja huolto
Jos haluat lisätietoja tai laitteen
kanssa tulee ongelmia, tutustu
Philipsin verkkosivustoon osoitteessa
www.philips.com tai kysy neuvoa
Philipsin kuluttajapalvelukeskuksesta
(puhelinnumero on kansainvälisessä
takuulehtisessä). Jos maassasi ei ole
kuluttajapalvelukeskusta, ota yhteys
paikalliseen Philips-jälleenmyyjään.
Osien tai tarvikkeiden
tilaaminen
Jos sinun on vaihdettava jokin osa
tai hankittava lisäosa, käy Philipsjälleenmyyjän luona tai osoitteessa
www.philips.com/support.
Jos et löydä varaosia, ota
yhteyttä Philipsin maakohtaiseen
kuluttajapalvelukeskukseen
(puhelinnumero on kansainvälisessä
takuulehtisessä).
9 Lausunnot
Sähkömagneettiset
kentät (EMF)
Tämä Philips-laite vastaa kaikkia
sähkömagneettisia kenttiä (EMF)
koskevia standardeja ja säännöksiä.
EMF-standardin
vaatimustenmukaisuus
Koninklijke Philips N.V. valmistaa
ja myy kuluttajille monia tuotteita,
jotka lähettävät ja vastaanottavat
sähkömagneettisia signaaleja, kuten
mitkä tahansa muutkin elektroniset
laitteet.
Yhtenä Philipsin pääperiaatteena
on varmistaa tuotteiden turvallisuus
kaikin tavoin sekä noudattaa kaikkia
lakisääteisiä vaatimuksia ja tuotteen
valmistusajankohtana voimassa olevia
EMF-standardeja.
Philips on sitoutunut kehittämään,
tuottamaan ja markkinoimaan tuotteita,
joista ei ole haittaa terveydelle. Philips
vakuuttaa, että jos sen tuotteita
käsitellään oikein asianmukaisessa
käytössä, niiden käyttö on nykyisten
tutkimustulosten perusteella turvallista.
Philipsillä on aktiivinen rooli
kansainvälisten EMF- ja
turvallisuusstandardien kehittämisessä,
joten se pystyy ennakoimaan
standardien kehitystä ja soveltamaan
näitä tietoja tuotteisiinsa jo aikaisessa
vaiheessa.
89FI
Page 92

Kierrätys
Tämä merkki tarkoittaa, että tätä
tuotetta ei saa hävittää tavallisen
kotitalousjätteen mukana (2012/19/EU).
Noudata maasi sähkö- ja
elektroniikkalaitteiden erillistä keräystä
koskevia sääntöjä. Asianmukainen
hävittäminen auttaa ehkäisemään
ympäristölle ja ihmisille mahdollisesti
koituvia haittavaikutuksia.
Ohjelmisto
App Store on Apple Inc:n palvelumerkki.
Google Play on Google Inc.:n
tavaramerkki.
Tämä Philips-laite ja Air Matters
-sovellus sisältävät useita avoimen
lähdekoodin ohjelmistoja. Tämän
tuotteen sisältämien avoimen
lähdekoodin ohjelmistojen lisenssien
tekstit ovat saatavana osoitteessa
www.philips.com/purier-compatibility.
90 FI
Page 93

Français
Contenu
1 Important 92
Sécurité 92
2 Votre puricateur d'air 95
Présentation du produit
(g.a)
95
Aperçu des commandes
(g.b) 95
3 Guide de démarrage 96
Installation des ltres 96
Conguration Wi-Fi 96
4 Utilisation de l'appareil 98
Compréhension du voyant
de qualité de l'air 98
Mise sous tension et hors
tension 98
Modication du réglage de
mode automatique 98
Modication de la vitesse
du ventilateur 99
Réglage du minuteur 99
Conguration du
verrouillage enfant 100
Utilisation de la fonction
d'activation/de
désactivation de la lumière
100
Changer le mode
d'achage 100
5 Nettoyage 101
Calendrier de nettoyage 101
Nettoyage de l'appareil 101
Nettoyage du capteur de
qualité de l'air 101
Nettoyage du préltre 102
6 Remplacement du ltre 102
Fonctionnement du
verrouillage de protection
de l'air sain 102
Remplacement des ltres 102
Réinitialisation du compteur
de durée de vie du ltre 103
Changement de type de
ltre 104
7 Dépannage 105
8 Garantie et service 108
Commande de pièces ou
d'accessoires 108
9 Mentions légales 108
Champs
électromagnétiques (CEM)
108
Recyclage 109
Logiciels 109
Papier écologique utilisé. Merci de contribuer à sauver des arbres.
91FR
Page 94

1 Important
Sécurité
Lisez attentivement ce mode d'emploi
avant d'utiliser l'appareil et conservez-le
pour un usage ultérieur.
Danger
• Veillez à ne pas faire
pénétrer d'eau, de
détergent inflammable
ou tout autre liquide dans
l'appareil afin d'éviter
toute électrocution et/ou
tout risque d'incendie.
• Ne nettoyez pas l'appareil
avec de l'eau, du
détergent (inflammable)
ou tout autre liquide
afin d'éviter toute
électrocution et/ou tout
risque d'incendie.
• Ne pulvérisez pas de
produits inflammables
tels que de l'insecticide
ou du parfum autour de
l'appareil.
Avertissement
• Avant de brancher
l'appareil, vérifiez si la
tension indiquée sur
l'appareil correspond à la
tension secteur locale.
• Si le cordon d'alimentation
est endommagé, il doit
être remplacé par Philips,
par un Centre Service
Agréé Philips ou par un
technicien qualifié afin
d'éviter tout accident.
• N'utilisez jamais l'appareil
si la prise, le cordon
d'alimentation ou
l'appareil lui-même est
endommagé.
• Cet appareil peut être
utilisé par des enfants
âgés de 8 ans ou
plus, des personnes
dont les capacités
physiques, sensorielles
ou intellectuelles sont
réduites ou des personnes
manquant d'expérience
et de connaissances, à
condition que ces enfants
ou personnes soient sous
surveillance ou qu'ils
aient reçu des instructions
quant à l'utilisation
sécurisée de l'appareil
et qu'ils aient pris
connaissance des dangers
encourus. Les enfants ne
doivent pas jouer avec
l'appareil. Le nettoyage
et l'entretien ne doivent
92 FR
Page 95

Français
pas être réalisés par des
enfants sans surveillance.
• Ne bloquez pas l'entrée
et la sortie d'air (par
exemple, en plaçant des
objets sur la sortie d'air ou
devant l'entrée d'air).
• Assurez-vous qu'aucun
objet ne tombe dans
l'appareil par la sortie d'air.
• Interface Wi-Fi standard
basée sur la norme
802.11b/g/n à 2,4 GHz
avec une puissance
de sortie maximale de
31,62 mW EIRP.
Attention
• Cet appareil ne remplace
pas une ventilation
correcte, l'utilisation
régulière d'un aspirateur
et l'utilisation d'une hotte
ou d'un ventilateur dans la
cuisine.
• Si la prise secteur utilisée
pour alimenter l'appareil
est en mauvais état, la
fiche de l'appareil risque
de surchauffer. Veillez à
brancher l'appareil sur une
prise secteur en bon état
de marche.
• Placez et utilisez toujours
l'appareil sur une surface
sèche, stable, plane et
horizontale.
• Laissez au moins 20 cm
d'espace libre derrière et
sur les côtés de l'appareil
et au moins 30 cm audessus de l'appareil.
• Ne placez jamais d'objets
au-dessus de l'appareil.
• Ne vous asseyez pas et ne
montez pas sur l'appareil.
S'asseoir ou monter sur
l'appareil peut entraîner
des blessures.
• Ne placez pas l'appareil
directement sous un
climatiseur afin d'éviter
que de la condensation
s'écoule sur l'appareil.
• Avant de mettre l'appareil
en marche, assurez-vous
que tous les filtres sont
correctement assemblés.
• Utilisez exclusivement
les filtres Philips d'origine
spécialement destinés à
cet appareil. N'utilisez pas
d'autres filtres.
93FR
Page 96

• La combustion du filtre
peut causer des blessures
irréversibles et/ou mettre
en péril d'autres vies.
N'utilisez pas le filtre
comme carburant ou à
des fins similaires.
• Évitez de heurter l'appareil
(l'entrée et la sortie d'air
en particulier) avec des
objets durs.
• Soulevez ou déplacez
toujours l'appareil par
la poignée située sur le
dessus de l'appareil.
• N'insérez pas vos doigts
ou des objets dans la
sortie d'air ou l'entrée
d'air afin d'éviter tout
risque de blessure ou de
dysfonctionnement de
l'appareil.
• N'utilisez pas l'appareil
après avoir utilisé un
insecticide ou à proximité
de résidus huileux,
d'encens se consumant
ou de fumées chimiques.
• N'utilisez pas l'appareil à
proximité d'un appareil
fonctionnant au gaz, d'une
installation de chauffage
ou d'une cheminée.
• Débranchez toujours
l'appareil après l'avoir
utilisé et avant de le
nettoyer ou d'effectuer
d'autres opérations
d'entretien.
• N'utilisez pas l'appareil
dans une pièce soumise
à des changements de
température importants ;
de la condensation
pourrait se former à
l'intérieur.
• Pour éviter les
interférences, placez
l'appareil à une distance
minimale de 2 mètres
des appareils électriques
qui utilisent des ondes
radio (par ex. téléviseurs,
radios et horloges
radiosynchronisées).
• Cet appareil est destiné
à un usage domestique
dans des conditions de
fonctionnement normales.
• N'utilisez jamais l'appareil
dans des environnements
humides ou soumis à des
températures ambiantes
élevées (salle de bain,
toilettes, cuisine, etc.,).
94 FR
Page 97

Français
• L'appareil n'élimine pas
le monoxyde de carbone
(CO) ni le radon (Rn). Il
ne peut pas être utilisé
comme dispositif de
sécurité en cas d'accidents
impliquant des processus
de combustion et des
produits chimiques
dangereux.
• Si vous avez besoin
de déplacer l'appareil,
commencez par le
débrancher.
• Ne déplacez pas l'appareil
en tirant sur son cordon
d'alimentation.
2 Votre
purificateur d'air
Félicitations pour votre achat et
bienvenue dans le monde de Philips !
Pour profiter pleinement de l'assistance
offerte par Philips, enregistrez votre
produit à l'adresse suivante :
www.Philips.com/welcome.
Présentation du produit
(g.a)
A Panneau de commande
B Voyant de qualité de l'air
C Capteurs de qualité de l'air
Filtre NanoProtect série 3 *
D
(FY3433)
E Filtre CA NanoProtect* (FY3432)
F Préfiltre
G Façade
Aperçu des commandes
(g.b)
H Bouton marche/arrêt
Bouton d'activation/
I
désactivation de la lumière
J Bouton du mode automatique
K Écran
L Bouton de vitesse du ventilateur
M Bouton du programmateur
Bouton de réinitialisation/
N
verrouillage enfant
95FR
Page 98

3 Guide de
démarrage
8 Lavez-vous soigneusement les
mains après avoir installé les filtres.
Conguration Wi-Fi
Installation des ltres
Note
• Assurez-vous que le purificateur d'air
est débranché de la prise électrique
avant d'installer les filtres.
• Assurez-vous que le côté étiqueté est
orienté dans votre direction lorsque
vous installez le filtre.
1 Tirez la partie inférieure du panneau
avant pour l'enlever de l'appareil
(fig.c).
2 Baissez les deux clips et tirez le
préfiltre vers vous (fig.d).
3 Retirez tous les filtres (fig.e).
4 Retirez les filtres de purification de
l'air de leur emballage (fig.f).
5 Replacez les filtres de purification
de l'air déballés dans l'appareil
(fig.g).
6 Remettez le préfiltre dans l'appareil
(fig.h).
Note
• Vérifiez que tous les crochets du
préfiltre sont correctement fixés au
purificateur.
7 Pour remettre en place le panneau
avant, commencez par installer le
panneau sur le dessus de l'appareil
(1). Ensuite, poussez doucement
le panneau contre le corps de
l'appareil (2) (fig.i).
Première conguration de la
connexion Wi-Fi
1 Téléchargez et installez l'application
« Air Matters » via l'Apple Store ou
le Play Store Google.
2 Branchez le purificateur d'air sur
la prise secteur et appuyez sur
pour l'allumer.
» Le voyant Wi-Fi clignote
en orange lors de la première
connexion.
3 Assurez-vous que votre appareil
mobile est correctement connecté à
votre réseau Wi-Fi.
4 Lancez l'application « Air Matters »
et suivez les instructions à l'écran
pour connecter le purificateur d'air à
votre réseau.
5 Une fois la connexion établie et le
couplage effectué, le voyant Wi-Fi
s'allume en blanc. Si le couplage
n'a pas réussi, consultez la section
de dépannage ou la section d'aide
dans l'application « Air Matters »
pour obtenir de nombreuses
astuces de dépannage à jour.
96 FR
Page 99

Français
Note
• Cette instruction est valable
uniquement lorsque le purificateur
d'air est configuré pour la première
fois. Si le réseau a changé ou si la
configuration doit être à nouveau
effectuée, consultez la section
« Configuration de la connexion Wi-Fi
après modification du réseau » en
page 15.
• Si vous souhaitez connecter plusieurs
purificateurs d'air à votre smartphone,
vous devez les connecter un par
un. Terminez la configuration d'un
purificateur d'air avant d'en allumer un
autre.
• Assurez-vous que la distance entre
votre appareil mobile et le purificateur
d'air est inférieure à 10 m et qu'aucun
obstacle n'interfère.
• Cette application prend en charge les
dernières versions d'Android et iOS.
Consultez www.philips.com/purifiercompatibility pour connaître les
dernières mises à jour des systèmes
d'exploitation et appareils pris en
charge.
Conguration de la connexion
Wi-Fi après modication du
réseau
Note
• Ceci s'applique lorsque le réseau
connecté par défaut à votre
purificateur d'air a été modifié.
1 Branchez le purificateur d'air sur
la prise secteur et appuyez sur
pour l'allumer.
2 Appuyez simultanément sur et
pendant 3 secondes, jusqu'à ce
que vous entendiez un bip.
» Le purificateur d'air passe en
mode de couplage.
» Le voyant Wi-Fi clignote en
orange.
3 Suivez les étapes 4 et 5 de la
section « Première configuration de
la connexion Wi-Fi ».
97FR
Page 100

4 Utilisation de
l'appareil
Compréhension du
voyant de qualité de l'air
Niveau
IAI
1-3 Bleu
4-6 Bleu-violet
7-9 Violet-rouge
10-12 Rouge
Le voyant de qualité de l'air s'allume
automatiquement à la mise sous
tension de l'appareil, en faisant
défiler toutes les couleurs dans
l'ordre. Les capteurs de qualité de l'air
sélectionnent rapidement la couleur qui
correspond à la qualité de l'air ambiant.
Couleur du
voyant de
qualité de l'air
Niveau de
qualité de
l'air
Bien
Acceptable
Mauvais
Très
mauvais
» Après avoir mesuré les
matières particulaires
dans l'air uniquement, le
puricateur d'air indique le
niveau d'IAI et fonctionne
en mode automatique avec
apparaissant sur l'acheur
(g.k).
3 Maintenez enfoncé pendant
3 secondes pour éteindre l'appareil.
Note
• Après que vous avez éteint l'appareil
au moyen du bouton marche/arrêt
, si la fiche est toujours dans la prise
secteur, l'appareil fonctionnera sur
la base des derniers paramètres à sa
prochaine mise en route.
• Si l'appareil est connecté à Internet
après avoir été éteint, le capteur
mesure la qualité de l'air intérieur et
envoie ces données en temps réel à
l'application.
Modication du réglage
de mode automatique
Mise sous tension et hors
tension
1 Branchez le cordon d'alimentation
de l'appareil sur la prise secteur.
2 Touchez pour allumer l'appareil
(fig.j).
» L'appareil fonctionne par défaut
en mode automatique.
» Après avoir mesuré rapidement
la qualité de l'air, le capteur
de qualité de l'air sélectionne
automatiquement la couleur du
voyant de qualité de l'air.
98 FR
Vous pouvez choisir entre le mode
général ( ), le mode spécial
allergènes ( ) et le mode bactéries et
virus ( ).
Mode spécial allergènes
Le mode spécial allergènes permet
d'éliminer efficacement les allergènes
courants, comme le pollen et les
squames d'animaux.
• Touchez le bouton du mode
automatique pour sélectionner le
mode spécial allergènes (fig.l).
» Auto (A) et apparaissent sur
l'afficheur.
 Loading...