

Page 1

AC3055, AC3058
ZH-S 用户手册
1
EN
User Manual 18
Page 2

Page 3

目录
1
重要事项
安全
电磁场
回收
2
您的空气净化器
产品概述
控件概述
3
使用入门
安装滤网
Wi-Fi
了解
Wi-Fi
................................................................................. 2
..........................................................................................................................2
(EMF)
..........................................................................................................................3
................................................................................................................ 5
...................................................................................................... 3
................................................................................................................ 4
.................................................................................6
................................................................................................................6
指示灯
............................................................................................................ 7
连接
4 使用空气净化器
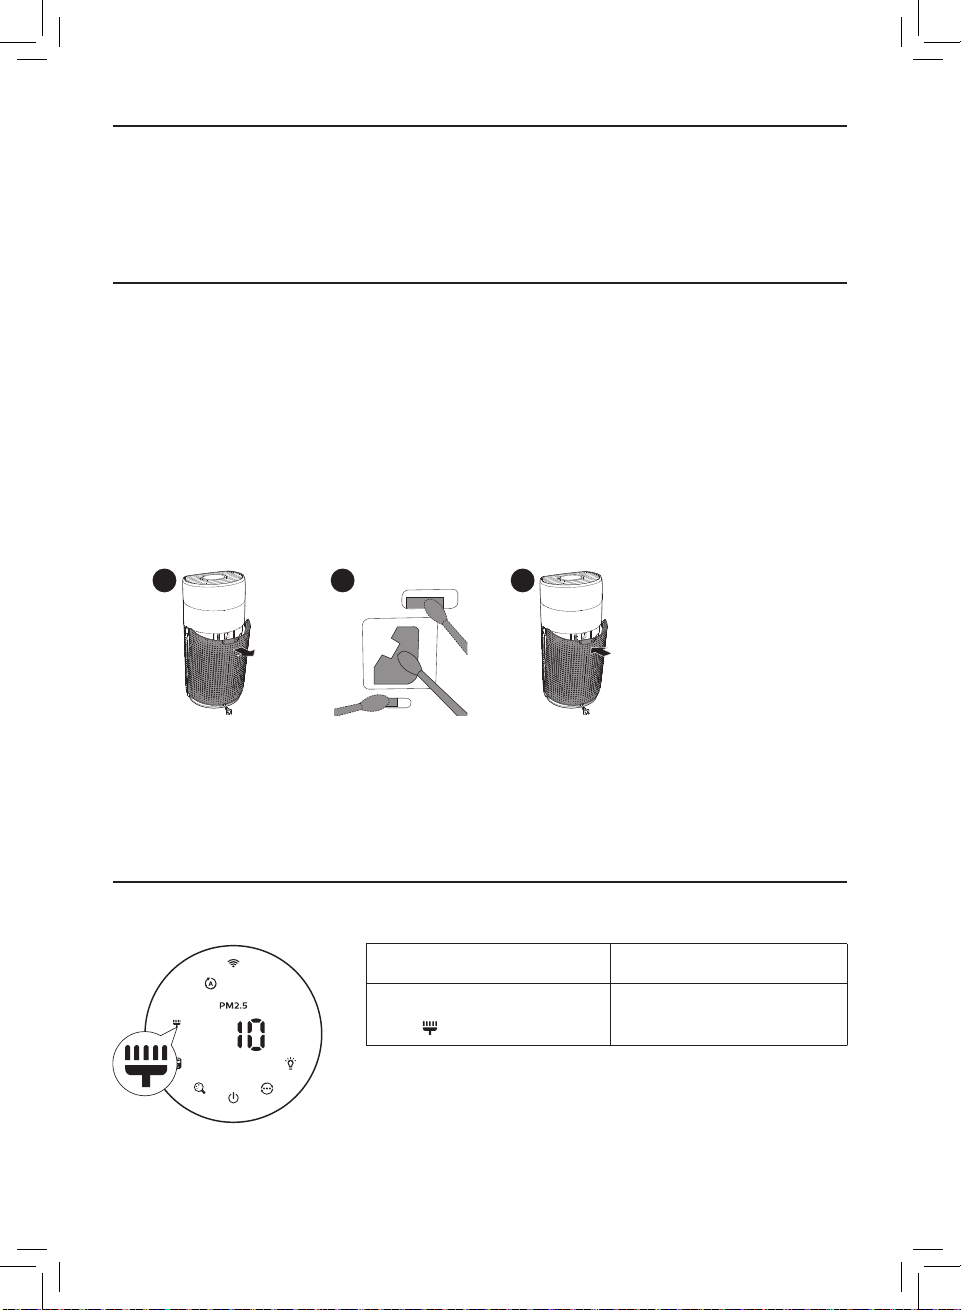
了解空气质量指示灯
打开和关闭
更改模式设置
切换显示指示灯
使用灯光开/关功能
检查滤网状态
...........................................................................................................9
......................................................................................................9
..................................................................................................... 11
....................................................................4
............................................................................................6
....................................................................8
........................................................................................8
...............................................................................................10
........................................................................................10
5
清洁和保养
清洁计划
清洁空气净化器的机身
清洁微粒感应器
清洁滤网表面
更换滤网
滤网重置
6
存放
7
故障排除
8
保修与服务
订购部件或附件
............................................................................................................... 11
.............................................................................................................. 13
.............................................................................................................. 14
........................................................................................ 14
............................................................................ 11
................................................................................. 12
............................................................................................... 12
.................................................................................................... 12
............................................................................... 15
............................................................................17
................................................................................................17
1ZH-S
Page 4

1
重要事项
安全
使用本产品之前,请仔细阅读本用户手册,并妥善保管以备日后参考。
危险
• 切勿用水或任何其它液体或(易燃性)清洁剂来清洁产品,也不
要使它们进入产品,以免发生触电和/或火灾。
• 切勿在产品周围喷洒杀虫剂或香水等任何可燃材料。
警告
• 在将产品连接电源之前,请先检查产品所标电压与当地的供电电
压是否相符。
• 如果电源线损坏,为避免危险,必须由飞利浦、飞利浦授权的服
务中心或类似的专职人员来更换。
• 如果插头、电源线或产品本身受损,请勿再使用本产品。
• 本产品不适合由肢体不健全、感觉或精神上有障碍或缺乏相关经
验和知识的人(包括儿童)使用,除非有负责他们安全的人对他
们使用本产品进行监督或指导。
• 不得让儿童玩耍本产品。
• 请勿让儿童在无人监督的情况下清洁和保养产品。
• 请勿堵塞进风和出风口,例如不要将物体放置在出风口上或进风
口前方。
• 确保异物未通过出风口进入产品内部。
小心
• 本产品不能替代正常通风、日常吸尘或者在烹饪时使用的抽油烟
机。
• 一定要在干燥、稳固、平整且水平的表面上放置和使用本产品。
• 产品周围要留出至少
30
厘米的空间。
• 请勿坐在或站在产品上面。切勿在本产品上放置任何物品。
• 切勿将产品直接放在空调下方,以防冷凝水滴到产品中。
2 ZH-S
20
厘米的空间,产品上方至少要留出
Page 5
• 只能使用飞利浦专门为本产品设计的原装滤网。切勿使用任何其
它滤网。
• 燃烧滤网可能会造成不可逆转的人体危害和/或危及他人生命安
全。请勿将滤网用作燃料或类似用途。
• 请勿用硬物敲击本产品(尤其是进风口和出风口)。
• 请勿将手指或物体插入出风口或进风口,以防止产品出现物理损
坏或发生故障。
• 当您使用室内喷雾式驱虫剂或在充满油污、易燃气体或化学烟雾
的地方时,请勿使用本产品。
• 请勿在气体用具、加热装置或火炉附近使用本产品。
• 当您要移动、清洁产品、更换滤网或执行其他维护时,请始终拔
下产品的电源插头。
• 本产品仅限于家用并在正常运行条件下使用。
• 请勿在潮湿环境或高湿度或高温环境中(例如浴室、卫生间或厨
房)或在温度变化较大的房间内使用本产品。
• 本产品不能去除一氧化碳
(CO)
或氡
(Rn)
。因此在发生燃烧和危
险化学品事故时,不能作为安全设备使用。
电磁场
本飞利浦产品符合所有有关暴露于电磁场的适用标准和法规。
(EMF)
回收
弃置产品时,请不要将它与一般生活垃圾一同丢弃,应将其交给官方指定的回收中
心。这样做有利于环保。
请遵循您所在国家/地区的电器及电子产品分类回收规定。正确弃置产品有助于避免
对环境和人类健康造成负面影响。
3ZH-S
Page 6

2
您的空气净化器
感谢您的惠顾,欢迎光临飞利浦!
为了您能充分享受飞利浦提供的支持,请在以下网站注册您的产品:
www.philips.com/welcome。
产品概述
控制面板
出风口
微粒感应器
气态污染物
传感器
纳米级劲护滤网
专业S3型 (FY3140)
4 ZH-S
后盖
Page 7

控件概述
控制按钮
过敏原 气态污染物
滤网状态/重置按钮
开/关按钮
灯光开/关按钮
显示面板
Wi-Fi 指示灯
劲速模式 睡眠模式
过敏原 室内过敏原指数
气态污染物 气态污染物显示 滤网清洁提醒
滤网更换提醒
显示切换按钮
模式切换按钮
自动模式
PM2.5 显示
5ZH-S
Page 8
3
使用入门
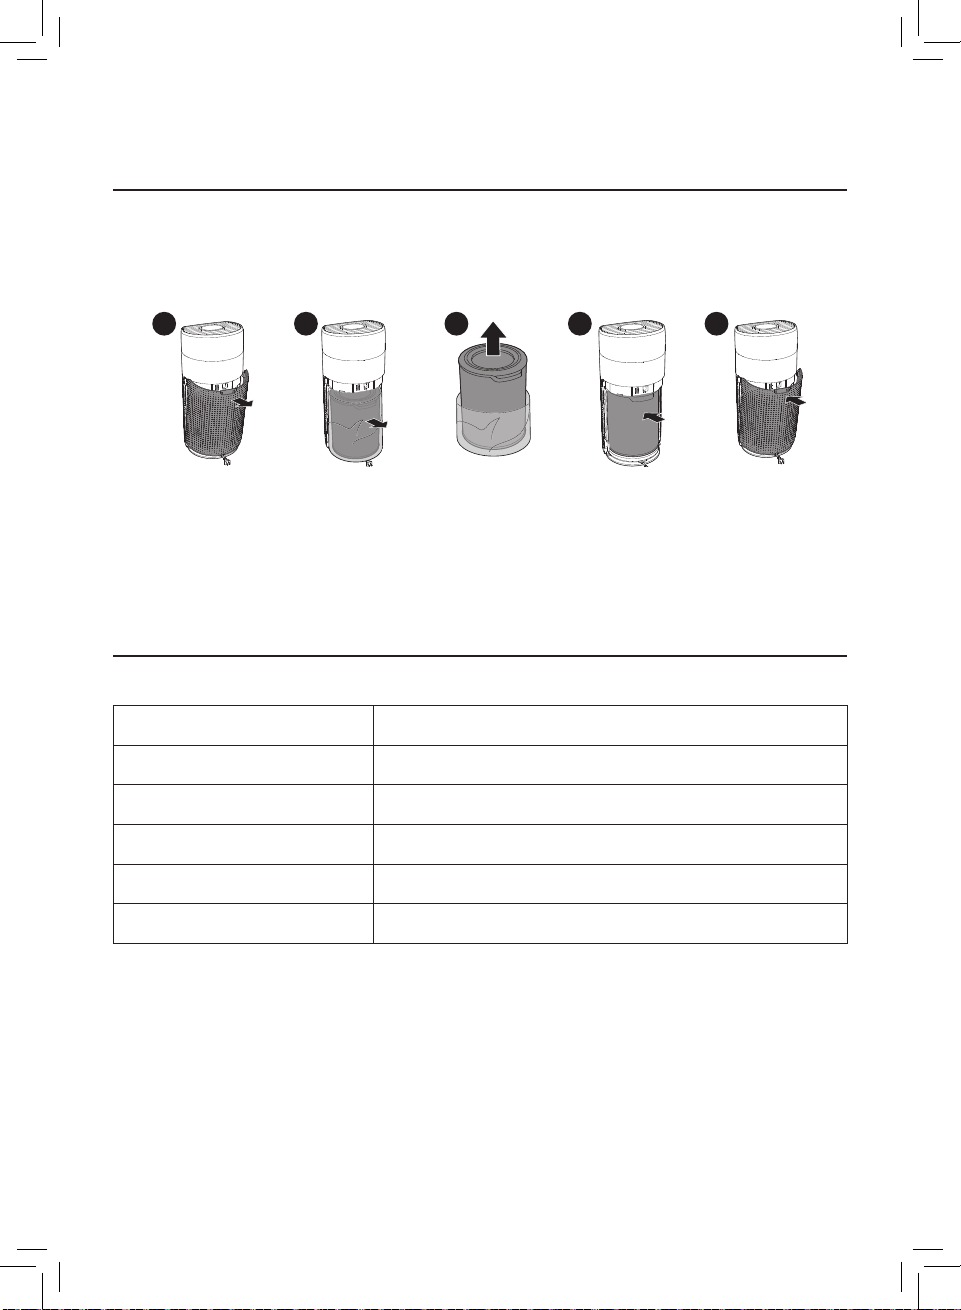
安装滤网
首次使用本产品之前,先拆掉滤网的所有包装。
注意:确保先从电源插座上拔下空气净化器的插头,然后再安装滤网。
1 2 3 4 5
1 拉开后盖,并将其从产品上取下。
2 从产品上取出滤网。
3 拆掉空气净化滤网的所有包装材料。
4 把滤网放回产品内。
5 重新装上后盖。
Wi-Fi
了解
指示灯
Wi-Fi
图标状态
橙色闪烁
橙色常亮
白色闪烁 正在连接服务器
白色常亮
关
6 ZH-S
Wi-Fi
连接状态
正在连接智能手机
已连接至智能手机
已连接至服务器
Wi-Fi
功能未连接
Page 9

Wi-Fi
连接
首次设置
Wi-Fi
连接
1 请从苹果应用程序商店或安卓应用市场下载
并安装飞利浦智慧家应用程序。
2 将智能手机或平板电脑连接到
»Wi-Fi
闪烁。
指示灯
初次亮起时呈橙色
Wi-Fi
网络。
3 打开应用程序,按照屏幕上的步骤将空气净
化器连接到您的网络。
注意:
• 此净化器也兼容飞利浦智净家应用程序。
Wi-Fi
重置
1 轻触
2 遵循“首次设置
和 3
»Wi-Fi
连接
秒钟,直至您听到蜂鸣音。
指示灯
呈橙色闪烁。
Wi-Fi
连接”部分中的
3
飞利浦智慧家
可连接此净化器和未来多品类
飞利浦智能新品
个步骤进行操作。
7ZH-S
Page 10

4 使用空气净化器
气态污染物级别 空气质量指示灯颜色
L1
蓝色
L2
蓝紫色
L3
紫红色
L4
红色
了解空气质量指示灯
空气净化器打开后,空气质量指示灯将自动
亮起,并按顺序亮起所有颜色。大约
后,空气质量指示灯显示稳定。指示灯的颜
色取决于
Gas
和
最高的一个。
PM2.5, IAI
(气态污染物指数)三个指标中风险
(室内过敏原指数)
30
秒
PM2.5
即使是空气中最细微的颗粒变化,
AeraSense
快速响应。它提供实时的 PM2.5 反馈,让您
安枕无忧。
大多数室内空气污染物属于 PM2.5 – 它是指
小于 2.5 微米的悬浮颗粒污染物。常见的室内
微粒源有烟草烟雾、烹饪、点燃的蜡烛。此外,
一些悬浮细菌、最小的霉菌芽孢、宠物过敏原
和尘螨过敏原颗粒也属于 PM2.5。
灵智感应技术也可精确地检测并
过敏原
专业级
敏原的级别,然后用 1 至 12 之间的数字进行
级别反馈,显示室内空气过敏原的潜在风险级
别。1 表示最佳空气质量。
AeraSense
传感器可检测室内空气过
空气质量指示灯颜色 空气质量级别
蓝色 良好
蓝紫色 一般
紫红色 较差
红色 很差
PM2.5 级别
≤35
36 - 75
76 - 115
>115
过敏原级别 空气质量指示灯颜色
1-3
4-6
7-9
10-12
空气质量指示灯颜色
蓝色
蓝紫色
紫红色
红色
蓝色
蓝紫色
紫红色
红色
气态污染物显示
使用高级气态污染物传感器,范围为
L4
的显示值可显示检测到的潜在有害气体
VOC
(包括
最佳空气质量。
8 ZH-S
、异味等)变化情况。
L1 至
L1
表示
Page 11
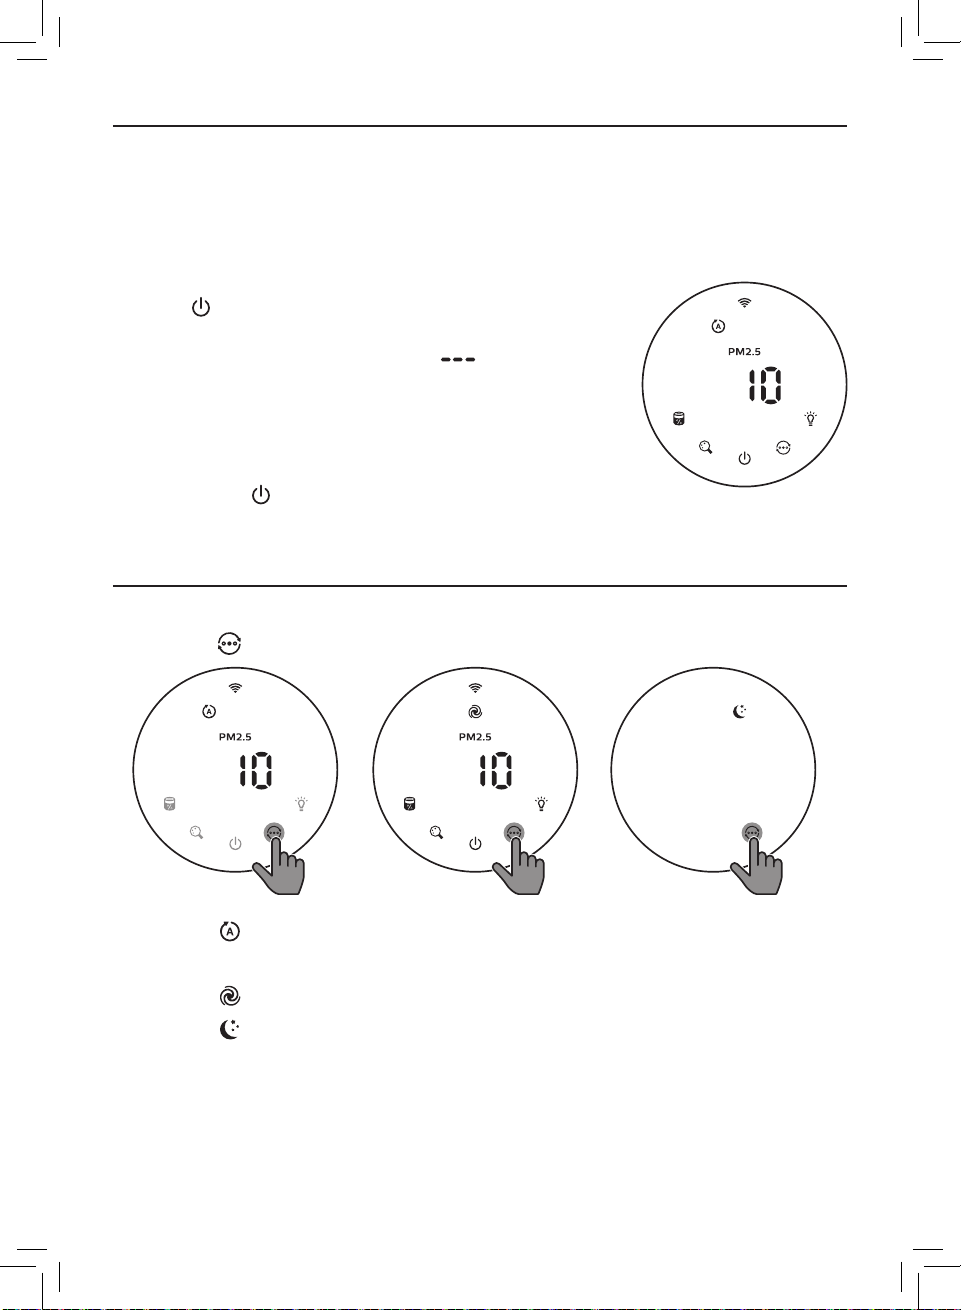
打开和关闭
注意:
• 为了获得出色的净化性能,请关闭门窗。
• 使窗帘远离进风口或出风口。
1 将空气净化器的插头插入电源插座。
2 轻触 可打开空气净化器。
» 空气净化器将发出蜂鸣音。
» 预热过程中,屏幕上会显示“ ”。然后,空气
净化器会在测量空气质量后显示 PM2.5/过敏原/
气态污染物读数。
» 空气净化器在自动模式下工作,并且屏幕上会显示
PM2.5 读数。
过敏原 气态污染物
3 轻触并按住 3 秒可关闭空气净化器。
注意:如果空气净化器关闭后仍与电源插座连接,则再次打开后,其将以之前的
设置运行。
更改模式设置
您可以轻触 按钮选择自动模式、劲速模式或睡眠模式。
过敏原 气态污染物 过敏原 气态污染物
自动模式(
在自动模式下,双传感器实时感应空气质量,设备会根据环境
):
空气质量自动调整风扇速度。
劲速模式(
睡眠模式(
在劲速模式下,空气净化器会以最高速度运行。
):
在睡眠模式下,空气净化器将以较低的速度安静地运行。3 秒
):
钟后,屏幕灯光熄灭。
9ZH-S
Page 12
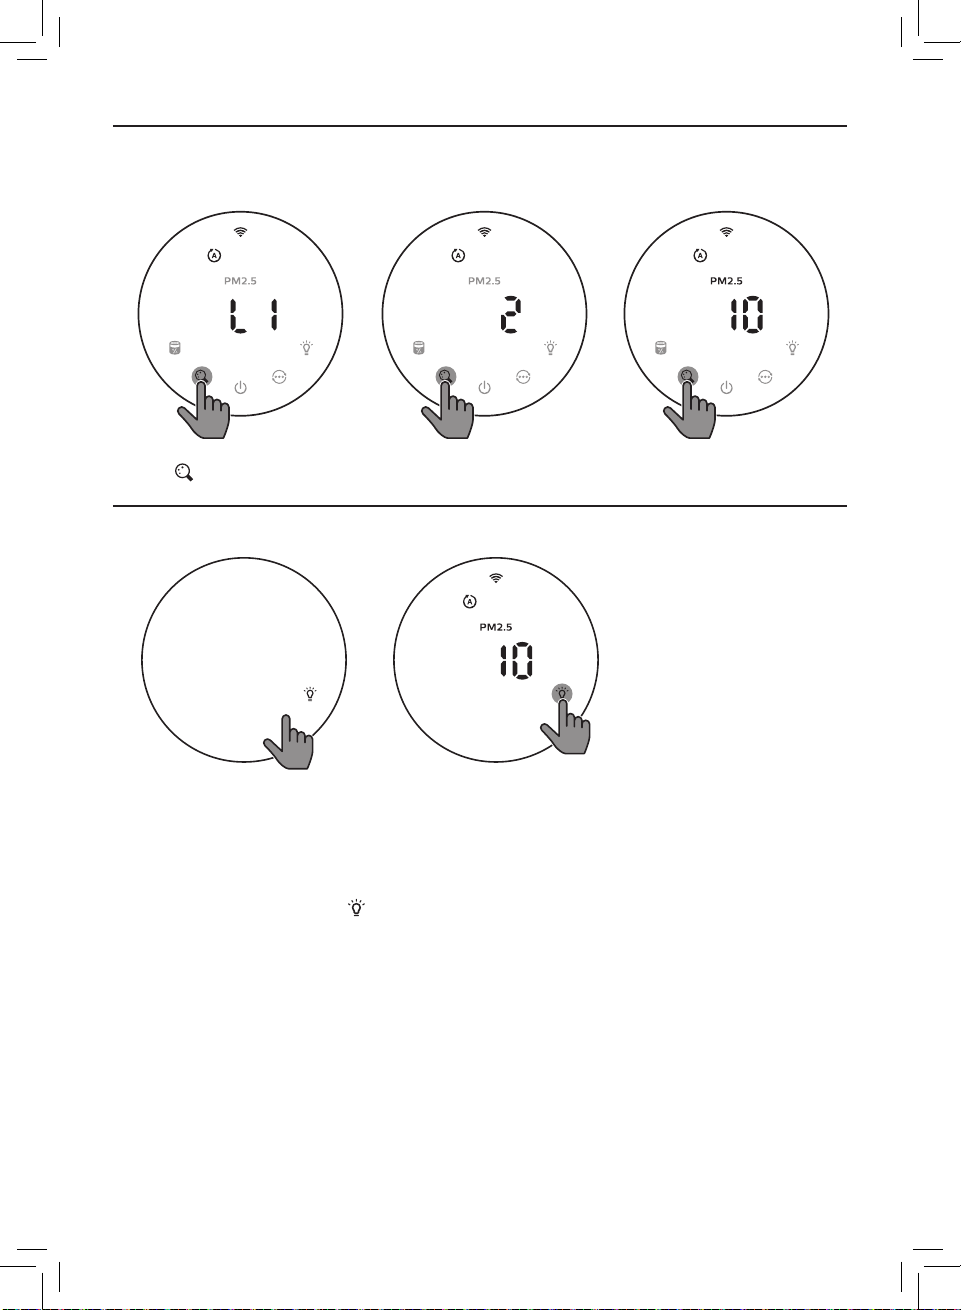
切换显示指示灯
注意:默认情况下,产品显示 PM2.5 级别。
过敏原 气态污染物
• 轻触
过敏原 气态污染物 过敏原 气态污染物
按钮可在
PM2.5/
气态污染物/过敏原之间切换显示指示灯。
使用灯光开/关功能
过敏原 气态污染物
借助光感应器,控制面板可根据环境光线自动打开、关闭或变暗。在环境光线较暗
时, 控制面板的亮度也将变暗或关闭。此时轻触控制面板的按键区,可以唤醒控制
面板查看空气情况。如果没有进一步操作,指示灯和控制面板将再次变暗,继续保
持与环境光线相匹配。
您可以触摸灯光开/关按钮
关闭指示灯和控制面板,按任意键唤醒所有指示灯。
10 ZH-S
Page 13

检查滤网状态
• 轻触滤网状态检查/重置 按钮,检查滤网使用寿命状态。
» 屏幕上将显示滤网剩余使用寿命的百分比。
图标颜色 滤网使用寿命指示
蓝色 最佳使用寿命
蓝紫色 良好使用寿命
紫红色 使用寿命几乎达到极限
红色 使用寿命结束,更换滤网
注意:如果
5
注意:
• 在清洁之前,请务必拔下产品的电源插头。
• 切勿将本产品浸入水中或任何其它液体中。
• 切勿使用研磨性、腐蚀性或易燃性清洁剂(例如漂白剂或酒精)清洁本产品的任
何部件。
• 切勿使用任何液体(包括水)清洁滤网。
• 请勿尝试用吸尘器清洁微粒感应器和气态污染物传感器。
3
秒后没有操作,产品将返回正常显示。
清洁和保养
显示屏 (%)
16-100
9-15
4-8
0-3
清洁计划
频率 清洁方法
必要时
每两个月 使用干棉签清洁微粒感应器
显示在屏幕上 清洁滤网表面
使用干软布擦拭产品表面
清洁出风口盖
11ZH-S
Page 14
清洁空气净化器的机身
定期清洁空气净化器的内侧和外侧,以防止灰尘积聚。
1 使用柔软的干布清洁空气净化器的内部和外部。
2 出风口也可用柔软的干布进行清洁。
清洁微粒感应器
每 2 个月清洁一次微粒感应器,确保产品以最佳性能运行。
注意:
• 如果将空气净化器用于多尘环境,则可能需要更频繁地进行清洁。
• 如果室内的湿度非常高,则微粒感应器上可能会形成冷凝水,即使空气质量确实
很好,空气质量指示灯也可能会指示空气质量较差。如果发生这种情况,请清洁
微粒感应器。
• 无需清洁气态污染物传感器。
1 关闭空气净化器,从电源插座上拔下插头。
2 3
2 拉开后盖,并将其从产品上取下。
3 使用湿棉签清洁微粒感应器。
4 使用干棉签彻底擦干所有部件。
5 重新装上后盖。
清洁滤网表面
滤网提示灯状态 操作
过敏原 气态污染物
屏幕上显示滤网清洁
提醒
5
使用吸尘器清洁滤网表面
12 ZH-S
Page 15

1 关闭空气净化器,从电源插座上拔下插头。
2 3 4 5 6
2 拉开后盖,并将其从产品上取下。
3 从产品上取出滤网。
4 使用吸尘器清洁滤网表面。
5 把滤网放回产品内。
6 重新装上后盖。
7 将空气净化器的插头插入电源插座。
8 轻触 按钮启动产品。
9 轻触并按住滤网状态/重置按钮 3 秒可重置滤网清洁时间。
10 清洁滤网后,彻底清洗双手。
更换滤网
了解健康空气智能锁
该空气净化器配有滤网更换指示灯,旨在确保空气净化器运行时,空气净化滤网处
于最佳工作状态。当滤网需要更换时,滤网更换提醒
如果未及时更换滤网,则空气净化器将停止运行并自动锁定,以保护室内的空气质
量。请尽快更换滤网。
将呈红色亮起。
更换滤网
注意:
• 滤网不可水洗,也不可重复使用。
• 在更换滤网之前,务必先关闭空气净化器并从电源插座上拔下插头。
滤网提示灯状态 操作
过敏原 气态污染物
滤网更换提醒 亮起
更换纳米级劲护滤网
S3
专业
型 (FY3140)
13ZH-S
Page 16

1 关闭空气净化器,从电源插座上拔下插头。
3s
2 3 4 5 6
2 拉开后盖,并将其从产品上取下。
3 从产品上取出滤网。
4 拆掉新滤网的所有包装材料。
5 将新滤网装入产品。
6 重新装上后盖。
7 将空气净化器的插头插入电源插座。
8 轻触 按钮启动产品。
9 轻触并按住滤网状态/重置按钮 3 秒可重置滤网使用寿命计数器。
10 更换滤网后,彻底清洗双手。
注意:请勿闻滤网的气味,因为其包含从空气中收集的污染物。
滤网重置
您可以在屏幕显示滤网更换提醒( )之前更换滤网。更换
滤网后,您需要手动重置滤网使用寿命计数器。
1 轻触电源
插头。
按钮 3 秒关闭空气净化器并拔掉电源
2 将电源插头插入插座。
和
存放
15
秒内,同时轻触并按住
3 开机后的
重置滤网的使用寿命计数器。
6
按钮
3 秒
过敏原 气态污染物
+
1 关闭空气净化器,从电源插座上拔下插头。
2 清洁空气净化器、微粒感应器和滤网表面(请参阅“清洁和保养”一章)。
3 待所有部件完全晾干后再进行存放。
4 将滤网装入密封的塑料袋中。
5 将空气净化器和滤网存放在阴凉干燥处。
6 拆装滤网后,务必彻底洗净双手。
14 ZH-S
Page 17

7
故障排除
本章归纳了您在使用产品时最常遇到的问题。如果您无法根据下面的信息解决问
题,请与您所在国家/地区的客户服务中心联系。
问题 可能的解决方法
产品无法正常
工作。
出风口排出的气流
比之前明显减弱。
即使在产品已经运
行很长时间以后,
空气质量也未见显
著改善。
空气质量指示灯的
颜色始终保持不
变。
产品散发出一种奇
怪的味道。
• 检查后盖是否安装正确。
• 滤网更换提醒指示灯持续亮起,但您未更换相应的滤网。
结果是本产品现在已被锁定。在此情况下,更换滤网并长按
重置滤网使用寿命计数器。
• 滤网表面变脏。清洁滤网表面(请参阅“清洁和保养”一
章)。
• 检查滤网包装材料是否已去除。
• 滤网没有放入产品内部。确保已正确安装滤网
• 微粒感应器是湿的。室内湿度过高,因此形成了冷凝水。
确保微粒感应器清洁干燥(请参阅“清洁和保养”一章)。
• 房间面积较大或室外空气质量较差。为了获得最佳的净化性
能,请在使用空气净化器时关闭门窗。
• 室内污染源形式各异。例如,吸烟、烹饪、熏香、香水或
酒精。
• 滤网达到了使用寿命的终点。换用新滤网。
• 微粒感应器已变脏。清洁微粒传感器(请参阅“清洁和保
养”一章)。
• 前几次使用产品时,其可能会产生塑料味。这是正常的。
但是,如果产品在取出滤网后依然发出烧焦的气味,请联系
飞利浦经销商或经授权的飞利浦服务中心。由于吸收室内气
体,该滤网可能会在使用后发出气味。滤网经过日晒之后即
可重复使用,建议您采用这种方式再次激活滤网。如果异味
仍然存在,建议更换滤网。
(FY3140)
。
15ZH-S
Page 18

问题 可能的解决方法
产品声音过大。 • 如果产品在劲速模式下运行,这是正常现象。
• 在自动模式下,如果产品声音太大,则设备可能因为空气质
量变差而高速运行,或者您在应用程序中的个性化设置触发
了较快的风扇速度。您可以选择睡眠模式,或更改应用程序
中的设置。
• 如果有异物进入出风口,则还可能会发出较大异常的声音。
请立即关闭产品,倒置产品,以从产品中清除异物。
• 如果产品发出异常的声音,请联系您所在国家/地区的客户
服务中心。
我已经更换过了滤
网,但是产品还是
一直指示需要更换
滤网。
屏幕上显示错误代
码“E1”。
Wi-Fi
设置
不成功。
• 可能是您未重置滤网使用寿命计数器。启动产品。然后轻触
并按住重置按钮( )3 秒钟。
• 马达出现故障。请与您所在国家/地区的客户服务中心
联系。
• 如果您的净化器连接到的路由器为双频段且当前未连接到
2.4GHz
网络,请切换至同一路由器
尝试再次将净化器配对。不支持
• 不支持
• 检查净化器是否在
Web
验证网络。
气净化器更靠近
Wi-Fi
Wi-Fi
路由器的范围内。您可以尝试使空
路由器。
(2.4GHz)
5GHz
的另一频段并
网络。
• 检查网络名称是否正确。网络名称区分大小写。
Wi-Fi
• 检查
• 使用“重置
Wi-Fi
•
密码是否正确。密码区分大小写。
Wi-Fi
连接”部分中的说明重试设置。
连接可能被电磁或其他干扰中断。使本产品远离可能
造成干扰的其他电子设备。
• 检查移动设备是否处于飞行模式。确保在连接
Wi-Fi
网络时
禁用飞行模式。
• 参阅应用程序中的帮助部分,以获得广泛和最新的故障排除
技巧。
16 ZH-S
Page 19

8
保修与服务
如果需要信息或有任何疑问,请访问飞利浦网站:www.philips.com 请联系您所在
国家/地区的飞利浦客户服务中心(可在全球保修卡中找到飞利浦客户服务中心的电
话号码)。如果您所在的国家/地区没有飞利浦客户服务中心,请向当地的飞利浦经
销商求助。
订购部件或附件
如果您必须更换部件或需要购买额外的部件,请转到您的飞利浦经销商或访问
www.philips.com/support。
如果获取部件有问题,请与您所在国家/地区的飞利浦客户服务中心联系(可在全球
保修卡中找到其电话号码)。
17ZH-S
Page 20

Contents
1 Important ............................................................................ 19
Safety ................................................................................................................... 19
Electromagnetic elds (EMF) ................................................................ 21
Recycling ............................................................................................................ 21
2 Your air purier .................................................................22
Product overview ......................................................................................... 22
Controls overview ........................................................................................ 23
3 Getting started .................................................................24
Installing the lter ........................................................................................24
Understanding Wi-Fi indicator ............................................................ 24
Wi-Fi connection ......................................................................................... 25
4 Using the air purier ...................................................... 26
Understanding the air quality light ...................................................26
Turning on and o ........................................................................................27
Changing the mode setting ...................................................................27
Switching the display indicator ...........................................................28
Using the light on/o function ............................................................ 28
Checking the lter status ........................................................................29
5 Cleaning and maintenance ......................................... 29
Cleaning schedule ...................................................................................... 29
Cleaning the body of the air purier ................................................30
Cleaning the particle sensor .................................................................30
Cleaning the surface of the lter .........................................................31
Replacing the lter .....................................................................................32
Filter reset ........................................................................................................ 33
6 Storage .................................................................................33
7 Troubleshooting ...............................................................34
8 Guarantee and service ..................................................37
Order parts or accessories ......................................................................37
18 EN
Page 21

1 Important
Safety
Read this user manual carefully before you use the appliance, and save it for
future reference.
Danger
• Do not clean the appliance with water, any other liquid, or a
(ammable) detergent, nor let them enter the appliance, to
avoid electric shock and/or a re hazard.
• Do not spray any ammable materials such as insecticides
or fragrance around the appliance.
Warning
• Check if the voltage indicated on the appliance corresponds
to the local power voltage before you connect the
appliance.
• If the power cord is damaged, you must have it replaced by
Philips, a service center authorized by Philips, or similarly
qualied persons in order to avoid a hazard.
• Do not use the appliance if the plug, the power cord, or the
appliance itself is damaged.
• This appliance is not intended for use by persons (including
children) with reduced physical, sensory, or mental
capabilities, or lack of experience and knowledge, unless
they have been given supervision or instruction concerning
use of the appliance by a person responsible for their safety.
• Child shall not play with the appliance.
• Cleaning and maintenance shall not be made by children
without supervision.
• Do not block the air inlet and outlet, e.g. by placing items on
the air outlet or in front of the air inlet.
• Make sure that foreign objects do not fall into the appliance
through the air outlet.
19EN
Page 22

Caution
• This appliance is not a substitute for proper ventilation,
regular vacuum cleaning, or use of an extractor hood or fan
while cooking.
• Always place and use the appliance on a dry, stable, level,
and horizontal surface.
• Leave at least 20cm free space around the appliance and
leave at least 30cm free space above the appliance.
• Do not sit or stand on the appliance. Do not place anything
on top of the appliance.
• Do not place the appliance directly below an air conditioner
to prevent condensation from dripping onto the appliance.
• Only use the original Philips lters specially intended for this
appliance. Do not use any other lters.
• Combustion of the lter may cause irreversible human
hazard and/or jeopardize other lives. Do not use the lter as
fuel or for similar purpose.
• Avoid knocking against the appliance (the air inlet and
outlet in particular) with hard objects.
• Do not insert your ngers or objects into the air outlet or the
air inlet to prevent physical injury or malfunctioning of the
appliance.
• Do not use this appliance when you have used indoor
smoke-type insect repellents or in places with oily residues,
burning incense, or chemical fumes.
• Do not use the appliance near gas appliances, heating
devices or replaces.
• Always unplug the appliance when you want to move, clean
appliance, replace the lter or carry out other maintenance.
• The appliance is only intended for household use under
normal operating conditions.
20 EN
Page 23

• Do not use the appliance in wet surroundings or in
surroundings with high humidity or high ambient
temperatures, such as the bathroom, toilet, or kitchen, or in
a room with major temperature changes.
• The appliance does not remove carbon monoxide (CO)
or radon (Rn). It cannot be used as a safety device in case
of accidents with combustion processes and hazardous
chemicals.
Electromagnetic elds (EMF)
This Philips appliance complies with all applicable standards and regulations
regarding exposure to electromagnetic elds.
Recycling
Do not throw away the product with the normal household waste at the end
of its life, but hand it in at an ocial collection point for recycling. By doing
this, you help to preserve the environment.
Follow your country's rules for the separate collection of electrical and
electronic products. Correct disposal helps prevent negative consequences for
the environment and human health.
21EN
Page 24

2 Your air purifier
Congratulations on your purchase, and welcome to Philips!
To fully benet from the support that Philips oers, register your product at
www.philips.com/welcome.
Product overview
Control panel
Air outlet
Particle sensor
Gas sensor
NanoProtect lter
Pro S3 (FY3140)
22 EN
Back
cover
Page 25

Controls overview
Control buttons
过敏原 气态污染物
Display panel
过敏原
气态污染物
Filter status/reset
button
Power on/o button Mode switch button
Light on/o button
Wi-Fi indicator Auto mode
Turbo mode Sleep mode
Indoor Allergen Index
display
Gas pollution display
Filter replacement alert
Display switch button
PM2.5 display
Filter cleaning alert
23EN
Page 26

3 Getting started
Installing the lter
Remove all packaging of the lter before rst use.
Note: Make sure the air purier is unplugged from the electrical outlet before
installing the lter.
1 2 3 4 5
1 Pull the back cover and remove it from the appliance.
2 Pull the lter from the appliance.
3 Remove all packaging materials of the air purication lter.
4 Put the lter back into the appliance.
5 Reattach the back cover.
Understanding Wi-Fi indicator
Wi-Fi icon status Wi-Fi connection status
Blink in orange Connecting to the smartphone
Stable in orange Connected to the smartphone
Blink in white Connecting to the server
Stable in white Connected to the server
O Wi-Fi function disabled
24 EN
Page 27

Wi-Fi connection
First time connection
1 Download and install the Philips Home
Care+ app from the App Store or Android
market.
2 Connect your smartphone or tablet to
your Wi-Fi network.
3 Launch the app and follow the onscreen
instructions to connect the air purier to
your network.
Note:
• The air purier is also compatible with the Philips Clean Home+ app.
Reset the Wi-Fi connection
1 Touch and for 3 seconds until you hear a beep.
» The Wi-Fi indicator blinks orange.
2 Follow the 3 steps in “First time connection” section.
Philips Home Care+
To connect this purier and
other upcoming Philips
smart products
25EN
Page 28

4 Using the air purifier
Gas level Air quality light color
L1 Blue
L2 Blue-purple
L3 Purple-red
L4 Red
Understanding the air quality light
The air quality light automatically
goes on when the air purier is
switched on, and lights up all colors
in sequence. After approximately
30 seconds, air quality light becomes
stable. The color of the air quality
light is determined by the highest
risk index among PM2.5, IAI and Gas
readings.
PM2.5
AeraSense sensing technology
accurately detects and quickly
responds to even the slightest
particle change in the air. It provides
you with reassurance with real-time
PM2.5 feedback.
Most of the indoor air pollutants fall under PM2.5 – which refers to airborne
particle pollutants smaller than 2.5 micrometers. Common indoor sources of
ne particles are tobacco smoke, cooking, burning candles. Some airborne
bacteria and the smallest mold spores, pet allergen and dust mite allergen
particles also fall under PM2.5.
IAI
The professional-grade AeraSense sensor
detects the level of indoor air allergen and
with numerical feedback from 1 to 12 the
potential risk level of indoor air allergens
can be displayed. 1 indicates best air
quality.
Air quality light color Air quality level
Blue Good
Blue-purple Fair
Purple-red Poor
Red Very poor
PM2.5 level Air quality light color
≤35 Blue
36-75 Blue-purple
76-115 Purple-red
>115 Red
IAI level Air quality light color
1-3 Blue
4-6 Blue-purple
7-9 Purple-red
10-12 Red
GAS
With an advanced gas sensor, a display
ranging from L1 to L4 shows the level change
of potential harmful gases (incl. VOC, odor,
etc.) detected. L1 indicates best air quality.
26 EN
Page 29

Turning on and o
Note:
• For optimum purication performance, close doors and windows.
• Keep curtains away from the air inlet or air outlet.
1 Put the plug of the air purier in the power socket.
2 Touch to switch on the air purier.
» The air purier beeps.
» The “ ” displays on the screen during warming
up. Then the air purier shows the PM2.5/IAI/
Gas level after measuring the air quality.
» The air purier operates in the auto mode with
PM2.5 displayed on the screen.
过敏原 气态污染物
3 Touch and hold the button for 3 seconds to
switch o the air purier.
Note: If the air purier stays connected to the electrical outlet after turning
OFF, the air purier will operate under the previous settings when turned ON
again.
Changing the mode setting
You can choose Auto mode, Turbo mode or the Sleep mode by touching the
button.
过敏原 气态污染物 过敏原 气态污染物
Auto mode ( ): In Auto mode, the dual-sensor senses the air quality in realtime and the appliance automatically adjusts the fan speed in accordance
with the ambient air quality.
Turbo mode ( ): In Turbo mode, the air purier operates on the highest
speed.
Sleep mode ( ): In Sleep mode, the air purier operates quietly at a low
speed. After 3 seconds, the screen lights o.
27EN
Page 30

Switching the display indicator
Note: The appliance displays PM2.5 level by default.
过敏原 气态污染物 过敏原 气态污染物
过敏原 气态污染物
• Touch the button to switch display indicator among PM2.5/Gas/IAI.
Using the light on/o function
过敏原 气态污染物
With
the light sensor, the control panel can automatically turn on, turn o or
dim according to the ambient light. The control panel will be o or dim when the
ambient light is dark. You can touch any button to wake up all lights. Then, if no
further operation, all lights will be o or dim again to match with the ambient
light.
You can touch the light on/o button manually to turn o all lights and the
control pa
nel. Touch any button to wake up all lights.
28 EN
Page 31

Checking the lter status
• Touch the lter status check/reset button to check the lter service life
status.
» The percentage of remaining service life of the lter displays on the
screen.
Icon color Filter life indication Display (%)
Blue Optimal service life 16-100
Blue-purple Good service life 9-15
Purple-red
Red
Note: The appliance goes back to normal display if no operations after
3 seconds.
Service life almost
reaches the end
Service life ends,
replace the lter
4-8
0-3
5 Cleaning and maintenance
Note:
• Always unplug the appliance before you clean it.
• Never immerse the appliance in water or any other liquid.
• Never use abrasive, aggressive, or ammable cleaning agents such as
bleach or alcohol to clean any part of the appliance.
• Never use any liquids (including water) to clean the lter.
• Do not attempt to clean the particle sensor and gas sensor with a vacuum
cleaner.
Cleaning schedule
Frequency Cleaning method
When necessary
Every two months Clean the particle sensor with a dry cotton swab
The displays
on the screen
Wipe the surface of the appliance with a soft dry cloth
Clean the air outlet cover
Clean the surface of the lter
29EN
Page 32

Cleaning the body of the air purier
Regularly clean the inside and outside of the air purier to prevent dust from
collecting.
1 Use a soft, dry cloth to clean both the interior and exterior of the air
purier.
2 The air outlet can also be cleaned with a dry, soft cloth.
Cleaning the particle sensor
Clean the particle sensor every 2 months for optimal functioning of the
appliance.
Note:
• If the air purier is used in a dusty environment, it may need to be cleaned
more often.
• If the humidity level in the room is very high, condensation may develop
on the particle sensor and the air quality light may indicate a more poor air
quality even though the air quality is actually good. If this occurs, clean the
particle sensor.
• The gas sensor doesn’t need to be cleaned.
1 Switch o the air purier and unplug from the power socket.
2
3
5
2 Pull the back cover and remove it from the appliance.
3 Clean the particle sensor with a damp cotton swab.
4 Dry all parts thoroughly with a dry cotton swab.
5 Reattach the back cover.
30 EN
Page 33

Cleaning the surface of the lter
Filter alert light status Action
过敏原 气态污染物
The lter cleaning
alert displays on the
screen
1 Switch o the air purier and unplug from the power socket.
Clean the surface of
the lter with a vacuum
cleaner
2
3 4 5 6
2 Pull the back cover and remove it from the appliance.
3 Pull the lter from the appliance.
4 Clean the surface of the lter with a vacuum cleaner.
5 Put the lter back into the appliance.
6 Reattach the back cover.
7 Put the plug of the air purier in the power socket.
8 Touch the button to switch on the appliance.
9 Touch and hold the lter status check/reset button for 3 seconds to
reset the lter cleaning time.
10 Wash your hands thoroughly after cleaning the lter.
31EN
Page 34

Replacing the lter
Understanding the healthy protection lock
This air purier is equipped with a lter replacement indicator to make sure
that the air purication lter is in optimal condition when the air purier is
operating. When the lter need to be replaced, the lter replacement alert
lights up red.
If the lter is not replaced in time, the air purier will stop operating and
automatically lock to protect the air quality in the room. Replace the lter as
soon as possible.
Replacing the lter
Note:
• The lter is not washable or reusable.
• Always turn o the air purier and unplug from the electrical outlet before
replacing the lters.
Filter alert light status Action
过敏原 气态污染物
The lter replacement
alert lights up
Replace the
NanoProtect lter Pro S3
(FY3140)
1 Switch o the air purier and unplug from the power socket.
2 3 4 5 6
2 Pull the back cover and remove it from the appliance.
3 Pull the lter from the appliance.
4 Remove all packaging materials of the new lter.
5 Put the new lter into the appliance.
6 Reattach the back cover.
32 EN
Page 35

7 Put the plug of the air purier in the power socket.
3s
8 Touch the button to switch on the appliance.
9 Touch and hold the lter status check/reset button for 3 seconds to
reset the lter lifetime counter.
10 Wash your hands thoroughly after replacing the lter.
Note: Do not smell the lter as it has collected pollutants from the air.
Filter reset
You can replace the lter even before lter replacement
alert ( ) displays on the screen. After replacing a lter,
you need to reset the lter lifetime counter manually.
过敏原 气态污染物
1 Touch the power button for 3 seconds to turn o
the appliance and unplug from power socket.
+
2 Put the power plug in the power socket.
3 Within 15 seconds after power on, touch and hold
and button for 3 seconds to reset the lter lifetime
counter.
6 Storage
1 Turn o the air purier and unplug from the power socket.
2 Clean the air purier, particle sensor and the surface of the lter (see the
chapter “Cleaning and maintenance”).
3 Let all parts air dry thoroughly before storing.
4 Wrap the lter in air tight plastic bags.
5 Store the air purier, lter in a cool, dry location.
6 Always thoroughly wash hands after handling lters.
33EN
Page 36

7 Troubleshooting
This chapter summarizes the most common problems you could encounter
with the appliance. If you are unable to solve the problem with the information
below, contact the Consumer Care Center in your country.
Problem Possible solution
The appliance
does not work
properly.
The airow that
comes out of
the air outlet
is signicantly
weaker than
before.
The air quality
does not improve,
even though the
appliance has
been operating
for a long time.
• Check if the back cover is properly installed.
• The lter replacement alert has been on continuously
but you have not replaced the corresponding lter. As a
result, the appliance is now locked. In this case, replace
the lter and long press to reset the lter lifetime
counter.
• The surface of the lter is dirty. Clean the surface of the
lter (see the chapter “Cleaning and maintenance”).
• Check if the packing material is removed from the lter.
• The lter has not been placed in the appliance. Make
sure that the lter (FY3140) is properly installed.
• The particle sensor is wet. The humidity level in your
room is high and causes condensation. Make sure that
the particle sensor is clean and dry (see the chapter
“Cleaning and maintenance”).
• Room size is large or the outdoor air quality is poor.
For optimum purication performance, please close the
doors and windows when operating the air purier.
• There are indoor pollution resources. For instances,
smoking, cooking, incense, perfume or alchohol.
• Filter reaches the end of life. Replace the lter with a
new one.
The color of the
air quality light
always stays the
same.
34 EN
• The particle sensor is dirty. Clean the particle sensor
(see the chapter “Cleaning and maintenance”).
Page 37

Problem Possible solution
The appliance
produces a
strange smell.
The appliance is
extra loud.
The appliance still
indicates that I
need to replace a
lter, but I already
did.
• The rst few times you use the appliance, it may
produce a plastic smell. This is normal. However, if the
appliance produces a burnt smell even if removing
lters, contact your Philips dealer or an authorized
Philips service center. The lter may produce smell after
being used for a while because of the absorption of
indoor gases. It’s recommended that you reactivate the
lter by putting it in direct sunlight for repeated use. If
odor still exists, replace the lter.
• It's normal if the appliance runs at the Turbo mode.
• In the Auto mode, if the appliance is too loud, maybe
the appliance runs at high speed because air quality
becomes worse, or your personalized setting in App
triggers a higher fan speed. You can choose the Sleep
mode, or change the settings in the App.
• If anything drops into air outlet, it may also cause
abnormal loud sound. Immediate turn o appliance,
turn appliance upside down, to get foreign objectives
out of appliance.
• If there is abnormal sound, contact the Consumer Care
Center in your country.
• Perhaps you did not reset the lter lifetime counter.
Switch on the appliance. Then touch and hold the reset
button ( ) for 3 seconds.
Error code “E1”
displays on the
screen.
• The motor has malfunctions. Contact the Consumer
Care Center in your country.
35EN
Page 38

Problem Possible solution
• If the router your purier is connected to is dual –
band and currently it is not connecting to a 2.4GHz
network, please switch to another band of the same
router (2.4GHz) and try to pair your purier again. 5GHz
networks are not supported.
• Web authentication networks are not supported.
• Check if the purier is within range of the Wi-Fi router.
You can try to locate the air purier closer to the Wi-Fi
router.
• Check if the network name is correct. The network
name is case-sensitive.
The Wi-Fi setup is
not successful.
• Check if the Wi-Fi password is correct. The password is
case-sensitive.
• Retry the setup with the instructions in section “Reset
the Wi-Fi connection”.
• The Wi-Fi connectivity can be interrupted by
electromagnetic or other interferences. Keep the
appliance away from other electronic devices that may
cause interferences.
• Check if the mobile device is in airplane mode. Make
sure to have the airplane mode deactivated when
connecting to the Wi-Fi network.
• Consult the help section in the App for extensive and
up-to-date troubleshooting tips.
36 EN
Page 39

8 Guarantee and service
If you need information or if you have a problem, please visit the Philips
website at www.philips.com or contact the Philips Consumer Care Center
in your country (you can nd its phone number in the worldwide guarantee
leaet). If there is no Consumer Care Center in your country, go to your local
Philips dealer.
Order parts or accessories
If you have to replace a part or want to purchase an additional part, go to your
Philips dealer or visit www.philips.com/support.
If you have problems obtaining the parts, please contact the Philips Consumer
Care Center in your country (you can nd its phone number in the worldwide
guarantee leaet).
37EN
Page 40

产品
型号
额定电压
额定频率
额定输入功率
生产日期
产地
飞利浦家电(中国)投资有限公司
上海市静安区灵石路 728 弄 20 号 201 室
全国顾客服务热线:4008 800 008
本产品根据国标 GB4706.1-2005,
GB4706.45-2008,信部无【2002】353号制造
飞利浦空气净化器 AC3058
KJ450F-C16
220V~
50Hz
55W
请见产品本体
中国浙江宁波
产品性能指标
目标污染物 洁净空气量(C ADR) 累计净化量(CCM) 净化能效等级
颗粒物 高效级
甲 醛 高效级
噪声( 声功率级) 适用面积*
>450 m3/h P4
300 m3/h
F4
≤70 dB (A)
31.5 - 54.0 m
*适用面积是按照国标GB/T18801-2015根据颗粒物洁净空气量计算得出
以上性能指标数据是在第三方试验室按照国标GB/T18801-2015,以特定
的烟尘颗粒物或气态污染物为目标污染物测试得出
2
Page 41

产品
型号
额定电压
额定频率
额定输入功率
生产日期
产地
飞利浦家电(中国)投资有限公司
上海市静安区灵石路 728 弄 20 号 201 室
全国顾客服务热线:4008 800 008
本产品根据国标 GB4706.1-2005,
GB4706.45-2008,信部无【2002】353号制造
飞利浦空气净化器 AC3055
KJ450F-C18
220V~
50Hz
55W
请见产品本体
中国浙江宁波
产品性能指标
目标污染物 洁净空气量(C ADR) 累计净化量(CCM) 净化能效等级
颗粒物 高效级
甲 醛 高效级
噪声( 声功率级) 适用面积*
>450 m3/h P4
300 m3/h
F4
≤70 dB (A)
*适用面积是按照国标GB/T18801-2015根据颗粒物洁净空气量计算得出
以上性能指标数据是在第三方试验室按照国标GB/T18801-2015,以特定
的烟尘颗粒物或气态污染物为目标污染物测试得出
能源效率标识见机身能效标识。
31.5 - 54.0 m
2
Page 42

产品中有害物质的名称及含量
部件名称
从业者提供相关物质的存在信息,有助于产品废弃时的妥善处理。
(parts name)
有毒有害物质或元素
(P铅 b) 汞(Hg) 镉(Cd)
六价铬
(Cr6+)
多溴联苯
(PBB)
多溴二苯醚
(PBDE)
主电路板组件
电源电路板组件
传感器板组件
电机组件
电源插头
本表格依据SJ/T 11364的规定编制。
○
表示该有害物质在该部件所有均质材料中的含量均在GB/T 26572
规定的限量要求以下。
×
表示该有害物质至少在该部件的某一均质材料中的含量超出
GB/T 26572规定的限量要求。
*该表格中所显示的“有害物质”在产品正常使用情况下不会对人身和
环境产生任何伤害。
*该表格中所显示的“有害物质”及其存在的部件向消费者和回收处理
○
○
○
○ ○ ○ ○ ○
×
○ ○
○
○ ○
○
○ ○ ○ ○ ○
○
○○
○
○
○
○
○
○
○
保留备用
出版日期:
2021-11-10
Page 43

Page 44

© 2021 Philips Domestic Appliances Holding B.V.
保留所有权利
3000.059.8318.2 (10/11/2021)
 Loading...