

Page 1

Original instruction by Philips
AC2939
EN User manual 1 27
ﻡﺪﺨﺘﺴﳌﺍ ﻞﻴﻟﺩ
AR
Page 2

Page 3

Contents
1 Your air purier �����������������������������������������������������������������������������2
Product overview �������������������������������������������������������������������������������������������������������2
Controls overview ������������������������������������������������������������������������������������������������������ 3
2 Getting started ������������������������������������������������������������������������������3
Installing the lter ������������������������������������������������������������������������������������������������������ 3
Wi-Fi indicator ������������������������������������������������������������������������������������������������������������ 4
Wi-Fi connection �������������������������������������������������������������������������������������������������������4
3 Using the air purier �������������������������������������������������������������������� 5
Air quality light ������������������������������������������������������������������������������������������������������������ 5
Turning on and o ������������������������������������������������������������������������������������������������������6
Changing the mode setting ������������������������������������������������������������������������������������ 7
Switching the display indicator ����������������������������������������������������������������������������� 7
Using the light on/o function ������������������������������������������������������������������������������8
Setting the child lock ����������������������������������������������������������������������������������������������� 8
Checking the lter status �����������������������������������������������������������������������������������������9
4 Cleaning and maintenance ��������������������������������������������������������9
Cleaning the body of the air purier ������������������������������������������������������������������� 9
Cleaning the particle sensor ���������������������������������������������������������������������������������� 9
Cleaning the surface of the lter ������������������������������������������������������������������������ 10
Replacing the lter ����������������������������������������������������������������������������������������������������11
Filter reset ���������������������������������������������������������������������������������������������������������������������11
5 Storage ������������������������������������������������������������������������������������������12
6 Troubleshooting ��������������������������������������������������������������������������12
1EN
Page 4

1 Your air purifier
Congratulations on your purchase of air cleaner AC2939�
To fully benet from the support that Philips oers, register your product at
www�philips�com/welcome�
Product overview
Control panel
Air outlet
Particle sensor
NanoProtect lter Series 3
(FY2180/30)
Back cover
2 EN
Page 5

Controls overview
Wi-Fi indicator
Filter cleaning alert
Filter replacement alert
Mode display:
Auto ( )
Turbo ( )
Gentle ( )
Sleep ( )
Filter status/ reset button
Display switch button
Power on/o button
Light on/o button
Mode switch button
2 Getting started
Installing the lter
Note: Make sure the air purier is unplugged from the electrical outlet before installing the lter�
1 2 3 4 5
1 Pull the back cover and remove it from the appliance�
2 Pull the lter from the appliance�
3 Remove all packaging materials of the air purication lter�
4 Put the lter back into the appliance�
5 Reattach the back cover�
3EN
Page 6

Wi-Fi indicator
Wi-Fi icon status Wi-Fi connection status
Blink in orange Connecting to the smartphone
Blink in white Connecting to the router
Stable in white Connected to the router
O Wi-Fi function disabled
Wi-Fi connection
Note:
• Corporate/Enterprise networks (e�g� certicates, network proles) are not supported� We recommend setting up
the Philips Air Puriers on a dedicated network created for IoT devices or WPA2-Personal networks�
• Conguration details are provided in the Clean Home+ app (e�g� Mac address) to help set-up on managed
networks�
First time connection
1 Download and install the Philips “Clean Home+” app from the
App Store or Google Play�
2 Connect your smartphone or tablet to your Wi-Fi network�
3 Launch the “Clean Home+” app and click on “Connect a New Device”
or press the “+” button on the top of the screen� Follow the onscreen
instructions to connect the air purier to your network�
Reset the Wi-Fi connection
1 Touch and for 3 seconds until you hear a beep�
» The Wi-Fi indicator blinks orange�
2 Follow the steps 3 in “First time connection” section�
Note:
• Enterprise/Additional webpage authentication networks are not supported�
• Please check www�philips�com/cleanhome for the latest update of supported Operation System and devices�
4 EN
Page 7

3 Using the air purifier
Air quality light
After approximately 30 seconds, the particle sensor selects the color that corresponds to the
surrounding air quality of airborne particles�
Note: The color of the air quality light is determined by the highest risk index among PM2�5, IAI and readings�
PM2�5 refers to airborne particle pollutants smaller than 2�5 micrometers�
PM2�5 level Air quality light color Air quality level
≤35 Blue Good
36-75 Blue-purple Fair
76-115 Purple-red Poor
>115 Red Very poor
IAI refers to the level of indoor air allergen�
IAI level Air quality light color Air quality level
1-3 Blue Good
4-6 Blue-purple Fair
7-9 Purple-red Poor
10-12 Red Very poor
5EN
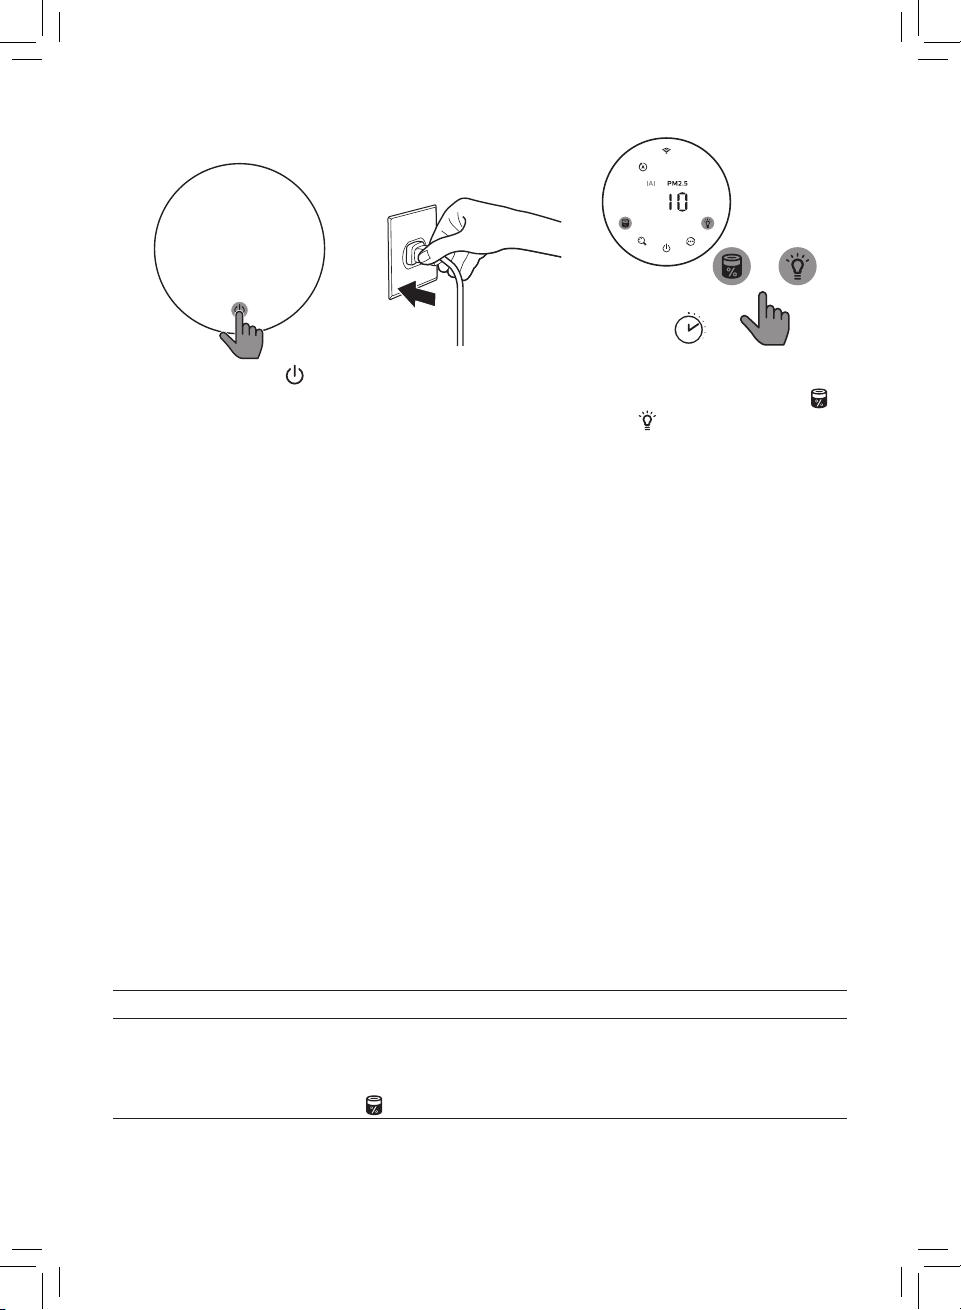
Page 8

Turning on and o
Note:
• Put the plug of the air purier in the power socket�
• If the purier stays connected to the electrical outlet after turning OFF, the air purier will operate under the previous
settings when turned ON again�
• Touch to switch on the air purier� • The “ ” displays on the screen
during warming up� Then the air
purier shows the PM2�5/IAI level after
measuring the air quality�
• The air purier operates in the Auto
mode with PM2�5 displayed on the
screen�
6 EN
3s
• Touch and hold the button for
3 seconds to switch o the air purier�
Page 9

Changing the mode setting
You can choose Auto mode, Turbo mode, Gentle mode or the Sleep mode by touching the
button�
Auto mode ( ): The air purier
automatically adjusts the fan speed in
accordance with the ambient air quality�
Gentle mode ( ): The air purier
operates at a low speed�
Switching the display indicator
Note:
• The appliance display PM2�5 level by default�
Turbo mode ( ): The air purier
operates on the highest speed�
Sleep mode ( ): The air purier operates
quietly at a low speed� After 3 seconds, the
screen lights o�
7EN
Page 10

Using the light on/o function
You can touch the light on/o button manually to turn o all lights and the control pa
Touch any button to wake up all lights�
With the light sensor:
• The control panel can automatically turn on, turn o or dim according to the ambient
light�
• The control panel will be o or dim when the ambient light is dark�
You can touch any button to wake up all lights� If no further operation, all lights will be o or
dim again to match with the ambient light�
nel�
Setting the child lock
+
3s
1 Touch and hold and button for 3 seconds to activate child lock�
» displays on the screen, only and button light up�
» After 3 seconds, the screen goes back to normal display�
2 Touch and hold and button for 3 seconds again to deactivate child lock�
» displays on the screen for 3 seconds and goes back to normal display�
» All buttons light up�
+
3s
8 EN
Page 11

Checking the lter status
• Touch the lter status check/reset button to check the lter service life status�
Icon color Display (%)
Blue 16-100
Blue-purple 9-15
Purple-red 4-8
Red 0-3
Note: The appliance goes back to normal display if no operations after 3 seconds�
4 Cleaning and maintenance
Note:
• Do not attempt to clean the particle sensor with a vacuum cleaner�
• Switch o the air purier and unplug from the power socket before following action�
Cleaning the body of the air purier
Use a soft, dry cloth to clean both the interior and exterior of the air
purier and the air outlet�
Cleaning the particle sensor
Clean the particle sensor every 2 months for optimal functioning of the appliance�
1 Clean the particle sensor inlet and
outlet with a soft brush�
2 Clean the particle sensor with a damp
cotton swab� Dry all parts thoroughly
with a dry cotton swab�
9EN
Page 12

Cleaning the surface of the lter
Clean the surface of lter with vacuum cleaner when the
lter cleaning alert display on the screen�
1 Pull the
back cover
and remove
it from the
appliance�
2 Pull the
6 Touch the button
to switch on the
appliance�
lter
from the
appliance�
7 Touch and hold the lter
3 Clean the
surface of
the lter
with a
vacuum
cleaner�
4 Put the
3s
status check/reset button
for 3 seconds to reset
the lter cleaning time�
5 Reattach
lter back
into the
appliance�
8 Wash your hands
thoroughly after
cleaning the lter�
the back
cover�
10 EN
Page 13

Replacing the lter
Note:
• The lter is not washable or reusable�
• Do not smell the lter as it has collected pollutants from the air�
When the lter need to be replaced, the lter replacement
alert lights up red�
1 Replace the lter with Philips NanoProtect lter Series 3 (FY2180/30) , Please
follow the step of Chapter “Installing the lter”�
3s
2 Touch the button
to switch on the
appliance�
3 Touch and hold the
lter status check/reset
button for 3 seconds
to reset the lter
replacement time�
4 Wash your hands
thoroughly after
replacing the lter�
Filter reset
You can also replace the lter before lter replacement alert ( ) displays on the screen�
After replacing a lter, you need to reset the lter lifetime counter manually�
11EN
Page 14
3s
+
1 Touch the power
button for 3 seconds to
turn o the appliance
and unplug from power
socket�
2 Put the power
plug in the power
socket�
3 Within 15 seconds after
power on, touch and hold
and button for 3 seconds
to reset the lter lifetime
counter�
5 Storage
1 Turn o the air purier and unplug from the power socket�
2 Clean the air purier, particle sensor and the surface of the lter (see chapter “Cleaning
and maintenance”)�
3 Let all parts air dry thoroughly before storing�
4 Wrap the lter in air tight plastic bags�
5 Store the air purier, lter in a cool, dry location�
6 Always thoroughly wash hands after handling lters�
6 Troubleshooting
This chapter summarizes the most common problems you could encounter with the
appliance� If you are unable to solve the problem with the information below, contact the
Consumer Care Center in your country�
Problem Possible solution
The appliance does
not work properly�
12 EN
• The lter replacement alert has been on continuously but you
have not replaced the corresponding lter� As a result, the
appliance is now locked� In this case, replace the lter and long
press to reset the lter lifetime counter�
Page 15

Problem Possible solution
The airow that
comes out of the air
• The surface of the lter is dirty� Clean the surface of the lter (see
the chapter “Cleaning and maintenance”)�
outlet is signicantly
weaker than before�
The air quality does
not improve, even
though the appliance
has been operating
for a long time�
• Check if the packing material is removed from the lter�
• The lter has not been placed in the appliance� Make sure that
the lter (FY2180/30) is properly installed�
• The particle sensor is wet� The humidity level in your room is high
and causes condensation� Make sure that the particle sensor is
clean and dry (see the chapter “Cleaning and maintenance”)�
• Room size is large or the outdoor air quality is poor�
For optimum purication performance, please close the doors
and windows when operating the air purier�
• There are indoor pollution resources� For instances, smoking,
cooking, incense, perfume or alchohol�
• Filter reaches the end of life� Replace the lter with a new one�
The color of the air
quality light always
• The particle sensor is dirty� Clean the particle sensor (see the
chapter “Cleaning and maintenance”)�
stays the same�
The appliance
produces a strange
smell�
• The rst few times you use the appliance, it may produce a plastic
smell� This is normal� However, if the appliance produces a burnt
smell even if removing lters, contact your Philips dealer or an
authorized Philips service center� The lter may produce smell
after being used for a while because of the absorption of indoor
gases� It’s recommended that you reactivate the lter by putting it
in direct sunlight for repeated use� If odor still exists, replace the
lter�
The appliance is extra
loud�
• It's normal if the appliance runs at the Turbo mode�
• In the Auto mode, if the appliance is too loud, maybe the
appliance runs at high speed because air quality becomes worse,
or your personalized setting in App triggers a higher fan speed�
You can choose the Sleep mode, or change the settings in the
app�
• If anything drops into air outlet, it may also cause abnormal loud
sound� Immediate turn o appliance, turn appliance upside down,
to get foreign objectives out of appliance�
• If there is abnormal sound, contact the Consumer Care Center in
your country�
13EN
Page 16

Problem Possible solution
The appliance still
indicates that I need
to replace a lter, but
• Perhaps you did not reset the lter lifetime counter� Switch on
the appliance� Then touch and hold the reset button ( ) for
3 seconds�
I already did�
Error code “E1”
displays on the
screen�
• The motor has malfunctions� Contact the Consumer Care Center in
your country�
• If the router your purier is connected to is dual – band and
currently it is not connecting to a 2�4GHz network, please switch
to another band of the same router (2�4GHz) and try to pair your
purier again� 5GHz networks are not supported� If your purier is
connected to a dual – band router, please switch to the 2�4GHz
network of the router and try to pair your purier again�
• Web authentication networks are not supported�Public Wi-Fi
such as oce or hotel networks are not supported�
• Check if the purier is within range of the Wi-Fi router� You can try
to locate the air purier closer to the Wi-Fi router�
• Check if the Wi-Fi password is correct� The password is casesensitive�
• Retry the setup with the instructions in section “Reset the Wi-Fi
The Wi-Fi setup is
not successful�
connection”�
• Keep the appliance away from other electronic devices that may cause
interferences�
• Check if the mobile device is in airplane mode� Make sure to have
the airplane mode deactivated when connecting to the Wi-Fi
network�
• If the Wi-Fi pairing fails after trying several times, please turn of
the cellular data on your smartphone in the Settings section and
start the pairing again�
• If the Wi-Fi icon on your purier’s display is in stable white but
without seeing the purier in your app, click on “Connect a New
Device” and add the purier from the local list on “Begin setup”
page�
• Consult the help section in the app for extensive and up-to-date
troubleshooting tips�
14 EN
Page 17

ﺔﻠﻜﺸﳌﺍﻞﻤﺘﺤﳌﺍ ﻞﺤﻟﺍ
ﻕﺎﻄﻨﺑ ﺔﻜﺒﺸﺑ ﻞﺼﺘﻣ ﻏ ﺎًﻴﻟﺎﺣ ﻮﻫﻭ ﺝﻭﺩﺰﻣ ﻕﺎﻄﻧ ﺍﺫ ﺀﺍﻮﻬﻟﺍ ﺔﻴﻘﻨﺗ ﺯﺎﻬﺟ ﻪﺑ ﻞﺼﺘﻳ ﻱﺬﻟﺍ ﻪّﺟﻮﳌﺍ ﻥﺎﻛ ﺍﺫﺇ
ﻥﺍﺮﻗﺇ ﻝﻭﺎﺣﻭ (ﺰﺗﺮﻫﺎﺠﻴﺟ
ً
ﻼﺼﺘﻣ ﺀﺍﻮﻬﻟﺍ ﺔﻴﻘﻨﺗ ﺯﺎﻬﺟ ﻥﺎﻛ ﺍﺫﺇ �ﺰﺗﺮﻫﺎﺠﻴﺟ
ﺯﺎﻬﺟ ﻥﺍﺮﻗﺇ ﺔﻟﻭﺎﺤﻣﻭ ﺰﺗﺮﻫﺎﺠﻴﺟ
ﻕﺪﻨﻔﻟﺍ ﻭﺃ ﺐﺘﻜﳌﺍ ﺕﺎﻜﺒﺷ ﻞﺜﻣ ﺔﻣﺎﻌﻟﺍ
ﺯﺎﻬﺟ ﻊﻗﻮﻣ ﺪﻳﺪﺤﺗ ﺔﻟﻭﺎﺤﻣ ﻚﻨﻜ
2,4
ﻕﺎﻄﻧ) ﻪﺴﻔﻧ ﻪّﺟﻮﳌﺍ ﲆﻋ ﺮﺧﺁ ﻕﺎﻄﻧ ﱃﺇ ﻞﻳﺪﺒﺘﻟﺍ ﻰﺟﻓ ،ﺰﺗﺮﻫﺎﺠﻴﺟ
5
ﻕﺎﻄﻨﺑ ﺕﺎﻜﺒﺸﻟﺍ ﻢﻋﺩ ﻢﺘﻳ ﻻ �ﺍًﺩﺪﺠﻣ ﺀﺍﻮﻬﻟﺍ ﺔﻴﻘﻨﺗ ﺯﺎﻬﺟ
2,4
ﻕﺎﻄﻨﺑ ﻪّﺟﻮﳌﺍ ﺔﻜﺒﺷ ﱃﺇ ﻞﻳﺪﺒﺘﻟﺍ ﻰﺟُﻓ ،ﻕﺎﻄﻨﻟﺍ ﺝﻭﺩﺰﻣ ﻪّﺟﻮ
�
ﺪﻳﺪﺟ ﻦﻣ ﺀﺍﻮﻬﻟﺍ ﺔﻴﻘﻨﺗ
Wi-Fi
ﺕﺎﻜﺒﺷﻭ ،ﺐﻳﻮﻟﺍ ﺔﻗﺩﺎﺼﻣ ﱃﺇ ﺝﺎﺘﺤﺗ ﻲﺘﻟﺍ ﺕﺎﻜﺒﺸﻟﺍ ﻥﺇ
�Wi-Fi
ﻪّﺟﻮﻣ ﻕﺎﻄﻧ ﻦﻤﺿ ﺀﺍﻮﻬﻟﺍ ﺔﻴﻘﻨﺗ ﺯﺎﻬﺟ ﻥﺎﻛ ﺍﺫﺇ ﻣ ﻖﻘﺤﺗ
�Wi-Fi
ﻪّﺟﻮﻣ ﻦﻣ ﺏﺮﻗﻷﺍ ﺀﺍﻮﻬﻟﺍ ﺔﻴﻘﻨﺗ
2,4
�
ﺓﺪﻤﺘﻌﻣ ﻏ
ﺔﺳﺎﺴﺣ ﺔﻜﺒﺸﻟﺎﺑ ﺔﺻﺎﺨﻟﺍ ﺭﻭﺮﳌﺍ ﺔﻤﻠﻛ ﻥﺇ �ﺔﺤﻴﺤﺻ ﺔﻜﺒﺸﻟﺎﺑ ﺔﺻﺎﺨﻟﺍ ﺭﻭﺮﳌﺍ ﺔﻤﻠﻛ ﺖﻧﺎﻛ ﺍﺫﺇ ﻣ ﻖﻘﺤﺗ
�
ﻑﺮﺣﻷﺍ ﺔﻟﺎﺤﻟ
ﻢﺴﻘﻟﺍ ﰲ ﺓﺭﻮﻛﺬﳌﺍ ﺕﺍﺩﺎﺷﺭﻺﻟ ﺎًﻘﻓﻭ ﺍًﺩﺪﺠﻣ ﺯﺎﻬﺠﻟﺍ ﺩﺍﺪﻋﺇ ﻝﻭﺎﺣ
�“connection
ﺕﻼﺧﺍﺪﺗ ﺐﺒﺴﺗ ﺪﻗ ﻲﺘﻟﺍ ﻯﺮﺧﻷﺍ ﺔﻴﻧﻭﱰﻜﻟﻹﺍ ﺓﺰﻬﺟﻷﺍ ﻦﻋ ﺍًﺪﻴﻌﺑ ﺯﺎﻬﺠﻟﺍ ﺀﺎﻘﺑﺇ ﲆﻋ ﺹﺮﺣﺍ
ﺪﻨﻋ ﻥﺍﻄﻟﺍ ﻊﺿﻭ ﻂﻴﺸﻨﺗ ﺀﺎﻐﻟﺇ ﲆﻋ ﺹﺮﺣﺍ �ﻥﺍﻄﻟﺍ ﻊﺿﻭ ﰲ ﻝﻮﻤﺤﳌﺍ ﺯﺎﻬﺠﻟﺍ ﻥﺎﻛ ﺍﺫﺇ ﻣ ﻖﻘﺤﺗ
�Wi-Fi
ﺔﻜﺒﺸﺑ ﻝﺎﺼﺗﻻﺍ
ﺔﻜﺒﺷ ﺕﺎﻧﺎﻴﺑ ﻞﻴﻐﺸﺗ ﻑﺎﻘﻳﺇ ﻰﺟُﻓ ،ﺓﺩﺪﻌﺘﻣ ﺕﺍﺮﻣ ﺔﻟﻭﺎﺤﳌﺍ ﺪﻌﺑ
�
ﺪﻳﺪﺟ ﻦﻣ ﻥﺍﺮﻗﻹﺍ ﺀﺪﺑﻭ ﺕﺍﺩﺍﺪﻋﻹﺍ ﻢﺴﻗ ﰲ ﺬﻟﺍ ﻚﻔﺗﺎﻫ ﲆﻋ ﻝﺍّﻮﺠﻟﺍ
ﺯﺎﻬﺟ ﻯﺮﺗ ﻻ ﻚﻧﺃ ﻻﺇ ﺖﺑﺎﺜﻟﺍ ﺾﻴﺑﻷﺍ ﻥﻮﻠﻟﺎﺑ ﺀﴤﻳ ﺀﺍﻮﻬﻟﺍ ﺔﻴﻘﻨﺗ ﺯﺎﻬﺟ ﺔﺷﺎﺷ ﲆﻋ
ﺔﻴﻠﺤﳌﺍ ﺔﺎﻘﻟﺍ ﻦﻣ ﺀﺍﻮﻬﻟﺍ ﺔﻴﻘﻨﺗ ﺯﺎﻬﺟ ﻒِﺿﺃﻭ "ﺪﻳﺪﺟ ﺯﺎﻬﺟ ﻞﻴﺻﻮﺗ" ﻕﻮﻓ ﺮﻘﻧﺎﻓ ،ﻖﻴﺒﻄﺘﻟﺍ ﰲ ﺀﺍﻮﻬﻟﺍ ﺔﻴﻘﻨﺗ
Wi-Fi
�"
ﺔﻜﺒﺸﺑ ﻥﺍﺮﻗﻹﺍ ﻞﺸﻓ ﺍﺫﺇ
Wi-Fi
ﺰﻣﺭ ﻥﺎﻛ ﺍﺫﺇ
ﺩﺍﺪﻋﻹﺍ ﺀﺪﺑ" ﺔﺤﻔﺻ ﰲ
ﺀﺎﻄﺧﻷﺍ ﻑﺎﺸﻜﺘﺳﺍ ﻝﻮﺣ ﺔﺛّﺪﺤﻣﻭ ﺔﻠﻣﺎﺷ ﺢﺋﺎﺼﻧ ﲆﻋ ﻝﻮﺼﺤﻠﻟ ﻖﻴﺒﻄﺘﻟﺍ ﰲ ﺕﻴﻠﻌﺘﻟﺍ ﻢﺴﻗ ﻊﺟﺍﺭ
�
ﺎﻬﺣﻼﺻﺇﻭ
•
•
•
•
�Wi-Fi
• Reset the Wi-Fi”
ﺩﺍﺪﻋﺇ ﺔﻴﻠﻤﻋ ﺖَﻠﺸﻓ
•�
•
•
•
•
15AR
Page 18

ﱰﻠﻔﻟﺍ ﻦﻋ ﻒﻴﻠﻐﺘﻟﺍ ﺩﺍﻮﻣ ﺔﻟﺍﺯﺇ ﺖ ﺍﺫﺇ ﻣ ﻖﻘﺤﺗ
ﺢﻴﺤﺻ ﻞﻜﺸﺑ ﺐّﻛﺮﻣ
ﺪﻛﺄﺗ �ﻩﺎﻴﳌﺍ ﻒﺛﺎﻜﺘﺑ ﺐّﺒﺴﺘﻳ ﺎﻣ ،ﺍًﺪﺟ
(FY2180/30)
ﻝﺎﻋ ﻚﺘﻓﺮﻏ ﰲ ﺔﺑﻮﻃﺮﻟﺍ ﻯﻮﺘﺴﻣ ﻥﺇ �ﺐﻃﺭ ﺕﻴﺴﺠﻟﺍ ﺮﻌﺸﺘﺴﻣ
ٍ
�("
ﺔﻧﺎﻴﺼﻟﺍﻭ ﻒﻴﻈﻨﺘﻟﺍ" ﻞﺼﻓ ﻊﺟﺍﺭ) ﻑﺎﺟﻭ ﻒﻴﻈﻧ ﺕﻴﺴﺠﻟﺍ ﺮﻌﺸﺘﺴﻣ ﻥﺃ
ﱰﻠﻔﻟﺍ ﻥﺃ ﻦﻣ ﺪﻛﺄﺗ �ﺯﺎﻬﺠﻟﺍ ﰲ ﱰﻠﻔﻟﺍ ﻊﺿﻭ ﻢﺘﻳ
ﻰﺟﺮُﻳ ،ﺔﻴﻘﻨﺘﻟﺍ ﺕﺎﺟﺭﺩ ﴡﻗﺃ ﻦﻣ ﺓﺩﺎﻔﺘﺳﻼﻟ �ﺔﺌﻳﺩﺭ ﺝﺭﺎﺨﻟﺍ ﰲ ﺀﺍﻮﻬﻟﺍ ﺓﺩﻮﺟ ﻭﺃ ﺔﻌﺳﺍﻭ ﺔﻓﺮﻐﻟﺍ ﺔﺣﺎﺴﻣ
�
ﺀﺍﻮﻬﻟﺍ ﺔﻴﻘﻨﺗ ﺯﺎﻬﺟ ﻞﻴﻐﺸﺗ ﺀﺎﻨﺛﺃ ﺬﻓﺍﻮﻨﻟﺍﻭ ﺏﺍﻮﺑﻷﺍ ﻕﻼﻏﺇ
ﻝﻮﺤﻜﻟﺍ ﻭﺃ ﺭﻮﻄﻌﻟﺍ ﻭﺃ ،ﺭﻮﺨﺒﻟﺍ ﻭﺃ ﻮﻬﻄﻟﺍ ﻭﺃ ﺧﺪﺘﻟﺍ ﻞﺜﻣ �ﺙّﻮﻠﺗ ﺭﺩﺎﺼﻣ ﲆﻋ ﺔﻴﻠﺧﺍﺪﻟﺍ ﻦﻛﺎﻣﻷﺍ ﻱﻮﺘﺤﺗ
ﺪﻳﺪﺟ ﺮﺧﺂﺑ ﱰﻠﻔﻟﺍ ﻝﺪﺒﺘﺳﺍ �ﻪﺘﻴﺣﻼﺻ ﺔﻳﺎﻬﻧ ﱰﻠﻔﻟﺍ ﻎﻠﺑ
ﺔﻧﺎﻴﺼﻟﺍﻭ ﻒﻴﻈﻨﺘﻟﺍ" ﻞﺼﻓ ﻊﺟﺍﺭ) ﺕﻴﺴﺠﻟﺍ ﺮﻌﺸﺘﺴﻣ ﻒّﻈﻧ �ﺦﺴّﺘﻣ ﺕﻴﺴﺠﻟﺍ ﺮﻌﺸﺘﺴﻣ
ﻝﺎﺣ ﰲ ﻦﻜﻟﻭ �ﻲﻌﻴﺒﻃ ﺮﻣﺃ ﺍﺬﻫ �ﻪﻣﺍﺪﺨﺘﺳﻻ ﱃﻭﻷﺍ ﺕﺍﺮﳌﺍ ﰲ ﺯﺎﻬﺠﻟﺍ ﻦﻣ ﻚﻴﺘﺳﻼﺑ ﺔﺤﺋﺍﺭ ﺚﻌﺒﻨﺗ ﺪﻗ
ﺪﻤﺘﻌﻣ ﺔﻣﺪﺧ ﺰﻛﺮﻣ ﻭﺃ
ﺕﺍﺯﺎﻐﻟﺍ ﺹﺎﺼﺘﻣﺍ ﺐﺒﺴﺑ ﺓﺩﺪﺤﻣ ﺓﱰﻔﻟ ﻪﻣﺍﺪﺨﺘﺳﺍ ﺪﻌﺑ ﱰﻠﻔﻟﺍ ﻦﻣ ﺔﺤﺋﺍﺭ ﺭﺪﺼﺗ ﺪﻗ
�
ﺭﺮﻜﺘﳌﺍ ﻡﺍﺪﺨﺘﺳﻼﻟ ﺓﴍﺎﺒﳌﺍ ﺲﻤﺸﻟﺍ ﺔﻌﺷﺃ ﺖﺤﺗ ﻪﻌﺿﻭ ﻝﻼﺧ ﻦﻣ ﱰﻠﻔﻟﺍ ﻂﻴﺸﻨﺗ ﺓﺩﺎﻋﺈﺑ ﴅﻮﻳ �ﺔﻴﻠﺧﺍﺪﻟﺍ
Philips
ﻞﻴﻛﻮﺑ ﻞﺼﺗﺎﻓ ،ﺮﺗﻼﻔﻟﺍ ﺔﻟﺍﺯﺇ ﺪﻌﺑ ﻰﺘﺣ ﺯﺎﻬﺠﻟﺍ ﻦﻣ ﻖﻳﺮﺣ ﺔﺤﺋﺍﺭ ﺖﺜﻌﺒﻧﺍ
�Philips
�
ﱰﻠﻔﻟﺍ ﻞﺒﺘﺳﺎﻓ ،ﺔﺤﺋﺍﺮﻟﺍ ﺖﻴﻘﺑ ﺍﺫﺇ
•�
ﺓﺩﻮﺟ ﰲ ﻦّﺴﺤﺗ ﻱﺃ ﻙﺎﻨﻫ ﺲﻴﻟ
•�
ﺯﺎﻬﺠﻟﺍ ﻥﺃ ﻦﻣ ﻢﻏﺮﻟﺍ ﲆﻋ ﺀﺍﻮﻬﻟﺍ
• ﻦﻣ
•
•�
•�
ﻮﻫ
•�("
�
•
ﺯﺎﻬﺠﻟﺍ ﻦﻣ ﺔﺒﻳﺮﻏ ﺔﺤﺋﺍﺭ ﺚﻌﺒﻨﺗ
ﻦﻣ
ﺔﻠﻜﺸﳌﺍﻞﻤﺘﺤﳌﺍ ﻞﺤﻟﺍ
�
ﺔﻠﻳﻮﻃ ﺓﱰﻓ ﺬﻨﻣ ﻞﻤﻌﻳ
ﺀﺍﻮﻬﻟﺍ ﺓﺩﻮﺟ ﺀﻮﺿ ﻥﻮﻟ ﻥﺇ
�
ﻪﺴﻔﻧ ﺎًﺍﺩ
ﻯﻮﺼﻘﻟﺍ ﺔﻋﴪﻟﺍ ﻊﺿﻮﺑ ﻞﻤﻌﻳ ﺯﺎﻬﺠﻟﺍ ﻥﺎﻛ ﻥﺇ ﺎًﻴﻌﻴﺒﻃ ﺕﻮﺼﻟﺍ ﻥﻮﻜﻳ
ﺔﻴﻟﺎﻋ ﺔﻋﴎ ﲆﻋ ﺯﺎﻬﺠﻟﺍ ﻞﻴﻐﺸﺘﻟ ﻚﻟﺫ ﺩﻮﻌﻳ ﺪﻘﻓ ،ﺎﻘﻠﺘﻟﺍ ﻊﺿﻮﻟﺍ ﰲ ﺍًﺪﺟ ﺎًﻴﻟﺎﻋ ﺯﺎﻬﺠﻟﺍ ﺕﻮﺻ ﻥﺎﻛ ﻝﺎﺣ ﰲ
ﻞﻴﻐﺸﺘﺑ ﺐﺒﺴﺗ ﻖﻴﺒﻄﺘﻟﺍ ﰲ ﺺﺼﺨﳌﺍ ﺩﺍﺪﻋﻹﺍ ﻥﻷ ﺎﺭ ﻭﺃ ،ﺔﻴﻓﺎﺿﺇ ﺓﺭﻮﺼﺑ ﺀﺍﻮﻬﻟﺍ ﺓﺩﻮﺟ ﺭﻮﻫﺪﺗ ﺐﺒﺴﺑ
�
ﻖﻴﺒﻄﺘﻟﺍ ﰲ ﺕﺍﺩﺍﺪﻋﻹﺍ ﻴﻐﺗ ﻭﺃ ﻥﻮﻜﺴﻟﺍ ﻊﺿﻭ ﺭﺎﻴﺘﺧﺍ ﻚﻨﻜ �ﲆﻋﺃ ﺔﻋﴎ ﲆﻋ ﺔﺣﻭﺮﳌﺍ
ﻒﻗﻭﺃ �ﺐﻳﺮﻏﻭ
ﻝﺎﻋ ﺕﻮﺻ ﺭﺍﺪﺻﺇ ﱃﺇ ﺎًﻀﻳﺃ ﻚﻟﺫ ﻱّﺩﺆﻳ ﺪﻗ ،ﺀﺍﻮﻬﻟﺍ ﺝﺮﺨﻣ ﰲ ﺽﺮﻏ ﻱﺃ ﻁﻮﻘﺳ ﻝﺎﺣ ﰲ
ٍ
�
ﻪﻨﻣ ﺐﻳﺮﻏ ﺽﺮﻏ ﻱﺃ ﺔﻟﺍﺯﻹ ﺐﻘﻋ ﲆﻋ ﺎًﺳﺃﺭ ﻪﺒﻠﻗﺍﻭ ﺭﻮﻔﻟﺍ ﲆﻋ ﺯﺎﻬﺠﻟﺍ ﻞﻴﻐﺸﺗ
ﻙﺪﻠﺑ ﰲ ﻚﻠﻬﺘﺴﳌﺍ ﺔﻣﺪﺧ ﺰﻛﺮ ﻞﺼﺗﺍ ،ﺐﻳﺮﻏ ﺕﻮﺻ ﻉﺳ ﻝﺎﺣ ﰲ
ﺲﳌﺍ ﻢﺛ �ﺯﺎﻬﺠﻟﺍ ﻞﻴﻐﺸﺘﺑ ﻢﻗ �ﱰﻠﻔﻟﺍ ﻙﻼﻬﺘﺳﺍ ﺓﱰﻓ ﺩﺍّﺪﻋ ﻴﻌﺗ ﺪﻌﺗ ﻚﻧﺃ ﻦﻜﻤﳌﺍ ﻦﻣ
�
3
ﻥﺍﻮﺛ
ﺓﺪﳌ ﺭﺍﺮﻤﺘﺳﺎﺑ
ٍ
ً
ﻙﺪﻠﺑ ﰲ ﻚﻠﻬﺘﺴﳌﺍ ﺔﻣﺪﺧ ﺰﻛﺮ ﻞﺼﺗﺍ
16 AR
�
ﻻﺎﻄﻋﺃ ﻙﺮﺤﳌﺍ ﻪﺟﺍﻮﻳ
•�
�
ﺎًﻳﻮﻗ ﺎًﺗﻮﺻ ﺯﺎﻬﺠﻟﺍ ﺭﺪﺼﻳ
•
•
•�
ﺏﻮﺟﻭ ﱃﺇ ﺸﻳ ﺯﺎﻬﺠﻟﺍ ﻝﺍﺰﻳ ﻻ
• ( ) ﺭﺯ
ﻦﻣ
ﻢﻏﺮﻟﺍ ﲆﻋ ،ﱰﻠﻔﻟﺍ ﻝﺍﺪﺒﺘﺳﺍ
ﲆﻋ "E1"
•�
�
ﻪﺘﻟﺪﺒﺘﺳﺍ ﺪﻗ ﻲﻨﻧﺃ
ﺄﻄﺨﻟﺍ ﺰﻣﺭ ﺽﺮﻋ ﻢﺘﻳ
�
ﺔﺷﺎﺸﻟﺍ
Page 19

3s
+
ﺲﳌﺍ ،ﺯﺎﻬﺠﻟﺍ ﻞﻴﻐﺸﺗ ﻦﻣ ﺔﻴﻧﺎﺛ
ﺓﺩﺎﻋﻹ
3
ﻥﺍﻮﺛ
ﺓﺪﳌ
ٍ
�
ﱰﻠﻔﻟﺍ ﻙﻼﻬﺘﺳﺍ ﺓﱰﻓ ﺩﺍﺪﻋ ﻴﻌﺗ
ﺭﺯﻭ
15
3
�
ﻥﻮﻀﻏ ﰲ
ﺭﺍﺮﻤﺘﺳﺎﺑ
�("
ﺔﻧﺎﻴﺼﻟﺍﻭ ﻒﻴﻈﻨﺘﻟﺍ" ﻞﺼﻓ ﻊﺟﺍﺭ) ﱰﻠﻔﻟﺍ ﺢﻄﺳﻭ ﺕﻴﺴﺠﻟﺍ ﺮﻌﺸﺘﺴﻣﻭ ﺀﺍﻮﻬﻟﺍ ﺔﻴﻘﻨﺗ ﺯﺎﻬﺟ ﻒّﻈﻧ
ﺔﻗﺎﻄﻟﺍ ﺬﺧﺄﻣ ﰲ ﺲﺑﺎﻘﻟﺍ ﻊَﺿ
2
�
ﺔﻗﺎﻄﻟﺍ ﺬﺧﺄﻣ ﻦﻋ ﻪﻠﺼﻓﺍﻭ ﺀﺍﻮﻬﻟﺍ ﺔﻴﻘﻨﺗ ﺯﺎﻬﺟ ﻞﻴﻐﺸﺗ ﻒﻗﻭﺃ
�
ﺎﻬﻨﻳﺰﺨﺗ ﻞﺒﻗ ﻖﻠﻄﻟﺍ ﺀﺍﻮﻬﻟﺍ ﰲ ﻞﻣﺎﻜﻟﺎﺑ
�
ﺀﺍﻮﻬﻟﺍ ﻝﻮﺧﺪﻟ ﺔﻌﻧﺎﻣ ﺔﻴﻜﻴﺘﺳﻼﺑ ﺱﺎﻴﻛﺃ ﰲ ﱰﻠﻔﻟﺍ ﺐﱢﺿﻭ
�
ﻑﺎﺟﻭ ﺩﺭﺎﺑ ﻥﺎﻜﻣ ﰲ ﱰﻠﻔﻟﺍﻭ ﺀﺍﻮﻬﻟﺍ ﺔﻴﻘﻨﺗ ﺯﺎﻬﺟ ﻥّﺰﺧ
�
ﺮﺗﻼﻔﻟﺍ ﻒﻴﻈﻨﺗ ﺪﻌﺑ ﺪﻴﺟ ﻞﻜﺸﺑ ﺎًﺍﺩ ﻚَﻳﺪﻳ ﻞﺴﻏﺍ
ﺎﻬﺣﻼﺻﺇﻭ ﺀﺎﻄﺧﻷﺍ ﻑﺎﺸﻜﺘﺳﺍ
ﻚﻨﻜﻤﻴﻓ ،ﻚﺘﻠﻜﺸﻣ ﻞﺣ ﲆﻋ ﺔﻴﻟﺎﺘﻟﺍ ﺕﺎﻣﻮﻠﻌﳌﺍ ﻙﺪﻋﺎﺴﺗ ﺍﺫﺇ �ﺯﺎﻬﺠﻟﺍ ﻡﺍﺪﺨﺘﺳﺍ ﺪﻨﻋ ﺎﻬﻨﻴﻓﺩﺎﺼﺗ ﺪﻗ ﻲﺘﻟﺍ
ﺯﺎﻬﺠﻟﺍ ﻝﺎﻔﻗﺃ ﻢﺗ ،ﻚﻟﺬﻟ ﺔﺠﻴﺘﻧ �ﺐﺳﺎﻨﳌﺍ ﱰﻠﻔﻟﺍ ﻝﺪﺒﺘﺴﺗ ﻚﻨﻜﻟﻭ
�
ﱰﻠﻔﻟﺍ ﻙﻼﻬﺘﺳﺍ ﺓﱰﻓ ﺩﺍﺪﻋ ﻴﻌﺗ ﺓﺩﺎﻋﻹ
ﲆﻋ
ﺀﺎﻀﻣ ﱰﻠﻔﻟﺍ ﻝﺍﺪﺒﺘﺳﺍ ﺀﻮﺿ ﻲﻘﺑ
ً
ً
ﻻّﻮﻄﻣ ﻂﻐﺿﺍﻭ ﱰﻠﻔﻟﺍ ﻝﺪﺒﺘﺳﺍ ،ﺔﻟﺎﺤﻟﺍ ﻩﺬﻫ
3
ﻥﺍﻮﺛ
ٍ
ﻦﻋ
ﻪﻠﺼﻓﺍﻭ ،ﺯﺎﻬﺠﻟﺍ ﻞﻴﻐﺸﺗ ﻑﺎﻘﻳﻹ
ﺓﺪﳌ ﺔﻗﺎﻄﻟﺍ
ﺭﺯ
�
ﺔﻗﺎﻄﻟﺍ ﺬﺧﺄﻣ
ﻦﻳﺰﺨﺘﻟﺍ
ّ
ﻒﺠﺘﻟ ﻊﻄﻘﻟﺍ ﻞﻛ ﻉَﺩ
ً
ﺎﻋﻮﻴﺷ ﻛﻷﺍ ﻞﻛﺎﺸﳌﺍ ﻞﺼﻔﻟﺍ ﺍﺬﻫ ﺺّﺨﻠﻳ
�
ﻙﺪﻠﺑ ﰲ ﻚﻠﻬﺘﺴﳌﺍ ﺔﻣﺪﺧ ﺰﻛﺮ ﻝﺎﺼﺗﻻﺍ
• ﰲ �
�
ﺐﺠﻳ ﻛ ﺯﺎﻬﺠﻟﺍ ﻞﻤﻌﻳ ﻻ
ﺲﳌﺍ
1
5
1
2
3
4
5
6
6
ﺔﻠﻜﺸﳌﺍﻞﻤﺘﺤﳌﺍ ﻞﺤﻟﺍ
ﺔﻧﺎﻴﺼﻟﺍﻭ ﻒﻴﻈﻨﺘﻟﺍ" ﻞﺼﻓ ﻊﺟﺍﺭ) ﱰﻠﻔﻟﺍ ﺢﻄﺳ ﻒّﻈﻧ �ﺦﺴّﺘﻣ ﱰﻠﻔﻟﺍ ﺢﻄﺳ
•�("
ﺝﺮﺨﻣ ﻦﻣ ﺀﺍﻮﻬﻟﺍ ﺏﺎﻴﺴﻧﺍ ﻥﺇ
ﻪﻴﻠﻋ ﻥﺎﻛ ﻣ ﺜﻜﺑ ﻒﻌﺿﺃ ﺀﺍﻮﻬﻟﺍ
�
ﻖﺑﺎﺴﻟﺍ ﰲ
17AR
Page 20

ﱰﻠﻔﻟﺍ ﻝﺍﺪﺒﺘﺳﺍ
:
ﻪﻣﺍﺪﺨﺘﺳﺍ ﺓﺩﺎﻋﺇ ﻭﺃ ﱰﻠﻔﻟﺍ ﻞﺴﻏ ﻦﻜ ﻻ
ﺀﺍﻮﻬﻟﺍ ﻦﻣ ﺔﺛّﻮﻠﻣ ﺩﺍﻮﻣ ﲆﻋ ﻱﻮﺘﺤﻳ ﻪﻧﻮﻛ ﱰﻠﻔﻟﺍ ّﻢﺸﺗ ﻻ
ﺔﻈﺣﻼﻣ
•�
•�
�
ﺮﻤﺣﻷﺍ ﻥﻮﻠﻟﺎﺑ
�"
ﱰﻠﻔﻟﺍ ﺐﻴﻛﺮﺗ" ﻞﺼﻓ ﰲ ﺓﺭﻮﻛﺬﳌﺍ ﺓﻮﻄﺨﻟﺍ ﻊﺒﺗﺍﻭ ،
ﱰﻠﻔﻟﺍ ﻝﺍﺪﺒﺘﺳﺍ ﻪّﺒﻨﻣ ﺀﻮﺿ ﺀﴤﻳ ،ﱰﻠﻔﻟﺍ ﻝﺍﺪﺒﺘﺳﺍ ﱃﺇ ﺔﺟﺎﺤﻟﺍ ﺪﻨﻋ
Philips ﻦﻣ (FY2180/30) 3
3s
ﺪﻌﺑ ﺍًﺪﻴﺟ ﻚﻳﺪﻳ ﻞﺴﻏﺍ
�
ﱰﻠﻔﻟﺍ ﻝﺍﺪﺒﺘﺳﺍ
ﻙﻼﻬﺘﺳﺍ ﺓﱰﻓ ﺩﺍّﺪﻋ ﻴﻌﺗ ﺓﺩﺎﻋﺇ ﺐﺠﻳ ،ﺩﺪﺤﻣ ﱰﻠﻓ ﻝﺍﺪﺒﺘﺳﺍ ﺪﻌﺑ �ﺔﺷﺎﺸﻟﺍ ﲆﻋ
4
ﺭﺯ ﲆﻋ
ﺓﺪﳌ
ﻝﺍﺪﺒﺘﺳﺍ ﺖﻗﻭ ﻴﻌﺗ ﺓﺩﺎﻋﻹ
ﺭﺍﺮﻤﺘﺳﺎﺑ ﻂﻐﺿﺍ
NanoProtect
ﻥﺍﻮﺛ
ٍ
�
ﱰﻠﻔﻟﺍ
ﺔﻠﺴﻠﺴﻟﺍ
�
ﺯﺎﻬﺠﻟﺍ ﻞﻴﻐﺸﺘﻟ
3
3
ﱰﻠﻔﺑ ﱰﻠﻔﻟﺍ ﻝﺪﺒﺘﺳﺍ
ﺭﺰﻟﺍ ﲆﻋ ﻂﻐﺿﺍ
ﱰﻠﻔﻟﺍ ﻴﻌﺗ ﺓﺩﺎﻋﺇ
( )
ﱰﻠﻔﻟﺍ ﻝﺍﺪﺒﺘﺳﺍ ﻪّﺒﻨﻣ ﺽﺮﻋ ﻞﺒﻗ ﱰﻠﻔﻟﺍ ﻝﺍﺪﺒﺘﺳﺍ ﺎًﻀﻳﺃ ﻚﻨﻜ
2
�
ﺎًﻳﻭﺪﻳ ﱰﻠﻔﻟﺍ
1
18 AR
Page 21

ﲆﻋ
ﱰﻠﻔﻟﺍ ﻒﻴﻈﻨﺗ ﻪّﺒﻨﻣ ﺽﺮﻋ ﻢﺘﻳ ﺎﻣﺪﻨﻋ ﺔﻴﺋﺎﺑﺮﻬﻛ ﺔﺴﻨﻜﻣ ﺔﻄﺳﺍﻮﺑ ﱰﻠﻔﻟﺍ ﺢﻄﺳ ﻒّﻈﻧ
�
ﺔﺷﺎﺸﻟﺍ
ﱰﻠﻔﻟﺍ ﺢﻄﺳ ﻒﻴﻈﻨﺗ
ﺀﺎﻄﻏ ﺐﻴﻛﺮﺗ ﺪِﻋﺃ
�
ﺔﻴﻔﻠﺨﻟﺍ ﺔﻬﺠﻟﺍ
ﻒﻴﻈﻨﺗ ﺪﻌﺑ ﺍًﺪﻴﺟ ﻚﻳﺪﻳ ﻞﺴﻏﺍ
5
�
ﱰﻠﻔﻟﺍ
ﱃﺇ
4
ﱰﻠﻔﻟﺍ ﺪِﻋﺃ
�
ﺯﺎﻬﺠﻟﺍ
ﱰﻠﻔﻟﺍ ﺢﻄﺳ ﻒّﻈﻧ
ﺔﺴﻨﻜﻣ ﺔﻄﺳﺍﻮﺑ
3s
8
ﺔﻟﺎﺣ ﻦﻣ ﻖﻘﺤﺘﻟﺍ/ﻴﻌﺗ ﺓﺩﺎﻋﺇ ﺭﺯ ﺲﳌﺍ
3
ﺓﺩﺎﻋﻹ
ﻥﺍﻮﺛ
ﺓﺪﳌ ﺭﺍﺮﻤﺘﺳﺎﺑ
ٍ
�
ﱰﻠﻔﻟﺍ ﻒﻴﻈﻨﺗ ﺖﻗﻭ ﻴﻌﺗ
�
ﺔﻴﺋﺎﺑﺮﻬﻛ
3
ﱰﻠﻔﻟﺍ
ﻦﻣ
7
ﱰﻠﻔﻟﺍ ﺝِﺮﺧﺃ
�
ﺯﺎﻬﺠﻟﺍ
�
ﺯﺎﻬﺠﻟﺍ ﻞﻴﻐﺸﺘﻟ
2
ﺔﻬﺠﻟﺍ ﺀﺎﻄﻏ ﻉﺰﻧﺍ
ﻪﺟﺮﺧﺃﻭ ﺔﻴﻔﻠﺨﻟﺍ
�
ﺯﺎﻬﺠﻟﺍ ﻦﻣ
ﺭﺰﻟﺍ ﲆﻋ ﻂﻐﺿﺍ
1
6
19AR
Page 22

ﱰﻠﻔﻟﺍ ﻡﺍﺪﺨﺘﺳﺍ ﺓﱰﻓ ﻦﻣ ﻖﻘﺤﺘﻠﻟ
ﱰﻠﻔﻟﺍ ﺔﻟﺎﺣ ﻦﻣ ﻖﻘﺤﺘﻟﺍ
ﱰﻠﻔﻟﺍ ﺔﻟﺎﺣ ﻦﻣ ﻖﻘﺤﺘﻟﺍ /ﻴﻌﺗ ﺓﺩﺎﻋﺇ ﺭﺯ ﺲﳌﺍ
•�
(%)
16-100
ﺔﺷﺎﺸﻟﺍ
9-15
4-8
0-3
ﺰﻣﺮﻟﺍ ﻥﻮﻟ
ﻕﺭﺯﺃ
ﺍﻮﺟﺭﺃ-ﻕﺭﺯﺃ
ﺮﻤﺣﺃ-ﺍﻮﺟﺭﺃ
ﺮﻤﺣﺃ
�
3
ﻥﺍﻮﺛ
ﺪﻌﺑ ﺔﻴﻠﻤﻋ ﻱﺃ ﺀﺍﺮﺟﺇ ﻢﺘﻳ ﺍﺫﺇ ﺔﻳﺩﺎﻌﻟﺍ ﺽﺮﻌﻟﺍ ﺔﺷﺎﺷ ﺯﺎﻬﺠﻟﺍ ﺮﻬﻈﻳ :ﺔﻈﺣﻼﻣ
ٍ
ﺔﻧﺎﻴﺼﻟﺍﻭ ﻒﻴﻈﻨﺘﻟﺍ
:
ﺔﻈﺣﻼﻣ
ﺔﻴﺋﺎﺑﺮﻬﻛ ﺔﺴﻨﻜﻣ ﺔﻄﺳﺍﻮﺑ ﺕﻴﺴﺠﻟﺍ ﺮﻌﺸﺘﺴﻣ ﻒﻴﻈﻨﺗ ﻝﻭﺎﺤﺗ ﻻ
ﺮﺧﺁ ﺀﺍﺮﺟﺇ ﻱﺄﺑ ﻡﺎﻴﻘﻟﺍ ﻞﺒﻗ ﺔﻗﺎﻄﻟﺍ ﺬﺧﺄﻣ ﻦﻋ ﻪﻠﺼﻓﺍﻭ ﺀﺍﻮﻬﻟﺍ ﺔﻴﻘﻨﺗ ﺯﺎﻬﺟ ﻞﻴﻐﺸﺗ ﻒﻗﻭﺃ
ﺀﺍﻮﻬﻟﺍ ﺔﻴﻘﻨﺗ ﺯﺎﻬﺟ ﻞﻜﻴﻫ ﻒﻴﻈﻨﺗ
�
ﺀﺍﻮﻬﻟﺍ ﺝﺮﺨﻣﻭ ﺝﺭﺎﺨﻟﺍﻭ ﻞﺧﺍﺪﻟﺍ ﻦﻣ ﺀﺍﻮﻬﻟﺍ ﺔﻴﻘﻨﺗ ﺯﺎﻬﺟ ﻒﻴﻈﻨﺘﻟ ﺔﻓﺎﺟﻭ ﺔﻤﻋﺎﻧ ﺵﻗ ﺔﻌﻄﻗ ﻡﺪﺨﺘﺳﺍ
4
•�
•�
�
ﻦﻄﻘﻟﺍ ﻦﻣ ﺐﻃﺭ ﻥﺫﺃ ﺩﻮﻋ ﺔﻄﺳﺍﻮﺑ ﺕﻴﺴﺠﻟﺍ ﺮﻌﺸﺘﺴﻣ ﻒّﻈﻧ
�
ﻑﺎﺟ ﻦﻄﻗ ﺩﻮﻋ ﺔﻄﺳﺍﻮﺑ ﺍًﺪﻴﺟ ﻊﻄﻘﻟﺍ ﻞﻛ ﻒّﻔﺟ
20 AR
ﺕﻴﺴﺠﻟﺍ ﺮﻌﺸﺘﺴﻣ ﻒﻴﻈﻨﺗ
�
ﺯﺎﻬﺠﻠﻟ ﱄﺎﺜﻣ ﺀﺍﺩﺄﺑ ﻉﺎﺘﻤﺘﺳﻼﻟ ﻦﻳَﺮﻬﺷ ﻞﻛ ﺕﻴﺴﺠﻟﺍ ﺮﻌﺸﺘﺴﻣ ﻒّﻈﻧ
2
ﺔﻄﺳﺍﻮﺑ ﻪﺟﺮﺨﻣﻭ ﺕﻴﺴﺠﻟﺍ ﺮﻌﺸﺘﺴﻣ ﻞﺧﺪﻣ ﻒّﻈﻧ
�
ﺔﻤﻋﺎﻧ ﺓﺎﺷﺮﻓ
1
Page 23

ﺀﻮﻀﻟﺍ ﻞﻴﻐﺸﺗ ﻑﺎﻘﻳﺇ/ﻞﻴﻐﺸﺗ ﺔﻔﻴﻇﻭ ﻡﺍﺪﺨﺘﺳﺍ
3s
3s
�
ﺀﺍﻮﺿﻷﺍ ﻞﻛ ﻞﻴﻐﺸﺘﻟ ﺭﺯ ﻱﺃ ﺲﳌﺍ �ﻢﻜﺤﺘﻟﺍ ﺔﺣﻮﻟﻭ ﺀﺍﻮﺿﻷﺍ ﻞﻛ ﻞﻴﻐﺸﺗ ﻑﺎﻘﻳﻹ ﺎًﻳﻭﺪﻳ
ﻂﻴﺤﳌﺍ ﺀﻮﻀﻟﺍ ﻊﻣ ﺐﺳﺎﻨﺘﻳ ﺎ ﺎًﻴﺋﺎﻘﻠﺗ ﺎﻬﻤﻴﺘﻌﺗ ﻭﺃ ﺎﻬﻠﻴﻐﺸﺗ ﻑﺎﻘﻳﺇ ﻭﺃ ﻢﻜﺤﺘﻟﺍ ﺔﺣﻮﻟ ﻞﻴﻐﺸﺗ ﻢﺘﻳ
ً
ﻠﻈﻣ ﻂﻴﺤﳌﺍ ﺀﻮﻀﻟﺍ ﻥﻮﻜﻳ ﺎﻣﺪﻨﻋ ﺎﻬﻤﻴﺘﻌﺗ ﻭﺃ ﻢﻜﺤﺘﻟﺍ ﺔﺣﻮﻟ ﻞﻴﻐﺸﺗ ﻑﺎﻘﻳﺇ ﻢﺘﻴﺳ
ﺀﻮﻀﻟﺍ ﻊﻣ ﺐﺳﺎﻨﺘﺘﻟ ﺍًﺩﺪﺠﻣ ﺎﻬﺘﻔﺧ ﻭﺃ ﺀﺍﻮﺿﻷﺍ ﻞﻛ ﻞﻴﻐﺸﺗ ﻑﺎﻘﻳﺇ ﻢﺘﻴﺴﻓ ،ﺔﻴﻓﺎﺿﺇ ﺔﻴﻠﻤﻋ ﻱﺃ ﺀﺍﺮﺟﺇ ﻢﺘﻳ ﺍﺫﺇ �ﺀﺍﻮﺿﻷﺍ ﻞﻛ ﻞﻴﻐﺸﺘﻟ ﺭﺯ ﻱﺃ ﺲﳌ ﻚﻨﻜ
ﺀﻮﻀﻟﺍ ﻞﻴﻐﺸﺗ ﻑﺎﻘﻳﺇ/ﻞﻴﻐﺸﺗ ﺭﺯ ﺲﳌ ﻚﻨﻜ
ﻝﺎﻔﻃﻷﺍ ﻞﻔﻗ ﺩﺍﺪﻋﺇ
+
:
ﺀﻮﻀﻟﺍ ﺮﻌﺸﺘﺴﻣ ﻊﻣ
•�
•�
�
ﻂﻴﺤﳌﺍ
+
�
ﻝﺎﻔﻃﻷﺍ ﻞﻔﻗ ﻂﻴﺸﻨﺘﻟ
�
�
ﻝﺎﻔﻃﻷﺍ ﻞﻔﻗ ﻂﻴﺸﻨﺗ ﺀﺎﻐﻟﻹ ﺪﻳﺪﺟ ﻦﻣ
�
ﺔﻴﻌﻴﺒﻄﻟﺍ ﺎﻬﺘﻟﺎﺣ ﱃﺇ ﺔﺷﺎﺸﻟﺍ ﺩﻮﻌﺗ ﻢﺛ ،ٍﻥﺍﻮﺛ
ﻭ
3
ﻥﺍﻮﺛ
ٍ
ﻱﱠﺭﺯ ﻯﻮﺳ ﺓﺀﺎﺿﺇ ﻢﺘﺗ ﻻﻭ ،ﺔﺷﺎﺸﻟﺍ ﲆﻋ
�
ﺔﻴﻌﻴﺒﻄﻟﺍ ﺎﻬﺘﻟﺎﺣ ﱃﺇ ﺔﺷﺎﺸﻟﺍ ﺩﻮﻌﺗ ،ٍﻥﺍﻮﺛ
3
ﻥﺍﻮﺛ
ٍ
3
ﺓﺪﳌ ﺔﺷﺎﺸﻟﺍ ﲆﻋ
ﺓﺪﳌ ﻭ
ﺓﺪﳌ
ﻭ
�
ﺀﺍﻮﺿﻷﺍ ﻞﻛ ﺀﴤﺗ
ﻱﱠﺭﺯ ﺭﺍﺮﻤﺘﺳﺎﺑ ﺲﳌﺍ
ﺽﺮﻋ ﻢﺘﻳ
3
ﺪﻌﺑ
ﻱﱠﺭﺯ ﺭﺍﺮﻤﺘﺳﺎﺑ ﺲﳌﺍ
ﺽﺮﻋ ﻢﺘﻳ
1
2
21AR
Page 24

ﻊﺿﻮﻟﺍ ﺩﺍﺪﻋﺇ ﻴﻐﺗ
� ﺭﺯ ﺲﳌ
ﲆﻋ
ﺀﺍﻮﻬﻟﺍ ﺔﻴﻘﻨﺗ ﺯﺎﻬﺟ ﻞﻤﻌﻳ
ﺔﻋﴪﺑﻭ ﺖﻤﺼﺑ ﺀﺍﻮﻬﻟﺍ ﺔﻴﻘﻨﺗ ﺯﺎﻬﺟ ﻞﻤﻌﻳ
:( )
�
3
ﻥﺍﻮﺛ
ﺭﻭﺮﻣ ﺪﻌﺑ ﺔﺷﺎﺸﻟﺍ ﺊﻔﻄﻨﺗ �ﺔﻀﻔﺨﻨﻣ
ٍ
ﻝﻼﺧ ﻦﻣ ﻥﻮﻜﺴﻟﺍ ﻊﺿﻭ ﻭﺃ ﻒﻴﻄﻠﻟﺍ ﻊﺿﻮﻟﺍ ﻭﺃ ﻯﻮﺼﻘﻟﺍ ﺔﻋﴪﻟﺍ ﻊﺿﻭ ﻭﺃ ﺎﻘﻠﺘﻟﺍ ﻊﺿﻮﻟﺍ ﺭﺎﻴﺘﺧﺍ ﻚﻨﻜ
ﻯﻮﺼﻘﻟﺍ ﺔﻋﴪﻟﺍ ﻊﺿﻭ
�
ﺔﻋﴎ ﲆﻋﺃ
:( )
ﻥﻮﻜﺴﻟﺍ ﻊﺿﻭ
ﺔﻋﴎ ﻂﺒﻀﺑ ﺀﺍﻮﻬﻟﺍ ﺔﻴﻘﻨﺗ ﺯﺎﻬﺟ ﻡﻮﻘﻳ
�
ﻂﻴﺤﳌﺍ ﺀﺍﻮﻬﻟﺍ ﺓﺩﻮﺟ ﻊﻣ ﺐﺳﺎﻨﺘﻳ ﺎ ﺎًﻴﺋﺎﻘﻠﺗ ﺔﺣﻭﺮﳌﺍ
ﺔﻋﴎ ﲆﻋ ﺀﺍﻮﻬﻟﺍ ﺔﻴﻘﻨﺗ ﺯﺎﻬﺟ ﻞﻤﻌﻳ
:( )
:( )
ﺎﻘﻠﺘﻟﺍ ﻊﺿﻮﻟﺍ
ﻒﻴﻄﻠﻟﺍ ﻊﺿﻮﻟﺍ
�
ﺔﻀﻔﺨﻨﻣ
22 AR
ﺔﻴﺿﺍﱰﻓﺍ ﺓﺭﻮﺼﺑ
ﺽﺮﻌﻟﺍ ﻞﻳﺪﺒﺗ ﴍﺆﻣ
PM2�5
ﻯﻮﺘﺴﻣ ﺯﺎﻬﺠﻟﺍ ﺽﺮﻌﻳ
:
ﺔﻈﺣﻼﻣ
•�
Page 25

ﻞﻴﻐﺸﺘﻟﺍ ﻑﺎﻘﻳﺇﻭ ﻞﻴﻐﺸﺘﻟﺍ
ﺎﺑﺮﻬﻜﻟﺍ ﺬﺧﺄﳌﺍ ﰲ ﺀﺍﻮﻬﻟﺍ ﺔﻴﻘﻨﺗ ﺯﺎﻬﺟ ﺲﺑﺎﻗ ﻊَﺿ
ﺔﻣﺩﺎﻘﻟﺍ ﺓﺮﳌﺍ ﰲ ﻪﻠﻴﻐﺸﺗ ﺪﻨﻋ ﺔﻘﺑﺎﺴﻟﺍ ﺕﺍﺩﺍﺪﻋﻺﻟ ﺎًﻘﻓﻭ ﺀﺍﻮﻬﻟﺍ ﺔﻴﻘﻨﺗ ﺯﺎﻬﺟ ﻞﻤﻌﻴﺴﻓ ،ﻪﻠﻴﻐﺸﺗ ﻑﺎﻘﻳﺇ ﺪﻌﺑ ﺎﺑﺮﻬﻜﻟﺍ ﺬﺧﺄﳌﺎﺑ
ً
ﻼﺼﺘﻣ ﺀﺍﻮﻬﻟﺍ ﺔﻴﻘﻨﺗ ﺯﺎﻬﺟ ﻲﻘﺑ ﺍﺫﺇ
:
ﺔﻈﺣﻼﻣ
•�
•�
ﺪﻴﻗ ﺯﺎﻬﺠﻟﺍ ﻥﻮﻜﻳ ﺎﻣﺪﻨﻋ ﺔﺷﺎﺸﻟﺍ ﲆﻋ
/PM2�5
ﴍﺆﻣ
�
ﺀﺍﻮﻬﻟﺍ ﺓﺩﻮﺟ ﺱﺎﻴﻗ ﺪﻌﺑ
ﻯﻮﺘﺴﻣ ﺀﺍﻮﻬﻟﺍ ﺔﻴﻘﻨﺗ ﺯﺎﻬﺟ ﺮﻬﻈﻳ ﻢﺛ �ﺀﺣﻹﺍ
(IAI)
ﺯﺎﻬﺟ ﻞﻴﻐﺸﺗ ﻑﺎﻘﻳﻹ
" "
ﻞﺧﺍﺪﻟﺍ ﰲ ﺔﻴﺳﺎﺴﺤﻟﺍ ﺕﺎﺒﺒﺴﻣ
3
ﻥﺍﻮﺛ
ﺓﺪﳌ ﺭﺍﺮﻤﺘﺳﺎﺑ
ٍ
ﺽﺮﻋ ﻢﺘﻳ
3s
ﺭﺯ ﺲﳌﺍ
ّ
�
ﺀﺍﻮﻬﻟﺍ ﺔﻴﻘﻨﺗ
•
•
ﻯﻮﺘﺴﻣ ﺽﺮﻋ ﻊﻣ ﺎﻘﻠﺘﻟﺍ ﻊﺿﻮﻟﺎﺑ ﺀﺍﻮﻬﻟﺍ ﺔﻴﻘﻨﺗ ﺯﺎﻬﺟ ﻞﻤﻌﻳ
ﺀﺍﻮﻬﻟﺍ ﺔﻴﻘﻨﺗ ﺯﺎﻬﺟ ﻞﻴﻐﺸﺘﻟ
�
ﺔﺷﺎﺸﻟﺍ ﲆﻋ
ﺲﳌﺍ
PM2�5
�
•
•
23AR
Page 26

ﺀﺍﻮﻬﻟﺍ ﺔﻴﻘﻨﺗ ﺯﺎﻬﺟ ﻡﺍﺪﺨﺘﺳﺍ
ﺀﺍﻮﻬﻟﺍ ﺓﺩﻮﺟ ﺀﻮﺿ
3
�
ﺀﺍﻮﻬﻟﺎﺑ ﺔﻟﻮﻘﻨﳌﺍ ﺕﻴﺴﺠﻟﺎﺑ ﺹﺎﺨﻟﺍ ﻂﻴﺤﳌﺍ ﺀﺍﻮﻬﻟﺍ ﺓﺩﻮﺟ ﻊﻣ ﻖﻓﺍﻮﺘﻳ ﻱﺬﻟﺍ ﻥﻮﻠﻟﺍ ﺕﻴﺴﺠﻟﺍ ﺮﻌﺸﺘﺴﻣ ﺩﺪﺤﻳ ،ﺎًﺒﻳﺮﻘﺗ ﺔﻴﻧﺎﺛ
�
ﺕﺍﺀﺍﺮﻘﻟﺍﻭ
(IAI)
ﻞﺧﺍﺪﻟﺍ ﰲ ﺔﻴﺳﺎﺴﺤﻟﺍ ﺕﺎﺒﺒﺴﻣﻭ
�
ﺕﺍﱰﻣﻭﺮﻜﻴﻣ
PM2�5 ﺑ ﻦﻣ
2,5 ﻦﻣ
ﺮﻐﺻﻷﺍﻭ ﺀﺍﻮﻬﻟﺍ ﰲ ﺔﻟﻮﻘﻨﳌﺍ ﺕﻴﺴﺠﻟﺍ ﻦﻣ ﺔﺛّﻮﻠﳌﺍ ﺩﺍﻮﳌﺍ ﱃﺇ
ﺀﺍﻮﻬﻟﺍ ﺓﺩﻮﺟ ﺀﻮﺿ ﻥﻮﻟﺀﺍﻮﻬﻟﺍ ﺓﺩﻮﺟ ﻯﻮﺘﺴﻣ
ﺮﻄﺧ ﴍﺆﻣ ﲆﻋﺃ ﻝﻼﺧ ﻦﻣ ﺀﺍﻮﻬﻟﺍ ﺓﺩﻮﺠﺑ ﺹﺎﺨﻟﺍ ﺀﻮﻀﻟﺍ ﻥﻮﻟ ﺩﺪﺤُﻳ :ﺔﻈﺣﻼﻣ
ﻕﺭﺯﺃﺪﻴﺟ
ﺍﻮﺟﺭﺃ-ﻕﺭﺯﺃﻝﺪﺘﻌﻣ
ﺮﻤﺣﺃ-ﺍﻮﺟﺭﺃﺀﻱﺩﺭ
ﺮﻤﺣﺃﺍًﺪﺟ ﺀﻱﺩﺭ
�
ﻞﺧﺍﺪﻟﺍ ﰲ ﺀﺍﻮﻬﻟﺍ ﰲ ﺔﻴﺳﺎﺴﺤﻟﺍ ﺕﺎﺒﺒﺴﻣ ﻯﻮﺘﺴﻣ ﱃﺇ
ﻞﺧﺍﺪﻟﺍ ﰲ ﺔﻴﺳﺎﺴﺤﻟﺍ ﺕﺎﺒﺒﺴﻣ ﴍﺆﻣ ﻯﻮﺘﺴﻣ
ﻕﺭﺯﺃﺪﻴﺟ
ﺍﻮﺟﺭﺃ-ﻕﺭﺯﺃﻝﺪﺘﻌﻣ
ﺮﻤﺣﺃ-ﺍﻮﺟﺭﺃﺀﻱﺩﺭ
ﺮﻤﺣﺃﺍًﺪﺟ ﺀﻱﺩﺭ
PM2�5
PM2�5
30
ﺸﻳ
ﻯﻮﺘﺴﻣﺀﺍﻮﻬﻟﺍ ﺓﺩﻮﺟ ﺀﻮﺿ ﻥﻮﻟﺀﺍﻮﻬﻟﺍ ﺓﺩﻮﺟ ﻯﻮﺘﺴﻣ
35
36-75
76-115
115 <
IAI
ﺸﻳ
(IAI)
1-3
4-6
7-9
10-12
ﺪﻌﺑ
≤
24 AR
Page 27

Wi-Fi
ﴍﺆﻣ
ﺔﺼﺼﺨﻣ ﺔﻜﺒﺷ ﲆﻋ
Philips ﻦﻣ
ﺀﺍﻮﻬﻟﺍ ﺔﻴﻘﻨﺗ ﺓﺰﻬﺟﺃ ﺩﺍﺪﻋﺈﺑ ﴆﻮﻧ �ﺔﻣﻮﻋﺪﻣ ﻏ (ﺕﺎﻜﺒﺸﻟﺍ ﻒﻳﺮﻌﺗ ﺕﺎﻔﻠﻣﻭ ﺕﺍﺩﺎﻬﺸﻟﺍ ،ﻝﺎﺜﳌﺍ ﻞﻴﺒﺳ ﲆﻋ) ﺕﺎﺴﺳﺆﳌﺍ/ﺕﺎﻛﴩﻟﺍ ﺕﺎﻜﺒﺷ ﻥﺇ
ﺓﺭﺍﺪﳌﺍ ﺕﺎﻜﺒﺸﻟﺍ ﲆﻋ ﺩﺍﺪﻋﻹﺍ ﰲ ﺓﺪﻋﺎﺴﻤﻠﻟ
�Google Play ﻭﺃ App Store
ﻊﺒﺗﺍ �ﺔﺷﺎﺸﻟﺍ ﲆﻋﺃ ﰲ
"+" ﺭﺯ ﲆﻋ
ﺓﺪﻤﺘﻌﳌﺍ ﺓﺰﻬﺟﻷﺍﻭ ﻞﻴﻐﺸﺘﻟﺍ ﺔﻤﻈﻧﻷ ﺚﻳﺪﺤﺗ ﺮﺧﺁ ﲆﻋ ﻝﻮﺼﺤﻠﻟ
Wi-Fi
ﻝﺎﺼﺗﺍ ﺔﻟﺎﺣ
ﺬﻟﺍ ﻒﺗﺎﻬﻟﺎﺑ ﻝﺎﺼﺗﻻﺍ ﻢﺘﻳ
ﻪّﺟﻮﳌﺎﺑ ﻞﺼّﺘﻣ
Wi-Fi
ﺔﻔﻴﻇﻭ
�
ﺔﻴﺼﺨﺸﻟﺍ
�ﻚﺑ
(Mac
ﺔﺻﺎﺨﻟﺍ
ﻥﺍﻮﻨﻋ ،ﻝﺎﺜﳌﺍ ﻞﻴﺒﺳ ﲆﻋ
Philips ﻦﻣ "Clean Home+ "
ﺮﺠﺘﻣ ﻦﻣ
Wi-Fi
) Clean Home+
ﺔﻜﺒﺸﺑ ﻲﺣﻮﻠﻟﺍ ﺮﺗﻮﻴﺒﻤﻜﻟﺍ ﻭﺃ ﺬﻟﺍ ﻚﻔﺗﺎﻫ ﻞﻴﺻﻮﺘﺑ ﻢﻗ ﻢﺛ
ﻂﻐﺿﺍ ﻭﺃ "ﺪﻳﺪﺟ ﺯﺎﻬﺟ ﻞﻴﺻﻮﺗ" ﻕﻮﻓ ﺮﻘﻧﺍﻭ
�
ﺔﻜﺒﺸﻟﺎﺑ ﺀﺍﻮﻬﻟﺍ ﺔﻴﻘﻨﺗ ﺯﺎﻬﺟ ﻞﻴﺻﻮﺘﻟ ﺔﺷﺎﺸﻟﺍ ﲆﻋ ﺮﻬﻈﺗ ﻲﺘﻟﺍ ﺕﺍﺩﺎﺷﺭﻹﺍ
�
ﺔﻴﺗﻮﺻ ﺓﺭﺎﺷﺇ ﻊﻤﺴﺗ ﻰﺘﺣ
�
ﱄﺎﻘﺗﱪﻟﺍ ﻥﻮﻠﻟﺎﺑ
�"
ﱃﻭﻷﺍ ﺓﺮﻤﻠﻟ ﻝﺎﺼﺗﻻﺍ" ﻢﺴﻘﻟﺍ ﰲ ﺓﺭﻮﻛﺬﳌﺍ
ﺓﺪﻤﺘﻌﻣ ﻏ ﺔﻛﴩﻠﻟ ﺔﻌﺑﺎﺗ/ﺔﻴﻓﺎﺿﺇ ﺐﻳﻭ ﺔﺤﻔﺻ ﺔﻗﺩﺎﺼﻣ ﺐّﻠﻄﺘﺗ ﻲﺘﻟﺍ ﺕﺎﻜﺒﺸﻟﺍ ﻥﺇ
www�philips�com/cleanhome ﲆﻋ
ﺖﺑﺎﺜﻟﺍ ﺾﻴﺑﻷﺍ ﻥﻮﻠﻟﺎﺑ ﺀﴤﻳ
WPA2
ﺕﺎﻜﺒﺷ ﻭﺃ "ﺀﺎﻴﺷﻷﺍ ﺖﻧﱰﻧﺇ" ﺓﺰﻬﺟﻷ ﺎﻫﺅﺎﺸﻧﺇ
ﻖﻴﺒﻄﺗ ﰲ ﻦﻳﻮﻜﺘﻟﺍ ﻞﻴﺻﺎﻔﺗ ﻓﻮﺗ ﻢﺘﻳ
ﻖﻴﺒﻄﺗ ﻞﻳﺰﻨﺘﺑ ﻢﻗ
"Clean Home+ "
Wi-Fi
3
ﻥﺍﻮﺛ
ﺓﺪﳌ
ٍ
Wi-Fi
ﴍﺆﻣ ﺾﻣﻮﻳ
3
ﻢﻗﺭ ﺓﻮﻄﺨﻟﺍ ﻊﺒﺗﺍ
Wi-Fi
ﺰﻣﺭ ﺔﻟﺎﺣ
ﱄﺎﻘﺗﱪﻟﺍ ﻥﻮﻠﻟﺎﺑ ﺾﻣﻮﻳ
ﺾﻴﺑﻷﺍ ﻥﻮﻠﻟﺎﺑ ﺾﻣﻮﻳﻪّﺟﻮﳌﺎﺑ ﻝﺎﺼﺗﻻﺍ ﻢﺘﻳ
ﻞﻴﻐﺸﺘﻟﺍ ﻦﻋ ﻒﻗﻮﺘﻣﺔﻠّﻄﻌﻣ
Wi-Fi
ﻝﺎﺼﺗﺍ
:
ﺔﻈﺣﻼﻣ
ﱃﻭﻷﺍ ﺓﺮﻤﻠﻟ ﻝﺎﺼﺗﻻﺍ
ﻖﻴﺒﻄﺗ ﻞّﻐﺷ
ﻝﺎﺼﺗﺍ ﻴﻌﺗ ﺓﺩﺎﻋﺇ
ﻭ
ﺲﳌﺍ
:
ﺔﻈﺣﻼﻣ
ﻉﻼّﻃﻻﺍ ﻰﺟﺮﻳ
• ﻢﺗ
•�
1
2
3
1
2
•�
•�
25AR
Page 28

Wi-Fi
ﴍﺆﻣ
ﱰﻠﻔﻟﺍ ﻒﻴﻈﻨﺗ ﻪّﺒﻨﻣ
ﱰﻠﻔﻟﺍ ﻝﺍﺪﺒﺘﺳﺍ ﻪّﺒﻨﻣ
ﱰﻠﻔﻟﺍ ﺔﻟﺎﺣ /ﻴﻌﺗ ﺓﺩﺎﻋﺇ ﺭﺯ
ﺽﺮﻌﻟﺍ ﻞﻳﺪﺒﺗ ﺭﺯ
ﻞﻴﻐﺸﺗ ﻑﺎﻘﻳﺇ/ﻞﻴﻐﺸﺗ ﺭﺰﻟﺍ
ﻢﻜﺤﺘﻟﺍ ﺯﺎﻬﺟ ﲆﻋ ﺔﻣﺎﻋ ﺓﺮﻈﻧ
:
ﻊﺿﻮﻟﺍ ﺔﺷﺎﺷ
( )
( )
ﺎﻘﻠﺗ
ﺔﻘﺋﺎﻓ ﺔﻋﴎ
( )
ﻒﻴﻄﻟ
( )
ﻥﻮﻜﺳ
ﻞﻴﻐﺸﺗ ﻑﺎﻘﻳﺇ/ﻞﻴﻐﺸﺗ ﺭﺯ
ﻊﺿﻮﻟﺍ ﻞﻳﺪﺒﺗ ﺭﺯ
ﺀﻮﻀﻟﺍ
ﻡﺍﺪﺨﺘﺳﻻﺍ ﺀﺪﺑ
ﱰﻠﻔﻟﺍ ﺐﻴﻛﺮﺗ
�
ﱰﻠﻔﻟﺍ ﺐﻴﻛﺮﺗ ﻞﺒﻗ ﺎﺑﺮﻬﻜﻟﺍ ﺬﺧﺄﳌﺍ ﻦﻋ ﺀﺍﻮﻬﻟﺍ ﺔﻴﻘﻨﺗ ﺯﺎﻬﺟ ﻞﺼﻓ ﻦﻣ ﺪّﻛﺄﺗ :ﺔﻈﺣﻼﻣ
2
26 AR
2345
�
ﺯﺎﻬﺠﻟﺍ ﻦﻣ ﻪﺟﺮﺧﺃﻭ ﺔﻴﻔﻠﺨﻟﺍ ﺔﻬﺠﻟﺍ ﺀﺎﻄﻏ ﻉﺰﻧﺍ
�
ﺯﺎﻬﺠﻟﺍ ﻦﻣ ﱰﻠﻔﻟﺍ ﺝِﺮﺧﺃ
�
ﺀﺍﻮﻬﻟﺍ ﺔﻴﻘﻨﺗ ﱰﻠﻓ ﻦﻋ ﻒﻴﻠﻐﺘﻟﺍ ﺩﺍﻮﻣ ﻞﻛ ﻝِﺯﺃ
�
ﺯﺎﻬﺠﻟﺍ ﱃﺇ ﱰﻠﻔﻟﺍ ﺪِﻋﺃ
�
ﺔﻴﻔﻠﺨﻟﺍ ﺔﻬﺠﻟﺍ ﺀﺎﻄﻏ ﺐﻴﻛﺮﺗ ﺪِﻋﺃ
1
1
2
3
4
5
Page 29

ﻚﺑ ﺹﺎﺨﻟﺍ ﺀﺍﻮﻬﻟﺍ ﺔﻴﻘﻨﺗ ﺯﺎﻬﺟ
1
ﻢﻜﺤﺘﻟﺍ ﺔﺣﻮﻟ
�www�philips�com/welcome ﲆﻋ
ﻚﺠﺘﻨﻣ ﻞّﺠﺳ ،
�AC2939
Philips
ﺀﺍﻮﻬﻟﺍ ﺝﺮﺨﻣ
ﺀﺍﻮﻬﻟﺍ ﺔﻴﻘﻨﺗ ﺯﺎﻬﺟ ﺀﺍﴍ ﲆﻋ ﺎﻨﻴﻧﺎﻬﺗ
ﻪﻣّﺪﻘﺗ ﻱﺬﻟﺍ ﻢﻋﺪﻟﺍ ﻦﻣ ﻞﻣﺎﻜﻟﺎﺑ ﺓﺩﺎﻔﺘﺳﻼﻟ
ﺞﺘﻨﳌﺍ ﻝﻮﺣ ﺔﻣﺎﻋ ﺓﺮﻈﻧ
ﺕﻴﺴﺠﻟﺍ ﺮﻌﺸﺘﺴﻣ
3
NanoProtect
ﺔﻠﺴﻠﺴﻟﺍ
(FY2180/30)
ﱰﻠﻓ
ﺔﻬﺠﻟﺍ ﺀﺎﻄﻏ
ﺔﻴﻔﻠﺨﻟﺍ
27AR
Page 30

ﺕﺎﻳﻮﺘﺤﻤﻟﺍ
27 ���������������������������������������������������������������������� ﻚﺑ
27 �����������������������������������������������������������������������������������������������������������
26 ��������������������������������������������������������������������������������������������������
26 ��������������������������������������������������������������������������������������
26 ������������������������������������������������������������������������������������������������������������������������
25 ��������������������������������������������������������������������������������������������������������������������� Wi-Fi
25 �������������������������������������������������������������������������������������������������������������������� Wi-Fi
24 ������������������������������������������������������������������������
24 ������������������������������������������������������������������������������������������������������������������
23 �������������������������������������������������������������������������������������������������������
22 ����������������������������������������������������������������������������������������������������������������
22 ��������������������������������������������������������������������������������������������������������������
21 ������������������������������������������������������������������������������
21 ���������������������������������������������������������������������������������������������������������������
20 �����������������������������������������������������������������������������������������������������������
ﺀﻮﻀﻟﺍ ﻞﻴﻐﺸﺗ ﻑﺎﻘﻳﺇ/ﻞﻴﻐﺸﺗ ﺔﻔﻴﻇﻭ ﻡﺍﺪﺨﺘﺳﺍ
20 ����������������������������������������������������������������������������������
20 ����������������������������������������������������������������������������������������������
20 ����������������������������������������������������������������������������������������������������
19 ����������������������������������������������������������������������������������������������������������������
18 �����������������������������������������������������������������������������������������������������������������������
18 ������������������������������������������������������������������������������������������������������������������
ﺹﺎﺨﻟﺍ ﺀﺍﻮﻬﻟﺍ ﺔﻴﻘﻨﺗ ﺯﺎﻬﺟ
ﺞﺘﻨﳌﺍ ﻝﻮﺣ ﺔﻣﺎﻋ ﺓﺮﻈﻧ
ﻢﻜﺤﺘﻟﺍ ﺯﺎﻬﺟ ﲆﻋ ﺔﻣﺎﻋ ﺓﺮﻈﻧ
ﻡﺍﺪﺨﺘﺳﻻﺍ ﺀﺪﺑ
ﱰﻠﻔﻟﺍ ﺐﻴﻛﺮﺗ
ﺀﺍﻮﻬﻟﺍ ﺔﻴﻘﻨﺗ ﺯﺎﻬﺟ ﻡﺍﺪﺨﺘﺳﺍ
ﺀﺍﻮﻬﻟﺍ ﺓﺩﻮﺟ ﺀﻮﺿ
ﻞﻴﻐﺸﺘﻟﺍ ﻑﺎﻘﻳﺇﻭ ﻞﻴﻐﺸﺘﻟﺍ
ﻊﺿﻮﻟﺍ ﺩﺍﺪﻋﺇ ﻴﻐﺗ
ﺽﺮﻌﻟﺍ ﻞﻳﺪﺒﺗ ﴍﺆﻣ
ﻝﺎﻔﻃﻷﺍ ﻞﻔﻗ ﺩﺍﺪﻋﺇ
ﱰﻠﻔﻟﺍ ﺔﻟﺎﺣ ﻦﻣ ﻖﻘﺤﺘﻟﺍ
ﺔﻧﺎﻴﺼﻟﺍﻭ ﻒﻴﻈﻨﺘﻟﺍ
ﺀﺍﻮﻬﻟﺍ ﺔﻴﻘﻨﺗ ﺯﺎﻬﺟ ﻞﻜﻴﻫ ﻒﻴﻈﻨﺗ
ﺕﻴﺴﺠﻟﺍ ﺮﻌﺸﺘﺴﻣ ﻒﻴﻈﻨﺗ
ﱰﻠﻔﻟﺍ ﺢﻄﺳ ﻒﻴﻈﻨﺗ
ﱰﻠﻔﻟﺍ ﻝﺍﺪﺒﺘﺳﺍ
ﱰﻠﻔﻟﺍ ﻴﻌﺗ ﺓﺩﺎﻋﺇ
1
2
ﴍﺆﻣ
ﻝﺎﺼﺗﺍ
3
4
17 �����������������������������������������������������������������������������������������������
17 �����������������������������������������������������������������������
28 AR
ﺎﻬﺣﻼﺻﺇﻭ ﺀﺎﻄﺧﻷﺍ ﻑﺎﺸﻜﺘﺳﺍ
ﻦﻳﺰﺨﺘﻟﺍ
5
6
Page 31

Page 32

© 2021 Philips Domestic Appliances Holding B�V�
All rights reserved�
Tussendiepen 4 a, 9206AD Drachten, The Netherlands
3000�059�8115�2 (22/09/2021)
 Loading...