

Page 1
1 2
J L M O PN RQ SK
AC2885
AC2889
CBA
D
FE G H1
H2
I
H3
AC2885, AC2889
EN User manual 1 FR Mode d’emploi 21
Page 2
3s
AC2885
AC2889
3
11
7
15
21
3s
19
5
13
9
17
23
6
14
10
18
24
4
12
8
16
22
3s
20
25
3s
29
3s
27
31
3s
32
28
26
30
Page 3
1EN
En gl is h
Contents
1 IMPORTANT SAFEGUARDS 2
2 Your air purier 8
Product overview (g.a) 8
Controls overview (g.b) 8
3 Getting started 8
Installing the lters 8
Setting up the Wi-Fi connection
for the rst time 9
Setting up the Wi-Fi connection
when the network has changed 10
4 Using the air purier 10
Understanding the air quality
light 10
Turning on and o 10
Changing the Auto mode setting 11
Changing the fan speed 12
Setting the timer 12
Using the light on/o function 12
Switching the display mode 13
5 Cleaning 13
Cleaning the body of the air
purier 13
Cleaning the air quality sensor 13
Cleaning the pre-lter 14
6 Replacing the lters 15
Filter replacement indicator 15
Replacing the lters 15
Filter reset 16
7 Storage 16
8 Troubleshooting 17
9 Warranty 19
10 Accessories 20
11 Disposal 20
Page 4

2 EN
1 IMPORTANT
SAFEGUARDS
READ AND SAVE THESE
SAFETY INSTRUCTIONS
BEFORE USING THIS AIR
PURIFIER
When using electrical
appliances, basic precautions
should always be followed to
reduce the risk of fire, electric
shock, and injury to persons,
including the following:
•
Read all instructions
before operating the air
purifier.
• Do not expose the air
purifier to rain, or use
near water, in a bathroom,
laundry area or other
damp location.
• Do not use the air purifier
where combustible gases
or vapors are present.
• Do not block the air inlet
and outlet by placing
items on the air outlet
or in front of the air inlet.
Do not insert fingers or
foreign objects into the air
outlet or air inlet.
• Do not let water or any
other liquid or flammable
detergent enter the
appliance to avoid electric
shock and/or a fire
hazard.
• Do not clean the
appliance with water,
any other liquid, or a
(flammable) detergent to
avoid electric shock and/
or a fire hazard.
• Do not spray any
flammable materials
such as insecticides or
fragrance around the
appliance.
• Check if the voltage
indicated on the
appliance corresponds to
the local power voltage
before you connect the
appliance to the electrical
outlet.
• Always switch the air
purifier OFF and unplug
from the electrical outlet
after using and before
cleaning, moving and
changing the filters. Be
sure to remove the plug
from the outlet. Never
handle the power plug
with wet or damp hands.
• Only use the power cord
supplied with the air
purifier.
Page 5

3EN
En gl is h
• Keep the cord out of
heavy traffic areas and
arrange cord so that it will
not be tripped over.
• Do not put the cord under
carpets or throw rugs or
near heat vents and open
flames.
• Locate the air purifier near
an electrical outlet and
avoid using an extension
cord.
• Do not use the plug in
or near a power outlet
that contains an electric
air freshener to prevent
damage to the plug.
• Do not use the air purifier
outdoors. For indoor use
only.
• If an extension cord must
be used, exercise care.
• The marked electrical
rating of the cord must be
as great as the rating of
the air purifier.
• Do not operate any air
purifier with a damaged
cord or plug. Discard air
purifier or call 1-866-3098817 for assistance.
• Do not run cord under
carpeting. Do not cover
cord with throw rugs,
runners, or similar
coverings. Do not route
cord under furniture or
appliances. Arrange cord
away from traffic area
and where it will not be
tripped over.
• The cord should be
arranged so that it will not
drape over the edge of
a counter or table where
it could be pulled by
children or tripped over
unintentionally.
• Do not operate this
appliance if it has a
damaged power cord,
plug or motor, if it is
not working properly
or after the appliance
malfunctions or has been
damaged in any manner.
For assistance call
1-866-309-8817.
• Close supervision is
necessary when the
appliance is used by,
on, or near children or
invalids.
• This appliance is not a
toy. Children should be
supervised to ensure they
do not play with the air
purifier.
Page 6

4 EN
there is no guarantee that
interference will not occur
in a particular installation.
If this product does cause
harmful interference to radio
or television reception, which
can be determined by turning
the equipment off and on,
the user is encouraged to try
to correct the interference by
one or more of the following
measures:
• Reorient or relocate the
receiving antenna.
• Increase the separation
between the equipment
and receiver.
• Connect the equipment
into an outlet on a circuit
different from that to
which the receiver is
connected.
• Consult the dealer or an
experienced radio/TV
technician for help.
Please take attention that
changes or modification
not expressly approved by
the party responsible for
compliance could void the
user’s authority to operate the
equipment.
WARNING: To reduce the
risk of fire or electric shock,
do not use this air purifier
with any solid-state speed
control device.
This device complies with
Part 15 of the FCC Rules.
Operation is subject to the
following two conditions:
(1) This device may not cause
harmful interference, and
(2) This device must accept
any interference received,
including interference
that may cause undesired
operation.
Note: This product has been
tested and found to comply
with the limits for a Class
B digital device, pursuant
to Part 15 of the FCC Rules.
These limits are designed
to provide reasonable
protection against harmful
interference in a residential
installation. This product
generates, uses, and can
radiate radio frequency
energy and, if not installed
and used in accordance with
the instructions, may cause
harmful interference to radio
communications. However,
Page 7

5EN
En gl is h
This equipment should be
installed and operated with
a minimum distance 20cm
between the radiator and
your body.
Caution
•
This appliance is not
a substitute for proper
ventilation, regular
cleaning, or use of an
exhaust fan or hood while
cooking.
• A loose fit between the
AC outlet (receptacle)
and plug may cause
overheating and a
distortion of the plug.
Contact a qualified
electrician to replace
loose or worn outlet.
• Never use the air
purifier unless it is fully
assembled and with filters
in place.
• The air purifier must
be used in its upright
position.
• Make sure the air purifier
is assembled/connected
properly after cleaning
the air quality sensor and
pre-filter or replacing the
filters.
This equipment should be
installed and operated with
a minimum distance 20cm
between the radiator and
your body.
This device complies with
Industry Canada licenceexempt RSS standard(s).
Operation is subject to the
following two conditions:
(1) this device may not cause
interference, and
(2) this device must accept
any interference, including
interference that may cause
undesired operation of the
device.
Under Industry Canada
regulations, this radio
transmitter may only operate
using an antenna of a type
and maximum (or lesser) gain
approved for the transmitter
by Industry Canada. To
reduce potential radio
interference to other users,
the antenna type and its gain
should be so chosen that
the equivalent isotropically
radiated power (e.i.r.p.) is not
more than that necessary for
successful communication.
Page 8

6 EN
from dripping onto the
appliance.
• Make sure all filters
are properly installed
before you switch on the
appliance.
• Only use the original
Philips filters specially
intended for this
appliance. Do not use any
other filters.
• Do not use the filter
as fuel or for similar
purposes.
• Avoid knocking against
the appliance (the air inlet
and outlet in particular)
with hard objects.
• Always lift or move the
appliance by the handle
on back side of the
appliance.
• NEVER tilt, move or
attempt to change or
replace a filter while the
air purifier is operating.
Switch OFF and unplug
from the electrical outlet.
Do not move the air
purifier by pulling on the
power cord.
• If the air purifier will not
be used for a long period
of time, unplug from the
electrical outlet, clean
the appliance, air quality
sensor and pre-filter (see
'Cleaning') before storing.
• Make sure that you
plug the appliance into
a properly connected
electrical outlet.
• Always place and use the
appliance on a dry, stable,
level, and horizontal
surface. Make sure the air
purifier cannot be easily
knocked over by a person
or object.
• Leave at least 20cm/8in
free space behind and
on both sides of the
appliance and leave
at least 30cm/12in
free space above the
appliance.
• Do not place anything on
top of the appliance.
• Do not sit, stand or place
heavy objects on the air
purifier.
• Do not place the
appliance directly below
an air conditioner to
prevent condensation
Page 9

7EN
En gl is h
• Do not use this appliance
when using indoor
smoke-type insect
repellents or in places
with oily residues, burning
incense, or chemical
fumes.
• Do not use the appliance
near gas appliances,
heating devices or
fireplaces.
• Do not use the appliance
in a room with major
temperature changes,
as this may cause
condensation inside the
appliance.
• To prevent interference,
place the appliance at
least 2 meters/6 1/2 feet
away from electrical
appliances that use
airborne radio waves such
as TVs, radios, and radiocontrolled clocks.
• Use this air purifier for
its intended household
use as described in
this manual. Do not
use attachments not
recommended by Philips
Electronics North America
Corporation.
• The appliance does
not remove carbon
monoxide (CO) or radon
(Rn). It cannot be used
as a safety device in
case of accidents with
combustion processes
and hazardous chemicals.
• Always wash your hands
thoroughly after changing
or cleaning a filter.
• Unplug the appliance to
override smart enabled or
remote functions.
SAVE THESE
INSTRUCTIONS
• This appliance has a
polarized plug (one
blade is wider than the
other). To reduce the risk
of electric shock, this
plug is intended to fit in
a polarized outlet only
one way. If the plug does
not fit fully in the outlet,
reverse the plug. If it
still does not fit, contact
a qualified electrician.
DO NOT ATTEMPT TO
DEFEAT THIS SAFETY
FEATURE.
Page 10
8 EN
2 Your air purifier
Congratulations on your purchase, and
welcome to Philips!
To fully benefit from the support that
Philips offers, register your product at
www.philips.com/welcome.
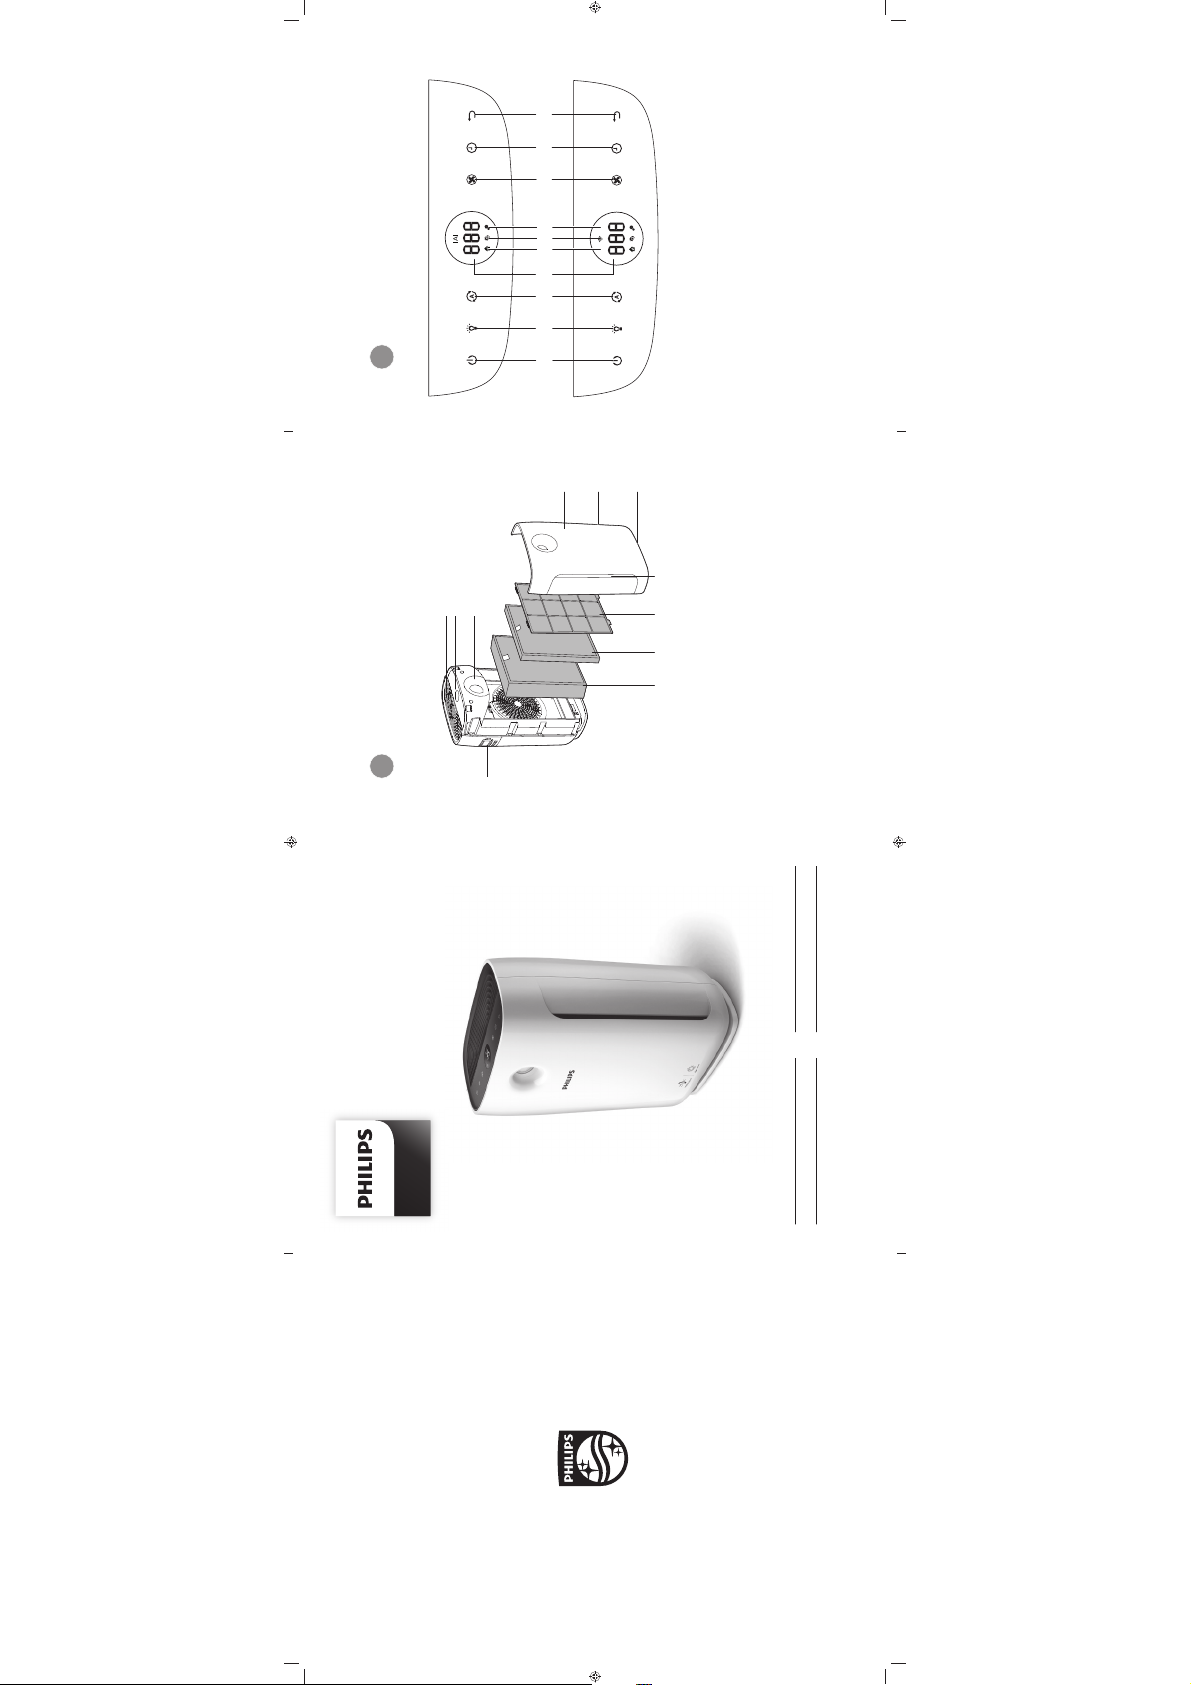
Product overview (g.a)
A Air outlet
B Control panel
C Air quality light
D Air quality sensors
E
NanoProtect True HEPA filter
(FY2422)
F
NanoProtect Active Carbon filter
(FY2420)
G Pre-filter
H H1, H2 and H3 air inlets
I Front panel
Controls overview (g.b)
J On/Off button
K Light dimming button
L Auto mode button
M Display screen
N General mode icon
O Allergen mode icon
P Bacteria & Virus mode icon
Q Fan speed button
R Timer button
S Reset button
3 Getting started
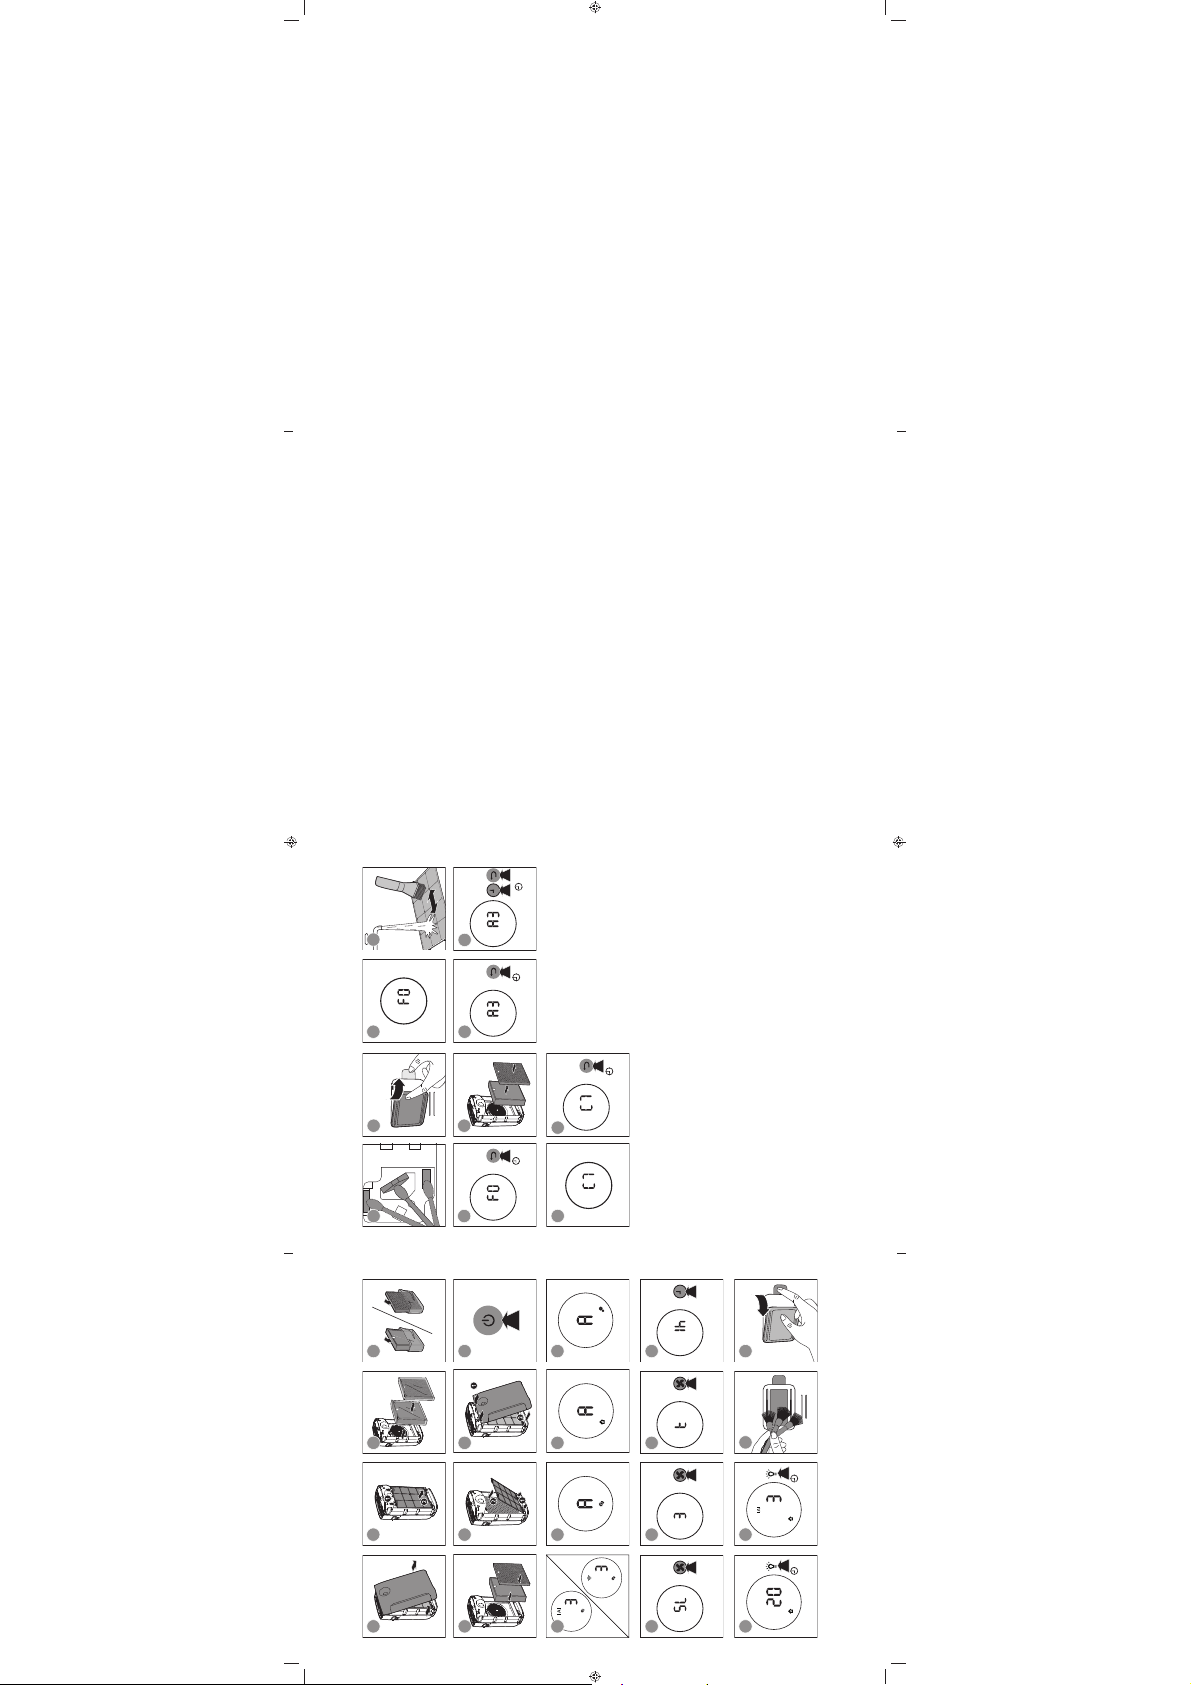
Installing the lters
Note
• Make sure the air purifier is unplugged
from the electrical outlet before
installing the filters.
• Make sure the side of the filter with the
tag is pointing towards you.
1 Pull the bottom part of the front
panel to remove it from the air
purifier (fig.c).
2 Press the two clips down (1) and
pull the pre-filter towards you (2)
(fig.d).
3 Remove all filters (fig.e).
4 Remove all packaging materials
from the
filters (fig.f).
5 Place the thick HEPA filter (FY2422)
into the air purifier and then the
thin AC (activated carbon) filter
(FY2420) (fig.g). The model
numbers are shown on each filter.
6 Attach the pre-filter back into the
air purifier (fig.h).
Note
• Make sure the side with the two clips
is pointing towards you, and that all
hooks of the pre-filter are properly
attached to the purifier.
7 Reattach the front panel by pressing
the top part of the panel onto the
top of the air purifier (1). Then,
gently push the panel against the
body of the air purifier (2) (fig.i).
8 Wash your hands thoroughly after
installing filters.
Page 11

9EN
En gl is h
Setting up the Wi-Fi
connection for the rst
time
Note
• This function is for AC2889 only.
• This instruction is only valid when
the air purifier is being set up for the
first time. If the network has changed
or the setup needs to be performed
again, consult section “Setting up the
Wi-Fi connection when the network
has changed” on page 10.
• You cannot set up two air purifiers at
the same time. If you want to set up
more than one air purifier, you can
only do it successively.
• Make sure that the distance between
your mobile device and the air purifier
is less than 33 ft/10 m without any
obstructions.
1 Put the plug of the air purifier in the
wall outlet and touch to turn on
the air purifier.
» The Wi-Fi indicator
is not
displayed on the screen when
using the air purifier for the first
time.
2 Download and install the 'Air
Matters' App developed by
FreshIdeas Studio or 'Philips
HealthSuite health' App from the
App Store or Google Play.
Note
• This App supports Android 4.4 version
and above or iOS 9.0 version and
above.
3 Touch and simultaneously for
3 seconds until you hear a beep.
» The air purifier goes to pairing
mode.
» The Wi-Fi indicator blinks
orange.
4 Make sure that your mobile device
is successfully connected to your
Wi-Fi network.
5 Launch the 'Air Matters' or 'Philips
HealthSuite health' App and
follow the onscreen instructions
to connect the air purifier to your
network.
6 After the successful pairing and
connection, the Wi-Fi indicator
will light up white. If pairing
is not successful, consult the
troubleshooting section, or the
help section in the 'Air Matters'
or 'Philips HealthSuite health'
App for extensive and up-to-date
troubleshooting tips.
Page 12

10 EN
4 Using the air
purifier
Understanding the air
quality light
Indoor Allergen Index (IAI) is a
real-time numerical display that provides
visual and immediate feedback on
indoor allergen level.
IAI Air quality
light color
Air quality
level
1-3 Blue
Good
4-6 Blue-
violet
Fair
7-9 Red-
purple
Poor
10-12 Red Very poor
The air quality light automatically goes
on when the air purifier is switched on,
and lights up all colors in sequence.
After approximately 30 seconds, the
air quality sensors select the color that
corresponds to the surrounding air
quality of airborne particles.
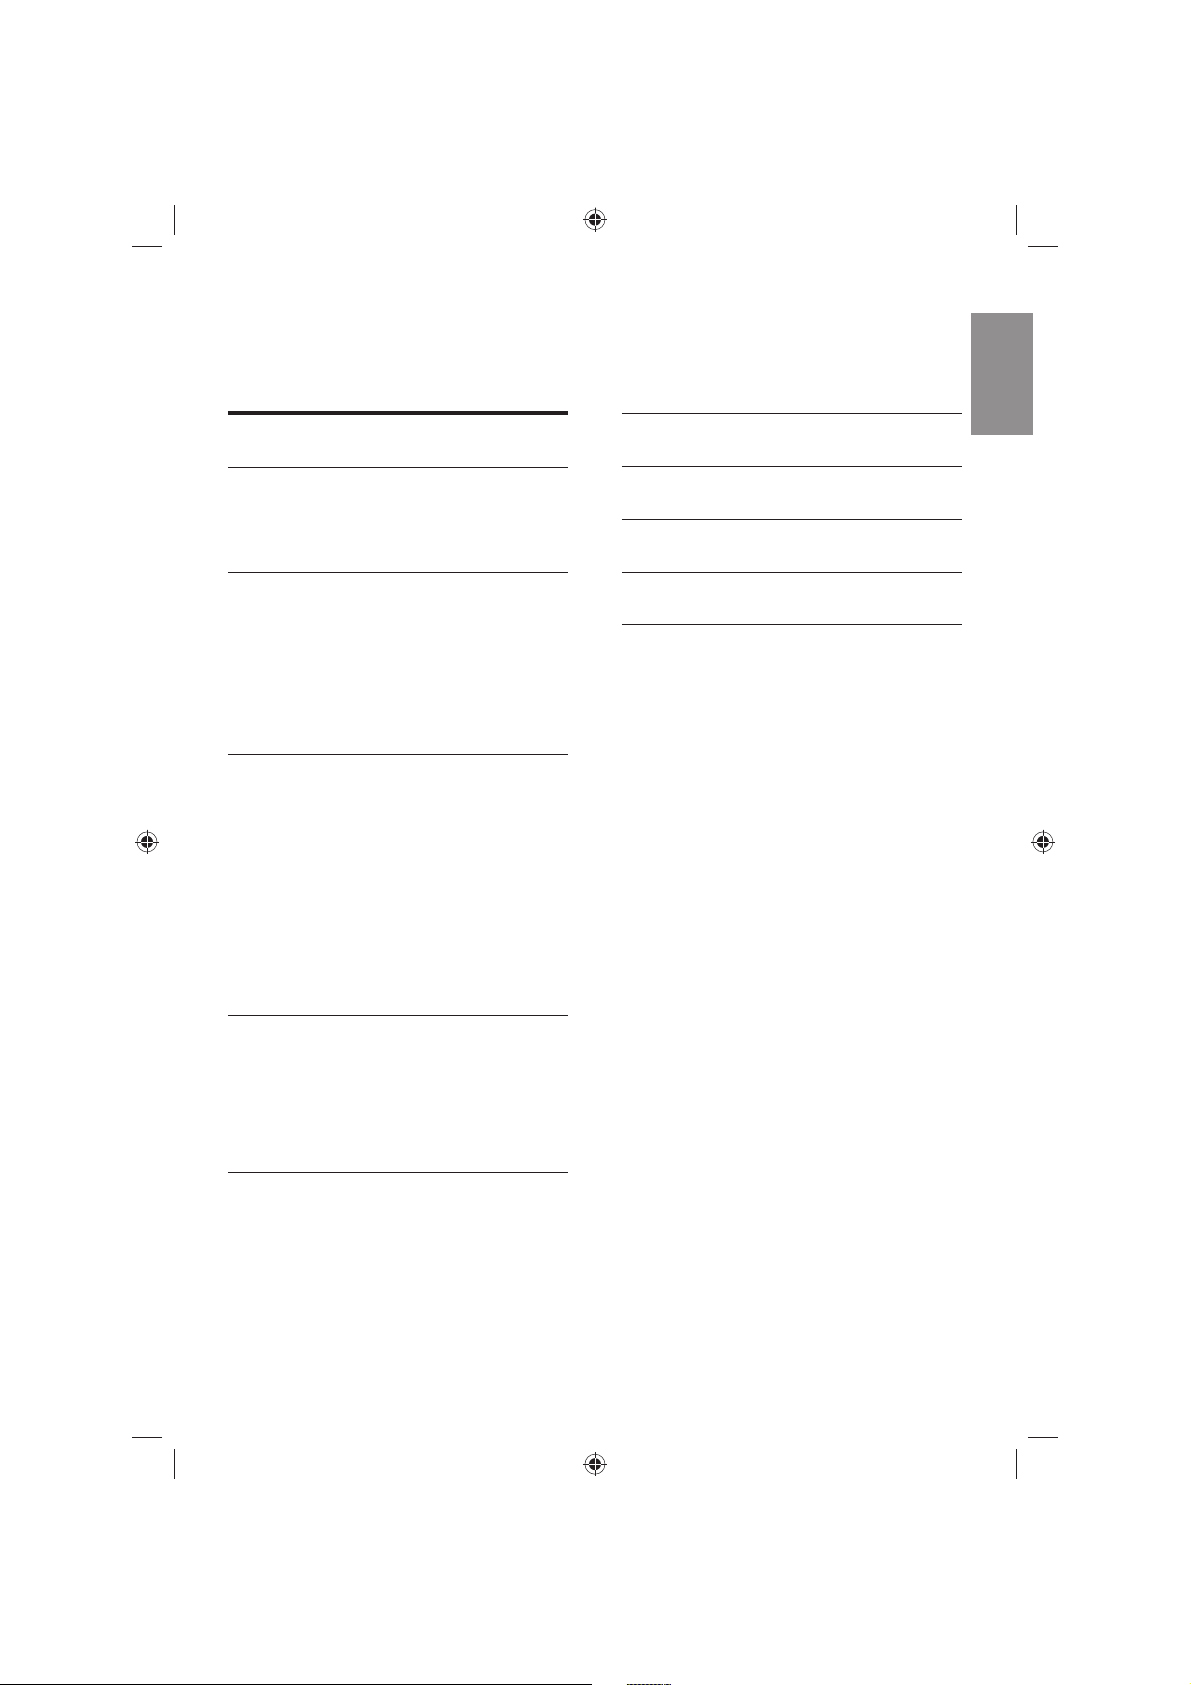
Turning on and o
Note
• Always place the air purifier on a
stable, horizontal, and level surface
with the front of the unit facing away
from walls or furniture.
• For optimum purification performance,
close doors and windows.
• Keep curtains away from the air inlet or
air outlet.
Setting up the Wi-Fi
connection when the
network has changed
Note
• This function is for AC2889 only.
• This applies when your default network
connected with your air purifier has
changed.
1 Put the plug of the air purifier in the
wall outlet and touch
to turn on
the air purifier.
» The Wi-Fi indicator blinks
white.
2 Touch and simultaneously for
3 seconds until you hear a beep.
» The air purifier goes to pairing
mode.
» The Wi-Fi indicator
blinks
orange.
3 Enter your Wi-Fi network name
and password in the App on your
mobile device. The network name
and password are case-sensitive.
4 Follow the steps 5-6 in "Setting up
the Wi-Fi connection for the first
time" section.
Page 13
11EN
En gl is h
1 Put the plug of the air purifier in the
wall outlet.
2 Touch to switch on the air purifier
(fig.j).
» The air purifier beeps.
» The air purifier operates under
the allergen mode by default.
» When the air purifier is warming
up, "
" displays on the
screen. After measuring the
particulate matter only in the
air, the air purifier shows the IAI
level and operates in the auto
mode with
displayed on the
screen (fig.k).
» After measuring the air
quality for approximately
30 seconds, the air quality
sensor automatically selects
the appropriate air quality light
color.
3 Touch and hold for 3 seconds to
switch off the air purifier.
Note
• If the air purifier stays connected to
the electrical outlet after turning OFF,
the air purifier will operate under the
previous settings when turned ON
again.
Changing the Auto mode
setting
You can choose the Allergen mode
(
), the General mode ( )or the
Bacteria & Virus mode (
).
Allergen mode
The extra-sensitive allergen mode
is designed to react to even a small
change in allergen levels in the
surrounding air.
• Touch the Auto mode button
to
select the Allergen mode (fig.l).
» Auto (A) and display on the
screen.
General mode
A smart auto-setting that automatically
adjusts the air purifier’s settings to the
ideal level.
• Touch the Auto mode button
to
select the General mode (fig.m).
» Auto (A) and display on the
screen.
Bacteria & Virus mode
The bacteria & virus mode boosts the
airflow to quickly reduce bacteria &
viruses.
• Touch the Auto mode button
to
select the Bacteria & Virus mode
(fig.n).
» Auto (A) and
display on the
screen.
Page 14
12 EN
Setting the timer
With the timer, you can have the air
purifier operate for a set number of
hours. When the set time has elapsed,
the air purifier will automatically switch
off.
• Touch the timer button
repeatedly to choose the number
of hours you want the air purifier to
operate (fig.r).
» The timer has set intervals of 1,
4 or 8 hours.
To deactivate the timer, touch the timer
button
repeatedly until "--"displays
on the screen.
Note
• If you set the timer once, next time
you use the timer, it starts from the
previous setting time.
Using the light on/o
function
With the light dimming button, you can
switch on or off the air quality light,
the display screen and the function
indicator if desired.
1 Touch the light dimming button
once, the air quality light will be
dimmed.
2 Touch the light dimming button
again, the air quality light will go off.
Note
• For AC2885, the display screen and
the function indicators will still be on,
but the lights will be dimmed with " "
displayed on the screen.
• For AC2889, all lights will go off.
Changing the fan speed
In addition to the Auto modes, there are
several fan speeds available.
When using the manual fan speed
settings, the purifier will still monitor the
air quality, but it will not automatically
adjust the fan speed if it detects
changes in the air quality.
Sleep (SL)
In sleep mode, the air purifier operates
quietly on a very low speed.
• Touch the fan speed button
to
select the sleep mode (SL) (fig.o).
Note
• For AC2889, all the lights will go off in
sleep mode.
• For AC2885, in sleep mode, "SL"
displays on the screen for one minute.
After one minute, all the lights will
go off and the display screen will be
dimmed with" " displayed.
• You can turn on the lights manually by
touching .
Manual
• Touch the fan speed button
repeatedly to select the fan speed
you need (fig.p).
Turbo (t)
In turbo mode, the air purifier operates
on the highest speed.
• Touch the fan speed button
to
select the turbo mode (t) (fig.q).
Page 15

13EN
En gl is h
5 Cleaning
Note
• Always turn the air purifier off and
unplug from the electrical outlet
before cleaning.
• Never immerse the air purifier in water
or any other liquid.
• Never use abrasive, aggressive, or
flammable cleaning agents such as
bleach or alcohol to clean any part of
the air purifier.
• Only the pre-filter is washable.
The HEPA and AC air filters are not
washable.
• Do not attempt to clean the filters or
air quality sensor with a vacuum.
Cleaning the body of the
air purier
Regularly clean the inside and outside
of the air purifier to prevent dust from
collecting.
1 Use a soft, dry cloth to clean both
the interior and exterior of the air
purifier.
2 The air outlet can also be cleaned
with a dry, soft cloth.
Cleaning the air quality
sensor
Clean the air quality sensor every
2 months for optimal functioning of the
purifier.
3 Touch the light dimming button
for the third time, all lights will be on
again.
Switching the display
mode
The air purifier has dual display mode,
IAI display and PM2.5 display.
Note
• The air purifier operates in IAI display
mode by default.
1 Touch the light dimming button
for 3 seconds to switch to PM2.5
display mode (Fig.s).
»
blinks twice.
» The actual PM2.5 level displays
on the screen.
2 Touch the light dimming button
for 3 seconds again to switch back
to IAI display mode (Fig.t).
» blinks twice.
» The IAI level displays on the
screen.
Page 16

14 EN
5 Allow the pre-filter to air dry
thoroughly before placing back in
the air purifier.
Note
• To optimize the lifetime of the pre-
filter, make sure it air dries completely
after cleaning.
• Wash your hands after handling the
filter.
6 Put the pre-filter back into the air
purifier (fig.h).
Note
• Make sure the side with the two clips
is pointing towards you, and that all
hooks of the pre-filter are properly
attached to the air purifier.
7 To reattach the front panel, press
the top part of the panel onto the
top of the air purifier (1). Then,
gently push the panel against the
body of the air purifier (2) (fig.i).
8 Put the plug of the air purifier in the
wall outlet.
9 Touch and hold the reset button
for 3 seconds to reset the pre-filter
cleaning time (fig.{).
10 Wash your hands thoroughly after
installing filters.
Note
• If the air purifier is used in a dusty
environment, it may need to be
cleaned more often.
• If the humidity level in the room is
very high, condensation may develop
on the air quality sensor and the air
quality light may indicate a more poor
air quality even though the air quality
is actually good. If this occurs, clean
the air quality sensor or use the air
purifier on a manual speed setting.
1 Switch off the air purifier and
unplug from the wall outlet.
2 Clean the air quality sensor inlet
and outlet with a soft brush (fig.u).
3 Remove the air quality sensor cover
(fig.v).
4 Clean the air quality sensor, the
dust inlet and the dust outlet with a
damp cotton swab (fig.w).
5 Dry all parts thoroughly with a dry
cotton swab.
6 Reattach the air quality sensor
cover (fig.x).
Cleaning the pre-lter
Clean the pre-filter when F0 is displayed
on the screen(fig.y).
1 Switch off the air purifier and
unplug from the wall outlet.
2 Pull the bottom part of the front
panel to remove it from the air
purifier (fig.c).
3 Press the two clips down (1) and
pull the pre-filter towards you (2)
(fig.d).
4 If the pre-filter is very dirty, use a
soft brush to brush away the dust
(fig.z). Then wash the pre-filter
under running tap water.
Page 17

15EN
En gl is h
Filter alert light
status
Action
A3 displays on the
screen
Replace the
NanoProtect
True HEPA filter
(FY2422)
C7 displays on the
screen
Replace the
NanoProtect
Active Carbon
filter (FY2420)
A3 and C7 display
on the screen
alternately
Replace both
filters
1 Turn off the air purifier and unplug
from the wall outlet.
2 Take out the used air filter according
to the filter alert light status
displayed on the screen (fig.|).
Discard used filters.
Note
• Do not touch the pleated filter surface,
or smell the filters as they have
collected pollutants from the air.
3 Remove all packaging material from
the new filters (fig.f).
4 Place the new filters into the air
purifier (fig.g).
5 Put the plug of the air purifier in the
wall outlet.
6 Touch and hold the reset button
for 3 seconds to reset the filter
lifetime counter (fig.}).
Note
• Wash your hands after changing a filter.
• This air purifier has no other user-
serviceable parts. For assistance, call
1-866-309-8817.
6 Replacing the
filters
Filter replacement
indicator
This air purifier is equipped with a
filter replacement indicator to make
sure that the air purification filter is in
optimal condition when the air purifier
is operating. When the filters need to be
replaced, the filter code displays on the
screen (see Filter alert chart).
If the filters are not replaced in 14 days,
the air purifier will stop operating and
automatically lock to protect the air
quality in the room. Replace the filters
as soon as possible according to the
filter code.
Replacing the lters
Note
• The HEPA and AC air filters are not
washable or reusable.
• Always turn off the air purifier and
unplug from the electrical outlet
before replacing the filters.
• Do not clean the filters with a vacuum.
• If the pre-filter is damaged, worn or
broken, do not use. Visit
www.philips.com/support or call
1-866-309-8817 for assistance.
Page 18

16 EN
Filter reset
You can replace filters even if there is
no filter replacement code displayed on
the screen. After replacing a filter, you
need to reset the filter lifetime counter
manually.
1 Touch and simultaneously
for 3 seconds to enter the filter reset
mode (fig.~).
» Code (A3) of the NanoProtect
True HEPA filter displays on the
screen.
2 Touch and hold for 3 seconds to
force reset the filter lifetime counter
of the NanoProtect True HEPA filter
(fig.}).
3 Code (C7) of the NanoProtect
Active Carbon filter displays on the
screen after the lifetime counter of
the NanoProtect True HEPA filter
has been reset (fig.5).
4 Touch and hold for 3 seconds to
force reset the filter lifetime counter
of the NanoProtect Active Carbon
filter and exit the filter reset mode
(fig.€).
7 Storage
1 Turn off the air purifier and unplug
from the wall outlet.
2 Clean the air purifier, air quality
sensor and pre-filter (see chapter
‘Cleaning’).
3 Let all parts air dry thoroughly
before storing.
4 Wrap the filters and pre-filter
separately in air tight plastic bags.
5 Store the air purifier, filters and pre-
filter in a cool, dry location.
6 Always thoroughly wash hands
after handling filters.
Page 19

17EN
En gl is h
8 Troubleshooting
This chapter summarizes the most common problems you could encounter with the air
purifier. If you are unable to solve the problem with the information below, visit
www.philips.com/support or call 1-866-309-8817 for assistance.
Problem Possible solution
The air purier
does not work
even though it is
plugged into the
wall outlet and
switched on.
• The timer is set to a specific time interval. Reset or turn off
the timer.
• Try a different electrical outlet or check the wall switch.
• The filter alert status is displaying the filter code. Replace
the corresponding filter and reset the filter lifetime counter
(see chapter "Replacing the filters").
• If the problem persists, visit www.philips.com/support or
call 1-866-309-8817 for assistance.
The air purier
does not work
even though it is
switched on.
• The filter replacement indicator has been on continuously
but you have not replaced the corresponding filter, and the
air purifier is now locked. In this case, replace the filter and
reset the filter lifetime counter.
The air purier
accidentally
powers o.
• The air purifier restarts automatically and goes to the
previous mode when the power resumes.
The Wi-Fi setup is
not successful.
• If the router your purifier is connected to is dual – band
and currently it is not connecting to a 2.4GHz network,
please switch to another band of the same router (2.4GHz)
and try to pair your purifier again. 5Ghz networks are not
supported.
• Web authentication networks are not supported.
• Check if the purifier is within range of the Wi-Fi router. You
can try to locate the air purifier closer to the Wi-Fi router.
• Check if the network name is correct. The network name is
case-sensitive.
• Check if the Wi-Fi password is correct. The password is
case-sensitive.
• Retry the setup with the instructions in section ‘Set up the
Wi-Fi connection when the network has changed’.
• The Wi-Fi connectivity can be interrupted by electromagnetic
or other interferences. Keep the appliance away from other
electronic devices that may cause interferences.
• Check if the mobile device is in airplane mode. Make sure
to have the airplane mode deactivated when connecting
to the Wi-Fi network.
• Consult the help section in the App for extensive and upto-date troubleshooting tips.
Page 20

18 EN
Problem Possible solution
The airow that
comes out of
the air outlet
is signicantly
weaker than
before.
• The pre-filter is dirty. Clean the pre-filter (see chapter
"Cleaning").
The air quality
does not improve,
even though the air
purier has been
operating for a
long time.
• One of the filters has not been placed in the air purifier or
a filter is not placed properly. Make sure that all filters are
properly installed in the following order, starting with the
innermost filter: 1) NanoProtect True HEPA filter (FY2422);
2) NanoProtect Active Carbon filter (FY2420); 3) pre-filter.
• The air quality sensor is wet. Make sure that the air quality
sensor is clean and dry (see chapter "Cleaning").
The color of the air
quality light always
stays the same.
• The air quality sensor is dirty. Clean the air quality sensor
(see chapter "Cleaning").
The air purier
produces a
unpleasant smell.
• The first few times you use the air purifier, it may produce
a plastic smell. This is normal. The air purifier may also
produce an unpleasant smell when the filter is dirty. In this
case, clean or replace the appropriate filter.
• If the air purifier produces a burnt odor, switch OFF and
unplug from the electrical outlet. Call 1-866-309-8817 for
assistance.
The air purier is
loud.
• If the air purifier is too loud, change the fan speed to a
lower fan speed level. When using the air purifier in a
bedroom at night, choose the sleep mode.
The air purier still
indicates that I
need to replace a
lter, but I already
did.
• Perhaps you did not reset the filter lifetime counter. Plug
in the air purifier, touch
to switch on the air purifier, and
touch and hold the reset button for 3 seconds (see
Filter force reset section).
Error codes "E1",
"E2", "E3" or "E4"
displays on the
screen.
• The air purifier has malfunctions. Visit www.philips.com/
support or call 1-866-309-8817 for assistance.
Page 21

19EN
En gl is h
9 Warranty
FULL TWO-YEAR WARRANTY
Philips Electronics North America
Corporation warrants each new Philips
product, Models AC2885/AC2889
(excluding filters), against defects in
materials or workmanship for a period
of two years from the date of purchase,
and agrees to repair or replace any
defective product without charge.
IMPORTANT: This warranty does not
cover damage resulting from accident,
misuse or abuse, lack of reasonable
care, the affixing of any attachment not
provided with the product or loss of
parts or subjecting the product to any
but the specified voltage.*
NO RESPONSIBILITY IS ASSUMED
FOR ANY SPECIAL, INCIDENTAL, OR
CONSEQUENTIAL DAMAGES.
In order to obtain warranty service,
simply go to www.philips.com/support
or call 1-866-309-8817 for assistance.
It is suggested that for your protection,
you return shipments of product
by insured mail, insurance prepaid.
Damage occurring during shipment is
not covered by this warranty.
NOTE: No other warranty, written or
oral, is authorized by Philips Electronics
North America Corporation. This
warranty gives you specific legal rights,
and you may also have other rights that
vary from state to state. Some states do
not allow the exclusion or limitation of
incidental or consequential damages,
so the above exclusion and limitations
may not apply to you.
* Read enclosed instructions carefully.
In US Manufactured for:
Philips Consumer Lifestyle, A division of
Philips Electronics North America
Corporation, P.O. Box 10313, Stamford,
CT 06904
In Canada Imported for:
Philips Electronics LTD, 281 Hillmount
Road, Markham, Ontario L6C 2S3
PHILIPS and Philips Shield are
registered trademarks of Koninklijke
Philips N.V.
©2016 Philips Electronics North America
Corporation. All rights reserved.
This symbol on the product’s
nameplate means it is listed
by Underwriters Laboratories,
Inc.
App Store is a service mark of Apple Inc.
Google Play is a trademark of Google
Inc.
“Air Matters” app developed by
FreshIdeas Studio.
The energy efficiency of
this ENERGY STAR qualified
model is measured based on
a ratio between the model’s
CADR for Dust and the electrical
energy it consumes, or CADR/Watt.
U
L
US
C
LISTED
Page 22

20 EN
11 Disposal
Your product is designed and
manufactured with high quality
materials and components, which can
be recycled and reused. For recycling
information, please contact your local
waste management facilities or visit
www.recycle.philips.com
10 Accessories
Philips accessories may be purchased
at a store near you, or on our website
www.philips.com/store.
Page 23

21FR
Fr an ça is
Contenu
1 RECOMMANDATIONS
IMPORTANTES 22
2 Votre puricateur d'air 29
Présentation du produit (g.a) 29
Aperçu des commandes (g.b) 29
3 Guide de démarrage 30
Installation des ltres 30
Première conguration de la
connexion Wi-Fi 30
Conguration de la connexion
Wi-Fi après modication du
réseau 31
4 Utilisation du puricateur
d'air 32
Compréhension du voyant de
qualité de l'air 32
Mise sous et hors tension 32
Modication du réglage de
mode automatique 33
Modication de la vitesse du
ventilateur 33
Réglage du minuteur 34
Utilisation de la fonction
d'activation/de désactivation
de la lumière 34
Changer le mode d’achage 35
5 Nettoyage 35
Nettoyage du corps du
puricateur d'air 35
Nettoyage du capteur de
qualité de l'air 36
Nettoyage du préltre 36
6 Remplacement des ltres 37
Indicateur de remplacement du
ltre 37
Remplacement des ltres 37
Réinitialisation du ltre 38
7 Stockage 39
8 Dépannage 40
9 Garantie 43
10 Accessoires 44
11 Mise au rebut 44
Page 24

22 FR
1 RECOMMAN-
DATIONS IMPORTANTES
VEUILLEZ LIRE CES
INSTRUCTIONS DE
SÉCURITÉ AVANT D'UTILISER
LE PURIFICATEUR D'AIR ET
CONSERVEZ-LES
Lorsque vous utilisez vos
appareils électriques, suivez
toujours les précautions de
base pour réduire les risques
d'incendie, d'électrocution et
de blessures, y compris les
précautions suivantes :
•
Lisez toutes les
instructions avant de faire
fonctionner le purificateur
d'air.
• N'exposez pas le
purificateur d'air à la
pluie et ne l'utilisez pas
à proximité d'une source
d'eau, dans une salle de
bain, une buanderie ou un
autre endroit humide.
• N'utilisez pas le
purificateur d'air en
présence de vapeurs ou
de gaz combustibles.
• Veillez à ne pas bloquer
la circulation de l'air en
évitant de placer des
objets sur la sortie d'air
ou devant l'entrée d'air.
Ne mettez jamais vos
doigts ou tout autre objet
étranger dans la sortie ou
l'entrée d'air.
• Veillez à ne pas faire
pénétrer d'eau, de
détergent inflammable
ou tout autre liquide dans
l'appareil afin d'éviter
toute électrocution et/ou
tout risque d'incendie.
• Ne nettoyez pas l'appareil
avec de l'eau, du
détergent (inflammable)
ou tout autre liquide
afin d'éviter toute
électrocution et/ou tout
risque d'incendie.
• Ne pulvérisez pas de
produits inflammables
tels que de l'insecticide
ou du parfum autour de
l'appareil.
• Avant de brancher
l'appareil sur la prise
électrique, vérifiez si la
tension indiquée sur
l'appareil correspond à la
tension secteur locale.
Page 25

23FR
Fr an ça is
• Éteignez toujours le
purificateur d'air et
débranchez-le de la prise
électrique après utilisation
et avant de nettoyer, de
déplacer ou de changer
les filtres. Veillez à retirer
la fiche de la prise. Ne
manipulez jamais la
fiche d'alimentation avec
des mains mouillées ou
humides.
• Utilisez exclusivement le
cordon d'alimentation
fourni avec le purificateur
d'air.
• Éloignez le cordon des
espaces très fréquentés
et placez-le de façon à ce
qu'il ne puisse pas causer
de chute.
• Ne placez pas le cordon
sous des tapis ou des
carpettes, ni à proximité
d'évents de chaleur ou de
flammes.
• Disposez le purificateur
d'air à proximité d'une
prise électrique et évitez
d'utiliser une rallonge.
• Afin d'éviter
d'endommager la fiche,
ne la branchez pas sur
une prise d'alimentation
contenant un
désodorisant électrique et
ne l'utilisez pas non plus à
proximité d'une telle prise.
• N'utilisez pas le
purificateur d'air à
l'extérieur. Il a été conçu
pour une utilisation en
intérieur uniquement.
• Si une rallonge est
nécessaire, utilisez-la
avec précaution.
• La puissance électrique
indiquée sur le cordon
doit être aussi élevée que
celle du purificateur d'air.
• Ne faites pas fonctionner
de purificateur d'air avec
un cordon ou une fiche
endommagé(e). Jetez
le purificateur d'air ou
appelez le 1-866-3098817 pour obtenir de
l'aide.
Page 26

24 FR
• Surveillez attentivement
les enfants et les
personnes handicapées
lorsqu'ils utilisent
l'appareil ou qu'ils se
trouvent à proximité.
• Cet appareil n'est pas un
jouet. Veillez à ce que les
enfants ne puissent pas
jouer avec le purificateur
d'air.
AVERTISSEMENT :
pour réduire les
risques d'incendie ou
d'électrocution, n'utilisez
pas le purificateur d'air avec
un dispositif de commande
de vitesse à semiconducteur.
Le présent appareil
est conforme aux CNR
d'Industrie Canada
applicables aux appareils
radioexempts de licence.
L'exploitation est autorisée
aux deux conditions
suivantes :
(1) l'appareil ne doit pas
produire de brouillage, et
• Ne placez pas le cordon
sous une moquette. Ne
couvrez pas le cordon
d'alimentation avec
des tapis, des carpettes
ou des revêtements
similaires. Ne placez
pas le cordon sous des
meubles ou des appareils.
Éloignez le cordon des
espaces très fréquentés
et placez-le de façon à ce
qu'il ne puisse pas causer
de chute.
• Le cordon doit être
placé de façon à ne pas
déborder du plan de
travail ou de la table pour
éviter que les enfants
ne tirent dessus ou qu'il
ne cause une chute
accidentelle.
• N'utilisez pas l'appareil
si son cordon
d'alimentation, sa fiche
ou son moteur est
endommagé(e), s'il ne
fonctionne pas ou plus
correctement ou s'il a été
endommagé de quelque
manière que ce soit.
Pour obtenir de l'aide,
composez le
1 866 309-8817.
Page 27

25FR
Fr an ça is
Attention
• Cet appareil ne remplace
pas une ventilation
correcte, un nettoyage
régulier et l'utilisation d'un
ventilateur ou d'une hotte
dans la cuisine.
• La présence d'un jeu trop
important entre la prise
secteur (réceptacle) et la
fiche risque d'entraîner
une surchauffe et une
déformation de la fiche.
Contactez un électricien
qualifié pour remplacer
une prise lâche ou usée.
• N'utilisez jamais le
purificateur d'air s'il n'est
pas entièrement assemblé
avec les filtres en place.
• Le purificateur d'air doit
être utilisé en position
verticale.
• Veillez à ce que le
purificateur d'air soit
assemblé/connecté
correctement après le
nettoyage du capteur
de qualité de l'air et du
préfiltre ou après avoir
remplacé les filtres.
(2) l'utilisateur de l'appareil
doit accepter tout brouillage
radioélectrique subi,
même si le brouillage
est susceptible d'en
compromettre le
fonctionnement.
Conformément à la
réglementation d'Industrie
Canada, le présent émetteur
radio peut fonctionner avec
une antenne d'un type
et d'un gain maximal (ou
inférieur) approuvé pour
l'émetteur par Industrie
Canada. Dans le but de
réduire les risques de
brouillage radioélectrique
à l'intention des autres
utilisateurs, il faut choisir
le type d'antenne et
son gain de sorte que la
puissance isotrope rayonnée
équivalente (p.i.r.e.) ne
dépasse pas l'intensité
nécessaire à l'établissement
d'une communication
satisfaisante.
Cet équipement doit être
installé et utilisé à une
distance minimale de 20 cm
entre le radiateur et votre
corps
.
Page 28

26 FR
que de la condensation
s'écoule sur l'appareil.
• Avant de mettre l'appareil
en marche, assurez-vous
que tous les filtres sont
correctement assemblés.
• Utilisez exclusivement
les filtres Philips d'origine
spécialement destinés à
cet appareil. N'utilisez pas
d'autres filtres.
• N'utilisez pas le filtre
comme carburant ou à
des fins similaires.
• Évitez de heurter
l'appareil (l'entrée et la
sortie d'air en particulier)
avec des objets durs.
• Soulevez ou déplacez
toujours l'appareil par la
poignée située à l'arrière
de l'appareil.
• Veillez à ne JAMAIS
incliner, déplacer ou
remplacer un filtre
lorsque le purificateur
d'air est en cours de
fonctionnement. Éteignez
le purificateur d'air et
débranchez-le de la prise
électrique. Ne déplacez
pas le purificateur d'air
en tirant sur son cordon
d'alimentation.
• Si vous n'utilisez pas
le purificateur d'air
pendant une période
prolongée, débranchezle de la prise électrique,
nettoyez l'appareil, le
capteur de qualité de
l'air et le préfiltre (voir
« Nettoyage ») avant de le
ranger.
• Veillez à brancher
l'appareil sur une prise
électrique en bon état de
marche.
• Placez et utilisez toujours
l'appareil sur une surface
sèche, stable, plane et
horizontale. Veillez à
placer le purificateur
d'air de manière à ne pas
risquer de le faire tomber.
• Laissez au moins 20 cm
d'espace libre derrière et
sur les côtés de l'appareil
et au moins 30 cm audessus de l'appareil.
• Ne placez jamais d'objets
au-dessus de l'appareil.
• Ne vous asseyez pas et ne
placez pas d'objets lourds
sur le purificateur d'air.
• Ne placez pas l'appareil
directement sous un
climatiseur afin d'éviter
Page 29

27FR
Fr an ça is
• N'utilisez pas l'appareil
après avoir utilisé un
insecticide ou à proximité
de résidus huileux,
d'encens se consumant
ou de fumées chimiques.
• N'utilisez pas l'appareil à
proximité d'un appareil
fonctionnant au gaz,
d'une installation de
chauffage ou d'une
cheminée.
• N'utilisez pas l'appareil
dans une pièce soumise
à des changements de
température importants ;
de la condensation
pourrait se former à
l'intérieur.
• Pour éviter les
interférences, placez
l'appareil à une distance
minimale de 2 mètres
des appareils électriques
qui utilisent des ondes
radio (par ex. téléviseurs,
radios et horloges
radiosynchronisées).
• N'utilisez le purificateur
d'air que dans le but
pour lequel il a été
conçu, conformément
aux descriptions fournies
dans le présent mode
d'emploi. N'utilisez
pas d'accessoires non
recommandés par Philips
Electronics North America
Corporation.
• L'appareil n'élimine
pas le monoxyde de
carbone (CO) ni le
radon (Rn). Il ne peut
pas être utilisé comme
dispositif de sécurité
en cas d'accidents
impliquant des processus
de combustion et des
produits chimiques
dangereux.
• Lavez-vous toujours
soigneusement les mains
après avoir changé ou
nettoyé un filtre.
• Débranchez l'appareil
pour outrepasser les
fonctions intelligentes ou
à distance.
Page 30

28 FR
CONSERVEZ CES
INSTRUCTIONS
• Cet appareil est doté
d'une fiche polarisée (une
broche est plus large que
l'autre). Pour réduire le
risque d'électrocution,
cette fiche est destinée
à être branchée sur une
prise polarisée dans un
seul sens. Si la fiche ne
s'insère pas correctement
dans la prise, retournezla. Si cela ne fonctionne
toujours pas, contactez
un électricien qualifié.
N'essayez pas d'annuler
cette fonctionnalité de
sécurité.
Page 31

29FR
Fr an ça is
2 Votre
purificateur d'air
Félicitations pour votre achat et
bienvenue dans le monde de Philips !
Pour profiter pleinement de l'assistance
offerte par Philips, enregistrez votre
produit à l'adresse suivante :
www.philips.com/welcome.
Présentation du produit
(g.a)
A Sortie d'air
B Panneau de commande
C Voyant de qualité de l'air
D Capteurs de qualité de l'air
E
Véritable filter HEPA NanoProtect
(FY2422)
F
Filtre à charbon actif
NanoProtect (FY2420)
G Préfiltre
H Entrées d'air H1, H2 et H3
I Panneau avant
Aperçu des commandes
(g.b)
J Bouton marche/arrêt
K Bouton de gradation de lumière
L Bouton du mode automatique
M Écran
N Icône du mode général
O Icône du mode Allergènes
P Icône du mode Bactéries et virus
Q Bouton de vitesse du ventilateur
R Bouton du programmateur
S Bouton de réinitialisation
Page 32

30 FR
7 Refixez le panneau avant en
appuyant la partie supérieure du
panneau sur le haut du purificateur
d'air (1). Ensuite, poussez
doucement le panneau contre
le corps du purificateur d'air (2)
(fig.i).
8 Lavez-vous soigneusement les
mains après avoir installé les filtres.
Première conguration
de la connexion Wi-Fi
Remarque
• Cette fonction concerne uniquement
le modèle AC2889.
• Cette instruction est valable
uniquement lorsque le purificateur
d'air est configuré pour la première
fois. Si le réseau a changé ou si la
configuration doit être à nouveau
effectuée, consultez la section «
Configuration de la connexion Wi-Fi
après modification du réseau » en
page 31.
• Vous ne pouvez pas configurer deux
purificateurs d'air en même temps.
Si vous voulez configurer plusieurs
purificateurs d'air, l'opération doit être
effectuée successivement.
• Assurez-vous que la distance entre
votre appareil mobile et le purificateur
d'air est inférieure à 33 ft/10 m et
qu'aucun obstacle n'interfère.
1 Branchez le purificateur d'air sur la
prise murale et appuyez sur
pour
l'allumer.
» Le voyant Wi-Fi
n'apparaît
pas à l'écran lorsque vous
utilisez le purificateur d'air pour
la première fois.
3 Guide de
démarrage
Installation des ltres
Remarque
• Assurez-vous que le purificateur d'air
est débranché de la prise électrique
avant d'installer les filtres.
• Assurez-vous que le côté étiqueté du
filtre est orienté dans votre direction.
1 Tirez la partie inférieure du panneau
avant pour l'enlever du purificateur
d'air (fig.c).
2 Baissez les deux clips (1) et tirez le
préfiltre vers vous (2) (fig.d).
3 Retirez tous les filtres (fig.e).
4 Retirez les filtres de leur emballage
(fig.f)
.
5 Placez le filtre HEPA épais (FY2422)
dans le purificateur d'air, puis le
filtre CA (charbon actif) fin (FY2420)
(fig.g). Les numéros de modèle
sont indiqués sur chaque filtre.
6 Refixez le préfiltre dans le
purificateur d'air (fig.h).
Remarque
• Assurez-vous que le côté avec les
deux clips est orienté vers vous et
que tous les crochets du préfiltre sont
correctement fixés au purificateur.
Page 33

31FR
Fr an ça is
2 Téléchargez et installez l'application
« Air Matters » développée par
FreshIdeas Studio ou l'application
« Philips HealthSuite health » via
l'App Store ou Google Play.
Remarque
• Cette application prend en charge
Android version 4.4 et supérieure ou
iOS version 9.0 et supérieure.
3 Appuyez simultanément sur et
pendant 3 secondes, jusqu'à ce
que vous entendiez un bip.
» Le purificateur d'air passe en
mode de couplage.
» Le voyant Wi-Fi
clignote en
orange.
4 Assurez-vous que votre appareil
mobile est correctement connecté à
votre réseau Wi-Fi.
5 Lancez l'application « Air Matters »
ou « Philips HealthSuite health » et
suivez les instructions à l'écran pour
connecter le purificateur d'air à votre
réseau.
6 Une fois la connexion et le
couplage effectués, le voyant Wi-Fi
s'allume en blanc. Si le couplage
n'a pas réussi, consultez la section
de dépannage ou la section d'aide
dans l'application « Air Matters » ou
« Philips HealthSuite health » pour
obtenir de nombreuses astuces de
dépannage à jour.
Conguration de la
connexion Wi-Fi après
modication du réseau
Remarque
• Cette fonction concerne uniquement
le modèle AC2889.
• Ceci s'applique lorsque le réseau
connecté par défaut à votre
purificateur d'air a été modifié.
1 Branchez le purificateur d'air sur la
prise murale et appuyez sur
pour
l'allumer.
» Le voyant Wi-Fi clignote en
blanc.
2 Appuyez simultanément sur et
pendant 3 secondes, jusqu'à ce
que vous entendiez un bip.
» Le purificateur d'air passe en
mode de couplage.
» Le voyant Wi-Fi
clignote en
orange.
3 Saisissez le nom de votre réseau
Wi-Fi et votre mot de passe dans
l'application, sur votre appareil
mobile. Le nom de réseau et le mot
de passe sont sensibles à la casse.
4 Suivez les étapes 5 et 6 de la
section « Première configuration de
la connexion Wi-Fi ».
Page 34

32 FR
Mise sous et hors tension
Remarque
• Placez toujours le purificateur d'air
sur une surface stable, horizontale
et plane, en éloignant l'avant de
l'appareil des murs ou des meubles.
• Pour des performances optimales de
purification, fermez portes et fenêtres.
• Tenez les rideaux à l'écart de l'entrée
d'air et de la sortie d'air.
1 Branchez la fiche du purificateur
d'air sur la prise murale.
2 Appuyez sur pour mettre le
purificateur d'air sous tension
(fig.j).
» Le purificateur d'air émet un
signal sonore.
» Le purificateur d'air fonctionne
par défaut en mode Allergènes.
» Lorsque le purificateur d'air
chauffe, «
» apparaît sur
l'afficheur. Après avoir mesuré
les matières particulaires
dans l'air uniquement, le
purificateur d'air indique le
niveau d'IAI et fonctionne en
mode automatique avec
apparaissant sur l'afficheur
(fig.k).
» Après avoir mesuré la qualité
de l'air pendant 30 secondes
environ, le capteur de
qualité de l'air sélectionne
automatiquement la couleur de
voyant appropriée à la qualité
de l'air.
3 Maintenez enfoncé pendant
3 secondes pour éteindre le
purificateur d'air.
4 Utilisation du
purificateur d'air
Compréhension du
voyant de qualité de l'air
L'indice d'allergènes en intérieur
(IAI, Indoor Allergen Index) est une
indication numérique en temps réel
donnant des informations visuelles et
immédiates sur le niveau d'allergènes
en intérieur.
IAI Couleur du
voyant de
qualité de l'air
Niveau de
qualité de
l'air
1-3 Bleu Bien
4-6 Bleu-violet Acceptable
7-9 Rouge-pourpre Mauvaise
10-12 Rouge
Très
mauvaise
Le voyant de qualité de l'air s'allume
automatiquement à la mise sous
tension du purificateur d'air, en
faisant défiler toutes les couleurs
dans l'ordre. Au bout de 30 secondes
environ, les capteurs de qualité de l'air
sélectionnent la couleur correspondant
à la qualité de l'air ambiant des
particules en suspension.
Page 35

33FR
Fr an ça is
Mode Bactéries et virus
Le mode Bactéries et virus amplifie le
flux d'air pour réduire rapidement les
bactéries et les virus.
• Appuyez sur le bouton du mode
automatique
pour sélectionner le
mode Bactéries et virus (fig.n).
» Auto (A) et
apparaissent sur
l'afficheur.
Modication de la
vitesse du ventilateur
Outre les modes automatiques,
plusieurs vitesses de ventilateur sont
disponibles.
En cas d'utilisation des réglages
manuels de la vitesse du ventilateur,
le purificateur continue de contrôler
la qualité de l'air, mais n'adaptera
pas automatiquement la vitesse du
ventilateur s'il détecte des variations de
la qualité de l'air.
Nuit (SL)
En mode Nuit, le purificateur d'air
fonctionne silencieusement à une
vitesse très basse.
• Appuyez sur le bouton de vitesse du
ventilateur
pour sélectionner le
mode Nuit (SL) (fig.o).
Remarque
• Si le purificateur d'air reste branché
sur la prise électrique après avoir
été mis hors tension, le purificateur
d'air fonctionnera selon les derniers
réglages utilisés lors de la mise sous
tension suivante.
Modication du réglage
de mode automatique
Vous pouvez choisir entre le mode
allergènes (
), le mode général ( ),
et le mode bactéries et virus (
).
Mode Allergènes
Le mode Allergènes est conçu pour
réagir au plus petit changement de
niveau d'allergènes dans l'air ambiant.
• Appuyez sur le bouton du mode
automatique
pour sélectionner le
mode Allergènes (fig.l).
» Auto (A) et apparaissent sur
l'afficheur.
Mode général
Un autoréglage intelligent qui règle
automatiquement les paramètres du
purificateur d'air sur le niveau idéal.
• Appuyez sur le bouton du mode
automatique
pour sélectionner le
mode général (fig.m).
» Auto (A) et apparaissent sur
l'afficheur.
Page 36

34 FR
Pour désactiver le minuteur, appuyez
sur le bouton du minuteur
à
plusieurs reprises jusqu'à ce que « -- »
apparaisse sur l'afficheur.
Remarque
• Si vous avez réglé le minuteur à
une reprise, lors de sa prochaine
utilisation, il démarre au temps
précédemment défini.
Utilisation de la
fonction d'activation/
de désactivation de la
lumière
Avec le bouton d'atténuation de la
lumière, vous pouvez allumer ou
éteindre le voyant de qualité de l'air,
l'afficheur et le voyant de fonction, si
nécessaire.
1 Appuyez sur le bouton
d'atténuation de la lumière ; la
luminosité du voyant de qualité de
l'air s'atténue.
2 Appuyez à nouveau sur le bouton
d'atténuation de la lumière ; le
voyant de qualité de l'air s'éteint.
Remarque
• Pour le modèle AC2885, l'afficheur
et les voyants de fonction restent
allumés, mais leur luminosité est
atténuée et « » apparaît sur
l'afficheur.
• Pour le modèle AC2889, tous les
voyants s'éteignent.
3 Appuyez une troisième fois sur le
bouton d'atténuation de la lumière
; tous les voyants sont à nouveau
allumés.
Remarque
• Pour le modèle AC2889, tous les
voyants s'éteignent en mode veille.
• Pour le modèle AC2885, en mode Nuit,
« SL » apparaît sur l'afficheur pendant
une minute. Après une minute, tous
les voyants s'éteignent, la luminosité
de l'afficheur est atténuée et « »
s'affiche.
• Vous pouvez allumer manuellement
les voyants en touchant .
Manuel
• Appuyez sur le bouton de vitesse du
ventilateur
à plusieurs reprises
pour sélectionner la vitesse de
ventilateur nécessaire (fig.p).
Turbo (t)
En mode Turbo, le purificateur d'air
fonctionne à la vitesse la plus élevée.
• Appuyez sur le bouton de vitesse
du ventilateur
pour sélectionner
le mode Turbo (t) (fig.q).
Réglage du minuteur
La fonction de minuteur vous permet
de laisser le purificateur fonctionner
pendant un nombre d'heures
défini. Le purificateur d'air s'éteint
automatiquement à la fin de la durée
définie.
• Appuyez sur le bouton du
minuteur
à plusieurs reprises
pour choisir le nombre d'heures de
fonctionnement du purificateur d'air
(fig.r).
» Le minuteur a des intervalles
définis de 1, 4 ou 8 heures.
Page 37

35FR
Fr an ça is
5 Nettoyage
Remarque
• Éteignez toujours le purificateur d'air
et débranchez-le de la prise électrique
avant de le nettoyer.
• N'immergez en aucun cas le
purificateur d'air dans de l'eau ou dans
un autre liquide.
• N'utilisez jamais de détergents
abrasifs, agressifs ou inflammables
(eau de javel, alcool, etc.,) pour
nettoyer les différentes parties du
purificateur d'air.
• Seul le préfiltre peut être lavé. Les
filtres HEPA et CA ne peuvent pas être
lavés.
• N'essayez pas de nettoyer les filtres ou
le capteur de qualité de l'air avec un
aspirateur.
Nettoyage du corps du
puricateur d'air
Nettoyez régulièrement l'intérieur et
l'extérieur du purificateur d'air pour
empêcher que de la poussière ne
s'accumule.
1 Utilisez un chiffon doux et sec pour
nettoyer l'intérieur et l'extérieur du
purificateur d'air.
2 La sortie d'air peut également être
nettoyée à l'aide d'un chiffon doux
et sec.
Changer le mode
d’achage
Le purificateur d'air est doté de deux
modes d'affichage : IAI et PM2.5.
Remarque
• Le purificateur d'air fonctionne par
défaut en mode d'affichage IAI.
1 Touchez le bouton d'atténuation de
la lumière pendant 3 secondes
pour que l'appareil passe en mode
d'affichage PM2.5 (fig.s).
» clignote deux fois.
» Le niveau PM2.5 réel apparaît
sur l'afficheur.
2 Touchez à nouveau le bouton
d'atténuation de la lumière
pendant 3 secondes pour revenir au
mode d'affichage IAI (fig.t).
»
clignote deux fois.
» Le niveau IAI apparaît sur
l'afficheur.
Page 38

36 FR
Nettoyage du préltre
Nettoyez le préfiltre lorsque F0 apparaît
sur l'afficheur (fig.y).
1 Éteignez le purificateur d'air et
débranchez-le de la prise murale.
2 Tirez la partie inférieure du panneau
avant pour l'enlever du purificateur
d'air (fig.c).
3 Baissez les deux clips (1) et tirez le
préfiltre vers vous (2) (fig.d).
4 Si le préfiltre est très sale, utilisez
une brosse douce pour éliminer la
poussière (fig.z). Ensuite, lavez le
préfiltre sous l'eau du robinet.
5 Laissez sécher le préfiltre à l'air
libre avant de le replacer dans le
purificateur d'air.
Remarque
• Pour optimiser la durée de vie du
préfiltre, veillez à ce qu'il sèche
entièrement à l'air libre après avoir été
nettoyé.
• Lavez-vous les mains après avoir
manipulé le filtre.
6 Replacez le préfiltre dans le
purificateur d'air (fig.h).
Remarque
• Assurez-vous que le côté avec les
deux clips est orienté vers vous et
que tous les crochets du préfiltre sont
correctement fixés au purificateur d'air.
7 Pour refixer le panneau avant,
appuyez la partie supérieure du
panneau sur le haut du purificateur
d'air (1). Ensuite, poussez
doucement le panneau contre
le corps du purificateur d'air (2)
(fig.i).
Nettoyage du capteur de
qualité de l'air
Nettoyez le capteur de qualité de l'air
tous les 2 mois pour un fonctionnement
optimal du purificateur.
Remarque
• Si le purificateur d'air est utilisé dans
un environnement poussiéreux, il peut
nécessiter un nettoyage plus fréquent.
• Si le taux d'humidité de la pièce est
très élevé, de la condensation peut
se former sur le capteur de qualité de
l'air et le voyant de qualité de l'air peut
indiquer une moins bonne qualité
de l'air même si celle est bonne en
réalité. Dans un tel cas, nettoyez le
capteur de qualité de l'air ou utilisez
le purificateur d'air avec un réglage de
vitesse manuel.
1 Éteignez le purificateur d'air et
débranchez-le de la prise murale.
2 Nettoyez l'entrée et la sortie du
capteur de qualité de l'air à l'aide
d'une brosse douce (fig.u).
3 Retirez le couvercle du capteur de
qualité de l'air (fig.v).
4 Nettoyez le capteur de qualité de
l'air, l'entrée de poussière et la
sortie de poussière avec un cotontige humide (fig.w).
5 Séchez soigneusement toutes les
pièces avec un coton-tige sec.
6 Remettez en place le couvercle du
capteur de qualité de l'air (fig.x).
Page 39

37FR
Fr an ça is
6 Remplacement
des filtres
Indicateur de
remplacement du ltre
Ce purificateur d'air est équipé d'un
indicateur de remplacement du
filtre afin de garantir des conditions
optimales pour le filtre de purification
d'air lorsque le purificateur d'air
fonctionne. Lorsque les filtres doivent
être remplacés, le code du filtre
apparaît sur l'afficheur (voir le tableau
d'alerte de filtre).
Si les filtres ne sont pas remplacés dans
un délai de 14 jours, le purificateur d'air
cesse de fonctionner et se verrouille
automatiquement pour protéger la
qualité de l'air de la pièce. Remplacez
les filtres dès que possible selon le
code du filtre.
Remplacement des ltres
Remarque
• Les filtres HEPA et CA ne peuvent pas
être lavés ni réutilisés.
• Éteignez toujours le purificateur d'air
et débranchez-le de la prise électrique
avant de remplacer les filtres.
• Ne nettoyez pas les filtres avec un
aspirateur.
• Si le préfiltre est endommagé, usé ou
cassé, ne l'utilisez pas. Pour obtenir de
l'aide, rendez-vous sur
www.philips.com/support ou
composez le 1 866 309-8817.
8 Branchez la fiche du purificateur
d'air sur la prise murale.
9 Maintenez enfoncé le bouton
de réinitialisation pendant
3 secondes pour réinitialiser
l'intervalle de nettoyage du préfiltre
(fig.{).
10 Lavez-vous soigneusement les
mains après avoir installé les filtres.
Page 40

38 FR
Remarque
• Lavez-vous les mains après avoir
changé un filtre.
• Aucune autre pièce de ce purificateur
d'air n'est susceptible d'être réparée
par l'utilisateur. Pour obtenir de l'aide,
composez le 1 866 309-8817.
Réinitialisation du ltre
Vous pouvez remplacer des filtres
même si aucun code de remplacement
de filtre n'apparaît sur l'afficheur. Après
avoir remplacé un filtre, vous devez
réinitialiser manuellement le compteur
de durée de vie du filtre.
1 Touchez et simultanément
pendant 3 secondes pour accéder
au mode de réinitialisation du filtre
(fig.~).
» Le code (A3) du véritable filter
HEPA NanoProtect apparaît sur
l'afficheur.
2 Maintenez enfoncé pendant
3 secondes pour forcer la
réinitialisation du compteur de
durée de vie du véritable filter HEPA
NanoProtect (fig.}).
3 Le code (C7) du filtre à charbon
actif NanoProtect apparaît sur
l'afficheur après que le compteur
de durée de vie du véritable filter
HEPA NanoProtect a été réinitialisé
(fig.5).
4 Maintenez enfoncé pendant
3 secondes pour forcer la
réinitialisation du compteur de
durée de vie du filtre à charbon actif
NanoProtect et quittez le mode de
réinitialisation du ltre (g.€).
État du voyant
d'alerte du filtre
Action
A3 apparaît sur
l'afficheur
Remplacement
du véritable
filter HEPA
NanoProtect
(FY2422)
C7 apparaît sur
l'afficheur
Remplacement
du filtre à
charbon actif
NanoProtect
(FY2420)
A3 et C7
apparaissent en
alternance sur
l'afficheur
Remplacer les
deux filtres
1 Éteignez le purificateur d'air et
débranchez-le de la prise murale.
2 Retirez le filtre à air usagé en
fonction du statut du voyant
d'alerte du filtre apparaissant sur
l'afficheur (fig.|). Jetez les filtres
usagés.
Remarque
• Ne touchez pas la surface plissée du
filtre et ne sentez pas les filtres, car ils
contiennent des polluants de l'air.
3 Retirez les nouveaux filtres de leur
emballage (fig.f).
4 Placez les nouveaux filtres dans le
purificateur d'air (fig.g).
5 Branchez la fiche du purificateur
d'air sur la prise murale.
6 Maintenez le bouton de
réinitialisation
enfoncé pendant
3 secondes pour réinitialiser le
compteur de durée de vie du filtre
(fig.}).
Page 41

39FR
Fr an ça is
7 Stockage
1 Éteignez le purificateur d'air et
débranchez-le de la prise murale.
2 Nettoyez le purificateur d'air,
le capteur de qualité de l'air
et le préfiltre (voir le chapitre
« Nettoyage »).
3 Laissez toutes les pièces sécher
entièrement à l'air libre avant de les
ranger.
4 Enveloppez les filtres et le préfiltre
séparément dans des sacs en
plastique hermétiques.
5 Rangez le purificateur d'air, les
filtres et le préfiltre dans un endroit
frais et sec.
6 Lavez-vous toujours soigneusement
les mains après avoir manipulé les
filtres.
Page 42

40 FR
8 Dépannage
Cette rubrique présente les problèmes les plus courants susceptibles de se produire
sur le purificateur d'air. Si vous ne parvenez pas à résoudre le problème à l'aide des
informations ci-dessous, rendez-vous sur www.philips.com/support ou composez le
1 866 309-8817 pour obtenir de l'aide.
Problème Solution possible
Le puricateur
d'air ne fonctionne
pas alors qu'il
est branché sur
la prise murale et
allumé.
• Le minuteur est réglé sur un intervalle de temps spécifique.
Réinitialisez ou éteignez le minuteur.
• Essayez une autre prise électrique ou vérifiez l'interrupteur
mural.
• Le statut d'alerte du filtre affiche le code du filtre.
Remplacez le filtre correspondant et réinitialisez le
compteur de durée de vie du filtre (voir le chapitre
« Remplacement des filtres »).
• Si le problème persiste, rendez-vous sur www.philips.
com/support ou composez le 1 866 309-8817 pour obtenir
de l'aide.
Le puricateur
d'air ne fonctionne
pas alors qu'il est
allumé.
• L'indicateur de remplacement de filtre est resté allumé,
mais vous n'avez pas remplacé le filtre correspondant. Le
purificateur d'air est maintenant verrouillé. Dans ce cas,
remplacez le filtre et réinitialisez le compteur de durée de
vie du filtre.
Le puricateur
d'air s'éteint
accidentellement.
• Le purificateur d'air redémarre automatiquement dans le
mode précédent une fois l'alimentation rétablie.
Page 43

41FR
Fr an ça is
Problème Solution possible
La conguration
Wi-Fi a échoué.
• Si le routeur auquel votre purificateur est connecté est
une double bande et actuellement il ne se connecte pas
à un réseau 2,4 GHz, veuillez passer à un autre du même
routeur (2,4 GHz) et essayez de coupler votre purificateur
encore une fois. Les réseaux 5Ghz ne sont pas supportés.
• Les réseaux d'authentification Web ne sont pas pris en
charge..
• Vérifiez que le purificateur est à portée du routeur Wi-Fi.
Vous pouvez essayer de rapprocher le purificateur d'air du
routeur Wi-Fi.
• Vérifiez que le nom de réseau est correct. Le nom de
réseau est sensible à la casse.
• Vérifiez que le mot de passe Wi-Fi est correct. Le mot de
passe est sensible à la casse.
• Recommencez la configuration en suivant les instructions
de la section « Configuration de la connexion Wi-Fi après
modification du réseau ».
• La connectivité Wi-Fi peut être interrompue par des
interférences électromagnétiques ou autres. Éloignez
l'appareil de tout autre appareil électronique susceptible
de causer des interférences.
• Vérifiez si l'appareil mobile est en mode avion. Veillez à
désactiver le mode avion lorsque vous vous connectez au
réseau Wi-Fi.
• Consultez la section d'aide de l'application pour obtenir de
nombreuses astuces de dépannage à jour.
Le ux d'air qui
s'échappe de la
sortie d'air est
signicativement
plus faible
qu'avant.
• Le préfiltre est sale. Nettoyez le préfiltre (voir le chapitre
« Nettoyage »).
La qualité de l'air
ne s'améliore
pas alors que le
puricateur d'air
fonctionne depuis
longtemps.
• L'un des filtres n'a pas été placé dans le purificateur d'air
ou un filtre n'a pas été placé correctement. Assurez-vous
que tous les filtres sont correctement installés dans l'ordre
suivant, en commençant par le filtre le plus à l'intérieur :
1) véritable filter HEPA NanoProtect (FY2422) ;
2) filtre à charbon actif NanoProtect (FY2420) ; 3) préfiltre.
• Le capteur de qualité de l'air est humide. Assurez-vous
que le capteur de qualité de l'air est propre et sec (voir le
chapitre « Nettoyage »).
Page 44

42 FR
Problème Solution possible
La couleur du
voyant de qualité
de l'air reste
toujours la même.
• Le capteur de qualité de l'air est sale. Nettoyez le capteur
de qualité de l'air (voir le chapitre « Nettoyage »).
Le puricateur d'air
dégage une odeur
désagréable.
• Lors des premières utilisations, le purificateur d'air peut
dégager une odeur de plastique. Ce phénomène est
normal. Le purificateur d'air peut également dégager une
odeur désagréable lorsque le filtre est sale. Dans ce cas,
nettoyez ou remplacez le filtre adéquat.
• Si le purificateur d'air dégage une odeur de brûlé,
Éteignez-le et débranchez-le de la prise électrique.
Composez le 1 866 309-8817 pour obtenir de l'aide.
Le puricateur d'air
est bruyant.
• Si le purificateur d'air est trop bruyant, diminuez la vitesse
du ventilateur. Lorsque vous utilisez le purificateur d'air
dans une chambre à coucher la nuit, choisissez le mode
Nuit.
Le puricateur
d'air continue
d'indiquer que je
dois remplacer un
ltre alors que je
l'ai déjà fait.
• Vous n'avez peut-être pas réinitialisé le compteur de durée
de vie du filtre. Branchez le purificateur d'air, appuyez sur
pour allumer le purificateur d'air et maintenez enfoncé
le bouton de réinitialisation
pendant 3 secondes (voir
la section sur la réinitialisation forcée du filtre).
Le code d'erreur
« E1 », « E2 »,
« E3 » ou « E4 »
apparaît sur
l'acheur.
• Le purificateur d'air fonctionne mal. Pour obtenir de l'aide,
rendez-vous sur www.philips.com/support ou composez
le 1 866 309-8817.
Page 45

43FR
Fr an ça is
bien que les exclusions et les limitations
mentionnées précédemment ne
s'appliquent pas.
* Veuillez lire attentivement les
instructions ci-jointes.
Fabriqué aux États-Unis pour :
Philips Consumer Lifestyle, une division
de Philips Electronics North America
Corporation, P.O.
Box 10313, Stamford, CT 06904
Importé au Canada pour :
Philips Electronics LTD, 281 Hillmount
Road, Markham, Ontario L6C 2S3
PHILIPS et l'emblème du bouclier
Philips sont des marques déposées de
Koninklijke Philips N.V.
©2016 Philips Electronics North America
Corporation. Tous droits réservés.
Ce symbole sur la plaque
signalétique du produit
signifie que ce dernier est
répertorié par Underwriters
Laboratories, Inc.
App Store est une marque de service
d'Apple Inc.
Google Play est une marque
commerciale de Google Inc.
L'application « Air Matters » est
développée par FreshIdeas Studio.
L'efficacité énergétique
de ce modèle homologué
ENERGY STAR est mesurée
selon un rapport entre le
CADR du modèle pour la
poussière et l'énergie électrique qu'il
consomme, ou CADR/watt.
U
L
US
C
LISTED
9 Garantie
GARANTIE COMPLÈTE DE DEUX ANS
Philips Electronics North America
Corporation garantit chaque nouveau
modèles Philips AC2885/AC2889 (à
l'exclusion des filtres) contre toute
anomalie en termes de matériaux ou
de fabrication pendant une période de
deux ans à compter de la date d'achat
et s'engage à réparer ou à remplacer
gratuitement tout produit défectueux.
IMPORTANT : Cette garantie ne couvre
pas les dommages causés par un
accident, une mauvaise utilisation
ou un abus, par un manque de soin
raisonnable, par la fixation d'un
accessoire non fourni avec le produit
ou par la perte de pièces, ou encore par
l'exposition du produit à une tension
autre que celle spécifiée.*
AUCUNE RESPONSABILITÉ NE
PEUT ÊTRE ENGAGÉE POUR DES
DOMMAGES PARTICULIERS,
ACCIDENTELS OU INDIRECTS.
Pour obtenir un service de garantie,
rendez-vous simplement sur www.
philips.com/support ou composez le
1 866 309-8817 pour obtenir de l'aide.
Par sécurité, nous vous recommandons
de retourner les produits dans le cadre
d'un envoi couvert par une assurance
prépayée. Les dommages occasionnés
durant l'envoi ne sont pas couverts par
cette garantie.
REMARQUE : Aucune autre garantie,
orale ou écrite, n'est autorisée par
Philips Electronics North America
Corporation. Cette garantie vous octroie
des droits légaux particuliers, mais
vous pouvez également bénéficier
d'autres droits, qui varient d'un État
à l'autre. Certains États n'autorisent
pas l'exclusion ou la limitation des
dommages accidentels ou indirects, si
Page 46

44 FR
11 Mise au rebut
Votre produit a été conçu et fabriqué
à partir de matériaux et composants
de haute qualité, recyclables et
réutilisables. Pour plus d'informations
sur le recyclage, veuillez contacter
l'organisme local de traitement des
déchets ou vous rendre à l'adresse
www.recycle.philips.com.
10 Accessoires
Vous pouvez acheter les accessoires
Philips dans un magasin près de chez
vous ou sur notre site Web :
www.philips.com/store.
 Loading...