

Page 1
1 2
A
B
D
C
© 2018 Koninklijke Philips N.V.
All rights reserved.
4241 211 00091
AC2729
M
L
K
J
I
H
Control buttons
Display panel
E
G
F
EN User manual 1
BG Ръководство за потребител 23
CZ Příručka pro uživatele 47
HU Felhasználói kézikönyv 69
PL Instrukcja obsługi 91
RO Manual de utilizare 113
SK Príručka užívateľa 135
UK Посібник користувача 157
Page 2
3
4
5
6
23
23 43
24 44
25 45
26 46
23
3S
27
31
35
28
28
32
28
36
12
16
8
9
13
17
10
14
18
7
11
2
1
15
3S
29
29
33
33
37
30
30
34
30
38
47
23
48
49
2119
2220
3S
39
28
40
2 hours
30
41
42
Page 3
English
Contents
1 Important 2
Safety 2
2 You air purier 5
Product overview (g. a) 6
Controls overview
(g. b) 6
3 Get started 7
Installing the NanoProtect lter 7
Preparing for humidication 7
Wi-Fi setup 8
4 Use the appliance 9
Understanding the air quality light 9
Switching on and o 9
Setting the humidity level 9
Switching the operation mode 10
Using the light dimming function 10
Switching the display mode 10
Changing the Auto mode setting 11
Changing the fan speed 11
Setting the timer 11
Setting the child lock 12
Water level 12
5 Cleaning 12
Cleaning schedule 12
Cleaning the body of the
appliance 13
Cleaning the air quality sensor 13
Cleaning the water tank, water
tray and NanoCloud rotary
humidication wick 13
Cleaning the pre-lter 14
Descaling the NanoCloud rotary
humidication wick 14
6 Replace the lter and wick 15
Understanding the healthy air
protect lock 15
Replacing the
(g. ‹) 15
Replacing the NanoCloud rotary
humidication wick 16
7 Troubleshooting 17
8 Guarantee and service 20
Order parts or accessories 20
9 Notices 20
Electromagnetic elds (EMF) 20
Recycling 21
Notice 21
Simplied EU declaration of
conformity 21
NanoProtect lter
Environmental friendly paper used. Thanks for your contribution to save trees.
1EN
Page 4

1 Important
Safety
Read this user manual carefully before
you use the appliance, and save it for
future reference.
Danger
• Do not let water or any
other liquid or ammable
detergent enter the
appliance to avoid electric
shock and/or a re hazard.
• Do not clean the
appliance with water,
any other liquid, or a
(ammable) detergent to
avoid electric shock and/
or a re hazard.
• Do not spray any
ammable materials
such as insecticides or
fragrance around the
appliance.
• The water in the water
tank is not suitable for
drinking. Do not drink this
water and do not use it to
feed animals or to water
plants. When you empty
the water tank, pour the
water down the drain.
Warning
• Check if the voltage
indicated on the
side of the appliance
corresponds to the local
power voltage before you
connect the appliance.
• If the power cord is
damaged, you must have
it replaced by Philips, a
service center authorized
by Philips, or similarly
qualied persons in order
to avoid a hazard.
• Do not use the appliance
if the plug, the power cord,
or the appliance itself is
damaged.
• This appliance can be
used by children aged
from 8 years and above
and persons with reduced
physical, sensory or
mental capabilities or
lack of experience and
knowledge if they have
been given supervision or
instruction concerning use
of the appliance in a safe
way and understand the
hazards involved.
2 EN
Page 5

English
• Cleaning and user
maintenance shall not be
made by children without
supervision.
• Children should be
supervised to ensure that
they do not play with the
appliance.
• Do not block the air inlet
and outlet, e.g. by placing
items on the air outlet or
in front of the air inlet.
• Standard WiFi interface
based on 802.11b/g/n at
2.4 GHz with a maximum
output power of 31.62 mW
EIRP.
Caution
• This appliance is not
a substitute for proper
ventilation, regular
vacuum cleaning, or use
of an extractor hood or
fan while cooking.
• If the power socket used
to power the appliance
has poor connections,
the plug of the appliance
becomes hot. Make
sure that you plug the
appliance into a properly
connected power socket.
• Always place and use the
appliance on a dry, stable,
level, and horizontal
surface.
• Leave at least 20cm free
space behind and on both
sides of the appliance
and leave at least 30cm
free space above the
appliance.
• Do not place anything on
top of the appliance.
• Do not place the
appliance directly below
an air conditioner to
prevent condensation
from dripping onto the
appliance.
• Make sure all lters
are properly installed
before you switch on the
appliance.
• Only use the original
Philips lters specially
intended for this
appliance. Do not use any
other lters.
• Avoid knocking against
the appliance (the air inlet
and outlet in particular)
with hard objects.
3EN
Page 6

• Do not insert your ngers
or objects into the air
outlet or the air inlet to
prevent physical injury
or malfunctioning of the
appliance.
• Do not use this appliance
when you have used
indoor smoke-type insect
repellents or in places
with oily residues, burning
incense, or chemical
fumes.
• Do not use the appliance
near gas appliances,
heating devices or
replaces.
• Always unplug the
appliance after use
and before lling water,
cleaning, or carrying out
other maintenance.
• Do not use the appliance
in a room with major
temperature changes.
• To prevent interference,
place the appliance
at least 2m away from
electrical appliances that
use airborne radio waves
such as TVs, radios, and
radio-controlled clocks.
• When the appliance is
not used for a long time,
bacteria may grow on the
lters. Check the lters
after a long period of
disuse. If the lters are
very dirty, replace them
(see the chapter "Replace
the lter and wick ").
• The appliance is only
intended for household
use under normal
operating conditions.
• Do not use the appliance
in wet surroundings or in
surroundings with high
ambient temperatures,
such as the bathroom,
toilet, or kitchen.
• The appliance does
not remove carbon
monoxide (CO) or
radon (Rn). It cannot be
used a safety device in
case of accidents with
combustion processes
and hazardous chemicals.
• Only ll the water tank
with cold tap water. Do
not use ground water or
hot water.
4 EN
Page 7
English
• Do not put any substance
other than water in the
water tank. Do not put
fragrance in the water
tank.
• If you do not use the
humidication function
for a long time, clean
the water tank and
NanoCloud rotary
humidication wick tray,
and air dry the NanoCloud
rotary humidication wick.
• If you need to move the
appliance, disconnect the
appliance from the power
supply rst. Then empty
or remove the water tank
and water tray. Carry the
appliance horizontally by
the handles on both sides
of the appliance.
• Unplug the appliance
during lling and cleaning.
2 You air purifier
Congratulations on your purchase, and
welcome to Philips!
To fully benet from the support that
Philips oers, register your product at
www.Philips.com/welcome.
The Philips air purier brings fresh,
humidied air to your house for the
health of your family. It oers you
advanced evaporation system with
NanoCloud technology, using a special
humidication lter which adds H2O
molecules to the dry air, and produces
healthy humid air without formation
of water mist. Its humidication lter
retains bacteria, calcium and other
particles from the water. It delivers only
pure humidied air in your home. No
more dry air in the winter season or
from the air conditioning.
Read this user manual carefully before
you use the appliance, and save it for
future reference.
5EN
Page 8

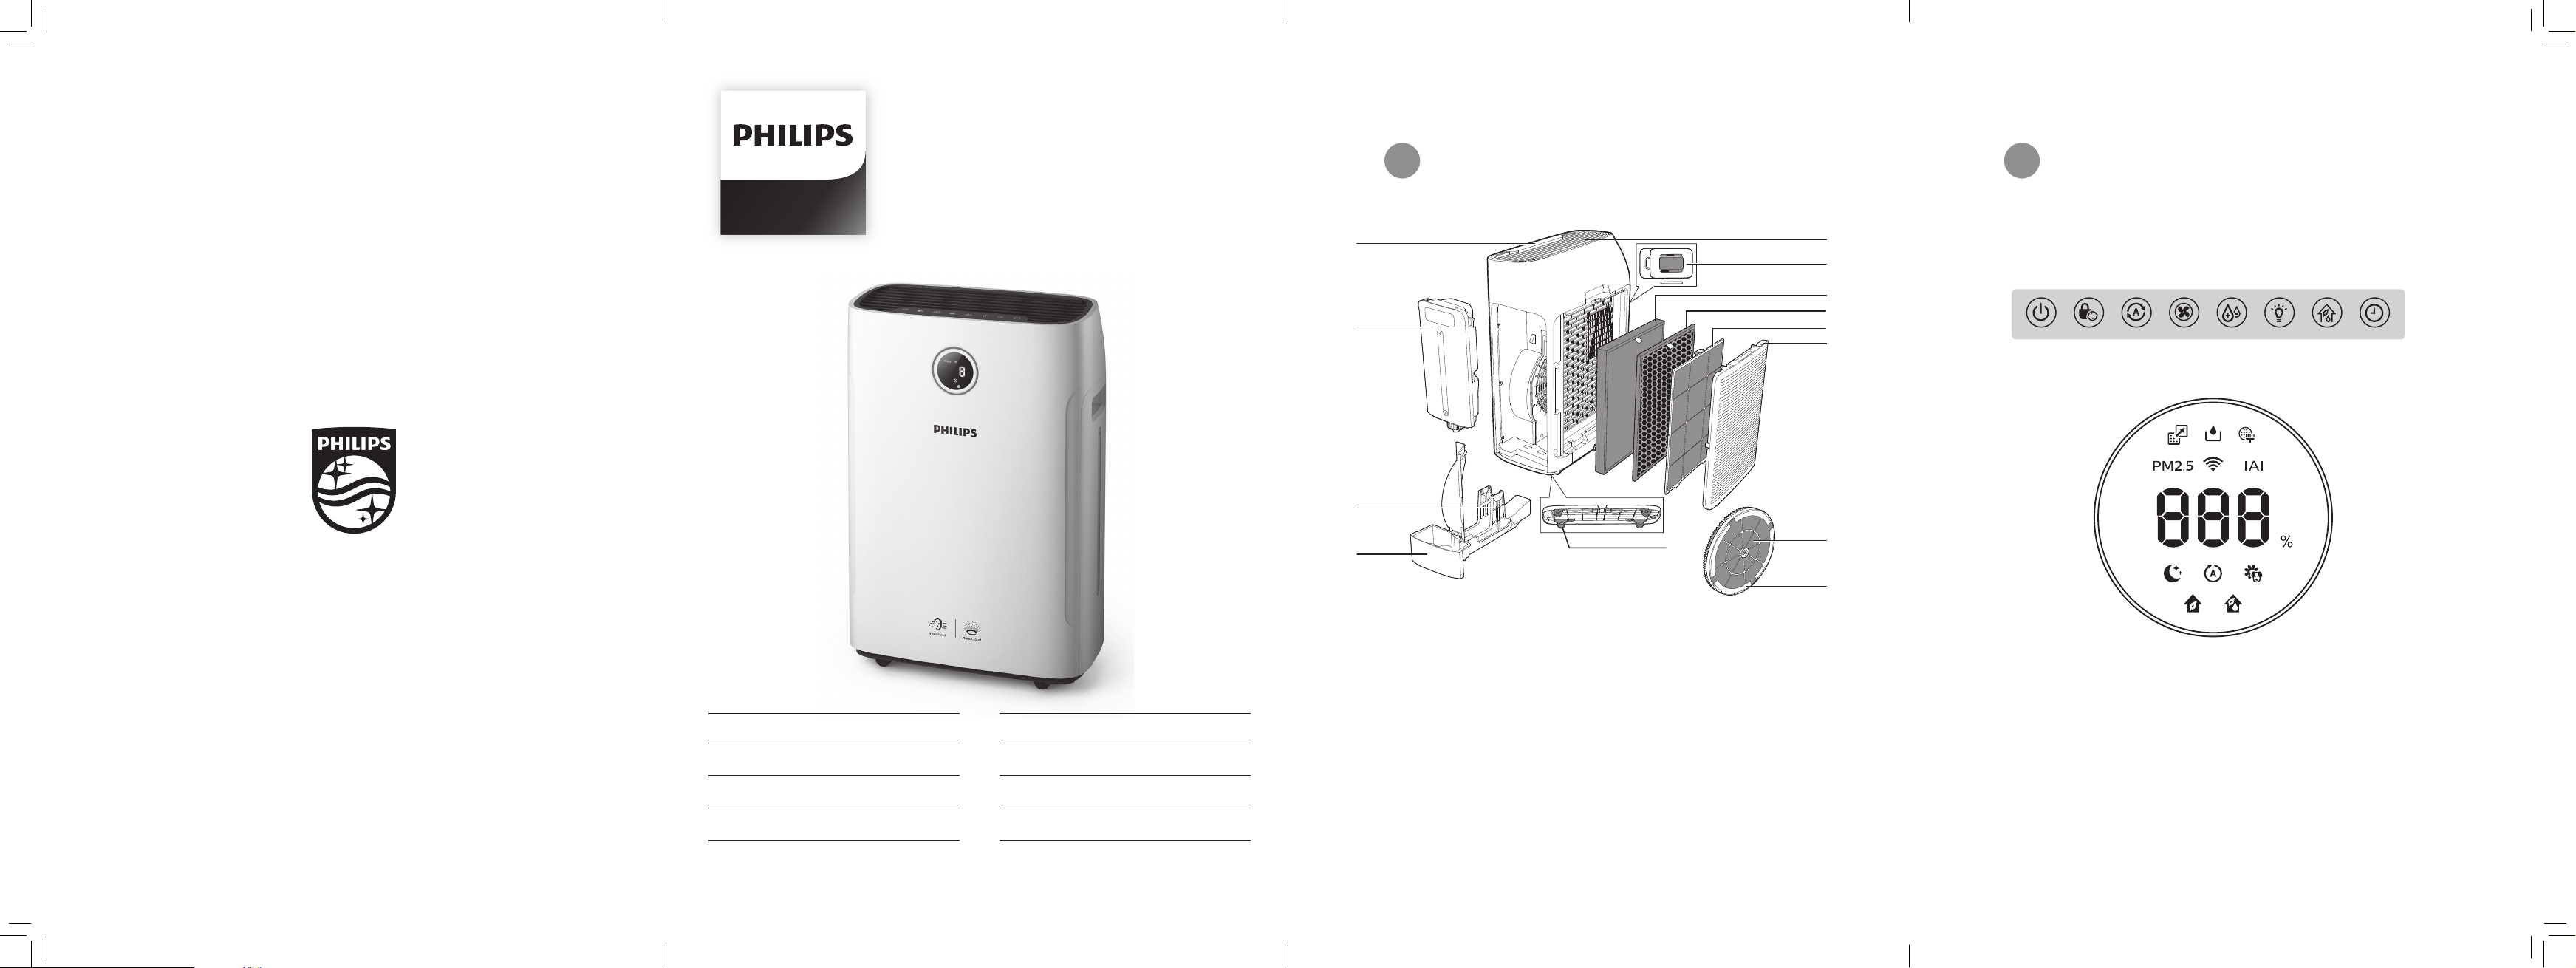
Product overview (g. a)
A Control panel
B Water tank
C Wick support
D Water tray
Controls overview
(g. b)
Control buttons
Power on/o button
Child lock button
E Unilateral wheels
F Wick wheel
NanoCloud rotary humidication
G
wick (FY2425)
H Back side cover
Pre-lter
I
NanoProtect lter Active Carbon
J
(FY1413)
NanoProtect lter Series 2
K
(FY1410)
L Air quality sensor
M Air outlet
Auto mode button
Fan speed button
Humidity setting button
Light dimming button
2-in-1 mode on/o button
Timer/Reset button
Display panel
Sleep mode
Auto mode
Allergen mode
Purication ONLY mode
2-in-1 mode
Filter replacement alert
Water rell alert
Pre-lter and wick cleaning alert
6 EN
PM2.5 display
Indoor Allergen Index display
Wi-Fi indicator
Page 9
English
3 Get started
Preparing for
humidication
Installing the
NanoProtect lter
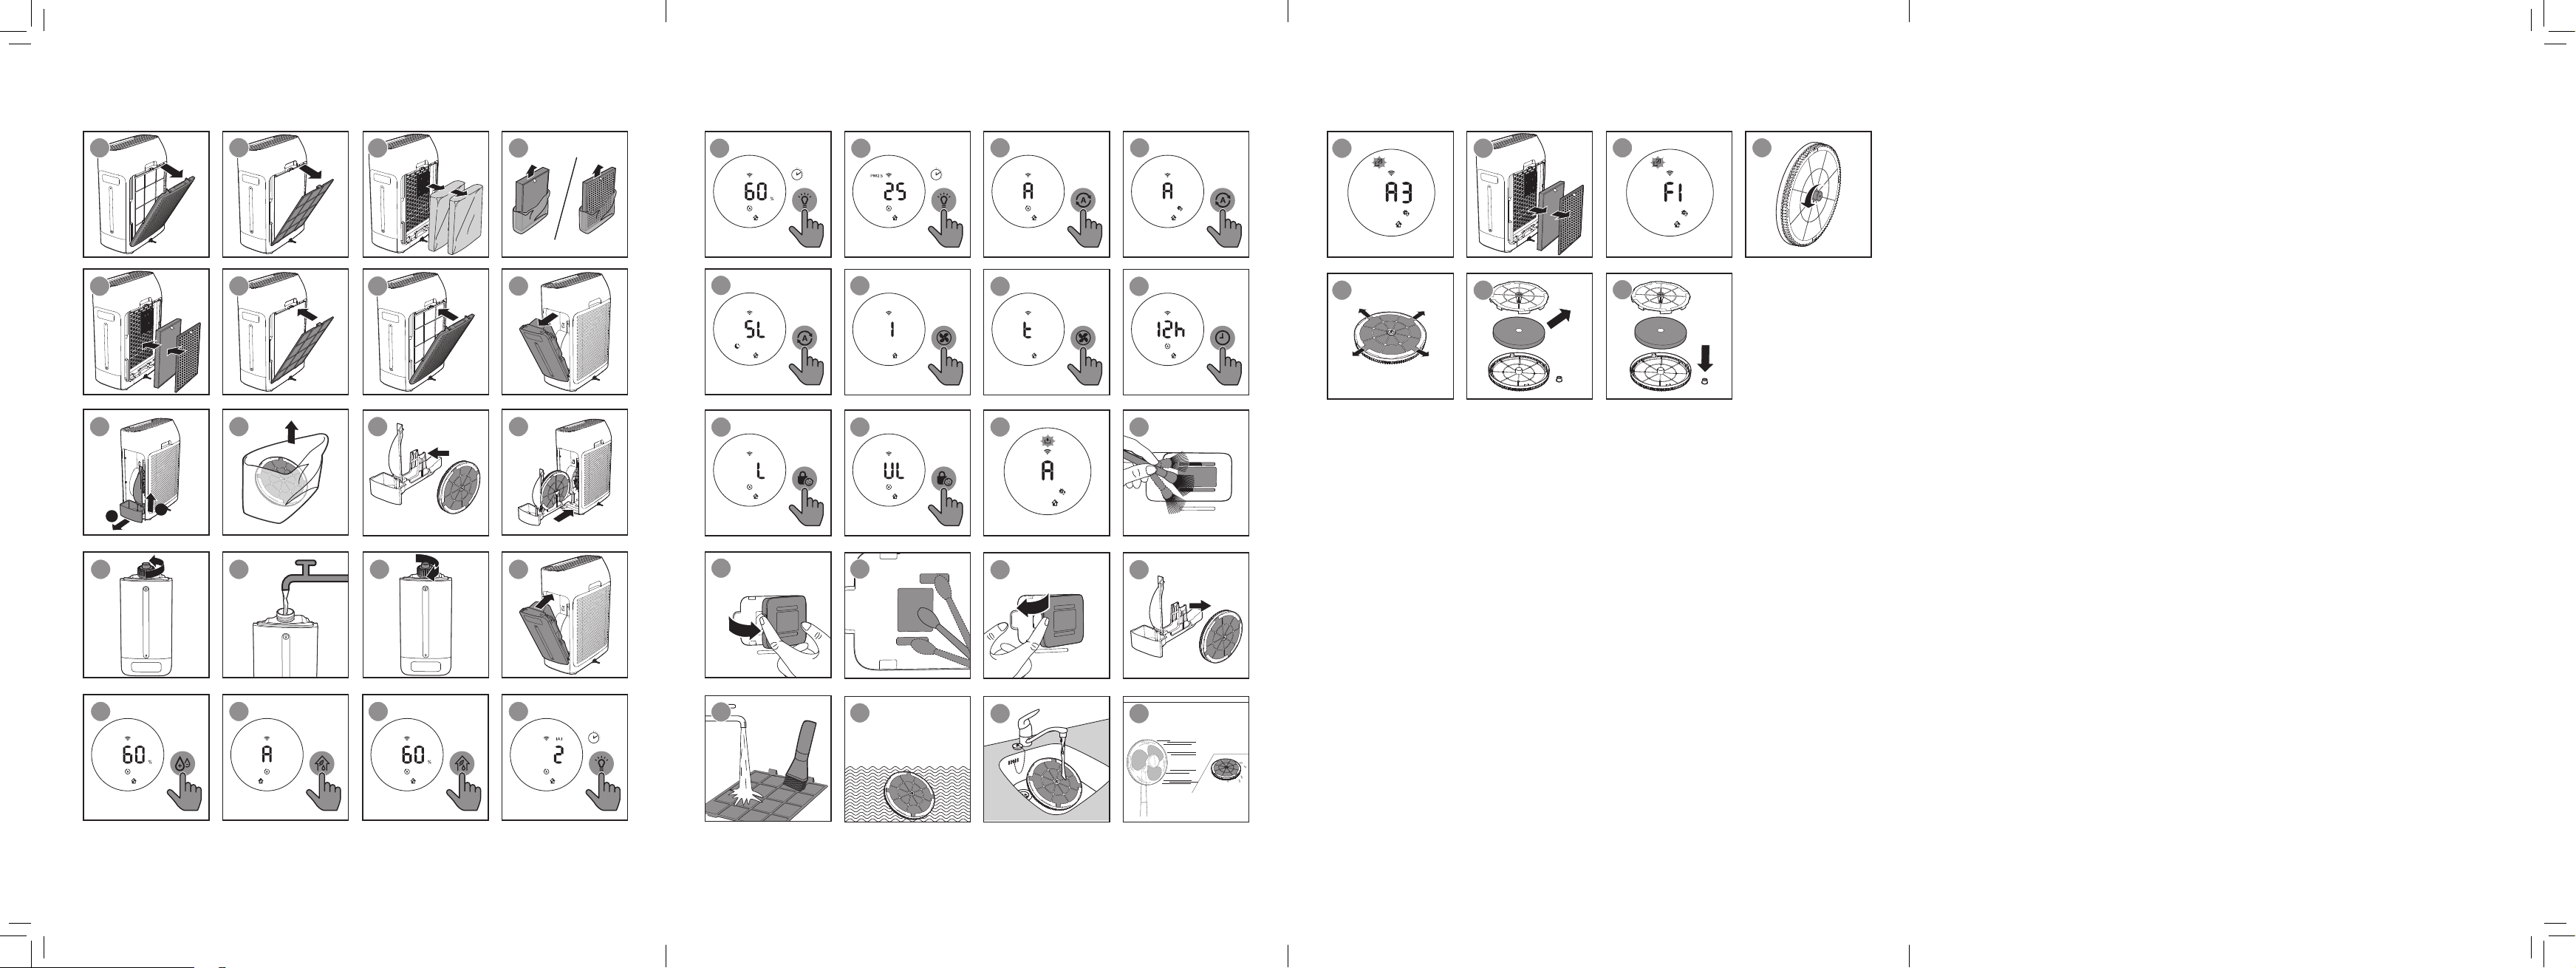
Before using the appliance, remove all
packaging materials of the lter and
place it into the appliance described as
follows:
Note
• Make sure that the side with the tag
is pointing towards you.
1 Pull the top part of the back panel
towards you to release it from the
appliance (g. c).
2 Press the clip down and pull the
pre-lter towards you (g. d).
3 Remove all lters (g. e).
4 Remove all packaging materials of
the NanoProtect lter (g. f) .
5 Place the NanoProtect lter back
into the appliance (g. g).
6 Put the pre-lter back into the
appliance, mount the pre-lter onto
the bottom of the appliance rst,
and then push the clips on the top
of pre-lter against the appliance
(g. h).
7 To reattach the back cover, mount
the panel onto the bottom of the
appliance rst, and then push
the top of the panel against the
appliance (g. i).
1 Pull out the water tank (g. j).
2 Lift the water tray upwards and pull
it out horizontally (g. k).
3 Remove all packaging material
of the NanoCloud rotary
humidication wick (g. l).
Note
• The humidication wick has been
assembled on the wick wheel upon
purchase.
4 Place the wick wheel on the wick
support (g. m).
Note
• When placing the wick wheel on the
wick support, make sure that the
projections on the wick wheel falls
into the corresponding grooves.
5 Place the water tray back into the
appliance (g. n).
6 Turn the top cap of the water tank
anti-clockwise to unscrew it (g. o).
7 Fill the water tank with cold tap
water (g. p).
8 Turn the top cap clockwise to tightly
lock it onto the water tank (g. q).
9 Place the water tank back into the
appliance (g. r).
7EN
Page 10
Wi-Fi setup
Setting up the Wi-Fi connection
for the rst time
1 Download and install the
"Air Matters" app from the App
Store or Google Play.
2 Put the plug of the air purier in the
power socket and touch to turn
on the air purier.
» The Wi-Fi indicator blinks
orange for the rst time.
3 Make sure that your smart device is
successfully connected to your WiFi network.
4 Launch the "Air Matters" app and
click on the "+" on the top right of
the screen. Follow the onscreen
instructions to connect the air
purier to your network.
5 After the successful pairing and
connection, the Wi-Fi indicator
will light up white. If pairing
is not successful, consult the
troubleshooting section, or the
help section in the "Air Matters"
app for extensive and up-to-date
troubleshooting tips.
Note
• This instruction is only valid when
the air purier is being set up for
the rst time. If the network has
changed or the setup needs to be
performed again, consult section
"Setting up the Wi-Fi connection
when the network has changed" on
page 8.
• If you want to connect more than
one air purier to your smart device,
you have to do this one by one.
Complete the set up of one air
purier before you turn on the other
air purier.
• Make sure that the distance
between your smart device and the
air purier is less than 10 m without
any obstructions.
• This app supports the latest
versions of Android and iOS. Please
check www.philips.com/puriercompatibility for the latest update
of supported operating systems and
devices.
Setting up the Wi-Fi connection
when the network has changed
Note
• This applies when the default
network to which your purier is
connected has changed.
1 Put the plug of the air purier in the
power socket and touch to turn
on the air purier.
2 Touch and simultaneously for
3 seconds until you hear a beep.
» The air purier goes to pairing
mode.
» The Wi-Fi indicator blinks
orange.
3 Follow the steps 4-5 in "Setting up
the Wi-Fi connection for the rst
time" section.
8 EN
Page 11
English
4 Use the
Switching on and o
appliance
Understanding the air
quality light
PM2.5
level
≤12 Blue
13-35 Blue-Purple
36-55 Purple-Red
>55 Red
The air quality light automatically goes
on when the appliance is switched on,
and lights up all colors in sequence.
In a short time the air quality sensors
select the color that corresponds to the
ambient air quality.
Air quality
light color
PM2.5
AeraSense sensing technology
accurately detects and quickly responds
to even the slightest particle change in
the air. It provides you with reassurance
with real-time PM2.5 feedback.
Most of the indoor air pollutants fall
under PM2.5 – which refers to airborne
particle pollutants smaller than 2.5
micrometers. Common indoor sources
of ne particles are tobacco smoke,
cooking, burning candles. Some
airborne bacteria and the smallest
mold spores, pet allergen and dust mite
allergen particles also fall under PM2.5.
Air quality
level
Good
Fair
Poor
Very poor
1 Put the plug in the power socket.
» The appliance beeps.
2 Touch to switch on the appliance.
» The appliance operates under
the 2-in-1 mode by default with
displayed on the screen.
» When the appliance is warming
up, " " displays on the
screen. After measuring the
particulate matter only in the
air, the appliance shows the
PM2.5 level and operates in the
auto mode by default.
» After measuring the air
quality for approximately
30 seconds, the air quality
sensor automatically selects the
appropriate air quality light color.
3 Touch and hold for 3 seconds to
switch o the appliance.
Note
• After the appliance is switched
o by the on/o button , if the
plug is still in the power socket, the
appliance will operate under the
previous settings when it is switched
on again.
Setting the humidity level
1 Touch the humidity button
repeatedly to set the desired air
humidity to 40%, 50%, 60% or " "
(g. s).
IAI
The professional-grade AeraSense
sensor detects the level of indoor air
allergen and with numerical feedback
from 1 to 12 the potential risk level of
indoor air allergens can be displayed. 1
indicates best air quality.
Note
• When the humidity level " " is
chosen, the appliance will keep
humidifying the room until the
ambient humidity level reaches
70%RH.
9EN
Page 12
Note
• When the target humidity level is
reached, the wick wheel will stop
rotating. It will start rotating again
when the humidity drops below the
target level.
• If you want to increase the humidity
level quickly, you can select a
higher fan speed.
Switching the operation
mode
The appliance has two operation
modes, the purication ONLY mode and
the 2-in-1 mode.
1 Touch the mode selection button
to switch to the purication ONLY
mode (g. t).
» displays on the screen when
the appliance operates in the
purication ONLY mode.
2 Touch the mode selection button
again to switch to the 2-in-1 mode
(g. u).
» displays on the screen when
the appliance operates in the
2-in-1 mode.
» The current humidity level
displays on the screen by default.
Note
• The screen will display humidity
level for 3 seonds and change to
display the highest level of IAI or
PM2.5 if one of which is not good.
Using the light dimming
function
With the light dimming button, you can
switch on or o the air quality light,
the display screen and the function
indicator if desired.
1 Touch the light dimming button
once, the air quality light will be
dimmed.
2 Touch the light dimming button
again, the air quality light and the
display panel will be turned o.
3 Touch the light dimming button
for the third time, all lights will be on
again.
Switching the display mode
The appliance has three display modes,
PM2.5 display, IAI display and humidity
level display.
Note
• The appliance operates in PM2.5
display mode by default.
1 Touch and hold for 3 seconds to
switch to IAI display (g. v).
» IAI indicator and the actual IAI
level display on the screen.
2 Touch and hold for 3 seconds
twice to switch to actual humidity
level display (g. w).
3 Touch and hold for 3 seconds to
switch to PM2.5 display (g. x).
» PM2.5 indicator and the actual
PM2.5 level display on the screen.
10 EN
Note
• The screen will display humidity
level for 3 seonds and change to
display the highest level of IAI or
PM2.5 if one of which is not good.
Page 13
English
Changing the Auto mode
setting
You can choose the Auto mode ( ),
the Allergen mode ( ) and the Sleep
mode ( ).
Auto mode
In auto mode, the appliance selects
the fan speed in accordance with the
ambient air humidity and air quality.
• Touch the fan speed button to
select Auto mode (g. y) .
» Auto ( ) and display on the
screen.
» The appliance operates in Auto
mode by default.
Allergen mode
The extra-sensitive allergen mode
is designed to react to even a small
change in allergen levels in the
surrounding air.
• Touch the Auto mode button to
select the Allergen mode (g. z).
» Auto ( ) and display on the
screen.
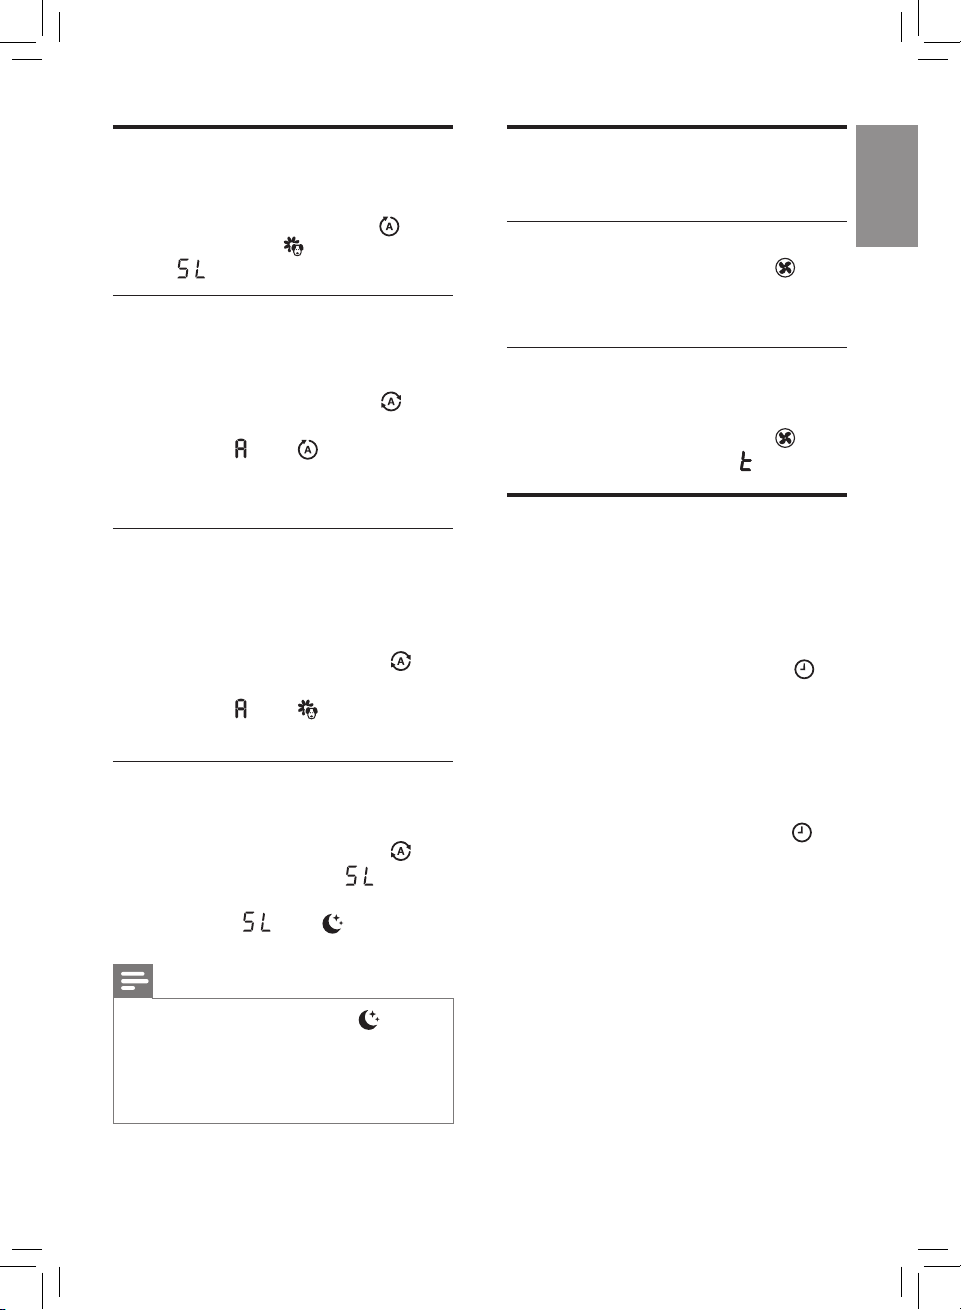
Sleep (SL)
In Sleep mode, the air purier operates
quietly on a very low speed.
• Touch the Auto mode button
select the Sleep mode ( )
(g. {).
» Sleep ( ) and display on
the screen.
Changing the fan speed
There are several fan speeds available.
Manual
• Touch the fan speed button
repeatedly to select the desired fan
speed (1, 2 or 3) (g. |).
Turbo (t)
In Turbo mode, the air purier operates
on the highest speed.
• Touch the fan speed button to
select the Turbo mode ( ) (g. }).
Setting the timer
With the timer, you can let the
appliance operate for a set number of
hours. When the set time has elapsed,
the appliance will automatically switch
o.
• Touch the Timer/Reset button
repeatedly to choose the number
of hours you want the appliance to
operate (g. ~).
» The timer is available from 1 to
12 hours.
• To deactivate the timer function,
touch the Timer/Reset button
repeatedly until "---" displays on the
screen.
Note
• All lights will go o except if no
buttons are touched after one
minute.
• You can turn on the lights manually
by touching any buttons.
11EN
Page 14
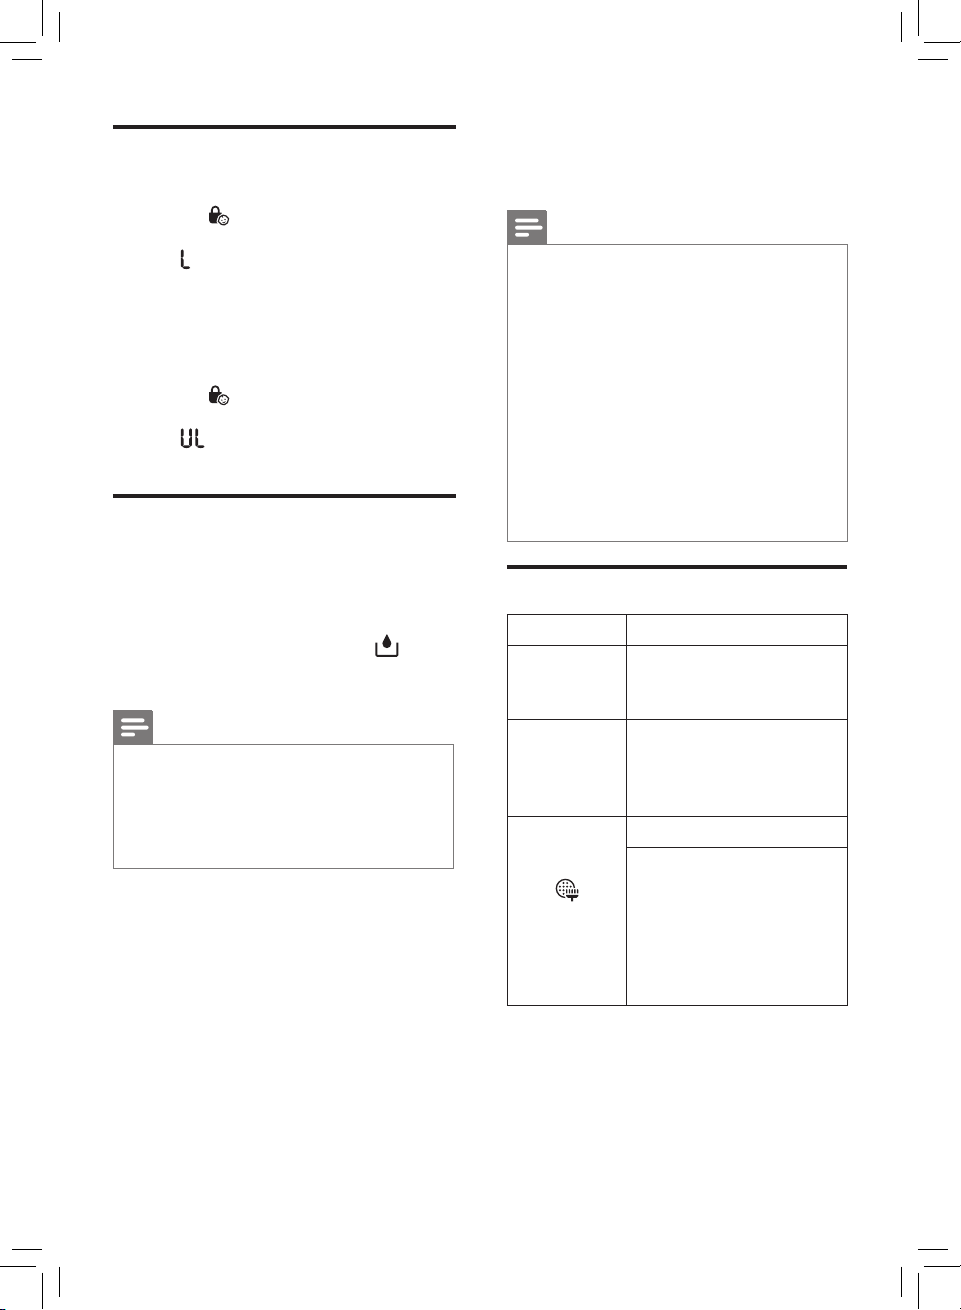
Setting the child lock
1 Touch and hold the child lock
button for 3 seconds to activate
child lock (g. ).
» displays on the screen for
3 seconds.
» When the child lock is on,
all the other buttons are not
responsive.
2 Touch and hold the child lock
button for 3 seconds again to
deactivate child lock (g. €).
» displays on the screen for
3 seconds.
Water level
The water level in the water tank is
visible through the water level window
on the water tank.
When there is not enough water in the
water tank, the water rell light goes
on to indicate that you have to rell the
water tank. (g. )
Note
• When there is no water in the
water tank, the wick wheel will stop
rotating. When the water tank is
relled with water, the wick wheel
will start rotating again.
5 Cleaning
Note
• Always unplug the appliance before
cleaning.
• Never immerse the appliance in
water or any other liquid.
• Never use abrasive, aggressive, or
ammable cleaning agents such as
bleach or alcohol to clean any part
of the appliance.
• Only the pre-lter and NanoCloud
rotary humidication wick are
washable. The NanoProtect lter
is not washable nor vacuum
cleanable.
Cleaning schedule
Frequency Cleaning method
When
necessary
Every week
When the
cleaning
icon
lights up
and F0
displays on
the screen.
Wipe the surface of the
appliance with a soft
dry cloth.
Rinse the water tank,
the water tray and
the NanoCloud rotary
humidication wick.
Clean the pre-lter.
Descale the NanoCloud
rotary humidication
wick with the water and
white vinegar (5% acetic
acid) or water and citric
acid.
12 EN
Page 15
English
Cleaning the body of the
appliance
Regularly clean the inside and outside
of the appliance to prevent dust from
collecting.
1 Wipe away dust with a soft dry cloth
from the body of the appliance.
2 Clean the air outlet with a soft dry
cloth.
Cleaning the air quality
sensor
Clean the air quality sensor every
2 months for optimal functioning of the
purier. Clean them more frequently
if you use the purier in a dusty
environment.
Note
• When the humidity level in the
room is very high, it is possible that
condensation develops on the air
quality sensor. As a result, the air
quality light may indicate that the
air quality is bad even though it is
good. In this case you have to clean
the air quality sensor or use one of
the manual speed settings.
1 Clean the air quality sensor inlet and
outlet with a soft brush (g. ‚).
2 Open the air quality sensor cover
(g. ƒ).
3 Clean the air quality sensor, the
dust inlet and the dust outlet with a
lightly moistened cotton swab
(g. „).
4 Dry them with a dry cotton swab.
5 Reattach the air quality sensor cover
(g. …).
Cleaning the water
tank, water tray and
NanoCloud rotary
humidication wick
Note
• Cleaning the water tank, water
tray and NanoCloud rotary
humidication wick every week to
keep them hygienic.
1 Pull out the water tank (g. j).
2 Lift the water tray upwards and pull
it out horizontally (g. k).
3 Take the wick wheel o the wick
support (g. †).
4 Rinse the water tank, water tray and
NanoCloud rotary humidication
wick under a running tap.
Note
• Do not take the NanoCloud rotary
humidication wick o the wheel
during cleaning.
• Do not scrub the NanoCloud rotary
humidication wick or place it under
direct sunlight.
• If necessary, use a mild detergent to
clean the water tank and water tray.
In this case, rinse the water tank and
water tray thoroughly.
5 Wipe the outside of the water tank
and water tray dry.
6 Place the wick wheel on the wick
support (g. m).
Note
• When placing the wick wheel on the
wick support, make sure that the
projections on the wick wheel falls
into the corresponding grooves.
13EN
Page 16
7 Place the water tray back into the
appliance (g. n).
8 Place the water tank back into the
appliance (g. r).
Cleaning the pre-lter
Note
• If the pre-lter is damaged, worn or
broken, do not use. Visit
www.philips.com/support or
contact the Consumer Care Center
in your country.
Filter alert light
status
F0 displays on the
screen and wick&
pre-lter cleaning
alert goes on
1 Pull the top part of the back panel
towards you to release it from the
appliance (g. c).
2 To remove the pre-lter, press the
clip down and pull the lter towards
you (g. d).
3 Wash the pre-lter under a running
tap. If the pre-lter is very dirty, use
a soft brush to brush away the dust
(g. ‡).
4 Air dry the pre-lter.
Note
• Make sure that the pre-lter is
completely dry. If it is still wet,
bacteria may multiply in it and
shorten the lifetime of the pre-lter.
Follow this
Clean the prelter
5 After the pre-lter is completely dry,
place it back into the back panel
(g. h).
6 Touch and hold for 3 seconds to
reset the pre-lter cleaning time.
Descaling the NanoCloud
rotary humidication
wick
Filter alert light
status
F0 displays on the
screen and wick&
pre-lter cleaning
alert goes on
1 Pull out the water tank (g. j).
2 Lift the water tray upwards and pull
it out horizontally (g. k).
3 Take the wick wheel o the wick
support (g. †).
4 Soak the NanoCloud rotary
humidication wick in cleansing
agent (e.g diluted white vinegar,
Citric acid solution) for two hours
(g. ˆ).
Note
• Please use mid or acid cleanser
• White vinegar (5% acetic acid)
mix with equal amount of water
• 24g citric acid mix with 4L
water
• If there are white deposits
(limescale) on the lter, make sure
that the side with the white deposits
is immersed in the water.
• Do not take the NanoCloud rotary
humidication wick o the wheel
during descaling.
Follow this
Descale the
NanoCloud
rotary
humidication
wick (FY2425)
14 EN
Page 17
English
5 Rinse the NanoCloud rotary
humidicationwick under the tap
to rinse away vinegar or citric acid
residues. During rinsing, turn the
wick so that both front and back are
rinsed (g. ‰).
6 Air dry the NanoCloud rotary
humidication wick (g. Š).
Note
6 Replace the
filter and wick
Understanding the
healthy air protect lock
• Do not put the NanoCloud rotary
humidication wick under direct
sunlight.
7 Touch and hold for 3 seconds
to reset the NanoCloud rotary
humidication wick cleaning time.
This appliance is equipped with the
healthy air protect lock to make sure
that the Nano protect lter and the
humidication wick are in optimal
condition when the appliance is
operating. When the Nano protect lter
and the humidication wick are almost
expired, the replacement light starts
to ash to indicate that they need to be
replaced.
If you do not replace the lter and
wick in time, the appliance will stop
operating and get locked.
Replacing the
NanoProtect lter (g. ‹)
Note
• The lter is not washable or
reusable.
• Always turn o the air purier and
unplug from the electrical outlet
before replacing the lters.
15EN
Page 18
Filter alert light
status
A3 is displayed
and the lter
replacement light
ashes on the
screen.
C7 is displayed
and the lter
replacement light
ashes on the
screen.
Follow this
Replace the
NanoProtect
lter Series 3
(FY1410)
Replace the
NanoProtect
lter Active
Carbon (FY1413)
1 Remove the used lters from the
appliance (g. Œ).
Note
• Do not touch the pleated lter
surface, or smell the lters as they
have collected pollutants from the
air.
• Wash your hands after disposing of
the used lters.
2 Remove all packaging material of
the new lters (g. f).
3 Place the new lters into the
appliance (g. g).
4 Touch and hold for 3 seconds to
reset the NanoProtect lter lifetime
counter.
Replacing the
NanoCloud rotary
humidication wick
1 Take the wick wheel o the wick
support (g. †).
2 Grip the shaft screw on the
other side of the wheel, rotate it
anticlockwise to release the wick
from the wheel (g. ).
3 Unfasten the locks on the edge
of the wheel successively to
disassemble the wick wheel (g. ).
4 Take the used NanoCloud rotary
humidication wick out (g. ).
5 Remove all packaging material
of the new NanoCloud rotary
humidication wick (g. l).
6 Place the new NanoCloud rotary
humidication wick in the wick
wheel, and then fasten the locks on
the wick wheel (g. ‘).
7 Place the wick wheel on the wick
support (g. m).
Note
• When placing the wick wheel on the
wick support, make sure that the
projections on the wick wheel falls
into the corresponding grooves.
8 Place the water tray and water tank
back into the appliance (g. n).
9 Touch and hold for 3 seconds
to reset the NanoCloud rotary
humidication wick lifetime counter.
Filter alert light status
F1 is displayed and
the lter replacement
light ashes on
the screen (g. ).
16 EN
Follow this
Replace the
NanoCloud
rotary
humidication
wick
Page 19
English
7 Troubleshooting
This chapter summarizes the most common problems you could encounter with the
appliance. If you are unable to solve the problem with the information below, contact
the Consumer Care Center in your country.
Problem Possible solution
• The lter replacement light has been ashing but you
The appliance
does not work
even though it is
plugged in.
The appliance
does not work
even though it is
switched on.
have not replaced the NanoProtect lter, and the appliance
is now locked. In this case, replace the lter and reset the
lter lifetime counter.
• The water rell light ashes. Make sure the water tank
is properly installed and there is enough water in the water
tank.
• The appliance is working but the buttons are not responsive.
Check if the child lock is on.
There are
some white
deposits on the
NanoCloud rotary
humidication wick.
No air comes out of
the air outlet.
The airow that
comes out of
the air outlet is
signicantly weaker
than before.
• The white deposits are called scale and they consist of
minerals from the water. Scale on the NanoCloud rotary
humidication wick aects the humidifying performance,
however it does not harm your health. Follow the cleaning
instructions in the user manual.
• Plug the appliance into the power supply and switch on.
• The pre-lter is dirty. Clean the pre-lter (see the chapter
"Cleaning").
• Make sure that you have removed all packaging material of
the NanoProtect lter.
17EN
Page 20

Problem Possible solution
• Check if the packing material is removed from the lters.
The air quality
does not improve,
even though the air
purier has been
operating for a long
time.
• One of the lters has not been placed in the air purier
or a lter is not placed properly. Make sure that all lters
are properly installed in the following order, starting with
the innermost lter: 1) NanoProtect lter Series 3 (FY1410);
2) NanoProtect lter Active Carbon (FY1413); 3) pre-lter.
• The air quality sensor is wet. Make sure that the air quality
sensor is clean and dry (see chapter "Cleaning").
• NanoCloud technology evenly distributes invisible water
vapour into your room. In dry conditions moisture from the
It takes a long time
to reach the target
humidity level.
humidier will be absorbed by walls, furniture, and other
items in your room. Ventilation of dry outside air will also
increase the time it takes to reach the target humidity.
To optimize humidication and purication performance, it's
recommended to close doors and windows during use.
I do not see water
vapor coming out
of the appliance. Is
it working?
The appliance
produces a strange
smell.
The appliance is
extra loud.
• When mist is very ne, it is invisible. The appliance has a
NanoCloud humidication technology, which produces
healthy humid air from the outlet area without formation of
water mist. Therefore, you cannot see the mist.
• The rst few times you use the appliance, it may produce
a plastic smell. This is normal. However, if the appliance
produces a burnt smell even if removing lters, contact your
Philips dealer or an authorized Philips service center.
• The lter may produce smell after being used for a while
because of the absorption of indoor air. Remove the lter
and place it where it has direct sunlight and ventilation for
several hours. Re-install and try using it again. If the odor
remains, please replace the lter.
• You have not removed all packaging material of the lters.
Make sure that you have removed all packaging material.
• Change the fan speed to lower fan speed level.
18 EN
Page 21
English
Problem Possible solution
The appliance still
indicates that I
need to replace a
lter, but I already
did.
Error codes "E1",
"E2", "E3", "E4" or
"E5" displays on the
screen.
The Wi-Fi setup is
not successful.
• Perhaps you did not touch and hold the Timer/Reset button
correctly. Plug in the appliance, touch to switch on the
appliance, and touch and hold the Timer/Reset button for
3 seconds.
• The appliance has malfunctions. Contact the Consumer Care
Center in your country.
• If the router your purier is connected to is dual – band and
currently it is not connecting to a 2.4GHz network, please
switch to another band of the same router (2.4GHz) and try
to pair your purier again. 5GHz networks are not supported.
• Web authentication networks are not supported.
• Check if the purier is within range of the Wi-Fi router. You
can try to locate the air purier closer to the Wi-Fi router.
• Check if the network name is correct. The network name is
case-sensitive.
• Check if the Wi-Fi password is correct. The password is case-
sensitive.
• Retry the setup with the instructions in section ‘Set up the
Wi-Fi connection when the network has changed’.
• The Wi-Fi connectivity can be interrupted by electromagnetic
or other interferences. Keep the appliance away from other
electronic devices that may cause interferences.
• Check if the mobile device is in airplane mode. Make sure to
have the airplane mode deactivated when connecting to the
Wi-Fi network.
• Consult the help section in the App for extensive and up-to-
date troubleshooting tips.
19EN
Page 22
8 Guarantee and
service
9 Notices
If you need information or if you have
a problem, please visit the Philips
website at www.philips.com or contact
the Philips Consumer Care Center in
your country (you nd its phone number
in the worldwide guarantee leaet). If
there is no Consumer Care Centre in
your country, go to your local Philips
dealer.
Order parts or
accessories
If you have to replace a part or want to
purchase an additional part, go to your
Philips dealer or visit
www.philips.com/support.
If you have problems obtaining the
parts, please contact the Philips
Consumer Care Center in your country
(you can nd its phone number in the
worldwide guarantee leaet).
Electromagnetic elds
(EMF)
This Philips appliance complies with all
applicable standards and regulations
regarding exposure to electromagnetic
elds.
Compliance with EMF
Koninklijke Philips N.V. manufactures
and sells many products targeted at
consumers, which, like any electronic
apparatus, in general have the ability
to emit and receive electromagnetic
signals.
One of Philips' leading Business
Principles is to take all necessary health
and safety measures for our products,
to comply with all applicable legal
requirements and to stay well within the
EMF standards applicable at the time of
producing the products.
Philips is committed to develop,
produce and market products that
cause no adverse health eects. Philips
conrms that if its products are handled
properly for their intended use, they
are safe to use according to scientic
evidence available today.
Philips plays an active role in the
development of international EMF
and safety standards, enabling Philips
to anticipate further developments in
standardization for early integration in
its products.
20 EN
Page 23
English
Recycling
This symbol means that this product
shall not be disposed of with normal
household waste (2012/19/EU).
Follow your country’s rules for the
separate collection of electrical and
electronic products. Correct disposal
helps prevent negative consequences
for the environment and human health..
Notice
App Store is a service mark of Apple Inc.
Google Play is a trademark of Google Inc.
"Air Matters" app developed by Air
Matters Network Pty Ltd.
This Philips appliance and Air Matters
app applied multiple open source
softwares, Copies of open source
software license text used in this
product can be derived from websitewww.philips.com/purier-compatibility.
Simplied EU declaration
of conformity
Hereby, Philips Consumer Lifestyle B.V.
declares that the radio equipment type
AC2729 is in compliance with Directive
2014/53/EU. The full text of the EU
declaration of conformity is available at
the following internet address:
www.philips.com.
21EN
Page 24

Page 25
Български
Съдържание
1 Важно 24
Безопасност 24
2 Вашият пречиствател на
въздух 28
Общ преглед на продукта
(фиг. a) 28
Общ преглед на бутоните за
управление (фиг. b) 29
3 Първи стъпки 30
Монтаж на филтъра
NanoProtect 30
Подготовка за овлажняване 30
Настройка на Wi-Fi 31
4 Използване на уреда 32
Разбиране на светлината за
качество на въздуха 32
Включване и изключване 33
Задаване на нивото на
влажността 33
Превключване на режима на
работа 34
Използване на функцията
затъмняване на светлината 34
Превключване на режима на
показване 34
Смяна на настройката за
автоматичен режим 35
Промяна на оборотите на
вентилатора 35
Настройване на таймера 35
Настройка на заключването
за деца 36
Ниво на водата 36
за
5 Почистване 36
График за почистване 36
Почистване на корпуса на
уреда 37
Почистване на сензора за
качество на въздуха 37
Почистване на водния
резервоар, тавичката
за вода и ротационния
овлажняващ фитил
NanoCloud 37
Почистване на предфилтъра 38
Премахване на котлен камък
от ротационния овлажняващ
фитил NanoCloud 39
6 сменете филтъра и фитила 40
Разбиране на заключване
за защита за здравословен
въздух 40
Смяна на филтъра
NanoProtect (фиг. ‹) 40
Смяна на ротационния
овлажняващ фитил
NanoCloud 41
7 Отстраняване на
неизправности 42
8 Гаранция и сервиз 45
Поръчка на части или
принадлежности 45
9 Бележки 45
Електромагнитни полета (EMF) 45
Рециклиране 46
Бележка 46
Опростената ЕС декларация
за съответствие 46
Използваме екологична хартия. Благодарим за вашия принос за спасяване на
дърветата.
23BG
Page 26
1 Важно
Безопасност
Преди да използвате уреда,
прочетете внимателно това
ръководство за потребителя и го
запазете за справка в бъдеще.
Опасност
• Не допускайте в уреда
да попадне вода или
друга течност, или
запалим почистващ
препарат, за да
избегнете токов удар и/
или опасност от пожар.
• Не почиствайте уреда с
вода, друга течност или
(запалим) почистващ
препарат, за да
избегнете токов удар и/
или опасност от пожар.
• Не пръскайте запалими
материали, като
например инсектициди
или аромати, около
уреда.
• Водата във водния
резервоар не е
подходяща за пиене.
Не пийте тази вода, не
я давайте на животни
и не я използвайте за
напояване растения.
Когато изпразвате
водния резервоар,
изливайте водата в
канализацията.
Предупреждение
• Преди да включите
уреда в контакта,
проверете дали
напрежението, посочено
на едната страна на
уреда, отговаря на
това на местната
електрическа мрежа.
• С оглед
предотвратяване на
опасност при повреда в
захранващия кабел той
трябва да бъде сменен
от Philips, оторизиран
от Philips сервиз или
квалифициран техник.
• Не използвайте
уреда, ако щепселът,
захранващият кабел или
самият уред е повреден.
• Този уред може да се
използва от деца на
възраст над 8 години
и от хора с намалени
физически възприятия
или умствени
недостатъци или без
опит и познания, ако
са инструктирани за
24 BG
Page 27
Български
безопасна употреба
на уреда или са
под наблюдение с
цел гарантиране на
безопасна употреба и
ако са им разяснени
евентуалните опасности.
• Не позволявайте на
деца да извършват
почистване или
поддръжка на уреда без
надзор.
• Наглеждайте децата, за
да не си играят с уреда.
• Не блокирайте отворите
за приток на въздух и за
изходящия въздух, напр.
не поставяйте предмети
в или пред тях.
• Стандартен Wi-Fi
интерфейс на базата
на 802.11b/g/n в 2,4 GHz
с максимална изходна
мощност от 31,62 mW
EIRP.
Внимание
• Този уред не е
заместител на
добрата вентилация,
редовното почистване
с прахосмукачка
или използването
на аспиратор или
вентилатор по време на
готвене.
• Ако захранващият
контакт, използван за
захранване на уреда,
не е свързан добре,
щепселът на уреда ще
се нагорещи. Уверете се,
че сте включили уреда
в правилно свързан
електрически контакт.
• Винаги поставяйте
и използвайте уреда
върху суха, стабилна,
равна и хоризонтална
повърхност.
• Осигурете поне 20 cm
свободно пространство
зад уреда и от двете му
страни и оставете наймалко 30 cm свободно
пространство над уреда.
• Не поставяйте нищо
върху уреда.
• Не поставяйте уреда
директно под климатик,
за да предотвратите
кондензация от капки
върху уреда.
• Уверете се, че всички
филтри са правилно
монтирани, преди да
включите уреда.
25BG
Page 28

• Използвайте само
оригинални филтри
на Philips, които
са предназначени
специално за този уред.
Не използвайте никакви
други филтри.
• Избягвайте удари с
твърди предмети по
уреда (особено по
отворите за приток на
въздух и за изходящия
въздух).
• Не бъркайте с пръсти
или предмети в
отвора за изходящ
въздух или отвора
за приток на въздух,
за да предотвратите
физическо нараняване
или повреда на уреда.
• Не използвайте уреда,
когато сте употребили
стайни препарати
против насекоми на
димна основа или
на места с остатъци
от мазнина, горящи
смоли или химически
изпарения.
• Не използвайте уреда в
близост до газови уреди,
печки или камини.
26 BG
• Винаги изключвайте
уреда след употреба и
преди пълнене с вода
или извършване на
друга поддръжка.
• Не използвайте уреда
в помещение с големи
температурни промени.
• За предотвратяване на
смущения поставете
уреда на поне 2 м от
електрически уреди,
които използват
ефирни радиовълни,
като телевизори,
радиоприемници и
радиоуправляеми
часовници.
• Когато уредът не се
използва за дълго
време, е възможно да се
развият бактерии върху
филтрите. Проверете
филтрите след
продължителен период
на липса на употреба.
Ако филтрите са много
замърсени, сменете ги
(вижте главата "Подмяна
на филтъра и фитила").
• Уредът е предназначен
само за домакински
цели при нормални
условия на
експлоатация.
Page 29

Български
• Не използвайте уреда на
места с висока влажност
или висока околна
температура, например
в банята, тоалетната или
кухнята.
• Уредът не отстранява
въглероден окис (CO)
или радон (Rn). Уредът
не може да се използва
като устройство за
безопасност в случай
на злополуки с горивни
процеси и опасни
химикали.
• Просто напълнете
водния резервоар
със студена чешмяна
вода. Не използвайте
подпочвена или гореща
вода.
• Не слагайте вещества,
различни от вода, във
водния резервоар. Не
слагайте аромати във
водния резервоар.
• Ако не използвате
функцията за
овлажняване за
дълъг период от
време, почистете
водния резервоар
и ротационната
овлажняваща
тавичка на фитила
NanoCloud и изсушете
с въздух ротационния
овлажняващ фитил
NanoCloud.
• Ако трябва да
движите уреда,
изключете го първо от
електрозахранването.
След това изпразнете
или свалете водния
резервоар и тавичката
за вода. Носете
уреда за дръжките
от двете страни на
уреда в хоризонтално
положение.
• Изключете уреда по
време на пълнене и
почистване.
27BG
Page 30
2 Вашият
пречиствател
Общ преглед на
продукта (фиг. a)
на въздух
Поздравяваме ви за покупката и
добре дошли във Philips!
За да се възползвате напълно от
предлаганата от Philips поддръжка,
регистрирайте продукта си на
www.Philips.com/welcome.
Пречиствателят на въздух на
Philips внася свеж влажен въздух
във вашата къща за здравето на
семейството ви. Той ви предлага
усъвършенствана система за
изпаряване с технологията
NanoCloud, като използва специален
овлажняващ филтър, който добавя
H2O молекули към сухия въздух
и създава здравословен влажен
въздух без формиране на водна
мъгла. Неговият овлажняващ филтър
задържа бактерии, калций и други
частици от водата. Той осигурява
само чист влажен въздух в дома ви.
Край на сухия въздух през зимния
сезон или от климатика.
Преди да използвате уреда,
прочетете внимателно това
ръководство за потребителя и го
запазете за справка в бъдеще.
A Контролен панел
B Воден резервоар
C Подпора на фитила
D Тавичка за вода
E Едностранни колела
F Колело на фитила
Ротационен овлажняващ
G
фитил NanoCloud (FY2425)
H Капак на задната страна
Предфилтър
I
Филтър NanoProtect Active
J
Carbon (FY1413)
NanoProtect филтър, серия 2
K
(FY1410)
Датчик за качеството на
л
въздуха
м Изходяща въздушна струя
28 BG
Page 31

Български
Общ преглед на
бутоните за управление
(фиг. b)
Бутони за управление
Бутон за включване/
изключване на захранването
Бутон за заключване за деца
Бутон за автоматичен режим
Бутон за обороти на
вентилатора
Бутон за настройка на
влажността
Бутон за затъмняване на
светлината
Бутон вкл./изкл. на режим 2 в 1
Бутон за таймер/нулиране
Панел на дисплея
Спящ режим
Автоматичен режим
Алергенен режим
Режим САМО за пречистване
Режим 2 в 1
Предупреждение за резервен
филтър
Предупреждение за доливане
на вода
Предупреждение за
почистване на предфилтър и
фитил
Дисплей за PM 2,5
Индексно показване на
алергени на закрито
Wi-Fi индикатор
29BG
Page 32

3 Първи стъпки
Подготовка за
овлажняване
Монтаж на филтъра
NanoProtect
Преди да използвате уреда, извадете
всички опаковъчни материали на
филтъра и го поставете в уреда както
следва:
Забележка
• Уверете се, че страната с етикета
е насочена към вас.
1 Издърпайте горната част на
задния панел към себе си, за да
го освободите от уреда (фиг. c).
2 Натиснете щипката надолу и
издърпайте предфилтъра към
себе си (фиг. d).
3 Свалете всички филтри (фиг. e).
4 Свалете всички опаковъчни
материали от филтъра
NanoProtect (фиг. f).
5 Поставете филтъра NanoProtect
обратно в уреда (фиг. g).
6 Сложете предфилтъра обратно
в уреда, първо, монтирайте
предфилтъра върху долната част
на уреда и след това натиснете
щипките на горната част на
предфилтъра към уреда (фиг. h).
7 За да закачите обратно задния
капак, първо, монтирайте панела
към долната част на уреда, и след
това натиснете горната част на
панела срещу уреда (фиг. i).
1 Извадете водния резервоар
(фиг. j).
2 Повдигнете тавичката за
вода нагоре и я издърпайте
хоризонтално (фиг. k).
3 Махнете всички опаковъчни
материали от ротационния
овлажняващ фитил NanoCloud
(фиг. l).
Забележка
• Овлажняващият фитил е
монтиран върху колелото на
фитила при покупка.
4 Поставете колелото на фитила на
подпората за фитила (фиг. m).
Забележка
• При поставянето на колелото
на фитила върху подпората на
фитила се уверете, че издатините
на колелото на фитила попадат в
съответните процепи.
5 Поставете тавичката за вода
обратно в уреда (фиг. n).
6 Завъртете горната капачка на
водния резервоар обратно на
часовниковата стрелка, за да го
отвинтите (фиг. o).
7 Напълнете водния резервоар със
студена чешмяна вода (фиг. p).
8 Завъртете горната капачка по
часовниковата стрелка, за да я
фиксирате плътно върху водния
резервоар (фиг. q).
9 Поставете водния резервоар
обратно в уреда (фиг. r).
30 BG
Page 33

Български
Настройка на Wi-Fi
Настройка на Wi-Fi връзката
за първи път
1 Изтеглете и инсталирайте
приложението "Air Matters" от App
Store или Google Play.
2 Поставете щепсела на
пречиствателя на въздуха
в гнездото за захранване и
докоснете , за да включите
пречиствателя на въздух.
» Индикаторът за Wi-Fi мига в
оранжево за първи път.
3 Уверете се, че смарт устройството
ви е успешно свързано към
вашата Wi-Fi мрежа.
4 Стартирайте приложението
"Air Matters" и щракнете върху
"+" в горната дясна част на
екрана. Следвайте инструкциите
на екрана, за да свържете
пречиствателя на въздух към
вашата мрежа.
5 След успешното сдвояване и
свързване Wi-Fi индикаторът
светва в бяло. Ако сдвояването
не е успешно, консултирайте се
с раздела за отстраняване на
неизправности или помощния
раздел в приложението
"Air Matters" за обширни и
актуални съвети за отстраняване
на неизправности.
Забележка
• Тази инструкция е валидна само
когато пречиствателят на въздух
се конфигурира за първи път.
Ако мрежата се е променила
или настройката трябва да се
извърши отново, направете
справка в раздел "Настройка
на Wi-Fi връзка при промяна на
мрежата" на страница page 32.
• Ако искате да свържете повече
от един пречиствател на въздух
към вашето смарт устройство,
трябва да направите това
последователно. Завършете
настройката на един
пречиствател на въздух, преди да
включите другия пречиствател на
въздух.
• Уверете се, че разстоянието
между вашето смарт устройство
и пречиствателя на въздух е помалко от 10 м и е без препятствия.
• Това приложение поддържа най-
новите версии на Android и iOS.
Моля, проверете
www.philips.com/puriercompatibility за последната
актуализация на поддържаните
операционни системи и
устройства.
31BG
Page 34

Настройка на Wi-Fi връзка
при промяна на мрежата
Забележка
4 Използване на
уреда
• Това се прилага, когато мрежата
по подразбиране, към която е
свързан вашият пречиствател, е
променена.
1 Поставете щепсела на
пречиствателя на въздуха
в гнездото за захранване и
докоснете , за да включите
пречиствателя на въздух.
2 Докоснете и едновременно
в продължение на 3 секунди,
докато чуете звуков сигнал.
» Пречиствателят на въздух
преминава в режим на
сдвояване.
» Wi-Fi индикаторът мига в
оранжево.
3 Следвайте стъпки 4 – 5 в раздела
"Настройка на Wi-Fi връзката за
първи път".
Разбиране на
светлината за качество
на въздуха
Цвят на
Ниво на
PM 2,5
≤ 12 Синьо Добро
13 – 35
36 – 55
> 55 Червено
Светлината за качество на въздуха
светва автоматично, когато уредът е
включен, и светват всички цветове в
последователност. За кратко време
сензорите за качество на въздуха
избират цвета, който съответства на
качеството на атмосферния въздух.
светлината
за качество
на въздуха
синьо-
лилаво
лилаво-
червено
PM 2,5
Сензорната технология AeraSense
открива точно и реагира бързо на
дори най-незначителните промени на
частиците във въздуха. Тя ви осигурява
спокойствие с обратна връзка в
реално време относно PM 2,5.
Повечето от замърсители на въздуха
на закрито спадат към PM 2,5, което
се отнася за пренасяни въздушно
частици на замърсители по-малки от
2,5 микрометра. Често срещаните
източници на фини частици на
закрито са тютюневият дим,
готвенето, запалените свещи. Някои
Ниво на
качество на
въздуха
Средно
Слаб
Много
слабо
32 BG
Page 35

Български
пренасяни въздушно бактерии и наймалките спори на мухъл, алергени
от домашни любимци и алергенни
частици от акари също спадат към
PM 2,5.
IAI
Сензорът от професионален клас на
AeraSense отчита нивото алергени
във въздуха на закрито, а с цифрова
обратна връзка от 1 до 12 може да
се показва потенциалното ниво
на опасност от алергени в него. 1
показва най-доброто качество на
въздуха.
Включване и
изключване
1 Включете щепсела в
електрическия контакт.
» Уредът издава звуков сигнал.
2 Натиснете , за да включите
уреда.
» Уредът работи в режим 2 в 1
по подразбиране с показано
на екрана.
» Когато уредът загрява, на
екрана се показва " ". След
измерване на частиците
само във въздуха уредът
показва нивото на PM 2,5 и
работи в автоматичен режим
по подразбиране.
» След измерване на
качеството на въздуха за
приблизително 30 секунди
сензорът за качеството на
въздуха автоматично избира
подходящия за качеството на
въздуха цвят на светлината.
3 Докоснете и задръжте за 3
секунди, за да изключите уреда.
Забележка
• След като уредът е изключен
чрез бутона вкл./изкл.
, ако щепселът е все още в
контакта, уредът ще работи под
предишните настройки, когато е
включен отново.
Задаване на нивото на
влажността
1 Докоснете неколкократно бутона
за влажност , за да зададете
желаната влажност на въздуха до
40%, 50%, 60% или " "
(фиг. s).
Забележка
• Когато е избрано ниво на
влажност " ", уредът ще
продължи да овлажнява въздуха
в стаята, докато нивото на
влажност на околната среда
достигне 70% RH.
Забележка
• Когато планираното ниво на
влажност е постигнато, колелото
на фитила ще спре да се върти. То
ще започне да се върти отново,
ако влажността спадне под
целевото ниво.
• Ако искате да увеличите нивото
на влажността бързо, можете да
изберете по-висока скорост на
вентилатора.
33BG
Page 36

Превключване на
режима на работа
Уредът има два режима на работа:
режим САМО за пречистване и
режим 2 в 1.
1 Докоснете бутона за избор на
режим , за да превключите
на режим САМО за пречистване
(фиг. t).
» се показва на екрана,
когато уредът работи в
режим САМО за пречистване.
2 Докоснете бутона за избор
на режим отново , за да
превключите към режим 2 в 1
(фиг. u).
» се показва на екрана,
когато уредът работи в
режим 2 в 1.
» Текущото ниво на влажност
се показва на екрана по
подразбиране.
Забележка
• На екрана ще се появи нивото
на влажност за 3 секунди и ще се
промени на най-високото ниво
на IAI или PM 2,5, ако едно от
двете не е добро.
Използване на функцията
за затъмняване на
светлината
С бутона за затъмняване на светлината
можете да включите или изключите
светлината за качество на въздуха,
екрана на дисплея и функционалния
индикатор, ако желаете.
1 Докоснете бутона за затъмняване
на светлината веднъж:
светлината за качество на въздуха
ще се затъмни.
2 Докоснете бутона за затъмняване
на светлината отново: светлината
за качеството на въздуха и панела
на дисплея ще се изключат.
3 Докоснете бутона за затъмняване
на светлината за трети път:
всички светлини ще бъдат отново
включени.
Превключване на
режима на показване
Уредът има три режима на дисплея
режима: PM 2,5 дисплей, IAI дисплей и
дисплей за нивото на влажност.
Забележка
• Уредът работи в режим на
дисплея PM 2,5 по подразбиране.
1 Докоснете и задръжте за 3
секунди, за да превключите на IAI
дисплей (фиг. v).
» Индикатор за IAI и дисплей на
действителното ниво на IAI на
екрана.
2 Докоснете и задръжте за 3
секунди два пъти, за да превключите
на дисплея за действителното ниво
на влажност (фиг. w).
3 Докоснете и задръжте за 3
секунди, за да превключите на PM
2,5 дисплей (фиг. x).
» Индикатор за PM 2,5 и на
дисплей на действителното
PM 2,5 ниво на екрана.
Забележка
• На екрана ще се появи нивото
на влажност за 3 секунди и ще се
промени на най-високото ниво
на IAI или PM 2,5, ако едно от
двете не е добро.
34 BG
Page 37

Български
Смяна на настройката
за автоматичен режим
Можете да изберете автоматичен
режим ( ), режим за алергени ( )
и режим на заспиване ( ).
Автоматичен режим
В автоматичен режим уредът
избира оборотите на вентилатора
в съответствие с влажността на
околния въздух и качеството му.
• Докоснете бутона за обороти на
вентилатора , за да изберете
автоматичен режим (фиг. y).
» Авто ( ) и се показват на
екрана.
» Уредът работи при
автоматичен режим по
подразбиране.
Алергенен режим
Изключително чувствителният
алергенен режим е проектиран да
реагира на дори малка промяна в
алергенните нива в околния въздух.
• Докоснете бутона за автоматичен
режим , за да изберете
алергенен режим (фиг. z).
» Авто ( ) и се показват на
екрана.
Сън (SL)
В режим на заспиване
пречиствателят на въздуха работи
тихо и на много ниски обороти.
• Докоснете бутона за автоматичен
режим , изберете режим на
заспиване ( ) (фиг. {).
» Заспиване ( ) и се
показват на екрана.
Забележка
• Всички светлини ще се изключат
освен , ако след една минута
няма докоснати бутони.
• Можете да включите светлините
ръчно чрез докосване на които и
да е бутони.
Промяна на оборотите
на вентилатора
Има няколко налични обороти на
вентилатора.
Ръчен
• Докоснете бутона за оборотите на
вентилатора неколкократно, за
да изберете желаните обороти на
вентилатора (1, 2 или 3) (фиг. |).
Турбо (t)
В режим турбо пречиствателят
на въздуха работи на най-високи
обороти.
• Докоснете бутона за обороти на
вентилатора , за да изберете
режима турбо ( ) (фиг. }).
Настройване на
таймера
С таймера можете да оставите уреда
да работи за определен брой часове.
След изтичане на зададеното време
уредът автоматично се изключва.
• Докоснете бутона за таймер/
нулиране неколкократно, за да
изберете колко часа искате уредът
да работи (фиг. ~).
» Таймерът е наличен от 1 до 12
часа.
35BG
Page 38

• За да дезактивирате функцията
за таймера, докоснете бутона
за таймер/нулиране
неколкократно, докато "---" се
покаже на екрана.
Настройка на
заключването за деца
1 Докоснете и задръжте бутона
за заключване за деца за
3 секунди, за да активирате
заключването за деца (фиг. ).
» се показва за 3 секунди.
» Когато заключването за деца
е включено, всички други
бутони не реагират.
2 Докоснете и задръжте бутона
за заключване за деца
за 3 секунди отново, за да
дезактивирате заключването за
деца (фиг. €).
» се показва за 3 секунди.
Ниво на водата
Нивото на водата във водния
резервоар се вижда през прозорчето
за ниво на водата на водния
резервоар.
Когато няма достатъчно вода във
водния резервоар, светлината за
доливане светва, за да покаже, че
трябва да го напълните. (фиг. )
Забележка
• Когато няма вода във водния
резервоар, колелото на фитила
ще спре да се върти. Когато
водният резервоар е зареден
с вода, колелото на фитила ще
започне да се върти отново.
5 Почистване
Забележка
• Винаги изключвайте уреда от
контакта, преди да го почиствате.
• Никога не потапяйте уреда във
вода или друга течност.
• Никога не използвайте
абразивни, агресивни или
запалими почистващи препарати,
като например белина или
алкохол, за да почиствате която и
да е част на уреда.
• Само предфилтърът и
ротационният овлажняващ фитил
NanoCloud могат да се мият.
Филтърът NanoProtect не може
да се мие или да се почиства с
прахосмукачка.
График за почистване
Честота Метод на почистване
Избършете
Когато е
необходимо
Всяка
седмица
Когато
иконата за
почистване
свети
и F0 се
показва на
екрана.
повърхността на
уреда с мека и суха
кърпа.
Изплакнете
водния резервоар,
тавичката за вода
и ротационния
овлажняващ фитил
NanoCloud.
Почистете
предфилтъра.
Премахнете
котления камък
от ротационния
овлажняващ фитил
NanoCloud с вода и
бял оцет (5% оцетна
киселина) или вода и
лимонена киселина.
36 BG
Page 39

Български
Почистване на корпуса
на уреда
Редовно почиствайте вътрешността
и външната част на уреда, за да
предотвратите натрупването на прах.
1 Избърсвайте праха от корпуса на
уреда със суха и мека кърпа.
2 Почиствайте отвора за изходящ
въздух с мека и суха кърпа.
Почистване на сензора
за качество на въздуха
1 Почистете входа и изхода на
сензора за качество на въздуха с
мека четка (фиг. ‚).
2 Отворете капака на сензора за
качество на въздуха (фиг. ƒ).
3 Почистете сензора за качество на
въздуха, входа и изхода за прах с
леко навлажнен памучен тампон
(фиг. „).
4 Подсушете ги със сух памучен
тампон.
5 Поставете отново капака на
сензора за качество на въздуха
(фиг. …).
Почиствайте сензора за качество
на въздуха на всеки 2 месеца за
оптимална работа на пречиствателя.
Почиствайте ги по-често, ако
използвате пречиствателя в
запрашена среда.
Забележка
• Когато нивото на влажността
в стаята е много високо, е
възможно образуване на конденз
върху сензора за качеството
на въздуха. В резултат на това
светлината за качество на въздуха
може да показва, че качеството
на въздуха е лошо, макар че е
добро. В този случай трябва да
почистите сензора за качество на
въздуха или да използвате една
от ръчните настройки за обороти.
Почистване на водния
резервоар, тавичката
за вода и ротационния
овлажняващ фитил
NanoCloud
Забележка
• Почиствайте водния резервоар,
тавичката за вода и ротационния
овлажняващ фитил NanoCloud
всяка седмица, за да ги запазите
хигиенични.
1 Извадете водния резервоар
(фиг. j).
2 Повдигнете тавичката за
вода нагоре и я издърпайте
хоризонтално (фиг. k).
3 Свалете колелото на фитила от
подпората на фитила (фиг. †).
4 Изплакнете водния резервоар,
тавичката за вода и ротационния
овлажняващ фитил NanoCloud
под течаща вода.
37BG
Page 40

Забележка
• Не махайте ротационния
овлажняващ фитил NanoCloud от
колелото по време на почистване.
• Не търкайте ротационния
овлажняващ фитил NanoCloud
и не го поставяйте на пряка
слънчева светлина.
• Ако е необходимо, използвайте
мек почистващ препарат за
почистване на водния резервоар
и тавичката за вода. В такъв
случай изплакнете старателно
водния резервоар и тавичката за
вода.
5 Подсушете отвън водния
резервоар и тавичката за вода.
6 Поставете колелото на фитила на
подпората за фитила (фиг. m).
Забележка
• При поставянето на колелото
на фитила върху подпората на
фитила се уверете, че издатините
на колелото на фитила попадат в
съответните процепи.
7 Поставете тавичката за вода
обратно в уреда (фиг. n).
8 Поставете водния резервоар
обратно в уреда (фиг. r).
Почистване на
предфилтъра
Състояние на
предупредителния
светлинен
индикатор за
филтъра
F0 се показва
на екрана и
предупреждението
за почистване
на фитила и
предфилтъра се
включва
Следвайте
това
Почистете
предфилтъра
1 Издърпайте горната част на
задния панел към себе си, за да
го освободите от уреда (фиг. c).
2 За да извадите предфилтъра,
натиснете щипката надолу и
издърпайте филтъра към себе си
(фиг. d).
3 Измийте предфилтъра под
течаща вода. Ако предфилтърът
е много замърсен, използвайте
мека четка за почистване на
праха (фиг. ‡).
4 Подсушете предфилтъра на
въздух.
Забележка
• Уверете се, че предфилтърът
е напълно сух. Ако е все още
влажен в него може да се
размножат бактерии и да
съкратят живота на предфилтъра.
Забележка
• Ако предфилтърът е повреден,
износен или счупен, не го
използвайте. Посетете
www.philips.com/support или
се свържете с Центъра за
обслужване на потребители във
вашата държава.
38 BG
Page 41

Български
5 След като предфилтърът е
напълно сух, поставете го
обратно в задния панел (фиг. h).
6 Докоснете и задръжте за
3 секунди, за да нулирате времето
за почистване на предфилтъра.
Премахване на котлен
камък от ротационния
овлажняващ фитил
NanoCloud
Състояние на
предупредителния
светлинен
индикатор за
филтъра
F0 се показва
на екрана и
предупреждението
за почистване
на фитила и
предфилтъра се
включва
1 Извадете водния резервоар
(фиг. j).
2 Повдигнете тавичката за
вода нагоре и я издърпайте
хоризонтално (фиг. k).
3 Свалете колелото на фитила от
подпората на фитила (фиг. †).
4 Накиснете ротационния
овлажняващ фитил NanoCloud
в почистващ препарат (напр.
разреден бял оцет, разтвор
на лимонена киселина) в
продължение на два часа
(фиг. ˆ).
Следвайте
това
Премахване
на котлен
камък от
ротационния
овлажняващ
фитил
NanoCloud
(FY2425)
Забележка
• Моля, използвайте неагресивен
препарат или такъв на киселинна
основа
• Бял оцет (5% оцетна
киселина) се смесва с равно
количество вода
• 24 г лимонена киселина се
смесват с 4 л вода
• Ако има бели отлагания
(варовикови) на филтъра, уверете
се, че страната с белите отлагания
е потопена във водата.
• Не махайте ротационния
овлажняващ фитил NanoCloud
от колелото по време на
премахване на котления камък.
5 Изплакнете ротационния
овлажняващ фитил NanoCloud
под течаща вода, за да
изплакнете остатъците от оцет
или лимонена киселина. По
време на изплакването завъртете
фитила така, че предната и
задната част да се изплакнат
(фиг. ‰).
6 Подсушете с въздух ротационния
овлажняващ фитил NanoCloud
(фиг. Š).
Забележка
• Не поставяйте ротационния
овлажняващ фитил NanoCloud на
пряка слънчева светлина.
7 Докоснете и задръжте за
3 секунди, за да нулирате времето
за почистване на ротационния
овлажняващ фитил NanoCloud.
39BG
Page 42

6 сменете
филтъра и
фитила
Разбиране на
заключване за защита
за здравословен въздух
Този уред е снабден със защита
за здравословен въздух, за да
се гарантира, че нанозащитният
филтър и овлажняващият фитил
са в оптимално състояние, когато
уредът работи. Когато нанозащитният
филтър и овлажняващият фитил са
почти за смяна, светлината за смяна
започва да мига, за да покаже, че
те трябва да се сменят.
Ако не смените филтъра и фитила
навреме, уредът ще спре да работи и
ще се заключи.
Смяна на филтъра
NanoProtect (фиг. ‹)
Забележка
• Филтърът не може да се мие или
да се използва многократно.
• Винаги изключвайте
пречиствателя на въздух
и изваждайте щепсела от
електрическия контакт, преди да
смените филтрите.
Състояние на
предупредителния
светлинен
индикатор за
филтъра
A3 се показва
и светлината за
резервен филтър
мига на екрана.
C7 се показва и
светлината за
резервен филтър
мига на екрана.
Следвайте
това
Сменете
филтъра
NanoProtect
серия 3
(FY1410)
Сменете
филтъра
NanoProtect
Active Carbon
(FY1413)
1 Премахнете използваните филтри
от уреда (фиг. Œ).
Забележка
• Не докосвайте нагъната
повърхност на филтъра и не
душете филтъра, тъй като по него
има натрупани замърсители от
въздуха.
• Измийте ръцете си, след като
изхвърлите използваните филтри.
2 Махнете всички опаковъчни
материали на новите филтри
(фиг. f).
3 Поставете новите филтри в уреда
(фиг. g).
4 Докоснете и задръжте за
3 секунди, за да нулирате брояча
за срок на експлоатация на
филтъра NanoProtect.
40 BG
Page 43

Български
Смяна на ротационния
овлажняващ фитил
NanoCloud
Състояние на
предупредителния
светлинен
индикатор за
филтъра
F1 се показва и
светлината за
резервен филтър
мига на екрана
(фиг. ).
1 Свалете колелото на фитила от
подпората на фитила (фиг. †).
2 Захванете винтовия вал от
другата страна на колелото
и го завъртете обратно на
часовниковата стрелка, за да
освободите фитила от колелото
(фиг. ).
3 Отключете последователно
закопчалките на ръба на
колелото за разглобяване на
колелото на фитила (фиг. ).
4 Извадете използвания
ротационен овлажняващ фитил
NanoCloud (фиг. ).
5 Махнете всички опаковъчни
материали от новия ротационен
овлажняващ фитил NanoCloud
(фиг. l).
Следвайте
това
Сменете
ротационния
овлажняващ
фитил
NanoCloud
6 Поставете новия ротационен
овлажняващ фитил NanoCloud
в колелото на фитила и след
това затегнете закопчалките на
колелото на фитила (фиг. ‘).
7 Поставете колелото на фитила на
подпората за фитила (фиг. m).
Забележка
• При поставянето на колелото
на фитила върху подпората на
фитила се уверете, че издатините
на колелото на фитила попадат в
съответните процепи.
8 Поставете тавичката за вода и
водния резервоар обратно в
уреда (фиг. n).
9 Докоснете и задръжте за
3 секунди, за да нулирате брояча
за срок на експлоатация на
ротационния овлажняващ фитил
NanoCloud.
41BG
Page 44

7 Отстраняване на неизправности
В тази глава са обобщени най-често срещаните проблеми, на които можете да
се натъкнете при ползване на уреда. Ако не можете да разрешите проблема с
помощта на информацията по-долу, се свържете с Центъра за обслужване на
потребители във вашата страна.
Проблем Възможно решение
• Светлината за резервен филтър мига от известно
Уредът не работи
дори когато
е включен в
контакта.
време, но не сте сменили филтъра NanoProtect и уредът
вече е заключен. В този случай сменете филтъра и
нулирайте брояча за експлоатационен срок на филтъра.
• Светлината за доливане на вода мига. Уверете се,
че водният резервоар е правилно монтиран и има
достатъчно вода в него.
Уредът не работи,
въпреки че е
включен.
Има малко бели
отлагания върху
ротационния
овлажняващ
фитил NanoCloud.
Не излиза въздух
от отвора за
изходящ въздух.
Въздушният поток,
който излиза
от отвора за
изходящ въздух,
е значително послаб от преди.
• Уредът работи, но бутоните не реагират. Проверете дали
заключването за деца е включено.
• Белите отлагания се наричат котлен камък и са
съставени от минерали от водата. Котленият камък върху
ротационния овлажняващ фитил NanoCloud се отразява
на производителността при овлажняване, но не е опасен
за здравето. Следвайте инструкциите за почистване в
ръководството за потребителя.
• Свържете уреда с електрозахранването и го включете.
• Предфилтърът е замърсен. Почистете предфилтъра
(вижте главата "Почистване").
• Уверете се, че сте премахнали всички опаковъчни
материали на филтъра NanoProtect.
42 BG
Page 45

Български
Проблем Възможно решение
• Проверете дали опаковъчният материал е отстранен от
филтрите.
Качество на
въздуха не се
подобрява,
въпреки че
уредът е работил
продължително
време.
• Един от филтрите не е поставен в пречиствателя на
въздух или някой филтър не е поставен правилно.
Уверете се, че всички филтри са правилно монтирани
в следния ред, започвайки с най-вътрешния филтър:
1) филтър NanoProtect серия 3 (FY1410); 2) филтър
NanoProtect Active Carbon (FY1413); 3) предфилтър.
• Сензорът за качество на въздуха е влажен. Уверете се, че
сензорът за качество на въздуха е чист и сух (вж. глава
"Почистване").
• Технологията NanoCloud разпределя равномерно
невидими водни пари във вашата стая. При сухи условия
Отнема много
време, за да
се постигне
целевото ниво на
влажност.
влагата от овлажнителя ще бъде погълната от стените,
мебелите и други предмети в стаята ви. Проветряването
със сух въздух отвън също ще увеличи времето,
необходимо за постигане на целевата влажност.
За да се оптимизира овлажняването и характеристиките
на пречистването, е препоръчително да се затворят
вратите и прозорците по време на употреба.
• Когато мъглата е много фина, тя е невидима. Уредът
Не виждам водни
пари да излизат от
уреда. Работи ли?
е с технология за овлажняване NanoCloud, която
произвежда здравословен влажен въздуха от изходната
зона без образуване на вода мъгла. Следователно не
можете да видите мъглата.
От уреда се
разнася странна
миризма.
• Първите няколко пъти, в които използвате уреда, може
да се усети миризма на пластмаса. Това е нормално.
Въпреки това ако от уреда се усеща миризма на
изгоряло дори след свалянето на филтри, обърнете се
към вашия търговец на Philips или към упълномощен
сервизен център на Philips.
• От филтъра може да се усеща миризма, след като е
използван известно време, поради абсорбцията на
въздуха в помещението. Свалете филтъра и го оставете
на пряка слънчева светлина и да се проветри за няколко
часа. Монтирайте повторно и опитайте да го използвате
отново. Ако миризмата остава, моля, сменете филтъра.
43BG
Page 46

Проблем Възможно решение
Уредът е
изключително
шумен.
Уредът продължава
да показва, че
трябва да сменя
филтъра, но аз вече
го направих.
Кодове за грешки
"E1", "E2", "E3",
"E4" или "E5" се
показват на екрана.
Настройката
на Wi-Fi не е
успешна.
• Не сте отстранили всички опаковъчни материали
от филтрите. Уверете се, че сте отстранили всички
опаковъчни материали.
• Промяна на оборотите на вентилатора на по-ниски.
• Може би не сте докоснали и задържали бутона за
таймер/нулиране правилно. Включете уреда,
докоснете , за да включите уреда и докоснете и
задръжте бутона за таймер/нулиране за 3 секунди.
• Уредът е неизправен. Свържете се с Центъра за
обслужване на потребители във вашата държава.
• Ако маршрутизаторът, към който е свързан вашият
пречиствател, е двулентов и в момента не се свързва
към 2,4 GHz мрежа, моля, превключете на друга лента от
същия маршрутизатор (2,4 GHz) и се опитайте да сдвоите
отново своя пречиствател. 5 GHz мрежи не се поддържат.
• Не се поддържат мрежи с уебудостоверяване.
• Проверете дали пречиствателят е в рамките на диапазона
на Wi-Fi маршрутизатора. Можете да опитате да поставите
пречиствателя на въздух по-близо до Wi-Fi маршрутизатора.
• Проверете дали името на мрежата е правилно. Името на
мрежата е чувствително към малки и големи букви.
• Проверете дали паролата за Wi-Fi е правилна. Паролата
е чувствителна към малки и големи букви.
• Повторете настройката с инструкциите в раздел
"Настройка на Wi-Fi връзката при промяна на мрежата".
• Wi-Fi връзката може да бъде прекъсната от електромагнитни
или други смущения. Дръжте уреда далеч от други
електронни устройства, които могат да причинят смущения.
• Проверете дали мобилното устройство е в самолетен
режим. Уверете се, че самолетният режим е
дезактивиран при свързване към Wi-Fi мрежата.
• Консултирайте се с помощния раздел в приложението
за обширни и актуални съвети за отстраняване на
неизправности.
44 BG
Page 47

Български
8 Гаранция и
сервиз
9 Бележки
Ако се нуждаете от информация или
имате проблем, посетете уебсайта на
Philips на адрес
www.philips.com или се свържете
с Центъра за обслужване на
потребители на Philips във
вашата държава (телефонния
му номер можете да намерите в
международната гаранционна карта).
Ако във вашата страна няма център
за обслужване на потребители,
обърнете се към местния търговец на
уреди на Philips.
Поръчка на части или
принадлежности
Ако трябва да замените част или
искате да закупите допълнителна
част, обърнете се към търговец на
Philips или посетете
www.philips.com/support.
Ако имате проблеми с получаване на
части, моля, свържете се с Центъра
за обслужване на потребители на
Philips във вашата държава (можете
да намерите телефонния му номер в
международната гаранционна карта).
Електромагнитни
полета (EMF)
Този уред на Philips е в съответствие
с нормативната уредба и всички
действащи стандарти, свързани с
излагането на електромагнитни
излъчвания.
Съвместимост с ЕМП
(електромагнитни полета)
Koninklijke Philips N.V. произвежда
и продава много изделия,
предназначени за потребителите,
които - като всяка друга електронна
апаратура - могат да излъчват и
приемат електромагнитни сигнали.
Един от водещите делови принципи
на компанията Philips е в нашите
изделия да се вземат всички
необходими мерки за безопасност,
да се придържаме към всички
приложими изисквания на закона
и да бъдем в съответствие с всички
стандарти за електромагнитни
полета, налични към момента на
произвеждане на изделията.
Philips цели да разработва,
произвежда и продава продукти,
които не причиняват нежелани
ефекти за здравето. Philips
потвърждава, че съгласно
съвременните научни данни, при
правилно използване на неговите
изделия в съответствие с тяхното
предназначение, те са безопасни.
45BG
Page 48

Philips играе активна роля в
разработването на международни
стандарти за електромагнитни
смущения и за безопасност, което
на свой ред позволява на Philips да
предвижда бъдещото развитие на
стандартизацията с оглед ранното й
внедряване в своите изделия.
Рециклиране
Този символ означава, че продуктът
не може да се изхвърля заедно с
обикновените битови отпадъци
(2012/19/ЕС).
Следвайте правилата на държавата
си относно разделното събиране
на електрическите и електронните
уреди. Правилното изхвърляне
помага за предотвратяване на
негативни последици за околната
среда и човешкото здраве.
Опростената ЕС
декларация за
съответствие
С настоящото Philips Consumer
Lifestyle B.V. декларира, че този
тип радиосъоръжение AC2729 е в
съответствие с Директива 2014/53/ЕС.
Цялостният текст на ЕС декларацията
за съответствие може да се намери
на следния интернет адрес:
www.philips.com.
Бележка
App Store е марка за услуги на Apple
Inc.
Google Play е запазена марка на
Google Inc.
Приложение "Air Matters",
разработено от Air Matters Network
Pty Ltd.
В този уред на Philips и в
приложението Air Matters са
използвани много софтуери с
отворен код. Копия от лицензните
текстове на софтуерите с отворен
код, използвани в този продукт, могат
да бъдат изтеглени от уебсайта:
www.philips.com/purier-compatibility.
46 BG
Page 49

CZ
Čeština
Obsah
1 Důležité 48
Bezpečnost 48
2 Vaše čistička vzduchu 51
Přehled výrobku (obr. a) 52
Přehled ovládacích prvků
(obr. b) 52
3 Začínáme 53
Instalace ltru NanoProtect 53
Příprava na zvlhčování 53
Nastavení Wi-Fi 54
4 Použití přístroje 55
Jak funguje kontrolka kvality
vzduchu 55
Zapnutí a vypnutí 55
Nastavení úrovně vlhkosti 55
Zapnutí provozního režimu 56
Používání funkce tlumení
osvětlení 56
Zapnutí režimu zobrazení 56
Změna nastavení
automatického režimu 57
Změna rychlosti ventilátoru 57
Nastavení časovače 57
Nastavení dětské pojistky 58
Hladina vody 58
5 Čištění 58
Plán čištění 58
Čištění těla přístroje 59
Čištění snímače kvality vzduchu 59
Čištění nádržky na vodu,
tácku na vodu a otočného
zvlhčovacího ltru zvlhčovače
NanoCloud 59
Čištění předltru 60
Odstranění vodního kamene
z otočného zvlhčovacího ltru
zvlhčovače NanoCloud 60
6 Výměna ltru a knotu 61
Jak funguje zámek ochrany
zdravého vzduchu 61
Výměna ltru NanoProtect
(obr. ‹) 61
Výměna otočného zvlhčovacího
ltru zvlhčovače NanoCloud 62
7 Odstraňování problémů 63
8 Záruka a servis 66
Objednání dílů nebo doplňků 66
9 Upozornění 66
Elektromagnetická pole (EMP) 66
Recyklace 67
Oznámení 67
Zjednodušené EU prohlášení
o shodě 67
S použitím papíru šetrného k přírodě Děkujeme, že pomáháte chránit stromy.
47
Page 50

CZ
1 Důležité
Bezpečnost
Před použitím přístroje si pozorně
přečtěte tuto uživatelskou příručku a
uschovejte ji pro budoucí použití.
Nebezpečí
• Zamezte proniknutí
vody, jiné kapaliny nebo
hořlavého čisticího
prostředku do přístroje.
Předejdete tak úrazu
elektrickým proudem a/
nebo požáru.
• Přístroj nečistěte vodou,
jakoukoli jinou tekutinou
ani (hořlavým) čisticím
prostředkem. Předejdete
tak úrazu elektrickým
proudem a/nebo požáru.
• Kolem přístroje
nerozstřikujte žádné
hořlavé látky, jako jsou
například insekticidy nebo
parfémy.
• Voda v nádržce není
vhodná k pití. Tuto vodu
nepijte a nepoužívejte
ji k napájení zvířat ani
k zalévání rostlin. Při
vyprazdňování nádržky
vylévejte vodu do odpadu.
Varování
• Před zapojením přístroje
zkontrolujte, zda napětí
uvedené na boční části
přístroje odpovídá napětí
místní rozvodné sítě.
• Pokud by byl poškozen
napájecí kabel, musí
jeho výměnu provést
společnost Philips,
autorizovaný servis
společnosti Philips nebo
obdobně kvalikovaní
pracovníci, aby se
předešlo možnému
nebezpečí.
• Pokud byste zjistili závadu
na zástrčce, na napájecím
kabelu nebo přímo na
přístroji, přístroj dále
nepoužívejte.
• Děti od 8 let věku a osoby
s omezenými fyzickými,
smyslovými nebo
duševními schopnostmi
nebo nedostatkem
zkušeností a znalostí
mohou tento přístroj
používat v případě, že jsou
pod dohledem nebo byly
poučeny o bezpečném
používání přístroje a
48
Page 51

CZ
Čeština
chápou rizika, která
mohou hrozit.
• Čištění a uživatelskou
údržbu nesmí provádět
děti bez dozoru.
• Dohlédněte na to, aby si
s přístrojem nehrály děti.
• Vyvarujte se zablokování
vstupu a výstupu vzduchu,
např. umístěním předmětů
na výstup vzduchu nebo
před vstup vzduchu.
• Standardní rozhraní WiFi
založené na standardu
802.11b/g/n při 2,4 GHz s
maximálním výstupním
výkonem 31,62 mW EIRP.
Upozornění
• Tento přístroj nenahrazuje
řádné větrání, pravidelné
vysávání prachu nebo
použití digestoře či
ventilátoru během vaření.
• Pokud je v zásuvce
použité k napájení
přístroje špatný kontakt,
začne se zástrčka přístroje
přehřívat. Dbejte na to,
abyste přístroj zapojili do
řádně instalované síťové
zásuvky.
• Přístroj vždy pokládejte
a používejte na suchém,
stabilním, vyrovnaném a
vodorovném povrchu.
• Za přístrojem a po obou
jeho stranách ponechejte
alespoň 20 cm volného
prostoru a zároveň
ponechejte alespoň
30 cm volného prostoru
nad přístrojem.
• Na přístroj nic
nepokládejte.
• Neumisťujte přístroj přímo
pod klimatizaci, zabráníte
tak tomu, aby na něj
kapala kondenzovaná
voda.
• Před zapnutím přístroje
se ujistěte, že všechny
ltry jsou správně
nainstalovány.
• Používejte pouze
originální ltry značky
Philips určené přímo pro
tento přístroj. Žádné jiné
ltry nepoužívejte.
• Dbejte na to, abyste
do přístroje (zejména
do vstupu a výstupu
vzduchu) nenarazili
tvrdým předmětem.
• Aby se zabránilo úrazu
nebo závadě přístroje,
49
Page 52

CZ
nevkládejte do výstupu či
vstupu vzduchu prsty ani
předměty.
• Nepoužívejte tento
přístroj, pokud jste použili
repelent proti hmyzu
kouřového typu pro vnitřní
prostory nebo na místech
se zbytky oleje, hořící
vonnou tyčinkou nebo
chemickými výpary.
• Nepoužívejte přístroj
v blízkosti plynových
zařízení, topných zařízení
nebo krbů.
• Po použití a před plněním
vodou, čištěním nebo
prováděním údržby
přístroj vždy odpojte od
zdroje napájení.
• Nepoužívejte zařízení
v místnosti s výraznými
výkyvy teplot.
• Aby nedocházelo k rušení,
umístěte přístroj nejméně
2 m od elektrických
zařízení využívajících
vzdušných rádiových vln,
např. televizorů, rádií a
rádiem řízených hodin.
• Pokud se přístroj dlouhou
dobu nepoužívá, může
ve ltrech dojít k množení
bakterií. V takovém
případě zkontrolujte ltry.
Pokud jsou ltry velmi
znečištěné, vyměňte je
(viz kapitola "Výměna ltrů
a otočného zvlhčovacího
ltru").
• Přístroj je určen pouze
pro domácí použití za
běžných provozních
podmínek.
• Nepoužívejte přístroj ve
vlhkém prostředí nebo
v prostředí s vysokými
okolními teplotami,
například v koupelně, na
záchodě nebo v kuchyni.
• Přístroj neodstraňuje
oxid uhelnatý (CO) ani
radon (Rn). Není možné jej
použít jako bezpečnostní
zařízení v případě
nehod se spalovacími
procesy a nebezpečnými
chemikáliemi.
• Nádržku na vodu
plňte pouze studenou
kohoutkovou vodou.
Nepoužívejte podzemní
nebo horkou vodu.
• Nedávejte do nádržky
jinou látku než vodu.
Do nádržky na vodu
nepřidávejte vůně.
50
Page 53

CZ
Čeština
• Pokud některou funkci
zvlhčovače dlouhou dobu
nepoužíváte, vyčistěte
nádržku na vodu a tác
otočného zvlhčovacího
ltru zvlhčovače
NanoCloud a nechte
otočný zvlhčovací ltr
zvlhčovače NanoCloud
vyschnout na vzduchu.
• Pokud potřebujete
přístroj přemístit, nejprve
ho odpojte od napájení.
Poté vyprázdněte nebo
vyjměte nádržku na vodu
a tácek s vodou. Přístroj
přenášejte ve vodorovné
poloze a držte za obě
rukojeti po jeho stranách.
• Během plnění a čištění
přístroj odpojte.
2 Vaše čistička
vzduchu
Gratulujeme k nákupu a vítáme vás
mezi uživateli výrobků společnosti
Philips!
Chcete-li využívat všech výhod
podpory nabízené společností Philips,
zaregistrujte svůj výrobek na stránkách
www.Philips.com/welcome.
Čistička vzduchu Philips přináší do
vašeho domu čerstvý a zvlhčený
vzduch a zajišťuje tak zdraví vaší rodiny.
Nabízí pokročilý odpařovací systém
s technologií NanoCloud: používá
speciální zvlhčovací ltr, který suchý
vzduch doplňuje o molekuly H2O a
produkuje tak zdravý vlhký vzduch, aniž
by vytvářel vodní opar. Jeho zvlhčovací
ltr zachytává bakterie, vápník a jiné
částečky ve vodě. Do vašeho domova
tak přináší pouze čistý, zvlhčený vzduch.
Už žádný suchý vzduch v zimě nebo
z klimatizace.
Před použitím přístroje si pozorně
přečtěte tuto uživatelskou příručku a
uschovejte ji pro budoucí použití.
51
Page 54

CZ
Přehled výrobku (obr. a)
A Ovládací panel
B Nádržka na vodu
Opěra otočného zvlhčovacího
C
ltru
D Tácek s vodou
E Jednosměrná kolečka
Kolečko otočného zvlhčovacího
F
ltru
Otočný zvlhčovací ltr
G
NanoCloud (FY2425)
H Kryt boční strany
Předltr
I
Aktivní uhlíkový ltr NanoProtect
J
(FY1413)
K Filtr NanoProtect řady 2 (FY1410)
L Snímač kvality vzduchu
M Výstup vzduchu
Přehled ovládacích prvků
(obr. b)
Tlačítka ovládání
Tlačítko zapnutí/vypnutí
Tlačítko dětské pojistky
Tlačítko automatického režimu
Tlačítko rychlosti ventilátoru
Tlačítko nastavení vlhkosti
Tlačítko ztlumení světla
Tlačítko zapnutí/vypnutí režimu
2 v 1
Tlačítko časovače/resetování
Panel displeje
Úsporný režim
Automatický režim
Režim proti alergenům
Režim POUZE čištění
Režim 2v1
Výstraha k výměně ltru
Upozornění na doplnění vody
Upozornění na čištění předltru
a knotu
Zobrazení režimu PM2,5
Displej indexu vnitřních alergenů
Ukazatel Wi-Fi
52
Page 55

CZ
Čeština
3 Začínáme
Instalace ltru
NanoProtect
Před použitím přístroje odstraňte z ltru
všechen balicí materiál a ltr pak uložte
do zařízení, jak je popsáno níže:
Poznámka
• Zkontrolujte, že strana s poutkem je
otočená směrem k vám.
1 Vytáhněte horní část zadního
panelu směrem k sobě a uvolněte
panel z přístroje (obr. c).
2 Zatlačte zaklapávací uzávěr dolů
a vysuňte předltr směrem k sobě
(obr. d).
3 Vyjměte všechny ltry (obr.e).
4 Odstraňte veškerý obalový materiál
z ltru NanoProtect (obr. f).
5 Filtr NanoProtect vložte zpět do
přístroje (obr. g).
6 Vložte předltr zpět do zařízení,
nejprve namontujte předltr na
spodní stranu přístroje a poté
zatlačte zaklapávací uzávěry na
horní části předltru směrem
k přístroji (obr. h).
7 Zadní kryt vraťte zpět takto: nejprve
jej nasaďte na spodní část přístroje
a poté zatlačte horní stranu panelu
do přístroje (obr. i).
Příprava na zvlhčování
1 Vytáhněte nádržku na vodu
(obr. j).
2 Zvedněte zásobník na vodu směrem
vzhůru a vodorovně jej vytáhněte
(obr. k).
3 Odstraňte veškerý obalový materiál
z otočného zvlhčovacího ltru
NanoCloud (obr. l).
Poznámka
• Otočný zvlhčovací ltr je při
nákupu již nainstalován na kolečku
otočného zvlhčovacího ltru.
4 Umístěte kolečko otočného
zvlhčovacího ltru na opěru
otočného zvlhčovacího ltru
(obr. m).
Poznámka
• Když dáváte kolečko otočného
zvlhčovacího ltru na opěru
otočného zvlhčovacího ltru, dbejte,
aby výstupek na kolečku otočného
zvlhčovacího ltru zapadl do
příslušných drážek.
5 Zásobník na vodu vložte zpět do
přístroje (obr. n).
6 Odšroubujte horní víčko nádržky
na vodu otáčením proti směru
hodinových ručiček (obr. o).
7 Nádržku na vodu naplňte studenou
kohoutkovou vodou (obrázek p).
8 Našroubujte horní víčko na nádržku
na vodu otáčením po směru
hodinových ručiček (obr. q).
9 Nádržku na vodu vložte zpět do
přístroje (obr. r).
53
Page 56

CZ
Nastavení Wi-Fi
První nastavení Wi-Fi připojení
1 Stáhněte si a nainstalujte aplikaci
"Air Matters" z obchodu App Store
nebo Google Play.
2 Zapojte zástrčku čističky vzduchu
do zásuvky a stisknutím tlačítka
čističku zapněte.
» Ukazatel Wi-Fi při prvním
spuštění oranžově zabliká.
3 Ověřte, že je vaše chytré zařízení
správně připojené k síti Wi-Fi.
4 Spusťte aplikaci "Air Matters"
a klepněte na symbol "+" v pravé
horní části obrazovky. Postupujte
podle pokynů na obrazovce
a připojte čističku vzduchu k vaší
síti.
5 Po úspěšném spárování a navázání
připojení se ukazatel Wi-Fi
rozsvítí bílým světlem. V případě,
že párování neproběhne úspěšně,
podívejte se do části věnované
řešení potíží v aplikaci "Air Matters",
kde jsou uvedeny podrobné
a aktuální tipy k odstraňování
problémů.
Poznámka
• Tyto pokyny jsou určeny pouze pro
první nastavování čističky vzduchu.
Pokud měníte síť nebo je nutné
přístroj znovu nastavit, podívejte se
do části "Nastavení Wi-Fi připojení
po změně sítě" na straně 54.
• Pokud chcete ke svému chytrému
zařízení připojit více čističek
vzduchu, je nutné připojovat jedno
zařízení po druhém. Dokončete
nastavení jedné čističky vzduchu
předtím, než zapnete jinou čističku.
• Vzdálenost mezi chytrými zařízením
a čističkou vzduchu musí být menší
než 10 m a mezi zařízeními nesmí
být překážky.
• Tato aplikace podporuje nejnovější
verze systémů Android a iOS. Na
stránkách www.philips.com/puriercompatibility najdete nejnovější
aktualizaci podporovaných
operačních systémů a zařízení.
Nastavení Wi-Fi připojení po
změně sítě
Poznámka
• Tento postup platí v případě změny
sítě, ke které je čistička připojená.
1 Zapojte zástrčku čističky vzduchu
do zásuvky a stisknutím tlačítka
čističku zapněte.
2 Současně stiskněte tlačítka a
na dobu 3 sekund, dokud se neozve
pípnutí.
» Čistička vzduchu přejde do
režimu párování.
» Ukazatel Wi-Fi oranžově
zabliká.
3 Postupujte podle kroků 4–5 v části
"První nastavení Wi-Fi připojení".
54
Page 57

CZ
Čeština
4 Použití přístroje
Jak funguje kontrolka
kvality vzduchu
Barva
Úroveň
PM2.5
≤12 Modrá Dobrý
13–35
36–55
>55 Červená Velmi špatný
Kontrolka kvality vzduchu se automaticky
zapne při zapnutí přístroje a postupně
rozsvítí všechny barvy. Po krátké době
vyberou snímače kvality vzduchu barvu,
která odpovídá kvalitě okolního vzduchu.
kontrolky
kvality
vzduchu
Modro-
nachová
Nachovo-
červená
PM2.5
Detekční technologie AeraSense přesně
detekuje i tu nejmenší změnu obsahu
částic ve vzduchu a rychle na ni reaguje.
Dá vám jistotu v podobě zpětné vazby
PM2.5 v reálném čase.
Většina látek znečišťujících vnitřní
ovzduší se řadí do kategorie PM2.5, která
označuje vzdušné škodlivé látky menší
než 2,5 mikrometru. Mezi běžné zdroje
těchto jemných částic patří tabákový kouř,
vaření a zapálené svíčky. Do kategorie
PM2.5 se řadí i některé vzduchem
přenášené bakterie a nejmenší spory
plísní, zvířecí alergeny a alergeny roztočů.
IAI
Snímač profesionální úrovně AeraSense
zjistí úroveň vnitřních alergenů a díky
číselné zpětné vazbě se škálou od 1
do 12 je pak možné zobrazit jejich
potenciální riziko. Číslo 1 ukazuje
nejvyšší kvalitu vzduchu.
Úroveň
kvality
vzduchu
Přiměřený
Špatný
Zapnutí a vypnutí
1 Zasuňte zástrčku do síťové zásuvky.
» Přístroj pípne.
2 Stiskem tlačítka zapněte přístroj.
» Přístroj pracuje ve výchozím
nastavení v režimu 2v1, přičemž
na obrazovce se zobrazuje .
» Když se přístroj zahřívá, zobrazí
se na displeji značka
" ". Poté, co přístroj změří
částice pouze ve vzduchu,
zobrazí hladinu PM2.5 a
funguje ve výchozím nastavení
v automatickém režimu.
» Vestavěný snímač kvality
vzduchu po asi 30 sekund
dlouhém měření kvality vzduchu
automaticky vybere odpovídající
barvu pro kvalitu vzduchu.
3 Stiskem a podržením tlačítka na
3 sekundy přístroj vypněte.
Poznámka
• Pokud přístroj, který je stále
zapojený ve zdroji napájení, vypnete
tlačítkem vypínače , bude přístroj
po opětovnému zapnutí fungovat
podle předchozích nastavení.
Nastavení úrovně
vlhkosti
1 Opakovaně stiskněte tlačítko
vlhkosti a nastavte úroveň
vlhkosti na požadovanou hodnotu
40 %, 50 %, 60 % nebo " "
(obr. s).
Poznámka
• Když je zvolena úroveň vlhkosti
" ", přístroj bude místnost stále
zvlhčovat, dokud okolní vlhkost
nedosáhne 70 % RH.
55
Page 58

CZ
Poznámka
• Po dosažení cílové úrovně vlhkosti
s
e kolečko otočného zvlhčovacího
ltru přestane otáčet. Začne se
otáčet znovu až tehdy, když úroveň
vlhkosti klesne pod cílovou hodnotu.
• Pokud chcete rychle zvýšit úroveň
vlhkosti, můžete vybrat vyšší otáčky
ventilátoru.
1 Jedním stisknutím tlačítka ztlumení
osvětlení se ztmaví kontrolka
kvality vzduchu.
2 Opakovaným stisknutím tlačítka
ztlumení osvětlení se kontrolka
kvality vzduchu a panel displeje
vypnou.
3 Po třetím stisknutí tlačítka ztlumení
osvětlení se znovu rozsvítí
všechna světla.
Zapnutí provozního
režimu
Přístroj má dva provozní režimy, režim
POUZE čištění a režim 2v1.
1 Stiskněte tlačítko pro výběr režimu
a přepněte na režim POUZE
čištění (obr. t).
» objevuje se na obrazovce,
když přístroj funguje v režimu
POUZE čištění.
2 Znovu stiskněte tlačítko pro výběr
režimu a přepněte na režim 2 v 1
(obr. u).
» objevuje se na obrazovce,
když přístroj funguje v režimu 2v1.
» Aktuální úroveň vlhkosti se ve
výchozím nastavení zobrazuje
na displeji.
Poznámka
• Úroveň vlhkosti se na displeji zobrazí
na 3 sekundy a poté zobrazí nejvyšší
úroveň IAI nebo PM2.5, pokud jedna
z nich přesahuje normu.
Zapnutí režimu zobrazení
Přístroj má tři režimy zobrazení:
zobrazení PM2.5, zobrazení IAI a
zobrazení úrovně vlhkosti.
Poznámka
• Ve výchozím nastavení je přístroj
spuštěný v režimu PM2.5.
1 Stisknutím a podržením tlačítka
na 3 sekundy přepnete na
zobrazení IAI (obr. v).
» Ukazatel IAI a skutečná hodnota
IAI se zobrazí na displeji.
2 Dvojím stisknutím a podržením
tlačítka na 3 sekundy přepnete
na zobrazení aktuální úrovně
vlhkosti (obr. w).
3 Stisknutím a podržením tlačítka
na 3 sekundy přepnete na
zobrazení PM2.5 (obr. x).
» Ukazatel PM2.5 a skutečná
hodnota PM2.5 se zobrazí na
displeji.
Poznámka
Používání funkce tlumení
osvětlení
Pomocí tlačítka ztlumení osvětlení
můžete v případě potřeby zapnout
nebo vypnout kontrolku kvality vzduchu,
displej a kontrolku funkcí.
56
• Úroveň vlhkosti se na displeji zobrazí
na 3 sekundy a poté zobrazí nejvyšší
úroveň IAI nebo PM2.5, pokud jedna
z nich přesahuje normu.
Page 59

CZ
Čeština
Změna nastavení
automatického režimu
Změna rychlosti
ventilátoru
Můžete si vybrat automatický režim
( ), režim proti alergenům ( ) a
režim spánku ( ).
Automatický režim
V automatickém režimu přístroj vybírá
vhodné otáčky ventilátoru podle
vlhkosti a kvality okolního vzduchu.
• Stisknutím tlačítka rychlosti
ventilátoru vyberete automatický
režim (obr. y).
» Symboly Auto ( ) a se
zobrazí na displeji.
» Ve výchozím nastavení pracuje
přístroj v automatickém režimu.
Režim proti alergenům
Mimořádně citlivý režim proti alergenům
je navržený tak, aby reagoval i na malé
změny v úrovni alergenů v okolním
vzduchu.
• Stisknutím tlačítka automatického
režimu vyberte režim proti
alergenům (obr. z).
» Symboly Auto ( ) a se
zobrazí na displeji.
Spánek (SL)
V režimu spánku čistička pracuje
potichu při velmi nízké rychlosti.
• Stisknutím tlačítka automatického
režimu vyberte režim spánku
( ) (obr. {).
» Symboly Sleep ( ) a se
zobrazí na displeji.
K dispozici je několik rychlostí
ventilátoru.
Manuální
• Opakovaným stisknutím tlačítka
otáček ventilátoru vyberete
požadované otáčky ventilátoru (1, 2
nebo 3) (obr. |).
Turbo (t)
V režimu turbo pracuje čistička na
nejvyšší rychlost.
• Stisknutím tlačítka rychlosti
ventilátoru vyberte režim Turbo
( ) (obr. }).
Nastavení časovače
Pomocí časovače můžete nechat
přístroj spuštěný po stanovený počet
hodin. Po uplynutí nastaveného času se
přístroj automaticky vypne.
• Opakovaným stisknutím tlačítka
časovače/resetování zvolte počet
hodin, kdy má být přístroj spuštěný
(obr. ~).
» Časovač je k dispozici po dobu
1 až 12 hodin.
• Chcete-li funkci časovače
deaktivovat, stiskněte opakovaně
tlačítko časovače/resetování
, dokud se na displeji nezobrazí
symbol "---".
Poznámka
• Všechna světla kromě zhasnou,
pokud po uplynutí jedné minuty
nestisknete žádné tlačítko.
• Světla můžete zapnout ručně
stisknutím jakýchkoli tlačítek.
57
Page 60

CZ
Nastavení dětské pojistky
1 Stisknutím a podržením tlačítka
dětské pojistky na 3 sekundy
aktivujete dětskou pojistku (obr. ).
» objeví se na obrazovce na
3 sekundy.
» Když je dětská pojistka
zapnutá, žádná ostatní tlačítka
nereagují.
2 Dalším stisknutím a podržením
tlačítka dětské pojistky na
dobu 3 sekund dětskou pojistku
deaktivujete (obr. €).
» objeví se na obrazovce na
3 sekundy.
Hladina vody
5 Čištění
Poznámka
• Před čištěním přístroj vždy odpojte
ze sítě.
• Nikdy přístroj nesmíte ponořit do
vody nebo do jiné tekutiny.
• K čištění žádné části přístroje nikdy
nepoužívejte abrazivní, agresivní
nebo hořlavé čisticí prostředky, jako
je například bělidlo nebo alkohol.
• Omývat lze pouze předltr a
otočný zvlhčovací ltr zvlhčovače
NanoCloud. Filtr NanoProtect není
možné omývat ani čistit pomocí
vysavače.
Hladina vody v nádržce na vodu je vidět
skrze okénko hladiny vody na nádržce
na vodu.
Když v nádržce na vodu není dost vody,
rozsvítí se kontrolka doplnění nádržky
na vodu , která indikuje, že je nutné
nádržku doplnit. (obr. )
Poznámka
• Když v nádržce na vodu není žádná
voda, kolečko knotu se přestane
otáčet. Jakmile se voda do nádržky
na vodu doplní, kolečko knotu se
začne znovu otáčet.
Plán čištění
Frekvence Metoda čištění
Podle
potřeby
Každý
týden
Když se
ikona
čištění
rozsvítí a na
obrazovce
se zobrazí
F0.
Povrch přístroje otřete
suchým hadříkem.
Vypláchněte nádržku
na vodu, tácek na vodu
a otočný zvlhčovací ltr
zvlhčovače NanoCloud.
Vyčistěte předltr.
Odvápněte otočný
zvlhčovací ltr
zvlhčovače NanoCloud
vodou a bílým octem
(5% kyselina octová)
nebo vodou a kyselinou
citrónovou.
58
Page 61

CZ
Čeština
Čištění těla přístroje
Tělo přístroje pravidelně čistěte zevnitř
i zvenku, aby se na něm neusazoval
prach.
1 Suchým měkkým hadříkem otřete
prach z těla přístroje.
2 Výstup vzduchu čistěte suchým
měkkým hadříkem.
Čištění nádržky na
vodu, tácku na vodu a
otočného zvlhčovacího
ltru zvlhčovače
NanoCloud
Poznámka
Čištění snímače kvality
vzduchu
K zajištění optimálního výkonu čističky
čistěte snímač kvality vzduchu každé
dva měsíce. Pokud čističku používáte
v prašném prostředí, čistěte je častěji.
Poznámka
• Jestliže je v místnosti velice vysoká
vlhkost, může na snímači kvality
vzduchu začít kondenzovat voda.
V důsledku toho může kontrolka
kvality vzduchu ukazovat, že kvalita
vzduchu je špatná, přestože je
ve skutečnosti dobrá. V takovém
případě musíte vyčistit snímač
kvality vzduchu nebo použít jedno
z manuálních nastavení rychlosti.
1 Vstup a výstup snímače kvality
vzduchu čistěte měkkým kartáčkem
(obr. ‚).
2 Otevřete kryt snímače kvality
vzduchu (obr. ƒ).
3 Lehce navlhčenou vatovou tyčinkou
vyčistěte snímač kvality vzduchu
a vstup a výstup prachu (obr. „).
4 Osušte je suchou vatovou tyčinkou.
5 Vraťte kryt snímače kvality vzduchu
na původní místo (obr. …).
• Nádržku na vodu, tácek na vodu a
otočný zvlhčovací ltr zvlhčovače
NanoCloud čistěte každý týden, aby
zůstaly v hygienickém stavu.
1 Vytáhněte nádržku na vodu
(obr. j).
2 Zvedněte zásobník na vodu směrem
vzhůru a vodorovně jej vytáhněte
(obr. k).
3 Sejměte kolečko otočného
zvlhčovacího ltru z opěry otočného
zvlhčovacího ltru (obr. †).
4 Vypláchněte nádržku na vodu, tácek
na vodu a otočný zvlhčovací ltr
zvlhčovače NanoCloud pod tekoucí
kohoutkovou vodou.
Poznámka
• Během čištění nesundávejte
otočný zvlhčovací ltr zvlhčovače
NanoCloud z kolečka.
• Otočný zvlhčovací ltr zvlhčovače
NanoCloud nedrhněte ani ho
nepokládejte na přímé sluneční
světlo.
• Pokud to bude třeba, použijte
k vyčištění nádržky na vodu a tácku
na vodu jemný čisticí prostředek.
V takovém případě nádržku na
vodu a tácek na vodu důkladně
vypláchněte.
59
Page 62

CZ
5 Otřete vnější stranu nádržky na
vodu a tácku na vodu do sucha.
6 Umístěte kolečko otočného
zvlhčovacího ltru na opěru
otočného zvlhčovacího ltru
(obr. m).
Poznámka
• Když dáváte kolečko otočného
zvlhčovacího ltru na opěru
otočného zvlhčovacího ltru, dbejte,
aby výstupek na kolečku otočného
zvlhčovacího ltru zapadl do
příslušných drážek.
7 Zásobník na vodu vložte zpět do
přístroje (obr. n).
8 Nádržku na vodu vložte zpět do
přístroje (obr. r).
Čištění předltru
2 Předltr vyjmete tak, že zatlačíte
zaklapávací uzávěr dolů a vysunete
ltr směrem k sobě (obr. d).
3 Předltr vyperte v tekoucí vodě.
Pokud je předltr výrazně
znečištěný, setřete z něj prach
měkkým kartáčkem (obr. ‡).
4 Nechte předltr oschnout.
Poznámka
• Ujistěte se, že je předltr zcela
suchý. Pokud je stále vlhký, mohou
se v něm začít množit bakterie
a zkrátit jeho životnost.
5 Jakmile bude předltr úplně suchý,
vložte ho zpět do zadního panelu
(obr. h).
6 Stisknutím a podržením tlačítka
na 3 sekundy resetujte dobu čištění
předltru.
Poznámka
• Pokud je předltr poškozený,
opotřebený nebo nefunkční,
nepoužívejte ho. Navštivte webové
stránky www.philips.com/support
nebo se obraťte na středisko péče
o zákazníky ve své zemi.
Stav kontrolky
výstrahy ltru
Na displeji se
zobrazí kód
F0 a výstraha
k čištění otočného
zvlhčovacího ltru
a předltru je
stále aktivní
Postupujte
takto
Vyčistěte
předltr.
1 Vytáhněte horní část zadního
panelu směrem k sobě a uvolněte
panel z přístroje (obr. c).
60
Odstranění vodního
kamene z otočného
zvlhčovacího ltru
zvlhčovače NanoCloud
Stav kontrolky
výstrahy ltru
Na displeji se
zobrazí kód
F0 a výstraha
k čištění otočného
zvlhčovacího ltru
a předltru je
stále aktivní
1 Vytáhněte nádržku na vodu
(obr. j).
2 Zvedněte zásobník na vodu směrem
vzhůru a vodorovně jej vytáhněte
(obr. k).
Postupujte
takto
Odstraňte
vodní kámen
z otočného
zvlhčovacího
ltru NanoCloud
(FY2425)
Page 63

CZ
Čeština
3 Sejměte kolečko otočného
zvlhčovacího ltru z opěry otočného
zvlhčovacího ltru (obr. †).
4 Na dvě hodiny namočte otočný
zvlhčovací ltr NanoCloud do
čisticího prostředku (např. zředěný
bílý ocet, roztok kyseliny citrónové)
(obr. ˆ).
Poznámka
• Použijte mírný nebo kyselý čisticí
prostředek
• Bílý ocet (5% octové kyseliny)
smíchejte se stejným
množstvím vody
• 24 g kyseliny citrónové
smíchejte se 4 l vody
• Pokud jsou na ltru bílé usazeniny
(vodní kámen), dbejte na to, aby
strana, na které je najdete, byla
ponořená do vody.
• Během odstraňování vodního
kamene nesundávejte otočný
zvlhčovací ltr zvlhčovače
NanoCloud z kolečka.
5 Otočný zvlhčovací ltr zvlhčovače
NanoCloud vypláchněte pod
tekoucí vodou, aby se spláchly
zbytky octa nebo kyseliny
citrónové. Při vyplachování otáčejte
otočným zvlhčovacím ltrem, aby
se vypláchla přední i zadní část
(obr. ‰)
6 Nechte otočný zvlhčovací ltr
NanoCloud vyschnout na vzduchu
(obr. Š).
6 Výměna filtru a
knotu
Jak funguje zámek
ochrany zdravého
vzduchu
Tento přístroj je vybaven zámkem
ochrany zdravého vzduchu, který
zajišťuje optimální stav ochranného
ltru Nano Protect a otočného
zvlhčovacího ltru zvlhčovače během
provozu přístroje. Když téměř uplyne
doba použitelnosti ochranného ltru
Nano Protect a otočného zvlhčovacího
ltru zvlhčovače, začne blikat kontrolka
výstrahy na výměnu na znamení, že
je potřeba je vyměnit.
Pokud ltr a otočný zvlhčovací ltr včas
nevyměníte, přístroj přestane pracovat a
zablokuje se.
Výměna ltru
NanoProtect (obr. ‹)
Poznámka
• Filtr není omyvatelný a slouží jen na
jedno použití.
• Před výměnou ltrů čističku
vzduchu vždy vypněte a odpojte od
zdroje napájení.
Poznámka
• Otočný zvlhčovací ltr zvlhčovače
NanoCloud nepokládejte na přímé
sluneční světlo.
7 Stisknutím tlačítka a jeho
podržením na 3 sekundy resetujte
dobu čištění otočného zvlhčovacího
ltru NanoCloud.
61
Page 64

CZ
Stav kontrolky
výstrahy ltru
Zobrazí se kód A3
a na obrazovce
bliká kontrolka
výměny ltru.
Zobrazí se kód C7
a na obrazovce
bliká kontrolka
výměny ltru.
Postupujte
takto
Vyměňte ltr
NanoProtect
řady 3 (FY1410)
Vyměňte aktivní
uhlíkový ltr
NanoProtect
(FY1413)
1 Vyjměte použité ltry z přístroje
(obr. Œ).
Poznámka
• Nedotýkejte se skládaného povrchu
ltru ani k ltrům nečichejte –
obsahují zachycené škodliviny ze
vzduchu.
• Po likvidaci použitých ltrů si umyjte
ruce.
2 Odstraňte veškerý obalový materiál
z nových ltrů (obr. f).
3 Nový ltr vložte do přístroje
(obr. g).
4 Stisknutím tlačítka a jeho
podržením na 3 sekundy resetujte
počítadlo životnosti ltru
NanoProtect.
Výměna otočného
zvlhčovacího ltru
zvlhčovače NanoCloud
Stav kontrolky
výstrahy ltru
Zobrazí se kód F1
a na obrazovce
bliká kontrolka
výměny ltru
(obr. ).
Postupujte
takto
Vyměňte otočný
zvlhčovací ltr
zvlhčovače
NanoCloud
1 Sejměte kolečko otočného
zvlhčovacího ltru z opěry otočného
zvlhčovacího ltru (obr. †).
2 Uchopte šroub hřídele na opačné
straně kolečka a jeho otočením
proti směru hodinových ručiček
uvolněte otočný zvlhčovací ltr
z kolečka (obr. ).
3 Postupným uvolněním západek na
hraně kolečka rozmontujte kolečko
otočného zvlhčovacího ltru
(obr. ).
4 Vyjměte použitý otočný zvlhčovací
ltr NanoCloud (obr. ).
5 Odstraňte veškerý obalový materiál
z nového otočného zvlhčovacího
ltru NanoCloud (obr. l).
6 Umístěte otočný zvlhčovací ltr
NanoCloud na kolečko otočného
zvlhčovacího ltru a poté upevněte
pojistky na okraji kolečka (obr. ‘).
7 Umístěte kolečko otočného
zvlhčovacího ltru na opěru
otočného zvlhčovacího ltru
(obr. m).
Poznámka
• Když dáváte kolečko otočného
zvlhčovacího ltru na opěru
otočného zvlhčovacího ltru, dbejte,
aby výstupek na kolečku otočného
zvlhčovacího ltru zapadl do
příslušných drážek.
8 Vložte zásobník na vodu a nádržku
na vodu zpět do přístroje (obr. n).
9 Stisknutím tlačítka a jeho
podržením na 3 sekundy resetujte
počitadlo životnosti otočného
zvlhčovacího ltru NanoCloud.
62
Page 65

CZ
Čeština
7 Odstraňování problémů
V této kapitole najdete nejběžnější problémy, s nimiž se můžete u přístroje setkat.
Pokud vám uvedené informace nepomohou váš problém vyřešit, kontaktujte středisko
péče o zákazníky ve své zemi.
Problém Možná řešení
• Kontrolka výměny ltru trvale svítí, ale nevyměnili jste ltr
I když je přístroj
zapojen do
elektrické sítě,
nefunguje.
NanoProtect, takže je přístroj nyní zablokován. V takovém
případě vyměňte ltr a resetujte počítadlo životnosti ltru.
• Kontrolka doplnění vody bliká. Ověřte, zda je správně
nainstalovaná nádržka na vodu a zda obsahuje dostatek
vody.
Přístroj nefunguje,
přestože je
zapnutý.
Na otočném
zvlhčovacím
ltru zvlhčovače
NanoCloud
jsou nějaké bílé
usazeniny.
Z výstupu vzduchu
nevychází žádný
vzduch.
Proud vzduchu,
který vychází
z výstupu vzduchu,
je výrazně slabší
než dříve.
• Přístroj pracuje, ale tlačítka nereagují. Zkontrolujte, zda je
aktivována dětská pojistka.
• Bílým nánosům se říká vodní kámen a skládají se z minerálů
obsažených ve vodě. Vodní kámen na otočném zvlhčovacím
ltru zvlhčovače NanoCloud ovlivňuje zvlhčovací výkon,
nepoškozuje však vaše zdraví. Řiďte se pokyny k čištění
v uživatelské příručce.
• Zapojte přístroj do zdroje napájení a zapněte ho.
• Předltr je špinavý. Vyčistěte předltr (viz kapitola "Čištění").
• Ujistěte se, že jste z ltru NanoProtect odstranili všechen
obalový materiál.
63
Page 66

CZ
Problém Možná řešení
• Zkontrolujte, že je z ltrů odstraněn balicí materiál.
Kvalita vzduchu
se nezlepšila,
přestože čistička už
je v provozu delší
dobu.
• V čističce vzduchu není vložen některý z ltrů nebo je vložen
nesprávně. Zkontrolujte, že jsou správně vloženy všechny
ltry, a to v následujícím pořadí (od nejvzdálenějšího ltru):
1) ltr NanoProtect řady 3 (FY1410); 2) aktivní uhlíkový ltr
NanoProtect (FY1413); 3) předltr.
• Snímač kvality vzduchu je vlhký. Ujistěte se, že je snímač
kvality vzduchu čistý a suchý (viz kapitola "Čištění").
• Technologie NanoCloud rovnoměrně distribuuje neviditelné
vodní páry do místnosti. Za suchých podmínek bude vlhkost
Dosažení cílové
úrovně vlhkosti trvá
dlouho.
ze zvlhčovače absorbována zdmi, nábytkem a dalšími věcmi
v místnosti. Také větrání suchým vzduchem zvenčí prodlouží
čas, který je potřeba k dosažení cílové úrovně vlhkosti.
Pro dosažení optimálního zvlhčovacího a čistícího výkonu
doporučujeme mít během používání zavřené dveře a okna.
Z přístroje
nevychází žádný
viditelný opar.
Funguje?
Přístroj vydává
divný zápach.
Přístroj je velice
hlučný.
• Když je opar velmi jemný, není vidět. Tento přístroj využívá
technologii zvlhčování NanoCloud, která z oblasti výstupu
vypouští zdravý vlhký vzduch a nevytváří vodní opar. Proto
opar není vidět.
• Při několika prvních použitích může přístroj vydávat zápach
plastu. To je normální jev. Pokud však z přístroje vychází
zápach spáleniny (i při vyměňování ltrů), kontaktujte
prodejce výrobků Philips nebo autorizované servisní centrum
Philips.
• Filtr může po určité době používání vydávat zápach
v důsledku absorpce vzduchu z interiéru. Filtr vyjměte
a umístěte tam, kde bude vystaven přímému slunečnímu
světlu a větrání. Přeinstalujte jej a zkuste opět použít. Pokud
zápach přetrvává, ltr vyměňte.
• Neodstranili jste z ltrů všechen obalový materiál. Ujistěte se,
že jste z ltrů odstranili všechen obalový materiál.
• Přepněte otáčky ventilátoru na nižší úroveň.
64
Page 67

CZ
Čeština
Problém Možná řešení
Přístroj stále
upozorňuje, že je
potřeba vyměnit
ltr, přestože už byl
vyměněn.
Na displeji se
zobrazují chybové
kódy "E1", "E2", "E3",
"E4" nebo "E5".
Nastavení Wi-Fi
není úspěšné.
• Je možné, že jste tlačítko časovače/resetování nestiskli a
nepodrželi správně. Zapojte přístroj, stisknutím tlačítka ho
zapněte a stiskněte a podržte tlačítko časovače/resetování
na 3 sekundy.
• Přístroj má poruchy. Obraťte se na středisko péče
o zákazníky ve vaší zemi.
• Pokud je router, k němuž je čistička připojená, dvoupásmový
a nemůže se připojit k síti 2,4 GHz, přepněte do jiného
pásma stejného routeru (2,4 GHz) a zkuste čističku znovu
spárovat. Nejsou podporovány sítě v pásmu 5 GHz.
• Nejsou podporovány sítě pro ověřování webu.
• Zkontrolujte, zda je síť v dosahu routeru Wi-Fi. Můžete zkusit
vyhledat čističku vzduchu blíže routeru Wi-Fi.
• Zkontrolujte, zda je název sítě správný. V názvu sítě se
rozlišují malá a velká písmena.
• Zkontrolujte, zda je správné heslo pro Wi-Fi. V heslech se
rozlišují malá a velká písmena.
• Znovu se pokuste o nastavení podle pokynů v části
Nastavení Wi-Fi připojení po změně sítě.
• Wi-Fi připojení může být přerušeno elektromagnetickým
nebo jiným rušením. Udržujte tento přístroj mimo dosah jiných
elektronických zařízení, která mohou způsobovat rušení.
• Zkontrolujte, zda není mobilní zařízení v režimu V letadle.
Režim V letadle nesmí být při připojování k síti Wi-Fi aktivní.
• V nápovědě v aplikaci najdete podrobné a aktuální tipy
k odstraňování problémů.
65
Page 68

CZ
8 Záruka a servis
Pokud potřebujete další informace
nebo máte jakýkoli problém, navštivte
web společnosti Philips na adrese
www.philips.com nebo kontaktujte
středisko péče o zákazníky společnosti
Philips ve vaší zemi (telefonní
číslo naleznete v záručním listu
s celosvětovou platností). Pokud se ve
vaší zemi středisko péče o zákazníky
společnosti Philips nenachází, obraťte
se na místního prodejce výrobků Philips.
Objednání dílů nebo
doplňků
Pokud musíte vyměnit některý díl nebo
chcete zakoupit další díl, obraťte se
na prodejce společnosti Philips nebo
navštivte stránky
www.philips.com/support.
Pokud byste měli s obstaráním dílů
k přístroji jakékoli problémy, obraťte se
na středisko péče o zákazníky
společnosti Philips ve své zemi
(příslušné telefonní číslo naleznete
v záručním listu s celosvětovou
platností).
9 Upozornění
Elektromagnetická pole
(EMP)
Tento přístroj Philips odpovídá všem
platným normám a předpisům týkajícím
se elektromagnetických polí.
Soulad se standardy EMP
Koninklijke Philips N.V. vyrábí a
prodává mnoho výrobků určených
pro spotřebitele, které stejně jako
jakýkoli jiný elektronický přístroj mají
obecně schopnost vysílat a přijímat
elektromagnetické signály.
Jednou z předních remních zásad
společnosti Philips je zajistit u našich
výrobků všechna potřebná zdravotní
a bezpečnostní opatření, splnit veškeré
příslušné požadavky stanovené
zákonem a dodržet všechny standardy
EMF platné v době výroby.
Společnost Philips se zavázala vyvíjet,
vyrábět a prodávat výrobky, které
nemají nepříznivé účinky na zdravotní
stav. Společnost Philips potvrzuje,
že pokud se s jejími výrobky správně
zachází a používají se pro zamýšlený
účel, je podle současného stavu
vědeckého poznání jejich použití
bezpečné.
Společnost Philips hraje aktivní roli
ve vývoji mezinárodních standardů
EMF a bezpečnostních norem, díky
čemuž dokáže předvídat další vývoj ve
standardizaci a rychle jej promítnout do
svých výrobků.
66
Page 69

CZ
Čeština
Recyklace
Tento symbol znamená, že výrobek
nelze likvidovat s běžným komunálním
odpadem (2012/19/EU).
Řiďte se pravidly vaší země pro sběr
elektrických a elektronických výrobků.
Správnou likvidací pomůžete předejít
negativním dopadům na životní
prostředí a lidské zdraví.
Oznámení
App Store je servisní značka společnosti
Apple Inc.
Google Play je ochranná známka
společnosti Google Inc.
Aplikaci "Air Matters" vyvinula
společnost Air Matters Network Pty Ltd.
Tento přístroj značky Philips a aplikace
Air Matters používají více softwarů typu
open source. Kopie licenčního textu
softwaru open source používaného
v tomto výrobku lze odvodit z webových
stránek:
www.philips.com/purier-compatibility.
Zjednodušené EU
prohlášení o shodě
Tímto Philips Consumer Lifestyle
B.V. prohlašuje, že typ rádiového
zařízení AC2729 je v souladu se
směrnicí 2014/53/EU. Úplné znění EU
prohlášení o shodě je k dispozici na této
internetové adrese: www.philips.com.
67
Page 70

Page 71

Magyar
Tartalom
1 Fontos tudnivalók 70
Biztonság 70
2 A légtisztító 73
Termék áttekintése
(a .ábra) 74
Vezérlőszervek áttekintése
(b .ábra) 74
3 Bevezetés 75
A NanoProtect szűrő beszerelése 75
Felkészülés a párásításra 75
Wi-Fi-beállítás 76
4 A készülék használata 77
A levegőminőség jelzőfényének
megismerése 77
Be- és kikapcsolás 78
A páratartalom szintjének
beállítása 78
Váltás a használati üzemmódok
között 78
A világításszabályozás funkció
használata 79
A kijelzőmód átváltása 79
Az Automata mód beállításának
módosítása 80
A ventilátorsebesség módosítása 80
Az időzítő beállítása 80
A gyermekzár beállítása 81
Vízszint 81
5 Tisztítás 81
Tisztítás ütemezése 81
A készüléktest tisztítása 82
A levegőminőség-érzékelő
tisztítása 82
A víztartály, a víztálca
és a NanoCloud forgó
párásítóbetét tisztítása 82
Az előszűrő tisztítása 83
A NanoCloud forgó
párásítóbetét vízkőmentesítése 83
6 A szűrő és a betét cseréje 84
Az egészséges levegővel
kapcsolatos biztonsági
gyelmeztetés megismerése 84
A NanoProtect szűrő cseréje
(‹ .ábra) 84
A NanoCloud forgó
párásítóbetét cseréje 85
7 Hibaelhárítás 86
8 Jótállás és szerviz 89
Alkatrészek és tartozékok
rendelése 89
9 Figyelmeztetések 89
Elektromágneses mezők (EMF) 89
Újrahasznosítás 90
Megjegyzés 90
Egyszerűsített EU-
megfelelőségi nyilatkozat 90
Környezetbarát papír felhasználásával készült. Köszönjük, hogy hozzájárul a fák
megóvásához.
69HU
Page 72

1 Fontos
tudnivalók
Biztonság
A készülék első használata előtt
gyelmesen olvassa el a használati
útmutatót, és őrizze meg későbbi
használatra.
Veszély
• Az áramütés és tűz
elkerülése érdekében
ügyeljen, hogy a
készülékbe ne kerüljön
víz, egyéb folyadék vagy
tűzveszélyes tisztítószer.
• Az áramütés és/vagy tűz
kockázatának elkerülése
érdekében ne tisztítsa
a készüléket vízzel,
egyéb folyadékkal vagy
(tűzveszélyes) tisztítószerrel.
• Ne permetezzen
gyúlékony anyagokat, pl.
rovarirtót vagy illatosítót a
készülék közelében.
• A víztartályban lévő
víz nem alkalmas
fogyasztásra. Ne igya meg
a vizet, és ne használja
állatok itatására vagy
növények öntözésére. A
víztartály kiürítésekor a
lefolyóba öntse a vizet.
Figyelem
• Mielőtt a készüléket a fali
aljzathoz csatlakoztatja,
ellenőrizze, hogy
a készülék oldalán
feltüntetett feszültség
egyezik-e a helyi hálózati
feszültséggel.
• Ha a hálózati kábel
meghibásodott, a
kockázatok elkerülése
érdekében Philips
szakszervizben vagy
hivatalos szakszervizben
ki kell cserélni.
• Ne használja a
készüléket, ha a hálózati
csatlakozódugó, a kábel
vagy a készülék sérült.
• A készüléket 8 éven
felüli gyermekek,
illetve csökkent
zikai, érzékelési vagy
szellemi képességekkel
rendelkező, vagy a
készülék működtetésében
járatlan személyek
is használhatják,
amennyiben ezt
felügyelet mellett
teszik, illetve ismerik a
készülék biztonságos
működtetésének
módját és az azzal járó
veszélyeket.
70 HU
Page 73

Magyar
• Gyermekek felügyelet
nélkül nem tisztíthatják
a készüléket, és nem
végezhetnek felhasználói
karbantartást rajta.
• Vigyázzon, hogy
gyermekek ne játsszanak
a készülékkel.
• Ne zárja el a
levegőbemeneti és a
levegőkimeneti nyílásokat,
például ne helyezzen
tárgyakat a levegőkimeneti
nyílásra vagy a
levegőbemeneti nyílás elé.
• Normál WiFi interfész
802.11b/g/n alapon, 2,4
GHz-en, 31,62 mW-os
EIRP maximális kimeneti
teljesítménnyel.
Vigyázat
• A készülék nem
helyettesíti a megfelelő
szellőztetést, a rendszeres
porszívózást, illetve
főzéskor a szagelszívó
használatát.
• Ha a készülék
áramellátását biztosító
hálózati aljzat rossz
csatlakozásokkal
rendelkezik, a készülék
csatlakozódugója
felmelegszik.
Ügyeljen arra, hogy a
készüléket megfelelően
csatlakoztatott hálózati
aljzathoz csatlakoztassa.
• Mindig száraz, stabil és
vízszintes felületen tárolja
és használja a készüléket.
• Hagyjon legalább 20 cm
szabad helyet a készülék
mögött és mindkét
oldalán, illetve hagyjon
legalább 30 cm szabad
helyet a készülék előtt.
• Ne tegyen semmit a
készülékre.
• Ne helyezze a
készüléket közvetlenül
légkondicionáló alá,
nehogy a kicsapódó pára
a készülékre csepegjen.
• A készülék bekapcsolása
előtt győződjön meg
arról, hogy minden szűrő
megfelelően be van-e
helyezve.
• Kizárólag az ehhez a
készülékhez való, eredeti
Philips szűrőket használja.
Semmilyen más szűrőt ne
használjon.
• Ügyeljen, hogy ne
csapódjanak kemény
tárgyak a készülékhez
(különösen a
71HU
Page 74

levegőbemeneti és a
levegőkimeneti nyíláshoz).
• Ne dugja be az ujjait
és más tárgyakat a
levegőkimenetbe vagy
-bemenetbe, mert az
sérüléshez vagy a készülék
meghibásodásához
vezethet.
• Ne használja a készüléket,
ha a helyiségben füstölő
rovarriasztót, olajos
párologtatót vagy füstölőt
helyezett el, vagy vegyi
gázok vannak a levegőben.
• Ne használja a
készüléket gázkészülék,
fűtőberendezés vagy
kandalló közelében.
• A készülék hálózati
csatlakozódugóját
a használat után,
valamint a vízzel való
feltöltés, tisztítás és
más karbantartási
tevékenységek előtt húzza
ki a fali aljzatból.
• Ne használja a készüléket
olyan helyiségben, ahol
nagy hőmérsékletingadozások vannak.
• Az interferencia
elkerülése érdekében a
készüléket legalább 2 m
távolságban helyezze el a
rádióhullámmal működő
elektromos készülékektől
(pl. televízióktól, rádióktól
és rádióvezérelt óráktól).
• Ha a párásítót hosszabb
időn keresztül nem
használja, baktériumok
szaporodhatnak el a
szűrőkön. A hosszabb
idejű állás után ellenőrizze
a szűrőket. Ha a szűrők
nagyon szennyezettek,
cserélje ki őket (lásd "A
szűrő és a betét cseréje"
című fejezetet).
• A készülék csak háztartási
használatra alkalmas,
normál működési
körülmények között.
• Ne használja a készüléket
nedves környezetben
vagy magas hőmérsékletű
helyiségekben, például
fürdőszobában,
mellékhelyiségben vagy
konyhában.
• A készülék nem távolítja
el a szén-monoxidot
(CO) és a radont (Rn).
Nem használható
biztonsági eszközként
égési folyamatokkal
és veszélyes vegyi
72 HU
Page 75

Magyar
anyagokkal kapcsolatos
balesetek esetén.
• A víztartályt kizárólag friss,
hideg csapvízzel töltse fel.
Ne használjon talajvizet
vagy forró vizet.
• Vízen kívül ne töltsön más
anyagot a víztartályba.
Ne öntsön illatanyagot a
víztartályba.
• Ha huzamosabb
ideig nem használja
a párásítási funkciót,
tisztítsa meg a víztartályt
és a NanoCloud forgó
párásítóbetét tálcáját,
és a levegőn szárítsa
meg a forgó NanoCloud
párásítóbetétet.
• Ha át kell helyeznie
a készüléket, először
húzza ki a hálózati
csatlakozóaljzatból.
Ezután ürítse ki vagy
távolítsa el a víztartályt és
a víztálcát. A készüléket
vízszintes helyzetben,
a két oldalán található
fogantyúknál fogva
szállítsa.
• Feltöltés és tisztítás
közben húzza ki a készülék
hálózati csatlakozódugóját
a fali aljzatból.
2 A légtisztító
Köszönjük, hogy Philips terméket
vásárolt, és üdvözöljük a Philips
világában!
A Philips által biztosított támogatás
teljes körű igénybevételéhez regisztrálja
termékét az alábbi honlapon:
www.philips.hu/welcome
A Philips légtisztító friss, párásított
levegőt varázsol otthonába a
családja egészsége érdekében.
NanoCloud technológiás, speciális
párologtató-rendszert biztosít, és
különleges párásítószűrőt használ,
amely vízmolekulákat ad hozzá a
száraz levegőhöz, és vízpára nélküli,
egészséges párás levegőt biztosít.
Párásítószűrője magába zárja a vízből
származó baktériumokat, kalciumot
és egyéb részecskéket. Kizárólag
tiszta párásított levegőt biztosít az
otthona számára. Többé nem kell a
téli időszakban vagy a légkondicionáló
miatt tapasztalható száraz levegő miatt
aggódnia.
A készülék első használata előtt
gyelmesen olvassa el a használati
útmutatót, és őrizze meg későbbi
használatra.
73HU
Page 76

Termék áttekintése
(a .ábra)
Vezérlőszervek
áttekintése (b .ábra)
A Vezérlőpult
B Víztartály
C Betéttartó
D Víztálca
E Egyoldalú kerekek
F Betétkerék
NanoCloud forgó párásítóbetét
G
(FY2425)
H Hátsó burkolat
Előszűrő
I
NanoProtect aktívszén szűrő
J
(FY1413)
NanoProtect 2-es sorozatú szűrő
K
(FY1410)
L A légminőség-érzékelő
M Levegőkimeneti nyílás
Kezelőgombok
Tápfeszültség be/ki gomb
Gyermekzár gomb
Automata mód gombja
Ventilátorsebesség gombja
Páratartalom-beállítás gomb
Világításszabályozó gomb
2 az 1-ben üzemmód be-/
kikapcsoló gombja
Időzítő/nullázó gomb
Kijelzőpanel
Alvó üzemmód
Automata mód
Allergén mód
CSAK tisztítás üzemmód
2 az 1-ben üzemmód
74 HU
Szűrőcsere-riasztás
Vízfeltöltési riasztás
Előszűrő és betét tisztítása
riasztás
PM2,5 kijelző
Beltéri allergénindex kijelzése
Wi-Fi jelzőfény
Page 77

Magyar
3 Bevezetés
A NanoProtect szűrő
beszerelése
A készülék használata előtt távolítson
el minden csomagolóanyagot a
szűrőről, majd helyezze vissza a szűrőt a
készülékbe az alább leírt módon:
Megjegyzés
• Ügyeljen, hogy a füllel ellátott oldal
nézzen Ön felé.
1 Húzza maga felé a hátsó panel
felső részét a készülékről való
eltávolításhoz (c .ábra).
2 Nyomja le a csatot, majd húzza
maga felé az előszűrőt (d .ábra).
3 Távolítsa el az összes szűrőt
(e .ábra).
4 Távolítson el minden
csomagolóanyagot a NanoProtect
szűrőről (f .ábra).
5 Helyezze vissza a NanoProtect
szűrőt a készülékre (g .ábra).
6 Helyezze vissza az előszűrőt a
készülékbe, majd szerelje fel a
készülék aljára, és nyomja az
előszűrő tetején lévő csatokat a
készülékre (h .ábra).
7 A hátsó burkolat
visszahelyezéséhez először szerelje
fel a panelt a készülék aljára,
majd nyomja a panel tetejét a
készülékhez (i .ábra).
Felkészülés a párásításra
1 Húzza ki a víztartályt (j .ábra).
2 Emelje meg a víztálcát, majd
vízszintes helyzetben húzza ki
(k .ábra).
3 Távolítsa el az összes
csomagolóanyagot a NanoCloud
forgó párásítóbetétről (l .ábra).
Megjegyzés
• A párásítóbetétet a vásárlás során
felszerelték a betétkerékre.
4 Helyezze a betétkereket a
betéttartóba (m .ábra).
Megjegyzés
• Amikor a betétkereket a
betéttartóba helyezi, ügyeljen arra,
hogy a keréken lévő kiemelkedések
a megfelelő mélyedésekbe
illeszkedjenek.
5 Helyezze vissza a víztálcát a
készülékbe (n .ábra).
6 Forgassa el a víztartály felső
kupakját az óramutató járásával
ellentétes irányba a lecsavarásához
(o .ábra).
7 Töltse fel a víztartályt hideg
csapvízzel (p .ábra).
8 Forgassa el a felső kupakot az
óramutató járásával megegyező
irányba, és szorosan csavarja rá a
víztartályra (q .ábra).
9 Helyezze vissza a víztartályt a
készülékbe (r .ábra).
75HU
Page 78

Wi-Fi-beállítás
A Wi-Fi kapcsolat beállítása az
első használatkor
1 Töltse le és telepítse az "Air Matters"
alkalmazást az App Store vagy a
Google Playoldaláról.
2 Csatlakoztassa a levegőtisztító
csatlakozódugóját a fali aljzathoz,
majd érintse meg a levegőtisztító
gombját.
» A Wi-Fi jelzőfény
narancssárgán villog az első
alkalommal.
3 Ellenőrizze, hogy az okoskészüléke
megfelelően csatlakoztatva van-e a
Wi-Fi hálózathoz.
4 Indítsa el az "Air Matters"
alkalmazást, majd kattintson
a kijelző jobb felső sarkában
található "+ "jelre. Kövesse a
képernyőn megjelenő utasításokat
a légtisztító hálózathoz történő
csatlakoztatásához.
5 A sikeres párosítást és
csatlakoztatást követően a WiFi jelzőfény fehéren kezd
el világítani. Ha a párosítás
nem sikerült, tekintse meg a
hibaelhárításról szóló részt, vagy
pedig az "Air Matters" alkalmazás
súgó részét az átfogó és naprakész
hibaelhárítási javaslatokért.
Megjegyzés
• Ez az utasítás csak a levegőtisztító
első beállításakor érvényes. Ha
a hálózat megváltozott vagy a
beállítást ismét el kell végezni,
tekintse meg "A Wi-Fi kapcsolat
beállítása, ha a hálózatot
módosították" című részt a 77.
oldalon.
• Ha egynél több levegőtisztítót
szeretne az okoskészülékéhez
csatlakoztatni, ahhoz különkülön el kell végeznie mindegyik
levegőtisztító csatlakoztatását.
Mielőtt bekapcsolná a másik
levegőtisztítót, fejezze be az adott
levegőtisztító beállítását.
• Győződjön meg arról, hogy az
okoskészülék és a levegőtisztító
közötti távolság elérje a 10 métert,
és akadályoktól mentes legyen.
• Az alkalmazás támogatja a
legújabb Android és iOS verziókat.
Tekintse meg a www.philips.com/
purier-compatibility weboldalt a
támogatott operációs rendszerek és
eszközök legújabb frissítéséért.
76 HU
Page 79

Magyar
A Wi-Fi kapcsolat beállítása, ha
a hálózatot módosították
Megjegyzés
• Ez abban az esetben érvényes, ha
megváltozott az alapértelmezett
hálózat, amelyhez a tisztító
csatlakozik.
1 Csatlakoztassa a levegőtisztító
csatlakozódugóját a fali aljzathoz,
majd érintse meg a levegőtisztító
gombját.
2 Érintse meg egyszerre a és a
gombot 3 másodpercig, amíg
hangjelzést nem hall.
» A levegőtisztító párosítási
üzemmódba lép.
» A Wi-Fi jelzőfény
narancssárgán villog.
3 Kövesse "A Wi-Fi kapcsolat
beállítása az első használatkor"
című rész 4. és 5. lépését.
4 A készülék
használata
A levegőminőség
jelzőfényének
megismerése
PM2,5
szint
≤12 Kék
13–35 Kék-lila
36–55 Lila-piros
>55 Piros
A levegőminőség jelzőfénye
automatikusan bekapcsol a készülék
bekapcsolásakor, és sorban minden
színt megjelenít. A levegőminőségérzékelők rövidesen kiválasztják
a környezeti levegő minőségének
megfelelő színt.
A levegőminőség
jelzőfényének színe
PM2,5
Az AreaSense érzékelő technológia
pontosan érzékeli és gyorsan
reagál még a levegő legkisebb
részecskeváltozására is. Valós idejű
PM2,5 visszajelzéssel tájékoztatja Önt.
A legtöbb beltéri levegőben
megtalálható szennyezőanyag nem
éri el a PM2,5 értéket – azaz ezeknek
a levegőben található részecskéknek
a mérete kisebb mint 2,5 mikrométer.
Az apró részecskék gyakori beltéri
forrása a dohányfüst, a főzés és a
meggyújtott gyertyák. Egyes levegőben
terjedő baktériumok és a legkisebb
penészspórák, illetve kisállatok és
poratkák által hordozott allergének
szintén PM2,5-nél kisebb méretűek.
Levegőminőség szintje
Jó
Kielégítő
Rossz
NagyonRossz
77HU
Page 80

IAI
Az AeraSense professzionális érzékelő
észleli a beltéri levegő allergénszintjét,
továbbá 1-től 12-ig terjedő numerikus
visszajelzéssel megjeleníthető a beltéri
levegő allergénjeinek potenciális
kockázati szintje. Az 1-es érték a legjobb
levegőminőséget jelzi.
A páratartalom
szintjének beállítása
1 A páratartalom gomb ismételt
megérintésével állítsa be a levegő
páratartalmát a 40%, 50%, 60%,
illetve a " " értékre (s .ábra).
Be- és kikapcsolás
1 Csatlakoztassa a hálózati dugót a
csatlakozóaljzatba.
» A készülék sípol.
2 Érintse meg a gombot a készülék
bekapcsolásához.
» A készülék alapértelmezetten
2 az 1-ben üzemmódban
működik, amely során a
jelenik meg a kijelzőn.
» A készülék melegedése közben
a " " jelenik meg a kijelzőn.
A csak a levegőben található
részecskék mennyiségének
lemérése után a készülék
PM2,5 szintet jelez ki, és
alapértelmezetten az
Automata módban működik.
» A levegő minőségének kb. 30
másodpercig tartó mérése
után a levegőminőség-érzékelő
automatikusan kiválasztja
a levegőminőség-jelzőfény
megfelelő színét.
3 A készülék kikapcsolásához
érintse meg és tartsa lenyomva 3
másodpercig a gombot.
Megjegyzés
• Ha a készüléket a be-/
kikapcsológombbal történő
kikapcsolás után nem csatlakoztatja
le az elektromos hálózatról, akkor
az az ismételt bekapcsoláskor a
korábban megadott beállításokkal
kezd működni.
Megjegyzés
• A " " páratartalomszint
kiválasztása esetén a készülék
mindaddig párásítani fogja a
helyiséget, amíg a környezet relatív
páratartalma el nem éri a 70% RH
értéket.
Megjegyzés
• A kívánt páratartalomszint
elérésekor a betétkerék abbahagyja
a forgást. Akkor kezd újra forogni, ha
a páratartalom a beállított szint alá
csökken.
• Ha gyorsan szeretné növelni a
páratartalmat, akkor válasszon
nagyobb ventilátorsebességet.
Váltás a használati
üzemmódok között
A készülék kétféle használati
üzemmóddal rendelkezik, a CSAK
tisztítás és a 2 az 1-ben üzemmóddal.
1 Érintse meg az üzemmódválasztó
gombot a CSAK tisztítás
üzemmódra váltáshoz (t .ábra).
» megjelenik a kijelzőn,
miközben a készülék CSAK
tisztítás üzemmódban működik.
2 Érintse meg még egyszer az
üzemmódválasztó gombot a 2 az
1-ben üzemmódra váltáshoz
(u .ábra).
78 HU
Page 81

Magyar
» megjelenik a kijelzőn,
miközben a készülék 2 az 1-ben
üzemmódban működik.
» A képernyőn alapértelmezés
szerint megjelenik az aktuális
páratartalom.
Megjegyzés
• A képernyőn 3 másodpercig a
páratartalom lesz látható, majd
megjelenik a legmagasabb IAI vagy
PM2,5 érték, ha valamelyik érték
nem megfelelő.
A világításszabályozás
funkció használata
A világításszabályozási gombbal
igény szerint be- vagy kikapcsolható a
levegőminőség jelzőfénye, a kijelző és a
funkció jelzőfénye.
1 Érintse meg egyszer a jelzőfény
világításszabályozási gombját
: a levegőminőség jelzőfénye
ekkor tompává válik.
2 Érintse meg még egyszer a jelzőfény
világításszabályozási gombját
( ), a levegőminőség jelzőfénye
és a kijelzőpanel ekkor kikapcsol.
3 Érintse meg harmadszorra is a
világításszabályozási gombot ( ):
ekkor az összes jelzőfény újra világít.
A kijelzőmód átváltása
A készülék háromféle megjelenítési
móddal rendelkezik: ez a PM2,5 kijelző,
IAI kijelző és a páratartalomszint kijelző.
Megjegyzés
• A készülék alapértelmezetten PM2,5
kijelzőmódban működik.
1 Érintse meg és tartsa lenyomva a
gombot 3 másodpercig az IAI
kijelzőre való váltáshoz (v .ábra).
» Az IAI mutató és a tényleges IAI
szint megjelenik a kijelzőn.
2 Érintse meg és tartsa lenyomva a
gombot kétszer 3 másodpercig az
aktuális páratartalomszint kijelzőre
való váltáshoz (w .ábra).
3 Érintse meg és tartsa lenyomva a
gombot 3 másodpercig a PM2,5
kijelzőre való váltáshoz (x .ábra).
» A PM2,5 mutató és a tényleges
PM2,5 szint megjelenik a
kijelzőn.
Megjegyzés
• A képernyőn 3 másodpercig a
páratartalom lesz látható, majd
megjelenik a legmagasabb IAI vagy
PM2,5 érték, ha valamelyik érték
nem megfelelő.
79HU
Page 82

Az Automata mód
beállításának
módosítása
Az Automata mód ( ), az Allergén
mód( ) és az Alvó mód ( ) közül
választhat.
Megjegyzés
• A kivételével az összes lámpa
kialszik, ha egy percig nem nyom le
gombot.
• A fényeket bekapcsolhatja
manuálisan bármelyik gomb
megérintésével.
Automata mód
Automata módban a készülék a
környezeti levegő páratartalma
és minősége alapján választja ki a
ventilátorsebességet.
• Érintse meg a ventilátorsebesség
gombot az Automata mód
(y .ábra) kiválasztásához.
» A képernyőn a következők
jelennek meg: Automata ( ) és
.
» A készülék alapértelmezetten
Automata módban működik.
Allergén mód
A rendkívül érzékeny allergén módot
úgy tervezték, hogy a környezeti levegő
allergénszintjének egészen minimális
változására is reagáljon.
• Érintse meg az Automata mód
gombot az Allergén mód
kiválasztásához (z .ábra).
» A képernyőn a következők
jelennek meg: Automata ( ) és
.
Alvás (SL)
Alvó módban a légtisztító csendesen
működik nagyon alacsony sebesség
mellett.
• Érintse meg az Automata
mód gombot az Alvó mód
kiválasztásához ( ) ({ .ábra).
» A képernyőn a következők
jelennek meg: Alvó ( ) és .
A ventilátorsebesség
módosítása
Számos ventilátorsebesség áll
rendelkezésre.
Kézi
• Érintse meg többször a
ventilátorsebesség gombot
a kívánt ventilátorsebesség
kiválasztásához (1, 2 vagy 3)
(| .ábra).
Turbó (t)
Turbó módban a légtisztító a
legnagyobb sebességen működik.
• A Turbó mód kiválasztásához
érintse meg a ventilátorsebesség
gombját ( ) (} .ábra).
Az időzítő beállítása
Az időzítővel a készülék megadott
számú órán át működtethető. Ha
a beállított idő letelt, a készülék
automatikusan kikapcsol.
• Érintse meg többször az időzítő/
nullázó gombot a készülék
kívánt működtetési óraszámának
kiválasztásához (~ .ábra).
» Az időzítő 1 és 12 óra közötti
értékre állítható.
80 HU
Page 83

Magyar
• Az időzítő funkció kikapcsolásához
érintse meg ismételten az időzítő/
nullázó gombot addig, amíg a
kijelzőn a következő nem látható:
"---".
A gyermekzár beállítása
1 Érintse meg és tartsa lenyomva a
gyermekzár gombot
( ) 3 másodpercig a gyermekzár
aktiválásához ( .ábra).
» 3 másodpercre megjelenik a
kijelzőn.
» Ha a gyermekzár be van
kapcsolva, minden más gomb
nem reagál.
2 Érintse meg és tartsa lenyomva újra
a gyermekzár gombot
( ) 3 másodpercig a gyermekzár
kikapcsolásához (€ .ábra).
» 3 másodpercre megjelenik a
kijelzőn.
Vízszint
A víztartály vízszintje a víztartályon
található vízszintellenőrző ablakon
keresztül tekinthető meg.
Ha nincs elegendő víz a víztartályban, a
vízfeltöltésre gyelmeztető jelzőfény
( ) világítani kezd, hogy
gyelmeztesse a víztartály feltöltésére
( .ábra)
Megjegyzés
• Ha nincs víz a víztartályban, a
betétkerék abbahagyja a forgást.
A víztartály újratöltése után a
betétkerék újra forogni kezd.
5 Tisztítás
Megjegyzés
• Tisztítás előtt mindig húzza ki a
készülék hálózati dugóját a fali
aljzatból.
• Soha ne merítse a készüléket vízbe
vagy más folyadékba.
• A készülék alkatrészeinek
tisztításához soha ne használjon
súrolószert, valamint agresszív
vagy gyúlékony tisztítószereket, pl.
fehérítőt vagy alkoholt.
• Csak az előszűrő és a NanoCloud
forgó párásítóbetét mosható. A
NanoProtect szűrő nem mosható,
valamint porszívóval sem tisztítható.
Tisztítás ütemezése
Gyakoriság Tisztítási módszer
Amikor
szükséges
Hetente
Ha a
tisztítás
ikon
világítani
kezd, és a(z)
F0 jelenik
meg a
kijelzőn.
A készülék burkolatát
száraz kendővel törölje
le.
Öblítse ki a víztartályt,
a víztálcát és a
NanoCloud forgó
párásítóbetétet.
Tisztítsa meg az
előszűrőt.
Vízkőmentesítse a
NanoCloud forgó
párásítóbetétet vízzel
és (5% ecetsav-tartalmú)
háztartási ecettel, vagy
vízzel és citromsavval.
81HU
Page 84

A készüléktest tisztítása
A por lerakódásának megelőzése
érdekében rendszeresen tisztítsa a
készülék belsejét és külsejét.
1 Puha, száraz kendővel törölje le a
port a készüléktestről.
2 A levegőkimeneti nyílást puha,
száraz ruhával tisztítsa.
4 Szárítsa meg őket száraz fültisztító
pálcikával.
5 Helyezze vissza a levegőminőség-
érzékelő burkolatát (… .ábra).
A víztartály, a víztálca
és a NanoCloud forgó
párásítóbetét tisztítása
A levegőminőségérzékelő tisztítása
A levegőminőség-érzékelő optimális
működése érdekében 2 havonta
végezze el a levegőtisztító tisztítását.
Ha poros környezetben használja a
levegőtisztítót, gyakrabban végezze el a
tisztítását.
Megjegyzés
• Ha a helyiség páratartalma nagyon
magas, páralecsapódás alakulhat ki
a levegőminőség-érzékelőn. Ennek
eredményeképpen a levegőminőség
jelzőfénye még jó minőségű levegő
esetén is azt jelezheti, hogy a levegő
minősége rossz. Ilyen esetben el
kell végezni a levegőminőségérzékelő tisztítását, vagy a manuális
sebességbeállítások egyikét kell
alkalmazni.
1 Tisztítsa meg puha kefével a
légminőség-érzékelő bemenetét és
kimenetét (‚ .ábra).
2 Nyissa fel a levegőminőség-
érzékelő burkolatát (ƒ .ábra).
3 Enyhén benedvesített fültisztító
pálcikával tisztítsa meg a
levegőminőség-érzékelőt, a
porbemenetet és a porkimenetet
(„ .ábra).
Megjegyzés
• A víztartály, a víztálca és a
NanoCloud forgó párásítóbetét
tisztítása hetente, a higiénikus
működés érdekében.
1 Húzza ki a víztartályt (j .ábra).
2 Emelje meg a víztálcát, majd
vízszintes helyzetben húzza ki
(k .ábra).
3 Vegye ki a betétkereket a
betéttartóból († .ábra).
4 Öblítse ki a víztartályt, a víztálcát és
a NanoCloud forgó párásítóbetétet
vízcsap alatt.
Megjegyzés
• Tisztítás közben ne vegye le a
NanoCloud forgó párásítóbetétet a
kerékről.
• Ne dörzsölje a NanoCloud forgó
párásítóbetétet, valamint ne tegye
ki közvetlen napfénynek.
• Ha szükséges, használjon enyhe
tisztítószert a víztartály és a víztálca
tisztításához. Tisztítószer használata
esetén alaposan öblítse át a
víztartályt és a víztálcát.
5 Törölje szárazra a víztartály és a
víztálca külső felületét.
6 Helyezze a betétkereket a
betéttartóba (m .ábra).
82 HU
Page 85

Magyar
Megjegyzés
• Amikor a betétkereket a betéttartóba
helyezi, ügyeljen arra, hogy a keréken
lévő kiemelkedések a megfelelő
mélyedésekbe illeszkedjenek.
7 Helyezze vissza a víztálcát a
készülékbe (n .ábra).
8 Helyezze vissza a víztartályt a
készülékbe (r .ábra).
Az előszűrő tisztítása
Megjegyzés
• Ha az előszűrő sérült, kopott vagy
törött, ne használja. Látogasson el a
www.philips.hu/support weboldalra,
vagy forduljon az országában
működő vevőszolgálathoz.
4 Hagyja a levegőn megszáradni az
előszűrőt.
Megjegyzés
• Ügyeljen arra, hogy az előszűrő
teljesen száraz legyen. Ha még
nedves, elszaporodhatnak rajta a
baktériumok, ami megrövidítheti az
előszűrő élettartamát.
5 Miután az előszűrő teljesen
megszáradt, helyezze vissza a hátsó
panelbe (h .ábra).
6 Érintse meg és 3 másodpercig tartsa
lenyomva a gombot az előszűrő
tisztítási idejének lenullázásához.
A NanoCloud forgó
párásítóbetét
vízkőmentesítése
A szűrő
gyelmeztető
jelzőfénye
Az F0 megjelenik
a kijelzőn, a betét
és az előszűrő
tisztítására
gyelmeztető
riasztás
bekapcsol
Követendő
eljárás
Tisztítsa meg az
előszűrőt
1 Húzza maga felé a hátsó panel
felső részét a készülékről való
eltávolításhoz (c .ábra).
2 Az előszűrő eltávolításához nyomja
le a csatot, és húzza maga felé a
szűrőt (d .ábra).
3 Mossa le az előszűrőt vízcsap alatt.
Ha az előszűrő nagyon piszkos,
puha kefe használatával távolítsa el
róla a port (‡ .ábra).
A szűrő
gyelmeztető
jelzőfénye
Az F0 megjelenik
a kijelzőn, a betét
és az előszűrő
tisztítására
gyelmeztető
riasztás
bekapcsol
Követendő
eljárás
Vízkőmentesítse
a NanoCloud
forgó
párásítóbetétet
(FY2425)
1 Húzza ki a víztartályt (j .ábra).
2 Emelje meg a víztálcát, majd
vízszintes helyzetben húzza ki
(k .ábra).
3 Vegye ki a betétkereket a
betéttartóból († .ábra).
4 Áztassa a NanoCloud forgó
párásítóbetétet tisztítószerben (pl.
hígított háztartási ecet, citromsavoldat) két órán át (ˆ .ábra).
83HU
Page 86

Megjegyzés
• Enyhe vagy savas tisztítószert
használjon
• Keverjen össze (5% ecetsav
tartalmú) háztartási ecetet és
vizet egyenlő arányban
• Keverjen össze 24 g
citromsavat 4 l vízzel
• Ha fehér lerakódások (vízkő)
találhatók a szűrőn, ügyeljen arra,
hogy a vízköves rész merüljön az
oldatba.
• Vízkőmentesítés közben ne vegye le
a NanoCloud forgó párásítóbetétet
a kerékről.
5 Az ecet- vagy
citromsavmaradványok
eltávolításához öblítse le a
NanoCloud forgó párásítóbetétet
vízcsap alatt. Az öblítés során a
betétet forgatva mossa le annak
elülső és hátsó oldalát is (‰ .ábra).
6 Hagyja megszáradni a NanoCloud
forgó párásítóbetétet (Š .ábra).
6 A szűrő és a
betét cseréje
Az egészséges levegővel
kapcsolatos biztonsági
gyelmeztetés
megismerése
A készülék a NanoProtect szűrő
és a párásítóbetét optimális
működés közbeni állapotának
megőrzése érdekében az egészséges
levegő védelméért felelős zároló
mechanizmussal van ellátva. Ha a
NanoProtect szűrő és a párásítóbetét
már majdnem lejárt, a cserére
gyelmeztető jelzőfény ( ) villogni
kezd, így jelzi, hogy ki kell cserélni őket.
Ha nem cseréli ki időben a szűrőt és a
betétet, a készülék működése leáll, és
zárolja magát.
Megjegyzés
• Ne tegye ki közvetlen napfénynek a
NanoCloud forgó párásítóbetétet.
7 Érintse meg és 3 másodpercig
tartsa lenyomva a gombot a
NanoCloud forgó párásítóbetét
tisztítási idejének lenullázásához.
84 HU
A NanoProtect szűrő
cseréje (‹ .ábra)
Megjegyzés
• A szűrő nem mosható és nem
használható fel újra.
• A szűrők cseréje előtt mindig
kapcsolja ki a levegőtisztítót,
és húzza ki a hálózati
csatlakozódugóját a fali aljzatból.
Page 87

Magyar
A szűrő gyelmeztető
jelzőfénye
Az A3 elem
jelenik meg, és
a szűrőcserére
gyelmeztető fény
villog a kijelzőn.
A C7 elem jelenik meg,
és a szűrőcserére
gyelmeztető fény
villog a kijelzőn.
Követendő
eljárás
Cserélje ki a
NanoProtect
3-as sorozatú
szűrőt
(FY1410)
Cserélje ki a
NanoProtect
aktívszén
szűrőt
(FY1413)
1 Vegye ki a használt NanoProtect
szűrőket a készülékből (Œ .ábra).
Megjegyzés
• Ne érintse meg a redőzött szűrő
felületét, és ne szagolja meg
a szűrőket, mert összegyűltek
rajta a levegőben található
szennyezőanyagok.
• A használt szűrők hulladékba
helyezése után mosson kezet.
2 Távolítson el minden csomago-
lóanyagot az új szűrőkről (f .ábra).
3 Helyezze be az új szűrőket a
készülékbe (g .ábra).
4 Érintse meg és 3 másodpercig
tartsa lenyomva a gombot a
NanoProtect szűrő élettartamszámlálójának lenullázásához.
1 Vegye ki a betétkereket a
betéttartóból († .ábra).
2 Fogja meg a tengelycsavart a kerék
másik oldalán, és forgassa el az
óramutató járásával ellentétes
irányba a betét kerékből való
kiengedéséhez ( .ábra).
3 Egymás után oldja ki a zárakat
a kerék peremén a betétkerék
szétszereléséhez ( .ábra).
4 Vegye ki a használt NanoCloud
forgó párásítóbetétet ( .ábra).
5 Távolítsa el az összes
csomagolóanyagot az új NanoCloud
forgó párásítóbetétről (l .ábra).
6 Helyezze rá az új NanoCloud forgó
párásítóbetétet a betétkerékre,
majd rögzítse a betétkeréken
található zárakat (‘ .ábra).
7 Helyezze a betétkereket a
betéttartóba (m .ábra).
Megjegyzés
• Amikor a betétkereket a betéttartóba
helyezi, ügyeljen arra, hogy a keréken
lévő kiemelkedések a megfelelő
mélyedésekbe illeszkedjenek.
8 Helyezze vissza a víztálcát és
víztartályt a készülékbe (n .ábra).
9 Érintse meg és 3 másodpercig tartsa
lenyomva a gombot a NanoCloud
forgó párásítóbetét élettartamszámlálójának lenullázásához.
A NanoCloud forgó
párásítóbetét cseréje
A szűrő gyelmeztető
jelzőfénye
Az F1 elem jelenik
meg, és a szűrőcserére
gyelmeztető fény
( ) villog a kijelzőn
( .ábra).
Követendő
eljárás
Cserélje ki a
NanoCloud
forgó
párásítóbetétet
85HU
Page 88

7 Hibaelhárítás
Ez a fejezet részletesen foglalkozik a készülékkel kapcsolatban leggyakrabban
felmerülő problémákkal. Ha a hibát az alábbi útmutató segítségével nem tudja
elhárítani, forduljon az adott ország vevőszolgálatához.
Probléma Lehetséges megoldás
• A szűrőcsere jelzőfénye ( ) villogott, de Ön nem cserélte
A készülék
csatlakozik az
elektromos
hálózathoz,
mégsem működik.
A készülék
bekapcsolt
állapotban sem
működik.
ki a NanoProtect szűrőt, ezért most a készülék zárolva van.
Ebben az esetben cserélje ki a szűrőt, és nullázza le a szűrő
élettartam-számlálóját.
• A vízfeltöltésre gyelmeztető jelzőfény ( ) villog.
Győződjön meg róla, hogy a víztartály megfelelően be van
szerelve, és elegendő víz van benne.
• A készülék működik, de a gombok nem reagálnak.
Ellenőrizze, hogy a gyermekzár be van-e kapcsolva.
Némi fehér
lerakódás látható
a NanoCloud forgó
párásítóbetéten.
Nem távozik
levegő a
levegőkimenetből.
A levegőkimenetből
távozó légáram
jelentősen
gyengébb, mint
korábban.
86 HU
• A fehér lerakódások elnevezése vízkő, és a vízben található
ásványokból állnak. A NanoCloud forgó párásítóbetéten
található vízkő hatással van a párásítási teljesítményre,
ugyanakkor nem ártalmas az egészségre. Kövesse a
felhasználói kézikönyvben leírt tisztítási utasításokat.
• Csatlakoztassa a készüléket az elektromos hálózathoz, és
kapcsolja be.
• Az előszűrő szennyezett. Tisztítsa meg az előszűrőt (lásd a
"Tisztítás" c. fejezetet).
• Ügyeljen rá, hogy minden csomagolóanyagot eltávolítson a
NanoProtect szűrőről.
Page 89

Magyar
Probléma Lehetséges megoldás
• Ellenőrizze, hogy a csomagolóanyag le lett-e véve a
szűrőkről.
A levegőminőség
nem javul, pedig
a levegőtisztító
hosszú ideje
működésben van.
• A levegőtisztító egyik szűrője nincs vagy nem megfelelően
van behelyezve. Ellenőrizze, hogy minden szűrő megfelelően
van-e behelyezve, a következő sorrendben, a legbelső
szűrőtől kezdve: 1) NanoProtect 3-as sorozatú szűrő (FY1410);
2) NanoProtect aktívszén szűrő (FY1413); 3) előszűrő.
• Nedves a levegőminőség-érzékelő. Ügyeljen arra, hogy a
levegőminőség-érzékelő tiszta és száraz legyen (lásd a
"Tisztítás" című fejezetet).
• A NanoCloud technológia egyenletesen eloszlatja a
helyiségben a láthatatlan vízpárát. Száraz körülmények
A célként beállított
páratartalomszint
eléréséhez sok idő
szükséges.
között a falak, a bútorok, és a helyiségben lévő egyéb
tárgyak elnyelik a párásítóból kiáramló nedvességet. A
kívülről beáramló száraz levegő is növeli a célként beállított
páratartalom eléréséhez szükséges időt.
A párásítás és tisztítási teljesítmény optimalizálása
érdekében használat közben célszerű becsukni az ajtókat és
ablakokat.
Nem látok
párát távozni
a párásítóból.
Működik?
A készülék
használatakor
furcsa szag
keletkezik.
• Ha a pára nagyon nom szemcséjű, nem látható. A
készülék NanoCloud párásító technológiát alkalmaz, amely
egészséges párás levegőt hoz létre a kimeneti részen, vízpára
létrejötte nélkül. Ebből kifolyólag a pára nem látható.
• Előfordulhat, hogy az első néhány használat alkalmával a
készülék műanyagszagot bocsát ki. Ez normális jelenség. Ha
azonban a készülék még a szűrők eltávolítása után is égett
szagot áraszt, lépjen kapcsolatba egy Philips értékesítővel
vagy egy hivatalos Philips márkaszervizzel.
• Előfordulhat, hogy a szűrő kellemetlen szagot áraszt, ha
már egy ideje használatban van. Ennek oka a beltéri levegő
abszorpciója. Távolítsa el a szűrőt, majd helyezze olyan
helyre, ahol közvetlen napfény éri, és hagyja szellőzni több
órán keresztül. Helyezze vissza, és próbálja újból használni.
Ha továbbra is érezhető a szag, cserélje ki a szűrőt.
87HU
Page 90

Probléma Lehetséges megoldás
A készülék nagyon
hangos.
A készülék még
mindig azt jelzi,
hogy ki kell
cserélnem egy
szűrőt, pedig már
megtettem.
Az "E1", "E2", "E3",
"E4" vagy "E5"
hibakód jelenik
meg a képernyőn.
A Wi-Fi beállítás
nem sikerült.
• Nem távolította el az összes csomagolóanyagot a szűrőkről.
Ügyeljen, hogy minden csomagolóanyagot eltávolítson.
• Csökkentse a ventilátor sebességét lassúbb fokozatra.
• Előfordulhat, hogy nem megfelelően érintette meg és
tartotta lenyomva az Időzítés/visszaállítás gombot
. Csatlakoztassa a készüléket az elektromos hálózathoz,
nyomja meg a gombot a bekapcsoláshoz, majd érintse
meg és tartsa lenyomva az Időzítés/visszaállítás gombot
3 másodpercig.
• A készülék hibásan működik. Forduljon az adott ország
vevőszolgálatához.
• Ha az útválasztó – amelyhez a levegőtisztító kapcsolódik
– kétsávos, és jelenleg nem kapcsolódik 2,4 GHz-es
hálózathoz, kapcsoljon át másik sávra ugyanezen az
útválasztón (2,4 GHz), majd próbálja meg ismét a tisztító
párosítását. 5 GHz-es hálózatok nem támogatottak.
• A webhitelesítési hálózatok nem támogatottak.
• Ellenőrizze, hogy a tisztító a Wi-Fi útválasztó hatótávolságán
belül van-e. Próbálja meg közelebb vinni a levegőtisztítót a
Wi-Fi útválasztóhoz.
• Ellenőrizze, hogy a hálózat neve megfelelő-e. A hálózat neve
megkülönbözteti a kis- és nagybetűket.
• Ellenőrizze, hogy helyes-e a beírt Wi-Fi jelszó. A jelszó
megkülönbözteti a kis- és nagybetűket.
• Ismételje meg a beállítást "A Wi-Fi kapcsolat beállítása, ha a
hálózatot módosították" című rész utasításait követve.
• A Wi-Fi csatlakozását zavarhatják elektromágneses vagy
egyéb interferenciák. Tartsa távol a készüléket az esetleg
interferenciákat okozó egyéb elektromos berendezésektől.
• Ellenőrizze, hogy a mobileszköze repülőgép üzemmódban
van-e. Ellenőrizze, hogy a repülőgép üzemmód ki van-e
kapcsolva, amikor a Wi-Fi hálózathoz csatlakozik.
• Tekintse meg az alkalmazás súgó részét az átfogó és
naprakész hibaelhárítási javaslatok megtekintéséhez.
88 HU
Page 91

Magyar
8 Jótállás és
szerviz
9 Figyelmeztetések
Ha információra van szüksége, vagy
valamilyen probléma merül fel,
látogasson el a Philips honlapjára
(www.philips.hu), vagy forduljon az
adott ország Philips vevőszolgálatához
(a telefonszám a világszerte érvényes
garancialevélen található). Ha
országában nem működik ilyen
vevőszolgálat, forduljon a Philips helyi
szaküzletéhez.
Alkatrészek és
tartozékok rendelése
Ha ki szeretne cserélni egy alkatrészt,
vagy újat szeretne vásárolni,
forduljon a területileg illetékes Philips
márkakereskedőhöz, vagy látogasson el
a www.philips.hu/support weboldalra.
Ha problémái adódnak az alkatrészek
beszerzésével, kérjük, forduljon az adott
ország Philips vevőszolgálatához (ennek
telefonszáma a világszerte érvényes
garancialevélen található).
Elektromágneses mezők
(EMF)
Ez a Philips készülék az
elektromágneses mezőkre érvényes
összes vonatkozó szabványnak és
előírásnak megfelel.
Az EMF-szabványoknak való
megfelelőség
Koninklijke Philips N.V. számos olyan
terméket gyárt és kínál vásárlóinak,
amelyek, mint az elektronikus
készülékek általában, elektromágneses
jelek kibocsátására és vételére képesek.
A Philips egyik leglényegesebb
működési irányelve az összes szükséges
egészségi és biztonsági intézkedés
betartása termékei gyártása során, hogy
ezzel megfeleljen az összes vonatkozó
jogi előírásnak, valamint a termék
gyártásakor érvényben lévő EMFszabványoknak.
A Philips olyan termékek fejlesztésére,
gyártására és eladására kötelezte el
magát, amelyeknek nincs ártalmas
élettani hatásuk. A Philips kijelenti, hogy
termékei megfelelő, rendeltetésszerű
használat mellett a tudomány
mai állása szerint biztonságosnak
minősülnek.
A Philips aktív szerepet vállal a
nemzetközi EMF- és biztonsági
szabványok előkészítésében,
ami lehetővé teszi számára a
szabványosításban várható további
fejlesztések előrevetítését és azok
beépítését termékeibe.
89HU
Page 92

Újrahasznosítás
Ez a szimbólum azt jelenti, hogy
a termék nem kezelhető normál
háztartási hulladékként (2012/19/EU).
Kövesse az országában érvényes,
az elektromos és elektronikus
készülékek hulladékkezelésére
vonatkozó jogszabályokat. A megfelelő
hulladékkezelés segítséget nyújt a
környezettel és az emberi egészséggel
kapcsolatos negatív következmények
megelőzésében.
Megjegyzés
Az App Store az Apple Inc. szolgáltatási
védjegye.
A Google Play a Google Inc. védjegye.
Az "Air Matters" alkalmazást az Air
Matters Network Pty Ltd fejlesztette ki.
Ez a Philips készülék és az Air
Matters alkalmazás több nyílt
forráskódú szoftvert használ. A
termékben felhasznált nyílt forráskódú
szoftverlicenc szöveg másolatai a
következő oldalról szerezhetők be:
www.philips.com/purier-compatibility.
Egyszerűsített EUmegfelelőségi
nyilatkozat
Philips Consumer Lifestyle B.V. igazolja,
hogy a AC2729 típusú rádióberendezés
megfelel a 2014/53/EU irányelvnek.
Az EU-megfelelőségi nyilatkozat teljes
szövege elérhető a következő internetes
címen: www.philips.com.
90 HU
Page 93

Polski
Spis treści
1 Ważne 92
Bezpieczeństwo 92
2 Twój oczyszczacz powietrza 95
Opis produktu (rys. a) 96
Panel sterowania
(rys. b) 96
3 Czynności wstępne 97
Instalacja ltra NanoProtect 97
Przygotowanie do nawilżania 97
Konguracja połączenia Wi-Fi 98
4 Korzystanie z urządzenia 99
Działanie wskaźnika jakości
powietrza 99
Włączanie i wyłączanie 100
Ustawianie poziomu wilgotności 100
Przełączanie trybu pracy 100
Korzystanie z funkcji
przyciemniania 101
Przełączanie trybu wyświetlania 101
Zmiana ustawień trybu
automatycznego 102
Zmiana prędkości wentylatora 102
Ustawianie zegara
programowanego 102
Ustawianie blokady
rodzicielskiej 103
Poziom wody 103
5 Czyszczenie 103
Harmonogram czyszczenia 103
Czyszczenie obudowy
urządzenia 104
Czyszczenie czujnika jakości
powietrza 104
Czyszczenie zbiornika wody,
tacki na wodę i obrotowego
ltra nawilżającego NanoCloud 104
Czyszczenie ltra wstępnego 105
Usuwanie kamienia
z obrotowego ltra
nawilżającego NanoCloud 105
6 Wymiana ltrów 106
Działanie blokady Healthy Air
Protect 106
Wymiana ltra NanoProtect
(rys. ‹) 106
Wymiana obrotowego ltra
nawilżającego NanoCloud 107
7 Rozwiązywanie problemów 108
8 Gwarancja i serwis 111
Zamawianie części i akcesoriów 111
9 Uwagi 111
Pola elektromagnetyczne (EMF) 111
Recykling 112
Uwaga 112
Uproszczona deklaracja
zgodności UE 112
Użyto papieru przyjaznego dla środowiska. Dziękujemy za Twój wkład w ochronę drzew.
91PL
Page 94

1 Ważne
Bezpieczeństwo
Przed rozpoczęciem korzystania z
urządzenia zapoznaj się dokładnie z
jego instrukcją obsługi. Instrukcję warto
też zachować na przyszłość.
Niebezpieczeństwo
• Nie wolno dopuścić
do dostania się wody,
łatwopalnych detergentów
ani innych płynów do
wnętrza urządzenia, gdyż
może to doprowadzić do
porażenia prądem i/lub
pożaru.
• Nie czyścić urządzenia
wodą, (łatwopalnymi)
detergentami ani innymi
płynami, gdyż grozi to
porażeniem prądem i/lub
pożarem.
• Nie rozpylaj wokół
urządzenia palnych
materiałów, takich jak
środki owadobójcze lub
zapachowe.
• Woda w zbiorniku nie
nadaje się do picia. Nie
pij tej wody, nie podlewaj
nią kwiatów ani nie dawaj
jej do picia zwierzętom.
Po opróżnieniu zbiornika
wodę wylej do kanalizacji.
Ostrzeżenie
• Przed podłączeniem
urządzenia sprawdź, czy
napięcie podane z boku
urządzenia jest zgodne
z napięciem domowej
instalacji elektrycznej.
• Jeżeli przewód zasilający
nieodłączalny ulegnie
uszkodzeniu, to powinien
on być wymieniony w
centrum serwisowym
rmy Philips lub przez
wykwalikowaną osobę
w celu uniknięcia
zagrożenia.
• Nie używaj urządzenia,
jeśli uszkodzona jest
wtyczka, przewód
zasilający lub samo
urządzenie.
• Niniejsze urządzenie
może być użytkowane
przez dzieci w wieku co
najmniej 8 lat i przez
osoby o obniżonych
możliwościach zycznych,
umysłowych i osoby o
braku doświadczenia i
znajomości urządzenia,
jeżeli zapewniony
zostanie nadzór lub
instruktaż odnośnie do
użytkowania urządzenia
92 PL
Page 95

Polski
w bezpieczny sposób,
tak aby związane z
tym zagrożenia były
zrozumiałe. Dzieci nie
powinny bawić się
urządzeniem. Dzieci bez
nadzoru nie powinny
wykonywać czyszczenia i
konserwacji urządzenia.
• Nie kładź żadnych
przedmiotów przy wlocie
i wylocie powietrza, aby
nie blokować przepływu
powietrza.
• Standardowy interfejs Wi-
Fi wykorzystujący protokół
802.11b/g/n, częstotliwość
2,4 GHz i maksymalną moc
wyjściową 31,62 mW EIRP.
Przestroga
• To urządzenie nie zastąpi
odpowiedniej wentylacji,
regularnego odkurzania
oraz okapu podczas
gotowania.
• Jeśli gniazdko elektryczne,
z którego zasilane jest
urządzenie, jest źle
podłączone, wtyczka
może się nagrzewać.
Sprawdź, czy podłączasz
urządzenie do prawidłowo
zainstalowanego
gniazdka.
• Zawsze ustawiaj
urządzenie i korzystaj z
niego na suchej, stabilnej,
równej i poziomej
powierzchni.
• Ustaw urządzenie tak,
aby z tyłu i po obu
jego stronach było
przynajmniej 20 cm
wolnej przestrzeni, a
nad urządzeniem 30 cm
przestrzeni.
• Nie stawiaj żadnych
przedmiotów na
urządzeniu.
• Nie umieszczaj urządzenia
bezpośrednio pod
klimatyzatorem, aby
zapobiec ściekaniu wody
na urządzenie.
• Przed włączeniem
urządzenia sprawdź,
czy wszystkie ltry
zostały odpowiednio
zamontowane.
• Używaj tylko oryginalnych
ltrów rmy Philips
przeznaczonych dla
danego urządzenia. Nie
używaj innych ltrów.
• Nie uderzaj w urządzenie
twardymi przedmiotami, a
w szczególności we wlot i
wylot powietrza.
93PL
Page 96

• Aby zapobiec uszkodzeniu
ciała lub urządzenia,
nie wkładaj palców ani
żadnych przedmiotów do
wlotu i wylotu powietrza.
• Nie używaj urządzenia
po rozpyleniu wewnątrz
pomieszczenia środków
odstraszających owady
ani w pomieszczeniach,
w których obecne są
resztki oleju, palące się
kadzidełka lub opary
chemiczne.
• Nie używaj urządzenia
w pobliżu urządzeń
gazowych, grzejników lub
kominków.
• Zawsze odłączaj
urządzenie od zasilania
po użyciu oraz przed
przystąpieniem do
napełniania wodą,
czyszczenia lub
przeprowadzania
innych czynności
konserwacyjnych.
• Nie korzystaj z urządzenia
w pomieszczeniu, w
którym występują znaczne
zmiany temperatury.
• Aby uniknąć zakłóceń,
ustaw urządzenie w
odległości przynajmniej
2 m od urządzeń
elektrycznych
wykorzystujących fale
radiowe, takich jak
telewizory, odbiorniki
radiowe lub zegary
sterowane drogą radiową.
• Jeśli urządzenie nie jest
długo używane, na ltrach
mogą pojawić się bakterie.
Sprawdź ltry po długim
okresie nieużywania. Jeśli
ltry są bardzo zabrudzone,
wymień je (patrz rozdział
"Wymiana ltrów").
• Urządzenie jest
przeznaczone wyłącznie
do użytku domowego w
normalnych warunkach
pracy.
• Nie używaj urządzenia
w miejscach wilgotnych
lub miejscach o wysokiej
temperaturze, takich
jak łazienka, toaleta lub
kuchnia.
• Urządzenie nie usuwa
tlenku węgla (CO) ani
radonu (Rn). Nie może być
używane jako urządzenie
ratunkowe w przypadku
pożarów lub wycieków
szkodliwych chemikaliów.
94 PL
Page 97

Polski
• Zbiornik napełniaj tylko
zimną wodą z kranu. Nie
używaj wód gruntowych
ani gorącej wody.
• Do zbiornika nie wlewaj
żadnych innych płynów.
Nie wlewaj substancji
zapachowych do
zbiornika wody.
• Jeśli przez długi czas
nie korzystasz z funkcji
nawilżania, wyczyść
zbiornik wody oraz
tackę obrotowego ltra
nawilżającego NanoCloud
i pozostaw ltr do
wyschnięcia.
• Jeśli zamierzasz
przestawić urządzenie,
najpierw odłącz je
od źródła zasilania.
Następnie opróżnij lub
wyjmij zbiornik wody i
tackę na wodę. Przenoś
urządzenie w pozycji
poziomej, trzymając je za
oba uchwyty znajdujące
się po bokach.
• Odłącz urządzenie
od zasilania podczas
napełniania i czyszczenia.
2 Twój
oczyszczacz
powietrza
Gratulujemy zakupu i witamy wśród
klientów rmy Philips!
Aby w pełni skorzystać z obsługi
świadczonej przez rmę Philips,
zarejestruj swój produkt na stronie
www.Philips.com/welcome.
Oczyszczacz powietrza rmy Philips
odświeża i nawilża powietrze w
Twoim domu, korzystnie wpływając na
zdrowie jego mieszkańców. Urządzenie
wyposażone jest w zaawansowany
system parowy z technologią
NanoCloud i specjalnym ltrem
nawilżającym, który dodaje cząsteczki
wody (H2O) do suchego powietrza,
zapewniając zdrowe, wilgotne powietrze
bez tworzenia mgiełki wodnej. Filtr
nawilżający zatrzymuje bakterie,
wapń i inne cząstki znajdujące się w
wodzie. Powietrze w domu jest czyste
i nawilżone. Nigdy więcej suchego
powietrza zimą i podczas korzystania z
klimatyzacji.
Przed rozpoczęciem korzystania z
urządzenia zapoznaj się dokładnie z
jego instrukcją obsługi. Instrukcję warto
też zachować na przyszłość.
95PL
Page 98

Opis produktu (rys. a)
A Panel sterowania
B Zbiornik wody
C Podstawa ltra
D Tacka na wodę
Panel sterowania
(rys. b)
Przyciski sterowania
Wyłącznik zasilania
Przycisk blokady rodzicielskiej
E Koła jednostronne
F Koło ltra
Obrotowy ltr nawilżający
G
NanoCloud (FY2425)
H Osłona tylna
Filtr wstępny
I
Aktywny ltr węglowy
J
NanoProtect (FY1413)
K Filtr NanoProtect serii 2 (FY1410)
L Czujnik jakości powietrza
M Wylot powietrza
Przycisk trybu automatycznego
Przycisk prędkości wentylatora
Przycisk ustawień wilgotności
Przycisk przyciemniania światła
Wyłącznik trybu 2 w 1
Przycisk zegara/resetowania
Panel wyświetlacza
Tryb snu
Tryb automatyczny
Tryb antyalergenowy
Tryb "TYLKO oczyszczanie"
Tryb 2 w 1
Alarm wymiany ltra
Alarm uzupełniania wody
Alarm czyszczenia ltra
wstępnego i ltra nawilżającego
Wskaźnik stężenia PM2,5
96 PL
Wyświetlanie indeksu alergenów
Wskaźnik Wi-Fi
Page 99

Polski
3 Czynności
wstępne
Instalacja ltra
NanoProtect
Przed rozpoczęciem korzystania z
urządzenia usuń wszystkie opakowania
ltra i umieść go w urządzeniu w
następujący sposób:
Uwaga
Przygotowanie do
nawilżania
1 Wyjmij zbiornik wody (rys. j).
2 Unieś tackę na wodę i wyciągnij ją
poziomo (rys. k).
3 Usuń wszystkie elementy
opakowania z obrotowego ltra
nawilżającego NanoCloud (rys. l).
Uwaga
• W momencie zakupu ltr
nawilżający jest zamocowany na
kole ltra.
• Strona z uchwytem powinna być
zwrócona przodem do Ciebie.
1 Pociągnij do siebie górną część
panelu tylnego, aby zwolnić go z
urządzenia (rys. c).
2 Dociśnij zacisk i pociągnij ltr
wstępny do siebie (rys. d).
3 Usuń wszystkie ltry (rys.e).
4 Usuń z ltra NanoProtect wszystkie
elementy opakowania (rys. f).
5 Włóż ltr NanoProtect z powrotem
do urządzenia (rys. g).
6 Włóż ltr wstępny z powrotem do
urządzenia: najpierw zamontuj
go w dolnej części urządzenia, a
następnie dociśnij zaciski na górze
ltra do urządzenia (rys. h).
7 Aby ponownie zamocować tylną
pokrywę, najpierw zamontuj panel
na dolnej części urządzenia, a
następnie dociśnij jego górną część
do urządzenia (rys. i).
4 Umieść koło ltra na podstawie
ltra (rys. m).
Uwaga
• Umieszczając koło ltra na
podstawie, sprawdź, czy wystające
części koła znajdują się w
odpowiednich szczelinach.
5 Umieść tackę na wodę z powrotem
w urządzeniu (rys. n).
6 Aby odkręcić górną nasadkę
zbiornika wody, obróć ją w lewo
(rys. o).
7 Napełnij zbiornik zimną wodą z
kranu (rys. p).
8 Aby dokładnie zablokować górną
nasadkę zbiornika wody, obróć ją w
prawo (rys. q).
9 Umieść zbiornik wody z powrotem
w urządzeniu (rys. r).
97PL
Page 100

Konguracja połączenia
Wi-Fi
Pierwsza konguracja
połączenia Wi-Fi
1 Pobierz aplikację "Air Matters" ze
sklepu App Store lub Google Play i
zainstaluj ją.
2 Podłącz wtyczkę oczyszczacza
powietrza do gniazdka
elektrycznego i dotknij przycisku ,
aby włączyć oczyszczacz powietrza.
» Wskaźnik Wi-Fi miga na
pomarańczowo po raz pierwszy.
3 Upewnij się, że urządzenie mobilne
jest prawidłowo podłączone do
sieci Wi-Fi.
4 Uruchom aplikację
"Air Matters" i kliknij przycisk "+"
w prawym górnym rogu ekranu.
Postępuj zgodnie z instrukcjami
wyświetlanymi na ekranie, aby
podłączyć oczyszczacz powietrza
do sieci.
5 Po pomyślnym zakończeniu
procesu parowania i nawiązaniu
połączenia wskaźnik Wi-Fi
będzie świecił na biało. Jeśli
parowanie się nie powiedzie,
zapoznaj się z informacjami w
sekcji dotyczącej rozwiązywania
problemów lub sekcji pomocy
w aplikacji "Air Matters", aby
uzyskać wyczerpujące i aktualne
wskazówki na temat rozwiązywania
problemów.
Uwaga
• Niniejsza instrukcja dotyczy
tylko pierwszej konguracji
oczyszczacza powietrza. Jeśli sieć
uległa zmianie lub kongurację
trzeba przeprowadzić ponownie,
zapoznaj się z częścią "Konguracja
połączenia Wi-Fi po zmianie sieci"
na stronie 99.
• Aby podłączyć więcej niż jeden
oczyszczacz powietrza do
urządzenia przenośnego, trzeba to
zrobić po kolei. Należy ukończyć
kongurację jednego oczyszczacza
powietrza przed włączeniem
następnego.
• Upewnij się, że odległość
pomiędzy urządzeniem mobilnym
i oczyszczaczem powietrza jest
mniejsza niż 10 m i nie ma pomiędzy
nimi żadnych przeszkód.
• Ta aplikacja obsługuje najnowsze
wersje systemów Android i
iOS. Najnowsze informacje na
temat obsługiwanych systemów
operacyjnych i urządzeń można
znaleźć na stronie
www.philips.com/puriercompatibility.
98 PL
 Loading...