


1 2
A
B
D
C
© 2019 Koninklijke Philips N.V.
All rights reserved.
4241 210 99944
AC2729
M
L
K
J
I
H
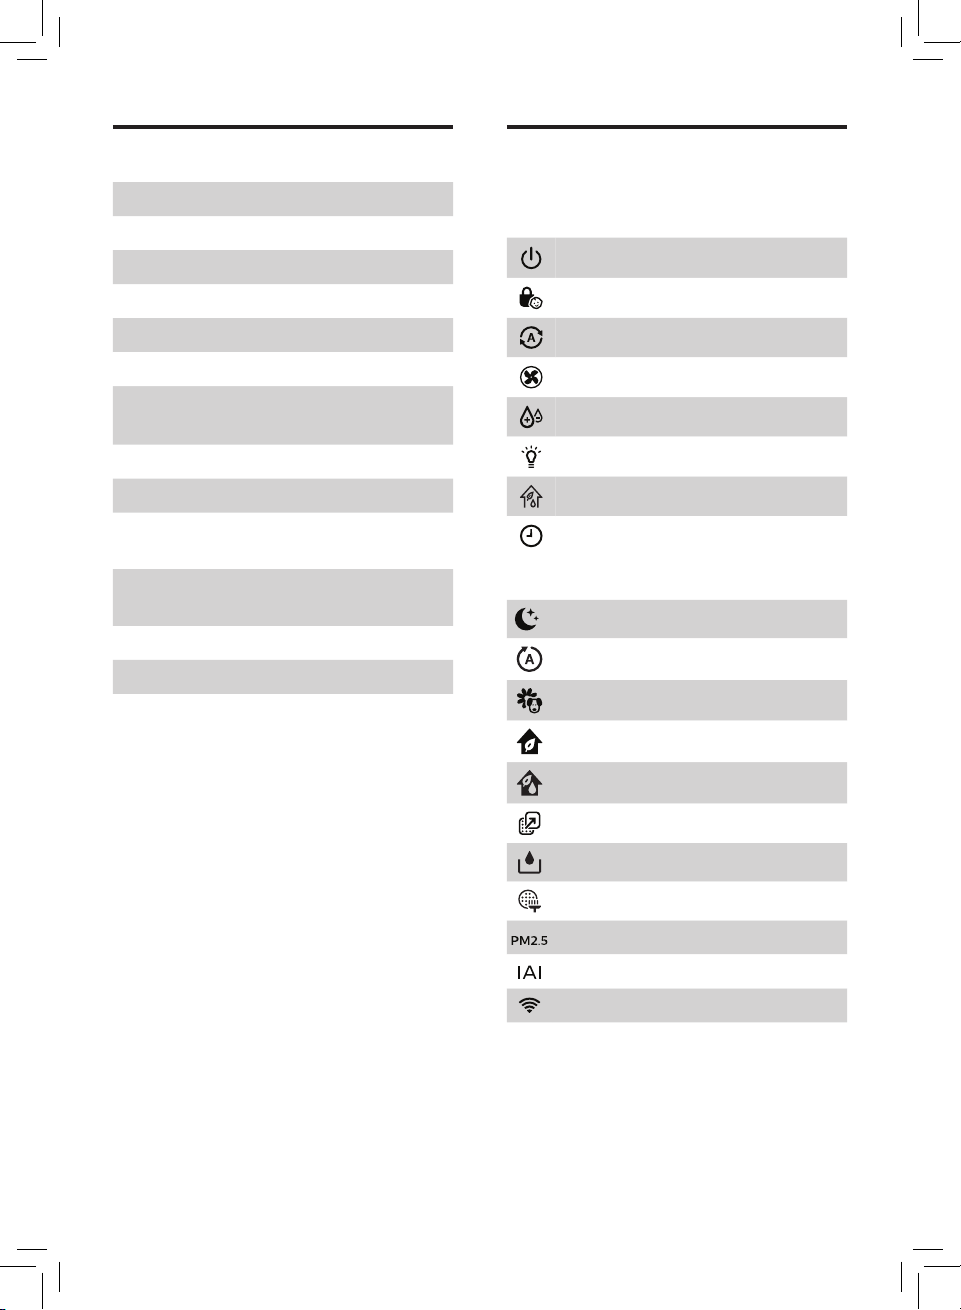
Control buttons
Display panel
E
G
F
EN User manual 1
DA Brugervejledning 22
DE Benutzerhandbuch 43
ES Manual del usuario 68
FI Käyttöopas 90
FR Mode d’emploi 112
IT Manuale utente 135
NL Gebruiksaanwijzing 157
NO Brukerhåndbok 180
SV Användarhandbok 201

3
4
5
6
23
23 43
24 44
25 45
26 46
23
3S
27
31
35
28
28
32
28
36
12
16
8
9
13
17
10
14
18
7
11
2
1
15
3S
29
29
33
33
37
30
30
34
30
38
47
23
48
49
2119
2220
3S
39
28
40
2 hours
41
30
42

English
Contents
1 Important 2
Safety 2
2 You air purier 5
Product overview (g. a) 6
Controls overview
(g. b) 6
3 Get started 7
Installing the NanoProtect lter 7
Preparing for humidication 7
Wi-Fi connection 8
4 Use the appliance 9
Understanding the air quality light 9
Switching on and o 9
Setting the humidity level 9
Switching the operation mode 10
Using the light dimming function 10
Switching the display mode 10
Changing the Auto mode setting 11
Changing the fan speed 11
Setting the timer 11
Setting the child lock 12
Water level 12
5 Cleaning 12
Cleaning schedule 12
Cleaning the body of the
appliance 13
Cleaning the air quality sensor 13
Cleaning the water tank, water
tray and NanoCloud rotary
humidication wick 13
Cleaning the pre-lter 14
Descaling the NanoCloud rotary
humidication wick 14
6 Replace the lter and wick 15
Understanding the healthy air
protect lock 15
Replacing the NanoProtect lter
(g. ‹) 16
Replacing the NanoCloud rotary
humidication wick 16
7 Troubleshooting 17
8 Guarantee and service 20
Order parts or accessories 20
9 Notices 20
Electromagnetic elds (EMF) 20
Recycling 21
Notice 21
Simplied EU declaration of
conformity 21
Environmental friendly paper used. Thanks for your contribution to save trees.
1EN

1 Important
Safety
Read this user manual carefully before
you use the appliance, and save it for
future reference.
Danger
• Do not let water or any
other liquid or ammable
detergent enter the
appliance to avoid electric
shock and/or a re hazard.
• Do not clean the
appliance with water,
any other liquid, or a
(ammable) detergent to
avoid electric shock and/
or a re hazard.
• Do not spray any
ammable materials
such as insecticides or
fragrance around the
appliance.
• The water in the water
tank is not suitable for
drinking. Do not drink this
water and do not use it to
feed animals or to water
plants. When you empty
the water tank, pour the
water down the drain.
Warning
• Check if the voltage
indicated on the
side of the appliance
corresponds to the local
power voltage before you
connect the appliance.
• If the power cord is
damaged, you must have
it replaced by Philips, a
service center authorized
by Philips, or similarly
qualied persons in order
to avoid a hazard.
• Do not use the appliance
if the plug, the power cord,
or the appliance itself is
damaged.
• This appliance can be
used by children aged
from 8 years and above
and persons with reduced
physical, sensory or
mental capabilities or
lack of experience and
knowledge if they have
been given supervision or
instruction concerning use
of the appliance in a safe
way and understand the
hazards involved.
2 EN

English
• Cleaning and user
maintenance shall not be
made by children without
supervision.
• Children should be
supervised to ensure that
they do not play with the
appliance.
• Do not block the air inlet
and outlet, e.g. by placing
items on the air outlet or
in front of the air inlet.
• Standard WiFi interface
based on 802.11b/g/n at
2.4 GHz with a maximum
output power of 31.62 mW
EIRP.
Caution
• This appliance is not
a substitute for proper
ventilation, regular
vacuum cleaning, or use
of an extractor hood or
fan while cooking.
• If the power socket used
to power the appliance
has poor connections,
the plug of the appliance
becomes hot. Make
sure that you plug the
appliance into a properly
connected power socket.
• Always place and use the
appliance on a dry, stable,
level, and horizontal
surface.
• Leave at least 20cm free
space behind and on both
sides of the appliance
and leave at least 30cm
free space above the
appliance.
• Do not place anything on
top of the appliance.
• Do not place the
appliance directly below
an air conditioner to
prevent condensation
from dripping onto the
appliance.
• Make sure all lters
are properly installed
before you switch on the
appliance.
• Only use the original
Philips lters specially
intended for this
appliance. Do not use any
other lters.
• Avoid knocking against
the appliance (the air inlet
and outlet in particular)
with hard objects.
3EN

• Do not insert your ngers
or objects into the air
outlet or the air inlet to
prevent physical injury
or malfunctioning of the
appliance.
• Do not use this appliance
when you have used
indoor smoke-type insect
repellents or in places
with oily residues, burning
incense, or chemical
fumes.
• Do not use the appliance
near gas appliances,
heating devices or
replaces.
• Always unplug the
appliance after use
and before lling water,
cleaning, or carrying out
other maintenance.
• Do not use the appliance
in a room with major
temperature changes.
• To prevent interference,
place the appliance
at least 2m away from
electrical appliances that
use airborne radio waves
such as TVs, radios, and
radio-controlled clocks.
• When the appliance is
not used for a long time,
bacteria may grow on the
lters. Check the lters
after a long period of
disuse. If the lters are
very dirty, replace them
(see the chapter "Replace
the lter and wick ").
• The appliance is only
intended for household
use under normal
operating conditions.
• Do not use the appliance
in wet surroundings or in
surroundings with high
ambient temperatures,
such as the bathroom,
toilet, or kitchen.
• The appliance does
not remove carbon
monoxide (CO) or
radon (Rn). It cannot be
used a safety device in
case of accidents with
combustion processes
and hazardous chemicals.
• Only ll the water tank
with cold tap water. Do
not use ground water or
hot water.
4 EN

English
• Do not put any substance
other than water in the
water tank. Do not put
fragrance in the water
tank.
• If you do not use the
humidication function
for a long time, clean
the water tank and
NanoCloud rotary
humidication wick tray,
and air dry the NanoCloud
rotary humidication wick.
• If you need to move the
appliance, disconnect the
appliance from the power
supply rst. Then empty
or remove the water tank
and water tray. Carry the
appliance horizontally by
the handles on both sides
of the appliance.
• Unplug the appliance
during lling and cleaning.
2 You air purifier
Congratulations on your purchase, and
welcome to Philips!
To fully benet from the support that
Philips oers, register your product at
www.Philips.com/welcome.
The Philips air purier brings fresh,
humidied air to your house for the
health of your family. It oers you
advanced evaporation system with
NanoCloud technology, using a special
humidication lter which adds H2O
molecules to the dry air, and produces
healthy humid air without formation
of water mist. Its humidication lter
retains bacteria, calcium and other
particles from the water. It delivers only
pure humidied air in your home. No
more dry air in the winter season or
from the air conditioning.
Read this user manual carefully before
you use the appliance, and save it for
future reference.
5EN
Product overview (g. a)
A Control panel
B Water tank
C Wick support
D Water tray
Controls overview
(g. b)
Control buttons
Power on/o button
Child lock button
E Unilateral wheels
F Wick wheel
NanoCloud rotary humidication
G
wick (FY2425)
H Back side cover
Pre-lter
I
NanoProtect lter Active Carbon
J
(FY1413)
NanoProtect lter Series 3
K
(FY1410)
L Air quality sensor
M Air outlet
Auto mode button
Fan speed button
Humidity setting button
Light dimming button
2-in-1 mode on/o button
Timer/Reset button
Display panel
Sleep mode
Auto mode
Allergen mode
Purication ONLY mode
2-in-1 mode
Filter replacement alert
Water rell alert
Pre-lter and wick cleaning alert
6 EN
PM2.5 display
Indoor Allergen Index display
Wi-Fi indicator
English
3 Get started
Preparing for
humidication
Installing the
NanoProtect lter
Before using the appliance, remove all
packaging materials of the lter and
place it into the appliance described as
follows:
Note
• Make sure that the side with the tag
is pointing towards you.
1 Pull the top part of the back panel
towards you to release it from the
appliance (g. c).
2 Press the clip down and pull the
pre-lter towards you (g. d).
3 Remove all lters (g. e).
4 Remove all packaging materials of
the NanoProtect lter (g. f) .
5 Place the NanoProtect lter back
into the appliance (g. g).
6 Put the pre-lter back into the
appliance, mount the pre-lter onto
the bottom of the appliance rst,
and then push the clips on the top
of pre-lter against the appliance
(g. h).
7 To reattach the back cover, mount
the panel onto the bottom of the
appliance rst, and then push
the top of the panel against the
appliance (g. i).
1 Pull out the water tank (g. j).
2 Lift the water tray upwards and pull
it out horizontally (g. k).
3 Remove all packaging material
of the NanoCloud rotary
humidication wick (g. l).
Note
• The humidication wick has been
assembled on the wick wheel upon
purchase.
4 Place the wick wheel on the wick
support (g. m).
Note
• When placing the wick wheel on the
wick support, make sure that the
projections on the wick wheel falls
into the corresponding grooves.
5 Place the water tray back into the
appliance (g. n).
6 Turn the top cap of the water tank
anti-clockwise to unscrew it (g. o).
7 Fill the water tank with cold tap
water (g. p).
8 Turn the top cap clockwise to tightly
lock it onto the water tank (g. q).
9 Place the water tank back into the
appliance (g. r).
7EN

Wi-Fi connection
Setting up the Wi-Fi connection
for the rst time
1 Download and install the Philips
"Clean Home+" app from the App
Store or Google Play.
2 Put the plug of the air purier in the
power socket and touch
on the air purier.
» The Wi-Fi indicator blinks
orange for the rst time.
3 Make sure that your smartphone or
tablet is successfully connected to
your Wi-Fi network.
4 Launch the "Clean Home+" app and
click on "Connect a New Device"
or press the "+" button on the top
of the screen. Follow the onscreen
instructions to connect the air
purier to your network.
5 After the successful pairing and
connection, the Wi-Fi indicator
will light up white. If pairing
is not successful, consult the
troubleshooting section, or the
help section in the "Clean Home+"
App for extensive and up-to-date
troubleshooting tips.
to turn
Note
• This instruction is only valid when
the air purier is being set up for the
rst time. If the network has changed
or the setup needs to be performed
again, consult section "Reset the WiFi connection" on page 8.
• If you want to connect more than
one air purier to your smartphone
or tablet, you have to do this one by
one. Complete the set up of one air
purier before you turn on the other
air purier.
• Make sure that the distance
between your smartphone or tablet
and the air purier is less than 10 m
without any obstructions.
• This App supports the latest
versions of Android and iOS. Please
check www.philips.com/cleanhome
for the latest update of supported
operating systems and devices.
Reset the Wi-Fi connection
Note
• This applies when the default
network to which your purier is
connected has changed.
• Reset the Wi-Fi connection when
your default network has changed.
1 Put the plug of the air purier in the
power socket and touch
on the air purier.
2 Touch and simultaneously for
3 seconds until you hear a beep.
» The air purier goes to pairing
mode.
» The Wi-Fi indicator
orange.
3 Follow the steps 4-5 in "Setting up
the Wi-Fi connection for the rst
time" section.
to turn
blinks
8 EN

English
4 Use the
Switching on and o
appliance
Understanding the air
quality light
IAI level Air quality
light color
1-3 Blue Good
4-6 Blue-Purple Fair
7-9 Purple-Red Poor
10-12 Red Very poor
The air quality light automatically goes
on when the appliance is switched on,
and lights up all colors in sequence.
In a short time the air quality sensors
select the color that corresponds to the
ambient air quality.
PM2.5
AeraSense sensing technology
accurately detects and quickly responds
to even the slightest particle change in
the air. It provides you with reassurance
with real-time PM2.5 feedback.
Most of the indoor air pollutants fall
under PM2.5 – which refers to airborne
particle pollutants smaller than 2.5
micrometers. Common indoor sources
of ne particles are tobacco smoke,
cooking, burning candles. Some
airborne bacteria and the smallest
mold spores, pet allergen and dust mite
allergen particles also fall under PM2.5.
Air quality
level
1 Put the plug in the power socket.
» The appliance beeps.
2 Touch to switch on the appliance.
» The appliance operates under
the 2-in-1 mode by default with
displayed on the screen.
» When the appliance is warming
up, " " displays on the
screen. After measuring the
particulate matter only in the
air, the appliance shows the IAI
level and operates in the auto
mode by default.
» After measuring the air
quality for approximately
30 seconds, the air quality
sensor automatically selects the
appropriate air quality light color.
3 Touch and hold for 3 seconds to
switch o the appliance.
Note
• After the appliance is switched
o by the on/o button
plug is still in the power socket, the
appliance will operate under the
previous settings when it is switched
on again.
, if the
Setting the humidity level
1 Touch the humidity button
repeatedly to set the desired air
humidity to 40%, 50%, 60% or " "
(g. s).
IAI
The professional-grade AeraSense
sensor detects the level of indoor air
allergen and with numerical feedback
from 1 to 12 the potential risk level of
indoor air allergens can be displayed. 1
indicates best air quality.
Note
• When the humidity level "
chosen, the appliance will keep
humidifying the room until the
ambient humidity level reaches
70%RH.
" is
9EN
Note
• When the target humidity level is
reached, the wick wheel will stop
rotating. It will start rotating again
when the humidity drops below the
target level.
• If you want to increase the humidity
level quickly, you can select a higher
fan speed.
Switching the operation
mode
The appliance has two operation
modes, the purication ONLY mode and
the 2-in-1 mode.
1 Touch the mode selection button
to switch to the purication ONLY
mode (g. t).
»
displays on the screen when
the appliance operates in the
purication ONLY mode.
2 Touch the mode selection button
again to switch to the 2-in-1 mode
(g. u).
»
displays on the screen when
the appliance operates in the
2-in-1 mode.
» The current humidity level
displays on the screen by
default.
Note
• The screen will display humidity
level for 3 seonds and change to
display the highest level of IAI or
PM2.5 if one of which is not good.
Using the light dimming
function
With the light dimming button, you can
switch on or o the air quality light,
the display screen and the function
indicator if desired.
1 Touch the light dimming button
once, the air quality light will be
dimmed.
2 Touch the light dimming button
again, the air quality light and the
display panel will be turned o.
3 Touch the light dimming button
for the third time, all lights will be on
again.
Switching the display mode
The appliance has three display modes,
PM2.5 display, IAI display and humidity
level display.
Note
• The appliance operates in IAI
display mode by default.
1 Touch and hold for 3 seconds to
switch to PM2.5 display (g. v).
» PM2.5 indicator and the actual
PM2.5 level display on the screen.
2 Touch and hold for 3 seconds
twice to switch to actual humidity
level display (g. w).
3 Touch and hold for 3 seconds to
switch to IAI display (g. x).
» IAI indicator and the actual IAI
level display on the screen.
10 EN
Note
• The screen will display humidity
level for 3 seonds and change to
display the highest level of IAI or
PM2.5 if one of which is not good.
English
Changing the Auto mode
setting
You can choose the Auto mode ( ),
the Allergen mode (
mode (
).
Auto mode
In auto mode, the appliance selects
the fan speed in accordance with the
ambient air humidity and air quality.
• Touch the fan speed button
select Auto mode (g. y) .
» Auto (
screen.
» The appliance operates in Auto
mode by default.
Allergen mode
The extra-sensitive allergen mode
is designed to react to even a small
change in allergen levels in the
surrounding air.
• Touch the Auto mode button
select the Allergen mode (g. z).
» Auto (
screen.
Sleep (SL)
In Sleep mode, the air purier operates
quietly on a very low speed.
• Touch the Auto mode button
select the Sleep mode (
(g. {).
» Sleep (
the screen.
) and the Sleep
to
) and display on the
to
) and display on the
)
) and display on
Changing the fan speed
There are several fan speeds available.
Manual
• Touch the fan speed button
repeatedly to select the desired fan
speed (1, 2 or 3) (g. |).
Turbo (t)
In Turbo mode, the air purier operates
on the highest speed.
• Touch the fan speed button
select the Turbo mode (
to
) (g. }).
Setting the timer
With the timer, you can let the
appliance operate for a set number of
hours. When the set time has elapsed,
the appliance will automatically switch
o.
• Touch the Timer/Reset button
repeatedly to choose the number
of hours you want the appliance to
operate (g. ~).
» The timer is available from 1 to
12 hours.
• To deactivate the timer function,
touch the Timer/Reset button
repeatedly until "---" displays on the
screen.
Note
• All lights will go o except
buttons are touched after one
minute.
• You can turn on the lights manually
by touching any buttons.
if no
11EN
Setting the child lock
1 Touch and hold the child lock
button for 3 seconds to activate
child lock (g. ).
»
displays on the screen for
3 seconds.
» When the child lock is on,
all the other buttons are not
responsive.
2 Touch and hold the child lock
button
deactivate child lock (g. €).
»
for 3 seconds again to
displays on the screen for
3 seconds.
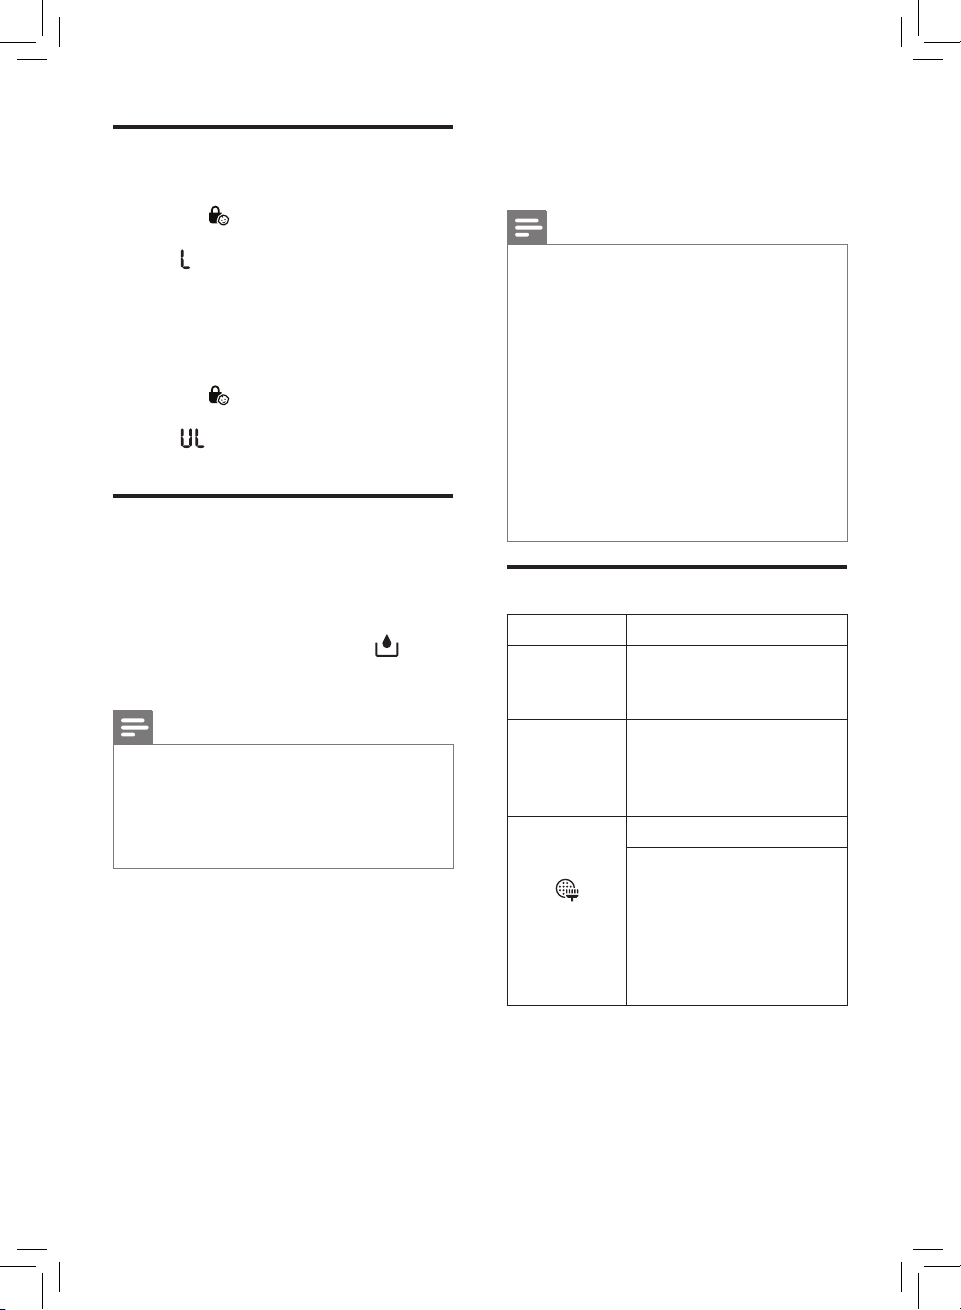
Water level
The water level in the water tank is
visible through the water level window
on the water tank.
When there is not enough water in the
water tank, the water rell light
on to indicate that you have to rell the
water tank. (g. )
Note
• When there is no water in the
water tank, the wick wheel will stop
rotating. When the water tank is
relled with water, the wick wheel
will start rotating again.
goes
5 Cleaning
Note
• Always unplug the appliance before
cleaning.
• Never immerse the appliance in
water or any other liquid.
• Never use abrasive, aggressive, or
ammable cleaning agents such as
bleach or alcohol to clean any part
of the appliance.
• Only the pre-lter and NanoCloud
rotary humidication wick are
washable. The NanoProtect lter
is not washable nor vacuum
cleanable.
Cleaning schedule
Frequency Cleaning method
When
necessary
Every week
When the
cleaning
icon
lights up
and F0
displays on
the screen.
Wipe the surface of the
appliance with a soft
dry cloth.
Rinse the water tank,
the water tray and
the NanoCloud rotary
humidication wick.
Clean the pre-lter.
Descale the NanoCloud
rotary humidication
wick with the water and
white vinegar (5% acetic
acid) or water and citric
acid.
12 EN

English
Cleaning the body of the
appliance
Regularly clean the inside and outside
of the appliance to prevent dust from
collecting.
1 Wipe away dust with a soft dry cloth
from the body of the appliance.
2 Clean the air outlet with a soft dry
cloth.
Cleaning the air quality
sensor
Clean the air quality sensor every
2 months for optimal functioning of the
purier. Clean them more frequently
if you use the purier in a dusty
environment.
Note
• When the humidity level in the
room is very high, it is possible that
condensation develops on the air
quality sensor. As a result, the air
quality light may indicate that the
air quality is bad even though it is
good. In this case you have to clean
the air quality sensor or use one of
the manual speed settings.
1 Clean the air quality sensor inlet
and outlet with a soft brush (g. ‚).
2 Open the air quality sensor cover
(g. ƒ).
3 Clean the air quality sensor, the
dust inlet and the dust outlet with a
lightly moistened cotton swab
(g. „).
4 Dry them with a dry cotton swab.
5 Reattach the air quality sensor
cover (g. …).
Cleaning the water
tank, water tray and
NanoCloud rotary
humidication wick
Note
• Cleaning the water tank, water
tray and NanoCloud rotary
humidication wick every week to
keep them hygienic.
1 Pull out the water tank (g. j).
2 Lift the water tray upwards and pull
it out horizontally (g. k).
3 Take the wick wheel o the wick
support (g. †).
4 Rinse the water tank, water tray and
NanoCloud rotary humidication
wick under a running tap.
Note
• Do not take the NanoCloud rotary
humidication wick o the wheel
during cleaning.
• Do not scrub the NanoCloud rotary
humidication wick or place it under
direct sunlight.
• If necessary, use a mild detergent to
clean the water tank and water tray.
In this case, rinse the water tank
and water tray thoroughly.
5 Wipe the outside of the water tank
and water tray dry.
6 Place the wick wheel on the wick
support (g. m).
Note
• When placing the wick wheel on the
wick support, make sure that the
projections on the wick wheel falls
into the corresponding grooves.
13EN
7 Place the water tray back into the
appliance (g. n).
8 Place the water tank back into the
appliance (g. r).
Cleaning the pre-lter
Note
• If the pre-lter is damaged, worn or
broken, do not use. Visit
www.philips.com/support or contact
the Consumer Care Center in your
country.
Filter alert light
status
F0 displays on the
screen and wick&
pre-lter cleaning
alert
goes on
1 Pull the top part of the back panel
towards you to release it from the
appliance (g. c).
2 To remove the pre-lter, press the
clip down and pull the lter towards
you (g. d).
3 Wash the pre-lter under a running
tap. If the pre-lter is very dirty, use
a soft brush to brush away the dust
(g. ‡).
4 Air dry the pre-lter.
Note
• Make sure that the pre-lter is
completely dry. If it is still wet,
bacteria may multiply in it and
shorten the lifetime of the pre-lter.
Follow this
Clean the prelter
5 After the pre-lter is completely dry,
place it back into the back panel
(g. h).
6 Touch and hold for 3 seconds to
reset the pre-lter cleaning time.
Descaling the NanoCloud
rotary humidication
wick
Filter alert light
status
F0 displays on the
screen and wick&
pre-lter cleaning
alert
goes on
1 Pull out the water tank (g. j).
2 Lift the water tray upwards and pull
it out horizontally (g. k).
3 Take the wick wheel o the wick
support (g. †).
4 Soak the NanoCloud rotary
humidication wick in cleansing
agent (e.g diluted white vinegar,
Citric acid solution) for two hours
(g. ˆ).
Note
• Please use mid or acid cleanser
• White vinegar (5% acetic acid)
mix with equal amount of water
• 24g citric acid mix with 4L
water
• If there are white deposits
(limescale) on the lter, make
sure that the side with the white
deposits is immersed in the water.
• Do not take the NanoCloud rotary
humidication wick o the wheel
during descaling.
Follow this
Descale the
NanoCloud
rotary
humidication
wick (FY2425)
14 EN
English
5 Rinse the NanoCloud rotary
humidicationwick under the tap
to rinse away vinegar or citric acid
residues. During rinsing, turn the
wick so that both front and back are
rinsed (g. ‰).
6 Air dry the NanoCloud rotary
humidication wick (g. Š).
Note
6 Replace the
filter and wick
Understanding the
healthy air protect lock
• Do not put the NanoCloud rotary
humidication wick under direct
sunlight.
7 Touch and hold for 3 seconds
to reset the NanoCloud rotary
humidication wick cleaning time.
This appliance is equipped with the
healthy air protect lock to make sure
that the Nano protect lter and the
humidication wick are in optimal
condition when the appliance is
operating. When the Nano protect lter
and the humidication wick are almost
expired, the replacement light
to ash to indicate that they need to be
replaced.
If you do not replace the lter and
wick in time, the appliance will stop
operating and get locked.
starts
15EN
Replacing the
NanoProtect lter
(g. ‹)
Replacing the
NanoCloud rotary
humidication wick
Note
• The lter is not washable or
reusable.
• Always turn o the air purier and
unplug from the electrical outlet
before replacing the lters.
Filter alert light
status
A3 is displayed
and the lter
replacement light
ashes on the
screen.
C7 is displayed
and the lter
replacement light
ashes on the
screen.
Follow this
Replace the
NanoProtect
lter Series 3
(FY1410)
Replace the
NanoProtect
lter Active
Carbon (FY1413)
1 Remove the used lters from the
appliance (g. Œ).
Note
• Do not touch the pleated lter
surface, or smell the lters as they
have collected pollutants from the
air.
• Wash your hands after disposing of
the used lters.
2 Remove all packaging material of
the new lters (g. f).
3 Place the new lters into the
appliance (g. g).
4 Touch and hold for 3 seconds to
reset the NanoProtect lter lifetime
counter.
Filter alert light status
F1 is displayed and
the lter replacement
light
the screen (g. ).
ashes on
Follow this
Replace the
NanoCloud
rotary
humidication
wick
1 Take the wick wheel o the wick
support (g. †).
2 Grip the shaft screw on the
other side of the wheel, rotate it
anticlockwise to release the wick
from the wheel (g. ).
3 Unfasten the locks on the edge
of the wheel successively to
disassemble the wick wheel (g. ).
4 Take the used NanoCloud rotary
humidication wick out (g. ).
5 Remove all packaging material
of the new NanoCloud rotary
humidication wick (g. l).
6 Place the new NanoCloud rotary
humidication wick in the wick
wheel, and then fasten the locks on
the wick wheel (g. ‘).
7 Place the wick wheel on the wick
support (g. m).
Note
• When placing the wick wheel on the
wick support, make sure that the
projections on the wick wheel falls
into the corresponding grooves.
8 Place the water tray and water tank
back into the appliance (g. n).
9 Touch and hold for 3 seconds
to reset the NanoCloud rotary
humidication wick lifetime counter.
16 EN

English
7 Troubleshooting
This chapter summarizes the most common problems you could encounter with the
appliance. If you are unable to solve the problem with the information below, contact
the Consumer Care Center in your country.
Problem Possible solution
The appliance
does not work
even though it is
plugged in.
The appliance
does not work
even though it is
switched on.
There are
some white
deposits on the
NanoCloud rotary
humidication wick.
No air comes out of
the air outlet.
The airow that
comes out of
the air outlet is
signicantly weaker
than before.
• The lter replacement light
have not replaced the NanoProtect lter, and the appliance
is now locked. In this case, replace the lter and reset the
lter lifetime counter.
• The water rell light
is properly installed and there is enough water in the water
tank.
• The appliance is working but the buttons are not responsive.
Check if the child lock is on.
• The white deposits are called scale and they consist of
minerals from the water. Scale on the NanoCloud rotary
humidication wick aects the humidifying performance,
however it does not harm your health. Follow the cleaning
instructions in the user manual.
• Plug the appliance into the power supply and switch on.
• The pre-lter is dirty. Clean the pre-lter (see the chapter
"Cleaning").
• Make sure that you have removed all packaging material of
the NanoProtect lter.
ashes. Make sure the water tank
has been ashing but you
17EN

Problem Possible solution
• Check if the packing material is removed from the lters.
The air quality
does not improve,
even though the air
purier has been
operating for a long
time.
• One of the lters has not been placed in the air purier
or a lter is not placed properly. Make sure that all lters
are properly installed in the following order, starting with
the innermost lter: 1) NanoProtect lter Series 3 (FY1410);
2) NanoProtect lter Active Carbon (FY1413); 3) pre-lter.
• The air quality sensor is wet. Make sure that the air quality
sensor is clean and dry (see chapter "Cleaning").
• NanoCloud technology evenly distributes invisible water
vapour into your room. In dry conditions moisture from the
It takes a long time
to reach the target
humidity level.
humidier will be absorbed by walls, furniture, and other
items in your room. Ventilation of dry outside air will also
increase the time it takes to reach the target humidity.
To optimize humidication and purication performance, it's
recommended to close doors and windows during use.
I do not see water
vapor coming out
of the appliance. Is
it working?
The appliance
produces a strange
smell.
The appliance is
extra loud.
• When mist is very ne, it is invisible. The appliance has a
NanoCloud humidication technology, which produces
healthy humid air from the outlet area without formation of
water mist. Therefore, you cannot see the mist.
• The rst few times you use the appliance, it may produce
a plastic smell. This is normal. However, if the appliance
produces a burnt smell even if removing lters, contact your
Philips dealer or an authorized Philips service center.
• The lter may produce smell after being used for a while
because of the absorption of indoor air. Remove the lter
and place it where it has direct sunlight and ventilation for
several hours. Re-install and try using it again. If the odor
remains, please replace the lter.
• You have not removed all packaging material of the lters.
Make sure that you have removed all packaging material.
• Change the fan speed to lower fan speed level.
18 EN

English
Problem Possible solution
The appliance still
indicates that I
need to replace a
lter, but I already
did.
Error codes "E1",
"E2", "E3", "E4" or
"E5" displays on the
screen.
The Wi-Fi setup is
not successful.
• Perhaps you did not touch and hold the Timer/Reset button
correctly. Plug in the appliance, touch to switch on the
appliance, and touch and hold the Timer/Reset button
for
3 seconds.
• The appliance has malfunctions. Contact the Consumer Care
Center in your country.
• If the router your purier is connected to is dual – band and
currently it is not connecting to a 2.4GHz network, please
switch to another band of the same router (2.4GHz) and try
to pair your purier again. 5GHz networks are not supported.
• Web authentication networks are not supported.
• Check if the purier is within range of the Wi-Fi router. You
can try to locate the air purier closer to the Wi-Fi router.
• Check if the network name is correct. The network name is
case-sensitive.
• Check if the Wi-Fi password is correct. The password is casesensitive.
• Retry the setup with the instructions in section "Set up the
Wi-Fi connection when the network has changed".
• The Wi-Fi connectivity can be interrupted by electromagnetic
or other interferences. Keep the appliance away from other
electronic devices that may cause interferences.
• Check if the mobile device is in airplane mode. Make sure to
have the airplane mode deactivated when connecting to the
Wi-Fi network.
• Consult the help section in the App for extensive and up-todate troubleshooting tips.
19EN

8 Guarantee and
service
9 Notices
If you need information or if you have
a problem, please visit the Philips
website at www.philips.com or contact
the Philips Consumer Care Center in
your country (you nd its phone number
in the worldwide guarantee leaet). If
there is no Consumer Care Centre in
your country, go to your local Philips
dealer.
Order parts or
accessories
If you have to replace a part or want to
purchase an additional part, go to your
Philips dealer or visit
www.philips.com/support.
If you have problems obtaining the
parts, please contact the Philips
Consumer Care Center in your country
(you can nd its phone number in the
worldwide guarantee leaet).
Electromagnetic elds
(EMF)
This Philips appliance complies with all
applicable standards and regulations
regarding exposure to electromagnetic
elds.
Compliance with EMF
Koninklijke Philips N.V. manufactures
and sells many products targeted at
consumers, which, like any electronic
apparatus, in general have the ability
to emit and receive electromagnetic
signals.
One of Philips' leading Business
Principles is to take all necessary health
and safety measures for our products,
to comply with all applicable legal
requirements and to stay well within the
EMF standards applicable at the time of
producing the products.
Philips is committed to develop,
produce and market products that
cause no adverse health eects. Philips
conrms that if its products are handled
properly for their intended use, they
are safe to use according to scientic
evidence available today.
Philips plays an active role in the
development of international EMF
and safety standards, enabling Philips
to anticipate further developments in
standardization for early integration in
its products.
20 EN

English
Recycling
This symbol means that this product
shall not be disposed of with normal
household waste (2012/19/EU).
Follow your country’s rules for the
separate collection of electrical and
electronic products. Correct disposal
helps prevent negative consequences
for the environment and human health..
Notice
App Store is a service mark of Apple Inc.
Google Play is a trademark of Google
Inc.
This Philips appliance and Clean
Home+ app applied multiple open
source softwares, Copies of open
source software license text used in this
product can be derived from websitewww.philips.com/cleanhome.
Simplied EU declaration
of conformity
Hereby, Philips Consumer Lifestyle B.V.
declares that the radio equipment type
AC2729 is in compliance with Directive
2014/53/EU. The full text of the EU
declaration of conformity is available at
the following internet address:
www.philips.com.
21EN

Indhold
1 Vigtigt 23
Sikkerhed 23
2 Din luftrenser 26
Produktoversigt (g. a) 27
Oversigt over
betjeningsknapper (g. b) 27
3 Sådan kommer du i gang 28
Montering af NanoProtect-lter 28
Forberedelse til befugtning 28
Wi-Fi-forbindelse 29
4 Brug af apparatet 30
Forklaring af luftkvalitetslyset 30
Tænd/sluk 30
Indstilling af
luftfugtighedsniveauet 30
Skift af driftstilstand 31
Sådan bruges funktionen til
lysdæmpning 31
Skift af visningstilstand 31
Ændring af indstillingen
Automatisk tilstand 32
Ændring af blæserhastighed 32
Indstilling af timeren 32
Indstilling af børnesikring 33
Vandstand 33
5 Rengøring 33
Rengøringsskema 33
Rengøring af selve apparatet 34
Rengøring af
luftkvalitetssensoren 34
Rengøring af vandbeholder,
vandbakke og NanoCloud
roterende befugtningsvæge 34
Rengøring af forlteret 35
Afkalkning af NanoCloud
roterende befugtningsvæge 35
6 Udskift lteret og vægen 36
Sådan virker beskyttelseslåsen
til sund luft 36
Udskiftning af NanoProtect-
lteret (g. ‹) 36
Udskiftning af NanoCloud
roterende befugtningsvæge 37
7 Fejlnding 38
8 Garanti og service 41
Bestilling af dele eller tilbehør 41
9 Bemærkninger 41
Elektromagnetiske felter (EMF) 41
Genbrug 42
Meddelelse 42
Forenklede EU-
overensstemme-lseserklæring 42
Der er anvendt miljøvenligt papir. Tak for dit bidrag til redningen af træerne.
22 DA

Dansk
1 Vigtigt
Sikkerhed
Læs denne brugsvejledning
omhyggeligt igennem, inden apparatet
tages i brug, og gem den til eventuelt
senere brug.
Fare
• Lad ikke vand eller
nogen andre væsker
eller brandbare
rengøringsmidler komme
i berøring med apparatet
for at undgå elektrisk stød
og/eller brandfare.
• Undlad at rengøre
apparatet med vand
eller andre væsker
eller (brandbart)
rengøringsmiddel for at
undgå elektrisk stød og/
eller brandfare.
• Sprøjt ikke brændbare
materialer som f.eks.
insektgift eller parfume
omkring apparatet.
• Vandet i vandbeholderen
er ikke egnet til
drikkevand. Drik ikke dette
vand, og anvend det ikke
til dyrefoder eller til at
vande planter. Når du
tømmer vandbeholderen,
så hæld vandet ud i
vasken.
Advarsel
• Kontroller, om
spændingsangivelsen
på siden af apparatet
svarer til den lokale
netspænding, før du
slutter strøm til apparatet.
• Hvis netledningen
beskadiges, må den
kun udskiftes af Philips,
et autoriseret Philipsserviceværksted eller en
tilsvarende kvaliceret
fagmand for at undgå
enhver risiko.
• Brug aldrig apparatet,
hvis netstik, netledning
eller selve apparatet er
beskadiget.
• Dette apparat kan bruges
af børn fra 8 år og opefter
og personer med nedsatte
fysiske, sensoriske eller
mentale evner eller
manglende erfaring og
viden, hvis de er blevet
instrueret i sikker brug af
apparatet og forstår de
medfølgende risici.
23DA

• Rengøring og
vedligeholdelse må ikke
foretages af børn uden
opsyn.
• Apparatet bør holdes
uden for børns
rækkevidde for at sikre, at
de ikke kan komme til at
lege med det.
• Luftind- og -udtagene må
ikke blokeres, f.eks. ved at
stille ting på luftudtaget
eller foran luftindtaget.
• Standard Wi-Figrænseade baseret
på 802.11b/g/n ved
2,4 GHz med en maksimal
udgangseekt på
31,62 mW EIRP.
Forsigtig
• Apparatet kan ikke bruges
som erstatning for grundig
udluftning, støvsugning
eller brug af emhætte
eller udsugning under
madlavning.
• Hvis den anvendte
stikkontakt er dårlig, vil
apparatets stik blive
varmt. Sørg for, at du
slutter apparatet til
en ordentlig tilsluttet
stikkontakt.
• Anbring og brug altid
apparatet på et stabilt,
plant og vandret underlag.
• Der skal være mindst
20 cm fri plads bag ved
og på begge sider af
apparatet, og der skal
være mindst 30 cm frirum
over apparatet.
• Placer ikke noget ovenpå
apparatet.
• Placer ikke apparatet
direkte under et
klimaanlæg for at
forhindre, at der drypper
kondensvand på
apparatet.
• Sørg for, at alle ltre er
installeret korrekt, inden
apparatet tændes.
• Brug kun de originale
ltre fra Philips, der er
særligt beregnede til dette
apparat. Anvend ikke
andre ltre.
• Undgå at støde mod
apparatet (særligt
luftindtag og -udtag) med
hårde genstande.
• Stik aldrig dine ngre eller
genstande ind i luftudtag
eller luftindtaget for at
undgå fysiske skader eller
funktionsfejl af apparatet.
24 DA

Dansk
• Brug ikke apparatet, når
du har anvendt et
indendørs, rygende
insektmiddel, eller på
steder med olierester,
brændende røgelse eller
kemiske dampe.
• Brug ikke apparatet
i nærheden af
gasapparater,
varmeapparater
eller brændeovne/
kaminer.
• Tag altid stikket ud af
stikkontakten efter brug
og før vandpåfyldning,
rengøring eller anden
vedligeholdelse.
• Brug ikke apparatet
i et rum med større
temperatursvingninger.
• Undgå interferens ved
at placere apparatet
mindst 2 m fra elektriske
apparater med luftbårne
radiobølger, som f.eks. TV,
radio og radiostyrede ure.
• Når apparatet ikke
bruges i længere tid, kan
der vokse bakterier på
ltrene. Kontroller ltrene
efter en længere pause i
anvendelsen. Hvis ltrene
er meget snavsede, skal
de udskiftes (se kapitlet
"Udskift lteret og
vægen").
• Apparatet er kun beregnet
til husholdningsbrug
under normale
driftsforhold.
• Brug ikke apparatet i
våde omgivelser eller ved
høje rumtemperaturer,
som f.eks. bad, toilet eller
køkken.
• Apparatet fjerner ikke
kulilte (CO) eller radon
(Rn). Det kan ikke bruges
som en sikkerhedsenhed
i tilfælde af ulykker med
forbrændingsprocesser og
farlige kemikalier.
• Fyld kun vandbeholderen
med koldt vand fra
vandhanen. Brug ikke
grundvand eller varmt
vand.
• Kom ikke andet
materiale end vand i
vandbeholderen. Kom ikke
dufte i vandbeholderen.
25DA

• Hvis du ikke bruger
befugtningsfunktionen
i lang tid, så rengør
vandbeholderen og
NanoCloud roterende
befugtningsvægebakke,
og lufttør NanoCloud
roterende
befugtningsvægebakke.
• Hvis du skal ytte
apparatet, skal du
frakoble apparatet
fra strømforsyningen.
Tøm eller fjern derefter
vandbeholderen og
vandbakken. Bær
apparatet horisontalt i
håndtagene på begge
sider af apparatet.
• Tag stikket ud af
stikkontakten under
påfyldning og rengøring af
apparatet.
2 Din luftrenser
Tillykke med dit køb, og velkommen til
Philips!
For at få fuldt udbytte af den støtte,
Philips tilbyder, skal du registrere dit
produkt på www.Philips.com/welcome.
Philips-luftrenseren sender frisk,
befugtet luft rundt i dit hjem til gavn for
din familie. Det består af et avanceret
fordampningssystem med NanoCloudteknologi, som ved hjælp af et specielt
fugtlter føjer H2O-molekyler til tør luft
og producerer sund, fugtig luft uden
dannelse af vandpartikler. Dets fugtlter
holder bakterier, kalk og andre partikler
fra vandet. Det leverer kun ren, befugtet
luft i dit hjem. Ikke mere tør luft om
vinteren eller fra aircondition.
Læs denne brugsvejledning
omhyggeligt igennem, inden apparatet
tages i brug, og gem den til eventuelt
senere brug.
26 DA

Dansk
Produktoversigt (g. a)
A Kontrolpanel
B Vandtank
C Vægestøtte
D Vandbakke
E Hjul i den ene side
Oversigt over
betjeningsknapper
(g. b)
Kontrolknapper
Afbryderknap
Børnesikringsknap
F Vægehjul
Fugtgivende NanoCloud-
G
rotationsvæge (FY2425)
H Bagsidepanel
Forlter
I
NanoProtect-lteret Aktivt kulstof
J
(FY1413)
NanoProtect-lter i 3-serien
K
(FY1410)
L Sensor til luftkvalitet
M Luftudtag
Knap til automatisk tilstand
Blæserhastighedsknap
Knap til indstilling af
luftfugtighed
Lysdæmpningsknap
Knap til 2-i-1-tilstand til/fra
Timer/reset-knap
Skærmpanel
Sleep-tilstand
Automatisk tilstand
Allergentilstand
Tilstanden UDELUKKENDE til
luftrensning
2-i-1-tilstand
Advarsel for udskiftning af lter
Advarsel for påfyldning af vand
Advarsel for rengøring af forlter
og væge
PM2.5-display
Visning af indendørs
allergiindeks
Wi-Fi-indikator
27DA

3 Sådan kommer
du i gang
Montering af
NanoProtect-lter
Før apparatet tages i brug, fjernes
al emballage på lteret, og sæt det i
apparatet som beskrevet nedenfor.
Bemærk
Forberedelse til
befugtning
1 Træk vandbeholderen ud (g. j).
2 Løft vandbakken opad, og træk den
vandret ud (g. k).
3 Fjern al emballage fra den
fugtgivende NanoCloudrotationsvæge (g. l).
Bemærk
• Befugtningsvægen er samlet på
vægehjulet ved købet.
• Sørg for, at siden med etiketten
vender mod dig.
1 Træk den øverste del af bagpanelet
mod dig for at frigøre det fra
apparatet (g. c).
2 Tryk klemmen ned, og træk
forlteret ind mod dig selv (g. d).
3 Fjern alle ltre (g. e).
4 Fjern al emballage fra NanoProtect-
lteret (g. f).
5 Sæt NanoProtect-lteret tilbage i
apparatet (g. g).
6 Sæt forlteret tilbage i apparatet,
monter først forlteret fast på
bunden af apparatet, og skub
derefter klemmerne oven på
forlteret mod apparatet (g. h).
7 Sæt bagpanelet på igen ved først
at montere panelet på bunden
af apparatet og derefter skubbe
toppen af panelet mod apparatet
(g. i).
4 Sæt vægehjulet på vægestøtten
(g. m).
Bemærk
• Ved anbringelse af vægehjulet på
vægestøtten skal du sørge for, at
tapperne på vægehjulet falder i hak
i de tilsvarende riller.
5 Sæt vandbakken tilbage i apparatet
(g. n).
6 Drej låget på vandbeholderen mod
uret for at skrue den af (g. o).
7 Fyld vandbeholderen med koldt
vand fra vandhanen (g. p).
8 Drej låget med uret for at låse det
fast på vandbeholderen (g. q).
9 Sæt vandbeholderen tilbage i
apparatet (g. r).
28 DA
 Loading...