

Page 1
AC1214
D
C
1 2
A
B
I
H
J K L N OM
E
EN User manual 1
© 2018 Koninklijke Philips N.V.
All rights reserved.
4241 210 98192
CS Příručka pro uživatele 19
HU Felhasználói kézikönyv 37
PL Instrukcja obsługi 57
RO Manual de utilizare 77
SK Príručka užívateľa 97
UK Посібник користувача 117
F
G
Page 2
3s
3s
3s
3s
Page 3

Contents
English
1 Important 2
Safety 2
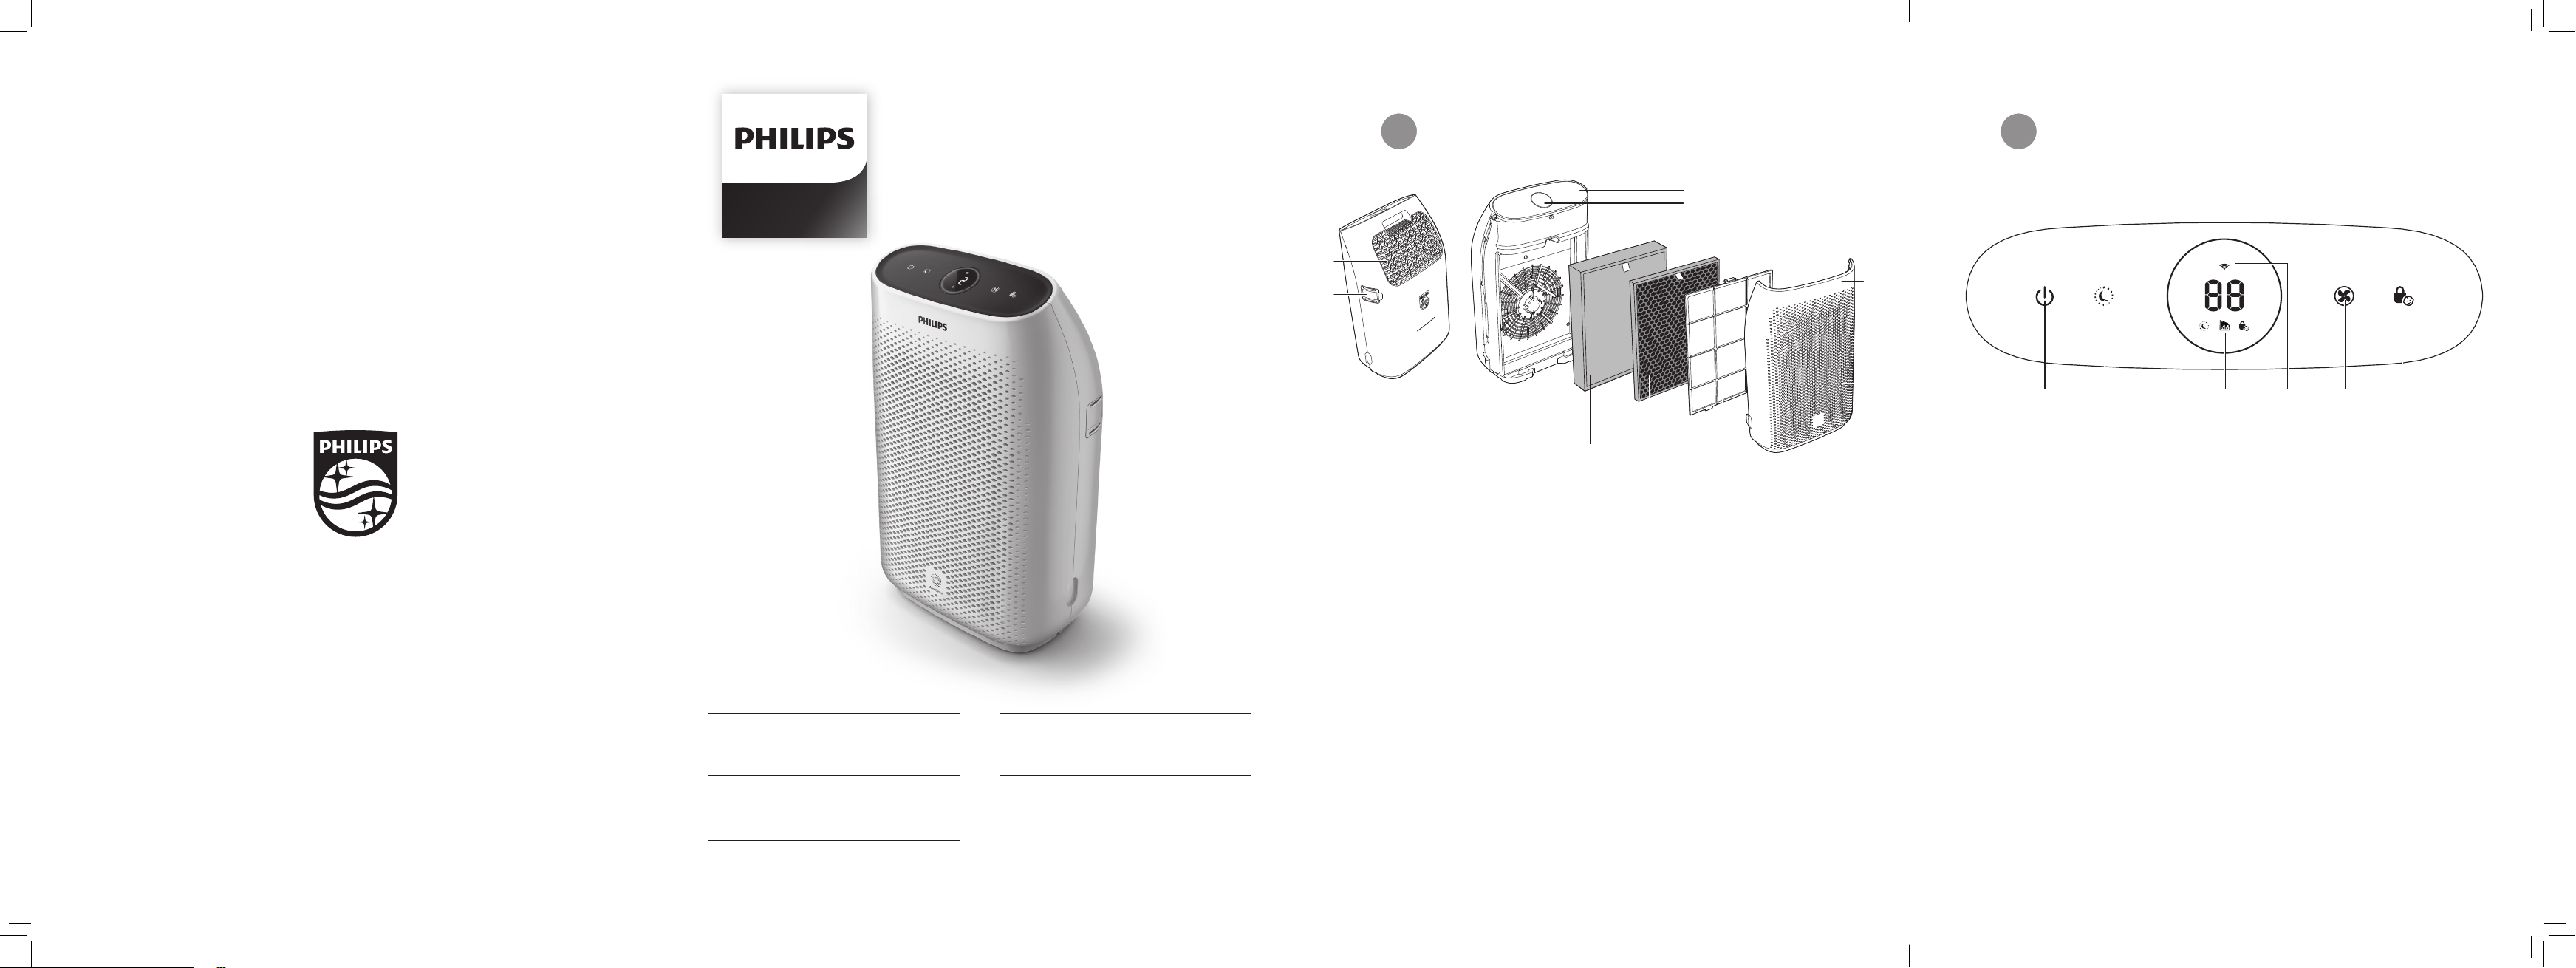
2 Your air purier 5
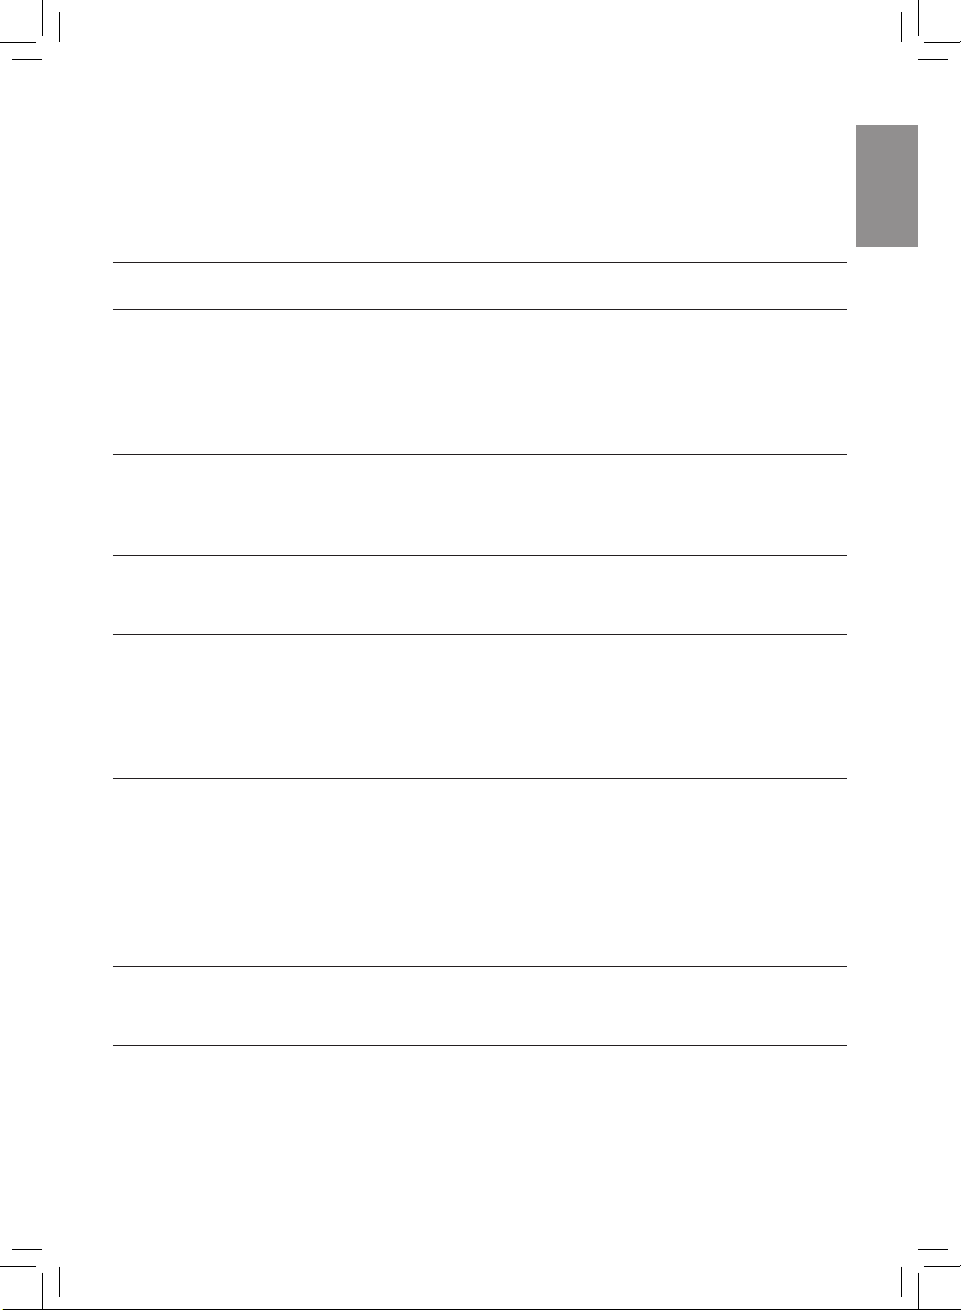
Product overview (g. a) 5
Controls overview (g. b) 5
3 Getting started 5
Installing the lters 5
Wi-Fi setup 6
4 Using the air purier 7
Understanding the air quality light 7
Turning on and o 7
Changing the fan speed 7
Light sensor 8
Night sensing mode 8
Setting the child lock 9
5 Cleaning 9
Cleaning the body of the air
purier 9
Cleaning the air quality sensor 9
Cleaning the pre-lter 10
7 Storage 12
8 Troubleshooting 13
9 Guarantee and service 16
Order parts or accessories 16
10 Notices 16
Electromagnetic elds (EMF) 16
Recycling 17
Software 17
6 Replacing the lters 11
Filter replacement indicator 11
Replacing the lters 11
Filter reset 12
Environmental friendly paper used. Thanks for your contribution to save trees.
1EN
Page 4

1 Important
Safety
Read this user manual carefully before
you use the appliance, and save it for
future reference.
Danger
• Do not let water or any
other liquid or ammable
detergent enter the
appliance to avoid electric
shock and/or a re
hazard.
• Do not clean the
appliance with water,
any other liquid, or a
(ammable) detergent to
avoid electric shock and/
or a re hazard.
• Do not spray any
ammable materials
such as insecticides or
fragrance around the
appliance.
Warning
• Check if the voltage
indicated on the
appliance corresponds to
the local power voltage
before you connect the
appliance.
• If the power cord is
damaged, you must have
it replaced by Philips, a
service center authorized
by Philips, or similarly
qualied persons in order
to avoid a hazard.
• Do not use the appliance
if the plug, the power
cord, or the appliance
itself is damaged.
• This appliance can be
used by children aged
from 8 years and above
and persons with reduced
physical, sensory or
mental capabilities or
lack of experience and
knowledge if they have
been given supervision or
instruction concerning use
of the appliance in a safe
way and understand the
hazards involved. Child
shall not play with the
appliance. Cleaning and
maintenance shall not be
made by children without
supervision.
• Do not block the air inlet
and outlet, e.g. by placing
items on the air outlet or
in front of the air inlet.
2 EN
Page 5

• Make sure that foreign
English
objects do not fall into
the appliance through the
air outlet.
• Standard WiFi interface
based on 802.11b/g/n at
2.4 GHz with a maximum
output power of 31.62 mW
EIRP.
Caution
• This appliance is not
a substitute for proper
ventilation, regular
vacuum cleaning, or use
of an extractor hood or
fan while cooking.
• If the power socket used
to power the appliance
has poor connections,
the plug of the appliance
becomes hot. Make
sure that you plug the
appliance into a properly
connected power socket.
• Always place and use
the appliance on a
dry, stable, level, and
horizontal surface.
• Leave at least 20cm
free space behind and
on both sides of the
appliance and leave at
least 30cm free space
above the appliance.
• Do not place anything on
top of the appliance.
• Do not sit or stand on
the appliance. Sitting or
standing on the appliance
may lead to potential
injury.
• Do not place the
appliance directly below
an air conditioner to
prevent condensation
from dripping onto the
appliance.
• Make sure all lters
are properly installed
before you switch on the
appliance.
• Only use the original
Philips lters specially
intended for this
appliance. Do not use any
other lters.
• Combustion of the lter
may cause inreversible
human hazard and/or
jeopardize other lives . Do
not use the lter as fuel or
for similar purpose.
• Avoid knocking against
the appliance (the air inlet
and outlet in particular)
with hard objects.
3EN
Page 6
• Always lift or move the
appliance by the handle
on top of the appliance.
• Do not insert your ngers
or objects into the air
outlet or the air inlet to
prevent physical injury
or malfunctioning of the
appliance.
• Do not use this appliance
when you have used
indoor smoke-type insect
repellents or in places
with oily residues, burning
incense, or chemical
fumes.
• Do not use the appliance
near gas appliances,
heating devices or
replaces.
• Always unplug the
appliance after use
and before cleaning
or carrying out other
maintenance.
• Do not use the appliance
in a room with major
temperature changes,
as this may cause
condensation inside the
appliance.
• To prevent interference,
place the appliance at
least 2 meters away from
electrical appliances that
use airborne radio waves
such as TVs, radios, and
radio-controlled clocks.
• The appliance is only
intended for household
use under normal
operating conditions.
• Do not use the appliance
in wet surroundings or in
surroundings with high
ambient temperatures,
such as the bathroom,
toilet, or kitchen.
• The appliance does
not remove carbon
monoxide (CO) or radon
(Rn). It cannot be used
as a safety device in
case of accidents with
combustion processes
and hazardous chemicals.
• If you need to move the
appliance, disconnect the
appliance from the power
supply rst.
• Do not move the
appliance by pulling its
power cord.
4 EN
Page 7

2 Your air purifier
English
Congratulations on your purchase, and
welcome to Philips!
To fully benet from the support that
Philips oers, register your product at
www.philips.com/welcome.
Product overview (g. a)
A Control panel
3 Getting started
Installing the lters
Note
• Make sure the air purier is unplugged
from the electrical outlet before
installing the lters.
• Make sure the side of the lter with the
tag is pointing towards you.
B Air quality light
C Air outlet
D Air quality sensor
NanoProtect lter Series 3
E
(FY1410)
NanoProtect lter Active Carbon
F
(FY1413)
G Pre-lter
H Air inlet
I Front panel
Controls overview
(g. b)
J On/O button
K Night sensing mode button
L Display screen
M Wi-Fi indicator
N Fan speed button
O Child lock button
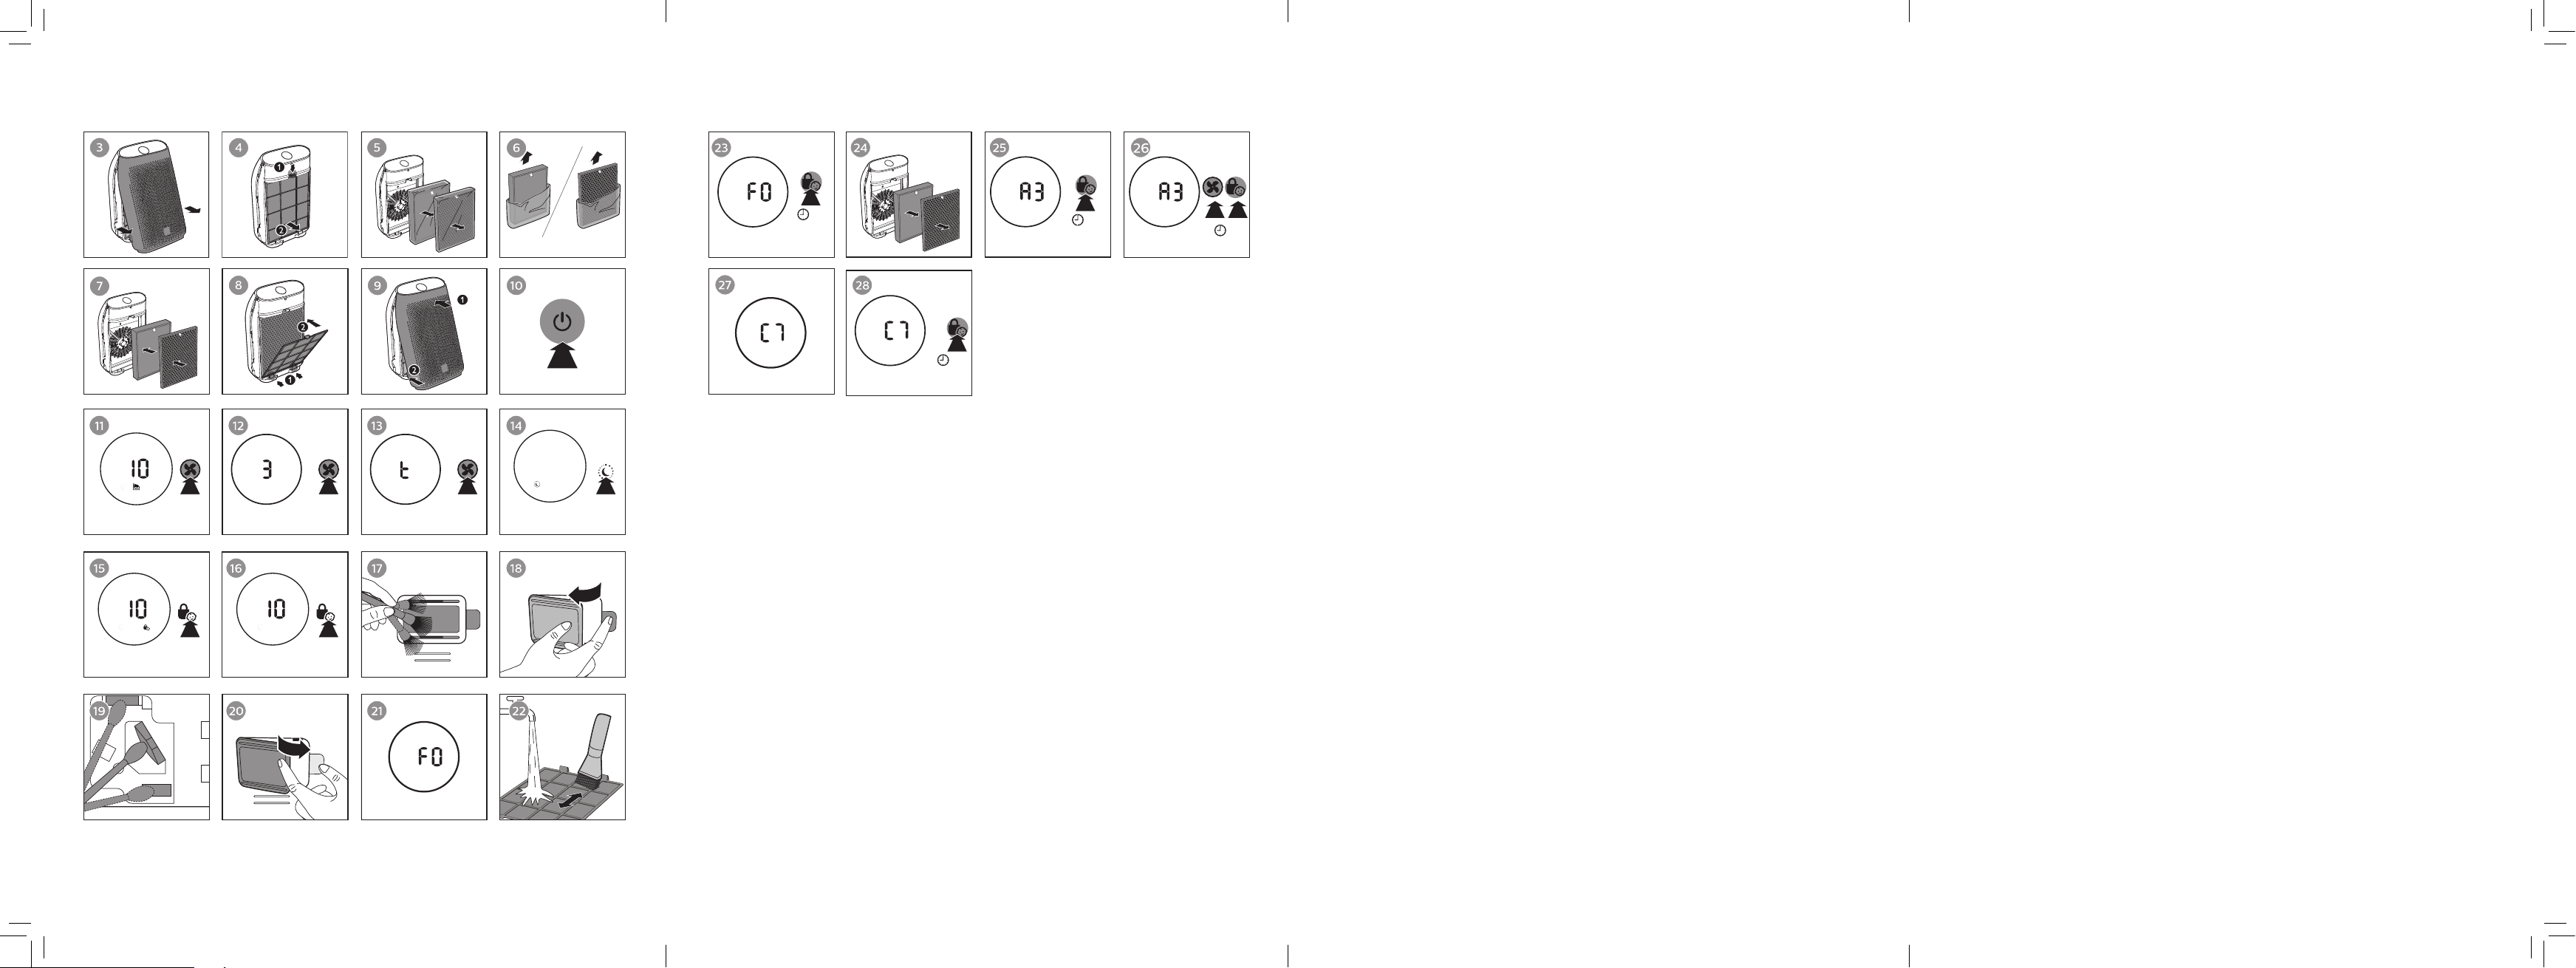
1 Pull the bottom part of the front
panel and gently lift to remove it
from the air purier (g. c).
2 Press the clip down (1) and pull the
pre-lter towards you (2) (g. d).
3 Remove all lters (g. e).
4 Remove all packaging materials
from the lters (g. f).
5 Place the thick lter (FY1410) into
the air purier and then the thin
active carbon lter (FY1413) (g. g).
The model numbers are shown on
each lter.
6 Attach the pre-lter back into the
air purier (g. h).
Note
• Make sure the side with the clip is
pointing towards you, and that all
hooks of the pre-lter are properly
attached to the purier.
7 Reattach the front panel by pressing
the top part of the panel onto the
top of the air purier (1). Then, gently
push the panel against the body of
the air purier (2) (g. i).
8 Wash your hands thoroughly after
installing lters.
5EN
Page 8

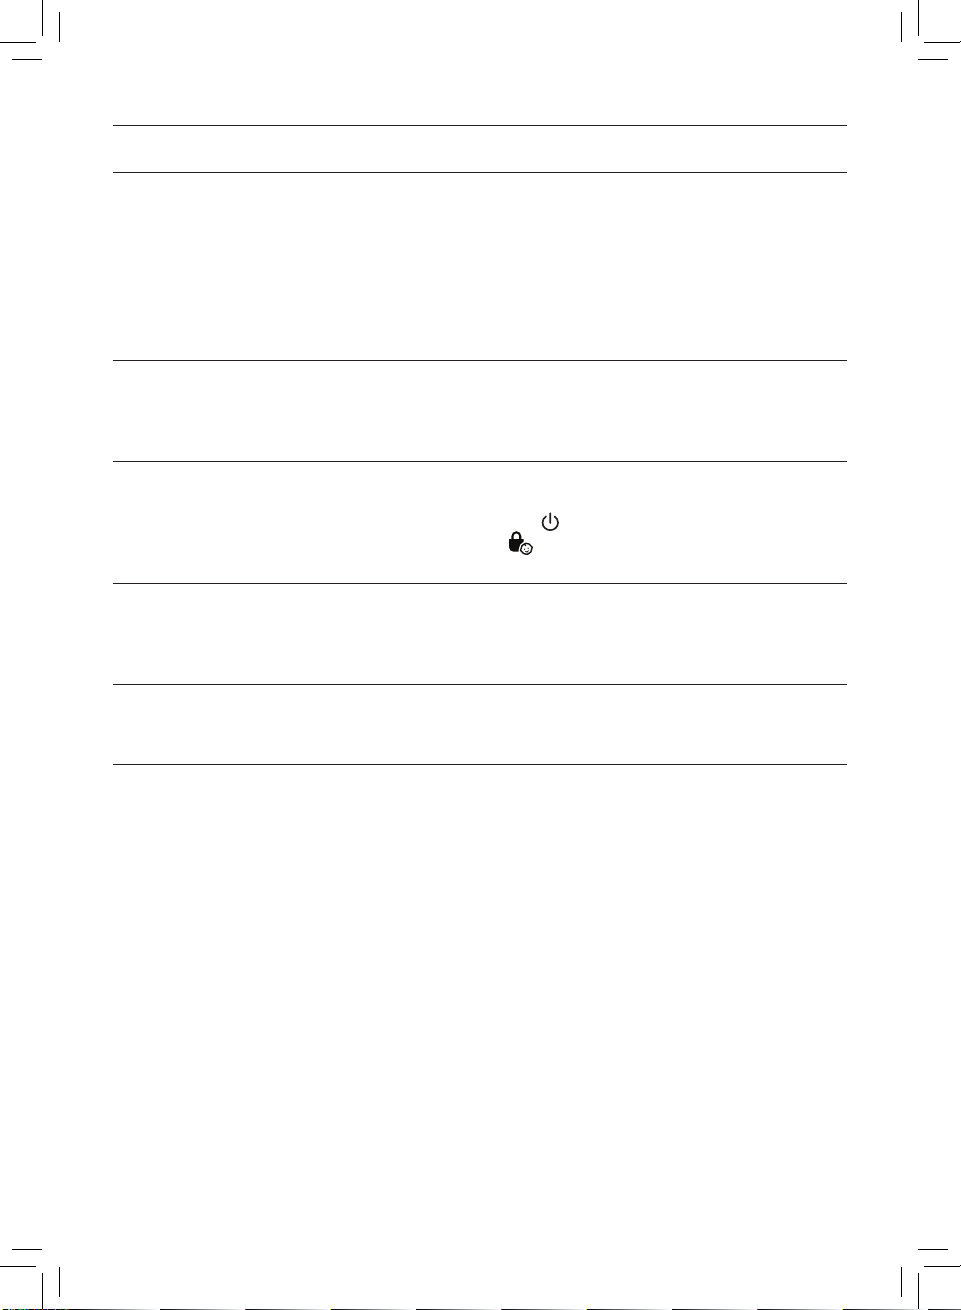
Wi-Fi setup
Setting up the Wi-Fi connection
for the rst time
1 Download and install the 'Air
Matters' app from the App Store or
Google Play.
2 Put the plug of the air purier in the
power socket and touch
on the air purier.
» The Wi-Fi indicator blinks
orange for the rst time.
to turn
3 Make sure that your mobile device
is successfully connected to your
Wi-Fi network.
4 Launch the 'Air Matters' app and
click on the ‘+’ on the top right of
the screen. Follow the onscreen
instructions to connect the air
purier to your network.
5 After the successful pairing and
connection, the Wi-Fi indicator
will light up white. If pairing
is not successful, consult the
troubleshooting section, or the
help section in the 'Air Matters'
app for extensive and up-to-date
troubleshooting tips.
Note
• This instruction is only valid when
the air purier is being set up for the
rst time. If the network has changed
or the setup needs to be performed
again, consult section “Setting up the
Wi-Fi connection when the network
has changed” on page 6.
• If you want to connect more than one
air purier to your smart device, you
have to do this successively. Complete
the set up of one air purier before you
turn on the other air purier.
• Make sure that the distance between
your mobile device and the air
purier is less than 10 m without any
obstructions.
• This app supports the latest versions
of Android and iOS. Please check
www.philips.com/purier-compatibility
for the latest update of supported
operating systems and devices.
Setting up the Wi-Fi connection
when the network has changed
Note
• This applies when the default network
to which your purier is connected has
changed.
1 Put the plug of the air purier in the
power socket and touch
on the air purier.
to turn
2 Touch and simultaneously
for 3 seconds until you hear a beep.
» The air purier goes to pairing
mode.
» The Wi-Fi indicator
orange.
blinks
3 Follow the steps 4-5 in "Setting up
the Wi-Fi connection for the rst
time" section.
6 EN
Page 9
4 Using the air
English
purifier
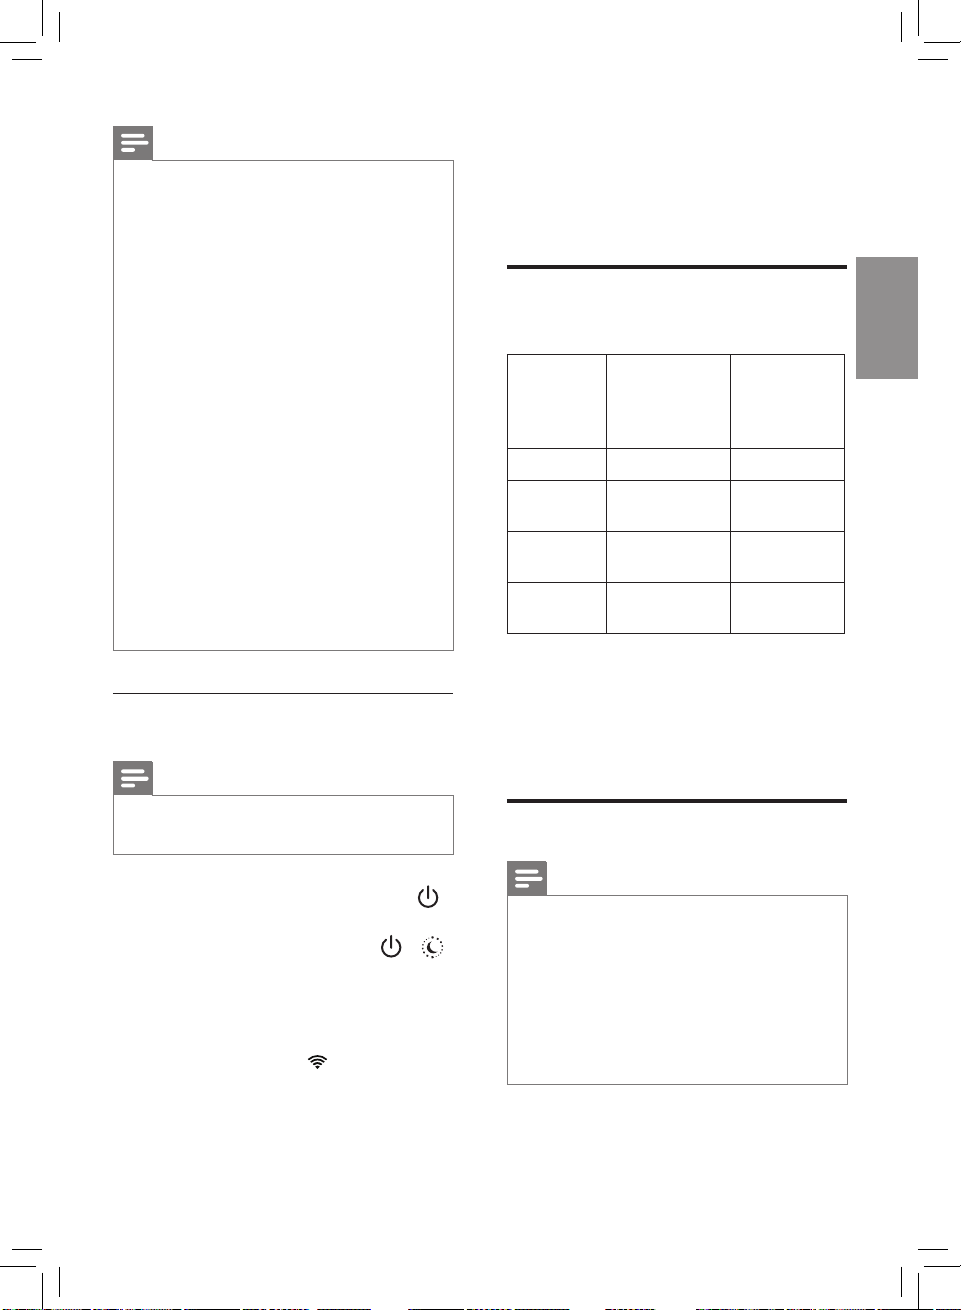
Understanding the air
quality light
PM2.5
level
≤12 Blue Good
13-35 Blue-Purple Fair
36-55 Purple-Red Poor
>55 Red Very poor
The air quality light automatically goes
on when the air purier is switched on,
and lights up all colors in sequence.
After approximately 30 seconds, the
air quality sensors select the color that
corresponds to the surrounding air
quality of airborne particles.
Turning on and o
Air quality
light color
Air quality
level
» When the air purier is warming
up, "
» After measuring the air
quality for approximately
30 seconds, the air quality
sensor automatically selects
the appropriate air quality light
color.
» The air purier shows the
PM2.5 level and operates in
the Pollution mode with
displayed on the screen.
" displays on the screen.
3 Touch and hold for 3 seconds to
switch o the air purier.
Note
• If the air purier stays connected to
the electrical outlet after turning OFF,
the air purier will operate under the
previous settings when turned ON
again.
• If the air purier accidentally shuts o
during running, it restarts automatically
and operates under previous settings
when the power supply is resumed.
• If the PM2.5 level is higher than 99, "--"
will be displayed on the screen.
Note
• Always place the air purier on a
stable, horizontal, and level surface
with the front of the unit facing away
from walls or furniture.
• For optimum purication performance,
close doors and windows.
• Keep curtains away from the air inlet or
air outlet.
1 Put the plug of the air purier in the
power socket.
2 Touch to switch on the air purier
(g. j).
» The air purier beeps.
Changing the fan speed
There are several fan speeds available.
You can choose the Pollution mode,
speed 1, 2, 3 or turbo mode (t).
Pollution mode
The specially designed pollution
mode can eectively remove airborne
pollutants such as PM2.5.
• Touch the fan speed button
select the Pollution mode (g. k).
» Auto (A) displays for 3 seconds
and then the
the screen.
icon displays on
to
7EN
Page 10

Manual
• Touch the fan speed button
repeatedly to select the fan speed
you need (g. l).
Turbo (t)
In turbo mode, the air purier operates
on the highest speed.
• Touch the fan speed button
select the turbo mode (t) (g. m).
to
Light sensor
With the light sensor, the air purier can
work according to the ambient light.
When the ambient light dims for
10 seconds, all the lights on the control
panel will turn o slowly. During this
period, you can touch any of the
buttons, all lights will turn on again. If
you don't perform other operations
within 10 seconds, all lights will turn o.
After the ambient light becomes bright
and lasts at least for 10 seconds, all
lights will turn on again.
Night sensing mode
You can activate the night sensing
mode in two ways.
» If the air quality light is not blue,
the air purier operates under
turbo mode for a maximum of
10 minutes, the air quality light
blinks slow during this time, and
then goes to the night sensing
mode.
Auto activating the night
sensing mode
When the air purier operates in the
Pollution mode, if the light sensor
detects the lights in your room are
turned o, the air purier goes to the
night sensing mode automatically. The
air purier will adjust the fan speed in
real-time to make sure the air in your
room is good. The air quality light will be
dimmed.
Note
• The light sensor detects the lights in
your room after 11 hours in the night
sensing mode.
• If the lights in your room are turned
on, the air purier will quit the night
sensing mode and operate under the
previous mode. The air quality light
and the display will be on again.
• To exit the night sensing mode
manually, touch
or button.
Activating the night sensing
mode manually
• Before you go to sleep, touch
manually to activate the night
sensing mode (g. n).
» If the air quality light is blue,
the air purier directly goes to
the night sensing mode. The air
purier operates quietly and the
air quality light will be dimmed.
8 EN
Page 11
Setting the child lock
English
Touch and hold the child lock
1
button
child lock (g. o).
» The child lock icon
» When the child lock is on,
for 3 seconds to activate
displays
on the screen.
all the other buttons are not
responsive, only the child lock
icon
blinks.
2 Touch and hold the child lock
button
deactivate child lock (g. p).
» The child lock icon
Note
for 3 seconds again to
disappears.
5 Cleaning
Note
• Always turn the air purier o and
unplug the air purier from the
electrical outlet before cleaning.
• Never immerse the air purier in water
or any other liquid.
• Never use abrasive, aggressive, or
ammable cleaning agents such as
bleach or alcohol to clean any part of
the air purier.
• Only the pre-lter is washable. The air
lter is not washable.
• Do not attempt to clean the lters or
air quality sensor with a vacuum.
• The child lock function is automatically
unlocked when the pre-lter cleaning
code or the lter replacement code
displays on the screen.
Cleaning the body of the
air purier
Regularly clean the inside and outside
of the air purier to prevent dust from
collecting.
1 Use a soft, dry cloth to clean both
the interior and exterior of the air
purier.
2 The air outlet can also be cleaned
with a dry, soft cloth.
3 Detach the front cover from the air
purier and wash it under running
tap water.
Cleaning the air quality
sensor
Clean the air quality sensor every
2 months for optimal functioning of the
purier.
9EN
Page 12
Note
• If the air purier is used in a dusty
environment, it may need to be
cleaned more often.
• If the humidity level in the room is
very high, condensation may develop
on the air quality sensor and the air
quality light may indicate a more poor
air quality even though the air quality
is actually good. If this occurs, clean
the air quality sensor or use the air
purier on a manual speed setting.
1 Switch o the air purier and
unplug from the power socket.
2 Clean the air quality sensor inlet
and outlet with a soft brush (g. q).
3 Open the air quality sensor cover
(g. r).
4 Clean the air quality sensor, the
dust inlet and the dust outlet with a
damp cotton swab (g. s).
5 Dry all parts thoroughly with a dry
cotton swab.
6 Reattach the air quality sensor
cover (g. t).
3 Press the clip down (1) and pull the
pre-lter towards you (2) (g. d).
4 If the pre-lter is very dirty, use a soft
brush to brush away the dust. Then
wash the pre-lter under running
tap water (g. v).
5 Allow the pre-lter to air dry
thoroughly before placing back in
the air purier.
Note
• To optimize the lifetime of the pre-
lter, make sure it dries completely
after cleaning.
• Wash your hands after handling the
lter.
6 Put the pre-lter back into the air
purier (g. h).
Note
• Make sure the side with the clip is
pointing towards you, and that all
hooks of the pre-lter are properly
attached to the air purier.
Note
• Always keep air quality cover closed
while the air purier is working.
Cleaning the pre-lter
Clean the pre-lter when F0 is displayed
on the screen (g. u).
1 Switch o the air purier and
unplug from the power socket.
2 Pull the bottom part of the front
panel and then gently lift to remove
it from the air purier (g. c).
10 EN
7 To reattach the front panel, press
the top part of the panel onto the
top of the air purier (1). Then, gently
push the panel against the body of
the air purier (2) (g. i).
8 Put the plug of the air purier in the
power socket.
9 Touch and hold the for
3 seconds to reset the pre-lter
cleaning time (g. w).
10 Wash your hands thoroughly after
installing lters.
Page 13
6 Replacing the
English
filters
Filter replacement
indicator
This air purier is equipped with a
lter replacement indicator to make
sure that the air purication lter is in
optimal condition when the air purier
is operating. When the lters need to be
replaced, the lter code displays on the
screen.
If the lters are not replaced in time,
the air purier will stop operating and
automatically lock.
Replacing the lters
Filter alert light
status
A3 displays on
the screen
C7 displays on
the screen
A3 and C7
display on
the screen
alternately
Action
Replace
NanoProtect lter
Series 3 (FY1410)
Replace
NanoProtect lter
Active Carbon
(FY1413)
Replace both lters
1 Turn o the air purier and unplug
from the power socket.
2 Take out the used air lter according
to the lter alert light status
displayed on the screen (g. x).
Discard used lters.
Note
Note
• The air purication lters are not
washable nor vacuum cleanable.
• Always turn o the air purier and
unplug from the electrical outlet
before replacing the lters.
• Do not clean the lters with a vacuum
cleaner.
• If the pre-lter is damaged, worn or
broken, do not use. Visit
www.philips.com/support or contact
the Consumer Care Center in your
country.
• Do not touch the pleated lter surface,
or smell the lter as it has collected
pollutants from the air.
3 Remove all packaging material from
the new lter (g. f).
4 Place the new lters into the air
purier (g. g).
5 Put the plug of the air purier in the
power socket.
6 Touch and hold the for 3 seconds
to reset the lter lifetime counter
(g. y).
7 Wash your hands after changing a
lter.
11EN
Page 14
Filter reset
You can replace lters even if there is
no lter replacement code displayed on
the screen. After replacing a lter, you
need to reset the lter lifetime counter
manually.
1 Touch and simultaneously for
3 seconds to enter the lter reset
mode (g. z).
» Code (A3) of the NanoProtect
lter Series 3 displays on the
screen.
2 Touch and hold for 3 seconds to
force reset the lter lifetime counter
of the NanoProtect lter Series 3
(g. y).
3 Code (C7) of the Nanoprotect lter
Active Carbon displays on the
screen after the lifetime counter of
the NanoProtect lter Series 3 has
been reset (g. {).
4 Touch and hold for 3 seconds to
force reset the lter lifetime counter
of the NanoProtect lter Active
Carbon and exit the lter reset
mode (g. |).
7 Storage
1 Turn o the air purier and unplug
from the power socket.
2 Clean the air purier, air quality
sensor and pre-lter (see chapter
‘Cleaning’).
3 Let all parts dry thoroughly before
storing.
4 Wrap the lter and pre-lter
separately in air tight plastic bags.
5 Store the air purier, the lter and
pre-lter in a cool, dry location.
6 Always thoroughly wash hands after
handling lters.
12 EN
Page 15
8 Troubleshooting
English
This chapter summarizes the most common problems you could encounter with the
appliance. If you are unable to solve the problem with the information below, contact
the Consumer Care Center in your country.
Problem Possible solution
The air purier
does not work
even though it is
plugged in to the
power socket and
switched on.
The air purier
does not work
even though it is
switched on.
The air purier
accidentally
powers o.
The airow that
comes out of
the air outlet
is signicantly
weaker than
before.
The air quality
does not improve,
even though the air
purier has been
operating for a
long time.
• Check if the front cover is properly installed.
• The lter replacement code has been displaying on the
screen but you have not replaced the corresponding lter
yet. The appliance will be locked if you keep using the
expired lter. In this case, replace the lter and reset the
lter lifetime counter.
• The lter replacement indicator has been on continuously
but you have not replaced the corresponding lter, and the
air purier is now locked. In this case, replace the lter and
reset the lter lifetime counter.
• The air purier restarts automatically and goes to the
previous mode when the power resumes.
• The pre-lter is dirty. Clean the pre-lter (see chapter
"Cleaning").
• One of the lters has not been placed in the air purier or
the lter is not placed properly. Make sure that all lters
are properly installed in the following order, starting with
the innermost lter:
1) NanoProtect lter Series 3 (FY1410); 2) NanoProtect lter
Active Carbon (FY1413) 3) pre-lter.
• The air quality sensor is wet. Make sure that the air quality
sensor is clean and dry (see chapter "Cleaning").
The color of the air
quality light always
stays the same.
• The air quality sensor is dirty. Clean the air quality sensor
(see chapter "Cleaning").
13EN
Page 16
Problem Possible solution
• The lter may produce smell after being used for a while
because of the absorption of indoor air. Remove the lter
The air purier
produces a
unpleasant smell.
and place it where it has direct sunlight and ventilation for
several hours. Re-install and try using it again. If the odor
remains, please replace the lter.
• If the air purier produces a burnt odor, switch OFF and
unplug from the electrical outlet. Contact Consumer Care
Center in your country.
• If the air purier is too loud, change the fan speed to a
The air purier is
loud.
lower fan speed level. When using the air purier in a
bedroom at night, choose the night sensing mode or select
a lower fan speed level.
The air purier still
indicates that I
need to replace a
lter, but I already
• Perhaps you did not reset the lter lifetime counter. Plug
in the air purier, touch
touch and hold the
did.
Error codes "E1",
"E2", "E3" or "E4"
displays on the
• The appliance has malfunctions. Contact the Consumer
Care Center in your country.
screen.
to switch on the air purier, and
for 3 seconds.
Which App I should
download?
14 EN
• Please download and install the 'Air Matters' App
developed by FreshIdeas Studio from the App Store or
Google Play.
Page 17
Problem Possible solution
English
• If the router your purier is connected to is dual – band
and currently it is not connecting to a 2.4GHz network,
please switch to another band of the same router (2.4GHz)
and try to pair your purier again. 5GHz networks are not
supported.
• Web authentication networks are not supported.
• Check if the purier is within range of the Wi-Fi router. You
can try to locate the air purier closer to the Wi-Fi router.
• Check if the network name is correct. The network name is
case-sensitive.
The Wi-Fi setup is
not successful.
• Check if the Wi-Fi password is correct. The password is
case-sensitive.
• Retry the setup with the instructions in section ‘Set up the
Wi-Fi connection when the network has changed’.
• The Wi-Fi connectivity can be interrupted by electromagnetic
or other interferences. Keep the appliance away from other
electronic devices that may cause interferences.
• Check if the mobile device is in airplane mode. Make sure
to have the airplane mode deactivated when connecting
to the Wi-Fi network.
• Consult the help section in the App for extensive and up-
to-date troubleshooting tips.
15EN
Page 18

9 Guarantee and
service
10 Notices
If you need information or if you have a
problem, please visit the Philips website
at www.philips.com or contact the
Philips Consumer Care Center in your
country (you nd its phone number
in the worldwide guarantee leaet). If
there is no Consumer Care Centre in
your country, go to your local Philips
dealer.
Order parts or
accessories
If you have to replace a part or want to
purchase an additional part, go to your
Philips dealer or visit www.philips.com/
support.
If you have problems obtaining the
parts, please contact the Philips
Consumer Care Center in your country
(you can nd its phone number in the
worldwide guarantee leaet).
Electromagnetic elds
(EMF)
This Philips appliance complies with all
applicable standards and regulations
regarding exposure to electromagnetic
elds.
Compliance with EMF
Koninklijke Philips N.V. manufactures
and sells many products targeted at
consumers, which, like any electronic
apparatus, in general have the ability
to emit and receive electromagnetic
signals.
One of Philips' leading Business
Principles is to take all necessary health
and safety measures for our products,
to comply with all applicable legal
requirements and to stay well within the
EMF standards applicable at the time of
producing the products.
Philips is committed to develop,
produce and market products that
cause no adverse health eects. Philips
conrms that if its products are handled
properly for their intended use, they
are safe to use according to scientic
evidence available today.
Philips plays an active role in the
development of international EMF
and safety standards, enabling Philips
to anticipate further developments in
standardization for early integration in
its products.
16 EN
Page 19
Recycling
English
This symbol means that this product
shall not be disposed of with normal
household waste (2012/19/EU).
Follow your country’s rules for the
separate collection of electrical and
electronic products. Correct disposal
helps prevent negative consequences
for the environment and human health.
Software
App Store is a service mark of Apple Inc.
Google Play is a trademark of Google
Inc.
Air Matters app developed by Air
Matters Network Pty Ltd.
This Philips appliance and Air Matters
app applied multiple open source
softwares, copies of open source
software license text used in this
product can be derived from website:
www.philips.com/purier-compatibility.
17EN
Page 20
Page 21
Obsah
Čeština
1 Důležité 20
Bezpečnost 20
2 Vaše čistička vzduchu 23
Přehled výrobku (obr. a) 23
Přehled ovládacích prvků
(obr. b) 23
3 Začínáme 24
Instalace ltrů 24
Nastavení Wi-Fi 24
4 Použití čističky vzduchu 25
Jak funguje kontrolka kvality
vzduchu 25
Vypnutí a zapnutí 25
Změna rychlosti ventilátoru 26
Světelný senzor 26
Noční režim 27
Nastavení dětské pojistky 27
5 Čištění 28
Čištění těla čističky 28
Čištění snímače kvality vzduchu 28
Čištění předltru 28
7 Uskladnění 31
8 Odstraňování problémů 32
9 Záruka a servis 35
Objednání dílů nebo doplňků 35
10 Upozornění 35
Elektromagnetická pole (EMP) 35
Recyklace 36
Software 36
6 Výměna ltrů 29
Indikátor výměny ltru 29
Výměna ltrů 29
Resetování ltru 30
S použitím papíru šetrného k přírodě Děkujeme, že pomáháte chránit stromy
19CS
Page 22

1 Důležité
Bezpečnost
Před použitím přístroje si pozorně
přečtěte tuto uživatelskou příručku a
uschovejte ji pro budoucí použití.
Nebezpečí
• Zamezte proniknutí
vody, jiné kapaliny nebo
hořlavého čisticího
prostředku do přístroje.
Předejdete tak úrazu
elektrickým proudem a/
nebo požáru.
• Přístroj nečistěte vodou,
jakoukoli jinou tekutinou
ani (hořlavým) čisticím
prostředkem. Předejdete
tak úrazu elektrickým
proudem a/nebo požáru.
• Kolem přístroje
nerozstřikujte žádné
hořlavé látky, jako jsou
například insekticidy nebo
parfémy.
Varování
• Dříve než přístroj připojíte
do sítě, zkontrolujte,
zda napětí uvedené
na přístroji souhlasí
s napětím v místní
elektrické síti.
• Pokud by byl poškozen
napájecí kabel, musí
jeho výměnu provést
společnost Philips,
autorizovaný servis
společnosti Philips nebo
obdobně kvalikovaní
pracovníci, aby se
předešlo možnému
nebezpečí.
• Pokud byste zjistili závadu
na zástrčce, na napájecím
kabelu nebo přímo na
přístroji, přístroj dále
nepoužívejte.
• Děti od 8 let věku a osoby
s omezenými fyzickými,
smyslovými nebo
duševními schopnostmi
nebo nedostatkem
zkušeností a znalostí
mohou tento přístroj
používat v případě, že
jsou pod dohledem
nebo byly poučeny
o bezpečném používání
přístroje a chápou rizika,
která mohou hrozit. Děti
si s přístrojem nesmí hrát.
Čištění a údržbu nesmí
provádět děti bez dozoru.
20 CS
Page 23
• Vyvarujte se zablokování
Čeština
vstupu a výstupu
vzduchu, např. umístěním
předmětů na výstup
vzduchu nebo před vstup
vzduchu.
• Dbejte na to, aby do
přístroje skrz výstup
vzduchu nespadly cizí
předměty.
• Standardní rozhraní WiFi
založené na standardu
802.11b/g/n při 2,4 GHz s
maximálním výstupním
výkonem 31,62 mW EIRP.
Upozornění
• Tento přístroj nenahrazuje
řádné větrání, pravidelné
vysávání prachu nebo
použití digestoře či
ventilátoru během vaření.
• Pokud je v zásuvce
použité k napájení
přístroje špatný kontakt,
začne se zástrčka přístroje
přehřívat. Dbejte na to,
abyste přístroj zapojili do
řádně instalované síťové
zásuvky.
• Přístroj vždy pokládejte
a používejte na suchém,
stabilním, vyrovnaném a
vodorovném povrchu.
• Za přístrojem a po obou
jeho stranách ponechejte
alespoň 20 cm volného
prostoru a zároveň
ponechejte alespoň
30 cm volného prostoru
nad přístrojem.
• Na přístroj nic
nepokládejte.
• Na přístroj si nesedejte
ani na něj nestoupejte.
Sednutí nebo stoupnutí
si na přístroj může vést
k potenciálnímu zranění.
• Neumisťujte přístroj přímo
pod klimatizaci, zabráníte
tak tomu, aby na něj
kapala kondenzovaná
voda.
• Před zapnutím přístroje
se ujistěte, že všechny
ltry jsou správně
nainstalovány.
• Používejte pouze
originální ltry značky
Philips určené přímo pro
tento přístroj. Žádné jiné
ltry nepoužívejte.
• Spalování ltru může
způsobit nevratné
ohrožení lidského zdraví
nebo ohrožení života
jiných osob. Nepoužívejte
ltr jako palivo ani pro
podobný účel.
21CS
Page 24

• Dbejte na to, abyste
do přístroje (zejména
do vstupu a výstupu
vzduchu) nenarazili
tvrdým předmětem.
• Přístroj vždy zvedejte
nebo s ním pohybujte
pomocí rukojeti na horní
straně.
• Aby se zabránilo úrazu
nebo závadě přístroje,
nevkládejte do výstupu či
vstupu vzduchu prsty ani
předměty.
• Nepoužívejte tento
přístroj, pokud jste použili
repelent proti hmyzu
kouřového typu pro vnitřní
prostory nebo na místech
se zbytky oleje, hořící
vonnou tyčinkou nebo
chemickými výpary.
• Nepoužívejte přístroj
v blízkosti plynových
zařízení, topných zařízení
nebo krbů.
• Po použití a před čištěním
nebo prováděním údržby
přístroj vždy odpojte od
zdroje napájení.
• Nepoužívejte zařízení
v místnosti s velkými
změnami teploty, protože
by tím mohlo dojít
ke kondenzaci uvnitř
přístroje.
• Aby nedocházelo k rušení,
umístěte přístroj nejméně
2 metry od elektrických
zařízení využívajících
vzdušných rádiových vln,
např. televizorů, rádií a
rádiem řízených hodin.
• Přístroj je určen pouze
pro domácí použití za
běžných provozních
podmínek.
• Nepoužívejte přístroj ve
vlhkém prostředí nebo
v prostředí s vysokými
okolními teplotami,
například v koupelně, na
záchodě nebo v kuchyni.
• Přístroj neodstraňuje
oxid uhelnatý (CO) ani
radon (Rn). Není možné jej
použít jako bezpečnostní
zařízení v případě
nehod se spalovacími
procesy a nebezpečnými
chemikáliemi.
• Pokud potřebujete přístroj
přemístit, nejprve ho
odpojte od napájení.
• Nepohybujte přístrojem
tažením za napájecí kabel.
22 CS
Page 25
2 Vaše čistička
Čeština
vzduchu
Gratulujeme k nákupu a vítáme vás
mezi uživateli výrobků společnosti
Philips!
Chcete-li plně využívat výhod, které
nabízí podpora společnosti Philips,
zaregistrujte svůj výrobek na adrese
www.Philips.com/welcome.
Přehled výrobku (obr. a)
A Ovládací panel
B Kontrolka kvality vzduchu
C Výstup vzduchu
D Snímač kvality vzduchu
Filtr NanoProtect řady 3
E
(FY1410)
Aktivní uhlíkový ltr NanoProtect
F
(FY1413)
Přehled ovládacích prvků
(obr. b)
J Tlačítko vypínače
K Tlačítko nočního režimu
L Displej
M Ukazatel Wi-Fi
N Tlačítko rychlosti ventilátoru
O Tlačítko dětské pojistky
G Předltr
H Vstup vzduchu
I Čelní panel
23CS
Page 26
3 Začínáme
Instalace ltrů
Note
• Před instalací ltrů zkontrolujte, zda
je čistička vzduchu odpojená od
elektrické sítě.
• Zkontrolujte, že je strana ltru
s poutkem otočená směrem k vám.
1 Vytáhněte spodní část předního
panelu a mírným nadzvednutím
panel sejměte z čističky vzduchu
(obr. c).
2 Zatlačte zaklapávací uzávěr dolů (1)
a vysuňte předltr směrem k sobě
(2) (obr. d).
3 Vyjměte všechny ltry (obr. e).
4 Odstraňte veškerý obalový materiál
z ltrů (obr. f).
5 Nejprve do čističky vzduchu
umístěte silný ltr (FY1410) a poté
slabý aktivní uhlíkový ltr (FY1413)
(obr. g). Čísla modelu jsou
vyznačena na každém ltru.
6 Vložte předltr zpět do čističky
vzduchu (obr. h).
Note
• Zkontrolujte, že strana se zaklapávacím
uzávěrem je otočená směrem k vám
a že všechny háčky předltru jsou
řádně připevněny k čističce.
Nastavení Wi-Fi
První nastavení Wi-Fi připojení
1 Stáhněte si a nainstalujte aplikaci
Air Matters z App Storu nebo
Google Play.
2 Zapojte zástrčku čističky vzduchu
do zásuvky a stisknutím tlačítka
čističku zapněte.
» Ukazatel Wi-Fi při prvním spuštění
oranžově zabliká.
3 Ověřte, že je vaše mobilní zařízení
správně připojené k síti Wi-Fi.
4 Spusťte aplikaci „Air Matters“ a
klepněte na symbol „+“ v pravé
horní části obrazovky. Postupujte
podle pokynů na obrazovce a
připojte čističku vzduchu k vaší síti.
5 Po úspěšném spárování a navázání
připojení se ukazatel Wi-Fi
rozsvítí bílým světlem. V případě,
že párování neproběhne úspěšně,
podívejte se do části věnované
řešení potíží v aplikaci Air Matters,
kde jsou uvedeny podrobné
a aktuální tipy k odstraňování
problémů.
7 Přední panel znovu nasaďte
zatlačením horní části panelu na
vrchní část čističky vzduchu (1).
Potom jemně zatlačte panel do těla
čističky vzduchu (2) (obr. i).
8 Po instalaci ltrů si pečlivě umyjte
ruce.
24 CS
Page 27
Note
Čeština
• Tyto pokyny jsou určeny pouze pro
první nastavování čističky vzduchu.
Pokud měníte síť nebo je nutné přístroj
znovu nastavit, podívejte se do části
„Nastavení Wi-Fi připojení po změně
sítě“ na straně 25.
• Pokud chcete ke svému chytrému
zařízení připojit více čističek vzduchu,
je nutné připojovat jedno zařízení po
druhém. Dokončete nastavení jedné
čističky vzduchu předtím, než zapnete
jinou čističku.
• Vzdálenost mezi mobilním zařízením
a čističkou vzduchu musí být menší
než 10 m a mezi zařízeními nesmí být
překážky.
• Tato aplikace podporuje nejnovější
verze systémů Android a iOS. Na
stránkách www.philips.com/puriercompatibility najdete nejnovější
aktualizaci podporovaných operačních
systémů a zařízení.
Nastavení Wi-Fi připojení po
změně sítě
Note
4 Použití čističky
vzduchu
Jak funguje kontrolka
kvality vzduchu
Barva
Úroveň
PM2.5
≤12 Modrá Dobrá
13-35
36-55
>55 Červená
Kontrolka kvality vzduchu se
automaticky zapne při zapnutí čističky
a postupně rozsvítí všechny barvy.
Přibližně po 30 sekundách zvolí snímač
kvality vzduchu barvu, která odpovídá
kvalitě okolního vzduchu.
kontrolky
kvality
vzduchu
Modro-
nachová
Nachovo-
červená
Úroveň
kvality
vzduchu
Uspokojivá
Špatná
Velmi
špatná
• Tento postup platí v případě změny
sítě, ke které je čistička připojená.
1 Zapojte zástrčku čističky vzduchu
do zásuvky a stisknutím tlačítka
čističku zapněte.
2 Současně stiskněte tlačítka a
na dobu 3 sekund, dokud se neozve
pípnutí.
» Čistička vzduchu přejde do
režimu párování.
» Ukazatel Wi-Fi
zabliká.
oranžově
3 Postupujte podle kroků 4–5 v části
První nastavení Wi-Fi připojení.
Vypnutí a zapnutí
Note
• Čističku vzduchu vždy umisťujte
na stabilní, horizontální a rovný
povrch tak, aby přední část jednotky
směřovala pryč od zdí a nábytku.
• Pro optimální čisticí výkon zavřete
dveře a okna.
• Ke vstupu nebo výstupu vzduchu by se
neměly dostat závěsy.
1 Zapojte zástrčku čističky vzduchu
do síťové zásuvky.
25CS
Page 28
2 Stisknutím tlačítka čističku
vzduchu zapněte (obr. j).
» Čistička vzduchu zapípá.
» Když se čistička zahřívá, zobrazí
se na displeji značka „
» Vestavěný snímač kvality
vzduchu po asi 30 sekund
dlouhém měření kvality
vzduchu automaticky vybere
odpovídající barvu pro kvalitu
vzduchu.
» Čistička vzduchu zobrazí
úroveň PM2.5 a funguje v
režimu znečištění, přičemž na
obrazovce se zobrazuje
“.
.
3 Stiskem a podržením tlačítka na
3 sekundy čističku vzduchu vypněte.
Note
• Když zůstane čistička po vypnutí
připojená k elektrické síti, bude
po opětovném zapnutí pracovat
v předchozím nastavení.
• Pokud se během provozu čistička
sama od sebe vypne, po obnovení
napájení se automaticky restartuje
a bude pracovat v předchozím
nastavení.
• Pokud je úroveň PM2.5 vyšší než 99,
na obrazovce se zobrazuje „--“.
Změna rychlosti
ventilátoru
K dispozici je několik rychlostí
ventilátoru. Můžete vybrat režim
znečištění, rychlost 1, 2, 3 nebo režim
turbo (t).
Režim Znečištění
• Speciálně navržený režim proti
znečištění dokáže efektivně
odstraňovat poletující nečistoty na
úrovni PM2.5.
• Stisknutím tlačítka rychlosti
ventilátoru
znečištění (obr. k).
» Na displeji se na 3 sekundy
zobrazí ikona Auto (A) a poté .
vyberte režim
Manuální
• Opakovaným stisknutím tlačítka
rychlosti ventilátoru
požadovanou rychlost ventilátoru
(obr. l).
vyberte
Turbo (t)
V režimu turbo pracuje čistička na
nejvyšší rychlost.
• Stisknutím tlačítka rychlosti
ventilátoru
(obr. m).
vyberte režim turbo (t)
Světelný senzor
Díky světelnému senzoru se čistička umí
přizpůsobit okolnímu světlu.
Když se na dobu 10 sekund sníží
množství okolního světla, všechna
světla na ovládacím panelu pomalu
zhasnou. Během této doby můžete
stisknout libovolné tlačítko a všechna
světla se opět rozsvítí. Pokud během
10 sekund neprovedete žádný úkon,
všechna světla zhasnou.
Až bude okolní světlo jasné na dobu
alespoň 10 sekund, všechna světla se
znovu rozsvítí.
26 CS
Page 29
Noční režim
Čeština
Noční režim lze aktivovat dvěma
způsoby.
Ruční aktivace nočního režimu
• Před spaním stiskněte ručně tlačítko
, čímž aktivujete noční režim
(obr. n).
» Pokud kontrolka kvality vzduchu
svítí modře, čistička rovnou
přejde do nočního režimu.
Chod čističky se ztiší a kontrolka
kvality vzduchu se ztlumí.
» Pokud kontrolka kvality vzduchu
nesvítí modře, čistička bude
po dobu maximálně 10 minut
pracovat v režimu turbo. Během
této doby bude kontrolka kvality
vzduchu pomalu blikat a poté
se čistička přepne do nočního
režimu.
Automatická aktivace nočního
režimu
Když čistička vzduchu pracuje v režimu
znečištění a světelný senzor detekuje,
že jsou světla v místnosti zhasnutá,
čistička se do nočního režimu přepne
automaticky. Čistička vzduchu bude
přizpůsobovat rychlost ventilátoru
dle aktuální potřeby, aby byl vzduch
v místnosti dobrý. Kontrolka kvality
vzduchu se ztlumí.
Note
• Světelný senzor detekuje světlo
v místnosti po 11 hodinách v nočním
režimu.
• Pokud jsou světla v místnosti
rozsvícená, čistička ukončí noční režim
a bude pracovat v předchozím režimu.
Kontrolka kvality vzduchu a displej se
znovu rozsvítí.
• Pro ruční ukončení nočního režimu
stiskněte tlačítko
nebo .
Nastavení dětské
pojistky
Stiskněte tlačítko dětské pojistky
1
a jeho podržením na 3 sekundy
aktivujte dětskou pojistku (obr. o).
» Na displeji se zobrazí ikona
dětské pojistky
» Když je aktivována dětská
pojistka, žádná ostatní tlačítka
nereagují, pouze ikona dětské
pojistky
bliká.
.
2 Dalším stisknutím tlačítka dětské
pojistky
dětskou pojistku deaktivujete
(obr. p).
» Ikona dětské pojistky
Note
na dobu 3 sekund
zmizí.
• Když se na displeji zobrazí kód
čištění předltru nebo kód výměny
ltru, dětská pojistka se deaktivuje
automaticky.
27CS
Page 30

5 Čištění
Note
• Čističku vzduchu před čištěním vždy
vypněte a odpojte ze zásuvky.
• Nikdy čističku neponořujte do vody ani
do jiné kapaliny.
• K čištění žádné části čističky nikdy
nepoužívejte abrazivní, agresivní
nebo hořlavé čisticí prostředky, jako je
například bělidlo nebo alkohol.
• Pouze předltr je omyvatelný.
Vzduchový ltr není omyvatelný.
• Nepokoušejte se čistit ltry nebo
snímače kvality vzduchu vysavačem.
Čištění těla čističky
Tělo čističky vzduchu pravidelně
čistěte zevnitř i zvenku, aby se na něm
neusazoval prach.
1 Pomocí jemného suchého hadříku
vyčistěte vnitřní i vnější část čističky.
2 Suchým měkkým hadříkem můžete
také vyčistit výstup vzduchu.
3 Sundejte z čističky vzduchu přední
kryt a omyjte jej pod tekoucí vodou.
Čištění snímače kvality
vzduchu
Note
• Při použití čističky v prašném prostředí
může být zapotřebí ji čistit častěji.
• Jestliže je v místnosti velice vysoká
vlhkost, může na snímači kvality
vzduchu začít kondenzovat voda
a kontrolka kvality vzduchu může
ukazovat, že je kvalita vzduchu špatná,
přestože je ve skutečnosti dobrá.
V takovém případě vyčistěte snímač
kvality vzduchu nebo na čističce
vzduchu nastavte rychlost manuálně.
1 Vypněte čističku vzduchu a odpojte
ji ze síťové zásuvky.
2 Vyčistěte vstup a výstup snímače
kvality vzduchu měkkým kartáčkem
(obr. q).
3 Otevřete kryt snímače kvality
vzduchu (obr. r).
4 Vlhkou vatovou tyčinkou vyčistěte
snímač kvality vzduchu a vstup
a výstup prachu (obr. s).
5 Všechny součásti pečlivě vysušte
suchou vatovou tyčinkou.
6 Vraťte kryt snímače kvality vzduchu
zpět (obr. t).
Note
• Když je čistička vzduchu v provozu,
ponechte kryt snímače kvality vzduchu
vždy zavřený.
K zajištění optimálního výkonu čističky
čistěte snímač kvality vzduchu každé
dva měsíce.
28 CS
Čištění předltru
Předltr vyčistěte poté, co se na displeji
zobrazí údaj F0 (obr. u).
1 Vypněte čističku vzduchu a odpojte
ji ze síťové zásuvky.
Page 31

2 Vytáhněte spodní část předního
Čeština
panelu a mírným nadzvednutím
panel sejměte z čističky vzduchu
(obr. c).
3 Zatlačte zaklapávací uzávěr dolů (1)
a vysuňte předltr směrem k sobě
(2) (obr. d).
4 Pokud je předltr výrazně
znečištěný, setřete z něj prach
měkkým kartáčkem. Poté předltr
vyperte pod tekoucí vodou (obr. v).
5 Než předltr umístíte zpět do
čističky, nechte jej zcela vyschnout.
Note
• Po čištění nechejte předltr úplně
vyschnout, abyste zvýšili jeho
životnost.
• Po práci s ltrem si umyjte ruce.
6 Vložte předltr zpět do čističky
vzduchu (obr. h).
Note
• Zkontrolujte, že strana se zaklapávacím
uzávěrem je otočená směrem k vám
a že všechny háčky předltru jsou
řádně připevněny k čističce vzduchu.
7 Přední panel znovu nasaďte
zatlačením horní části panelu na
vrchní část čističky vzduchu (1).
Potom jemně zatlačte panel do těla
čističky vzduchu (2) (obr. i).
8 Zapojte zástrčku čističky vzduchu
do síťové zásuvky.
9 Stisknutím tlačítka a jeho
podržením na 3 sekundy resetujte
dobu čištění předltru (obr. w).
10 Po instalaci ltrů si pečlivě umyjte
ruce.
6 Výměna filtrů
Indikátor výměny ltru
Tato čistička vzduchu je vybavena
indikátorem výměny ltru, který slouží
k ověření, že je ltr čističky vzduchu
v době jejího provozu v optimálním
stavu. Když je potřeba ltry vyměnit, na
displeji se zobrazí kód ltru.
Pokud nebudou ltry vyměněny včas,
čistička vzduchu přestane fungovat
a automaticky se uzamkne.
Výměna ltrů
Note
• Filtry čištění vzduchu není možné prát
ani čistit pomocí vysavače.
• Před výměnou ltrů čističku vzduchu
vždy vypněte a odpojte od zdroje
napájení.
• K čištění ltrů nepoužívejte vysavač.
• Pokud je předltr poškozený,
opotřebený nebo nefunkční,
nepoužívejte ho. Navštivte webové
stránky www.philips.com/support
nebo se obraťte na středisko péče
o zákazníky ve své zemi.
29CS
Page 32

Stav kontrolky
výstrahy ltru
Na displeji se
zobrazí údaj A3
Na displeji se
zobrazí údaj C7
Na displeji
se střídavě
zobrazují údaje
A3 a C7
Akce
Vyměňte ltr
NanoProtect řady 3
(FY1410)
Vyměňte aktivní
uhlíkový ltr NanoProtect (FY1413)
Vyměňte oba ltry
1 Vypněte čističku vzduchu a odpojte
ji ze síťové zásuvky.
2 Použitý vzduchový ltr vyjměte
podle stavu kontrolky výstrahy ltru
zobrazeného na displeji (obr. x).
Použité ltry vyhoďte.
Note
• Nedotýkejte se skládaného povrchu
ltru ani k němu nečichejte – obsahuje
zachycené škodliviny ze vzduchu.
3 Odstraňte veškerý obalový materiál
z nového ltru (obr. f).
4 Nové ltry vložte do čističky
vzduchu (obr. g).
5 Zapojte zástrčku čističky vzduchu
do síťové zásuvky.
6 Stisknutím a podržením tlačítka
na 3 sekundy resetujte počítadlo
životnosti ltru (obr. y).
7 Po výměně ltru si umyjte ruce.
Resetování ltru
Filtry můžete vyměnit i v případě, že
se na displeji nezobrazuje žádný kód
pro výměnu ltru. Po výměně ltru je
nutné ručně resetovat počítadlo jeho
životnosti.
1 Současným stisknutím a podržením
tlačítek
vstupte do režimu resetování ltrů
(obr. z).
» Na displeji se zobrazí kód (A3)
a na 3 sekundy
ltru NanoProtect řady 3.
2 Stiskněte tlačítko a podržte
ho po dobu 3 sekund, aby se
resetovalo počítadlo životnost ltru
NanoProtect řady 3 (obr. y).
3 Po resetování počítadla životnosti
ltru NanoProtect řady 3 se na
displeji zobrazí kód (C7) aktivního
uhlíkového ltru NanoProtect
(obr. {).
4 Stisknutím a podržením tlačítka
na 3 sekundy dojde k vynucenému
resetování počítadla životnosti
aktivního uhlíkového ltru
NanoProtect a následnému
ukončení režimu resetování ltrů
(obr. |).
30 CS
Page 33

7 Uskladnění
Čeština
1 Vypněte čističku vzduchu a odpojte
ji ze síťové zásuvky.
2 Vyčistěte čističku vzduchu, snímač
kvality vzduchu a předltr (viz
kapitolu „Čištění“).
3 Před uskladněním nechte všechny
součásti zcela vyschnout.
4 Filtr a předltr zabalte zvlášť do
vzduchotěsných plastových sáčků.
5 Čističku vzduchu, ltr a předltr
uchovávejte na chladném a suchém
místě.
6 Po manipulování s ltry si vždy
důkladně umyjte ruce.
31CS
Page 34

8 Odstraňování problémů
V této kapitole najdete nejběžnější problémy, s nimiž se můžete u přístroje setkat.
Pokud vám uvedené informace nepomohou váš problém vyřešit, kontaktujte středisko
péče o zákazníky ve své zemi.
Problém Možná řešení
Čistička vzduchu
nefunguje,
přestože je
zapojená do síťové
zásuvky a zapnutá.
Čistička vzduchu
nefunguje,
přestože je
zapnutá.
Čistička se sama
od sebe vypne.
Proud vzduchu,
který vychází
z výstupu vzduchu,
je výrazně slabší
než dříve.
Kvalita vzduchu
se nezlepšila,
přestože čistička
už je v provozu
delší dobu.
• Zkontrolujte, že je přední kryt správně nasazený.
• Na displeji se zobrazuje kód výměny ltru, ale vy jste
příslušný ltr dosud nevyměnili. Pokud budete nadále
používat prošlý ltr, přístroj se zablokuje. V takovém
případě vyměňte ltr a resetujte počítadlo životnosti ltru.
• Indikátor výměny ltru trvale svítí, ale nevyměnili jste
příslušný ltr, takže je čistička nyní zablokována. V takovém
případě vyměňte ltr a resetujte počítadlo životnosti ltru.
• Jakmile je přívod energie obnoven, čistička vzduchu se
automaticky restartuje a přejde do předchozího režimu.
• Předltr je špinavý. Vyčistěte předltr (viz kapitola „Čištění“).
• V čističce vzduchu není vložen některý z ltrů nebo
je vložen nesprávně. Zkontrolujte, že jsou správně
vloženy všechny ltry, a to v následujícím pořadí (od
nejvzdálenějšího ltru):
1) ltr NanoProtect řady 3 (FY1410); 2) aktivní uhlíkový ltr
NanoProtect (FY1413); 3) předltr.
• Snímač kvality vzduchu je vlhký. Ujistěte se, že je snímač
kvality vzduchu čistý a suchý (viz kapitola „Čištění“).
Barva kontrolky
snímače kvality
vzduchu je stále
stejná.
32 CS
• Snímač kvality vzduchu je znečištěný. Vyčistěte snímač
kvality vzduchu (viz kapitola „Čištění“).
Page 35

Problém Možná řešení
Čeština
• Filtr může po určité době používání vydávat zápach
v důsledku absorpce vzduchu z interiéru. Filtr vyjměte
a umístěte tam, kde bude vystaven přímému slunečnímu
Čistička vydává
nepříjemný zápach.
světlu a větrání. Přeinstalujte jej a zkuste opět použít.
Pokud zápach přetrvává, ltr vyměňte.
• Pokud čistička vzduchu vydává zápach spálenin, vypněte
ji a vypojte ze zásuvky. Obraťte se na středisko péče
o zákazníky ve vaší zemi.
Čistička je hlučná.
Čistička stále
upozorňuje, že je
potřeba vyměnit
ltr, přestože
k výměně už došlo.
Na displeji se
zobrazují chybové
kódy „E1“, „E2“, „E3“
nebo „E4“.
Kterou aplikaci si
mám stáhnout?
• Pokud je čistička příliš hlučná, změňte rychlost ventilátoru
na nižší úroveň. Při použití čističky přes noc v ložnici
nastavte noční režim nebo zvolte nižší rychlost ventilátoru.
• Možná jste neprovedli resetování počítadla životnosti ltru.
Zapojte čističku vzduchu a stisknutím tlačítka
Poté stiskněte a na 3 sekundy podržte tlačítko
ji zapněte.
.
• Přístroj má poruchy. Obraťte se na středisko péče
o zákazníky ve vaší zemi.
• Stáhněte si a nainstalujte aplikaci „Air Matters“ z App
Storu nebo Google Play od vývojářů z FreshIdeas Studio.
33CS
Page 36

Problém Možná řešení
• Pokud je router, k němuž je čistička připojená,
dvoupásmový a nemůže se připojit k síti 2,4 GHz, přepněte
do jiného pásma stejného routeru (2,4 GHz) a zkuste
čističku znovu spárovat. Nejsou podporovány sítě v pásmu
5 GHz.
• Nejsou podporovány sítě pro ověřování webu.
• Zkontrolujte, zda je síť v dosahu routeru Wi-Fi. Můžete
zkusit vyhledat čističku vzduchu blíže routeru Wi-Fi.
• Zkontrolujte, zda je název sítě správný. V názvu sítě se
rozlišují malá a velká písmena.
Nastavení Wi-Fi
není úspěšné.
• Zkontrolujte, zda je správné heslo pro Wi-Fi. V heslech se
rozlišují malá a velká písmena.
• Znovu se pokuste o nastavení podle pokynů v části
Nastavení Wi-Fi připojení po změně sítě.
• Wi-Fi připojení může být přerušeno elektromagnetickým
nebo jiným rušením. Udržujte tento přístroj mimo dosah
jiných elektronických zařízení, která mohou způsobovat
rušení.
• Zkontrolujte, zda není mobilní zařízení v režimu V letadle.
Režim V letadle nesmí být při připojování k síti Wi-Fi
aktivní.
• V nápovědě v aplikaci najdete podrobné a aktuální tipy
k odstraňování problémů.
34 CS
Page 37

9 Záruka a servis
Čeština
Pokud potřebujete další informace
nebo máte jakýkoli problém, navštivte
web společnosti Philips na adrese
www.philips.com nebo kontaktujte
středisko péče o zákazníky společnosti
Philips ve vaší zemi (telefonní
číslo naleznete v záručním listu
s celosvětovou platností). Pokud se ve
vaší zemi středisko péče o zákazníky
společnosti Philips nenachází, obraťte
se na místního prodejce výrobků Philips.
Objednání dílů nebo
doplňků
Pokud musíte vyměnit některý díl nebo
chcete zakoupit další díl, obraťte se
na prodejce společnosti Philips nebo
navštivte stránkywww.philips.com/
support.
Pokud byste měli s obstaráním dílů
k přístroji jakékoli problémy, obraťte se
na středisko péče o zákazníky
společnosti Philips ve své zemi
(příslušné telefonní číslo naleznete
v záručním listu s celosvětovou
platností).
10 Upozornění
Elektromagnetická pole
(EMP)
Tento přístroj Philips odpovídá všem
platným normám a předpisům týkajícím
se elektromagnetických polí.
Soulad se standardy EMP
Koninklijke Philips N.V. vyrábí a
prodává mnoho výrobků určených
pro spotřebitele, které stejně jako
jakýkoli jiný elektronický přístroj mají
obecně schopnost vysílat a přijímat
elektromagnetické signály.
Jednou z předních remních zásad
společnosti Philips je zajistit u našich
výrobků všechna potřebná zdravotní
a bezpečnostní opatření, splnit veškeré
příslušné požadavky stanovené
zákonem a dodržet všechny standardy
EMF platné v době výroby.
Společnost Philips se zavázala vyvíjet,
vyrábět a prodávat výrobky, které
nemají nepříznivé účinky na zdravotní
stav. Společnost Philips potvrzuje,
že pokud se s jejími výrobky správně
zachází a používají se pro zamýšlený
účel, je podle současného stavu
vědeckého poznání jejich použití
bezpečné.
Společnost Philips hraje aktivní roli
ve vývoji mezinárodních standardů
EMF a bezpečnostních norem, díky
čemuž dokáže předvídat další vývoj ve
standardizaci a rychle jej promítnout do
svých výrobků.
35CS
Page 38

Recyklace
Tento symbol znamená, že výrobek
nelze likvidovat s běžným komunálním
odpadem (2012/19/EU).
Řiďte se pravidly vaší země pro sběr
elektrických a elektronických výrobků.
Správnou likvidací pomůžete předejít
negativním dopadům na životní
prostředí a lidské zdraví
Software
App Store je servisní značka společnosti
Apple Inc.
Google Play je ochranná známka
společnosti Google Inc.
Aplikace „Air Matters“ od vývojářů z Air
Matters Network Pty Ltd.
Tento přístroj značky Philips a aplikace
Air Matters používají více softwarů typu
open source. Kopie licenčního textu
softwaru open source používaného
v tomto výrobku lze odvodit z webových
stránek: www.philips.com/puriercompatibility.
36 CS
Page 39

Tartalom
Magyar
1 Fontos tudnivalók 38
Biztonság 38
2 A levegőtisztító 41
Termék áttekintése (a .ábra) 41
Vezérlőszervek áttekintése
(b .ábra) 42
3 Bevezetés 42
A szűrők behelyezése 42
Wi-Fi-beállítás 43
4 A levegőtisztító használata 44
A levegőminőség jelzőfényének
megismerése 44
Be- és kikapcsolás 44
A ventilátorsebesség módosítása 45
Fényérzékelő 45
Éjszakai érzékelés üzemmód 46
A gyermekzár beállítása 46
5 Tisztítás 47
A levegőtisztító házának
tisztítása 47
A levegőminőség-érzékelő
tisztítása 47
Az előszűrő tisztítása 48
7 Tárolás 50
8 Hibaelhárítás 51
9 Jótállás és szerviz 54
Alkatrészek és tartozékok
rendelése 54
10 Figyelmeztetések 54
Elektromágneses mezők (EMF) 54
Újrahasznosítás 55
Szoftver 55
6 A szűrők cseréje 49
Szűrőcsere-jelzőfény 49
A szűrők cseréje 49
Szűrő visszaállítása 50
Környezetbarát papír felhasználásával készült. Köszönjük, hogy hozzájárul a fák
megóvásához.
37HU
Page 40

1 Fontos
tudnivalók
Biztonság
A készülék első használata előtt
gyelmesen olvassa el a használati
útmutatót, és őrizze meg későbbi
használatra.
Veszély
• Az áramütés és tűz
elkerülése érdekében
ügyeljen, hogy a
készülékbe ne kerüljön
víz, egyéb folyadék vagy
tűzveszélyes tisztítószer.
• Az áramütés és/vagy
tűz kockázatának
elkerülése érdekében
ne tisztítsa a készüléket
vízzel, egyéb folyadékkal
vagy (tűzveszélyes)
tisztítószerrel.
• Ne permetezzen
gyúlékony anyagokat, pl.
rovarirtót vagy illatosítót a
készülék közelében.
Figyelem
• A készülék csatlakoztatása
előtt ellenőrizze, hogy
a rajta feltüntetett
feszültség egyezik-e a
helyi hálózatéval.
• Ha a hálózati kábel
meghibásodott, a
kockázatok elkerülése
érdekében Philips
szakszervizben vagy
hivatalos szakszervizben
ki kell cserélni.
• Ne használja a
készüléket, ha a hálózati
csatlakozódugó, a kábel
vagy a készülék sérült.
• A készüléket 8 éven
felüli gyermekek,
illetve csökkent
zikai, érzékelési vagy
szellemi képességekkel
rendelkező, vagy a
készülék működtetésében
járatlan személyek
is használhatják,
amennyiben ezt
felügyelet mellett
teszik, illetve ismerik a
készülék biztonságos
működtetésének
módját és az azzal
járó veszélyeket.
Ne engedje, hogy
gyermekek játsszanak a
készülékkel. Gyermekek
felügyelet nélkül nem
tisztíthatják a készüléket
38 HU
Page 41

és nem végezhetnek
Magyar
karbantartást rajta.
• Ne zárja el a
levegőbemeneti és
a levegőkimeneti
nyílásokat, például ne
helyezzen tárgyakat a
levegőkimeneti nyílásra
vagy a levegőbemeneti
nyílás elé.
• Vigyázzon, hogy ne essen
idegen tárgy a készülékbe
a levegőkimeneti nyílásán
keresztül.
• Normál WiFi interfész
802.11b/g/n alapon, 2,4
GHz-en, 31,62 mW-os
EIRP maximális kimeneti
teljesítménnyel.
Vigyázat
• A készülék nem
helyettesíti a megfelelő
szellőztetést, a rendszeres
porszívózást, illetve
főzéskor a szagelszívó
használatát.
• Ha a készülék
áramellátását biztosító
hálózati aljzat rossz
csatlakozásokkal
rendelkezik, a készülék
csatlakozódugója
felmelegszik.
Ügyeljen arra, hogy a
készüléket megfelelően
csatlakoztatott hálózati
aljzathoz csatlakoztassa.
• Mindig száraz, stabil és
vízszintes felületen tárolja
és használja a készüléket.
• Hagyjon legalább 20 cm
szabad helyet a készülék
mögött és mindkét
oldalán, illetve hagyjon
legalább 30 cm szabad
helyet a készülék előtt.
• Ne tegyen semmit a
készülékre.
• Ne üljön vagy álljon a
készülékre. A készüléken
való ülés vagy állás
sérülésekhez vezethet.
• Ne helyezze a
készüléket közvetlenül
légkondicionáló alá,
nehogy a kicsapódó pára
a készülékre csepegjen.
• A készülék bekapcsolása
előtt győződjön meg
arról, hogy minden szűrő
megfelelően be van-e
helyezve.
• Kizárólag az ehhez a
készülékhez való, eredeti
Philips szűrőket használja.
Semmilyen más szűrőt ne
használjon.
39HU
Page 42

• A szűrő égése
visszafordíthatatlan
veszéllyel járhat az
emberre nézve és/vagy
veszélyeztetheti mások
életét. Ne használja a
szűrőt tüzelőanyagként
vagy hasonló célokra.
• Ügyeljen, hogy ne
csapódjanak kemény
tárgyak a készülékhez
(különösen a
levegőbemeneti és a
levegőkimeneti nyíláshoz).
• A készüléket mindig
a tetején található
fogantyúnál fogva emelje
meg, illetve mozgassa.
• Ne dugja be az ujjait
és más tárgyakat a
levegőkimenetbe
vagy -bemenetbe,
mert az sérüléshez
vagy a készülék
meghibásodásához
vezethet.
• Ne használja a készüléket,
ha a helyiségben
füstölő rovarriasztót,
olajos párologtatót vagy
füstölőt helyezett el, vagy
vegyi gázok vannak a
levegőben.
• Ne használja a
készüléket gázkészülék,
fűtőberendezés vagy
kandalló közelében.
• A készülék hálózati
csatlakozódugóját
a használat után,
valamint tisztítás és
más karbantartási
tevékenységek előtt húzza
ki a fali aljzatból.
• Ne használja a készüléket
olyan helyiségben, ahol
nagy hőmérsékletingadozások vannak,
mivel páralecsapódás
keletkezhet a
készülékben.
• Az interferencia elkerülése
érdekében a készüléket
legalább 2 méter
távolságban helyezze el a
rádióhullámmal működő
elektromos készülékektől
(pl. televízióktól, rádióktól
és rádióvezérelt óráktól).
• A készülék csak háztartási
használatra alkalmas,
normál működési
körülmények között.
40 HU
Page 43

Ne használja a készüléket
Magyar
•
nedves környezetben
vagy magas hőmérsékletű
helyiségekben, például
fürdőszobában,
mellékhelyiségben vagy
konyhában.
• A készülék nem távolítja
el a szén-monoxidot
(CO) és a radont (Rn).
Nem használható
biztonsági eszközként
az égési folyamatokkal
és veszélyes vegyi
anyagokkal kapcsolatos
balesetek esetén.
• Ha át kell helyeznie
a készüléket, először
húzza ki a hálózati
csatlakozóaljzatból.
• A készüléket ne húzza
a hálózati vezetékénél
fogva.
2 A levegőtisztító
Köszönjük, hogy Philips terméket
vásárolt, és üdvözöljük a Philips
világában!
A Philips által biztosított támogatás
teljes körű igénybevételéhez regisztrálja
a terméket a www.philips.com/welcome
címen.
Termék áttekintése
(a .ábra)
A Vezérlőpult
B Levegőminőség jelzőfénye
C Levegőkimeneti nyílás
D A légminőség-érzékelő
NanoProtect 3-as sorozatú szűrő
E
(FY1410)
NanoProtect aktívszén szűrő
F
(FY1413)
G Előszűrő
H Levegőbemeneti nyílás
I Előlap
41HU
Page 44

Vezérlőszervek
áttekintése (b .ábra)
3 Bevezetés
J Be-/kikapcsoló gomb
Éjszakai érzékelés üzemmód
K
gombja
L Kijelző
M Wi-Fi jelzőfény
N Ventilátorsebesség gombja
O Gyermekzár gomb
A szűrők behelyezése
Megjegyzés
• Ellenőrizze, hogy a levegőtisztító
hálózati csatlakozódugója ki van-e
húzva a fali aljzatból, mielőtt
behelyezné a szűrőket.
• Ellenőrizze, hogy a szűrő füllel ellátott
oldala néz-e Ön felé.
1 Húzza meg az első panel alsó
részét, majd óvatosan emelje fel a
levegőtisztítóról való eltávolításhoz
(c .ábra).
2 Nyomja le a csatot (1), majd húzza
maga felé az előszűrőt (2) (d .ábra).
3 Távolítsa el az összes szűrőt
(e .ábra).
4 Távolítson el minden
csomagolóanyagot a szűrőkről
(f .ábra).
5 Helyezze a levegőtisztítóba a vastag
szűrőt (FY1410), majd a vékony
aktívszén szűrőt (FY1413)
(g .ábra). A típusszám fel van
tüntetve minden szűrőn.
6 Tegye vissza az előszűrőt a
levegőtisztítóba (h .ábra).
42 HU
Megjegyzés
• Ügyeljen arra, hogy a csattal ellátott
oldal nézzen Ön felé, és hogy az
előszűrő összes kampója megfelelően
csatlakozzon a levegőtisztítóhoz.
Page 45

7 Helyezze vissza az első panelt
Magyar
úgy, hogy a panel felső részét
visszanyomja a levegőtisztító felső
részébe (1). Ezután óvatosan nyomja
rá a panelt a levegőtisztító házára
(2) (i .ábra).
8 A szűrők beszerelését követően
alaposan mosson kezet.
5 A sikeres párosítást és
csatlakoztatást követően a WiFi jelzőfény
el világítani. Ha a párosítás
nem sikerült, tekintse meg a
hibaelhárításról szóló részt, vagy
pedig az „Air Matters” alkalmazás
súgó részét az átfogó és naprakész
hibaelhárítási javaslatokért.
fehéren kezd
Wi-Fi-beállítás
A Wi-Fi kapcsolat beállítása az
első használatkor
1 Töltse le és telepítse az „Air
Matters” alkalmazást az App Store
vagy a Google Play oldaláról.
2 Csatlakoztassa a levegőtisztító
csatlakozódugóját a fali aljzathoz,
majd érintse meg a levegőtisztító
gombját.
» A Wi-Fi jelzőfény
narancssárgán villog az első
alkalommal.
3 Ellenőrizze, hogy a mobileszköze
megfelelően csatlakoztatva van-e a
Wi-Fi hálózathoz.
4 Indítsa el az „Air Matters”
alkalmazást, majd kattintson
a kijelző jobb felső sarkában
található „+” jelre. Kövesse a
képernyőn megjelenő utasításokat
a légtisztító hálózathoz történő
csatlakoztatásához.
Megjegyzés
• Ez az utasítás csak a levegőtisztító első
beállításakor érvényes. Ha a hálózat
megváltozott vagy a beállítást ismét
el kell végezni, tekintse meg „A Wi-Fi
kapcsolat beállítása, ha a hálózatot
módosították” című részt a 44. oldalon.
• Ha egynél több levegőtisztítót szeretne
az okoskészülékéhez csatlakoztatni,
ahhoz ezt egymás után végre kell
hajtania. Mielőtt bekapcsolná a másik
levegőtisztítót, fejezze be az adott
levegőtisztító beállítását.
• Győződjön meg arról, hogy a
mobileszköz és a levegőtisztító közötti
távolság legfeljebb 10 m legyen, és
akadályoktól mentes legyen.
• Az alkalmazás támogatja a legújabb
Android és iOS verziókat. Tekintse
meg a www.philips.com/puriercompatibility weboldalt a támogatott
operációs rendszerek és eszközök
legújabb frissítéséért.
43HU
Page 46

A Wi-Fi kapcsolat beállítása, ha
a hálózatot módosították
Megjegyzés
• Ez abban az esetben érvényes, ha
megváltozott az alapértelmezett
hálózat, amelyhez a tisztító csatlakozik.
1 Csatlakoztassa a levegőtisztító
csatlakozódugóját a fali aljzathoz,
majd érintse meg a levegőtisztító
gombját.
2 Érintse meg egyszerre a és a
gombot 3 másodpercig, amíg
hangjelzést nem hall.
» A levegőtisztító párosítási
üzemmódba lép.
» A Wi-Fi jelzőfény
narancssárgán villog.
3 Kövesse „A Wi-Fi kapcsolat
beállítása az első használatkor”
című rész 4. és 5. lépését.
4 A levegőtisztító
használata
A levegőminőség
jelzőfényének
megismerése
PM2.5
szint
≤12 Kék Megfelelő
13-35 Kék-lila Kielégítő
36-55 Lila-piros Gyenge
>55 Piros
A levegőminőség jelzőfénye
automatikusan bekapcsol a
levegőtisztító bekapcsolásakor, és
sorban minden színt megjelenít. Kb. 30
másodperc múlva a levegőminőségérzékelők kiválasztják a levegőben
található részecskék okozta környezeti
levegő minőségének megfelelő színt.
A levegőminőség jelzőfényének
színe
Levegőminőség
szintje
Nagyon
rossz
44 HU
Be- és kikapcsolás
Megjegyzés
• A levegőtisztítót stabil, vízszintes és sík
felületre helyezze olyan módon, hogy
az egység eleje ne fal felé vagy bútorok
felé nézzen.
• Az optimális tisztítási teljesítményért
csukja be az ajtókat és ablakokat.
• Tartsa távol a függönyöket a
levegőbemeneti és -kimeneti nyílástól.
Page 47

1 Csatlakoztassa a levegőtisztító
Magyar
hálózati dugóját a fali aljzatba.
2 Érintse meg a gombot a
levegőtisztító bekapcsolásához
(j .ábra).
» A levegőtisztító hangjelzést ad.
» Amikor a levegőtisztító
melegszik, „
képernyőn.
» A levegő minőségének kb. 30
másodpercig tartó mérése után
a levegőminőség-érzékelő
automatikusan kiválasztja
a levegőminőség-jelzőfény
megfelelő színét.
» A légtisztító mutatja a PM2.5
szintet, és a Szennyezettség
módban működik, miközben
jelenik meg a képernyőn.
a(z)
” jelenik meg a
3 A levegőtisztító kikapcsolásához
érintse meg és tartsa lenyomva 3
másodpercig a
Megjegyzés
• Ha a levegőtisztító a kikapcsolást
követően csatlakoztatva marad a fali
aljzathoz, a levegőtisztító az ismételt
bekapcsoláskor a korábban megadott
beállításokkal kezd el működni.
• Ha a levegőtisztító véletlenül kikapcsol
működés közben, automatikusan
újraindul, és a tápellátás helyreállását
követően a korábbi beállításokkal
folytatja a működést.
• Ha a PM2.5 szint magasabb, mint 99, a
„--” jel jelenik meg a képernyőn.
gombot.
A ventilátorsebesség
módosítása
Számos ventilátorsebesség áll
rendelkezésre. A Szennyezettség mód,
az 1, 2, 3 sebesség és a turbó mód (t)
közül választhat.
Szennyezettség mód
A speciálisan tervezett szennyezettség
mód hatékonyan képes eltávolítani a
levegőben található szennyeződéseket,
például a PM2.5 részecskéket.
• Érintse meg a ventilátorsebesség
gombját a Szennyezettség mód
kiválasztásához (k .ábra).
» Az Automatikus (A) jelenik meg 3
másodpercre, majd a(z)
jelenik meg a kijelzőn.
ikon
Kézi
• Érintse meg többször a
ventilátorsebesség gombját
) a kívánt ventilátorsebesség
(
kiválasztásához (l .ábra).
Turbó (t)
Turbó módban a levegőtisztító a
legnagyobb sebességen működik.
• Érintse meg a ventilátorsebesség
gombját
kiválasztásához (m .ábra).
a turbó mód (t)
Fényérzékelő
A fényérzékelő segítségével a
levegőtisztító a környezeti fényt
gyelembe véve képes működni.
Ha a környezeti fény legalább 10
másodpercre elhalványul, a kezelőpanel
minden jelzőfénye lassan kikapcsol.
Ilyenkor a fények ismét bekapcsolnak,
ha bármelyik gombot megérinti. Ha
10 másodpercen át nem használja
a készülék vezérlőszerveit, minden
jelzőfény kikapcsol.
Ha a környezeti fény legalább 10
másodpercre felerősödik, minden
jelzőfény újra bekapcsol.
45HU
Page 48

Éjszakai érzékelés
üzemmód
Az éjszakai érzékelés üzemmódot két
módon is bekapcsolhatja.
Az éjszakai érzékelés üzemmód
manuális bekapcsolása
• Az éjszakai érzékelés manuális
bekapcsolásához érintse meg a
gombot, mielőtt aludni tér (n .ábra).
» Ha a levegőminőség jelzőfénye
kék színű, a levegőtisztító
közvetlenül az éjszakai
érzékelés üzemmódba lép.
A levegőtisztító csendes
működést alkalmaz, a
levegőminőség jelzőfénye pedig
elhalványul.
» Ha a levegőminőség jelzőfénye
nem kék, a levegőtisztító
legfeljebb 10 percen át turbó
üzemmódban működik, és
a levegőminőség jelzőfénye
lassan villog, majd a készülék
éjszakai érzékelés üzemmódba
lép.
Az éjszakai érzékelés üzemmód
automatikus bekapcsolása
Amennyiben a légtisztító
Szennyezettség üzemmódban
működik, és a fényérzékelő azt észleli,
hogy a szoba fényeit lekapcsolták,
akkor a készülék automatikusan
éjszakai érzékelés üzemmódra vált.
A levegőtisztító a ventilátorsebesség
valós idejű módosításával biztosítja
a szoba levegőjének minőségét. A
levegőminőség jelzőfénye elhalványul.
Megjegyzés
• A fényérzékelő 11 órányi éjszakai
érzékelés üzemmódban való
működést követően észleli a szoba
fényeit.
• Ha a szoba fényei be vannak
kapcsolva, a levegőtisztító kilép az
éjszakai érzékelés üzemmódból,
és folytatja az előző módban való
működést. A levegőminőség jelzőfénye
és a kijelző ismét bekapcsol.
• Az éjszakai érzékelés üzemmód
manuális kikapcsolásához érintse meg
a
vagy a gombot.
A gyermekzár beállítása
Érintse meg és tartsa lenyomva
1
a gyermekzár gombot
másodpercig a gyermekzár
aktiválásához (o .ábra).
» A gyermekzár ikon
megjelenik a kijelzőn.
» Ha a gyermekzár be van
kapcsolva, akkor a többi
gomb nem reagál, és csak a
gyermekzár ikon
3
villog.
2 Érintse meg és tartsa lenyomva
újra a gyermekzár gombot
3 másodpercig a gyermekzár
kikapcsolásához (p .ábra).
» A gyermekzár ikon
Megjegyzés
• A gyermekzár automatikusan felold,
ha az előszűrő-tisztítási kód vagy
a szűrőcsere kód jelenik meg a
képernyőn.
eltűnik.
46 HU
Page 49

5 Tisztítás
Magyar
A levegőminőségérzékelő tisztítása
Megjegyzés
• Tisztítás előtt mindig kapcsolja ki a
levegőtisztítót, és húzza ki a hálózati
csatlakozódugót a fali aljzatból.
• Soha ne merítse a levegőtisztítót vízbe
vagy más folyadékba.
• A levegőtisztító alkatrészeinek
tisztításához soha ne használjon
súrolószert, valamint agresszív vagy
gyúlékony tisztítószereket, pl. fehérítőt
vagy alkoholt.
• Csak az előszűrő mosható. A
levegőszűrő nem mosható.
• Ne kísérelje meg porszívóval tisztítani
a szűrőket vagy a levegőminőségérzékelőt.
A levegőtisztító házának
tisztítása
A por lerakódásának megelőzése
érdekében rendszeresen tisztítsa meg a
levegőtisztítót kívül és belül.
1 Törölje meg a levegőtisztítót kívül és
belül egy puha, száraz ruhával.
2 A levegőkimeneti nyílás is
megtisztítható puha, száraz ruhával.
3 Vegye le az elülső fedelet a
levegőtisztítóról, és mossa át folyó
csapvíz alatt.
A levegőminőség-érzékelő optimális
működése érdekében 2 havonta
végezze el a levegőtisztító tisztítását.
Megjegyzés
• Ha a levegőtisztítót poros
környezetben használják, elképzelhető,
hogy gyakrabban kell tisztítani.
• Ha a helyiség páratartalma nagyon
magas, páralecsapódás alakulhat
ki a levegőminőség-érzékelőn,
és a levegőminőség jelzőfénye
rosszabb levegőminőséget jelezhet
ki még jó minőségű levegő esetén
is. Ebben az esetben tisztítsa meg
a levegőminőség-érzékelőt vagy
manuális sebességbeállítással
használja a levegőtisztítót.
1 Kapcsolja ki a levegőtisztítót, és
húzza ki a hálózati aljzatból.
2 Tisztítsa meg puha kefével a
levegőminőség-érzékelő bemenetét
és kimenetét (q .ábra).
3 Nyissa fel a levegőminőség-
érzékelő burkolatát (r .ábra).
4 Nedves fültisztító pálcikával tisztítsa
meg a levegőminőség-érzékelőt, a
porbemenetet és a porkimenetet
(s .ábra).
5 Minden alkatrészt gondosan
töröljön szárazra száraz fültisztító
pálcikával.
6 Helyezze vissza a levegőminőség-
érzékelő burkolatát (t .ábra).
47HU
Page 50

Megjegyzés
• A levegőtisztító működése
közben mindig tartsa lecsukva a
levegőminőség-érzékelő fedelét.
Az előszűrő tisztítása
Tisztítsa meg az előszűrőt, amikor az F0
jelenik meg a képernyőn (u .ábra).
1 Kapcsolja ki a levegőtisztítót, és
húzza ki a hálózati aljzatból.
2 Húzza meg az elülső panel alsó
részét, majd óvatosan emelje fel a
levegőtisztítóról való eltávolításhoz
(c .ábra).
3 Nyomja le a csatot (1), majd húzza
maga felé az előszűrőt (2) (d .ábra).
4 Ha az előszűrő nagyon piszkos,
puha kefe használatával távolítsa
el róla a port. Majd mossa le az
előszűrőt folyó csapvíz alatt
(v .ábra).
5 Hagyja teljesen megszáradni az
előszűrőt, mielőtt visszahelyezi a
levegőtisztítóba.
6 Tegye vissza az előszűrőt a
levegőtisztítóba (h .ábra).
Megjegyzés
• Ügyeljen arra, hogy a csattal ellátott
oldal nézzen Ön felé, és hogy az
előszűrő összes kampója megfelelően
csatlakozzon a levegőtisztítóhoz.
7 Helyezze vissza az első panelt
úgy, hogy a panel felső részét
visszanyomja a levegőtisztító felső
részébe (1). Ezután óvatosan nyomja
rá a panelt a levegőtisztító házára
(2) (i .ábra).
8 Csatlakoztassa a levegőtisztító
hálózati dugóját a fali aljzatba.
9 Érintse meg és tartsa lenyomva
3 másodpercig a
az előszűrő tisztítási idejének
lenullázásához (w .ábra).
gombot
10 A szűrők beszerelését követően
alaposan mosson kezet.
Megjegyzés
• Az előszűrő élettartamának
optimalizálásához ellenőrizze, hogy az
teljesen megszáradt-e a tisztítás után.
• Mosson kezet a szűrő cseréjét
követően.
48 HU
Page 51

6 A szűrők cseréje
Magyar
Szűrőcsere-jelzőfény
Ez a levegőtisztító szűrőcserejelzőfénnyel van felszerelve annak
érdekében, hogy a levegőtisztító
szűrő optimális állapotban legyen a
levegőtisztító működése közben. Ha
a szűrőket cserélni kell, a képernyőn
megjelenik a szűrőkód.
Ha nem cserél ki időben a szűrőket,
a levegőtisztító működése leáll, és a
készülék automatikusan zárolja magát.
A szűrők cseréje
Megjegyzés
• A levegőtisztító szűrők nem moshatók,
valamint porszívóval sem tisztíthatók.
• A szűrők cseréje előtt mindig kapcsolja
ki a levegőtisztítót, és húzza ki a
hálózati csatlakozódugóját a fali
aljzatból.
• Ne tisztítsa a szűrőket porszívóval.
• Ha az előszűrő sérült, kopott vagy
törött, ne használja. Látogasson el a
www.philips.com/support weboldalra,
vagy forduljon az országában működő
vevőszolgálathoz.
A szűrő
gyelmeztető
jelzőfénye
A3 jelenik meg
a kijelzőn
C7 jelenik meg
a kijelzőn
Az A3 és C7
jelenik meg
felváltva a
kijelzőn
Működés
Cserélje ki a
NanoProtect 3-as
sorozatú szűrőt
(FY1410)
Cserélje ki a
NanoProtect
aktívszén szűrőt
(FY1413)
Cserélje ki mindkét
szűrőt
1 Kapcsolja ki a levegőtisztítót, és
húzza ki a hálózati aljzatból.
2 Vegye ki a használt levegőszűrőt
a képernyőn látható szűrőgyelmeztető jelzőfény alapján
(x .ábra). Dobja el a használt
szűrőket.
Megjegyzés
• Ne érintse meg a redőzött szűrő
felületét, és ne szagolja meg a szűrőt,
mert összegyűltek rajta a levegőben
található szennyezőanyagok.
3 Távolítson el minden
csomagolóanyagot az új szűrőről
(f .ábra).
4 Helyezze be az új szűrőket a
levegőtisztítóba (g .ábra).
5 Csatlakoztassa a levegőtisztító
hálózati dugóját a fali aljzatba.
6 Érintse meg és tartsa lenyomva
3 másodpercig a
szűrő élettartam-számlálójának
lenullázásához (y .ábra).
gombot a
7 Mosson kezet szűrőcsere után.
49HU
Page 52

Szűrő visszaállítása
Akkor is kicserélheti a szűrőket, ha
a szűrőcsere kódja nem látható a
képernyőn. A szűrő cseréje után
manuálisan le kell nulláznia a szűrő
élettartam-számlálóját.
1 Érintse meg egyszerre a és
a
gombot 3 másodpercig
a szűrőnullázás módba való
belépéshez (z .ábra).
» A NanoProtect 3-as sorozatú
szűrő kódja (A3) jelenik meg a
képernyőn.
2 Érintse meg és tartsa lenyomva
3 másodpercig a
a NanoProtect 3-as sorozatú
szűrő élettartam-számlálójának
kényszerített nullázásához
(y .ábra).
gombot
3 A NanoProtect 3-as sorozatú
szűrő élettartam-számlálójának
nullázását követően a Nanoprotect
aktívszén szűrő (C7) kódja jelenik
meg a kijelzőn ({ .ábra).
4 Érintse meg és tartsa lenyomva
3 másodpercig a
NanoProtect aktívszén szűrő
élettartam-számlálójának
kényszerített nullázásához és a
szűrő nullázási módjából való
kilépéséhez (| .ábra).
gombot a
7 Tárolás
1 Kapcsolja ki a levegőtisztítót, és
húzza ki a hálózati aljzatból.
2 Tisztítsa meg a levegőtisztítót,
a levegőminőség-érzékelőt és
az előszűrőt (lásd a „Tisztítás” c.
fejezetet).
3 Hagyja teljesen megszáradni az
összes alkatrészt, mielőtt elteszi
azokat.
4 Csomagolja be a szűrőt és az
előszűrőt légmentesen záró
műanyag zacskókba, külön-külön.
5 Száraz, hűvös helyen tárolja a
levegőtisztítót, a szűrőt és az
előszűrőt.
6 A szűrők érintése után mindig
alaposan mosson kezet.
50 HU
Page 53

8 Hibaelhárítás
Magyar
Ez a fejezet részletesen foglalkozik a készülékkel kapcsolatban leggyakrabban
felmerülő problémákkal. Ha a hibát az alábbi útmutató segítségével nem tudja
elhárítani, forduljon a helyi Philips vevőszolgálathoz.
Probléma Lehetséges megoldás
• Ellenőrizze, hogy az elülső fedél megfelelően van-e
A levegőtisztító a
hálózati aljzathoz
csatlakoztatva és
bekapcsolva sem
működik.
behelyezve.
• A szűrőcsere kódja látható a kijelzőn, Ön azonban nem
cserélte ki a megfelelő szűrőt. A készülék zárolja magát,
ha továbbra is a lejárt szűrőt használja. Ebben az esetben
cserélje ki a szűrőt, és nullázza le a szűrő élettartamszámlálóját.
A levegőtisztító
bekapcsolt
állapotban sem
működik.
A levegőtisztító
véletlenül
kikapcsol.
A
levegőkimenetből
távozó légáram
jelentősen
gyengébb, mint
korábban.
A levegőminőség
nem javul, pedig
a levegőtisztító
hosszú ideje
működésben van.
A levegőminőség
jelzőfénye mindig
ugyanolyan színű
marad.
• A szűrőcsere jelzője már egy ideje megjelent, Ön azonban
nem cserélte ki a vonatkozó szűrőt, ezért a levegőtisztító
zárolta magát. Ebben az esetben cserélje ki a szűrőt, és
nullázza le a szűrő élettartam-számlálóját.
• A levegőtisztító automatikusan újraindul, és bekapcsolást
követően az előző módra vált.
• Az előszűrő szennyezett. Tisztítsa meg az előszűrőt (lásd a
„Tisztítás” c. fejezetet).
• A levegőtisztító egyik szűrője nincs vagy nem megfelelően
van behelyezve. Ellenőrizze, hogy minden szűrő
megfelelően van-e behelyezve, a következő sorrendben, a
legbelső szűrőtől kezdve:
1) NanoProtect 3-as sorozatú szűrő (FY1410);
2) NanoProtect aktívszén szűrő (FY1413); 3) előszűrő.
• Nedves a levegőminőség-érzékelő. Ügyeljen arra, hogy a
levegőminőség-érzékelő tiszta és száraz legyen (lásd a
„Tisztítás” című fejezetet).
• A levegőminőség-érzékelő szennyezett. Tisztítsa meg a
levegőminőség-érzékelőt (lásd a „Tisztítás” című fejezetet).
51HU
Page 54

Probléma Lehetséges megoldás
• Előfordulhat, hogy a szűrő kellemetlen szagot áraszt, ha
már egy ideje használatban van. Ennek oka a beltéri levegő
abszorpciója. Távolítsa el a szűrőt, majd helyezze olyan
A levegőtisztítóból
kellemetlen szag
árad.
helyre, ahol közvetlen napfény éri, és hagyja szellőzni több
órán keresztül. Helyezze vissza, és próbálja újból használni.
Ha továbbra is érezhető a szag, cserélje ki a szűrőt.
• Ha a levegőtisztító égett szagot bocsát ki magából,
kapcsolja ki, és húzza ki a hálózati csatlakozódugóját a fali
aljzatból. Forduljon az adott ország vevőszolgálatához.
• Ha a levegőtisztító hangos, csökkentse a ventilátor
A levegőtisztító
hangos.
sebességét. Ha a levegőtisztítót hálószobában használja
éjszaka, válassza az éjszakai érzékelés üzemmódot, vagy
állítson be alacsonyabb ventilátorsebességet.
A levegőtisztító
még mindig azt
jelzi, hogy ki kell
cserélnem egy
szűrőt, pedig már
megtettem.
Az „E1”, „E2”,
„E3” vagy „E4”
hibaüzenet jelenik
meg a képernyőn.
Melyik alkalmazást
kell letöltenem?
• Előfordulhat, hogy nem nullázta le a szűrő élettartam-
számlálóját. Csatlakoztassa a levegőtisztítót az elektromos
hálózathoz, érintse meg a
bekapcsolásához, majd tartsa lenyomva a
gombot a készülék
gombot 3
másodpercig.
• A készülék hibásan működik. Forduljon az adott ország
vevőszolgálatához.
• Kérjük, töltse le és telepítse a FreshIdeas Studio „Air
Matters” alkalmazását az App Store vagy a Google Play
oldaláról.
52 HU
Page 55

Probléma Lehetséges megoldás
Magyar
• Ha az útválasztó – amelyhez a levegőtisztító kapcsolódik
– kétsávos, és jelenleg nem kapcsolódik 2,4 GHz-es
hálózathoz, kapcsoljon át másik sávra ugyanezen az
útválasztón (2,4 GHz), majd próbálja meg ismét a tisztító
párosítását. 5 GHz-es hálózatok nem támogatottak.
• A webhitelesítési hálózatok nem támogatottak.
• Ellenőrizze, hogy a tisztító a Wi-Fi útválasztó
hatótávolságán belül van-e. Próbálja meg közelebb vinni a
levegőtisztítót a Wi-Fi útválasztóhoz.
• Ellenőrizze, hogy a hálózat neve megfelelő-e. A hálózat
A Wi-Fi beállítás
nem sikerült.
neve megkülönbözteti a kis- és nagybetűket.
• Ellenőrizze, hogy helyes-e a beírt Wi-Fi jelszó. A jelszó
megkülönbözteti a kis- és nagybetűket.
• Ismételje meg a beállítást „A Wi-Fi kapcsolat beállítása, ha
a hálózatot módosították” című rész utasításait követve.
• A Wi-Fi csatlakozását zavarhatják elektromágneses vagy
egyéb interferenciák. Tartsa távol a készüléket az esetleg
interferenciákat okozó egyéb elektromos berendezésektől.
• Ellenőrizze, hogy a mobileszköze repülőgép üzemmódban
van-e. Ellenőrizze, hogy a repülőgép üzemmód ki van-e
kapcsolva, amikor a Wi-Fi hálózathoz csatlakozik.
• Tekintse meg az alkalmazás súgó részét az átfogó és
naprakész hibaelhárítási javaslatok megtekintéséhez.
53HU
Page 56

9 Jótállás és
10 Figyelmezteté-
szerviz
Ha információra van szüksége, vagy
valamilyen probléma merül fel,
látogasson el a Philips honlapjára
(www.philips.com), vagy forduljon az
adott ország Philips vevőszolgálatához
(a telefonszám a világszerte érvényes
garancialevélen található). Ha
országában nem működik ilyen
vevőszolgálat, forduljon a Philips helyi
szaküzletéhez.
Alkatrészek és
tartozékok rendelése
Ha ki szeretne cserélni egy alkatrészt,
vagy újat szeretne vásárolni,
forduljon a területileg illetékes Philips
márkakereskedőhöz, vagy látogasson el
a www.philips.com/support weboldalra.
Ha problémái adódnak az alkatrészek
beszerzésével, kérjük, forduljon az adott
ország Philips vevőszolgálatához (ennek
telefonszáma a világszerte érvényes
garancialevélen található).
sek
Elektromágneses mezők
(EMF)
Ez a Philips készülék az
elektromágneses mezőkre érvényes
összes vonatkozó szabványnak és
előírásnak megfelel.
Az EMF-szabványoknak való
megfelelőség
Koninklijke Philips N.V. számos olyan
terméket gyárt és kínál vásárlóinak,
amelyek, mint az elektronikus
készülékek általában, elektromágneses
jelek kibocsátására és vételére képesek.
A Philips egyik leglényegesebb
működési irányelve az összes szükséges
egészségi és biztonsági intézkedés
betartása termékei gyártása során, hogy
ezzel megfeleljen az összes vonatkozó
jogi előírásnak, valamint a termék
gyártásakor érvényben lévő EMFszabványoknak.
A Philips olyan termékek fejlesztésére,
gyártására és eladására kötelezte el
magát, amelyeknek nincs ártalmas
élettani hatásuk. A Philips kijelenti, hogy
termékei megfelelő, rendeltetésszerű
használat mellett a tudomány
mai állása szerint biztonságosnak
minősülnek.
A Philips aktív szerepet vállal a
nemzetközi EMF- és biztonsági
szabványok előkészítésében,
ami lehetővé teszi számára a
szabványosításban várható további
fejlesztések előrevetítését és azok
beépítését termékeibe.
54 HU
Page 57

Magyar
Újrahasznosítás
Ez a szimbólum azt jelenti, hogy
a termék nem kezelhető normál
háztartási hulladékként (2012/19/EU).
Kövesse az országában érvényes,
az elektromos és elektronikus
készülékek hulladékkezelésére
vonatkozó jogszabályokat. A megfelelő
hulladékkezelés segítséget nyújt a
környezettel és az emberi egészséggel
kapcsolatos negatív következmények
megelőzésében.
Szoftver
Az App Store az Apple Inc. szolgáltatási
védjegye.
A Google Play a Google Inc. védjegye.
A Air Matters Network Pty Ltd által
kifejlesztett „Air Matters” alkalmazás.
Ez a Philips készülék és az Air
Matters alkalmazás több nyílt
forráskódú szoftvert használ. A
termékben felhasznált nyílt forráskódú
szoftverlicenc szöveg másolatai a
következő oldalról szerezhető be:
www.philips.com/purier-compatibility.
55HU
Page 58

Page 59

Instrukcja obsługi
Polski
1 Ważne 58
Bezpieczeństwo 58
2 Twój oczyszczacz powietrza 61
Opis produktu (rys. a) 61
Panel sterowania (rys. b) 62
3 Czynności wstępne 62
Montaż ltrów 62
Konguracja połączenia Wi-Fi 63
4 Korzystanie z oczyszczacza
powietrza 64
Działanie wskaźnika jakości
powietrza 64
Włączanie i wyłączanie 65
Zmiana prędkości wentylatora 65
Czujnik światła 66
Tryb monitorowania nocą 66
Ustawianie blokady rodzicielskiej 67
5 Czyszczenie 67
Czyszczenie obudowy
oczyszczacza powietrza 67
Czyszczenie czujnika jakości
powietrza 68
Czyszczenie ltra wstępnego 68
7 Przechowywanie 71
8 Rozwiązywanie problemów 72
9 Gwarancja i serwis 75
Zamawianie części i akcesoriów 75
10 Uwagi 75
Pola elektromagnetyczne (EMF) 75
Ochrona środowiska 76
Oprogramowanie 76
6 Wymiana ltrów 69
Działanie blokady Healthy Air
Protect 69
Wymiana ltrów 69
Zerowanie ltra 70
Użyto papieru przyjaznego dla środowiska. Dziękujemy za Twój wkład w ochronę
drzew.
57PL
Page 60

1 Ważne
Bezpieczeństwo
Przed rozpoczęciem korzystania z
urządzenia zapoznaj się dokładnie z
jego instrukcją obsługi. Instrukcję warto
też zachować na przyszłość.
Niebezpieczeństwo
• Nie wolno dopuścić
do dostania się
wody, łatwopalnych
detergentów ani innych
płynów do wnętrza
urządzenia, gdyż może
to doprowadzić do
porażenia prądem i/lub
pożaru.
• Nie czyścić urządzenia
wodą, (łatwopalnymi)
detergentami ani innymi
płynami, gdyż grozi to
porażeniem prądem i/lub
pożarem.
• Nie rozpylaj wokół
urządzenia palnych
materiałów, takich jak
środki owadobójcze lub
zapachowe.
Ostrzeżenie
• Przed podłączeniem
urządzenia upewnij się,
że napięcie podane na
urządzeniu jest zgodne z
napięciem w lokalnej sieci
elektrycznej.
• Ze względów
bezpieczeństwa
wymiana uszkodzonego
przewodu zasilającego
musi zostać wykonana
przez autoryzowane
centrum serwisowe rmy
Philips lub odpowiednio
wykwalikowaną osobę.
• Nie używaj urządzenia,
jeśli uszkodzona jest
wtyczka, przewód
zasilający lub samo
urządzenie.
• Urządzenie może być
używane przez dzieci w
wieku powyżej 8 lat oraz
osoby z ograniczonymi
zdolnościami zycznymi,
sensorycznymi lub
umysłowymi, a także
nieposiadające wiedzy
lub doświadczenia
w użytkowaniu tego
typu urządzeń, pod
warunkiem, że będą
one nadzorowane lub
zostaną poinstruowane
na temat korzystania
z tego urządzenia w
bezpieczny sposób oraz
58 PL
Page 61

zostaną poinformowane
Polski
o potencjalnych
zagrożeniach. Dzieci
nie mogą bawić się
urządzeniem. Dzieci
chcące pomóc w
czyszczeniu i obsłudze
urządzenia zawsze
powinny to robić pod
nadzorem dorosłych.
• Nie kładź żadnych
przedmiotów przy wlocie
i wylocie powietrza, aby
nie blokować przepływu
powietrza.
• Upewnij się, że żadne
przedmioty nie wpadną
do urządzenia przez wylot
powietrza.
• Standardowy interfejs
Wi-Fi wykorzystujący
protokół 802.11b/g/n,
częstotliwość 2,4 GHz
i maksymalną moc
wyjściową 31,62 mW EIRP.
Uwaga
• To urządzenie nie zastąpi
odpowiedniej wentylacji,
regularnego odkurzania
oraz okapu podczas
gotowania.
• Jeśli gniazdko
elektryczne, z którego
zasilane jest urządzenie,
jest źle podłączone,
wtyczka może się
nagrzewać. Sprawdź, czy
podłączasz urządzenie
do prawidłowo
zainstalowanego
gniazdka.
• Zawsze ustawiaj
urządzenie i korzystaj z
niego na suchej, stabilnej,
równej i poziomej
powierzchni.
• Ustaw urządzenie tak,
aby z tyłu i po obu
jego stronach było
przynajmniej 20 cm
wolnej przestrzeni, a
nad urządzeniem 30 cm
przestrzeni.
• Nie stawiaj żadnych
przedmiotów na
urządzeniu.
• Nie siadaj ani nie
stawaj na urządzeniu.
Siadanie lub stawanie
na urządzeniu może
skutkować obrażeniami
ciała.
• Nie umieszczaj urządzenia
bezpośrednio pod
klimatyzatorem, aby
zapobiec ściekaniu wody
na urządzenie
59PL
Page 62

• Przed włączeniem
urządzenia sprawdź,
czy wszystkie ltry
zostały odpowiednio
zamontowane.
• Używaj tylko oryginalnych
ltrów rmy Philips
przeznaczonych dla
danego urządzenia. Nie
używaj innych ltrów.
• Spalanie ltra może
stanowić zagrożenie
dla ludzkiego życia lub
zdrowia. Nie używaj
ltra jako opału lub do
podobnych celów.
• Nie uderzaj w urządzenie
twardymi przedmiotami, a
w szczególności we wlot i
wylot powietrza.
• Zawsze podnoś lub
przenoś urządzenie za
pomocą uchwytu, który
znajduje się na górze
urządzenia.
• Aby zapobiec uszkodzeniu
ciała lub urządzenia,
nie wkładaj palców ani
żadnych przedmiotów do
wlotu i wylotu powietrza.
• Nie używaj urządzenia
po rozpyleniu wewnątrz
pomieszczenia środków
odstraszających owady
ani w pomieszczeniach,
w których obecne są
resztki oleju, palące się
kadzidełka lub opary
chemiczne.
• Nie używaj urządzenia
w pobliżu urządzeń
gazowych, grzejników lub
kominków.
• Zawsze odłączaj
urządzenie od zasilania
po użyciu oraz przed
przystąpieniem do
czyszczenia lub
przeprowadzania
innych czynności
konserwacyjnych.
• Nie używaj urządzenia
w pomieszczeniach
narażonych na duże
zmiany temperatury, gdyż
może to spowodować
skraplanie pary wewnątrz
urządzenia.
• Aby uniknąć zakłóceń,
ustaw urządzenie
w odległości co
najmniej 2 metrów od
urządzeń elektrycznych
wykorzystujących fale
radiowe, takich jak
telewizory, odbiorniki
radiowe lub zegary
sterowane drogą radiową.
60 PL
Page 63

Urządzenie jest
Polski
•
przeznaczone wyłącznie
do użytku domowego w
normalnych warunkach
pracy.
• Nie używaj urządzenia
w miejscach wilgotnych
lub miejscach o wysokiej
temperaturze, takich
jak łazienka, toaleta lub
kuchnia.
• Urządzenie nie usuwa
tlenku węgla (CO) ani
radonu (Rn). Nie może być
używane jako urządzenie
ratunkowe w przypadku
pożarów lub wycieków
szkodliwych chemikaliów.
• Jeśli zamierzasz
przestawić urządzenie,
najpierw odłącz je od
źródła zasilania.
• Nie przenoś urządzenia,
ciągnąc za przewód
zasilający.
2 Twój
oczyszczacz
powietrza
Gratulujemy zakupu i witamy wśród
klientów rmy Philips!
Aby w pełni korzystać z pomocy
technicznej oferowanej przez rmę
Philips, należy zarejestrować produkt na
www.philips.com/welcome.
Opis produktu (rys. a)
A Panel sterowania
B Wskaźnik jakości powietrza
C Wylot powietrza
D Czujnik jakości powietrza
Filtr NanoProtect serii 3
E
(FY1410)
Aktywny ltr węglowy
F
NanoProtect (FY1413)
G Filtr wstępny
H Wlot powietrza
I Panel przedni
61PL
Page 64

Panel sterowania
(rys. b)
J Włącznik/wyłącznik
K Przycisk trybu nocnego
L Wyświetlacz
3 Czynności
wstępne
Montaż ltrów
M Wskaźnik Wi-Fi
N Przycisk prędkości wentylatora
O Przycisk blokady rodzicielskiej
Uwaga
• Przed przystąpieniem do montażu
ltrów sprawdź, czy oczyszczacz
powietrza jest odłączony od gniazdka
elektrycznego.
• Filtr powinien być zwrócony stroną
z uchwytem do Ciebie.
1 Pociągnij dolną część panelu
przedniego i podnieś delikatnie, aby
zdjąć go z oczyszczacza powietrza
(rys. c).
2 Dociśnij zacisk (1) i pociągnij ltr
wstępny do siebie (2) (rys. d).
3 Usuń wszystkie ltry (rys. e).
4 Usuń wszystkie elementy
opakowania z ltrów (rys. f).
5 Najpierw umieść w oczyszczaczu
powietrza grubszy ltr (FY1410), a
następnie cienki ltr z aktywnym
węglem (FY1413) (rys. g). Numer
modelu znajduje się na każdym
ltrze.
6 Włóż ltr wstępny z powrotem do
oczyszczacza powietrza (rys. h).
62 PL
Uwaga
• Strona z zaciskiem powinna być
zwrócona w Twoim kierunku, a
wszystkie haczyki ltra wstępnego
powinny być odpowiednio
przyczepione do oczyszczacza.
Page 65

7 Zamocuj przedni panel z powrotem,
Polski
dociskając jego górną część
do górnej części oczyszczacza
powietrza (1). Następnie delikatnie
dociśnij panel do obudowy
oczyszczacza powietrza (2) (rys. i).
8 Po zamontowaniu ltrów dokładnie
umyj ręce.
Konguracja połączenia
Wi-Fi
5 Po pomyślnym zakończeniu
procesu parowania i nawiązaniu
połączenia wskaźnik Wi-Fi
będzie świecił na biało. Jeśli
parowanie się nie powiedzie,
zapoznaj się z informacjami w
sekcji dotyczącej rozwiązywania
problemów lub sekcji pomocy
w aplikacji Air Matters, aby
uzyskać wyczerpujące i aktualne
wskazówki na temat rozwiązywania
problemów.
Pierwsza konguracja
połączenia Wi-Fi
1 Pobierz aplikację Air Matters ze
sklepu App Store lub Google Play i
zainstaluj ją.
2 Podłącz wtyczkę oczyszczacza
powietrza do gniazdka
elektrycznego i dotknij przycisku
aby włączyć oczyszczacz powietrza.
» Wskaźnik Wi-Fi miga na
pomarańczowo po raz pierwszy.
3 Upewnij się, że urządzenie mobilne
jest prawidłowo podłączone do
sieci Wi-Fi.
4 Uruchom aplikację „Air
Matters” i kliknij przycisk „+” w
prawym górnym rogu ekranu.
Postępuj zgodnie z instrukcjami
wyświetlanymi na ekranie, aby
podłączyć oczyszczacz powietrza
do sieci.
Uwaga
• Niniejsza instrukcja dotyczy jedynie
pierwszej konguracji oczyszczacza
powietrza. Jeśli sieć uległa zmianie
lub kongurację trzeba przeprowadzić
ponownie, zapoznaj się z rozdziałem
„Konguracja połączenia Wi-Fi po
zmianie sieci” na stronie 64.
• Aby podłączyć więcej niż jeden
oczyszczacz powietrza do urządzenia
przenośnego, trzeba to zrobić po
kolei. Należy ukończyć kongurację
jednego oczyszczacza powietrza przed
,
włączeniem następnego.
• Upewnij się, że odległość
pomiędzy urządzeniem mobilnym
i oczyszczaczem powietrza jest
mniejsza niż 10 m i nie ma pomiędzy
nimi żadnych przeszkód.
• Ta aplikacja obsługuje najnowsze
wersje systemów Android i
iOS. Najnowsze informacje na
temat obsługiwanych systemów
operacyjnych i urządzeń można
znaleźć na stronie www.philips.com/
purier-compatibility.
63PL
Page 66

Konguracja połączenia Wi-Fi
po zmianie sieci
Uwaga
• Dotyczy to sytuacji, w której uległa
zmianie sieć, do której podłączony jest
oczyszczacz powietrza.
4 Korzystanie z
oczyszczacza
powietrza
1 Podłącz wtyczkę oczyszczacza
powietrza do gniazdka
elektrycznego i dotknij przycisku
aby włączyć oczyszczacz powietrza.
2 Przytrzymaj jednocześnie przyciski
i przez 3 sekundy, aż
usłyszysz sygnał dźwiękowy.
» Oczyszczacz powietrza
przejdzie w tryb parowania.
» Wskaźnik Wi-Fi
migać na pomarańczowo.
zacznie
3 Wykonaj czynności opisane
w krokach 4–5 w rozdziale
„Konguracja połączenia Wi-Fi po
raz pierwszy”.
Działanie wskaźnika
,
jakości powietrza
Kolor
Poziom
PM2.5
≤12 Niebieski Dobry
13-35
36-55
>55 Czerwony Bardzo zły
Wskaźnik jakości powietrza włącza
się automatycznie po uruchomieniu
oczyszczacza powietrza i świeci kolejno
we wszystkich kolorach. Po upływie
około 30 sekund wskaźnik jakości
powietrza zaczyna świecić w kolorze
odpowiadającym jakości powietrza
otoczenia.
wskaźnika
jakości
powietrza
Niebiesko-
oletowy
Fioletowo-
czerwony
Poziom
jakości
powietrza
Przeciętny
Zły
64 PL
Page 67

Włączanie i wyłączanie
Polski
Uwaga
• Oczyszczacz powietrza należy
umieścić na płaskiej, stabilnej i równej
powierzchni, w taki sposób, aby przód
urządzenia nie był zwrócony w stronę
ścian ani mebli.
• Aby zapewnić optymalne
oczyszczanie, zamknij drzwi i okna.
• Uważaj, aby zasłony nie dostały się do
wlotu ani wylotu powietrza.
1 Włóż wtyczkę oczyszczacza
powietrza do gniazdka
elektrycznego.
2 Dotknij przycisk , aby włączyć
oczyszczacz powietrza (rys. j).
» Oczyszczacz powietrza
wyemituje sygnał dźwiękowy.
» Gdy oczyszczacz powietrza
nagrzewa się, na ekranie jest
widoczny symbol „
» Po przeprowadzeniu pomiaru
jakości powietrza trwającego
około 30 sekund czujnik jakości
powietrza automatycznie
wybiera odpowiedni kolor
wskaźnika jakości powietrza.
» Na wyświetlaczu oczyszczacza
powietrza będzie widoczny
poziom PM2.5, a urządzenie
będzie działać w trybie
usuwania zanieczyszczeń
z wyświetlonym na ekranie
symbolem
.
”.
3 Dotknij przycisku i przytrzymaj
go przez 3 sekundy, aby wyłączyć
oczyszczacz powietrza.
Uwaga
• Jeśli po wyłączeniu oczyszczacz
powietrza pozostanie podłączony
do gniazdka elektrycznego, to po
ponownym włączeniu będzie pracował
z ostatnimi ustawieniami.
• Jeśli oczyszczacz powietrza przez
przypadek wyłączy się podczas pracy,
po ponownym podłączeniu zasilania
automatycznie uruchomi się on
ponownie i powróci do działania w
poprzednich ustawieniach.
• Jeśli poziom PM 2.5 będzie wyższy niż
99, na ekranie zostanie wyświetlony
komunikat „--”.
Zmiana prędkości
wentylatora
Dostępnych jest kilka prędkości
wentylatora. Możesz wybrać tryb
usuwania zanieczyszczeń i prędkość 1,
2, 3 lub tryb turbo (t).
Tryb usuwania zanieczyszczeń
Specjalnie opracowany tryb usuwania
zanieczyszczeń skutecznie usuwa
czynniki zanieczyszczenia powietrza,
takie jak pył zawieszony PM2.5.
• Dotknij przycisku prędkości
wentylatora
usuwania zanieczyszczeń (rys. k).
» Na ekranie zostanie wyświetlone
przez 3 sekundy oznaczenie A
(automat.), a następnie ikona
Ręczną
• Dotknij kilkakrotnie przycisku
prędkości wentylatora , aby
wybrać wymaganą prędkość
wentylatora (rys. l).
, aby wybrać tryb
.
65PL
Page 68

Turbo (t)
W trybie turbo oczyszczacz powietrza
działa z największą możliwą prędkością.
• Dotknij przycisku prędkości
wentylatora
turbo (t) (rys. m).
, aby wybrać tryb
» Jeśli wskaźnik jakości powietrza
nie świeci się na niebiesko,
oczyszczacz powietrza działa
w trybie turbo maksymalnie
przez 10 minut. Wskaźnik jakości
powietrza w tym czasie wolno
miga, a następnie przechodzi w
tryb nocny.
Czujnik światła
Dzięki czujnikowi światła oczyszczacz
powietrza może działać w zależności od
światła otoczenia.
Gdy światło otoczenia jest
przyciemnione przez 10 sekund,
wszystkie wskaźniki na panelu
sterowania powoli gasną. W tym czasie
możesz dotknąć dowolnego przycisku,
a wszystkie wskaźniki ponownie się
zapalą. Jeśli nie wykonasz innych
czynności w ciągu 10 sekund, wszystkie
wskaźniki zgasną.
Kiedy światło otoczenia staje się jasne
i utrzymuje się przez co najmniej 10
sekund, wszystkie wskaźniki ponownie
się zapalają.
Tryb monitorowania nocą
Tryb nocny można włączyć na dwa
sposoby.
Ręczne włączanie trybu
nocnego
• Przed pójściem spać dotknij przycisk
, aby włączyć tryb nocny (rys. n).
» Jeśli wskaźnik jakości
powietrza świeci na niebiesko,
oczyszczacz powietrza
przejdzie bezpośrednio w tryb
nocny. Oczyszczacz powietrza
będzie pracował cicho, a
wskaźnik jakości powietrza
będzie przyciemniony.
Automatyczne włączanie trybu
nocnego
Jeśli podczas pracy oczyszczacza
powietrza w trybie usuwania
zanieczyszczeń czujnik światła
wykryje, że światła w pomieszczeniu
są wyłączone, oczyszczacz powietrza
automatycznie przejdzie tryb
monitorowania jakości powietrza nocą.
Oczyszczacz powietrza dostosuje
prędkość wentylatora w czasie
rzeczywistym, aby upewnić się, że
jakość powietrza w pomieszczeniu
jest dobra. Wskaźnik jakości powietrza
będzie przyciemniony.
Uwaga
• Czujnik światła wykrywa światła w
pomieszczeniu po 11 godzinach w
trybie nocnym.
• Jeśli światła w pomieszczeniu są
włączone, oczyszczacz powietrza
wyjdzie z trybu nocnego i wróci do
poprzedniego trybu. Wskaźnik jakości
powietrza i wyświetlacz znowu się
włączą.
• Aby ręcznie wyjść z trybu nocnego,
dotknij przycisku
lub .
66 PL
Page 69

Ustawianie blokady
Polski
rodzicielskiej
5 Czyszczenie
Dotknij przycisk blokady
1
rodzicielskiej
przez 3 sekundy, aby włączyć tę
funkcję (rys. o).
» Na ekranie wyświetli się ikona
blokady rodzicielskiej
» Gdy włączona jest blokada
rodzicielska, wszystkie
pozostałe przyciski nie są
czułe, miga tylko ikona blokady
rodzicielskiej
i przytrzymaj go
.
.
2 Ponownie dotknij przycisk blokady
rodzicielskiej
przez 3 sekundy, aby ją wyłączyć
(rys. p).
» Ikona blokady rodzicielskiej
zniknie.
Uwaga
• Funkcja blokady rodzicielskiej jest
automatycznie wyłączana, gdy na
ekranie wyświetla się kod czyszczenia
ltra wstępnego lub kod wymiany ltra.
i przytrzymaj go
Uwaga
• Zawsze wyłączaj oczyszczacz
powietrza i wyjmuj jego wtyczkę
z gniazdka elektrycznego przed
przystąpieniem do czyszczenia.
• Nigdy nie zanurzaj oczyszczacza
powietrza w wodzie ani innym płynie.
• Do czyszczenia oczyszczacza
powietrza nie używaj ściernych,
żrących ani łatwopalnych środków
czyszczących.
• Do mycia nadaje się tylko ltr wstępny.
Filtrów oczyszczających nie można
myć.
• Nie próbuj czyścić ltrów ani czujnika
jakości powietrza przy użyciu
odkurzacza.
Czyszczenie obudowy
oczyszczacza powietrza
Aby zapobiec osiadaniu kurzu,
regularnie czyść oczyszczacz powietrza
z zewnątrz i od wewnątrz.
1 Do czyszczenia części zewnętrznej
oraz wnętrza oczyszczacza
powietrza używaj miękkiej, suchej
szmatki.
2 Suchą szmatką można czyścić także
wylot powietrza.
3 Zdejmij osłonę przednią z
oczyszczacza powietrza i umyj ją
pod bieżącą wodą.
67PL
Page 70

Czyszczenie czujnika
jakości powietrza
Aby uzyskać optymalne funkcjonowanie
oczyszczacza, czyść czujnik jakości
powietrza co 2 miesiące.
Uwaga
• Pokrywa czujnika jakości powietrza
powinna być zawsze zamknięta
podczas pracy oczyszczacza
powietrza.
Uwaga
• Jeśli oczyszczacz powietrza jest
używany w obecności dużej ilości
kurzu, może być konieczne częstsze
jego czyszczenie.
• Jeśli poziom wilgotności w
pomieszczeniu jest bardzo wysoki,
na czujniku jakości powietrza może
skraplać się para, przez co wskaźnik
jakości powietrza może sygnalizować
jakość powietrza gorszą od
rzeczywistej. W takim przypadku należy
wyczyścić czujnik jakości powietrza lub
użyć ręcznego ustawienia prędkości
pracy oczyszczacza powietrza.
1 Wyłącz oczyszczacz powietrza i
wyjmij jego wtyczkę z gniazdka
elektrycznego.
2 Wytrzyj wlot i wylot czujnika jakości
powietrza miękką szczotką (rys. q).
3 Otwórz pokrywę czujnika jakości
powietrza (rys. r).
4 Wyczyść czujnik jakości powietrza
oraz wlot i wylot kurzu zwilżonym
bawełnianym wacikiem (rys. s).
5 Osusz dokładnie wszystkie części
za pomocą suchego bawełnianego
wacika.
6 Zamknij pokrywę czujnika jakości
powietrza (rys. t).
Czyszczenie ltra
wstępnego
Wyczyść ltr wstępny, kiedy na ekranie
zostanie wyświetlony kod F0 (rys. u).
1 Wyłącz oczyszczacz powietrza i
wyjmij jego wtyczkę z gniazdka
elektrycznego.
2 Pociągnij dolną część panelu
przedniego i podnieś delikatnie, aby
zdjąć go z oczyszczacza powietrza
(rys. c).
3 Dociśnij zacisk (1) i pociągnij ltr
wstępny do siebie (2) (rys. d).
4 Jeśli ltr wstępny jest bardzo
brudny, wyczyść go przy użyciu
miękkiej szczotki. Następnie umyj
ltr wstępny pod bieżącą wodą
(rys. v).
5 Przed ponownym włożeniem
ltra wstępnego do oczyszczacza
powietrza poczekaj, aż ltr
całkowicie wyschnie.
Uwaga
• Aby uzyskać optymalną żywotność
ltra wstępnego, po zakończeniu
czyszczenia pozostaw ltr do
całkowitego wyschnięcia.
• Po pracy z ltrem umyj ręce.
68 PL
6 Włóż ltr wstępny z powrotem do
oczyszczacza powietrza (rys. h).
Page 71

Uwaga
Polski
• Strona z zaciskiem powinna być
zwrócona w Twoim kierunku, a
wszystkie haczyki ltra wstępnego
powinny być odpowiednio
przymocowane do oczyszczacza
powietrza.
7 Zamocuj przedni panel z powrotem,
dociskając jego górną część
do górnej części oczyszczacza
powietrza (1). Następnie delikatnie
dociśnij panel do obudowy
oczyszczacza powietrza (2) (rys. i).
8 Włóż wtyczkę oczyszczacza
powietrza do gniazdka
elektrycznego.
9 Dotknij i przytrzymaj przez
3 sekundy
czyszczenia ltra wstępnego
(rys. w).
, aby wyzerować czas
10 Po zamontowaniu ltrów dokładnie
umyj ręce.
6 Wymiana filtrów
Działanie blokady
Healthy Air Protect
Ten oczyszczacz powietrza jest
wyposażony we wskaźnik konieczności
wymiany ltrów, dzięki któremu można
mieć pewność, że podczas działania
urządzenia ltry oczyszczające
powietrze są zawsze w optymalnym
stanie. Gdy zachodzi potrzeba wymiany,
na ekranie jest wyświetlany kod ltra.
Jeśli ltry nie zostaną wymienione na
czas, oczyszczacz powietrza przestanie
działać i zostanie zablokowany.
Wymiana ltrów
Uwaga
• Filtrów oczyszczających powietrze nie
można myć ani odkurzać.
• Przed wymianą ltrów należy zawsze
wyłączyć oczyszczacz powietrza i
wyjąć wtyczkę urządzenia z gniazdka
elektrycznego.
• Nie należy czyścić ltrów za pomocą
odkurzacza.
• Jeśli ltr wstępny jest uszkodzony lub
zużyty, nie wolno z niego korzystać.
Przejdź do strony internetowej
www.philips.com/support lub
skontaktuj się z Centrum Obsługi
Klienta w swoim kraju.
69PL
Page 72

Stan wskaźnika
ostrzegawczego ltra
Na
wyświetlaczu
pojawia się kod
A3
Na
wyświetlaczu
pojawia się kod
C7
Na
wyświetlaczu
pojawiają się
na przemian
kody A3 i C7
Czynność
Wymień ltr
NanoProtect serii 3
(FY1410)
Wymień aktywny
ltr węglowy
NanoProtect
(FY1413)
Wymień oba ltry
1 Wyłącz oczyszczacz powietrza i
wyjmij jego wtyczkę z gniazdka
elektrycznego.
2 Wyjmij zużyty ltr powietrza
zgodnie ze stanem wskaźnika
ostrzegawczego ltra wyświetlanym
na ekranie (rys. x). Wyrzuć zużyte
ltry.
Uwaga
• Nie dotykaj przeplatanej powierzchni i
nie wąchaj ltra, ponieważ znajdują się
na nim zanieczyszczenia z powietrza.
Zerowanie ltra
Filtry można wymienić, nawet jeśli
na ekranie nie jest wyświetlany kod
wymiany ltra. Po wymianie ltra należy
ręcznie zresetować licznik okresu
użytkowania ltra.
1 Dotknij równocześnie przycisków
i i przytrzymaj je przez
3 sekundy, aby przejść do trybu
resetowania ltra (rys. z).
» Na wyświetlaczu pojawi się kod
(A3) ltra NanoProtect serii 3.
2 Dotknij przycisku i przytrzymaj
go przez 3 sekundy, aby wymusić
reset licznika okresu użytkowania
ltra NanoProtect serii 3 (rys. y).
3 Po zresetowaniu licznika okresu
użytkowania ltra NanoProtect serii
3 na wyświetlaczu pojawi się kod
(C7) aktywnego ltra węglowego
NanoProtect (rys. {).
4 Dotknij przycisku i przytrzymaj
go przez 3 sekundy, aby wymusić
reset licznika okresu użytkowania
aktywnego ltra węglowego
NanoProtect i wyjść z trybu
resetowania ltra (rys. |).
3 Usuń wszystkie elementy
opakowania z nowego ltra (rys. f).
4 Włóż nowe ltry do oczyszczacza
powietrza (rys. g).
5 Włóż wtyczkę oczyszczacza
powietrza do gniazdka
elektrycznego.
6 Dotknij i przytrzymaj przez 3
sekundy
okresu użytkowania ltra (rys. y).
, aby zresetować licznik
7 Po wymianie ltra umyj ręce.
70 PL
Page 73

7 Przechowywa-
Polski
nie
1 Wyłącz oczyszczacz powietrza i
wyjmij jego wtyczkę z gniazdka
elektrycznego.
2 Wyczyść oczyszczacz powietrza,
czujnik jakości powietrza i
ltr wstępny (patrz rozdział
„Czyszczenie”).
3 Przed odstawieniem urządzenia
do przechowywania pozostaw
wszystkie części do całkowitego
wyschnięcia.
4 Umieść ltry i ltr wstępny w
oddzielnych hermetycznych
plastikowych woreczkach.
5 Przechowuj oczyszczacz powietrza,
ltry i ltr wstępny w suchym i
chłodnym miejscu.
6 Zawsze dokładnie myj ręce
po zakończeniu wykonywania
czynności przy ltrach.
71PL
Page 74

8 Rozwiązywanie problemów
W tym rozdziale opisano najczęstsze problemy, z którymi można się zetknąć,
korzystając z urządzenia. Jeśli poniższe wskazówki okażą się niewystarczające do
rozwiązania problemu, skontaktuj się z Centrum Obsługi Klienta w swoim kraju.
Problem Możliwe rozwiązanie
Oczyszczacz
powietrza nie
działa, mimo że
jest podłączony
do gniazdka
elektrycznego i
włączony.
Oczyszczacz
powietrza nie
działa, mimo że
jest włączony.
Oczyszczacz
powietrza
przypadkowo się
wyłącza.
Strumień
powietrza
wydobywający
się z wylotu jest
słabszy niż do tej
pory.
Jakość powietrza
nie poprawia się
nawet po długim
czasie pracy
oczyszczacza
powietrza.
• Sprawdź, czy osłona przednia jest poprawnie założona.
• Na wyświetlaczu pojawia się kod wymiany ltra, mimo że
dany ltr nie został jeszcze wymieniony. Jeśli korzystasz
z ltra, którego okres użytkowania upłynął, urządzenie
zostanie zablokowane. W takim przypadku należy
wymienić ltr i zresetować licznik okresu użytkowania ltra.
• Wskaźnik wymiany ltra stale się świeci, jednak nie
wymieniono odpowiedniego ltra i oczyszczacz powietrza
jest teraz zablokowany. W takim przypadku należy
wymienić ltr i zresetować licznik okresu użytkowania ltra.
• Oczyszczacz powietrza automatycznie uruchamia
się ponownie i powraca do poprzedniego trybu po
wznowieniu zasilania.
• Filtr wstępny jest zabrudzony. Wyczyść ltr wstępny (patrz
rozdział „Czyszczenie”).
• Jeden z ltrów nie został umieszczony w oczyszczaczu
powietrza lub ltr nie został prawidłowo zamontowany.
Sprawdź, czy wszystkie ltry są poprawnie zainstalowane
w następującej kolejności, począwszy od ltra
umieszczonego najgłębiej:
1) ltr NanoProtect serii 3 (FY1410); 2) aktywny ltr węglowy
NanoProtect (FY1413) 3) ltr wstępny.
• Czujnik jakości powietrza jest mokry. Sprawdź, czy czujnik
jakości powietrza jest czysty i suchy (patrz rozdział
„Czyszczenie”).
72 PL
Page 75

Problem Możliwe rozwiązanie
Polski
4-kolorowy
wskaźnik jakości
powietrza
wskazuje zawsze
• Czujnik jakości powietrza jest brudny. Wyczyść czujnik
jakości powietrza (patrz rozdział „Czyszczenie”).
ten sam kolor
• Z używanego przez dłuższy czas ltra może się wydobywać
nieprzyjemny zapach spowodowany wchłanianiem
powietrza z pomieszczenia. Wyjmij ltr i umieść go na kilka
Z oczyszczacza
powietrza
wydobywa się
nieprzyjemny
zapach.
godzin w miejscu wystawionym na bezpośrednie działanie
promieni słonecznych i o dobrej wentylacji. Zainstaluj i
spróbuj ponownie. Jeśli nieprzyjemny zapach pozostanie,
wymień ltr.
• Jeśli z oczyszczacza powietrza wydobywa się zapach
spalenizny, wyłącz urządzenie i wyjmij jego wtyczkę z
gniazdka elektrycznego. Skontaktuj się z Centrum Obsługi
Klienta w swoim kraju.
Oczyszczacz
powietrza działa
głośno.
Oczyszczacz
powietrza nadal
informuje o
konieczności
wymiany ltra,
choć ltr został już
wymieniony.
Na wyświetlaczu
pojawiają się kody
błędów „E1”, „E2”,
„E3” lub „E4”.
Jaką aplikację
należy pobrać?
• Jeśli urządzenie działa za głośno, możesz ustawić
niższą prędkość wentylatora. W przypadku korzystania z
oczyszczacza powietrza w sypialni w nocy wybierz tryb
nocny lub ustaw niższą prędkość wentylatora.
• Być może licznik okresu użytkowania ltra nie został
zresetowany. Podłącz urządzenie do sieci elektrycznej,
dotknij przycisku
przycisku
, aby je włączyć, a następnie dotknij
i przytrzymaj go przez 3 sekundy.
• Urządzenie działa wadliwie. Skontaktuj się z Centrum
Obsługi Klienta w swoim kraju.
• Pobierz i zainstaluj aplikację Air Matters opracowaną przez
FreshIdeas Studio ze sklepu App Store lub Google Play.
73PL
Page 76

Problem Możliwe rozwiązanie
• Jeśli router, do którego jest podłączony oczyszczacz
powietrza, jest dwuzakresowy i aktualnie nie łączy się
z siecią 2,4 GHz, należy przełączyć się na inne pasmo
tego samego routera (2,4 GHz) i ponownie sparować
oczyszczacz. Sieci 5 GHz nie są obsługiwane.
• Sieci wymagające uwierzytelniania sieciowego nie są
obsługiwane.
• Sprawdź, czy oczyszczacz znajduje się w zasięgu routera
Wi-Fi. Możesz spróbować ustawić oczyszczacz powietrza
bliżej routera Wi-Fi.
• Sprawdź, czy nazwa sieci jest prawidłowa. W nazwie sieci
wielkość znaków ma znaczenie.
Konguracja
sieci Wi-Fi się nie
powiodła.
• Sprawdź, czy hasło do sieci Wi-Fi jest prawidłowe. W haśle
wielkość znaków ma znaczenie.
• Spróbuj ponownie przeprowadzić kongurację zgodnie z
instrukcjami w rozdziale „Konguracja połączenia Wi-Fi po
zmianie sieci”.
• Źródła elektromagnetyczne i inne mogą powodować
zakłócenia łączności Wi-Fi. Urządzenie powinno
znajdować się z dala od innych urządzeń elektronicznych,
które mogą powodować zakłócenia.
• Sprawdź, czy urządzenie mobilne jest w trybie
samolotowym. Upewnij się, że tryb samolotowy jest
wyłączony podczas łączenia z siecią Wi-Fi.
• Zapoznaj się z sekcją pomocy w aplikacji, aby
uzyskać wyczerpujące i aktualne wskazówki na temat
rozwiązywania problemów.
74 PL
Page 77

Polski
9 Gwarancja i
serwis
10 Uwagi
W razie jakichkolwiek pytań lub
problemów prosimy odwiedzić naszą
stronę internetową www.philips.pl lub
skontaktować się z lokalnym Centrum
Obsługi Klienta rmy Philips (numer
telefonu znajduje się w ulotce
gwarancyjnej). Jeśli w Twoim kraju nie
ma Centrum Obsługi Klienta, zwróć się o
pomoc do sprzedawcy produktów rmy
Philips.
Zamawianie części i
akcesoriów
Jeśli chcesz wymienić jakąś część albo
zakupić dodatkowy element, zwróć się
do sprzedawcy produktów rmy Philips
lub przejdź na stronę www.philips.com/
support.
W przypadku trudności z zakupem
części wymiennych skontaktuj się z
lokalnym Centrum Obsługi Klienta rmy
Philips (numer telefonu można znaleźć
w ulotce gwarancyjnej).
Pola elektromagnetyczne
(EMF)
To urządzenie rmy Philips spełnia
wszystkie normy i jest zgodne z
wszystkimi przepisami dotyczącymi
narażenia na działanie pól
elektromagnetycznych.
Zgodność ze standardami EMF
Koninklijke Philips N.V. produkuje
i sprzedaje wiele produktów
przeznaczonych dla klientów
detalicznych, które — jak wszystkie
urządzenia elektroniczne — mogą
emitować oraz odbierać sygnały
elektromagnetyczne.
Jedną z najważniejszych zasad rmy
Philips jest podejmowanie wszelkich
koniecznych działań zapewniających
bezpieczne i nieszkodliwe dla zdrowia
korzystanie z jej produktów. Obejmuje
to spełnienie wszystkich mających
zastosowanie przepisów prawnych oraz
wymogów standardów dotyczących
emisji pola magnetycznego (EMF) już na
etapie produkcji.
Jesteśmy czynnie zaangażowani
w opracowywanie, wytwarzanie i
sprzedawanie produktów, które nie
mają niekorzystnego wpływu na
zdrowie. Firma Philips zaświadcza,
że zgodnie z posiadaną obecnie
wiedzą naukową wytwarzane przez
nas produkty są bezpieczne, jeżeli są
używane zgodnie z ich przeznaczeniem.
75PL
Page 78

Aktywnie uczestniczymy także w
doskonaleniu międzynarodowych
standardów EMF i przepisów
bezpieczeństwa, co umożliwia nam
przewidywanie kierunków rozwoju
standaryzacji i szybkie dostosowywanie
naszych produktów do nowych
przepisów.
Ochrona środowiska
-Symbol przekreślonego kontenera
na odpady, oznacza, że produkt
podlega selektywnej zbiórce zgodnie
z Dyrektywą 2012/19/UE i informuje,
że sprzęt po okresie użytkowania,
nie może być wyrzucony z innymi
odpadami gospodarstwa domowego.
Użytkownik ma obowiązek oddać
go do podmiotu prowadzącego
zbieranie zużytego sprzętu
elektrycznego I elektronicznego,
tworzącego system zbierania takich
odpadów - w tym do odpowiedniego
sklepu, lokalnego punktu zbiórki lub
jednostki gminnej. Zużyty sprzęt może
mieć szkodliwy wpływ na środowisko
i zdrowie ludzi z uwagi na potencjalną
zawartość niebezpiecznych
substancji, mieszanin oraz części
składowych. Gospodarstwo domowe
spełnia ważną rolę w przyczynianiu
się do ponownego użycia i odzysku
surowców wtórnych, w tym recyklingu
zużytego sprzętu. Na tym etapie
kształtuje się postawy, które
wpływają na zachowanie wspólnego
dobra jakim jest czyste środowisko
naturalne.
Oprogramowanie
App Store jest znakiem usługowym
rmy Apple Inc.
Google Play jest znakiem towarowym
rmy Google Inc.
Aplikacja „Air Matters” opracowana
przez Air Matters Network Pty Ltd.
To urządzenie rmy Philips oraz
aplikacja Air Matters wykorzystują
wiele programów o otwartym kodzie
źródłowym. Kopie tekstu licencji
programów o otwartym kodzie
źródłowym znajdują się na naszej
stronie internetowej: www.philips.com/
purier-compatibility.
76 PL
Page 79

Cuprins
Română
1 Important 78
Siguranţă 78
2 Puricatorul de aer 81
Prezentare generală a
produsului (g. a) 81
Prezentarea generală a
comenzilor (g. b) 82
3 Primii paşi 82
Instalarea ltrelor 82
Congurarea Wi-Fi 83
4 Utilizarea puricatorului de
aer 84
Descrierea indicatorului luminos
pentru calitatea aerului 84
Pornirea şi oprirea 85
Schimbarea turaţiei ventilatorului 85
Senzorul de lumină 86
Modul de detectare nocturn 86
Congurarea blocării pentru copii 87
6 Înlocuirea ltrelor 89
Indicator de înlocuire a ltrului 89
Înlocuirea ltrelor 89
Resetare ltru 90
7 Depozitare 91
8 Depanare 92
9 Garanţie şi service 95
Comandarea pieselor sau a
accesoriilor 95
10 Observaţii 95
Câmpuri electromagnetice (EMF) 95
Reciclare 96
Software 96
5 Curăţarea 87
Curăţarea corpului
puricatorului de aer 87
Curăţarea senzorului de calitate
a aerului 88
Curăţarea preltrului 88
S-a utilizat hârtie ecologică. Îţi mulţumim pentru contribuţia ta la salvarea copacilor.
77RO
Page 80

1 Important
Siguranţă
Citeşte cu atenţie acest manual de
utilizare înainte de a folosi aparatul şi
păstrează-l pentru consultare ulterioară.
Pericol
• Nu permite pătrunderea
în aparat a apei sau a
oricărui lichid sau a unui
detergent inamabil,
pentru a evita pericolul
de electrocutare şi/sau
incendiu.
• Nu curăţa aparatul cu apă
sau orice alt lichid ori cu
detergent (inamabil),
pentru a evita pericolul
de electrocutare şi/sau
incendiu.
• Nu pulveriza substanţe
inamabile, precum
insecticide sau parfumuri,
în apropierea aparatului.
Avertisment
• Înainte de a conecta
aparatul, verică dacă
tensiunea indicată pe
aparat corespunde
tensiunii de reţea locale.
• În cazul în care cablul de
alimentare este deteriorat,
acesta trebuie înlocuit
întotdeauna de Philips,
de un centru de service
autorizat de Philips sau
de personal calicat în
domeniu, pentru a evita
orice accident.
• Nu folosi aparatul dacă
ştecărul, cablul de
alimentare sau aparatul
însuşi este deteriorat.
• Acest aparat poate
utilizat de către persoane
care au capacităţi zice,
senzoriale sau mentale
reduse sau sunt lipsite de
experienţă şi cunoştinţe
şi copii cu vârsta minimă
de 8 ani dacă au fost
supravegheaţi sau instruiţi
cu privire la utilizarea
în condiţii de siguranţă
a aparatului şi înţeleg
pericolele implicate. Copiii
nu trebuie să se joace
cu aparatul. Curăţarea şi
întreţinerea nu trebuie
realizate de către copii
nesupravegheaţi.
78 RO
Page 81

• Nu bloca gurile de
Română
admisie şi evacuare a
aerului, de exemplu, prin
plasarea unor obiecte pe
gura de evacuare sau în
faţa gurii de admisie a
aerului.
• Asigură-te că în aparat nu
cad obiecte străine prin
oriciul de ieşire a aerului.
• Interfaţă WiFi standard
bazată pe 802.11b/g/n
la 2,4 GHz cu o putere
maximă de ieşire de 31,62
mW EIRP.
Atenţie
• Acest aparat nu este un
înlocuitor pentru ventilaţia
corespunzătoare,
curăţarea obişnuită cu
aspiratorul sau utilizarea
unei hote absorbante ori
a unui ventilator în timpul
gătirii.
• Dacă priza utilizată
pentru alimentarea
aparatului are conexiuni
necorespunzătoare,
ştecărul aparatului se
încinge. Asigură-te că
vei conecta aparatul
la o priză conectată
corespunzător.
• Aşază şi utilizează
întotdeauna aparatul pe
o suprafaţă orizontală
plană, stabilă şi uscată.
• Lasă un spaţiu liber
de cel puţin 20 cm în
spatele aparatului şi în
ambele părţi laterale ale
acestuia şi cel puţin 30 cm
deasupra aparatului.
• Nu aşeza nimic pe partea
superioară a aparatului.
• Nu sta jos sau în picioare
pe aparat. Statul pe
aparat în poziţia aşezat
sau în picioare poate duce
la potenţiale vătămări
corporale.
• Nu amplasa aparatul
direct sub o unitate de aer
condiţionat, pentru a evita
picurarea vaporilor de
condens pe aparat.
• Asigură-te că toate
ltrele au fost instalate
corect înainte de a porni
aparatul.
• Foloseşte doar ltrele
originale Philips create
special pentru acest
aparat. Nu folosi niciun alt
tip de ltru.
79RO
Page 82

• Combustia ltrului
poate duce la pericole
ireversibile pentru om şi/
sau poate pune în pericol
şi alte persoane. Nu utiliza
ltrul ca şi combustibil sau
în scopuri similare.
• Evită lovirea aparatului
(în special a fantelor de
admisie şi de evacuare a
aerului) cu obiecte dure.
• Ridică sau mută aparatul
ţinând întotdeauna de
mânerul din partea de sus
a acestuia.
• Nu introdu degetele
sau obiecte în fanta de
admisie a aerului sau
în fanta de evacuare a
aerului, pentru a evita
rănirea sau funcţionarea
defectuoasă a aparatului.
• Nu utiliza aparatul după
ce ai utilizat repelenţi
de interior împotriva
insectelor, care produc
fum, sau în locuri cu
reziduuri uleioase, tămâie
aprinsă sau vapori chimici.
• Nu utiliza aparatul în
apropierea aparatelor cu
gaz, a dispozitivelor de
încălzire sau a şemineelor.
• Scoate întotdeauna
din priză aparatul după
utilizare şi înainte de
curăţare sau efectuarea
altor operaţii de
întreţinere.
• Nu utiliza aparatul într-o
cameră cu variaţii mari de
temperatură, deoarece
acest lucru poate produce
condens în interiorul
aparatului.
• Pentru a preveni
interferenţele,
poziţionează aparatul la
cel puţin 2 metri distanţă
de aparatele electrice
care utilizează unde
radio aeriene, precum
televizoare, aparate radio
şi ceasuri controlate prin
radio.
• Aparatul este destinat
exclusiv utilizării casnice
în condiţii de operare
normale.
• Nu utiliza aparatul în
medii umede sau cu
temperaturi ridicate,
cum ar băi, toalete sau
bucătării.
80 RO
Page 83

•
Română
Aparatul nu elimină
monoxidul de carbon
(CO) sau radonul (Rn).
Acesta nu poate utilizat
ca dispozitiv de siguranţă
în caz de accidente cu
procese de combustie
şi substanţe chimice
periculoase.
• Dacă trebuie să muţi
aparatul, mai întâi
deconectează-l de la
sursa de alimentare.
• Nu deplasa aparatul
trăgând de cablul său de
alimentare electrică.
2 Purificatorul de
aer
Felicitări pentru achiziţie şi bun venit la
Philips!
Pentru a benecia pe deplin
de asistenţa oferită de Philips,
înregistrează-ţi produsul la
www.philips.com/welcome.
Prezentare generală a
produsului (g. a)
A Panou de control
Indicator luminos pentru
B
calitatea aerului
C Fanta de evacuare a aerului
D Senzorul pentru calitatea aerului
Filtrul NanoProtect seria 3
E
(FY1410)
Filtrul NanoProtect cu carbon
F
activ (FY1413)
G Preltrul
H Fanta de admisie a aerului
I Panou frontal
81RO
Page 84

Prezentarea generală a
comenzilor (g. b)
3 Primii paşi
J Buton Pornit/Oprit
Butonul pentru modul de
K
detectare pe timp de noapte
L Ecran de aşare
M Indicatorul Wi-Fi
Butonul pentru turaţia
N
ventilatorului
O Buton de blocare pentru copii
Instalarea ltrelor
Note
• Înainte de a instala ltrele, asigură-te
că puricatorul de aer este deconectat
de la priza de curent.
• Asigură-te că partea cu eticheta a
ltrului este îndreptată către tine.
1 Trage partea de jos a panoului
frontal şi ridică-l uşor pentru a-l
scoate din puricatorul de aer
(g. c).
2 Apasă clema în jos (1) şi trage
preltrul spre tine (2) (g. d).
3 Scoate toate ltrele (g. e).
4 Scoate toate materialele de
ambalare de pe ltre (g. f).
5 Aşază ltrul gros (FY1410) în
puricatorul de aer, apoi introdu
ltrul subţire cu carbon activ (AC)
(FY1413) (g. g). Numerele de
model sunt indicate pe ecare ltru.
6 Pune preltrul la loc în puricatorul
de aer (g. h).
82 RO
Note
• Asigură-te că partea care conţine
clema este îndreptată spre tine
şi că toate cârligele de xare ale
preltrului sunt xate corespunzător
pe puricator.
Page 85

7 Pune la loc panoul frontal, apăsând
Română
partea superioară a panoului pe
partea de sus a puricatorului de
aer (1). Apoi, împinge uşor panoul
pe corpul puricatorului de aer (2)
(g. i).
8 După instalarea ltrelor, spală-te
bine pe mâini.
Congurarea Wi-Fi
Congurarea conexiunii Wi-Fi
pentru prima dată
1 Descarcă şi instalează aplicaţia
„Air Matters” de pe App Store sau
Google Play.
2 Introdu ştecărul puricatorului de
aer în priză şi apasă butonul
pentru a porni puricator de aer.
» Indicatorul Wi-Fi luminează
intermitent în portocaliu pentru
prima dată.
3 Asigură-te că dispozitivul mobil este
conectat cu succes la reţeaua Wi-Fi.
4 Lansează aplicaţia ‚Air Matters’
şi fă clic pe ‚+’ din partea dreaptă
superioară a ecranului. Urmează
instrucţiunile de pe ecran pentru a
conecta puricatorul de are la reţea.
5 După o asociere şi conectare
reuşite, indicatorul Wi-Fi
aprinde în alb. Dacă asocierea
nu reuşeşte, consultă secţiunea
de depanare sau secţiunea de
asistenţă din aplicaţia „Air Matters”
pentru sfaturi de depanare
cuprinzătoare şi la zi.
se va
Note
• Aceste instrucţiuni sunt valabile numai
la prima congurare a puricatorului
de aer. Dacă reţeaua s-a schimbat sau
trebuie efectuată din nou congurarea,
consultă secţiunea „Congurarea
conexiunii Wi-Fi atunci când reţeaua
s-a schimbat” de la pagina 84.
• Dacă vrei să conectezi mai mult de
un puricator de aer la dispozitivul
inteligent, trebuie să conectezi
aparatele pe rând. Finalizează
congurarea unui puricator de aer
înainte de a porni alt puricator de aer.
• Asigură-te că distanţa dintre
dispozitivul mobil şi puricatorul de
aer este mai mică de 10 m şi nu există
obstacole între acestea.
• Această aplicaţie acceptă cele mai
recente versiuni de Android şi iOS. Te
rugăm să consulţi
www.philips.com/purier-compatibility
pentru cele mai recente informaţii
privind sistemele de operare şi
dispozitivele acceptate.
83RO
Page 86

Congurarea conexiunii WiFi atunci când reţeaua s-a
schimbat
4 Utilizarea
purificatorului
Note
• Aceste instrucţiuni se aplică atunci
când reţeaua la care este conectat
puricatorul a fost schimbată.
1 Introdu ştecărul puricatorului de
aer în priză şi apasă butonul
pentru a porni puricator de aer.
2 Apasă simultan butoanele şi
timp de 3 secunde până când auzi
un semnal sonor scurt.
» Puricator de aer de trece în
modul de asociere.
» Indicatorul Wi-Fi
intermitent în portocaliu.
luminează
3 Urmează paşii 4-5 din secţiunea
„Congurarea conexiunii Wi-Fi
pentru prima dată”.
de aer
Descrierea indicatorului
luminos pentru calitatea
aerului
Culoarea
indicatorului
Nivelul
PM2.5
≤12 Albastru Bună
13-35
36-55 Violet-roşu Slabă
>55 Roşcat Foarte slabă
Indicatorul luminos pentru calitatea
aerului se aprinde automat când
puricatorul de aer este pornit şi
aşează în mod succesiv toate culorile.
După aproximativ 30 de secunde,
senzorii de calitate a aerului selectează
culoarea corespunzătoare calităţii
particulelor în suspensie din aerul
ambiental.
luminos
pentru
calitatea
aerului
Albastru-
violet
Nivelul de
calitate a
aerului
Acceptabilă
84 RO
Page 87

Pornirea şi oprirea
Română
Note
• Aşază întotdeauna puricatorul de aer
pe o suprafaţă stabilă, orizontală şi
netedă, cu partea frontală a unităţii la
distanţă de pereţi sau mobilă.
• Pentru o performanţă optimă de
puricare, închide uşile şi ferestrele.
• Ţine perdelele la distanţă faţă de fanta
de admisie sau de evacuare a aerului.
1 Introdu ştecărul puricatorului de
aer în priză.
2 Apasă butonul pentru a porni
puricatorul de aer (g. j).
» Puricatorul de aer emite
semnale sonore.
» Atunci când puricatorul de
aer se încălzeşte, pe ecran se
aşează „
» După ce măsoară calitatea
aerului timp de aproximativ 30
de secunde, senzorul de calitate
a aerului selectează automat
culoarea corespunzătoare
indicatorului luminos pentru
calitatea aerului.
» Puricatorul de aer aşează
nivelul PM2.5 şi funcţionează
în modul pentru poluare cu
pictograma
”.
aşată pe ecran.
3 Apasă butonul şi ţine-l apăsat
timp de 3 secunde pentru a opri
puricatorul de aer.
Note
• Dacă puricatorul de aer rămâne
conectat la priza de curent după ce
este oprit, la repornire va funcţiona
conform setărilor anterioare.
• Dacă puricatorul de aer se opreşte
accidental în timpul funcţionării, acesta
reporneşte automat şi funcţionează la
setările anterioare atunci când se reia
alimentarea cu energie.
• Dacă nivelul PM2.5 este mai mare de
99, pe ecran se va aşa indicaţia „--”.
Schimbarea turaţiei
ventilatorului
Sunt disponibile mai multe turaţii ale
ventilatorului. Poţi selecta modul pentru
poluare, turaţia 1, 2 sau 3 sau modul
turbo (t).
Modul pentru poluare
Modul special conceput pentru poluare
poate îndepărta cu ecienţă poluanţii
din aer, precum PM2.5.
• Atinge butonul de turaţie a
ventilatorului
modul pentru poluare (g. k).
» Pe ecran se aşează Auto (A) timp
de 3 secunde şi apoi pictograma
.
Manuală
• Apasă butonul pentru turaţia
ventilatorului în mod repetat
pentru a selecta turaţia dorită a
ventilatorului (g. l).
pentru a selecta
Modul turbo (t)
În modul turbo, puricatorul de aer
funcţionează la turaţia cea mai ridicată.
85RO
Page 88

• Apasă butonul pentru turaţia
ventilatorului
modul turbo (t) (g. m).
pentru a selecta
Senzorul de lumină
Cu senzorul de lumină, funcţionarea
puricatorului de aer se poate adapta
luminii ambiante.
Atunci când lumina ambiantă scade în
intensitate timp de 10 secunde, toate
indicatoarele luminoase de pe panoul
de control se vor stinge treptat. În timpul
acestei perioade, poţi apăsa orice
buton şi toate indicatoarele luminoase
se vor aprinde din nou. Dacă nu
efectuezi alte operaţi în interval de 10
secunde, toate indicatoarele luminoase
se vor stinge.
După ce lumina ambiantă devine
intensă şi se menţine cel puţin 10
secunde, toate indicatoarele luminoase
se vor aprinde din nou.
» Dacă indicatorul luminos
pentru calitatea aerului nu este
albastru, puricatorul de aer
funcţionează în modul turbo
timp de maxim 10 minute. În
acest timp, indicatorul pentru
calitatea aerului luminează
intermitent cu frecvenţă
redusă, apoi trece în modul de
detectare pe timp de noapte.
Activarea automată a modului
de detectare pe timp de noapte
Atunci când puricatorul de aer
funcţionează în modul pentru poluare,
dacă senzorul de lumină detectează
că luminile din cameră sunt stinse,
puricatorul trece automat în modul
de detectare pe timp de noapte.
Puricatorul de aer va regla în timp real
turaţia ventilatorului, astfel încât aerul
din cameră să aibă o bună calitate.
Indicatorul luminos pentru calitatea
aerului va lumina mai slab.
Modul de detectare
nocturn
Poţi activa modul de detectare pe timp
de noapte prin două metode.
Activarea manuală a modului de
detectare pe timp de noapte
• Înainte de a merge la culcare, apasă
butonul pentru a activa modul de
detectare pe timp de noapte (g. n).
» Dacă indicatorul luminos pentru
calitatea aerului este albastru,
puricatorul de aer trece direct
în modul de detectare pe
timp de noapte. Puricatorul
de aer funcţionează silenţios
şi indicatorul luminos pentru
calitatea aerului va lumina mai
slab.
86 RO
Note
• Senzorul de lumină detectează
luminile din cameră după 11 ore de
funcţionare în modul de detectare pe
timp de noapte.
• Dacă luminile din cameră sunt aprinse,
puricatorul de aer va ieşi din modul
de detectare pe timp de noapte şi va
funcţiona în modul anterior. Indicatorul
luminos pentru calitatea aerului şi
aşajul vor reactivate.
• Pentru a ieşi manual din modul de
detectare pe timp de noapte, apasă
butonul
sau .
Page 89

Congurarea blocării
Română
pentru copii
5 Curăţarea
Apasă şi ţine apăsat butonul de
1
blocare pentru copii
secunde pentru a activa funcţia de
blocare pentru copii (g. o).
» Pe ecran se aşează
pictograma funcţiei de blocare
pentru copii
» Atunci când funcţia de
blocare pentru copii este
activată, celelalte butoane nu
reacţionează la comenzi. Numai
pictograma funcţiei de blocare
pentru copii
intermitent.
timp de 3
.
luminează
2 Apasă şi ţine din nou apăsat timp
de 3 secunde butonul de blocare
pentru copii
funcţia de blocare pentru copii
(g. p).
» Pictograma funcţiei de blocare
pentru copii
Note
• Funcţia de blocare pentru copii
se dezactivează automat când pe
ecran se aşează codul de curăţare
a preltrului sau codul de înlocuire a
ltrului.
pentru a dezactiva
dispare.
Note
• Înainte de curăţare, opreşte
întotdeauna puricatorul de aer şi
deconectează-l de la priză.
• Nu introdu niciodată puricatorul de
aer în apă sau în alte lichide.
• Nu folosi niciodată agenţi de curăţare
abrazivi, agresivi sau inamabili,
precum înălbitori sau alcool, pentru
a curăţa vreuna din componentele
puricatorului de aer.
• Doar preltrul poate spălat. Filtrul de
aer nu este lavabil.
• Nu încerca să cureţi ltrele sau
senzorul de calitate a aerului cu un
aspirator.
Curăţarea corpului
puricatorului de aer
Curăţă în mod regulat atât interiorul,
cât şi exteriorul puricatorului de aer,
pentru a evita depunerea prafului.
1 Utilizează o lavetă moale şi uscată
pentru a curăţa atât interiorul, cât şi
exteriorul puricatorului de aer.
2 Şi oriciul de evacuare a aerului
poate curăţat cu o lavetă moale şi
uscată.
3 Scoate capacul frontal de pe
puricatorul de aer şi spală-l la
robinet.
87RO
Page 90

Curăţarea senzorului de
calitate a aerului
Curăţă senzorul de calitate a aerului
la ecare 2 luni pentru a asigura
funcţionarea optimă a puricatorului.
Note
• Când puricatorul de aer funcţionează,
capacul senzorului de calitate a aerului
trebuie să e închis.
Note
• Dacă puricatorul de aer este utilizat
într-un mediu cu mult praf, s-ar putea
să e necesar să e curăţat mai des.
• Dacă nivelul de umiditate din cameră
este foarte ridicat, se poate forma
condens la senzorul de calitate a
aerului şi indicatorul luminos pentru
calitatea aerului poate să arate o
calitate mai scăzută, chiar dacă
calitatea aerului este de fapt adecvată.
Dacă se întâmplă acest lucru, curăţă
senzorul de calitate a aerului sau
foloseşte puricatorul de aer la o
setare manuală de turaţie.
1 Opreşte puricatorul de aer şi
deconectează-l de la priză.
2 Curăţă cu o perie moale fantele
de admisie şi de evacuare ale
senzorului pentru calitatea aerului
(g. q).
3 Deschide capacul senzorului de
calitate a aerului (g. r).
4 Curăţă senzorul de calitate a aerului
şi fantele de admisie şi de evacuare
a prafului cu un tampon din
bumbac umezit (g. s).
5 Usucă bine toate componentele cu
un tampon din bumbac uscat.
6 Fixează la loc capacul senzorului de
calitate a aerului (g. t).
Curăţarea preltrului
Curăţă preltrul atunci când pe ecran se
aşează F0 (g. u).
1 Opreşte puricatorul de aer şi
deconectează-l de la priză.
2 Trage partea de jos a panoului
frontal, apoi ridică-l uşor pentru
a-l scoate din puricatorul de aer
(g. c).
3 Apasă clema în jos (1) şi trage
preltrul spre tine (2) (g. d).
4 Dacă preltrul este foarte murdar,
foloseşte o perie moale pentru
a îndepărta praful. Spală apoi
preltrul la robinet (g. v).
5 Lasă preltrul să se usuce bine
înainte de a-l monta la loc în
puricatorul de aer.
Note
• Pentru a creşte durata de viaţă a
preltrului, asigură-te că s-a uscat
complet după curăţare.
• După manevrarea ltrului, spală-te pe
mâini.
88 RO
Page 91

6 Montează preltrul înapoi în
Română
puricatorul de aer (g. h).
6 Înlocuirea
Note
• Asigură-te că partea care conţine
clema este îndreptată spre tine şi că
toate cârligele de xare ale preltrului
sunt xate corespunzător pe
puricatorul de aer.
7 Pentru a reataşa panoul frontal,
apasă partea superioară a panoului
pe partea de sus a puricatorului
de aer (1). Apoi, împinge uşor panoul
pe corpul puricatorului de aer (2)
(g. i).
8 Introdu ştecărul puricatorului de
aer în priză.
9 Apasă butonul şi ţine-l apăsat
timp de 3 secunde pentru a reseta
intervalul de curăţare a preltrului
(g. w).
10 După instalarea ltrelor, spală-te
bine pe mâini.
filtrelor
Indicator de înlocuire a
ltrului
Acest puricator de aer este echipat
cu un indicator de înlocuire a ltrului
pentru a te asigura că ltrul de
puricare a aerului este în stare optimă
atunci când puricatorul de aer este în
funcţiune. Când ltrele trebuie înlocuite,
pe ecran se aşează codul ltrului.
Dacă ltrele nu sunt înlocuite la timp,
puricatorul de aer nu va mai funcţiona
şi se va bloca automat.
Înlocuirea ltrelor
Note
• Filtrele de puricare a aerului nu
sunt lavabile şi nu se pot curăţa prin
aspirare.
• Înainte de a înlocui ltrele, opreşte
întotdeauna puricatorul de aer şi
scoate ştecărul din priză.
• Nu curăţa ltrele cu un aspirator.
• Dacă preltrul este deteriorat, uzat sau
rupt, nu îl folosi. Accesează
www.philips.com/support sau
contactează centrul de asistenţă
pentru clienţi din ţara ta.
89RO
Page 92

Starea
indicatoarelor
luminoase
de avertizare
pentru ltre
A3 se aşează
pe ecran
C7 se aşează
pe ecran
A3 şi C7 sunt
aşate pe
ecran în mod
alternativ
Acţiune
Înlocuieşte ltrul
NanoProtect seria 3
(FY1410)
Înlocuieşte ltrul
NanoProtect
cu carbon activ
(FY1413)
Înlocuieşte ambele
ltre
1 Opreşte puricatorul de aer şi
deconectează-l de la priză.
2 Scoate ltrele de aer uzate în
conformitate cu starea indicatorului
luminos de avertizare pentru ltre
aşat pe ecran (g. x). Aruncă
ltrele uzate.
Note
• Nu atinge suprafaţa cutată a ltrului
şi nu mirosi ltrul, deoarece acesta a
colectat agenţi poluanţi din aer.
Resetare ltru
Poţi, de asemenea, să înlocuieşti ltrele
chiar dacă pe ecran nu se aşează
un cod de înlocuire a ltrului. După
înlocuirea unui ltru, trebuie să resetezi
manual contorul ciclului de viaţă al
ltrului.
1 Apasă simultan butoanele şi
timp de 3 secunde pentru a accesa
modul de resetare a ltrului (g. z).
» Pe ecran se va aşa codul (A3)
al ltrului NanoProtect seria 3.
2 Apasă butonul şi ţine-l apăsat
timp de 3 secunde pentru a reseta
forţat contorul ciclului de viaţă al
ltrului NanoProtect seria 3 (g. y).
3 După resetarea contorului ciclului
de viaţă al ltrului NanoProtect seria
3, pe ecran se va aşa codul (C7) al
ltrului NanoProtect cu carbon activ
(g. {).
4 Apasă butonul şi ţine-l apăsat
timp de 3 secunde pentru a reseta
forţat contorul ciclului de viaţă al
ltrului NanoProtect cu carbon
activ şi pentru a ieşi din modul de
resetare a ltrului (g. |).
3 Scoate toate materialele de
ambalare de pe ltrele noi (g. f).
4 Introdu ltrele noi în puricatorul de
aer (g. g).
5 Introdu ştecărul puricatorului de
aer în priză.
6 Apasă butonul şi ţine-l apăsat
timp de 3 secunde pentru a reseta
contorul ciclului de viaţă al ltrului
(g. y).
7 Spală-te pe mâini după schimbarea
unui ltru.
90 RO
Page 93

7 Depozitare
Română
1 Opreşte puricatorul de aer şi
deconectează-l de la priză.
2 Curăţă puricatorul de aer, senzorul
de calitate a aerului şi preltrul
(consultă capitolul „Curăţarea”).
3 Lasă toate componentele să se
usuce bine înainte de depozitare.
4 Ambalează separat ltrul şi preltrul
în pungi etanşe din plastic.
5 Depozitează puricatorul de aer,
ltrul şi preltrul într-un loc rece şi
uscat.
6 Spală-te întotdeauna bine pe mâini
după manevrarea ltrelor.
91RO
Page 94

8 Depanare
Acest capitol descrie cele mai frecvente probleme pe care le poţi avea la utilizarea
aparatului. Dacă nu puteţi rezolva problema cu ajutorul informaţiilor de mai jos,
contactaţi Centrul de asistenţă clienţi din ţara dvs.
Problemă Soluţie posibilă
Puricatorul de aer
nu funcţionează
chiar dacă este
conectat la priza
electrică şi este
pornit.
Puricatorul de aer
nu funcţionează
chiar dacă este
pornit.
Puricatorul de
aer se opreşte
accidental.
Fluxul de aer care
iese din fanta de
evacuare a aerului
este semnicativ
mai slab decât
înainte.
Calitatea
aerului nu se
îmbunătăţeşte,
deşi puricatorul
funcţionează
o perioadă
îndelungată.
• Verică dacă ai instalat corespunzător capacul frontal.
• Codul de înlocuire al ltrului este aşat pe ecran, dar încă
nu ai înlocuit ltrul corespunzător. Aparatul se va bloca
dacă vei continua să utilizezi ltrul expirat. În acest caz,
înlocuieşte ltrul şi resetează contorul ciclului de viaţă al
ltrului.
• Indicatorul de înlocuire a ltrului a fost activ continuu, dar
nu ai înlocuit ltrul corespunzător, iar aparatul s-a blocat.
În acest caz, înlocuieşte ltrul şi resetează contorul ciclului
de viaţă al ltrului.
• La restabilirea alimentării, puricatorul de aer reporneşte
automat şi trece în modul anterior.
• Preltrul este murdar. Curăţă ltrul (consultă capitolul
„Curăţare”).
• Unul dintre ltre nu a fost introdus în puricatorul de aer
sau ltrul nu este poziţionat corect. Asigură-te că toate
ltrele sunt montate corespunzător, în următoarea ordine,
începând dinspre interior:
1) ltrul NanoProtect seria 3 (FY1410); 2) ltrul NanoProtect
cu carbon activ (FY1413); 3) preltrul.
• Senzorul de calitate a aerului este umed. Asigură-te că
senzorul de calitate a aerului este curat şi uscat (consultă
capitolul „Curăţare”).
Culoarea
indicatorului
luminos pentru
calitatea aerului nu
se modică.
92 RO
• Senzorul de calitate a aerului este murdar. Curăţă senzorul
de calitate a aerului (consultă capitolul „Curăţare”).
Page 95

Problemă Soluţie posibilă
Română
• Filtrul poate produce miros după un anumit timp
de utilizare, deoarece absoarbe aerul din interior.
Îndepărtează ltrul şi amplasează-l într-un loc expus direct
Puricatorul de aer
emană un miros
neplăcut.
la lumina solară şi la o sursă de ventilaţie timp de mai
multe ore. Reinstalează-l şi încercă să-l utilizezi din nou.
Dacă mirosul persistă, te rugăm să înlocuieşti ltrul.
• Dacă puricatorul de aer produce un miros de ars, opreşte
aparatul şi scoate ştecărul din priză. Contactează centrul
de asistenţă pentru clienţi din ţara ta.
• Dacă puricatorul de aer funcţionează prea zgomotos,
Puricatorul de
aer emite produce
prea mult zgomot.
schimbă turaţia ventilatorului la un nivel inferior. Când
foloseşti puricatorul de aer într-un dormitor pe timpul
nopţii, alege modul de detectare pe timp de noapte sau
selectează o turaţie mai redusă a ventilatorului.
Puricatorul de
aer continuă să
indice că trebuie să
înlocuiesc un ltru,
cu toate că l-am
• Poate că nu ai resetat contorul ciclului de viaţă al ltrului.
Conectează puricatorul de aer la sursa de alimentare
electrică, apasă
apăsat
înlocuit deja.
Pe ecran sunt
aşate codurile de
eroare „E1”, „E2”,
• Aparatul funcţionează defectuos. Contactează centrul de
asistenţă pentru clienţi din ţara ta.
„E3” sau „E4”.
tpentru a-l porni şi apasă şi menţine
timp de 3 secunde.
Ce aplicaţie ar
trebui să descarc?
• Descarcă şi instalează aplicaţia „Air Matters” dezvoltată de
FreshIdeas Studio de pe App Store sau Google Play.
93RO
Page 96

Problemă Soluţie posibilă
• Dacă routerul la care este conectat puricatorul este dual-
band şi momentan nu se conectează la o reţea de 2,4 GHz,
te rugăm să comuţi la altă bandă a aceluiaşi router
(2,4 GHz) şi să încerci să asociezi din nou puricatorul.
Reţelele de 5 GHz nu sunt acceptate.
• Reţelele cu autenticare pe web nu sunt acceptate.
• Verică dacă puricatorul este în raza de acţiune a
routerului Wi-Fi. Poţi încerca să aşezi puricatorul de aer
mai aproape de routerul Wi-Fi.
• Verică dacă numele reţelei este corect. Numele reţelei
face diferenţa între majuscule şi minuscule.
Congurarea Wi-Fi
nu a reuşit.
• Verică dacă parola Wi-Fi este corectă. Parola face
diferenţa între majuscule şi minuscule.
• Încearcă din nou congurarea cu instrucţiunile din
secţiunea „Congurarea conexiunii Wi-Fi atunci când
reţeaua s-a schimbat”.
• Conectivitatea Wi-Fi poate întreruptă de interferenţe
electromagnetice sau de alt tip. Ţine aparatul la distanţă
de alte dispozitive electronice care pot produce
interferenţe.
• Verică dacă dispozitivul mobil este în modul avion.
Asigură-te că modul avion este dezactivat atunci când te
conectezi la reţeaua Wi-Fi.
• Consultă secţiunea de asistenţă din aplicaţie pentru sfaturi
de depanare extinse şi la zi.
94 RO
Page 97

Română
9 Garanţie şi
service
10 Observaţii
Dacă ai nevoie de informaţii sau
întâmpini probleme, vizitează site-ul
web Philips la adresa www.philips.com
sau contactează Centrul de asistenţă
pentru clienţi Philips din ţara ta (vei
găsi numărul de telefon în broşura de
garanţie internaţională). Dacă în ţara
ta nu există niciun centru de asistenţă
pentru clienţi, contactează distribuitorul
Philips local.
Comandarea pieselor sau
a accesoriilor
Dacă trebuie să înlocuieşti o
componentă sau dacă doreşti
să achiziţionezi o componentă
suplimentară, adresează-te
distribuitorului tău Philips sau vizitează
www.philips.com/support.
Dacă întâmpini dicultăţi la
achiziţionarea componentelor, te
rugăm să contactezi Centrul Philips
de asistenţă pentru clienţi din ţara ta
(numărul de telefon îl vei găsi în broşura
de garanţie internaţională).
Câmpuri
electromagnetice (EMF)
Acest aparat Philips respectă toate
standardele şi reglementările aplicabile
privind expunerea la câmpuri
electromagnetice.
Concordanţa cu EMF
Koninklijke Philips N.V. produce şi vinde
o gamă largă de produse destinate
consumatorilor, produse care, ca orice
dispozitive electronice, au de obicei
capacitatea de a emite şi a primi
semnale electromagnetice.
Unul dintre cele mai importante
principii de business ale Philips constă
din adoptarea tuturor măsurilor
necesare vizând sănătatea şi siguranţa
pentru produsele noastre, în vederea
îndeplinirii tuturor cerinţelor legale
aplicabile şi a respectării standardelor
EMF aplicabile în momentul realizării
produselor.
Philips depune eforturi să conceapă,
să realizeze şi să comercializeze
produse care nu au efecte negative
asupra sănătăţii. Philips conrmă că,
dacă produsele sale sunt manevrate
corespunzător în scopul pentru care
au fost concepute, acestea sunt sigure,
conform dovezilor ştiinţice disponibile
în prezent.
Philips joacă un rol activ în dezvoltarea
standardelor internaţionale EMF şi de
siguranţă, ceea ce permite Philips să
anticipeze progresele din domeniul
standardizării pentru a le integra rapid
în cadrul produselor sale.
95RO
Page 98

Reciclare
Acest simbol înseamnă că acest produs
nu poate eliminat împreună cu
gunoiul menajer obişnuit (2012/19/UE).
Urmează regulile din ţara ta pentru
colectarea separată a produselor
electrice şi electronice. Eliminarea
corectă contribuie la prevenirea
consecinţelor negative asupra mediului
şi asupra sănătăţii umane.
Software
App Store este o marcă de servicii a
Apple Inc.
Google Play este o marcă înregistrată a
Google Inc.
Aplicaţia „Air Matters” a fost dezvoltată
de Air Matters Network Pty Ltd.
Acest aparat Philips şi aplicaţia Air
Matters folosesc mai multe software-uri
open source; copii ale textului licenţei
software open source utilizate în acest
produs pot luate de pe site-ul web
www.philips.com/purier-compatibility.
96 RO
Page 99

Obsah
Slovensky
1 Dôležité informácie 98
Bezpečnosť 98
2 Čistička vzduchu 101
Prehľad výrobku (obr. a) 101
Prehľad ovládacích prvkov
(obr. b) 101
3 Začíname 102
Inštalácia ltrov 102
Nastavenie Wi-Fi 102
4 Používanie čističky vzduchu
104
Význam svetelného indikátora
kvality vzduchu 104
Zapnutie a vypnutie 104
Zmena otáčok ventilátora 105
Svetelný senzor 105
Režim nočného snímania 105
Nastavenie detského zámku 106
5 Čistenie 107
Čistenie tela čističky vzduchu 107
Čistenie snímača kvality
vzduchu 107
Čistenie predltra 108
7 Odkladanie 110
8 Riešenie problémov 111
9 Záruka a servis 114
Objednanie dielov alebo
príslušenstva 114
10 Poznámky 114
Elektromagnetické polia (EMF) 114
Recyklácia 115
Softvér 115
6 Výmena ltrov 109
Indikátor výmeny ltra 109
Výmena ltrov 109
Vynulovanie ltra 110
Bol použitý ekologický papier. Ďakujeme, že prispievate k záchrane stromov.
97SK
Page 100

1 Dôležité
informácie
Bezpečnosť
Pred použitím zariadenia si pozorne
prečítajte tento návod na použitie a
uschovajte si ho na neskoršie použitie.
Nebezpečenstvo
• Zabráňte vniknutiu vody,
akejkoľvek inej kvapaliny
alebo horľavého
čistiaceho prostriedku do
zariadenia, aby ste predišli
zásahu elektrickým
prúdom a/alebo
nebezpečenstvu požiaru.
• Zariadenie nečistite
vodou, akoukoľvek inou
kvapalinou ani (horľavým)
čistiacim prostriedkom,
aby ste predišli zásahu
elektrickým prúdom a/
alebo nebezpečenstvu
požiaru.
• V blízkosti zariadenia
nestriekajte žiadne
horľavé látky, ako
napríklad insekticídy či
voňavky.
Varovanie
• Pred pripojením
zariadenia skontrolujte,
či sa napätie uvedené
na zariadení zhoduje
s napätím v miestnej sieti.
• Poškodený napájací kábel
smie vymeniť výlučne
personál spoločnosti
Philips, servisné
stredisko autorizované
spoločnosťou Philips
alebo osoba s podobnou
kvalikáciou, aby nedošlo
k nebezpečnej situácii.
• Ak je poškodená zástrčka,
sieťový kábel alebo
samotné zariadenie,
nepoužívajte ho.
• Toto zariadenie môžu
používať deti od 8
rokov a osoby, ktoré
majú obmedzené
telesné, zmyslové alebo
mentálne schopnosti
alebo nemajú dostatok
skúseností a znalostí,
pokiaľ sú pod dozorom
alebo im bolo vysvetlené
bezpečné používanie
tohto zariadenia a za
predpokladu, že rozumejú
príslušným rizikám. Deti
sa s týmto zariadením
98 SK
 Loading...