

Philips 625 User Manual

Discover your phone
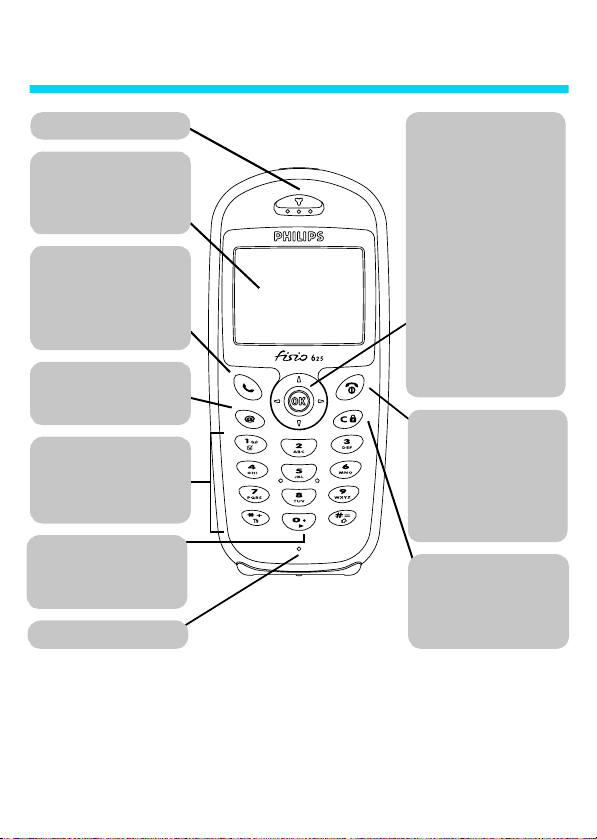
Earpiece
Screen
Idle screen displays the time,
date, network name and battery
level.
"Pick up" key
Press to answer a call, or to dial
a number or a name displayed
on the screen. In WAP mode,
corresponds to a softkey.
WAP
In idle mode, press to access
WAP browser.
Alphanumeric keypad
Press keys to enter numbers and
text. Press and hold a key to
activate a programmed hotkey.
Language
In idle mode, long press 0 to
select a language for the
telephone functions.
Microphone
@
(
key
Joystick key
Idle mode
- Use < & > to
increase or decrease ringer
volume,
+
to access the Call list
and
-
to access the phonebook.
Navigation mode
or + & - to navigate in the
menus, and
information.
Call context
increase or decrease earpiece
volume.
OK key
In idle mode, press and hold for
"Hang up"
and "On/Off" key
Press to end a call and to switch
your phone on. Press and hold
to switch your phone off.
In WAP mode, corresponds to a
softkey.
Cancel/back key
Idle mode
unlock the keypad.
Navigation mode
return to previous menu.
- Use < &
,
to validate
- Use < & > to
,
)
e
- Long press to lock/
- Press to
>
Philips continuously strives to improve its products, and the information and specifications described in thi s user
guide are subject to change without notice. Philips tries to ensure that all information in this user guide is correct,
but does not accept liabil ity for any error, omission or discrepancy between this user gu ide and t he product
described.

Table of contents
Operate your phone .......... 4
The carousel ..................................... 4
Text or number entry .................... 4
T9® text Input ..................................... 4
Basic text input ..................................... 6
Reminder ........................................... 7
1. Getting started................. 8
First steps .......................................... 8
Get started ........................................ 8
Insert the SIM card ............................. 8
Enter the PIN code .............................. 9
Set date and time ................................ 9
Copy of the SIM phonebook......... 9
Accept the copy .................................... 9
Refuse the copy ..................................10
Abort the copy ....................................10
First call............................................10
Customise your phone................. 10
Charge the battery ........................ 12
2. Main features ..................14
Idle screen ....................................... 14
Symbols ...............................................14
Events ....................................................15
Make a call ....................................... 15
Answer and end a call................... 15
See & hear who’s calling:
Fotocall............................................. 16
Redial and reply.............................. 16
Flash dial........................................... 17
Voice dial..........................................17
Clear the call list.............................18
Clear the SMS list ...........................18
Clear the phonebook ....................18
Lock / unlock the keypad .............18
Deactivate the ringer ....................19
Activate the vibra alert .................19
Read your mobile
phone number.................................20
During a call, you can… ...............20
Adjust the earpiece volume .............20
Mute the microphone .......................20
Unmute the microphone ..................20
Write in the notepad .........................20
Consult the phonebook .....................20
Record a conversation .......................20
Other features during a call ............21
3. Menu tree ........................22
4. Display & images ............24
Introduction.....................................24
Images album ...................................24
Display ..............................................25
Screen saver .........................................25
Screen animation ................................26
Animation .............................................26
Backlight ...............................................26
5. Settings
& Quick Settings ............27
Introduction.....................................27
1

Settings ............................................. 27
Sounds ...................................................27
Display ..................................................29
Security ..................................................29
Time and date ....................................31
Language ..............................................32
Accessories ...........................................32
Hotkeys .................................................33
Voice command ..................................35
Network ................................................35
Call settings ..........................................36
Quick settings ................................. 38
Quick settings ......................................38
Accessories settings ............................39
6. Phonebooks .................... 40
Introduction ....................................40
Phonebook ......................................41
Phonebook in SIM card ....................41
Phonebook in phone ..........................41
Add names in the phonebook.....41
In the SIM card ...................................41
In the phone ........................................42
Own number .......................................43
Edit and manage names ................43
In the SIM card ...................................43
In the phone ........................................43
7. Calls and messages ........46
Introduction ....................................46
Call a number ................................. 46
Emergency number ............................46
Other number .....................................47
Messages .......................................... 48
Send a SMS .........................................48
Read SMS .............................................49
Clear SMS ............................................50
SMS settings ........................................50
Broadcast SMS ....................................51
Call list ..............................................52
Display ...................................................52
Reset ......................................................52
8. Organiser & Extras ........53
Introduction ....................................53
Organiser .........................................53
Creating a new event ........................53
Modifying an event ............................54
Views of events ...................................55
Time zone ............................................56
Extras ................................................56
Brick game ...........................................56
Call counters ........................................56
Euro ........................................................58
Memory status ....................................58
Calculator .............................................58
Alarm clock ..........................................59
Memo ....................................................59
9. E-mail ................................60
Introduction ....................................60
Settings .............................................61
Network access ...................................61
E-mail server access ..........................63
Advanced ..............................................64
Write and send e-mails.................65
To one or several recipients ............65
With an attachment ..........................66
Receive and read e-mails ..............66
Connect to the server ........................66
2

Download e-mails ..............................67
Get and store attachments .............67
Add an e-mail address
to the phonebook ...............................68
Delete e-mails .....................................69
Reply to an e-mail ..............................69
Forward an e-mail ..............................69
10. WAP services............... 70
Introduction .................................... 70
WAP ................................................. 70
Launch ...................................................70
Browse ...................................................71
Favourites .............................................71
Last page ..............................................72
Advanced ..............................................72
Access settings ....................................72
11. Other operator
services ............................75
Introduction .................................... 75
GSM strings ..................................... 75
Query a voice server, voice
mailbox, messaging service, etc.
(DTMF tones) .................................76
Pause and wait characters ...............76
Access your answering machine
(example) .............................................76
Make a second call .........................76
Answer a second call.....................77
Answer a third call
(Subscription dependent) .............78
Conference Call .............................78
Explicit Call Transfer .....................78
In-call symbols .................................79
Precautions .........................80
Troubleshooting ................84
Glossary ..............................86
Philips authentic
accessories ..........................88
Declaration
of conformity .....................90
3
Operate your phone
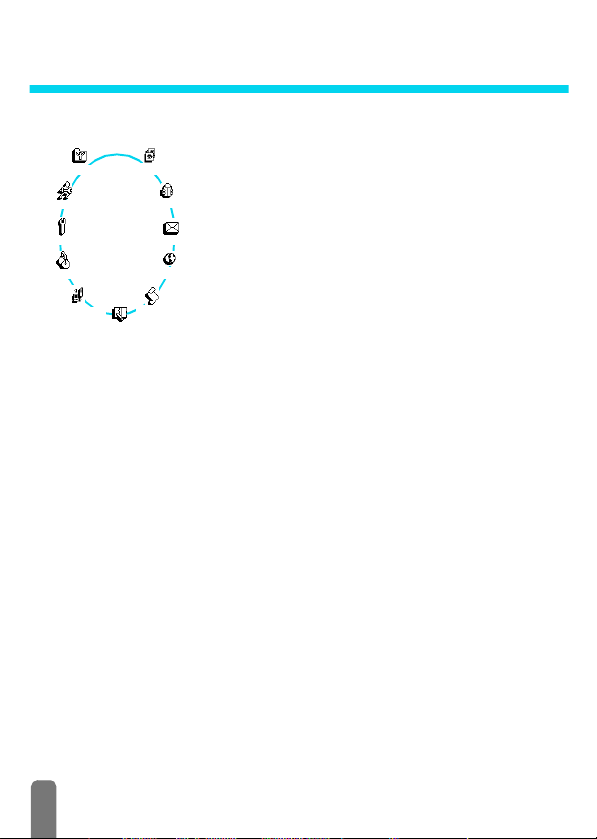
The carousel
A carousel is a circular loop of icons displayed on the screen, in
Oper. services
Quick settings
Extras
Synchronise
Images album
Call list
Organiser
Main carousel
L
Repeat the operation described above and browse carousels and lists until you
reach the desired feature or option. When navigating in a list, a scroll bar
located on the right handside of the screen shows your actual position in the
list. With the navigation key, you can then select or adjust all the functions of
your phone as described in the relevant chapter of this user guide.
Text or number entry
Text can be entered in editing screens in two different ways: by using T9
predictive Text Input, or basic text input. Two other modes for numbers and
punctuation marks, are also available. Icons appearing on the screen show the
active text mode. You switch from one mode to the other by pressing the
key, and from lower to upper case by pressing the # key.
T9® text Input
What is it?
T9® predictive Text Input is an intelligent editing mode for SMS and e-mail,
including a comprehensive dictionnary. It allows you to quickly enter text. Press
which each icon represents a feature or option used to operate
your phone.
Phonebook
L
All icons don’t fit within the screen; the hidden ones appear when
<
MessagesSettings
E-mail
Pressing < or > will alternate between two options, such as Activate/
Deactivate, On/Off, Increase/Decrease a value, etc.
scrolling
The first carousel available when you turn on your mobile phone
is called the "main" carousel. You access it by pressing
in idle mode, and it features the icons shown opposite. A small
icon in the upper left corner of the screen shows your actual
position within the carousel. To access a feature or option, move
<
(anti clockwise) or > (clockwise) and press , when the
feature or option of your choice is selected. Another subcarousel or list will then appear.
or >.
,
when
®
*
4
Tegic Euro. Pat .
App. 0842463
How to use it?
only once on the key corresponding to each letter needed to spell a word:
keystrokes input are analysed and the word suggested by T9
®
is displayed in the
bottom of the screen. If several words are available according to the keys used,
0
press
to browse the list and choose from those proposed by the T9
built-in dictionary (see example below).
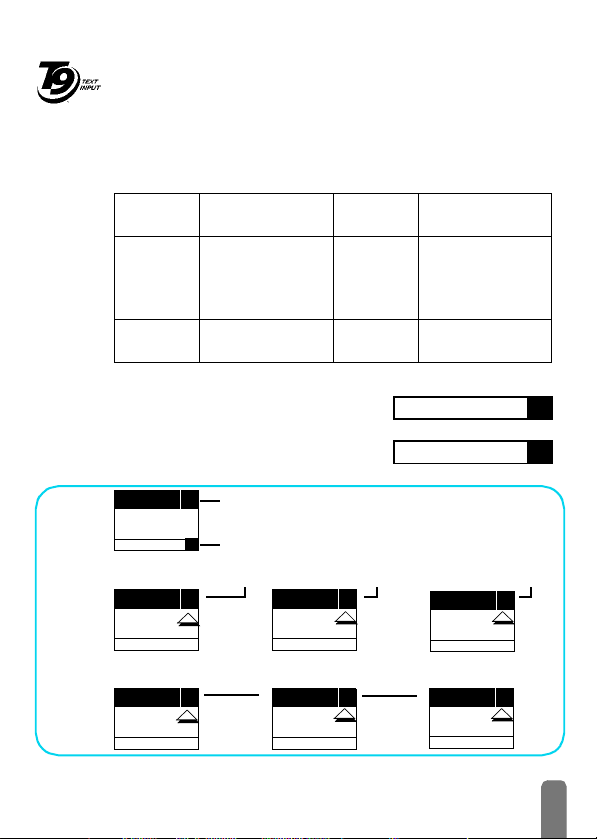
Alphabets and symbols represented by each key are as follows:
2
to
9
To key in letters.
1
or
#
To co nf i r m e nt r y .
®
e
Short press to clear
one entry, long press
to clear all text.
0
Short press to
browse the list of
candidate words, long
press to browse back.
*
To select the typing
mode.
#
Shift.
Example: how to enter the word "home":
1Press 4 6 6 3 The screen
displays the first word of a list: Good.
2Press
3Press
ENTER TEXT: Eng
0
to scroll and select Home.
1
to confirm Home.
Language used: English
T9
Editing mode used: T9
Good
Home
®
Press the * key to switch to basic mode, to numeric mode, or to punctuation mode
ENTER TEXT: Abc
ENTER TEXT: 123
ENTER TEXT: %!?
While in any text mode, press the # key to switch from lower to upper case:
ENTER TEXT: abc ENTER TEXT: Abc
ENTER TEXT: ABC
T9
T9
5

Basic text input
Although your phone provides you with the T9® predictive Text Input by
default, if you wish to access the basic text input, select “Abc” basic text input
using
character: the letter "h" is the second letter on key
times
many times as is equal to the order of the letter.
L
To enter the word "Home" in basic text input mode, you should therefore key
4, 4
in
Press
Letters, numbers and symbols are located on each key as follows:
Key Alphanumeric Key Alphanumeric
1
2
3
4
5
6
7
*
key. This method requires multiple key presses to reach the desi red
4
, you must press 2
4
in order to enter "h". Using this mode requires you press a key as
In basic mode, the complete list of characters available for the key you press
appears in the bottom of the screen, allowing you to see each available character
located on this key (see below).
(GHI) 6, 6, 6 (MNO), 6 (MNO), 3, 3 (DEF).
,
to confirm the completion of the editing.
space 1 @ _ # = < > ( ) & £ $ ¥
a b c 2 à ä å æ ç
d e f 3 é è ∆
g h i 4 Γ ì
j k l 5
m n o 6 ñ ò ö
p q r s 7 β Π Θ
Φ
Λ
Σ
t u v 8 ü ù
8
w x y z 9 ø Ω Ξ
9
. 0 , / : ; " ’ ! ¡ ? ¿ * + - %
0
Toggles between the different
*
Text Input modes.
Switches from lower case to
#
upper case and vice-versa.
Short press to delete one
character, long press to delete all
e
text.
Ψ
6

Reminder
Switch on/off
Enter PIN
Make a call
Answer a call
End a call
View last call
Quickly access the
Quickly access the
Return to previous menu
Return to idle screen
Lock/ unlock the keypad
Change the language used
Access the carousel
Use the phonebook
Phonebook
Call
list
Press ) to switch on, press and hold to switch off.
Enter your PIN code using the keypad and press , or
#
to confirm.
Enter phone number on keypad and press ( to dial, or
,
to select Call or Call handsfree, then press (
press
,
to call.
or
Press ( when your phone rings.
Press ).
Press ( in idle mode.
In idle mode, move -.
In idle mode, move +.
Press e.
Press and hold e.
In idle mode, press and hold e.
In idle mode, press and hold 0, select the language
,
and press
1. Press , to access the Carousel.
2. Move
enter the sub-menu.
3. Repeat step 2 until you reach the desired function.
1. In idle mode, press -.
2. Browse the list by moving
the selected name.
.
<
or > to select a function, then press , to
+
or - and press ( to call
7
1 • Getting started
L
Read the safety instructions in the "Precautions" section before use.
First steps
To use your phone, you must insert a valid SIM card supplied by your GSM
operator or retailer. The SIM card contains your subscription, your mobile
number, and a memory in which you can store phone numbers and messages
(see “Phonebooks” page 40).
Get started
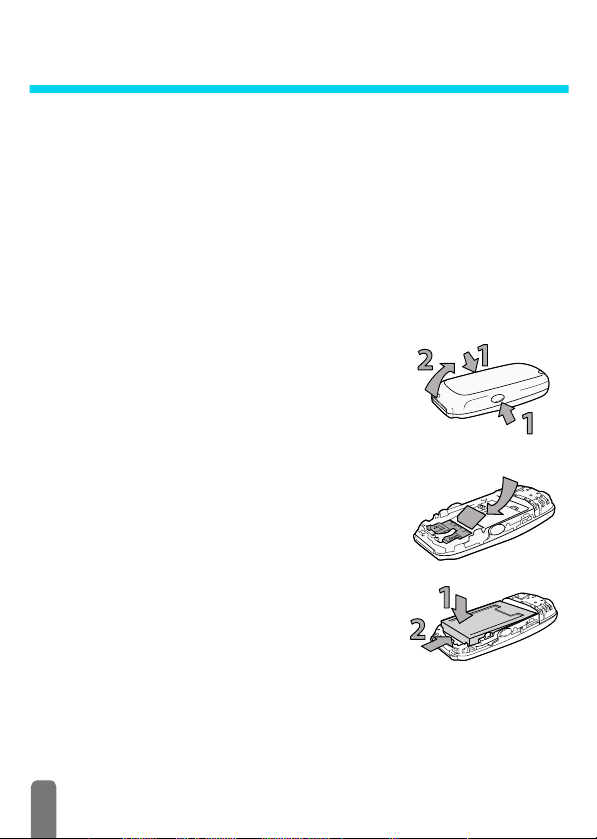
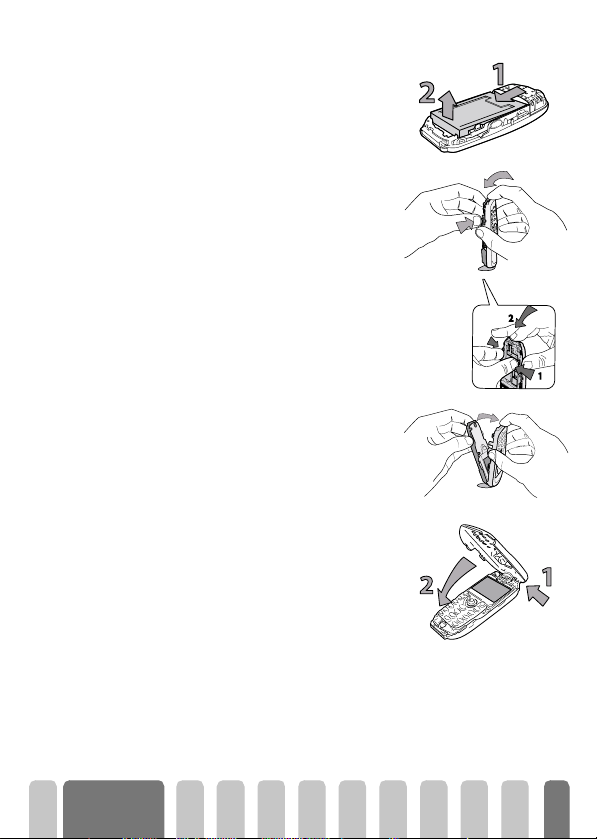
Insert the SIM card
1 Press on the two clips on each si de of the
back cover of your phone, as shown
opposite (1). Rotate the cover from the
bottom of the phone and remove it (2).
L
Make sure the phone is switched off before
removing the cover.
2 Reomove the SIM card from its holder and
insert in its slot, under the metal clip holder,
until it stops. Be careful that the clipped
corner of the card is in the bottom left
corner as shown opposite.
3 Slide the battery pack into its slots, metallic
connectors downwards, until it stops.
8

4 Put the back cover back on your phone:
hook the front housing onto the hinges on
the top of the phone (1), then press the
bottom down until latch catches (2).
5 Remove the protective film before using the
phone.
Enter the PIN code
Set date and time
1 To switch on the phone, press and hold the ) key.
2 When you switch on the phone, you may be prompted to enter the PIN
code, which is the 4 to 8-digit secret code of your SIM card to protect it
from abusive use. It is preconfigured and communicated to you by your
operator or retailer. To personalise the PIN code, see “Change codes”
page 30.
L
If you enter a wrong PIN code 3 times, your SIM card is blocked. To unblock it,
you must request the PUK code from your operator.
3 Enter your PIN code. If you make a mistake, press e. Then confirm by
,
pressing
As prompted by the phone at first switch on, set the date by pressing the
appropriate numeric keys (press
validate. Proceed in the same way to set the time.
L
For complete date and time options, see page 31.
or #.
Copy of the SIM phonebook
L
If you do not copy the SIM phonebook at very first switch, you will be able to do
it directly from the phonebook menu (see page 41).
If you had a mobile phone before and are using the same SIM card, the card
might contain all or part of your current phonebook. The mobile phone detects
this and a message asks you if you want to copy your SIM phonebook onto the
built-in phonebook (see below). Press
Accept the copy
Press , to accept the copy of the SIM phonebook onto your phone. Once the
copy is done, the phonebook located on your phone is automatically set as
e
to erase a number), then press , to
e
to cancel or , to accept.
Getting
started
9

your default phonebook. To switch back to the SIM phonebook, select
>
Phonebook
Refuse the copy
If you press the e key to refuse the download of your SIM card contents at
switch on, the copy isn’t launched and the phonebooks stay unchanged. The
SIM phonebook is the default and you must select Phonebook
settings > Phonebook select >
Abort the copy
1 If you change your mind while the copy has already taken place, press the
2 The copy is aborted and the phonebooks only contain the records
3 The SIM phonebook is the default and you must select
In SIM card.
e
key to abort the download of your SIM card contents.
downloaded before cancellation of the process.
Phonebook
switch phonebooks.
>
Phonebook settings > Phonebook select > In phone to
First call
1 Enter the phone number (if you make a mistake, press e) and press
(
.
2 Once connected, your phone emits 2 beeps. To end the call, press
Customise your phone
You can customise your mobile phone by removing front and back covers and
replace them with different ones.
L
You must always remove the battery and make sure the phone is switched off
before removing the cover when customising your phone.
1 Press on the two clips on each side of the
back cover of your phone, as shown
opposite (1). Rotate the cover from the
bottom of the phone and remove it (2).
In phone to switch phonebooks.
>
Phonebook
)
.
10
Getting
started
2 Remove the battery pack by sliding it
downwards from its slot (1), then lifting it
upwards (2).
3 Then hold the phone upside down and
place your forefinger on the connectors.
Press the two inner clips with your left
fingers as shown opposite (1) and pull the
cover from the top while pushing the inside
part of the phone with your forefinger still
on the connectors (2).
L
Make sure you handle the product with care
when the front is removed, in order not to
damage the joystick key which is then
unprotected, and also try not to touch the screen
Do not turn on your mobile phone when front
and back covers are removed.
4 Remove the keypad and place it in the
front cover that will replace the one you
just removed.
5 Put the new front cover on your phone:
hook the front housing onto the hinges on
the top of the phone (1), then press the
bottom down until the latches catch (2).
Getting
started
11
6 Slide the battery pack into its slots,
connectors downwards, until it stops.
7 Put the back cover back on your phone:
hook the front housing onto the hinges on
the top of the phone (1), then press the
bottom down until the latches catch (2).
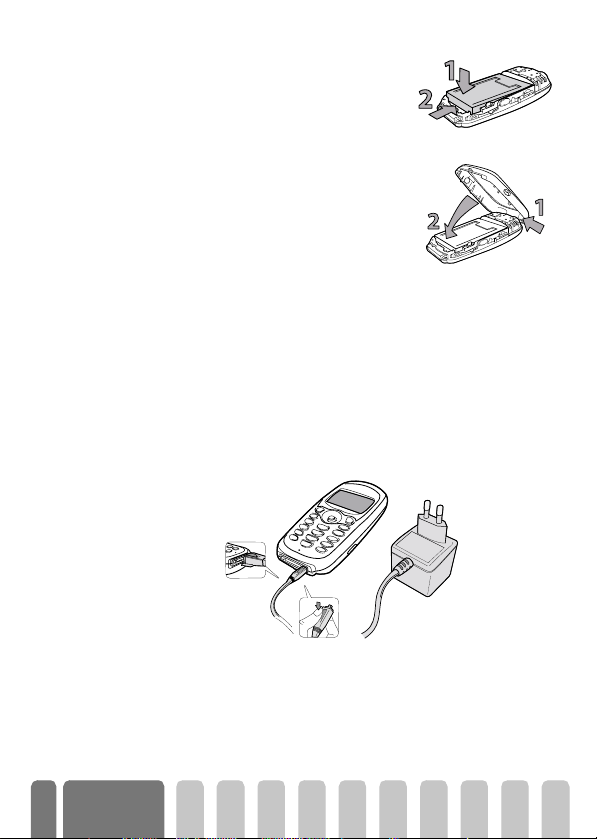
Charge the battery
Your phone is powered by a rechargeable battery. A new battery is partially
charged and an alarm will warn you when the battery reaches low.
L
We recommend that you do not remove the battery when the phone is switched
on: you may lose all your personal settings (see information on battery safety,
page 82).
1 Once the battery and battery cover are clipped on the phone, plug the
charger (supplied with the phone, in the box) into the right hand socket
at the base of the phone as shown below.
12
2 Plug the transformer unit into a main AC power socket with easy access.
b
symbol indicates the state of charge:
The
• During charging the 4 charge indicators change; Each bar represents
around 25% of charge and it takes around 2.15 hours to fully recharge
your mobile phone.
Getting
started

•
When all 4 bars are steady the battery is fully charged and
you can disconnect the charger
• When the battery is charged, remove the connector by pressing the
release button on top of the connector.
• Depending on the network and condition of use, talk time goes from
2.30 to 4.30 hours and standby time from 1 to 2 weeks.
L
Keeping the charger plugged to the mobile when the battery is fully charged
doesn’t damage the battery. The only way to turn off the charger is to unplug it,
so use an easily accessible AC power socket. You can connect the charger to an
IT supply (Belgium only).
3If you don’t intend to use your phone for several days, we recommend
you to disconnect the battery.
L
You can use the phone while it is on charge. If the battery is completely flat, the
battery icon will only reappear after 2 or 3 minutes of charging.
.
Getting
started
13

2 • Main features
Idle screen
After switching your phone on and entering the PIN code (see page 8), your
phone displays the idle screen which means that it is ready to be used. In idle
mode, several symbols can be displayed simultaneously.
L
If the n symbol isn’t displayed, the network is not currently available. You may
be in a bad reception area: move to a different location. The phone automatically
returns to idle screen over 2 mn of inactivity.
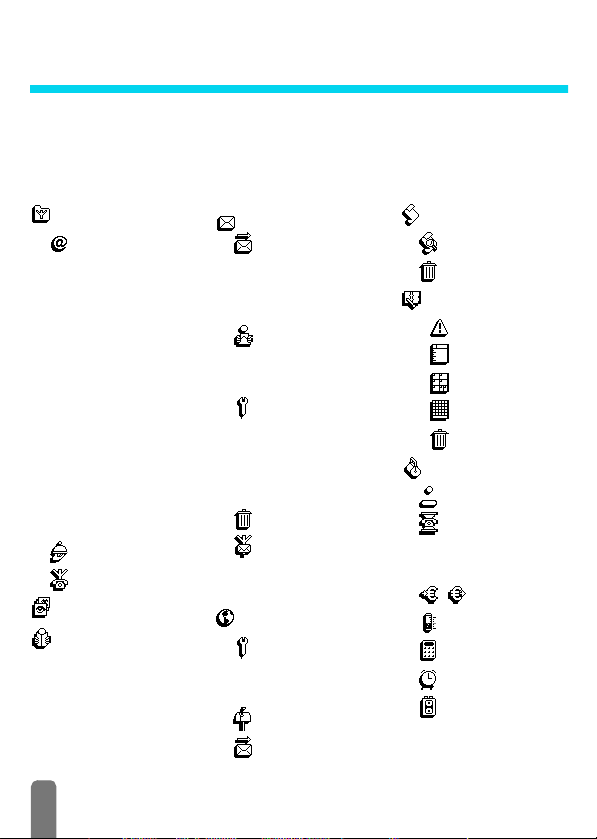
Symbols
Silent
Q
V
- Your phone will not ring
when receiving a call.
Vibra
- Your phone will vibrate when
receiving a call.
s
M
SMS message
message.
Voice mail
voic e mail.
- You have received a new
- You have received a new
Keypa d loc k -
L
from being pressed accidentally.
SMS full
S
full. Delete old messages to receive
new ones.
Call Forward Unconditional to
F
number
calls are being forwarded to a number
other than voice mail.
Call Forward Unconditional to
f
voice mailbox
calls are being forwarded to voice
mail.
GPRS attach
connected to the GPRS network.
Protects the keys
- Memory for messages is
- All your incoming voice
- All your incoming
- Your mobile phone is
14
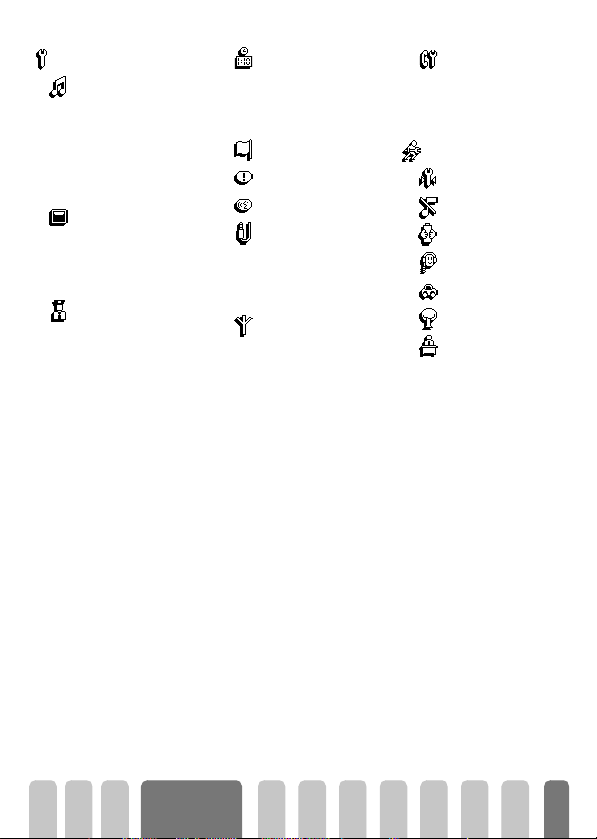
Battery
B
H
N
A
R
- The bars indicate the battery
level (4 bars = full, 1 bar = low).
Home zone
network operator. Subscription dependent,
contact your service provider for details.
a GSM Network :
connected to a GSM network
q
shown the better the reception is.
Memo
recorded and saved but not yet played.
Alar m clock
Roaming
registered to a network other than your
own (especially when you’re abroad).
- A zone designated by your
your phone is
Recep tion quality : the more bars are
- A memo or conversation has been
activated.
- Displayed when your phone is

Events
Some events may modify the i dle screen (missed call, new message, reminder
from the organiser, etc.). In this case, press
menu or long press
L
If you locked your keypad, you must unlock it before being able to access any
menu. You lock/unlock your keypad by pressing and holding the
e
Make a call
1 In idle mode, enter the phone number using the keypad. To correct an
error, press
L
For an international call, you can enter the "+" key instead of the usual
international prefix. To do this press and hold
code.
2Press ( to dial the number and press ) to hang up.
L
To learn other ways of making a call, see “Call a number” page 46.
e
Answer and end a call
1 When receiving a call, the phone can ring and/or vibrate, the incoming call
animation and Incoming call are displayed. Depending on your
subscription and if the caller has permitted this information to be
transmitted, their number may be displayed. If the number is stored in the
selected phonebook (see page 40), then the corresponding name is
displayed instead of the number.
2 To answer the call, press
3 To reject a call, press
page 36), the call is diverted to a number or voicemail.
L
Notes:
• The phone will not ring if the ringer is deactivated (see page 19).
• If you have selected
call by pressing any key (except
4 To hang up, press ).
to go back to idle.
.
(
.
)
. If you have activated “Call forward” (see
Any Key Answer
,
to access the corresponding
e
*
before dialling the country
(see page 38), you can accept a
)
).
key.
Main features
15

See & hear who’s calling: Fotocall
L
This feature is only available when you select the phonebook of your phone, not
the SIM phonebook.
The Fotocal l feature allows you to:
- personalize the 10 groups available with a specific name ("Friends",
"Office", "Leasure", etc.), a given picture of the Picture album and a
melody of the Ringer list,
- link one or several contacts of your phonebook to a group, so that
when the/a person of this group calls you, his/her name appears on
the screen together with the picture of the group he/she belongs to.
The melody defined for this group will also ring.
1 If not done during the start-up procedure (see “First steps” page 8), copy
the content of your SIM phonebook onto your phone: press
Phonebook, Phonebook settings, Copy all to phone and press
for the copy to be completed.
2 Back to the Phonebook carousel, select Group settings, press
select the group of your choice.
3 Rename the group to be identifi ed ("Friends", "Kids", etc.) and select the
Melody and the Picture to be associated to this group.
4 Long press
Phonebook. Select a contact you wish to link to this group and press
Then choose Select group and select the group of your choice.
5 When this contact calls you, the Melody and Picture associated to his
group will ring/appear on the screen.
e
to go back to idle, then - to display the content of your
Redial and reply
The phone stores the last 30 numbers in the Call list (called, missed or
received). You can redial or reply to any of these numbers and dial it directly.
The most recent number is displayed first.
+
1 In idle screen, move
chronological list of the last calls received or made. If a number of the Call
list is also in your Phonebook, the corresponding name is displayed.
2Move
+
or - to select the number to redial or reply. Press ( to dial
the selected number and press
to access the Call list, which displays a
)
to hang up.
,
and select
,
. Wait
,
and
,
.
16
Main features

Flash dial
Flash dial
Voice dial
Voice Dial
Instead of accessing the Phonebook menu and scrolling through the list, you can
link the relevant name card to a hotkey, so that a long press on the chosen key
2
will directly call him (e.g. long press on
call your office).
L
You can only program keys 2 to 9, as keys 0 (selection of the
language) and
1 To set a hotkey for flash dial, press , to enter the main menu, then select
Settings > Hotkeys and press
2 Select a key "Not in use" from
3 Then select Flash Dial, press
displayed. Press
4 In idle mode, press and hold the programmed key to dial the associated
entry: the connection is established. Press
L
You can also set hotkeys for commands (see “Hotkeys” page 33). Hotkeys can
be changed or deleted at any time.
Voice dial also allows you to quickly call a name from your phonebook: instead
of programming a hotkey, you simply set a voice command by recording a word
that will call the corresponding name when pronounced.
1 To set a voice tag for voice dial, press
name of your choice in the list and press
2 Depending on the selected phonebook (see “Phonebooks” page 40):
- SIM phonebook: press
- phonebook in phone: select Show and press
3 When the option Add voice tag? appears, press
instructions displayed on the screen. When prompted to record your
voice tag, make sure you are in a quiet environment, choose a short and
simple word and clearly pronounce it.
1
(voice mailbox) are predefined and cannot be changed.
,
to confirm your choice.
,
phone number of your choice if several numbers were stored for
,
this name and press
,
and press
. Then select Voice d i al in the carousel menu,
.
to call your home or on 3 to
,
.
2
to 9 and press ,.
,
and select a name in the Phonebook
)
to hang up.
-
when in idle mode, select the
,
.
, select Voi c e d i al and press ,,
,
, then select the
,
, then follow the
Main features
17

4From the Voi c e d i al menu, long press e to go back to idle.
5Press and hold
corresponding to the number you want to dial.
To display the list of voice dials you have defined, select Settings, Vo ic e
Commands, Voi ce di al and press
from this menu, by selecting the <New> item, pressing
instructions appearing on the screen.
Voice tags you set for Voice dial can be played, changed or deleted at any time.
You can also set a voice tag for a voice command (e.g. launch calculator or add
organiser event, see page 35).
L
The duration of a voice tag is 2 seconds. Up to 40 voice tags can be defined and
shared between voice dial and voice command.
,
Clear the call list
To clear your call list, press , and select Call list, then Reset. Press , to
reset the call list.
Reset
Clear the SMS list
As explained further in this guide, short messages (SMS) sent or received can
also be saved (see “Read SMS” page 49). To clear the whole list at once, press
Reset
,
and select Messages, then press ,. Select Reset and press , to reset the
SMS li st.
L
Deleting your SMS list is useful to free memory space in order to receive new
messages.
Clear the phonebook
Reset phonebo ok
To clear the content of your phonebook at once, press , and select
Phonebook, Phonebook settings, Reset phonebook. Press
phonebook content.
L
This option only applies to the phonebook in your phone, not to the SIM
phonebook (see “Phonebooks” page 40).
Lock / unlock the keypad
You can lock the keypad to protect the keys from being pressed accidentally
Keypa d lock
(e.g., when the phone is in your pocket).
when in idle mode, then say the voice tag
,
. You can also set a voice tag for a voice dial
,
and following the
,
to reset the
18
Main features

To lock the keypad, press and hold e when in idle screen. The icon
appears on the screen. To unlock the keypad, press and hold e again.
L
Notes:
• You can also choose immediate or delayed lock by selecting
>
Security
>
your keypad will be permanently locked. If you unlock it by pressing the
e
key, it will be temporarily unlocked while you use your phone, and
then locked again after the time period you selected.
• The emergency number is available even when the keypad is locked and
you can still receive calls (see “Emergency number” page 46).
• Immediate keypad lock can be assigned to a Hotkey (see page 33).
• You must unlock your keypad before switching the phone off.
• It is possible to accept or reject a call even when the keypad is locked. The
keypad is unlocked automatically when the phone receives a call, and then
re-locks again once the call is finished.
Deactivate the ringer
If you don’t want your phone to ring when you receive a call, you can deactivate
the ringer. In this case, the incoming call symbol flashes when you receive a call,
Silence
the display shows Incoming call, but the phone doesn’t ring. To deactivate the
ringer, proceed as follows:
1Press , and select Settings >Sounds >Ringer volume
2Move < until the volume is set to Silence.
L
Silent mode can also be set by selecting
the vibra alert is also activated. For faster access, you can assign a hotkey to this
function.
Activate the vibra alert
If you have set the function, your phone vibrates when receiving an incoming
Vibra alert
call (activating the silent mode via the Silence Quicksetting as described above
will also activate the vibra alert). Otherwise, proceed as follows:
1 In idle screen, press
2Move
<
or > to select On or Off and press , to confirm.
Keypad lock
, then one of the available values. In this case,
Quick Settings > Silence
,
and select Settings > Sounds > Vibra.
L
Settings
.
. In this case,
Main features
19

L
Activating the vibra doesn’t mute the ringer. If you want to mute it and keep the
Silence
vibra function on, activate the
mode as described above.
Read your mobile phone number
To read your own mobile phone number, press - when in idle mode and select
Own num., then press
number is displayed if present on your SIM card. If not, select New, then follow
the instructions.
L
If your own number has been stored in the Phonebook, you can read it during a
call. See “Consulting the Names list” page 20.
,
, select Show and press , again. Your phone
During a call, you can…
Adjust the earpiec e volume
Mute the microphone
Unmute the microphone
Write in the notepad
Consult the phonebook
View Names List
Record a conversation
Record conv.
Mute
Unmute
Notepad
During a call, move < to increase the volume, or > to decrease it.
You can mute the microphone so that your correspondent cannot hear you.
,
During a call, press
To unmute the microphone during a call, press ,, select Unmute and confirm
by pressing
The notepad is a temporary memory in which you can note down a number
during a call. To do so during a call, simply enter the number that you want to
note. Wait a few seconds for your entry to be stored automatically in the
notepad memory. When the call ends, press
Phonebook, etc.
To consult the phonebook during a call:
1Press
2Press
Only one recording is available, and each new recording (either memo or
conversation) will replace the previous one and is available in the menu
Extras > Memo > Play me mo. To record a conversation during a call:
,
,
by pressing
e
, select Mute and confirm by pressing ,.
. The microphone is unmuted.
, select View Names List, press , and scroll through the entries
-
or +.
twice to return to the in-call screen.
,
to dial it, store it in the
20
Main features

1 While one or several simultaneous calls are in progress, press , to
access the call context carousel.
2 Select Record conv. and press
press
,, e
or hang up.
L
If you select
In most countries, conversation recording is subject to law regulation. We advise
you to notify the caller if you intend to record the conversation you have with him
and only record if he agrees. You should also keep any recording private. 30
seconds is the maximum recording time available (see “Memo” page 59).
Other features during a call
• Change the equalizer settings (see page 29),
• Add a name to the phonebook (see page 41),
• Switch to a handsfree (see page 47),
• Write and send a message (SMS) via the phonebook or the Notepad (see
page 48),
• Read a message (see page 49),
• Consult your Call list (see page 52),
• Consult your Organiser (see page 53),
• Check a voice mailbox or access a voice server via the Notepad (see
page 76),
• Transmit DTMF tones to answering machines and other devices (see
page 76),
• Make a second call (see page 76).
Mute
, then
,
Record conv.
. To end the conversation recording,
, only the caller’s voice is recorded.
Main features
21
3 • Menu tree
The menus contain all your GSM phone functions. They all feature icons or scrollable lists:
,
to enter a menu or sub-menu, press < or > to move left or right in a menu and
press
+
or - to scroll in a list and press , to validate an entry or to confirm a choice.
Oper. Services p75
WAP p70
Launch / Favourites / Last
page / Favourites / Error
messages during WAP
connections are mainly due
to incorrect parameters: you
should contact your
operator before first use, in
order to have the
appropriate WAP and GPRS
parameters. With some
operators , WAP access
parameters can be set
remotely. Please check
directly by your operator.
Services + p75
Service numbers p75
Images album p24
Phone book p41
22
*
Messages p46
Send a SMS p48
To g e t h er w i t h an
attachment / Send now /
Save
Read SMS p49
Saved Messages / Received
Messages
SMS settings p50
SMS centre / Signature /
Validity period / Reply path /
Delivery report / Auto save
SMS
Reset p52
Broadcast SMS p51
Reception / Topics / District
codes
E-Mail p60
Settings p61
Network access / E-mail
server access / Advanced
Open mailbox p66
Send mail p65
Call list p52
Call list p52
Reset p52
Organiser p53
Events p53
Day view p53
Week view p53
Month view p53
Delete past p53
Extras p56
GSM counters / GPRS
counters
Brick game p56
Call counters p56
Euro p58
Memory status p58
Calculator p58
Alarm clock p59
Memo p59
Settings p27
Sounds p27
Ringer / Ringer volume / Key
tones / Minute beep /
Organiser aler ts / Battery
low alert / New SMS tone /
Vibra alert / Equalizer
Display p25
Screen saver / Backlight
Animation
/
animation
Security p29
Keypad lock / Public names /
Call barring / Change codes
/ PIN protection
Screen
Time and date p31
Clock display / Set date / Set
time / Time zone / Daylight
savings
Language p32
Hotkeys p33
Voice command p35
/
Accessories p32
Car melodies / Speakers /
Car kit command / Auto
switch off / Auto answer
Network p35
GPRS attach / Register
again / Preferred list
Call settings p36
Call waiting / Caller ID / Call
forward /Autoredial / Any
key answer / Mailboxes
Quick settings p38
Personal p39
Silence p39
Autonomy p39
Headset p39
Car p39
Outdoors p39
Meeting p39
* Subscription dependent.
Menu tree
23
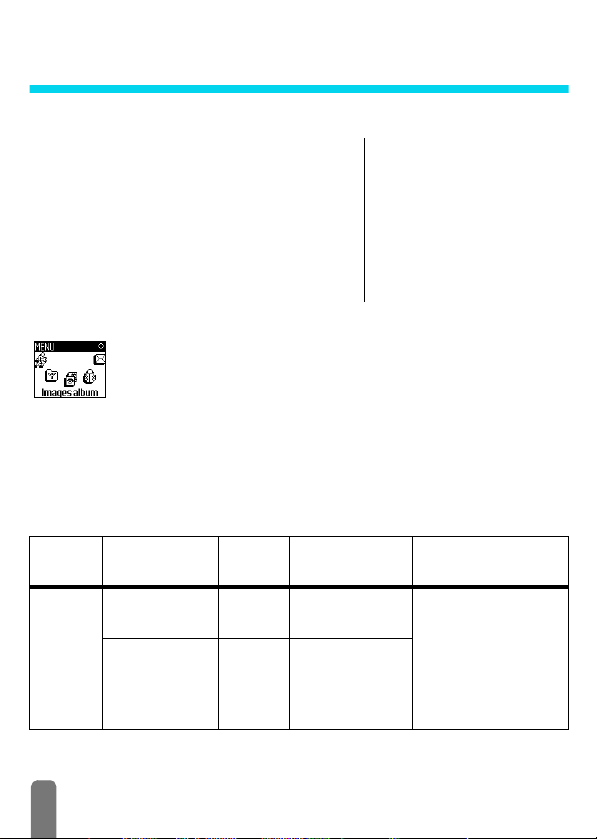
4 • Display & images
Introduction
The Images album and Display menus allow you to
select images in a list and display them, as well as set the
backlight duration, screen animations, screen saver, etc.
,
In idle mode, press
first option described in this chapter, or Settings, then
Display for the second set of options.
Images album
and select Image album for the
This menu allows you to manage and display the pictures stored in your mobile
phone, to View or Delete them and Change their name.
When entering one of the available sub-menus, the pictures stored in your
phone are displayed as a text list. To access the graphical display, select a picture
in the list and press
picture, or
When renaming the file, select it in the list and press
and press
The table below gives you an overview of the devices files can be sent to and
received from, as well as connection means.
>
<
,
. Then press 8 or 2 to go to the next or previous
to go back to the text list.
, enter a name and press ,.
Images album
View all / JPEG / Bitmap /
Animations
Settings
Display
Screen saver / Backlight /
Animation / Screen
animation
,
twice. Select Rename
Devices File type Sent
Mobile
to mobile
EMS animation
and BMP icon
JPEG EMail “Get and store
via...
SMS “Send an SMS”
24
See... Example
page 48.
attachments”
page 67
Sent by or received from
another mobile phone.
Devices File type Sent
via...
PC to
mobile
Network
to mobile
JPEG pictures,
e.g., resized with
Mobile Phone
To o l s .
JPEG EMail “Get and store
BMP icons, JPEG
pictures and
iMelodies
L
Wap s it e
dependent
L
JPEG images must have the correct size and format for your mobile phone to
store and display them correctly. Please check “Get and store attachments”
page 67 for complete information on this subject.
USB
cable
Wa p “Download fun
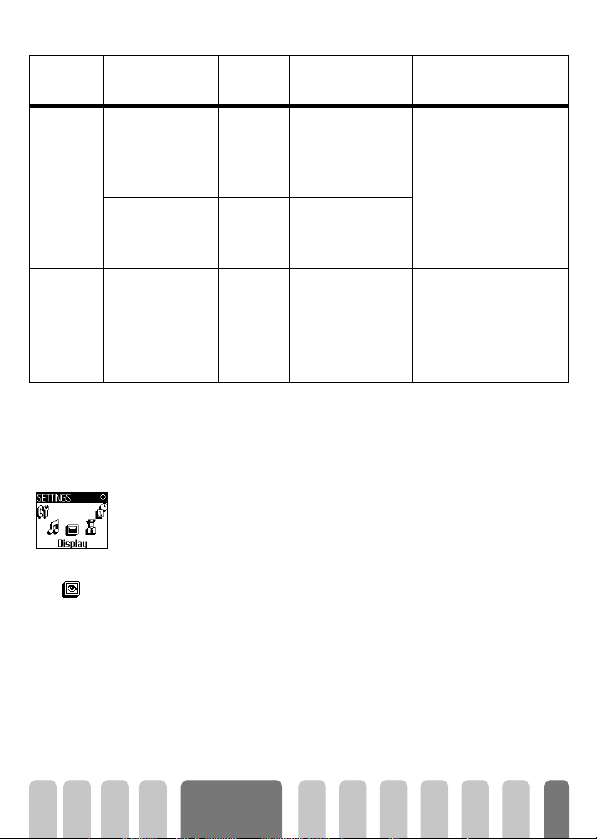
Display
This item of the Settings menu gives you access to all options concerning the
display, including the management of the screen saver.
See... Example
Requires a data
connect kit (see
page 89).
attachments”
page 67
URL” page 79.
Photographs taken with
a digital camera, files
downloaded from the
Internet or pictures
present on the data
connect kit CD-Rom.
By connecting to a
"Download fun" Wap
site.
Screen saver
Screen saver
Allows you to activate/deactivate the screen saver. When activated, it will run
a slide show in idle mode, by using the jpeg file(s) you have stored in your phone
and selected (see “Get and store attachments” page 67).
1 Select Settings, Displ ay, Screen saver and press
,
,
select On and press
<
pressing
-
choice, press
or > (you deselect it also by pressing these keys), then press
to move to the next image. Once you selected the images of your
,
Display &
images
. In the list that appears, select an image by
to activate the screen saver.
, then press < or > to
25

L
You must select several images (up to 10) in order to display a slide show. When
selecting only one image to be used as screen saver, only this image will be
displayed.
2 Select Start delay and press < or > to choose a value between 1 and
5 mn. When in idle mode, the screen saver will start according to the
time limit you have set.
3 Then select the screen saver Display period (from 10 seconds to 5 mn)
and press ,. The timing you have set will be applied between each image
of the slideshow.
L
Background images are automatically deactivated when entering an edit screen.
Also note that activating this function will automatically deactivate the screen
saver.
Screen animation
Screen animation
Animation
Animation
Allows you to activate a screen animation that will be displayed in idle mode.
<
Press
randomly, then press
L
Activating this function will automatically deactivate the screen saver.
Allows you to activate/deactivate the animation in different menus.
L
Deactivating this function increases the autonomy of your phone.
or > to select one of the available icons or Random to display all icons
,
to confirm.
Backlight
Backlight
26
The backlight is activated when receiving incoming calls or messages, browsing
<
lists and menus, etc. Press
1 mn backlight and press
color from level 1 to level 7 and press
L
Deactivating this function increases the autonomy of your phone.
Display &
images
or > to set the backlight Duration from Off to
,
to confirm. Then press < or >to set the Screen
,
to confirm.
 Loading...