

Page 1
Your Television's
Directions for Use
55PP9753
60PP9753
Pixel Plus™
Digital Natural Motion™
Philips HD Optics
Active Control™ with ambient light sensor
ARAC™—^Automatic Phosphor Aging Compensation
HDTV Monitor
with Pixel Plus"’
Auto IntelliSense™ Focus
HD DVI and Component inputs
Dolby® Virtual Surround
^ ^ v;;#y.5a i i
J''- >1
iliii
3135 035 21421
PHILIPS
mmm
Page 2

Return your Warranty Registration card today to ensure you
receive all the benefits youVe entitled to.
Once your PHILIPS purchase is registered, youVe eligible to receive all the privileges
of owning a PHILIPS product So complete and return the Warranty Registration
Card enclosed with your purchase at once. And take advantage of these important benefits.
C i/at /oUt sj
(fÿc-jîvi .(H i'»© IrrcF^oiiisg^f
¿li©rg V''e)(ti"‘/Slil picjfîfy liol' 4> cp№
5>V/Ciîfî clfWo;.( ^«16)0©.
Congratulations on your purchase,
and welcome to the “family!”
PHILIPS
Dear PHILIPS product owner:
Thank you for your confidence in PHILIPS.YouVe selerted one of the best-built, best-backed products available
today. And we’ll do everything in our power to keep you happy with your purchase for many years to come.
As a member of the PHILIPS “family,” you’re entitled to protection by one of the most comprehensive war
ranties and outstanding service networks in the industry.
What’s more, your purchase guarantees you’ll receive all the information and special offers for which
you qualify, plus easy access to accessories from our convenient home shopping network.
And most importantly, you can count on our uncompromising commitment to your total satisfaction.
All of this is our way of saying welcome-and thanks for investing in a PHILIPS product
Sincerely,
P.S. Remember, to get the most from your
Lawrence J. Blanford
President and Chief Executive Officer
Know these
S3.fBty symbols
CAUTIOIM
R18K OF ELECnuC SHOCK
A'
CAUTION: TO REDUCE THE RISK OF ELECTRIC SHOCK, DO NOT
REMOVE COVER (OR BACK). MO USER^ERVICEABLE PARTS
IN6DE. REFER SERVKIN6 TO QUALIFIED SERVICE PERSONNEL
DO NOT OPEN
A
A This “bolt of lightning” indicates uninsulated material within your unit may cause an elec
trical shock. For the safety of everyone in your household, please do not remove product cov
ering.
The “exclamation point” calls attention to features for which you should read the enclosed
literature closely to prevent operating and maintenance problems.
WARNING:TO PREVENT FIRE OR SHOCK HAZARD, DO NOT EXPOSETHIS EQUIPMENT
TO RAIN OR MOISTURE.
CAUTION:To prevent electric shock, match wide blade of plug to wide slot, and fully insert
ATTENTION: Pour éviter les chocs électriques, introduire la lame la plus large de la fiche dans
la borne correspondante de la prise et pousser jusqu’au fond.
PHILIPS product you must return your
Warranty Registration Card within 10
days. So please mail it to us right now!
PHILIPS Visit our World Wide Web Site at http://www.philips.com
Page 3
IMPORTANT SAFETY INSTRUCTIONS
Read before operating equipment
1. Read these instructions. 16.
2. Keep these instructions.
3. Heed all warnings.
4. Follow all instructions.
5. Do not use this apparatus near water.
6. Clean only with a dry cloth.
7. Do not block any of the ventilation openings. Install in accordance
with the manufacturers instructions.
8. Do not install near any heat sources such as radiators, heat régis- 17.
ters, stoves, or other apparatus (including amplifiers) that produce
heat.
9. Do not defeat the safety piupose of the polarized or groundingtype plug. A polarized plug has two blades with one wider than
the other. A grounding type plug has two blades and third ground
ing prong. The wide blade or third prong are provided for your
safety. When the provided plug does not fit into your outlet, con
sult an electrician for replacement of the obsolete outlet.
Protect the power cord from being walked on or pinched particu
10.
larly at plugs, convenience receptacles, and the point where they 18.
exit from the apparatus.
Only use attachments/accessories specified by the manufacturer. 19.
11.
12.
the cart/apparatus combination to avoid injury from tip-over.
Unplug tliis apparatus during lightning storms or when unused for
13.
long periods of time.
Refer all servicing to qualified service personnel. Servicing is
14.
required when the apparatus has been damaged in any way, such
as power-supply cord or plug is damaged, liquid has been spilled
or objects have fallen into apparatus, the apparatus has been
exposed to rain or moisture, does not operate normally, or has
been dropped. 21.
15. This product may contain lead and mercury. Disposal of these
materials may be regulated due to environmental considerations.
For disposal or recycling information, please contact your local
authorities or the Electronic Industries Alliance: www.eiae.org
Use only with a cart, stand, tripod, bracket, or table
specified by the manufacturer, or sold with the ap- 20.
paratus. When a cart is used, use caution when moving
Damage Requiring Service - The appliance should be serviced
by qualified service personnel when;
A. The power supply cord or the plug has been damaged; or
B. Objects have fallen, or liquid has been spilled into the appli
ance; or
C. The appliance has been exposed to rain; or
D. The appliance does not appear to operate normally or
exhibits a marked change in performance; or
E. The appliance has been dropped, or the enclosure damaged.
Tflt/Stability - All televisions must comply with recommended
international global safety standards for tilt and stability properties
of its cabinet design.
• Do not compromise these design standards by applying exces
sive pull force to the front, or top, of the cabinet which could ulti
mately overturn the product,
• Also, do not endanger yoiuself, or children, by placing electron
ic equipment/toys on the top of the cabinet. Such items could
unsuspectingly fall from the top of the set and cause product dam
age and/or personal injury.
WaB or Ceiling Mounting - The appliance should be mounted to
a wall or ceiling only as recommended by the manufacturer.
Power Lines - An outdoor antenna should be located away from
power lines.
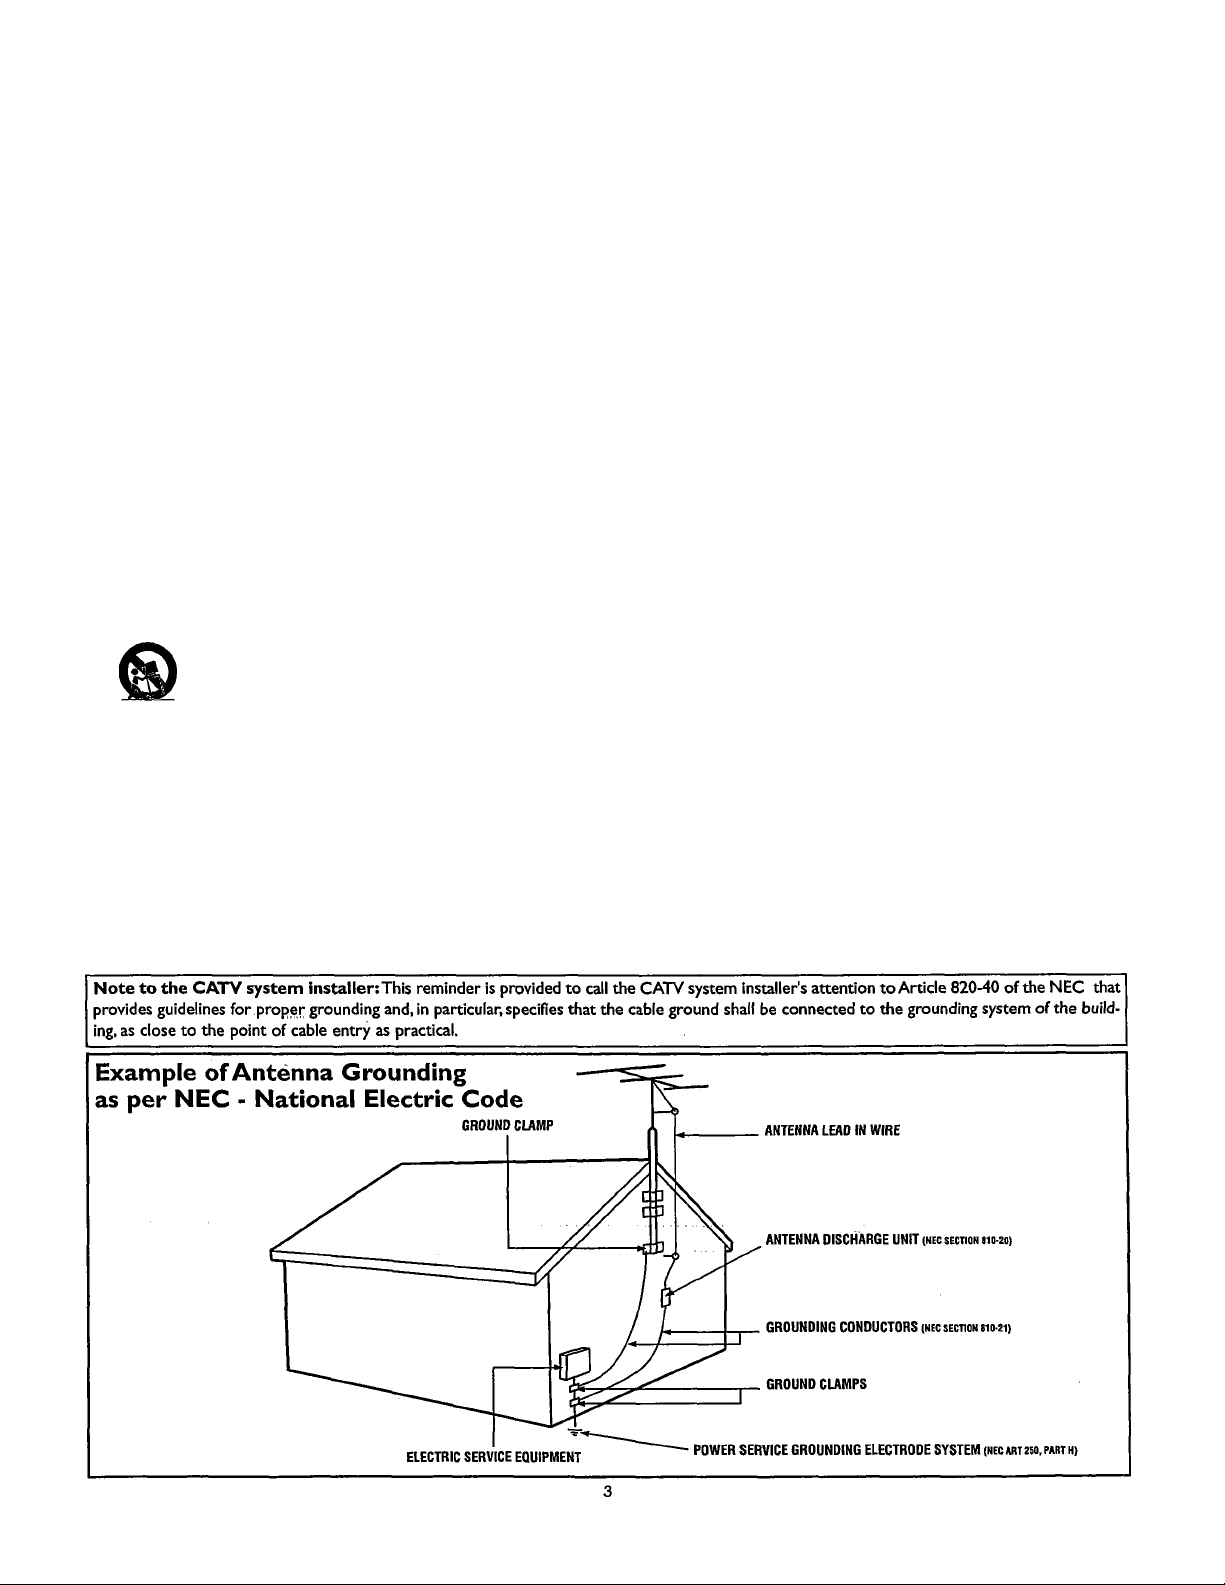
Outdoor Antenna Grounding - If an outside anterma is cormected to the receiver, be sure the anterma system is grounded so as to
provide some protection against voltage surges and built up static
charges.
Section 810 of the National Electric Code, ANSI/NFPANo. 701984, provides information with respect to proper grounding of
the mast and supporting structure, grounding of the lead-in wire to
an antenna discharge unit, size of grounding connectors, location
of anteima-discharge unit, coimection to groimding electrodes, and
requirements for the grounding electrode. See Figure below.
Object and Liquid Entry - Care should be taken so that objects
do not fall and liquids are not spilled into the enclosure through
openings.
Page 4

Contents
Introduction
Welcome/Registration of Your TV
Safety/Precautions
Features
.........................................
..........................
Connecting Accessory Devices
TO Your TV
Descriptions of Jacks, Cables, and Connectors
Panel jack Compatibility Information........................................7
Preconnection Recommendations...........................................8
Connecting aVCR
Connecting a VCR and Cable Box.........................................10
Connecting an S-Video Device
Connecting a Standard DVD Player
Connecting a Progressive-scan DVD Player
Connecting an HD Satellite Receiver to Y Pb Pr
Setting Color Space for HD input-AV 3....................................15
Connecting an HD Satellite Receiver to DVI
Connecting Surround Sound Equipment
Connecting to the Side Inputs: Video Game System
Labeiing the Audio/Video Input Sources................................ 19
....................................................................
............................................
......................................
......................
.........................
...................
...........................
...............................
..............
6
9
11
12
13
14
16
17
Using the Remote Control
Programming the Remote Control.....................................20—21
Programming the Remote Control: Set-up Codes ... .22-23
Operating Accessory Devices with the TV Remote .. .24-26
Using Active Control™ Plus+ ................................................27
Using AutoPIcture .................................................................28
Using Active Display
..............................................................
29
Using the On-screen Menus
Picture
Adjusting/Setting the Picture Controls
Selecting a Digital Processing Option
Seiecting a Dynamic Contrast Option
Selecting a DNR (Dynamic Noise Reduction) Option ... .33
Turning on Color Enhancement
Selecting a Picture Format Option ...................................35-36
H»)
Sound
Selecting an AutoSound™ Option
Seiecting a TV Equaiizer Option
Adjusting the TV and Headphone Volume
Turning Loudness on or off......................................................40
Adjusting TV Speaker Balance .............................................41
Selecting a Sound Mode Option
...................................
...................................
....................................
.............................................
.........................................
............................................
............................
...........................................
30
31
32
34
37
38
39
42
Using Alternate Audio (SAP)
Setting the TV for Stereo Programming
Turning the AVL (Audio Volume Leveler) on or off
Adjusting the Delta Volume .....................
Adjusting TV Speakers and Audio Out
.................................................
......
...........................
...............................
....................................
Features
Setting the Sleeptimer............................................................48
Setting the On Timer
Using Zoom............................................................................50
CH
Channels
Using the Channel List
Removing Channels from the Channel List
Using Lock Channel...............................................................53
Using Lock After .................................................................. 54
Blocking Programming Based on TV Ratings
Blocking Programming Based on Movie Ratings
Turning the Antenna Attenuator on or off
H General
18
Turning the Menu Background on or off.................................58
Using Surf...............................................................................59
Selecting a PIP Format
Changing Channels or Input Sources in Dual Screen/PIP . .61
Selecting a Picture Freeze Option .........................................62
Resetting the Audio/Video Settings to Factory
DefaultValues......................................................................63
Selecting Closed Captioning Option ......................................64
Selecting an On-screen Display Option
Setting up or Changing a PIN (Personal
Identification Number)
Setting the Clock—^Auto Clock mode
Setting the Clock Manually .....................................................68
Selecting a Time Zone and Setting the Daylight
Savings Control
Manual Convergence
Manual Convergence, Multipoint................................71
...
..........................................................49
.......
............
..........................................................
........................................................
...................................................................
............................... .51
............................
...............................
.................................
...................................
.................................................
Additional Information
Cleaning thé TV......................................................................72
Troubleshooting......................................................................73
Index.......................................................................................74
Factory Service Locations.................................................75-76
Limited Warranty
....................................................................
.................
........................
...................
43
44
45
46
47
52
55
56
57
60
65
66
67
69
70
80
Page 5

Features
Pixel Plus™
Get more! More detail, more texture, more resolution, more
high-defmition-like images from any source. By doubling the
number of lines and the number of pixels per line. Pixel Plus™
will take your viewing to new levels of enjoyment. Pixel Plus™
is only from Philips.
Digital Natural Motion™
Eliminates motion jitter from film-based sources such as DVDs
for distortion-free, natural viewing.
Philips HD Optics
The Philips HD Optics gives extreme resolution HD with cut
ting-edge processing and display technology. Includes Philips
wideband video amplifier, microphosphor CRTs, hybrid projec
tion lenses, first-surface mirror, and fine-pitched lenticular
screen.
Active Control Plus™
By continually adjusting picture settings over 60 times per sec
ond, Active Control Plus™ ensures that the viewing experience
is always optimal. Changes in ambient light are even compensat
ed for!
APAC—^Automatic Phosphor Aging Compensation
Stationary images, particularly black bars that outline 4:3 pro
gramming on a widescreen TV, could eventually leave an after
image on the screen. APAC automatically shifts the image, just
enough to blur after-image retention, which reduces the effect of
stationary images.
Auto IntelliSense™ Focus
Automatically adjust picture convergence at the push of a button.
Auto IntelliSense™ Focus responds to the natural and man-made
magnetic field conditions where the projection TV is located, so
you can easily enjoy a well-converged picture.
Dolby* Virtual Surround
Dolby processing circuitry for enhanced surround sound effect
creates the sensation of Dolby Pro Logic without the hassle of
additional rear speakers.
HD DVI and Componeni; Inputs
DVI supports High-definition Copy-protected digital video input
for connection to compliant set-top boxes. HD component con
nection (Y Pb Pr or RGB + HV) offers color purity, crisp color
detail, and reduced color noise.
Items included with This TV
As you unpack your TV, please note the included items:
• Quick Use and Setup Guide to help you set up your new TV.
• Directions for Use manual—contains information on safely,
set maintenance. Factory Service Center loeations, and prod
uct warranty
• Warranty Registration Card
• Remote Control (with supplied batteries).
Please take a few minutes to complete your registration card.
The serial number for the TV is on the rear of the set. For
your future reference, please write down the serial and
model number of this television in the space provided on the
warranty page at the back of this manual. (In the unlikely
event you should need to place a service call, these numbers
will be needed.)
End-of-Life Disposal
Your new television and its packing contain materials that can
be recycled and reused. Specialized companies can recycle
your product to increase tire amount of reusable materials and
minimize the amounts that need to be properly disposed of.
Your product also uses batteries that should not be thrown
away when depleted, but should be handed in and disposed of
as small chemical waste.
When you replace your existing equipment, please find out
about ftie local regulations regarding disposal of your old tel
evision, batteries, and packing materials.
As an Energy Star® Partner, Philips Consumer
Electronics has determined this product meets the
Energy Star® guidelines for energy efficiency.
Energy Star® is a U.S. registered mark. Using products with the
Energy Star® label can save energy. Saving energy reduces air pol
lution and lowers utility bills.
♦Manufactured imder license from Dolby Laboratories. “Dolby”,
“Pro Logic” and the double-D symbol are trademarks of Dolby
Laboratories.
Active Control, APAC, Digital Natural Motion, IntelliSense, and
Pixel Plus are trademarks of Philips Consumer Electronics.
Copyright 2003 Philips Consumer Electronics. Alt rights reserved.
Page 6
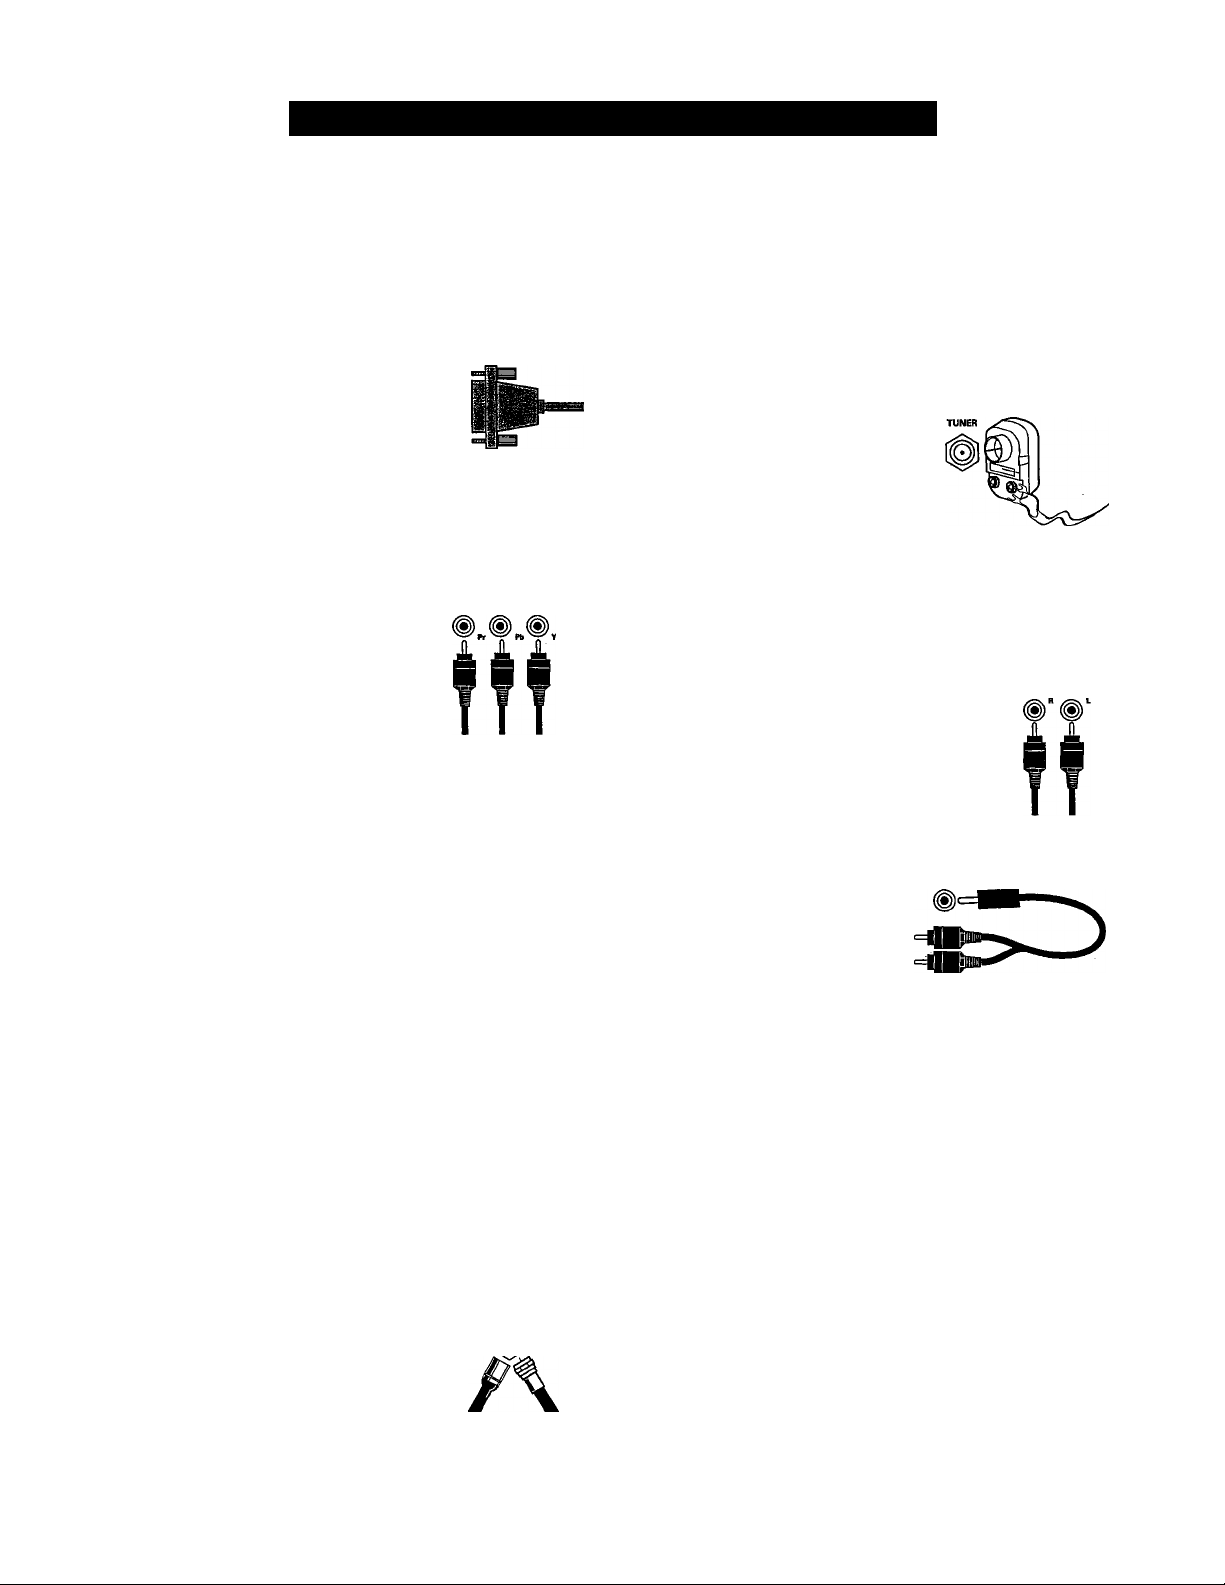
Descriptions of Jacks, Cables, and Connectors
This page contains descriptions and illustrations of jacks, cables,
and connectors you might use in making connections. The cables
and connectors are not supplied with your TV, but you can pur
chase at your electronics dealer. Or you can order them by calling
our Customer Care Center at 1-800-531-0039.
DVI-D Input Jack
Cable used:DYI-D
DVI-D Jack
Cables Used: DVI-D
This jack works only with DVt TMDS
(Transition Minimized Differential Signaling)
digital video. Allows encrypted transmissions
of uncompressed digital content. The DVI-D
jack used in this product is not for computer
coimections.
Component Video Input Jacks
Cables used: component video with
RCA-type phono plugs
Allow you to connect accessory devices such
Component Video Jacks
Cables Used: Component
Video with RCA-type
Phono Plugs
as DVD players. Separating the video into
three signals, these inputs provide excellent
quality. Be sure to connect the left and right
audio cables, because the Y, Pb, Pr jacks
receive only the picture signal.
NOTE: See the “Helpful Hint” on page 12
for more information.
S-Yideo Input Jacks
Cable used: S-Yideo
S-VIDEO Jack
Cable Used: S-VIdeo
Provide a higher quality picture than the
Video (composite) jacks because the color
part of the picture is separated from the black
and white portion. Be sure to connect the left
and right audio cables, because the S-Video
jacks receive only the picture signal.
Video (called “CVBS” or “composite”) video (Composite) Jack
Input Jacks Cable Used:Video with
Cable USedtVideo with RCA-type RCA-type Phono Plugs
phono plugs
Provide better picture performance than the
antenna RF input. Be sure to connect the audio
cables, because the video jacks receive only the
picture signal.
Your TV also has a monitor output (“Output”)
video (“V’) jack. Use a video cable with RCAtype phono plugs to make connections.
Signal Splitter
Allows you to route an antenna or cable TV
signal to two inputs.
300- to 75-ohm Twin-lead Adapter
Accepts twin-lead wires from an anterma and
allows connection to the antenna input on the
TV. If your antenna is already equipped with
an RF coaxial cable you will not need this
adapter.
Audio Input Jacks
Cables used: Audio with RCA-type phono
plugs
Provide sound for the video inputs. If your acces
sory device has only one output for audio, connect
it to the left (color coded white) audio jack on the
TV.
Your TV also has monitor output (“MON OUT”)
audio (“L” and “R”) jacks and a subwoofer output
(“SUB OUT”) jack. Use an audio cable with RCA-
type phone plugs to make connections.
3.5mm Stereo Mini Phone
3.5mm 5tereo Mini Phone Plug
Plug to RCA Jack Adapter
Allows a connection between the
3.5mm stereo audio out jack on a com
puter and the left and right audio inputs
on the television. Coimect A/V cables
with RCA-type phono plugs to the
adapter, then to the TV.
Center Channel Amp Speaker
Terminals (+ and -)
Center Channel Amp 5peaker
Terminals (for the connection
Allow a coimection from a surround
sound receiver. Set the EXT/INT switch
to EXT to use the TV speakers as the
center speakers in a surround sound
arrangement.
Signal Splitter
Cables Used: RF '
Coaxial (7Sn)
300- to 75-ohm
Twin-lead Adapter
Audio Jacks
Cabies Used:
Audio with RCA-
type Phono Piugs
to RCA Jack Adapter
of speaker wires)
B
Tuner(RF)Input Jack
Cables used: RF coaxial cable (75£2)
Allows you to connect an antenna, cable TV,
or components having RF outputs to the
antenna input on the TV. RF coaxial cables
are available in push-on or screw-on type.
Antenna RF Jack
Cable Used: RF
Coaxial (75D)
Push-on
Type Cable Type Cable
Or
5crew-on
Page 7
L::;-
Panel Jack Compatibility Information
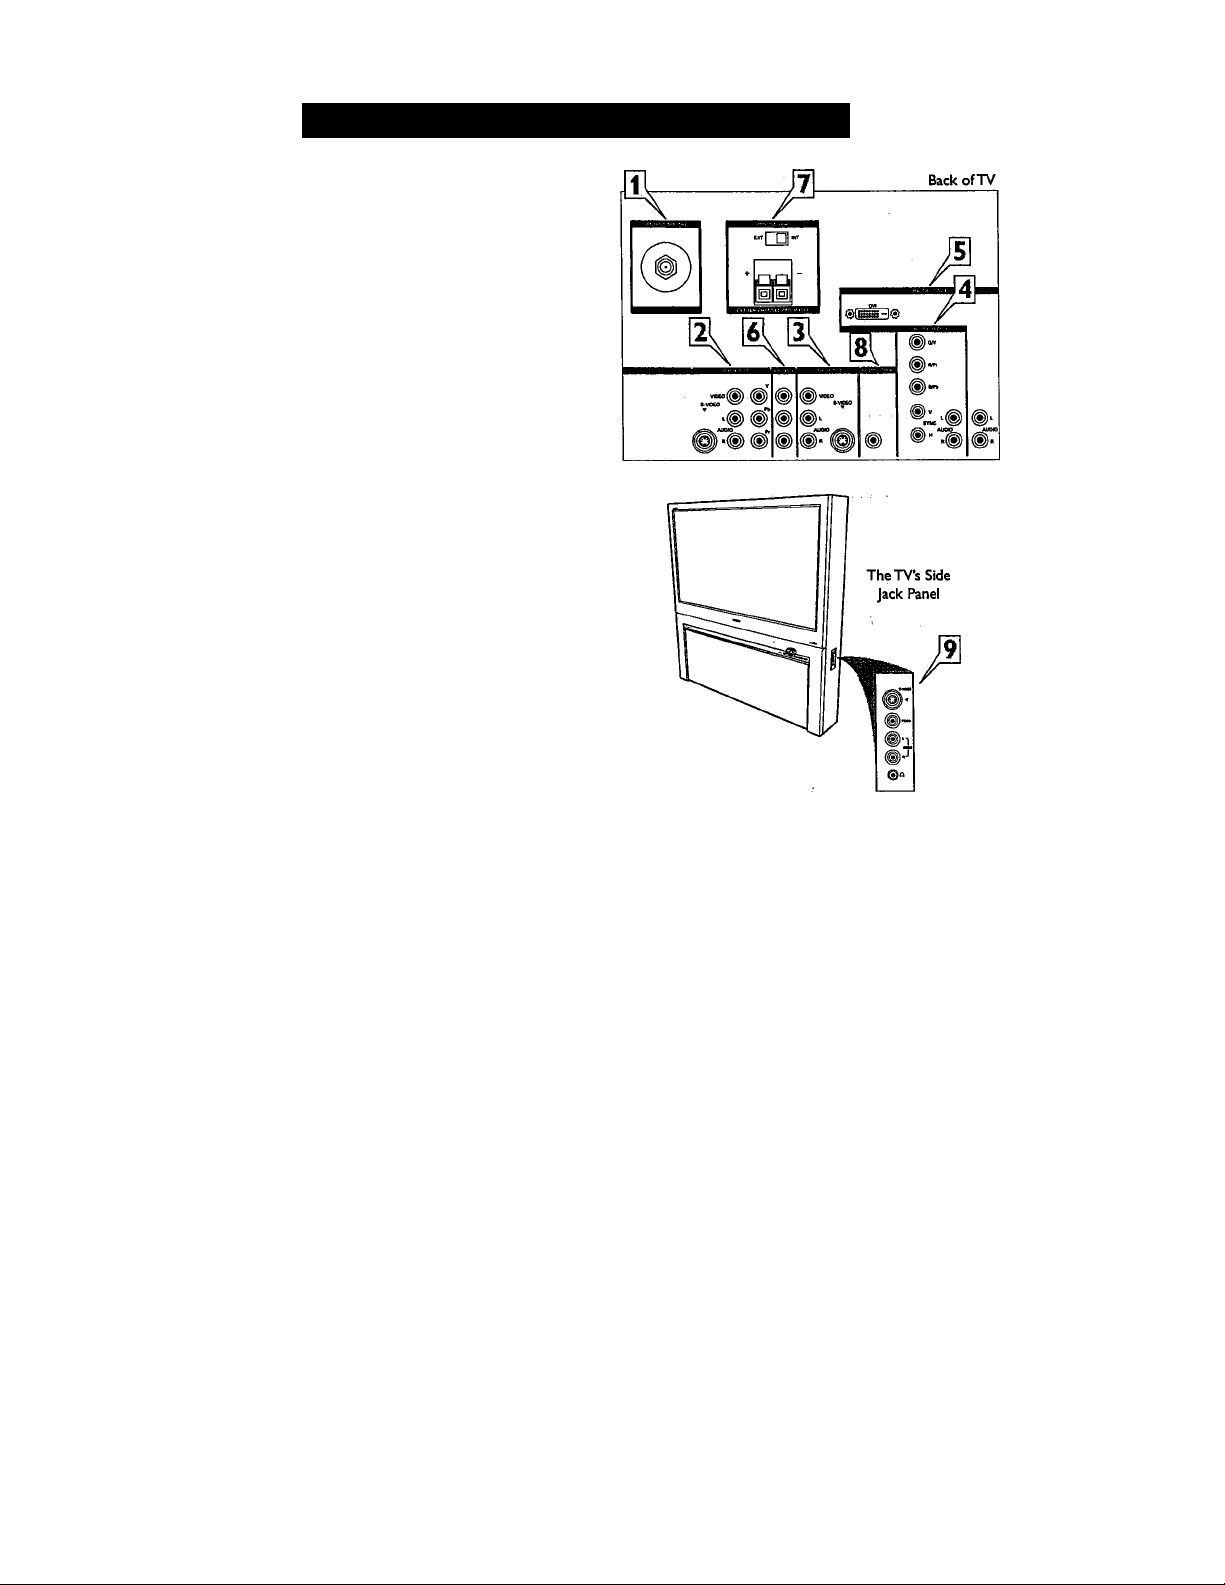
ANTENNA IN 75i2 Input Jack
Signals accepted: NTSC (480i).
1
Inputs available: 75C1RF coaxial.
This is for antenna or cable RF input.
INPUT-AV 1/Component Video (CVI) Jacks
Signals accepted: NTSC (480i).
2
Inputs available (three types): Y Pb Pr (com
ponent video), S-Video (super video), or Video
(eomposite), plus audio left and right.
Only one of die types of video inputs should be
used at a time. For either an S-Video or Yideo
connection, select the AVI source in the on
screen display. For a Y Pb Pr connection, select
CVI. For sound, connections must be made to
the INPUT-AVl audio inputs.
INPUT-AV 2 Jacks
Signals accepted: NTSC (480i).
3
Inputs available (two types): S-Video (super
video) or Video (composite), plus audio left and
right.
Only one of the types of video inputs should be
used at a time. For either an S-\Tdeo or Video
eonnection, seleet the AV2 source in the on
screen display. For sound, connections must be
made to the INPUT-AV 2 audio inputs.
HD INPUT-AV 3 Jacks
Signals accepted: 480p and I080i, plus audio
4
left and right.
Inputs available (two types): Y Pb Pr (compo
nent video) or RGB+HV sync, plus audio.
For sound, connections must be made to the
HD INPUT-AV 3 audio inputs.
HD INPUT-AV 4 Jacks
Signals accepted: Digital only (TMDS
[Transition Minimized Differential Signaling]
encoded, uneompressed); DVI 480p and 1080i,
plus audio left and right.
Inputs available: DVI TMDS, plus audio.
For sound, conneetions must be made to the
HD INPUT-AV 4 audio inputs.
OUTPUT Jacks
Provide video and left/right audio output signals
6
from the input source currently being viewed on
screen, except for HD INPUT-AV 3 or AV 4.
When HD INPUT-AV 3 or AV 4 is used, only
the audio is available through the OUTPUT
audio L/R jacks. The OUTPUT audio is at a
fixed volume level; changing the TV volume
does not affeet them. Adjust the volume at your
external home cinema system.
CENTER CHANNEL AMP INPUT Click-fit
Terminals
7
Provides speaker-wire input terminals for con
nection of an external home-cinema surround-
sound system amplifier. For this use, set the
switch to “EXT,” and the TV speakers beeome
the center speakers for the home-cinema sur
round-sound system.
NOTE: If no audio is heard from the set, cheek
to make sure the Center Channel Amp switch is
in the INT position. This switch should be in the
EXT position only when an external eenter
ehaimel input is connected to the Click-fit
Terminals.
Why So Many Types of Inputs?
As better-quality signals have beeome available, new inputs have been designed into
accessory devices (VCRs, DVD players, cable boxes, ete.) and TVs to carry them. The
other inputs have been left in place to work with the installed base of older equipment.
Here is a summary of the quality of signal offered by the different types of inputs:
Basic: ANTENNA IN 75i2. May provide the only way to connect an antenna and some
older cable boxes and VCRs.
Good: VIDEO (Composite) Input A small step up in quality from the ANTENNA IN
75ii input. Most cable boxes, VCRs, and DVD players have this type of eoimection.
Better: S-VIDEO (Super Video) Input Separates the signal into color and brightness,
improving image quality. Used with DVD players, digital cable boxes, satellite receivers,
and some camcorders.
Best: Y Pb Pr (Component Video) Input Carry potentially the best-quality signals.
The video signal is split into three signals, two color and one brightness. Used primarily
with DVD players.
SUBWOOFER
Provides a signal to an external powered sub
8
woofer.
SIDE JACK PANEL
Signals accepted: Analog NTSC (480i).
9
Inputs available (two kinds):
S-Video (super video) and Video (eompos
ite), plus audio left and right.
Output available: Headphone.
Only one of the inputs can be used at a time.
Select the Side source, and the TV detects
the input to which you have conneeted. For
sound, connections must be made to the Side
audio inputs.
7
Color Coding Used on
Jacks and Plugs to simpli
fy connections:
Yellow: VIDEO
(Composite Video)
Green, Blue, Red: Y Pb Pr
(Component Video)
Red: Right AUDIO
White: Left AUDIO.
Page 8
Preconnection Recommendations
Before connecting accessory devices—VCR,
DVD player, or HD satellite receiver, for exam
ple—^please keep the following in mind.
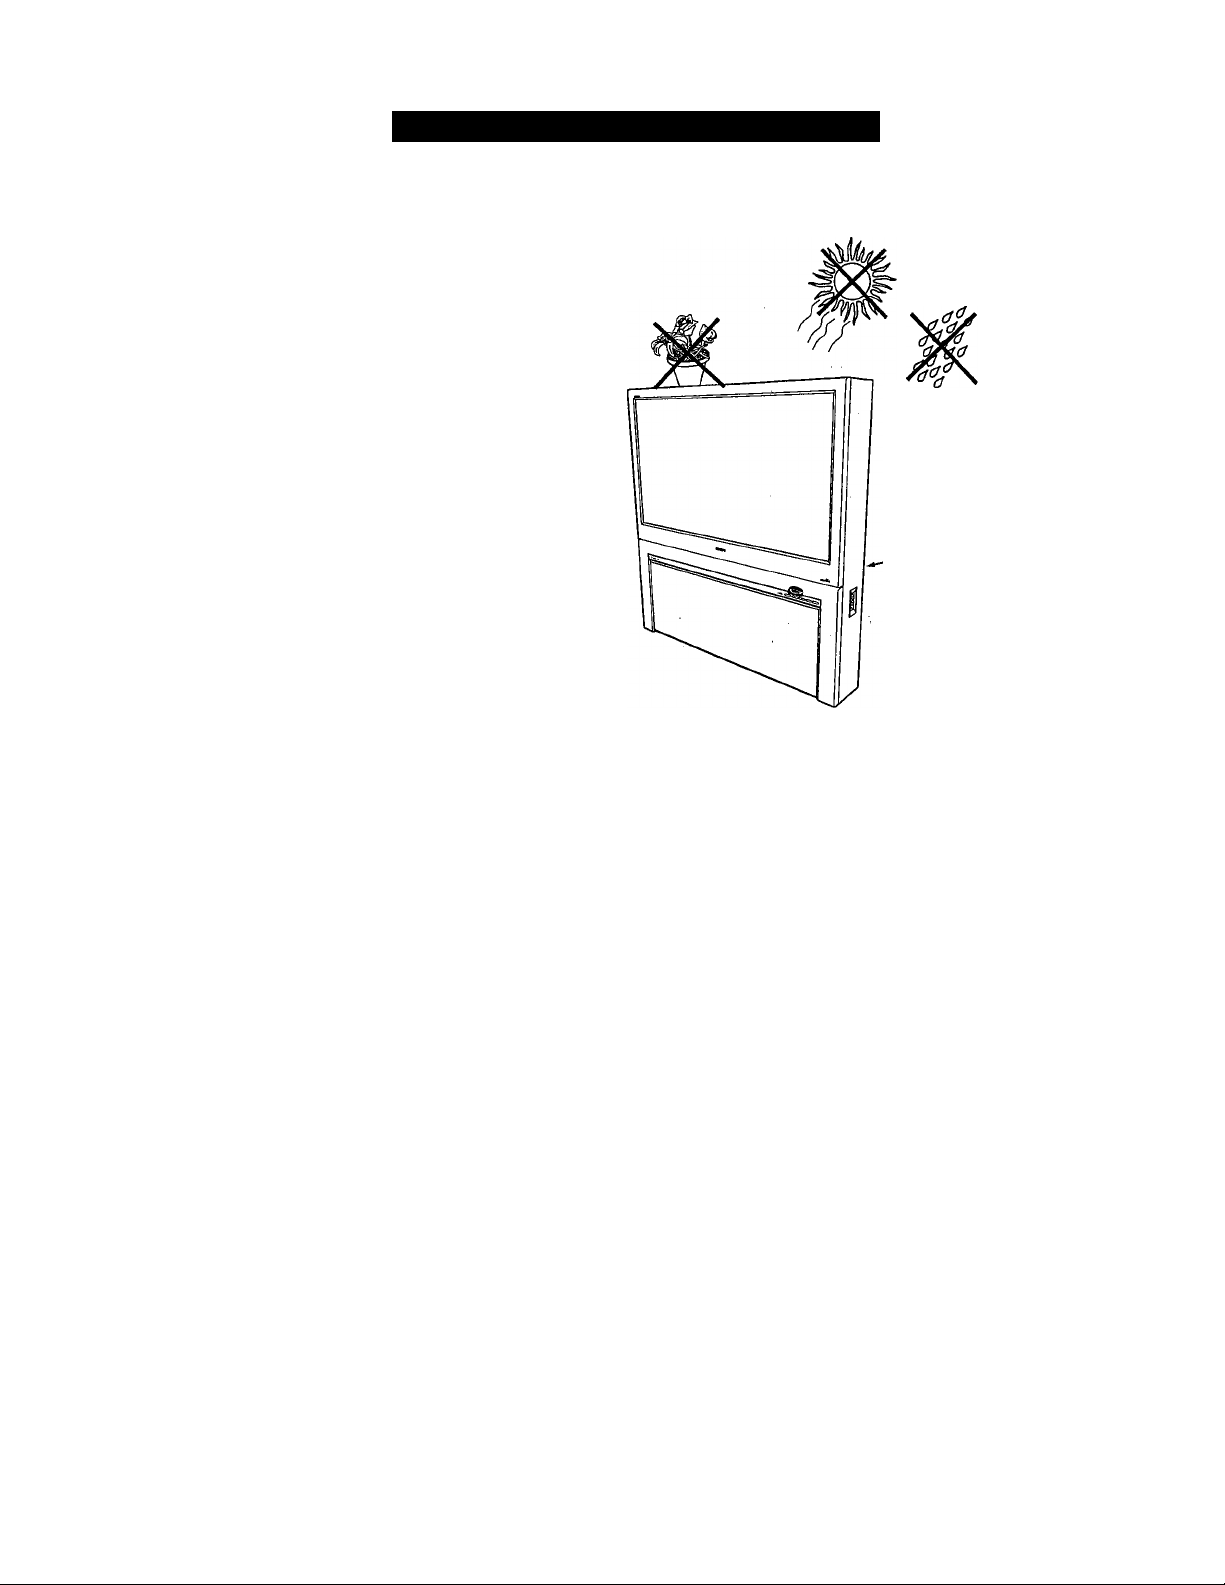
Positioning the TV
• Allow 4 to 6 inches of space behind the TV
for ventilation.
• Test various locations in the room to find the
optimal spot to locate the set for best viewing.
• Do not place the TV in direct sunlight or near
a heating appliance.
• Do not expose the TV to rain or moisture.
• To prevent any unsafe situations, do not place
objects on top of the TV.
Providing Protection Against Power
Surges
• Connect all accessory devices before you
plug any of their power cords into the wall
outlet or power strip. NEVER plug your TV
into an outlet that is controlled by a wall
switch.
• Turn off the TV and/or accessory devices
before you connect or disconnect any cables.
• Ensure that all antennas and cables are prop
erly grounded. See page 3, “Important Safety
Instructions.”
Protecting Accessory Devices from
Overheating
• Arrange accessory devices so that air can cir
culate freely around them.
• Don’t stack the accessory devices. Arrange
them to allow for good ventilation.
• If you connect an audio receiver or amplifier,
place it on the top shelf so the heated air from
it will not flow around other components.
Connecting Cables
Be sure to insert each cable firmly into the cor
rect jack.
Using the Connection Examples in
This Manual
The accessory device jack panels shown are for
example purpose only. The jack panels on your
accessory devices may look different. Also, note
that connections can be made in various ways.
The examples are presented only as guides.
For safety, do not
set objects on top
of the TV.
Situate the TV where
it will not be exposed
to heat or moisture.
Allow 4 to 6 inch
es behind the TV
for ventilation.
Page 9

Connecting aVCR
Connect the incoming antenna or cable
TV signal to the ANT IN jack on the
1
back of the VCR.
Using a coaxial cable, connect the
ANT OUT j ack on the back of the
2
VCR to the ANTENNA IN 75Q jack
on the back of the TV.
Using AN cables, connect the AUDIO
and VIDEO OUT jacks on the back of
3
the VCR to the corresponding INPUTAV 2 audio (L and R) and video (V)
jacks on the back of the TV.
Press the Source button on the remote
control to access the Source list.
4
Press the Cursor Up or Down button to
select the AV2 input source.
5
Press the OK button to confirm your
choice. The set is now switched to the
6
AV2 input source for the viewing of pro
grams from the VCR.
NOTE: Since you’ve connected the
cable TV signal directly to the TV’s
tuner (step 2 above), you can watch the
unscrambled programs by simply tun
ing to the desired channel. To store
chaimels in the TV’s memory, you
must use Autoprogram, which you can
access through “Install” in the TV’s
on-screen menu. See the Autoprogram
section in the QuicIc Use and Setup
Guide that came with the TV. If you
use Autoprogram, you can select chan
nels by pressing the CH + or - buttons
on the TV remote control (in TV
mode). Otherwise, you must press the
digit (number) buttons to tune directly
to the channel you desire.
Color Coding Used on Jacks and Plugs to
simplify connections:
Yellow: VIDEO (Composite Video)
Red: Right AUDIO
White: Left AUDIO.
Back ofTV
TY
AVI:None
1 Source AniNoiK 1
CVI: Mone
AV3:Kone
AV4:Nene
SIDE:None
O © ©
© © ©
© © ©
© © ©
(a) (a)
----------
Incoming
Cable TV
or
Antenna
Signal
^
/ II \
O 0 0 1
Z=lOI
ia=nl
Page 10

Connecting aVCR and Cable Box
NOTE: A cable box with AUDIO OUT jacks
such as the one used in the example on this
page might pass stereo sound to die TV. Check
with your cable TV company. The RF jack out
put jack on a cable box (conunonly labeled
“OUT TO TV” “OUTPUT,” or “OUT”) will
not pass stereo sound to your TV.
Connect the incoming cable TV signal
to a two-way signal splitter. The signal
1
splitter enables you to route the cable
signal to the TV without using the
OUT TO TV jack on the cable box,
which will not pass stereo sound to the
TV.
Using a coaxial cable, connect one of
the connectors on the signal splitter to
the ANTENNA IN 75£2 jack on the
back of the TV.
Using a coaxial cable, connect the
other connector on the signal splitter to
3
the CABLE IN jack on the back of the
cable box.
Using AudioA^deo cables, connect the
AUDIO and VIDEO OUT jacks on the
4
back of the cable box and to the corre
sponding AUDIO and VIDEO IN jacks
on the back of the VCR.
Back ofTV
Incoming
Cable TV
Signal
Signal
Splitter
Using AudioA^deo cables, connect the
AUDIO and VIDEO OUT jacks on the
5
back of the VCR to the corresponding
AV2 audio (L and R) and video (V)
input jacks on the back of the TV.
Press the SomCe button on the remote
control to access the Source list.
6
Press the Cursor Up or Down button to
select the AV2 input source.
7
Press the OK button to confirm your
choice. The set is now switched to the
8
AV2 input source for the viewing of pro
grams from the cable box or the VCR.
Color Coding Used on Jacks and Plugs to
simplify connections:
Yellow: VIDEO (Composite Video)
Red: Right AUDIO
White: Left AUDIO.
O © ©
© © ©
© © ©
© © ©
® (a)
NOTE: You can watch the unscram
bled cable programs by simply tun
ing to the desired channel. To store
channels in the TV’s memory, you
must use Autoprogram, which you
can access through “Install” in the
TV’s on-screen menu. See the
Autoprogram section in the Quick
Use and Setup Guide that came with
the TV. If you use Autoprogram,
you can select channels by pressing
the CH + or - buttons on the TV
remote control (in TV mode).
Otherwise, you must press the digit
(number) buttons to tune directly to
the channel you desire.
10
Page 11
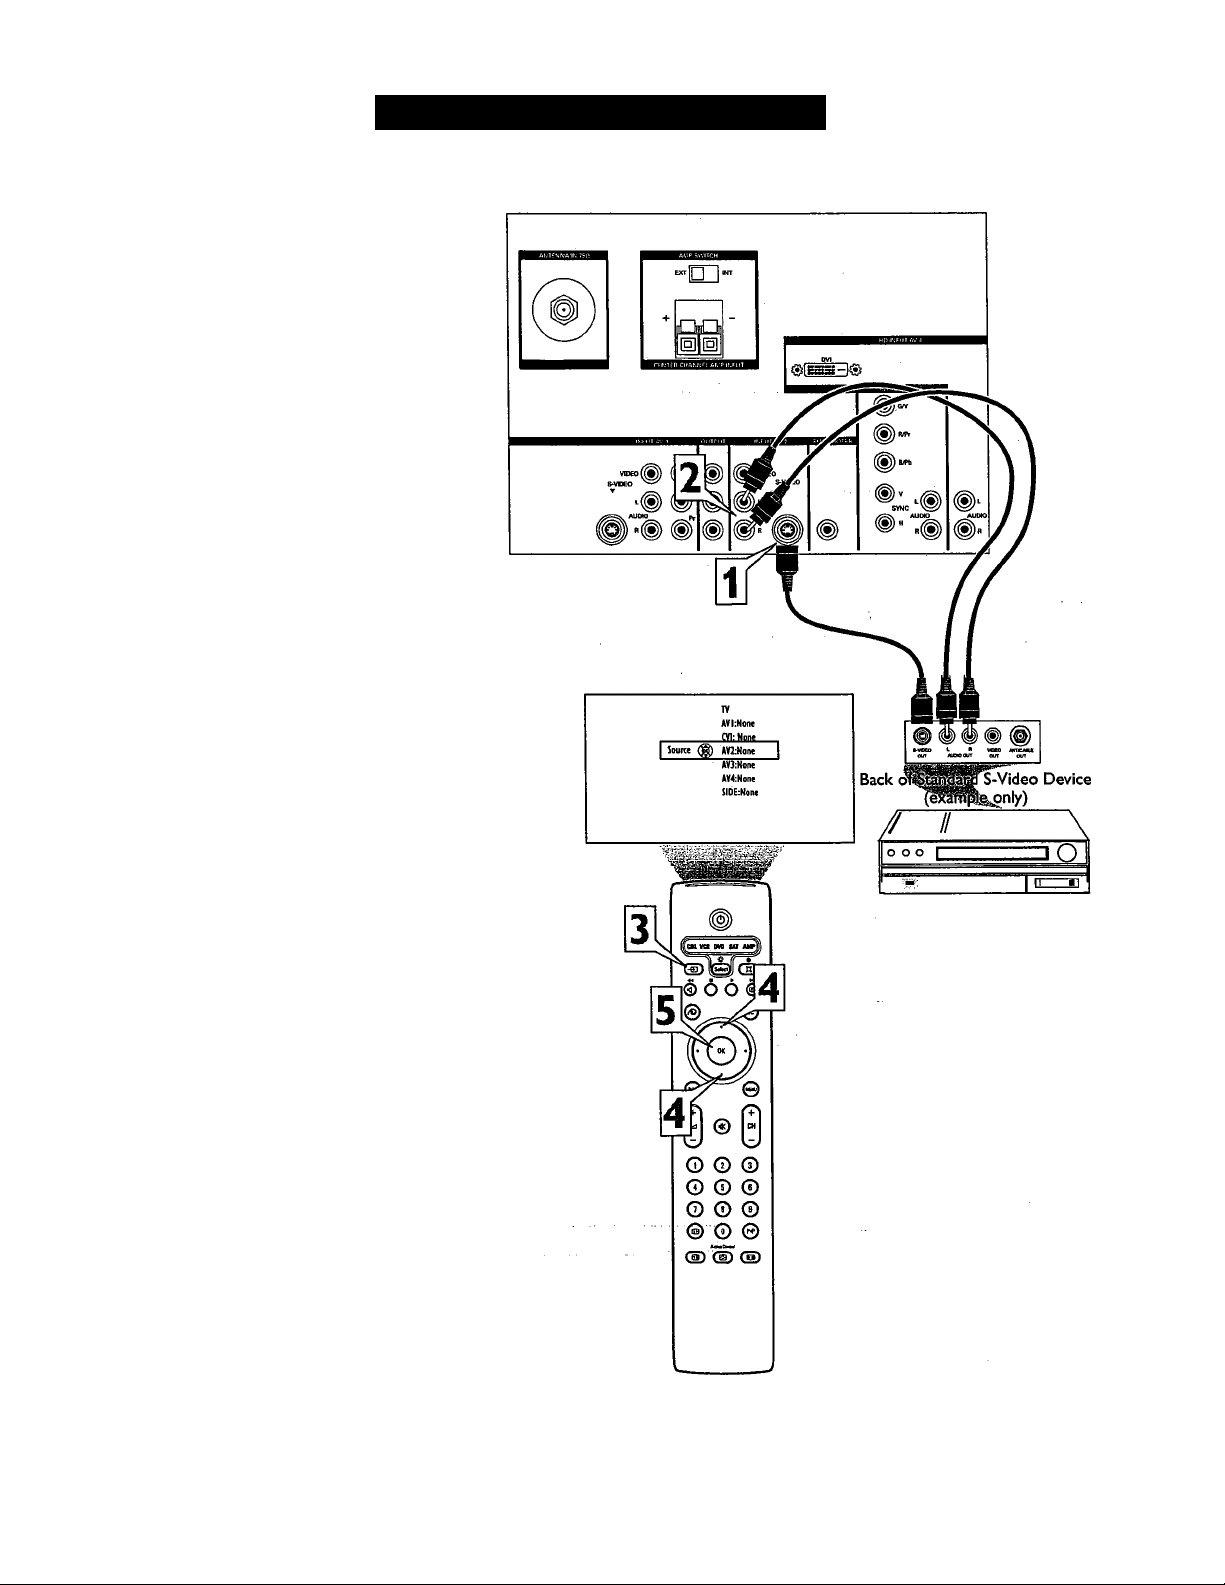
Using an S-Video cable, connect the
S-Video output on the back of the
1
S-Video device to the INPUT-
AV 2 S-VIDEO input.
Using Stereo Audio cables, connect the
AUDIO OUT jacks on the back of the
2
S-Video device to the corresponding
INPUT-AV 2 audio inputs
(L and R).
Press the Source button on the remote
control to access the Source list.
3
Press the Cursor Up or Down button to
select the AV2 input source.
4
Press the OK button to confirm your
choice. The set is now switched to the
5
AV2 input source for the viewing of
programs from the S-Video device.
Connecting an S-Video Device
Back ofTV
Color Coding Used on Jacks and Plugs to
simplify connections:
Red: Right AUDIO
White: Left AUDIO.
An S-Video cable must be used to make the
S-Video connection.
11
Page 12
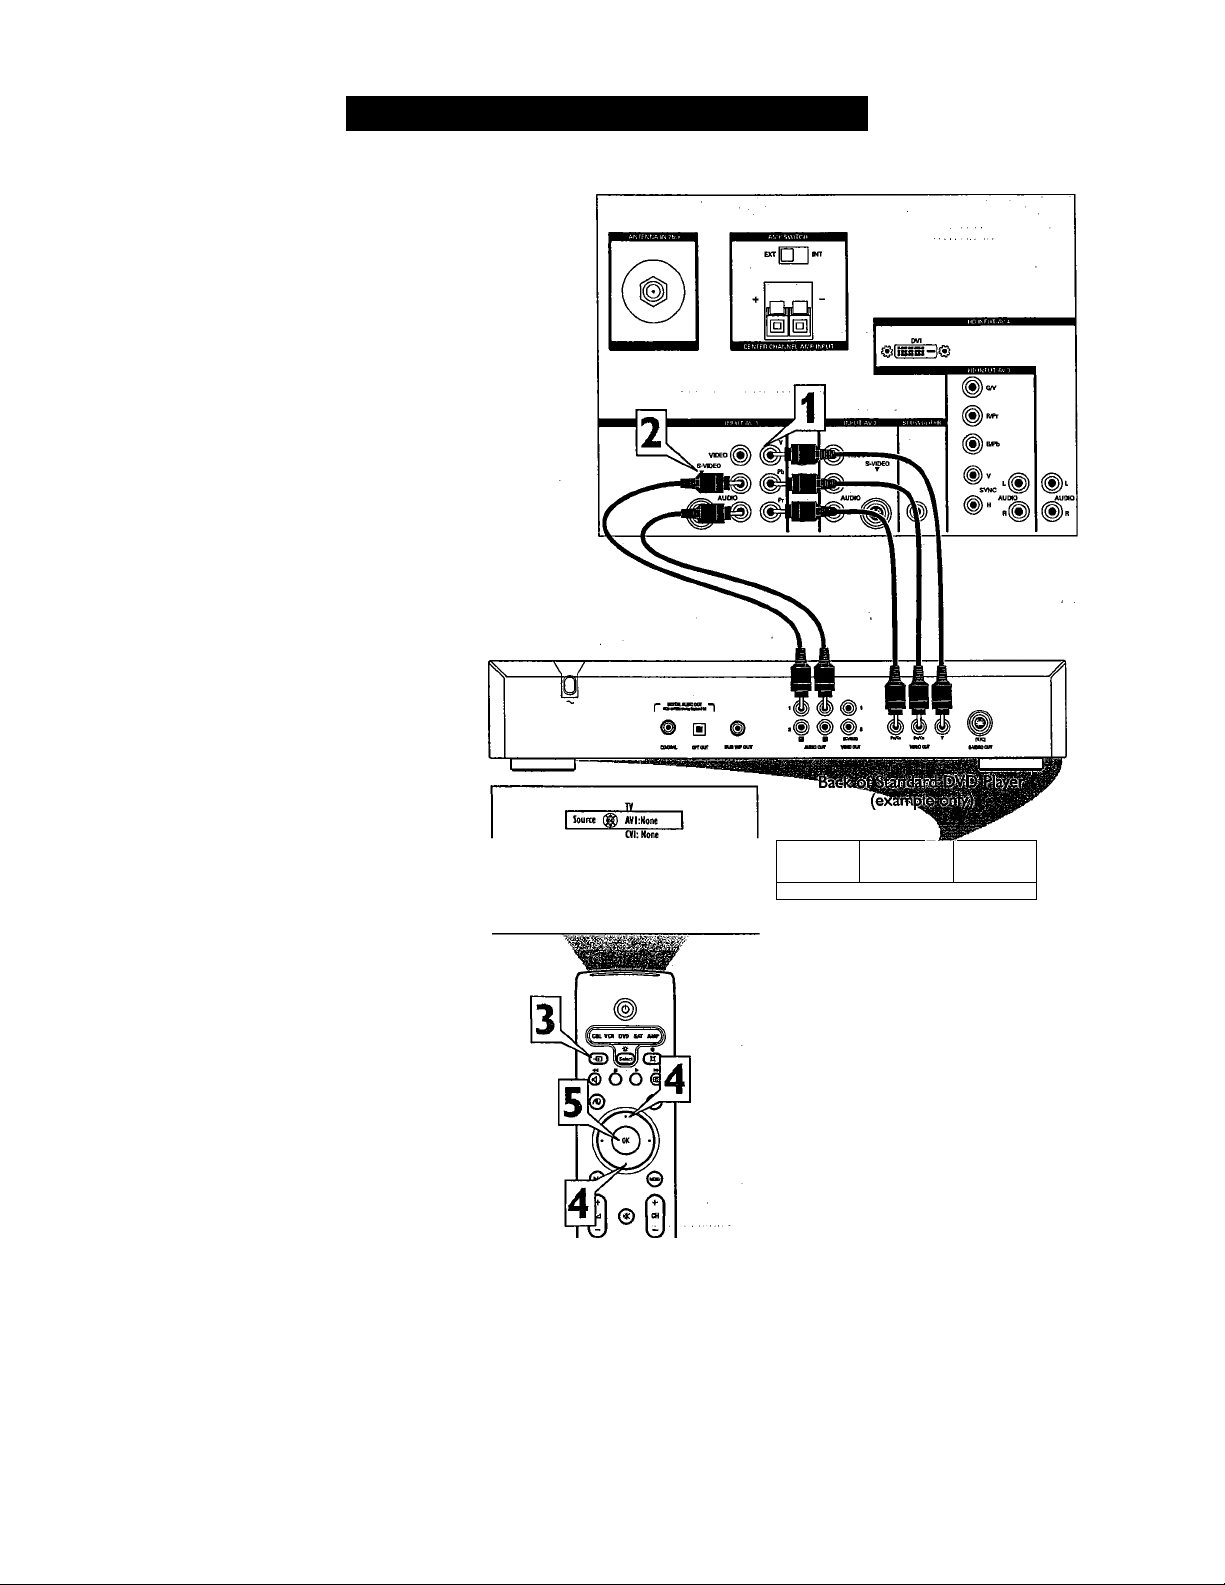
Connecting a Standard DVD Player
Using AudioA^deo cables, connect the
YPbPr jacks on the back of the stan
1
dard DVD player to the Y Pb Pr jacks
located under the INPUTAV 1 label on the back of the TV.
Using Stereo Audio cables, connect the
AUDIO OUT jacks on the back of the
2
DVD player to the corresponding
audio (L and R) jacks located under the
INPUT-AV I label on the back of the
TV.
Press the Source button on the remote
control to access the Source list.
3
Press the Cursor Up or Down button to
select the CVI (component video
4
input) source.
Press the OK button to confirm your
choice. The set is now switched to the
5
CVI soiuce for the viewing of programs
from the DVD player.
Back ofTV
To simplify making connections, the con
nectors on audio and video cables are often
color coded to match the colors on TV
jacks. Red for Right audio and White for
Left audio.
The names for the component video jacks
may differ depending on the DVD player or
accessory digital source equipment used.
For example, besides Y Pb Ifr, you may see
R-Y/B-Y/Y; or Cr Cb Y. Although abbrevia
tions and terms may vary, the letters B and
R stand for the blue and red color compo
nent signal connectors, tfeSpectively, and Y
indicates the luminance signal. If necessary,
refer to the user manual for your DVD or
digital accessory for more iriformation.
If you experience difficulties receiving
sound with a DVD disc, check the sound
settings through the DVD disc’s menu.
(S CD(3C3
O © ©
© © ©
© © ©
© © ©
® ® Ca)
12
Page 13

Connecting a Progressive-scan DVD Player
Using AudioA^deo cables, connect the
YPbPr jacks on the back of the pro
1
gressive-scan DVD player to the HD
INPUT-AV 3 Y Pb Pr jacks on the back
of the TV.
Using Stereo Audio cables, connect the
AUDIO OUT jacks on the back of the
2
DVD player to the corresponding HD
INPUT-AV 3 audio (L and R) jacks on
the back of the TV.
If your DVD player has an I/P switch
on the back, be sme it is set to the “P”
3
position for progressive-scan mode.
NOTE: Some DVD players have an
I/P switch on the back, while others
may allow the user to change the mode
by pressing a button on the DVD play
er’s remote control or by using the
DVD player’s on-screen menu. Also,
some DVD players have dedicated pro
gressive-scan output jacks that are
labeled as such and require no switch
ing by the user. See the user manual for
your DVD player for more information
on placing the player in progressivescan mode.
Press the Source button on the remote
control to access the Source list.
4
Press the Cursor Up or Down button to
select the AV3 input source.
5
Press the OK button to confirm your
choice. The set is now switched to the
6
AV3 input source for the viewing of pro
grams from the DVD player.
Back ofTV
I Source
TV
AYI:None
on: None
AV2:None
m-Mat I
AV4:lione
SIDE:Hone
•MUM
____
igressive-
'VD Player
‘(example only)
1
-----
ET—1
dbCB
To simplify making connections, the con
nectors on audio and video cables are often
color coded to match the colors on TV
jacks.
The names for the component video jacks
may differ depending on the DVD player or
accessory digital source equipment used.
For example, besides Y Pb Pr, you may see
R-Y/B-Y/Y; or Cr Cb Y. Although abbrevia
tions and terms may vary, the letters B and
R stand for the blue and red color compo
nent signal connectors, respectively, and Y
indicates the luminance signal. If necessary,
refer to the user manual for your DVD or
digital accessory for more information.
If you experience difiHculties receiving
sound with a DVD disc, check the sound
settings through the DVD disc’s menu.
O Q ©
0 © ©
© © ©
© © ©
® (a)
V
_
13
Page 14

Connecting an HD Satellite Receiver toY Pb Pr
Using Component Video cables, con
nect the YPbPr jacks on the back of the
1
HD satellite receiver to the correspon
ding AV3 YPbPr jacks on the back of
the TV.
Using Stereo Audio cables, connect the
AUDIO OUT jacks on the back of the
2
HD satellite receiver to the correspon
ding AV3 audio (L and R) jacks on the
back of the TV.
Refer to the user manual for the HD
satellite receiver for information.
3
After completing HD satellite receiver
connections and setup through the on
4
screen setup menus, press the Source
button on the TV remote to access the
Source list.
Press the Cursor Up or Down button to
select the AV3 input source.
5
Press the OK button to confirm your
choice. The set is now switched to the
6
AV3 input source for the viewing of pro
grams from the HD satellite receiver.
Back of TV
I10I0
VtOEOuS^ OSd
s-voEO vZy
▼
AUDIO p,
IT
—
v
^^JviDEO
s-vmo
AUDIO AUDvl
F
©
mwn
mJ
SATEIUTEM
fily)
I Source (§) AV4:WQne
O © ©
© © ©
© © ©
0 0 0
® ® ®
14
Page 15
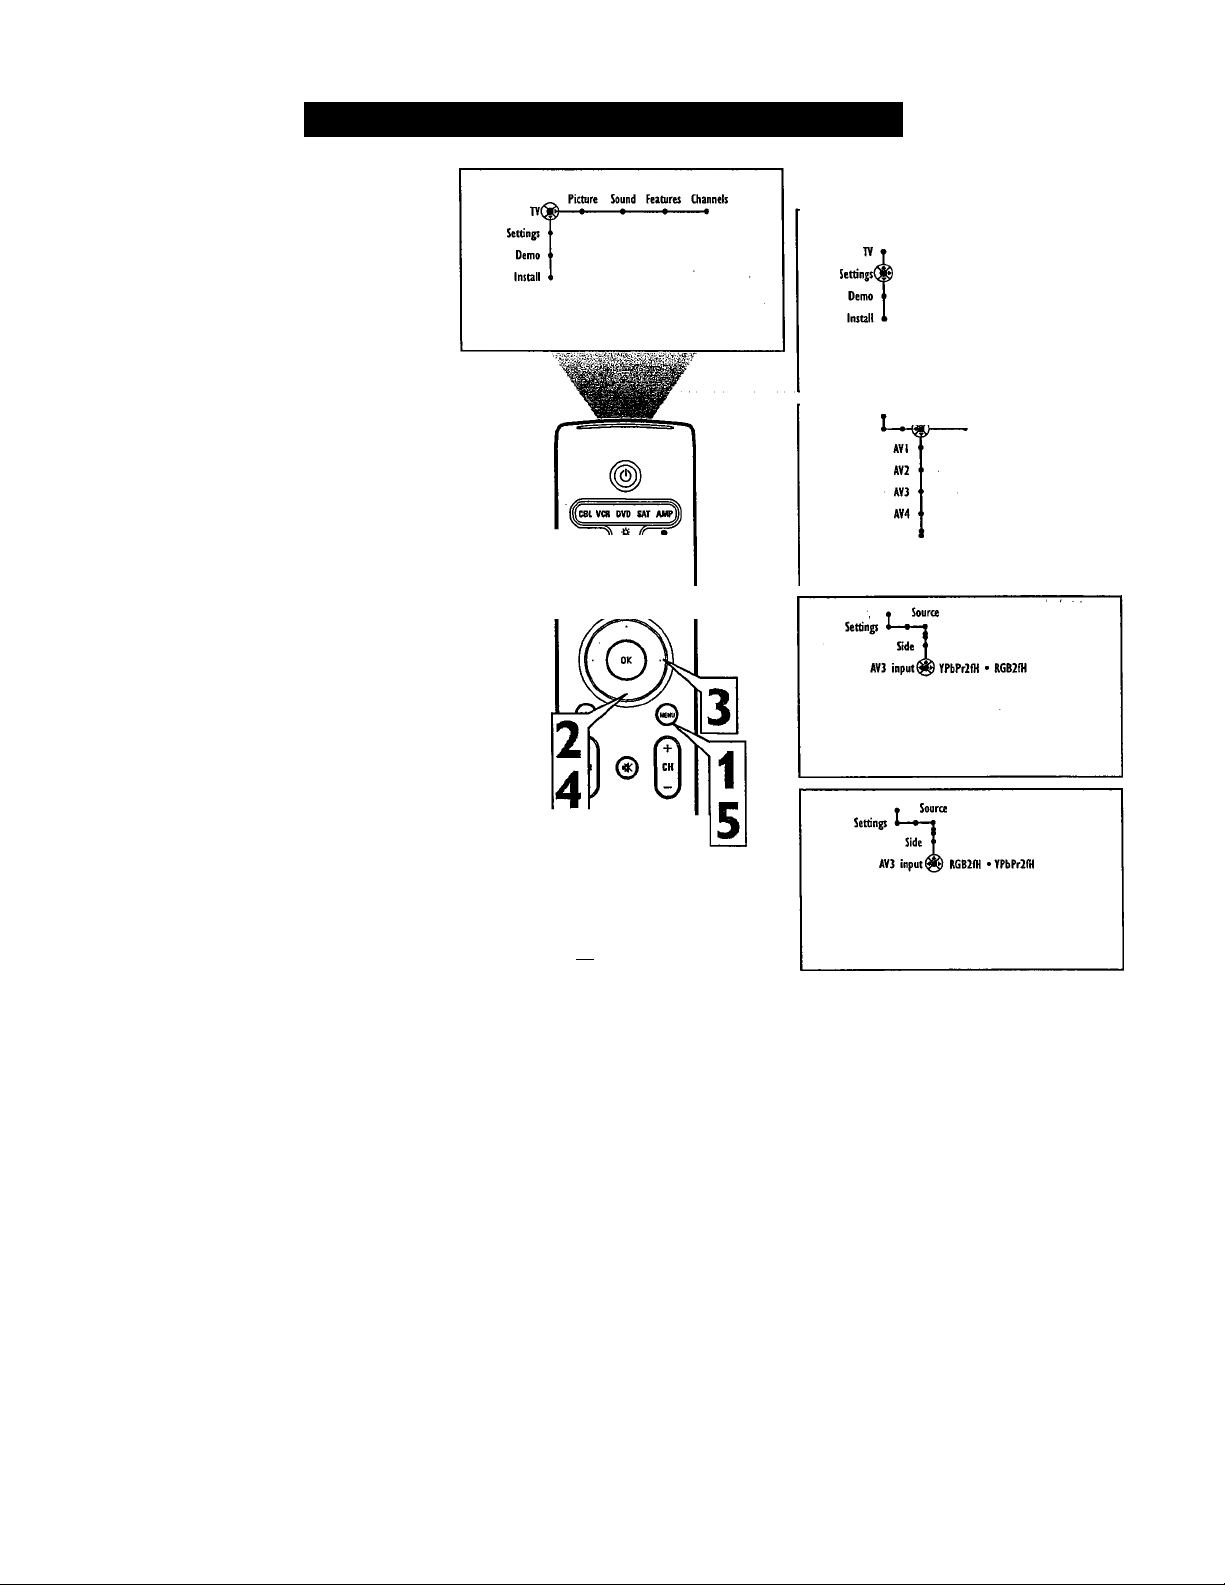
Setting Color Space for HD INPUT-AV 3
Color space refers to how colors are defined
and appear on your TV. The INPUT-AV 3
color space needs to match the output of the
accessory device you have connected to the
output, either YPbPr or RGB. The default set
ting for HD INPUT-AV 3 is YPbPr. Change
the setting to RGB if necessary for your
accessory device.
Press the Menu button on the remote
control to display the on-screen menu.
1
Press the Ciusor Down button to select
“Settings.”
2
Press the Cursor Right button repeated
ly to select the “Source” menu.
3
Press the Cursor Down button repeat
edly until “AV3 input” is selected. The
4
current Color Space setting is high
lighted.
If you need to change the setting, press
the Cursor Right button.
® I PCD
©66®
Settings
General Clock
SMira Converge
Press the Menu button to remove the
on-screen menu from the TV screen.
5
td © ©
© © ©
© © ©
© © ©
(al
15
Page 16

Connecting an HD Satellite Receiver to DVI
Using a DVI cable, connect the DVI
jack on the back of the HD satellite
1
receiver to the corresponding HD
INPUT-AV 4 jack on the back of the
TV.
Using Stereo Audio cables, connect the
AUDIO OUT jacks on the back of the
2
HD satellite receiver to the correspon
ding HD INPUT-AV 4 audio (L and R)
jacks on the back of the TV.
Refer to the user manual for the HD
satellite receiver for information.
3
After completing HD satellite receiver
connections and setup through the on
4
screen setup menus, press the Source
button on the TV remote to access the
Source list.
Press the Cursor Up or Down button to
select the AV4 input source.
5
Press the OK button to confirm your
choice. The set is now switched to the
6
AV4 input source for the viewing of
programs from the HD satellite receiver.
Back ofTV
Because DVI is such new technology, the
electronics industry is still working toward
a single standard. Philips testing has deter
mined that compatibility , issues exist with
respect to a limited number of high-definition receivers when they are connected to
the DVI input on this television. If you
should experience difficulties, please con
tact our Customer Care Center at
1-800-531-0039.
o © ©
© © ©
© © ©
© © ©
16
Page 17

Connecting Surround Sound Equipment
1
2
3
4
6
Using speaker wires, connect the
Center Speaker output terminals
(+, -) on the back of the surround
sound receiver to the corresponding
(+, -) CENTER CHANNEL AMP
terminals on the back of the TV.
Set the CENTER CHANNEL AMP
INPUT switch to EXT. This allows
the TV cabinet speakers to be used
as the center speakers in a surround
sound arrangement.
Using Stereo Audio cables, coimect
the MON OUT L and R jacks on the
back of the TV to the corresponding
TV IN jacks on the back of the
receiver.
Using speaker wires, coimect the R
and L Front Speakers terminals to
the corresponding terminals on the
backs of the front speakers.
Using speaker wires, connect to the
Surround Speakers terminals (+, -)
on the back of the receiver and to the
corresponding terminals (+, -) on the
back of the surround speakers.
Back of TV
Using a Powered Subwoofer
You can coimect a subwoofer to your TV to
get a fuller, deeper sound.
Using an Audio Gable, connect the
1
SUB OUT jack on the back of teh
TV to the Audio INput jack on the
back of a powered subwoofer.
Back of Receiver
(example only)
17
Page 18

Connecting to the Side Inputs:Video Game System
Using the AudioA^ideo cable supplied
with your video game system, connect
1
to the back of the game system and to
the corresponding S-VIDEO and
AUDIO (L and R) jacks in the Side
panel of the TV.
Press the Source button on the TV
remote control to access the Source
2
list.
Press the Cursor Up or Down button to
select the Side input source.
3
Press the OK button to confirm your
choice. The set is now switched to the
Side input source for the viewing of
your video game system.
Panel on
Side of
TV
You can press the Cursor Up or Down but
ton to pan the screen up and down on your
to see excluded parts of the picture. Use this
feature with Super Zoom, Movie Expand
14:9, Movie Expand 16:9, and 16:9
Subtitle. See pages 35-36 for details on
using the Picture Format options.
Left and right panning is possible with the
Side input source when the source has been
labeled “Game.” See page 19 for details on
labeling input sources.
You can label the Side AudioMdeo
input source “Game” if you would like.
See page 19 for details on labeling.
O © ©
© © ©
© © ©
© © ©
dD ®
The side panel is also
convenient for con
necting equipment
such as camcorders or
cameras. If you use
an S-Video connec
tion (the preferred
connection), you must also make an audio
connection (L and R for stereo or L for mono)
to receive sound. The S-Video cable does not
carry a soimd signal.
Camcorder
18
Page 19
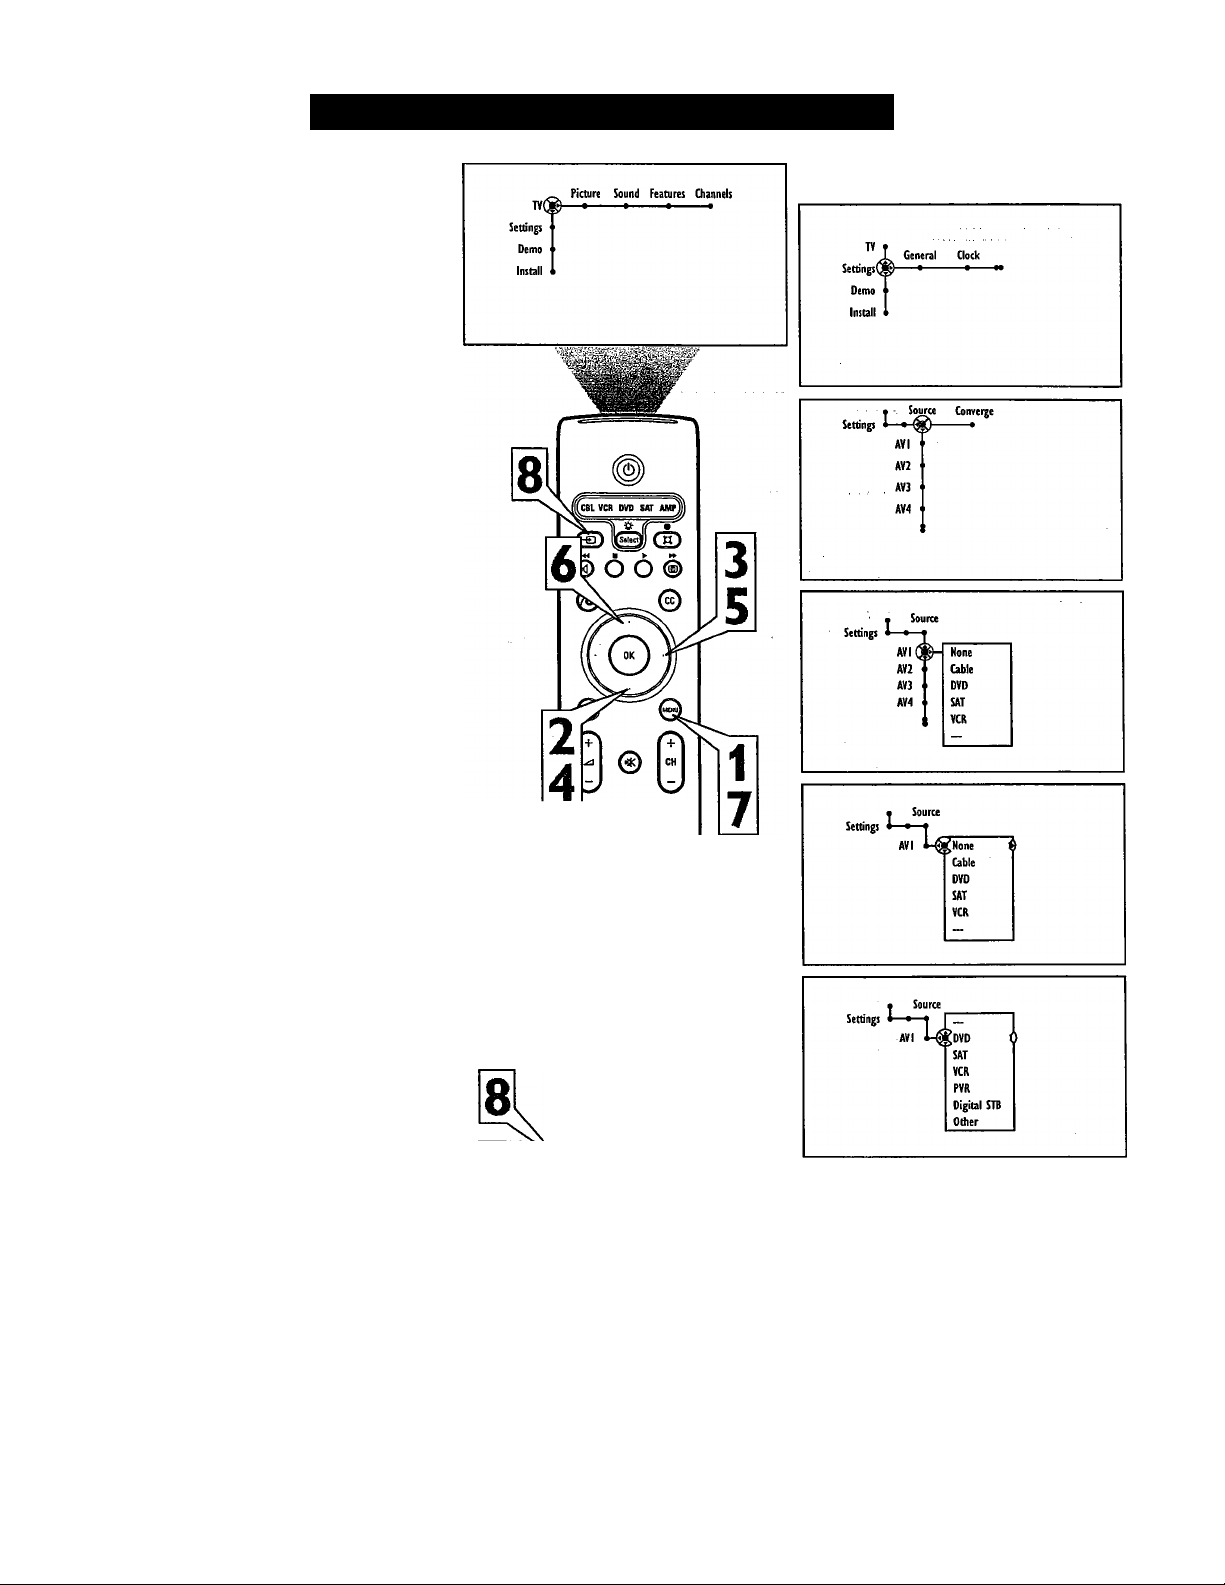
Labeling the Audio/Video Input Sources
You can label all the external AudioA^ideo
input sources—AVI, AV2, AV3, AV4, and
Side—according to the type of accessory
deviee you have connected to each input.
After labeling, you can use the Source button
to cycle through and select your desired
souree.
Press the Menu button on the remote
control to display the on-screen menu.
1
Press the Cursor Down button to select
“Settings.”
2
Press the Cursor Right button repeated
ly to select the “Source” menu.
3
Press the Cursor Down button repeat
edly to select any of the AV Inputs. A
4
list of labels will appear next to the
selected AV input.
Press the Cursor Right button to enter
the list.
5
Press the Cursor Up or Down button to
scroll and select one of the labels in the
6
list.
Press the Menu button on the remote
control to remove the on-screen menu
7
from the TV sereen.
Press the Source button on the remote
control to display the list of AV inputs
8
and their labels.
The CVl source shown in the list when you
press the Source button will have the same
label you apply to AVI.
This is just a sample of what the
labeling might look like. Your
Source Labels will depend on the
options you choose to label the
AV inputs.
© ©
S © ©
© © ©
© © ©
AcinCtrtrol
(H) ®
TV
AVI:DVD
CVI:DVD
AV2:VCR
AV3:DVD
AV4:HD
19
Page 20

Programming the Remote Control
The remote control supplied with your televi
sion will also operate a variety of inffaredcontrolled accessory devices such as cable
boxes, VCRs, DVD players, satellite
receivers, and amplifiers.
The TV remote’s default mode at power up
and after replacing the batteries is TV. You
must press the Select button to switch the
remote to one of the accessory modes—CBL,
VCR, DVD, SAT, or AMP.
Depending on the accessory device you have,
progranuning may not be necessary, because
default codes for certain accessory devices
have already been programmed into the
remote. So before attempting to program, try
this test:
• Press the Select button to cycle through the
accessory modes—CBL, VCR, DVD, SAT,
or AMP. The green light indicates the
selected mode. Two seconds after selection,
the accessory-mode light will begin to
blink. The blinking light means the remote
is in the selected accessory mode.
• Point the remote toward the accessory
device, then press the Standby-On button
to see if the accessory device responds. If
not, follow the steps below to program the
remote. Suggestion; The programming
process is easy, but you may want to read
the following steps first to familiarize
yourself with what you’ll be doing, then go
back through the steps again, reading and
performing them.
Press the Select and Standby-On but
1
tons at the same time, then release.
□ n □
o o o
PHIUPS ...
©
ZH
O 0 O 1
1 :Mi:
U
AMP
SAT
1 ra- 1 G3 QQQ
DVD
--in
1 It' "•!
VCR
: BaBBgQBQQBQ
NOTE: When inputting the digits as
described below, you must not allow
2
more than 20 seconds to pass between
the input of each digit or you will need
to return to step 1 and begin the pro
gramming process again.
Input the appropriate digit provided
below for the type of accessory device
you want to operate:
1 Cable (CBL)
2 VCR
3 DVD
4 Satellite (SAT)
5 Amplifier (AMP).
Input the 4-digit code for the type and
brand of accessory device. The codes
3
are listed on pages 22-23.
20
r©’© ©:
:© © ©:
I© © ©j
©'©1©
In'll Cll^
(m) ® ®
Page 21
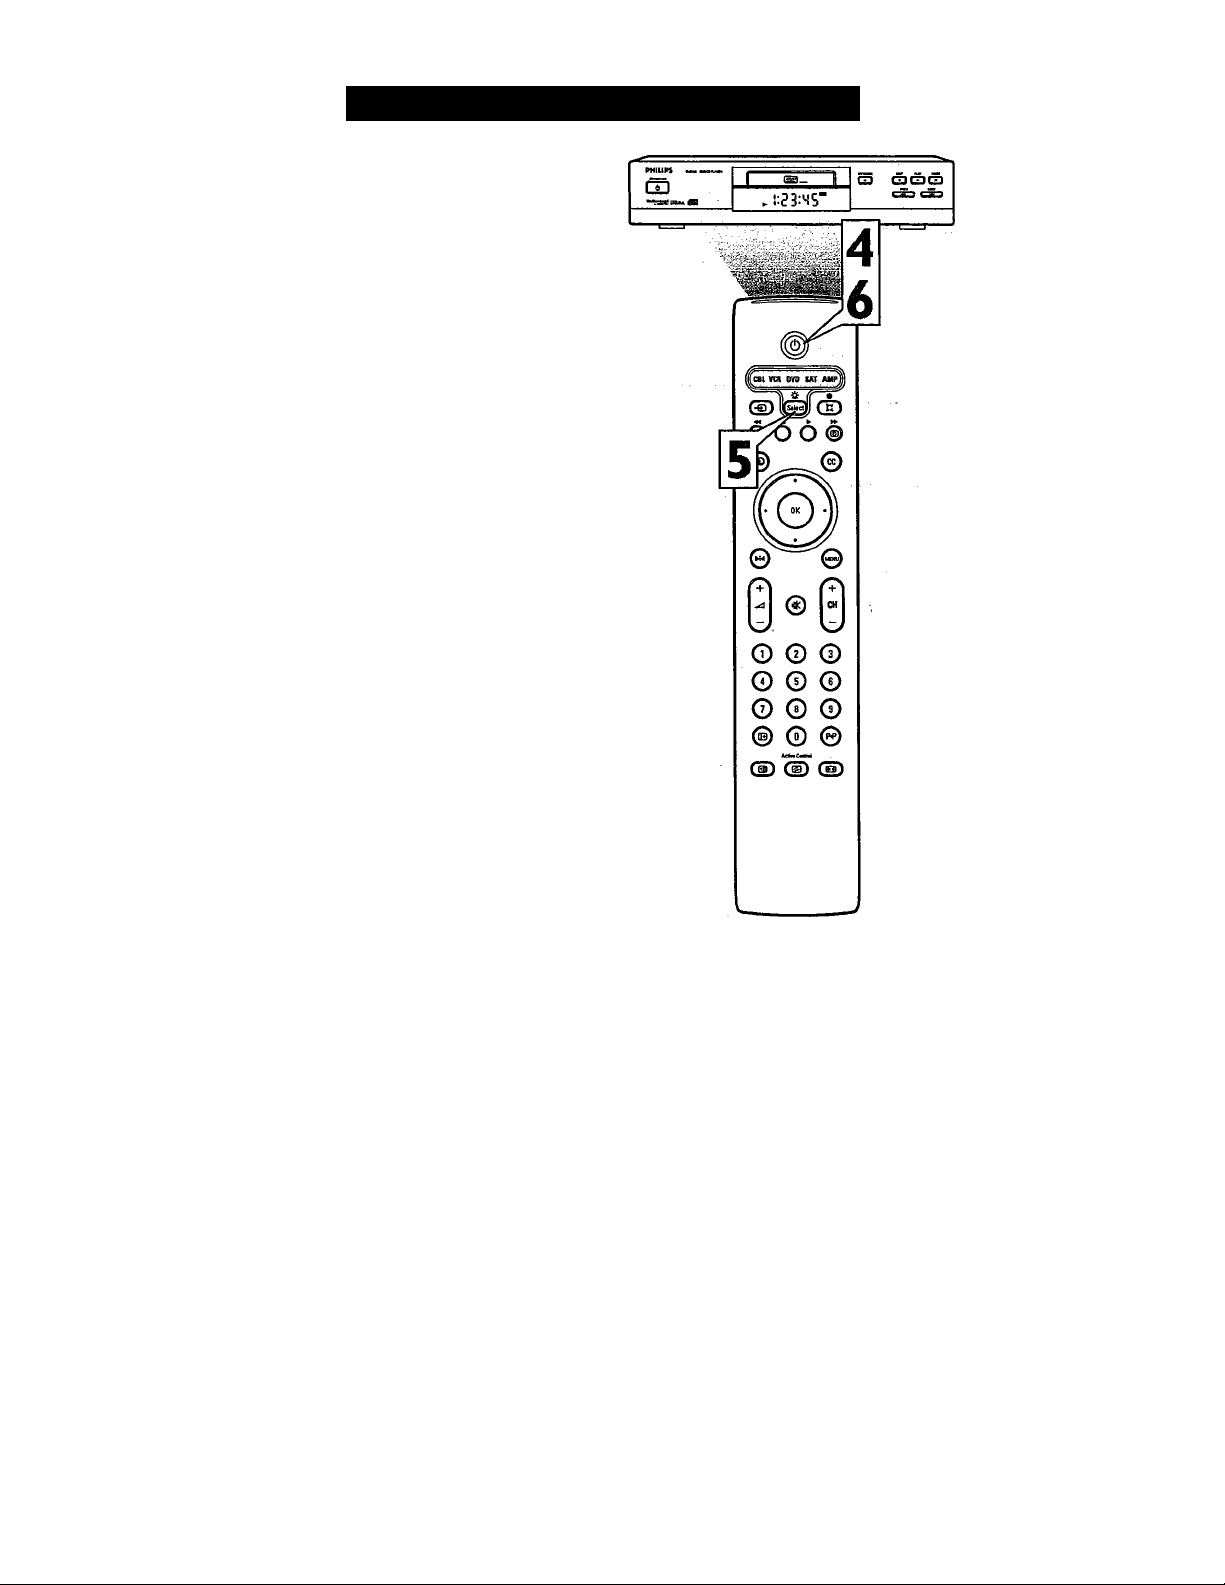
Continued from page 20.
The green light behind the Standby-On
button will blink for 3 seconds to show
4
that a valid code was input. If a valid
code was not entered, the light will
stay on continuously for 3 seconds. If
that occurs, go back to step I and
begin the programming process again.
Now you will try to use the TV remote
with the accessory device.
5
Press the Select button on the remote
to cycle across the accessory mode
dial. Stop pressing the button when the
mode you desire is lighted. The light
will stay on for 2 seconds and then
begin blinking. The blinking means
that the remote is in the accessory
mode you have selected.
Within 60 seconds from the time the
blinking starts, point the remote toward
6
the accessory device and press the
Standby-On button.
Programming the Remote Control
If the device does not respond to the
Standby-On command, follow the
steps for programming the remote
again using a different setup code for
the type and brand of accessory device
you wish to operate. Refer again to the
code list on pages 22-23. If no more
codes are listed for the type and brand
of accessory device, the remote likely
will not operate your particular model
of accessory device. NOTE: Your TV
remote is not necessarily capable of
being programmed to operate all mod
els of the brands of accessory devices
listed on pages 22-23. You may want to
try the programming process again. Try
using the number(s) that are listed for
your type and brand of device to be
sure you did not make a mistake in
inputting the digits during your first
attempt at programming.
If the remote control is in one of the acces
sory modes (a mode light is flashing)—
CBL, VCR, DVD, SAT, AMP—and you
don’t press any of the remote buttons for
sixty seconds, a “time-out” occurs, returning
the remote to TV mode.
You can change the duration of the time-out
mode by simultaneously pressing the Select
button and a digit button, 1-4. Using digit 1
will set the time-out to 15 seconds; digit 2,30
seconds; digit 3, 60 seconds; and digit 4,120
seconds. The default time-out setting after
you replace the batteries in the remote is 60
seconds. All modes will have the same time
out setting.
21
Page 22

Programming the Remote Control; Setup Codes
Carver
.........................................................
Curtis Mathes .............................................0327
GE ..............................................................0105
JVC..............................................................0358
Linn
.............................................................
Magnavox
Marantz
Optimus........................................................0422, 0327
Phiiips
Pioneer........................................................0327
Poik Audio...................................................0296
RCA
Reaiistic
Sony
Soundesign.................................................0105
Victor
Wards..........................................................0105
Yamaha
...................................................
.....................................................
.........................................................
...........................................................
.....................................................
............
.......................................0716,0247
...........................................................
......................................................
0296
0296
0296
0296
0296
0327
0422
0358
0381
Cable Box
ABC..........................................0030, 0034, 0035
Allegro..........................................................0180, 0342
Amplifier
Americast
Archer.................................................0180,0824
BellSouth.....................................................0926
Century........................................................0180
Citizen..........................................................0180, 0342
Comtronics .................................................0067
Contec ........................................................0046
Emerson......................................................0824
Everquest
Focus
Garrard........................................................0180
Gemini ........................................................0042
General Instrument ............................0503, 0837
GoldStar ............................................0067,0171
Goodmind
Hamlin
Hytex...........................................................0034
Jasco
Jerrold
Memorex.....................................................0027
Motorola .....................................................1133
Movie Time
NSC
Oak
Optimus.......................................................0048
Panasonic
Paragon
Philips
Pioneer
Popular Mechanics
Pulsar..........................................................0027
Quasar
RCA
Radio Shack
Recoton.............................................................. . .0427
Regal............................................................0047, 0286
Runco..........................................................0027
SL Marx.......................................................0067
Samsung
Scientific Atlanta
Signal ................................................0042,0067
Sprucer........................................................0048
Starcom........................................................0030, 0042
Stargate.....................................0067,0042, 0824
Starquest.....................................................0042
TV86 ...........................................................0090
...................................................
..........................................
.........................................................
...................................................
........................
.........................................
.........................
..................................................................0837
................................................
...................................
....................................................
............................
.....................................................
.....................................
....................................
.......................................................
...........................................................
..................
.....................................................
0047, 0036, 0286, 0061
0042, 0180, 0342
0030, 0039, 0503, 0042,
; ; . . .................
.0048, 0134, 0027
0180, 0332, 0344
....................................
.......................
0171,0560,0904
0042, 0910, 0342, 0824
0035, 0504, 0904
0926
0042, 0067
0427
0824
0090
0090
0046,0034
0027
0427
0027
0048
0067, 0171
Teleview .....................................................0067
Tocom
.........................................................
Toshiba........................................................0027
Tusa ............................................................0042
Unika...........................................................0180
United Artists...............................................0034
Universal
Viewstar ......................................................0090
Zenith
Zentek
............................................
.......................................
.........................................................
0027, 0552, 0926
0039
0180, 0218
0427
Surround Sound Receiver
ADC
...............................................
Aiwa .......................................................... 0148
Capetronic...................................................0558
Carver ......................................0069,1116,1216
Casio...........................................................0222
Clarinette.....................................................0222
Denon
................................................
Fisher
..........................................................
Garrard........................................................0490
Harman/Kardon...........................................0137
JVC
.............................................................
Kenwood
Lloyd's
MCS
Magnavox
Marantz
Modulaire
Nakamichi
Onkyo..........................................................0162
Optimus
Panasonic
Penney........................................................0222
Philips.............................1116, 1216, 1296, 0418
Pioneer
ProScan......................................................1281
Quasar
RCA
Realistic ......................................................0222
Sansui
Sharp ..........................................................0213
Shen/vood
Sony ........................................1185, 1085, 1285
Sunfire ........................................................1340
Teac
Technics.........................0066, 1335,1545, 1336
Thorens
Victor...........................................................0101
Yamaha.....................................0203,0213,1203
Yorx.............................................................0222
......................
.........................................................
.........................................................
..........................................................
.......................
................................................
....................................
..................................................
...................................................
...........................
....................................................
...................................
.......................................................
........................................
.........................................................
..................................................
...........................................................
.......................................................
1054, 0069, 0213, 1340
0418, 1116, 0558, 1216
........0558
1187,1131
0069
0101
1596, 1597
0222
0066
..................0222
1116,1216,0066
.0222
0124
1050,0213,0558,0069
0066, 1545
0177,0558,1050
0066
1281, 0558, 1050
1116
0529
0490
1216
Satellite Receiver
AlphaStar ....................................................0799
EchoStar ............................................1032, 0802
Expressvu
GE
General Instrument........0388, 0896, 0654
HTS ............................................................0802
Hitachi
Hughes Network Systems
JVC..............................................................0802
Jerrold
Magnavox ..........................................0749, 0751
Memorex.....................................................0751
Next Level
Panasonic
Philips
Primestar......................................................0654, 0388
...................................................
..............................................................
.........................................................
..........................................................
...................................................
...................................................
.....................................
.........................
1103, 0749, 0751
0802
0593
0846
0776
0388, 0654
0896
0728
22
RCA .
...
........................0593, 0170, 0419, 0882
Radio Shack
Samsung
Sony......................................................... 0666
Star Choice............ 0896
Toshiba
Uniden
Zenith .........................................................0883
..............................................
..................................................
............................................
.........................................................
.0776,0817
0896
1136
0751, 0749
VCR
Admiral ..............................................0075,0236
Adventure....................................................0027
Aiko
.............
Aiwa
Akai ............................................................0068
America Action ...........................................0305
American High
Asha........................................................... 0267
Audiovpx .... 0064
Beaumark
Bell &. Howell..............................................0131
Broksonic
CCE
Calix ...........................................................0064
Canon ...
Carver
Cineral
Citizen..........................................................0305, 0064
Colt ............................................................0099
Craig
Curtis Mathes
..................................................................0787
Cybernex
Daewoo
Denon
Dynatech.....................................................0027
Electrohome
Electrophonic............................................. 0064
Emerex
Emerson ........................0211,0029,0236,0305,
. .................................
Fisher
Fuji
Funai......................
GE..........................
Garrard
Go Video
GoldStar ................
Gradiente ..............
Hl-Q
Harley Davidson .
Harman/Kardon ..
Harwood
Hitachi
Hughes Network Systems .
JVC
Jensen
KEC ......................
KLH
Kenwood
Kodak
LXI
Lloyd's....................
Logik
MEI
MGA
MGN Technology........................................0267
MTC
Magnasonic.................................................0305
Magnavox
................................................0305
...
...............................................0027,0064
...........................................
...................................................
...........
.................................................
...
.......................................................
...................
.......................................................
.........................................................
.......................................................
....................
.........................
..................
......................
....................
........................
..................
.......................
....................
........................
......................
........................
..................................................
..................................................
0148, 0211, 0029, 0236, 0506
.............................................;.. .0062
..................................................
0064, 0099, 0074, 0267, 0298
..............
0062, 0068, 0087, 0189
....................................................
..............................................
0148, 0506, 0027, 0064,
. . .0062, 0087, 0075, 0267,
................
................
...............
...........
0062, 0108, 0027, 0066, 0176
0099,0305
.............
0074, 0131
......................
......................
......................
......................
.............
0459, 0553
.............
0064, 0065
......................
......................
......................
.............
0065, 0108
........................0099
. .0069, 0027, 0068
........................
.............
0094, 0068
........................
.............
0064, 0305
........................
. .0068, 0094, 0065
.............
0062, 0064
........................
........................
........................
........................
0070, 0267
0027,0267
0062
0267
0108
0305
0267
0305, 0072
0069
0064
0059
0062
0027
0787
0027
0027
0074
0027
0069
0068
0099
0064
0027
0099
0062
Page 23

Programming the Remote Control: Setup Codes
Magnin
Marantz
Marta
...........................................................
Matsushita....................................................0062, 0189
Memorex
......................................
.....................................
Minolta ........................................................0069
Mitsubishi
Motorola .............................................0062, 0075
Multitech
NEC...............................0065, 0068, 0094, 0131
Nikko
...........................................................
Noblex
Olympus
Optimus........................0189, 1189, 0075, 0064,
..........................................................0131, 0459
Orion
Panasonic
Penney................0062, 0267, 0064, 0069, 0065
Pentax
Philco
Philips ......................................0108, 0062, 0645
Pilot..............................................................0064
Pioneer........................................................0094
Polk Audio
Profitronic
ProScan
Protec..........................................................0099
Pulsar
Quasar................................... .0062, 0189,1189
RCA .............................0087, 0176, 0069, 0062,
...............................................0075, 0267, 0787
Radio Shack................................................0027
Radix
Randex........................................................0064
VCR (continued)
.........................................................
........................................................
.........................
.................................
............................................
.........................................................
.....................................................
.............................
....................
.........................................................
......................................
...................................................
...................................................
.......................................................
..........................................................
...........................................................
0131,0074,0506,0027
0064,0075, 0062, 0267
0066, 0189, 0236, 1189
0070, 0075, 0094
0027, 0099
0506, 0029, 0211, 0236
0062, 0189, 1189, 0643
0062, 0236, 0506
0267
0108, 0062
0064
0064
0267
0062
0069
0108
0267
0087, 0787
0066
0064
Realistic
.......................
.........................................................
ReplayTV
Runco..........................................................0066
STS
Samsung............................................ 0072, 0267
Sanky
Sansui .. .0068, 0506, 0027, 0094, 0236, 0298
Sanyo .......................................0074,0131,0267
Scott...............................0211,0148, 0070, 0072
Sears
Semp ..........................................................0072
Sharp .........................................................0075
Shintom
Shogun........................................................0267
Singer..........................................................0099
Sony
Sylvania
Symphonic
TMK ............................................................0267
Tatung
Teac
Technics
Teknika ....................................0027, 0062, 0064
Thomas
Tivo.................................................... 0645,0663
Toshiba
Totevision
Unitech .......................................................0267
Vector
Vector Research
Video Concepts...........................................0072
Videosonic...................................................0267
Wards.......................................0062, 0087, 0027, 0074,
White Westinghouse
.....................................................
.............................................................
................................................
.......................................
.........................................................
.......................................................
..............................
...........................
.................................................
.........................................................
..................................................
............................................
.......................................................
.............................................
..........................................
..........................................................
........................
............................................
0027, 0131, 0074, 0075,
0059, 0027, 0062, 0063
0062,0108,0027,0070
........................................
...........0267, 0069, 0075, 0099
...............
0064, 0062
0641, 0643
0069
0066,0075
0064, 0069, 0027, 0062,
0074, 0131
0099
0027
0068
0027,0068
0062, 0189
0027
0072,0070
0064, 0267
0072
0065
0108, 0176, 0787
0099, 0305, 0236
XR-1000 ..................................0Ó99, 0027, 0062
Yamaha...............................................0065
Zenith............................0066, 0027, 0236, ÓS06
Digital Video Disc (DVD)
Apex....................................................0699
Denon
.................................................
Fisher..................................................0697
GE ..............................................................0549
Hitachi ..........................................................0691
Hiteker ........................................................0699
JVC . ..................................................0650, 0585
Kenwood.............................................0709, 0561
Konka
...........................
Magnavox .........................................0530, 0702
Marantz
..............................................
Mitsubishi ................................................. 0548
Onkyo..........................................................0530
Optimus 0598
Oritron
.........................................................
Panasonic
Philips
Pioneer ...................................0598, 0552, 0659
Prosean
RCA
Samsung ;
Sharp ..........................................................0657
Sony............................................................0560
Technics .....................................................0517
Theta Digita.................................................0598
Toshiba........................................................0530
Yamaha
Zenith
.............. ...........................
.................................................
...............
.......................................
...................................................
..............................................
................................................
0746, 0738, 0747, 0748
.......................................
..........
0517
0566
0678
0517, 0659
0566, 0530
0549
0549, 0598
0600
0517, 0572
0618,0530
23
Page 24

Operating Accessory Devices with the TV Remote
After having programmed your TV remote,
use the illustrations on pages 25-26 as a refer
ence to the functions of the remote buttons
with accessory devices.
Before the remote will operate an accessory
device, you must select the correct mode:
CBL (cable box), VCR, DVD, SAT (satellite),
or AMP (amplifier). Here’s how;
Press the Select button to cycle across
the accessory mode dial. Stop pressing
1
the button when the mode you desire is
lighted. The light will stay on for two
seconds and then begin blinking. The
blinking means that the remote is in the
accessory mode you have selected.
NOTE; If you do not use the remote
for 60 seconds from the time the acces
sory mode light begins blinking, the
light will switch off, and the TV will
go back to TV mode. Each time you
press any of the remote buttons when
an accessory mode light is blinking, a
timer is reset to keep the remote in the
accessory mode you have selected.
Point the front of the remote toward
the front of the accessory device, then
2
press the button to perform the desired
function.
Point the front of the remote
toward the front of the
accessory device, then press
the necessary buttons to per
form the ftmctions you
desire. Refer to pages 25-26
to see the functions of the
buttons in the respective
accessory modes.
To backlight the
remote control but- ^==
tons, press and hold ((Select
the Select button for
two seconds. If you do not press
any remote buttons for five sec
onds, the backlight switches off.
Each time you press a remote but
ton while the backlight is on, the
five-second time-out function is
reset. After the backlight switches
off, you must press and hold the
Select button for two seconds to
turn it back on.
If the remote control is in one of the accesso
ry modes (mode light flashing)—CBL, VCR,
DVD, SAT, AMP—and you don’t press any
of the remote buttons for sixty seconds, a
“time-out” occurs, returning the remote to TV
mode.
You can change the duration of the time-out
mode by simultaneously pressing the Select
button and a digit button, 1-4. Using digit 1
will set the time-out to 15 seconds; digit 2,30
seconds; digit 3, 60 seconds; and digit 4,120
seconds. The default time-out setting after
you replace the batteries in the remote is 60
seconds. All modes will have the same time
out setting.
24
Page 25
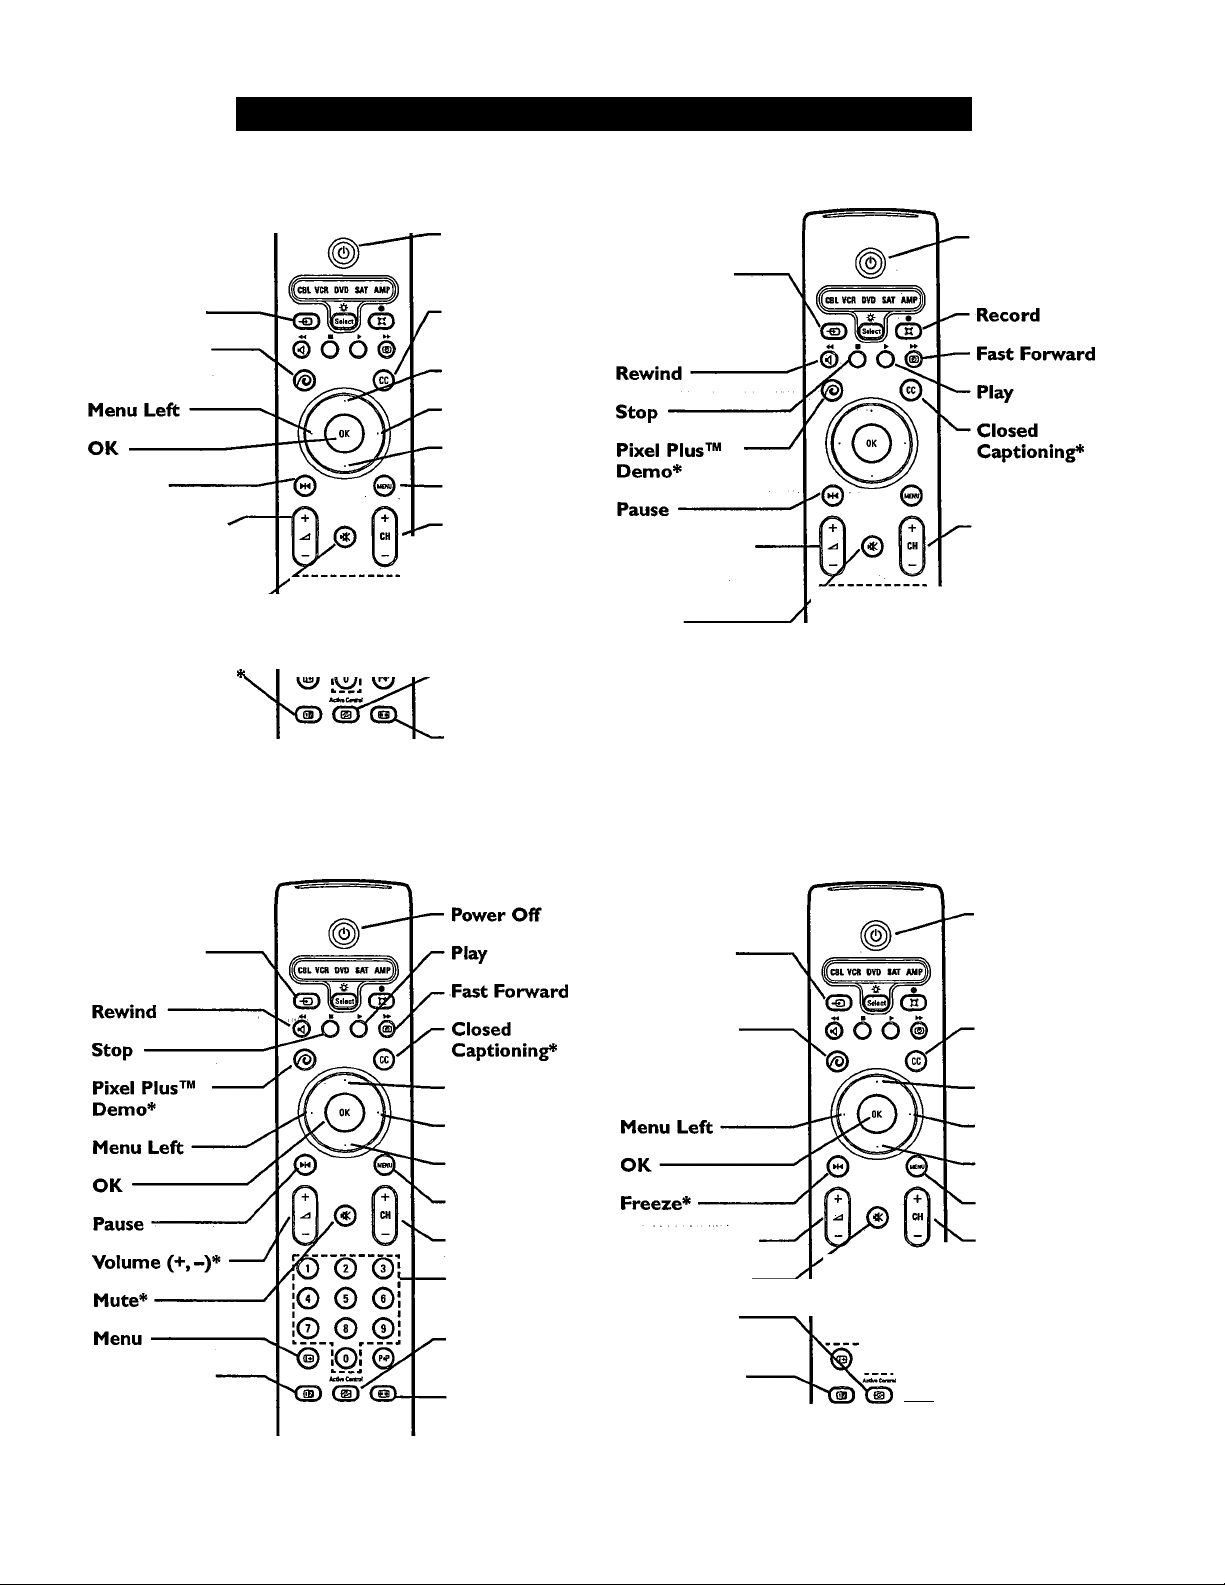
Operating Accessory Devices with the TV Remote
Go to Ch 4*
Pixel Plus™
Demo*
Freeze*
Volume (+, -)*
Mute*
Dual Screen/PIP
CBL (Cable) Mode
¡0 0 0i
|0 © ©j
¡0 © 0] .
i/T\i /TSf
Power Off
Closed
Captioning*
Menu Up
Menu Right
Menu Down
Menu
Channel (+, -)
Digits (Numbers)
Previous Channel
Active
Control™ Plus+*
Picture Format*
Go To VCR
Input*
Volume (+, -)*
Mute*
Dual Screen/
PIP*
VCR Mode
^0 © ©|-
j© 0 ©j
[©_©©]
® [©■ ^
AefctC»w»l
(Dab)'
Power Off
Channel (+,-)
Digits (Numbers)
Active
Control™ Plus+*
Picture Format*
♦Point remote at TV when using this button.
DVD Mode
Go To DVD
Input*
Dual Screen/
PIP*
Menu Up
Menu Right
Menu Down
Disc Menu
Channel (+, -)
Digits
(Numbers)
Active
Control ™ Plus+*
Picture Format*
♦Point remote at TV when using this button.
SAT Mode
Go to Ch 4*
Pixel Plus™
Demo*
Volume (+, -)*
Mute*
Active
Control™*
Dual Screen/
PIP*
!© © ©L
I© © ©I
I© © ©]
¡0] 0’'
Cm\'
Power Off
Closed
Captioning*
Menu Up
Menu Right
Menu Down
Menu
Channel (+, -)
Digits
(Numbers)
Previous Channel
Picture Format*
♦Point remote at TV when using this button.
♦Point remote at TV when using this button.
25
Page 26
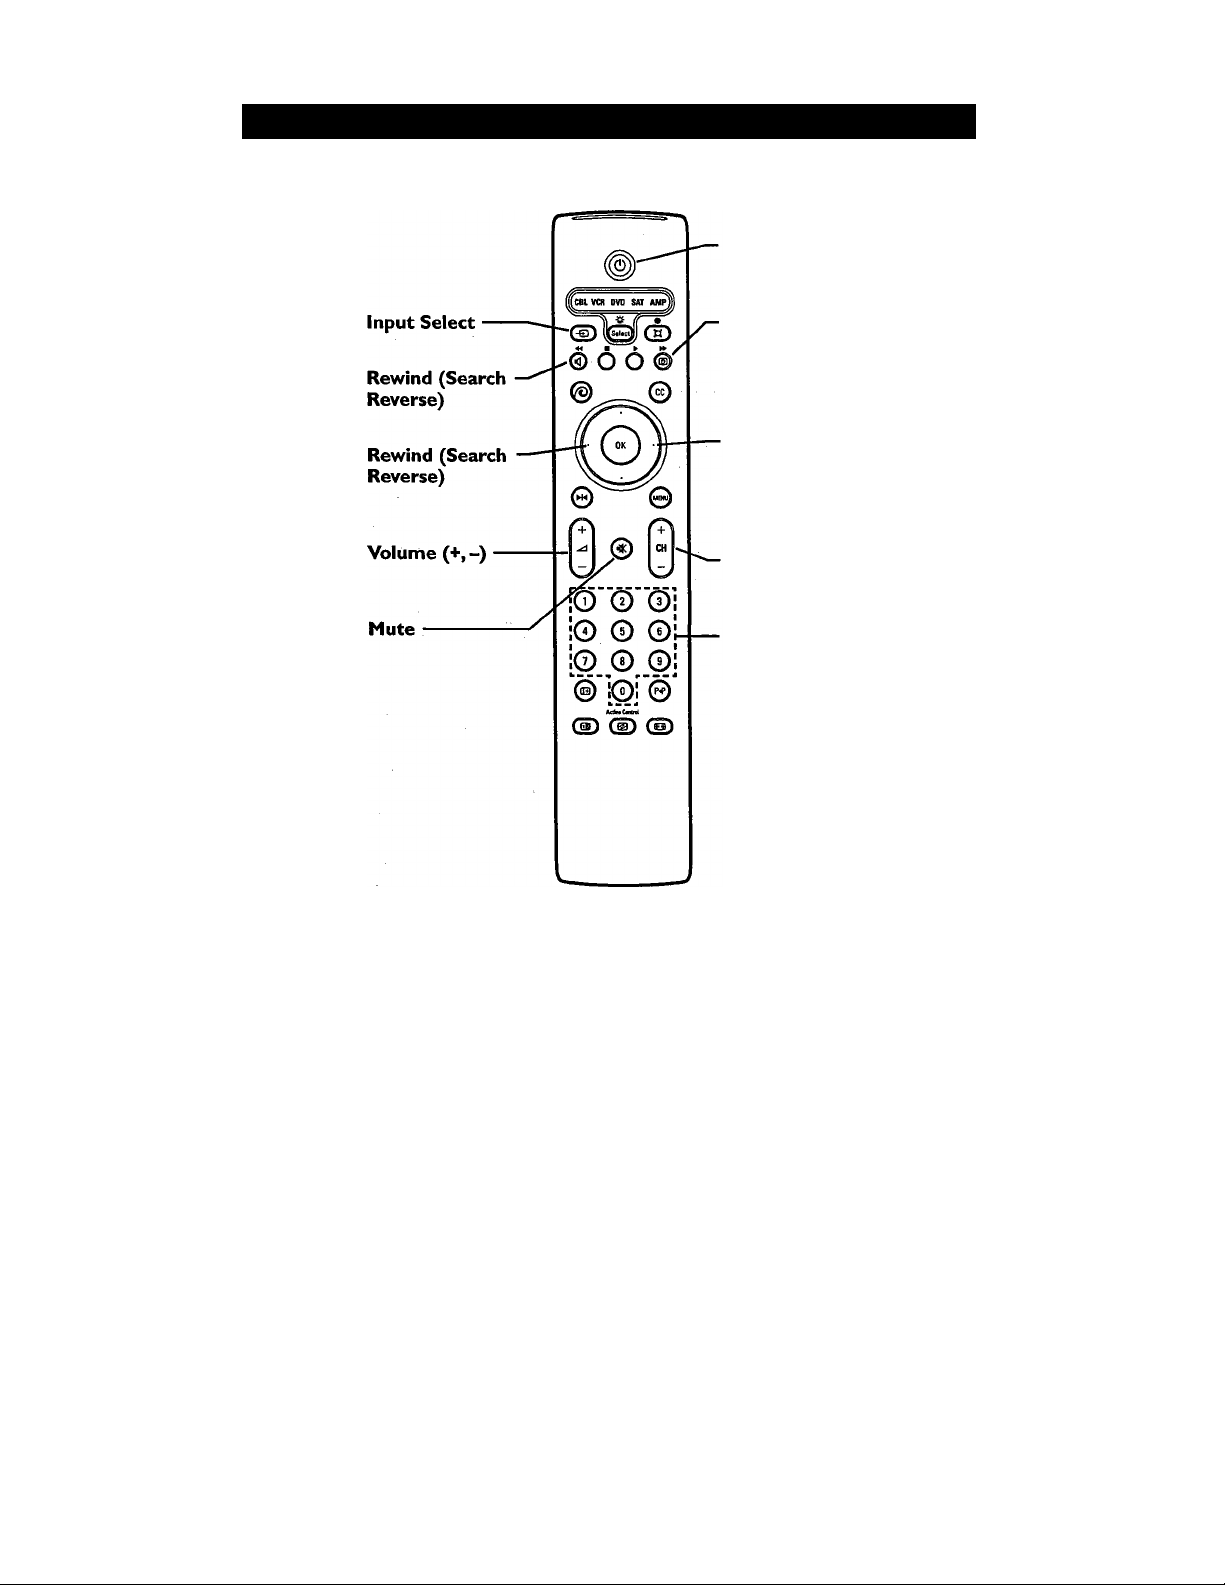
Operating Accessory Devices with the TV Remote
AMP mode
Power Off
Fast Forward
(Search
Forward)
Fast Forward
(Search
Forward)
Channel (+, -)
- Digit (Numbers)
26
Page 27
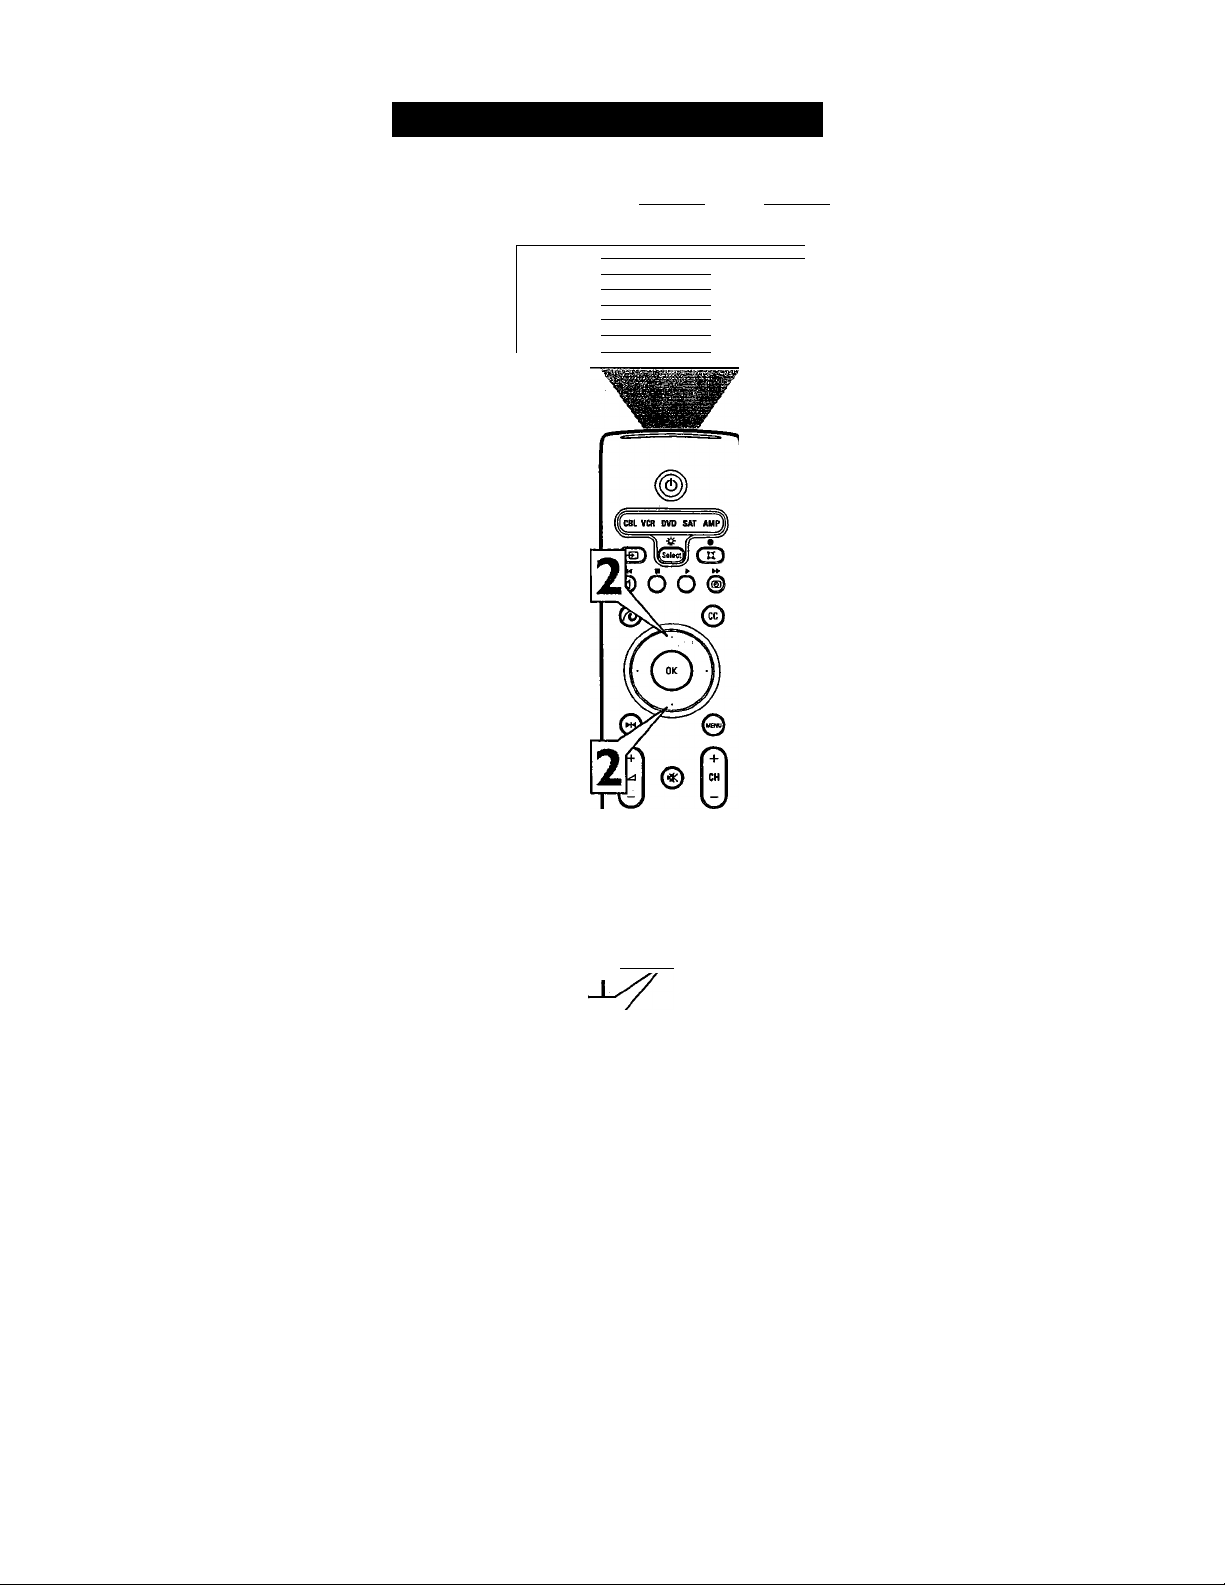
Active Control™ PIus+ monitors incoming
video signals from the Tuner, AVI, AV2, and
Side inputs and adjusts key picture settings
for best picture quality. In addition to measur
ing picture noise, this feature uses an ambient
light sensor (located on the front of the TV)
to adjust the picture settings according to
viewing conditions in the room. When you
choose to turn Active Control™ Plus+ on,
you have the options Minimum, Medium, or
Maximum. Maximum is the recommended
option.
NOTE: Active Control™ Plus is disabled
with the AV3 and AV4 input sources.
Press the Active Control™ button on
the remote control to display the
1
“Active Control” menu.
Press the Cursor Up or Down button to
select one of the options: “Minimum,”
2
“Medium,” “Maximum,” or “Off.”.
NOTE: The Active Control™ values
shown in the information window will
based on the current AutoPicture™ set
ting: Personal, Rich, Natural, Soft,
Multimedia, or Eco.
Using Active Control™ Plus+
Active Control
Contrast
Dynamic contrast
Color
Sharpness
DNR
Hotion
Tint
Active picture Active display
0 =
0=
0 )
0
----------
=>
0=
0=>
0- >
=> 0«
0 15
052
0 20
004
0 44
03i
Press the Active Control button to
remove the on-screen menu from the
3
TV screen.
Active Control™ Plus-t- Settings
Minimum—Sharpness, Dynamic Contrast,
and Noise Reduction are controlled auto
matically.
Medium—Sharpness, Color, Dynamic
Contrast, and Noise Reduction are con
trolled automatically.
Maximum—Sharpness, Color, Contrast,
Dynamic Contrast, and Noise Reduction are
controlled automatically.
O © ©
© © ©
© © ©
© © ©
ActaCand
fm) Cot
1
3
X
27
Page 28
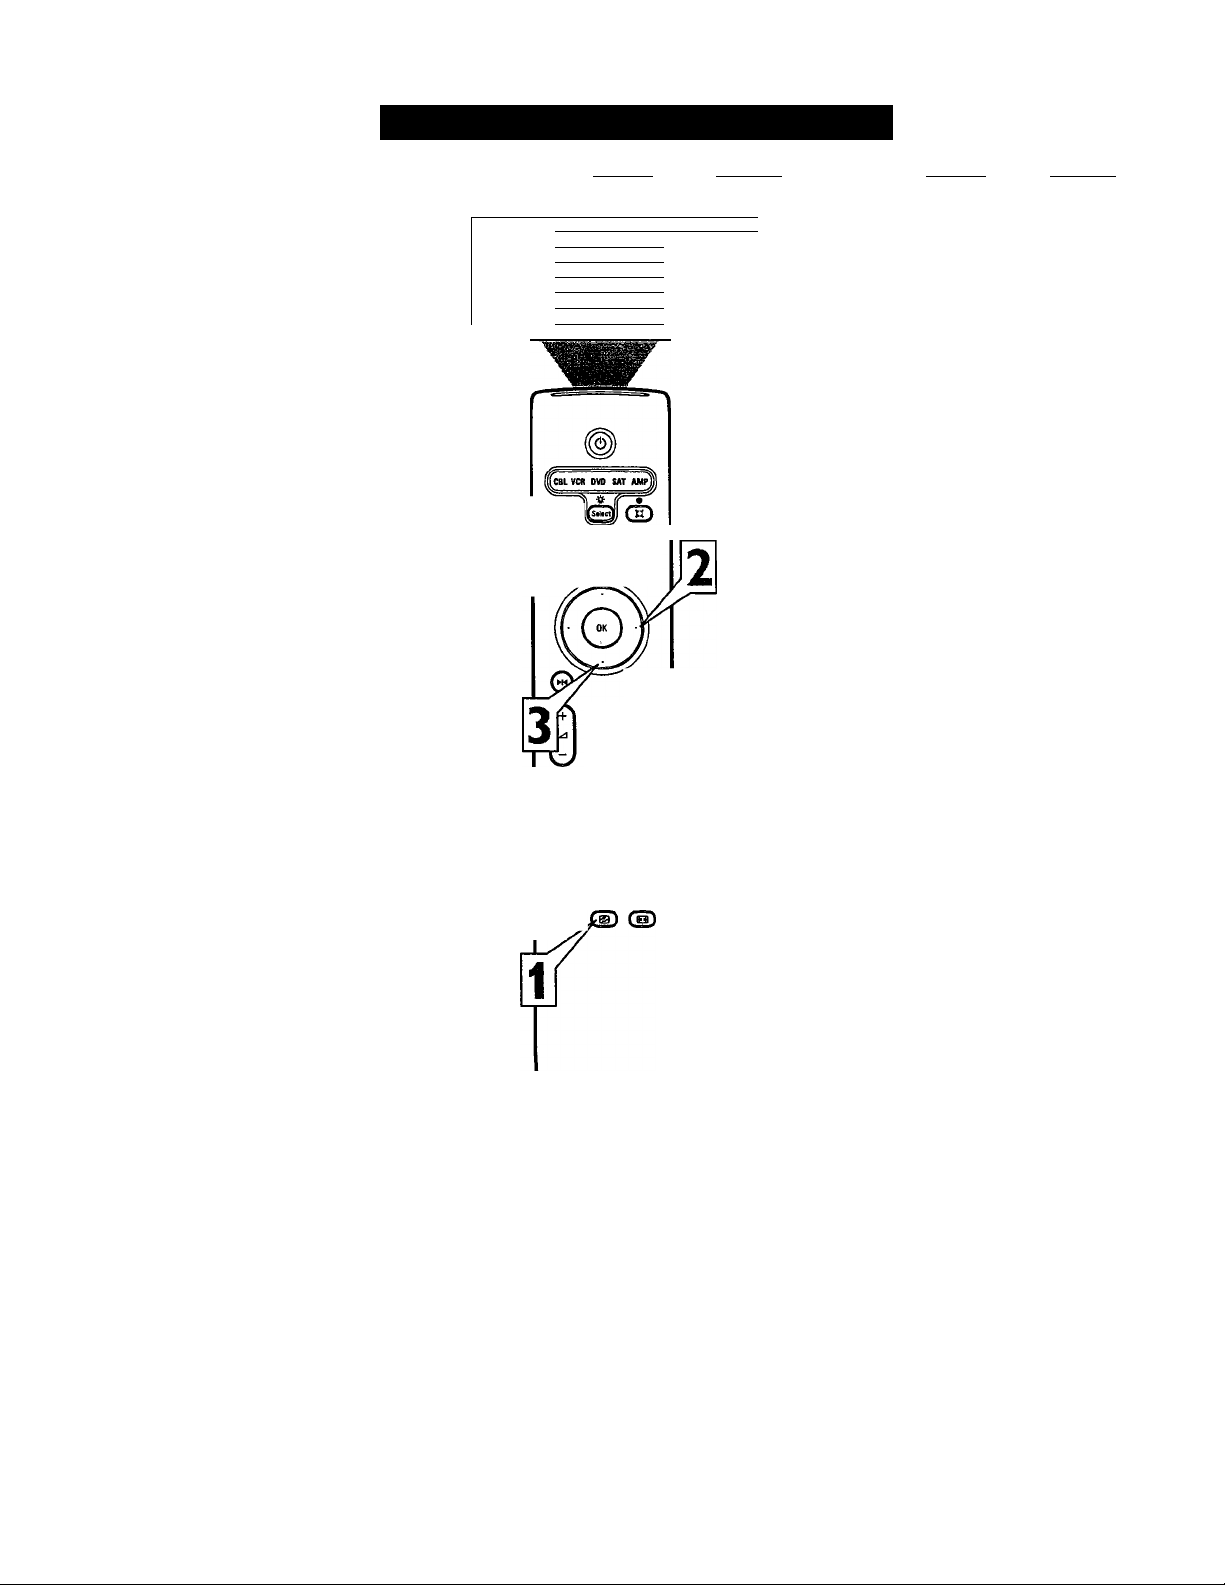
Selecting an AutoPicture™ Option
Whether you’re watching a movie or playing
a video game, yom TV has automatic video
control settings to match your current pro
gram source or content. AutoPicture™ quick
ly resets your TV’s video controls for a num
ber of different types of programs and view
ing conditions that you may have in your
home. The Personal AutoPicture™ settings
are the same as the Picture control adjust
ments made within the on-screen menu.
Press the Active Control™ button on
the remote control to display the
1
“Active Control” menu.
Press the Cursor Right button to select
Auto picture
2
Press the Cursor Down button to select
one of the AutoPicture™ options:
3
“Personal,” “Rich,” “Natural,” “Soft,”
“Multimedia,” or “Eco.”
Press the Menu button to remove the
on-screen menu from the TV screen.
4
NOTE: You can also adjust the Auto picture
in the on-screen menu.
•Press Menu to display the
menu.
•Then use the cursor buttons to
navigate to “Picture,” and “Auto
picture.”
•Use the Cursor Up and Down
buttons to select “Personal,”
“Rich,” “Natural,” “Soft,”
“Multimedia,” or “Eco.”
Active Control
Contrast
Dynamic contrast
Color
Sharpness
DNR
Motion
Tînt
Auto picture Active display
0 =
Ct=)
0 • >
0
................. =>
0==>
0
Œ) I
© Ô Ô ©
®ü)4
o © ©
© © ©
© © ©
© © ©
ActaCMil
(ffl)
=> 06Î
015
036
052
020
004
044
Active Control
Contrast 4^
Dynamic contrast
Color
Sharpness
DKR
Notion
Tint J
AutoPicture™ Options
Personal settings are based on your
personal choice or viewer control pref
erences.
Rich emphasizes very vibrant colors, a
good choice when used in a brightly
lighted room.)
Natural sets picture controls at
midlevel settings for consistent view
ing conditions.
Soft emphasizes warm colors, a good
choice for dimly lighted room. It gives
a cinema-like effect when the light is
switched off.
NOTE: This option can also be used
with the Pixel Plus™ control to soften
the appearance of harsh screen ele
ments. See page 31 for information
about Pixel Plus™.
Multimedia emphasizes soft colors, a
good choice for playing computer
games, for example.
ECO reduces brightness and contrast
settings to low levels as a power con
sumption saving measure.
Auto picture Active display
/0=
/ £
0=
0=
Oii
OIS
03<
052
020
004
044
To view the picture without the menu bars,
go to Active Display and select “Off.”
28
Page 29
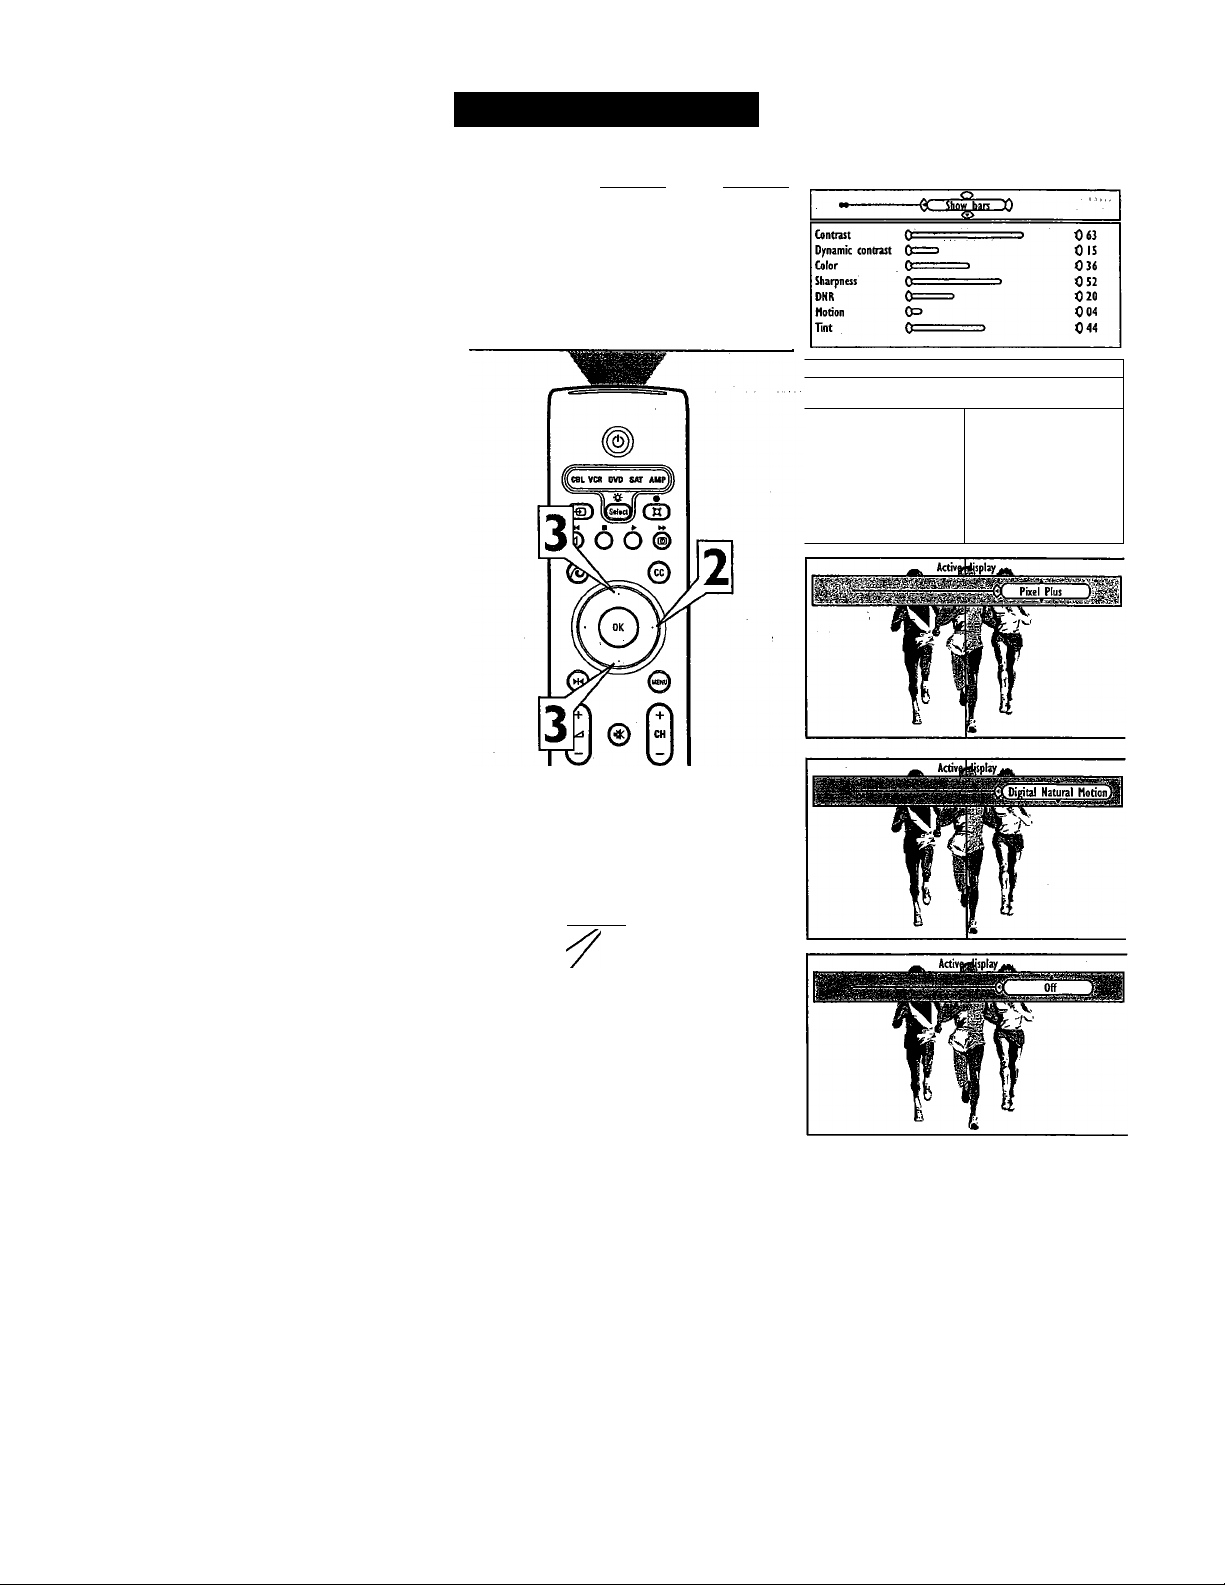
Using Active Display
Use Active display to turn off the Active con
trol Bars as well as view a sample of various
display options.
Press the Active Control™ button on
the remote control twice to display the
1
“Active Control” menu.
Press the Cursor Right button to select
Active Display
2
Press the Cursor Down button to select
“Show Bars,” as well as a sample
3
screen for “Dynamic Contrast,” “Pixel
Plus,” or “Digital Natural Motion.”
The last option is “Off,” which applies
to the bars in the Active Control and
Auto Picture displays. To turn the bars
back on, select “Show bars.”
After selecting “Dynamic Contrast,”
“Pixel Plus,” or “Digital Natural
Motion” the menu will disappear and
the screen will display a sample where
one side has the feature turned off and
the other has the feature turned on.
Press Cmsor Up or Down to active the
menu
Press the Menu button to remove the
on-screen menu from the TV screen.
5
Active Control
cc
Contrast
Dynamic contrast
Color
Sharpness
DNR
Motion
Tint
Active picture
0=>
0=
o © ©
© © ©
© © ©
© © ©
(W) CS)
Active display
063
CIS
036
052
020
004
044
Active display
^ Activottosolav 1*.
Conlrasl
№
1 IT
V
X
1
4
29
Page 30
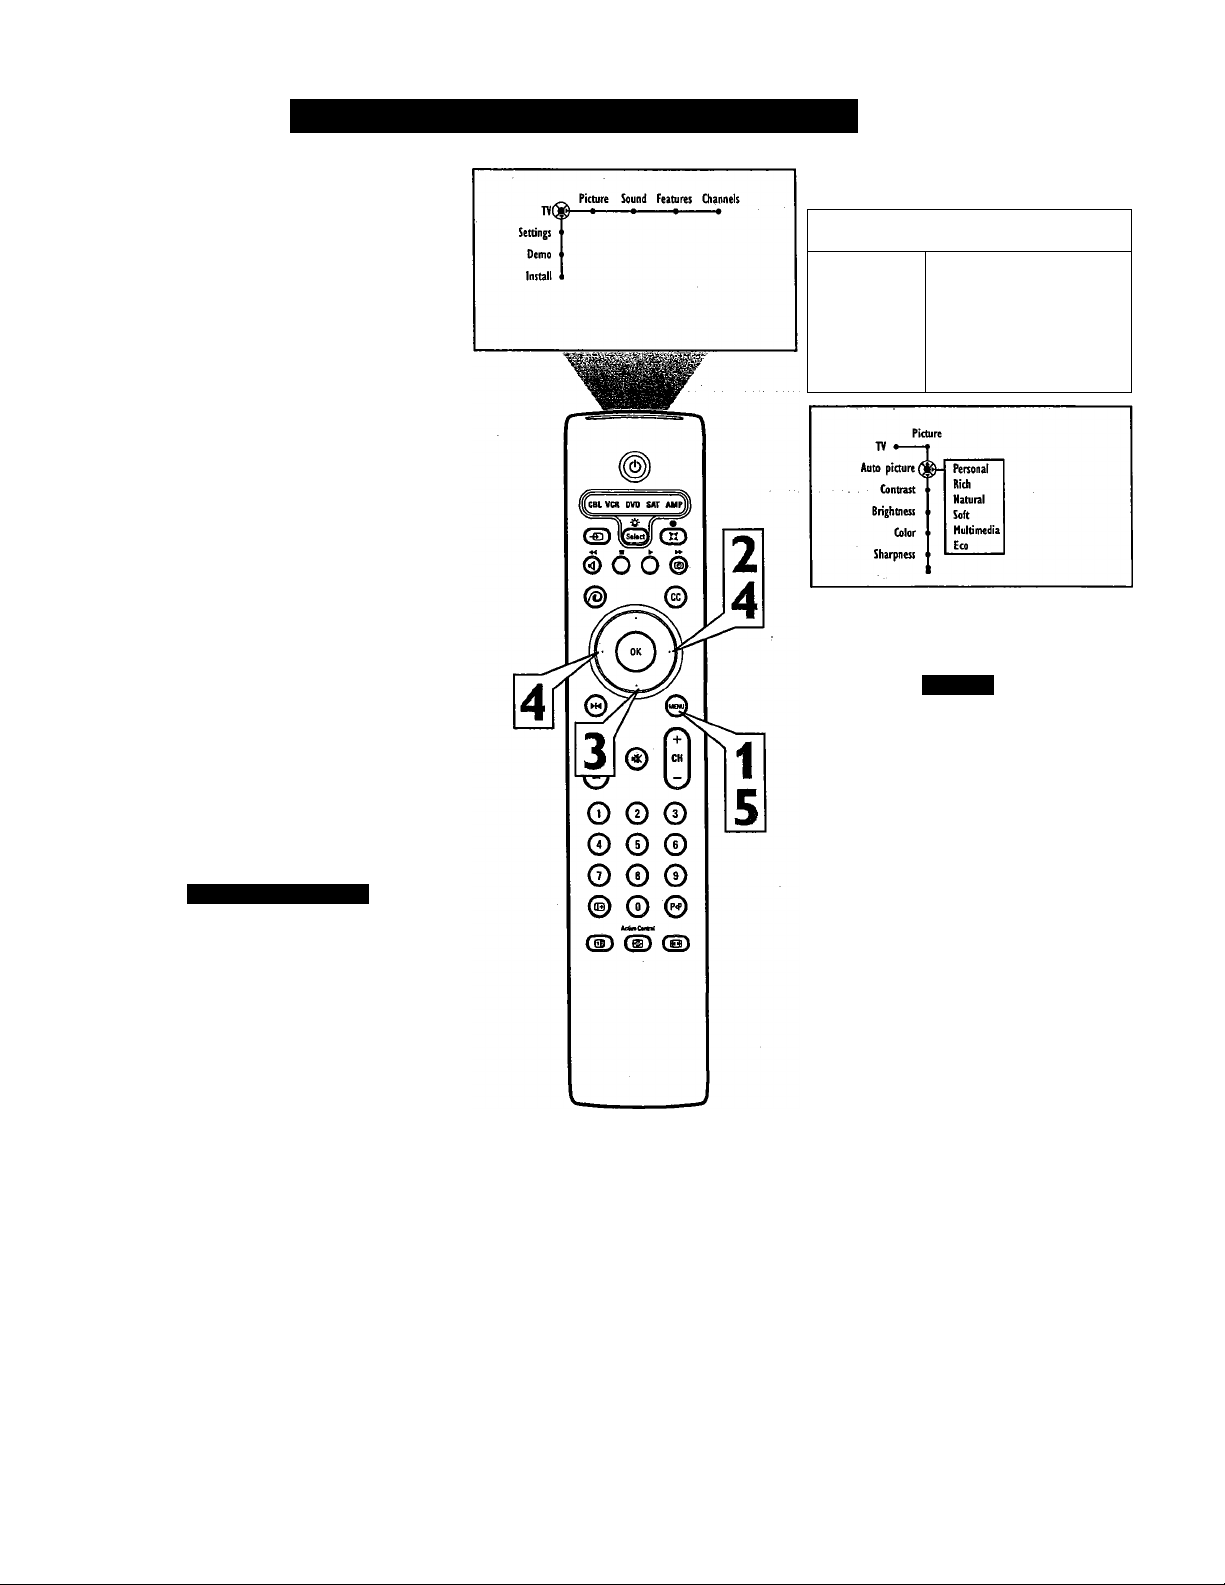
Adjusting/Setting the Picture Controls
To adjust your TV picture controls, select a chan
nel and follow these steps.
Press the Menu button on the remote con
trol to show the on-screen menu.
1
Press the Cursor Right button to select
‘Ticture.”
2
Press the Cursor Down button to select
one of the picture adjustments: “Auto pic
3
ture,” “Contrast,” “Brightness,” “Color,”
“Sharpness,” “Color temperature,”
“Digital processing,” “Dynamic contrast,”
“DNR,” “Color enhancement,” “Tint,”
and “Picture format.” Descriptions for
some of these options are provided below.
Pages that follow contain details about the
other Picture menu options.
If the menu item has a sublist of items,
press the Cursor Right button to enter the
sublist, then press the Cursor Up or Down
button to select the item.
If the item has a bar scale, press the
Cursor Right or Left button to adjust.
Press the Menu button to remove the on
screen menu from the TV screen.
5
TV Contrast
Brightness
Color
Sharpness
ito picture 4Auto
Contrast
Brightness
Color
Sharpness
yre Sound Features Channels
p ■ • •
Picture
The tint control will not be available for
adjustment when the TV is tuned to the
AV3 or AV4 input sources.
Picture Control Settings
Contrast adjusts the difference in bright
ness between the light and dark portions of
the picture.
Brightness adds or subtracts light from the
darkest part of the picture.
Color adds or eliminates color.
Sharpness improves the detail in the pic
ture.
Tint adjusts the picture to obtain natural
skin tones.
Color temperature offers “Normal,”
“Cool,” or “Warm” picture preferences.
Normal keeps whites, white.
Cool makes whites, bluish.
Warm makes whites, reddish.
30
Page 31
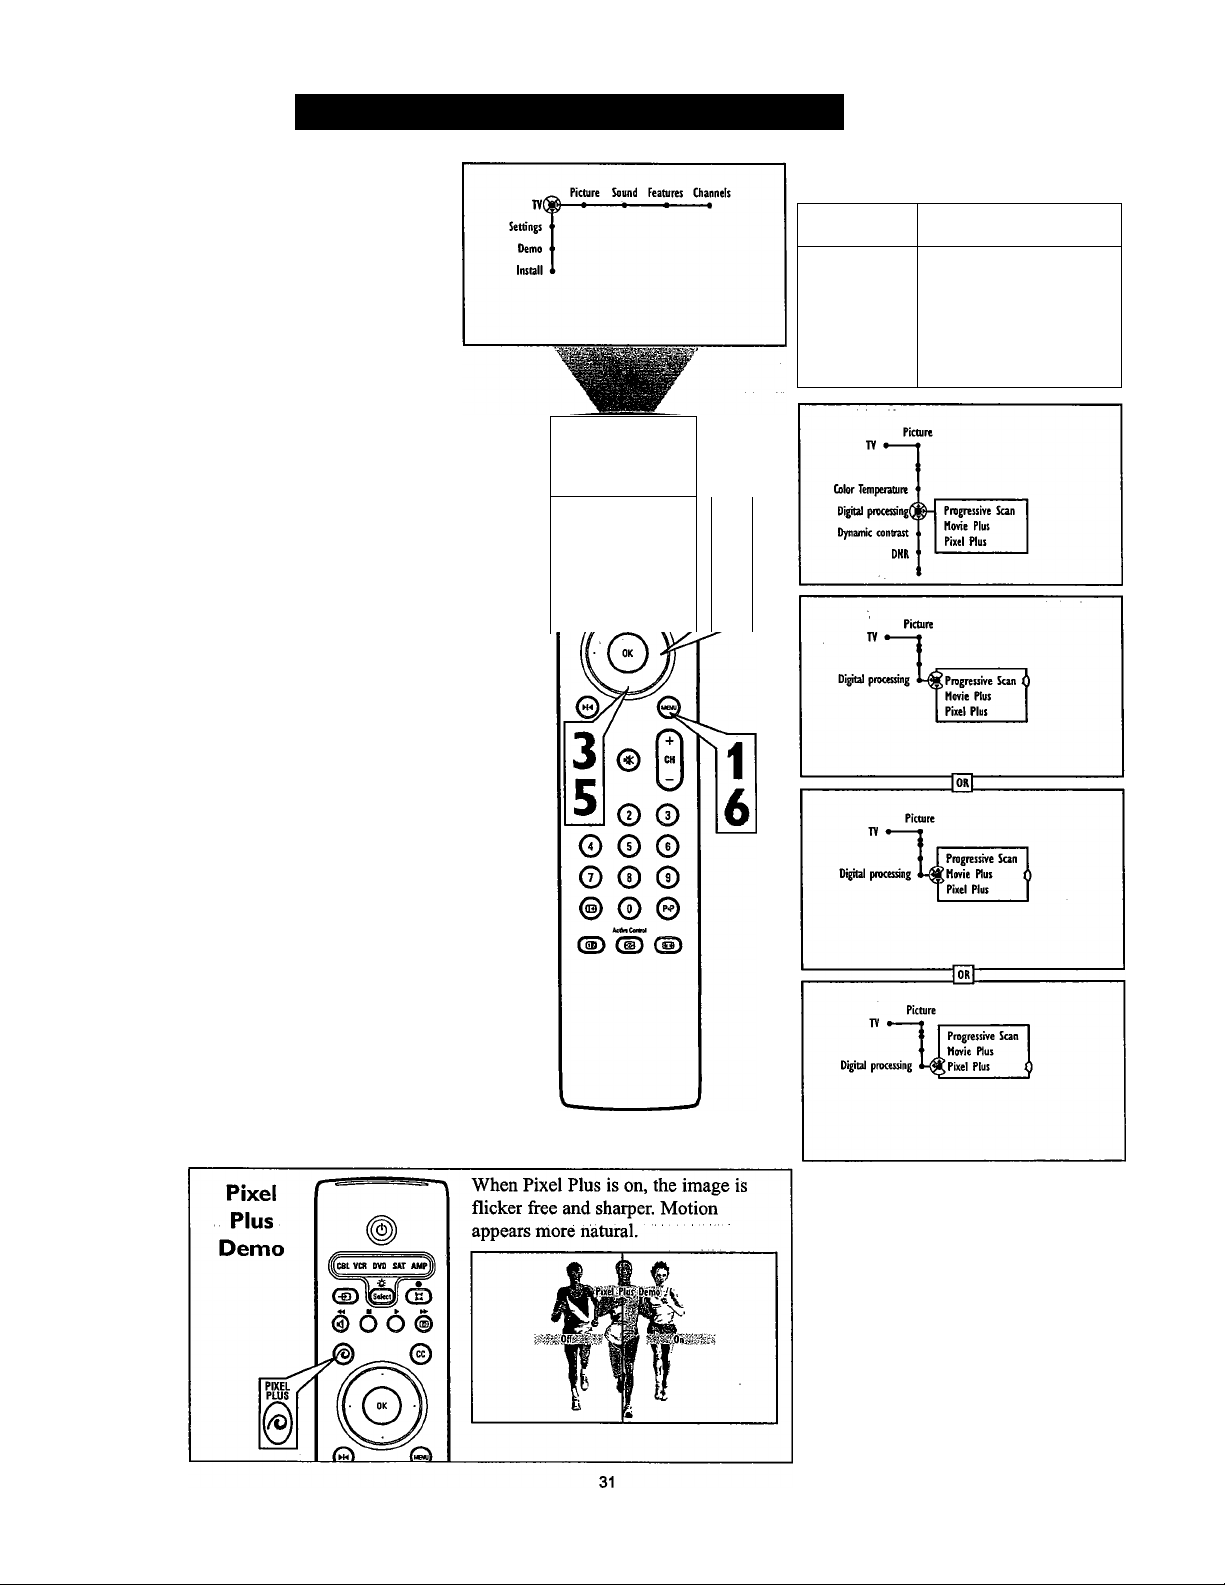
Selecting a Digital Processing Option
The Digital Processing control gives you a
choice of different picture scaiming modes.
Progressive Scan doubles the mmiber of pic
ture lines, eliminating line flicker and provid
ing a jitter-ffee picture.
Movies Plus provides motion compensation to
prevent bands of light (a halo effect) that may
occur around moving images in the picture.
Pixel Plus improves the picture quality and
appearance of on-screen images. The number
of picture lines is increased along with the
number of pixels per line, giving normal
broadcast signals, DVD reproduction or
Digital TV signals, unparalleled sharpness
and depth. This gives the viewer near high-
definition and natural-looking detail without
the high-definition signal.
®
({(ceL VCR DVD SAT AM^j]
n-
IV • {1
Auto picture
Contrast
Brightness
Color
Sharpness
ure Sound Features Channels
0 ■
Press the Menu button on the remote to
display the on-screen menu.
1
Press the Cursor Right button to select
“Picture.”
2
Press the Cursor Down button repeat
edly rmtil the “Digital processing” con
3
trol is selected.
Press the Ciusor Right button to enter
the digital processing submenu.
4
Press the Cursor Up or Down button to
select Progressive Scan or Pixel Plus.
5
Press the Menu button to remove the on
screen menu from the TV screen.
6
The Digital Processing control is not avail
able for use with the AV3 or AV4 input
sources.
^6 6©
2
4l
Page 32
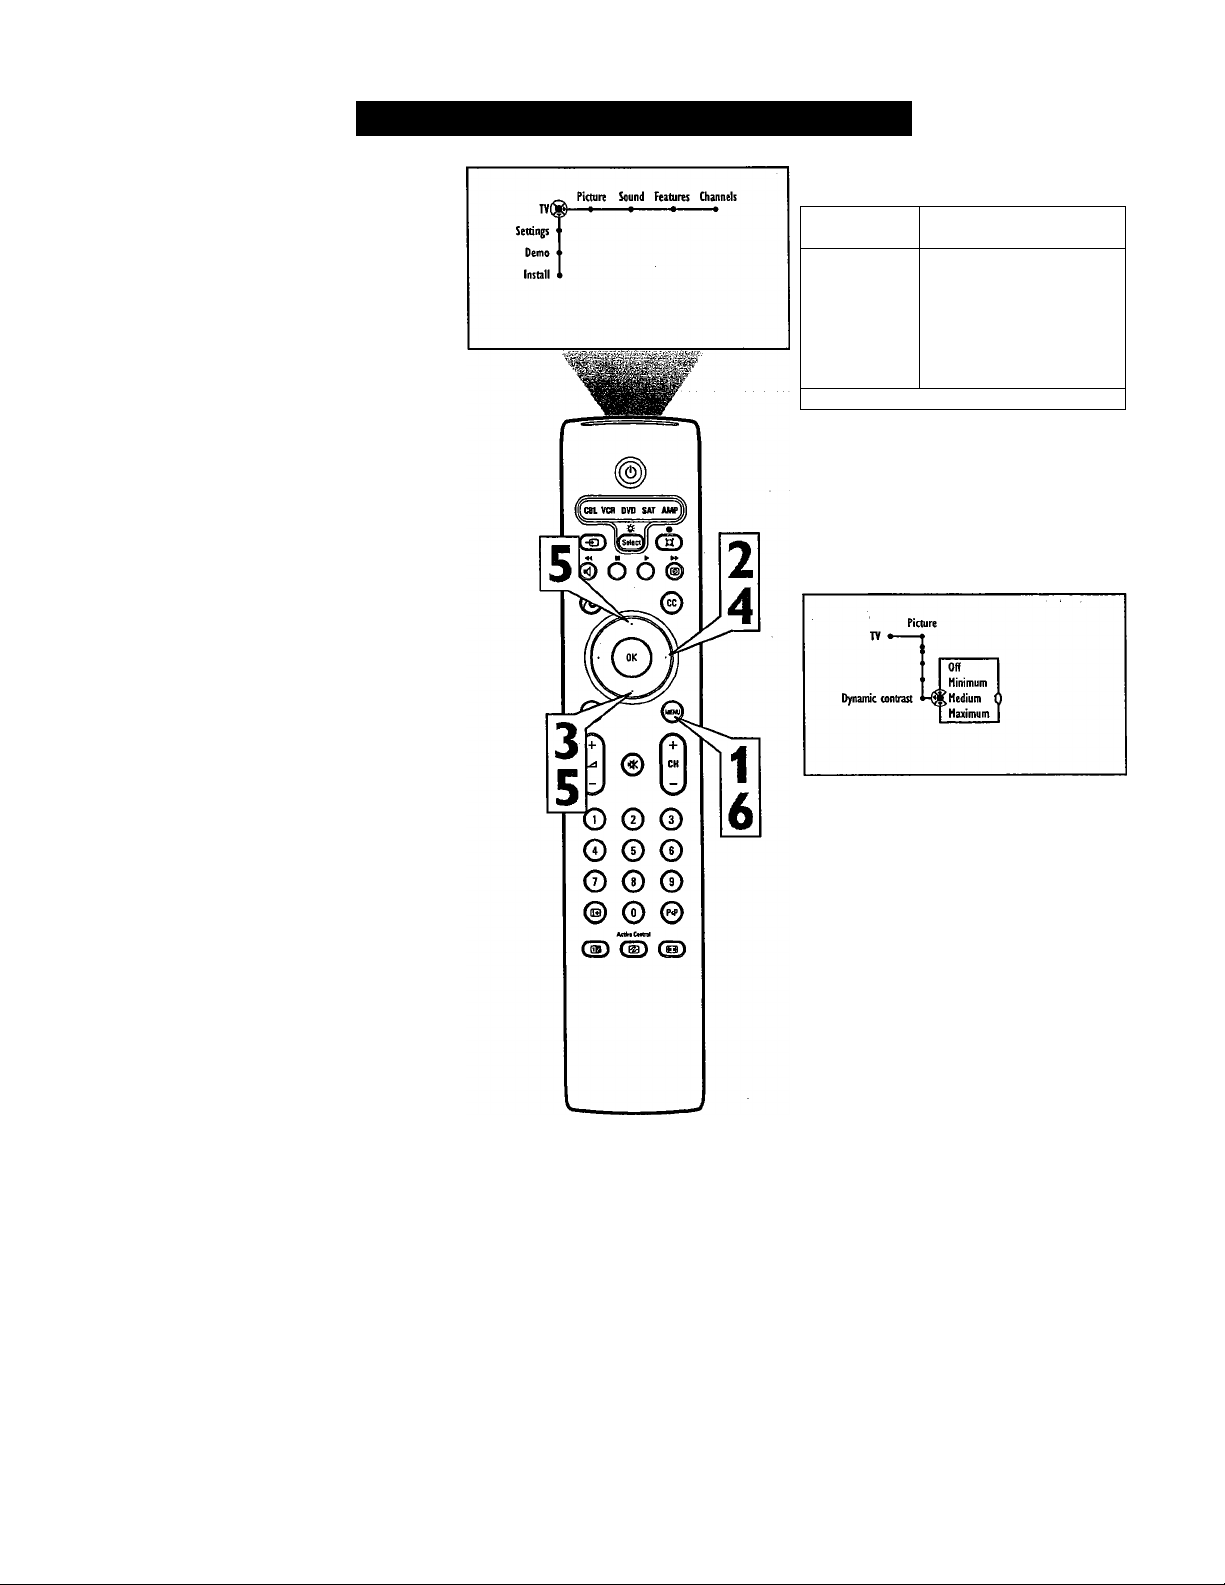
Selecting a Dynamic Contrast Option
The Dynamic Contrast control allows you to
sharpen the picture quality by making dark
portions of the picture darker and light por
tions of the picture more noticeable.
Normally, you will probably want to select
Medium. In certain circumstances, however,
you may prefer Minimum or Maximum.
Press the Menu button on the remote to
display the on-screen menu.
1
Press the Cursor Right button to select
Picture.
2
Press the Cursor Down button repeat
edly until the “Dynamic contrast” con
3
trol is selected.
Press the Cursor Right button to enter
the Dynamic Contrast submenu.
4
Press the Cursor Up or Down button to
select one of the Dynamic Contrast
5
options: “Off,” “Minimum,”
“Medium,” or “Maximum.”
Auto picture
Contrast
Brightness
Color
Sharpness
Colof Temperature
Dij^ procening
Dynamic contrast^
DNR
ure Sound. Features Channels
tì • • •
Picture
Off
m
Minimum
Medium
Maximum
Press the Menu button to remove the
on-screen menu from the TV screen.
6
The Dynamic Contrast control is not avail
able for use with the AV3 or AV4 input
sources.
32
Page 33
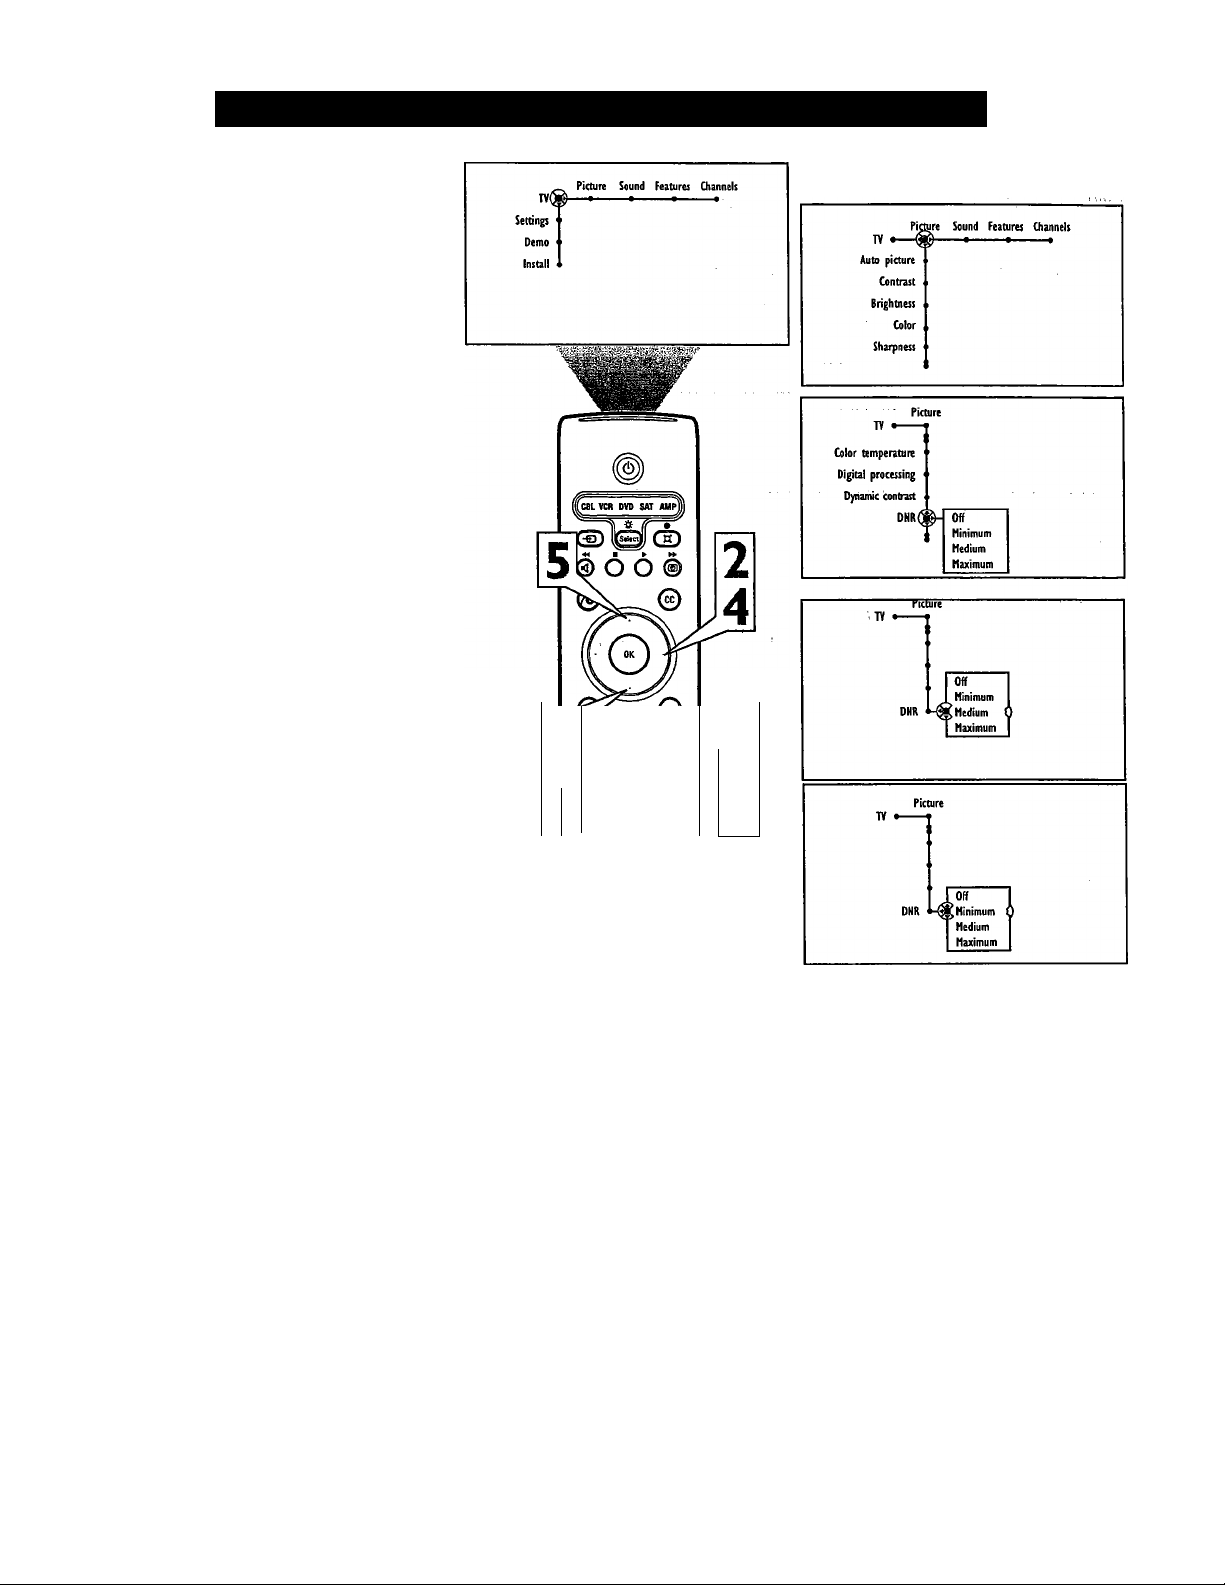
Selecting a DNR (Dynamic Noise Reduction) Option
For many reasons, one of which is poor cable
reception, the picture can sometimes appear
slightly “speckled” (an indication of signal
noise in the picture). The DNR (Dynamic
Noise Reduction) control can help eliminate
this type of interference and improve the
quality of the picture.
Press the Menu button on the remote to
display the on-screen menu.
1
Press the Cursor Right button to select
“Picture.”
2
Press the Cursor Down button repeat
edly until the DNR control is selected.
3
Press the Cursor Right button to enter
the DNR submenu.
4
Press the Cursor Up or Down button to
select one of the DNR options; Off,
5
Minimum, Medium, or Maximum.
Press the Menu button to remove the
on-screen menu from the TV screen.
6
^ ^ Pi
[3
C
© © ©
o © ©
© © ©
@ © 0
' *e«nCHM
®
1
6
33
Page 34
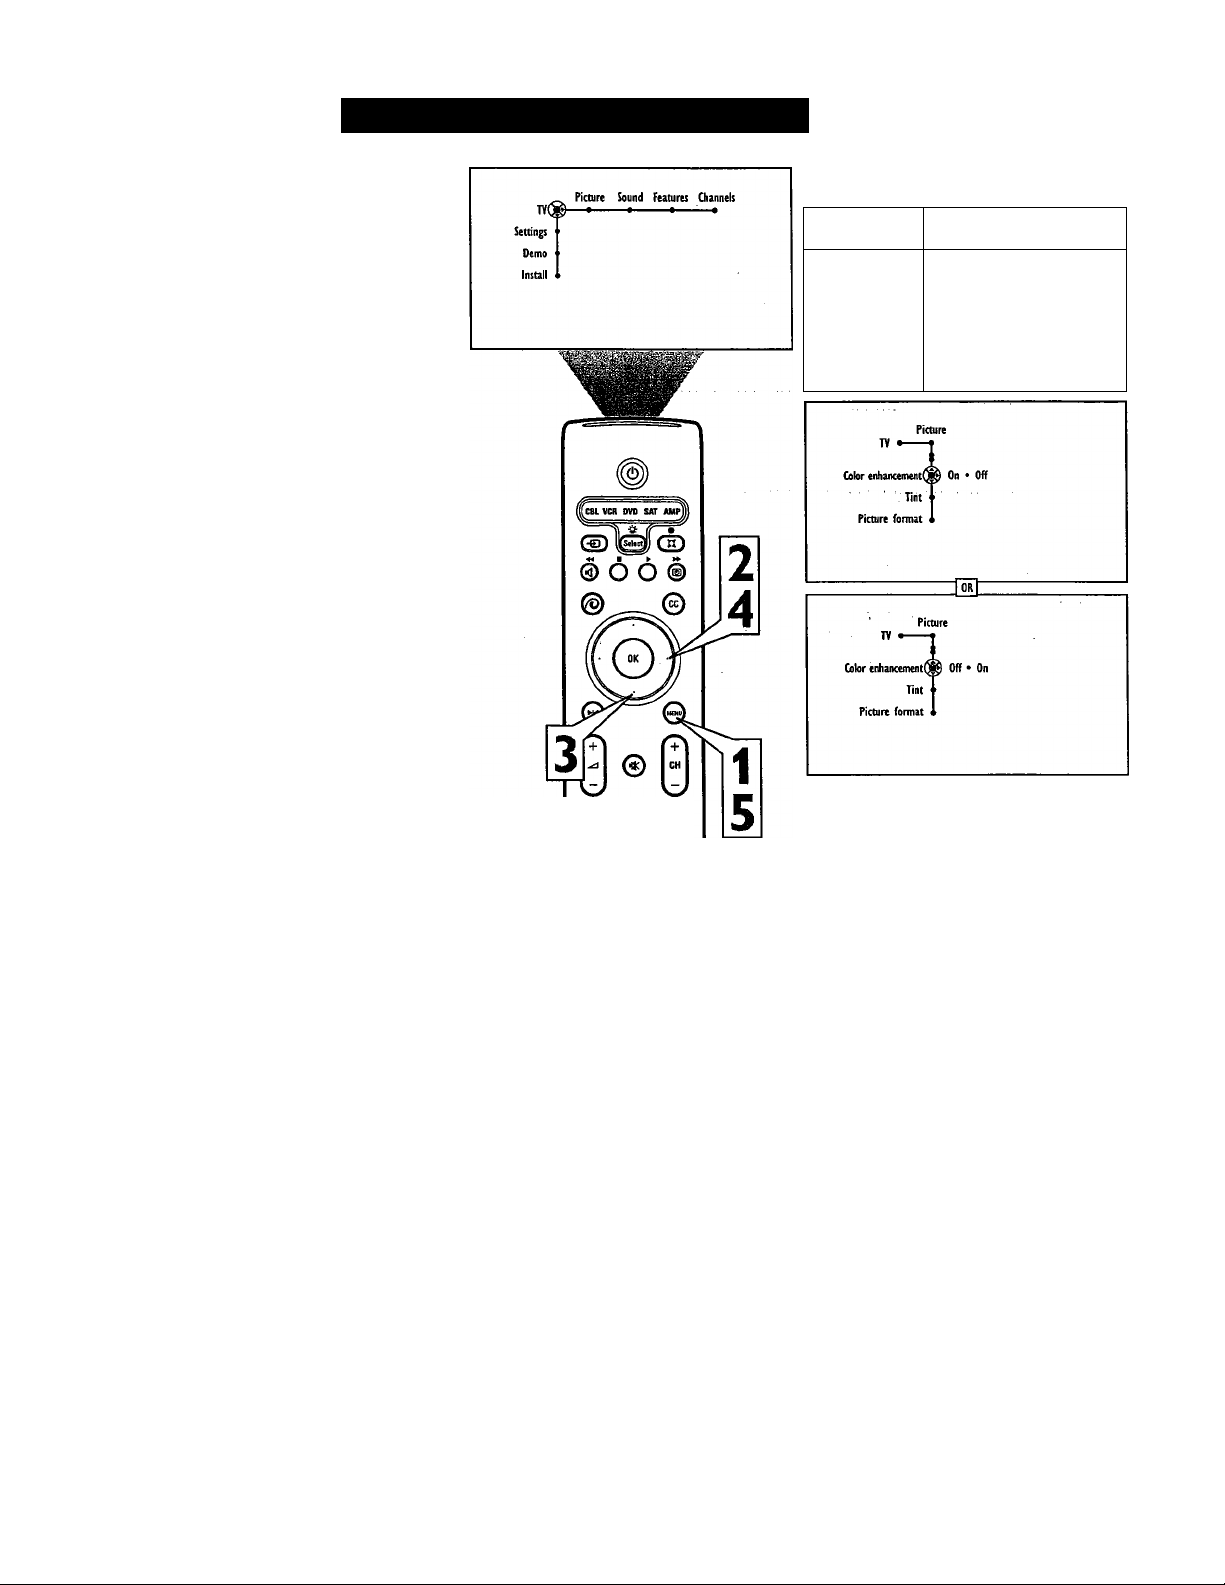
Turning on Color Enhancement
The Color Enhancement control can dramati
cally improve the picture quality of pictures
with a high saturation of color. This control
works in four ways:
Dynamic Blue Stretch corrects the white col
ors toward a more bluish-colored white with
out changing the other colors. Improves the
sharpness of the picture.
Green Enhancement offers a more saturated
green color in case of low green broadcasts,
giving landscapes a fresher and brighter look.
Color-dependent Sharpness improves the
sharpness of the picture through the color
information. Gives the picture more details,
especially in red colors.
Skin-tone Correction adjusts for over satura
tion of red that often appears in skin tones.
Press the Menu button on the remote to
display the on-screen menu.
1
Press the Cursor Right button to select
“Picture.”
2
Press the Cursor Down button repeat
edly until the “Color enhancement”
3
control is selected.
TV. '(§
Auto picture
Contrast
Brightness
Color .
Sharpness
ure Sound features Channels
^ ■ t ■
Press the Cursor Right button to turn
the color enhancement control on or
4
off.
Press the Menu button to remove the
on-screen menu from the TV screen.
5
The color enhancement control is not avail
able for use with the AV3 or AV4 input
sources.
o © ©
© © ©
© © ©
© © ©
AdnCmrrf
C© CM) (M)
34
Page 35
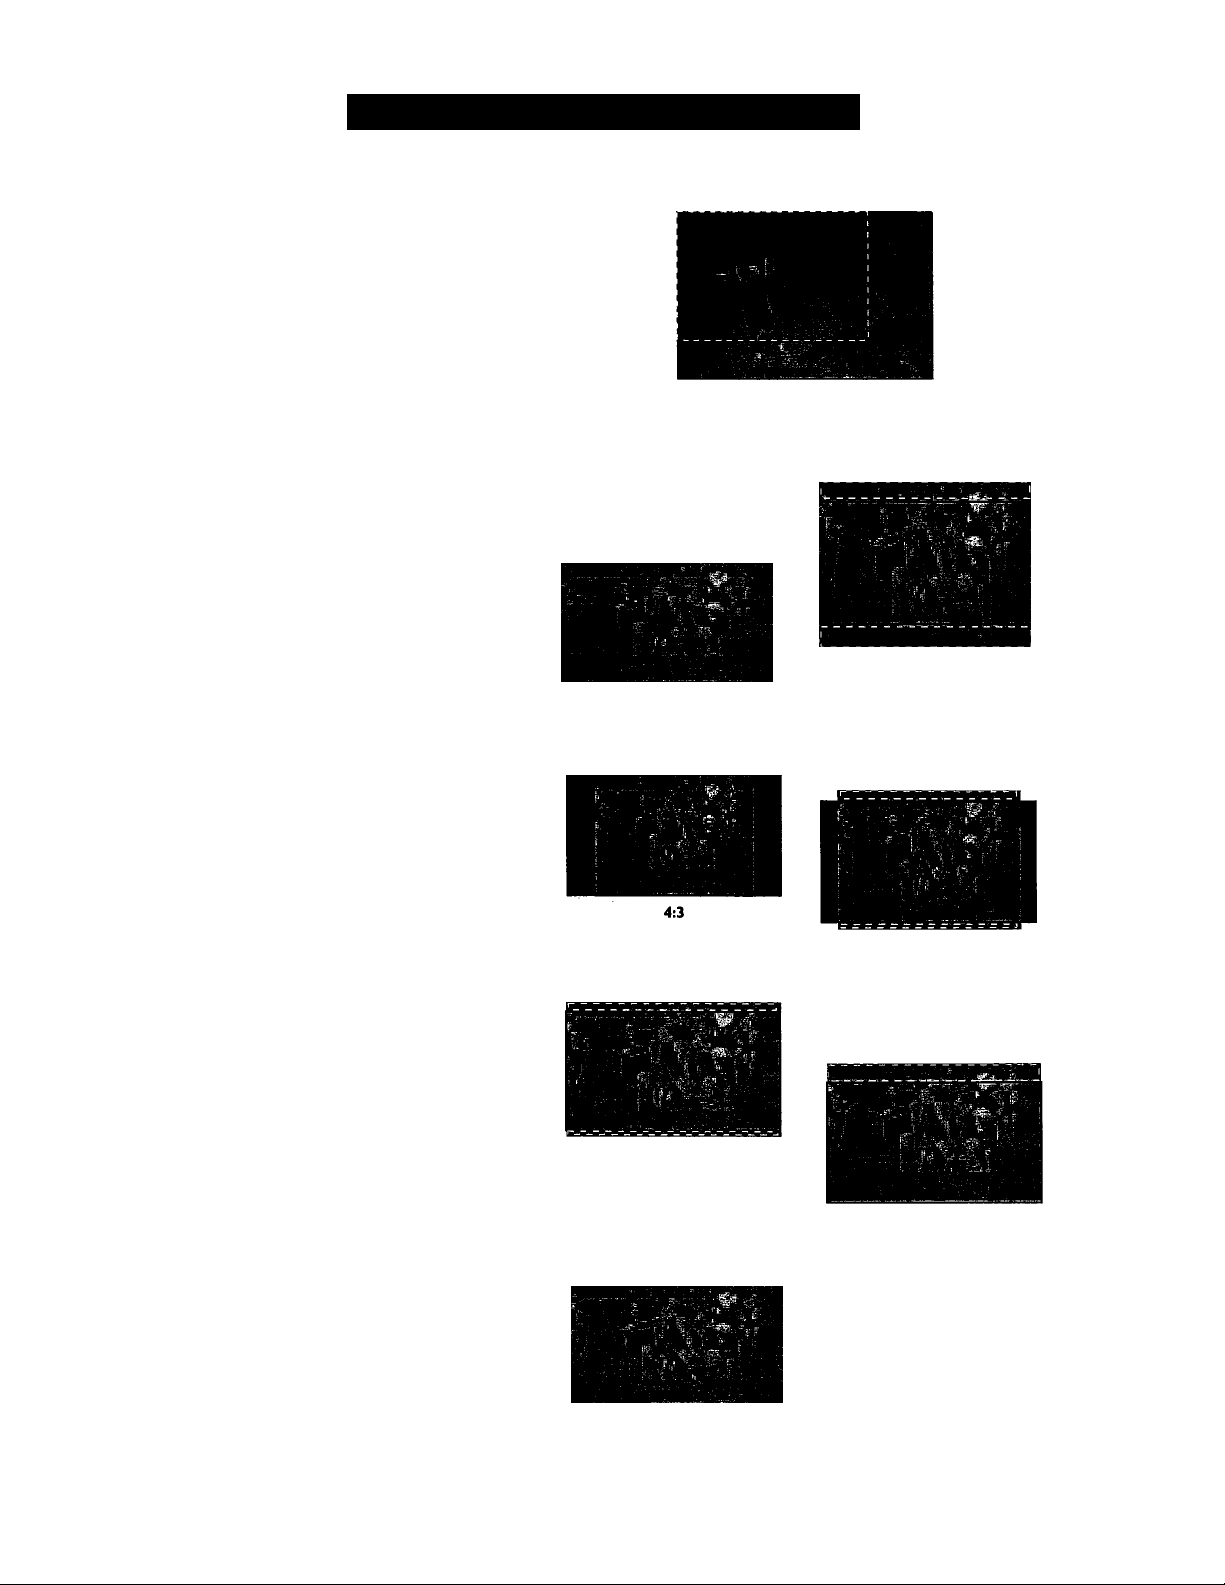
Selecting a Picture Format Option
Your TV’s wide screen (16:9 aspect ratio)
delivers a home-cinema experience that isn’t
possible with a conventional (4:3 aspect ratio)
set. The 16:9 format of high-definition (HD)
programs and other widescreen-format video
sources appear more lifelike, dramatic, and
theatrical. Black or gray bars are diminished
or eliminated. As the television industry
moves toward the high-definition format stan
dard and more HD broadcasts become avail
able, you will be able to see the broadcasts as
they were intended—in 16:9 format.
For flexibility in viewing conventional 4:3-
format video sources on your TV’s wide
screen, you have the options Automatic,”
“Super zoom,” “Panoramic,” “4:3,” “Movie
expand 14:9,” “Movie expand 16:9,” “16:9
subtitle,” or “Wide screen.”
Page 36 explains how to select a picture
format option.
You can press the Cursor Up or Down but
ton to pan the screen up and down to see
excluded parts of the picture. Use this fea
ture with Super Zoom, Movie Expand 14:9,
Movie Expand 16:9, and 16:9 Subtitle.
Left and right panning is possible with the
Side input source when the source has been
labeled “Game.” See page 19 for details on
labeling input sources.
Conventional 4:3 Screen Size
Your TVs 16:9 Screen Size
Your TV’s Picture Format Options
Automatic
Makes the pieture fill the screen
as much as possible.
Panoramic
Evenly stretches the edges of the
picture to fill the TV’s wide
screen.
Displays a conventional 4:3 pic
ture without change. Black or
gray bars will show at the left and
right sides.
Removes the black or gray bars
Super zoom
on the sides of a 4:3-format pic
ture with minimal distortion. Part
of the top and bottom portions of
the picture are excluded from the
screen.
Movie expand 14:9
Expands the picture to 14:9 movie
aspect ratio. Part of the top and bot
tom portions of the picture are
excluded ftom the screen. Black or
gray bars are shown at the left and
right sides.
The term aspect ratio refers to the relation
ship between the width and height of a TV
screen. Historically, TV screen width has
been 33 percent greater than its height,
amounting to a 4:3 aspect ratio. The width
of your widescreen TV, however, is nearly
80 percent greater than its height, which
means its aspect ratio is 16:9. This screen
corresponds well with the tendency of the
eyes to feel more comfortable with fields of
view and action planes that are horizontally
oriented. The wide screen is also propor
tionally traer to the formats in which
movies are filmed and presented in theaters.
Movie expand 16:9
Alters the image both horizontal
ly (stretched) and vertically
(cropped) to fill the TV’s wide
screen. Part of the top and bottom
portions of the picture will be
excluded from the screen.
Wide screen
Evenly stretches the width of the
picture to fill the screen.
35
Zooms the picture for a full view
16:9 subtitle
of subtitles or other information
displayed at the bottom of the
picture. Part of the top portion of
the picture is excluded from the
screen.
Page 36
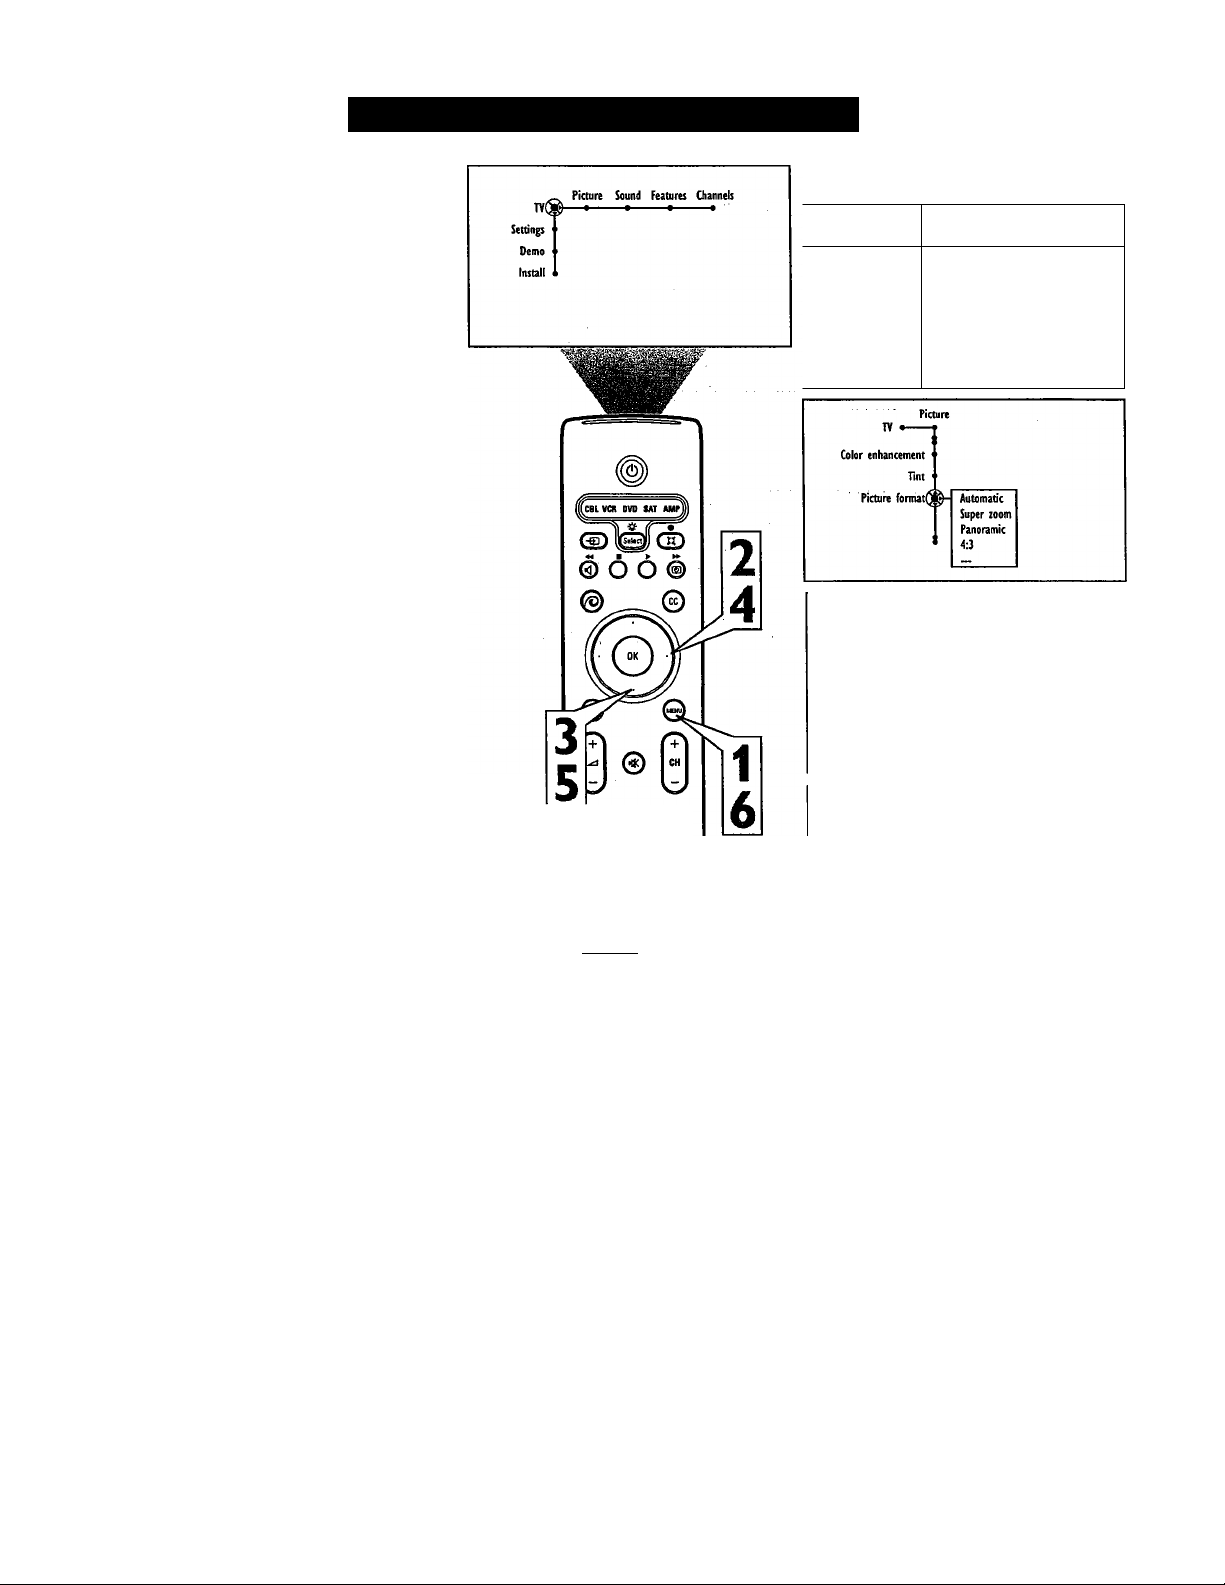
Selecting a Picture Format Option
Choose a picture format size to match the
type of program you’re watching. Select the
4:3 aspect ratio or a variety of widescreen for
mats.
Press the Menu button on the remote to
display the on-screen menu.
1
Press the Cursor Right button to select
“Picture.”
2
Press the Cursor Down button repeat
edly until the “Picture format” control
3
is selected.
Press the Cursor Right button to enter
the picture-format submenu.
4
Press the Cursor Down button to select
one of the seven screen formats:
5
“Automatic,” “Super zoom,”
“Panoramic,” “4:3,” “Movie expand
14:9,” “Movie expand 16:9,” “16:9
subtitle,” or “Wide screen.”
The Automatic option senses the pres
ence of black or gray bars around the
picture and s the picture to reduce or
eliminate the bars.
Press the Menu button to remove the
on-screen menu from the TV screen.
6
You can also select a picture format
simply by pressing the Picture Format
7
button on the remote control.
© ©
© © ©
© © ©
© © ©
Acta MM
fir> CS\
ure Sound Features Channels
IV. %
Vi • ^
® • •
Auto picture
Gintrast
Brightness
Gilor
Sharpness
Picture
Picture format Automatic
Picture format 1-^ ^ Super zoom
Super zoom
Panoramic
4:3
Picture
1 Automatic
Movie expand 14:9
Panoramic
4:3
36
Page 37
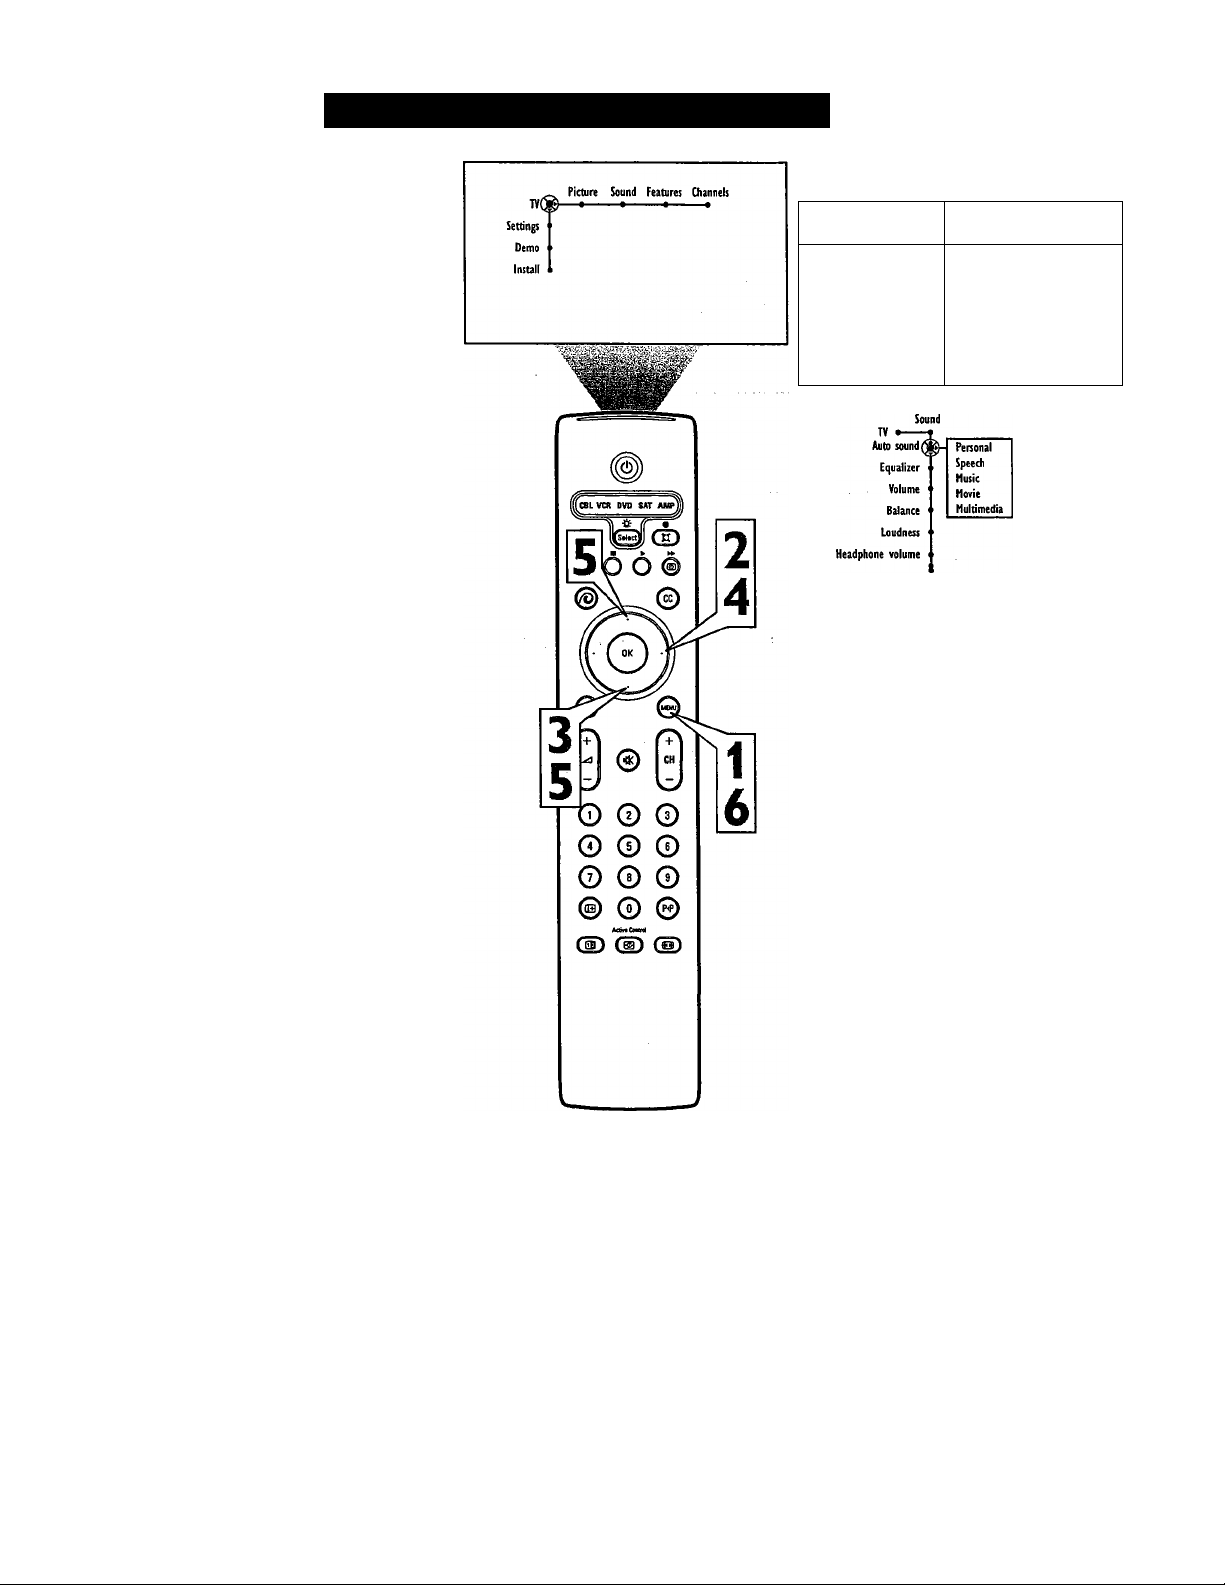
Selecting anAutoSound™ Option
AutoSound™ allows you to select from four
factory-set controls and a personal control.
The personal control consists of settings you
adjust through the on-screen Sound menu.
The four factory-set controls—Speech,
Music, Movie, or Multimedia—enable you to
tailor the TV sound to enhance the particular
program you are watching. Follow these steps
to select any of the options.
Press the Menu button on the remote
to display the on-screen menu.
1
Press the Cmsor Right button repeat
edly to select “Sound.”
2
Press the Cursor Down button repeat
edly until the “Auto sound” control is
3
selected.
Press the Cursor Right button to enter
the AutoSoimd™ submenu.
4
Press the Cursor Up or Down button to
select an option: “Speech,” “Music,”
5
“Movies,” “Multimedia,” or
“Personal.”
TV • •
Auto sound
Equalizer
Volume
Balance
Loudness
Headphone volume
Sound
Auto sound
SouiQd Features Channels
0 • •
Personal
[Speech
Husic
Movies
Multimedia
(((H
Press the Menu button to remove the
on-screen menu from the TV screen.
6
AutoSound™ Options
Personal presents the TV’s sound according
to the settings you make within the sound
menu.
Speech brings voices to the forefront and
emphasizes them. Moves music to the back
ground.
Music emphasizes music over voices.
Movies provides a balance between voices
and music.
Multimedia provides soimd balance best
suited for gaming consoles or interactive
media.
37
Page 38
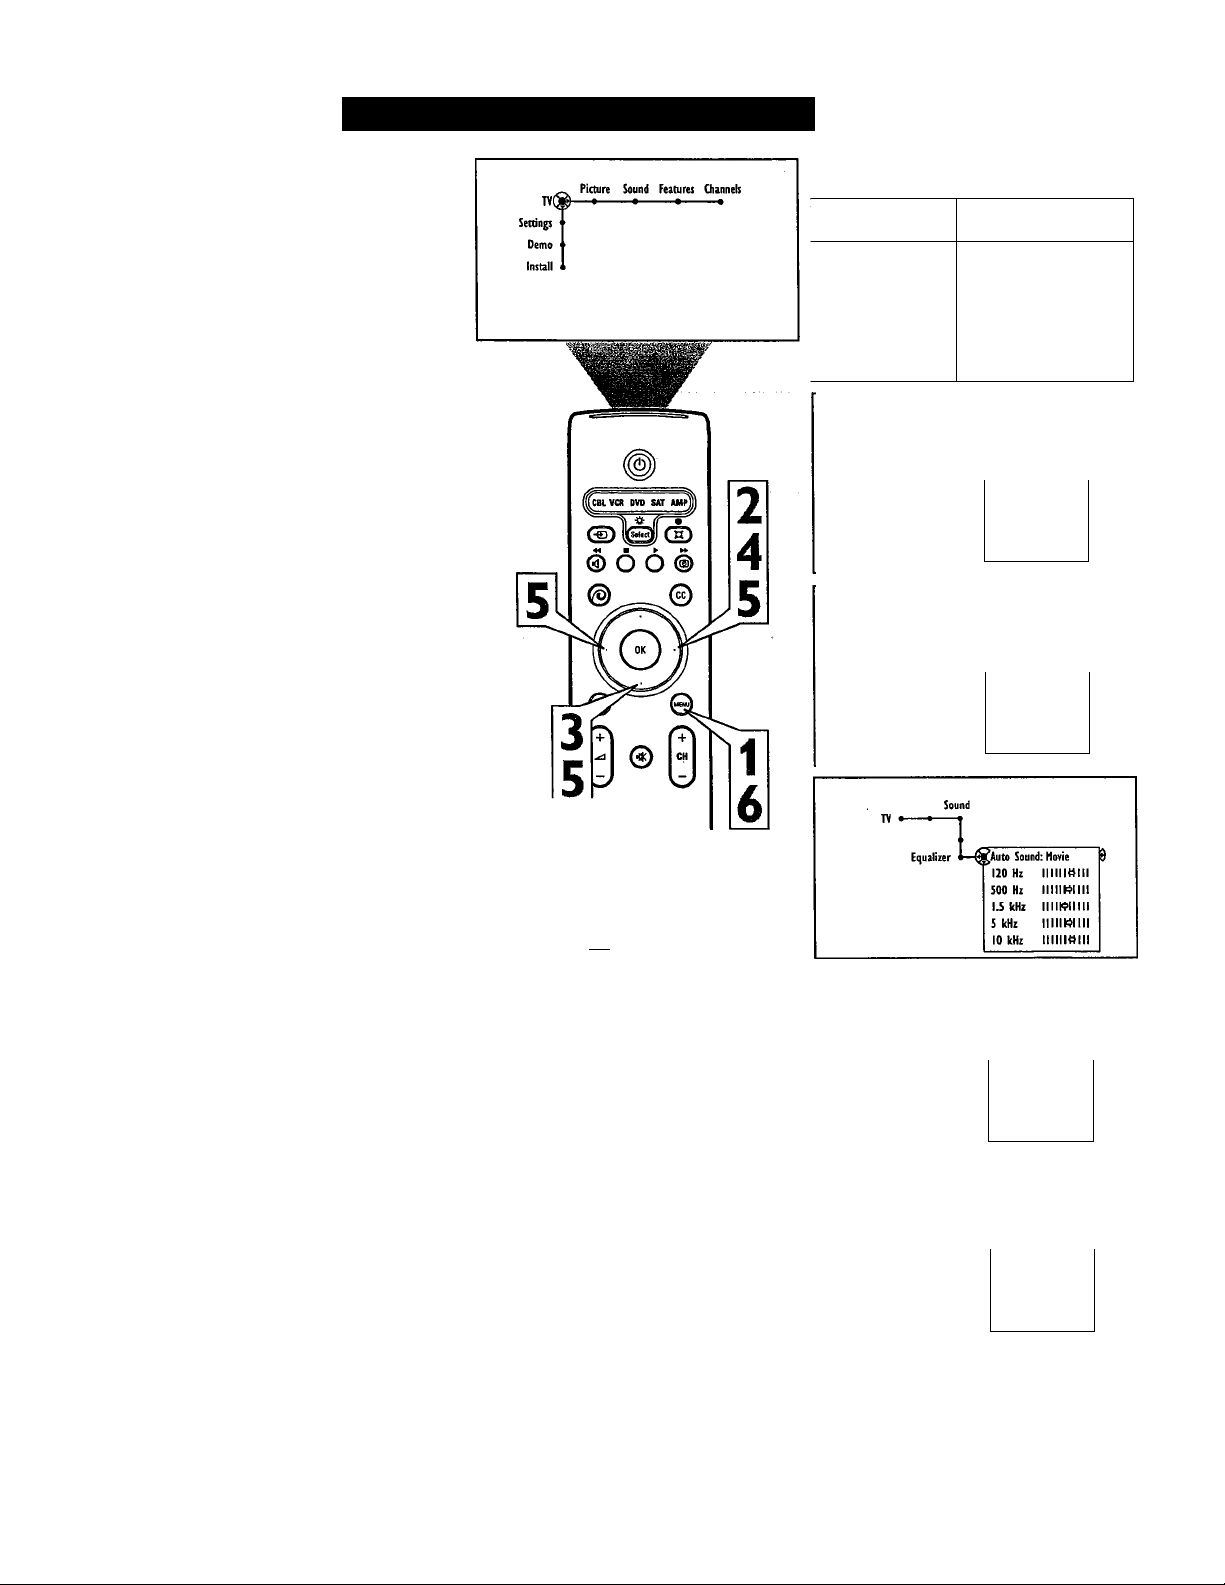
Selecting aTV Equalizer Option
The Equalizer control will change the dynam
ics of the sound being heard through the TV.
You can adjust the settings for the Personal
Equalizer option. The other options have been
preset at the factory and caimot be changed.
Press the Menu button on the remote to
display the on-screen menu.
1
Press the Cursor Right button repeated
ly to select “Sound.”
2
Press the Cursor Down button repeat
edly until the “Equalizer” control is
3
selected.
Press the Cursor Right button to enter
the equalizer submenu. Continue to
4
press the Ciusor Right button to select
one of the options; “Speech,” “Music,”
“Movie,” “Multimedia,” or “Personal.”
Auto sound
Equalizer
Volume
Balance
Loudness
Headphone volume
Equalizer
sd Features Channels
Souj
5 • ■
Sound
^Auto Sound: Speech 9
120 Hz
500 Hz
1.5 kHz
5 kHz llllll:>IIII
10 kHz
iimilllll
mollili
llll)<MIUI
llllll^llll
If you select the Personal option and
want to make adjustments, press the
5
Cursor Down button to select an
adjustment, then press the Cursor Left
or Right button to adjust the slider con
trol to the desired position.
NOTE; If you attempt to change the settings
for the factory-preset options Speech, Music,
Movie, or Multimedia, the Equalizer control
will default to the Personal option.
Press the Menu button to remove the
on-screen menu from the TV screen.
6
"3 0©
o © ©
© © ©
© © ©
AcAnCtolnl
fSI (s)
Equalizer
^Auto Sound: Husk 5
Sound
Equalizer
Equalizer i»^Auto Sound: Penonal 9
•^Auto Sound: Hultimedia $
llllllll«n
120 Hz
iiiiimiii
500 Hz
iiiimiiii
1.5 kHz
5 kHz iiiiimiii
11III1I44II
10 kHz
120 Hz lllllll«<ll
inumili
500 Hz
iiimiiiti
1.5 kHz
5 kHz iiimiiiii
IIIIKHIIIl
10 kHz
IIIIIIKHII
120 Hz
iiiimiiii
500 Hz
iiimiiiii
1.5 kHz
IIIIIK>IIII
5 kHz
iiiiimiii
10 kHz
38
Page 39
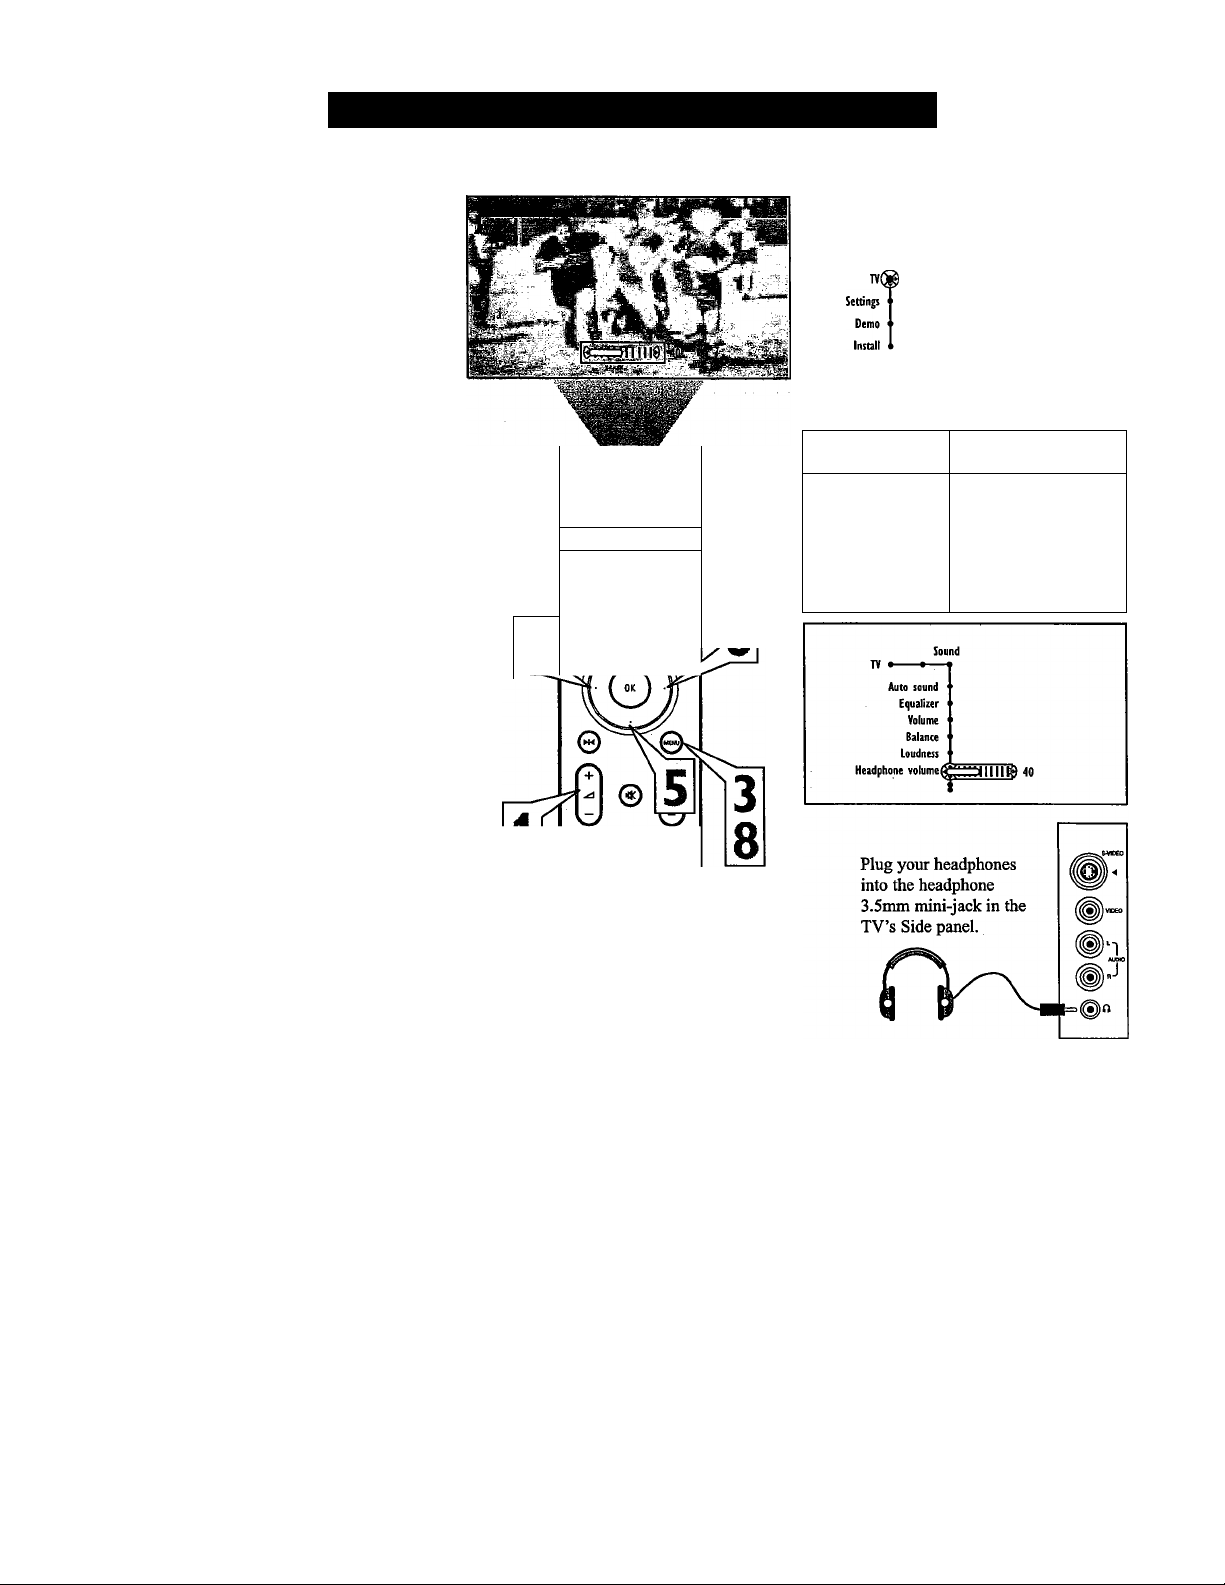
Adjusting the TV and Headphone Volume
Besides the normal volume level control, your
TV also has a headphone volume control.
This control can be adjusted when using
headphones without having to adjust the main
volume control for the TV cabinet speakers.
To control the television volume:
Press the Volume + button on the
remote control to increase the televi
1
sion volume level.
Press the Volume - button on the
remote control to decrease the televi
2
sion volume level.
NOTE: The Volume level can also be adjust
ed within the on-screen menu. Select the
Sound menu and cursor down to the Volume
control. Use the Cursor Left and Right but
tons to adjust.
To control the Headphone volume:
Press the Menu button on the remote
control to display the on-screen menu.
3
Press the Cursor Right button to select
“Sound.”
4
Television Volume
r* -----
(0)
(((CBL VCR DVD SAT AMp))]
© Ó Ó è
\ll
Headphone Volume
Picture Sound Features Qiannels
Sou]^ Features Channels
5 • •
Auto sound
Equaliser
Volume
Balance
Loudness
Headphone volume
Press the Cursor Down button repeat
edly until the “Headphone volume”
5
control is selected.
Press the Cursor Right button to
increase the headphone voliune level.
6
Press the Cursor Left button to
decrease the headphone volume level.
7
Press the Menu button on the remote
control to remove the on-screen menu
8
from the TV screen.
When using headphones with PIP viewing,
you will only be able to hear the audio for
each PIP window if the primary window is
a main signal, i.e. antenna or cable. If the
primay window is from an aux source
(VCR, DVD, etc.) you will only be able to
hear the primary window.
O © ©
© © ©
© © ©
0 0 0
AoknCatMl
(®) CD
39
Page 40
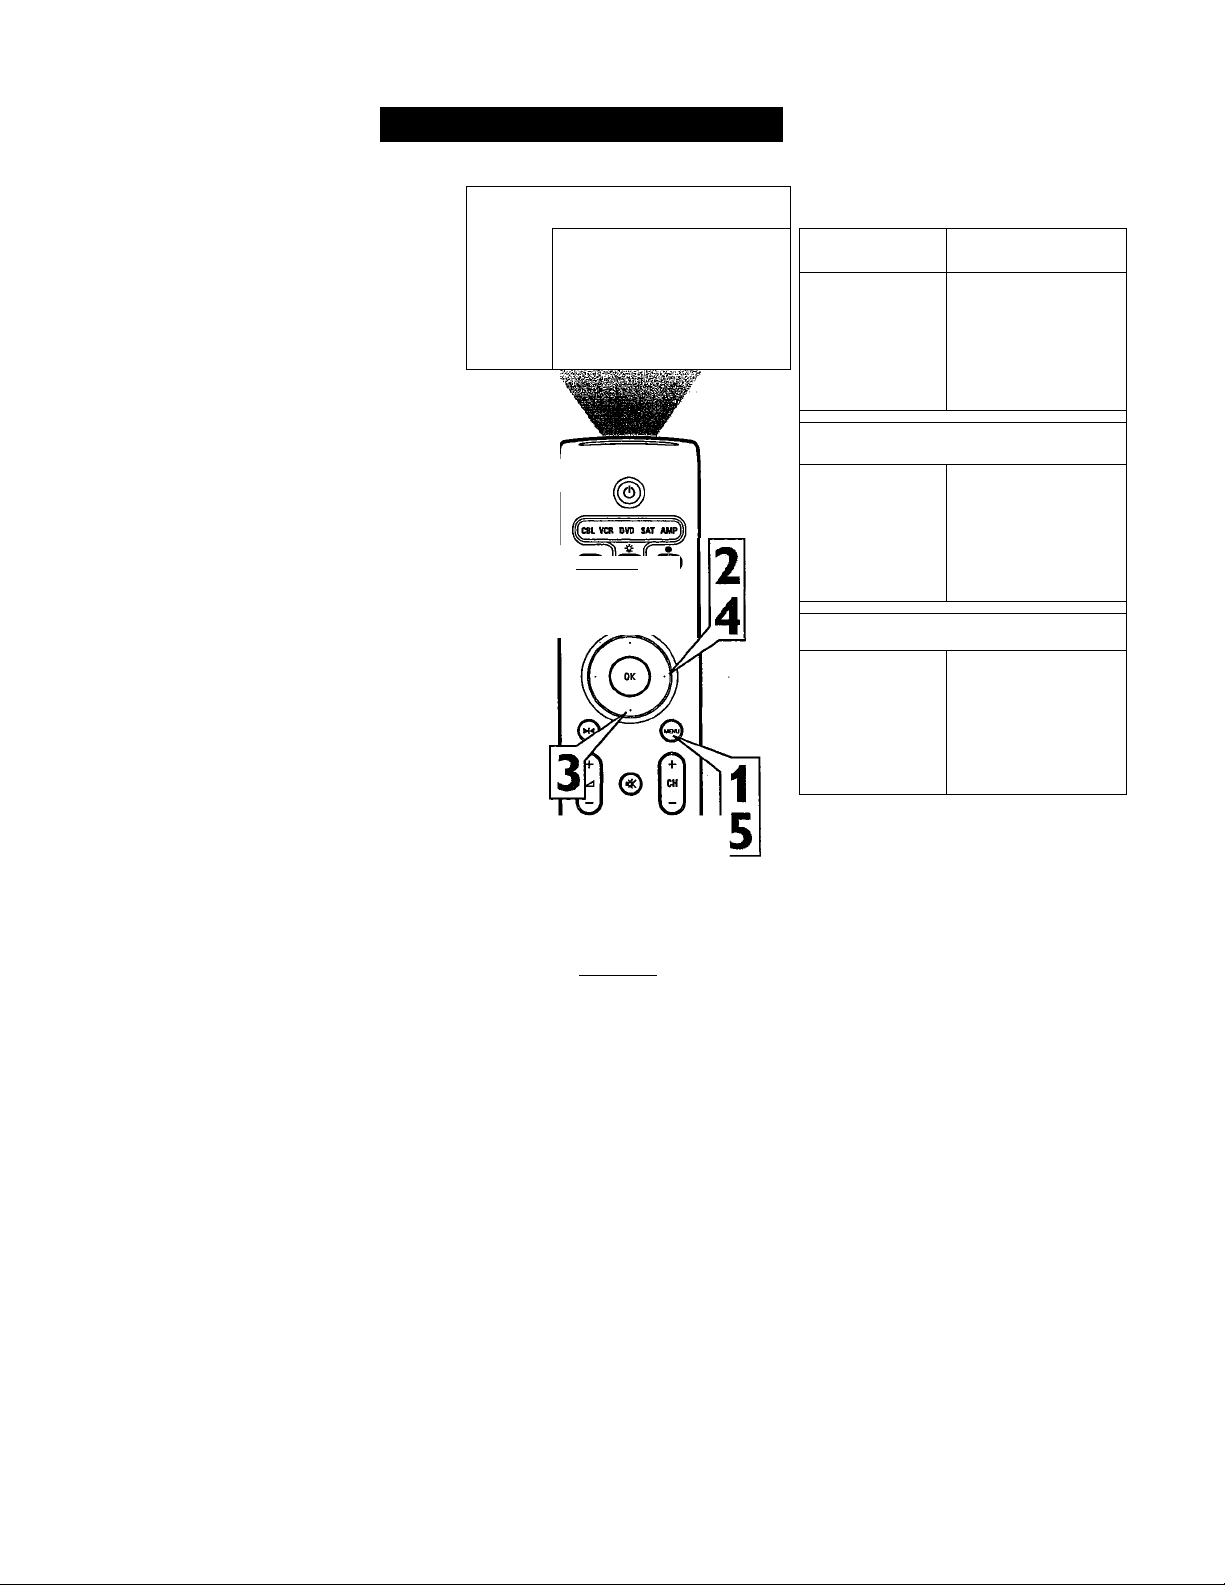
Turning the Loudness control on provides a
volume-dependent bass-boost effect to the
speakers. Follow the steps here to turn the
Loudness control on.
Press the Menu button on the remote to
display the on-screen menu.
1
Press the Cursor Right button repeated
ly to select “Sound.”
2
Turning Loudness on or off
Picture Sound Features Channels
y • • • •
ivg
Settings
Demo
Install
TV • •
Auto sound
Equalizer
Volume
Balance
Loudness
Headphone volume
Sou id Features Channels
h T t
№
Press the Cursor Down button repeat
edly until the “Loudness” control is
3
selected.
Press the Cursor Right to toggle loud
ness on or off.
4
Press the Menu button to remove the
on-screen menu from the TV screen.
5
Qg) 11^) dj
© Ó Ó ®
@
___
O © ©
© © ©
© © ©
© © ©
AcdNCawd
fai CWi fSi
Auto sound
Equalizer
Volume
Balance
Loudness
Headphone volume
Auto sound
Equalizer
Volume
Balance
Loudness(
Headphone volume
Sound
^ Off • On
Sound
^ On • Off
40
Page 41
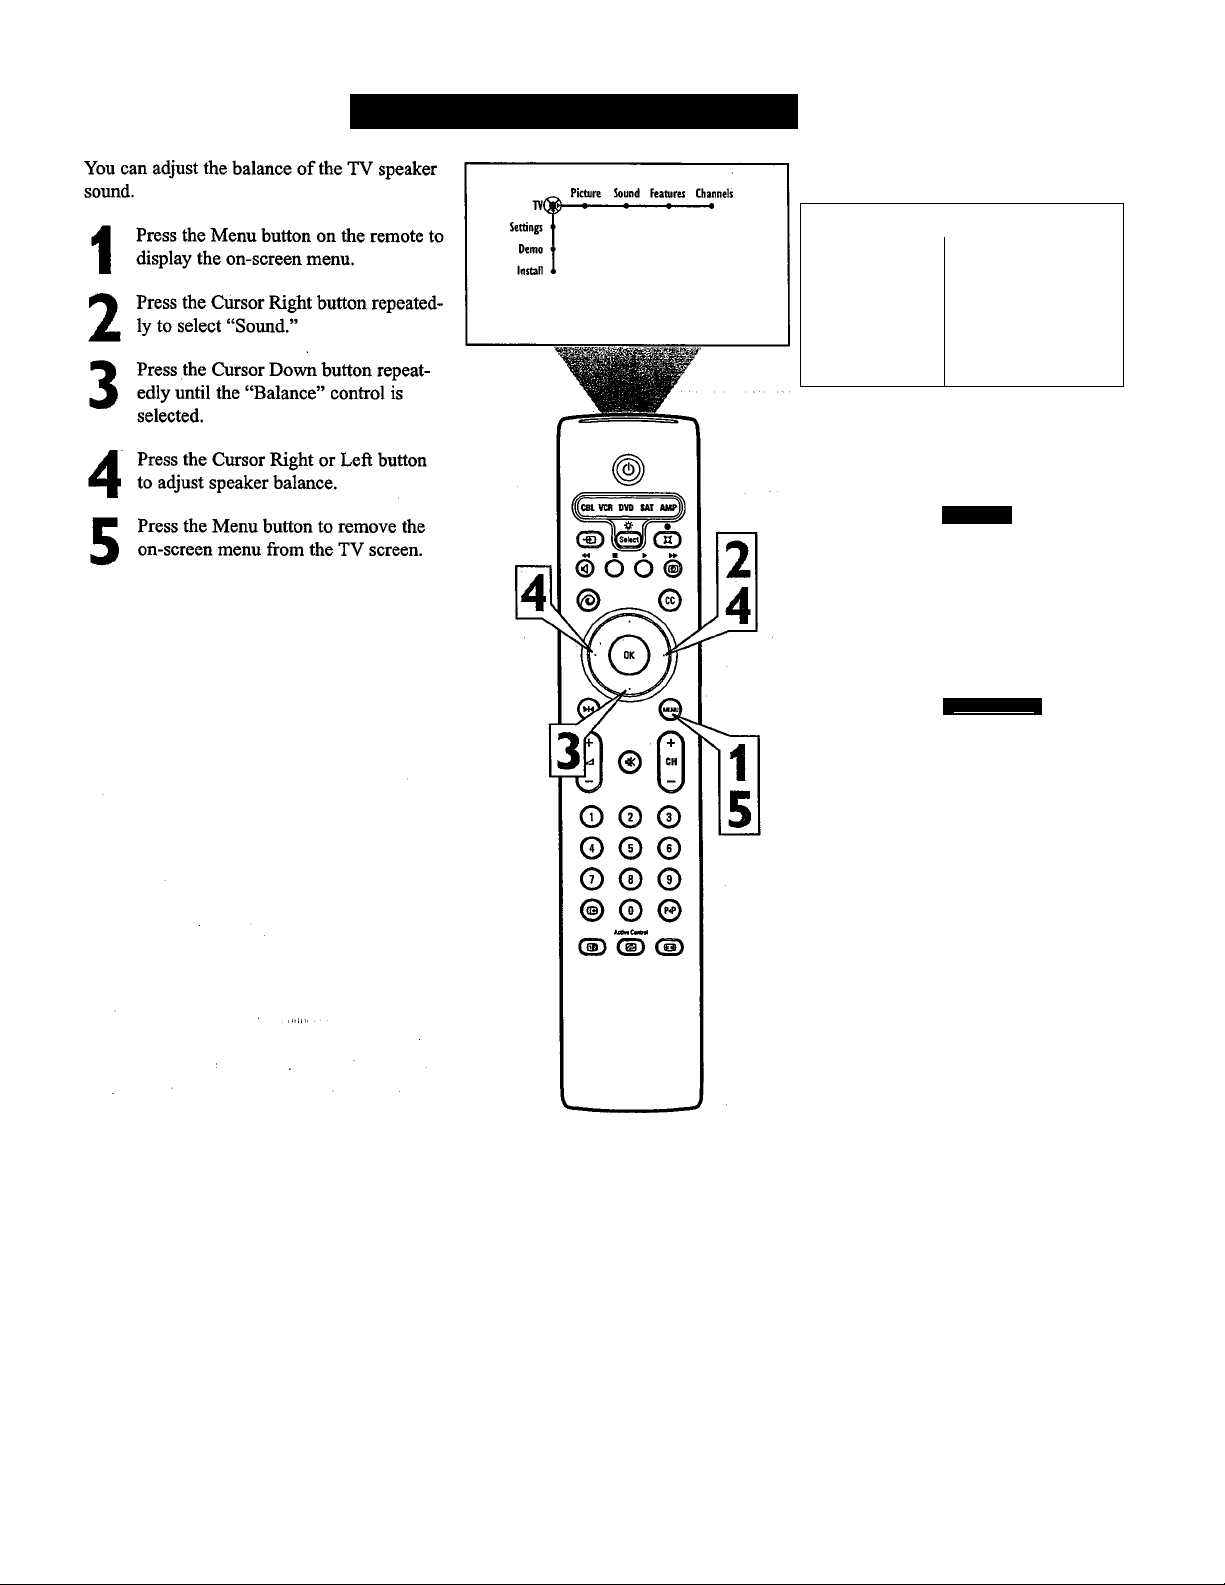
Adjusting TV Speaker Balance
Auto sound
Equalizer
Volume
Balance
Loudness
Headphone volume
Sound Features Channels
TV ^
p—-—.
H)))
TV
Aute sound
Equalizer
Volume
Balancel
Loudness
Headphone volume
TV
Auto sound
Equalizer
Volume
Balancel
Loudness
Headphone volume
Sound
'^ansmE;
Sound
fjOTT-TTUg
41
Page 42
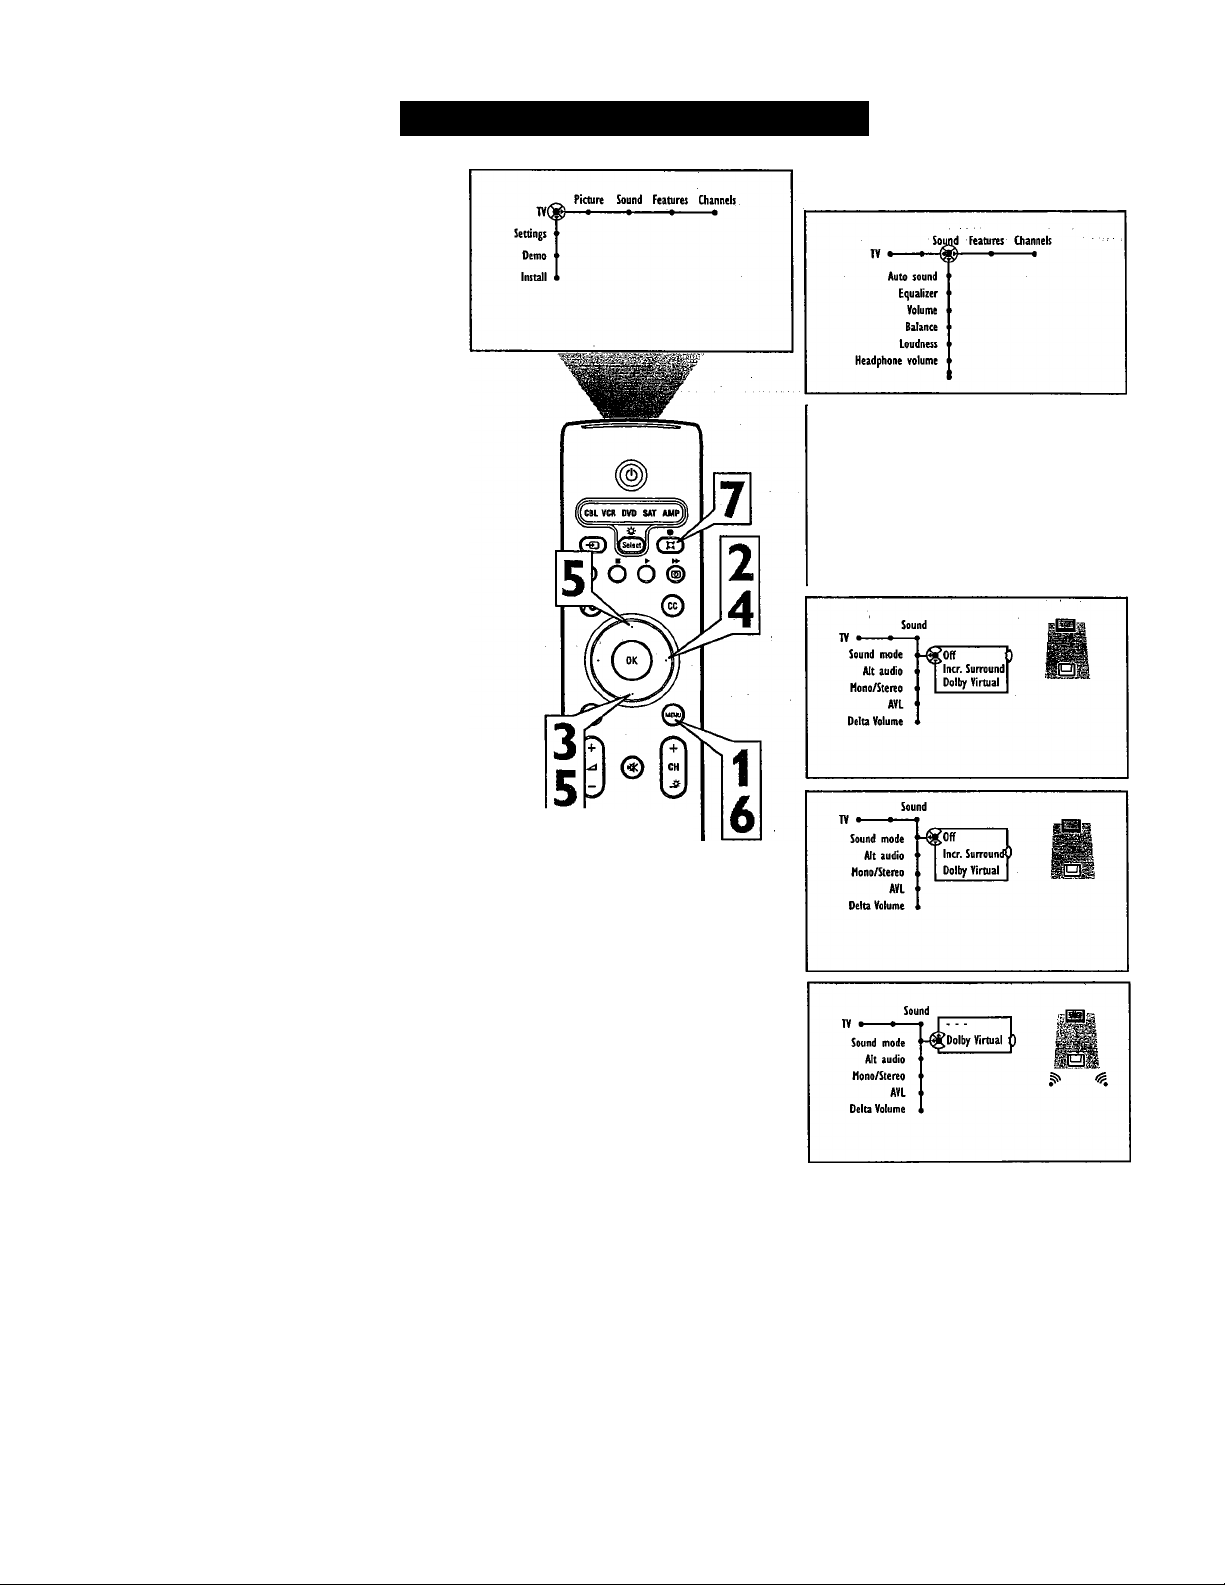
The Soxmd Mode control allows you to place
the TV sound into either Incredible
Surroimd™ or Dolby* Virtual mode. The
steps below explain how to select one of
those options.
Press the Menu button on the remote to
display the on-screen menu.
1
Press the Cursor Right button repeated
ly to select “Sound.”
2
Press the Cursor Down button repeat
edly until the “Sound mode” control is
3
selected.
Press the Cursor Right button to enter
the sound mode submenu.
4
Press the Cursor Up or Down button to
select one of modes, either “Incr.
5
Surround” or “Dolby Virtual.”
Incr. Surround enhances stereo pro
grams by making the sound broader
and fuller.
Dolby Virtual creates a virtualized
surround-soimd experience from two
speakers. Dolby Virtual retains all the
original multichannel audio informa
tion and provides the listener with the
sensation of being surrounded by addi
tional speakers.
When finished, press the Menu button
to remove the on-screen menu from the
6
TV screen.
Selecting a Sound Mode Option
“Э © ©
© © ©
© © ©
© ® ©
AetaCaari
(©
Sound mode
Alt audio
Hono/Stereo
AVL
Delta Volume
Sound
Off
Incr. Surround
Dolby Virtual
You can also select a sound mode
option simply by pressing the
7
Surroimd Sound button on the remote
control.
Incredible Surround is a trademark of Philips
Consumer Electronics. Copyright 2003 Philips
Consumer Electronics. All rights reserved.
42
Page 43
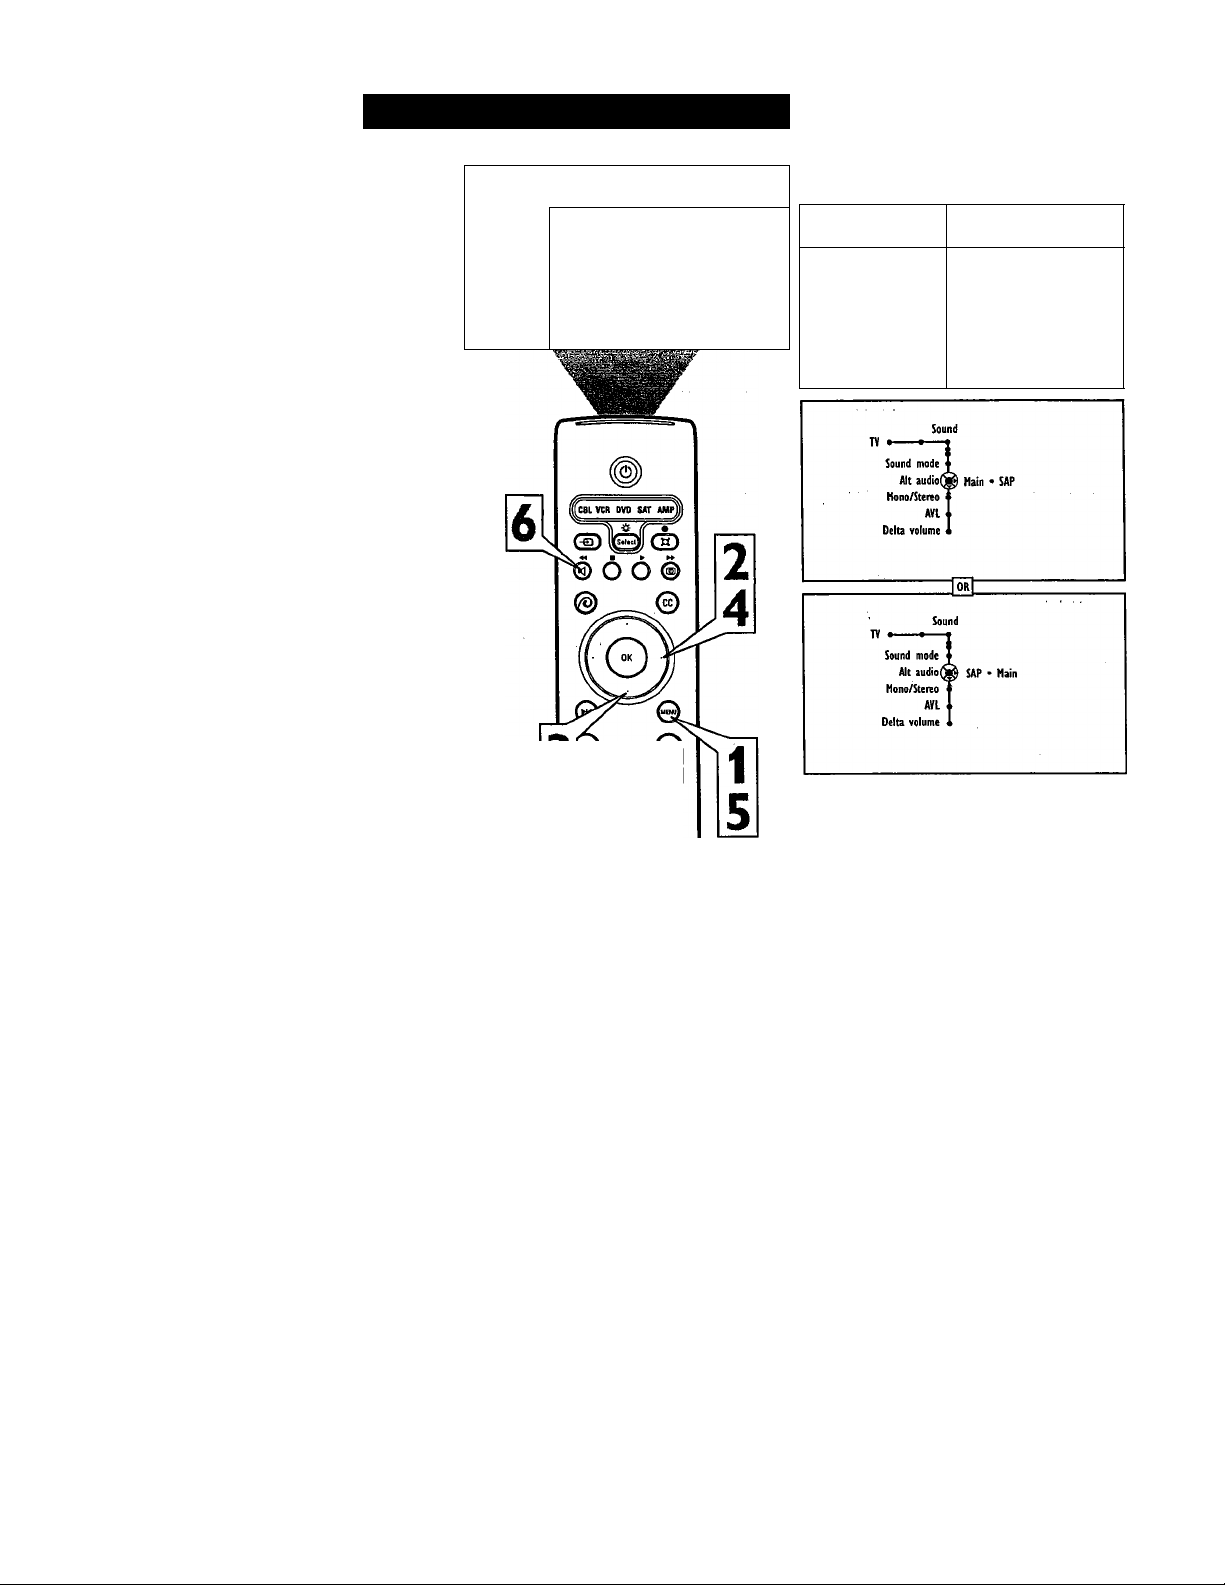
Using Alternate Audio (SAP)
For broadcasts that contain SAP (Secondary
Audio Program) information, the Alt Audio
Control can be set to SAP. Sent as a third
audio channel, SAP is an additional part of the
stereo broadcast system that can be heard apart
from the current TV program sound. TV sta
tions are free to use SAP for any number of
purposes.
If an SAP signal is not present with a selected
program, the “Alt Audio” option in the TV’s
on-screen menu cannot be selected and will
appear grayed out.
If SAP is available on the tuned channel:
Press the Menu button on the remote to
display the on-screen menu.
1
Press the Cursor Right button repeated
ly to select “Soimd.”
2
Press the Cmsor Down button repeat
edly until the Alt Audio control is
3
selected.
Press the Cursor Right button to toggle
and select either “Main” or “SAP.”
4
Press the Menu button to remove the
on-screen menu from the TV screen.
5
You can also select SAP by simply
pressing the Alternate Audio button on
6
the remote control.
Settings
Demo
Install
Picture Sound Features Channels
ivg
y • • • ■
[+1
M1
©
o
©©
o
©
o ©©
0
©
(3
©
0
TV •
------
•—Q
Auto sound
Equalizer
Volume
Balance
Loudness
Headphone volume
jd Features Channels
Sow
0 • •
43
Page 44
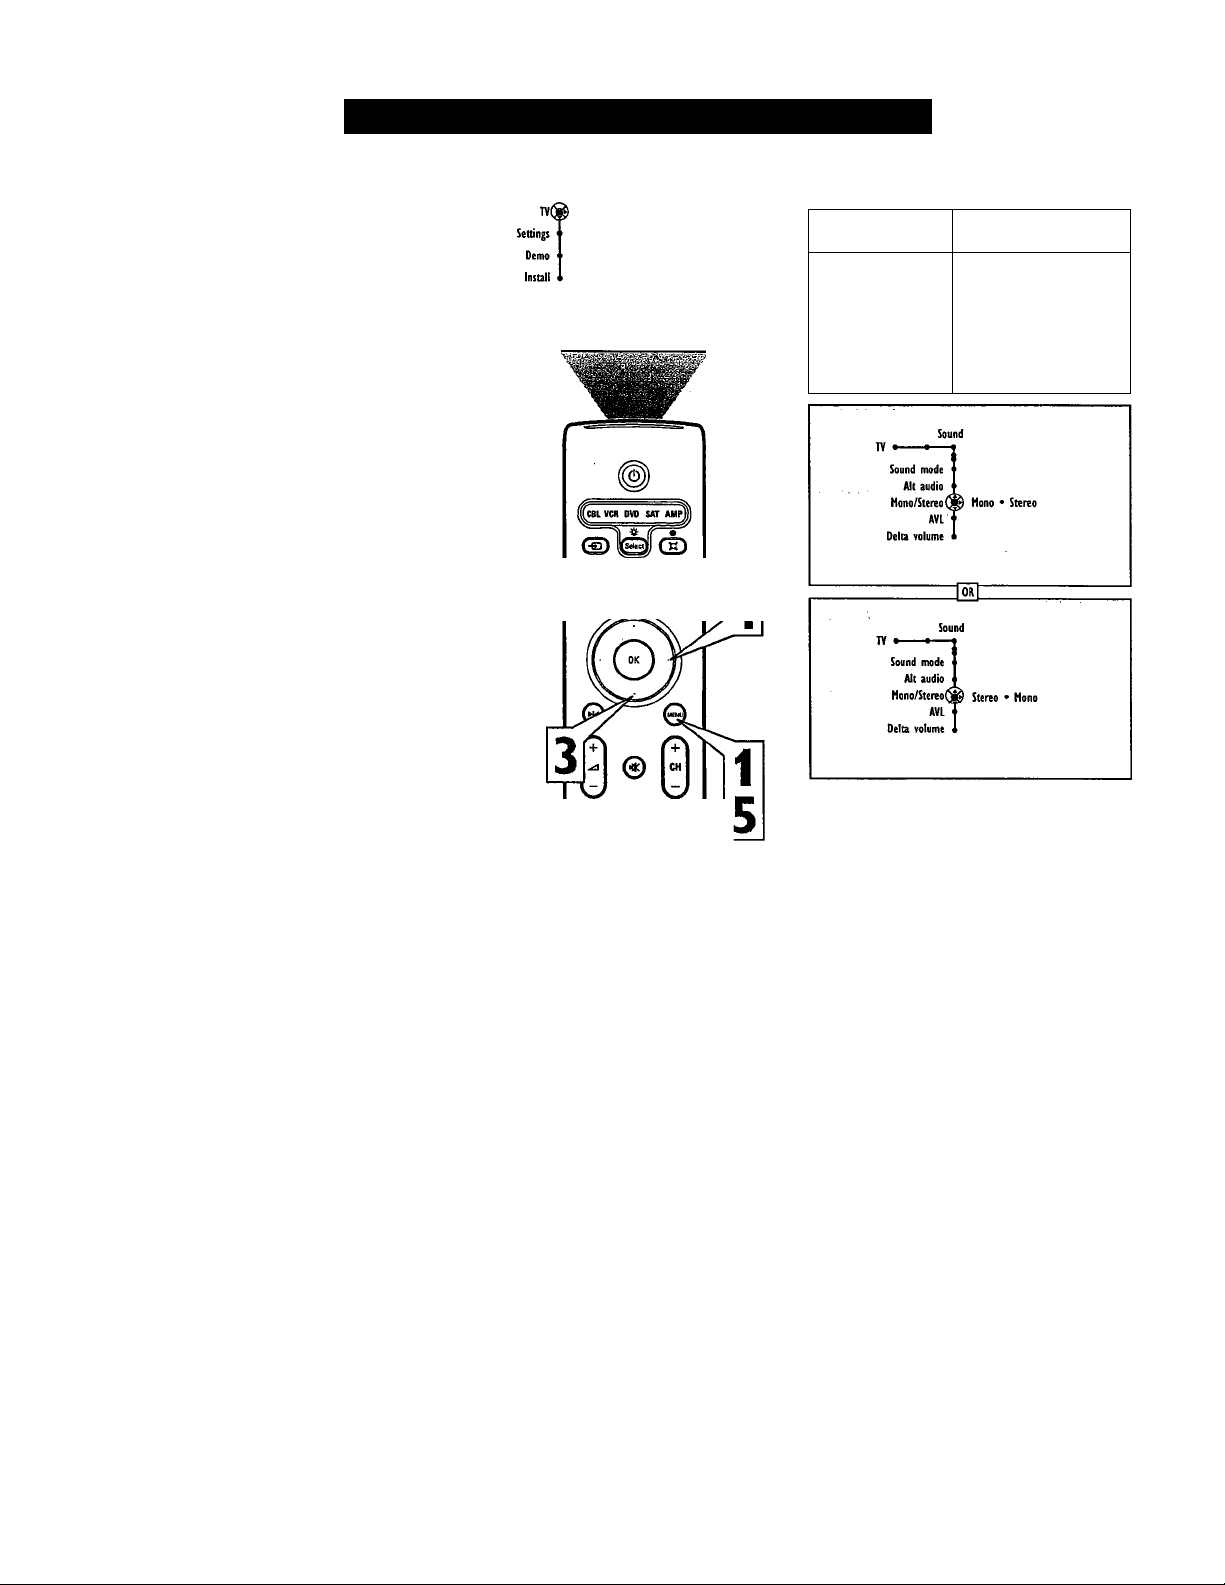
■<)))
Yoxir TV can output stereo sound. It has both
a Hi Fi Stereo amplifier and stereo two-way
speakers through which the stereo sound can
be heard.
Press the Menu button on the remote
to display the on-screen menu.
1
Press the Cursor Right button repeated
ly to select “Sound.”
2
Press the Cursor Down button repeat
edly until the “Mono/Stereo” control is
3
selected.
Press the Cursor Right button to toggle
and select either Mono or Stereo.
4
Setting the TV for Stereo Programming
Picture Sound Features Oiannels
Soui^ Features Channels
® • •
Auto sound
Equaliier
Volume
Balance
Loudness
Headphone volume
NOTE: If the signal being received is in
mono, it cannot be set to Stereo. If, however,
the signal is being received in Stereo, the TV
can be placed in the Mono mode. (If you
select the Mono option, remember to return
the Mono/Stereo control back to Stereo when
using the TV with stereo programming.)
Press the Menu button to remove the
on-screen menu from the TV screen.
5
© Ó Ó ©
@
_____
O
© ©
o
© ©
o © ©
0
©
MflCoM
0
44
Page 45
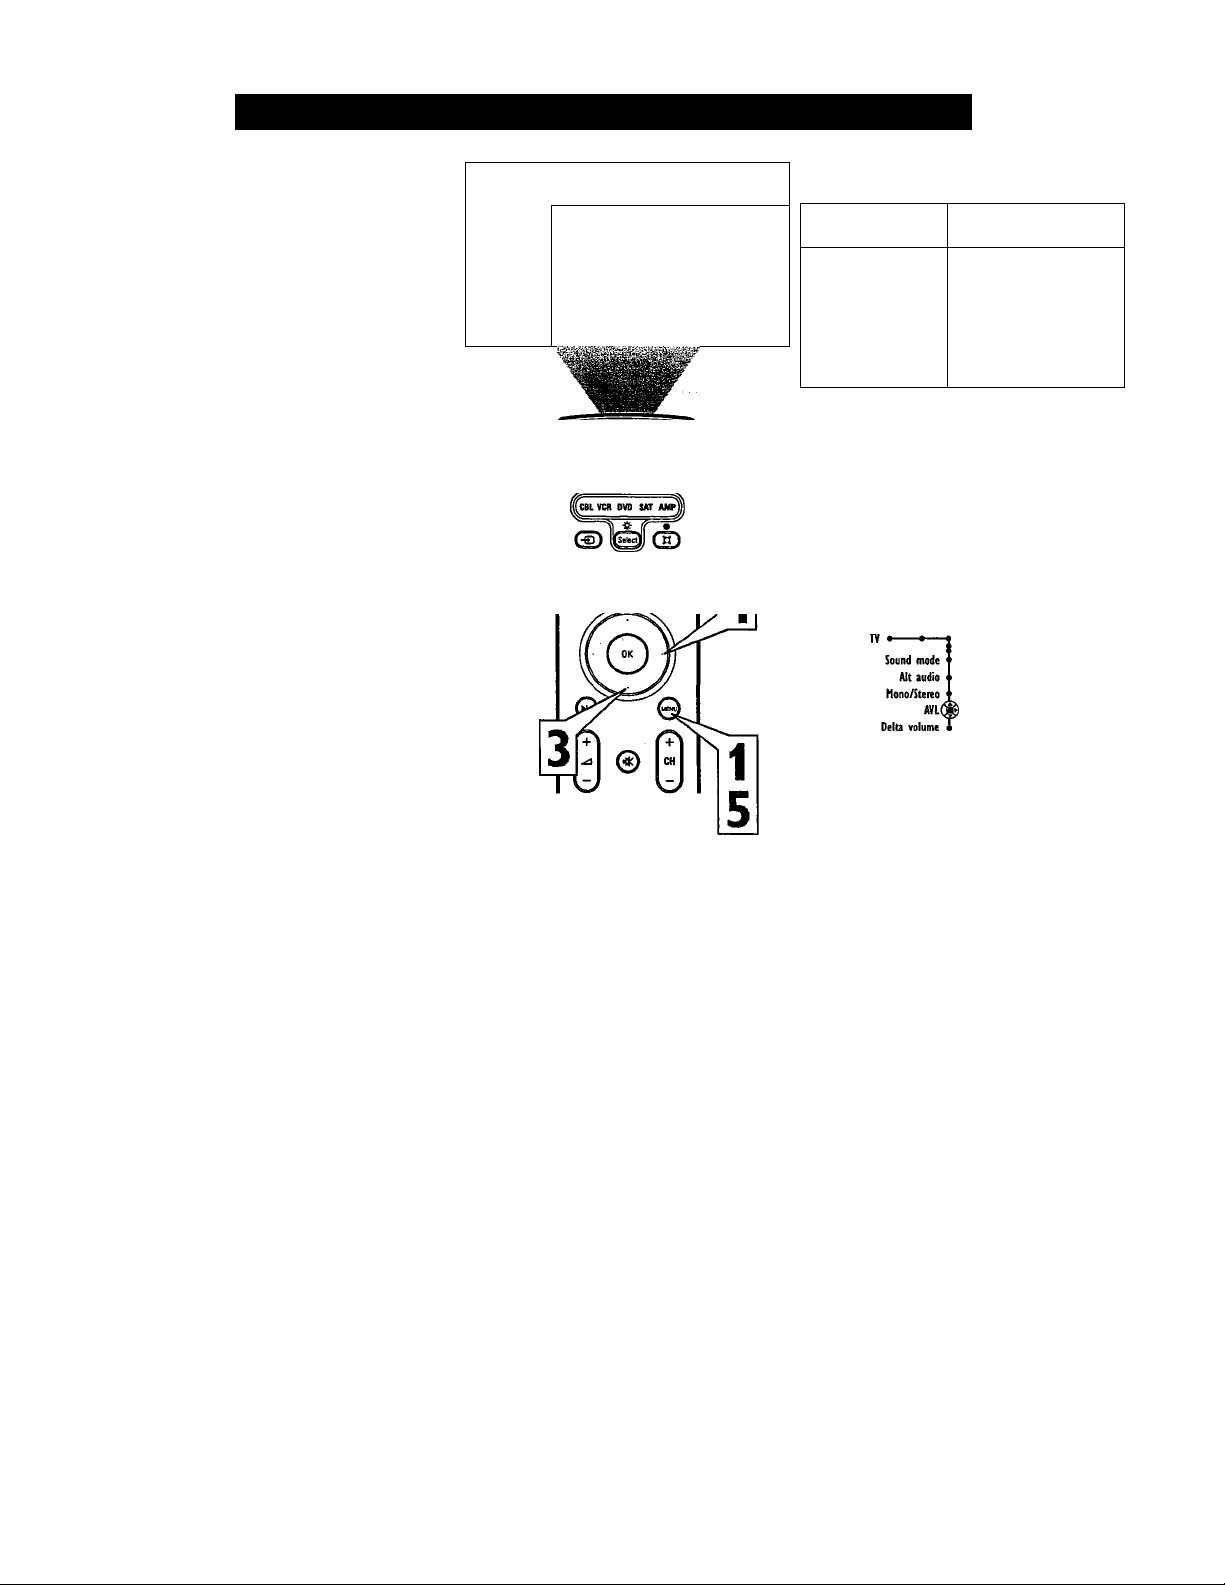
Turning the AVL (Audio Volume Leveler) on or off
You may have noticed the peaks and valleys
of sound that occur between program changes
or at commercial breaks. The volume levels
often vary considerably. By turning on the
AVL (Audio Volume Leveler) control, you
can make your TV produce a more consistent
volume level. Follow the steps below to turn
AVL on.
Press the Menu button on the remote
control to display the on-screen menu.
1
Press the Cursor Right button repeated
ly to select “Sound.”
2
Press the Cursor Down button repeat
edly until AVL is highlighted.
3
Press the Cursor Right button to toggle
the control on or off.
4
Press the Menu button to remove the
menu from the TV screen.
5
Settings
Demo
Install
Picture Sound Features Channels
5 • • ■ •
TVg
© Ó Ó ©
%
__
___
lY
Auto sound
Equalizer
Volume
Balance
Loudness
Headphone volume
Sound mode
Alt audio
Hono/Stereo
Delta volume
Soyj |d Features Channels
5 • •
Sound
AVL
Off* On
C(h
O © ©
© © ©
© © ©
0 0 0
AcftnCoM
(H) CM) (s)
On • Off
45
Page 46
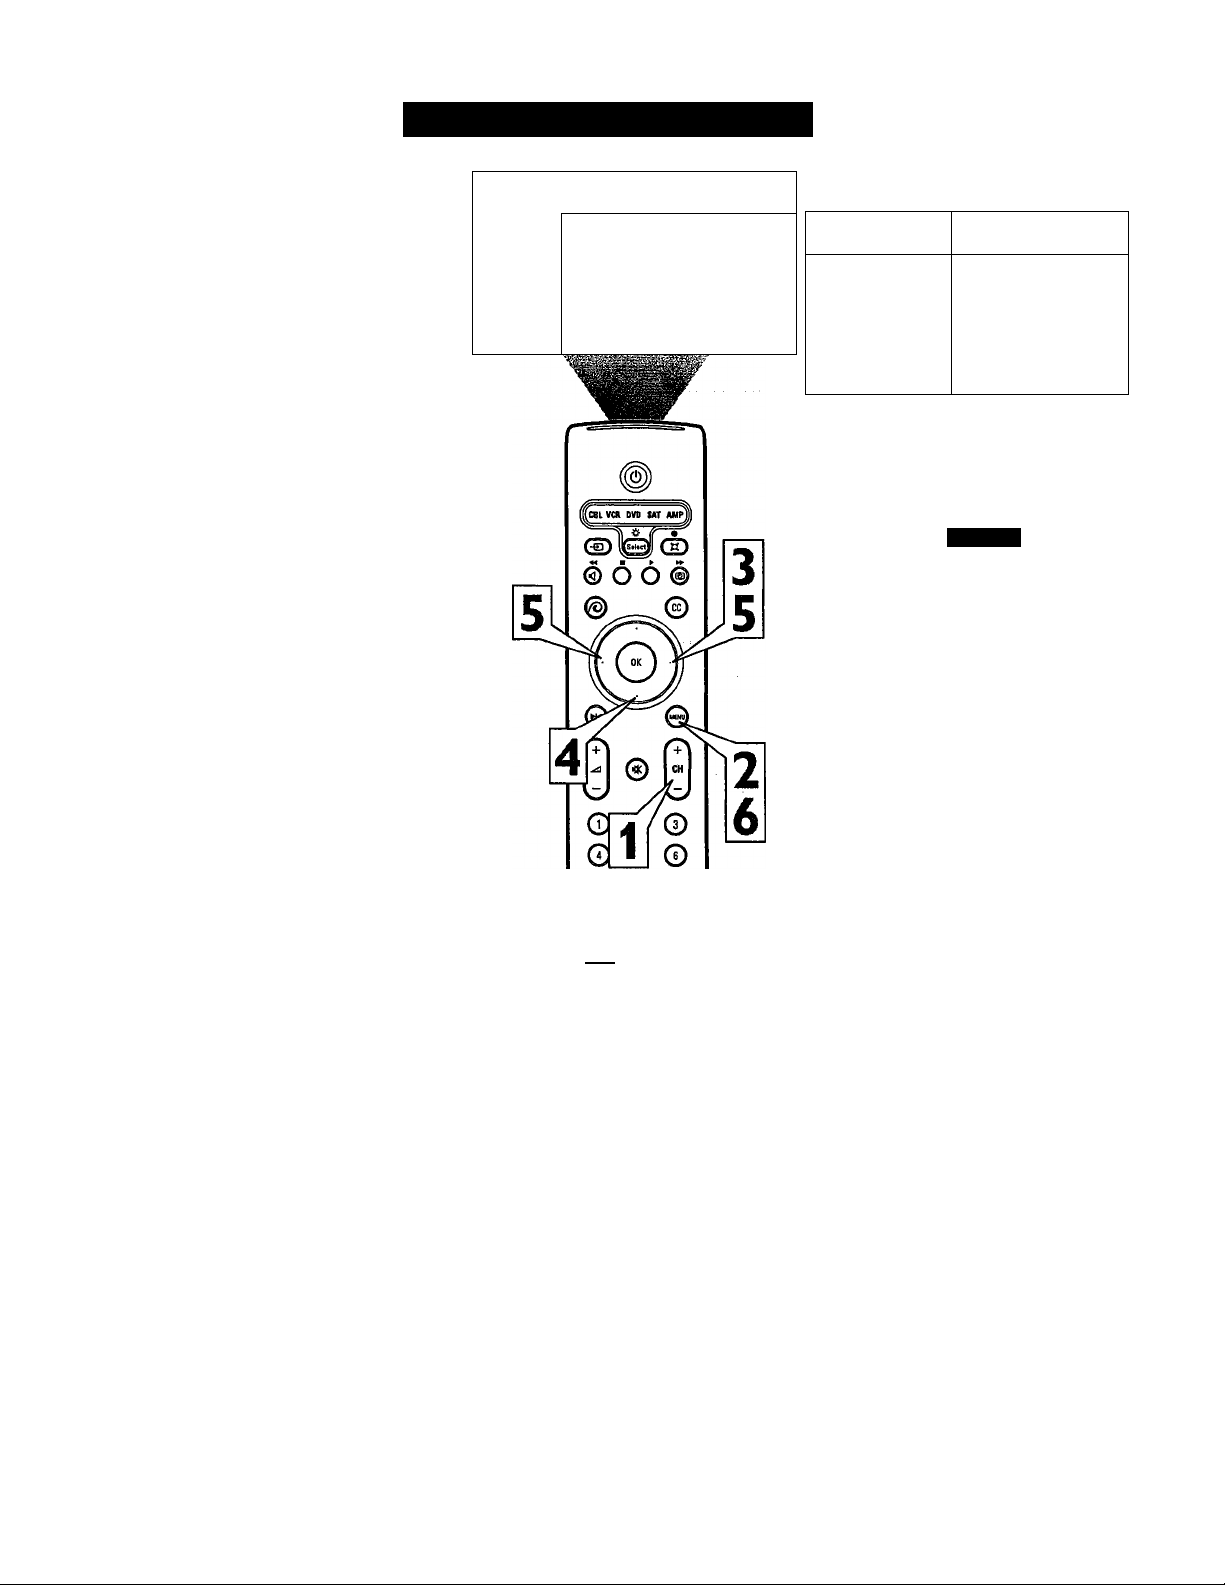
H»)
The volume level coming from channel to
channel and broadcast to broadcast can vary
widely. The Delta Volume control will allow
the volume to be increased for channels with
weaker audio signals while allowing other
chaimels with stronger signals to be reduced.
When the Delta Volume control is adjusted or
changed, it will affect only the currently
tuned chaimel. The TV will store the setting
for that channel in its memory and remember
it when the chaimel is tuned again.
NOTE: The Delta Volume control does not
work with the headphones.
Press the CH + or - button on the
remote control to tune to a specific
1
channel.
Press the Menu button on the remote
control to show the on-screen menu.
2
Press the Cursor Right button repeated
ly to select “Sound.”
3
Press the Cursor Down button
repeatedly imtil “Delta volume” is
4
highlighted.
Adjusting the Delta Volume
. Picture Sound Features Channels
y • • • •
Settings
Demo
Install
IV • •
Auto sound
Equaliter
Volume
Balance
Loudness
Headphone volume
Sound mode
Alt audio
Hono/Stereo
Delta volume
SoU]
^ Features Channels
V ■ •
Sound
AVL
cMEmE:
Press the Cursor Left button to
decrease the overall volume, or press
5
the Cursor Right button to increase the
overall volume for the tuned channel.
Repeat the steps above to adjust the delta vol
ume for additional channels.
Press the Menu button to remove the
on-screen menu from the TV screen.
6
o © ©
© © ©
(m) CD ®
46
Page 47
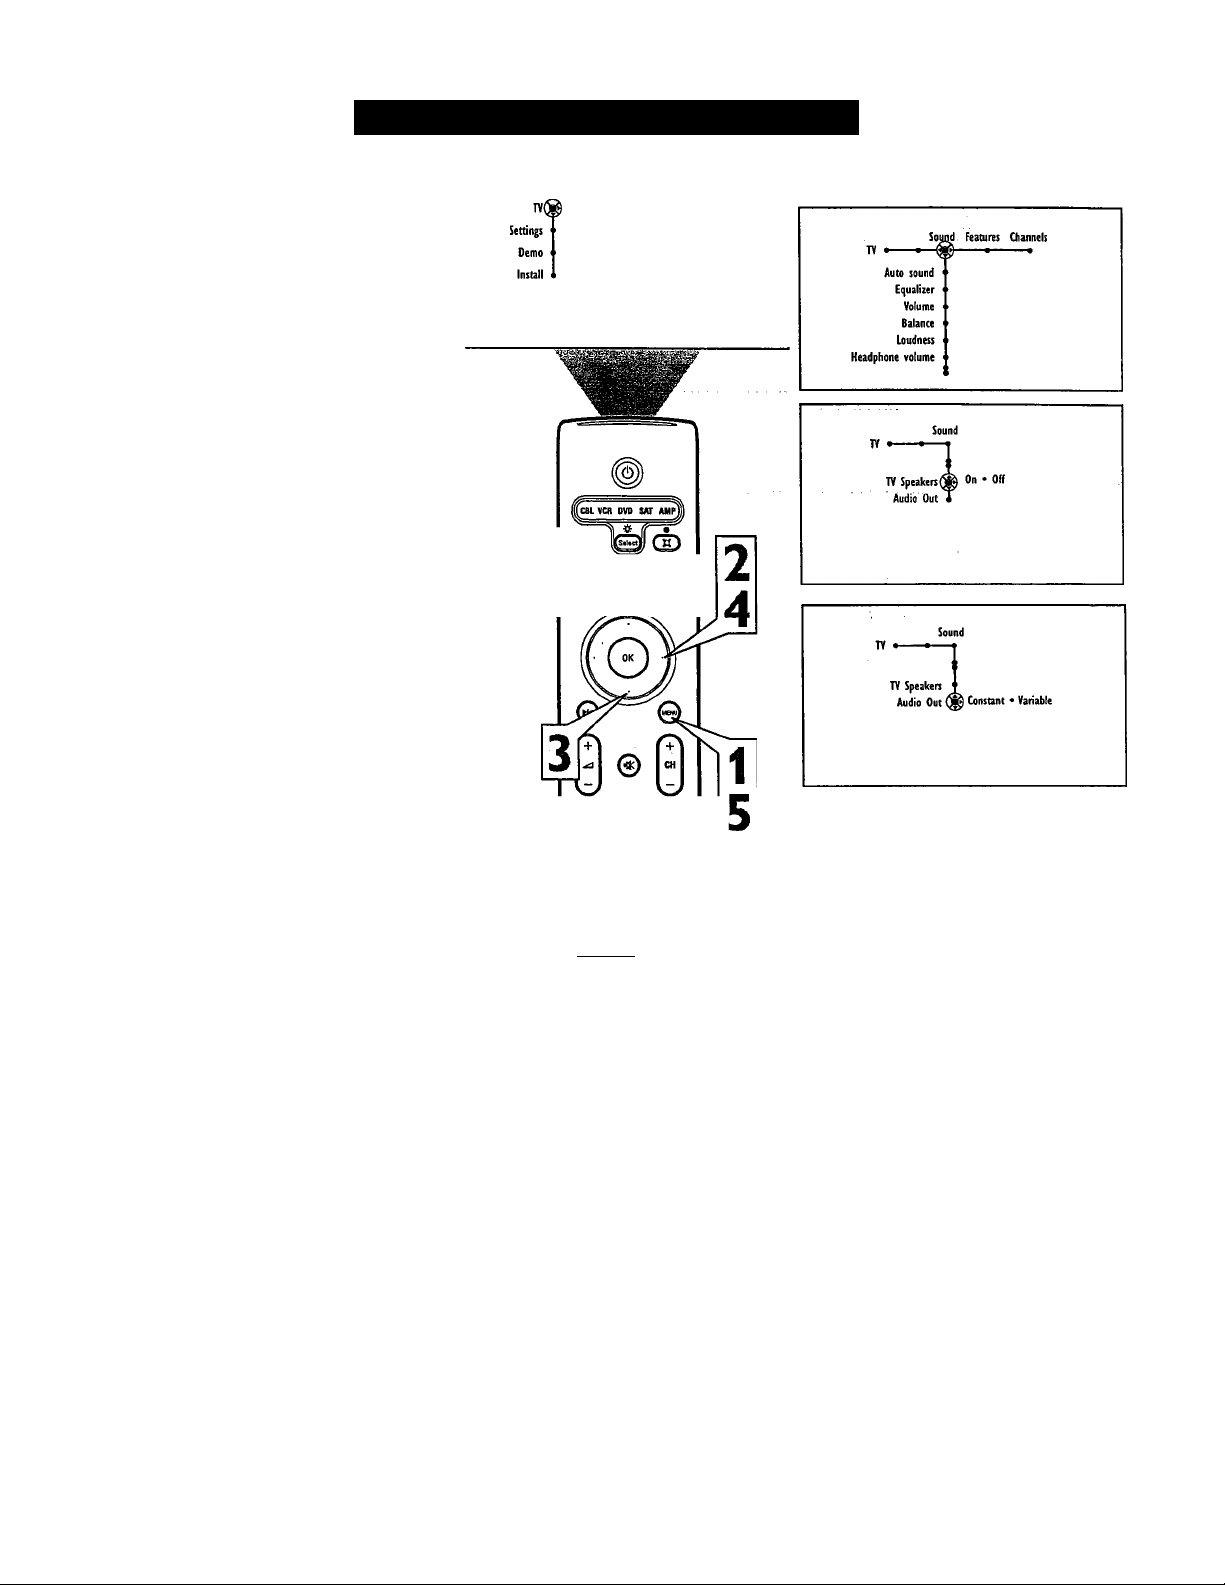
Adjusting Audio Out,TV Speakers
H
If you have connected the TV’s AUDIO
OUTPUT jacks to the AUDIO INPUT jacks
on an external audio system, you can turn off
the TV Speakers. Once the TV Speakers are
off, you can adjust the Audio Out to either
constant or variable output. With Variable
output, adjustments made to the TV volume
will change the level going to the external
audio system.
NOTE: If TV Speakers are “On” then Audio
Out is geyed out and catmot be selected. It is
automatically set to “Constant.” The TV
Speakers must be “Off’ to adjust Audio Out.
Press the Menu button on the remote
control to display the on-screen menu.
1
Press the Cmsor Right button repeated
ly to select “Sound.”
2
Press the Cursor Down button repeat
edly until “Audio Out” or “TV
3
Speakers” is highlighted.
Press the Cursor Right button to toggle
the control On or Off for “TV
4
Speakers”, Constant or Variable for
“Audio Out.”
Press the Menu button to remove the
menu from the TV screen.
5
Picture Sound Features Channels
©00©
O © ©
© © ©
© © ©
© © ©
AcfnCnvtf
(S’) (bD
47
Page 48
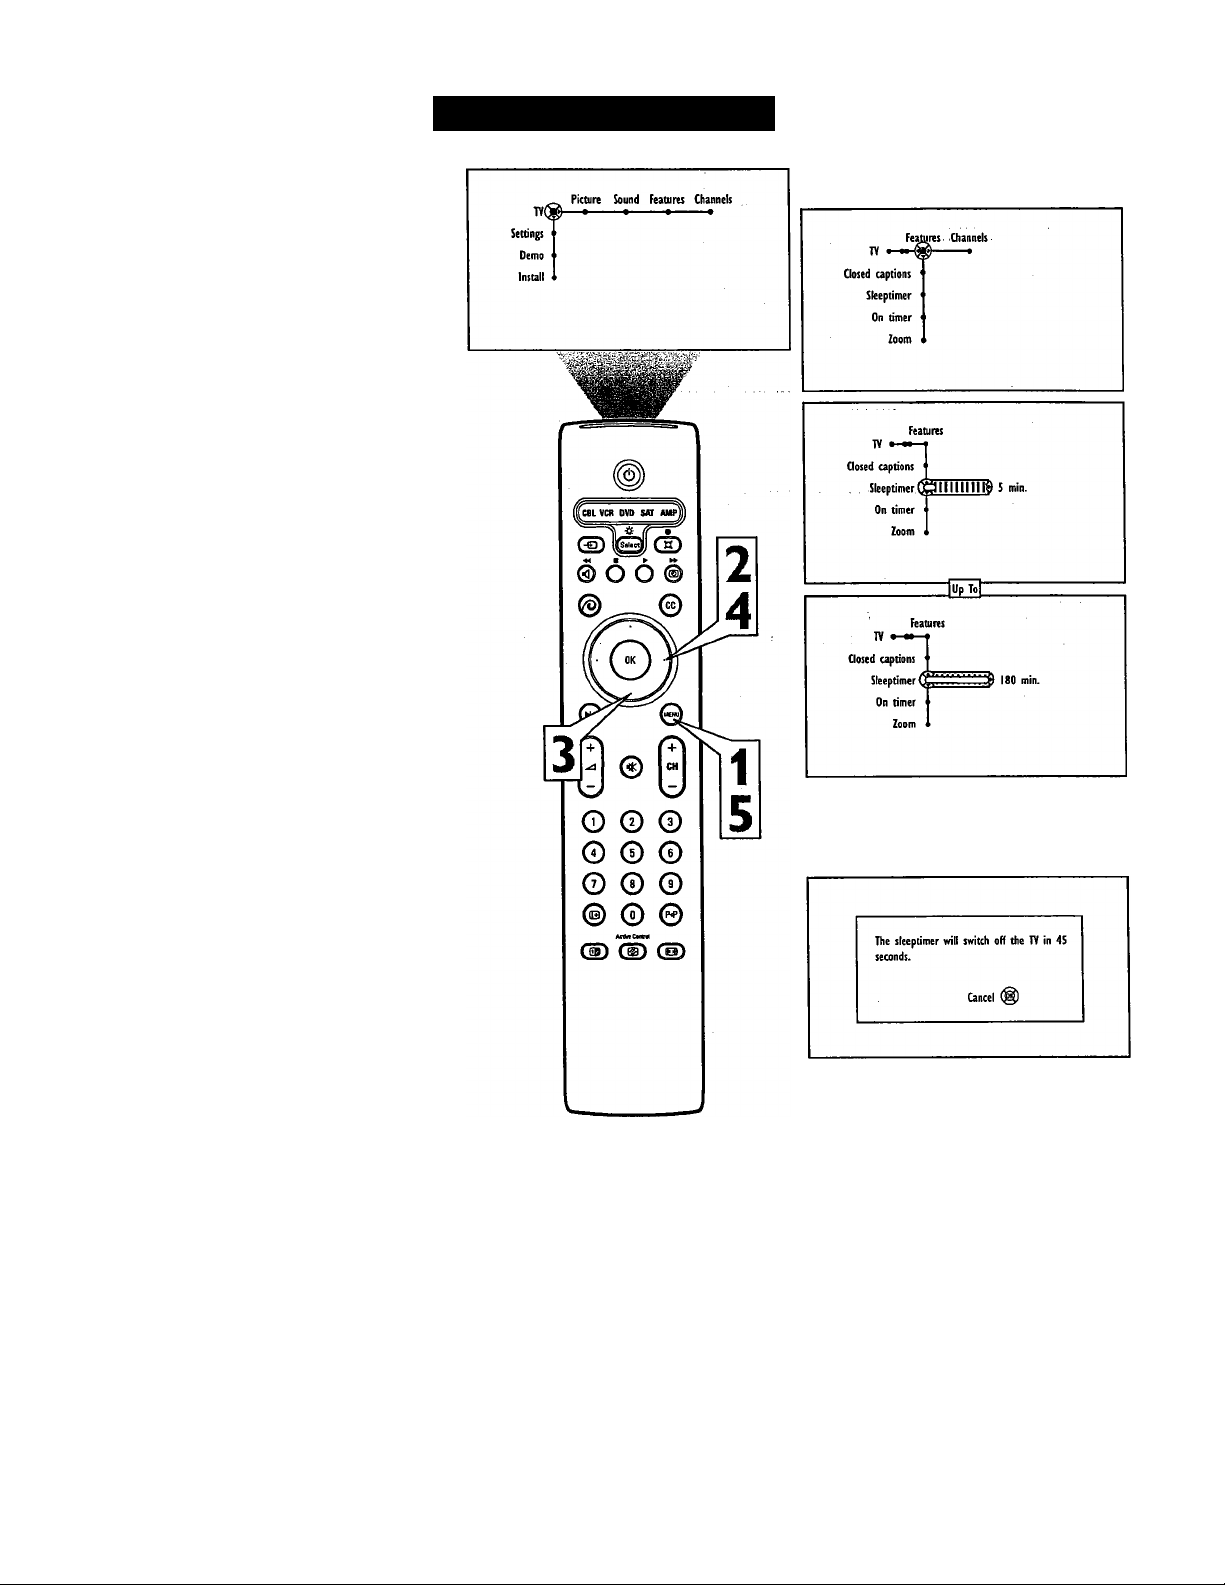
The Sleeptimer feature allows you to set a
timer to automatically switch the TV off after
a period of time you choose—5 minutes up to
180 minutes in 5-minute increments.
Press the Menu button on the remote
control to display the on-screen menu.
1
Press the Cursor Right button repeated
ly until “Features” is selected.
2
Press the Qursor Down button repeat
edly to select “Sleeptimer.”
3
Press the Cursor Right button to set the
sleeptimer in 5-minute increments,
4
from 5 minutes to 180 minutes.
Press the Menu button to remove the
on-screen menu from the TV screen.
5
Setting the Sleeptimer
To see how many minutes remain before
the TV shuts itself off, press the
Information Plus+ (SI button.
An on-screen countdown will appear dur
ing the last minute before the TV shuts
itself off. At this time, you may cancel
the Sleeptimer setting by pressing the OK
button on the remote control.
During the last minute of a sleeptimer set
ting, the TV will display a countdown screen
that will allow you to cancel the setting.
48
Page 49
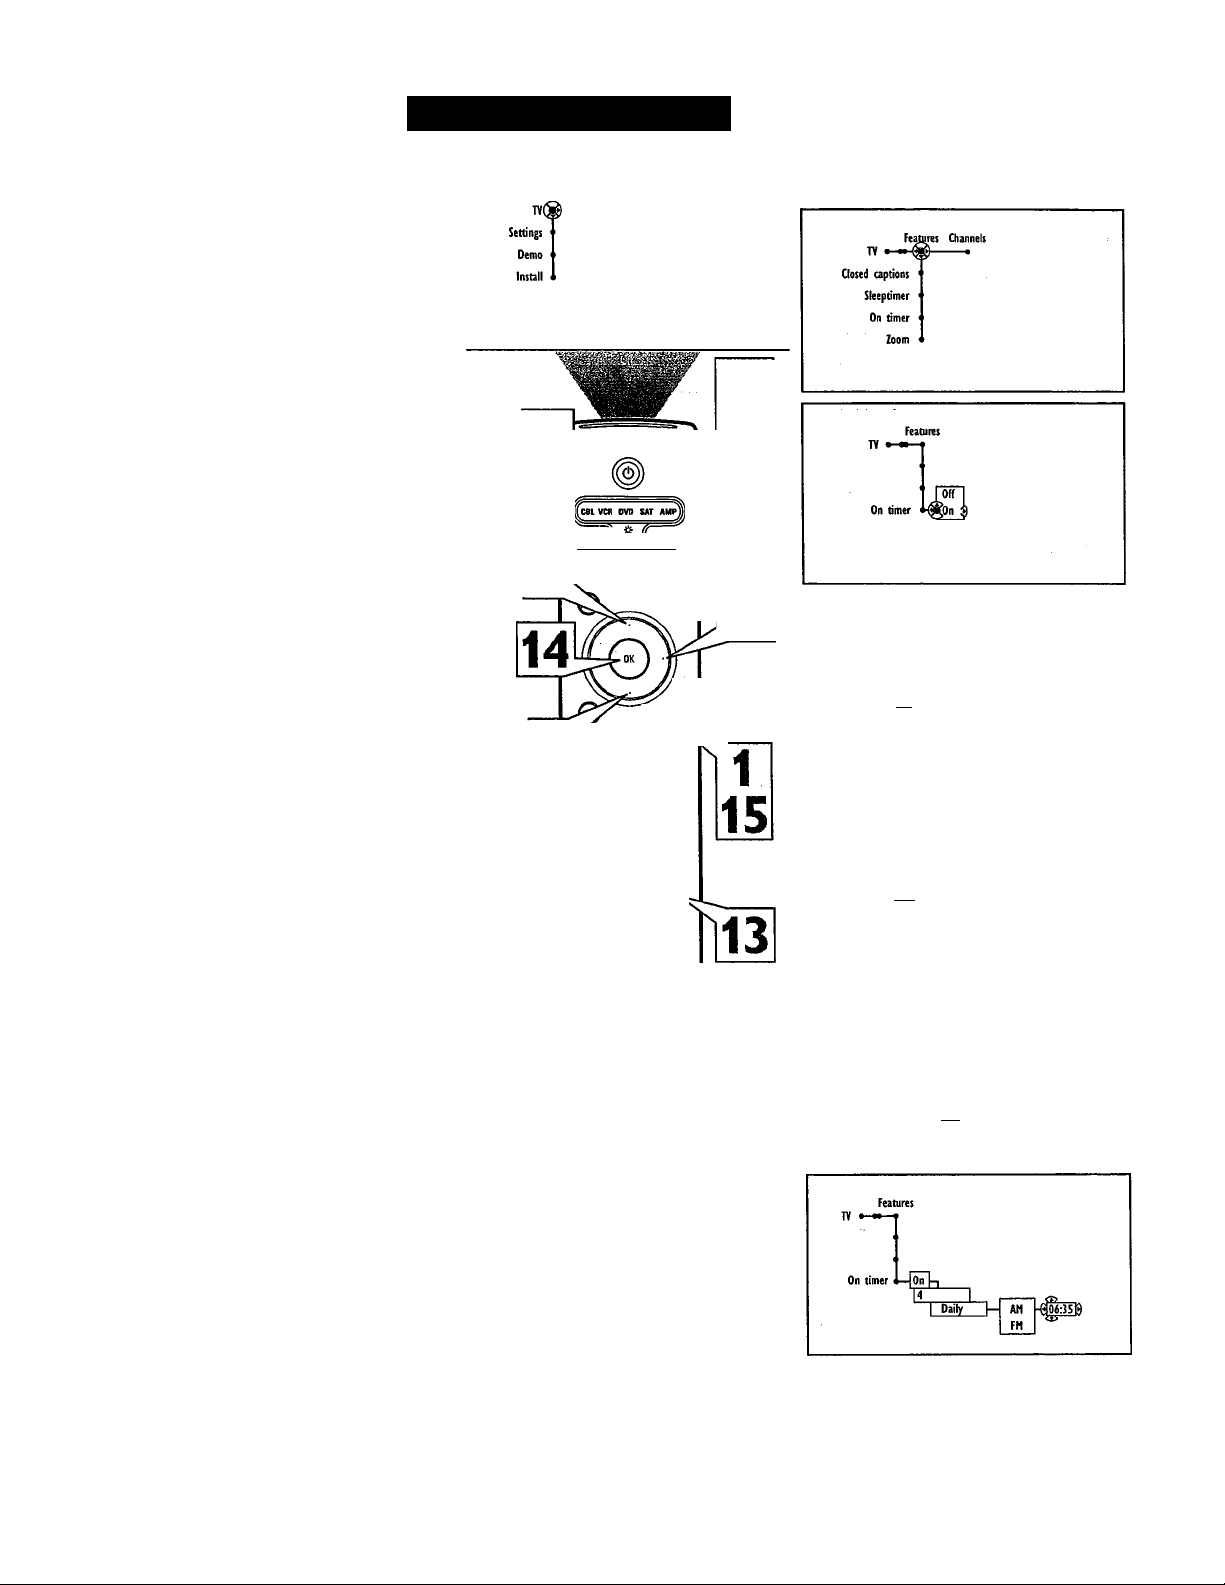
The On Timer control allows you to set a time
for the TV to come on automatically at a cer
tain time of day. The on timer can be set to
work once or daily at a time you specify.
Press the Menu button on the remote
1
2
3
4
5
6
7
8
9
10
11
12
13
control to display the on-screen
menu.
Press the Cursor Right button repeat
edly to select “Features.”
Press the Cursor Down button repeated
ly to select the “On timer” control.
Press the Cursor Right button to enter
the On Timer submenu.
Press the Cursor Up or Down button to
select “On.”
Press the Cursor Right button to shift
the menu to the start-channel submenu.
Press the Cursor Up or Cursor Down
button to select the channel you would
like the TV to tune to when it turns on.
Press the Cursor Right button to shift
the menu to the day/daily submenu.
Press the Cursor Up or Down button
to select the day to turn on or select
“Daily.”
Press the Cursor Right button to
enter the AM/PM submenu.
Press the Cursor Up or Down button
to select “AM” or “PM.”
Press the Cursor Right button to
enter the start time.
Press the Number buttons to enter
the time. Use “0” first if entering a
signal digit (for example, input “0,1,
3, 0” for 1:30).
Press the OK button to confirm.
14
Press the Menu button to remove the
15
on-screen menu from the TV screen.
Setting the On Timer
Picture Sound Features Gtannels
5
7
9
[-631 ( K1
© о о ©
11
7
9
11
О © ©
0 © ©
"Ш) СЩ) (Н)
^ 0 © ©
* © ©
ДсбяС<пМ
0
©
2
4
6
8
10
12
On timer 1—|0n i-^ A )
Features
On timer i—|0n |-|
\£
On timer 1—}0n |-i
Daily
Tliunday
Friday
Saturday
ezzzl
49
Page 50
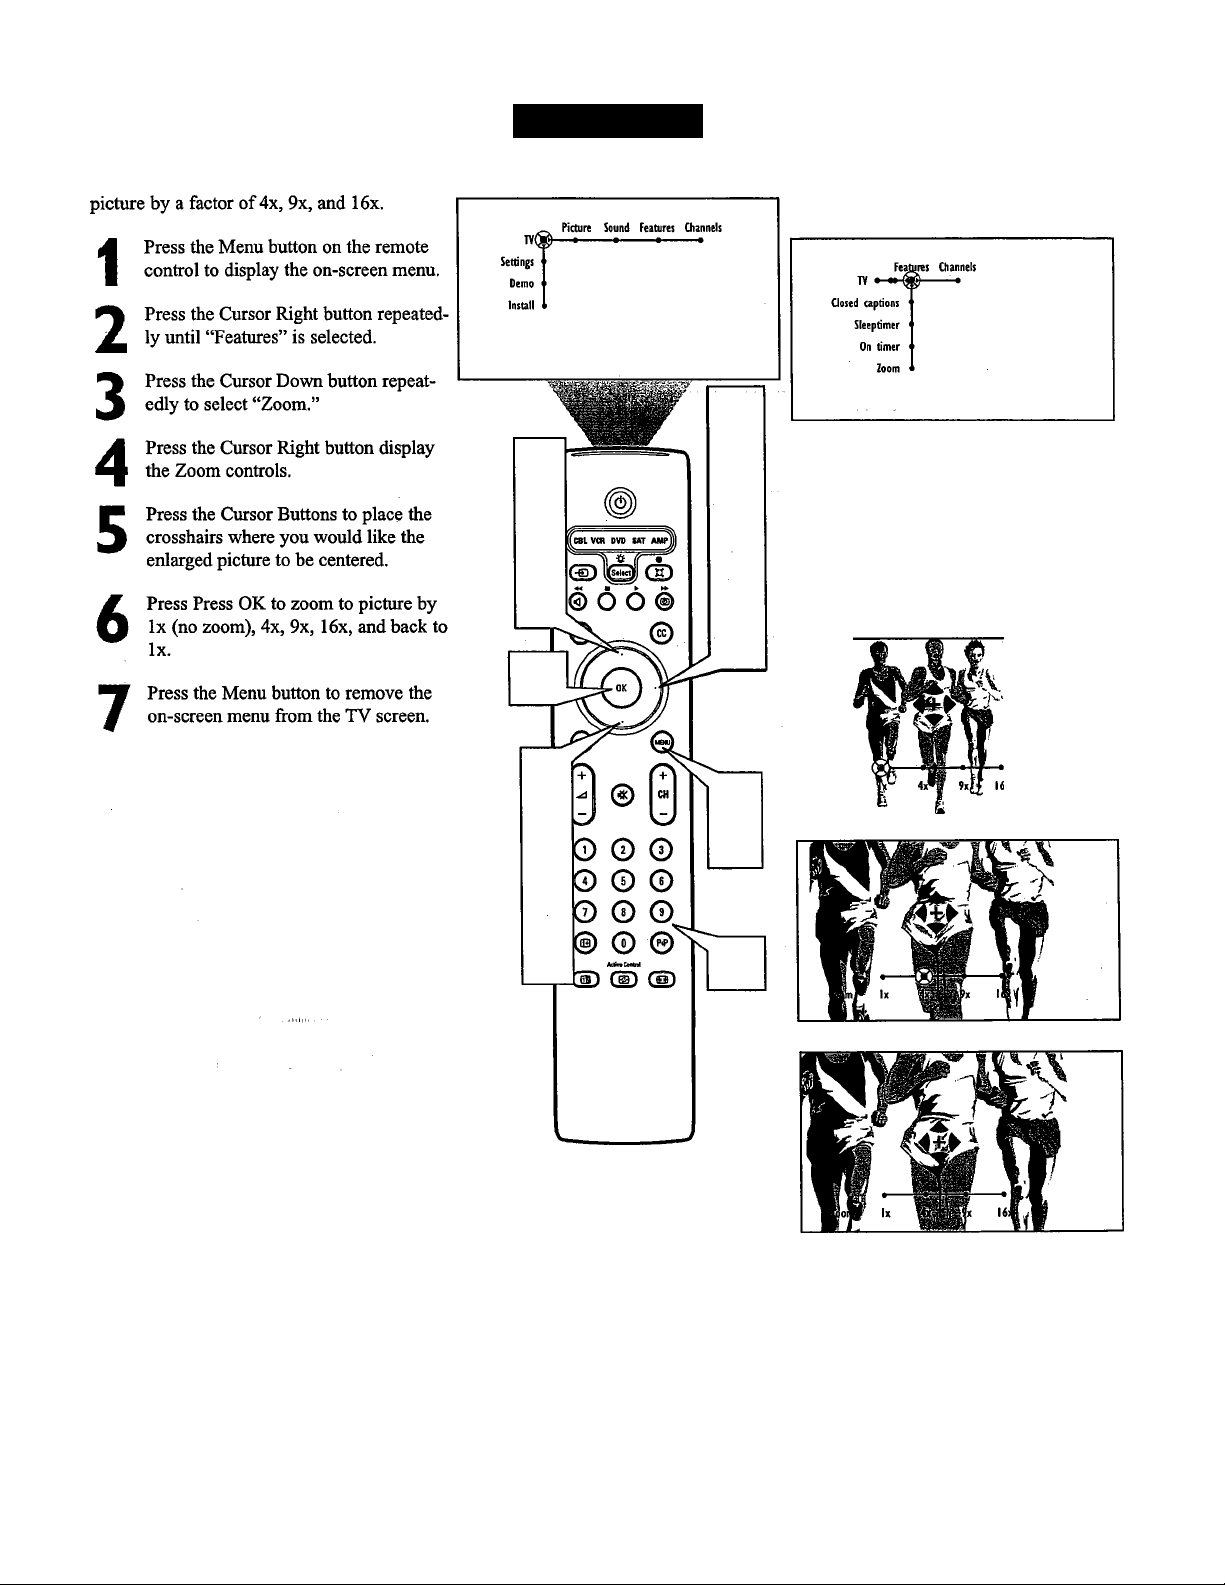
0
The Zoom feature allows you to zoom the
Using Zoom
TV '
Closed captions
Steeptimer
On timer
Zoom(
Features Channels
Zoom
50
Page 51
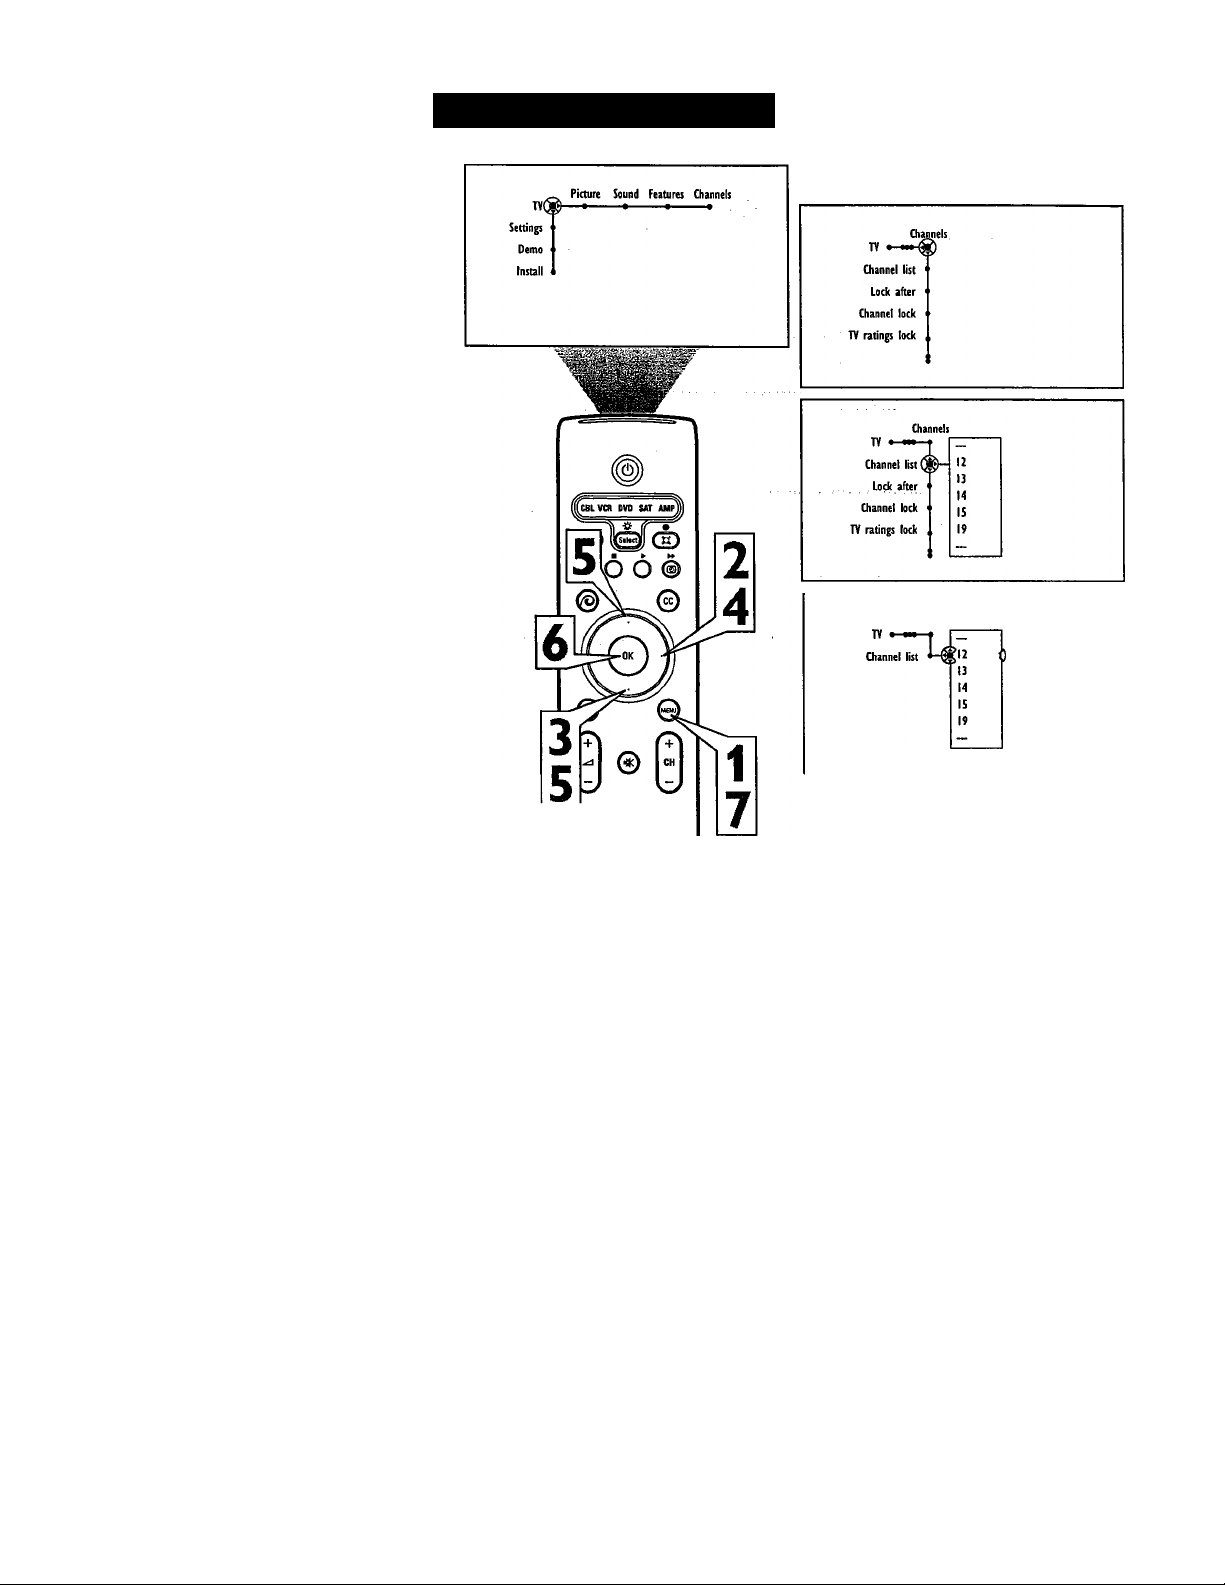
CH
The Channel List control shows all the avail
able channels that Auto Programming placed
in the TV memory. The chaimels can be
selected from this list.
Press the Menu button on the remote
control to display the on-screen menu.
1
Press the Cursor Right button repeated
ly to select “Channels.”
2
Press the Cursor Down button to select
the “Chaimel list” control.
3
Press the Cursor Right button to enter
the Channel List submenu.
4
Press the Cursor Up or Down button to
select a specific chaimel from the list.
5
Press the OK button. The television
will tune to the selected channel.
6
Press the Menu button to remove the
on-screen menu from the TV screen.
7
Using the Channel List
Oianneli
■э © ©
© © ©
© © ©
© © ©
AoinCwM
® ® ®
51
Page 52
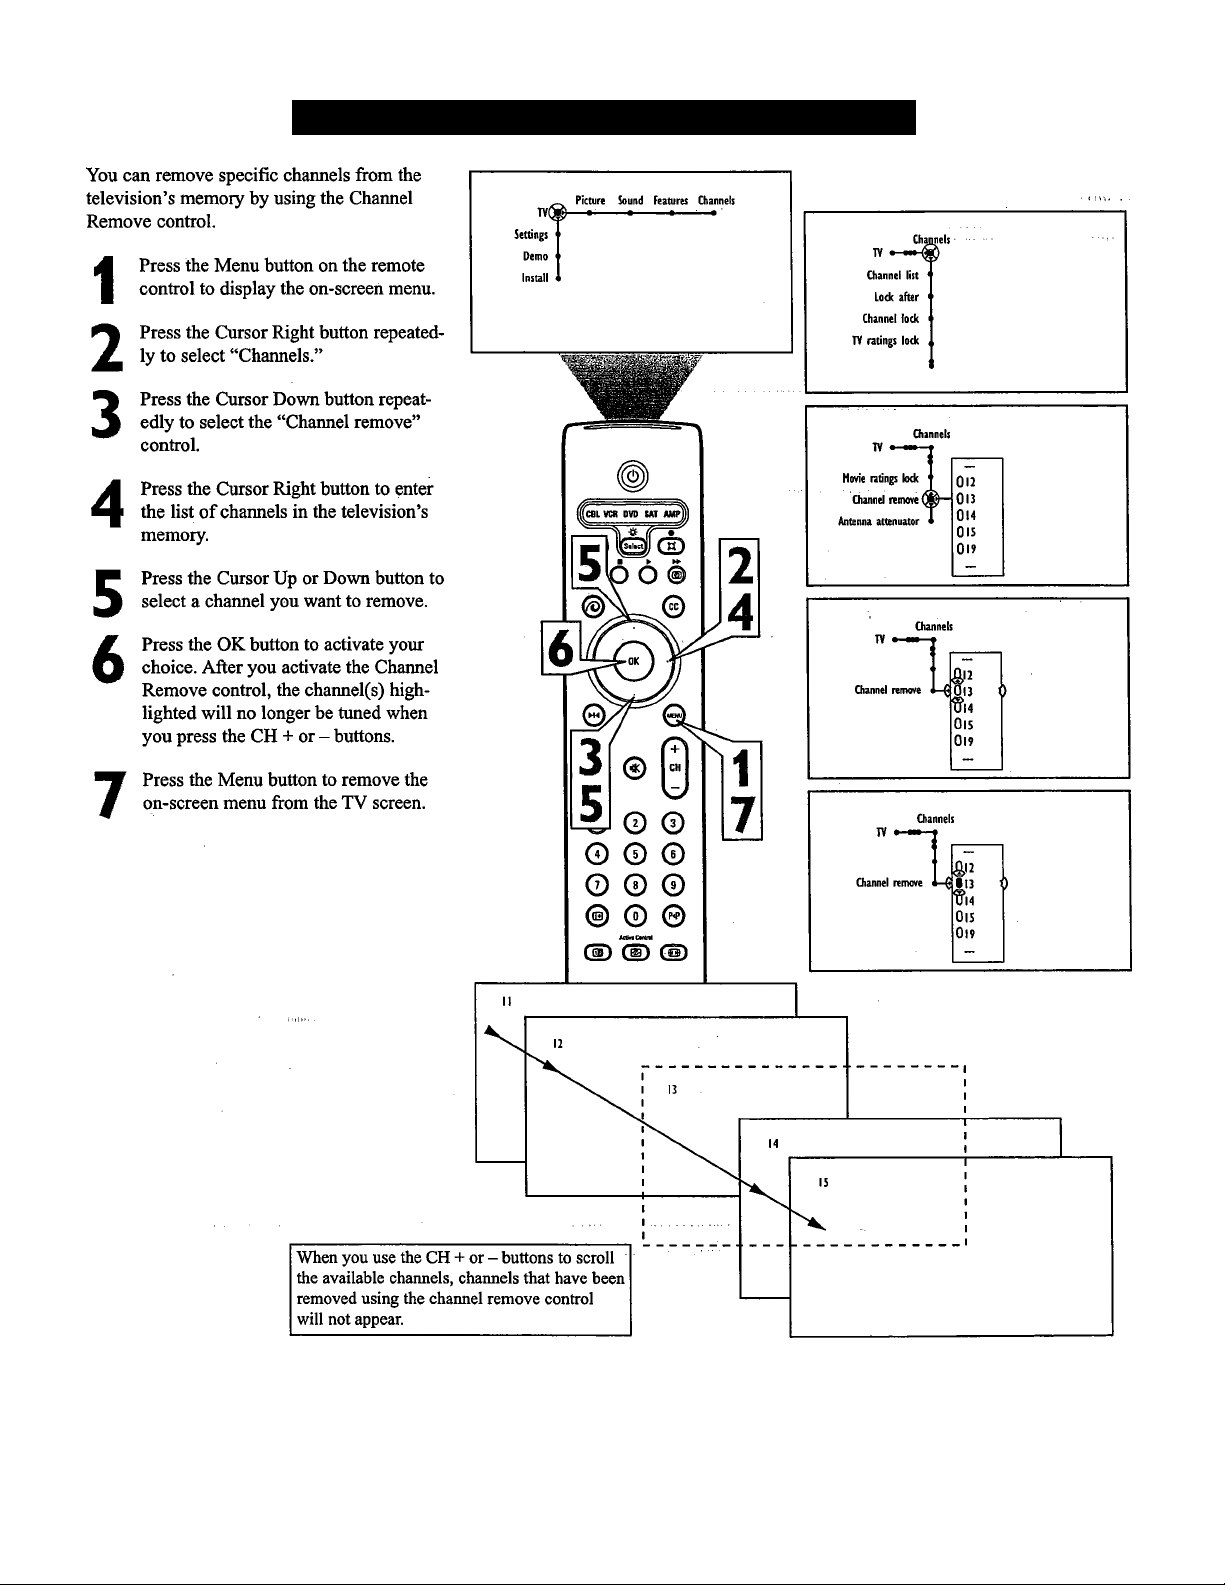
Removing Channels from the Channel List
CH
52
Page 53
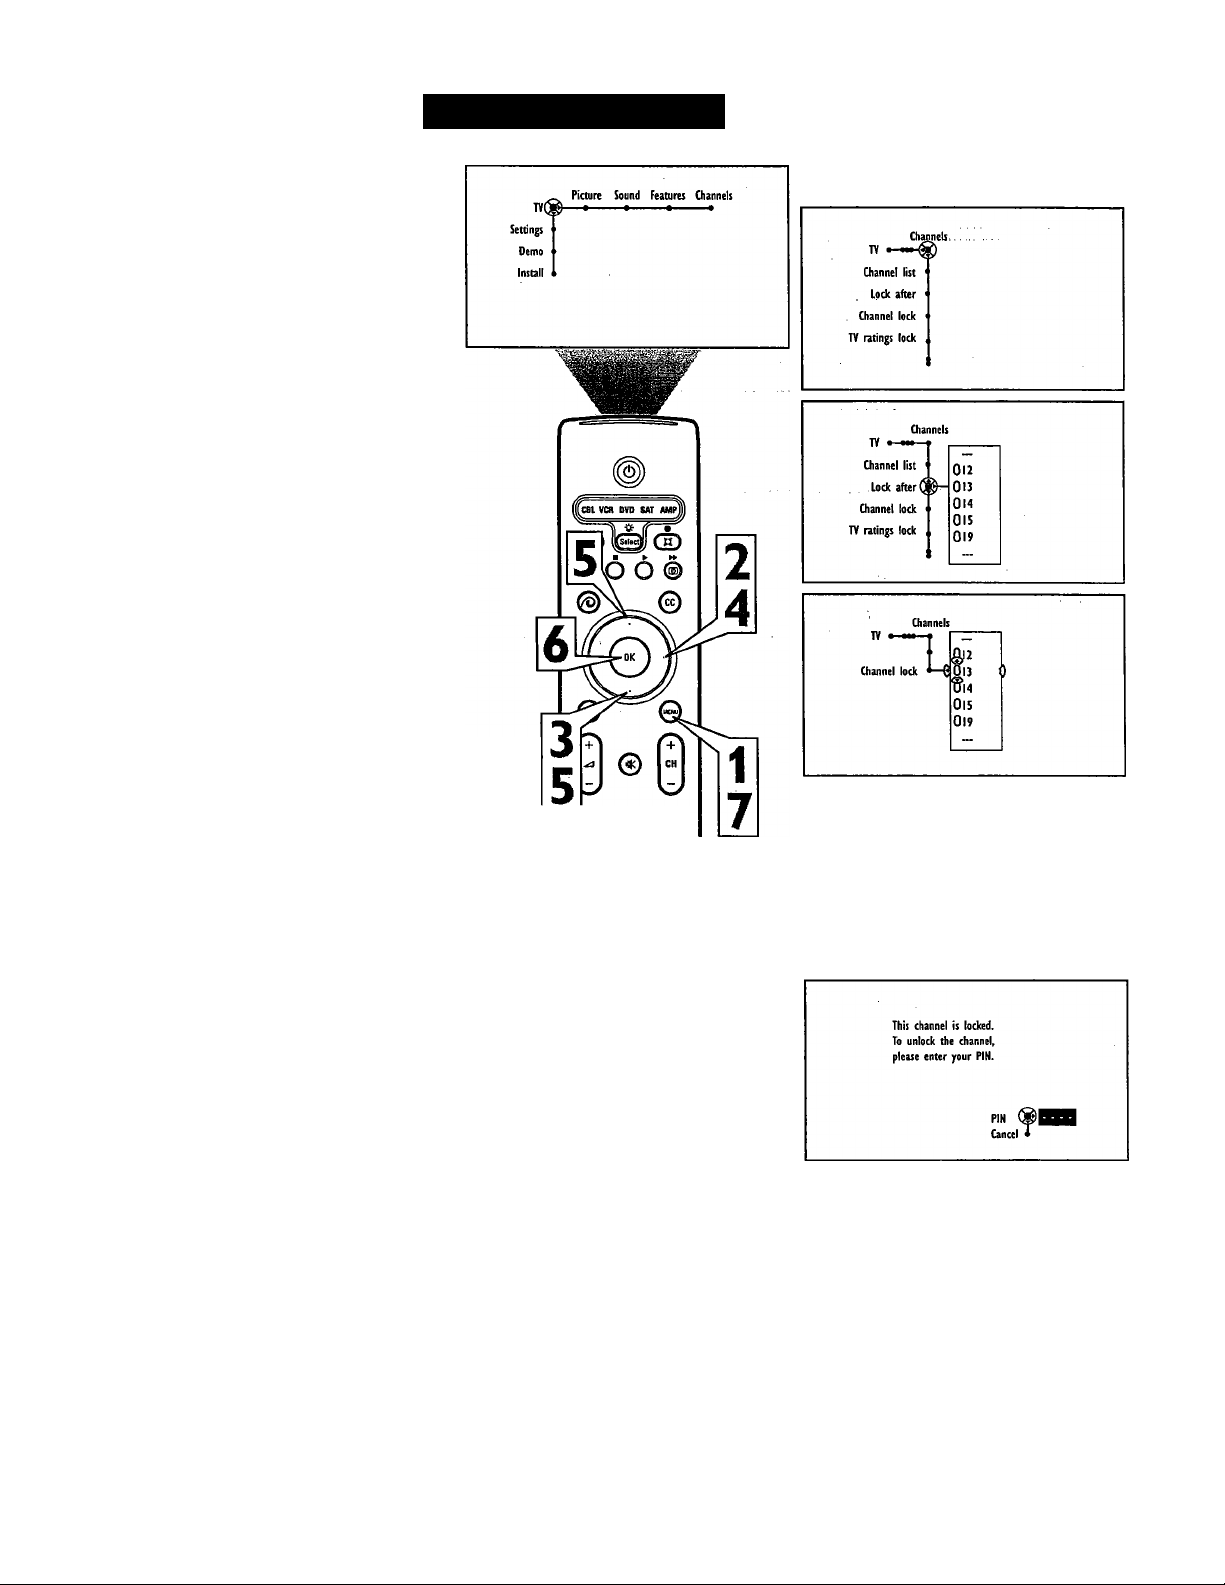
For various reasons, you may want to block
the viewing of materials on a specific chaimel
or chatmels or through the audio/video (AV)
inputs. Lock Channel provides this capability.
Before using the Lock Channel feature for the
first time, you will be asked to enter the PIN
number. Use the digit buttons on the remote
control to enter the PIN you choose. All num
ber combinations from 0000 to 9999 are
valid. After you enter the number once, you
will be asked to confirm the number, and then
the niunber is stored.
To change your PIN number, see page 66.
Press the Menu button on the remote
control to display the on-screen menu.
1
Press the Cursor Right button repeated
ly to select “Channels.”
2
Press the Cursor Down button repeat
edly to highlight the “Chatmel lock”
3
control.
Using Lock Channel
CH
Press the Cursor Right button to enter
the channel lock submenu.
4
Press the Cursor Up or Down button to
select a specific channel from the list.
5
Press the OK button. The oval in front
of the channel number will change to
6
yellow to show that the channel is
locked.
Repeat steps 5 and 6 for other channels you
want to lock.
Press the MENU button to remove the
7
on-screen menu from the TV screen.
NOTE: To imlock a locked channel, enter
your personal PIN number.
m
If you tune to a channel or input source that
is locked and you enter your PIN, all locked
channels or input sources will be unlocked
until the television is shut off. When the tele
vision is turned back on again, previously
locked channels or input sources will be
locked again.
tD © ©
© © ©
© © ©
© © ©
CD ® CD
Channels
TV • m» •
Channel lock •—€
OIS
019
This screen will appear when tuned to a
loeked ehannel. To view the channel, enter
your PIN.
53
Page 54
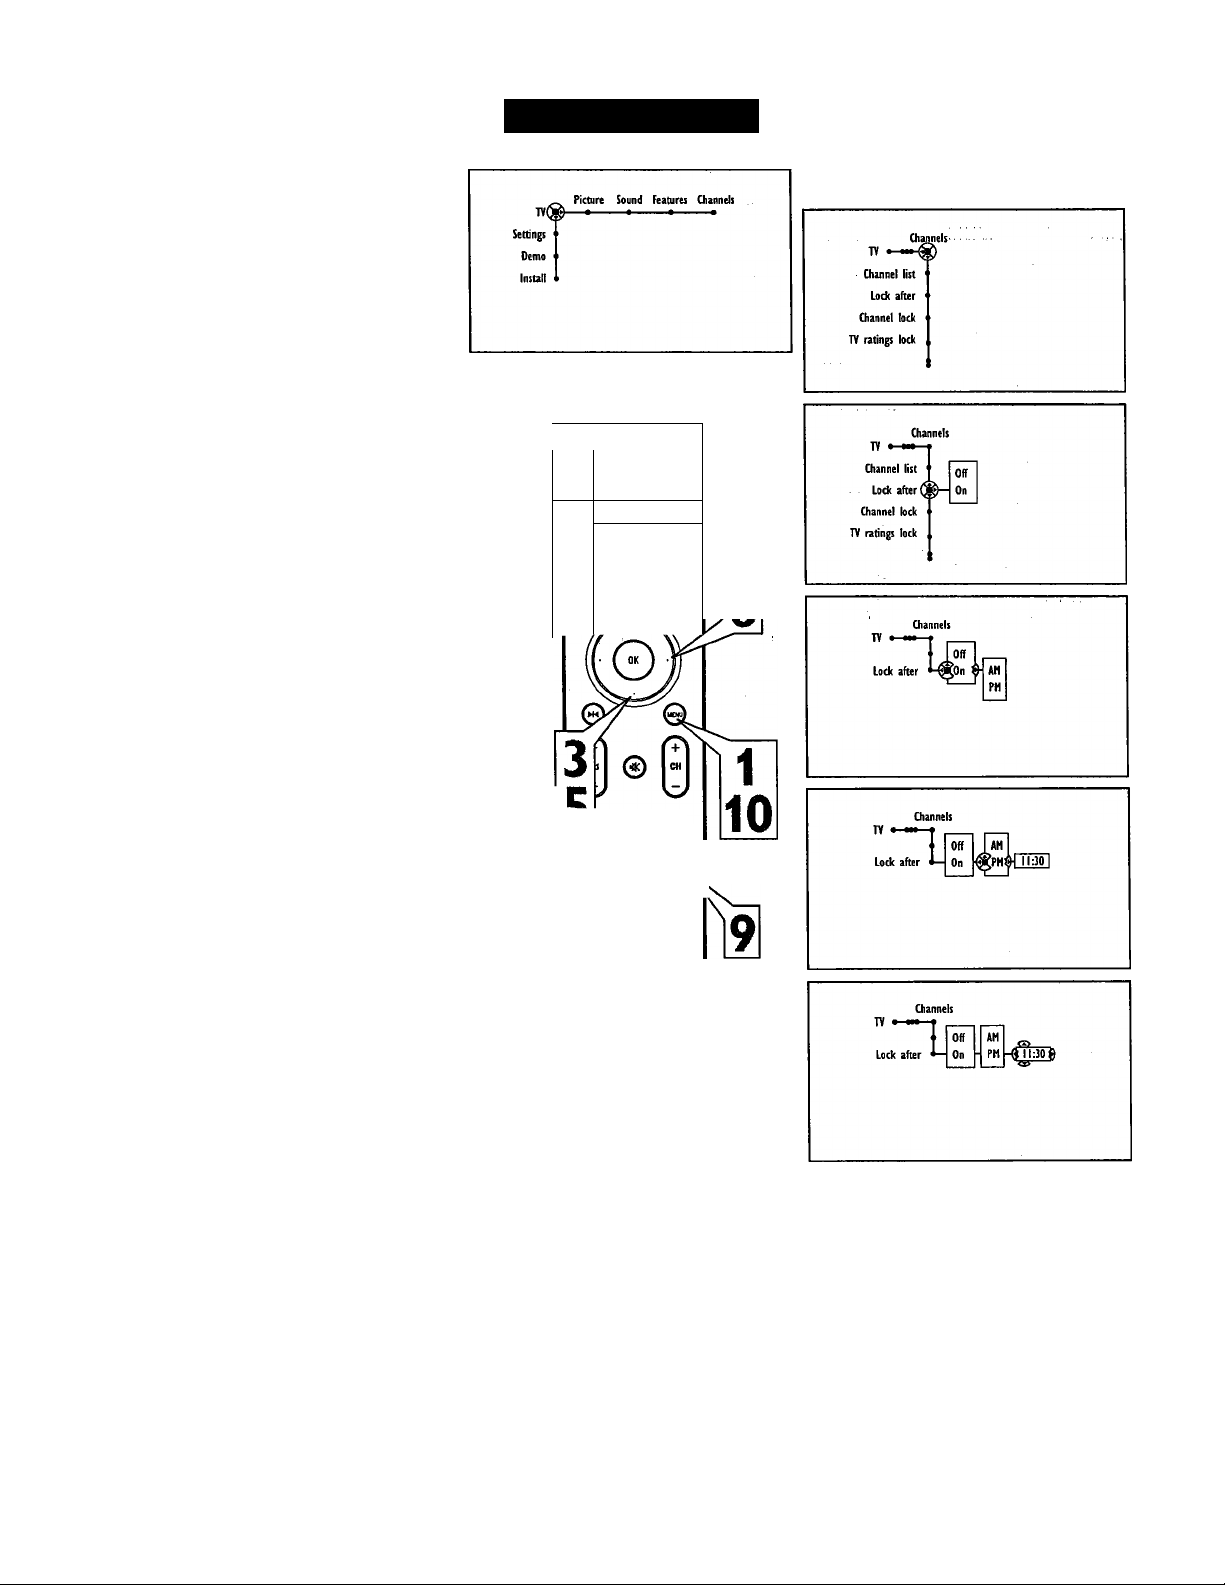
CH
You may want to block programming after a
certain time of day. This feature is excellent for
limiting the amount of time your children wateh
TV or for preventing them watching unsuitable
programs that are often shown at night
NOTE: The set automatically unlocks after
3 a.m.
Press the Menu button on the remote
1
2
3
4
eontrol to display the on-sereen
menu.
Press the Cursor Right button repeat
edly to select “Channels.”
Press the Cursor Down button
repeatedly to select the “Lock after”
control.
Press the Cursor Right button to
enter the Lock After submenu (with
the options “Off’ or “On”).
Using Lock After
-------------------------
L VCR OVD UT AMP||
c
Il7
dIqT^d
>6 6 ©
7
—
Press the Cursor Up or Down button
5
6
7
8
9
to select “On” from the submenu. A
submenu with the options of “AM”
or “PM” will appear.
Press the Cursor Right button to
enter the AM/PM submenu. A box
with the time (or area where the time
can be entered) will appear.
Press the Cursor Up or Down button
to select AM or PM.
Press the Cursor Right button to
enter the Lock Aftpr time.
Press the Number buttons to enter
the time you want the television to
lock all chamiels.
Press the Menu button to remove the
10
If you tune to a channel or input source that
is locked and you enter your PIN, all locked
channels or input sources will be unlocked
until the television is shut off. When the tele
vision is turned back on again, previously
locked channels or input sources will be
locked again.
on-screen menu from the TV screen.
) © ©
© ©
Ty © ©^
© © ©
® Cs)
54
Page 55
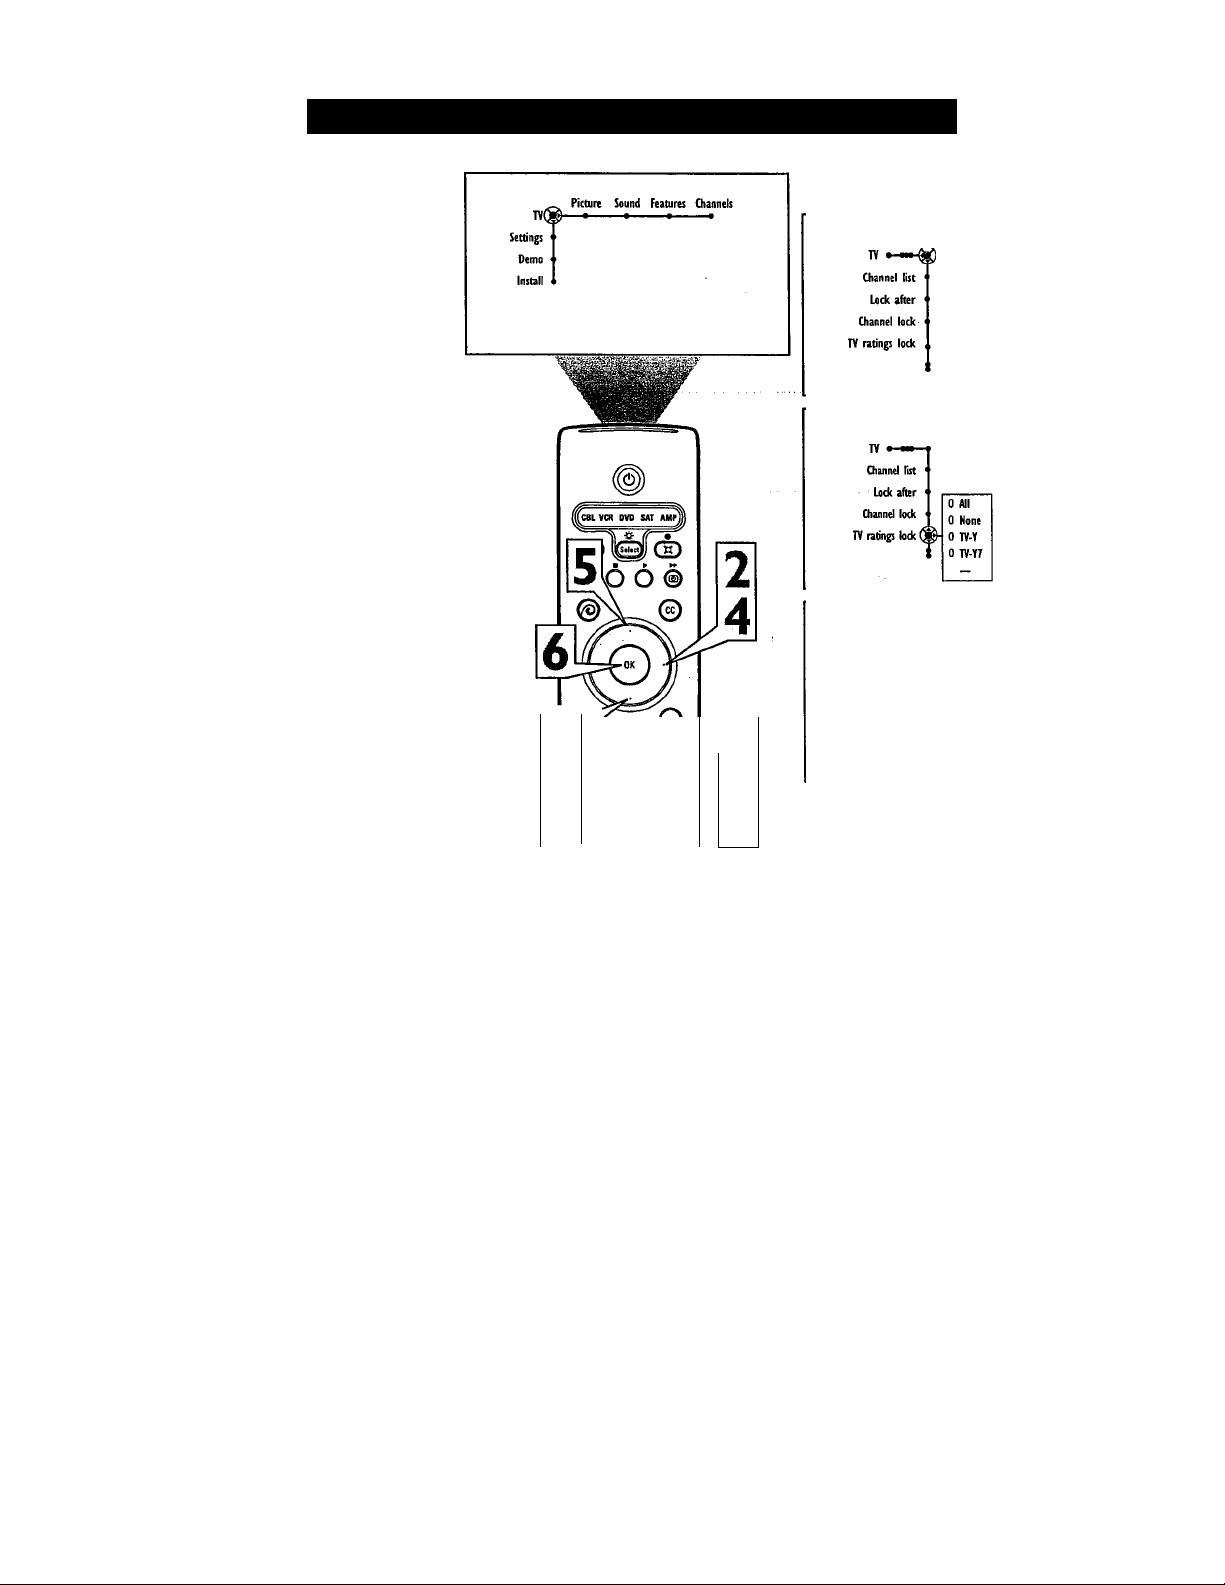
CH
[
You can select specific TV Ratings to block
broadcast signals that have unsuitable content.
Blocking Programming Based on TV Ratings
Press the Menu button on the remote
control to display the on-screen menu.
1
Press the Cursor Right button repeated
ly to select “Channels.”
2
Press the Cursor Down button repeat
edly to select the “TV ratings lock”
3
control.
Press the Cursor Right button to enter
the TV Ratings Lock list of options.
4
Press the Cursor Up or Dovm button to
select one of the ratings.
5
Press the OK button to activate your
choice.
6
NOTE: Whenever a rating is turned
on, all higher ratings (with their subrat
ings) will also be turned on, or
blocked.
NOTE: Some of the TV Rating options con
tain specific subratings. “TV-Y7” contains the
“(FV) Fantasy Violence” subrating; “TV-PG”
and ‘TV-14” contain “(D) Dialogue,” “(L)
Language,” “(S) Sex,” and “(V) Violence”
subratings; “TV-MA” contains “(L)
Language,” “(S) Sex,” and “(V) Violence”
subratings.
-I © l'"j
5
© © ©
O © ©
© © ©
© © ©
1
t—
1
7
Giannels
0 All
TV ratings lock 0
> None
T TV-Y7
Oiannels
TV
TV ratings lock i— 0 jv*Y7
0 All
0 None
• TV-Y
TV-G
(FV) Fantasy )
Violence
Press the Menu button to remove the
7
on-screen menu from the TV screen.
TV Ratings (from TV Broadcasters)
None—^programs that are either rated “None” or have no content advisory. Selecting this option will block all such programs.
TV-Y (All Children)—programs designed to be appropriate for all children, especially ones ages 2-6. These programs are not expected to frighten
younger children.
I TV-Y7 (Directed to Older Children)—^programs designed for children ages 7 and older. These programs may be more appropriate for children who
have acquired the development skills needed to distinguish between make-believe and reality. Such programs may include mild fantasy and comic vio
lence (FV).
I TV-G (General Audience)—^most parents will consider programs that are rated TV-G to be suitable for children of all ages. Such programs have little
I or no violence, no strong language, and little or no sexual dialogue or sexual situations.
TV-PG (Parental Guidance Suggested)—^programs contain material that parents may find unsuitable for younger children. This type of programming
has one or more of the following: moderate violence (V), some sexual situations (S), infrequent coarse language (L), or some suggestive dialogue (D).
TT TV-14 (Parents Strongly Cautioned)—programs contain material that many parents will find unsuitable for children under 14 years of age. These
n programs have one or more of the following: intense violence (V); intense sexual situations (S); strong, coarse language (L); or intensely suggestive
dialogue (D).
a
TV-MA (Mature Audience Only)—specifically designed to be viewed by adults and therefore may be unsuitable for children under 17. Such programs have
A one or more of the following: graphic violence (V); explicit sexual situations (S); or cmde, indecent language (L).
55
®
Some TV Ratings have subrating options.
Page 56
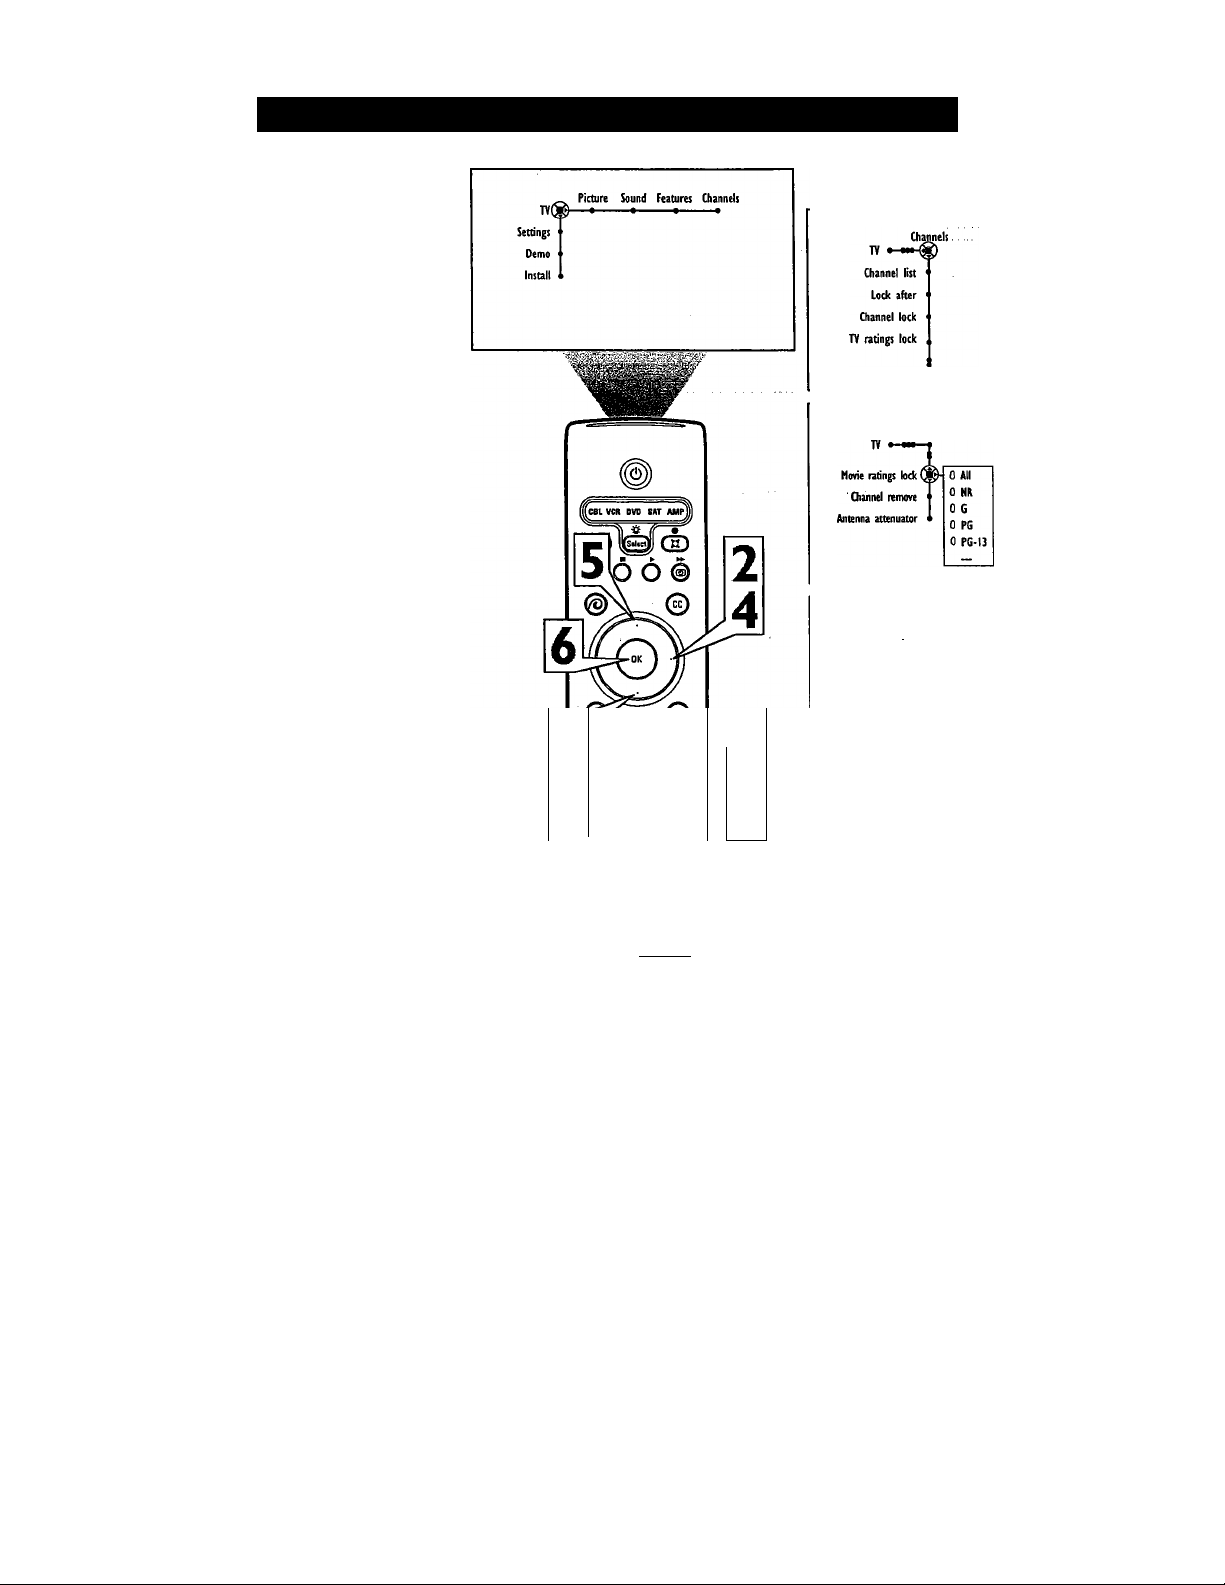
Blocking Programming Based on Movie Ratings
You can prevent the viewing of unsuitable
programming based on movie ratings.
Press the Menu button on the remote
control to display the on-screen menu.
1
Press the Cursor Right button repeated
ly to select “Channels.”
2
Press the Cursor Down button repeat
edly to select the “Movie ratings lock”
3
control.
Press the Cursor Right button to enter
the Movie Ratings Lock list of options.
4
Press the Cursor Up or Down button to
select the rating you want to lock.
5
Press the OK button to activate your
choice.
6
NOTE: When a rating is turned on, all
higher ratings (and subratings) will be
turned on. (for example, if “R” is
selected, “NC-17” and “X” will auto
matically turn on also.)
Press the MENU button to remove the
on-screen menu from the TV sereen.
Ì3
5
© © ©
O © ©
© © ©
AeSnCMM
(W) fSi
0
© © ©
1
7
Channels
Channek
TV • — I
Movie ratings lock •-( :
TV 0 ■— »
Movie ratings lock ^
All
0^ HR
0 G
0 PG
0 PG-13
tnanneu
0 NR
0 G
0 PG
0 PG-13
[ CH
Movie Ratings
(from the Motion Picture Association of America)
NR (Not Rated)—^programs that the Motion Picture Association of America has chosen not to rate.
G (General Audience)—^all ages admitted. Most parents will find programs that are rated G to be suitable for children of all ages. Such programs
have little or no violence, no strong language, and little or no sexual dialogue or sexual situations.
PG (Parental Guidance Suggested)—contain material that parents may find unsuitable for younger children. These programs have one or more of the
following: moderate violence, some sexual situations, infrequent coarse language, or some suggestive dialogue.
PG-13 (Parents Strongly Cautioned)—contain material that parents may find unsuitable for children under the age of 13. Programs that are rated PG-
13 have one or more of the following: violence, sexual situations, coarse language, or suggestive dialogue.
R (Restricted)—specifically designed for adults. Anyone under the age of 17 should view programs that are rated R only with an accompanying parent
or adult guardian. Such programs have one or more of the following: intense violence; intense sexual situations; strong, coarse language; or intensely
suggestive dialogue.
NC-17 (No one under the age of 17 will be admitted)—should be viewed by adults only. These programs have graphic violence; explicit sex; or crude,
indecent language.
X (Adults Only)—contain one or more of the following; very graphic violence, very graphic and explicit or indecent sexual acts, or very
coarse and intensely suggestive language.
56
Page 57
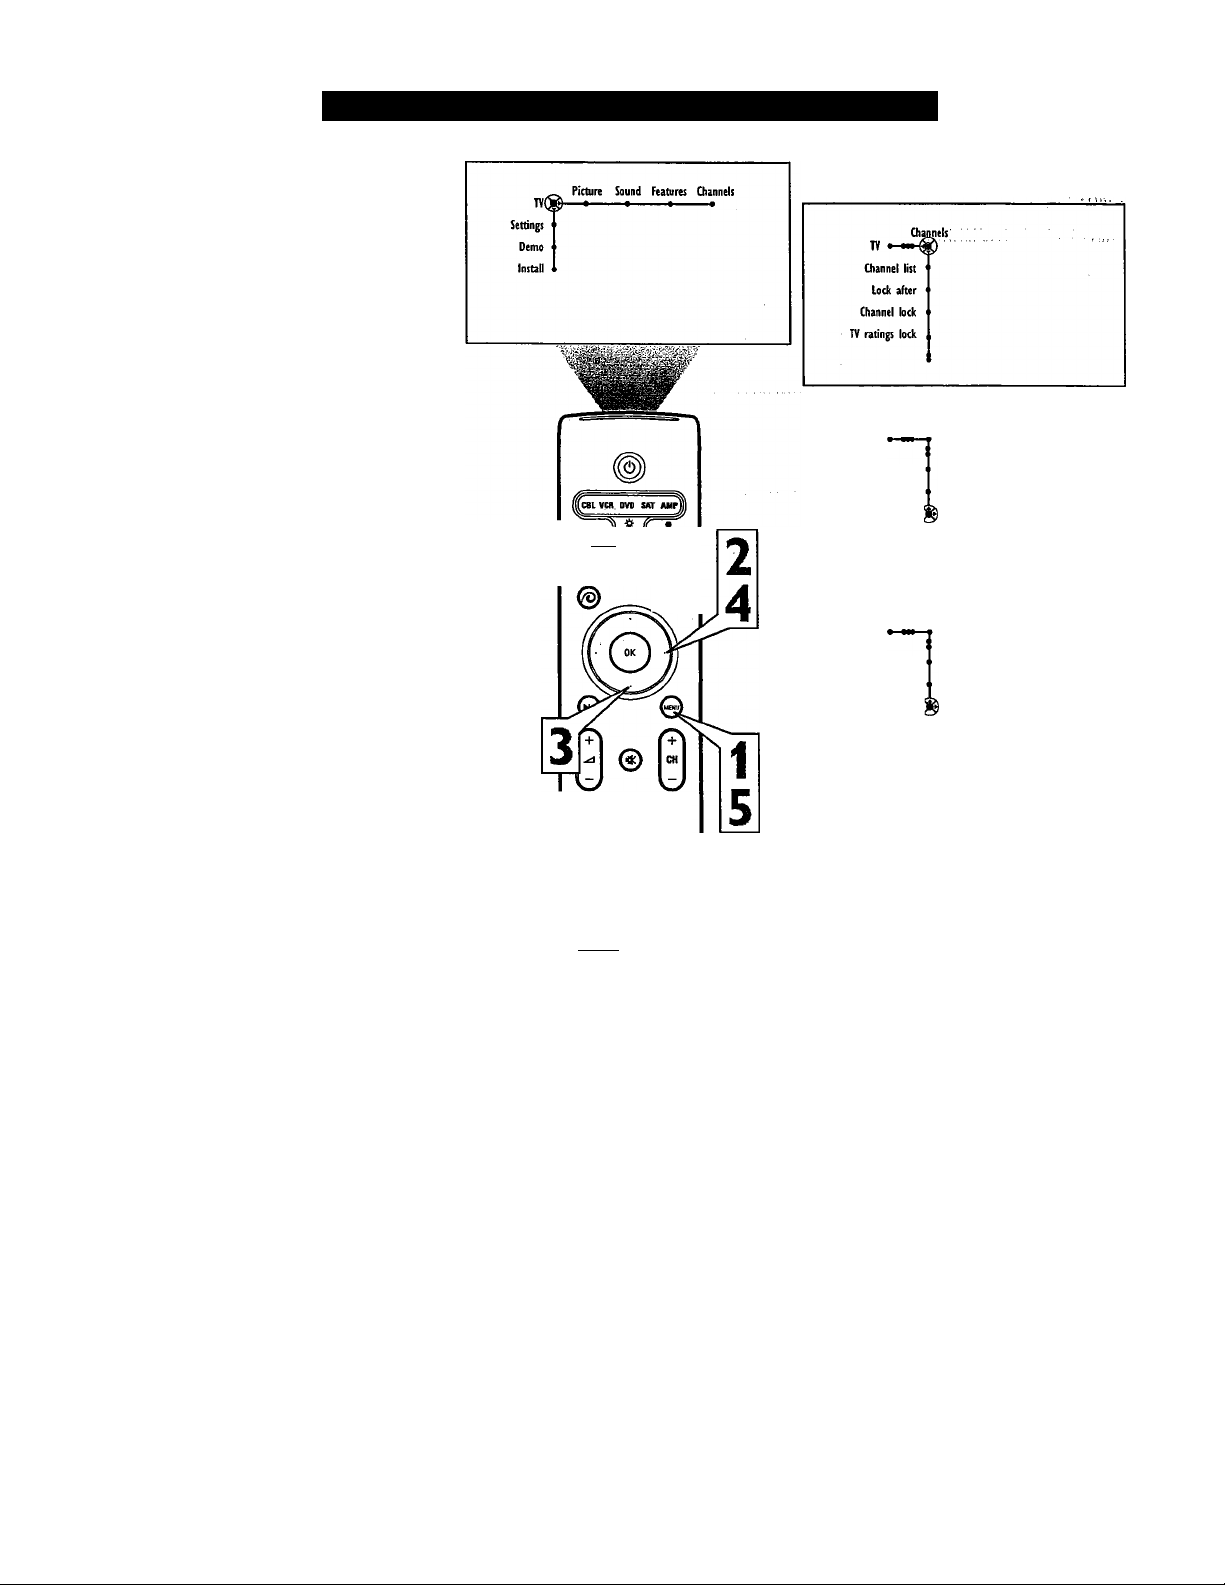
0
Turning the Antenna Attenuator on or off
If you live near a television station’s transmit
ter tower, you may receive an interfering sig
nal from the station while watching other TV
channels. Your television’s Anteima
Attenuator control is designed to reduce the
strength of such a signal in the presence of a
strong main signal. The default setting for the
Antenna Attenuator is “Off.” If you need to
use the feature, simply toggle it “On” in the
on-screen menu.
Press the Menu button on the remote
control to display the on-screen menu.
1
Press the Cursor Right button repeat
edly to select “Channels.”
2
Press the Cursor Down button repeat
edly to select the “Antenna attenuator”
3
control.
Press the Cursor Right button to toggle
the control “On” or “Off.”
4
Press the Menu button to remove the
on-screen menu from the TV screen.
5
fai I PCD
© Ó Ó è
0
O © ©
© © ©
© © ©
© © ©
Mv*Cem(
fai foi
Channels
Movie ratings lock
Channel remove
Antenna attenuamr ( Off * On
Channels
Movie ratings lock
Channel remove
Antenna attenuator ( On • Off
57
Page 58
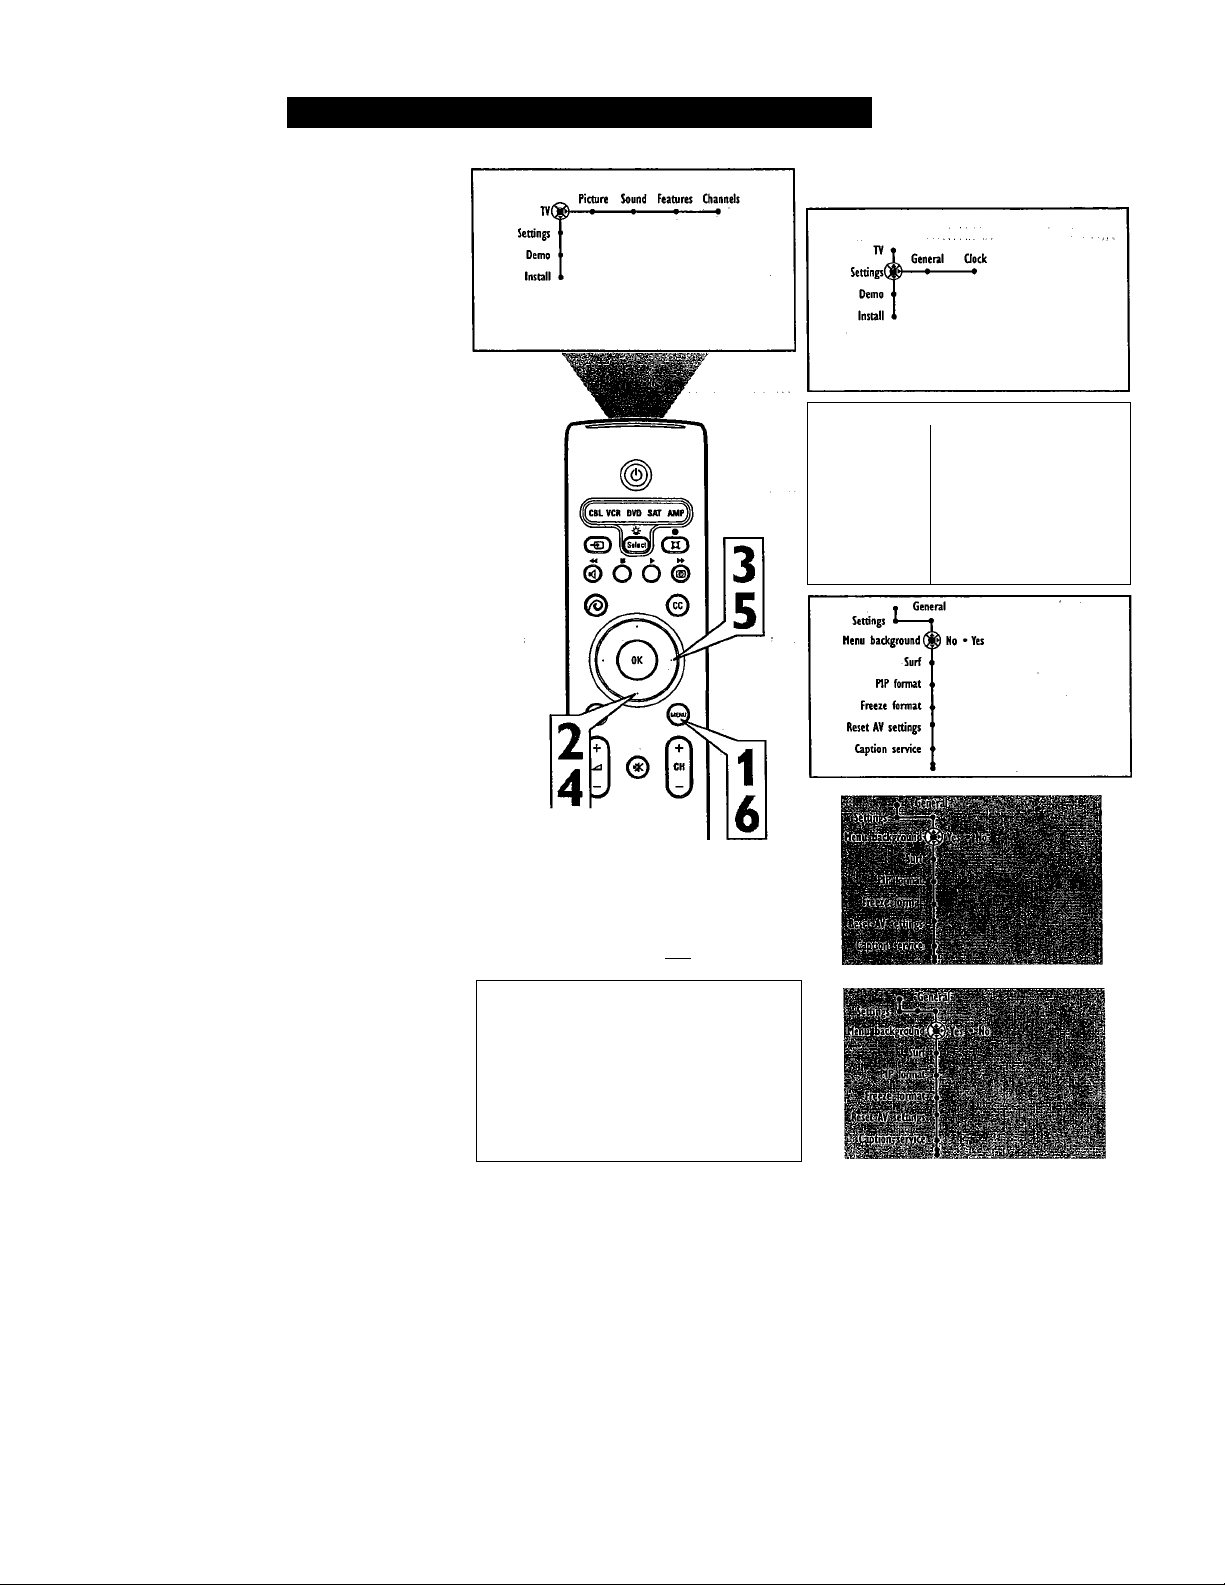
Turning the Menu Background on or off
You have the option of turning on a back
ground that will make reading the on-screen
menu easier. The Menu Background control
places a light colored field behind the on
screen menu that makes it easier to see. When
turned on, the menu background appears only
while the on-screen menu is displayed on the
TV screen.
Press the Menu button on the remote
control to display the on-screen menu.
1
Press the Cursor Down button to select
“Settings.”
2
Press the Cursor Right button to select
the “General” menu.
3
Press the Cursor Down button to select
the “Menu background” control.
4
Press the Cursor Right button to toggle
the menu background control “On” or
5
“Off.”
• General Qock
Settings ■ Q
Henu background
PIP format
Freeze format
Reset AV settings
Caption service
0
Surf
Press the Menu button to remove the
on-screen menu from the TV screen.
6
"Э © ©
© © ©
O 0 ©
Ac4fiC«ml
(@) f5D
• ^neral ^
Menu
Settings fTgL~| 11^1
Freeze
Reset AV settM^. |
Caption serv^ 1
With Menu Background off
1 *
© © ©
1,
ffe.
With Menu Background on
58
Page 59
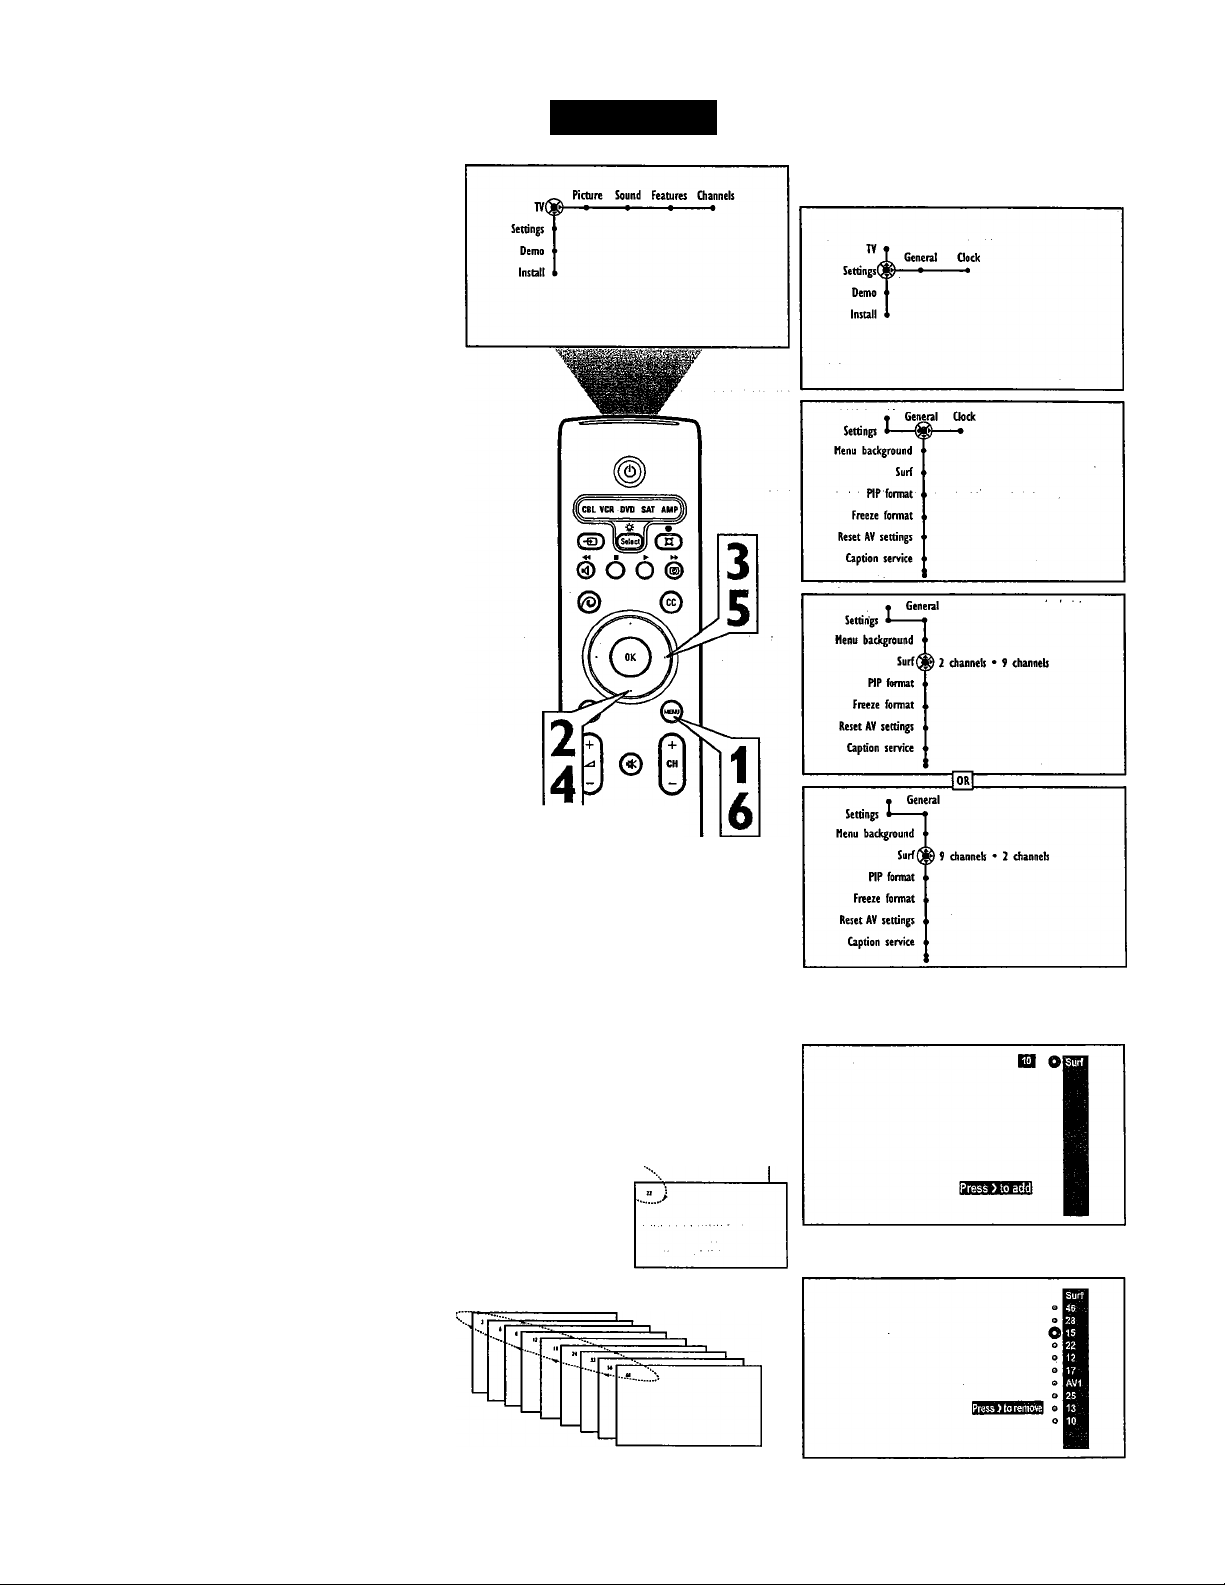
G
You can access a list of previously viewed
channels with the Previous Program/Surf but
ton (labeled “P-^ P”) on the remote control.
With Surf you can easily switch between dif
ferent TV channels that currently interest you.
Surf allows you to set up the television to
cycle through two or nine channels by press
ing the Surf (P.^ P) button on the remote con
trol.
Press the Menu button on the remote
control to display the on-screen menu.
1
Press the Cursor Down button to select
“Settings.”
2
Press the Cursor Right button to select
the “General” menu.
3
Press the Cursor Down button repeat
edly to select the “Surf’ control.
4
Press the Cursor Right button to toggle
the Surf control to “2 channels” or “9
5
channels.”
Using Surf
Press the Menu button to remove the
on-screen menu from the TV screen.
6
If you seleeted the “2 channels” Surf option,
pressing the P-^ P (Surf) button allows you to
alternate between the currently viewed chan
nel and the previously viewed channel.
If you seleeted the “9 channels” Surf option,
pressing the P-^ P (Surf) button displays a
Surf list in which you can place up to 9
favorite channels. AiV sources also can be
included in the list.
To add a channel to the list,. tune to the chan
nel, press the P-^ P (Surf) button, then press
the Cursor Right button.
If you attempt to add more than 9 channels to
the list, the last channel will be automatically
removed to make room for the newly added
channel.
After you have placed your favorite channels
in the list, press the P-^ P (Surf) button as
many times as necessary to tune to the
desired favorite channel. Or, with the Surf list
displayed, press the Cursor Down or Up but
tons to tune to the desired channel.
'3 0©
© © ©
© © ©
0 0
(ffl) (®) ®
2 Channels Surf
9 Channels Surf
%
Using 9 Channels Surf, place up to 9 favorite
chaimels in the Surf list.
If you decide you don’t want a channel in the
list, you can remove it.
To remove a channel from the list, press the
P-^ P (Surf) button to display the list, press
the Cursor Down or Up buttons until you
seleet the channel you want to remove, then
press the Cursor Right button.
59
Page 60
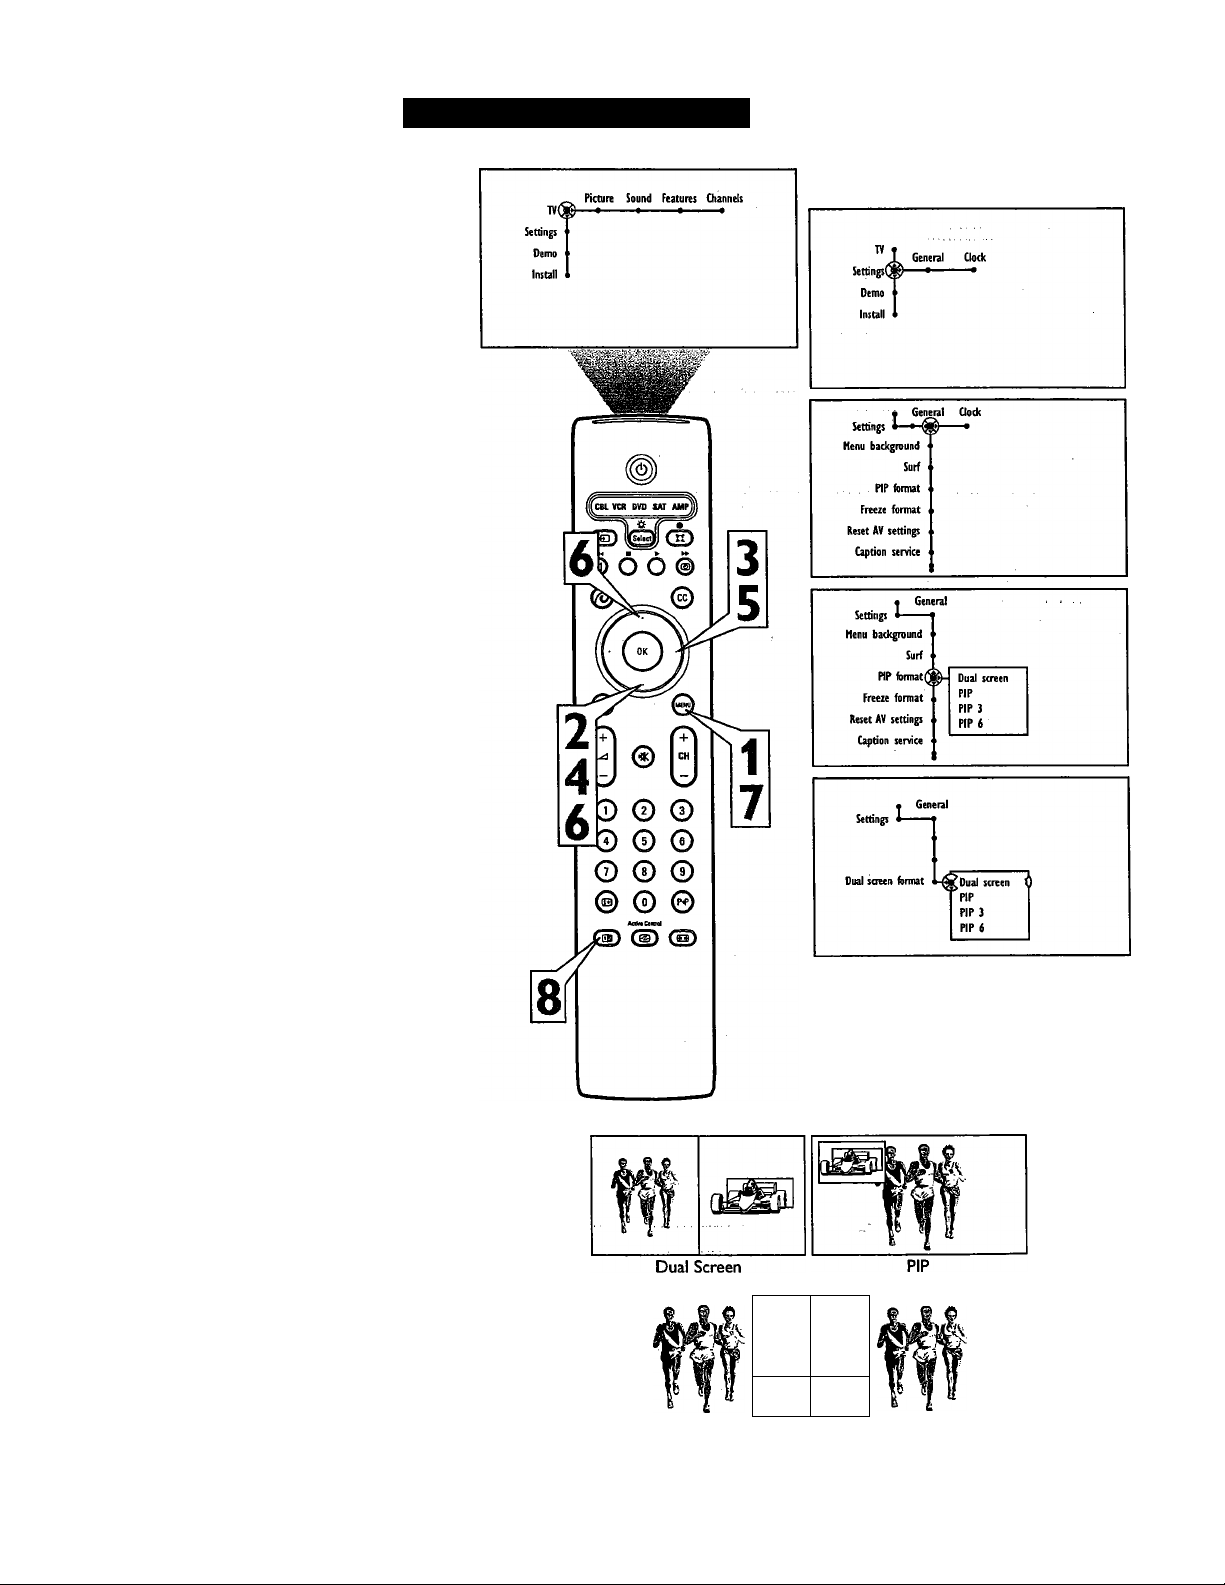
The Dual Screen feature, also referred to as
Picture In Picture (PIP), will allow you to
choose the size of the dual screen window to
be displayed when the Dual Screen/PIP but
ton is pressed on the remote control. The win
dow can be set to Dual Screen, PIP, PIP 3, or
PIP 6.
Press the Menu button on the remote
control to display the on-screen menu.
1
Press the Cursor Down button to select
“Settings.”
2
Press the Cursor Right button to select
the “General” menu.
3
Press the Cursor Down button repeat
edly to select the “PIP Format” con
4
trol. A submenu or list of options will
appear.
Press the Cursor Right button to enter
the list of options.
5
Selecting a PIP Format
m
Press the Cursor Up or Down button to
select the desired PIP format. Choose
6
from “Dual screen,” “PIP,” “PIP 3,” or
“PIP 6.”
Press the Menu button to remove the
on-screen menu from the TV screen.
7
Press the Dual Screen/PIP button on
the remote control to display the sec
8
ond video window in the format you
have chosen.
Continuing to hold ithe Dual
Screen/PIP button will cycle through
the Dual Screen/PIP options.
Press the Dual Screen button again to
return the television to the main video
screen.
See the next page for information on chang
ing channels or input sources in Dual
Screen/PIP mode, and for re-positioning the
PIP screens.
tfftff
№
PIP3
60
PIP 6
Page 61
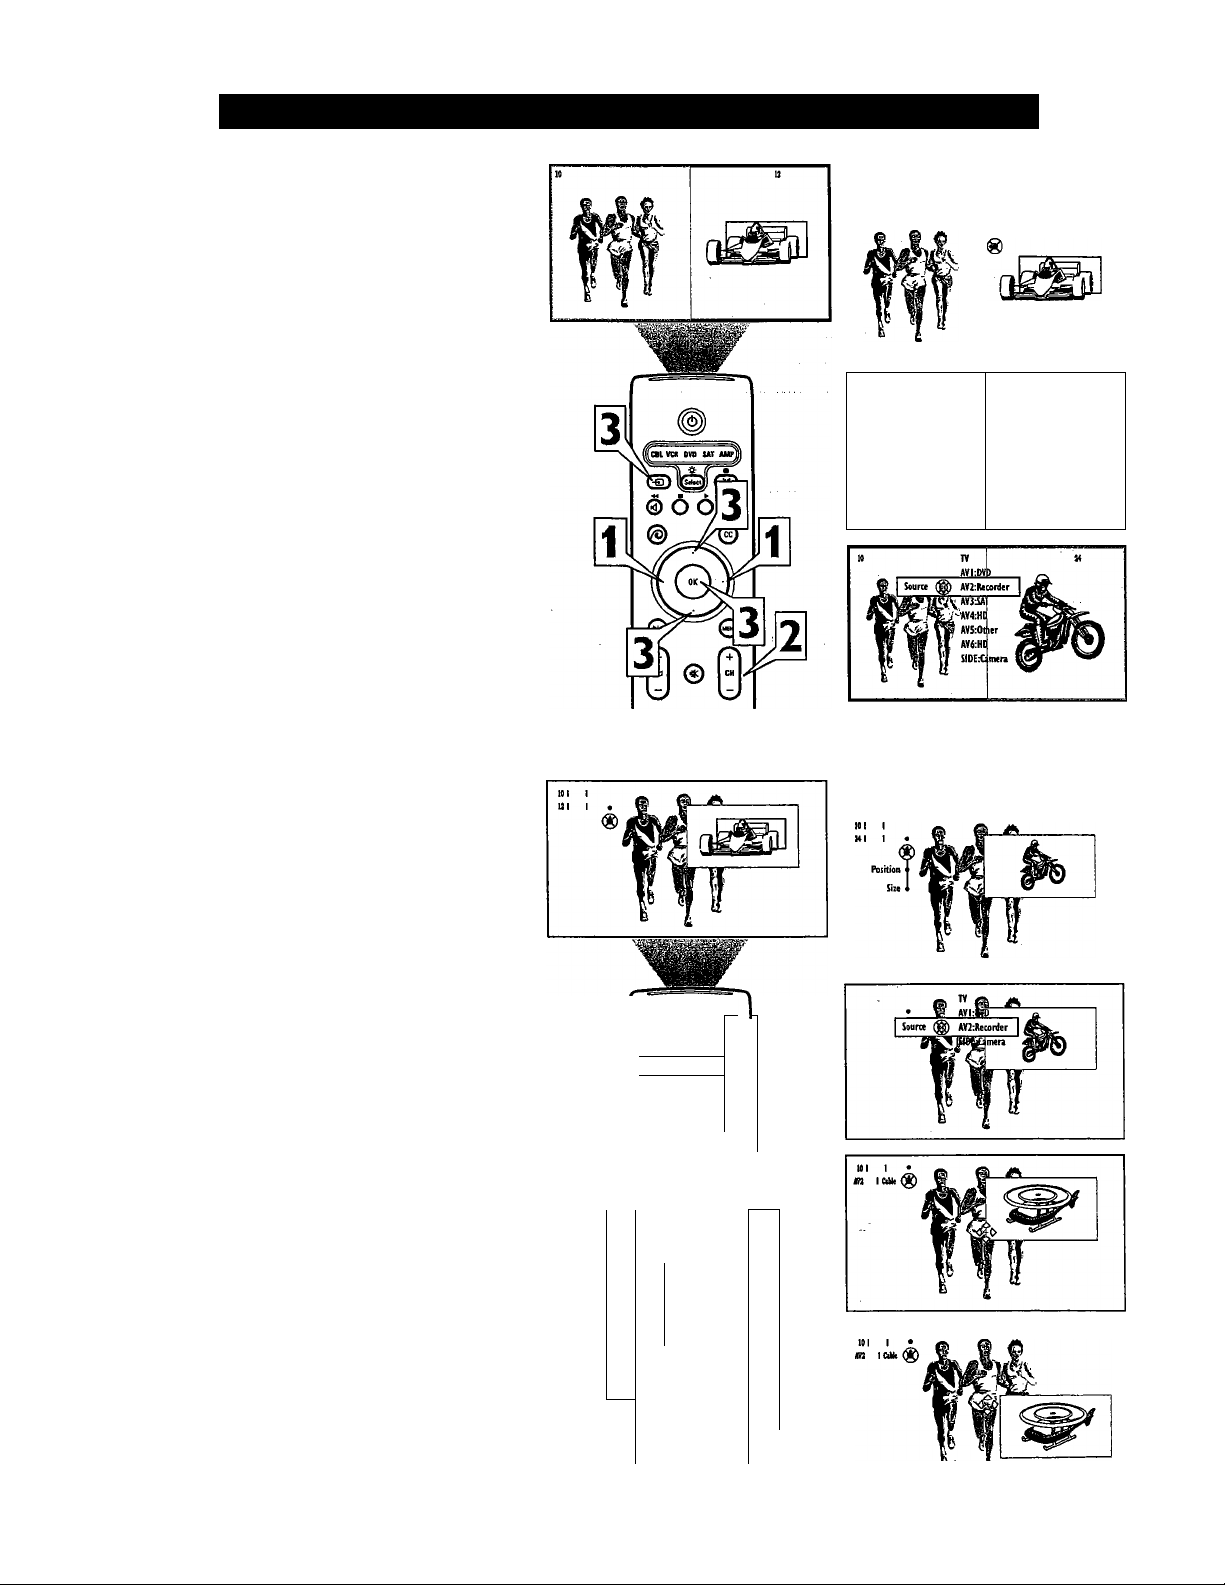
G
When using Dual Screen:
A light-colored border indicates the seleeted
screen. If the sereen whose channel or input
source you want to change is not selected,
1
press the Cursor Right or Left button to select
the desired screen.
To ehange ohannels in the selected screen, press
the CH (Channel Selection) + or - buttons.
2
Or:
To change the input source, first press the
Source button. Then, within 6 seconds, press
the Cursor Up or Down until your desired
3
input source is highlighted. Press the OK but
ton to confirm. The desired input source
appears in the selected screen.
NOTE: If the list of input sources “times out”
(leaves the screen) before you can make your
selection, press the Source button again to dis
play the list again.
When using PIP:
When the PIP window is on screen, press the
Cursor Up or Down button to select either the
main or PIP screen. A light-colored border sur
I
rounds the PIP screen when it is selected. The
PIP screen must be selected before its channel
or input source can be changed.
To switch the PIP window and the main win
dow press OK.
2
To change channels in the PIP screen, press
the CH (Channel Selection) + or - buttons.
3
Or:
To select a different input source, first press
the Source button. Then, within 6 seconds,
press the Cursor Up or Down until your
4
desired input source is highlighted. Press the
OK button to confirm. The desired input
source appears in the PIP screen.
NOTE: If the list of input sources “times out”
(leaves the screen) before you can make your
selection, press the Source button again to dis
play the list again.
To reposition or resize the PIP screen:
Press the Cursor Down button to select
Position or Size and press OK.
5
If you select Position, a direction indicator
6
appears on the screen. If you select size a
slider bar appears with 12 size options. Use
Ctnsor Up, Down, Left, and Right to adust the
position or the Size slider bar.
Press OK to return to the PIP menu. The
menu will disappear in several seconds.
7
When using PIP3 or PIP6:
To change channels when in PIP3 or PIP6 modes,
press the Cursor Right, Left, Up, or Down buttons to
select the screen whose chaimel or source you want to
change. Then follow step 2 or 3 in either section
above to change channels or input sources.
Changing Channels or Input Sources in Dual Screen/PIP
fc8L VCR DVB t«J Al
f-Oj (|[s»i»cijJ M
©66<
(Si
i
1
1 ^
4
G
O © ©
o © ©
6
© © ©
fSl (®) (TF)
61
1
©
f ■
Jb ©
4
6
w
u
III
1
M
2
4
6
7
Page 62
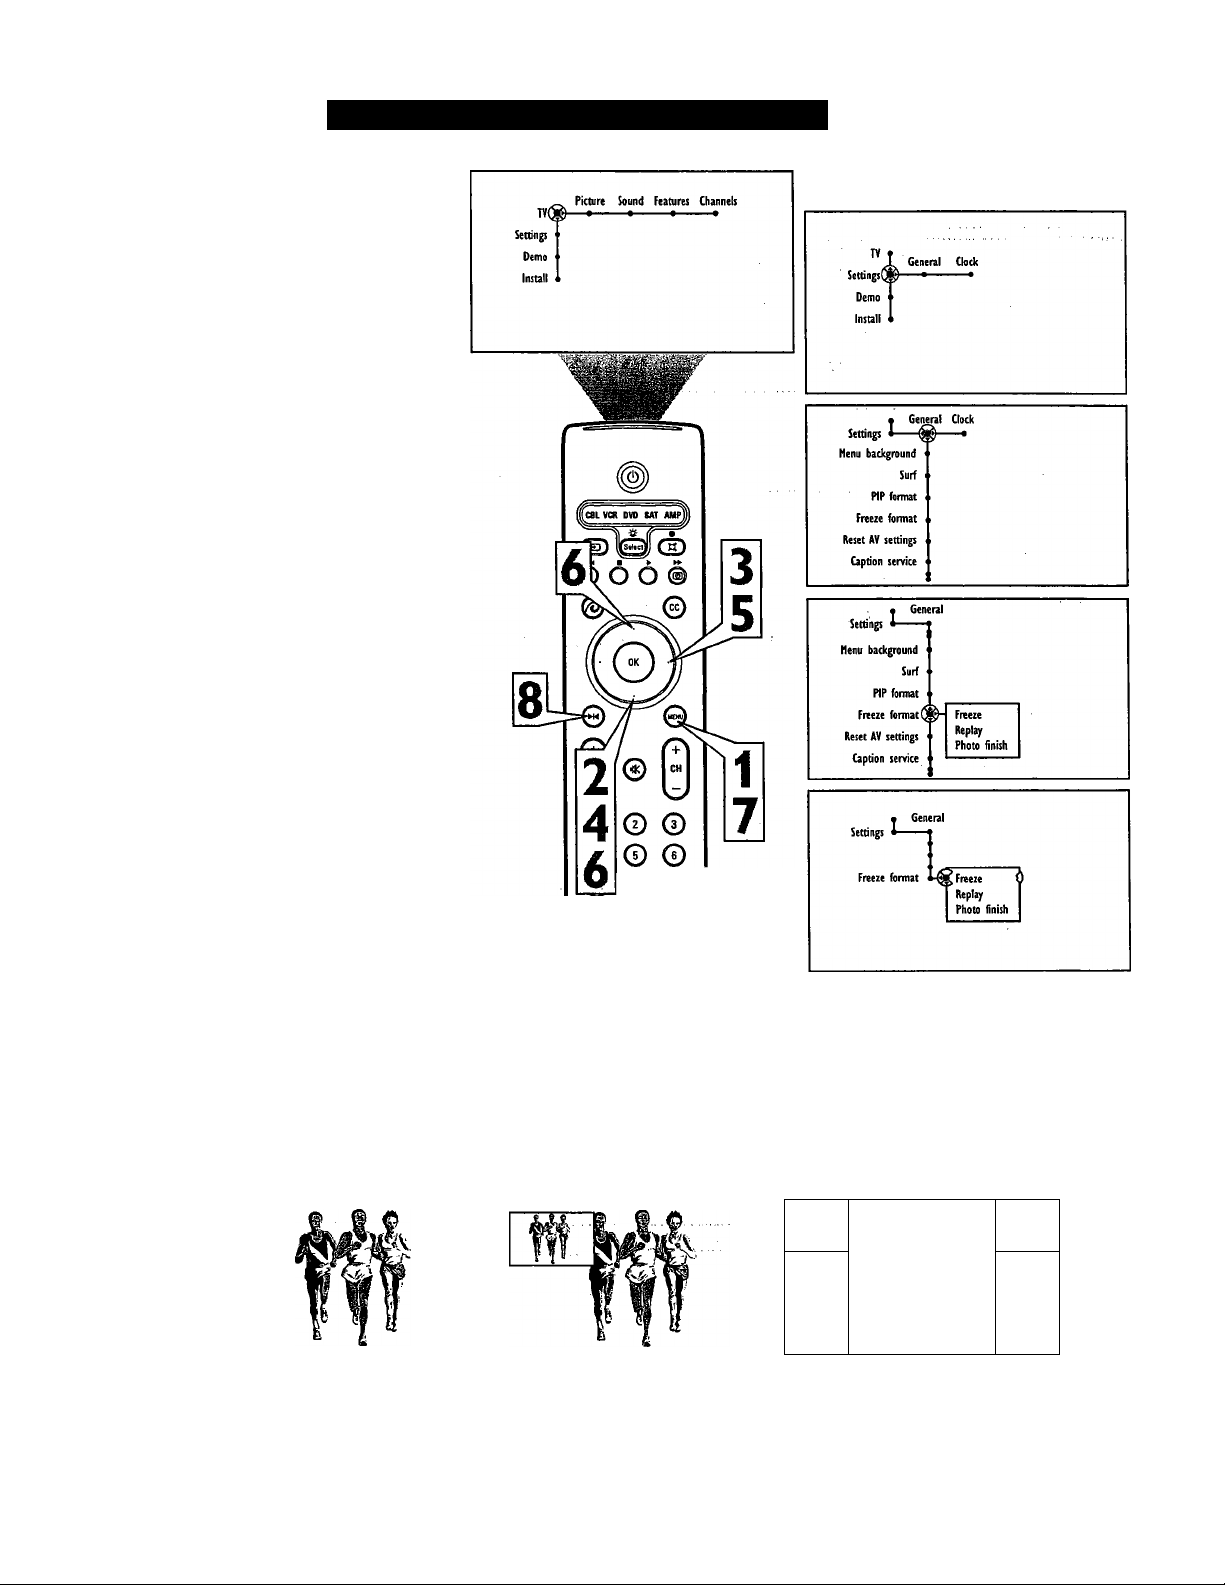
Selecting a Picture Freeze Option
The Freeze control provides three ways for
you to stop the action of programs. The
Freeze control options allow you to get a bet
ter look at exciting sports plays or copy down
broadcasted addresses or phone numbers. The
steps below explain how to select an option.
Press the Menu button on the remote
control to display the on-screen menu.
1
Press the Cursor Down button to select
“Settings.”
2
Press the Cursor Right button to high
light the “General” menu.
3
Press the Cursor Down button repeat
edly to highlight the “Freeze format”
4
control. A submenu will appear.
Press the Cursor Right button to enter
the submenu.
5
Press the Cursor Up or Down button to
select the desired freeze format.
6
Choose from “Freeze,” “Replay,” or
“Photo finish.”
Freeze stops motion in the main screen
image while the audio continues to play.
Replay displays and replays a few sec
onds of stored video information in the
single-PIP window.
Photo finish displays a series of frozen
frames in six PIP windows. A TV pic
ture consists of a series of very fastmoving frames.
Press the Menu button to remove the
on-screen menu from the TV screen.
7
Press the Freeze Format button on the
remote control to display the format
8
you have chosen.
NOTE: Continuing to hold the Freeze
Format button will cycle the TV
through the Freeze modes.
To return the television to the main video
screen, press the Freeze button again.
© © ©
m
© 0
AcMbard
Freeze
Stops motion on the main screen.
Replay
Replays a few seconds of stored
video.
62
fft
fft
tft
iW
Iff-
Photo finish
Displays six still ftames from a TV pic
ture while the current program contin
ues to play on the main (center) screen.
NOTE: Frame order will vary.
ft
Page 63
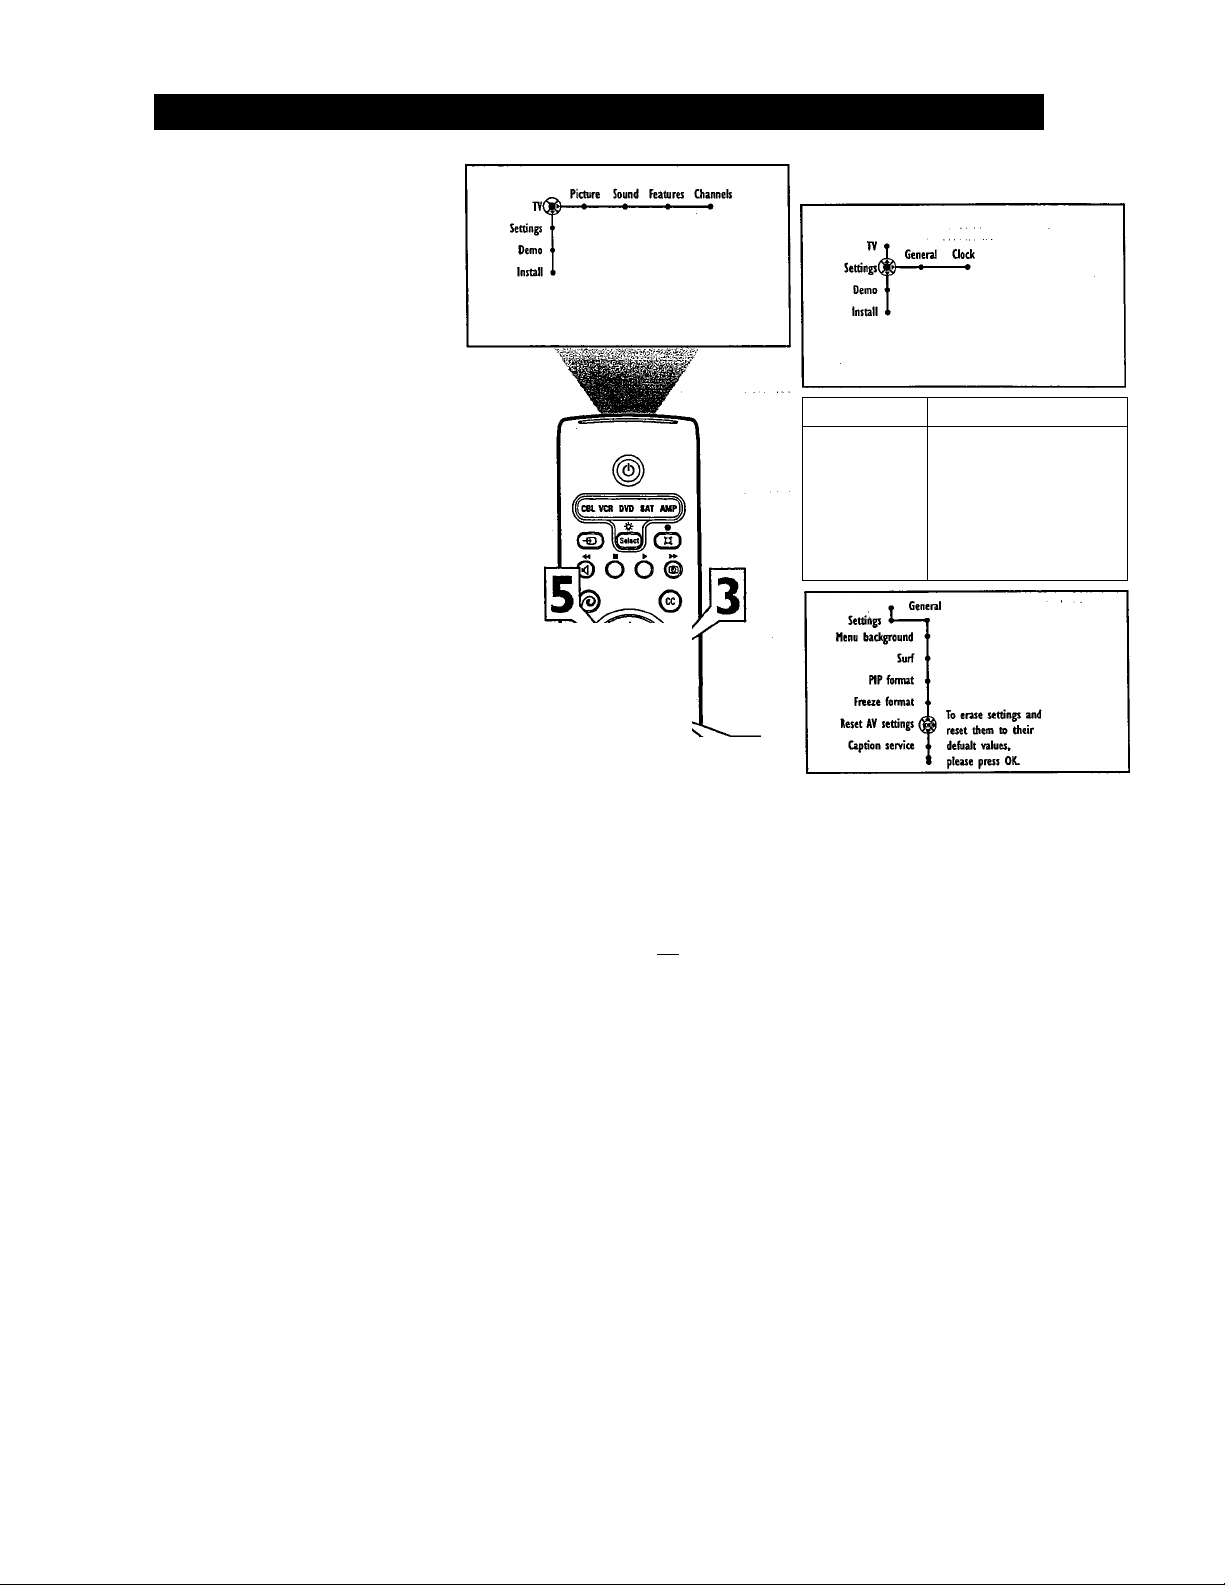
Resetting the Audio/Video Settings to Factory Default Values
You can reset the TV’s Sound and Pieture set
tings to the factory default values.
Press the Menu button on the remote
eontrol to display the on-screen menu.
1
Press the Cursor Down button to select
“Settings.”
2
Press the Cursor Right button to seleet
the “General” menu.
3
Press the Cursor Down button repeat
edly to select the “Reset AV settings”
4
control.
Press the OK button to reset the AV
settings to factory values.
5
Press the Menu button to remove the
on-sereen menu from the TV screen.
6
• Gen ral Clock
Menu background
Surf
. PIP fornut
Freeze format
Reset AV settings
Caption service
G
ST—»
40 ®0
"3 0©
o © ©
© © ©
© © ©
(5^
63
Page 64
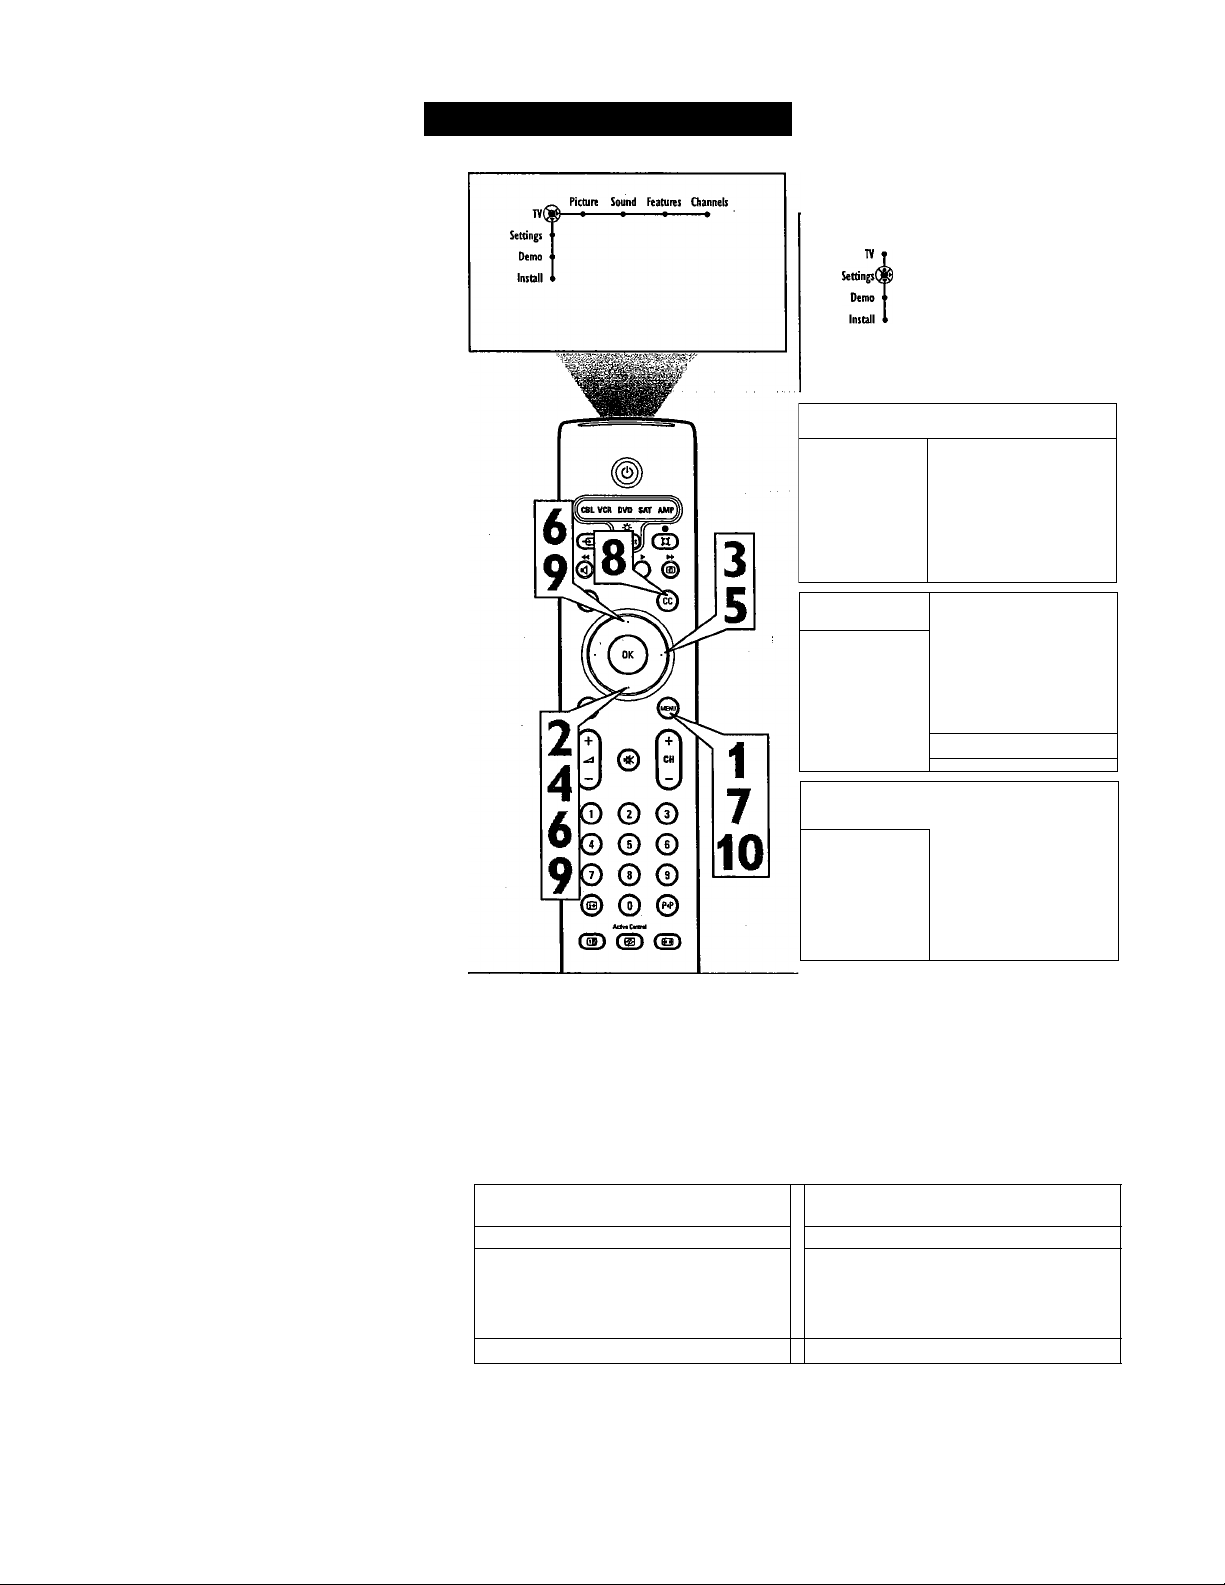
El
Closed Captioning (CC) allows you to read the voice
content of television programs on the TV screen.
Designed to help the hearing impaired, this feature uses
on-screen text boxes to show dialogue and conversa
tions while the TV program is in progress. Captions
will appear on screen during captioned broadcasts.
Follow steps 1 through 7 to select a Closed
Captioning option:
Press the Menu button on the remote
1
2
3
4
5
6
To turn Closed Captioning on or off:
8
9
control to display the on-screen menu.
Press the Cursor Down button repeatedly
to select “Settings.”
Press the Cursor Right button to select
“General.”
Press the Cursor Down button repeatedly
to select “Caption service.”
Press the Cursor Right button to enter the
caption service submenu.
Press the Cursor Up or Down button to
select one of the caption modes:
CC-1, CC-2, CC-3, or CC-4—^Dialogue
(and descriptions) for the action on the
captioned TV program shows on screen.
CC-1 is used most frequently. CC-2 may
be used for alternate languages if they
are being transmitted.
T-1, T-2, T-3, or T-4—Often used for a
channel guide, schedules, bulletin board
information for captioned programs, news,
weather information, or stock market
reports.
NOTES
• Text Modes (T-1 through T-4) appear
on screen as boxes and
may block portions of the TV screen.
• Not all caption services are necessarily
being used by a TV channel during the
transmission of a captioned program.
Press the Menu button to remove the on
screen menu from the TV screen.
Press the CC button on the remote
control.
Press the Cursor Up or Down button
repeatedly to select “Off,” “On,” or “On
during mute.”
Off—Closed captioning service will not
be displayed on the TV screen.
On—Closed captioning information (if
available) will display on the TV screen.
On during mute—Closed Captioning
information will turn on only when the
Mute button is pressed. Turns the Closed
Captioning information off when the TV
volume is restored.
Press the Menu button on the remote to
10
remove the on-screen display
from the TV screen.
Using Closed Captioning
Generi Clock
T General Qock
Settings i
................
Q
Henu background
Freeze format
Reset AV settings
Caption service
Henu background
Freeze format
Reset AV settings
Caption serviced
Settings i ■
Caption service
Closed captions tiff
Menus to Turn the
Closed Captions
Control On or Off
Off
1 Closed captions On
On during mute
NOTES: • The captions do not always use correct spelling and grammar. • Not all TV programs
and product commercials made for broadcast include Closed Captioning information. Refer to
your area’s TV program listings for the TV channels and times of shows with Closed Captioning.
The captioned programs are usually noted in the TV listings with service marks such as “CC.”
64
Closed captions On during mute
r
Surf
PIP format
T Ger erai
Surf
np format
^ CC-1
T General
-^cc7|)
On
On during mute
Off
On
Page 65
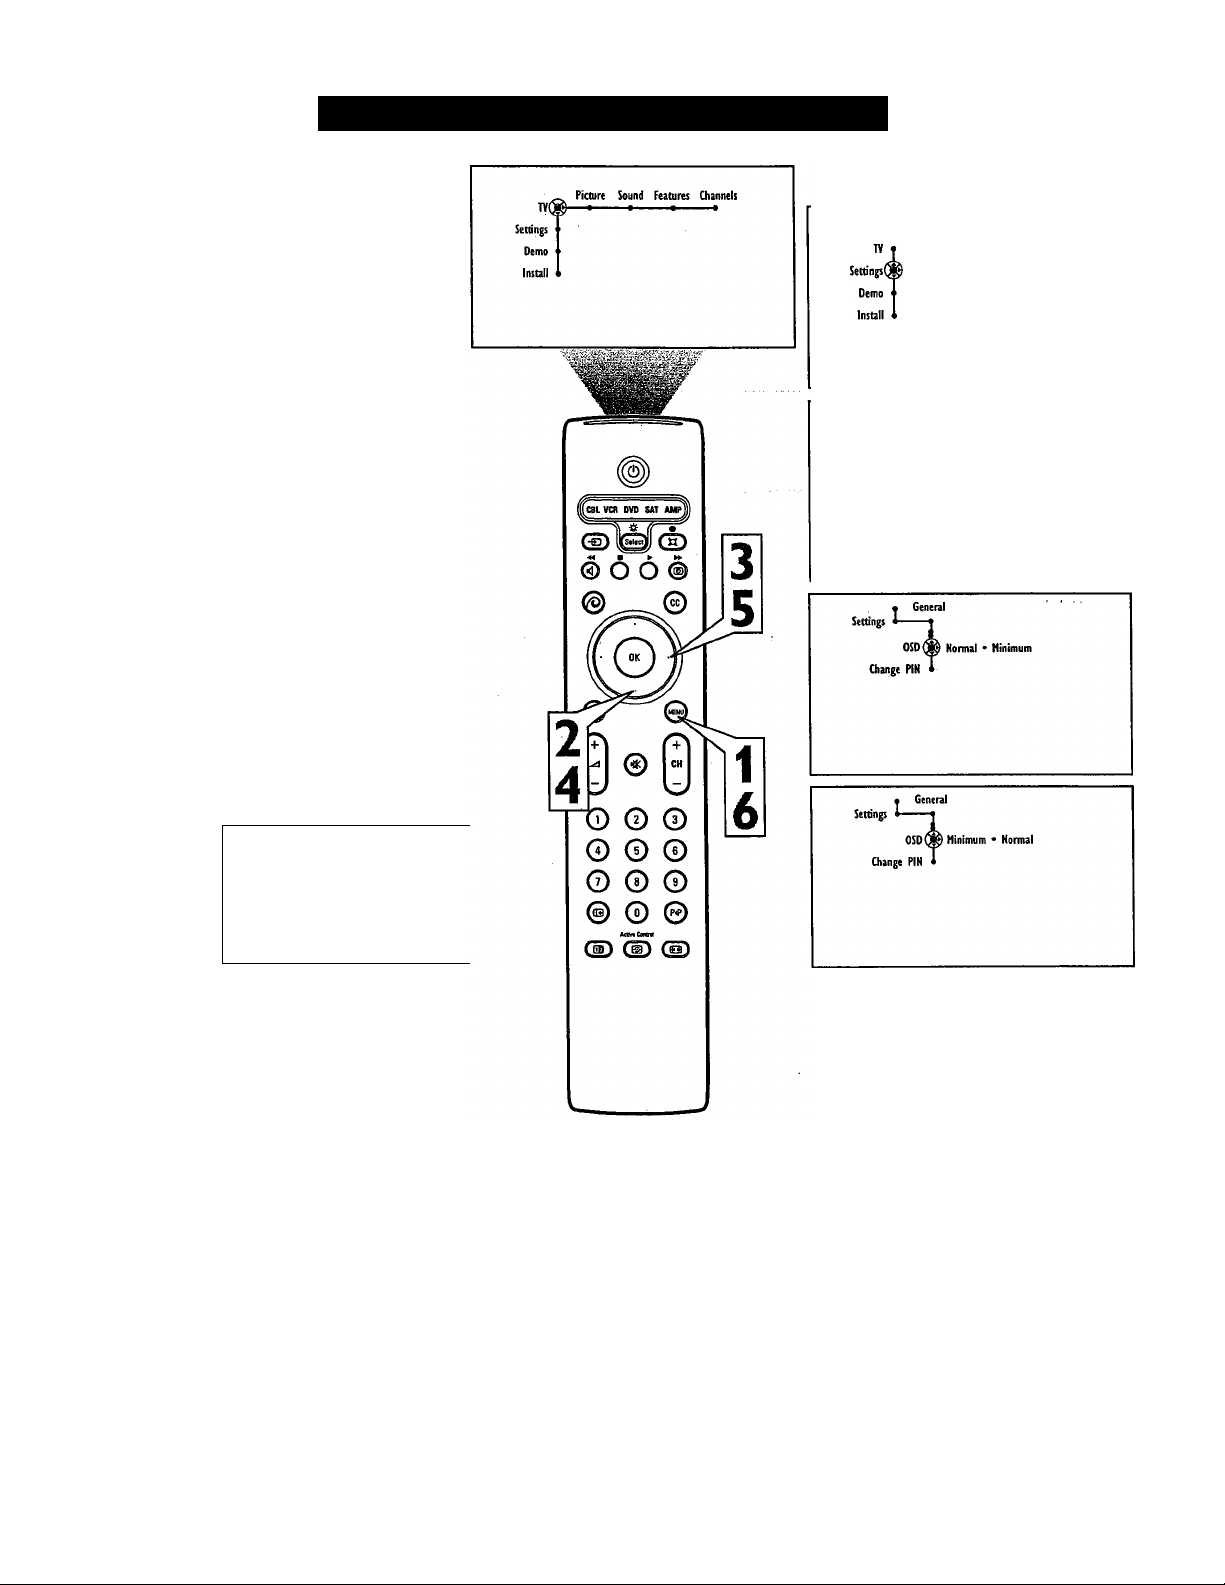
Selecting an On-screen Display Option
The television’s on-screen display (OSD) can
be set to show only the current channel num
ber or the channel nrunber with additional TV
operating modes and status-screen informa
tion.
Press the Menu button on the remote
control to display the on-screen menu.
1
Press the Cursor Down button to select
“Settings.”
2
Press the Cursor Right button to select
the “General” menu.
3
Press the Cursor Down button repeat
edly to select the “OSD” control.
4
Press the Cursor Right button to toggle
between “Minimum” and “Normal.”
5
In Normal mode the on-screen display
stays on screen. In Minimum mode the
on-screen display disappears after a
few seconds.
Settings
Henu background
PIP format
Freeze format
keset AV settings
Caption service
General Qock
Genifal Clock
Surf
Press the Menu button to remove the
on-screen menu from the TV screen.
6
10 WABC
Minimum
Mode
Automaik
Hone leleded
—• Normal
Mode
65
Page 66
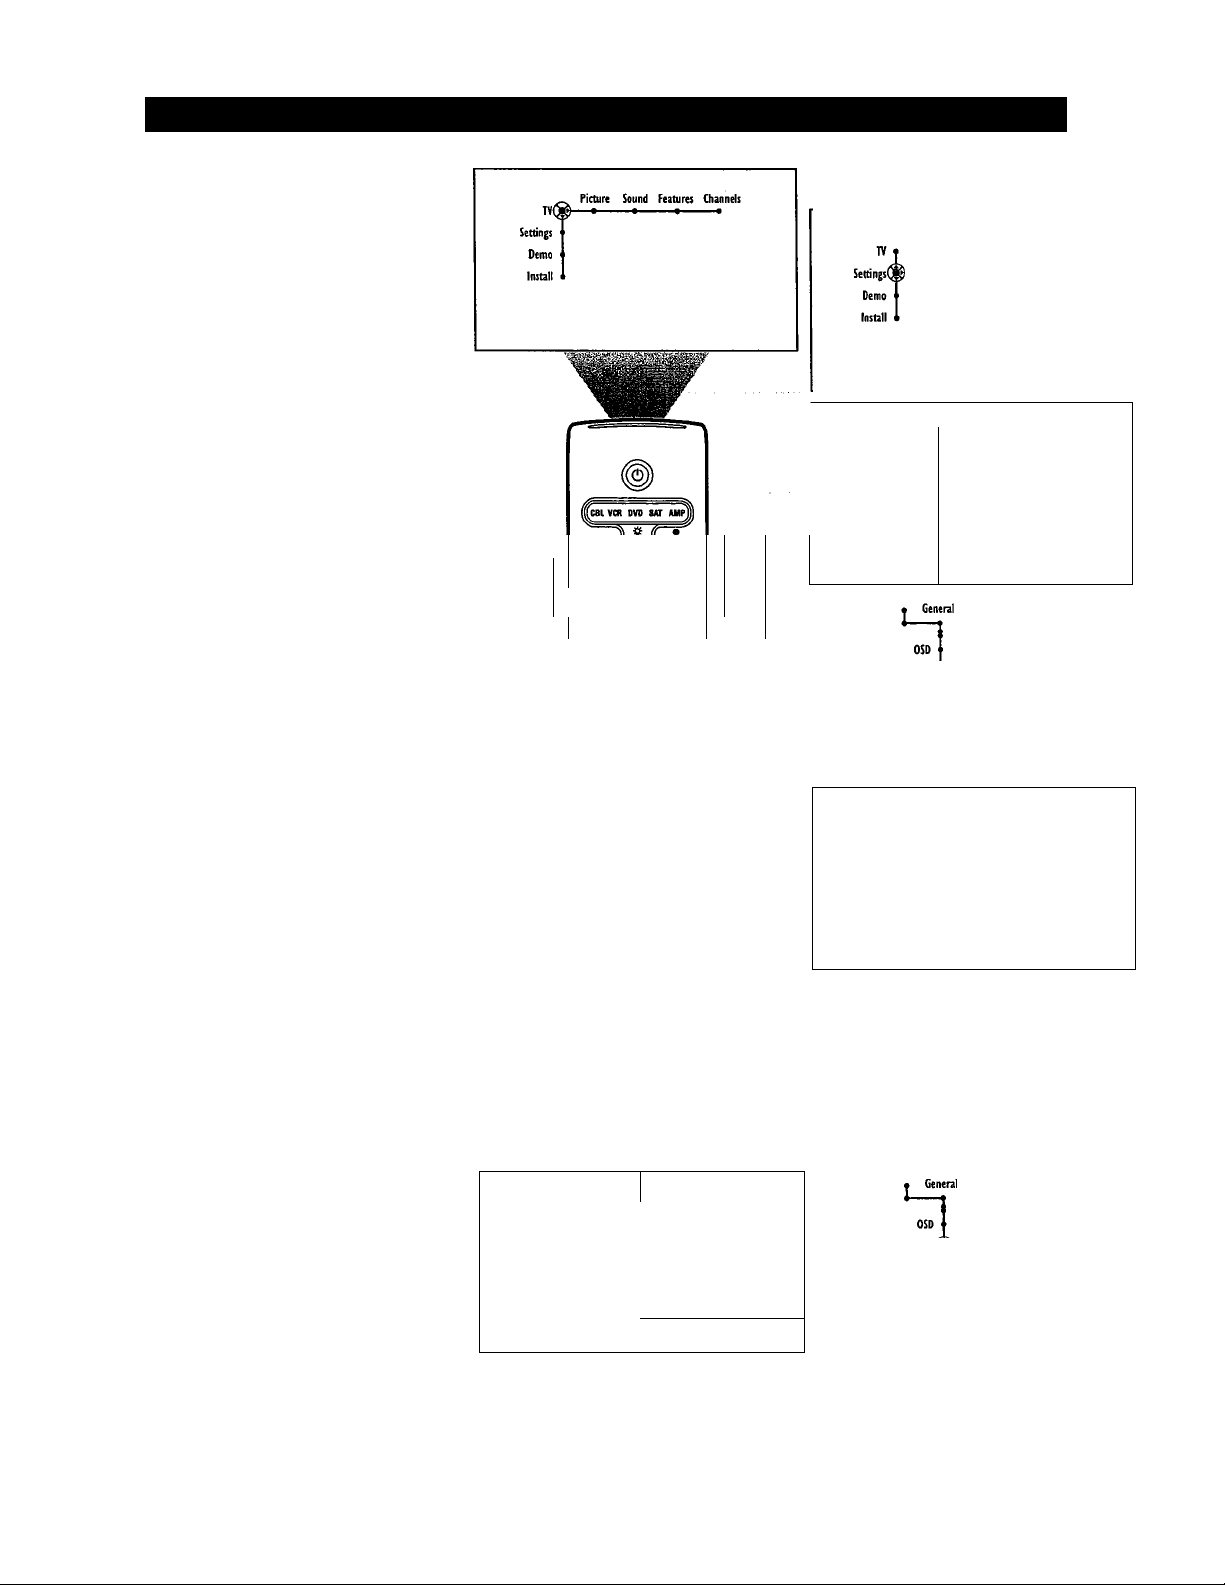
[
Setting up or Changing a PIN (Personal Identification Number)
In the General menu, you can set up a new
PIN number or change an existing one for the
Lock Channel feature.
Press the Menu button on the remote
control to display the on-screen menu.
1
Press the Cursor Down button to select
“Settings.”
2
Press the Cursor Right button to select
the “General” menu.
3
Press the Cursor Down button repeat
edly to select either “Set PIN” or
4
“Change PIN.”
NOTES:
• If no PIN exists yet, the menu will
show “Set PIN.” Simply follow the
on-screen instructions to set your
PIN.
• If a PIN has previously been entered,
the menu will show “Change PIN.”
• All number combinations from 0000
to 9999 are valid numbers.
Press the OK or Cursor Right button to
begin the process.
5
Enter your current PIN using the Digit
buttons on the remote control.
6
If you have forgotten your PIN, you
can enter the overriding code 0-7-I-I.
Enter a new four-digit PIN.
7
Re-enter your new PIN using the Digit
buttons to confirm the code. Your PIN
8
is now changed.
Press the Menu button on the remote
control to remove the on-screen menu
9
from the TV screen.
о о © 3
"Э © ©
© © ©
© © ©^
© © ©
® (Ш) Ш)
To confirm your new
please enter it again.
©
General Clock
• General Cock
Kenu background
Surf
PIP format
Freeze format
Reset AV settings
Caption service
1C
Settings
Change PIN(^ To change your PIN,
please press OK.
N
Please enter your
current PIN.
6
rlH
Cancel •
7
8
PIN,
Please enter your new PIN.
Settings
Change PIK(^ Your PIN has been changed.
PIN
Cancel
Pill
Cancel 0
66
Page 67
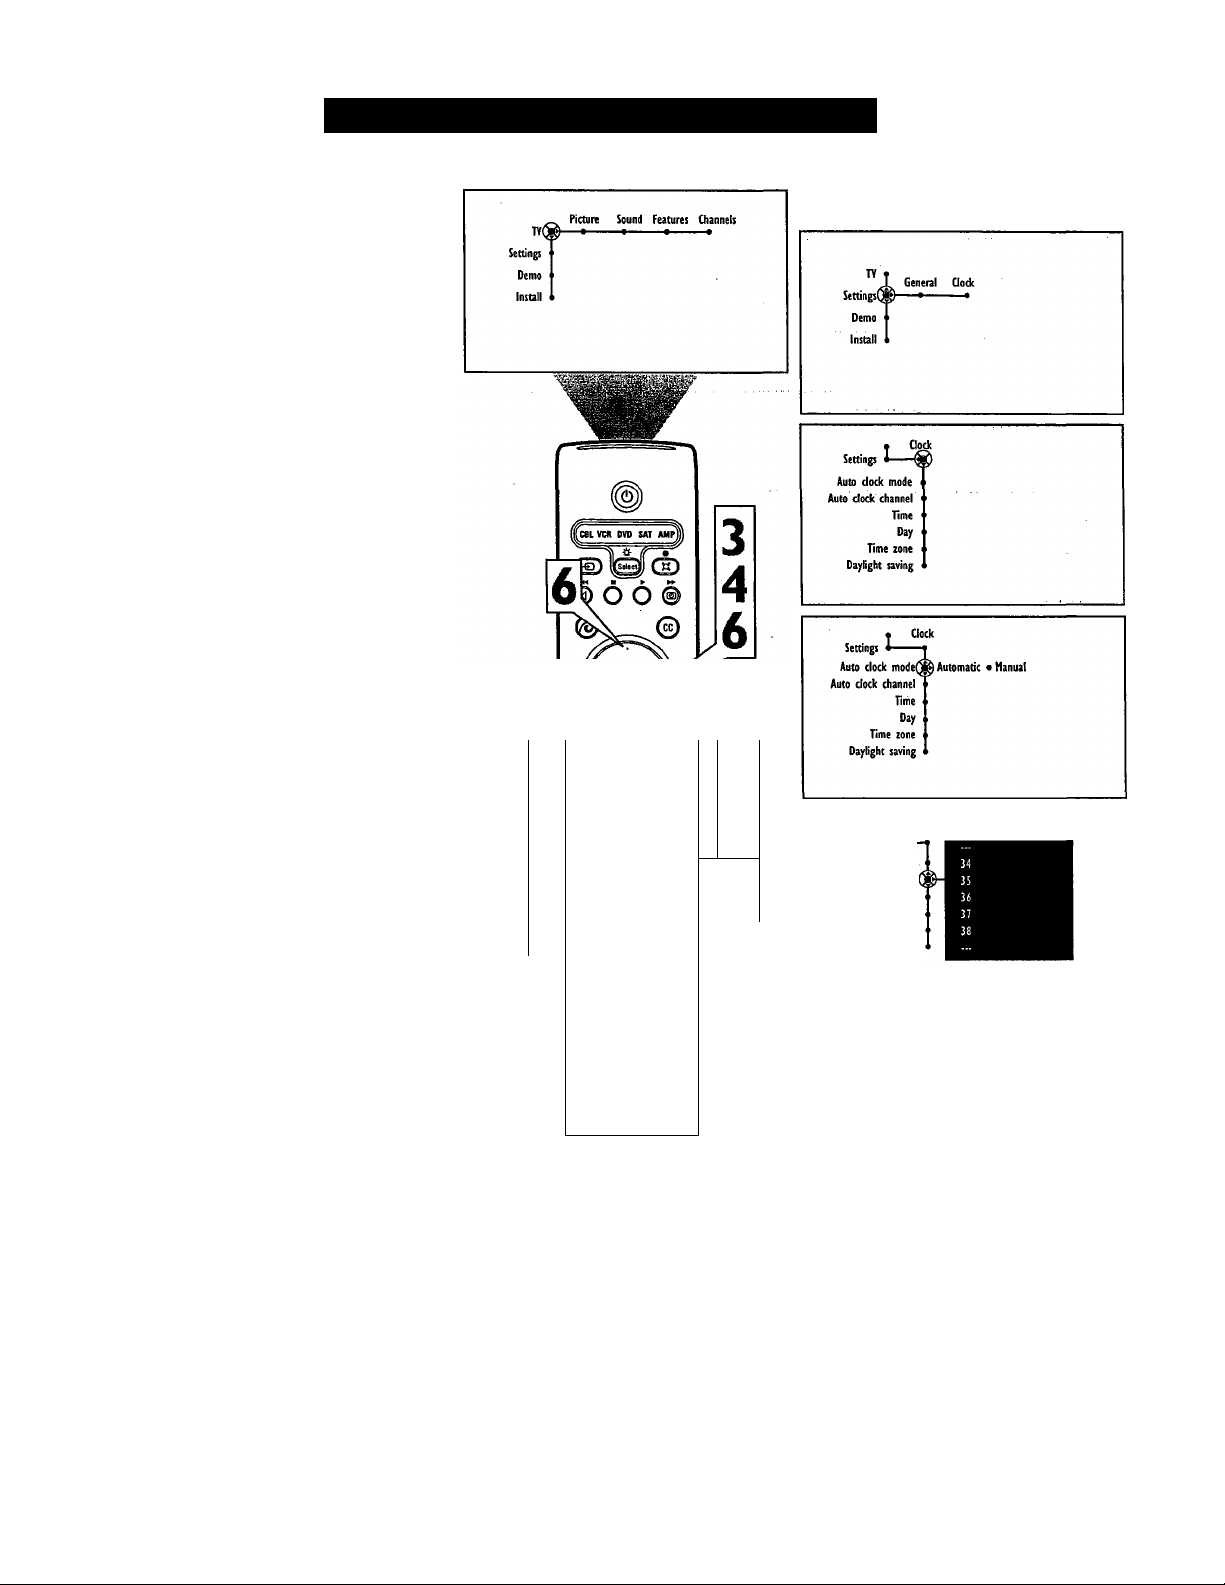
Setting the Clock—Auto Clock Mode
There are several features which require the
TV clock to be set. You can either set the
clock manually or have the TV acquire the
time from the appropriate TV chaimel.
Press the Menu button on the remote
control to display the on-screen menu.
1
Press the Cursor Down button to high
light “Settings.”
2
Press the Cursor Right button repeated
ly to select the “Clock” menu.
3
Press the Cursor Down button to select
Auto Clock Mode. Then Press Cursor
4
Right Button to Select “Automatic” or
“Manual.” Select Automatic to have
the TV acquire the time from a the TV
signal. Choose “Manual” to set the
time yourself
If you choose to set the time Automatically
you will need to set the “AutoClock Channel”
by continuing with steps 5-8 below. If you
select manual you will iieed to make the cor
rect settings by continuing on page 68.
G
Auto Clock Channel
After following steps 1-4 above, press
the Cursor Down button to select Auto
5
Clock Chaimel.
Press the Cursor Right button to enter
the channel list. Select your local PBS
6
channel by using the Cursor Up or
Down buttons to scroll through the
channel list or inputing the the channel
using the number buttons.
Press the Menu button on the remote
control to remove the on-screen menu
7
from the TV screen.
Next Set the Time Zone and Daylight
Savings Time. See page 69 for instruc
8
tions.
When the clock is set to “automatic” there
will be a several second delay when the TV
is turned on and off. During this delay the
blue LED will blink. This is normal.
2
f!i 0 fTl
U U
4
o © ©
5
o © ©
© © ©^
6
© © ©
® ®
'll
■f
7
in
y6
Settings
Auto dock mode
Auto dock channel
Time
Day
Time zone
Daylight saving
Uock
67
Page 68
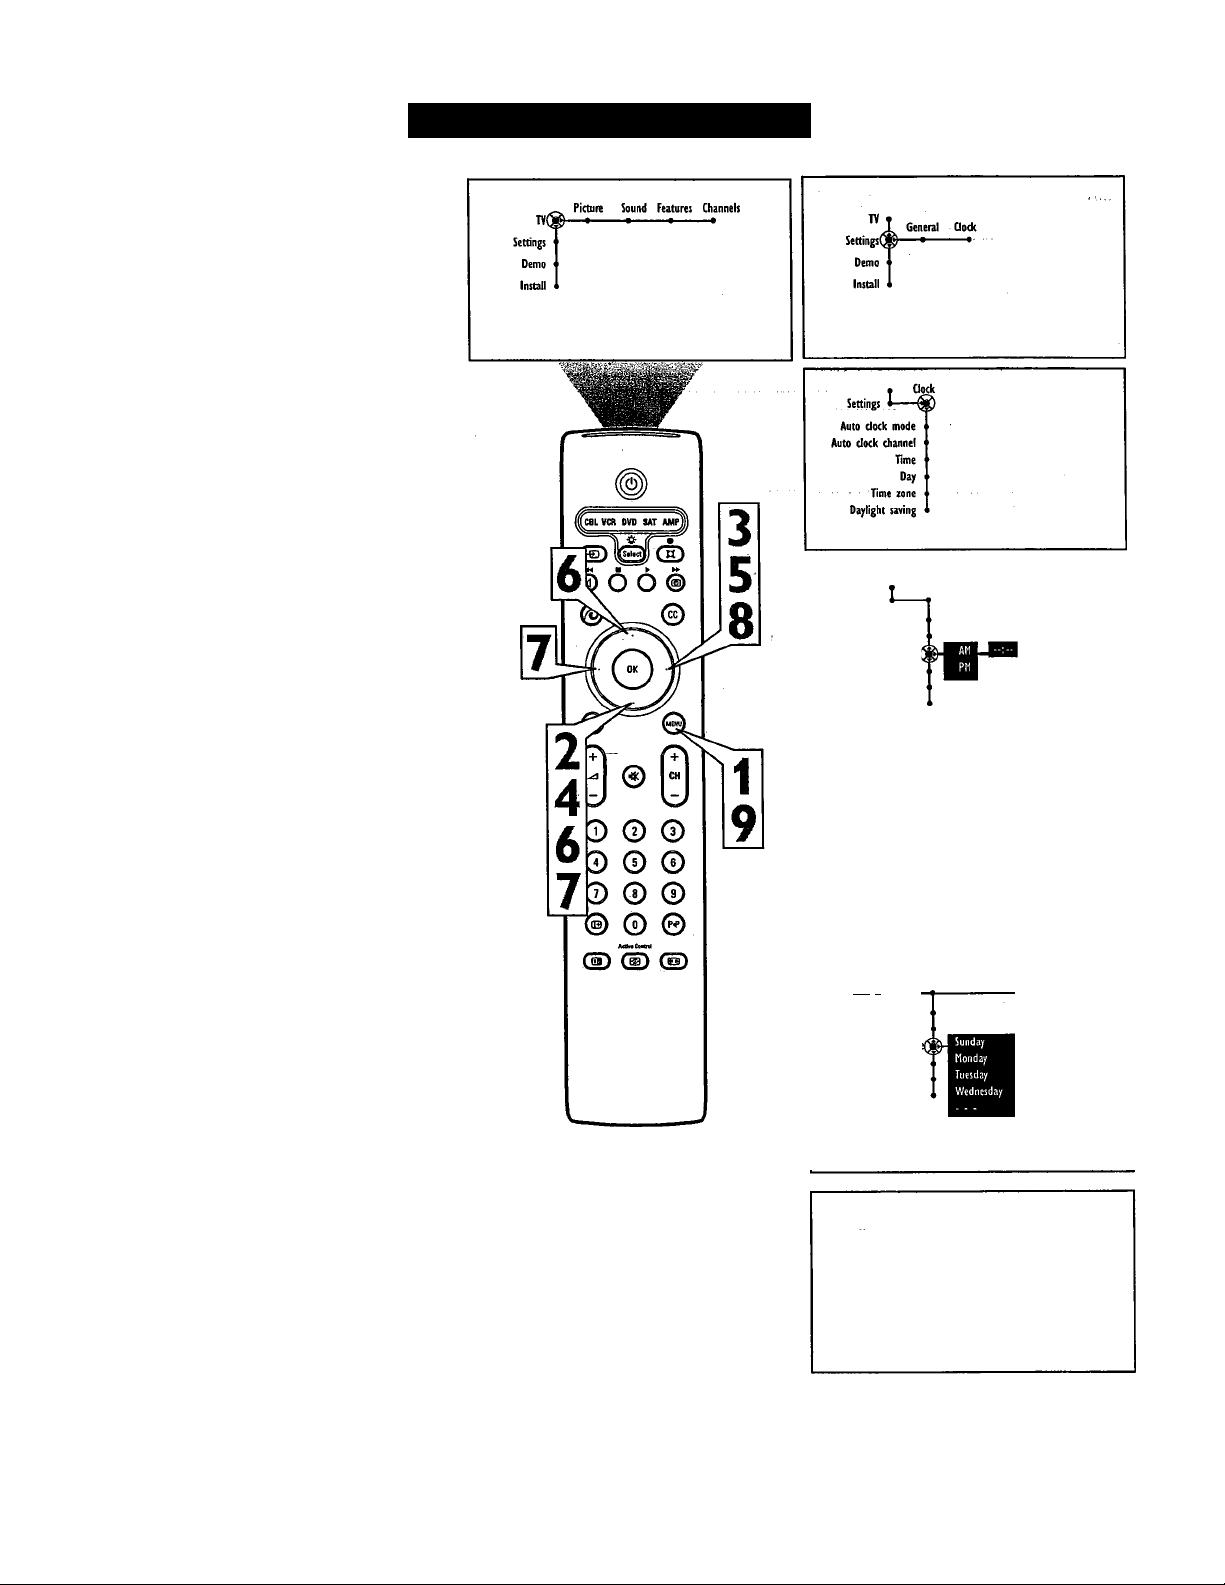
G
If you select Manual in the Auto Clock Mode,
you need to set the time manually.
Press the Menu button on the remote
1
2
3
4
5
6
7
8
control to display the on-screen
menu.
Press the Cursor Down button to
highlight “Settings.”
Press the Cursor Right button repeat
edly to select the “Clock” menu.
Press the Cursor Down button to
select Time.
Press the Cursor Right and Up or
Down buttons to select AM or PM.
Press the Cursor Right button and
use the number buttons to enter the
current time. (For example, enter 0,
8, 3, and 0 if the time is 8:30 or 1, 2,
4, and 5 if the time is 12:45.) You
can also use the Cursor buttons (Up,
Down, Right, Left) and scroll
through each number. Press Cursor
Right to move to the next place.
Next press the Cursor Left button
repeatedly to back out to the Clock
Menu.
Press Cursor Down to select “Day”.
Then press Cursor Right to enter the
list of days.
Setting the Clock Manually
Settings
Auto dock mode
Auto dock channel
Time zone
Daylight saving
• Oock
Settings • ■'
Auto dock mode
Auto clock channel
Time zone
Daylight saving
Oock
Timi
Day
Time
Day
9
10
11
Press the Cursor Up or Down but
tons to select the current day.
Press the Menu button on the remote
control to remove the on-screen
menu from the TV screen.
Next Set the Time Zone and
Daylight Savings Time. See page 69
for instructions.
Settings ■
Auto clock mode
Auto clock channel
68
aock
Timt
Day
Time zone
Daylight saving
Page 69
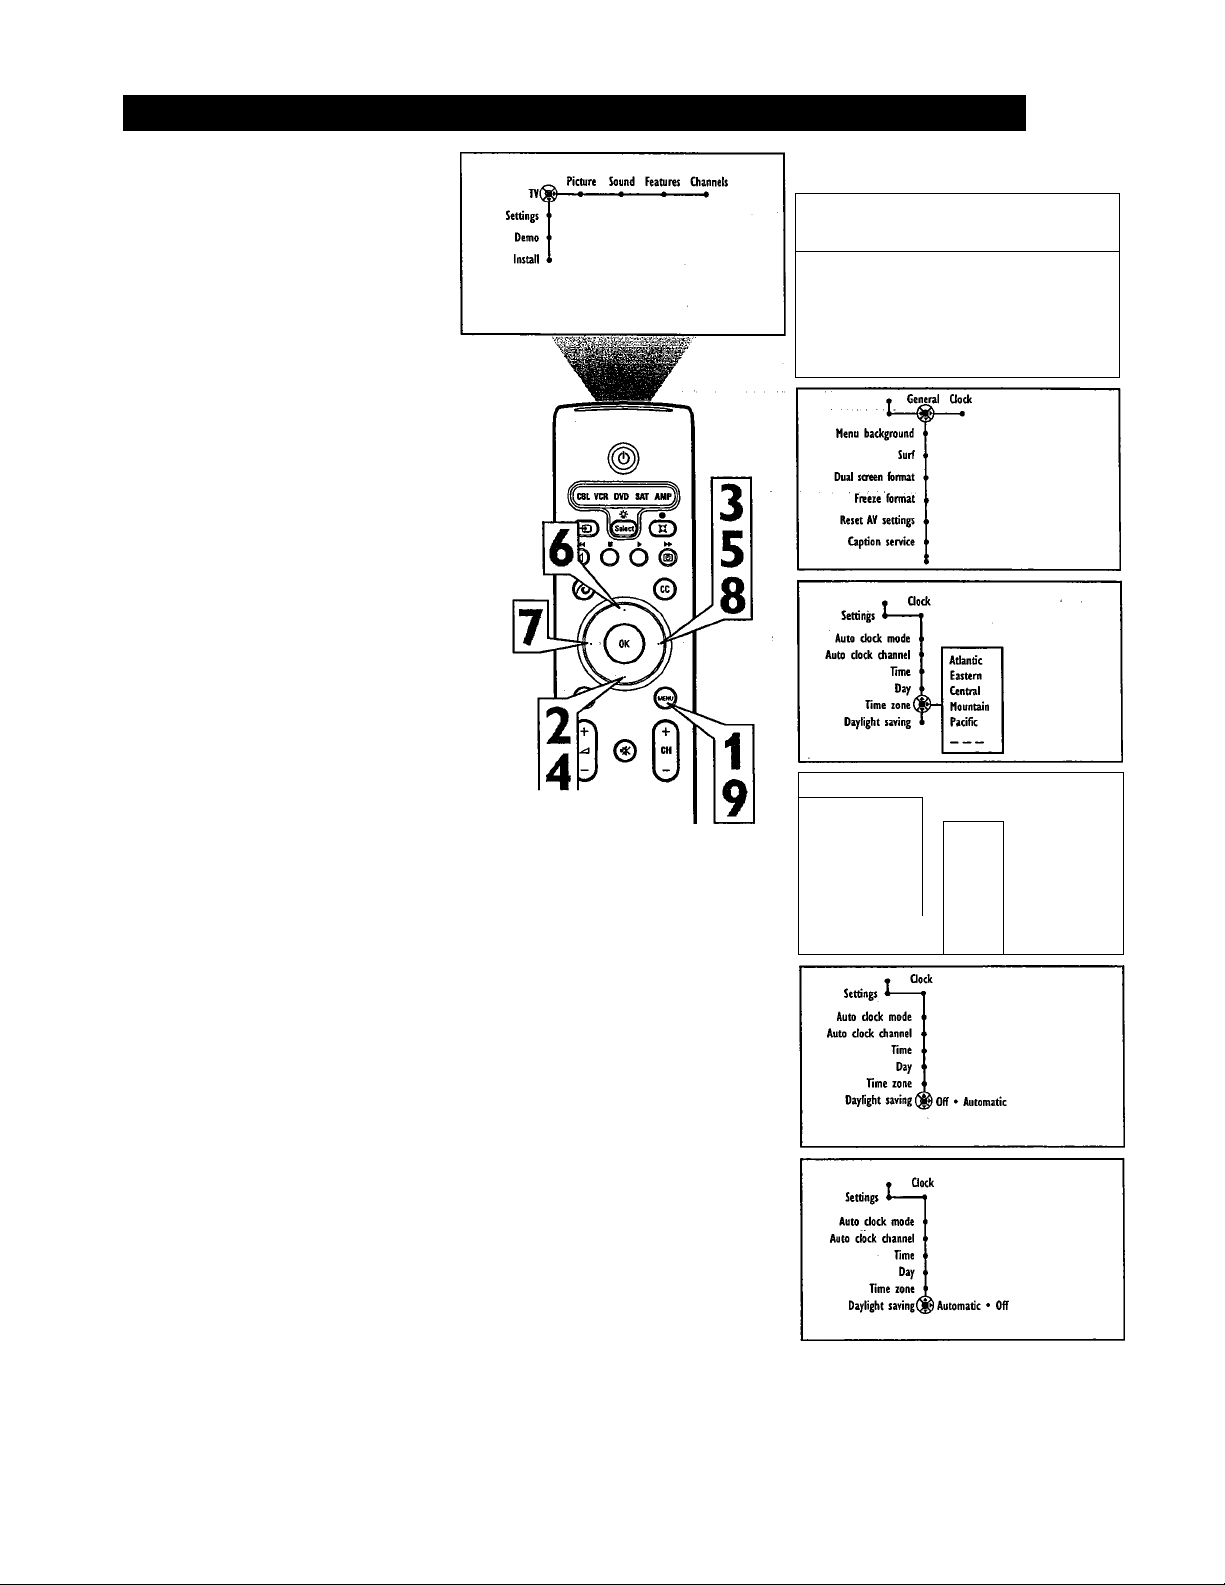
Selecting aTime Zone and Setting the Daylight Savings Control
Your television can acquire the current time
from the signal being received. It needs to
know your Time Zone, however, and whether
or not you use Daylight Savings.
Press the Menu button on the remote
control to display the on-screen menu.
1
Press the Cursor Down button to high
light “Settings.”
2
Press the Cursor Right button repeated
ly to select the “Clock” menu.
3
Press the Cursor Down button repeat
edly to select the “Time Zone” control.
4
Press the Cursor Right button to enter
the list of available time zones.
5
Press the Cursor Up or Down button to
select your time zone.
6
Press the Cursor Left button, then press
the Cursor Down button to select the
7
“Daylight Savings” control.
Settings«
Demo 1
Install i
General Ood
---------
G
-
Press the Cursor Right button to toggle
“Daylight Savings” to “Automatic” for
8
the TV to change to Daylight Savings
Time automatically. Or select “Off.”
Press the Menu button to remove the
on-screen menu from the TV screen.
9
6
^0©
s © ©
7p © ®
® ® ®
(0 0
Settings i '
Auto clod mode
Auto clod diannel
Time zone
Dayfight saving
Time
Day
• Clod
Eastern
Central
Mountain
^Pacific
Alaska
1
Havraii
p
69
Page 70
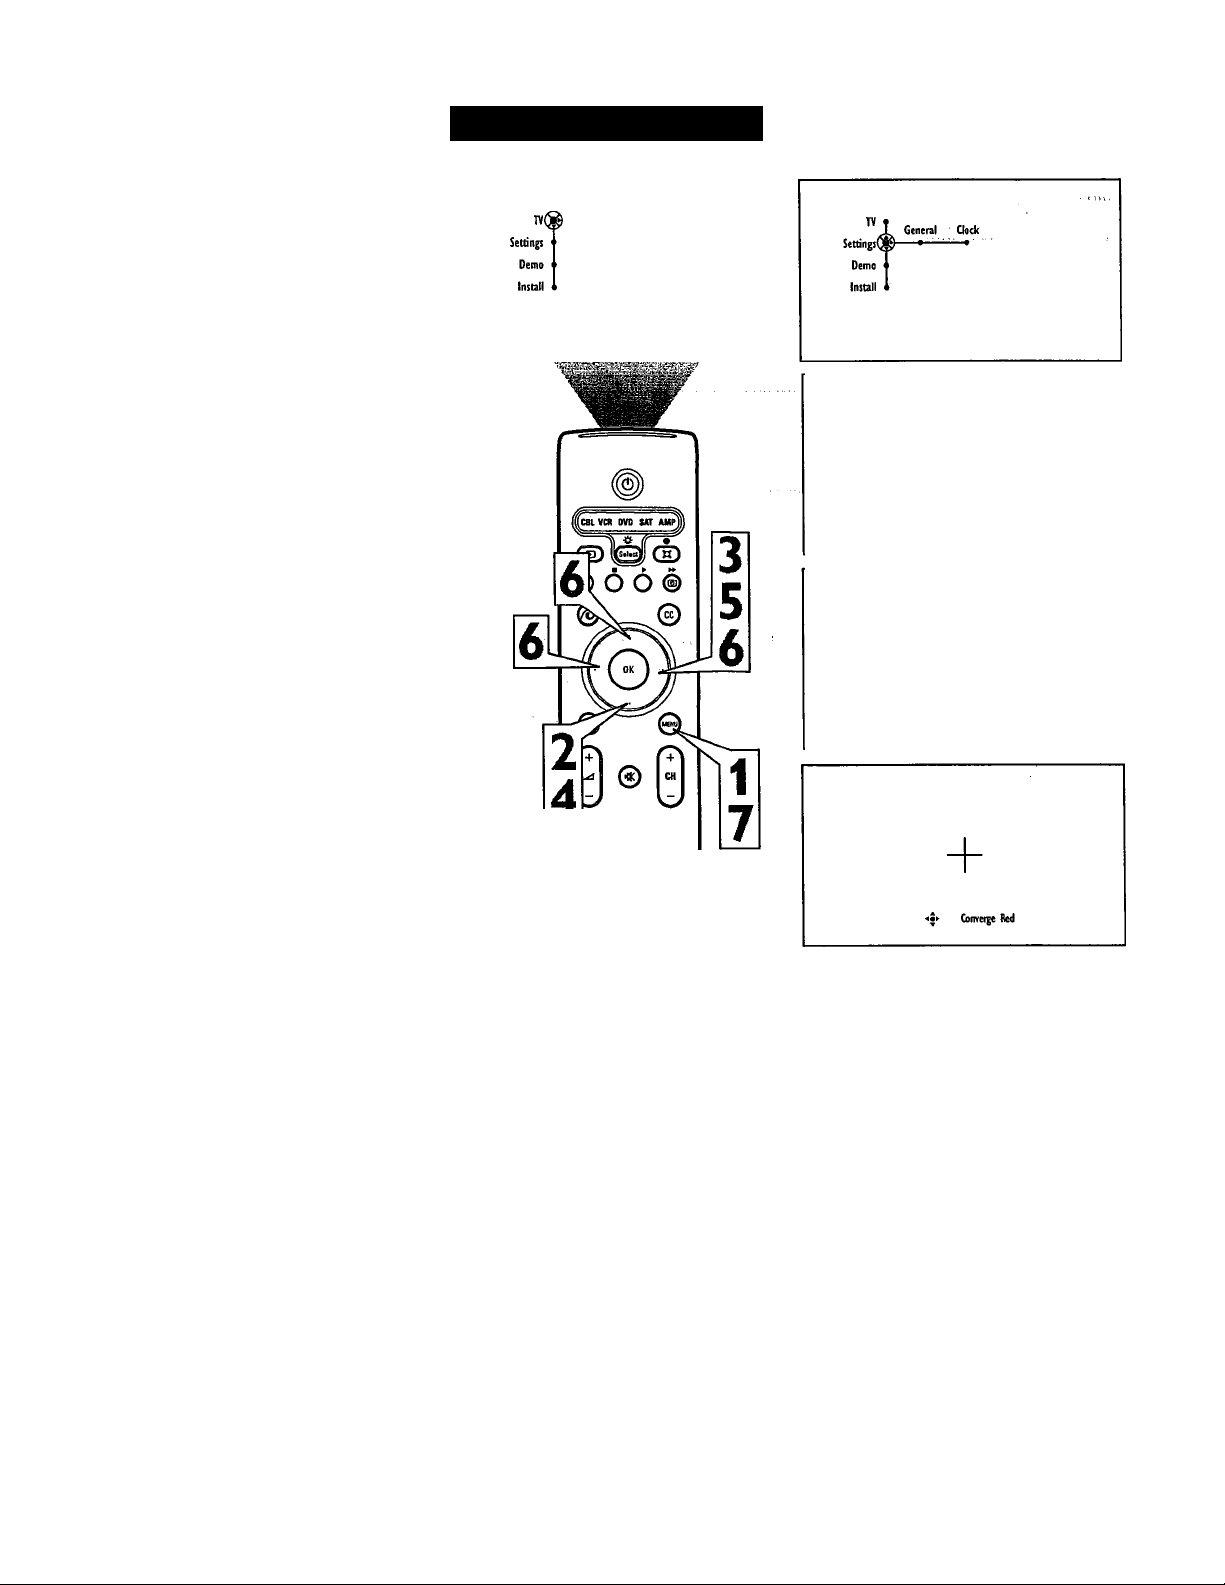
When the Red and Blue projections line up
they are in Convergence. Sometimes the pro
jections don’t line up and images on the
screen will have a red or blue fringe. You can
use IntelliSense to correct convergence, but if
it does not completely solve the problem, you
will need to adjust convergence manually.
Press the Menu button on the remote
control to display the on-screen menu.
1
Press the Cursor Down button to select
“Settings.”
2
Press the Cursor Right button to select
the “Converge” menu.
3
Press the Cursor Down button repeat
edly to select “Manual Convergence.”
4
Press the Cursor Right button to enter
the menu. Press the Cursor Down but
5
ton to select Converge Red or
Converge Blue (according to the color
of the fringes) and press Cursor Right
again to enter the adjust mode.
Manual Convergence
Picture Sound Features Channels
Settings '
elliSense f
IntelliSense
rereence •
Manual Convergence
Settings
' IntelliSense
Manual Convergence
Converge
Converge
^Converge red
Converge blue
Multipoint red
Multipoint blue
Save multipoint
Undo multipoint
Factory settings
Press Cursor Up, Down, Left and Right
to converge the Red or Blue cross with
6
the golden center cross
Press MENU to return to the inenu and
make further adjustments if needed.
7
Press the Menu button on the remote
control to remove the on-screen menu
from the TV screen.
3 © ©
3 © ©
3 © ©
I © ©
® (m) (S)
70
Page 71
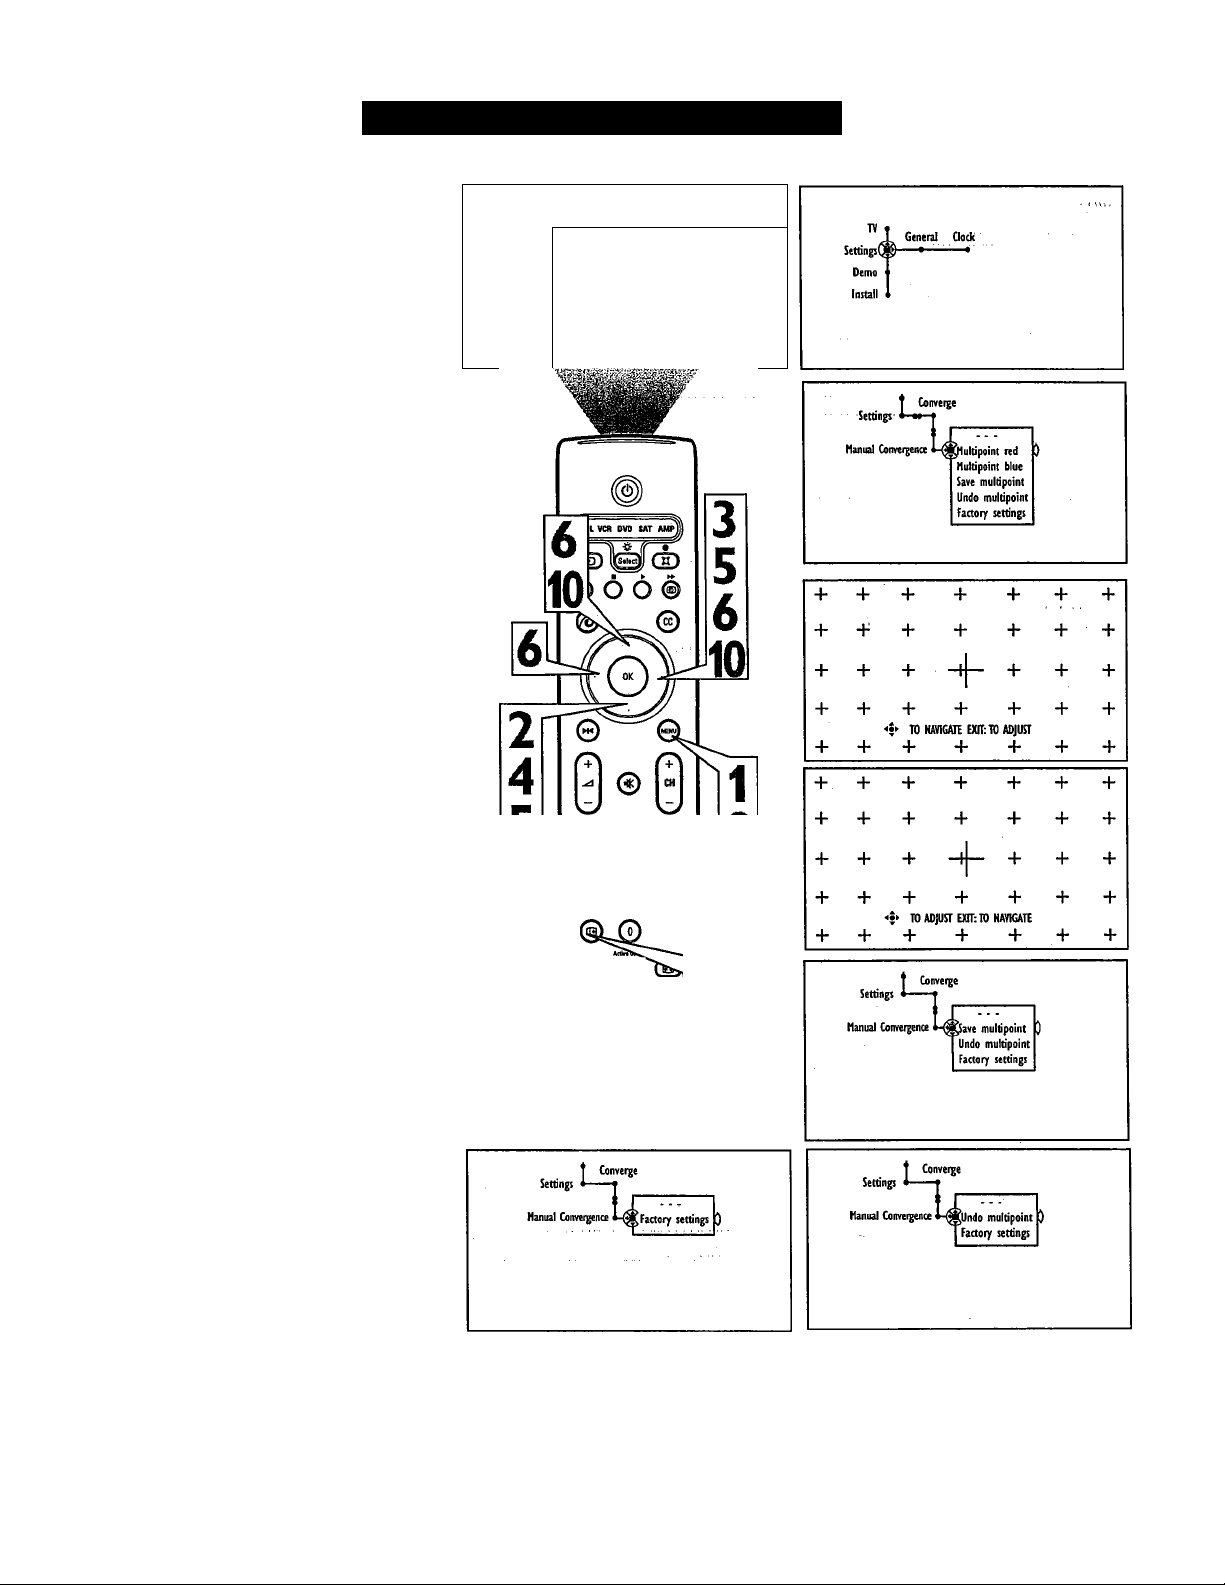
Sometimes the convergence is only out of
alignment in one part of the screen. To cor
rect convergence in a specific part of the
screen, use Multipoint Red or Blue.
Press the Menu button on the remote
1
2
3
4
5
control to display the on-screen
menu.
Press the Cursor Down button to
select “Settings.”
Press the Cursor Right button to
select the “Converge” menu.
Press the Cursor Down button repeat
edly to select “Manual
Convergence.”
Press the Cursor Right button to
enter the menu. Press the Cursor
Down button to select Multipoint
Red or Multipoint Blue (according to
the color of the fringes) and press
Cursor Right again to enter the adjust
mode.
Manual Convergence, Multipoint
. Picture Sound Features Channels
[vg
y • ■ • '
Settings
Demo
Install
,'V ;•
Press Cursor Up, Down, Left and
6
7
8
9
After changing the Multipoint convergence
you can Save Multipoint, Undo Multipoint, or
restore Factory Settings
10
11
Right to select the point on the
screen to adjust.
Press Q3 then Cursor Up, Down,
Left and Right to converge the small
Red or Blue cross with the golden
center cross.
Press e to switch to navigate
mode. Repeat steps 6-8 until the pic
ture is converged.
Press the Menu button to return to
the menu and make further adjust
ments if needed.
In the Manual Convergence menu,
use Cursor Up and Down to select
Save Multipoint, Undo Multipoint, or
Factory Settings. Press Cursor Right
to activate your selection.
Press the Menu button again to
remove the on-screen menu from the
TV screen.
O 0 ©
o © ©
© © ©
©
7
8
71
Page 72
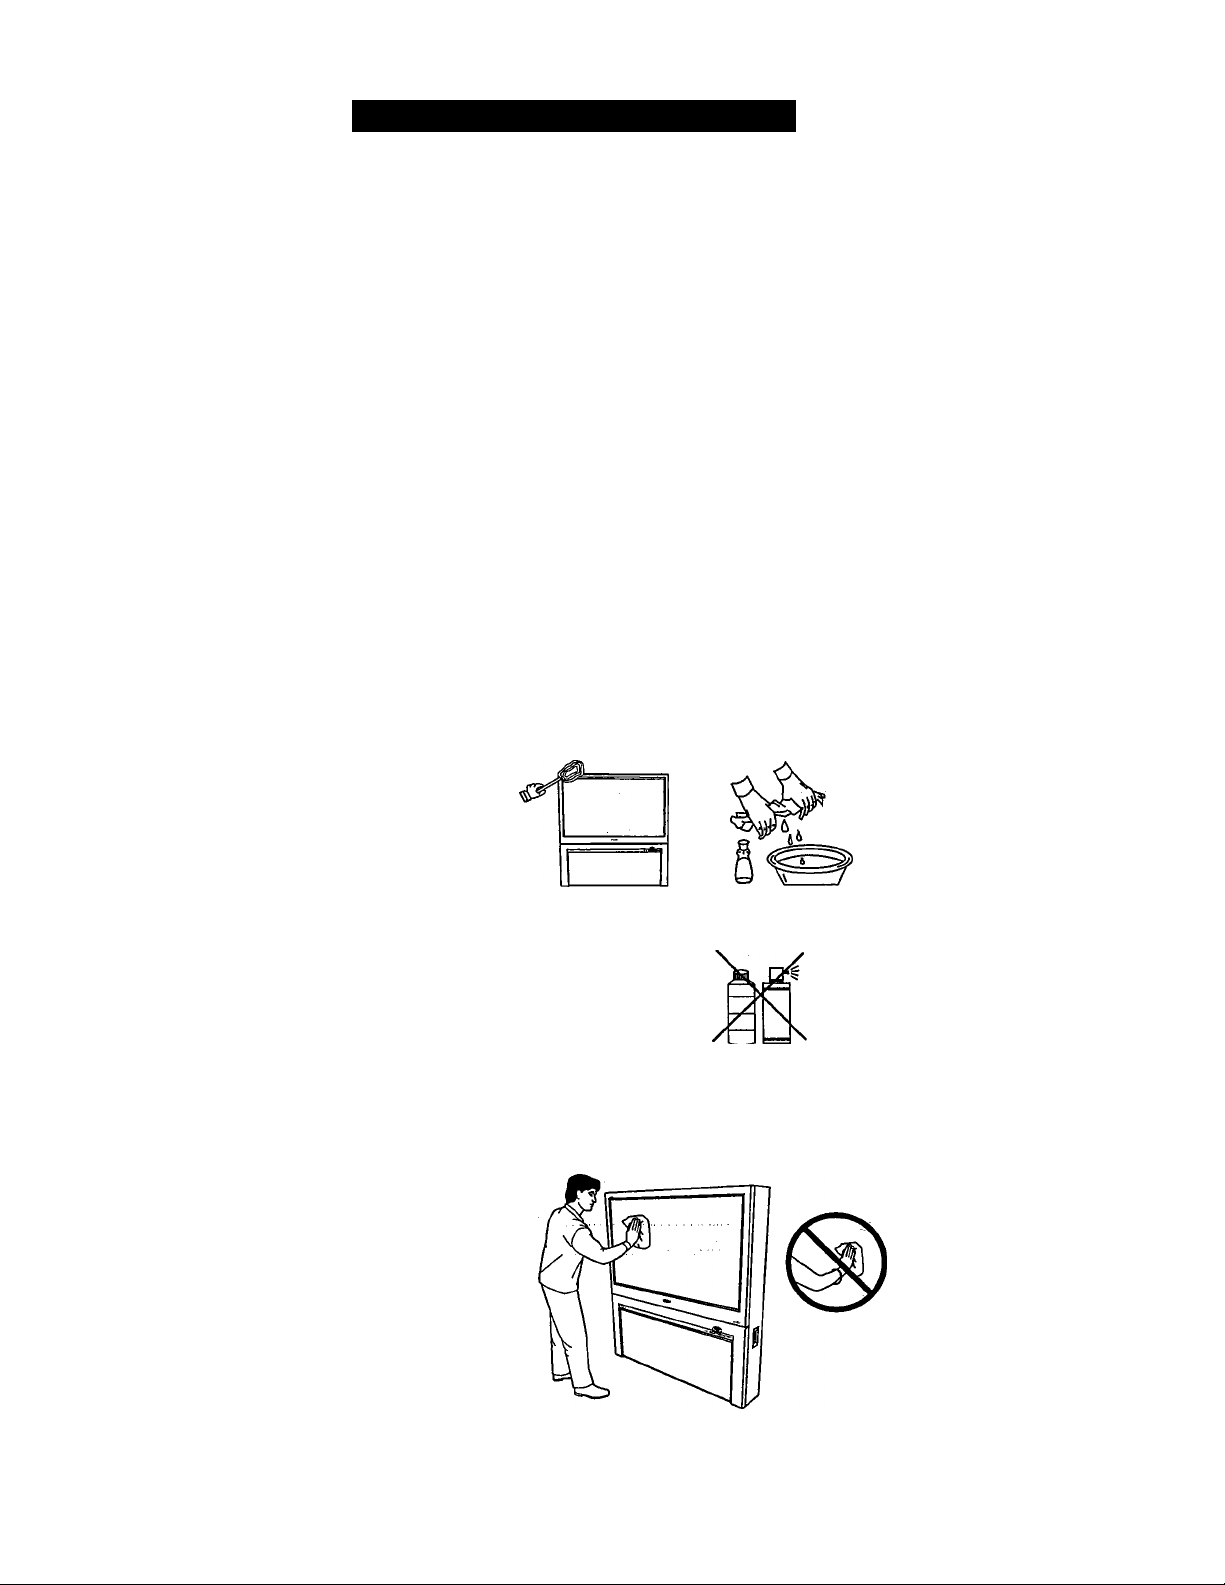
Care and Cleaning of the TV
WARNING Concerning Stationary Images on the TV Screen:
Do not leave picture border bars or stationary images on screen for extended periods of time.This can cause uneV^h
picture tube aging.
Normal use of the TV should involve the showing of pictures that contain constantly moving and changing images that fill the screen. Be careful
not to leave nonmoving images on screen for extended periods of time, or to display the same images on screen too frequently, because subtle
ghost images can be left on the picture tubes. Avoid showing pictures with border bars or the same stationary images more than 15 percent of your
total viewing in any one week. Sources of stationary images may be broadcast chatmels, cable channels, satellite chaimels, digital television boxes,
DVD discs, laser discs, video games, CD-i discs, videotapes, and others. Here are some examples of stationary images (this is not an all-inclu
sive list; you may encounter others in your viewing); Border bars—solid bars shown when viewing a standard (4:3) picture and some
widescreen movies on your widescreen (16:9) TV; DVD menus—^listings of DVD disc content; Video-game images and scoreboards; Television station logos—^present a problem if they are bright and stationary; moving or low-contrast graphics are less like
ly to cause imeven aging of the picture tube; Stock-market tickers—^presented at the bottom of the TV screen; Shopping channel
logos and pricing displays—^bright and shown constantly or repeatedly in the same location on the TV screen.
All picture tubes age with use, with their light output diminishing over time. But by maintaining normal use—^mixing television picture types—^you
will ereate conditions in the tubes age at an even rate. The result will be a TV picture that is evenly bright over the entire screen.
WARNING
To avoid possible shock hazard, be sure the
TV is unplugged from the electrical outlet
before cleaning.
Cleaning the Cabinet
• Regularly dust the TV cabinet with a dry,
nonscratching duster.
• Gently wipe the cabinet surfaces with a
soft, clean cloth. Even if the surfaces are
very dirty, do not apply cleaner to them
directly. Soak the cloth in a solution of
cool, clean water and mild soap or deter
gent. Wring out the cloth and wipe the cab
inet surfaces clean. Then use a clean, dry
cloth to dry the wiped surfaces.
• Occasionally vacuum the ventilation slots
on the back cover of the set. See the next
section on “Cleaning or Replacing the
Filters.”
• Never use thinners, insecticide sprays, or
other chemicals on or near the cabinet, as
they might cause penriâïlent marring of the
cabinet finish.
• The television contains plastic parts. DO
NOT use benzine, thinners, or other chemi
cals to clean. DO NOT use insecticide or
other volatile substances nearby. DO NOT
allow the TV to come into contact for
extended periods of time with rubber or
vinyl products.
Cleaning the Screen
• Wipe the screen with a clean cloth damp
ened with water. Screen-cleaning kits with
antistatic cleaners and cloths are available.
Contact our Customer Care Center at 1800-531-0039 to purchase the kit.
Be sure the TV is
unplugged before
©
Use a nonscratching duster.
cleaning it.
Don’t use chemicals
on or near the TV.
Soak the wiping cloth in
cool, clean water and mild
detergent. Then ring the
cloth out before using.
Avoid wearing
jewelry that may
scratch the TV.
When cleaning the screen, take care not to
scratch or damage the screen surface.
Avoid wearing jewelry or using anything
abrasive.
Wipe with even, easy,
vertical strokes.
72
Page 73

jy; ■ V
Troubleshooting
Review This List of Symptoms and Checks Before Requesting Service
You may be able to solve the problem yourself. Charges for TV installation and adjustment of customer controls are not cov
ered under your warranty.
If you need to call a customer service representative, please know the model number and serial number of yotu* product before you
call. This information is displayed on the back of the product. Our representative will be happy to assist you.
To reach our Customer Care Center, call 1-800-531-0039.
The TV won’t switch on.
• Make sure the power plug is plugged in.
• If you’re using the TV remote control to turn the TV on, be sure the remote is in TV mode.
• Plug something else in to be sure the wall outlet (or extension cord) is receiving power.
• The remote control could have a problem. See the troubleshooting section “Remote-related Checks” on the next page.
The TV switches off unexpectediy.
• The Sleeptimer may have been set to turn the TV off. Turn the TV back on if desired.
The TV switches on unexpectediy.
• The On Timer may have been set.
• If the TV experienced a power outage, it will switch on when power is restored.
You have a picture but no sound.
• Make sure Mute is not on.
• The TV speakers may be turned off. Make sure the Center Channel Amp Switch on the back of the TV is in the INT position.
You have no picture.
• If you have made a connection to the TV’s ANTENNA IN 75£2 jack, be sure to use Autoprogram, to program channels into the
TV’s memory.
• If you want to view materials from an accessory device (DVD player, VCR, or satellite receiver, for example) be sure you have
selected the input source to which you have connected the device—^AVl, AV2, AV3, AV4, or Side.
• Make sure you have made connections correctly.
You see scrolling images.
• Make sure you have made connections correctly.
The picture appears doubled or tripled.
• If you are using an antenna, be sure it is facing in the correct direction for proper reception. Also, check to see if it may be receiv
ing signals that are being reflected off of mountains or buildings.
The picture shakes or is not clear.
• If you are using an antenna, make sure it is not broken or shorted, and make sure the antenna cable is connected properly and
securely.
• If you are using a VCR and selecting channels on the TV, make sure the TVA^CR mode on the VCR is set to TV.
The picture has no colors or colors are not correct.
• Make sure you have made connections correctly
• If you have connected accessory equipment, such as an HD satellite receiver, make sure the color space setting (either YPbPr or
RGB) on the accessory equipment is correct. If you have connected to HD INPUT-AV 3, make sure the color space setting for the
AV3 input in the TV’s Sources submenu (within the Settings menu) matches that of the accessory equipment—either YPbPr or
RGB. See the section in this manual on setting the color space for AV3, and refer to the user manual for the HD satellite receiver.
The TV sound has an unusual quality.
• Check the TV’s Equalizer control to be sure it is set to the option you want.
The remote control does not work.
• Make sure nothing is blocking the path between the remote control and the; TV or accessory device you want to operate.
• Make sure you point the remote directly at the TV or accessory device you want to operate.
• If you want to operate the TV, make sure the remote is in TV mode. If you want to operate an accessory device, program the
remote to operate the device if necessary and make sure the remote is in the appropriate mode for the device.
• Make sure you have installed the batteries correctly.
• The batteries could be dead. When the batteries in the remote run low, the remote will send a “Battery Low” command to the TV.
The TV will then display a message on the screen reminding you to replace the batteries as soon as possible.
• You may want to try taking the remote batteries out and then putting them back in. NOTE: After taking the batteries out, you
may need to reprogram the remote for use with accessory devices.
*Q refers to the Quick Use and Setup Guide that came with your TV.
73
Page 74

Index
Active Control™ Plus+, 27
Active Controi™ Plus+Window, *Q5
Active Standby Window, *Q5
Alternate Audio (SAP), 43
Antenna Attenuator, 57
Audio/Video Input Sources, Labeling, 19
Audio Out, 47
AutoPicture™ Options, 28
AutoSound™ Options, 37
AVL (AutoVoiume Leveler),45
B
Blocking Programs
Based on TV Ratings, 55
Based on Movie Ratings, 56
c
Cabinet
Buttons, *Q5
Windows, *Q5
Channel List, 51
Channels, Programming into the TV’s
Memory, *Q8
Cieaning the TV, 72
Clock
Auto Clock Mode. 67
Manual Setting. 68
Time Zone and Daylight savings, 69
Closed Captioning, 64
Coior Enhancement, 34
Connections
Camcorder, 18
HD Sateilite Receiver to DVI, 16
HD Sateliite Receiver toYPbPr, 14
Progressive-scan DVD Player, 13
Standard DVD Player, 12
Surround Sound, 17
S-Video,11
VCR, 9
VCR and Cable Box, 10
Video Game System, 18
D
Dayiight Savings, Setting, 69
Deità Volume, 44
Digital Processing Options, 30
Dolby**Virtuai (See Sound Mode Options)
PIP Format
Changing Channeis or Input Sources, 61
Selecting, 60
DVI Inputjack, 6-7,16
Dynamic Contrast Options, 32
Dynamic Noise Reduction Options, 33
Factory Service Locations,75-76
H
Headphone Volume,Adjusting, 39
I
Incredible Surround™ (See Sound Mode
Options)
J
Jacks/Cabies/Connectors, Descriptions, 6
L
Language, Setting for the On-screen
Menu, *Q8
Lock After, 54
Lock Channel, 53
Loudness, 40
M
Menu Background, 58
o
On-screen Displays Options, 65
On Timer, 49
Overheating, Preventing, *Q1-2,8
P
Panei Jacks, Compatibility Information, 6-7
Panning the Screen (with Cursor Buttons),
*06,18,35
Picture Controls, 30
Picture Format Options, 35-36
Picture Freeze Options, 62
PIN, Setting up or Changing, 66
PIP, 60
Power Surges, Protecting Against, 8
Pre-connection Recommendations, 8
Product End of Life Disposal, 5
Remote Control
Programming, 22-23
Using with theTV, *Q6,24-26
Using with Accessory Devices, 24-26
Remote Sensor Window, *Q5
RGB+HV Input Jack, 6-7
s
Safety Information/lnstructions, *Q1 ,*Q2,2,
3,8
SAP (See Alternate Audio Control)
Service (See Factory Service Locations)
Signal Splitter, *Q4,6,10
Sleeptimer, 48
Sound Mode Options, 42
Stereo, Seiecting, 44
Subwoofer
Output Jack, 6-7,17
Control (in on-screen menu), 17
Surf Options, 59
Surround Sound (See Connections and Sound
Mode Options)
S-Video Input Jacks, 6-7,11
Time Zone, Seiecting, 69
Troubleshooting, 73
Tuner (RF) Input Jack, *Q3-5,7-8
TV Equalizer Options, 38
TV Signals
Information on, 6
Ways of Receiving, 6
TV Speaker Balance, 41
TV Speakers, 47
Twin-lead Adapter, 8
V
Video Game System (See Connections)
Volume,Adjusting
Headphone, 39
TV, 39
w
Warranty, 80
Welcome, 2
YPbPr Input Inputjacks, 6-7,12-13
*Q refers to the Quick Use and Setup Guide that came with your TV.
74
Page 75

if Indicates In-Home Service Oniy
Milwaukee: call Chicago
Cincinnati and Columbus: call Cleveland
Nashville and Chattanooga: call Knoxville
Washington/Baltimore: call Philadelphia
Charlotte: call Atlanta
San Antonio: call Houston
All Florida locations: call Tampa
* Indicates in-Home/Carry-in Service
Toll-lree numbers provided on the next page
_____
Factory Service Locations
Tampa/W Fiorida
★ Ft. Myers/SW Fiorida
' Miami/SE Florida
:_J'
____
* Phlladelphla/S New Jersey
d^Wash/Balt
NOTE: If you reside in one of our Philips Factory Service Branch areas (see the directory on the next page), you can contact the nearest Service
Branch to obtain efficient and expedient repair for your product. If your product Is In-Warranty, you should have proof-of-purchase to ensure No
Charge Service. For Out-of-Warranty service, call the location nearest you.
NOTA: Si vous résidez dans une des régions desservies par une succursale de service après vente du fabricant Philips (voir liste ci-dessous), vous
pourrez contacter la branche de service après vente la plus près de chez vous pour obtenir un service après vente rapide et efficace. Si le produit est
sous garantie, il suffira de présenter une preuve d'achat pour bénéficier d'un service sans frais. Pour les produits non couverts par la garantie, con
tactez le centre le plus près de chez vous.
NOTA: Si Ud. reside en una de nuestras zonas para sucursales Philips de servicio al de fábrica (ver directorio más abajo), Ud. puede comunicarse con
la sucursal de servicio más cercana para obtener una reparación oportuna y eficaz de su producto. Si su producto está todavía bajo garantía, Ud.
debe presentar comprobante de compra para no ocasionar ningunos cargos por servicio. Para servicio después del vencimiento de la garantía, llame
al lugar más cercano de los abajo indicados.
In Canada
How/ you can obtain efficient and expedient carry-in, mail-in, or in-home service for your product
Please contact Philips at 1 -800-661 -6162 (French speaking)
1-800-531-0039 (English or Spanish speaking)
Au Canada
Comment obtenir ie service après-vente pour les produits apportés ou envoyés par la poste à notre centre de service ou le service à domicile
Veuillez contacter, philips á:
1-800-661-6162 (Francophone)
...............
1-800-531-0039 (Anglais ou Espagnol)
En el Canadá
Cómo recibir servicio efficiente para su producto, en persona, por correo o a domicilio
Favor de comunicarse con Philips al: 1-800-661-6162 (francófono)
1-800-531-0039 (Inglés o Español))
Rev. HH - 1/9/2003
3135 035 21421
75
Page 76

Factory Service Locations
Quality service is as close as your telephone! Simply look over the list below for the number of a Factory Service Center
NEAR YOU. Your product will receive efficient and expedient carry-in, mail-in, or in-home service, and you will receive peace of mind,
KNOWING YOUR PRODUCT IS BEING GIVEN THE EXPERT ATTENTION OF PHILIPS’ FACTORY SERVICE.
COMMENT OBTENIR NOTRE SERVICE APRÈS VENTE RAPIDE ET EFFICACE SOIT PAR COURRIER, A DOMICILE, OU EN SE PRÉSENTANT A UN CENTRE DE SERVICE PHILIPS. PLUS DE eOO CENTRES DE
RÉCEPTIDN DE PRDDUITS A RÉPARER A TRAVERS LE PAYS: CDNTACTER LE CENTRE DE SERVICE AUX CONSDMMATEURS LE PLUS PROCHE POUR SAVOIR L’EMPLACEMENT DE CES DÉPÔTS DANS
UN RAYON DE 50 A 75 MILES (80 KM A120 KM) DU CENTRE DE SERVICE LOCAL.
CÓMO OBTENER UN SERVICIO OPORTUNO Y EFICIENTE POR CORREO, EN CASA O EN PERSONA PARA SU PRODUCTO A TRAVÉS DE UN CENTRO PHILIPS DE SERVICIO. MAS DE 600 SITIOS POR
TODO EL PAIS PARA LA RECEPCION DE PRODUCTOS NECESITADOS DE REPARACIONES: COMUNICARSE CON EL CENTRO DE SERVICIO DE FABRICA MAS CERCANO PARA ESTOS LUGARES DENTRO
DE UN RADIO DE 80 A120 KM (50 A 75 MILLAS) DEL CENTRO DE SERVICIO LOCAL.
ATLANTA
Philips Factory Service
550 Franklin Road., Suite F
Marietta, GA 30067
800-273-1501
TAMPA
Philips Factory Service
1911 US Highway 301 North, Suite 100
Tampa, FL 33619 Madison Heights, Ml 48071
800-442-2027
SAN FRANCISCO DALLAS
Philips Factory Service
CLEVELANO
CHICAGO
Philips Factory Service Philips Factory Service
950 Keynote Circle 1279 W. Hamilton Pkwy.
Brooklyn Heights, OH 44131 Itasca, IL 60143
800-331-7037
800-531-2922
OETROIT KNOXVILLE
Philips Factory Service Philips Factory Service
25173 Dequindre One Philips Drive
Building 2
800-438-1398 Knoxville, TN 37914
800-821-1767
Philips Factory Service
PHILADELPHIA
681 East Brokaw Rd. 415 N. Main Street, #107 Philips Factory Service
San Jose, CA 95112
Euless, TX 76040 354 Dunks Ferry Rd.
800-300-9013 800-952-3254 Bensalem, PA 19020
HOUSTON
Philips Factory Service
1110 N. Post Oak Rd., Suite 100
Houston, TX 77055
800-952-3254
LOS ANGELES
Philips Factory Service
20930 Bonita, Ste. V
Carson, CA 90746
800-300-9013
800-847-9320
76
Page 77

. .. . rVV, , - :-;,V
This page is intentionally left blank.
77
Page 78

This page is intentionally left blank.
78
Page 79

This page is intentionally left blank.
79
Page 80

Limited Warranty
PHILIPS TELEVISION
One Year Free Labor
One Year Free Service on Parts
30 days Free Service on Television Screen
This product can be repaired in-home.
WHO IS COVERED?
You must have proof of purchase to receive warranty service. A sales
receipt or other document showing that you purchased the product is
considered proof of purchase.
WHAT IS COVERED?
Warranty coverage begins the day you buy your product For one year
thereafter (30 days for the TV screen), all parts will be repaired or
replaced, and labor and transportation are free. After one year from the
day of purchase, you pay for the replacement or repair of ail parts and
for all labor and transportation charges.
All parts, including repaired and replaced parts, are covered only for
the original warranty period. When the warranty on the product
expires, the warranty on all replaced and repaired parts also expires.
WHAT IS EXCLUDED?
Your warranty does not coven
* labor charges for installation or setup of the product, adjustment of
customer controls on the product, and installation or repair of
antenna systems outside of the product
* product repair and/or part replacement because of misuse, acci
dent unauthorized repair or other cause not within the control of
Philips Consumer Electronics Company.
* reception problems caused by signal conditions or cable or antenna
systems outside the unit
* a product that requires modification or adaptation to enable it to
operate in any country other than the country for which it was
designed, manufactured, approved and/or authorized, or repair of
products damaged by these modifications.
* incidental or consequential damages resulting from the product.
(Some states do not allow the exclusion of incidental or consequen
tial damages, so the above exclusion may not apply to you. This
includes, but is not limited to, prerecorded material, whether copy
righted or not copyrighted.)
* a product used for commercial or institutional purposes.
MAKE SURE YOU KEEP...
Please keep your sales receipt or other document showing proof of
purchase. Attach it to this owner’s manual and keep both nearby.
Also keep the original box and packing material in case you need to
return your product.
BEFORE REQUESTING SERVICE...
Please check your owner’s manual before requesting service.
Adjustments of the controls discussed there may save you a service call.
TO GET WARRANTY SERVICE...
Repair must be performed by an authorized service center or a factory
service center. If you do not live near a factory service center, contact
your dealer. If your dealer is an authorized service center, he will
arrange repair. If your dealer is npt an authorized service center, he
will direct you to the authorized service center engaged by him to
service the products he sells.
(In U.SA, Puerto Rico and U.S. Virgin Islands, all implied warranties,
including implied warranties of merchantability and fitness for a particular
purpose, are limited in duration to the duration of this express warranty.
But, because some states do not allow limitations on how long an implied
warranty may last, this limitation may not apply to you.)
(In Canada, this warranty is given in lieu of all other warranties. No
other warranties are expressed or implied, including any implied war
ranties of merchantability or fitness for a particular purpose. Philips is
not liable under any circumstances for any direct, indirect, special, inci
dental or consequential damages, howsoever incurred, even if notified
of the possibility of such damages.)
IF YOU HAVE QUESTIONS...
Please contact Philips at:
1-800-531-0039, if calling from the USA (English or Spanish Speaking)
I-800-661-6162, if calling from Canada (French Speaking)
1-800-531-0039, if calling from Canada (English or Spanish Speaking).
WHERE IS SERVICE AVAILABLE?
Warranty service is available in all countries where the product is offi
cially distributed by Philips Consumer Electronics Company. In coun
tries where Philips Consumer Electronics Company does not distribute
the product, the local Philips service organization will attempt to pro
vide service (although there may be a delay if the appropriate spare
parts and technical manual(s) are not readily available).
Philips Consumer Electronics, P.O. Box 520890, Miami, FL 33152, (402) 536-4171
REMEMBER...
Please record below the model and serial numbers found on the prod
uct Also, please fill out and mail your warranty registration card
promptly. It will be easier for us to notify you if necessary.
MODEL# ____________________________________________________
SERIAL# ____________________________________________________
EL655IE00I /3-03
80
 Loading...