

Page 1

Projection Television
43”/50”/ 55’’
Instructions for Use
43PP925
50PP925
55PP925
3135 015 22191
Page 2

INTRODUCTION
Thank you for purchasing this television set. You are now the proud owner of a PHILIPS TV
set, which promises full value to you as a customer. Please read the instruction manual carefully
and thoroughly to help you install and operate your TV set.
TABLE OF CONTENTS
SAFETY INFORMATION/USEFUL TIPS .......................................................................3
BEFORE CALLING SERVICE......................................................................................3
INSTALLATION .......................................................................................................4
CONNECTING THE AUDIO/VIDEO SOCKETS
Playback .....................................................................................................................................5–6
Recording ...................................................................................................................................... 7
EXTERNAL SPEAKER CONNECTIONS ....................................................................8–9
FUNCTIONS OF REMOTE CONTROL ................................................................. 10–11
FUNCTIONS OF TV CONTROLS ...................................................................... 12–13
SELECTING THE MENU LANGUAGE, TUNER MODE
AUTOMATIC TUNING OF CHANNELS..............................................................14
AND
FINE TUNING OF CHANNELS ................................................................................15
EDITING OF CHANNELS ........................................................................................16
NAMING OF CHANNELS........................................................................................17
USING THE PICTURE MENU ..................................................................................18
USING THE SOUND MENU....................................................................................19
CONVERGENCE
Converge Red/Blue................................................................................................................... 20
Multipoint Red/Blue ...........................................................................................................21–22
Undo Multipoint ........................................................................................................................23
ACTIVATING THE TIMER ................................................................................. 24–25
ACTIVATING THE CHILD LOCK
Access Code...............................................................................................................................26
Change Code..............................................................................................................................27
Lock Channel..............................................................................................................................28
Clear All.......................................................................................................................................29
USING THE CLOSED CAPTIONING CONTROL ................................................... 30–31
USING THE SURF CONTROL .................................................................................32
ACTIVATING THE BLUE MUTE CONTROL ..............................................................33
USING THE PROGRAM LIST FEATURE ....................................................................33
SMART PICTURE AND SMART SOUND ....................................................................34
ACTIVATING THE PIP (PICTURE-IN-PICTURE)
AND DOUBLE WINDOW CONTROL .................................................................35–37
SPECIFICATIONS...................................................................................................38
2
Page 3

SAFETY INFORMATION/USEFUL TIPS
Safety
Disconnect mains plug when :
– the red light below the TV screen is flashing continuously.
– a bright white line is displayed across the screen.
– cleaning the TV screen. Never use abrasive cleaning agents. Use a slightly damp chamois
leather or soft cloth.
– there is a lightning storm.
– the set is left unattended for a prolonged period of time.
Useful Tips
• Do not place your TV set under direct sunlight or heat.
• Avoid placing your set (e.g., near the window) where it is likely to be exposed to rain
or water.
• Do not leave your set on standby mode for a prolonged period of time. Switch off set
to allow it to be demagnetised. A demagnetised set supports good picture quality.
• Do not shift or move the set around when it is switched on. Uneveness in colour in
some parts of the screen may occur.
• Never attempt to repair a defective TV yourself. Always consult a skilled service person.
BEFORE CALLING SERVICE
Below is a list of frequently occurring symptoms. Before you call for service, make these simple
checks. Some of these symptoms can easily be rectified if you know what to do.
Symptom What you should do
Colour patch • Switch off the TV by the mains power button. Wait for 20
(uneveness) minutes before switching on again.
• Check the TV is not placed too near speakers or magnetic
objects.
No power • Check the TV’s AC power cord is plugged into the mains
No picture • Check the antenna connection at the rear of the TV.
Good picture • Try increasing the volume.
but no sound • Check that the sound is not muted. If it is muted, press the
Good sound but poor • Try increasing the contrast and brightness setting.
colour or no picture
Snowish picture and • Check antenna connection at the rear of the TV.
noise
Horizontal dotted lines • Possible electrical interference (e.g., hairdryer, vacuum
Double images or • Possible poor positioning of antenna. Using a highly
“Ghost” images directional antenna may improve reception.
TV not responding to • Check life span of batteries of remote control handset.
remote control handset • Aim remote control handset directly at remote control
socket. If there is still no power, disconnect plug. Wait for
60 seconds and re-insert plug. Switch on the TV again.
• Possible TV station problem. Try another channel.
mute button on the remote control to restore sound.
cleaner). Switch off appliances.
sensor lens on the TV.
3
Page 4
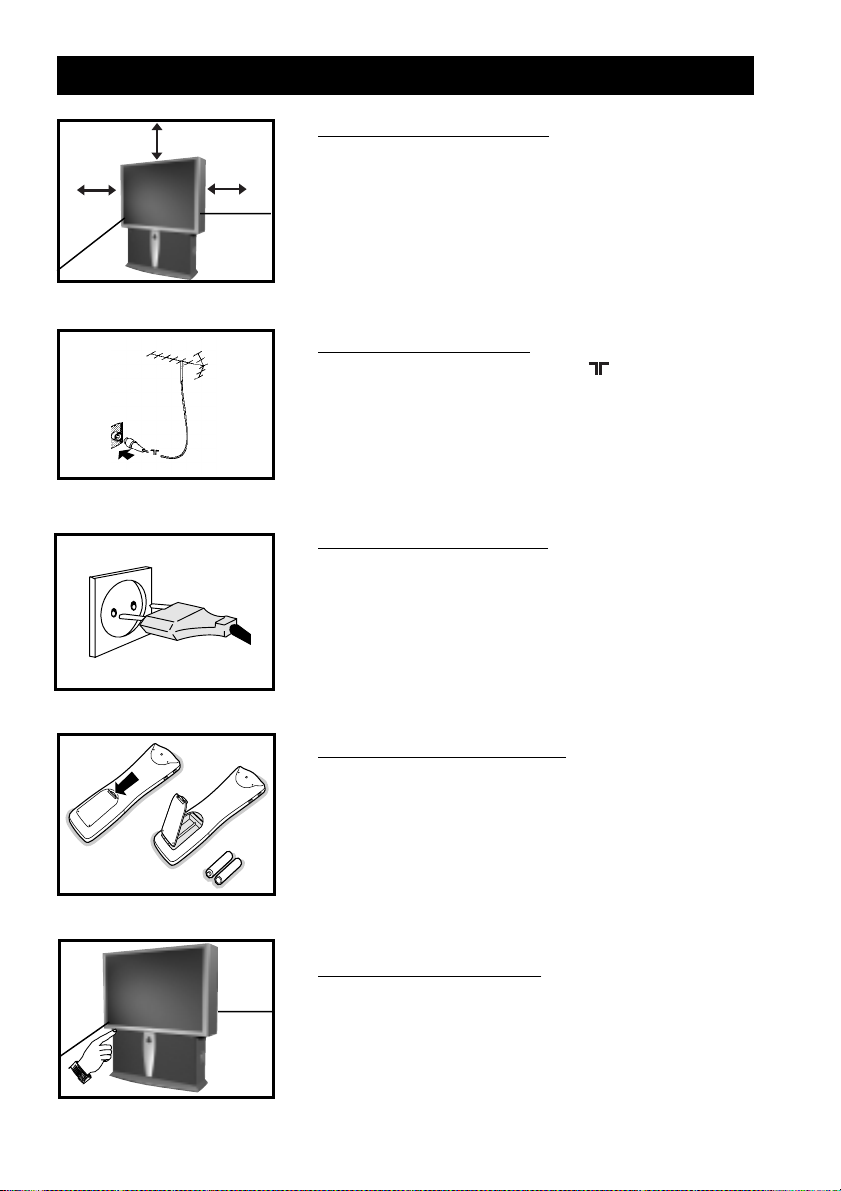
INSTALLATION
5 cm
5 cm
5 cm
Positioning of the TV set
• Place your TV set on a solid base, strong enough to
withstand the weight of the set.
• Leave a space of at least 5 cm around each side of the
TV set to allow for proper ventilation.
• Do not place TV set near a radiator or other sources of
heat.
• Do not place TV set where it can be exposed to rain or
excesssive moisture.
Connecting the Aerial
• Insert the aerial plug into the socket at the rear of
the set.
Connecting to the mains
• Insert the mains plug into the wall socket. (For correct
mains voltage, refer to the type sticker at the rear of the
set.)
Note : This diagram is not representative of the actual
plug and socket.
Using the Remote Control
Battery Usage CAUTION - To prevent battery leakage
which may result in bodily injury or damage to the remote:
• Install ALL batteries correctly, + and - as marked on the
remote control.
• Do not mix batteries: (OLD and NEW or CARBON and
ALKALINE, etc.).
• Remove batteries when the remote is not used for a long
time.
Switching on the TV set
• Press the mains power button to switch on/off the TV set.
• If the set is on standby mode (indicator light is red), press
the Standby button on the remote control to switch on set.
4
Page 5

CONNECTING THE AUDIO/VIDEO SOCKETS (PLAYBACK)
AV sockets
on rear of
TV
OUT
OUT
OUT
ANTENNA
VIDEO
IN
IN
You can view the playback of VCR tapes (Video Disc players, camcorders, etc.) by using the AUDIO
and VIDEO INPUT sockets on the rear of the TV.
– Connect the VIDEO and AUDIO IN sockets on the rear of the TV to the AUDIO and
VIDEO OUT sockets on the VCR.
Back of
L
R
AUDIO
VCR
IN
VCR (Equipped with
Video and Audio Output
sockets)
AV sockets
on rear of
TV
OUT
R
AUDIO
IN
OUT
OUT
OUT
ANTENNA
IN
Back of S-VHS
VCR
L
VIDEO
S-VIDEO
IN
The S-Video connection on the rear of the TV is used for the playback of S-VHS VCR tapes, Video
Discs, Video Games or Compact Disc-Interactive (cd-i) discs. Better picture detail and clarity is
possible with the S-Video playback as compared to the picture from a normal antenna (RF)
connection.
– Connect the S-VIDEO socket on the rear of the TV to the S-VHS OUT socket on a
S-VHS VCR.
– Connect the AUDIO IN sockets from the rear of the TV to the AUDIO OUT sockets
on the VCR.
Note: You need not connect the VIDEO IN socket of the TV if S-VIDEO IN socket is
connected.
5
Page 6

CONNECTING THE AUDIO/VIDEO SOCKETS (PLAYBACK)
AV sockets
on side of
TV
Camcorder
Connect the headphone cable
to the headphone socket for
personal listening
For more convenient direct playback connections, the Side Audio/Video Input sockets allow for quick
and easy connections, particularly Camcorder tape recordings.
– Connect the S-VIDEO socket (if available) from the Camcorder to the Side S-VIDEO
socket of the TV. You need not connect the Side VIDEO IN socket of the TV if the
S-VIDEO socket is connected.
– Connect the AUDIO OUT sockets (Right and Left) from the Camcorder to the Side
AUDIO IN sockets.
AV sockets
on rear of
TV
OUT
OUT
Pb
Y
Pr
Back of DVD
L
R
AUDIO
DVD (Equipped with “Y”,
“Pb” and “Pr” and Output
sockets)
You can view the playback of DVD discs by using the COMPONENT VIDEO INPUT sockets on the
rear of the TV.
– Connect the “Y,” “Pb” and the “Pr” INPUT sockets on the TV to the “Y,” “Pb” and
“Pr” OUTPUT sockets on the DVD to view playback of DVD discs.
6
Page 7

CONNECTING THE AUDIO/VIDEO SOCKETS (RECORDING)
Connection for recording from the TV channel
AV sockets
on rear of
TV
OUT
OUT
ANTENNA
IN
– Connect the corresponding INPUT sockets of the VCR to the MONITOR OUTPUT
sockets on the rear of the TV.
– To enhance the sound of your TV, connect the AUDIO L and R sockets to an external
audio system instead of the VCR. For mono equipment, connect only the AUDIO L socket.
OUT
L
VIDEO
R
AUDIO
IN
IN
VCR (Equipped with Video
and Audio Input sockets)
Connection for recording from one VCR to another VCR
AV sockets on
rear of TV
OUT
VCR 1
OUT
ANTENNA
VIDEO
IN
IN
OUT
OUT
L
R
AUDIO
IN
OUT
ANTENNA
IN
OUT
VIDEO
R
AUDIO
VCR (Equipped with
L
Video and Audio
Output sockets)
VCR 2
VCR (Equipped with Video
and Audio Input sockets)
– Connect the sockets of the VCR which you wish to record from, to the corresponding
sockets at either AV1 or AV2.
– Connect the sockets of the receiving VCR to the MONITOR OUTPUT sockets on the
rear of the TV.
7
Page 8
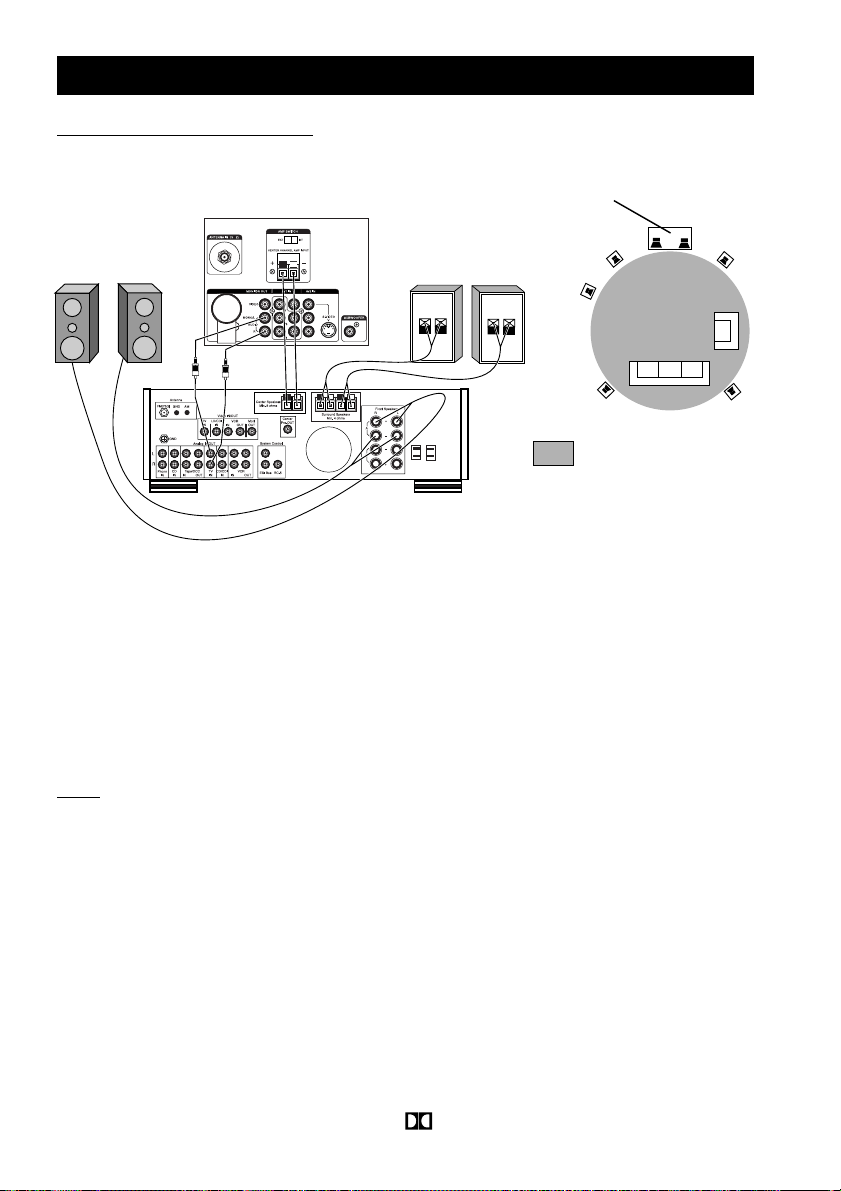
EXTERNAL SPEAKER CONNECTIONS
Center Channel Amp Input
Front Speakers
Rear of
TV
Rear Surround
Sound Speakers
+-
Center Speakers
+
-
Powered
Subwoofer
Front
Speaker
Rear
Speaker
Primary Viewing Area
TV
Front
Speaker
Rear
Speaker
Back of a Receiver with Dolby Pro Logic or Dolby Digital
By adding an external audio system, you can create the feeling of reflected sound that surrounds you at
a movie theater or concert hall.
– Connect the corresponding OUTPUT sockets of a receiver with Dolby Pro Logic* or
Dolby Digital to the CENTER CHANNEL AMP INPUT sockets on the rear of the TV.
– Connect the corresponding INPUT sockets of the receiver to the AUDIO L and R
sockets on the rear of the TV.
– Connect the front speakers and the rear surround sound speakers to the receiver.
Note
• To use a receiver with Dolby Pro Logic or Dolby Digital with your TV, the TV’s AUDIO
OUT control must be set to “FIXED.” (Refer to the sections on “Using the Picture
Menu” and “Using the Sound Menu.”)
• You must have the AMP SWITCH on the rear of the TV in the EXT position for the
center channel speakers to operate.
*“Dolby,” “Pro Logic,” and the double-D symbol are trademarks of Dolby Laboratories.
8
Page 9
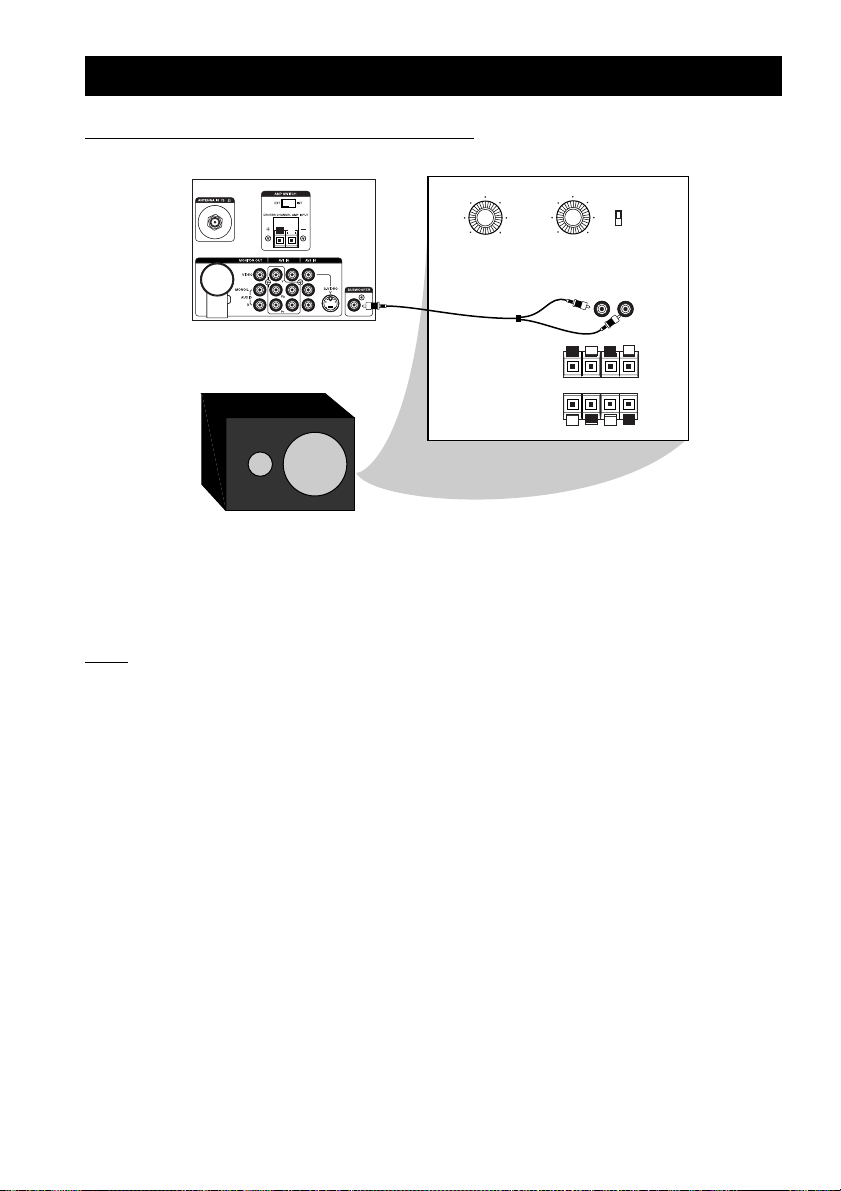
EXTERNAL SPEAKER CONNECTIONS (CONTINUED)
90
150 Hz
Crossover
Frequency
Volume
110
-180
o
Phase
0
o
R
L
Low
Level
Input
High
Level
Input
High
Level
Output
+ R – – L +
External Powered Subwoofer Connection
Back of
TV
Back of
Powered
Subwoofer
Powered
Subwoofer
– Connect the INPUT sockets of a powered subwoofer to the SUBWOOFER socket on
the rear of the TV. You can use a y-shaped cable to make the connection. You can also use
a single cable and connect to either the R or L Low Level Input sockets.
Note
• If you use a single cable to make the connection to the powered subwoofer, you will need
to increase the volume on the back of the subwoofer to compensate for the absence of the
second cable.
• The powered subwoofer trim must be adjusted from the external powered subwoofer.
9
Page 10

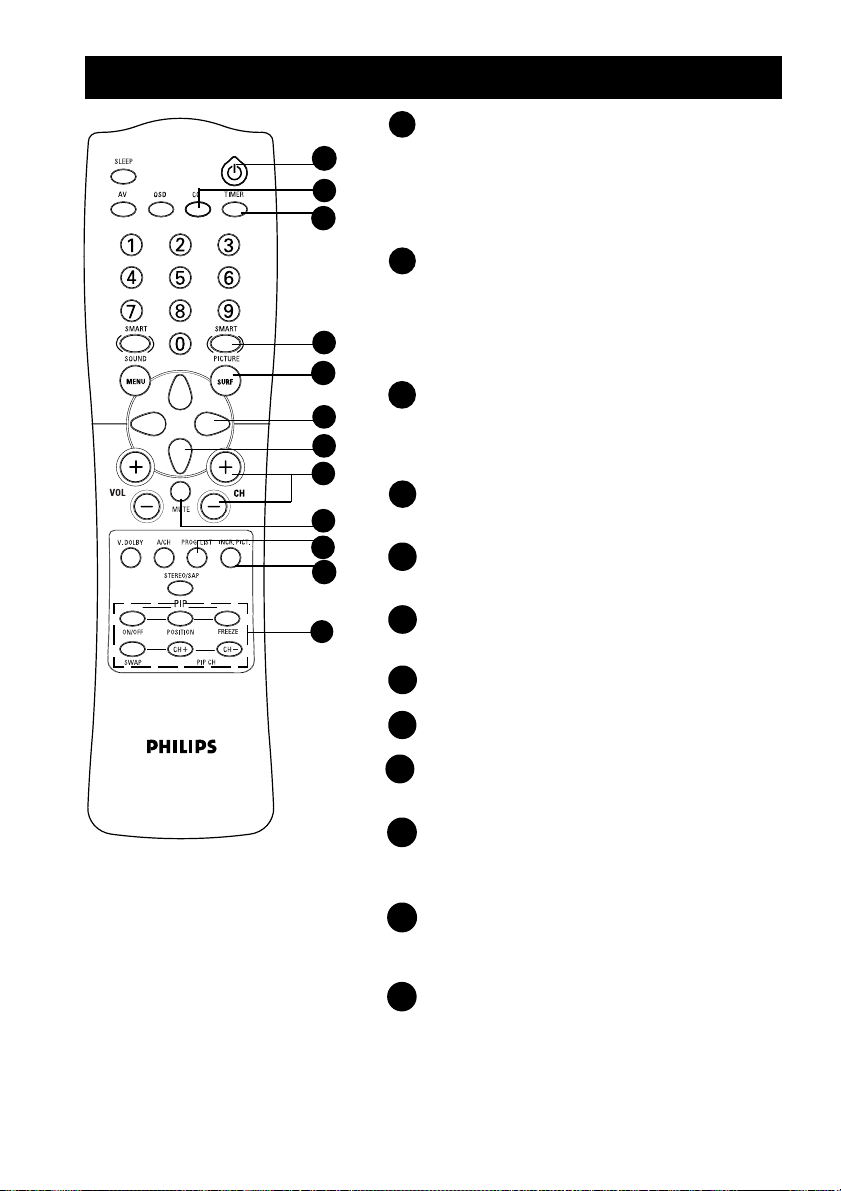
FUNCTIONS OF REMOTE CONTROL
1 SLEEP
Allows you to select a time period after which the
set will switch to standby mode automatically.
2 OSD
– Displays the channel number, sound and colour
transmission mode, status of the sleeptimer,
channel name (if channel is named) and the
current time (if current time is being entered in
the Timer menu).
– Also allows you to exit menu from screen.
3 AV
Allows you to select the AV channels.
4 DIGIT (0-9)
Allows you select a channel. Note : For a 2-digit
number, the second digit must be entered before
the “–” sign disappears.
5 SMART SOUND
Allows you to select your desired sound setting
from 4 types of sound settings.
6 MENU
Displays main menu. Also exits menu from screen.
7 CURSOR UP
Allows you to select the next item on the menu.
8 CURSOR LEFT
Allows you to access the sub-menus and adjust
the settings.
9 VOLUME + / –
Increases or decreases volume.
10 A/CH
Allows you to alternate between the last viewed
channel and the present channel.
11 VIRTUAL DOLBY SURROUND*
– Allows you to select Stereo, Incredible Surround,
or Virtual Dolby Surround sound when transmission
is in Stereo.
Note: Selecting Virtual Dolby Surround will allow
you to enjoy the sensation of Home Cinema
surround sound with just 2 front speakers.
– Allows you to select Spatial or Mono when
transmission is in Mono.
12 STEREO/SAP
– Allows you to select Stereo or Mono when
transmission is in Stereo.
– Allows you to select Dual5or Dual 6
during dual sound transmission.
1
2
3
4
5
6
7
8
9
10
11
12
*Manufactured under license from Dolby Laboratories.
“Dolby,” “Virtual Dolby Surround” and the double-D symbol are trademarks
of Dolby Laboratories.
10
Page 11
FUNCTIONS OF REMOTE CONTROL
13 STANDBY
13
14
15
16
17
18
19
20
21
22
23
24
– Switch set off temporarily to standby mode.
(The red light indicator lights up when set is
in standby mode.)
– To switch on set from standby mode, press
Channel Up/Down, Digit (0-9) or Standby
button.
14 CC (Closed Captioning) Button
Allows the hearing impaired to read the voice
content of television programs when “ON”
option is selected. To select your desired
caption mode, refer to the section on “Using
the Closed Captioning Control.”
15 TIMER
Allows you to set the clock to switch to
another channel at a specified time while you
are watching a channel or when the set
is in standby mode.
16 SMART PICTURE
Allows you to select your desired picture setting
from 5 types of picture settings.
17 SURF
Allows you to select up to a maximum of 10
channels and view quickly the selected channels.
18 CURSOR RIGHT
Allows you to access the sub-menus and adjust
the settings.
19 CURSOR DOWN
Allows you to select the next item on the menu.
20 CHANNEL + / –
Selects channel in ascending or descending order.
21 MUTE
Mutes sound. To restore sound, press button
again.
22 PROGRAM LIST
Allows you to navigate through a list of installed
programmes for a quick overview of the channels
and activate the channel you have selected.
23 INCREDIBLE PICTURE
Allows you to view a more vivid and realistic
picture with better contrast when the “ON”
function is selected.
24 PIP
Allows you to access the Picture-in-Picture and
Double Window features. (For more detailed
description of functions, refer to section on
“Activating the PIP and Double Window
Control.”)
11
Page 12
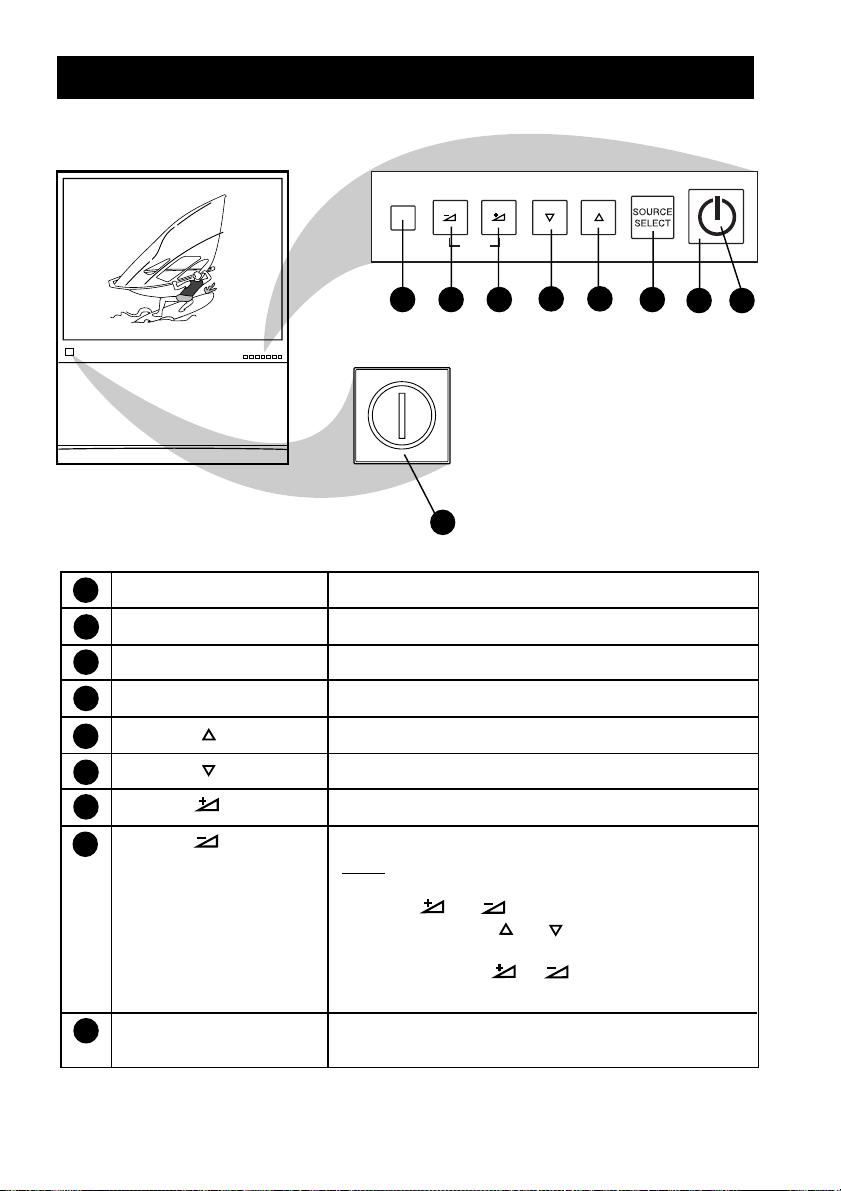
FUNCTIONS OF TV CONTROLS (43PP925)
6
MONO
AUTO
VOL
MENU
9
CH
6
5
4
3827
1
1 Mains Power button Switch mains power on or off.
2 Power/Standby button Switch TV on or activate standby mode.
3 Standby Light Indicator Indicates red light when standby mode is activated.
4 Source Select button Cycle through the signal sources.
5 Channel button Select channel in ascending order.
6 Channel button Select channel in descending order.
7 Volume button Adjust the sound volume louder.
8 Volume button Adjust the sound volume softer.
Note
•You can enter the main menu by pressingboth the
Volume and buttons at the same time.
•Press the Channel or button to select the
next item on the menu.
•Press the Volume or button to access the
sub-menus and adjust the settings.
9 Remote Sensor Acts as a sensor for activating the controls of the TV
when the remote control handset is aimed at it.
Note: When the Mains Power button has been pressed so that the TV is in Power/Standby
mode, you can press any of the TV’s other controls to turn the set on.
12
Page 13

FUNCTIONS OF TV CONTROLS (50PP925 AND 55PP925)
6
MONO
AUTO
3
4
9
MENU
MENU
CH
VOL
STATUS/EXIT
6
VOL
CH
2
SOURCE SELECT
1
5
10
1 Mains Power button Switch mains power on or off.
2 Power/Standby button Switch TV on or activate standby mode.
3 Standby Light Indicator Indicates red light when standby mode is activated.
4 Remote Sensor Acts as a sensor for activating the controls of the TV
when the remote control handset is aimed at it.
7
8
5 Volume button Adjust sound volume softer.
6 Volume button Adjust sound volume louder.
7 Channel button Select channel in ascending order.
8 Channel button Select channel in descending order.
9 Menu button Display the main menu.
Note
• Press the Channel or button to select the
next item on the menu.
• Press the Volume or button to access the
sub-menus and adjust the settings.
10 Source Select button Cycle through the signal sources.
Note: When the Mains Power button has been pressed so that the TV is in Power/Standby
mode, you can press any of the TV’s other controls to turn the set on.
13
Page 14

SELECTING THE MENU LANGUAGE, TUNER MODE
INSTALL
LANGUAGE
•
ENGLISH
•
TUNER MODE
•
AUTO PROGRAM
•
CHANNEL EDIT
•
MANUAL
Ñ
▲
É
▼
•
▼
▲
É
▼
INSTALL
LANGUAGE
• ENGLISH
•TUNER MODE
•AUTO PROGRAM
•
CHANNEL EDIT
•
MANUAL
•
Ñ
▼
INSTALL
•
LANGUAGE
TUNER MODE
•
AUTO
•
AUTO PROGRAM CABLE
•
CHANNEL EDIT
ANTENNA
•
MANUAL
•
Ñ
▲
É
▼
INSTALL
•
LANGUAGE
•
TUNER MODE
AUTO PROGRAM
•
SEARCH
•
CHANNEL EDIT
•
MANUAL
•
Ñ
▲
É
▼
▲
▼
É
INSTALL
•
LANGUAGE CABLE
•
TUNER MODE
•
PLEASE WAIT
•
AUTO PROGRAM
•
MANUAL CHANNEL 2
▼
•
AND AUTOMATIC TUNING OF CHANNELS
Before you tune in the channels by the Auto Store method, select the desired menu language
and tuner mode. Note: The available menu languages will vary based on region.
MENU
1. Enter main menu.
É
•
2. Press button repeatedly
until INSTALL is
selected.
3. Enter INSTALL menu.
4. Enter LANGUAGE mode.
5. Select desired language.
OR
PICTURE
▼
•
SOUND
•
FEATURES
•
INSTALL SHARPNESS
•
PICTURE
•
SOUND
•
FEATURES
▲
É
•
INSTALL CHANNEL EDIT
BRIGHTNESS
COLOUR
CONTRAST
HUE
LANGUAGE
TUNER MODE
AUTO PROGRAM
MANUAL
6. Exit from language mode.
7. Select TUNER MODE.
8. Enter TUNER MODE
menu.
INSTALL
•
LANGUAGE
Ñ
TUNER MODE
•
AUTO PROGRAM CABLE
•
CHANNEL EDIT
•
MANUAL
•
▲
É
•
ANTENNA
▼
AUTO
9. Select desired tuner mode
OR
(AUTO, CABLE or
ANTENNA).
10. Exit tuner mode.
11. Select AUTO PROGRAM.
12. Enter AUTO PROGRAM
mode.
13. Start automatic tuning.
OSD
14. When tuning is completed,
exit menu from screen.
14
Page 15

FINE TUNING OF CHANNELS
INSTALL
LANGUAGE
•
ENGLISH
•
TUNER MODE
•
AUTO PROGRAM
•
CHANNEL EDIT
•
MANUAL
Ñ
▲
É
▼
•
▼
This feature allows you to adjust picture reception in areas of weak reception.
MENU
SURF
➠
MENU
SURF
➠
MENU
SURF
➠
1. Enter main menu. 2. Select INSTALL. 3. Enter install menu.
4. Press button repeatedly
until MANUAL is selected.
5. Enter MANUAL menu.
6. Start fine-tuning until desired
OR
picture and sound are obtained.
7. Select STORE.
INSTALL
•
LANGUAGE
•
•
•
▲
•
▼
•
INSTALL
MANUAL
Ñ
•
INSTALL
MANUAL
•
Ñ
TUNER MODE STORE
AUTO PROGRAM
CHANNEL EDIT
É
MANUAL
FINE TUNE 0
STORE
FINE TUNE
STORE
▲
•
FINE TUNE
▲
É
▼
É
8. Store last fine-tuned status.
OSD
9. Exit menu from screen.
15
INSTALL
MANUAL STORE
•
FINE TUNE
STORE
Ñ
INSTALL
MANUAL
•
FINE TUNE
STORE
Ñ
▲
É
•
STORED
▲
É
•
Page 16

EDITING OF CHANNELS
INSTALL
•
LANGUAGE 3
•
TUNER MODE 4
•
AUTO PROGRAM 5
CHANNEL EDIT • 6
•
MANUAL 7
•
▲
▼
É
Ñ
▼
INSTALL
•
LANGUAGE 3
•
TUNER MODE 4
•
AUTO PROGRAM 5
CHANNEL EDIT • 6 SKIPPED
•
MANUAL 7
•
▲
▼
É
Ñ
▼
INSTALL
LANGUAGE
• ENGLISH
•
TUNER MODE
•
AUTO PROGRAM
•
CHANNEL EDIT
•
MANUAL
Ñ
▲
É
▼
•
▼
This feature allows you to edit or skip channels which have bad or weak TV signal or channels
that you do not watch often.
Note : Once a channel is skipped, you cannot have access to it by the CHANNEL + or –
button. You can only access the channel by the DIGIT (0-9) button.
MENU
MENU
SURF
➠
1. Enter main menu. 2. Select INSTALL. 3. Enter install mode.
SURF
➠
MENU
SURF
➠
4. Press button repeatedly
until CHANNEL EDIT
is selected.
INSTALL
•
LANGUAGE 3
•
TUNER MODE 4
•
AUTO PROGRAM 5
Ñ
CHANNEL EDIT • 6
•
MANUAL 7
•
5. Enter channel edit
mode.
6. Select the channel you
OR
want to skip.
7. Activate skipped mode.
OSD
8. Exit menu from screen.
How to add back channels
• Repeat steps 1 to 5 as in “Editing of Channels.”
• Select the channel you want to add back by the (CURSOR UP) or (CURSOR
DOWN) button.
• Press the (CURSOR RIGHT) button to activate adding back of channel.
• Exit menu from screen by the (OSD) button.
OSD
16
▲
É
▼
▼
Page 17

NAMING OF CHANNELS
INSTALL
• TUNER MODE
• AUTO PROGRAM
•
CHANNEL EDIT
• MANUAL
NAME
•
PERSONAL
▲
▲
É
Ñ
•
INSTALL
• TUNER MODE
• AUTO PROGRAM
• CHANNEL EDIT
• MANUAL
NAME • _
▲
▲
É
Ñ
•
INSTALL
•
TUNER MODE
•
AUTO PROGRAM
•
CHANNEL EDIT
•
MANUAL
NAME
•
LUCKY
▲
▲
É
Ñ
•
INSTALL
•
TUNER MODE
•
AUTO PROGRAM
•
CHANNEL EDIT
•
MANUAL
NAME
•
LUCKY
▲
▲
É
Ñ
•
INSTALL
LANGUAGE
• ENGLISH
•
TUNER MODE
•
AUTO PROGRAM
•
CHANNEL EDIT
•
MANUAL
Ñ
▲
É
▼
•
▼
This feature allows a selection of 50 pre-defined names. It also allows you to enter a new name
or modify an existing name according to your personal preference.
MENU
SURF
1. Enter main menu. 2. Select INSTALL. 3. Enter install mode.
➠
MENU
SURF
MENU
➠
4. Press button repeatedly
until NAME is highlighted.
SURF
➠
5. Enter NAME mode.
6. Select desired preset name
OR
and press (CURSOR
RIGHT) button to store
selected pre-set name.
7. If you select PERSONAL,
move to first character slot
8. Press button repeatedly
OR
to cycle through the
characters and select
desired character.
Move to next character
slot by the (CURSOR
RIGHT) button and select
in the next character.
(You can enter up to a
maximum of 5 characters.)
MENU
9. Store named channel.
OSD
10.Exit menu from screen.
17
INSTALL
•
•
TUNER MODE
•
AUTO PROGRAM
•
CHANNEL EDIT
•
MANUAL
Ñ
NAME
▲
▲
É
•
PERSONAL
Page 18

PICTURE
•
HUE
•
COLOUR TEMP
•
NR
•
INCR. PICTURE
•
CONVERGENCE
É
▲
▲
CONVERGE RED
CONVERGE BLUE
MULTIPOINT RED
MULTIPOINT BLUE
SAVE MULTIPOINT
•
•
USING THE PICTURE MENU
The picture menu allows you to make adjustments to the picture. It also allows you to select
and activate other features in the menu.
1. Press the (MENU) button to enter main menu.
2. Press the (CURSOR RIGHT) button to enter the PICTURE menu.
3. Press the or (CURSOR UP/DOWN)buttons to select the items on the
PICTURE menu.
4. Press the or (CURSOR LEFT/RIGHT) buttons to adjust or change settings.
Note: To enter the CONVERGENCE sub-menu, select CONVERGENCE and press
the (CURSOR RIGHT) button. See the section on CONVERGENCE for instructions in how to adjust the CONVERGENCE controls.
MENU
Picture Activities
menu items
Brightness Increase or decrease brightness level.
Colour Increase or decrease color level.
Contrast Increase or decrease contrast level until
lightest parts of the picture show good
detail.
Sharpness Increase or decrease sharpness level to
improve detail in the picture.
Hue Increase or decrease hue level.
Colour Allows you a choice of 3
Temp picture settings (NORMAL, WARM and
COOL).
NR (Noise
Allows you to reduce the “noise” (little
Reduction) dots on the picture) from weak signal
broadcast. Selecting the “ON” option will
make the picture clearer.
Incredible
Picture details in the picture. The result is a more
Selecting the “ON” option enhances the
dynamic and vivid picture.
Convergence
Allows you to adjust how the red, green,
and blue colour components of the
picture come together on the screen.
➠
PICTURE
BRIGHTNESS 38
•
COLOUR
•
CONTRAST
•
SHARPNESS
•
HUE
•
•
➠
18
Page 19

USING THE SOUND MENU
The sound menu allows you to make adjustments to the sound. It also allows you to select and
activate other features in the menu.
1. Press the (MENU) button to enter main menu.
2. Press the (CURSOR DOWN) button to select the SOUND menu.
3. Press the (CURSOR RIGHT) button to enter the SOUND menu.
4. Press the or (CURSOR DOWN/UP) buttons to select the items on the
SOUND menu.
5. Press the or (CURSOR LEFT/RIGHT) buttons to adjust or change settings.
Note: See the instructions below for adjusting the HEADPHONE settings.
MENU
Sound Activities
menu items
Treble Increase or decrease the high frequency
level.
Bass Increase or decrease the low frequency
level.
Balance Adjusts the balance of the right and left
speakers’ sound output.
AVL As variation in signal conditions can result
(Auto in a sudden change in volume during
Volume commercial breaks or channel switching,
Leveller) selecting the “ON” function will enable
the volume to remain at a standard
volume level.
Incredible Allows you to dramatically expand the
Surround wall of sound that surrounds the listener
and heighten overall viewing pleasure.
Headphone Allows you to adjust the volume and
balance of the headphone.
Audio Out
You can connect an external audio system
to enhance the sound of your TV. Selecting
“VARIABLE” allows you to change the
volume at the TV using the TV’s remote
control. Choosing “FIXED” allows you to
adjust the volume at the receiver using the
receiver’s controls.
Note: You may have to set your external audio system to
Auxiliary mode to play sound from your TV.
Speakers Allows you to turn the TV’s speakers “ON”
Bass Boost Increases the low frequency range. This
or “OFF.”
creates a deeper, fuller sound.
Note: STEREO and SAP (Second Audio Program) features are
offered in some areas. SAP is an additional audio channel. The
SAP channel usually is used to provide a second language
translation for a programme that is being shown.
19
SOUND
➠
TREBLE 38
•
BASS
•
BALANCE
•
AVL
•
HEADPHONE
•
•
➠
➠
SOUND
•
•
• INCR. SURROUND
• HEADPHONE
• AUDIO OUT
• SPEAKERS
BASS BOOST • OFF•
How to adjust the
HEADPHONE settings
• With HEADPHONE
selected, press the
(CURSOR RIGHT)
button to enter the
HEADPHONE submenu.
• Press the or
(CURSOR DOWN/
UP) buttons to select
VOLUME or BALANCE.
• Press the or
(CURSOR LEFT/
RIGHT) buttons to
adjust settings.
• Press the (MENU)
button to return to the
SOUND menu.
MENU
Page 20

CONVERGENCE (CONVERGE RED/BLUE)
PICTURE
•
HUE
•
COLOUR TEMP
•
NR
•
INCR. PICTURE
•
CONVERGENCE
CONVERGE RED
CONVERGE BLUE
MULTIPOINT RED
MULTIPOINT BLUE
SAVE MULTIPOINT
•
•
PICTURE
CONVERGENCE
•
CONVERGE RED
•
•
CONVERGE BLUE
•
MULTIPOINT RED
•
MULTIPOINT BLUE
•
SAVE MULTIPOINT
•
•
CONVERGE RED
•
CONVERGE RED
•
CONVERGE BLUE
Due to the influence of magnetic fields and changes in the position of the TV, the red, blue, and
green screen colours may not align properly. The result is that red or blue colours may
appear around the edges of images. If various images on the entire picture have red outlines,
adjust CONVERGE RED. Then if any red outlines remain, adjust MULTIPOINT RED. If
various images on the entire picture have blue outlines, adjust CONVERGE BLUE. Then if
any blue outlines remain, adjust MULTIPOINT BLUE. Use UNDO MULTIPOINT if you
want to restore the picture screen to the way it was before you made Multipoint adjustments.
Note
• After turning the TV set on, allow it to warm up for 15 minutes before adjusting Convergence.
• If you adjust Convergence and then change your signal source from PAL to NTSC or from
NTSC to PAL, you may need to readjust Convergence for the new signal source.
MENU
1. Enter main menu.
2. Enter PICTURE menu.
3. Press button repeatedly
until CONVERGENCE
is selected.
4. Enter CONVERGENCE
menu.
5. Enter CONVERGE
RED mode.
6. Adjust cross image until
colour outline is gone.
OSD
7. Exit menu from screen.
Note: You can adjust CONVERGE BLUE similar to the way you would adjust
CONVERGE RED.
•
•
•
•
•
PICTURE
•
•
HUE
COLOUR TEMP
NR
INCR. PICTURE
CONVERGENCE
CONVERGE RED
CONVERGE BLUE
MULTIPOINT RED
MULTIPOINT BLUE
SAVE MULTIPOINT
PICTURE
CONVERGENCE
•
CONVERGE RED
•
CONVERGE BLUE
•
MULTIPOINT RED
•
MULTIPOINT BLUE
▲
▲
•
SAVE MULTIPOINT
•
•
É
•
CONVERGE BLUE
20
Page 21

CONVERGENCE (MULTIPOINT RED/BLUE)
PICTURE
•
HUE
•
COLOUR TEMP
•
NR
•
INCR. PICTURE
•
CONVERGENCE
É
▲
▲
CONVERGE RED
CONVERGE BLUE
MULTIPOINT RED
MULTIPOINT BLUE
SAVE MULTIPOINT
•
•
PICTURE
CONVERGENCE
•
CONVERGE RED
•
•
CONVERGE BLUE
•
MULTIPOINT RED
•
MULTIPOINT BLUE
•
SAVE MULTIPOINT
•
É
▲
▲
PICTURE
CONVERGENCE
•
CONVERGE RED
•
CONVERGE BLUE
•
MULTIPOINT RED
•
•
MULTIPOINT BLUE
•
SAVE MULTIPOINT
•
É
▲
▲
•
NAVIGAT E
OSD: ADJUST
If various images on the entire picture have red outlines, adjust CONVERGE RED. Then if
any red outlines remain, adjust MULTIPOINT RED. If various images on the entire picture
have blue outlines, adjust CONVERGE BLUE. Then if any blue outlines remain, adjust
MULTIPOINT BLUE. Use UNDO MULTIPOINT if you want to restore the picture
screen to the way it was before you made Multipoint adjustments.
Note
• After turning the TV set on, allow it to warm up for 15 minutes before adjusting
Convergence.
• You can use Multipoint Red and Multipoint Blue controls to adjust 25 Convergence points
on the screen.
• If you adjust Convergence and then change your signal source from PAL to NTSC or from
NTSC to PAL, you may need to readjust Convergence for the new signal source.
MENU
1. Enter main menu.
2. Enter PICTURE menu.
3. Press button repeatedly
until CONVERGENCE
is selected.
4. Enter CONVERGENCE
menu.
5. Press button repeatedly
until MULTIPOINT
RED is selected.
6. Enter NAVIGATE
mode.
21
Page 22

CONVERGENCE (MULTIPOINT RED/BLUE) (CONTINUED)
PICTURE
CONVERGENCE
•
CONVERGE RED
•
CONVERGE BLUE
•
MULTIPOINT RED
•
•
MULTIPOINT BLUE
•
SAVE MULTIPOINT
•
É
▲
▲
PICTURE
CONVERGENCE
•
CONVERGE RED
•
CONVERGE BLUE
•
MULTIPOINT RED
•
•
MULTIPOINT BLUE
•
SAVE MULTIPOINT
•
▲
•
PICTURE
CONVERGENCE
•
CONVERGE RED
•
CONVERGE BLUE
•
MULTIPOINT RED
•
•
MULTIPOINT BLUE
•
SAVE MULTIPOINT • STORED
•
▲
7. Navigate to a cross image
that has a colour outline.
Note: To display three
hidden cross images,
navigate to bottom row.
OSD
8. Enter ADJUST mode.
9. Adjust cross image until
colour outline is gone.
OSD
10. Return to NAVIGATE
mode.
Repeat steps 7 to 10
until all misaligned crosses
have been adjusted.
MENU
11.
Return to
CONVERGENCE
menu.
NAVIGAT E
•
ADJUST OSD: N AVIG ATE
•
NAVIGAT E
•
OSD: ADJUST
OSD: ADJUST
12. Press button repeatedly
until SAVE
MULTIPOINT is selected.
13. Activate storing of
Multipoint adjustments.
OSD
14. Exit menu from screen.
Note: You can adjust MULTIPOINT BLUE similarly to the way you would adjust MULTIPOINT
RED.
22
Page 23

CONVERGENCE (UNDO MULTIPOINT)
PICTURE
•
HUE
•
COLOUR TEMP
•
NR
•
INCR. PICTURE
•
CONVERGENCE
É
▲
▲
CONVERGE RED
CONVERGE BLUE
MULTIPOINT RED
MULTIPOINT BLUE
SAVE MULTIPOINT
•
•
PICTURE
CONVERGENCE
•
CONVERGE RED
•
•
CONVERGE BLUE
•
MULTIPOINT RED
•
MULTIPOINT BLUE
•
SAVE MULTIPOINT
•
É
▲
▲
PICTURE
CONVERGENCE
•
CONVERGE BLUE
•
MULTIPOINT RED
•
•
MULTIPOINT BLUE
•
SAVE MULTIPOINT
•
•
UNDO MULTIPOINT • RESTORING
▲
PICTURE
CONVERGENCE
•
CONVERGE BLUE
•
MULTIPOINT RED
•
•
MULTIPOINT BLUE
•
SAVE MULTIPOINT
•
•
UNDO MULTIPOINT • RESTORED
▲
UNDO MULTIPOINT allows you to restore the TV’s picture screen to the way it was
before you made Multipoint adjustments.
MENU
1. Enter main menu.
2. Enter PICTURE menu.
3. Press button repeatedly
until CONVERGENCE
is selected.
4. Enter CONVERGENCE
menu.
5. Press button repeatedly
until UNDO MULTIPOINT
is selected.
6. Activate restoring of
previous picture screen.
OSD
7. Exit menu from screen.
23
Page 24

ACTIVATING THE TIMER
The Timer feature allows you to set the timer to switch to another channel at a specified
time while you are watching another channel or when the TV is on standby mode.
TIMER
1. Enter TIMER menu.
2. Enter TIME mode.
2
13
4
7
3. Key in the current time
5
6
9
8
0
MENU
4. Exit from TIME mode.
5. Select START TIME.
6. Enter the START TIME
2
13
4
7
7. Key in the time you want
5
6
9
8
0
For example, if the current
time is 12:30, key digit 1
and 2 in the hour column,
followed by digit 3 and 0
in the minute column.
mode.
the programme to be
switched on.
FEATURES
TIMER
TIME
•
•
•
•
ACTIVATE
•
FEATURES
TIMER
TIME
•
START TIME
•
STOP TIME
•
CHANNEL
•
ACTIVATE
•
FEATURES
TIMER
•
•
•
•
ACTIVATE
•
FEATURES
TIMER
•
TIME
START TIME
•
STOP TIME
•
CHANNEL
•
ACTIVATE
•
START TIME
STOP TIME
CHANNEL
TIME
START TIME
STOP TIME
CHANNEL
•
•
•
•
– – : – –
– – : – –
12:30
13:30
MENU
8. Exit from START TIME
9. Select STOP TIME.
10. Enter STOP TIME mode.
2
13
4
7
11. Key in the time you want
5
6
9
8
0
mode.
the programme to be
switched off.
24
FEATURES
TIMER
•
•
•
•
ACTIVATE
•
FEATURES
TIMER
•
•
•
•
ACTIVATE
•
TIME
START TIME
STOP TIME
CHANNEL
TIME
START TIME
STOP TIME
CHANNEL
•
•
– – : – –
15:30
Page 25

ACTIVATING THE TIMER (CONTINUED)
MENU
12. Exit from STOP TIME
13. Select CHANNEL.
2
13
4
7
14. Key in the channel you
5
6
9
8
0
15. Select ACTIVATE.
16. Activate timer. You can
17. Select DISPLAY.
18. Select ON mode if you
OSD
19. Exit menu from screen.
mode.
want to switch to.
select to activate timer
by DAILY or ONCE
mode.
want to display the
current time on the TV
screen.
FEATURES
TIMER
•
TIME
•
START TIME
•
STOP TIME
CHANNEL
•
ACTIVATE
•
FEATURES
TIMER
•
TIME
•
START TIME
•
STOP TIME
CHANNEL
•
ACTIVATE
•
FEATURES
TIMER
•
TIME
•
START TIME
•
STOP TIME
•
CHANNEL
ACTIVATE
•
FEATURES
TIMER
•
TIME
•
START TIME
•
STOP TIME
•
CHANNEL
ACTIVATE
•
FEATURES
TIMER
•
•
START TIME
•
STOP TIME
•
CHANNEL
•
ACTIVATE
DISPLAY
•
3
•
8
•
OFF
•
ONCE
•
ON
Note
30 seconds before the timer is activated, a message indicating the time left for the channel
switch will appear on the screen. To disable the channel switch, press any button on the
remote control.
25
Page 26

ACTIVATING THE CHILD LOCK (ACCESS CODE)
The Child Lock feature allows you to lock channels to prevent your children from watching
programmes you deem undesirable.
Note : You cannot have access to the locked channels via the TV set’s controls.
You can only have access to the locked channels via the remote control. Keep the remote
control out of reach so as to prevent your children from having access to it.
MENU
SURF
MENU
SURF
MENU
SURF
➠➠➠
1. Enter main menu. 2. Select FEATURES . 3. Enter FEATURES menu.
4. Select CHILD LOCK.
FEATURES
▲
É
•
TIMER TIME
▼
•
CHILD LOCK START TIME
•
PIP STOP TIME
•
CLOSED CAP CHANNEL
•
BLUE MUTE ACTIVATE
FEATURES
•
▲
É
•
▼
•
•
•
BLUE MUTE
TIMER ACCESS CODE
CHILD LOCK
PIP
CLOSED CAP
– – – –
5. Enter ACCESS CODE
2
13
4
7
13
4
7
6. Key in access code 0711
5
6
9
8
0
2
7. Key in 0711 the second
5
6
9
8
0
mode.
(0711 is the default access
code). A message
INCORRECT will appear.
time. When the message
CORRECT appears, the
CHILD LOCK menu is
now accessible.
You can now proceed to
change the access code
of your choice.
26
FEATURES
É
•
TIMER ACCESS CODE
Ñ
CHILD LOCK
•
PIP INCORRECT
•
CLOSED CAP
•
BLUE MUTE
FEATURES
É
•
TIMER ACCESS CODE
Ñ
CHILD LOCK
•
PIP CORRECT
•
CLOSED CAP
•
BLUE MUTE
FEATURES
CHILD LOCK
•
•
5
6
X X X X X
X X X X
LOCK CHANNEL • 2
CHANGE CODE 3
CLEAR ALL 4
Page 27

ACTIVATING THE CHILD LOCK (CHANGE CODE)
FEATURES
CHILD LOCK
•
LOCK CHANNEL ENTER
CHANGE CODE • NEW CODE
•
CLEAR ALL
X X X X
FEATURES
CHILD LOCK
•
LOCK CHANNEL CONFIRM
CHANGE CODE • CODE
•
CLEAR ALL
X X X X
CORRECT
8. Select CHANGE CODE.
9. Enter CHANGE CODE
2
13
4
7
13
4
7
10. Key in the access code of
5
6
9
8
0
2
11. Confirm access code.
5
6
9
8
0
mode.
your choice.
When the new code
is confirmed, the
message CORRECT
will appear.
FEATURES
CHILD LOCK
•
•
FEATURES
CHILD LOCK
LOCK CHANNEL ENTER
CHANGE CODE
CLEAR ALL
•
LOCK CHANNEL CONFIRM
CHANGE CODE • CODE
•
CLEAR ALL
•
NEW CODE
– – – –
X X X X
Note : After you have exited menu from screen and you want to enter child lock menu again,
you need to key the new access code only once. If you have forgotten the new access code,
key in 0711 twice to enter the child lock menu. Upon entering the child lock menu, you can
proceed to change code again.
OSD
12. Exit menu from screen.
27
Page 28

ACTIVATING THE CHILD LOCK (LOCK CHANNEL)
MENU
SURF
1. Enter main menu. 2. Select FEATURES. 3. Enter FEATURES menu.
MENU
SURF
MENU
SURF
➠➠
➠
FEATURES
▲
É
•
TIMER TIME
▼
•
CHILD LOCK START TIME
•
PIP STOP TIME
•
CLOSED CAP CHANNEL
•
BLUE MUTE ACTIVATE
4. Select CHILD LOCK .
FEATURES
É
•
TIMER ACCESS CODE
▲
•
CHILD LOCK
▼
•
PIP
•
CLOSED CAP
•
BLUE MUTE
– – – –
5. Enter ACCESS CODE
2
13
4
5
6
6. Key in access code .
9
8
7
0
7. Enter LOCK CHANNEL
8. Select the channel you
OR
9. Activate blocking of
OSD
mode.
mode.
want to block.
channel. A keylock symbol
will appear beside the
channel number indicating
that it is locked.
FEATURES
É
•
TIMER ACCESS CODE
Ñ
CHILD LOCK
•
PIP CORRECT
•
CLOSED CAP
•
BLUE MUTE
FEATURES
CHILD LOCK
LOCK CHANNEL • 2
•
CHANGE CODE 3
•
CLEAR ALL 4
5
6
FEATURES
CHILD LOCK
LOCK CHANNEL • 3
•
CHANGE CODE 4
•
CLEAR ALL 5
6
7
X X X X
10. Exit menu from screen.
Note : You cannot have access to the locked channels via the TV set’s controls.
You can only have access to the locked channels via the remote control.
When AV1 source is locked, CV1 source is automatically locked. Likewise, if CV1 source is
locked, AV1 source is also automatically locked, as they share the same audio input.
If you attempt to enter the INSTALL menu after locking a channel, a message
“Enter ACCESS CODE” will appear on the screen. You need to enter the ACCESS CODE
to enable you to enter the INSTALL menu.
28
Page 29

ACTIVATING THE CHILD LOCK (CLEAR ALL)
To unlock all channels that you have locked, enter the Child Lock menu and activate the
CLEAR ALL mode.
➠
FEATURES
▲
É
•
TIMER TIME
▼
•
CHILD LOCK START TIME
•
PIP STOP TIME
•
CLOSED CAP CHANNEL
•
BLUE MUTE ACTIVATE
MENU
SURF
➠
MENU
SURF
MENU
SURF
➠
1. Enter main menu. 2. Select FEATURES 3. Enter FEATURES menu.
4. Select CHILD LOCK.
FEATURES
É
•
TIMER ACCESS CODE
▲
•
CHILD LOCK
▼
•
PIP
•
CLOSED CAP
•
BLUE MUTE
5. Enter ACCESS CODE
2
13
4
7
6. Key in access code.
5
6
9
8
0
7. Press button repeatedly
mode.
until CLEAR ALL is
selected.
FEATURES
É
•
TIMER ACCESS CODE
Ñ
CHILD LOCK
•
PIP CORRECT
•
CLOSED CAP
•
BLUE MUTE
FEATURES
CHILD LOCK
•
LOCK CHANNEL
•
CHANGE CODE
CLEAR ALL
– – – –
X X X X
•
8. Activate clearing of all
locked channels.
OSD
9. Exit menu from screen.
FEATURES
CHILD LOCK
•
LOCK CHANNEL
•
CHANGE CODE
CLEAR ALL
•
CLEARED
Note
You can also unlock individual channels by the LOCK CHANNEL menu.
• Repeat step 1 to 7 as in “ACTIVATING THE CHILD LOCK (LOCK CHANNEL).”
• Select the channel you want to unlock by the or (CURSOR UP / DOWN) buttons.
• Press the (CURSOR RIGHT) button to unlock channel (the keylock symbol will
disappear).
29
Page 30

USING THE CLOSED CAPTIONING CONTROL
▲
▼
FEATURES
CLOSED CAP
Ñ
CAPTION MODE
•
CC1
•
CC DISPLAY CC2
CC3
CC4
CC MUTE
É
Closed Captioning (CC) allows you to read the voice content of television programmes on
the TV. Designed to help the hearing impaired, this feature uses on-screen “text boxes” to
show dialogue and conversations while the TV programme is in progress.
➠
FEATURES
▲
É
•
TIMER TIME
▼
•
CHILD LOCK START TIME
•
PIP STOP TIME
•
CLOSED CAP CHANNEL
•
BLUE MUTE ACTIVATE
MENU
SURF
MENU
SURF
MENU
SURF
➠➠
1.Enter main menu. 2. Select FEATURES. 3. Enter FEATURES menu.
4. Select CLOSED CAP.
5. Enter CLOSED CAP
menu.
6. Enter CAPTION MODE
mode.
FEATURES
•
TIMER CAPTION MODE
•
CHILD LOCK CC DISPLAY
É
•
PIP
▲
É
•
CLOSED CAP
▼
•
BLUE MUTE
FEATURES
CLOSED CAP
Ñ
CAPTION MODE
•
CC DISPLAY CC2
CC3
CC4
CC MUTE
7. Select your desired caption
OR
mode. You can choose
caption or in text mode.
There are 5 types of caption
(CC1, CC2, CC3, CC4 and
CC MUTE) and 4 types of
text (TXT1, TXT2, TXT3
and TXT4).
➠
▲
É
•
CC1
▼
8. Exit from CAPTION
MODE.
9. Select CC DISPLAY.
10. Select ON to display
Closed Captioning
on screen.
OSD
11. Exit menu from screen.
30
FEATURES
CLOSED CAP
•
CAPTION MODE
Ñ
CC DISPLAY • OFF
FEATURES
CLOSED CAP
•
CAPTION MODE
Ñ
CC DISPLAY • ON
▲
É
▲
É
Page 31

USING THE CLOSED CAPTIONING CONTROL
Example of a CAPTION mode
Darling, are sure you do not want anything to eat?
Example of a TEXT mode
Caption 1, 2, 3 or 4
During screening, dialogues (or descriptions)
for the captioned television programme
appear on the screen. The text can appear
up to 4 rows simultaneously anywhere on
the screen.
Closed Caption Programme on TCS
All items are based on standard time
(est). Check local listings for the time
in your area.
08 : 00 Things People Do
10 : 00 Dining in Style
12 : 00 News at Noon
12 : 30 The Animal Kingdom
TEXT 1, 2, 3 or 4
Text mode is often used for channel guides,
schedules or bulletin board information when
programmes with Closed Captioning are
shown. The complete screen is used for
displaying the text.
IMPORTANT
1. Not all television programmes and product commercials are made for broadcast with
Closed Captioning information included. Neither are all Closed Captioning modes (Caption
1 to 4 or TEXT 1 to 4) necessarily being used by a broadcast station during transmission
of a programme with Closed Captioning. Check with your local listings for details.
2. A broadcast station will often use spelling abbreviations, symbols and other grammatical
short-cuts in order to keep pace with the on-screen action. These vary with the source
of the captioned text material and do not indicate a need for the service of the television.
31
Page 32

USING THE SURF CONTROL
A list or series of previously viewed channels can be selected with the SURF button. This
feature allows you to switch between different TV programmes that currently interest you.
You can set up to a maximum of ten channels in the SURF list.
How to add a channel to the surf list
2
13
4
7
1. Select a channel you
5
6
want to add to the
9
8
0
SURF
surf list.
2. Enter SURF menu.
3. Add selected channel to
the surf list.
Repeat steps 1 - 3 to add
more channels to the
surf list.
8
SURF
•
8 ADD?
SURF LIST EMPTY
Ñ
SURF
•
8 DELETE?
Ñ
SURF
•
8
•
5 ADD?
OSD
4. After you have completed
adding the selected
channels to the surf list,
Ñ
SURF
•
8
•
5 DELETE?
exit menu from screen.
Ñ
Note : To view the the selected channels in the surf list, press the SURF button repeatedly
to cycle through the channels.
How to delete a channel from the surf list
1. Press the (SURF) button to display surf list.
2. Press the (SURF) button repeatedly to cycle through the surf list and select the
channel you want to delete.
3. Press the (CURSOR RIGHT) button to delete channel from the surf list.
4. Repeat all the above steps if you want to delete more channels from the surf list.
SURF
SURF
32
Page 33

ACTIVATING THE BLUE MUTE CONTROL
Ñ
PROGRAM LIST
1 ACTIO
2
DRAMA
3 VIOLE
4 ROMAN
•
5
_ _ _ _ _
▼
FEATURES
•
TIMER
•
CHILD LOCK
•
PIP
•
CLOSED CAP
•
BLUE MUTE
•
ON
BLUE MUTE
•
ON
É
Ñ
The Blue Mute feature indicates to you the absence of signal in the transmission when the
“ON” option is activated. Upon the detection of absence of signal, the TV screen will turn
blue in colour.
MENU
SURF
1. Enter main menu. 2. Select FEATURES. 3. Enter the FEATURES menu.
4. Press the (CURSOR DOWN) button repeatedly
until BLUE MUTE is selected.
5. Press the (CURSOR RIGHT) button to select ON
to activate blue mute feature.
6. Press the (OSD) button to exit menu from screen.
OSD
➠
MENU
SURF
➠
MENU
SURF
➠
FEATURES
▲
É
•
TIMER TIME
▼
•
CHILD LOCK START TIME
•
PIP STOP TIME
•
CLOSED CAP CHANNEL
•
BLUE MUTE ACTIVATE
The Program List feature allows you to navigate through a list of installed programmes for a
quick overview of the channels and activate the channel you have selected.
1. Press the (PROGRAM LIST) button to
2. Press the (CURSOR UP) or (CURSOR DOWN)
3. Press the (CURSOR RIGHT) button to activate
4. Press the (OSD) button to exit menu from screen.
USING THE PROGRAM LIST FEATURE
PROG. LIST
display the list of installed programmes. The current
channel is highlighted.
button to cycle through the programme list and
highlight the channel number you want to activate.
the channel you have selected.
OSD
33
PROGRAM LIST
•
1
_ _ _ _ _
2
_ _ _ _ _
3
_ _ _ _ _
4
_ _ _ _ _
5
_ _ _ _ _
Ñ
Page 34

SMART PICTURE AND SMART SOUND CONTROL
SMART PICTURE feature offers you a choice of 5 picture settings, namely, PERSONAL,
RICH, NATURAL, SOFT and MULTIMEDIA.
SMART SOUND feature offers you a choice of 4 sound settings, namely, PERSONAL,
VOICE, MUSIC and THEATRE.
SMART
Press (SMART PICTURE) or (SMART SOUND) button repeatedly to cycle
PICTURE
through the settings to select your desired mode.
Definition of Picture Settings
PERSONAL : Picture settings are set to your preference.
RICH : Emphasize very vibrant colours
(suitable for AV mode in brightly lit room).
NATURAL : Emphasize original colours.
SOFT : Emphasize “warm” colours
(suitable for dimly lit room condition and
gives cinema-like effect when light is
switched off).
MULTIMEDIA: Emphasize “soft” colours (suitable for
playing computer games, surfing, etc.).
Note: The PERSONAL setting is the setting that you
set up using the Picture menu in the main menu. This
is the only setting in the Smart Picture settings that
can be changed. All the other settings are pre-set at
the factory.
SMART
SOUND
BRIGHTNESS 38
COLOUR 32
PICTURE 52
SHARPNESS 45
BRIGHTNESS 60
COLOUR 33
PICTURE 99
SHARPNESS 74
BRIGHTNESS 50
COLOUR 30
PICTURE 75
SHARPNESS 60
BRIGHTNESS 41
COLOUR 30
PICTURE 50
SHARPNESS 59
BRIGHTNESS 41
COLOUR 30
PICTURE 50
SHARPNESS 59
PERSONAL
RICH
NATURAL
SOFT
MULTIMEDIA
Definition of Sound Settings
PERSONAL : Sound settings are set to your preference.
VOICE : Emphasize high tone (treble boosted).
MUSIC : Emphasize low tone (bass boosted).
THEATRE : Emphasize sensation to action
(bass and treble boosted).
34
TREBLE 52
BASS 68
TREBLE 56
BASS 47
PERSONAL
VOICE
TREBLE 63
BASS 69
MUSIC
TREBLE 60
BASS 72
THEATRE
Page 35

ACTIVATING THE PIP (PICTURE-IN-PICTURE)
AND DOUBLE WINDOW CONTROL
Picture-in-Picture feature allows you to call up a sub-screen within your main screen,
enabling you to watch two channels at the same time.
Double Window feature allows you to divide the main screen into two sub-screens,
enabling two channels to be watched simultaneously.
How to switch on the PIP/Double Window screen
• Press the (PIP On/Off) button
to switch on PIP mode. (A normal size
ON/OFF
PIP screen appears.)
• Press the button the second
time to change the normal size PIP
ON/OFF
screen to a smaller size.
• Press the button the third time
to switch to Double Window screens
ON/OFF
in 4:3 format.
How to hear PIP sound
• Press the (PIP On/Off) button
to switch on PIP mode.
• Connect the headphone cable to the
headphone socket to hear PIP sound.
(The HEADPHONE control within the
SOUND menu allows you to adjust the
headphone volume. Refer to the section
on “Using the Picture/Sound Menu” for
instructions.)
ON/OFF
AV sockets
on side of
TV
35
Page 36

ACTIVATING THE PIP (PICTURE-IN-PICTURE)
ONTROL
C
A/CH
V. DOLBY
ON/OFF POSITION
SWAP
A/CH
V. DOLBY
ON/OFF POSITION
SWAP
A/CH
V. DOLBY
ON/OFF POSITION
SWAP
STEREO/SAP
PIP
CH
STEREO/SAP
PIP
CH
STEREO/SAP
PIP
CH
PROG. LIST
+
PROG. LIST
+
PROG. LIST
+
INCR. PICT.
FREEZE
PIP CH
INCR. PICT.
FREEZE
CH
PIP CH
• Press the (PIP On/Off) button to
ON/OFF
switch on PIP screen.
CH
–
• Press the (PIP CH +) or
CH +
(PIP CH –) button to select a PIP
channel in ascending or descending order.
–
2
3
CH
–
4
How to freeze the PIP screen
How to select a PIP channel
INCR. PICT.
FREEZE
CH
PIP CH
• Press the (PIP On/Off) button
to switch on PIP screen.
–
ON/OFF
V. DOLBY
ON/OFF POSITION
SWAP
A/CH
STEREO/SAP
PIP
CH
PROG. LIST
+
INCR. PICT.
• Press (PIP Freeze) button once
FREEZE
CH
–
PIP CH
FREEZE
to freeze the PIP screen
. Freezing the PIP
screen allows you to view a programme
in the still mode. For example, you may
want to write down some information
from the PIP screen, freezing the screen
will allow you time to do so.
• Press the (PIP Freeze) button
the second time to unfreeze the
FREEZE
PIP Freeze
PIP screen.
PIP Unfreeze
36
Page 37

ACTIVATING THE PIP (PICTURE-IN-PICTURE)
C
ONTROL
How to position the PIP screen
INCR. PICT.
A/CH
PROG. LIST
V. DOLBY
STEREO/SAP
ON/OFF POSITION
SWAP
A/CH
V. DOLBY
STEREO/SAP
ON/OFF POSITION
SWAP
PIP
CH
+
PROG. LIST
PIP
CH
+
• Press the (PIP On/Off)
FREEZE
PIP CH
button to switch on PIP
screen.
CH
–
• Press the (PIP Position)
button repeatedly to your
INCR. PICT.
ON/OFF
POSITION
desired position. (You can
choose the PIP screen to be on
FREEZE
the top left corner, top right
CH
–
PIP CH
corner, bottom right corner
or the bottom left corner.)
➠
➠
➠
➠
A/CH
V. DOLBY
ON/OFF POSITION
SWAP
V. DOLBY
ON/OFF POSITION
SWAP
STEREO/SAP
PIP
CH
A/CH
STEREO/SAP
PROG. LIST
+
PIP
CH
PROG. LIST
+
INCR. PICT.
FREEZE
PIP CH
PIP CH
How to swap the PIP screen and the main screen
• Press the (PIP On/Off)
button to switch on PIP
screen.
CH
–
• Press the (PIP Swap)
INCR. PICT.
button to swap the programme
in the PIP screen and the
programme in the main screen.
FREEZE
CH
–
ON/OFF
SWAP
How to adjust the PIP Hue setting
1. Press the (MENU) button to enter main menu.
2. Press the (CURSOR DOWN) button
repeatedly until FEATURES is selected.
3. Press the (CURSOR RIGHT) button to enter
the FEATURES menu.
4. Press the (CURSOR DOWN) button repeatedly
until PIP is selected.
5. Press the (CURSOR RIGHT) button to enter
PIP menu.
6. Press the (CURSOR LEFT) or (CURSOR
RIGHT) button to adjust HUE setting to your desired level.
7. Press the (OSD) button to exit menu from screen.
Note : Hue adjustments in the PIP programmes will only
take effect if programmes are in NTSC mode.
MENU
OSD
➠
➠
•
PICTURE TIMER
•
SOUND
•
FEATURES
•
INSTALL CLOSED CAP
FEATURES
•
•
▲
É
•
▼
•
•
FEATURES
PIP
HUE 8
CHILD LOCK
PIP
BLUE MUTE
TIMER HUE
CHILD LOCK
PIP
CLOSEDCAP
BLUE MUTE
37
Page 38

SPECIFICATIONS
43PP925 50PP925 55PP925
Picture visible area 109 cm 127 cm 140 cm
Audio Output 2 x 15 W
TV System NTSC M
Set Dimensions
Width 950 cm 1130 cm 1222 cm
Depth 540 cm 613 cm 612 cm
Height 1142 cm 1476 cm 1549 cm
Net weight of set approx. 58 kg approx. 83 kg approx. 90 kg
Note
For Operating Voltage, Frequency, Power Consumption and Version Number, refer to the
type number at the rear of the set.
38
 Loading...