

Philips 55PL9223/17 Quick Start Guide
HDTV Monitor
HDTV Monitor
Quick Use and Setup Guide
Quick Use and Setup Guide
3135 035 21292
WARNING: TO PREVENT FIRE OR SHOCK HAZARD, DO NOT
EXPOSE THIS UNIT TO RAIN OR EXCESSIVE MOISTURE.
As an Energy Star® Partner, Philips Consumer Electronics has deter-
mined this product meets the Energy Star® guidelines for energy effi-
ciency. Energy Star® is a U.S. registered mark. Using products with
the Energy Star® label can save energy. Saving energy reduces air pollution and
lowers utility bills.
3135 035 21303
HDTV Monitor
HDTV Monitor
44PL9523
55PL9523
55PL9223
Refer to the Quick Use and Setup Guide (supplied with your TV)
for information on basic connections,remote control button
descriptions,on-screen menu language, and Autoprogram.
Highlights
• Liquid-crystal-on-silicon (LCOS) High-definition
Imaging
• High-resolution Display—1280 x 720 pixels
Features
• Digital Natural Motion™
• Active Control™—analyzes and adjusts incoming signal
• Two-tuner, Double-window PIP (Picture-in-Picture)
• Dolby
®
Virtual Surround, 40-watt RMS
• 3D Y/C Comb Filter
• HD Component and DVI Input
• Center Channel Audio Input
• Side AV Convenience Jacks
• Matching stand and swivel available
3/21/04
DVI
G
S-VIDEO
G
S-VIDEO
RLV
RL
RL
RL
V
Pr Pb Y
RL
RL
Pr Pb Y
Pr Pb Y
RL
V
STANDARD/
HD INPUTS
STANDARD/
HD INPUTS
TUNER
RGB+HV
AV5 AV6
AV1MONSUB OUT AV2AV3AV4
OUT
SERVICE 1
2
C
Language Autoprogram
Select your menu language with
the cursor up/down.
Press the OK key on the remote
control to confirm.
Contents
Warning . . . . . . . . . . . . . . . . . . . . . . . . . . . . . . . . . . . . . . . . . . . . . . . . . . . . . . .1
See the User Manual . . . . . . . . . . . . . . . . . . . . . . . . . . . . . . . . . . . . . . . . . . . . . .1
Positioning the TV . . . . . . . . . . . . . . . . . . . . . . . . . . . . . . . . . . . . . . . . . . . . . . .2
Mounting the Swivel to the TV . . . . . . . . . . . . . . . . . . . . . . . . . . . . . . . . . . . . . .2
Mounting the Swivel and TV to the Stand . . . . . . . . . . . . . . . . . . . . . . . . . . . . .3
Making Basic Connections to the TV . . . . . . . . . . . . . . . . . . . . . . . . . . . . . . .3–5
Operating the TV . . . . . . . . . . . . . . . . . . . . . . . . . . . . . . . . . . . . . . . . . . . . . . . .5
Using the Remote Control . . . . . . . . . . . . . . . . . . . . . . . . . . . . . . . . . . . . . . . . .6
Using the On-screen Menu . . . . . . . . . . . . . . . . . . . . . . . . . . . . . . . . . . . . . . . . .7
Using the Demo Mode . . . . . . . . . . . . . . . . . . . . . . . . . . . . . . . . . . . . . . . . . . . .7
Using the Installation Features . . . . . . . . . . . . . . . . . . . . . . . . . . . . . . . . . . . . . .8
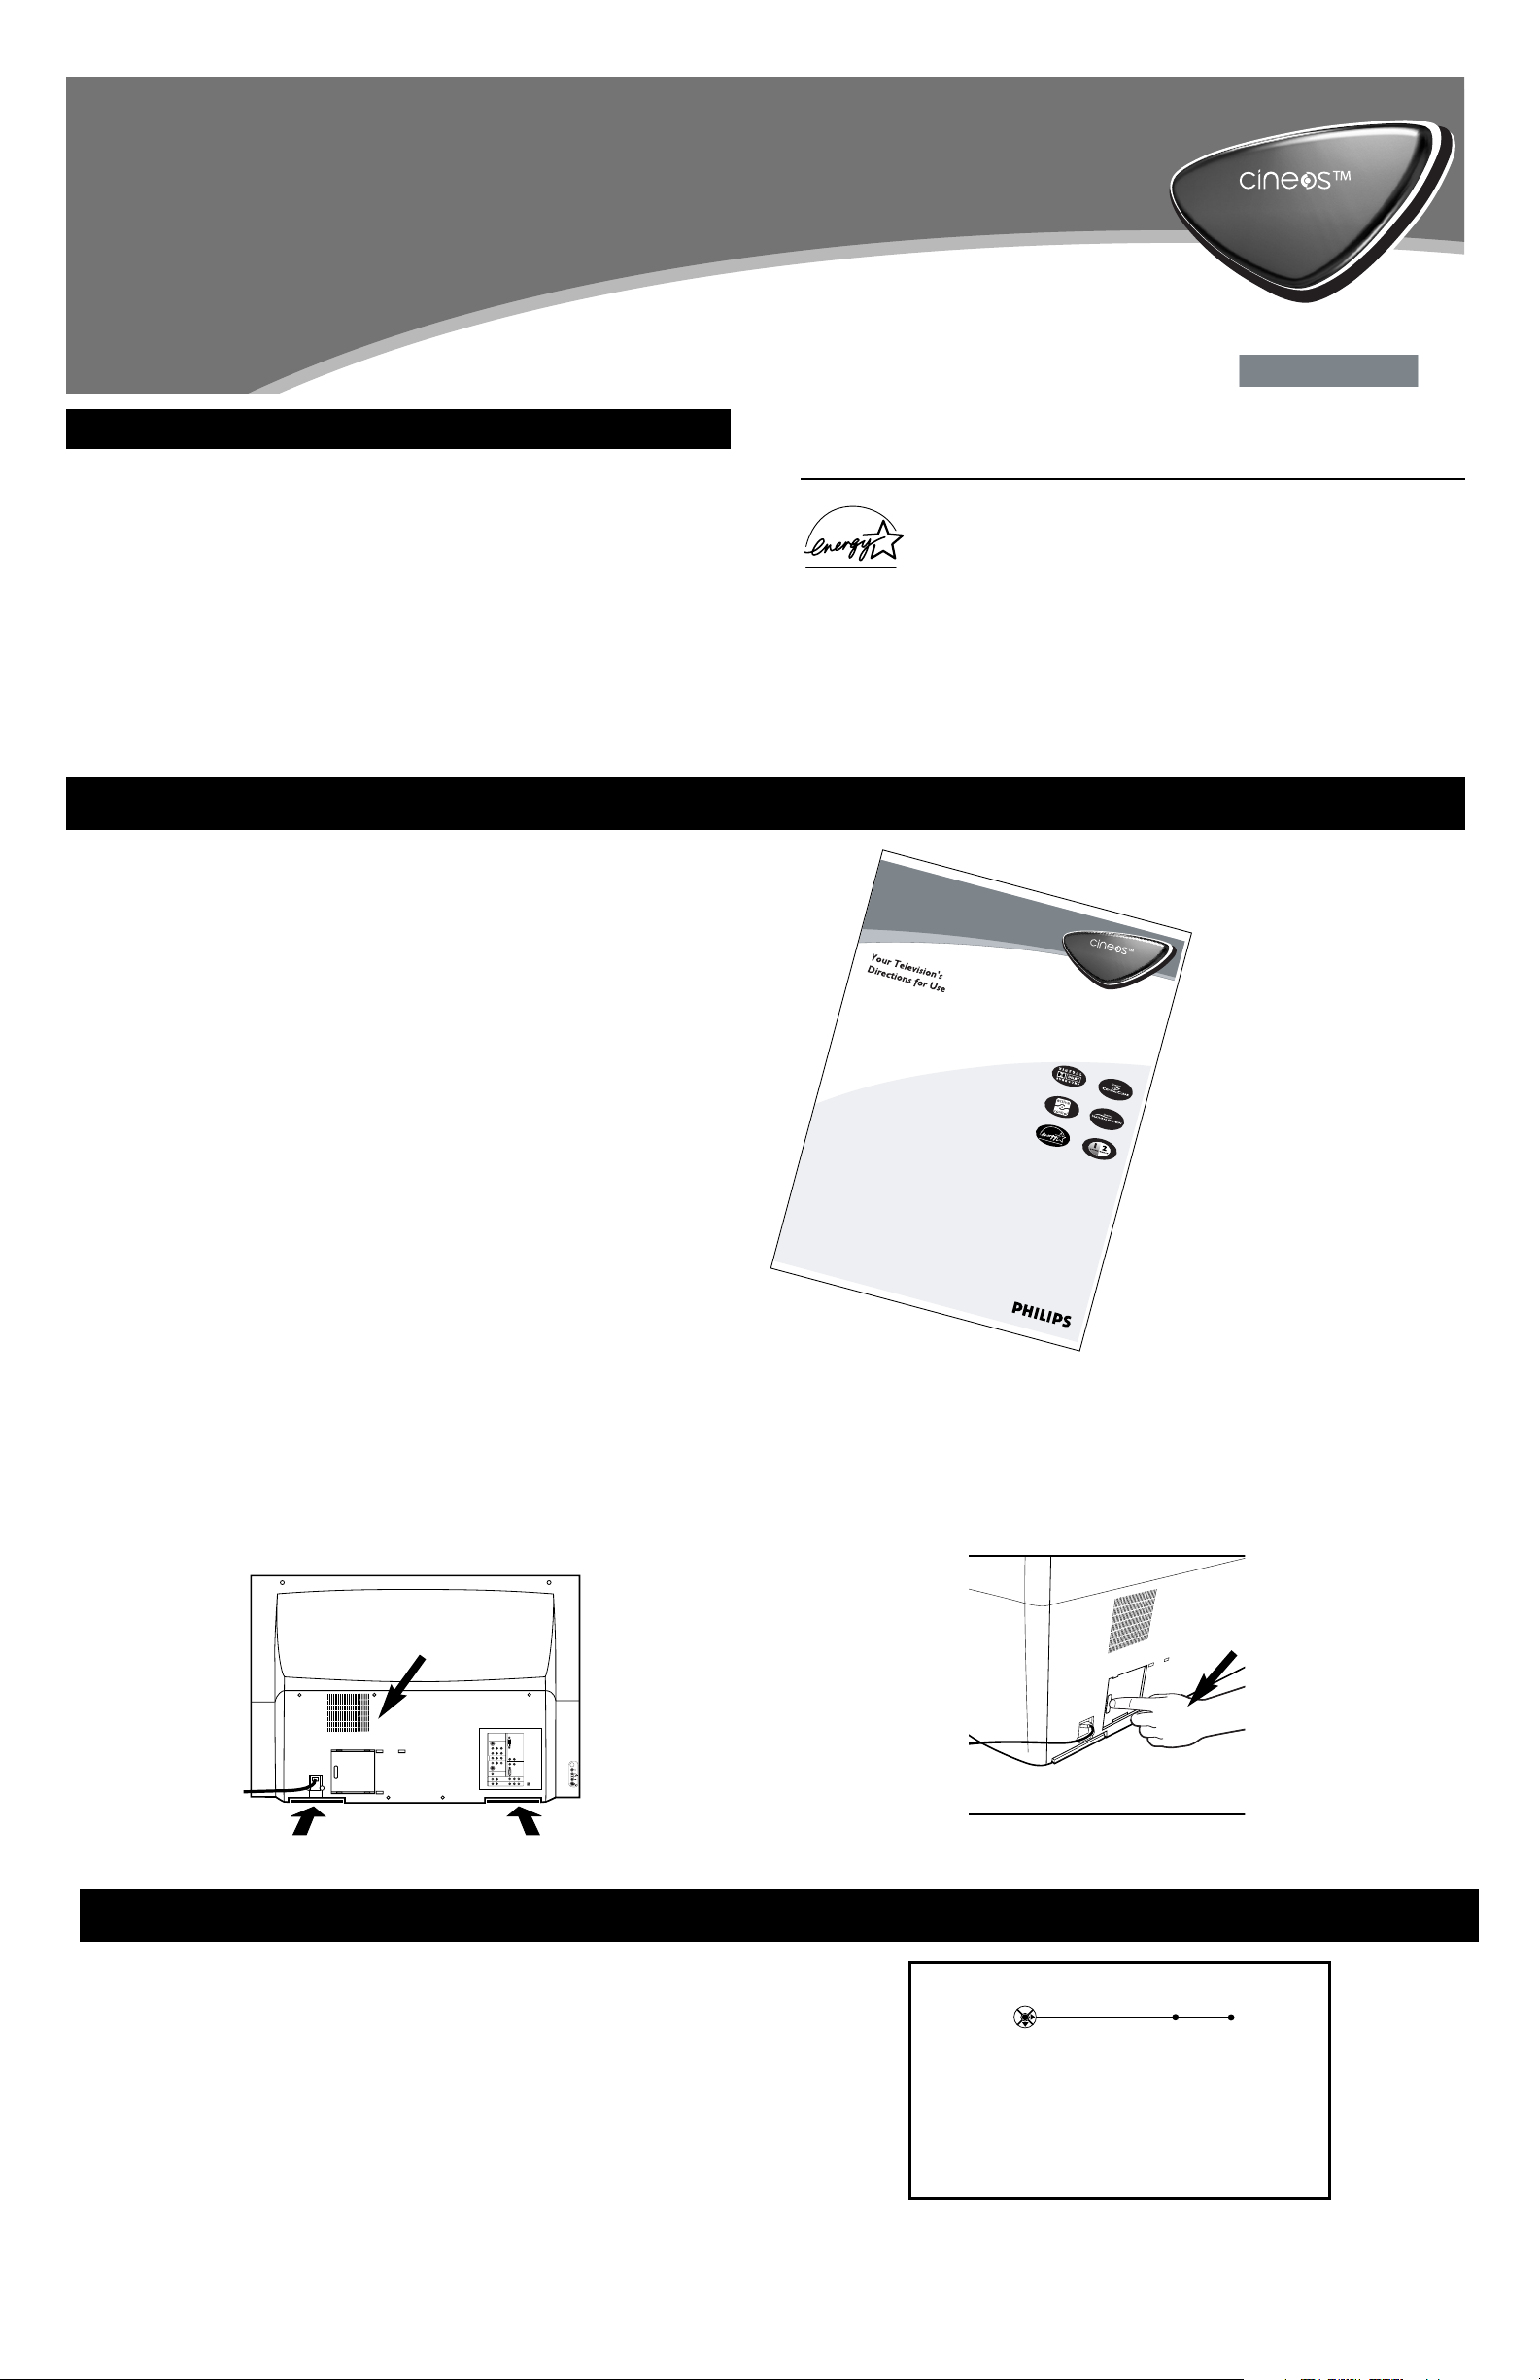
See the User Manual for Important Maintenance Information
In addition to providing information about safety, connecting accessory devices,
and using the TV’s features, the Directions for Use manual explains how to care
for and maintain your Cineos television. The TV contains air filters that must be
maintained and eventually replaced, and a lamp that eventually will need to be
replaced.
Air Filters
The air filters (located at the bottom of the TV) must be kept clean and free of
blockage.
NOTE: DO NOT operate the TV without the filters. Damage to the TV will occur.
Allow four to six inches of space behind the TV for air flow through the back
slots.
IMPORTANT: Excessive heat inside the TV resulting from inadequate ventilation
will cause the TV to shut down or not
to operate.
Lamp
An on-screen message will alert you when the lamp is nearing the end of its
expected lifetime so that you can change it before it wears out.
IMPORTANT: The TV will not operate if the lamp door is left open, and the TV
will shut down if the door is opened during operation.
Picture Settings
Your TV was set up at the factory for optimal showroom viewing. For optimal
home viewing change the Auto Picture setting to Natural. See page 34 in the
Direction for Use Manual.
Back of TV
Keep the Directions for Use manual
accessible to correctly maintain and
care for your TV, as well as to
understand and use its features.
Back of TV
Please read this Quick Use and Setup Guide completely before
you turn on the TV.
When you turn on your TV for the first time it will prompt you to enter
some setup information about Language preference and Channel programming. See page 8 in this Quick Use and Setup Guide for more information
about these menus.
3/23/04
Ventilation Slots
Lamp Door
The lamp door must be closed for the TV to operate.
Locations of Air Filters
IMPORTANT! Initial TV Setup
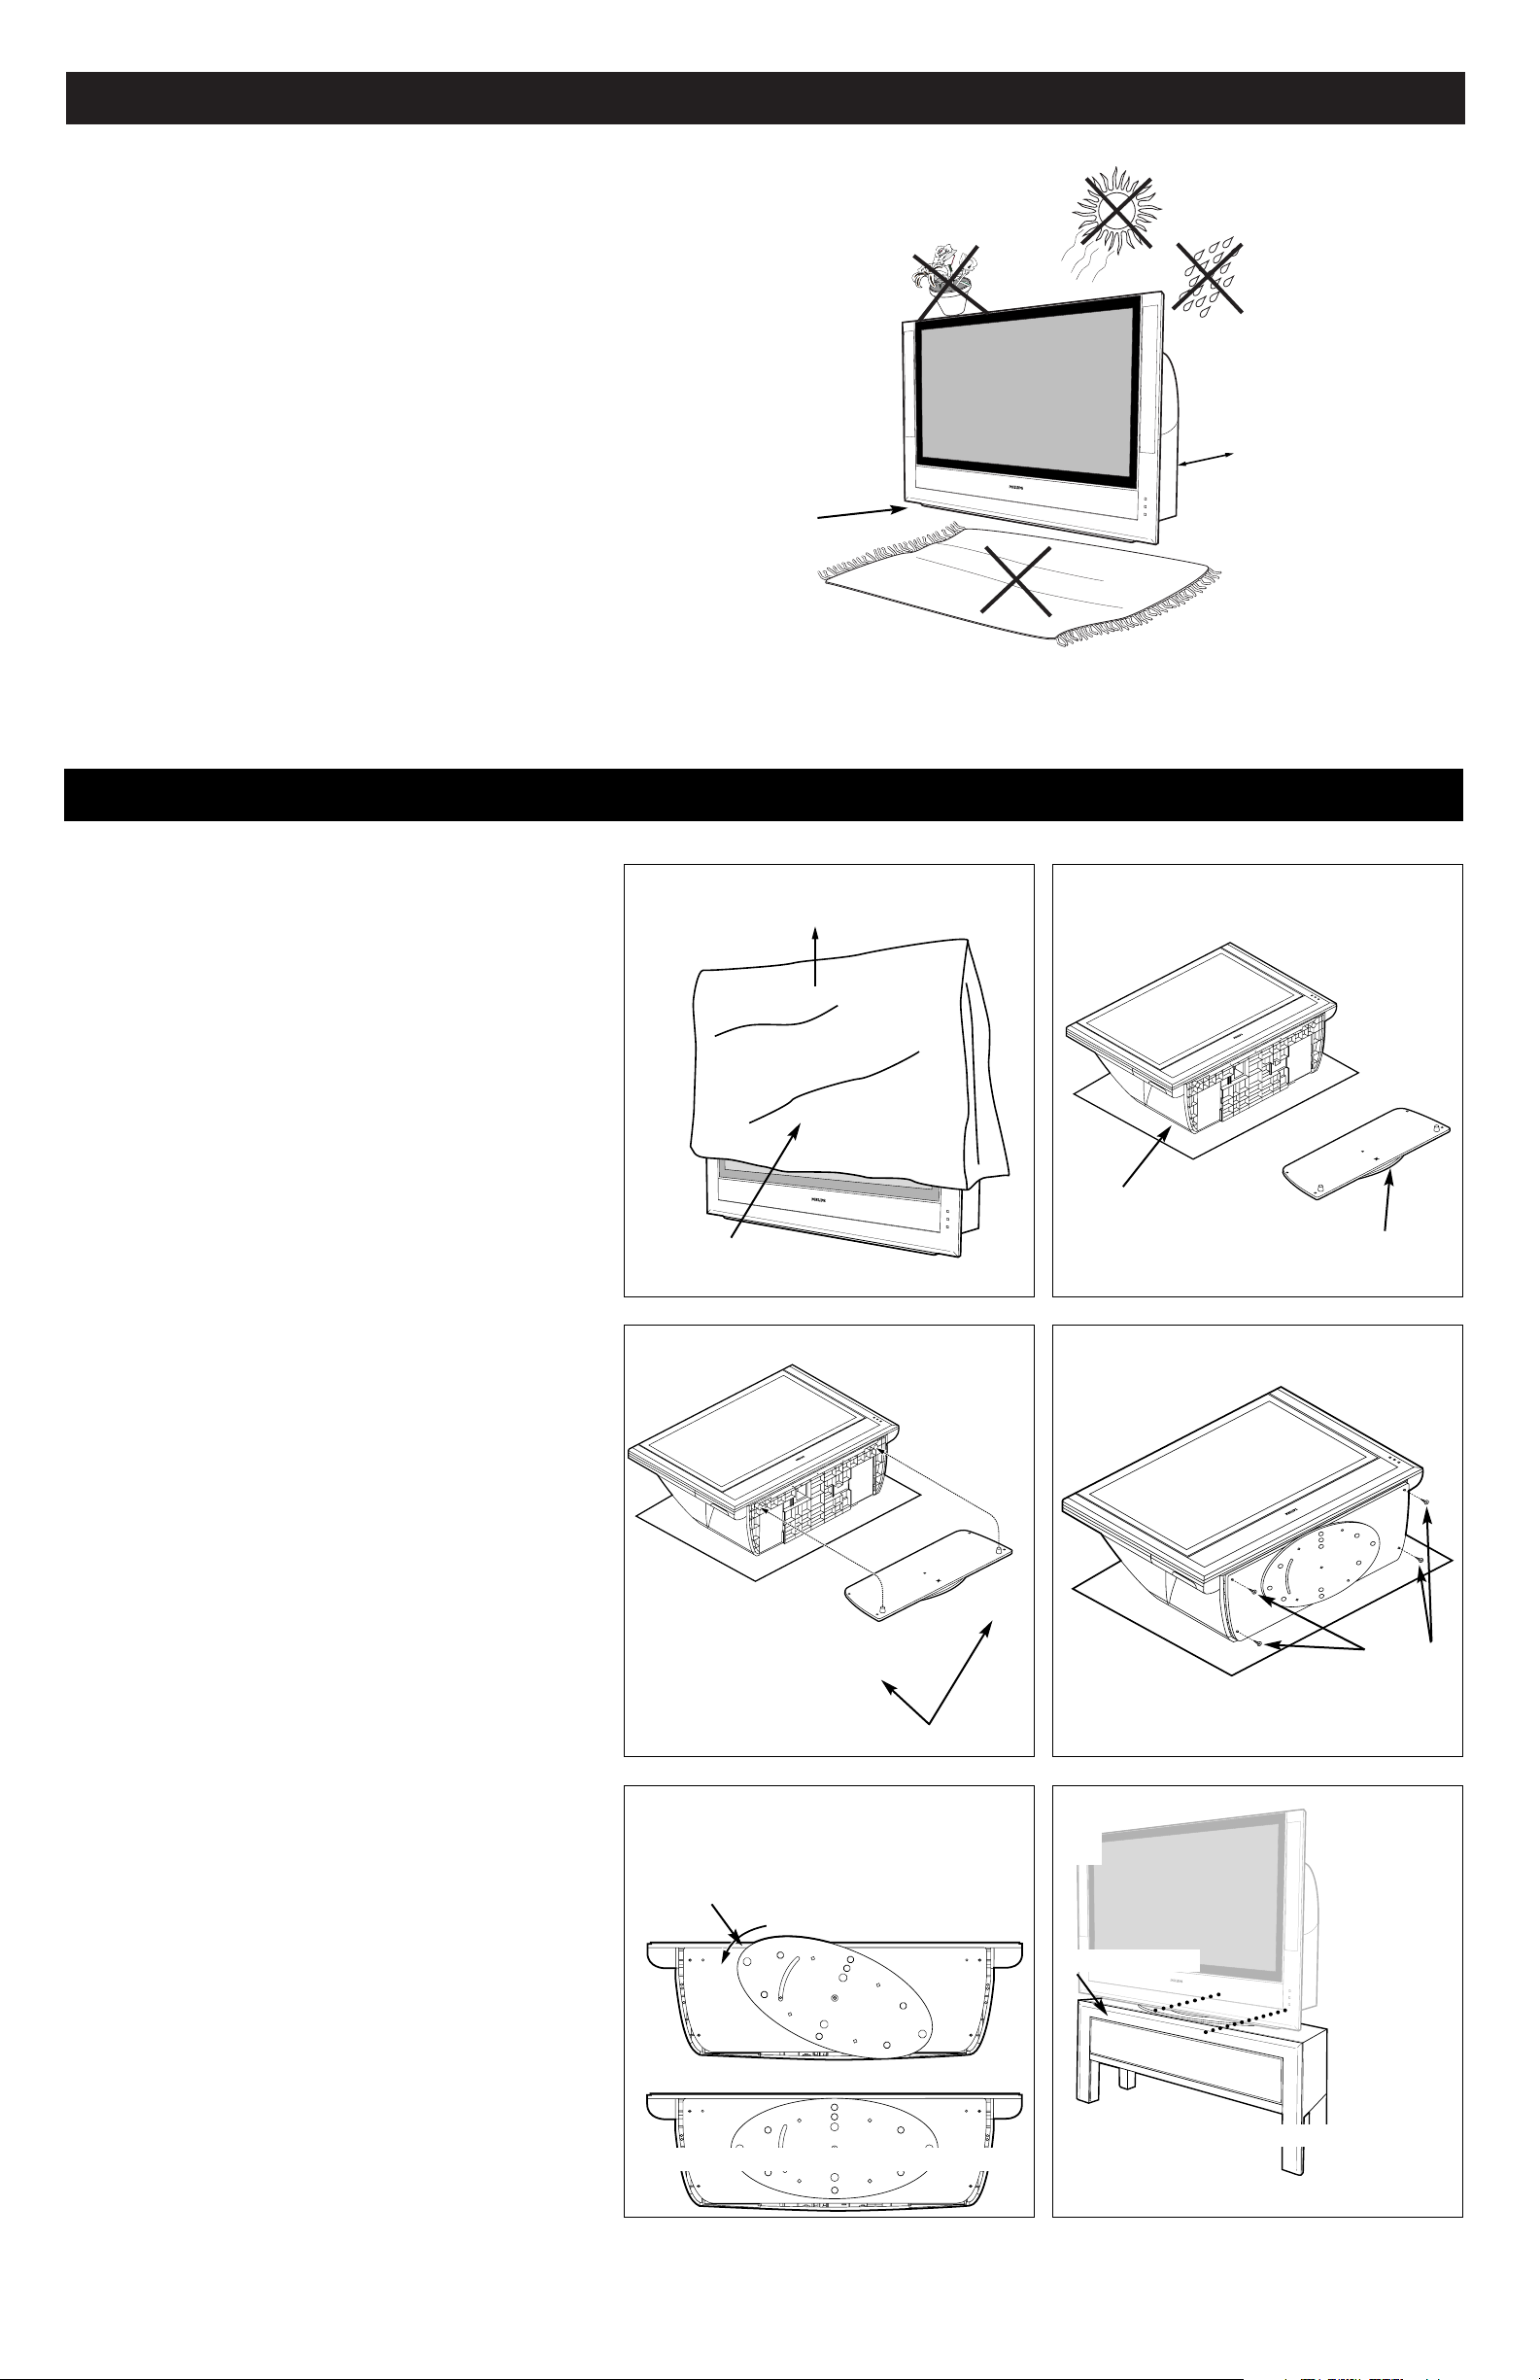
Positioning the TV
Allow 4 to 6 inches
behind the TV for
ventilation.
Place the TV on
a flat surface.
Do not place the TV on a surface that will block
the air filters located underneath the set.
Situate the TV where it will not be
exposed to heat or moisture.
For safety, do not
set objects on top
of the TV.
Before connecting accessory devices—VCR, DVD player, or HD
receiver, for example—please keep the following in mind:
• Place the TV on a flat surface. An unlevel surface may adversely
affect picture performance.
• Do not place the TV on shag carpet or any surface that will
block the air inlets at the bottom of the set. Blockage will cause
the TV to overheat and shut down.
• Allow 4 to 6 inches of space behind the TV for ventilation.
• To purchase an optional swivel and/or stand to go with your
Philips Cineos TV, see the electronics dealer where you bought
your TV.
• Test various locations in the room to find the optimal spot to
locate the set for best viewing.
• Do not place the TV in direct sunlight or near a heating appliance.
• Do not expose the TV to rain or moisture.
• To prevent any unsafe situations, do not place objects on top of
the TV.
2
Mounting the Swivel to the TV
2
Optional Swivel
Polybag
Rubber Bumpers
Optional Stand
Swivel in Center Position
Screws
Polybag
Remove and Place on Floor
1
3 4
5 6
0-Degree Holder
0-Degree Holder
Following are instructions for mounting the optional swivel.
NOTE: Attach the swivel before hooking up the TV.
1
Remove the foam cushion polybag from around your TV
and place it on the floor.
2
NOTE: At least two people are required to perform this task.
Carefully lay the TV back flat on the foam cushion polybag
with the screen up.
3
Use screws to fasten rubber bumpers to the swivel as
shown. Guide the two rubber bumpers on the swivel into
the corresponding holes on the bottom of the TV.
4
Use the supplied screws (4) to fasten the swivel to the TV.
Tighten the screws until hand tight. Do not overtighten.
5
Be sure the swivel is in center position.
6
Place the TV and mounted swivel upright on a level surface, preferably a TV stand. An unlevel surface may
adversely affect picture performance. Once you have positioned TV on a TV stand or other surface, remove the
wooden 0-Degree Holder by pulling it to the left, then
toward the front of the TV. The swivel will not turn until it
is removed.
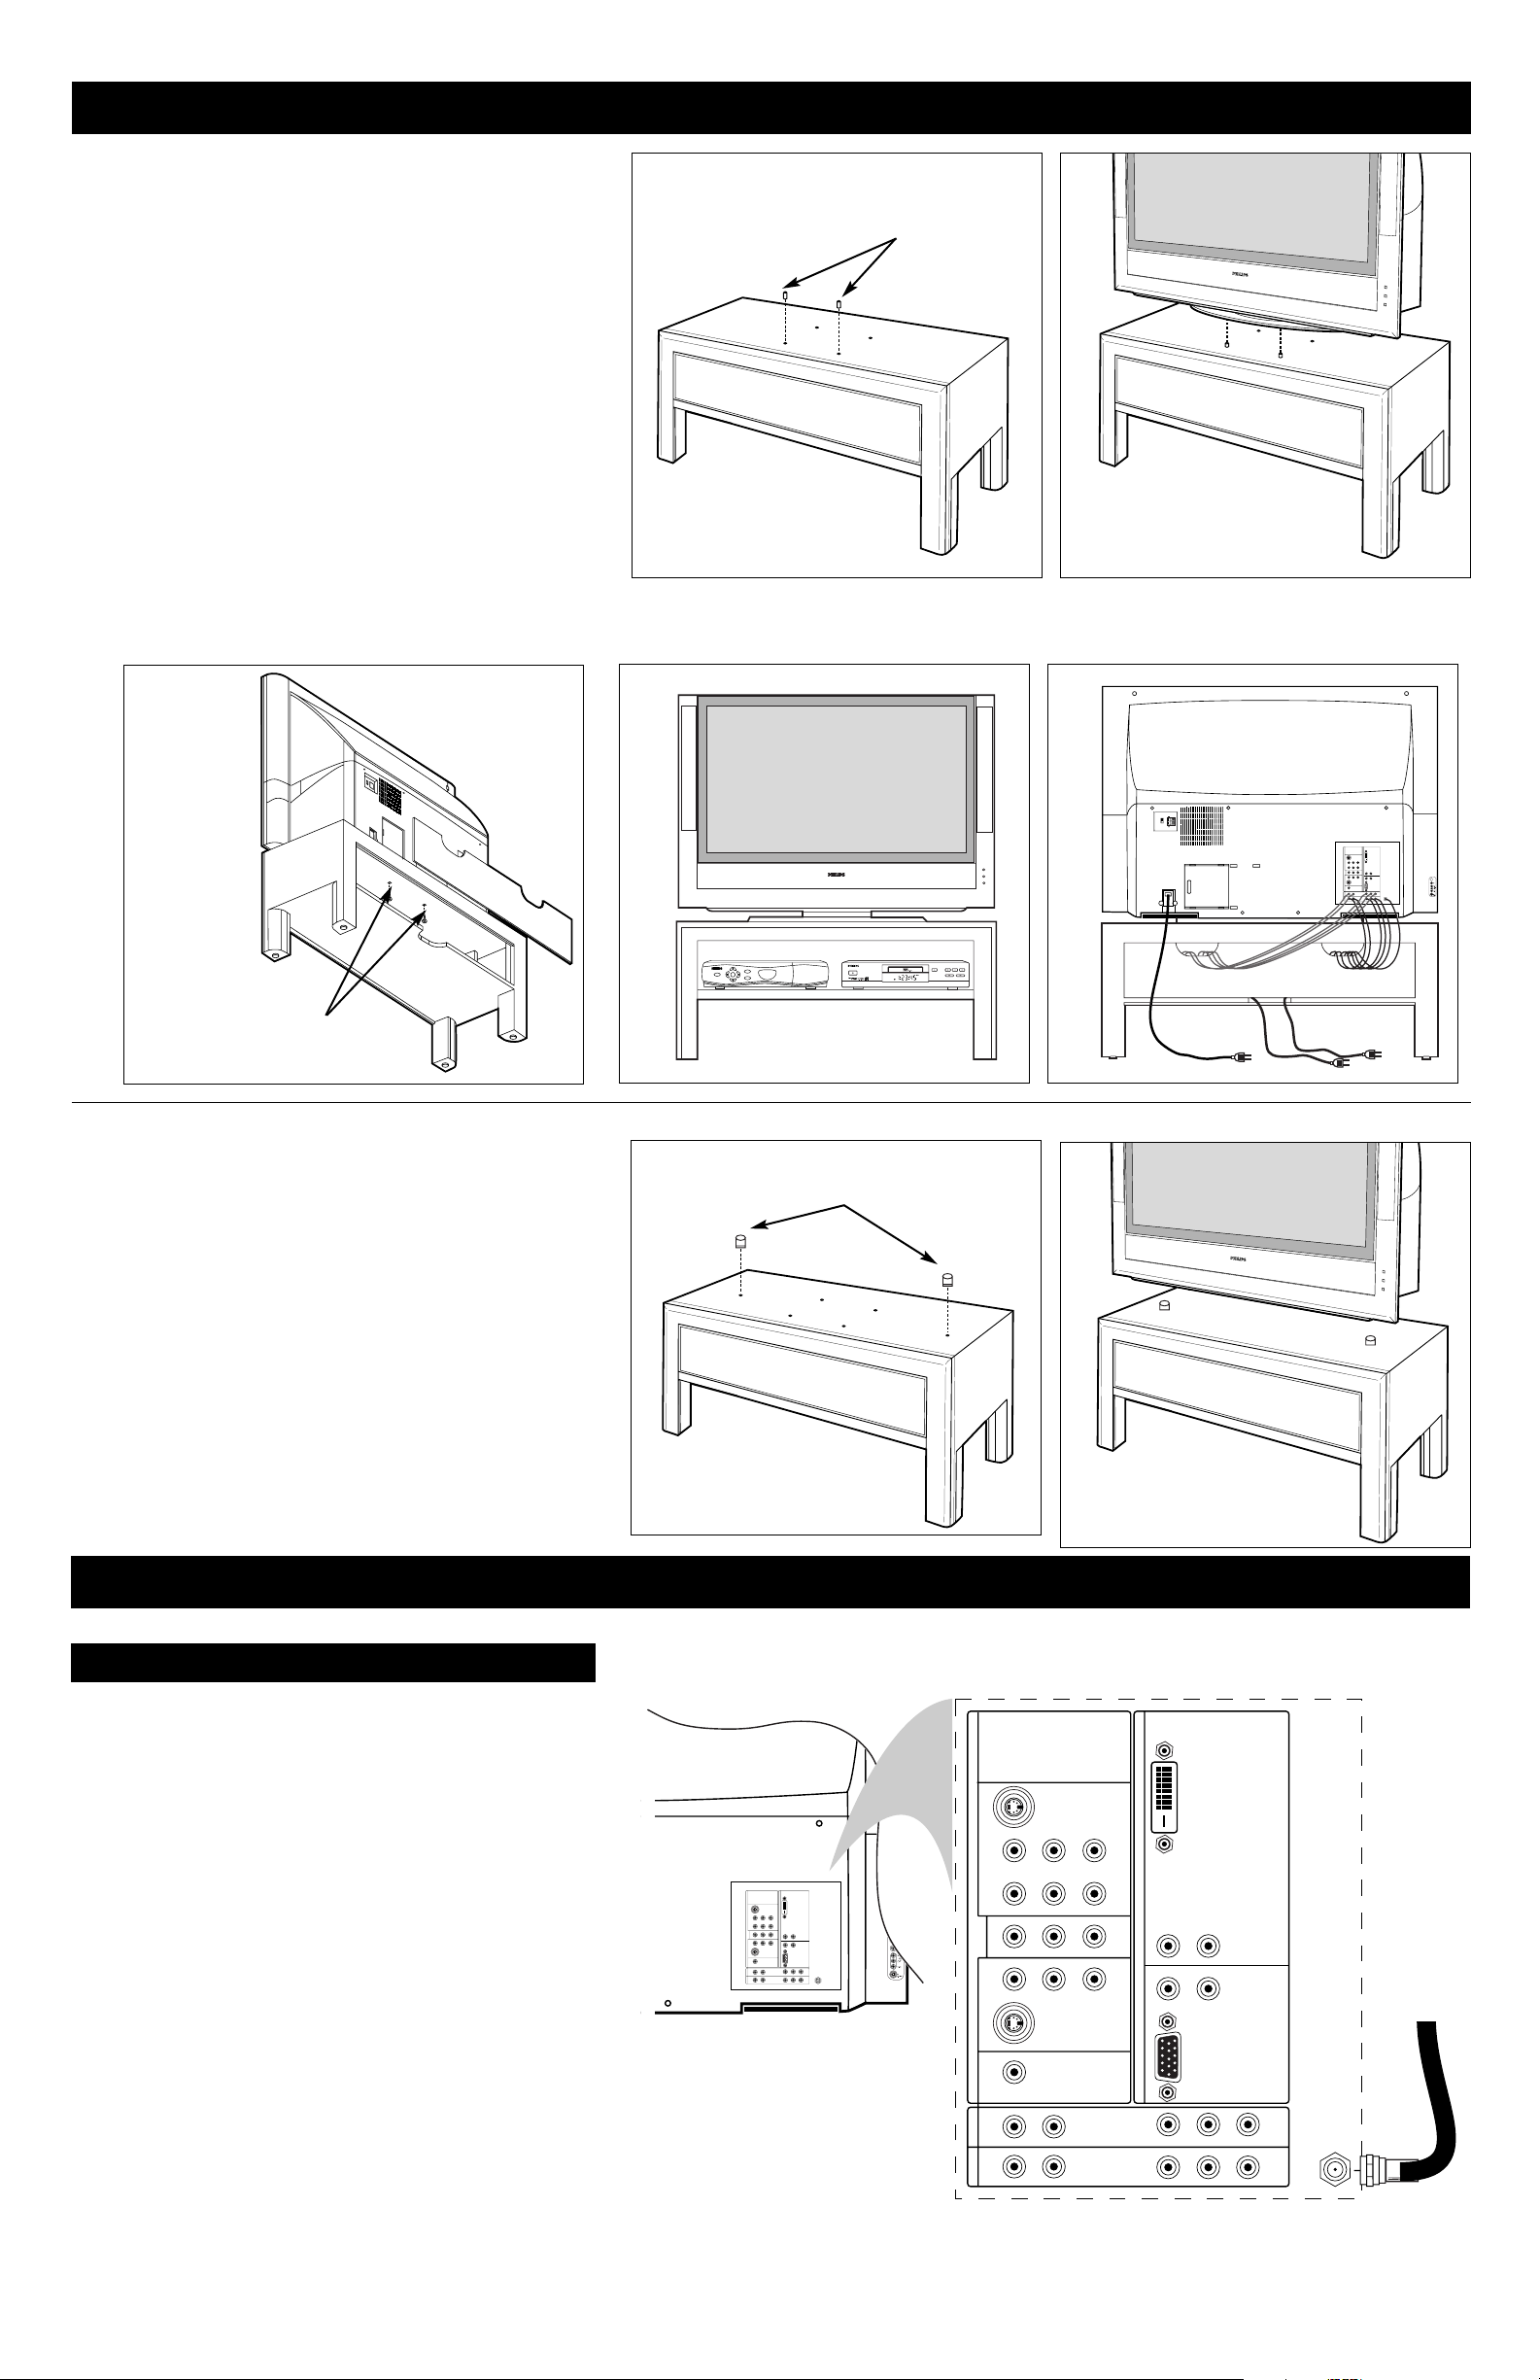
3
Making Basic Connections to the TV
Cable TV
DVI
G
S-VIDEO
G
S-VIDEO
RLV
RL
RL
RL
V
Pr Pb Y
RL
RL
Pr Pb Y
Pr Pb Y
RL
V
STANDARD/
HD INPUTS
STANDARD/
HD INPUTS
TUNER
RGB+HV
AV5 AV6
AV1MONSUB OUT AV2AV3AV4
OUT
SERVICE 1
2
C
DVI
G
S-VIDEO
G
S-VIDEO
RLV
RL
RL
RL
V
Pr Pb Y
RL
RL
Pr Pb Y
Pr Pb Y
RL
V
STANDARD/
HD INPUTS
STANDARD/
HD INPUTS
TUNER
RGB+HV
AV5 AV6
AV1MONSUB OUT AV2AV3AV4
OUT
SERVICE 1
2
C
Back of TV
Incoming
Cable TV
Signal
Connect the incoming cable
TV signal to the TUNER
jack on the back of the TV.
Connect the cable TV signal to the TUNER jack on the back of
the TV. See page 8 for details on using Autoprogram to store channels in the TV’s memory.
NOTE: This connection will supply stereo sound to the TV if it is
being broadcast by the station you are watching.
Mounting the Swivel and TV to the Stand
1
POWER
SELECT
GUIDE
INFO
HIGH DEFINITION
POWER
OPEN/CLOSE
STANDBY-ON
STOP
PREV NEXT
PLAY PAUSE
DVD619 DVD/CD PLAYER
DVI
G
S-VIDEO
G
S-VIDEO
RLV
RL
RL
RL
V
Pr Pb Y
RL
RL
Pr Pb Y
Pr Pb Y
RL
V
STANDARD/
HD INPUTS
STANDARD/
HD INPUTS
TUNER
RGB+HV
AV5 AV6
AV1MONSUB OUT AV2AV3AV4
OUT
SERVICE 1
2
C
C
E
N
T
E
R
C
H
A
N
N
E
L
A
M
P
IN
P
U
T
INT
EXT
Screws
Positioning
Pins
2
3
4 5
Placing the TV on the Stand
without the Swivel
If you should decide not to purchase the optional swivel, you can
place the TV directly on the stand.
• First locate the nut and washer for each supplied rubber locator
(2).
• Place the rubber locators over the pre-drilled holes in the stand.
• Place the washer and nut on each rubber locator.
• Tighten each nut.
• Place the TV and mounted swivel on the stand, aligning the
front and sides of the TV with the front and sides of the stand.
This will help properly seat the TV. The rubber locators will
prevent the TV from sliding.
Rubber Locators
NOTE:
Installing these
screws
reduces the
risk of the TV
sliding.
1
Install the plastic position pins in the stand.
2
Place the TV and mounted swivel on the stand, aligning the
front and sides of the TV with the front and sides of the
stand. This will help properly seat the TV on the positioning pins and align the pre-drilled holes on the stand and
swivel. You do not need the rubber bumpers and long
screws if you have already attached the swivel to the TV.
3
Use the supplied screws (2) and screw key to fasten the swivel to
the stand. Install the back cover by sliding it up into the groove
above the opening, then slide into the lower groove.
Note: If accessories and cables protrude from the stand, leave the
back cover off.
4
Place accessory devices—HD satellite receiver, cable box, DVD
player, or VCR, for example—inside the stand. (See below and
Directions for Use manual for connection information.) Route the
power cords through the opening in the bottom of the stand shelf,
and route the connection cables through the openings in the back of
the stand.
5
Before swiveling the TV, make sure you have left enough slack in
the cords of any connected accessory devices. This will prevent
damage to the cords.
 Loading...