

Philips 52PFL7422D/37B, 52PFL7422D/37E, 52PFL7432D/37E, 52PFL7432D/37B, 52PFL7432D/37 Firmware Upgrade Instruction
...Page 1

What do you need ?
• An archive utility that supports the ZIP-format (e.g.
WinZip for Windows of Stuffit for Mac OS).
•A USB portable memory with min. 64 Mb free space.
New software can be downloaded from the
www.philips.com/support website.
1. Click on the Download arrow in the upper left corner of
your screen.
2. Save the latest software upgrade file to your computer.
3. Double click on the zip-file and copy the file “autorun.upg”
to the root directory on the USB portable memory.
How to upgrade the TV software
Preparing a USB portable memory for software
upgrade
Note: Only use software upgrades that can be found on
the www.philips.com/support web site.
Introduction
Philips continuously tries to improve its products and it
wants you to profit of that even after your purchase.
Therefore it allows you to upgrade your TV software using a
USB memory device (not supplied).
You can execute the software upgrade procedure yourself.
Page 2
How to upgrade the TV software (continued)
Televison upgrade
Warning:
-You are not allowed to remove the USB portable
memory during the software upgrade procedure;
- In case of a power drop during the upgrade procedure,
don’t remove the USB portable memory from the TV.
The TV will continue the upgrade as soon as the power
comes back;
- If an error occurs during the upgrade you should retry
the procedure or if you need further assistance or in
case of problems, please call your local Philips Customer
Centre. See Philips Consumer Care on the
www.philips.com/support website.
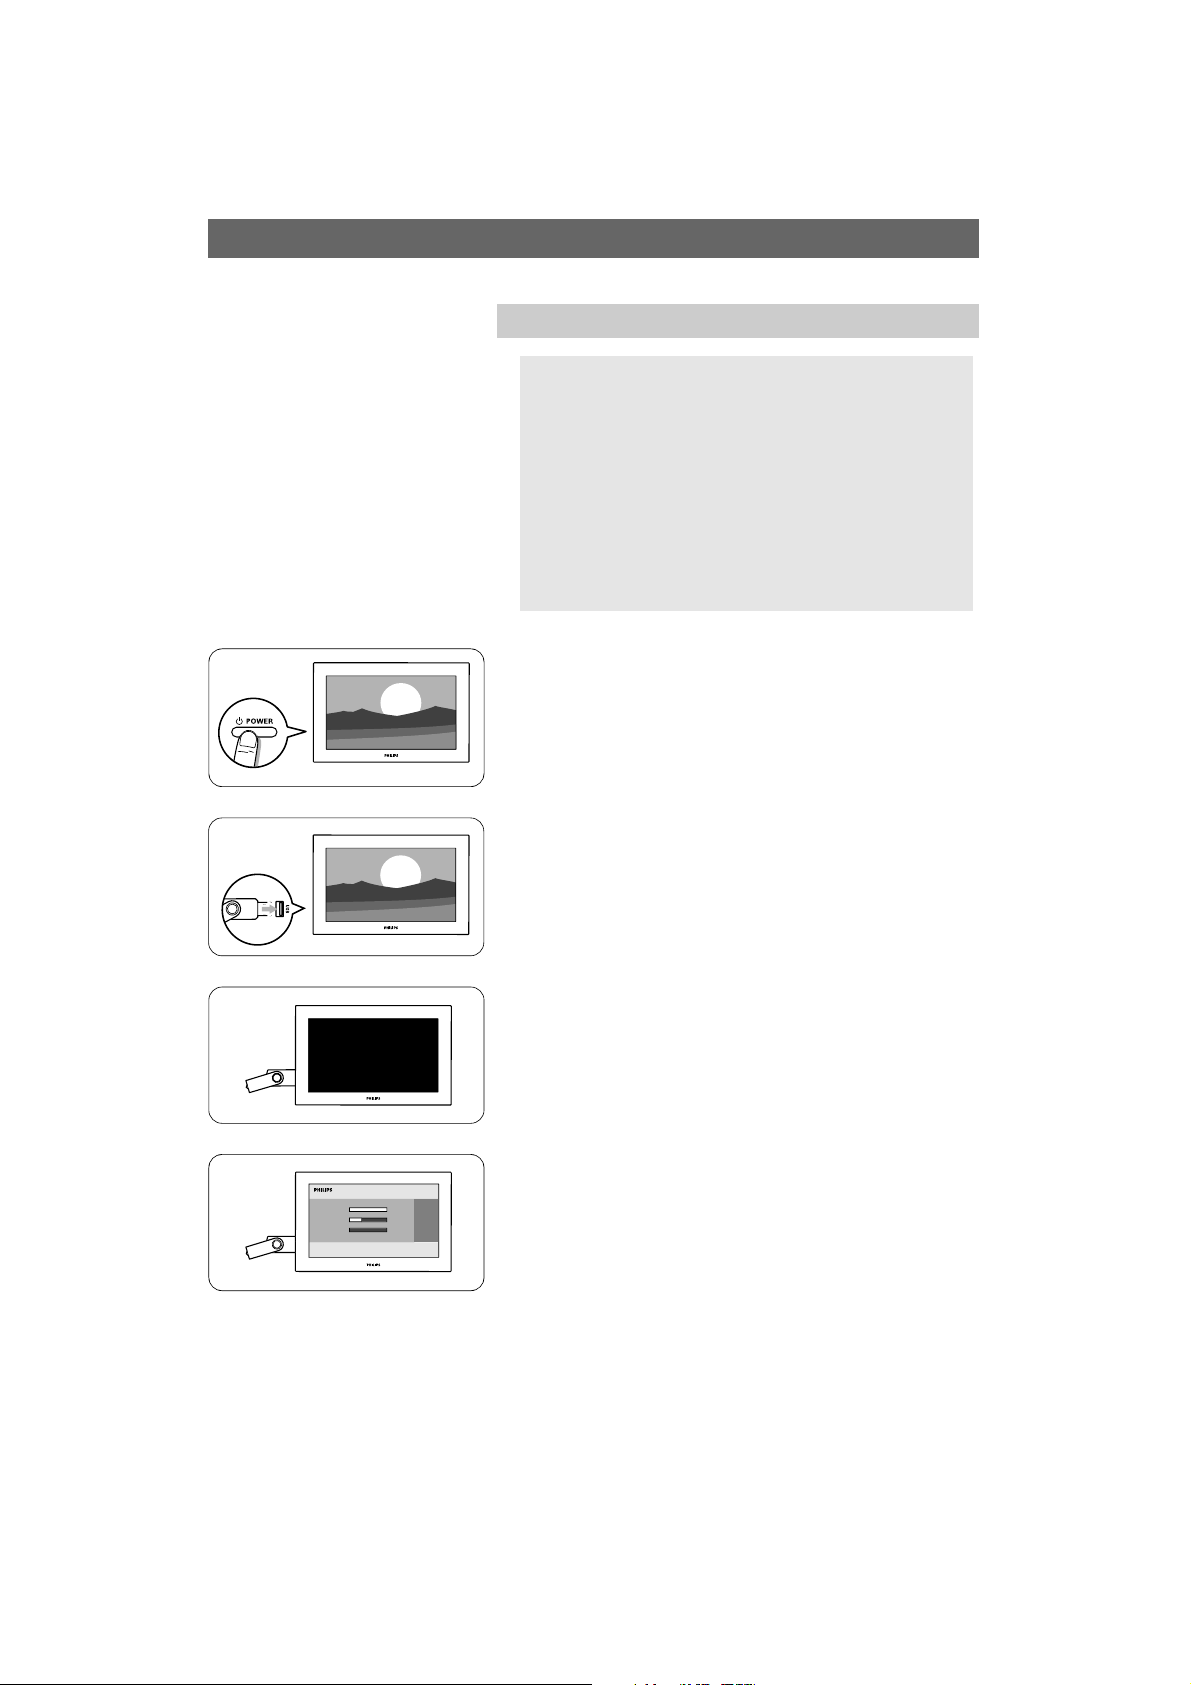
1. Switch the TV on.
2. Insert the USB memory stick in the USB slot of the TV.
3. The TV switches off.
The screen stays black for about 10 seconds.
Please, wait and do not use the power switch on the TV.
4. The upgrade process starts automatically.
Please wait.
Page 3

How to upgrade the TV software (continued)
g
5. The upgrade is finished when the message “Operation
successful” appears on the screen.
6. Remove the USB memory stick from the TV.
7. Press B/POWER on the remote control.
Do not press more than once.
Do not use the power switch on the TV.
8. The TV switches off.
The screen stays black for about 10 seconds.
Please, wait.
9. The TV switches back on again.
The upgrade is done.
10. Once the upgrade is finished use your PC to remove the TV
software from your USB portable memory.
B
/POWER
B
/POWER
Page 4

Software history
Main modifications
Each release contains:
●
All solutions identified in earlier versions
● Improved connectivity to improve compatibility with other external devices
Q531U_0.64.14.18
• HRC channel missing (analogue) on channel 4 in Atlanta
• close captions problem
•
DVP5940 series HDMI problem
Q531U-0.64.14.11
New version software for new model number introductions
●
Q531U-0.64.14.6
●
Improved start-up behavior when power cycling (on/off) with 'tact' switch
● Solved: occasional “unsupported video format” with DirecTV box
● Solved: choppy picture on 1080p/24Hz when noise reduction is off
Q531U-0.59.31.0
Solved: occasional “unsupported video format” with DirecTV box
●
● Solved: 'digital audio out' connection gives back the wrong source
Q531U-0.59.22.0
●
New version software for new model number introductions
Q531U-0.59.15.0
Solved: snaps in the sound when changing channels on some Cable Boxes when
●
connected to the HDMI input.
● Solved: Multimedia Browser locks up with MP3 files with long names.
● Improved start-up behavior, to make sure set turns on with picture and
sound
Q531U-0.51.12.1
Solved: with the TV connected directly to some cable company signals (no
●
cable box used), after auto programming, the TV will not turn on after it
is turned off.
Page 5

Q531U-0.51.12.0
●
Solved: no picture on HDMI with some devices connected to the HDMI
input(s)
● Solved: set locks up when trying to view certain digital photos (jpg
files)
● Solved: TV program end time on info banner shows AM instead of PM
● Solved: vertical ghost image is seen on AV1 and AV3 YPBPR inputs when
displaying 1080i signals with Picture Format set to "High Resolution"
● Solved: Customer entered channel names disappear from digital channels
● Solved: distorted picture visible at the bottom in High resolution picture
format mode with PC mode input
● Solved: Closed Caption errors on some non-digital channels
● Solved: loss of audio on Digital Audio Input when a DVD player is paused
for over 30 seconds
● Picture Format name changed from "High resolution" to "Unscaled”
Q531U-0.39.11.0
Removal of faint horizontal bars that could be seen on multiple inputs
●
● Picture stability improved with ATSC
Q531U-0.39.9.0
●
Solved: periodic loss of picture when using a Comcast Cable Box that's
connected to the HDMI input
● Solved: with clock in the automatic mode, the TV does not always turn on
correctly
● Solved: sometimes the picture is not displayed when the TV is turned on
when set to a digital channel
● Solved: duplicate channel numbers displayed in the channel list
● Solved: loss of picture and/or vertical lines in the picture when
switching between the HDMI inputs
Q531U-0.39.6.0
Solved: Noise on Digital Audio input when changing chapters with some DVD
●
players, when using SPDIF-input
 Loading...