

Page 1

A|gflf^/03
ProjBuiion TV
OFSPiA TiJj G Maj'J UA L
PHILIPS ^MADEtNUSA
SgFIi 7D AA
MODEL :48PP9103/05 A
^T786700001001539006202
220-240V
-50Hx3**‘^lSl
liiiiiliilllliifllcc
PROD.NO:TD009739000062
LdhimhiiM^beite^
PHILIPS
Page 2

Page 3

Contents
Remote control
Front Controls
Back connection
...................................
.....................................
.................................
3
4
5
Setting up the remote control
and TV.
Before Calling Service
.................................................
.......................
6
7
Safety precaution................................9
On-Screen menu controls...................11
General TV controls
Select menu languages
Automatic Installation
Manual Installation
Give Name
............................................
............................
......................
.........................
..............................
12
13
14
15
17
TV Configuration..................................19
Reshuffle
Favourite Programmes
Picture Adjustment
Sound Adjustment
Features
Picture enhancement features
Stereo sound
Stereo enhancement features
..............................................
.......................
.............................
Contrast.................................................22
Brightness.............................................22
Colour....................................................22
Tint.........................................................22
Sharpness.............................................22
White tone
.............................................
..............................
Balance
Treble.....................................................23
Bass
Sound only............................................23
.................................................
......................................................
...............................................
Pip
.........................................................
Sleeptimer.............................................25
Child Lock.............................................26
Message................................................26
Timers
...................................................
Convergence
Incredible picture.................................31
DNR
.......................................................
........................................
.......................................
...........
Incredible sound
Spatial sound
..................................
.......................................
..........
20
21
22
22
23
23
23
24
25
29
30
31
31
32
33
33
33
Smart controls.....................................34
VCR controls
Picture In Picture (PIP)
.......................................
.......................
35
36
Teletext.................................................38
Subtitle Txt...........................................42
Connecting other equipment
Playback from VCR
Playback from Laser disc player,
CD-I etc.................................................44
Amplifier connection...........................44
Recording.............................................45
Frequency tables
.............................
...............................
...........
43
43
46
Specifications.....................................49
NOTE: This owner's manual is
used with several different
television models. Not all
features (and drawings)
discussed in this manual will
necessarily match those found
with your television set. This is
normal and does not require you
contacting your dealer or
requesting service.
Page 4

Page 5

Information for usors in the UK
(Noc applicable outside the UK)
Positioning the TV
For the best results, choose a position where iight does not fall directly on the screen, and at some distance away from radiators or
other sources of heat Leave a space of at ieast S cm all around the TV for ventilation, making sure that curtains, cupboards etc.
cannot obstruct the air flow through the ventilation apertures.
The TV is intended for use in a domestic environment oniy and should never be operated or stored in excessively hot or humid
atmospheres.
General Points
Please take note of the section 'General Information’ at the end of the English section in this booklet.
Interference
The Department of Trade and Industry operates a Radio Interference Investigation Service to help TV license holders improve
reception of BBC and IBA programmes where they are being spoilt by interference.
If your dealer cannot help, ask at a main Post Office for the booklet "How to improve Television and Radio Reception".
Mains connection
Before connecting the TV to the mains, check that the mains suppiy voltage corresponds to the voltage printed on the type plate on
the rear panel of the TV. If the mains voltage is different, consult your dealer.
Important
This apparatus is fitted with an approved moulded 13 Amp plug.
To change a fuse in this type of plug proceed as follows :
1. Remove fuse cover and fuse.
2. Fit new fuse which should be a BS1362 5A, A.S.TA or BSI approved type.
In order to maintain conformity to the EMC directive, the mains piug on this product must not be removed.
Connecting the aerial
The aerial should be connected to the socket marked “P at the back of the set. An inferior aerial is likely to result in a poor,
perhaps unstabie picture with ghost images and iack of contrast Make-shift loft or set-top aerials are often inadequate.
Your dealer will know from experience the most suitable type for your locality.
Should you wish to use the set in conjunction with other equipment which connects to the aerial socket such as TV games, or a
video camera, it is recommended that these be connected via a combiner unit to avoid repeated connection and disconnection of
the aerial plug.
Loop aerial (if provided)
The loop aerial packed with the set wili give satisfactory reception under good signal conditions. Fit the aerial bracket and lead by
pushing the peg into the square hole in the backcover until it iatches in piace. Then insert the plug on the lead into the aerial
socket
3135 015 03451
Page 6

Page 7

Remote control
PKmjM select picture
menu
SOUND select sound
menu
RATUiE select feature
menu
select external
connection
select volume
level
■^1
switch to "stand-by"
/
/ 0 confirm your choice
^ select your choice
select channel
i iCK I "mute" sound
not applicable
switch sound
mode
select "incredible
sound"
Teletext:
on/off Teletext
coloured keys
■fast select pages
select index page
display time
reveal solution
hold sub-pages
enlarge page
interrupt
teletext
not applicable
(0^
reduce picture
interference
not applicable
INCnEOrBLE
f—' switch on
piciuBE "incredible picture"
S switch on subtitle
------
CM3 O © ©
KCUCHSlf —^
C13 © © ©
© © &
CS3 d£3 © B)
on/off PIP
select PIP source
move PIP screen
select PIP channel
not applicable
switch PIP screen
freeze PIP screen
/© to select digits
[a/t:h| select previous channel
/
; osp i display on screen
"SMART" control:
( KWK ) select "SMART" picture
( ioMo ) select "SMART" sound
VCR:
^ stop tace
^ record cnto tape
jp forwarj tape
^ play tace
information
rewind tape
Page 8

Page 9

«UA >(■
Front Controls
ST3 V
VCl ! 1 '/O L CH CH
+ , 1 1 1 T -
ABV I 1 ADV
T
i.
i V iSU 1
iL_ Vj
1 i ! T
CK
Button no. Function
m
m
0
0
0
0
0
0
9
10
Switch on/off TV.
Switch on/off TV from standby.
Dual function a) Increase volume of sound.
Dual function a) Decrease volume of sound.
Select a higher channel number.
Select a lower channel number.
Call up the main menu.
Move cursor up in a menu.
Move cursor down in a menu.
Move to a higher level menu.
ml0
0
b) When a menu is active, move cursor to the left.
b) When a menu is active, move cursor to the right.
10
Page 10

Page 11

1
Back connection
Connect your aerial cable
Hi
Insert the aerial plug tightly
into the aerial socket at the
back of the TV with an aerial
cable of good quality. Consult
your local dealer if you have
any queries or need any as
sistance on connection.
nr
Audio Video connection
Refer to the section on "Connecting other equipment"
at the back of this manual for details.
Connect to power
Refer to the specification
page for the correct operat
ing voltage. Consult your
local dealer if your mains
supply is different.
• Connect your television
to the mains supply
socket and switch on.
(Diagram is only a rep
resentation of the actual
plug and socket)
Page 12

Page 13

Setting up the remote control and TV
Setting up the remote control
Remove the battery
cover at the back of
your remote control.
Note:
• Remove the batteries from the remote control if you do not use it for an extended
period. This is to prevent possible damage due to battery leakage.
• Make sure that there is no obstruction between the remote control and the
television.
• Do not use old and new batteries together.
Insert two batteries
{Type AAA, 1.5 V) into
the compartment.
Replace the cover.
Setting up the TV
Press the power knob © button on the front, bottom left of your television.
A green or red indicator light appears.
MAIN POWER
If the indicator light is GREEN, it means:
Your television is switched ON. Wait a few seconds for the screen to light up. If no
signal input is detected, you will see a blue screen with the word "PHILIPS."
If the indicator light is RED, it means:
Your television is switched on but the screen stays dark. Your television is on
'standby.'
• Press any digit button, CH + or — button, A/CH button or VIDEO
button on your remote control.
The screen lights up. If no signal input is detected, you will see a blue
screen with the word "PHILIPS."
Note : If there is no signal detected after about 10 minutes, your television will switch
over to standby.
Page 14

Page 15

Before Calling Service
Caution:
Avoid displaying stationary images on your TV screen for an extended period of
time. Stationary patterns generated by the PIP display, computer displays,
teletext, etc., can become permanently ingrained on the picture tube. This
damage is not protected by your warranty as it is a result of misuse. If you need
to display still images, it is always advisable to reduce the brightness and
contrast settings or alternate with normal TV viewing.
Please make these simple checks before calling service. These tips can save you time
and money since charges for TV installation and adjustments of customer controls are
not covered under your warranty.
Symptoms
'Ghosts' or double
images or teletext
garbled
No Power
No picture
Good picture
but no sound
Good sound but
poor or abnormal
colour or no
picture
Items to Check and Actions to follow
This may be caused by obstruction to the antenna due to
high rise buildings or hills. Using a highly directional
antenna may improve the picture.
• Check that the TV's AC power cord is plugged into mains
socket.
• Unplug the TV, wait for 60 seconds. Then re-insert plug
into the mains socket and switch on the TV again.
• Check antenna connections at the rear of the TV to see if
they are properly connected to the TV input terminal.
• Possible TV station trouble. Try another channel.
• Adjust the contrast and brightness settings
• Increase the VOLUME.
• To check that the TV is not muted, press the iQC button
on the remote control.
• When no TV signal is detected, the TV automatically
mutes the sound.
This is a proper set operation and does not indicate a
malfunction.
• Check that you have selected a suitable sound system in
"Manual Installation" for this channel.
• Adjust the contrast and brightness setting.
Snowish picture
and noise
Horizontal dotted
lines
One white line
across the screen
• Check the antenna connection.
This may be caused by electrical interference (e.g.
hairdryer, nearby neon lights, etc.).
• Switch off the equipment.
• Switch off the TV immediately and consult the service
personnel.
Page 16

Page 17

before calling service
Symptoms
TV not respond
ing to remote
control
NICAM sound
distortion
(crackling noise)
Blue or red
colour appears
around the
edges of picture
No On-ScreenDisplay
Items to Check and Actions to follow
• Check batteries and replace them if necessary.
• Clean the remote control sensor lens on the TV.
• Operating range between TV and remote control
should not be more than 6 metres.
This could be due to the antenna siting or reflected
signal.
• Switch over to the "NICAM Mono" mode by pressing
the 1-H button.
The convergence of the picture has probably drifted.
• Select the "FEATURES" menu and select
"Convergence." Adjust accordingly.
• Check that you are not in the "Teletext" mode or
"Subtitle Txt" mode. To see the On-Screen-Display,
exit from this mode.
Page 18

Page 19

Safety precaution
/
X
Avoid heat and direct sunlight.
Leave sufficient space for ventilation.
Place on flat ground. Do not hang or
mount the TV to the wall.
X
Avoid exposure to rain or water.
• Watch TV from a
distance.
• Maintain sufficient
lighting.
• Be considerate to your
neighbours when you
adjust the volume of
your TV.
Page 20

Page 21

... safety precaution
X
Never repair the TV yourself-get a skilled
personnel!
Clean with the "Enhanced Screen Cleaning Kit"
Your projection TV’s screen is made up of thousands
of vertical ridges that help enhance and define the
colour TV images. These ridges can collect airborne
dust which will reduce the clarity and brightness of
your TV picture. To clean your TV screen effectively,
it is recommended that you purchase an "Enhanced
Screen Cleaning Kit" (with anti-static cleaner and
magnetic cleaning cloth) from your dealer.
How to use the cleaning kit:
The magnetic cleaning cloth works well alone to
remove dust from your screen. If the screen is very
dirty from smudges and residue, then the screen
cleaning fluid should be used.
Note: Do not spray the fluid directly onto the screen.
Apply directly to the magnetic cloth and wipe onto
the screen's vertical ridges with a top-to-bottom
downward motion stroke.
•J D
Page 22

Page 23

On-Screen menu controls
Features of your TV can be adjusted from a "MENU" screen shown on the TV. Alterna
tively, you can also use the button on the remote control with the same name as the
menu, e.g. press PICTURE button to call up the "PICTURE" menu directly. A menu is
an on-screen list of features. Each item on the menu can be adjusted by pressing
buttons on the TV control or the remote control.
1. Press MENU button on the TV control to call up the main menu.
2. Move cursor up or down to highlight an item.
3. Select the item and perform adjustment.
Page 24

Page 25

General TV controls
-®.®
®,®
Function of controls:
(7) Switch off your television
temporarily (standby).
A red indicator light appears on
the front of the television.
® Switch on again from standby.
(D Select a higher or lower channel
numbers. The numbers must be
in the "Favourite Programme"
list.
® Key in channel number directly.
For 2-digit channel number, you
have to complete keying in
within 2 seconds.
(D Adjust volume.
(D Switch off sound temporarily.
@ Switch on sound again.
,
----------------------------------
i 1 , !t^
I r-< CH M
f A.
CD,© ®,®
TV Control
,r.. ll
--------- ---------------
1 i »ViU i
(D Switch between last viewed and
current channel number.
(D Switch on or off on screen
information such as picture
mode, status of DNR, channel
number and name and sound
mode.
Note : For permanent display of
channel number, press button
for more than 4 seconds.
A2V i
* 1
, :t ,
i ^ !
f T •
•J 2
Page 26

Page 27

Select menu languages
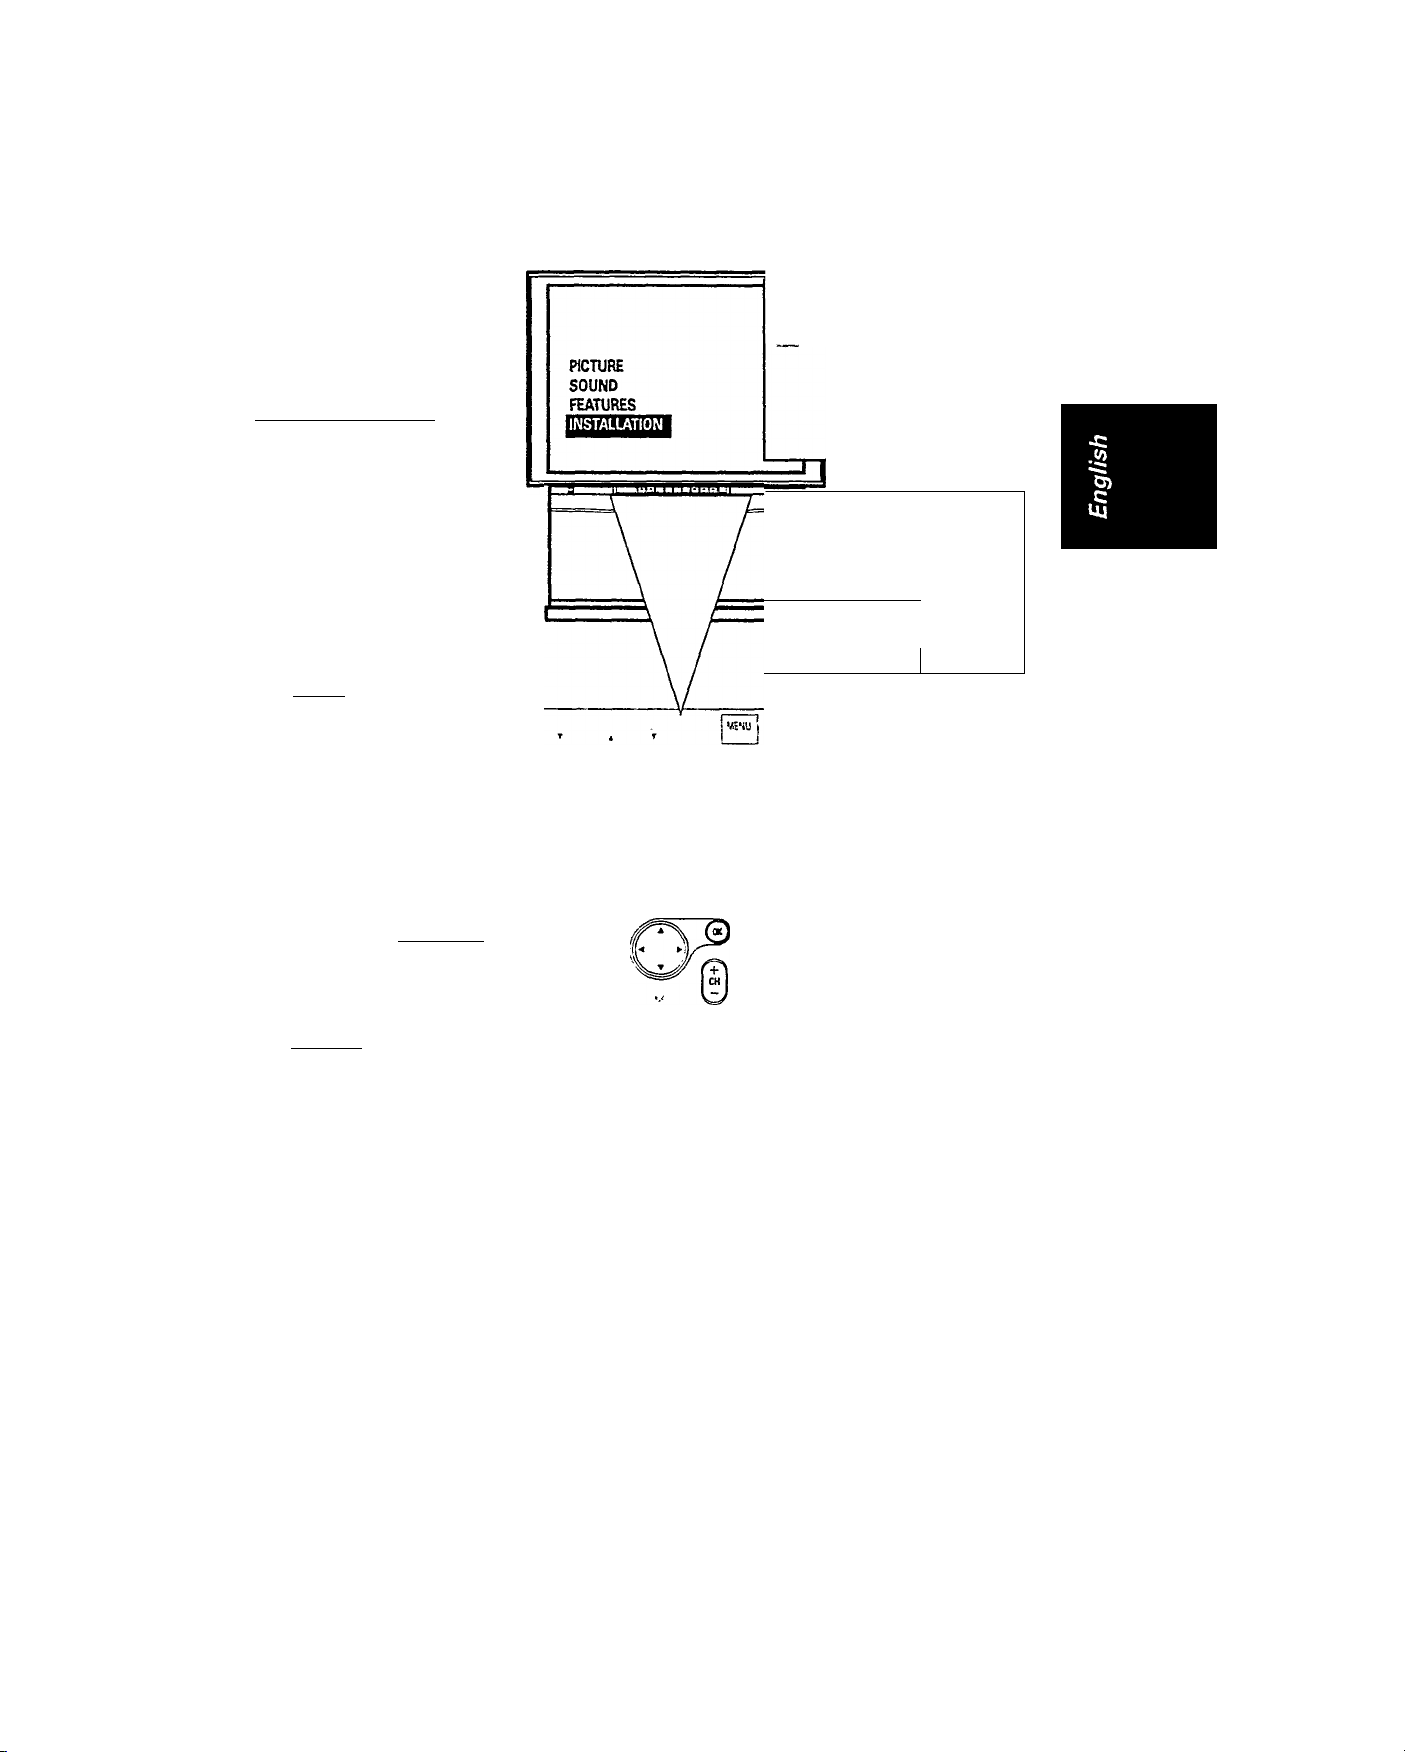
With the "Menu Language" option, you can set the TV’s on-screen features to be
shown in the other languages available.
To start:
^ Press MENU button on
the TV control to call up
the main menu.
Press T button to
highlight "INSTALLA
TION" and use ◄ or ►
button to select it.
V
Press or ► button to
go into "MENU
LANGUAGE" menu.
>-
Press or ► button to
select a language.
y-
© Press OK button to
return to the "INSTALLA
TION" menu.
From now on, all the on
screen displays will appear
In the language that you
have chosen.
<
_________________________
Note : If you need to re-select
the language again, go back to
the "INSTALLATION" menu
and repeat steps 2 to 4.
Otherwise proceed to the next
step.
■<
-<
■<
/
To exit:
@ Press OK button
several times until the
main menu disappears.
'S />
. 3
.-'N
PHILPS
Page 28

Page 29

Automatic Installation
Use this item to search and store channels automatically.
Note : Channel number 0 is not installed and is reserved for external connection via
antenna input.
To start:
Q Press MENU button on
the TV control to call up
the main menu.
Q) Press T button to
highlight "INSTALLA
TION" and use or kbutton to select it.
>
Press T button to
highlight "Automatic
Installation" and use -4
or ► button to select it
>-
Press ► button to start
searching and storing
channels automatically.
An indicator appears at the
bottom of the screen
showing the progress of
searching from 0% to 100%.
-<
-<
To exit:
^
-------------------------------------
@ Press OK button
several times until the
main menu disappears.
-
Page 30

Page 31
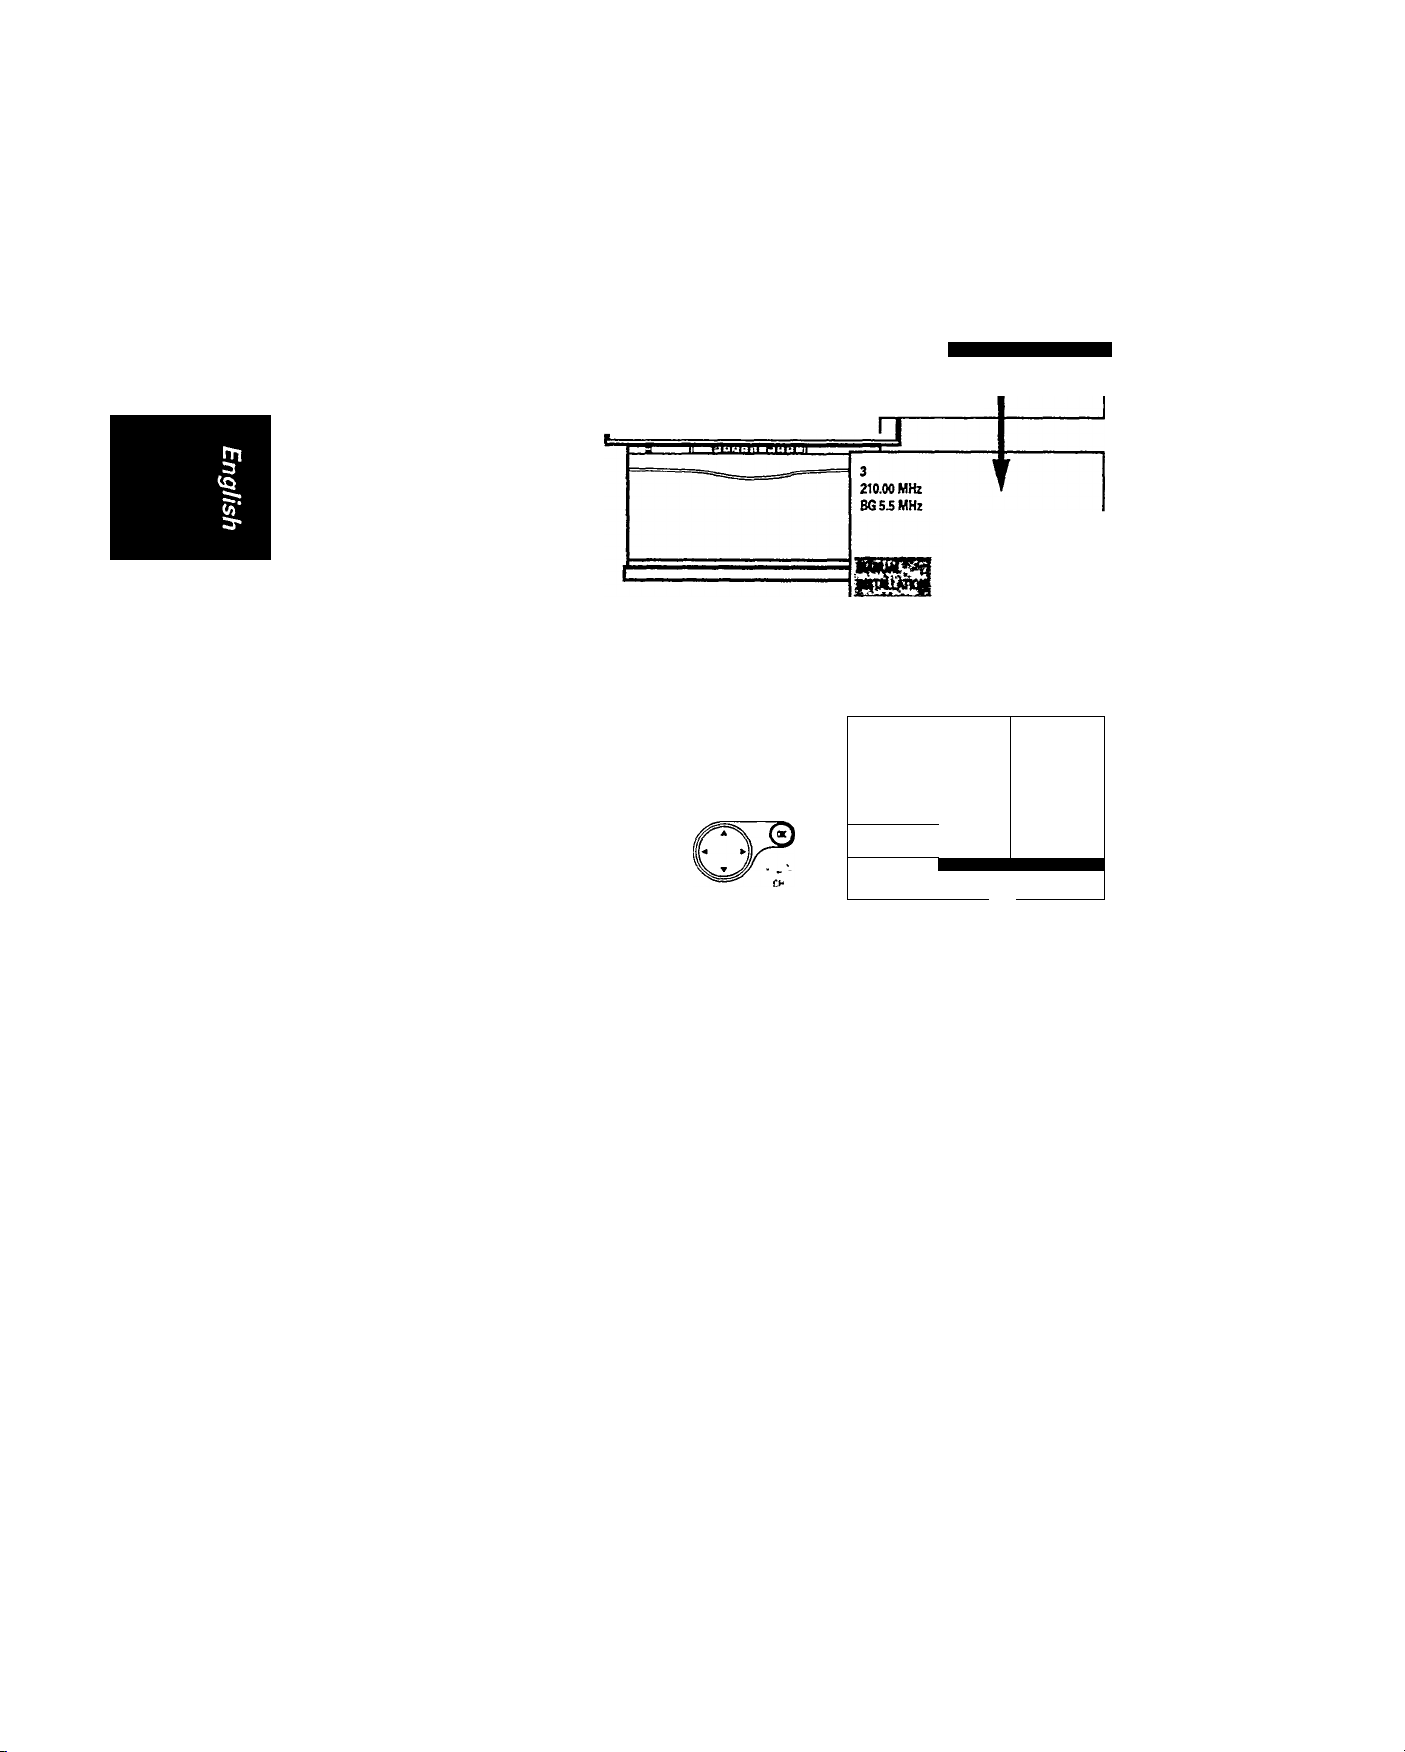
Manual Installation
Use this item to search channels individually and store them to your preferred numbers.
To start:
Q Press MENU button on
the TV control to call up
the main menu.
(2) Press T button to
highlight
•INSTALLATION" and use
^ or ► button to select i^
Press T button to
highlight "Manual
Installation" and use ■<
or button to select it.
The"MANUAL
INSTALLATION" menu
appears.
^-------<
MCIUUnOM
3 1
210.00 MHz
BG5SMHZ
M«nu Ljngum«
Automttic instaRttion
Manual Installation
Qv* №m*
TV Confijuration
>>>
Press T button to
©
highlight "Search."
To start searching
Method 1 :
Press ◄ or ► .
Once a channel is found, its
sound system will be
automatically selected. If
reception is poor, press
•< or ► button to start
searching again or CH + or
CH — button to fine tune in
steps of 0.06 MHz (the
change is reflected on the
upper left hand corner of
your screen).
Note : If you need to interrupt
during searching, press ▼ or
— ■ - ■ ^
A button.
Method 2:
Enter frequency (3 digits)
directly with the digit
button.
Use the frequency tables at
the back of this manual to
find the frequency you need.
For a frequency below 100
MHz, enter "0" before the
frequency, e.g. 050 MHz.
\
_______________________
Note : If you have entered a
wrong number, enter all
digits first, then re-enter the
correct number or press A
or ▼ to return to the previous
frequency.
MTHUIXIN. Seaidi
210.00 MHz
6G 5.5 MHz
ìèSbìl:“ 1
HSmUnON;
- Syston
—, piogfjmmt No. 3
Ston
__________
Pngnmm«№. 3
Ston
BG5SMHZ
210 MHz
BG5JMHZ
O0©
© © ©
© © ©
- ©
y
5HIL*?S
Page 32

Page 33
... manual installation
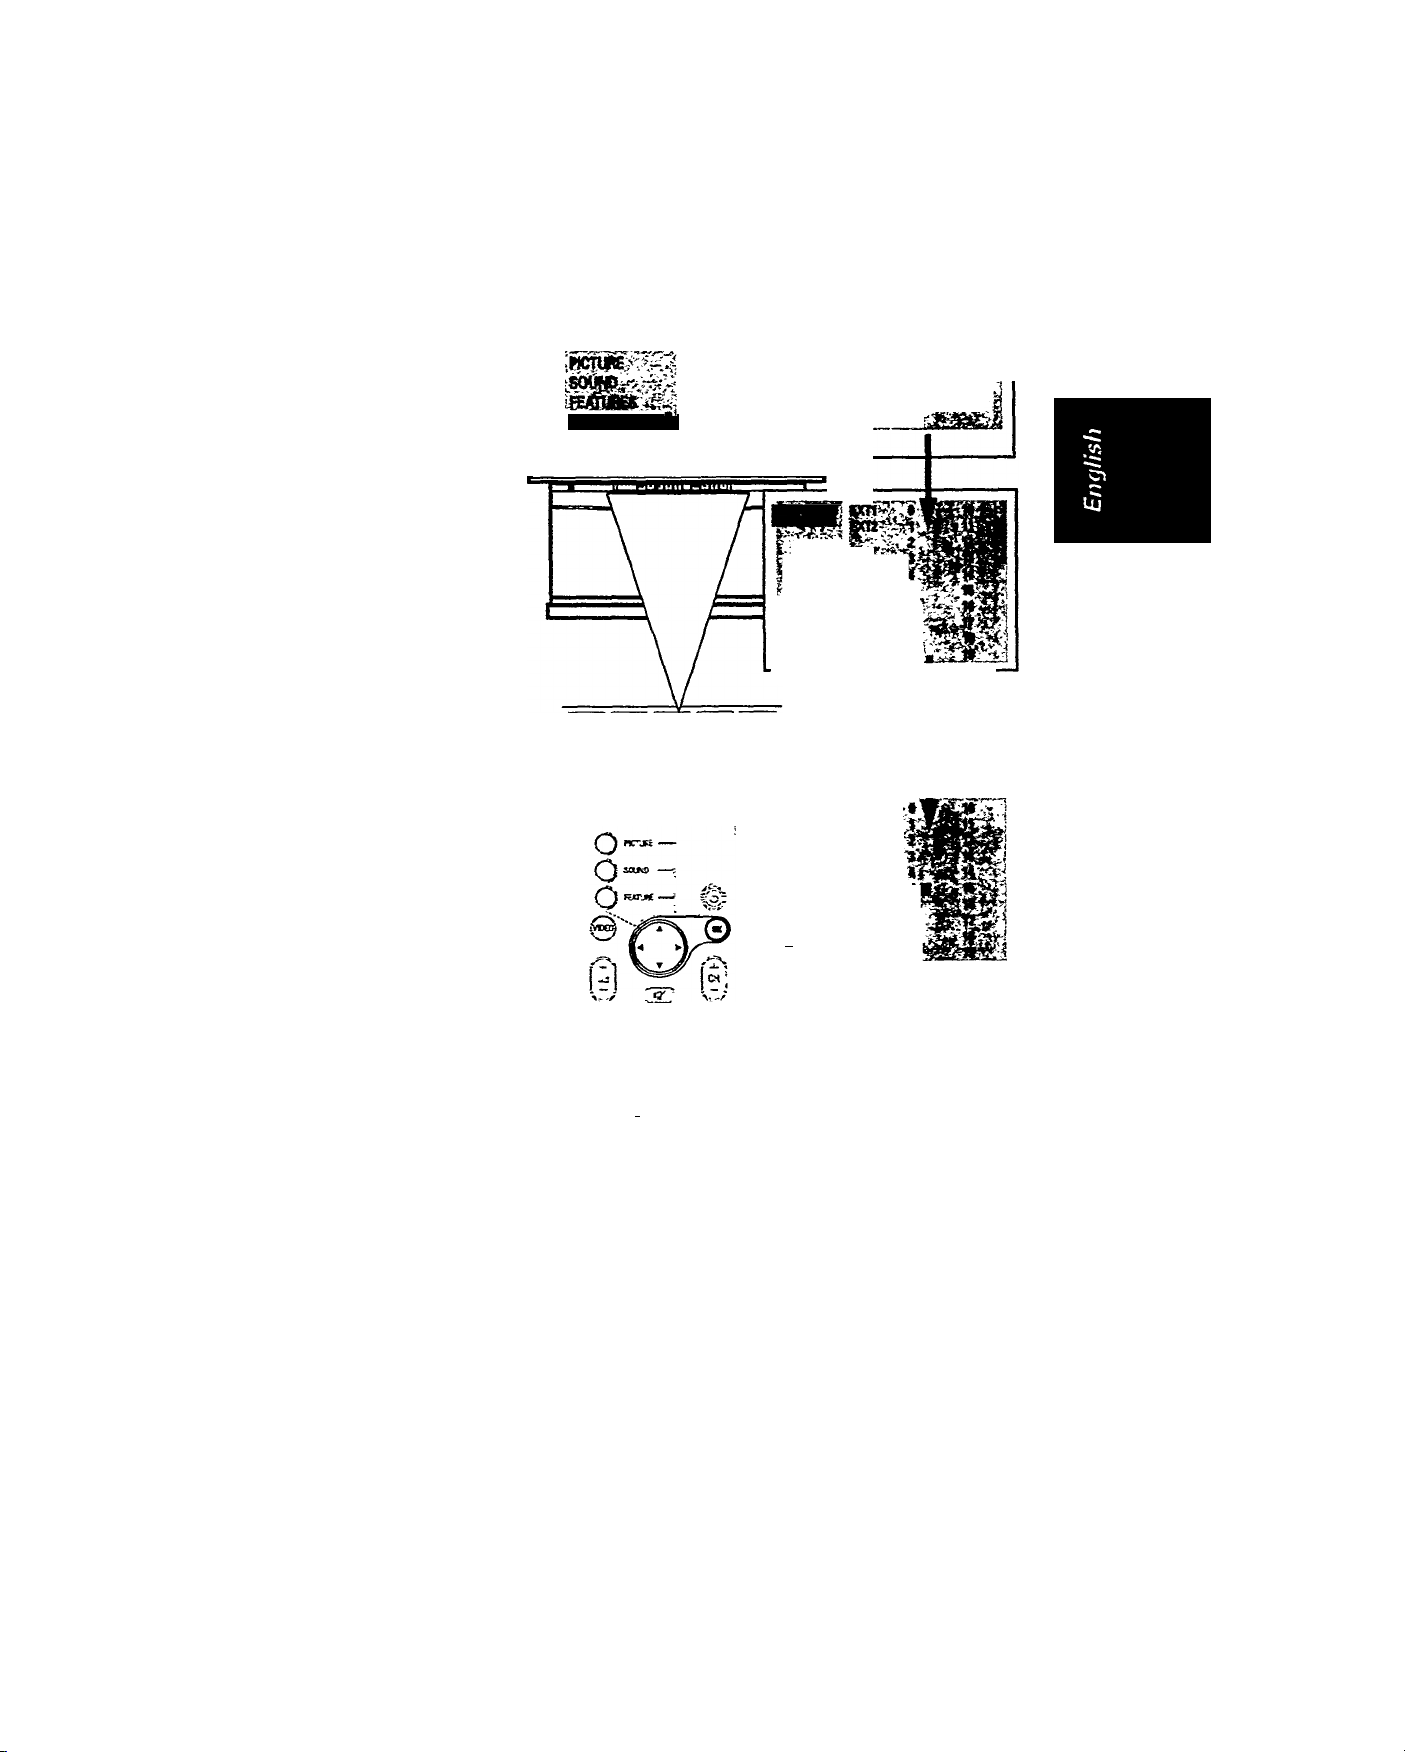
To select the sound system
of the channel found
/'
-------------------------------------
© Press A button to
highlight "System."
s
This is the sound system of
the channel. It is automati
cally selected according to
the frequency of the
channel. If the sound is
weak (noisy), proceed to the
next step, otherwise go to
the next item on the menu.
^ Press -4 or ^ button to
select a suitable system
To assign a number for the
channel located
© Press T button to
highlight "Programme
No."
Press 4 or ^ or digit
©
button to select a
number.
-<
210.00 MHz
BOSS MHz
iMiRMtr
; -cm _
System
s^rch ¿iV»i
Prognunm« No. 3
Stort
BG5
210.00 MHz
BG5.5 MHz
System BGSSMHz
Settch 210 MHz
PrognmmtNo. 3
Stort
Systtm BGSSMHz
Sureh 210 MHz
Programme No. 3
Stort
5
210.00 MHz
BG5S MHz
To store your selection in
memory
Od) Press T button to
highlight "Store."
Press
4
or ► button to
store your selection.
The word ‘Stored' appears
briefly to confirm that your
selection is stored.
\__________________________
Continue searching for more
channels if you wish.
To exit;
Press OK button
several times until the
main menu disappears.
<
PHILIPS
•J £3
Pm
210.00 MHz
BGSSMHz
210.00 MHz
BG 5S MHz
Stortd
Systtm
Stitdi
Programme No< 5 |
Stort
___________L.
Syjttm BGSSMHz
Sttrch 210Htz
PrognmmtNo. 5
Stort
Sytttm BGSSMtz
Stttdt 210 MHz
PrognmmtNo. S
BGSSMHz
210 MHz
Page 34

Page 35
4,1
Give name
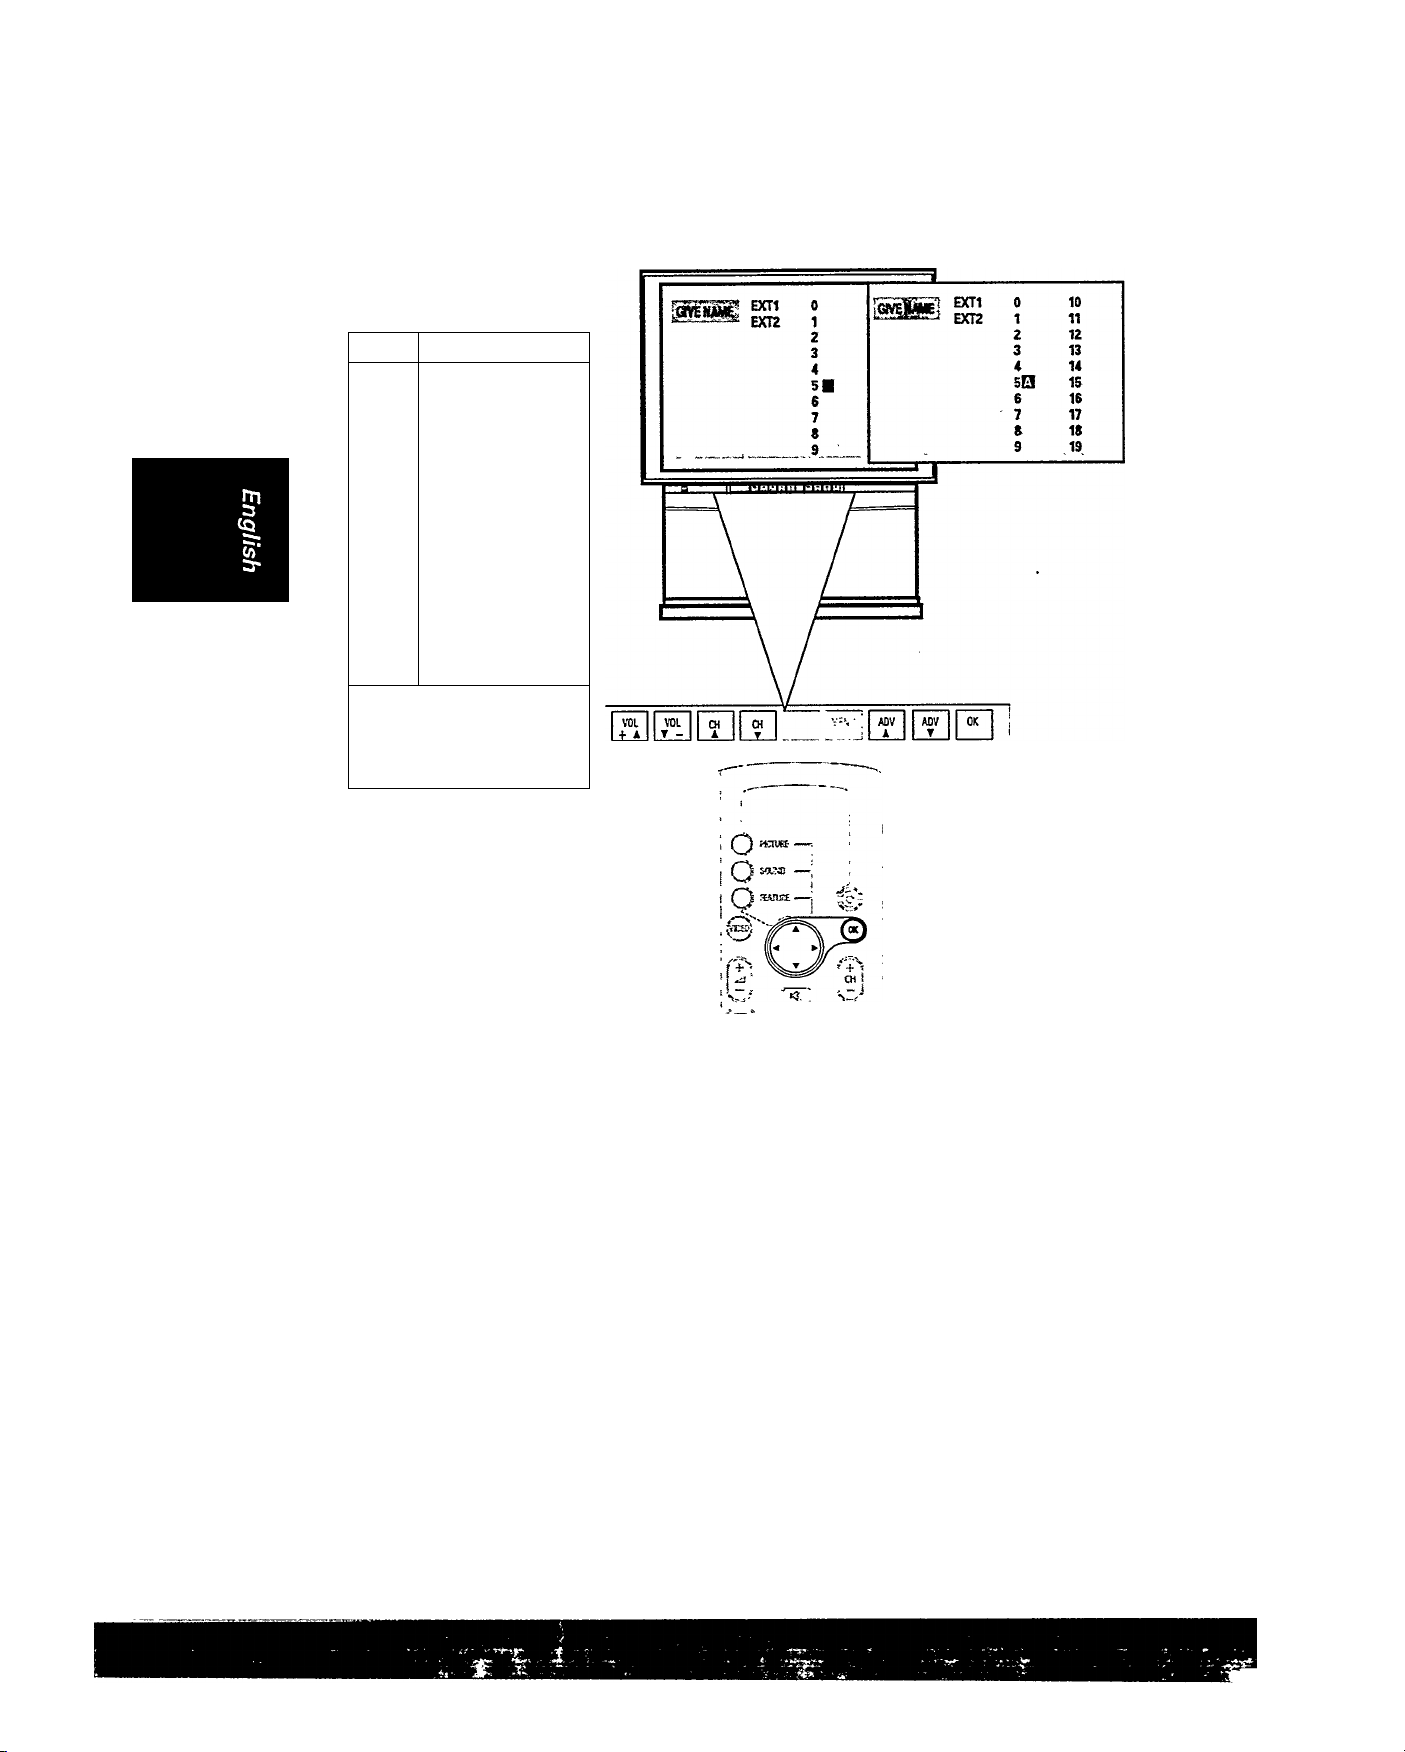
You can enter a new name or modify an existing name of a channel (including external
channels EXT1 and EXT2) by the following steps.
To start;
© Press MENU button on
the TV control to call up
the main menu.
© Press T button to
highlight “INSTALLA
TION” and use or>-
button to select H.
Press ▼ button to
highlight “Give
Name'and use '4 or ^
button to select h.
The 'GIVE NAME' menu
appears.
The current channel number
and name lit any) is high
lighted.
<
IMSTALLATlOfJ
X-i-J
© Highlight the channel
number which you wish
to name or edit the name
with the or ► button.
A block appears on the first
position of the name for you
to start keying in.
^ ® © ©
0 ® ®
© ©
'Li - ^ v£/
ZHD C2*3
PHIUPS
• a «
\l/
_____
v.-'-i-'-i'.'- T f ii'--
■ ^ T ^ f.*
Ejm
,iiXBX-.
-'-r. ■
17
Page 36

Page 37
give name
To start keying in refer to
the table below for
buttons to use.
Use To
OK
— or ►
+or-<
ADVA
or A
ADVT
orT
Note: The possible charac
ters for a channel name are
■AtoZ,-,*,/,-|-,-,#,0to
9 and [Space]."
end keying in
process.
select next
character position.
select previous
character position.
select next
character or
number for the
current position.
select previous
character or
number for the
current position.
Repeat the same steps for
other channel numbers.
To exit:
© Press OK button several
times until the main
menu disappears.
o © ©
G©0
©00
PHILIPS
M
Page 38

Page 39
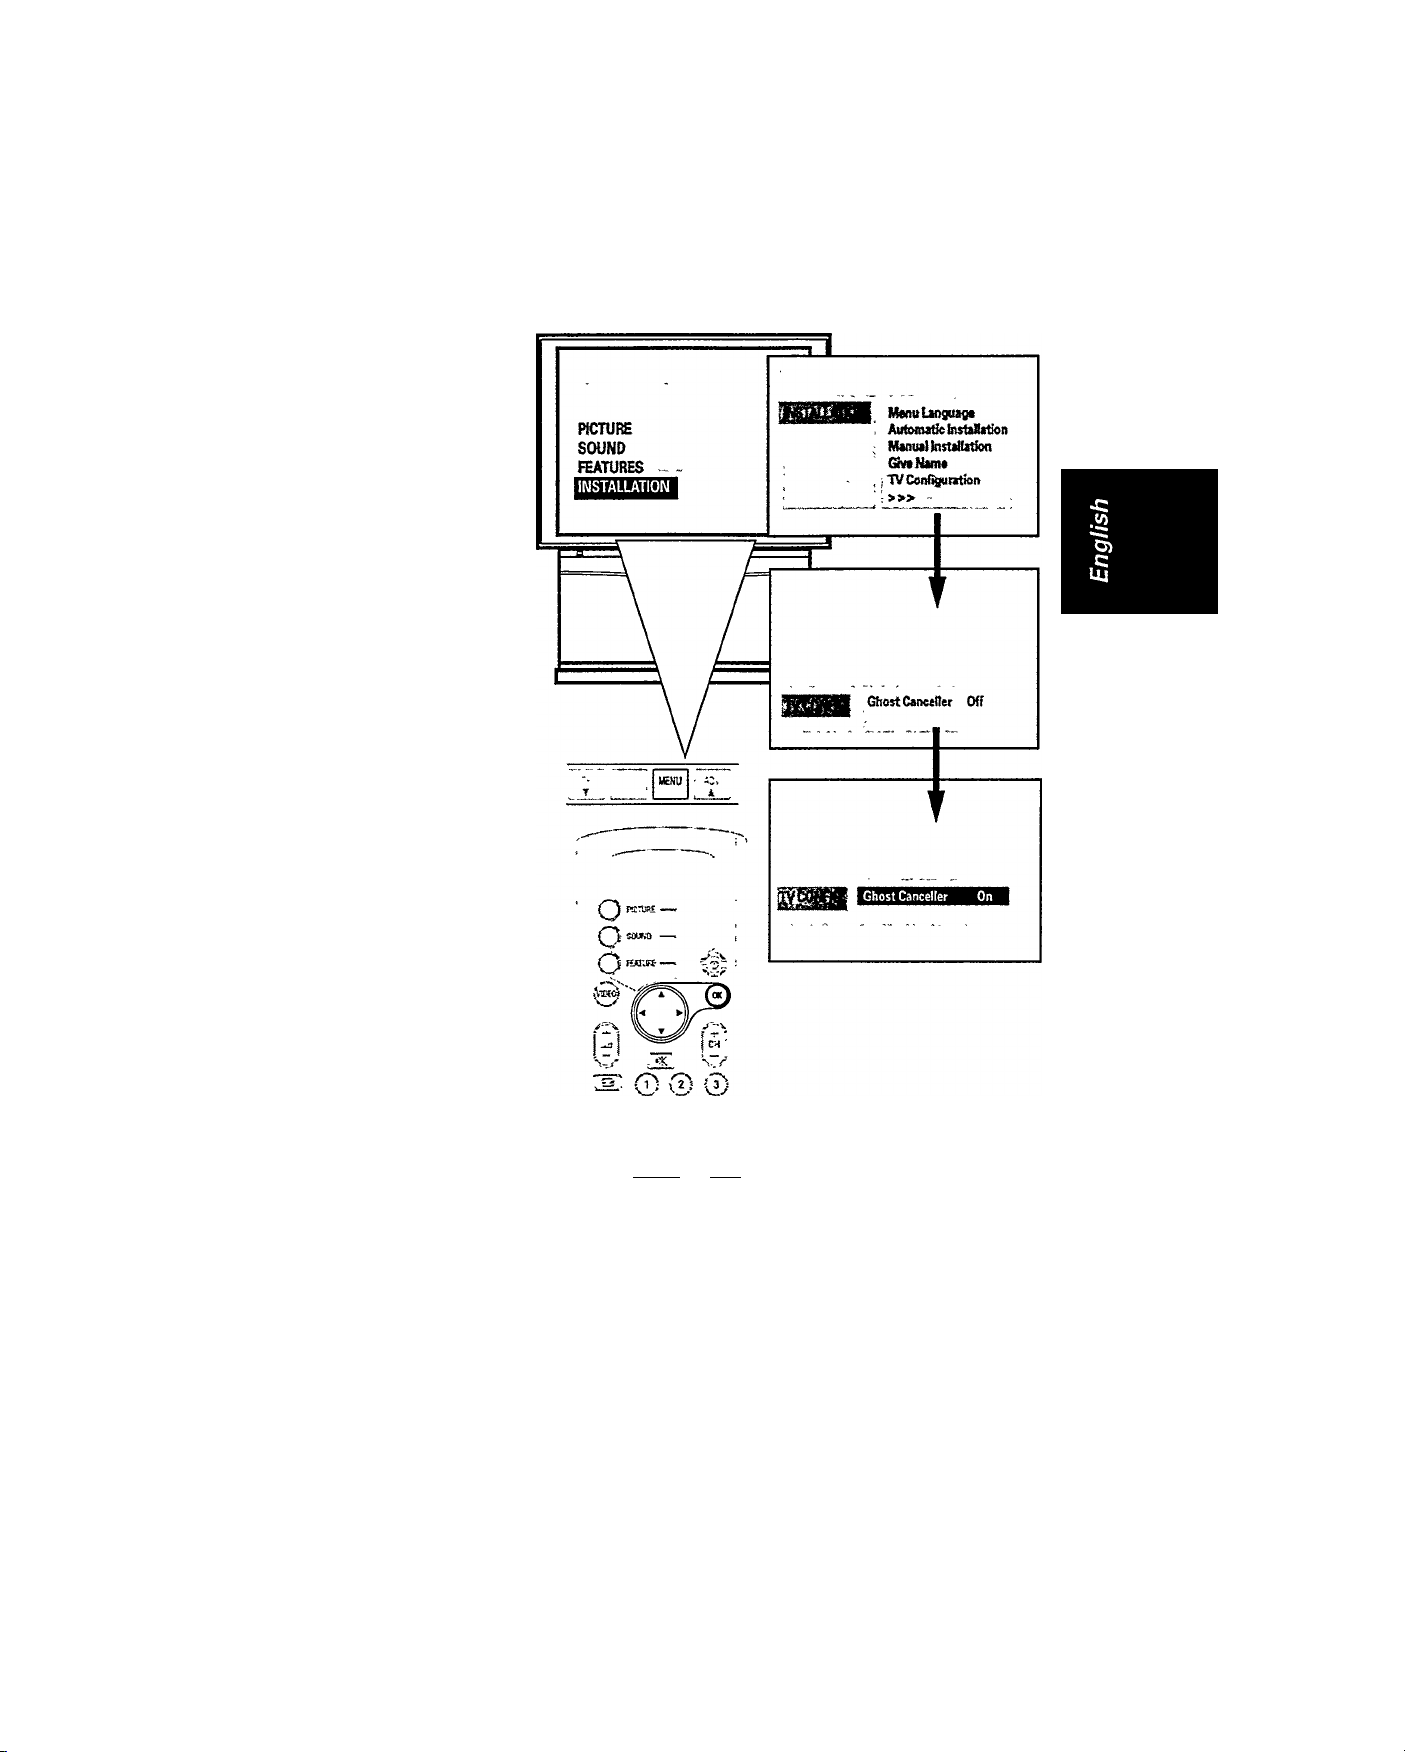
TV Configuration
Select your TV Configuration with antenna-based or broadcast system external equip
ment connections. Note: TV Configuration may not be present on your model. This is
available only with select region models.
To start:
^ Press MENU button on
the TV control to call up
the main menu.
<
Press T button to
©
highlight
■INSTALLATION" and use
or ^ button to select
it.
Press T button to
©
highlight "TV
Configuration" and use
or ► button to select
it.
A Ghost Canceller Set-Top Box
will work within countries
broadcasting a "Ghost
Canceller" signal. You are
recommended to use this
feature when you receive
■ghosts" or double images in
your broadcasted picture.
Follow the connection
instructions provided with the
Ghost Canceller Set-Top Box.
<
il
© Press ◄ or ► to set
"Ghost Canceller" to
"On."
Once your connection is
done, leave it "On" to
improve the reception
of the picture you are
watching.
To exit :
© Press OK button
several times until the
main menu disappears.
I i
©0©
©©©
"cstt ' ' AO) "
PHILIPS
/
•] 3
Page 40

Page 41
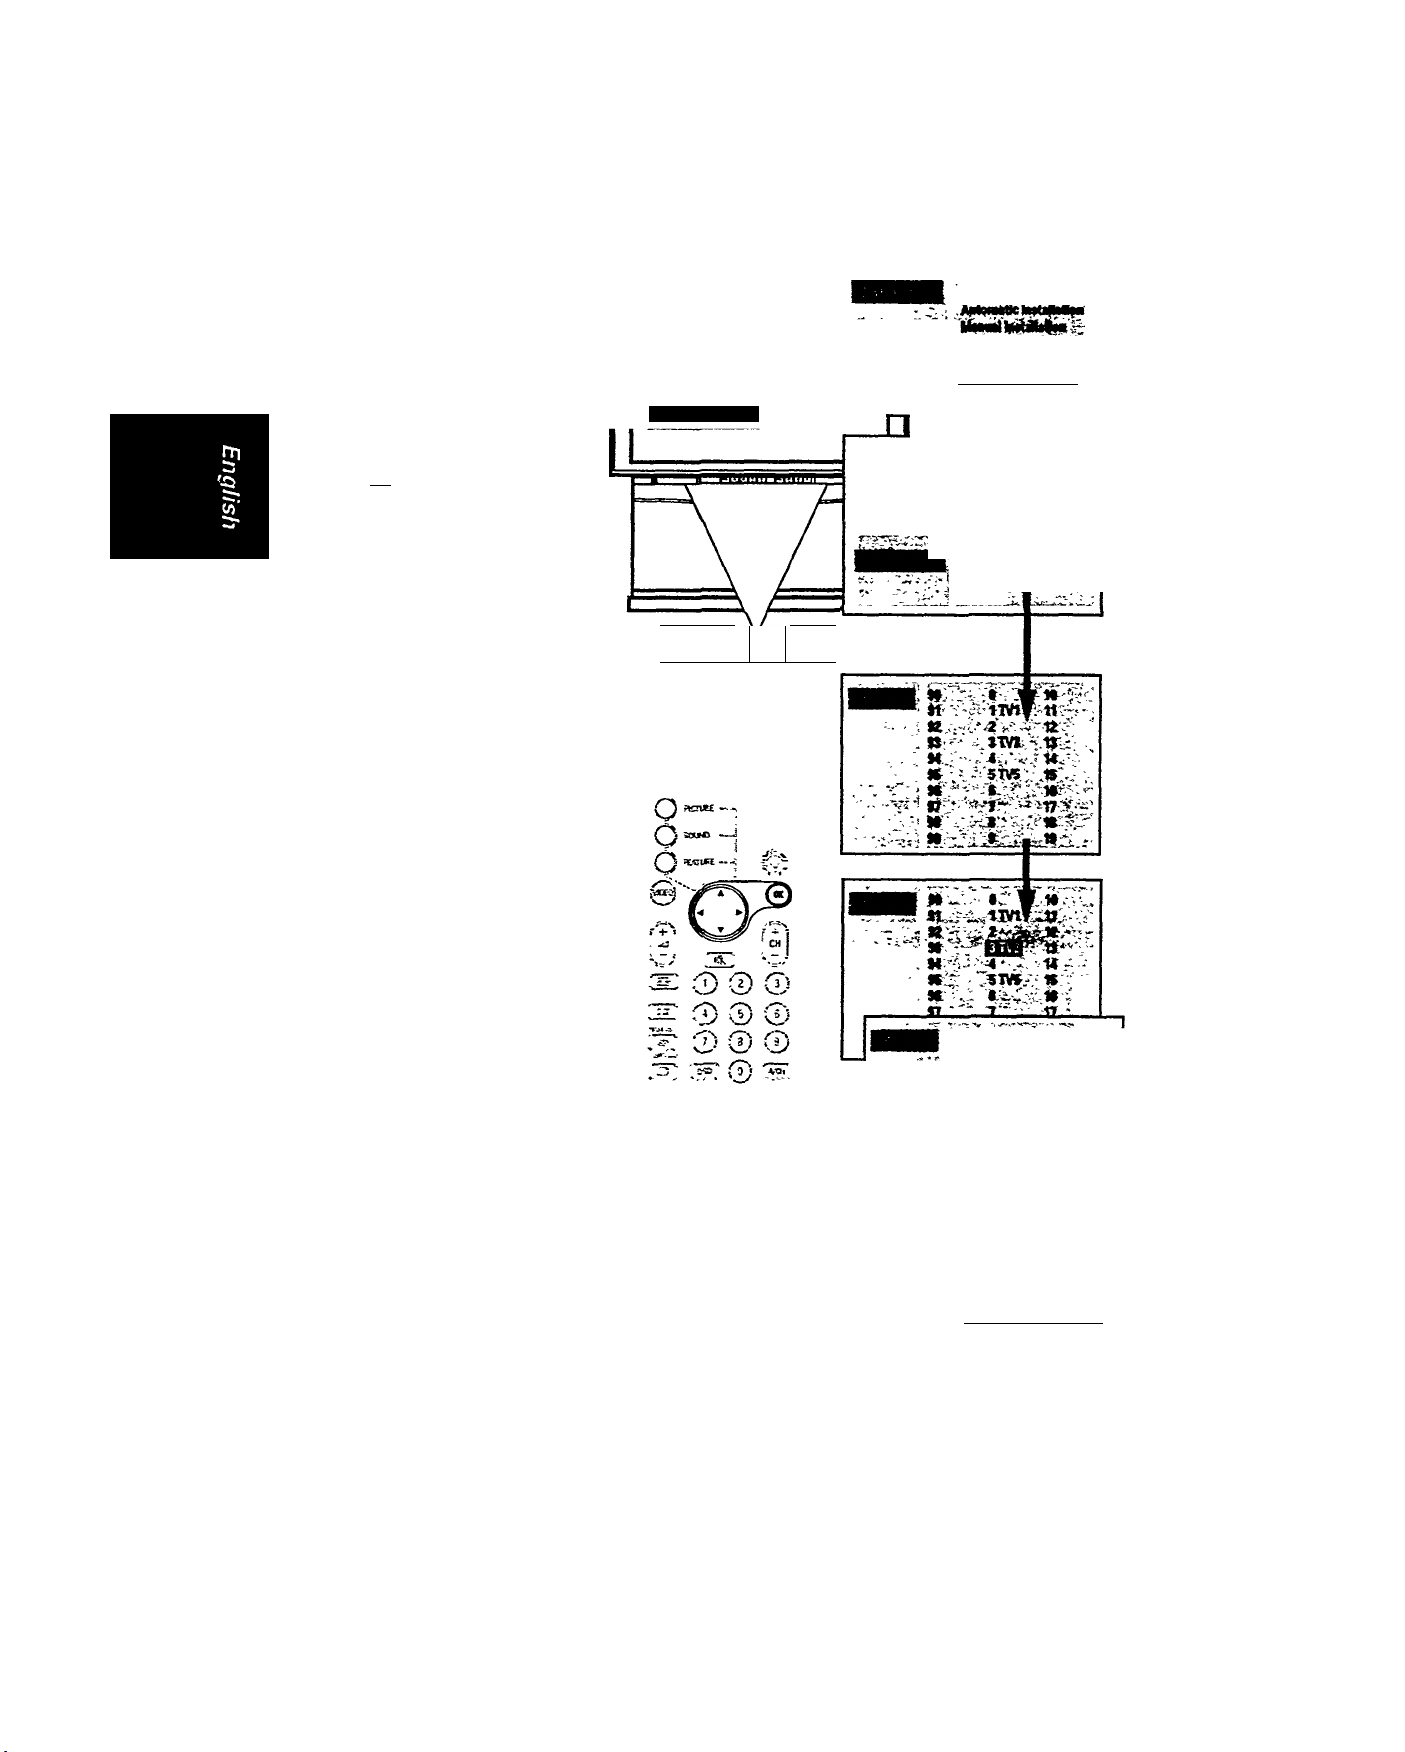
Reshuffle
To arrange the channel list in the order of your preference.
To start:
^ Press MENU button on
the TV control to call up
the main menu.
Press T button to
©
highlight
•INSTALLATION' and use
or ^ button to select
•rt-
Press ▼ button to
highlight ’> > >* and use
•4 or button to select
ft
Press '4 or ^ button to
select 'Reshuffle.'
A channel list appears
and the current channel
number and name is
highlighted (e.g. 5).
>-
Press A or ▼ button to
©
select a channel (e.g. 3)
which you wish to
relocate to another
number. Confirm with
4 or button.
The selected channel
number is highlighted.
@ Press A orV button to
move to a new channel
number (e.g. 1).
<
■<
<
INSTALLATION
T
№AJ
C V'-it '
»> ' '-fe.
'• V V'-. *
AwfMirils^rs9rsBMMs ^
1.
Press 4 or button.
The TV channel stored in
channel numbers and
that in channel number 1
exchanges place.
Repeat the same steps for
other channel numbers which
you want to rearrange.
To exit:
@ Press OK button several
times until the main
menu disappears.
PHILIPS
2 D
; .->TVt Jl.
«' ■ -• 12» - jivj : tj
U'— '
K siw.r«
It . t-- w
-SOI
_____-3________
M S "
M 1TV3.
>2
S3 31V1
14
15
St t It
17 7
St
ss s
*2 '
4
STVS
t
s_
IS
-11
12
13
14
15
17
IS
IS
Page 42

Page 43
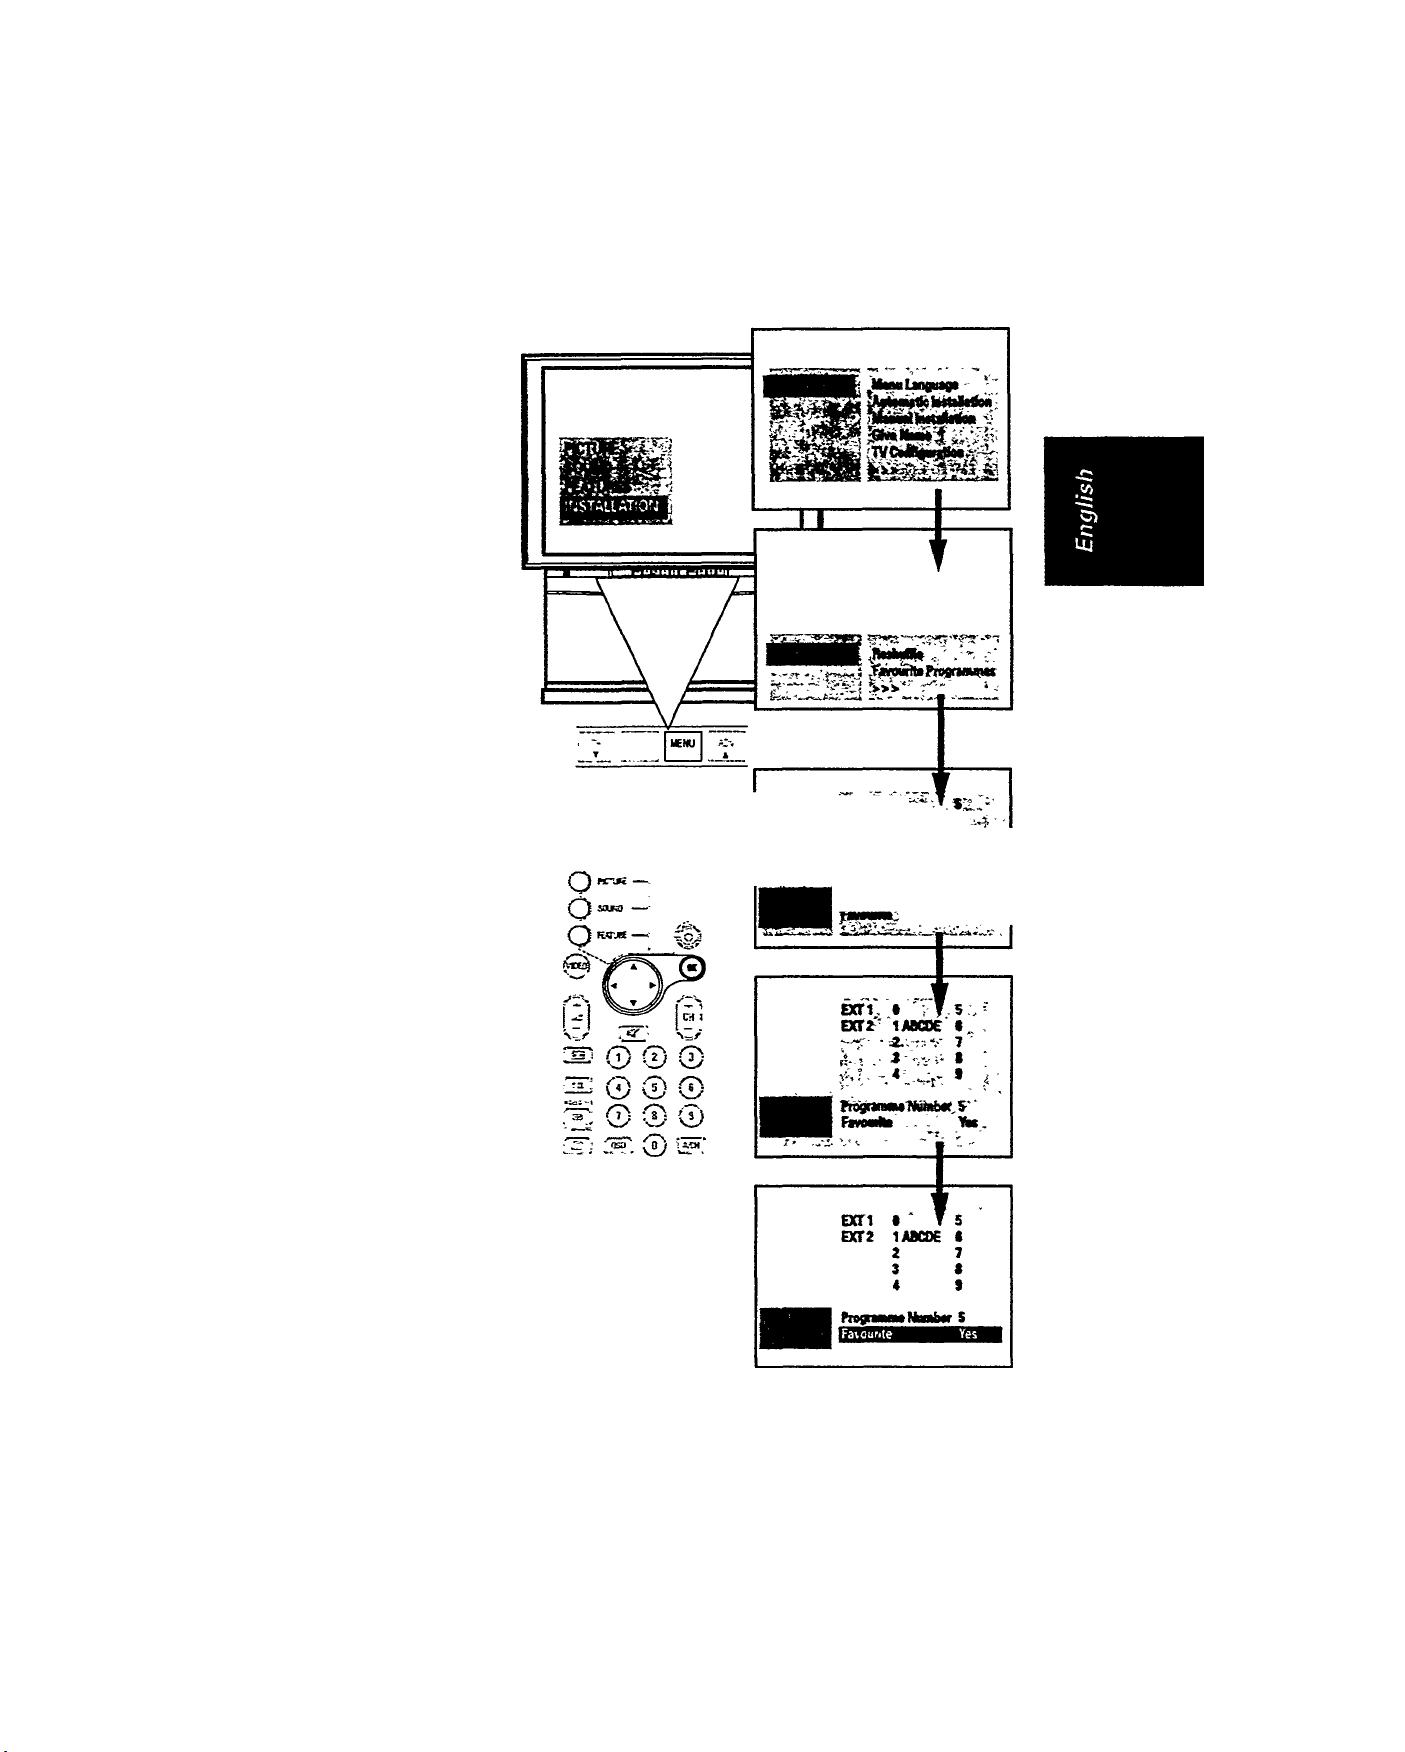
Favourite Programmes
All the TV channels which you have stored earlier during installation has been auto
matically placed into a "favourite"list. Only those channel numbers which are in this
list can be called up by pressing the CH -f- or — button. All other channel numbers
could only be called up by the digit buttons. You may want to include more or exclude
certain channel numbers from this list.
To start;
^ Press MENU button on
the TV control to call up
the main menu.
>
© Press ▼ button to
highlight 'INSTALLA
TION' and use -4 or ^
button to select h.
Press T button to
highlight '> > >' and
use ◄ or ► button to
select it.
>
© Press T button to
highlight 'Favourite
Programmes" and use
'4 or ^ button to select
it.
A channel list appears
and the current channel
number and name is
highlighted.
© Select a channel number
which you want to add
or delete from the
"Favourite Programmes'
list.
>
© Press T button to
highlight "Favourite".
<
<
-<
<
© Press -4 or button to
select "Yes" (add to list)
or 'No" (delete from
list).
Repeat the same steps for
more channel numbers.
To exit:
© Press OK button
several times until the
main menu disappears.
PHIUPS
2']
Page 44

Page 45
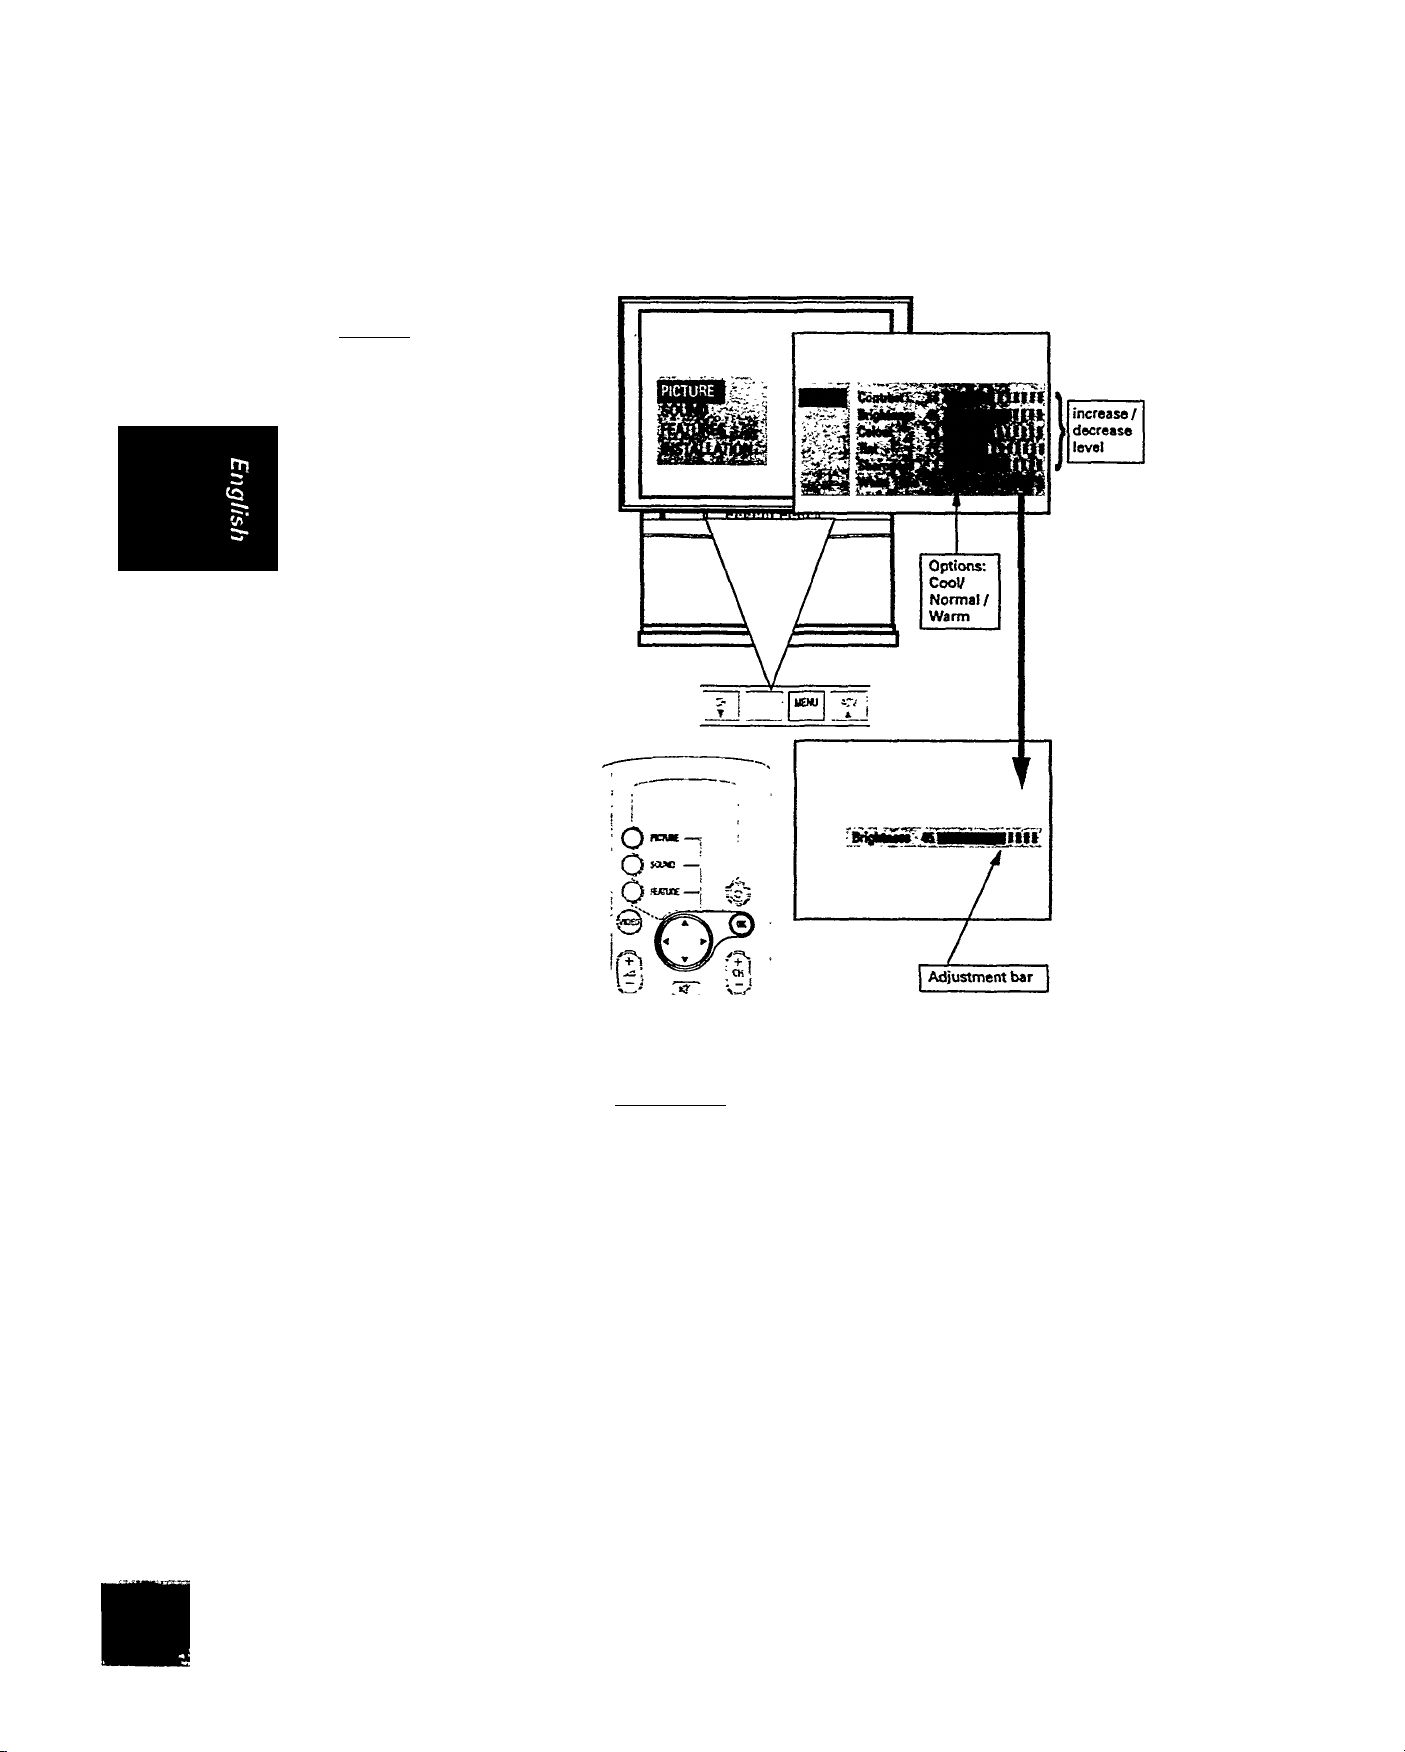
Picture adjustment
For adjustment of contrast, brightness, colour, tint {only active for NTSC programmes),
sharpness and white tone.
To start:
Method 1:
a) Press MENU button
on the TV control to
call up the main
menu.
b) Press ^ or ► button
to select'PICTURE’
menu.
OR
Mgthod.2-:
0 Press PICTURE button
on the remote control to
call up the 'PICTURE'
menu.
<
Press T button to
©
highlight an item e.g.
'Brightness.'
Press -4 or P’ to adjust
©
level.
An adjustment bar
indicates the level of
adjustment
Note: tf no adjustment is
made within 2 seconds, the
'PICTURE' menu comes back
onto the screen.
>
0 Press OK button to
return to the 'PICTURE'
menu and select another
item.
To exit:
^
--------------------------
0 Press OK or PICTURE
button twice.
-<
<
o © ©
'^ © © ©
5 © © ©
. a ~ 'go" :«.oi~
PHIUPS
22
Page 46

Page 47
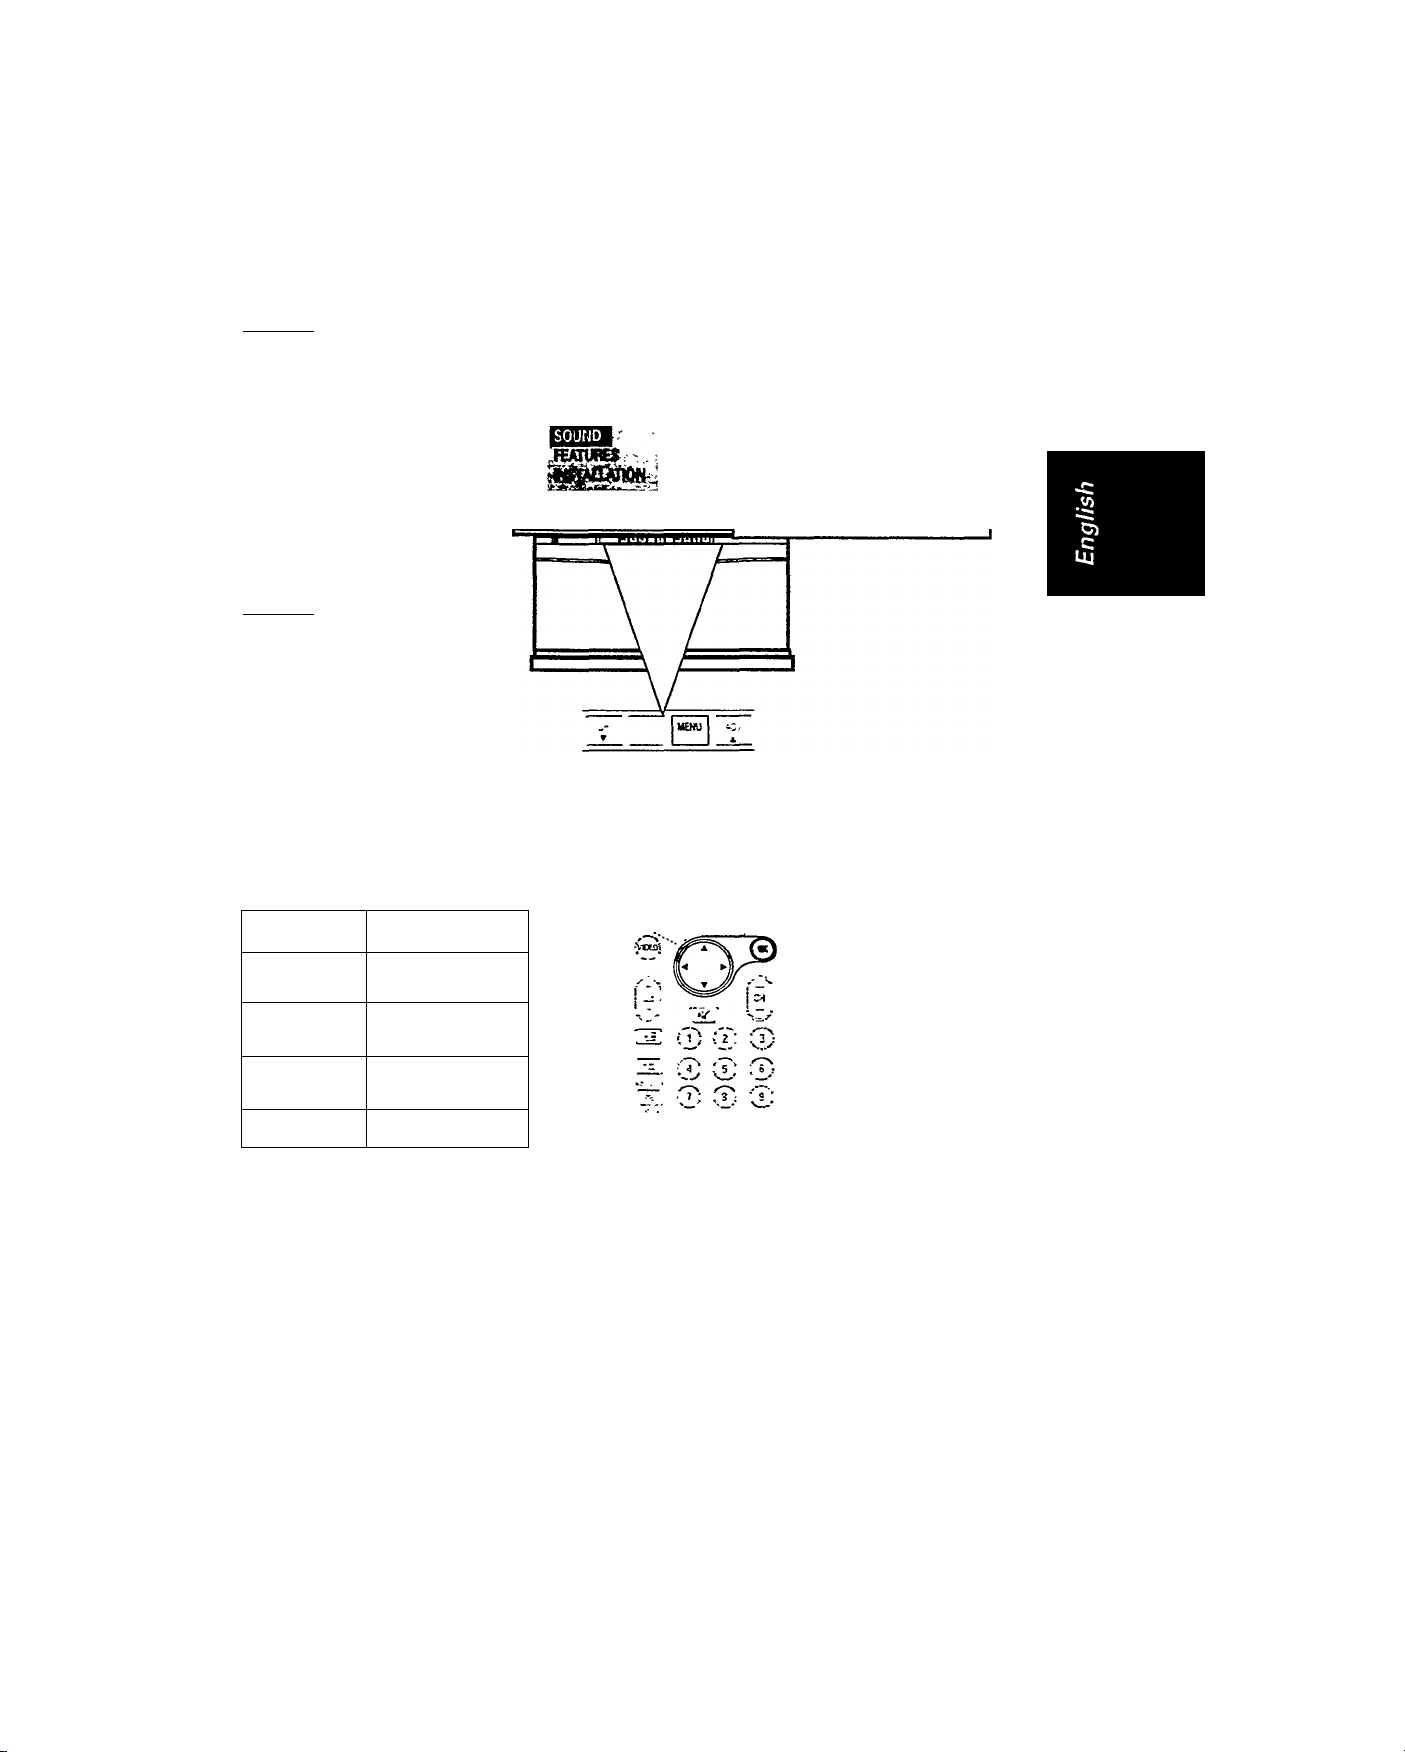
Sound adjustment
For adjustment of balance, treble, bass and sound only.
To start:
Method 1:
^ a) Press MENU button
on the TV control to
call up the main
menu.
b) Press ▼ button to
highlight ’SOUND'
and use -4 or ^ button
to select it.
OR
Method 2:
^
---------------------------------------------
© Press SOUND button
on the remote control to
call up the ’SOUND’
menu.
>
© Press T button to
highlight an item, e.g.
’Treble.’
-
<
PICTURE
■Hm e lIlilHliiir
.-4 UIIIIIBIIII
«Nid(Mr
.Off
© Press -4 or ^ to adjust
level.
Item
Balance
Treble
Bass
Sound Only*
* If you select *On,‘ the screen will
blank out and you can only hear sound.
To recover the screen, press any button
(except the volume control buttons) on
your remote control or TV controls.
Wait for 6 to 10 seconds.
Selection
increase/decrease
level.
increase/decrease
level.
increase/decrease
level.
On/Off
To exit:
0 Press OK or SOUND
button twice.
O ’*'•**■
Q nsx.--
--- ----
PHILIPS
Page 48

Page 49
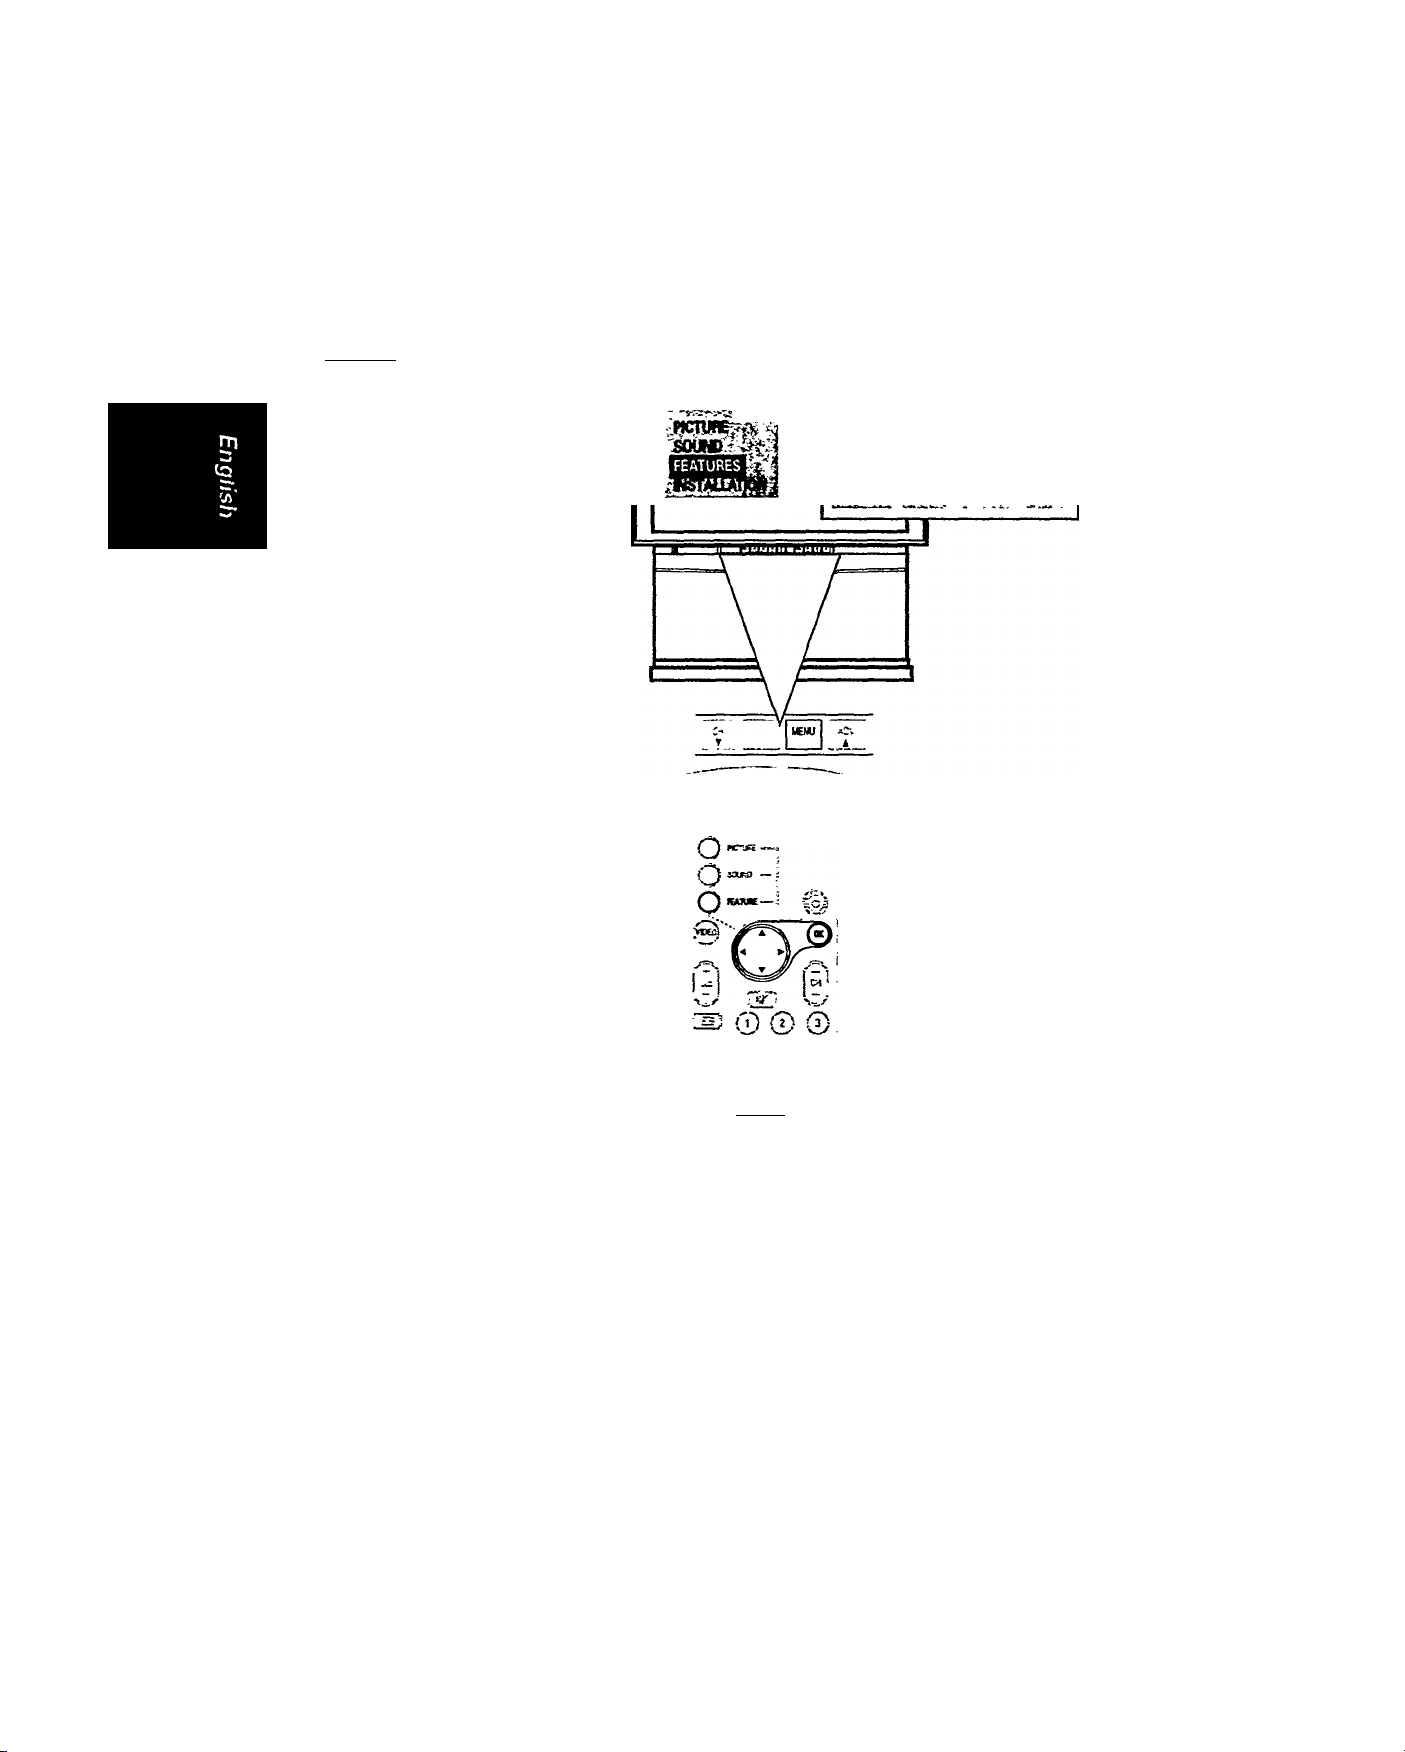
Features
The features menu consists of the following ; Pip
To start:
Method 1:
^ a) Press MENU button
on the TV control to
call up the main
menu.
b} Press T button to
highnght "FEATURES*
and use ^4 or button
to select it
OR
MettLod.2.;
(© Press FEATURES
button on the remote
control to call up the
■FEATURES" menu.
Sleeptimer
Child Lock
Message
Timers
Convergence
r
SiMpflMr Off
^ Press ▼ button to
highlight an Hem e.g.
"Sleeptimer."
Press •< or ► to select
options.
V
_________!_____________
To exit:
y*
-------------------------------------
0 Press OK or FEATURE
button twice.
-
0 0
©
g ©0©
^ ico I 0 J2L.,
PHILIPS
2 4
Page 50

Page 51
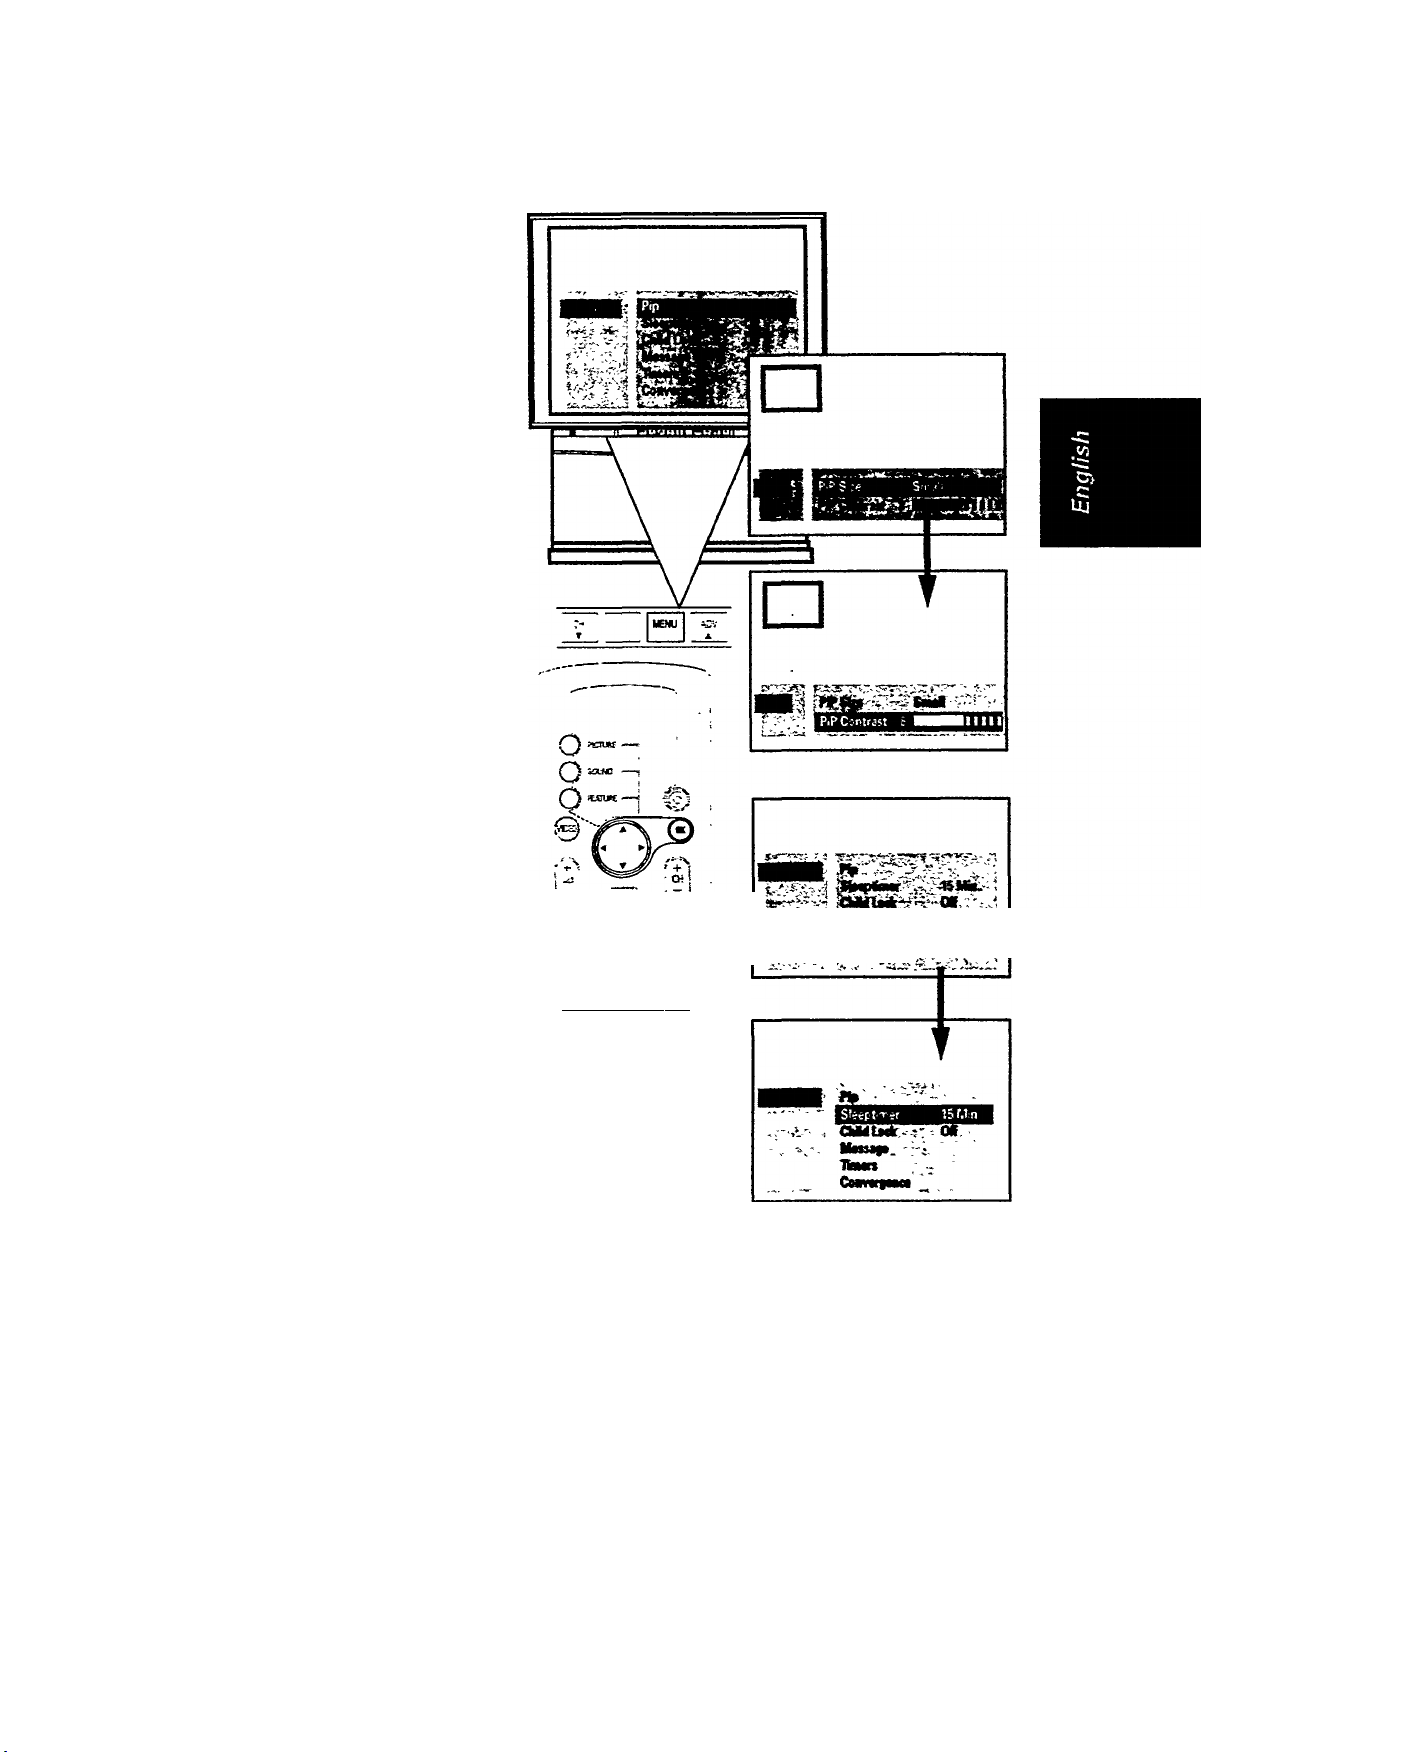
... features
Pip
Fix the size and adjust the
contrast level of the PIP screen.
Select PIP size
✓
-------------------------------
© Press or ► to select the
•PIP" menu.
© Press ■< or ► to select
either 'Small' or 'Large.'
A PIP screen appears
at one corner of the
screen showing the
size that you selected.
Adjust PIP contrast
Press T to select "PIP
Contrast.'
© Press or ^ to adjust
contrast level.
To return to the "FEATURES"
menu
<
<
35 Press OK button.
Sleeptimer
Use to set a time for the TV
to switch to 'standby'
(switch off temporarily). If
you do not wish to set the
timer, select 'Off.' One
minute before the TV
switches to 'standby,' the
time appears on the screen
with the message 'Good
Night' and counts down.
© Press T to select
'Sleeptimer' in the
'FEATURES' menu.
Press and hold down the
^ button to increase the
timer in steps of 15
minutes to a maximum
of 180 minutes, or press
and hold down the <
button to decrease the
timer.
o © ©
0 0 0
© © ©
^ '«.O'
PHILIPS
<
Page 52

Page 53
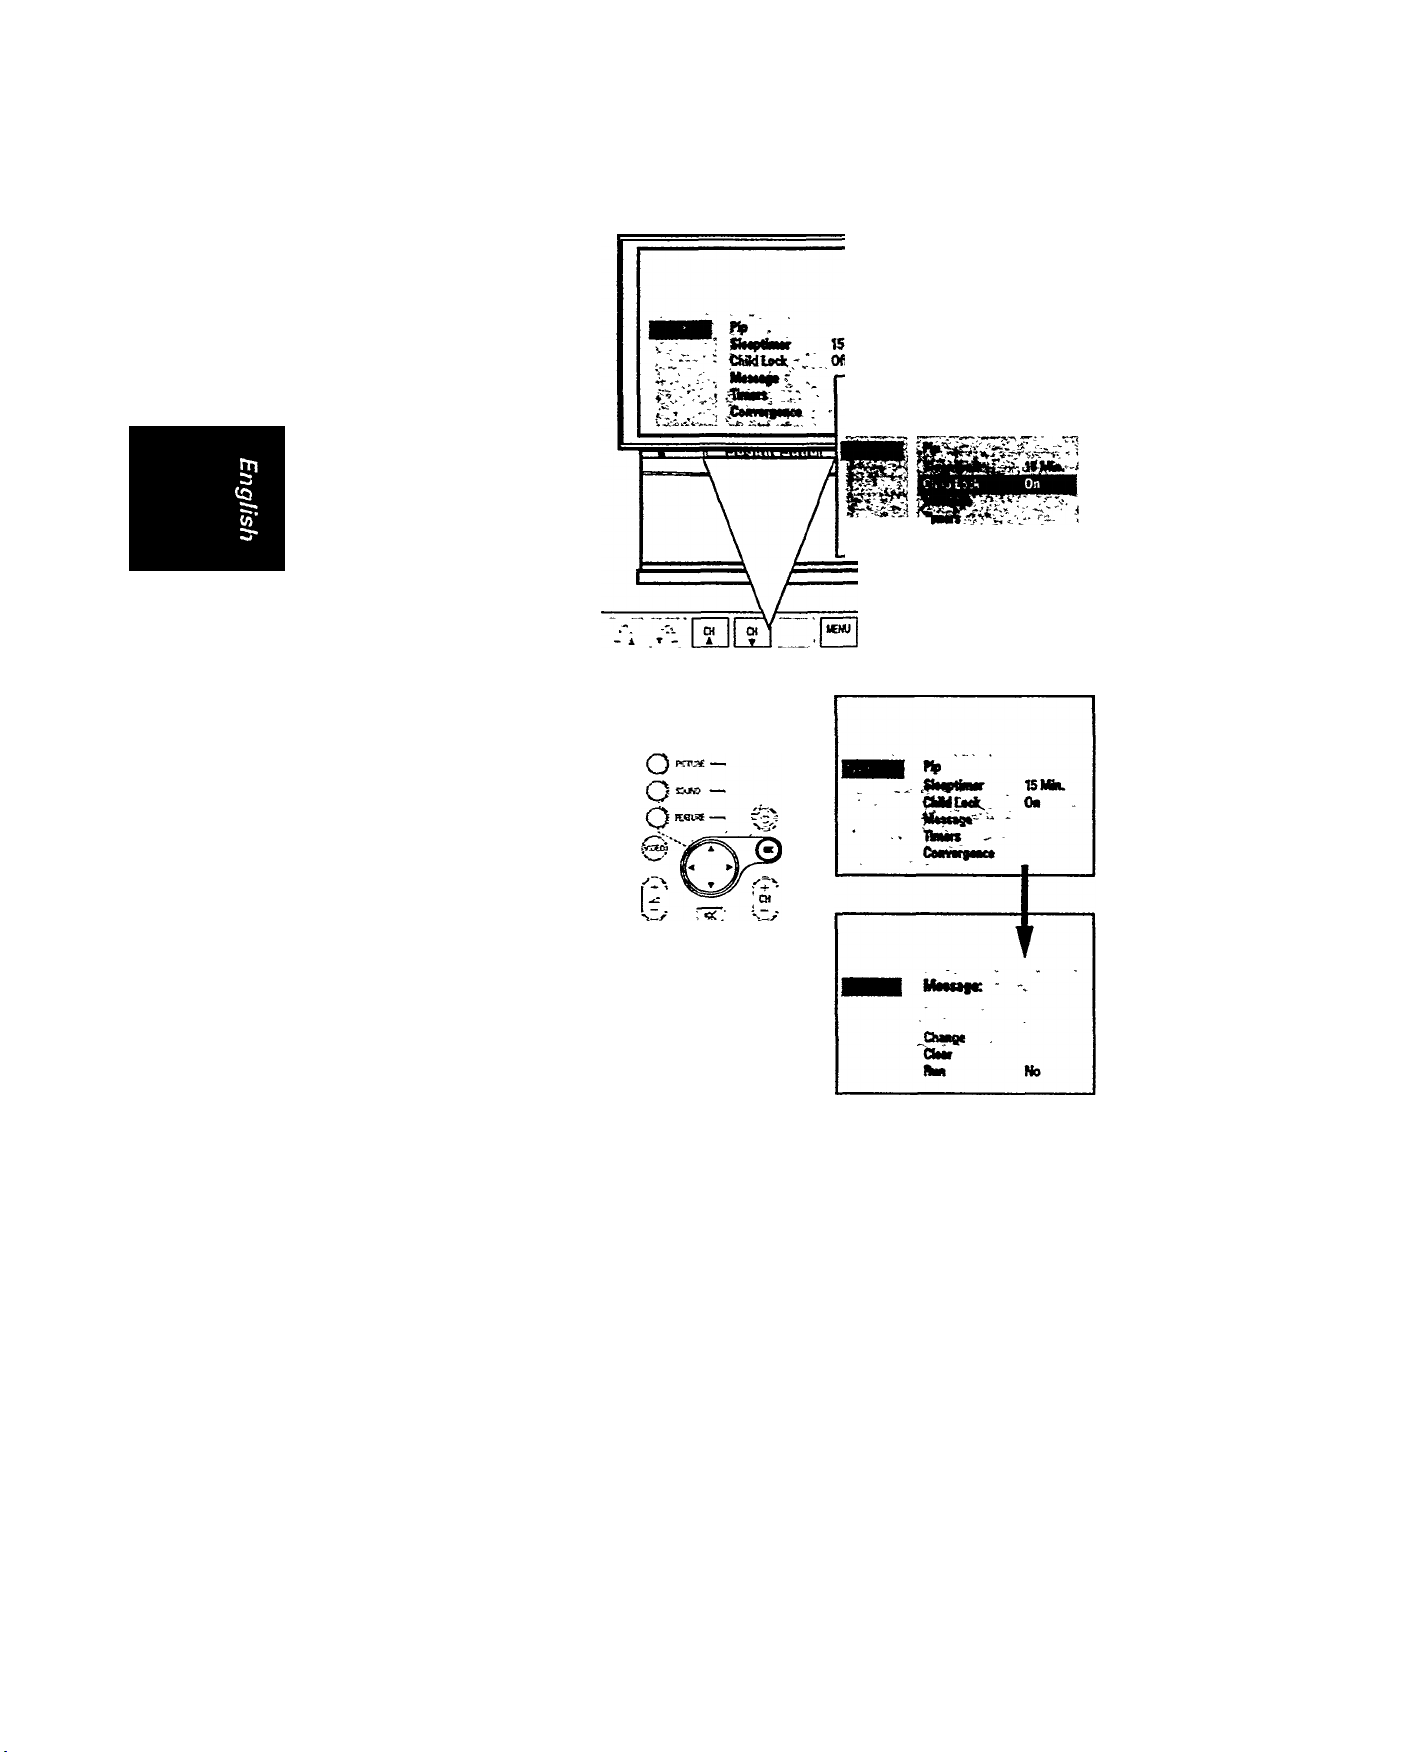
... features
Child Lock
Use to prevent children or
unauthorised personnel from
selecting TV channels. This
feature locks the CH A, CH ▼
and MENU button on the TV
control. Control of the TV via
the remote control is still
possible. Therefore, keep the
remote control in a separate,
secure place in order to
effectively use this feature.
Press ▼ button to
©
highlight an Hern 'Child
Lock.'
Press '4 or ^ to select
either 'Off* or 'On.'
When 'Child Lock' is
switched 'On,'
a) a message 'Child Lock
Onl' appears whenever
you press the CH A,
CH T or MENU button
on the TV control.
b) TV will go to 'standby'
whenever you switch on
the TV via the power
knob or mains supply.
Note: To switch on the TV
from 'standby,' refer to page
12 on 'General TV controls.'
<
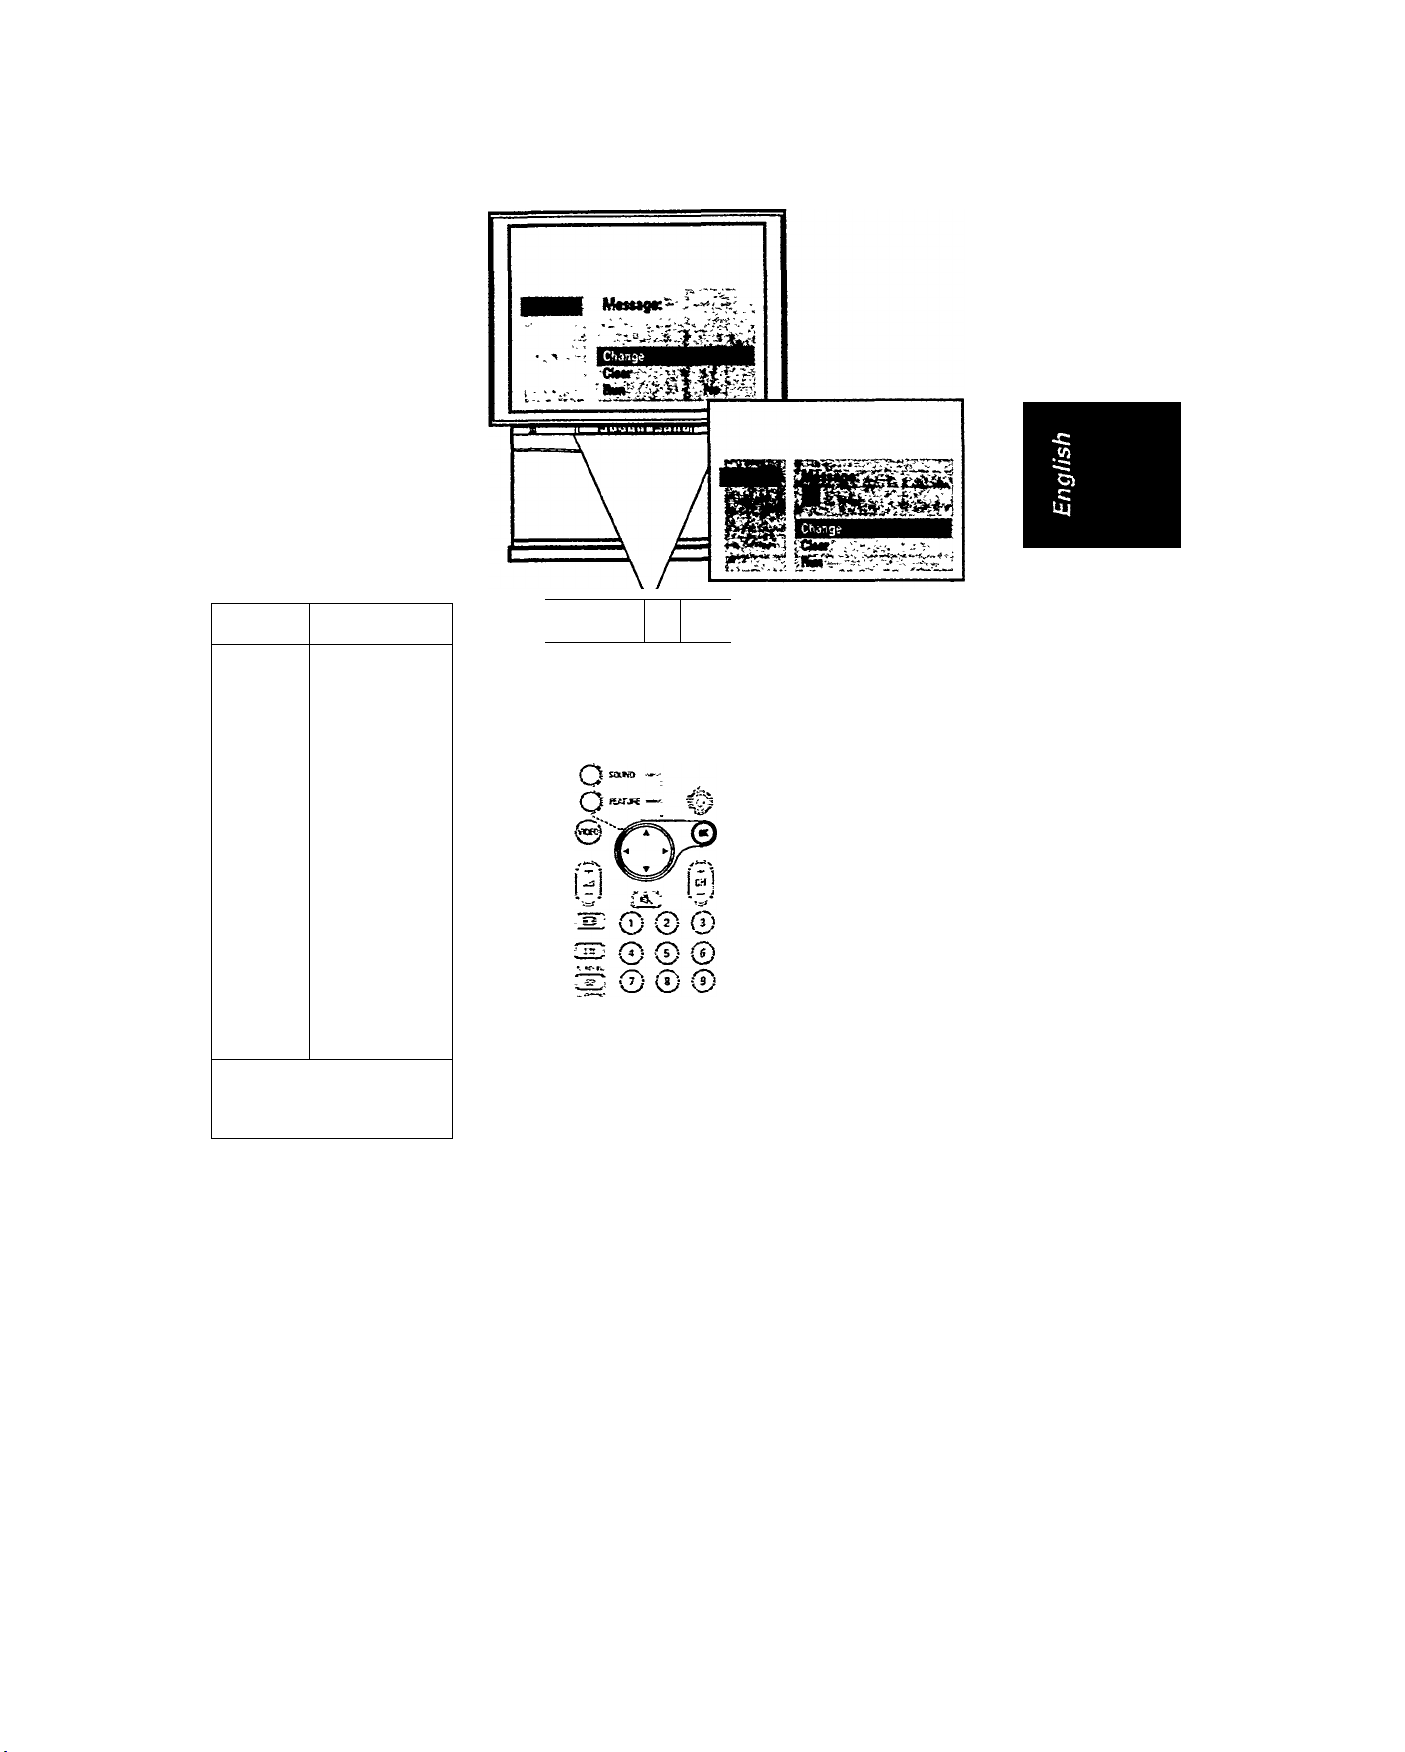
Message
Create messages for display
on the TV screen.
Press T button to
highlight an item
'Message.'
@ Press -4 or to select it.
A 'MESSAGE' menu
appears.
<
^ O © 0
^000
S 0 © ©
PHIUPS
Page 54

Page 55
... features
Change message
Create a new message or edit
an existing message.
Q) Press '4 or ^ to select
"Change.*
A block appears below
“Message:.“
Press
^4
button to key in the
characters.
or ^ or T or
A maximum of 2 lines with
27 characters per line is
possible. Refer to Table 1
below for details.
Use this
►
The possible characters are
OK
•4
A
T
To
end keying in
process.
select next
character
position.
select previous
character
position.
seiect next
character or
number for the
current posi
tion.
select previous
character or
number for the
current posi
tion.
•A...Z.0...9
and [Space].*
Table 1
A
<
-
---
f k
mu -Is !
o
'CSB 1 (
0
PHIUPS
\
27
Page 56

Page 57
u
features
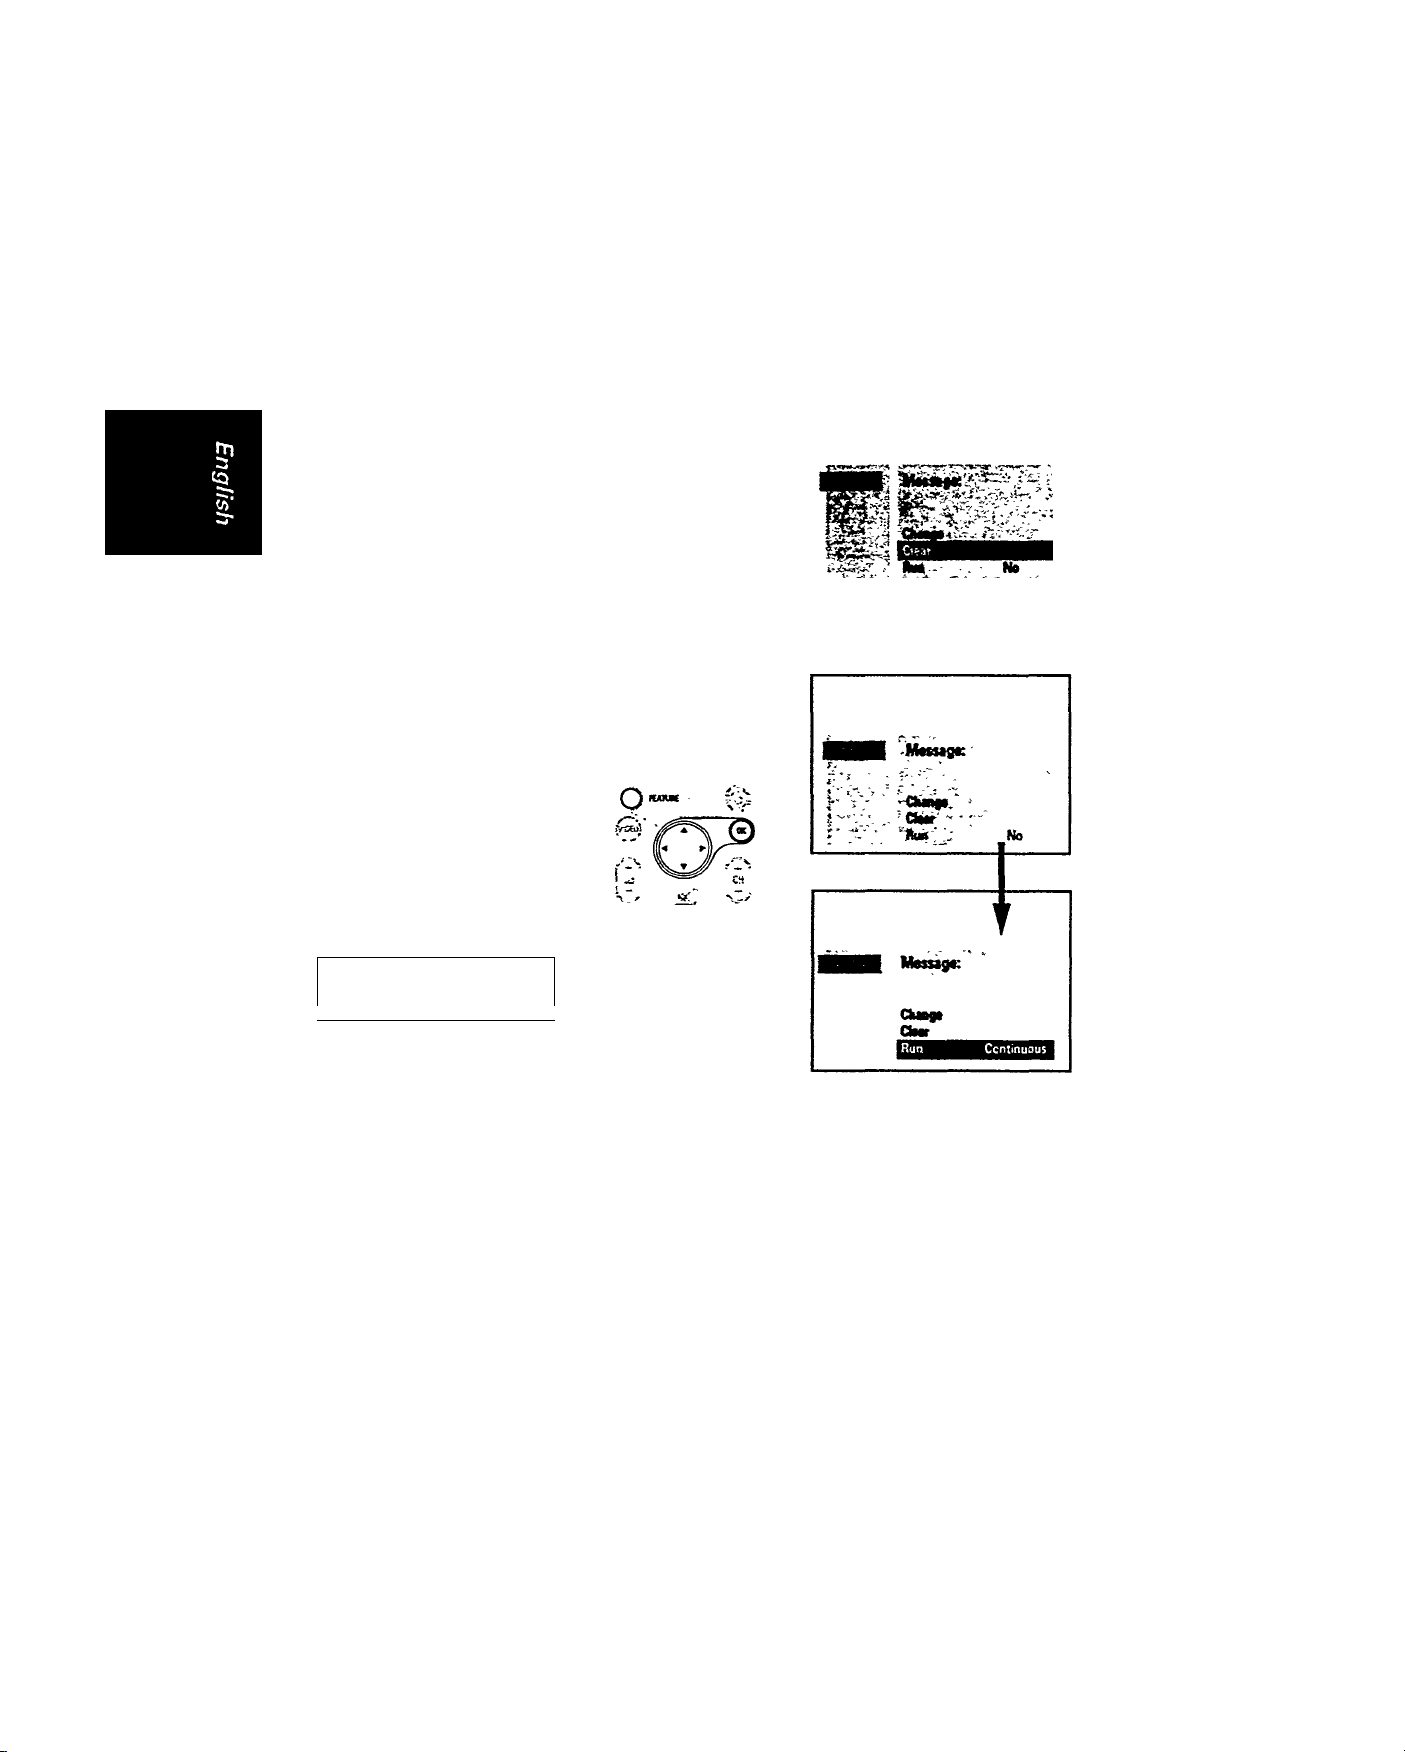
Clear message
Delete a message completely.
^ Press T to highlight
■Clear."
@ Press 4 or ► button to
select it.
The whole message is
deleted.
-<
Run message
Select the mode of display of a
message.
Q Press T to highlight
■Run."
@ Press or ► button to
select *No* or
■Continuous.*
No; Do not run message.
Continuous: Run message
continuously.
Note: The 'Run'message
will reset to ’No“ once you
switch off the TV by the
mains supply, mains power
knob, or OK button.
<
Message:
ABC01234
Ckangt .
Clear
N»'
O
To return to "FEATURES"
menu:
Press OK or FEATURE
(D
button once.
'O' vv
i'i)
J
-T— —:r^
0
»••J'rsrsc,'
PHILIPS
Page 58

Page 59
Us
===1 ... features
---------
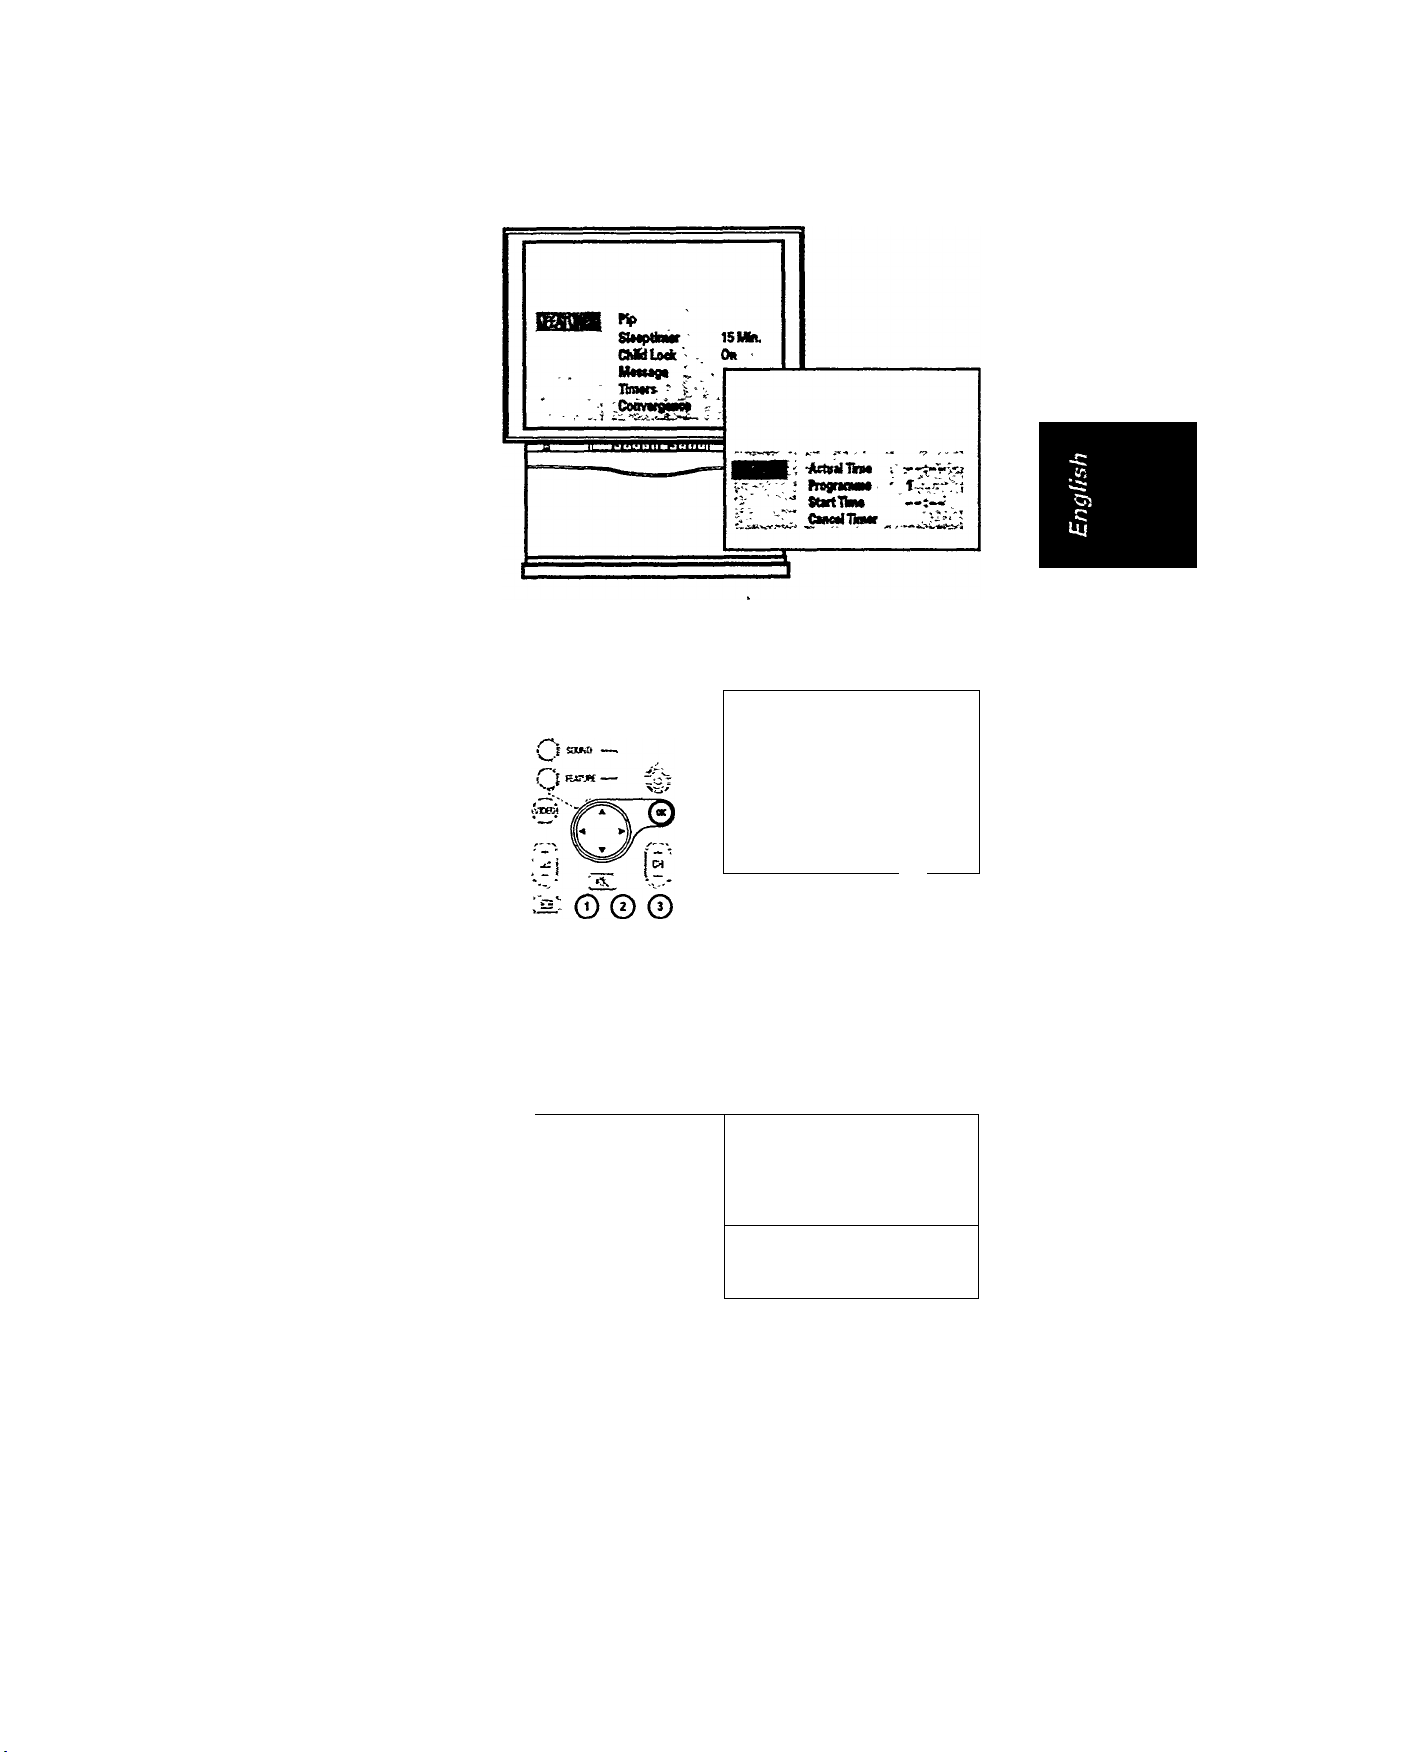
Timers
Program the TV to switch to
another channel at a specific
time.
© Press T to highlight
"Timers."
Press or ► button to
select it.
A TIMERS’ menu appears.
Press
-4
start keying the "Actual
Time."
This is the current time.
Enter the time with the digit
buttons, starting with hours,
then minutes.
>
© Press ▼ to highlight
"Programme."
This the channel that you
want to switch to at the pre
set time.
Enter the channel number
for the desired channel.
or ^ button to
>
© Press T to highlight
"Start Time."
This is the preset time that
you want the channel
switching to occur.
Enter the time with the digit
buttons, starting with hours,
^/jen
minutes.
© Press ▼ to highlight
"Cancel Timer."
This cancels the ‘Start Time.
To execute, press the
button.
4
or ►
<
<
i
<
< ^
©0®
0 0®
II
ActlUiTlRM
*■
rrognmin*
StMtHm*
CanedliMr
AcbulTloM
FrogrMMW
StaitTm*
C«K«niaMr
N:3*
1
—. -4
2
To return to "FEATURES"
menu:
0 Press OK or FEATURE
button once.
PHIUPS
- •
9HVI ActuaiTiM M:M
PrognmiM 2
StactTinw 13:0S
Cancel'Hmer
2 S
Page 60

Page 61
... features
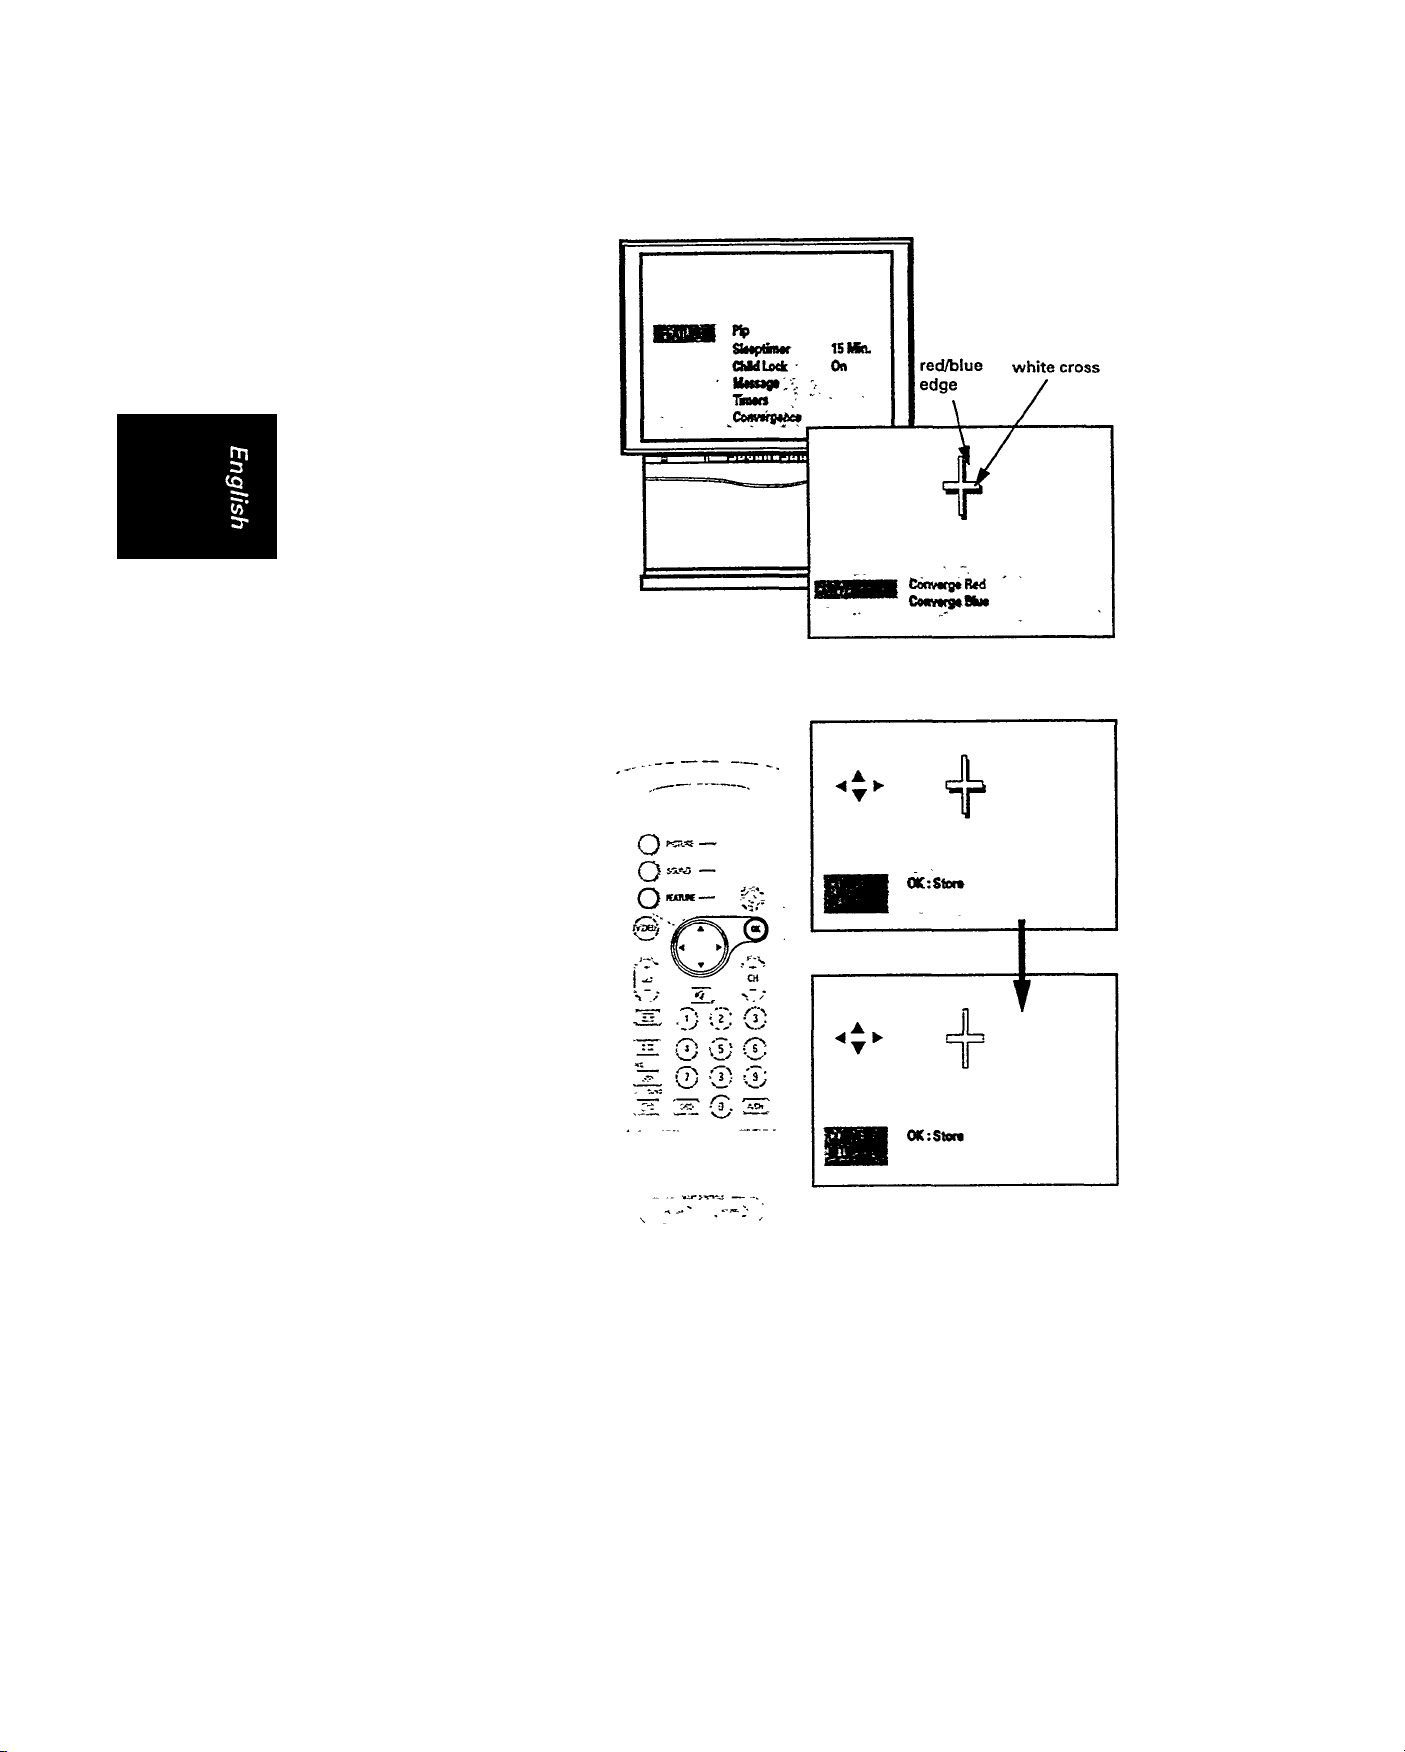
Convergence
This projection TV uses 3
separate tubes: red, green and
blue. The red, green and blue
images are projected onto the
screen, where they converge to
form a full colouf^icture. You
can see a clear picture only
when they converge correctly.
Convergence has been set at
the factory but may drift over
time. If you do not see a clear
picture, follow the steps below
to do an adjustment
© Press T to highlight
“Convergence."
Press ◄ or ► button to
©
call up the
•CONVERGENCE* menu
If red colour appears around
the edges of the object, select
“Converge Red.“ If blue colour
appears, select “Converge
Blue“ to adjust.
<
Press T to highlight an
item, e.g. “Converge
Blue“ and -4 or ^ button
to call up the
“CONVERGE BLUE“
menu.
Press or ► or A or T
%
button to move the blue
(red) cross directly over
the white cross on the
TV screen.
The blue (red) cross is
properly adjusted when
completely merged with the
white cross. (No colour
appears around the edge of
the white cross.)
<
To exit without saving :
Press FEATURE or any menu
button.
To exit and save:
Press OK button.
PHILIPS
Page 62

Page 63
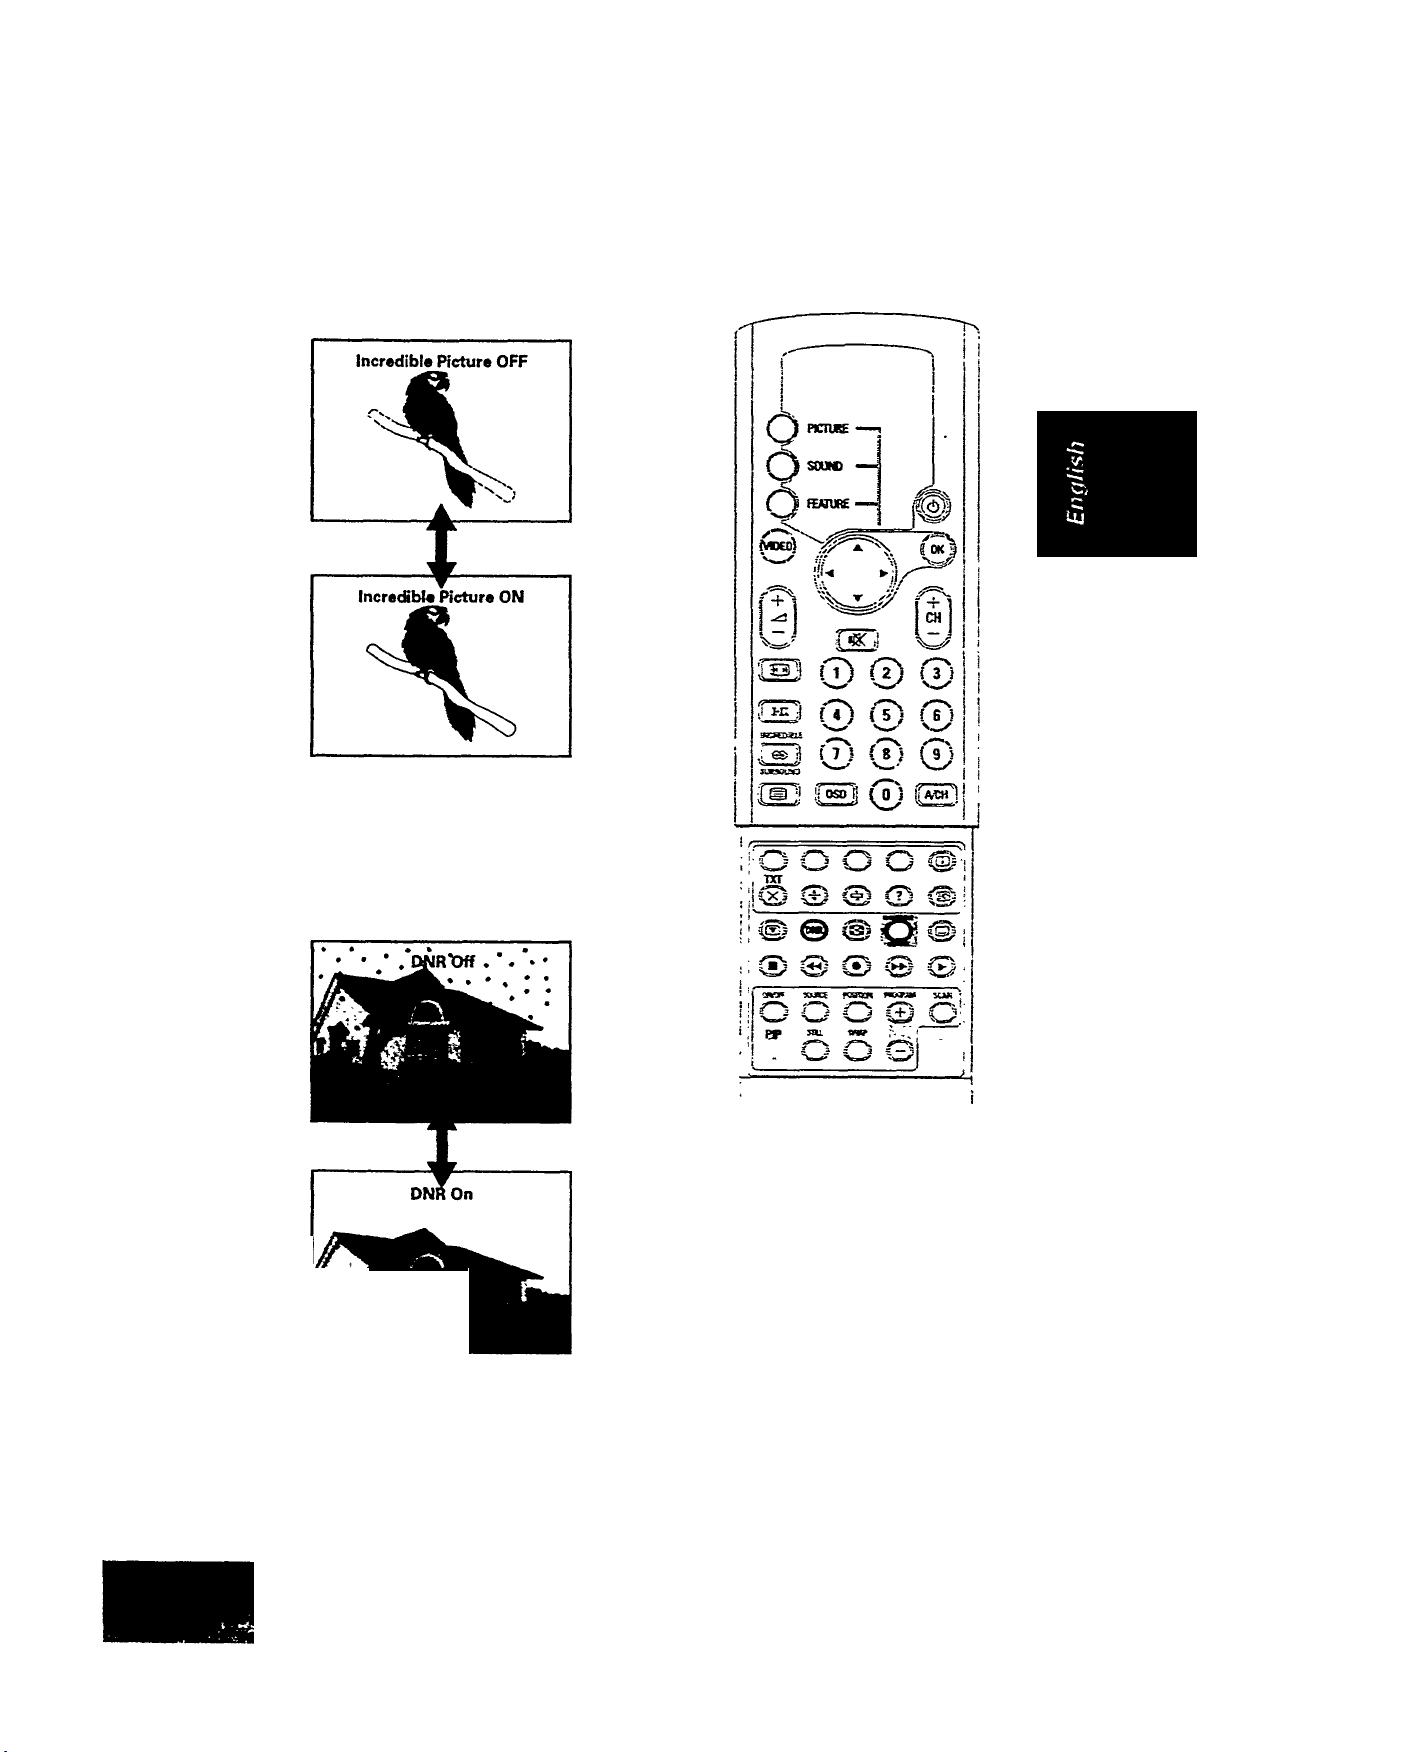
Picture enhancement features
Incredible picture
This feature automatically optimises the picture
you are watching.
• Press the INCREDIBLE PICTURE button to
switch on or off this feature.
DNR
If you encounter some picture interference (e.g.
snowy picture] while watching a programme,
switch to *DNR On* to Improve the picture.
• Press the DNR button to switch to *On* or
■Off.’
S']
Page 64

Page 65
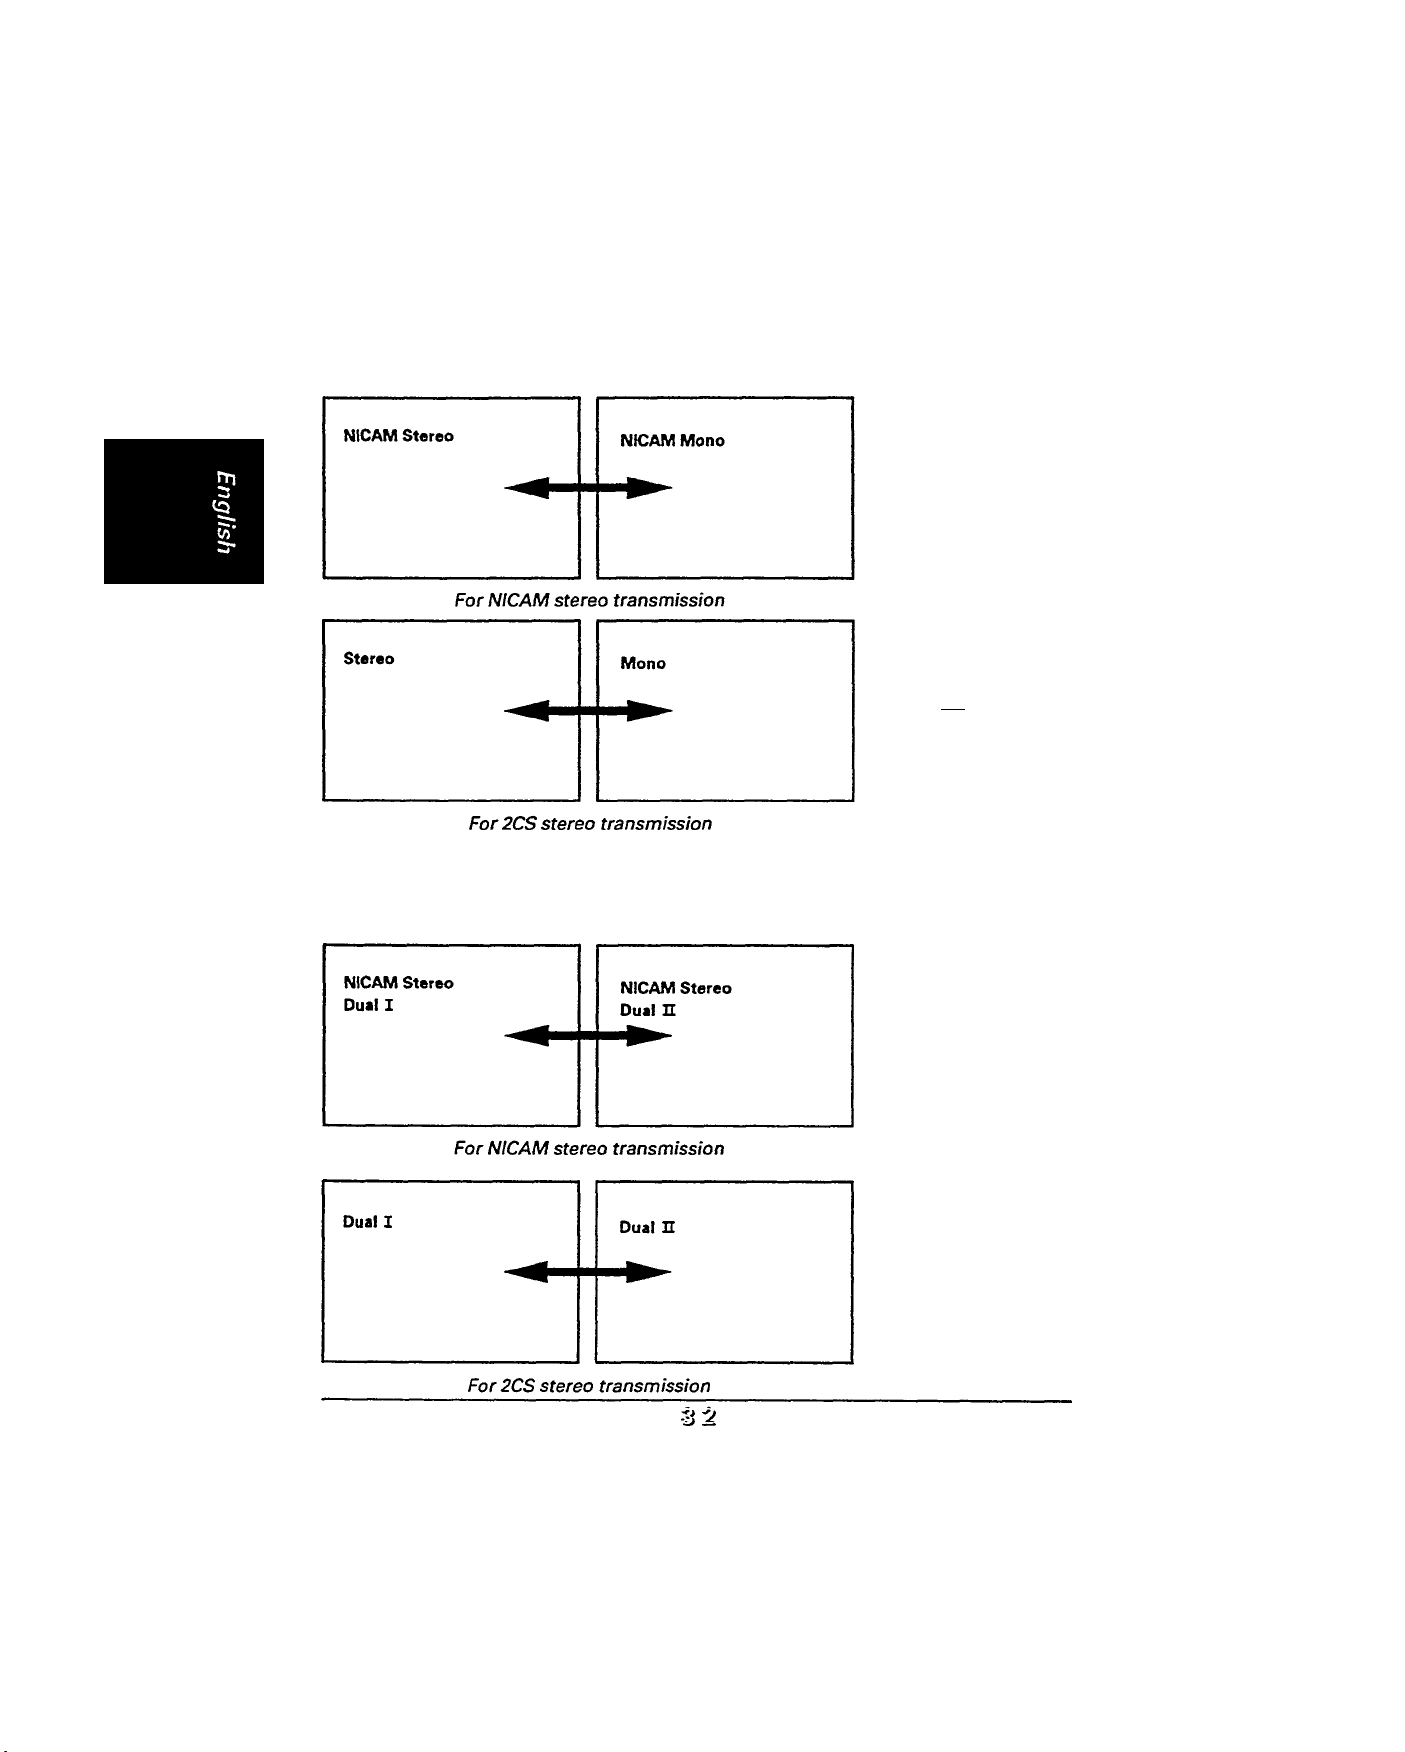
Stereo sound
Depending on the sound system in transmission, a TV programme may be transmitted
in NICAM or 2CS Stereo. You can switch to "Mono" and back again. When there are
two languages in simultaneous transmission, you can select either one of the lan
guages.
Switch to mono ------------
• Press the I-n button to switch between stereo and mono. ■
HCr.«-,
: wa •
o
,i
o
I
5»|.
I“l-
Switch first and second language
• Press the I-H button to select the first and second
language.
i dt©
go©
^ ®
3 1 ^
PHIUPS
©
©
©
Page 66

Page 67
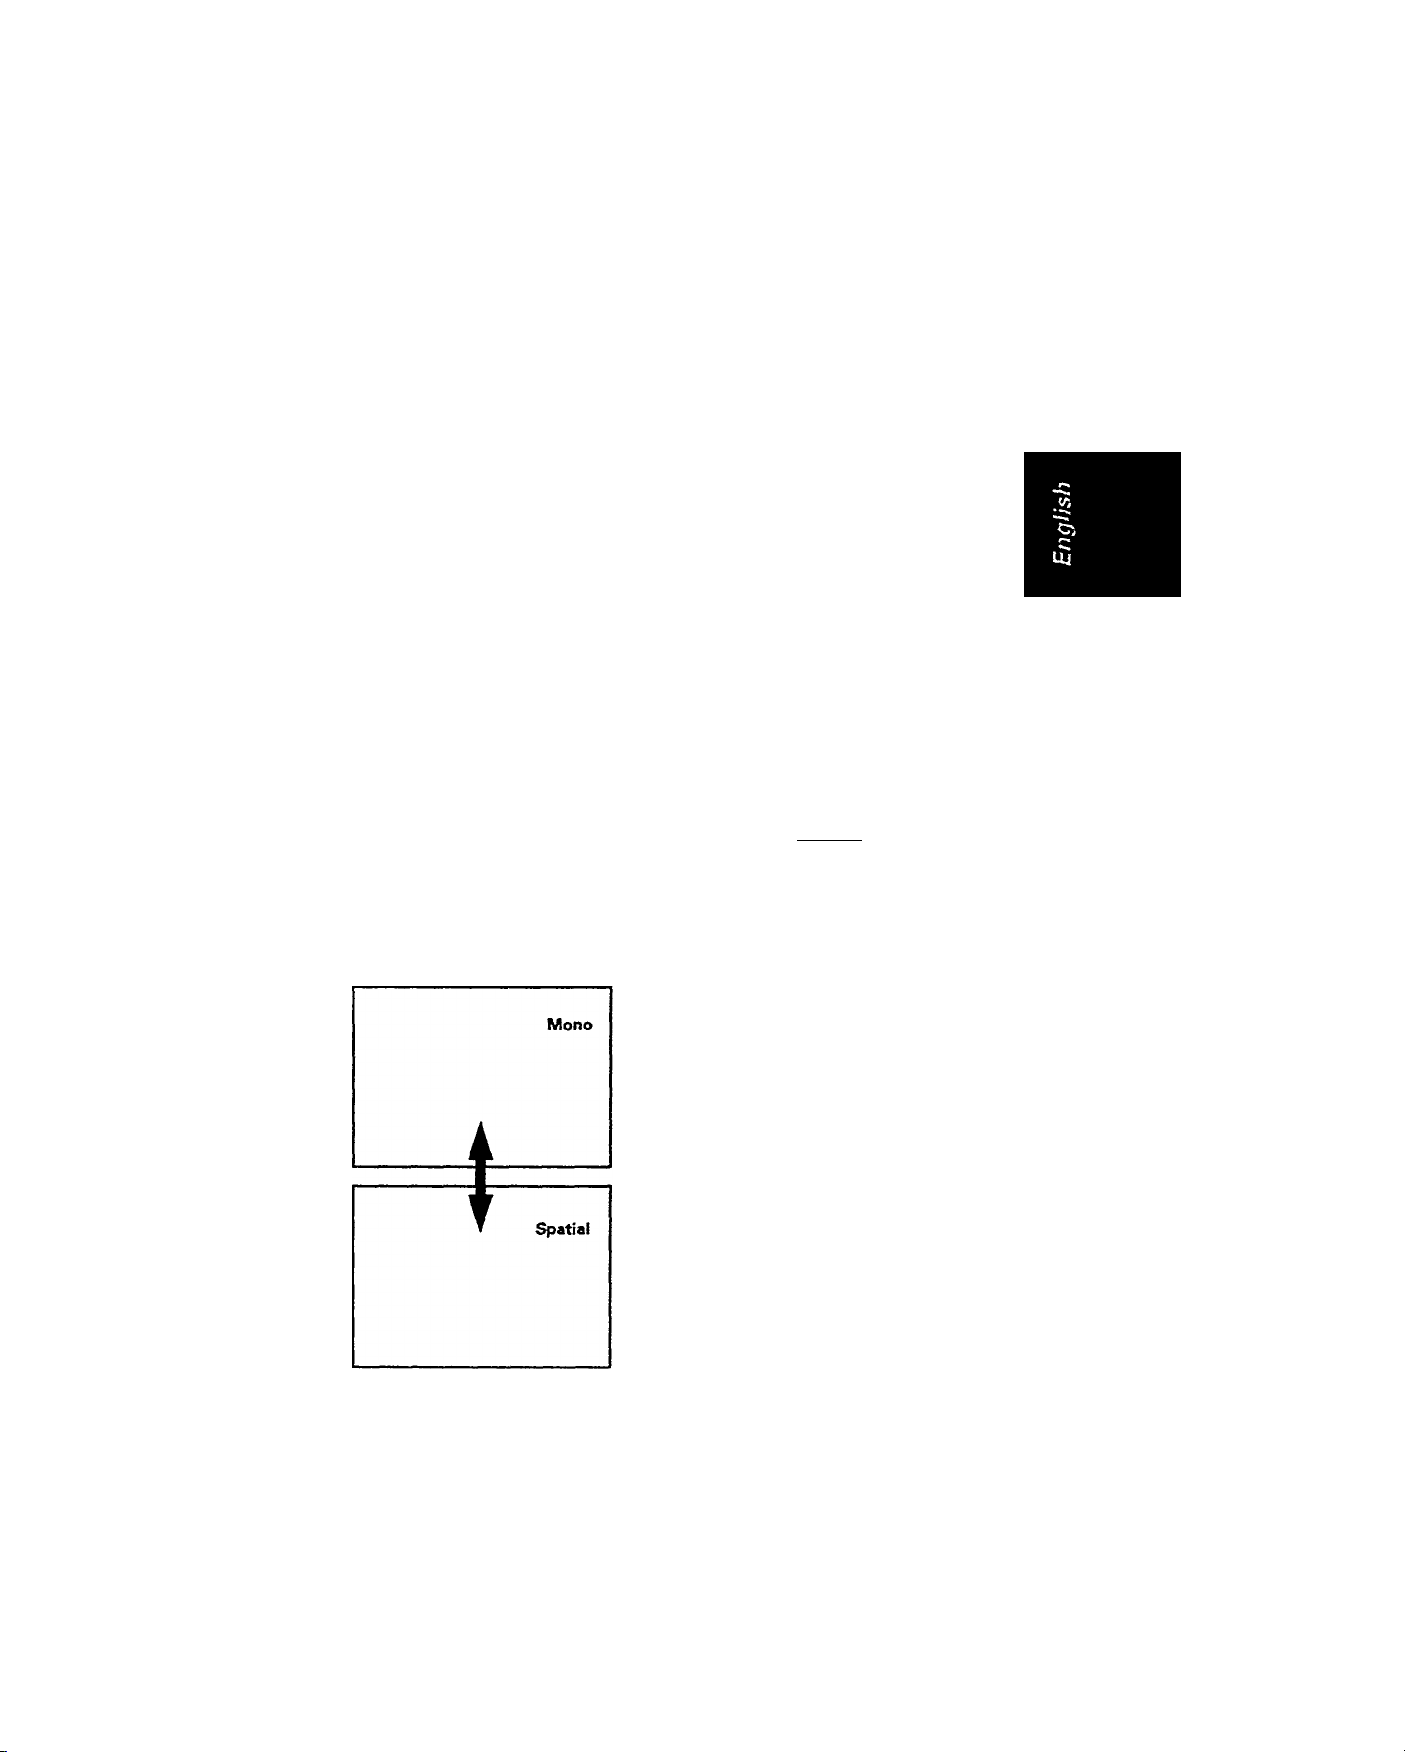
Stereo enhancement features
The "Incredible Sound* and the "Spatial Sound" features are designed to boost the
sound effect of the TV. The "Incredible Sound" feature is meant to enhance stereo
sound, while the "Spatial Sound* feature gives a "surround" effect to mono sound.
Incredible sound (for stereo sound only)
• Press the INCREDIBLE SURROUND button to switch on or
off the effect.
NICAM Stareo
i O««—
!
;
I
Incredible Sound
:
0 0 0
S 0 © ©
's' icu>'
CH
Spatial sound (for mono sound only)
• Press the INCREDIBLE SURROUND button to switch on or
off the effect.
PHIUPS
/
Page 68

Page 69
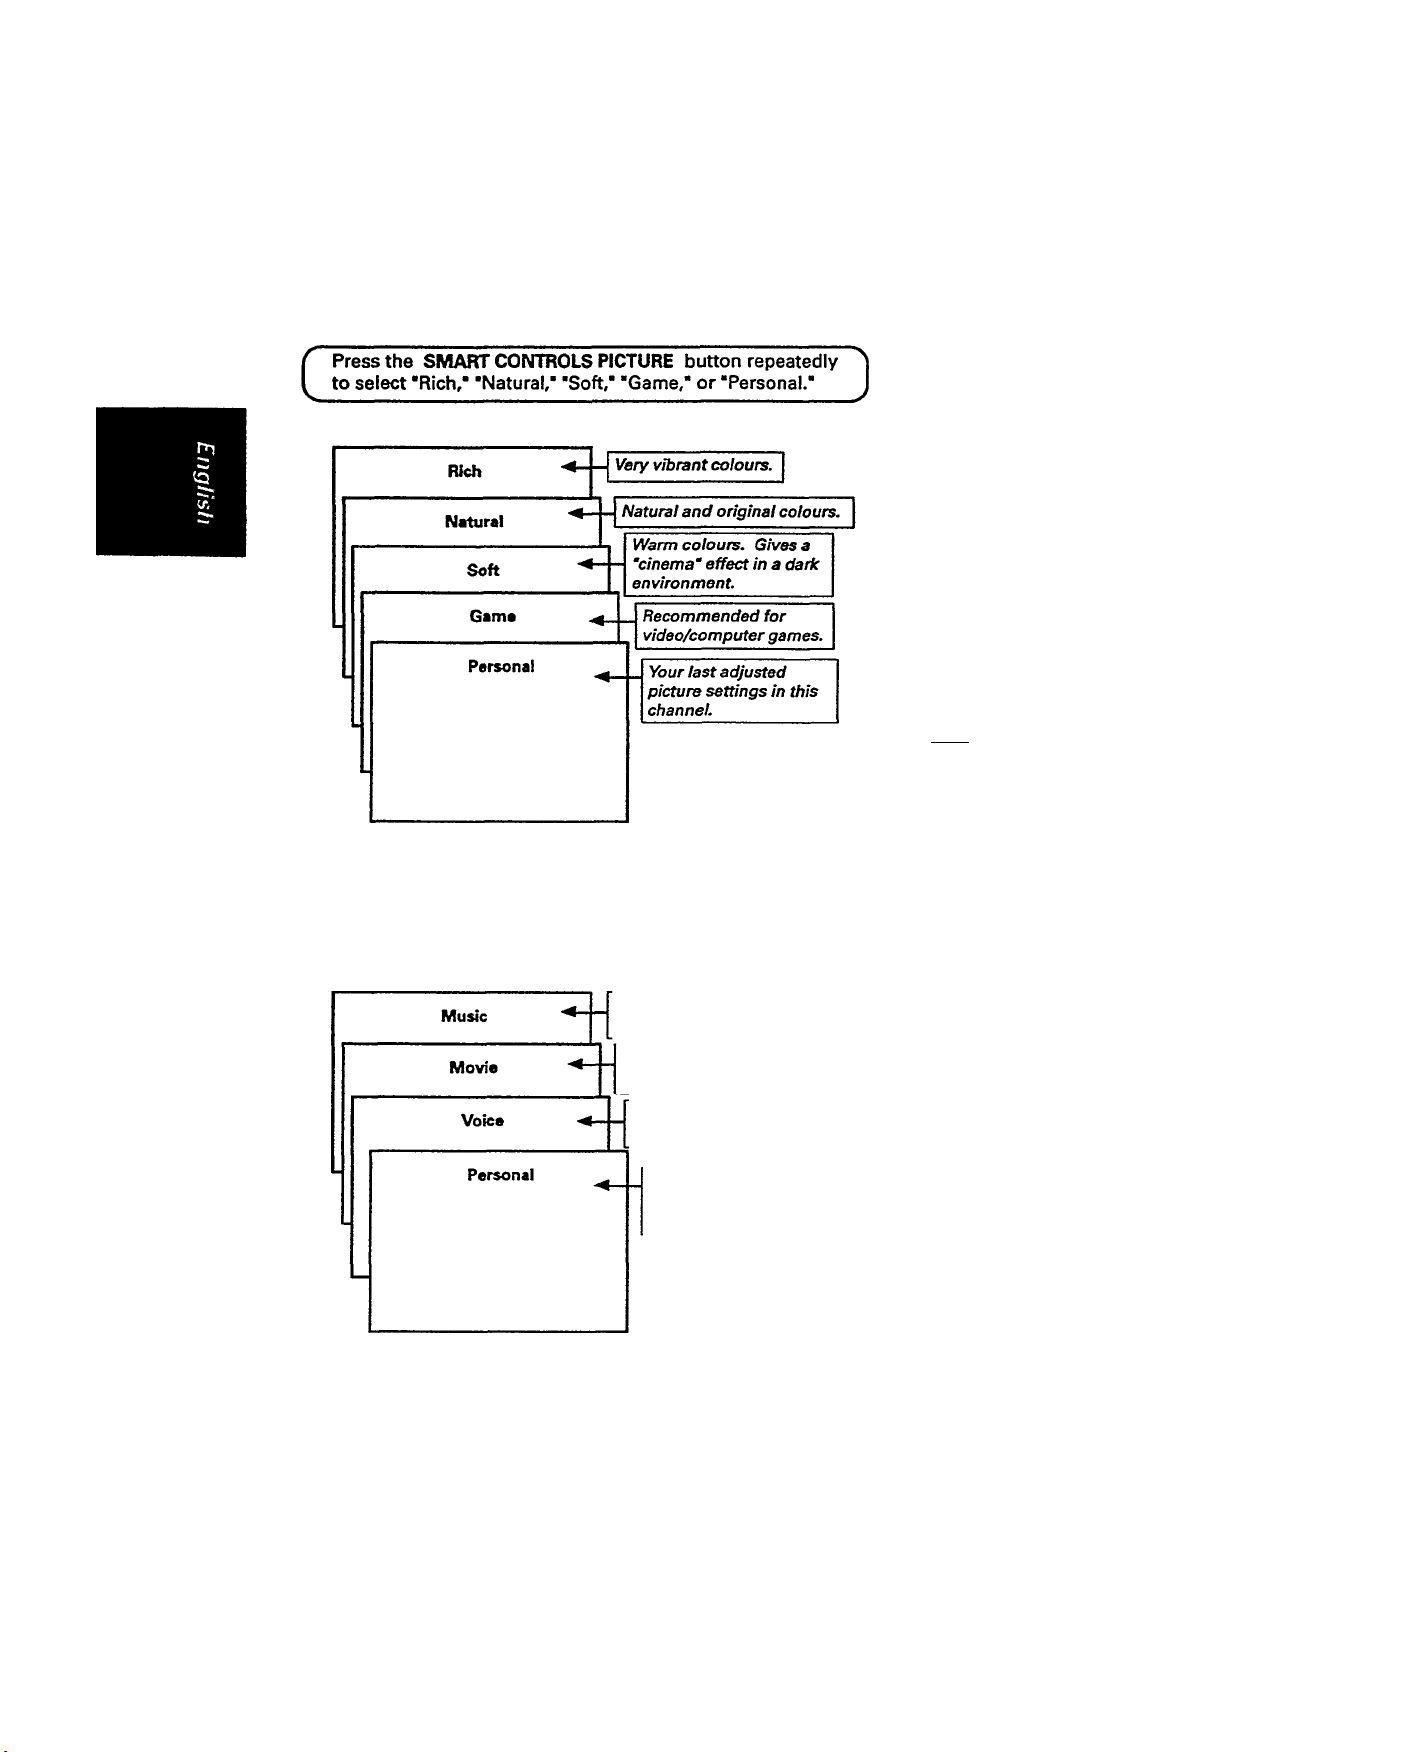
Smart controls
Your TV has been programmed with certain preset modes to optimise the picture and
sound quality of the programme you are watching. The "Personal* mode is the only
mode which you could set yourself.
Select picture settings
lO
!0
f&OUÏ -
O
■fTN
w '-O''
'^ © © ©
'^ © © ©
© © ®
(csa 4
—
Select sound settings
Press the SMART CONTROLS SOUND button repeatedly
to select "Music," "Movie," "Voice," or "Personal." K
Emphasizes bass frequency
- makes music dynamic.
Emphasizes low/high frequency
- gives sensation to action.
Emphasizes speech frequency
- voice is clear.
Your last adjusted
sound settings in this
channel.
PHIUPS
Page 70

Page 71
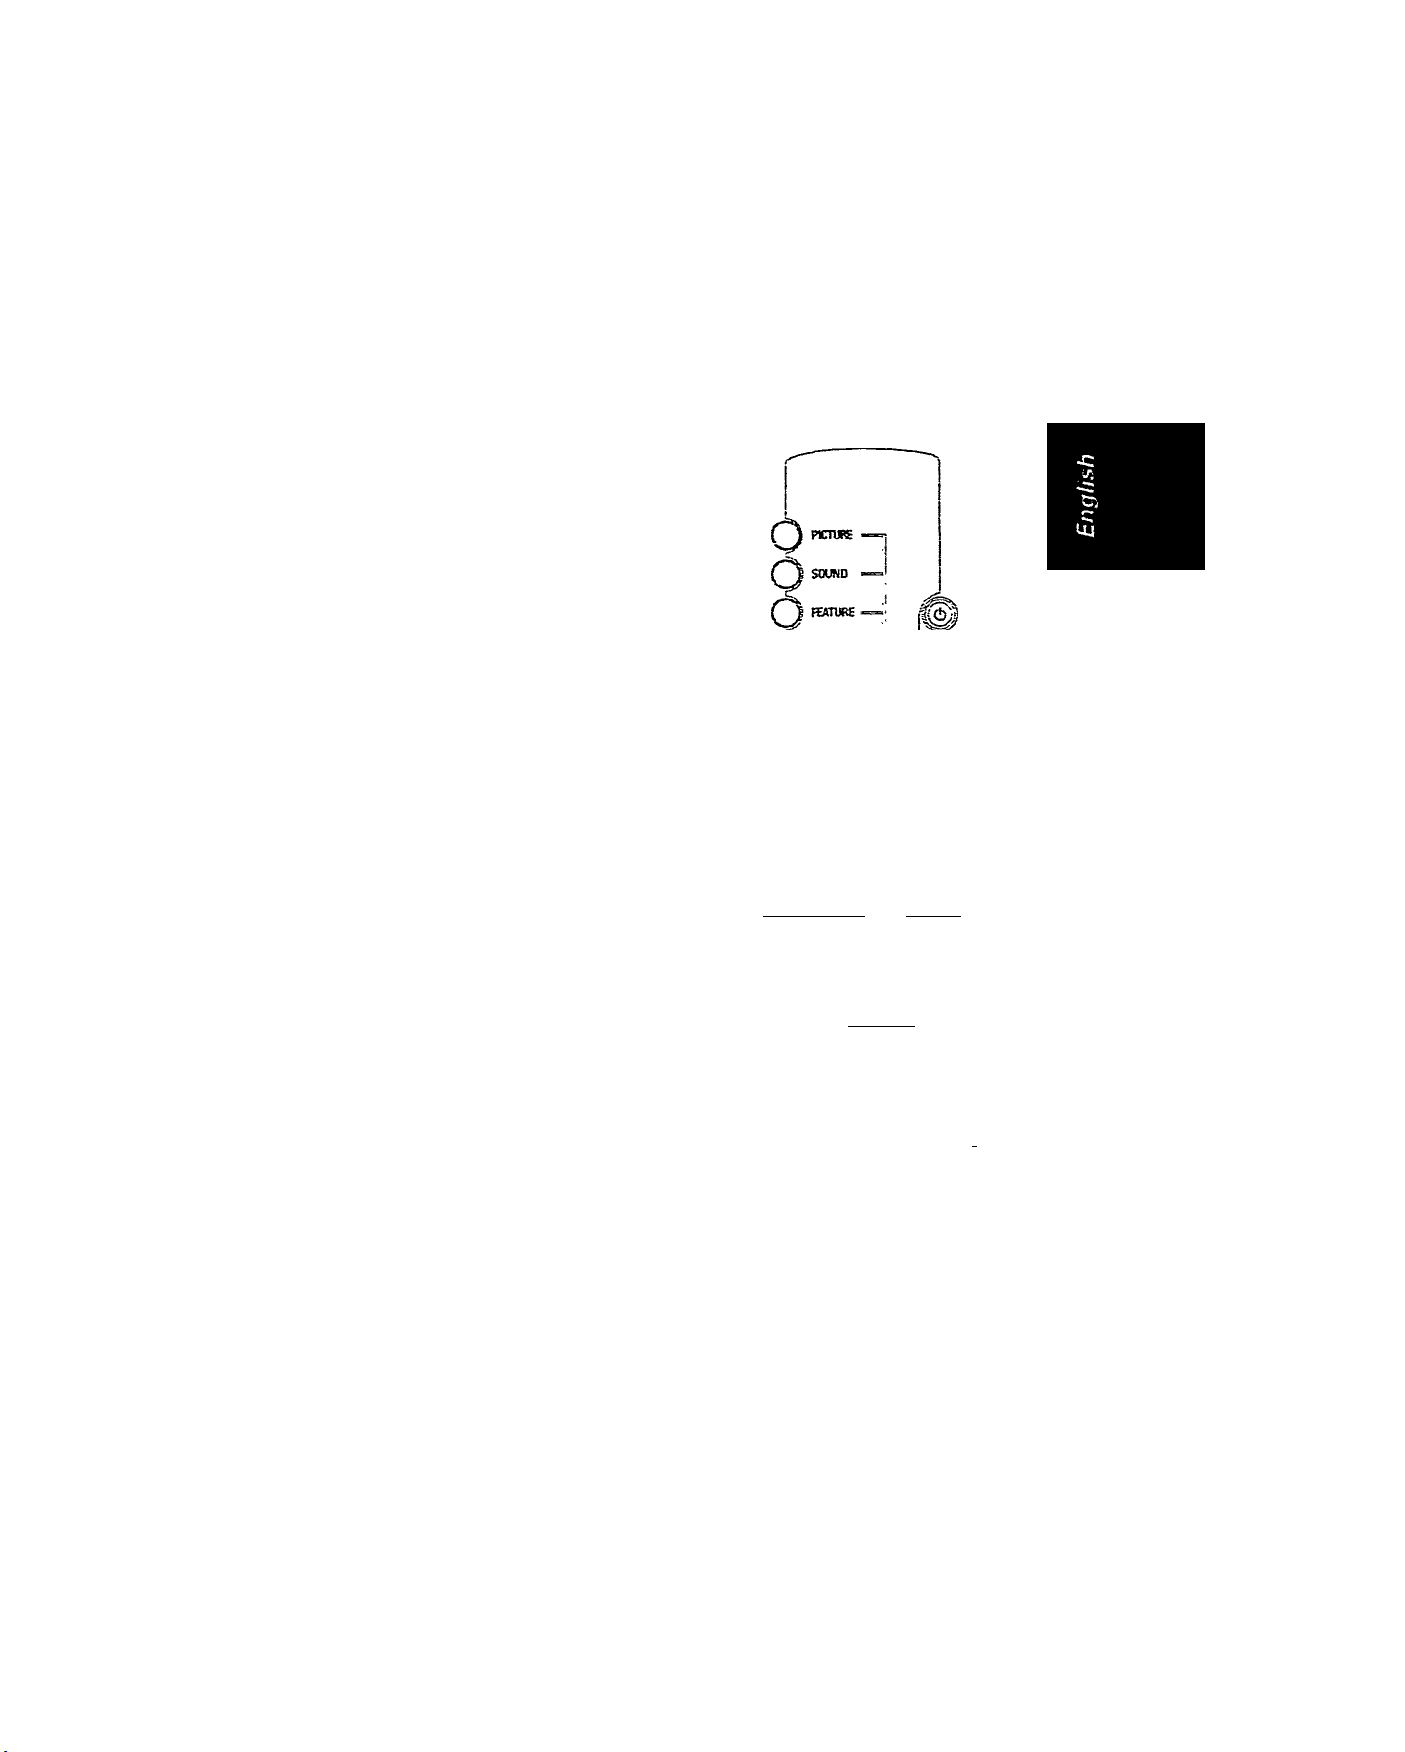
VCR controls
The remote control for this TV is designed specially to be used with selected PHILIPS
video cassette recorders (VCR). To ensure compatibility, please refer to the individual
equipment's instruction manual when using this remote control.
Open the lower half of the remote control to access the VCR control buttons.
Stop movement of tape
Press ■ button.
c
Rewind tape
Press button.
c
Record onto tape
Press • button.
c
Fast forward tape
^ Press ►►
Playback tape
Press ► button.
button.
c
J
3
3
3
3
j I W I
O © ©I
lt=j © © ©i
I cKi3l5C<3U >
aiiwc'jc •
¡[s'; aosoj {^- {».CHljl I
■!W w w
! TXT !i.
• ' ‘
, ^ © :
u; (¿3 ©.
® MJ
!
•ii O
CD ® (5) ® ® ,
’[ 0«PF 9XKi nSXtt PK3OCi0 CAM}'
I I
) ^ f’ I
•j pjp m a«F
Page 72

Page 73
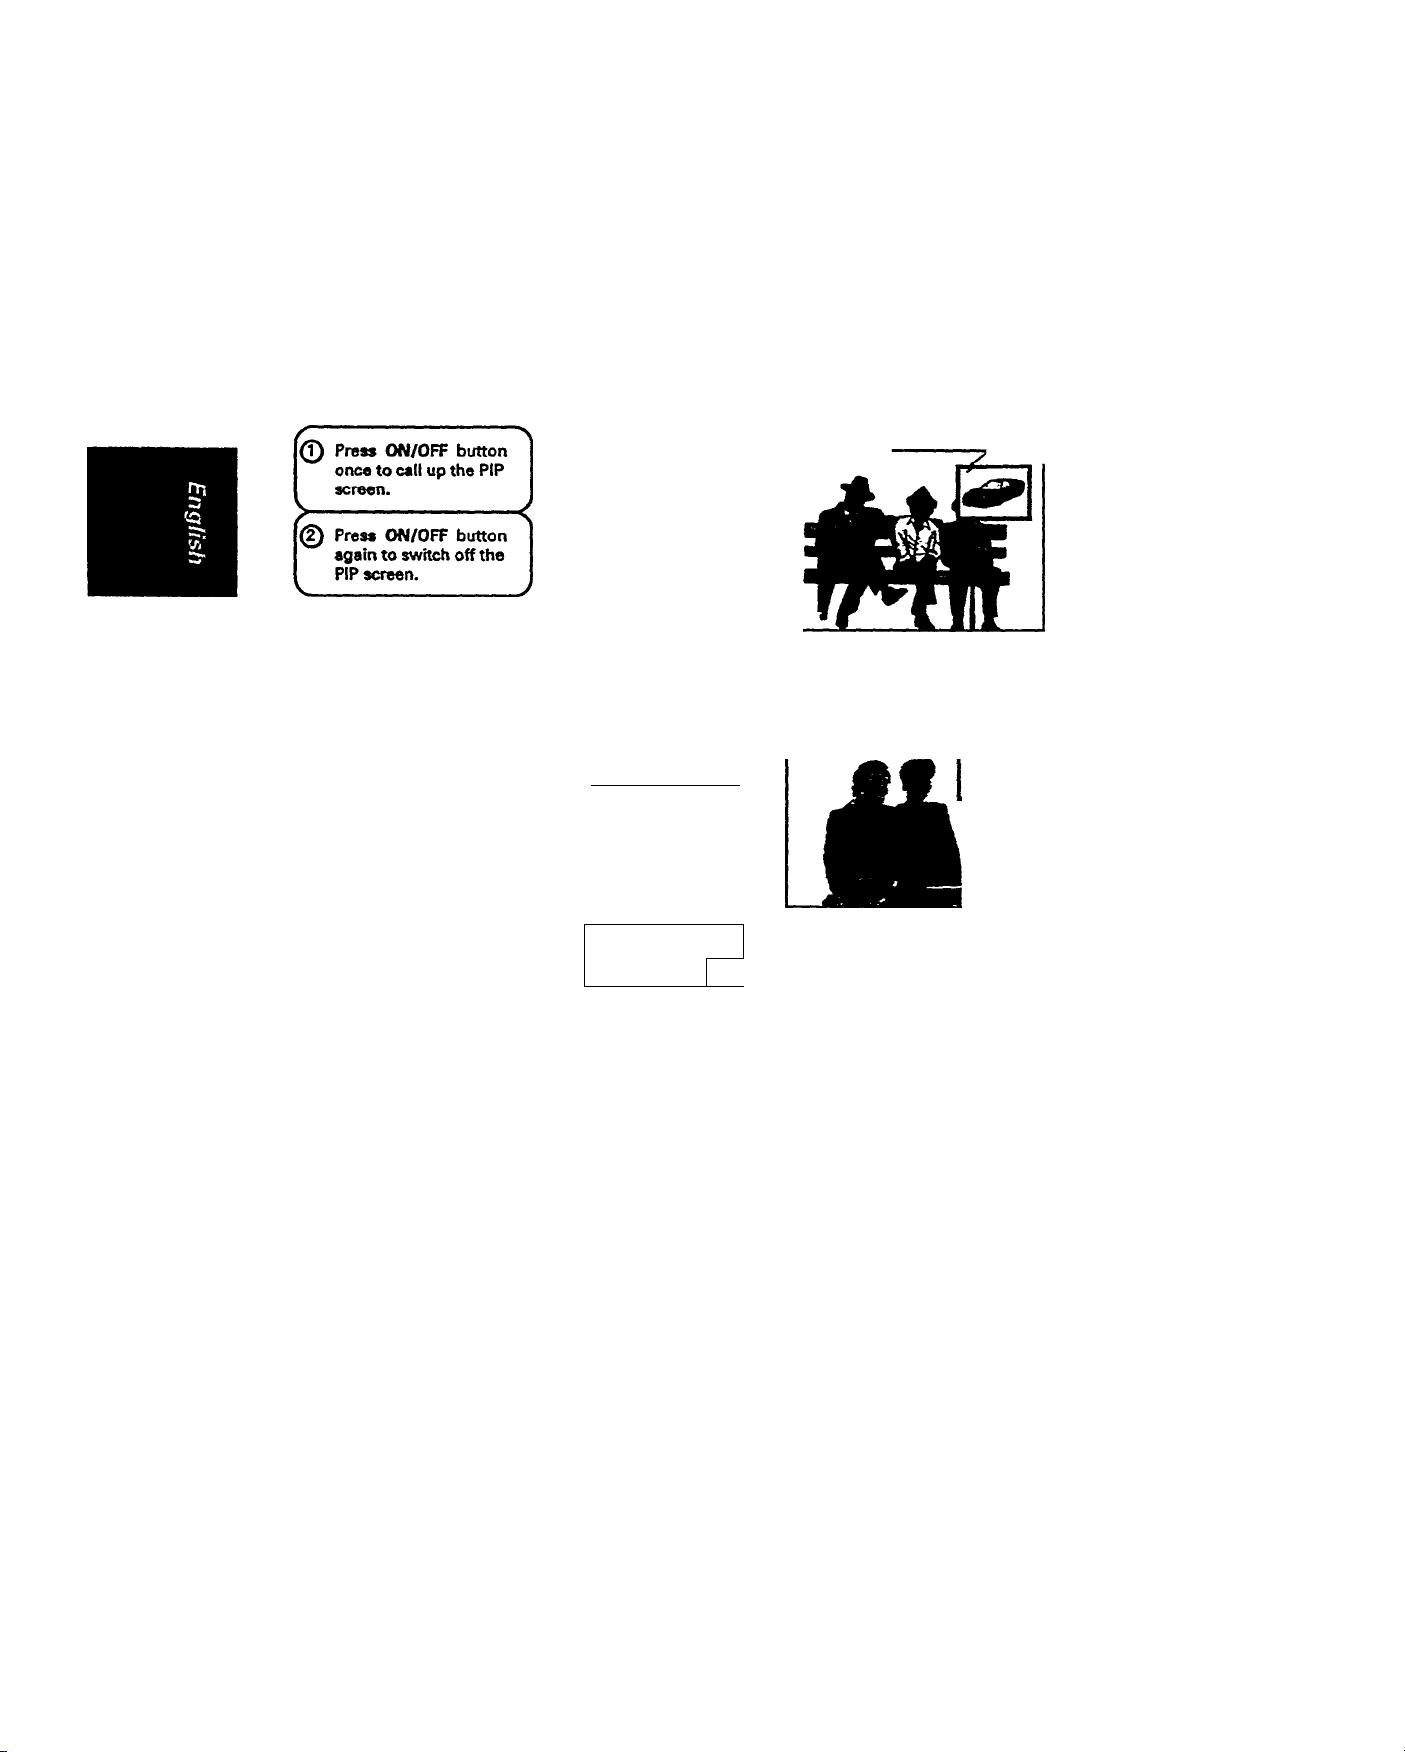
Picture In Picture (PIP)
Your television is equipped with the PIP feature. With PIP, you can call up a sub-screen
within the main television screen. Therefore, you can watch 2 channels at the same
time.
Open the lower half of the remote control to access the PIP function buttons.
Switch on/off PIP
Select PIP source
Press SOURCE button
repeatedly to cycle through
the various sources. Stop
as soon as you find the
source that you want
If you have not made a prior
connection to a VCR, Laser
disc piayer, etc., then the
PiP screen will appear
blank.
- ■
Freeze PIP screen
Q) Press STILL button
once to freeze the PIP
screen.
@ Press STILL button
again to unfreeze the
PIP screen.
'v
_____________________
Main screen
PIP screen
A,
a
1
if?]
jw w
■3: © © ®
s; 0© ©
CC © © ^¿1
fc. -w. TO
's'' iom' ;
© © O
O O O |01
-<
>
a..»
o o ©
PIP On
U
PIP Source
Scan PIP channels
' >
Press PROGRAM -F or —
button for more than 3
seconds. The TV will
automatically scan through
all the channels in the
"Favourite Programmes" list
and EXT 1 and EXT 2.
The scan goes in a loop. To
stop scanning, press any PIP
function button.
PIP Freeze
-3
Page 74

Page 75
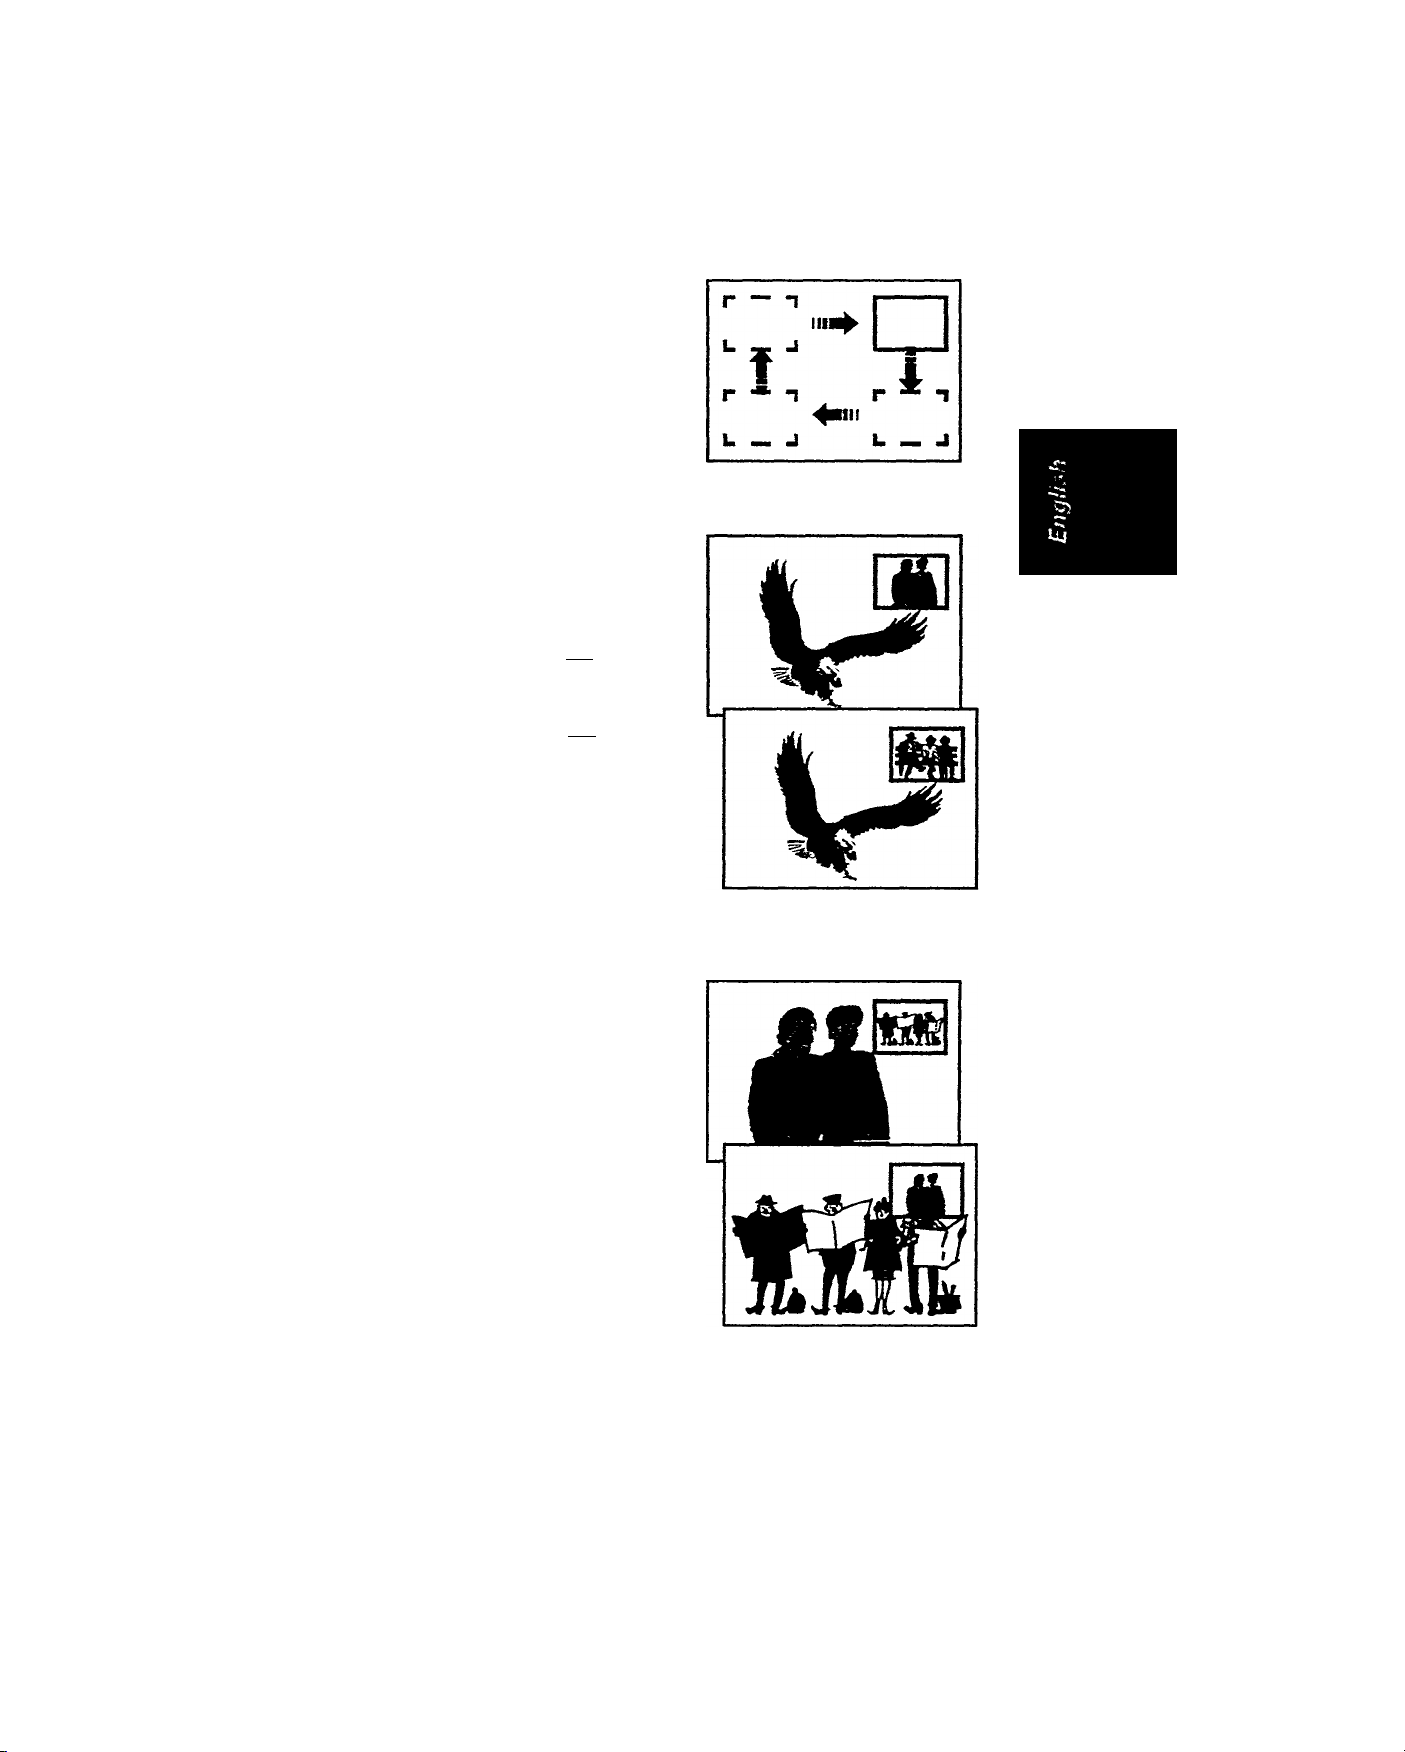
...
picture in picture
Select PIP position
Press POSITION button to
move PIP screen to any of
the 4 corners of your main
screen.
Select PIP channels
-
-----------------------------------------------,
Press PROGRAM +/ button repeatedly to select a
higher or lower channel
number.
Swap PIP screen with
main screen
o-*-
SOM D
------
!
IMWE —
\ i
.if 4
U ^ jCH I
O 0 © i
^ © © ©
PIP Position
;
Press SWAP button to
interchange the PIP screen
whh the main screen.
S 00©
■ 5j IH3 © 4^
‘ rxT
'Ti :T-
>£»
© 'S © ©
o o o ©^:
" öoör
■
PIP Channels
a?
PIP Swap
Page 76

Page 77
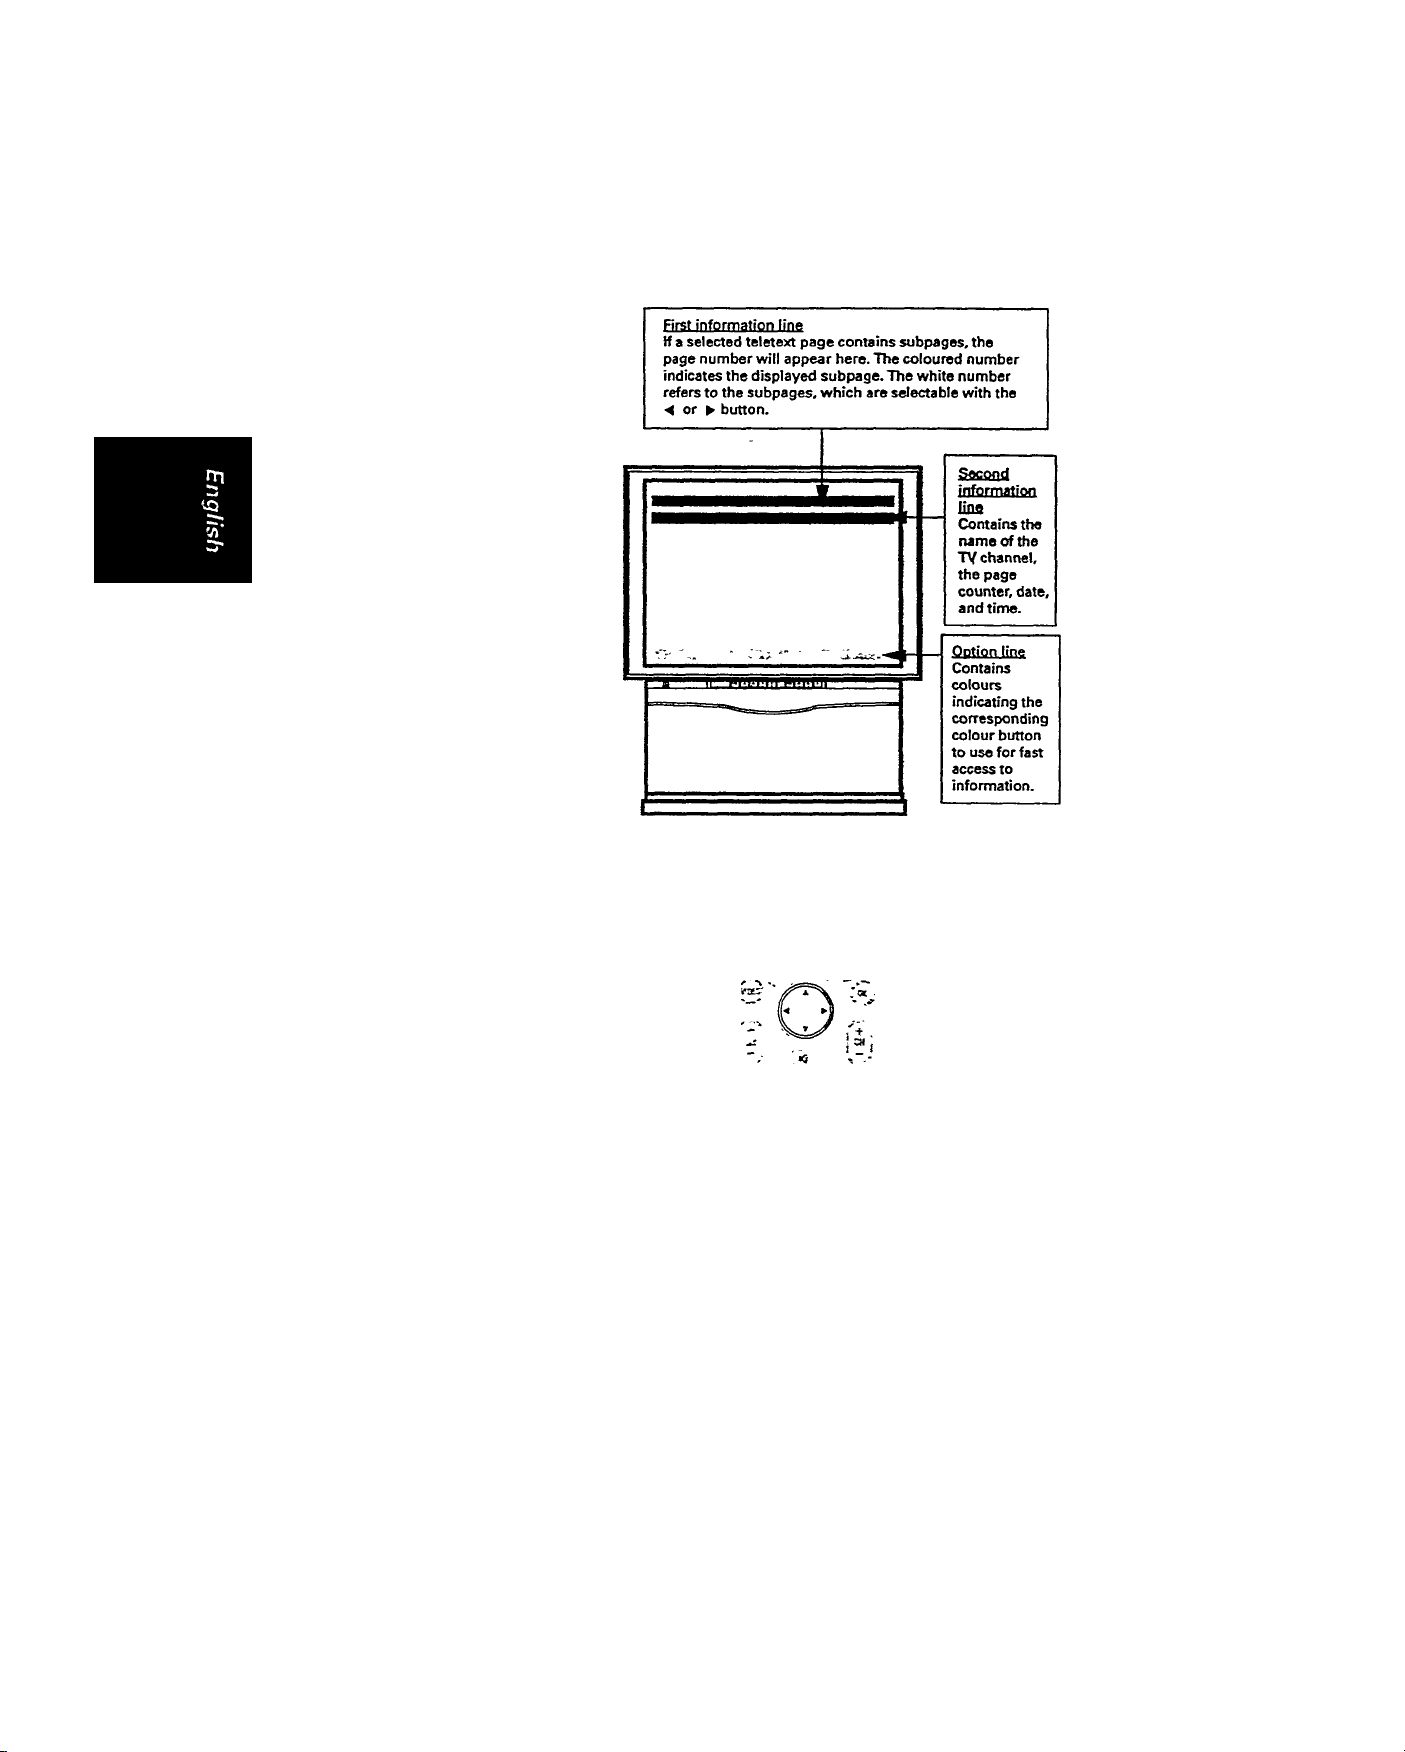
Teletext
Most television channels broadcast information via teletext. Look for the main index
page (usually page 100) for information on how to use its teletext system. To start,
select a channel that is broadcasting teletext.
To switch on/off Teletext
Press the S button
once to switch on
Teletext.
A teletext page appears
with two information lines
at the top and an option
line at the bottom.
>
Press the S button
repeatedly until you
see the last viewed TV
prograntme again.
Select Index page
Press QD button to select
(;
Select a teletext page
a) with the digit buttons
•<
)
Enter a page number (3
digits) with the digit
buttons.
The selected page number
will display at the top left
corner. If page is not
available, the message
'Page Not Available'
appears on the first
information line. If you
make a mistake entering
the page number, you
have to complete the 3
digits before rekeying the
correct page number.
b) with the option line
Press the corresponding
colour buttons of the colour
options shown at the
bottom of the screen to
select the respedtive
Teletext page.
^ O © ©
3; © © ©
© © ©
CM3 ^ © ^
O O O O ©'
Page 78

Page 79
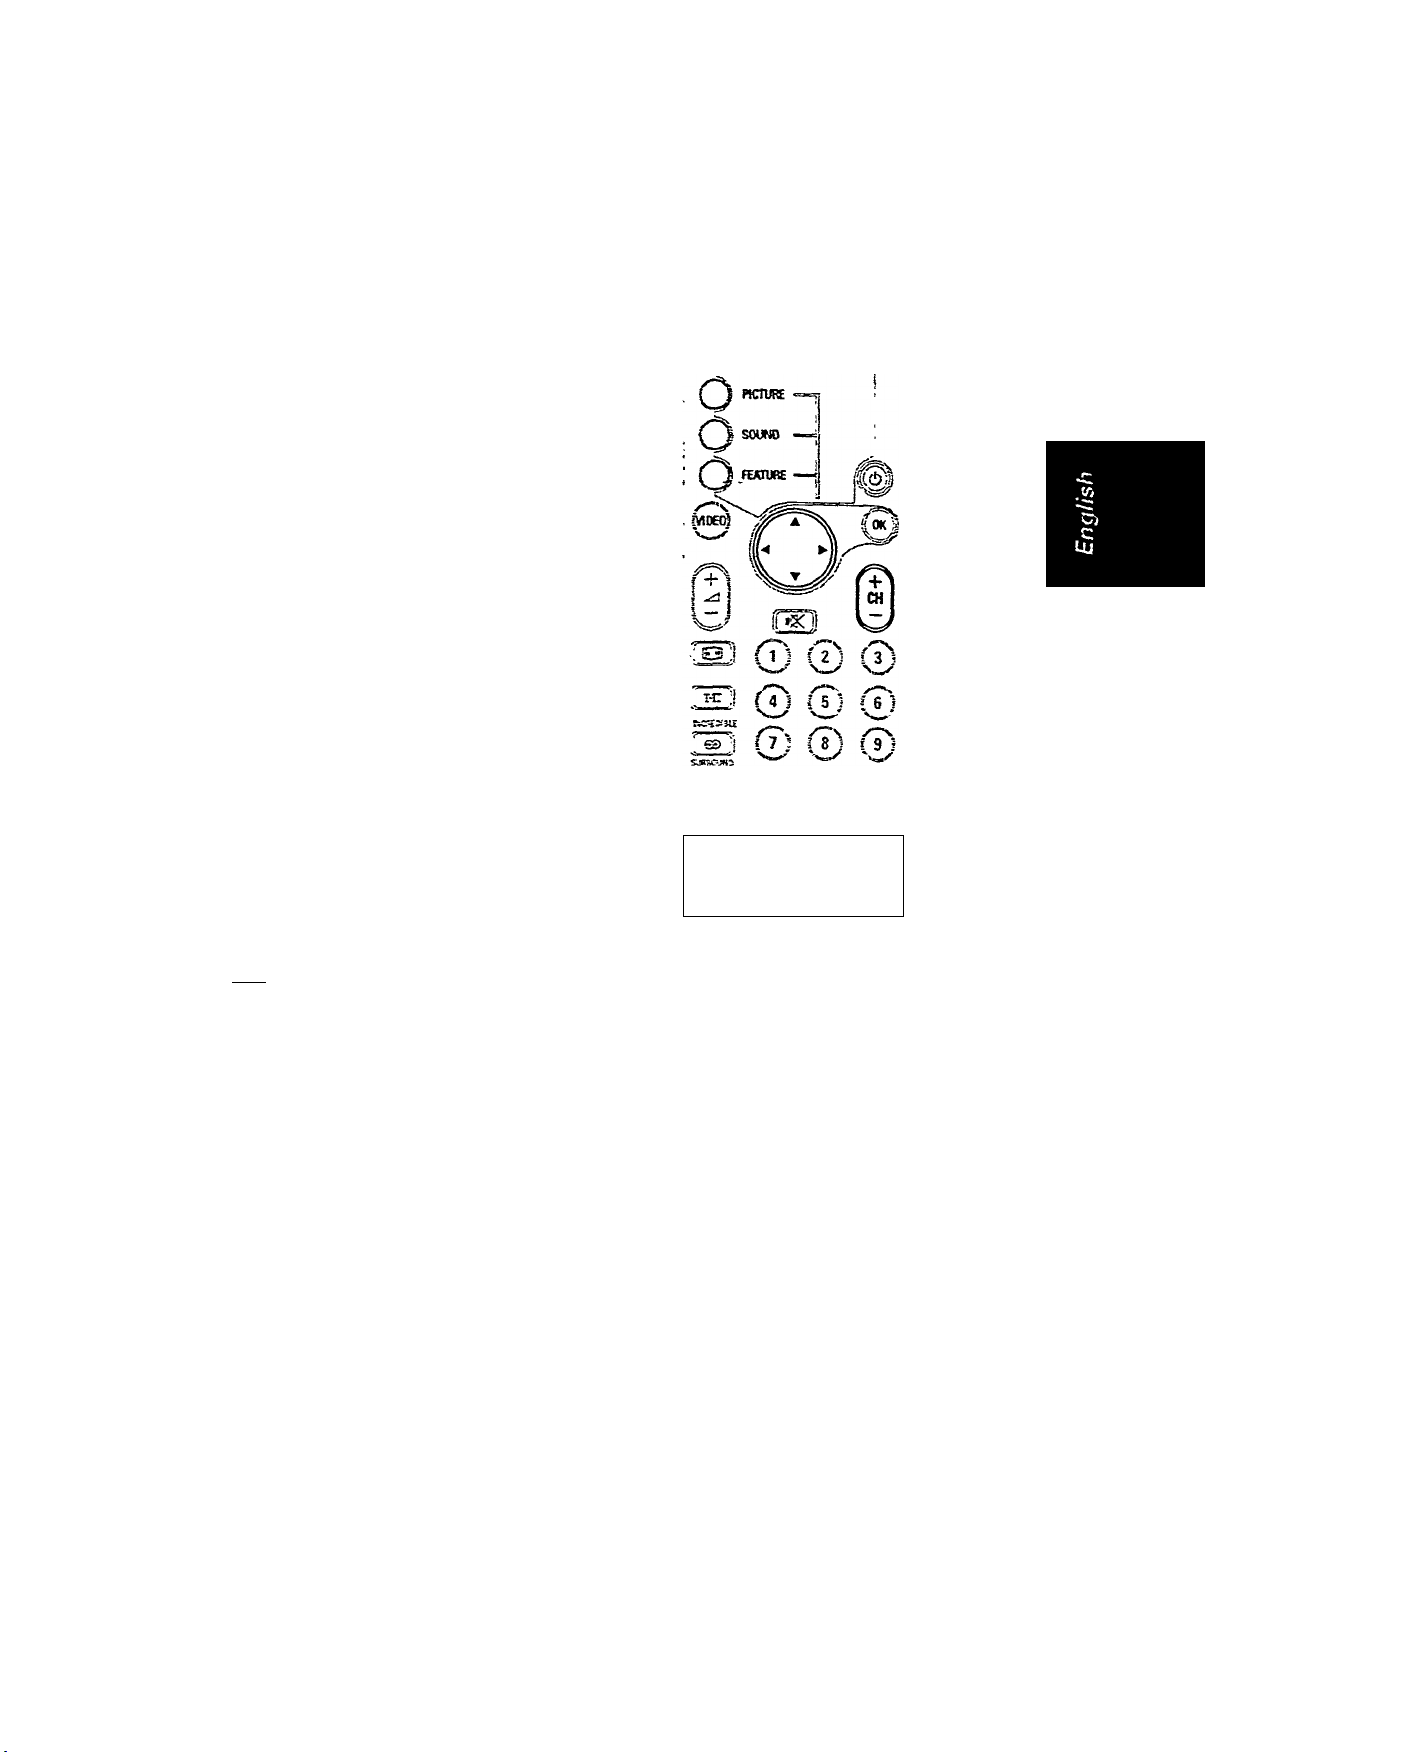
teletext
F»st Ml»ct teletext pages a) 'Scroll through pages
0
Pres*
CH — or T button to select
hie previous page.
0 Press CH + or A button to select
the following page.
<
b) Select current and previous page
|0 Press A/CH once to go to previous
page.
Press A/CH again to come back to
current page.
<
Select a subpage
When you view a selected teletext page
containing subpages, one of them will appear
on the screen. Once the rest of the subpages
are found, they will appear in white on the
first information line. The current subpage
will be in colour.
0 Press ◄ button to select the
___
previous subpage.
I© Press ► button to select the
I following subpage.
iJEJi (oj
Interchange Teletext or TV mode
0 Press X button.
Uie television programme appears with
a 'Iffilsymbol at the top left corner of
the screen. If you select a page number
at this moment, it will appear in place of
^the * symbol.
@ Press X button again to view your
Teletext page.
<
V
News Rash
If you select the news flash page and you
are viewing the television programme after
pressing X button, the moment news is
updated, the word 'NEWS FLASH" and the
news will appear on the screen.
o Press X button to conceal the
news.
The television programme appears with
the ' symbol at the top left corner of
the screen. If you select a page number
at this moment, it will appear in place of
the " symbol.
© Press X button to recall the news.
3€)
,/=s
m
©
■«cir ■sSr
nSt 'Kr "vi/
JKO? 3SUCC KSUifi fWXftói
pjp sw
f@3
Page 80

Page 81
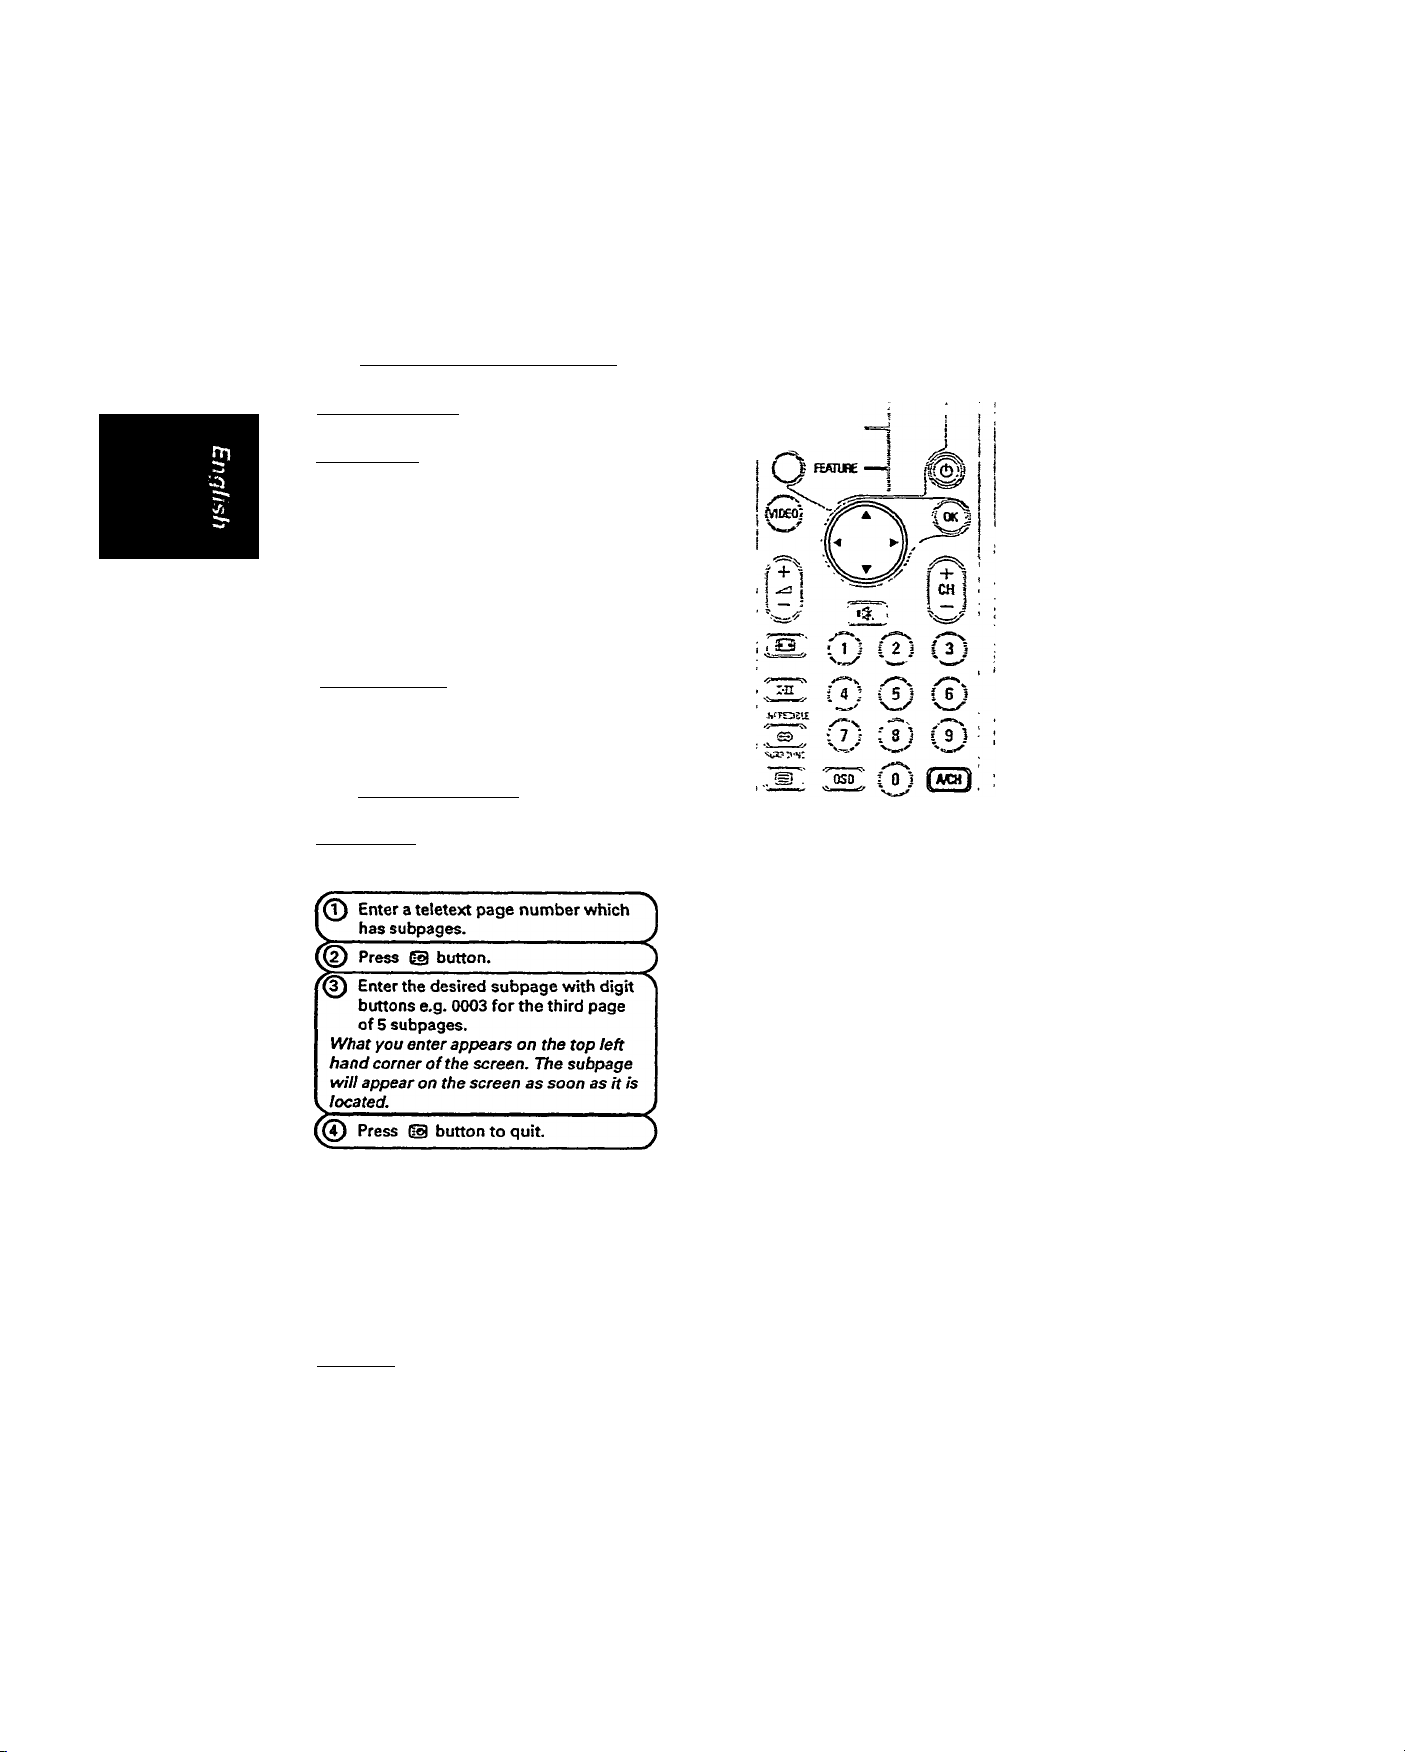
□
teletext
Enlarge Teletext page
r© Press button to enlarge the top
^ half of the teletext page.
f^) Press A or T button to scroll the
I text line by line.
Press -4- button again to enlarge the ^
bottom half of the teletext page.
Press A or T button to scroll the
^ text line by line.
Press -f- button once more to return
V. to normal.
Hold a teletext page
A subpage wilt rotate to the next after about
20 seconds. You can use this feature to hold
down a subpage. The total number of
subpages are indicated on the top right
hand corner of your screen (e.g. 1/2} and on
the first information line (e.g. 01,02).
Press button to hold a subpage.
Press button again to resume
^ page rotation.
Reveal concealed information
o Press ? button to reveal concealed
information such as solutions to
riddles and puzzles.
r© Press ? button to conceal informa-
^ tion again._______________________
__________________
__________________
___________________
____________
<
; ( j PICTURE
I *
i {^S0l«D
I
Cali up a subpage or time display
You can also use this button to call up the
time display (only on channels that are
broadcasting teletext) when you are in the
television mode.
-------------------------------------
Press ^ button to switch on the
time display.
The time is displayed on the top left
hand corner.
© Press ^ button to switch off the
^ display.
-
© © © © <D
® Si €> 3 ©
S 3 3 3
'ffU tyiAf
4 0
ii
Page 82

Page 83
... teletext
To store "Personal" pages
You are able to store up to 4 pages on the
colour keys (1 page on 1 colour key). To do
this, you need to be in Teletext mode.
Select a teletext page (e.g. 800).
I
Press the OK button.
A messsge line ‘Press colour key to
store“ appears.
0 Press any of the 4 coloured buttons
(e.g. red) in which you want to store
the page.
A message tine ‘Page stored in red key“
appears to confirm that you have already
stored the page in the designated colour
button.
If you vvish to store pages in the
remaining 3 coloured buttons, repeat
steps 1 to 3. To exit, press the @
^ button twice._________________________
<
To call up “Personal" pages (only works in TV mode)
© Press the respective coloured button
to call up the stored page.
The page is displayed in ‘News On
Demand“ mode.
Note; If your pre-stored teletext page in
the colour key belongs to another
channel, the TV will switch channels
when you press the colour key.
Press the OK button to return to the
last viewed channel.
V
__
<
News ON Demand
Í P!Cna£ —;
I t souw
News ON Demand
If you are in teletext mode.
Press the @ button once.
(!
If you are in TV mode.
Press the ® button twice.
The contents of the teletext page appear
in 4 lines at the bottom, leaving the rest
of the screen free for watching the TV
programme.
Press either the A or T button to scroll
and view the rest of the page.
:§:©©©
^ © ® ©
^©©©
W' ® "aOi~
O O O O
ixr
:x' .3'
.2: -fe Í .
^ »V-«
Í - .m"
jAfrt .arxaaa
»Tt_ JM?
Page 84

Page 85
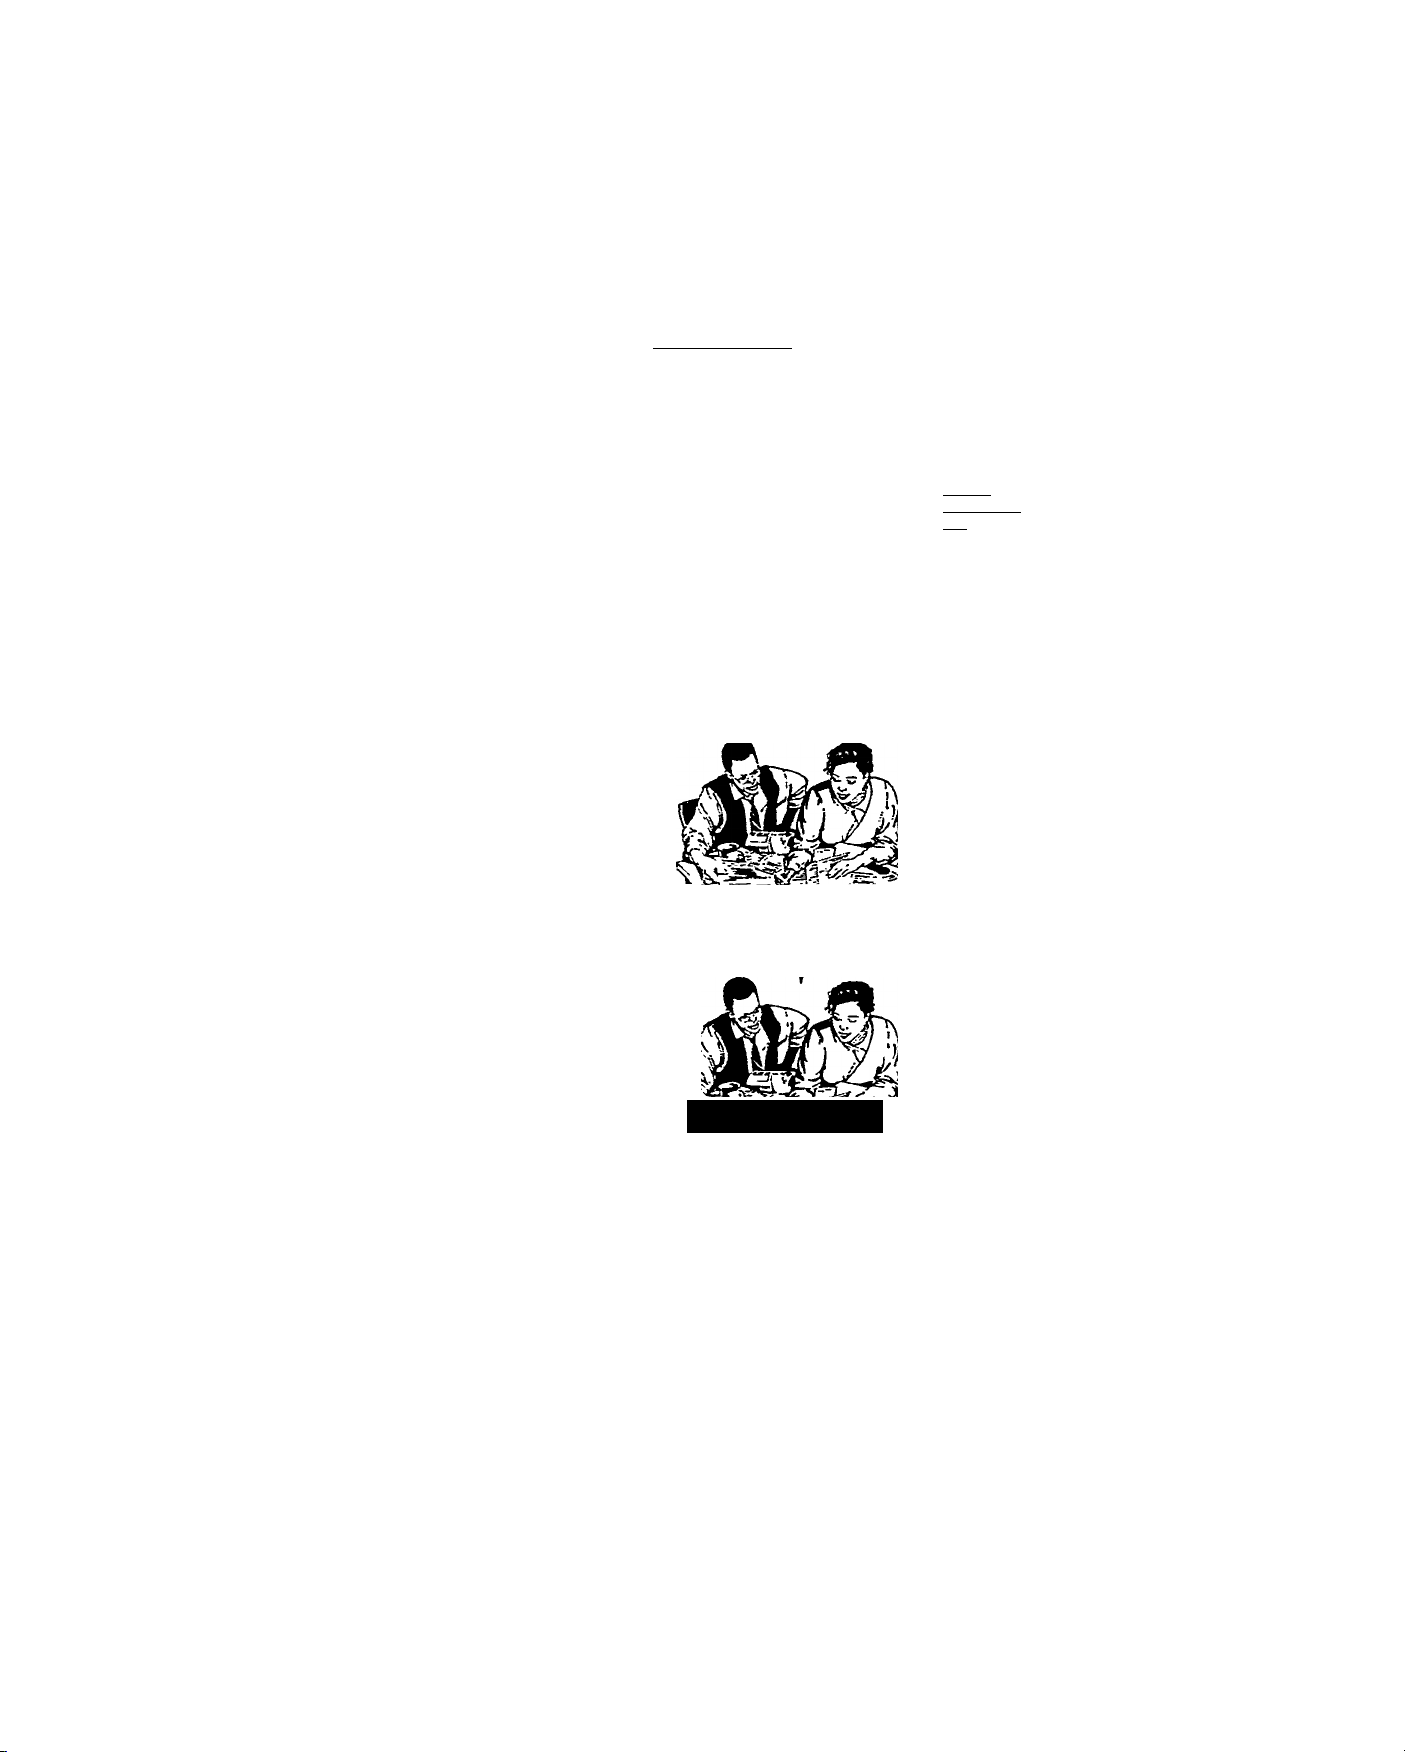
Subtitle Txt
TV channels which broadcast teletext often transmit certain programmes with subti
tling for the hearing impaired.
First information line
© Switch on the Teletext
index pagejo check
for a page number
which contains
subtitle information;
select it
Press the Q button
once.
"subtitle stored’ appears
on the first information
line of the Teletext page.
>
© Exit from Teletext.
>
© Press the Q button
to switch on the
subtitles transmitted
by the broadcaster.
‘Subtitle Txt ON" appears
momentarily and the
subtitles will come onto
the screen.
<
К
<
If a selected teletext page contains subpages, the
page number will appear here. The coloured number
indicates the displayed subpage. The white number
refers to the subpages, which are selectable with the
4 or ► button.
Second
information
line
Contains the
name of the
TV channel,
the page
counter, date,
and time.
Qption.lin6
Contains
colours
indicating the
corresponding
colour button
to use for fast
access to
information.
^' © © ©
© © ©
.:«;©©©
СЮ 0 i.
я ^ ©
subtitles subtitles
-subtitles • sub,titles
©
Page 86

Page 87
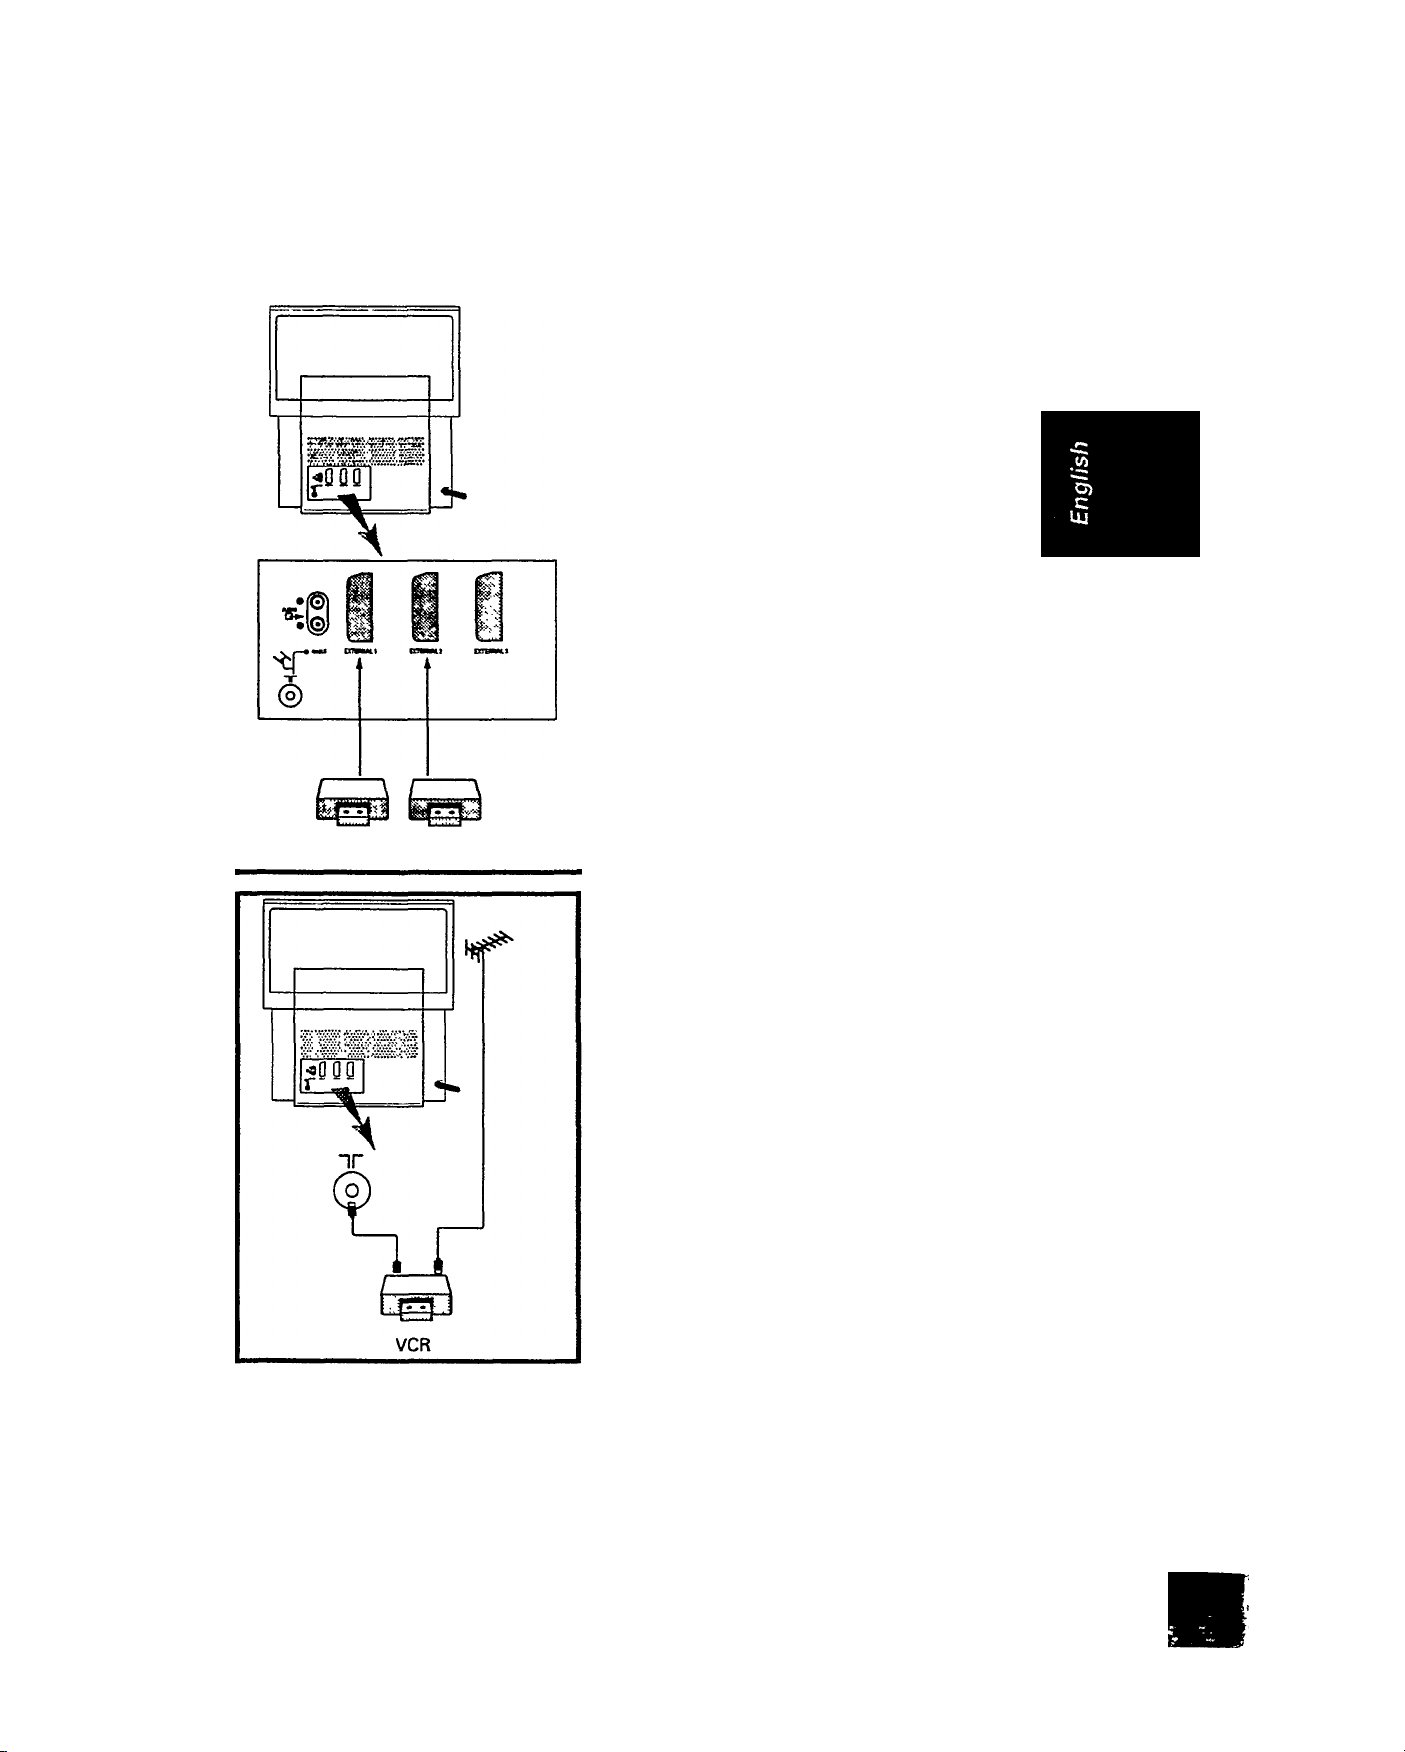
Connecting other equipment
Equipment such as a VCR, Laser disc player, CD-I, etc. could be connected to the back
sockets of the TV. Switch off the TV and equipment before making any connection.
Playback from VCR
a) Connect a eurocable to either the
EXT 1 or the EXT 2 terminal on the
back of the TV and to the appropriate
output terminal on the VCR.
If you connected the VCR to EXT 1, press
the VIDEO button on the remote
control repeatedly to select either
EXT 1 CVBS or EXT 1 RGB,
whichever is available on your TV.
If you connected the VCR to EXT 2, press
the VIDEO button repeatedly to select
EXT 2 CVBS or EXT 2 RGB,
whichever is available on your TV.
VCR ofl VCR
OR
b) Connect the Antenna or Cable signal to
the VCR’s 'Antenna In* jack. Then,
connect the 'Out to TV" jack of the VCR
to the "Cable In' jack of the TV.
The VCR is now considered a TV channel by
the TV. You must tune into the VCR's
test signal and assign the channel 0 to
it. For further information on the test
signal, refer to the VCR's instruction
manual. Select the channel 0 to view the
playback picture.
4 3
Page 88

Page 89
connecting other equipment
fAf. AW
CD-i LD
Playback from Laser disc player,
CD-i, etc.
Use a eurocable to connect the equipment
to the EXT 1 or EXT 2 terminal on the back
of the TV.
• Press the VIDEO button on the remote
control to select EXT 1 RGB or EXT 1
CVBS (whichever is available on your
TV) if you connected the equipment to
the E>^ 1 terminal. Press the VIDEO
button to select EXT 2 RGB or EXT 2
CVBS (whichever is available on your
TV) if you connected the equipment to
the EXT 2 terminal.
rC’
Amplifier connection
Connect an audio cable to the Left and
Right Audio Out terminals on the back of
the TV and to the Left and Right Audio In
terminals on the amplifier.
«0 0 Q
©
C3m fs
Amplifier
ii it
Page 90

Page 91
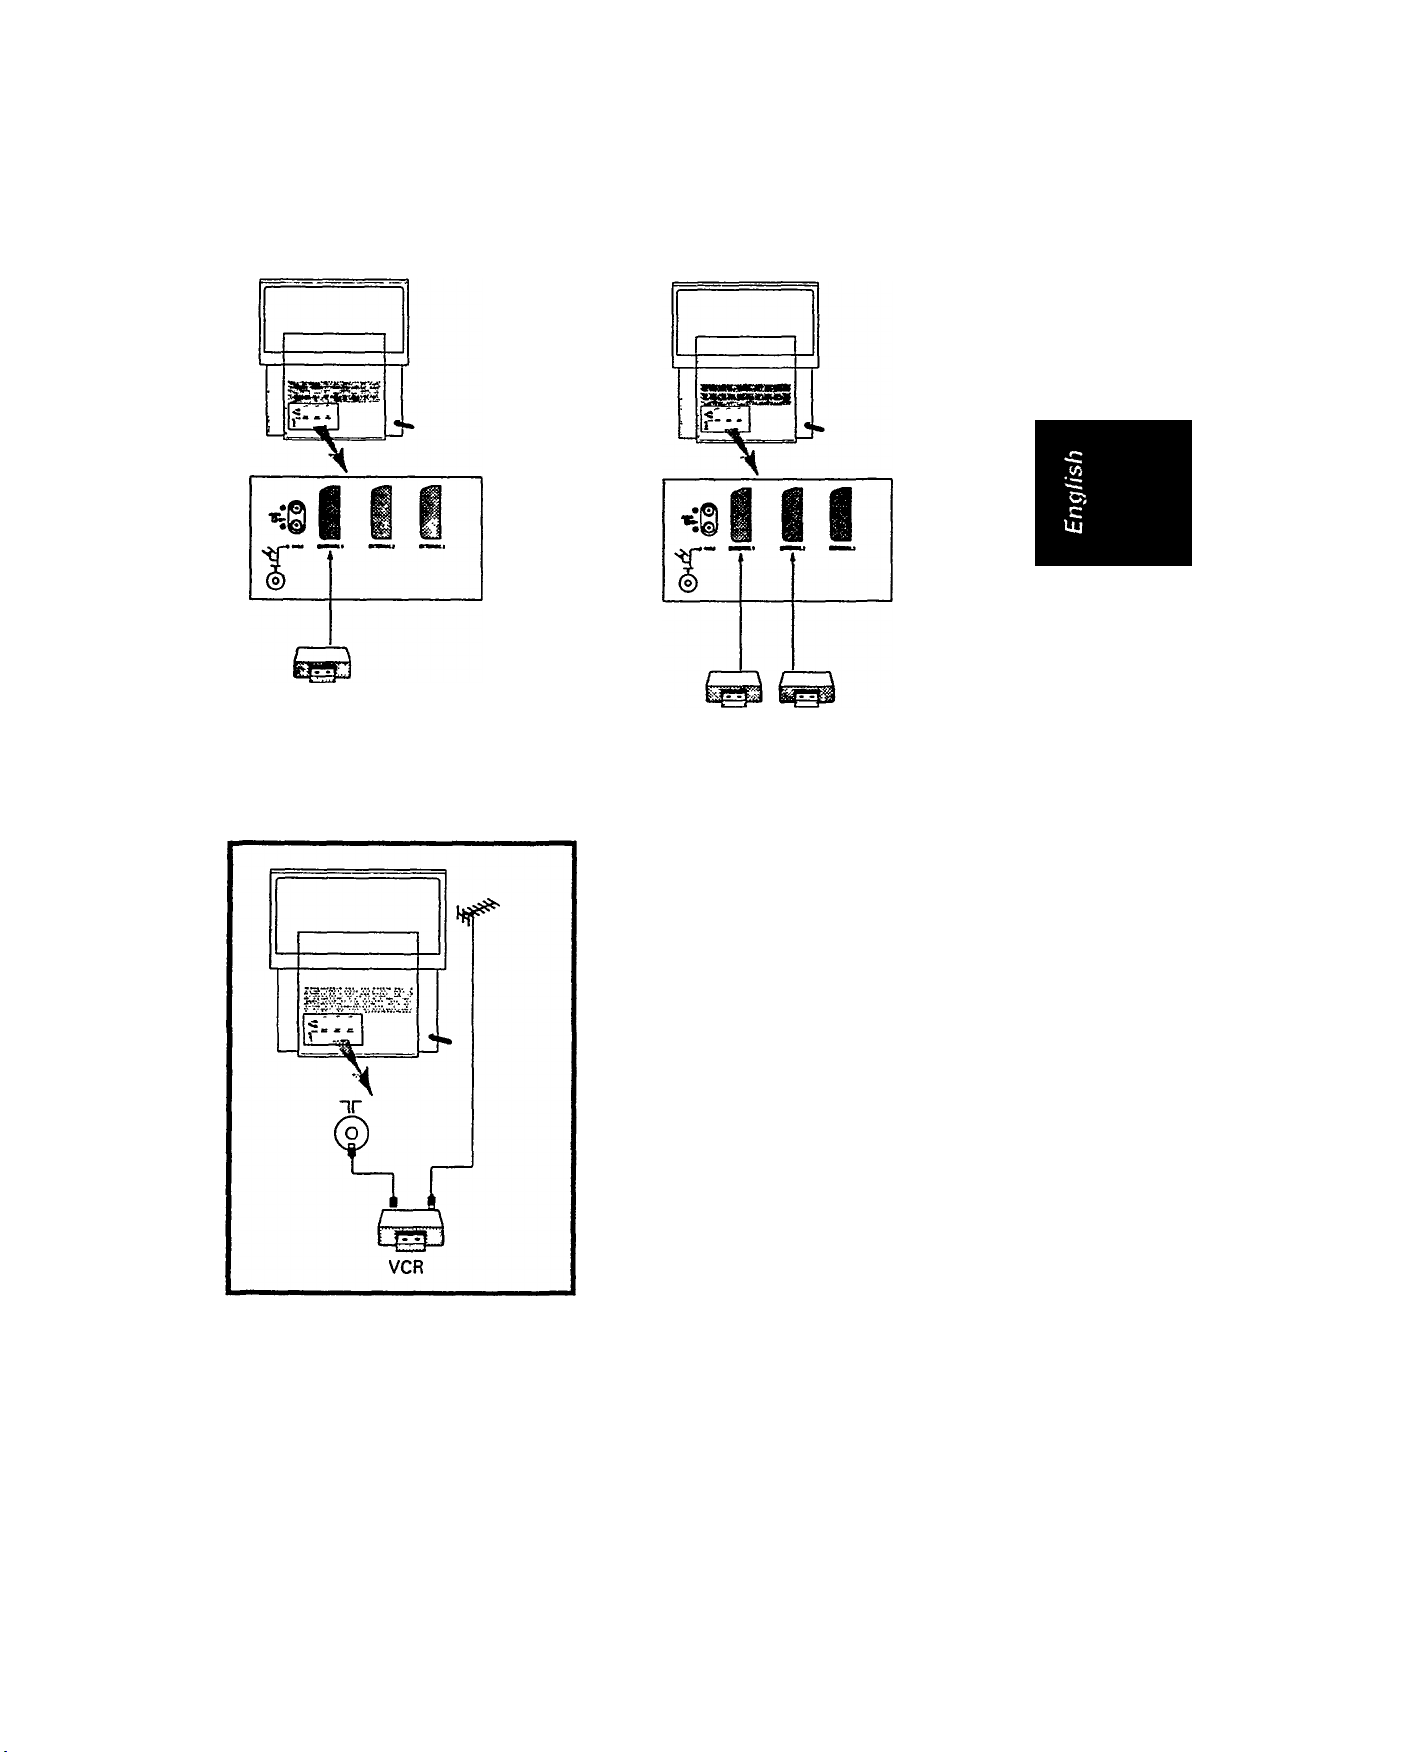
..
connecting other equipment
Recording
VCR
TV programme on the channel you are
watching. Connect VCR to "EXT 1."
VCR 1 VCR 2
Programme from one VCR (e.g. VCR 1)
to another VCR {e.g. VCR 2).
TV programme directly from the
antenna. You do not need to watch the
programme at the same time.
4 6
Page 92

Page 93

□
Frequency tables
Table 1 - C.C.I.R. Channel Frequency
Channel
No.
2
3
4
5
6
7
8
9
1 0
1 1
12
21
22
23
24
25
26
27
28
29
Picture
Freq. (MHz)
-48.25
55.25
62.25
175.25
182.25
189.25
196.25
203.25
210.25
217.25
224.25
471.25 41 631.25 61
479.25
487.25
495.25
503.25
511.25
519.25
527.25
535.25
Channel
No.
30
31 551.25
32
33 567.25
34
35
36
37 599.25
38
39
40
42
43
44
45 663.25
46 671.25 66 831.25
47
48
49 695.25
Picture
Freq. (MHz)
543.25
559.25
575.25 54 735.25
583.25
591.25
607.25 58
615.25 59 775.25
623.25 60
639.25 62
647.25 63
655.25 64
679.25 67
687.25 68
Channel
No.
50
51
52
53
55
56
57
65
69
Picture
Freq. (MHz)
703.25
711.25
719.25
727.25
743.25
751.25
759.25
767.25
783.25
791.25
799.25
807.25
815.25
823.25
839.25
847.25
855.25
Page 94

Page 95
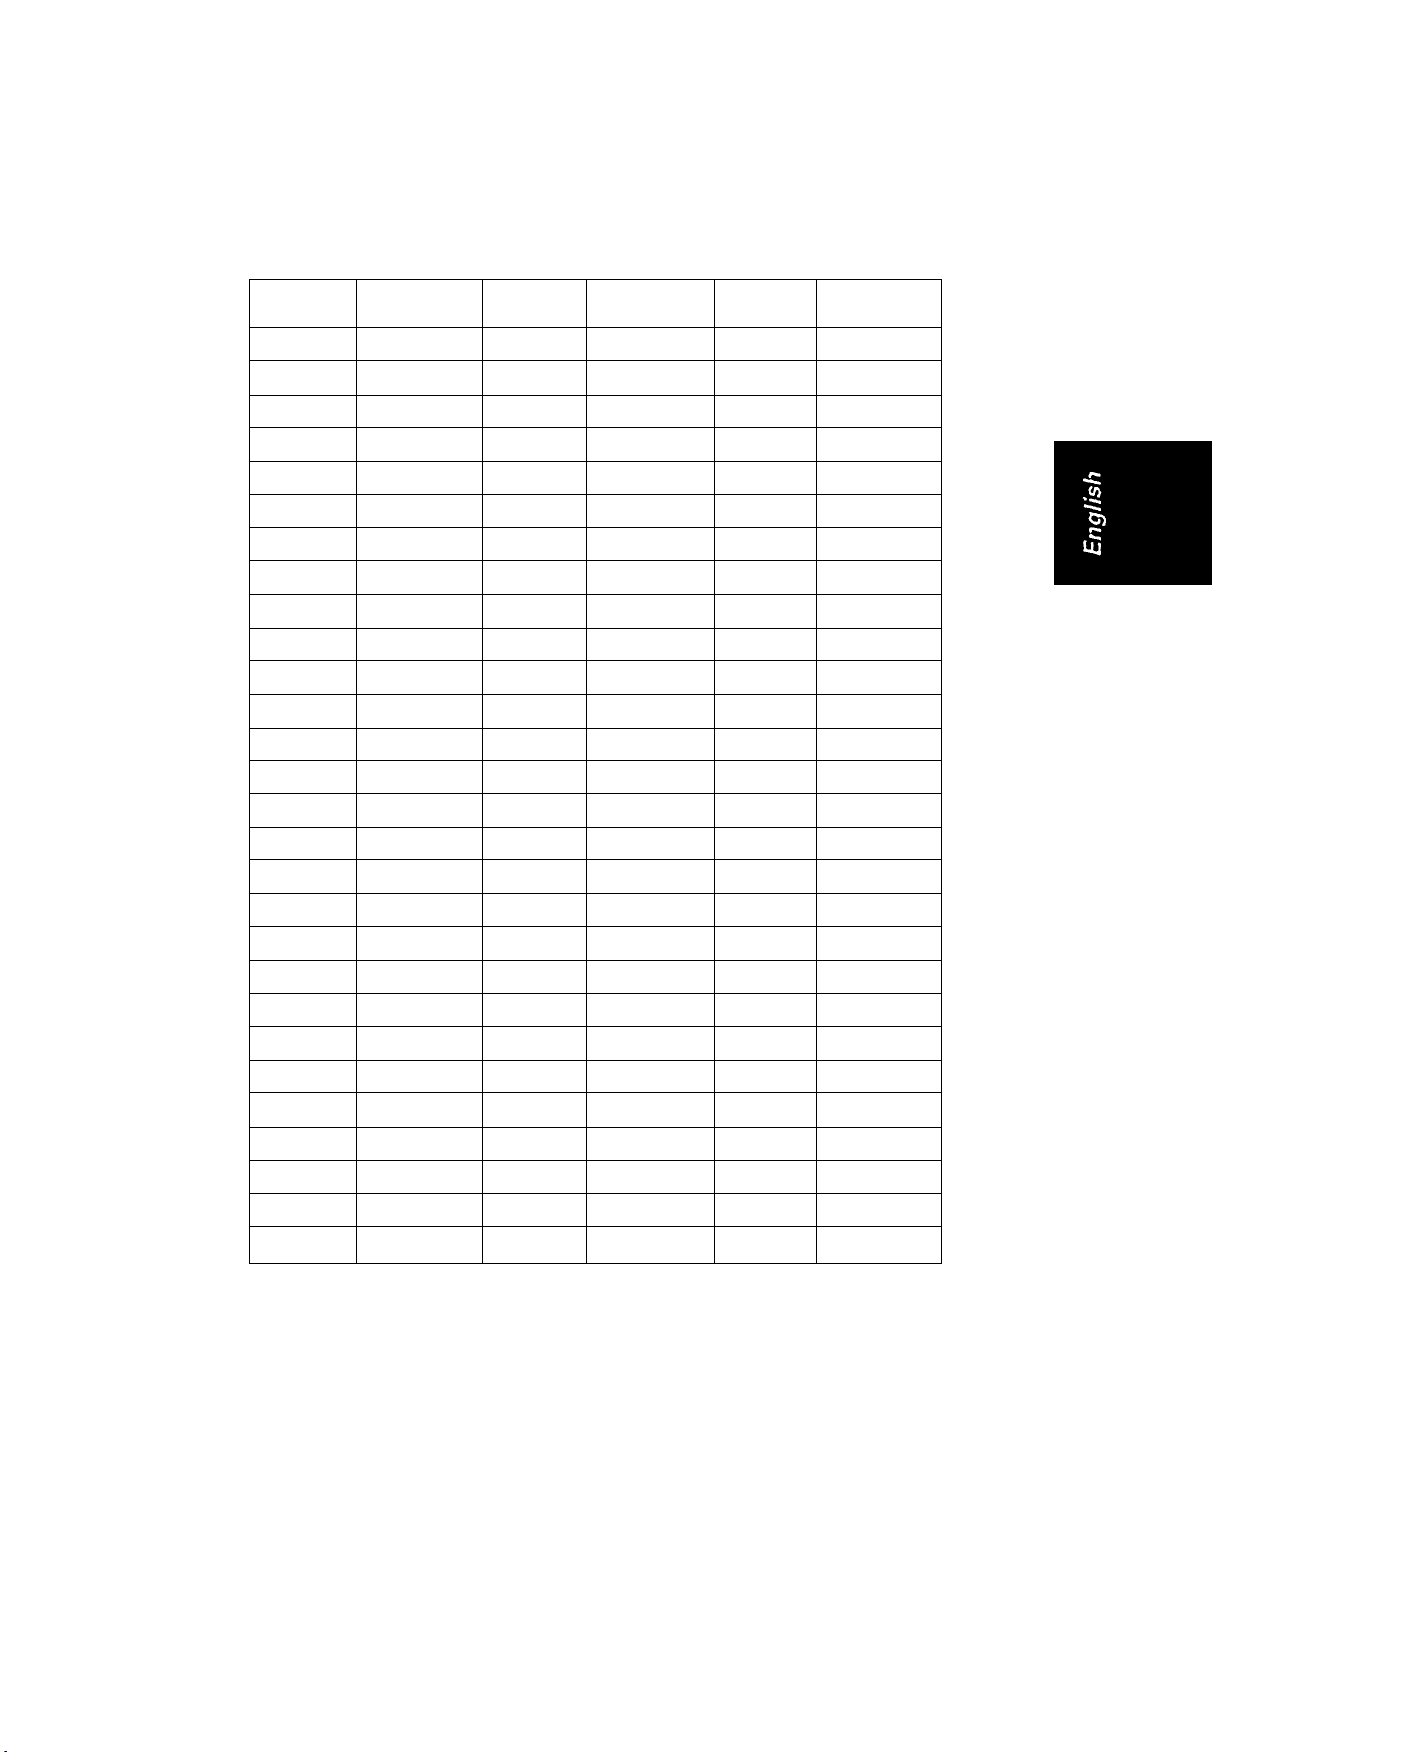
frequency tables
Table 2 - NTSC (Cable transmission)
Channel
No.
2
3
4
5A
5
6
A-5
A-4
A-3
A-2
A-1
A 34 121.25
B
C
D
E
F
G 40
H 41
I 42 169.25 GG
7
Picture
Freq. (MHz)
23 55.25 K 223.25
24
25 67.25 M 235.25 RR
26 73.25 N
27 77.25
28
29 91.25
30 97.25
31
32 109.25
33 115.25
35 127.25
36 133.25
37
38 145.25
39
43 175.25 HH
10 193.25
11
12 205.25
13 211.25
J 217.25
61.25 L
83.25
103.25
139.25 BB
151.25 DD
157.25 EE 41 325.25
163.25 FF
8 181.25
9 187.25
199.25 LL
Channel
CC 39
II
JJ 46
KK 47 361.25
MM
NN
OO
No.
Picture
Freq.(MHz)
229.25
241.25 SS
247.25 TT
C
P 253.25
259.25
G
R 265.25
271.25 AAA 60
S
T 277.25
283.25 CCC 62
u
V 289.25
295.25 EEE 64
w
AA
38
40
42
43
44 343.25 72
45
48
49
50
51
301.25 65
307.25 66
313.25
319.25
331.25
337.25
349.25
355.25 74 523.25
367.25
373.25
379.25
385.25
Channel
No.
PP
QQ
UU
W
ww
6BB
ODD
Picture
Freq. (MHz)
391.25
52
397.25
53
403.25
54
409.25
55
415.25
56
421.25
57
427.25
58
433.25
59
439.25
445.25
61
451.25
457.25
63
463.25
469.25
475.25
481.25
67
487.25
68
69
70
71
73
75
76
77 541.25
493.25
499.25
505.25
511.25
517.25
529.25
535.25
4 7
Page 96

Page 97
... frequency tables
-------------------------------------------------------------------
Table 3 - NTSC (Terrestrial transmission)
Channel
No.
2 55.25 30
3 61.25 31
4 67.25 32
5
6
7
8
9 187.25 37 609.25 65
10 193.25
11 199.25
12 205.25
13 211.25 41 633.25 69
14 471.25 42
15 477.25
16 483.25 44 651.25 72
17 489.25
18 495.25
19 501.25
20
21
22
23 525.25
24
25 537.25
26
27 549.25
28 555.25
29 561.25
Picture
Freq. (MHz)
77.25
83.25 34 591.25 62 759.25
175.25
181.25
507.25
513.25
519.25
531.25
543.25 54
Channel
No.
33
35
36
38
39
40
43
45
46
47
48
49
50
51 693.25 79
52 699.25 80
53 705.25
55 717.25 83
56
57 729.25
Picture
Freq. (MHz)
567.25 58 735.25
573.25 59 741.25
579.25 60
585.25 61 753.25
597.25
603.25 64
615.25 66
621.25 67
627.25 68
639.25
645.25 71
657.25
663.25 74
669.25
675.25
681.25 77
687.25
711.25 82
723.25
Channel
No.
63
70
73 825.25
75 837.25
76
78
81
Freq. (MHz)
Picture
747.25
765.25
771.25
777.25
783.25
789.25
795.25
801.25
807.25
813.25
819.25
831.25
843.25
849.25
855.25
861.25
867.25
873.25
879.25
885.25
Page 98

Page 99

Information for usors in the UK
(Noc applicable outside the UK)
Positioning the TV
For the best results, choose a position where light does not fall directly on the screen, and at some distance away from radiators or
other sources of heat. Leave a space of at least 5 cm all around the TV for ventilation, making sure that curtains, cupboards etc.
cannot obstruct the air flow through the ventilation apertures.
The TV is intended for use in a domestic environment only and should never be operated or stored in excessively hot or humid
atmospheres.
General Points
Please take note of the section 'General Information’ at the end of the English section in this booklet.
Interference
The Department of Trade and Industry operates a Radio Interference Investigation Service to help TV license holders improve
reception of BBC and IBA programmes where they are being spoilt by interference.
If your dealer cannot help, ask at a main Post Office for the booklet "How to improve Television and Radio Reception".
Mams connection
Before connecting the TV to the mains, check that the mains supply voltage corresponds to the voltage printed on the type plate on
the rear panel of the TV. If the mains voltage is different, consult your dealer.
Important
This apparatus is fitted with an approved moulded 13 Amp plug.
To change a fuse in this type of plug proceed as follows :
1. Remove fuse cover and fuse.
2. Fit new fuse which should be a BS1362 5A, AS.T.A. or BSI approved type.
In order to maintain conformity to the EMC directive, the mains plug on this product must not be removed.
Connecting the aerial
The aerial should be connected to the socket marked ПГ at the back of the set. An inferior aerial is likely to result in a poor,
perhaps unstable picture with ghost images and lack of contrast Make-shift loft or set-top aerials are often inadequate.
Your dealer will know from experience the most suitable type for your locality.
Should you wish to use the set in conjunction with other equipment which connects to the aerial socket such as TV games, or a
video camera. It is recommended that these be connected via a combiner unit to avoid repeated connection and disconnection of
the aerial plug.
Loop aerial (if provided)
The loop aerial packed with the set will give satisfactory reception under good signal conditions. Fit the aerial bracket and lead by
pushing the peg into the square hole in the backcover until it latches in place. Then insert the plug on the lead into the aerial
socket.
■
3135 015 03451
Page 100

 Loading...