

Page 1
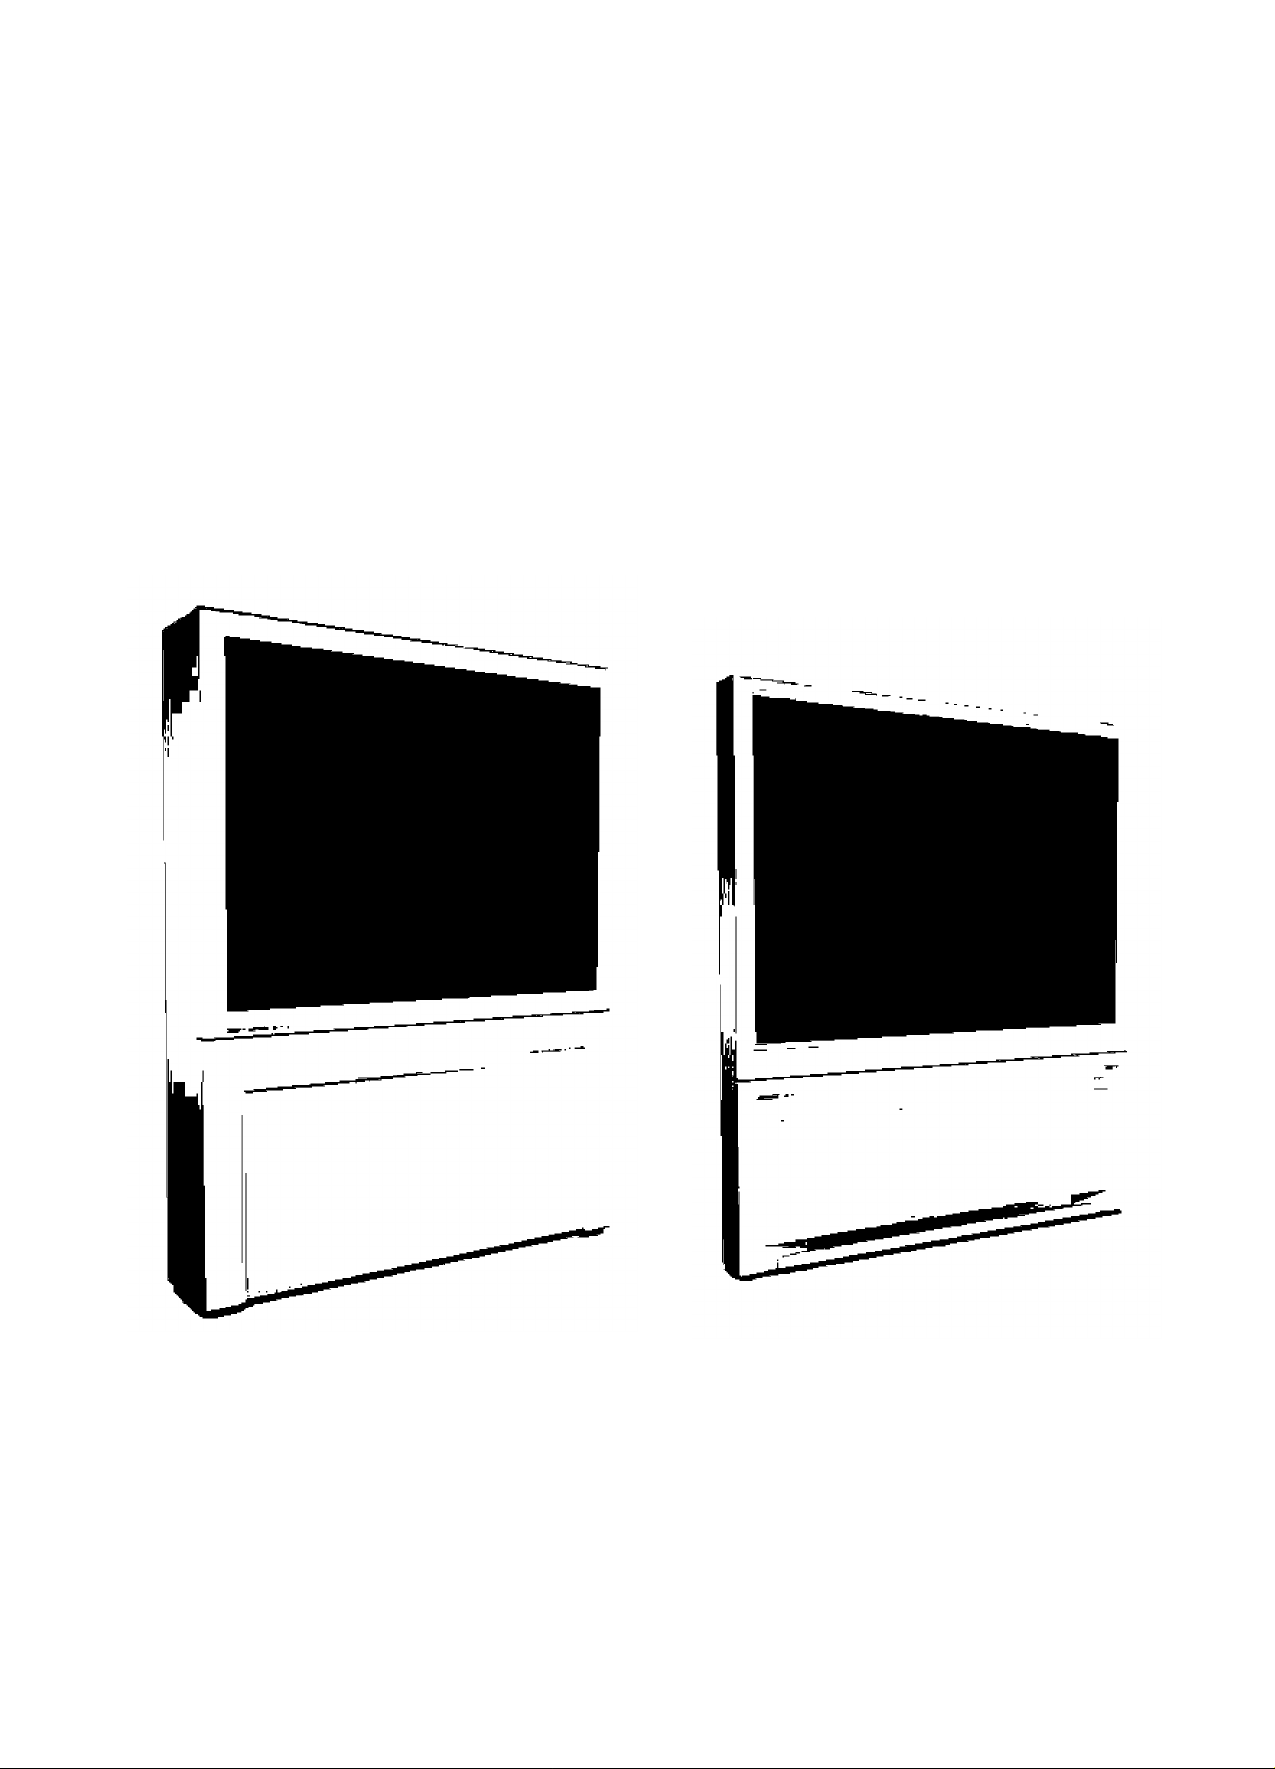
Rear-projection TV
with HD Input
User manual
43PP7445
50PP7445
PHILIPS
43.50PP7445_DFU_Eng_69.indd 1 2005-01-20 10:09:41 AM
Page 2

Contents
Thank you for purchasing this television set. You are now the proud owner of a Philips TV, which promises full value to you as a customer.
Please read this manual carefully and thoroughly for help with installation and operation.
Setup and Installation
Product Highlights
Installing the TV...............................................................................4
Using the TV Keys...........................................................................5
Using the Remote Control Keys
...........................................................................
...................................................
6-7
Operation
Using the Menus.........................................................................7-17
Overview.....................................................................................7
Install.....................................................................................8-10
Picture
.................................................................................
Sound........................................................................................14
Features...............................................................................15-17
Using Smart Surf^
Using Smart Picture and Smart Sound
Using Teletext (if provided)......................................................20-21
.........................................................................
.........................................
11-13
18
19
Peripheral Equipment
3
Connecting Peripheral Equipment............................................22-23
Selecting Connected Equipment for Viewing
................................
General Information
Care, Cleaning and Tips................................................................25
Before Calling Service...................................................................26
Specifications.................................................................................27
24
Safety Information
♦ No naked flame sources, such as lighted candles, should be placed on top of the TV or in the vicinity.
♦ Do not place your TV set under direct sunlight or heat.
♦ Leave at least 5 cm around each side of TV set to allow for proper ventilation.
♦ Avoid placing your set (e.g. near the window) where it is likely to be exposed to rain or water.
♦ No objects (such as vases) filled with liquids should be placed on top the TV so as to avoid dripping or splashing of liquids on the set.
Disconnect mains plug when:
♦ the red light below the TV screen is flashing continuously
♦ a bright white line is displayed across the screen
♦ cleaning the TV screen (never use abrasive cleaning agents; use a slightly damp chamois leather or soft cloth)
♦ a lightning storm is occurring
♦ the set is left unattended for a prolonged period.
Never attempt to repair a defective TV yourself. Always consult a skilled service person.
Battery Usage CAUTION
To prevent battery leakage which may result in bodily injury or damage to the remote:
♦ Install ALL batteries correctly, + and - as marked on the remote control.
♦ Do not mix batteries: (OLD and NEW or CARBON and ALKALINE, etc.).
♦ Remove batteries when the remote is not used for a long time.
43.50PP7445_DFU_Eng_69.indd 2 2005-01-20 10:09:41 AM
Page 3

Product Highlights
See it as an eyewitness
♦ Progressive Scan - double the visible picture lines for better resolution
♦ 100Hz Digital Scan eliminates flicker and line jitter for stable picture
♦ HDTV Monitor - HDTV is the latest and best television signal available
♦ Saphlon™ Screen - better picture and scratch resistance
Technology made simple
♦ Active Control measures signal to produce best picture
♦ APAC - Automatic Phosphor Aging Compensation
Rich sound experience
♦ Virtual Dolby®* Surround - surround sound without additional rear speakers
Product highlights
100Hz Digital Scan
Conventional TV creates a picture by scanning 50 times per second (50Hz). This frequency can be detected by the human eye in the
form of a field flickering picture. 100Hz sets scan 100 times per second, eliminating the field flickering.
Progressive Scan
A picture frame consists of two fields: the field with the odd lines (field A) and the field with the even lines (field B). Instead of sending
field A to the screen first, followed by field B, the fields A and B are written at one time. In one second, a full image is created using the
maximum resolution. At this speed, the human eye perceives a sharper picture with no line structure.
HDTV Monitor
HDTV Display Capability (1080i). HDTV monitors enable you to view high-definition or enhanced-definition TV programming in
the 1080i or480p signal format. In orderto do so, the TV must be connected via its component video or RGB inputs to a set-top
box, which is set to operate in the DTV mode. A DTV signal must be present in your area and the set-top box must be tuned to
the proper channel. An external over-the-air antenna may be required. Another option is HDTV broadcast satellite service. Stunning
realism in both picture and sound are delivered!
Saphlon™ Screen
Saphlon™ Screen technology is built with materials and processes that deliver more brightness and picture contrast. It guards against
most scratches and fingerprints and eliminates the glare associated with a separate protective screen.
Auto IntelliSense™ Focus
Sensors in the TV scan a predefined test pattern and readjust the signal on the CRTs to assure that red, green and blue are well
aligned.
Active Control
With over 3,000 picture adjustments per minute, this ‘proactive control system' continuously analyzes incoming video signal qualities
for Dynamic Noise Reduction and sharpness and then automatically corrects them to be like the settings you previously selected in the
picture menu.
APAC
ABAC is designed to minimize the effects of image retention from stationary images on the screen. Because both analog sources (cable
TV and DVD) and digital sources (HD and progressive scan DVD) have different aspect ratios (4:3, 16:9, 21:9, etc.), the picture on a
digital television may have black bars on the sides or top and bottom. When black bars are detected in either the 4:3 or 16:9 viewing
mode, APAC automatically shifts the television picture pixel-by-pixel, just enough to soften image retention. APAC works in both the
analog and digital modes, so it provides excellent protection.
Active Control and APAC, are trademarks of Philips Consumer electronics North America. IntelliSense is a registered trademark of Philips
Consumer electronics North America. Copyright 2002 Philips Consumer electronics.
*Manufactured under license from Dolby haboratories. “Dolby" and the double-D symbol are trademarks of Dolby haboratories.
43.50PP7445_DFU_Eng_69.indd 3 2005-01-20 10:09:42 AM
Page 4
Installing the TV
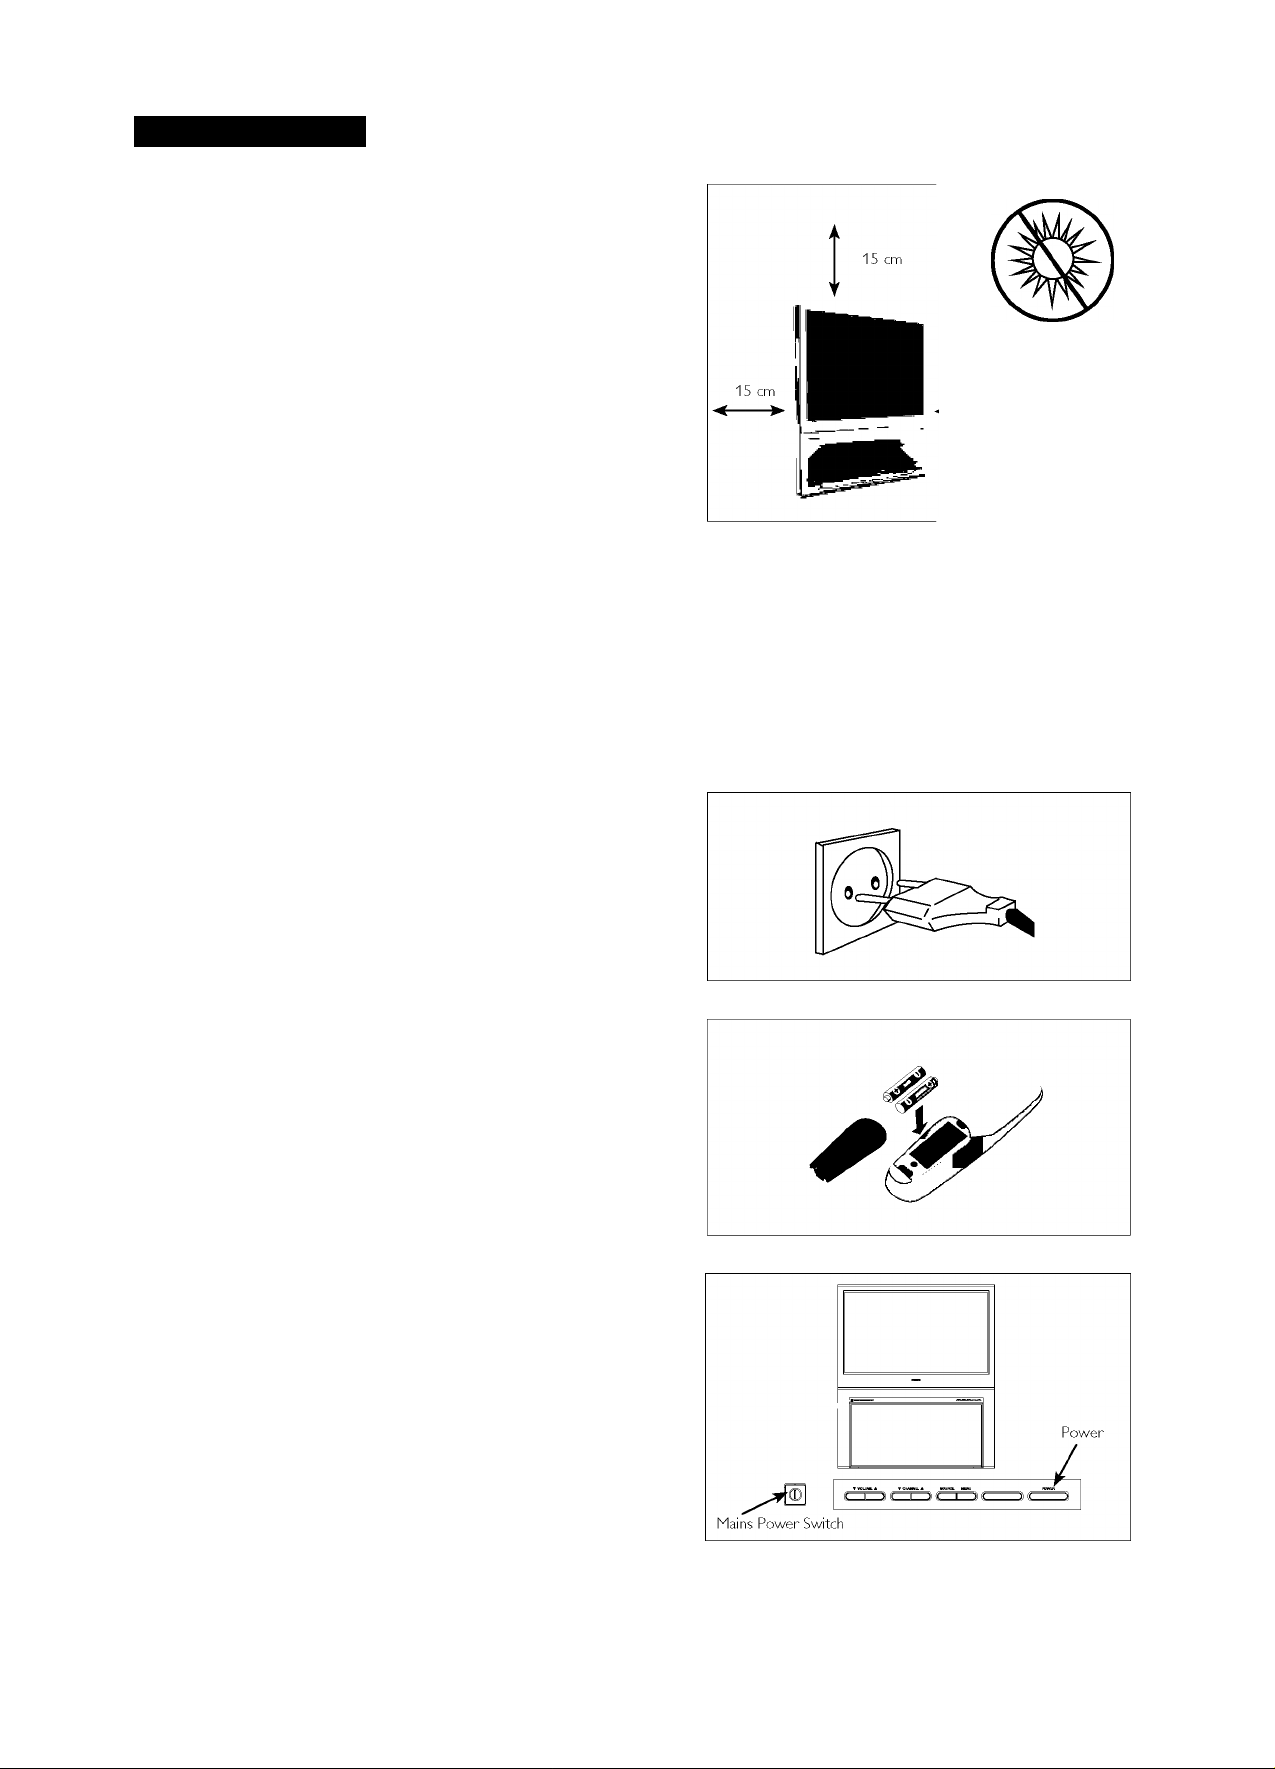
O The major benefit of this projection television is its large
viewing screen. To see the large screen at Its best, test various
locations In the room to find the optimal spot for viewing.
Be sure to allow a minimum of 15 cm of space around the
TV.
To avoid cabinet warping, cabinet colour changes, and
Increased chance of set failure, do not place the TV where
temperatures can become excessively hot - for example. In
direct sunlight or near a heating appliance.
Magnetic fields, such as those of external speakers, may cause
the picture to distort If the speakers are placed too close to
the television. Move the magnetic field source away from the
TV until there Is no picture distortion.
Q Insert the aerial plug firmly Into the ANTENNA IN 75Q
socket at the rear of the set.
o Insert the mains plug In the wall socket. Refer to the back
of the TV set for the correct operation voltage. Consult
your local dealer If your main supply Is different. To prevent
damaging the mains (AC) cord, which could cause hazard, do
not place the TV on the cord.
Do not place
the TV in direct
sunlight or
15 cm near a heating
^^ appliance.
ANTENNA IN 75Q
Socket on the rear of
the TV
O Remove the cover of the battery compartment on the remote
control. Insert the two batteries supplied (Type R6-1.5V).
The batteries supplied do not contain the heavy metals
mercury and cadmium. Nevertheless, In many countries
exhausted batteries may not be disposed of with your
household waste. Please check on how to dispose of
exhausted batteries according to local regulations.
See the battery caution statement on page 2.
Note; This remote control functions with TVs that use the RC5
signalling standard.
0 Switch the TV on: Press the mains power switch on the front
of the TV. If the Standby key Is lighted, press the CH +/- keys,
digit keys or the Power key on the remote control. Or press
the Standby or CHANNEL keys on the front of the TV.
43.50PP7445_DFU_Eng_69.indd 4 2005-01-20 10:09:44 AM
Page 5
Using the TV Keys
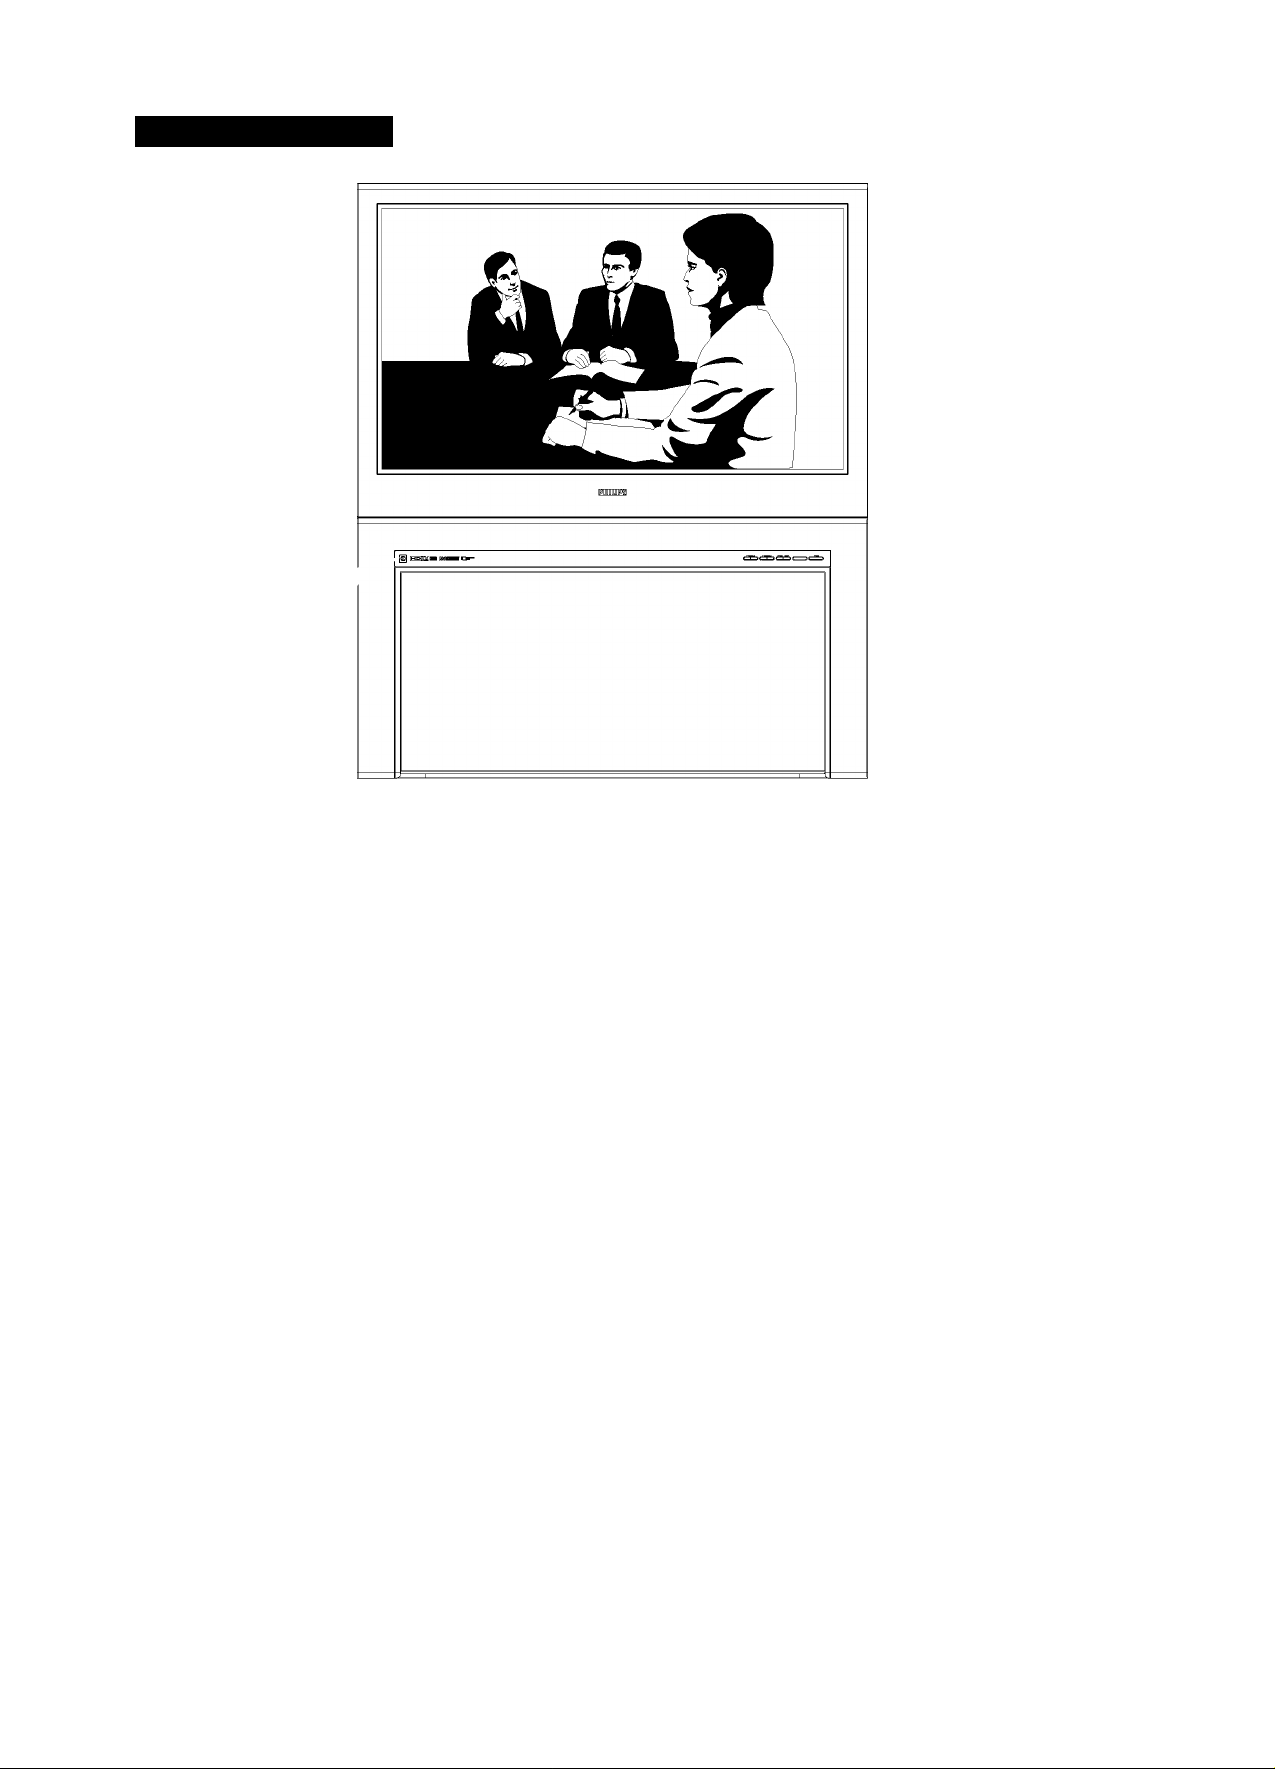
MAINS POWER KEY
Switches the mains power
on or off.
VOLUME VA
The V key adjusts the sound volume
softer. The ▲ key adjusts the sound
volume louder.
---------------------
CHANNEL VA
The V key selects channels In descending
order. The A key selects channels In
ascending order. When the onscreen
menu Is displayed, pressing V or A
selects the next Item In the menu. Also,
use either of these keys to switch the TV
on from Standby mode.
▼ VOLUME ▲ T CHANNEL ▲
--------------------------------
POWER -
Switches the TV on or
activates standby mode.
REMOTE SENSOR
Receives Infrared commands
to activate controls when
the remote control handset
Is aimed at It and remote
keys are pushed.
MENU
Press to activate the on-screen
menu.
SOURCE
Press to select the Input source for
the TV.
43.50PP7445_DFU_Eng_69.indd 5 2005-01-20 10:09:45 AM
Page 6
Using the Remote Control Keys
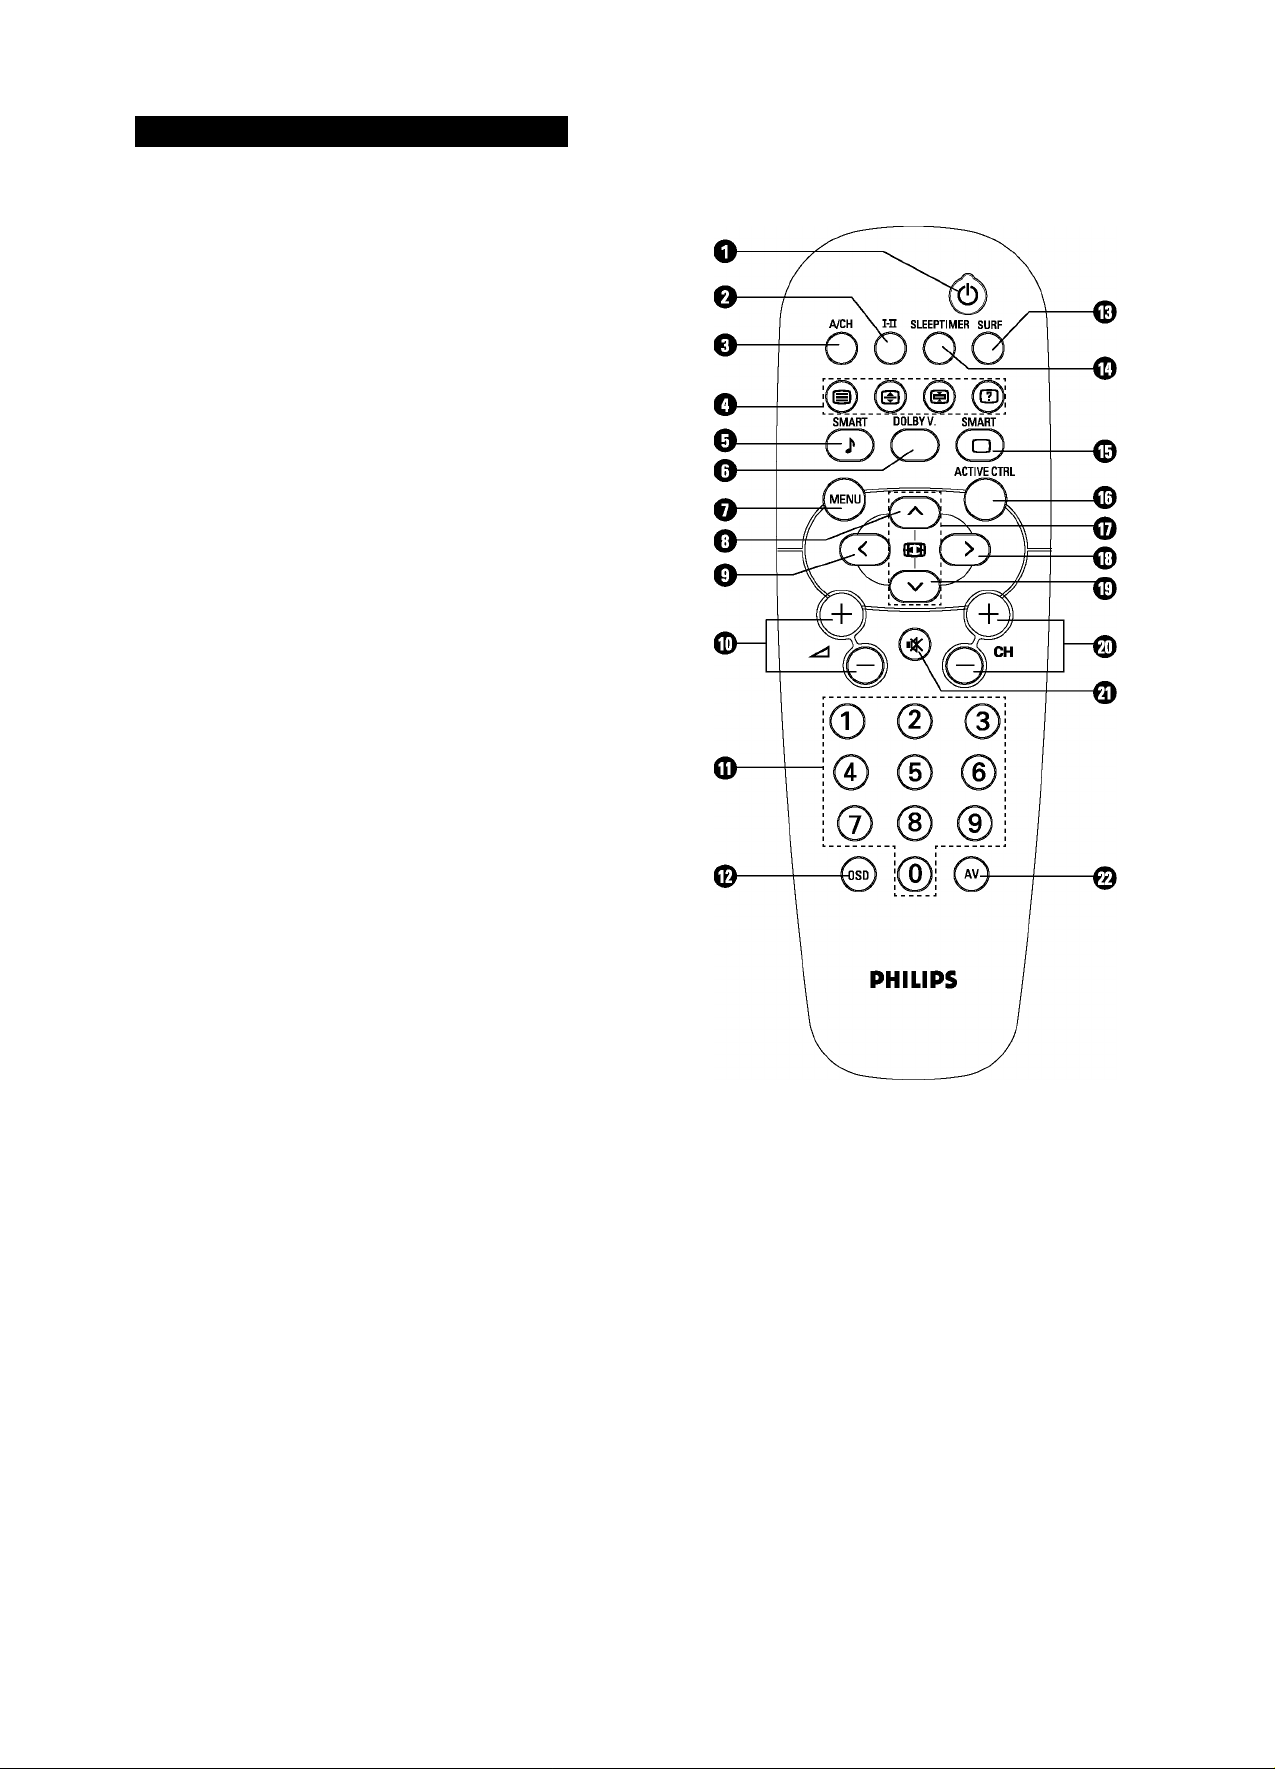
O 6 (STANDBY)
♦ Switches the set off temporarily to standby mode. (The red
light indicator lights up when the set is in standby mode.)
♦ To switch the set on from standby mode, press the Standby,
CH +/-, or Digit (0-9) keys.
Oi-n
Allows you to switch from stereo to mono sound during
stereo transmission or to choose between languagel or
languageH during dual sound transmission.
Qa/CH (Alternate Channel)
Allows you to alternate between the last viewed channel and
the present channel.
O TELETEXT
Allows you to navigate through a list of Installed programmes
for a quick overview of the channels and to activate the
channel you have selected. See page 20-21.
OSMART SOUND
Allows you to select from three predefined optimal settings
- Voice, Music and Theatre - and a Personal setting based on
your own selections through the onscreen Sound menu. Press
the key repeatedly to select a setting. See page 19.
O DOLBY V. (with Dolby* Surround Signals)
Allows you to select various factory surround-sound listening
modes:
Dolby Virtual (Virtual Dolby* Surround)
Dolby Virtual uses two speakers to simulate the surround
effect produced by a multichannel system.
Incredible Surround™
♦ In Stereo sound mode - when switched on, the Incredible
Surround™ feature provides the feeling that the speakers
are farther apart to enhance the home-cinema effect.
♦ In Mono sound mode - when switched on, the Incredible
Surround feature enables you to hear a spatial sound effect.
Omenu
Displays the main menu. Also allows you to go backwards In
the menu system.
O CURSOR UP
Allows you to select the next or previous Item In the menu
and to select a screen format.
©CURSOR LEFT
Allows you to access the menus and adjust the settings.
® ^ +/- (VOLUME)
Increases or decreases volume.
O DIGIT (0-9)
Allows you to select a channel. Note: For a two-digit number,
the second digit must be entered before the sign
disappears.
*Manufactured under license from Dolby Laboratories. “Dolby" and the double-D symbol are trademarks of Dolby Laboratories.
43.50PP7445_DFU_Eng_69.indd 6 2005-01-20 10:09:46 AM
Page 7
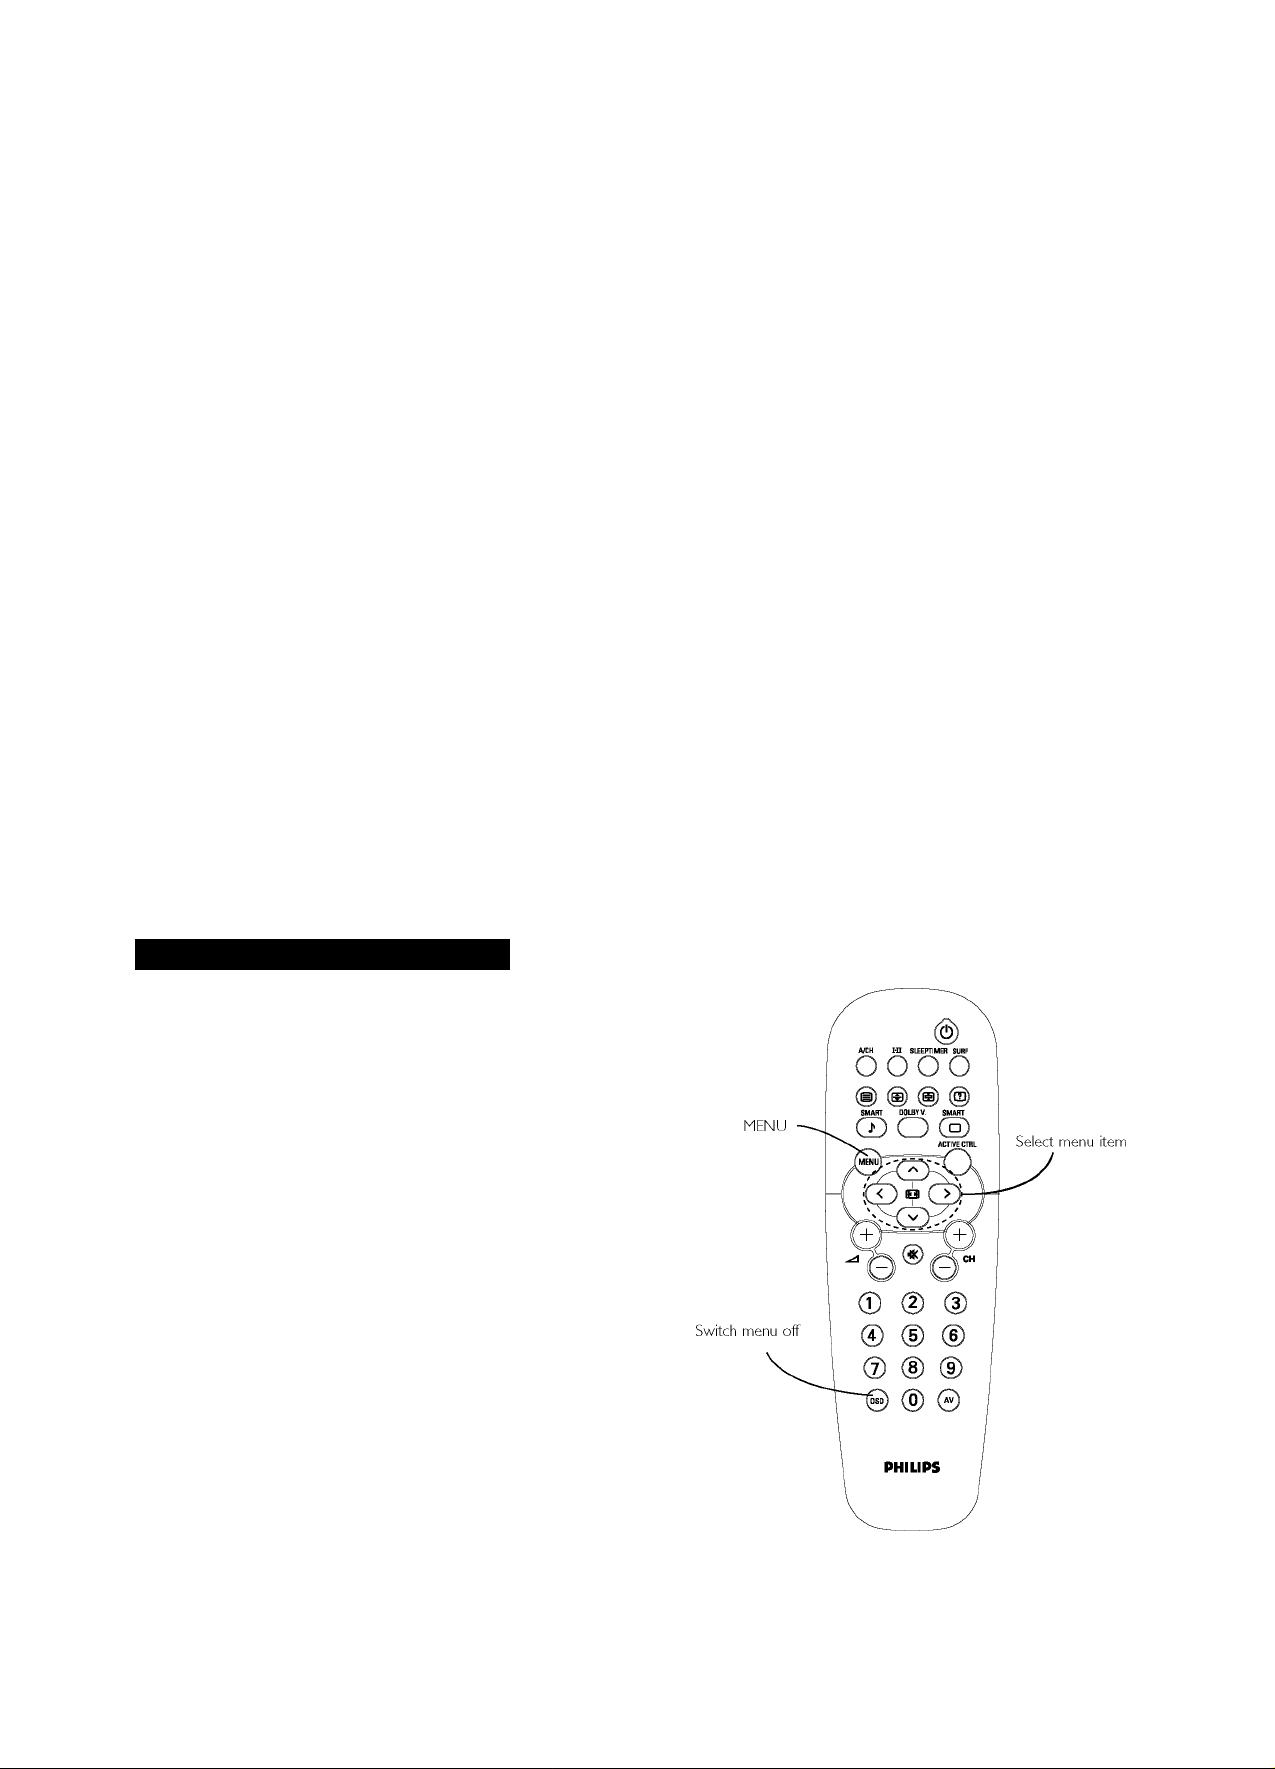
© OSD (STATUS/EXIT)
♦ Displays the channel number, sound and colour transmission
modes, status of the sleep timer, channel name (If the
channel has been named) and the current time (If the time
has been set).
♦ Allows you to navigate or make adjustments In multipoint-
convergence mode.
♦ Allows you to switch the menu off
0SURF
Allows you to select up to 10 channels and quickly view them.
See page 18.
<D SLEEP TIMER
Allows you to select a time period after which the set will
automatically switch to standby mode. Choose 15, 30, 45, 60,
90, 120, 180, or 240 minutes.
©SMART PICTURE
Allows you to select from four predefined optimal settings
- Rich, Natural, Soft and Multimedia - and a Personal setting
based on choices you make through the onscreen Picture
menu. See page 19.
©ACTIVE CONTROL™
Allows you to switch the Active Control™ feature on or off
When Active Control™ Is on. It measures and corrects all
Incoming signals to provide the best picture-quality settings,
controlling Sharpness and Noise Reduction continuously and
automatically. The onscreen Active Control™ display Items
cannot be selected. See page 17.
0 o (FORMAT)
Each press selects another picture format. For AVI, CVI, or
AV2 the options are 4:3, Auto, and Expand 4:3. For AV3
10801 signal source, the option Is 4:3 and compress 16:9.
For AV3 480p signal source, no screen format options are
available through the TV. Control the format at the source
(DVD player or digital set-top box).
©CURSOR RIGHT
Allows you to access the menus and adjust the settings.
©CURSOR DOWN
Allows you to select the next or previous Item In the menu or
to select a screen format.
© CH +/- (CHANNEL)
Allows you to select channels In ascending and descending
order.
© < (MUTE)
Allows you to mute the sound. To restore the sound, press
the key again.
©AV
Allows you to select the different signal sources connected to
the TV.
Using the Menus: Overview
© Press the MENU key to display/cancel the main menu.
© Use the cursor In the up/down directions to select a menu
Item.
Note: Sometimes not all the menu Items are visible on the screen;
press the cursor up/down until you can see the Item you desire.
o Use the cursor In the left/right directions to display the menu
and adjust the settings.
O Press the MENU key to return.
© Press the OSD key to switch the menu off.
Note: If no action Is executed, the menu automatically disappears
after about 20 seconds.
43.50PP7445_DFU_Eng_69.indd 7 2005-01-20 10:09:47 AM
Page 8

Using the Menus: Install
Selecting the Menu Language
Note: The menu languages available vary by model.
O Press the MENU key.
O Select INSTALL with the cursor down.
o Press the cursor right to select LANGUAGE.
O Press the cursor right again.
O Select your language with the cursor up/down.
From this point on, all onscreen displays will appear in the
language that you have chosen.
Now you can search for and store the TV channels in two
different ways: with Auto Store or Manual Store (tuning in
channel by channel).
Tuning Channels Automatically
O Select AUTO STORE in the INSTALL menu.
Q Press the cursor right to start the searching. All the TV
channels are searched for and stored automatically.
o When the tuning is completed, press the MENU key to return
to the INSTALL menu or press the OSD key to switch the
menu off.
Note: Channel numbers will always be written in Latin characters,
even when a language that uses other characters has been
selected.
INSTALL
• LANGUAGE
• MANUAL STORE
• SORT
• CHANNEL EDIT
INSTALL
4 LANGUAGE
• AUTO STORE
• MANUAL STORE
• SORT
• CHANNEL EDIT
BRIGHTNESS
COLOUR
CONTRAST
SHARPNESS
COLOUR TEMP
»SEARCHING
PLEASE WAIT
CHAN.FOUND 8
048 31 MHZ
• PICTURE LANGUAGE
• SOUND AUTO STORE
• FEATURES MANUAL STORE
INSTALL
• AUTOSTORE B.MELAYU
• MANUAL STORE ipA
• SORT
• CHANNEL EDIT
I LANGUAGE
> AUTO STORE
• MANUAL STORE
• SORT
> CHANNEL EDIT
SORT
CHANNEL EDIT
»»ENGLISH
Tuning Channels Manually
Manual tuning allows you to store channel by channel. You must
go through every step of the manual store menu.
o Select MANUAL STORE in the INSTALL menu.
Q Press the cursor right to enter the menu.
Q Select COLOUR SYSTEM and press the cursor right.
If AUTO is selected, the respective colour system will be
automatically selected according to the transmission system.
Note: If reception Is poor, select another colour system with the
cursor up/down.
Q Press the MENU key or the cursor left.
^ Select SOUND SYSTEM and press the cursor right.
If AUTO is selected, the respective sound system will be
automatically selected according to the transmission system.
Note: If the reception Is poor, select another sound system with
the cursor up/down.
Q Press the MENU key or the cursor left.
Q Select SEARCH and press the cursor left or right to start the
searching. Searching stops once a transmitting channel is found.
BRIGHTNESS
COLOUR
CONTRAST
SHARPNESS
COLOUR TENP
LANGUAGE
AUTO STORE
MANUAL STORE
SORT
CHANNEL EDIT
• LANGUAGE
• AUTO STORE
«»MANUAL STORE
• CHANNEL EDIT FINE TUNE
INSTALL
MANUAL STORE .
• COLOUR SYSTEM
• SOUND SYSTEM
• CHANNEL
> STORE
INSTALL
MANUAL STORE a
• COLOUR SYSTEM
• SOUND SYSTEM
• CHANNEL
• STORE
COLOUR SYSTEM
SOUND SYSTEM
SEARCH
CHANNEL
Note: If the reception Is poor, select another colour and/or sound
system.
43.50PP7445_DFU_Eng_69.indd 8 2005-01-20 10:09:51 AM
Page 9

o Select CHANNEL.
^ Key in the desired channel number with the digit keys or with
the cursor left/right.
(JD Press the cursor down.
INSTALL
MANUAL STORE
• COLOUR SYSTEM
• SOUND SYSTEM
• SEARCH
• STORE
In case of poor reception, you can improve the reception by
adjusting the frequency using FINE TUNE.
0 Select FINE TUNE and press the cursor left/right to adjust.
©In rare cases, certain TV channels may reproduce distorted or
unstable pictures.
Select PLL (Phase Locked Loop) to switch to the setting
2 with the cursor left/right to restore the picture for the
respective transmission.
© Select STORE.
© Press the cursor right.
The message STORED appears and the search menu item is
highlighted again.
© Now repeat steps 7-14 to continue searching for another
transmitting channel.
© Press the MENU key to return to the INSTALL menu or
press the OSD key to switch the menu off.
Sorting Channels
According to your preference, you can change the order of the
stored TV channels.
© Select SORT in the INSTALL menu.
© Press the cursor right to enter the menu.
INSTALL
MANUAL STORE
s SOUND SYSTEM
• SEARCH
• CHANNEL
« STORE
________
INSTALL
MANUAL STORE
S SEARCH
• CHANNEL
• STORE
■ FINE TUNE
INSTALL
MANUAL STORE
• COLOUR SYSTEM
• SOUND SYSTEM
• SEARCH
• CHANNEL
INSTALL
MANUAL STORE
• COLOUR SYSTEM
• SOUND SYSTEM
• SEARCH
• CHANNEL
INSTALL
SORT
• TO
• EXCHANGE
o Key in the channel number“ in the FROM column you want to
swap from. Use the digit keys or the cursor left/right.
Q Press the cursor“ down and select TO.
^ Key in the channel number“ in the TO column you want to
swap to.
Q Press the cursor“ down and select EXCHANGE.
O Press the cursor right.
The message EXCHANGED appears and the selected
channels are exchanged.
O Repeat steps 3-7 until all TV channels are allocated as you like.
Q Press the MENU key to return to the INSTALL menu or
press the OSD key to switch the menu off.
• LANGUAGE FROM
• AUTO STORE TO
• MANUAL STORE EXCHANGE
' CHANNEL EDIT
INSTALL
SORT
• FROM
INSTALL
SORT
• FROM
• TO
INSTALL
SORT
• FROM
• TO
43.50PP7445_DFU_Eng_69.indd 9 2005-01-20 10:09:52 AM
Page 10
Using the Menus: Install
Editing Channels
This feature allows you to edit or skip channels from the channel
list that have bad or weak signals or channels that you do not
watch often.
Note: Once a channel is skipped, you cannot select It with the CH
- or + key. You can only access the channel with the digit keys.
o Select CHANNEL EDIT in the INSTALL menu.
Q Press the cursor right to enter the channel list.
o Select the channel you want to skip with the cursor up/down.
Q Press the cursor right to skip the selected channel.
The message SKIPPED Is displayed.
^ Press the cursor up/down to select another channel and
repeat step 4.
^ Press the cursor left or the MENU key to return to the
INSTALL menu or the OSD key to switch the menu off
Note: To add back channels to the list, repeat steps 1-4 and
press the OSD key to switch the menu off.
INSTALL
• LANGUAGE 3
• AUTO STORE 4
• MANUAL STORE 5
• SORT
_________
6
•»7
' LANGUAGE
' AUTO STORE
' MANUAL STORE
' SORT
CHANNEL EDIT
INSTALL
• LANGUAGE 3
• AUTO STORE 4
• MANUAL STORE
• SORT 6
•« CHANNEL EDIT •»^7 SKIPPED 1
5
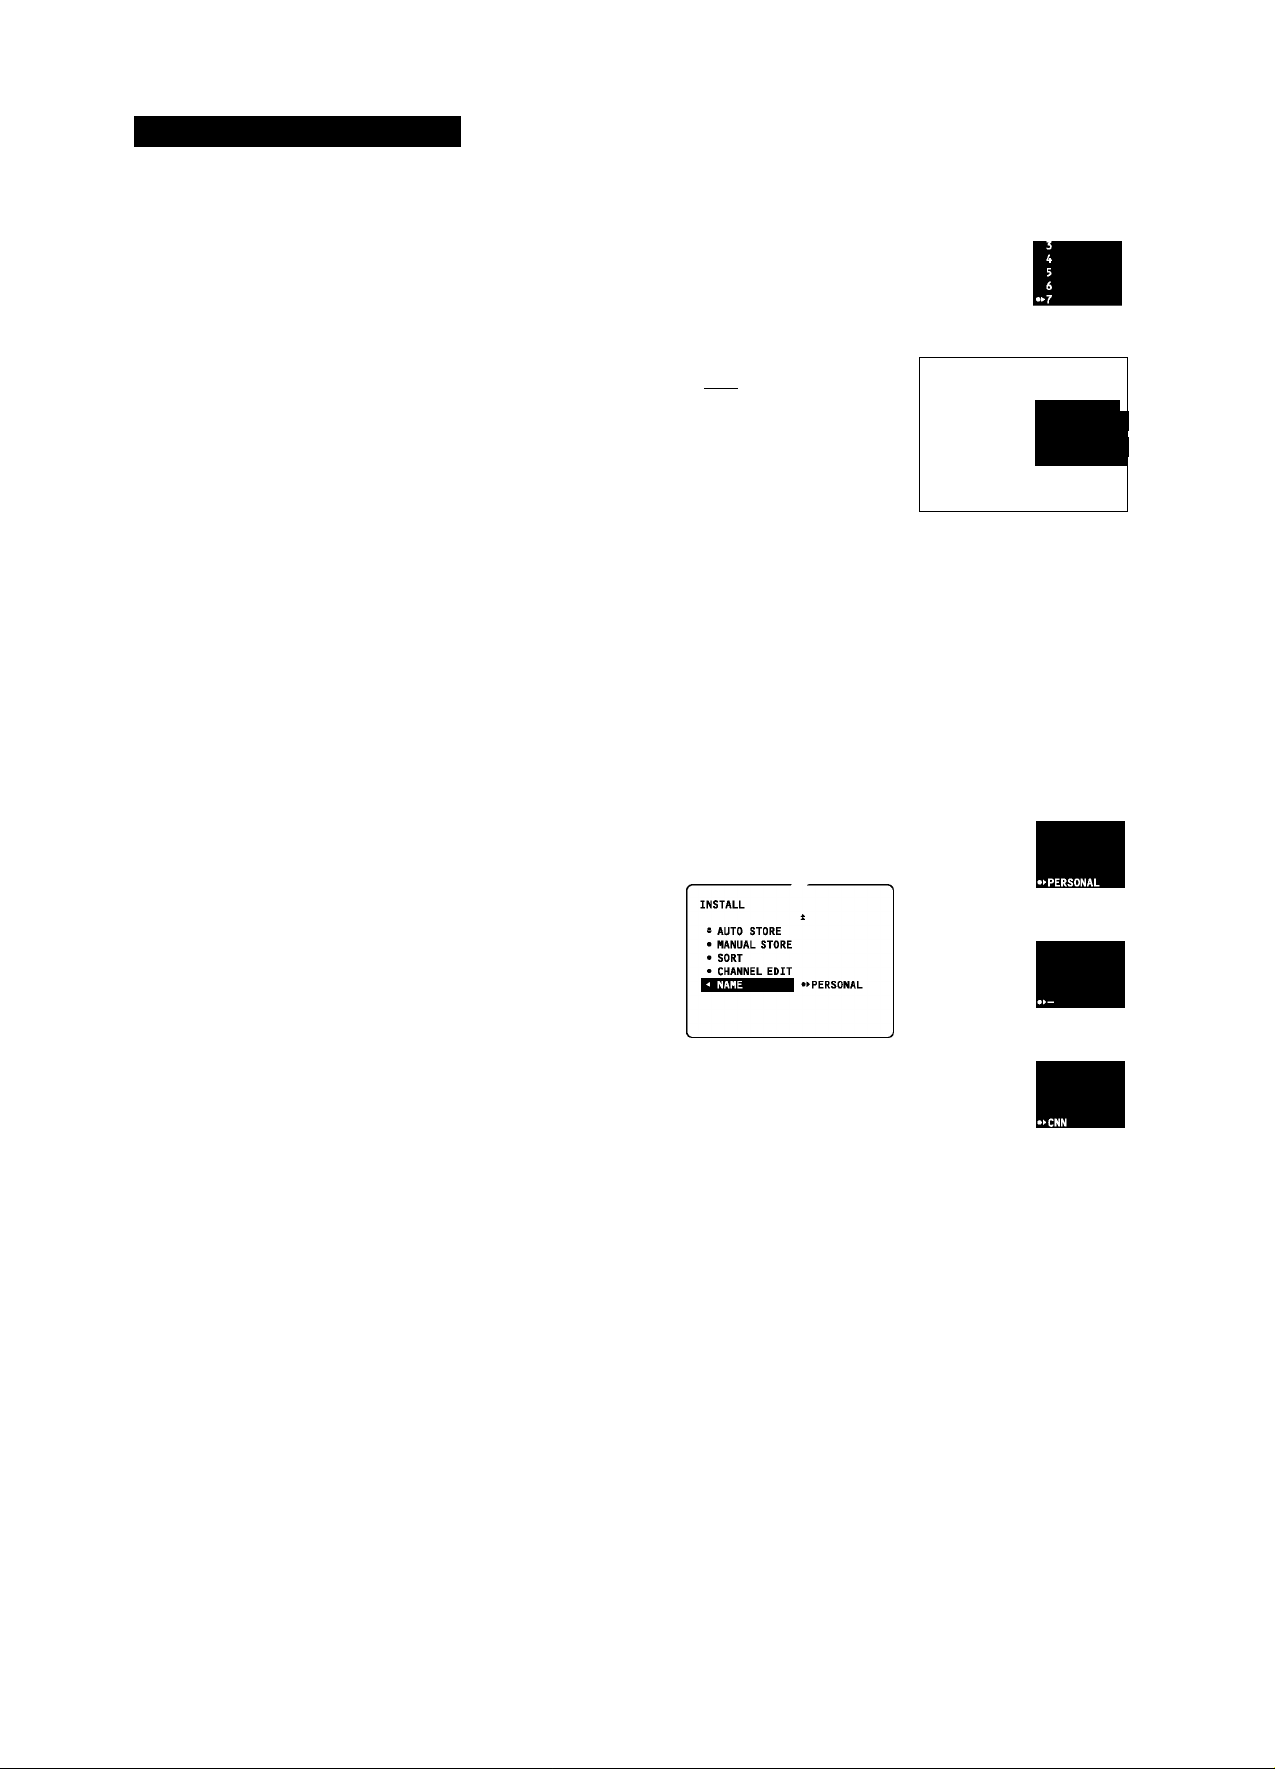
Naming Channels
It is possible to assign a name to a TV channel. This feature allows
you to enter“ a name or modify an existing name of a channel,
including peripherals.
Note: Even when you have selected another language In the
LANGUAGE menu, only the English language character set is offered
to enter names to the TV channels stored.
O Select a TV channel or peripheral you want to assign a name
or modify the existing name.
Q Select NAME in the INSTALL menu.
© Press the cursor“ right twice to enter the menu.
Q Key in the selected character with the cursor“ up/down.
Q Move to the next character with the cursor right and key in
the next character. You can key in up to a maximum of five
characters.
0 Press the MENU key to store the named channel.
INSTALL
s AUTO STORE
• MANUAL STORE
• SORT
• CHANNEL EDIT
•< NAME
INSTALL
s AUTO STORE
• MANUAL STORE
• SORT
• CHANNEL EDIT
•• NAME
INSTALL
s AUTO STORE
• MANUAL STORE
• SORT
• CHANNEL EDIT
-• NAME
INSTALL
s AUTO STORE
• MANUAL STORE
• SORT
• CHANNEL EDIT
10
43.50PP7445_DFU_Eng_69.indd 10 2005-01-20 10:09:54 AM
Page 11

Using the Menus: Picture
Accessing the Menu
Q Press the MENU key to display the main menu.
O Select PICTURE.
^ Press the cursor right to access the PICTURE submenu.
Q Use the cursor in the up/down directions to select an item.
0 Use the cursor in the left/right directions to make adjustments
or settings.
O Press the MENU key to return or press the OSD key to
switch the menu off.
Picture Menu Items
Brightness
Allows you to adjust the brightness levels of the picture.
Colour
Allows you to adjust the colour saturation of the picture.
Contrast
Allows you to adjust the contrast levels of the picture.
• SOUND
' FEATURES
' INSTALL
BRIGHTNESS
COLOUR
CONTRAST
SHARPNESS
COLOUR TEMP
• COLOUR
• CONTRAST
• SHARPNESS
• COLOUR TEHP
I DIGITAL OPTIONS
PICTURE
1 SHARPNESS
• COLOUR TEMP CONVERGE BLUE
• DIGITAL OPTIONS MULTIPOINT RED
1 • DYNAMIC CONTRAST MULTIPOINT BLUE I
■^MANUALCOJ^^
CONVERGE RED
SAVE MULTIPOINT
Sharpness
Allows you to adjust the edge definition of the picture to improve
details.
Hue (only with NTSC signals)
Allows you to adjust the colour mix of the picture.
Colour Temperature
Offers the options Normal, Warm and Cool. Make your selection
with the cursor left/right. Normal keeps whites white. Warm
makes whites reddish. Cool makes whites bluish.
Digital Options
Digital Scan includes 100Hz plus Digital Scan, which together
eliminate picture flickering and line jitter, offering a stable picture
for relaxed viewing (no eye strain). 100Hz offers field flicker
reduction. Progressive doubles the number of visible picture
lines per field by displaying all picture frame lines at once. This
minimizes the visibility of the scan lines. Auto detects the input
signal and provides the appropriate mode for the best picture
performance. Choose Digital Scan for PAL 50Hz signals and
Progressive Scan for NTSC 60Hz signals.
Dynamic Contrast
Automatically makes the contrast in the darker and the brighter
picture areas more noticeable as the image on screen changes.
Normally, select MED. In certain circumstances it may be
preferable to select MIN, MAX or OFF.
Manual Converge
Allows you to make additional picture convergence adjustments
to suit personal preferences to to further fine-tune the picture.
Note: The picture settings Brightness, Colour, Contrast, Sharpness
(Hue) and Colour Temperature are stored separately for channels
0-11 and for the external sources.
11
43.50PP7445_DFU_Eng_69.indd 11 2005-01-20 10:09:56 AM
Page 12
Using the Menus: Picture
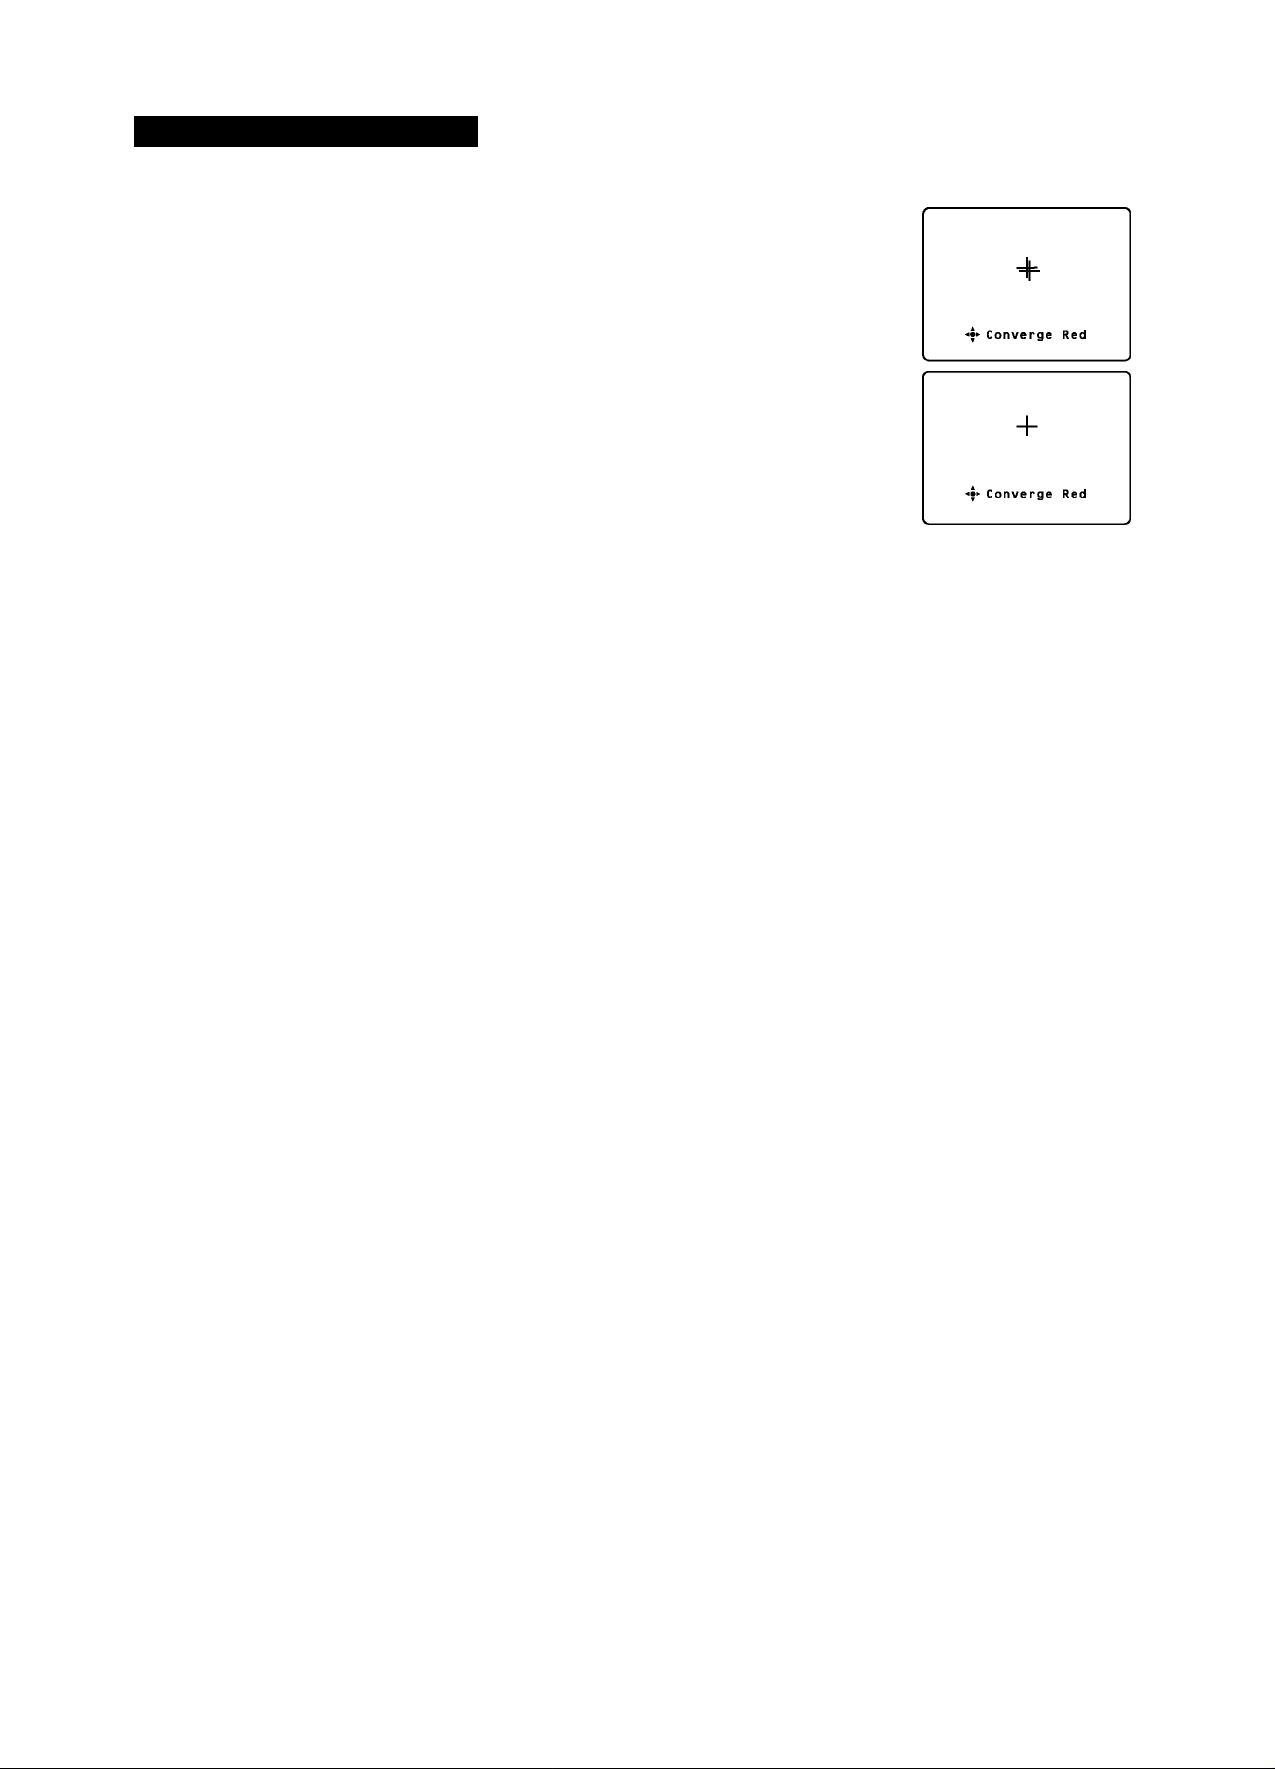
Using Manual Converge: Converge Red/Blue
You can use the Manual Converge controls to make convergence
adjustments to suit your personal preferences or to further fine
tune the picture.
Note: Allow the TV to warm up for 20 minutes before adjusting
convergence.
O Select MANUAL CONVERGE in the PICTURE menu.
O Press the cursor down and select either CONVERGE RED or
CONVERGE BLUE.
Note: If various Images In the picture have red outlines, select
CONVERGE RED. If various Images In the picture have blue
outlines, select CONVERGE BLUE.
o Use the cursor right, left, up or down to adjust the cross hair
until the colour outline is gone. The adjustment is automatically
saved in the TV's memory when you exit the adjust mode.
O Press the MENU key to return or the OSD key to switch the
menu off
Check the TV picture. If any colour outlines remain around
the images, use the MULTIPOINT RED (for red outlines) or
MULTIPOINT BLUE (for blue outlines) control. See the next
section for“ instructions for using those controls.
PICTURE
MANUAL CONVERGE
• CONVERGE BLUE
• MULTIPOINT RED
• MULTIPOINT BLUE
• SAVE MULTIPOINT
12
43.50PP7445_DFU_Eng_69.indd 12 2005-01-20 10:09:56 AM
Page 13
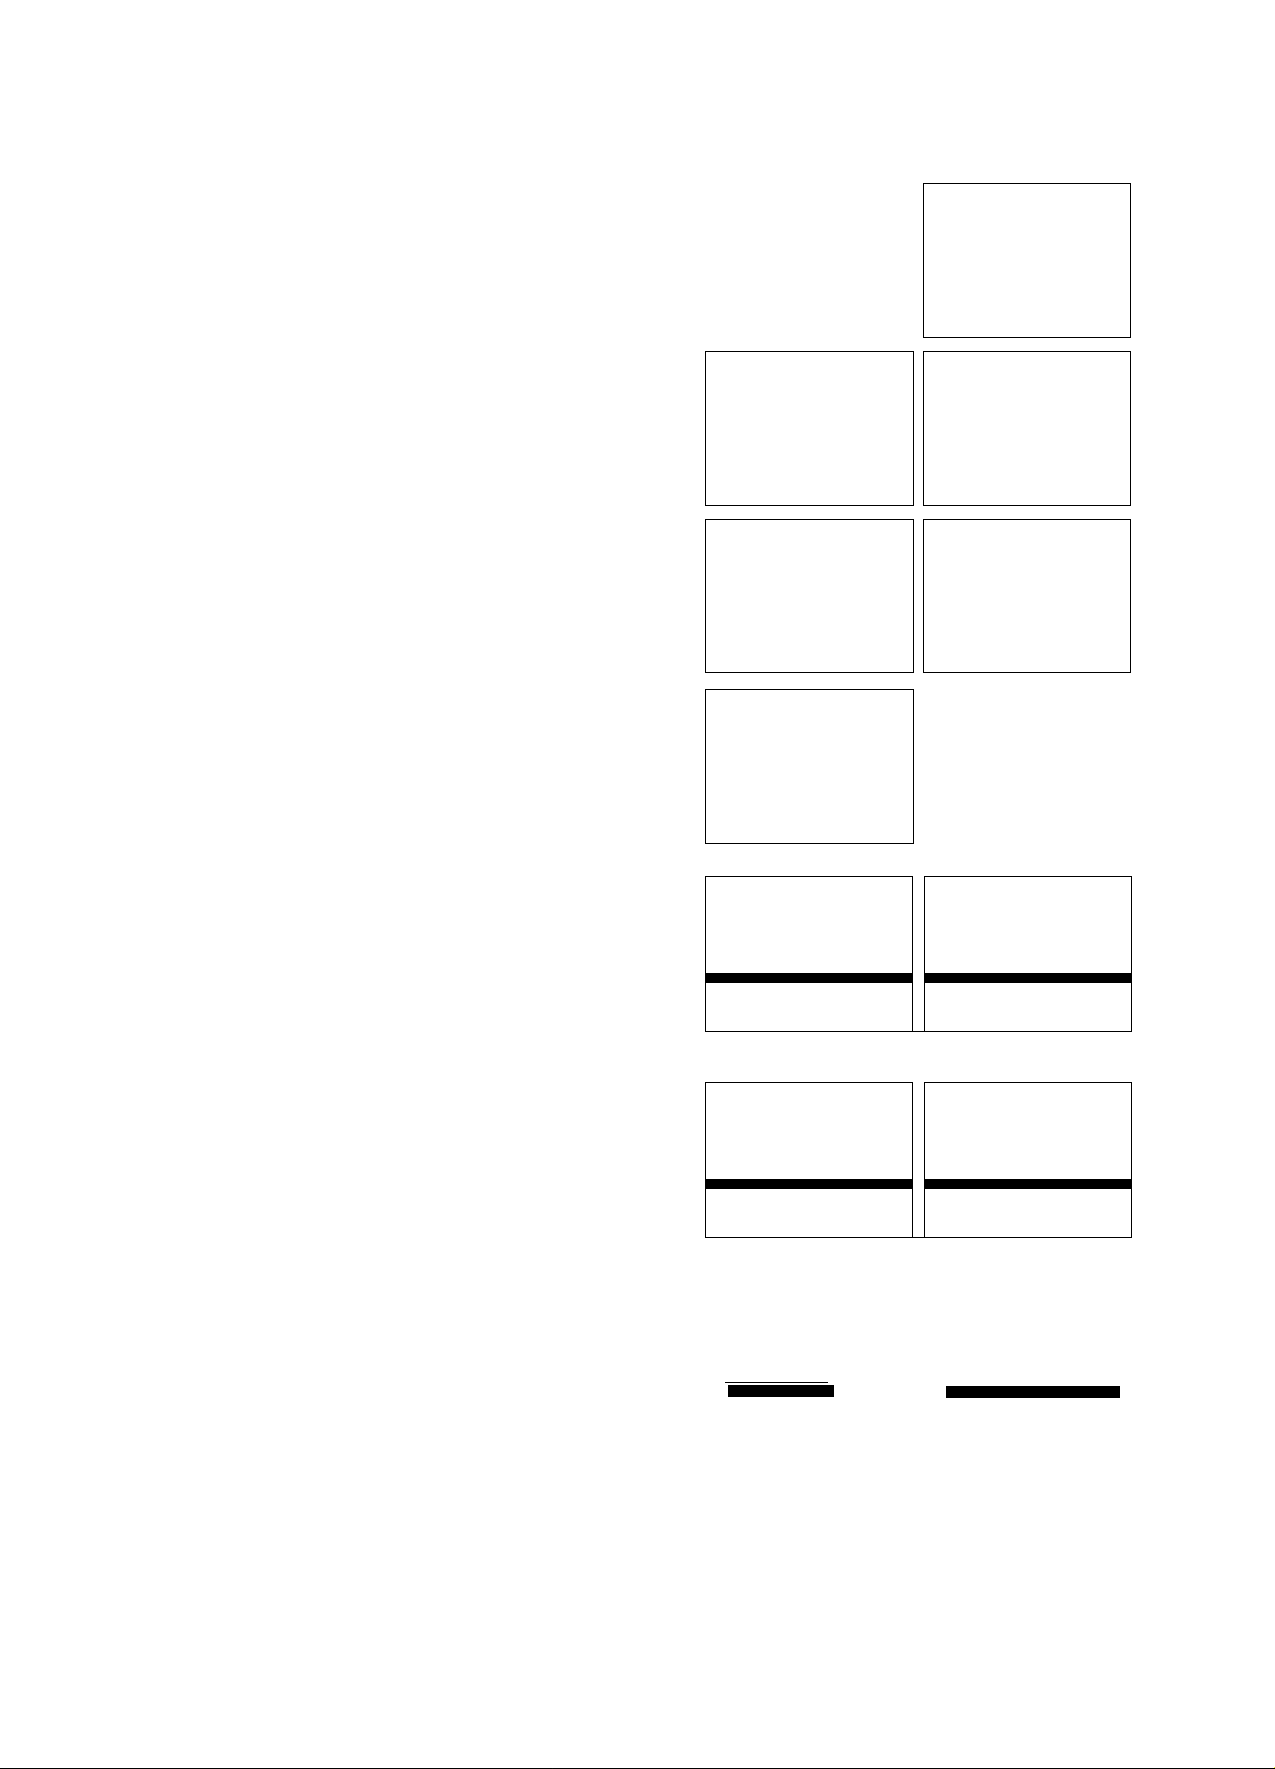
Using Manual Converge: Multipoint Red/Blue
The Multipoint Red/Blue convergence controls allow you to adjust
picture convergence at specific points on the TV screen.
Note: Allow the TV to warm up for 20 minutes before adjusting
convergence. Adjust Converge Red or Converge Blue before using the
Multipoint Red/Blue controls. See the previous page.
PICTURE
MANUAL CONVERGE ..
• CONVERGE RED
• CONVERGE BLUE
• MULTIPOINT BLUE
• SAVE MULTIPOINT
+ + + + + + +
+ +
+ + +
+ +
+ + +
+ + + + + +
4^ to Navigate i + t o Adjust
+ +
+ + +
+ +
+ +
+ +
+
O Select MULTIPOINT RED or MULTIPOINT BLUE in the
MANUAL CONVERGE menu.
0 Press the cursor right to enter navigate mode.
Q Use the cursor left, right, up or down to move to a cross hair
that has a colour outline.
O Press the OSD (Status/Exit) key to enter adjust mode.
0 Use the cursor left, right, up or down to adjust the cross hair
until the colour outline is gone.
Q Press the OSD key to return to navigate mode.
Q Repeat steps 3-6 until all misaligned cross hairs have been
adjusted. Then press the MENU key.
O For your multipoint adjustments to be stored in the TV's
memory, you must activate SAVE MULTIPOINT.
Note: If you are not satisfied with the adjustments you just made
and want to start over, you can use the UNDO MULTIPOINT
control. This control allows you to undo the adjustments, but only
if you use it before saving.
To save your multipoint adjustments: Select SAVE MULTIPOINT
and press the cursor left or right.
To undo your multipoint adjustments: Select UNDO
MULTIPOINT and press the cursor left or right.
To restore the TV's picture convergence to factory settings, select
RESTORE FACTORY and press the cursor left or right.
^ Press the MENU key to return or the OSD key to switch the
menu off.
+ + + + + + +
+
+
+
+
+
+
+ + + +
+
+
+
+ + + +
+
+
+
+ + +
+
+ +
+ +
+ +
+ +
+
+ +
+
«
SAVE MULTIPOINT
+ +
+ +
+ + + + + + +
4 to Navigate i+ to Adjust
+ +
+ +
+ + + + + + +
+ + + + + +
+
+ + + + + + +
to Navigate + to Adju st
+ + + + + + +
+ +
+ +
+ + + + + +
+
+ +
p to Adjusti+:o Navigate
PICTURE PICTURE
MANUAL CONVERGE a MANUAL CONVERGE a
• CONVERGE RED • CONVERGE RED
• CONVERGE BLUE • CONVERGE BLUE
• MULTIPOINT RED • MULTIPOINT RED
• MULTIPOINT BLUE • MULTIPOINT BLUE
■ SAVE MULTIPOINT 1 ■ SAVE MULTIPOINT «^STORED ■
9 9
+
+
+
++ +
+ + + + + + +
+ + + + +
+ +
+ + +
+ + + + + + +
+ + + + + + +
+ + + + + + +
+ + + + + + +
+ +
+ + + + + + +
+ + + + + + +
PICTURE
MANUAL CONVERGE .
• CONVERGE RED
• CONVERGE BLUE
nzHBHmaiia
• MULTIPOINT BLUE
• SAVE MULTIPOINT
+
i+ to Navigate
4 to Adjust
+ + + + +
4 to Adjust
+ + +
Ì+ to Navigate
OR
-
--------------------------------PICTURE PICTURE
MANUAL CONVERGE ± MANUAL CONVERGE i
« CONVERGE BLUE s CONVERGE BLUE
• MULTIPOINT RED • MULTIPOINT RED
• MULTIPOINT BLUE • MULTIPOINT BLUE
• SAVE MULTIPOINT • SAVE MULTIPOINT
■ UNDO MULTIPOINT 1 ■ UNDO MULTIPOINT «»RESTORED ■
UNDO MULTIPOINT
-
9 9
OR
RESTORE FACTORY
PICTURE
MANUAL CONVERGE 1
S MULTIPOINT RED
• MULTIPOINT BLUE
• SAVE MULTIPOINT
« UNDO MULTIPOINT
RESTORE FACTORY
PICTURE
MANUAL CONVERGE i
S MULTIPOINT RED
• MULTIPOINT BLUE
• SAVE MULTIPOINT
• UNDO MULTIPOINT
I RESTORE FACTORY RESTORED
13
43.50PP7445_DFU_Eng_69.indd 13 2005-01-20 10:09:58 AM
Page 14

Using the Menus: Sound
Accessing the Menu
O Press the MENU key to display the main menu.
O Select SOUND with the cursor down.
o Press the cursor right to access the SOUND submenu.
« PICTURE TREBLE
• FEATURES BALANCE
• INSTALL AVL
BASS
O Use the cursor in the up/down directions to select an item.
0 Use the cursor in the left/right directions to make adjustments
or settings.
O Press the MENU key to return or press the OSD key to
switch the menu off.
Sound Menu Items
Treble
Attenuates or amplifies the high-frequency response of the audio
output signal.
Bass
Attenuates or amplifies the low-frequency response of the audio
output signal.
Balance
Adjusts the balance of the right and left speaker's sound output.
AVL (Automatic Volume Leveller)
Automatically controls the volume level to avoid excessive level
differences, especially when switching to another channel or
during commercial breaks.
BRIGHTNESS
COLOUR
CONTRAST
SHARPNESS
COLOUR TEMP
> BASS
> BALANCE
- AVL
» BASS
• BALANCE
• AVL
14
43.50PP7445_DFU_Eng_69.indd 14 2005-01-20 10:09:59 AM
Page 15
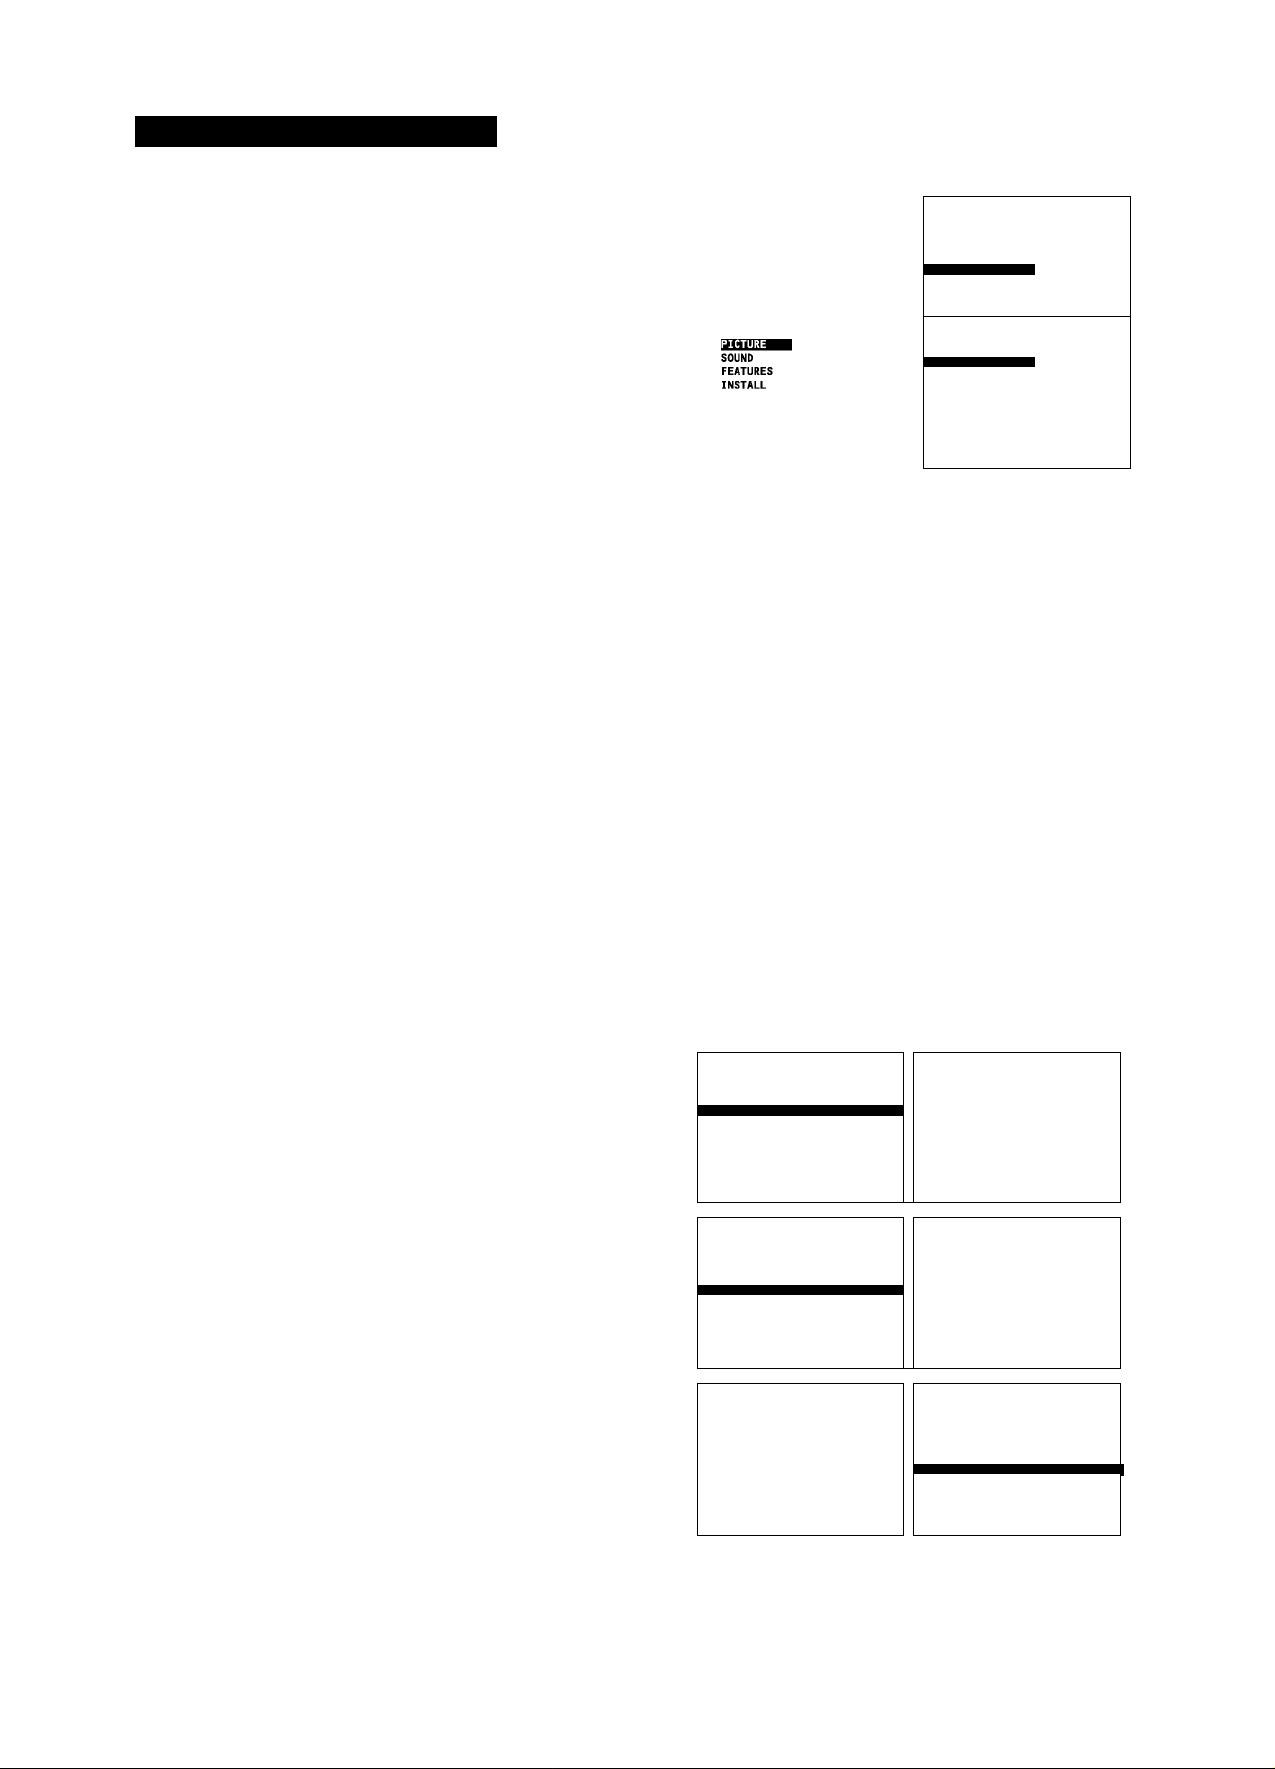
Using the Menus: Features
Accessing the Menu
O Press the MENU key to display the main menu.
O Select FEATURES with the cursor down.
0 Press the cursor right to access the FEATURES submenu.
• PICTURE TIMER
• SOUND CHILD LOCK
■ »»-FEATURES FORMAT
• INSTALL BLUE MUTE
ACTIVE CTRL
O Use the cursor in the up/down directions to select an item.
0 Use the cursor in the left/right directions to make settings.
O Press the MENU key to return or press the OSD key to
switch the menu off.
Activating the Timer
The Timer feature allows you to set the timer to switch to
another channel at a specified time while you are watching a
channel or when the TV is in standby mode. You can also set the
TV to switch off automatically at a specific time by setting a Stop
Time.
O Select TIMER in the FEATURES menu.
Q Press the cursor right to enter the Timer.
Setting the Timer
Q Press the cursor right twice to enter TIME mode.
Q Key in the current time with the digit keys. You must use 24-
hour or military time. For example: 2:15 p.m. is 14:15.
If you entered an Incorrect digit: Complete the actual time with
arbitrary numbers, then start again.
0 Press the cursor left to exit TIME mode.
Setting Start Time
O Select START TIME with the cursor down.
FEATURES
TIMER
• START TIME
• STOP TIME
• CHANNEL
• ACTIVATE
BRIGHTNESS
COLOUR
CONTRAST
SHARPNESS
COLOUR TEMP
FEATURES
■ rTINER TIME
• CHILD LOCK START TIME
• FORMAT
• BLUE MUTE CHANNEL
• ACTIVE CTRL ACTIVATE
• CHILD LOCK
• FORMAT
• BLUE MUTE
FEATURES
TIMER
TIME
• START TIME
• STOP TIME
• CHANNEL
• ACTIVATE
STOP TIME
O Press the cursor right to enter the START TIME mode.
O Key in the time you want the programme to switch on.
O Press the cursor left to exit START TIME mode.
Setting Stop Time
O Select STOP TIME with the cursor down.
O Press the cursor right to enter the STOP TIME mode.
O Key in the time you want the programme to be switched off.
O Press the cursor left to exit STOP TIME mode.
Selecting the Channel
O Select CHANNEL with the cursor down.
O Select the channel you want to switch to.
Activating the Timer
O Select ACTIVATE with the cursor down.
O Press the cursor right to enter the ACTIVATE mode to
activate the timer.
FEATURES FEATURES
TIMER ^
• TIME
■ •• START TIME START TINE
• STOP TIME
• CHANNEL
• ACTIVATE
• •
FEATURES
TIMER .
• TIME
• START TIME
■ 4 STOP TINE
• CHANNEL
• ACTIVATE
• •
FEATURES
TIMER . TIMER ^
• TIME
• START TIME
• STOP TIME • STOP TIME
• ACTIVATE
• •
TIMER
• TIME ^
• STOP TIME ’■
• CHANNEL
• ACTIVATE
FEATURES
TIMER
• TIME
• START TINE ^
< STOP TIME
• CHANNEL ''
• ACTIVATE
FEATURES
• TIME
• START TIME
• ACTIVATE
'
9
■ •« CHANNEL ■
9
15
43.50PP7445_DFU_Eng_69.indd 15 2005-01-20 10:10:00 AM
Page 16
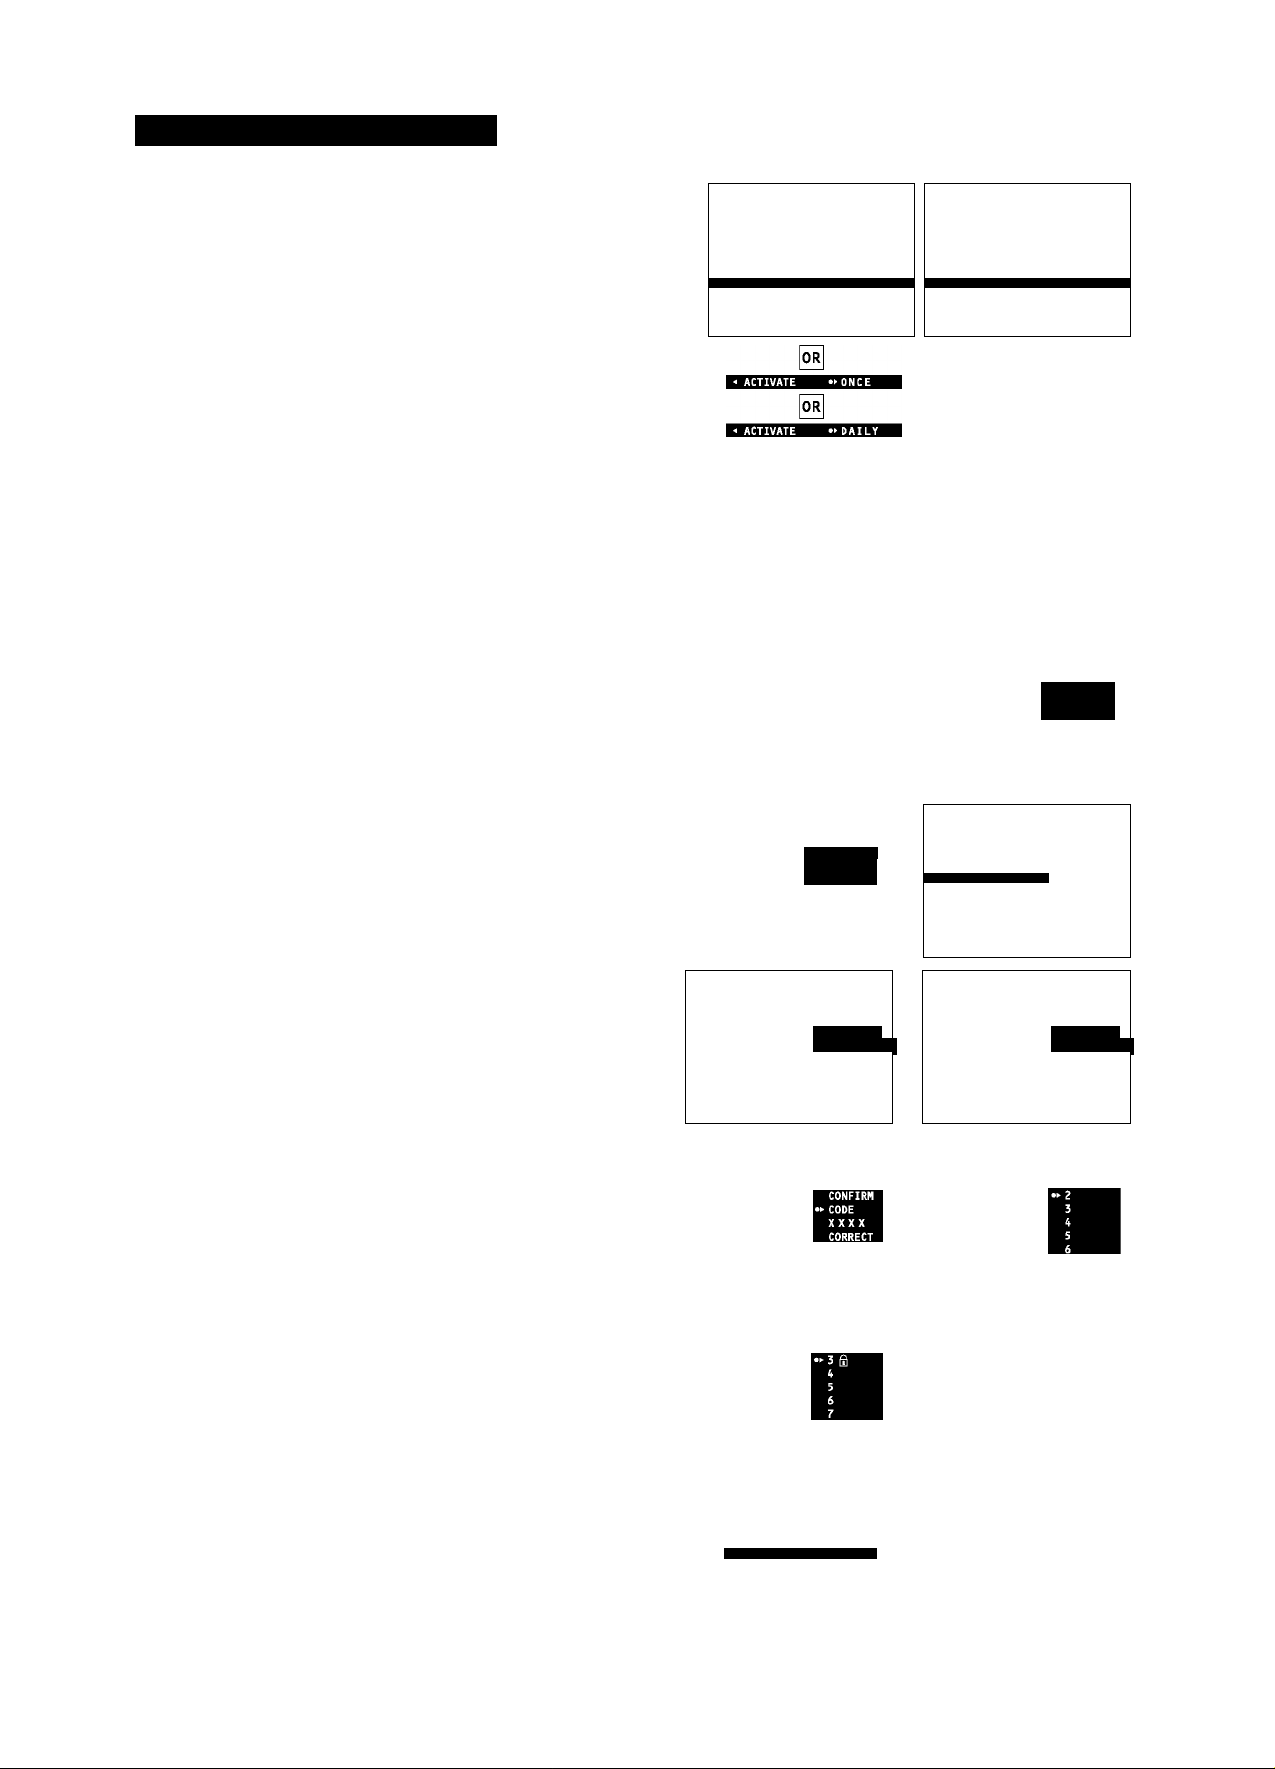
Using the Menus: Features
O Using the cursor right, select ONCE or DAILY, according to
if you want to activate the timer on the selected channel and
the selected time every day or only once.
Displaying the Time
O Select DISPLAY with the cursor down.
O Press the cursor right to select ON or OFF, according to If
you want to display the current time on the TV screen or not.
O Press the MENU key to return or the OSD key to switch the
menu off
Activating the Child Lock
The Child Lock feature allows you to lock channels to prevent
children from watching certain programmes.
Entering the Access Code
О Select CHILD LOCK in the FEATURES menu.
Q Press the cursor right to enter the ACCESS CODE.
О Key in the access code 0711 (the default access code). A
message INCORRECT will appear.
Q Key In access code 0711 a second time. The message
CORRECT will appear and make the Child Lock menu
accessible.
Changing the Access Code
©Select CHANGE CODE to enter an access code of your
choice.
FEATURES FEATURES
TIMER ^
• TIME
• START TIME • STOP TIME
• STOP TIME
• CHANNEL
■ •« ACTIVATE •• OFF ■ ■ DISPLAY «»ON ■
«
FEATURES
• TIMER ACCESS CODE
• FORMAT
• BLUE MUTE
• ACTIVE CTRL
FEATURES
• TIMER
rCHlLD LOCK
• FORMAT
• BLUE MUTE
• ACTIVE CTRL
ACCESS CODE
xxxx
CORRECT
TIMER i
* START TIME
• CHANNEL
• ACTIVATE
FEATURES
• TIMER
••■CHILD LOCK
• FORMAT
• BLUE MUTE
• ACTIVE CTRL
•
FEATURES
CHILD LOCK
• LOCK CHANNEL ENTER
•« CHANGE CODE ••^ NEW CODE
• CLEAR ALL
ACCESS CODE
XXXX
INCORRECT
—
-
© Press the cursor right to enter the CHANGE CODE mode.
О Key In the access code of your choice and confirm it again.
The message CORRECT will appear.
Activating the Child Lock
© Select LOCK CHANNEL in the CHILD LOCK menu.
Note; Enter the access code if requested. See above.
© Press the cursor right to enter the LOCK CHANNEL mode.
© Use the cursor up/down to select the channel you want to
lock.
© Press the cursor right to lock the channel. A keylock symbol
will appear beside the locked channel.
From now on the locked channel(s) can be accessed only via
the remote control.
© Repeat steps 1-4 to unlock a locked channel.
To clear all locked channels at once, select CLEAR ALL In the
CHILD LOCK menu and press the cursor right. The message
CLEARED will appear.
© Press the MENU key to return or the OSD key to switch the
menu off.
FEATURES
CHILD LOCK
• LOCK CHANNEL ENTER
-• CHANGE CODE •»^ NEW CODE
• CLEAR ALL
■
CHILD LOCK
• LOCK CHANNEL
< CHANGE CODE
• CLEAR ALL
CHILD LOCK
« LOCK CHANNEL
• CHANGE CODE
• CLEAR ALL
CHILD LOCK
• LOCK CHANNEL
• CHANGE CODE
CLEAR ALL CLEARED
FEATURES
CHILD LOCK
• LOCK CHANNEL CONFIRM
1
-• CHANGE CODE CODE
• CLEAR ALL
■
CHILD LOCK
•• LOCK CHANNEL
• CHANGE CODE
• CLEAR ALL
CHILD LOCK
• LOCK CHANNEL
• CHANGE CODE
1
16
43.50PP7445_DFU_Eng_69.indd 16 2005-01-20 10:10:01 AM
Page 17

Selecting the Screen Format
The TV's Screen Format options allow you flexibility In viewing
video sources. Select a screen format using the cursor up/down
keys or the onscreen menu. To use the onscreen menu:
O Select FORMAT in the FEATURES menu.
O Press the cursor right repeatedly to cycle through the different
screen formats and select your desired format. The options
vary by Input source (see specifics to the right):
♦ 4:3 format displays the 4:3 picture using the full surface of
the screen.
♦ AUTO format make the picture fill the screen as much as
possible.
For AVI and AV2 Sources:
• TIMER
• CHILD LOCK
• BLUE MUTE
• ACTIVE CTRL
OR
FORMAT AUTO
OR
<< FORMAT EXPAND 4:3
♦ EXPAND 4:3 format expands movie Images recorded In the
letterbox format. The black bars at the top and bottom of
the screen are expanded, thus filling the entire TV screen.
♦ COMPRESS 16:9 allows you to show widescreen, hlgh-
definltlon video sources as they were Intended for a more
natural picture. Black bars are displayed at the top and
bottom of the screen.
Switching Blue Mute on
The Blue Mute feature Indicates to you the absence of signal In
the transmission when BLUE MUTE Is activated.
O Select BLUE MUTE in the FEATURES menu.
O Press the cursor right to select ON to activate the blue mute
feature.
o Press the OSD key to switch the menu off.
Switching Active Control™ on
Turn Active Control™ on using the remote control ACTIVE
CTRL key or the onscreen menu. To use the onscreen menu:
O Select ACTIVE CTRL in the FEATURES menu.
For AV3 1080i Source:
OR
For AV3 480p Source:
No picture format options are available through
the TV. Control the screen format at the source
(DVD player or digital set-top box).
• TIMER
• CHILD LOCK
• FORMAT
• ACTIVE CTRL
OR
O Press the cursor right to select ON to activate automatic
control of Sharpness and Noise Reduction.
o Press the OSD key to switch the menu off.
Note; Should your remote control be lost or broken, you can still
change some of the basic picture and sound settings with the keys on
the front of the TV. See page 5.
17
s CHILD LOCK
• FORMAT
• BLUE MUTE
ACTIVE CTRL «ON
OR
43.50PP7445_DFU_Eng_69.indd 17 2005-01-20 10:10:02 AM
Page 18
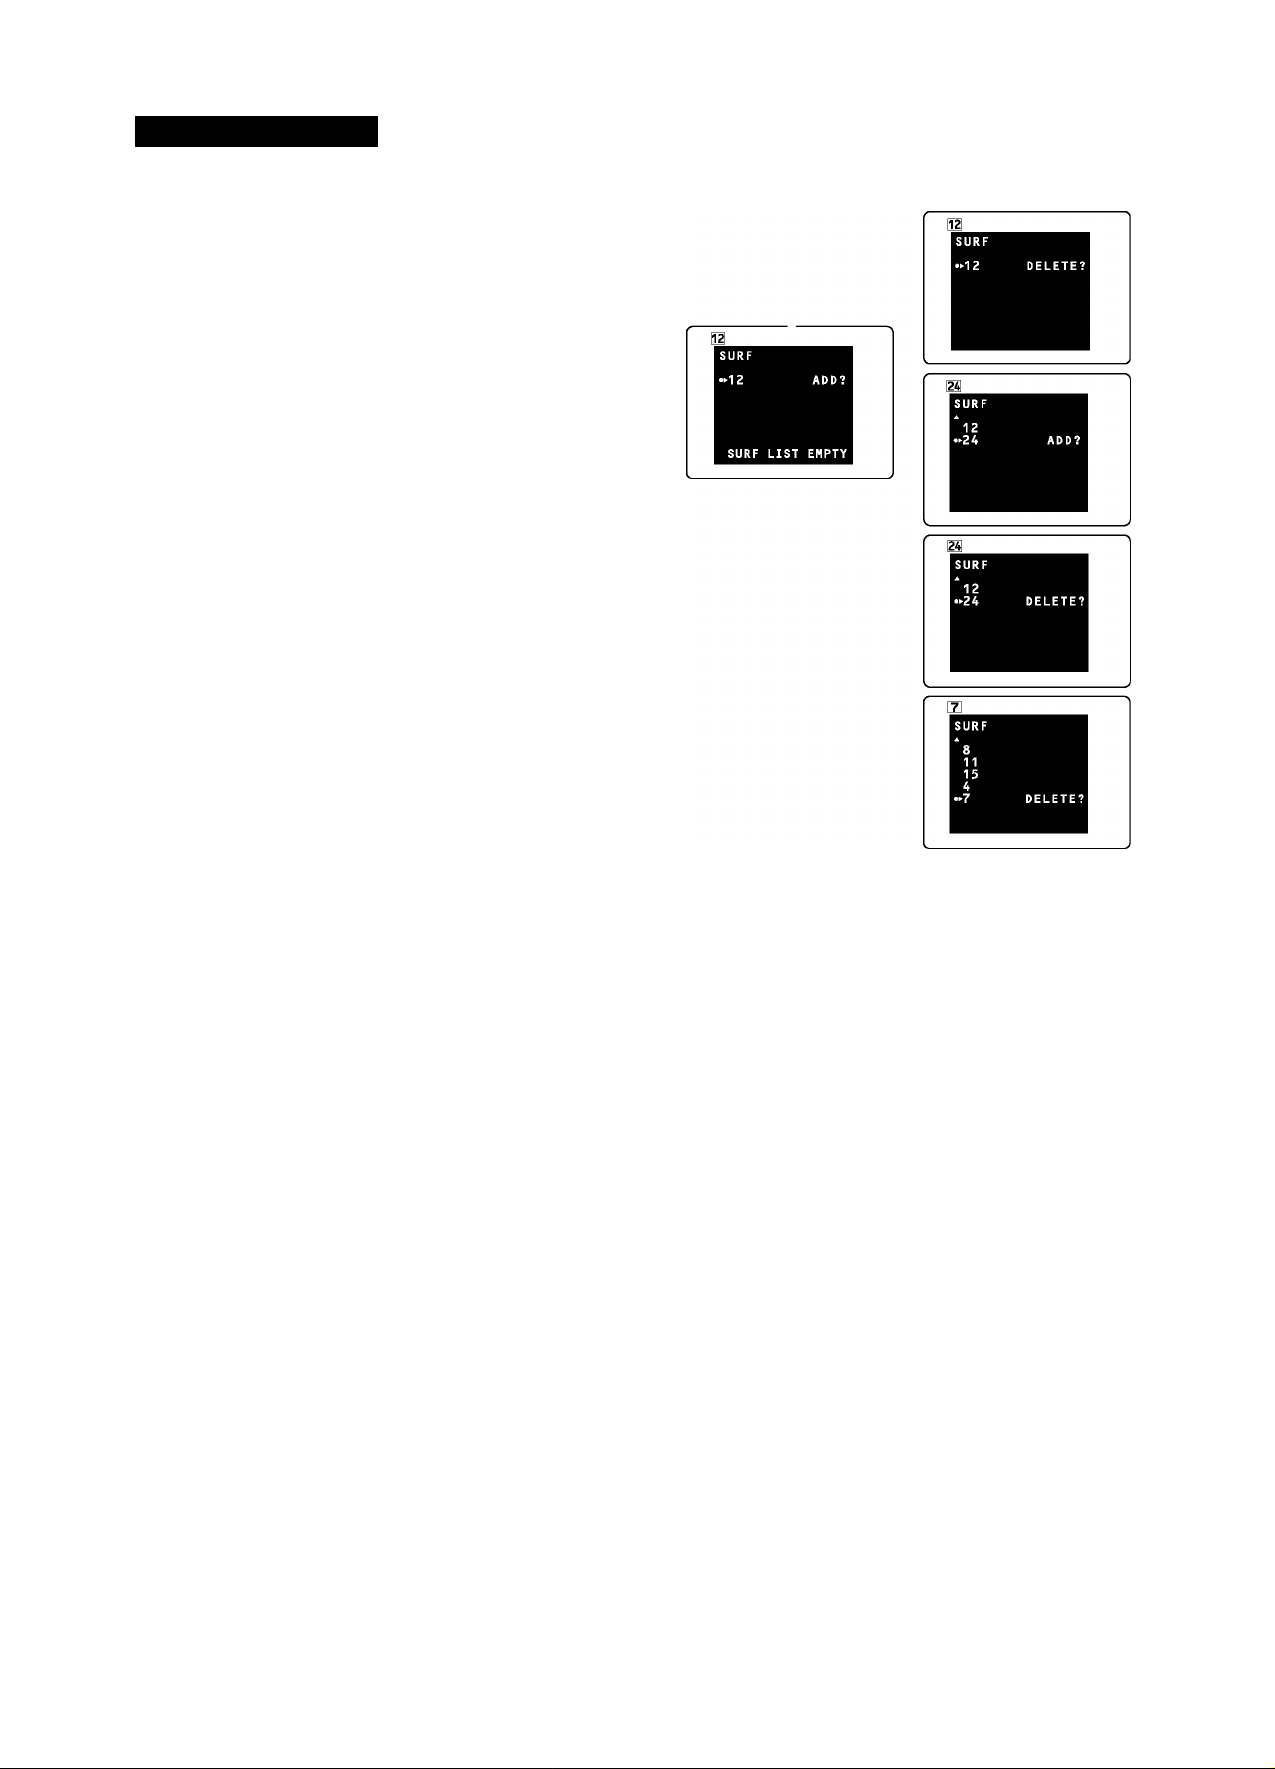
Using Smart Surf
Adding Channels to the Surf List
You can select a list or series of previously viewed channels with
the SURF key. This feature allows you to switch between different
TV programmes that currently interest you. You can have up to
10 channels in the SURF list. Five channels are shown in the list at
one time. Cursor down/up as necessary to see all the channels in
the list.
O Select a channel you want to add to the Surf list.
Q Press the SURF key.
o Cursor right to add the selected channel to the Surf list. The
channel is added when “delete?” appears, representing the
next available action.
Q Repeat steps 1-3 to add more channels to the Surf list.
0 Press the OSD key to switch the menu off.
Q Press the SURF key repeatedly to cycle through channels.
Deleting Channels to the Surf List
O Press the SURF key.
Q Press the SURF key again as many times as necessary to select
the channel you want to delete from the Surf list.
0 Cursor right to delete the channel from the list.
©To delete more channels, repeat the steps above.
18
43.50PP7445_DFU_Eng_69.indd 18 2005-01-20 10:10:02 AM
Page 19
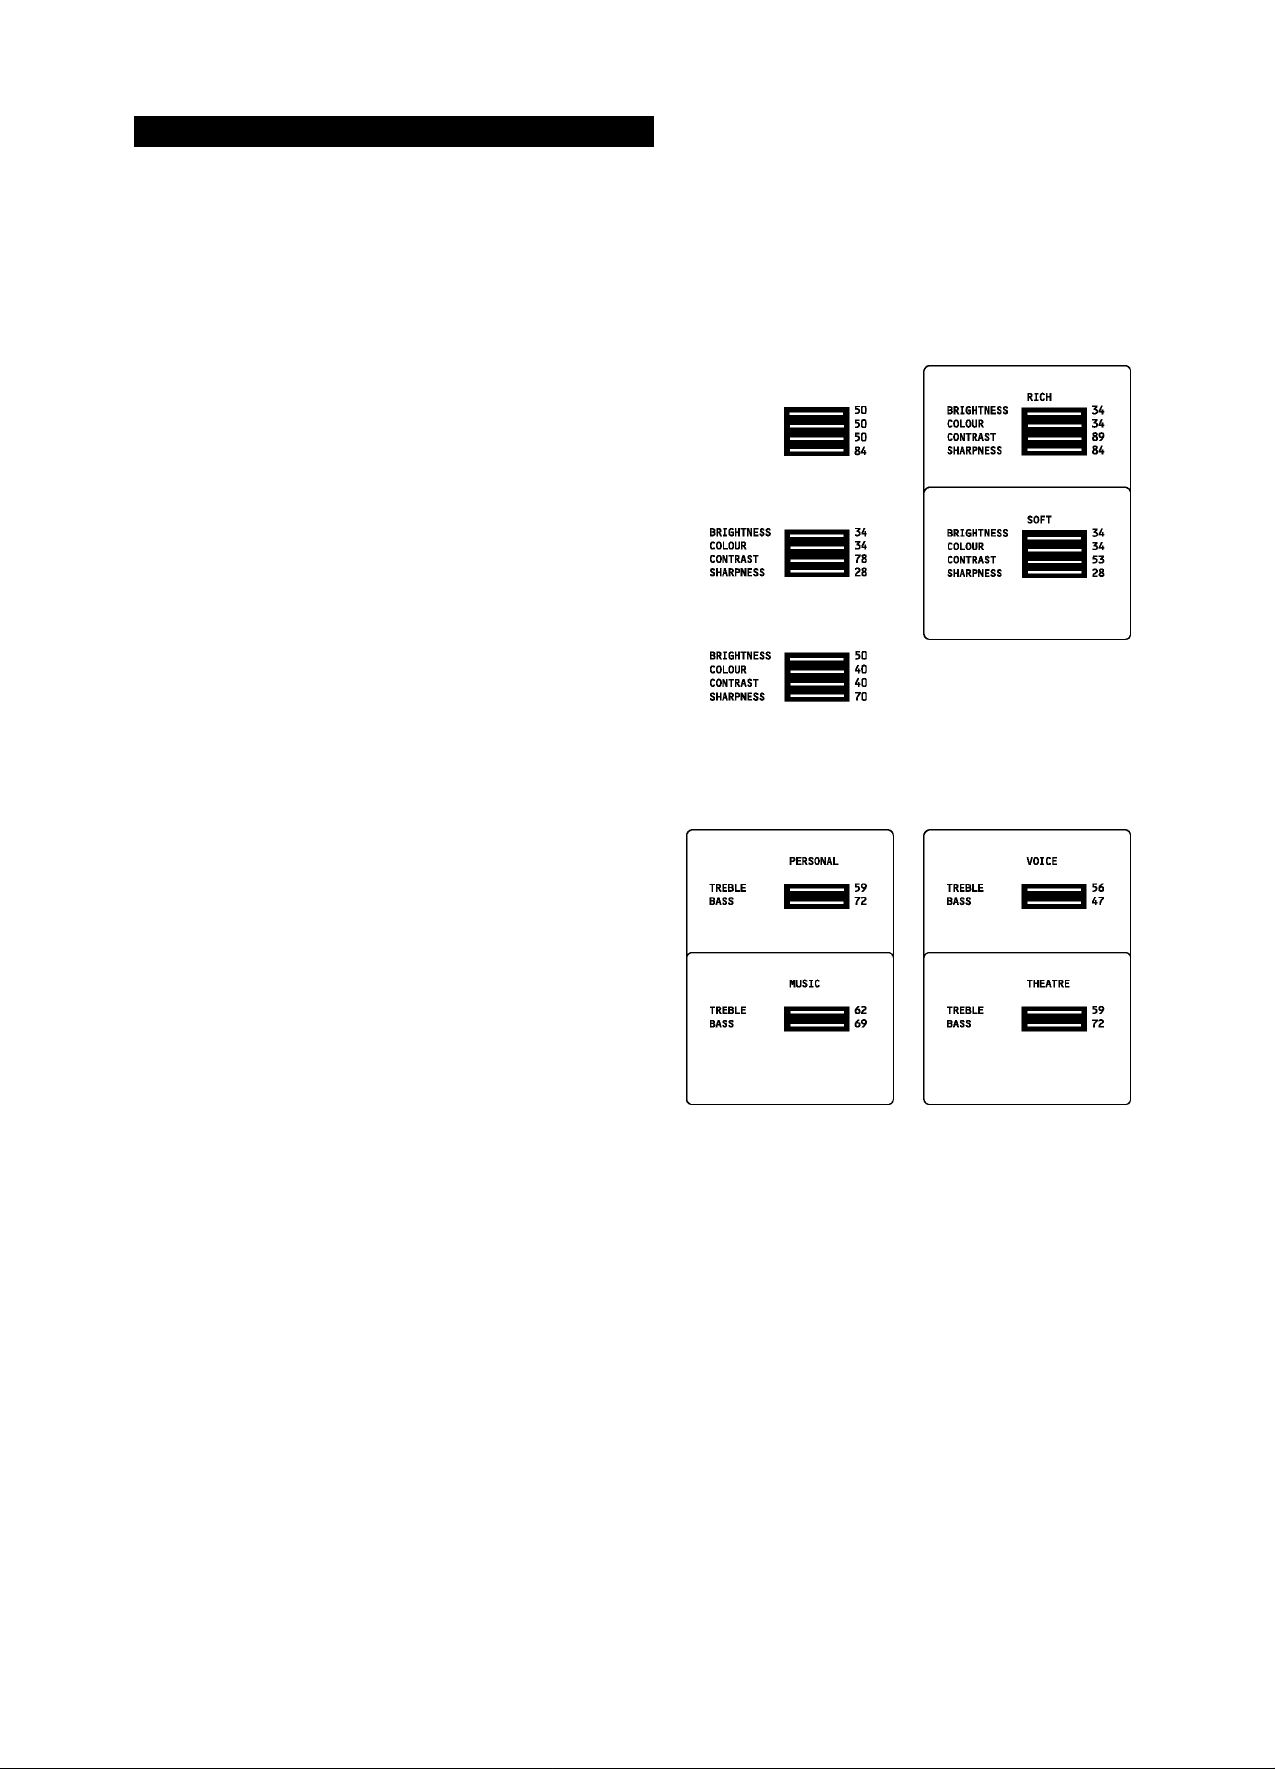
Using Smart Picture and Smart Sound
The Smart Picture feature offers you a choice of five picture
settings: Personal, Rich, Natural, Soft and Multimedia. Smart Sound
offers you a choice of four sound settings: Personal, Voice, Music
and Theatre.
Press the SMART O Picture or SMART S' Sound key on the
remote control repeatedly to cycle through the settings and select
your desired mode.
Note; The values shown In the Picture/Sound Setting diagrams are
sample values only. Your television's values may vary and display
different numbers.
Smart Picture O Options
Personal
Picture settings are based on your preference.
Rich
Emphasizes very vibrant colours. This option Is desirable for AV
mode In a brightly lighted room.
Natural
Emphasizes all settings equally.
BRIGHTNESS
COLOUR
CONTRAST
SHARPNESS
MULTIMEDIA
Soft
Emphasizes “warm” colours. This option Is desirable for a dimly
lighted room and gives a cinema-llke effect when the light Is
switched off.
Multimedia
Emphasizes “soft” colours. This option Is desirable for playing
computer games.
Smart Sound S' Options
Personal
Sound settings are based on your preferences.
Voice
Brings voices to the forefront, emphasizing them. Moves music to
the background.
Music
Emphasizes music over voices.
Theatre
Provides a balance between voices and music.
Note: The PERSONAL settings are the ones that you make using
the PICTURE or SOUND menus. These are the only Smart Picture
and Smart Sound settings that can be changed. All others are set at
the factory.
19
43.50PP7445_DFU_Eng_69.indd 19 2005-01-20 10:10:02 AM
Page 20
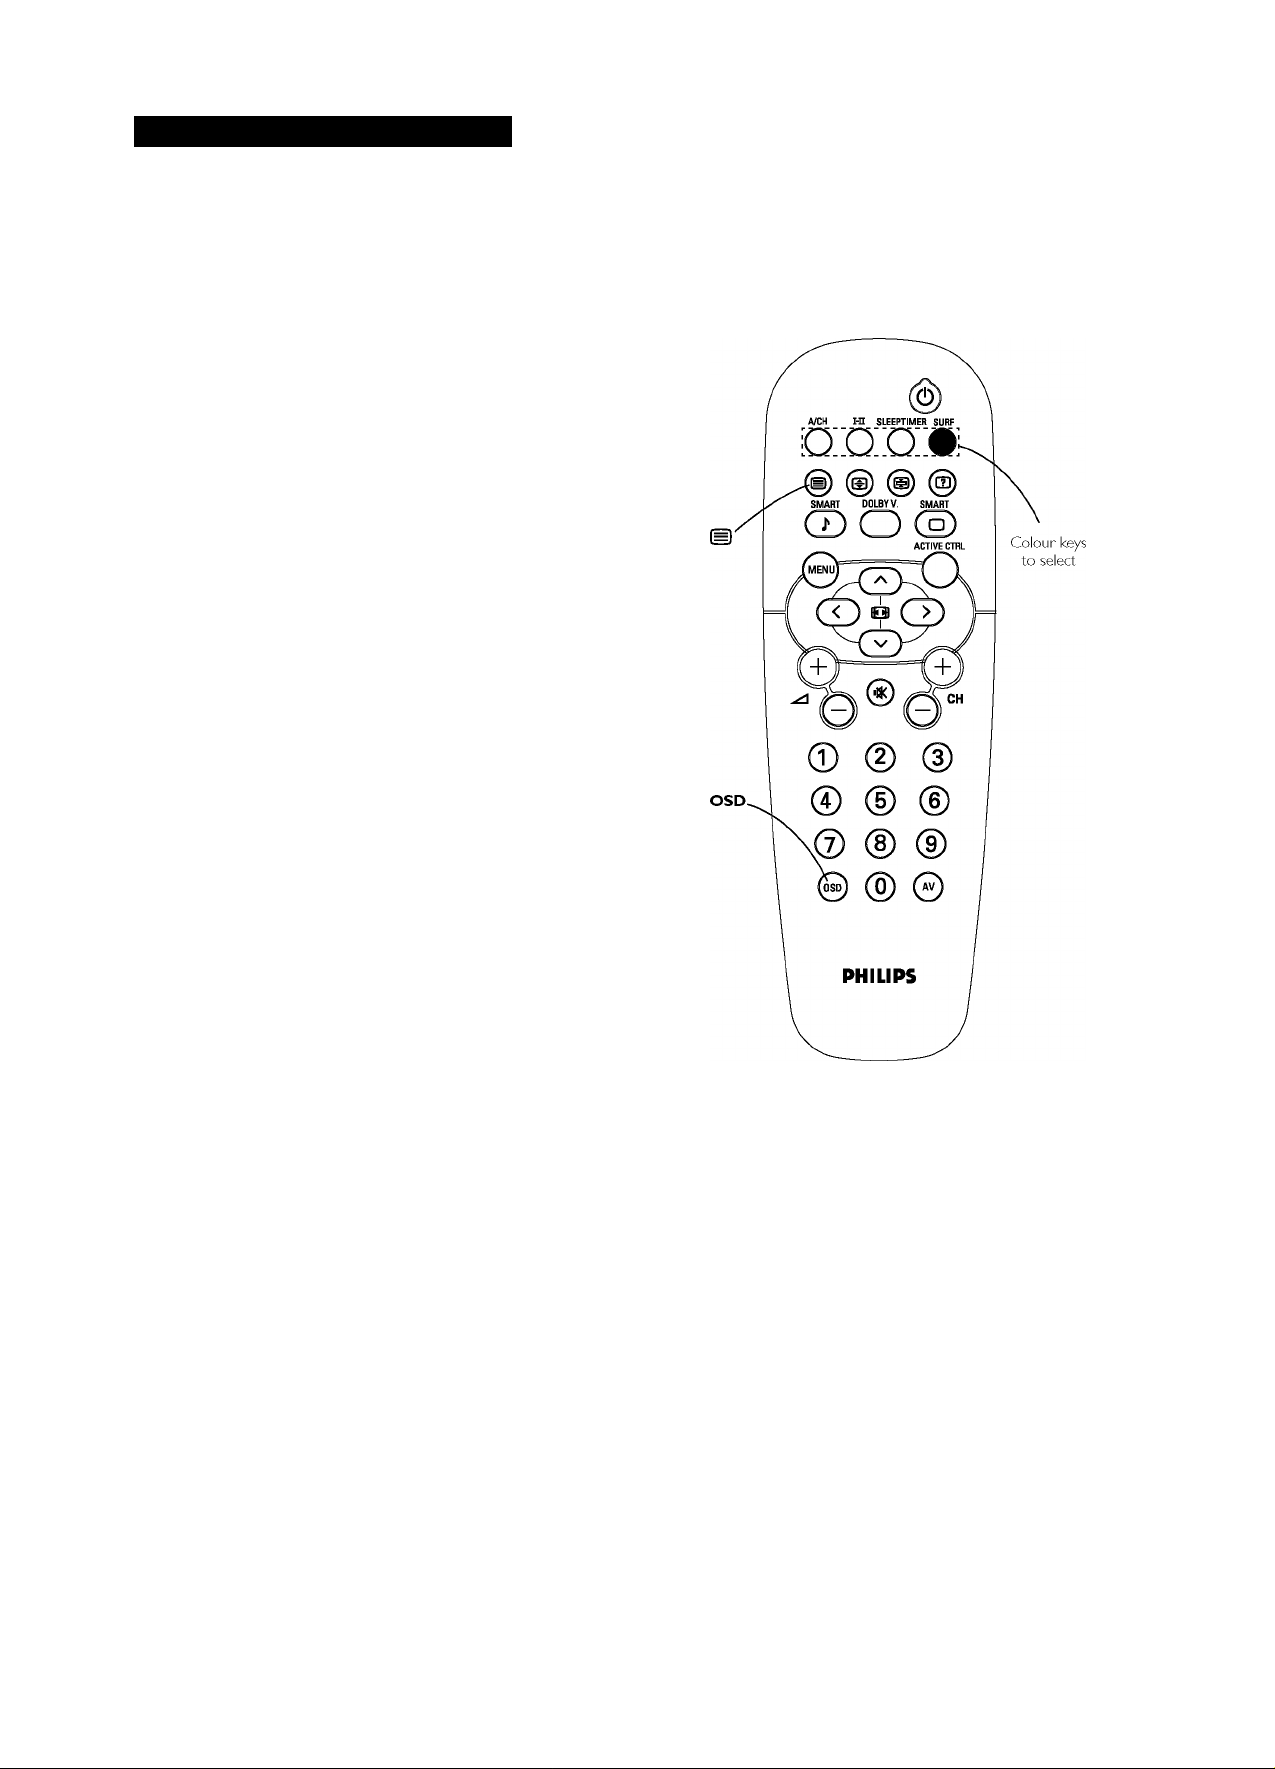
Using Teletext (if provided)
Many TV channels broadcast information via teletext. Each
channel that broadcasts teletext transmits a page with information
on how to use its teletext system. Look for the teletext page with
the main index (usually p. 100).
Depending on the TV channel, teletext is transmitted in different
systems. The colours used in the options line correspond with the
colour keys of your remote control.
About Teletext
Easy Text considerably reduces the waiting time (on condition
that the teletext broadcast of the particular TV channel is received
for at least half a minute) by:
♦ a direct selection of previous and following pages that are in
transmission and of the pages referred to in the options line at
the bottom of the teletext screen;
♦ a habit watcher list: frequently used pages are put automatically
in a list of preferred pages so that they are immediately
available;
♦ the precapturing of the page numbers referred to in the
displayed page; and
♦ the precapturing of all the subpages.
Switching Teletext on and off
O Press the © key to switch the teletext on.
The main index page appears on the screen together with two
information lines at the top and one option line at the bottom
of the screen.
Q Press the ^ key again to overlay the teletext page on the TV
programme.
o Press the © key once again to switch the teletext off
Selecting a Teletext Page
With the digit keys
Enter the desired page number with the digit keys.
The page counter seeks the page or the page appears
immediately when the page number has been stored in the
memory.
A message appears when you have entered a nonexistent or incorrect
page number. Page numbers beginning with 0 or 9 do not exist.
Choose another number.
With the option line
Use the colour keys - which correspond to the coloured options
at the bottom of the screen - to select the desired subject.
If the option line is not on the screen, press the selected colour
key TWICE.
20
43.50PP7445_DFU_Eng_69.indd 20 2005-01-20 10:10:03 AM
Page 21
Quickly Running Through the Teletext Pages
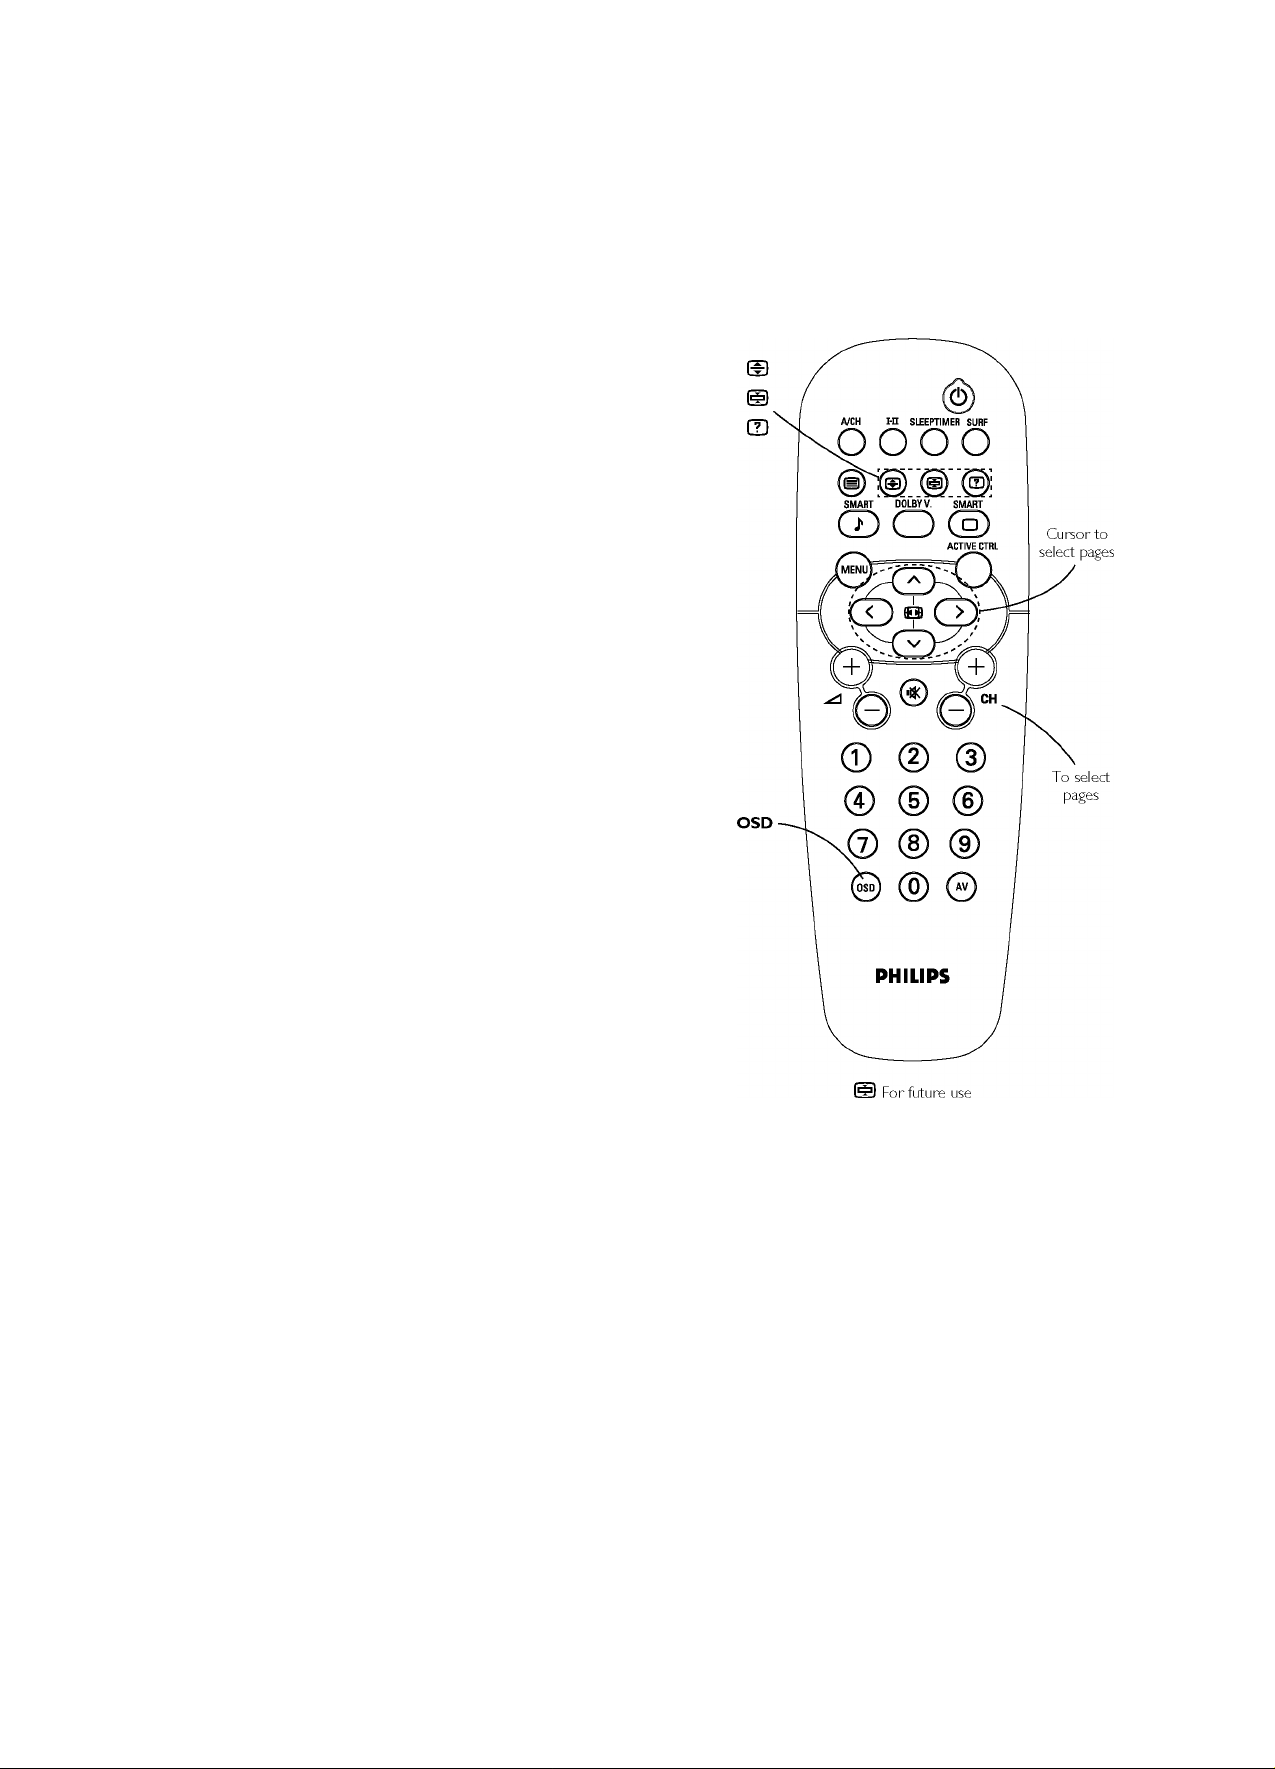
Press the cursor up/down or the CH +/- keys to run through the
previous or the following pages.
Selecting the Index Teletext Page
Press the OSD key to return to the main index (usually p. 100).
Selecting Subpages
When a selected teletext page consists of different subpages, one
of the subpages appears on the screen.
Arrows In front of the page number Indicate that other subpages
are available.
The other subpages can be selected In two ways:
With the cursor left/right
The other subpage numbers appear In white as soon as the
transmission has found them. They are stored In the memory so
that they are available while the teletext page Is on screen.
Use the cursor left/right to select the previous or the following
subpage.
Using Special Teletext Functions
Enlarge
Press ® repeatedly to display the upper part and the lower part,
and then to return to the normal page size. When the upper part
Is displayed, you can scroll the text, line by line using the cursor
up/down.
Reveal
Press m to reveal/conceal the hidden Information, such as
solutions to riddles and puzzles.
21
43.50PP7445_DFU_Eng_69.indd 21 2005-01-20 10:10:03 AM
Page 22
Connecting Peripheral Equipment
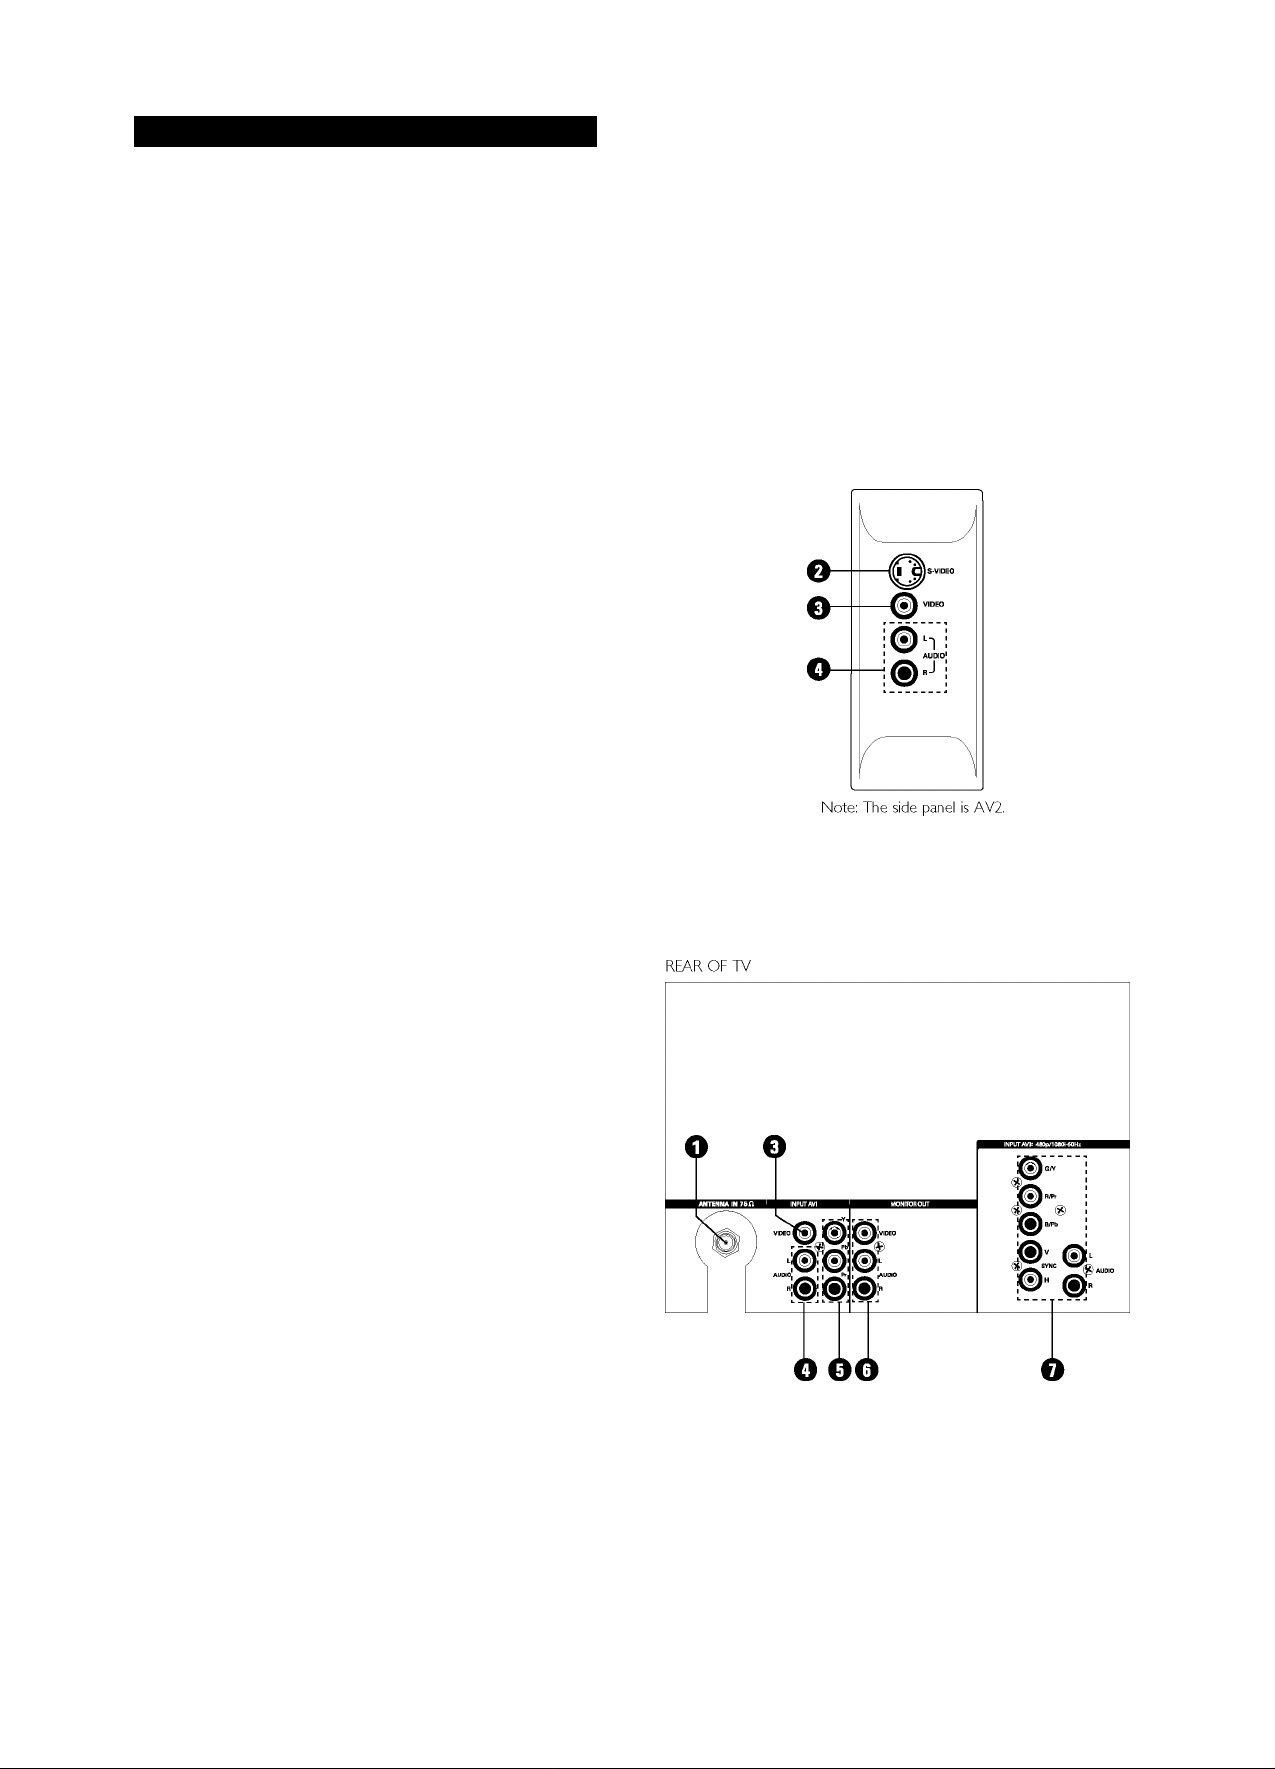
You can connect a wide range of video and audio equipment
to your TV in various ways. This page and the next one provide
an overview of signal compatibilities and the types of equipment
you can connect to the sockets. Connection examples follow on
subsequent pages. As necessary, also refer to the handbook for
peripheral equipment.
Overview: Standard Inputs/Outputs
O antenna in 75Q socket
- compatible with the broadcast standard In your area. Use
to connect radio-frequency (RF) signals from VHF/UHF
antennas or a cable system.
Q S-VIDEO (super video) sockets
- compatible with 4801 signals. Use to connect peripherals
having Super VHS (S-VHS) outputs, such as VCRs, DVD
players, laser-disc players, video-game players, satellite
receivers or other equipment.
©VIDEO (composite) sockets
(INPUT-AV 1 and TV’s side socket panel [AV2])
- compatible with 480I signals. Use to connect peripherals
having composite video outputs, such as VCRs, video-game
players or other equipment.
SIDE PANEL
©audio inputs (INPUT-AV1 and TV’s side socket panel
[AV2])
- use to connect from the audio output sockets on VCRs,
DVDs or other peripherals.
© YPbPr (component video input [CVI] sockets)
- compatible with 480I signals. Use to connect equipment
having component video outputs, such as DVD players,
laser-disc players, video-game players, satellite receivers or
other equipment. Use the INPUT-AV 1 L(eft) and R(lght)
AUDIO sockets for sound connections.
© MONITOR OUT (VIDEO/AUDIO)
- use to connect to a VCR to record programmes from the
TV. Or use the AUDIO outputs to connect to an audio hi-fi
system.
Overview: High-definition Inputs
The AV3 socket allow you to connect digital equipment with
1080l/480p (60Hz) signal output.
©AV3
- use to connect digital equipment with a 1080l/480p (60Hz)
signal output, such as digital set-top boxes or DVD players
with progressive-scan capability. You can connect equipment
with YPbPr component video or RGB outputs to the AV3
sockets. H and V Sync connections may or may not be
required for RGB connections. Use the AV3 L(eft) and
R(lght) AUDIO sockets for sound connections.
See the handbook for the digital equipment you are
connecting.
22
43.50PP7445_DFU_Eng_69.indd 22 2005-01-20 10:10:03 AM
Page 23
AV3 Digital High-definition Inputs
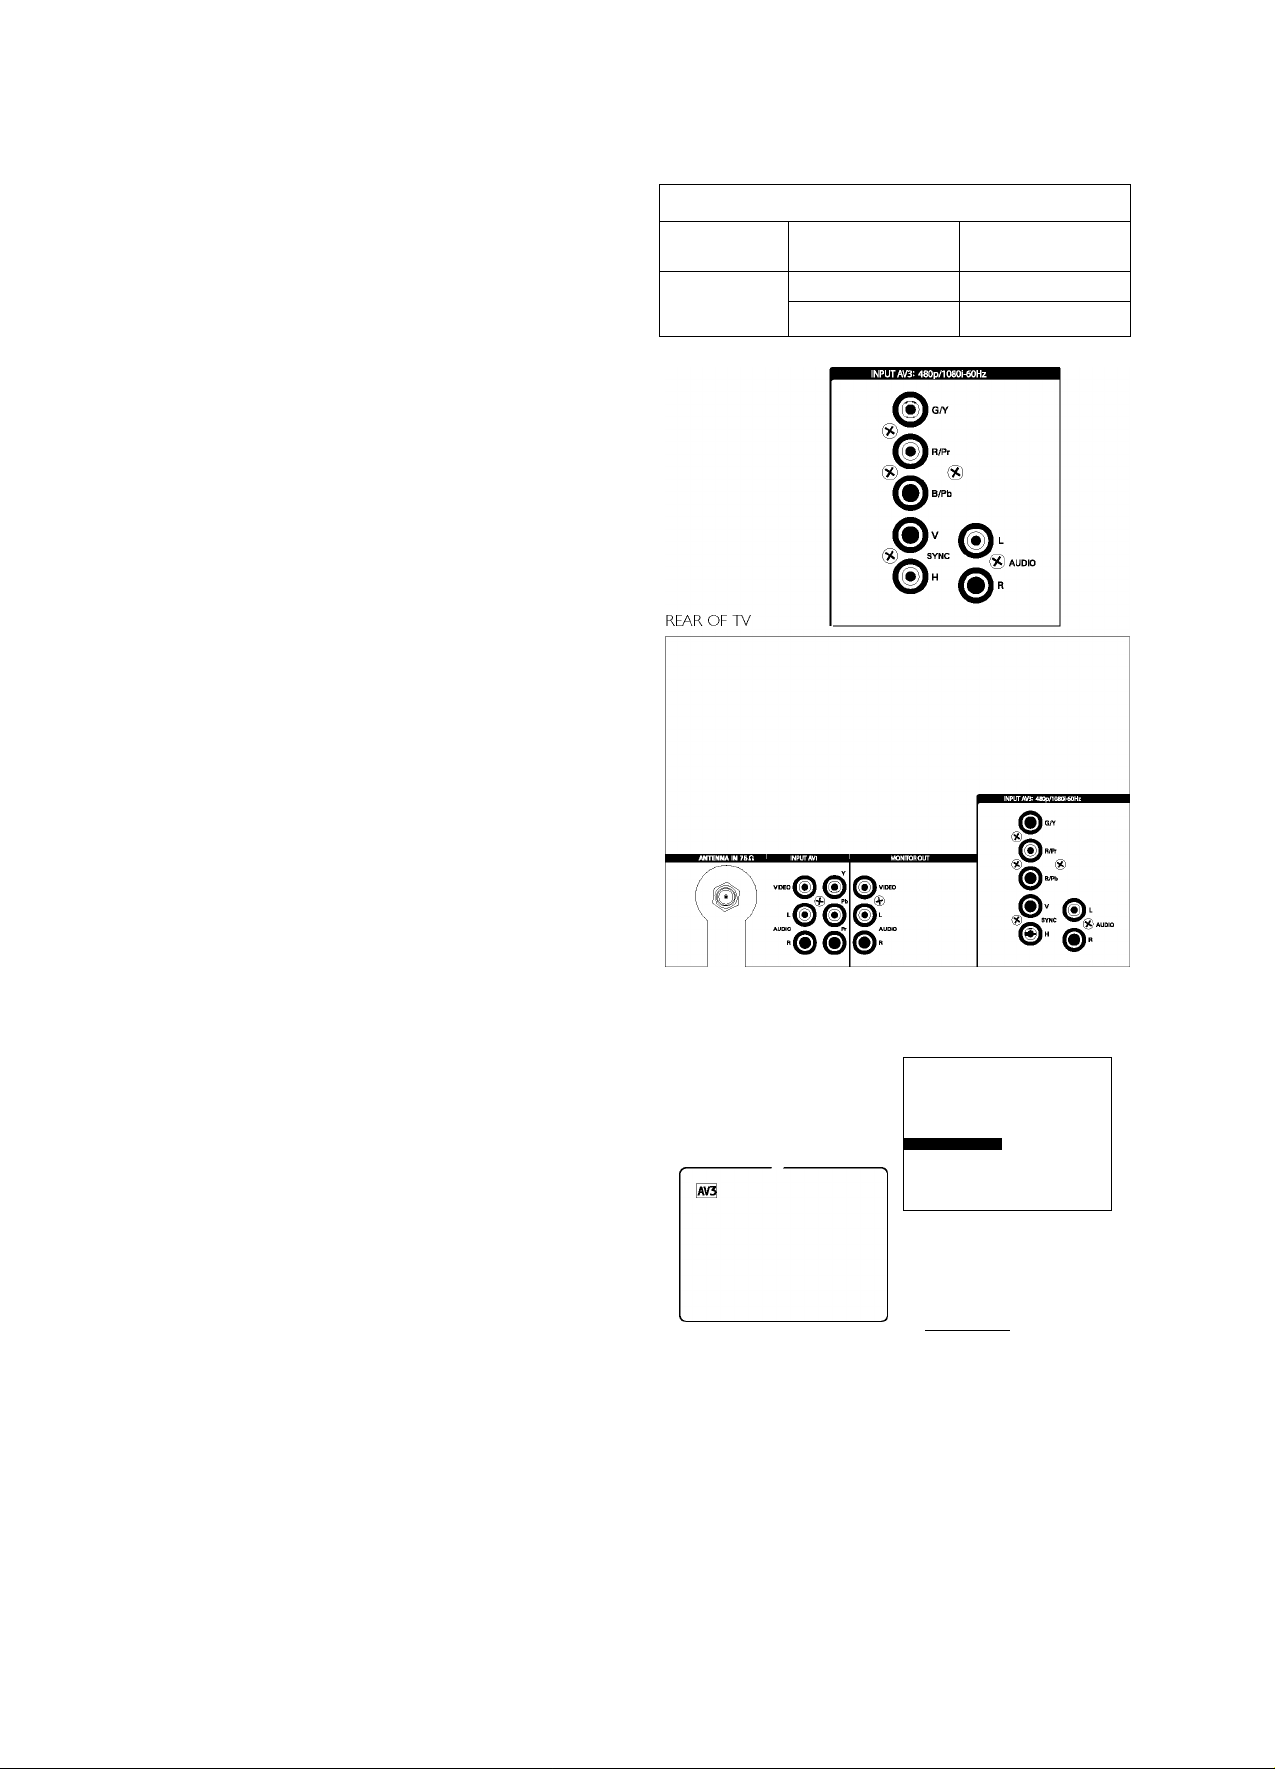
When you have digital equipment with 1080i on480p signal
output (60Hz), connect It to the AV3 Inputs on your TV.
Examples of such equipment are digital set-top boxes and
progressive-scan DVD players.
Connecting to AV3
Connect digital equipment with component video output (usually
labeled Y-Pb-Pr) or with RGB output (phono-type connectors) to
the AV3 Inputs for video and audio left and right. Also connect to
the H and V SYNC Inputs on the TV If required for your digital
equipment.
Note: The AV3 sockets are compatible with some digital equipment
having RGB outputs with “sync on green" or RGB with “separate H
and V sync." Output standards for digital equipment, however, may
vary by manufacturer. No industry standards have been established
for HD television RGB signal systems, timing, synchronization, and
signal strengths. If the digital equipment you want to connect to your
TV offers both component video and RGB outputs, component video
is the suggested connection to use. See the handbook for the digital
equipment.
Notes regarding connecting to AV3:
♦ For connections to AV3, be sure the TV's colour-space setting
matches the output (Y-Pb-Pr or RGB) of the digital equipment
you have connected to the AV3 Inputs.
High-definition Inputs - Video Synchronizing Reference
Input Video Description
AV3
480p (60Hz) EIA/CEA-770.2-C
1080Ì (60Hz) EIA/CEA-770.3-C
Accepts Video Sync
according to:
♦ See the handbook for the hlgh-definltlon equipment.
♦ If you notice scrolling images, wrong colours or no colour, no picture
or even combinations of these on your screen, check to see if the
connections have been done properly.
Setting the AV3 Colour Space
The term colour space refers to how colours are defined and
appear on your TV. When making connections to the AV3
socket, you will need to be sure the TV's colour space Is set to
match the output of the peripheral you have connected.
O Press the AV key on the remote control as many times as
necessary to select the hlgh-definltlon Input you desire, AV3.
0 Press the MENU key to display the menu.
© Select INSTALL with the cursor down.
O Press the cursor right to enter the INSTALL menu.
0 Cursor down until the hlgh-definltlon Input (AV3) Is selected.
O The current colour-space setting appears to the right of AV3.
To change the setting, cursor left or right.
O Press the OSD key to switch the menu off
• PICTURE LANGUAGE
• SOUND AUTO STORE
• FEATURES MANUAL STORE
■ t^INSTALLI SORT
INSTALL
s AUTO STORE
• MANUAL STORE
• SORT
« CHANNEL EDIT
CHANNEL EDIT
-OR-
23
43.50PP7445_DFU_Eng_69.indd 23 2005-01-20 10:10:04 AM
Page 24
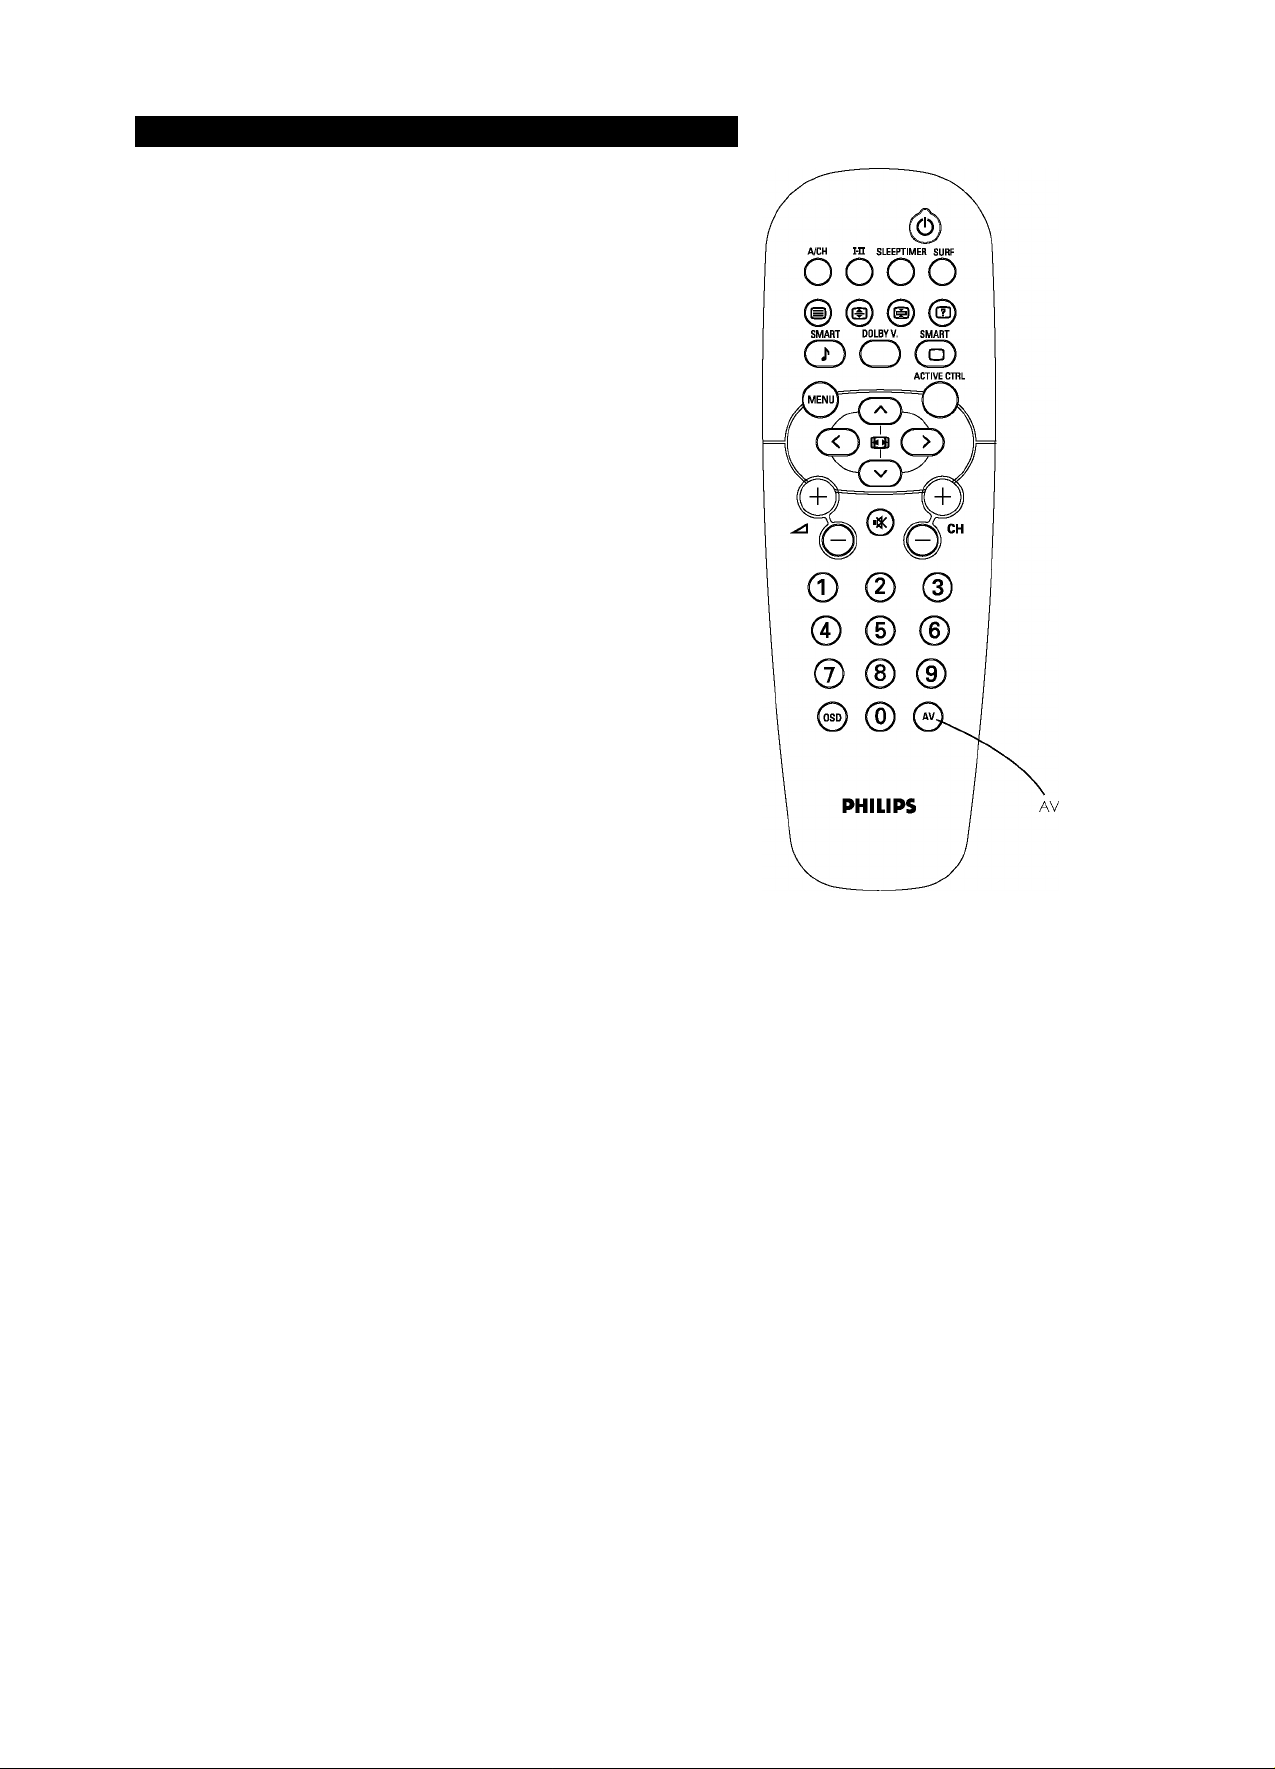
Selecting Connected Equipment for Viewing
Equipment Connected with an Aerial Cable
Only
Select the channel number under which you have stored the test
signal with the digit keys.
Equipment Connected to the back or to the
side of the TV (AV2)
Press the AV key repeatedly to select AV1, CVI, AV2 or AV3
according to where you have connected your equipment at the
back or the side of your TV.
Select CVI to view the playback of DVD discs If you used the
INPUT-AV 1 component video Input sockets (Y-Pb-Pr and
AUDIO L [mono] and R Inputs).
TV Channels
Enter the channel number of the TV channel you want to watch
with the digit or CH +/- keys.
24
43.50PP7445_DFU_Eng_69.indd 24 2005-01-20 10:10:05 AM
Page 25

Care, Cleaning and Tips
WARNING Concerning Stationary Images on the TV Screen:
Do not leave stationary or “letterbox” images on screen for extended periods of time. This can cause uneven
picture-tube aging.
Normal use of the TV should Involve the showing of pictures that contain constantly moving and changing Images that fill the screen. Be
careful not to leave nonmoving Images on screen for extended periods of time or to display the same Images on screen too frequently,
because subtle ghost Images can be left on the picture tubes. Avoid showing the same stationary Images more than 15 percent of your
total viewing In any one week. Sources of stationary Images may be DVD discs, laser discs, video games, CD-I discs, videotapes, digital
television boxes, broadcast channels, cable channels, satellite channels and others.
Here are some examples of stationary Images (this Is not an all-inclusive list; you may encounter others In your viewing):
♦ DVD menus - listings of DVD disc content.
♦ “Letterbox” black borders - black bars shown along the edges of the picture when a widescreen (16:9) movie Is played on TV.
♦ Video-game images and scoreboards.
♦ Television station logos - present a problem If they are bright and stationary; moving or low-contrast graphics are less likely to
cause uneven aging of the picture tube.
♦ Stock-market tickers - presented at the bottom of the TV screen.
♦ Shopping channel logos and pricing displays - bright and shown constantly or repeatedly In the same location on the TV screen.
All picture tubes age with use, with their light output diminishing overtime. But by maintaining normal use—mixing television picture
types - you will create conditions for the tubes to age at an even rate. The result will be a TV picture that Is evenly bright over the
entire screen.
Placement of the TV
♦ See page 4.
Cleaning
♦ To avoid possible shock hazard, be sure the TV Is unplugged from the electrical outlet before cleaning.
♦ Regularly dust the TV with a dry, nonscratching duster to keep the TV clean.
♦ When cleaning the TV, take care not to scratch or damage the screen surface. Avoid wearing jewelry or using anything abrasive. Do
not use household cleaners. Wipe the front screen with a clean cloth dampened with water. Use even, easy, vertical strokes when
cleaning.
♦ Gently wipe the cabinet surfaces with a clean cloth or sponge dampened In a solution of cool, clear water and a mild soap or
detergent. Use a clean, dry cloth to dry the wiped surfaces.
♦ Occasionally vacuum the ventilation holes or slots In the back cover of the set.
♦ Never use thinners. Insecticide sprays, or other chemicals on or near the cabinet, as they might cause permanent marring of the
cabinet finish.
Tips
♦ Do not shift or move the set around when it is switched on. Unevenness in colour In some parts of the screen may occur.
End-of-life Disposal of the TV
Philips Is paying much attention to making Its products environmentally friendly. Your new TV contains materials that can be recycled
and reused. Specialised companies can dismantle your discarded TV at the end of Its life, concentrating on the reusable materials and
minimising the amount of materials to be disposed. Please be sure to dispose of your old TV according to local regulations.
Disposal of Exhausted Batteries
The batteries supplied do not contain the heavy metals mercury and cadmium. Nevertheless, In many countries exhausted batteries
may not be disposed of with your household waste. Please ensure you dispose of exhausted batteries according to local regulations.
25
43.50PP7445_DFU_Eng_69.indd 25 2005-01-20 10:10:05 AM
Page 26

Before Calling Service
Symptom
TV remote control does not work
No power
No picture
What to do
Check that the batteries are installed correctly.
Replace the batteries, it necessary.
Clean the remote control and the remote-sensor window on the TV.
Be no farther than 6 meters from fhe TV when using fhe remofe confrol and aim fhe remofe
confrol foward fhe TV’s remofe-sensor window.
If fhe remofe confrol sfill will nof work, use fhe keys on fhe TV.
Check fhaf fhe TV’s power cord is plugged info fhe mains sockef. If fhere is sfill no power,
disconnect the plug. Wait for 60 seconds and reinsert the plug and then switch on the TV again.
See if fhe ouflef is confrolled by a wall swifch.
If you are using an AC power sfrip, be sure fhe fuse on fhe power sfrip is nof blown.
Check fhe anfenna connecfion af fhe rear of fhe TV fo see if if is properly connecfed fo fhe TV
inpuf ferminal.
The broadcasf sfafion may be experiencing difficulfy. Try anofher channel.
Adjusf fhe confrasf and brighfness settings or select another picture setting with the Smart
Picture key on the remote control.
If using peripheral equipmenf fhrough fhe A/V inpufs, be sure if is properly connecfed.
Be sure you have selecfed fhe correcf signal source for viewing.
If you are attempfing fo view a picfure from a progressive-scan-capable DVD player connecfed
fo fhe AV3 sockef, be sure you have swifched fhe DVD player fo progressive-scan mode.
If you are using an HD receiver, be sure ifs oufpuf is sef correcfly (fo HD or SD), based on fhe
connecfion fo fhe TV you have made.
Good picture but no sound
Good sound but poor colour or no picture
Poor picture
Snowy picture and noise
Colour patch (unevenness)
Horizontal dotted lines • This may be caused by electrical interference from appliances such as hair driers or vacuum
Increase fhe volume.
Check fhaf fhe TV is nof mufed; press fhe ^ key on fhe remofe confrol.
When no signal is defecfed, fhe TV aufomafically swifches off fhe sound. This is proper
operafion and does nof indicafe a malfuncfion.
Check fhe fransmission sysfem’s sound settings on the set.
Adjust the contrast and brightness setting or select another picture setting with the Smart
Picture key on the remote control.
Check the transmission system’s colour settings on this set.
Poor picture quality sometimes occurs when an S-VHS camera or camcorder has been
connected to the side panel (AV2) of fhe TV when anofher peripheral is connecfed fo AV1
simulfaneously. In fhis case, swifch off one of fhe ofher peripherals.
Check fhe anfenna connecfion.
Swifch off fhe TV by fhe mains power key. Waif for 20 minufes before swifching on again.
Be sure you have made connecfions correctly.
If you have connecfed digifal equipmenf fo fhe AV3 sockefs, check fhe colour-space setting on
the equipment or TV and change the setting on either if necessary.
Check fo be sure fhe TV is nof placed foo near speakers or magnefic objects.
Adjust the TV’s convergence.
cleaners or ofher sources such as neon lighfs. Turn off fhe appliance or move fhe TV.
Double images or “ghost" images • High-rise building or hills may be obsfructing recepfion. Tr^ using a highly directional antenna to
improve the picture.
One white line across the screen • Switch the TV off immediafely and consulf a qualified service person.
NICAM sound distortion (crackling noise)
• This could be due fo anfenna sifing or reflecfed signal.
• Swifch over fo “MONO" by pressing fhePH key on fhe remofe confrol.
If your problem is not solved, switch the TV off and then back on again once. Never attempt to repair a defective
TV yourself. Check with your dealer or call a TV technician.
26
43.50PP7445_DFU_Eng_69.indd 26 2005-01-20 10:10:05 AM
Page 27

Specifications
Picture/Display
♦ Aspect Ratio: 4:3
♦ Display Technology: Projection TV, CRT, 7” liquid cooled
♦ Picture Enhancement: Active Control, APAC, Black Stretch, Blue
Stretch, Digital Comb Filter, Color Temperature, Digital Crystal
Clear, Digital Noise Reduction, Dynamic Contrast, Progressive
Scan, 100Hz Digital Scan
♦ Screen Enhancements: Saphlon Screen, Anti- Aging Circuit, Anti
Reflection, High Brightness, High Contrast
♦ Size: 43PP7445, 43”: 50PP7445, 50”
Supported Display Resolution
♦ Video Formats: 480i 60Hz, 480p 60Hz, 1080i 60Hz
Sound
♦ Bass Enhancement: Bass Boost
♦ Output Power (RMS): 24 W or 2x12 W
♦ Sound Enhancement: Automatic Volume Leveler
♦ Speaker Size: 4”x6”
♦ Speaker Number: 2
♦ Speaker Type: full range oval
Tuner/Reception
♦ Aerial Input: 75 Ohm lEC-Type
♦ Auto Store: Yes
♦ Standards: NTSC M (3.58-4.5), NTSC (4.43-5.5), PAL B/G, PAL
D/K, PAL I, SECAM B/G, SECAM D/K, SECAM K1
Connectivity
♦ AVI: 480i 60Hz, CVBS in, YPbPr, Audio L/R in
Convenience
♦ Child Protection: Child Lock, Parental Control
♦ Clock Functions: Clock, Sleep Timer
♦ Convenience Enhancements: Auto Program, Auto Picture
Modes, Auto Sound Modes
♦ Menu Languages: /93 Chinese-Simplified, English
/69 and /79: Chinese-Simplified, English, Malay
♦ Picture Functions: Freeze
♦ Teletext: 100 page Easytext (Not available on /93)
♦ Remote Control: RC19335022, Batteries
Dimensions
43PP7445
♦ Product Dimensions (WxHxD): 96 cm x 115 cm x 53 cm
♦ Product Weight: 57 kg
♦ Carton Dimensions: 106 cm x 125 cm x 62 cm
♦ Weight Incl. Packaging: 65 kg
50PP7445
♦ Product Dimensions (WxHxD): 113 cm x 148 cm x 62 cm
♦ Product Weight: 82 kg
♦ Carton Dimensions: 125 cm x 154 cm x 71 cm
♦ Weight Incl. Packaging: 94 kg
Power
♦ Compiles with Energy Star, less than
1 watt standby
♦ Mams Power: /69, 79: 90-276V, 50/60Hz
/93: 160-276V, 50/60 Hz.
♦ AV2: Side, 480i 60Hz, CVBS in, S-Video Y/C, Audio L/R in
♦ AV3: 1080i 60Hz, 480p 60Hz, YPbPr, RGB+H/V
♦ Output Rear: CVBS out. Audio L/R out
♦ Power Consumption: 180 watts average
These technical specifications are subject to change without notice.
27
43.50PP7445_DFU_Eng_69.indd 27 2005-01-20 10:10:05 AM
Page 28

PHILIPS
MODEL:.
PROD. No:
3141 085 20091
43.50PP7445_DFU_Eng_69.indd 28 2005-01-20 10:10:05 AM
©
 Loading...