

Page 1
Fully automatic
espresso machine
4300 series
5400 series
EN USER MANUAL
DA BRUGERVEJLEDNING
DE BENUTZERHANDBUCH
ES MANUAL DEL USUARIO
FR MODE D’EMPLOI
IT MANUALE UTENTE
NL GEBRUIKSAANWIJZING
NO BRUKERHÅNDBOK
PT MANUAL DO UTILIZADOR
FI KÄYTTÖOPAS
SV ANVÄNDARHANDBOK
www.philips.com/co ee-care
Page 2
Page 3
A2A1 A3 A4
A14
A8A7A6
A9
A12
A13
A10
A11
A5
A17
A15
A
A20
A18
A16
A19 A21 A22 A23 A24 A25
A17A18 A16 A14 A25 A24 A22 A15 A9 A4 A12
B
Page 4
Classic Milk Frother
Series 4300
Series 5400
EP4327
EP4324
EP4321
EP5447
EP5446
EP5444
EP5443
EP5441
EP4349
EP4346
EP4343
EP4341
LatteGo
SettingsClean
Espresso Americano Cappuccino Latte Macchiato
Cafe au lait More Drinks
A20 A21 A22 A23 A24 A25
D1 D2 E1 E2
D
E
C3C4C5C6C8 C2C7
C1
C
F
Page 5

8
English
Contents
Machine overview (Fig. A) ____________________________________________________________________________ 8
Control panel _________________________________________________________________________________________ 9
Introduction __________________________________________________________________________________________ 9
Before first use _______________________________________________________________________________________ 10
Brewing drinks________________________________________________________________________________________ 11
Personalizing drinks __________________________________________________________________________________ 13
Adjusting machine settings __________________________________________________________________________ 14
Removing and inserting the brew group ____________________________________________________________ 15
Cleaning and maintenance __________________________________________________________________________ 16
AquaClean water filter _______________________________________________________________________________ 18
Descaling procedure (30 min.) ______________________________________________________________________ 19
Ordering accessories _________________________________________________________________________________ 20
Troubleshooting ______________________________________________________________________________________ 21
Technical specifications______________________________________________________________________________ 26
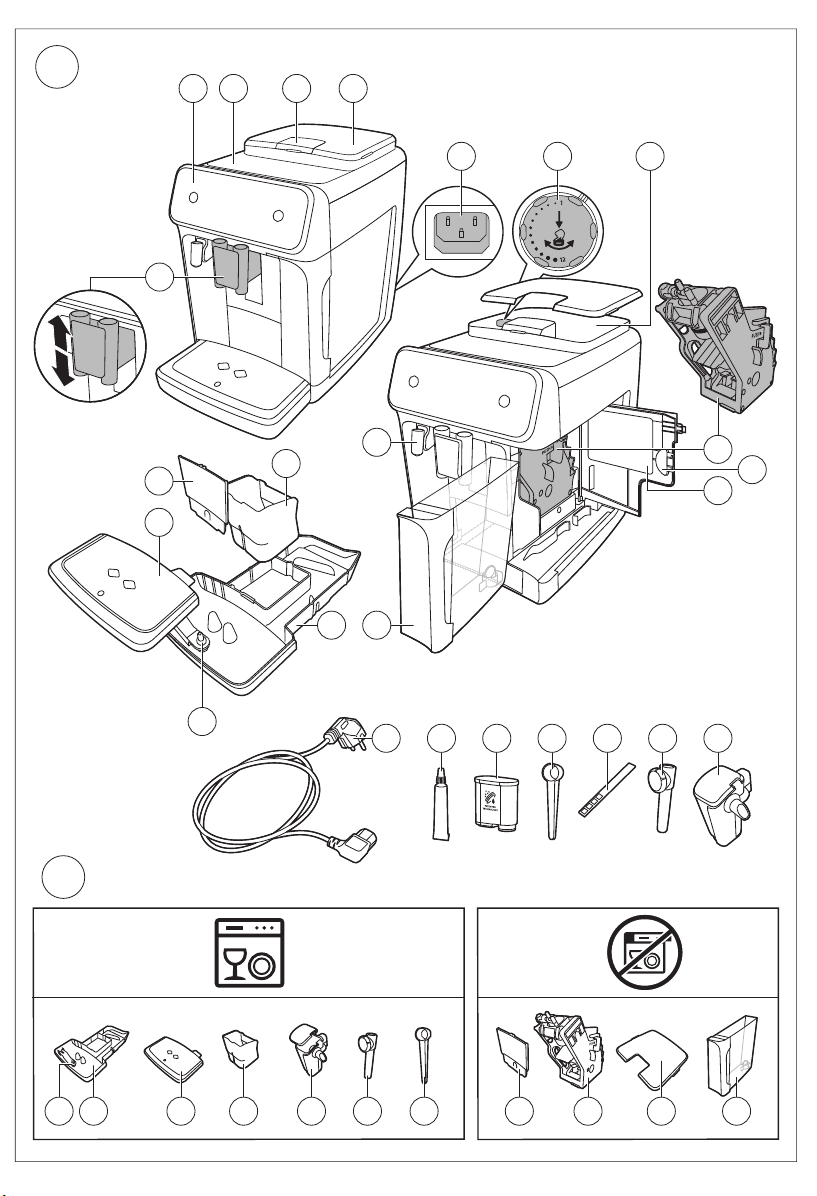
Machine overview (Fig. A)
A1 Control panel A10 Service door
A2 Cup holder A11 Data label with type number
A3 Pre-ground coffee compartment A12 Water tank
A4 Lid of bean hopper A13 Hot water spout
A5 Adjustable coffee spout A14 Coffee grounds container
A6 Socket for power cord A15 Front panel of coffee grounds
A7 Grind setting knob A16 Drip tray cover
A8 Coffee bean hopper A17 Drip tray
A9 Brew Group A18 'Drip tray full' indicator
container
Accessories
A19 Power cord A23 Water hardness test strip
A20 Grease tube A24 Classic milk frother (specific types only)
A21 AquaClean water filter A25 LatteGo (milk container) (specific types
A22 Measuring scoop
only)
Page 6
English
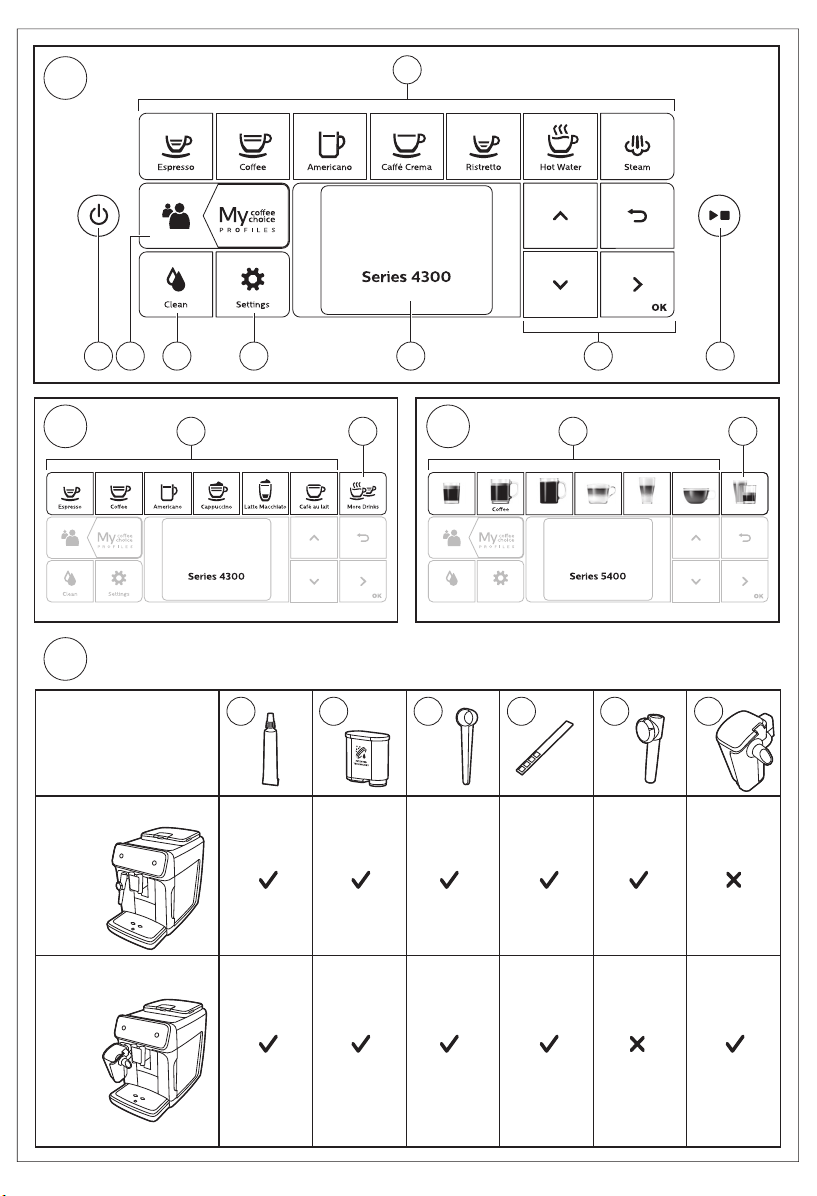
Control panel
There are multiple versions of this espresso machine, with different control panels. Each version has
its own type number. You can find the type number on the data label on the inside of the service door
(Fig. A11). You can also find the type number by tapping the Settings
Refer to figure C, D and E for an overview of all buttons and icons. Below you find the description.
Use the up and down arrows to scroll through the display and tap the OK icon to select or confirm
your choices.
All types (Fig. C/D/E)
C1/D1/E1 One-touch drink icons C3. Navigation icons (up,
down, back, ok)
C2. Start/stop button C4. Display C7. Personal profiles
D2/E2 Menu with More Drinks C5. Machine settings C8. On/off button
EP4327, EP4324, EP4321 only (Fig. C)
C1 One-touch drink icons: Espresso, Coffee, Americano, Caffé Crema, Ristretto, Hot Water and Steam
EP4349, EP4346, EP4343, EP4341 only (Fig. D)
D1 One-touch drink icons: Espresso, Coffee, Americano, Cappuccino, Latte Macchiato, Café au lait
icon and selecting 'Support'.
C6. Cleaning menu
9
English
EP5447, EP5446, EP5444, EP5443, EP5441 only (Fig. E)
E1 One-touch drink icons: Espresso, Coffee, Americano, Cappuccino, Latte Macchiato, Café au lait
Introduction
Congratulations on your purchase of a Philips fully automatic coffee machine! To fully benefit from the
support that Philips offers, register your product at www.philips.com/registeryourcoffee.com or by
scanning the QR code (Fig. 1) in this booklet.
Read the separate safety booklet carefully before you use the machine for the first time and save it for
future reference.
To help you get started and to get the best out of your machine, Philips offers support in multiple
ways. In the box you find:
1 This user manual with picture-based usage instructions and more detailed information on cleaning
and maintenance.
2 The separate safety booklet with instructions on how to use the machine in a safe way.
3 For online support (frequently asked questions, movies etc.), scan the QR code on the cover of this
booklet or visit www.philips.com/coffee-care . You can also find the QR code by tapping the
Settings icon and selecting support.
This machine has been tested with coffee. Although it has been carefully cleaned, there may be
some coffee residues left. We guarantee, however, that the machine is absolutely new.
The machine automatically adjusts the amount of ground coffee that is used to make the best-tasting
coffee. You should brew 5 coffees initially to allow the machine to complete its self-adjustment.
Make sure you rinse the LatteGo (milk container) or the classic milk frother before first use.
Page 7

ON
,WDOLDQR
1HGHUODQGV
(QJOLVK
(VSD³RO
/DQJXDJH
:DWHUKDUGQHVV
,WDOLDQR
1HGHUODQGV
(QJOLVK
(VSD³RO
/DQJXDJH
)ROORZWKHQH[WVWHSV
WRVHWWKHFRUUHFW
ZDWHUKDUGQHVVOHYHO
<RXDUHDERXW
WRVHWWKHODQJXDJH
WR(QJOLVK
3UHVVVWDUWVWRS
WRFRQILUP
:DWHUKDUGQHVV
<RXVHOHFWHG
UHGVTXDUHV
3UHVVWRFRQILUP
+HDWLQJXS
+HDWLQJ
5LQVLQJ
5LQVLQJ
)LOOLQJZDWHUFLUFXLW
)LOOLQJ
=
:DWHUKDUGQHVV
1 sec.
1 min.
5 sec.
30 sec.
1 min.
$TXD&OHDQ
8VH$TXD&OHDQILOWHU
WRHQMR\FXSV
ZLWKRXWGHVFDOLQJ
$OPRVWUHDG\
)LOOEHDQVUHILOOZDWHU
WDQNDQGHQMR\
\RXUFRIIHH
5HJLVWHU\RXUSURGXFW
9LVLWZZZSKLOLSVFRP
$TXD&OHDQ
:RXOG\RXLQVWDOO
DQ$TXD&OHDQILOWHU"
3UHVVWRFRQILUP
3UHVVWRUHIXVH
10
English
Before first use
Page 8
CLICK
1
2
English
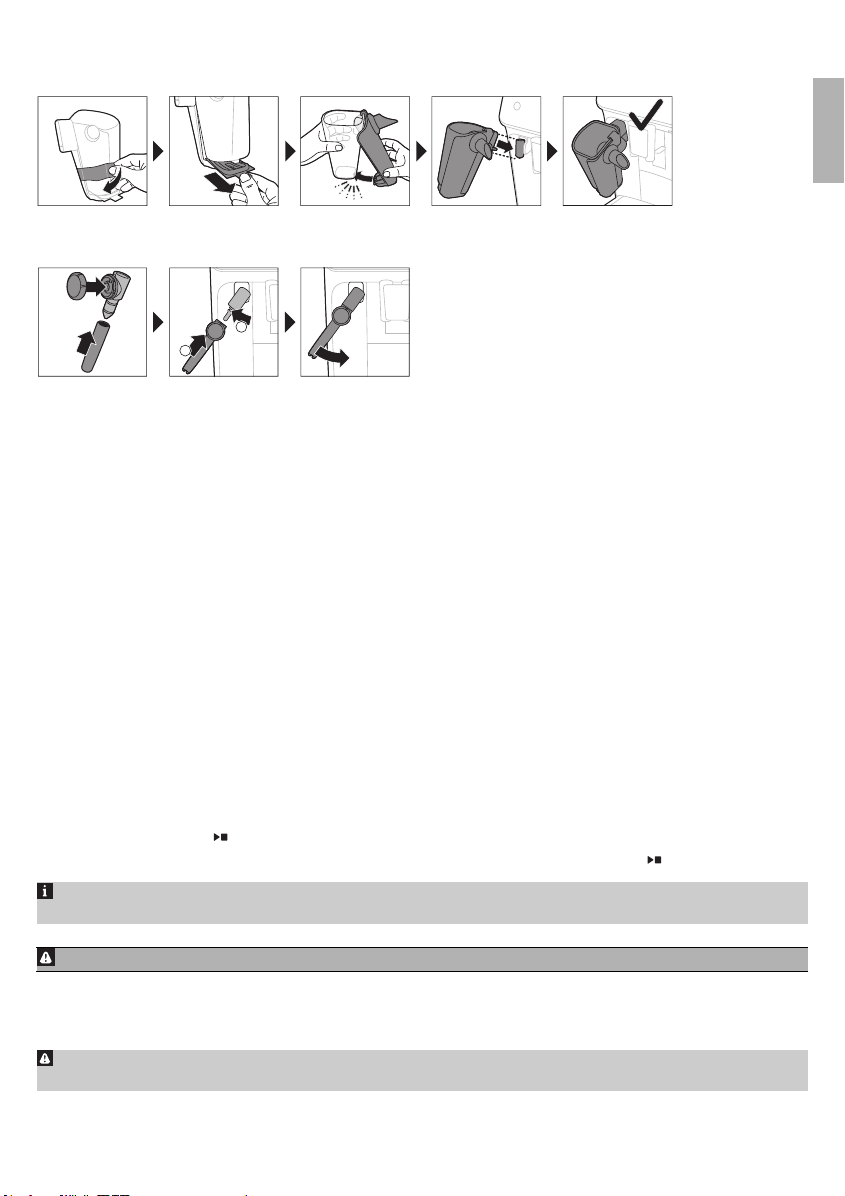
Assembling LatteGo (specific types only)
Assembling the classic milk frother (specific types only)
Brewing drinks
General steps
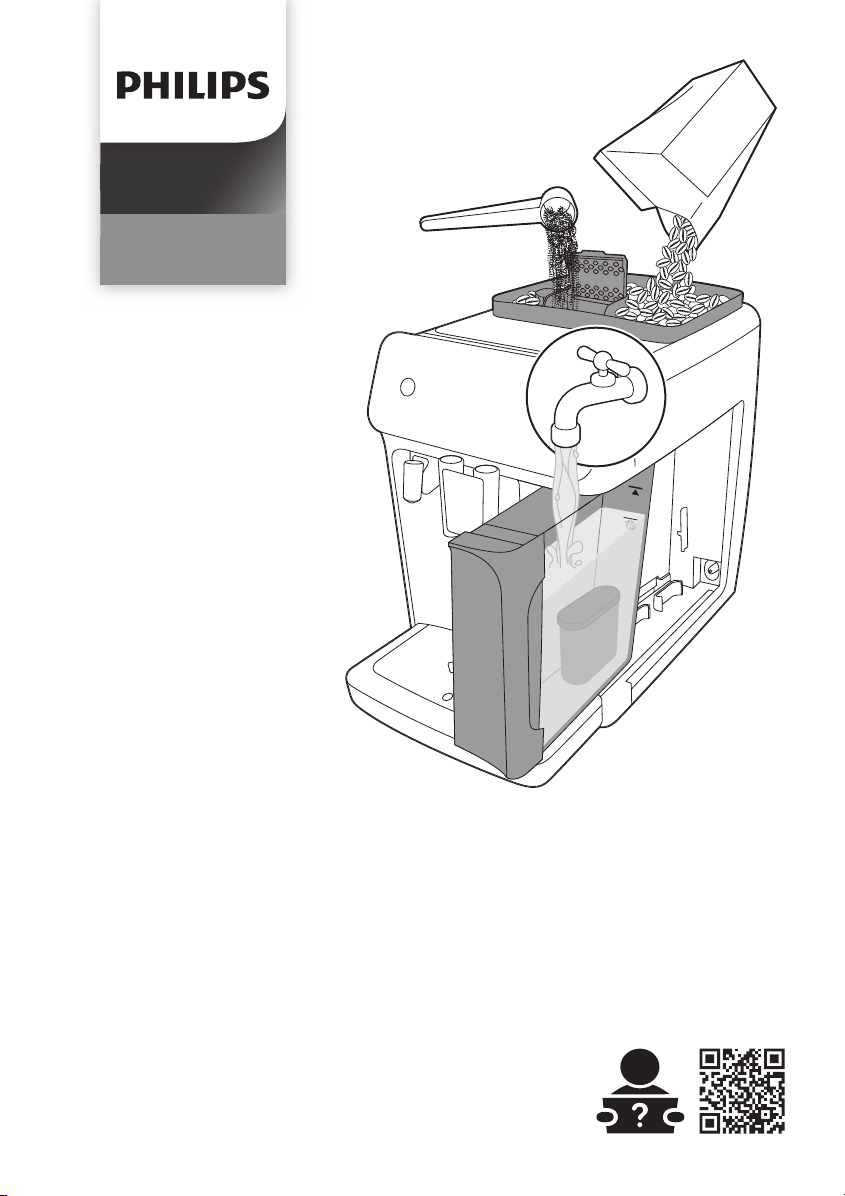
1 Fill the water tank with tap water and fill the bean hopper with beans.
2 Insert the small plug into the socket located on the back of the machine. Insert the mains plug into
the wall socket.
3 Press the on/off button to switch on the machine.
-
The machine starts heating up and performs the automatic rinsing cycle.
-
When all lights in the drink icons light up continuously, the machine is ready for use.
4 Place a cup under the coffee dispensing spout. Slide the coffee dispensing spout up or down to
adjust its height to the size of the cup or glass you are using (Fig. 2).
11
English
Brewing coffee with beans
1 To brew a coffee, tap the drink icon of your choice (Fig. 3) or tap the 'More Drinks' icon (Fig. 4)
(specific types only).
-
You can now adjust the drink to your personal taste (Fig. 5). Use the up and down arrows (Fig. 6)
to adjust the coffee strength. Tap the OK icon if you want to adjust more settings (Fig. 7).
2 Press the start/stop
3 To stop dispensing coffee before the machine is finished, press the start/stop button again.
To brew 2 coffees at the same time, tap the drink icon twice or select the 2x icon scrolling the
dedicated bar.
button at any time to start brewing the selected drink.
Do not use caramelized or flavored coffee beans.
Brewing milk-based drinks with LatteGo (milk container)
LatteGo consists of a milk container, a frame and a storage lid. To avoid leakage, make sure the
frame and the milk container are properly assembled before you fill the milk container.
Page 9
12
English
1 To assemble LatteGo, first insert the top of the milk container under the hook at the top of the
frame (Fig. 8). Then press home the bottom part of the milk container. You hear a click when it locks
into place (Fig. 9).
Note: Make sure that the milk container and the frame are clean before you connect them.
2 Slightly tilt LatteGo and put it on the hot water spout (Fig. 10). Then press it home until it locks into
place (Fig. 11).
3 Fill LatteGo with milk (Fig. 12). Do not fill the milk container beyond the maximum indication.
If you have personalized the milk quantity, you may need to fill the milk container with more or
less milk than indicated for this drink on LatteGo.
Always use milk coming directly from the fridge for optimal results.
4 Place a cup on the drip tray.
5 Tap the milk-based drink icon of your choice or tap the 'More Drinks' icon (specific types only) to
select a different drink (see 'Personalizing drinks')
-
You can now adjust the drink to your own preference.
6 Press the start/stop button.
-
When you brew cappuccino, flat white or latte macchiato, the machine first dispenses milk and
then coffee. When you brew caffè latte or café au lait, the machine first dispenses coffee and
then milk.
-
To stop dispensing milk before the machine has dispensed the preset amount, press the
start/stop button.
7 To stop dispensing the complete drink (milk and coffee) before the machine is finished, press and
hold the start/stop button.
Frothing or heating up milk with classic milk frother
Always use milk coming directly from the fridge for the best foam quality.
1 Tilt the black silicone handle on the machine to the left and slide the milk frother onto it (Fig. 13).
2 Fill a milk jug with with approx. 100 ml milk for cappuccino and approx. 150 ml milk for latte
macchiato.
3 Insert the milk frother approx. 1 cm into the milk.
4 Tap the steam icon (Fig. 14).
5 Turn the knob on the classic milk frother to the milk frothing icon (Fig. 15) if you want to froth milk.
Turn the knob on the classic milk frother to the flat milk icon (Fig. 16) if you want heat up milk.
6 Make sure that the icon on the knob of the classic milk frother is aligned with the black arrow.
7 Press the start/stop button to start (Fig. 17).
-
The machine starts heating up, steam is forced into the milk and the milk is either frothed or
heated.
8 When the milk in the milk jug has reached the required foam volume or heat, press the start/stop
button again to stop frothing/heating milk.
Never steam milk longer than 90 seconds. The steaming automatically stops after 90 seconds.
In order to get the best milk froth quality, you do not have to move the milk jug during milk frothing.
Extra shot (specific types only)
Your machine offers you the possibility to add an extra shot of Ristretto to your coffee and milk drinks,
for example if you want to have a stronger coffee.
Page 10
English
1 Place a cup under the spout
2 Tap one of the one-touch drinks icons to select a drink or tap the 'More Drinks' icon (specific types
only) to select a drink.
3 Use the up arrow to set the strength to the top level and then select the ExtraShot function (Fig. 18).
4 Tap the OK icon if you want to personalize the other settings. Then press the start/stop icon to
start brewing the drink.
5 To stop dispensing the drink before the machine has finished, press the start/stop icon again.
When you have selected the ExtraShot function, you can only brew one coffee at the time.
13
Brewing coffee with pre-ground coffee
You can choose to use pre-ground coffee instead of beans, for example if you prefer a different coffee
variety or decaffeinated coffee.
1 Open the lid of the pre-ground coffee compartment and pour one leveled measuring scoop of pre-
ground coffee into it (Fig. 19). Then close the lid.
2 Tap one of the one-touch drink icons or tap the 'More Drinks' icon (specific types only) to select
another drink.
3 Select the pre-ground coffee function. You can do this in 2 different ways:
-
use the down arrow to set the strength to the lowest level and then select the pre-ground function.
-
press the Settings icon and use the down arrow to select the pre-ground function.
4 To stop dispensing coffee before the machine has finished, press the start/stop button again.
When you select the pre-ground coffee function:
- it is automatically stored.
- you can only brew one coffee at a time.
- you cannot select a different aroma strength.
English
Dispensing hot water
1 If attached, remove LatteGo or the milk frother.
2 Place a cup under the hot water spout.
3 Tap the 'Hot Water' icon (specific types only) or tap the 'More Drinks' icon (specific types only) (Fig.
4) to select hot water.
4 Use the up and down arrows to adjust the hot water quantity and/or temperature to your
preference.
5 Press the start/stop button.
-
Hot water is dispensed from the hot water spout (Fig. 20).
6 To stop dispensing hot water before the machine is finished, press the start/stop button again.
Personalizing drinks
The machine allows you to adjust the settings of a drink to your own preference and to store the
adjusted drink in a personal profile. The different profiles have different colors.
After selecting a drink by tapping one of the one-touch drink icons or by tapping the 'More Drinks'
icon (specific types only), you can do the following things:
1 adjust the aroma strength with the up and down icons (Fig. 21). There are 5 strengths, the lowest is
the mildest and the highest is the strongest.
2 adjust the coffee quantity (Fig. 22) and/or the milk quantity (specific types only) with the up and
down icons. There are 5 quantities for each of the settings.
Page 11
14
English
As soon as the machine has finished brewing, the settings you selected will be stored automatically
in the profile you chose.
Select a profile
You can select a profile and store a recipe using My coffee choice profiles (My Coffee Choice Profiles).
1 Tap the profiles icon repeatedly to select one of the colored profiles. All profiles have a different
color.
2 Select a drink by tapping one of the one-touch drink icons or by tapping the 'More Drinks' icon
(specific types only).
3 Adjust the drink settings to your favorite taste.
4 Press start/stop button to brew the drink you selected
-
Your new settings have now been stored in the colored profile you selected.
You can always restore the factory settings of the machine (see 'Restoring factory settings').
Guest profile
Your machine is equipped with a guest profile. When the guest profile is selected, the profile icon is
off. When you select this profile, you can still personalize the settings to your own preference but the
recipes you brew will not be stored.
Adjusting machine settings
Setting the water hardness
We advise you to adjust the water hardness setting to the water hardness level in your region for
optimal performance and a longer lifetime of the machine. This also prevents you from having to
descale the machine too often. The default water hardness setting is 4: hard water.
Use the water hardness test strip supplied in the box to determine the water
hardness in your region:
1 Immerse the water hardness test strip in tap water or hold it under the tap for 1 second (Fig. 23).
2 Wait 1 minute. The number of squares on the test strip that turn red indicates the water hardness
(Fig. 24).
Set the machine to the correct water hardness:
1 Tap the Settings icon and use the up and down arrows to select 'Water hardness'. Then press the
OK icon to confirm.
2 Use the up and down icons to select the water hardness level. The number of red squares selected
on the display should be the same as the number of red squares on the test strip (Fig. 25).
3 When you have set the correct water hardness, tap the OK icon to confirm.
Adjusting grinder settings
You can change the coffee strength with the grind setting knob inside the bean container. The lower
the grind setting, the finer the coffee beans are ground and the stronger the coffee. There are 12
different grind settings you can choose from.
The machine has been set up to get the best taste out of your coffee beans. Therefore we advise you
not to adjust the grinder settings until you have brewed 100-150 cups (approx. 1 month of use).
Page 12
English
You can only adjust the grind settings when the machine is grinding coffee beans. You need to
brew 2 to 3 drinks before you can taste the full difference.
15
Do not turn the grind setting knob more than one notch at a time to prevent damage to the grinder.
1 Place a cup under the coffee dispensing spout.
2 Open the lid of the coffee bean hopper.
3 Tap the espresso icon and then press the start/stop button.
4 When the grinder starts grinding, press down the grind setting knob and turn it to the left or right.
(Fig. 26)
Adjusting other machine settings
By tapping the Settings icon you can adjust the following machine settings:
-
Water hardness: you can select between 5 levels according to the water hardness in your region;
-
Standby time: you can select 15, 30, 60 or 180 min
-
Display brightness: you can select low, medium and high.
-
Language
-
Sound: you can activate or deactivate the beeping sound of the machine
-
Temperature: you can choose between 3 brewing temperatures for your coffee
-
Front illumination (specific types only): you can choose 'always on', 'on during brewing' or 'always
off'.
-
Measuring unit: you can choose between ml. or oz.
Restoring factory settings
The machine offers you the possibility to restore the factory settings at any moment.
1 Tap the Settings icon.
2 Use the up and down icons to select 'Factory settings'. Confirm by tapping the OK icon.
3 Press the start/stop button to confirm you want to restore the settings.
-
The settings are now being restored.
English
The following factory settings are restored to default: water hardness, standby time, display
brightness, sound, temperature, front illumination, profiles.
Removing and inserting the brew group
Go to www.philips.com/coffee-care for detailed video instructions on how to remove, insert and
clean the brew group.
Removing the brew group from the machine
1 Switch off the machine.
2 Remove the water tank and open the service door (Fig. 27).
3 Press the PUSH handle (Fig. 28) and pull at the grip of the brew group to remove it from the
machine (Fig. 29).
Reinserting the brew group
Before you slide the brew group back into the machine, make sure it is in the correct position.
Page 13

16
English
1 Check if the brew group is in the correct position. The arrow on the yellow cylinder on the side of
the brew group has to be aligned with the black arrow and N (Fig. 30).
-
If they are not aligned, push down the lever until it is in contact with the base of the brew group
(Fig. 31).
2 Slide the brew group back into the machine along the guiding rails on the sides (Fig. 32) until it
locks into position with a click (Fig. 33). Do not press the PUSH button.
3 Close the service door and place back the water tank.
Cleaning and maintenance
Regular cleaning and maintenance keeps your machine in top condition and ensures good-tasting
coffee for a long time with a steady coffee flow.
Consult the table below for a detailed description on when and how to clean all detachable parts of
the machine. You can find more detailed information and video instructions on
www.philips.com/coffee-care. See figure B for an overview of which parts can be cleaned in the
dishwasher.
Detachable parts
Brew group Weekly Remove the brew group from the machine
When to clean How to clean
(see 'Removing and inserting the brew
group'). Rinse it under the tap (see 'Cleaning
the brew group under the tap').
Monthly Clean the brew group with the Philips coffee
Classic milk frother After every use First clean the milk frother while it is
Pre-ground coffee
compartment
Coffee grounds
container
Check the pre-ground coffee
compartment weekly to see if it
is clogged.
Empty the coffee grounds
container when prompted by
the machine. Clean it weekly.
oil remover tablet (see 'Cleaning the brew
group with the coffee oil remover tablets').
attached to the machine by using the 'Quick
milk clean' program (see 'Quick cleaning the
classic milk frother'). Then remove the milk
frother from the machine and disassemble it.
Clean all parts under the tap or in the
dishwasher.
Unplug the machine and remove the brew
group. Open the lid of the pre-ground coffee
compartment and insert the spoon handle
into it. Move the handle up and down until
the clogged ground coffee falls down (Fig.
34). Go to www.philips.com/coffee-care for
detailed video instructions.
Remove the coffee grounds container while
the machine is switched on. Rinse it under
the tap with some washing-up liquid or
clean it in the dishwasher. The front panel of
the coffee grounds container (Fig. A15) is
not dishwasher-safe.
Page 14
Detachable parts When to clean How to clean
Drip tray Empty the drip tray daily or as
soon as the red 'drip tray full'
indicator pops up through the
drip tray (Fig. 35). Clean the drip
tray weekly.
Remove the drip tray (Fig. 36) and rinse it
under the tap with some washing-up liquid.
You can also clean the drip tray in the
dishwasher. The front panel of the coffee
grounds container (Fig. A15) is not
dishwasher-safe.
English
17
English
LatteGo After every use First clean LatteGo while it is attached to the
Lubrication of the
brew group
Water tank Weekly Rinse the water tank under the tap
Machine front Weekly Clean with a non-abrasive cloth
Every 2 months Consult the lubrication table and lubricate
machine by using the 'Quick milk clean'
program (see 'Quick cleaning LatteGo'). Then
remove it from the machine and rinse it
under the tap or clean it in the dishwasher.
the brew group with the Philips grease (see
'Lubricating the brew group').
Cleaning the brew group
Regular cleaning of the brew group prevents coffee residues from clogging up the internal circuits.
Visit www.philips.com/coffee-care for support videos on how to remove, insert and clean the brew
group.
Cleaning the brew group under the tap
1 Remove the brew group (see 'Removing and inserting the brew group').
2 Rinse the brew group thoroughly with water. Carefully clean the upper filter (Fig. 37) of the brew
group.
3 Let the brew group air-dry before you place it back. Do not dry the brew group with a cloth to
prevent fibers from collecting inside the brew group.
Cleaning the brew group with the coffee oil remover tablets
Only use Philips coffee oil remover tablets.
1 Tap the Clean icon and use the up and down arrows to select 'Brew group clean'.
2 Tap the OK icon to confirm and then follow the instructions on the screen.
Lubricating the brew group
To improve your machine's performance, we suggest that you lubricate the brew group every 2
months, to ensure that the moving parts continue to move smoothly.
1 Apply a thin layer of grease on the piston (grey part) of the brew group (Fig. 38).
2 Apply a thin layer of grease around the shaft (grey part) in the bottom of the brew group (Fig. 39).
3 Apply a thin layer of grease to the rails on both sides (Fig. 40).
Cleaning LatteGo (milk container) (specific types only)
Quick cleaning LatteGo
1 Make sure LatteGo is properly attached to the machine (Fig. 10).
Page 15

18
English
2 Place a cup under the spout.
3 Tap the Clean icon and use the up and down arrows to select the 'Quick milk clean' program.
4 Tap the OK icon to confirm and then follow the instructions on the screen to remove any milk that
may be left inside the milk system.
-
Small jets of hot water will be dispensed by the milk system.
5 Store LatteGo with the remaining milk in the fridge.
Thoroughly cleaning LatteGo
1 Remove LatteGo from the machine (Fig. 41).
2 Pour out any remaining milk.
3 Press the release button and remove the milk container from the frame of LatteGo (Fig. 42).
4 Clean all parts in the dishwasher or under the tap with lukewarm water and some washing-up
liquid.
Cleaning the classic milk frother (specific types only)
Quick cleaning the classic milk frother
1 Make sure the classic milk frother is properly attached to the machine (Fig. 13).
2 Place a cup under the spout.
3 Tap the Clean icon and use the up and down arrows to select the 'Quick milk clean' program.
4 Tap the OK icon to confirm and then follow the instructions on the screen to remove any milk that
may be left inside the milk frother.
-
Small jets of hot water will be dispensed by the milk system.
5 Clean the milk frother with a damp cloth.
Daily cleaning of the classic milk frother
1 Let the milk frother cool down completely.
2 Tilt the milk frother to the left and remove the metal part and the silicone part (Fig. 43).
3 Disassemble the three parts (Fig. 44) and rinse them with fresh water or clean them in the
dishwasher.
4 Reassemble the three milk frother parts and reattach the milk frother to the machine.
AquaClean water filter
Your machine is AquaClean enabled. You can place the AquaClean water filter in the water tank to
preserve the taste of your coffee. It also diminishes the need for descaling by reducing limescale
build-up in your machine. You can purchase an AquaClean water filter from your local retailer, from
authorized service centers or online at www.philips.com/parts-and-accessories.
AquaClean filter status indication
When the AquaClean is active, the status of the AquaClean filter is always visible on the screen as a
percentage.
-
If the status of the AquaClean filter is 10% or less, the screen shows a message for 2 seconds each
time you switch on the machine. This message advises you to buy a new filter.
-
If the status of the filter is 0%, the machine asks you to replace the AquaClean filter every time you
switch on the machine.
Page 16
English
Activating the AquaClean water filter (5 min.)
The machine does not automatically detect that a filter has been placed in the water tank.
Therefore you need to activate each new AquaClean water filter that you install in the 'Clean' menu.
When the machine stops showing the filter activation message, you can still activate an AquaClean
water filter, but you will need to descale the machine first.
Your machine has to be completely limescale-free before you start using the AquaClean water
filter.
Before activating the AquaClean water filter, it has to be prepared by soaking it in water as described
below. If you don't do this, air might be drawn into the machine instead of water, which makes a lot of
noise and prevents the machine from being able to brew coffee.
1 Tap the 'Clean' icon and use the up and down arrows to select 'AquaClean'.
2 Tap the OK icon to confirm.
3 Tap the OK icon again when the activation screen appears. Follow the instructions on the screen.
4 Shake the filter for about 5 seconds (Fig. 45).
5 Immerse the filter upside down in a jug with cold water and shake/press it (Fig. 46).
6 Insert the filter vertically onto the filter connection in the water tank. Press it down to the lowest
possible point (Fig. 47).
7 Fill the water tank with fresh water and place it back into the machine.
8 If attached, remove the LatteGo (specific types only).
9 Place a bowl under the hot water spout/milk frother.
10 Press the start/stop button to start the activation process.
11 Hot water will be dispensed from the hot water spout/milk frother during 1 minute.
12 The filter is now successfully activated.
19
English
Replacing the AquaClean water filter (5 min.)
After 95 liters of water have flowed through the filter, the filter will cease to work. The AquaClean
status indicator drops to 0% to remind you to replace the filter. As long as the AquaClean status
indicator is shown on the display you can replace the filter without having to descale the machine first.
If you do not replace the AquaClean water filter in time, the AquaClean indicator goes out after some
time. In that case you can still replace the filter but you first need to descale the machine.
When the AquaClean status indicator drops to 0% or when the machine reminds you to replace the
AquaClean filter:
1 take out the old AquaClean water filter.
2 install a new filter and activate it as described in chapter 'Activating the AquaClean water filter (5
min.)'.
Replace the AquaClean water filter at least every 3 months, even if the machine does not yet
indicate that replacement is required.
Descaling procedure (30 min.)
Please use Philips descaler only. Under no circumstances should you use a descaler based on sulfuric
acid, hydrochloric acid, sulfamic or acetic acid (vinegar) as this may damage the water circuit in your
machine and not dissolve the limescale properly. Not using the Philips descaler will void your
warranty. Failure to descale the appliance will also void your warranty. You can buy Philips descaling
solution in the online shop at www.philips.com/coffee-care.
Page 17

20
English
When the machine needs descaling, a message appears on the display.
1 Touch the clean icon on the user interface and select 'Descaling' in the menu.
2 Follow the instructions on the screen.
3 If attached, remove LatteGo or the milk frother.
4 Remove the drip tray and the coffee grounds container, empty them and put them back into place.
5 Remove the water tank and empty it. Then remove the AquaClean water filter.
6 Pour the whole bottle of Philips descaler in the water tank and then fill it with water up to the Calc
/ Clean indication (Fig. 48). Then place it back into the machine.
7 Place a large container (1.5 l) under the coffee dispensing spout and the water spout.
8 Press the start/stop button to start the descaling procedure. The descaling procedure lasts
approximately 30 minutes and consists of a descaling cycle and a rinsing cycle.
9 Wait until the machine stops dispensing water. Refill the water tank when the message appears on
the display. The descaling procedure is finished when the machine stops dispensing water.
10 Install and activate a new AquaClean water filter in the water tank.
-
When the descaling procedure is finished, the machine reminds you to install the new
AquaClean filter (see 'Replacing the AquaClean water filter (5 min.)').
Tip: Using the AquaClean filter reduces the need for descaling!
What to do if the descaling procedure is interrupted
You can exit the descaling procedure by pressing the on/off button on the control panel. If the
descaling procedure is interrupted before it is completely finished, do the following:
1 Empty and rinse the water tank thoroughly.
2 Fill the water tank with fresh water up to the Calc / Clean level indication and switch the machine
back on. The machine will heat up and perform an automatic rinsing cycle.
3 Before brewing any drinks, perform a manual rinsing cycle. To perform a manual rinsing cycle, first
dispense half a water tank of hot water by repeatedly selecting the hot water function and then
brew 2 cups of pre-ground coffee without adding ground coffee.
If the descaling procedure was not completed, the machine will require another descaling
procedure as soon as possible.
Ordering accessories
To clean and descale the machine, only use the Philips maintenance products. These products can be
purchased from your local retailer, from the authorized service centers or online at
www.philips.com/parts-and-accessories. To find a full list of spare parts online, enter the model
number of your machine. You can find the model number on the inside of the service door.
Maintenance products and type numbers:
-
Descaling solution CA6700
-
AquaClean water filter CA6903
-
Brew group grease HD5061
-
Coffee oil remover tablets CA6704
Brita-filters are not compatible with this machine.
Page 18
English
Troubleshooting
This chapter summarizes the most common problems you could encounter with the machine. Support
videos and a complete list of frequently asked questions are available on www.philips.com/coffee-
care. If you are unable to solve the problem, contact the Consumer Care Center in your country. For
contact details, see the warranty leaflet.
Warning icons
Warning
icon
Solution
The 'water tank empty' icon pops up on the display.
The water tank is almost empty. Fill the water tank with fresh water to the
-
maximum level indication.
The water tank is not in place. Place back the water tank.
-
The 'add beans' icons pops up on the display.
Fill the bean hopper with coffee beans.
-
The 'empty coffee ground container' icon pops up on the display.
The coffee grounds container is full. Remove and empty the coffee grounds
-
container while the machine is switched on. Wait 5 seconds before you place it
back.
The 'insert brew group' icon pops up on the display.
The brew group is not in place or not placed correctly. Remove the brew group
-
and make sure it is locked into place. See chapter 'Removing and inserting the
brew group' for step-by-step instructions.
21
English
Error codes
Below you find a list of the error codes showing problems that you can solve yourself. Video
instructions are available on www.philips.com/coffee-care. If another error code appears, please
contact the Philips Consumer Care Center in your country. For contact details, see the warranty leaflet.
Error
code
01 The coffee funnel is
03 The brew group is dirty
04 The brew group is not
Problem Possible solution
clogged.
or not well-greased.
positioned correctly.
Switch off the machine and unplug it. Remove the brew group.
Then open the lid of the pre-ground coffee compartment and
insert the spoon handle. Move the handle up and down until
the clogged ground coffee falls down. Visit
www.philips.com/coffee-care for detailed video instructions.
Switch off the machine. Rinse the brew group with fresh water,
let it air-dry and then lubricate it. Consult chapter 'Cleaning the
brew group' or visit www.philips.com/coffee-care for detailed
video instructions. Then switch the machine on again.
Switch off the machine. Remove the brew group and reinsert it.
Make sure that the brew group is in the correct position before
you insert it. Consult chapter 'Handling the brew group or visit
www.philips.com/coffee-care for detailed video instructions.
Then switch the machine on again.
Page 19

22
English
Error
Problem Possible solution
code
05 There is air in the water
circuit.
The AquaClean filter
was not prepared
properly before
installation or it is
clogged.
11 Machine needs to
adjust to room
temperature
14 The machine is
overheated.
Restart the machine by switching it off and on again. If this
works, dispense 2-3 cups of hot water. Descale the machine if
you have not done so for a longer period of time.
Remove the AquaClean filter and try again to brew a coffee. If
this works, make sure that the AquaClean filter is prepared
properly before you place it back. Put the AquaClean filter
back into the water tank. If this still does not work, the filter
might be clogged and needs to be replaced.
Allow some time for the machine to adjust from
transport/outdoor temperature to room temperature. Switch
off the machine for 30 minutes and switch it on again. If this
does not work, contact the Consumer Care Center in your
country. For contact details, see the warranty leaflet.
Switch the machine off and switch it back on again after 30
minutes.
Troubleshooting table
This chapter summarizes the most common problems you could encounter with the machine. Support
videos and a complete list of frequently asked questions are available on www.philips.com/coffee-
care. If you are unable to solve the problem, contact the Consumer Care Center in your country. For
contact details, see the warranty leaflet.
Problem
There are some coffee
residues inside my new
coffee machine.
Cause Solution
This machine has been tested
with coffee.
Although it has been carefully cleaned,
there may be some coffee residues left.
However, the machine is absolutely
new.
The drip tray fills up
quickly / there is always
some water in the drip
tray.
The 'empty coffee
grounds container' icon
remains on.
The machine prompts to
empty the coffee
grounds container even
though the container is
not full.
This is normal. The machine
uses water to rinse the internal
circuit and brew group. Some
water flows through the internal
system directly into the drip
tray.
You emptied the coffee grounds
container while the machine
was switched off, or placed it
back too fast.
The machine did not reset the
counter the last time you
emptied the coffee grounds
container.
Empty the drip tray daily or as soon as
the red 'drip tray full' indicator pops up
through the drip tray cover. Tip: place a
cup under the dispensing spout to
collect rinsing water that comes out of
it.
Always empty the coffee grounds
container while the machine is switched
on. Remove the coffee grounds
container, wait at least 5 sec. and then
insert it again.
Always wait approx. 5 seconds when
you place back the coffee grounds
container. In this way the coffee
grounds counter will be reset to zero
and the number of coffee pucks is
counted correctly.
Page 20

Problem Cause Solution
Always empty the coffee grounds
container while the machine is switched
on. If you empty the coffee grounds
container when the machine is switched
off, the coffee grounds counter won't
reset.
English
23
English
The coffee grounds
container is too full and
the 'empty coffee
grounds container' icon
did not appear on the
display.
I cannot remove the
brew group.
I cannot insert the brew
group.
You removed the drip tray
without emptying the grounds
container.
The brew group is not in the
correct position.
The brew group is not in the
correct position.
When you remove the drip tray, also
empty the coffee grounds container
even if it contains only a few coffee
pucks. This ensures that the coffee
pucks counter is reset to zero and that
the number of coffee pucks is counted
correctly.
Reset the machine in the following way:
close the service door and place back
the water tank. Switch the machine off
and back on again and wait for the
lights in the drinks icons to come on. Try
again to remove the brew group. See
chapter 'Removing and inserting the
brew group' for step by step
instructions.
Reset the machine in the following way:
close the service door and place back
the water tank. Leave the brew group
out. Switch the machine off and unplug
it. Wait for 30 sec. and then plug the
machine back in and switch it on and
wait for the lights in the drinks icons to
come on. Then put the brew group in
the correct position and reinsert it into
the machine. See chapter 'Removing
and inserting the brew group' for step
by step instructions.
The coffee is watery. The brew group is dirty or needs
to be lubricated.
The machine is performing its
self-adjustment procedure. This
procedure is started
automatically when you use the
machine for the first time, when
you change to another type of
coffee beans or after a long
period of non-use.
Remove the brew group (see 'Removing
the brew group from the machine'),
rinse it under the tap and leave it to dry.
Then lubricate the moving parts (see
'Lubricating the brew group').
Brew 5 cups of coffee initially to allow
the machine to complete its selfadjustment procedure.
Page 21
24
English
Problem Cause Solution
The grinder is set to a too
coarse setting.
Set the grinder to a finer (lower) setting.
Brew 2 to 3 drinks to be able to before
taste the full difference.
The coffee is not hot
enough.
Coffee does not come
out or coffee comes out
slowly.
The temperature is set too low. Set the temperature to the maximum
A cold cup reduces the
temperature of the drink.
Adding milk reduces the
temperature of the drink.
The AquaClean water filter was
not prepared properly for
installation.
The AquaClean water filter is
clogged.
The grinder is set to a too fine
setting.
setting. To adjust the temperature,
press the 'Settings' icon.
Preheat the cups by rinsing them with
hot water.
Regardless of whether you add hot or
cold milk, adding milk always reduces
the temperature of the coffee. Preheat
the cups by rinsing them with hot water.
Remove the AquaClean filter and
dispense some hot water. If this works,
the AquaClean filter was not installed
properly. Reinstall and activate the
AquaClean filter and follow all steps in
chapter 'AquaClean water filter'.
After a long period of non-use, you
need to prepare the AquaClean water
filter for use again and dispense 2-3
cups of hot water.
Replace the AquaClean water filter
every 3 months. A filter that is older
than 3 months can become clogged.
Set the grinder to a coarser (higher)
setting. Note that this will impact the
coffee taste.
The brew group is dirty. Remove the brew group and rinse it
The coffee dispensing spout is
dirty.
The pre-ground coffee
compartment is clogged
The machine circuit is blocked
by limescale.
under the tap (see 'Cleaning the brew
group under the tap').
Clean the coffee dispensing spout and
its holes with a pipe cleaner or needle.
Switch off the machine and remove the
brew group. Open the lid of the preground coffee compartment and insert
the spoon handle into it. Move the
handle up and down until the clogged
ground coffee falls down (Fig. 34).
Descale the machine with Philips
descaler. Always descale when the
machine prompts you.
Page 22
Problem Cause Solution
The milk does not froth. Machines with LatteGo: LatteGo
is assembled incorrectly.
Make sure that the milk container is
properly assembled to the frame of
LatteGo ('click') (see 'Assembling
LatteGo (specific types only)').
English
25
English
Milk is leaking from the
bottom of the LatteGo
milk container.
The machine seems to
be leaking.
Machines with LatteGo: the milk
container and/or frame of
LatteGo are dirty.
Machines with classic milk
frother: the milk frother is
assembled incorrectly.
The type of milk used is not
suitable for frothing.
The frame and the milk
container are not assembled
properly.
The milk container and/or frame
of LatteGo are dirty.
The machine uses water to rinse
the internal circuit and brew
group. This water flows through
the internal system directly into
the drip tray. This is normal.
Disassemble LatteGo and rinse both
parts under the tap or clean them in the
dishwasher.
Make sure that the classic milk frother is
proplerly assembled (see 'Assembling
the classic milk frother (specific types
only)').
Different types of milk result in different
amounts of froth and different froth
qualities. We have tested the following
milk types which proved to deliver a
good milk froth result: semi-skimmed or
full-fat cow's milk and lactose-free milk.
First insert the top of the milk container
under the hook at the top of the frame.
Then press home the bottom part of the
milk container. You hear a click when it
locks into place.
Disassemble LatteGo and rinse both
parts under the tap or clean them in the
dishwasher.
Empty the drip tray every day or as
soon as the 'drip tray full' indicator pops
up through the drip tray cover. Tip:
Place a cup under the dispensing spout
to collect rinsing water and reduce the
amount of water in the drip tray.
The drip tray is too full and has
overflowed which makes it look
like the machine is leaking.
The water tank is not fully
inserted, some water is leaking
out of the water tank and air is
drawn into the machine.
The brew group is dirty/clogged. Rinse the brew group.
The machine is not placed on a
horizontal surface.
Empty the drip tray every day or as
soon as the 'drip tray full' indicator pops
up through the drip tray cover.
Make sure the water tank is in the
correct position: remove it and insert it
again pushing it as far as possible.
Place the machine on a horizontal
surface so that the drip tray does not
overflow and the 'drip tray full' indicator
works properly.
Page 23
26
English
Problem Cause Solution
I cannot activate the
AquaClean water filter
and the machine asks
for descaling.
The filter has not been installed
or replaced in time after the
screen shows the AquaClean
reminder. This means your
machine is not anymore
completely limescale free.
Descale your machine first and then
install the AquaClean water filter.
The new water filter
does not fit.
The machine is making a
loud noise.
You are trying to install another
filter than the Philips AquaClean
water filter.
The rubber ring on the
AquaClean water filter is not in
place.
It is normal that your machine
makes some noise during use.
The AquaClean water filter was
not prepared properly and air is
now drawn into the machine.
The water tank is not fully
inserted and air is drawn into
the machine.
Only the Philips AquaClean water filter
fits into the machine.
Place back the rubber ring on the
AquaClean water filter.
If the machine starts to make a different
kind of noise, clean the brew group and
lubricate it (see 'Lubricating the brew
group').
Remove the AquaClean water filter from
the water tank and properly prepare it
for use before you place it back. See
chapter 'AquaClean water filter' for
step-by-step instructions.
Make sure the water tank is in the
correct position: remove it and insert it
again pushing it as far as possible.
Technical specifications
The manufacturer reserves the right to improve the technical specifications of the product. All the
preset quantities are approximate.
Description
Size (w x h x d) 246 x 377 x 434 mm
Value
Weight 7 - 7.5 kg
Power cord length 1200 mm
Water tank 1.8 litres
Coffee bean hopper capacity 275 g
Coffee grounds container capacity 12 pucks
LatteGo (milk container) capacity 250 ml
Adjustable spout height 88-145 mm
Nominal voltage - Power rating - Power supply See data label on inside of service door (Fig. A11)
Page 24
Dansk
27
Indhold
Oversigt over maskinen (fig. A)_______________________________________________________________________ 27
Betjeningspanel ______________________________________________________________________________________ 28
Introduktion __________________________________________________________________________________________ 28
Før apparatet tages i brug ___________________________________________________________________________ 29
Brygning af drikke ____________________________________________________________________________________ 30
Personlige indstillinger af drikke _____________________________________________________________________ 33
Justering af maskinens indstillinger__________________________________________________________________ 34
Udtagning og isætning af bryggeenheden __________________________________________________________ 35
Rengøring og vedligeholdelse _______________________________________________________________________ 35
AquaClean-vandfilter ________________________________________________________________________________ 38
Afkalkning (30 min.) __________________________________________________________________________________ 39
Bestilling af tilbehør __________________________________________________________________________________ 40
Fejlfinding_____________________________________________________________________________________________ 40
Tekniske specifikationer______________________________________________________________________________ 46
Oversigt over maskinen (fig. A)
A1 Betjeningspanel A10 Låge
A2 Kopholder A11 Dataskilt med typenummer
A3 Formalet kafferum A12 Vandtank
Dansk
A4 Låg til beholderen til kaffebønner A13 Varmtvandsrør
A5 Justerbart kaffeudløb A14 Kaffegrumsbeholder
A6 Stik til netledning A15 Frontpanel til kaffegrumsbeholder
A7 Knap til formalingsindstilling A16 Dæksel til drypbakke
A8 Beholder til kaffebønner A17 Drypbakke
A9 Bryggeenhed A18 Indikator for "Fyldt drypbakke"
Tilbehør
A19 Netledning A23 Teststrimmel til måling af vandets
A20 Smøringsrør A24 Classic-mælkeskummer (kun bestemte
A21 AquaClean-vandfilter A25 LatteGo (mælkebeholder) (kun
A22 Måleske
hårdhedsgrad
typer)
bestemte typer)
Page 25

28
Dansk
Betjeningspanel
Der findes flere forskellige udgaver af denne espressomaskine med forskellige kontrolpaneler. Hver
udgave har sit eget typenummer. Du kan finde typenummeret på dataskiltet, som sidder indvendigt
på lågen (figur A11). Du kan også finde typenummeret ved at trykke på ikonet indstillingsikonet
vælge "Support".
Se figur C, D og E for at få en oversigt over alle knapper og ikoner. Du finder beskrivelsen nedenfor.
Ved hjælp af pil op og pil ned kan du rulle gennem skærmbilledet, og du kan trykke på ikonet OK for
at vælge eller bekræfte dine valg.
Alle typer (figur C/D/E)
C1/D1/E1 One touch-drinkikoner
C2. Start/stop knap C4. Display C7. Personlige profiler
D2/E2 Menu med flere drikke C5. Maskinindstillinger C8. On/off-knap
C3. Navigationsikoner (op,
ned, tilbage, ok)
C6. Menuen Rengøring
Kun på EP4327, EP4324, EP4321 (figur C)
C1 One touch-drink-ikoner: Espresso, Coffee (Kaffe), Americano, Caffè Crema, Ristretto, Hot water
(Varmt vand) og Steam (Damp)
Kun på EP4349, EP4346, EP4343, EP4341 (figur D)
D1 One touch-drink-ikoner: Espresso, Coffee (Kaffe), Americano, Cappuccino, Latte Macchiato, Café
au lait
og
Kun på EP5447, EP5446, EP5444, EP5443, EP5441 (figur E)
E1 One touch-drink-ikoner: Espresso, Coffee (Kaffe), Americano, Cappuccino, Latte Macchiato, Café au
lait
Introduktion
Tillykke med dit køb af en fuldautomatisk Philips-kaffemaskine! For at få fuldt udbytte af den support,
Philips tilbyder, skal du registrere dit produkt på www.philips.com/registeryourcoffee.com eller ved at
scanne QR-koden (fig. 1) i denne brochure.
Læs den separate garantifolder grundigt, før du bruger maskinen for første gang, og gem den til
senere brug.
For at du kan komme i gang og få mest muligt ud af din maskine, tilbyder Philips support på flere
forskellige måder. I æsken finder du:
1 Denne brugervejledning med billedbaserede anvendelsesinstruktioner og mere detaljerede
oplysninger om rengøring og vedligeholdelse.
2 Det separate sikkerhedshæfte med vejledning til, hvordan maskinen bruges på en sikker måde.
3 Du kan få onlinesupport (ofte stillede spørgsmål, film osv.) ved at scanne QR-koden på denne
brochures omslag eller gå til www.philips.com/coffee-care . Du kan også finde QR-koden ved at
trykke på indstillingsikonet
og vælge Support.
Page 26
ON
,WDOLDQR
1HGHUODQGV
(QJOLVK
(VSD³RO
/DQJXDJH
:DWHUKDUGQHVV
,WDOLDQR
1HGHUODQGV
(QJOLVK
(VSD³RO
/DQJXDJH
)ROORZWKHQH[WVWHSV
WRVHWWKHFRUUHFW
ZDWHUKDUGQHVVOHYHO
<RXDUHDERXW
WRVHWWKHODQJXDJH
WR(QJOLVK
3UHVVVWDUWVWRS
WRFRQILUP
:DWHUKDUGQHVV
<RXVHOHFWHG
UHGVTXDUHV
3UHVVWRFRQILUP
+HDWLQJXS
+HDWLQJ
5LQVLQJ
5LQVLQJ
)LOOLQJZDWHUFLUFXLW
)LOOLQJ
=
:DWHUKDUGQHVV
1 sec.
1 min.
Dansk
Denne maskine er blevet testet med kaffe. Selvom maskinen er blevet omhyggeligt rengjort, kan der
være kafferester tilbage. Vi kan dog garantere, at maskinen er helt ny.
Maskinen justerer automatisk den mængde formalet kaffe, der bruges til at brygge den mest
velsmagende kaffe. Du skal først brygge 5 kopper kaffe for at lade maskinen udføre sin selvjustering.
Skyl LatteGo (mælkebeholder) eller den klassiske mælkeskummer, før den tages i brug første gang.
29
Før apparatet tages i brug
Dansk
Page 27

5 sec.
30 sec.
1 min.
$TXD&OHDQ
8VH$TXD&OHDQILOWHU
WRHQMR\FXSV
ZLWKRXWGHVFDOLQJ
$OPRVWUHDG\
)LOOEHDQVUHILOOZDWHU
WDQNDQGHQMR\
\RXUFRIIHH
5HJLVWHU\RXUSURGXFW
9LVLWZZZSKLOLSVFRP
$TXD&OHDQ
:RXOG\RXLQVWDOO
DQ$TXD&OHDQILOWHU"
3UHVVWRFRQILUP
3UHVVWRUHIXVH
CLICK
1
2
30
Dansk
Samling af LatteGo (kun bestemte typer)
Samling af den klassiske mælkeskummer (kun bestemte typer)
Brygning af drikke
Generelle trin
1 Fyld postevand i vandbeholderen, og fyld kaffebønner i beholderen til bønner.
2 Sæt det lille stik ind i stikket på maskinens bagside. Sæt netstikket i en stikkontakt.
3 Tænd maskinen ved at trykke på on/off-knappen.
-
Maskinen begynder at varme op og foretager den automatiske gennemskylningscyklus.
-
Når alle indikatorer i drink-ikonerne lyser konstant, er maskinen klar til brug.
4 Sæt en kop under kaffeudløbsrøret. Skub kaffeudløbsrøret op eller ned for at justere højden efter
den kop eller det glas, du bruger (fig. 2).
Page 28
Dansk
Kaffebrygning med kaffebønner
1 For at brygge en kop kaffe skal du trykke på ikonet for den ønskede (fig. 3) drik eller trykke på
ikonet (fig. 4) for "Flere drikke" (kun bestemte modeller).
-
Du kan nu justere drikken efter dine egne præferencer (fig. 5). Brug pil op og pil ned (fig. 6) til at
justere kaffens styrke. Tryk på ikonet OK, hvis du vil ændre flere indstillinger (fig. 7).
2 Tryk på knappen start/stop
3 Tryk på start/stop
Du kan brygge to kopper kaffe på en gang ved at trykke to gange på drikkens ikon. Du kan også at
trykke på ikonet 2x ved at rulle i det tilhørende rullepanel.
-knappen igen, hvis du vil stoppe dispenseringen, inden maskinen er færdig.
for når som helst at starte brygning af den valgte drik.
Brug ikke karamelliserede kaffebønner eller kaffebønner med tilsat smag.
Brygning af mælkebaserede drikke med LatteGo (mælkebeholder)
LatteGo består af en mælkebeholder, en ramme og et opbevaringslåg. For at undgå lækage skal du
sørge for, at rammen og mælkebeholderen er samlet korrekt, inden du fylder mælkebeholderen.
1 Du samler LatteGo ved først at indsætte toppen af mælkebeholderen under krogen øverst på
rammen (fig. 8). Tryk derefter den nederste del af mælkebeholderen på plads. Du hører et klik, når
den låser på plads (fig. 9).
Bemærk: Sørg for, at mælkebeholderen og rammen er rene, inden du samler dem.
2 Vip LatteGo en smule, og sæt den på varmtvandsudløbet (fig. 10). Tryk derefter på den, indtil den
låser på plads (fig. 11).
3 Fyld LatteGo med mælk (fig. 12). Fyld kun mælkebeholderen til maksimum-mærket.
Hvis du har tilpasset mælkemængden, skal du muligvis fylde mere eller mindre mælk i
mælkebeholderen end det, der er angivet for denne drik på LatteGo.
Brug altid mælk direkte fra køleskabet, da det giver det bedste resultat.
4 Stil en kop på drypbakken.
5 Tryk på ikonet for den mælkebaserede drik, du ønsker, eller tryk på ikonet "Flere drikke" (kun
bestemte modeller) for at vælge en anden drik (se 'Personlige indstillinger af drikke')
-
Du kan nu justere kaffen til din foretrukne smag.
6 Tryk på start/stop
-
Når du brygger cappuccino, flat white eller latte macchiato, dispenserer maskinen først mælk og
derefter kaffe. Når du brygger caffè latte eller café au lait, dispenserer maskinen først kaffe og
derefter mælk.
-
Hvis du vil afbryde dispenseringen af mælk, inden maskinen har dispenseret den
forudindstillede mængde, skal du trykke på start/stop
7 Tryk på start/stop -knappen, og hold den inde, hvis du vil stoppe med at dispensere hele drikken
(mælk og kaffe), inden maskinen er færdig.
-knappen.
-knappen.
31
Dansk
Skumning eller opvarmning af mælk med den klassiske mælkeskummer
Brug altid mælk direkte fra køleskabet, da det giver det bedste skum.
Page 29
32
Dansk
1 Vip det sorte silikonehåndtag på maskinen mod venstre, og skub mælkeskummeren over på det
(fig. 13).
2 Fyld en mælkekande med ca. 100 ml mælk til cappuccino og ca. 150 ml mælk til latte macchiato.
3 Sæt mælkeskummeren ca. 1 cm ned i mælken.
4 Tryk på dampikonet (fig. 14).
5 Drej valgknappen på den klassiske mælkeskummer hen på mælkeskummerikonet (fig. 15), hvis du
vil skumme mælk. Drej valgknappen på den klassiske mælkeskummer hen på ikonet for uskummet
mælk (fig. 16), hvis du vil varme mælk op.
6 Sørg for, at ikonet på valgknappen på den klassiske mælkeskummer er tilpasset den sorte pil.
7 Tryk på start/stop-knappen
-
Maskinen varmes op, dampen presses ned i mælken, og mælken enten skummes ellers
opvarmes.
8 Når mælken i mælkekanden har nået den nødvendige skummængde eller temperatur, skal du
trykke på start/stop-knappen
Brug aldrig damp i mælken i mere end 90 sekunder. Dampen stopper automatisk efter 90
sekunder.
Du behøver ikke at bevæge mælkekanden under skumningen for at få det bedste skum.
for at starte (fig. 17).
igen for at stoppe skumningen eller opvarmningen.
Ekstra shot (ExtraShot) (kun bestemte modeller)
Maskinen giver dig mulighed for at tilføre din kaffe og dine mælkebaserede drikke et ekstra shot
ristretto, for eksempel hvis du ønsker en stærkere kaffe.
1 Sæt en kop under røret.
2 Tryk på ét af one touch-drink-ikonerne for at vælge en drik, eller tryk på ikonet "Flere drikke" (kun
bestemte modeller) for at vælge en drik.
3 Brug pil op, for at indstille styrken til det maksimale, og vælg derefter ExtraShot-funktionen (fig. 18).
4 Tryk på OK-ikonet, hvis du vil justere de andre indstillinger. Tryk derefter på start/stop-knappen
for at starte brygningen af drikken.
5 Tryk på start/stop-knappen igen, hvis du vil stoppe dispenseringen af drikken, inden maskinen er
færdig.
Når du har valgt ExtraShot-funktionen, kan du kun brygge én kop kaffe ad gangen.
Kaffebrygning med formalet kaffe
Du kan vælge at bruge formalet kaffe i stedet for kaffebønner, hvis du f.eks. foretrækker en anden
kaffevariant eller koffeinfri kaffe.
1 Åbn låget på beholderen til formalet kaffe, og hæld én måleske formalet kaffe i beholderen (fig. 19).
Luk derefter låget.
2 Tryk på ét af one touch-drink-ikoner, eller tryk på ikonet "Flere drikke" (kun bestemte modeller) for
at vælge en anden drik.
3 Vælg funktionen for formalet kaffe. Du kan gøre dette på to forskellige måder:
-
Brug nedpilen, for at indstille styrken til det laveste niveau, og vælg derefter funktionen for formalet
kaffe.
-
Tryk på ikonet Indstillinger
4 Tryk på start/stop-knappen igen, hvis du vil stoppe dispenseringen, inden maskinen er færdig.
og brug nedpilen, for at vælge funktionen for formalet kaffe.
Page 30
Dansk
Når du vælger funktionen for formalet kaffe:
- lagres indstillingen automatisk.
- kan du kun brygge én kop kaffe ad gangen.
- kan du ikke vælge en anden aromastyrke.
33
Dispensering af varmt vand
1 Fjern LatteGo eller mælkeskummeren, hvis den sidder på.
2 Sæt en kop under røret.
3 Tryk på ikonet "Varmt vand" (kun bestemte modeller), eller tryk på ikonet "Flere drikke" (kun
bestemte modeller) (fig. 4) for at vælge varmt vand.
4 Brug pil op og pil ned for at justere mængden af varmt vand og/eller temperaturen efter dine
ønsker.
5 Tryk på start/stop -knappen.
-
Der vil blive dispenseret varmt vand fra varmtvandsudløbet (fig. 20).
6 Tryk på start/stop -knappen igen, hvis du vil stoppe dispenseringen af varmt vand, inden
maskinen er færdig.
Personlige indstillinger af drikke
Med denne maskine kan du justere indstillingerne for en drik efter dine egne præferencer, og du kan
gemme den tilpassede drik i en personlig profil. De forskellige profiler har forskellige farver.
Når du har valgt drik ved at trykke på et af one touch-drink-ikonerne eller ved at trykke på ikonet
"Flere drikke" (kun bestemte modeller), kan du gøre følgende:
1 Brug ikonerne (fig. 21) for op og ned til at justere kaffens aromastyrke. Der er 5 styrker, den laveste
er den mildeste, og den højeste er den stærkeste.
2 Juster mængden (fig. 22) af kaffe og/eller mængden af mælk (kun bestemte modeller) ved at trykke
på op- og ned-ikonerne. Der er 5 mængder for hver af indstillingerne.
Dansk
Så snart maskinen er færdig med at brygge, bliver dine valgte indstillinger automatisk lagret i den
profil, du har valgt.
Vælg en profil
Du kan vælge en profil og gemme en opskrift ved at benytte Mine kaffevalgprofiler (My Coffee Choice
Profiles).
1 Tryk på profilikonet flere gange for at vælge én af de farvede profiler. Alle profiler har forskellige
farver.
2 Tryk på et one touch-drink-ikonerne, eller tryk på ikonet "Flere drikke" (kun bestemte modeller) for
at vælge en drik.
3 Du kan ændre indstillinger for drikke efter din egen favoritsmag.
4 Tryk på start/stop-knappen for brygge den valgte drik
-
Dine nye indstillinger er nu blevet gemt under den farvede profil, som du valgte.
Du kan altid gendanne maskinens (se 'Gendannelse af fabriksindstillinger.') standardindstillinger.
Gæsteprofil
Denne maskine er udstyret med en gæsteprofil. Når gæsteprofilen er valgt, slukkes profilikonet. Når du
vælger denne profil, kan du stadig justere indstillingerne efter dine egne præferencer, men de
opskrifter, du brygger, gemmes ikke.
Page 31

34
Dansk
Justering af maskinens indstillinger
Indstilling af vandets hårdhed
Vi anbefaler, at du indstiller vandets hårdhedsgrad i forhold til, hvor hårdt vandet er i dit område,
for at sikre, at maskinen fungerer optimalt og holder længere. Det betyder også, at du ikke behøver at
afkalke maskinen alt for ofte. Standardindstillingen for vandets hårdhed er 4: hårdt vand.
Brug den medfølgende strimmel til måling af vandets hårdhedsgrad til at måle
vandets hårdhedsgrad i dit område:
1 Sænk strimlen til måling af vandets hårdhedsgrad ned i vand fra hanen, eller hold den under
rindende vand i 1 sekund (fig. 23).
2 Vent 1 minut. Det antal felter på teststrimmelen, som bliver røde, angiver vandets hårdhedsgrad (fig.
24).
Indstil maskinen til den korrekte hårdhedsgrad for vandet:
1 Tryk på indstillingsikonet
knappen for at fortsætte.
2 Brug op- og ned-ikonerne for at vælge vandets hårdhedsgrad. Det antal røde felter, du har valgt på
skærmen, bør være det samme som antallet af røde felter på teststrimlen (fig. 25).
3 Når du har indstillet den korrekte hårdhedsgrad for vandet, skal du bekræfte ved at trykke på OK-
knappen.
Regulering af formalingsindstillinger
Du kan ændre kaffestyrken ved hjælp af knappen til formalingsindstillinger inde i
kaffebønnebeholderen. Jo lavere formalingsindstillingen er, jo finere males kaffebønnerne, og jo
stærkere bliver kaffen. Du kan vælge mellem 12 forskellige formalingsindstillinger.
Maskinen er indstillet til at få den bedste smag ud af dine kaffebønner. Vi anbefaler derfor, at du ikke
justerer kværnindstillingerne, før du har brygget 100-150 kopper kaffe (ca. 1 måneds brug).
, og brug op- og ned-ikonerne for at vælge "Vandhårdhed". Tryk på OK-
Du kan kun justere formalingsindstilling, når maskinen maler kaffebønner. Det er først efter to eller
tre drikke, du vil kunne smage den fulde forskel.
Drej ikke knappen til formalingsindstillinger mere end ét hak ad gangen for at undgå beskadigelse
af kværnen.
1 Sæt en kop under kaffeudløbsrøret.
2 Åbn låget til beholderen til kaffebønner.
3 Tryk på espresso-ikonet, og tryk derefter på start/stop -knappen.
4 Når kværnen begynder at male kaffen, skal du trykke knappen til formalingsindstillinger ned og
dreje den til venstre eller højre. (fig. 26)
Justering af maskinens andre indstillinger
Ved at trykke på indstillingsikonet kan du justere følgende af maskinens indstillinger:
-
Vandets hårdhedsgrad: Du kan vælge mellem fem niveauer efter vandhårdheden i dit område;
-
Standbytid: Du kan vælge 15, 30, 60 eller 180 min.
-
Displaylysstyrke: Du kan vælge lav, mellem og høj.
-
Sprog
-
Lyd: Du kan aktivere eller deaktivere maskinens biplyd
Page 32

Dansk
-
Temperatur: Du kan vælge mellem tre bryggetemperaturer til din kaffe
-
Frontbelysning (kun bestemte modeller): Du kan vælge "always on" (altid tændt), "on during
brewing" (tændt under brygning" eller "always off" (altid slukket).
-
Måleenhed: Du kan vælge mellem ml eller oz.
Gendannelse af fabriksindstillinger.
Maskinen giver dig mulighed for når som helst at gendanne standardindstillingerne.
1 Tryk på indstillingsikonet .
2 Brug op- og ned-ikonerne for at vælge "Factory settings" (Fabriksindstillinger). Tryk på OK-ikonet
for at bekræfte.
3 Tryk på start/stop -knappen for at bekræfte, at du vil gendanne indstillingerne.
-
Indstillingerne bliver nu gendannet.
Følgende fabriksindstillinger gendannes til standard: vandhårdhed, standbytid, displayets lysstyrke,
lyd, temperatur, frontbelysning, profiler.
Udtagning og isætning af bryggeenheden
Gå til www.philips.com/coffee-care, hvor der er detaljerede videoanvisninger om, hvordan du fjerner,
indsætter og rengør bryggeenheden.
Sådan tages bryggeenheden ud af maskinen
1 Sluk for maskinen.
2 Tag vandtanken ud, og åbn lågen (fig. 27).
3 Tryk på PUSH-håndtaget (fig. 28), og træk i bryggeenhedens håndtag for at tage den ud af
maskinen (fig. 29).
35
Dansk
Sådan sættes bryggeenheden i igen
Før du sætter bryggeenheden tilbage i maskinen, skal du kontrollere, at den er placeret korrekt.
1 Kontrollér, om bryggeenheden er placeret korrekt. Pilen på den gule cylinder på siden af
bryggeenheden skal flugte med den sorte pil og N (fig. 30).
-
Hvis de ikke flugter, skal du skubbe stangen ned, indtil den er helt nede ved bryggeenhedens
(fig. 31) bund.
2 Skub bryggeenheden tilbage på plads i maskinen langs styrerillerne på siderne (fig. 32), indtil den
låses på plads med et klik (fig. 33). Tryk ikke på knappen PUSH (Skub ud).
3 Luk lågen, og sæt vandtanken tilbage igen.
Rengøring og vedligeholdelse
Regelmæssig rengøring og vedligeholdelse holder din maskine i topform og sikrer en velsmagende
kaffe i lang tid med en stabil kaffegennemstrømning.
Tabellen nedenfor indeholder en detaljeret beskrivelse af, hvornår alle maskinens aftagelige dele skal
rengøres. Du kan finde flere oplysninger og videoanvisninger på www.philips.com/coffee-care. Figur
B indeholder en oversigt over, hvilke dele der kan vaskes i opvaskemaskinen.
Page 33

36
Dansk
Aftagelige dele Hvor ofte skal de rengøres? Hvordan skal de rengøres?
Bryggeenheden Hver uge Tag bryggeenheden ud af maskinen (se
'Udtagning og isætning af bryggeenheden').
Skyl den under vandhanen (se 'Rengøring af
bryggeenheden under vandhanen').
Hver måned Rengør bryggeenheden med Philips en
Klassisk
mælkeskummer
Formalet kafferum Tjek beholderen til formalet
Kaffegrumsbeholder Tøm kaffegrumsbeholderen, når
Drypbakke Tøm drypbakken dagligt, eller
Efter hver brug Rengør først mælkeskummeren, mens den
kaffe hver uge for at se, om den
er tilstoppet.
maskinen gør opmærksom på
det. Rengør den en gang om
ugen.
når den røde indikator for fuld
drypbakke stikker op fra
drypbakken (fig. 35). Rengør
drypbakken en gang om ugen.
kaffeoliefjernertablet (se 'Rengøring af
bryggeelementet med
kaffeoliefjernertabletterne').
sidder på maskinen, ved hjælp af
programmet (se 'Hurtigrengøring af den
klassiske mælkeskummer') "Quick milk clean"
(Hurtig rengøring af mælkeskummer). Tag
derefter mælkeskummeren af maskinen, og
skil den ad. Rengør alle dele under
vandhanen eller i opvaskemaskinen.
Tag maskinens stik ud af stikkontakten, og
tag bryggeenheden ud. Åbn låget til
beholderen til formalet kaffe, og stik enden
af skeen ned i den. Bevæg skeen op og ned,
indtil den tilstoppede formalede kaffe falder
ned (fig. 34). Gå til www.philips.com/coffee-
care hvor du finder detaljerede
videoanvisninger.
Fjern kaffegrumsbeholderen, mens
maskinen er tændt (står på ON). Rengør den
under vandhanen med lidt opvaskemiddel,
eller vask den i opvaskemaskinen.
Frontpanelet på kaffegrumsbeholderen
(figur A15) må ikke vaskes i
opvaskemaskine.
Tag drypbakken (fig. 36) ud, og vask den
under vandhanen med lidt opvaskemiddel.
Du kan også vaske drypbakken i
opvaskemaskinen. Frontpanelet på
kaffegrumsbeholderen (figur A15) må ikke
vaskes i opvaskemaskine.
LatteGo Efter hver brug Rengør først LatteGo, mens den sidder på
Smøring af
bryggeenheden
Hver 2. måned Se smøretabellen, og smør bryggeenheden
maskinen, ved hjælp af programmet (se
'Hurtigrengøring af LatteGo') "Quick milk
clean" (Hurtig rengøring af mælkeskummer).
Fjern den derefter fra maskinen, og skyl den
under vandhanen, eller vask den i
opvaskemaskinen.
med smøremiddel (se 'Smøring af
bryggeenheden') fra Philips.
Page 34

Dansk
37
Aftagelige dele Hvor ofte skal de rengøres? Hvordan skal de rengøres?
Vandtank Hver uge Skyl vandtanken under rindende vand
Maskinens front Hver uge Rengør med en ikke-skurende klud.
Rengøring af bryggeenheden
Regelmæssig rengøring af bryggeenheden forhindrer kaffegrums i at tilstoppe de indvendige kredsløb.
Besøg www.philips.com/coffee-care, hvor der er instruktive videoer om, hvordan du fjerner,
indsætter og rengør bryggeenheden.
Rengøring af bryggeenheden under vandhanen
1 Fjern bryggeenheden (se 'Udtagning og isætning af bryggeenheden').
2 Skyl bryggeenheden grundigt med vand. Rengør omhyggeligt det øverste filter (fig. 37) i
bryggeenheden.
3 Lad bryggeenheden lufttørre, før du sætter den i igen. Undlad at tørre bryggeenheden med et
klæde, da der kan samle sig fibre i bryggeenheden.
Rengøring af bryggeelementet med kaffeoliefjernertabletterne
Brug kun kaffeoliefjernertabletter fra Philips.
1 Tryk på rengøringsikonet , og brug pil op og pil ned for at vælge "Brew group clean" (Rengøring af
bryggeenhed).
2 Tryk på OK-ikonet for at bekræfte, og følg derefter vejledningen på skærmen.
Smøring af bryggeenheden
For at forbedre maskinens ydeevne anbefaler vi, at du smører bryggeenheden hver anden måned for
at sikre, at de bevægelige dele fortsat kan bevæge sig uhindret.
1 Påfør et tyndt lag smøremiddel på stemplet (grå del) på bryggeenheden (fig. 38).
2 Påfør et tyndt lag smøremiddel omkring akslen (den grå del) i bunden af bryggeenheden (fig. 39).
3 Påfør et tyndt lag smøremiddel på rillerne på begge sider (fig. 40).
Dansk
Rengøring af LatteGo (mælkebeholderen) (kun bestemte modeller)
Hurtigrengøring af LatteGo
1 Sørg for, at LatteGo sidder ordentligt fast på maskinen (fig. 10).
2 Sæt en kop under røret.
3 Tryk på rengøringsikonet , og brug pil op og pil ned for at vælge programmet "Quick milk clean"
(Hurtig rengøring af mælkeskummer).
4 Tryk på OK-ikonet for at bekræfte, og følg derefter instruktionerne på skærmen for at fjerne mælk,
der eventuelt sidder tilbage i mælkesystemet.
-
Små stråler varmt vand dispenseres af mælkesystemet.
5 Opbevar LatteGo med den resterende mælk i køleskabet.
Grundig rengøring af LatteGo
1 Fjern LatteGo fra maskinen (fig. 41).
2 Hæld resterende mælk ud.
3 Tryk på udløserknappen, og fjern mælkebeholderen fra rammen på LatteGo (fig. 42).
4 Rengør alle delene i opvaskemaskinen eller under rindende lunkent vand med lidt opvaskemiddel.
Page 35

38
Dansk
Resning af den klassisk mælkeskummer (kun bestemte typer)
Hurtigrengøring af den klassiske mælkeskummer
1 Sørg for, at den klassiske mælkeskummer sidder ordentligt fast på maskinen (fig. 13).
2 Sæt en kop under røret.
3 Tryk på rengøringsikonet , og brug pil op og pil ned for at vælge programmet "Quick milk clean"
(Hurtig rengøring af mælkeskummer).
4 Tryk på OK-ikonet for at bekræfte, og følg derefter instruktionerne på skærmen for at fjerne mælk,
der eventuelt sidder tilbage i mælkeskummeren.
-
Små stråler varmt vand dispenseres af mælkesystemet.
5 Rengør mælkeskummeren med en fugtig klud.
Daglig rengøring af den klassiske mælkeskummer
1 Lad mælkeskummeren køle helt af.
2 Vip mælkeskummeren mod venstre, og fjern både metal- og silikonedelene (fig. 43).
3 Skil de tre dele (fig. 44) ad, og skyl dem med rent vand, eller vask dem i opvaskemaskinen.
4 Saml de tre dele af mælkeskummeren igen, og sæt mælkeskummeren på maskinen igen.
AquaClean-vandfilter
Maskinen er AquaClean-aktiveret. Du kan placere AquaClean-filteret i vandtanken for at bevare
kaffens gode smag. Det fjerne desuden behovet for afkalkning, fordi det reducerer kalkaflejringer i
maskinen. Du kan købe AquaClean-filtre hos din lokale forhandler eller hos de godkendte forhandlere
eller online på www.philips.com/parts-and-accessories.
Statusindikator på AquaClean-vandfilter
Når AquaClean er aktiv, vises AquaClean-filtrets status altid på skærmen som en procent.
-
Hvis AquaClean-filtrets status er på 10 % eller derunder, vises en meddelelse i to sekunder, hver
gang du tænder for maskinen. Denne meddelelse råder dig til at købe et nyt filter.
-
Hvis filtrets status er på 0 %, beder maskinen dig udskifte AquaClean-filtret, hver gang du tænder
for maskinen.
Aktivering af AquaClean-vandfilteret (5 min.)
Maskinen registrerer ikke automatisk, at der er placeret et filter i vandtanken. Derfor skal du aktivere
hvert nyt AquaClean-vandfilter, som du installerer, i rengøringsmenuen.
Når maskinen stopper med at vise meddelelsen om aktivering af filter, kan du stadig aktivere
AquaClean-vandfiltret, men du er nødt til at afkalke maskinen først.
Maskinen skal nemlig være helt fri for kalk, før du begynder at bruge AquaClean-vandfiltret.
Inden du aktiverer AquaClean-filteret, skal det klargøres ved at lægge det i blød i vand som beskrevet
herunder. Hvis du ikke gør dette, kan der blive trukket luft ind i maskinen i stedet for vand. Det vil lave
en masse larm og forhindrer maskinen i at brygge kaffe.
1 Tryk på rengøringsikonet "Clean" , og brug pil op og pil ned til at vælge "AquaClean".
2 Tryk
på ikonet OK for at bekræfte.
3 Når aktiveringsskærmen vises, skal du trykke på OK-ikonet igen. Følg anvisningerne på skærmen.
4 Ryst filteret i cirka 5 sekunder (fig. 45).
5 Vend filteret på hovedet, læg det i en kande med koldt vand, og ryst det, og tryk på det (fig. 46).
Page 36

Dansk
6 Sæt filteret lodret på filtertilslutningen i vandtanken. Pres det ned til det lavest mulige punkt (fig.
47).
7 Fyld vandtanken med friskt, rent vand, og sæt den tilbage i maskinen.
8 Fjern LatteGo, hvis den sidder på (kun bestemte modeller).
9 Sæt en skål under varmtvandsudløbet/mælkeskummeren.
10 Tryk på start/stop-knappen for at starte aktiveringsprocessen.
11 Der dispenseres varmt vand fra varmtvandsudløbet/mælkeskummeren i ét minut.
12 Filtret er nu aktiveret korrekt.
Udskiftning af AquaClean-vandfilteret (5 min.)
Når der er strømmet 95 liter vand gennem filteret, stopper filteret med at virke. AquaCleanstatusindikatoren falder til 0 % for at minde dig om at udskifte filtret. Så længe AquaCleanstatusindikatoren vises på displayet, kan du udskifte filtret, uden at du behøver at afkalke maskinen
først. Hvis du ikke udskifter AquaClean-vandfiltret i tide, slukkes AquaClean-indikatoren efter et stykke
tid. Hvis det sker, kan du stadig udskifte filteret, men du skal afkalke maskinen først.
Når AquaClean-statusindikatoren falder til 0 %, eller når maskinen minder dig om at udskifte
AquaClean-filtret:
1 Tag det gamle AquaClean-vandfilter ud.
2 Installer et nyt filter og aktivér det, som beskrevet i kapitlet "Aktivering af AquaClean-vandfiltret (5
min.)".
Udskift AquaClean-filteret mindst hver tredje måned, også selvom maskinen endnu ikke har vist, at
udskiftning kræves.
39
Dansk
Afkalkning (30 min.)
Brug kun Philips-afkalker. Brug aldrig et afkalkningsmiddel, der er baseret på svovlsyre, saltsyre,
sulfaminsyre eller eddikesyre (f.eks. eddike), da dette kan beskadige maskinens vandkredsløb og ikke
opløser kalken ordentligt. Hvis du ikke bruger Philips-afkalkningsmiddel, bortfalder garantien.
Garantien bortfalder også, hvis apparatet ikke afkalkes. Du kan købe Philips-afkalkningsopløsning i
onlinebutikken på www.philips.com/coffee-care.
Når maskinen behøver afkalkning, vises en meddelelse i displayet.
1 Tryk på rengøringsikonet "Clean" på betjeningspanelet, og vælg "Descaling" (Afkalkning) i
menuen.
2 Følg anvisningerne på skærmen.
3 Fjern LatteGo eller mælkeskummeren, hvis den sidder på.
4 Tag drypbakken og beholderen til kaffegrums ud. Tøm dem, inden de sættes på plads igen.
5 Fjern vandtanken og tøm den. Fjern derefter AquaClean-vandfilteret.
6 Hæld hele flasken med Philips-afkalkningsmiddel i vandtanken. Påfyld derefter vand op til
Calc/Clean-mærket (fig. 48). Sæt den derefter tilbage i maskinen.
7 Placer en stor beholder (1,5 l) under kaffedispenseringstuden og varmtvandsudløbet.
8 Tryk på start/stop-knappen for at starte afkalkningsprocessen. Afkalkningsproceduren varer ca.
30 minutter og består af en afkalkningscyklus og en gennemskylningscyklus.
9 Vent, til der ikke længere kommer vand ud af maskinen. Genopfyld vandtanken, når meddelelsen
dukker op på displayet. Afkalkningsproceduren er slut, når maskinen stopper med at dispensere
vand.
10 Installer og aktivér et nyt AquaClean-vandfilter i vandtanken.
Page 37

40
Dansk
-
Når afkalkningsproceduren er færdig, minder maskinen dig om at installere det nye AquaCleanfilter (se 'Udskiftning af AquaClean-vandfilteret (5 min.)').
Tip: Når AquaClean-filteret bruges, reduceres behovet for afkalkning!
Hvad gør man, hvis afkalkningsproceduren afbrydes
Du kan afslutte afkalkningsprocessen ved at trykke på of/off-knappen på kontrolpanelet. Gør
følgende, hvis afkalkningsproceduren afbrydes, inden den er helt afsluttet:
1 Tøm vandtanken, og skyl den omhyggeligt.
2 Fyld vandtanken op med rent vand til niveaumarkeringen Calc/Clean, og tænd maskinen igen.
Maskinen varmer op og udfører en automatisk gennemskylningsproces.
3 Før du brygger kaffe, skal du udføre et manuelt gennemskylningsprogram. For at udføre en manuel
skylning skal du først dispensere en halv tank varmt vand ved at trykke flere gange på ikonet for
varmt vand. Bryg derefter to kopper formalet kaffe uden at tilsætte formalet kaffe.
Hvis afkalkningsprocessen ikke er blevet gennemført, skal maskinen igennem endnu en
afkalkningsproces så snart som muligt.
Bestilling af tilbehør
Brug udelukkende vedligeholdelsesprodukter fra Philips til rengøring og afkalkning af maskinen. Disse
produkter kan købes hos din lokale forhandler eller hos de godkendte forhandlere eller online på
www.philips.com/parts-and-accessories. Du kan finde en komplet liste over reservedele online ved
at indtaste din maskines modelnummer. Du kan finde modelnummeret indvendigt på lågen.
Vedligeholdelsesprodukter og typenumre:
-
Afkalkningsopløsning CA6700
-
AquaClean-vandfilter CA6903
-
Smørefedt HD5061 til bryggeenheden
-
Kaffeoliefjernertabletter CA6704
Brita-filtre er ikke kompatible med denne maskine.
Fejlfinding
Dette afsnit opsummerer de mest almindelige problemer, der kan forekomme ved brug af maskinen.
Supportvideoer og en komplet liste med ofte stillede spørgsmål findes på www.philips.com/coffee-
care. Hvis du ikke kan løse problemet, kan du kontakte dit lokale Philips Kundecenter. Se
garantibrochuren for at få kontaktoplysninger.
Advarselsikoner
Advarselsi
kon
Løsning
Ikonet for "tom vandtank" dukker op på displayet.
Vandtanken er næsten tom. Fyld vandtanken med rent vand til
-
maksimummarkeringen.
Vandtanken er ikke på plads. Sæt vandtanken i igen.
-
Page 38

Dansk
41
Advarselsi
Løsning
kon
Ikonet for "tilføj bønner" dukker op på displayet.
Fyld kaffebønnebeholderen med kaffebønner.
-
Ikonet for "tøm kaffegrumsbeholderen" dukker op på displayet.
Kaffegrumsbeholderen er fuld. Tag kaffegrumsbeholderen ud, og tøm den, mens
-
maskinen er tændt. Vent fem sekunder, før du sætter den tilbage på plads.
Ikonet for "sæt bryggeenheden i" dukker op på displayet.
Bryggeenheden er ikke sat i, eller den er ikke placeret korrekt. Tag
-
bryggeenheden ud, og sørg for, at den sidder korrekt. Se kapitlet "Udtagning og
isætning af bryggeenheden" for at få trin-for-trin-instruktioner.
Fejlkoder
Nedenfor finder du en liste med fejlkoder, som angiver problemer, du kan løse selv. Du kan finde
videoinstruktioner på www.philips.com/coffee-care. Kontakt dit lokale Philips-kundecenter, hvis en
anden fejlkode vises. Se kontaktoplysninger i garantibrochuren.
Fejlkode Problem Mulig løsning
01 Kaffetragten er
tilstoppet.
03 Bryggeenheden er
snavset eller ikke smurt
ordentligt.
Sluk for maskinen, og tag stikket ud af stikkontakten. Fjern
bryggeenheden. Åbn derefter låget til beholderen til formalet
kaffe, og stik enden af skeen ned i kaffen. Bevæg skeen op og
ned, indtil den tilstoppede formalede kaffe falder ned. Besøg
www.philips.com/coffee-care hvor du finder detaljerede
videoanvisninger.
Sluk for maskinen. Skyl bryggeenheden med rent vand, lad den
lufttørre, og smør den. Se kapitlet "Rengøring af
bryggeenheden", eller besøg www.philips.com/coffee-care
hvor du finder detaljerede videoanvisninger. Tænd derefter for
maskinen igen.
Dansk
04 Bryggeenheden er ikke
sat rigtigt i maskinen.
05 Der er luft i
vandkredsløbet.
AquaClean-filteret blev
ikke korrekt klargjort før
installationen, eller
filteret er tilstoppet.
Sluk for maskinen. Fjern bryggeenheden, og sæt den i igen.
Sørg for, at bryggeenheden vender korrekt, inden du sætter
den i. Se kapitlet "Håndtering af bryggeenheden", eller besøg
www.philips.com/coffee-care hvor du finder detaljerede
videoanvisninger. Tænd derefter for maskinen igen.
Genstart maskinen ved at slukke for den og tænde den igen.
Hvis det løser problemet, skal du lave 2-3 kopper varmt vand
på maskinen. Afkalk maskinen, hvis den ikke er blevet afkalket i
en længere periode.
Fjern AquaClean-filteret, og prøv at brygge en kop kaffe igen.
Hvis det løser problemet, skal du kontrollere, at AquaCleanfilteret er klargjort korrekt, før du sætter det tilbage. Sæt
AquaClean-filteret tilbage i vandtanken. Hvis det ikke løser
problemet, er filteret muligvis tilstoppet og skal udskiftes.
Page 39

42
Dansk
Fejlkode Problem Mulig løsning
11 Maskinen skal nå
stuetemperatur.
Giv maskinen tid til at tilpasse sig fra transport/udendørstemperatur til stuetemperatur. Sluk for maskinen,
vent i 30 minutter, og tænd den igen. Hvis det ikke virker,
bedes du kontakte dit lokale Philips Kundecenter. Se
kontaktoplysninger i garantibrochuren.
14 Maskinen er
overophedet.
Sluk maskinen, og tænd den igen efter 30 minutter.
Fejfindingstabel
Dette afsnit opsummerer de mest almindelige problemer, der kan forekomme ved brug af maskinen.
Supportvideoer og en komplet liste med ofte stillede spørgsmål findes på www.philips.com/coffee-
care. Hvis du ikke kan løse problemet, kan du kontakte dit lokale Philips Kundecenter. Se
kontaktoplysninger i garantibrochuren.
Problem
Der er kaffegrums i min
nye kaffemaskine.
Drypbakken fyldes
hurtigt op/der er altid
lidt vand i drypbakken.
Ikonet for "tøm
kaffegrumsbeholder"
bliver ved med at lyse.
Maskinen beder om, at
kaffegrumsbeholderen
tømmes, selvom
beholderen ikke er fuld.
Årsag Løsning
Denne maskine er blevet testet
med kaffe.
Dette er normalt. Maskinen
bruger vand til at skylle det
indvendige kredsløb og
bryggeenheden med. Noget af
vandet løber igennem det
indvendige system og direkte
ned i drypbakken.
Du har tømt
kaffegrumsbeholderen, mens
maskinen var slukket, eller sat
den i for hurtigt.
Maskinen startede ikke
optællingen af kaffegrums
forfra, sidst du tømte
kaffegrumsbeholderen.
Selvom maskinen er blevet omhyggeligt
rengjort, kan der være kafferester
tilbage. Maskinen er dog helt ny.
Tøm drypbakken dagligt, eller når den
røde indikator for fuld drypbakke stikker
op fra drypbakken. Tip: sæt en kop
under udløbet for at opsamle det
skyllevand, der kommer ud.
Tøm altid kaffegrumsbeholderen, mens
maskinen er tændt. Tag
kaffegrumsbeholderen ud, vent mindst
5 sekunder, og sæt den derefter i igen.
Vent altid ca. 5 minutter, før du sætter
kaffegrumsbeholderen på plads igen.
Da starter optællingen af kaffegrums
forfra fra nul og starter forfra med at
tælle kaffegrums korrekt.
Kaffegrumsbeholderen
er overfyldt, men ikonet
"tøm
kaffegrumsbeholder"
blev ikke vist på
displayet.
Du har haft fjernet drypbakken
uden at tømme
kaffegrumsbeholderen.
Tøm altid kaffegrumsbeholderen, mens
maskinen er tændt. Hvis du tømmer
kaffegrumsbeholderen, mens maskinen
er slukket, nulstilles
kaffegrumsbeholderen ikke.
Når du fjerner drypbakken, skal du også
tømme kaffegrumsbeholderen, selv hvis
der er meget lidt kaffegrums i den. Dette
sikrer, at optællingen af kaffegrums
nulstilles og starter forfra med at tælle
kaffegrums korrekt.
Page 40
Problem Årsag Løsning
Jeg kan ikke tage
bryggeenheden ud.
Bryggeenheden er ikke korrekt
placeret.
Nulstil maskinen på følgende måde: Luk
lågen, og sæt vandtanken tilbage igen.
Sluk maskinen, og tænd den igen, og
vent på, at lysene i drink-ikonerne
tændes. Prøv at tage bryggeenheden
ud igen. Se kapitlet "Udtagning og
isætning af bryggeenheden" for at få
trin-for-trin-instruktioner.
Dansk
43
Dansk
Jeg kan ikke sætte
bryggeenheden i.
Kaffen er tynd. Bryggeenheden er beskidt eller
Bryggeenheden er ikke korrekt
placeret.
skal smøres.
Maskinen justerer sig selv.
Denne procedure startes
automatisk, når du bruger
maskinen første gang, når du
skifter til en anden type
kaffebønner eller efter en lang
periode uden brug.
Kværnen er sat på en for grov
indstilling.
Nulstil maskinen på følgende måde: Luk
lågen, og sæt vandtanken tilbage igen.
Lad være med at sætte bryggeenheden
i maskinen. Sluk for maskinen, og tag
stikket ud af stikkontakten. Vent i 30
sekunder, tilslut maskinen igen, og tænd
for den, og vent på, at lysene i drinkikonerne tænder. Placer derefter
bryggeenheden i den korrekte position,
og sæt den i maskinen igen. Se kapitlet
"Udtagning og isætning af
bryggeenheden" for at få trin-for-trininstruktioner.
Tag bryggeenheden (se 'Sådan tages
bryggeenheden ud af maskinen') ud,
skyl den under rindende vand, og lad
den tørre. Smør derefter de bevægelige
dele (se 'Smøring af bryggeenheden').
Bryg 5 kopper kaffe først for at lade
maskinen udføre sin selvjustering.
Sæt kværnen på en finere (lavere)
indstilling. Bryg 2 til 3 drikke, så du kan
smage den fulde forskel.
Kaffen er ikke varm nok. Den indstillede temperatur er
for lav.
En kold kop reducerer drikkens
temperatur.
Hvis du tilsætter mælk,
reduceres drikkens temperatur.
Indstil temperaturen til det maksimale.
Juster temperaturen ved at trykke på
indstillingsikonet.
Forvarm kopperne ved at skylle dem
med varmt vand.
Uanset om du tilsætter varm eller kold
mælk, vil tilsætning af mælk altid
reducere kaffens temperatur. Forvarm
kopperne ved at skylle dem med varmt
vand.
Page 41
44
Dansk
Problem Årsag Løsning
Der kommer ikke kaffe
ud, eller kaffen kommer
meget langsomt ud.
AquaClean-filteret blev ikke
korrekt klargjort til installation.
Fjern AquaClean-filtret af, og dispenser
lidt varmt vand. Hvis dette virker, var
AquaClean-filtret ikke blevet installeret
korrekt. Installer og aktivér AquaCleanfiltret igen, og følg alle trinnene i kapitlet
"AquaClean-vandfiltret".
Efter en længere periode uden brug
skal du klargøre AquaClean-vandfiltret
til brug igen og dispensere 2-3 kopper
varmt vand.
Mælken er ikke
skummet.
AquaClean-vandfilteret er
tilstoppet.
Kværnen er sat på en for fin
indstilling.
Bryggeenheden er snavset. Tag bryggeenheden ud, og skyl den
Kaffeudløbet er snavset. Rengør kaffeudløbsrøret og hullerne i
Beholderen til formalet kaffe er
tilstoppet
Maskinens kredsløb er
tilstoppet af kalk.
Maskiner med LatteGo: LatteGo
er ikke samlet rigtigt.
Maskiner med LatteGo:
Mælkebeholderen og/eller
LatteGos ramme er beskidt.
Udskift AquaClean-vandfilteret hver
tredje måned. Et filter, som er ældre end
3 måneder, kan blive tilstoppet.
Sæt kværnen på en grovere (højere)
indstilling. Bemærk, at dette vil påvirke
kaffens smag.
under vandhanen (se 'Rengøring af
bryggeenheden under vandhanen').
det med en piberenser eller en nål.
Sluk maskinen, og tag bryggeenheden
ud. Åbn låget til beholderen til formalet
kaffe, og stik enden af skeen ned i den.
Bevæg skeen op og ned, indtil den
tilstoppede formalede kaffe falder ned
(fig. 34).
Afkalk maskinen med Philipsafkalkningsmiddel. Du skal altid afkalke
maskinen, når den beder dig om det.
Sørg for, at mælkebeholderen er samlet
rigtigt på LatteGos ramme (kliklyd) (se
'Samling af LatteGo (kun bestemte
typer)').
Skil LatteGo ad, skyl begge delene
under rindende vand, eller vask dem i
opvaskemaskinen.
Maskiner med klassisk
mælkeskummer:
Mælkeskummeren er ikke
samlet rigtigt.
Sørg for, at den klassiske
mælkeskummer er ordentligt samlet (se
'Samling af den klassiske
mælkeskummer (kun bestemte typer)').
Page 42
Problem Årsag Løsning
Der siver mælk ud fra
bunden af LatteGomælkebeholderen.
Du har brugt en type mælk, der
ikke egner sig til at lave skum.
Rammen og mælkebeholderen
er ikke samlet korrekt.
Forskellige mælketyper giver forskellige
mængder skum og forskellige
skumkvaliteter. Vi har testet følgende
mælketyper, som giver mælkeskum
med et godt resultat: Letmælk eller
sødmælk fra køer og laktosefri mælk.
Indsæt først toppen af
mælkebeholderen under krogen øverst
på rammen. Tryk derefter den nederste
del af mælkebeholderen på plads. Du
hører et klik, når den låser på plads.
Dansk
45
Dansk
Maskinen ser ud til at
være utæt.
Jeg kan ikke aktivere
AquaClean-vandfilteret,
og maskinen beder om
at blive afkalket.
Mælkebeholderen og/eller
LatteGos ramme er snavset.
Maskinen bruger vand til at
skylle det indvendige kredsløb
og bryggeenheden med. Dette
vand løber igennem det
indvendige system og direkte
ned i drypbakken. Dette er
normalt.
Drypbakken er overfyldt og er
løbet over, hvilket får det til at
se ud som om, maskinen er
utæt.
Vandtanken er ikke sat helt ind i
maskinen. Der lækker vand fra
vandtanken, og der trænger luft
ind i maskinen.
Bryggeenheden er
beskidt/tilstoppet.
Maskinen står ikke på en
vandret overflade.
Filtret er ikke blevet installeret
eller udskiftet i tide, efter at
skærmen viste AquaCleanpåmindelsen. Det betyder, at
maskinen ikke længere er helt
fri for kalk.
Skil LatteGo ad, skyl begge delene
under rindende vand, eller vask dem i
opvaskemaskinen.
Tøm drypbakken dagligt, eller når
indikatoren for fuld drypbakke stikker
op fra dækslet til drypbakken. Tip: Sæt
en kop under udløbet for at opsamle
skyllevand og reducere mængden af
vand i drypbakken.
Tøm drypbakken dagligt, eller når
indikatoren for fuld drypbakke stikker
op fra dækslet til drypbakken.
Sørg for, at vandtanken sidder korrekt:
Tag den ud, og sæt den så langt ind i
maskinen, den kan komme.
Skyl bryggeenheden.
Anbring maskinen på en vandret
overflade, så drypbakken ikke flyder
over, og indikatoren for fuld drypbakke
fungerer korrekt.
Afkalk maskinen først, og monter
derefter AquaClean-filteret.
Det nye vandfilter
passer ikke.
Du forsøger at installere et
andet filter end Philips
AquaClean-filtret.
Gummiringen på AquaClean-
mangler.
filteret
Det er kun AquaClean-vandfiltret, der
passer i maskinen.
Sæt gummiringen på AquaCleanfilteret.
Page 43

46
Dansk
Problem Årsag Løsning
Maskinen siger en høj
lyd.
Det er normalt, at der kommer
lyde fra maskinen under brug.
Hvis maskinen begynder at lyde
anderledes, skal bryggeenheden
rengøres og smøres (se 'Smøring af
bryggeenheden').
AquaClean-vandfilteret blev
ikke korrekt klargjort, og der
trækkes nu luft ind i maskinen.
Vandtanken er ikke sat helt i
maskinen.
Tag AquaClean-filteret ud af
vandtanken, og klargør det korrekt,
inden du sætter det i igen. Se kapitlet
"AquaClean-vandfilter" for at få trin-fortrin-instruktioner.
Sørg for, at vandtanken sidder korrekt:
Tag den ud, og sæt den så langt ind i
maskinen, den kan komme.
Tekniske specifikationer
Producenten forbeholder sig ret til at forbedre produktets tekniske specifikationer. Alle de
forudindstillede mængder er cirkaangivelser.
Beskrivelse
Størrelse (B x H x D) 246 x 377 x 434 mm
Vægt 7-7.5kg
Længde af ledning 1200 mm
Vandtank 1,8 liter
Rumindhold af beholder til kaffebønner 275 g
Rumindhold af kaffegrumsbeholder 12 portioner
LatteGo-kapacitet (mælkebeholder) 250 ml
Justérbart kaffeudløb 88-145 mm
Værdi
Nominel spænding – Nominel effekt –
Strømforsyning
Se dataskiltet indvendigt på lågen (figur A11)
Page 44

Deutsch
47
Inhalt
Geräteüberblick (Abb. A) _____________________________________________________________________________ 47
Bedienfeld ____________________________________________________________________________________________ 48
Einführung ___________________________________________________________________________________________ 48
Vor dem ersten Gebrauch____________________________________________________________________________ 49
Brühen von Getränken _______________________________________________________________________________ 50
Getränke personalisieren ____________________________________________________________________________ 53
Einstellungen der Kaffeemaschine anpassen _______________________________________________________ 54
Die Brühgruppe herausnehmen und einsetzen _____________________________________________________ 56
Reinigung und Wartung ______________________________________________________________________________ 56
AquaClean-Wasserfilter _____________________________________________________________________________ 59
Entkalkungsvorgang (30 Minuten) __________________________________________________________________ 60
Bestellen von Zubehör _______________________________________________________________________________ 61
Fehlerbehebung______________________________________________________________________________________ 62
Technische Daten ____________________________________________________________________________________ 68
Geräteüberblick (Abb. A)
A1 Bedienfeld A10 Serviceklappe
A2 Tassenhalter A11 Etikett mit Typennummer
A3 Behälter für vorgemahlenen Kaffee A12 Wasserbehälter
Deutsch
A4 Deckel des Bohnenbehälters A13 Heißwasserauslauf
A5 Einstellbarer Kaffeeauslauftrichter A14 Kaffeesatzbehälter
A6 Steckdose für Netzkabel A15 Vorderseite des Kaffeesatzbehälters
A7 Drehknopf für Mahlgrad A16 Abdeckung für Abtropfschale
A8 Kaffeebohnenbehälter A17 Abtropfschale
A9 Brühgruppe A18 Anzeiger "Abtropfschale voll"
Zubehör
A19 Netzkabel A23 Teststreifen zum Bestimmen der
A20 Schmierfetttube A24 Klassischer Milchaufschäumer (Nur
A21 AquaClean Wasserfilter A25 LatteGo (Milchbehälter) (Nur
A22 Messlöffel
Wasserhärte
bestimmte Typen)
bestimmte Typen)
Page 45
48
Deutsch
Bedienfeld
Es gibt mehrere Versionen dieser Espressomaschine mit unterschiedlichen Bedienfeldern. Jede
Ausführung verfügt über eine eigene Typennummer. Sie finden diese Typennummer auf dem Etikett
auf der Innenseite der Serviceklappe (siehe Abb. A11). Sie können die Typennummer auch finden,
indem Sie auf das Einstellungssymbol tippen und „Support“ auswählen.
Die Abbildungen C, D und E bieten einen Überblick über alle Tasten und Symbole. Nachstehend
finden Sie die Beschreibung.
Blättern Sie mithilfe des Nach-oben- und Nach-unten-Pfeils durch die Anzeige, und drücken Sie zur
Auswahl oder Bestätigung Ihrer Wahl die OK-Taste.
Alle Typen (Abb. C/D/E)
C1/D1/E1 Symbole für OneTouch-Getränke
C2. Start/Stopp-Taste -Taste C4. Display C7. Persönliche Profile
C3. Navigationssymbole
(nach oben, nach unten,
zurück, OK)
C6. Reinigungsmenü
D2/E2 Menü mit weiteren
Getränken
C5. Geräteeinstellungen C8. Ein-/Ausschalter
Nur EP4327, EP4324, EP4321 (Abb. C)
C1 Symbole für One-Touch-Getränke: Espresso, Coffee (Kaffee), Americano, Caffè Crema, Ristretto,
Hot Water (heißes Wasser) und Steam (Dampf)
Nur EP4349, EP4346, EP4343, EP4341 (Abb. D)
D1 Symbole für One-Touch-Getränke: Espresso, Coffee (Kaffee), Americano, Cappuccino, Latte
Macchiato, Café au Lait (Milchkaffee)
Nur EP5447, EP5446, EP5444, EP5443, EP5441 (Abb. E)
E1 Symbole für One-Touch-Getränke: Espresso, Coffee (Kaffee), Americano, Cappuccino, Latte
Macchiato, Café au Lait (Milchkaffee)
Einführung
Herzlichen Glückwunsch zum Kauf eines Kaffeevollautomaten von Philips! Registrieren Sie Ihr Produkt
unter www.philips.com/registeryourcoffee.com oder durch Scannen des QR-Codes (Abb. 1) in dieser
Bedienungsanleitung, um den vollen Support, den Philips bietet, in Anspruch nehmen zu können
Lesen Sie die separate Sicherheitsbroschüre vor dem ersten Gebrauch des Gerät aufmerksam durch,
und bewahren Sie sie für eine spätere Verwendung auf.
Um Ihnen den Einstieg zu erleichtern und um sicherzustellen, dass Sie Ihr Gerät bestmöglich nutzen,
bietet Ihnen Philips auf verschiedenen Wegen Support an. Im Lieferumfang enthalten ist:
1 Eine Bedienungsanleitung mit bildbasierten Benutzeranweisungen und genaueren Informationen
zur Reinigung und Wartung.
2 Eine Sicherheitsbroschüre mit Anweisungen zur sicheren Verwendung der Kaffeemaschine.
Page 46
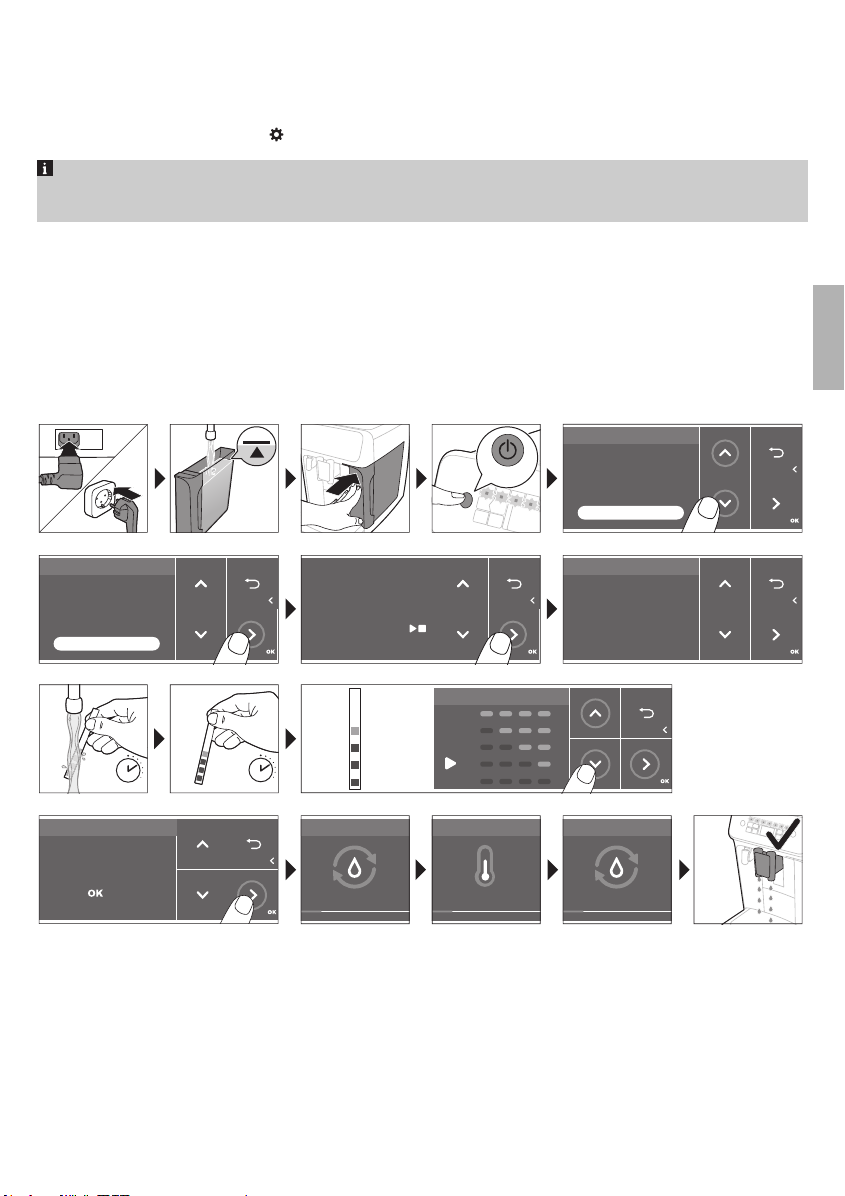
ON
,WDOLDQR
1HGHUODQGV
(QJOLVK
(VSD³RO
/DQJXDJH
:DWHUKDUGQHVV
,WDOLDQR
1HGHUODQGV
(QJOLVK
(VSD³RO
/DQJXDJH
)ROORZWKHQH[WVWHSV
WRVHWWKHFRUUHFW
ZDWHUKDUGQHVVOHYHO
<RXDUHDERXW
WRVHWWKHODQJXDJH
WR(QJOLVK
3UHVVVWDUWVWRS
WRFRQILUP
:DWHUKDUGQHVV
<RXVHOHFWHG
UHGVTXDUHV
3UHVVWRFRQILUP
+HDWLQJXS
+HDWLQJ
5LQVLQJ
5LQVLQJ
)LOOLQJZDWHUFLUFXLW
)LOOLQJ
=
:DWHUKDUGQHVV
1 sec.
1 min.
Deutsch
3 Für Online-Support (häufig gestellte Fragen, Videos usw.), scannen Sie den QR-Code auf dem
Cover dieser Broschüre oder besuchen Sie die Seite www.philips.com/coffee-care, um den
Support von Philips optimal nutzen zu können. Sie können den QR-Code auch finden, indem Sie
auf das Einstellungssymbol tippen und Support auswählen.
Dieses Gerät wurde mit Kaffee getestet. Zwar wurde die Maschine anschließend sorgfältig gereinigt,
aber es ist möglich, dass noch ein Rest Kaffee in der Maschine ist. Wir garantieren aber, dass Ihre
Maschine absolut neu ist.
Um den besten Kaffee zuzubereiten, passt die Kaffeemaschine die Menge des gemahlenen Kaffees,
der verwendet wird, automatisch an. Damit die Kaffeemaschine den Selbsteinstellungsprozess
abschließen kann, sollten Sie zunächst 5 Tassen zubereiten.
Spülen Sie den LatteGo (Milchbehälter) und den klassischen Milchaufschäumer vor dem ersten
Gebrauch.
Vor dem ersten Gebrauch
49
Deutsch
Page 47
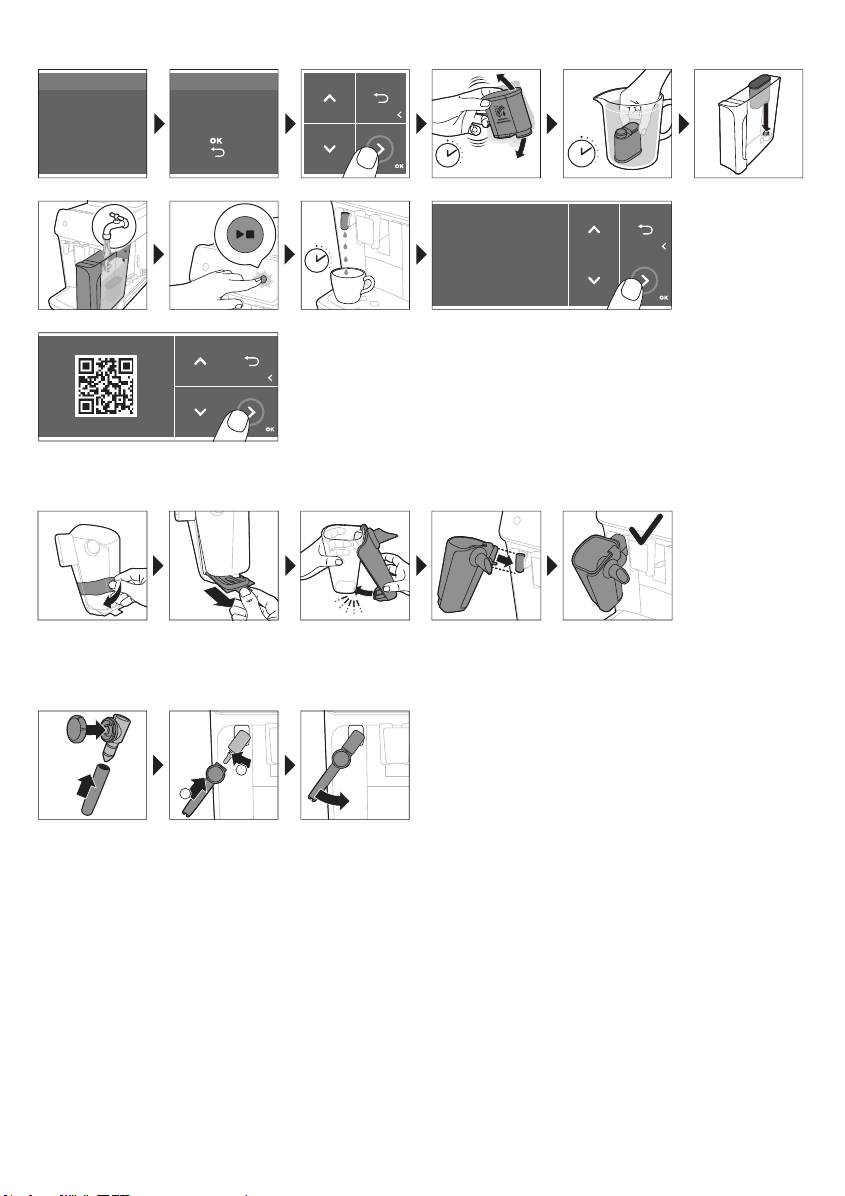
5 sec.
30 sec.
1 min.
$TXD&OHDQ
8VH$TXD&OHDQILOWHU
WRHQMR\FXSV
ZLWKRXWGHVFDOLQJ
$OPRVWUHDG\
)LOOEHDQVUHILOOZDWHU
WDQNDQGHQMR\
\RXUFRIIHH
5HJLVWHU\RXUSURGXFW
9LVLWZZZSKLOLSVFRP
$TXD&OHDQ
:RXOG\RXLQVWDOO
DQ$TXD&OHDQILOWHU"
3UHVVWRFRQILUP
3UHVVWRUHIXVH
CLICK
1
2
50
Deutsch
LatteGo zusammensetzen (nur bestimmte Gerätetypen)
Den klassischen Milchaufschäumer zusammensetzen (nur bestimmte Gerätetypen)
Brühen von Getränken
Allgemeine Schritte
1 Füllen Sie den Wasserbehälter mit Leitungswasser und den Kaffeebohnenbehälter mit
Kaffeebohnen.
2 Stecken Sie den kleinen Stecker in die Buchse auf der Rückseite der Maschine. Stecken Sie den
Netzstecker in die Steckdose.
3 Drücken Sie den Ein-/Ausschalter, um die Maschine einzuschalten.
-
Die Maschine beginnt aufzuheizen und führt den automatischen Spülzyklus durch.
-
Sobald alle Getränke-Symbole ständig aufleuchten, ist die Kaffeemaschine betriebsbereit.
Page 48

Deutsch
4 Stellen Sie eine Tasse unter den Kaffeeauslauftrichter. Schieben Sie den Kaffeeauslauftrichter nach
oben oder unten, um die Höhe an die Größe der verwendeten Tasse oder des verwendeten (Abb.
2) Glases anzupassen.
Kaffee aus Kaffeebohnen zubereiten
1 Um einen Kaffee zuzubereiten, tippen Sie auf das gewünschte (Abb. 3) Getränkesymbol oder auf
das Symbol (Abb. 4) „Weitere Getränke“ (nur bestimmte Gerätetypen).
-
Sie können das Getränk nun Ihren persönlichen Vorlieben (Abb. 5) anpassen. Benutzen Sie die
Pfeiltasten (Abb. 6), um die Kaffeestärke einzustellen. Tippen Sie auf das OK-Symbol, wenn Sie
weitere Einstellungen (Abb. 7) anpassen möchten.
2 Sie können jederzeit die Start-/Stopp-Taste drücken, um die Zubereitung des ausgewählten
Getränks zu starten.
3 Um die Ausgabe von Kaffee zu beenden, bevor die Kaffeemaschine fertig ist, drücken Sie nochmals
die Start/Stopp -Taste.
Um 2 Tassen Kaffee gleichzeitig zuzubereiten, tippen Sie zweimal auf das Getränke-Symbol oder
wählen Sie das 2x-Symbol, indem Sie den entsprechenden Balken scrollen.
Verwenden Sie keine karamellisierten oder aromatisierten Kaffeebohnen.
Brühen von milchhaltigen Getränken mit LatteGo (Milchbehälter)
LatteGo besteht aus einem Milchbehälter, einem Rahmen und einem Aufbewahrungsdeckel. Um
ein Auslaufen zu vermeiden, achten Sie darauf, dass der Rahmen und der Milchbehälter
ordnungsgemäß zusammengesetzt sind, bevor Sie den Milchbehälter füllen.
1 Um LatteGo anzubringen, setzen Sie zuerst den oberen Teil des Milchbehälters unter dem Haken
am oberen Ende des Rahmens (Abb. 8). Drücken Sie dann das Unterteil des Milchbehälters wieder
zurück. Sie hören ein Klicken, wenn er einrastet (Abb. 9).
Hinweis: Stellen Sie sicher, dass der Milchbehälter und der Rahmen sauber sind, bevor Sie sie
zusammensetzen.
2 Kippen Sie LatteGo leicht und setzen Sie ihn auf den Heißwasserauslauftrichter (Abb. 10). Drücken
Sie ihn wieder hinein, bis er einrastet (Abb. 11).
3 Befüllen Sie LatteGo mit Milch (Abb. 12). Füllen Sie den Milchbehälter nicht über die angezeigte
Maximalhöhe hinaus.
Bei der Zubereitung individueller Milchgetränke müssen Sie den Milchbehälter mit mehr
beziehungsweise weniger Milch füllen, als für diese Getränke auf LatteGo angegeben.
Für optimale Ergebnisse verwenden Sie immer direkt aus dem Kühlschrank kommende Milch.
4 Stellen Sie eine Tasse auf die Abtropfschale.
5 Tippen Sie auf das Symbol für das milchhaltige Getränk Ihrer Wahl oder tippen Sie auf das Symbol
„Weitere Getränke“ (nur bestimmte Gerätetypen), um ein anderes Getränk (siehe 'Getränke
personalisieren') auszuwählen.
-
Sie können das Getränk nun gemäß Ihrer persönlichen Vorlieben anpassen.
6 Drücken Sie die Start/Stopp -Taste.
-
Wenn
Sie einen Cappuccino, Flat White oder Latte Macchiato zubereiten, gibt das Gerät zuerst
Milch und dann Kaffee aus. Wenn Sie Café Latte oder einen Café au Lait zubereiten, gibt das
Gerät zuerst Kaffee und anschließend Milch aus.
51
Deutsch
Page 49

52
Deutsch
-
Um die Ausgabe von Milch zu stoppen, bevor die Kaffeemaschine die voreingestellte Menge
ausgegeben hat, drücken Sie die Start/Stopp
7 Um die Ausgabe des Getränks (Milch und Kaffee) zu beenden, bevor die Kaffeemaschine damit
fertig ist, drücken Sie die Start/Stopp -Taste.
-Taste.
Milch mit klassischem Milchaufschäumer aufschäumen oder aufwärmen
Verwenden Sie immer Milch direkt aus dem Kühlschrank. So erhalten Sie die optimale
Schaumqualität.
1 Kippen Sie den schwarzen Silikon-Griff auf der Kaffeemaschine nach links und schieben Sie den
Milchaufschäumer darauf (Abb. 13).
2 Füllen Sie ein Milchkännchen mit etwa 100ml Milch für einen Cappuccino oder mit etwa 150ml
Milch für einen Latte Macchiato.
3 Tauchen Sie den Milchaufschäumer ca. 1 cm tief in die Milch.
4 Tippen Sie auf das Dampf-Symbol (Abb. 14).
5 Wenn Sie Milch aufschäumen möchten, drehen Sie den Knopf am klassischen Milchaufschäumer
auf das Milchschaum-Symbol (Abb. 15). Wenn Sie Milch aufwärmen möchten, drehen Sie den
Knopf am klassischen Milchaufschäumer auf das Symbol (Abb. 16) „normale Milch“.
6 Vergewissern Sie sich, dass das Symbol auf dem Milchaufschäumerknopf auf den schwarzen Pfeil
ausgerichtet ist.
7 Drücken Sie die Start-/Stopptaste , um den Vorgang zu starten (Abb. 17).
-
Da Gerät beginnt mit dem Aufheizen; Dampf wird in die Milch gepresst und die Milch wird
entweder aufgeschäumt oder aufgewärmt.
8 Wenn der Milchschaum im Milchkännchen das gewünschte Volumen oder die gewünschte
Temperatur erreicht hat, dann drücken Sie erneut die Start/Stopptaste
/Aufschäumvorgang zu beenden.
, um den Aufwärm-
Schäumen/wärmen Sie Milch nie länger als 90 Sekunden auf. Der Dampf stoppt automatisch nach
90 Sekunden.
Um die beste Milchschaumqualität zu erhalten, sollten Sie das Milchkännchen während des
Aufschäumens nicht bewegen.
Extraschuss (ExtraShot) (nur bestimmte Gerätetypen)
Ihre Maschine bietet Ihnen die Möglichkeit, Ihren Kaffee- und Milchgetränken einen zusätzlichen
Schuss Ristretto hinzuzufügen, wenn Sie z. B. gerne einen stärkeren Kaffee hätten.
1 Stellen Sie eine Tasse unter den Auslauf.
2 Tippen Sie auf eines der Symbole für One-Touch-Getränke oder auf das Symbol „Weitere
Getränke“ (nur bestimmte Gerätetypen), um ein Getränk auszuwählen.
3 Verwenden Sie den Nach-oben-Pfeil, um die Stärke auf die höchste Stufe einzustellen, und wählen
Sie dann die ExtraShot-Funktion (Abb. 18) aus.
4 Tippen Sie auf das OK-Symbol, wenn Sie die anderen Einstellungen personalisieren möchten.
Drücken Sie Start/Stopp
5 Drücken Sie das Start/Stopp-Symbol erneut, wenn Sie die Getränkeausgabe beenden möchten,
bevor die Maschine fertig ist.
erneut, um die Getränkezubereitung zu starten.
Page 50

Deutsch
Wenn Sie die ExtraShot-Funktion ausgewählt haben, können Sie nicht mehr als einen Kaffee
gleichzeitig zubereiten.
Brühen von Kaffee aus vorgemahlenem Kaffee
Sie können auch bereits gemahlenen Kaffee anstelle von Kaffeebohnen verwenden, z.B. wenn Sie
eine andere Kaffeesorte oder entkoffeinierten Kaffee bevorzugen.
1 Öffnen Sie den Deckel des Behälters für gemahlenen Kaffee, und schütten Sie einen Messlöffel
gemahlenen Kaffee in den Behälter (Abb. 19). Schließen Sie dann den Deckel.
2 Tippen Sie auf eines der Symbole für One-Touch-Getränke oder auf „Weitere Getränke“ (nur
bestimmte Gerätetypen), um ein weiteres Getränk auszuwählen.
3 Wählen Sie die Funktion für gemahlenen Kaffee. Es gibt zwei Möglichkeiten, dies zu tun:
-
Verwenden Sie den Nach-unten-Pfeil, um die Stärke auf die niedrigste Stufe einzustellen, und
wählen Sie dann die „gemahlener Kaffee“-Funktion aus.
-
Drücken Sie das Einstellungssymbol und verwenden Sie den Nach-unten-Pfeil um die
„gemahlener Kaffee“-Funktion auszuwählen.
4 Drücken Sie erneut die Start/Stopp-Taste , um die Kaffeeausgabe zu beenden, bevor die
Maschine fertig ist.
Wenn Sie die „gemahlener Kaffee“-Funktion auswählen:
- wird diese automatisch gespeichert.
- können Sie nicht mehr als einen Kaffee gleichzeitig zubereiten.
- können Sie keine andere Aromastärke auswählen.
Heißes Wasser bereiten
1 Entfernen Sie LatteGo beziehungsweise den Milchaufschäumer, falls er angebracht ist.
2 Stellen Sie eine Tasse unter den Heißwasserauslauf.
3 Tippen Sie auf das Symbol für heißes Wasser (nur bestimmte Gerätetypen) oder auf das „Weitere
Getränke“-Symbol (nur bestimmte Gerätetypen) (Abb. 4), um heißes Wasser auszuwählen.
4 Stellen Sie die Menge oder Temperatur des heißen Wassers über den Nach-oben- und den Nach-
unten-Pfeil nach Wunsch ein.
5 Drücken Sie die Start/Stopp -Taste.
-
Aus dem Heißwasserauslauf (Abb. 20) wird heißes Wasser ausgegeben.
6 Um die Ausgabe von Heißwasser zu beenden, bevor die Kaffeemaschine den Vorgang
abgeschlossen hat, drücken Sie nochmals die Start/Stopp -Taste.
53
Deutsch
Getränke personalisieren
Die Maschine ermöglicht Ihnen, die Getränkeeinstellungen Ihren eigenen Vorlieben anzupassen und
das angepasste Getränk in einem persönlichen Profil zu speichern. Die verschiedenen Profile haben
unterschiedliche Farben.
Wenn Sie ein Getränk ausgewählt haben, indem Sie auf eines der Symbole für One-Touch-Getränke
oder auf „Weitere Getränke“ (nur bestimmte Gerätetypen) getippt haben, können Sie die
Einstellungen folgendermaßen anpassen:
1 Passen Sie die Aromastärke mithilfe der Nach-oben- und Nach-unten-Symbole (Abb. 21) an. Es
gibt 5 Stärken, wobei die niedrigste Stufe den mildesten und die höchste Stufe den stärksten
Kaffee braut.
2 Passen Sie die Kaffee (Abb. 22)- und/oder Milchmenge (nur bestimmte Gerätetypen) über die
Nach-oben- und Nach-unten-Symbole an. Für jede der Einstellungen sind 5 Mengen verfügbar.
Page 51
54
Deutsch
Sobald das Gerät Ihr Getränk zubereitet hat, werden die gewählten Einstellungen automatisch im
von Ihnen ausgewählten Profil gespeichert.
Ein Profil auswählen
In „Meine Kaffeeauswahl“ können Sie ein Profil auswählen und ein Rezept speichern.
1 Tippen Sie mehrmals auf das Symbol „Profile“ , um eines der Farbprofile auszuwählen. Jedes
Profil hat eine andere Farbe.
2 Wählen Sie ein Getränk aus, indem Sie auf eines der Symbole für One-Touch-Getränke oder auf
„Weitere Getränke“ (nur bestimmte Gerätetypen) tippen.
3 Passen Sie die Getränkeeinstellung Ihren Vorlieben an.
4 Drücken Sie die Start/Stopp-Taste , um das ausgewählte Getränk zuzubereiten
-
Ihre neuen Getränkeeinstellungen wurden jetzt im ausgewählten Farbprofil gespeichert.
Sie können das Gerät (siehe 'Werkseinstellung wiederherstellen') jederzeit auf die
Werkseinstellung zurücksetzen.
Gästeprofil
Ihr Gerät verfügt über ein Gästeprofil. Wenn das Gästeprofil ausgewählt ist, ist das Profilsymbol
deaktiviert. Wenn Sie dieses Profil auswählen, können Sie die Einstellungen zwar nach Belieben
anpassen, das zubereitete Rezept wird jedoch nicht gespeichert.
Einstellungen der Kaffeemaschine anpassen
Wasserhärte einstellen
Wir empfehlen Ihnen, den Wasserhärtegrad gemäß dem Wasserhärtegrad in Ihrer Region
einzustellen. So sorgen Sie für eine optimale Leistung und stellen eine längere Lebensdauer des
Geräts sicher. Dies erspart Ihnen auch, das Gerät allzu häufig entkalken zu müssen. Die Voreinstellung
für die Wasserhärte ist 4: hartes Wasser.
Verwenden Sie den Wasserhärte-Teststreifen im Lieferumfang, um die Wasserhärte
in Ihrer Region zu bestimmen:
1 Halten Sie den Wasserhärte-Teststreifen eineSekunde lang in Leitungswasser (Abb. 23).
2 Warten Sie eineMinute. Die Anzahl der Quadrate auf dem Teststreifen, die rot werden, zeigen die
Wasserhärte (Abb. 24) an.
Stellen Sie die Wasserhärte richtig auf dem Gerät ein:
1 Tippen Sie auf das Einstellungssymbol und wählen Sie mithilfe der Nach-oben- und Nach-
unten-Pfeile die Option „Wasserhärte“ aus. Drücken Sie dann das OK-Symbol, um zu bestätigen.
2 Wählen Sie über die Nach-oben- und Nach-unten-Symbole den Wasserhärtegrad aus. Die Anzahl
der ausgewählten roten Quadrate auf dem Display sollte der Anzahl der roten Quadrate auf dem
Teststreifen (Abb. 25) entsprechen.
3 Wenn Sie die richtige Wasserhärte eingestellt haben, dann tippen Sie zur Bestätigung auf das OK-
Symbol.
Page 52

Deutsch
Einstellung des Mahlgrads
Sie können die Kaffeestärke mithilfe des Drehknopfs im Bohnenbehälter ändern. Je niedriger die
Mahlgradeinstellung, desto feiner werden die Kaffeebohnen gemahlen und desto stärker wird der
Kaffee. Es stehen 12 verschiedene Mahlwerkeinstellungen zur Auswahl.
Das Gerät wurde so eingestellt, dass der bestmögliche Geschmack aus Ihren Kaffeebohnen geholt
wird. Daher empfehlen wir Ihnen, die Mahlwerkseinstellung erst nach 100–150 zubereiteten Tassen
Kaffee zu verändern (ca. 1Monat Nutzung).
Sie können den Mahlgrad nur einstellen, während die Kaffeemaschine Kaffeebohnen mahlt. Sie
müssen 2 bis 3 Getränke brühen, bevor Sie den vollen Unterschied herausschmecken können.
Drehen Sie den Mahleinstellungs-Drehknopf immer nur jeweils um eine Position, um Schäden am
Mahlwerk zu verhindern.
1 Stellen Sie eine Tasse unter den Kaffeeauslauftrichter.
2 Öffnen Sie den Deckel des Kaffeebohnenbehälters.
3 Tippen Sie auf das Espresso-Symbol und drücken Sie dann die Start/Stopp -Taste.
4 Wenn das Mahlwerk anfängt zu arbeiten, drücken Sie den Mahlwerk-Drehknopf und drehen Sie ihn
nach links oder rechts. (Abb. 26)
Andere Geräteeinstellungen anpassen
Durch Tippen auf das Einstellungssymbol können Sie die folgenden Geräteeinstellungen anpassen:
-
Wasserhärte: Sie können je nach Wasserhärte in Ihrer Region aus 5 verschiedenen
Wasserhärtegraden auswählen;
-
Timer (Stand-by): Sie können 15, 30, 60 oder 180 Minuten auswählen.
-
Anzeigehelligkeit: Sie können „niedrig“, „mittel“ oder „hoch“ auswählen.
-
Sprache
-
Ton: Sie können das akustische Signal des Geräts aktivieren oder deaktivieren.
-
Temperatur: Sie können aus 3 Brühtemperaturen für Ihren Kaffee auswählen
-
Frontbeleuchtung (nur bestimmte Gerätetypen): Sie können „immer eingeschaltet“, „während der
Zubereitung eingeschaltet“ oder „immer ausgeschaltet“.
-
Messeinheit: Sie können zwischen ml oder oz wählen.
55
Deutsch
Werkseinstellung wiederherstellen
Das Gerät kann jederzeit auf die Werkseinstellungen zurückgesetzt werden.
1 Tippen Sie auf das Einstellungssymbol .
2 Wählen Sie mithilfe der Nach-oben- und Nach-unten-Symbole die Option „Werkseinstellung“ aus.
Tippen Sie zur Bestätigung auf das OK-Symbol.
3 Drücken Sie die Start/Stopp -Taste, um zu bestätigen, dass Sie die Einstellungen wiederherstellen
möchten.
-
Die Einstellungen werden jetzt zurückgesetzt.
Die folgenden Werkseinstellungen werden standardmäßig wiederhergestellt. Wasserhärte, StandbyTimer, Anzeigehelligkeit, Ton, Temperatur, Frontbeleuchtung, Profile.
Page 53
56
Deutsch
Die Brühgruppe herausnehmen und einsetzen
Ausführliche Video-Anweisungen zum Entfernen, Einsetzen und Reinigen der Brühgruppe finden Sie
unter www.philips.com/coffee-care.
Entfernen der Brühgruppe aus der Maschine
1 Schalten Sie die Maschine aus.
2 Nehmen Sie den Wasserbehälter heraus und öffnen Sie die Serviceklappe (Abb. 27).
3 Drücken Sie die PUSH-Taste (Abb. 28) und ziehen Sie am Griff der Brühgruppe, um diese aus der
Kaffeemaschine (Abb. 29) herauszunehmen.
Wiedereinsetzen der Brühgruppe
Bevor Sie die Brühgruppe wieder in das Gerät einsetzen, stellen Sie sicher, dass sie richtig
positioniert ist.
1 Überprüfen Sie, ob die Brühgruppe in der richtigen Position ist. Der Pfeil auf dem gelben Zylinder
auf der Seite der Brühgruppe muss auf einer Linie liegen mit dem schwarzen Pfeil und N (Abb. 30).
-
Wenn sie nicht ausgerichtet sind, drücken Sie den Hebel, bis er die Unterseite der Brühgruppe
(Abb. 31) berührt.
2 Schieben Sie die Brühgruppe entlang der Führungsschienen an den Seiten (Abb. 32) in die
Maschine zurück, bis sie mit einem Klick (Abb. 33) einrastet. Drücken Sie nicht die PUSH-Taste
(Drucktaste).
3 Schließen Sie die Serviceklappe und setzen Sie den Wasserbehälter wieder ein.
Reinigung und Wartung
Regelmäßiges Reinigen und Warten halten Ihr Gerät in einwandfreiem Zustand und garantieren lang
anhaltenden Kaffeegenuss und zuverlässigen Kaffeefluss.
In der folgenden Tabelle finden Sie ausführliche Informationen, wann und wie alle herausnehmbaren
Bestandteile des Geräts gereinigt werden sollten. Weitere Informationen und Video-Anweisungen
finden Sie unter www.philips.com/coffee-care. Abbildung B bietet einen Überblick über die Teile, die
in der Spülmaschine gereinigt werden können.
Abnehmbare
Teile
Brühgruppe Wöchentlich Nehmen Sie die Brühgruppe aus der
Wann wird das Gerät
Wie wird das Gerät gereinigt
gereinigt
Kaffeemaschine (siehe 'Die Brühgruppe
herausnehmen und einsetzen'). Spülen Sie
sie unter fließendem Leitungswasser (siehe
'Brühgruppe unter fließendem
Leistungswasser reinigen').
Monatlich Reinigen Sie die Brühgruppe mit der Philips
Tablette (siehe 'Reinigung der Brühgruppe
mit den Tabletten zur Entfernung von
Kaffeefett') zum Entfernen von Kaffeefett.
Page 54

Deutsch
57
Abnehmbare
Teile
Klassischer
Milchaufschäumer
Behälter für
vorgemahlenen
Kaffee
Kaffeesatzbehälter Leeren Sie den
Abtropfschale Leeren Sie täglich die
Wann wird das Gerät
gereinigt
Nach jedem Gebrauch Reinigen Sie den Milchschäumer zunächst
Prüfen Sie wöchentlich, ob der
Behälter für gemahlenen Kaffee
nicht verstopft ist.
Kaffeesatzbehälter, wenn das
Gerät Sie dazu auffordert.
Reinigen Sie sie einmal pro
Woche.
Abtropfschale, sobald die rote
Anzeige „Abtropfschale voll“
durch die Abtropfschale (Abb.
35) zu sehen ist. Reinigen Sie
die Abtropfschale einmal pro
Woche.
Wie wird das Gerät gereinigt
mit dem Schnellreinigungsprogramm „Quick
Milk Clean", während er am Gerät befestigt
ist. Anschließend nehmen Sie den
Milchaufschäumer ab und zerlegen ihn in
seine Einzelteile. Reinigen Sie alle Teile unter
fließendem Wasser oder in der
Spülmaschine.
Ziehen Sie den Netzstecker aus der
Steckdose, und entfernen Sie die
Brühgruppe aus dem Gerät. Öffnen Sie den
Deckel des Behälters für gemahlenen Kaffee
und stecken Sie den Löffelstiel hinein.
Bewegen Sie den Stiel auf und ab, bis der
Klumpen aus gemahlenem Kaffee
herausfällt (Abb. 34). Besuchen Sie
www.philips.com/coffee-care für
ausführliche Video-Anweisungen.
Entfernen Sie den Kaffeesatzbehälter immer
bei eingeschaltetem Gerät. Spülen Sie den
Behälter mit etwas Spülmittel unter
fließendem Wasser ab oder reinigen Sie ihn
in der Spülmaschine. Die Vorderseite des
Kaffeesatzbehälters (Abb. A15) ist nicht
spülmaschinenfest.
Nehmen Sie die Abtropfschale (Abb. 36)
heraus und spülen Sie sie unter fließendem
Wasser mit etwas Spülmittel ab. Sie können
die Abtropfschale auch in der Spülmaschine
reinigen. Die Vorderseite des
Kaffeesatzbehälters (Abb. A15) ist nicht
spülmaschinenfest.
Deutsch
LatteGo Nach jedem Gebrauch Reinigen Sie den LatteGo zunächst mit dem
Schmierung der
Brühgruppe
Wasserbehälter Wöchentlich Spülen Sie den Wasserbehälter unter
Vorderseite des
Geräts
Alle 2 Monate Beachten Sie die Tabelle mit Angaben zur
Wöchentlich Reinigen Sie die Vorderseite wöchentlich mit
Schnellreinigungsprogramm „Quick Milk
Clean"-, während er am Gerät befestigt ist.
Nehmen Sie ihn dann aus der Maschine und
spülen Sie ihn unter fließendem Wasser ab
oder reinigen Sie ihn im Geschirrspüler.
Schmierung und schmieren Sie die
Brühgruppe mit Philips Schmierfett (siehe
'Schmierung der Brühgruppe').
fließendem Wasser ab.
einem
nicht-scheuernden Tuch.
Page 55

58
Deutsch
Brühgruppe reinigen
Eine regelmäßige Reinigung der Brühgruppe beugt eine Verstopfung des internen Kreislaufs durch
Kaffeereste vor. Supportvideos zum Entfernen, Einsetzen und Reinigen der Brühgruppe finden Sie
unter www.philips.com/coffee-care.
Brühgruppe unter fließendem Leistungswasser reinigen
1 Entfernen Sie die Brühgruppe (siehe 'Die Brühgruppe herausnehmen und einsetzen').
2 Spülen Sie die Brühgruppe gründlich mit Wasser ab. Reinigen Sie vorsichtig (Abb. 37) den oberen
Filter der Brühgruppe.
3 Lassen Sie die Brühgruppe an der Luft trocknen, bevor Sie sie zurück in die Maschine einsetzen.
Trocknen Sie die Brühgruppe nicht mit einem Tuch, damit keine Fusseln in die Brühgruppe
gelangen.
Reinigung der Brühgruppe mit den Tabletten zur Entfernung von Kaffeefett
Verwenden Sie nur die Philips Tabletten zum Entfernen von Kaffeefett.
1 Tippen Sie auf das Reinigungssymbol
Taste „Reinigung der Brühgruppe“ aus.
2 Tippen Sie zur Bestätigung auf das OK-Symbol und folgen Sie dann den Anweisungen auf dem
Bildschirm.
und wählen Sie mithilfe der Nach-oben- und Nach-unten-
Schmierung der Brühgruppe
Um die Leistung Ihres Geräts zu verbessern, empfehlen wir Ihnen, die Brühgruppe alle 2Monate zu
schmieren. So wird sichergestellt, dass sich die beweglichen Teile weiterhin reibungslos bewegen.
1 Tragen Sie eine dünne Schicht Schmierfett auf den Kolben (grauer Teil) der Brühgruppe (Abb. 38)
auf.
2 Tragen Sie eine dünne Schicht Schmierfett um den Schaft (grauer Teil) im unteren Teil der
Brühgruppe (Abb. 39) auf.
3 Geben Sie eine dünne Schicht Fett auf die Schienen auf beiden Seiten (Abb. 40).
LatteGo-Milchbehälter reinigen (nur bestimmte Gerätetypen)
LatteGo-Schnellreinigung
1 Überprüfen Sie, ob der LatteGo korrekt am Gerät (Abb. 10) angebracht ist.
2 Stellen Sie eine Tasse unter den Auslauf.
3 Tippen Sie auf das Reinigungssymbol
Pfeile das Schnellreinigungsprogramm „Quick Milk Clean“ aus.
4 Tippen Sie zur Bestätigung auf das OK-Symbol und folgen Sie dann den Anweisungen auf dem
Bildschirm, um Milch zu entfernen, die sich möglicherweise noch im Milchsystem befindet.
-
Das Milchsystem gibt kleine heiße Wasserspritzer ab.
5 Bewahren Sie den LatteGo mit der restlichen Milch im Kühlschrank auf.
Gründliche Reinigung des LatteGo
1 Nehmen Sie LatteGo von der Maschine (Abb. 41) ab.
2 Gießen Sie etwaige Milchreste aus.
3 Drücken Sie die Entriegelungstaste, und nehmen Sie den Milchbehälter aus dem Rahmen von
LatteGo (Abb. 42).
4 Reinigen Sie alle Teile in der Spülmaschine oder mit lauwarmen fließenden Wasser und etwas
Spülmittel.
und wählen Sie mithilfe der Nach-oben- und Nach-unten-
Page 56

Deutsch
Reinigung des klassischen Milchaufschäumers (nur bestimmte Gerätetypen)
Schnellreinigung des klassischen Milchaufschäumers
1 Vergewissern Sie sich, dass der Milchaufschäumer korrekt am Gerät (Abb. 13)angebracht ist.
2 Stellen Sie eine Tasse unter den Auslauf.
3 Tippen Sie auf das Reinigungssymbol und wählen Sie mithilfe der Nach-oben- und Nach-unten-
Pfeile das Schnellreinigungsprogramm „Quick Milk Clean“ aus.
4 Tippen Sie zur Bestätigung auf das OK-Symbol und folgen Sie dann den Anweisungen auf dem
Bildschirm, um Milch zu entfernen, die sich möglicherweise noch im Milchschäumer befindet.
-
Das Milchsystem gibt kleine heiße Wasserspritzer ab.
5 Reinigen Sie den Milchaufschäumer mit einem feuchten Tuch.
59
Tägliche Reinigung des klassischen Milchaufschäumers
1 Lassen Sie den Milchaufschäumer vollständig abkühlen.
2 Kippen Sie den Milchaufschäumer nach links und nehmen Sie das Metall- und das Silikonteil (Abb.
43) ab.
3 Nehmen Sie die drei Teile (Abb. 44) auseinander und spülen Sie sie mit frischem Wasser ab oder
reinigen Sie sie in der Spülmaschine.
4 Setzen Sie die drei Teile des Milchaufschäumer wieder zusammen und setzen Sie den
Milchaufschäumer wieder auf das Gerät.
AquaClean-Wasserfilter
Ihre Kaffeemaschine ist für AquaClean geeignet. Um ein noch besseres Kaffee-Aroma zu erhalten,
können den AquaClean-Wasserfilter in den Wasserbehälter setzen. Der Wasserfilter verringert auch
den Entkalkungsaufwand, indem er die Bildung von Kalk in Ihrem Gerät reduziert. Sie können den
AquaClean-Wasserfilter bei Ihrem Händler vor Ort, einem autorisierten Service-Center oder online
unter www.philips.com/parts-and-accessories erwerben.
AquaClean-Filterstatusanzeige
Wenn der AquaClean aktiv ist, wird der Status des AquaClean-Filters immer als Prozentsatz auf dem
Display angezeigt.
-
Wenn der Status des AquaClean-Filters 10% oder weniger beträgt, wird bei jedem Einschalten des
Geräts 2 Sekunden lang eine Meldung angezeigt. Die Meldung weist darauf hin, dass Sie einen
neuen Filter kaufen sollten.
-
Wenn der Status des Filters 0% beträgt, bitte das Gerät Sie bei jedem Einschalten, den AquaCleanFilter zu wechseln.
Deutsch
Den AquaClean-Wasserfilter aktivieren (5Minuten).
Das Gerät erkennt nicht automatisch, dass ein Filter in den Wasserbehälter eingesetzt wurde. Sie
müssen daher jeden neuen AquaClean-Wasserfilter aktivieren, den Sie im Reinigungsmenü
installieren.
Wenn das Gerät die Filteraktivierungsmeldung nicht mehr anzeigt, können Sie den AquaCleanWasserfilter zwar dennoch aktivieren, müssen das Gerät aber zunächst entkalken.
Sie können den AquaClean-Wasserfilter erst verwenden, wenn Ihr Gerät komplett kalkfrei ist.
Page 57

60
Deutsch
Bevor Sie den AquaClean-Wasserfilter aktivieren, muss der Filter vorbereitet werden. Dazu wird er in
Wasser eingeweicht, wie nachstehend beschrieben. Wenn Sie dies nicht tun, könnte Luft in das Gerät
gesaugt werden; dies verursacht ein lautes Geräusch und das Gerät ist dann nicht mehr in der Lage,
Kaffee zu brühen.
1 Tippen Sie auf das Reinigungssymbol
Pfeile „AquaClean“ aus.
2 Tippen Sie zur Bestätigung auf das OK-Symbol.
3 Wenn die Aktivierungsanzeige erscheint, dann tippen Sie erneut auf das OK-Symbol. Folgen Sie
den Anweisungen auf dem Bildschirm.
4 Schütteln Sie den Filter ca. 5 Sekunden (Abb. 45) lang.
5 Tauchen Sie den Filter mit der Oberseite in eine Kanne mit kaltem Wasser, und schütteln/drücken
Sie ihn (Abb. 46).
6 Setzen Sie den AquaClean-Filter senkrecht auf den Filteranschluss im Wasserbehälter. Drücken Sie
ihn auf den niedrigstmöglichen Punkt (Abb. 47).
7 Füllen Sie den Wasserbehälter mit frischem Wasser und setzen Sie ihn wieder in das Gerät ein.
8 Wenn der LatteGo angebracht ist, dann entfernen Sie diesen (nur bestimmte Gerätetypen).
9 Stellen Sie einen Behälter unter den Heißwasserauslauf/Milchaufschäumer.
10 Drücken Sie die Start/Stopp-Taste
11 Der Heißwasserauslauf/Milchaufschäumer gibt 1 Minute lang heißes Wasser aus.
12 Der Filter ist nun erfolgreich aktiviert.
und wählen Sie mithilfe der Nach-oben- und Nach-unten-
, um den Aktivierungsvorgang zu starten.
Den AquaClean-Wasserfilter auswechseln (5Minuten).
Sobald 95Liter Wasser durch den Filter gelaufen sind, funktioniert der Filter nicht mehr. Die
AquaClean-Statusanzeige sinkt auf 0%, um Sie an den Filterwechsel zu erinnern. Solange die
AquaClean-Statusanzeige auf dem Display angezeigt wird, können Sie den Filter wechseln, ohne dass
vorher eine Entkalkung des Geräts erforderlich ist. Wenn Sie den AquaClean-Wasserfilter nicht
rechtzeitig austauschen, erlischt die AquaClean-Anzeige irgendwann. In diesem Fall können Sie den
Filter trotzdem auswechseln, müssen allerdings zuerst das Gerät entkalken.
Wenn die AquaClean-Statusanzeige auf 0% sinkt oder das Gerät Sie daran erinnert, den AquaCleanFilter zu wechseln, dann ...
1 nehmen Sie den alten AquaClean-Wasserfilter heraus.
2 setzen Sie einen neuen Filter ein und aktivieren Sie Ihn wie im Kapitel „Den AquaClean-Wasserfilter
aktivieren (5Minuten)“ beschrieben.
Tauschen Sie den AquaClean-Wasserfilter mindestens alle 3 Monate aus, selbst wenn die
Kaffeemaschine noch nicht anzeigt, dass ein Filteraustausch notwendig ist.
Entkalkungsvorgang (30 Minuten)
Verwenden Sie ausschließlich Entkalker von Philips. Unter keinen Umständen dürfen Sie Entkalker auf
Schwefel-, Salz- oder Essigsäurebasis (Essig) verwenden, da dies den Wasserkreislauf der Maschine
beschädigen kann und die Kalkablagerungen nicht ordnungsgemäß auflöst. Wenn Sie einen anderen
Entkalker als den von Philips verwenden, verfällt die Garantie. Auch wenn Sie das Gerät nicht
entkalken, verfällt die Garantie. Die Philips Entkalkungslösung ist im Online-Shop unter
www.philips.com/coffee-care erhältlich.
Wenn die Maschine entkalkt werden muss, wird auf dem Display eine Meldung angezeigt.
1 Berühren Sie das Reinigungssymbol
„Entkalken“ aus.
2 Folgen Sie den Anweisungen auf dem Bildschirm.
auf der Benutzeroberfläche und wählen Sie im Menü
Page 58

Deutsch
3 Entfernen Sie LatteGo beziehungsweise den Milchaufschäumer, falls er angebracht ist.
4 Entfernen Sie die Abtropfschale und den Kaffeesatzbehälter, leeren Sie diese und setzen Sie
beides zurück in das Gerät.
5 Nehmen Sie den Wasserbehälter ab, und entleeren Sie ihn. Entfernen Sie dann den AquaClean-
Wasserfilter.
6 Gießen Sie die gesamte Flasche Philips Entkalker in den Wasserbehälter und füllen Sie ihn dann bis
zur Markierung Calc/Clean (Entkalken) mit frischem Wasser auf (Abb. 48). Setzen Sie ihn wieder in
das Gerät ein.
7 Stellen Sie einen großen Behälter (1,5l) unter den Kaffeeauslauf und den Wasserauslauf.
8 Drücken Sie die Start/Stopp-Taste , um die Entkalkung zu starten. Der Entkalkungsvorgang
dauert etwa 30 Minuten und besteht aus einem Entkalkungszyklus und einem Spülzyklus.
9 Warten Sie, bis das Gerät kein Wasser mehr ausgibt. Füllen Sie den Wasserbehälter wieder auf,
wenn eine entsprechende Meldung auf dem Display erscheint. Wenn kein Wasser mehr läuft, ist
der Reinigungsvorgang beendet.
10 Setzen Sie einen neuen AquaClean-Wasserfilter in den Wasserbehälter und aktivieren Sie ihn.
-
Wenn der Entkalkungsvorgang beendet ist, erinnert Sie die Maschine daran, den neuen
AquaClean (siehe 'Den AquaClean-Wasserfilter auswechseln (5Minuten).')-Filter zu installieren.
Tipp: Der AquaClean-Filter reduziert den Entkalkungsaufwand!
61
Wenn der Entkalkungsvorgang unterbrochen wurde
Sie können den Entkalkungsvorgang abbrechen, indem Sie den Ein-/Ausschalter auf dem Bedienfeld
drücken. Wenn der Entkalkungsvorgang vorzeitig unterbrochen wurde, gehen Sie wie folgt vor:
1 Leeren und spülen Sie den Wasserbehälter gründlich.
2 Füllen Sie den Wasserbehälter bis zur Markierung Calc/Clean mit frischem Wasser, und schalten Sie
das Gerät wieder ein. Das Gerät heizt auf und führt einen automatischen Spülzyklus durch.
3 Bevor Sie Getränke zubereiten, führen Sie einen manuellen Spülzyklus durch. Um einen manuellen
Spülzyklus durchzuführen, geben Sie erst einen halben Wasserbehälter heißes Wasser aus, indem
Sie wiederholt auf die Heißwasser-Funktion tippen, und bereiten Sie dann zwei Tassen
gemahlenen Kaffee zu, ohne vom Gerät gemahlenen Kaffee hinzuzugeben.
Deutsch
Wenn die Entkalkung nicht beendet wurde, muss so bald wie möglich ein weiterer
Entkalkungsvorgang durchgeführt werden.
Bestellen von Zubehör
Verwenden Sie zum Reinigen und Entkalken des Geräts nur Philips Wartungsprodukte. Sie können
diese Produkte bei Ihrem lokalen Händler, in den autorisierten Kundenzentren oder online unter
www.philips.com/parts-and-accessories erwerben. Um eine vollständige Online-Ersatzteilliste zu
finden, geben Sie die Modellnummer Ihres Geräts ein. Sie finden die Modellnummer auf der
Innenseite der Serviceklappe.
Wartungsprodukte und Typnummern:
-
Entkalkungslösung CA6700
-
AquaClean-Wasserfilter CA6903
-
Fett für Brühgruppe HD5061
-
Kaffeefettlöser-Tabletten CA6704
Brita-Filter sind mit diesem Gerät nicht kompatibel.
Page 59

62
Deutsch
Fehlerbehebung
In diesem Kapitel werden die häufigsten Probleme beschrieben, die beim Gebrauch der Maschine
auftreten können. Supportvideos und eine vollständige Liste häufig gestellter Fragen finden Sie unter
www.philips.com/coffee-care. Sollten Sie das Problem nicht beheben können, wenden Sie sich an
ein Philips Service-Center in Ihrem Land. Kontaktinformationen können Sie der Garantieschrift
entnehmen.
Warnsymbole
Warnsym
bol
Lösung
Das Symbol „Wasserbehälter leer“ wird auf dem Display angezeigt.
Der Wasserbehälter ist fast leer. Füllen Sie den Wasserbehälter bis zur Maximal-
-
Markierung mit frischem Wasser.
Der Wasserbehälter ist nicht ordnungsgemäß eingesetzt. Setzen Sie den
-
Wasserbehälter wieder ein.
Das Symbol „Bohnen auffüllen“ erscheint auf dem Display.
Füllen Sie den Kaffeebohnenbehälter mit Kaffeebohnen.
-
Auf dem Display wird das Symbol „Kaffeesatzbehälter leeren“ angezeigt.
Der Kaffeesatzbehälter ist voll. Entfernen und entleeren Sie den
-
Kaffeesatzbehälter immer bei eingeschaltetem Gerät. Warten Sie 5Sekunden,
bevor Sie den Behälter wieder einsetzen.
Das Symbol „Brühgruppe einsetzen“ wird auf dem Display angezeigt.
Die Brühgruppe ist nicht oder nicht richtig eingesetzt. Nehmen Sie die
-
Brühgruppe heraus und stellen Sie sicher, dass sie richtig einrastet. Eine Schrittfür-Schritt-Anleitung finden Sie in Kapitel „Die Brühgruppe herausnehmen und
einsetzen“.
Fehlercodes
Nachstehend finden Sie eine Liste der Fehlercodes für die Probleme, die Sie selbst beheben können.
Video-Anweisungen finden Sie unter www.philips.com/coffee-care. Wenn ein anderer Fehlercode
angezeigt wird, wenden Sie sich an ein Philips Service-Center in Ihrem Land. Kontaktinformationen
können Sie der Garantieschrift entnehmen.
FehlercodeProblem Mögliche Lösung
01 Der Kaffeetrichter ist
verstopft.
Schalten Sie das Gerät aus und ziehen Sie den Netzstecker aus
der Steckdose. Entfernen Sie die Brühgruppe. Öffnen Sie dann
den Deckel des Behälters für vorgemahlenen Kaffee, und
führen Sie den Löffelstiel in den Kaffeetrichter ein. Bewegen
Sie den Stiel auf und ab, bis der Klumpen aus gemahlenem
Kaffee herausfällt. Besuchen Sie www.philips.com/coffee-
care für ausführliche Video-Anweisungen.
Page 60

FehlercodeProblem Mögliche Lösung
Deutsch
63
03 Die Brühgruppe ist
schmutzig oder nicht
gut gefettet.
04 Die Brühgruppe ist
nicht richtig positioniert.
05 Es ist Luft im
Wasserkreislauf.
Der AquaClean-Filter
wurde vor der
Installation nicht richtig
vorbereitet oder ist
verstopft.
11 Das Gerät muss sich an
die Zimmertemperatur
anpassen.
Schalten Sie die Maschine aus. Spülen Sie die Brühgruppe mit
frischem Wasser aus, lassen Sie sie an der Luft trocknen, und
fetten Sie sie dann ein. Schlagen Sie das Kapitel "Reinigung der
Brühgruppe" nach oder besuchen Sie
www.philips.com/coffee-care für ausführliche VideoAnweisungen. Schalten Sie das Gerät dann wieder ein.
Schalten Sie die Maschine aus. Nehmen Sie die Brühgruppe
heraus, und setzen Sie sie erneut ein. Stellen Sie sicher, dass
die Brühgruppe richtig positioniert ist, bevor Sie sie einsetzen.
Schlagen Sie das Kapitel "Handhabung der Brühgruppe" nach
oder besuchen Sie www.philips.com/coffee-care für
ausführliche Video-Anweisungen. Schalten Sie das Gerät dann
wieder ein.
Starten Sie das Gerät neu, indem Sie es aus- und wieder
einschalten. Wenn dies funktioniert, lassen Sie zwei bis drei
Tassen heißes Wasser ablaufen. Entkalken Sie das Gerät, wenn
Sie dies längere Zeit nicht gemacht haben.
Entfernen Sie den AquaClean-Filter, und versuchen Sie erneut,
einen Kaffee zu brühen. Wenn dies funktioniert, stellen Sie
sicher, dass der AquaClean-Filter richtig vorbereitet ist, bevor
Sie ihn wieder einsetzen. Setzen Sie den AquaClean-Filter
wieder in den Wasserbehälter ein. Wenn das immer noch nicht
zum gewünschten Ergebnis führt, ist möglicherweise der Filter
verstopft und muss ausgetauscht werden.
Warten Sie, bis sich das Gerät von der Transport/Außentemperatur an die Zimmertemperatur angepasst hat.
Schalten Sie das Gerät für 30 Minuten aus und dann wieder
ein. Wenn das Gerät dann immer noch nicht funktioniert, dann
kontaktieren Sie den Kundendienst in Ihrem Land.
Kontaktinformationen können Sie der Garantieschrift
entnehmen.
Deutsch
14 Das Gerät ist überhitzt. Schalten Sie das Gerät aus und nach 30Minuten wieder ein.
Tabelle für Fehlerbehebung
In diesem Kapitel werden die häufigsten Probleme beschrieben, die beim Gebrauch des Geräts
auftreten können. Supportvideos und eine vollständige Liste häufig gestellter Fragen finden Sie unter
www.philips.com/coffee-care. Sollten Sie das Problem nicht beheben können, wenden Sie sich an
ein Philips Service-Center in Ihrem Land. Kontaktinformationen können Sie der Garantieschrift
entnehmen.
Problem
In meiner neuen
Kaffeemaschine
befinden sich
Kaffeerückstände.
Ursache Lösung
Dieses Gerät wurde mit Kaffee
getestet.
Zwar wurde die Maschine anschließend
sorgfältig gereinigt, aber es ist möglich,
dass noch ein Rest Kaffee in der
Maschine ist. Das Gerät ist jedoch
komplett neu.
Page 61

64
Deutsch
Problem Ursache Lösung
Die Abtropfschale füllt
sich schnell / in der
Abtropfschale befindet
sich immer etwas
Wasser.
Das ist normal. Das Gerät spült
den internen Kreislauf und die
Brühgruppe mit Wasser. Ein Teil
des Wassers fließt durch das
interne System direkt in die
Abtropfschale.
Leeren Sie täglich die Abtropfschale,
sobald die rote Anzeige „Abtropfschale
voll“ durch die Abdeckung der
Abtropfschale zu sehen ist. Tipp: Stellen
Sie ein Tasse unter den Auslauf, um
herausfließendes Wasser aufzufangen.
Das Symbol
„Kaffeesatzbehälter
leeren“ geht nicht aus.
Das Gerät fordert auf,
den Kaffeesatzbehälter
zu leeren, obwohl der
Behälter nicht voll ist.
DerKaffeesatzbehälter
ist übervoll, aber die
Anzeige
„Kaffeesatzbehälter
leeren“ wurde nicht auf
dem Display angezeigt.
Sie haben den
Kaffeesatzbehälter geleert,
während das Gerät
ausgeschaltet war, oder haben
ihn zu schnell wieder eingesetzt.
Das Gerät hat den Zähler bei
der letzten Entleerung des
Kaffeesatzbehälters nicht
zurückgesetzt.
Sie haben die Abtropfschale
entfernt, ohne den
Kaffeesatzbehälter zu
entleeren.
Leeren Sie den Kaffeesatzbehälter
immer bei eingeschaltetem Gerät.
Nehmen Sie den Kaffeesatzbehälter
heraus, warten Sie mindestens
5Sekunden lang, und setzen Sie ihn
dann wieder ein.
Warten Sie stets ca. 5Sekunden ab,
bevor Sie den Kaffeesatzbehälter
wieder einsetzen. Auf diese Weise wird
der Kaffeesatzzähler auf0
zurückgesetzt, sodass die
Kaffeeportionen wieder korrekt gezählt
werden.
Leeren Sie den Kaffeesatzbehälter
immer bei eingeschaltetem Gerät. Wenn
der Kaffeesatzbehälter bei
ausgeschaltetem Gerät geleert wird,
wird der Kaffeesatzzähler nicht
zurückgesetzt.
Wenn Sie die Abtropfschale
herausnehmen, dann entleeren Sie
auch den Kaffeesatzbehälter – selbst
wenn er nur einige wenige
Kaffeeportionen enthält. Dadurch wird
sichergestellt, dass der Kaffeesatzzähler
wieder auf 0 zurückgesetzt wird und die
Kaffeeportionen wieder korrekt gezählt
werden.
Ich kann die Brühgruppe
nicht entnehmen.
Die Brühgruppe ist nicht in der
richtigen Position.
Setzen Sie das Gerät folgendermaßen
zurück: Schließen Sie die Serviceklappe
und setzen Sie den Wasserbehälter
wieder ein. Schalten Sie das Gerät aus
und wieder ein und warten Sie, bis die
Getränkesymbole aufleuchten.
Versuchen Sie erneut, die Brühgruppe
zu entfernen. Eine Schritt-für-SchrittAnleitung finden Sie in Kapitel „Die
Brühgruppe herausnehmen und
einsetzen".
Page 62

Problem Ursache Lösung
Ich kann die Brühgruppe
nicht einsetzen.
Die Brühgruppe ist nicht in der
richtigen Position.
Setzen Sie das Gerät folgendermaßen
zurück: Schließen Sie die Serviceklappe
und setzen Sie den Wasserbehälter
wieder ein. Lassen Sie die Brühgruppe
ausgebaut. Schalten Sie das Gerät aus
und ziehen Sie den Netzstecker aus der
Steckdose. Warten Sie 30Sekunden
und stecken Sie das Gerät dann wieder
ein. Schalten Sie das Gerät an und
warten Sie, bis die Getränkesymbole
aufleuchten. Bringen Sie die
Brühgruppe in die richtige Position und
setzen Sie sie wieder in das Gerät ein.
Eine Schritt-für-Schritt-Anleitung finden
Sie in Kapitel „Die Brühgruppe
herausnehmen und einsetzen".
Deutsch
65
Deutsch
Der Kaffee ist wässrig. Die Brühgruppe ist schmutzig
Der Kaffee ist nicht heiß
genug.
oder muss geölt werden.
Das Gerät führt den
Selbsteinstellungsvorgang
durch. Dieser Vorgang wird
automatisch gestartet, wenn Sie
das Gerät zum ersten Mal
verwenden, wenn Sie eine
andere Art von Kaffeebohnen
verwenden oder nach einer
längeren Gebrauchspause.
Es ist ein zu grober Mahlgrad
eingestellt.
Die Temperatur ist zu niedrig
eingestellt.
Wenn Sie eine kalte Tasse
verwenden, sinkt die
Temperatur des Getränks.
Nehmen Sie die Brühgruppe (siehe
'Entfernen der Brühgruppe aus der
Maschine') heraus, spülen Sie sie unter
fließendem Wasser ab und lassen Sie
sie trocknen. Schmieren Sie dann die
beweglichen Teile (siehe 'Schmierung
der Brühgruppe').
Bereiten Sie zunächst 5 Tassen Kaffee
zu, damit das Gerät den
Selbsteinstellungsvorgang abschließen
kann.
Stellen Sie einen feineren (niedrigeren)
Mahlgrad ein. Bereiten Sie 2 bis 3
Getränke zu, um den Unterschied voll
schmecken zu können.
Stellen Sie die Temperatur auf die
höchste Stufe. Sie können die
Temperatur anpassen, indem Sie das
Symbol „Einstellungen“ drücken.
Wärmen Sie die Tassen vor, indem Sie
sie mit heißem Wasser ausspülen.
Die Temperatur des Getränks
sinkt, wenn Milch hinzugefügt
wird.
Unabhängig davon, ob Sie heiße oder
kalte Milch hinzufügen, sinkt dadurch
stets die Temperatur des Kaffees.
Wärmen Sie die Tassen vor, indem Sie
sie mit heißem Wasser ausspülen.
Page 63

66
Deutsch
Problem Ursache Lösung
Es kommt kein Kaffee
oder der Kaffee fließt
nur langsam heraus.
Der AquaClean-Filter wurde
nicht entsprechend für die
Installation vorbereitet.
Nehmen Sie den AquaClean-Filter und
geben Sie etwas Heißwasser aus. Wenn
dies funktioniert, wurde der AquaCleanFilter nicht richtig installiert. Setzen Sie
den AquaClean-Filter wieder ein wie im
Kapitel „AquaClean-Wasserfilter“
beschrieben und aktivieren Sie ihn.
Nach einer längeren Gebrauchspause
müssen Sie den AquaClean-Filter
erneut für eine Verwendung
vorbereiten, indem Sie 2 bis 3 Tassen
Heißwasser ausgeben.
Der AquaClean-Wasserfilter ist
verstopft.
Es ist ein zu feiner Mahlgrad
eingestellt.
Die Brühgruppe ist verschmutzt. Nehmen Sie die Brühgruppe heraus,
Der Kaffeeauslauftrichter ist
verschmutzt.
Der Behälter für gemahlenen
Kaffee ist verstopft.
Der Gerätekreislauf ist verkalkt. Entkalken Sie das Gerät mit Philips
Tauschen Sie den AquaCleanWasserfilter alle 3 Monate aus. Ein Filter,
der älter als 3Monate ist, kann sich
verstopfen.
Stellen Sie einen gröberen (höheren)
Mahlgrad ein. Beachten Sie, dass sich
dies auf den Kaffeegeschmack auswirkt.
und spülen Sie sie unter fließendem
Wasser (siehe 'Brühgruppe unter
fließendem Leistungswasser reinigen')
ab.
Reinigen Sie den Kaffeeauslauftrichter
und seine Öffnungen mithilfe eines
Pfeifenreinigers oder einer Nadel.
Schalten Sie das Gerät aus und nehmen
Sie die Brühgruppe heraus. Öffnen Sie
den Deckel des Behälters für
gemahlenen Kaffee und stecken Sie
den Löffelstiel hinein. Bewegen Sie den
Stiel auf und ab, bis der Klumpen aus
gemahlenem Kaffee herausfällt (Abb.
34).
Entkalker. Entkalken Sie immer, wenn
das Gerät Sie dazu auffordert.
Die Milch schäumt nicht
auf.
Geräte mit LatteGo: LatteGo ist
falsch zusammengesetzt.
Achten Sie darauf, dass der
Milchbehälter richtig am Rahmen von
LatteGo angebracht ist (Klickgeräusch
beim Einrasten) (siehe 'LatteGo
zusammensetzen (nur bestimmte
Gerätetypen)').
Page 64

Problem Ursache Lösung
Geräte mit LatteGo: Der
Milchbehälter und/oder
Rahmen des LatteGo ist
schmutzig.
Zerlegen Sie LatteGo, spülen Sie beide
Teile unter fließendem Wasser ab oder
reinigen Sie die Teile in der
Spülmaschine.
Deutsch
67
Geräte mit klassischem
Milchaufschäumer: Der
Milchaufschäumer ist falsch
zusammengesetzt.
Die verwendete Milchsorte
Milch entweicht von der
Unterseite des LatteGoMilchbehälters.
Das Gerät scheint
undicht zu sein.
eignet sich nicht zum
Aufschäumen.
Der Rahmen und der
Milchbehälter sind nicht richtig
zusammengesetzt.
Der Milchbehälter und/oder
Rahmen des LatteGo ist
schmutzig.
Das Gerät spült den internen
Kreislauf und die Brühgruppe
mit Wasser. Das Wassers fließt
durch das interne System direkt
in die Abtropfschale. Das ist
normal.
Vergewissern Sie sich, dass der
klassische Milchschaum richtig
zusammengesetzt (siehe 'Den
klassischen Milchaufschäumer
zusammensetzen (nur bestimmte
Gerätetypen)') ist.
Die Menge und die Qualität des
erzielbaren Milchschaums variieren je
nach der verwendeten Milchsorte. Wir
haben die folgenden Milcharten
getestet, und sie lassen sich gut
aufschäumen: Kuhmilch (teilentrahmt
oder vollfett) und laktosefreie Milch.
Setzen Sie zuerst den oberen Teil des
Milchbehälters unter den Haken am
oberen Ende des Rahmens. Drücken Sie
dann das Unterteil des Milchbehälters
zurück. Sie hören ein Klicken, wenn er
einrastet.
Zerlegen Sie LatteGo, spülen Sie beide
Teile unter fließendem Wasser ab oder
reinigen Sie die Teile in der
Spülmaschine.
Leeren Sie die Abtropfschale täglich
oder sobald die rote Anzeige
„Abtropfschale voll“ durch die
Abdeckung der Abtropfschale zu sehen
ist. Tipp: Stellen Sie eine Tasse unter
den Heißwasserauslauf, um Spülwasser
aufzufangen und so die Menge des
Wassers in der Abtropfschale zu
verringern.
Deutsch
Die Abtropfschale ist voll und
läuft über, sodass es danach
aussieht, als ob das Gerät
undicht ist.
Der Wasserbehälter ist nicht
vollständig eingesetzt, es tritt
etwas Wasser aus dem
Wasserbehälter aus und es wird
Luft in die Maschine gezogen.
Leeren Sie die Abtropfschale täglich
oder sobald die rote Anzeige
„Abtropfschale voll“ durch die
Abdeckung der Abtropfschale zu sehen
ist.
Achten Sie darauf, dass der
Wasserbehälter in der richtigen Position
ist. Nehmen Sie ihn heraus und setzen
Sie ihn erneut ein, wobei sie ihn so seit
wie möglich in das Gerät
hineinschieben.
Page 65

68
Deutsch
Problem Ursache Lösung
Die Brühgruppe ist
verschmutzt/verstopft.
Spülen Sie die Brühgruppe ab.
Ich kann den
AquaClean-Wasserfilter
nicht aktivieren und das
Gerät will entkalkt
werden.
Der neue Wasserfilter
passt nicht.
Das Gerät macht ein
lautes Geräusch.
Das Gerät steht nicht auf einer
gerade Oberfläche.
Der Filter wurde nicht
rechtzeitig installiert oder
ausgetauscht, nachdem die
AquaClean-Erinnerung
angezeigt wurde. Das bedeutet,
dass Ihr Gerät nicht mehr
vollständig kalkfrei ist.
Sie versuchen gerade einen
Wasserfilter zu einzusetzen, der
kein Philips AquaClean-Filter ist.
Der Dichtungsring auf dem
AquaClean-Wasserfilter ist nicht
ordnungsgemäß positioniert.
Es ist ganz normal, dass Ihre
Maschine bei Verwendung
hörbare Geräusche macht.
Der AquaClean-Wasserfilter
wurde nicht ordnungsgemäß
vorbereitet, sodass jetzt Luft in
das Gerät gesaugt wird.
Stellen Sie das Gerät auf eine ebene
Fläche, damit die Abtropfschale nicht
überläuft und die Anzeige
„Abtropfschale voll“ ordnungsgemäß
funktioniert.
Entkalken Sie das Gerät, bevor Sie den
AquaClean-Wasserfilter einsetzen.
Es passen nur Philips AquaCleanWasserfilter in das Gerät.
Platzieren Sie den Dichtungsring wieder
auf den AquaClean-Wasserfilter.
Wenn das Gerät andere Geräusche von
sich gibt, reinigen Sie die Brühgruppe
und schmieren Sie sie (siehe
'Schmierung der Brühgruppe').
Nehmen Sie den AquaCleanWasserfilter aus dem Wasserbehälter
und bereiten Sie ihn ordnungsgemäß
für den Gebrauch vor, bevor Sie ihn
wieder einsetzen. Eine Schritt-fürSchritt-Anleitung finden Sie in Kapitel
„AquaClean-Wasserfilter“.
Der Wasserbehälter wurde nicht
richtig eingesetzt und nun wird
Luft in das Gerät gesaugt.
Achten Sie darauf, dass der
Wasserbehälter in der richtigen Position
ist. Nehmen Sie ihn heraus und setzen
Sie ihn erneut ein, wobei sie ihn so seit
wie möglich in das Gerät
hineinschieben.
Page 66

Deutsch
Technische Daten
Der
Hersteller behält sich das Recht vor, die technischen Eigenschaften des Produkts zu verbessern.
Alle
voreingestellten Mengen sind Circa-Mengen.
Beschreibung
Größe (B
x H x T)
Wert
246
x 377 x 434 mm
69
Gewicht 7–7.5
Netzkabellänge 1200mm
Wasserbehälter 1,8 Liter
Fassungsvermögen des Kaffeebohnenbehälters 275g
Kapazität des Kaffeesatzbehälters 12 Portionen
Fassungsvermögen des LatteGo (Milchbehälter) 250 ml
Anpassbare Öffnungshöhe 88-145 mm
Nennspannung – Nennleistung – Netzanschluss Siehe Etikette auf der Innenseite der
kg
Serviceklappe (Abb. A11)
Deutsch
Page 67
70
Español
Contenido
Descripción general del aparato (Fig. A)_____________________________________________________________ 70
Panel de control______________________________________________________________________________________ 71
Introducción _________________________________________________________________________________________ 71
Antes de utilizarlo por primera vez __________________________________________________________________ 72
Preparación de bebidas______________________________________________________________________________ 73
Personalización de bebidas__________________________________________________________________________ 76
Cambio de los ajustes de la máquina _______________________________________________________________ 77
Retirada e inserción del grupo de preparación del café ____________________________________________ 78
Limpieza y mantenimiento___________________________________________________________________________ 79
Filtro de agua AquaClean ___________________________________________________________________________ 82
Procedimiento de eliminación de los depósitos de cal (30minutos) ______________________________ 83
Solicitud de accesorios_______________________________________________________________________________ 84
Resolución de problemas____________________________________________________________________________ 84
Especificaciones técnicas ____________________________________________________________________________ 90
Descripción general del aparato (Fig. A)
A1 Panel de control A10 Puerta de mantenimiento
A2 Soporte para tazas A11 Etiqueta de datos con el número de
A3 Compartimento de café molido A12 Depósito de agua
A4 Tapa de la tolva de granos A13 Boquilla de agua caliente
A5 Boquilla de dispensación del café ajustable A14 Recipiente para posos de café
A6 Toma del cable de alimentación A15 Panel frontal del recipiente de posos
A7 Rueda de configuración del molinillo A16 Tapa de la bandeja de goteo
A8 Tolva de granos de café A17 Bandeja de goteo
A9 Grupo de preparación del café A18 Indicador de 'bandeja de goteo llena'
tipo
de café
Accesorios
A19 Cable de alimentación A23 Tira de prueba de dureza del agua
A20 Tubo de grasa A24 Espumador de leche clásico (solo en
A21 Filtro de agua AquaClean A25 LatteGo (depósito de leche) (solo en
A22 Cuchara de dosificación
modelos específicos)
modelos específicos)
Page 68

Español
Panel de control
Hay varias versiones de esta máquina de espresso, con paneles de control distintos. Cada versión
tiene un número de tipo. Puede encontrar el número de tipo en la etiqueta de datos que se
encuentra dentro de la puerta de mantenimiento (Fig.A11). También puede consultar el número de
tipo tocando el icono de Ajustes y seleccionando "Soporte".
Consulte la vista general de todos los botones e iconos en las figuras C, D y E. A continuación
encontrará la descripción.
Utilice las flechas hacia arriba y hacia abajo para desplazarse por la pantalla y toque el icono OK
(Aceptar) para seleccionar o confirmar las selecciones.
Todos los tipos (Fig. C/D/E)
C1/D1/E1 Iconos de bebidas con
un solo toque
C2. Inicio/parada Botón C4. Pantalla C7. Perfiles personales
D2/E2 Menú con más bebidas C5. Ajustes de la cafetera C8. Botón de encendido/apagado
C3. Iconos de navegación
(arriba, abajo, atrás, aceptar)
C6. Menú de limpieza
71
EP4327, EP4324, EP4321 solamente (Fig. C)
C1 Iconos de bebidas con un solo toque: Espresso, Coffee (Café), Americano, Cafè Crema, Ristretto,
Hot Water (agua caliente) y Steam (Vapor)
EP4349, EP4346, EP4343, EP4341 solamente (Fig. D)
D1 Iconos de bebidas con un solo toque: Espresso, Coffee (Café), Americano, Cappuccino, Latte
Macchiato, Café au lait (Café con leche)
EP5447, EP5446, EP5444, EP5443, EP5441 solamente (Fig. E)
E1 Iconos de bebidas con un solo toque: Espresso, Coffee (Café), Americano, Cappuccino, Latte
Macchiato, Café au lait (Café con leche)
Introducción
¡Enhorabuena por la adquisición de una cafetera totalmente automática Philips! Para aprovechar el
soporte de Philips al máximo, registre su producto en www.philips.com/registeryourcoffee.com o
escaneando el código QR (Fig. 1) de este folleto.
Lea atentamente el librillo de seguridad separado antes de usar la máquina por primera vez y
consérvelo por si necesitara consultarlo en el futuro.
Para ayudarle a empezar y sacarle el máximo provecho al aparato, Philips le ofrece ayuda de muchas
maneras. En la caja encontrará:
1 Este manual del usuario con instrucciones de uso con imágenes e información más detallada
sobre la limpieza y el mantenimiento.
2 El folleto de seguridad adjunto con instrucciones sobre cómo usar el aparato de forma segura.
3 Para obtener ayuda en línea (preguntas frecuentes, vídeos, etc.), escanee el código QR de la
portada de este folleto o visite www.philips.com/coffee-care. También puede encontrar el código
QR tocando el icono de Ajustes
y seleccionando Soporte.
Español
Page 69

ON
,WDOLDQR
1HGHUODQGV
(QJOLVK
(VSD³RO
/DQJXDJH
:DWHUKDUGQHVV
,WDOLDQR
1HGHUODQGV
(QJOLVK
(VSD³RO
/DQJXDJH
)ROORZWKHQH[WVWHSV
WRVHWWKHFRUUHFW
ZDWHUKDUGQHVVOHYHO
<RXDUHDERXW
WRVHWWKHODQJXDJH
WR(QJOLVK
3UHVVVWDUWVWRS
WRFRQILUP
:DWHUKDUGQHVV
<RXVHOHFWHG
UHGVTXDUHV
3UHVVWRFRQILUP
+HDWLQJXS
+HDWLQJ
5LQVLQJ
5LQVLQJ
)LOOLQJZDWHUFLUFXLW
)LOOLQJ
=
:DWHUKDUGQHVV
1 sec.
1 min.
72
Español
Este aparato se ha probado con café. Aunque se ha limpiado cuidadosamente, es posible que
quede algún residuo de café. Le garantizamos, no obstante, que el aparato es absolutamente nuevo.
El aparato ajusta automáticamente la cantidad de café molido que se utiliza para hacer un café con el
mejor sabor. Debe preparar 5 cafés al principio para permitir que la máquina complete su ajuste
automático.
Asegúrese de enjuagar el LatteGo (el depósito de leche) o el espumador de leche clásico antes de
utilizarlo por primera vez.
Antes de utilizarlo por primera vez
Page 70

5 sec.
30 sec.
1 min.
$TXD&OHDQ
8VH$TXD&OHDQILOWHU
WRHQMR\FXSV
ZLWKRXWGHVFDOLQJ
$OPRVWUHDG\
)LOOEHDQVUHILOOZDWHU
WDQNDQGHQMR\
\RXUFRIIHH
5HJLVWHU\RXUSURGXFW
9LVLWZZZSKLOLSVFRP
$TXD&OHDQ
:RXOG\RXLQVWDOO
DQ$TXD&OHDQILOWHU"
3UHVVWRFRQILUP
3UHVVWRUHIXVH
CLICK
1
2
Español
73
Montaje de LatteGo (solo en modelos específicos)
Montaje del espumador de leche clásico (solo en modelos específicos)
Preparación de bebidas
Pasos generales
1 Llene el depósito de agua con agua del grifo y la tolva de granos, con granos.
2 Inserte la clavija pequeña en la toma situada en la parte posterior de la cafetera. Enchufe el
aparato a la red.
3 Pulse el botón de encendido/apagado para encender el aparato.
-
La máquina empieza a calentarse y lleva a cabo el ciclo de enjuagado automático.
-
Cuando todos los pilotos de los iconos de las bebidas están iluminados de forma continua, el
aparato está listo para utilizarse.
4 Coloque una taza debajo de la boquilla dispensadora de café. Deslice la boquilla dispensadora de
café arriba o abajo para ajustar la altura al tamaño de la taza o del vaso que esté usando (Fig. 2).
Español
Page 71

74
Español
Preparación de café con granos de café
1 Para preparar un café, toque el icono de bebida que elija (Fig. 3) o toque el icono (Fig. 4) "Más
bebidas" (solo tipos específicos).
-
Ahora puede ajustar la bebida según sus preferencias (Fig. 5). Utilice las flechas (Fig. 6) arriba y
abajo para ajustar la intensidad del café. Toque el icono Ok (Aceptar) para configurar más
ajustes (Fig. 7).
2 Pulse el botón de inicio/parada
seleccionada.
3 Para detener la dispensación de café antes de que el aparato haya terminado, pulse otra vez el
botón de inicio/parada
Para preparar 2cafés al mismo tiempo, toque el icono de bebida dos veces o seleccione el icono
2x desplazando la barra específica.
.
en cualquier momento para empezar a preparar la bebida
No utilice granos de café con sabores o caramelizados.
Preparación de bebidas con leche con LatteGo (el depósito de leche)
LatteGo consiste en un depósito de leche, un marco y una tapa para almacenamiento. Para evitar
pérdidas, asegúrese de que el marco y el depósito de leche se han montado correctamente antes de
llenar dicho depósito de leche.
1 Para montar LatteGo, inserte primero la parte superior del depósito de leche bajo el gancho de la
parte superior del marco (Fig. 8). Luego encaje la parte inferior del depósito de leche. Oirá un clic
cuando se encaje en su lugar (Fig. 9).
Nota: Asegúrese de que el depósito de leche y el marco están limpios antes de conectarlos.
2 Incline ligeramente LatteGo y colóquelo en la boquilla (Fig. 10) de agua caliente. A continuación,
presiónelo hasta que encaje en su lugar (Fig. 11).
3 Llene LatteGo con leche (Fig. 12). No llene el depósito de leche por encima de la indicación de nivel
máximo.
Si ha personalizado la cantidad de leche, es posible que necesite llenar el depósito con más o
menos leche de la indicada para esta bebida en LatteGo.
Utilice siempre leche recién sacada del frigorífico para obtener unos resultados óptimos.
4 Coloque una taza en la bandeja de goteo.
5 Toque el icono de bebida a base de leche que desee o toque el icono "Más bebidas" (solo tipos
específicos) para seleccionar otra bebida (consulte 'Personalización de bebidas')
-
Ahora puede ajustar la bebida a su gusto.
6 Pulse el botón de inicio/parada
-
Al preparar un capuchino, flat white o latte macchiato, el aparato dispensa primero la leche y
luego el café. Al preparar un caffè latte o un café au lait, el aparato dispensa primero el café y, a
continuación, la leche.
-
Para detener la dispensación de leche antes de que el aparato haya dispensado la cantidad
programada, pulse el botón de inicio/parada
7 Para detener la dispensación de la bebida completa (leche y café) antes de que la máquina haya
terminado, mantenga pulsado el botón de inicio/parada .
.
.
Page 72

Español
Espumar o calentar leche con el espumador de leche clásico
Utilice siempre leche sacada directamente del frigorífico para lograr una espuma de la mejor
calidad.
1 Incline el asa negra de silicona del aparato hacia la izquierda y deslice el espumador de leche
hacia ella (Fig. 13).
2 Llene una jarra de leche con unos 100ml de leche para un capuchino y unos 150ml de leche para
un latte macchiato.
3 Inserte el espumador de leche en la leche aproximadamente 1cm.
4 Toque el icono (Fig. 14) de vapor.
5 Gire la perilla del espumador de leche clástico a la posición del icono (Fig. 15) de espumado de
leche para espumar la leche. Gire la perilla del espumador de leche clástico a la posición del icono
(Fig. 16) de leche sin espuma para calentar la leche.
6 Asegúrese de que el icono de la perilla del espumador de leche clásico esté alineado con la flecha
negra.
7 Pulse el botón de inicio/parada
-
El aparato empieza a calentarse, se fuerza el paso de vapor hacia la leche y se espuma o se
calienta la leche.
8 Cuando la jarra de leche tenga la cantidad de espuma deseada o esté caliente, pulse el botón de
inicio/parada
No aplique nunca vapor a la leche durante más de 90segundos. El aparato deja de aplicar vapor
automáticamente al cabo de 90segundos.
Para obtener la mejor calidad de espuma de leche, no es necesario mover la jarra de leche durante
el espumado.
otra vez para dejar de espumar o calentar la leche.
para empezar (Fig. 17).
75
Español
Dosis adicional (ExtraShot) (solo tipos específicos)
Su cafetera le ofrece la posibilidad de añadir una cantidad adicional de Ristretto a las bebidas de café
y leche, por ejemplo, por si desea tomar un café más fuerte.
1 Coloque una taza debajo de la boquilla de agua.
2 Toque uno de los iconos de bebidas de un solo toque para seleccionar una bebida o toque el
icono "Más bebidas" (solo tipos específicos) para seleccionar una bebida.
3 Utilice la flecha hacia arriba para ajustar la intensidad hasta el máximo y seleccione la función (Fig.
18) ExtraShot.
4 Toque el icono Ok (Aceptar) si desea realizar otros ajustes a su gusto. A continuación, pulse el
icono de inicio/parada para empezar a preparar la bebida.
5 Para detener la dispensación de la bebida antes de que el aparato haya terminado, pulse otra vez
el icono de inicio/parada .
Al seleccionar la función ExtraShot, solo se puede preparar un café a la vez.
Preparación de café con café molido
Puede elegir usar café molido previamente en lugar de granos, por ejemplo si prefiere una variedad
de café diferente o café descafeinado.
1 Abra la tapa del compartimento de café molido y ponga una cuchara de medida rasa en él (Fig. 19).
Cierre la tapa.
Page 73

76
Español
2 Toque uno de los iconos de bebida de un solo toque o el icono "Más bebidas" (solo tipos
específicos) para seleccionar otra bebida.
3 Seleccione la función de café molido previamente. Puede hacerlo de 2formas distintas:
-
Utilice la flecha hacia abajo para ajustar la intensidad en el nivel mínimo y, a continuación,
seleccione la función de molido.
-
Pulse el icono de ajustes
4 Para detener la dispensación de café antes de que el aparato haya terminado, pulse otra vez el
botón de inicio/parada
Al seleccionar la función de café molido previamente:
- Se almacena automáticamente.
- Solo se puede preparar un café a la vez.
- No se puede seleccionar otra intensidad de aroma.
y utilice la flecha hacia abajo para seleccionar la función de molido.
.
Dispensación de agua caliente
1 Si está colocado, quite el LatteGo o el espumador de leche.
2 Coloque una taza debajo de la boquilla de agua caliente.
3 Toque el icono Agua caliente (solo tipos específicos) o pulse el icono "Más bebidas" (solo (Fig. 4)
tipos específicos) para seleccionar agua caliente.
4 Utilice las flechas hacia arriba y hacia abajo para ajustar la cantidad o la temperatura del agua
caliente según sus preferencias.
5 Pulse el botón de inicio/parada .
-
Se dispensa agua caliente por la boquilla (Fig. 20) de agua caliente.
6 Para detener la dispensación de agua caliente antes de que el aparato haya terminado, pulse otra
vez el botón de inicio/parada
.
Personalización de bebidas
La cafetera permite ajustar la configuración de una bebida a sus preferencias y guardar la bebida en
un perfil personal. Cada perfil tiene un color distinto.
Después de seleccionar una bebida tocando uno de los iconos de bebida de un solo toque o tocando
el icono "Más bebidas" (solo tipos específicos), puede hacer lo siguiente:
1 Ajustar la intensidad del aroma con los iconos (Fig. 21) hacia arriba y hacia abajo. Hay 5
intensidades: la más baja es el más suave y la más alta es la más fuerte.
2 Ajustar la cantidad (Fig. 22) de café o de leche (solo tipos específicos) con los iconos hacia arriba y
hacia abajo. Hay 5cantidades para cada uno de los ajustes.
En cuanto la cafetera haya terminado de preparar la bebida, los ajustes seleccionados se
almacenarán automáticamente en el perfil elegido.
Seleccionar un perfil
Es posible seleccionar un perfil y almacenar una receta utilizando Mis perfiles de elección de café (Mis
perfiles de elección de café).
1 Toque el icono de perfiles
perfil tiene un color distinto.
2 Seleccione una bebida tocando uno de los iconos de bebida de un solo toque o tocando el icono
"Más bebidas" (solo tipos específicos).
3 Configure los ajustes de la bebida según sus preferencias.
repetidamente para seleccionar uno de los perfiles de colores. Cada
Page 74

Español
4 Pulse el botón de inicio/parada para preparar la bebida que ha seleccionado
-
A continuación, la configuración nueva se almacena en el perfil del color seleccionado.
Siempre puede restablecer los ajustes de fábrica de la cafetera (consulte 'Restablecimiento de
los ajustes de fábrica').
Perfil de invitado
El aparato dispone de un perfil de invitado. Al seleccionar el perfil de invitado, el icono de perfil se
desactiva. Al seleccionar este perfil, todavía es posible personalizar la configuración según sus
preferencias, pero las recetas que se preparen no se almacenarán.
Cambio de los ajustes de la máquina
Ajuste de la dureza del agua
Le aconsejamos ajustar el ajuste de dureza del agua a la dureza del agua de su zona para lograr un
rendimiento óptimo y una mayor duración del aparato. Esto también evita tener que descalcificar el
aparato con demasiada frecuencia. El ajuste predeterminado de la dureza del agua es 4: agua dura.
Utilice la tira de prueba de dureza del agua que se incluye en la caja para determinar
la dureza del agua de su zona:
1 Sumerja la tira de prueba de dureza del agua en agua del grifo o manténgala bajo el grifo durante
1segundo (Fig. 23).
2 Espere 1minuto. El número de cuadros de la tira de prueba que se ponen rojos indica la dureza
(Fig. 24) del agua.
77
Español
Ajuste el aparato a la dureza del agua correcta:
1 Toque el icono de ajustes y utilice las flechas hacia arriba y hacia abajo para seleccionar "Dureza
del agua". A continuación, pulse el icono OK (Aceptar) para confirmar.
2 Utilice los iconos hacia arriba y hacia abajo para seleccionar el nivel de dureza del agua. El número
de cuadrados rojos seleccionados en la pantalla debe ser igual al número de cuadrados rojos que
se muestran en la tira (Fig. 25) de prueba.
3 Después de ajustar la dureza del agua correcta, toque el icono OK (Aceptar) para confirmar.
Selección de los ajustes de molido
Puede cambiar la intensidad del café con la rueda de configuración del molinillo situada en el
contenedor de granos de café. Cuanto menor sea el ajuste del molinillo, más finos se molerán los
granos de café y más intenso será el café. Puede elegir entre 12 ajustes diferentes para el molinillo.
La máquina está concebida para extraer el mejor sabor de sus granos de café. Por consiguiente, es
recomendable que no realice ajustes en el molinillo hasta que haya preparado entre 100 y 150tazas
de café (aprox. 1mes de uso).
Solo es posible establecer los ajustes del molinillo cuando el aparato está moliendo granos de
café. Necesita preparar 2 o 3 bebidas antes de que pueda apreciar la diferencia.
Para evitar daños en el molinillo, no gire la rueda de configuración del molinillo más de un grado
cada vez.
1 Coloque una taza debajo de la boquilla dispensadora de café.
Page 75

78
Español
2 Abra la tapa de la tolva de granos de café.
3 Toque el icono de expreso y luego pulse el botón de inicio/parada .
4 Cuando el molinillo empiece a moler, pulse la rueda de configuración del molinillo y gírela hacia la
izquierda o la derecha. (Fig. 26)
Cambio de otros ajustes del aparato
Tocando el icono de ajustes puede realizar los ajustes siguientes en el aparato:
-
Dureza del agua: es posible seleccionar entre 5niveles según la dureza del agua en su región;
-
Tiempo en modo de espera: es posible seleccionar 15, 30, 60 o 180min
-
Brillo de la pantalla: las opciones disponibles son: bajo, medio y alto.
-
Idioma
-
Sonido: permite activar o desactivar el pitido del aparato.
-
Temperatura: permite elegir entre 3temperaturas de preparación del café.
-
Iluminación frontal (solo tipos específicos): es posible elegir opciones para estar siempre
encendido, encendido durante la preparación de bebidas o siempre apagado.
-
Unidad de medida: es posible elegir entre ml. y oz.
Restablecimiento de los ajustes de fábrica
El aparato ofrece la posibilidad de restablecer los ajustes de fábrica en cualquier momento.
1 Toque el icono de ajustes .
2 Utilice los iconos hacia arriba y hacia abajo para seleccionar "Configuración de fábrica". Confirme
pulsando el icono OK (Aceptar).
3 Pulse el botón de inicio/parada para confirmar que desea restablecer los ajustes.
-
Se restablece la configuración.
Los ajustes de fábrica siguientes se restablecen al valor predeterminado: dureza del agua, tiempo
de espera, brillo de la pantalla, sonido, temperatura, iluminación frontal, perfiles.
Retirada e inserción del grupo de preparación del café
Acceda a www.philips.com/coffee-care para consultar el vídeo de instrucciones detalladas sobre
cómo quitar, introducir y limpiar el grupo de preparación de café.
Extracción del grupo de preparación de café de la máquina
1 Apague el aparato.
2 Retire el depósito de agua y abra la puerta (Fig. 27) de mantenimiento.
3 Presione el asa (Fig. 28) PUSH y tire del asa del grupo de preparación del café para retirarlo del
aparato (Fig. 29).
Colocación del grupo de preparación de café
Antes de volver a colocar el grupo de preparación del café en la máquina, asegúrese de que se
encuentra
en la posición correcta.
Page 76

Español
1 Compruebe si el grupo de preparación del café está en la posición correcta. La flecha del cilindro
amarillo del lateral del grupo de preparación de café debe estar alineada con la flecha negra y la
letra N (Fig. 30).
-
Si no están alineadas, baje la palanca hasta que entre en contacto con la base del grupo (Fig.
31) de preparación de café.
2 Vuelva a colocar el grupo de preparación del café en la máquina a lo largo de los raíles de guía de
los laterales (Fig. 32) hasta que encaje en su posición y se oiga un clic (Fig. 33). No pulse el botón
PUSH.
3 Cierre la puerta de mantenimiento y vuelva a colocar el depósito de agua.
79
Limpieza y mantenimiento
La limpieza y el mantenimiento periódicos contribuyen a mantener la máquina en condiciones
óptimas y garantizan un café con sabor inmejorable durante mucho tiempo con un flujo de café
estable.
Consulte la tabla siguiente para ver una descripción detallada de cuando y como limpiar todas las
partes desmontables del aparato. Puede obtener información detallada e instrucciones en vídeo en
www.philips.com/coffee-care. Consulte la figura B para ver una descripción general de las piezas que
se pueden lavar en el lavavajillas.
Piezas
desmontables
Grupo de
preparación del café
Cuándo se debe limpiar Cómo se debe limpiar
Semanalmente Quite el grupo de preparación del café del
aparato (consulte 'Retirada e inserción del
grupo de preparación del café'). Lávelo bajo
el grifo (consulte 'Limpieza de la unidad de
preparación de café bajo el grifo').
Español
Espumador de
leche clásico
Compartimento de
café molido
Cada mes Limpie el grupo de preparación con la
Después de cada uso En primer lugar, limpie el espumador de
Compruebe el compartimento
de café molido cada semana
para ver si está atascado.
pastilla (consulte 'Limpieza del grupo de
preparación de café con pastillas
desengrasantes') desengrasante Philips.
leche mientras está conectado al aparato
utilizando el programa (consulte 'Limpieza
rápida del espumador de leche clásico')
"Limpieza rápida de leche". Luego retire al
espumador de leche del aparato y
desmóntelo. Limpie todos los componentes
bajo el grifo o en el lavavajillas.
Desenchufe la máquina y retire el grupo de
preparación de café. Abra la tapa del
compartimento de café molido e introduzca
en él el mango de la cuchara. Mueva el
mango arriba y abajo hasta que caiga (Fig.
34) el café molido que está atascado.
Acceda a www.philips.com/coffee-care
para ver el vídeo de instrucciones
detalladas.
Page 77

80
Español
Piezas
Cuándo se debe limpiar Cómo se debe limpiar
desmontables
Recipiente para
posos de café
Bandeja de goteo Vacíe la bandeja de goteo a
LatteGo Después de cada uso En primer lugar, limpie el LatteGo mientras
Lubricación del
grupo de
preparación
Vacíe el recipiente de posos de
café cuando lo indique la
máquina. Límpielo
semanalmente.
diario en cuanto el indicador de
"bandeja de goteo llena" rojo
sobresalga de la bandeja de
goteo (Fig. 35). Limpie la
bandeja de goteo
semanalmente.
Cada 2 meses Consulte la tabla de lubricación y lubrique el
Retire el recipiente de posos de café
mientras el aparato está encendido.
Enjuáguelo bajo el grifo con un poco de
detergente líquido o límpielo en el
lavavajillas. El panel frontal del recipiente
de posos de café (Fig. A15) no es apto para
el lavavajillas.
Quite la bandeja (Fig. 36) de goteo y
enjuáguela bajo el grifo con un poco de
detergente líquido. También puede lavar la
bandeja de goteo en el lavavajillas. El panel
frontal del recipiente de posos de café
(Fig. A15) no es apto para el lavavajillas.
está conectado al aparato utilizando el
programa (consulte 'Limpieza rápida de
LatteGo') "Limpieza rápida de leche". A
continuación, retírelo del aparato y
enjuáguelo bajo el grifo o límpielo en el
lavavajillas.
grupo de preparación del café con la grasa
(consulte 'Lubricación del grupo de
preparación') Philips.
Depósito de agua Semanalmente Enjuague del depósito de agua bajo el grifo
Parte delantera del
aparato
Semanalmente Limpiar con un paño no abrasivo
Limpieza del grupo de preparación
La limpieza periódica del grupo de preparación de café impide que los residuos de café obstruyan los
circuitos internos. Visite www.philips.com/coffee-care para ver los vídeos en los que se explica cómo
quitar, introducir y limpiar el grupo de preparación de café.
Limpieza de la unidad de preparación de café bajo el grifo
1 Extraiga el grupo (consulte 'Retirada e inserción del grupo de preparación del café') de preparación
del café.
2 Enjuague bien el grupo de preparación de café con agua. Limpie exhaustivamente el filtro (Fig. 37)
superior del grupo de preparación del café.
3 Deje que el grupo de preparación de café se seque al aire antes de volver a colocarlo. Para evitar
que se introduzcan fibras en el interior, no seque el grupo de preparación del café con un paño.
Limpieza del grupo de preparación de café con pastillas desengrasantes
Utilice pastillas desengrasantes de café Philips exclusivamente.
1 Toque el icono Limpiar
del grupo de preparación de café".
y utilice las flechas hacia arriba y hacia abajo para seleccionar "Limpieza
Page 78

Español
2 Toque el icono OK (Aceptar) para confirmar y, a continuación, siga las instrucciones que aparecen
en pantalla.
Lubricación del grupo de preparación
Para mejorar el rendimiento del aparato, le sugerimos que lubrique el grupo de preparación de café
cada 2meses para asegurarse de que las piezas móviles sigan moviéndose sin problemas.
1 Aplique una capa fina de grasa en el pistón (parte gris) del grupo (Fig. 38) de preparación del café.
2 Aplique una capa fina de grasa alrededor del eje (parte gris) de la parte inferior del grupo (Fig. 39)
de preparación del café.
3 Aplique una fina capa de grasa a los raíles de ambos lados (Fig. 40).
Limpieza de LatteGo (recipiente de leche) (solo tipos específicos)
Limpieza rápida de LatteGo
1 Asegúrese de que LatteGo esté bien colocado en la cafetera (Fig. 10).
2 Coloque una taza debajo de la boquilla de agua.
3 Toque el icono Limpiar
programa "Limpieza rápida de leche".
4 Toque el icono OK (Aceptar) para confirmar y, a continuación, siga las instrucciones que aparecen
en la pantalla para eliminar toda la leche que pueda quedar en el sistema de leche.
-
El sistema de leche dispensará pequeños chorros de agua caliente.
5 Guarde el LatteGo con la leche restante en la nevera.
y utilice las flechas hacia arriba y hacia abajo para seleccionar el
81
Español
Limpieza de LatteGo a fondo
1 Quite LatteGo de la máquina (Fig. 41).
2 Vierta la leche restante.
3 Pulse el botón de liberación y quite el depósito de leche del marco de LatteGo (Fig. 42).
4 Limpie todos los componentes en el lavavajillas o bajo el grifo con agua tibia y un poco de
detergente líquido.
Limpieza del espumador de leche clásico (solo en modelos específicos)
Limpieza rápida del espumador de leche clásico
1 Asegúrese de que el espumador de leche clásico esté bien conectado a la cafetera (Fig. 13).
2 Coloque una taza debajo de la boquilla de agua.
3 Toque el icono Limpiar
programa "Limpieza rápida de leche".
4 Toque el icono OK (Aceptar) para confirmar y, a continuación, siga las instrucciones que aparecen
en la pantalla para eliminar toda la leche que pueda quedar en el espumador de leche.
-
El sistema de leche dispensará pequeños chorros de agua caliente.
5 Limpie el espumador de leche con un paño húmedo.
Limpieza diaria del espumador de leche clásico
1 Deje que el espumador de leche se enfríe por completo.
2 Incline el espumador de leche hacia la izquierda y quite la pieza metálica y la pieza (Fig. 43) de
silicona.
y utilice las flechas hacia arriba y hacia abajo para seleccionar el
Page 79

82
Español
3 Desmonte las tres piezas (Fig. 44) y enjuáguelas con agua limpia o lávelas en el lavavajillas.
4 Vuelva a montar las tres piezas del espumador de leche y colóquelo otra vez en el aparato.
Filtro de agua AquaClean
AquaClean está activado en la cafetera. Para conservar el sabor del café, se puede colocar el filtro de
agua AquaClean en el depósito de agua. También reduce la necesidad de descalcificar, ya que reduce
la acumulación de cal en el aparato. El filtro de gua AquaClean se puede adquirir en un distribuidor
local, en los centros de servicio autorizados o en línea en www.philips.com/parts-and-accessories.
Indicación del estado del filtro AquaClean
Cuando AquaClean está activo, el estado del filtro AquaClean siempre está visible en la pantalla en
forma de porcentaje.
-
Si el estado del filtro AquaClean es del 10% o menos, la pantalla muestra un mensaje durante
2segundos cada vez que se enciende el aparato. Este mensaje aconseja comprar un filtro nuevo.
-
Si el estado del filtro es 0%, el aparato pide que se sustituya el filtro AquaClean cada vez que se
enciende.
Activación del filtro de agua AquaClean (5min)
El aparato no detecta automáticamente que se ha colocado un filtro en el depósito de agua. Por lo
tanto, es necesario activar cada filtro de agua AquaClean nuevo instalado en el menú "Limpiar".
Cuando el aparato deja de mostrar el mensaje de activación del filtro, todavía es posible activar un
filtro de agua AquaClean, pero primero es necesario descalcificar el aparato.
El aparato desde estar completamente libre de depósitos de cal antes de empezar a usar el filtro
de agua AquaClean.
Antes de activar el filtro de agua AquaClean, este debe prepararse remojándolo en agua, tal como se
describe más adelante. Si no lo hace, en el aparato podría entrar aire en lugar de agua, lo que provoca
mucho ruido e impide que el aparato prepare café.
1 Toque el icono de limpieza y utilice los iconos hacia arriba y hacia abajo para seleccionar
"AquaClean".
2 Toque el icono OK (Aceptar) para confirmar.
3 Cuando aparezca la pantalla de activación, vuelva a tocar el icono OK (Aceptar). Siga las
instrucciones de la pantalla.
4 Sacuda el filtro durante unos 5 segundos (Fig. 45).
5 Sumerja el filtro (Fig. 46) boca abajo en una jarra con agua fría y agítelo/presiónelo.
6 Inserte el filtro en posición vertical en la conexión del filtro del depósito de agua. Presiónelo hasta
el punto (Fig. 47) más bajo posible.
7 Llene el depósito con agua y colóquelo de nuevo en la cafetera.
8 Si está instalado, quite el LatteGo (solo tipos específicos).
9 Coloque un bol debajo de la boquilla dispensadora de agua caliente o el espumador de leche.
10 Pulse el botón de inicio/parada para empezar el proceso de activación.
11 Se dispensará agua caliente por la boquilla del agua caliente o el espumador de leche durante
1minuto.
12 Ahora el filtro está activado correctamente.
Page 80

Español
Sustitución del filtro de agua AquaClean (5min)
Cuando hayan pasado 95litros de agua por el filtro, este dejará de funcionar. El indicador de estado
de AquaClean baja hasta el 0% para recordarle que debe sustituir el filtro. Es posible sustituir el filtro
sin tener que descalcificar primero el aparato mientras se muestre el indicador de estado de
AquaClean en la pantalla. Si no se sustituye el filtro de agua AquaClean a tiempo, el indicador de
AquaClean se apaga al cabo de un tiempo. En ese caso, aún puede sustituir el filtro, pero antes
deberá descalcificar el aparato.
Cuando el indicador de estado de AquaClean baja hasta el 0% o cuando el aparato le recuerda que
debe reemplazar el filtro AquaClean:
1 quite el filtro de agua AquaClean antiguo.
2 instale un filtro nuevo y actívelo como se describe en el capítulo "Activación del filtro de agua
AquaClean (5min)".
Sustituya el filtro de agua AquaClean como mínimo cada 3meses, aunque el aparato no indique
aún que es necesaria la sustitución.
Procedimiento de eliminación de los depósitos de cal (30 minutos)
Utilice solo descalcificador Philips. No utilice en ningún caso descalcificadores a base de ácido
sulfúrico, ácido clorhídrico, ácido sulfámico o acético (vinagre), ya que pueden dañar el circuito de
agua del aparato y no disolver correctamente la cal. No utilizar el descalcificador de Philips anulará la
garantía. No descalcificar el aparato también anulará la garantía. Puede comprar la solución
descalcificadora de Philips en la tienda en línea www.philips.com/coffee-care.
Cuando el aparato necesita descalcificación, aparece un mensaje en la pantalla.
1 Toque el icono Limpiar en la interfaz de usuario y seleccione "Descalcificación" en el menú.
2 Siga las instrucciones de la pantalla.
3 Si está colocado, quite el LatteGo o el espumador de leche.
4 Retire la bandeja de goteo y el recipiente de posos de café, vacíelos y vuelva a colocarlos en su
lugar.
5 Extraiga el depósito de agua y vacíelo. Luego quite el filtro de agua AquaClean.
6 Vierta todo el contenido de la botella de descalcificador Philips en el depósito de agua y llénelo de
agua hasta la indicación Calc/clean (Fig. 48). Después, vuelva a colocarlo en el aparato.
7 Coloque un recipiente grande (1,5l) debajo de la boquilla dispensadora de café y la boquilla del
agua.
8 Pulse el botón de inicio/parada para iniciar el proceso de descalcificación. El proceso de
eliminación de los depósitos de cal dura aproximadamente 30minutos y consiste en un ciclo de
descalcificación y un ciclo de enjuagado.
9 Espere hasta que la máquina deje de dispensar agua. Vuelva a llenar el depósito de agua en
cuanto se muestre el mensaje en la pantalla. El procedimiento de descalcificación habrá finalizado
cuando el aparato deje de dispensar agua.
10 Instale y active un nuevo filtro de agua AquaClean en el depósito de agua.
-
Al finalizar el procedimiento de descalcificación, el aparato le recuerda que debe instalar el filtro
(consulte 'Sustitución del filtro de agua AquaClean (5min)') AquaClean nuevo.
83
Español
Consejo: El uso del filtro AquaClean reduce la necesidad de descalcificación.
Page 81

84
Español
Qué hacer si el proceso de descalcificación se interrumpe
Puede salir del procedimiento de descalcificación pulsando el botón de encendido/apagado del
panel de control. Si el proceso de descalcificación se interrumpe antes de que termine, realice lo
siguiente:
1 Vacíe y lave bien el depósito de agua.
2 Llene el depósito con agua hasta la indicación de nivel Calc/clean y vuelva a encender el aparato.
El aparato se calentará y realizará un ciclo de enjuagado automático.
3 Antes de preparar cualquier bebida, realice un ciclo de enjuague manual. Para realizar un ciclo de
enjuague manual, primero dispense medio depósito de agua pulsando el icono de agua caliente
repetidamente y luego prepare 2 tazas de café molido sin añadir café molido.
Si el procedimiento de descalcificación no se ha completado, el aparato requerirá otro
procedimiento de descalcificación tan pronto como sea posible.
Solicitud de accesorios
Para limpiar y descalcificar el aparato, utilice solamente productos de mantenimiento de Philips. Estos
productos se pueden adquirir en su distribuidor local, en los centros de servicio autorizados o en línea
en www.philips.com/parts-and-accessories. Para encontrar la lista completa de repuestos en línea,
introduzca el número de modelo de la máquina. Puede encontrar el número de modelo en el interior
de la puerta de mantenimiento.
Productos de mantenimiento y números de tipo:
-
Solución descalcificadora CA6700
-
Filtro de agua AquaClean CA6903
-
Grasa para el grupo de preparación de café HD5061
-
Pastillas desengrasantes de café CA6704
Los filtros Brita no son compatibles con este aparato.
Resolución de problemas
Este capítulo resume los problemas más comunes que pueden surgir al usar el aparato. Vídeos de
ayuda y una lista completa de las preguntas más frecuentes están disponible en
www.philips.com/coffee-care. Si no logra solucionar el problema, póngase en contacto con el Centro
de Atención al Cliente de Philips en su país. Para información de contacto, consulte el folleto de la
garantía.
Iconos de advertencia
Icono de
advertencia
Solución
La pantalla muestra el icono de depósito de agua vacío.
El depósito de agua está casi vacío. Llene el depósito de agua con agua limpia
-
hasta la indicación de nivel máximo.
El depósito de agua no está en el lugar. Vuelva a colocar el depósito de agua.
-
La pantalla muestra el icono de añadir café en grano.
Llene el recipiente para café con café en grano.
-
Page 82
Español
85
Icono de
Solución
advertencia
La pantalla muestra el icono de recipiente de café molido vacío.
El recipiente de posos de café está lleno. Retire y vacíe el recipiente de posos de
-
café con el aparato encendido. Espere 5segundos antes de volver a colocarlo.
La pantalla muestra el icono de insertar el grupo de preparación de café.
El grupo de preparación del café no está colocado o no está colocado
-
correctamente. Retire el grupo de preparación del café y asegúrese de que está
bloqueado en su sitio. Consulte el capítulo "Retirada e inserción del grupo de
preparación del café" para obtener instrucciones paso a paso.
Códigos de error
A continuación, encontrará una lista de los códigos de error que muestran problemas que puede
solucionar sin ayuda. Las instrucciones en vídeo están disponibles en www.philips.com/coffee-care.
Si aparece otro código de error, póngase en contacto con el Centro de Atención al Cliente de su país.
Para información de contacto, consulte el folleto de la garantía.
Código
de error
01 La abertura de café
03 El grupo de
Problema Posible solución
está obstruida.
preparación de café
está sucio o no está
bien engrasado.
Apague la máquina y desenchúfela. Extraiga el grupo de
preparación del café. Luego abra la tapa del compartimento
de café molido e introduzca el mango de una cuchara. Mueva
el mango arriba y abajo hasta que caiga el café molido que
está atascado. Visite www.philips.com/coffee-care para ver el
vídeo de instrucciones detalladas.
Apague el aparato. Enjuague el grupo de preparación con
agua limpia, deje que se seque y después lubríquelo. Consulte
el capítulo 'Limpieza del grupo de preparación de café' o visite
www.philips.com/coffee-care para ver el vídeo de
instrucciones detalladas. Después, encienda la máquina de
nuevo.
Español
04 El grupo de
preparación de café no
está colocado
correctamente.
05 Hay aire en el circuito
de agua.
El filtro AquaClean no
se preparó de forma
adecuada antes de la
instalación o está
obstruido.
Apague el aparato. Quite el grupo de preparación del café y
vuelva a insertarlo. Asegúrese de que el grupo de preparación
del café está en la posición correcta antes de introducirlo.
Consulte el capítulo 'Manejo del grupo de preparación de café'
o visite www.philips.com/coffee-care para ver el vídeo de
instrucciones detalladas. Después, encienda la máquina de
nuevo.
Encienda y apague el aparato para reiniciarlo. Si funciona,
dispense 2 o 3 tazas de agua caliente. Elimine los depósitos de
cal de la máquina si no lo ha hecho desde hace mucho
tiempo.
Retire el filtro AquaClean e intente preparar un café otra vez. Si
funciona, asegúrese de que el filtro AquaClean se ha
preparado de forma adecuada antes de colocarlo otra vez.
Vuelva a colocar el filtro AquaClean en el depósito de agua. Si
no funciona, es posible que el filtro esté obstruido y sea
preciso cambiarlo.
Page 83

86
Español
Código
Problema Posible solución
de error
11 Es necesario ajustar la
cafetera a temperatura
ambiente
14 La máquina se ha
sobrecalentado.
Deje que la cafetera se temple durante un tiempo desde la
temperatura de transporte o del exterior hasta la temperatura
ambiente. Apague el aparato, espere 30minutos y vuelva a
encenderlo. Si esto no funciona, póngase en contacto con el
Servicio de Atención al Cliente de su país. Para información de
contacto, consulte el folleto de la garantía.
Apague el aparato y enciéndalo de nuevo después de 30
minutos.
Tabla de resolución de problemas
Este capítulo resume los problemas más comunes que pueden surgir al usar el aparato. Vídeos de
ayuda y una lista completa de las preguntas más frecuentes están disponible en
www.philips.com/coffee-care. Si no logra solucionar el problema, póngase en contacto con el Centro
de Atención al Cliente de Philips en su país. Para información de contacto, consulte el folleto de la
garantía.
Problema
Hay algunos residuos de
café dentro de la
cafetera nueva.
La bandeja de goteo se
llena
rápidamente/siempre
hay algo de agua en la
bandeja de goteo.
Causa Solución
Este aparato se ha probado con
café.
Esto es normal. El aparato
utiliza agua para enjuagar el
circuito interno y el grupo de
preparación del café. Parte del
agua fluye a través del sistema
interno y directamente hacia la
bandeja de goteo.
Aunque se ha limpiado
cuidadosamente, es posible que quede
algún residuo de café. Sin embargo, la
cafetera es absolutamente nueva.
Vacíe la bandeja de goteo a diario en
cuanto el indicador de "bandeja de
goteo llena" rojo sobresalga de la tapa
de la bandeja de goteo. Consejo:
Coloque una taza debajo de la boquilla
dispensadora para recoger el agua de
enjuagado que sale.
El icono de vaciar el
recipiente de posos de
café permanece
encendido.
La máquina solicita que
se vacíe el recipiente de
posos de café aunque
no esté lleno.
Se ha vaciado el recipiente de
posos de café mientras el
aparato estaba apagado, o se
ha colocado de nuevo
demasiado rápido.
El contador de la máquina no se
ha puesto a cero la última vez
que se ha vaciado el recipiente
de posos de café.
Vacíe siempre el recipiente de posos de
café con el aparato encendido. Retire el
recipiente de posos de café, espere al
menos 5segundos y luego vuelva a
insertarlo.
Espere siempre aproximadamente 5
segundos cuando vuelva a colocar el
recipiente de posos de café. De esta
forma, el contador de posos de café se
restablecerá a cero y se contará
correctamente el número de discos de
café.
Vacíe siempre el recipiente de posos de
café con el aparato encendido. Si vacía
el recipiente de posos de café con el
aparato apagado, el contador de posos
de café no se restablecerá.
Page 84

Problema Causa Solución
El recipiente de posos
de café está demasiado
lleno y el icono de vaciar
el recipiente de posos
de café no aparece en la
pantalla.
Ha quitado la bandeja de goteo
sin vaciar el recipiente de posos.
Cuando quite la bandeja de goteo,
vacíe también el recipiente de posos de
café, incluso si solo contiene unos
cuantos posos de café. Esto garantiza
que el contador de discos de café se
restablezca a cero y que el número de
discos de café se cuente correctamente.
Español
87
No puedo retirar el
grupo de preparación
del café.
No puedo insertar el
grupo de preparación de
café.
El café está aguado. El grupo de preparación de café
El grupo de preparación de café
no está en la posición correcta.
El grupo de preparación de café
no está en la posición correcta.
está sucio o debe lubricarse.
Restablezca el aparato de la siguiente
manera: cierre la puerta de
mantenimiento y vuelva a colocar el
depósito de agua. Apague y vuelva a
encender la cafetera y espere a que se
enciendan las luces de los iconos de las
bebidas. Haga otro intento de quitar el
grupo de preparación de café. Consulte
el capítulo "Retirada e inserción del
grupo de preparación del café" para
obtener instrucciones paso a paso.
Restablezca el aparato de la siguiente
manera: cierre la puerta de
mantenimiento y vuelva a colocar el
depósito de agua. Deje fuera el grupo
de preparación del café. Apague la
máquina y desenchúfela. Espere
30segundos, luego vuelva a conectar la
cafetera, enciéndala y espere a que se
enciendan las luces de los iconos de
bebidas. Después, ponga el grupo de
preparación en la posición correcta y
vuelva a introducirlo en la cafetera.
Consulte el capítulo "Retirada e
inserción del grupo de preparación del
café" para obtener instrucciones paso a
paso.
Retire el grupo (consulte 'Extracción del
grupo de preparación de café de la
máquina') de preparación de café,
enjuáguelo bajo el grifo y deje que se
seque. Luego lubrique los componentes
(consulte 'Lubricación del grupo de
preparación') móviles.
Español
El aparato está realizando el
procedimiento de ajuste
automático. Este procedimiento
se inicia automáticamente
cuando se utiliza el aparato por
primera vez, al cambiar a otro
tipo de granos de café o tras un
largo periodo sin uso.
Prepare 5 tazas de café al principio para
permitir que el aparato complete el
proceso de ajuste automático.
Page 85

88
Español
Problema Causa Solución
El molinillo está configurado
con un ajuste demasiado
grueso.
Configure el molinillo con un ajuste más
fino (bajo). Preparar 2 o 3 bebidas para
poder saborear toda la diferencia.
El café no está lo
suficientemente
caliente.
No sale café o sale con
mucha lentitud.
La temperatura ajustada es
demasiado baja.
Una taza fría reduce la
temperatura de la bebida.
Si se añade leche, se reduce la
temperatura de la bebida.
El filtro de agua AquaClean no
se ha preparado correctamente
para su instalación.
El filtro de agua AquaClean está
obstruido.
El molinillo está configurado
con un ajuste demasiado fino.
Ajuste la temperatura al máximo. Para
ajustar la temperatura, pulse el icono
Ajustes .
Caliente las tazas previamente
enjuagándolas con agua caliente.
Independientemente de si añade leche
caliente o fría, añadir leche siempre
reduce la temperatura del café. Caliente
las tazas previamente enjuagándolas
con agua caliente.
Quite el filtro AquaClean y dispense un
poco de agua caliente. Si esto funciona,
significa que el filtro AquaClean no
estaba bien instalado. Vuelva a instalar
y activar el filtro AquaClean y siga todos
los pasos del capítulo 'Filtro de agua
AquaClean'.
Tras un largo periodo sin uso, es
necesario preparar el filtro de agua
AquaClean para volver a usarlo y
dispensar 2 o 3tazas de agua caliente.
Cambie el filtro de agua AquaClean
cada 3 meses. Un filtro de más de
3meses puede obstruirse.
Configure el molinillo con un ajuste más
grueso (alto). Tenga en cuenta que esto
afectará al sabor del café.
El grupo de preparación del
café está sucio.
La boquilla dispensadora de
café está sucia.
El compartimento de café
molido está obstruido
Retire el grupo de preparación de café y
enjuáguelo bajo el grifo (consulte
'Limpieza de la unidad de preparación
de café bajo el grifo').
Limpie la boquilla dispensadora de café
y sus orificios con un limpiapipas o una
aguja.
Apague el aparato y retire el grupo de
preparación del café. Abra la tapa del
compartimento de café molido e
introduzca en él el mango de la
cuchara. Mueva el mango arriba y abajo
hasta que caiga (Fig. 34) el café molido
que está atascado.
Page 86
Problema Causa Solución
El circuito del aparato está
atascado por depósitos de cal.
Descalcifique el aparato con el
descalcificador Philips. Descalcifique
siempre que la cafetera lo solicite.
Español
89
El aparato no produce
espuma de leche.
El tipo de leche utilizado no es
Sale leche de la parte
inferior del depósito de
leche de LatteGo.
Modelos con LatteGo: LatteGo
no está colocado
correctamente.
Modelos con LatteGo: el
depósito de leche o el marco de
LatteGo están sucios.
Modelos con el espumador de
leche clásico: El espumador de
leche no está montado
correctamente.
adecuado para producir
espuma.
El marco y el depósito de leche
no están montados
correctamente.
El depósito de leche o el marco
de LatteGo están sucios.
Asegúrese de que el depósito de leche
está correctamente montado en el
marco de LatteGo (debe hacer un clic)
(consulte 'Montaje de LatteGo (solo en
modelos específicos)').
Desmonte LatteGo y enjuague ambas
piezas bajo el grifo o lávelas en el
lavavajillas.
Asegúrese de que el espumador de
leche esté montado (consulte 'Montaje
del espumador de leche clásico (solo en
modelos específicos)') correctamente.
Los diferentes tipos de leche producen
como resultado cantidades y calidades
diferentes de espuma. Hemos probado
los siguientes tipos de leche que han
demostrado producir espuma de leche
con buenos resultados: leche de vaca
semidesnatada o entera, y leche sin
lactosa.
Inserte primero la parte superior del
depósito de leche bajo el gancho de la
parte superior del marco. Luego encaje
la parte inferior del depósito de leche.
Oirá un clic cuando se encaje en su
lugar.
Desmonte LatteGo y enjuague ambas
piezas bajo el grifo o lávelas en el
lavavajillas.
Español
Parece que la máquina
pierde líquido.
El aparato utiliza agua para
enjuagar el circuito interno y el
grupo de preparación del café.
Esta agua fluye a través del
sistema interno y directamente
hacia la bandeja de goteo. Esto
es normal.
La bandeja de goteo está
demasiado llena y ha rebosado,
lo que da la impresión de que
hay una fuga en la máquina.
Vacíe la bandeja de goteo todos los
días o en cuanto el indicador de
"bandeja de goteo llena" sobresalga de
la tapa de la bandeja de goteo. Consejo:
Coloque una taza debajo de la boquilla
dispensadora para recoger el agua de
enjuague y reducir la cantidad de agua
en la bandeja de goteo.
Vacíe la bandeja de goteo todos los
días o en cuanto el indicador de
"bandeja de goteo llena" sobresalga de
la tapa de la bandeja de goteo.
Page 87

90
Español
Problema Causa Solución
El depósito de agua no está
completamente insertado, algo
de agua se fuga del depósito de
agua y se introduce en la
cafetera.
Asegúrese de que el depósito de agua
está en la posición correcta: retírelo y
vuelva a insertarlo presionándolo todo
lo posible.
No puedo activar el filtro
de agua AquaClean y la
máquina solicita que se
realice una
descalcificación.
El filtro nuevo del agua
no encaja.
El aparato hace mucho
ruido.
El grupo de preparación del
café está sucio u obstruido.
La máquina no está colocada
en una superficie horizontal.
No se ha instalado o sustituido
el filtro a tiempo después de
que la pantalla haya mostrado
el recordatorio de AquaClean.
Esto significa que el aparato ya
no está completamente libre de
depósitos de cal.
Está intentado instalar un filtro
diferente del filtro de agua
Philips AquaClean.
La junta de goma del filtro de
agua AquaClean no está en su
lugar.
Es normal que el aparato haga
algún ruido durante el uso.
El filtro de agua AquaClean no
se ha preparado correctamente
y ahora entra aire en la
máquina.
Enjuague el grupo de preparación del
café.
Coloque el aparato sobre una superficie
horizontal para que la bandeja de goteo
no rebose y el indicador de "bandeja de
goteo llena" funcione correctamente.
Primero descalcifique el aparato y luego
instale el filtro de agua AquaClean.
El aparato solamente admite el filtro de
agua Philips AquaClean.
Vuelva a colocar la junta de goma en el
filtro de agua AquaClean.
Si la máquina empieza a hacer un ruido
diferente, limpie el grupo de
preparación de café y lubríquelo
(consulte 'Lubricación del grupo de
preparación').
Retire el filtro de agua AquaClean del
depósito de agua y prepárelo
correctamente para su uso antes de
volver a colocarlo. Consulte el capítulo
"Filtro de agua AquaClean" para
obtener instrucciones paso a paso.
El depósito de agua no se ha
introducido completamente y
entra aire en el aparato.
Asegúrese de que el depósito de agua
está en la posición correcta: retírelo y
vuelva a insertarlo presionándolo todo
lo posible.
Page 88

Español
Especificaciones técnicas
El fabricante se reserva el derecho a mejorar las especificaciones técnicas del producto. Todas las
cantidades predefinidas son aproximadas.
Descripción Valor
Dimensiones (ancho x alto x largo) 246 x 377 x 434 mm
Peso 7 - 7.5kg
Longitud del cable de alimentación 1200 mm
Depósito de agua 1,8litros
Capacidad de la tolva de granos de café 275g
91
Capacidad del recipiente para posos de café 12 discos
Capacidad de LatteGo (depósito de leche) 250ml
Altura de la boquilla ajustable 88-145 mm
Tensión nominal - Potencia nominal - Fuente de
alimentación
Consulte la etiqueta de datos del interior de la
puerta de mantenimiento (Fig. A11)
Español
Page 89

92
Français
Sommaire
Présentation de la machine (Fig. A)__________________________________________________________________ 92
Panneau de commande _____________________________________________________________________________ 92
Introduction __________________________________________________________________________________________ 93
Avant la première utilisation _________________________________________________________________________ 94
Préparation de boissons _____________________________________________________________________________ 95
Personnalisation des boissons ______________________________________________________________________ 98
Réglage des paramètres de la machine _____________________________________________________________ 99
Retrait et insertion du groupe de percolation_______________________________________________________ 100
Nettoyage et entretien _______________________________________________________________________________ 101
Filtre à eau AquaClean ______________________________________________________________________________ 104
Procédure de détartrage (30min.) __________________________________________________________________ 105
Commande d'accessoires____________________________________________________________________________ 106
Dépannage ___________________________________________________________________________________________ 106
Caractéristiques techniques _________________________________________________________________________ 113
Présentation de la machine (Fig. A)
A1 Panneau de commande A10 Porte d’accès au groupe café
A2 Support de tasse A11 Étiquette de données avec référence
A3 Compartiment à café prémoulu A12 Réservoir d’eau
A4 Couvercle du bac à grains A13 Buse de distribution d’eau chaude
A5 Buse de distribution du café réglable A14 Bac à marc de café
A6 Prise du câble d’alimentation A15 Panneau avant du bac à marc de café
A7 Bouton de réglage de la mouture A16 Grille du plateau égouttoir
A8 Réservoir à grains de café A17 Plateau égouttoir
A9 Groupe de percolation A18 Indicateur «Plateau égouttoir plein»
Accessoires
A19 Câble d’alimentation A23 Bande de test de la dureté de l’eau
A20 Tube de graisse A24 Mousseur à laitclassique (certains
A21 Filtre à eau AquaClean A25 LatteGo (réservoir de lait) (certains
A22 Cuillère de mesure
modèles uniquement)
modèles uniquement)
Panneau de commande
Il existe plusieurs versions de cette machine à espresso, avec différents panneaux de commande.
Chaque version a sa propre référence. Vous trouverez le numéro de référence sur l’étiquette de
Page 90

Français
données située à l’intérieur de la porte d’accès (fig.A11). Vous pouvez également trouver le numéro de
référence en tapant sur l’icône des paramètres et en sélectionnant «assistance».
Veuillez vous reporter aux figuresC, D etE pour une présentation de tous les boutons et icônes. La
description figure au-dessous.
Utilisez la flèche vers le haut ou vers le bas pour faire défiler le menu d’affichage, puis touchez
l’icôneOK pour confirmer vos choix.
Tous types (fig.C/D/E)
C1/D1/E1 Icônes de boissons à
simple pression
C2. Marche/arrêt (bouton) C4. Afficheur C7. Profils personnels
C3. Icônes de navigation
(vers le haut, vers le bas, OK)
C6. Menu de nettoyage
93
D2/E2 Menu des autres
boissons
C5. Paramètres de la
machine
C8. Bouton de veille
EP4327, EP4324, EP4321 uniquement (fig.C)
C1 Icônes des boissons à simple pression: Espresso, Coffee (Café), Americano, Caffé Crema (Café
Crème), Ristretto, Hot Water (Eau Chaude) et Steam (Vapeur)
EP4349, EP4346, EP4343, EP4341 uniquement (fig.D)
D1 Icônes de boissons à simple pression: Espresso, Coffee (Café), Americano, Cappuccino, Latte
Macchiato, Café au lait
EP5447, EP5446, EP5444, EP5443, EP5441 uniquement (fig.E)
E1 Icônes de boissons à simple pression: Espresso, Coffee (Café), Americano, Cappuccino, Latte
Macchiato, Café au lait
Introduction
Félicitations pour votre achat d’une machine à café Philips entièrement automatique! Pour bénéficier
pleinement de l’assistance qu’offre Philips, enregistrez votre produit sur le site
www.philips.com/registeryourcoffee.com ou en scannant le codeQR (Fig. 1) de ce mode d’emploi.
Lisez attentivement le livret de sécurité distinct avant d’utiliser la machine pour la première fois, et
conservez-le pour un usage ultérieur.
Pour vous aider à vous familiariser avec votre machine et en profiter au maximum, Philipsoffre une
assistance à plusieurs égards. La boîte contient les éléments suivants:
1 Le présent mode d’emploi avec les instructions d’utilisation illustrées et de plus amples
informations sur le nettoyage et l’entretien.
2 Le livret de sécurité séparé, avec les instructions relatives à l’utilisation sûre de la machine à café.
3 Pour obtenir de l’aide en ligne (foire aux questions, vidéos, etc.), veuillez scanner le codeQR
figurant sur la couverture du présent mode d’emploi ou consulter la page
www.philips.com/coffee-care. Vous pouvez également trouver le codeQR en appuyant sur l’icône
des paramètres
, puis en sélectionnant Support.
Français
Page 91
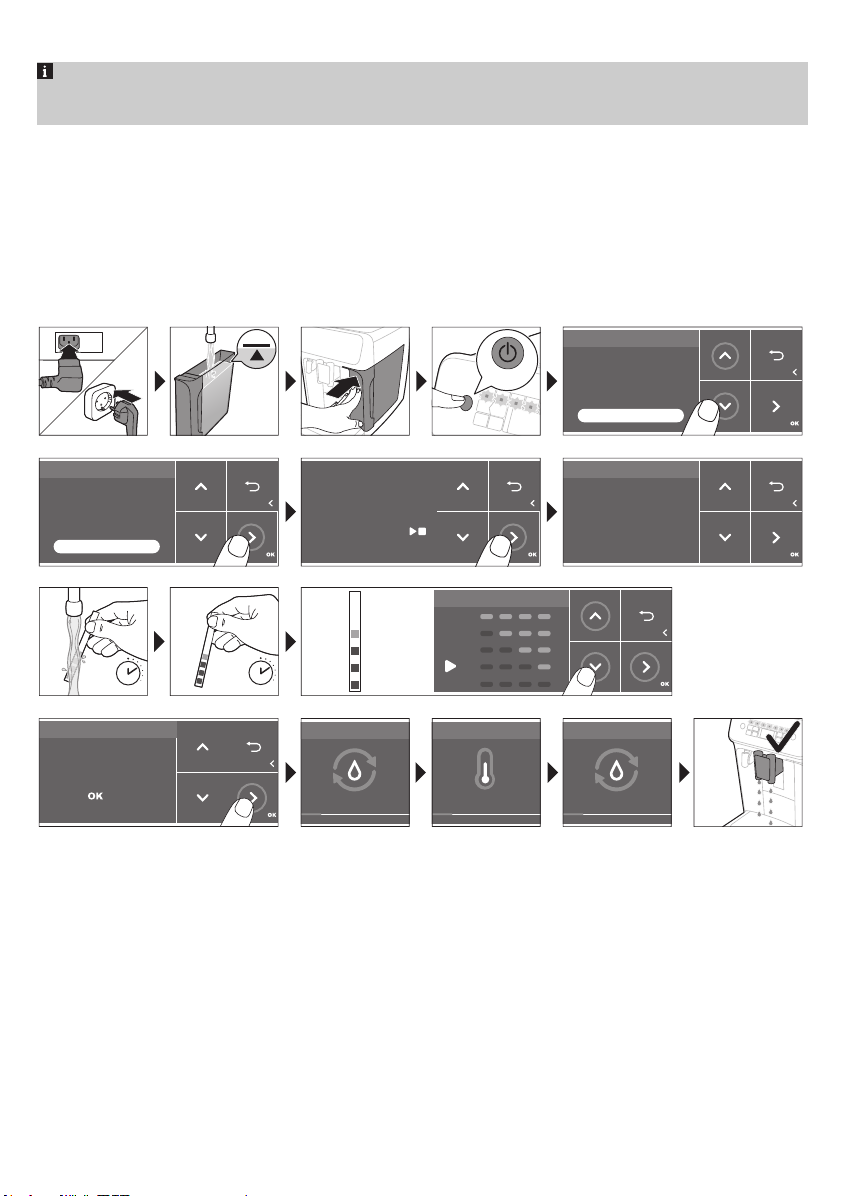
ON
,WDOLDQR
1HGHUODQGV
(QJOLVK
(VSD³RO
/DQJXDJH
:DWHUKDUGQHVV
,WDOLDQR
1HGHUODQGV
(QJOLVK
(VSD³RO
/DQJXDJH
)ROORZWKHQH[WVWHSV
WRVHWWKHFRUUHFW
ZDWHUKDUGQHVVOHYHO
<RXDUHDERXW
WRVHWWKHODQJXDJH
WR(QJOLVK
3UHVVVWDUWVWRS
WRFRQILUP
:DWHUKDUGQHVV
<RXVHOHFWHG
UHGVTXDUHV
3UHVVWRFRQILUP
+HDWLQJXS
+HDWLQJ
5LQVLQJ
5LQVLQJ
)LOOLQJZDWHUFLUFXLW
)LOOLQJ
=
:DWHUKDUGQHVV
1 sec.
1 min.
94
Français
Cette machine a été testée avec du café. Bien qu’elle ait été soigneusement nettoyée, il se peut
que quelques résidus de café subsistent. Nous garantissons néanmoins que la machine est
entièrement neuve.
La machine à café règle automatiquement la quantité de café moulu utilisée pour obtenir un café au
goût optimal. Il convient de préparer initialement 5cafés pour permettre à la machine de compléter
son autoréglage.
Veillez à rincer le LatteGo (réservoir de lait) ou le mousseur à lait classique avant la première
utilisation.
Avant la première utilisation
Page 92
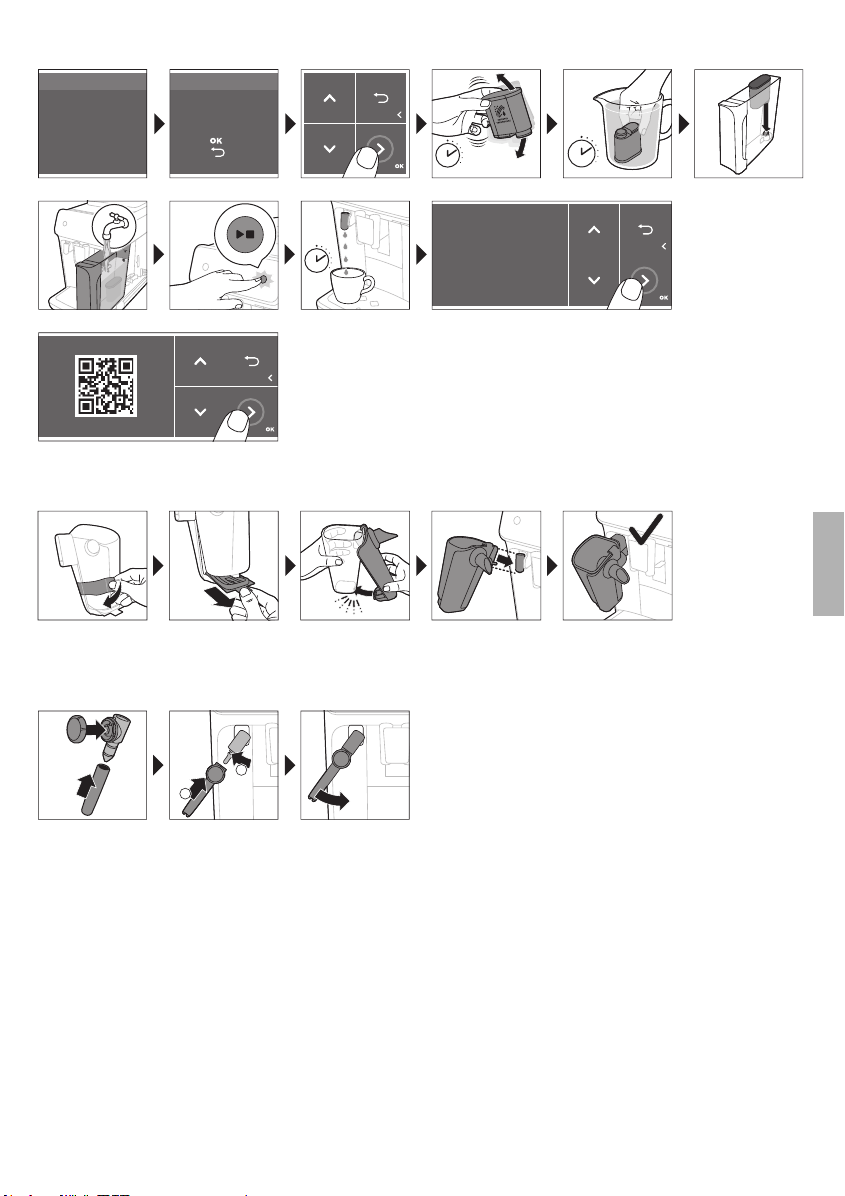
5 sec.
30 sec.
1 min.
$TXD&OHDQ
8VH$TXD&OHDQILOWHU
WRHQMR\FXSV
ZLWKRXWGHVFDOLQJ
$OPRVWUHDG\
)LOOEHDQVUHILOOZDWHU
WDQNDQGHQMR\
\RXUFRIIHH
5HJLVWHU\RXUSURGXFW
9LVLWZZZSKLOLSVFRP
$TXD&OHDQ
:RXOG\RXLQVWDOO
DQ$TXD&OHDQILOWHU"
3UHVVWRFRQILUP
3UHVVWRUHIXVH
CLICK
1
2
Français
Assemblage du LatteGo (certains modèles uniquement)
95
Français
Assemblage du mousseur à lait classique (certains modèles uniquement)
Préparation de boissons
Étapes générales
1 Remplissez le réservoir avec de l’eau du robinet et le bac à grains avec des grains de café.
2 Insérez la petite fiche dans la prise située à l’arrière de l’appareil. Branchez le cordon d’alimentation
sur la prise secteur.
3 Mettez l’appareil en marche en appuyant sur le bouton marche/arrêt.
-
La machine commence à chauffer et effectue le cycle de rinçage automatique.
-
Lorsque tous les voyants des icônes des boissons restent allumés, la machine est prête à
l’emploi.
4 Placez une tasse sous le double bec-verseur. Faites coulisser la buse de distribution vers le haut
ou vers le bas pour adapter sa hauteur à la taille de la tasse ou du verre utilisé (Fig. 2).
Page 93

96
Français
Préparation du café avec des grains
1 Pour préparer un café, appuyez sur l’icône de la boisson de votre choix (Fig. 3) ou appuyez sur
l’icône «More drinks» (Fig. 4) (certains modèles uniquement).
-
Vous pouvez maintenant régler les paramètres de la boisson à votre goût (Fig. 5). Utilisez les
flèches (Fig. 6) vers le haut ou vers le bas pour régler l’intensité du café. Pour régler d’autres
paramètres, appuyez sur l’icôneOK (Fig. 7).
2 Appuyez sur le bouton marche/arrêt
sélectionnée.
3 Pour arrêter l’écoulement de café avant que la machine ait terminé, appuyez de nouveau sur le
bouton marche/arrêt
Pour préparer deuxcafés en même temps, appuyez deuxfois sur l’icône de la boisson ou
sélectionnez l’icône2x en faisant défiler le menu concerné.
.
à tout moment pour commencer à préparer la boisson
N’utilisez pas de grains de café caramélisés ou aromatisés.
Préparation de boissons à base de lait avec le LatteGo (réservoir de lait)
Le LatteGo est composé d’un réservoir de lait, d’un cadre et d’un couvercle de rangement. Afin
d’éviter toute fuite, assurez-vous que le cadre et le réservoir de lait sont correctement assemblés
avant de remplir le réservoir de lait.
1 Pour installer le LatteGo, insérez tout d’abord la partie supérieure du réservoir de lait sous le
crochet en haut du cadre (Fig. 8). Ensuite, remettez la partie inférieure du réservoir de lait en place.
Vous entendez un clic lorsqu’il est verrouillé et correctement en place (Fig. 9).
Remarque: assurez-vous que le réservoir de lait et le cadre sont propres avant de les installer.
2 Inclinez légèrement le LatteGo et placez-le sur la buse de distribution d’eau chaude (Fig. 10).
Ensuite, appuyez jusqu’à ce qu’il s’enclenche et soit en place (Fig. 11).
3 Remplissez le LatteGo de lait (Fig. 12). Ne remplissez pas le réservoir de lait au-delà de l’indication
maximum.
Si vous avez personnalisé la quantité de lait, vous devrez peut-être remplir le réservoir de lait
avec une quantité de lait supérieure ou inférieure à celle indiquée pour cette boisson sur le
LatteGo.
Pour un résultat optimal, utilisez toujours du lait sortant directement du réfrigérateur.
4 Placez une tasse sur le plateau égouttoir.
5 Appuyez sur l’icône de boisson à base de lait de votre choix ou appuyez sur l’icône «More Drinks»
(certains modèles uniquement) pour choisir une autre boisson. (voir 'Personnalisation des
boissons')
-
Vous pouvez à présent régler les paramètres de la boisson selon vos préférences.
6 Appuyez sur le bouton marche/arrêt
-
Lorsque vous préparez un cappuccino, un flat white ou un latte macchiato, la machine verse
d’abord le lait, puis le café. Lorsque vous préparez un caffè latte ou un café au lait, la machine
verse d’abord le café, puis le lait.
-
Pour arrêter l’écoulement de lait avant que la machine ait versé la quantité prédéfinie, appuyez
sur le bouton marche/arrêt
7 Pour arrêter de verser la boisson complète (café et lait) avant que la machine ait terminé,
maintenez le bouton marche/arrêt enfoncé.
.
.
Page 94

Français
Production de mousse ou chauffage du lait avec le mousseur à lait classique
Pour une qualité de mousse optimale, utilisez toujours du lait provenant directement du
réfrigérateur.
1 Inclinez le manche en silicone noir situé à gauche sur la machine et faites glisser le mousseur à lait
sur celui-ci (Fig. 13).
2 Remplissez un pot à lait avec environ 100ml de lait pour le cappuccino et environ 150ml pour le
latte macchiato.
3 Immergez le mousseur à lait d’environ 1cm dans le lait.
4 Appuyez sur l’icône de la vapeur (Fig. 14).
5 Pour faire mousser le lait, tournez le bouton du mousseur à lait classique sur l’icône de mousse de
lait (Fig. 15). Pour chauffer le lait, tournez le bouton du mousseur à lait classique sur l’icône de lait
(Fig. 16).
6 Veillez à bien aligner l’icône sur le bouton du mousseur à lait classique avec la flèche noire.
7 Appuyez sur le bouton marche/arrêt
-
La machine commence à chauffer, la vapeur est injectée dans le lait et le lait mousse ou chauffe.
8 Lorsque vous obtenez le volume de mousse requis ou la température souhaitée dans le pot à lait,
appuyez de nouveau sur le bouton marche/arrêt
lait.
N’injectez jamais de vapeur dans le lait pendant plus de 90secondes. L’injection de vapeur cesse
automatiquement après 90secondes.
Il est inutile de déplacer le pot à lait pendant que le lait mousse pour obtenir une mousse d’une
qualité optimale.
pour démarrer (Fig. 17).
pour arrêter de faire mousser ou de chauffer le
97
Français
Jet supplémentaire ExtraShot (certains modèles uniquement)
Votre machine vous offre la possibilité d’ajouter un jet supplémentaire de ristretto à votre café ou à
votre boisson à base de lait, par exemple si vous voulez un café plus fort.
1 Placez une tasse sous la buse de distribution.
2 Appuyez sur l’une des icônes de boisson à simple pression ou sur l’icône «More Drinks» (certains
modèles uniquement) pour sélectionner une boisson.
3 Utilisez la flèche vers le haut pour augmenter l’intensité, puis sélectionnez la fonction ExtraShot (jet
supplémentaire) (Fig. 18).
4 Pour personnaliser d’autres paramètres, appuyez sur l’icôneOK. Puis, appuyez sur le bouton
marche/arrêt pour commencer à préparer la boisson.
5 Pour arrêter l’écoulement de la boisson avant que la machine ait terminé, appuyez de nouveau sur
le bouton marche/arrêt .
Si vous avez sélectionné la fonctionExtraShot, vous ne pouvez préparer qu’un seul café à la fois.
Préparation d’un café avec du café prémoulu
Vous pouvez choisir d’utiliser un café prémoulu au lieu de grains, par exemple si vous préférez une
variété de café différente ou décaféinée.
1 Ouvrez le couvercle du compartiment du café prémoulu et versez une mesurette de café prémoulu
nivelé dans le compartiment (Fig. 19). Fermez le couvercle.
Page 95

98
Français
2 Appuyez sur l’un des icônes de boisson à simple pression ou sur l’icône «More Drinks» pour
sélectionner une autre boisson.
3 Sélectionnez la fonction de préparation du café prémoulu. Vous pouvez le faire de deuxmanières:
-
Utilisez la flèche vers le bas pour régler l’intensité sur le niveau le plus bas, puis sélectionnez la
fonction de préparation de café prémoulu.
-
Appuyez sur l’icône des paramètres et utilisez la flèche vers le bas pour sélectionner la fonction
de préparation de café prémoulu.
4 Pour arrêter l’écoulement de café avant que la machine ait terminé, appuyez de nouveau sur le
bouton marche/arrêt .
Lorsque vous sélectionnez la fonction de préparation du café prémoulu:
- elle est automatiquement mémorisée.
- vous ne pouvez préparer qu’un seul café à la fois.
- vous ne pouvez pas sélectionner une autre intensité d’arôme.
Verser l’eau chaude
1 S’il est attaché, retirez le LatteGo ou le mousseur à lait.
2 Placez une tasse sous la buse de distribution d’eau chaude.
3 Pour sélectionner l’eau chaude, appuyez sur l’icône «Hot Water» (certains modèles uniquement)
ou sur l’icône «More Drinks» (certains modèles uniquement) (Fig. 4).
4 Utilisez les flèches vers le haut et vers le bas pour régler la quantité et la température de l’eau
chaude selon vos préférences.
5 Appuyez sur le bouton marche/arrêt
-
De l’eau chaude s’écoule de la buse de distribution d’eau chaude (Fig. 20).
6 Pour arrêter l’écoulement d’eau chaude avant que la machine ait terminé, appuyez de nouveau sur
le bouton marche/arrêt
.
.
Personnalisation des boissons
La machine vous permet de régler les paramètres d’une boisson selon vos préférences et d’enregistrer
ceux-ci dans un profil personnel. Les profils sont de couleurs différentes.
Après avoir sélectionné une boisson en appuyant sur l’une des icônes de boissons à simple pression
ou sur l’icône «More Drinks» (certains modèles uniquement), vous pouvez:
1 Réglez l’intensité de l’arôme à l’aide des icônes de flèches vers le haut et vers le bas (Fig. 21). Vous
pouvez choisir parmi 5niveaux d’intensité, le plus bas étant le plus faible et le plus haut le plus
intense.
2 Réglez la quantité de café (Fig. 22) ou de lait (certains modèles uniquement) à l’aide des icônes de
flèches vers le haut et vers le bas. Vous pouvez choisir parmi 5quantités pour chaque paramètre.
Une fois la boisson préparée, les paramètres que vous avez sélectionnés sont enregistrés
automatiquement dans le profil que vous avez choisi.
Sélection d’un profil
Vous pouvez sélectionner un profil et enregistrer une recette à l’aide des profils de sélection de café.
1 Appuyez plusieurs fois sur l’icône des profils
profils sont de couleurs différentes.
2 Sélectionnez une boisson en appuyant sur l’une des icônes de boissons à simple pression ou sur
l’icône «More Drinks» (certains modèles uniquement).
pour sélectionner un des profils de couleur. Les
Page 96

99
3 Réglez les paramètres de boisson selon vos préférences.
4 Appuyez sur le bouton marche/arrêt pour préparer la boisson sélectionnée.
-
Vos nouveaux paramètres sont désormais enregistrés dans le profil de couleur sélectionné.
Vous pouvez toujours rétablir les paramètres par défaut de la machine (voir 'Rétablir les
paramètres par défaut').
Français
Profil d’invité
Votre machine propose un profil d’invité. Lorsque le profil d’invité est sélectionné, l’icône de profil est
désactivée. Lorsque vous sélectionnez ce profil, vous pouvez toujours personnaliser les paramètres
selon vos préférences, mais les recettes que vous préparez ne sont pas enregistrées.
Réglage des paramètres de la machine
Réglage de la dureté de l’eau
Pour obtenir les meilleurs résultats et accroître la durée de vie de la machine, il est conseillé de
régler la dureté de l’eau en fonction de la dureté de l’eau dans votre région. Cela vous évite également
de devoir détartrer la machine trop souvent. Le réglage par défaut de la dureté de l’eau est 4: eau
calcaire.
Utilisez la bandelette de test de dureté de l’eau fournie dans la boîte pour
déterminer la dureté de l’eau dans votre région:
1 Immergez la bandelette de test de dureté de l’eau dans l’eau du robinet ou maintenez-la sous le
robinet pendant 1seconde (Fig. 23).
2 Attendez une minute. Le nombre de carrés sur la bandelette de test qui rougissent indique la
dureté (Fig. 24) de l’eau.
Français
Réglez la machine sur la dureté de l’eau adéquate:
1 Appuyez sur l’icône des paramètres , puis utilisez les flèches vers le haut ou vers le bas pour
sélectionner «Water hardness» (dureté de l’eau). Appuyez ensuite sur l’icôneOK pour confirmer.
2 Utilisez les icônes des flèches vers le haut et vers le bas pour sélectionner la dureté de l’eau. Le
nombre de carrés rouges sur l’afficheur doit être égal au nombre de carrés rouges sur la bande de
test (Fig. 25).
3 Après avoir réglé la dureté de l’eau, appuyez sur l’icôneOK pour confirmer.
Réglage des paramètres du moulin
Vous pouvez modifier l’intensité du café avec le bouton de réglage de la mouture dans le réservoir à
grains. Plus le paramètre de mouture est bas, plus les grains de café sont fins et plus le café est
intense. Vous pouvez choisir parmi 12paramètres de mouture différents.
L’appareil a été configuré de manière à extraire une saveur optimale de vos grains de café. Nous vous
conseillons donc de ne pas modifier les réglages du moulin avant d’avoir préparé 100 à 150tasses
(environ 1mois d’utilisation).
Vous pouvez uniquement régler les paramètres de mouture lorsque la machine moût des grains de
café.
Vous devez préparer2 ou 3boissons avant de sentir toute la différence de goût.
Page 97

100
Français
Ne tournez pas le bouton de réglage de la mouture de plus d’un cran à la fois afin d’éviter
d’endommager le moulin à café.
1 Placez une tasse sous la buse de distribution du café.
2 Ouvrez le couvercle du réservoir à grains.
3 Appuyez sur l’icône de l’espresso, puis appuyez sur le bouton marche/arrêt .
4 Lorsque le moulin commence à moudre, enfoncez le bouton de réglage de la mouture et tournez-
le vers la gauche ou la droite. (Fig. 26)
Réglage des autres paramètres de la machine
En appuyant sur l’icône des paramètres , vous pouvez régler les paramètres suivants de la machine:
-
Dureté de l’eau: Vous pouvez sélectionner 5niveaux en fonction de la dureté de l’eau dans votre
région.
-
Durée de veille: vous pouvez sélectionner 15, 30, 60 ou 180min.
-
Luminosité de l’afficheur: vous pouvez sélectionner une intensité faible, moyenne ou élevée.
-
Langue
-
Son: vous pouvez activer ou désactiver le signal sonore de la machine.
-
Température: vous pouvez choisir entre 3températures de préparation pour votre café.
-
Éclairage avant (certains modèles uniquement): vous pouvez choisir «always on» (toujours activé),
«on during brewing» (activé pendant la préparation) ou «always off» (toujours éteint).
-
Unité de mesure: vous pouvez choisir entre ml ou oz.
Rétablir les paramètres par défaut
La machine à café offre la possibilité de rétablir les paramètres par défaut à tout moment.
1 Touchez l’icône des paramètres .
2 Sélectionnez «Factory Settings» (paramètres par défaut) à l’aide des icônes des flèches vers le
haut et vers le bas. Appuyez sur l’icôneOK pour confirmer.
3 Appuyez sur le bouton marche/arrêt pour confirmer que vous souhaitez rétablir les paramètres.
-
Les paramètres sont à présent restaurés.
Les valeurs par défaut des paramètres d'usine suivants sont rétablies: dureté de l’eau, temps de
veille, luminosité de l’afficheur, son, température, éclairage avant, profils.
Retrait et insertion du groupe de percolation
Consultez le site www.philips.com/coffee-care pour obtenir des instructions vidéo détaillées sur le
retrait, l'insertion et le nettoyage du groupe de percolation.
Retrait du groupe de percolation de la machine
1 Éteignez la machine.
2 Retirez le réservoir d’eau et ouvrez la porte de service (Fig. 27).
3 Appuyez sur la manette PUSH (Fig. 28) et tirez le groupe de percolation pour l’enlever de la
machine (Fig. 29).
Page 98
Français
101
Réinsertion du groupe de percolation
Avant de faire glisser le groupe de percolation dans la machine, vérifiez qu’il est dans la bonne
position.
1 Assurez-vous que le groupe de percolation est positionné correctement. La flèche située sur le
cylindre jaune sur le côté du groupe de percolation doit être alignée sur la flèche noire et N (Fig.
30).
-
Si ce n’est pas le cas, poussez le levier vers le bas jusqu’à ce qu’il touche la base du groupe de
percolation (Fig. 31).
2 Replacez le groupe de percolation dans la machine en le faisant glisser le long des rainures
latérales (Fig. 32) de guidage jusqu’à ce qu’il soit enclenché (Fig. 33). N’appuyez pas sur le bouton
PUSH.
3 Fermez la porte d’accès et replacez le réservoir d’eau.
Nettoyage et entretien
Un nettoyage et un entretien réguliers optimisent le fonctionnement de votre machine, préservent le
bon goût du café pendant longtemps et assurent un débit du café stable.
Consultez le tableau ci-dessous pour savoir quand et comment nettoyer toutes les parties
détachables de la machine. Vous trouverez plus d’informations détaillées et des instructions vidéo sur
www.philips.com/coffee-care. Reportez-vous à la figureB pour savoir quelles pièces peuvent être
nettoyées au lave-vaisselle.
Pièces amovibles
Groupe de
percolation
Quand nettoyer Comment nettoyer
Toutes les semaines Retirez le groupe de percolation de la
machine (voir 'Retrait et insertion du groupe
de percolation'). Rincez-le sous le robinet
(voir 'Nettoyage du groupe de percolation
sous l'eau').
Français
Mousseur à
laitclassique
Compartiment à
café prémoulu
Tous les mois Nettoyez le groupe de percolation à l’aide
Après chaque utilisation Nettoyez d’abord le mousseur à lait lorsqu’il
Vérifiez le compartiment du
café prémoulu toutes les
semaines pour voir s’il est
obstrué.
de la tablette (voir 'Nettoyage du groupe de
percolation à l'aide de tablettes de
dégraissage pour café') de dégraissage pour
café Philips.
est fixé à la machine à café à l’aide du
programme «Quick milk clean» (nettoyage
rapide du lait) (voir 'Nettoyage rapide du
mousseur à lait classique'). Ensuite, retirez le
mousseur à lait de la machine et démontezle. Nettoyez toutes les pièces sous le robinet
ou passez-les au lave-vaisselle.
Débranchez la machine et retirez le groupe
de percolation. Ouvrez le couvercle du
compartiment à café prémoulu et insérez-y
le manche d’une cuillère. Agitez le manche
de haut en bas pour faire tomber (Fig. 34) le
bouchon de café moulu. Visitez:
www.philips.com/coffee-care. pour des
instructions vidéo détaillées.
Page 99

102
Français
Pièces amovibles Quand nettoyer Comment nettoyer
Bac à marc de café Videz le bac à marc de café
lorsque la machine vous y
invite. Nettoyez-le une fois par
semaine.
Retirez le bac à marc de café lorsque la
machine est allumée. Rincez-le sous le
robinet avec du liquide vaisselle ou
nettoyez-le dans le lave-vaisselle. Le
panneau avant du bac à marc de café
(fig. A15) ne résiste pas au lave-vaisselle.
Plateau égouttoir Videz le plateau égouttoir tous
LatteGo Après chaque utilisation Nettoyez d’abord le LatteGo lorsqu’il est fixé
Lubrification du
groupe de
percolation
Réservoir d’eau Toutes les semaines Rincez le réservoir d’eau sous le robinet
Avant de la machine Toutes les semaines Nettoyez à l’aide d’un chiffon non abrasif.
les jours ou dès que le voyant
rouge «Plateau égouttoir
plein» s’allume à travers le
couvercle du plateau égouttoir
(Fig. 35). Nettoyez le plateau
égouttoir une fois par semaine.
Tous les deuxmois Consultez le tableau de lubrification et
Retirez le plateau égouttoir (Fig. 36) et
nettoyez-le sous le robinet avec un peu de
liquide vaisselle. Vous pouvez également
passer le plateau égouttoir au lave-vaisselle.
Le panneau avant du bac à marc de café
(fig. A15) ne résiste pas au lave-vaisselle.
à la machine à café à l’aide du programme
«Quick milk clean» (nettoyage rapide du
lait) (voir 'Nettoyage rapide du LatteGo').
Ensuite, retirez-le de la machine et rincez-le
sous l’eau du robinet ou nettoyez-le au
lave-vaisselle.
lubrifiez le groupe de percolation avec la
graisse Philips (voir 'Lubrification du groupe
de percolation').
Nettoyage du groupe de percolation
Un nettoyage régulier du groupe de percolation empêche les résidus de café d'obstruer les circuits
internes. Visitez www.philips.com/coffee-care pour visionner des vidéos d'assistance pour le retrait,
l'insertion et le nettoyage du groupe de percolation.
Nettoyage du groupe de percolation sous l'eau
1 Retirez le groupe (voir 'Retrait et insertion du groupe de percolation') de percolation.
2 Rincez soigneusement le groupe de percolation avec de l’eau. Nettoyez soigneusement le filtre
(Fig. 37) supérieur du groupe de percolation.
3 Laissez le groupe de percolation sécher à l’air libre avant de le remettre en place. Évitez de sécher
le groupe de percolation avec un chiffon, afin d’empêcher que des fibres ne tombent dedans.
Nettoyage du groupe de percolation à l'aide de tablettes de dégraissage pour café
Utilisez uniquement des tablettes de dégraissage pour café Philips.
1 Appuyez sur l’icône de nettoyage
sélectionner «Brew Group Clean» (nettoyer le groupe de percolation).
2 Appuyez sur l’icôneOK pour confirmer, puis suivez les instructions à l’écran.
et utilisez les flèches vers le haut et vers le bas pour
Page 100

Français
103
Lubrification du groupe de percolation
Pour améliorer les performances de votre machine, nous vous suggérons de lubrifier le groupe de
percolation tous les 2mois, afin de vous assurer que les pièces mobiles continuent à bouger
correctement.
1 Appliquez une fine couche de graisse sur le piston (partie grise) du groupe de percolation (Fig. 38).
2 Appliquez une fine couche de graisse autour de l’axe (partie grise) dans le bas du groupe de
percolation (Fig. 39).
3 Appliquez une fine couche de graisse sur les rails des deux côtés (Fig. 40).
Nettoyage du LatteGo (récipient à lait) (certains modèles uniquement)
Nettoyage rapide du LatteGo
1 Vérifiez que le LatteGo est correctement fixé à la machine (Fig. 10).
2 Placez une tasse sous la buse de distribution.
3 Appuyez sur l’icône de nettoyage et utilisez les flèches vers le haut ou vers le bas pour
sélectionner le programme «Quick milk clean» (nettoyage rapide du lait).
4 Appuyez sur l’icôneOK pour confirmer, puis suivez les instructions à l’écran pour retirer le lait qui
pourrait rester dans le système de distribution de lait.
-
De petits jets d’eau chaude seront distribués par le système de distribution de lait.
5 Conservez le LatteGo contenant le lait restant au réfrigérateur.
Nettoyage en profondeur du LatteGo
1 Retirez LatteGo de la machine (Fig. 41).
2 Versez le lait restant.
3 Appuyez sur le bouton de déverrouillage et retirez le réservoir de lait du cadre de LatteGo (Fig. 42).
4 Nettoyez toutes les pièces dans le lave-vaisselle ou sous le robinet à l’eau tiède avec du liquide
vaisselle.
Français
Nettoyage du mousseur à lait classique (certains modèles uniquement)
Nettoyage rapide du mousseur à lait classique
1 Vérifiez que le mousseur à lait classique est correctement fixé à la machine (Fig. 13).
2 Placez une tasse sous la buse de distribution.
3 Appuyez sur l’icône de nettoyage
sélectionner le programme «Quick milk clean» (nettoyage rapide du lait).
4 Appuyez sur l’icôneOK pour confirmer, puis suivez les instructions à l’écran pour retirer le lait qui
pourrait rester dans le mousseur à lait.
-
De petits jets d’eau chaude seront distribués par le système de distribution de lait.
5 Nettoyez le mousseur à lait avec un chiffon humide.
Nettoyage quotidien du mousseur à lait classique
1 Laissez complètement refroidir le mousseur à lait.
2 Inclinez le mousseur à lait vers la gauche et retirez la partie métallique et la partie en silicone (Fig.
43).
3 Désassemblez les troispièces (Fig. 44) et rincez-les à l’eau fraîche ou nettoyez-les au lave-
vaisselle.
et utilisez les flèches vers le haut ou vers le bas pour
 Loading...