

Philips 42PF9936D/78M, 42PF9936/37B, 42PF9936/37, 42PF9936, 42-WIDESCREEN FLAT TV DIGITAL CRYSTAL CLEAR 42PF9936 User Manual

tv
cover 2265.1 17-12-2003 13:10 Pagina 1

cover 2265.1 17-12-2003 13:10 Pagina 2
Once your PHILIPS purchase is registered, you’re eligible to receive all the privileges of owning a
PHILIPS product. So complete and return the Warranty Registration Card enclosed with your
purchase at once, and take advantage of these important benefits.
Return your Warranty Registration card today to ensure
you receive all the
benefits
you’re entitled to.
For Customer Use
Enter below the Serial No., which is
located on the rear of the cabinet. Retain
this information for future reference.
Model No. __________________________
Serial No. __________________________
Congratulations on your purchase, and
welcome to the “family!”
Dear PHILIPS product owner:
Thank you for your confidence in PHILIPS.You’ve selected one of
the best-built, best-backed products available today.And we’ll do
everything in our power to keep you happy with your
purchase for many years to come.
As a member of the PHILIPS “family,” you’re entitled to
protection by one of the most comprehensive warranties and
outstanding service networks in the industry.
What’s more, your purchase guarantees you’ll receive all the
information and special offers for which you qualify, plus easy
access to accessories from our convenient home shopping
network.
And most importantly you can count on our uncompromising
commitment to your total satisfaction.
All of this is our way of saying welcome-and thanks for investing
in a PHILIPS product.
Sincerely,
Lawrence J. Blanford
President and Chief Executive Officer
P.S. Remember, to get the most from your PHILIPS
product, you must return your Warranty
Registration Card within 10 days. So please mail
it to us right now!
Know these
safety symbols
This “bolt of lightning” indicates
uninsulated material within your unit
may cause an electrical shock. For the
safety of everyone in your household, please
do not remove product
covering.
The “exclamation point” calls attention
to features for which you should read
the enclosed literature closely to
prevent operating and maintenance
problems.
WARNING:TO PREVENT FIRE OR
SHOCK HAZARD, DO NOT EXPOSE THIS
EQUIPMENT TO RAIN OR MOISTURE.
CAUTION: To prevent electric shock,
match wide blade of plug to wide slot, fully
insert.
ATTENTION:Pour éviter les choc
électriques, introduire la lame la plus large de
la fiche dans la borne correspondante de la
prise et pousser jusqu’au fond.
CAUTION
RISK OF ELECTRIC SHOCK
DO NOT OPEN
CAUTION: TO REDUCE THE RISK OF ELECTRIC SHOCK, DO NOT
REMOVE COVER (OR BACK). NO USER-SERVICEABLE PARTS
INSIDE. REFER SERVICING TO QUALIFIED SERVICE PERSONNEL.
R
E
G
I
S
T
R
A
T
I
O
N
N
E
E
D
E
D
W
I
T
H
I
N
1
0
D
A
Y
S
Hurry!
Warranty
Verification
Registering your product within
10 days confirms your right to
maximum protection under the
terms and conditions of your
PHILIPS warranty.
Owner
Confirmation
Your completed Warranty
Registration Card serves as
verification of ownership in the
event of product theft or loss.
Model
Registration
Returning your Warranty Registration
Card right away guarantees you’ll
receive all the information and special
offers which you qualify for as the
owner of your model.
Visit our World Wide Web Site at http://www.philips.com
t
s
2265.1 am 17-12-2003 13:27 Pagina 1
1. Read these instructions.
2. Keep these instructions.
3. Heed all warnings.
4. Follow all instructions.
5. Do not use this apparatus near water.
6. Clean only with a dry cloth.
7. Do not block any of the ventilation openings. Install in
accordance with the manufacturers instructions.
8. Do not install near any heat sources such as radiators, heat
registers, stoves, or other apparatus (including amplifiers)
that produce heat.
9. Do not defeat the safety purpose of the polarized or
grounding-type plug. A polarized plug has two blades with
one wider than the other. A grounding type plug has two
blades and third grounding prong.The wide blade or third
prong are provided for your safety.When the provided plug
does not fit into your outlet, consult an electrician for
replacement of the obsolete outlet.
10. Protect the power cord from being walked on or pinched
particularly at plugs, convenience receptacles, and the point
where they exit from the apparatus.
11. Only use attachments/accessories specified by the
manufacturer.
12. Use only with a cart, stand,tripod, bracket, or
table specified by the manufacturer, or sold with
the apparatus.When a cart is used, use caution
when moving the cart/apparatus combination to avoid injury
from tip-over.
13. Unplug this apparatus during lightning storms or when
unused for long periods of time.
14. Refer all servicing to qualified service personnel. Servicing is
required when the apparatus has been damaged in any way,
such as power-supply cord or plug is damaged, liquid has
been spilled or objects have fallen into apparatus, the
apparatus has been exposed to rain or moisture, does not
operate normally,or has been dropped.
15. This product may contain lead or mercury. Disposal of these
materials may be regulated due to environmental
considerations. For disposal or recycling information, please
contact your local authorities or the Electronic Industries
Alliance: www.eiae.org.
16. Damage Requiring Service - The appliance should be
serviced by qualified service personnel when:
A. The power supply cord or the plug has been damaged;
or
B. Objects have fallen, or liquid has been spilled into the
appliance; or
C. The appliance has been exposed to rain;or
D. The appliance does not appear to operate normally or
exhibits a marked change in performance; or
E. The appliance has been dropped, or the enclosure
damaged.
17. Tilt/Stability - All televisions must comply with
recommended international global safety standards for tilt
and stability properties of its cabinets design.
• Do not compromise these design standards by applying
excessive pull force to the front,or top,of the cabinet
which could ultimately overturn the product.
• Also, do not endanger yourself, or children, by placing
electronic equipment/toys on the top of the cabinet.
Such items could unsuspectingly fall from the top of
the set and cause product damage and/or personal
injury.
18. Wall Mounting - The appliance should be mounted to a
wall only as recommended by the manufacturer.
19. Pow er Lines - An outdoor antenna should be located away
from power lines.
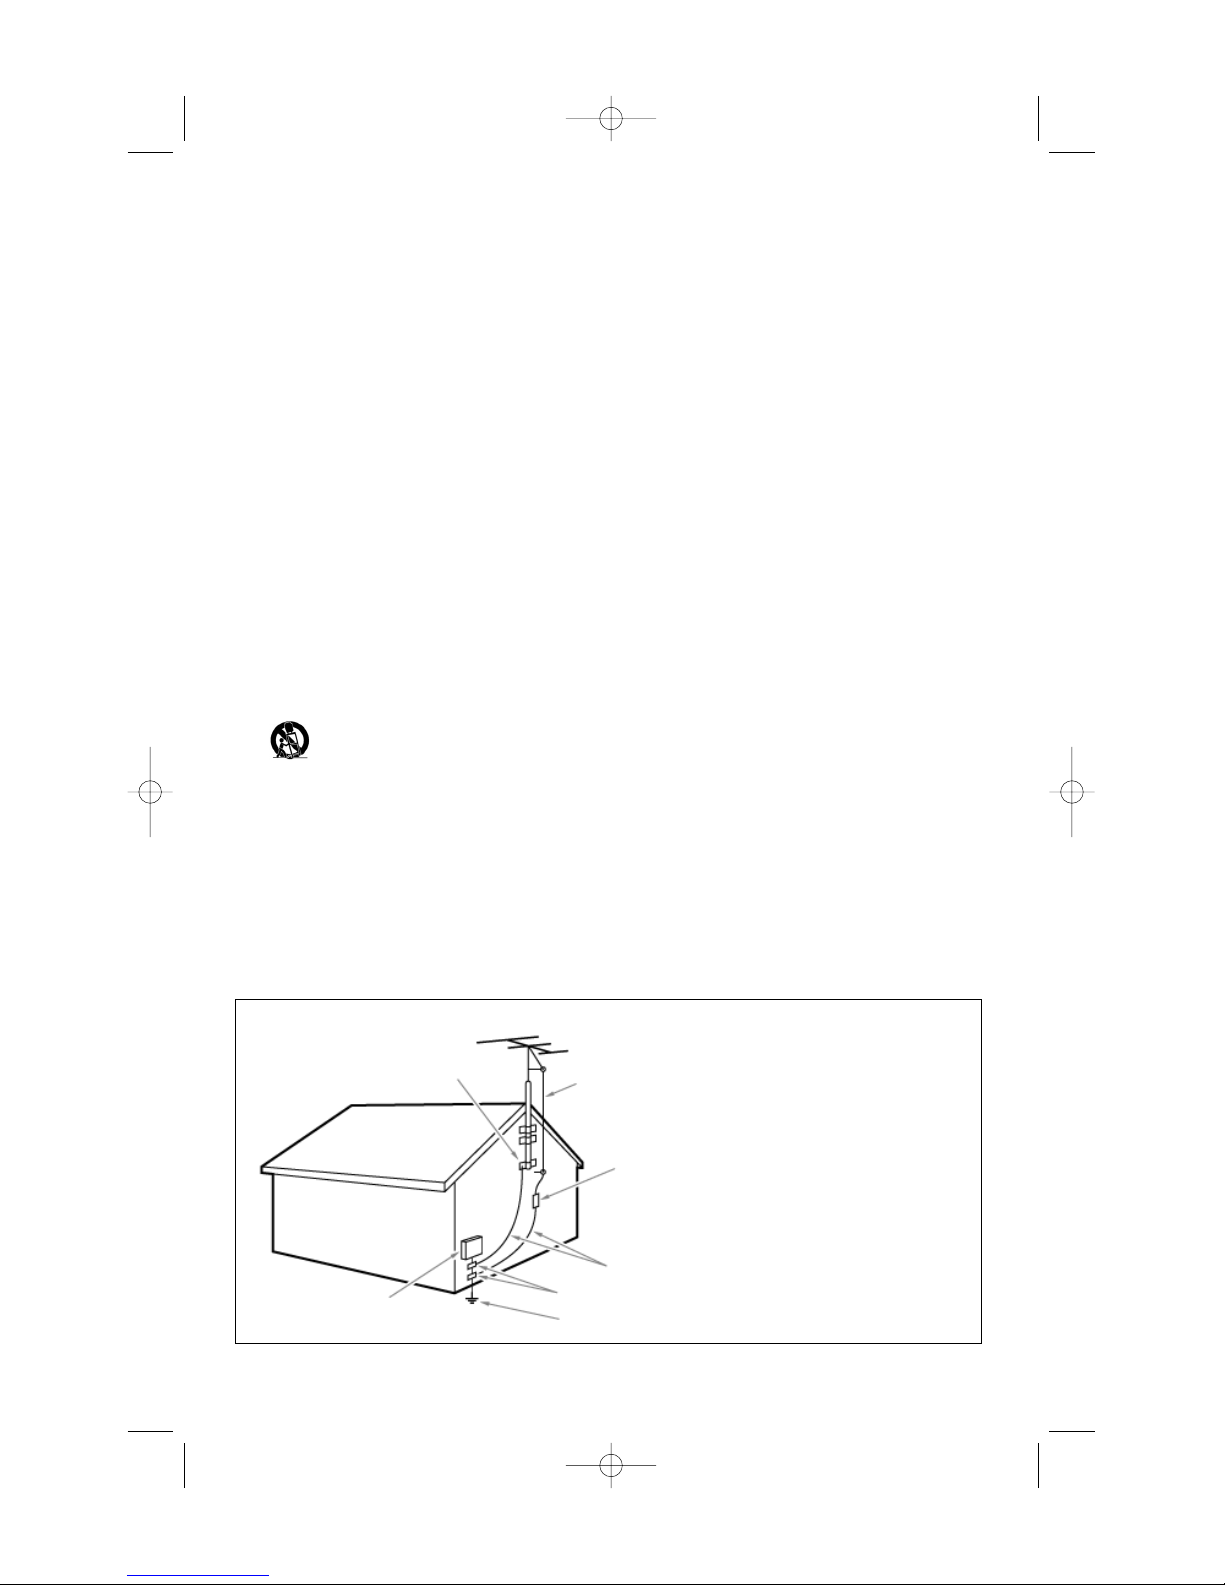
20. Outdoor Antenna Grounding - If an outside antenna is
connected to the receiver, be sure the antenna system is
grounded so as to provide some protection against voltage
surges and built up static charges.
Section 810 of the National Electric Code, ANSI/NFPA No.
70-1984, provides information with respect to proper
grounding of the mats and supporting structure grounding
of the lead-in wire to an antenna-discharge unit, size of
grounding connectors, location of antenna-discharge unit,
connection to grounding electrodes and requirements for
the grounding electrode. See Figure below.
21. Objects and Liquid Entry - Care should be taken so that
objects do not fall and liquids are not spilled into the
enclosure through openings.
IMPORTANT SAFETY INSTRUCTIONS
Read before operating equipment
Note to the CATV system installer: this reminder is provided to call the CATV system installer’s attention to Article 820-40
of the NEC that provides guidelines for proper grounding and,in particular, specifies that the cable ground shall be connected to
the grounding system of the building, as close to the point of cable entry as practical.
EXAMPLE OF ANTENNA GROUNDING AS PER NATIONAL ELECTRICAL CODE (NEC)
GROUND CLAMP
ANTENNA LEAD IN WIRE
ANTENNA DISCHARGE UNIT (NEC SETION 810-20)
GROUNDING CONDUCTORS
(NEC SETION 810-21)
GROUND CLAMPS
POWER SERVICE GROUNDING ELECTRODE SYSTEM
(NEC ART 250, PART H )
ELECTRIC SERVICE EQUPMENT
2265.1 am 17-12-2003 13:27 Pagina 2
1
Contents
Preparation ...................................................................................... 2
Buttons on top of the TV ............................................................. 2
Use of the remote control ....................................................... 3-4
To use the menus ........................................................................... 4
Select the menu language ............................................................. 5
Store TV channels .......................................................................... 5
Select TV settings ........................................................................ 6-7
Demo menu ..................................................................................... 8
Installation
TV menu
Picture menu ........................................................................ 8-9
Sound menu ........................................................................... 10
Features menu....................................................................... 10
Closed Captions ............................................................. 10
Channels menu ................................................................ 11-13
Connect Accessory Devices
Connecting accessory devices ........................................... 14-18
Selecting connected devices ...................................................... 18
Audio and Video equipment buttons ....................................... 19
Record with your recorder ....................................................... 19
Setting the Remote Control to work accessory devices ... 20
Remote Control Direct Entry Codes for
accessory devices ............................................................ 20-22
Before Calling Service ........................................................... 23-24
Tips ................................................................................................ 24
Service/Warranty Information ............................................ 25-27
Operation
R End of life directives
Philips is paying a lot of attention to
producing environmentally-friendly in
green focal areas.Your new TV contains
materials which can be recycled and
reused. At the end of its life specialized
companies can dismantle the
discarded TV to concentrate the
reusable materials and to minimize
the amount of materials to be
disposed of.
Please ensure you dispose of your old
TV according to local regulations.
Help?
If this instruction manual does
not give an answer or if ‘Before
Calling Service’ do not solve your
TV problem, you can call your
Local Philips Customer or Service
Centre. See the supplied Worldwide guarantee booklet.
Please, have the Model and
Product number which you can
find at the back of your
television set or on the
packaging, ready, before calling
the Philips helpline.
(800-531-0039)
Model: 42PF9936/37
Product No: ............................................
EnglishFrançaisEspañol
2265.1 am 17-12-2003 13:27 Pagina 1
2
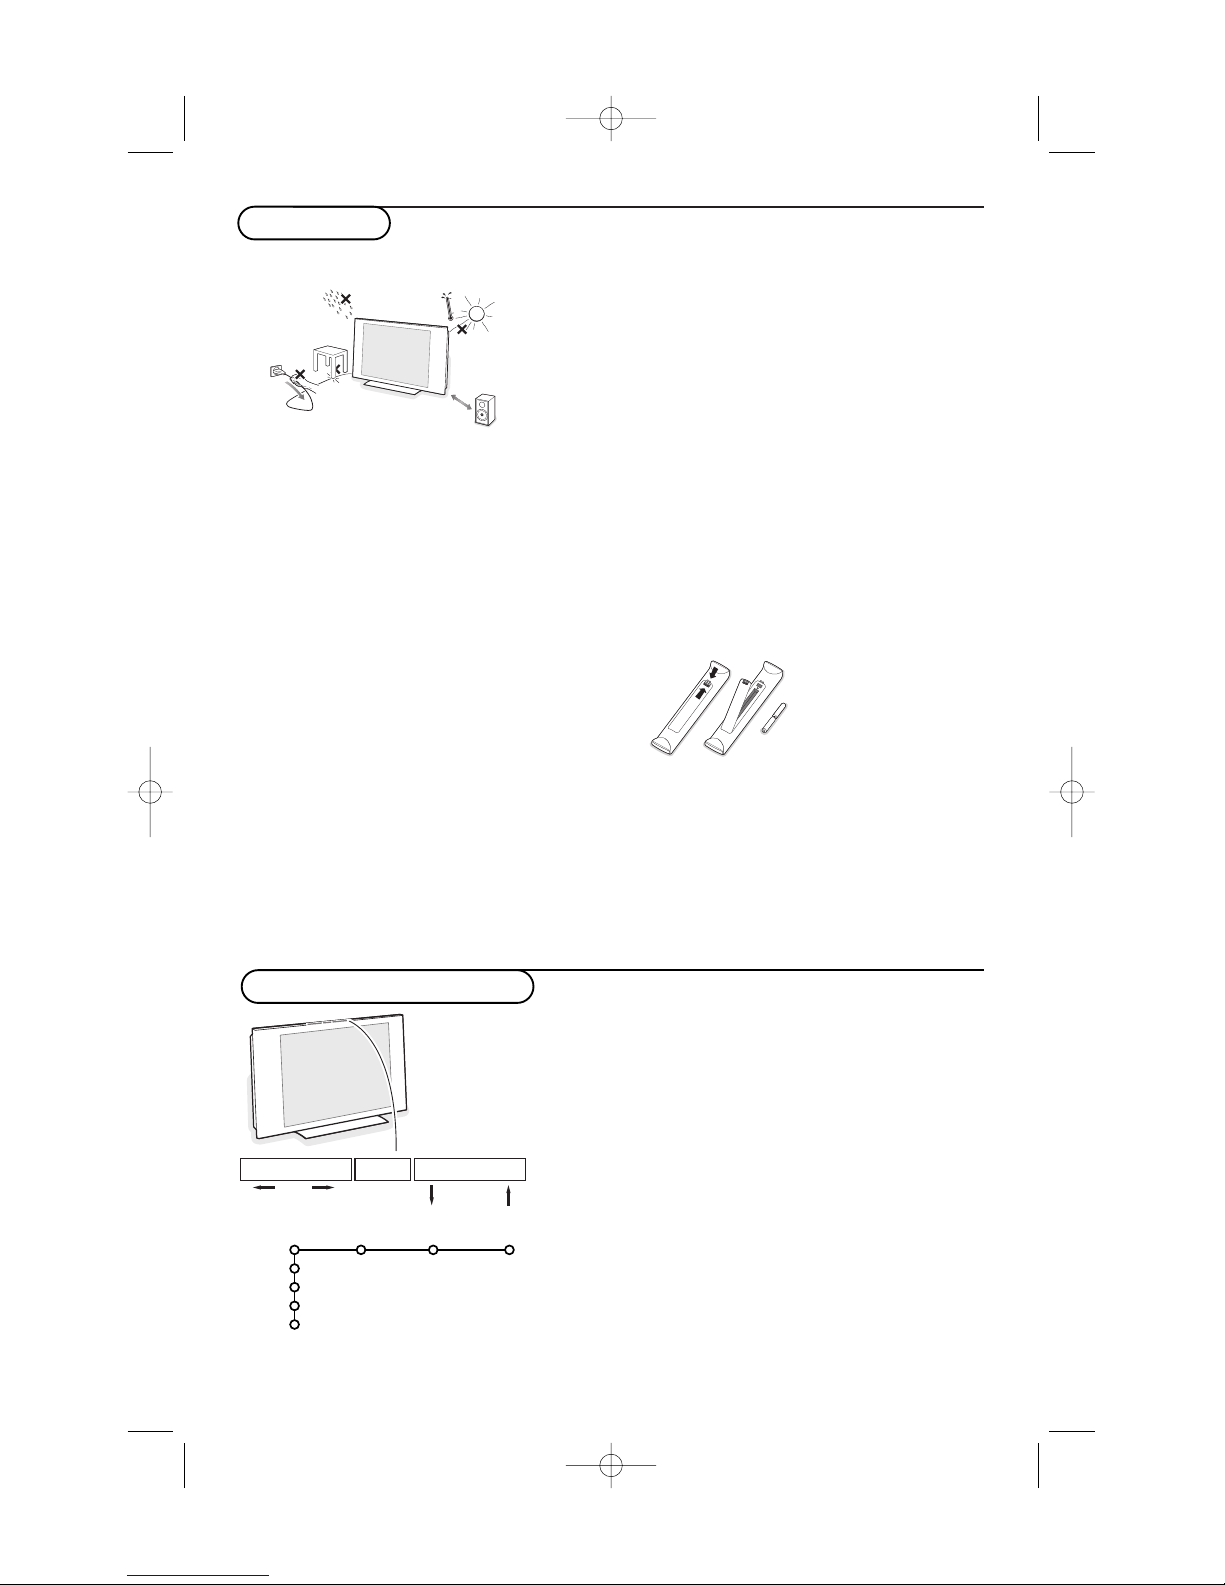
Preparation
Do not insert the power plug in a wall socket
before all connections are made.
& Wall mounting instructions
For the wall mounting instructions follow the
illustrated steps printed on the separate
template. Make sure that the wall mount is
being fixed securely enough so that it meets
safety standards.The weight of the TV (excl.
packaging) is about 87 Lbs. How to mount the
supplied stand, see the separate leaflet.
Note: not supplied stands are optional accessories.
Consult your dealer.
é Place or hang the TV wherever you want,but
make sure that air can circulate freely through
the ventilation slots. Do not install the TV in a
confined space such as a book case or a similar
unit.
To prevent any unsafe situations, no naked
flame sources, such as lighted candles, should
be placed on or in the vicinity. Avoid heat,
direct sunlight and exposure to rain or water.
The equipment shall not be exposed to
dripping or splashing and no objects filled with
liquids, such as vases, shall be placed on it.
“ Insert the aerial plug firmly into the aerial
socket x at the bottom of the TV. For best
picture quality use the suppressor-aerial cable
supplied.
‘ To connect your computer, see p. 17.
To connect other accessory devices, see p. 14.
In order to obtain the best result, please use
only the supplied aerial cables between the TV
and videorecorder, and between videorecorder
and aerial socket.
( Insert the power plug supplied into the mains
at the bottom of the TV and in the wall socket.
Refer to the rear of the TV set for the correct
operation voltage. Consult your local dealer if
your AC power supply is different.To prevent
damaging the power (AC) cord which could
cause a fire or electric shock, do not place the
TV on the cord.
§ Remote control: Insert the 2 batteries
supplied (Type R6-1,5V).
The batteries supplied
do not contain the heavy
metals mercury and
cadmium. Please check
on how to dispose of
exhausted batteries
according to local
regulations.
è Turn the TV on :Press the power button B
at the right side of the TV.
A green LED and the screen light on.
The green LED blinks every time you press a
button on the remote control.When you turn on
your set for the first time, the menu language
automatically appears on the screen. Alternately the
explanation appears in different languages.
1m
min.
Buttons on top of the TV
Should your remote be lost or broken you can still change
some of the basic settings with the buttons on top of your
TV.
Press:
• the V - or + button to adjust the volume;
• the
-P/CH+ buttons to select the TV channels or sources.
The
MENU/OK button can be used to summon the main
menu without the remote control.
Use:
• the V - and + buttons and the
P/CH- and P/CH+ buttons
to select menu items in the directions as shown;
• the
MENU/OK button to confirm your selection.
Note:
When activated via the
MENU/OK button on top of the TV, only
Exit lets you remove the menu.
Navigate to
Exit and press the MENU/OK button.
MENU/OK - V + - P/CH +
TV
Setup
Install
Demo
Exit
Picture Sound Features
2265.1 am 17-12-2003 13:27 Pagina 2
3
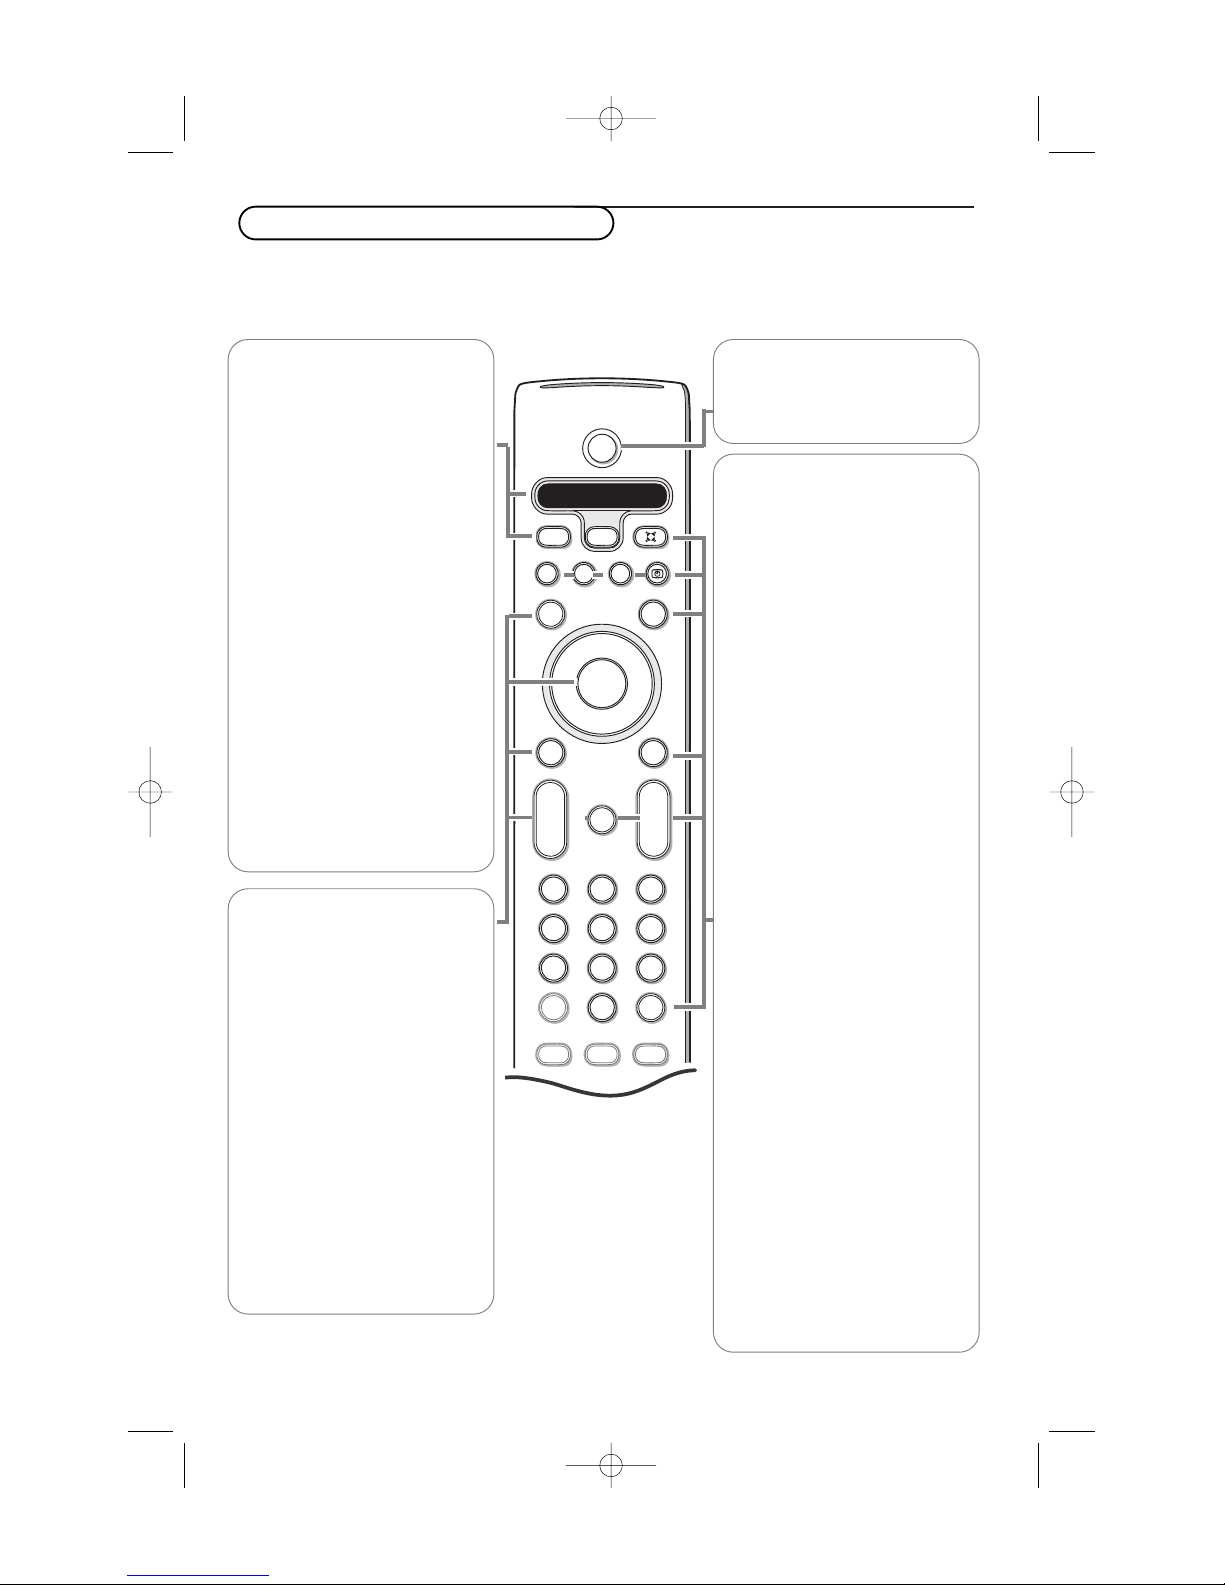
Use of the remote control RC4305
3
Note: For most buttons pressing a button once will activate the function. Pressing a second time will de-activate it.
When a button enables multiple options, a small list will be shown. Press repeatedly to select the next item in the
list.The list will be removed automatically after 4 seconds or press
OK to remove immediately.
B
¬
+
-
V
+
-
CH
v
b
i
0
h
q
Select
VCR DVD SAT AMP
MENU
OK
123
456
789
0
Ò®‡π
†
Active Control
S
®
®
®
®
x
CBL
CC
l
l
x no function
OK Press this button to activate
your choice or to confirm when
in the menus.
S Freeze
To freeze the picture.
Dependent on the input signal,
the function may not be possible.
V Volume
Press + or - to adjust the
volume.
0/9 Digit buttons
To select a TV channel.
For a two digit program number,
enter the second digit before the
dash disappears.To switch
immediately to a selected one
digit TV channel, keep the digit
button pressed a bit longer.
v Press this button repeatedly to
select
AV1 , AV 2, AV3, AV4, DVI
or TV channels when in TV
mode, according to where you
connected the accessory devices
(p. 18).
CBL VCR DVD SAT AMP
Press the Select button
repeatedly to select one of the
system modes in which the
remote control can be used.
If no action is being undertaken
within 2 seconds, the remote
control returns to TV mode.
After an action in the selected
system mode the remote control
will remain in this mode for 60
seconds and will then return to
TV mode.
l Backlighting button
Press the Select button more
than 2 seconds.The backlighting
of the buttons
V, CH, ¬ and
the digit buttons stays on for 5
seconds after pressing the
button.
B Power
Press to turn on/off the TV.
The TV is never powered off completely
unless it is physically unplugged.
® Ò ‡ π †
Audio and Video equipment buttons
See p. 19.
U Time display
Q Sound mode
Incredible surround
With stereo transmission, and
when Incredible surround is
selected, it seems as though the
loudspeakers are spread further
apart from one another.
Virtual Dolby surround
Optimal with Dolby surround
signals. Enables you to experience
the effect of Dolby surround Pro
Logic, reproducing a rear sound
effect. See Sound menu, 3D
effect, p. 10.
Note:You can make the same
selection in the Sound menu, Sound
mode, p. 10.
l Alternate audio
When you tune a channel where
SAP (Second Audio Program) is
available, you can toggle between
Main and
SAP. If not available,
only Main can be selected.
CC Closed Caption
On/Off/On during mute
see p. 10
MENU Main menu on/off
see p. 8.
¬ Mute
Interrupt the sound or restore it.
CH Channel selection
To browse through the TV
channels or sources stored.
0 Previous TV channel
Press to display the previously
selected TV channel.
2265.1 am 17-12-2003 13:27 Pagina 3
4
To use the menus
& Press the MENU button on the remote control to summon
the main menu.At any moment you can exit the menu by
pressing the MENU button again.
é Use the cursor in the up/down direction to select the TV,
Settings, Demo or Install menu.
Note: Sometimes not all the menu items are visible on the screen
(indicated by a cluster of blue balls). Press the cursor down to
reveal all items.
“ Use the cursor in the left/right direction to select the menu
item.
‘ Use the cursor up/down again to select the control you
want to select or to adjust.
Note: Items temporary not available or not relevant are displayed
in a light grey color and cannot be selected.
B
v
Select
VCR DVD SAT AMP
MENU
OK
Ò®‡π
†
S
®
®
®
®
x
CBL
CC
l
l
cursor to select
adjustments
OK button to
activate
return or switch
main menu on/off
B
¬
+
-
V
+
-
CH
v
b
i
0
h
q
Select
VCR DVD SAT AMP
MENU
OK
123
456
789
0
Ò®‡π
†
Active Control
S
®
®
®
®
x
CBL
CC
l
l
iDisplay information
Press to display (when available) information about the selected TV
channel and program.
Menu/Remote control info
When a menu is on screen, press i to display info on the selected
menu item.While the menu info is displayed, press any button to display
remote control info.The normal function of the button is not executed.
bDual screen
& Press the b or æ button.
Press the b button to show Teletext or Teletext Guide on the right half
of the screen.
é Move the puck to the blue ball in the left screen.
Press +P- to select another TV channel.
“ Press the q button to select a vertical squeezed or a non vertical
squeezed picture size.
‘ Press the b button to switch off Dual screen.
Active screen selection
When in dual screen picture, enter the desired page number with the -P+
button, then press the MENU button, then select the left screen (with
the blue ball at the top).
You can now select a compressed or full screen view of picture with the
q button.
h Active control see p. 9.
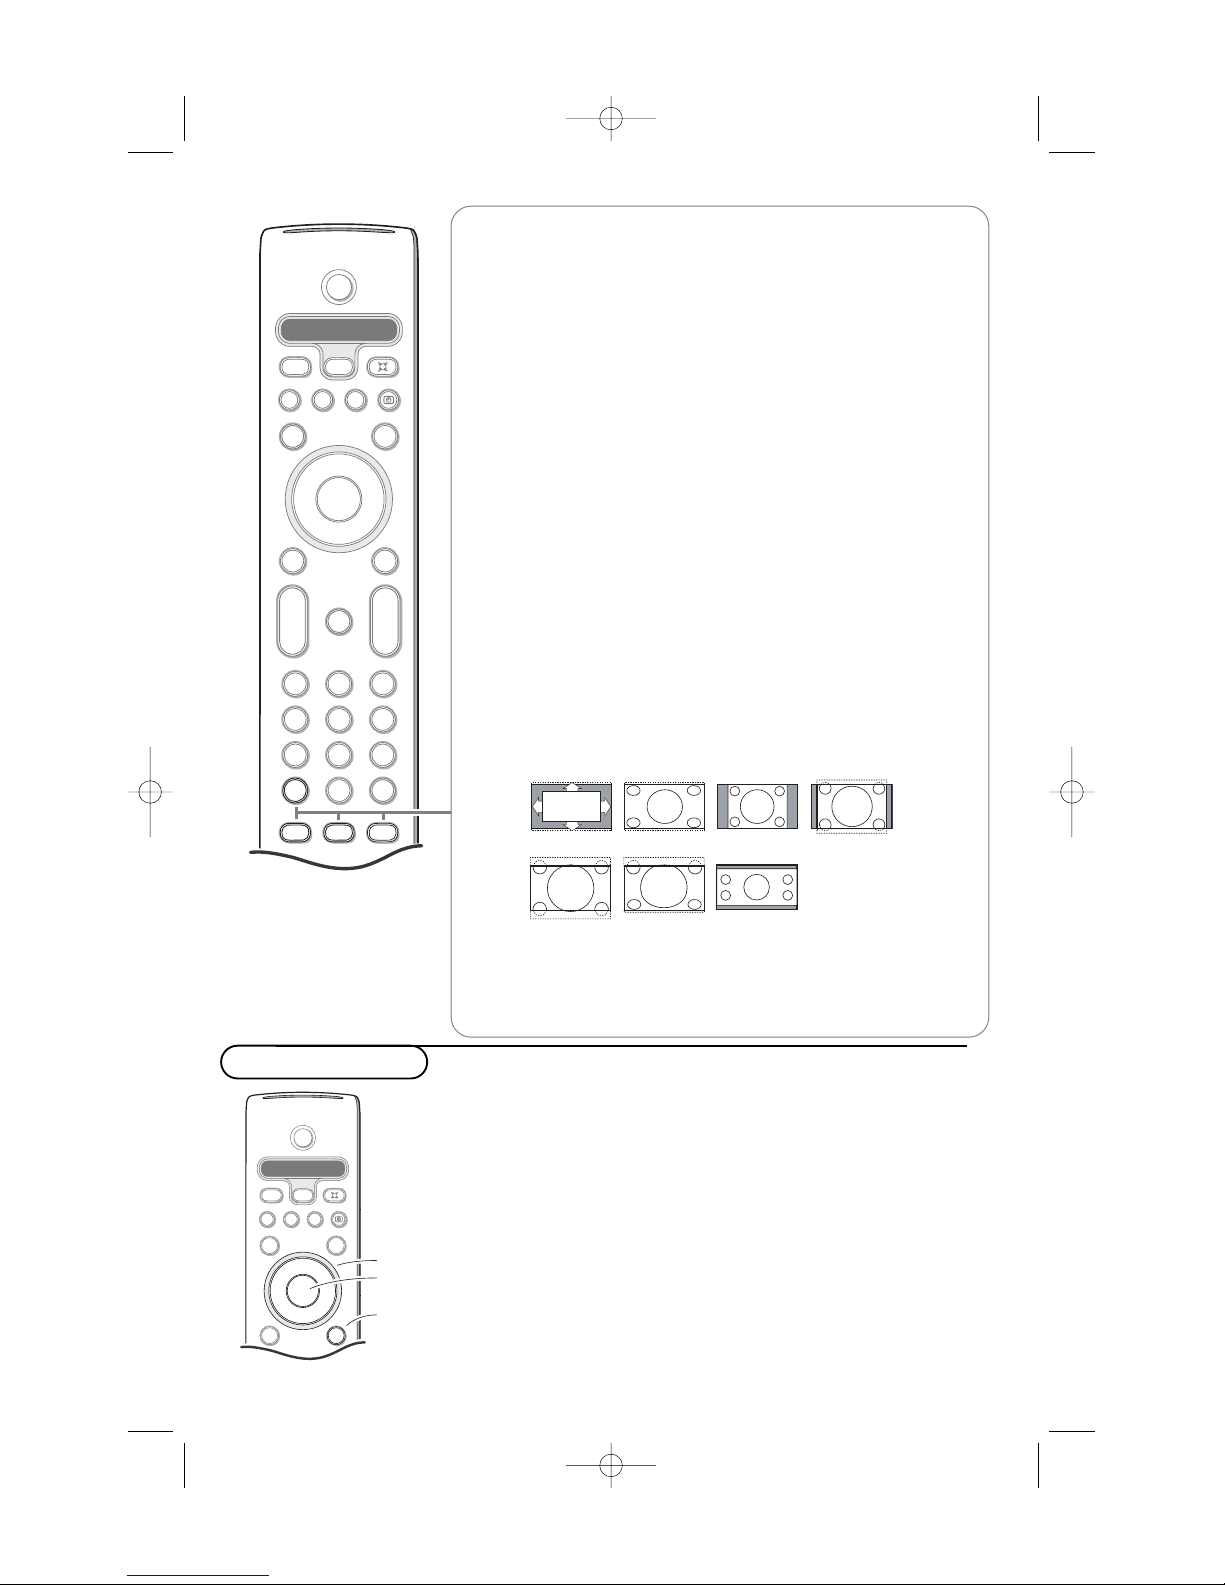
qPicture format
Press this button to summon a list of available display formats for
showing video images in the traditional 4:3 proportions.
Press this button repeatedly or press the cursor up/down to select
another picture format:Automatic, Super zoom, 4:3,Movie expand 14:9,
Movie expand 16:9, 16:9 subtitle or Wide screen.
Automatic makes the picture fill the screen as much as possible.
Super zoom removes the black bars on the sides of 4:3 programs with
minimal distortion.
When in Movie expand 14:9, Movie expand 16:9 or Super zoom picture
format, you can make subtitles visible with the cursor up/down.
Automatic Super zoom 4:3 Movie expand 14:9
Movie expand 16:9
16:9 subtitle
Wide screen
2265.1 am 17-12-2003 13:27 Pagina 4
5
Installation
& Press the MENU button on the remote control.
é Use the cursor down to select Install.
“ Use the cursor right to select Language.
Follow the instructions on screen.
‘ Use the cursor up/down to select your preferred language
and press the
OK button to confirm your selection.
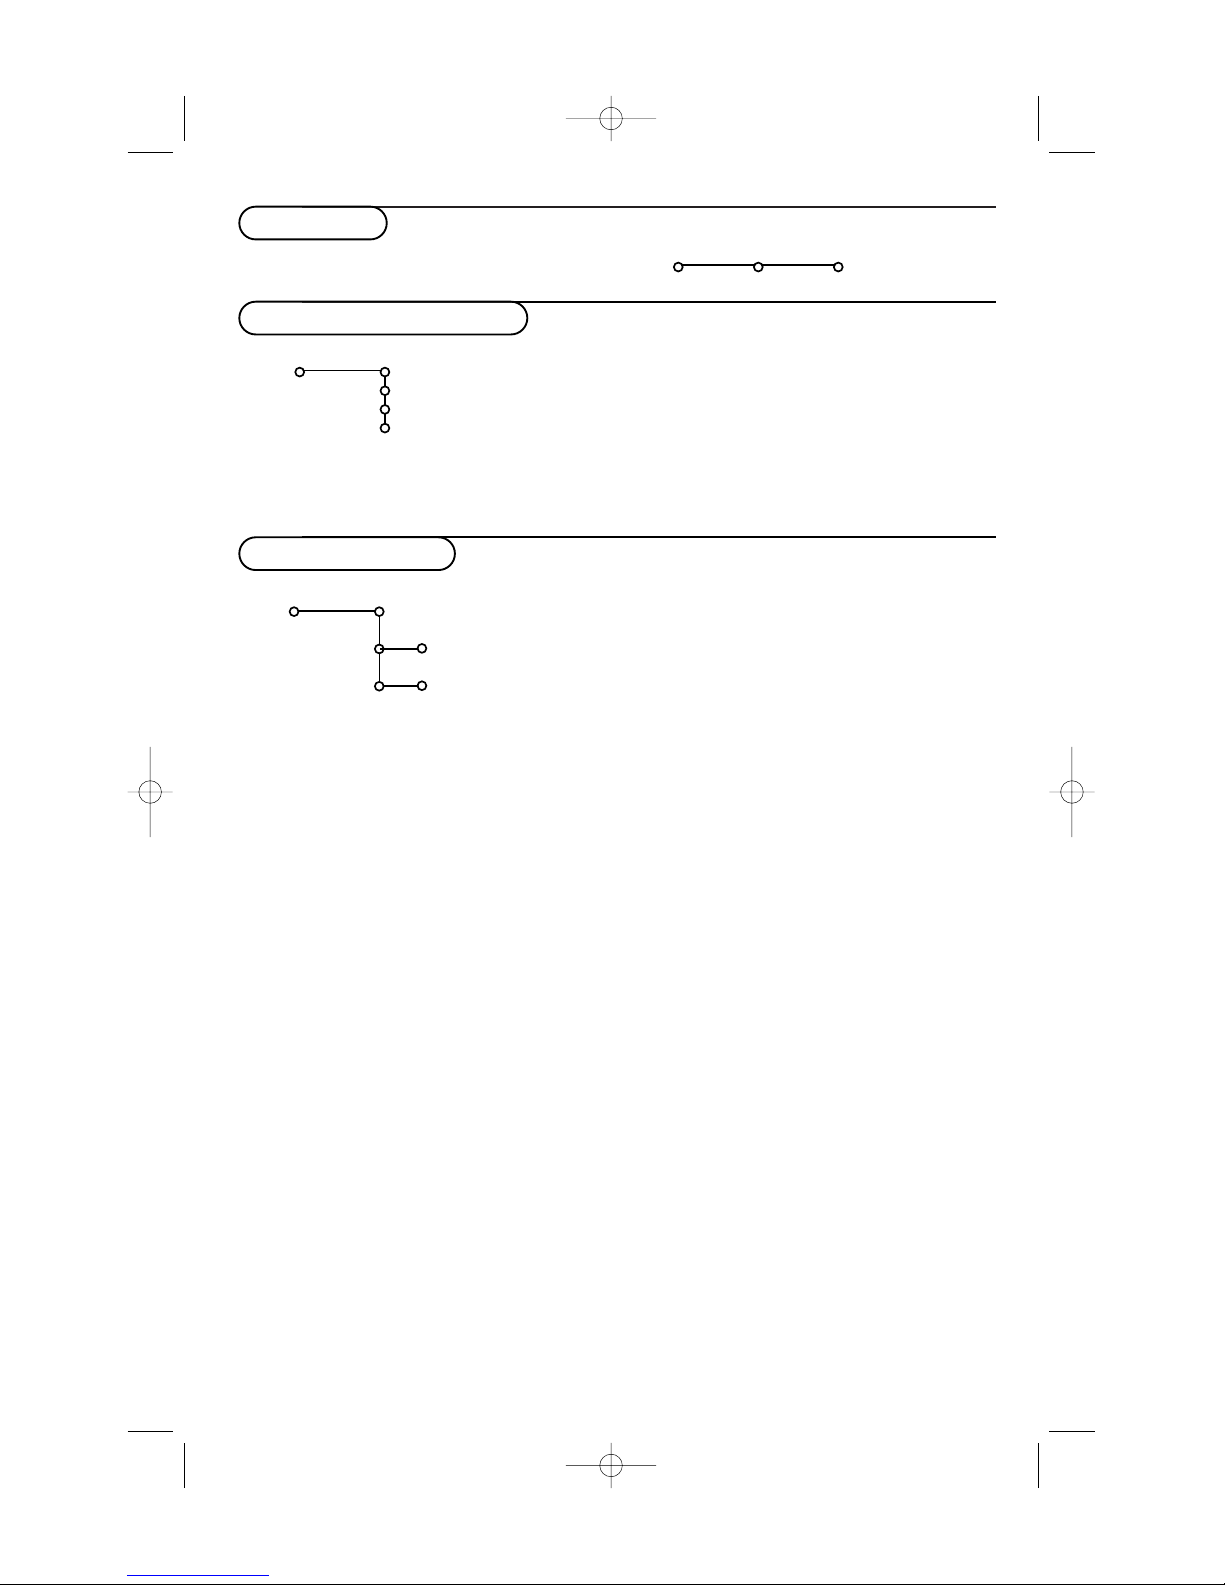
( Proceed with the Install menu.
The installation menu contains the following items:
Language
English
Français
Español
Install
Select the menu language
Store TV channels
Install
Language Autoprogram
Autoprogram
Install mode
Install
Install
Start
Antenna
Automatic
Cable
& Select Autoprogram in the Install menu.
é Press the cursor down to select Install mode.
“ Press the cursor right.
Note: It is recommended to keep the predefined
Automatic way of
autoprogramming. In case of difficulties in autoprogramming with the
automatic method, choose for Antenna or Cable whether antenna or
cable signals are present.
When
Automatic is selected, the TV will automatically detect
whether or not cable signal input is present.
When
Antenna is selected, the TV will detect antenna signals
and will search for all antenna TV channels available in your local
area.
When
Cable is selected, the TV will detect cable signals and will
search for all cable TV channels available in your local area.
‘ Press the cursor down to select Install.
Note: All channels must be unlocked in order to autoprogram. If
requested, enter your PIN code to unlock all channels. (See Channels
in the TV menu, p. 11.)
( Press the cursor right.
§ The message Searching appears and the progress of
autoprogramming is displayed.
When Autoprogramming is complete, the puck navigates to
Stop.A message appears confirming the completion together
with the total number of channels found.
Note: when you navigate to Stop before autoprogramming is
complete, you are given the option to continue.
Available channels:
- with cable: max. from 1 to 125
- off air: max. from 2 to 69
Note: In case a particular channel is too weak for the
autoprogramming to identify, after installation is complete, you should
tune to that channel by using the digit buttons on the remote control.
If the channel is not acquired, a message will appear that the channel
is not available.
2265.1 am 17-12-2003 13:27 Pagina 5
6
General
Menu background
& Select Menu Background with the cursor
down and press the cursor right.
“ Select On or Off to turn the menu background
on or off.
Reset AV settings
This function allows you to reset most of the
picture and sound settings to their predefined
factory states.
& Select
Reset AV settings with the cursor
down.
é Press OK to erase settings and reset them to
their default values.
Caption Service
Closed Captioning allows you to read the voice
content of television programs on the TV
screen. Designed to help the hearing impaired,
this feature uses on-screen ‘text boxes’ to
show dialogue and conversations while the TV
program is in progress. Captions will appear on
the screen during captioned broadcasts.
Note:The captions do not always use correct
spelling and grammar. Not all TV programs and
product commercials are made for broadcast with
Closed Caption information included. Refer to your
area’s TV program listings for the TV channels and
times of Closed Caption shows.The captioned
programs are usually noted in the TV listings with
service marks such as ‘CC’.
& Select Caption service with the cursor down.
é Press the cursor right.
“ Select the desired Caption Service:
• CC 1, 2, 3 or 4
Dialogue (and descriptions) for the action on
the captioned TV program shows on screen.
Usually CC 1 is the most used. CC 2 may be
used for alternate languages if they are being
transmitted.
•T 1,2, 3 or 4
Often used for channel guide, schedules,
bulletin board information for Closed Caption
programs, news, weather informations or
stock market reports.
Not all Caption Services are necessarily being
used by a TV channel during the transmission of a
Closed Caption program.
‘ See Closed Captions in the TV, Features menu,
see p. 10, to turn the
Caption service On or
Off.
Note:This television provides display of television
closed captioning conforming with the EIA-608
standard and in accordance with Sections 15.119
of the FCC rules.
OSD (On Screen Display)
& Select OSD with the cursor down.
é Press the cursor right to select Normal or
Minimum.
Normal to activate the continuous display of
the channel number and extended display of TV
channel and channel information on screen.
Minimum to activate the display of reduced
channel information.
See Use of the Remote Control, p. 4, Display
information.
Note:When Closed Captions is switched on, see
Features, p. 10, continuous display of the channel
number is not possible
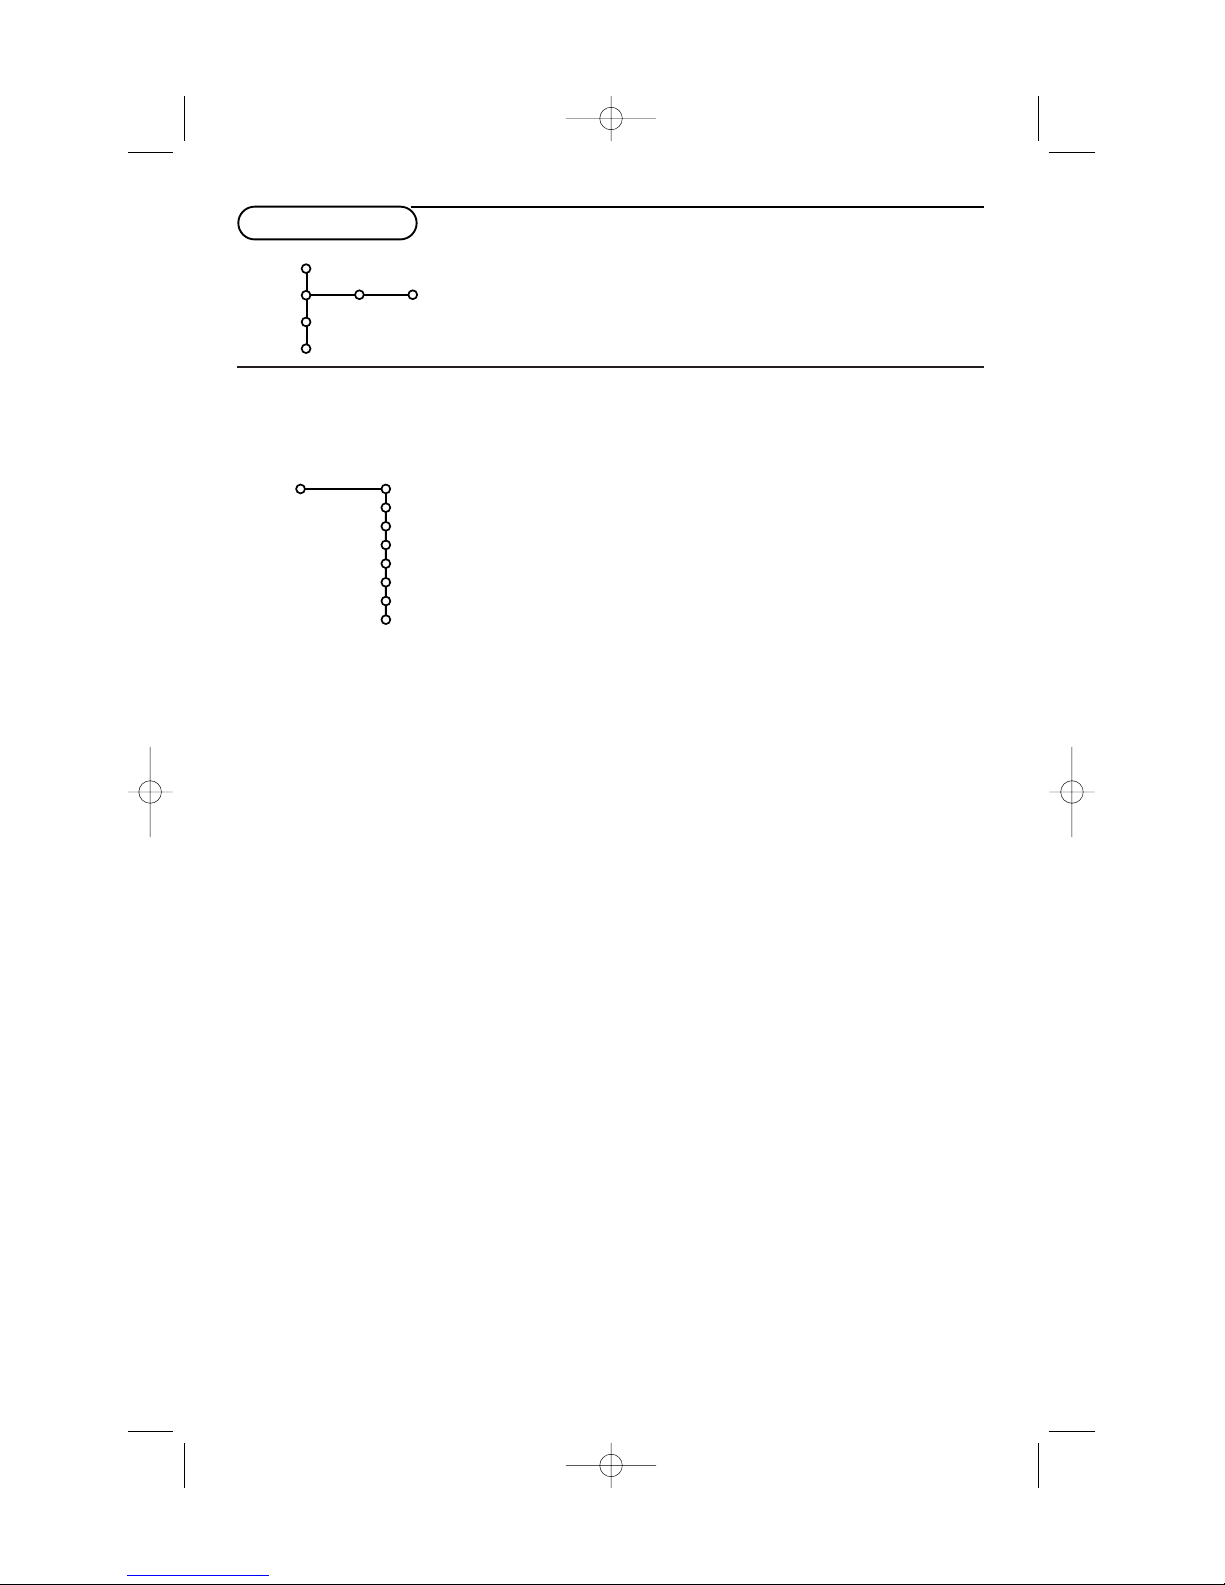
This menu allows you to change various settings that are presumably adjusted less frequently than most
other settings.
Settings menu
General Source
TV
Settings
Demo
Install
The General menu allows you to change settings that will
typically be accessed only occasionally.
The
Source menu allows you to select a source.
General
Menu background
Reset AV settings
Caption Service
OSD
Time zone
Daylight saving
Set/Change pin
Settings
2265.1 am 17-12-2003 13:27 Pagina 6
77
Time zone
This function allows you to select your local
time zone. Broadcasted time information will
correct the clock display for your local time.
& Select Time zone with the cursor down.
é Press the cursor right to select your local time
zone.
Daylight saving
Daylight saving time is automatically set by specially
broadcasted signals.This menu item allows you to
disable the automatic setting of daylight saving
time.This is useful if you live in an area or state
where daylight saving is not applied, but you receive
channels from other areas where daylight saving
signals are broadcasted.
& Select Daylight saving with the cursor down.
é Press the cursor right to select Automatic for
automatic clock correction for daylight saving
time, based on specially broadcasted signals.
“ Select Off to disable automatic clock
correction based on the specially broadcasted
signals.
Set/Change PIN
& Select Set or Change PIN with the cursor
down.
é If no PIN-code exists yet, the menu item is set
to
Set PIN.Follow the instructions on screen.
If a PIN-code has previously been entered, the
menu item is set to
Change PIN.Follow the
instructions on screen.
All number combinations from 0000 to 9999
are valid numbers.
“ The General menu reappears with a message
confirming that the PIN has been created.
Important:You have forgotten your PIN !
& Select Change PIN in the General menu and
press
OK.
é Press the cursor right to enter the overriding
PIN-code 0-7-1-1.
“ Press the cursor again and enter a new
personal 4-digit PIN code.The previous code is
erased and the new PIN-code is stored.
& Select Source with the cursor right.
é Press the cursor down to select one of the external AV inputs.
“ Press the cursor right to enter the list of types of devices
attached to the selected input.
‘ Select the accessory device with the cursor up/down.
Once you have named the source, e.g.VCR, this source will
automatically be selected when your remote control is in VCR
mode, see p. 3, and when you press the v button on the
remote control.
( Press the MENU button on the remote control to turn off all
menus on screen.
§ Press the v button on the remote control.
The Source Select menu appears in which you may select a
source or peripheral connected to be displayed on screen.
Center input - Center in volume
When you have connected a multichannel surround receiver to
the TV, the loudspeakers of the monitor can act as center
speaker, making a separate center speaker unnecessary;
Select
Center input On.
When having selected On you can adjust the Center in volume
with the cursor left/right to correct volume level differences of
the external audio receiver and speakers.
Source
AV1
AV2
AV3
YPbPr
Center input
Center in volume
Settings
Source
2265.1 am 17-12-2003 13:27 Pagina 7
 Loading...