

Philips 42 PW 9962, 42PW996299 User Manual

H
G
I
A
B
A
tv
CABLE
2
1
3
6
SUBWOOFER
CONNECTION
POWER
110V
L
R
L
R
DISPLAY VIDEO
CONNECTION
R
AUDIORAUDIO
L
AUDIO
L
AUDIO
DISPLAY POWER
CONNECTION
EXTERNAL
CENTER
SPEAKER
EXTERNAL
FRONT
SPEAKERS
REAR
SPEAKERS
INTERNAL
EXTERNAL
SPEAKERS
8
8
8
6
6
A/V
IN
6
PrPr
YPb
VH
L
R
AUDIO
A/VINA/V
IN
L
R
AUDIO
S-VIDEO
VIDEO
AUDIO
OUT
VIDEO
OUT
12
A/V
IN
5
A/V
OUT
5
A/V
IN
3
CVBS
RGB
AUDIO L/R
CABLE
VHF/UHF
75
4 5

This product was designed and manufactured to meet strict quality and
safety standards. There are, however, some installation and operation
precautions which you should be particularly aware of.
1. Read Instructions - All the safety and operating instructions
should be read before the appliance is operated.
2. Retain Instructions - The safety and operating instructions
should be retained for future reference.
3. Heed Warnings - All warnings on the appliance and in the
operating instructions should be adhered to.
4. Follow Instructions - All operating and use instructions should
be followed.
5. Water and Moisture - The appliance should not be used near
water - for example, near a bathtub, washbowl, kitchen sink,
laundry tub, in a wet basement or near a swimming pool, etc.
6. Carts and Stands - The appliance should be used only with a
cart or stand that is recommended by the manufacturer.
6A. An appliance and cart combination should be moved
with care. Quick stops, excessive force, and uneven
surfaces may cause the appliance and cart combination
to overturn.
7. Wall or Ceiling Mounting - The appliance should be mounted
to a wall or ceiling only as recommended by the manufacturer.
8. Ventilation - The appliance should be situated so that its location
or position does not interfere with its proper ventilation. For
example, the appliance should not be situated on a bed, sofa, rug,
or similar surface that may block the ventilation openings; or,
placed in a built-in installation, such as a bookcase or cabinet that
may impede the flow of air through the ventilation openings.
9. Heat - The appliance should be situated away from heat sources
such as radiators, heat registers, stoves, or other appliances
(including amplifiers) that produce it.
10. Power Sources - The appliance should be connected to a power
supply only of the type described in the operating instructions or
as marked on the appliance.
11. Power-Cord Protection - Power supply cords should be routed
so that they are not likely to be walked on or pinched by items
placed upon or against them, paying particular attention to cords
and plugs, convenience receptacles, and the point where they exit
from the appliance.
12. Cleaning - The appliance should be cleaned only as recommended
by the manufacturer.
13. Power Lines - An outdoor antenna should be located away from
power lines.
14. Outdoor Antenna Grounding - If an outside antenna is
connected to the receiver, be sure the antenna system is grounded
so as to provide some protection against voltage surges and built
up static charges.
Section 810 of the National Electric Code, ANSI/NFPA No.70,
provides information with respect to proper grounding of the mats
and supporting structure, grounding of the lead-in wire to an
antenna discharge unit, size of grounding connectors, location of
antenna-discharge unit, connection to grounding electrodes and
requirements for the grounding electrode. See Fig. below.
15. Non-use Periods - The power cord of the appliance should be
unplugged from the outlet when left unused for a long period of
time.
16. Object and Liquid Entry - Care should be taken so that objects
do not fall and liquids are not spilled into the enclosure through
openings.
17. Damage Requiring Service - The appliance should be serviced
by qualified service personnel when:
A. The power supply cord or the plug has been damaged; or
B. Objects have fallen, or liquid has been spilled into the appliance;
or
C. The appliance has been exposed to rain; or
D. The appliance does not appear to operate normally or exhibits
a marked change in performance; or
E. The appliance has been dropped, or the enclosure damaged.
18. Servicing - The user should not attempt to service the appliance
beyond that described in the operating instructions. All other
servicing should be referred to qualified service personnel.
19. Alternate Warnings - This product is equipped with a three-
wire grounding-type plug, a plug having a third (grounding) pin.
This plug will only fit into a grounding-type power outlet. This is a
safety feature. If you are unable to insert the plug into the outlet,
contact your electrician to replace your obsolete outlet. Do not
defeat the safety purpose of the grounding-type plug.
SAFETY INSTRUCTIONS - Read before operating equipment
Note to the CATV system installer: This reminder is provided to call the CATV system installer’s attention to Article 820-40 of the
NEC that provides guidelines for proper grounding and, in particular, specifies that the cable ground shall be connected to the grounding
system of the building, as close to the point of cable entry as practical.
ANTENNA LEAD IN WIRE
GROUND CLAMP
ELECTRIC SERVICE EQUIPMENT
GROUND CLAMPS
POWER SERVICE GROUNDING ELECTRODE SYSTEM
(NEC ART 250, PART H)
ANTENNA DISCHARGE UNIT (NEC SECTION 810-20)
GROUNDING CONDUCTORS
(NEC SECTION 810-21)

The lightning flash within a triangle tells you that the voltage inside may cause
an electrical shock. For the safety of everyone in your household, please do
not remove product covering.
The exclamation point within the triangle calls attention to features for which
you should read the enclosed literature closely to prevent operating and
maintenance problems.
WARNING : to prevent fire or shock hazard, do not expose this equipment
to rain or moisture.
Wall mounting instruction - Safety note
See supplied booklet.
Use the poster supplied as template to determine the location of the holes.
Use at least two outside holes. The distance between the two outside holes is
16”. Failing to do this may cause instability resulting in injury.
1. Wood stud installation
Drill holes into the center of the wall studs.
Be certain to center the two outside holes of the bracket over two
adjacent studs.
Attach using the two or three center holes in the plate.
2. Concrete wall installation
Drill the holes and secure the anchor bolts in accordance with the
instructions for HILTI anchor bolts. Place the mounting plate on the
anchor bolts. Place and tighten the washers and the nuts on the anchor
bolts.
FCC Compliance notice
This equipment has been tested and found to comply with the limits for a
Class A digital device, pursuant to Part 15 of the FCC Rules. These limits are
designed to provide reasonable protection against harmful interference when
the equipment is operated in a commercial environment. This equipment
generates, uses and can radiate radio frequency energy and, if not installed and
used in accordance with the instruction manual, may cause harmful
interference to radio communications. Operation of this equipment in a
residential area is likely to cause harmful interference, in which case the user
will be required to correct the interference at his own expense.
CAUTION
ATTENTION
RISK OF ELECTRIC SHOCK
DO NOT OPEN
RISQUE DE CHOC ELECTRIQUE
NE PAS OUVRIR
!
!
!

1
English
Contents
Your remote control . . . . . . . . . . . . . . . . . . . . . . . . . . . . . . . . . . . . . . . 2
Preparation . . . . . . . . . . . . . . . . . . . . . . . . . . . . . . . . . . . . . . . . . . . . . . . 3
Installation
Store TV channels . . . . . . . . . . . . . . . . . . . . . . . . . . . . . . . . . . . . . . . . . 4
Select the menu language and channel system . . . . . . . . . . . . . . . . . . . . 4
Automatic installation . . . . . . . . . . . . . . . . . . . . . . . . . . . . . . . . . . . . . . . 5
Manual installation . . . . . . . . . . . . . . . . . . . . . . . . . . . . . . . . . . . . . . . . . 5
Enter or modify a channel name . . . . . . . . . . . . . . . . . . . . . . . . . . . . . . 6
Select favorite TV channels . . . . . . . . . . . . . . . . . . . . . . . . . . . . . . . . . . 6
Install TV setup . . . . . . . . . . . . . . . . . . . . . . . . . . . . . . . . . . . . . . . . . . . . 7
The keys on the front of the receiver box . . . . . . . . . . . . . . . . . . . . . . 8
Operation
Use of the remote control . . . . . . . . . . . . . . . . . . . . . . . . . . . . . . . . . . . 9
Picture menu . . . . . . . . . . . . . . . . . . . . . . . . . . . . . . . . . . . . . . . . . . . . 11
Sound menu . . . . . . . . . . . . . . . . . . . . . . . . . . . . . . . . . . . . . . . . . . . . . 12
Features menu . . . . . . . . . . . . . . . . . . . . . . . . . . . . . . . . . . . . . . . . . . . 14
Closed Caption . . . . . . . . . . . . . . . . . . . . . . . . . . . . . . . . . . . . . . . . . . . 16
Dual Screen . . . . . . . . . . . . . . . . . . . . . . . . . . . . . . . . . . . . . . . . . . . . . 17
Peripheral equipment
Connect peripheral equipment . . . . . . . . . . . . . . . . . . . . . . . . . . . . . . 18
Select peripheral equipment . . . . . . . . . . . . . . . . . . . . . . . . . . . . . . . . . 23
Record with your videorecorder . . . . . . . . . . . . . . . . . . . . . . . . . . . . . 25
Tips . . . . . . . . . . . . . . . . . . . . . . . . . . . . . . . . . . . . . . . . . . . . . . . . . . . . 26
Index . . . . . . . . . . . . . . . . . . . . . . . . . . . . . . . . . . . . . . . . . . . . . . . . . . . 26
Conversion tables . . . . . . . . . . . . . . . . . . . . . . . . . . . . . . . . . . . . . . . . . 27
2
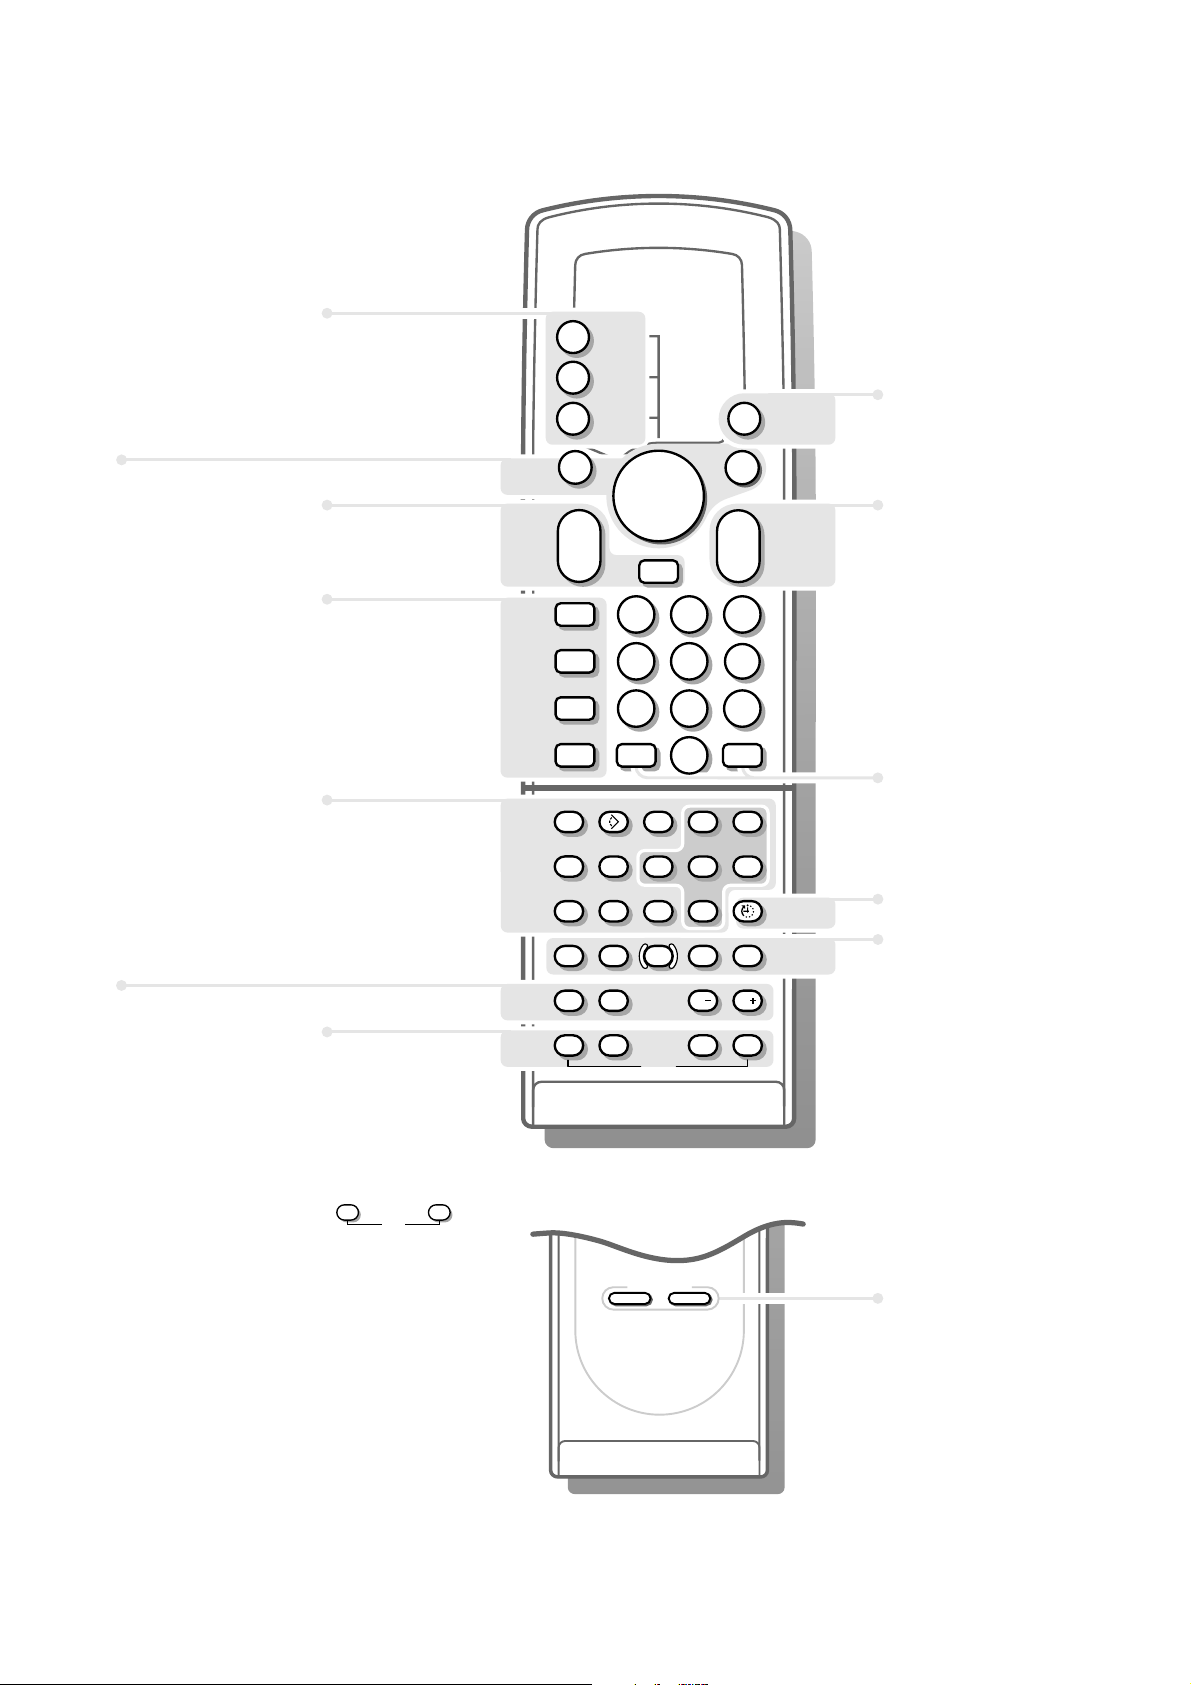
Your remote control
p. 9 V volume key
¬ switch sound
off temporarily
p. 17 b dual screen
p. 9 q picture format
p. 9 X mono-stereo-SAP
selection
p. 16 CC closed caption
p. 17
Dual Screen
c switching screens
d freeze the subpicture
CH -/+ channel selection
p. 10 S freeze the picture
P reduce image noise
fi mosaic screen
s personal preferences
p. 4 Installation
sS
yÚ
B switch to standby p. 9
i on screen information p. 9
A/CH previous TV channel p. 9
U sleeptimer p. 10
Videorecorder p. 24
‡ stop
Ò rewind
® record
† wind
π play
CH TV channel selection p. 9
PICTURE picture and sound p. 9
SOUND
settings
SMART CONTROLS
PICTURE SOUND
1
23
456
789
0
CH
+
-
+
-
V
X
q
b
¬
A/CH
i
B
VIDEO
π
π
π
π
OK
SOUND
FEATURE
PICTURE
‡
†Ò
π
CC
®
c
d
b
AUDIO
DVD
j
Ò
‡
i
MENU
o
OK
π
œ
p
π
†
CH CH
VCR
S
P
fi s
yÚ
p. 11 PICTURE picture menu
p. 12 SOUND sound menu
p. 14 FEATURE features menu
p. 23
VIDEO
selection of video
source
p. 4
A select your choice
K activate your choice
p. 24 Digital Video keys
3
Preparation
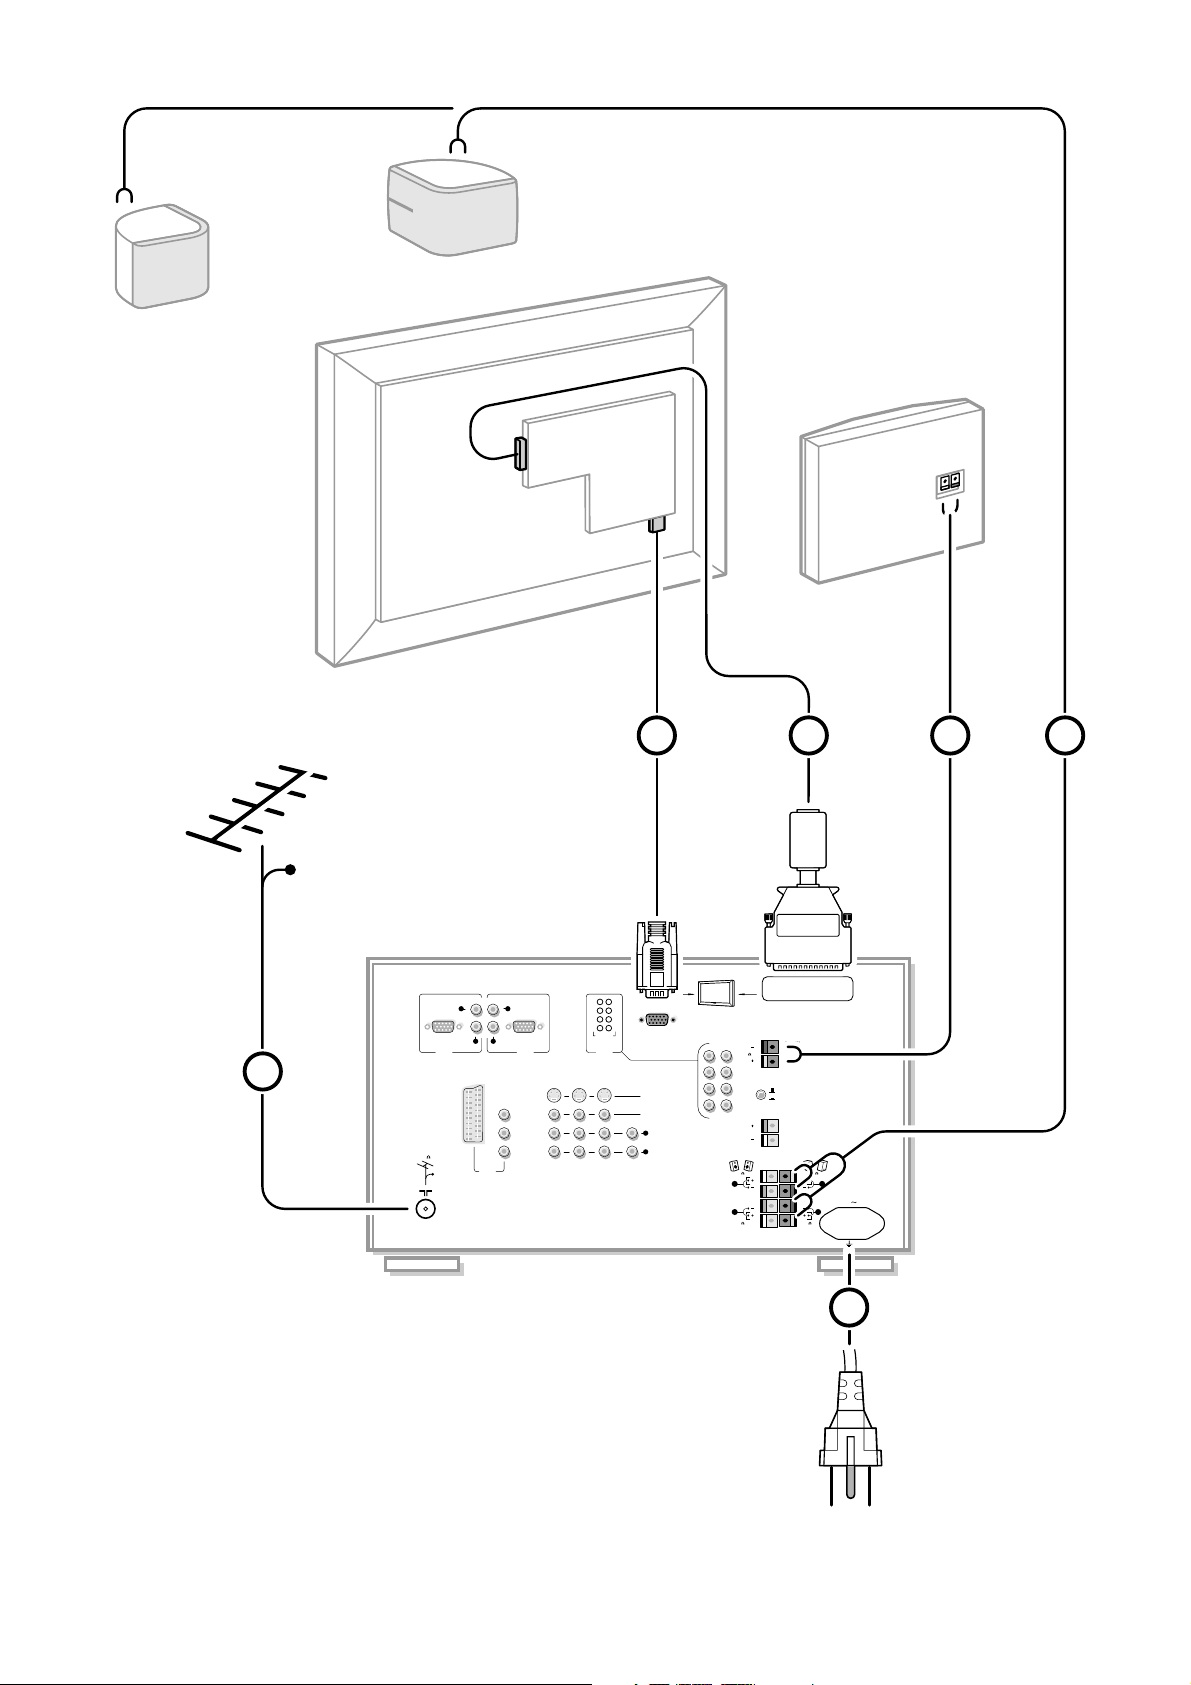
Do not insert the power plug in a wall socket before all connections
are made.
& Place the receiver box wherever you want, but leave at least 5 cm space free
all around the box for ventilation.
(E.g. on the ground, in a cupboard, behind a wall, in another room....)
é Connect one of the supplied antenna cables 1, and the
DISPLAY POWER
3, DISPLAY VIDEO 2, and SUBWOOFER 4 cables as shown in the inside
frontcover of this handbook.
Make sure all screws of the cables 2 and 3 are tighted well.
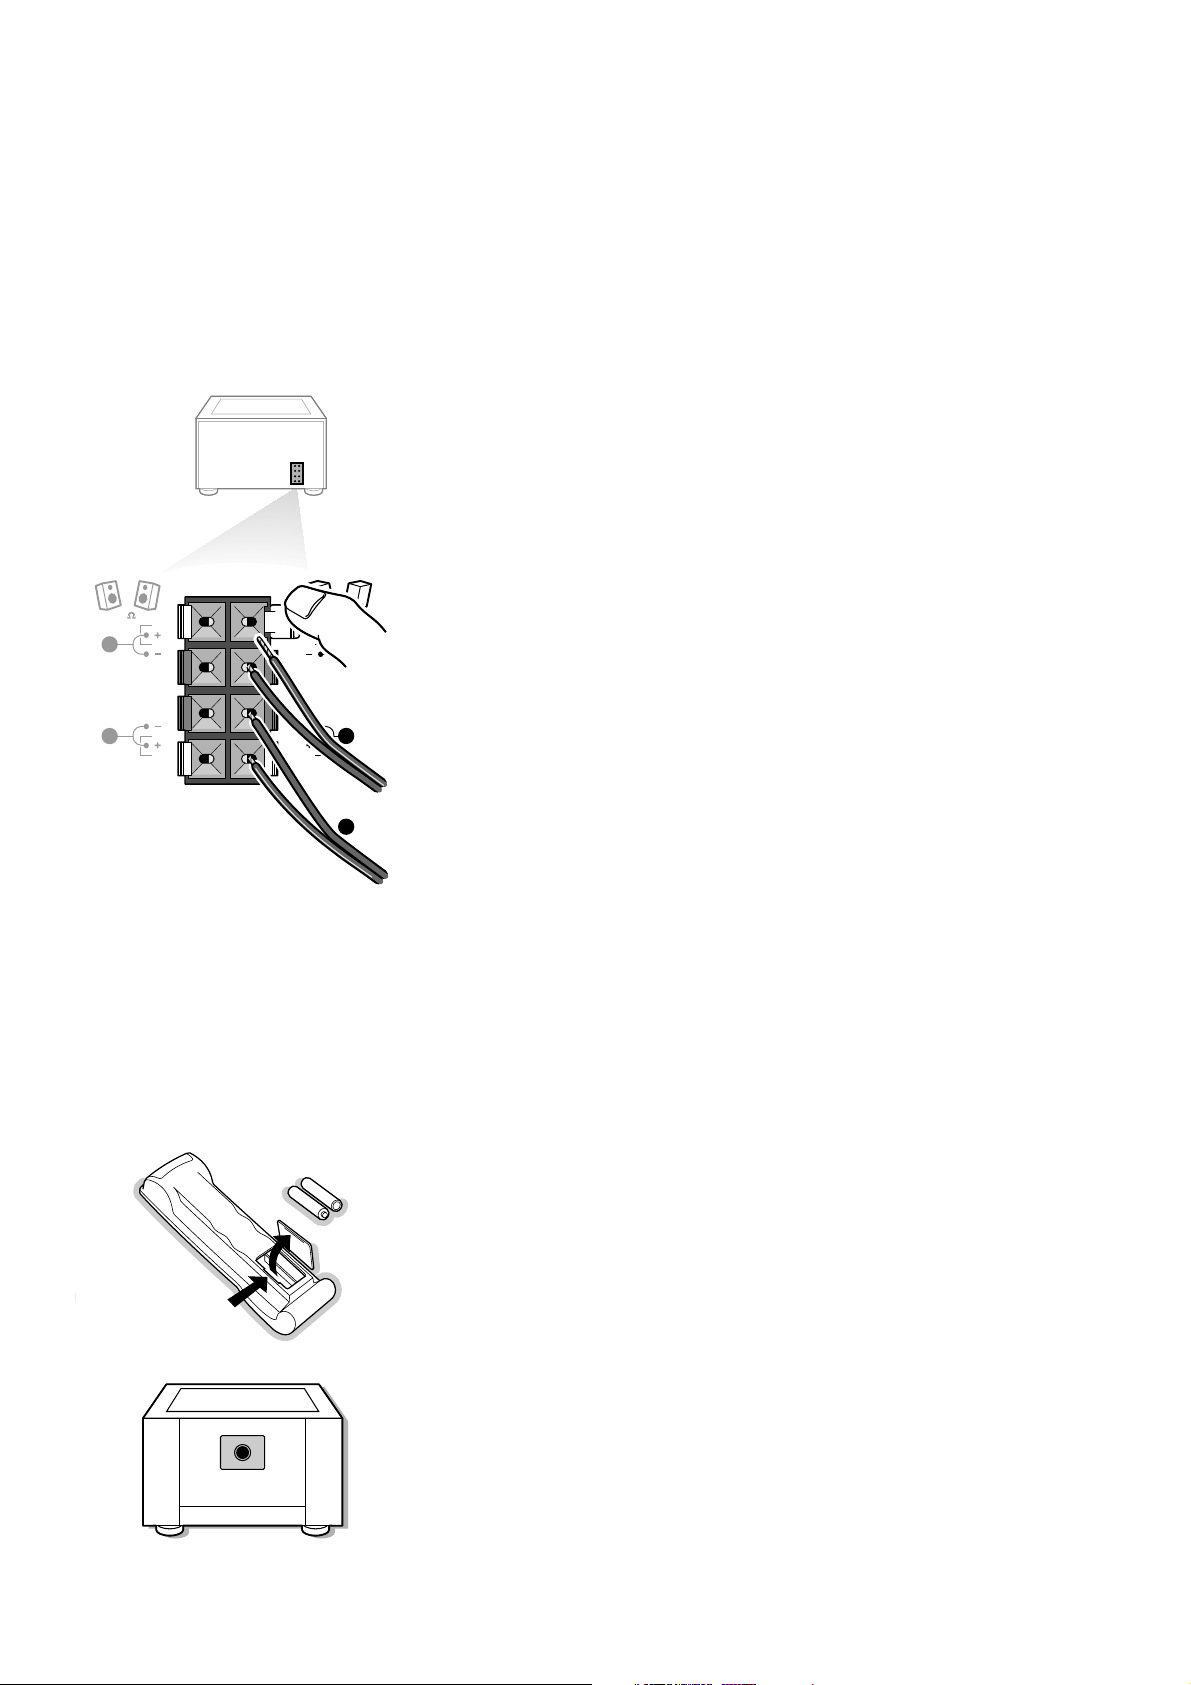
“ Check if the red speaker button at the back of the receiver is in the
INTERNAL
SPEAKERS position.
‘ Connect the two Surround Sound rear speakers supplied 5.
Always connect both Surround Sound speakers: the left rear speaker at
REAR L; the right rear speaker at REAR R.
Push the connector clip down and insert the end of the wire into the opening: the
positive wire (the one with the black line) to the grey speaker connection; the negative
wire to the black speaker connection. Do not insert the wires too far.
The Surround Sound speakers should always be located behind or to either side of the
listener. If preferred you can also hang the speakers on the wall.
( To connect your multimedia peripheral, see p. 22.
To connect other peripherals, see p. 18.
In order to obtain the best result, please use only the supplied antenna cables
between the receiver box and videorecorder, and between videorecorder and
antenna connector.
§ Insert the power cord supplied 6 into the power socket in the rear of the
receiver and in the wall socket with a mains voltage of 110V.
Please, only use the supplied rim-earthed power cord with its built-in
suppressor to ensure safety and EMC.
è Remote control: Remove the cover of the battery compartment.
Insert the two AAA batteries supplied (Type R03G/AAA-1,5V).
The batteries supplied do not contain the heavy metals mercury and cadmium.
Nevertheless in many countries dead batteries may not be disposed of with your
household waste. Please dispose of dead batteries according to local regulations.
! Turn TV on: Press the power button A on the front of the receiver.
A green indicator and the screen light up.
If the indicator is red, press the +
CH - key on the remote control.
The green indicator blinks every time you press a key on the remote control.
When you turn on your set for the first time, the
MENU LANGUAGE automatically
appears on the screen. Alternately the explanation appears in the different languages.
L
R
R
L
R
EXTERNAL
FRONT
SPEAKERS
REAR
SPEAKERS
8
6
RO3 / AAA
4
Installation
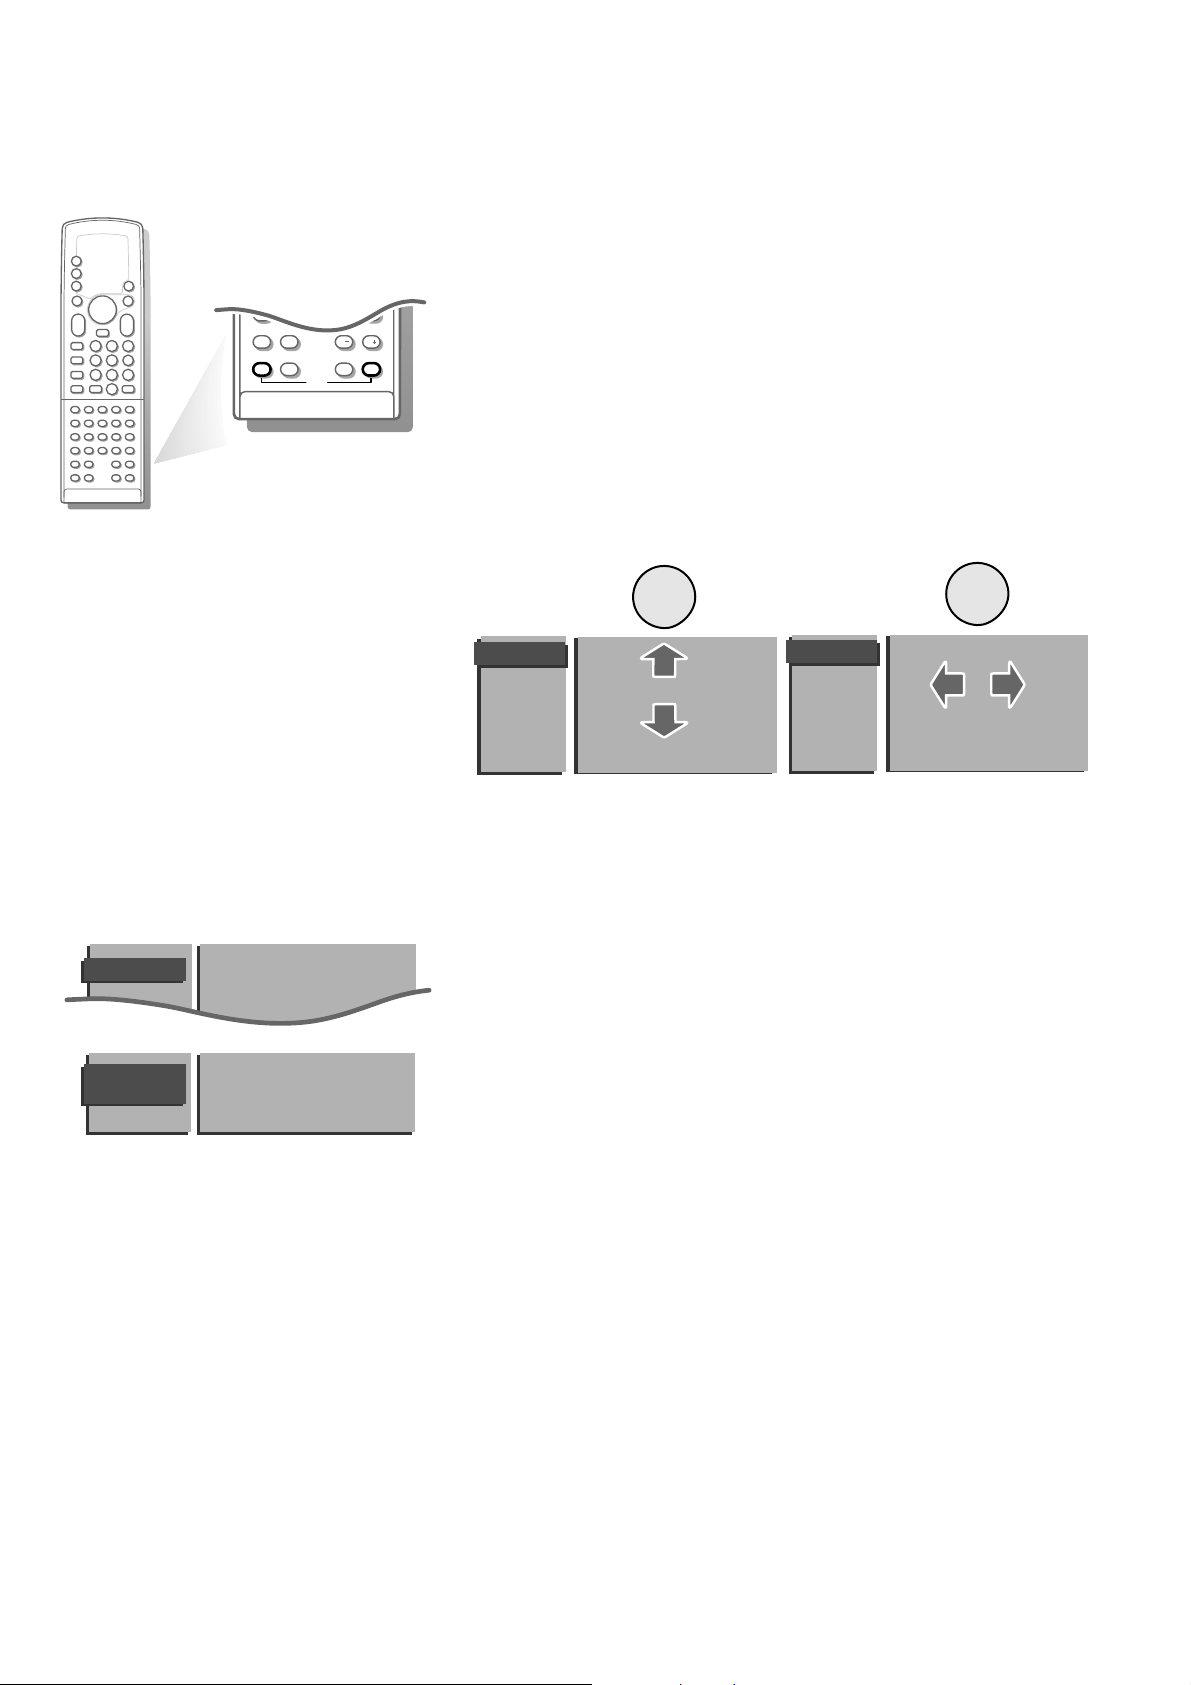
Select the INSTALLATION MENU
& Open the door of the remote control.
é Press S and s at the same time.
To use the menus
& Use the A keys to select a menu or menu item.
é Press the OK key to activate.
“ Press the
PICTURE, SOUND or FEATURE key on the remote control to return
or to turn menu off.
0
A/CH
i
CC
c
d
b
CH CH
S
P
yÚ
fi
s
‡
†Ò
π
VCR
®
AUDIO
DVD
j
Ò
‡
i
π
†
MENU
o
OK
π
œ
p
Menu Language
Channel System
Automatic Installation
Manual Installation
Channel label
Favorite channels
Setup
INSTALLATION
B
B
B
B
Menu Language
Channel System
Automatic Installation
Manual Installation
Channel label
Favorite channels
Setup
INSTALLATION
B
B
B
B
Store TV channels
First, you have to select your language and your channel system.
& Select the Menu Language in the INSTALLATION menu and press the
OK key.
é Select your language and press the OK key.
The
INSTALLATION menu reappears.
“ Select Channel System and press the OK key.
‘ a. If you have your own antenna, select VHF/UHF (for terrestrial
transmission).
b. If you are connected to a cable system, select Cable.
Menu Language
Channel System
Automatic Installation
Manual Installation
channel label
INSTALLATION
MENU
LANGUAGE
English Français Español

5
Automatic Installation On
Searching O%..................... 100%
AUTOMATIC
INSTALLATION
MANUAL
INSTALLATION
Channel
Favorite
Automatic installation
All possible broadcasted TV channels have been programmed at the factory
and are put in a favorite list.
& Select Automatic Installation in the
INSTALLATION menu.
é Select On with the pπ keys to activate.
All TV channels you can receive are put in a favorite list.
Wait until the Searching bar at the bottom of the screen has disappeared and
the message Ready is displayed.
Note: Every time you change the Channel System or move to another place, repeat
the automatic installation.
TV channels broadcast by a cable company.
Some cable systems operate in frequency offsets that are as much as
+ .20 MHz or - .20 MHz. See Conversion tables, p. 27.
Go to Enter or Modify a channel name, p. 6.
Off-air TV channels
The frequencies for TV channels used by a cable company may differ from the
frequencies of off-air TV channels.
Consult the tables on p. 27.
Manual installation
Manual installation is characterized by the ability to include or exclude a TV
channel in the Favorite list.
& Select Manual Installation in the
INSTALLATION menu and press OK.
é Select the TV channel number you want to change into a favorite or a non
favorite TV channel.
“ Select Favorite TV channels
After leaving the installation menu, you can browse through the TV channels
by pressing the
CH - or + key. Only those TV channels which are in the
favorite list will be displayed. The non-favorite TV channels can still be selected
with the digit keys.
It is recommended that you put channels in this list that have a good reception
or you watch often.
‘ Press the
PICTURE, SOUND or FEATURE key to return to the installation menu.
Menu Language
Channel System
Automatic Installation
Manual Installation
Channel Label
Favorite channels
Setup
INSTALLATION
a
K
L
B
VIDEO
PICTURE
SOUND
FEATURES
B
B
B
B
OK
1
23
c
E
CH
K
L

6
You can assign a name to the TV channel.
A name with up to five letters or numbers can be given to each TV channel.
For example: CNN, SUPER,...
You can also name any peripherals that are connected.
& Select Channel label in the
INSTALLATION menu with the o or œ keys
and press the OK key.
é Select the TV channel to be modified or assigned a name with the o, œ,
p or π keys and press OK.
“ Select with the p or π keys the position of the letter or number you want
to change or to enter.
‘ Select with the o or œ keys the correct letter or number you want to
enter. A space, numbers or other special letters are located between Z and
A.
Did you fill in a wrong letter or number ?
• Select with the p or π keys the position of the letter or number you want to
change.
• Select with the o or œ keys the correct letter or number.
When the complete name is entered,
( Press OK.
§ Select another TV channel to be modified or named with the o, œ, p or π
keys and press OK.
è Press the
PICTURE, SOUND or FEATURE key to return to the INSTALLATION
menu.
After leaving the installation you can browse through the TV channels by
pressing the +
CH - key. Only those TV channels which are in the favorite list
will be displayed. The non-favorite TV channels can still be selected with the
digit keys.
You can also do this for channel numbers reserved for external A/V devices.
& Select Favorite channels in the
INSTALLATION menu and press the OK
key.
é Select your channel number.
“ Select Favorite.
‘ Select Yes or No.
( Repeat é to ‘ for every TV channel or external A/V device you want to
change into a favorite or a non-favorite TV channel.
§ Press the
PICTURE, SOUND or FEATURE key to return to the INSTALLATION
menu.
CHANNEL
LABEL
90
A/V 5 0
91 A/V 6 1 CNN
92 A/V 1 2 NBC
93 A/V 2 3 ....
94 A/V 3 4 ....
95 A/V 4 5 ....
96 .......
97
98
99
FAVORITE
CHANNELS
A/V 5 0 .... 10 ....
A/V 6 1 .... 11 ....
A/V 1 2 .... 12 ....
A/V 2 3 .... 13 ....
A/V 3 4 .... 14 ....
A/V 4 5 .... 15 ....
...... .......
Channel Number
Favorite
Enter or modify a channel name
Menu Language
Channel System
Automatic Installation
Manual Installation
Channel label
Favorite channels
Setup
INSTALLATION
Select Favorite TV channels
 Loading...