

Page 1
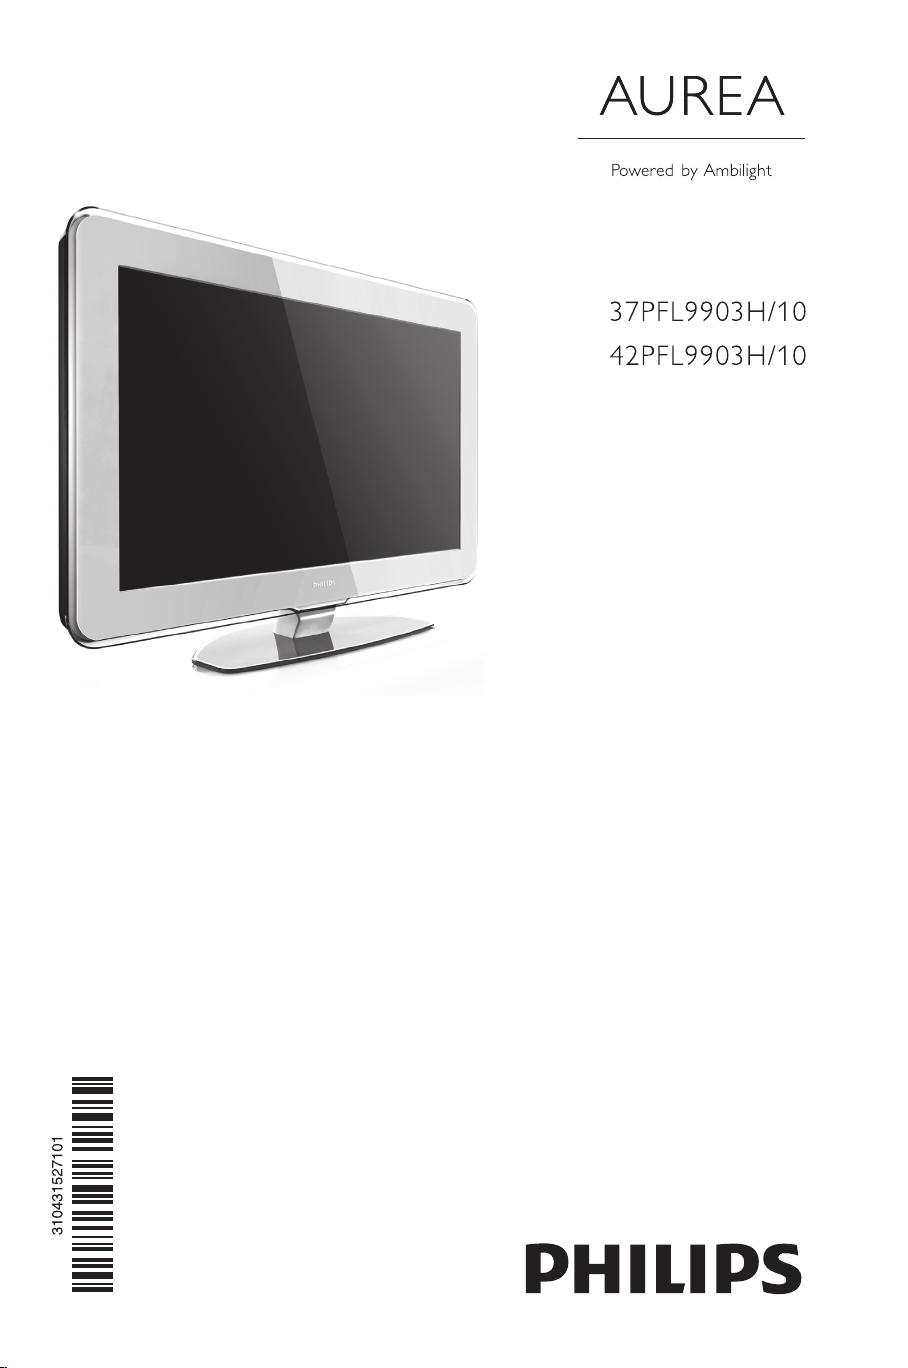
Register your product and get support at
www.philips.com/welcome
EN LCD television
________________________________
DE LCD-Fernsehgerät
________________________________
FR Téléviseur LCD
________________________________
NL LCD televisie
________________________________
IT Televisore LCD
________________________________
ES Televisor LCD
________________________________
PT Televisor LCD
________________________________
EL TËÏÂfiÚ·Û˘ LCD
________________________________
Page 2

Page 3

Ta b le of contents
1 Important 3
1.1 Safety 3
1.2 Care of the screen 3
1.3 Recycling 3
2Your TV 4
2.1 Television overview 4
2.2 How to enjoy HD TV 5
2.3 Product highlights 5
3 Getting started 5
3.1 Position the TV 5
3.2 Wall mounting - VESA 6
3.3 Remote control batteries 9
3.4 Antenna cable 9
3.5 Power cable 9
4 Use your TV 10
4.1 Switch on or off - Standby 10
4.2 Watch TV 11
4.3 Watch channels from a digital receiver 11
4.4 Watch connected devices 11
4.5 Watch a DVD 12
4.6 Select a Teletext page 12
4.7 Change Ambilight mode 13
5 Use more of your TV 14
5.1 Remote Control 14
5.2 LightGuide brightness 17
5.3 TV menus 17
5.4 Picture and sound settings 18
5.5 Ambilight 21
5.6 Teletext 22
5.7 Create favourite channel lists 23
5.8 Electronic Programme Guide 24
5.9 Timers and locks 26
5.10 Subtitles 27
5.11 Watch and play photos, MP3... 27
5.12 Listen to digital radio channels 29
5.13 Software update 30
6 Channel installation 32
6.1 Automatic channel installation 33
6.2 Manual channel installation 34
6.3 Rearrange stored channels 34
6.4 Channel management 35
6.5 Digital reception test 35
6.6 Factory settings 35
7 Connections (DVD, receiver, ...) 36
7.1 Connections overview 36
7.2 About connections 37
7.3 Connect your devices with the
Connection assistant 38
7.4 Connect your devices without the
Connection assistant 38
7.5 Connection setup 44
7.6 Preparing for digital services 45
7.7 PC network 46
8Technical data 52
9Troubleshooting 54
10 Index 56
UK Digital TV switchover info 58
Remote control setup codes at the end of this
book.
Aurea service
Call us if you need help or in case of product
failure.To avoid an interruption of your Aurea
Viewing Experience, we will repair the TV at your
home or offer you an Aurea TV replacement during
the repair at our workshops.
United Kingdom
00800 74454771 / 0800 0131562
Ireland
00800 74454771 / 1800 818833
Please have the Model and Serial Number ready
before you call.
You can find these numbers on the packaging label
or on the back and bottom of your TV.
Aurea registration
Register your product and get support at ...
www.philips.com/welcome
ENGLISH
Ta ble of contents 1
Page 4

2008 © Koninklijke Philips Electronics
N.V. All rights reserved. Specifications
are subject to change without notice.
Tr ademarks are the property of
Koninklijke Philips Electronics N.V. or
their respective owners.
Philips reserves the right to change
products at any time without being
obliged to adjust earlier supplies
accordingly.
The material in this manual is believed
adequate for the intended use of the
system. If the product, or its individual
modules or procedures, are used for
purposes other than those specified
herein, confirmation of their validity
and suitability must be obtained. Philips
warrants that the material itself does
not infringe any United States patents.
No further warranty is expressed or
implied.
Warranty
No components are user-serviceable.
Do not open or remove covers and
do not insert objects in the ventilation
slots or insert objects not suitable for
the specific connectors. Repairs may
only be done by Philips Service
Centres and official repairshops. Failure
to do so shall void any warranty, stated
or implied.
Any operation expressly prohibited in
this manual, any adjustments, or
assembly procedures not
recommended or authorised in this
manual shall void the warranty.
Pixel characteristics
This LCD product has a high number
of colour pixels. Although it has
effective pixels of 99,999% or more,
black dots or bright points of light
(red, green or blue) may appear
constantly on the screen.This is a
structural proper ty of the display
(within common industry standards)
and is not a malfunction.
Open source software
This television contains open source
software. Philips hereby offers to
deliver or make available, upon
request, for a charge no more than the
cost of physically performing source
distribution, a complete machinereadable copy of the corresponding
source code on a medium customarily
used for software interchange.
This offer is valid for a period of 3
years after the date of purchase of this
product.
To obtain the source code, write to
Philips Innovative Applications N.V.
Ass. to the Development Manager
Pathoekeweg 11
B-8000 Brugge
Belgium
Compliance with EMF
Koninklijke Philips Electronics N.V.
manufactures and sells many products
targeted at consumers, which, like any
electronic apparatus, in general have
the ability to emit and receive
electromagnetic signals.
One of Philips’ leading Business
Principles is to take all necessary
health and safety measures for our
products, to comply with all applicable
legal requirements and to stay well
within the EMF standards applicable at
the time of producing the products.
Philips is committed to develop,
produce and market products that
cause no adverse health effects.
Philips confirms that if its products are
handled properly for their intended
use, they are safe to use according to
scientific evidence available today.
Philips plays an active role in the
development of international EMF and
safety standards, enabling Philips to
anticipate further developments in
standardisation for early integration in
its products.
Mains fuse (UK only)
This TV is fitted with an approved
moulded plug. Should it become
necessary to replace the mains fuse,
this must be replaced with a fuse of
the same value as indicated on the
plug (example 10A).
1. Remove fuse cover and fuse.
2. The replacement fuse must comply
with BS 1362 and have the ASTA
approval mark. If the fuse is lost,
contact your dealer in order to
verify the correct type.
3. Refit the fuse cover.
In order to maintain conformity to the
EMC directive, the mains plug on this
product must not be detached from
the mains cord.
Copyrights
VESA, FDMI and the VESA
Mounting Compliant logo are
trademarks of the Video Electronics
Standards Association.
Manufactured under license
from Dolby Laboratories. ‘Dolby’, ‘Pro
Logic’ and the double D symbol
are trademarks of Dolby Laboratories.
Manufactured under
license from BBE Sound, Inc. Licensed
by BBE, Inc under one or more of the
following US patents: 5510752,
5736897. BBE and BBE symbol are
registered trademarks of BBE Sound
Inc.
Windows Media is either a registered
trademark or trademark of Microsoft
Corporation in the United States
and/or other countries
® Kensington and MicroSaver are
registered US trademarks of ACCO
Wor ld Corporation with issued
registrations and pending applications
in other countries throughout the
world.
DLNA®, the DLNA
logo and DNLA Certified™ are
trademarks, service marks, or
certification marks of the Digital Living
Network Alliance.
All other registered and unregistered
trademarks are the proper ty of their
respective owners.
G,
2
Page 5

1 Important
Read this user manual before you start to use this
product.
Pay attention to this section and closely follow the
instructions.The warranty does not apply to
damage caused by not taking into account the
instructions.
1.1 Safety
•To avoid short circuit, do not expose the product
to rain or water.
•To avoid a risk of fire or electric shock do not
place naked flame sources (e.g. lighted candles)
close to the TV.
• Leave a space of at least 10cm (4 inches) all
around the TV for ventilation.
• Keep away from radiators or other heat sources.
• Do not install the TV in a confined space such as
a book case. Make sure that curtains, cupboards
and so on cannot obstruct the air flow through
the ventilation slots.
•To prevent damage, do not insert any object into
the ventilation slots.
• Make sure the TV cannot fall down. Place the TV
on a solid and flat surface and only use the stand
provided with the TV.
•To prevent damaging the mains cord, do not
place the TV, or anything else, on the cord.
Damage the cord may cause a fire or electric
shock.
• When mounted on a swivel stand or VESA wall
bracket avoid force coming on the mains plugs.
Mains plugs that are partly loosened can cause
arcing or fire.
• Stationary images
Avoid stationary images as much as possible. If
you cannot, reduce screen contrast and
brightness to prevent damage to the screen.
Stationary images are images that remain on the
screen for a long time. Examples of stationary
images are: on screen menus, teletext pages, black
bars, stock market information,TV channel logos,
time displays, and so on.
1.3 Recycling
•Take the packaging to your local recycling centre.
• Dispose old batteries safely according local
regulations.
• This product is designed and manufactured for
material recycling and re-use.
• Do not dispose this product with other
household waste. Inform yourself or ask your
dealer about local environmentally safe recycling
and local regulations. Uncontrolled waste disposal
harms the environment and human health.
(EEC 2002/96/EC)
ENGLISH
1.2 Care of the screen
• Unplug the TV before cleaning.
• Clean the surface with a soft damp cloth. Do not
apply any other substance (chemical or
household cleaning agent).This may damage the
screen.
• Do not touch, push or rub or strike the screen
with anything hard as this may scratch, mar or
damage the screen permanently.
•To avoid deformations and colour fading, wipe off
water drops as soon as possible.
Important 3
Page 6
2Your TV
DEMO
This section gives you an overview of the controls
and functions of this TV.
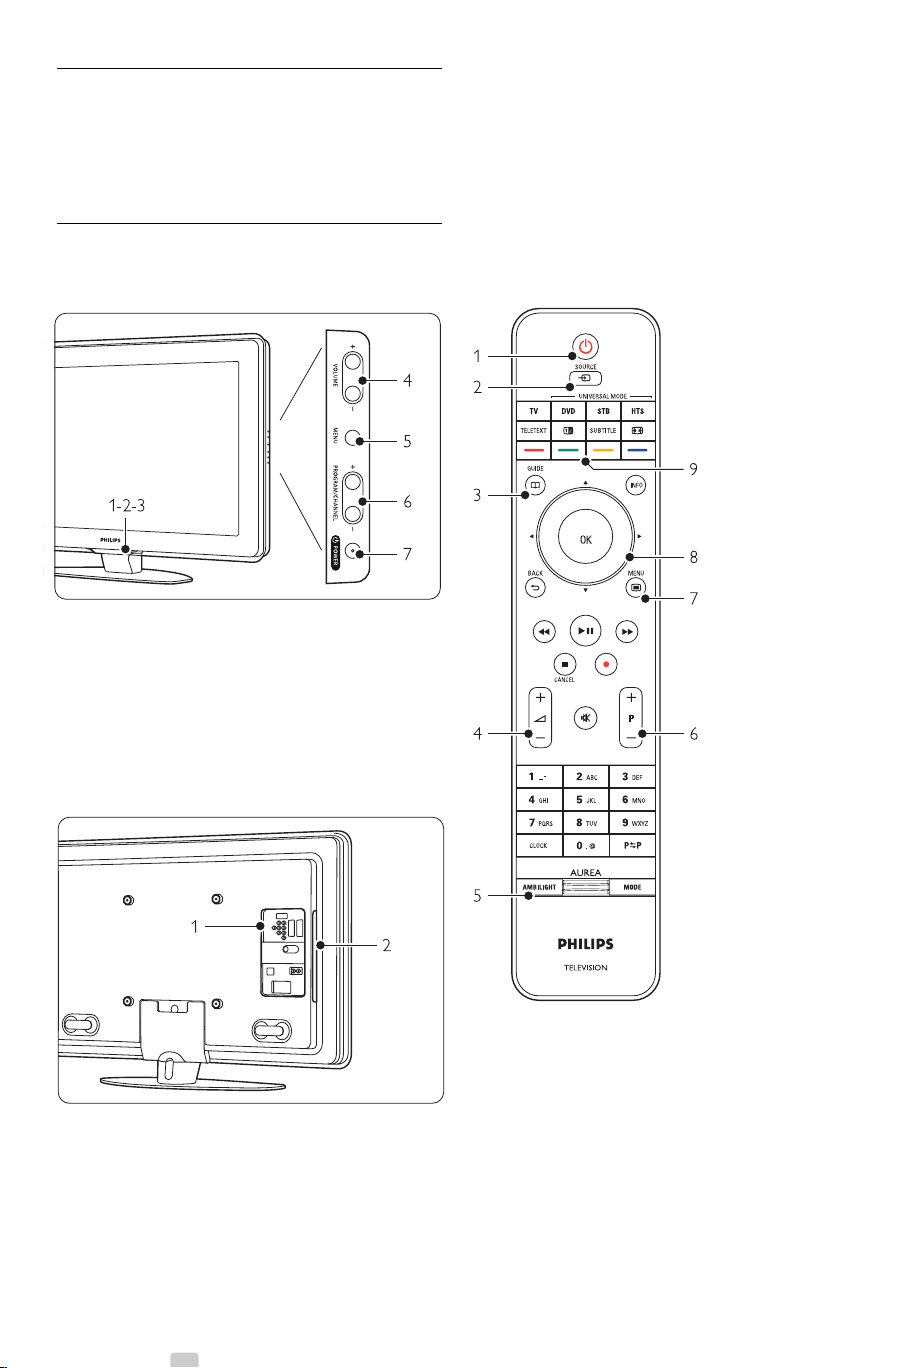
2.1 Television overview
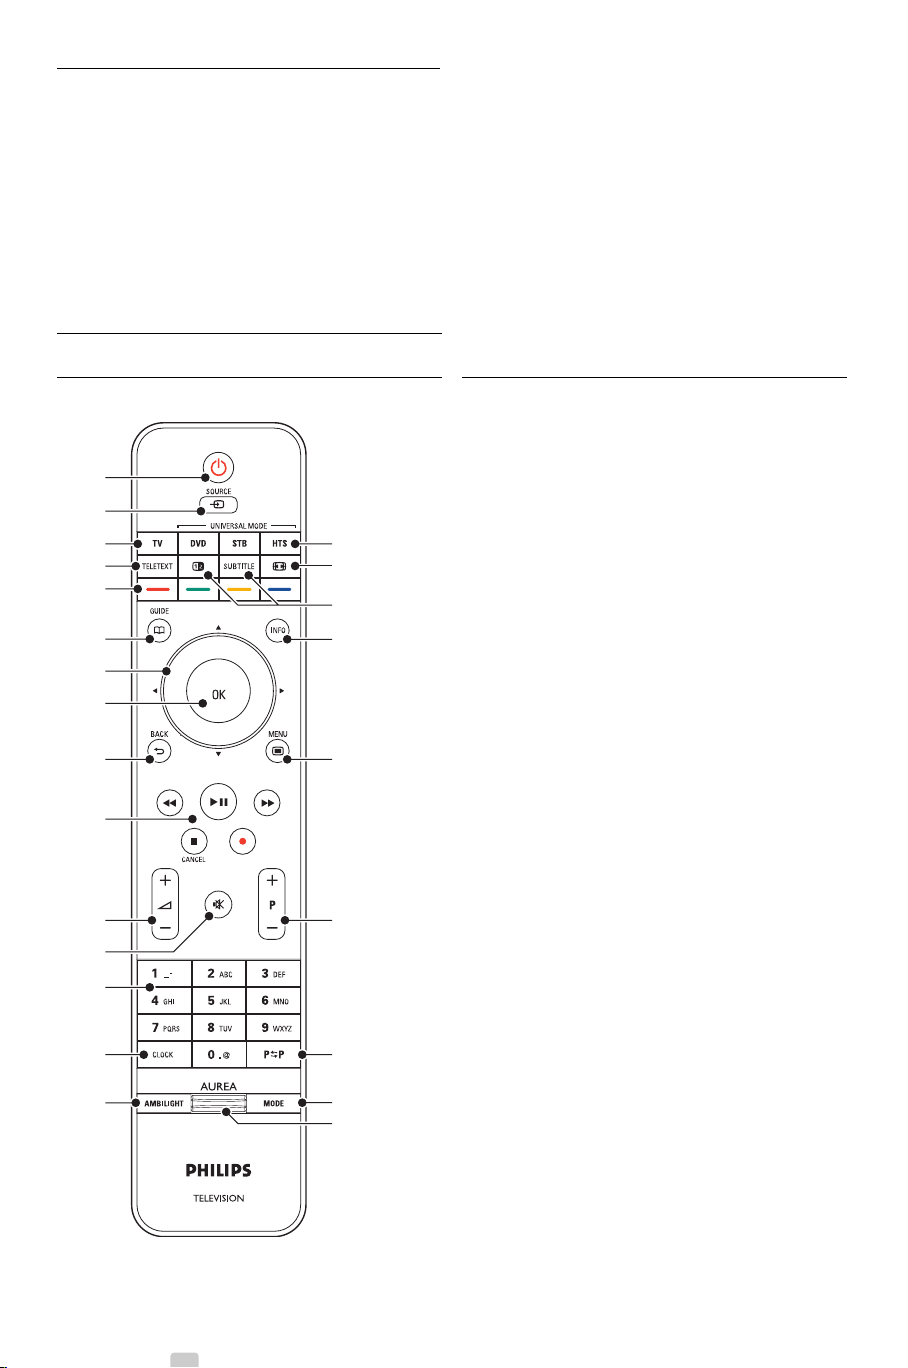
Controls
1 LightGuide
2 Indicator light
3 Remote control sensor
4Volume up and down
5 Menu
6 Program/Channel up and down
7Power switch
Connectors
Remote control
1 Switch On or switch to Standby
2Watch a connected device - DVD,VCR ...
3 Programme guide
4Volume up + or down 1 Back connectors
2 Side connectors
For more info see section 7 Connections.
4 Your TV
5 Ambilight On or Off
6 Program/Channel up + and down -
7 Menu On or Off
8Navigation and Rotary key
9 Colour keys
For more info see section 5.1 Remote control
overview.
Page 7

2.2 How to enjoy HD TV ?
This TV can display High Definition TV programmes.
But to enjoy HD TV you need to get programmes
in HD first.The picture quality of this TV without
HD programmes is just normal TV.
3 Get started
This section helps you with the positioning and the
first time installation of the TV.
ENGLISH
You can receive HD programmes from ...
-a Blu-ray Disc player, connected to HDMI, with a
HD Movie
-a digital HD receiver, connected to HDMI, with a
subscription to HD channels from a Cable or
Satellite company
- an Over-the-air HD broadcaster (DVB-T MPEG4)
-a HD channel on your DVB-c network
-a Game console (Xbox 360 / PlayStation 3),
connected to HDMI, with a HD game.
Contact your dealer for more information. Go to
www.philips.com/support FAQ’s to find the list of
HD channels or providers in your country.
2.3 Product highlights
Your new TV is equipped with some of the most
modern audio or video innovations.
Your TV offers the following advantages ...
Full High Definition LCD display
A full HD resolution of 1920x1080p, the highest
resolution of HD sources. It offers a brilliant flickerfree progressive scan picture with optimum
brightness and superb colours.
3.1 Position the TV
Carefully read the safety precautions in section 1.1
Safety before you position the TV.
• Large screen TVs are heavy. Carry and handle the
TV with at least two persons.
• The ideal distance from which to watch TV is
three times its diagonal screen size.
•Position the TV where light does not fall directly
on the screen.
• Dim lighting conditions in the room for best
Ambilight effect.
•Position the TV 10 to 20cm away from the wall
for the best Ambilight effect.
•Your TV is equipped with a Kensington Security
Slot at the back of the TV for an anti-theft lock
(not supplied).
Ambilight
For a more relaxed viewing experience and
improved perceived picture quality.
DVB-T and DVB-C integrated tuner
Next to normal analogue TV broadcast your TV
receives digital terrestrial and in certain countries
also digital cable TV and radio broadcasts.
Electronic Programme Guide - EPG
The EPG shows the scheduled digital TV
programmes on screen.The guide can remind you
when programmes start, switch the TV on, etc.
USB connection / PC network connection
Multimedia connection for instantly view or play
your photos or music.
Your TV 5
Page 8

3.2 Wall mounting
You can wall mount the TV with the supplied wall
mount bracket.
3.2.1 Unmounting the TV stand
The TV stand should be unmounted from the TV to
allow the TV to be wall mounted.
‡ Unscrew the 4 screws that secure the stand to
the TV.
® Lift the TV from the stand.
‡ Collect the parts for wall mounting.
A
2x
® Insert just a little bit both security screws in
the wall mount bracket.
ÒVer ify the presence of the 4 plastic discs at the
back of the TV.
2
3.2.2 Mounting the wall mount bracket
) Caution
Wall mounting the TV requires special skills that
should only be performed by qualified personnel.
Wall mounting the TV should meet safety standards
according to the TV’s weight.
Koninklijke Philips Electronics N.V. bears no
responsibility for improper mounting or mounting
that results in accident or injury.
Read also the safety precautions in section
1.1 Safety before you position the TV.
6 Your TV
Page 9
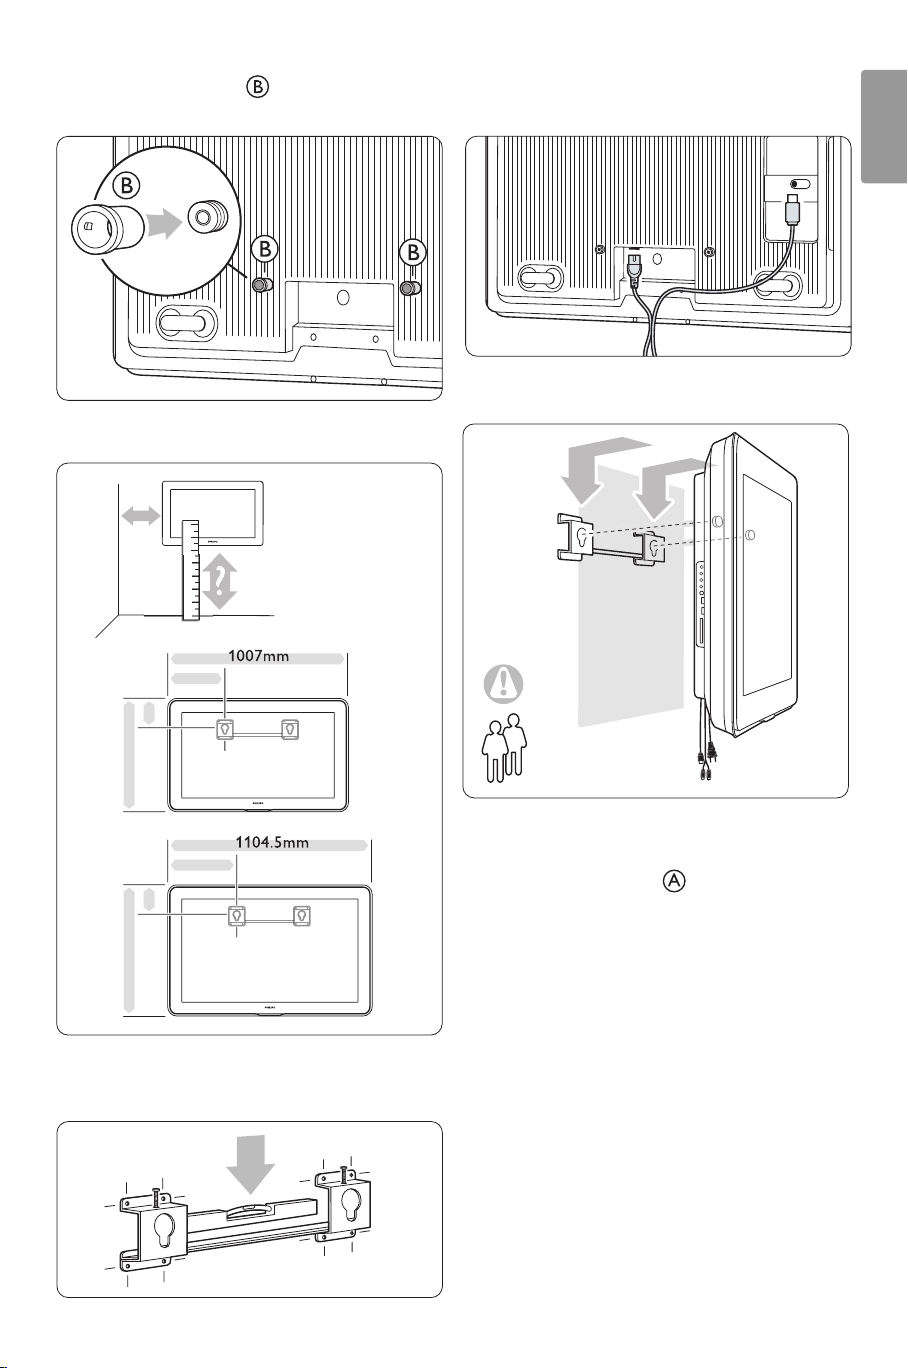
† Mount the 2 spacers on the 2 lower discs
648mm
m
g
697.5mm
m
g
at the back of the TV.
º Calculate your TV’s ideal position.
‹Connect all cables.
See section 7 Connections.
ENGLISH
≈Lift the TV into the wall mount bracket.
404m
mm
25k
402m
mm
30k
◊Position and level the wall mount bracket and
fix the bracket firmly to the wall.
2
ÚSecure the TV in the bracket by screwing in the
2 already fitted screws .
Your TV 7
Page 10
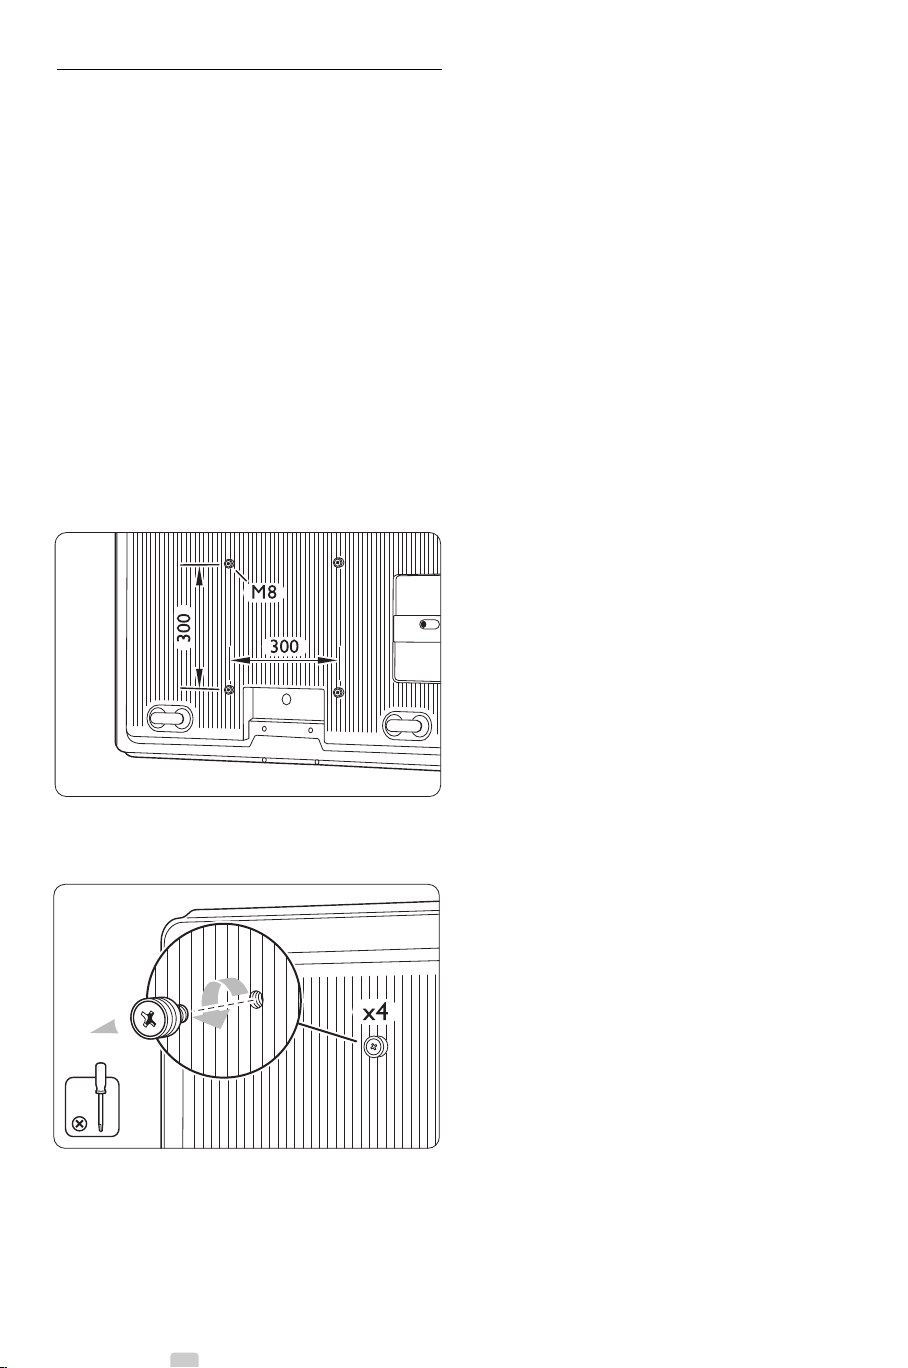
3.2.3 VESA compliant mounting
) Caution
Consider the TV’s weight when you wall mount it.
Improper mounting can result in severe injury or
damage. Koninklijke Philips Electronics N.V. bears
no responsibility for improper mounting or
mounting that results in accident or injury.
Your TV is prepared for VESA compliant wall
mounting.This bracket is not included.
You need one of the VESA codes hereunder to
purchase the bracket that fits your TV.
37” / 94cm VESA MIS-F 200, 200, 8
42” / 107cm VESA MIS-F 300, 300, 8
Prepare the TV for VESA compliant mounting.
‡ Locate the VESA screwholes on the back of the
TV.
® Should the plastic discs obstruct the VESA
bracket, you can unscrew these 4 discs.
8 Your TV
Page 11
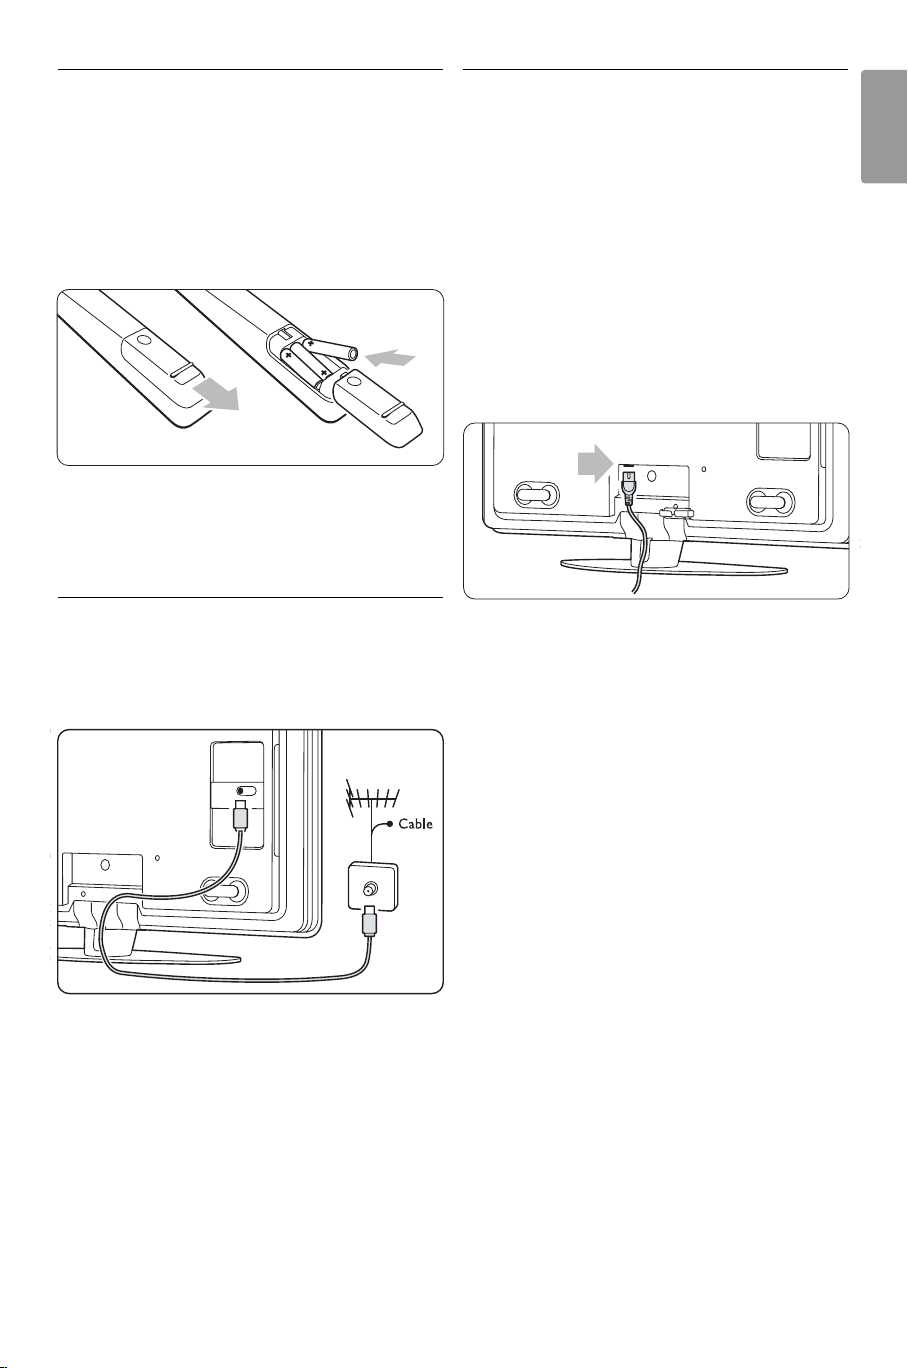
3.3 Remote control batteries
3.5 Power cable
‡ Open the battery cover on the back of the
remote control.
® Insert the 3 batteries supplied (Type AAA-
LR03-1,5V). Make sure the + and - ends of the
batteries line up correctly (inside of case is
marked.)
ÒClose the cover.
rNote
Remove the batteries if not using the remote
control for an extended period of time.
3.4 Antenna cable
‡ Locate the antenna connection at the back of
the TV.
® Insert the antenna cable tightly into the
Antenna x socket.
Keep the mains plug at the wall socket accessible at
all time.
The TV is never powered off completely and
consumes energy unless the mains cord is physically
unplugged.
Although this TV has a very low standby power
consumption, unplug the mains cord if you do not
use the TV for a long time to save energy.
‡ Verify that your mains voltage corresponds with
the voltage printed on the sticker at the back of
the TV. Do not insert the mains cord if the
voltage is different.
® Insert the mains cord tightly.
ENGLISH
Your TV 9
Page 12
4 Use your TV
Learn how to operate your TV for daily use.
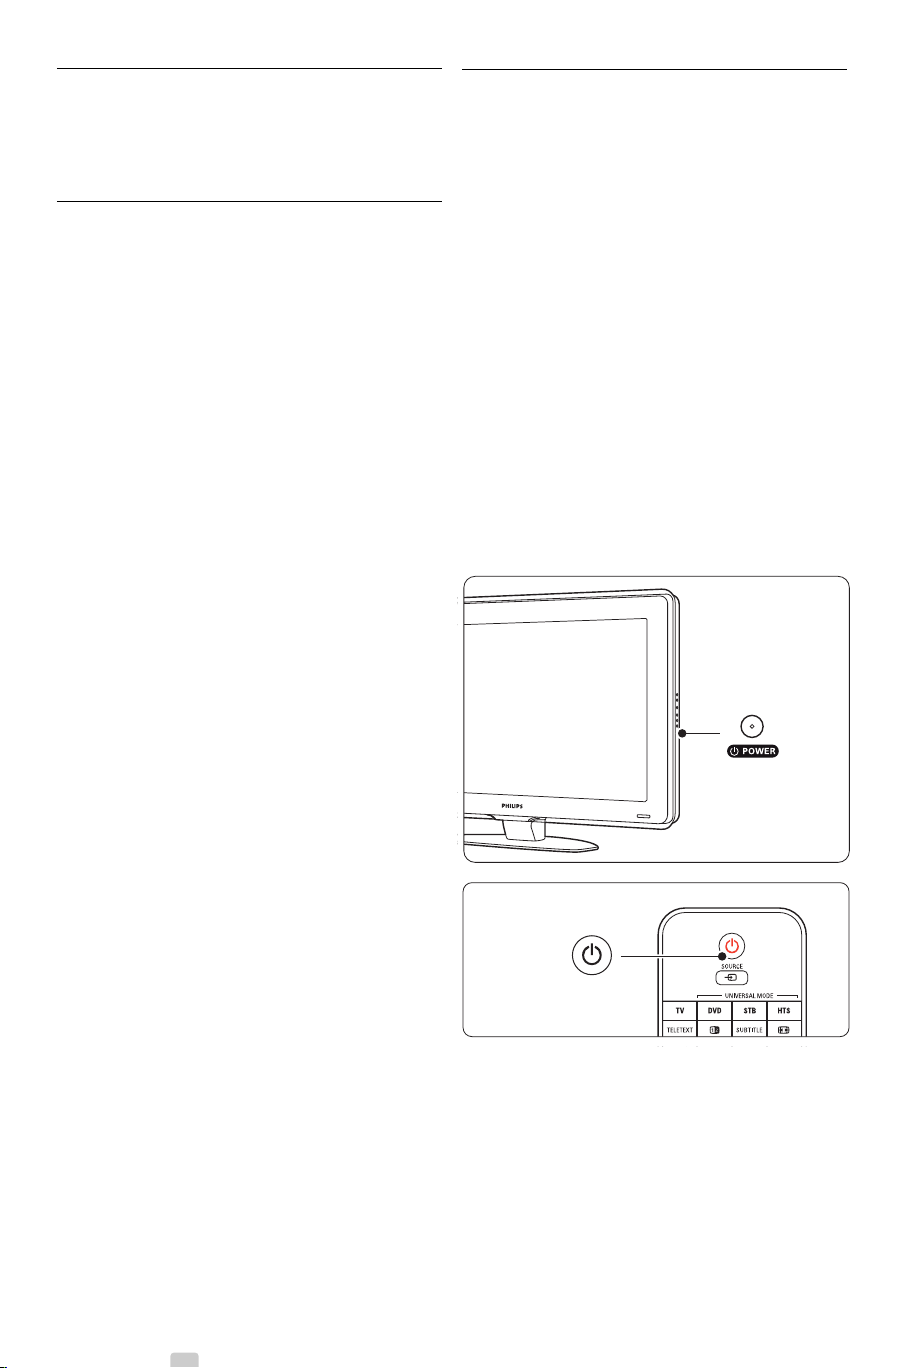
4.1 Turn on or off - Standby
rNote
The TV may take up to 15 seconds to turn on.
To turn on the TV:
• Press B Power at the right of the TV if the
standby indicator is off.
• Press B on the remote control if the standby
indicator is on.
The LightGuide flashes during start up and turns
on completely when the TV is ready for use.
To switch to standby:
• Press B on the remote control.
The LightGuide turns off and the standby
indicator is on.
To turn off:
• Press B Power at the side of the TV.
Both the LightGuide and the standby indicator
turn off.
10 Use your TV
Page 13
4.2 Watch TV
SOURCE
4.3 Watch channels from a
digital receiver
4.2.1 Switch channels
‡ To switch TV channels:
• Press a number (1 to 999) or press P+ or P-
on your remote control.
• Press
Program/Channel - or + on the side
controls of the TV.
® Press R to return to the previously viewed TV
channel or connected device.
4.2.2 Adjust volume
‡ To adjust the volume:
• Press V + or - on the remote control
• Press Volume + or - on the side controls
of your TV.
® To m ute the sound:
• Press ¬.
• Press ¬ again to restore the sound.
‡ Switch on the digital receiver.
The picture from your receiver automatically
appears on the screen.
® Use the remote control of your digital receiver
to select TV channels.
If the picture does not appear:
‡ Press the Source v key.
® Press o or œ to select where you connected
your digital receiver.
ÒPress
OK.
rNote
When you did not connect your devices yet, go to
section 7 Connections.
4.4 Watch connected devices
‡ Switch on the device.
The picture from your device automatically
appears on the screen.
ENGLISH
Use your TV
If the picture does not appear:
® Press the Source v key.
ÒPress o or œ to select where you connected
your device.
† Press
OK.
rNote
When you did not connect your devices yet, go to
section 7 Connections.
11
Page 14

4.5 Watch a DVD
SOURCE
DEMO
4.6 Select a Teletext page
‡ Switch on your DVD player.
® Insert a DVD disc in your player.
The DVD picture automatically appears on the
screen.
ÒPress Play πon the DVD player.
If the picture does not appear:
‡ Press the Source v key.
® Press o or œ to select where you connected
your DVD player.
ÒPress
OK.
Wait a few seconds until the picture appears.
† Press Play π.
Most TV channels broadcast information through
Teletext.
To watch Teletext:
‡ Press Teletext.
The main index page appears.
® To select a page of your choice:
• Enter the page number with the number keys.
• Press P- or P+ or o or œ or the g key to
view the next or the previous page.
•Press a colour key to select one of the colour
coded items at the bottom of the screen.
•Press R to return to the previously viewed
page.
ÒPress Teletext again to switch Teletext off.
r
Note
Only for UK: some digital TV channels offer
dedicated digital text services (for example BBC1).
For more information on teletext, see section 5.6
Teletext.
12 Use your TV
Page 15
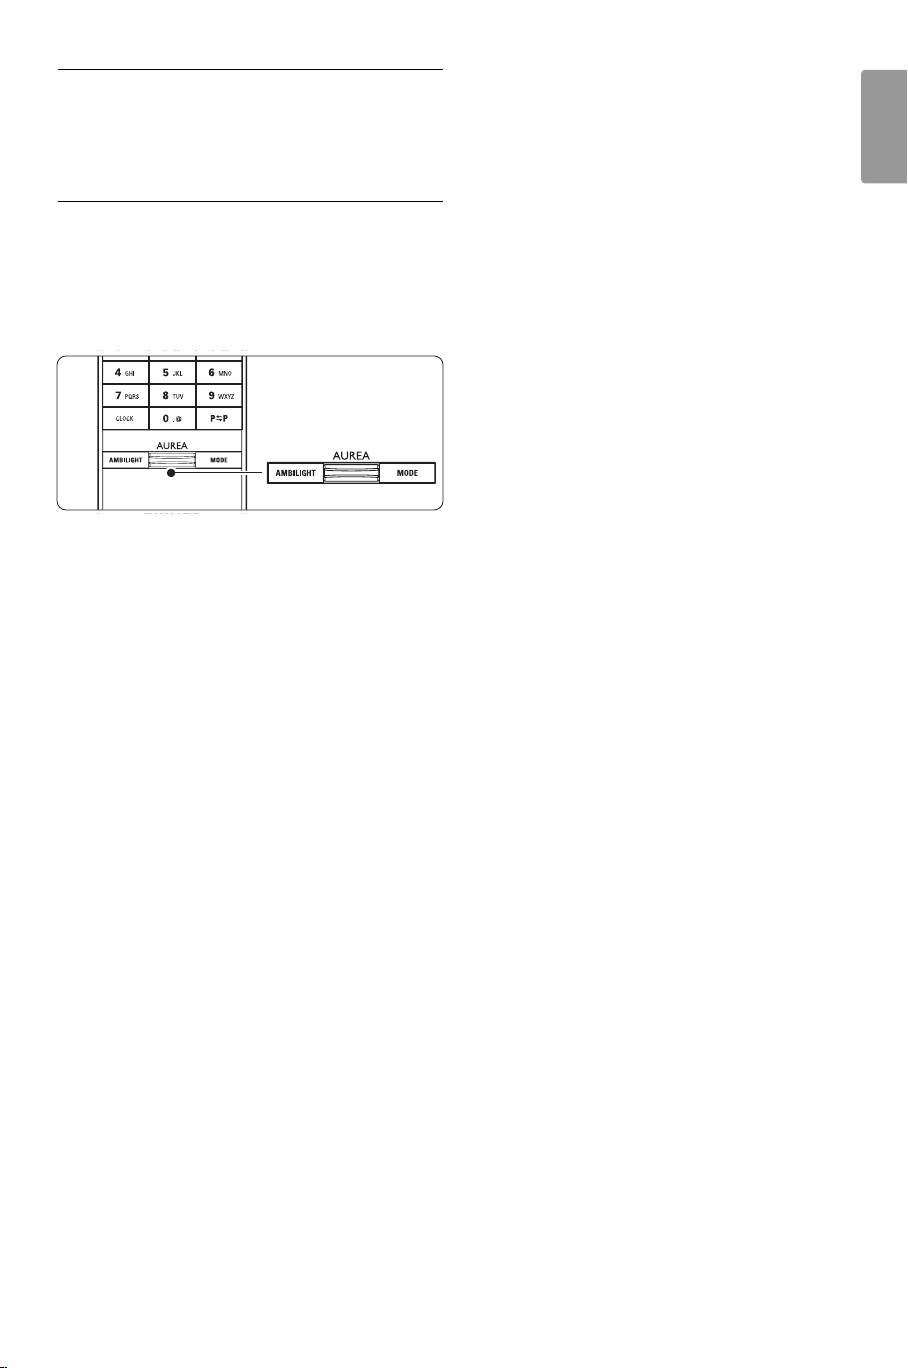
4.7 Change Ambilight mode
You can adjust the speed at which Ambilight
responds to the on-screen images.
Adjust the Ambilight mode:
‡ Press Ambilight to switch on.
® Press Mode to change the light intensity of
Ambilight.
ÒSlide the
AUREA Ambilight switch up or down
to change the light intensity.
LoungeLight mode
When the TV is in standby, you can switch
Ambilight on.
‡ Press Ambilight.Wait until Ambilight lights up.
® Press Mode repeatedly to toggle through the
available Ambilight effects.
ENGLISH
For more information on Ambilight, see section 5.5
Ambilight.
à Tip
Dim lighting conditions in the room for best
Ambilight effect.
Use your TV
13
Page 16
5 Use more of your TV
DEMO
1
2
4
3
5
6
7
8
9
10
20
21
17
18
19
11
12
13
14
15
24
25
22, 23
16
This section helps you perform advanced TV
operations including how to:
• use the menus
• adjust picture, sound and Ambilight settings
• make use of Teletext
• create favourite channel lists
5.1 Remote control
5.1.1 Remote control overview
• make advantage of Electronic Programme Guide
• set locks and timers
• set subtitles and select a subtitle language
• view your photos or play your favourite music
from a USB memory device or from your PC or
Home network.
1 Standby B
To switch the TV on or back to standby.
2 Source v
•To switch the Source menu on or off.
•To select a connected device or to return to
TV.
3 TV
Sets the remote control in TV mode.
4 Teletext
To switch teletext on or off.
5 Colour keys
• Easy selection of teletext pages.
• Easy selection of tasks.
Demo
To switch the Demo menu on and to get a
demonstration of the features of the TV.
6 Guide a
To switch on or off the Electronic Programme
Guide.
7 Navigation and rotary key
To navigate (o, œ, p, π) or turn left or right
to go through lists or settings.
8
OK
•To display the channel list.
•To activate a setting.
9 Back key g
To select the previous programme or the
previous TXT page.
To remove the channel list.
10 Audio and video keys
To operate a DVD player or recorder, Blu-ray
Disc player or VCR.
Cancel (only for UK)
To cancel only Digital text or Interactive
services.
11 Volume V
To adjust the volume.
12 Mute ¬
To m ute the sound or restore it.
Ò,π/º,†,‡,®
14 Use more of your TV
Page 17

13 Number keys
To select a TV channel.
14 Clock
To display the time on screen.
15 Ambilight
To switch Ambilight on or off.
16 Ambilight AUREA
To change the light intensity of Ambilight
17 Mode
To adjust the dynamic effect of Ambilight
18 Previous channel R
To return to the previously viewed channel
19 +P- Channel up or down
To switch to the next or previous channel in
the channel list.
20 Menu Ï
To switch the menu on or off
21 On screen information i
To show channel or programme information if
available.
22 Dual screen b
To show teletext on the right and the picture
on the left of the screen.
23 Subtitle
To activate or deactivate the subtitle mode.
24 Widescreen Picture format q
To select a picture format.
25 DVD STB HTS
To control connected devices.
See section 10 Index to find the section in the
manual about a specific remote control key.
5.1.2 Universal remote control
Your TV remote control is a universal remote
control that can operate other devices such as
DVD players and recorders, digital receivers (Settop boxes – STB) or Home Theatre Systems (HTS)
of Philips and many other brands.
‡ Press DVD, STB or HTS to select a DVD, a
cable receiver (STB) or a Home Theatre (HTS)
device.The key blinks as long as you are in this
control.
If the device does not react or operates
incorrectly, you need to set up your remote
control for your particular device.
See section 5.1.3 Set to operate a particular
device.
ÒPress the TV key to return to normal TV mode.
When no key is pressed for 30 seconds the
remote control switches back to normal TV.
5.1.3 Set to operate a particular device
You can choose from three ways to programme the
remote control for a device of a particular brand.
You can:
- use the Universal remote control assistant to
help you
- enter a brand's setup code or
- start an auto search.
r
Note
Possibly the remote control is not compatible with
all types of DVD, cable receivers and Home Theatre
Systems.
Method 1: Use the Universal remote control
assistant
‡ Tu rn on your device.
® Press the DVD, STB or HTS universal mode key
for 4 seconds to select the universal mode you
need or press Menu Ï and select Setup >
Installation > Remote control assistant and
press π to enter.
- DVD stands for DVD, DVD-R, HDD and Blu-
ray Disc
- STB stands for digital receiver and set-top-
boxes (cable, satellite)
- HTS for Home Theatre Systems,Audio/Video
systems
The remote control is now in the selected
programming mode. Follow the instructions on
screen.
r
Note
Ensure that the TV and the device are within reach
of the remote control.
ENGLISH
® Use the relevant keys on the TV remote control
to operate the device.
Use more of your TV
Method 2: Enter the setup code directly
Instead of using the Universal remote control
assistant, you can also enter a setup code directly.
Find a list of these codes per brand and device at
the end of this manual.
‡ Press the DVD, STB or HTS key and OK at the
same time for 4 seconds to select the universal
mode you need.
15
Page 18

® Enter the three-number code for the type and
brand of your device. Some brands have several
setup codes available and you need to select
the known one.You can tr y them one by one.
If you entered a known code, all universal mode
keys will blink to confirm the selection. If you
entered an unknown code, all universal mode
keys will light up for 2 seconds. Repeat Step 2
with a different code.
ÒPoint the remote control at the device, and
press B to test if the code is known for your
device.
If successful try whether you can operate all
functions. If not successful, or if you cannot
operate all functions, repeat Step 1 and 2 with
one of the other setup codes for your brand.
Method 3:Automatic search of all codes
If you are not successful to find the known brand
or code, try an automatic search of all codes.The
automatic search can take several minutes.
If after the automatic search no code is successful, it
is not possible to operate your particular device
with the remote control. In such case, use the
device's own remote control.
‡ Tu rn on the device you want the TV remote
control to set up for.
®.Point the remote control to the device during
the automatic search.
ÒTo select the universal mode you need, press
the DVD, STB or HTS key and the OK key at
the same time for 4 seconds.
The selected universal mode lights up
constantly.
† Press OK to start the automatic search.
Every two seconds, when a new code is sent,
the B key will blink.
Keep pointing the remote control to the device.
º When the device switches off, press OK to
stop the search.
◊Press B to switch on your device.
‹Press the remote control keys to try if you can
operate all functions. If you cannot operate all
functions, press OK again to continue the
automatic search for a correct code.
≈If you can operate all functions, press the
currently selected universal mode key to
confirm and to quit the automatic search.
5.1.4 Keep the remote control in the
chosen universal mode permanently
If you press the DVD, STB or HTS key the remote
control can operate other devices. When no key is
pressed for 30 seconds the remote control
switches back to normal TV.
You can set the remote control to hold a universal
mode as long as no other universal mode is
pressed.This disables the 30 seconds switch back to
normal TV.
‡ Press the TV key.
® Press OK and ¬ at the same time for 4
seconds.The B key lights up for 2 seconds.
From now on the remote control will not switch
back to normal TV mode.
To return to the 30 seconds switch back to
normal TV mode, follow the same steps 1 and 2.
5.1.5 Device functions overview
When the remote control is set for a particular
device all keys have the same function except the
keys mentioned here.
• DVD player
Menu key = DVD Disc menu
P+/- = DVD Next/Previous track
• DVD Recorder
Ò key = DVD-R previous track
† key = DVD-R next track
• DVD recorder with Hard Disc Drive
Menu key = DVD-R HDD browser
Ò key = DVD-R HDD previous track
† key = DVD-R HDD next track
• Blu-ray Disc player
a key = BD Content menu
Menu key = BD Disc menu
rNote:
To pause the automatic search, press OK. Press o
or œ to search for the codes one by one backward
or forward to locate the known code for your
device or press OK again to continue the
automatic search.
16 Use more of your TV
Page 19

• Digital or Satellite receiver
u
d
t
t
es
p
e
No change of functions.
• Home Theatre System
Menu key = HTS Disc menu
V key = HTS volume
P+/- = HTS Next/Previous
5.3 TV menus
With the on screen menus you install your TV,
adjust picture, sound and Ambilight settings and
access features.This section gives an overview of
the menus and describes how to navigate.
ENGLISH
5.1.6 Remote control setup codes
See the end of this manual.
5.2 LightGuide brightness
The LightGuide at the front of the TV indicates the
start up of the TV.
After start up the LightGuide is lit constantly.You
can set the light intensity or let it switch off after
start up.
‡ Press Menu Ï > Setup > Installation >
Preferences > LightGuide brightness.
® Press π to enter the list.
ÒPress o or œ to select the brightness level
from 0 (off) to 4.
5.3.1 The menu
‡ Press Menu Ï to show the TV menu.
® Press Menu Ï to quit the TV menu.
The TV menu offers the following items:
TV men
Smart settings
Pictur
Soun
Ambiligh
Settings assistan
Featur
Setu
• Smart settings
Select this item to set the TV to one of the
predefined settings. Each setting combines
picture, sound and Ambilight.
• Picture
Select this menu item to adjust all picture
settings.
• Sound
Select this menu item to adjust all sound settings.
• Ambilight
Select this menu item to adjust all Ambilight
settings.
• Settings assistant
Use the Settings assistant to guide you through
basic picture, sound and Ambilight settings in an
easy way.
• Features
Select this item for other feature settings.
• Setup
Select this item
-for installation and to update the TV software;
- to make use of the Remote control assistant
which will help you to setup your remote
control to operate other devices;
Use more of your TV
17
Page 20

- to use the connection assistant which will help
e
t
r
ue
t
98
0
eduction
e
t
r
ue
t
90
0
eduction
t
u
d
t
t
es
p
e
you to connect your devices to the TV.
◊Press o or œ to adjust the setting.
‹Press p to return to the Picture settings or
press Menu Ï to quit the TV menu.
5.3.2 Use of the menu
Learn to use the menus with this example.
‡ Press Menu Ï.
The TV menu appears on the screen.
TV men
Smart settings
Pictur
Soun
Ambiligh
Settings assistan
Featur
Setu
® Press o or œ to select Picture.
ÒPress π to enter the picture settings.
Pictur
ontras
Brightness
olou
H
Sharpness
Noise r
Tin
ontras
† Press œ to select Brightness.
Pictur
ontras
Brightness
olou
H
Sharpness
Noise r
Tin
Brightness
rNote:
More choices come available when digital channels
are installed and broadcasted.
5.4 Picture and Sound settings
The first time you switched on the TV you have
selected your preferred settings for picture, sound
and Ambilight.The following sections describe how
to modify or read just those settings.
5.4.1 Smart settings
Sets the TV to one of the predefined settings. Each
setting combines picture, sound and Ambilight.
‡ Press Menu Ï and select Smart settings.
® Press π to enter the list.
ÒPress o or œ to select a setting.
† Press OK.
º Press Menu Ï to quit the TV menu.
Smart settings: Personal,Vivid, Standard, Movie,
Energy saving, Game.
5.4.2 Settings assistant
Use the Settings assistant to guide you through
basic picture and sound settings in an easy way.
‡ Press Menu.
® Select Settings assistant and press π to enter.
ÒPress the green key to start the assistant.
† Press p or π to select the left or right side to
make your choice.
º Press the green key to go to the next setting.
Go through several settings.
◊When finished, press the green key to store all
your settings.
º Press π to enter the brightness setting.
Brightness
18 Use more of your TV
Page 21

5.4.3 Picture settings
ePerfec
D
on
CD
.
t
eduction
t
at
ode
ol
.
.
r
D
e
t
r
ue
t
eduction
Active control
ode
at
r
u
d
t
es
p
e
This section describes how to adjust all picture
settings individually.
‡ Press Menu Ï.
® Select Picture and press π to enter the list.
ÒPress o or œ to select a setting.
TV men
Smart settings
Pictur
Soun
Ambiligh
Featur
Setu
Pictur
ontras
Brightness
olou
H
Sharpness
Noise r
Tin
Light senso
Picture form
Auto format m
• Contrast
Changes the level of bright parts in the picture
but keeps the dark parts unchanged.
• Brightness
Changes the level of light of the total picture.
• Colour
Changes the level of saturation.
• Hue
If NTSC is broadcasted, this level compensates
the colour variations.
• Sharpness
Changes the level of sharpness of fine details.
• Noise reduction
Filters out and reduces the noise in the picture.
Set the level to Minimum, Medium, Maximum or
Off.
• Tint
Sets the colours to Normal, Warm (reddish) or
Cool (bluish). Select Custom to make a setting of
your own in the Custom menu.
•Custom
Press the green key to select each bar to
change the value of:
- R-WP red whitepoint
- G-WP green whitepoint
- B-WP blue whitepoint
- R-BL red blacklevel
- G-BL green blacklevel
• Perfect Pixel HD
Controls the advanced settings of the Perfect
Pixel HD Engine, resulting in best sharpness,
contrast, colour and motion.
Pictur
Noise r
Tin
Perfect Pixel H
Active contr
Light senso
Picture form
Auto format m
t Pixel H
HD Natural Moti
100 Hz Clear L
Advanced sharpn..
Dynamic contras
MPEGrtefact red..
olour enhance..
- HD Natural Motion
Removes motion judder and reproduces
smooth movement especially in movies.
- 100 Hz Clear LCD
Gives a superior motion sharpness, better black
level, high contrast with a flicker-free, quiet
image and a larger viewing angle.
- Advanced sharpness
Enables superior sharpness, especially on lines
and contours in the picture.
- Dynamic contrast
Sets the level at which the TV automatically
enhances the details in dark, middle and light
areas of the picture.
- Dynamic backlight
Sets the level at which power consumption can
be reduced by dimming the brightness intensity
of the screen.
Choose for the best power consumption or for
the picture with the best brightness intensity.
- MPEG artefact reduction
Smooths the digital transitions in the picture.
- Colour enhancement
Makes the colours more vivid and improves the
resolution of details in bright colours
• Active control
Corrects all incoming signals in order to provide
the best picture possible.
Switches Active control on or off.
• Light sensor
Adjusts the picture and Ambilight settings on the
lighting conditions of the room. Switches Light
sensor on or off.
• Picture format / Auto format mode
See section 5.4.4 Widescreen picture format.
ENGLISH
Use more of your TV 19
Page 22

5.4.4 Widescreen picture format
u
d
r
e
.
ce
ge
t
es
p
TV speakers
I
o
e
.
e
d
d
e
DEMO
Avoid black bars on the sides or on top and
bottom of the picture. Change the picture format
to a format that fills the screen.
‡ Press q to switch on the Picture format
menu.
® Press o or œ to select an available picture
format.
ÒPress OK.
† Press o to shift the picture upwards if subtitles
are hidden.
à Tip
For minimal distortion, select the Auto format
setting.
• Auto format (Not for PC.)
Enlarges the picture automatically to fill the
screen. Subtitles remain visible. You can set Auto
format in two different modes.
‡ In the TV menu, select Picture > Auto format
mode.
® Select Auto-fill to fill the
screen as much as
possible. Select Auto-
zoom to keep the original
picture format but black
bars may be visible.
• Super zoom (Not for HD.)
Removes the black bars on
the side of 4:3 broadcasts.
There is a minimal
distortion.
• 4:3 (Not for HD.)
Shows the classical 4:3
format.
•Movie expand 14:9
(Not for HD.)
Scales the format to 14:9.
•Movie expand 16:9
(Not for HD.)
Scales the format to 16:9.
• Wide screen
Stretches the format to
16:9.
• Unscaled
(Only for HD and PC.)
Maximum sharpness.
Distortion may appear on
borders. Black bars may
appear with pictures from
your PC.
rNote
Do not forget to name the connection in the
Connection menu. See section 7.5.1 Naming your
devices.
5.4.5 Sound settings
This section describes how to adjust all sound
settings.
‡ Press Menu Ï and select Sound.
® Press π to enter the list.
ÒPress o or œ to select a setting.
TV men
Smart settings
Pictur
Soun
Ambiligh
Featur
Setu
Soun
Equalize
Volum
Volume - Visually..
Balan
Audio langua
Dual I/I
Mono/Stere
Headphone volum
Auto volume level..
Delta volum
Auto surroun
• Equalizer
Changes the bass and treble of the sound. Select
each bar to change the setting.
•Volume
Changes the volume. When adjusting the volume
with V a volume bar appears. If you do not
want it to appear go to Menu > Setup >
Installation > Preferences and press π to enter
the list and select Volume bar off.
20 Use more of your TV
Page 23

• Volume – Visually impaired (UK only)
u
t
t
ode
n
t
t
es
p
e
d
Changes the volume of the selected Visually
impaired audio language in the Setup, Installation
menu. See section 6.1 Automatic installation.
• Balance
Sets the balance of the left and right
loudspeakers to fit best your listening position.
• Audio language
A list of audio languages for the current
programme may be available when digital
channels are installed and broadcasted.
To permanently change the audio language, see
section 6 Channel installation.
• Dual I/II
If broadcasted, you can choose between two
different languages.
• Mono/stereo
If stereo broadcasting is available, you can select
Mono or Stereo per TV channel.
• TV speakers
If you have connected an audio system to your
TV, you can switch off the TV speakers.
If your audio system supports Easylink, see
section 7.2.2 Easylink.
Select Automatic to have the sound from your
TV automatically reproduced by your audio
system.
• Surround mode
To select a more spatial sound if broadcasted or
if available from a connected device.
• Headphone volume
Changes the volume of the headphone.
You can mute the TV speakers with ¬ on the
remote control.
• Auto volume levelling
Reduces sudden volume differences like at the
beginning of commercials or when switching from
one channel to another.
Select on or off.
• Delta volume
Levels out volume differences between channels
or connected devices.
‡ Switch to the channel or device you want to
level out the volume difference.
® Select Delta volume in the Sound menu and
change the volume level.
• Auto surround
Switches the TV automatically to the best
surround sound mode dependant on the
broadcast.
Select on or off.
5.5 Ambilight
You can adjust Ambilight settings.
‡ Press Menu Ï and select Ambilight.
® Press π to enter the list.
ÒPress o or œ to select a setting.
TV men
Smart settings
Pictur
Soun
Ambiligh
Settings assistan
Featur
Setu
• Ambilight
Switches Ambilight on or off.
• Active mode
Adjusts the speed at which Ambilight responds to
the on-screen images..
Relaxed sets Ambilight to change soft and
smoothly with the images on screen.
Dynamic sets Ambilight to change quick and
responsive.
• Brightness
Changes the light output of Ambilight.
• Separation
Sets the difference in colour level between the
Ambilights at the sides of the TV.
Separation off gives a dynamic but uniform
colour Ambilight.
ç Caution
To avoid bad infrared remote control reception,
place your devices out of sight of Ambilight.
Ambiligh
Ambiligh
Active m
Brightness
Separatio
ENGLISH
Use more of your TV 21
Page 24

5.6 Teletext
Your TV has a 1200 pages memory that stores
broadcasted teletext pages and subpages to reduce
waiting time.
To select a teletext page see section 4.6 Select a
Teletext page.
5.6.1 Select a teletext language
Some digital TV broadcasters offer the possibility to
select your preferred teletext language. See section
6.1 Automatic installation.
5.6.2 Select pagenumber subpages
A teletext page number can hold several subpages.
The pages are shown on a bar next to the main
pagenumber.
‡ Press Teletext
® Select a teletext page.
ÒPress p or π to select a subpage.
5.6.3 Select T.O.P. teletext broadcasts
T. O.P. teletext (Table of Pages) is not broadcast by
all TV channels. You can easily jump from one
subject to another without using pagenumbers.
‡ Press Teletext.
® Press i.
The T.O.P. overview appears.
ÒUse p or π, o or œ to select a subject.
† Press
.
DEMO
OK to view the page.
5.6.4 Dual screen teletext (not available for
channels with Digital Text services)
View the TV channel and teletext next to each
other.
‡ Press b for Dual screen teletext.
® Press Teletext again to show normal teletext.
ÒPress Teletext to switch off teletext.
5.6.5 Search teletext
Quickly jump to a subject linked to a series of
pagenumbers or search for specific words in
teletext pages.
‡ Press Teletext.
® Press
OK to highlight the first word or number.
ÒPress p or π, o or œ to jump to the next
word or number on the page.
† Press
OK to search a page which holds the
highlighted word or number.
º Press o until no word or number is highlighted
to quit Search.
5.6.6 Enlarge teletext pages
For a more comfortable reading, you can enlarge
the teletext page.
‡ Press Teletext and select a teletext page.
® Press q to enlarge the top part of the page.
ÒPress q again to view the enlarged lower
part of the page.
† Press o or œ to scroll through the enlarged
page.
º Press q again to return to the normal page
size.
DEMO
DEMO
5.6.7 Teletext menu
With the options in the teletext menu you can
reveal hidden info, let cycle subpages automatically
and change the character setting.
•Reveal
Hide or unhide hidden information on a page,
such as solutions to riddles or puzzles.
• Cycle subpages
If subpages are available for the selected page,
you can make subpages cycle automatically.
22 Use more of your TV
Page 25

• Language
s
3
2
1
1
1
t
Teletext menu
Reveal
Language
Gr. II
Off
Cycle subpages
Off
Some languages use a different set of characters.
Switch to the other group to show the text
correctly.
‡ Press Teletext.
® Press Menu Ï.
ÒPress o or œ to select an option.
† Press
OK to change a setting.
º Press Menu Ï to quit the teletext menu.
◊Press Teletext to switch off teletext.
5.7 Create favourite channel
lists
View the All channels list or set up a Favourite list
of your own with your preferred TV channels and
radio stations.
5.7.1 Select a favourite list
You can select one of the favourite channel lists.
‡ Press
OK.
The first time after you have finished the
installation, the All channels list is shown. In
other situations, it brings up the last selected
favourite list.
All channel
ENGLISH
5.6.8 Digital text services (UK only)
Some digital TV broadcasters offer dedicated digital
text or interactive services (for example BBC1) on
their digital TV channels. These services work as
normal Teletext with the number, colour and
navigation keys to select and navigate.
‡ Press Teletext.
® Press p or π, o or œ to select or highlight
items.
ÒPress one of the colour keys to select an
option.
† Press
OK to confirm or activate.
º Press ‡ Cancel to cancel Digital text or
interactive services.
ç Caution
Digital text services are blocked when subtitles are
broadcasted and Subtitle On is set in the Features
menu. See section 5.10 Subtitles.
5.6.9 Teletext 2.5
If broadcasted by the TV channel this teletext offers
more colours and better graphics.
Teletext 2.5 is switched on as a factory setting.
‡ Press Menu Ï on the remote control and
select Setup > Installation > Preferences >
Teletext 2.5 and press π to enter the list.
® Select on or off.
EXT
1 Analogue channel
2 Digital channel
3 Digital channel
4 Radio channel
Select lis
® Press the red key to show all favourite lists.
ÒPress o or œ to select a list.
† Press
OK.
The selected favourite list appears.
º Press
OK again to quit.
5.7.2 To set up a favourite list
Create or modify your own favourite list.
‡ Press
OK.
The last selected list appears.
® Press the red key to show all favourite lists.
ÒPress o or œ to select a list.
† Press
OK.
º Press the green key to enter the Edit mode.
The selected list brings up a full channel list.
◊Press o or œ to highlight a channel.
‹Press
OK to mark (or unmark) the highlighted
channel.The channel is added to (or removed
from) the selected list.
≈Press the green key again to leave the Edit
mode.
The modified channel list appears again.
Use more of your TV 23
Page 26

5.7.3 Select a channel from a favourite list
26 BBC1 Tue., 12 Sep 09:17
Title : Commonwealth Games
Info: 7:50 - 12:30 : 280 min
..........
t
.
t
DEMO
‡ Press
OK.
The last selected channel list appears.
® Use o or œ to highlight a channel.
ÒPress
OK.
The TV tunes to that channel.
à Tip
• Use
-P+ to go through the TV channels of the
selected favourite list.
• With the number keys you can still select
channels which are not marked as favourite.
-
5.8 Electronic Programme
Guide - EPG -
The Electronic Programme guide is an on screen
guide to scheduled digital TV programmes.
You can navigate, select and view programmes by
time, title or genre.There are two types of EPG,
‘Now and Next’ and ‘7 or 8 day’ EPG.
When digital channels are installed and
broadcasted, EPG is available. ‘Now and Next’ is
always available but the ‘7 or 8 day’ EPG is only
available in some countries.
With the EPG menu you can...
• see a list of current broadcasted programmes
• see the next programme
• group programmes by genre
• set reminders when programmes will star t
• set up preferred EPG channels
• etc.
5.8.1 Switch on EPG
‡ Press a.
The following type of EPG appears:
‘Now and Next’ EPG
Detailed information about the current programme
is shown.
Exi
Press -P+ to change channel
Nex
Or
‘7 or 8 day’ EPG
It may take some time to receive the EPG data.
The list of TV programmes will show.
24 Use more of your TV
Page 27

on
y
d
h
e
.
a
on
e
.
Programme guide Tue., 12 Sep
09:55
BBC ONE
BBC TWO
five
BBC THREE
OUR
09:50 Tweenies
09:00 The Wright Stuff
05:32 This is BBC THREE
05:3
OUR
09:20
g
12:30 Commonwealth
10:15 Something Special
10:30 Trisha Goddard
12:00 This is BBC THREE
OUR
addio
Around Next
07:50 Commonwealth
ch
o
.
ENGLISH
BBC F
2 This is BBC F
Moonlightin
RemindWat
13:50 Anastasia 0010 - EEN
12:00 This is BBC F
10:15 D
Jump to ..
Inf
® Use the colour keys to activate the available
actions at the bottom of the screen.
• Next: to show information about the next
programme.
• Remind: to mark or unmark a programme as a
reminder.
• Watch: to watch or listen to a current
programme.
• Jump to...: to jump to the next or previous day.
• Info: to display information on a selected
programme (if available).
ÒPress a to quit the EPG.
5.8.2 More on ‘7 or 8 day’ EPG
Search by genre, scheduled reminders, etc. are
managed in the Programme guide menu.
‡ Press a on the remote control.
® Press Menu Ï.
The Programme guide menu appears.
Programme guideWhat's
What's
Search by genr
Scheduled remind..
Preferred EPG ch..
Acquire EPG dat
12:30 South Toda
11:50 Working Lunc
11:55 Melrose Plac
13:00 In aller Freun
ÒPress o or œ to select a menu option.
† Press π to enter.
º Press o or œ to make a selection.
◊Press
OK to activate or press the green key to
watch
‹Press a to quit the EPG.
rNote
Only channels marked as Preferred EPG channels
appear in the Programme guide menu.
Use more of your TV 25
Page 28

5.9 Timers and locks
k
k
er
k
g
ock
k
k
This section describes how to switch the TV on or
off at a specified time and to lock or unlock the TV.
5.9.1 Automatically switch to standby
Sleeptimer switches the TV to standby after a time.
‡ Press Menu Ï on the remote control and
select Features > Sleeptimer and press π to
enter the sleeptimer bar.
® Press o or œ to set the time up to 180
minutes in steps of 5 minutes. If set to 0
minutes, the Sleeptimer is switched off.
You can always switch off your TV earlier or reset
the time during countdown.
5.9.2 Automatically switch the TV on
On timer switches the TV on automatically to a
specified channel at a specified time, from standby.
‡ Press Menu Ï on the remote control and
select Features > On timer and press π to
enter the On timer menu.
® Use p or π, o or œ to select and enter the
menu items one by one to set a channel, a day
of the week or daily, and a starting time.
ÒPress
† Press Menu Ï to quit the menu.
à Tip
To switch off the On timer, select Off in the On
timer menu.
5.9.3 Lock TV channels and programmes
Lock TV channels and/or programmes from
connected devices to prevent children from
watching them. Lock and unlock with a four number
code.
Set or change your code
‡ Press Menu Ï on the remote control and
® Enter your code with the number keys.
Did you forget your code ?
‡ Select Change code.
® Press π.
OK to confirm.
select Features > Set or Change code and press
π to enter your code.
The Features menu reappears with a message
confirming that your code has been created or
changed.
ÒEnter the overriding code 8-8-8-8.
† Enter a new personal code.
º Confirm your new entered code.
The previous code is erased and the new code
is stored.
5.9.4 Activate or deactivate Child lock
Set your code and you can:
• Lock all channels and devices,
• Lock specific channels and devices,
• Set a time after which all channels and devices
are locked,
• Set the maximum allowed parental rating for
digital channels that are installed and broadcast.
‡ Press Menu Ï.
® Select Features > Child lock and press π.
ÒEnter your code with the number keys.
† Select one of the options.
º Press π.
Lock or unlock all channels and connected devices
‡ Select Lock or Unlock.
Lock a certain programme or all channels from a
certain time
hild loc
L
ustom loc
nloc
ustom loc
Lock aft
hannel loc
Parental ratin
‡ Select Custom lock.
® Press π to enter the Custom lock menu.
ÒPress π again to enter the Lock after menu.
† Select On to switch on the Timer lock.
º Press p.
◊Select Time.
‹Press π.
≈Enter the time with o or œ and π.
ÚPress
OK.
Lock one or more channels and connected devices
‡ Select Custom lock.
® Press π to enter.
ÒPress o or œ to select Channel lock.
† Press π.
º Press o or œ to select the channel(s) you
want to lock or unlock.
◊Each time press
OK to lock or unlock the
channel.
26
Use more of your TV
Page 29

Set an age rating to a digital programme
u
es
e
ge
r
k
e
r
o
es
e
d
t
p
Some digital broadcasters have their programmes
rated (depending on your country).When the
rating is higher than your child’s age, the
programme will be locked.
‡ Select Custom lock.
® Press π to enter.
ÒPress o or œ to select Parental rating.
† Press π.
º Press o or œ to select an age rating.
◊Press Menu Ï to quit the Child lock menu.
5.10.3 Select a digital subtitle language
If subtitle broadcasting is available with digital
channels, you can select a preferred subtitle
language out of a list of broadcasted languages.The
preferred subtitle languages set in the Installation
menu are overruled temporarily.
‡ Press Menu Ï on the remote control and
select Features > Subtitle language and press π
to enter the list of available languages.
® Press o or œ to select a subtitle language.
ÒPress
OK.
ENGLISH
5.10 Subtitles
For each TV channel, subtitles can be set, coming
from Teletext or DVB-T (digital) broadcasts.
If digital channels are installed and broadcasted, you
can select your preferred subtitle language.
5.10.1 Subtitling from analogue TV channels
‡ Select an analogue TV channel.
® Press Teletext to switch on Teletext.
ÒEnter the three number pagenumber of the
subtitle page.
† Press Teletext to switch off Teletext.
rNote
The Teletext subtitle page of analogue channels
must be stored for each TV channel separately.
5.10.2 Activate or deactivate subtitling
‡ Press Menu Ï on the remote control and
select Features > Subtitle and press π to enter
the list.
® Press o or œ to select On to show the
subtitles always or On during mute to show the
subtitles only when the sound is muted with the
¬ key on the remote control.
ÒPress p to return to the Features menu.
TV men
Smart settings
Pictur
Soun
Ambiligh
Featur
Setu
Featur
ommon interfac
Subtitle
Subtitle langua
Sleeptime
hild loc
Set/Change cod
n time
Dem
5.11 Watch and play your
photos and music
Watch pictures or listen to music stored on a USB
device (not supplied with the TV), a camcorder
(only for photos) or from your PC network.Watch
your pictures as a slideshow or listen to a self made
music playlist.
rNote
Philips is not responsible if your USB device is not
supported nor shall Philips accept any liability for
damage or loss of stored data.
5.11.1 Insert the USB device
‡ Insert a device at the side of the TV while the
TV is switched on.
A message appears that a USB device has been
detected.
rNote
In case the USB device does not automatically
break in, press Source v > USB/Memory devices
and press OK.
Select Side and press OK to display your
camcorder content.
5.11.2 Remove the USB device
‡ Press Source v.
® Remove the USB device.
ÒSelect TV or another connected device to
watch a programme.
Use more of your TV 27
Page 30

5.11.3 Watch your pictures, start a
jpg
jpg
jpg
jpg
e
1
jpg
jpg
jpg
jpg
5
jpg
1
1
1
jpg
jpg
jpg
jpg
jpg
jpg
B
e
1
6
jpg
jpg
jpg
c
e
slideshow and play music
Look up your pictures in the Picture album of your
USB device.
‡ Select the Picture folder for the picture files you
have stored on your USB device.
US
Pictur
Musi
Pictur
Afrika_200
Paris_200
My_car.
Jean.
Mary.
® Press π to enter the Picture folder.
ÒPress o or œ to select a picture or a picture
album.
Pictur
Afrika_200
Paris_200
My_car.
Jean.
Mary.
Afrika_200
Kenya.
Congo.
Victoria.
Cairo.
• Slide time
Sets the time lag for the picture transitions:
Short, Medium or Long.
• Rotate
To rotate a picture.
• Start/Show/Pause
To stop, pause and restart the slideshow.
Thumbnails
Watch the pictures of a selected album in an
overview.
‡ Select a picture album.
® Press π to enter the picture list.
ÒPress the blue key.
† Press o or œ, p or π to highlight a picture.
º Press
OK to watch the picture.
◊Press p to return to the thumbnail overview.
‹Press the blue key again to go back to the
picture list.
USBAfrika_2001Kenya.
Kenya.
Afrika_200
Kenya.
Congo.
Victoria.
Dakar.
Cairo.
† Press
OK to watch the picture or to start a
Afrika_200
Kenya.
slideshow of the pictures in the album.
º Press
OK to pause the slideshow. Press again to
restart.
◊Press one of the colour keys on the remote
control to perform the corresponding function
shown at the bottom of the screen.
If the function bar at the bottom disappeared,
press any colour key to let it reappear.
‹Press p and select another picture or another
album.
Slideshow settings
• Details / More details
Shows the picture name, date, size and next
picture in the slideshow.
• Transitions
Shows the list of available transition styles of the
pictures.
Press o or œ to select and press
OK to
activate.
Listen to music
Look up your songs in the Music album of your
USB device.
‡ Select the Music folder for the music files you
have stored on your USB device.
® Press π to enter the Music folder.
ÒPress o or œ to select a song or a music
album.
† Press
OK to play the selected song or to play a
song followed by the next song in the same
album.
º Press one of the colour keys on the remote
control to perform the corresponding function
shown at the bottom of the screen.
If the function bar at the bottom disappeared,
press any colour key to let it reappear.
Music settings
• Details
Shows the file name.
• Repeat one/all
Repeat all songs in the album until you stop a
song or only repeat the one song selected until
you stop the song.
• Shuffle
Play songs in a random sequence.
28
Use more of your TV
Page 31

Watch a slideshow with background music
Watch a slideshow of your stored pictures
accompanied with your stored background music.
‡ Select an album of songs first and press
OK.
® Highlight the Picture folder and select an album
of pictures and press
OK.
5.11.4 Watch photos or listen to music from
your PC
To watch photos and listen to music from a
connected PC, make sure:
-your router and PC are switched on
-a media server software is running on your PC.
See section 7.7 PC network.
‡ Press the Source v key on the remote
control.
® Select PC network and press π.
Wait until the PC content comes on.
ÒSelect the content you want to watch or listen
to and press π.
† Use p or π, o or œ to go through the
photo or music files or folders.
º Press OK to watch or listen.
◊Press p to go back to the previous list.
ENGLISH
See section 9 Troubleshooting in case of problems
playing files or in case your PC does not appear in
the PC network menu.
5.12 Listen to digital radio
channels
If digital broadcasting is available, digital radio
channels are installed during installation.
To listen to a digital radio channel:
‡ Press
® Use the number keys to select a radio channel
ÒPress
OK on the remote control.
The All channels menu is displayed.
available from channel number 400 onwards.
To reorder see section 6.3.3 Reorder the
channels.
OK.
Use more of your TV 29
Page 32

5.13 Software update
p
e
t
.
t
allation
e
BSU
Philips continually tries to improve its products.To
benefit, update the TV software regularly.To update
your TV software you need a USB Memory device
(not supplied).
Ver ify that your USB memory device has at least
128Mb free space. Make sure the write protection
is switched off. Some USB devices do not work
with our TV.
5.13.1 Update assistant
The Update assistant helps you to update the TV’s
software.
Step 1:TV identification
The TV has to identify with your USB memory
device.
‡ Press Menu Ï > Setup.
® Press π.
ÒPress o or œ to select Software update.
† Press π.
Setu
nst
Software updat
Software updat
Update assistan
urrent software ..
Local updates
Announcemen
Step 2: Software download from the PC to
the USB device
‡ Insert the USB memory device into a PC linked
to the internet.
® Locate and open the file update.htm on your
USB device.
ÒRead the instructions on screen and click on
the Send
ID button.
If new software is available, the update is
downloaded on the USB memory device.
† Remove the USB memory device from your
PC.
Step 3: Software update transfer to the TV
The downloaded software on the USB memory
device must now be uploaded to your TV.
ç Caution
• Never remove the USB memory device from the
TV during the software update.
• If a power drop occurs during the update, do not
remove the USB memory device from the TV.
When the power retuirns, the TV continues to
update.
‡ Switch on the TV.
® Insert the USB memory device to the USB
connector at the side of the TV.
º Press o or œ to select Update assistant.
◊Press π.
‹Press
OK to activate.
≈Insert a USB memory device into the USB
connector at the side of the TV.
The TV menu appears.
Ú Press the green key to proceed.
A message appears that the TV has successfully
written its identification file to the USB memory
device.
œ Press the green key again to finish.
πRemove the USB memory device from the TV.
30
ÒThe TV switches off. The screen stays black for
about 10 seconds.Wait and do not use the
power switch B on the TV.
BSU
Use more of your TV
Page 33

† The update process starts automatically. Please
S
U
Operation Successful! Re
g
S
U
BSU
wait.
The update is finished when the message
‘Operation successful’ appears on the screen.
º Remove the USB memory device from the TV.
≈The TV switches back on again. The update is
done.
ENGLISH
5.13.2 Software update by digital broadcast
(DVB-T)
Your TV might receive new software from the
digital broadcast system automatically.
If you receive an update message on screen it is
strongly advised to update the software
immediately - select Now.
If you want to be reminded later on, select Later.
Select Cancel to quit the update (not
recommended). If you cancelled the update you can
still update yourself from the TV menu > Setup >
Software update > Local updates.
◊Press B on the remote control.
Do not press more than once and do not use
the Power B switch on the TV.
‹The TV switches off.The screen stays black for
about 10 seconds. Please, wait.
Use more of your TV
31
Page 34

6 Channel installation
.
w
.
e
ge
.
.
ge
on
ge
o
.
t
t
Visually impaired
audio format
ces
.
.
ces
p
The first time you turned on your TV
•you have selected the language of the TV menus
and the country where you are located
• all the available TV Channels have been installed.
This chapter provides instructions on how to
reinstall channels as well as other useful channel
installation features.
rNote:
Re-installation will modify the All channels list and
new added channels will not be added to any
favourite list.
6.1 Automatic installation
• Preferred teletext languages
Select one of the available teletext languages as
primary referred and secondary preferred
language.
• Hearing impaired
Select On to display the hearing impaired subtitle
version of your preferred audio or subtitle
language when available.
• Visually impaired (UK only)
Select to hear the additional commentary audio
(if available) in your selected audio language
through the loudspeakers of your TV or through
the headphones or through both
rNote:
If both Visually impaired and Hearing impaired are
enabled, the Visually impaired language will have
priority for audio, the Hearing impaired for subtitles.
This section describes how to search for and store
all available channels automatically.
Step 1: Menu language
Sets the language of the TV menus. Go to a next
step if your language settings are correct.
‡ Press Menu Ï on the remote control and
select Setup > Installation > Languages and
press π to enter Menu language.
® Press o or œ to select your language.
ÒPress
OK to confirm.
† Press p to return to the Installation menu.
Installati
Languages
hannel install..
Preferen
onnections assist
Rename devi
Audio setu
Languages
Menu langua
Primary audi
Secondary subtitl.
Primary teletex
Secondary teletex
Pref.
The Languages menu also offers the following
language settings when digital channels are installed
and broadcasted.
• Preferred audio language
Select one of the available audio languages as
primary preferred and secondary preferred
language.
• Preferred subtitle languages
Select one of the available subtitle languages as
primary preferred and secondary preferred
language. See section 5.10 Subtitles.
• Preferred audio format
Select your preferred and available audio format
to achieve the best sound reproduction.
Select Advanced for the best sound reproduction
if a Home theatre system is connected to your
TV. Select Standard in all other cases.
Step 2: Select your country
Select the country where you are located.
The TV will install and arrange the TV channels
according to the country selected.
Go to a next step if your country selection is
correct.
‡ Press œ to select Channel installation.
® Press π to enter the Channel installation menu.
Automatic installation is highlighted.
ÒPress π to enter.
† Press OK.
The Country list appears.
º Press o or œ to select your country.
◊Press Next.
hannel install...Automatic install..
Automatic install..
Installation updat
Start-up messa
Digital: Test recept..
Analogue: Manual..
Rearran
Start no
32
Channel installation
Page 35

Step 3: Select Antenna or Cable
on
k
ode
e
g
.
p
ces
ecoder
.
k
This selection is only available when this TV is
prepared to receive DVB-C channels in your
country.
Select Antenna to install all digital terrestrial (DVBT) and analogue channels available.
Select Cable to install all digital cable (DVB-C) and
analogue channels available.
‡ Press o or œ to select Antenna or Cable.
® Press Next.
ÒIf the TV asks for it, enter the Network ID you
received from your provider.
rNote
You can do a Channel installation if you are both
connected to a digital antenna and a cable network.
Therefore do the installation twice.To watch the
stored Antenna channels or the stored Cable
channels, you will have to switch between Antenna
or Cable in the Channel installation > Antenna or
Cable menu.
Step 4: Install TV and radio channels
Your TV will search for and store all available digital
and analogue TV channels and all available digital
radio channels.
Step 5 Clock, time zone and daylight saving
selection
Only available when the country selected supports
digital broadcasts.
Go to a next step if this step is not applicable.
‡ Press œ to select Clock.
® Press π to enter.
ÒPress o or œ to select Auto clock mode.
† Press π to enter.
Installati
onnections assist
Rename devi
Audio setu
D
Man. network inst
loc
Factory settings
loc
Auto clock m
Time zon
Daylight savin
Auto clock mode
Select Automatic to instruct your TV to always get
the time correctly.Time zone and Daylight saving
correction are automatically set.
Select Manual when Universal Time Coordinated
(UTC) is not available in your area.
ENGLISH
If you selected Cable in Step 3, a Settings menu is
available. Leave these settings unchanged unless
your provider supplied specific values to use for
Network frequency, Network ID or Symbol rate.
Follow the text on screen to change the settings.
Use the digit keys to enter the numbers.You can
also select to install analogue channels or not.
‡ Select Start.
The installation may take a few minutes.
In case of Cable selection, the TV can ask to
enter the Network ID supplied by the cable
provider. Enter this ID with the digit keys.
® When the installation is done, press Finish to
return to the Channel installation menu.
ÒPress Menu Ï to quit the menu.
à Tip
When digital channels are found, the list of installed
channels may show some empty channel numbers.
If you want to rename, reorder or uninstall stored
channels, see section 6.3 Rearrange channels.
Time zone/Daylight saving
When you selected Auto clock mode manually,
select your local time zone and choose between
Standard (winter) and Daylight saving time
(summer).
Channel installation 33
Page 36

6.2 Analogue: Manual installation
.
m
h
e
.
.
e
ge
ge
You can tune-in analogue TV channels channel by
channel manually with Manual installation.
6.2.1 Select the system
‡ Press Menu Ï and select Setup > Installation
> Channel installation > Analogue: Manual
installation.
® Press π to enter the Manual installation menu.
System is highlighted.
ÒPress π to enter the System list.
† Press o or œ to select your country or part
of the world where you are now located.
º Press p to return to the Manual installation
menu.
hannel install...Analogue: Manual..
Automatic install..
Installation updat
Start-up messa
Rearran
Syste
Searc
Fine tun
Store as new ch..
6.2.3 Fine tune a channel
Fine tune a found channel when the reception is
poor.
‡ Press Menu Ï and select Setup > Installation
> Channel installation > Analogue: manual
installation > Fine tune.
® Press π to enter the Fine tune menu.
ÒPress o or œ to adjust the frequency
† Press p when you finished fine tuning.
º Select Store current channel to store the fine
tuned channel under the current channel
number.
◊Press π to enter.
‹Press
OK.
Done appears.
≈Press Menu Ï to quit the Channel installation
menu.
6.3 Rearrange stored channels
To rename, reorder, uninstall or reinstall stored
channels.
6.3.1 Rename a channel
Assign or change a channel name to a channel for
which a name has not yet been entered.
6.2.2 Search for and store a new channel
‡ Press Menu Ï and select Setup > Installation
> Channel installation > Analogue: manual
installation > Search.
® Press π to enter the Search menu.
ÒPress the red key to enter the frequency
yourself or press the green key to search for a
next channel.
à Tip
If you know the frequency, enter the three numbers
of the frequency with the number keys of the
remote control.
† Press p when the new channel has been
found.
º Select Store as new channel to store the new
channel under a new channel number.
◊Press π to enter.
‹Press
OK.
Done appears.
≈Press Menu Ï to quit the channel installation
menu.
‡ Press Menu Ï and select Setup > Installation
> Channel installation > Rearrange.
® Press π to enter the channel list.
ÒPress o or œ in the channel list to select the
channel you want to rename.
† Press the red key.
º Press p or π to select a character or o or œ to
change the characters. Space, numbers and other
special characters are located between z and A.
◊Press the green key or
OK to finish.
à Tip
To delete all characters, press the yellow key.
To delete the highlighted characters, press the blue
key..
6.3.2 Uninstall or reinstall a channel
To uninstall a stored channel so that it is no longer
possible to tune to.
Reinstall an earlier uninstalled channel.
‡ Press Menu Ï and select Setup > Installation
> Channel installation > Rearrange.
® Press π to enter the channel list.
34
Channel installation
Page 37

ÒPress o or œ in the channel list to select the
channel you want to uninstall or reinstall.
† Press the green key to uninstall or reinstall the
channel.
º Press Menu Ï to quit the menu.
6.3.3 Reorder the channels
Change the order of the stored channels.
‡ Press Menu Ï and select Setup > Installation
> Channel installation > Rearrange.
® Press π to enter the channel list.
ÒPress o or œ in the channel list to select the
channel you want to reorder.
† Press the yellow key to move up the highlighted
channel in your channel list.
º Press the blue key to move down the
highlighted channel in your channel list.
◊Press Menu Ï to quit the menu.
6.4 Channel management
6.4.1 Automatic search
Once a day, at 3 AM, the TV searches for all
available TV channels automatically. Leave your TV in
standby.
Earlier found channels are updated and new
channels are stored. Channels not found by the
search anymore are removed from the channel list.
When Channel management has found or removed
channels, a message at TV start up is shown.You
can activate or deactivate this message.
‡ Press Menu Ï and select Setup > Installation
> Channel installation > Startup message.
® Select On or Off.
6.5 Digital reception test
If you receive Digital TV broadcasting you can verify
the quality and signal strength of a specific channel.
‡ Select a channel.
® Press Menu.
ÒSelect Setup > Installation > Channel
installation > Digital:Test reception.
† Press π to enter
º Press
◊Press the green key to start the test.
‹Use the cursor keys to change the frequency to
≈Press the green key to store the frequency if
ÚPress the red key to return to the Channel
œ Press Menu to quit the menu.
à Tip
To achieve the best results, contact a specialised
antenna installer.
OK.
Information on the quality and the signal
strength of this channel is shown.
improve the signal or enter a new frequency
directly with the digit keys.
the signal quality and strength are good.
installation menu.
6.6 Factory settings
You might want to return to the original factory
settings. Only picture, sound and Ambilight settings
will be reset.
‡ Press Menu Ï and select Setup > Installation
> Factory settings.
® Press π to enter the Factory settings menu.
ÒPress
† Press Menu Ï to quit the menu.
OK.
ENGLISH
6.4.2 Manual search
You can install the updates at any time.
‡ Press Menu Ï and select Setup > Installation
> Channel installation > Installation update.
® Press π to enter the Installation update menu.
ÒPress
† Press the green key to start.
º When the update is completed, press the red
◊Press Menu Ï to quit the menu.
Channel installation 35
OK.
The update starts and may take a few minutes.
key to return to the Channel installation menu.
Page 38

7 Connections
7.1 Connection overview Side connectors
1 Headphones
Stereo Mini jack
2 Audio L/R
Audio L/R input to be used together with Video
or S-Video on the side of the TV.
3 Video
Video input to be used together with the
Audio L/R on the side of the TV.
4 S-Video
S-Video input to be used together with the
Audio L/R on the side of the TV.
5 USB
USB connector.
6 HDMI Side
HDMI input
7 Common interface
Slot for Conditional Access Modules (CAM)
Back connectors
8
EXT1, EXT2
Scart connectors for DVD,VCR, Digital receiver,
Game console, etc.
9
EXT3
Component Video Y Pb Pr and Audio L/R
connectors for DVD, Digital receiver or Game
console, etc.
VGA and Audio L/R connectors for a PC.
10 Service UART
For service only.
11
Digital Audio Out
Sound output cinch connector for a Home
Theatre System, etc.
12
Audio Out L/R
Sound output cinch connectors for a Home
Theatre System, etc.
13 Antenna input
14 Network
Home network connector.
15 HDMI 1, HDMI 2, HDMI 3
HDMI input connectors for Blu-ray Disc player,
HD Digital receiver or HD Game console, etc.
16 Audio L/R In [DVI to HDMI]
Audio In L/R connectors to be used together
with a DVI to HDMI connection.
Connections36
Page 39

7.2 About connections
7.2.1 What you need to know
Connect your device with the highest possible
quality connection.
Look for the highest quality connection on your
device. Use that connection to your TV.
HDMI - Highest quality ★★★★★
An HDMI connection has the best picture and
sound quality. One cable combines video and audio
signals. Use HDMI for HD ( High Definition) TV
signals. HDMI with EasyLink offers easy operating
of your connected devices when these have the
HDMI CEC standard. See section 7.2.2 EasyLink
A device connected with HDMI to the TV can only
send out audio and video signals to your TV.The
device cannot receive or record audio and video
from your TV.
YPbPr – Higher quality ★★★★
Use the Component Video YPbPr connections
together with Audio Left and Right. Match the cable
colours when you connect.
YPbPr can handle HD TV signals.
Component Video Audio L/R cable
YPbPr cable - Red,White
- Red, Green, Blue
Scart - Good quality ★★★
One cable combines video and audio signals.
Scart connectors can handle RGB video but no HD
TV signals.
ENGLISH
HDMI cable (max. 5m)
à Tip
DVI to HDMI – Higher quality ★★★★
Use a DVI to HDMI adaptor if your device has only
a DVI connection.
Connect an Audio L/R cable to Audio In L/R (DVI
to HDMI) for sound.
Assign this Audio In to the HDMI 1, 2 or 3 where
the device is connected. See section 7.5.2 Audio
setup (if present).
r Note
HDMI supports HDCP (High-bandwidth Digital
Contents Protection). HDCP is a copy protection
signal that comes with HD content (DVD disc or
Blu-ray Disc).
Scart cable
S-Video - Good quality ★★
Use an S-Video cable together with an Audio L/R
(cinch) cable. Match the cable colours when you
connect.
An S-Video cable Audio L/R cable
- Red,White
Connections 37
Page 40

Video - Basic quality ★
Use a Video (cinch) cable together with an Audio
L/R (cinch) cable. Match the cable colours when
you connect.
Combined Video - yellow and Audio L/R cable
- red and white
7.2.2 HDMI with EasyLink
Connected devices that are compliant with the
HDMI CEC standard can work together.
‡ Press Menu Ï > Setup > Installation >
Preferences and press π to enter the list.
® Press o or œ to select EasyLink.
ÒPress π to enter.
† Press o or œ to select On or Off.
º Select On to activate EasyLink.
EasyLink might not work with devices from other
brands.
One touch play
Insert a DVD disc and press Play. The TV switches
on from standby and shows the DVD programme
automatically.
System standby
Press the B key on the remote control for more
than 2 seconds to switch the connected devices in
standby.
7.2.3 Display synchronised audio out
For the best match of image and sound in speech
on screen, connect a Home Theatre System to
Audio Out L/R or Digital Audio outputs. See
diagrams 7.4.4 and 7.4.8.
Do not connect the audio signal of a DVD player,
digital receiver or other audio/video device directly
to the Home Theatre System.
7.3 Connect with the
Connection assistant
(if available)
Use the Connection assistant to show you how to
connect your devices to your TV. It sets all
necessary settings automatically.
You can also connect your devices without the use
of the Connection assistant. See section 7.4
Connect without the Connection assistant.
‡ Press Menu Ï on the remote control and
select Setup > Installation > Connection
assistant.
® Press π to start the Connection assistant.
ÒPress OK.
7.4 Connect without the
Connection assistant
The connections shown in this section are
recommendations for the most used cases. Other
solutions are possible.
When a device is connected the TV needs to know
what connection you made. See section 7.5
Connection setup.
System audio control
When you connect an audio system you can listen
to the sound from your TV through your audio
system while the TV speakers are muted. See
section 5.4.5 Sound settings,TV speakers.
rNote
Ensure that all HDMI-CEC features in the HDMICEC devices (for ex. Home Theatre System) are
properly set up.
38
Connections
Page 41

7.4.1 DVD player
EXT 3
VGA
SERVICE
UART
OUT
YPb
Pr
L
R
L
R
EXT 2 EXT 1
AUDIO
OUT
AUDIO
DIGITAL
VGA/Y PbPr AUDIO
VGA +
YPbPr
Receiver / Cable boxDVD Recorder
IN
OU
T
I
N
OUT
EXT 3
VGA
SERVICE
UART
OUT
YPb
Pr
L
R
L
R
EXT 2 EXT 1
AUDIO
OUT
AUDIO
DIGITAL
VGA/YPbPr AUDIO
VGA +
YPbPr
DVD Player
EXT 3
VGA
SERVICE
UART
OUT
YPb
Pr
L
R
L
R
EXT 2 EXT 1
AUDIO
OUT
AUDIO
DIGITAL
VGA/YPbPr AUDIO
VGA +
YPbPr
DVD Recorder / Digital receiver
IN
OUT
Use a scart cable to connect the device to the
EXT1 input at the back of the TV.
7.4.2 DVD Recorder or Digital Receiver
Use a scart cable and 2 antenna cables.
ENGLISH
7.4.3 DVD Recorder and Digital Receiver
Use 3 scart cables and 3 antenna cables.
Connections 39
Page 42

7.4.4 DVD Recorder and Home Theatre
System
Use a scart cable, 2 antenna cables and 1 digital
audio (cinch) cable.
SERVICE
UART
DIGITAL
DIGITAL
AUDIO
AUDIO
OUT
EXT 3
VGA +
YPbPr
L
OUT
AUDIO
OUT
R
VGA
YPb
EXT 2 EXT 1
Pr
L
R
VGA/YPbPr AUDIO
7.4.5 DVD Recorder and DVD Home
Theatre System
Use 2 scart cables, 2 antenna cables and 1 digital
audio (cinch) cable.
SERVICE
UART
DIGITAL
DIGITAL
AUDIO
AUDIO
OUT
EXT 3
VGA +
YPbPr
L
OUT
AUDIO
OUT
R
VGA
YPb
EXT 2 EXT 1
Pr
L
R
VGA/Y PbPr AUDIO
OUTIN
Home Theatre SystemDVD Recorder
DIGITAL
AUDIO
IN
7.4.6 Satellite receiver
Use a scart cable and 2 antenna cables.
EXT 3
SERVICE
VGA +
UART
YPbPr
DIGITAL
AUDIO
L
OUT
AUDIO
OUT
R
40
VGA
YPb
EXT 2 EXT 1
Pr
L
R
VGA/Y PbPr AUDIO
OUTIN
DVD Home Theatre SystemDVD Recorder
Satellite receiver
DIGITAL
AUDIO
IN
Connections
Page 43

7.4.7 HD Digital receiver / HD satellite
LR
HDMI 1 HDMI 2 HDMI 3
AUDIO
HDMI
[]
DVI
NETWORK
IN
Blu-ray Disc player
OUT
HDMI
LR
HDMI 1 HDMI 2 HDMI 3
AUDIO
HDMI
[]
DVI
NETWORK
IN
OUT
HD Digital receiver / HD Satellite receiver
IN
OUT
HDMI
EXT 3
VGA
SERVICE
UART
OUT
YPb
Pr
L
R
L
R
EXT 2 EXT 1
AUDIO
OUT
AUDIO
DIGITAL
VGA/YPbPr AUDIO
VGA +
YPbPr
Home Theatre SystemDigital ReceiverDVD Recorder
DIGITAL
AUDIO
IN
IN
OUT
IN
OUT
DIGITAL
AUDIO
OUT
receiver
Use an HDMI cable and 2 antenna cables.
7.4.8 DVD-R,Home Theatre System and
Digital receiver
Use 3 scart cables, 3 antenna cables and 1 audio
(cinch) cable.
ENGLISH
7.4.9 Blu-ray Disc player
Use an HDMI cable.
Connections
41
Page 44

7.4.10 Game console
The most practical connections for a game console
are at the side of the TV.
7.4.11 Camcorder
The most practical connection for a camcorder is at
the side of the TV.
Note:
To prevent picture delay, set the TV in game mode.
Press Menu > TV menu > Smart settings > Game.
Connected at the side of the TV
Use the HDMI connection or the S-Video and
Audio L/R connections or the Video and Audio L/R
connections.
Connected at the back of the TV
Use an HDMI connection or the EXT3-YPbPr and
Audio L/R connections for HD quality
EXT 3
VGA
VGA +
YPbPr
YPb
Pr
L
R
HDMI 1 HDMI 2 HDMI 3
VGA/Y PbPr AUDIO
Connected at the side of the TV
Use the HDMI connection or the Video and Audio
L/R connections or use the S-Video and Audio L/R
connections.
Connected at the back of the TV
Use an HDMI connection or the EXT3-YPbPr and
Audio L/R connections for HD quality.
EXT 3
VGA
VGA +
YPbPr
YPb
Pr
L
R
HDMI 1 HDMI 2 HDMI 3
VGA/Y PbPr AUDIO
42
Connections
Page 45
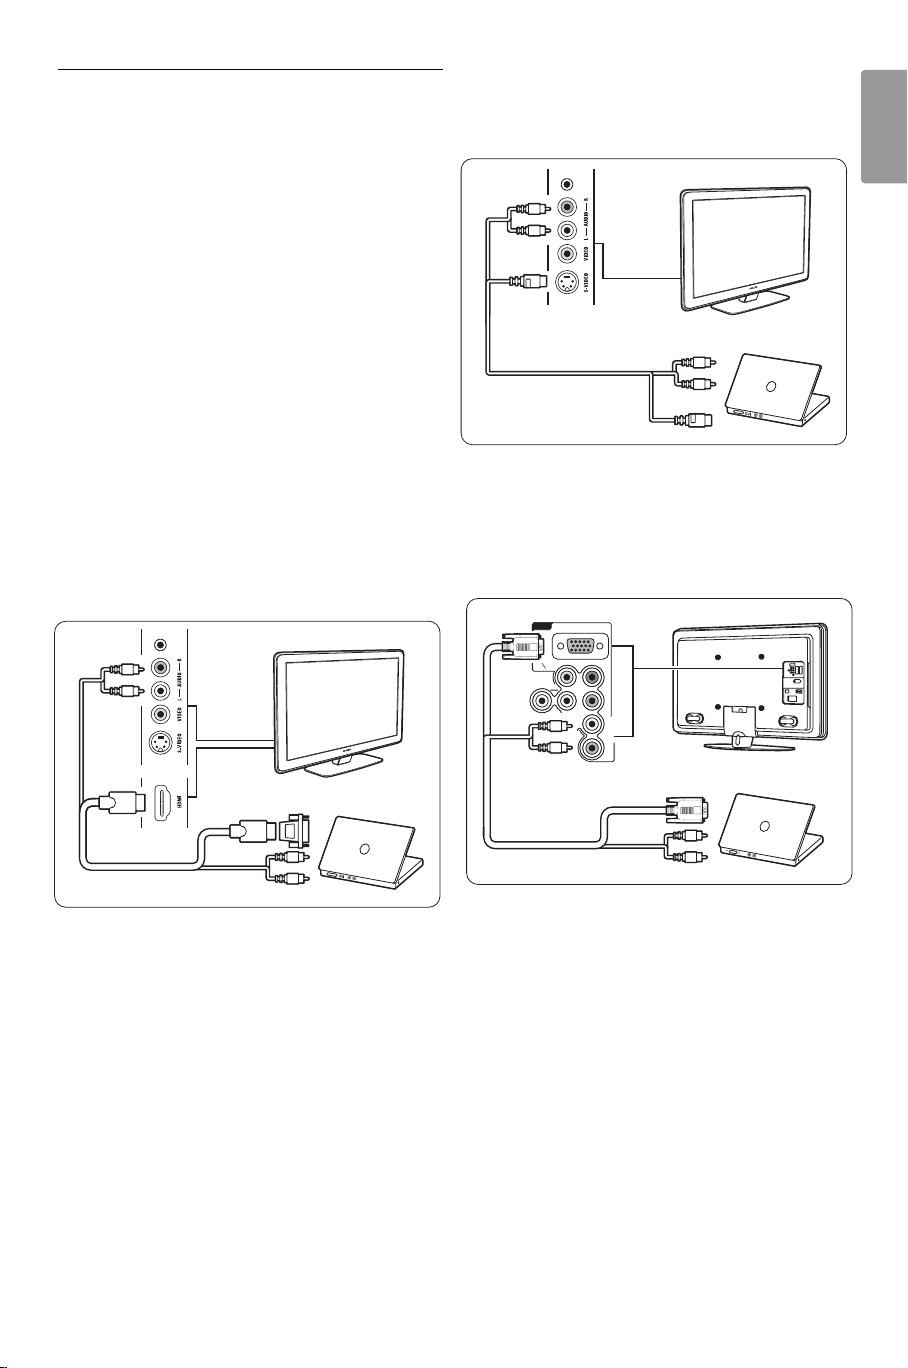
7.4.12 Personal Computer
DVI-HDMI
AUDIO L/R
HDMI
AUDIO L/R
AUDIO L/R
S-VIDEO
S-VIDEO
AUDIO L/R
EXT 3
VGA
b
Pr
L
R
VGA/YPbPr AUDIO
VGA +
YPbPr
VGA
AUDIO L/R
VGA
AUDIO L/R
You can connect your PC directly to the TV.
The TV works as a monitor of your PC.
For more features you can connect your PC in a
PC network. See section 7.7 PC network.
As a monitor the PC can be connected at the side
with a DVI to HDMI adaptor or with a PC to TV
cable. Alternatively you can connect the PC at the
back with the VGA connection.
ç Caution
Before connecting the PC, set the PC monitor
refresh rate to 60Hz.
à Tip
Set the TV picture format to Unscaled in the
Picture format menu for maximal PC picture
sharpness. See section 5.4.4 Widescreen picture
format.
DVI to HDMI connection
Use a DVI to HDMI adaptor to connect to the
HDMI side connection.
Connect the Audio L/R at the side for sound.
PC to TV connection
Use a PC-TV out cable to S-Video and Audio L/R
cable to connect to the side of the TV.
ENGLISH
VGA connection
Use a VGA cable to connect the PC to the EXT3
connection at the back of the TV.
Connect the Audio L/R to the EXT3 Audio L/R.
Connections
For supported PC monitor resolutions, see section
8 Technical data.
43
Page 46

7.5 Connection setup
on
ecoder
l
.
p
ces
ecoder
.
k
p
/R
e
3
/R
The TV needs to know what connections you have
made and which device is connected to which
connector.
If you have used the Connection assistant the
connection setup is already done.
7.5.1 Naming your devices
Name the connected devices for easy selection and
best signal handling.
Assign the type of device (DVD,VCR, Game, ...) to
the connector you use for that device.
‡ Press Menu Ï on the remote control and
select Setup > Installation> Rename devices.
® Press π to enter the list.
ÒPress o or œ to select the connector you
used for the device you connected.
† Press π.
º Press o or œ to select the type of device.
◊Press Menu Ï to quit the menu.
7.5.2 Audio setup (if present)
If you use the Audio In L/R (DVI to HDMI)
connector for a device connected to HDMI at the
back of the TV, assign this Audio In to the HMDI 1,
2 or 3 where the device is connected.
‡ Press Menu Ï on the remote control and
select Setup > Installation > Audio setup.
® Press π twice.
ÒPress o or œ to select the HDMI connection
to link with this Audio In.
7.5.3 Decoder channels
Decoders that decode an antenna channel are
connected to EXT1 or EXT2 (scart).
You have to assign the TV channel as a channel to
be decoded.Then assign the connection where the
decoder is connected
‡ Press Menu Ï on the remote control and
select Setup > Installation > Decoder >
Channel.
® Press π to enter the list.
ÒPress o or œ to select the channel to decode.
† Press p and go back to select Status.
º Press o or œ to select the connector used by
the decoder.
◊Press Menu Ï to quit the menu.
Installati
onnections assist
Rename devi
Audio setu
D
Man. network inst
loc
Factory settings
D
hanne
Status
Audio setu
Audio in L
44
Audio in L
Non
HDMI
Connections
Page 47

7.6 Preparing for digital
COMMON INTERFACE
services
Scrambled digital TV channels can be decoded with
a Conditional Access Module (CAM) and a Smart
card provided by a digital TV service operator.The
CAM may enable several services depending on the
operator you choose (e.g. Pay TV).
Contact your digital TV service operator for more
information and terms.
7.6.1 Insert a Conditional Access Module CAM
) Warning
Switch off the TV before inserting the CAM.
Look on the CAM for the correct inserting
direction. Incorrect inser tion can damage the CAM
and the TV.
‡ Gently insert the CAM into the Common
Interface slot at the side of your TV as far as it
will go.
® Leave the CAM in the Common Interface slot
permanently.
It can take a few minutes before a CAM is
activated. Removing the CAM will deactivate the
digital TV service.
ENGLISH
7.6.2 Common interface menu
From this menu you access the CAM service you
have installed.The applications and their function,
the content and the messages on screen come
from the CAM service provider.
‡ Press Menu Ï on the remote control and
select Features > Common interface.
This menu option is available when a CAM is
inserted and has made contact with the provider.
Connections
45
Page 48

7.7 PC network
You can link up your TV on a PC network in your
home. Watch your photos and listen to your music
from any linked PC on the TV.The PC network
feature of this TV is DLNA certified.
You can use Microsoft Windows XP or Vista, Intel
Mac OSX or Linux.
An example of a home PC network.
7.7.1 What you need
To set up your TV in a home PC network you
need:
•a router and a computer in a home network
•a network cable
• recent media server software (Windows, media
Player 11 or similar) on your computer.
For a complete list of compatible media server
software see section 8 Technical data.
† Some media server software needs a setting to
share your files with the TV.
In the media server this TV will present itself as
a number - a MAC or IP number.
Have the TV and router switched on for this
number to appear in the media server.
Select the TV number in the media server and
set the server to share files with this number.
For media server software marked with an * in
sections 8 Technical data,a step by step setting
instruction is available in the online User
manual.Type in your TV model number on
www.philips.com/support. In the extended User
manual, see section 7.7 PC network.
A firewall, a security system on your computer,
could also block the network connection.
Allow the media server software to go to the
network.
º Press the Source v key on the remote
control.
◊Select PC network and press π.
It could take some time for the TV to connect.
‹Use the colour and navigation/rotation keys to
browse your folders or play your files.
If the TV cannot connect to the network, study the
server software, router or PC manuals.
7.7.2 Set up a PC network connection
On the TV no special settings are necessary to
connect automatically to the network.
‡ Connect the network cable from your router to
the Network connector at the back of the
TV.
NETWORK
LR
AUDIO
IN
HDMI
DVI
HDMI 1 HDMI 2 HDMI 3
[]
® Switch on the router. Set the router to DHCP
On.
ÒSwitch on the computer and start the media
server software.
46
7.7.3 Manual network setup
Some expert network settings can be set on the
TV.The DHCP is set to On to automatically
connect to the network.
Press Menu Ï > Setup > Installation > Manual
network installation.
Connections
Page 49
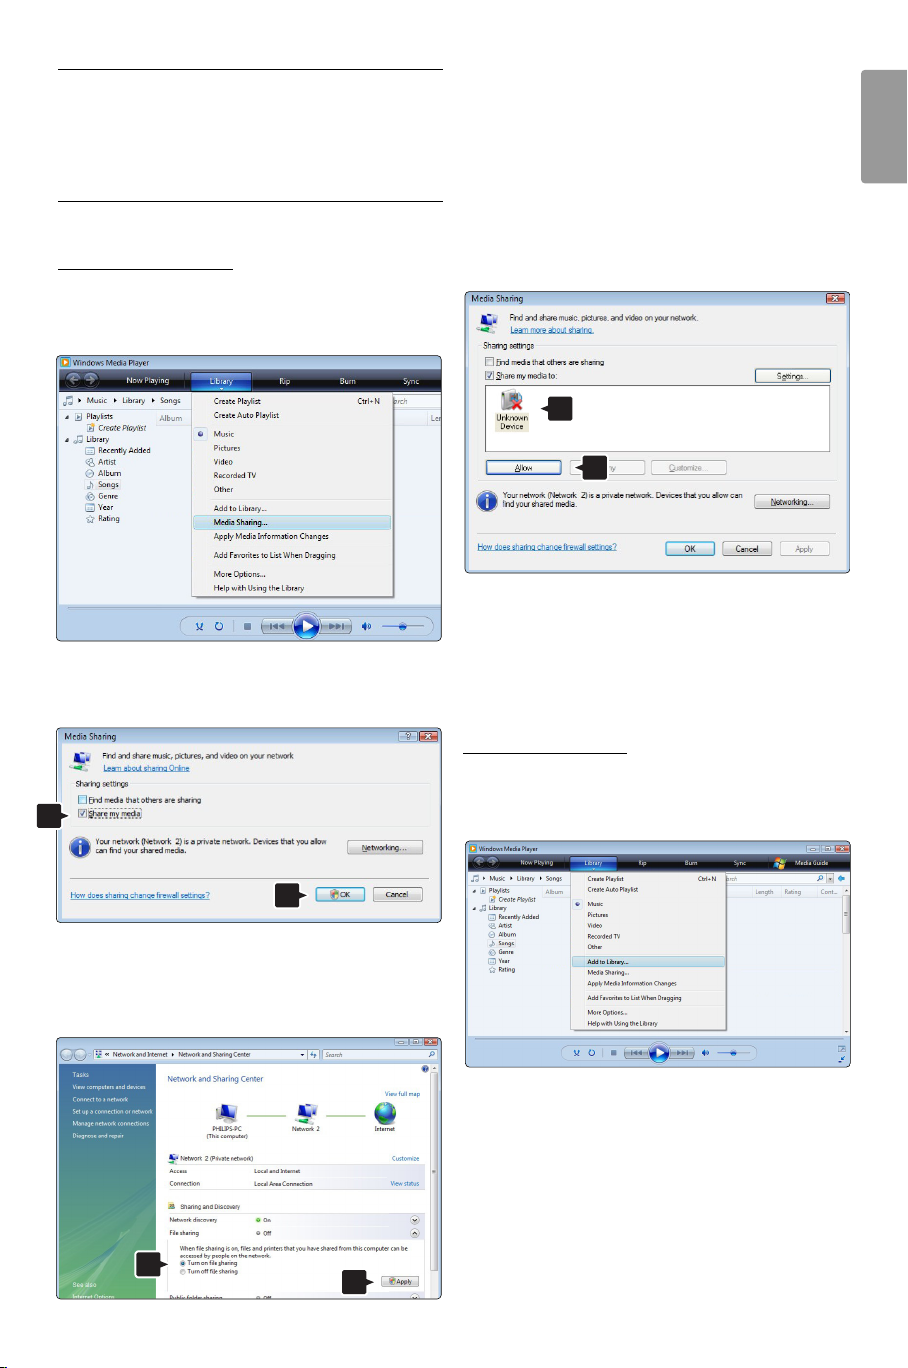
7.7.4 Media server settings
Media servers need to be set for sharing their files
and folders. Follow the instructions closely to set
your specific server.
Windows Media Player v11on Windows Vista
Set f
or network sharing
In Windows Media Player select Library from the
menu and select Media sharing.
In the Media Sharing window, check the Share my
media box. Click OK.
Set Network discovery to On. Set File sharing to
On. Go back to the Media Sharing window in
Windows Media Player and check the Share my
media box. Click OK.
When the TV is connected, by the router, to the
PC and everything is switched On, the Media
sharing window will show the TV as an Unkown
Device. Select the device and click Allow.
1
2
You can open the Settings window to change
particular settings on sharing.
When the device icon (the TV) is checked with a
green tick, click OK.
ENGLISH
Set f
olders for sharing
In Windows Media Player select Library from the
1
menu and select Add to Library.
2
If no network connection was found, and you are
unable to check this box, click the Networking
button to show the Network and Sharing Center
window, …
In the Add To Library window, select My folders
and those of others that I can access and click
the Advanced Options button. …
1
2
Connections 47
Page 50

1
2
With Advanced Options open, you can add
specific folders to the list to share. Click Add.
1
Now everything is set to enjoy music, photos and
videos on your TV.
In the Add Folder window select a folder with
music, photos or videos you want to share with
other devices (your TV). Click OK.
Windows Media Player v11 on Windows XP
Set f
or network sharing
In Windows Media Player select Library from the
menu and select Media sharing …
1
2
In the Add To Library window the newly added
folder is shown.You can add more folders to
share. Click the OK button to add the files to the
library.
48 Connections
Page 51

In the Media Sharing window, check the Share my
media box.
With Advanced Options open, you can add
specific folders to the list to share. Click Add.
When the TV is connected, by the router, to the
PC and everything is switched On, the Media
sharing window will show the TV as an Unkown
Device. Select the device and click Allow.
1
2
3
You can open the Settings window to change
particular settings on sharing.
When the device icon (the TV) is checked with a
green tick, click OK.
Set f
olders for sharing
In Windows Media Player select Library from the
menu and select Add to Library.
ENGLISH
1
In the Add Folder window select a folder with
music, photos or videos you want to share with
other devices (your TV). Click OK.
In the Add To Library window the newly added
folder is shown.You can add more folders to
share. Click the OK button to add the files to the
library.
In the Add To Library window, select My folders
and those of others that I can access and click
the Advanced Options button.
Connections 49
Page 52
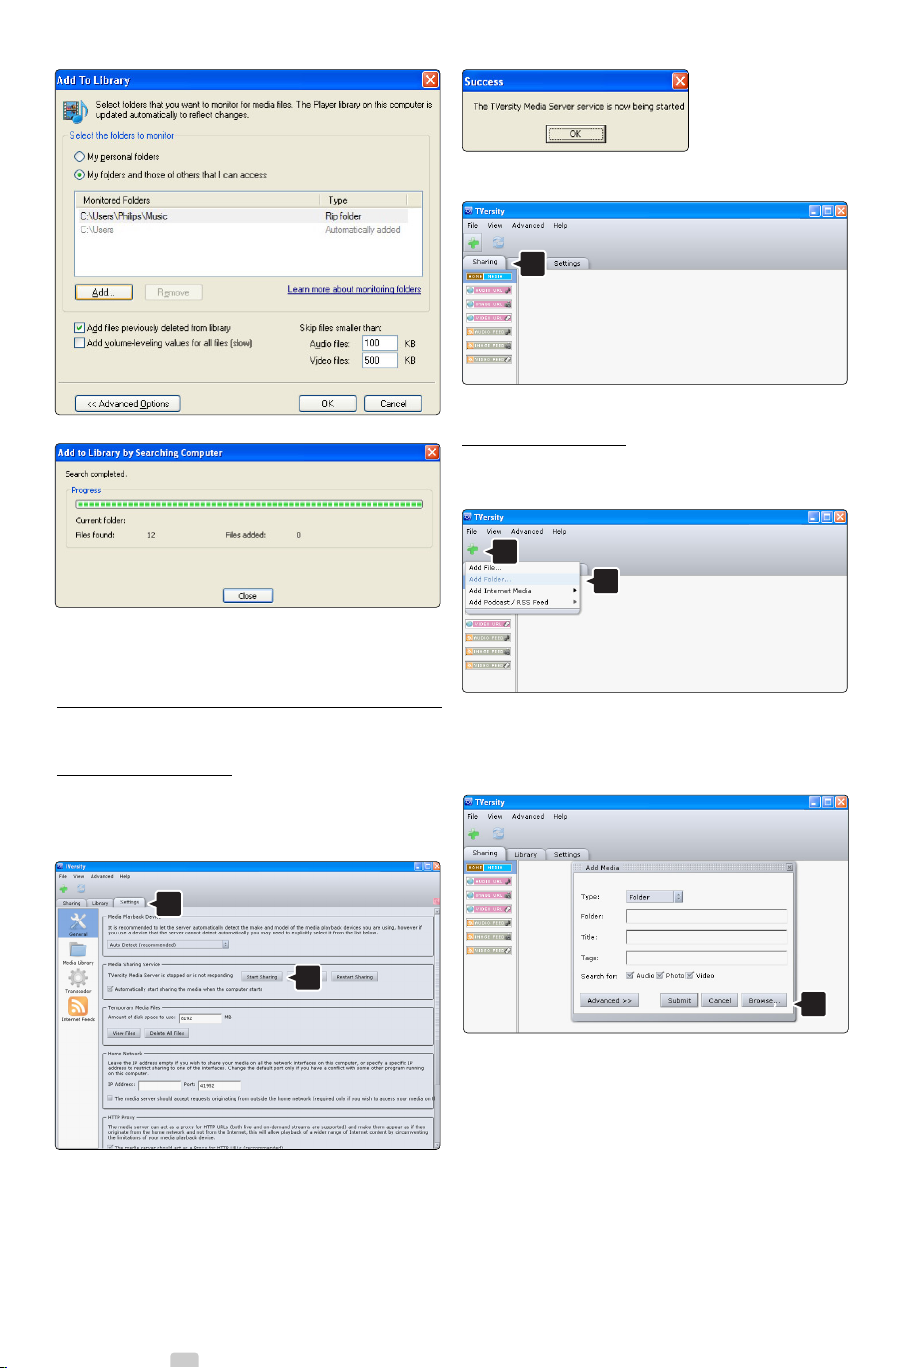
Now everything is set to enjoy music, photos and
videos on your TV.
Click the Sharing tab.
1
Set f
olders for sharing
Click the green plus icon and select Add folder…
1
2
TVersity v.0.9.10.3 on Windows XP
Set f
or netw
ork sharing
Click the Settings tab and click the Start Sharing
button.
1
2
A pop-up window tells you that the media
server service is started. Click OK.
In the Add media pop-up window, click the
Browse button.
1
In the Browse for Folder window select a folder
with music, photos or videos you want to share.
Click OK.
Now everything is set to enjoy music, photos and
videos on your TV.
50 Connections
Page 53

Tw onky Media v4.4.2 on Macintosh OS X
Set f
or network sharing
In Tw onky Media click Basic Setup > First steps.
In this window you can change the server name
that appears on your TV.
1
2
In the blue frame click the hard disk name to
browse to a folder with music, photos or videos
you want to share with other devices (your TV).
ENGLISH
Click Select to select the folder for sharing.
Now click Save Changes.
Click Basic Setup > Clients/Security.
Check the box next to Enable sharing for new
clients automatically.
Set f
olders for sharing
Click on Basic Setup > Sharing.
Some ‘Content Locations’ might be set already
automatically.To add a folder (a content location)
to be shared on the network click the Browse
button.
1
2
Then click Rescan content directories.
In some cases this might not make all files and
folders available.
Click Support > Tr oubleshooting and click
Rebuild database to make sure everything
works OK. This rebuilt might take a while.
Now everything is set to enjoy music, photos and
videos on your TV.
Connections 51
Page 54

8Technical data
Picture / Display
• Display type: LCD Full HD W-UXGA
•Panel resolution: 1920x1080p
•Perfect Pixel HD picture enhancement
• 1080p 24/25/30/50/60Hz processing
• 100 Hz Clear LCD
Supported display resolutions
• Computer formats
Resolution Refresh rate
640 x 480p 60Hz (VGA/HDMI)
600 x 800p 60Hz (VGA/HDMI)
1024 x 768p 60Hz (VGA/HDMI)
1280 x 768p 60Hz (VGA/HDMI)
1360 x 765p 60Hz (VGA/HDMI)
1360 x 768p 60Hz (VGA/HDMI)
1280 x 1024p 60Hz (HDMI)
1920 x 1080i 60Hz (HDMI)
1920 x1080p 60Hz (HDMI)
• Video formats
Resolution Refresh rate
480i 60Hz
480p 60Hz
576i 50Hz
576p 50Hz
720p 50Hz, 60Hz
1080i 50Hz, 60Hz
1080p 24Hz, 25Hz, 30Hz
1080p 50Hz, 60Hz
Tuner / Reception / Transmission
• Antenna input: 75ohm coaxial (IEC75)
• TV system: DVD COFDM 2K/8K,
(MPEG2, MPEG4 if available)
• Video playback: NTSC, SECAM, PAL
•DVD: DVB Terrestrial
(see selected countries on the TV typeplate)
Sound
• Sound system:
- Virtual Dolby Digital
- BBE
Multimedia
• Connections: USB
• Playback formats: MP3, Slideshow (.alb)
JPEG, MPEG1, MPEG2.
Supported media server software
• Windows Media Player 11 (on Microsoft
Windows XP* or Vista*)
•PacketVideo Twonky Media 4.4.2 (on PC* &
Intel Mac OSX*)
• Sony Vaio media server (on Microsoft Windows
XP or Vista)
•TVersity v.0.9.10.3 (on Windows XP*)
• Nero 8 - Nero MediaHome (on Microsoft
Windows XP)
• DiXiM (on Windows XP)
• Macrovision Network Media Server (on
Windows XP)
• Fuppes (on Linux)
• UShare (on Linix)
• Philips Media Manager (on Microsoft Windows
XP)
• Philips NAS SPD8020
* For this media server software a step by step
setting instruction is available in the online User
manual on www.philips.com/support.
Supported USB/Memory device formats
•FAT 16, FAT 32, NTFS.
Remote control
•Type: RC4491
• Batteries: 3 Size AAA-LR03-1,5V type
Connectivity
Back
• EXT1 (scart): Audio L/R, CVBS in, RGB
• EXT2 (scart): Audio L/R, CVBS in, RGB,
• EXT3:Y Pb Pr or VGA, Audio L/R
• HDMI 1 in (HDMI 1.3a for all HDMI
connections)
• HDMI 2 in
• HDMI 3 in
• Audio In L/R (DVI to HDMI)
• Audio Out L/R - display synchronised
• Digital Audio out (coaxial-cinch-S/PDIF) display synchronised
• Network - (RJ45)
Side
• HDMI side in
• S-Video in (Y/C)
• Video in (CVBS)
• Audio L/R in
• Headphone (stereo mini jack)
• USB
• Common interface slot
52 Technical data
Page 55

Power
• Mains power: AC 220-240V (±10%)
•Power and standby power consumption:
See technical specification on www.philips.com
• Ambient temperature: 5°C - 35°C
Specifications are subject to change without notice.
For more specification details of this product see
www.philips.com/support.
Dimensions and weights (approx.)
TV model 37PFL9903 42PFL9903
- width 953mm 1054mm
- height 604mm 658mm
- depth 101mm 100mm
- weight ± 25kg ± 28kg
TV + stand
- width 953mm 1054mm
- height 677mm 731mm
- depth 242mm 265mm
- weight ± 28,5kg ± 32,5kg
ENGLISH
Technical data 53
Page 56

9Troubleshooting
Television and remote control
Picture
LightGuide is on but there is no picture
•Verify if the antenna is connected properly.
•Verify if the correct device is selected.
The TV does not switch on
•Verify the mains cord connection.
•Verify if the batteries of the remote control are not
empty or weak.Verify their + / - orientation.
You can use the keys on the TV to switch the TV on.
• Unplug the mains cord, wait a minute and plug it
back in.Try again to switch on.
The TV does not react on the remote control
•Verify if the batteries of the remote control are not
empty or weak.Verify their + / - orientation.
• Clean the remote control and TV sensor lens.
The TV switches off and the red light blinks
• Unplug the mains cord, wait a minute and plug it
back in.Verify if there is enough space for ventilation.
Wait until the TV has cooled down.When the TV
does not restart to standby and the blinking occurs
again, call our Customer Care.
You forgot your code to unlock Child lock
• See section 5.9.3 Set code / Change code.
Wrong language in the TV menu ?
Follow these steps to change the language.
‡ Press Menu Ï on the remote control.
® Use œ to select the last menu line.
ÒPress πthree times.
† Press o or œ to select your language.
º Press OK.
◊Press Menu Ï to quit the menus.
The sound is on, but there is no picture
•Verify the contrast or brightness setting in the menu.
The TV picture is poor
•Verify if the antenna is connected properly.
• Non-earthed audio devices, neon lights, high
buildings or mountains can influence the picture
quality.Try to improve the picture by changing the
antenna direction or place devices away from the
TV.
•Verify if the correct TV system is chosen in the
Manual installation menu.
• If only a certain channel is poor, try to fine tune this
channel in the Fine tune menu. See section 6.2.3.
The picture has poor colour
•Verify the colour settings in the Picture menu.
Select any of the smart settings in the Smart
settings menu. See section 5.4.1.
•Verify the connections and cables of the connected
devices.
Picture delay when a game console is connected
•To prevent picture delay, set the TV in game mode.
Press Menu > TV menu > Smart settings > Game.
The TV does not remember my settings when I
switch back on
•Verify if the TV is set to Home in the TV menu >
Setup > Installation > Preferences > Location
menu.
The picture does not fit the screen, it is too big or
TV channels
Some TV channels are gone
•Verify if the correct channel list is chosen.
•A channel could be uninstalled in the Rearrange
menu.
No digital channels found during installation
•Verify if the TV supports DVB-T or DVB-C in your
country. See the label “Digital TV Country
Compatibility” on the back of the TV.
54 Troubleshooting
too small
• Select a more fitting picture format in the Picture
format menu.
See section 5.4.4 Widescreen picture format.
• Name your connected device in the Connections
menu to obtain the best signal handling.
See section 7.4.1 Naming your devices.
The picture position on screen is not correct
• Some picture signals from some devices do not fit
the screen correctly.You can shift the picture with
the cursor keys on the remote control.Verify the
signal output of the device.
Page 57

Sound
USB connection
There is a picture but no sound
•Verify the volume is not set to 0.
•Verify the sound has not been muted with the ¬
key.
•Verify if all cables are connected properly.
• If no sound signal is detected, the TV automatically
switches off the sound.
This is proper operation and is not a malfunction.
The sound is poor
•Verify if the sound is set to Stereo.
•Verify the Equalizer in the Sound menu.
• Select any of the Smart settings in the menu.
The sound comes from one speaker only
•Verify if the Balance is not set to extreme left or
right.
Sound delay when A HTS-DVD device is connected
• See the user manual of the HTS-DVD device to
adjust the audio sync delay.
If you cannot set A delay, switch off HD Natural
MOtion in the Picture > Perfect Pixel HD menu.
See section 5.4.3 Picture settings.
HDMI connections
The TV does not show the USB device content
• Set your device (camera) to ‘Mass Storage Class’
compliant.
• The USB device may need specific driver software.
Unfortunately this software cannot be downloaded
to your TV.
I cannot see my files in the Multimedia menu.
• Not all audio and picture files are supported. See
section 8 Technical data.
Photo and music files do not playback smoothly
• The transfer performance of the USB device limits
the transfer rate.
Personal computer
The PC display on my TV is not stable or is not
synchronised
•Verify if the correct resolution mode is selected on
your PC. See section 8 Technical data.
I cannot find my PC files on my PC
•Verify if files have been added in the folder.
• Not all file formats are supported. See section 8
Technical data.
ENGLISH
Tr ouble with devices connected with HDMI
• The HDMI - HDCP procedure might take a few
seconds before the TV shows the picture from a
device.
• If the TV does not recognise the device and the
screen shows no picture, try switching from one
device to another and back again to restart the
HDCP procedure.
• If sound interruptions occur persistently, see the user
manual of the device to verify the output settings. If
that does not help, connect an additional audio
cable.
• If a DVI to HDMI adaptor is used, verify if an
additional audio connection is in place to complete
the DVI connection.
• HDMI with EasyLink does not work
-Verify if the connected device supports the HDMI
CEC standard. See the user manual that comes
with the device.
-Verify if the HDMI cable is properly connected.
-Verify if Easylink is activated in the Setup,
Installation, Preferences menu.
- Ensure that the System audio control in your
HDMI CEC audio devices is properly set up. See
the user manual that comes with your audio
device.
PC files are not shown in the PC network menu
•You have to set the PC media server to share files
with the TV. See section 7.7.2 Set up a PC network
connection.
PC files do not play
• See section 8 Technical data for supported file
formats.
If your problem is not solved
Switch your TV off and on again, that may help. If not,
call our Consumer Care or consult our website
www.philips.com/support.
Find the Consumer Care telephone numbers on the
back cover of this manual.
Please, have the TV Model and Product Number
ready before you call.
You can find these numbers on the packaging label or
on the typelabel on the back and bottom of the TV.
) Warning
Never try to repair the TV yourself.
Troubleshooting 55
Page 58

10 Index
100 Hz Clear LCD 5,19
A
Active control 19
Advanced sharpness 19
Ambilight
active mode 21
LoungeLight 13
menu / settings 21
modes 21
Analogue
manual installation 34
TV channels 34
Antenna
cable 9
connect 9
with devices 36
Audio setup 44
Auto clock mode 33
Auto format 20
Automatic installation 32
Auto surround 21
Auto Volume levelling 21
B
Balance
sound 21
Batteries 3,9
Blacklevel 19
Blu-ray Disc 41
Brightness 19
ambilight 21
C
CA module 45
Cable
HDMI 37
Scart 37
S-Video 38
Video 37
YPbPr 37
Camcorder 42
Camera (photo) 42
Care of the screen 3
Change code 26
Channel
all channels list 23
favourite list 23
installation 32
lock 26
Channel
management 34
up/down 15
previous 15
rearrange 34
store / install 33
Child lock 26
Clock 15,33
Code 26
Colour
enhancement 19
menu 19
keys 4,14
Common interface (CAM)
menu 45
slot 36,45
Connection
best 37
overview 36
set up 44
Contrast 19
Country selection 32
Custom lock 26
Custom tint 19
D
Daylight saving 33
Decoder channel 44
Delta volume 21
Device
connecting 38
naming 44
watch 11
DHCP 46
Digital
audio out 36
subtitle language 27
receiver 39
text services 23
test reception 35
Dual I/II 21
Dual screen 15
DVB-T 5
DVD
connect 39
playback 12
player 39
recorder 39,40
Dynamic
backlight 19
contrast 19
E
EasyLink 38
Electronic Programme Guide 24
Energy saving 18
Equalizer 20
External 1,2,3 (EXT) 36
F
Factory settings 35
Favourite channel lists 23
Fine tune 34
G
Game console 42
H
HDCP 37
HDMI connection 37
HD digital receiver 41
HD natural motion 19
Headphone
connect 4,36
volume 21
Hearing impaired 32
Home theatre system 40
Hue 19
I
Installation
automatic 32
manual 33
manual network setup 46
menu 32
update 34
K
Kensington Security Slot 5
Key(s)
colour 14
on TV 4
on remote control 4,14
L
Language
menu 32
audio 21
56 Index
Page 59

Language
subtitle 27
LightGuide 17
Light sensor 19
Location 54
Locks 26
LoungeLight 13
M
Menu key 15
Mono 21
Movie expand 20
MPEG artefact reduction 19
Music 27
Mute key 14
N
Naming devices 44
Network setup 46
Noise reduction 19
O
OK key 14
On timer 26
P
Perfect Pixel HD 19
Personal Computer
connect 43
display resolutions 52
Photo viewer 28
Picture
album 28
format 20
menu 19
Position the TV 5
Power cable 9
Preferred audio format 32
R
Radio channel 29
Rearrange channels 34
Recorder 39
Recycling 3
Remote control
assistant 15
batteries 9
mode 15
overview 14
setup code 18
Remote control
universal 15
Rename 34
Reorder 34
S
Safety 3
Satellite receiver 40
Scart connection 37
Screen cleaning 3
Search
channels 33
teletext pages 22
Set code 26
Settings assistant 18
Sharpness 19
Sleeptimer 26
Smart settings 18
Software update 30
Sound
menu 20
surround mode 21
Standby 14,26
Super zoom 20
Stationary images 3
Stereo 21
Subtitle 27
language 27
shift 20
Switch on 10
T
Ta ble of Pages T.O.P 22
Technical data 52
Teletext 22
digital 23
dual screen 22
language 22
menu 23
page 22
teletext 2.5 23
Time zone 33
Timers 26
Tint 19
Troubleshooting 54
TV speakers 21
U
Universal mode 15
Universal remote control 15
Unmount the stand 6
Unscaled 20
USB
connector 36
device 27
photo viewer 27
V
VCR
connect 39
VGA 43
Video cable 38
Video formats 52
Visual impaired 32
Volume
bar 20
key 14
visual impaired 21
W
Whitepoint 19
Widescreen picture format 20
Y
YPbPr 37
ENGLISH
Index 57
Page 60

Information about how to
re-tune your TV during the
digital TV switchover.
this use
e
Television in the UK is going digital, bringing us all
more choice and new services. Starting in late 2007
and ending in 2012, television services in the UK
will go completely digital, TV region by TV region.
Please see the next page to find out when your area
switches to digital.
Digital UK is the independent, non-profit organisation leading the process of digital TV switchover in
the UK. Digital UK provides impartial information on
what people need to do to prepare for the move to
digital, and when they need to do it.
How the switchover affects your
TV equipment:
Your new TV has a digital tuner built in, which
means it is ready to receive the Freeview signal by
simply plugging it into your aerial socket (check if
you can get digital TV through your aerial now, or
whether you'll have to wait until switchover, at
www.digitaluk.co.uk).
When the TV switchover happens in your area, there
are at least two occasions when you will need to
re-tuner your TV in order to continue receiving your
existing TV channels, and also to pick up new ones.
r manual saf
- you'll need it.
58
Page 61

pp
?
d
y
es.
Visit us at digitaluk.co.uk
50
7
depends on the transmitter
you are served by. To check
when you switch, go to
Digital UK's postcode
checker on
www.digitaluk.co.uk.
Check your ITV news service
or look at Teletext page 106
to see what TV region you're
in.
How to re-tune:
Digital UK, the body leading the digital TV switchover, will advise you when you need to re-tuner
during the switchover.
If you choose to connect your TV to satellite or
cable with a digital box then it will no be affected
by switchover, and you won't need to re-tune.
If you have any questions, please contact your
equipment supplier or call Digital UK on ...
0845 6 50 50 50 or visit www.digitaluk.co.uk
To find out how to re-tune your TV, check this user
manual for details.
Go to section 6.1 Automatic installation and go to
Step 4 Install TV and radio channels.
If you do not re-tune your channels when advised to
do so by Digital UK, you may lose some or all of`
your channels until you do re-tune. You should
re-tune your TV every few months to check for any
new channels.
If you are missing any channels, it may be that they
are not available in your area, or that your aerial
needs upgrading.
ENGLISH
When does switchover ha
* Copeland switches on October 17, 200
The exact date you switch
en
ll us on
Calls charged at BT rate of 3p pr minute daytime an
1p per minute evenings and weekends. Rates may var
for calls from non-BT lin
45 6 50 50
Page 62

60
Page 63

Remote control setup codes
Codeeinstellung in die Fernbedienung
Codes de la télécommande
Instelcodes voor de afstandsbediening
Codici per il telecomando
Códigos de acceso para el mando a distancia
Códigos de introdução no telecomando
¶›У·ОВ˜ Оˆ‰ИОТУ О·Щ·¯ТЪИЫЛ˜ ЩЛПВ¯ВИЪИЫЩЛЪ›Ф˘
DVD
DVD player
DVD recorder
DVD-R HDD
Blu-ray Disc
STB
Digital receiver
- DVB-T
Satellite receiver
- DVB-S
Cable receiver
- DVB-C
DVD Codes
PHILIPS 0000,0001, 0002, 0003, 0013,
0021, 0030, 0049, 0100, 0105,
0107, 0111, 0123, 0127, 0131,
0135, 0145, 0150, 0153,
0154,0155, 0156, 0161, 0163,
0164, 0177, 0193, 0197, 0204,
0221, 0225, 0226, 0231, 0232,
0233, 0258, 0260, 0271, 0273,
0275, 0288, 0289, 0295, 0301,
0310, 0311, 0312, 0318, 0320,
0325, 0333, 0341, 0342, 0343,
0354, 0355
Aiwa 0028, 0109, 0140,0171, 0303
Aika 0020
Akura 0066
Alba 0004, 0118, 0119,0129, 0195,0256
Apex 0040
Bang & Olufsen 0071
Best Buy 0062
Bosston 0056
Brandt 0049, 0115, 0132, 0191
Brittannia 0053
Bush 0004,0032, 0050, 0052, 0060, 0064,
0119, 0120, 0134, 0141, 0147,
0183, 0185, 0189, 0256
Cambridge Audio 0055,0070
CAT 0057, 0058
Celestial 0068
Centrex 0144
Centrum 0058
CGV 0055
Cinevision 0063
Classic 0034
Clatronic 0060
Conia 0050
Crypto 0065
C-Tech 0126
CyberHome 0108, 0124,0137
HTS
Home Theatre Systems
Amplifier
Daewoo 0007, 0008,0009, 0125, 0139,
0261, 0286
Dalton 0069
Dansai 0054, 0188
Daytek 0110, 0121
DEC 0060
Denon 0015, 0039, 0166,0173, 0184
Denver0032, 0060, 0066, 0118, 0172, 0308
Denzel 0051
Desay 0059
Diamond 0055, 0126
Digitor 0067
DK Digital 0134, 0292
Dmtech 0005
Dual 0051
DVX 0126
Easy Home 0062
Eclipse 0055
Elta 0015, 0033, 0136
Eltax 0290
Emerson 0026
Enzer 0051
Finlux 0055
Fisher 0029
Gericom 0144
Global Solutions 0126
Global sphere 0126
Go Video 0018
Goldstar 0114
Goodmans 0004, 0060,0064, 0119, 0144,
0147, 0169, 0179, 0187, 0236, 0256
Graetz 0051
Grundig 0021, 0031, 0139, 0144,0148
H&B 0060, 0061
Haaz 0055, 0126
Harman/Kardon 0045
HiMAX0062
Hitachi 0018, 0037, 0051, 0062, 0196, 0209,
0284, 0302, 0317, 0330
Humax 0157
Innovation 0022, 0023, 0024, 0037
Jeutech 0056
JVC 0012, 0049, 0106, 0117, 0133, 0214,
0215, 0216, 0217, 0237, 0238,
0239, 0240, 0276, 0277, 0278,
0279, 0293, 0329, 0335
Kenwood 0015,0043, 0138, 0181, 0186,
0300
Kingavon 0060
Kiss 0051, 0061
Koda 0060
KXD 0062
Lawson0126
Lecson 0054
Lenco 0060
LG 0026, 0114, 0160, 0213, 0304,
0324, 0338, 0352, 0359
Life 0022, 0023, 0024
Lifetec 0022, 0023, 0024,0037
Limit 0126
Loewe 0021, 0146, 0174
LogicLab 0126
Luxor 0144
Magnavox 0049, 0060, 0100
Magnum 0024, 0037
Marantz 0030, 0164, 0175, 0176
Matsui 0132, 0194
MBO 0046
Mediencom 0053
Medion0006, 0022, 0023, 0024, 0037, 0064
Metz 0055
MiCO 0055
Micromaxx 0022, 0023, 0024, 0037
Micromedia 0049
Micromega 0105, 0271
Microstar 0022, 0023, 0024,0037
Mirror 0064
Mitsubishi 0017, 0101
Mizuda 0060, 0062
Monyka0051
Mustek 0034, 0256, 0296
Mx Onda 0055
1
Page 64

NAD 0044
Naiko 0144
Nakamichi 0048
Neufunk 0051
NU-TEC 0050
Omni 0053
Onkyo 0025, 0049, 0100, 0182
Optim 0054
Optimus 0019, 0103
Orava 0060
Orion 0185
Oritron 0024
P&B 0060
Pacific 0126
Palsonic 0052
Panasonic 0015, 0165,0184, 0198, 0199,
0200, 0243, 0244, 0245,0246, 0247,
0248, 0249, 0250, 0251, 0252,
0253, 0254, 0266, 0267, 0274,
0291, 0294, 0313, 0314, 0315,
0319, 0336, 0347, 0348, 0349,
0356, 0358
Philips Magnavox 0013
Pioneer0019, 0103, 0112, 0113, 0116,0128,
0149, 0159, 0180, 0201, 0202,
0203, 0206, 0207, 0208, 0242,
0255, 0263, 0305, 0321, 0326,
0327, 0328, 0337, 0344, 0345,
0346, 0353, 0357
Proline 0144, 0194
Provision 0060
Raite 0051
RCA 0035
REC 0052, 0053
RedStar 0066
Reoc 0126
Revoy 0061
Roadstar 0004, 0052,0060
Rowa 0050, 0144
Rownsonic 0058
Saba 0115, 0132
Sabaki 0126
Sampo 0036
Samsung 0018, 0196,0205, 0210, 0227,
0241, 0259, 0270, 0272, 0283,
0287, 0299, 0322, 0339, 0340
Sansui 0055, 0126
Sanyo 0257, 0262, 0285, 0298
ScanMagic 0256
Schneider 0004, 0005, 0006, 0024
Scott 0069, 0118
SEG 0004, 0042, 0051, 0126, 0152
Sharp 0022,0044, 0130, 0151, 0268, 0280,
0350
Sherwood 0041
Shinco 0035
Sigmatek 0062
Silva 0066
Singer 0055, 0126
Skymaster 0033, 0034,0126
Skyworth 0066
SM Electronic 0126
Sony 0014, 0104, 0109, 0122, 0171,0178,
0192, 0222, 0223, 0224, 0228,
0229, 0230, 0282, 0297, 0306,
0309, 0316, 0323, 0351
Soundmaster 0126
Soundmax0126
Standard 0126
Star Cluster 0126
Starmedia 0060
Supervison 0126
Synn 0126
Tatung 0125
TCM 0022, 0023, 0024, 0037, 0072, 0073,
0074, 0075, 0076, 0077, 0078,
0079, 0080, 0081, 0082, 0083,
0084, 0085, 0086, 0087, 0088,
0089, 0090, 0091, 0092, 0134,
0210, 0269, 0272
Teac 0019, 0050, 0126, 0168
Te c 0066
Technics 0170, 0184
Telefunken 0058
Te vion 0022, 0023, 0024,0037, 0069, 0126
Thomson 0010, 0011, 0093, 0094, 0095,
0096, 0097, 0098, 0099, 0102,
0115, 0162, 0167, 0191, 0331, 0332
Tokai 0051, 0066
Toshiba0013, 0049, 0100, 0142, 0161, 0190,
0211, 0212, 0218, 0218, 0220,
0234, 0235, 0264, 0265, 0281
TruVision 0062
Vtrek 0065
Wharfedale 0027, 0055, 0126
Wintel 0056
Xbox 0102 ,0115
Xenon 0334
Xlogic 0126
XMS 0052
Yakumo 0144
Yamada0144
Yamaha 0015, 0038, 0131, 0143, 0158, 0184,
0271, 0307
STB Codes
PHILIPS 0000,0001, 0003, 0020, 0043,
0066, 0068, 0069, 0073, 0085,
0087, 0095, 0097, 0098, 0105,
0109, 0113, 0114, 0117, 0122,
0124, 0174, 0176, 0184, 0187,
0206, 0207, 0208, 0211, 0213,
0281, 0282, 0285, 0297, 0298,
0301, 0304, 0325, 0331, 0358,
0360, 0361, 0386, 0387, 0393,
0395, 0412, 0421, 0429, 0434
ABC 0432
AB Sat 0100, 0122,0123, 0132
AGS 0122
Akai 0043, 0105
Alba 0002, 0003, 0004,0005, 0031,0045,
0087, 0107, 0123, 0209, 0270
Alcatel 0430, 0431
Aldes 0004, 0005, 0006, 0072, 0107
Allsat 0007, 0025, 0042, 0061, 0068, 0105
Allsonic 0005, 0010,0072, 0108, 0115
Alltech 0089, 0123
Alpha 0105
Altai 0078
Amitronica 0123
Ampere 0008, 0078, 0222
Amstrad 0044, 0071,0078, 0090, 0092, 0096,
0101, 0106, 0123, 0127, 0128,
0155, 0222, 0225, 0274, 0275,
0278, 0317, 0388, 0405,
Amstrad 0435
Anglo 0123
Ankaro 0005, 0010, 0069, 0072, 0108, 0115,
0123
Anttron 0002, 0005,0068, 0087
Apollo 0002
Arcon 0008, 0009, 0026, 0094, 0222,0280,
0405
Armstrong 0105, 0225
ASA 0079
Asat 0043, 0105
ASLF 0123
AST 0014, 0074
Astacom 0095, 0122
Aston 0053, 0271
Astra 0012, 0013,0037, 0064, 0076, 0082,
0119, 0123, 0225
Astro 0005, 0006, 0010,0017, 0066, 0087,
0108, 0113, 0114, 0115, 0116,
0119, 0283, 0392
AudioTon 0005, 0025, 0087
Aurora 0126
Austar 0126, 0157
Avalon 0078
2
Page 65

Axiel 0122
Axis 0010, 0013, 0021, 0077, 0082, 0108,
0115, 0405
Barcom0009
Best 0009, 0010, 0108, 0115
Blaupunkt 0017, 0066,0113
Blue Sky 0123, 0128
Boca 0037, 0059, 0085, 0091, 0123, 0222,
0225, 0237, 0242, 0251
Boston 0122, 0222
Brain Wave 0019, 0075, 0094
Brandt 0049, 0334,0335, 0336
Broadcast 0018, 0076
Broco 0082, 0123
BSkyB 0101, 0155, 0183, 0216
BT 0122
BT Satellite 0049, 0095,0277
Bubu Sat 0123
Bush 0003, 0007, 0020, 0031, 0045,0061,
0068, 0107, 0200, 0207
BVV 0094
Cabletime 0406, 0407,0408, 0424, 0426,
0428
Cambridge 0091, 0116
Canal Satellite 0073, 0109,0114
Canal+ 0047, 0115
Channel Master 0004, 0107
Chaparral 0040
Cherokee 0122, 0132
Chess 0052, 0112, 0118, 0123, 0322
CityCom 0003, 0022, 0098, 0110, 0119,
0124, 0157
Clatronic 0019, 0075
Clemens Kamphus 0033
Clyde Cablevison 0409
CNT 0006
Colombia 0222
Columbia 0222
Columbus 0028
Comag 0222
Comcrypt 0433
Commander 0069
Commlink0005, 0072
Comtec 0021, 0072,0077
Condor 0010, 0108, 0115,0119
Connexions 0016, 0078,0108, 0115, 0284
Conrad0084, 0085, 0108, 0110, 0115, 0116,
0119, 0222
Conrad Electronics 0119, 0123
Contec 0021, 0022, 0077,0085
Cosat 0025
Crown 0225
Cryptovision 0410
Cybermax 0057
Daeryung 0016
Daewoo 0123, 0188
Dansat 0007, 0061, 0068
D-Box 0103
DDC 0004, 0107
Decca 0023
Delega 0004
Dew 0021, 0077
Diamond 0024
Digiality 0119
Digipro0129
Discoverer 0112, 0118
Discovery0122
Diseqc 0122
Diskxpress 0009, 0284
Distratel 0128
Distrisat 0105
Ditristrad 0025
DNR 0094
DNT 0016, 0043, 0078, 0105
Dong Woo 0036
Drake 0026, 0327
DStv 0126
Dune 0108, 0115
Dynasat 0121
Echostar 0016, 0052,0078, 0102, 0109, 0123,
0132, 0279, 0286, 0287, 0288,
0294, 0342, 0343, 0344, 0345
Einhell 0002, 0005, 0071,0072, 0116,0123,
0222, 0225, 0275
Elap 0122, 0123
Elekta 0006
Elsat 0092, 0123
Elta 0002, 0010, 0025, 0043, 0105, 0108,
0115
Emanon 0002
Emme Esse 0010, 0020,0033, 0102, 0108,
0115, 0121
Engel 0123
Ep Sat 0003
Eurieult 0111, 0127,0128
Eurocrypt 0064
Eurodec 0055
Europa 0069, 0085, 0105, 0105, 0119
Europhon 0119, 0222
Eurosat0225
Eurosky 0010, 0108, 0110, 0115, 0116,
0119, 0222, 0225
Eurostar 0104, 0110, 0119, 0121, 0124,
0225
Eutelsat 0123
Eutra 0089
Exator 0002, 0005,0087
Fenner 0112, 0115, 0118, 0123
Ferguson 0003, 0007,0020, 0055, 0061,
0068, 0182, 0289, 0290, 0291, 0391
Fidelity 0071, 0090,0116, 0275, 0405
Finlandia 0003, 0064
Filmnet 0433
Filmnet Cablecrypt 0411, 0427
Filmnet Comcrypt 0411
Finlux 0003, 0030, 0064, 0080,0084, 0292,
0363, 0413
Finnsat 0021, 0055
Flair Mate 0123
Foxtel 0126, 0131,0157, 0435
Fracarro 0045, 0102
France Satellite/TV 0028
France Telecom 0429, 0434
Freebox 0210
Freecom 0002, 0032, 0113, 0116
Freesat 0089, 0127
FTE 0008, 0034, 0085, 0091, 0108,0277
FTEmaximal 0115, 0123
Fuba 0002, 0009, 0010, 0012, 0016, 0017,
0028, 0030, 0043, 0064, 0078,
0108, 0110, 0113, 0115, 0323
Fugionkyo 0129
Galaxi 0009
Galaxis 0005, 0010,0013, 0021, 0025, 0031,
0050, 0072, 0077, 0082, 0108,
0110, 0115, 0126, 0157, 0293,
0295, 0346
Galaxisat 0074
Gardiner 0124
GEC 0409
General Instrument 0425, 0432
GMI 0225
Goldbox 0073, 0109, 0114
Goldstar 0032
Gooding 0117, 0412
Goodmans 0003, 0031,0186, 0195
Granada 0064
Grandin 0062, 0111
Grothusen 0002, 0032
Grundig 0003, 0005, 0017, 0020,0044,
0054, 0065, 0066, 0097, 0101,
0106, 0113, 0116, 0117, 0126,
0128, 0155, 0166, 0167, 0169,
0175, 0282, 0298, 0325, 0388,
0393, 0405, 0412
G-Sat 0068
Hanseatic 0039, 0086, 0118
Haensel & Gretel 0119, 0222
Hantor 0002, 0019, 0036, 0075
Hanuri 0006
Hase & Igel 0094
Hauppage 0179, 0198
Heliocom 0008, 0119
Helium 0119
Hinari 0004, 0068,0107
3
Page 66

Hirschmann 0017, 0033,0066, 0078, 0079,
0081, 0084, 0113, 0115, 0116,
0119, 0122, 0127, 0165, 0322,
0323, 0328, 0389, 0413
Hisawa 0019, 0075
Hitachi 0003, 0020, 0212, 0313
HNE 0222
Houston 0025, 0069
Humax 0157, 0161, 0163, 0190, 0215,
0217, 0296, 0346
Huth 0005, 0018, 0019, 0021, 0025,0033,
0069, 0072, 0075, 0076, 0077,
0085, 0119, 0130, 0222, 0225, 0272
Hypson0111
ID Digital 0157
Imex 0111
Imperial 0031, 0045
Ingelen 0127
Innovation 0010, 0039, 0050, 0052, 0057,
0297, 0303, 0347, 0372
Inernational 0222
Interstar 0129
Intertronic 225
Intervision 0025, 0088, 0119
ITT/Nokia0003, 0020, 0064, 0079, 0084,
0103, 0284, 0313, 0323, 0413
Jerrold 0414, 0420,0422, 0425, 0432
Johansson 0019, 0075
JOK 0093, 0095,0122
JSR 0025
JVC 0117, 0186, 0412
Kamm 0123
Kathrein 0017, 0022, 0034, 0040, 0043, 0066,
0081, 0087, 0098, 0105, 0110,
0113, 0122, 0123, 0124, 0132,
0152, 0157, 0159, 0160, 0189,
0218, 0283, 0299, 0300, 0324,
0362, 0371, 0381, 0392, 0395
Kathrein Eurostar 0110
Key West 0222
Klap 0122
Konig 0119
Kosmos 0032, 0033,0034, 0081
KR 0005, 0087, 0089
Kreiselmeyer 0017, 0066, 0113
K-SAT 0123
Kyostar 0002, 0087, 0222
L&S Electronic 0115, 0222
Lasat 0006, 0010, 0035, 0036, 0037, 0077,
0091, 0108, 0110, 0112, 0115,
0119, 0222, 0334, 0335, 0336
Lemon 0094
Lenco 0002, 0032, 0038, 0069, 0082, 0094,
0108, 0110, 0115, 0119, 0123, 0277
Leng 0019
Lennox 0025
Lenson 0029, 0116
Lexus 0105
LG 0032
Life 0050
Lifesat 0010, 0039, 0050, 0052, 0057, 0086,
0108, 0112, 0115, 0118, 0123,
0222, 0297, 0303, 0347, 0372
Lifetec 0010, 0039,0050, 0052, 0057, 0297,
0303, 0347, 0372
Lorenzen 0069, 0094, 0096, 0119, 0222
Lorraine 0032
Lupus 0010, 0108, 0115
Luxor 0064, 0084, 0103, 0106,0116, 0275,
0313, 0323, 0388
Lyonnaise 0055
M & B 0086, 0118
Macab 0055, 0434
Manata 0095, 0111,0122, 0123, 0222
Manhattan 0003, 0006,0020, 0025, 0095,
0122, 0269, 0383
Marantz 0043
Mascom 0006, 0081
Maspro0003, 0020, 0040, 0063, 0066, 0089,
0094, 0113, 0117, 0123, 0289,
0328, 0393, 0412
Matsui 0049, 0066, 0095,0107, 0113, 0117,
0122, 0412
Max 0119
MB 0039, 0086, 0118
Mediabox 0073, 0109, 0114
Mediamarkt 0225
Mediasat 0013, 0073, 0082, 0109, 0114,
0116
Medion0010, 0039, 0050, 0052, 0057, 0108,
0115, 0123, 0222, 0297, 0303,
0335, 0347, 0372
Medison 0123
Mega 0043, 0105
Melectronic 0124
Metronic 0002, 0005, 0006, 0009, 0062,
0072, 0087, 0098, 0111, 0123,
0124, 0128, 0359, 0366, 0367,
0368, 0369, 0382
Metz 0017, 0066, 0113
Micro Electronic 0116, 0119, 0123
Micro Technology 0082, 0123
Micromaxx 0010, 0039, 0050, 0052, 0057,
0115, 0297, 0303, 0347, 0372
Microstar 0010, 0039, 0050, 0052, 0057,
0297, 0303, 0347, 0372
Microtec 0123
Minerva 0017, 0117, 0412
Mitsubishi 0003, 0017,0049
Mitsumi 0037
Mnet 0427, 0433
Morgan Sydney 0056
Morgan’s 0037,0043, 0085,0091, 0105,
0123, 0222, 0225
Motorola 0125
Movie Time 0419
Mr Zapp 0434
Multichoice 0054, 0126,0433
Multistar 0034, 0036
Multitec 0052, 0112, 0347
Muratto 0015, 0032,0074
Mysat 0123
Navex 0019, 0075
NEC 0041, 0067, 0302
Network 0068
Neuhaus 0013, 0025, 0029, 0069, 0082,
0085, 0094, 0116, 0119, 0123
Neusat 0094,0123
NextWave 0051, 0130, 0273
Nikko 0123, 0225
Nokia 0003, 0020, 0064, 0079, 0084, 0103,
0114, 0156, 0170, 0196, 0221,
0233, 0235, 0241, 0253, 0254,
0257, 0262, 0263, 0264, 0265,
0284, 0310, 0311, 0320, 0323,
0332, 0333, 0396, 0400, 0413
Nomex0058
Nordmende 0002, 0003, 0004, 0006, 0055,
0075, 0107, 0290, 0324, 0391
Noos 0434
Nova 0126
Novis 0019, 0075
Oceanic 0024
Octagon 0002, 0005, 0021, 0077, 0087
Okano 0033, 0034, 0225
Ondigital 0070, 0386,0387
Optex 0022, 0025
Optus 0114, 0126,0130
Orbit 0014
Orbitech 0002, 0083,0085, 0112, 0114,
0116, 0390
Osat 0005, 0106, 0388
Otto Versand 0017
Pace 0003, 0007, 0017, 0020, 0031, 0044,
0061, 0068, 0070, 0101, 0122,
0132, 0155, 0183, 0199, 0201,
0202, 0203, 0205, 0289, 0301,
0307, 0329, 0394
Pacific 0024
Packsat 0122
Palcom 0004, 0012, 0028, 0029, 0107
Palladium 0116, 0117,0225, 0412
Palsat 0112, 0116
Paltec 0012
Panasat 0120, 0126
4
Page 67

Panasoic 0003, 0020,0044, 0101, 0155, 0192,
0318
Panda 0003, 0007, 0061, 0064, 0113,0119
Patriot 0122, 0222
Phoenix 0021, 0031,0068, 0077
Phonotrend 0003, 0005, 0025, 0033, 0072,
0346
Pioneer 0109, 0114,0197, 0373, 0405, 0415,
0416
Polsat 0055
Polytron 0022
Predki 0019, 0075
Preisner 0078, 0085, 0091, 0222
Premiere 0025, 0047, 0073, 0109, 0114,
0157, 0253, 0254, 0266
Priesner 0225
Profile 0038, 0122
Promax0003
Prosat 0004, 0005, 0031, 0045, 0072, 0088,
0107, 0270
Prosonic 0096
Protek 0024
Provision 0006
PVP Stereo Visual Matrix 0422
Pye 0117
Quadral 0004, 0005,0010, 0072, 0085, 0088,
0095, 0107, 0108, 0115, 0122, 0132
Quelle 0017, 0071,0110, 0119, 0275
Quiero 0055
Radiola 0043,0105
Radix 0016, 0078, 0089, 0127, 0191, 0247,
0256, 0380, 0397, 0399
Rainbow 0005, 0087, 0089
Rediffusion 0041
Redpoint 0013, 0082
RedStar 0010, 0108,0115
RFT 0005, 0043, 0069, 0072, 0083,0105
Roadstar 0123
Roch 0111
Rover 0088,0115, 0123
Ruefach 0038
Saba 0006, 0020, 0045,0068, 0093,0094,
0095, 0110, 0119, 0122, 0128,
0270, 0289, 0290, 0319, 0326,
0334, 0337, 0338, 0339, 0340, 0391
Sabre 0003
Sagem 0055, 0099, 0434
Sakura 0021, 0031, 0077
Salora 0041, 0064,0302, 0307
Samsung 0002, 0153,0154, 0162, 0193, 0204,
0280
SAT 0004, 0014,0015, 0074, 0090, 0116,
0405
Sat Cruiser 0130
Sat Partner 0116
Sat Team 0123
Satcom 0018,0039, 0076, 0086, 0118, 0119,
0306
Satec 0020, 0068, 0123
Satelco 0108, 0115
Satford 0018, 0076
Satline 0088
Satmaster 0018, 0076
SatPartner 0002, 0005,0006, 0019,0032,
0033, 0075
Satplus 0112
Schacke 0087
Schneider 0010, 0050,0052, 0057, 0097,
0112, 0122, 0285, 0303, 0347, 0385
Schwaiger 0022, 0024,0039, 0051, 0068,
0085, 0086, 0112, 0118, 0119,
0128, 0222, 0272, 0299, 0305,
0335, 0337, 0339, 0340, 0341,
0346, 0347, 0357, 0370, 0383, 0385
Scientific Atlanta 0417,0418
SCS 0110
Sedea Electronique 0129, 0222
Seemann 0013, 0016, 0082, 0108, 0225
SEG 0002, 0010, 0019, 0039, 0075, 0086,
0096, 0108, 0115, 0118, 0139,
0229, 0231, 0234, 0250, 0258,
0317, 0384
Seleco 0025, 0102
Septimo 0128
Servi Sat 0111, 0123
Siemens 0017, 0066, 0091, 0113
Silva 0032
Skantin 0123
Skardin 0013, 0082
Skinsat 0116
SKR 0123
SKY 0125
Sky Digital 0044
Skymaster0005, 0039, 0052,0072, 0086,
0088, 0104, 0112, 0118, 0123,
0139, 0149, 0158, 0219, 0227,
0246, 0249, 0255, 0268, 0321,
0322, 0347, 0348, 0349, 0350,
0351, 0352, 0374
Skymax0043, 0105
SkySat 0112, 0116, 0118, 0119, 0123
Skyvision 0025
SL 0094,0222
SM Electronic 0112, 0123
Smart 0110, 0123, 0127, 0222
Sony 0044, 0114, 0276
SR 0037, 0222, 0225, 0290
Starcom 0432
Starland 0052, 0123
Starring0019, 0075
Start Trak 0002
Strong 0002, 0005, 0010, 0032, 0045,0108,
0114, 0115, 0126, 0129, 0231,
0232, 0234, 0238, 0243, 0245,
0253, 0266, 0284
STVO 0111
Sumida 0225
Sunny Sound 0108, 0115
Sunsat 0082, 0123
Sunstar 0037, 0108,0115, 0222, 0225, 0307
Super Sat 0121
Supermax 0130
Systec 0222
Tandberg 0055
Tandy 0005
Tantec 0003, 0020, 0028, 0029, 0289
Tatung 0023
TCM 0010, 0039, 0050, 0052, 0057, 0133,
0134, 0135, 0136, 0137, 0138,
0139, 0140, 0141, 0142, 0143,
0144, 0145, 0146, 0147, 0148,
0297, 0303, 0347, 0372
Techniland 0018, 0076
TechniSat 0016, 0029, 0060, 0083, 0105,
0112, 0114, 0116, 0150, 0151,
0164, 0185, 0194, 0213, 0214,
0220, 0224, 0226, 0236, 0239,
0240, 0260, 0267, 0308, 0309,
0390, 0398
Technology 0126
Technosat 0130
Technowelt 0119, 0128, 0222
Teco 0037, 0225
Tele+1 0411, 0427, 0433
Telanor0004
Telasat 0039, 0086, 0110,0118, 0119
Teleciel 0087
Telecom 0123
Teledirekt 0068
Telefunken 0002, 0020, 0049, 0095, 0122,
0330, 0334, 0335, 0336
Teleka 0005, 0016, 0078, 0081, 0087, 0094,
0116, 0119, 0225, 0280, 0393
Telemaster 0006
Telemax 0035
Telepiu 0427, 0433
Telesat 0039, 0086, 0118,0119
Telestar 0029, 0112, 0114, 0116
Teletech 0104
Televes 0003, 0056, 0222, 0365
Telewire 0025
Tempo 0130
Te vion 0010, 0039, 0050,0052, 0057, 0123,
0297, 0303, 0347, 0372
5
Page 68

Thomson 0003, 0011,0027, 0046, 0049,
0055, 0073, 0110, 0114, 0119,
0122, 0123, 0168, 0172, 0173,
0177, 0178, 0180, 0181, 0290,
0330, 0391, 0401, 0402, 0403, 0404
Thorens 0024
Thorn 0003, 0007, 0020, 0289,0291
Tioko 0022, 0222
Tokai 0105
Tonna 0003, 0018, 0025, 0076, 0116, 0123
Torx 0432
TPS 0048
Triad 0014, 0015, 0032, 0074, 0312
Triasat 0030, 0080, 0116
Triax 0017, 0029, 0080,0110, 0116, 0123,
0222, 0334, 0364
Turnsat 0123
Tvonics 0182
Twinner 0056, 0111, 0123, 0222, 0365
UEC 0126, 0131
Uher 0112
Uniden 0042, 0090
Unisat 0021, 0077, 0105, 0222, 0225
Unitor 0009, 0019
United Cable 0422
Universum 0017, 0066, 0079, 0090, 0096,
0110, 0113, 0117, 0119, 0292,
0412, 0413
Variosat 0017,0066, 0113
Vega 0115
Ventana 0043,0105
Vestel 0096
Via Digital 0046
Viasat 0132
Videoway 0423
Visionic 0019, 0025,0052, 0053,0093, 0122,
0123, 0353, 0354, 0355, 0356
Visiopass 0413, 0429,0434
Visiosat122, 140, 156
Viva 0069
Vivanco0059
Vivid 0131
Vor tec 0002, 0070, 0280
V-Tech 0014, 0015, 0074,0093, 0098, 0124,
0304, 0313
Wela 0085
Welltech 0112
WeTe K om 0112, 0116, 0118
Wevasat 0003
Wewa 0003
Winersat 0019, 0075
Wintergarten 0072
Wisi 0003, 0014,0015, 0016, 0017, 0066,
0074, 0078, 0085, 0093, 0113,
0116, 0119, 0143, 0148, 0223,
Wisi 0228, 0230, 0235, 0236, 0242, 024,
0248, 0252, 0259, 0261, 0262,
0312, 314, 0315, 0316, 0356, 0375,
0376, 0377, 0378, 0379
Wittenberg 0405
Woorisat 0006
World 0075
Worldsat 0122
Xrypton 0108, 0115
Xsat 0123, 0132
Zaunkonig 0094
Zehnder 0006, 0009, 0010, 0015, 0034,
0074, 0096, 0098, 0108, 0110,
0115, 0124, 0171, 0219, 0299,
0317, 0381, 0382
Zenith 0125
Zinwell 0157
Zodiac 0005, 0087
HTS Codes
Philips 0000, 0002, 0003, 0004, 0009,
0020, 0027, 0030, 0031, 0032,
0033, 0034, 0052, 0062, 0063,
0064, 0065, 0066, 0067, 0071,
0078, 0079, 0080, 0081, 0121,
0127, 0161, 0176, 0272, 0273,
0274, 0275, 0276, 0277, 0278,
0279, 0280, 0281, 0295, 0296,
0308, 0309, 0312, 0313
Aiwa 0023, 0043, 0090, 0091, 0092, 0162,
0163, 0168, 0169, 0170, 0199,
0200, 0201, 0288, 0289, 0290, 0291
Alba 0100
Denon 0058, 0059, 0060,0061, 0072, 0073
Denver 0028, 0086, 0087, 0105, 0106
DK digital 0007
Eltax 0005
Goodmans 0103, 0104
Harman/Kardon 0045
Hitachi 0022, 0041, 0095, 0096, 0097
JVC 0008, 0015,0044, 0055, 0056, 0057,
0125, 0126, 0128, 0129, 0150,
0151, 0164, 0165, 0183, 0211,
0212, 0213, 0219, 0220, 0221,
0222, 0223, 0224, 0225, 0231,
0232, 0233, 0240, 0241, 0242,
0262, 0263, 0264, 0265, 0266
Kenwood 0018, 0094, 0155, 0194, 0202,
0203, 0204, 0214, 0215, 0216,
0230, 0243, 0244, 0245, 0253, 0254
LG 0024, 0098, 0099, 0117, 0118, 0119,
0207, 0314
Magnavox 0127
Mustek 0012
Panasonic 0010, 0011, 0019, 0035, 0036,
0037, 0038, 0039, 0042, 0075,
0076, 0077, 0147, 0148, 0149,
0158, 0159, 0160, 0171, 0172,
0173, 0174, 0177, 0189, 0190,
0191, 0195, 0196, 0236, 0237,
0286, 0287, 0297, 0298, 0299,
0300, 0301, 0302, 0315, 0318
Pioneer 0025, 0084, 0085, 0138, 0139,
0209, 0210, 0226, 0227, 0249,
0282, 0283, 0284, 0285, 0292,
0293, 0294, 0310, 0316, 0317
Saba 0101, 0102
Samsung 0017, 0088, 0089, 0250, 0251,
0252
Sanyo 0014, 0016, 0082, 0083, 0167
Sharp 0068, 0069,0070, 0132, 0133, 0134,
0155, 0181, 0182, 0230, 0238,
0239, 0303, 0304
Sony 0006, 0013, 0021, 0029, 0040, 0043,
0049, 0050, 0051, 0116, 0120,
0122, 0123, 0124, 0140, 0141,
0142, 0143, 0144, 0145, 0146,
0156, 0157, 0175, 0184, 0185,
0186, 0187, 0188, 0192, 0193,
0197, 0198, 0205, 0206, 0207,
0208, 0217, 0218, 0228, 0229,
0234, 0234, 0255, 0256, 0257,
0260, 0261, 0269, 0270, 0271,
0305, 0306, 0311
TCM 0001, 0046, 0107, 0108, 0109, 0110,
0111, 0112, 0113, 0114, 0115, 0116
Teac 0053, 0054, 0267, 0268
Technics 0035, 0047, 0048, 0074, 0152, 0153,
0154, 0166, 0171, 0246, 0247, 0248
Thomson 0130, 0131, 0135, 0136, 0137,
0175, 0178, 0179, 0180, 0205
Yamaha 0026, 0093,0258, 0259
6
Page 69

Page 70

GSM
Mobile
Portable
Aureau service
Type nr.
Product nr.
Printed in Belgium
 Loading...