

Philips 42PF9966/93, 32PF9966/93, 50PF9966/93 User Manual

1
Contents
Preparation . . . . . . . . . . . . . . . . . . . . . . . . . . . . . . . . . . . . . . . . . . . . . . . . 2
Keys on the right side of the TV . . . . . . . . . . . . . . . . . . . . . . . . . . . . . . . . 2
Use of the remote control RC4302 . . . . . . . . . . . . . . . . . . . . . . . . . . . . . 3
To use the menus . . . . . . . . . . . . . . . . . . . . . . . . . . . . . . . . . . . . . . . . . . . 5
Installation. . . . . . . . . . . . . . . . . . . . . . . . . . . . . . . . . . . . . . . . . . . . . . . . . 5
Select the menu language. . . . . . . . . . . . . . . . . . . . . . . . . . . . . . . . . . . . . 5
Store TV channels . . . . . . . . . . . . . . . . . . . . . . . . . . . . . . . . . . . . . . . . . . . 5
Automatic installation 5
Manual installation 6
Give name 6
Reshuffle the programme list 6
Select Favourite TV channels 6
TV Setup . . . . . . . . . . . . . . . . . . . . . . . . . . . . . . . . . . . . . . . . . . . . . . . . . . 7
General 7
Source 9
Demo. . . . . . . . . . . . . . . . . . . . . . . . . . . . . . . . . . . . . . . . . . . . . . . . . . . . . 9
TV menu . . . . . . . . . . . . . . . . . . . . . . . . . . . . . . . . . . . . . . . . . . . . . . . . . 10
Picture menu 10
Active Control 11
Sound 11
Ambilight 12
Features menu 13
Dual screen / PIP / Multipip . . . . . . . . . . . . . . . . . . . . . . . . . . . . . . . . . . 14
Teletext . . . . . . . . . . . . . . . . . . . . . . . . . . . . . . . . . . . . . . . . . . . . . . . . . . 15
Switch Teletext on and off 15
Select a Teletext page 15
Previously selected teletext page 15
Select the index teletext page 15
Select subpages 15
Picture/Teletext 15
Enlarge a Teletext page 15
Hypertext 15
Teletext menu . . . . . . . . . . . . . . . . . . . . . . . . . . . . . . . . . . . . . . . . . . . . 16
Connect Accessory Devices . . . . . . . . . . . . . . . . . . . . . . . . . . . . . . . . . . 17
Recorder (vcr-dvd+rw) 17
Recorder and other A/V devices 17
DVD Player or other accessory digital source devices 18
Multi channel Surround receiver 18
HDMI (High Definition Multimedia Interface) connector 19
Connect extra subwoofer 19
Side connections 20
To select connected peripherals 20
Record with your recorder . . . . . . . . . . . . . . . . . . . . . . . . . . . . . . . . . . . 20
Audio- and video equipment keys. . . . . . . . . . . . . . . . . . . . . . . . . . . . . . 21
Tips . . . . . . . . . . . . . . . . . . . . . . . . . . . . . . . . . . . . . . . . . . . . . . . . . . . . . 22
R End of life directives
Philips is paying a lot of attention to producing
environmentally-friendly in green focal areas.
Your new TV contains materials which can be
recycled and reused. At the end of its life
specialised companies can dismantle the
discarded TV to concentrate the reusable
materials and to minimise the amount of
materials to be disposed of.
Your TV contains a (tolerated) small amount of
mercury. Please ensure you dispose of your old
TV according to local regulations.
Help?
If this instruction manual does not give
an answer or if ‘Tips’ do not solve your TV
problem, you can call your Local Philips
Customer or Service Centre. See the
supplied World-wide guarantee booklet.
Please, have the Model and Product
number which you can find at the back
of your television set or on the packaging,
ready, before calling the Philips helpline.
Model: 32PF9966/93
42PF9966/93
50PF9966/93
Product No: ...........................................
Care of the screen
See Tips, p. 22.
2
& Wall mounting instructions/Stand
How to mount the supplied stand and/or wall mount bracket, see the
supplied separate Quick Start Guide. Make sure that the wall mount is
being fixed securely enough so that it meets safety standards.
The weight of the TV (excl. packaging) is about 20 kg (32PF9966); 42 kg
(42PF9966); 58 kg (50PF9966).
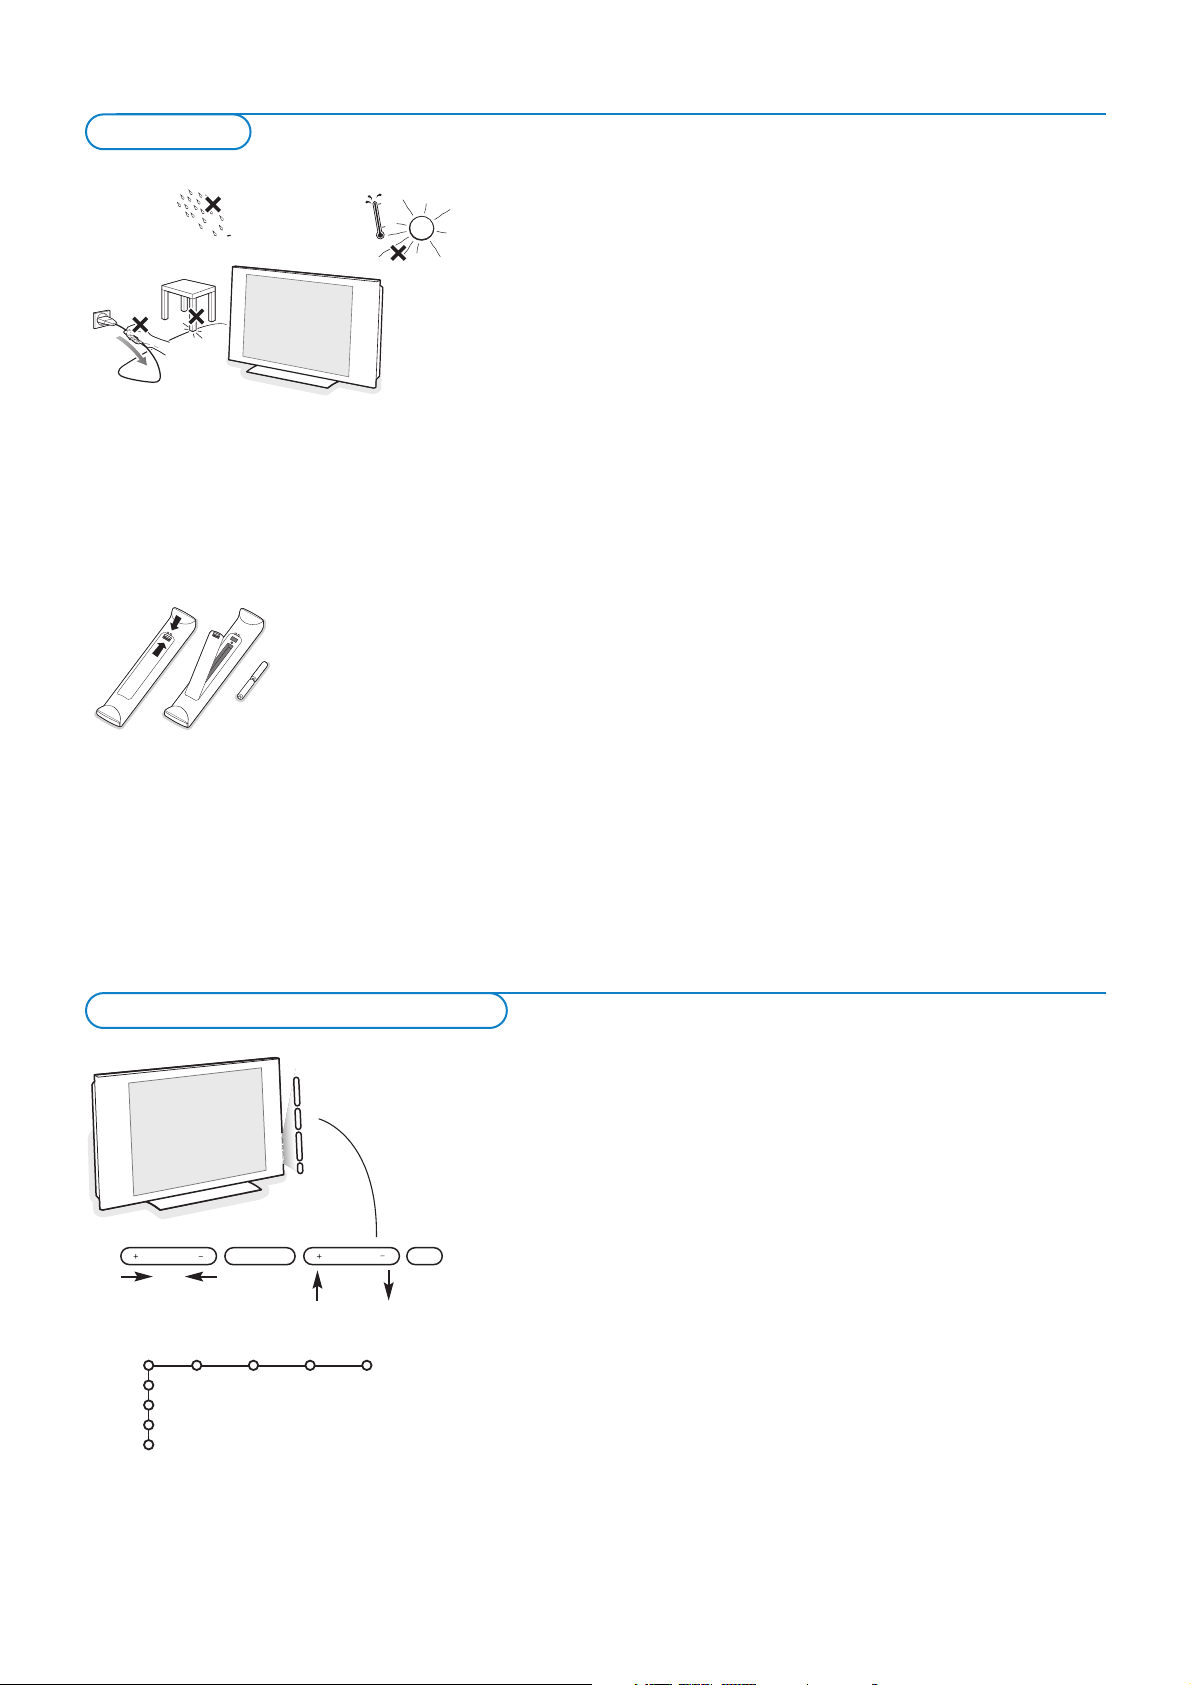
é Place or hang the TV wherever you want, but make sure that air can
circulate freely through the ventilation slots. Do not install the TV in a
confined space such as a book case or a similar unit.
To prevent any unsafe situations, no naked flame sources, such as lighted
candles, should be placed in the vicinity. Avoid heat, direct sunlight and
exposure to rain or water.
The equipment shall not be exposed to dripping or splashing.
“ Insert the aerial plug firmly into the aerial socket x at the bottom of the
TV. For best picture quality use the suppressor-aerial cable supplied.
‘ To connect your computer, see p. 19.
To connect other peripherals, see p. 17.
In order to obtain the best result, please use only the supplied aerial cable
between the TV and recorder, and between recorder and aerial connector.
( Insert the mains cord supplied into the mains at the bottom of the TV and
in the wall socket. Check that the mains supply voltage corresponds to the
voltage printed on the sticker at the rear of the TV.
To prevent damaging the power (AC) cord which could cause a fire or
electric shock, do not place the TV on the cord.
§ Remote control: Insert the 2 batteries supplied (Type R6-1,5V).
The batteries supplied do not contain the heavy metals mercury and cadmium.
Please check on how to dispose of exhausted batteries according to local
regulations.
è Switch the TV on :Press the power switch B at the right side of the TV.
An indicator on the front of the TV lights up and the screen comes on. If
the TV is in standby mode, press the
-P+ keys or the B key on the remote
control.
Should your remote be lost or broken you can still change some of the basic
settings with the keys on the right side of your TV.
Press:
• the
+ V - key to adjust the volume;
• the
+ P/CH - key to select the TV channels or sources.
Press the
MENU key to summon the main menu without the remote control.
Use:
• the
+ V - key and the + P/CH - key to select menu items in the directions
as shown;
• the
MENU key to confirm your selection.
Note:
When activated via the
MENU key on the right side of the TV, only Exit lets you
remove the menu.
Navigate to
Exit and press the MENU key.
MENU P/CHV
B
TV
Setup
Demo
Install
Exit
Picture Sound Ambilight Features
Keys on the right side of the TV
Preparation
3
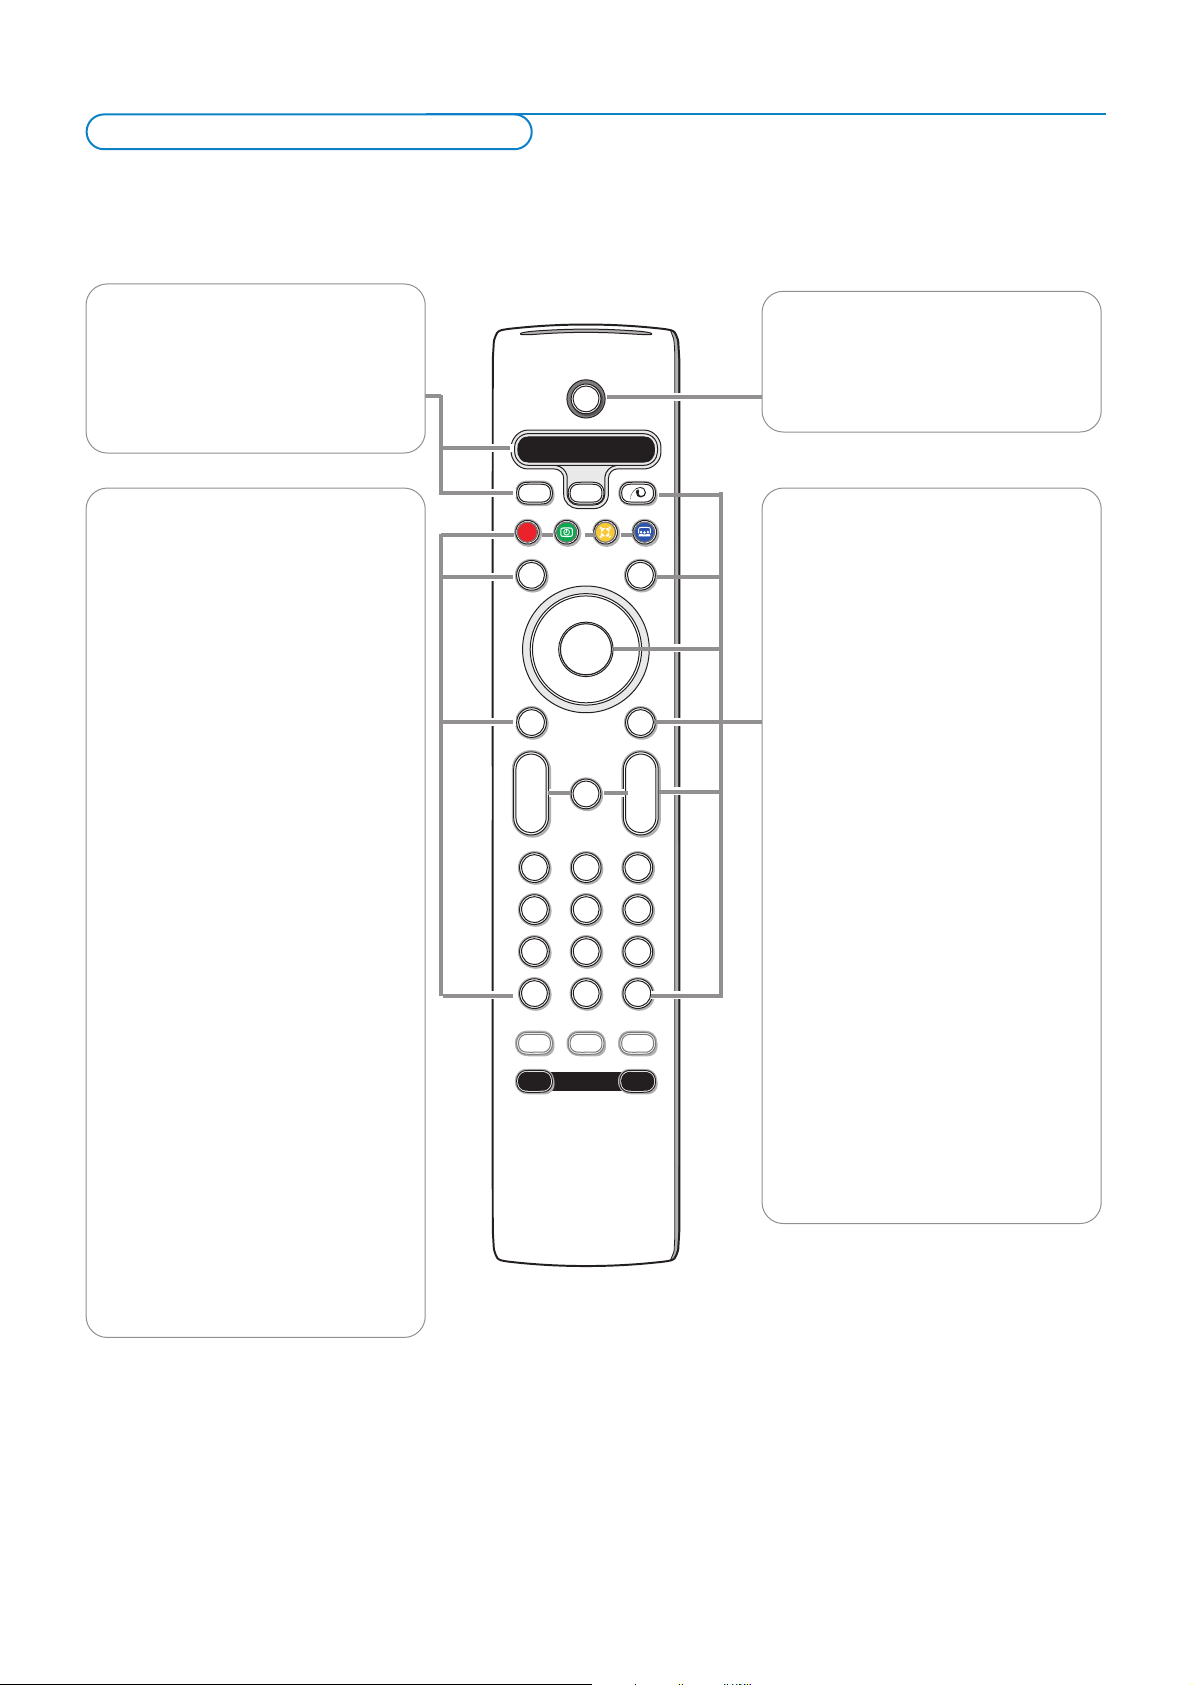
Note: For most keys pressing a key once will activate the function. Pressing a second time will de-activate it.
When a key enables multiple options, a small list will be shown. Press repeatedly to select the next item in the list. The list will be removed
automatically after 6 seconds or press
OK to remove immediately.
Remark: in HDMI mode only some keys are valid.
B
bæ
¬
+
-
V
+
-
P
v
b
i
0
h
q
Select
AMP DVD/R TV SAT AUX
MENU
MODEON/OFF
Ambilight
123
456
789
0
Ò®‡π
º
Ì
†
Active Control
S
®
®
®
®
OK
®
AMP DVD/R TV SAT AUX
See ‘Audio- and Video equipment keys’,
p. 21.
v Select your peripherals
See p. 20.
®ºÒ‡π†
Audio and Video equipment keys,
see p. 21.
U Time display
The time is displayed on the screen.
Q Surround mode
Incredible surround
With stereo transmission, and when
Incredible surround is selected, it seems
as though the loudspeakers are spread
further apart from one another.
Virtual Dolby Surround
Optimal with Dolby Surround signals.
Enables you to experience the effect of
Dolby Surround Pro Logic, reproducing a
rear sound effect. See Sound menu, 3D
effect, p. 11.
Note:You can make the same selection in
the Sound menu, surround mode, p. 11.
Ì
no function
æ no function
S Freeze
To freeze the picture.
Dependent on the input signal, the
function may not be possible.
i On Screen information
Press to display (when available)
information about the selected TV
channel and programme.
Menu info
When a menu is on screen, press i to
display info on the selected menu item.
B Standby
Press to switch the TV on or off from or to
standby mode.
When switched off, a red indicator on the TV
lights up.
x Pixel Plus 2 demo on/off
•Press to switch the Pixel Plus 2 demo
on or off. In the right part of the screen
Pixel Plus 2 is switched on.
•Press longer to display the list of digital
options settings.
Use the cursor up/down to select one
of the settings. See also Picture menu,
Digital options, p. 10.
b Teletext On/Off see p. 15
Cursor keys
Press the cursor keys up/down, left/right
to navigate through the menus.
OK Press this key
• to activate your choice, when in the
menus.
• to display the programme list.
MENU Main menu on/off see p. 5
V To adjust the volume.
¬ Interrupt the sound or restore it.
PProgramme selection
To browse through the TV channels and
sources stored in the favourite list.
0/9 Digit keys
To select a TV channel.
For a two digit programme number, enter
the second digit before the dash
disappears.To switch immediately to a
selected one digit TV channel, keep the
digit key pressed a bit longer.
Use of the remote control RC4302
4
B
bæ
¬
+
-
V
+
-
P
v
b
i
0
h
q
Select
AMP DVD/R TV SAT AUX
MENU
MODEON/OFF
Ambilight
123
456
789
0
Ò®‡π
º
Ì
†
Active Control
S
®
®
®
®
OK
®
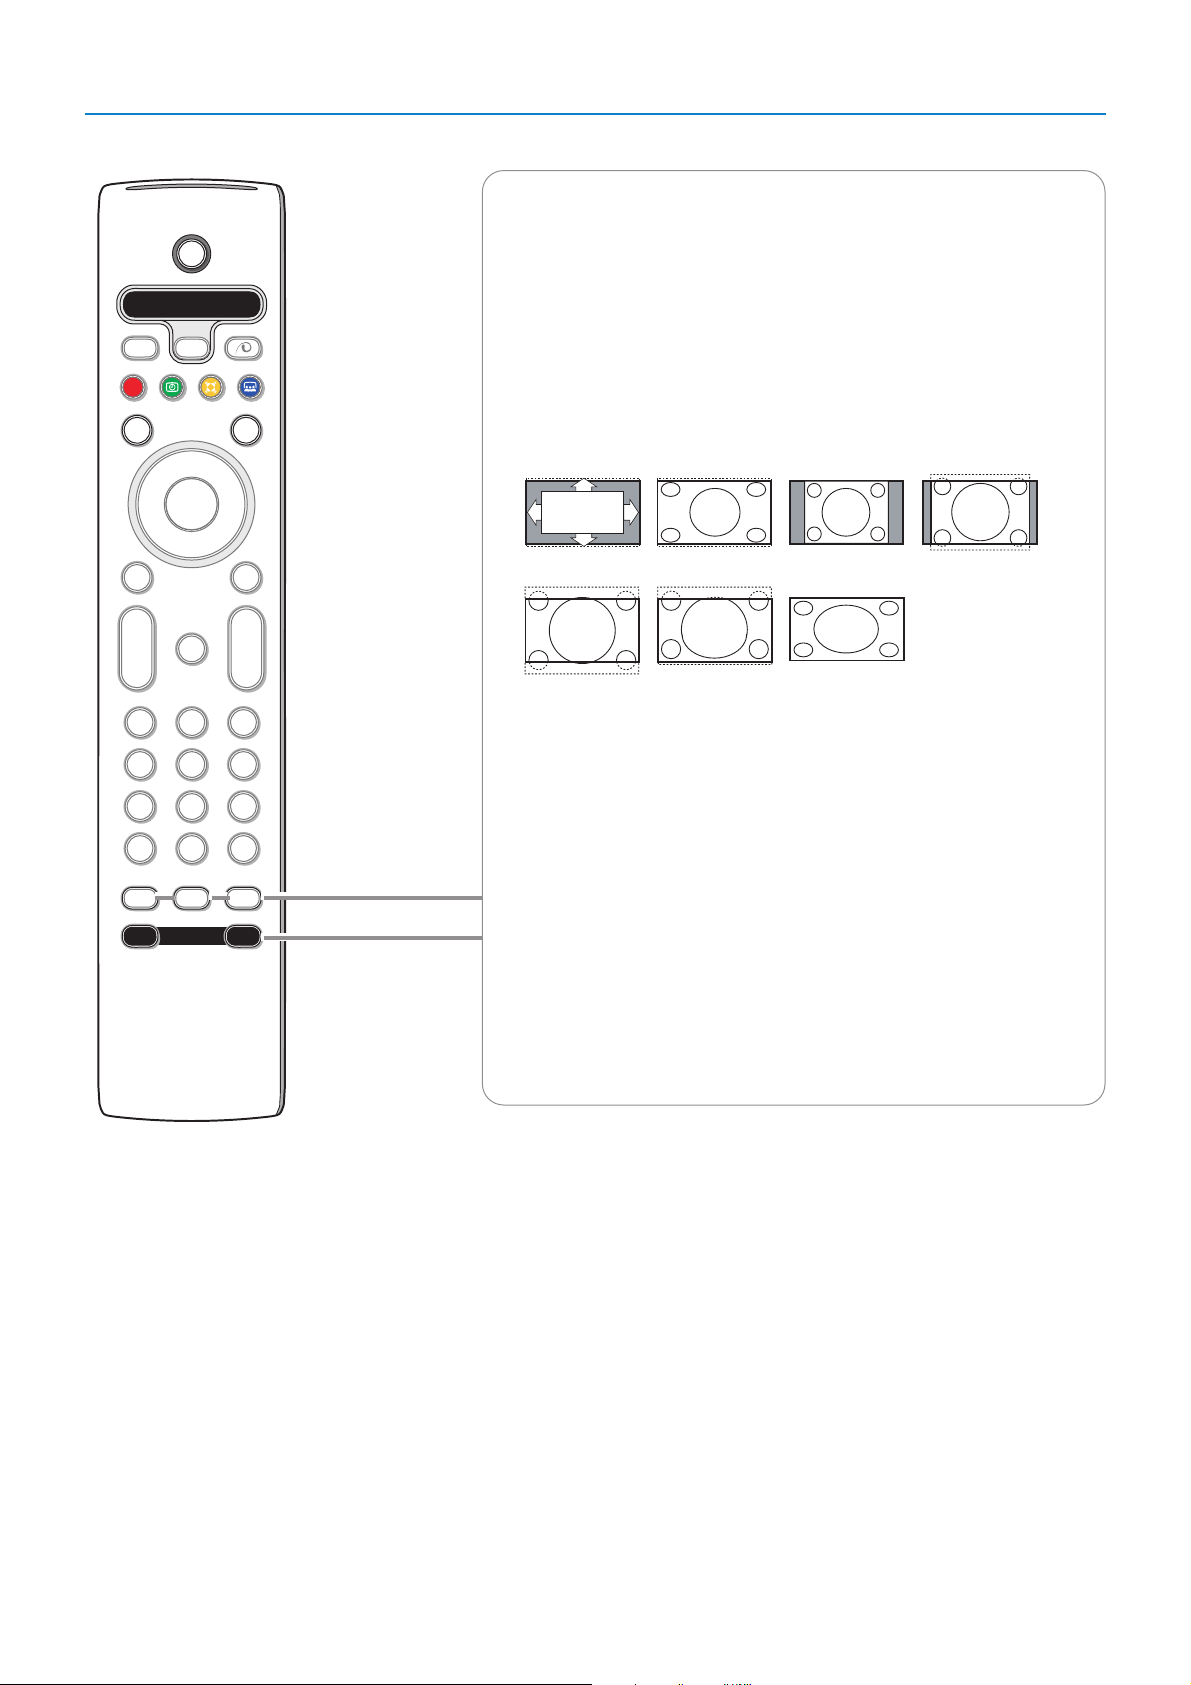
0 Smart surf
With this key you can easily switch between 2 up to 9 different TV channels or
sources. See General, Smart surf, p. 7.
Press the
OK key or wait for the time out to dismiss the Smart surf display.
b Dual screen / PIP / Multipip See p. 7 and 14.
h Active control see p. 11.
q Picture format
Press this key repeatedly or press the cursor up/down to select another picture
format:Auto format, Super zoom, 4:3, Movie Expand 14:9, Movie Expand 16:9,
Subtitle zoom or Wide screen.
Auto format makes the picture fill the screen as much as possible.
In case of subtitles in the bottom black bar Auto format makes the subtitles
visible.
In case of a broadcaster logo in the corner of the top black bar, the logo
disappears from the screen.
Super zoom removes the black bars on the sides of 4:3 programs with minimal
distortion.
When in Movie Expand 14:9, Movie Expand 16:9, Super zoom or Subtitle zoom
picture format, you can make subtitles visible with the cursor up/down.
Note: With signals via the
HDMI connector or HD signals via AV1 or AV2 less picture
formats are selectable.
Ambilight see also p. 12.
•
ON/OFF Press to switch Ambilight on or off.
•
MODE Press repeatedly to select one of the predefined ambient
light settings.
Note: When the TV is switched to standby, and you switch Ambilight On,
Ambilight will be active. Only then less modes are available.
Auto format Super zoom 4:3 Movie expand 14:9
Movie expand 16:9 Subtitle zoom Wide screen
5
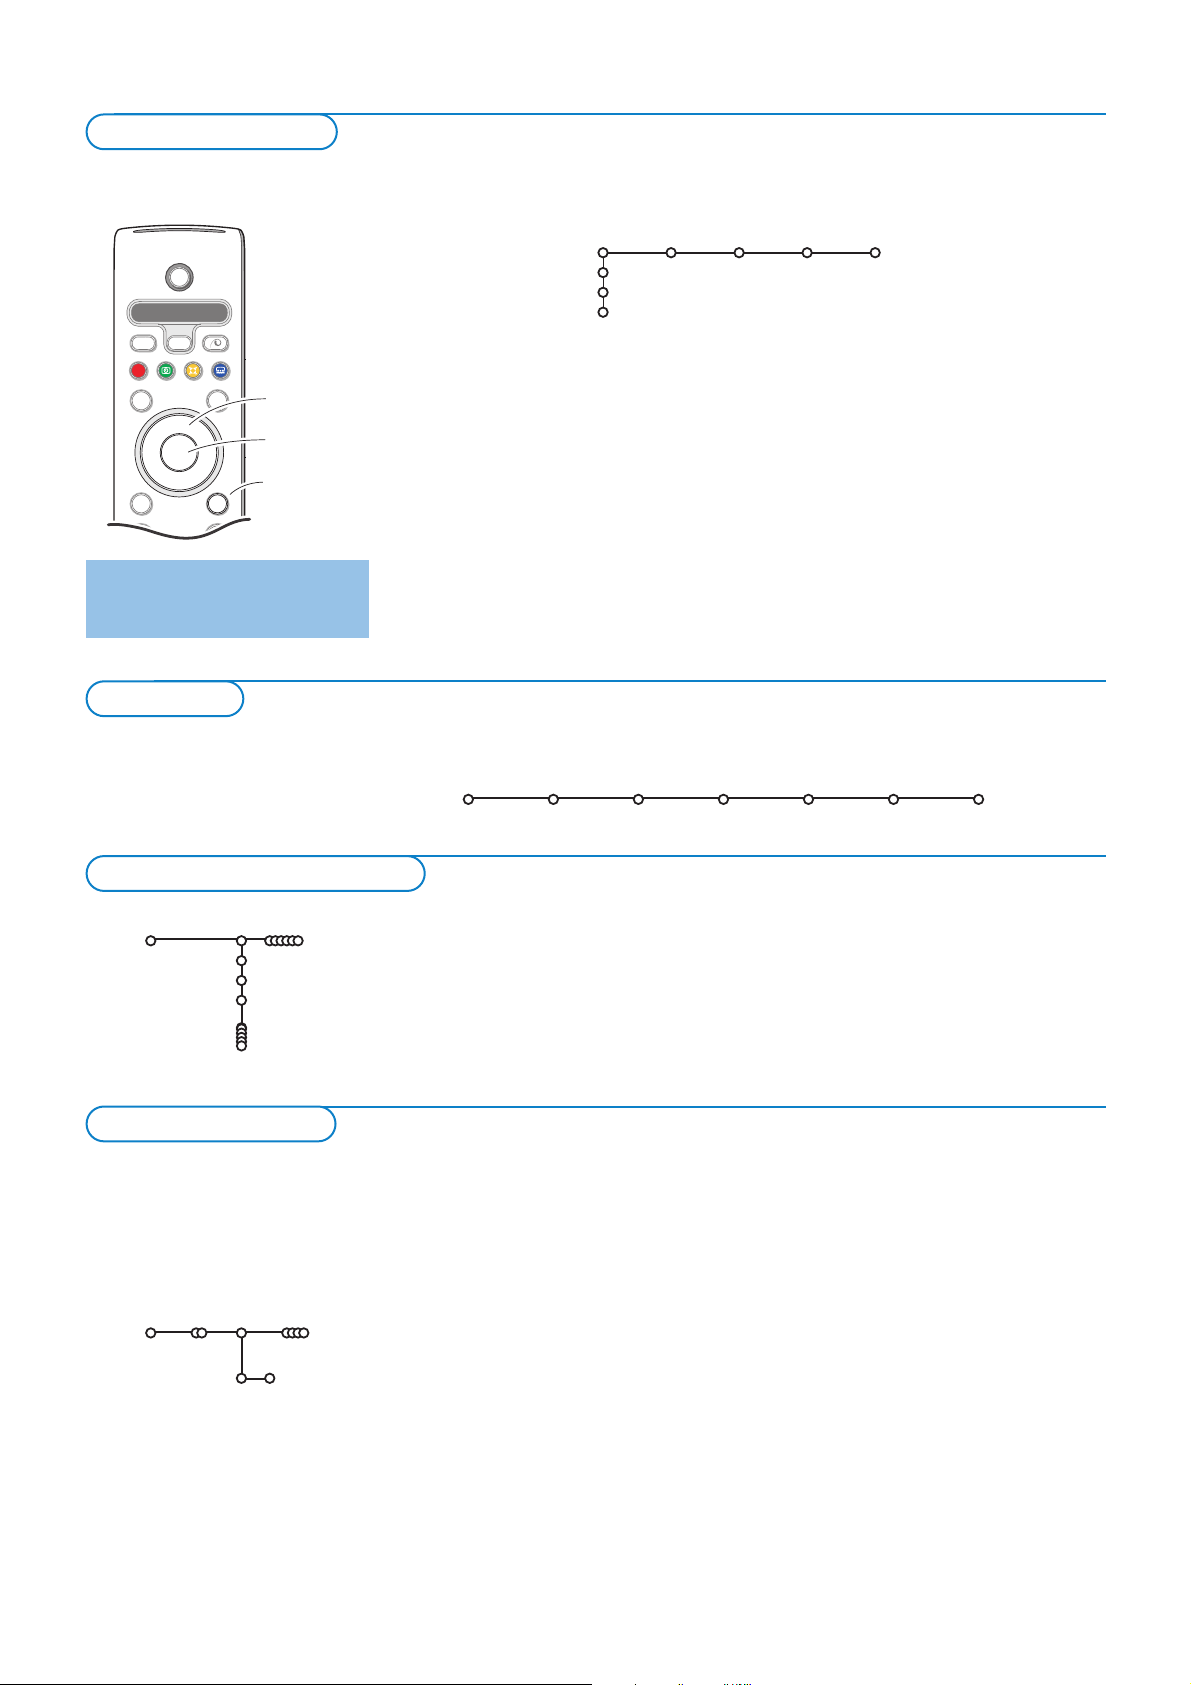
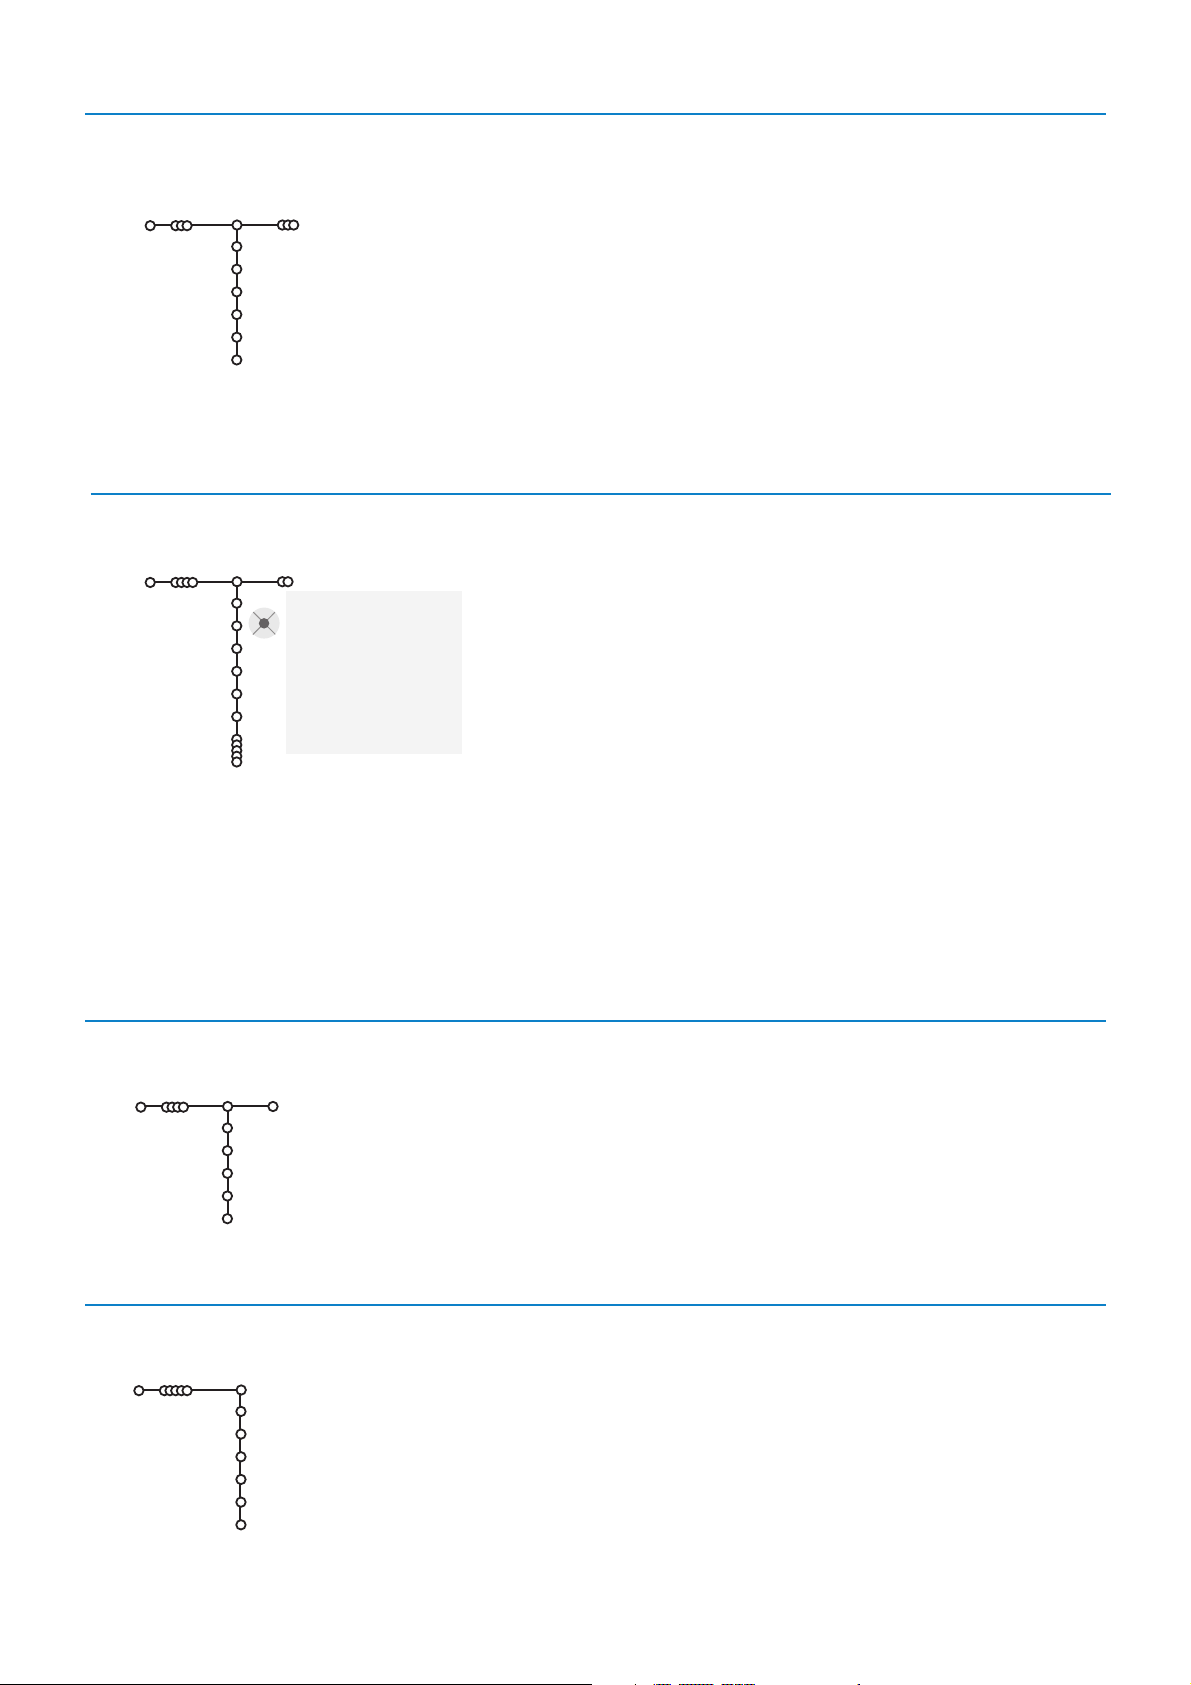
& Press the MENU key on the remote control to summon the main menu.At
any moment you can exit the menu by pressing the
MENU key again.
é Use the cursor in the up/down direction to select the TV, Setup, Demo or
Install menu.
Use the cursor left/right to select
Picture, Sound, Ambilight or Features.
Note: Sometimes not all the menu items are visible on the screen (indicated by a
cluster of blue balls). Use the cursor down or right to reveal all items.
“ Use the cursor in the left/right direction to select the menu item.
‘ Use the cursor up/down again to select the control you want to select or
to adjust.
Note: Items temporary not available or not relevant are displayed in a light grey colour
and cannot be selected.
b
¬
+
-
V
+
-
P
v
Select
Ò‡ π
†
S
®
®
®
®
æ
B
AMP DVD/R TV SAT AUX
º
MENU
OK
®
cursor to select
adjustments
OK key to
activate
return or switch
main menu on/off
Press the i key to get
information about the selected
menu item.
TV
Setup
Demo
Install
Picture Sound Ambilight Features
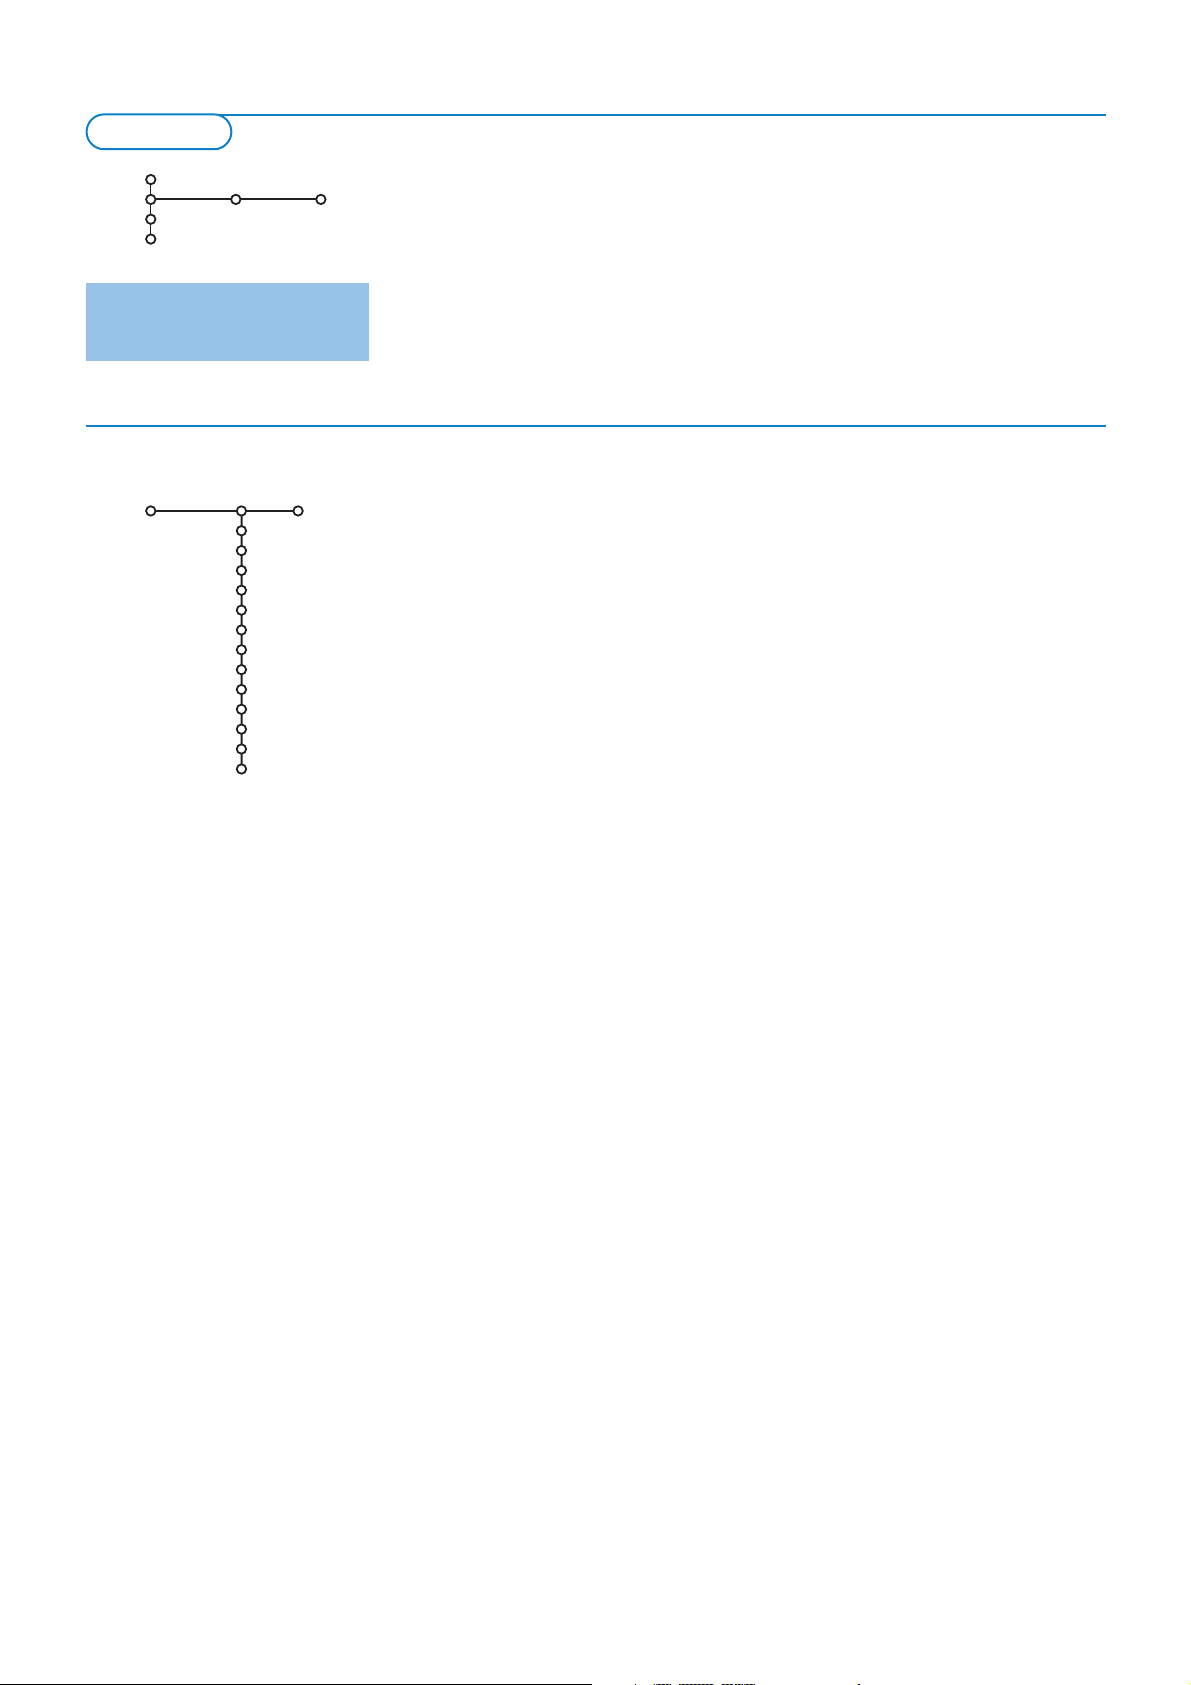
Install
Language Automatic Manual Give name Reshuffle Favourite
install install channels
The installation menu contains the following items:
& Press the MENU key on the remote control.
é Use the cursor down to select Install.
“ Use the cursor right to select Language.
Follow the instructions on screen.
‘ Use the cursor up/down to select your preferred language and press the
OK key to confirm your selection.
( Proceed with the Install menu.
Language
English
Français
Chinese
Install
Select the menu language
Installation
To use the menus
After language is set correctly, you can now search for and store the TV channels in two different ways: using Automatic Installation or
Manual Installation (tuning-in channel by channel). Select your choice with the cursor right.
Automatic install
Install Start
Install
Automatic installation
Store TV channels
& Select Automatic install in the Install menu.
Note: All channels must be unlocked in order to autoprogram. If requested, enter
your code to unlock all channels. (See TV, Features menu, Childlock, p. 13.)
é Press the cursor down.
The autoprogramming option label
Start appears.
“ Press the cursor right.
‘ The message Searching appears and the progress of autoprogramming is
displayed.
You can change the order of the stored TV channels.
You can use Reshuffle to renumber them. See p. 6.
6
Searching for and storing TV channels is done channel by channel.
You must go
through every step of the Manual Installation menu.
& Select Manual install in the Install menu.
é Press the cursor down.
Follow the instructions on screen.
Search or direct selection of a TV channel:
If you know the frequency, enter the 3 or 2 digits of the frequency directly with the
digit keys 0 to 9 (e.g. 048).
Repeat to search for another TV channel after you have stored the selected
TV channel.
Manual install
Install
System
Channel
Search
Fine tune
(Antenna level)
Store
It is possible to change the name stored in the memory or to assign a name to
a TV channel or external for which a name has not yet been entered.A name
with up to 5 letters or numbers can be given to the channel numbers 0 to 99.
& Select Give Name in the Install menu and press the cursor down.
é Select the channel number.
Note: keep the cursor up/down pressed to scroll through the channel list quickly.
“ Press the cursor right.
A keyboard appears on the screen.
Note: Only European characters are displayed.
Press the cursor right to enter the keyboard.
Press the cursor up/down, left/right to select the first character and press
OK. Repeat for every character you want to enter.
Select
Space to enter a space; Delete to erase the highlighted character in
the name entered;
Shift to display upper- or lowercase characters on the
keyboard;
Special to display special characters on the keyboard.
Press
OK to confirm.
‘ Press the cursor left repeatedly when you have finished the name giving.
( Select another channel number and repeat steps “ to ‘.
pπ
® Space ® Delete
ABCDEFG 123
HIJKLMN 456
OPQRSTU 789
VWXYZ 0
® Shift ® Special
Give name
Install
BBC1
BBC2
CNN
.....
You can change the order of the stored TV channels.
& Select Reshuffle in the Installation menu.
é Follow the instructions on screen.
& Select Favourite channels in the Install menu.
é Select your channel number with the cursor up/down.
“ Select Ye s or No with the cursor right.
‘ Repeat é and “ for every TV channel or external you want to make a
favourite or a non-favourite TV channel or external.
Reshuffle
Install
BBC1
BBC2
CNN
ITV
NEWS
Favourite channels
Install
Ye s
Ye s
No
Ye s
Ye s
BBC1
BBC2
CNN
ITV
NEWS
....
Select Favourite TV channels
Reshuffle the programme list
Give name
Manual installation
7
The Setup menu contains items that control the settings of the TV’s functions,
features, services and peripherals you may have connected.
The
General menu allows you to change settings that will typically be accessed
only occasionally.
The
Source menu allows you to select a source.
Press the i key to get
information about the selected
menu item.
This menu allows you to change various settings that are presumably adjusted
less frequently than most other settings.
Menu background
Select
Ye s or No to turn the menu background on or off.
Smart surf
& Select Smart surf.
é With the cursor left/right, select
•
2 channels if you want the 0 key to toggle between the current and the
previously selected channel,
•
9 channels if you want the 0 key to summon a list of up to 9 channels
which can be selected.
To add/remove a channel or source to the 9 channels list:
Tune to the channel or source you wish to add or remove. Press the 0
key and press the cursor right to add or remove.
Note: If there are already 9 channels/sources in the list, the one at the bottom of
the list will be removed.
PIP format
This menu allows you to select the preferred format which can then be
displayed toggling the b key on and off.
& Select PIP format with the cursor down.
é Press the cursor right.
“ Select Dual screen, PIP, PIP 3 or PIP 6 with the cursor down.
When Dual screen mode is activated with the remote control b key, and
when
•
Dual screen is selected, the TV splits the screen into two equally sized
screens.
•
PIP is selected, the TV shows a full screen of video with a pip window of
video on top if it;
•
PIP3 or PIP6 is selected, the TV will display the main screen together with
3 or 6 pip screens. See also p. 14.
Factory settings
This resets the picture and sound settings to their predefined factory
values, but maintains the channel installation settings.
OSD (On Screen Display)
& Select OSD.
é Select Normal to activate the continuous display of the programme
number and extended display of TV channel and programme information on
screen.
Minimum to activate the display of reduced channel information.
Note: When subtitles is switched on, see Features, p.13, display of the channel
number is not possible
General
TV Setup
General Source
TV
Setup
Demo
Install
General
Menu background
Smart surf
PIP format
Factory settings
OSD
Programme title
Teletext 2.5
Auto surround
Subwoofer
Set/Change code
Colour
PLL
Audio recovery
Setup
 Loading...