

Page 1
Hospitality Television
32HF9385D/42HF9385D
- 1 -
Page 2
Installation of your Philips Hotel TV
1. Introduction
This addendum has been designed to help you install programmes on this Digital TV and activating the hotel
mode.
Use this addendum in conjunction with the User Manual of this television.
Please handle the TV with care and wipe with a soft cloth to ensure your TV keeps looking new.
2. The benefits of the Philips hotel TV
This TV is specially designed for hotels. The Philips hotel TV offers all kind of features to
Maximise the convenience for the hotel and meet the needs for the guest
Welcome message to give a friendly welcome to your guest when activating the tv
Remote control features like low battery detection and an anti-theft screw for preventing of theft for
batteries
Access to the user menu can be blocked. This prevents users (e.g. guests) from deleting or changing
program settings and/or modifying picture and sound settings. This ensures that TVs are always set up
correctly.
A
switch-on
specified program and volume level.
The maximum volume can be limited in order to prevent disturbance.
The television keys VOLUME +/- , PROGRAM +/- and MENU can be blocked.
Screen information can be suppressed.
Programmes can be blanked
3. Installing the channels
Installing Digital Programs (only applicable for 20/26/32HF5335D)
Ensure the TV is in Digital mode. If it is in Analogue mode, press the A/D (Analogue/Digital) key on the
Remote Control to enter the Digital mode.
volume and programme can be selected. After switching on, the TV will always start on the
1. Press the
2. Press the Up/Down Arrow Key to scroll to the item called INSTALLATION and press the Right Arrow
Key
3. Press the Up/Down Arrow Key to scroll to the item called SERVICE SETUP and press the Right Arrow
Key
4. Press the Up/Down Arrow Key to scroll to the item called REINSTALL ALL SERVICES and press the Right
Arrow Key
5. Press the Up/Down Arrow Key to scroll to the item called SEARCH and press OK to start the scan.
(Menu Digital) key on the Remote Control
The
TV will now start to scan and install all available (Digital) TV channels and Radio stations automatically.
When the scan is completed, the TV menu will indicate the number of digital services found.
6. Press the OK key again to Store all the services that have been found.
- 2 -
Page 3
Installing Analogue Programs
Ensure the TV is in Analogue mode. If it is in Digital mode, press the A/D (Analogue/Digital) key on the
Remote Control to enter the Analogue mode.
1. Press the
2. Press the Up/Down Arrow Key to scroll to the item called INSTALL and press OK
3. Press the Up/Down Arrow Key to scroll to the item AUTO STORE and press OK
The TV will now start to scan and install all available (Analogue) TV channels automatically. This operation will
take a few minutes. The TV display will show the progress of the scan and the number of programmes found.
Refer to the chapter on
can also refer to the chapter on
preferred.
4. Activating the Hotel Mode Setup menu (BDS)
1. Switch on the television and select an analogue channel
2. On the Remote Control, press keys: [3, 1, 9, 7, 5, 3, MUTE]
3. The BDS HOTEL MODE SETUP MENU becomes visible
4. Use the cursor keys to select and change any of the following settings:
5. Select “STORE” and press [CURSOR RIGHT] to save the settings and exit BDS Hotel Mode
setup. Press [MENU] to exit without saving.
6. For BDS Hotel Mode settings to take effect, you must turn the TV set Off, then back On.
BDS Hotel Mode Functions
This paragraph describes the functionality of each item in the BDS Hotel Mode Setup menu.
BDS MODE
ON BDS Hotel Mode is ON:
The user menu is blocked.
All settings of the Hotel Mode Setup menu are in effect.
Automatic Tuning of Analogue Programmes
Function Possible selections
BDS MODE ON /OFF
SWITCH ON SETTINGS
SWITCH ON VOLUME 0-100, LAST STATUS
MAXIMUM VOLUME 0-100
SWITCH ON CHANNEL USER DEFINED, LAST STATUS
POWER ON ON/STANDBY/LAST STATUS
DISPLAY MESSAGE ON/OFF
WELCOME MESSAGE LINE 1/LINE 2/CLEAR
CONTROL SETTINGS
LOCAL KEYBOARD LOCK ON/OFF/ALL
REMOTE CONTROL LOCK ON/OFF
OSD DISPLAY ON/OFF
HIGH SECURITY MODE ON/OFF
AUTO SCART ON/OFF
MONITOR OUT ON/OFF
BLANK CHANNEL ON/OFF
STORE >
(Menu TV) key on the Remote Control
in the User Manual for more details. You
Manual Tuning of Analogue Programmes
in the User Manual if a manual scan is
- 3 -
Page 4

OFF BDS Hotel Mode is OFF:
The TV operates as a normal consumer TV
SWITCH ON VOL
When the user switches the TV ON, it will play at the specified volume level. There are 2 options:
LAST STATUS Upon start-up, the TV volume will be set to the level before the TV set was
USER DEFINED As specified by installer
Remark: “SWITCH ON VOL” cannot exceed the MAXIMUM VOL level. This is the volume level with which
the Hotel Mode Setup menu was entered.
MAXIMUM VOL
The TV Volume will not exceed the selected volume level.
SWITCH ON CHANNEL
When the user switches the TV ON, it will tune to the specified channel. There are 2 options:
LAST STATUS The TV will switch on to the last channel that was shown before the TV set
USER DEFINED Any analogue channel can be chosen to be the first channel to switch on
POWER ON
The Power On function allows the TV to enter a specific mode of operation (On or Standby) after the mains
power is activated.
ON When set, the TV will always turn ON after the mains power is enabled.
STANDBY When set, the TV will always turn to STANDBY after mains power is enabled
LAST STATUS When set, the TV will always turn to the last power status before the mains power was
DISPLAY MESSAGE
ON Enables display of the Welcome Message for 30 seconds after the TV set is turned on
OFF Disables the display of the Welcome Message.
If OSD DISPLAY is set to OFF, then the Welcome Message is automatically disabled.
WELCOME MESSAGE
The Welcome Message function allows the TV to show a customized greeting to the hotel guest whenever the
TV is switched on. This helps to personalize the hotel experience for guests.
The Welcome Message can consist of 2 lines of text, with each line containing a maximum of 20 alphanumeric
characters. Use the Remote Control arrow keys to create the Welcome Message.
To enable the display of the Welcome Message, the DISPLAY MESSAGE option must be ON
To clear the Welcome Message from the TV’s memory, select CLEAR
LOCAL KEYBOARD LOCK
ON The television keys VOLUME +/-, PROGRAM +/- and MENU are blocked.
OFF The television keys VOLUME +/-, PROGRAM +/- and MENU function normally
ALL The television keys VOLUME +/-, PROGRAM +/-, MENU and POWER are blocked.
REMOTE CONTROL LOCK
ON Standard Remote Control keys are disabled.
OFF All Remote Control keys will function normally.
OSD DISPLAY
ON Normal screen information is displayed (e.g. programme information)
OFF Screen information is suppressed.
last turned off.
was turned off
disabled.
- 4 -
Page 5

HIGH SECURITY MODE
ON Allows access to the BDS Hotel Mode Setup Menu via the special BDS Setup Remote only.
(RC2573/01)
OFF Allows access to the BDS Hotel Mode Setup Menu via BDS Setup Remote or via normal Remote
Control (using special key code sequence).
AUTO SCART
The Auto Scart function enables auto-detection of AV devices that are connected to the TV’s Scart connector.
ON Enables Auto Scart switching in BDS Hotel Mode.
OFF Disables Auto Scart switching in BDS Hotel Mode.
MONITOR OUT
ON Allows audio & video output from TV via relevant AV connectors (if available).
OFF Disables both Audio & Video output from the TV (to prevent illegal copying).
BLANK CHANNEL
The Blank Channel function disables the display of video on the TV, but does not affect the audio output. This
function can be used for audio applications (example: Off-air radio transmission, music channels, and so on),
which do not necessarily require the display of video.
ON The current programme is blanked
OFF The current programme is not blanked (normal visible; DEFAULT value)
BLANK CHANNEL can be set for every channel. Use [P+ / P-] to go through all the programmes and set the
desired status per channel. The programme number is visible in the top left corner.
Low Battery Check
This television set has a special feature which checks the battery power level of a TV Remote Control, and
indicates if the battery is low and requires changing.
(Note: The Low Battery Check function works only with certain models of Remote Controls. Please check
with the Philips sales representative if the Remote Control used with this TV supports this function)
To activate the Low Battery Check function, hold the TV Remote Control in front of the TV, and press and
hold the OK button on the Remote Control for at least 5 seconds. A message will appear on the TV screen to
indicate if the battery power level is OK, or if it is Low. If the message indicates that the battery level is low, it
is recommended to change the batteries of the Remote Control immediately.
5. Cloning of settings
Cloning of analogue TV channels and TV settings as described in the chapter
Hotel Mode Set-up menu
For 15/20HF5234
o Wireless cloning with the SmartLoader 22AV1120 or 22AV1135
o Cloning off all adjustable TV settings + analogue channel table
For 20/26/32HF5335D
o Wired cloning with the SmartLoader 22AV1135 using the wire packed with the SmartLoader
o Cloning off all adjustable TV settings + analogue channel table (digital channel table via automatic
installation)
Instruction for cloning of settings between TVs
Philips SmartLoader (22AV1135/00)
The Philips SmartLoader is an installation tool especially designed for easy and fast installation and copying of
TV settings on Philips Institutional TV’s.
- 5 -
Page 6
The Philips SmartLoader works in 2 modes – Wireless and Wired:
Wireless mode ---- through infrared sensor (15/20HF5234)
Switch the SmartLoader to “Wireless” mode by sliding the side-switch to the icon on the SmartLoader
device. Point the Wireless SmartLoader to the TV’s infrared receiver (optimal distance of 5-30cm) and proceed
with the Installation procedure listed below.
Wired mode ---- using the by-packed accessory cable(s) (20/26/32HF5335D)
Switch the SmartLoader to “Wired” mode by sliding the side-switch to the icon on the SmartLoader
device.
Examine the rear connectors of the TV set to determine if the 3-pin or 4-pin female connector wire (packed
with the Wireless SmartLoader) should be used. Plug in the correct connector wire to the corresponding
opening on the TV set (usually marked as SERV C), and then connect the RJ11 jack end of the accessory wire
to the RJ11 socket on the SmartLoader.
The Installation Procedure consists of three simple steps:
1. Choosing a Master TV
The Master TV is the TV set whose installation and configuration settings are to be copied into other TV’s (of
the same type only).
2. Programming the SmartLoader with the settings from the Master TV
Follow these steps to program the SmartLoader with the settings of the Master TV.
a) Wireless method
Set the SmartLoader to “Wireless” mode using the side switch.
Turn on the TV, and while holding the SmartLoader, point it in the direction of the
TV. Press the “MENU” Key on the SmartLoader.
b) Wired method
Connect the SmartLoader to the TV using the appropriate accessory cable.
Set the SmartLoader to “Wired” mode using the side switch.
Turn on the TV, and while holding the SmartLoader, point it in the direction of the
TV. Press the “MENU” Key on the SmartLoader.
The Master TV will show the following menu:
SMARTLOADER TO TV >
TV TO SMARTLOADER >
On the TV screen, highlight the menu option “TV TO SMARTLOADER”
Press the right arrow key on the SmartLoader to start the programming process
A number display (from 0~100) will be shown on screen, indicating the percentage of the programming
progress from the TV to the SmartLoader. When the programming is completed, “##” will show “100” and the
message “DONE” will appear.
TV TO SMARTLOADER ## (0-100)
The SmartLoader is programmed and can be used to install and configure other TVs.
Copying the settings of the Master TV to other TVs with the SmartLoader
Follow these steps to install and configure the settings of a Philips TV with the SmartLoader.
- 6 -
Page 7

a) Wireless method
Set the SmartLoader to “Wireless” mode using the side switch.
Turn on the TV, and while holding the SmartLoader, point it in the direction of the
TV. Press the “MENU” Key on the SmartLoader.
b) Wired method
Connect the SmartLoader to the TV using the appropriate accessory cable.
Set the SmartLoader to “Wired” mode using the side switch.
Turn on the TV, and while holding the SmartLoader, point it in the direction of the
TV. Press the “MENU” Key on the SmartLoader.
On the TV screen, highlight the menu option “SMARTLOADER TO TV”
Press the right arrow key on the SmartLoader to initiate the copying process
> A number display (from 0~100) will be shown on screen, indicating the percentage of the installation
progress from the SmartLoader to the TV. When the data transfer is completed, “##” will show “100” and
the message GOODBYE will appear.
SMARTLOADER TO TV ## (0-100)
> The TV will go to Standby mode. When the TV is next powered on, it will be configured with the settings
from the Master TV, and ready for use.
Problems and Solutions:
1.
The message “I2C ERROR” is displayed on the screen.
Bad connection of RJ11 wire or wrong data transmission has occurred. Try again.
2.
The message “WRONG VERSION” is displayed on the screen.
The program contained in the SmartLoader has a software code incompatible with the actual TV.
Reprogram the Wireless SmartLoader from a Master TV whose software code is compatible with the
actual TV.
3.
TV doesn’t respond to the SmartLoader.
Check if the LED on the SmartLoader lights up in green when pressing any button.
If the LED is red, it means that the batteries are low and should be replaced.
Bring the SmartLoader closer to the TV infrared receiver and try again.
Notes:
Make sure that the 3 R6/AA sized batteries are placed correctly in the bottom compartment of the
SmartLoader. The LED on the SmartLoader should light up in green when pressing any button, indicating
operational batteries. When the LED shows red, the batteries need to be replaced.
The SmartLoader can only copy the settings between 2 TVs of the same type. Once the
SmartLoader is programmed with the settings from a Master TV of a certain type or model,
then these settings can be installed on another TV of the same model only.
The SmartLoader cannot be used to copy the (digital) channel table of a Digital TV set.
If the SmartLoader is used with a DVB (European Digital) TV set, then the TV set must first
be switched to Analog mode.
- 7 -
Page 8

Y
T
Disposal of your old product.
our product is designed and manufactured with high quality materials and
components, which can be recycled and reused. When this crossed-out wheeled bin
symbol is attached to a product it means the product is covered by the European
Directive 22002/96/EC. Please find out more about the separate collection system for
electrical and electronic products in your local neighborhood.
2007© Koninklijke Philips Electronics N.V. all rights reserved
Specifications are subject to change without notice
Trademarks are property of Koninklijke Philips Electronics N.V. or their respective owners.
Please act according to your local rules and do not dispose of your old products with
your normal household waste. The correct disposal of your old product will help
prevent potential negative consequences for the environment and human health.
he packaging of this product is intended to be recycled. Apply to the
local authorities for correct disposal.
- 8 -
Page 9
Sisällysluettelo
1 Tärkeää 3
1.1 Turvallisuus 3
1.2 Kuvaruudun hoito 3
1.3 Kierrätys 3
2Televisio 4
2.1 Television esittely 4
2.2 Tärkeimmät ominaisuudet 5
3 Aloittaminen 5
3.1 Television sijoittaminen 5
3.2 Seinäkiinnitys – VESA 5
3.3 Kaukosäätimen paristot 7
3.4 Antennikaapeli 7
3.5 Virtajohdon liittäminen 7
3.6 Ensiasennus 7
4Television käyttäminen 8
4.1 Virran kytkeminen ja katkaiseminen valmiustila 8
4.2 Television katsominen 9
4.3 Televisiokanavien katsominen
digitaalivastaanottimesta 9
4.4 Ohjelmien katsominen kytketyistä
laitteista 9
4.5 DVD:n katsominen 10
4.6 Teksti-tv-sivun valitseminen 10
4.7 Ambilight-toiminnon vaihtaminen 11
5 Lisätietoja television käyttämisestä 12
5.1 Kaukosäätimen esittely 12
5.2 TV-valikon esittely 13
5.3 Kuva- ja ääniasetukset 15
5.4 Ambilight 18
5.5 Teksti-tv 19
5.6 Suosikkikanavaluettelon luominen 20
5.7 Sähköinen ohjelmaopas 21
5.8 Ajastimet ja lukitukset 22
5.9 Tekstitys 23
5.10 Valokuvien, MP3-tiedostojen yms
näyttäminen ja toistaminen 24
5.11 Digitaalisten radiokanavien kuuntelu 26
5.12 Ohjelmistopäivitys 26
6 Kanavan asennus 27
6.1 Kanavan automaattinen asennus 27
6.2 Analoginen: manuaalinen asennus 28
6.3 Tallennettujen kanavien järjestäminen
uudelleen 28
6.4 Kanavien automaattinen hallinta 29
6.5 Digitaalivastaanoton testi 29
6.6 Tehdasasetukset 29
7Kytkennät 30
7.1 Kytkentöjen esittely 30
7.2 Tietoja kytkennöistä 31
7.3 Laitteiden kytkeminen 33
7.4 Kytkentäasetukset 37
7.5 Ennen digitaalipalvelujen käyttöönottoa 38
8Tekniset tiedot 39
9 Vianmääritys 40
10 Hakemisto 42
Rekisteröi tuote ja hae tukitietoja osoitteessa
www.philips.com/welcome.
Sisällysluettelo 1
SUOMI
2657.1 fi 14-05-2007 12:21 Pagina 1
Page 10
2007 © Koninklijke Philips Electronics
N.V. Kaikki oikeudet pidätetään.Tekniset
tiedot voivat muuttua ilman erillistä
ilmoitusta.Tavaramerkit ovat Koninklijke
Philips Electronics N.V:n tai omistajiensa
omaisuutta.
Philips pidättää oikeuden muuttaa
tuotteita koska tahansa ilman
velvollisuutta muuttaa aiempia varusteita
vastaavasti.
Tätä käyttöopasta pidetään riittävänä
järjestelmän tarkoitettua käyttöä varten.
Jos tuotetta tai sen yksittäisiä moduuleja
tai toimintoja käytetään johonkin
muuhun kuin tässä määritettyyn
tarkoitukseen, niiden kelpoisuudesta ja
soveltuvuudesta on pyydettävä vahvistus.
Philips takaa, että itse materiaali ei riko
mitään yhdysvaltalaista patenttia.
Mihinkään muuhun nimenomaiseen tai
oletettuun takuuseen ei viitata.
Takuu
Mitkään osat eivät ole käyttäjän
huollettavia.
Älä avaa tai poista tuotteen sisäosan
suojuksia. Korjauksia saa tehdä vain
Philipsin asiakaspalveluissa tai
valtuutetuissa huoltoliikkeissä. Muussa
tapauksessa nimenomainen tai oletettu
takuu ei päde.
Takuu raukeaa, jos käyttäjä suorittaa
minkä tahansa tässä käyttöoppaassa
kielletyn toiminnon tai tekee sellaisia
säätöjä tai asennuksia, joiden
suorittamista ei suositella tai hyväksytä
käyttöoppaassa.
Kuvapisteen ominaisuudet
Tässä LCD-tuotteessa on suuri määrä
värillisiä kuvapisteitä.Vaikka tehollisten
kuvapisteiden osuus on vähintään
99,999 %, mustia pisteitä tai kirkkaita
valopisteitä (punaisia, vihreitä tai sinisiä)
voi näkyä jatkuvasti näytössä.Tämä johtuu
näytön rakenteesta (joka noudattaa alan
yleisiä standardeja), eikä kyseessä ole
toimintahäiriö.
Avoimen lähdekoodin ohjelmisto
Tässä televisiossa käytetään avoimen
lähdekoodin ohjelmistoa Philips lupaa
pyydettäessä toimittaa tai tarjota
käytettäväksi lähdekoodia vastaavan
kopion, joka on koneellisesti luettavissa
ohjelmistonsiirtoon tavallisesti
käytettävällä tallennusvälineellä. Philips
veloittaa tästä vain lähteen todelliset
jakelukustannukset.
Etu on voimassa kolmen vuoden ajan
tuotteen ostopäivästä alkaen.
Lähdekoodia voi pyytää kirjoittamalla
osoitteeseen
Philips Innovative Applications N.V.
Ass. to the Development Manager
Pathoekeweg 11
B-8000 Brugge
Belgium
EMF-standardin vaatimustenmukaisuus
Koninklijke Philips Electronics N.V.
valmistaa ja myy kuluttajille monia
tuotteita, jotka lähettävät ja vastaanottavat
sähkömagneettisia signaaleja, kuten mitkä
tahansa muutkin elektroniset laitteet.
Yhtenä Philipsin pääperiaatteena on
varmistaa tuotteiden turvallisuus kaikin
tavoin sekä noudattaa kaikkia lakisääteisiä
vaatimuksia ja tuotteen
valmistusajankohtana voimassa olevia
EMF-standardeja.
Philips on sitoutunut kehittämään,
tuottamaan ja markkinoimaan tuotteita,
joista ei ole haittaa terveydelle.
Philips vakuuttaa, että jos sen tuotteita
käsitellään oikein asianmukaisessa
käytössä, niiden käyttö on nykyisten
tutkimustulosten perusteella turvallista.
Philipsillä on aktiivinen rooli
kansainvälisten EMF- ja
turvallisuusstandardien kehittämisessä,
joten se pystyy ennakoimaan standardien
kehitystä ja soveltamaan näitä tietoja
tuotteisiinsa jo aikaisessa vaiheessa.
Verkkosulake (vain Iso-Britannia)
Tässä televisiossa voi käyttää hyväksyttyä
muottipuristettua pistoketta. Jos
verkkosulake on vaihdettava, tilalle on
asetettava samanarvoinen sulake kuin
pistokkeessa on ilmoitettu (esim. 10 A).
1. Irrota sulakekansi ja sulake.
2. Uuden sulakkeen on oltava BS 1362 standardin mukainen ja sen on oltava
ASTA:n hyväksymä. Jos sulake katoaa,
tarkista oikea sulaketyyppi
jälleenmyyjältä.
3. Aseta sulakekansi paikalleen.
Laite ei vastaa EMC-direktiivin
vaatimuksia, jos pistoke irrotetaan
virtajohdosta.
Tekijänoikeustiedot
VESA- ja FDMI-logot sekä
VESA:n kiinnityksen
yhteensopivuuslogo ovat Video
Electronics Standards Associationin
tavaramerkkejä.
Dolby Laboratories on antanut
luvan valmistukseen. Dolby, Pro
Logic ja kaksois-D-symboli
G ovat Dolby
Laboratoriesin tavaramerkkejä.
BBE Sound, Inc on antanut
luvan valmistukseen. BBE, Inc
on myöntänyt käyttöoikeuden seuraavien
yhdysvaltalaisten patenttien mukaan:
5510752 ja 5736897. BBE ja BBE-symboli
ovat BBE Sound Inc:n rekisteröityjä
tavaramerkkejä.
Windows Media on Microsoft
Corporationin tavaramerkkejä tai
rekisteröityjä tavaramerkkejä
Yhdysvalloissa ja/tai muissa maissa.
® Kensington ja MicroSaver ovat ACCO
Wor ld Corporationin Yhdysvalloissa
rekisteröityjä tavaramerkkejä, ja
rekisteröinti on suoritettu tai
hakemuksia käsitellään muissa maissa eri
puolilla maailmaa. Kaikki muut
rekisteröidyt tai rekisteröimättömät
tavaramerkit ovat omistajiensa
omaisuutta.
2
2657.1 fi 14-05-2007 12:21 Pagina 2
Page 11
SUOMI
Tärkeää 3
1 Tärkeää
Lue tämä käyttöopas ennen tuotteen käyttämistä.
Lue huolellisesti tämä luku ja noudata ohjeita
tarkoin.Takuu ei ole voimassa, jos näitä ohjeita ei
ole noudatettu.
1.1 Turvallisuus
• Älä altista tuotetta sateella tai vedelle, sillä se
saattaa aiheuttaa oikosulun.
• Älä aseta avoliekkiä (esimerkiksi palavaa kynttilää)
television lähelle, sillä se saattaa aiheuttaa tulipalotai sähköiskuvaaran.
• Jätä television ympärille vähintään 10 cm, jotta
ilma pääsee kiertämään.
• Älä sijoita televisiota lämpöpatterin tai muiden
lämmönlähteiden lähelle.
• Älä sijoita televisiota ahtaaseen tilaan, kuten
kirjahyllyyn.Varmista, että esimerkiksi verhot tai
kaapin seinät eivät estä ilman kulkua
tuuletusaukkojen kautta.
•Varmista, että televisio ei putoa.Aseta televisio
tukevalle ja tasaiselle pinnalle ja käytä vain
television mukana toimitettua telinettä.
• Älä aseta television johdon päälle mitään ja
varmista, ettei johto ole puristuksissa. Muutoin
verkkojohto saattaa vaurioitua ja aiheuttaa
tulipalo- tai sähköiskuvaaran.
• Jos laite on kiinnitetty kiertojalustalle tai VESAseinätelineeseen, vältä pistokkeeseen kohdistuvaa
vetoa. Osittain irronnut pistoke voi aiheuttaa
valokaaren tai tulipalon..
1.2 Kuvaruudun hoito
•Irrota television verkkojohto ennen puhdistusta.
• Puhdista kuvaruutu pehmeällä, hieman kostealla
kankaalla. Älä käytä mitään puhdistusaineita
(kemiallisia aineita tai yleispuhdistusaineita), sillä
ne saattavat vaurioittaa kuvaruutua.
• Älä kosketa, paina tai hankaa kuvaruutua millään
kovalla esineellä, ettei kuvaruutu naarmuunnu tai
vahingoitu pysyvästi.
• Pyyhi vesipisarat pois mahdollisimman nopeasti,
jotta kuvaruutu ei vahingoitu eivätkä värit
haalene.
• Liikkumattomat kuvat
Vältä liikkumattomia kuvia. Jos näitä kuvia ei voi
estää, pienennä kuvaruudun kontrastia ja
kirkkautta, jotta kuvaruutu ei vahingoitu.
Liikkumattomat kuvat ovat kuvia, jotka viipyvät
kuvaruudussa pitkään. Liikkumattomia kuvia ovat
esimerkiksi ruutuvalikot, teksti-tv-sivut, mustat
sivupalkit, pörssikurssitiedot,TV-kanavan logot ja
kellonajan näyttö.
1.3 Kierrätys
• Vie pakkaus paikalliseen kierrätyskeskukseen.
• Hävitä vanhat paristot turvallisesti paikallisten
ohjeiden mukaisesti.
•Tuote on suunniteltu ja valmistettu siten, että sen
voi kierrättää ja käyttää uudelleen.
•Tuotetta ei saa hävittää kotitalousjätteen mukana.
Ota selvää ympäristölle ystävällisestä
kierrätystavasta ja paikallisista ohjeista tai kysy
asiasta jälleenmyyjältäsi. Jätteiden virheellinen
hävittäminen vahingoittaa ympäristöä ja ihmisten
terveyttä.
(Euroopan parlamentin ja neuvoston direktiivi
2002/96/EY)
2657.1 fi 14-05-2007 12:21 Pagina 3
Page 12
2Televisio
Tässä luvussa on tietoja television painikkeista ja
toiminnoista.
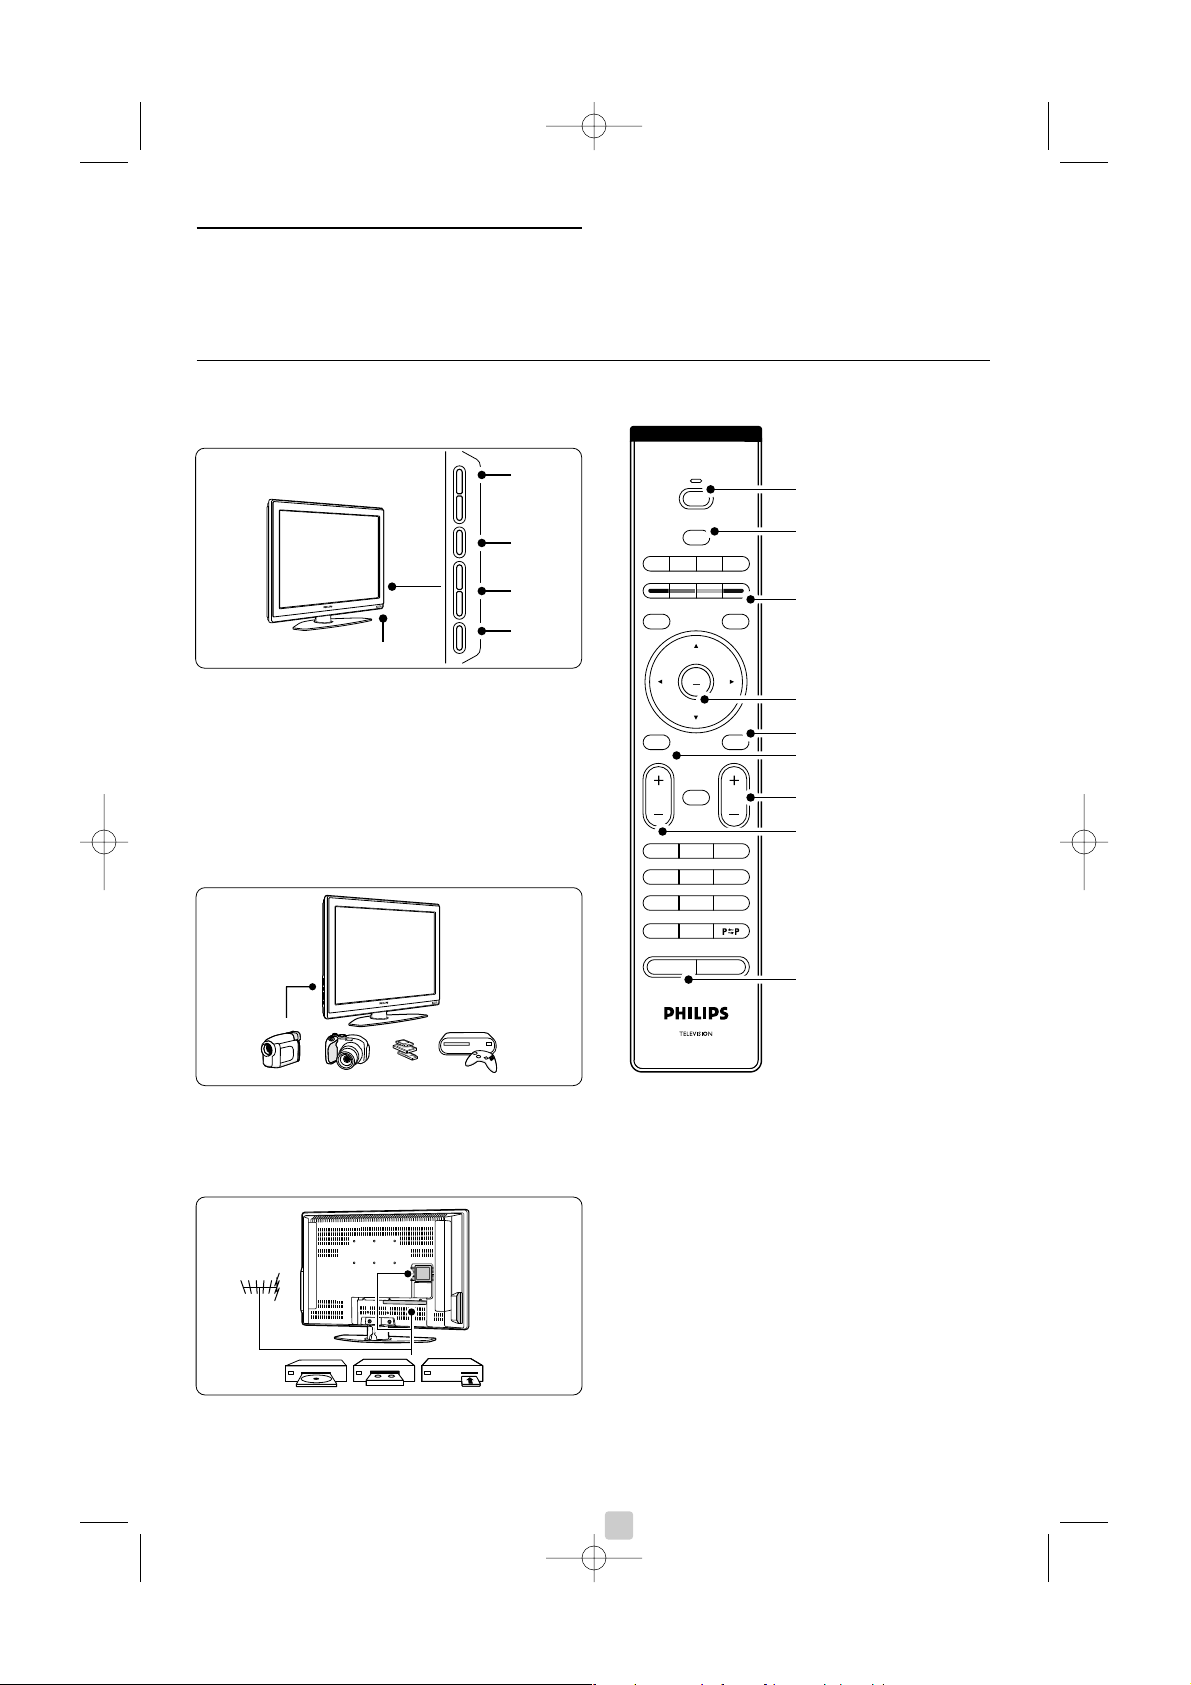
2.1 Television esittely
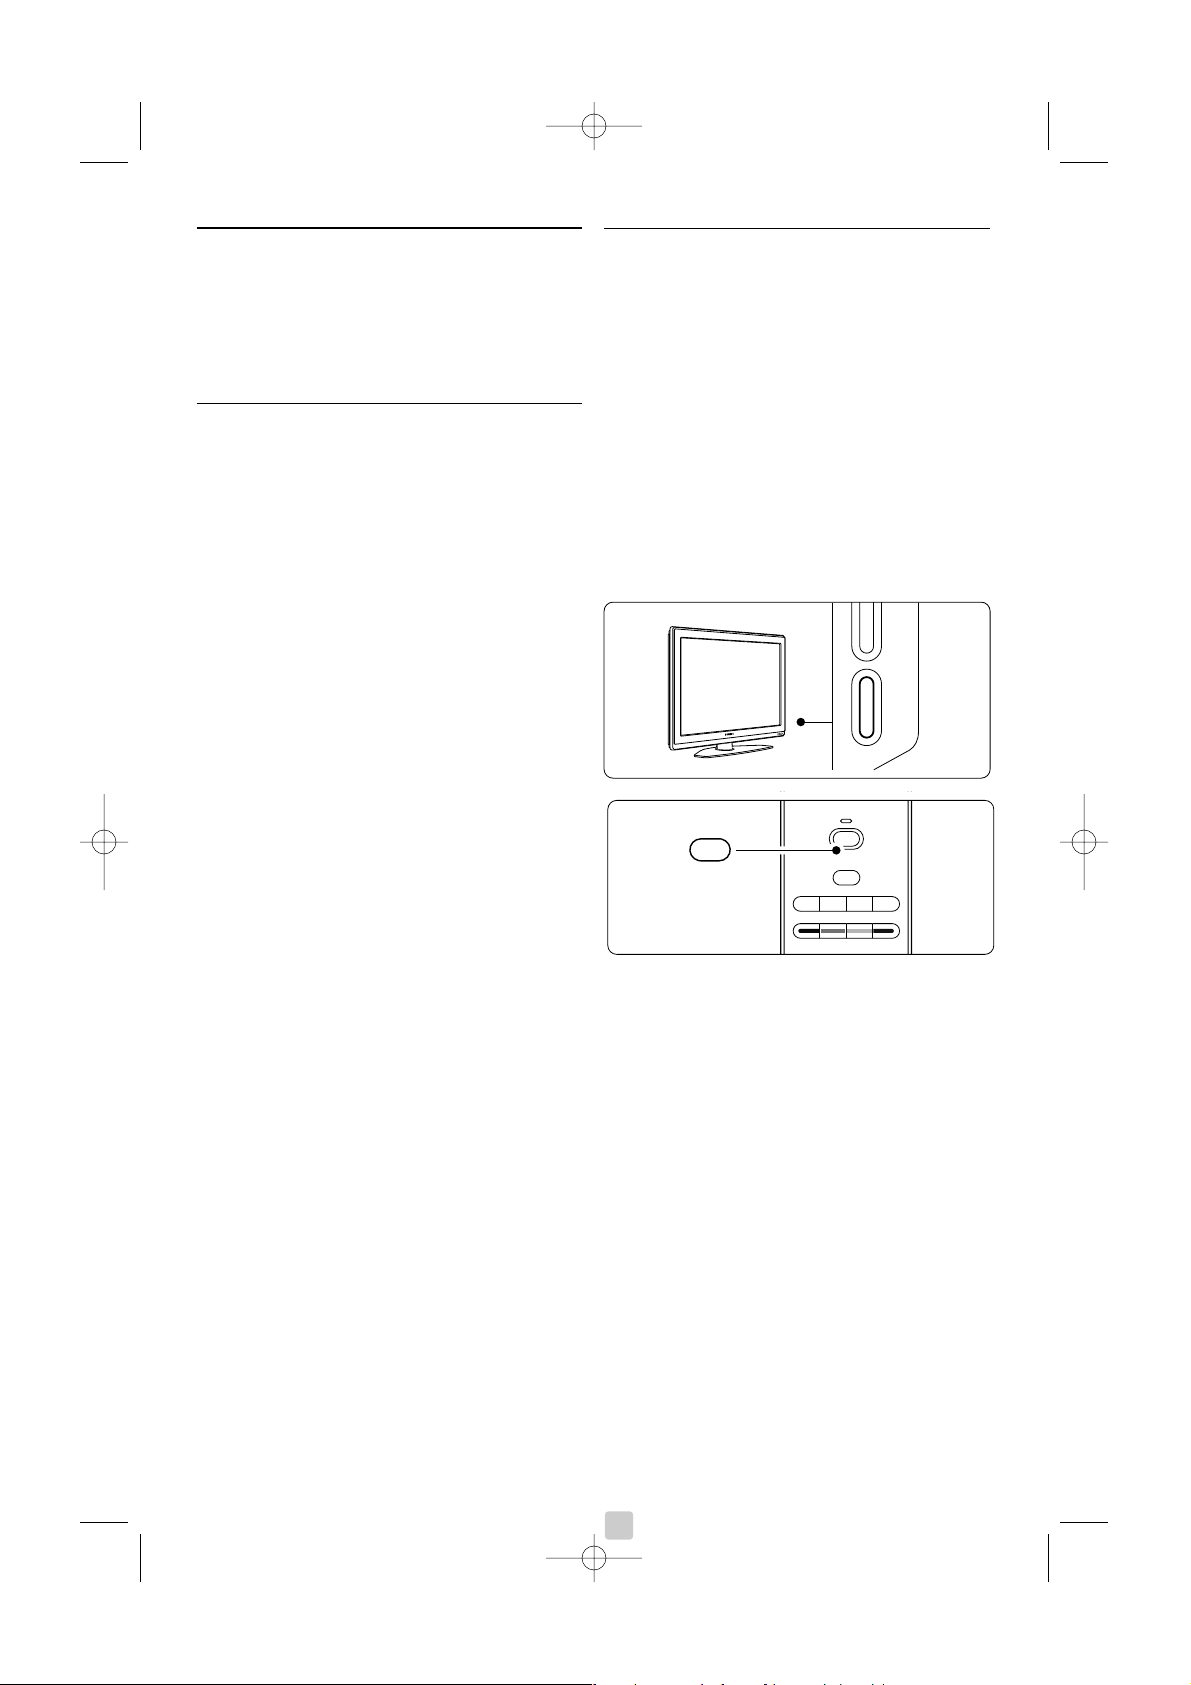
Television sivussa olevat painikkeet
1 Äänenvoimakkuuden säätö
2Valikko
3 Ohjelman tai kanavan vaihtaminen
4 Virtakytkin
5 Merkkivalo (sininen: käytössä, punainen:
valmiustila)
6 Kaukosäätimen tunnistin
Television sivussa olevat liittimet
Kameran, pelikonsolin, kuulokkeiden tai USBmuistitikun kytkemiseen.
Television takaosan liittimet
Antennin, DVD-soittimen, videonauhurin tai muun
laitteen kytkemiseen.
Kaukosäädin
1Valmiustila tai käytössä
2 Laitevalinta (kuten DVD ja videonauhuri)
3 Väripainikkeet
4Navigointipainike (ylös o, alas œ, vasen p,
oikea π)
OK ja LIST
5Teksti-tv-painike
6 Menu-painike
7 Ohjelman vaihto
8 Äänenvoimakkuuden säätö
9 Ambilightin ottaminen käyttöön tai poistaminen
käytöstä
Lisätietoja kaukosäätimestä on luvussa 5.1
Kaukosäätimen esittely.
4 Televisio
MENU
b
¬
P
V
321
654
9807
i
Ambilight MODE
B
BROWSE
DEMO
OPTION
GUIDE
a
OK
LIST
v
INPUT
j b q
MHEG
CANCEL
1
2
3
4
6
5
7
8
9
- PROGRAM
+-
VOLUME +
MENUB POWER
5-6
1
2
3
4
2657.1 fi 14-05-2007 12:21 Pagina 4
Page 13
SUOMI
2.2 Tärkeimmät ominaisuudet
Uudessa televisiossasi käytetään uusinta ääni- ja
videotekniikkaa.
Television ominaisuuksia...
Ambilight
Katselukokemus on entistä rentouttavampi, ja
kuvakin näyttää paremmalta.
Perfect Pixel HD
Täydellinen kuvalaatu kaikista lähteistä.
100Hz Clear LCD
100Hz Clear LCD tuottaa veitsenterävät ääriviivat
liikkuvassa kuvassa, voimakkaamman mustan tason
paremman kontr. ja välkkymättömän kuvan sekä
laajemman katselukulman.
Sisäinen DVB-T-viritin
Ta vallisten analogisten televisiolähetysten lisäksi
televisio vastaanottaa myös maanpäällisiä digitaalisia
televisio- ja radiokanavia.
Sähköinen ohjelmaopas
Sähköinen ohjelmaopas näyttää kuvaruudussa
digitaalisten ohjelmien lähetysajat. Opas voi
muistuttaa käyttäjää esimerkiksi ohjelman
alkamisesta tai television kytkemisestä päälle.
HDMI-liittimet
Kolme HDMI-liitintä takaavat laadukkaat
teräväpiirtoliitännät.
USB-liitäntä
Multimedialiitäntä, jolla voi katsella heti valokuvia tai
toistaa musiikkia.
3 Aloittaminen
Tässä luvussa on tietoja television sijoittamisesta ja
ensiasennuksesta.
3.1 Television sijoittaminen
) Varoitus
Lue luku 1.1 Turvallisuus huolellisesti ennen
television sijoittamista.
Kuvaruudultaan suuret televisiot ovat raskaita, ja
television kantamiseen ja siirtämiseen tarvitaan kaksi
henkilöä.
Kytke erilaiset laitteet televisioon ennen sen
asettamista paikalleen tai kiinnittämistä seinään.
Ihanteellinen television katseluetäisyys on
kuvaruudun koko kerrottuna kolmella.
Paras katselutulos saadaan, kun televisio sijoitetaan
siten, että valo ei osu suoraan kuvaruutuun.
Ambilight-valaistus on parhaimmillaan, kun
huoneessa on hämärää.
Parhaan Ambilight-vaikutelman saa, kun televisio on
10–20 cm seinästä. Sijoita televisio paikkaan, jossa se
ei altistu suoralle auringonvalolle.
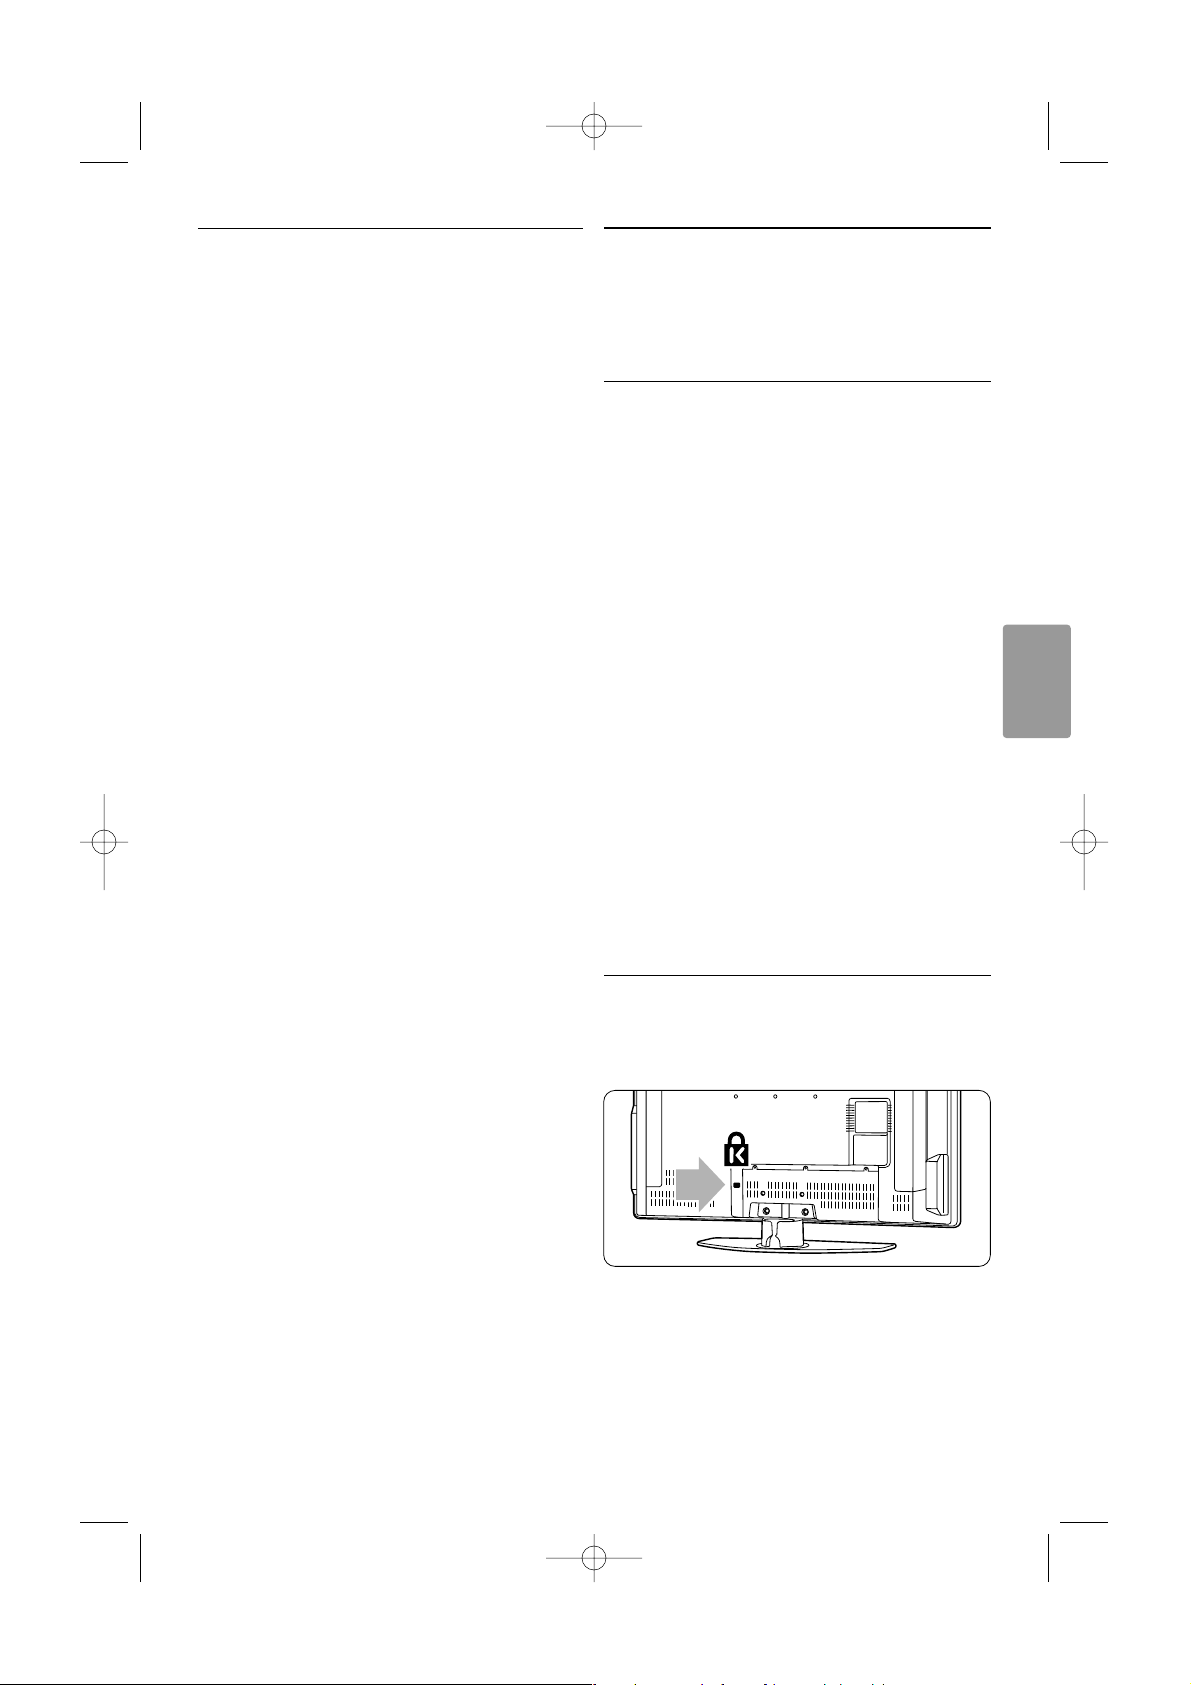
Kensington-lukon paikka
Television takaosassa on paikka Kensington-lukolle,
jolla voidaan estää television varastaminen.
Kensington-lukko on erikseen ostettava lisävaruste.
Televisio 5
2657.1 fi 14-05-2007 12:21 Pagina 5
Page 14
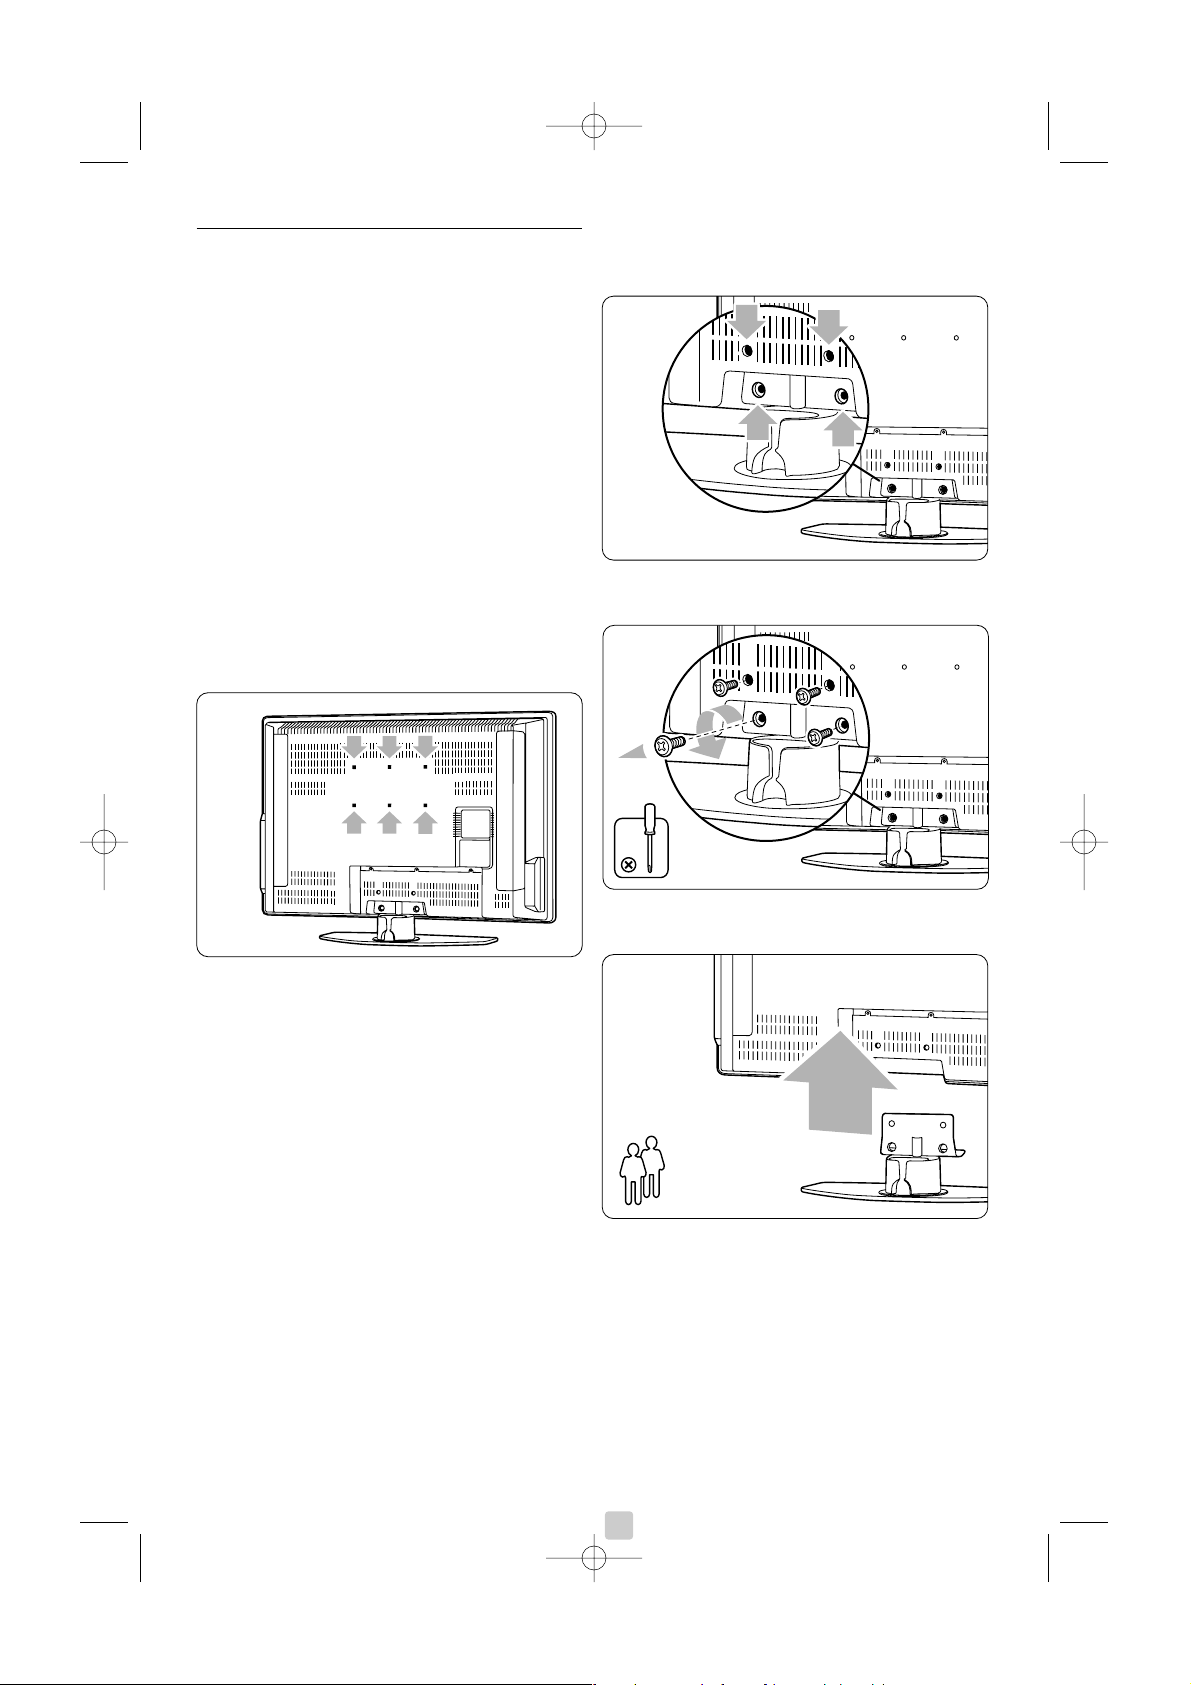
3.2 Seinäkiinnitys – VESA
ç Varoitus
Television paino on otettava huomioon
seinäkiinnityksessä. Seinäkiinnitys on tehtävä
huolellisesti onnettomuuksien ja vahinkojen
välttämiseksi. Koninklijke Philips Electronics N.V. ei
vastaa virheellisestä tai onnettomuuden tai vahingon
aiheuttavasta kiinnityksestä.
Television voi kiinnittää seinään VESA-yhteensopivilla
kiinnikkeillä. Kiinnikkeet ovat lisävarusteita.
Käytä sellaista VESA-yhteensopivaa kiinnikettä, jossa
on koodi VESA MIS-E, 200, 100 M4.
Lisätietoja VESA-seinätelineestä saat laitteen
jälleenmyyjältä.
VESA-seinätelineen kiinnityspisteet
Etsi television taustapuolella olevat 6
kiinnityspistettä. Kiinnitä VESA-kiinnike reikiin.
TV-telineen irrottaminen
‡ Etsi telineessä olevat neljä ruuvia.
® Irrota nämä ruuvit.
† Nosta televisio telineestä.
à Vihjeitä
Kytke kaikki television takaosaan tulevat liittimet
ennen television seinäkiinnitystä. Lisätietoja on
luvussa 7 Kytkennät.
6 Televisio
2657.1 fi 14-05-2007 12:21 Pagina 6
2
Page 15
SUOMI
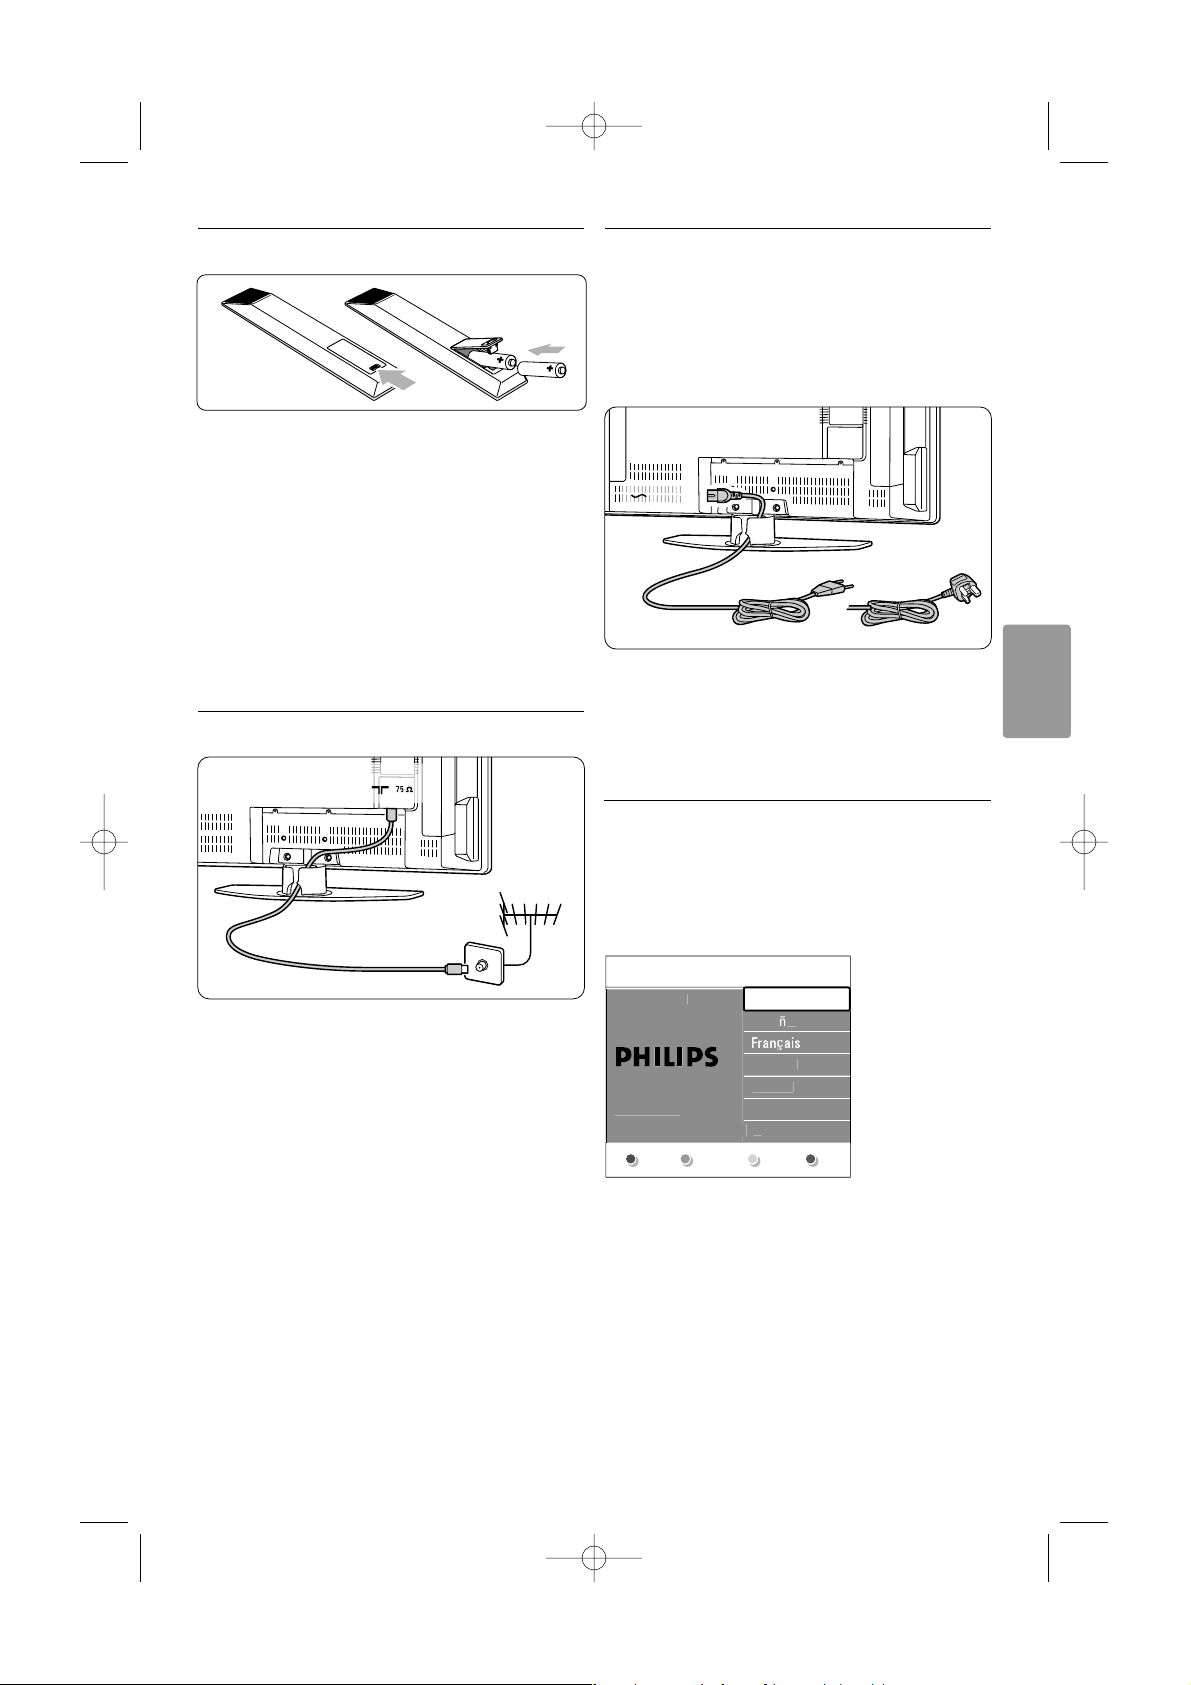
3.3 Kaukosäätimen paristot
‡ Avaa kaukosäätimen takaosan paristolokeron
kansi.
® Aseta kaksi mukana toimitettua paristoa
lokeroon (tyyppi AA-R6-1,5V).Varmista, että
asetat paristot lokeroon oikein. Napaisuus +ja
on merkitty lokeron sisäpuolelle.
Ò Sulje paristolokeron kansi.
rHuomautus
Poista paristot kaukosäätimestä, jos se on
käyttämättä pitkään.
3.4 Antennikaapeli
‡ Etsi television takaosasta antenniliitäntä.
® Aseta antennikaapeli tiukasti antenniliitäntään
x Antenna.
3.5 Virtajohdon kytkeminen
‡ Varmista, että paikallinen verkkojännite vastaa
television takaosan tarraan painettua
jännitemerkintää. Älä kytke virtajohtoa, jos
jännitteet eivät vastaa toisiaan.
® Kytke virtajohto tiukasti.
Television vir ta ei ole koskaan täysin katkaistu, ellei
television pistoketta ole irrotettu pistorasiasta.
Tämän vuoksi pistokkeeseen on päästävä aina
käsiksi.
3.6 Ensiasennus
Kun virtajohto kytketään ensimmäisen kerran (ja
vain tämän ensimmäisen kytkennän yhteydessä),
asennus käynnistyy automaattisesti. Noudata
kuvaruudussa näkyviä ohjeita.
à Vihjeitä
• Jos olet valinnut väärän kielen, voit palata
kielivalikkoon kaukosäätimen punaisella
painikkeella.
• Lisätietoja kanavajärjestyksen muuttamisesta on
luvussa 6.3 Tallennettujen kanavien järjestäminen
uudelleen.
Televisio 7
ANTENNA
MAINS
UK & Ireland
i
pa
ol
ç
i
o
r
.
s
.
h
a
2657.1 fi 14-05-2007 12:21 Pagina 7
Valikkokiel
Valitse kieli..
käyttämällä
kohdistinta ylös ja ala
Seuraav
Englis
Es
Hrvatsk
Italian
Magya
Page 16
4Television
käyttäminen
Tietoja television päivittäisessä käytössä tarvittavista
toiminnoista.
4.1 Virran kytkeminen ja
katkaiseminen - valmiustila
Virran kytkeminen televisioon:
•Paina television sivussa olevaa B Power -
painiketta, jos valmiusvalo ei pala.
• Jos valmiusvalo palaa, paina kaukosäätimen B-
painiketta.
Valmiustilaan siirtyminen:
•Paina kaukosäätimen B-painiketta.
Virran kytkeminen valmiustilasta ilman
kaukosäädintä:
• Katkaise ensin virta painamalla television sivussa
olevaa B Power -painiketta ja kytke sitten virta
painamalla B Power -painiketta uudelleen.
Virran katkaiseminen:
•Paina television sivussa olevaa B Power -
painiketta.
rHuomautus
Energiankulutus edesauttaa ilman ja vesistöjen
saastumista. Kun virtajohto on kytketty pistorasiaan,
televisio kuluttaa energiaa.Tämä televisio kuluttaa
valmiustilassa erittäin vähän energiaa.
8 Television käyttäminen
- PROB POWER
B
DEMO
OPTION
GUIDE
a
v
INPUT
j b q
MHEG
CANCEL
B
a
2657.1 fi 14-05-2007 12:21 Pagina 8
Page 17

SUOMI
4.2 Television katsominen
4.2.1 Kanavien vaihtaminen
‡ Televisiokanavien vaihtaminen:
•Valitse kaukosäätimen numeropainikkeilla
kanavan numero (1–999) tai paina painiketta
P+ tai P-.
•Paina television sivussa painikkeita
Program/Channel - tai +.
® Voit palata kanavalle, jota katsoit, painikkeella
R.
4.2.2 Äänenvoimakkuuden säätäminen
‡ Äänenvoimakkuuden säätäminen:
• Paina kaukosäätimessä painiketta V + tai -.
• Paina television sivussa painiketta Volume +
tai -.
® Äänen mykistäminen:
• Paina kaukosäätimen ¬-painiketta.
• Voit poistaa mykistyksen painamalla uudelleen
¬-painiketta.
4.3 Televisiokanavien
katsominen
digitaalivastaanottimesta
‡ Kytke digitaalivastaanottimen virta.
Vastaanottimen kuva voi tulla automaattisesti
kuvaruutuun.
® Valitse televisiokanavat digitaalivastaanottimen
kaukosäätimellä.
Jos kuva ei tule ruutuun:
‡ Paina kaukosäätimen v-painiketta.
® Valitse laite painamalla v-painiketta toistuvasti.
Odota muutama sekunti, kunnes kuva tulee
näkyviin.
Ò Paina
OK-painiketta.
† Valitse televisiokanavat digitaalivastaanottimen
kaukosäätimellä.
4.4 Ohjelmien katsominen
kytketyistä laitteista
‡ Kytke laitteeseen virta.
Laitteen kuva voi tulla automaattisesti
kuvaruutuun.
Jos kuva ei tule ruutuun:
® Paina kaukosäätimen v-painiketta.
Ò Valitse laite painamalla v-painiketta toistuvasti.
Odota muutama sekunti, kunnes kuva tulee
näkyviin.
† Paina
OK-painiketta.
º Valitse televisiokanavat laitteen kaukosäätimellä.
Television käyttäminen 9
B
DEMO
OPTION
GUIDE
a
v
INPUT
j b q
MHEG
CANCEL
v
¬
P
V
321
654
9807
i
BROWSE
P
90
-
¬
P
V
321
654
98
0
7
i
BROWSE
V
¬
2657.1 fi 14-05-2007 12:21 Pagina 9
Page 18

10 Television käyttäminen
4.5 DVD:n katsominen
‡ Aseta DVD-levy soittimeen.
® Paina painiketta Play π.
Soittimen kuva voi tulla automaattisesti
kuvaruutuun.
Jos kuva ei tule ruutuun:
‡ Paina kaukosäätimen v-painiketta.
® Valitse DVD-soitin painamalla v-painiketta
toistuvasti. Odota muutama sekunti, kunnes kuva
tulee näkyviin.
Ò Paina
OK-painiketta.
† Paina painiketta Play π.
4.6 Teksti-tv-sivun valitseminen
Useimmat TV-kanavat lähettävät tietoa teksti-TV:n
kautta.
Teksti-tv:n katsominen:
‡ Paina b-painiketta.
Kuvaruutuun tulee päähakemistosivu.
® Sivun valitseminen:
• Näppäile sivun numero numeropainikkeilla.
• Voit katso seuraavan tai edellisen sivun
painikkeilla P- tai P+ tai o, œ.
•Voit valita kuvaruudun alareunassa olevia
värillisiä vaihtoehtoja painamalla vastaavaa
väripainiketta.
à Vihje
Voit palata viimeksi katsomallesi sivulle painamalla
R- painiketta.
Ò Voit poistua teksti-tv:stä painamalla uudelleen
b-painiketta.
r
Huomautus
Vain Iso-Britannia: joihinkin digitaalisiin
televisiokanaviin liittyy oma digitaalinen teksti-tvpalvelu (esimerkiksi BBC1).
Lisätietoja teksti-tv:stä on luvussa 5.5 Teksti-tv.
B
DEMO
OPTION
GUIDE
a
v
INPUT
j b q
MHEG
CANCEL
v
MENU
b
¬
P
V
OK
LIST
b
2657.1 fi 14-05-2007 12:21 Pagina 10
Page 19

SUOMI
Television käyttäminen 11
4.7 Ambilight-toiminnon
vaihtaminen
Valittavana on neljä Ambilight-toimintoa
• Väri Määrittää Ambilightin yhdeksi väriksi.
• Rauhallinen Määrittää Ambilightin vaihtumaan
pehmeästi kuvaruudun kuvien mukaan.
• Kohtalainen Määrittää Ambilightin asetuksen
rauhallisen ja dynaamisen välille.
• Dynaaminen Määrittää Ambilightin vaihtumaan
nopeasti ja herkästi.
Ambilight-toiminnon vaihtaminen:
‡ Toiminnon voi ottaa käyttöön tai poistaa
käytöstä Ambilight-painikkeella.
® Voit vaihdella Ambilight-toimintoja painamalla
Mode-painiketta toistuvasti.
Ò Paina
OK-painiketta.
Lisätietoja Ambilight-toiminnosta on luvussa 5.4
Ambilight.
à Vihje
Ambilight on parhaimmillaan, kun huoneen valot on
sammutettu tai himmennetty.
Ambilight MODE
Ambilight MODE
2657.1 fi 14-05-2007 12:21 Pagina 11
Page 20

Lisätietoja television käyttämisestä
5.1 Kaukosäätimen esittely 1 Valmiustila B
Virran kytkeminen televisioon tai paluu
valmiustilaan.
2 Input v
Kytketyn laitteen valitseminen tai paluu
televisioon.
3 Dual screen b
Teksti-tv:n näyttäminen kuvaruudun oikealla
puolella ja kuvan vasemmalla puolella.
4 Laajakuvaformaatti q
Kuvaformaatin valitsemiseen.
5 Väripainikkeet
• Kätevä tapa valita teksti-tv-sivuja.
• Kätevä tapa valita tehtäviä.
6 Guide a
Sähköisen ohjelmaoppaan ottaminen käyttöön
tai poistaminen käytöstä.
7
OK/List
• Kanavaluettelon näyttämiseen.
• Asetuksen ottaminen käyttöön.
8 Suuntapainikkeet pπoœ
Valikossa liikkumiseen.
9 Teksti-tv b
Teksti-tv:n ottaminen käyttöön tai poistaminen
käytöstä.
10 +P- Kanavan vaihtaminen
Siirtyminen edellisen tai seuraavan
kanavaluettelon kanavaan.
11 Mykistys ¬
Äänen mykistämiseen tai mykistyksen
poistamiseen.
12 Numeropainikkeet
Televisiokanavan valitsemiseen.
13 Edellinen kanava R
Paluu edelliseen kanavaan.
14 Mode
Ambilight-toiminnon vaihtamiseen
15 Ambilight
Ambilightin ottaminen käyttöön tai poistaminen
käytöstä.
16 Näyttötiedot i
Mahdollisten kanava- ja ohjelmatietojen
näyttämiseen.
12
Tässä luvussa on lisätietoja television toiminnoista:
• valikkojen käyttäminen
• kuva-, ääni- ja Ambilight-asetusten säätäminen
• lisätietoja teksti-tv:stä
• suosikkiluettelon luominen
• sähköisen ohjelmanoppaan ominaisuudet
• lukitusten ja ajastimien määrittäminen
• tekstityksen määrittäminen ja tekstityskielen
valitseminen
• valokuvien katsominen tai lempimusiikin
toistaminen USB-muistitikusta.
MENU
b
¬
P
V
321
654
98
0
7
i
Ambilight MODE
B
BROWSE
DEMO
OPTION
GUIDE
a
OK
LIST
v
INPUT
j b q
MHEG
CANCEL
18
17
16
15
19
21
22
20
6
1
2
4
5
3
8
7
9
10
12
11
13
14
5 Lisätietoja television käyttämisestä
2657.1 fi 14-05-2007 12:21 Pagina 12
Page 21

SUOMI
Lisätietoja television käyttämisestä
17 Äänenvoimakkuuden säätö +V-
Äänenvoimakkuuden säätämiseen.
18 Menu
Valikon ottaminen käyttöön tai poistaminen
käytöstä.
19 Option
Pikahakuvalikon ottaminen käyttöön tai
poistaminen käytöstä.
20 Demo
Esittely-valikkoon siirtymiseen ja television
ominaisuuksien esittelyyn.
21 Tekstitys j
Tekstitystilan ottaminen käyttöön tai
poistaminen käytöstä.
22
MHEG cancel (vain Iso-Britannia)
Vain digitaalisen teksti-tv:n tai interaktiivisten
palvelujen peruuttamiseen.
Luvussa 10 Hakemisto voi etsiä sivun, jossa on
lisätietoja kaukosäätimen yksittäisistä painikkeista.
5.2 TV-valikon esittely
Näyttövalikkojen avulla voi asentaa television, säätää
kuva-, ääni- ja Ambilight-asetuksia sekä käyttää
toimintoja.Tässä luvussa esitellään valikot ja
kerrotaan, miten niissä liikutaan.
5.2.1 Valikko
‡ Saat päävalikon näkyviin kuvaruutuun painamalla
kaukosäätimen Menu-painiketta.
® Poistu valikosta painamalla uudelleen Menu-
painiketta.
Päävalikossa on seuraavat vaihtoehdot:
• TV-valikko
Tästä valikosta valitaan asennus-, kuva- ja
ääniasetuksia sekä Ambilight-toiminnon ja muiden
toimintojen asetuksia.
• Kanavaluettelo
Kanavaluettelo tulee kuvaruutuun, kun tämä
vaihtoehto valitaan. Suosikkiluettelo luodaan
tässä vaihtoehdossa.
• Ohjelmaopas
Käytössä, kun digitaaliset kanavat on asennettu,
jolloin digitaalisten ohjelmien tiedot ovat
näkyvissä.
Sähköisen ohjelmaoppaan version mukaan pääset
tarkastelemaan ajoitettujen digitaalisten televisioohjelmien taulukkoa ja valitsemaan haluamasi
ohjelman kätevästi. Lisätietoja on luvussa 5.7
Sähköinen ohjelmaopas.
• Multimedia
Tämän vaihtoehdon avulla voi katsella valokuvia
tai toistaa musiikkia USB-laitteesta. Lisätietoja on
luvussa 5.10 Valokuvien, MP3-tiedostojen yms.
näyttäminen ja toistaminen
13
MENU
b
¬
P
V
BROWSE
OK
LIST
MENU
BROWSE
o
a
o
o
2657.1 fi 14-05-2007 12:21 Pagina 13
Televisi
Multimedi
Tv-valikk
Kanavaluettel
Ohjelmaopas
Page 22

Lisätietoja television käyttämisestä
5.2.2 Valikon käyttäminen
Esimerkki valikon käyttämisestä.
‡ Paina kaukosäätimen Menu-painiketta.
Päävalikko tulee kuvaruutuun.
® Valitse Tv-valikko π-painikkeella.
ÒValitse Tv-asetukset-valikko π-painikkeella.
† Valitse Kuva œ-painikkeella.
º Siirry kuva-asetuksiin π-painikkeella.
◊Valitse Kirkkaus œ-painikkeella.
‹Valitse kirkkausasetus π-painikkeella.
≈Säädä asetusta o- tai œ-painikkeella.
ÚPalaa kuva-asetuksiin p-painikkeella tai poistu
valikosta painamalla Menu-painiketta.
rHuomautus:
Valittavana on lisävaihtoehtoja, kun digitaaliset
kanavat on asennettu ja niiden ohjelmia lähetetään.
14
MENU
b
BROWSE
OPTION
a
OK
LIST
MENU
BROWSE
o
a
o
o
asetukset
a
i
aus
D
y
t
ja
oon
a
aKo
i
D
n
i
aus
a
aus
i
D
n
y
aus
aus
asetukset
.
yt
t
.
oon
a
2657.1 fi 14-05-2007 12:21 Pagina 14
Televisi
Multimedi
Tv-valikk
Kanavaluettel
Ohjelmaopas
Tv-valikko Tv-asetukset
Tv-asetukset
Toiminnot
Asennus
Ohjelm. päivitys
Asetukset avustaja
Nollaa vakioon
Kuva
Ääni
Ambilight
Kuv
ntrast
Kontrast
Kirkk
Perfect Pixel H
Dig...Nat...Motio
Kuv
Kirkk
Kontrast
Kirkk
v
Perfect Pixel H
Dig...Nat...Motio
Kirkk
Tv-
Asetukset avust..
Asetukset avust..
Nollaa vaki
Aloita n
Kuv
Ambiligh
Tv-
Asetukset avusta
Nollaa vaki
Kuv
Ambiligh
Kuv
Kontrast
Kirkk
v
Perfect Pixel H
Page 23

SUOMI
5.2.3 Pikahakuvalikko
Pikahakuvalikossa voi siirtyä suoraan usein
käytettäviin valikkovaihtoehtoihin.
Kun digitaaliset kanavat on asennettu ja niiden
ohjelmia lähetetään, vastaavat digitaaliset
vaihtoehdot näkyvät valikossa.
‡ Paina kaukosäätimen Option-painiketta.
® Valitse asetus o- tai œ-painikkeella.
Ò Saat valitun asetusvalikon näkyviin painamalla
OK-painiketta.
† Voit säätää valikon asetuksia painikkeilla o, œ,
p ja π.
º Voit poistua valikosta painamalla uudelleen
Option-painiketta.
• Audiokieli
Lisätietoja on luvussa 5.3.5 Ääniasetusten
säätäminen.
•Tekstityskieli
Lisätietoja on luvussa 5.9.3 Digitaalisen
tekstityskielen valitseminen.
•Tekstitys
Lisätietoja on luvussa 5.9 Tekstitys.
•Kuvaformaatti
Lisätietoja on luvussa 5.3.4 Laajakuvaformaatti.
•Taajuusvastekorjain
Lisätietoja on luvussa 5.3.5 Ääniasetusten
säätäminen.
•Kello
Kellon näyttäminen
‡ Jos haluat, että kello näkyy jatkuvasti, paina
OK-
painiketta.
® Valitse Kello uudelleen painamalla ensin Option-
painiketta ja sitten o- tai œ-painiketta.
Ò Voit piilottaa kellon painamalla
OK-painiketta.
5.3 Kuva- ja ääniasetukset
Tässä luvussa on tietoja kuvan ja äänen säätämisestä
valikoissa.
5.3.1 Asetusavustaja
Asetusavustaja auttaa valitsemaan kuva-, ääni- ja
Ambilight-perusasetukset.
‡ Paina kaukosäätimen Menu-painiketta ja valitse
Tv-valikko > Tv-asetukset > Asetukset avustaja.
Siirry π-painikkeella.
® Paina
OK-painiketta.
Ò Käynnistä avustaja kaukosäätimen vihreällä
painikkeella.
† Valitse vasen tai oikea puoli p- tai π-
painikkeella.
º Siirry seuraavaan asetukseen vihreällä
painikkeella.
Useita asetuksia käsitellään tällä tavoin.Televisio
pyytää lopuksi tallentamaan nämä asetukset.
◊Tallenna kaikki asetukset painamalla vihreää
painiketta.
5.3.2 Vakioiden palauttaminen
Määrittää televisioon jonkin esiasetuksista. Kuhunkin
asetukseen sisältyy kuva, ääni ja Ambilight.
‡ Paina kaukosäätimen Menu-painiketta ja valitse
Tv-valikko > Tv-asetukset > Nollaa vakioon.
Siirry luetteloon π-painikkeella.
® Valitse asetus o- tai œ-painikkeella.
Ò Tallenna asetus vihreällä painikkeella.
Vakioasetukset: Nykyinen, Luonnollinen, Eloisa,
Elokuva
Lisätietoja television käyttämisestä 15
DEMO
OPTION
GUIDE
a
OK
LIST
v
j b q
MHEG
CANCEL
OPTION
u
i
i
n
i
o
2657.1 fi 14-05-2007 12:21 Pagina 15
Pikahak
Audio kiel
Tekstikiel
Tekstitys
Kuvaformaatt
Taajuusvastekorjai
Kell
Page 24

Lisätietoja television käyttämisestä
5.3.3 Kuva-asetukset
Tässä luvussa on tietoja kaikkien kuva-asetusten
säätämisestä.
‡ Paina kaukosäätimen Menu-painiketta ja valitse
Tv-valikko > Tv-asetukset > Kuva. Siirry
luetteloon π-painikkeella.
® Valitse asetus o- tai œ-painikkeella.
•Kontrasti
Muuttaa kuvan vaaleiden kohtien tasoa mutta
tummia osia ei muuteta.
• Kirkkaus
Muuttaa koko kuvan valon voimakkuutta.
• Väri
Muuttaa värikkyystasoa.
• Värisävy
NTSC-lähetyksissä tämä taso kompensoi
värivaihteluja.
•Terävyys
Muuttaa pienten yksityiskohtien terävyystasoa.
• Sävy
Määrittää väreihin seuraavat sävyt: Normaali,
Lämmin (punertava) ja Kylmä (sinertävä).Voit
tehdä oman asetuksen valitsemalla Katselusävyvalikossa Katselu.
• Katselusävy
Jos Sävy-valikossa on valittu Katselu, voit määrittää
oman asetuksen.
Valitse vihreällä painikkeella kukin palkki, kun
haluat muuttaa seuraavia asetuksia:
- R-WP, punainen, valkoinen piste
- G-WP, vihreä, valkoinen piste
- B-WP, sininen, valkoinen piste
- R-BL, punainen, mustan taso
- G-BL, vihreä, mustan taso
• Perfect Pixel HD
Paras kuva-asetus, Perfect Pixel HD, otetaan
käyttöön tai poistetaan käytöstä.
• Digital Natural Motion
Vähentää häiriöitä ja tuottaa sulavan liikkeen
etenkin elokuvissa.
Määritä tasoksi Minimi, Maksimi tai Pois.
• 100Hz Clear LCD
100Hz Clear LCD -toiminto otetaan käyttöön tai
poistetaan käytöstä.
• Dynaaminen kontr.
Parantaa kontrastia kuvissa kuvan vaihtuessa
ruudussa. Määritä tasoksi Minimi, Keskiasento,
Maksimi tai Pois. Keskitaso on suositusasetus.
• Melun vähennys
Suodattaa ja vähentää kuvassa olevia häiriöitä.
Määritä tasoksi Minimi, Keskiasento, Maksimi tai
Pois.
• MPEG artifact vähentyminen
Tasoittaa digitaalisten kuvien siir tymiä. MPEG
artifact vähentyminen -toiminto otetaan käyttöön
tai poistetaan käytöstä.
• Värien parannus
Värit ovat eloisampia, ja kirkkaiden värien
yksityiskohdat näkyvät paremmin. Määritä tasoksi
Minimi, Keskiasento, Maksimi tai Pois.
• Active Control
Korjaa kaikki tulevat signaalit, jotta kuva olisi
mahdollisimman hyvä. Active Control -toiminto
otetaan käyttöön tai poistetaan käytöstä.
• Valoanturi
Säätää kuva- ja Ambilight-asetuksia huoneen
valaistuksen mukaan.Valoanturi otetaan käyttöön
tai poistetaan käytöstä.
• Kuvaformaatti
Lisätietoja on luvussa 5.3.4 Laajakuvaformaatti.
16
asetukset
a
i
aus
us
y
t
.
ol
Valoanturi
i
y
oon
a
2657.1 fi 14-05-2007 12:21 Pagina 16
Tv-
Nollaa vaki
Kuv
Ambiligh
Kuv
Kontrast
Kirkk
v
v
Pixel Pl
Melun vhennys
MPEG vhentym..
rien parannus
Active contr
Kuvaformaatt
Page 25

SUOMI
5.3.4 Laajakuvaformaatti.
Tällä asetuksella voidaan estää mustien palkkien
muodostuminen kuvan sivuille tai ylä- ja alapuolelle.
Kuvaformaatin voi valita siten, että se täyttää koko
ruudun.
‡ Siirry Kuvaformaatti-valikkoon q-painikkeella.
® Valitse jokin kuvaformaatti o- tai œ-
painikkeella.
Ò Siirrä kuvaa ylöspäin painamalla o, jotta osittain
näkyvä tekstitys tulee kokonaan näkyviin.
à Vihje
Autom. kuvakoko on suositusasetus, sillä kuva
vääristyy silloin mahdollisimman vähän.
Autom. kuvakoko (Ei PC)
Suurentaa kuvan
automaattisesti kuvaruudun
kokoiseksi ja tekstitys pysyy
näkyvissä.
Superzoomaus (Ei HD)
Poistaa 4:3-lähetyksissä
esiintyvät mustat palkit. Kuva
vääristyy mahdollisimman
vähän.
4:3 (Ei HD)
Kuva on perinteisessä 4:3formaatissa.
Movie expand 14:9 (Ei HD)
Muuntaa perinteisen 4:3formaatin kokoon 14:9.
Movie expand 16:9 (Ei HD)
Muuntaa perinteisen 4:3formaatin kokoon 16:9.
Laajakuva
Venyttää 4:3-formaatin
kokoon 16:9.
Skaalaamaton
(Vain HD ja PC.)
Paras terävyys. Reunoilla voi
ilmetä kuvan vääristymistä.
Tietokoneesta näytettävissä
kuvissa voi olla mustat palkit.
rHuomautukset
Muista nimetä yhteys liitännöissä Lisätietoja on
luvussa 7.4.3 Laitteiden nimeäminen.
5.3.5 Ääniasetukset
Tässä luvussa on tietoja kaikkien ääniasetusten
säätämisestä.
‡ Paina kaukosäätimen Menu-painiketta ja valitse
Tv-valikko > Tv-asetukset > Ääni. Siirry
luetteloon π-painikkeella.
® Valitse asetus o- tai œ-painikkeella.
•Taajuusvastekorjain
Muuttaa basso- ja diskanttiääniä. Asetuksia
muutetaan valitsemalla vastaava palkki. Lisätietoja
on myös luvussa 5.2.3 Pikahakuvalikko.
• Äänenvoimakkuus
Äänenvoimakkuuden muuttamiseen.
Kun äänenvoimakkuutta säädetään painikkeella
V, kuvaruutuun tulee äänenvoimakkuuspalkki.
Voit poistaa sen näkyvistä valitsemalla Tvvalikko > Asennus > Esiasetukset ja siirtymällä
luetteloon π-painikkeella. Poista sitten
äänenvoimakkuuspalkki käytöstä.
‡ Valitse Äänenvoimakkuuspalkki o- tai œ-
painikkeella.
® Siirry asetukseen π-painikkeella.
Ò Valitsemalla Päälle saat äänenvoimakkuuspalkin
näkyviin äänenvoimakkuuden säätämisen ajaksi.
Lisätietoja television käyttämisestä 17
DEMO
OPTION
GUIDE
a
OK
LIST
v
j b q
MHEG
CANCEL
q
asetukset
Taajuusvastekorjain
uus
o
I
o
-
a-
d
t
ja
oon
a
2657.1 fi 14-05-2007 12:21 Pagina 17
Tv-
Asetukset avusta
Nollaa vaki
Kuv
nenvoimakk
Tasapain
Ambiligh
I/I
Mono/Stere
Surround
Delt
Autom. surroun
Page 26

Lisätietoja television käyttämisestä
•Tasapaino
Määrittää vasemman ja oikean kaiuttimen
tasapainon kuuntelusijainnin kannalta parhaalla
mahdollisella tavalla.
• Audiokieli
Kun ohjelmaa katsotaan digitaaliselta kanavalta,
siihen voi liittyä äänen kieliluettelo.
Lisätietoja on myös luvussa 5.2.3 Pikahakuvalikko.
Lisätietoja äänen kielen vaihtamisesta pysyvästi on
luvussa 6 Kanavan asennus.
• Ääni I/II
Lähetykseen voi liittyä mahdollisuus valita
jompikumpi kahdesta kielestä.
• Mono/Stereo
Jos kyseessä on stereolähetys, televisiokanavalle
voi valita mono- tai stereoäänen.
• Surround-ääni
Tämä asetus valittavissa, jos lähetykseen tai
kytkettyyn laitteeseen sisältyy tilaääni.
• Kuulokevoimakkuus
Muuttaa kuulokkeiden äänenvoimakkuutta.
Television kaiuttimet voi mykistää kaukosäätimen
¬-painikkeella.
• Autom. äänenvoimakkuus
Pienentää äkillisiä äänenvoimakkuuden eroja, joita
esiintyy esimerkiksi mainosten alkaessa tai kanavaa
vaihdettaessa. Otetaan käyttöön tai poistetaan
käytöstä.
• Delta-äänenvoimakkuus
Tasoittaa kanavien tai kytkettyjen laitteiden välisiä
äänenvoimakkuuden eroja.
‡ Siirry kanavalle tai laitteeseen, jonka
äänenvoimakkuuden eroja haluat tasoittaa.
® Valitse Delta-äänenvoimakkuus Ääni-valikossa ja
muuta äänenvoimakkuutta.
• Automaattinen surround
Televisiossa otetaan automaattisesti käyttöön
lähetyksen paras Surround-ääni. Otetaan käyttöön
tai poistetaan käytöstä.
5.4 Ambilight
Tässä luvussa on tietoja kaikkien Ambilight-asetusten
säätämisestä.
‡ Paina kaukosäätimen Menu-painiketta ja valitse
Tv-valikko > Tv-asetukset > Ambilight. Siirr y
luetteloon π-painikkeella.
® Valitse asetus o- tai œ-painikkeella.
• Ambilight Ambilight otetaan käyttöön tai
poistetaan käytöstä.
• Kirkkaus Muuttaa Ambilight-valaistusta.
• Toiminto
Valittavana on neljä Ambilight-toimintoa: Väri,
Rauhallinen, Kohtalainen ja Dynaaminen.
Lisätietoja on luvussa 4.7 Ambilight-toiminnon
vaihtaminen.
• Väri Jos Toiminto-valikosta on valittu Väri, voit
valita luettelosta vakaan värin tai luoda oman
värisi.
- Lämmin valkoinen
- Kylmä valkoinen
- Sininen
- Katselu
Voit muokata väriä valitsemalla Väri-valikosta
Katselu.
‡ Valitse ensin Värikkyys ja määritä arvo
korkeaksi.
® Valitse Sävy. Kun siirrät säädintä 0:sta 100:aan,
väri muuttuu punaisesta keltaiseksi ja vihreästä
siniseksi.
• Erottelu Määrittää television vasemmalla ja
oikealla puolella olevien värien eron, jos Toimintovalikossa on valittu Rauhallinen, Kohtalainen tai
Dynaaminen.
Ambilight-väri on erottelussa dynaaminen mutta
yksivärinen.
• Tasapaino
Määrittää stereoäänen tasapainon tavoin
Ambilight-tason television oikealla ja vasemmalla
puolella.
ç Varoitus
Voit varmistaa, että infrapunakaukosäädin toimii
oikein asettamalla sen Ambilight-valon
ulottumattomiin.
18
asetukset
t
t
aus
o
o
t
.
oon
a
2657.1 fi 14-05-2007 12:21 Pagina 18
Tv-
Asetukset avust..
Nollaa vaki
Kuv
Ambiligh
Ambiligh
Ambiligh
Kirkk
Toimint
Tasapain
Page 27

SUOMI
TV-valmiustila ja Ambilight
Ambilight-toiminto voidaan ottaa käyttöön myös
television valmiustilassa.Tällöin Ambilight-toiminto
toimii yksivärisenä.
‡ Paina kaukosäätimen Ambilight-painiketta, kun
televisio on valmiustilassa.
® Valitse väri painamalla Toiminto-painiketta
toistuvasti.
5.5 Teksti-tv
Televisiossa on 1200 sivun muisti, johon useimmat
lähetetyt sivut ja alasivut tallentuvat, mikä nopeuttaa
sivujen käyttöä.
Lisätietoja teksti-tv-sivun valitsemista on luvussa 4.6
Teksti-tv-sivun valitseminen.
5.5.1 Sivujen alasivujen valitseminen
Teksti-tv-sivulla voi olla useita alasivuja.
Nämä sivut näkyvät pääsivunumeron vieressä
olevassa palkissa.
‡ Paina b-painiketta.
® Valitse teksti-tv-sivu
Ò Valitse alasivu p- tai π-painikkeella.
5.5.2 T.O.P.-teksti-tv-lähetykset
Kaikki televisiokanavat eivät lähetä T.O.P.-teksti-tv:tä.
Voit siirtyä vaivattomasti aiheesta toiseen ilman
sivunumeroita.
‡ Paina b-painiketta.
® Paina i-painiketta.
T. O.P.-yhteenveto tulee näkyviin.
Ò Valitse aihe painikkeilla p, π tai o, œ.
† Siirry sivulle
OK-painikkeella.
5.5.3 Dual screen -teksti-tv
Voit katsoa televisiokanavaa ja teksti-tv:tä rinnakkain.
‡ Saat Dual screen -teksti-tv:n näkyviin b-
painikkeella.
® Saat tavallisen teksti-tv:n näkyviin painamalla
b-painiketta uudelleen.
Ò Voit poistua teksti-tv:stä b-painikkeella.
5.5.4 Teksti-tv-haku
Voit siirtyä nopeasti sivunumeroihin liittyviin aiheisiin
tai hakea tiettyjä sanoja teksti-tv-sivuilta.
‡ Paina b-painiketta.
® Korosta ensimmäinen sana tai numero
OK-
painikkeella.
Ò Siirry sivulla seuraavaan sanaan tai numeroon
painikkeilla o, œ tai p, π.
† Etsi korostetun sanan tai numeron sisältävä sivu
OK-painikkeella.
º Lopeta haku painamalla o-painiketta, kunnes
näkyviin ei tule enää korostettua sanaa tai
numeroa.
5.5.5 Teksti-tv-sivujen suurentaminen
Teksti-tv-sivua voi suurentaa, mikä parantaa
lukumukavuutta.
‡ Paina b-painiketta ja valitse teksti-tv-sivu.
® Suurenna sivun yläosa painamalla kaukosäätimen
Option-painiketta.
Ò Voit katsoa sivun suurennetun alaosan
painamalla uudelleen Option-painiketta.
† Voit selata suurennettua sivua o- tai œ-
painikkeella.
º Palaa tavalliseen sivukokoon painamalla
uudelleen Option-painiketta.
Lisätietoja television käyttämisestä 19
0
i
Ambilight MODE
Ambilight MODE
v
2657.1 fi 14-05-2007 12:21 Pagina 19
i
i
Ambilight MODE
OPTION
j b q
DEMO
OPTION
9807
CANCEL
MHEG
GUIDE
a
OK
LIST
Page 28

Lisätietoja television käyttämisestä
5.5.6 Teksti-tv-valikko
Teksti-tv-valikon asetuksilla saat näkyviin piilotettuja
tietoja, voit selata alasivuja automaattisesti ja
muuttaa merkkiasetuksia.
• Näytä
Piilottaa tai näyttää sivulla olevan piilotiedon,
kuten kysymysten vastaukset ja ratkaisut.
• Alasivujen kierto
Jos valitulla sivulla on alasivuja, voit määrittää
alasivut kiertämään automaattisesti.
• Kieli
Kielissä käytetään erilaisia merkkejä. Ryhmää
vaihtamalla saat tekstin näkymään oikein.
‡ Paina b-painiketta.
® Paina Menu-painiketta.
Ò Valitse asetus o- tai œ-painikkeella.
† Vaihda asetus
OK-painikkeella.
º Poistu valikosta painamalla uudelleen Menu-
painiketta.
◊Poistu teksti-tv:stä painamalla b-painiketta.
5.5.7 Digitaaliset tekstipalvelut (vain Iso-
Britannia)
Joihinkin digitaalisiin televisiokanaviin (esimerkiksi
BBC1) sisältyy digitaalinen teksti-tv tai interaktiivisia
palveluita. Nämä palvelut toimivat tavallisen tekstitv:n tavoin, sillä niissä voi liikkua numeron, värin ja
siirtymispainikkeiden avulla.
‡ Paina b-painiketta.
® Valitse tai korosta kohteita painikkeilla o, œ tai
p, π.
Ò Valitse vaihtoehto värillisellä painikkeella.
† Vahvista valinta tai ota se käyttöön
OK-
painikkeella.
º Peruuta digitaalinen teksti-tv tai interaktiiviset
palvelut MHEG Cancel -painikkeella.
ç Varoitus
Digitaalisia teksti-tv-palveluita ei voi käyttää, kun
lähetyksessä on tekstitys ja Toiminnot-valikossa on
valittu Tekstitys päälle. Lisätietoja on luvussa 5.9
Tekstitys.
5.5.8 Teksti-tv 2.5
Tässä teksti-tv-muodossa on enemmän värejä ja
grafiikkaa on parannettu.
Teksti-tv 2.5 on oletusarvoisesti käytössä
(tehdasasetus).
‡ Paina kaukosäätimen Menu-painiketta ja valitse
Tv-valikko > Asennus > Esiasetukset > Teksti-
tv 2.5 ja siirry luetteloon π-painikkeella.
® Otetaan käyttöön tai poistetaan käytöstä.
5.6 Suosikkikanavaluettelon
luominen
Näytä Kaikki kanavat -luettelo tai määritä omaan
suosikkiluetteloosi haluamasi televisiokanavat ja
radioasemat. Kaikki perheenjäsenet voivat
esimerkiksi luoda oman suosikkiluettelon.
5.6.1 Suosikkiluettelon valitseminen
Opettele valitsemaan suosikkikanavaluettelo.
‡ Paina
OK-painiketta.
Kaikki kanavat -luettelo tulee näkyviin, kun käytät
toimintoa ensimmäisen kerran asennuksen
jälkeen. Muulloin näkyviin tulee viimeiseksi valittu
suosikkiluettelo.
® Saat kaikki suosikkiluettelot näkyviin punaisella
painikkeella.
Ò Valitse luettelo o- tai œ-painikkeella.
† Paina
OK-painiketta.
Valittu suosikkiluettelo tulee ruutuun.
º Poistu luettelosta painamalla uudelleen
OK-
painiketta.
20
Valikko
Näytä
Kieli
Gr. II
Pois
Alasivujen kierto
Pois
at
3
2
1
1
1
a
2657.1 fi 14-05-2007 12:21 Pagina 20
Kaikki kanav
EXT
1 Analog. kanavat
2 Digitaaliset kanavat
3 Digitaaliset kanavat
4 Radiokanavat
Valitse list
Page 29

SUOMI
5.6.2 Suosikkiluettelon määrittäminen
Voit luoda oman suosikkiluettelon tai muokata sitä.
‡ Paina
OK-painiketta.
Viimeksi valittu suosikkiluettelo tulee
kuvaruutuun.
® Saat kaikki suosikkiluettelot näkyviin punaisella
painikkeella.
Ò Valitse luettelo o- tai œ-painikkeella.
† Paina
OK-painiketta.
º Siirry vihreällä painikkeella muokkaustoimintoon.
Valittu luettelo sisältää täydellisen
kanavaluettelon.
◊Korosta kanava o- tai œ-painikkeella.
‹Merkitse valittu kanava (tai poista sen merkintä)
OK-painikkeella.
Kanava lisätään valittuun luetteloon (tai
poistetaan siitä).
≈Poistu muokkaustoiminnosta painamalla
uudelleen vihreää painiketta.
Muokattu kanavaluettelo tulee uudelleen
näkyviin.
5.6.3 Kanavan valitseminen
suosikkiluettelosta
‡ Paina
OK-painiketta.
Viimeiseksi valittu kanavaluettelo tulee näkyviin.
® Korosta kanava o- tai œ-painikkeella.
Ò Paina
OK-painiketta.
Televisio siir tyy kyseiselle kanavalle.
à Vihje
•Voit selata suosikkiluettelon kanavia
-P+-
painikkeella.
•Voit edelleen valita numeropainikkeilla kanavia,
joita ei ole merkitty suosikeiksi.
5.7 Sähköinen ohjelmaopas
Sähköinen ohjelmaopas on digitaalisten televisioohjelmien opas.Voit selata, valita ja tarkastella
ohjelmia oppaassa ajan, nimen ja lajin mukaan.
Sähköiset ohjelmaoppaita on kahdenlaisia: nyt ja
seuraava sekä 7 tai 8 päivää.
Kun digitaaliset kanavat on asennettu, niiden
ohjelmatiedot ovat sähköisessä ohjelmaoppaassa.
Nyt ja seuraava -opas on aina käytettävissä, mutta 7
tai 8 päivän opas on käytössä vain joissakin maissa.
Sähköisen ohjelmaoppaan valikossa ...
• on luettelo käynnissä olevista ohjelmista
• näkyy seuraava ohjelma
•voi ryhmitellä ohjelmia lajin mukaan
•voi asettaa muistutuksia ohjelman alkamisesta
•voi määrittää sähköisen oppaan suosikkikanavia
• jne.
5.7.1 Sähköisen oppaan ottaminen
käyttöön
‡ Paina a-painiketta.
Näkyviin tulee seuraavanlainen sähköinen
ohjelmaopas.
Nyt ja seuraava -ohjelmaopas
Ruudussa näkyy tarkat tiedot meneillään olevasta
ohjelmasta.
Lisätietoja television käyttämisestä 21
¬
P
V
321
654
9807
i
Ambilight MODE
BROWSE
P
90
-
26 BBC1 Ti, 12 Syys 09:17
Nimike: Commonwealth Games
Info: 7:50 - 12:30 : 280 min.
..........
s
.
a
DEMO
OPTION
GUIDE
a
OK
LIST
v
j b q
MHEG
CANCEL
GUIDE
a
2657.1 fi 14-05-2007 12:21 Pagina 21
Poi
Vaihda kanava painamalla - P +
Seuraav
Page 30

22 Lisätietoja television käyttämisestä
Tai
7 tai 8 päivän ohjelmaopas
Sähköisen ohjelmaoppaan tietojen saamiseen voi
kulua jonkin verran aikaa.
Kuvaruutuun tulee televisio-ohjelmaluettelo.
® Voit käyttää ruudun alareunassa olevia
toimintoja väripainikkeilla.
•Seuraava: näyttää seuraavan ohjelman tiedot.
•Muistuta: ohjelman merkitseminen muistutuksena
tai merkinnän poistaminen.
•Katso:nykyisen ohjelman katsominen tai
kuunteleminen.
•Mene kohtaan...: siirtyminen edelliseen tai
seuraavaan päivään.
•Info: valitun ohjelman tietojen näyttäminen (jos
käytössä).
Ò Poistu sähköisestä ohjelmaoppaasta painamalla
a-painiketta.
5.7.2 Lisätietoja 7 tai 8 päivän
ohjelmaoppaasta
Esimerkiksi ohjelman tyyppikohtaista hakua ja
ohjelmoituja muistuttajia ohjataan Ohjelmaopasvalikossa.
‡ Paina kaukosäätimen a-painiketta.
® Paina Menu-painiketta.
Ohjelmaopas-valikko tulee kuvaruutuun.
Ò Valitse valikkovaihtoehto o- tai œ-painikkeella.
† Siirry asetukseen π-painikkeella.
º Tee valinta œ- tai o-painikkeella.
◊Ota käyttöön
OK-painikkeella tai siirry
katsomaan ohjelmaa painamalla vihreää
painiketta.
‹Poistu sähköisestä ohjelmaoppaasta painamalla
a-painiketta.
rHuomautus
Vain Suosikki-EPG-kanaviksi merkityt kanavat
näkyvät Ohjelmaopas-valikossa.
5.8 Ajastimet ja lukitukset
Tässä luvussa on tietoja virran kytkemisestä tai sen
katkaisemisesta määritettyyn aikaan sekä television
lukitsemisesta ja lukituksen poistamisesta.
5.8.1 Automaattinen siirtyminen
valmiustilaan
Uniajastin siirtää television valmiustilaan tietyn ajan
jälkeen.
‡ Paina kaukosäätimen Menu-painiketta ja valitse
Tv-valikko > Toiminnot > Uniajastin. Siirry
uniajastimeen π-painikkeella.
® Määritä o- tai œ-painikkeella ajaksi enimmillään
180 minuuttia (viiden minuutin välein). Jos
asetukseksi määritetään 0 minuuttia, uniajastin
kytkeytyy pois päältä.
Voit halutessasi katkaista televisiosta virran
aikaisemmin tai määrittää uuden ajan ajastetun ajan
kuluessa.
5.8.2 Virran kytkeminen televisioon
automaattisesti
Ajastin kytkee televisioon automaattisesti virran ja
televisio siirtyy valitulle kanavalle määritettyyn
aikaan.
‡ Paina kaukosäätimen Menu-painiketta ja valitse
Tv-valikko > Toiminnot > Kytkentäajastin. Siirry
ajastinvalikkoon π-painikkeella.
® Valitse yksi kerrallaan valikkovaihtoehto ja siirry
niihin o- tai œ-, p- tai π-painikkeilla.
Määritä näin kanava, viikonpäivä (tai päivittäin) ja
aloitusaika.
† Vahvista
OK-painikkeella.
º Poistu valikosta painamalla uudelleen Menu-
painiketta.
à Vihje
Poista Kytkentäajastin käytöstä valitsemalla
ajastinvalikosta Pois.
Ohjelmaopas Ti, 12 Syys
09:55
BBC ONE
BBC TWO
five
BBC THREE
OUR
09:50 Tweenies
09:00 The Wright Stuff
05:32 This is BBC THREE
OUR
g
12:30 Commonwealth
10:15 Something Special
10:30 Trisha Goddard
12:00 This is BBC THREE
OUR
addio
Noin Seuraava
07:50 Commonwealth
so
oAsenna
.
on
y
d
h
.
t
on
yyppp
.
2657.1 fi 14-05-2007 12:21 Pagina 22
BBC F
:32 This is BBC F
:20 Moonlightin
MuistutaKat
13:50 Anastasia 0010 - EEN
12:00 This is BBC F
10:15 D
Inf
..
Ohjelmaopas Mit
Mit
Ohjelm.t
12:30 South Toda
11:50 Working Lunc
ikoht..
Suosikki-EPG-kan..
Laata EPG-tiedo
13:00 In aller Freun
Page 31

Lisätietoja television käyttämisestä 23
SUOMI
5.8.3 Televisiokanavien ja -ohjelmien
lukitseminen
Voit estää lasten lapsia katsomasta kytkettyjen
laitteiden televisiokanavia ja/tai -ohjelmia
lukitsemalla ne.Voit lukita ohjelmat ja poistaa niiden
lukituksen nelinumeroisella koodilla.
Koodin määrittäminen ja muuttaminen
‡ Paina kaukosäätimen Menu-painiketta ja valitse
Tv-valikko > Toiminnot > Aseta tai Muuta
koodi. Ilmoita koodi π-painikkeella.
® Ilmoita koodi numeropainikkeilla.
Näkyviin tulee Toiminnot-valikko sekä viesti,
jossa vahvistetaan, että koodi on luotu tai sitä
on muutettu.
Unohtunut koodi
‡ Valitse Muuta koodi.
® Paina π-painiketta.
Ò Ilmoita ohituskoodi 8-8-8-8.
† Ilmoita uusi koodi.
◊Vahvista antamasi uusi koodi.
Aikaisempi koodi poistetaan ja uusi koodi
tallennetaan.
5.8.4 Lapsilukon ottaminen käyttöön tai
poistaminen käytöstä
Kun koodi on määritetty, voit lukita kaikki kanavat ja
laitteet tai tietyn kanavan tai laitteen, määrittää ajan,
jonka jälkeen kaikki kanavat ja laitteet lukitaan, tai
määrittää vanhempien luokitteluun lapsen iän
digitaalisten kanavien asennuksen ja lähetyksen
yhteydessä.
‡ Paina kaukosäätimen Menu-painiketta ja valitse
Tv-valikko > Toiminnot > Lapsilukko. Ilmoita
koodi π-painikkeella.
® Ilmoita koodi numeropainikkeilla.
Ò Valitse jokin asetuksista.
† Paina π-painiketta.
Kaikkien kanavien tai liitettyjen laitteiden
lukitseminen ja lukituksen poistaminen
‡ Valitse Lukko tai Lukitus pois.
® Paina
OK-painiketta.
Tiettyjen ohjelmien tai kaikkien kanavien
lukitseminen tietystä ajasta lähtien
‡ Valitse Katselunesto.
® Valitse Katselunesto π-painikkeella.
Ò Siirry Lukitus alkaa -valikkoon painamalla π-
painiketta uudelleen.
† Ota ajastinlukitus käyttöön valitsemalla Päälle.
º Paina p-painiketta.
◊Valitse Aika.
‹Paina π-painiketta.
≈Ilmoita aika o- tai œ- ja π-painikkeella.
ÚPaina
OK-painiketta.
Yhden tai usean kanavan tai liitetyn laitteen
lukitseminen
‡ Valitse Katselunesto.
® Siirry asetukseen π-painikkeella.
Ò Valitse Kanavalukitus o- tai œ-painikkeella.
† Paina π-painiketta.
º Valitse o- tai œ-painikkeilla kanavat, jotka
haluat lukita tai joiden lukituksen haluat poistaa.
◊Lukitse kanava tai poista lukitus painamalla
OK-
painiketta.
Ikäluokituksen määrittäminen digitaaliselle
ohjelmalle
Jotkin digitaalikanavien ohjelmat on luokiteltu
(joissakin maissa). Kun lapsesi on nuorempi kuin
luokituksessa mainittu ikä, ohjelma lukitaan.
‡ Valitse Katselunesto.
® Siirry asetukseen π-painikkeella.
Ò Valitse Vanhempien luokittelu o- tai œ-
painikkeella.
† Paina π-painiketta.
º Valitse ikäluokitus o- tai œ-painikkeella.
◊Poistu Lapsilukko-valikosta painamalla Menu-
painiketta.
5.9 Tekstitys
Kullekin televisiokanavalle voidaan määrittää tekstitys
teksti-tv:n tai digitaalisen kanavan (DVB-T) kautta.
Tekstityskielen voi valita asennettujen digitaalisten
kanavien ohjelmiin.
5.9.1 Analogisten televisiokanavien
tekstitys
‡ Valitse analoginen televisiokanava.
® Siirry teksti-tv:hen b-painikkeella.
Ò Ilmoita tekstityssivun kolminumeroinen
sivunumero.
Ò Poistu teksti-tv:stä b-painikkeella.
rHuomautus
Teksti-tv:n tekstityssivu on tallennettava muistiin
erikseen kullekin televisiokanavalle.
o
o
aa
us
.
o
o
2657.1 fi 14-05-2007 12:21 Pagina 23
Lapsilukk
Lukk
Katselunest
Lukitus pois
Katselunest
Lukitus alk
Kanavalukit
Vanhempien luok..
Page 32

5.9.2 Tekstityksen ottaminen käyttöön tai
poistaminen käytöstä
‡ Paina kaukosäätimen Menu-painiketta ja valitse
Tv-valikko > Toiminnot > Tekstitys ja siirry
luetteloon π-painikkeella.
® Jos haluat tekstityksen olevan aina käytössä,
valitse o- tai œ-painikkeella Päälle.Valitse
Mute-toiminnossa, jos haluat tekstityksen
näkyvän silloin, kun ääni on mykistetty
kaukosäätimen ¬-painikkeella.
Ò Palaa Toiminnot-valikkoon p-painikkeella.
à Vihje
Voit valita Tekstitys-valikon suoraan kaukosäätimen
Option-painikkeella. Lisätietoja on luvussa 5.2.3
Pikahakuvalikko.
5.9.3 Digitaalisen tekstityskielen
valitseminen.
Jos digitaalisella kanavalla voi valita tekstityksen, voit
esivalita tekstityskielen lähettävien kielten
luettelosta. Asennus-valikossa määritetty esivalittu
tekstityskieli ohitetaan tilapäisesti.
‡ Paina kaukosäätimen Menu-painiketta ja valitse
Tv-valikko > Toiminnot > Tekstityskieli ja siirry
saatavissa olevien kielten luetteloon π-
painikkeella.
® Valitse tekstityskieli o- tai œ-painikkeella.
Ò Paina
OK-painiketta.
à Vihje
Voit valita Tekstityskieli-valikon suoraan
kaukosäätimen Option-painikkeella. Lisätietoja on
luvussa 5.2.3 Pikahakuvalikko.
5.10 Valokuvien, MP3tiedostojen yms.
näyttäminen ja toistaminen
Voit katsoa USB-laitteelle (lisävaruste) tallennettuja
muotoisia kuvia tai kuunnella muotoisia
musiikkitiedostoja.Voit katsoa kuvia diaesityksenä tai
kuunnella omaa soittoluetteloasi.
rHuomautus
Philips ei vastaa siitä, että USB-laitetta ei tueta eikä
tallennetun tiedon vahingoittumisesta tai
katoamisesta.
5.10.1 USB-laitteen asettaminen paikalleen
Aseta laite television sivussa olevaan liitäntään, kun
televisioon on kytkettynä virta.
Päävalikko tulee automaattisesti kuvaruutuun ja
USB-laitteen nimi näkyy korostettuna Multimedia-
kohdan vieressä.
5.10.2 USB-laitteen poistaminen
ç Varoitus
Voit estää USB-laitteen vahingoittumisen poistumalla
näyttövalikosta ja odottamalla viisi sekuntia, ennen
kuin poistat USB-laitteen.
‡ Poistu valikosta painamalla uudelleen Menu-
painiketta.
® Poista USB-laite.
5.10.3 Kuvien katsominen
USB-laitteelle tallennetut tiedostot näkyvät
Multimedia-valikossa.
‡ Siirry Multimedia-valikkoon π-painikkeella.
Kuva on korostettu.
® Valitse Kuva-kansio π-painikkeella.
Ò Valitse USB-laitteesta kuva tai kuva-albumi o-
tai œ-painikkeella.
24 Lisätietoja television käyttämisestä
o
ot
i
n
o
i
t
j
n
ä
y
ot
us
asetukset
jpg
jpg
a
1
jpg
jpg
jpg
jpg
5
jpg
1
o
a
o
o
2657.1 fi 14-05-2007 12:21 Pagina 24
Tv-valikk
Tv-
Toiminn
Asenn
Ohjelm. pivitys
Toiminn
Tekstitys
Tekstityskiel
Uniajasti
Lapsilukk
Aseta/muuta kood
Kytken
Yleinen liittym
Esittel
asti
Televisi
Multimedi
Tv-valikk
Kanavaluettel
Ohjelmaopas
Kuv
Afrika_200
Paris_200
My_car.
Jean.
Mary.
Afrika_200
Kenya.
Congo.
Victoria.
Cairo.
Page 33

† Valitse katsottava kuva tai käynnistä albumissa
olevien kuvien diaesitys
OK-painikkeella.
º Keskeytä diaesitys
OK-painikkeella. Jatka
painamalla painiketta uudelleen.
º Suorita ruudun alareunassa mainittu toiminto
painamalla kaukosäätimen vastaavaa
väripainiketta. Sinisellä painikkeella voit pysäyttää
esityksen ja saada käyttöösi lisätoimintoja.
Jos alareunassa oleva toimintopalkki ei ole
näkyvissä, saat sen näkyviin painamalla jotakin
väripainiketta.
◊Valitse toinen kuva tai albumi p-painikkeella.
Diaesitysasetukset
• Yksityiskohdat/Lisää
Näyttää kuvan nimen, päivämäärän, koon ja
diaesityksen seuraavan kuvan.
• Siirtotavat
Näyttää saatavissa olevat kuvien siirtotyylit. Valitse
o- tai œ-painikkeella ja ota käyttöön
OK-
painikkeella.
• Näyttöaika
Määrittää kuvien siirron väliajan Lyhyeksi,
Keskinkertaiseksi tai Pitkäksi.
• Kierrä
Kuvan kiertämiseen.
• Zoom Näyttää valittavat suurennokset.
• Aloita/Näytä Diaesityksen pysäyttämiseen ja
käynnistämiseen uudelleen.
5.10.4 Hakukuvat
Valitun albumien kuvien katselu yhteenvedossa.
‡ Valitse kuva-albumi.
® Valitse kuvaluettelo π-painikkeella.
Ò Paina vihreää painiketta.
† Korosta kuva o- tai œ-, p- tai π-painikkeella.
º Siirry kuvaan
OK-painikkeella.
◊Palaa hakukuvien yhteenvetoon p-painikkeella.
‹Palaa kuvaluetteloon painamalla vihreää
painiketta uudelleen.
5.10.5 Musiikin kuuntelu
Kappaleet ovat Multimedia-valikon Musiikkialbumissa.
‡ Korosta Multimedia-valikossa Musiikki.
® Valitse Musiikki-kansio π-painikkeella.
Ò Valitse kappale tai musiikkialbumi o- tai œ-
painikkeella.
† Toista valitsemasi kappale tai toista kappale ja
samalla albumilla sitä seuraava kappale
painamalla
OK-painiketta.
Musiikkiasetukset
• Yksityiskohdat
Näyttää tiedoston nimen.
• Uusinta: yksi/kaikki
Toistaa kaikkia albumin kappaleita, kunnes pysäytät
toiston, tai toistaa valittua kappaletta, kunnes
pysäytät toiston.
• Satunnaistoisto
Toistaa kappaleita satunnaisessa järjestyksessä.
5.10.6 Diaesitys, jossa taustamusiikkia
Voit katsoa tallennetuista kuvista tehdyn
diaesityksen, johon olet liittänyt tallentamasi
taustamusiikin.
‡ Valitse ensin musiikkialbumi ja paina
OK-
painiketta.
® Korosta Kuva-kansio, valitse kuva-albumi ja paina
OK-painiketta.
Lisätietoja television käyttämisestä 25
SUOMI
jpg
jpg
a
1
jpg
jpg
jpg
jpg
5
jpg
1
1
1
jpg
jpg
jpg
jpg
jpg
jpg
jpg
jpg
2657.1 fi 14-05-2007 12:21 Pagina 25
Kuv
Afrika_200
Paris_200
My_car.
Jean.
Mary.
Afrika_200
Kenya.
Congo.
Victoria.
Dakar.
Cairo.
Afrika_200
Kenya.
Congo.
Victoria.
Cairo.
Afrika_200
Kenya.
USBAfrika_2001Kenya.
Kenya.
Page 34

5.11 Digitaalisten radiokanavien
kuuntelu
Jos digitaalisia lähetyksiä on saatavana, digitaaliset
radiokanavat asennetaan asennuksen aikana.
Digitaalisen radiokanavan kuuntelu:
‡ Paina kaukosäätimen
OK-painiketta.
Kaikki kanavat -valikko näkyy kuvaruudussa.
® Valitse radiokanava numeropainikkeilla.
Radiokanavat alkavat numerosta 400. Lisätietoja
uudelleenjärjestämisestä on luvussa 6.3.3
Kanavien järjestäminen uudelleen.
Ò Paina
OK-painiketta.
5.12 Ohjelmistopäivitys
Philips yrittää jatkuvasti parantaa tuotteitaan ja voi
suositella käyttäjille televisio-ohjelmistojen
päivittämistä. Ohjelmiston voi päivittää internetistä
tai ottamalla käyttöön digitaalikanavan toimittaman
uuden ohjelmiston.
Ohjelmiston päivittäminen internetissä
Lisätietoja TV-ohjelmistojen päivittämisestä on
sivustossa www.philips.com/support. Etsi
tuotetukisivulta kohta Ohjelmistot ja ohjaimet.
Ohjelmiston päivittäminen digitaalilähetyksen (DVBT) kautta
Digitaalikanava voi toimittaa ohjelmiston
automaattisesti televisioon.
Jos kuvaruudussa on ilmoitus päivityksestä, voit
päivittää ohjelmiston heti valitsemalla Nyt.
Voit siirtää ohjelmiston päivittämistä valitsemalla
Myöhemmin, jolloin siitä tulee muistutus.
Voit poistua päivityksestä valitsemalla Peruuta (tätä
vaihtoehtoa ei suositella). Jos peruutit päivityksen,
voit suorittaa päivityksen itse valitsemalla TVvalikko > Ohjelmiston päivitys > Paikalliset
päivitykset.
26 Lisätietoja television käyttämisestä
2657.1 fi 14-05-2007 12:21 Pagina 26
Page 35

6 Kanavan asennus
Kun televisio käynnistettiin ensimmäisen kerran,
valittiin TV-valikoiden kieli ja kaikki vastaanotettavissa
olevat kanavat tallennettiin.
Tässä luvussa annetaan ohjeita ensiasennuksen
mahdolliseen uusimiseen ja uuden analogisen TVkanavan tallentamiseen.
rHuomautus:
- Niitä vaiheita ei tar vitse suorittaa, jotka ne eivät
ole tarpeellisia.
- Uudelleenasennus muokkaa Kaikki kanavat -
luetteloa, eikä uusia kanavia lisätä
suosikkiluetteloon.
6.1 Kanavan automaattinen
asennus
Tässä luvussa on tietoja saatavissa olevien kanavien
etsimisestä ja tallentamisesta automaattisesti.
Vaihe 1 Valikkokieli
Määrittää TV-valikoiden kielen.
Siirry seuraavaan vaiheeseen, jos kieliasetukset ovat
kunnossa.
‡ Paina kaukosäätimen Menu-painiketta ja valitse
TV-valikko > Asennus > Kielet ja siirry π-
painikkeella Valikkokieli-asetukseen.
® Valitse kieli o- tai œ-painikkeella.
Ò Vahvista
OK-painikkeella.
† Palaa Asennus-valikkoon p-painikkeella.
Kielet-valikossa on myös seuraavat kieliasetukset,
kun digitaaliset kanavat on asennettu ja niiden
ohjelmia lähetetään.
• Esivalittu audio
Valitse esivalituksi kieleksi jokin saatavissa olevista
audiokielistä.
• Esivalitut tekstitykset
Valitse esivalituksi kieleksi jokin saatavissa olevista
tekstityskielistä. Lisätietoja on luvussa 5.9 Tekstitys.
• Kuulemisvaikeus
Valitsemalla Päälle saat näkyviin
kuulemisvaikeuksisten tekstityksen sillä kielellä,
jonka olet valinnut esivalituksi audio- tai
tekstityskieleksi, silloin kun se on saatavissa.
Vaihe 2 Maan valinta
Valitse asuinmaasi.Televisio asentaa ja järjestää
televisiokanavat maavalinnan mukaisesti.
‡ Valitse Maa œ-painikkeella.
® Siirry luetteloon π-painikkeella.
Ò Valitse maa o- tai œ-painikkeella.
† Palaa Asennus-valikkoon p-painikkeella.
Vaihe 3 Aikavyöhykkeen valinta
Saatavissa vain maissa, joissa on useita
aikavyöhykkeitä
‡ Valitse Aikavyöhyke œ-painikkeella.
® Siirry luetteloon π-painikkeella.
Ò Valitse aikavyöhyke o- tai œ-painikkeella.
† Palaa Asennus-valikkoon p-painikkeella.
Vaihe 4 Televisio- ja radiokanavien
asentaminen
Televisio etsii ja tallentaa kaikki saatavissa olevat
digitaaliset ja muut kuin digitaaliset televisiokanavat
ja kaikki digitaaliset radiokanavat.
‡ Valitse Kanavan asennus œ-painikkeella.
® Siirry Kanavan asennus -valikkoon π-
painikkeella.
Automaattinen asennus on korostettu.
Ò Valitse π-painikkeella Aloita nyt.
† Paina
OK-painiketta.
º Aloita painamalla vihreää painiketta.
Asennus voi kestää muutamia minuutteja.
◊Palaa Asennus-valikkoon painamalla punaista
painiketta, kun kanavahaku on suoritettu.
® Poistu TV-valikosta painamalla uudelleen Menu-
painiketta.
à Vihje
Kun digitaaliset televisiokanavat on haettu,
asennettujen kanavien luettelossa voi olla tyhjiä
kanavanumeroita.
Lisätietoja asennettujen kanavien nimien
vaihtamisesta, kanavien uudelleenjärjestämisestä ja
kanavien poistamisesta on luvussa 6.3 Tallennettujen
kanavien järjestäminen uudelleen.
Lisätietoja television käyttämisestä 27
SUOMI
Asennus Kielet
Valikkokieli
Esivalittu audio
Esivalitut tekstityk...
Kuulemisvaikeus
Kielet
Maa
Aikavyöhyke
Kanavan asennus
Esiasetukset
Littännät
…
2657.1 fi 14-05-2007 12:21 Pagina 27
Page 36

6.2 Analoginen: manuaalinen
asennus
Voit virittää analogiset TV-kanavat kanava kerrallaan
manuaalisella asennuksella.
6.2.1 Järjestelmän valitseminen
‡ Paina kaukosäätimen Menu-painiketta ja valitse
Tv-valikko > Asennus > Kanavan asennus >
Analog.: Manuaalinen asennus.
® Siirry manuaaliseen asennukseen π-painikkeella.
Järjestelmä näkyy korostettuna.
ÒSiirry Järjestelmäluetteloon π-painikkeella.
† Valitse maa tai maanosa, jossa asut, o- tai œ-
painikkeella.
º Palaa Manuaalinen asennus -valikkoon p-
painikkeella.
6.2.2 Uuden kanavan hakeminen
‡ Paina kaukosäätimen Menu-painiketta ja valitse
Tv-valikko > Asennus > Kanavan asennus >
Analog.: Manuaalinen asennus > Haku.
® Siirry Haku-valikko π-painikkeella.
Ò Paina punaista painiketta, jos haluat näppäillä
kanavan taajuuden itse, tai paina vihreää
painiketta, jos haluat etsiä seuraavan kanavan.
à Vihje
Jos tiedät taajuudet, näppäile kolme taajuusnumeroa
kaukosäätimen numeropainikkeilla.
† Paina p-painiketta, kun uusi kanava on löytynyt.
º Jos haluat tallentaa uuden kanavan uuden
kanavanumeron kohdalle, valitse Tallenna uutena
kanavana.
◊Siirry π-painikkeella.
‹Paina
OK-painiketta.
Valmis tulee ruutuun.
≈Poistu Kanavan asennus -valikosta painamalla
Menu-painiketta.
6.2.3 Hienosäätö
Voit hienosäätää löytynyttä kanavaa, jos vastaanotto
on heikko.
‡ Paina kaukosäätimen Menu-painiketta ja valitse
Tv-valikko > Asennus > Kanavan asennus >
Analog.: Manuaalinen asennus > Hienosäätö.
® Siirry π-painikkeella.
Ò Säädä taajuutta o- tai œ-painikkeella.
† Paina p-painiketta, kun hienosäätö on päättynyt.
º Jos haluat tallentaa hienosäädetyn kanavan
nykyisen kanavanumeron kohdalle, valitse
Tallenna nykyninen kanavana.
◊Siirry π-painikkeella.
‹Paina
OK-painiketta.
Valmis tulee ruutuun.
≈Poistu Kanavan asennus -valikosta painamalla
Menu-painiketta.
6.3 Tallennettujen kanavien
järjestäminen uudelleen
Tallennettujen kanavien nimeämiseen uudelleen,
poistamiseen ja uudelleen asentamiseen.
6.3.1 Kanavan nimen vaihtaminen
Kanavan nimen vaihtaminen tai sellaisen kanavan
nimeäminen, jolle ei ole vielä ilmoitettu nimeä.
‡ Paina kaukosäätimen Menu-painiketta ja valitse
Tv-valikko > Asennus > Kanavan asennus >
Nimeä uudell..
® Siirry kanavaluetteloon π-painikkeella.
Ò Valitse kanava, jonka nimen haluat vaihtaa
painamalla o- tai œ-painiketta kerran
kanavaluettelossa.
† Paina punaista painiketta.
º Valitse merkki painamalla p- tai π-painiketta.
Muuta merkkiä painamalla o- tai œ-painiketta.
Väli, numerot ja muut erikoismerkit ovat z ja A-
kirjaimen välissä.
◊Lopeta painamalla vihreää painiketta tai
OK-
painiketta.
à Vihje
Kaikki merkit voi poistaa keltaisella painikkeella, ja
Korostetun merkin voi poistaa sinisellä painikkeella.
28 Lisätietoja television käyttämisestä
asennus
.
m
u
t
.
asennus
.
.
uudelleen
2657.1 fi 14-05-2007 12:21 Pagina 28
Kanavan
Automaat.
Asennuksen pivit..
Digitaalinen: koev..
Analog.: Manuaal..
rjestel
Hak
Tallenna uutena..
Page 37

6.3.2 Kanavan poistaminen ja asentaminen
uudelleen
Tallennetun kanavan voi poistaa, jolloin sitä ei voi
enää katsoa.
Aiemmin poistetun kanavan voi asentaa uudelleen.
‡ Paina kaukosäätimen Menu-painiketta ja valitse
Tv-valikko > Asennus > Kanavan asennus >
Nimeä uudell..
® Siirry kanavaluetteloon π-painikkeella.
Ò Valitse kanava, jonka haluat poistaa tai asentaa
uudelleen painamalla o- tai œ-painiketta
kerran luettelossa.
† Paina vihreää painiketta, jos haluat poistaa
kanavan tai asentaa sen uudelleen.
º Poistu valikosta painamalla uudelleen Menu-
painiketta.
6.3.3 Kanavien järjestyksen muuttaminen
Tallennettujen kanavien järjestystä voi muuttaa.
‡ Paina kaukosäätimen Menu-painiketta ja valitse
Tv-valikko > Asennus > Kanavan asennus >
Nimeä uudell..
® Siirry kanavaluetteloon π-painikkeella.
Ò Valitse kanava, jonka paikkaa haluat vaihtaa
painamalla o- tai œ-painiketta kerran
luettelossa.
† Siirry kanavaluettelossa ylöspäin korostettuun
kanavaan keltaisella painikkeella.
º Siirry kanavaluettelossa alaspäin korostettuun
kanavaan sinisellä painikkeella.
◊Poistu valikosta painamalla uudelleen Menu-
painiketta.
6.4 Kanavien automaattinen
hallinta
kanavanhallinta
Kaikki saatavissa olevat televisiokanavat päivitetään
automaattisesti kerran päivässä kello 3.00. Päivitys
tehdään, jos televisio on valmiustilassa. Jos päivitys ei
löydä kanavaa, joka oli tallennettuna aiemmin, se
poistetaan kanavaluettelosta.
Päivityksen voi tehdä myös itse koska tahansa.
‡ Paina kaukosäätimen Menu-painiketta ja valitse
Tv-valikko > Asennus > Kanavan asennus >
Asennuksen päivitys.
® Siirry π-painikkeella.
Ò Paina
OK-painiketta.
† Aloita painamalla vihreää painiketta.
Asennuksen päivitys käynnistyy ja kestää
muutaman minuutin.
º Kun päivitys on suoritettu, palaa Kanavan
asennus -valikkoon painamalla punaista
painiketta.
◊Poistu valikosta painamalla uudelleen Menu-
painiketta.
6.5 Digitaalivastaanoton testi
Digitaalisten televisiokanavien laadun ja signaalin
voimakkuuden voi tarkistaa. Signaalin vahvuuden
perusteella antennin paikkaa voi muuttaa, jotta
vastaanotto paranisi.
‡ Valitse kanava.
‡ Paina kaukosäätimen Menu-painiketta ja valitse
Tv-valikko > Asennus > Kanavan asennus >
Digitaalinen: koevastaanotto.
Ò Siirry π-painikkeella.
† Paina
OK-painiketta.
Kuvaruutuun tulee kanavan taajuus, verkon nimi
sekä signaalin laatu ja vahvuus.
º Paina vihreää painiketta, kun haluat käynnistää
tai näppäillä sen kanavan taajuuden, jota haluat
kokeilla. Muuta antennin paikkaa, jos signaali ei
ole hyvälaatuinen ja vahva.
◊Tallenna kanava keltaisella painikkeella, jos
signaali on vahva ja hyvälaatuinen.
◊Palaa Kanavan asennus -valikkoon punaisella
painikkeella.
‹Poistu valikosta painamalla uudelleen Menu-
painiketta
à Vihje
Parhaan tuloksen saa käyttämällä asiantuntevan
antenniasentajan apua.
6.6 Tehdasasetukset
Jos kuva-, ääni- ja Ambilight-asetukset ovat menneet
sekaisin, voit palauttaa niiden tehdasasetukset.
‡ Paina kaukosäätimen Menu-painiketta ja valitse
Tv-valikko > Asennus > Tehdasasetukset.
® Siirry π-painikkeella.
Ò Paina
OK-painiketta.
† Poistu valikosta painamalla uudelleen Menu-
painiketta
rHuomautus
Kanavan asennusasetukset eivät muutu.
Lisätietoja television käyttämisestä 29
SUOMI
2657.1 fi 14-05-2007 12:21 Pagina 29
Page 38

Television takaosan liittimet
1
EXT1
Esimerkiksi DVD:n, videonauhurin,
digitaalivastaanottimen ja pelikonsolin Scart-liitin.
2 EXT2
Toinen Scart-liitin.
3 EXT3
Esimerkiksi DVD:n, digitaalivastaanottimen ja
pelikonsolin komponenttivideon Y Pb Pr- ja Audio
L/R -liittimet.
4 Common Interface
CA-moduulin liittymä.
5 Audio Out L/R
Esimerkiksi kotiteatterijärjestelmän RCAäänilähtöliittimet.
6 Digital Audio In (jatkuu)
RCA-äänilähtöliitin HDMI-liittimiin, joissa on
HDMI–DVI-sovitin.
7
Digital Audio Out
Esimerkiksi kotiteatterijärjestelmän RCAäänilähtöliitin.
8 HDMI 1 In
Esimerkiksi Blu-ray-soittimen sekä HDdigitaalivastaanottimen ja -pelikonsolin HDMItuloliitin.
9 HDMI 2 In
Toinen HDMI-tuloliitin.
10 HDMI 3 In
Kolmas HDMI-tuloliitin.
11 Antenna input
Television sivussa olevat liittimet
12 S-Video (sivussa)
Esimerkiksi videokameran ja pelikonsolin Audio
L/R -liittimien kanssa käytettävä S-Video-tuloliitin.
13 Video (sivussa)
Esimerkiksi videokameran ja pelikonsolin Audio
L/R -liittimien kanssa käytettävä RCA-videotuloliitin.
14 Audio L/R in (sivussa)
Esimerkiksi videokameran ja pelikonsolin Audio
L/R -liitin.
15 Kuulokkeet
Stereominiliitin.
16 USB
USB-liitin.
30 Liitännät
7Kytkennät
7.1 Kytkentöjen esittely
S-VIDEO
VIDEO
L
R
USB
AUDIO
EXT 3
Y
Pb
Pr
AUDIO
L/
R
EXT 1EXT 2
AUDIO OUT DIGITAL
AUDIO
L
R
ANTENNA
COMMON INTERFAC
E
IN
OUT
SERVICE
UAR
T
DISPLAY SYNCHRONIZED
DISPLAY SYNCHRONIZED
.
HDMI 1 HDMI 2 HDMI 3
123
16
15
14
12
4 8 9 10 115 76
13
2657.1 fi 14-05-2007 12:21 Pagina 30
Page 39

7.2 Tietoja kytkennöistä
Tässä luvussa on tietoja laitteeseen parhaiten
sopivista liitännöistä.
Television takaosassa on kuusi liitäntää: TV - EXT1,
EXT2, EXT3, HDMI1, HDMI2 ja HDMI3. Kytke laite
laadultaan parhaimpaan liitäntään.Etsi laitteen
laadukkain liitäntä ja kytke laite sen avulla
televisioon.
Kytkentäasetukset
Kun laitteet on kytketty, television on oltava selvillä
tehdyistä kytkennöistä ja miten laitteet on kytketty
liittimiin. Nämä asetukset voi tehdä TV-valikossa.
Lisätietoja on luvussa 7.4 Kytkentäasetukset.
7.2.1 HDMI - laadukkain ★★★★★
HDMI-liitännällä saadaan paras kuvan ja äänen laatu.
Video- ja äänisignaalit käyttävät samaa kaapelia.
HDMI-liitäntä sopii teräväpiirtotelevision
signaaleihin.
HDMI-liitännällä televisioon liitetty laite voi vain
lähettää televisioon ääni- ja videosignaaleja. Laite ei
siis pysty vastaanottamaan tai tallentamaan
televisiosta ääntä tai videota.
HDMI-kaapeli (enintään 5 m)
à Vihje
Käytä HDMI/DVI-sovitinta, jos laitteessa on vain
DVI-liitäntä.Tällöin tarvitaan lisäksi ylimääräinen
äänikaapeli.
rHuomautus
HDMI tukee HDCP:tä (High-bandwidth Digital
Contents Protection). HDCP on HD-sisältöön
(DVD- tai Blu-ray-levy) sisältyvä
kopiosuojaussignaali.
7.2.2 YPbPr - laadukas ★★★★
Käytä samanaikaisesti komponenttivideon YPbPrliitäntöjä ja Audio L/R -miniliitintä.Varmista, että
kytket kaapelit värien mukaisesti.
YPbPr-liitäntä pystyy käsittelemään
teräväpiirtotelevisiosignaaleja.
Komponenttivideon Audio L/R stereoYPbPr-kaapeli miniliitinkaapeliin
- punainen, vihreä, sininen
7.2.3 Scart - hyvälaatuinen ★★★
Video- ja äänisignaalit käyttävät samaa kaapelia.
Scart-liitäntä sopii RGB-videonsignaalin mutta ei
teräväpiirtotelevisiosignaalin käsittelemiseen.
Scart-kaapeli
Liitännät 31
SUOMI
2657.1 fi 14-05-2007 12:21 Pagina 31
Page 40

7.2.4 S-Video - hyvälaatuinen ★★
Käytä yhdessä S-Video- ja Audio L/R (RCA) kaapeleita.Varmista, että kytket kaapelit värien
mukaisesti.
S-Video-kaapeli Audio L/R -kaapeli
- punainen, valkoinen
7.2.5 Video - peruslaatu ★
Käytä yhdessä video (RCA)- ja Audio L/R (RCA) kaapeleita.Varmista, että kytket kaapelit värien
mukaisesti.
Yhdistetty video- (keltainen) ja Audio L/R -kaapeli
(punainen ja valkoinen)
7.2.6 Kuvaan synkronisoitu äänilähtö
Kun kyseessä on puhe, äänen ja kuvan saa parhaiten
vastaamaan toisiaan kytkemällä
kotiteatterijärjestelmä Audio L/R- tai Digital Audio lähtöön.
Katso kaavioita 7.3.4 ja 7.3.8.
Älä kytke DVD-soittimen, digitaalivastaanottimen tai
muun AV-laitteen äänisignaalia suoraan
kotiteatterijärjestelmään.
32 Liitännät
2657.1 fi 14-05-2007 12:21 Pagina 32
Page 41

Liitännät 33
SUOMI
7.3 Laitteiden kytkeminen
Tässä luvussa kuvattuja liitäntöjä suositellaan
käytettäväksi useimmissa tapauksissa,
mutta myös muita ratkaisuja voi ehkä käyttää.
7.3.1 DVD-soitin
Kytke laite scart-kaapelilla
EXT1-tuloon television
takaosassa.
7.3.2 DVD-tallennin tai digitaalivastaanotin
Käytä scart-kaapelia ja 2 antennikaapelia.
7.3.2 DVD-tallennin tai digitaalivastaanotin
Käytä 3 scart-kaapelia ja 3 antennikaapelia.
EXT 3
Y
Pb
Pr
AUDIO
L/R
HDMI 3HDMI 1 HDMI 2
EXT 1EXT 2
AUDIO OUT
L
R
OUT
IN
ANTENNA
DIGITAL
AUDIO
Receiver / Cable boxDVD Recorder
IN
OU
T
I
N
OUT
EXT 3
Y
Pb
Pr
AUDIO
L/R
HDMI 3HDMI 1 HDMI 2
EXT 1EXT 2
DVD Player
AUDIO OUT
L
R
OUT
IN
ANTENN
A
DIGITAL
AUDIO
EXT 3
Y
Pb
Pr
AUDIO
L/R
HDMI 3HDMI 1 HDMI 2
EXT 1EXT 2
DVD Recorder / Digital receiver
AUDIO OUT
L
R
OUT
IN
ANTENN
A
DIGITAL
AUDIO
IN
OUT
2657.1 fi 14-05-2007 12:21 Pagina 33
Page 42

7.3.4 DVD-tallennin ja
kotiteatterijärjestelmä
Käytä scart-kaapelia, 2 antennikaapelia ja 2
digitaalista RCA-audiokaapelia.
7.3.5 DVD-tallennin ja DVDkotiteatterijärjestelmä
Käytä 2 scart-kaapelia, 2 antennikaapelia ja 2
digitaalista RCA-audiokaapelia.
7.3.6 Satelliittivastaanotin
Käytä scart-kaapelia ja 2 antennikaapelia.
34 Liitännät
EXT 3
Y
Pb
Pr
AUDIO
L/R
HDMI 3HDMI 1 HDMI 2
EXT 1EXT 2
Satellite receiver
AUDIO OUT
L
R
OUT
IN
ANTENN
A
DIGITAL
AUDIO
EXT 3
Y
Pb
Pr
AUDIO
L/R
HDMI 3HDMI 1 HDMI 2
EXT 1EXT 2
AUDIO OUT
L
R
OUT
IN
ANTENN
A
DIGITAL
AUDIO
IN
DIGITAL
AUDIO
OUT
DIGITAL
AUDIO
OUT
Home Theatre SystemDVD Recorder
DIGITAL
AUDIO
IN
IN
OUT
EXT 3
Y
Pb
Pr
AUDIO
L/R
HDMI 3HDMI 1 HDMI 2
EXT 1EXT 2
AUDIO OUT
L
R
OUT
IN
ANTENN
A
DVD Home Theatre SystemDVD Recorder
DIGITAL
AUDIO
IN
DIGITAL
AUDIO
OUT
IN
OUT
2657.1 fi 14-05-2007 12:21 Pagina 34
Page 43

7.3.7 HD-digitaalivastaanotin tai HDsatelliittivastaanotin
Käytä HDMI-kaapelia ja 2 antennikaapelia.
7.3.8 DVD-R, kotiteatterijärjestelmä ja
digitaalivastaanotin
Käytä 3 scart-kaapelia, 3 antennikaapelia ja 2
digitaalista RCA-audiokaapelia.
7.3.9 Blu-ray-soitin
Käytä HDMI-kaapelia.
Liitännät 35
SUOMI
EXT 3
Y
Pb
Pr
AUDIO
L/R
HDMI 3HDMI 1 HDMI 2
EXT 1EXT 2
Blu-ray Disc player
AUDIO OUT
L
R
OUT
IN
ANTENN
A
DIGITAL
AUDIO
OUT
HDMI
EXT 3
Y
Pb
Pr
AUDIO
L/R
HDMI 3HDMI 1 HDMI 2
EXT 1EXT 2
HD Digital receiver / HD Satellite receiver
AUDIO OUT
L
R
OUT
IN
ANTENN
A
DIGITAL
AUDIO
IN
OUTOUT
HDMI
EXT 3
Y
Pb
Pr
AUDIO
L/R
HDMI 3HDMI 1 HDMI 2
EXT 1EXT 2
AUDIO OUT
L
R
OUT
IN
ANTENN
A
DIGITAL
AUDIO
IN
DIGITAL
AUDIO
OUT
DIGITAL
AUDIO
OUT
Home Theatre SystemDigital ReceiverDVD Recorder
DIGITAL
AUDIO
IN
IN
OUT
IN
OUT
2657.1 fi 14-05-2007 12:21 Pagina 35
Page 44

7.3.10 Pelikonsoli
Kätevin pelikonsoliliitäntä on television sivussa.
Laadukkaat liitännät ovat television takaosassa.
Kytketty television sivussa oleviin liitäntöihin
Käytä video-ja Audio L/R (RCA) -liittimiä.
Kytketty television takana oleviin liitäntöihin
Käytä HDMI- tai YPbPr (EXT3) tuloa, jos haluat
HD-laadun.
7.3.11 Videokamera
Kätevin videokameraliitäntä on television sivussa.
Laadukkaat liitännät ovat television takaosassa.
Kytketty television sivussa oleviin liitäntöihin
Käytä video- ja Audio L/R (RCA) -liittimiä tai SVideo- ja Audio L/R -liittimiä.
Kytketty television takana oleviin liitäntöihin
Käytä HDMI- tai YPbPr (EXT3) tuloa, jos haluat
HD-laadun.
7.3.12 Tietokone
Tietokoneen paras liitäntä on television
taustapuolella. Käytännöllisempi liitäntä katsottaessa
valokuvia ja elokuvia tietokoneesta on television
sivulla.
ç Varoitus
Määritä tietokoneen näytön virkistystaajuudeksi
60 Hz ennen tietokoneen kytkemistä televisioon.
Liitäntä television taustapuolella
Suorita liitäntä tietokoneen DVI-liitännästä television
HDMI-liitäntään. Käytä HDMI - DVI -kaapelia tai
HDMI - DVI -sovitinta.
Kytke ääni stereominiliitinkaapelilla. Liitä
stereominiliitin television
EXT3-liitäntään.
Yhdistä Liitännät-valikossa tämä
EXT3 -liitäntä
käyttämääsi HDMI-liittimeen. Lisätietoja on luvussa
7.4 Kytkentäasetukset.
Liitäntä television sivulla
Jos tietokoneessa ei ole DVI-liitäntää, käytä
television sivulla olevaa S-Video-liitäntää ja v/oRCA-ääniliitäntää. Tämä liitäntä sopii ainoastaan
Windows Media Centerin ja vastaavien kaltaisille
sovelluksille.
à Vihje
Vaihda Kuvaformaatti-valikossa television
kuvaformaatiksi Skaalaamaton. Näin saat
mahdollisimman terävän kuvan. Lisätietoja on
luvussa 5.3.4. Laajakuvaformaatti.
Lisätietoja tuetuista tietokoneen näytön
erottelukyvyistä on luvussa 8 Tekniset tiedot.
36 Liitännät
S-VIDEO
VIDEO
L
R
USB
AUDIO
DVI
AUDI
O OUT
DVI
AUDIO
OUT
HDMI
HDMI
EXT 3 - AUDIO L/R
S-VIDEO
VIDEO
L
R
AUDIO
S-VIDEO
VIDEO
L
R
USB
AUDIO
2657.1 fi 14-05-2007 12:21 Pagina 36
Page 45

7.4 Kytkentäasetukset
Kun kaikki laitteet on kytketty, television on
tiedettävä, mitä liitäntöjä on tehty ja miten laitteet
on kytketty liittimiin.
7.4.1 Digital Audio In (jatkuu)
Jos käytät Digital Audio In -liitäntää,
määritä liitäntä valikossa siihen laitteeseen, josta ääni
tulee.
‡ Paina kaukosäätimen Menu-painiketta ja valitse
Tv-valikko > Asennus > Liitännät > Digital
Audio In.
® Siirry luetteloon π-painikkeella.
Ò Valitse laitteen käyttämä liitin œ- tai o-
painikkeella.
7.4.2 Audio In L/R
Jos käytät Audio In L/R -liitäntää, määritä liitäntä
valikossa siihen laitteeseen, josta ääni tulee.
‡ Paina kaukosäätimen Menu-painiketta ja valitse
Tv-valikko > Asennus > Liitännät > Audio In
L/R.
® Siirry luetteloon π-painikkeella.
Ò Valitse laitteen käyttämä liitin œ- tai o-
painikkeella.
7.4.3 Laitteiden nimeäminen
Nimeä kytketyt laitteet, sillä se helpottaa valintaa ja
signaalin käsittelyä.
Määritä laitteen kanssa käytettävälle liittimelle
laitetyyppi (kuten DVD,VCR tai Peli).
‡ Paina kaukosäätimen Menu-painiketta ja valitse
Tv-valikko > Asennus > Liitännät >
EXT1.
® Siirry luetteloon π-painikkeella.
Ò Valitse laitetyyppi œ- tai o-painikkeella.
† Poistu valikosta painamalla uudelleen Menu-
painiketta.
7.4.4 Dekooderikanavat
Antennikanavia purkavat dekooderit kytketään
liittimiin
EXT1 tai EXT2 (scart).
TV-kanava on määritettävä dekoodattavaksi
kanavaksi. Määritä liitäntä, johon dekooderi on
kytketty.
‡ Paina kaukosäätimen Menu-painiketta ja valitse
Tv-valikko > Asennus > Dekooderi > Kanava.
® Siirry luetteloon π-painikkeella.
Ò Valitse purettava kanava œ- tai o-painikkeella.
† Siirry takaisin p-painikkeella ja valitse Tila.
º Valitse dekooderin käyttämä liitin œ- tai o-
painikkeella.
◊Poistu valikosta painamalla Menu-painiketta.
Liitännät 37
SUOMI
tt
t
N
N
3
3
u
/R
t
3
3
u
tt
t
/R
3
3
u
/R
t
3
3
tt
t
3
3
u
ään
y
R
.
i
CR
2657.1 fi 14-05-2007 12:21 Pagina 37
Li
EXT
HDMI
Siv
AUDIO IN L
DIGITAL AUDIO I
Li
EXT
HDMI
Siv
AUDIO IN L
DIGITAL AUDIO I
Ei mi
EXT
HDMI
Siv
AUDIO IN L
Ei mi
EXT
HDMI
Li
Ei mit
EXT
HDMI
Siv
Blu-ra
HDD/DVD
HD rek
Pel
V
Page 46

7.5 Ennen digitaalipalvelujen
käyttöönottoa
Salattuja digitaalisia TV-kanavia voi purkaa
digitaalisten TV-ohjelmien palveluntarjoajan
toimittamalla CA-moduulilla. CA-moduulin avulla
voi olla mahdollista käyttää monenlaisia palveluja
(kuten maksullisia TV-kanavia), mutta nämä palvelut
vaihtelevat palveluntarjoajien mukaan.
Pyydä lisätietoja ja käyttöehdot omalta digitaalisten
TV-lähetysten palveluntarjoajalta.
7.5.1 Aseta CA-moduuli paikalleen
) Varoitus
Katkaise televisiosta virta ennen CA-moduulin
asettamista paikalleen.Tarkista CA-moduulista oikea
asetussuunta. Jos moduuli asetetaan virheellisesti,
CA-moduuli tai televisio voi vahingoittua.
‡ Aseta CA-moduuli varovasti television
takaosassa olevaan Common Interface liittymään.
® Jätä CA-moduuli Common Interface -liittymään.
CA-moduulin aktivoitumiseen menee muutama
minuutti. CA-moduulin poistaminen poistaa
digitaalisen TV-ohjelmat käytöstä.
7.5.2 Yleinen liittymä -valikko
Tästä valikosta voi käyttää asennettuja CA-moduulin
palveluja. CA-moduulin palveluntarjoaja toimittaa
sovellukset toimintoineen, sisällön ja kuvaruudussa
näkyvät sanomat.
‡ Paina kaukosäätimen Menu-painiketta ja valitse
Tv-valikko > Toiminnot > Yleinen liittymä.
Tämä valikkovaihtoehto on valittavissa, kun CAmoduuli on asetettu paikalleen ja se on
muodostanut yhteyden palveluntarjoajaan.
38 Liitännät
COMMON INTERFACE COMMON INTERFACE
2657.1 fi 14-05-2007 12:21 Pagina 38
Page 47

8Tekniset tiedot
Kuva/näyttö
• Näyttötyyppi: täysi LCD-teräväpiirto W-UXGA
•Paneelin erottelukyky: 1366 x 768p
•Perfect Pixel HD -kuvanparannus
• 1080p, 24/25/30/50/60 Hz:n käsittely
Tuetut näyttötarkkuudet
• Tietokoneformaatit
Erottelukyky Virkistystaajuus
640 x 480 60 Hz
800 x 600 60 Hz
1024 x 768 60 Hz
1280 x 1024 60 Hz
1360 x 768 60 Hz
• Videoformaatit
Erottelukyky Virkistystaajuus
480i 60 Hz
480p 60 Hz
576i 50 Hz
576p 50 Hz
720p 50 Hz, 60 Hz
1080i 50 Hz, 60 Hz
1080p 24 Hz, 25 Hz, 30 Hz
1080p 50 Hz, 60 Hz
Viritin/vastaanotto/lähetys
• Antenni-tuloliitäntä: 75 ohmia, koaksiaalinen
(IEC75)
•TV-järjestelmä: DVD COFDM 2K/8K
• Videotoisto: NTSC, SECAM, PAL
•DVD: DVB-T
(katso maakohtaiset tiedot television
tyyppikilvestä)
Mitat ja painot (noin)
TV-malli 32PFL9632D/10
- leveys 823 mm
- korkeus 536 mm
- syvyys 125 mm
- paino 20 kg
TV ja teline
- leveys 823 mm
- korkeus 601 mm
- syvyys 219 mm
- paino 23 kg
Tekniset tiedot voivat muuttua ilman erillistä
ilmoitusta.
Ääni
• Äänijärjestelmä:
- Virtual Dolby Digital
- BBE
Multimedia
• Liitäntä: USB
•Toistoformaatit: MP3, LPCM, diaesitys (.alb)
JPEG, MPEG1, MPEG2
Kaukosäädin
•Tyyppi: RC4450
•Paristot: 2 AA-paristoa (tyyppi: R6)
Liitännät
• EXT1 (scart): Audio L/R, CVBS-tulo/-lähtö, RGB
• EXT2 (scart): Audio L/R, CVBS-tulo/-lähtö, RGB,
S-video-tulo/-lähtö
• EXT3:Y Pb Pr, Audio L/R -tulo (miniliitäntä)
• HDMI 1
• HDMI 2
• HDMI 3
• Analoginen Audio L/R out - display synchronised
• Digital Audio in (koaksiaalinen-RCA-S/PDIF)
• Digital Audio out (koaksiaalinen-RCA-S/PDIF)
display synchronised
• Sivussa: Audio L/R -tulo,Video (CVBS) -tulo, SVideo, kuulokelähtö (stereominiliitäntä), USB
Virta
•Verkkojännite: 220–240V AC (±10 %)
• Virrankulutus ja virrankulutus valmiustilassa:
Tekniset tiedot ovat osoitteessa www.philips.com
• Ympäristön lämpötila: 5–35 °C
Tekniset tiedot voivat muuttua ilman erillistä
ilmoitusta. Lisää tämän tuotteen teknisiä tietoja on
osoitteessa www.philips.com/support.
Tekniset tiedot 39
SUOMI
2657.1 fi 14-05-2007 12:21 Pagina 39
Page 48

9 Vianmääritys
Te levisio ja kaukosäädin
Televisioon ei voi kytkeä virtaa.
•Tarkista, että virtajohto on kytketty verkkovirtaan.
•Tarkista, että kaukosäätimen paristot eivät ole
kuluneet tai kulumassa loppuun.Tarkista, että
paristot on asetettu oikein (merkintä +/ - on
oikein).
Voit kytkeä televisioon virran television
painikkeilla.
•Irrota pistoke pistorasiasta, odota minuuttia ja
kytke pistoke uudelleen pistorasiaan.
Televisio ei reagoi kaukosäätimeen
•Tarkista, että kaukosäätimen paristot eivät ole
kuluneet tai kulumassa loppuun.Tarkista, että
paristot on asetettu oikein (merkintä +/ - on
oikein).
• Puhdista kaukosäädin ja television tunnistimen
linssi.
• Muuta sivussa olevilla painikkeilla kuvan ja äänen
perusasetuksia.
‡ Säädä äänenvoimakkuutta painikkeilla Volume -
tai +.
® Selau suosikkikanavia painikkeilla
Program/Channel - tai +.
Ò Päävalikko tulee näyttöön Menu-painikkeella.
Säädä tai valitse kuva- ja äänivalikon
vaihtoehtoja painikkeilla Volume + tai - sekä
painikkeilla Program/Channel - tai +.
Televisiossa vilkkuu punainen valo
•Irrota pistoke pistorasiasta puoleksi minuutiksi ja
kytke se takaisin pistorasiaan.Tarkista, että
ilmanvaihdolle on riittävästi tilaa. Odota, kunnes
televisio on jäähtynyt. Jos televisio ei käynnisty
valmiustilaan ja valo vilkkuu uudelleen, ota yhteys
asiakaspalveluun.
Lapsilukon purkukoodi on unohtunut
• Lisätietoja on luvussa 5.8.3 Koodin määrittäminen
ja koodin vaihtaminen.
TV-valikkokieli on väärä
Vaihda kieli seuraavien ohjeiden mukaan.
‡ Paina kaukosäätimen Menu-painiketta.
® Paina π-painiketta.
Ò Korosta kolmas rivi œ-painikkeella.
† Paina π-painiketta kolmesti.
º Valitse kieli œ- tai o-painikkeella.
◊Paina
OK-painiketta.
‹Poistu TV-valikosta painamalla uudelleen Menu-
painiketta.
TV-kanavat
Osa TV-kanavista on kadonnut
•Tarkista, että olet valinnut oikean kanavaluettelon.
• Kanava on voitu poistaa Järjestä uudelleen -
valikossa.
Asennuksen aikana ei löytynyt digitaalisia kanavia.
•Tarkista, että televisio tukee maassasi DVB-T:tä.
Television tyyppikilvessä on luettelo näistä maista.
Kuva
Vihreä valo palaa, mutta kuvaa ei näy
•Tarkista, että antenni on kytketty oikein.
•Tarkista, että oikea laite on valittuna.
Ääni kuuluu, mutta kuvaa ei näy
•Tarkista valikossa kontrasti- ja kirkkausasetukset.
TV-kuvan laatu on huono
•Tarkista, että antenni on kytketty oikein.
• Kaiuttimet, maadoittamattomat äänilaitteet,
neonvalot, korkeat rakennukset tai vuoret voivat
vaikuttaa kuvan laatuun.Yritä parantaa kuvan
laatua muuttamalla antennin suuntaa ja
sijoittamalla laitteita etäälle televisiosta.
•Tarkista, että Manuaalinen asennus -valikossa on
valittu oikea TV-järjestelmä.
• Jos vain osa kanavista näkyy huonosti, hienosäädä
kyseinen kanava Hienosäätö-valikossa. Lisätietoja
on luvussa 6.2.3.
Kuvan väri on heikkolaatuinen
•Tarkista väriasetukset Kuva-valikossa.
Valitse jokin Nollaa vakioon -asetuksista Nollaa
vakioon -valikossa. Lisätietoja on luvussa 5.3.2.
•Tarkista kytkettyjen laitteiden liitännät ja kaapelit.
Televisio ei muista asetuksia virrankatkaisun jälkeen
•Tarkista, että television asetuksena on Koti.Valitse
Tv-valikko > Asennus > Esiasetukset > Paikka-
valikko.
Kuva ei sovi kuvaruutuun, vaan se on liian suuri tai
pieni
•Valitse Kuvaformaatti-valikosta parempi
kuvaformaatti.
Lisätietoja on luvussa 5.3.4 Laajakuvaformaatti.
40 Vianmääritys
2657.1 fi 14-05-2007 12:21 Pagina 40
Page 49

•Voit parantaa signaalin käsittelyä nimeämällä
kytketyn laitteen Liitännät-valikossa.
Lisätietoja on luvussa 7.4.3 Laitteiden
nimeäminen.
Kuva on väärässä kohdassa kuvaruudussa
• Osa joidenkin laitteiden kuvasignaaleista ei sovi
kunnolla kuvaruutuun.Voit siirtää kuvaa
kaukosäätimen painikkeilla p, π tai o, œ.
Ta r kista laitteen signaali.
Ääni
Kuva näkyy, mutta ääntä ei kuulu
•Tarkista, että äänenvoimakkuudeksi ei ole valittu
0.
•Tarkista, että ääntä ei ole mykistetty ¬-
painikkeella.
•Tarkista, että kaikki kaapelit on kytketty oikein.
• Jos televisio ei havaitse äänisignaalia, ääni
poistetaan automaattisesti käytöstä.
Kyse ei siis ole toimintahäiriöstä.
Ääni on heikkolaatuinen
•Tarkista, onko ääniasetukseksi valittu Stereo.
•Tarkista Taajuusvastekorjain-asetukset.
•Valitse jokin Nollaa vakioon -asetuksista Nollaa
vakioon -valikossa. Lisätietoja on luvussa 5.3.2.
Ääni kuuluu vain toisesta kaiuttimesta
•Tarkista, että Tasapaino-asetus ei ole vasemmassa
tai oikeassa ääripäässä.
HDMI-liitännät
Laitteiden HDMI-liitäntään liittyvät ongelmat
• HDMI - HDCP:ssä kuluu muutama sekunti, ennen
kuin televisiossa näkyy laitteesta tuleva kuva.
• Jos televisio ei tunnista laitetta eikä kuvaruudussa
ole kuvaa, siirry toiseen laitteeseen ja sitten
takaisin alkuperäiseen, jolloin HDCP käynnistyy
uudelleen.
• Jos äänihäiriöt ovat toistuvia, tarkista
lähtöasetukset laitteen käyttöoppaasta.
• Jos käytössä on HDMI–DVI-sovitin, tarkista, että
lisä-ääniliitäntä täydentää DVI-liitäntää.
USB-liitäntä
USB-laitteen sisältö ei näy televisiossa
• Määritä laite (kamera) Massamuistityyppiyhteensopivaksi.
• USB-laitteen on kanssa on ehkä käytettävä tiettyä
ohjainohjelmistoa.Tätä ohjelmisto ei valitettavasti
voi ladata televisioon.
Tiedostot eivät näy Multimedia-valikossa
• Kaikkia ääni- ja kuvatiedostoja ei tueta. Lisätietoja
on luvussa 8 Tekniset tiedot.
Ääni- ja kuvatiedostojen toistossa on häiriöitä
• USB-laitteen siirtotoiminto rajoittaa
siirtonopeutta.
Tietokone
Tietokoneen näyttö ei näy vakaana tai
synkronoituna televisiossa
•Tarkista, että tietokoneessa on valittu oikea
erottelukyky. Lisätietoja on luvussa 8 Tekniset
tiedot.
Jos ongelma ei ratkea
Katkaiset televisiosta virta ja kytke se takaisin. Jos
ongelma ei ratkea, ota yhteys asiakaspalveluun
tutustu sivustoon www.philips.com/support.
Asiakaspalvelun puhelinnumerot ovat tämän
käyttöoppaan viimeisellä sivulla.
Selvitä television malli ja tuotenumero, ennen kuin
soitat.
Nämä numerot löytyvät pakkauksen tarrasta tai
television takana tai pohjassa olevista tyyppikilvistä.
) Varoitus
Älä koskaan yritä korjata televisiota itse.
Vianmääritys 41
SUOMI
2657.1 fi 14-05-2007 12:21 Pagina 41
Page 50

10 Hakemisto
Active Control 16
Aikavyöhyke 27
Ajastimet 22
Ambilight
ja television valmiustila 19
kaksikanavainen 5
toiminnot 11
väri 18
valikko/asetukset 18
Analoginen
manuaalinen asennus 28
TV-kanavat 28
Antenni
kaapeli 7
kytkeminen 7
laitteisiin 30
Asennus
automaattinen 27
manuaalinen 28
päivitys 29
valikko 27
Asetusavustaja 15
Automaattinen kuvakoko 17
Automaattinen asennus 27
Automaattinen surround 18
Autom.n äänenvoimakkuus 18
Blu-ray 30,31,35
CA-moduuli 30,38
Dekooderi
kanava 36
Delta-äänenvoimakkuus 18
Digitaalinen
audio out 30
audiokieli 17
HD-vastaanotin 35
natural motion 16
tekstityskieli 24
teksti-tv 20
vastaanotin 33
vastaanottotesti 29
Dual screen 12
DVB-T 5
DVD
liitäntä 33
toisto 9
soitin 33
tallennin 33
Dynaaminen kontrasti 16
External 1,2,3 (EXT) 30
Haku
kanavat 28
teksti-tv-sivut 19
HDCP 31
HDMI
liitäntä 30
Hienosäätö 28
Järjestäminen uudelleen 28
Kaapeli
HDMI 31
Scart 32
YPbPr 31
S-Video 32
Video 32
Kamera (valokuva) 36
Kanava
asennus 27
edellinen 12
hallinta 29
järjestää uudelleen 28
kaikki kanavat -luettelo 20
lukitus 20
suosikkiluettelo 20
tallentaa/asentaa 28
Kanavien järjestäminen
uudelleen 28
Katseluväri
Katselunesto 20
Katselusävy 16
Kaukosäädin
paristot 7
esittely 12
Kello 15
Kensington-lukon paikka 5
Kieli
audio 18
tekstitys 19
valikko 27
Kierrätys 3
Kirkkaus 16
ambilight 18
Kontrasti 16
Koodi 22
Koodin määrittäminen 22
Koodin vaihtaminen 22
Koti
paikka 40
Kotiteatterijärjestelmä 34
Kuulemisvaikeus 27
Kuulokkeet
liitäntä 4,30
äänenvoimakkuus 18
Kuva
formaatti 16
valikko 16
Kuvaruudun hoito 3
Kuvaruudun puhdistaminen 3
Kytkentäajastin 22
Laajakuvaformaatti 17
Laite
kytkeminen 31
nimeäminen 36
katsominen 9
Laitteiden nimeäminen 36
Lapsilukko 23
Liikkumattomat kuvat 3
Liitäntä
asetukset 31,36
esittely 30
paras 31
Lukot 22
Maa
digitaalinen järjestelmä 29
valinta 27
Melun vähennys 16
Menu-painike 13
Mono 18
Movie expand 17
MPEG artifact vähentyminen 16
M
L
K
J
H
E
D
C
B
A
42 Hakemisto
2657.1 fi 14-05-2007 12:21 Pagina 42
Page 51

Musiikki 25
Mustan taso 16
Mykistyspainike 12
Nimeäminen uudelleen 28
Ohjelman vaihto 12
Ohjelmiston päivitys 26
OK-painike 12
Paikka 40
Painikkeet
kaukosäätimessä 4,12
televisiossa 4
väri 12
Paristot 3,7
Pelikonsoli 36
Pikahakuvalikko 15
Pixel Plus 3 HD 16
Radiokanava 27
Satelliittivastaanotin 34
Scart-liitäntä 32
Stereo 18
Suosikkiluettelot 20
Superzoomaus 17
Sähköinen ohjelmaopas 21
Sävy 16
Taajuusvastekorjain 17
Tallennin 33
Tasapaino
Ambilight 18
ääni 17
Tehdasasetukset 29
Tekniset tiedot 39
Teksti-tv 19
digitaalinen 28
dual screen 19
sivu 19
teksti-tv 2.5 20
T. O.P 19
valikko 20
Tekstitys 23
Television sijoittaminen 5
Terävyys 16
Tietokone
kytkeminen 36
näytön erottelukyky 39
Tu r vallisuus 3
TV-asetukset-valikko 15
Uniajastin 22
USB
laite 24
liitin 30
valokuvien katselu 24
Vakioiden palauttaminen 15
Valkoinen piste 16
Valmiustila 22
Valoanturi 16
Valokuvien katselu 24
VCR
liitäntä 33
Vianmääritys 40
Videokamera 36
Videokaapeli 32
Videoformaatit 39
Virran kytkeminen 8
Virta 8
Virtajohto 8
Värien parannus 16
Väri
valikko 16
painikkeet 4,12
Värisävy 16
Yleinen liittymä (CA-moduuli)
liittymä 30,38
valikko 38
YPbPr 31
Ääni I/II 18
Ääni
Surround-ääni 18
valikko 17
Äänenvoimakkuus
painike 12
valikko 17
Ä
Y
V
U
T
S
R
P
O
N
Hakemisto 43
SUOMI
2657.1 fi 14-05-2007 12:21 Pagina 43
Page 52

44
2657.1 fi 14-05-2007 12:21 Pagina 44
 Loading...