

Page 1
Page 2
~ MAINS
RS232
VGA 1 VGA 2
RC OUT
VGA 2
L
R
L
R
AUDIO
VGA 1
EXTERNAL 5
ANTENNA
EXTERNAL 3
EXTERNAL 1 EXTERNAL 2
EXTERNAL 4
AUDIO
OUT
R
L
NO FUNCTION
VGA IN MONITOR
AUDIO VGA IN
CENTRE
AUDIO MONITOR
MAINS INLET
LL
RR
L
RV
U
Y
CABLE
1
2
3
Page 3
~ MAINS
RS232
LRL
VGA 2
VGA 1
AUDIO IN
R
VGA 1
min.
1 m
VGA 2
RC OUT
Preparation
Unpacking and wall mounting instructions
For the unpacking instructions follow the illustrated steps printed on the
packaging (outside and inside). For the wall mounting instructions follow the
illustrated steps ‘ to § printed on the separate leaflet.
Make sure that the wall mount is being fixed securely enough so that it meets
safety standards.The weight of the monitor (excl. packaging) is about 24 kg
(32”), 30 kg (37”) and 35,5 (42”).
Note: Stands are optional accessories. Consult your dealer.
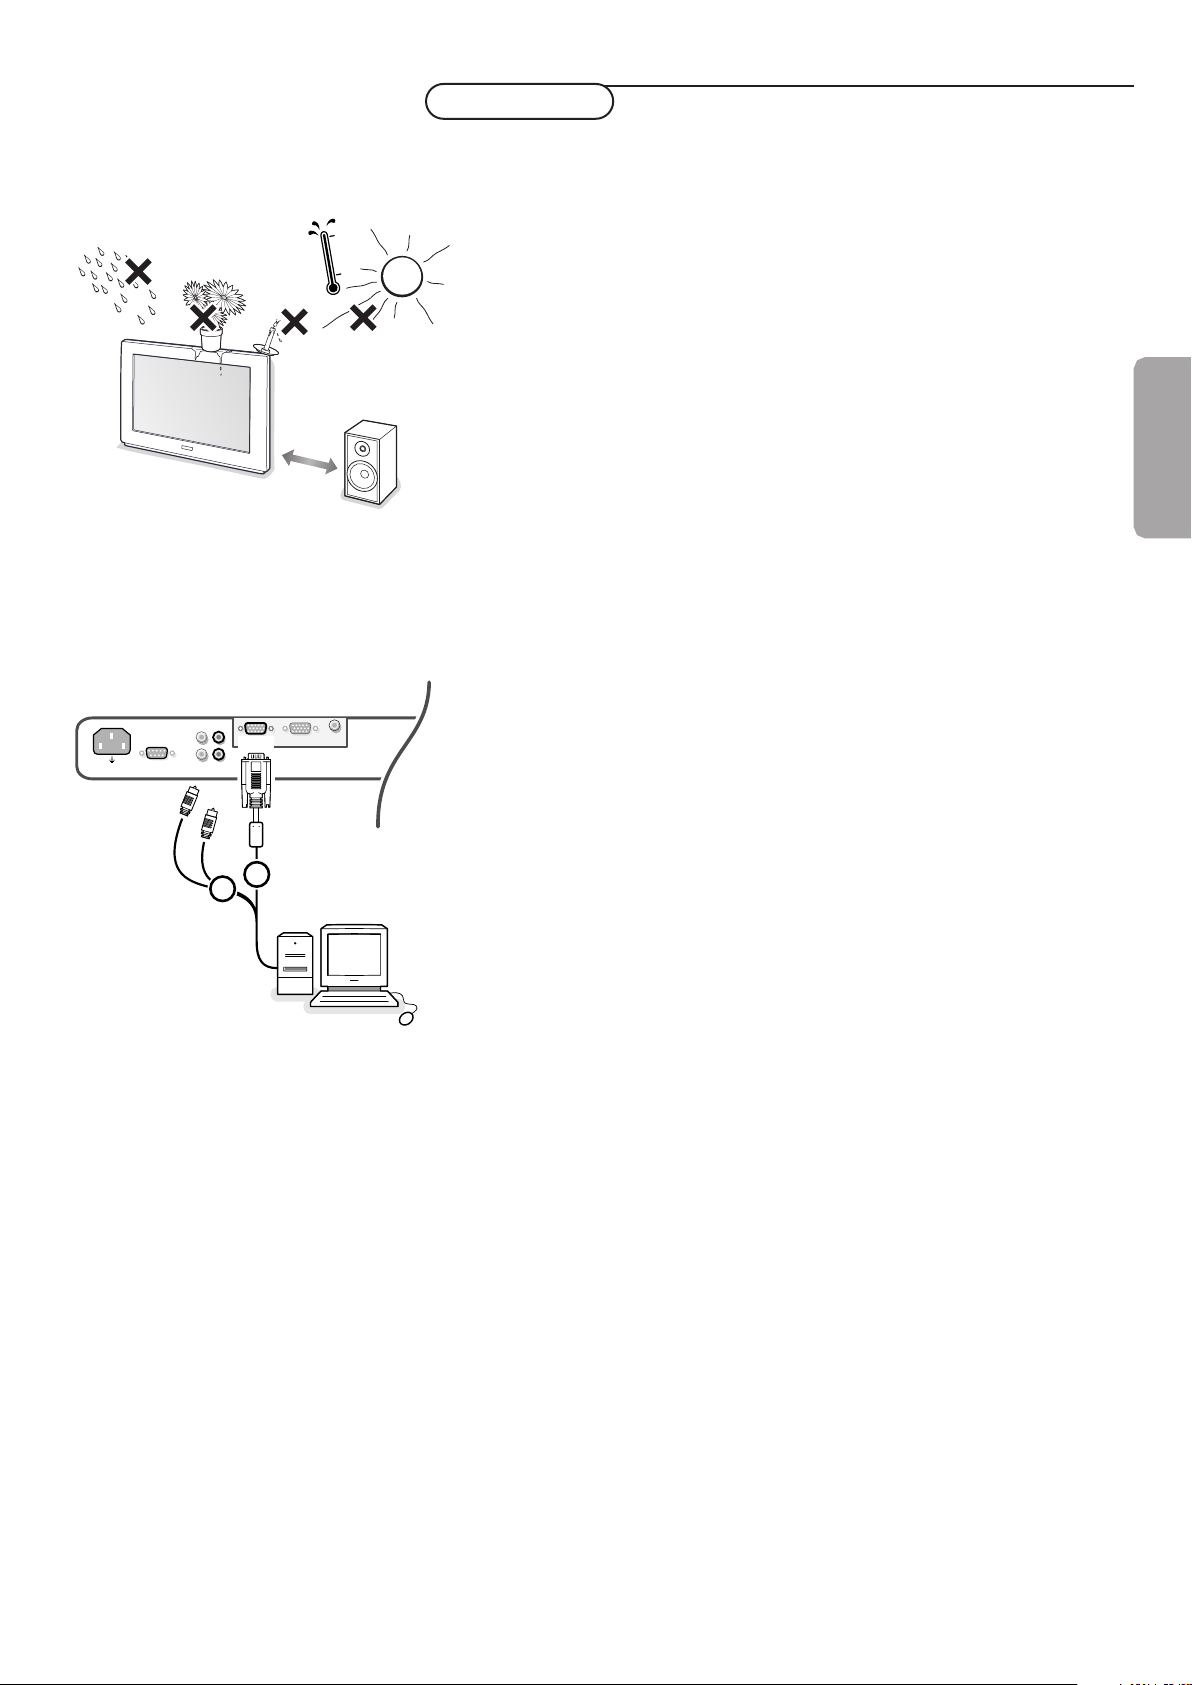
To prevent any unsafe situations, no naked flame sources, such as lighted
candles, should be placed on or in the vicinity.Avoid heat, direct sunlight and
exposure to rain or water.
The equipment shall not be exposed to dripping or splashing and no objects
filled with liquids, such as vases, shall be placed on it.
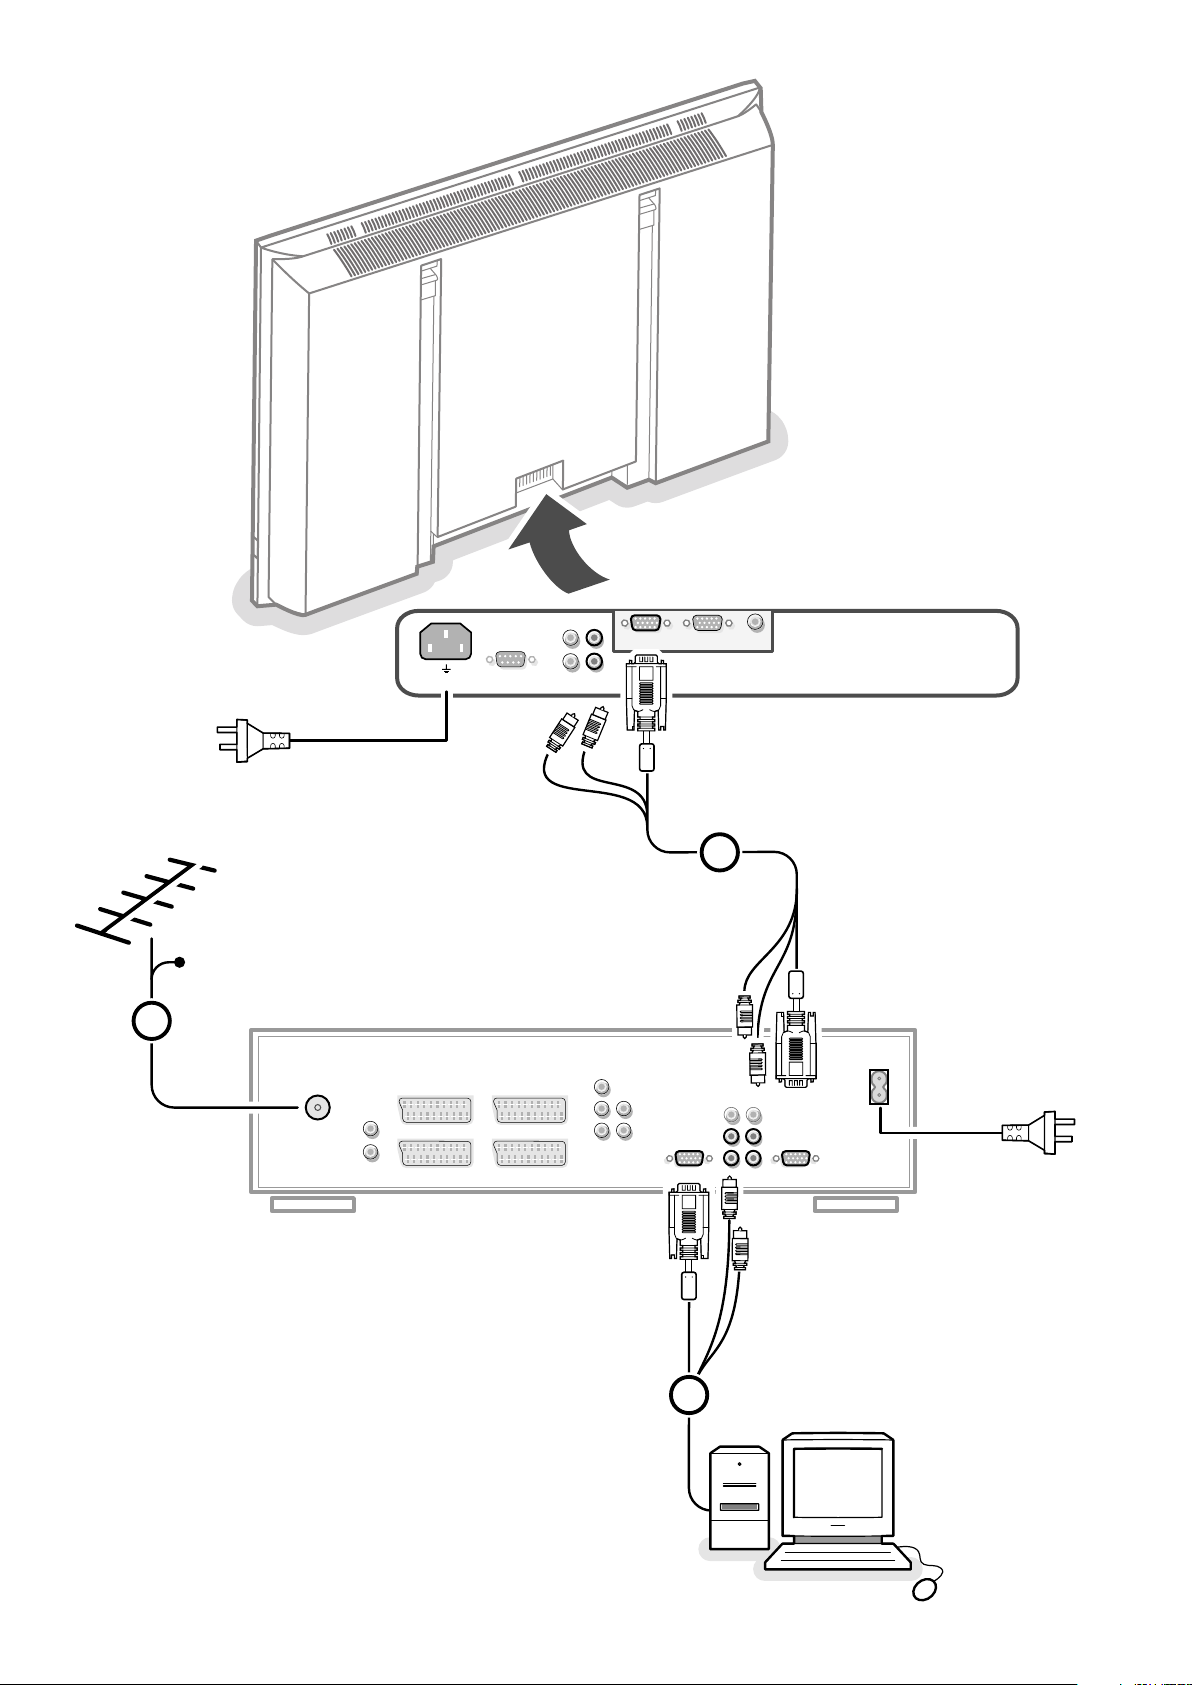
Connect your electronic receiver box
See the separate supplied instruction manual with your receiver box.
Connect your computer
To the receiver box
See the illustration in the inside frontcover of this handbook.
& Connect one end of a VGA cable to the video card of the computer and the
other end to the
the connectors firmly with the screws on the plug.
VGA IN connector at the rear side of the receiver box. Fix
é In case of a Multimedia computer, connect the audio cable to the audio
outputs of your Multimedia computer and to the
(left) inputs of the receiver box.
AUDIO VGA R (right) and L
English
1
2
Directly to the monitor
& Connect one end of a VGA cable 1 to the video card of the computer and
the other end to the
connectors firmly with the screws on the plug.
VGA 1 connector at the rear side of the monitor. Fix the
é In case of a Multimedia computer, connect the audio cable 2 to the audio
outputs of your Multimedia computer and to the
L (left) inputs of the TV monitor.
Daisy chaining
The Loop Through facility makes it possible to make a daisy chain with a
second monitor.
AUDIO VGA 1 R (right) and
“ Connect one end of another VGA cable to the VGA 2 connector at the rear
side of the monitor and the other end to the
monitor.
VGA 1 connector of a second
‘ In case of a Multimedia computer, also connect audio cables to the AUDIO L
and R outputs of the original monitor and to the AUDIO L and R inputs of the
second monitor.
The RC out jack next to the
remote control signals to other equipment.
This output cannot be used to daisy chain a second monitor.
Serial I/O port RS232
The RS232 connector is only to be used with the monitor as stand alone.
This connector allows you to control the monitor via your PC (as a
replacement of the remote control).
Note:This connector can also be used for dealer service tools.
VGA 2 connector makes it possible to daisy chain
1
Page 4

R6 / AA
B
Monitor Display modes
VGA 640x480 60, 72, 75, 85 Hz
Wide VGA 848x480 60 Hz
Wide VGA 852x480 60 Hz
MAC 640x480 66.67 Hz
MAC 832x624 74.55 Hz
MAC 1024x768 74.93 Hz
MAC 1152x870 75 Hz
SVGA 800x600 56, 60, 72, 75, 85 Hz
XGA 1024x768 60, 70, 75, 85 Hz
SXGA 1280x1024 60, 72 Hz
When a VGA computer is connected, the display selection is made
automatically.
A message is displayed when the monitor does not support the connected
VGA mode. Switch your computer to a correct display mode.
Operation
& Insert the mains plug supplied into the mains inlet at the back of the
monitor and in the wall socket.
For safety, please, only use the supplied rim-earthed mains cord which has to be
inserted in a grounded socket.
é Remote control: remove the cover of the battery compartment.
Insert the 2 batteries supplied (Type R6/AA-1.5V).
The batteries supplied do not contain the heavy metals mercury and cadmium.
Nevertheless in many countries batteries may not be disposed of with your
household waste. Please check on how to dispose of batteries according to local
regulations.
“ Make sure that your electronic receiver box and/or PC are switched on and
that your PC is in the correct display mode.
‘ Switch the monitor on : Press the on/off key B at the right side of the
monitor.
A green indicator lights up and the screen comes on.
When the monitor does not receive a supported VGA signal and is not
connected to a receiver box, the screen switches to standby and the red
indicator lights up.
When you switch on your monitor for the first time, and the monitor is
not connected to an electronic receiver box, the language menu
automatically appears on the screen.The explanation appears in different
languages one at a time.
Follow the instructions on screen to select the correct language or see
Setup menu, Language, p. 5.
Preparation
2
2
Page 5

Use of the remote control
POWER
BRIGHTNESS
CONTRAST
ZOOM OUTZOOM INZOOM ON/OFF
VGA AV1 AV2 AV3
MUTE
AV MUTE
q
1
2
3
4
5
6
7
8
9
0
V
CH/PR
MENU
OK
¬
B
Use of the remote control
VGA to select your computer connected
to the
VGA 1 connector
AV1 , AV 2, AV3 no function
BRIGHTNESS +/-
to adjust the brightness level of the
picture
CONTRAST +/-
to adjust the contrast level of the picture
ZOOM ON/OFF to activate/de-activate the
zoom function. See p. 4.
ZOOM IN/OUT to adjust the zoom factor
and to change the magnification of the
picture when zoom is activated. See p. 4.
B to switch to standby or on again
MENU to switch the menu on/off
cursor keys to select your choice and to
alter a selected adjustment.
OK to activate your choice
V press - or + to adjust the volume
¬ Mute key
Temporarily mute the sound or restore it
CH/PR Programme selection
To browse through the sources selected.
AV MUTE to temporarily mute the
picture and the sound or restore it.
When activated a yellow indicator
starts blinking in front of the monitor.
q Picture format
See Picture 2 menu, p. 4.
Press the q key to switch between the
different picture formats.
3Use of the remote control 3
Page 6

Use of the menus and the menu system
Picture 1 Picture 2 Sound Setup
Brightness
Contrast
Colour temperature
Sharpness
Picture 1
Brightness
Contrast
Colour temperature
Sharpness
& Press the MENU key on the remote control to summon the different menu
headers.
é Press the cursor left/right to move the cursor horizontally through the menu
headers.
“ Press the cursor down to access the menu.
In case of a slider, move the cursor left/right to adjust.
In case of a list with options, move the cursor right to enter and use the
cursor up/down to select an option.
Press the cursor left to leave the options list.
‘ Press the MENU key again to switch off the menu.
Note: Sometimes not all the menu items are visible on the screen.
Press the cursor down until all the items are displayed.
Only when the US English language has been selected (see Setup menu,
Language, p. 5), the menu items will be displayed with additional icons.
Operation
Press the MENU key on the remote control to summon the main menu.
Picture 1 menu
Brightness
This control allows you to adjust the brightness level of the picture.
Contrast
This control allows you to adjust the contrast level of the picture.
Colour temperature
This control allows you to select the colour temperature of the picture.
Move the cursor up/down to make a selection.
Press the cursor left to return to the Picture 1 menu.
Picture 2
Format
Zoom Wide screen
Zoom factor
Shift
Clock frequency
Phase
Auto align
4:3
‡
4:3
Wide screen
Sharpness
This control allows you to adjust the edge definition of a picture.
Picture 2 menu
In this menu you are allowed to adjust attributes which are relevant for the
picture on the display, like format, zoom, size, etc.
Format
Format to summon a list of available display formats for showing
Select
images in the traditional 4:3 proportions.
Press the cursor up/down to select another display format: 4:3 or Wide
screen.
Zoom
Zoom On to activate the zoom function.
Select
You may also activate the zoom function with the
remote control.
Press the cursor left/right, up/down to select which part of the screen will be
zoomed.
Zoom factor
Zoom factor and press the cursor left/right to adjust the zoom factor
Select
and to change the magnification of the picture.
If zoom is not active, Zoom Off, changing the magnification factor will have no
effect on the displayed picture.
ZOOM ON/OFF key on the
Use of the menus
4
Page 7

Picture 2
Format
Zoom Wide screen
Zoom factor
Shift
Clock frequency
Phase
Auto align
Sound
Volume
Bass
Treble
Sound mode
‡
4:3
Clock frequency (optional, only available in VGA mode on VGA 1 or VGA 2)
This control allows you, when necessary, to adjust the values of the clock
frequency so that especially text can be displayed with an optimal overall
sharpness.
Use the cursor left/right to adjust.
Shift (optional, only available in VGA mode on VGA 1 or VGA 2)
This control allows you, when necessary, to move the picture in a horizontal
or vertical way.
& Use the cursor left/right to adjust.
é Press the OK key when done.
Phase (optional, only available in VGA mode on VGA 1 or VGA 2)
This control allows you, when necessary, to adjust the pixel phase of the
picture to avoid picture interference.
Use the cursor left/right to adjust.
Auto align (optional, only available in VGA mode on VGA 1 or VGA 2)
This control allows you to automatically adjust the shift,the clock frequency
and the phase in VGA mode.
Press OK to execute.
Sound menu
Volume
This control allows you to adjust the volume level.
Bass
Bass attenuates or amplifies the low-frequency response of the sound of the
loudspeakers.
Setup
Language US English
English
Nederlands
Deutsch
Français
Español
...
Tr eble
Tr eble attenuates or amplifies the high-frequency response of the sound of
the loudspeakers.
Sound mode
This control allows you to switch between mono and stereo sound.
Note: Bass, Treble and Sound mode will not be available when an electronic receiver
box is connected to the monitor and a VGA source is selected.
Setup menu
Language
& Use the cursor down to select Language.
é Press the cursor right to enter the list of selectable languages.
“ Use the cursor up/down to scroll through the list and to bring up other
languages which are not displayed on the screen at present.
5Use of the menus
Page 8

Tips
Ambient temperature
Do not hang up the monitor above a
central heating or other heating sources.
Care of the screen
Clean the anti-reflex coated flat glass
screen with a slightly damp soft cloth. Do
not use abrasives solvents as it can
damage the glass surface of the screen.
Plasma Display characteristics
Caution:A video source (such as a video
game, DVD, or TV information channel)
which shows a constant non-moving
pattern on the TV screen, can cause
damage to the screen.When your Flat-TV
is continuously used with such a source,
the pattern of the non-moving portion of
the game (DVD, etc.) could leave an image
permanently on the screen.When not in
use, turn the video source OFF.
Regularly alternate the use of such video
sources with normal TV viewing.
When switching over to another picture
after having displayed the same still picture
for a long time (many hours), it may
happen that some parts from the previous
picture will remain on screen due to a
kind of memory effect.This ghost picture
will disappear after some time.To avoid
this effect change the pictures regularly or
for PC use you can turn on a screen saver
in your computer.
For video signals, Philips has built in an
automatic shift of the picture every 5
minutes to avoid this effect and to prolong
the life of the screen.
Very incidentally and after a longer period
of unuse (approx. 1 year) the screen may
display some strange colour deficiencies.
This is quite normal for plasma displays
and these effects will disappear after the
set has been turned on for some time.
A plasma display consists of a high number
of colour pixels. It is within industry
standards that very few pixels
(< 0.001%) may be defective, even for a
new set.There is however no reason to
doubt about the quality of the set.
The plasma display technology operates
with rare gases which are being influenced
by air pressure.
Up to an altitude of 2000 m above sealevel (local air pressure equal or above
800 hPa), the display is functioning fine.
Operating the set at a higher altitude
(lower air pressure),the picture becomes
unstable and the picture performance is
deteriorating. The plasma display might
then also produce a humming sound.After
bringing the set below 2000 m (local air
pressure equal or above 800 hPa) it works
fine again.Transportation has no influence.
Control of peripheral equipment
The infrared signals of the screen may
influence the reception sensitivity of other
peripherals. Solution: replace the batteries
of the remote control or change position
of other equipment. E.g. keep away a
wireless headphone from within a radius
of 1.5 m.
No stable or not synchronised VGA
picture
Check if you have selected the correct
VGA mode in your PC.
No picture or no sound
Are the supplied cables connected
properly? (The power cable to the display,
the VGA cables, the audio cables,...)
Is your PC or receiver box switched on?
Do you see a black screen and the
indicator on front of the monitor lights up
green, this means that the display mode is
not supported.
Switch your VGA source to a correct
mode.
Remote control
If your monitor no longer responds to the
remote control, the batteries may be
exhausted.
If your problem is not solved:
Switch your monitor off and then on
again.
Never attempt to repair a defective
monitor yourself.
Check with your dealer or call a TV
technician.
Tr ansport
Keep the original packaging to transport the
monitor if needed.
End of life directives
Philips is paying a lot of attention to
produce environmentally-friendly in green
focal areas.Your new monitor contains
materials which can be recycled and
reused.
At the end of its life specialised companies
can dismantle the discarded monitor to
concentrate the reusable materials and to
minimise the amount of materials to be
disposed of.
Please ensure you dispose of your old
monitor according to local regulations.
How to dispose of batteries ?
The batteries supplied do not contain the
heavy metals mercury and cadmium.
Nevertheless in many countries batteries
may not be disposed of with your
household waste. Please ensure you dispose
of batteries according to local regulations.
Miscellaneous
. Ambient temperature: + 5 ~ + 40°C
. Maximum operating altitude: 2000 m
(min. air pressure 800 hPa)
. Mains:Auto Voltage ranging from
110V to 240V 50Hz/60Hz
.Power consumption:
around 315 W (42FD9953/93S) or
around 365 W (42FD9944/93S)
. Standby consumption: < 2 W
.Weight (excl. packaging)
Display: 24 kg (32”), 30 kg (37”),
35,5 kg (42”)
. Dimensions (wxhxd):
Display: 96.4 x 51.2 x 8.9 cm (32”)
106 x 58 x 9 cm (37”)
121 x 66 x 9 cm (42”)
.Wall mounting bracket included
Tips
6
Page 9

Page 10

Published by Philips Consumer Electronics Belgium
Printed in China
3104 315
2270.1
 Loading...