

Philips 42FD9934/69S, 42FD9934S User Manual

~ MAINS
RS232
DVI-D
Y/C S-VHS
G/Y/Y
CVBS B/Pb/Cb
R/Pr/Cr V
H
VGA 1
VGA 2
RC-OUT
VIDEO 3
(AV3)
VIDEO 2
(AV2)
VIDEO 1
(AV1)
cover 1017.4 03-10-2003 11:06 Pagina 2
1
Unpacking and wall mounting instructions
For the unpacking instructions follow the illustrated steps printed on the
packaging (outside and inside). For the wall mounting instructions follow the
illustrated steps ‘ to § printed on the separate template.
Make sure that the wall mount is being fixed securely enough so that it meets
safety standards.The weight of the monitor (excl. packaging) is about 36 kg.
Note: Stands are optional accessories. Consult your dealer.
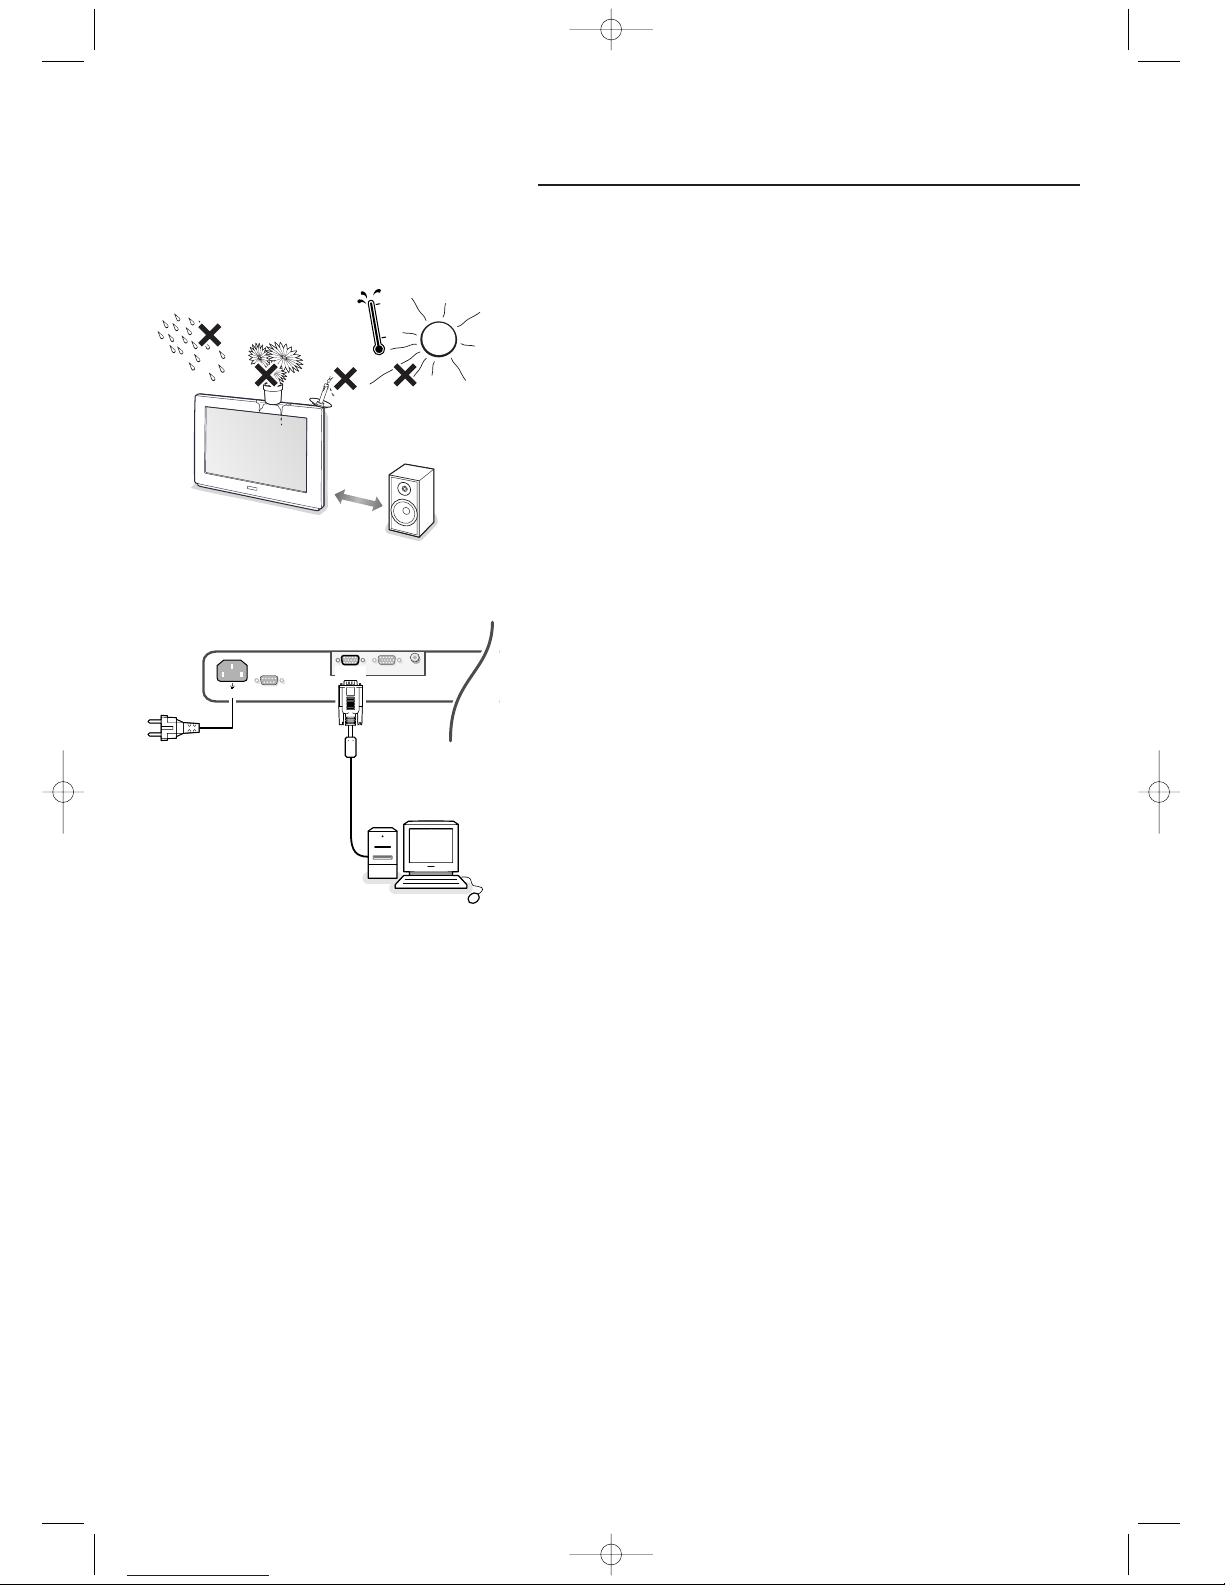
To prevent any unsafe situations, no naked flame sources,such as lighted
candles, should be placed on or in the vicinity.Avoid heat, direct sunlight and
exposure to rain or water.
The equipment shall not be exposed to dripping or splashing and no objects
filled with liquids, such as vases, shall be placed on it.
Connect your computer
Directly to the monitor
& Connect one end of a VGA cable to the video card of the computer and the
other end to the
VGA 1 connector at the rear side of the monitor. Fix the
connectors firmly with the screws on the plug.
é In case of a multimedia computer, connect the audio cable to the audio
outputs of your multimedia computer and to the audio inputs of your external
amplifier.
VGA 2:The video connector for VGA 2 can be programmed to become an input or an
output via the Setup menu, see p. 6.The function of being input or output is
determined by the used mode. If the monitor is used in video mode, the VGA 2
connector is VGA output. If the monitor is used in monitor mode,the connector is VGA
input or output.
To an electronic receiver box
See the handbook of the receiver box.
& Connect one end of a VGA cable to the video card of the computer and the
other end to the
PC/MAC IN connector at the rear side of the receiver box.
Fix the connectors firmly with the screws on the plug.
é In case of a Multimedia computer, connect the audio cable to the audio
outputs of your Multimedia computer and to the
AUDIO IN R and L inputs of
the receiver box. For sound reproduction, connect your external amplifier to
the electronic receiver box.
Note: Only use the VGA cable supplied with the monitor.
Daisy chaining
The Loop Through facility makes it possible to make a daisy chain with a
second monitor.
Connect one end of another VGA cable to the
VGA 2 connector at the rear
side of the monitor and the other end to the
VGA 1 connector of a second
monitor.
The RC out jack next to the
VGA 2 connector makes it possible to daisy chain remote
control signals to other equipment.This output cannot be used to daisy chain a
second monitor.
~ MAINS
RS232
VGA 1
VGA 2
RC OUT
1 m
min.
1017.4 en 12-11-2003 11:19 Pagina 1

22
VGA 640x480 60, 72, 75, 85 Hz
Wide VGA 848x480 60 Hz
Wide VGA 852x480 60 Hz
MAC 640x480 66.67 Hz
MAC 832x624 74.55 Hz
MAC 1024x768 74.93 Hz
MAC 1152x870 75 Hz
SVGA 800x600 56, 60, 72, 75, 85 Hz
XGA 1024x768 60, 70, 75, 85 Hz
SXGA 1280x1024 60
72 Hz (not with DVI-D-source)
When a VGA computer is connected, the display selection is made
automatically.
A message is displayed when the monitor does not support the connected
VGA mode.
Switch your computer to a correct display mode.
R6 / AA
B
Use of the remote control
Computer Display modes
Operation
& Insert the mains plug supplied into the mains inlet at the back of the
monitor and in the wall socket. Please, only use the supplied rim-earthed
mains cord which has to be inserted in a grounded socket.
é Remote control: remove the cover of the battery compartment.
Insert the 2 batteries supplied (Type LR6/AA-1.5V).
The batteries supplied do not contain the heavy metals mercury and cadmium.
Nevertheless in many countries batteries may not be disposed of with your
household waste. Please check on how to dispose of batteries according to local
regulations.
“ Make sure that your receiver box and/or PC are switched on and that your
PC is in the correct display mode.
‘ Switch the monitor on : Press the power button B at the right side of
the monitor.
A green indicator lights up and the screen comes on.
When the monitor does not receive a supported VGA signal and is not
connected to a receiver box the screen switches to standby and the red
indicator lights up.
When you switch on your monitor for the first time, and the monitor is
not connected to an electronic receiver box,the menu language
automatically appears on the screen.The explanation appears in different
languages one at a time.
Follow the instructions on screen to select the correct language or see
Setup menu, Language, p. 6.
1017.4 en 12-11-2003 11:19 Pagina 2
3Use of the remote control 3
POWER
BRIGHTNESS
CONTRAST
ZOOM OUTZOOM INZOOM ON/OFF
VGA AV1 AV2 AV3
MUTE
AV MUTE
q
1
2
3
4
5
6
7
8
9
0
V
CH/PR
MENU
OK
¬
B
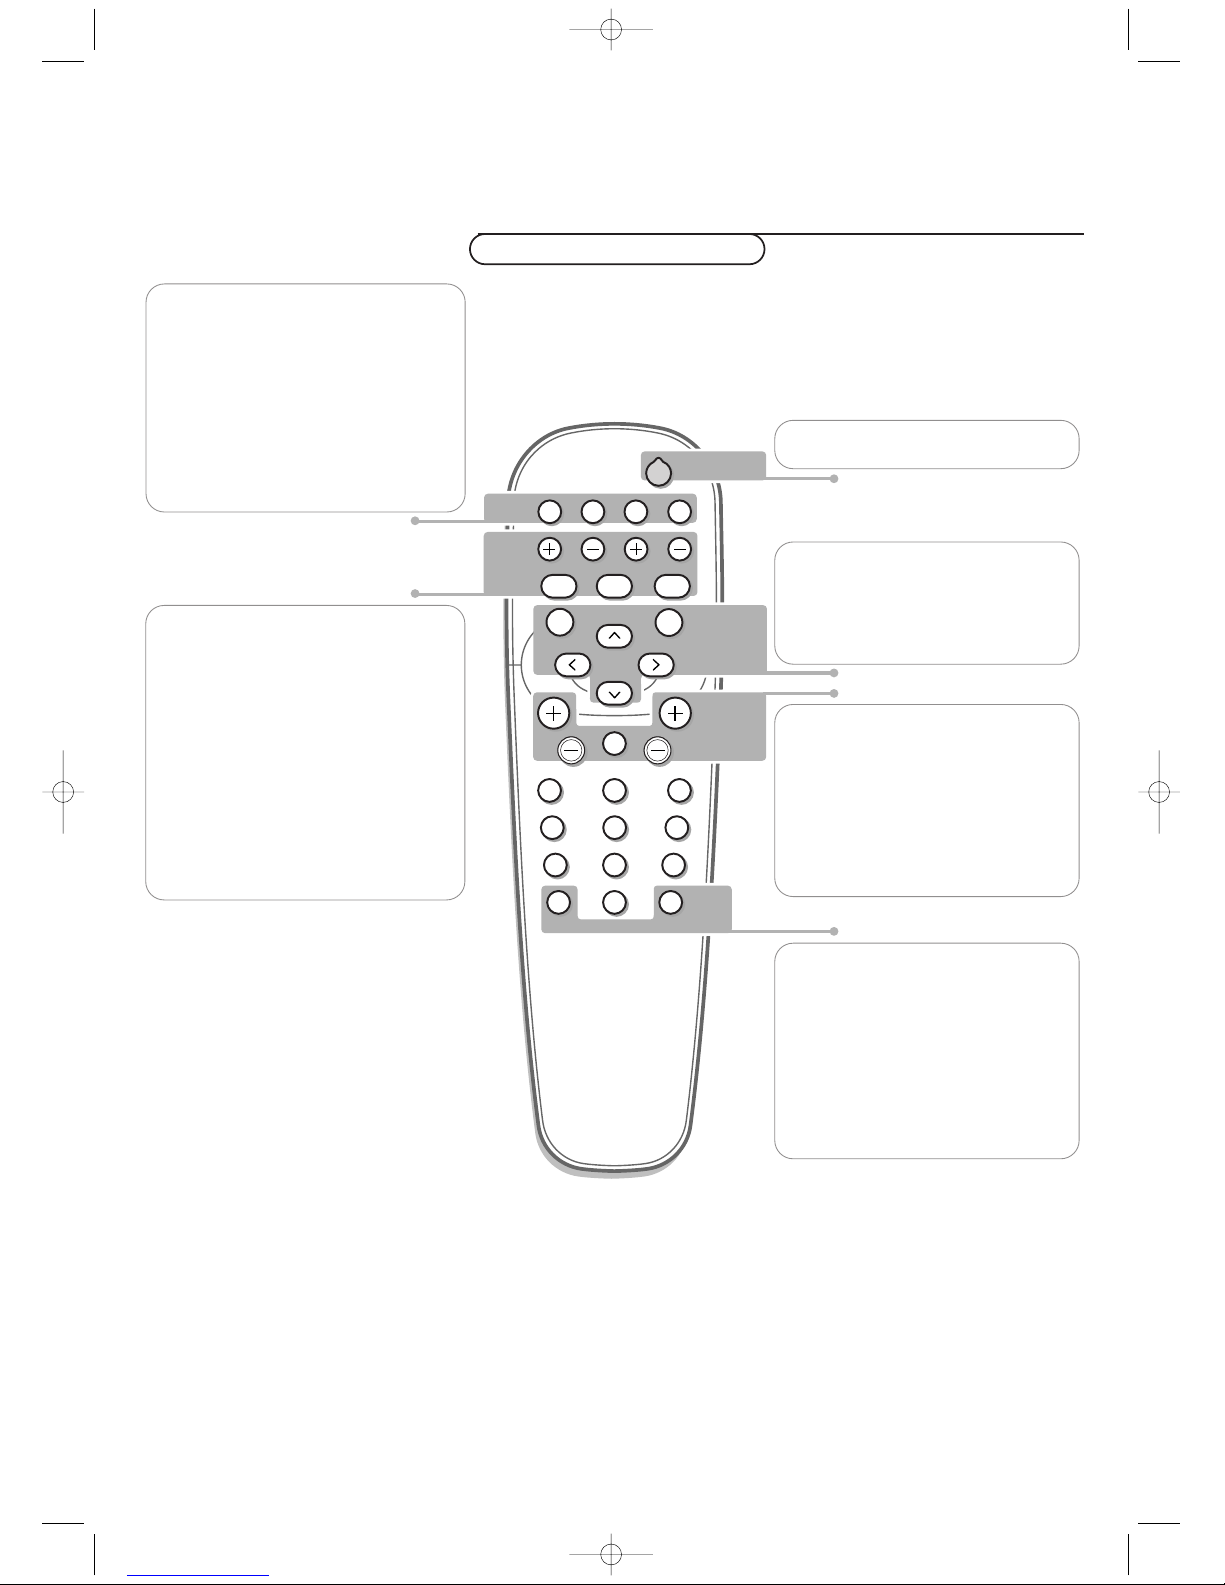
V no function (except when in
combination with an electronic receiver
box and a Home Cinema audio receiver)
¬ no function (except when in
combination with an electronic receiver
box and a Home Cinema audio receiver)
CH/PR Program selection
To browse through the sources selected.
B to switch to standby or on again
MENU to switch the menu on/off
cursor buttons to select your choice and
to alter a selected adjustment.
OK to activate your choice
AV MUTE to mute the picture or restore
it (if the monitor is used in monitor
mode).
When activated a green indicator starts
blinking in front of the monitor.
q Picture format
See Picture 2 menu, p. 5.
Press the q key to switch between the
different picture formats.
BRIGHTNESS +/-
to adjust the brightness level of the
picture
CONTRAST +/-
to adjust the contrast level of the picture
ZOOM ON/OFF
to activate/de-activate the zoom function.
See p. 5.
ZOOM IN/OUT
to adjust the zoom factor and to change
the magnification of the picture when
zoom is activated. See p. 5.
Use of the remote control
On screen information
When the monitor is used in the monitor mode, information about the active
source (
AV1 , AV 2, AV3 , VGA1, VGA2 or DV I-D) and the supported video,VGA or
HD-format of the selected source is displayed on the screen together with the
selected picture format and icons informing about AV mute.
VGA
press repeatedly to select your computer
connected to the
VGA 1 or 2 connector or
to the
DVI-D connector.
AV1 , AV 2, AV3
press to select the peripherals connected
to the connector indicated on the monitor.
Note: in case the monitor is operating in
combination with an electronic receiver box, the
AV inputs on the monitor will be disabled and
the VGA2 connector becomes an output.
1017.4 en 12-11-2003 11:19 Pagina 3
 Loading...