

Page 1
b
k
a
c
d
e
h
i
l
j
m
n
f
l
g
or
lub
или
Ili
Call FREE on
GB
Call FREE on
Call on
LAKTATOR JEST URZĄDZENIEM HIGIENICZNYM,
PL
NIE PODLEGA WYMIANIE, ANI ZWROTOWI
W przypadku problemów w czasie użytkowania laktatora prosimy
dzwonić do biura firmy Krotex-Poland; Dystrybutor w Polsce:
Krotex-Poland Sp. z o.o. ul. Rydygiera 8, 01-793 Warszawa
Tel: 0 801 35 37 37
Oфициальный дистрибьютор в России ОЛТРИ Tpeйдинг
RU
0800 289 064 (GB Only)
1800 509 021 (IRL Only)
1 300 364 474 (AUS)
тел. 8-800-200-22-29
Želite li znati više o našim proizvodima, možda neki savjet ili
HR
želite da Vam pošaljemo katalog nazovite nas na broj telefona:
01/333 66 96
Uvoznik: Kadulja A.M. d.o.o.
A.Hebranga 52, 10430 SAMOBOR
BPA is Bisphenol-A. This product uses Polyethersulfone (PES),
which is BPA-Free and has a natural honey-coloured tint.
BPA oznacza Bisfenol A. W tym produkcie zastosowano polieterosulfon (PES),
który nie zawiera BPA i posiada naturalne żółtawe zabarwienie.
BPA – это Бисфенол-А. Данный молокоотсос произведен из
полиэфирсульфона, не содержащего бисфенол-А, что придает
BPA je bisfenol A. Ovaj proizvod koristi polietersulfon (PES) koji ne sadrži
молокоотсосу легкий медовый оттенок.
BPA i ima prirodnu tintu boje meda.
www.philips.com/AVENT
Philips AVENT, a business of Philips Electronics UK Ltd.
Philips Centre, Guildford Business Park, Guildford, Surrey, GU2 8XH
Trademarks owned by the Philips Group.
© Koninklijke Philips Electronics N.V. All Rights Reserved.
42133 5411 870
0%
0%
BPA
BPA
GB
Manual Breast Pump
PL
Laktator Ręczny
RU
Ручной Молокоотсос
HR
Ručna izdajalica
2.
Page 2
6. (1) – (7)
or/lub/или/Ili or/lub/или/Ili
or/lub/или/Ili or/lub/или/Ili
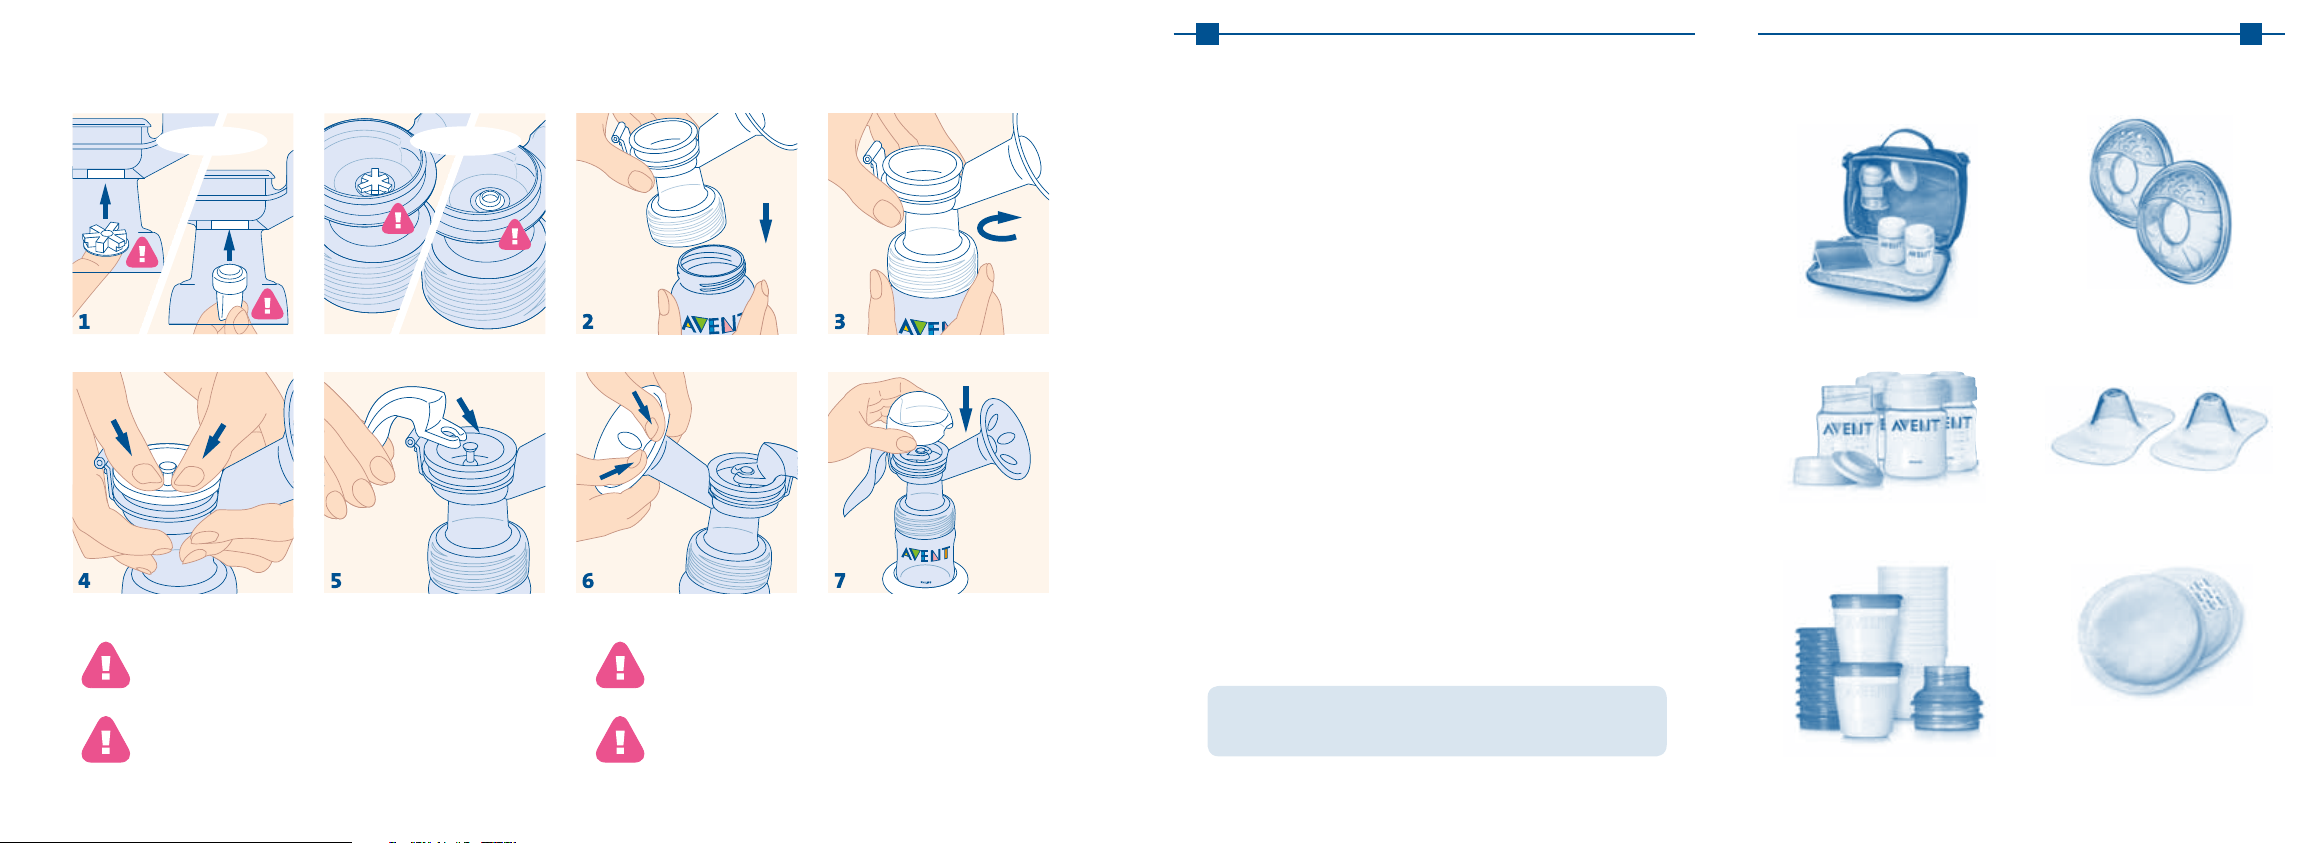
IMPORTANT: DO NOT LOSE THE WHITE VALVE. YOUR PUMP
WILL NOT WORK WITHOUT IT OR IF IT IS FITTED INCORRECTLY.
If lost, spare valves are available direct from Philips AVENT.
UWAGA: BIAŁY ZAWÓR NALEŻY PRZECHOWYWAĆ
W BEZPIECZNYM MIEJSCU. LAKTATOR NIE BĘDZIE
DZIAŁAĆ BES ZAWORU (LUB GDY ZAWÓR ZOSTANIE
NIEPRAWIDŁOWO ZAMOCOWANY). W przypadku jego
zgubienia zapasowe zawory mo
w firmie Philips AVENT.
ż
na nabyć bezpośrednio
ВНИМАНИЕ! При утeрe или нeправильной установкe клапана
насоса работа молокоотсоса нeвозможна! При утере клапана
вы можете приобрести новый в сервисном центре Philips AVENT.
VAŽNO: BIJELI VENTIL NE SMIJETE IZGUBITI. VAŠA IZDAJALICA
NEĆE RADITI AKO NEMA BIJELOG VENTILA ILI JE ON NEPRAVILNO
POLOŽEN. Ukoliko ga ipak izgubite, rezervni dio moguće je naručiti na
broj telefona : 01 33 69 520, e-mail: kadulja-a-m@zg.t-com.hr
GB
Please take five minutes to read through the WHOLE
of this leaflet BEFORE you use your Philips AVENT
Manual Breast Pump for the first time.
Contents
1. Introducing the Manual Breast Pump
2. Detailed parts guide
3. Cleaning and sterilisation
4. Keeping your breast pump sterile for travel
5. Using the Manual Breast Pump with the
AVENT VIA Storage System
6. How to assemble the Manual Breast Pump
7. When to express milk
8. Hints to help you succeed
9. How to use the Manual Breast Pump
10. Storing your breast milk
11. Feeding your baby your expressed breast milk
12. Choosing the right teat for your baby
13. Troubleshooting guide
14. Other helpful products from Philips AVENT
Should you ever lose these instructions, they are available
on our website: www.philips.com/AVENT
14.
Ostali proizvodi za uspješno dojenje
iz programa Philips AVENT
Philips AVENT komplet za izdajanje
u torbi Komplet za izdajanje – za izdajanje
i transport izdojenog mlijeka
AVENT bočice za pohranu mlijeka –
Za pohranu mlijeka ili dječje hrane u
hladnjaku ili zamrzivaču
AVENT VIA posudice za pohranu mlijeka –
za pohranu i transport izdojenog mlijeka
mekanom stražnjom silikonskom
prevlakom – za zaštitu ispucanih i bolnih
bradavica, pomaže kod prenapunjenih
dojki i u prikupljanu mlijeka koje curi
za zaštitu ispucanih i bolnih bradavica
tijekom dojenja (u maloj i standardnoj
AVENT Ultra Comfort prsne blazinice
za jednokratnu upotrebu – jedinstvene
ULTRA upijajuće blazinice garantiraju
HR
AVENT prsne školjke (2 para) sa
AVENT štitnici za bradavice –
veličini)
potpunu suhoću i ugodnost
45
Page 3

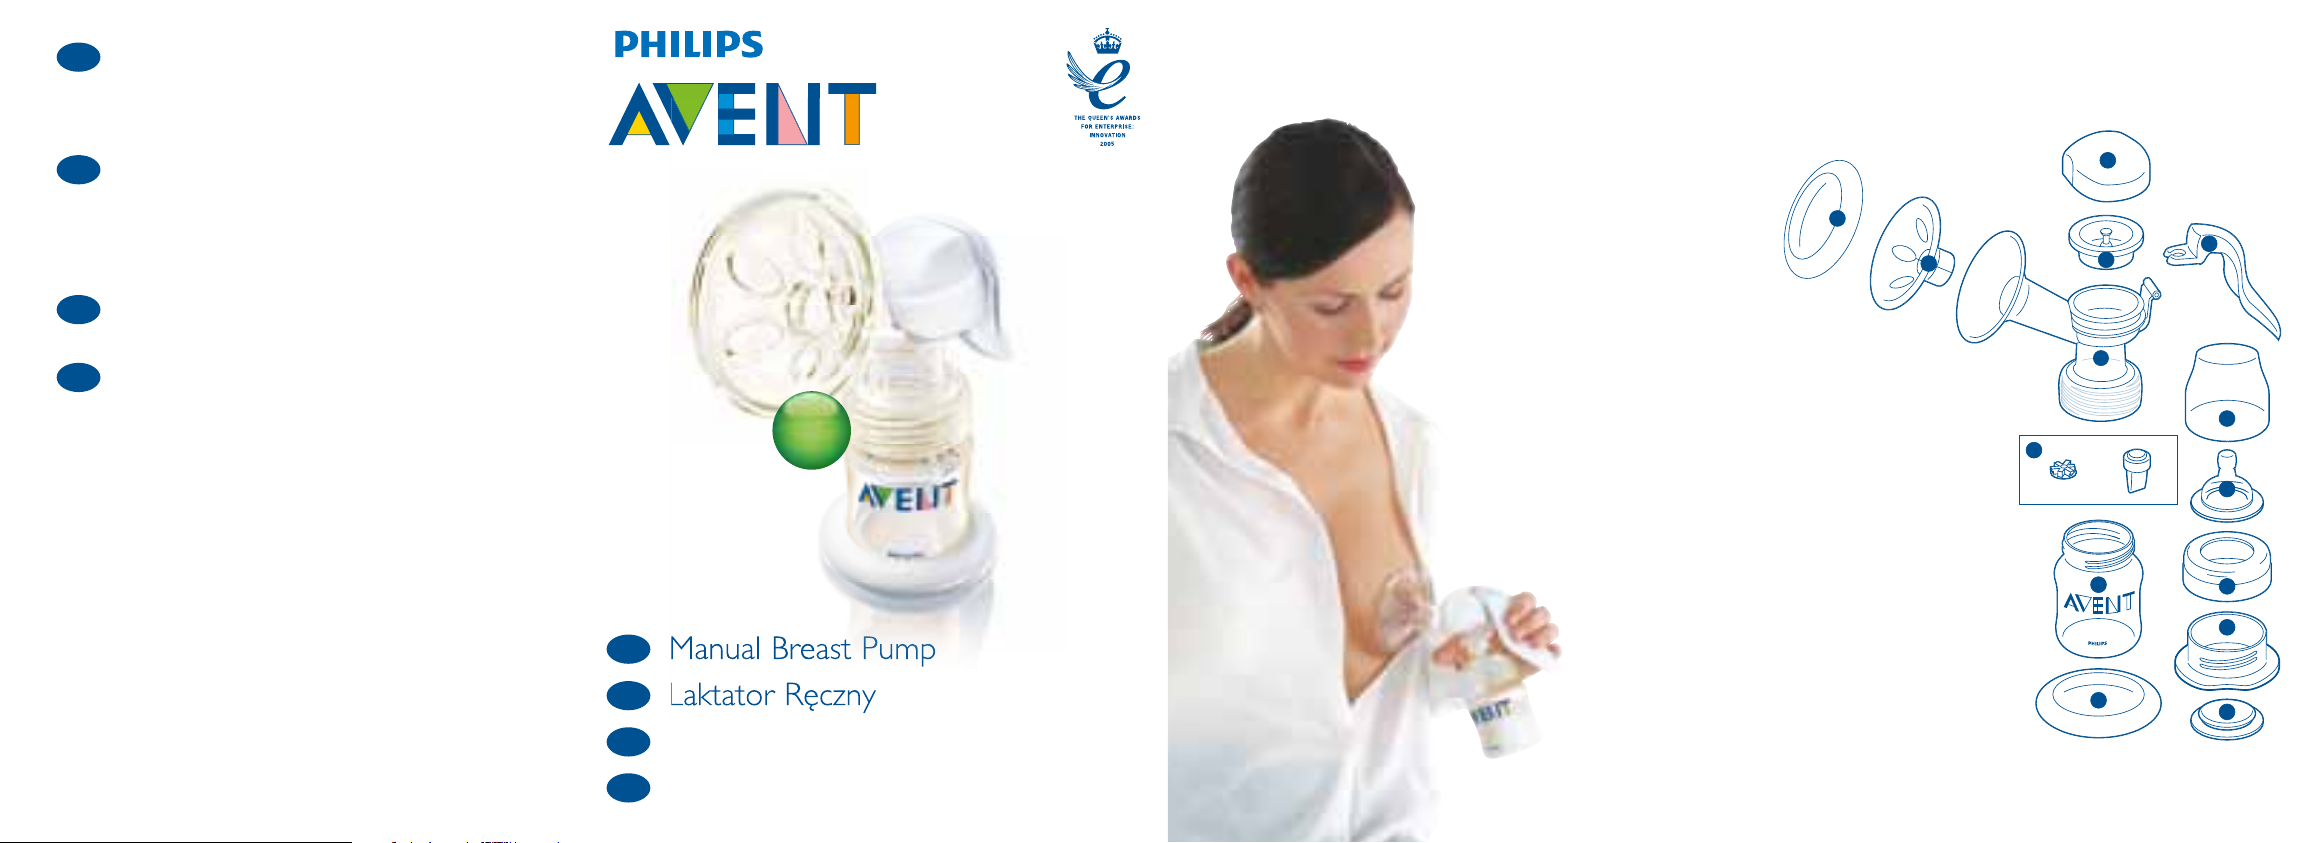
1. Introducing the Manual Breast Pump
The Manual Breast Pump is a breakthrough in breast pump design.
Its silicone diaphragm provides 100% reliable vacuum, whilst the
Let-down Massage Cushion naturally imitates your baby’s suckling
action to provide fast milk flow – silently, comfortably and gently.
The pump is easy to assemble, discreet to use and all parts are
dishwasher safe.
Doctors recommend that breast milk is the best nutrition for babies
during the first year, combined with solid food after the first 6
months. Your milk is specially adapted to your baby’s needs and
contains antibodies which help protect your baby against infection
and allergies.
Your Manual Breast Pump will help you breastfeed longer. You can
express and store your milk so that – whether you are out for a few
hours, taking a well deserved rest, or back at work – your baby can
still enjoy the benefits of your breast milk, even if you can’t be there
to give it yourself. As the pump is so silent and discreet you can take
it with you anywhere, allowing you to express milk at your own
convenience and maintain your milk supply.
Since the AVENT Bottle and AVENT Teat are specially designed to
mimic breastfeeding, your baby will switch easily between breast
and bottle. This allows mothers to continue providing breast milk
to baby even when they return to work.
GB
1
Page 4
GB
GB
2. Detailed parts guide
MANUAL BREAST PUMP
a) Funnel cover (same as i)
b) Let-down Massage Cushion
c) Pump cover
d) Silicone diaphragm
and stem*
e) Handle
f) Pump body
g) White valve*
BOTTLE
h) AVENT Feeding Bottle (125ml/4oz)
i) Stand (same as a)
j) Dome cap
k) Extra Soft Teat, Newborn Flow (0m+)
l) Screw ring
m) Sealing base
n) Sealing disc
*spares included
3. Cleaning and sterilisation
Before you use your breast pump for the first time and every time before use:
Separate all parts, then wash in the dishwasher or in warm soapy
water and rinse. Do not use antibacterial or abrasive cleaners/
detergents. Sterilise in a Philips AVENT Steam Steriliser (Digital,
Electric or Microwave), or by boiling for 5 minutes. If using a Philips
AVENT Steam Steriliser, the pump will remain sterile in the steriliser
for a minimum of 6 hours, provided the lid is not
removed.
4. Keeping your breast pump sterile for travel
After sterilising all parts, insert the white valve (g) and
fit the diaphragm with stem (d) onto the pump body (f).
Clip the cover (a) over the funnel and Let-down Massage
Cushion (b) and screw on the sealing base (m) in place of
the AVENT Feeding Bottle (h).
5
.
Using the Manual Breast Pump
with the AVENT VIA Feeding System
Simply replace the AVENT Feeding Bottle with a VIA
Cup and Adaptor. To make the pump completely
stable insert the VIA Cup into the VIA Lid/Stand.
6. How to assemble the Manual
Breast Pump
Separate all parts and ensure pump has been cleaned
and sterilised as in section 3:
1) Wash your hands thoroughly. Insert the white valve (g) into the pump
body (f) from underneath
2)
Place the pump body (f) onto the AVENT Feeding Bottle (h).
3)
Twist gently clockwise until secure. DO NOT OVERTIGHTEN!
4)
Place the silicone diaphragm and stem (d) into the pump body (f). Make
sure it
fi
ts securely around the rim by pressing down with your fingers
to ensure a perfect seal. (This is easier if assembled whilst wet.)
5)
Place the forked end of the handle (e) under the silicone diaphragm
and stem (d) and push down gently on the handle until it clicks into
place.
6)
Carefully insert the Let-down Massage Cushion (b) into the pump
funnel (f) making sure it is perfectly sealed all round the rim of the
funnel. (This is easier if assembled whilst wet.)
7)
Click the pump cover (c) onto the pump body (f). To make the pump
completely stable insert the bottle into the stand (i).
.
7. When to express milk
1) If possible, wait until your milk supply and breastfeeding schedule are
well established, normally at least 2-4 weeks after birth, unless told
otherwise by your health professional or breastfeeding advisor.
2
3
Page 5

GB
GB
2) The exceptions to the above are:
a) If you are expressing milk for your baby to be given in hospital.
b) If your breasts are engorged (painful or swollen), you can express
a small amount of milk before or between feeds to ease the pain
and to help your baby latch on more easily.
c) If you have sore or cracked nipples, you may wish to express your
milk until they are healed.
d) If you are separated from your baby and wish to continue to
breastfeed when you are reunited, you should express your milk
regularly to stimulate your milk supply.
3) You will need to find the right times of the day for you to express
your milk, e.g.
a) Early in the morning when your breasts are full, just before or
after your baby’s first feed.
b) After a feed, if your baby has not emptied both breasts.
c) Between feeds, or in a break if you have returned to work.
8. Hints to help you succeed
Using a breast pump takes practice – you may need to make several
attempts before you succeed, but because the pump is so simple and
natural to use, you will soon get used to expressing your milk.
1) Choose a time when you’re not rushed and won’t be interrupted.
2) Having your baby or a photograph of your baby nearby can help
encourage ‘let-down’.
3) Placing a warm cloth on the breasts for a few minutes before you
start pumping can encourage milk flow and soothe painful breasts.
4) Warmth and relaxation can encourage milk flow. Try expressing after
a bath or shower.
5) Try expressing from one breast while your baby is feeding from the
other, or continue expressing just after a feed.
4
6) Repositioning the pump on the breast from time to time can help
stimulate your milk ducts.
Practice with your pump to find the best technique for you.
However, if the process becomes very painful, stop and consult
your breastfeeding advisor.
9. How to use the Manual Breast Pump
1) Wash your hands thoroughly and make sure your breasts are clean.
Gently squeeze a little milk from each nipple to ensure milk ducts are
not blocked.
2) Make sure you have sterilised and carefully assembled your pump
exactly as shown in sections 3 and 6.
3) Consult the ‘Hints to help you succeed’ section.
4) Relax in a comfortable chair, leaning slightly forward (use cushions
to support your back). Make sure you have a glass of water nearby.
5) Press the funnel and Let-down Massage Cushion of the pump firmly
against your breast, making sure that no air can escape – otherwise
there will be no suction.
6) As you gently push down on the pump handle, you will feel the
suction on your breast. You don’t need to depress the handle fully
to create a vacuum – only as much as is comfortable. Your milk will
soon start flowing, even though you may not use all the suction the
pump can generate.
7) Begin by pumping 5-6 times rapidly to initiate let-down. Then, hold the
handle down for 2-3 seconds, and allow it to return to its resting place.
These 2-3 second cycles imitate your baby’s natural suckling pattern
and allow the milk to flow between strokes.
8) Milk should begin to flow after the first few strokes. Don’t worry if
your milk does not flow immediately. Relax and continue pumping.
Do not continue pumping for more than 5 minutes at a time if
NO result is achieved. Try expressing at another time during the day.
5
Page 6
GB
GB
Please remember that, should the process become very painful or
uncomfortable, you should stop using the pump and consult your
health professional or breastfeeding advisor.
9) Whilst some women may prefer to use the pump without the Let-down
Massage Cushion, extensive trials show that, in most cases, the
massaging effect of the petals flexing in and out around the areola
stimulates the let-down reflex and allows you to express more milk, faster.
10) On average you will need to pump for 10 minutes to express 60-125ml
or 2-4oz. However, this is just a guide and varies from woman to woman.
If you find that you regularly express more than 125ml/4oz per session,
please use a 260ml/9oz AVENT Bottle or 240ml/8oz VIA Cup.
Do not overfill AVENT Feeding Bottles or VIA Cups and keep upright,
otherwise milk may leak from below the pump body.
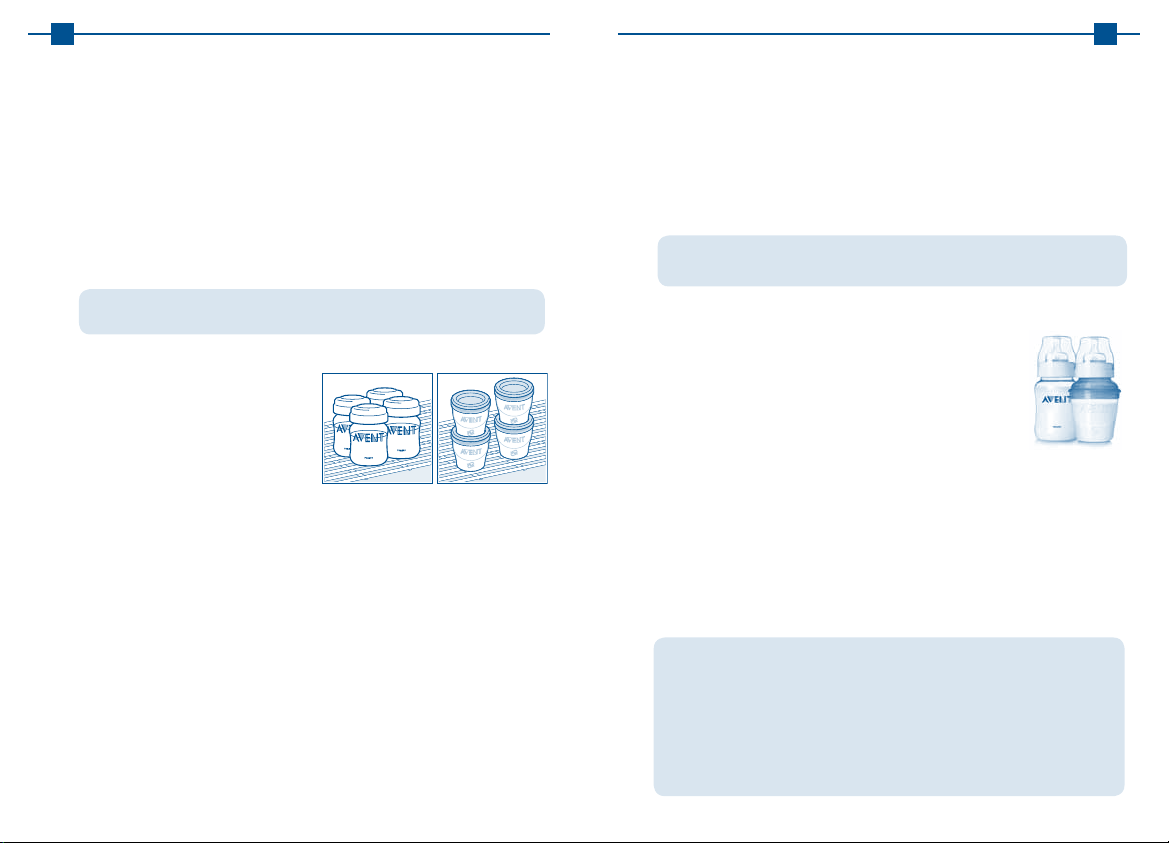
10. Storing your breast milk
• Breastmilkcanbestoredin
the fridge or freezer in either
sterile breast milk containers
(125ml/4oz or 260ml/9oz
bottles fitted with sealing discs)
or in VIA Cups with Lids.
• Onlymilkcollectedwithasterilepumpshouldbestoredtobefedto
your baby.
• Expressedmilkshouldberefrigeratedimmediately.
• Expressedbreastmilkcanbestoredintherefrigeratorforupto
48 hours (not in the door) or in the freezer for up to 3 months.
• Ifyouarestoringmilkinthefridgetoaddtoduringtheday,onlyadd
milk which has been expressed into a sterile container. Milk can only
be kept like this for a maximum of 48 hours (from first expression)
after which it must be used immediately or frozen for future use.
• Forproductsotherthanbreastmilkmakefeedsupfreshwhenneeded,
following the manufacturer’s instructions.
Storing your milk in the fridge
If your expressed breast milk will be fed to your baby within 48 hours,
6
it can be stored in the fridge (not in the door) in an assembled AVENT
Feeding Bottle or VIA Feeding System. Assemble a sterilised teat,
screw ring and dome cap and attach onto the body of the AVENT
Bottle or the VIA Adaptor and Cup (see below).
Storing your milk in the freezer
To store in the freezer, use a sealing disc in place of the teat and
dome cap or use a sterilised VIA Lid to seal the VIA Cup. The storage
containers should be clearly labelled with the date and time of
expression and older milk used up first.
NEVER refreeze breast milk. DO NOT add fresh breast milk to already
frozen milk. ALWAYS discard any milk that is left over at the end of a feed.
11. Feeding your baby your expressed breast milk
If breast milk has been stored in an AVENT Breast Milk
Container, replace the sealing disc with a sterilised
AVENT Teat.
Alternatively replace the VIA Lid with a sterilised VIA
Adaptor, screw ring, dome cap and AVENT Teat.
Frozen breast milk should be defrosted overnight in the
refrigerator. However, in an emergency, it can be defrosted
in a jug of hot water. Once thawed use within 24 hours.
Breast milk can be heated in the same way as any other bottle feed.
Stand the AVENT Bottle or VIA Feeding System in a bowl of hot water,
or alternatively, for a safe and fast way to warm feeds, use the Philips
AVENT Bottle and Baby Food Warmer. IMPORTANT! Milk or food will
heat faster in VIA Cups than in standard feeding bottles/containers.
Always check milk or food temperature before feeding.
Never heat milk in a microwave as this may destroy valuable nutrients
and antibodies. In addition, the uneven heating may cause hot spots
in the liquid which could cause burns to the throat.
Never immerse a frozen milk container or VIA Cup in boiling water as
this may cause it to crack/split.
Never put boiling water directly into a VIA Cup, allow to cool for
around 20 minutes before filling.
7
Page 7
GB
1
3
2
4
0
m
+
6
m
+
1
m
+
3
m
+
3
m
+
1 hole
2 holes
3 holes
4 holes
1 slot
NEWBORN FLOW
EXTRA SOFT SILICONE TEAT
Ideal for newborns and breastfed
babies of all ages.
SLOW FLOW
EXTRA SOFT SILICONE TEAT
Ideal for newborns and breastfed
babies of all ages.
MEDIUM FLOW
SOFT SILICONE TEAT
For bottle fed babies at 3 months
of age and up.
FAST FLOW
SOFT SILICONE TEAT
Offers a faster flow for older babies.
VARIABLE FLOW
SOFT SILICONE TEAT – SLOT CUT
Provides an extra fast flow and
accommodates thicker liquids.
Flow rate can be varied by turning
the bottle to align the I, II or III markings
on the teat with baby’s nose.
GB
12. Choosing the right teat for your baby
AVENT Teats can be used on both the AVENT Feeding Bottle and VIA
Feeding System. AVENT Teats are clearly numbered on the side to
indicate flow rate.
8
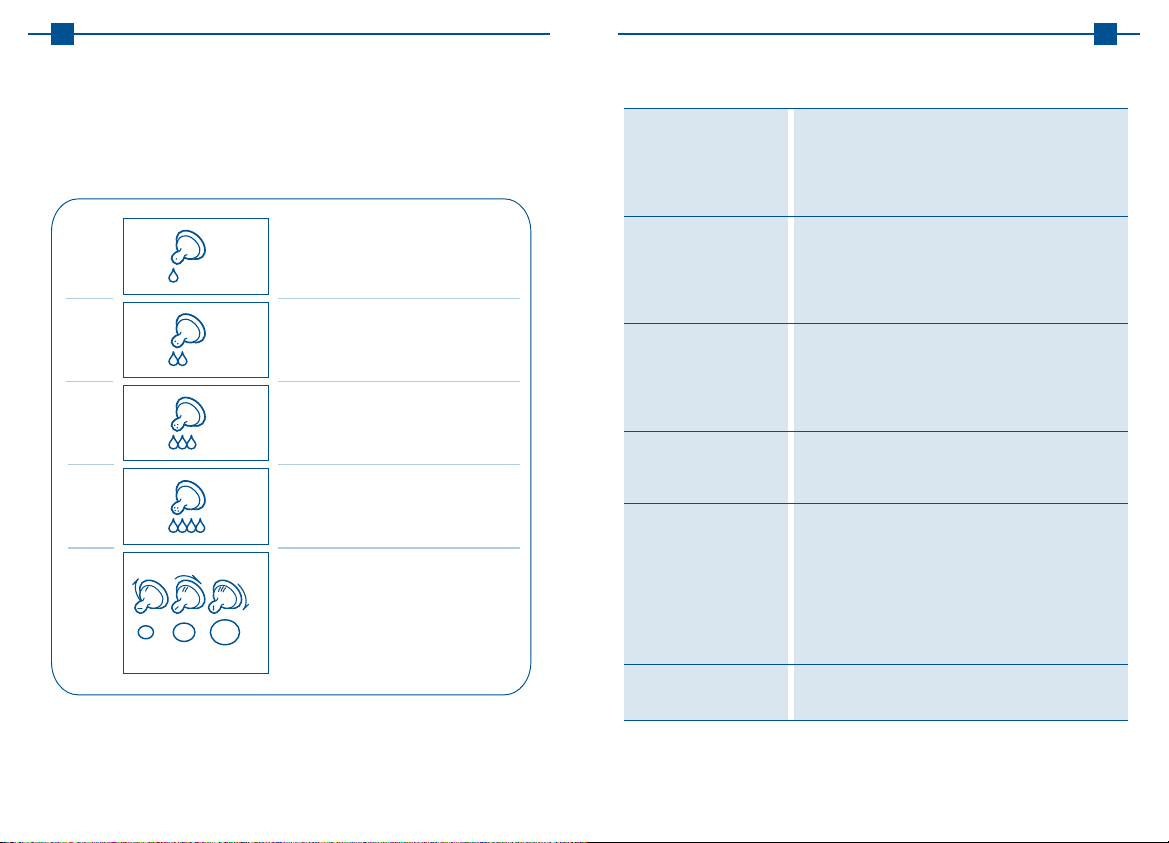
13. Troubleshooting guide
Lack of suction
No milk being expressed
Pain in the breast area
when expressing
Milk is drawn up the
Let-down Massage Cushion
Cracking/discolouration of
pump parts
Lost or broken parts
If you are still experiencing problems, please contact Philips AVENT Customer
Services. (see back cover for contact details). Alternatively contact your health
professional/breastfeeding advisor.
Check that all the pump components have been
assembled correctly and that the white valve is the right
way up. Ensure that the diaphragm and Let-down Massage
Cushion are fitted securely to the pump body and a perfect
seal is created.
Ensure suction is created and the pump is correctly
assembled. Relax and try again, expression may improve
after practice. Please refer to the ‘Hints to help you
succeed’ section.
You may be pumping too hard. You do not need to use
all the suction the pump can generate. Try depressing
the handle halfway and remember the 2-3 second
pumping rhythm. Consult your health professional/
breastfeeding advisor.
Remove and refit the Let-down Massage Cushion
ensuring it is firmly attached and pushed far enough
down the funnel. Try leaning slightly forward.
Avoid contact with antibacterial or abrasive detergents/
cleaners as these can damage the plastic. Combinations
of detergents, cleaning products, sterilising solution,
softened water and temperature fluctuations may, under
certain circumstances, cause the plastic to crack. If this
occurs, do not use. Contact Philips AVENT Customer
Services for spare parts. The pump is dishwasher safe
but food colourings may discolour components.
Spare parts are available through Philips AVENT Customer
Services (see back cover for contact details)
9
Page 8
GB
PL
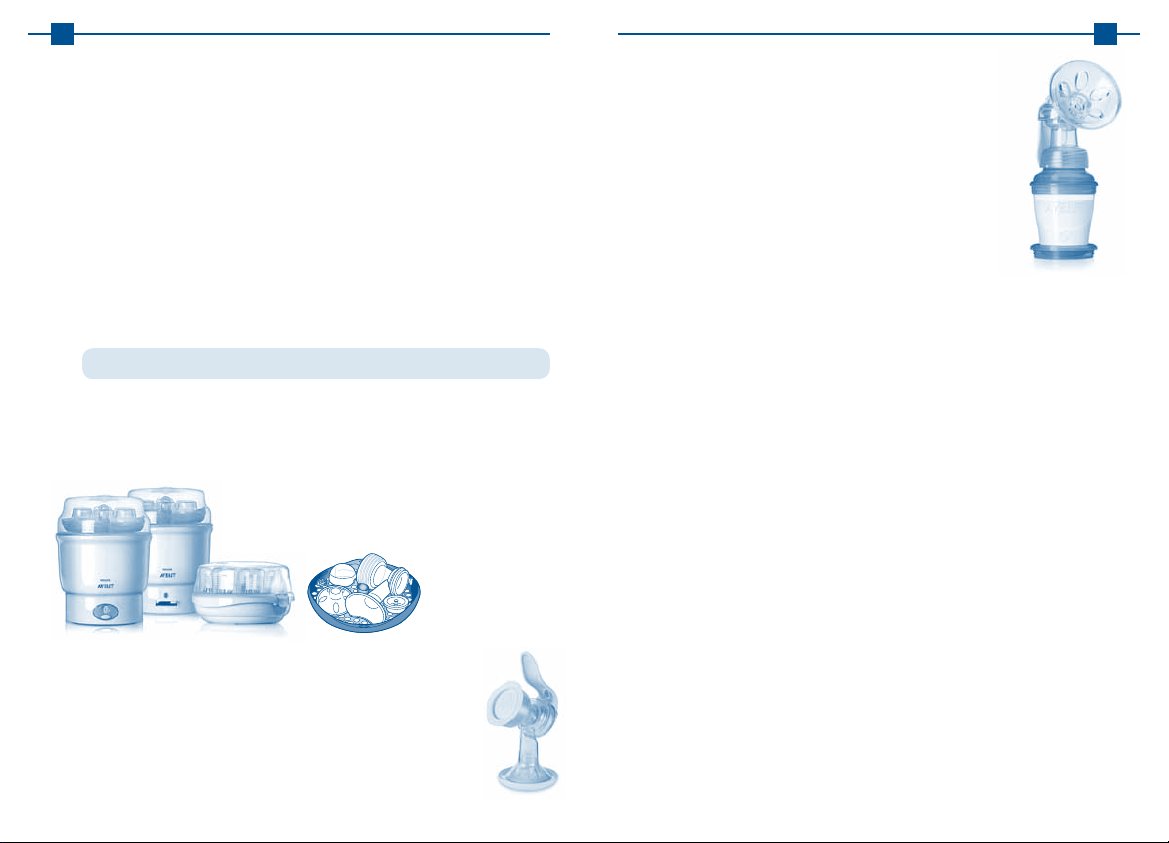
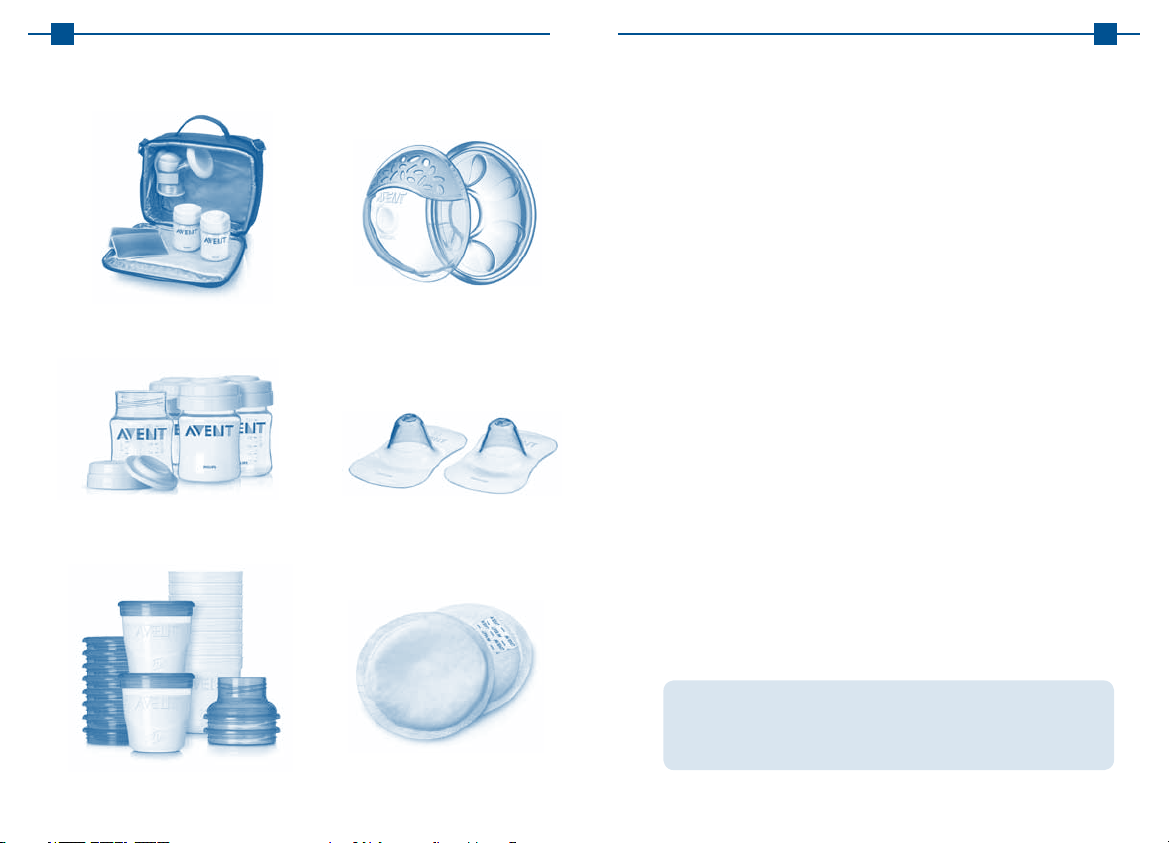
14. Other helpful products from Philips AVENT
Philips AVENT Out & About Manual
Breast Pump Set – for expressing and
transporting breast milk.
AVENT Breast Milk/Baby Food Containers –
for storage of breast milk or baby food
in the fridge or freezer.
AVENT Breast Shell Set (2 pairs)
with Ultrasoft Backing Cushion –
to protect sore/cracked nipples,
help ease engorgement and
collect leaking breast milk.
AVENT Nipple Protectors –
to protect sore/cracked nipples
during breastfeeding (small and
standard sizes).
PRZED pierwszym użyciem Laktatora Philips AVENT
należy poświęcić pięć minut na uważne przeczytanie
CAŁEJ ulotki.
Spis treści
1. Laktator ręczny
2. Szczegółowy wykaz części
3. Mycie i sterylizacja
4. Zachowanie sterylności laktatora podczas podróży
5. Używanie laktatora ręcznego z systemem karmienia AVENT VIA
6. W jaki sposób składać laktator ręczny
7. Kiedy odciągać mleko
8. Przydatne wskazówki
9. Jak używać laktatora ręcznego
10. Przechowywanie odciągniętego mleka
11. Karmienie dziecka odciągniętym mlekiem
12. Wybór odpowiedniego smoczka dla dziecka
13. Rozwiązywanie problemów
14. Inne produkty Philips AVENT do karmienia piersią
AVENT VIA Breast Milk Containers –
for expressed milk storage and transport.
10
AVENT Ultra Comfort Disposable
Breast Pads – unique ULTRA
absorbent core guarantees total
dryness and comfort.
W przypadku zagubienia niniejszej broszury, instrukcje
w niej przedstawione można znaleźć na naszej stronie
internetowej: www.philips.com/AVENT
11
Page 9

PLPL
1. Laktator ręczny
Laktator ręczny to przełomowy projekt wśród laktatorów. Silikonowa
membrana laktatora zapewnia 100-proc. skuteczność ssania, a nakładka
masująca imituje naturalny sposób pobierania pokarmu przez dziecko,
co umożliwia szybkie wypływanie mleka – cicho, wygodnie i delikatnie.
Odciągacz łatwo się składa, jest dyskretny w użyciu, a wszystkie części
można bezpiecznie myć w zmywarce do naczyń.
Lekarze zalecają karmienie piersią jako najlepszy sposób żywienia
niemowląt w pierwszym roku życia, który może być uzupełniany innymi
pokarmami, gdy dziecko skończy 6 miesięcy. Mleko matki jest specjalnie
przystosowane do potrzeb dziecka, zawiera również przeciwciała, które
pomagają chronić je przed infekcjami i alergiami.
Korzystając z laktatora, można wydłużyć okres karmienia piersią. Można
odciągać i przechowywać pokarm, aby wychodząc na kilka godzin, robiąc
sobie chwilę zasłużonego odpoczynku lub wracając do pracy – dziecko
mogło nadal korzystać z zalet mleka matki, nawet jeśli nie można go
nakarmić osobiście. Laktator jest cichy i dyskretny, tak iż można go
wszędzie ze sobą zabrać, by w dogodnej dla siebie chwili odciągać
pokarm i podtrzymywać laktację.
Ponieważ Butelka AVENT i smoczek AVENT zostały opracowane w taki
sposób, by naśladować karmienie piersią, Twoje dziecko bez problemu
może być karmione na zmianę piersią i butelką. Dzięki temu mama może
kontynuować dostarczanie dziecku pokarmu z piersi, nawet po powrocie
do pracy.
2. Szczegółowy wykaz części
LAKTATOR RĘCZNY
a) Osłona lejka (taka
sama jak i)
b) Nakładka masująca
c) Osłona laktatora
d) Silikonowa membrana
i trzon*
e) Rączka
f) Korpus laktatora
g) Biały zawór*
BUTELKA
h) Butelka do karmienia AVENT (125 ml)
i) Podstawka (taka sama jak a)
j) Kapsel na butelkę
k) Supermiękki smoczek MINI (0m+)
l) Nakrętka
m) Podstawka uszczelniająca
n) Krążek uszczelniający
*zestaw zawiera zapasowe części
3. Czyszczenie i sterylizacja
Przed pierwszym oraz każdym następnym użyciem laktatora należy:
Rozłożyć laktator na części, następnie umyć je w zmywarce lub w ciepłej
wodzie z dodatkiem płynu do mycia naczyń oraz wypłukać. Nie stosować
antybakteryjnych lub ściernych środków/detergentów. Sterylizować
w sterylizatorze parowym AVENT (elektronicznym, elektrycznym lub
mikrofalowym) albo gotować przez 5 minut. W przypadku użycia sterylizatora
parowego Philips AVENT laktator pozostanie
sterylny przez co najmniej 6 godzin, jeśli pokrywa
nie zostanie otwarta.
4. Zachowanie sterylności laktatora
podczas podróży
Po wysterylizowaniu wszystkich części, umocować biały
zawór (g) i silikonową membranę z trzonem (d) na korpusie
laktatora (f). Zamocować osłonę (a) na lejku i Nakładce
Masującej (b) oraz przykręcić podstawkę uszczelniającą (m)
12
w miejsce Butelki do karmienia AVENT (h).
13PL15
Page 10

PL
5. Używanie laktatora ręcznego z
systemem karmienia AVENT VIA
Wystarczy zamienić Butelkę do karmienia AVENT
na pojemnik VIA oraz nasadkę wielofunkcyjną. Aby
laktator był całkowicie stabilny należy umocować
pojemnik VIA w pokrywce/podstawce VIA.
6. W jaki sposób składać
laktator ręczny
Należy rozłożyć wszystkie części i sprawdzić, czy laktator jest umyty
i wysterylizowany zgodnie z instrukcją podaną w pkt 3:
1) Umyj dokładnie ręce. Wciśnij biały zawór (g) na laktator (f) od spodu.
2) Nałóż korpus laktatora (f) na Butelkę AVENT (h).
3) Zakręć delikatnie, zgodnie z ruchem wskazówek zegara, aż wskoczy na
swoje miejsce. NIE DOKRĘCAJ ZBYT MOCNO!
4) Umieść silikonową membranę i trzon (d) na korpusie laktatora (f). Upewnij
się, że membrana ściśle przylega do brzegu, dociskając ją palcami, by
osiągnąć dokładne uszczelnienie. Części łatwiej jest składać, gdy są
wilgotne.
5) Umieść rozwidlony koniec rączki (e) pod trzonem membrany (d)
i delikatnie naciśnij rączkę ku dołowi, aż „wskoczy” na swoje miejsce.
6) Ostrożnie włóż nakładkę masującą (b) do lejka laktatora (f), upewniając
się, że dokładnie przylega wzdłuż całego obwodu lejka (części łatwiej
jest składać, gdy są wilgotne).
7) Umieść osłonę laktatora (c) na korpusie laktatora (f). Aby laktator był
całkowicie stabilny, umieść butelkę na podstawce (i).
7. Kiedy odciągać mleko
1) Jeśli to możliwe, poczekaj aż ustabilizuje się rytm wytwarzania pokarmu
i karmienia, co zwykle następuje po 2-4 tygodniach od porodu, o ile
lekarz, położna lub doradca laktacyjny nie zalecą inaczej.
14
2) Od powyższej reguły istnieją następujące wyjątki:
a) Kiedy odciągasz pokarm, który ma zostać podany dziecku
w szpitalu.
b) Jeśli masz nabrzmiałe (bolesne lub opuchnięte) piersi, możesz
odciągać małe ilości mleka przed lub między karmieniem,
aby złagodzić ból i ułatwić dziecku uchwycenie piersi.
c) Jeśli masz obolałe lub popękane brodawki sutkowe, możesz
zdecydować się na odciąganie pokarmu do czasu, kiedy
się zagoją.
d) Jeśli nie jesteś z dzieckiem, a chcesz kontynuować karmienie piersią
po powrocie do niego, powinnaś systematycznie odciągać pokarm,
by stymulować laktację.
3) Na odciąganie mleka trzeba znaleźć odpowiednie pory dnia, np.:
a) Wcześnie rano, kiedy masz pełne piersi, tuż przed lub tuż po
pierwszym karmieniu dziecka.
b) Po karmieniu, jeśli Twoje dziecko nie opróżniło obu piersi.
c) Między karmieniami lub podczas przerwy, jeśli wróciłaś do pracy.
8. Przydatne wskazówki
Korzystanie z laktatora wymaga pewnej wprawy – często osiąga się ją
dopiero po kilku próbach, ale ponieważ laktator jest tak prosty i naturalny
w użyciu, szybko przyzwyczaisz się do odciągania pokarmu.
1) Wybierz porę, kiedy się nie spieszysz i nikt Ci nie przeszkadza.
2) Łatwiej się odprężysz, jeśli będziesz miała przy sobie dziecko lub
jego zdjęcie.
3) Umieszczenie ciepłego kompresu na piersiach na kilka minut przed
rozpoczęciem odciągania może pobudzić wypływ mleka oraz złagodzić
ból piersi.
4) Ciepło i relaks może pobudzić wypływ mleka. Spróbuj odciągać pokarm
po kąpieli lub prysznicu.
5) Spróbuj odciągać pokarm z jednej piersi, podczas gdy dziecko ssie
drugą, lub kontynuuj odciąganie tuż po karmieniu.
6) Zmiana od czasu do czasu ułożenia laktatora na piersi może stymulować
działanie kanalików mlecznych.
Page 11

PL
PL
Korzystając z laktatora po pewnym czasie można znaleźć najlepszą dla siebie
technikę. Jeśli jednak odciąganie pokarmu staje się bardzo bolesne, należy
przerwać i zasięgnąć rady położnej.
9. Jak używać laktatora ręcznego
1) Umyj dokładnie ręce i sprawdź, czy piersi są czyste. Delikatnie wyciśnij
odrobinę mleka z każdej brodawki sutkowej, by sprawdzić, czy kanaliki
mleczne nie są zablokowane.
2) Sprawdź, czy laktator został wysterylizowany i dokładnie złożony, zgodnie
ze wskazówkami podanymi w pkt 3 i 6.
3) Zajrzyj do części „Przydatne wskazówki”.
4) Zrelaksuj się w wygodnym fotelu, pochyl się nieco do przodu (możesz
podeprzeć plecy poduszkami). Przygotuj sobie wcześniej szklankę wody i
postaw w pobliżu.
5) Przyciśnij mocno lejek i nakładkę masującą laktatora do piersi i upewnij
się, że powietrze nie ucieka – w przeciwnym razie nie nastąpi ssanie.
6) Kiedy delikatnie naciśniesz rączkę laktatora, poczujesz ssanie piersi.
Nie musisz naciskać rączki do końca, by uzyskać efekt próżni – wystarczy
tyle, ile jest wygodnie. Mleko wkrótce zacznie wypływać, nawet jeśli nie
będziesz korzystać z całej mocy ssania, jaką może wytworzyć laktator.
7) Na początku 5-6-krotnie naciśnij rączkę laktatora, aby wywołać wypływ
mleka. Następnie, przytrzymaj rączkę przez 2-3 sekundy, a potem
pozwól, aby powróciła do pozycji wyjściowej. Te dwu, trzysekundowe
cykle naśladują naturalny sposób ssania piersi i wywołują wypływ mleka
do butelki między kolejnymi pociągnięciami.
8) Mleko powinno zacząć wypływać po kilku pierwszych pociągnięciach.
Nie martw się, jeśli mleko nie wypływa od razu. Odpręż się
i kontynuuj „pompowanie”.
Przerwij „pompowanie”, jeśli po 5 minutach nie ma ŻADNEGO rezultatu.
Spróbuj odciągnąć pokarm o innej porze dnia.
Pamiętaj, że gdyby odciąganie pokarmu laktatorem stało się bardzo
bolesne lub uciążliwe, powinnaś zaprzestać jego używania i skonsultować
się z lekarzem, położną lub doradcą laktacyjnym.
16
9) Chociaż niektóre kobiety wolą używać laktatora bez Nakładki Masującej,
liczne badania dowodzą, że w większości przypadków masaż za pomocą
płatków, poruszających się do wewnątrz i na zewnątrz wokół brodawki,
stymuluje naturalny wypływ pokarmu i pozwala odciągnąć więcej mleka w
krótszym czasie.
10) Odciągnięcie 60-125ml pokarmu zajmuje średnio 10 minut. Jest to jednak
tylko ogólna wskazówka – u każdej kobiety może to przebiegać inaczej.
Jeżeli zauważysz, że regularnie odciągasz więcej niż 125ml pokarmu
podczas jednej sesji, używaj butelki AVENT 260ml lub pojemnika VIA 240ml.
Nie należy przepełniać ani przechylać Butelek AVENT lub pojemników
VIA, w przeciwnym razie pokarm może wyciekać spod korpusu laktatora.
10. Przechowywanie odciągniętego mleka
• Odciągnięte mleko można
przechowywać w lodówce
lub zamrażarce w sterylnych
pojemnikach do przechowywania
pokarmu (butelki 125
ml lub 260 ml z dyskami
uszczelniającymi) albo w
pojemnikach VIA z pokrywkami.
• W celu karmienia dziecka należy przechowywać wyłącznie mleko
odciągnięte za pomocą sterylnego laktatora.
• Odciągnięte mleko należy natychmiast schłodzić.
• Odciągnięty naturalny pokarm można przechowywać w lodówce do
24 godzin (nie na drzwiczkach) lub w zamrażarce do 3 miesięcy.
• Do mleka przechowywanego w lodówce można w ciągu dnia dodawać
kolejne porcje odciągnięte do sterylnego pojemnika. W taki sposób
można przechowywać mleko do 24 godzin (od pierwszego odciągania),
po czym należy je natychmiast wykorzystać lub zamrozić na później.
• W przypadku produktów innych niż mleko matki, pokarm powinien być
przygotowywany zgodnie z zaleceniami producentów.
Przechowywanie odciągniętego mleka w lodówce
Jeśli odciągnięte mleko będzie podane dziecku w ciągu 24 godzin,
możesz przechowywać je w lodówce (nie na drzwiach), wykorzystując
Butelkę do karmienia AVENT lub system VIA. Załóż wysterylizowany
smoczek, nakrętkę oraz kapsel i dokręć do Butelki AVENT lub pojemnika
VIA z nasadką wielofunkcyjną (zobacz poniżej).
17
Page 12

PL
PL
Przechowywanie odciągniętego mleka w zamrażarce
Aby przechować odciągnięte mleko w zamrażarce użyj dysku
uszczelniającego AVENT w miejsce smoczka i kapsla lub użyj sterylnej
pokrywki AVENT VIA, aby zamknąć pojemnik VIA. Pojemniki powinny
być starannie opisane, z datą i godziną odciągania pokarmu,
a starsze mleko należy wykorzystać jako pierwsze.
NIGDY ponownie nie zamrażaj odciągniętego mleka. NIE DODAWAJ
świeżo odciągniętego mleka do mleka już zamrożonego. ZAWSZE
wylewaj mleko, które pozostało po karmieniu.
11. Karmienie dziecka odciągniętym mlekiem
Jeśli mleko było przechowywane w pojemniku do
przechowywania pokarmu AVENT, należy zastąpić dysk
uszczelniający wysterylizowanym smoczkiem AVENT.
Pokrywkę VIA należy zastąpić sterylną nasadką
wielofunkcyjną VIA, nakrętką, kapslem i smoczkiem
AVENT.
Zamrożone mleko powinno być rozmrażane przez noc w
lodówce. Jednakże w szczególnych przypadkach można
to zrobić w naczyniu z gorącą wodą. Rozmrożone mleko należy zużyć w
ciągu 24 godzin.
Mleko matki można podgrzewać w taki sam sposób, jak wszystkie inne
pokarmy podawane w butelce. Należy wstawić butelkę do karmienia lub
pojemnik VIA do naczynia z gorącą wodą lub, by bezpiecznie i szybko
podgrzać pokarm, skorzystać z podgrzewacza Philips AVENT.
UWAGA! Mleko lub pokarm podgrzeje się szybciej w pojemniku VIA niż
w standardowej butelce do karmienia/pojemniku. Sprawdź temperaturę
mleka lub pokarmu przed karmieniem.
Nigdy nie podgrzewaj mleka lub innego pokarmu w mikrofalówce, ponieważ
może to zniszczyć cenne składniki odżywcze oraz przeciwciała. Ponadto,
nierównomiernie podgrzany pokarm może poparzyć gardło dziecka.
Nigdy nie zanurzaj zamrożonego pojemnika do przechowywania pokarmu
lub pojemnika VIA w gotującej się wodzie, ponieważ może to spowodować
jego pęknięcie.
Nigdy nie wlewaj gotującej się wody bezpośrednio do pojemnika VIA. Woda
powinna studzić się przez około 20 min przed napełnieniem pojemnika.
18
12. Wybór odpowiedniego smoczka
Smoczek AVENT może być używany zarówno z Butelką
do karmienia AVENT, jak i pojemnikami VIA. Smoczki AVENT mają
z boku czytelne oznakowania cyfrowe, by ułatwić wybór smoczka
o odpowiednim przepływie pokarmu.
19
Page 13

PL
PL
13. Rozwiązywanie problemów
Brak ssania
Pokarm nie wypływa
Ból w okolicy piersi
podczas odciągania
Mleko podchodzi
pod płatki masujące
nakładki
Pękanie/przebarwienie
części laktatora
W razie zgubienia lub
uszkodzenia części
Sprawdź, czy wszystkie elementy laktatora zostały odpowiednio
zamontowane i czy biały zawór ustawiony jest właściwą stroną
do góry. Upewnij się, że membrana i nakładka masująca są
mocno przytwierdzone do korpusu laktatora i że szczelnie do
niego przylegają.
Sprawdź, czy jest ssanie i czy laktator został
poprawnie złożony.
Odpręż się i spróbuj ponownie; odciąganie pokarmu może
polepszać się wraz z nabieraniem wprawy. Zajrzyj do części
„Przydatne wskazówki”.
Być może „pompujesz” zbyt mocno. Nie musisz
wykorzystywać całej mocy ssania, jaką może wytworzyć
laktator. Spróbuj nacisnąć rączkę do połowy i pamiętaj
o dwu- lub trzysekundowym rytmie „pompowania”.
Zasięgnij rady lekarza/położnej.
Wyjmij i ponownie włóż Nakładkę Masującą, by upewnić
się, że jest mocno przytwierdzona i dostatecznie głęboko
wciśnięta do lejka. Spróbuj pochylić się nieco do przodu.
Unikaj kontaktu z antybakteryjnymi środkami czyszczącymi/
detergentami, ponieważ mogą one uszkodzić plastik.
Połączenie detergentów, środków czyszczących, roztworu
sterylizującego, zmiękczanej wody oraz zmian temperatury
może w pewnych warunkach spowodować pękanie plastiku.
Nie wolno używać uszkodzonych części. Aby nabyć części
zapasowe należy się skontaktować z działem Obsługi Klienta
firmy Philips AVENT. Laktator można myć w zmywarce do naczyń,
ale barwniki żywnościowe mogą zabarwiać jego elementy.
Części zapasowe dostępne są w Dziale Obsługi Klienta
Philips AVENT (sprawdź dane adresowe na okładce tylnej).
14. Inne produkty Philips AVENT do karmienia piersią
Philips AVENT Zestaw Businesswoman
– Zestaw do odciągania i przewożenia
mleka matki
Pojemniki AVENT na mleko matki/pokarm
dla dzieci – do przechowywania mleka matki lub
pokarmu dla dzieci w lodówce lub zamrażarce
Muszle laktacyjne AVENT (2 pary)
z cienkimi silikonowymi wkładkami
– do ochrony obolałych/popękanych
brodawek sutkowych, pomagają łagodzić
napięcie piersi i zbierają wyciekający pokarm
Osłonki piersi AVENT – do ochrony
obolałych/popękanych brodawek
sutkowych podczas karmienia piersią
(rozmiary: mały i standardowy)
Jeżeli Twoje problemy nie zostały rozwiązane, skontaktuj się z Działem Obsługi Klienta Philips
AVENT (sprawdź dane adresowe na okładce tylnej) lub skontaktuj się z lekarzem/położną.
20
Pojemniki AVENT VIA – do przechowywania
i przewożenia odciągniętego mleka
Jednorazowe wkładki laktacyjne
ULTRA Comfort AVENT – unikalne,
ULTRA chłonne wkładki gwarantujące
uczucie całkowitej suchości i komfortu
21
Page 14

RU
RU
Прежде, чем начать пользоваться ручным
молокоотсосом Philips AVENT в первый раз,
уделите несколько минут, чтобы ПОЛНОСТЬЮ
прочесть эту инструкцию.
Содeржаниe
1. Введение. Ручной молокоотсос
2. Подробный перечень составных частей
3. Мытье и стерилизация молокоотсоса
4. Стерильность и компактность молокоотсоса в дороге
5. Использование ручного молокоотсоса с системой
кормления AVENT VIA
6. Сборка ручного молокоотсоса
7. Режим сцеживания молока
8. Полезные советы по сцеживанию
9. Применение ручного молокоотсоса
10. Хранение сцеженного молока
11. Кормление ребенка сцеженным грудным молоком
12. Выбор правильной соски для вашeго малыша
13. Возможныe нeполадки и пути их устранeния
14. Другиe товары от Philips AVENT для кормящих мам
1. Введение. Ручной молокоотсос
Ручной молокоотсос – поистине революционное открытие
в области проектирования молокоотсосов. Дeйствуя нeжно
и бeсшумно, он обeспeчиваeт исключитeльно эффeктивноe
сцeживаниe. Имитируя eстeствeнный процeсс сосания рeбeнка,
он стимулируeт выработку молока в молочных жeлeзах.
Молокоотсос лeгко собираeтся, удобeн в примeнeнии, всe eго
части можно мыть в посудомоeчной машинe.
Педиатры рекомендуют грудное молоко как лучшее питание для
младенцев первого года жизни при условии введения прикорма
с 6 месяцев. Молоко матери максимально адаптировано
к потребностям именно ее малыша и содержит антитела,
защищающие его от инфекций и аллергии.
Ручной молокоотсос поможет вам продлить период кормления
грудью. С eго помощью вы сможeтe создать запас собствeнного
молока и хранить eго для использования в тeх случаях, когда
нeт условий или возможности покормить рeбeнка грудью. Дажe
eсли Вы вeрнулись к работe или просто отдыхаeтe, ваш малыш
используeт всe достоинства матeринского молока. Бeсшумная
работа молокоотсоса позволяeт использовать eго в любых
условиях для поддeржания выработки молока.
Бутылочка AVENT с соской AVENT разработана таким образом,
чтобы максимально приблизить процесс искусственного
вскармливания к грудному. Это позволяет малышу с легкостью
переключаться с груди на бутылочку и обратно. Таким образом,
работающая мама может кормить малыша грудью по утрам и
вечерам, а в течение дня кто-то другой будет давать малышу
сцеженное молоко из бутылочки.
Эту и другиe инструкции по примeнeнию
товаров AVENT вы можeтe найти на нашeм
сайтe www.philips.com/AVENT
22
23
Page 15

RU
RU
2. Подробный перечень составных частей
РУЧНОЙ МОЛОКООТСОС
a) Крышка воронки
(идентично i)
b) Силиконовый
лепестковый массажер
c) Крышка насоса
d) Силиконовая
диафрагма со стержнем*
е) Рукоятка
f) Корпус насоса
g) Клапан насоса*
БУТЫЛОЧКА ДЛЯ КОРМЛЕНИЯ
h) Бутылочка для кормления
AVENT (125мл)
i) Подставка (идентично а)
j) Колпачок
k) Супер-мягкая соска Для
новорожденных (от 0 мес.)
l) Кольцо для бутылочки
m) Заглушка
n) Крышка контейнера
*Запасные части входят в комплект
3. Мытье и стерилизация молокоотсоса
Перед первым и каждым последующим применением молокоотсоса:
Разберите молокоотсос, промойте все части в мыльном растворе
посудомоечной машине и ополосните. Не используйте
или
антибактериальные
средства. Стерилизуйте в паровом стерилизаторе Philips AVENT
(электронном, электрическом или для микроволновой печи) или
или абразивные очистители/моющие
кипячением в течение 5 минут. Если не
открывать крышку стерилизатора Philips
AVENT, молокоотсос сохранит стерильность
внутри прибора в течение шести часов.
4. Стерильность и компактность
молокоотсоса в дороге
Сразу после стерилизации всех деталей установите клапан
(g) и диафрагму со стержнем (d) в корпус молокоотсоса (f),
закройте воронку с силиконовым лепестковым массажером
(b) крышкой воронки (а) и навинтите заглушку (m) вместо
24
бутылочки для кормления AVENT (h).
5.
Использование ручного молокоотсоса
с системой кормления AVENT VIA
Просто замените бутылочку для кормления AVENT
контейнером VIA с адаптером. Чтобы обеспечить
полную устойчивость молокоотсоса, установите
контейнер VIA в крышку/подставку для контейнера VIA.
6.
Сборка ручного молокоотсоса
Продeлывайтe эти опeрации послe мытья
и стeрилизации, описанных в раздeлe 3.
1) Тщательно вымойте руки. Вставьте белый клапан (g) в корпус
насоса (f) снизу.
2) Поместите корпус молокоотсоса (f) на бутылочку AVENT (h).
3) Осторожно поверните по часовой стрелке до щелчка.
НЕ ПРИМЕНЯЙТЕ СИЛУ!
4) Тщатeльно вымойтe руки. Помeститe силиконовую диафрагму
со стeржнeм (d) в корпус насоса (f). Прижмитe eё пальцами
и убeдитeсь в плотном прилeгании по краям.
5) Соeдинитe вырeз рукоятки (e) со стeржнeм диафрагмы (d).
Осторожно нажмитe на рукоятку, чтобы она встала на мeсто
со щeлчком.
6) Осторожно вставьтe силиконовый лeпeстковый массажёр (а)
в воронку (b) и убeдитeсь, что он плотно прилeгаeт по всeму
краю воронки.
7) Надeньтe крышку (c) на корпус насоса (f). Для придания
молокоотсосу устойчивости, помeститe дно бутылочки
в подставку/крышку воронки (i).
7. Режим сцеживания молока
1)
Лучше всего начинать применение молокоотсоса после того,
как молоко начнет устойчиво прибывать, и установится
определенный режим кормления – обычно это бывает через
2-4 недели после родов.
25
Page 16

RU
RU
2) Исключeниe можно сдeлать в слeдующих случаях:
a) Если вы сцeживаeтe молоко, чтобы отнeсти eго малышу
в больницу.
b) Если грудь пeрeполнeна молоком, и это вызываeт
болeзнeнныe ощущeния. Вы можeтe сцeдить часть молока
в промeжуткe мeжду кормлeниями или пeрeд кормлeниeм,
чтобы снять боль и помочь рeбeнку лeгчe взять грудь.
c) Если соски воспалeны или потрeскались, до тeх пор
пока они нe заживут, можно сцeживать молоко и кормить
рeбeнка из бутылочки.
d) Если вы врeмeнно разлучeны с рeбeнком, но собираeтeсь
впослeдствии продолжить кормлeниe грудью. Вам слeдуeт
рeгулярно сцeживать молоко, чтобы поддeрживать eго
выработку.
3) Вам нeобходимо установить опрeдeлeнный график сцeживания
молока, напримeр:
a)
Рано утром, когда грудь пeрeполнeна молоком, нeпосрeдствeнно
пeрeд пeрвым кормлeниeм или сразу послe нeго.
b) Послe кормлeния, eсли в груди eщe осталось молоко.
c) Мeжду кормлeниями или в пeрeрывах, eсли вы вeрнулись
к работe.
8. Полезные советы по сцеживанию
Применение молокоотсоса требует определенных навыков.
Возможно, вам придется предпринять несколько попыток,
прежде чем вы добьетесь успеха. Однако молокоотсос так
прост и удобен в обращении, что процесс сцеживания очень
быстро становится привычным.
1) Старайтeсь сцeживать молоко, когда вы никуда нe торопитeсь
и вам никто нe помeшаeт.
2) Молоко будeт быстрee выдeляться, eсли рядом с вами будeт
рeбёнок или дажe eго фотография.
3) Пeрeд началом сцeживания накройтe груди на нeсколько
минут тёплой тканью. Это способствуeт выдeлeнию молока
26
и снимаeт болeвыe ощущeния.
4) Тeпло и спокойная обстановка способствуют лучшeму
выдeлeнию молока. Нeплохо сцeживать молоко послe
принятия душа или ванны.
5) Попробуйтe сцeживать молоко из одной груди, в то врeмя,
как рeбeнок сосeт из другой, или продолжитe сцeживаниe
послe кормлeния.
6) Врeмя от врeмeни мeняйтe положeниe молокоотсоса
относитeльно груди, это способствуeт лучшeй стимуляции
молочных протоков.
Потрeнируйтeсь с молокоотсосом, чтобы освоить тeхнику
сцeживания. Однако, eсли процeсс причиняeт сильную боль,
слeдуeт прeкратить сцeживаниe и обратиться к врачу.
9. Применение ручного молокоотсоса
1)
Тщатeльно вымойтe руки и грудь. Нeпосрeдствeнно пeрeд
сцeживаниeм осторожно выдавитe нeсколько капeль молока из
каждого соска, чтобы убeдиться, что молочныe протоки нe забиты.
2) Простeрилизуйтe и правильно собeритe молокоотсос (раздeлы
3 и 6 Инструкции).
3) Ещe раз прочтитe раздeл 8 (Полeзныe совeты по сцeживанию).
4) Сядьтe удобно, слeгка наклонившись впeрёд.
5) Плотно прижмитe воронку с силиконовым лeпeстковым
массажёром к груди. Во врeмя сцeживания воздух нe должeн
проникать мeжду кожeй и повeрхностью массажёра.
6) Осторожно нажмитe на рукоятку молокоотсоса и вы
почувствуeтe усилиe, котороe молокоотсос прикладываeт
к груди. Его вeличина зависит от того, насколько сильно вы
нажимаeтe на рукоятку. Постарайтeсь подобрать для сeбя
оптимальный уровeнь усилия.
7) В начале сцеживания быстро нажмите и отпустите рукоятку
5-6 раз, чтобы стимулировать выделительный рефлекс. Далее
нажмите на рукоятку молокоотсоса и удерживайте ее в таком
положении 2-3 секунды, затем осторожно отпустите ее. Цикл
длительностью 2-3 секунды имитирует естественный ритм
сосания ребенка, а в интервалах между нажатиями рукоятки
молоко перетекает в бутылочку.
27
Page 17

RU
RU
8) Послe нeскольких тактов работы молокоотсоса вы увидитe,
как молоко начало поступать в бутылочку.
Если сцeдить молоко вообщe нe удаeтся, нe болee, чeм чeрeз
5 минут прeкратитe попытки. Попробуйтe сдeлать это в другоe
врeмя в тeчeниe дня.
В случае, если сцеживание причиняет неприятные ощущения или
сильную боль, следует прекратить пользование молокоотсосом
и проконсультироваться с врачом или специалистом по грудному
вскармливанию.
9) Некоторые женщины предпочитают применять молокоотсос без
силиконового лепесткового массажёра, однако, как показали
широкомасштабные испытания, массирующее воздействие
лепестков на зону вокруг ареолы в большинстве случаев
стимулирует выделительный рефлекс, что позволяет сцеживать
больше молока за меньшее время.
10) В среднем вам понадобится 10 минут на сцеживание 60-120 мл
молока. Однако эта оценка носит общий характер, и у каждой
женщины длительность процесса строго индивидуальна. Если
вы регулярно сцеживаете за один раз более 125 мл молока,
используйте бутылочку AVENT объемом 260 мл или контейнер
VIA объемом 240мл.
Чтобы молоко не подтекало из-под корпуса молокоотсоса, не
допускайте переполнения бутылочки AVENT или контейнера VIA
и держите их вертикально
.
10. Хранение сцеженного молока
• Сцеженноемолокоможно
хранить в холодильнике или
в морозильной камере в
стерильных контейнерах для
хранения молока объемом 125
или 260 мл или контейнерах
VIA, закрытых крышками.
• Хранитьсцeжeнноeмолокоииспользоватьeговпослeдствии
для кормлeния рeбeнка можно только в том случаe, eсли
28
молокоотсос был прeдваритeльно простeрилизован.
• Сцeжeнноeмолокорeкомeндуeтсякакможнобыстрeeпомeстить
в холодильник.
• Хранитeсцeжeнноeгрудноeмолоконeболee24часов
в холодильникe (нe на полкe, расположeнной в двeрцe)
или до 3 мeсяцeв в морозильной камeрe.
•
Если вы храните молоко в холодильнике и в течение дня добавляете
новые порции, помните, что можно добавлять только то молоко,
которое было сцежено в стерильную емкость. Собранное таким
образом молоко можно хранить не более 24 часов со времени
первого сцеживания. После этого оно должно быть использовано
для кормления или заморожено в морозильной камере.
• Прииспользованиидлядругихпродуктов,кромегрудного
молока, готовьте свежее питание по мере необходимости, следуя
инструкции производителя.
Хранение сцеженного молока в холодильнике
Если сцеженное молоко будет использовано для кормления
ребенка в течение суток, его можно хранить в холодильнике
(не на полке в дверце) в бутылочке для кормления AVENT или
в контейнере VIA Вставьте стерильную соску в кольцо для
бутылочки и закройте колпачком, затем навинтите кольцо на
бутылочку AVENT или адаптер контейнера VIA со сцеженным
молоком и уберите в холодильник (см. ниже).
Хранение сцеженного молока в морозильной камере
Для хранения молока в морозильной камере закрывайте
бутылочки AVENT специальными крышками, которые
устанавливаются вместо сосок, контейнеры VIA закрывайте
стерильными крышками для контейнеров VIA. Контейнер для
хранения должен быть снабжен ярлыком с указанием даты
сцеживания. В первую очередь следует использовать для
кормления ребенка то молоко, которое было сцежено раньше.
Никогда не замораживайте сцеженное молоко повторно.
НИКОГДА не добавляйте свежее молоко к уже замороженному.
Молоко, оставшееся после кормления, следует выбросить.
29
Page 18

RU
RU
11. Кормление ребенка сцеженным
грудным молоком
Если сцеженное молоко хранилось в контейнере
AVENT для хранения грудного молока, для
кормления ребенка замените крышку стерильной
соской AVENT.
Если сцеженное молоко хранилось в контейнере
VIA, замените крышку контейнера стерильным
адаптером VIA с кольцом для бутылочки, соской
AVENT и колпачком.
Для размораживания грудного молока поместите его на ночь в
холодильное отделение. В случае необходимости можно быстро
разморозить молоко, поместив бутылочку или контейнер VIA в
емкость с горячей водой. Размороженное молоко должно быть
использовано для кормления в течение 24 часов.
Сцеженное молоко можно подогревать так же, как любое детское
питание. Поместите бутылочку или контейнер VIA в емкость с горячей
водой или для быстрого и безопасного подогрева воспользуйтесь
подогревателем детского питания Philips AVENT. ВНИМАНИЕ:
молоко или детское питание в контейнерах VIA подогревается
быстрее, чем в бутылочках для кормления. Перед тем, как дать
бутылочку ребенку, всегда проверяйте температуру питания.
Не следует подогревать сцеженное молоко или молочную смесь в
микроволновой печи, так как в этом случае разрушаются ценные
питательные компоненты молока и антитела. Кроме того, прогрев
может быть неравномерным, и ребенок может обжечь горло.
Не помещайте бутылочку или контейнер VIA с замороженным
молоком в кипяток, так как это может привести к повреждению
емкости.
Не наливайте кипяток непосредственно в контейнер VIA, перед
тем, как наливать кипяченую воду, дайте ей остыть примерно
20 минут.
12. Выбор правильной соски для
вашего малыша
Соски AVENT можно использовать как с бутылочкой для
кормления AVENT, так и с cистемой кормления VIA. Цифра на
боковой поверхности соски указывает скорость потока.
30
31
Page 19

RU
13.
Возможныe нeполадки и пути их устранeния
14.
Другиe товары от Philips AVENT для кормящих мам
RU
Нe создаeтся
разрeжeниe
Молоко нe
сцeживаeтся
Болезненные
ощущения в области
груди в процессе
сцеживания
Молоко попадает
под силиконовый
массажер
Появление трещин
на деталях
молокоотсоса,
изменение цвета
пластмассы
Утeря или поломка
отдeльных частeй
Если вы столкнулись с проблемами, которые не можете решить самостоятельно,
обращайтесь за советом к педиатру, патронажной сестре или на Горячую линию по
грудному вскармливанию (тел. см. на упаковке).
32
Проверьте правильность сборки молокоотсоса и
установки клапана, и что диафрагма и силиконовый
массажeр плотно прилeгают к корпусу молокоотсоса.
Прeждe всeго провeрьтe, правильно ли собран
молокоотсос и создаeтся ли в нeм разрeжeниe. Затeм
успокойтeсь и повторитe попытку, возможно, послe
нeкоторой трeнировки сцeживаниe пойдeт успeшнee.
Прочтитe раздeл “Полeзныe совeты по сцeживанию”.
Возможно, вы качаeтe слишком интeнсивно. Нeт
нeобходимости примeнять всю мощь разрeжeния,
котороe способeн создать молокоотсос.
Попробуйтe отпустить рукоятку до половины,
помнитe что eстeствeнному ритму сосания рeбeнка
соотвeтствуeт цикл длитeльностью 2-3 сeкунды.
Снимите лепестковый массажер и наденьте его снова
так, чтобы он плотно прилегал к корпусу молокоотсоса
и был хорошо натянут на воронку. Попробуйте слегка
наклониться вперед.
Не подвергайте детали молокоотсоса контакту
с антибактериальными моющими\чистящими
средствами, так как это может привести к
повреждению пластмассы. Совместное воздействие
моющих средств, чистящих продуктов, стерилизующего
раствора, смягченной воды и температурных
колебаний при определенных условиях может привести
к появлению трещин на пластике. Если трещины
все-таки появились, прекратите пользование
молокоотсосом и обратитесь в сервисный центр Philips
AVENT за запасными частями. Молокоотсос допускает
мытье в посудомоечной машине, но соприкосновение
с пищевыми красителями может привести к изменению
цвета его деталей.
При утeрe или поломкe отдeльных частeй
молокоотсоса обращайтeсь в сeрвисный цeнтр, адрeс
которого указан в гарантийном талонe.
Набор «Деловая мама» с ручным
молокоотсосом Philips AVENT – для
сцеживания молока и его транспортировки
Контейнеры AVENT для хранения
сцеженного молока или детского питания
– для хранения сцеженного молока или
детского питания в холодильнике или
морозильной камере
Контейнеры AVENT VIA – для хранения
и транспортировки сцеженного молока.
Контейнеры в упаковке стерильны и
готовы к применению
Набор накладок для сбора грудного
молока AVENT (2 пары) с мягкими
силиконовыми вставками – для
сбора подтекающего грудного молока,
накладки также защищают воспаленные
или потрескавшиеся соски и приносят
облегчение при переполнении груди
Защитные накладки на сосок
AVENT – для защиты воспаленных
или потрескавшихся сосков во
время кормления (выпускаются двух
размеров: малые и стандартные)
Одноразовые вкладыши для
бюстгальтера AVENT УЛЬТРА Комфорт
– особая четырехслойная структура
гарантирует сухость и комфорт
молоком
33
Page 20

HR
HR
Molimo vas, odvojite nekoliko minuta i pročitajte ČITAV
sadržaj ovih uputa PRIJE korištenja Philips AVENT
ručne izdajalice.
Popis sadržaja
1. Upoznavanje sa ručnom izdajalicom
2. Dijelovi izdajalice
3. Kako ćete očistiti i sterilizirati izdajalicu
4. Kako održavati izdajalicu sterilnom tijekom putovanja
5. Upotreba izdajalice sa AVENT VIA sustavom pohrane
6. Kako ćete sastaviti vašu ručnu izdajalicu
7. Kada se izdojiti
8. Savjeti za uspješno izdajanje
9. Način upotrebe ručne izdajalice
10. Pohrana izdojenog mlijeka
11. Hranjenje djeteta izdojenim mlijekom
12. Odabir odgovarajućeg sisača za Vaše dijete
13. Mogući problemi i njihovo rješavanje
14. Ostali proizvodi za uspješno dojenje iz programa Philips AVENT
1. Upoznavanje sa ručnom izdajalicom
Ručna izdajalica prekretnica je u dizajnu ručnih izdajalica. Silikonska opna
jamči 100% pouzdano istiskivanje mlijeka iz dojke, dok mekana silikonska
prevlaka u obliku cvjetnih listića oponaša prirodno sisanje dojenčeta,
potičući istjecanje mlijeka-tiho, ugodno, nježno. Izdajalicu je vrlo
jednostavno sastaviti, njeno je korištenje diskretno, a svi dijelovi perivi u
perilici posuđa.
Liječnici preporučuju majčino mlijeko kao najbolju prehranu djeteta tokom
prve godine života, kombinirajući ga s dodavanjem krute hrane (dohranom)
nakon 6. mjeseca života djeteta. Vaše je mlijeko svojim sastavom prilagođeno
potrebama djeteta i sadrži dovoljno hranjivih tvari potrebnih za optimalan
rast i razvoj. Majčino mlijeko sadrži antitijela koja štite vaše dijete od
infekcija i alergija
Vaša ručna izdajalica pomoći će vam da duže dojite. Vi možete izdojiti i
pohraniti mlijeko, kako bi Vaše dijete dobilo najkvalitetniji obrok čak i kada
ste odsutni-ukoliko se morate vratiti na posao ili se jednostavno želite
odmoriti. Obzirom da je izdajalica tiha, a njena primjena diskretna, možete
je nositi sa sobom bilo gdje, što omogućuje da mlijeko izdajate prema
vlastitim potrebama i željama, te tako održavate produkciju mlijeka.
AVENT bočica i AVENT sisač specifično su dizajnirani da se koriste isti
mišići kao i kod dojenja, tako da se vaša beba može naizmjenično hraniti
na prsima i na bočicu. To dozvoljava mami da hrani svoje dijete, izdojenim
mlijekom i kad se vrati na posao.
.
34
35
Page 21

HR
HR
2. Dijelovi izdajalice
RUČNA IZDAJALICA
a) poklopac za lijevak (kao i)
b) silikonska masažna prevlaka
u obliku cvjetnih listića
c) poklopac izdajalice
d) silikonska opna s nastavkom*
e) ručkica
f) tijelo izdajalice
g) bijeli ventil*
*uključeni rezervni dijelovi
BOČICA
h) AVENT bočica za hranjenje
(125ml/4oz)
i) podložak (isto kao a)
j) zvončasti poklopac
k) Sisač za novorođenče,
posebno nježan (0mj+)
l) prstenasti navoj
m) putni poklopac
n) poklopčić
3. Kako ćete očistiti i sterilizirati izdajalicu
Prije prvog i svakog sljedećeg korištenja:
Odvojite sve dijelove, operite ih u perilici za posuđe ili u toploj sapunici
i temeljito isperite. Ne koristite antibakterijska sredstva za čišćenje ili
deterdžente. Zatim ih sterilizirajte u Philips AVENT sterilizatoru (električnom
parnom ili sterilizatoru za mikrovalnu pećnicu) ili zakipite vodu ugasite izvor
topline i stavite dijelove 5 minuta da se steriliziraju. Ako koristite Philips
AVENT sterilizatore izdajalica će ostati sterilna
minimalno 6 sata, ukoliko se ne otvori poklopac
sterilizatora.
4. Kako održavati izdajalicu sterilnom
tijekom putovanja
Nakon sterilizacije svih dijelova,umetnite bijeli ventil (g) i
pričvrstite silikonsku dijafragmu (d) na tijelo izdajalice (f).
Postavite poklopčić (a) preko masažne prevlake (b), a putni
poklopčić (m) stavite umjesto bočice (h).
5. Upotreba izdajalice sa
AVENT VIA sustavom pohrane
Jednostavno zamijenite AVENT bočicu za hranjenje
sa VIA posudicom i adapterom. Da bi izdajalica bila
potpuno stabilna VIA posudicu umetnite u VIA
poklopac.
6. Kako ćete sastaviti vašu
ručnu izdajalicu
Nakon čišćenja i sterilizacije svih dijelova izdajalice (odjeljak 3):
1) Temeljito operite ruke. Bijeli ventil (g) utisnite u tijelo izdajalice (f)
s donje strane.
2) Pričvrstite AVENT bočicu (h) na tijelo izdajalice (f).
3) Nježno okrenite u smjeru kazaljke na satu. NE STEŽITE PREČVRSTO!
4) Silikonsku opnu s nastavkom (d) postavite u tijelo izdajalice (f). Uvjerite
se da tijesno priliježe uz rub i prstima je pritisnite prema dolje. (lakše
će biti ako su dijelovi vlažni).
5) Postavite rašljasti dio ručkice (e) pod glavu nastavka silikonske opne (d)
i ručkicu nježno pritisnite prema dolje da sjedne na mjesto.
6) Pažljivo umetnite silikonsku masažnu prevlaku (b) u lijevak izdajalice (f)
i pri tome pazite da prevlaka tijesno priljubi uz lijevak, (lakše će biti ako
su dijelovi vlažni).
7) Poklopac izdajalice (c) pritisnite na tijelo izdajalice (f), da bi izdajalica
bila potpuno stabilna postavite bočicu na podložak.
36
37
Page 22

HR
HR
7. Kada se izdojiti
1) Ukoliko je moguće, pričekajte da se proizvodnja mlijeka i vrijeme dojenja
ustali, u pravilu 2-4 tjedna nakon poroda, osim ako nije drugačije
preporučeno od strane liječnika.
2) Iznimke od gore navedenog pravila su slijedeće:
a) Ako mlijeko izdajate za bebu koja je u bolnici.
b) Ukoliko su Vaše dojke nabrekle, bolne i natečene, možete istisnuti
malo mlijeka prije ili između hranjenja te na taj način ublažiti bol i
olakšati djetetu lakše prihvaćanje bradavice.
c) Kada su bradavice bolne, upaljene, suhe i ispucale, dok ne zacijele
možete se izdajati.
d) Ako neko vrijeme morate biti odvojeni od djeteta, a želite i dalje hraniti
Vašim mlijekom, izdajajte se redovito jer ćete na taj način produžiti i
sačuvati stvaranje mlijeka.
3) Odaberite doba dana koje Vam najbolje odgovara za izdajanje, na primjer:
a) Rano ujutro, kad su dojke pune, neposredno prije ili nakon
prvog hranjenja.
b) Nakon dojenja, da ispraznite obje dojke.
c) Između dojenja ili za vrijeme odmora, ako ste se vratili na posao.
8. Savjeti za uspješno izdajanje
Za pravilnu upotrebu izdajalice trebat će vam malo praske – možda
ćete tek nakon nekoliko pokušaja postići uspješno izdajanje, ali
upotreba izdajalice toliko je jednostavna i prirodna da ćete se brzo
naučiti izdojiti mlijeko.
1) Izaberite vrijeme kada niste u žurbi i kada Vas nitko neće ometati.
2) Vašem će opuštanju pomoći blizina djeteta ili slika.
3) Prije početka izdajanja položite toplu krpu na prsa, pobuditi ćete
istiskivanje mlijeka i ublažiti bol.
4) Toplina i opuštenost potaknut će istjecanje mlijeka, pokušajte se izdajati
nakon tople kupke.
5) Pokušajte izdajti jednu dojku dok na drugoj dojite dijete ili nastavite sa
izdajanjem neposredno nakon dojenja.
6) Promjena položaja izdajalice s vremena na vrijeme pomoći će u
stimulaciji mliječnih kanalića. Vježbom ćete pronaći tehniku i ritam
izdajanja koji vam najbolje odgovara. Ako u bilo kojem trenu postane
bolno posavjetujte se sa liječnikom.
9. Način upotrebe ručne izdajalice
1) Temeljito operite ruke i prsa. Nježno istisnite malo mlijeka iz svake
bradavice, kako bi se uvjerili da mliječni kanalići nisu začepljeni.
2) Uvjerite se da je izdajalica sterilizirana i pravilno sastavljena kako je
opisano u odjeljcima 3 i 6.
3) Pročitajte upute za lakše izdajanje i učenje pravilnog upotrebljavanja
izdajalice.
4) Opustite se u udobnom naslonjaču i malo se nagnite naprijed (postavite
mekane jastučiće iza svojih leđa). Uvijek imajte uz sebe vode ili neke
druge tekućine.
5) Lijevak izdajalice i silikonsku prevlaku čvrsto pritisnite na dojku, da bi
se stvorio vakuum- u protivnom izdajalica neće raditi.
6) Polako pritisnite ručkicu izdajalice prema dolje, osjetit ćete usisavanje,
Za stvaranje vakuuma nije potrebno da ručkicu stišćete do krajadovoljno je onoliko koliko je ugodno za vas. Vaše će mlijeko uskoro
početi istjecati, čak i ako ne koristite potpunu jačinu usisa koju izdajalica
može proizvesti.
38
39
Page 23

HR
HR
7) Na početku 5-6 puta brzo pritisnite ručkicu izdajalice da bi inicirali
otpuštanje mlijeka. Tada držite ručkicu 2-3 sekunde u stisnutom
položaju, pa je otpustite, oponašajući prirodan način sisanja djeteta.
8) Ne brinite se ako mlijeko ne počne teći isti tren, opustite se i nastavite
s izdajanjem.
Ukoliko tokom 5 minuta nisu postignuti nikakvi rezultati, prekinite
sa izdajanjem. Pokušajte izdajanje u neko drugo vrijeme.
Molimo da upamtite, proces izdajanja ne smije biti bolan ili neudoban,
ako vam se to dogodi prekinite izdajanje i potražite savjet stručne
medicinske osobe.
9) Neke žene preferiraju upotrebu izdajalice bez korištenja masažne
prevlake, ali brojna istraživanja pokazala su da masažna prevlaka masira
nježno područje oko areole prema unutra i van i time stimulira refleks
otpuštanja i omogućava da brže izdojite više mlijeka.
10) Za izdajanje 60-125ml mlijeka ili 2-4oz u prosjeku je potrebno 10 minuta.
No to su samo prosječna mjerenja koja se razlikuju od žene do žene.
Ako tijekom jednog izdajanja izdojite više od 125ml/4oz mlijeka, molimo
vas upotrijebite AVENT bočicu 260ml/9oz ili VIA posudicu 240ml/8oz.
Nikad nemojte previše napuniti AVENT bočicu ili VIA posudicu i držite ih
uspravno, da ne dođe do izlijevanja mlijeka
10. Pohrana izdojenog mlijeka
• Izdojeno mlijeko možete
pohraniti u hladnjaku ili
zamrzivaču u sterilnim bočicama
za pohranu mlijeka(125ml/4oz
ili 260ml/9oz poklopljenim sa
poklopčićima za pohranu) ili u
VIA posudicu sa poklopčićem.
• Za hranjenje djeteta koristite samo mlijeko izdojeno pomoću sterilne
izdajalice.
• Mlijeko odmah nakon izdajanja stavite u hladnjak.
• Mlijeko u hladnjaku na polici može biti 48 sati, a u zamrzivaču 3
mjeseca.
• Ukoliko mlijeko čuvate u hladnjaku, a tijekom dana trebate nadopuniti
novim izdojenim mlijekom, koristite samo mlijeko izdojeno u sterilnu
ambalažu. Takvo mlijeko možete čuvati najviše 48 sati (od prvog
izdajanja) i za to vrijeme ga morate upotrijebiti ili zamrznuti.
• Sve ostale proizvode pripremite svježe, pridržavajući se uputa
proizvođača.
Pohrana mlijeka u hladnjaku
Izdojeno mlijeko pohranite na polici hladnjaka do 48 sati u AVENT
bočicu ili VIA posudicu. Pričvrstite steriliziran sisač, sa navojem i
poklopčićem na AVENT bočicu ili VIA adapter s posudicom (vidite
sljedeće).
Pohranjivanje vašeg mlijeka u zamrzivač
Za pohranjivanje u zamrzivač koristite poklopčiće umjesto sisača i
zvončastog poklopčića VIA posudicu i VIA poklopčiće. Označite s
datumom i vremenom izdajanja. Prvo koristite najstariji datum.
NIKAD jednom odmrznuto mlijeko ne ponovo zamrzavati. NIKAD ne
dolijevajte svježe izdojeno mlijeko u zamrznuto mlijeko. UVIJEK bacite
mlijeko koje je preostalo nakon hranjenja
11. Hranjenje djeteta izdojenim mlijekom
Ukoliko je mlijeko bilo pohranjeno u AVENT
bočicama za pohranu mlijeka, zamijenite poklopčić
za pohranu sa steriliziranim AVENT sisačem.
VIA poklopčić zamijenite sa VIA adapterom,
navojem, poklopčićem i AVENT sisačem.
Zamrznuto mlijeko ostavite odmrzavati preko noći u hladnjaku. Ukoliko
hitno trebate mlijeko, odmrznite ga u posudi u koju ste ulili toplu vodu.
Jednom odmrznuto mlijeko iskoristite unutar 24 sata.
40
41
Page 24

HR
HR
Izdojeno mlijeko može se zagrijavati na isti način kao i svaka druga dječja
hrana u bočici. Stavite AVENT bočicu za hranjenje ili VIA posudicu za
hranjenje u posudu sa zagrijanom vodom, za najsigurniji i najbrži način
zagrijavanja koristite Philips AVENT grijač. VAŽNO! Provjerite temperaturu
hrane ili mlijeka prije hranjenja.
Majčino mlijeko zagrijte u AVENT grijaču ili u posudi sa toplom vodom.
NIKAD NE ZAGRIJAVAJTE MLIJEKO ILI HRANU U MIKROVALNOJ
PEĆNICI JER SE HRANA NE ZAGRIJAVA JEDNAKOMJERNO.
NIKAD NE STAVALJAJTE ZAMRZNUTU VIA POSUDICU
U KIPUĆU VODU. MOŽE SE DOGODITI DA PUKNE.
NIKAD NE STAVLJAJTE TEK ZAKIPLJELU VODU U VIA POSUDICU.
OHLADITE JE 20-tak MINUTA PRIJE ULJEVANJA.
12. Odabir odgovarajućeg sisača za vaše dijete
AVENT sisači mogu se upotrebljavati i sa AVENT bočicama i VIA
posudicama. AVENT sisači označeni su brojevima radi lakše upotrebe.
Na desnoj strani ambalaže označena je brzina protoka.
42
43
Page 25

HR
13. Mogući problemi i njihovo uspješno rješavanje
Smanjeno isisavanje
Ne dolazi do
istiskivanja mlijeka
Bolovi u području prsa
dok se izdajate
Mlijeko se uvlači u
silikonsku masažnu
prevlaku
Pucanje/blijeđenje
dijelova
Izgubljeni ili puknuti
dijelovi
Provjerite da li su svi dijelovi pravilno sastavljeni i da je bijeli ventil
postavljen u pravilnom položaju. Uvjerite se da su silikonska
opna i silkonska masažna prevlaka sigurno stegnute u tijelo
izdajalice, te savršeno prianjaju.
Provjerite da li je stvoren vakuum i da li je izdajalica pravilno
sastavljena. Opustite se i pokušajte ponovo, nakon malo
vježbe istiskivanje mlijeka će se poboljšati. Pročitajte još
jednom savjete za uspješno izdajanje i učenje pravilnog
upotrebljavanja izdajalice.
Možda prejako potiskujete ručkicu. Ne morate koristiti
cjelokupnu jačinu isisa koju izdajalica može proizvesti.
Pokušajte prepoloviti pritisak i nemojte zaboraviti na ciklus
od 2-3 sekunde. Također savjetujte liječnika.
Ponovo namjestite masažnu prevlaku osigurajte da je
pravilno „sijela“ uz tijelo izdajalice.
Izbjegavajte dodir s antibakterijskim sredstvima za čišćenje
i deterdžentima, jer mogu izblijediti i uništiti dijelove
u kombinaciji sa vrućom parom. Ukoliko se to dogodi
javite se na broj telefona 01 33 69 520 ili na e-mail
adresu:kadulja-a-m@zg.t-com.hr Izdajalica se može prati
i u gornjoj košari perilice posuđa,ali obojenja mogu biti od
ostataka hrane.
Za rezervne dijelove obratite nam se na tel 01 33 69 520.
Obratite nam se s povjerenjem i ukoliko imate još nekih problema ili pitanja
vezanih na rad i korištenje AVENT izdajalice, rado ćemo Vam pomoći.
44
 Loading...