

Page 1
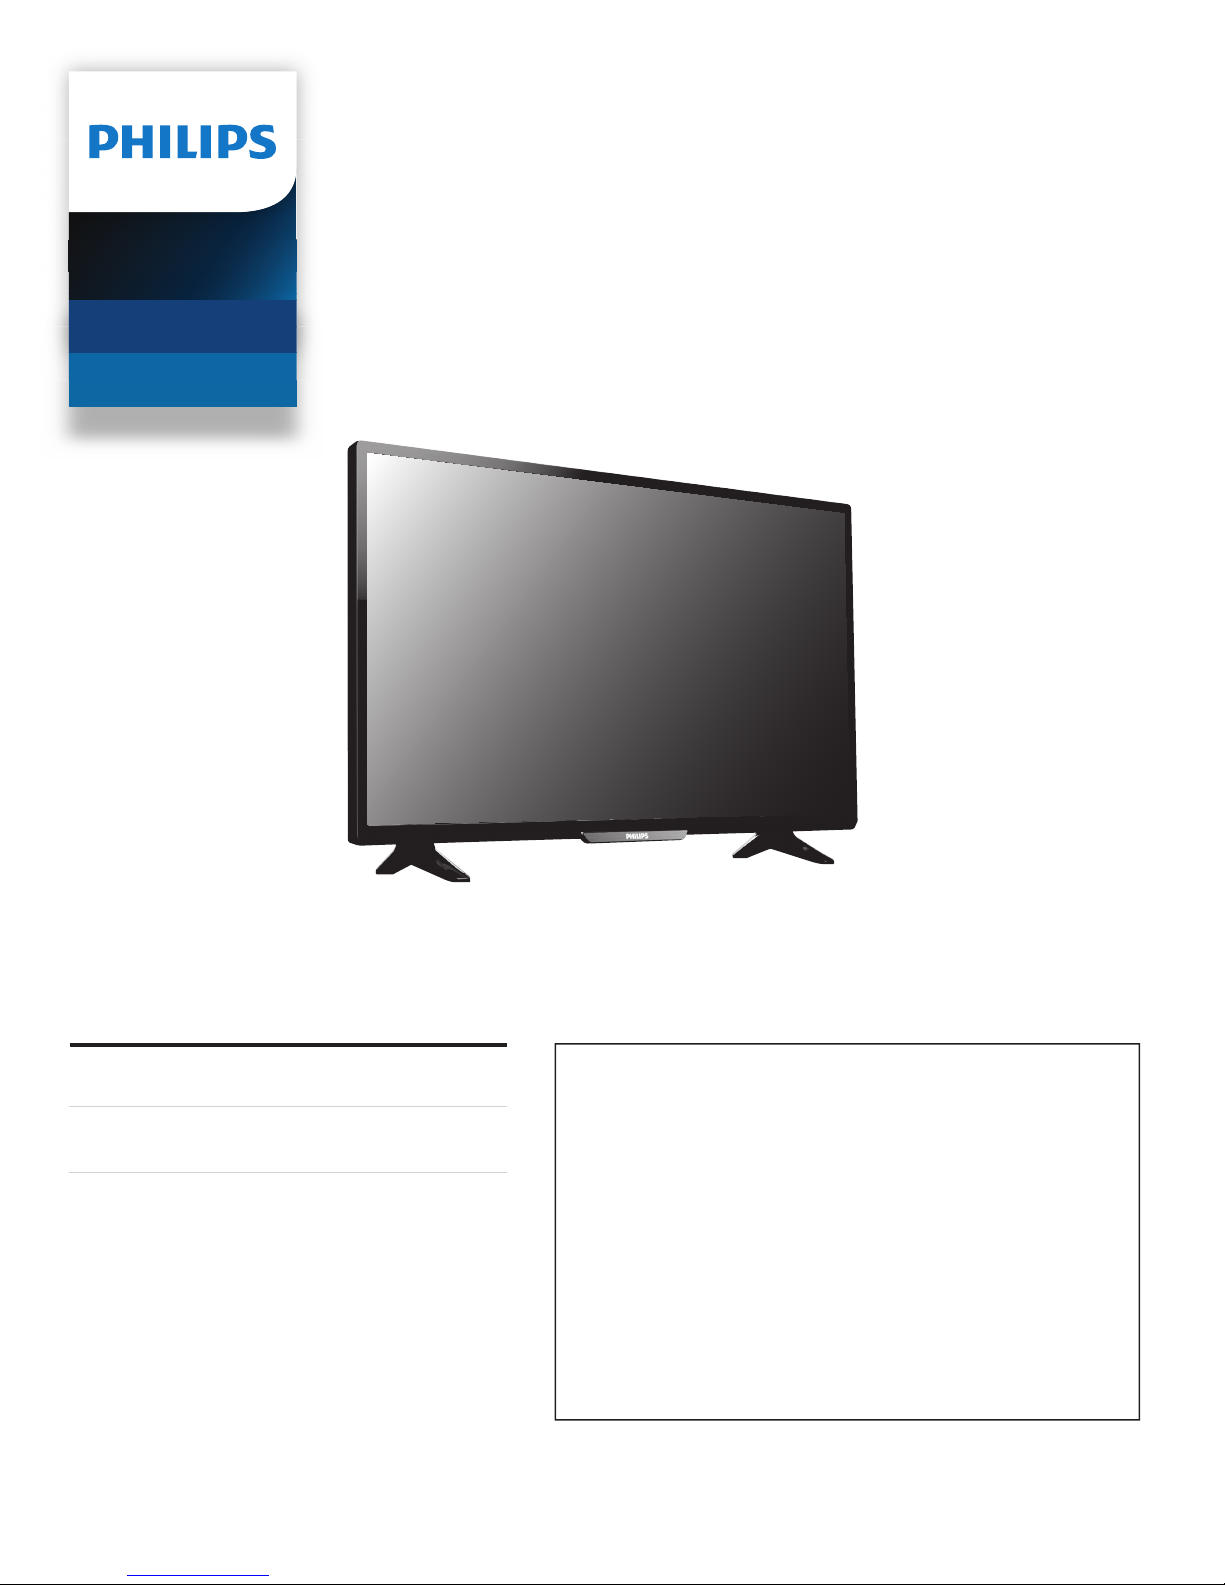
Televisions
4000 series
40PFL4701
Register your product and get support at
www.philips.com/support
EN For further assistance, call the customer support service in your country.
EN
User Manual
ES Manual del Usuario
• To obtain assistance, contact Philips Customer Care Center;
México D.F. and Área Metropolitana; 58 87 97 36
Interior de la Republica; 01 800 839 19 89
Colombia; 01 800 952 0640
Costa Rica; 0800 052 1564
Guatemala; 1 800 835 0351
El Salvador; 1 800 6141
Honduras; 01 800 122 6276
ES Para obtener más información, llame al servicio de soporte al cliente de
su país.
• Para obtener asistencia, póngase en contacto con el CENTRO DE
INFORMACION AL CLIENTE,
México D.F. y Área Metropolitana;58 87 97 36
Interior de la Republica; 01 800 839 19 89
Colombia; 01 800 952 0640
Costa Rica; 0800 052 1564
Guatemala; 1 800 835 0351
El Salvador; 1 800 6141
Honduras; 01 800 122 6276
Page 2

Contents
2 .English
1 Notice ....................................................................................... 5
2 Important .............................................................................. 6
Positioning the TV
Regulatory Notices
Environmental Care
Batteries usage
Preparing to Move / Ship the Unit
3 Getting Started ................................................................... 7
Features
Supplied Accessories
Symbols used in this User Manual
Attaching the Base
Installing the Remote Control Batteries
Remote Control
Control Panel
Terminals
Connecting Antenna or Cable / Satellite Set-top Box
Plugging in the AC Power Cord
Selecting your Connection quality
Connecting your Devices
Initial Setup
10
10
11
11
12
12
15
4 Use your TV ....................................................................... 17
Switching on your TV and putting it in Standby mode
Adjusting Volume
Switching Channels
Watching Channels from an External Device
Sleep Timer
Switching Audio Mode
EasyLink options
Create a list of favorite channels
Changing Picture Format
TV Screen information
17
17
17
18
18
18
19
19
19
20
5 Making more use with your TV .............................. 21
Displaying the Main Menu
Picture
6
6
6
6
6
7
7
7
8
8
9
Sound
Setup
Autoprogram
Channel list
Add channels
Antenna Confirmation
Features
Caption settings
Child and Ratings Lock
EasyLink
Power indicator
Setting your Location to Home
E-sticker
Language
USB
21
22
23
24
24
24
25
25
25
25
27
29
30
30
30
31
31
6 Upgrade your TV Software ...................................... 33
Checking your Current Software version
Upgrading the Software
33
33
7 Useful tips ........................................................................... 34
FAQ
Troubleshooting Tips
34
35
8 Information ........................................................................ 36
Glossary
Maintenance
36
36
9 Specifications ................................................................... 37
10 Warranty .............................................................................. 38
Page 3
3 .English
Know these safety symbols
CAUTION
RISK OF ELECTRIC SHOCK
DO NOT OPEN
CAUTION: TO REDUCE THE RISK OF ELECTRIC SHOCK, DO NOT
REMOVE COVER (OR BACK). NO USER-SERVICEABLE PARTS ARE
INSIDE. REFER SERVICING TO QUALIFIED SERVICE PERSONNEL.
The caution marking is located on the rear or bottom of the cabinet.
WARNING: To reduce the risk of re or electric shock, do not expose this apparatus to rain or moisture.
Apparatus shall not be exposed to dripping or splashing and no objects lled with liquids, such
as vases, shall be placed on the apparatus.
CAUTION: To prevent electric shock, match wide blade of plug to wide slot, fully insert.
ATTENTION: Pour éviter les choc électriques,introduire la lame la plus large de la che dans la borne
correspondante de la prise et pousser jusqu’au fond.
The lightning ash with arrowhead symbol, within an
equilateral triangle, is intended to alert the user to the
presence of uninsulated “dangerous voltage” within
the apparatus’s enclosure that may be of sucient
magnitude to constitute a risk of electric shock to
persons.
The exclamation point within an equilateral triangle is
intended to alert the user to the presence of important
operating and maintenance (servicing) instructions in
the literature accompanying the apparatus.
Visit our World Wide Web Site at www.philips.com/support
CHILD SAFETY:
PROPER TELEVISION PLACEMENT MATTERS
THE CONSUMER ELECTRONICS INDUSTRY CARES
• Manufacturers, retailers and the rest of the consumer
electronics industry are committed to making home
entertainment safe and enjoyable.
• As you enjoy your television, please note that all
televisions – new and old- must be supported on
proper stands or installed according to the
manufacturer’s recommendations. Televisions that are
inappropriately situated on dressers, bookcases,
shelves, desks, speakers, chests, carts, etc., may fall
over, resulting in injury.
TUNE IN TO SAFETY
• ALWAYS follow the manufacturer’s recommendations
for the safe installation of your television.
• ALWAYS read and follow all instructions for proper
use of your television.
• NEVER allow children to climb on or play on the
television or the furniture on which the television is
placed.
• NEVER place the television on furniture that can
easily be used as steps, such as a chest of drawers.
• ALWAYS install the television where it cannot be
pushed, pulled over or knocked down.
• ALWAYS route cords and cables connected to the
television so that they cannot be tripped over, pulled
or grabbed.
WALL OR CEILING MOUNT YOUR TELEVISION
• ALWAYS contact your retailer about professional
installation if you have any doubts about your ability
to safely mount your television.
• ALWAYS use a mount that has been recommended
by the television manufacturer and has a safety
certication by an independent laboratory (such as
UL, CSA, ETL).
• ALWAYS follow all instructions supplied by the
television and mount manufacturers.
• ALWAYS make sure that the wall or ceiling where you
are mounting the television is appropriate. Some
mounts are not designed to be mounted to walls and
ceilings with steel studs or cinder block construction.
If you are unsure, contact a professional installer.
• Televisions can be heavy. A minimum of two people
is required for a wall or ceiling mount installation.
MOVING AN OLDER TELEVISION TO A NEW PLACE
IN YOUR HOME
• Many new television buyers move their older CRT
televisions into a secondary room after the purchase
of a at-panel television. Special care should be
made in the placement of older CRT televisions.
• ALWAYS place your older CRT television on furniture
that is sturdy and appropriate for its size and weight.
• NEVER place your older CRT television on a dresser
where children may be tempted to use the drawers
to climb.
• ALWAYS make sure your older CRT television does
not hang over the edge of your furniture.
Page 4
I
Brand Model # Screw dimension
4 .English
1. Read these instructions.
2. Keep these instructions.
3. Heed all warnings.
4. Follow all instructions.
5. Do not use this apparatus near water.
6. Clean only with dry cloth.
7. Do not block any ventilation openings. Install in
accordance with the manufacturer’s instructions.
8. Do not install near any heat sources such as
radiators, heat registers, stoves, or other apparatus
(including ampliers) that produce heat.
9. Do not defeat the safety purpose of the polarized
or grounding type plug. A polarized plug has two
blades with one wider than the other. A grounding
type plug has two blades and a third grounding
prong. The wide blade or the third prong are
provided for your safety. If the provided plug does
not t into your outlet, consult an electrician for
replacement of the obsolete outlet.
10. Protect the power cord from being walked on or
pinched particularly at plugs, convenience
receptacles, and the point where they exit from
the apparatus.
1 1. Only use attachments / accessories specied by
the manufacturer.
12. Use only with the cart, stand,
tripod, bracket, or table specied
by the manufacturer, or sold with
the apparatus. When a cart is
used, use caution when moving
the cart / apparatus combination
to avoid injury from tip-over.
13. Unplug this apparatus during lightning storms or
when unused for long periods of time.
14. Refer all servicing to qualied service personnel.
Servicing is required when the apparatus has
been damaged in any way, such as
power-supply cord or plug is damaged, liquid
has been spilled or objects have fallen into the
apparatus, the apparatus has been exposed to
rain or moisture, does not operate normally, or
has been dropped.
Note to the CATV system installer:
This reminder is provided to call the CATV system installer’s
attention to Article 820-40 of the NEC that provides guidelines
for proper grounding and, in particular, species that the cable
ground shall be connected to the grounding system of the
building, as close to the point of cable entry as practical.
Example of Antenna Grounding as per NEC National Electric Code
GROUND CLAMP
ELECTRIC SERVICE EQUIPMENT
ANTENNA LEAD IN WIRE
ANTENNA DISCHARGE UNIT
(NEC SECTION 810-20)
GROUNDING CONDUCTORS
(NEC SECTION 810-21)
GROUND CLAMPS
POWER SERVICE GROUNDING
ELECTRODE SYSTEM (NEC ART 250,
PART H)
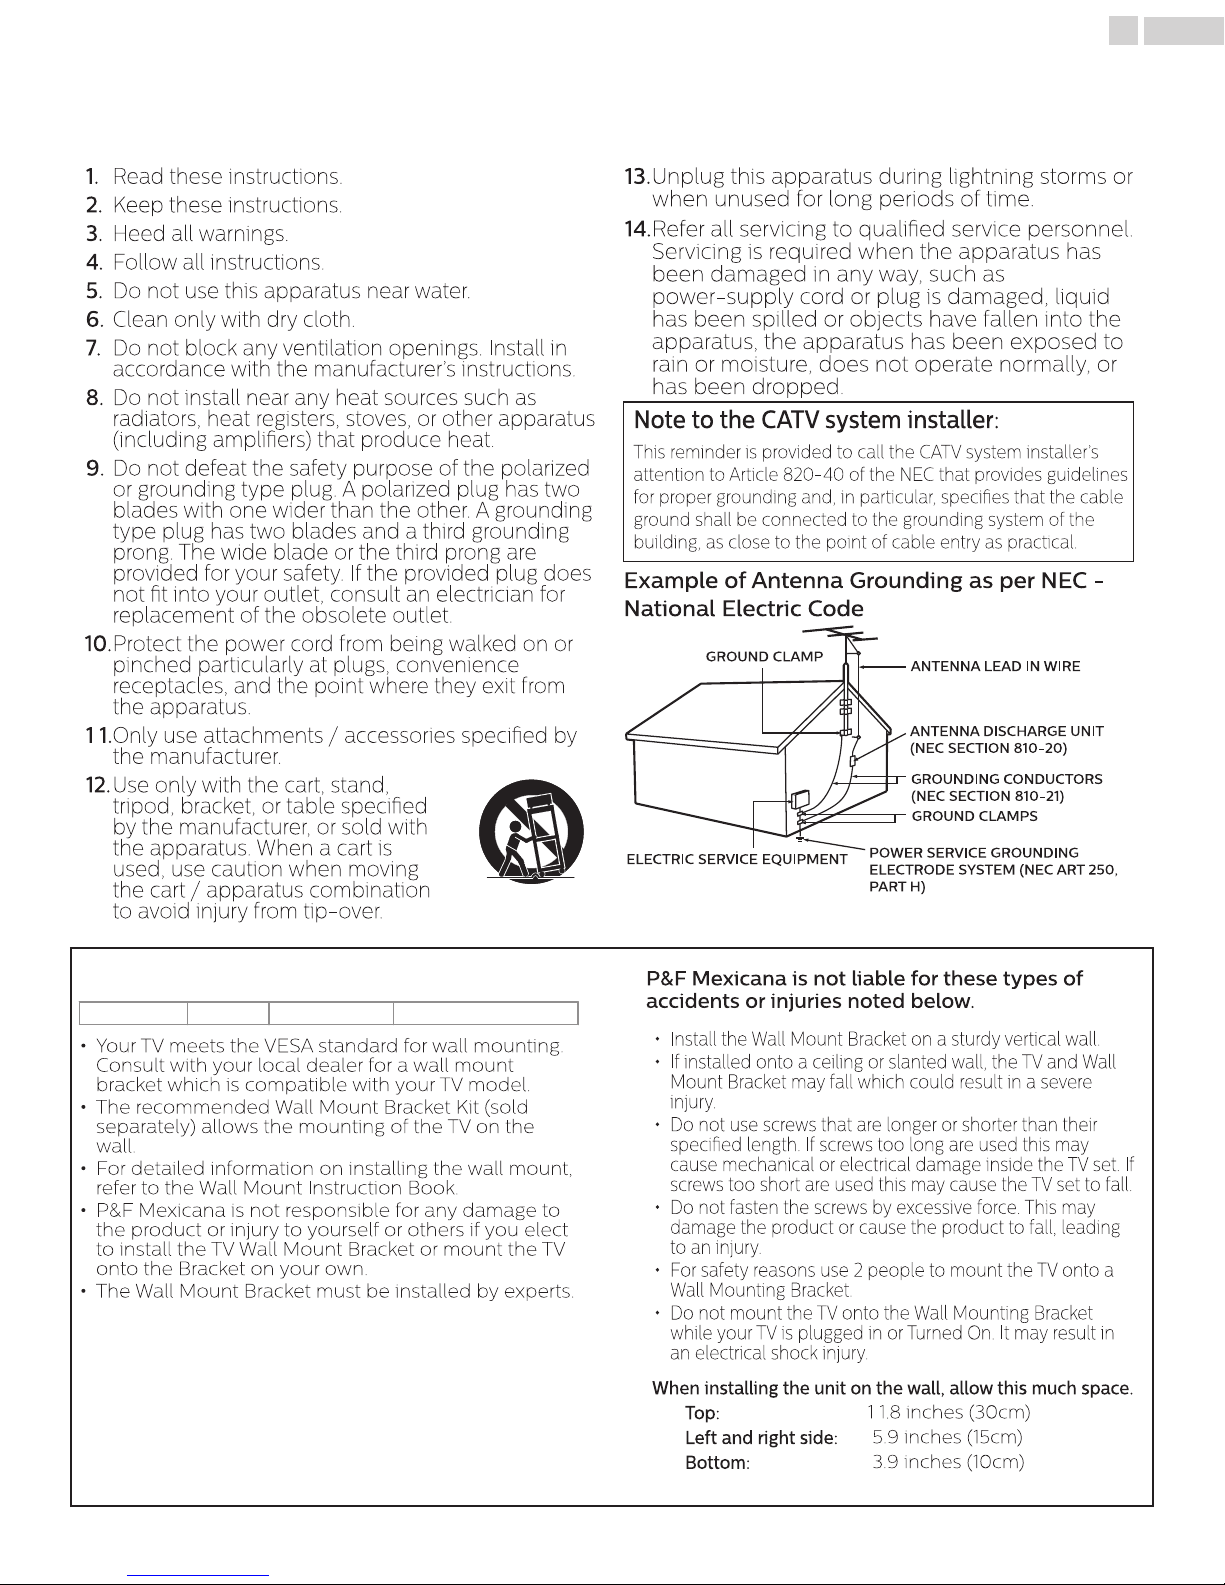
Wall Mount Bracket Kit
40PFL4701 SANUS SAN25BB M4 x 12mm (0.472”)
• Your TV meets the VESA standard for wall mounting.
Consult with your local dealer for a wall mount
bracket which is compatible with your TV model.
• The recommended Wall Mount Bracket Kit (sold
separately) allows the mounting of the TV on the
wall.
• For detailed information on installing the wall mount,
refer to the Wall Mount Instruction Book.
• P&F Mexicana is not responsible for any damage to
the product or injury to yourself or others if you elect
to install the TV Wall Mount Bracket or mount the TV
onto the Bracket on your own.
• The Wall Mount Bracket must be installed by experts.
P&F Mexicana is not liable for these types of
accidents or injuries noted below.
• Install the Wall Mount Bracket on a sturdy vertical wall.
• If installed onto a ceiling or slanted wall, the TV and Wall
Mount Bracket may fall which could result in a severe
injury.
• Do not use screws that are longer or shorter than their
specied length. If screws too long are used this may
cause mechanical or electrical damage inside the TV set. If
screws too short are used this may cause the TV set to fall.
• Do not fasten the screws by excessive force. This may
damage the product or cause the product to fall, leading
to an injury.
• For safety reasons use 2 people to mount the TV onto a
Wall Mounting Bracket.
• Do not mount the TV onto the Wall Mounting Bracket
while your TV is plugged in or Turned On. It may result in
an electrical shock injury.
When installing the unit on the wall, allow this much space.
Top:
Left and right side:
Bottom:
1 1.8 inches (30cm)
5.9 inches (15cm)
3.9 inches (10cm)
Page 5
5 .English
1 Notice
Trademarks are the property of Koninklijke Philips N.V. or
their respective owners.
P&F Mexicana reserves the right to change products at any
time without being obliged to adjust earlier supplies
accordingly.
The material in this manual is believed adequate for the
intended use of the system. If the product or its individual
modules or procedures are used for purposes other than
those specied herein, conrmation of their validity and
suitability must be obtained. P&F Mexicana warrants that
the material itself does not infringe any United States
patents. No further warranty is expressed or implied.
P&F Mexicana cannot be held responsible neither for any
errors in the content of this document nor for any problems
as a result of the content in this document. Errors reported
to P&F Mexicana will be adapted and published on the
P&F Mexicana support website as soon as possible.
Pixel characteristics
This LCD product has a high number of color pixels.
Although it has eective pixels of 99.999% or more, black
dots or bright points of light (red, green or blue) may
appear constantly on the screen. This is a structural
property of the display (within common industry standards)
and is not a malfunction.
Warranty
No components are user serviceable. Do not open or
remove covers to the inside of the product. Repairs may
only be done by Service Centers and ocial repair shops.
Failure to do so shall void any warranty, stated or implied.
Any operation expressly prohibited in this manual, any
adjustments or assembly procedures not recommended or
authorized in this manual shall void the warranty.
Copyright
All other registered and unregistered trademarks are the
property of their respective owners.
The terms HDMI and HDMI
High-Denition Multimedia
Interface, and the HDMI Logo
are trademarks or registered
trademarks of HDMI Licensing
LLC in the United States and
other countries.
Manufactured under license from
Dolby Laboratories. Dolby and
the double-D symbol are
trademarks of Dolby Laboratories.
Sonic Emotion and the Sonic
Emotion logo symbol are
registered trademarks of sonic
emotion ag.
Portions of this software are copyright © The FreeType Project
(www.freetype.org).
The American Academy of Pediatrics discourages television
viewing for children younger than two years of age.
Page 6
6 .English
2 Important
Positioning the TV
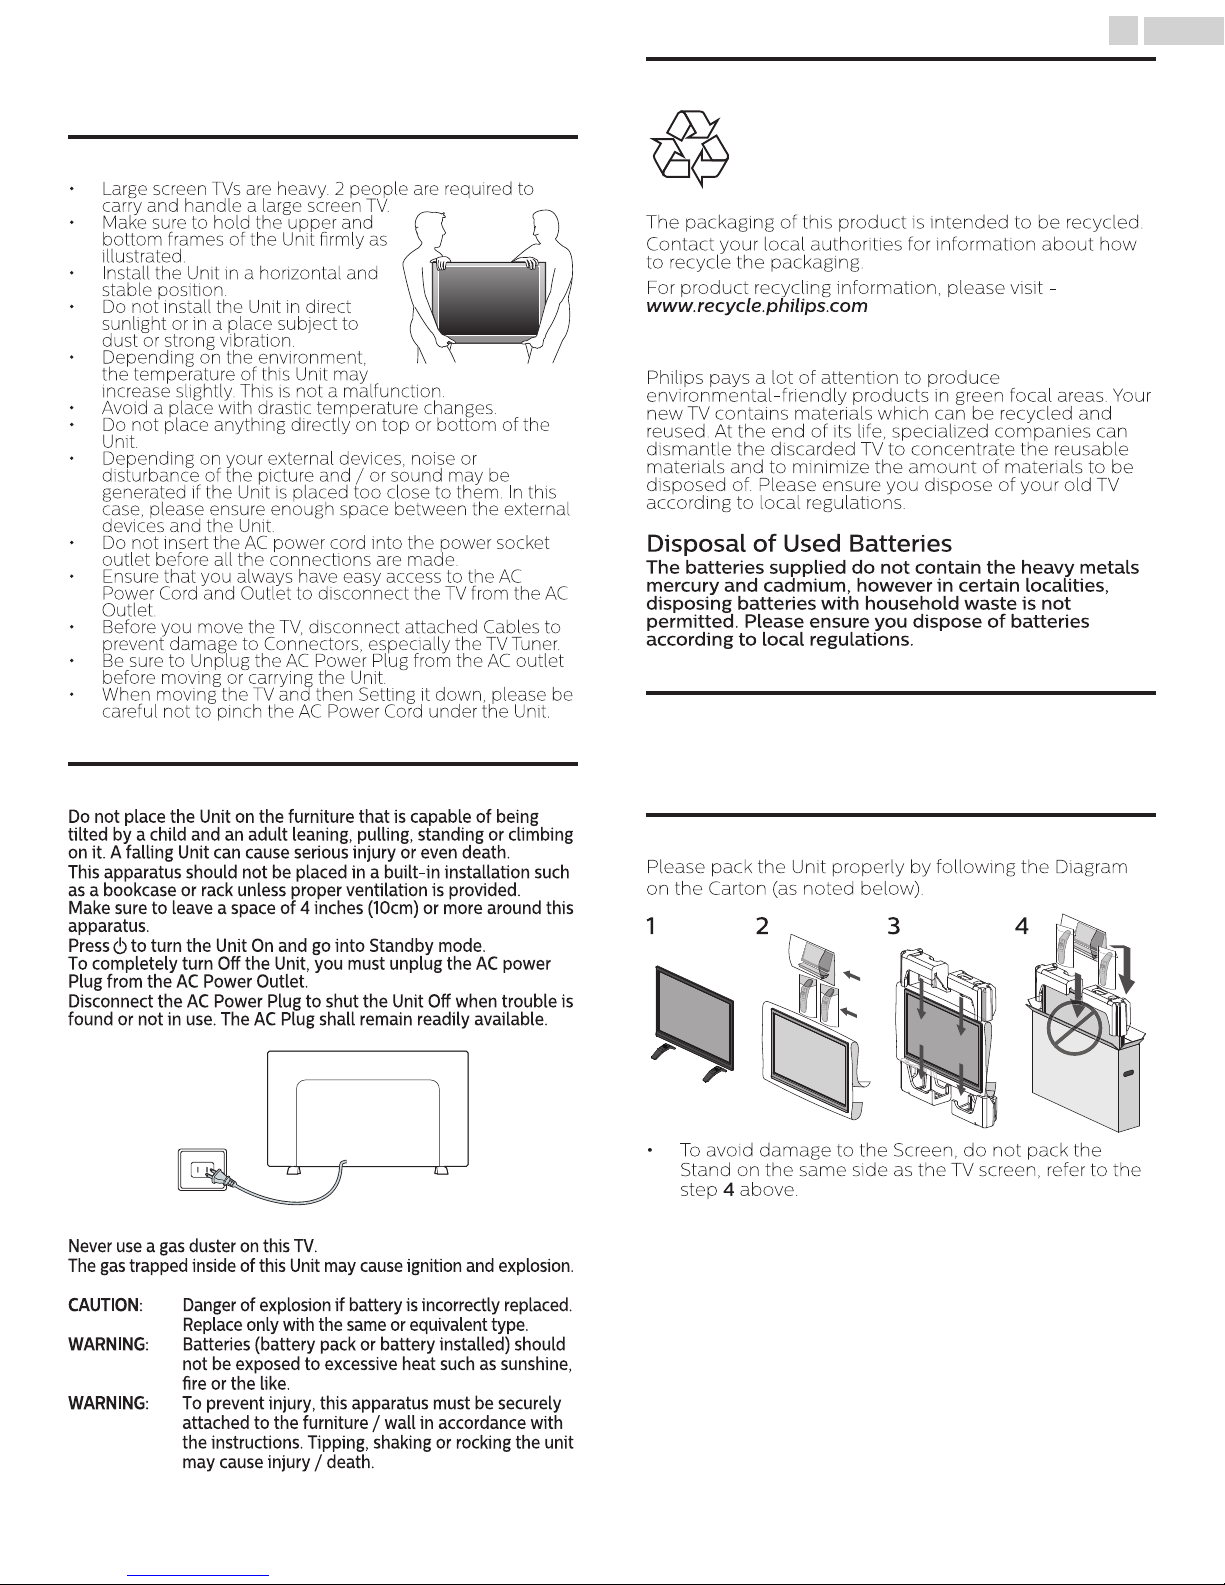
• Large screen TVs are heavy. 2 people are required to
carry and handle a large screen TV.
• Make sure to hold the upper and
bottom frames of the Unit rmly as
illustrated.
• Install the Unit in a horizontal and
stable position.
• Do not install the Unit in direct
sunlight or in a place subject to
dust or strong vibration.
• Depending on the environment,
the temperature of this Unit may
increase slightly. This is not a malfunction.
• Avoid a place with drastic temperature changes.
• Do not place anything directly on top or bottom of the
Unit.
• Depending on your external devices, noise or
disturbance of the picture and / or sound may be
generated if the Unit is placed too close to them. In this
case, please ensure enough space between the external
devices and the Unit.
• Do not insert the AC power cord into the power socket
outlet before all the connections are made.
• Ensure that you always have easy access to the AC
Power Cord and Outlet to disconnect the TV from the AC
Outlet.
• Before you move the TV, disconnect attached Cables to
prevent damage to Connectors, especially the TV Tuner.
• Be sure to Unplug the AC Power Plug from the AC outlet
before moving or carrying the Unit.
• When moving the TV and then Setting it down, please be
careful not to pinch the AC Power Cord under the Unit.
Regulatory Notices
Environmental Care
The packaging of this product is intended to be recycled.
Contact your local authorities for information about how
to recycle the packaging.
For product recycling information, please visit -
End of Life Directives
Philips pays a lot of attention to produce
environmental-friendly products in green focal areas. Your
new TV contains materials which can be recycled and
reused. At the end of its life, specialized companies can
dismantle the discarded TV to concentrate the reusable
materials and to minimize the amount of materials to be
disposed of. Please ensure you dispose of your old TV
according to local regulations.
Disposal of Used Batteries
The batteries supplied do not contain the heavy metals
mercury and cadmium, however in certain localities,
disposing batteries with household waste is not
permitted. Please ensure you dispose of batteries
according to local regulations.
Batteries usage
Do not mix old and new batteries.
•
Do not mix alkaline, standard (carbon-zinc) or rechargeable (ni-cad,
•
ni-mh, Li-ion, etc.) batteries.
Do not place the Unit on the furniture that is capable of being
tilted by a child and an adult leaning, pulling, standing or climbing
on it. A falling Unit can cause serious injury or even death.
This apparatus should not be placed in a built-in installation such
as a bookcase or rack unless proper ventilation is provided.
Make sure to leave a space of 4 inches (10cm) or more around this
apparatus.
Press to turn the Unit On and go into Standby mode.
To completely turn O the Unit, you must unplug the AC power
Plug from the AC Power Outlet.
Disconnect the AC Power Plug to shut the Unit O when trouble is
found or not in use. The AC Plug shall remain readily available.
AC Power Plug
Never use a gas duster on this TV.
The gas trapped inside of this Unit may cause ignition and explosion.
CAUTION: Danger of explosion if battery is incorrectly replaced.
Replace only with the same or equivalent type.
WARNING: Batteries (battery pack or battery installed) should
not be exposed to excessive heat such as sunshine,
re or the like.
WARNING: To prevent injury, this apparatus must be securely
attached to the furniture / wall in accordance with
the instructions. Tipping, shaking or rocking the unit
may cause injury / death.
Preparing to Move / Ship the Unit
Please pack the Unit properly by following the Diagram
on the Carton (as noted below).
12 3 4
• To avoid damage to the Screen, do not pack the
Stand on the same side as the TV screen, refer to the
step 4 above.
Page 7
7 .English
3 Getting Started
Features
DTV / Analog TV / CATV
•
You can use your Remote Control to Select channels which are Broadcast in Digital format and
conventional Analog format. Also, Cable and Satellite subscribers can access their TV channels.
Information display
•
You can display on the TV screen the Title, contents (DTV only) and other information on the
current Program.
Autoprogram
•
This Unit Automatically scans and memorizes channels available in your area, Eliminating difficult
Setup procedures.
Child lock
•
This feature allows you to Block children’s access to inappropriate Programs.
Closed Caption decoder
•
Built-in Closed Caption decoder displays text for Closed Caption supported Programs.
MTS / SAP tuner
•
Audio can be selected from the Remote Control.
Auto Standby
•
If there is No Input Signal and No Operation for 15 minutes, the Unit will go into Standby mode
Automatically.
Sleep Timer
•
You can set the Unit to go into Standby mode after a specific amount of time.
Choices for On-screen language
•
Select your On-screen language: English, Spanish or French.
Stereo sound function
•
PLL frequency synthesized tuning
•
Provides free and easy channel selection and lets you tune directly to any channel using the
number and decimal point “•” keys on the Remote Control.
Various adjustments for Picture and Sound
•
Customizes picture quality suitable for your room and sets your sound preference.
EasyLink via HDMI link
•
EasyLink allows your other HDMI link devices to be controlled by the HDMI cable connected to
your TV.
HDMI Input
•
HDMI-DVI Input
•
If your Video Device has a DVI Output jack, use an HDMI-DVI Conversion Cable to connect the
Unit.
Component Video Input
•
AV Input
•
Audio and Video Input from an External Device.
USB terminal
•
The Picture (JPEG) and Video (Motion JPEG) files stored on a USB Memory Stick can be played
back on this Unit.
Digital Audio Output
•
Digital Audio (Supporting Dolby Digital) sent to Home Theaters and other Digital Audio systems.
Headphone Audio Output
•
Headphone 3.5mm Stereo jack for personal listening.
Supplied Accessories
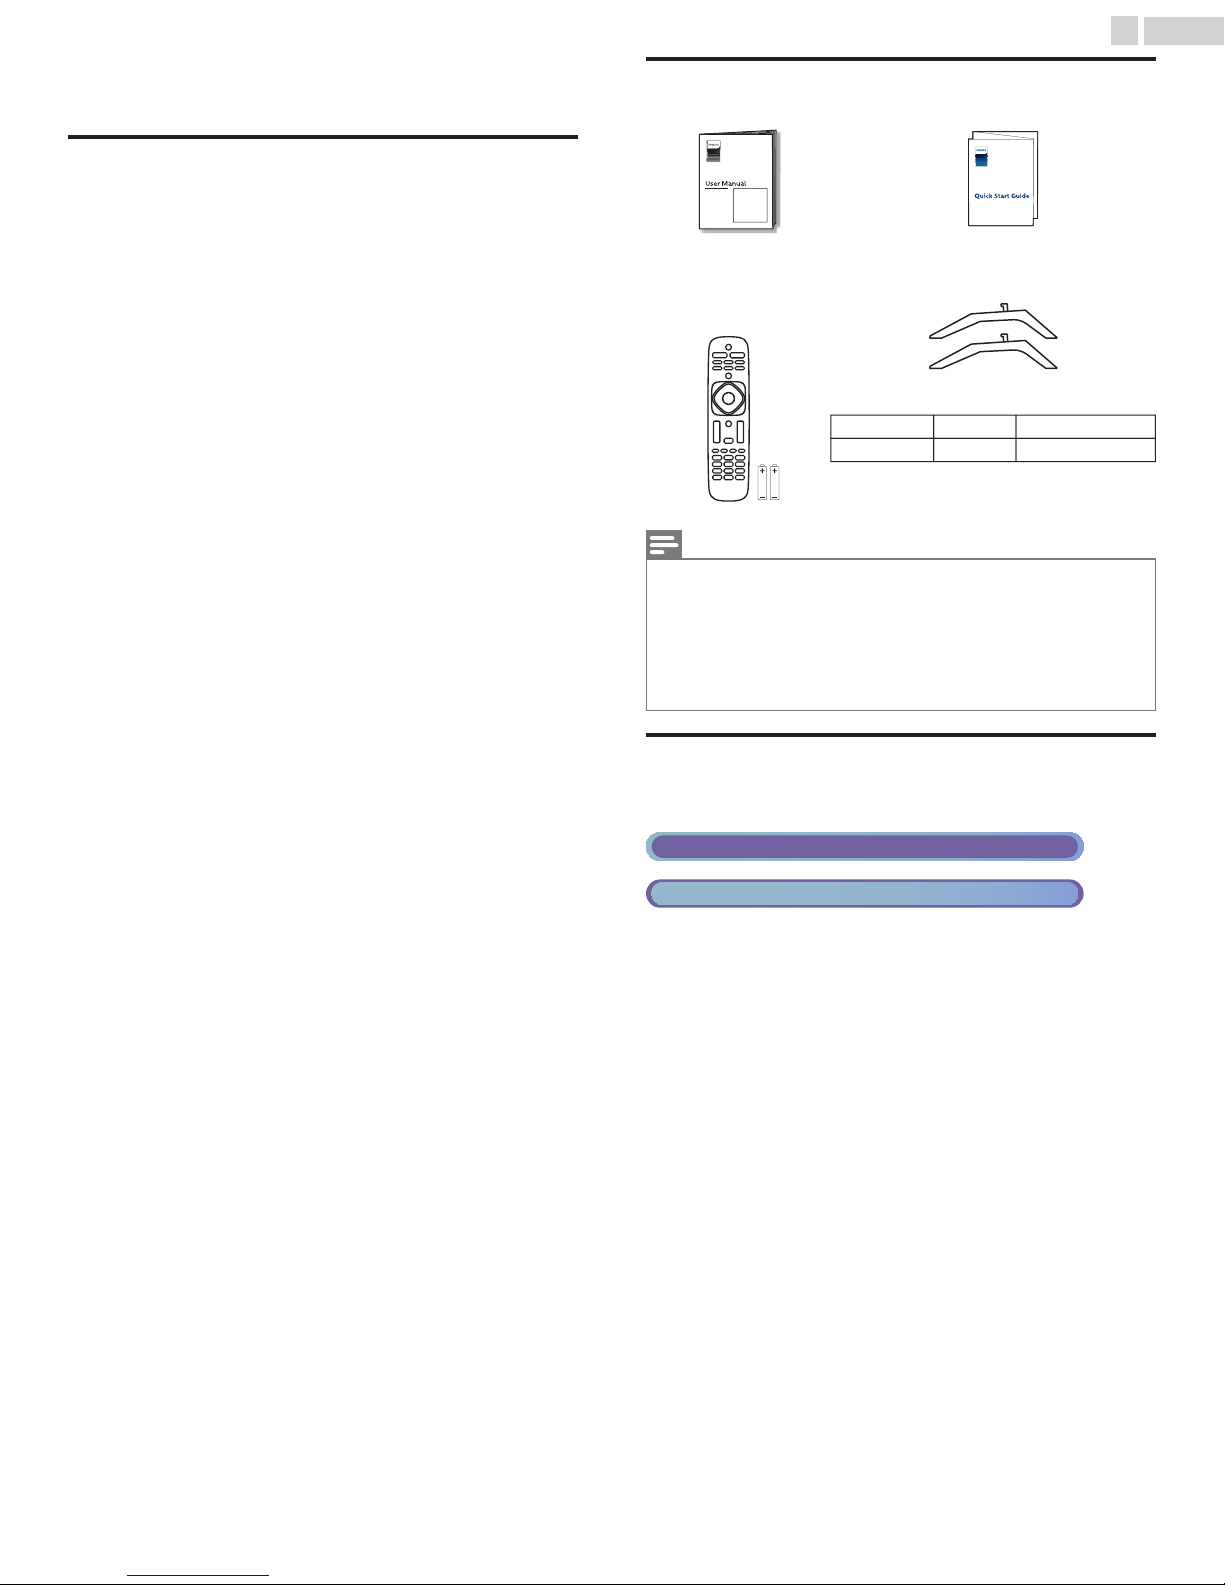
User Manual
Remote Control
and Batteries
(AAA, 1.5V x 2)
Screws packed with this Unit.
40PFL4701 4
AAA
AA
A
Note(s)
If you lose the Screws, please purchase the above-mentioned Phillips head Screws at your
•
local store.
If you need to replace these accessories, please refer to the part name or No. with the illustrations
•
and call our toll free customer support line found on the cover of this User Manual.
W
Make sure the component code on your Universal Remote Control is set to our brand. Refer to
•
the instruction book accompanying your Remote Control for more details.
We Do Not guarantee 100% interoperability with All Universal Remote Controls.
•
Quick Start Guide
TV base and Screws
SizeQuantityModel
M4 x 0.787”(20mm)
Symbols used in this User Manual
The following is the description for the symbols used in this User Manual.
Description refers to:
Digital TV Operation
Cable / NTSC (Analog) TV Operation
If neither symbol appears, the operation is applicable to both.
•
Continued on next page.
Page 8
8 .English
Attaching the Base
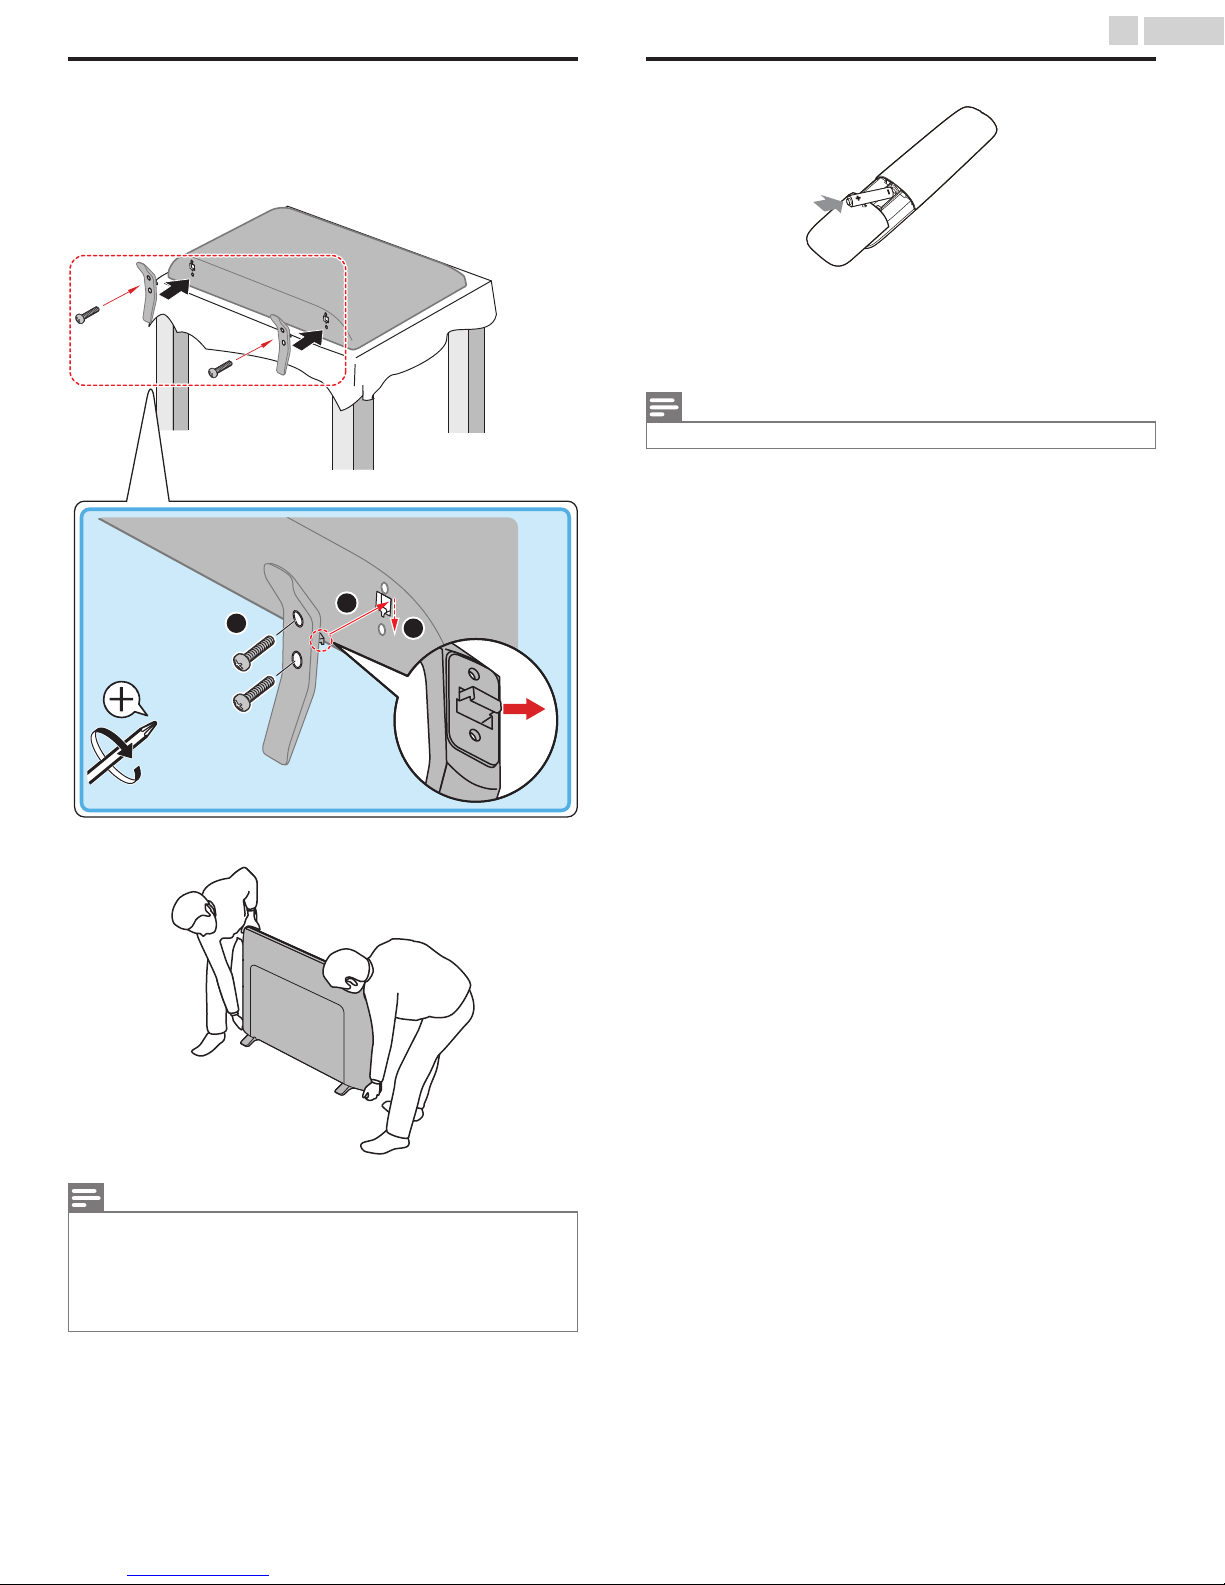
You must attach the base to the Unit to have it as a table top Unit.
Be sure the front and rear of the base match the proper direction. For large
screen TVs, at least 2 people are required for these steps.
1
1
3
2
Installing the Remote Control Batteries
Slide the battery cover off the back of the Remote Control.
1
Insert the two supplied batteries (AAA, 1.5V). Be sure the + and – ends
2
of the Batteries line up with the markings inside the case.
Slide the cover back into position.
3
Note(s)
Remove the Batteries if not using the Remote Control for an extended period of time.
•
× 4
2
Note(s)
Make sure to use a table which can support the weight of this Unit and is larger than this Unit.
•
Make sure the table is in a stable location.
•
A Phillips-head screwdriver is required to fasten the stands to the TV set.
•
When attaching the base, ensure that All Screws are tightly fastened. If the base is not properly
•
attached, it could cause the Unit to fall, resulting in injuries as well as damage to the Unit.
To remove the base from this Unit, unscrew the Phillips head screws by the reversing procedure.
•
Be careful not to drop the base when you remove it.
Continued on next page.
Page 9
Remote Control
r
q
p
o
n
m
a
b
c
d
e
f
g
h
i
j
k
l
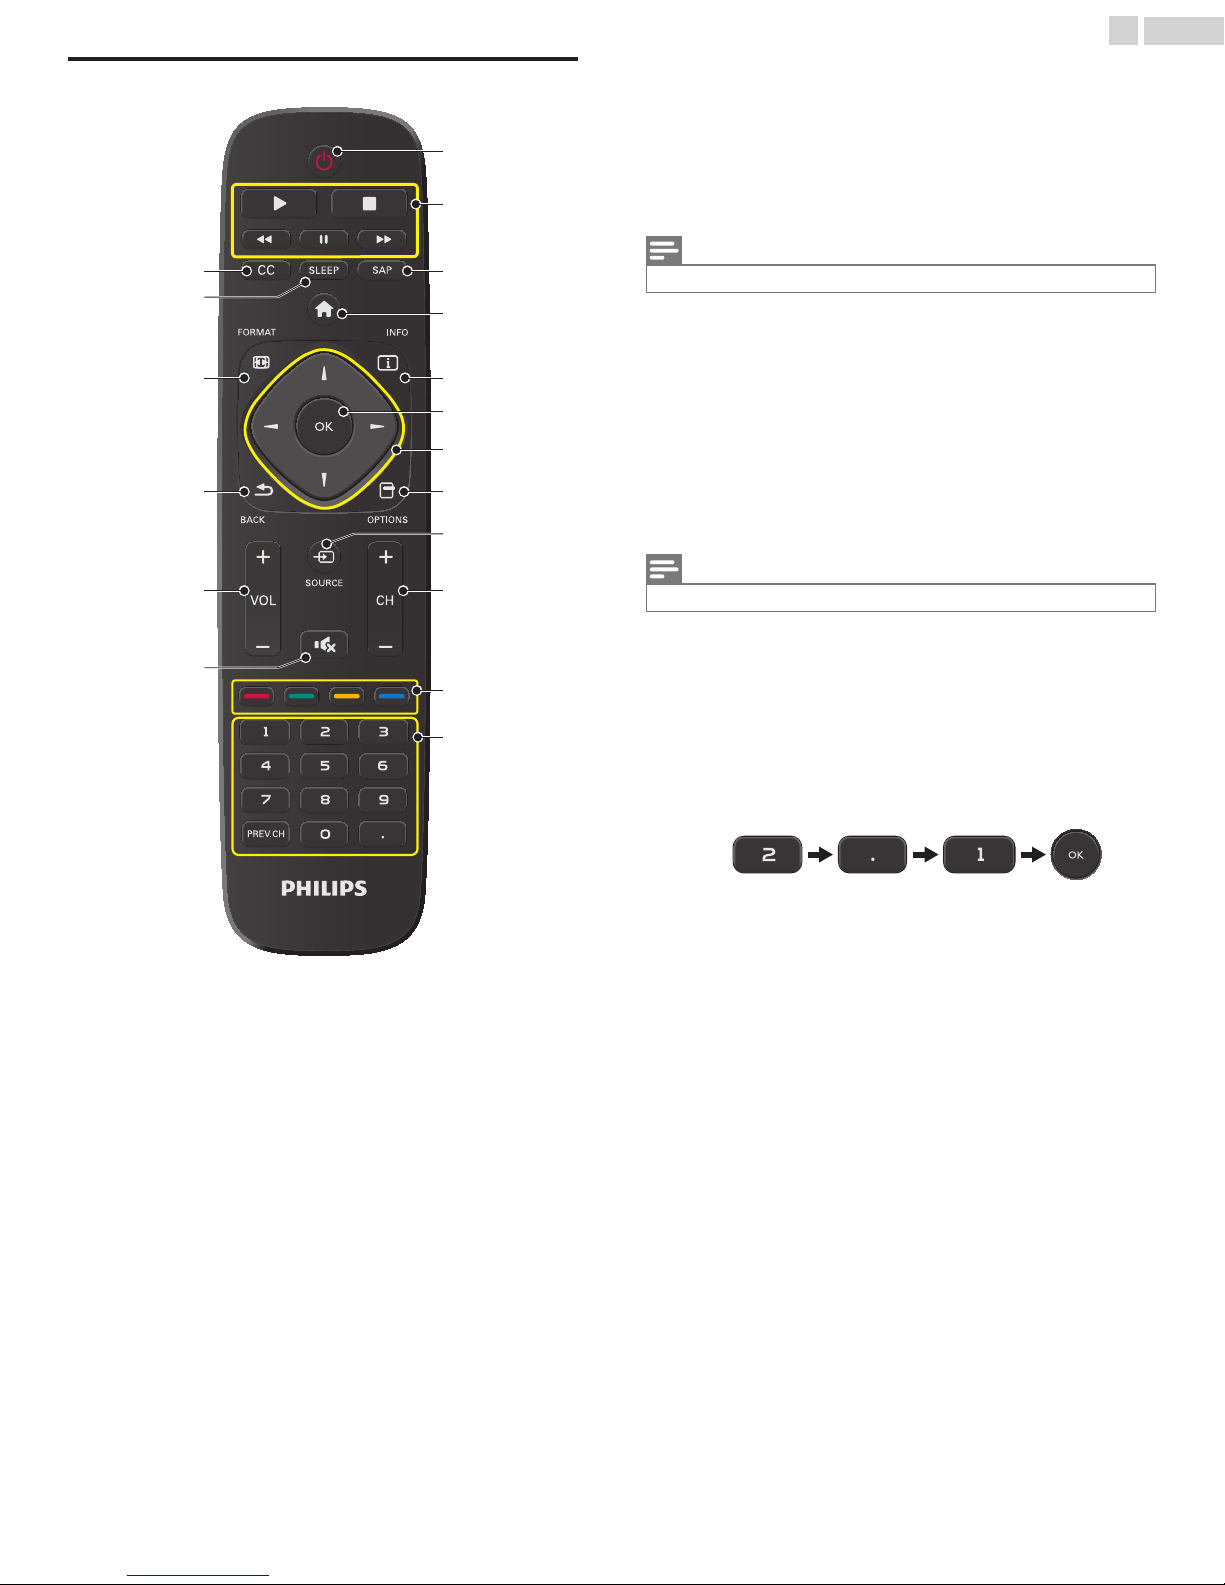
(POWER)
Turns the TV On from Standby or Off to Standby.
EasyLink buttons
.
.
0 / /
Note(s)
You must set On in the EasyLink ( p. 19) to operate the above functions.
•
SAP
Selects Audio mode (MONO / STEREO / SAP) / Audio language.
(Home)
Displays the main menu.
INFO
Displays Information about the current program.
OK
Press to decide the command of setting when the menu is displayed.
!
(NAVIGATION buttons)
Moves the cursor, Selects the On-screen Menu items.
"
OPTIONS
Opens EasyLink options menu.
Note(s)
You must set On in the EasyLink ( p. 19) to operate the above functions.
•
#
SOURCE
Selects Connected devices.
CH + / –
$
Selects a Channel.
COLOR buttons
%
Use these Keys according to the directions On-screen.
0 - 9 (NUMBER buttons)
&
Used to enter a Channel / Program number.
• (DOT) : Use with 0-9 to Select digital channels. For example, to
: Begins or Restarts the Disc Playback.
: Pauses the Disc Playback.
: Stops the Disc Playback.
: Searches Backward or Forward through the Disc.
enter 2.1, press
9 .English
PREV.CH : Returns to the previously viewed Channel.
'
(MUTE)
Turns the Sound On and Off.
VOL + / –
(
Adjusts the Volume.
)
BACK
Returns to the previous Menu operation.
*
FORMAT
Adjusts the Picture size on the TV screen.
SLEEP
+
Sets Sleep Timer.
CC
,
Displays the audio portion of programming as text superimposed
over the video.
Continued on next page.
Page 10

Control Panel
i
j
Terminals
10 .English
Remote Control Sensor
Receives IR Signal from Remote control.
Do Not Block this Remote Control Sensor window to allow proper
d
e
f
g
h
cba
n
o
operation.
Ambient Light Sensor
Alters the brightness of the TV screen Automatically by detecting your
room lighting level. Do Not Block this Light Sensor window to allow
proper operation.
Power On / Standby Indicator
(On : lights in white, Standby : no light)
(POWER)
Turns the TV On and Off.
SOURCE
Selects Connected Devices.
MENU
Opens the Main On-screen Menu.
!
CH/
Selects a Channel in the Memorized Channel Ring (Low to High or
High to Low). In the Menu screen, moves the Cursor Up () (+) / Down
() (–).
"
VOL/
Adjusts the Volume.
VOL (–) : Volume Down
VOL (+) : Volume Up
In the Menu screen, moves the Cursor Left () (–) / Right () (+).
Component (Y/Pb/Pr) / Composite Video (VIDEO) Input jack(s) for
#
VIDEO
Composite Video Input (VIDEO) jack is a shared jack with Component
Video Input (Y) jack. Green / Yellow color orientation depends on
model.
Analog Audio (L/R) Input jacks
$
Connect Analog Audio Signals from;
HDMI-DVI / Analog Audio (L/R) jacks Signal
•
Component Video / Analog Audio (L/R) jacks Signal
•
Composite Video / Analog Audio (L/R) jacks Signal
•
PC Connection / Analog Audio (L/R) jacks Signal from Stereo Mini
•
3.5mm Plug Audio Cable on PC.
Digital Audio Output jack
%
Digital Audio (S/PDIF) Output to Home Theaters and other Digital
Audio systems.
HDMI Input jack(s)
&
Digital Audio and Video Input from High-Definition Digital Devices
such as DVD / Blu-ray Disc players, Cable or Set-top Boxes and
PC’s.
USB Terminal
'
Data Input from USB Memory Stick only.
Do Not Connect any Device to this terminal such as; Digital Camera,
Keyboard, Mouse, etc.
75 ohm Cable / Antenna Connection
(
Signal Input from an Antenna, Cable or Set-top Boxes.
Headphone Audio Output jack
)
Headphone 3.5mm Stereo jack for personal listening.
k
l m
Continued on next page.
Page 11
OUT
Cable
75
IN
OUT
IN
IN
IN
OUT
OUT
IN
IN
11 .English
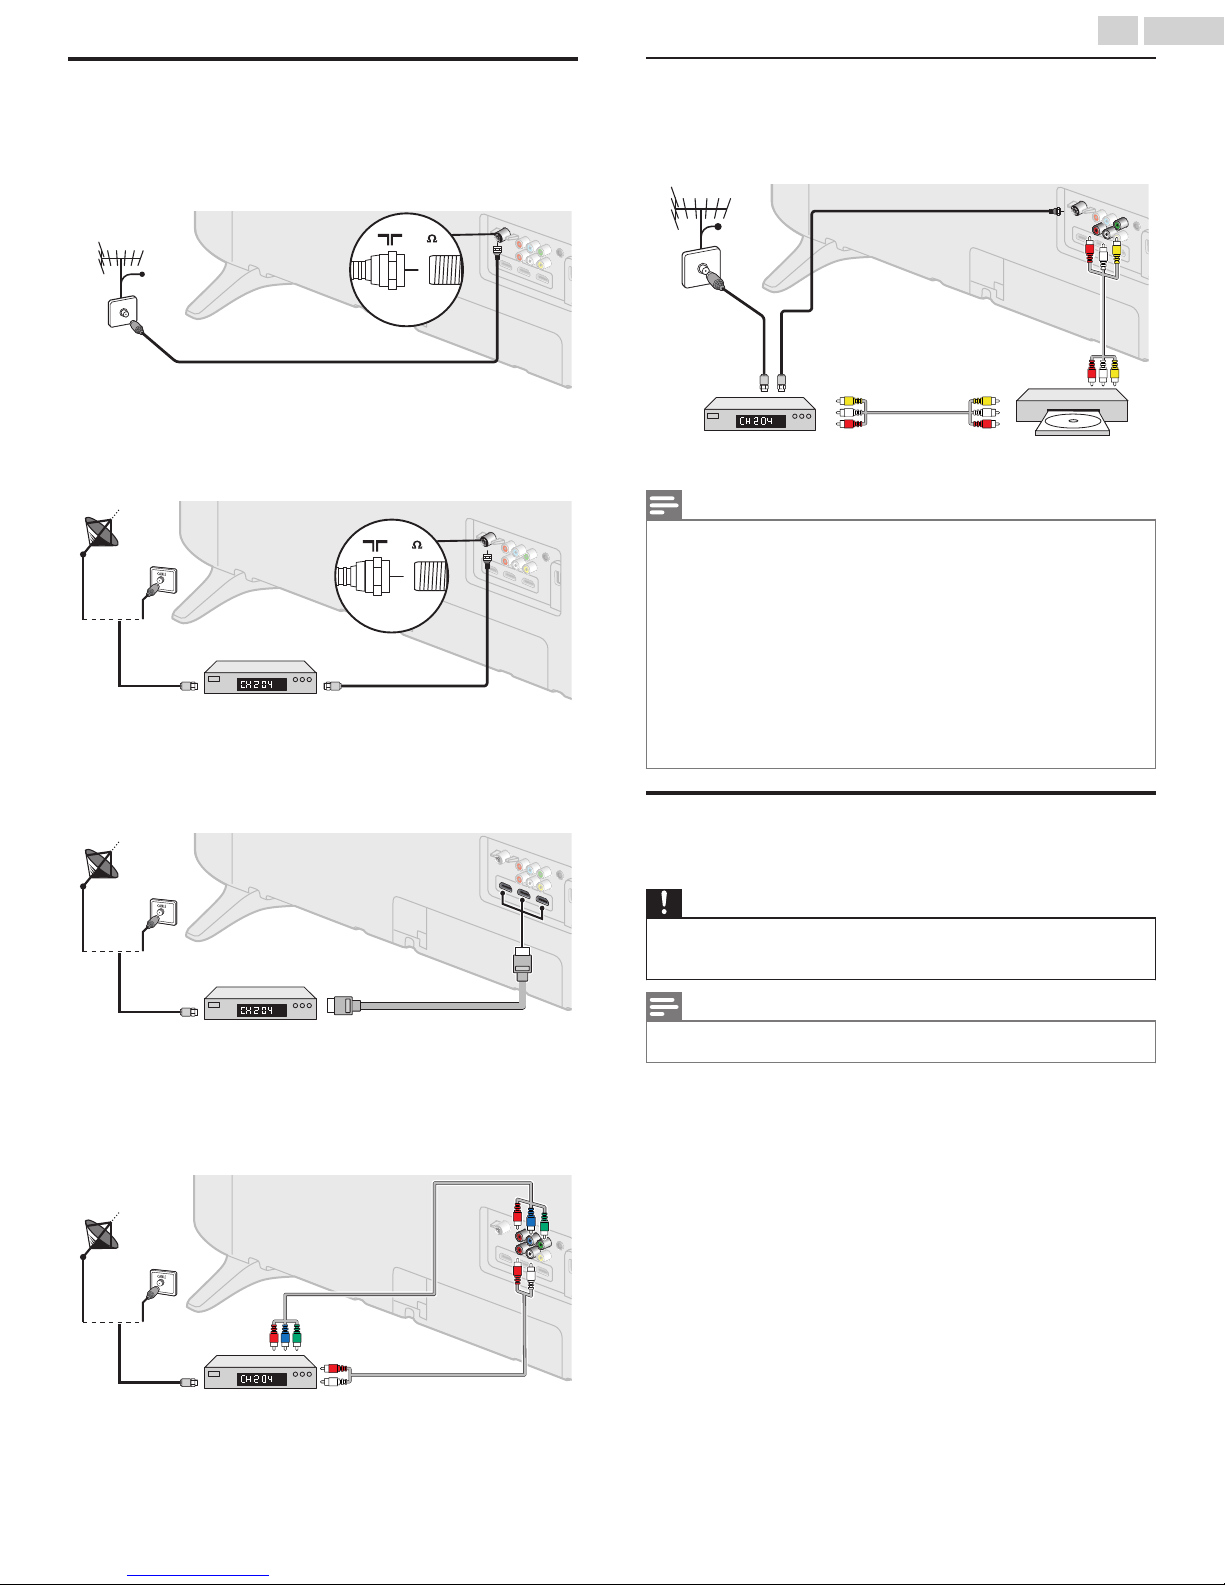
Connecting Antenna or Cable / Satellite Set-top Box
Be sure your Antenna or another Device is connected properly before
plugging in the AC Power Cord.
If connecting to an Antenna through an RF cable
Any DTV Programs that are Broadcast in your area can be received for
free through an Antenna Connection.
75
IN
IN
Connecting a Cable / Satellite Set-top Box, Blu-ray
Disc / DVD Recorder via Composite Connectors and
Analog Audio
Do Not place your Recorder too close to the Screen because some
Recorders can be susceptible to Signals from the TV.
Cable
Antenna
Antenna
RF cable
OUT
RF cable
RF cable
RF cable
If connecting Cable / Satellite Set-top Box using an RF cable
If the TV is connected to a Cable or Set-top Box via a Coaxial Connection,
set the TV to channel 3/4 or the channel specified by the service
provider.
If you have any question about the DTV’s Antenna, visit www.antennaweb.org for further
75
IN
IN
Antenna
RF cable
OUTIN
Set-top Box
RF cable
If connecting Cable / Satellite Set-top Box using an HDMI
cable
If the TV is connected to a Cable / Satellite Set-top Box via an HDMI cable,
make sure you select the correct Source by using SOURCE.
•
information.
Depending on your Antenna system, you may need different types of combiners (mixers)
•
or separators (splitters) for HDTV Signal. The minimum RF bandpass on these Devices is 2,
000MHz or 2GHz.
For your safety and to avoid damage to this Unit, please unplug the RF Coaxial Cable from the
•
Antenna Input jack before moving the Unit.
If you did use an Antenna to receive Analog TV, it should also work for DTV reception. Outdoor
•
or attic Antennas will be more effective than a Set-top Box or inside Antenna.
To Turn On your reception source easily between Antenna and Cable, Install an Antenna
•
selector.
If you are not receiving a Signal from your Cable service, contact the Cable provider.
•
Refer to the Quick Start Guide that shows the connections for the HDMI or Component Input
•
mode.
Plugging in the AC Power Cord
Cable
Cable
OUT
IN
Set-top Box
Set-top Box
Note(s)
OUT
Audio (L/R) + Video
Audio (L/R) + Video
Audio (L/R) +
Audio (L/R) +
Video cables
Video cables
OUT
OUT
RF cable
RF cable
IN
IN
IN
IN
IN
cables
cables
OUT
OUT
Blu-ray Disc /
Blu-ray Disc /
DVD Recorder
DVD Recorder
RF cable
RF cable
IN
Set-top Box
Set-top Box
OUT
HDMI cable
HDMI cable
If connecting Cable / Satellite Set-top Box using Component
Video Input
If the TV is connected to a Cable / Satellite Set-top Box via Component
Video Input, make sure you select the correct Component Video Source
by using SOURCE.
Component
Component
(Y/Pb/Pr) Video
(Y/Pb/Pr) Video
cables
cables
RF cable
OUT
IN
Set-top Box
OUT
Audio (L/R) cables
Audio (L/R) cables
IN
IN
IN
Make sure All the Necessary Connections are made before the AC Power
Cord is plugged into an AC outlet.
Caution(s)
Connect the Analog Audio signal cables from the external device to the Analog Audio L/R Input
•
jacks.
If you have an amplifier, connect the HDMI cable to the HDMI input via your amplifier.
•
Note(s)
Each time you plug in the AC Power Cord, no operations will be performed for several seconds.
•
This is not a malfunction.
Continued on next page.
Page 12
IN
OUT
IN
IN
12 .English
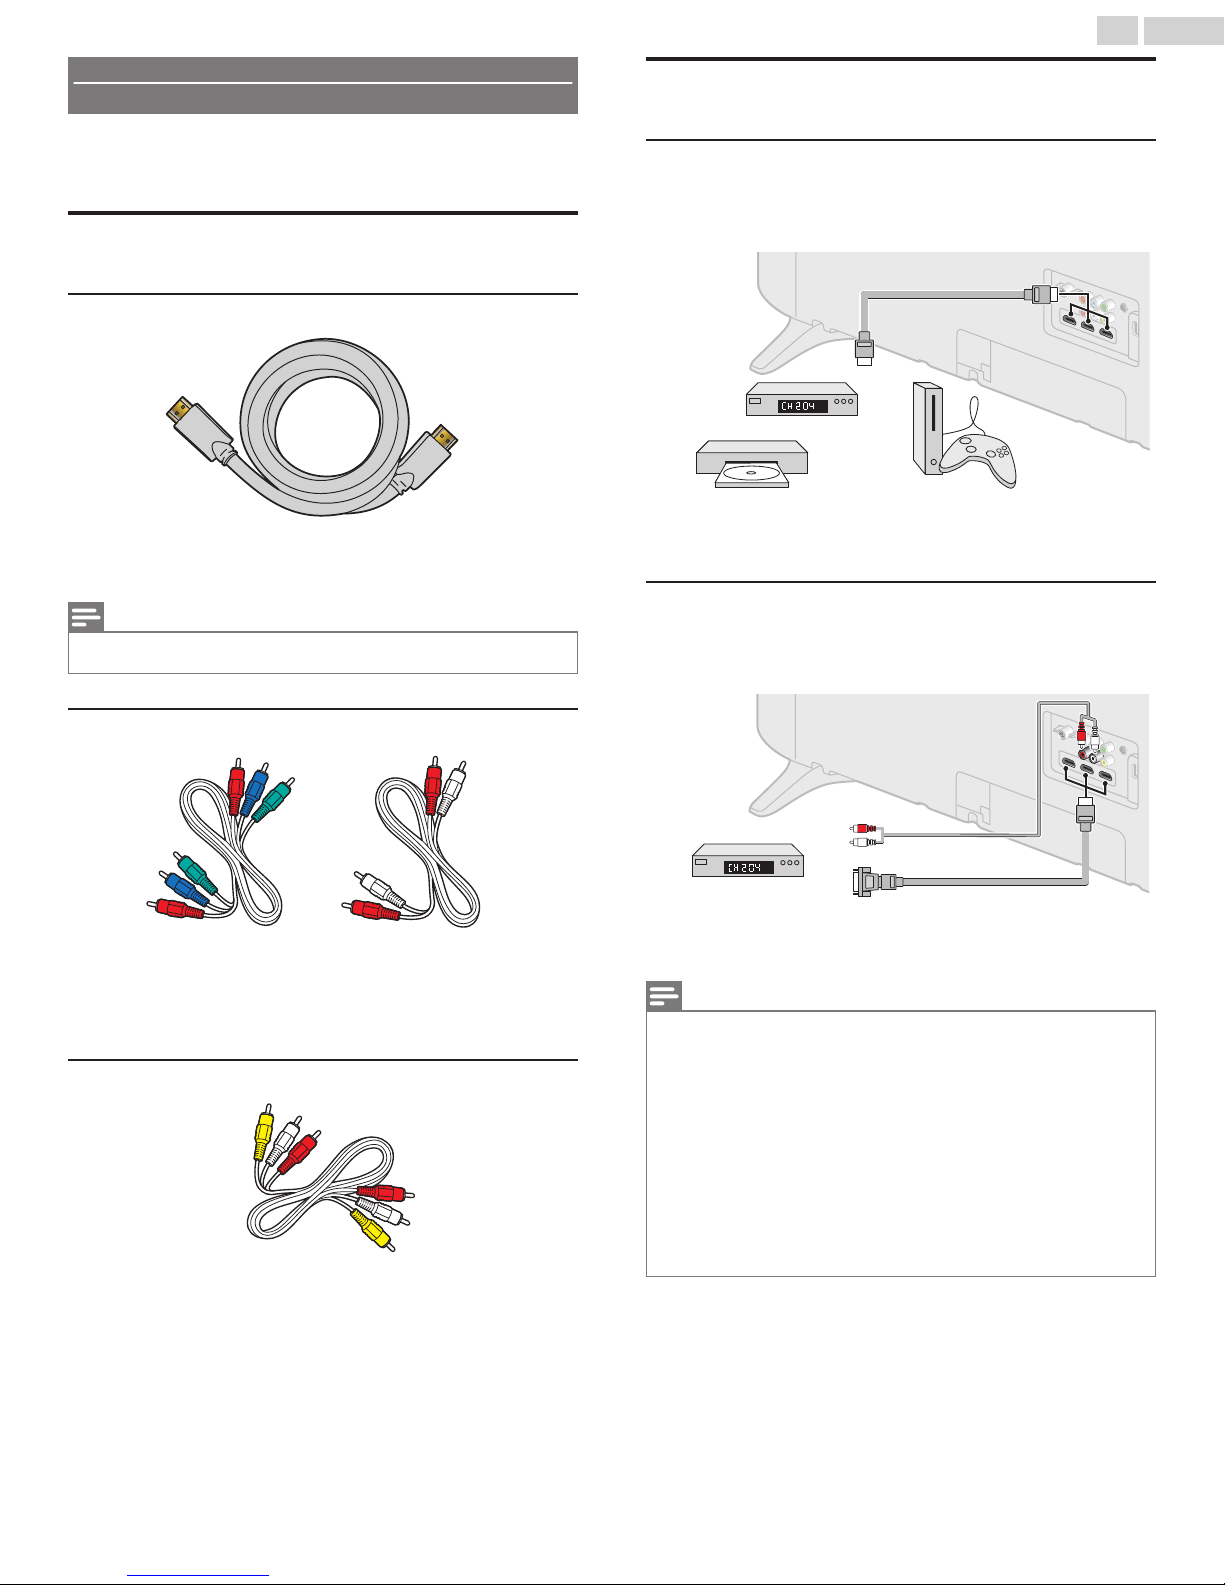
No supplied cables are used with these connections:
Please purchase the Necessary Cables at your local store.
•
B
Be sure other Devices are connected properly before plugging in the AC
Power Cord.
Selecting your Connection quality
HDMI - Highest quality
Supports high-definition Digital signals and gives highest picture and
sound quality. Video and Audio signals are combined in one cable. You
must use HDMI for full High-Definition Video and to enable EasyLink.
Note(s)
Philips HDMI supports HDCP (High-bandwidth Digital Contents Protection). HDCP is a form of
•
Digital Rights Management that protects High-Definition content in Blu-ray Discs or DVDs.
Connecting your Devices
HDMI Digital Connection
HDMI Connection offers the Highest Picture quality.
HDMI (High-Definition Multimedia Interface) transports High-Definition
Digital Video and multi-channel Digital Audio through a single cable.
HDMI cable
HDMI cable
IN
OUT
Set-top Box
or
Blu-ray Disc /
DVD Player
HDMI-DVI Connection
This Unit can be connected to your Device that has a DVI Terminal.
Use an HDMI-DVI Conversion Cable for this Connection and it requires
Audio Cable for Analog Audio signal as well.
HD game console
Component (Y Pb Pr) - High quality
Supports High-Definition Analog signals but gives lower picture quality
than HDMI. Component (Y/Pb/Pr) Video cables combine red / green /
blue Video cables with red / white Audio (L/R) Cables. Match the cable
colors when you connect to the TV.
Composite - Basic quality
For Analog Connections. Composite Video / Audio Analog cable usually
combine a yellow Video Cable with red / white Audio (L/R) Cables. With
this Unit, yellow cable must be connected to Y (green) jack on the
Component Video Input jacks.
Audio (L/R) cables
Audio (L/R) cables
IN
OUT
Cable Receiver or
Set-top Box with the
DVI Output jack
Note(s)
Use an HDMI cable with the HDMI logo (a certified HDMI cable). High Speed HDMI cable is
•
recommended for the Better compatibility.
For HDMI Connection
The Unit accepts 480i / 480p / 720p / 1080i, 1080p 24/30/60Hz of Video signals,
•
32kHz / 44.1kHz and 48kHz of Audio signals.
This Unit accepts a 5.1 channel Audio signal (Dolby Digital) and 2 channel Audio signal (LPCM).
•
If Audio Source is 7.1 channel Audio signal (Dolby Digital) and user selects Multichannel at Digital
•
output format, then the Digital Audio Output will be 5.1 channel Audio signal (Dolby Digital).
This Unit accepts only signals in compliance with EIA861.
•
For HDMI-DVI Connection
The Unit accepts 480i, 480p, 720p, 1080i and 1080p Video signals.
•
HDMI-DVI Connection requires separate Audio Connections as well and the Audio signals are
•
Output as Analog (L/R) Audio.
DVI does not display 480i image which is not in compliance with EIA/CEA-861/861B.
•
OUT
HDMI-DVI
HDMI-DVI
conversion cable
conversion cable
IN
Continued on next page.
Page 13
IN
IN
IN
13 .English
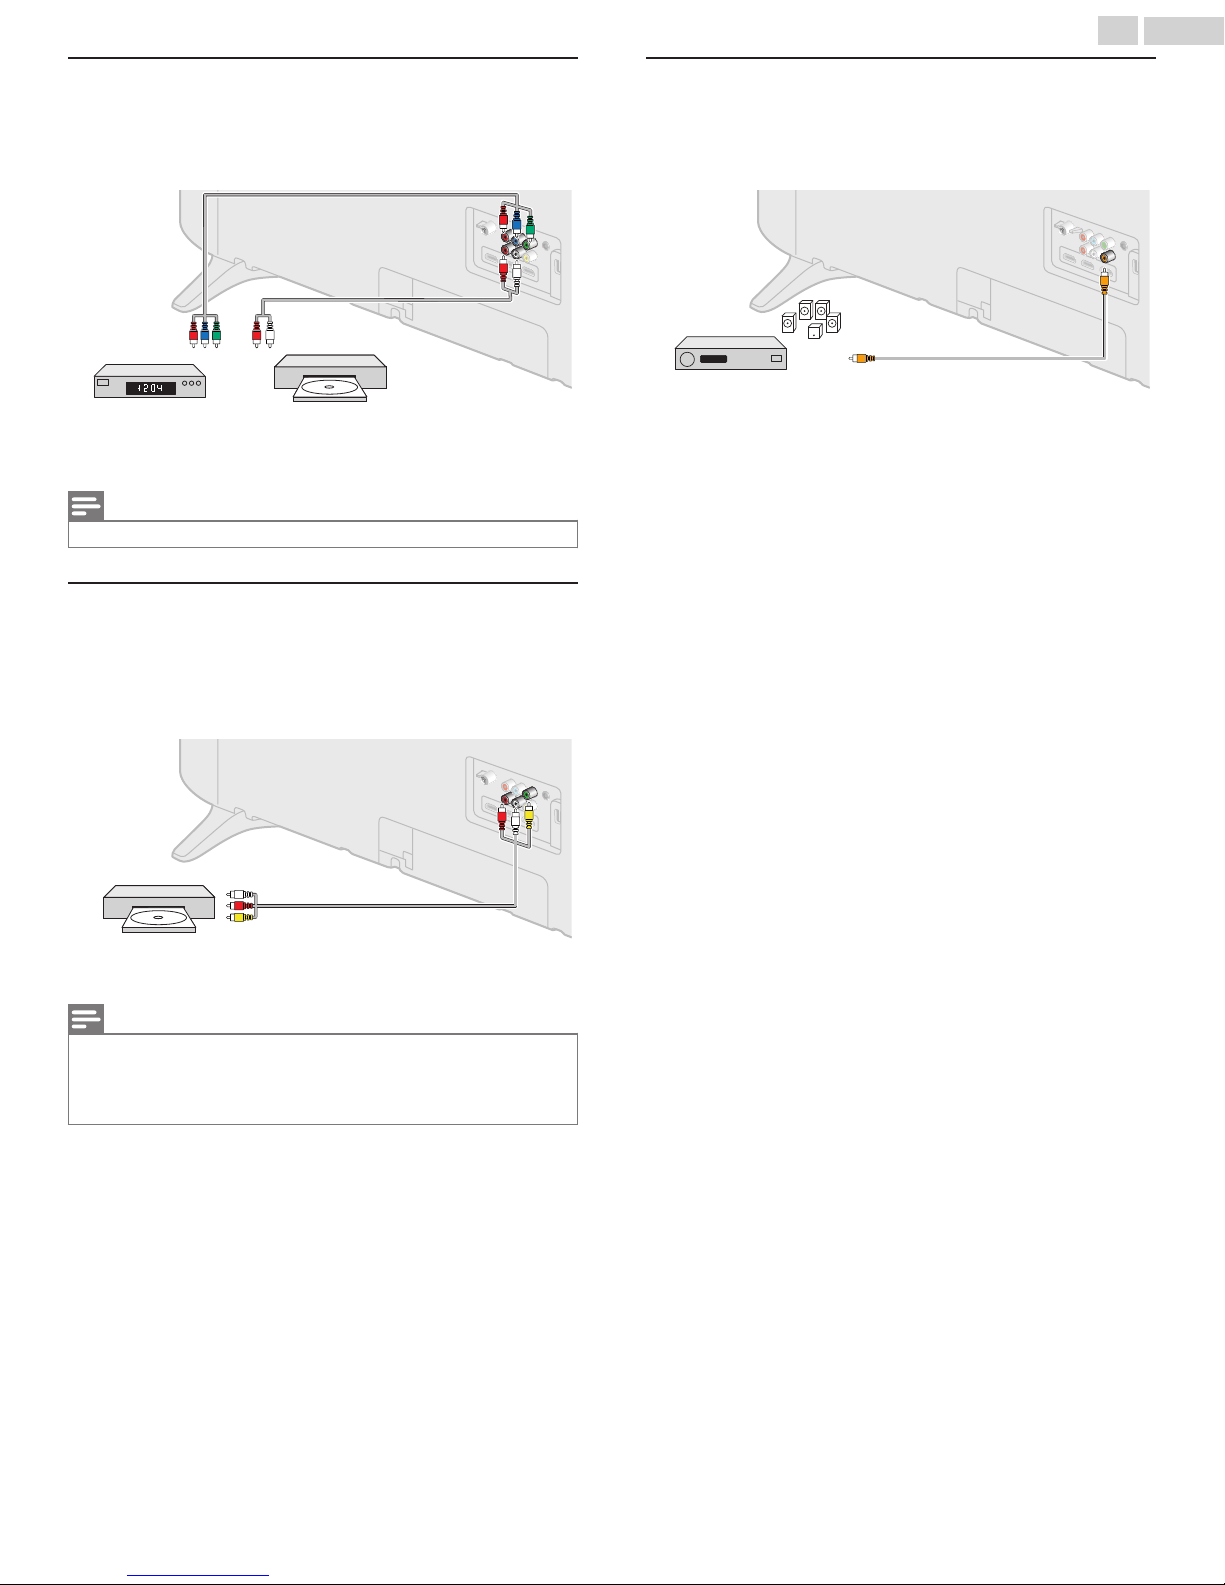
Component Analog Video Connection
Component Analog Video Connection offers Better Picture quality for
Video Devices connected to the Unit.
If you connect to the Unit’s Component Video (Y/Pb/Pr) Input jacks,
connect Analog Audio Cables to the Analog Audio (L/R) Input jacks.
Component
Component
(Y/Pb/Pr) Video
(Y/Pb/Pr) Video
cables
cables
IN
IN
IN
Audio (L/R) cables
Audio (L/R) cables
OUT OUT
or
Set-top Box
Blu-ray Disc /
DVD Recorder
Note(s)
The Unit accepts 480i / 480p / 720p and 1080i of Video signals for this Connection.
•
Composite Analog Video Connection
Composite Analog Video Connection offers Standard Picture quality for
Video Devices connected to the Unit.
If you connect to the Unit’s Component/Composite Video (Y/VIDEO)
Input jack (green), connect Audio Cables to the Audio (L/R) Input jacks.
When the Audio is monaural, then only connect to the Audio L Input jack.
Digital Audio Output Connection
If you connect this Unit to an External Digital Audio Device, you can enjoy
multi-channel Audio like 5.1ch Digital Broadcasting sound.
Use a Digital Audio Coaxial Cable to connect the Unit to External Digital
Audio Devices.
OUT
OUT
IN
Digital Audio Coaxial cable
Digital Home
Theater Amplier
Digital Audio Coaxial cable
IN
OUT
Audio (L/R) + Video cables
DVD Player
Note(s)
With this Unit, yellow cable must be connected to Y (green) jack on the Component Video Input
•
jacks.
Whenever you connect to the Composite Video Input jack (Y/VIDEO), you must disconnect the
•
Component Video Input jacks (Pb and Pr). If you leave those jacks connected, it may cause an
unstable picture.
Continued on next page.
Page 14
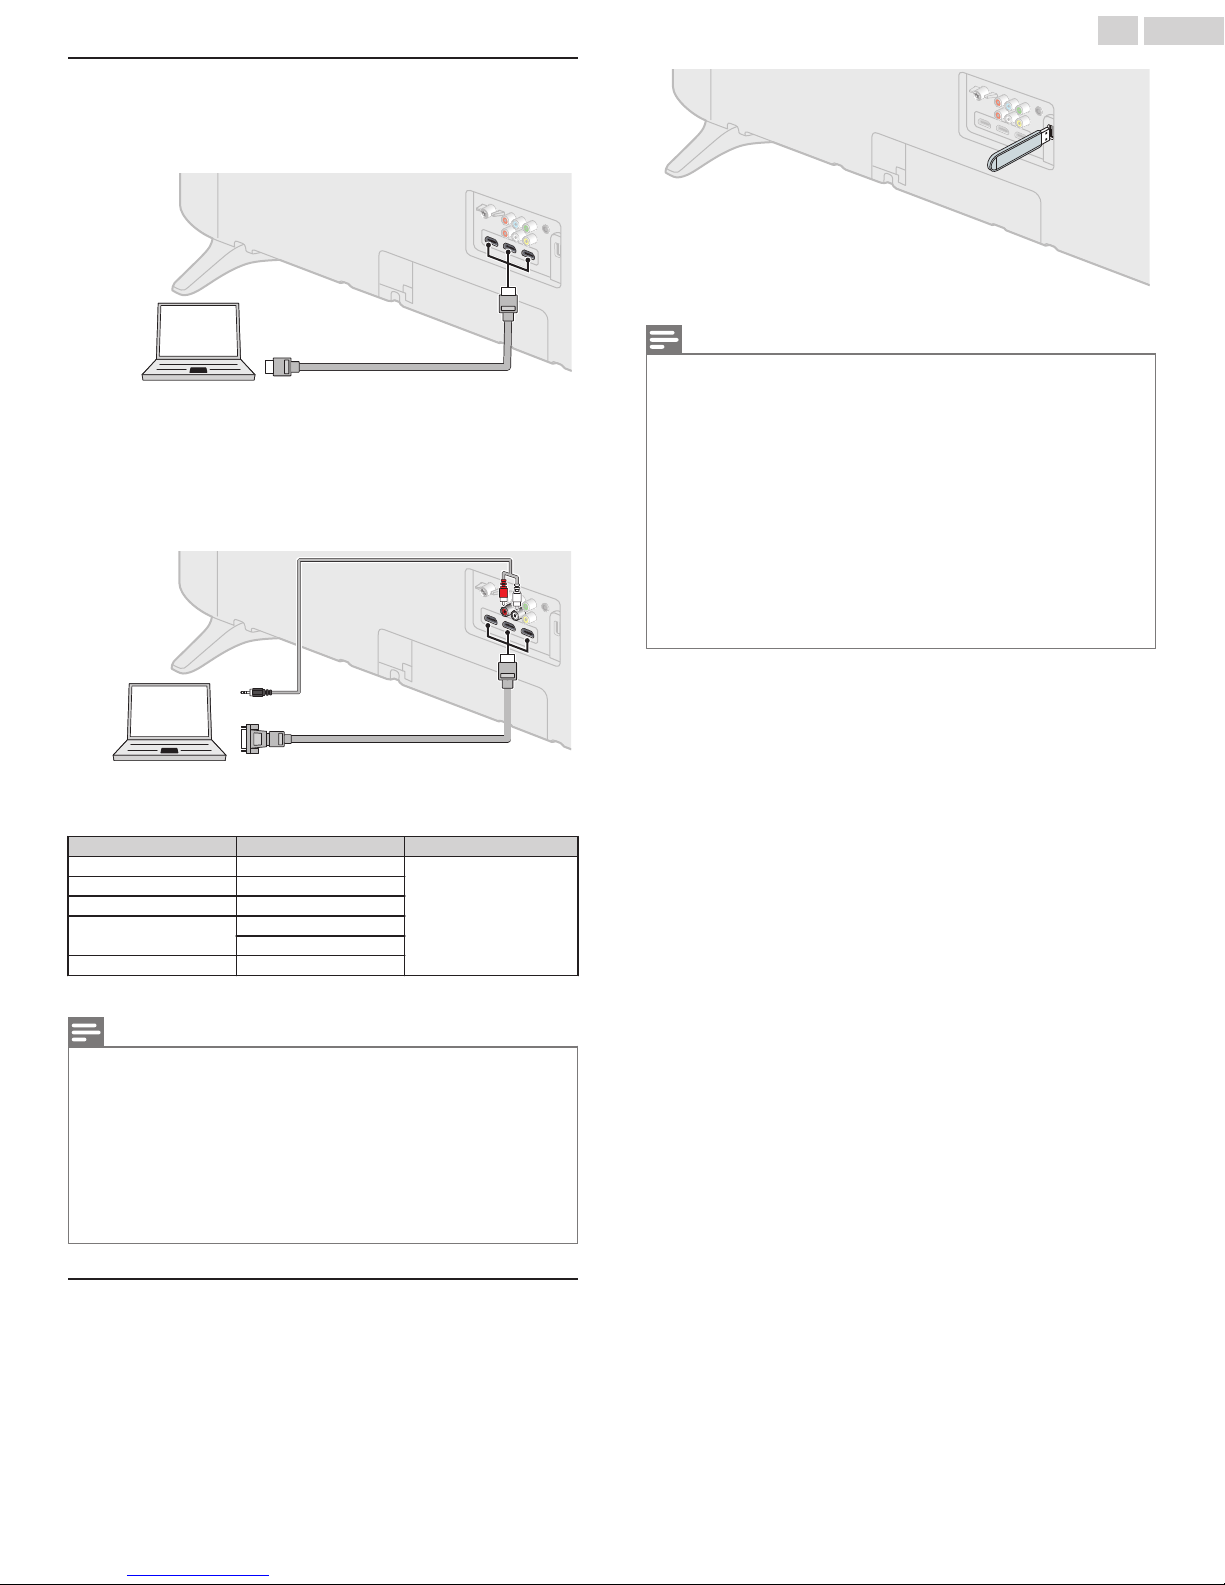
PC Connection
IN
IN
HDMI Connection
This Unit can be connected to your PC that has an HDMI terminal.
Use an HDMI cable for this Digital Connection.
IN
IN
14 .English
OUT
PC
HDMI cable
HDMI-DVI Connection
This Unit can be connected to your PC that has a DVI Terminal.
Use an HDMI-DVI Conversion Cable for this Video Digital Connection and
it requires Stereo mini 3.5mm Plug Audio Cable for Analog Audio signal
as well.
Stereo Mini 3.5 mm
Stereo Mini 3.5 mm
Plug Audio cable
Plug Audio cable
OUT
HDMI-DVI
PC
The following PC-Input Video signals can be displayed:
Format Resolution Refresh rate
VGA 640 x 480
SVGA 800 x 600
XGA 1,024 x 768
WXGA
FHD 1,920 x 1,080
Other formats or non-standard signals will not be displayed correctly.
OUT
1,280 x 720
1,360 x 768
HDMI-DVI
conversion cable
conversion cable
60Hz
IN
IN
Note(s)
The Unit recognizes only a USB Memory Stick.
•
Do Not use a USB hub or an extension cable to connect an External hard disk drive to the Unit.
•
(Not Supported.)
Always insert a USB Memory Stick directly to this Unit.
•
A USB Memory Stick is Not Supplied with this Unit.
•
We Do Not guarantee that All USB Memory Sticks can be supported by this Unit.
•
Be sure to keep a Backup Copy of the Original files on your USB device before you Play them
•
back on this Unit. We have no responsibilities for damage or loss of your USB Stored Data.
To protect your USB Memory Stick files from being erased place the write protect sliding tab in
•
the protect position (if available).
When you are ready to remove a USB Memory Stick, set the Unit to go into Standby mode to
•
avoid any damage to your data and the Unit.
A USB Memory Stick that requires its own driver or the Device with a special system such as
•
fingerprint recognition are Not Supported.
This unit is not allowed to use the USB Memory Stick which requires an External Power Supply
•
(500mA or more).
Note(s)
Please purchase a HDMI-DVI Conversion Cable that has a ferrite core.
•
The following operations may reduce noise.
•
– Attach a ferrite core to the AC Power Cord of your PC.
– Unplug the AC Power Cord and use the built-in battery of your Portable / Laptop PC.
Use an HDMI cable with the HDMI logo (a certified HDMI cable). High Speed HDMI cable is
•
recommended for the Better compatibility.
The Unit accepts 480i, 480p, 720p, 1080i and 1080p Video signals.
•
HDMI-DVI Connection requires separate Audio Connections as well and the Audio signals are
•
Output as Analog (L/R) Audio.
DVI does not display 480i image which is not in compliance with EIA/CEA-861/861B.
•
USB Memory Stick
This unit offers easy Playback of Picture (JPEG) and Video (Motion JPEG)
files.
Insert the USB Memory Stick into the USB terminal shown below.
USB p. 31
Continued on next page.
Page 15
15 .English
These Operations are accessible by Remote Control.
Some may also be accessible by the Main Unit's Control
Panel.
Initial Setup
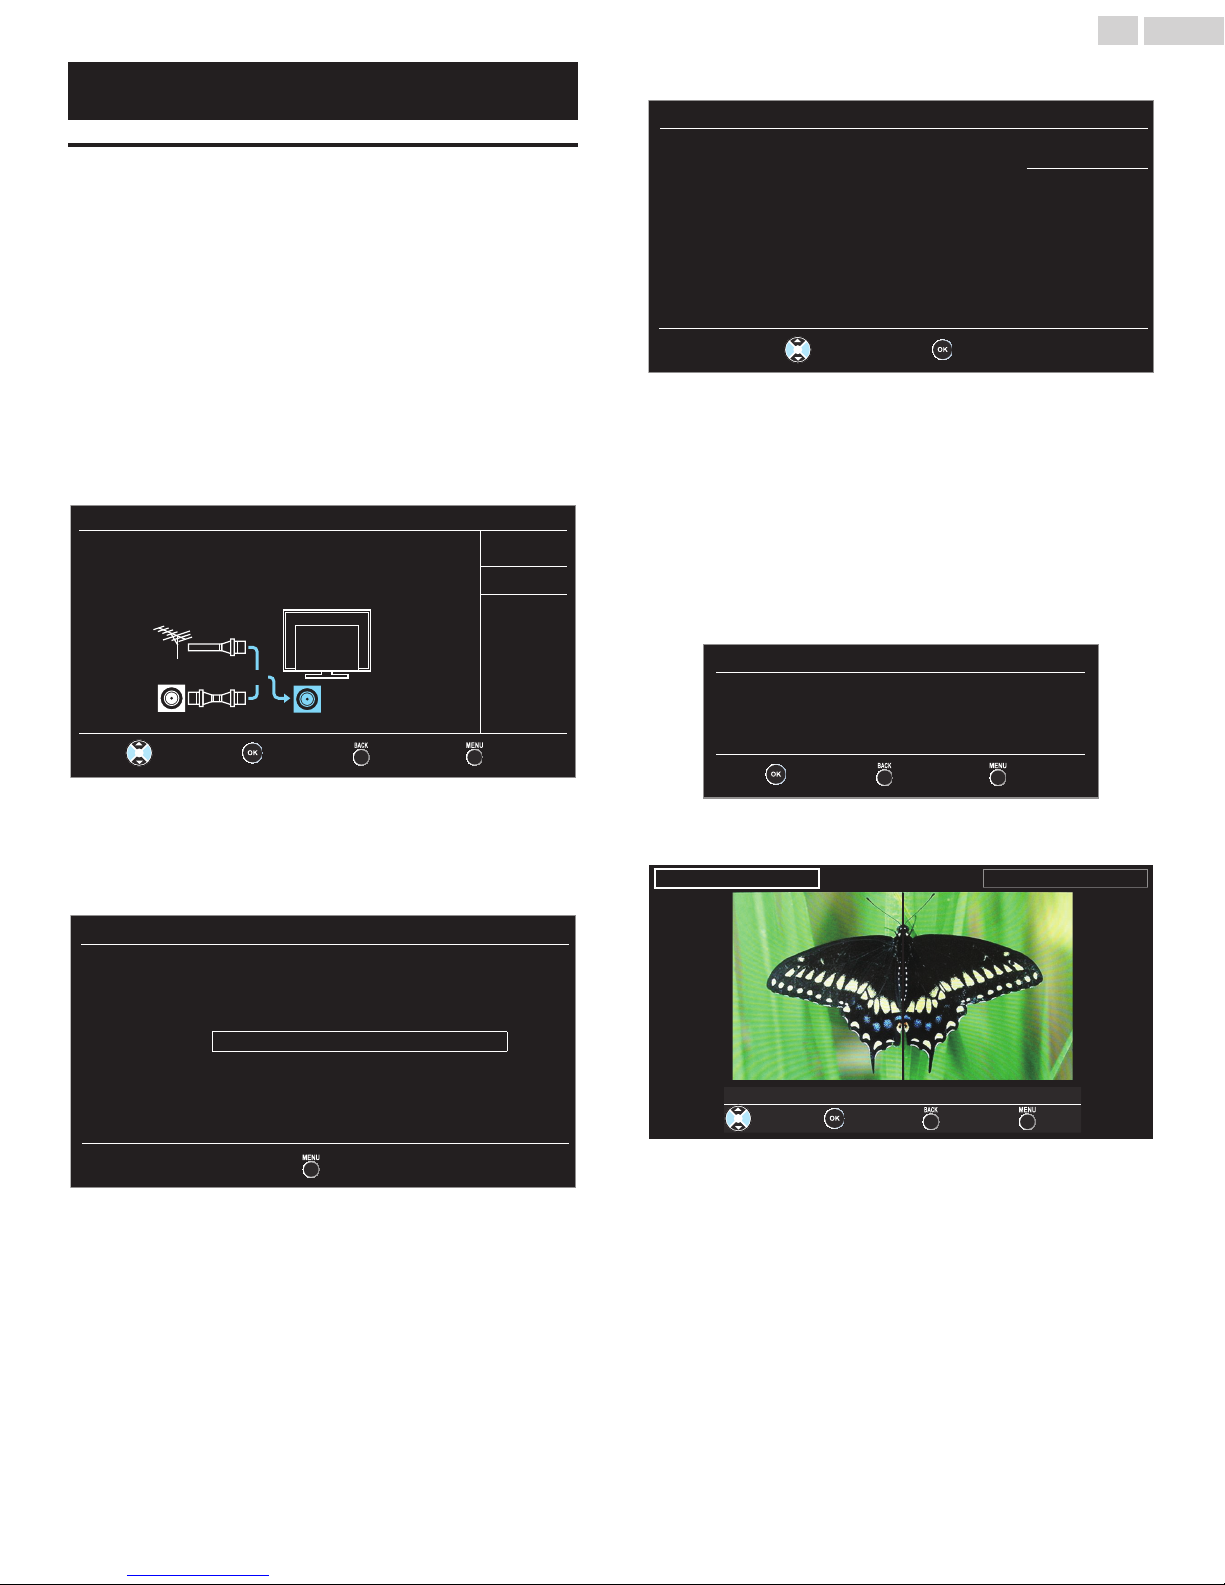
This section will guide you through the Unit’s Initial setting which includes
selecting a Language for your On-screen Menu and Autoprogram, which
Automatically scans and memorizes viewable channels.
B
Make sure the Unit is connected to an Antenna or Cable.
After making All the Necessary Connections, press to Turn On the
1
Unit.
It may take a few moments to Turn On the Unit for the first time.
•
Initial setup menu appears Automatically after the Unit is Turned
•
On.
Use to select the On-screen language from the choices
2
(English / Español / Français) on the right side of the TV screen, then
press OK.
Use to select Antenna for TV channels or Cable for CATV
3
channels, then press OK.
Initial setup
Make sure the antenna is connected to "ANTENNA IN"
jack.
Select your signal source.
Antenna
Antenna
Cable
Skip
Use to select the desired Location setting, then press OK.
4
Initial setup
Retail
Location:
“Home” mode is optimized for efficient
energy usage for home use.
“Retail” mode is optimized for Store Demo
with fixed settings.
Select
Select Home, the Unit is set to maximize the energy efficiency for
•
home setting and it can be adjusted through a choice of Picture
and Sound quality according to your preference. Use this setting to
remove the E-sticker, if visible on the display. p. 30
You must set Home in step 4. Otherwise, Picture and Sound
•
settings you adjusted will not be memorized after the Unit goes into
Standby mode.
When the Initial setup is completed, the Lowest Memorized
•
Channel with the confirmation message of the Location setting will
be displayed on the TV screen.
Select Retail, the Unit will be set up with predefined settings for
•
retail displays.
When you select Home, press OK to begin Settings assistant.
5
OK
Home
Cable
Select
–When Antenna is selected, the TV detects Antenna signals. It
searches for DTV and Analog TV channels available in your area.
–When Cable is selected, the TV detects signals supplied by
Cable. It searches for DTV, Analog TV and Cable channels
available in your area.
Autoprogram will begin.
•
Initial setup
Please wait while the system is scanning for channels.
Auto programming may take more than 20 minutes to
complete.
Or
ANTENNA IN
0%
0 chDigital channels
0 chAnalog channels
Skip
Settings assistant
Settings assistant helps you customize picture settings.
You will see a series of test pictures where the right side
and left side differ. Select the side that is most pleasing to
you with the Left/ Right keys.
SkipBackOK
ExitBackNext
Press or 3 times to select the side of the pictures that is the most
6
pleasing to you, then press OK.
Left side
1/3 Select the picture setting that you prefer.
Right side
ExitBackNextSelect
Page 16
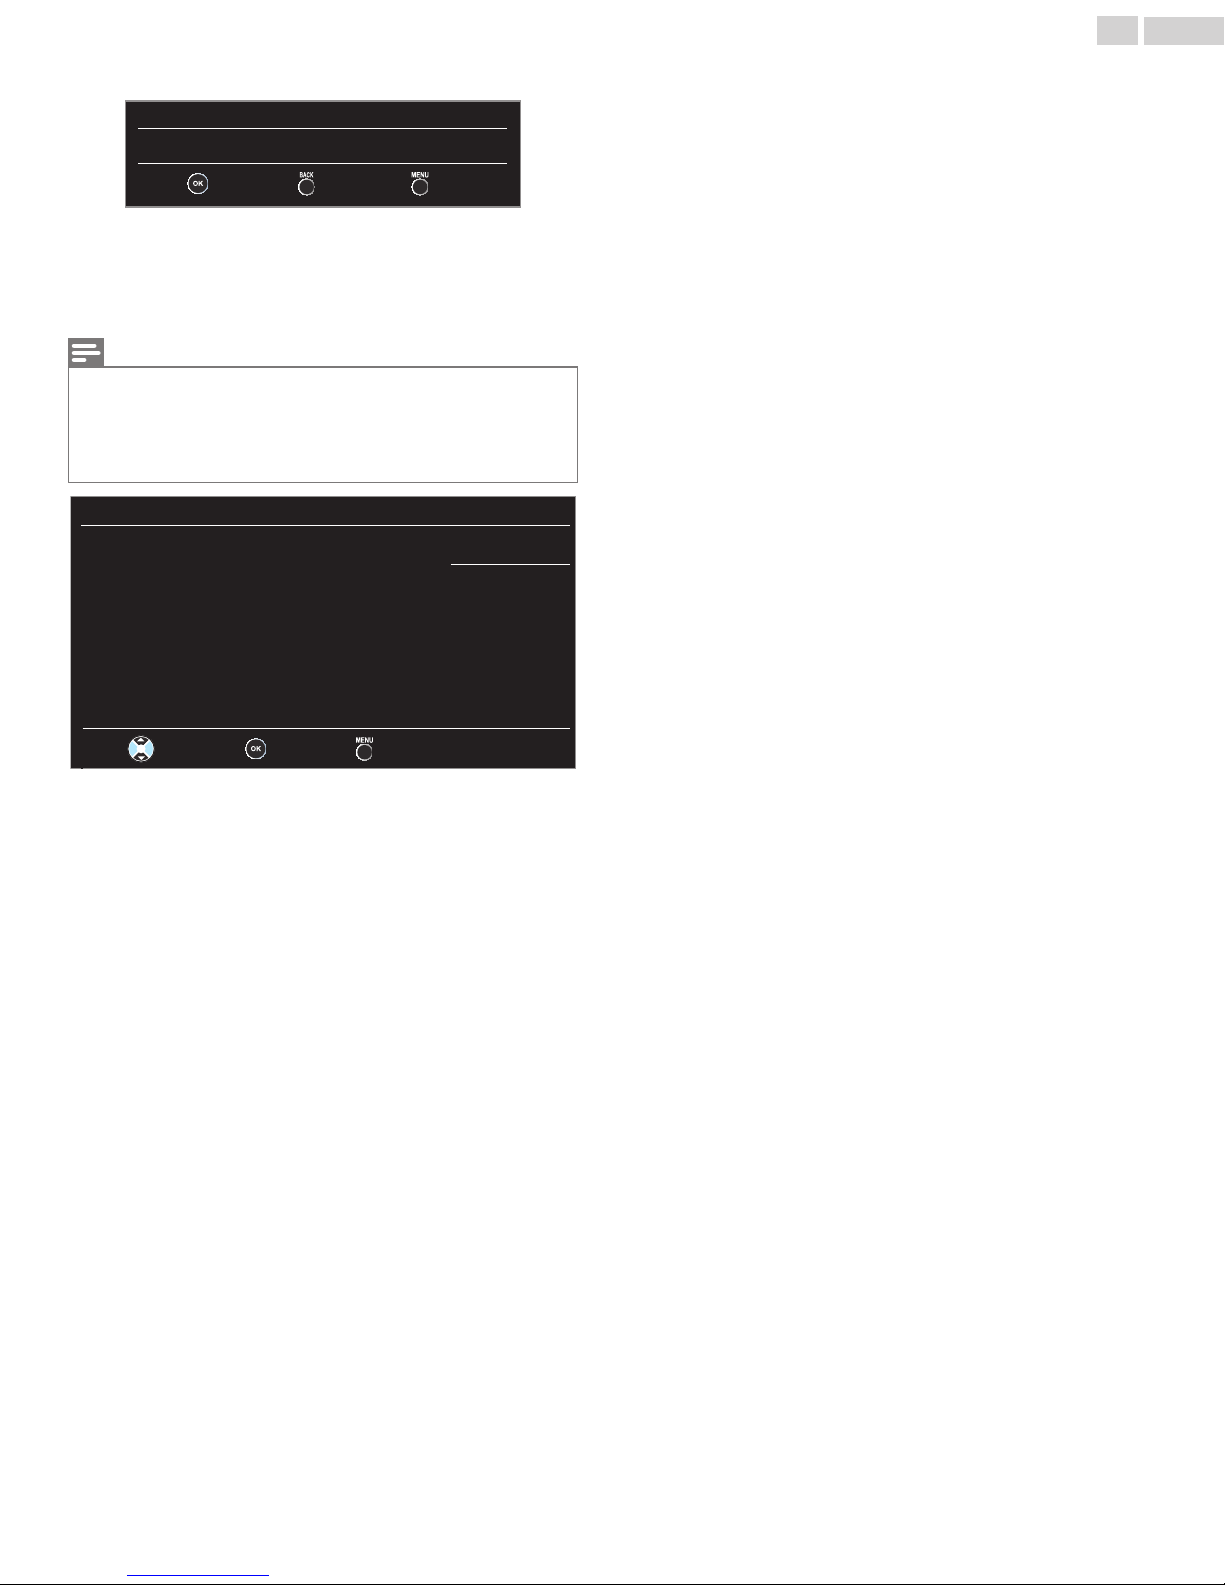
Press OK to finish Settings assistant.
After an Initial Setup is completed...
7
Settings assistant
You have set up your viewing preferences.
ExitBackStore
When the initial setup is completed, the lowest memorized channel
•
with the confirmation message of the location setting will be
displayed on the TV screen.
You must set Home in step 4. Otherwise, Picture and Sound
•
settings you adjusted will not be memorized after the unit goes into
Standby mode.
Note(s)
If you are not receiving a signal from your Cable service, contact the Cable provider.
•
If you press or during Autoprogram, this Setup of TV channels will be Cancelled.
•
The Initial Autoprogram function can be executed for either Antenna or Cable only Once. When
•
you change the Connection (Antenna / Cable), select Autoprogram again.
p. 24
If there is no signal Input from the Antenna terminal and no operation for several seconds after
•
you Turn On the Unit, Helpful hints appears. Follow the instructions listed on the TV screen.
Initial setup
16 .English
No channel is registered.
Try Autoprogram again?
Verify that you have a cable connected to the
ANTENNA IN jack on the back of the TV, the channel
installation process searches this connection.
If you are using a cable or satellite box, please confirm
the input which you have connected to the box and
press "SOURCE" key on the remote control to select
the appropriate source input.
####
####
Select
SkipOK
Retry
Later
If you want to scan the channels Automatically again.
•
Autoprogram p. 24
You can add the desired Cable and Analog channels not memorized
•
by Autoprogram.
Add channels p. 25
If you want to change to another Language.
•
Language p. 31
If you want to change the Location setting.
•
Location p. 30
If you want to restore the picture setting.
•
Settings assistant p. 22
Page 17
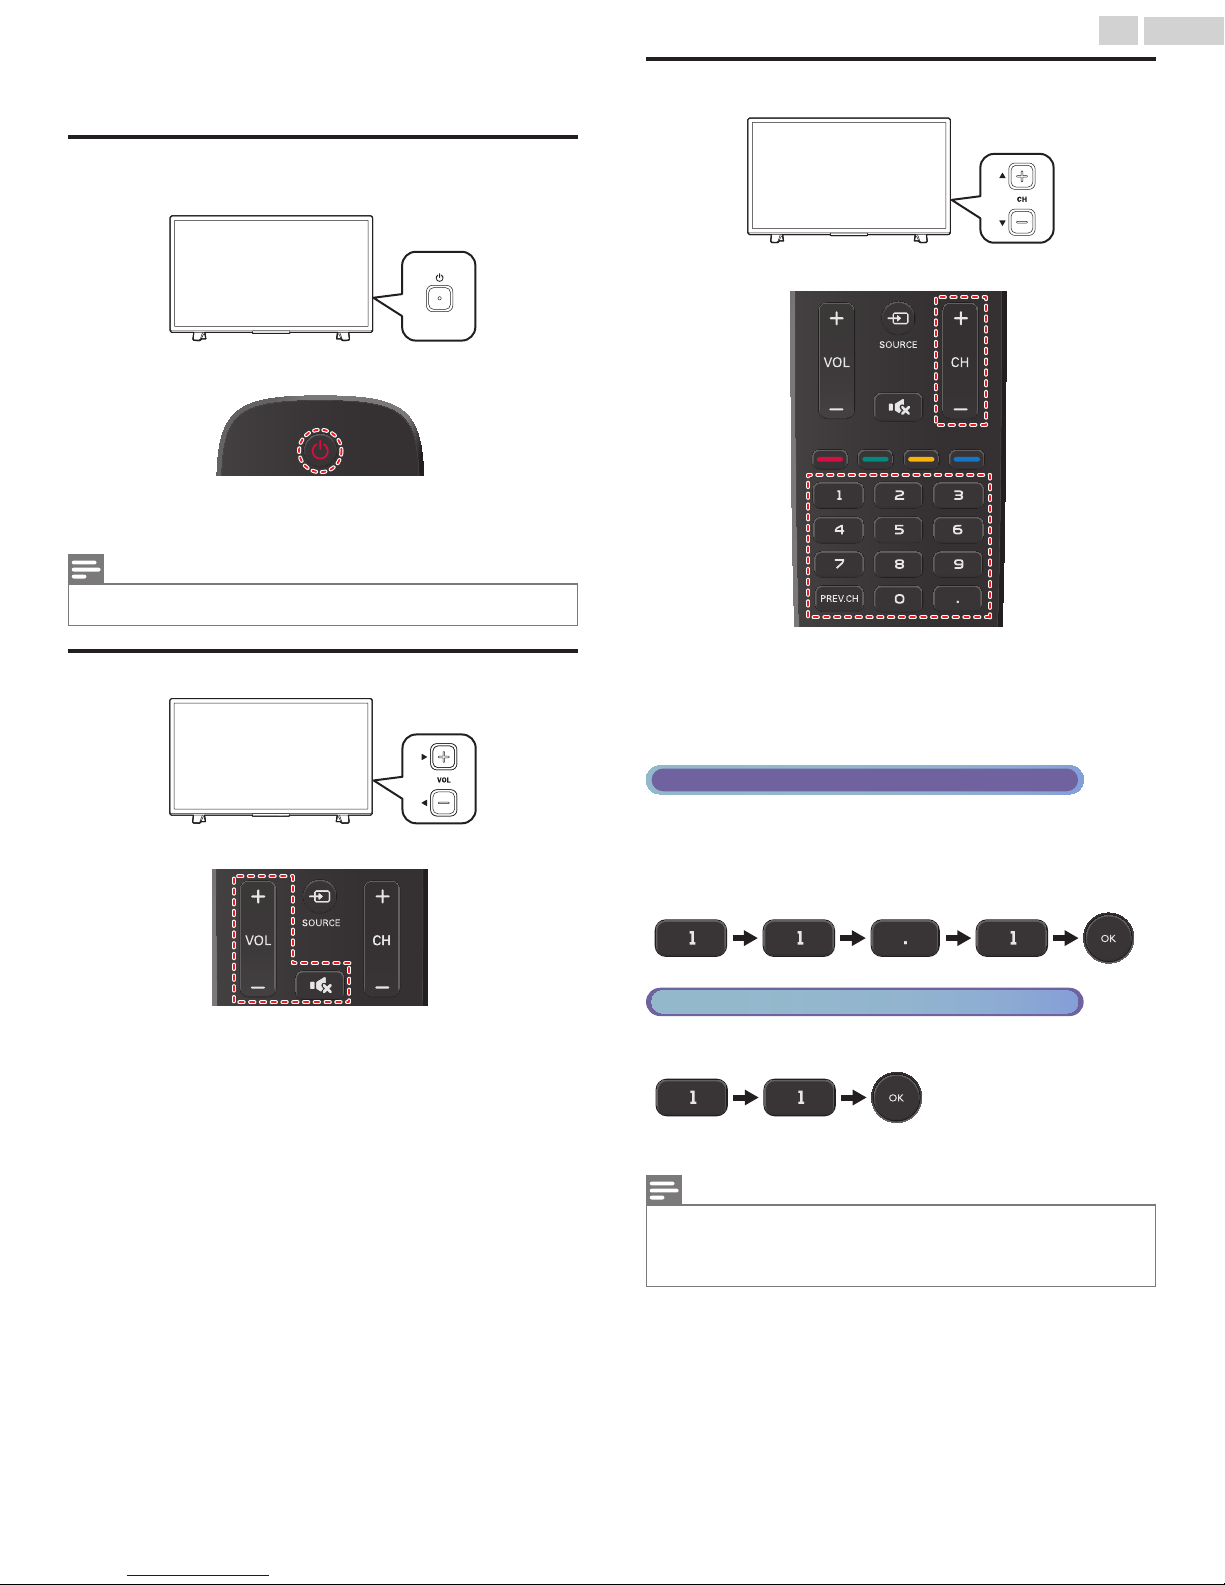
To decrease or increase Volume
To mute or unmute sound
To Select Channels by using CH / or CH + / –
To select Channels by using the NUMBER keys
17 .English
4 Use your TV
Switching on your TV and putting it in
Standby mode
TV
Remote Control
T
Press on the Unit or the Remote Control.
•
Note(s)
Energy Consumption contributes to air and water pollution. When the AC Power Cord is plugged
•
in, your TV consumes energy with a very low Standby Power Consumption.
Switching Channels
TV
Remote Control
Adjusting Volume
TV
Remote Control
Press VOL(–) /(+) on the Unit or press VOL + / – on the Remote
•
Control.
VOL(–) : Volume Down
VOL(+) : Volume Up
Press on the Remote Control to mute the sound.
•
Press again or VOL + / – to recover the original sound.
•
Press CH(–) (Down) / (+) (Up) on the Unit or press CH + / – on the
•
Remote Control.
Digital TV Operation
For Digital channels, press a number followed by a dot “•” and the
•
corresponding sub channel number.
–When selecting Digital channel 11.1
Be sure to press • before entering the subchannel number.
Cable / NTSC (Analog) TV Operation
–When selecting Cable or Analog channel 11
Press PREV.CH to return to the previously viewed channel.
Note(s)
To select the non-memorized channels, use the NUMBER keys.
•
No signal will appear on the TV screen after the subchannel broadcast is over.
•
Audio only program message will appear on the TV screen, when you receive only a sound
•
signal.
Continued on next page.
Page 18
18 .English
Watching Channels from an External
Device
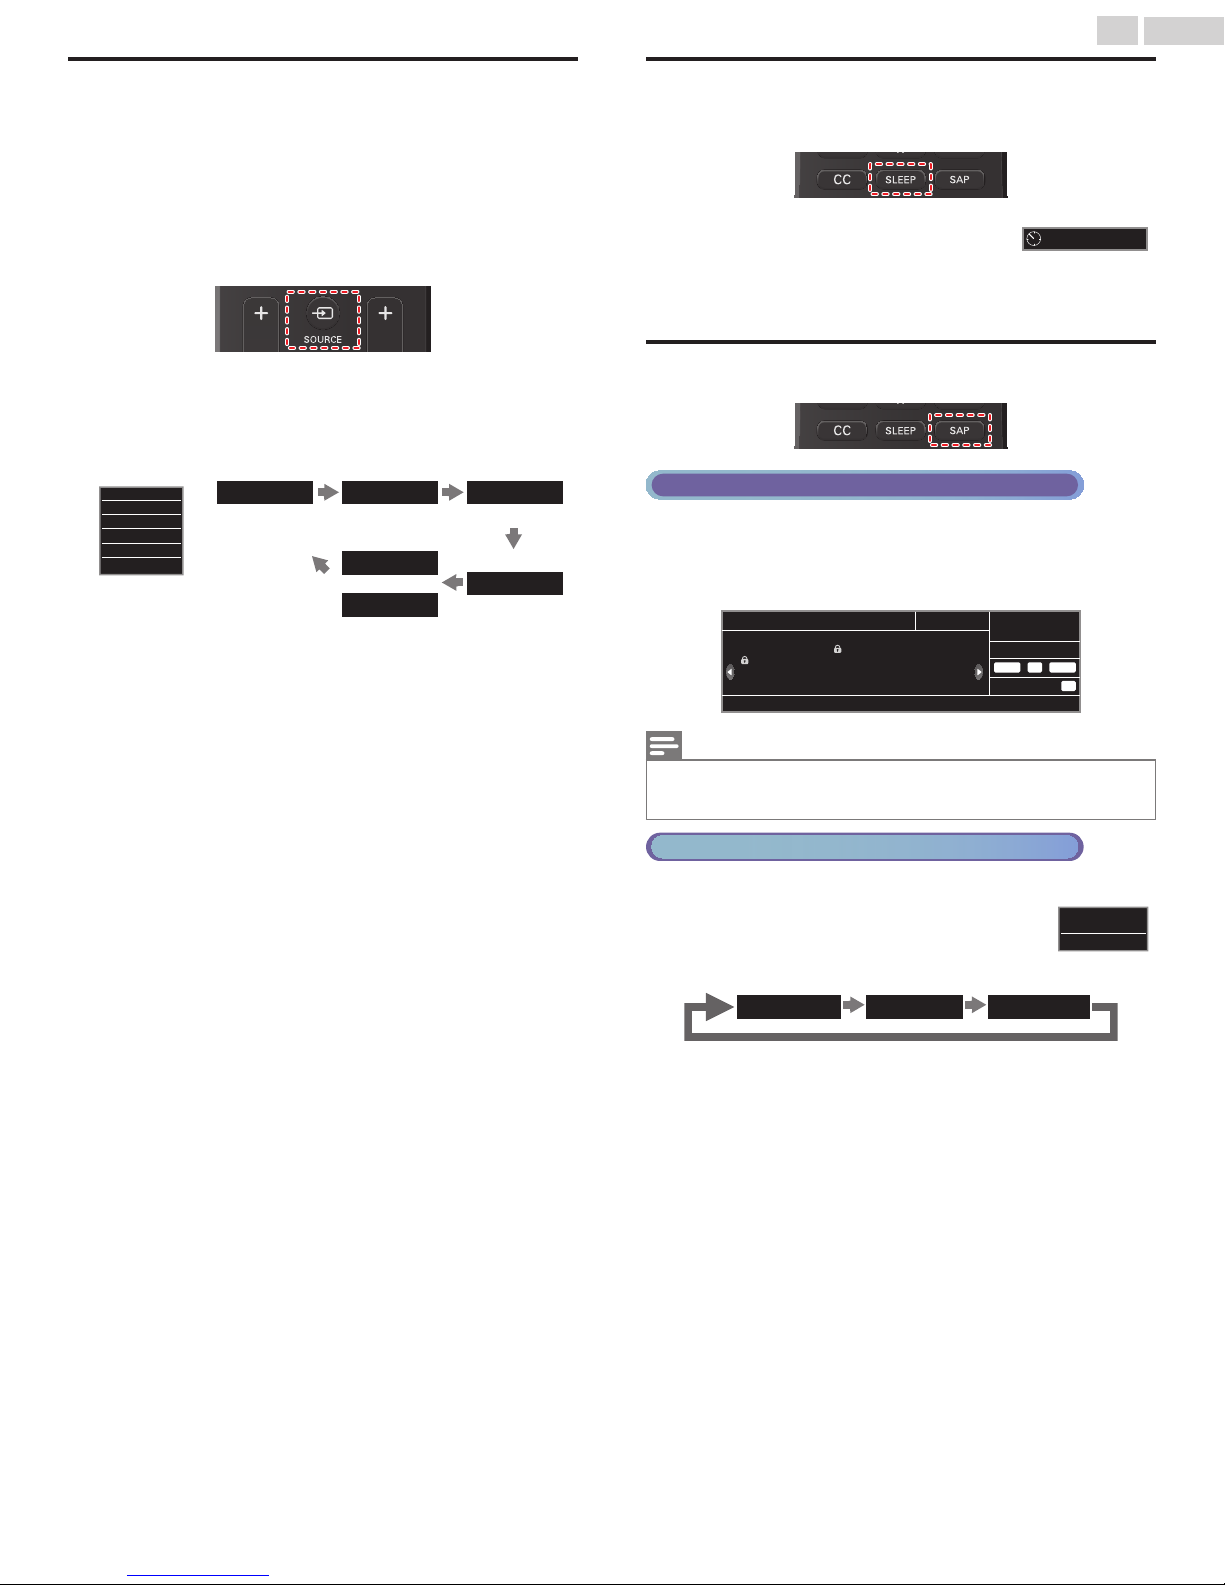
Switching Each Input Mode can easily switch with the Remote Control
between TV (DTV or Analog TV) and External Devices when they are
connected to the Unit.
Turn On the Set-top Box or the Connected Device.
1
The picture from the Set-top Box or the Connected Device might
•
appear Automatically on the TV screen.
I
Press SOURCE Repeatedly to select the Set-top Box or the
Connected Device and wait a few seconds till the Picture appears.
Pressing reverses the direction of the Input modes.
•
e.g.)
Source
TV
HDMI1
HDMI2
HDMI3
Video
Use the Remote Control for the Set-top Box or the Connected
Device to Select Channels to view.
DTV / Analog TV
11.1
channel
Video
or
Component
HDMI2HDMI1
HDMI3
Sleep Timer
Sleep Timer can set the Unit to go into Standby mode after an incremental
period of time.
Press SLEEP Repeatedly to change the amount of time
(increases the time by 30 minutes up to 120 minutes).
120 min.Sleep timer
Press SLEEP Once to call up the display for checking the remaining time.
To cancel Sleep Timer, press SLEEP Repeatedly until Off is displayed.
•
Switching Audio Mode
Digital TV Operation
Press SAP to display the currently selected Language and the
1
number of available Languages.
Press SAP Repeatedly to cycle through the available Audio
2
Languages.
A Day of Memories
Rating information:
US TV
: TV-MA : X
: TV-14 : NC-17
US TV
: TV-PC : R
US TV
: TV-G : PG-13
US TV
US movie
US movie
US movie
US movie
EnglishAudio information:
audio
KABC
English
1080i 16:9HD
Rating
11.1
1/2
CC
Note(s)
Available Languages differ depending on the Broadcast.
•
Other is displayed when the Audio Language cannot be acquired or the acquired Languages
•
are other than English, French or Spanish.
Cable / NTSC (Analog) TV Operation
Press SAP to display the currently selected Audio mode.
1
While receiving an MTS broadcast, press SAP Repeatedly
2
to cycle through the available Audio Channels.
SAP / STEREO
e.g.) When All Audio Modes are available
SAP / STEREO
SAP / MONO
SAP / STEREO
Stereo : Outputs Stereo Audio
SAP : Outputs a Second Audio Program
Mono : Outputs Mono Audio
11
Continued on next page.
Page 19
To edit the favorite list
To remove a channel from the favorite list
19 .English
EasyLink options
If you have our brand products such as Blu-ray Disc player or DVD
recorder that are compatible with EasyLink functions, connect them to
this Unit via an HDMI cable so you can simply operate various items from
this Unit’s Remote Control.
B
You must set On in Device control and EasyLink control. p. 29
Otherwise, LINK does not work even if you connected our brand devices
to this unit.
1
Press OPTIONS to display EasyLink options menu.
Device-menu
Device-contents
Device-favorite Controls the pop-up menu of your Blu-ray Discs.
2
Use or OK on this Unit’s Remote Control to operate the desired
functions for your devices.
Note(s)
Some of EasyLink functions may not be available depending on your EasyLink devices or
•
Discs.
You must connect this Unit to our brand EasyLink devices and be sure its EasyLink setting is
•
also set to On.
We do Not guarantee 100% interoperability with other brands of HDMI link compliant devices.
•
Controls the menu of your connected EasyLink
device.
Controls the top menu of your DVD or Blu-ray
Discs.
EasyLink options
Device-menu
Device-contents
Device-favorite
Create a list of favorite channels
You can create lists of your preferred TV channels so that you can find
those channels easily.
Press OK while viewing a TV program.
1
Press INFO key to register channel to Favorite list.
2
3
Use to Select the desired channel, then press OK to add or
remove on the list of favorite channels.
indicates that the channel is added.
•
indicates that the channel is removed.
•
4
Press to Select list, then press OK to tune to channels.
Changing Picture Format
Display Modes can be Selected when your TV receives a
16:9 or 4:3 Video Signal.
Three types of Display Modes can be Selected for a PC Input Signal.
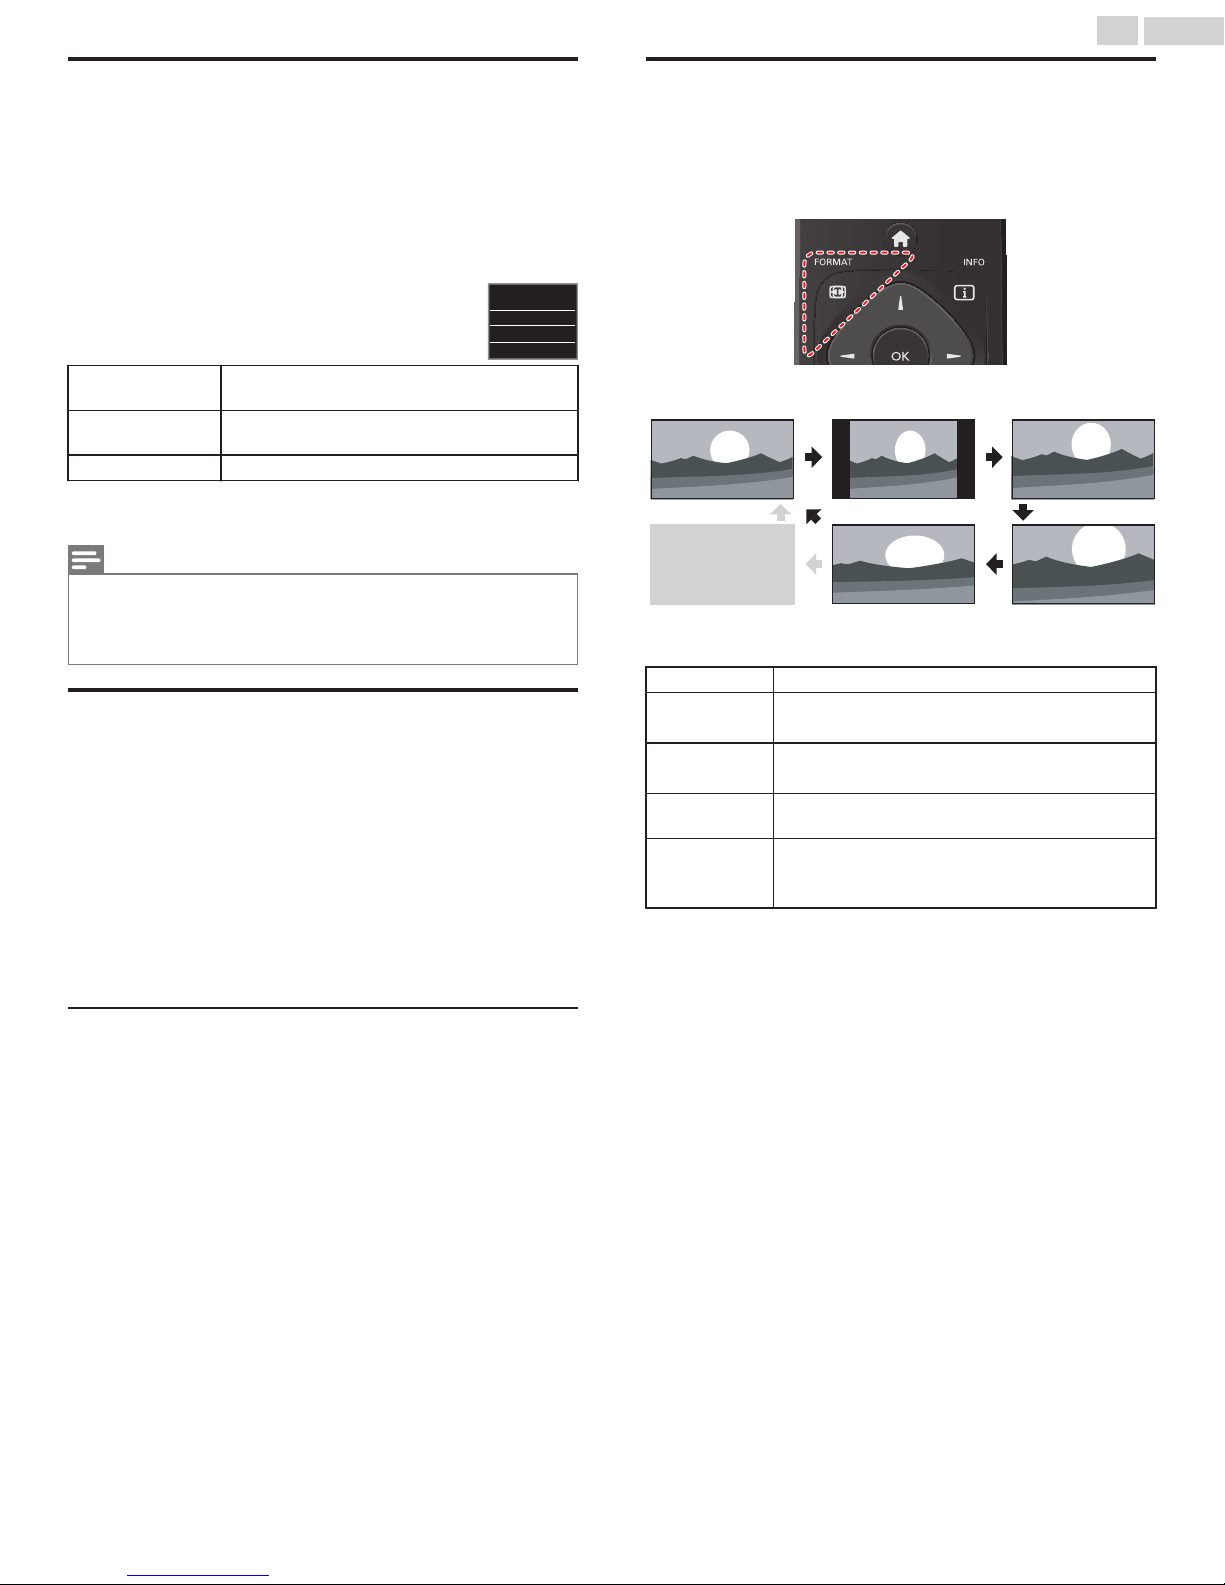
Press FORMAT Repeatedly to Switch the TV Aspect Ratio.
For 16:9 Video signal
Full can also be selected
after Wide if an HDMI
Device is selected. This
picture format similarly
displays like Normal.
Full
(HDMI Device only)
Normal Original size.
4:3
Movie expand
Zoom
Wide
Wide Zoom
Shortened horizontally.
Sidebars appear on both edges of the screen.
Vertically stretched to fill the screen.
This only crops out the top of the picture.
Maximum size without changing its horizontal and
vertical ratio.
Horizontally stretched picture.
This crops out some of the left and right sides of the
picture.
Movie expand4:3Normal
Display the list of favorite channels
Press OK while viewing a TV program.
1
2
Use to Select favorite channel, then press OK to tune to
channels.
Press OK while viewing a TV program.
1
Press INFO key to edit the Favorite list.
2
1
Use to Select the desired channel, then press OK button.
2
Press to Select list.
Continued on next page.
Page 20
20 .English
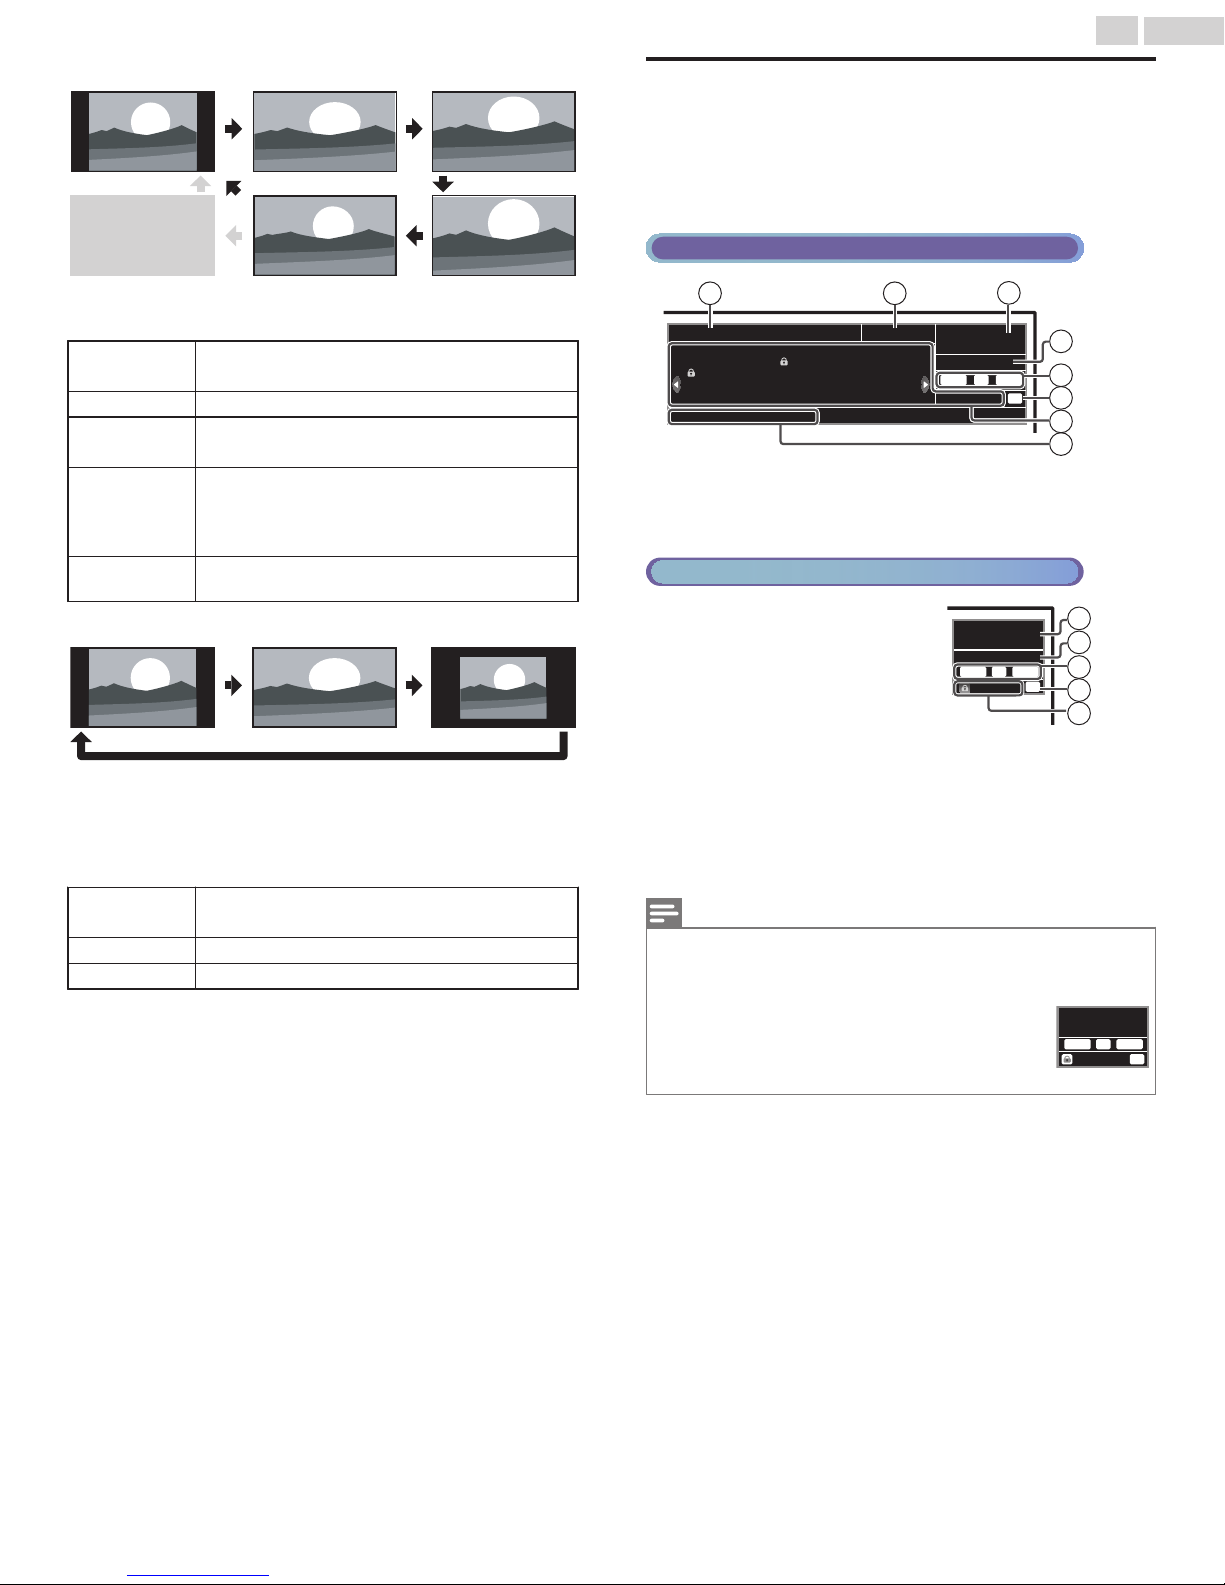
For 4:3 Video signal
Movie expand16:9Normal
Full can also be selected
after Wide if an HDMI
Device is selected. This
picture format similarly
displays like 16:9.
Full
Wide Zoom
(HDMI Device only)
Normal
16:9 Stretched horizontally to fill the screen.
Movie expand
Zoom
Wide
Original size.
Sidebars appear on both edges of the screen.
Stretched more vertically at the top of the screen.
This crops out the top of the picture.
Maximum size that is more vertically stretched to fill
the screen.
This crops out some of the top and bottom of the
picture.
Original size and the edges stretched horizontally to
fill the screen.
For PC Input signal
UnscaledFullNormal
This Unit can also be connected to your PC that has a DVI Terminal.
•
Use an HDMI-DVI Conversion Cable for this Video Connection and it
requires a Stereo Mini 3.5mm Plug Audio Cable for Analog Audio signal
as well.
Refer to 16:9 Video Signal on this page if the PC has an HDMI Output.
•
Normal
Full Stretched out of proportion to fill the screen.
Unscaled Original size.
Proportionately stretched picture.
Sidebars appear on both edges of the screen.
TV Screen information
You can display the currently selected channel or other information such
as the aspect ratio on the TV screen.
In the Digital mode, the detailed broadcasting information for the current
off the air channel, such as Program title, are displayed.
1
Press INFO.
Digital TV Operation
11.1
English
1/2
Rating
SAP / STEREO
480i 4:3SD
TV-PG DLSV
3
4
5
CC
6
7
8
3
11
4
5
CC
6
7
Video
480i 4:3SD
TV-PG DLSV
CC
1
A Day of Memories
Rating information:
US TV
: TV-MA : X
: TV-14 : NC-17
US TV
: TV-PC : R
US TV
: TV-G : PG-13
US TV
Audio information:
Program title
Broadcast station
Audio information
"
English
US movie
US movie
US movie
US movie
audio
2
KABC
1080i 16:9HD
Cable / NTSC (Analog) TV Operation
Channel Number
Switching channels p. 17
Audio Language (DTV) /
Audio mode (Analog TV)
Switching Audio Mode p. 18
Program’s image Aspect Ratio
Changing Picture Format p. 19
CC (Not available if Closed Caption is
set to Off)
Caption settings p. 25
Child Lock rating
!
Child and Ratings Lock p. 27
2
Press INFO to hide the information.
Note(s)
When the program guide consists of more than 4 lines, use to scroll to the next / previous
•
lines.
No description provided. is displayed when the program guide is not provided.
•
While the TV screen information is displayed, the Closed Caption function is interrupted.
•
In External Input mode, the following screen is displayed;
•
e.g.) When an External Device is connected to Video Input jack.
The information display will Automatically disappear in 5 seconds.
•
Page 21
5 Making more use with
your TV
2
Use to Select the desired Menu and an item, then press OK or
use to determine the setting.
21 .English
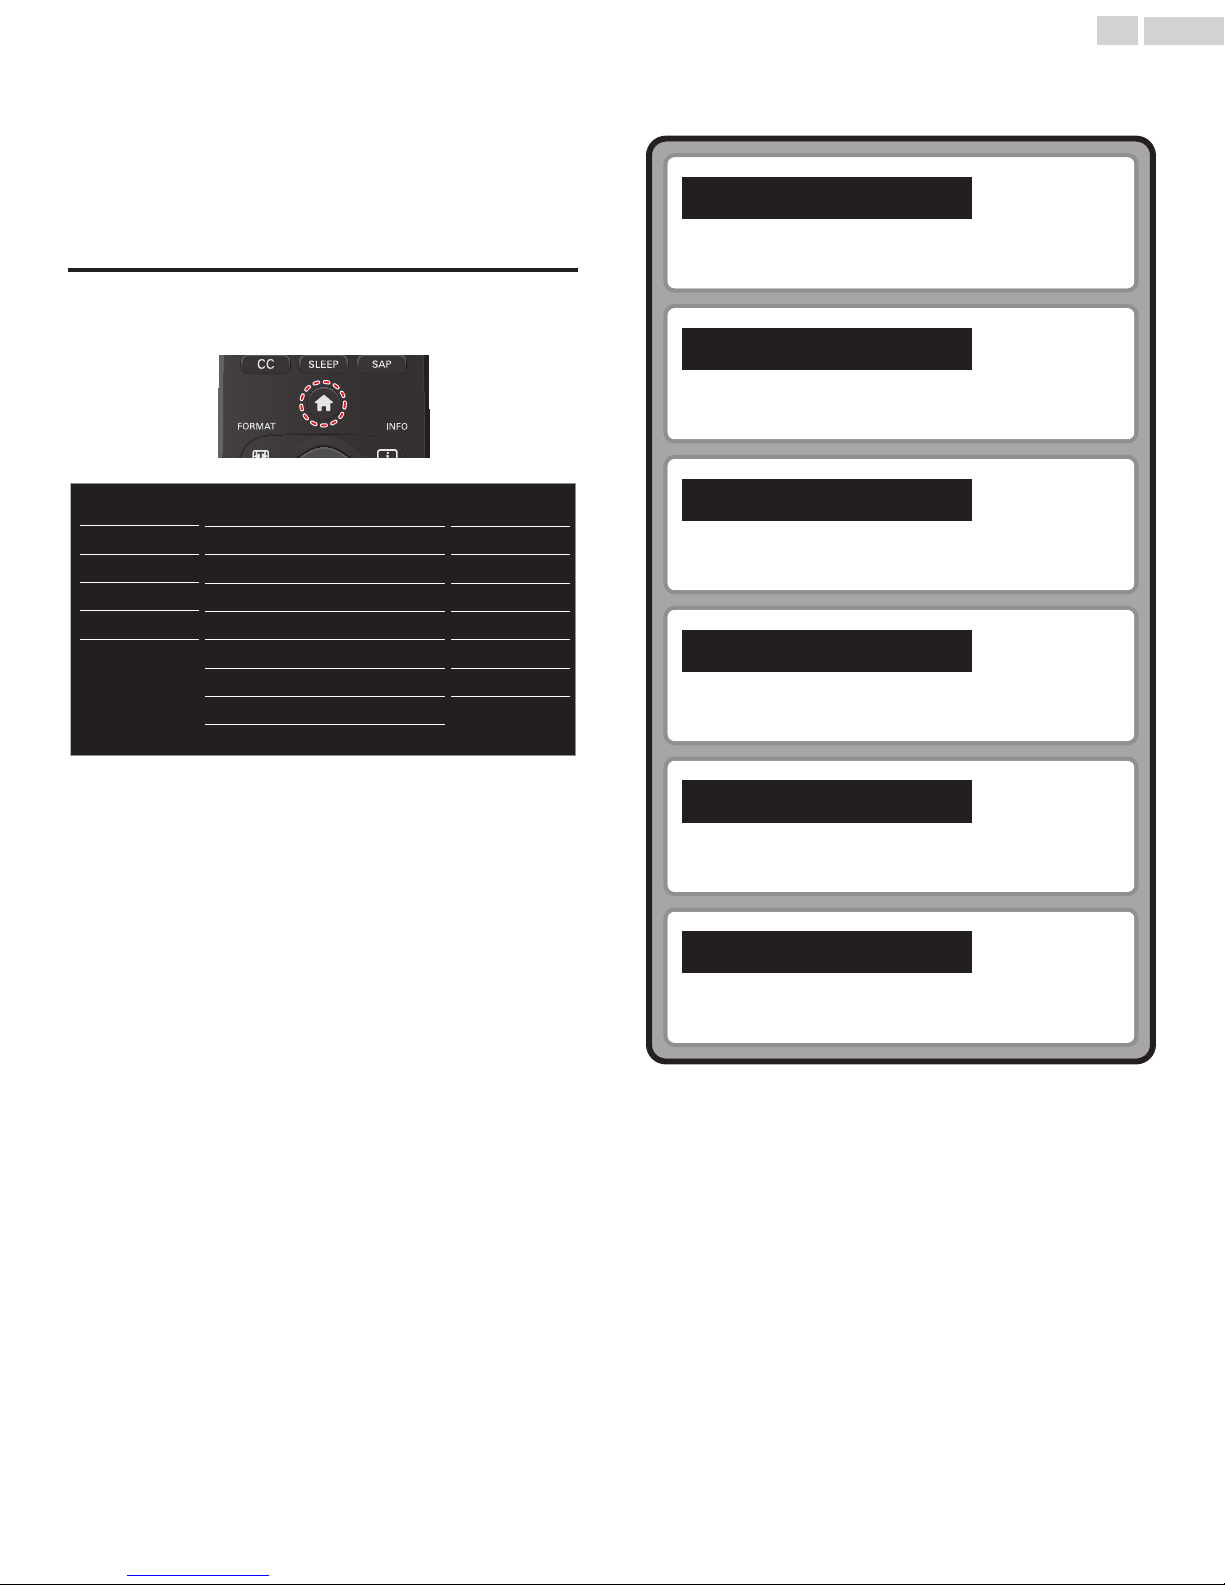
This section describes the overview of the Main Menu displayed when
you press .
The Main Menu consists of the function setting items below.
Displaying the Main Menu
1
Press to display the Main Menu.
Picture
Sound
Setup
Features
Language
USB
Settings assistant
Auto picture
Backlight
Contrast
Brightness
Color
Tint
Sharpness
Advanced settings
Personal
18
50
30
30
Picture
Adjusting the Picture Mode or customize the Picture quality as
your preference.
Sound
Adjusting the Sound Mode, Equalizer and some other Sound
functions.
Setup
Scanning the Channels available in your area and see what the
Antenna Signal levels are.
Features
0
2
Adjusting the Closed Caption, Parental Guide and some other
useful functions.
p. 22
p. 23
p. 24
p. 25
Language
You can choose English, Spanish or French as your On-screen
Language.
USB
You can view Picture (JPEG) and Video (Motion JPEG) files
stored on a USB Memory Stick.
3
When the Setting is completed, press or BACK to Exit.
p. 31
p. 31
Continued on next page.
Page 22
Picture
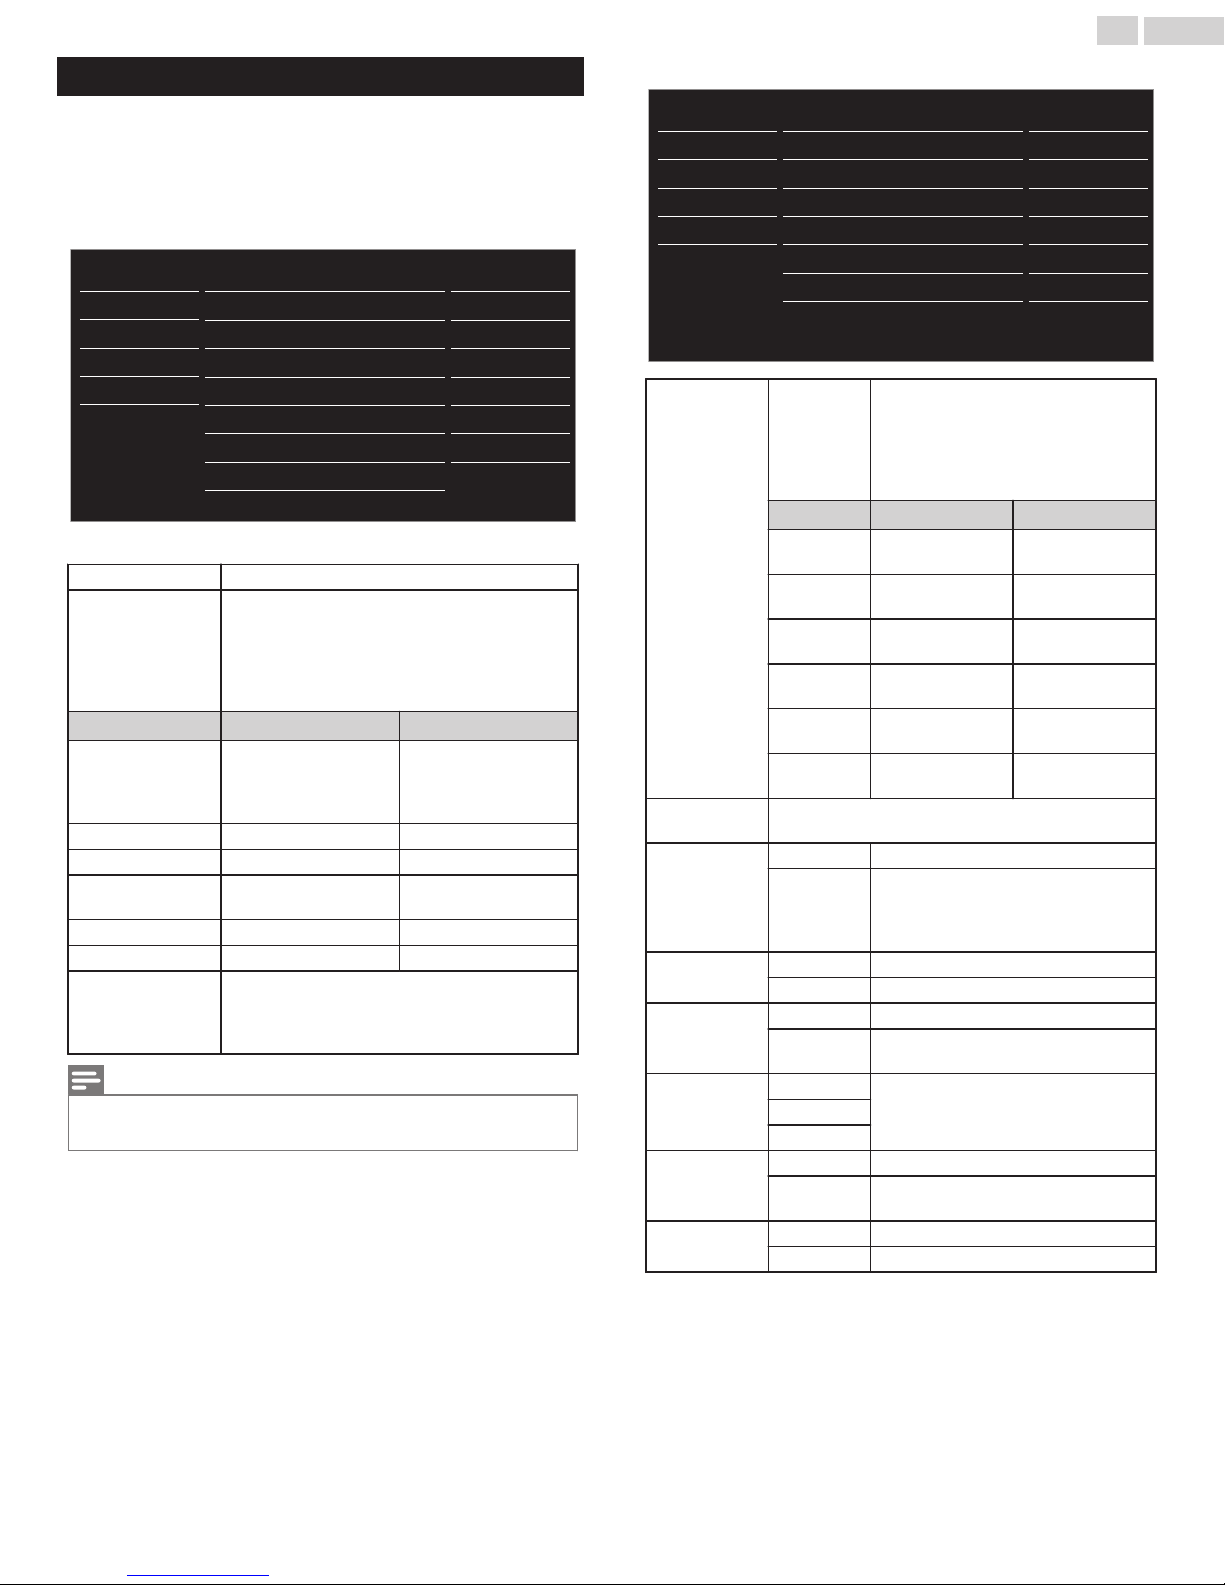
•
You can set a Particular Picture Quality using Advanced settings.
22 .English
B
You must set Home in Location. p. 30
Otherwise, personalized Picture and Sound settings will not be
memorized after the Unit goes into Standby Mode.
1
Press and use to select Picture, then press OK.
Picture
Sound
Setup
Features
Language
USB
Settings assistant
Auto picture
Backlight
Contrast
Brightness
Color
Personal
Tint
Sharpness
Advanced settings
2
Use to Select the item you want to adjust, then press OK.
Settings assistant to guide you through the best picture setting
to select the desired setting, then press OK.
(Personal, Standard, Vivid, Sports, Movie, Game
Auto picture
Backlight
Contrast to Decrease Contrast to Increase Contrast
Brightness to Decrease Brightness to Increase Brightness
Color
Tint to Add Red to Add Green
Sharpness to Soften to Sharpen
Advanced settings
Note(s)
When the Ambient light sensor is Set to On, it adjusts the Backlight for the Best Picture Quality
•
by Dynamically Adjusting the Backlight Intensity in accordance with the Room Lighting
Condition. Please ensure the Room Lighting is Stable and the Light Sensor is Not Blocked.
or Eco)
When you adjust the following settings, Personal
picture will be set Automatically when Location is
set to Home.
Cursor Cursor
to Reduce Power
Consumption and
Reduce Backlight
Brightness
to Decrease Color
Intensity
to Select the desired Setting, then press OK.
(Color alignment, Noise reduction, Ambient light
sensor, Black stretch, Dynamic contrast, Gamma,
Film mode or 120 PMR)
to Increase Power
Consumption and
Brightness
to Increase Color
Intensity
18
50
30
30
Picture
Sound
Setup
Features
Language
USB
Color alignment
Noise reduction
Ambient light sensor
Black stretch
Dynamic contrast
Gamma
Film mode
120 PMR
to set the picture color temperature to
Color
0
temperature
mode
2
Red gain
Color
alignment
Noise
reduction
Ambient light
sensor
Black stretch
Dynamic
contrast
Gamma
Film mode
120 PMR
Green gain
Blue gain
Red offset
Green offset
Blue offset
to select the desired setting, then press OK
(Off, Minimum, Medium or Maximum)
Off to Set Ambient light sensor to Off
On
Off to Set Black stretch to Off
On to Enhance Black Color
Off to Set Dynamic contrast to Off
On
Gamma1
Gamma2
Gamma3
Off to Set Film mode to Off
Auto
Off to Set 120 PMR to Off
On to Make the Video appear smoother
Personal (Cool, Normal or Warm)
When you adjust the following settings,
Personal picture will be set
Automatically when Location is set to
Home.
Cursor Cursor
to Decrease Red
Contrast
to Decrease Green
Contrast
to Decrease Blue
Contrast
to Decrease Red
Brightness
to Decrease Green
Brightness
to Decrease Blue
Brightness
to Adjust Backlight for the Best Picture
quality by dynamically adjusting the
backlight intensity in accordance with
lighting condition in the room
to Enhance Contrast in an Image
Automatically
to Change the Gamma setting
(changes the Brightness and Contrast in
the picture)
to Optimize the Picture recorded by the
Original film
Normal
Medium
On
On
On
Gamma2
Auto
On
to Increase Red
Contrast
to Increase Green
Contrast
to Increase Blue
Contrast
to Increase Red
Brightness
to Increase Green
Brightness
to Increase Blue
Brightness
Continued on next page.
Page 23
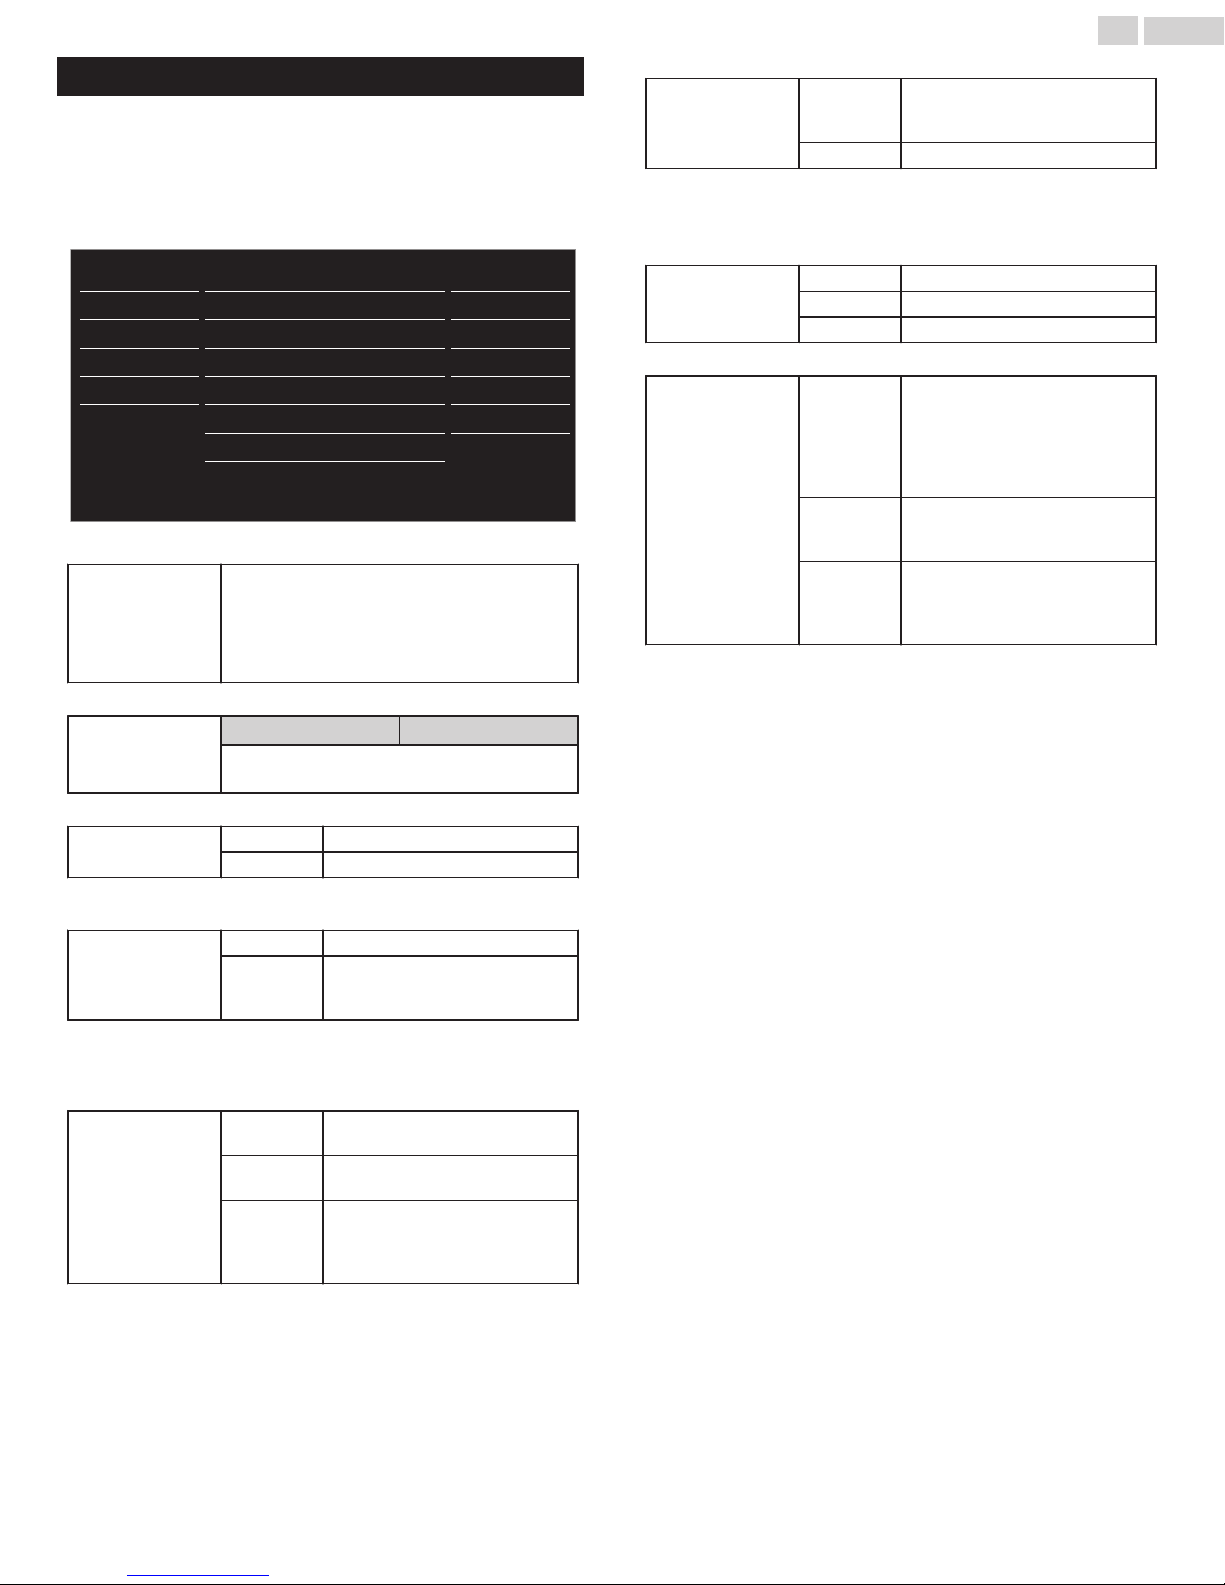
23 .English
Sound
B
You must set Location to Home. p. 30
Otherwise, personalized Picture and Sound settings will not be memorized
after the Unit goes into Standby Mode.
1
Press and use to select Sound, then press OK.
Picture
Sound
Setup
Features
Language
USB
Auto sound
Equalizer
Sonic Emotion
Auto volume leveling
TV speakers
Digital output format
Primary MTS
Digital audio preferences
2
Use to Select the item you want to adjust, then press OK.
to select the desired setting, then press OK.
(Personal, Standard, Vivid, Sports, Movie, Music or
Auto sound
Adjust the tonal quality for each frequency.
Equalizer
This selects Sound Modes for more spatial or Surround Sound reproduction.
Sonic Emotion
This function keeps a constant loudness level between the TV commercials
and the Programs.
Auto volume leveling
You can select the Audio Output from the Unit’s speakers or not. If your
amplifier is HDMI link function compatible and connected by an HDMI cable
to this Unit, some sound operations such as volume up can be changed by
using this Unit’s Remote Control.
TV speakers
News)
When you adjust the following settings (Equalizer,
Sonic Emotion or Auto volume leveling), Personal
sound will be set Automatically when Location is set
to Home.
Cursor
to adjust each level of tonal quality.
Press BACK to go back to the previous menu.
Off to set Sonic Emotion to Off
On to set Sonic Emotion to On
Off to Remove the Auto volume leveling
On
On
Off
Speakers
EasyLink
to Reduce Volume Differences
between the TV Commercials and
the Programs
to Output Sound from the Unit’s
Speakers
No Output Sound from the Unit’s
Speakers
to Control Audio Output from your
connected EasyLink Compliant
Devices with VOL + / – by using this
Unit's Remote Control.
Standard
On
Off
On
Bitstream
Stereo
Cursor
You can select Audio Output through a Digital Audio Output connector.
Digital output format
You can set the Output mode as a default for the Sound mode (Analog TV
only).
This setting is not interlocked when you change the Output mode by pressing
SAP. Refer to Switching Audio Mode. p. 18
Primary MTS
You can set the interpretive broadcasting by an audio explanation.
Digital audio
preferences
Bitstream
PCM to Output PCM format
Stereo to Output Stereo Audio
Mono to Output Mono Audio
SAP to Output Second Audio Program
Accessibility
Audio
language
Primary
audio
selection
criteria
to Output Audio in its native format as
Bitstream to connected Audio
receiver.
to prioritize VI-Visually Impaired
Streaming or HI-Hearing Impaired
Streaming: The setting for
Handicapped users (Main audio,
Visually Impaired or Hearing
Impaired).
to set your Preferred language in the
Audio Streaming (English, Spanish or
French).
to set TV Priority based on either of
the above Settings: (Accessibility or
Audio language).
Continued on next page.
Page 24
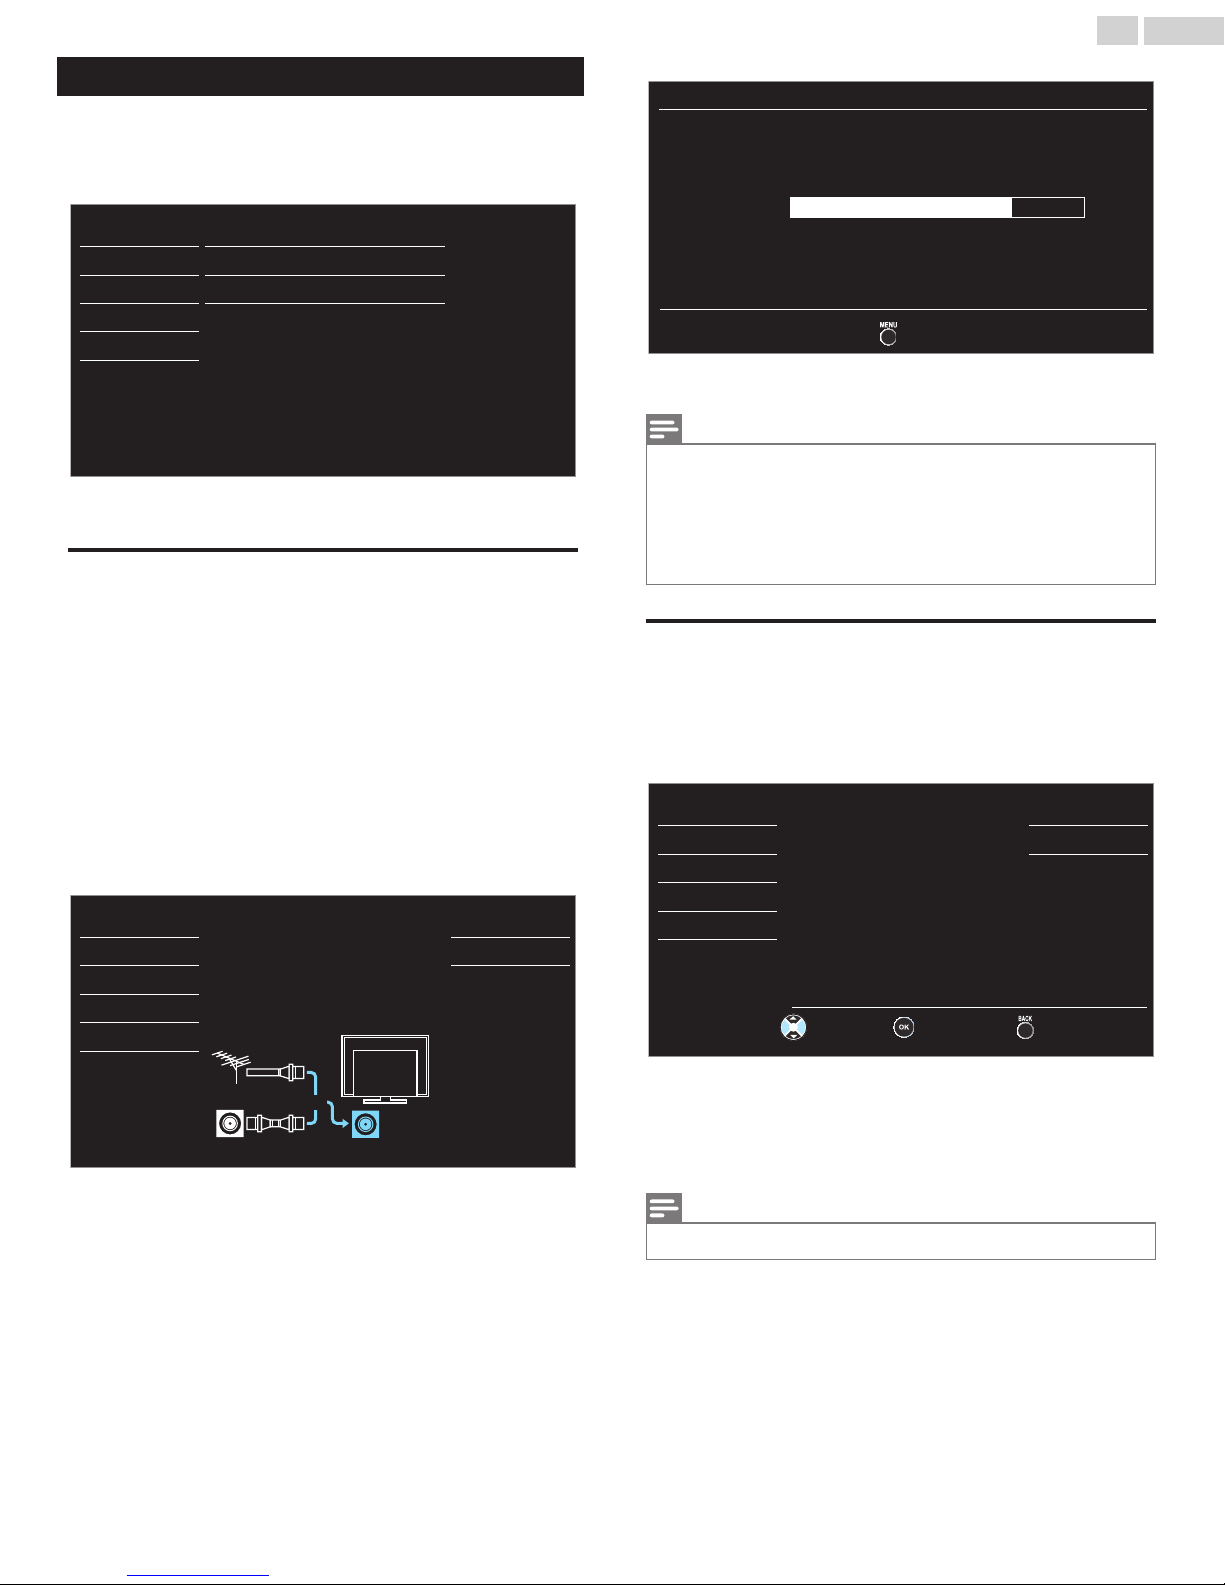
24 .English
Setup
B
Make sure the Unit is connected to Antenna or Cable.
1
Press and use to select Setup, then press OK.
Picture
Sound
Setup
Features
Autoprogram
Channel list
Add channels
Antenna
Language
USB
Adjust the following items.
2
Autoprogram
Be sure the RF cable is correctly connected to this Unit and you are
registered with your Cable TV provider when you Install Cable channels.
Use to Select Autoprogram, then press OK.
1
If you run Autoprogram when you have Locked Channels, a
•
Message appears asking to enter your PIN. Enter your Child Lock
PIN in order to Complete the Installation. (Default PIN code is 0, 0,
0, 0.) You need to reset or set the Channel Lock again after the
Installation.
Use to Select an appropriate Option, then press OK.
2
–When Antenna is selected, the TV Detects Any Off-the-Air
Antenna Signals. It searches for ATSC (Digital) and NTSC (Analog)
Channels available in your Area.
–When Cable is selected, the TV detects signals supplied by
Cable. It searches for DTV, Analog TV and Cable channels
available in your area.
Picture
Sound
Setup
Features
Language
USB
Auto program will rescan all channels.
Auto programming may take more
than 20 minutes to complete.
####
Select your signal source.
Antenna
Cable
Or
ANTENNA IN
Back
Antenna
Cable
Autoprogram
Please wait while the system is scanning for
channels.
Auto programming may take more than 20 minutes
to complete.
75%
Digital channels
Analog channels
When the Scanning and Memorizing of Available Channels is
•
Completed, the Lowest Memorized Channel will be Displayed.
Note(s)
After setting Autoprogram, using CH + / – skips unavailable channels Automatically.
•
If you are not receiving a signal from your Cable service, contact the Cable provider.
•
If you press or during Autoprogram, the Setup of TV channels will be Cancelled.
•
Even if Autoprogram is completed, the channel setting will be lost if the AC Power Cord is
•
unplugged before the Unit goes into Standby mode by pressing .
The PIN Code will be required Once you set a PIN code in the Child and Ratings Lock.
•
p. 27
If you want to change your PIN code, follow the instruction for Change PIN. p. 29
•
10 ch
6 ch
Exit
Channel list
The channels selected in the Channel list can be skipped when selecting
the channels using CH + / –.
These channels can still be selected with the NUMBER keys.
Use to select Channel list, then press OK.
1
Use to select the channel you want to remove, then press OK.
2
Picture
Sound
Setup
Highlight channels for Ch Up/Down
key selection.
Features
Language
USB
Ch Select
The channel display for the removed channel darkens. You will not
•
be able to select the channel again using CH + / –.
To reactivate a removed channel, use and press OK. The
•
registered channels are highlighted.
When you remove a main channel, its subchannels are removed
•
as well.
Watch / Skip
DTV
DTV
DTV
Back
11.1
11.2
11.3
Note(s)
The channel with DTV indicated on the display is Digital TV (ATSC). Otherwise the channel is
•
Analog TV (NTSC).
Continued on next page.
Page 25
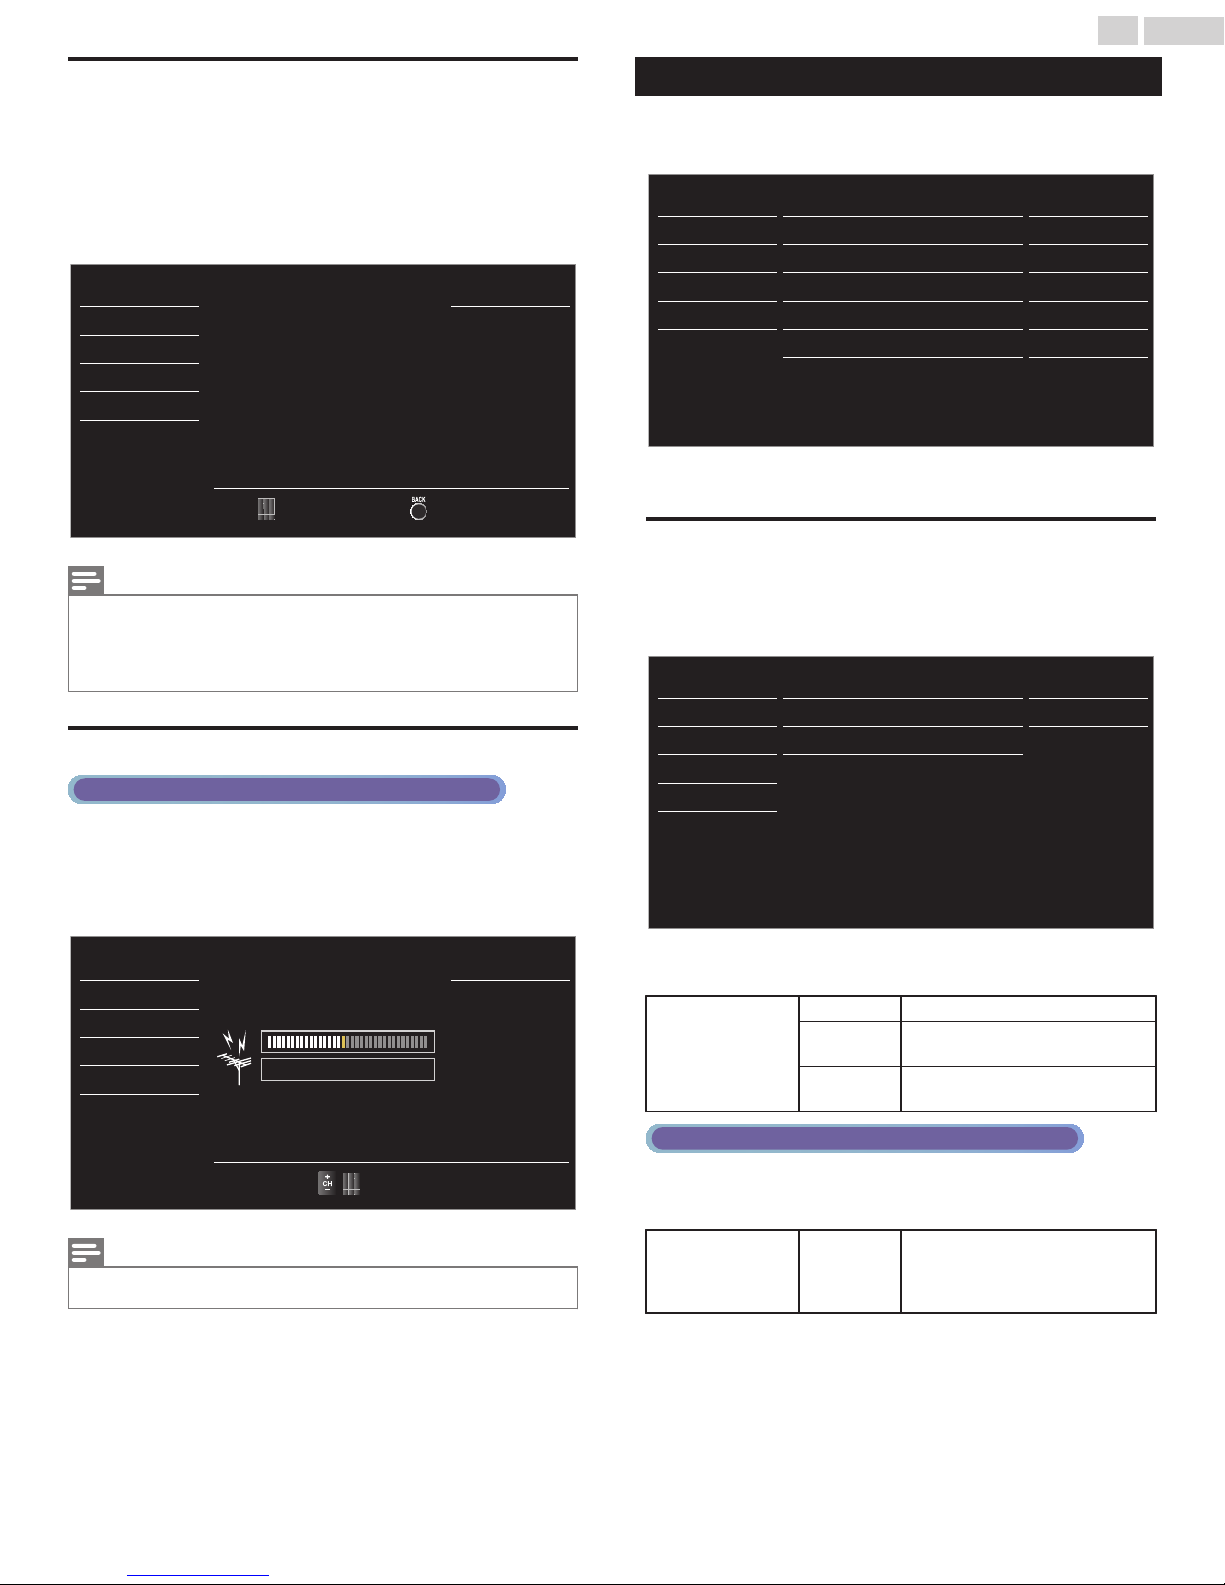
25 .English
Add channels
This function lets you add the off the air Analog TV or Analog Cable
channels that were not added by the Autoprogram due to reception
conditions during the Initial Setting.
1
Use to select Add channels, then press OK.
Use the NUMBER keys to enter the number of the channel you want
2
to add, then press OK.
Picture
Sound
Setup
Features
Language
For analog channels, select a channel
to be added using number keys.
For digital channels, Autoprogram
function is required.
####
####
Add channels
USB
Ch Change
Note(s)
If Setup completes successfully, Added to the channel list is displayed.
•
If External Input is used, it is not possible to register the channel and Unavailable will be
•
displayed on the TV screen.
Some channels cannot be selected by CH + / –. Use the NUMBER keys to select the non-
•
memorized Channel list channels.
Back
Antenna Confirmation
Digital TV Operation
This function lets you check the Digital signal strength of each channel.
1
Use to select Antenna, then press OK.
Use the NUMBER keys or CH + / – to select the channel for which
2
you want to check the Digital signal strength.
Features
1
Display Setup using Home Menu and use to select Features,
then press OK.
Picture
Sound
Setup
Features
Language
USB
Caption settings
Child lock
EasyLink
Power indicator
Location
E-sticker
Home
- -
Software upgrade
Adjust the following items.
2
Caption settings
Closed Captions displays the Audio portion of the Program as
Superimposed Text over the Video.
1
Use to Select Caption settings, then press OK.
Picture
Sound
Setup
Features
Language
USB
Closed captions
Caption service
Digital caption service
Caption style
Off
CC-1
CS-1
Picture
Back
Sound
Setup
Features
Language
Current
50
Max
50
USB
Ch Change
Note(s)
If the channel is set to an Analog channel or External Input, you cannot confirm the Antenna
•
condition.
2
Use to select the Feature you want to use, then press OK.
You can choose the Closed Caption display.
Off Closed Caption is not displayed.
Closed captions
In addition to the basic Closed Caption, DTV has its own Closed Caption
called Digital caption service. Use this menu to change the settings for
Digital caption service.
Digital caption
service
On
CC w/ mute
Digital TV Operation
CS-1 to CS-6
Closed Caption is always
displayed.
Closed Caption is displayed when
the Sound is Off.
Select one of these before
changing any other item in Caption
settings menu. Choose CS-1 under
normal conditions.
Continued on next page.
Page 26
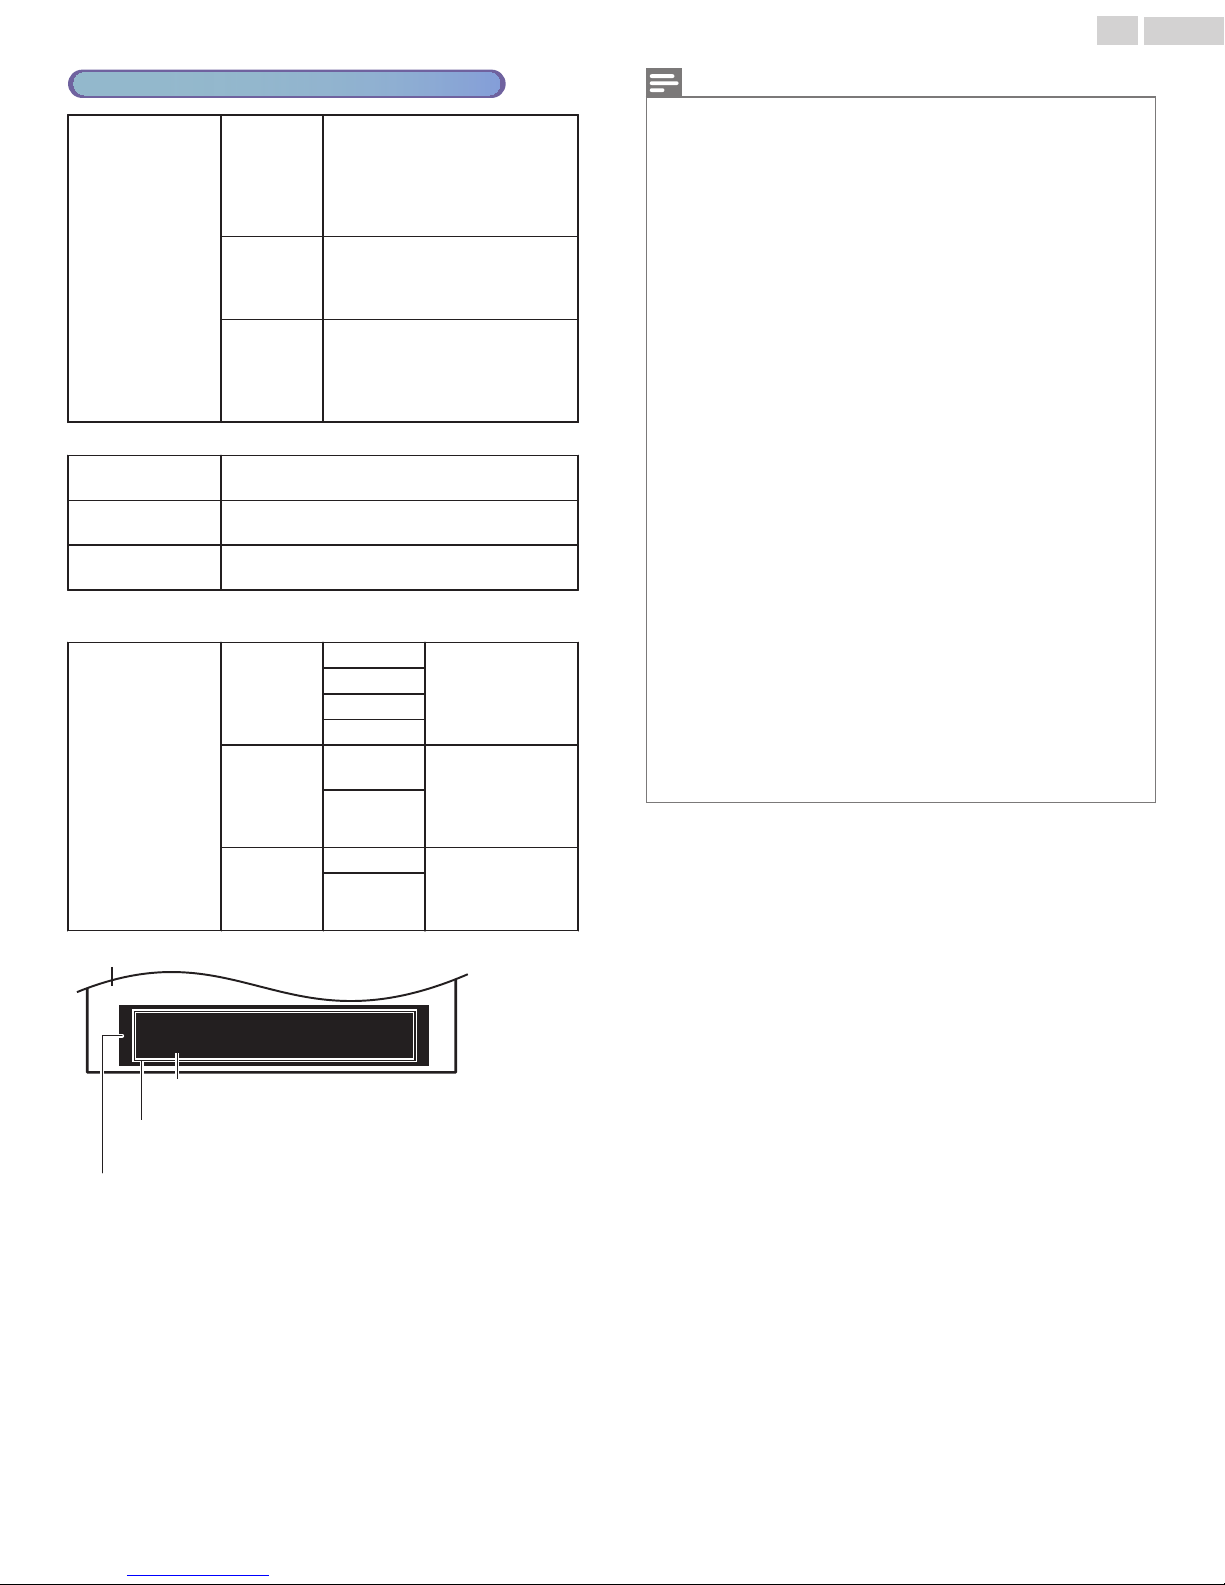
26 .English
Cable / NTSC (Analog) TV Operation
The primary Closed Captions and
Text Services. The Closed Captions
CC-1 and T-1
or Text is Displayed in the same
Language as the Program’s Dialog
(up to 4 lines of script on the TV
Screen).
Serve as the preferred Data
Caption service
CC-3 and
T-3
Channels. The Closed Captions or
Text is often a Secondary
Language.
Rarely available and Broadcasters
CC-2, CC-4,
T-2 and T-4
use them only in Special
conditions, such as when CC-1 and
CC-3 or T-1 and T-3 are Not
available.
There are 3 Display modes according to Programs:
•
Paint-on
Pop-on
Roll-up
Displays Characters on the TV screen
immediately.
Once Characters are Stored in Memory, they are
Displayed All at Once.
Displays the Characters Continuously by Scrolling
(max. 4 lines).
You can choose the Font (Size, Color, etc), Background and other
Characteristics of the Closed Captions Text.
Caption style
Font
Background
Font style
Font size
Font color
Font opacity
Background
color
Background
opacity
Closed Captioning
font style, size, color
and transparency
(opacity) can be
changed.
Background color
and transparency
(opacity) of the
displayed caption
can be switched.
Edge color Edge color and type
Edge
Edge type
of the displayed
caption can be
switched.
Note(s)
Closed Caption will NOT be displayed when you are using an HDMI Connection.
•
Digital caption service that you can switch differs depending on the broadcast format.
•
Caption style will not have any effect if the User setting is set to Off.
•
Closed Captions Service may not be controlled by this Unit’s Menu options if you are watching
•
television through a Set-top Box. In which case you will need to use the Menu options on the External
Set-top Box to control Closed Captions.
The Captions do not always use correct Spelling and Grammar.
•
Not all TV Programs and product Commercials include Closed Captions information. Refer to
your area TV Program Listings for the TV Channels and times of Closed Captions shows. The
Closed Captions Programs are usually noted in the TV Listings with a Service Mark such as CC.
Not all Closed Captions Services are used by a TV Broadcaster during the Transmission of a
•
Closed Caption Program.
To show the Closed Caption on your TV screen, Broadcast signal must contain the Closed
•
Caption data.
Captions and texts may not exactly match the TV voice.
•
Changing channels may delay the Closed Caption for a few seconds.
•
Adjusting or muting the volume may delay the Closed Caption for a few seconds.
•
Abbreviations, symbols and other grammatical shortcuts may be used in order to keep pace
•
with the on-screen action. This is not a malfunction.
The caption or text characters will not be displayed while the main menu or functions display
•
is shown.
If a black box appears on the TV screen, this means that the Closed Caption is set to the text
•
mode. To clear the box, select CC-1, CC-2, CC-3, or CC-4.
Refer to Caption settings p. 25
If the Unit receives poor quality television signals (mainly when the Analog (NTSC) is received),
•
the captions may contain Errors or there might be no captions at all. Some possible causes of
poor quality signals are:
– Automobile ignition noise
– Electric motor noise
– Weak signal reception
– Multiplex signal reception (ghosts or screen flutter)
– Data dropout and Pixelation (for DTV only)
The Unit retains the Closed Caption setting if the Power fails.
•
When the Unit receives special effects Playback signal (e.g. Search, Slow and Still) from a VCR’s
•
Video Output channel (ch3 or ch4), the Unit may not display the correct caption or text.
The EUT (Equipment Under Test) setting that satisfies
•
§ 79.102 (e) is as follows:
– Font: Mono-font
– Character Size: Large
Picture display
So, you must be Philip. Hi!
So, you must be Philip. Hi!
I’m pleased to meet you.
I’m pleased to meet you.
Text Font
(Font style, Font size, Font color and Font opacity)
Text Edge
(Edge color and Edge type)
Background
(Background color and Background opacity)
Review your setting choice made above by looking in the upper right
•
corner of the displayed setting box (not All selections show the
differences selected).
Continued on next page.
Page 27
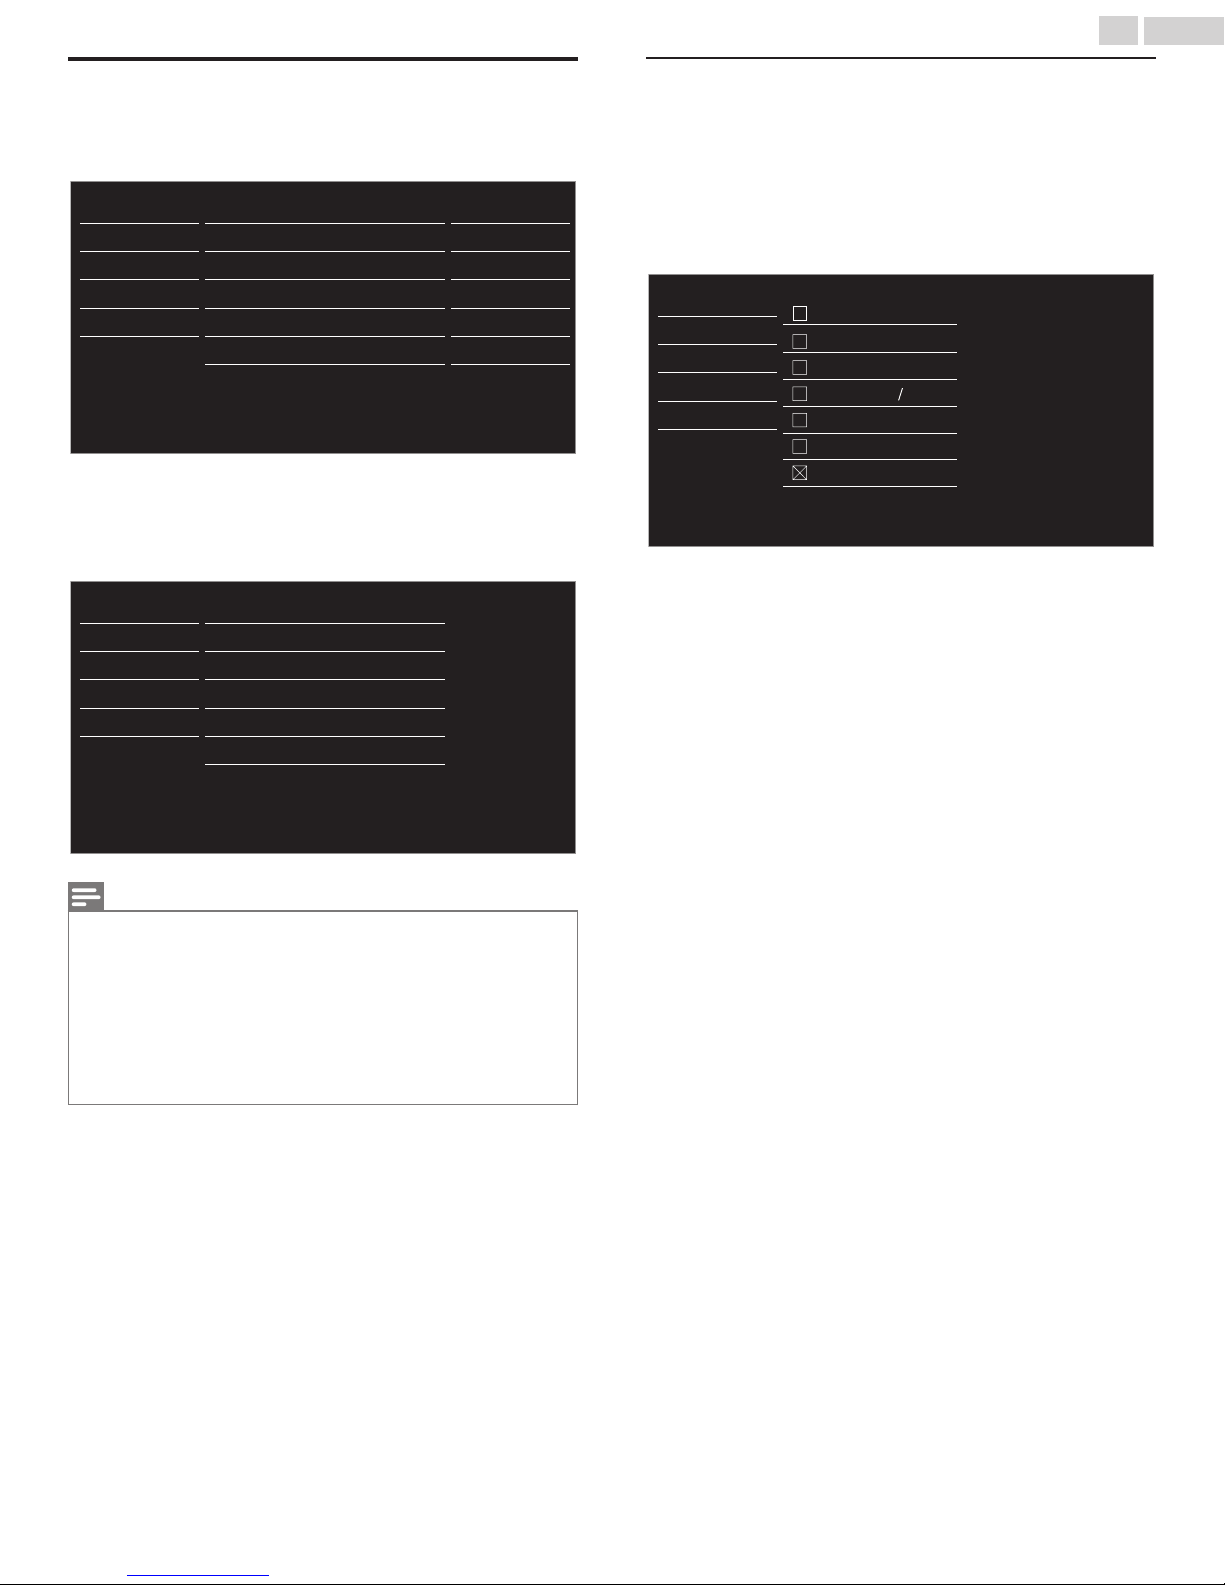
27 .English
Child and Ratings Lock
You can prevent your children from watching certain Programs or certain
Channels by locking the TV Controls and by using Ratings.
Use to select Child lock, then press OK.
1
Picture
Sound
Setup
Features
Language
USB
Use the NUMBER buttons to enter the 4-digit numbers for your PIN
2
code.
When you have not set up your PIN code, enter 0, 0, 0, 0.
•
When the PIN code is correct, Child lock menu is displayed.
•
See the following description for setting each item.
Picture
Sound
Setup
Features
Language
USB
Caption settings
Child lock
EasyLink
Power indicator
Location
E-sticker
Software upgrade
Channel lock
US movie ratings lock
US TV ratings lock
Canadian English rating
Canadian French rating
Region ratings lock
Change PIN
Home
- -
Channel lock
Particular Channels or External Input modes can be invisible in this
function.
Use to Select Channel lock, then press OK.
3
Use to Select the Particular Channels or External Input, then press
4
OK Repeatedly to Switch between Block and View.
indicates that the Channel or Input Source is Not Locked
•
(Viewable).
indicates that the Channel or Input Source is Locked (Blocked).
•
Picture
Sound
Setup
Features
Language
USB
HDMI1
HDMI2
HDMI3
Component
40.1 DTV
40.2
40.3
Video
DTV
DTV
Note(s)
When you select a rating and set it to or , the higher ratings will be Blocked Automatically.
•
The lower ratings will be available for viewing.
When you set the highest rating to , All ratings turn to Automatically.
•
To Block any inappropriate programs, set your limits in US movie ratings lock, US TV ratings
•
lock and Region ratings lock.
The Child Lock setting will be retained after a Power failure or after the Power is removed for
•
longer than 10 seconds (except the PIN code reverts to 0000).
Child and Ratings Lock p. 27
Region ratings lock will be available when the Unit receives a Digital broadcast using the New
•
rating system.
For the United States, the Unit may download the Region Ratings Lock Table, if required.
•
The Canadian rating systems on this Unit are based on CEA-766-A and CRTC policy.
•
Continued on next page.
Page 28
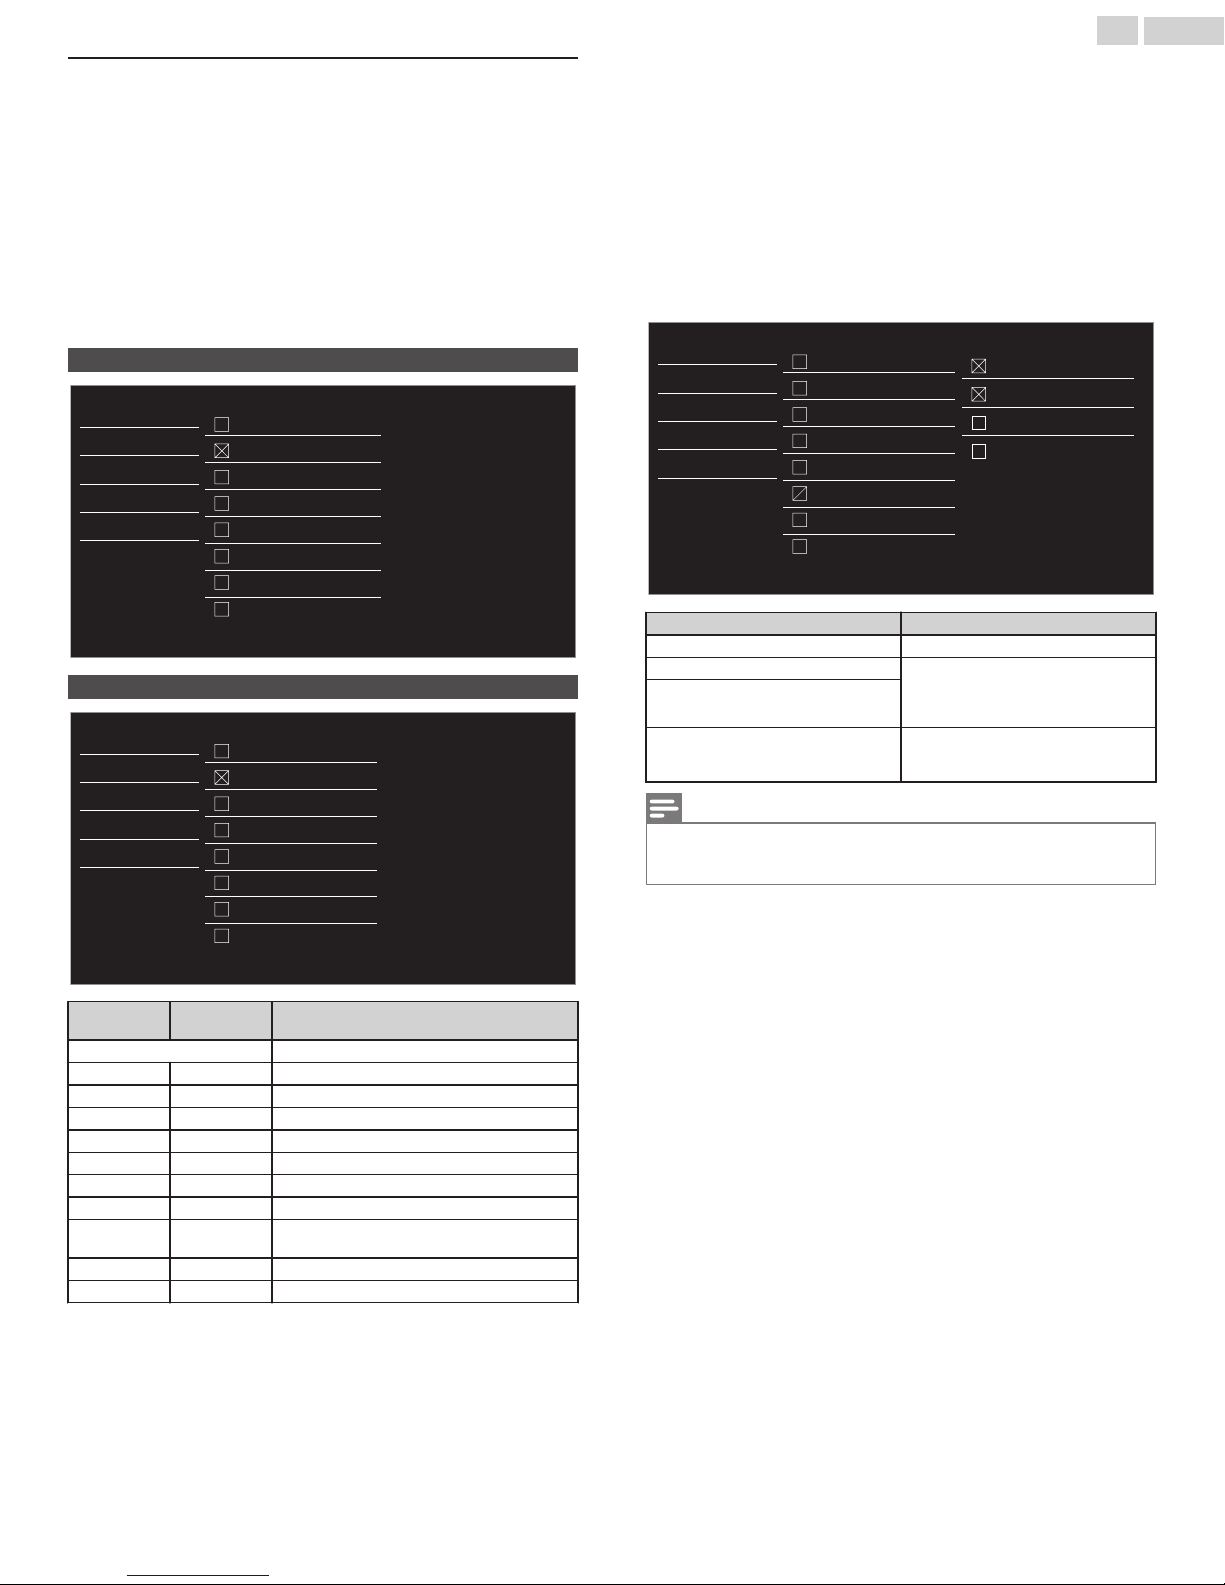
Setting US Movie and TV Ratings
To set the Sub ratings (displayed in the right column)
US Movie Ratings Lock is the Rating System created by MPAA.
US TV Ratings Lock has Controlled Access to Individual Programs based
on their Age and Content rating.
Use to Select US movie ratings lock or US TV ratings lock, then
3
press OK.
Use to Select the Desired Rating, then press OK Repeatedly to
4
Switch between Block and View.
For US TV Ratings, you can further set the Sub Ratings to Block
•
Specific Elements within Programs.
indicates that the Rating is Not Locked (Viewable).
•
indicates that the Rating is Locked (Blocked).
•
indicates that the Sub Rating is Locked (Blocked).
•
US movie ratings lock
Picture
Sound
Setup
Features
Language
USB
US TV ratings lock
Picture
Sound
Setup
Features
Language
USB
All
NR
G
PG
PG-13
R
NC-17
X
All
None
TV-Y
TV-Y7
TV-G
TV-PG
TV-14
TV-MA
28 .English
As for TV-Y7, TV-PG, TV-14 or TV-MA, you can further set the Sub ratings
to Block Specific Elements within programs. To set the Sub ratings, follow
the step below.
Use to Select the desired rating, then press OK Repeatedly to
switch between and .
indicates in the right column that the Sub Rating is Not Locked
•
(Viewable).
indicates in the right column that the Sub Rating is Locked (Blocked).
•
indicates in the middle column that All the Sub Ratings are Locked
•
(Blocked).
indicates in the middle column that one or more, but not All of the
•
Sub Rating(s) are Locked (Blocked).
Picture
Sound
Setup
Features
Language
USB
US TV ratings Sub rating
TV-Y7 (FV)Fantasy Violence
TV-PG (D)Dialog
TV-14
TV-MA
Note(s)
Blocked Sub Rating will appear beside the Main Rating category in US TV ratings lock Menu.
•
You cannot Block a Sub Rating if the Main Rating is set to .
•
Changing the Category to or automatically changes All its Sub Ratings to the ( or ).
•
All
None
TV-Y
TV-Y7
TV-G
TV-PG
TV-14
TV-MA
(D)Dialog
(L)Language
(S)Sex
(V)Violence
(L)Language
(S)Sex
(V)Violence
(L)Language
(S)Sex
(V)Violence
US Movie
ratings
NR None No Rating
– TV-Y Appropriate for All Children
– TV-Y7 Appropriate for All Children 7 and Older
G TV-G General Audience
PG TV-PG Parental Guidance Suggested
PG-13 – Unsuitable for children under 13
– TV-14 Unsuitable for children under 14
R –
NC-17 – No One under 17 Admitted
X TV-MA Mature Audience Only
US TV
ratings
All All Ratings Locked including No Rating
Restricted under 17 Requires
Accompanying Parent or Adult Guardian
Description
Continued on next page.
Page 29
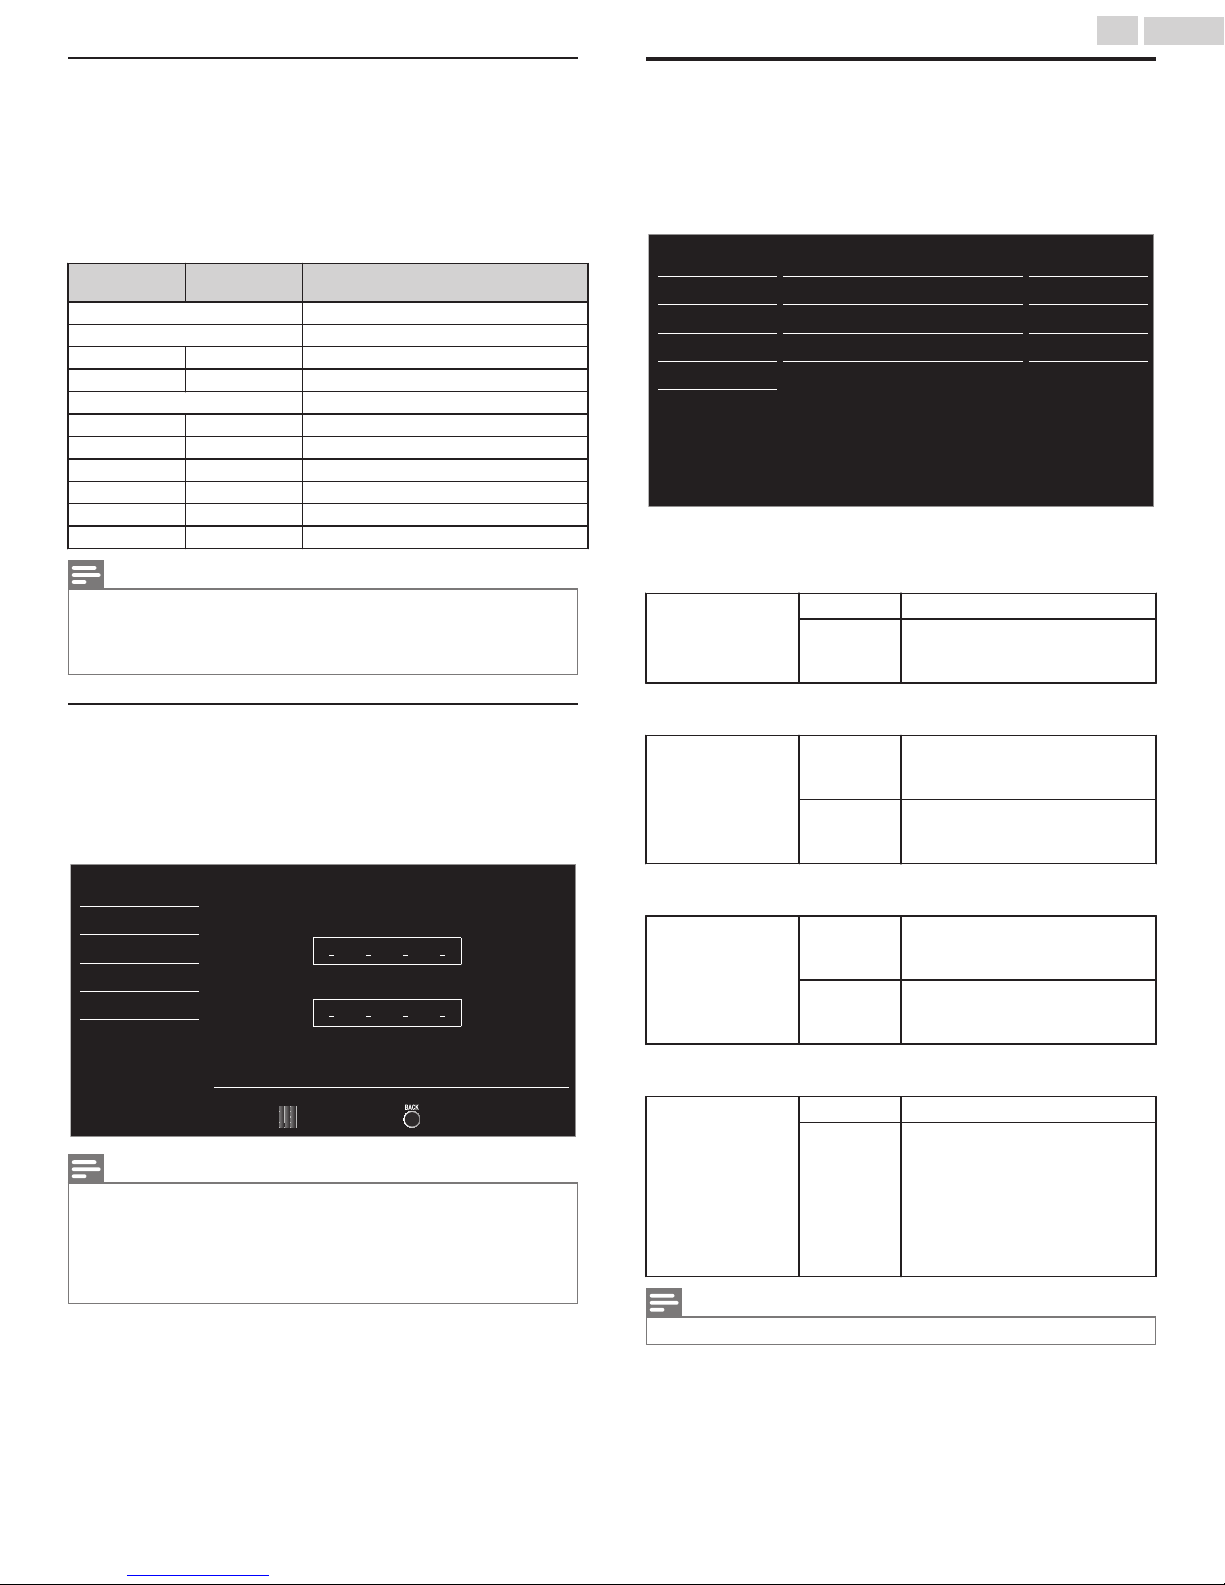
29 .English
Canadian English or Canadian French Ratings
You can select the Rating for Canadian English or Canadian French
broadcasting.
Use to Select Canadian English rating or Canadian French
3
rating, then press OK.
Use to Select the Desired Rating, then press OK Repeatedly to
4
Switch between Block and View.
indicates that the Rating is Not Locked (Viewable).
•
indicates that the Rating is Locked (Blocked).
•
Canadian
English rating
C – For All Children
C8+ – For All Children 8 and Older
– 8ans+ Unsuitable for Ages under 8
PG – Parental Guidance Suggested
– 13ans+ Unsuitable for Ages under 13
14+ – Unsuitable for Ages under 14
– 16ans+ Unsuitable for Ages under 16
18+ 18ans+ Adult Audience Only
Note(s)
The V-Chip can Block Non Rated Programs as per “CEA-608-E sec. L.3”. If the Option to Block
•
NR, None or E Programs are used in US movie ratings lock, US TV ratings lock, Canadian
English rating or Canadian French rating accordingly “unusual results may occur and the Unit
may not Receive Emergency Bulletins or other Types of Programming”: / Emergency Bulletins
(Such as EAS messages, Weather Warnings and Others) / Locally originated Programming /
News / Political / Public Service Announcements / Religious / Sports / Weather.
Canadian
French rating
All Locked All Ratings
E Exempt Program
G General Audience
Description
Change PIN
Although the default PIN code (0000) is supplied with the Unit, you can
set your own PIN code.
Use to select Change PIN, then press OK.
3
Press the NUMBER buttons to enter the New 4-digit PIN code.
4
Enter PIN code again in Confirm PIN. entry field.
•
Picture
Sound
Enter PIN.
Setup
Features
Confirm PIN.
Language
USB
PIN Code
Note(s)
Make sure to enter a PIN code and the confirm PIN code must be exactly the same.
•
If they are different, the space is cleared to reenter the New PIN code.
When a Power failure occurs the PIN code will be erased and Unit returns to the default PIN
•
code (0000).
If you forget the PIN code, unplug the AC Power Cord then wait for 10 seconds to plug the AC
•
Power Cord in again.
The Unit will restore the PIN code to 0000 (factory default). Then repeat the Change PIN
procedure to Setup a New PIN code.
Back
EasyLink
This function allows you to operate the linked functions between our
brand Devices with a EasyLink feature and this Unit connecting through
an HDMI cable. You must connect this Unit to our brand EasyLink devices
and be sure it's EasyLink setting is also set to On.
1
Use to select EasyLink, then press OK.
Picture
Sound
Setup
Features
Language
Master EasyLink
Auto device off
Auto TV on
Device control
Device list
USB
2
Use to Select the item you want to adjust, then press OK.
Set the Master EasyLink to On or Off. The following additional settings
will be grayed out when you set them to Off.
Off Disables All EasyLink.
Master EasyLink
You can set your connected EasyLink device to Turn Off by interlocking
from this Unit’s Power.
Auto device off
This Unit will Turn On when the Power On Signal is sent from your
connected EasyLink device.
Auto TV on
You can operate some functions such as Disc Playback or call up the
menu of the connected devices, by using this Unit’s Remote Control.
Device control
Note(s)
Some Set-top Boxes are not compatible with Master EasyLink, this is not a malfunction.
•
On
Off
On
Off
On
Off Disables the device control.
On
Selects if you have connected an
External Device that is compatible
with the EasyLink function.
Your connected EasyLink device
stays On even if the Unit goes into
Standby mode.
Your connected EasyLink device
Turns Off Automatically when the
Unit goes into Standby mode.
This Unit stays in Standby mode
even if you Turn On your
connected EasyLink device.
This Unit Turns On Automatically
when you Turn On your connected
EasyLink device.
PLAY, PAUSE. / STOP. /
FWD/ / REV0 / VOL + / – /
(MUTE) / OPTIONS / /
OK / BACK / the NUMBER
buttons can be used to control
your connected EasyLink devices
by this unit’s remote control.
On
On
On
On
Continued on next page.
Page 30
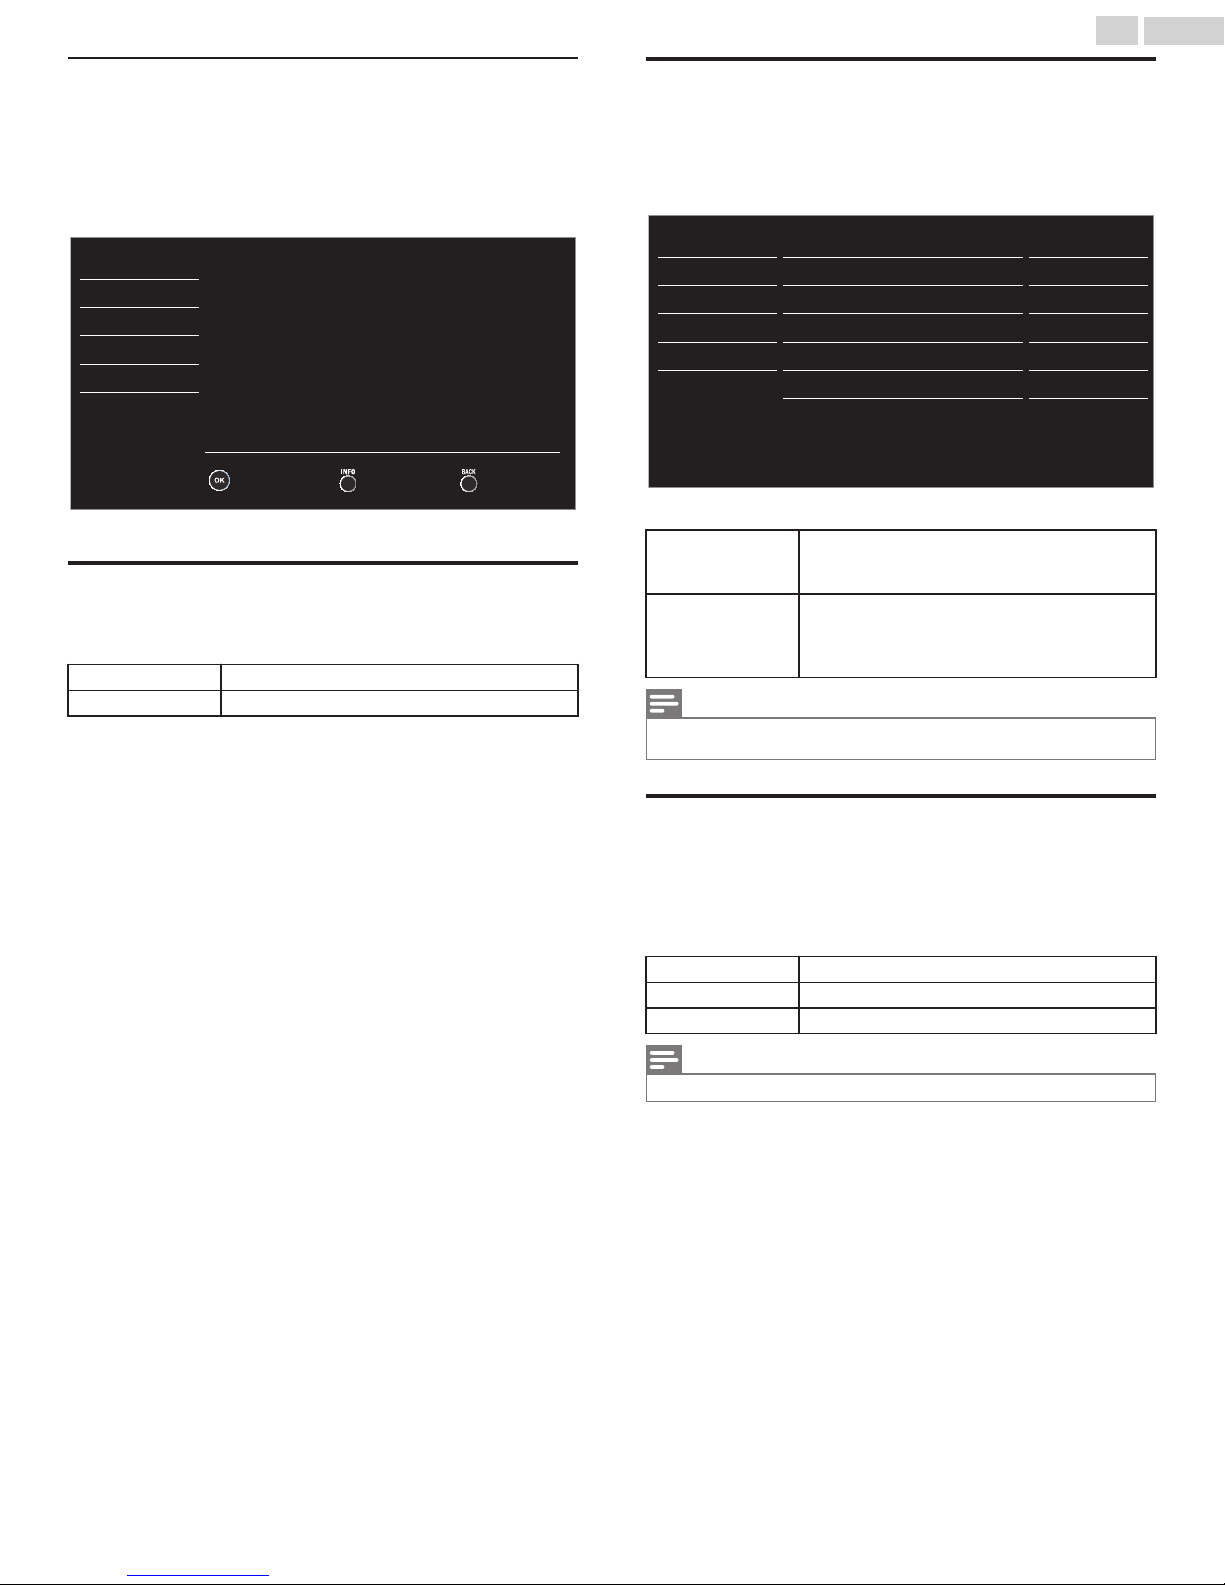
30 .English
Device list
This function lets you see the product model number or name of
Connected Devices.
Use to select the desired EasyLink devices listed on the TV screen,
then press OK.
Your connected EasyLink device will be Turned On if the device is in
Standby mode.
Picture
Sound
Setup
DVD recorderHDMI1
Blu-ray disc playerHDMI2
Features
Language
Home theater systemHDMI3
USB
Input Change
BackRefresh
Power indicator
To set power indicator On or Off.
1
Use to Select Power indicator, then press OK.
Off to turn off the Power indicator.
On to turn on the Power indicator.
Setting your Location to Home
You can set the Location of your TV to Home or Retail. Choosing Home
gives you full flexibility to change predefined settings for Picture and
Sound.
1
Use to Select Location, then press OK.
Picture
Sound
Setup
Features
Language
USB
2
Use to select Home or Retail, then press OK.
Retail
Home
Note(s)
You must set Home in the Menu. Otherwise, personalized Picture and Sound Settings will Not
•
Be Memorized after the Unit goes into Standby Mode.
Caption settings
Child lock
EasyLink
Power indicator
Location
E-sticker
Home
- -
Software upgrade
The Unit will be set up with predefined settings for
retail displays. In this setting, you can set the
backlight brighter.
The Unit is set to maximize the energy efficiency
for Home setting and it can be adjusted through a
choice of Picture and Sound quality selections
according to your preference.
E-sticker
When you set Location to Retail store, E-sticker (Electronic Sticker) is
displayed. E-sticker can be Turned Off using procedure below.
1
Use to select E-sticker, then press OK.
2
Use to select Off, then press OK.
Off You can Turn Off E-sticker.
Top E-sticker is displayed on top of the TV screen.
Bottom E-sticker is displayed on bottom of the TV screen.
Note(s)
If you set Location to Home, E-sticker will not be displayed.
•
Continued on next page.
Page 31
31 .English
Language
1
Press and use to select Language, then press OK.
Picture
Sound
Setup
Features
Language
USB
2
Use to Select English, Español or Français, then press OK.
Note(s)
If you need the English menu instead of the Spanish or French menu’s, press .
•
Use to select Idioma or Langue, then press OK.
Use to select English then press OK.
Press to Exit the Main menu.
Select your menu language.
Seleccione el idioma para el menú.
Sélectionnez la langue du menu.
English
Español
Français
USB
Your TV is fitted with a USB Connection that enables you to view JPEG
photos or watch Motion JPEG files stored on a USB Memory Stick.
Connect the USB Memory Stick to the USB terminal on the back of
1
your TV.
2
Press and use to select USB, then press OK.
The Highlighted Text will move to Start now, then press OK again.
•
Picture
Sound
Setup
This menu allows you to enjoy your
pictures and videos via your USB
device.
Features
Language
USB
3
Use to Select the Picture or Video, then press OK.
These Recorded Files must meet Specifications shown below:
•
Picture (JPEG) Upper limit 4000 x 4000 pixels
Size 320 x 240 (QVGA)
Video
(Motion JPEG)
Frame rate 30fps
Audio type LPCM
Sampling frequency
(32 kHz, 44.1 kHz or 48 kHz)
Quantization bit rate (16 bit)
Start now
Note(s)
Up to 2GB (FAT16) or 8GB (FAT32) capacity can be supported.
•
Up to 10,000 files or 1,000 folders with 19 hierarchies can be recognized.
•
Up to 255 English characters can be recognized.
•
This unit does Not Support MTP (Media Transfer Protocol).
•
This unit supports FAT16 and FAT32 file systems.
•
If the file is Not Supported, an Error message appears.
•
When the USB Memory Stick is not recognized, try reconnecting it again.
•
We cannot be held responsible if your USB Memory Stick is Not Supported, nor will we accept
•
any liability for damage or loss of stored data.
To protect your USB Memory Stick files from being erased place the write protect sliding tab in
•
the protect position (if available).
Be sure to keep a Backup Copy of the original files on your device before you Play them back
•
on this Unit.
This unit does not recognize USB Memory Stick that requires a special driver.
•
This unit is not allowed to use the USB Memory Stick which requires an External Power Supply
•
(500mA or more).
A File Name exceeding 128 characters or contains a Dot character is Not Supported on this TV.
•
Progressive JPEG files are Not Supported.
•
Only a Motion JPEG file with an “.avi” extension is supported. An extension “.mov” is Not
•
Supported.
During Motion JPEG Playback, “Pause”, “Forward” and “Reverse” Do Not Work on this Unit.
•
Continued on next page.
Page 32
32 .English
Picture (JPEG)
Use to select the desired file, then press OK.
1
Picture
Picture
Go to root folder
Image1.jpg
Image2.jpg
Image3.jpg
Image4.jpg
Image5.jpg
1 2 3 4
Press "OK" key to play/pause.
To toggle between List and Thumbnails press the NUMBER 2 key
•
each time.
The unit goes to the Slide show Automatically.
•
To Pause / Play the Slide show, press OK.
•
Use the NUMBER keys (1 through 4) to see the file details ( ) or
Thumbnails
change the following settings ( a ).
See the description in table below.
Item Detail
Press 1 to display file details below.
More Detail
Start show
Transitions
Slide time
Name, Album, Date, Size or Next.
Press 1 again to remove file details.
Press 4 or OK to start the Slide show.
While the Slide show is on, the following 2 settings will be
displayed.
Press 2, then use to select the transition mode choosing
from;
None, Dissolve, Wipe right, Wipe left, Wipe up, Wipe down, Box
in or Box out.
Press 3, then use to change the display time choosing from;
Short, Medium or Long.
Image1.jpg
Image1.jpg
1024:768
2009/04/02 17:42:06
Video (Motion JPEG)
Use to select the desired file, then press OK.
1
Video
MOVIE1.aviVideo
Go to root folder
MOVIE1.avi
MOVIE2.avi
MOVIE3.avi
MOVIE4.avi
MOVIE5.avi
Director:
Date:
Duration:
1 2 3 4
Supported format: motion jpeg, 320 x 240, 30FPS
To stop Playback and return to the file list, press BACK, OK or
•
CH +.
Press CH - to play back from the beginning.
•
Item Detail
Press 1 to display file details below.
More Detail
Title:, Director:, Date: and Duration:.
Press 1 again to remove file details.
MOVIE1.aviTitle:
2009/04/02
00:06:37
Stop show
Repeat
Rotate
Zoom
Press 4 or OK to stop the Slide show.
While the Slide show is Off, the following 2 settings will be
displayed.
Press 1, then use to select the repeat mode choosing from;
Off, One or All.
Every press on 2 will turn the picture clockwise by 90 degrees.
Press 3, then use to select the zoom factor (1x, 2x or 4x). Press
OK to set the zoom factor.
Page 33
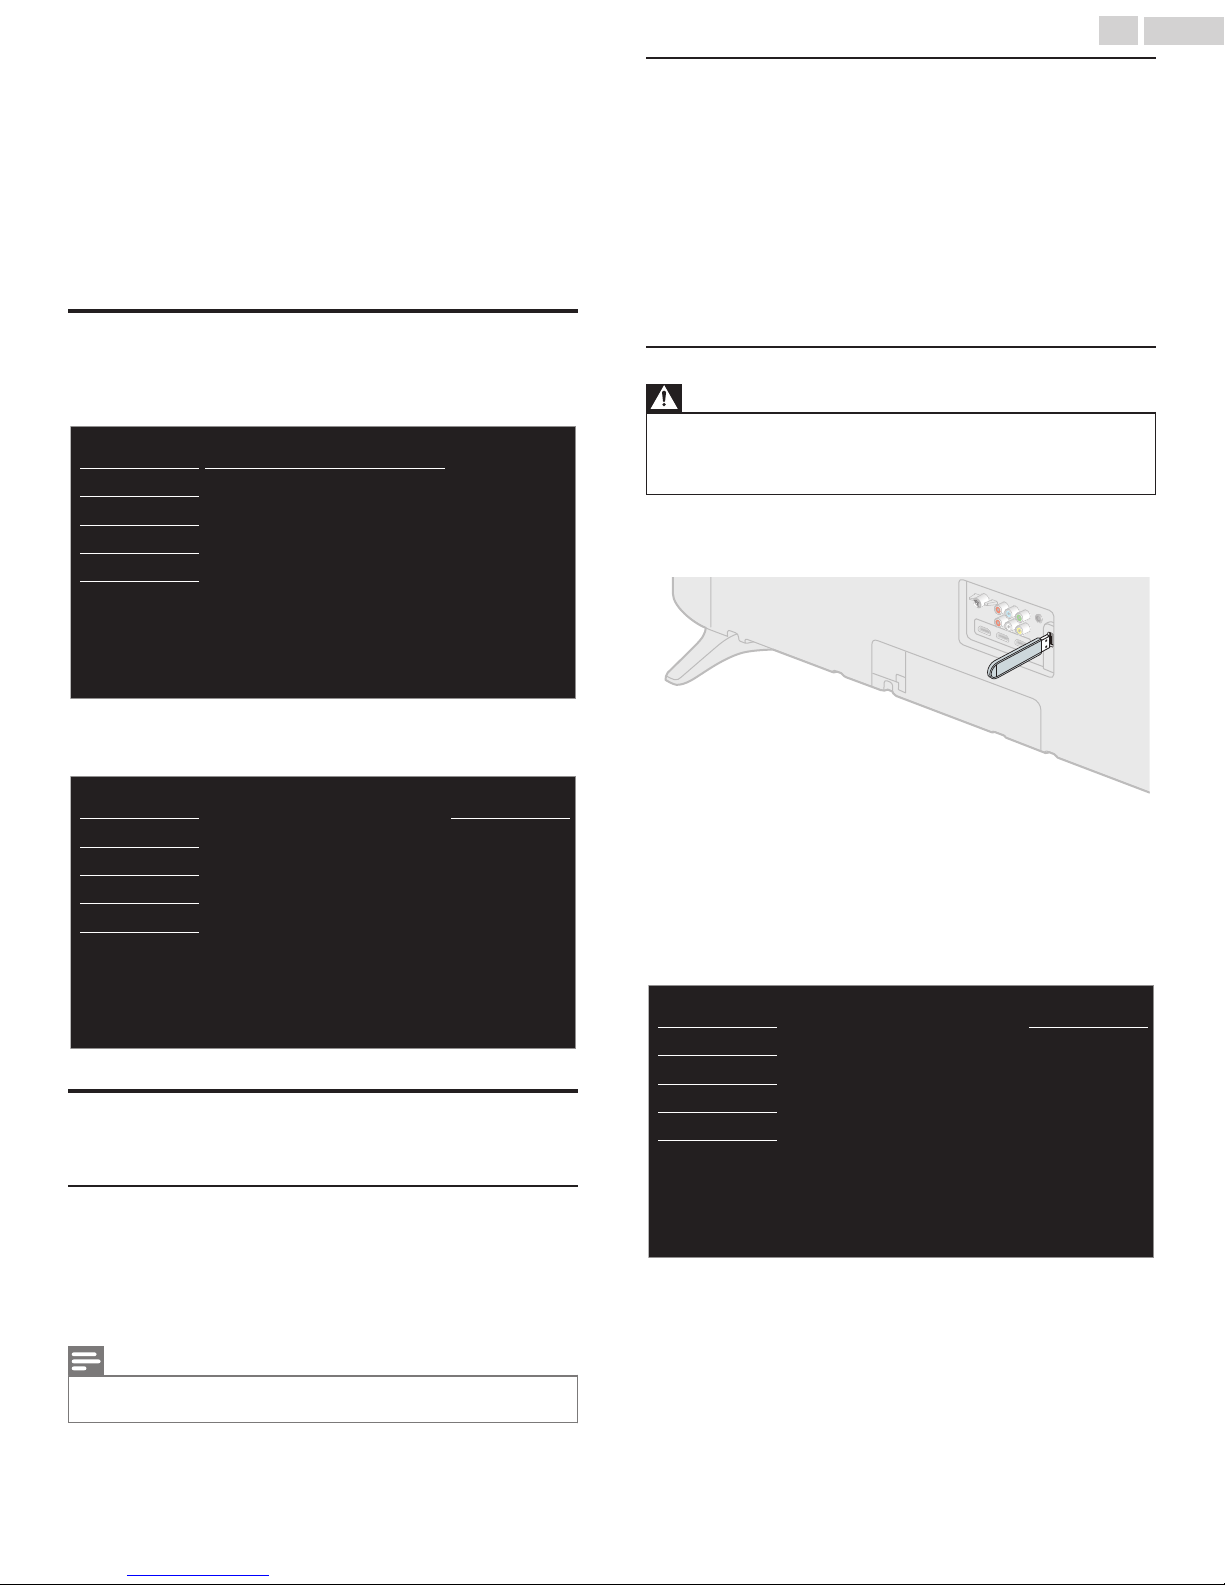
33 .English
6 Upgrade your TV
Software
Philips continuously tries to improve its products and we strongly
recommend that you Upgrade the TV Software when Upgrades are
available.
New Software can be Downloaded from our website at
www.philips.com/support
using the model number of your TV to find information.
Checking your Current Software version
1
Press and use to select Features, then press OK.
2
Use to select Software upgrade, then press OK.
Picture
Sound
Setup
Features
Language
USB
Current software info
Upgrade
Downloading the Software
Find information and Software related to your TV and Download the
Latest Software Upgrade file to your PC.
On your PC, open a web browser and go to
1
www.philips.com/support
Enter the model number in the “Type the Model Number...” field.
2
Click the desired Software to be Downloaded.
3
Decompress the ZIP-file.
•
Copy the Upgrade file to the Empty root directory on the clean
4
formatted USB Memory Stick.
Starting the Software Upgrade
Warning
When the Software Upgrade is running, don’t press any keys.
•
Do Not remove the USB Memory Stick during the Software Upgrade.
•
If an Error occurs during the Upgrade, retry the procedure or for further assistance, please contact
•
the Call Center.
Connect your USB Memory Stick with the Upgrade file to the USB
1
Service Port on the back of your TV. Use only the Unit's Side Panel
Keys to enter the following Instruction Steps 2 to 6.
3
Use to select Current software info, then press OK.
The version and a description of the Current Software is displayed.
•
Picture
Back
Sound
Setup
Release Version:
XXXXXXXX_XX_XX_XXXX_XXXX
Features
Language
USB
Upgrading the Software
You can Upgrade the Software by using a USB Memory Stick.
Preparing for the Software Upgrade
You require the following equipment :
A PC with web browsing capability.
•
An archive utility that supports the ZIP-format (e.g. WinZip for Windows
•
or Stuffit for Mac OS).
A Blank empty clean formatted USB Memory Stick.
•
Note(s)
Only FAT / DOS-formatted portable memory is supported.
•
Use only Software Upgrades that can be found on the Philips website.
•
2
Press and use to select Features, then press OK.
3
Use to select Software upgrade, then press OK.
4
Use to select Upgrade, then press OK.
Read the On-screen instructions and confirm that you want to
5
continue with the Installation.
Picture
Start now
Sound
Setup
Would you like to upgrade the
software?
Features
Language
USB
6
When the Software Upgrade is completed, press to set the Unit into
Standby mode, then remove the USB Memory Stick and then press
again to Turn the Unit back On.
The TV starts up with the New Software.
•
For further assistance, please contact the Call Center.
Page 34
7 Useful tips
FAQ
Question Answer
My Remote Control does not
work.
What should I do?
How come the Initial Setup
appears every time I Turn On
this Unit?
Why can I not watch some RF
signal TV Programs?
How come there is no image
from the Connected External
Devices?
When I enter a channel
number, why does it change
Automatically?
Why are captions not
displayed Entirely?
Or why are captions delayed
behind the dialog?
How can I set the clock?
My PIN code no longer
works, how can I change the
Child Lock setting?
34 .English
Check the Antenna or Cable Connection to the Main Unit.
•
Check the Batteries on the Remote Control.
•
Re-insert or replace the AAA Batteries with their Polarities (+/–) as indicated on the Remote Control Battery area.
•
Check if there is an obstacle between the infrared sensor window and the Remote Control.
•
Test the IR Signal Output use IR Signal Check. p. 36
•
If okay, then possible Infrared Sensor trouble.
Aim the Remote Control directly at the infrared sensor window on the front of the Unit.
•
Reduce the distance to the Unit.
•
When there is an infrared-equipped device such as PC near this Unit, it may interrupt the Remote Control signal on this
•
Unit. Move the infrared-equipped device away from this Unit, change the angle of the Device's infrared sensor or Turn Off
the infrared communication function.
Connect the RF Coaxial Cable directly to this Unit and run the Initial Setup.
•
Make sure to complete the Initial Setup before the Unit goes into Standby mode.
•
Autoprogram must be completed when you Set Up the Unit for the First time or Move it to a location where previously
•
unavailable channels are broadcast.
Make sure Autoprogram has been completed. p. 24
•
The selected channel may not be broadcasting.
•
When Autoprogram is interrupted and not completed, some channels will not be received. Make sure to complete the
•
Autoprogram. p. 24
The selected channel cannot be viewed by the Child and Ratings Lock setting. p. 27
•
The Unit requires some kind of Antenna Input. An indoor Antenna (Digital or VHF / UHF), an External Antenna (Digital or
•
VHF / UHF) or an RF Coaxial Cable from your wall Cable or Set-top Box needs to be plugged into the Unit.
Check if the correct Input mode is selected by pressing SOURCE or using CH + / –. Refer to Watching Channels from
•
an External Device. p. 18
Check the Antenna, Cable or other Input Connection to the Unit.
•
When using the Component Video Connection check that the Green (Y), Blue (Pb/Cb) and Red (Pr/Cr) connectors are
•
connected to their corresponding colored jacks on the Unit.
Many Digital channels have alternate channel numbers. The Unit changes the numbers Automatically to the ones signifying
•
the Broadcasting Station's channel number. These basic numbers used for the previous Analog Broadcasts. (e.g., Input
Digital ch# 30 Automatically changes to Digital ch# 8.1)
Closed Captions that are delayed a few seconds behind the actual dialog are common for Live broadcasts. Most captioning
•
production companies can display a dialog to maximum of 220 words per minute. If a dialog exceeds that rate, selective
editing is used to insure that the Closed Captions remain up-to date with the current TV screen dialog.
There is No clock function on this Unit.
•
If a Power failure occurs for longer than 10 seconds the child lock setting is retained, but the PIN code is reset to the default
•
code 0000. Refer to Child and Ratings Lock. p. 27
Continued on next page.
Page 35
Troubleshooting Tips
If the Unit does not perform properly when operated as instructed in this User Manual,
P
Power
No Power
Make sure the AC Power Cord is plugged in.
•
Make sure that the AC outlet supplies the proper voltage, plug another electrical
•
appliance into the AC outlet to ensure that the AC outlet operates normally.
If a Power Failure occurs, Unplug the AC Power Cord for 1 minute to allow the
•
Unit to Reset Itself.
Remote
Control keys do not work.
Do NOT press more than one key at the same time.
•
Ensure that no keys on the Remote Control are depressed and move freely.
•
Universal Remote Control does not work properly.
Refer to the user manual of the universal remote control for the Philips code.
•
Picture
Power is On but No Screen Image.
Check whether the Connection for the Antenna, Cable or Set-top Box is
•
Connected Correctly.
Check whether All the Cables to the Unit are connected to the correct Output
•
Jack on your separate Device like Blu-ray Disc / DVD Recorder.
Make sure that the selected Input mode is connected to the working Input jack.
•
Check if your computer is NOT in Sleep Mode when the Input Mode on this Unit
•
is in PC mode. Tap any Key on the Computer Keyboard to Wake it up.
No Color
View other TV channels. The problem might be limited to the broadcasting
•
station.
Adjust Color in Picture settings. p. 22
•
Picture Poor
Adjust Contrast and Brightness in Picture settings. p. 22
•
For the Best Picture Quality, watch “High Definition” wide screen Programs. If the
•
HD content is Not available, watch “Standard Definition” Programs instead.
You see Pixelation on the Screen.
When the capabilities of the Unit exceed the capabilities of the Digital
•
Broadcasting, the signal will be increased to match the capabilities of the Display
on the Unit. This may cause Pixelation, Noise or Trash.
Unusual picture appears and the TV does Not Operate.
Press the Power key first. If it does not solve the problem, then press the keys on
•
the Remote Control in the order shown below to change the Unit to the Live
Mode.
SLEEPFORMAT
Sound
No sound, distorted sound or incorrect Audio Sound is heard when using the
HDMI-DVI Connections.
Make sure that the Analog Audio signals from the HDMI-DVI Device are
•
connected to the Analog Audio (L/R) Input jacks.
Refer to For PC Input signal p. 20
When using Component Analog Video, Composite Analog Video or HDMI-DVI
•
Video make sure that the Analog Audio (L/R) connectors are mounted into the
Audio (L/R) Input jacks.
Sound Intermittent or No Sound.
Check if the Audio Cable is connected into the Unit correctly.
•
You Switch to a Different Input and the Volume Changes.
This Unit will Memorize the Volume Level from the last time you adjusted it.
•
If the Volume of the Sound from another Device is Higher or Lower, then the
•
Loudness will Change.
Make sure Auto volume leveling is set to On. p. 23
•
Picture & Sound
No Picture or Sound
•
•
•
•
•
•
•
•
•
Adjusted Picture or Sound settings are not the same (memorized) every time the
Unit is turned On.
•
You see a Distorted Picture or Hear an Unusual Sound. (Analog TV - NTSC
signal)
•
•
Ghosts, lines or streaks in picture. (Analog TV- NTSC signal)
•
•
Picture Poor, Sound Intermittent or No Sound
•
Screen
You Switch to a different Input and the Screen Size changes.
•
The Display image does not cover the Entire Screen.
•
Different color marks on the TV screen
•
Closed Captions
Closed Captions are displayed as a white box. No Closed Captions are displayed
in the Closed Captions-Supported Program.
•
•
•
Black Box is displayed on the TV Screen.
•
•
35 .English
Check if the Power is On.
Check whether All the cables to the Unit are connected to the correct Output jack
of your device like Blu-ray / DVD Recorder.
View other TV channels. The problem might be limited to the Broadcasting
Station or Weak Signal Strength, if DTV channel check signal strength. Refer to
Antenna Confirmation p. 25.
Unplug the AC Power Cord and wait for about 1 minute, then Plug the AC Power
Cord and turn On the Unit again.
Check whether the Connection of the Antenna or Cable or Set-top Box is
connected correctly.
Make sure that the selected Input mode is connected to the working Input jack.
Check if your computer is NOT in sleep mode when the Input mode of this Unit
is in PC mode. Tap any key on the keyboard to wake up your computer.
Make sure that the sound is not muted. Press so that the volume bar and
current volume level will appear on the TV screen.
Make sure that the volume is NOT set to 0 or . If so, use VOL + / – to adjust to
the desired volume.
You must set Home in Location. p. 30 (Otherwise, the settings you adjusted
will not be memorized after the Unit goes into Standby Mode.)
You may be getting interference from electrical appliances, automobiles,
motorcycles or fluorescent lights.
Try moving the Unit to another Location to see if this is the Cause of the Problem.
Electrical interference from nearby appliances may affect picture quality.
View other TV channels. The problem might be limited to the Broadcasting
Station or Weak Signal Strength, if DTV channel check signal strength. Refer to
Antenna Confirmation p. 25.
View other TV channels. The problem might be limited to the Broadcasting
Station or Weak Signal Strength, if DTV channel check signal strength. Refer to
Antenna Confirmation p. 25.
This Unit will Memorize the Viewing Mode from the last time you used those
Particular Input Modes.
If you are watching TV or using the Composite Video, Component Video or HDMI
with 480i Input, press FORMAT Repeatedly to Switch to various Screen
Modes.
View other TV channels. The problem might be limited to the broadcasting
station, missing data or pixelation due to weak signal strength.
Interference from buildings or weather conditions may cause captioning to be
incomplete if watching Analog TV signals.
Broadcasting Station may shorten the program to insert advertisements.
The Closed Captions Decoder cannot read the information of a shortened
program.
The Text mode is selected. For Closed Captions, select CC-1, CC-2, CC-3 or
CC-4. p. 25
If connected to a Blu-ray / DVD device then Closed Captions are part of its Video
signal and is only controlled through this Device's Menu or Remote Control.
Remove the TV Closed Captions mode.
Note(s)
The LCD screen is manufactured to provide many years of useful life.
•
Occasionally a few non active pixels may appear as a fixed point of blue, green
or red.
This is Not to be considered a Defect in the LCD screen.
Some Functions are Not available in Specific Modes, but this is Not a
•
Malfunction. Read the Description in this User Manual for more Details on
Correct Operations of this Unit.
Page 36
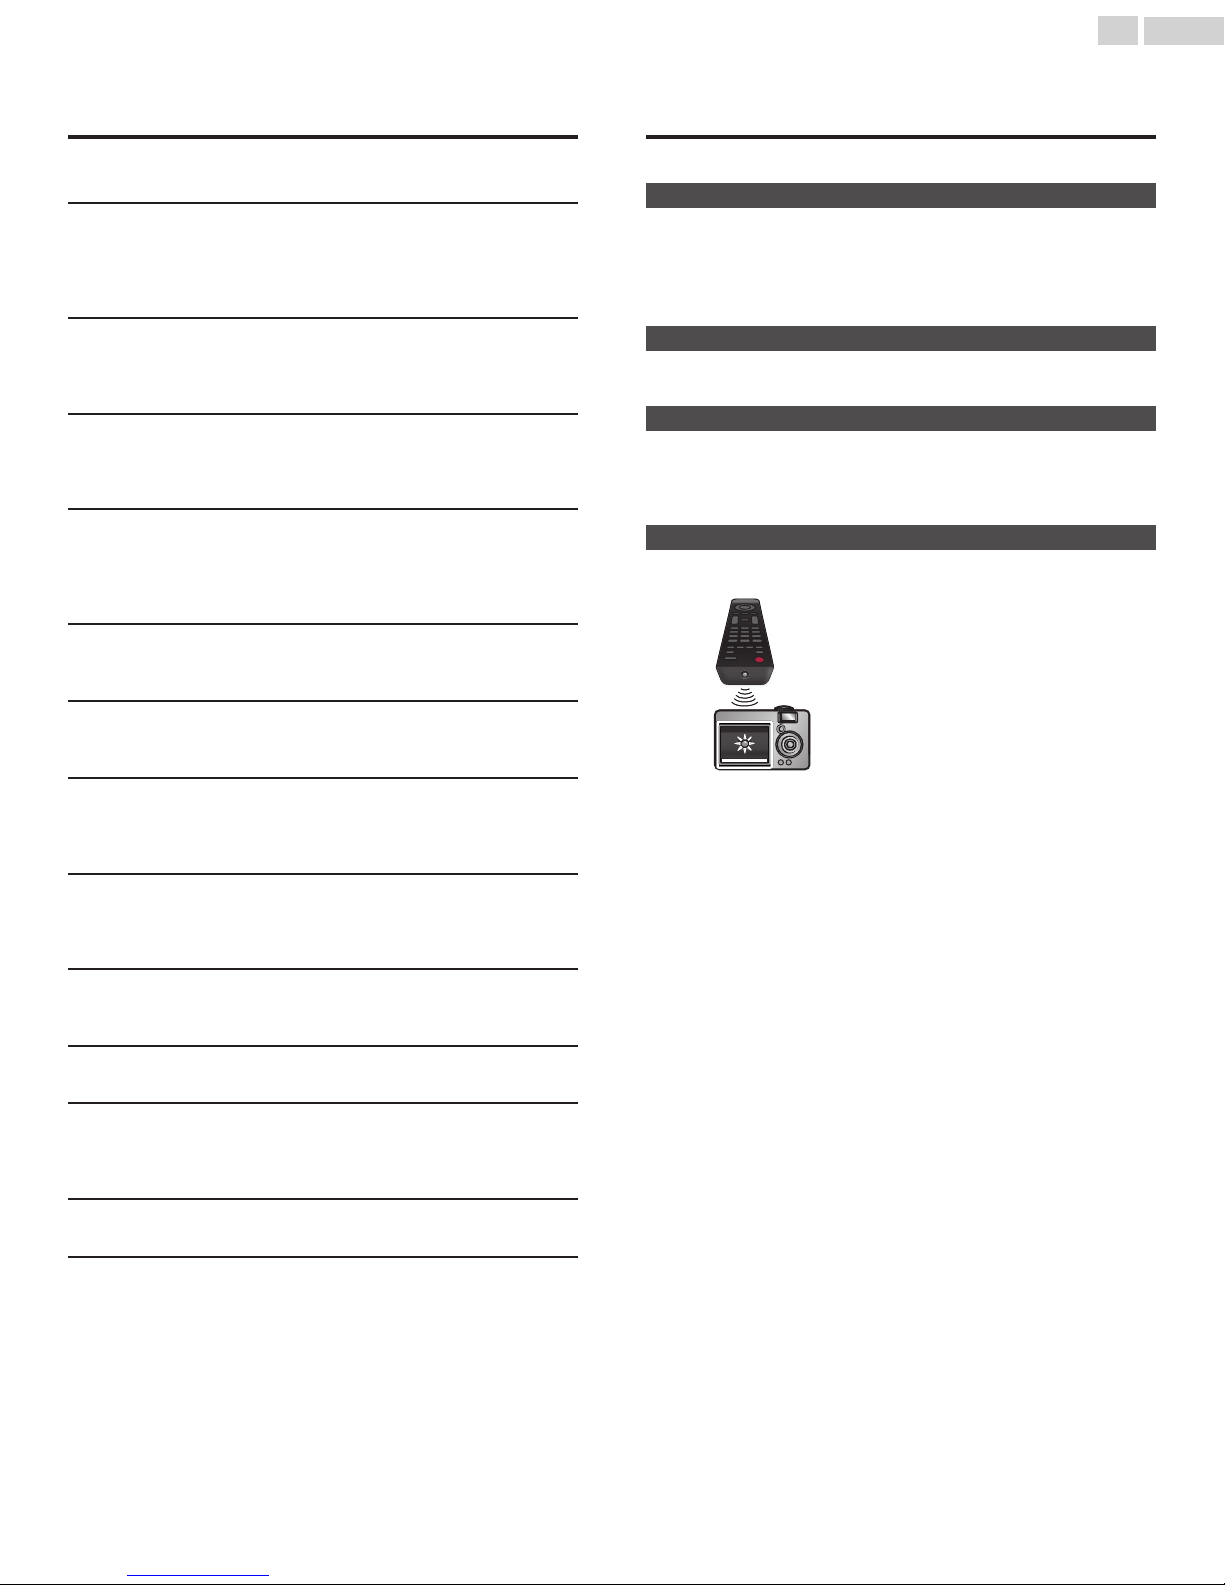
8 Information
36 .English
Glossary
Analog TV (NTSC)
Acronym that stands for National Television Systems Committee and the
name of Analog broadcasting standards.
Off the air Analog TV signals are no longer being sent by major
broadcasting stations in the USA.
Aspect ratio
The width of a TV screen relative to its height. Conventional TVs are 4:3 (in
other words, the TV screen is almost square); widescreen models are 16:9
(the TV screen is almost twice as wide as its height).
CEC (Consumer Electronics Control)
This allows you to operate the linked functions between our brand
devices with CEC feature and this Unit. We Do Not guarantee 100%
interoperability with other brands of CEC compliant devices.
Component Video
This is a Video signal format that conveys each of 3 principal colors of light
(red, blue and green) through different signal lines. This allows the viewers
to experience picture colors as original as it is. There are several signal
formats, including Y / Pb / Pr and Y / Cb / Cr.
Dolby Digital
The system developed by Dolby Laboratories to compress Digital sound.
It offers Stereo Sound (2ch) or multi-channel Audio.
DTV (ATSC)
Abbreviation that stands for Advanced Television Systems Committee
and the name of the Digital broadcasting standards.
E-sticker
E-sticker is showing set features, technical information, etc on this TV set
that is displayed on the TV screen mainly used by TV retailers. Previously
the information was on a printed sticker that was put on the display.
HDMI (High-Definition Multimedia Interface)
Interface that supports All uncompressed, Digital Audio / Video formats
including Set-top Box, Blu-ray / DVD Recorder or Digital television, over
a single cable.
HDTV (High-Definition TV)
Ultimate Digital format that produces high resolution and high picture
quality.
PIN code
A stored 4-digit number that allows access to Parental control features.
SAP (Secondary Audio Program)
Second-Audio channel delivered separately from the Main-Audio
channel. This Audio channel is used as an alternate in bilingual
broadcasting.
SDTV (Standard Definition TV)
Standard Digital format that is similar to the Analog TV picture quality.
Sonic Emotion
Sonic Emotion delivers immersive sound with clear voice.
Maintenance
Cabinet Cleaning
Wipe the front panel and other exterior surfaces of the Unit with a soft
•
cloth.
Never use a solvent or alcohol. Do Not spray insecticide liquid near the
•
Unit. Such chemicals may cause damage and discoloration to the
exposed surfaces.
Panel Cleaning
Wipe the panel of the Unit with a soft cloth. Before cleaning the panel,
disconnect the AC Power Cord.
Servicing
Should your Unit become inoperative, Do Not try to correct the problem
yourself. There are no user serviceable parts inside. Call our toll free
customer support line found on the cover of this User Manual to locate
an Authorized Service Center.
IR Signal Check
If the Remote Control is not working properly, you can use a Digital or Cell
Phone Camera to see if it is sending out an infrared signal.
e.g.) With a Digital Camera:
Point the Digital Camera towards the
Remote Control infrared diode at the front
of the Remote Control. Press and Hold any
Key on the Remote Control and look at the
Camera Display. If an infrared pulsating light
appears on the Display, the Remote Control
is sending out an IR signal.
or Dual Camera Cell Phones may have an IR Filter in one of the Camera's
and both will not Display the IR signal.
Note: Some Cameras may have an IR Filter
Page 37
9 Specifications
Model # 40PFL4701
Picture
Type FHD (Full HD) (1920 x 1080 pixels 60Hz)
Diagonal screen size / Aspect ratio
Viewing Angles 176° (V) by 176° (H)
Built-in Digital / Analog Tuner
Sound
Mono / Stereo
Power Output (RMS watts) 8W x 2
Equalizer 5 Band
Ease of Use
Picture Format
Photo Slide Show JPEG Files Only
Video Playback Only Motion JPEG 320 x 240, 30 fps with le extension “avi” will Playback.
Channel
Channel Coverage
CATV (Analog NTSC)
Tuning System Channel Frequency Synthesized Tuning System
Channel Access
Connectivity
Component Video Input
(Y/Pb/Pr)
Composite Video Input
(Shared Y Green Terminal
with Component Video)
HDMI Input
Analog Audio L/R Input 1 (L Audio / R Audio)
PC Input HDMI and HDMI-DVI + Analog Audio L/R
USB 1
Digital Audio Output
Headphone Output
Power
Power Requirements 120V∼ +/− 10%, 50/60Hz +/− 0.5%
Temperature
Operating Temperature 41 °F (5 °C) to 104 °F (40 °C)
39.5”/ 16:9
ATSC (Digital) / NTSC (Analog)
Mono, Stereo, Sonic Emotion
SD (4:3 Source) : Normal / 16:9 / Movie expand / Zoom / Wide
HD (16:9 Source) : Normal / 4:3 / Movie expand / Zoom / Wide
HDMI AV (4:3 Source) : Normal / 16:9 / Movie expand / Zoom / Wide / Full
HDMI AV (16:9 Source) : Normal / 4:3 / Movie expand / Zoom / Wide / Full
PC - Only HDMI or HDMI-DVI
(16:9 Source)
Terrestrial DTV (ATSC)
Terrestrial Analog (NTSC)
2∼13, A∼W
W+1∼W+94 (Analog W+1∼W+84), A-5∼A-1, 5A
Direct Access Number Keyboard,
Programmable Scan, Channel +(up) / -(down) and PREV. CH (Previous Channel)
1
Supporting Video Signals : 480i/p, 720p, 1080i @60Hz
1
3
Supporting Video Signals : 480i/p, 720p, 1080i @60Hz, 1080p @24/30/60Hz
Supporting PC-Input Video Signal up to FHD (1920 x 1080)
1
Supporting Dolby Digital
1
3.5mm (1/8 inch)
: Normal / Full / Unscaled
(Refer to HDMI AV (16:9 Source) above if PC has HDMI Output.)
:VHF : 2∼13
UHF : 14∼69 (Each Channel has e.g. 2.1∼2.9, 3.1∼3.9, etc)
:VHF : 2∼13
UHF : 14∼69
37 .English
Specifications are Subject to Change without Prior Notice.
•
Page 38
10 Warranty
ESTA PÓLIZA ES GRATUITA
Este aparato ha sido cuidadosamente diseñado y se ha fabricado con los mejores materiales bajo un estricto control de calidad,
garantizando su buen funcionamiento por los periodos establecidos según el aparato (ver lista en la parte inferior) a partir de la
entrega del aparato al consumidor.
Esta póliza incluye la reparación o reposición gratuita de cualquier parte o componente que eventualmente fallase y la mano de
obra necesaria para su reparación, así como los gastos de transportación razonablemente erogados dentro de nuestro centro de
servicio, misma que se hará efectiva en cualquiera de nuestros centros de servicio autorizados en el país.
Si tu aparato llegase a requerir de nuestro servicio de garantía, acuda al centro de servicio más cercano a su domicilio, de tener alguna
duda por favor llame a nuestro CENTRO DE INFORMACIÓN AL CLIENTE LADA sin costo en toda la republica al 01 800 839 19 89
en donde con gusto le indicaremos el centro de servicio autorizado más cercano a su domicilio.
P&F MEXICANA S.A. de C.V. a través de sus centros de servicio autorizados reparará y devolverá a usted su aparato en un plazo no
mayor a 20 días hábiles contados a partir de la fecha de ingreso, impresa en la orden de servicio de cualquiera de nuestros centros
de servicio autorizados.
La garantía de esta póliza cubre cualquier desperfecto o daño eventualmente ocasionado por los trabajos de reparación y/o
traslado del aparato en el interior de nuestros centros de servicio autorizados.
Esta póliza sólo tendrá validez, si está debidamente requisitada, sellada por la casa vendedora, en caso de extravío de esta póliza,
podrá hacer efectiva su garantía con la presentación de su factura de compra.
ESTA PÓLIZA NO SE HARÁ EFECTIVA EN LOS SIGUIENTES CASOS:
-Cuando el aparato sea utilizado en condiciones distintas a las normales.
-Cuando el aparato no haya sido operado de acuerdo con el instructivo de uso que se le acompaña.
-Cuando la causa de la falla o mal funcionamiento sea consecuencia de una reparación inadecuada o alteración producida por
personas no autorizadas por P&F MEXICANA S.A.de C.V.
PERIODOS DE GARANTÍA
12 meses.– Televisores con y sin reproductor de video digital DVD, reproductores de discos de video digital DVD, reproductores de
disco de video digital BLU-RAY, grabadores reproductores de discos de video digital DVD, sistemas de cine en casa, radiograbadoras
con y sin reproductor de disco compacto, video proyector (excepto la lámpara), mini sistemas de audio, equipos modulares, antenas
de recepción de satélite, teléfonos, teléfonos inalámbricos, auto estéreos, tabletas electrónicas, Base para iPod y bocinas
inalámbricas (Bluetooth).
6 meses.– Radio relojes, radios A.M./F.M, batería recargables y reproductores de audio digital MP3 (internet).
90 días.– Accesorios, controles remotos, bocinas, micrófonos, audífonos y aparatos reconstruidos de LCD TV, DVD, Blu-ray, Barras de
audio y Sistemas de Teatro en casa.
38 .English
POLIZA DE GARANTÍA
MC -719 - ARCO - 2
Page 39

P&F Mexicana, S.A. de C.V.
Av. La Palma No. 6, Col. San Fernando La Herradura.
Huixquilucan, Edo. de México. C.P. 52787
This product has been manufactured by and is sold
under the responsibility of P&F Mexicana, S.A. de C.V.,
and P&F Mexicana, S.A. de C.V. is the warrantor in
relation to this product.
The Philips trademark and the Philips Shield Emblem
are registered trademarks of Koninklijke Philips N.V.
used under license.
A5G23MT
䖩䖩䖩䖩䖩
 Loading...