

PHILIPS 42PFL7606H, 47PFL7606H, 42PFL7656H, 42PFL7666H, 37PFL7606H User Manual
...
EN User Manual
Register your product and get support at
www.philips.com/welcome
55PFL76x6H
47PFL76x6H
42PFL76x6H
37PFL76x6H
32PFL76x6H
55PFL76x6K
47PFL76x6K
42PFL76x6K
37PFL76x6K
32PFL76x6K
55PFL76x6T
47PFL76x6T
42PFL76x6T
37PFL76x6T
32PFL76x6T

Contents
1 Get started 3
TV tour 3
Important 6
Environmental efforts 8
Position the TV 9
Help and support 10
2 Use your TV 12
Controls 12
Watch TV 14
Watch a connected device 17
Watch 3D 18
Ambilight 19
Browse PC through DLNA 21
Net TV and online video 22
Games 25
3 Use more of your TV 27
Pause TV 27
Record TV shows 28
Enjoy HbbTV 31
View Teletext 32
Set locks and timers 33
View subtitles 34
View Scenea 34
Use EasyLink 35
4 Set up your TV 38
Settings assistant 38
Picture and sound 38
Channels 39
Menu language 42
Set universal access 42
Other settings 43
Update software 43
Reinstall the TV 45
5 Connect your TV 46
6 Troubleshooting 62
Contact Philips 62
General TV 62
TV channel 62
Picture 63
Sound 63
HDMI 64
USB 64
Network 64
7 Product specifications 65
Power and reception 65
Display and sound 65
Display resolutions 65
Multimedia 66
Connectivity 66
Dimensions 67
Help version 68
8 Index 69
About cables 46
Connect devices 47
Connect more devices 53
Computers and the Internet 55
Common interface 60
EN 2
1 Get started
TV tour
Remote control
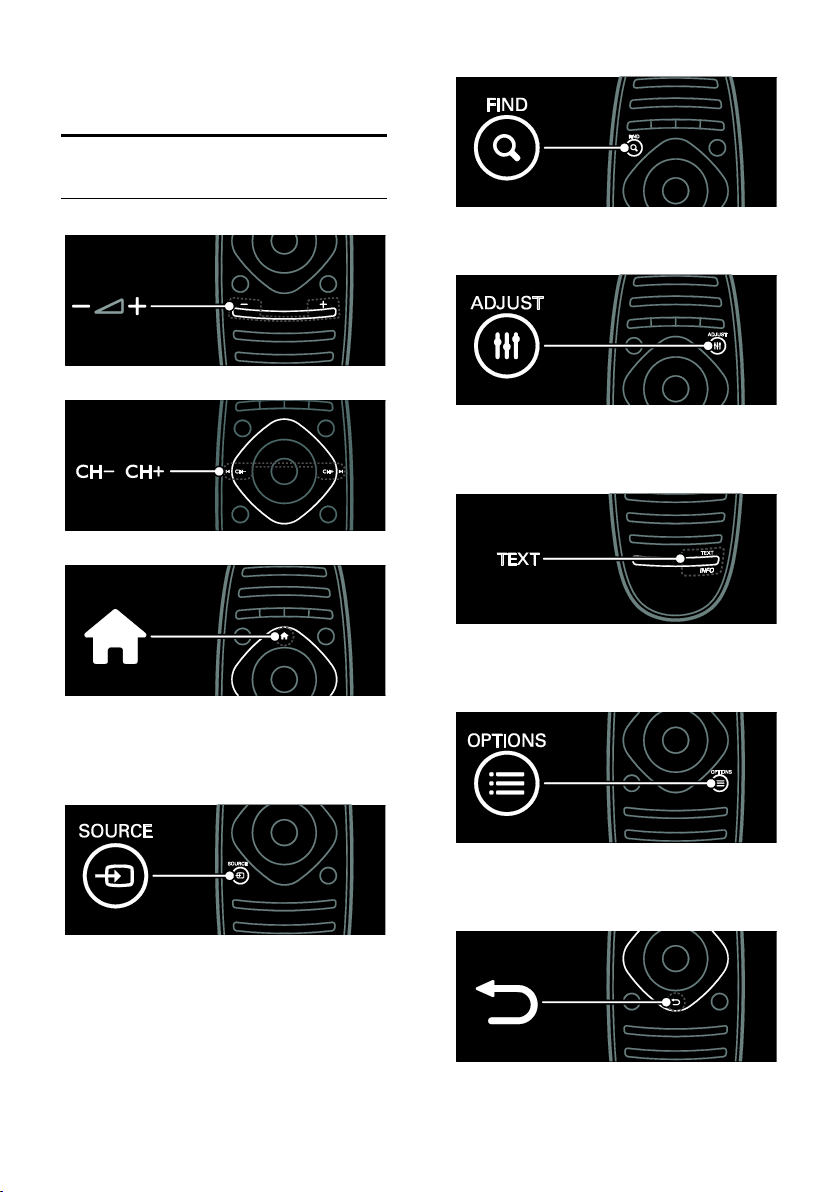
To adjust the volume.
To switch TV channels.
To open or close the Home menu.
In the Home menu, access connected
devices, picture and sound settings, and
other useful features.
To open or close the Find menu.
In the Find menu, access the channel list.
To open or close the Adjust menu.
In the Adjust menu, access a range of
frequently used settings.
To open or close the Text menu.
In the Text menu, access teletext for news
and information.
To open or close the Source menu.
In the Source menu, access connected
devices.
To open or close the Options menu.
Options menus offer convenient settings for
TV channels or programmes.
To return to the previous menu page or to
exit from a TV function.
EN 3

Press and hold to return to watching TV.
To select a red menu option, access digital
Interactive TV services*, or watch TV
demonstration clips.
*Available on certain models only.
To select a green menu option or to access
energy efficient settings.
To select a yellow menu option or to access
the electronic user manual.
Read more about the remote control in Use
your TV > Controls > Remote control
(Page 12).
Alternatively, look at the index in Search
for...
Press to select the next TV tour.
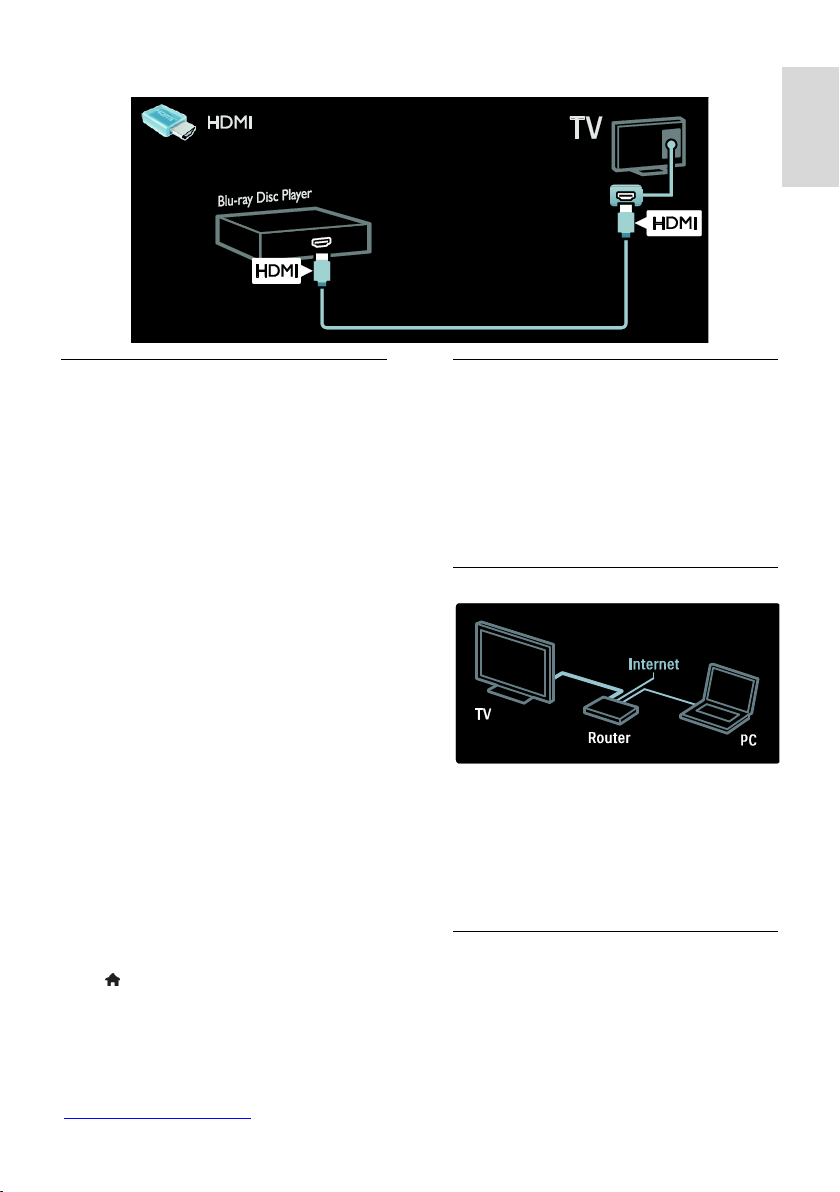
Connect devices
For the best picture and sound quality,
connect a DVD, Blu-ray disc player, or game
console through HDMI (TM).
To watch a non EasyLink compliant device,
add it to the Home menu.
1. Press > [Add your devices].
2. Follow the onscreen instructions.
Note: If you are prompted to select the TV
connection, select the connector that this
device uses. See Connect your TV >
Connect devices (Page 47) for information
on connection.
If an EasyLink or HDMI-Consumer Electronic
Control (HDMI-CEC) compliant device is
connected to the TV, it is automatically
added to the Home menu when both
devices are switched on.
To watch a connected device
1. Press .
2. Select the newly added device icon.
EN 4
English
You can learn more on device connections in Connect your TV > Connect devices.
High Definition TV
For high-definition (HD) picture quality,
watch HD programmes.
On standard-definition (SD) programmes,
the picture quality is standard.
You can watch HD video content in these
ways and more:
a Blu-ray disc player, connected with an
HDMI cable, playing a Blu-ray disc
an upscaling DVD player, connected
with an HDMI cable, playing a DVD
disc
an over-the-air HD broadcaster (DVB-
T MPEG4)
a digital HD receiver, connected with
an HDMI cable, playing HD content
from a cable or satellite operator
an HD channel on your DVB-C
network
an HD game console (for example, X-
Box 360 or PlayStation 3), connected
with an HDMI cable, playing an HD
game
HD video clip
To experience the stunning sharpness and
picture quality of HD TV, watch the HD
video clip from the Home menu.
Press > [Setup] > [Watch demos].
Watch Demo is on the second page of the
setup menu.
For more information about the availability
of HD channels in your country, contact
your Philips dealer or visit
www.philips.com/support.
Ambilight
*Available on certain models only.
Ambilight gives a more relaxed viewing
experience. It automatically adjusts the
colour and brightness of the light to match
the TV picture.
Read more in Use your TV > Ambilight
(Page 19).
Network
Connect your TV to your home network to
play music, photos, and videos from a
computer or other media server on the
same network.
Read more in Connect your TV >
Computers and the Internet (Page 55).
Net TV
If your home network is connected to the
Internet, you can connect your TV to Net
TV. Net TV offers movies, pictures, music
and much more.
Read more in Use your TV > Browse Net
TV.
EN 5

3D TV
This is a 3D TV. Connect your TV to a 3D
Blu-ray disc player or tune in to a TV
channel that broadcasts programmes in 3D.
Read more in Use your TV > Watch 3D
(Page 18).
Important
Safety
Read and understand all instructions before
you use your TV. If damage is caused by
failure to follow instructions, the warranty
does not apply.
Risk of electric shock or fire!
Never expose the TV to rain or water.
Never place liquid containers, such as
vases, near the TV. If liquids are spilt on
or into the TV, disconnect the TV from
the power outlet immediately. Contact
Philips Consumer Care to have the TV
checked before use.
When the TV is swivelled, ensure that
no strain is exerted on the power cord.
Strain on the power cord can loosen
connections and cause arcing.
To disconnect the TV from the mains
power, the power plug of the TV must
be disconnected. When disconnecting
the power, always pull the power plug,
never the cord. Ensure that you have
full access to the power plug, power
cord and outlet socket at all times.
Never insert objects into the ventilation
slots or other openings on the TV.
Never place the TV, remote control or
batteries near naked flames or other
heat sources, including direct sunlight.
To prevent the spread of fire, keep
candles or other flames away from the
TV, remote control and batteries at all
times.
Risk of short circuit or fire!
Never expose the remote control or
batteries to rain, water or excessive
heat.
Avoid force coming onto power plugs.
Loose power plugs can cause arcing or
fire.
Risk of injury or damage to the TV!
Two people are required to lift and
carry a TV that weighs more than 25kg
or 55lbs.
When stand mounting the TV, use only
the supplied stand. Secure the stand to
the TV tightly. Place the TV on a flat,
level surface that can support the
combined weight of the TV and the
stand.
When wall mounting the TV, use only a
wall mount that can support the weight
of the TV. Secure the wall mount to a
wall that can support the combined
weight of the TV and wall mount. TP
Vision Netherlands B.V. bears no
responsibility for improper wall
mounting that result in accident, injury
or damage.
If you need to store the TV,
disassemble the stand from the TV.
Never lay the TV on its back with the
stand installed.
EN 6

English
Before you connect the TV to the
power outlet, ensure that the power
voltage matches the value printed on
the back of the TV. Never connect the
TV to the power outlet if the voltage is
different.
Parts of this product may be made of
glass. Handle with care to avoid injury
and damage.
Risk of injury to children!
Follow these precautions to prevent the TV
from toppling over and causing injury to
children:
Never place the TV on a surface
covered by a cloth or other material
that can be pulled away.
Ensure that no part of the TV hangs
over the edge of the surface.
Never place the TV on tall furniture,
such as a bookcase, without anchoring
both the furniture and TV to the wall
or a suitable support.
Educate children about the dangers of
climbing on furniture to reach the TV.
Risk of swallowing batteries!
The product/remote control may
contain a coin-type battery, which can
be swallowed. Keep the battery out of
reach of children at all times!
Risk of overheating!
Never install the TV in a confined
space. Always leave a space of at least 4
inches or 10 cm around the TV for
ventilation. Ensure that curtains or
other objects never cover the
ventilation slots on the TV.
Risk of injury, fire or power cord damage!
Never place the TV or any objects on
the power cord.
Disconnect the TV from the socket and
aerial before lightning storms. During
lightning storms, never touch any part
of the TV, power cord or aerial cable.
Risk of hearing damage!
Avoid using earphones or headphones
at high volumes or for prolonged
periods of time.
Low temperatures
If the TV is transported in temperatures
below 5°C or 41°F, unpack the TV and
wait until the TV temperature matches
room temperature before connecting
the TV to the power outlet.
Screen care
Risk of damage to the TV screen!
Never touch, push, rub or strike the
screen with any object.
Unplug the TV before cleaning.
Clean the TV and frame with a soft
damp cloth. Never use substances such
as alcohol, chemicals or household
cleaners on the TV.
To avoid deformations and colour
fading, wipe off water drops as soon as
possible.
Avoid stationary images as much as
possible. Stationary images are images
that remain onscreen for extended
periods of time. Stationary images
include onscreen menus, black bars,
time displays, etc. If you must use
stationary images, reduce screen
contrast and brightness to avoid screen
damage.
3D, health warning
If you or your family have a history of
epilepsy or photosensitive seizures,
consult a medical professional before
exposing yourself to flashing light
sources, rapid image sequences or 3D
viewing.
To avoid discomfort such as dizziness,
headache or disorientation, we
recommend not watching 3D for
extended periods of time. If you
experience any discomfort, stop
watching 3D and do not immediately
engage in any potentially hazardous
activity (for example driving a car) until
your symptoms have disappeared. If
symptoms persist, do not resume
watching 3D without consulting a
medical professional first.
EN 7

Parents should monitor their children
during 3D viewing and ensure they do
not experience any discomfort as
mentioned above. Watching 3D is not
recommended for children under 6
years of age as their visual system is not
fully developed yet.
Do not use the 3D glasses for any
purpose other than watching 3D TV.
Care of 3D glasses
3D glasses are supplied with this TV. Follow
these care instructions for your glasses:
Use a clean soft cloth (microfibre or
cotton flannel) to clean the lenses to
avoid scratching them. Never spray
cleaner directly on the 3D glasses. You
can use pre-moistened cleaning cloths
from most well-known lens
manufacturers of sunglasses.
Do not expose the 3D glasses to direct
sunlight, heat, fire or water. This may
result in a product malfunction or fire.
Do not drop, bend or apply force to
the lenses of the 3D glasses.
Do not use cleaning chemicals
containing alcohol, solvent, surfactant,
or wax, benzene, thinner, mosquito
repellent or lubricant. Using these
chemicals can cause discolouration or
cracks.
CHOKING HAZARD - Keep the
product out of reach of children under
three years of age at all times! The
product contains small parts which can
be swallowed.
Environmental efforts
To access energy efficient settings:
While you watch TV, press the green button
on the remote control.
These energy-efficient settings include:
Energy saving picture settings: You can
apply a combination of energy saving
picture settings. While you watch TV,
press the green button and select
[Energy saving].
Power switch: You can completely cut
off power to the TV with the power
switch. It is located at the base of the
set.
Screen off: If you only want to listen to
audio from the TV, you can turn off the
TV display. Other functions continue to
operate normally.
Light sensor: The built-in ambient light
sensor lowers the brightness of the TV
screen when the surrounding light
darkens.
Low standby power: The advanced
power circuitry brings down the power
consumption of the TV to an extremely
low level, without losing out on the
constant standby functionality.
Power management: The advanced
power management of this TV ensures
the most efficient use of its energy.
To view how your personalised TV
settings affect the TV's relative power
consumption, press and select
[Setup] > [Watch demos] > [Active
Control].
End of use
Your product is designed and manufactured
with high quality materials and components,
which can be recycled and reused.
Energy efficiency
Philips continuously focuses on lowering the
environmental impact of our innovative
consumer products. We aim our efforts
towards environmental improvements during
manufacturing, reduction of harmful
substances, energy-efficient use, end-of-life
instructions and product recycling.
EN 8
English
When this crossed-out wheeled bin symbol
is attached to a product it means that the
product is covered by the European
Directive 2002/96/EC. Please inform yourself
about the local separate collection system
for electrical and electronic products.
Please act according to your local rules and
do not dispose of your old products with
your normal household waste. Correct
disposal of your old product helps to
prevent potential negative consequences for
the environment and human health.
Your product contains batteries covered by
the European Directive 2006/66/EC, which
cannot be disposed of with normal
household waste. Please inform yourself
about the local rules on separate collection
of batteries because correct disposal helps to
prevent negative consequences for the
environment and human health.
Position the TV
The ideal distance from which to watch
TV is three times its diagonal screen
size. For example, if the diagonal screen
size of the TV is 116cm / 46", the ideal
viewing distance is ~3.5m / ~138" from
the front of the screen.
While seated, your eyes should be level
with the centre of the screen.
Stand mount or wall mount
To apply the best settings for your TV, select
wall mount or stand mount.
1. In the [Preferences] menu, select [TV
placement].
2. Select [On a TV stand] or [Wall
mounted], then press OK.
Wall mount
You can also wall mount your TV on a
compatible TV mount (not supplied). Check
your TV screen size and match it against the
list for the type of wall mount to purchase:
81 cm / 32 inches : 200mm x 200mm, M6
94 cm / 37 inches: 200mm x 200mm, M6
107 cm / 42 inches: 400mm x 400mm, M6
119 cm / 47 inches: 400mm x 400mm, M6
140 cm / 55 inches: 400mm x 400mm, M8
Warning: Follow all instructions provided
with the TV mount. TP Vision Netherlands
B.V. bears no responsibility for improper
TV mounting that results in accident, injury
or damage.
To prevent damage to cables and
connectors, leave a gap of at least 5.5 cm /
2.2 inches from the back of the TV.
For 32-inch to 42-inch TVs:
Before you wall mount the TV, find the
correct length of screw.
Placement
Before you position the TV, read all
safety precautions. See Get Started >
Important > Safety (Page 6).
Position the TV where light does not
shine directly on the screen.
EN 9
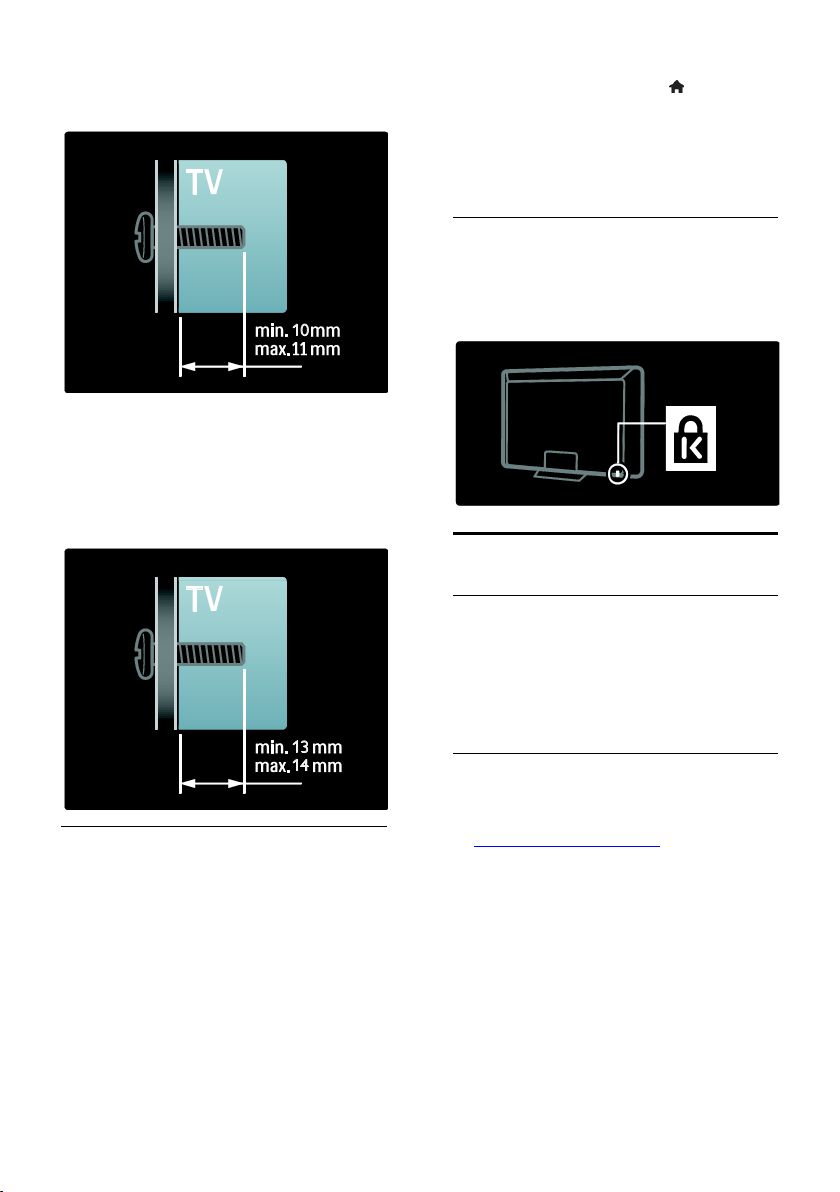
To find the length of screw, add the
thickness of your wall mount to the screw
length, as shown in the graphic.
1. While you watch TV, press .
2. Select [Setup] > [TV settings] >
[Preferences].
3. Select [Location] > [Home] or [Shop],
then press OK.
4. Restart the TV.
Lock the TV
Your TV is equipped with a Kensington
security slot at the base of the TV. Purchase
a Kensington anti-theft lock (not supplied) to
secure the TV.
For 47 inch to 55 inch TVs:
Before you wall mount the TV, find the
correct length of screw.
To find the length of screw, add the
thickness of your wall mount to the screw
length, as shown in the graphic.
Location
A range of TV settings are applied to suit the
location of the TV.
Shop or home mode
Set the TV location to Home mode to
access all TV settings. In Shop mode, you can
access only a few settings.
Help and support
Use Help
You can access onscreen [Help] from the
Home menu by pressing the Yellow button.
You can also switch between the [Help]
menu and the TV menu by pressing the
Yellow button.
Online support
If you can't find what you need in the
onscreen [Help], consult our online support
at www.philips.com/support.
Follow the website instructions to select
your language, then enter your product
model number.
At our support website, you can also:
find answers to frequently asked
questions
download a printable PDF version of
this user manual to read
email us a specific question
chat online with one of our support
personnel (available in certain countries
only)
EN 10

English
Contact Philips
If you like, you can contact Philips Consumer
Care in your country for support. You can
find the contact number in the leaflet
accompanying the TV.
Before you contact Philips, note down your
TV model and serial number. You can find
this information on the back of your TV or
on its packaging.
EN 11
2 Use your TV
Controls
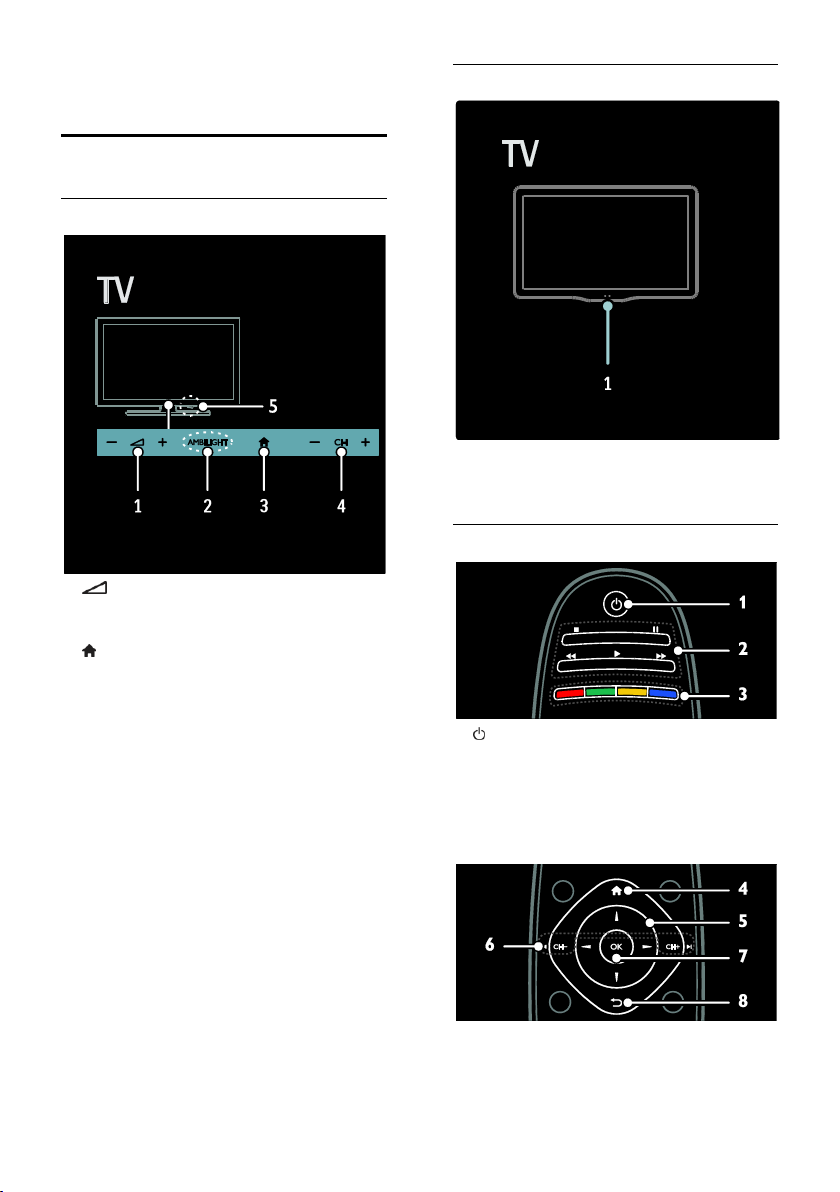
TV controls
1. +/-: Increase or decrease volume.
2. AMBILIGHT: Switch Ambilight on or off.
Ambilight is available on certain models only.
3. (Home): Access the Home menu. Press
again to launch an activity in the Home
menu. Confirm an entry or selection.
4. CH +/-: Switch to the next or previous
channel.
5.Power: Switch the TV on or off.
Indicators
1. Ambient sensor / remote control sensor
Ambient sensor is available on certain
models only.
Remote control
1. (Standby): Switch the TV on or to
standby.
2. Play buttons: Control video or music play.
3. Colour buttons: Select tasks or options.
The buttons function according to the
services offered by the service provider.
EN 12
English
4. (Home): Access the Home menu.
5. (Navigation buttons): Navigate
through menus and select items.
6. CH - / CH + (Previous/Next): Switch
channels, navigate through menu pages,
tracks, albums or folders.
7. OK: Confirm an entry or selection.
8. (Back): Return to the previous menu
page or exit from a TV function.
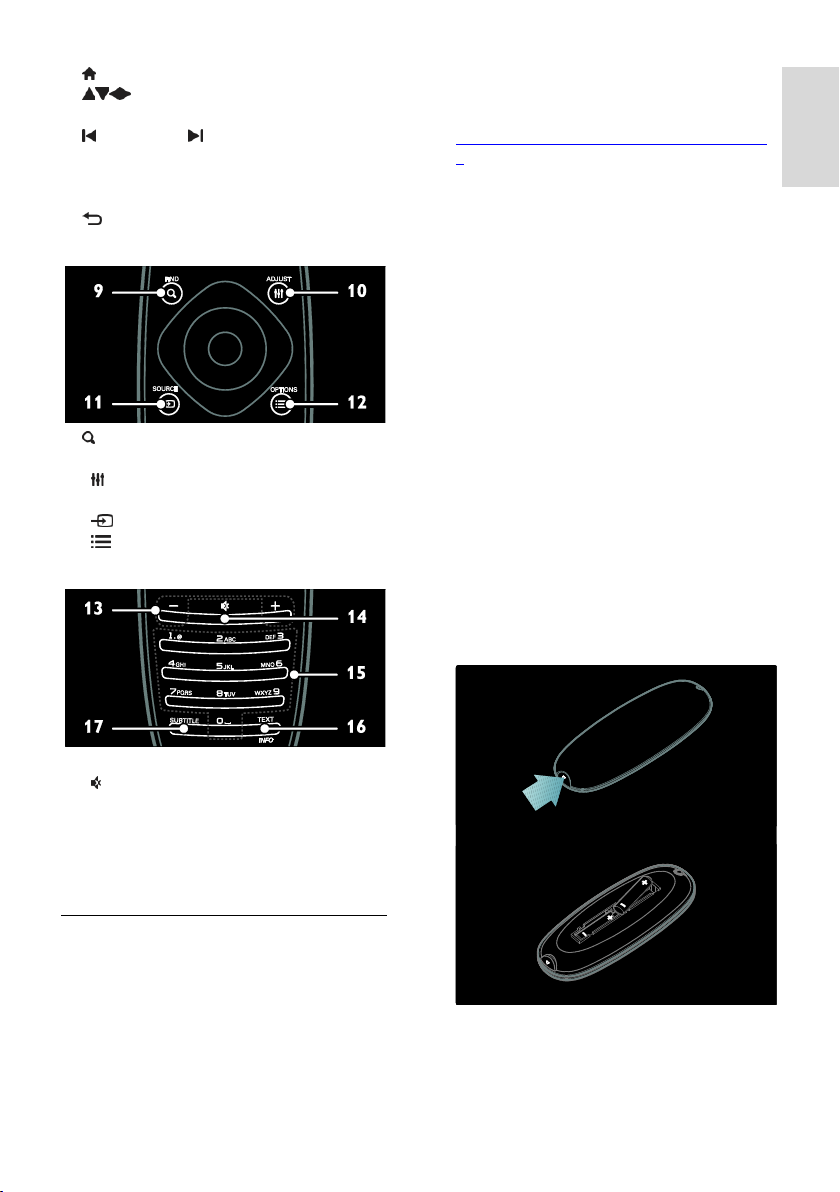
9. FIND: Access the menu to select TV
channel list.
10. ADJUST: Access the menu to adjust
settings.
11. SOURCE: Select connected devices.
12. OPTIONS: Access options for the
current activity or selection.
Caution: The battery contains perchlorate
material, handle it with care. For information,
see
www.dtsc.ca.gov/hazardouswaste/perchlorat
e.
If your remote control signal is weak, replace
the batteries:
1. Open the battery cover.
2. Remove the old batteries from the battery
compartment, and replace them with fresh
batteries.
Make sure that the ends of the batteries line
up correctly with the +/- markings in the
battery compartment.
Notes:
Dispose of batteries according to
environmental directives. Read Get started
> Environmental efforts > End of use (Page
8).
Remove batteries from the remote control if
you will not use it for an extended period of
time.
The type of battery varies according to RC
model:
For remote control with AAA batteries (end
to end):
13. +/- (Volume): Adjust volume.
14. (Mute): Mute or restore audio.
15.0-9(Numeric buttons): Select channels.
16.TEXT/INFO: Enable or disable teletext.
Press and hold to view more information on
the current activity.
17.SUBTITLE: Enable or disable subtitles.
Batteries
Warning: Risk of swallowing batteries!
The product/remote control may contain a
coin-type battery, which can be swallowed.
Keep the battery out of reach of children at
all times!
EN 13

For remote control with AAA batteries (side
by side):
For remote control with CR2032 (3V)
batteries:
Access EasyLink controls
1. While you view content from a connected
HDMI-CEC device, press OPTIONS.
2. Select [Show device keys], then press
OK.
3. Select the EasyLink control button, then
press OK.
Read more on EasyLink in Use more of
your TV > Use EasyLink (Page 35).
Smartphone control
Use your smartphone as a secondary
remote, and even as a keyboard. You can
also view a slideshow of the images in your
smartphone on the TV. To download the
application 'Philips My Remote', visit the
Apple Apps store or the Android Market.
Follow the instructions provided at the
applications store.
Ensure that your TV and smartphone are
connected to the same local network. Read
more about network connections in
Connect your TV > Computers and the
Internet (Page 55).
EasyLink controls
Note: EasyLink controls are available when
the connected device is HDMI-CEC
compliant.
EasyLink allows you to control your TV and
other HDMI-CEC devices with one remote
control.
EN 14
Watch TV
Switch TV on or off
Switch the TV on
Press the power switch at the base of
the TV to the ON position.

English
If the TV is in standby, press on the
remote control.
Note: There is a short delay before the TV
responds.
Tip: If you cannot find your remote control
and want to switch on the TV from standby,
press CH +/- on the front of the TV.
Though your TV consumes very little energy
in standby, it does use some energy. If you
are not going to use the TV for an extended
period of time, switch it off to cut off the
power.
Switch TV to standby
Press on the remote control. The remote
control sensor on the TV switches to red.
Switch off the TV
Press the power switch at the base of the
TV to the OFF position.
The TV no longer consumes energy.
Automatic switch off
This TV is designed with energy efficiency
settings. If there is no user interaction (such
as pressing a remote control button or a
control on the front panel) for four hours,
the TV will automatically switch to standby.
To disable automatic switch off,
While you watch TV, press the green button
on the remote control. Select [Auto switch
off] and press OK. An on screen message
confirms that automatic switch off is
disabled.
Press +/- on the front of the TV.
Mute or unmute the TV volume
Press to mute the TV, or
Press again to restore the volume.
Adjust headphone volume
1. Press > [Setup] > [TV settings] >
[Sound].
2. Select [Headphones volume], then press
OK.
Switch TV channels
Press on the remote control.
Press CH +/- on the TV.
Press the Numeric buttons to enter a
channel number.
Adjust TV volume
Increase or decrease the TV volume
Press +/- on the remote control.
EN 15

Manage channel lists
You can view all channels, or only a list of
your favourite channels. Press FIND to
access the channel list.
Create a list of your favourite channels
1. Press FIND.
2. Select the channel to mark as a favourite
and press OPTIONS.
3. Select [Mark as favourite] and press OK.
The selected channel is marked with a star.
To deselect a channel, select [Unmark as
favourite], and then press OK.
Select a channels list
1. In the channel list, press OPTIONS.
2. Select [Select list] > [Favourites] to
display channels in the favourite list; or [All]
to display all channels.
3. Press OK to confirm.
View only analogue or digital TV channels
You can filter the channel list to access only
analogue or digital channels.
1. In the channel list, press OPTIONS.
2. Select [Select list] > [Analogue] or
[Digital], then press OK.
Depending on your selection, only analogue
or digital channels are available.
Listen to digital radio
If digital radio channels are available, they are
installed automatically when you install the
TV channels.
1. While you watch TV, press FIND. The
channel list is displayed.
2. Press OPTIONS.
3. Select [Select list] > [Radio], then press
OK.
4. Select a radio channel, then press OK.
View programme guide
The programme guide displays information
about digital TV channels, for example:
Channel schedules
Synopsis of programmes
Note: TV programme guides are available in
certain countries only.
Set programme guide
Before you use the programme guide, check
the following settings:
1. Press .
2. Select [Setup] > [TV settings] >
[Preferences] > [Programme guide].
3. Select [From the broadcaster] or [From
network], then press OK.
Access the TV programme guide
1. Press .
2. Select [Programme guide], then press
OK.
Note: If you are viewing the programme
guide for the first time, follow the onscreen
instructions when asked to update the guide.
Use TV programme guide options
You can customise the displayed information
to:
Remind you when programmes start
Display only preferred channels
1. In the programme guide, press
OPTIONS.
2. Select one of these settings, then press
OK:
[Set reminder]: Set programme
reminders.
[Clear reminder]: Clear programme
reminders.
[Change day]: Select the day to display.
[More info]: Display programme
information.
[Search by genre]: Search TV
programmes by genre.
[Scheduled reminders]: List
programme reminders.
[Update Programme guide]: Update
the latest programme information.
Use smart picture settings
Select your preferred picture setting.
1. While you watch TV, press ADJUST.
2. Select [Smart picture].
3. Select one of the following settings, then
press OK:
[Personal]: Apply your personalised
picture settings.
EN 16

English
[Vivid]: Rich and dynamic settings, ideal
for daytime viewing.
[Natural]: Natural picture settings.
[Cinema]: Ideal settings for movies.
[Game]: Ideal settings for games.
[Energy saving]: Settings that conserve
the most energy.
[Standard]: Default settings that suit
most environments and types of video.
[Photo]: Ideal settings for photos.
[Custom]: Customise and store your
own picture settings.
Use smart sound settings
Select your preferred sound setting.
1. While you watch TV, press ADJUST.
2. Select [Smart sound].
3. Select one of the following settings, then
press OK:
[Personal]: Apply your preferred setting
in the sound menu.
[Standard]: Settings that suit most
environments and types of audio.
[News]: Ideal settings for spoken audio,
such as the news.
[Movie]: Ideal settings for movies.
[Game]: Ideal settings for games.
[Drama]: Ideal settings for drama
programs.
[Sports]: Ideal settings for sports.
Change picture format
Change the picture format to suit your
preference.
1. Press ADJUST.
2. Select [Picture format], then press OK.
3. Select a picture format, then press OK to
confirm.
The available picture formats depend on the
video source:
[Auto fill]: Adjust the picture to fill the
screen (subtitles remain visible).
Recommended for minimal screen
distortion but not for HD or PC.
[Auto zoom]: Enlarge the picture to fill
the screen. Recommended for minimal
screen distortion but not for HD or PC.
[Super zoom]: Remove the black bars
on the sides of 4:3 broadcasts. Not
recommended for HD or PC.
[Movie expand 16:9]: Scale 4:3 format
to 16:9. Not recommended for HD or
PC.
[Wide screen]: Stretch 4:3 format to
16:9.
[Unscaled]: Provide maximum detail for
PC. Only available when PC mode is
enabled in the picture menu.
Watch a connected device
Add new device
Notes:
Before you watch a connected device,
you must add its icon to the Home
menu. See Connect your TV >
Connect device (Page 47).
If you connect an HDMI-CEC
compliant device to the TV through an
HDMI connector and switch it on, the
device is automatically added to the
Home menu.
1. Connect and switch on the device.
2. Press .
3. Select [Add your devices], then press
OK.
4. Follow the onscreen instructions.
Select your device.
Select the connector.
Note: If you are prompted to select the TV
connection, select the connector that this
device uses.
Select a source
From Home menu
After you have added the new device to the
Home menu, select the new device icon to
view its contents.
1. Press .
2. Select the device icon from the Home
menu.
3. Press OK to confirm.
From Source menu
EN 17

You can also press SOURCE to display a
list of connector names. Select the
connector that connects the device to the
TV.
1. Press SOURCE.
2. Press the Navigation buttons to select a
connector in the list.
3. Press OK to confirm.
Play from USB
If you have photos, videos or music files on a
USB storage device, you can play the files on
TV.
Caution: TP Vision is not responsible if the
USB storage device is not supported, nor is
it responsible for damage or loss of data in
the device.
Do not overload the USB port. If you
connect an HDD device that consumes
more than 500mA power, make sure that it
is connected to its own external power
supply.
Access the USB content browser as follows:
While you watch TV, connect the USB
device to the USB connector on the
TV.
Press , select [Browse USB], then
press OK.
Watch video
Press the Navigation buttons to select a
video file, then press OK.
Press or to search forward or
backward within a video.
Press and hold to exit the content
browser.
While you play video, press OPTIONS
to access the following video options:
[Stop]: Stop playback.
[Repeat]: Repeat a video.
[Shuffle on] / [Shuffle off]: Enable or
disable random play of videos.
View picture
Press the Navigation buttons to select a
picture, then press OK.
To pause or stop play, press OK.
To skip to the previous or next file,
press or .
Press and hold to exit content
browser.
Press OPTIONS to access or exit the
following picture options:
[Show info]: Display the file
information.
[Stop]: Stop slideshow.
[Rotate]: Rotate the file.
[Repeat]: Repeat the slideshow.
[Play once]: Play the file once.
[Shuffle off] / [Shuffle on]: Enable or
disable random display of pictures in
the slideshow.
[Slideshow speed]: Set the display time
for each picture in the slideshow.
[Slideshow transition]: Set the
transition from one picture to the next.
[Set as Scenea]: Set the selected
picture as wallpaper on TV.
Listen to music
Press the Navigation buttons to select a
music track, then press OK.
Press / to search forward or
backward within a track.
Press and hold to exit content
browser.
Press OPTIONS to access or exit the
following music options:
[Stop]: Stop audio play.
[Repeat]: Repeat a track or an album.
[Play once]: Play the track once.
[Shuffle on] / [Shuffle off]: Enable or
disable random play of tracks.
Watch 3D
What you need
Your TV is a 3D TV. To watch 3D, you can
use the Philips Easy 3D glasses, included with
this TV. You can purchase additional Philips
3D glasses PTA416 or PT426 (sold
separately) from your local dealer.
EN 18
English
Before you watch 3D, read the health
warning information in Get started >
Important > 3D Health warning (Page 7).
Note: Passive 3D glasses from other
manufacturers may not work or offer less
optimal 3D viewing.
Start 3D
To enjoy a 3D movie or programme, insert a
3D movie disc into the 3D Blu-ray disc
player connected to the HDMI connector
on this TV or tune to a TV channel that
broadcasts 3D content.
Press and select the 3D Blu-ray disc player
or select [Watch TV] and tune to the TV
channel.
The TV will prompt a message when 3D is
available. To start watching 3D, select [Start
3D] and press OK. Put on your 3D glasses.
If you have tuned to a 3D TV channel and
do not see the prompt to switch to 3D, you
have to select the 3D format manually. To
switch on 3D format manually, press
ADJUST. Select [2D/3D] > [3D], then press
OK.
Select a suitable 3D format
If the TV shows a double picture but the 3D
effect is not seen with the 3D glasses, you
will need to select a suitable 3D viewing
format.
To set the TV in 3D, press ADJUST.
Select [3D format] and press OK, then
select [3D - Side by side] or [3D - Top /
bottom] according to the double picture
positions.
Note: The 2D/3D menu is only available
when the TV receives 3D content from the
input signal, or when [3D format] has been
set to [3D - Side by side] or [3D - Top /
bottom].
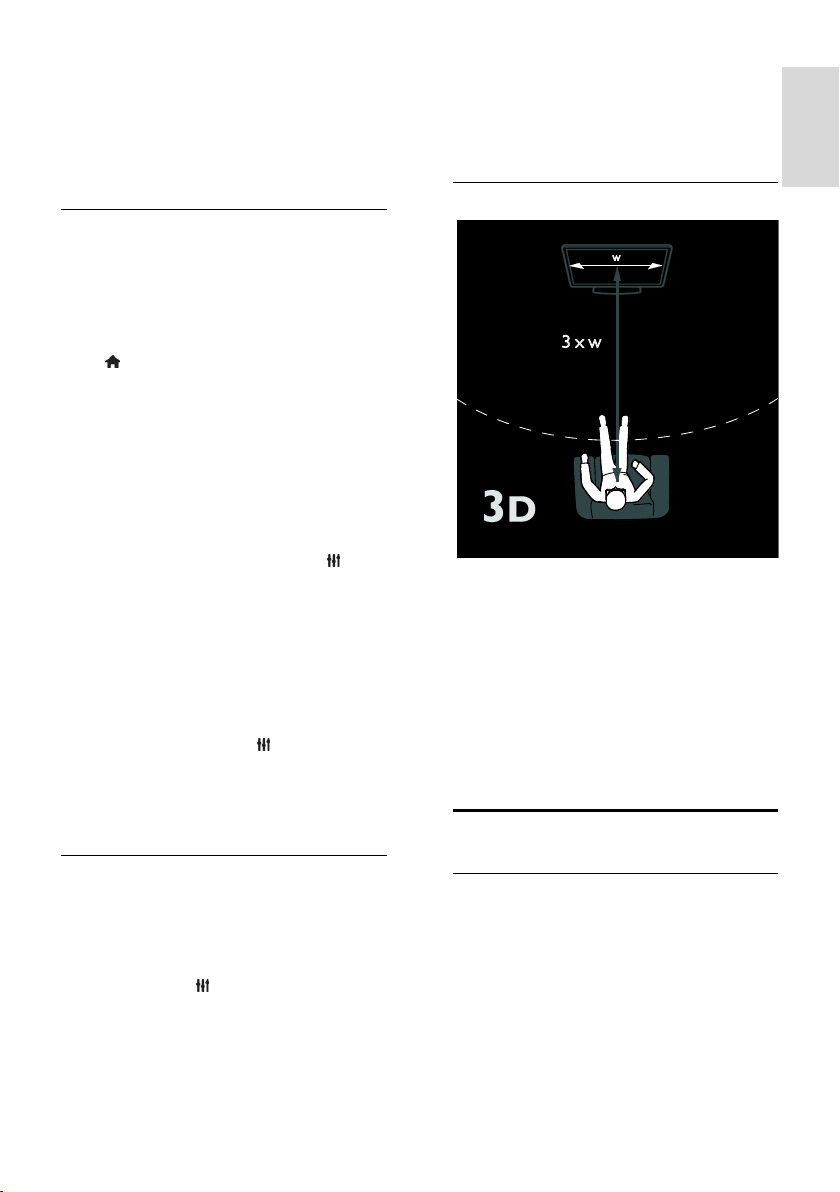
Optimal 3D viewing
For an optimal 3D viewing experience, we
recommend that you:
sit at a distance that is at least three
times the width (W) of the TV screen.
Do not sit more than six metres away.
view the centre of the TV screen at
your eye level.
watch the TV away from direct sunlight
as it may interfere with the 3D
experience.
Ambilight
Stop 3D
If you switch to another channel or a
connected device, the TV switches back to
2D.
To stop watching 3D during a 3D
programme, press ADJUST. Select
[2D/3D] > [2D], then press OK. This
forced 2D picture shows only the 3D-left
picture.
What you can do
*Available on certain models only.
Ambilight gives a more relaxed viewing
experience. It automatically adjusts the
colour and brightness of the light to match
the TV picture.
EN 19

What you need
For the best Ambilight effect, position
the TV 25cm away from the wall.
Keep the remote control away from
the TV, as it can interfere with the
infrared signals.
Dim the light in the room.
Switch on
1. Press ADJUST.
2. Select [Ambilight], then press OK.
3. To switch Ambilight on or off, select [On]
or [Off].
You can also press AMBILIGHT on the TV
to switch Ambilight on or off.
1. While you watch TV, press > [Setup].
2. Select [TV settings] > [Ambilight].
3. Select a setting to adjust:
[Dynamic]: Adjust Ambilight between
relaxed and dynamic levels. Available
only if Ambilight [Colour] is set to
[Dynamic].
[Brightness]: Adjust the brightness of
Ambilight.
[Colour]: Select a predefined colour.
[Custom colour]: Set your own
Ambilight colour. To access this option,
set [Ambilight] > [Colour] >
[Custom].
[Separation]: Adjust the difference in
colour levels on each side of the TV.
Turn off this feature for a dynamic and
uniform Ambilight colour.
[TV switch off]: Select how Ambilight
switches off when the TV is switched
off.
[Lounge light mood]: Select a lounge
light mode. The lounge light comes on
when the TV is in standby.
[Scenea lounge light]: Switch Scenea
lounge light on or off when Scenea is
enabled.
[Wall colour]: Select the colour of the
wall behind the TV. Ambilight corrects
its colours to suit the colour of the wall.
Change settings
In the Ambilight menu, you can access more
Ambilight settings.
EN 20
Use lounge light
When the TV is in standby, press Ambilight
on the front of the TV to create a lounge
light effect in your room.
Note: It may take more than 5 seconds for
the lounge light to switch on.
To select another lounge light colour, see
Use your TV > Ambilight > Change
settings.

English
Browse PC through DLNA
What you can do
If you have photos, videos or music files
stored on a computer connected through a
home network, you can play the files on
your TV.
What you need
A wired or wireless home network,
connected with a Universal Plug and
Play (uPnP) router.
A Philips wireless USB adapter or a
LAN cable that connects your TV to
your home network.
A media server such as:
PC running Windows Media Player 11
or higher; or
Mac running Twonky Media Server.
Make sure that your computer firewall
allows you to run the media server
software program.
You will also need to set up the network
connection:
Connect your TV and the computer to
the same home network. See Connect
your TV > Computers and the
Internet (Page 55).
Switch on your computer and the
router.
Proceed to set up a media sharing server
with Windows Media Player 11 or higher, or
Twonky Media Server.
Note: For help to use other media servers,
such as TVersity, see the web site of the
media server.
If the apparatus does not return to DLNA
mode due to external electrical disturbances
(e.g. electrostatic discharge), user
intervention is required.
Enable sharing on Windows Media Player 11
1. Start Windows Media Player on your
computer.
2. Select Library > Media Sharing.
The first time you select Media Sharing,
a pop-up screen appears. Tick the
Share my media box and click OK.
A device marked as Unknown Device
appears in the Media Sharing screen.
If the unknown device does not appear
after a minute or so, make sure that
your PC firewall is not blocking the
connection.
3. From the Media Sharing screen, select the
unknown device and click Allow.
A green tick appears next to the device.
By default, Windows Media Player
shares files from these folders: My
Music, My Pictures, and My Videos.
4. If your files are in other folders, select
Library > Add to Library, and then follow
the onscreen instructions to add the folders.
If necessary, select Advanced options
to display a list of monitored folders.
5. Select Library > Apply Media Information
Changes to activate the changes.
Enable sharing on Windows Media Player 12
1. Start Windows Media Player on your
computer.
2. In Windows Media Player, select the
Stream tab, and then select Turn on media
streaming.
The Media streaming options screen
appears.
3. Click Turn on media streaming.
Return to the Windows Media Player screen.
4. Click Stream > More streaming options.
The Media streaming options screen
appears.
A media program appears in the local
network screen. If the media
programme does not appear, make
sure that your PC firewall is not
blocking the connection.
5. Select the media programme and click
Allowed.
A green arrow appears next to the
media programme.
EN 21

By default, Windows Media Player
shares files from these folders: My
Music, My Pictures, and My Videos.
6. If your files are in other folders, select
Organize tab and select Manage libraries >
Music.
Follow the onscreen instructions to add the
folders that contain your media files.
Enable sharing on Twonky Media
1. Visit www.twonkymedia.com to purchase
the software, or download a free 30-day trial
to your Macintosh.
2. Start Twonky Media on the Macintosh.
3. In the Twonky Media Server screen,
select Basic Setup and First steps.
The First steps screen appears.
4. Type a name for your media server, and
then click Save changes.
5. Back in the Twonky Media screen, select
Basic Setup > Sharing.
6. Browse and select folders to share, and
then select Save Changes.
Your Macintosh rescans the folders
automatically so that they are ready to share.
Play files from computer
Note: Before you play multimedia content
from the computer, make sure that the TV is
connected to the home network, and the
media server software is properly set up.
1. Switch on the computer and the router.
2. Switch on your TV.
3. Press on the remote control.
4. Select [Browse PC], then press OK. If the
network installation starts, follow the
onscreen instructions.
5. If the content browser is displayed, select
a file, then press OK.
The file starts to play.
6. Press the Play buttons on the remote
control to control play.
View pictures
To play a picture slideshow, select a
photo, then press OK.
To pause or stop playback, press OK
again.
To play the previous or next file, press
or .
Press OPTIONS to access one of the
following options:
[Show info]: Display the file
information.
[Stop]: Stop slideshow.
[Rotate]: Rotate the file.
[Repeat]: Repeat the slideshow.
Net TV and online video
What you can do
Enjoy Internet Applications (Apps), specially
adapted internet websites for your TV. You
can control the Apps with the TV remote
control. For example, you can:
Read newspaper headlines
Watch videos
Check weather forecasts
Use the catch-up TV feature to watch TV
programmes that you missed. Availability of
catch-up TV Apps differ for each country.
To find out which TV programmes are
available, access the Net TV programme
guide.
Find out more on Net TV services at the
Net TV forum website,
www.supportforum.philips.com.
Notes:
Each country has different Net TV
services.
Certain websites may not display
completely. Some functions are not
available, for example file download, or
functions that require plug-ins.
Net TV services are updated
automatically. To view the latest
updates, change [All] to [New]in the
[App Gallery].
Net TV displays one page at a time, in
full screen.
TP Vision Netherlands B.V. bears no
responsibility regarding the content and
the quality of the content provided by
the content service providers.
EN 22
 Loading...