

Philips 37PF7320 93, 42PF7320 93, 42PF7320Z 93, 42PF7420 93, 42PF7520Z 93 User Manual
...
1
Preparation . . . . . . . . . . . . . . . . . . . . . . . . . . . . . . . . . . . . .2
To use the menus . . . . . . . . . . . . . . . . . . . . . . . . . . . . . . . .3
Remote control . . . . . . . . . . . . . . . . . . . . . . . . . . . . . .4-5
The keys on the right side of the TV set . . . . . . . . . . . . . .6
Rear connections . . . . . . . . . . . . . . . . . . . . . . . . . . . . . . . .6
Recorder (VCR-DVD+RW) . . . . . . . . . . . . . . . . . . . . . .7
Devices with Component Video Output connectors . . .8
Devices with Progressive Scan output . . . . . . . . . . . . . 9
Devices with HDMI connector . . . . . . . . . . . . . . . . . .10
Devices with DVI connector to the HDMI connector
of the TV . . . . . . . . . . . . . . . . . . . . . . . . . . . . . . . . . . .10
Computer with VGA connector to the PC-VGA
connector of the TV . . . . . . . . . . . . . . . . . . . . . . . . . .11
Side connections . . . . . . . . . . . . . . . . . . . . . . . . . . . . . . . .12
Record with your recorder . . . . . . . . . . . . . . . . . . . . . . . .13
How to search for and store TV channels . . . . . . . . . . . . .14
Give name . . . . . . . . . . . . . . . . . . . . . . . . . . . . . . . . . .16
Editing of channels . . . . . . . . . . . . . . . . . . . . . . . . . . . .16
Features menu . . . . . . . . . . . . . . . . . . . . . . . . . . . . . . . . . .17
PIP (Picture in Picture) . . . . . . . . . . . . . . . . . . . . . . . .17
Child lock . . . . . . . . . . . . . . . . . . . . . . . . . . . . . . . . . . 18
Teletext . . . . . . . . . . . . . . . . . . . . . . . . . . . . . . . . . . . . . . .19
Using in PC monitor mode . . . . . . . . . . . . . . . . . . . . . . . .20
Using in HD (High Definition) mode . . . . . . . . . . . . . . . . .21
Tips . . . . . . . . . . . . . . . . . . . . . . . . . . . . . . . . . . . . . . . . . .22
Thank you for purchasing this television set.
This handbook has been designed to help you install and
operate your TV set. We would strongly recommend that you
read it thoroughly.
We hope our technology meets entirely with your satisfaction.
Introduction
Ta b le of Contents
°
Recycling
The materials used in your set are either reusable or can be recycled.
To minimise environmental waste, specialist companies collect used
appliances and dismantle them after retrieving any materials that can be used
again (ask your dealer for further details).
Help?
If this instruction manual does
not give an answer or if ‘Tips’ do
not solve your TV problem, you
can call your Local Philips
Customer or Service Centre. See
the supplied World-wide
guarantee booklet.
Please, have the Model and
Product number which you can
find at the back of your
television set or on the
packaging, ready, before calling
the Philips helpline.
Model: 37PF7320/93
42PF7320/93
42PF7320Z/93
42PF7420/93
42PF7520Z/93
50PF7320/93
Product No:
English
3104 315 2445.3
2445.3 en 11-10-2005 10:45 Pagina 1
2
Care of the screen
Do not touch, push or rub or strike the screen with anything hard as this may scratch, mar or damage the
screen permanently. Do not rub with dust clothes with chemical treatment. Do not touch the surface with bare
hands or greasy cloth (some cosmetics are detrimental to the screen). Unplug the TV before cleaning the
screen. When the surface becomes dusty, please wipe gently with absorbent cotton or other soft materials like
chamois soaks. Do not use acetone, toluene and alcohol because they cause chemical damage.
Do not use liquid cleaners or aerosol cleaners. Wipe off saliva or water drops as soon as possible.Their long
time contact with the screen causes deformations and colour fading.
Warning concerning stationary images on the TV screen
A characteristic of Plasma Display Panels is that displaying the same image for a long time can cause a
permanent after-image to remain on the screen.This is called phosphor burn in.
Normal use of the TV should involve the showing of pictures that contain constantly moving and changing
images that fill the screen.
Black Bars
When black bars appear at the left and right side of the screen, it is recommended to change to a picture
format so that the picture fills the entire screen.
Preparation
& Wall mounting instructions/Table stand
According to the type of TV you’ve purchased a
wall mount bracket and/or stand may be
supplied. How to mount the supplied stand
and/or wall mount bracket, see the supplied
Quick Start Guide. Make sure that the wall
mount is being fixed securely enough so that it
meets safety standards.
The weight of the TV (excl. packaging) is about
23,2 kg (37PF7320); 37,3 kg (42PF7320/ 7320Z/
7520Z); 27kg (42PF7420); 50 kg (50PF7320).
Note: Other (not supplied) stands are optional
accessories. Consult your dealer.
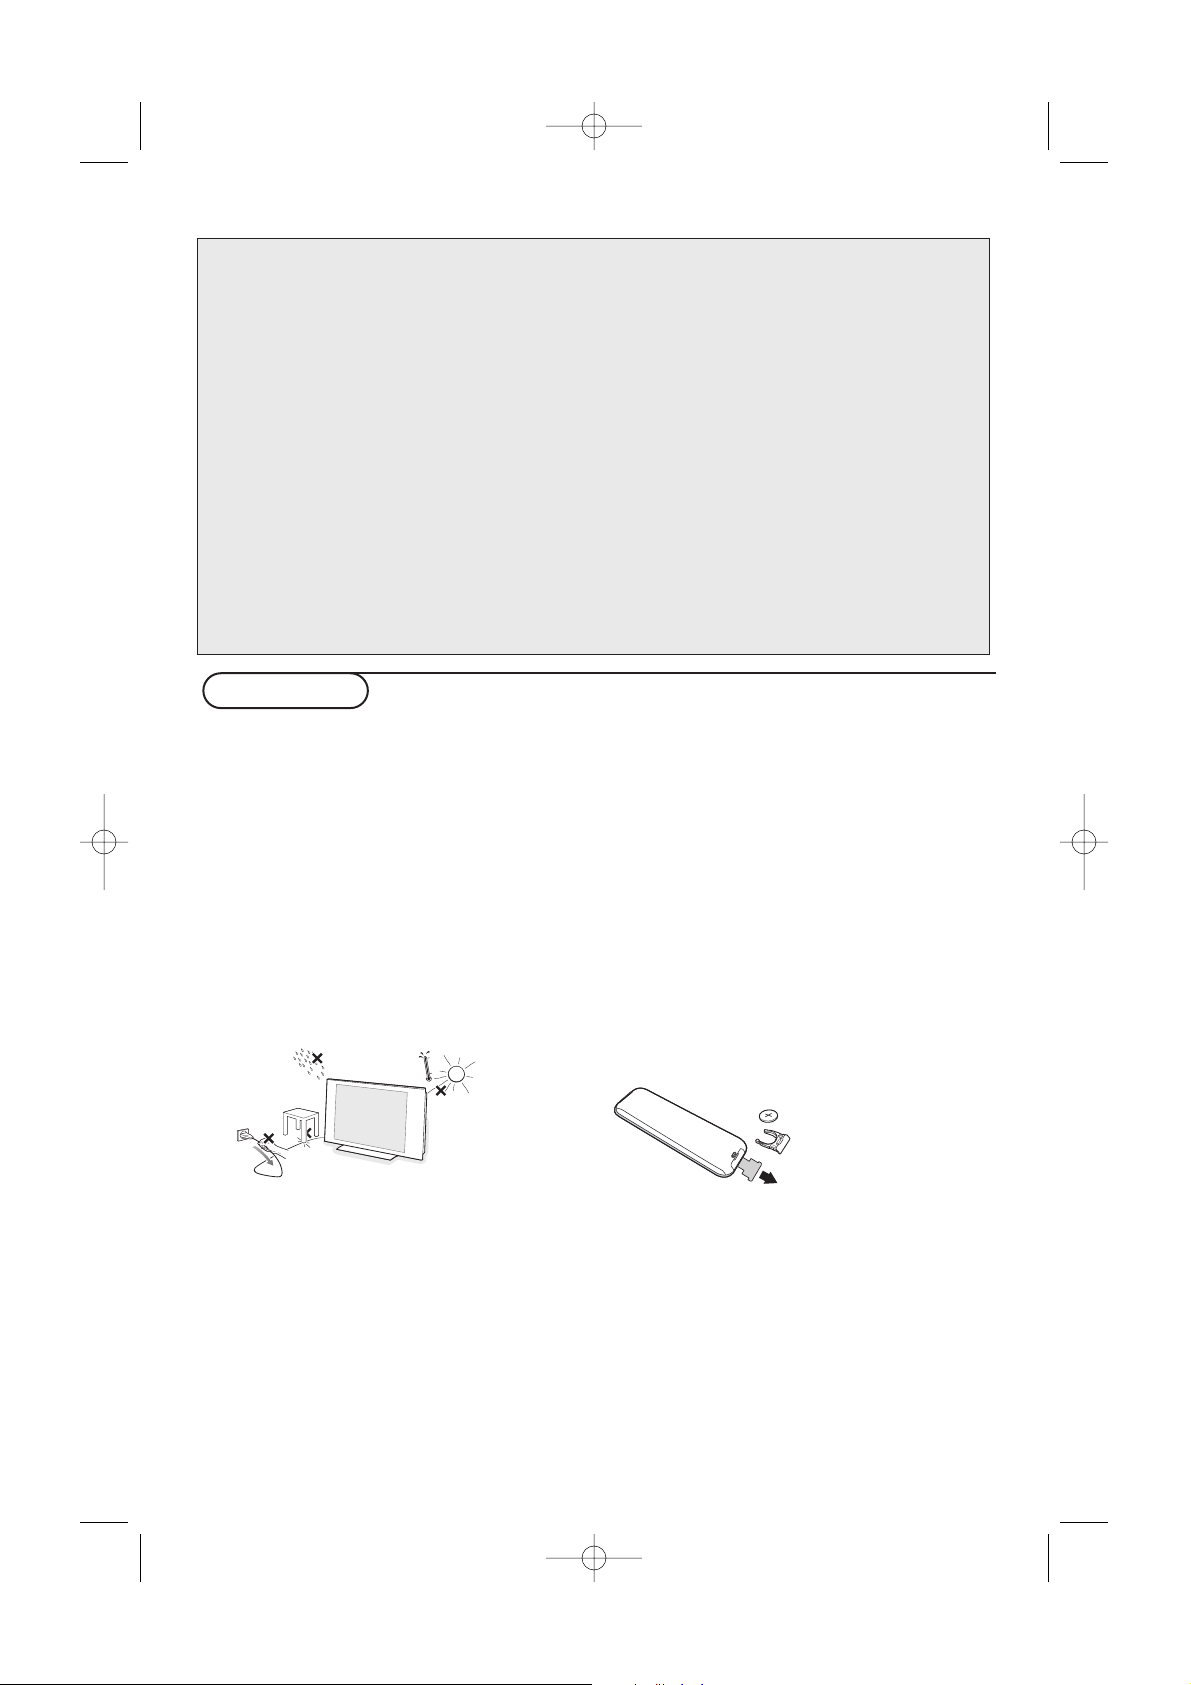
é For ventilation, leave at least 5 cm free all
around the TV.
To prevent any unsafe situations, no naked
flame sources, such as lighted candles, should
be placed in the vicinity.Avoid heat, direct
sunlight and exposure to rain or water.
The equipment shall not be exposed to
dripping or splashing.
“ Insert the aerial plug firmly into the aerial
socket x at the bottom of the TV. For best
picture quality use the suppressor-aerial cable
supplied.
‘ To connect peripheral equipment, see p. 6.
( Insert the mains cord supplied into the mains
at the bottom of the TV and in the wall socket
having a mains voltage of 110-240V / 220 240V (see p.22).
To prevent damaging the power (AC) cord
which could cause a fire or electric shock, do
not place the TV on the cord.
§
Remote control: Pull out the plastic insulation
sheet from the battery, this will activate the
remote control.
The battery supplied with
the appliance does not
contain mercury or nickel
cadmium so as to protect
the environment. Please
do not discard your used
batteries, but use the
recycling methods
available (consult your
distributor).
è Switch the TV on :Press the power switch B
at the right side of the TV.
An indicator on the front of the TV lights up.
Press the
-P+ keys or the B key on the
remote control.
CR 2025
2445.3 en 11-10-2005 10:45 Pagina 2
3
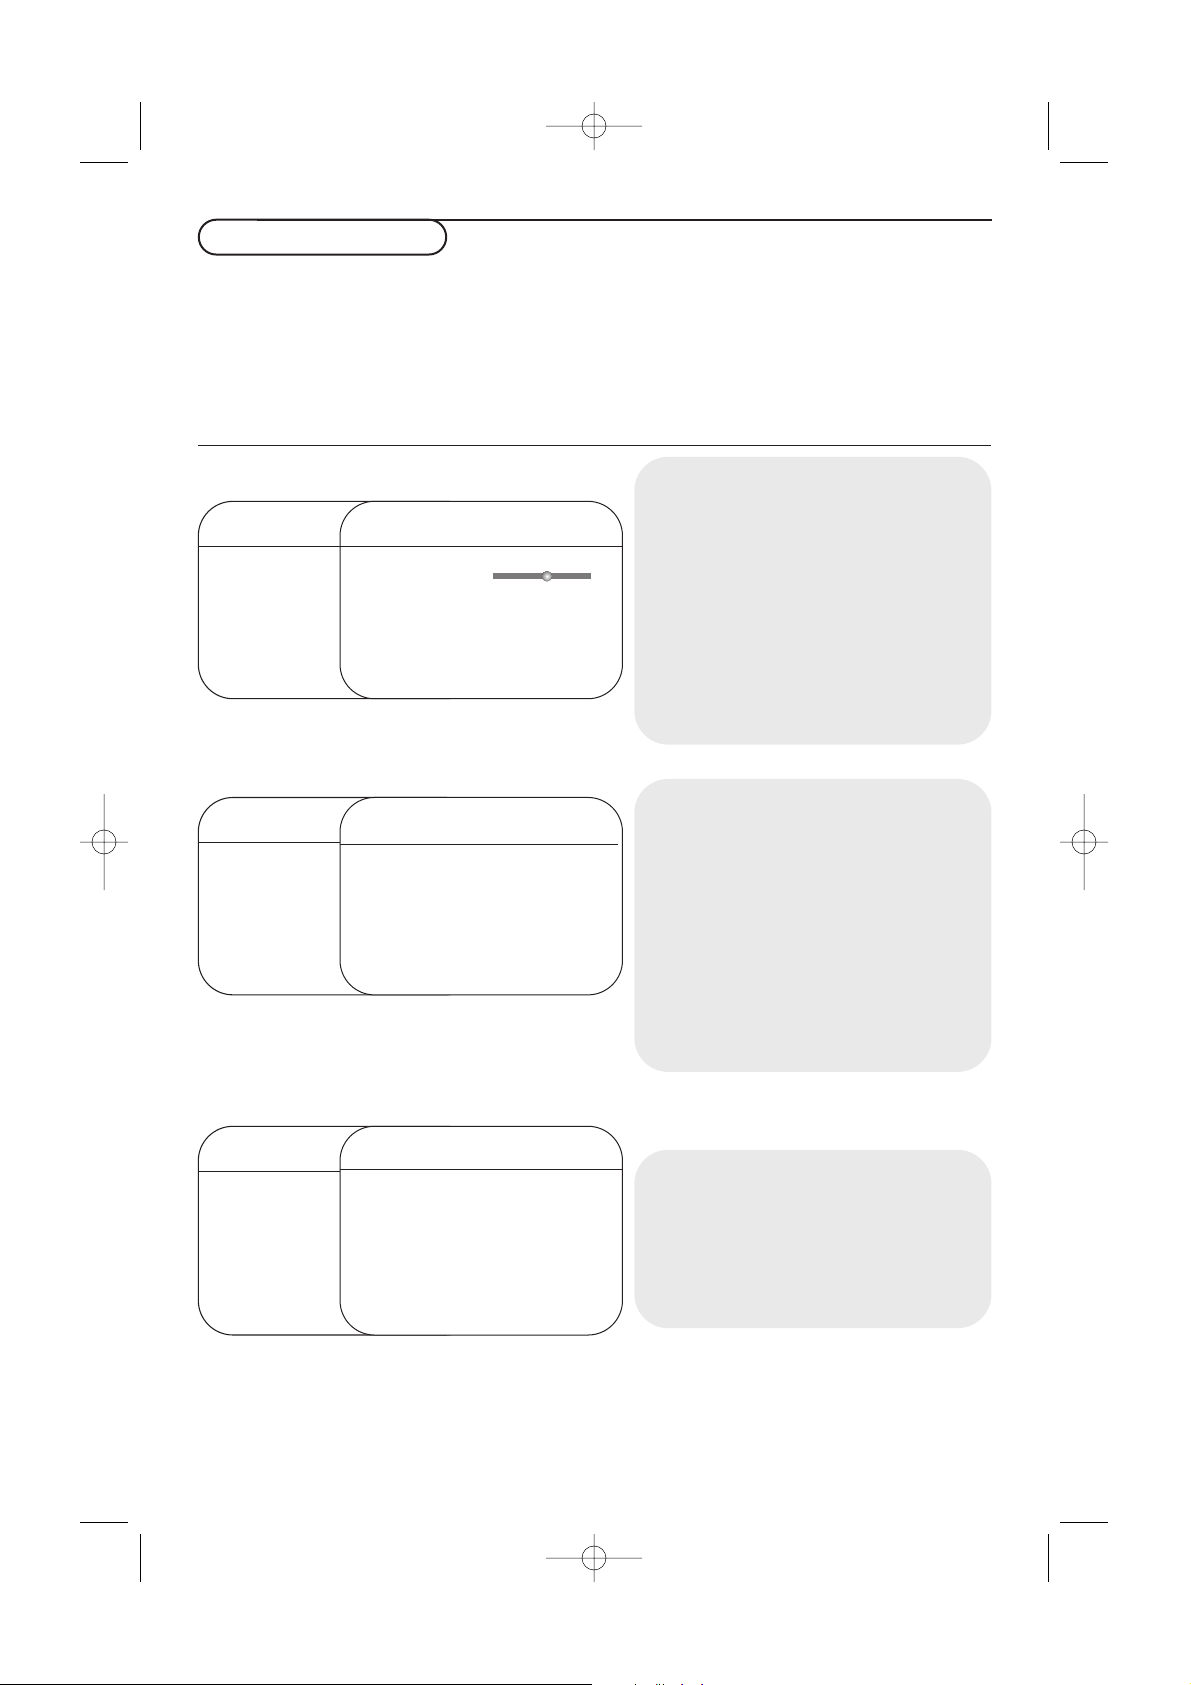
To use the menus
& Press the MENU key on the remote control to
summon the main menu.
é Use the cursor up/down to select Picture,
Sound, Features or Install.
“ Use the cursor in the right direction to select
the menu item.
‘ Use the cursor up/down again to select a
setting.
( Use the cursor left/right to adjust.
§ To exit the menus, press the MENU key
repeatedly.
Note: Items temporary not available or not relevant are
displayed in a light grey colour and cannot be selected.
TV menu
TV Menu
Picture π Brightness
Sound Colour
Features Contrast
Install Sharpness
Colour Temp
TV Menu
Picture Brightness
Sound π Colour
Features Contrast
Install Sharpness
Colour Temp
TV Menu
Picture Brightness
Sound Colour
Features π Contrast
Install Sharpness
Colour Temp
Picture
Brightness π
Colour
Contrast
Sharpness
Hue
Colour Temp.
pπ
Sound
Equalizer π 120 Hz
Balance 500 Hz
(AVL) 1500 Hz
Dolby Virtual 5 kHz
10 kHz
Features
Timer π (Sleep)
Child Lock Time
Contrast+ Start Time
NR Stop Time
PIP Channel
Install menu:
see p. 14
Picture menu:
•
Brightness: this changes picture brilliance.
•
Colour: this changes the intensity of the
colour.
•
Contrast: this changes the difference
between the light and dark tones.
•
Sharpness: this changes the picture
definition.
•
Hue: this adjusts the picture to obtain
natural skintones.
•
Colour Temp.: this changes the colour
rendering:
Cool
(bluer);
Normal
(balanced)
or
Warm
(redder).
Sound menu:
•
Equalizer: to adjust the sound tone (from
bass 120 Hz to treble 10 kHz).
•
Balance: this balances the sound on the left
and right speakers.
•(
AVL (Automatic Volume Leveller): this is
used to limit increases in sound, especially on
programme change or advertising slots.)
•
Dolby Virtual
: simulates the surround sound
experience from two speakers using Dolby
Pro Logic* providing the listener with the
sensation of being surrounded by additional
speakers.
Features menu:
•
Timer, Child lock and
PIP
: see p. 17-18.
•
Contrast+: automatic adjustment of the
picture contrast which permanently sets the
darkest part of the picture to black.
•
NR
: attenuates picture noise (snow) in
difficult reception conditions.
* Manufactured under license from Dolby Laboratories.
Dolby’ ‘Pro Logic’ and the double-D symbol are trademarks of
Dolby Laboratories.
2445.3 en 11-10-2005 10:45 Pagina 3
4
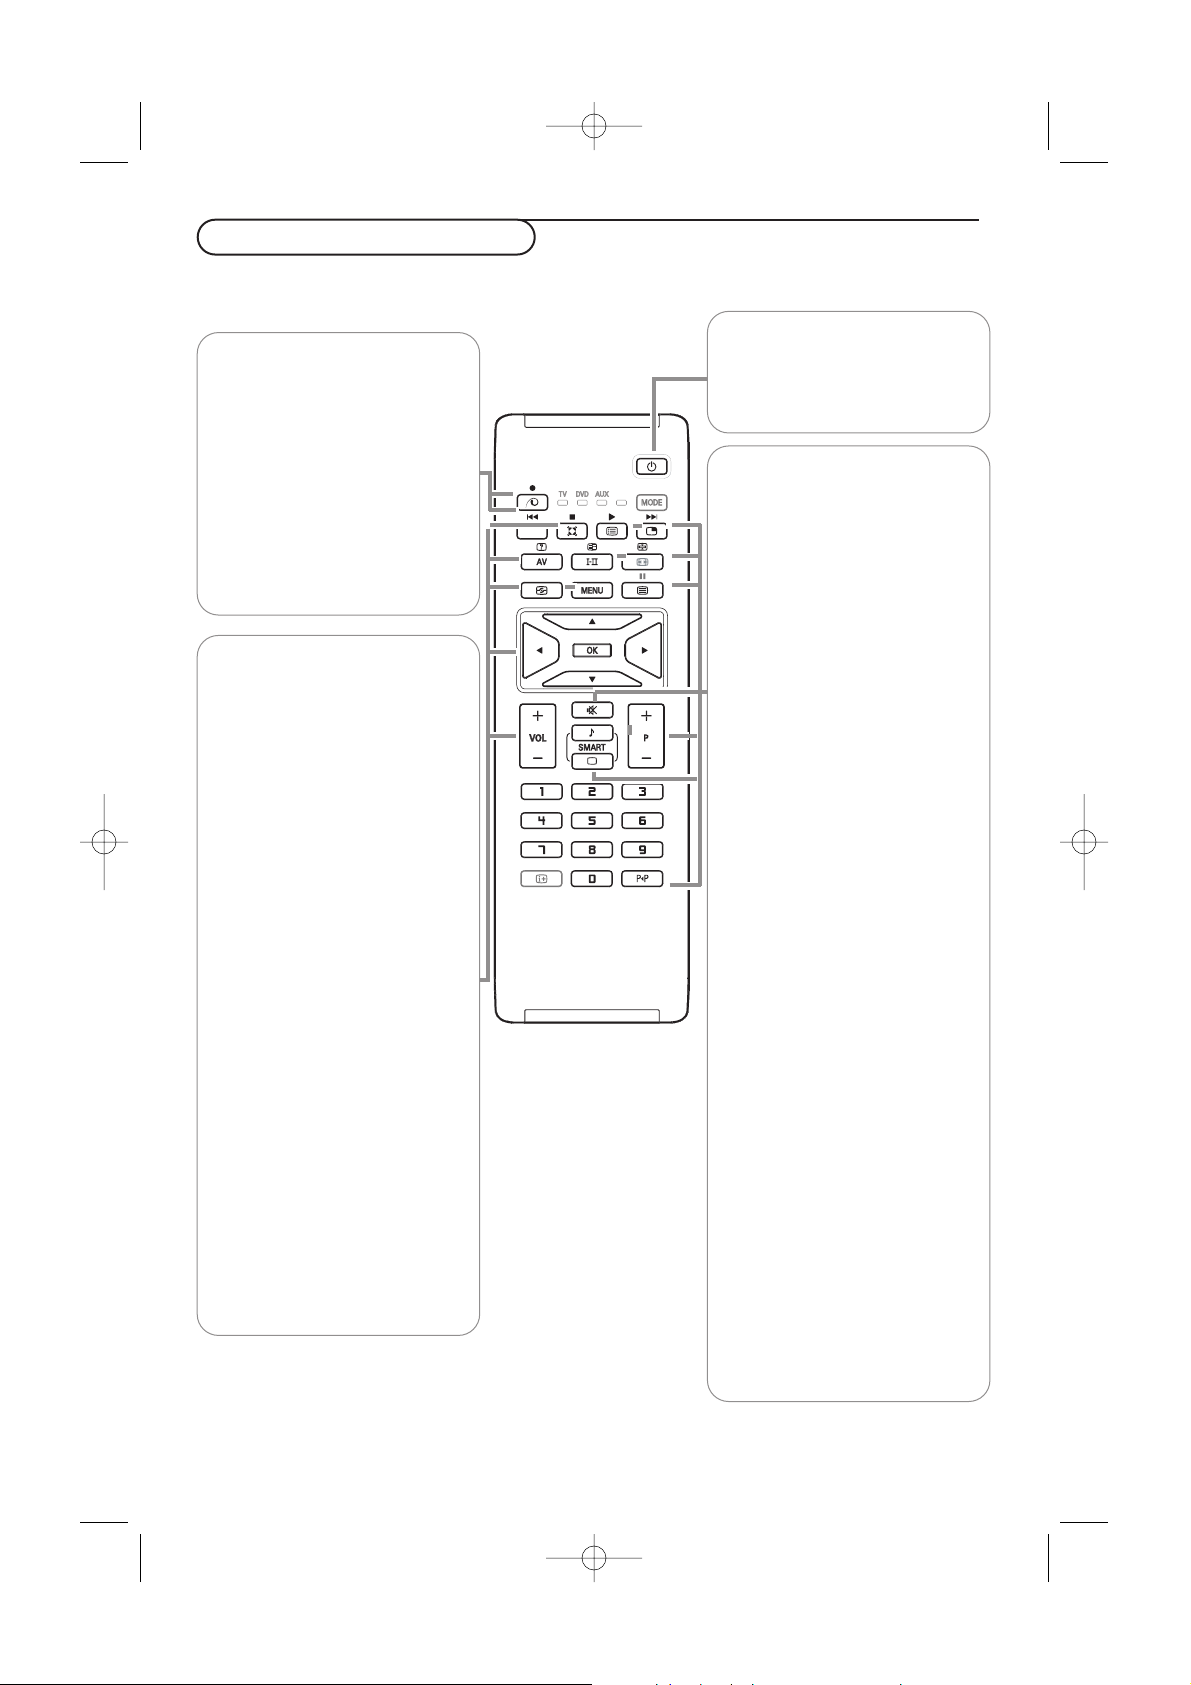
Use of the remote control
x Pixel Plus demo on/off
(Only available on certain versions.)
•Press the
x key.
The screen is divided into 2 parts:
- in the left part Pixel Plus is
switched off;
- In the right part Pixel Plus is
switched on.
•Press the
x key again to
switch the Pixel Plus demo off.
®Ò‡π†
Video recorder or DVD keys
æPIP (Picture in Picture) on/off
(p. 17)
ı List of programmes
To display/clear the list of
programmes. Use the keys oœ to
select a programme and the key π
to display it.
X Sound mode
To s witch from Stereo or Nicam
Stereo to Mono or to choose
between Dual I or Dual II in case of
bilingual transmission.
When the sound mode is Mono, the
indication is displayed in red.
f:gb Teletext
Teletext keys. See p. 19.
¬ Interrupt the sound or restore it.
Smart picture a and sound M
To select predefined picture and
sound settings.
This Philips TV has been set at the
factory to look best in bright store
environments which use fluorescent
lighting. As your home will likely not be
as well lit as a store, we recommend
you that you cycle through the various
smart picture modes to find the one
that best stuits your own viewing
conditions. Most consumers will find
that Natural is the correct choice.
P Programme selection
To move up or down a programme.
The number, (the name) and the
sound modes are displayed for a few
seconds.
For some TV programmes the title of the
programme appears at the bottom of the
screen.
0 Previous TV channel
Press to display the previously
selected TV channel.
Q Surround mode
Virtual Dolby* Surround
Optimal with Dolby surround signals.
Enables you to experience the effect
of Dolby surround Pro Logic,
reproducing a rear sound effect. See
Sound menu, Dolby Virtual, p. 3.
Note:You can make the same selection in
the Sound menu, p. 3.
AV To display the Source list to
select TV or peripheral equipment
connected to
CVI-1, AV, PC-
VGA/CVI-2, HDMI/PC-D or Side.
See also p. 6.
h Active control
Optimizes the picture quality
according to the quality of the
reception.
Press this key to switch between
On, On with sensor and Off.
MENU Main menu on/off
Cursor keys
Press the keys oœpπ to
navigate through the menus.
VOL To adjust the volume.
0/9 Digit keys
To select a TV channel.
For a two digit programme number,
enter the second digit before the
dash disappears.
B Standby
Press to switch the TV on or off
from or to standby mode.
When switched off, a red indicator
on the TV lights up.
2445.3 en 11-10-2005 10:45 Pagina 4
5
MODE* Press this key to switch between TV, DVD and AUX functions.
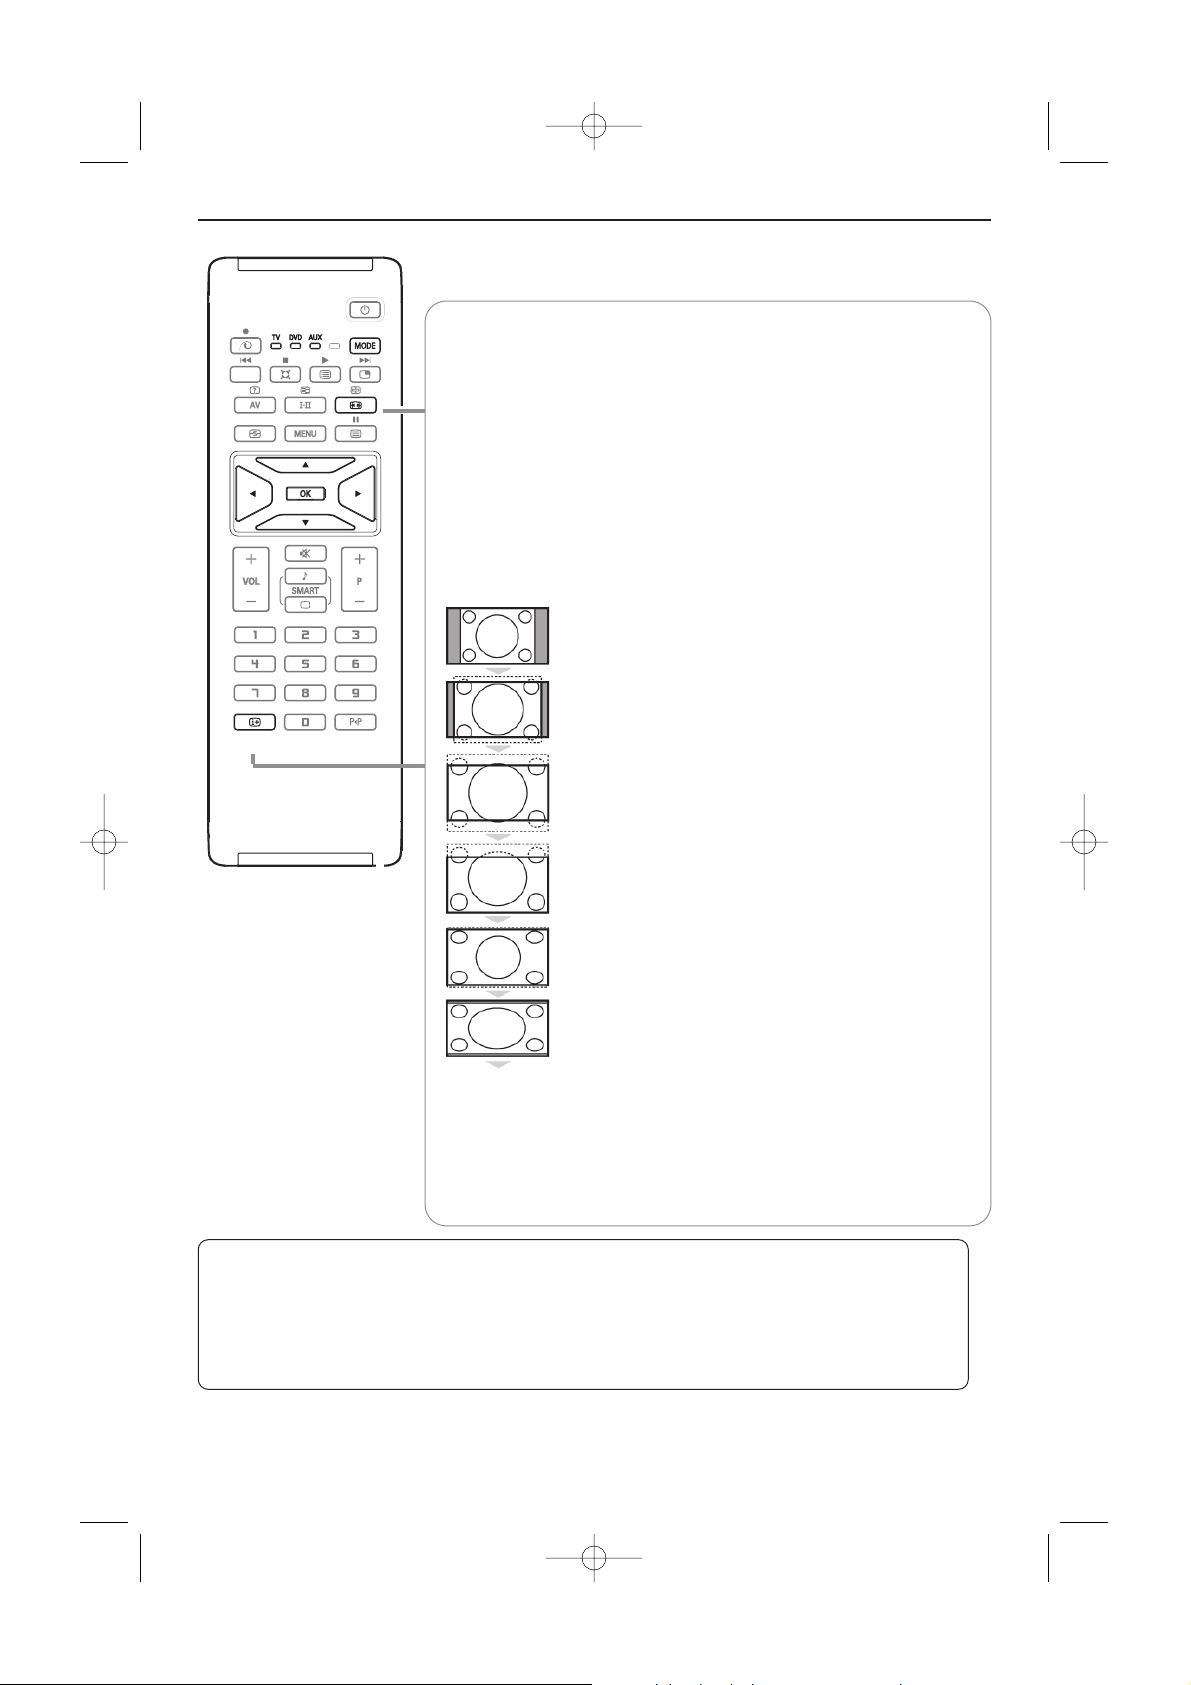
q 16:9 formats
The pictures you receive may be transmitted in 16:9 format (wide screen)
or 4:3 format (conventional screen).
4:3 picture sometimes have a black band at the top and the bottom of
the screen (letterbox format).
This function allows you to optimise the picture display on screen.
Using the different formats
Press the q key or use the keys pπ to select the different modes:
4:3, Movie Expand 14:9, Movie Expand 16:9, Subtitle Zoom, Superzoom
and Widescreen.
4:3
The picture is reproduced in 4:3 format and a black band is
displayed on either side of the picture.
Movie Expand 14:9
The picture is enlarged to 14:9 format, a thin black band
remains on both sides of the picture.
Movie Expand 16:9
The picture is enlarged to 16:9 format.This mode is
recommended when displaying pictures which have black
bands at the top and bottom (letterbox format).
Subtitle Zoom
This mode is used to display 4:3 pictures using the full
surface of the screen leaving the subtitles visible.
Superzoom
This mode is used to display 4:3 pictures using the full
surface of the screen by enlarging the sides of the picture.
Widescreen
This mode restores the correct proportions of pictures
transmitted in 16:9 using the full screen display.
Note: If you display a 4:3 picture in this mode, it will be enlarged
horizontally
.
i Screen information
To display/remove the programme number, the name (if it exists), the
time, the sound mode and the time remaining on the timer.
Hold down for 5 seconds to permanently display the programme number
on the screen.
* Mode selector
The remote control lets you control the main functions of the VCR or DVD.
Press the
MODE key to select the required mode: DVD or AUX (VCR).
The remote control indicator lights up to display the selected mode. It switches off automatically
after 20 seconds if left idle.The remote control automatically returns to TV mode.
The following keys are operational, depending on the equipment:
B
, X, ®Ò‡π†, OK, MENU, cursor keys, -P+, digit keys, i, 0.
2445.3 en 11-10-2005 10:45 Pagina 5
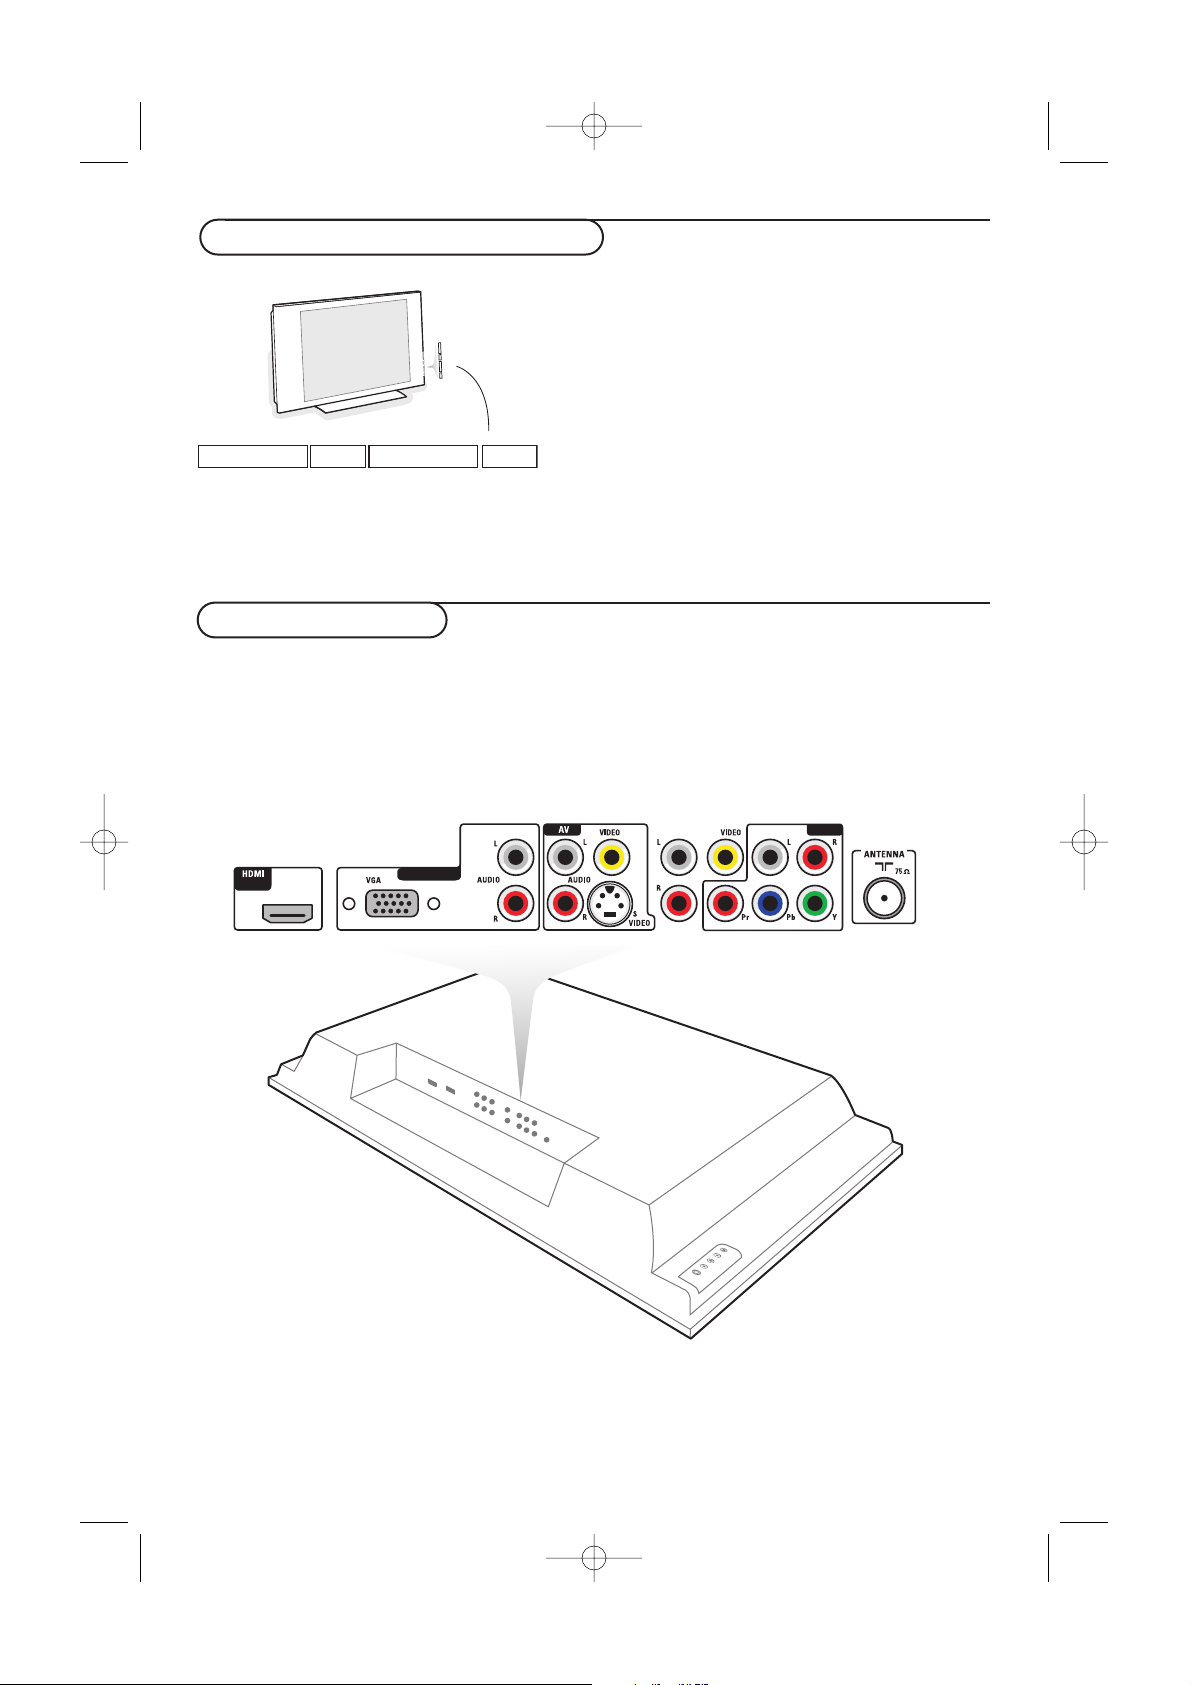
6
Rear connections
There is a wide range of audio and video devices that can be connected to your TV.The following
connection diagrams show you how to connect them to the TV.
CVI-1 can handle YPbPr and Audio L/R; AV CVBS, Y/C and Audio L/R; PC-VGA/CVI-2 VGA or YPbBr and Audio L/R;
HDMI/PC-D HDMI or DVI.
/PC-D
PC-VGA/CVI-2
MONITOR
OUT
CVI-1
Keys on the right side of the TV
Should your remote be lost or broken you can still
change some of the basic settings with the keys on
the right side of your TV.
Press:
•
POWER : to switch the TV on or off.
•
+VOLUME - : to adjust sound level.
•
+PROGRAM - : to select programmes.
•
MENU : to access or close menus.
The
+ PROGRAM - keys can be used to select an
adjustment and the
+ VOLUME - keys to make
that adjustment.
MENU/OK - VOLUME + - PROGRAM + POWER
2445.3 en 11-10-2005 10:45 Pagina 6
/PC-D
PC-VGA/CVI-2
MONITOR
OUT
CVI-1
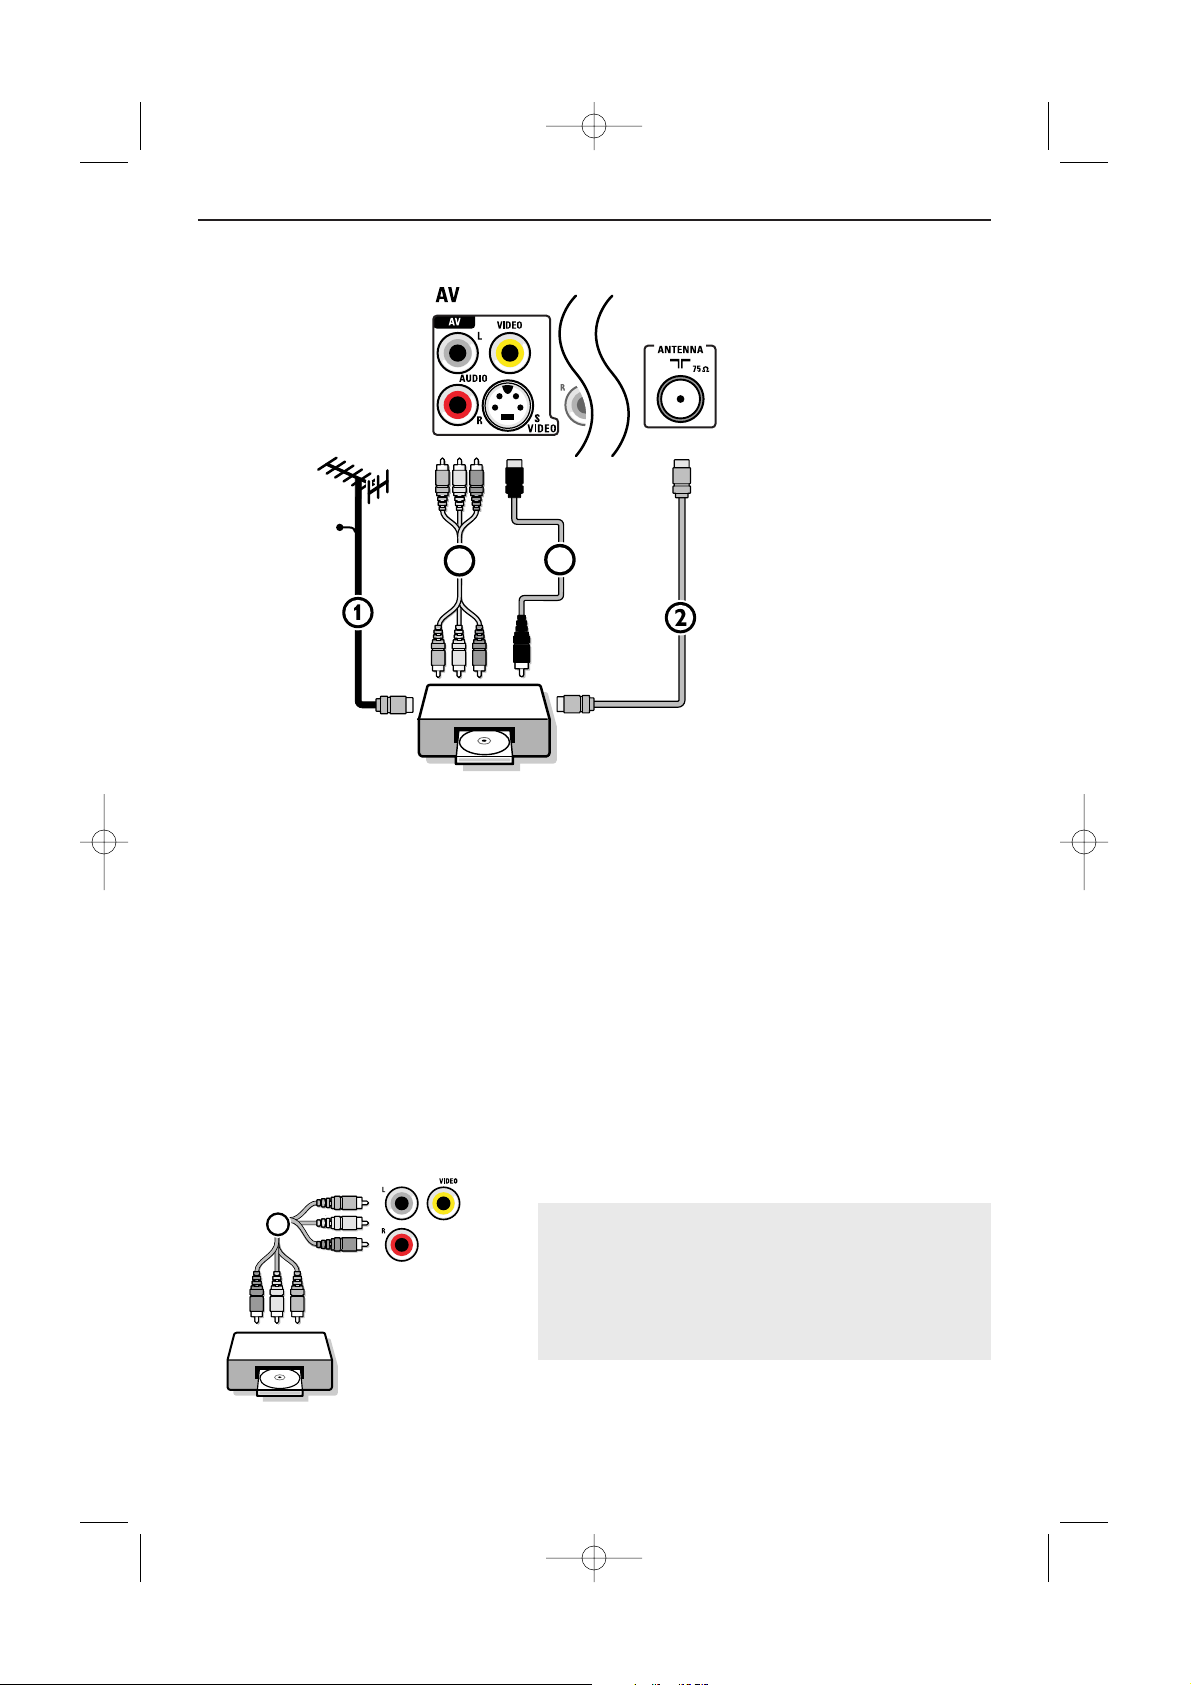
7
Note: Do not place your recorder too close to the screen as some recorders may be susceptible for signals from the
display. Keep a minimum distance of 0,5m from the screen.
& Connect the RF Antenna cable 1 to the RF IN socket of your recorder.
é Connect another RF cable 2 from the output OUT of your recorder to the TV’s input x
ANTENNA 75 Ω jack.
“ Better playback quality can be obtained if you also connect the Video, Audio Left and Right (only for
stereo equipment) AV cables 3 to the
VIDEO, AUDIO L and R input jacks of AV.
‘ Press the AV key on the remote control repeatedly until AV is selected.
If your recorder has an S-VHS video jack:
For improved picture quality, connect an S-video cable 4 with the
S-VIDEO input.
S-Video does not provide audio, so audio cables must still be connected to provide sound.
CABLE
RECORDER
IN OUT
4
3
The
MONITOR OUT
connector can be used for daisy
chaining or to record programs from your TV 6. Only
when a recorder is connected to
MONITOR OUT
it is
possible to record an analog program from your TV. See
Record with your recorder, p. 13.
RECORDER
IN OUT
VIDEO
L/Mono
R
6
MONITORMONITOR
OUT OUT
Recorder (VCR-DVD+RW)
2445.3 en 11-10-2005 10:45 Pagina 7
 Loading...