

Philips 26PW8402137 User m, 30PW84021/37, 34PW84021/37, 30PW85021/37, 34PW85021/37 User Manual

User Manual
26PW8402137
30PW8402137
34PW8402137
30PW8502137
34PW8502137
Thank you for choosing Philips.
Need help fast?
Read your User Manual first for quick tips that make
using your Philips product more enjoyable. If you have
read your instructions and still need assistance you may
access our online help at
www.p4c.philips.com
or
call 1-800-531-0039
while with your product.
Model No,:
Serial No,:
PHILIP$
3121 235 21791

Registering your model with PHfLfPSmakes you eligible for all of the valuable benefits listed below, so don't miss out.
Complete and return your Product Registration Card at once to ensure:
PHILIPS
Congratulations on your purchase,
and welcome to the "famifyl. "
Dear PHtLIPS product owner:
Thank you for your cant dence in PHILiP&You've selected one of the
best-built, best-backed products avalable today.We'll do everything in
our power to keep you happy wth your purchase for many years to
cattle.
As a member of the PHILIPS"famty,"you're ent Ued to protect on by
one of the most comprehensive warranties and outstand ng service
networks n the ndustry.What's more, your purchase guarantees
you'll receive all the informal on and special offers for whch you
qualify, plus easy access to accessor es from our conven ent home
shopping network.
Most importantly, you can count on our uncompromising commit-
ment to your total sat sfact on.
All of ths is our way of saying welcome - and thanks for nvesting in
a PHELPSproduct.
P.S. To get the most from your PHILIPS purchase, be
sure to complete and return your Product Registration
Card at once.
2
Know these
sa fetysy bofs
_IL This _'bolt of li_hulin_" indicates
uninsulated material "wi_Jlin your" unit
may cause an electrical shock, For" the safe-
ty of everyone in your household, please
do not remove product covering,
The _'exclamation point" calls atten-
tion to features for which you
should read the ellclosed literature closely
to prevent operating a_d mainte_ance
problems,
CAUTION: To prevent electric shock,
match wide blade of plug to wide slot. fully
i_ser't,
ATTENTION: Pour _viter" les choc alec-
triques, il_tr'oduire la lame la plus lar'ge de
la fiche dens la bor'_e correspo_dante de la
prise eL pousser" jusqu'au fond,
For Customer Use
[_llter" below the Serial No, which is
located o_ the rear of the cabinet, Retain
this infor'l:qatioll for" future refer'elite,
Model No,
Serial No,
IMPORTANT SAFETY INSTRUCTIONS
Read before operating equipment
B. Objects havc I'allen, or liquid has bcen .spilled inlo flae ag91i-
C. The a_Iianc_ _as b_ exposed to rain; or
D. Tile a_Iian¢_ do_ n_tl appear l_t Opo_a]_ t_o_l_y or
exh_i_ a ma_ed chmage in per folvna_ce; or
E. The a_pIimace has be_ _pped, or _e enclos_rc dama_d.
17. TilffStabi_ _ All lel_visi_s rm_.st c_mp_ wilh _eomrn_nd_d
in_n_aI gIobaI sal'ety _and_ds I'or till a_d stability pro_erties
ofi_ cabinet d_,_ign.
• Do _ot compromis_ th_,_e d_,_i_ sla_dard_ by applying exce_
s_ve pull I_rce 1o fl_e fixmt, or top, of 1]_ cabh_et which co_dd _1_
• A]_o, do _ot e_dan_r y_eIt_ or chiklrc_, by pIaeing ele¢_un_
ic _q_iprn_tiloys o_ th_ top o1!_e cabi_et. Such items could
ur_s_,_pectingly _hlI fi'om fl_e top ofth_ _el a_d caus_ producl _rn-
18. Wall or Ceilillg Mo_illg _ Thc applia_ce sh_ld be rn_n_ed 1_
a wa]| or ¢_iling onIy as _c_n_m_dcd _y ll_ man_P_¢h_re_
19. Power Lilies _ An outdoor matenna should be ]oca_d aw_ l?om
20. O_t_or A_te_a Grou_fllng - If an o_side a_te_ma i_ c_n_cd m
rcc_ _% be _e _he _te_ma _tem i.s_x_a_ded _ a_ _ _mvide
_n_c prote_'ti_ agai_st _ ollage _ and _i]t up static ¢ha_ge,s.
Seelion 810 oflhe Na_aI Elcc_c C_|e, ANSFNFPA No. 70_
1984, pmvid_,_ inlbrma_ion _lh _z_ect m pro_er _'_ding oP
flac rna_ a_ s_pporting slructm_z, grooa_ing oflh_ l_ad_in wi_
aa_at_lll& discharge ililit_ size of gro_ndiilg ¢on]_¢_o1"6_ location
of matenna-_cha_e unit, co_cc_ _ gm_nding el_¢trud_,_, a_
req_irements Ibr _e gm_nding el_¢trud_. See Figm_z beIow.
21. Object and Li_l_ifl E_tr_ _ Care sh_ld be lakc_ ,_o fl_t o_eel_
not _h]] a_ ]iq_id,_ are not _illed in_ lhe enclosurc through
o?,ening_.
a) W'a_ing: To vcd_ce lhe n,_k of l]re or e]cclric shriek, lhis appa_
ram_ should _ot be exposed to rain or moi_tm_z mad o_eel_ filled
_ Iiquid,_, ,_ueh a,_ v_ses, _ho_dd not be pIae_d o_ thi_ apparatu_s.
22. Battery Usage CAUTION - To prevcn_ battery leakage lhat m_
resell in bo_Iy i_j_vy, property damage, o_"damage to _e u_i_:
• ]r_stall all ba_t_e_ corrc¢l]_ with _ and - ali_ed a.s ma_cd o_
flac _nit.
• Do _ot rni_ ba_er_e_ (old a_d ncw o_"ea_on a_d alkaline, etc.).
• Remove bakeries w_ lhe ul_it i_ not as_d I_r a long tim_.
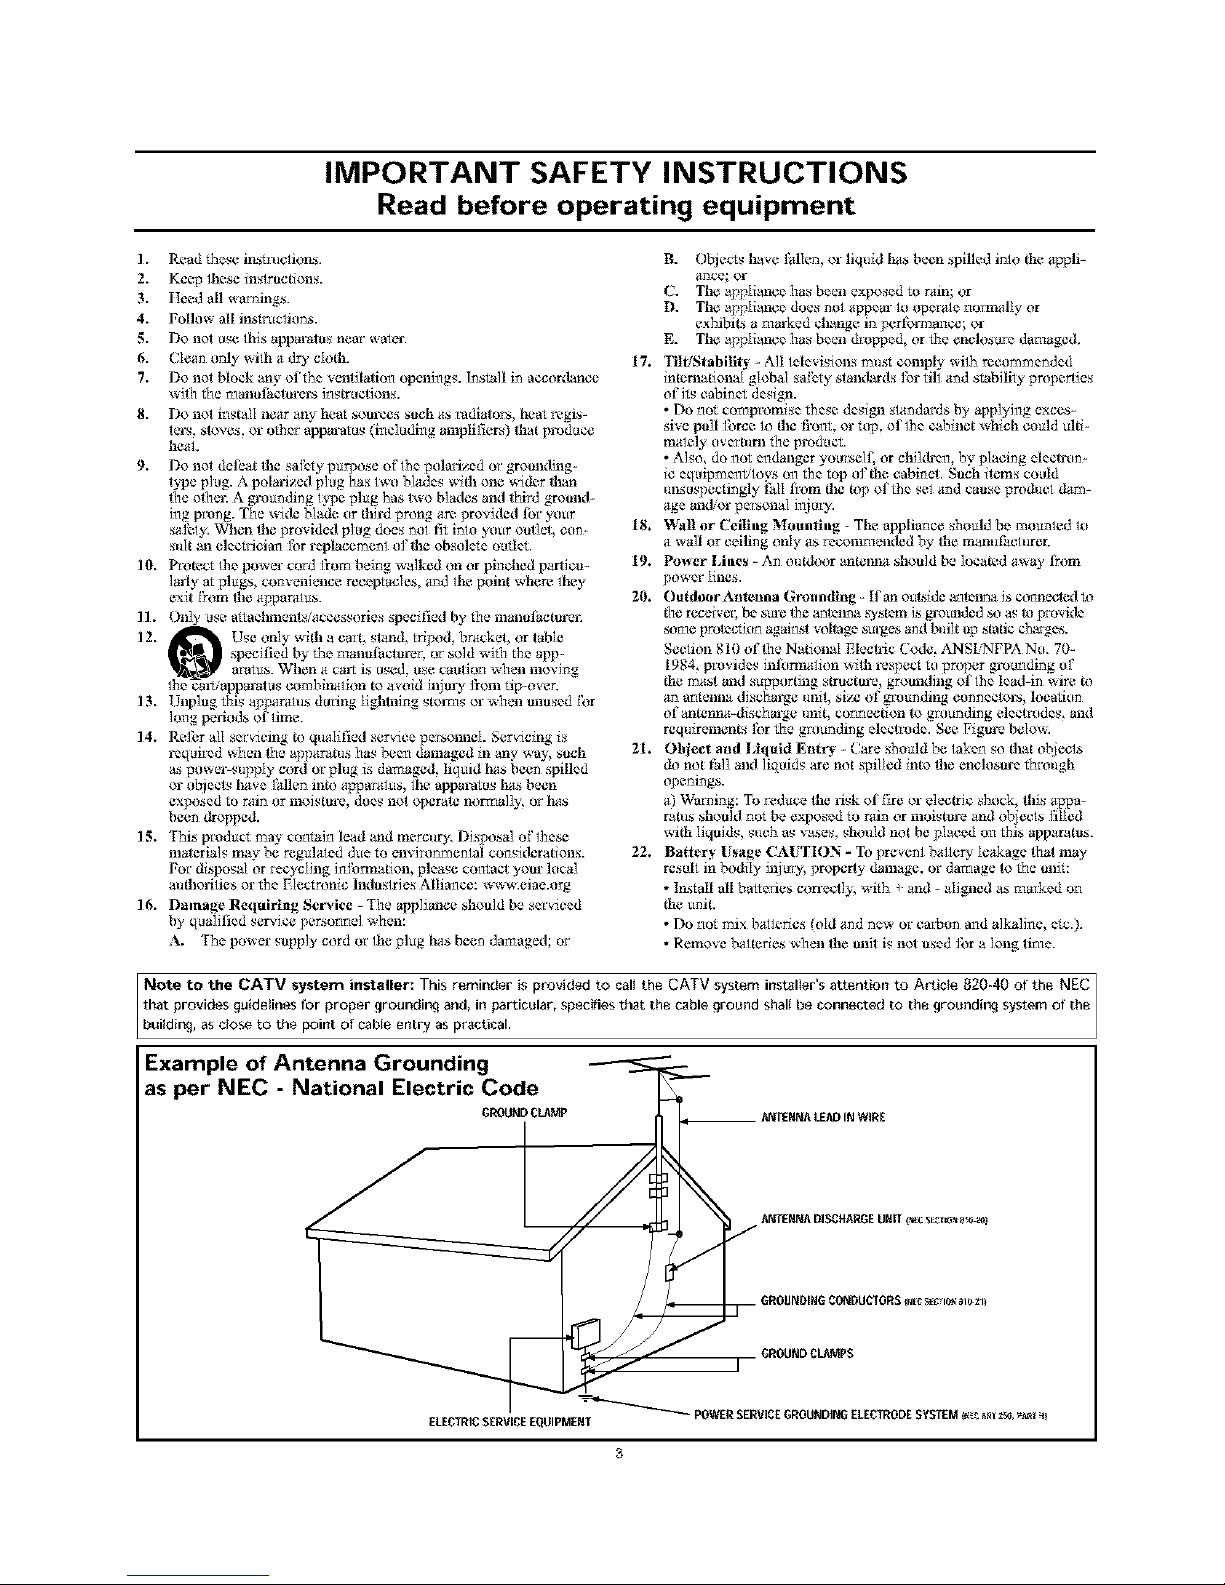
INote to the CATV system installer: This reminder is provided to calI the CATV system instalter's attention to Article 820-40 of the NEC
that providesguidelines for proper 9roundir_j and, in particular, specifies that the cable ground shalI be connected to the groundir_J s_tem of the
LbuiIdir_J as cio_ to the point of cable entry aspractical.
Example of Antenna Grounding
as per NEC - National Electric Code
GI_0UND CLt_Mp __ ANTEHNA LEAD IN WIR£
[lllmIi! l
Features
Active Cont_fl TM continuously measures aarl corrects all incoraing
signals m help provide the best picture quality. _IIlis feature renal-
tars aarl corrects both the sharpness control aarl noise reduction con-
trot.
AudioNidea Jack Panel allows direct conneclinas with VCRs,
DVDs, or adler devices, providing quativy TV picture mad sound
playback,
Audio _flume Leveler (AVL) Control keeps tbe TV sound at an
even level. Peaks _nd valleys that occur during progrmn changes or
commercial breaks are reduced, making for a more conalstent, cora-
fortable sound.
AutoLaek TM allows you to block the viewing of certain channels or
programs with certain ratings if you do not wmlt your children m
view inappropriate m_erials,
AuloPieture TM allows you to chmlge the picttlre settings (edior, tint,
con_st, etc,t for v_oas types of programming, such _s sports,
movies, multimedia (Dunes), or weak signals with the push of one
button,
AutoSoRnd TM allows you to select from fbt_ factory-set controls
and a personal contrdi _hN you set according to your own prefer-
ences _hrough the onscreen Smmd menu. The four factory-set con-
trdis (Speech, Movie, Music, and Multimedia) enable you m tailor
the TV sound so as R) enNmce the particular progrmnming you are
watching.
Channd Edit allows you m add or delete charmels from (he list
stored in the TV's memory. Charmel Edit makes it easy to limit or
exp_nd (he munber of channels _hat are available tu you when you
press the Chmmal (+) or (-} buttons on your remote central.
Clos_I Captioning allows _he viewer to read TV progrzan dialogue
or vdice cnaversations as onsarcen text,
hffrared Remote Contral works your TV and o(ber remote-con-
trolled devices sach as VCtLs, DX,_Dplayers, cable comerters, and
satellite recei_ ors.
Onsereen Menu shows helpful messages aarl instructions for set-
ting TV feature centrals (ca_ be viewed in English, French, or
SpanishL
Sleep Timer automatically turns the TV OFF after a set mnount of
time that you choose.
Timer allows you to set your TV to turn itself ON and OFF once or
dally like ma Mann clock,
_ As ma Energy Star,. Pretzel-, Ph_hps (onsumer
/ _._ Electronics has determined this product meets fl_e
/_/_ Energy Star_ guidelines for energy efficiency.
Energy Star@ is a U.S. registered mark. Using
products with the Energy Stal*_ label can save eneNy. Saving
energy reduces air pollution mad lowers utility bills.
Active Control, AutoPicture, AutoSom_d, AutoChmn, and
[ncrediMe SulTound are trademarks of Philips Consumer
Electronics Company. Copyright 2001 Philips Consumer
Electronics.
*Manufactured under license from Dolby Laboratories. "Dolby"
and the double-D symt,_l are trademarks of Dolby Laboratories.
Refer to the simple Quick Use andSetup
Guide (supplied with your TV) for details on
making Connections and Remote Control
Operation.
RII"IMIILI_,
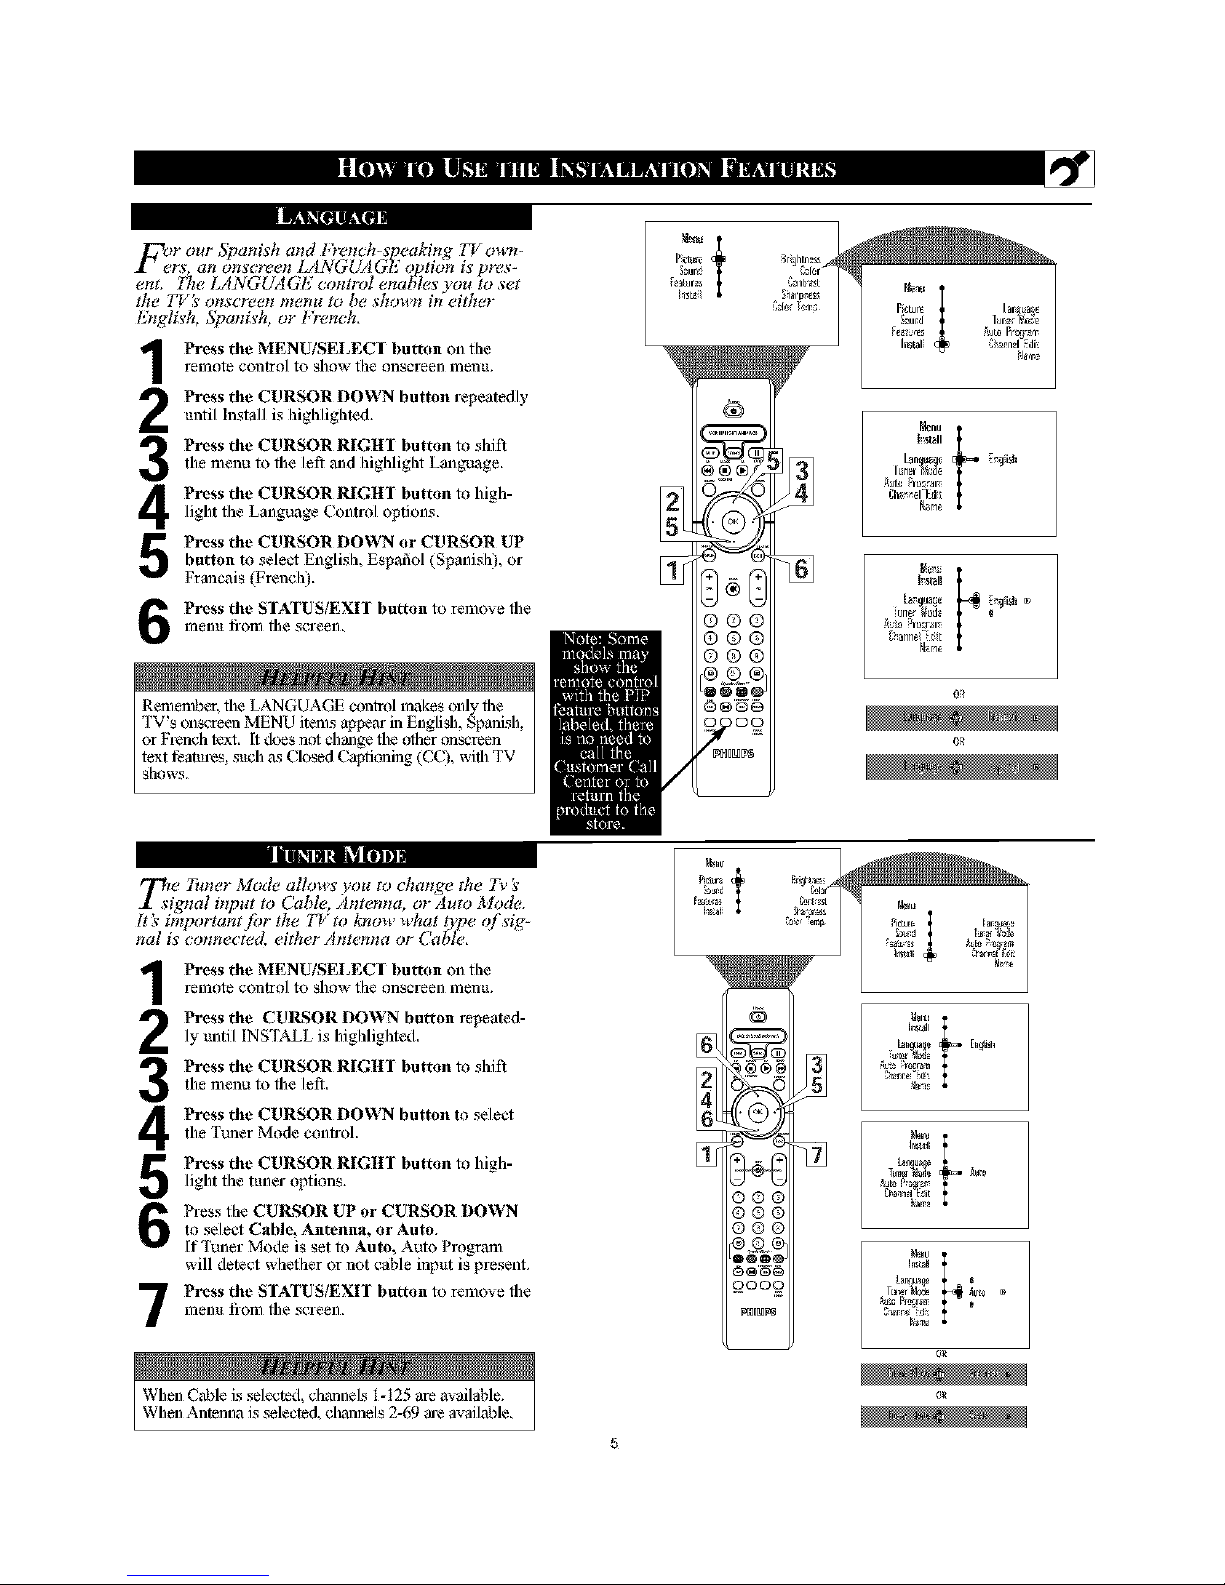
Foer our 5)_anis'h a_td [+em:h-s'peaking ZT own-
rs, an ons'cree_ LANGUA GI( ot_tion is' pres-
ent, l[!e LANGUAGE comrol ena_les'you to set
the T_/ s' ollscFeell IlleHa to be sho]lll iH either
E_tglis'h, 5_a_tis'h, or l;)_ench,
Press the MENU/SELEC$ button on flae
1-efllote control to show file onscl-een fllen_L
Press the CURSOR DOWN button repeatedlyuntil Install is higlaliglated.
Press the CURSOR RIGtII Imtton to shift
the menu to fl_e let_ _d higldiglat Language,
Press the CURSOR RIGHI Imtton to high-light flae Language (ontrol options,
Press the CURSOR DOWN or CURSOR EPbutton to select English, Espafiol (Spanisla), or
Francois (French).
Press the SIATUS/EXH I)utton to remove file
fflenl_ li-om the screen.
RememI_r, file LANGUAGE conlrol makes only the
'|'V's onscreen MENU items a_em- in English, Spanish,
or French text. [t does not change the other ¢mscreen
text i_aatul-es, such ,_._Closed Capti¢ming (CC),with TV
show&
"t
_eur
°°'{.
gh_ri_el_Edi_
0_
_zi e 7i_zer Mode allows' you to cha_z,ge the 7_' 's'
,gnal bzpat to Cable, Amemta, or Auto Mode.
It _ important/br the ZT to know what t)pe of s'ig-
ha! is' _:o_mecied, either Amemm or Cable.
Press the MENU/SELECI Imtton on the
remote control to show the onscreen menu.
Press the CUlLS;OR DOWN button repeated-ly until INSTALL is highlighted,
Press the CURSOR RIGItl Imtton to shift
the menu to tbe let%
Press the CURSOR DOWN button to select
the Tuner Mode conh-ol.
Press the CURSOR RIGltl Imtton to high-
light flae tuner options,
Press flae CUI_;OR UP or CURSOR DOWN
to select Cable, Antenna, or Auto,
If Tuner Mode is set to Auto, Auto Program
will detect whether or not cable input is present.
Press the SIATUStEXH butt< n to remove fl_e
fflenu li-om fl_e screen.
53er "e_ Pietu_ [a_ _
°"C
uN_ IN_ I
NN re_mn
t*n_u_
N_n
When C,nMe is selected, chmnlels t-125 are available.
When Antenna is selected, chmmels 2-69 are available.
5
LtL iBl ilur IOI!N][1B
IM E|il U NIl]iN _lll
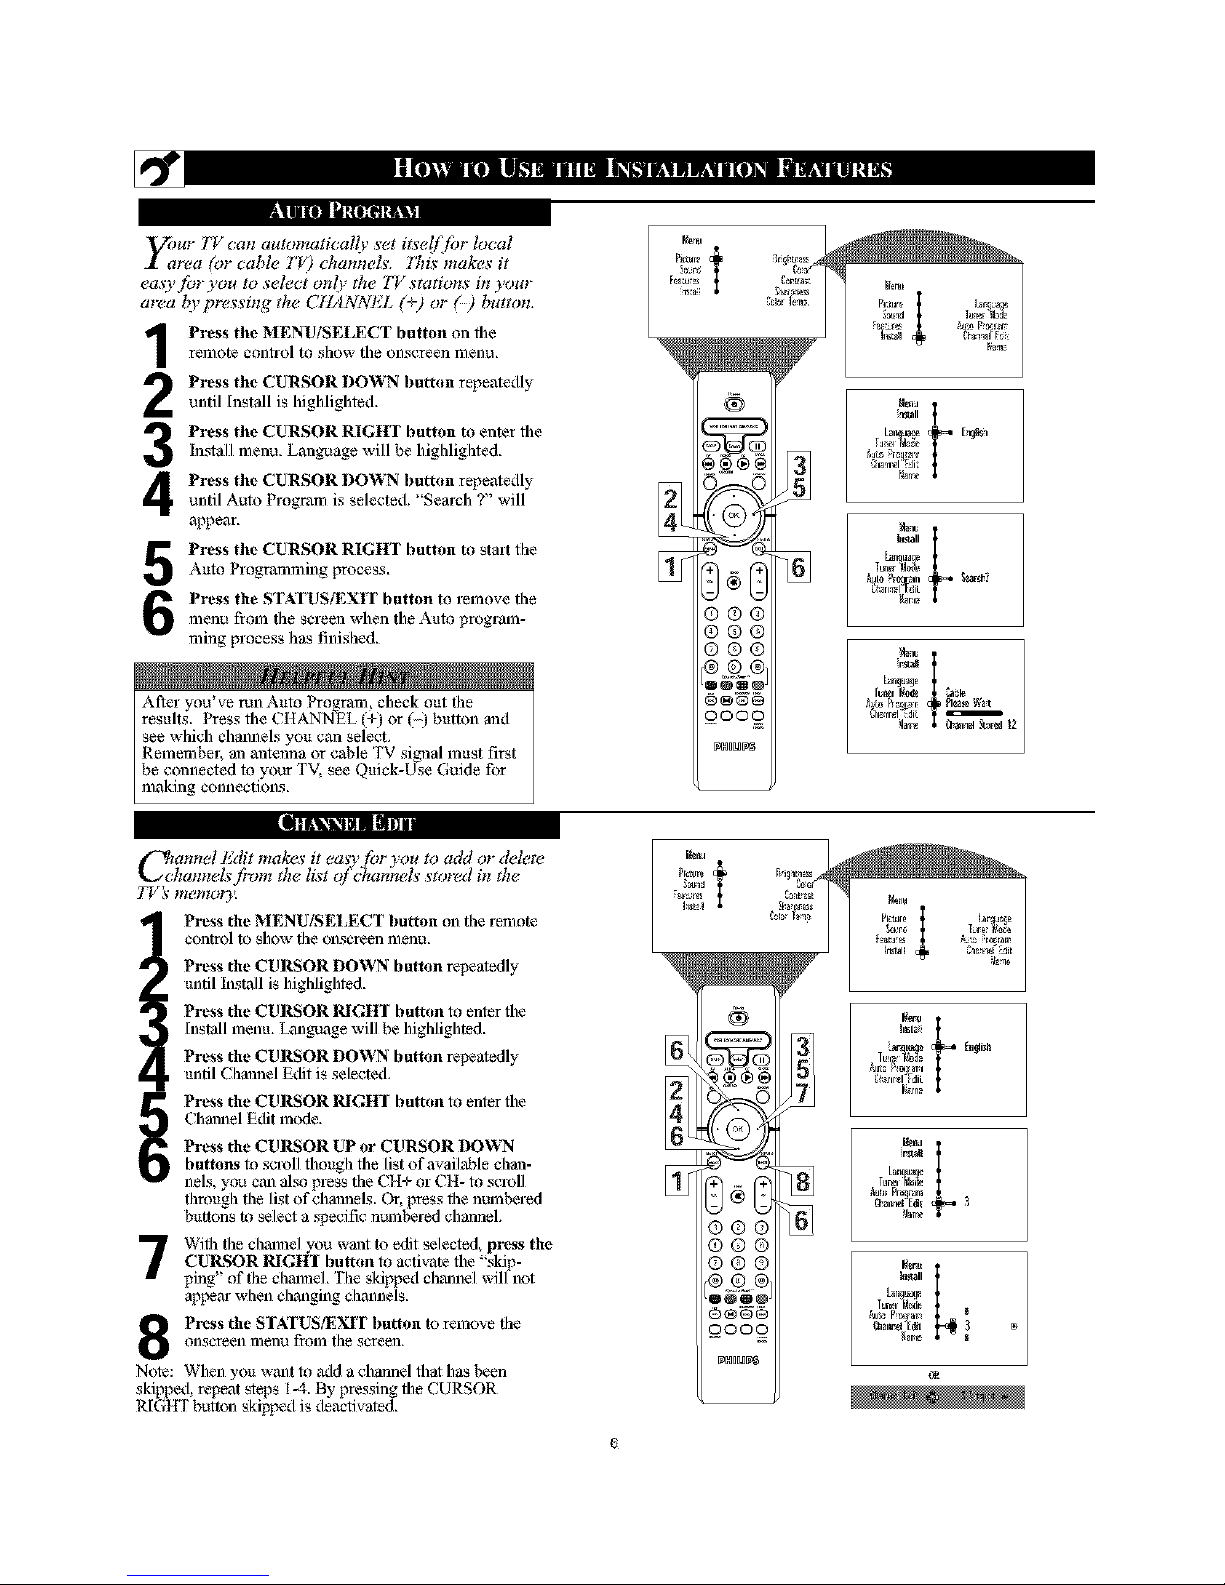
_mr TV can automatically set i_se!/for local
21 area (or cable T_) channels. 77ffs makes it
easy for you to select only the TV stations in your
area l_v pressing the CtlANNEL (_) or ( ) button,
Press the MENUiSEI,ECT button on fileremote control to show tile onscreen menu,
Press the CURSOR DOWN I)utton repeatedly
until Install is highlighted,
Press the CURSOR RIGHT button to enter fileInstall menu. Language will }._ higldighted.
Press the CURSOR DOWN button repeatedlyuntil Auto Program is selected. "Search ?" will
appear.
Press the CURSOR RIGHT button to stalt riseAuto Programming process,
Press the STATUS!_XIT button to remove the
menu from the screen when tile Auto program-
ruing process has finislsed.
Ariel- you've run Auto Program, check out the
results. Press tbe CItANN_EL (+) or button and
see which chanllels you can select.
Remember, ma matemaa or cable TV signal must first
be connected to your TV. see Quick-Use Guide for
making conllections.
_mnnel Edit mak_<_ it easy for you to add or &dew
k._ cham_ds fmm th_ list o/ channcls storcd in th_
T_ k memor3_
Press the MENU/SELECT I)utton oil the remote
control to show the onscreen menu,
Press the CURSOR DOWN button repeatedly
until Install is higlalighted,
Press the CURSOR RIGHI button to enter file
[nstall menu, Lmlguoge will },_ higlalighted,
Press the CURSOR DOWN button repeatedly
until Chmmel Edit is selected,
Press the CURSOR RIGHI button to enter file
Chmnlel E,_fit mode,
Press the CURSOR UP or CURSOR DOWN
buttons to scroll though the list of available chan-
nels, you can also press tile CH+ or CH- to scroll
through the list ofchmmels. Or. press the numbered
buttons to select a _eciflc numbered channel.
With the channel y_u wmat to edit selected, pre_s the
CUlLs;OR RIGHI button to activate file "skip-
ping" of the channel. The skipped channel _,_illnot
appem- when thronging chmmels,
Prcss the STATUStE_r button to remove the
onscreen menu from tile sereen.
Note: When yoit want to add a chmmel that has been
skipped, repeat steps t-4. By pressing the CURSOR
RIGHT button skipped is deactivated.
umn mmmm I"I
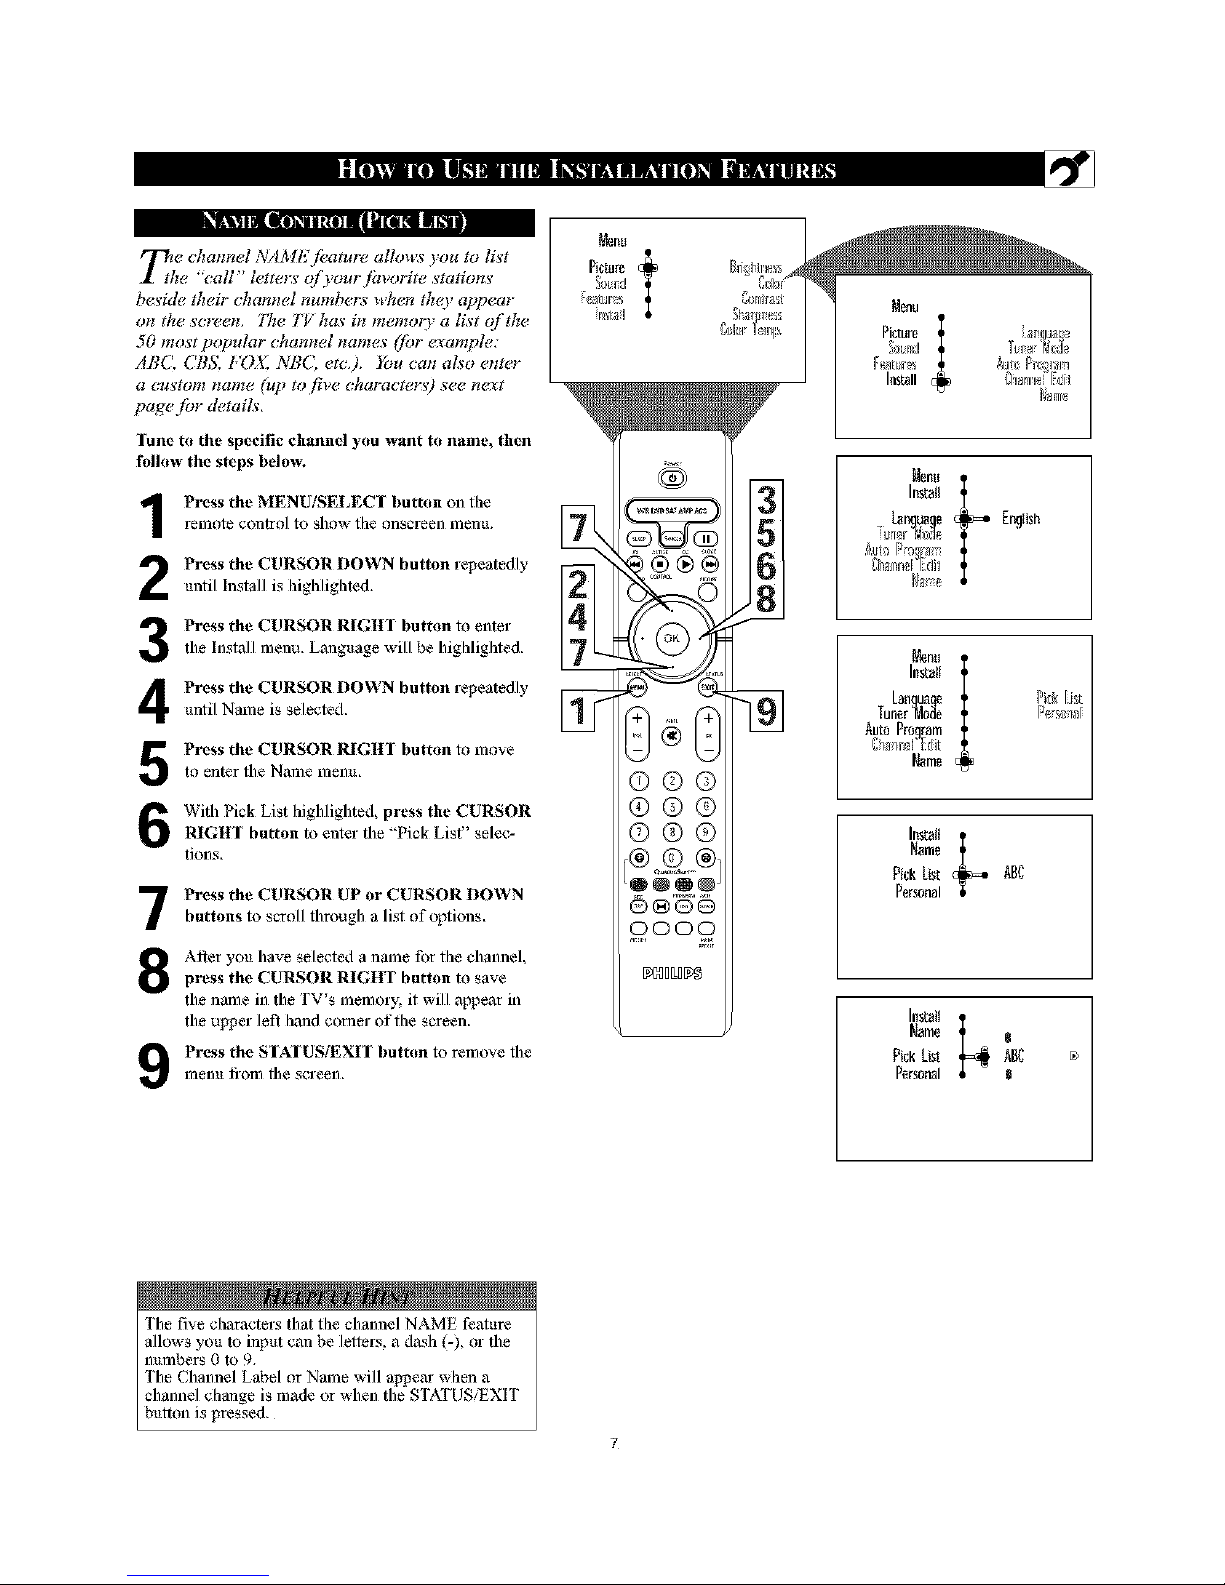
77ze channel NAME feature allows you to li_'t
I the "call" letferw ofyourfavorife _'tation_'
be_'ide their channel numbers when tho_ appear
on #w _'creen+ 77w T_ has in memoo_ a li,w of the
50 mo_¢ popular channel names ([br ¢<_;ample:
ABC, CBS, /,*OX, NBQ era,), _bu can also enter
a ct_'loIll halite (t_p fo five. chaFacfe_:s') S¢.¢.n¢<_g
page for details.
lune to the specific channel you want to name, then
follow the steps I)elo,_
Press the MENU/SELECI Imtton on floe
relTlote control to show file onscreen ITlenu,
Press the CURSOR DOWN button repeatedly
until Install is highlighted,
3
4
Press the CURSOR RIGHI Imtton to enter
the Install menu, Language will _,_ highliglated,
Press the CURSOR DOWN button repeatedly
until Name is selected,
Press the CURSOR RIGHI Imtton to moveto enter the Name menu,
With Pick List highlighted, press the CURSOR
RIGtlI button to enter the "Pick List" selec-
tions.
7
8
Press the CURSOR UP or CURSOR DOWN
buttons to scroll fllrough a list of options.
Alter you have selected a name for the channel,
press the CURSOR RIGHT button to save
the name in the TV's memory, it will appear in
the upper left hand comer of the screen.
Prcss the SIAIUSiEXIT Imtton to remo_e the
menu li-om the screen,
Pi+mm t
++u++j
_,+++J+,m
+I+N++H
Imtstl
tz_mtmqe [r_{ish
%_nn_Zdi_
Nm+
Install
Lanquam Pick[.[+t
Tuner'Mo_e P+r_m'+_
Auto Program
12rmnnelE;/it
[@me
hr,tstt e_=.
Name
P+_kList _BC
Personal
Install
N_me
PickLim ABC ++
Personal
The fi'_e characters that the channel NAME feature
allows you to input can be letlers, a tkn._h(-), or the
numbers 0 to 9.
The Channel Label or Name will aI_ear when a
channel change is made or when the STATUS/EXIT
button is pressed,

rl_ze channel NAME feature allows you to lis't
I the "call" letterw ofyourl'avorite s'tations'
bes'ide their channel numbers when thc(v appear"
0II the" S'CF_IL _'OH C(llt _llte!r a Ct_s'lo_t llem_e (t_p
to five characters)for each channel,
Tune to the specific channel you want to name, then
follow the steps below.
Press the MENU/SELECT Imtton on thereDlote control to show the onscreen Dlenu,
Press the CURSOR DOWN button repeatedly
until Install is highlighted+
3
4
Press the CURSOR RIGHI Imtton to enter
the Install menu. Lmlguage will _,_ highlighted,
Press the CURSOR DOWN button repeatedly
until Name is selected,
Press the CURSOR RIGH] Imtton to move
to enter fl_eName menu,
Press the CURSOR DOWN button to select
Personah
7
8
Press the CURSOR RIGHT Imtton again;
then press the CURSOR UP or CURSOR
DOWN buttons to scroll through a list of
options for the first character (A through Z, 0
through 9)+ Press the CURSOR RIGItT but+
ton, mad repeat for the second, third, fourth, mid
fifth characters,
Press the SIATUS/EX[I button to remove file
fflenu from file screen,
Pi+mm t
++u+J
+#m+
+I+++i++H
_NOBO_5
Imtstl
LB_UB{le [r_!lish
%ann_ Edil
NNne
l_+tsl+
Lan_uam Pi@[.ist:
Tuner"_Ao_e r++_+_
Auto Program
@annul DU_
Name
Name
Pi+kList AB_
Personal
Name
Pick List m
Personal F +
®
Name
Pickbst
Personal FAV +
The fi'_e characters that the channel NAME feature
allows you to input can be letlel-s, a d.x_h (-), or the
numbers 0 to 9.
The Channel Label or Name will al_em when a
channel change is made or when the STATUS!EXIT
button is pressed,

Tjva_(fust ycmr TV pictum conttg[_, select a channel and
l[ow these steps.
Press the MENU/SELECT button on the remot_ P'_tur_ai_
contrnl tu 5how the on_reen ITlellU. b__
Press the CURSOR UP or CURSOR DOWN but- Irr_all
ton to lfigh]ight PICI'URE.
Press the CURSOR RIGHT button to e_ter the
Pietare metal
3
4
Press the CURSOR UP or CURSOR DOWN
button to select the picture adjustment you w,mt to
change: Brighmess, Color, Contrast, gharl_less,
Color Temp., Tint, Dyn. Contrast, or CNOr Enh.
NOTE: 'IIle menu will show only five items at a dine, so
_xm will need to continue sernllJng with the CURSOR
DOWN button to adjust ihe Tint, Dyn. Contrast, or Color
Enh,
Press the CURSOR LEFF or CURSOR RIGHTbutton to a@lst the selected eontroh OR_ if Color
Temp. or Dwl. Conlr_t is chosen, press Ihe CUR,
SOR UP or CURSOR DOWqN tu select the pre-
ferred mode, If Color Enh, is _le¢ied press file
CURSOR RIGIfF button repeatedly m toggle the
various modes.
Press the STATUS/EXIT button when finished to
remo_e the mei}u from the screell.
NOTE: The Tint Controls will not be available for
adjuslments when tuned to the AVt iAV2!AV3
Inputs,
Brightness adds or subtracts light from the darkest
pmt of the picture,
Color adds or eliminates color,
Contrast improves the detail of the lightest parts of
the picture,
Sharpness improves the detuil in the picture.
Color Iemp. ofi&-s NORMAL, COOL, or WARM
picture preferences, (Normal will keep the whites,
white; Cool will make the whites, bluish; mid Warn1
will make the whites, reddish,)
Tint adjusts the picture to obtuin natural skin tones.
Dyn(amic) Contrast helps m "sharpen, the picture
quality by making the dark ix_rtions of the picture
&arker mid the light i'4_rtions more noticeable. You can
select from the various modes: OFF, Min, Med, mid
Max.
Color Enh(ancement) increases file intensity of file
color when "On" is selected.
®&,N1
OOO_ j
_NHLH_

7_/ a_(h_sty(mr TV so*md cot*troLL select a chatmet and
follow these steps.
Press the MENU/SELECT bution on the remote
conlrot to show the al}_reen ixiellu.
Press the CURSOR UP or CURSOR DOWN buy
ton to highlight Sound.
3
4
Press the CURSOR RIGHT bution to enter fl_e
Pictare meun.
Press the CURSOR UP or CURSOR DOWN
button to select the sound adjusmaent you wailt to
akange: Trehie Bass, Bslance, AVL Dynmnic
Bass, Incr. Sl_ound, Stereo, SAP, Audio Ou_, mad
Speaker, NOTE: Tile melm will sllow allty five
items at a time, so you will need m continue semlt-
hlg with _he CURSOR DO_LN button m adjust the
Incr. Surround, Stereo, SAE Audio Out, or Speaker.
Press the CURSOR LEI:T or CURSOR RIGHTbutton to alliust the selected eontroh Or, if lner,
S_ound is chosen, press die CURSOR UP or
CURSOR DOWN to select the preferred mode, If
AVL, Stereo, SAE Audio Out, or Speaker is select-
ed press the CURSOR RIGHT burion repeatedly 1o
toggle the various modes.
Press the STATUS/EXIT bufron when finished to
remo_e the mei}u from the sereell.
Trelfle enhal/ces the high frequency sounds.
Bass - enhallces file low fi-equency sounds.
Balance - adj _rs the level _ sound cxmlJng from the
left and right speakers.
Alvq, (Aura Volume Leveler} - when On, AVL will
level out the sound t,ming head when sudden clmnges
in volume eccur during commercial breaks or channel
changes.
Dynamic Bass - enhances the low frequency sound.s.
Incr. Surraund - adds greater depth and dimension to
TV sound. Select from h/un Su_tourd, Dolby \;irlual or
Stereo sound (if Stereo) or Dolby Virtual, Spatial or
Mono (if M_Io).
SAP (Secondary Audio l_'ogramming) sent as a
third audio ehalmel, a SAP signal can be he_d apat
from the current TV prog_mn sound. Note: If SAP is
not available, *'Not Avvailable" will appeal- on the
screen.
Audio Out select from ValSable or Fixed. When
Vaiable is selected, chal/ge the volume ,atthe TV using
the TV's remote controh If fixed is selecte& change
the volume at the external device's audio controls.
Speaker -turn the TV s_eaker On or Off. When a Hi-
Fi system is used, turn the TV s_eaker Off to hear the
sound from the Hi-fi system instead of the TV's speak-
el-s. When no external audio system is calmected, On
mu_t be selected to hear sound coming from the TM
[saktlr.% G_r Ir_,
hI_
®®®
©@®
@®®
®®N@
OOOO
t
10
s_i
OR
OR
OR
OR
OR
OR
OR
OR
OR
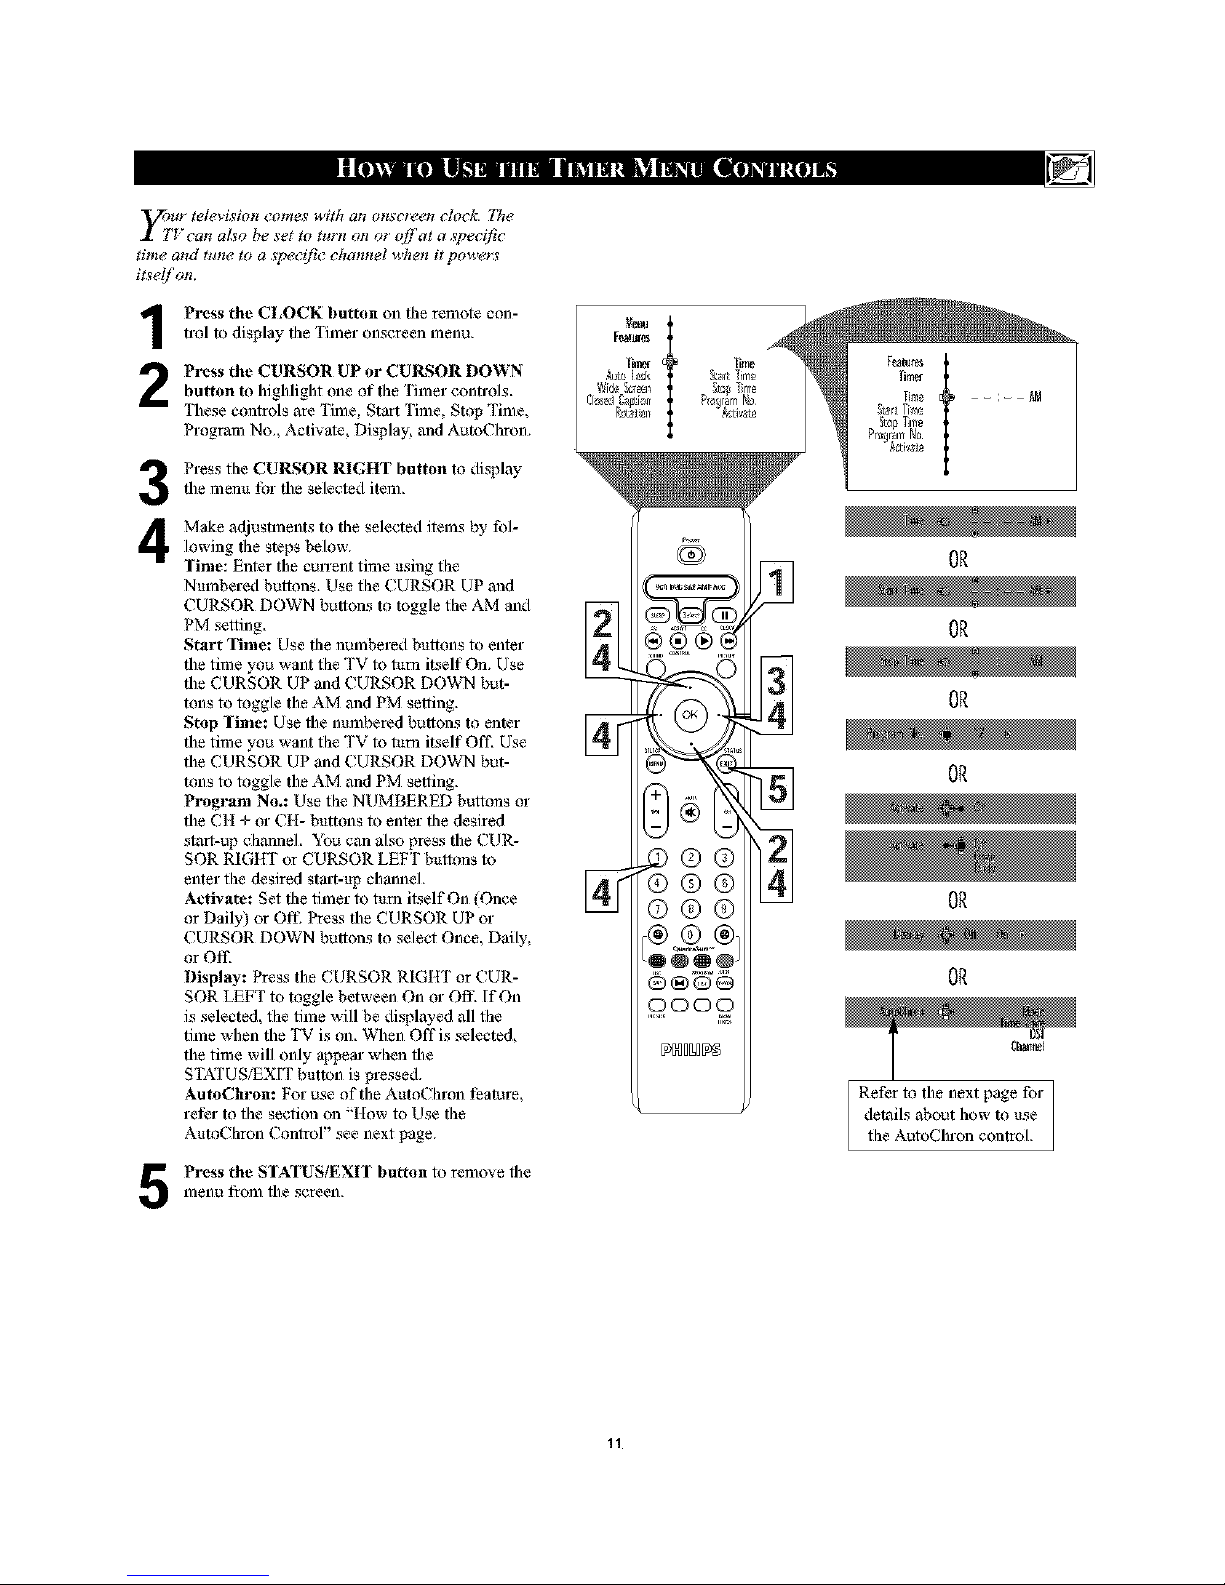
"_ur television comes with ate onsct_,et¢ clock. 777e
I TVean aL_o be set to turn on or off]at a sFeeifie
time and tt¢ne _ a ,_pe_?ifi_?ehamtel _¢4ten it powem
itseljon.
Press the CLOCK button on the remote con-trol to display the Timer onscreen menu,
Press the CURSOR UP or CUlLs;OR DOWNbutton to highlight one of the Timer controls,
These controls are 'l'ime, Start Time, Stop Time,
Program No,, Activate, Display, mad Auto( hron,
3
4
Press the CUlLs;OR RIGHT button to display
tile menu _br tile selected item,
Make adjustments to ttie selected items by fol-
lowing ttie steps below,
Time: Enter the CUlxent time using the
Numbered buttons, Use the CURSOR UP and
CURSOR DOWN buttons to toggle the AM and
PM setting,
Start Time: Use ttie numbered buttons to enter
the time you want the TV to tuna itself On, Use
the CURSOR UP and CURSOR DOWN but-
tons to toggle the AM and PM setting,
Stop Time: Use the numbered buttons to enter
the time you want the TV to tuna itself Off, Use
the CURSOR UP and CURSOR DOWN but-
tons to toggle the AM and PM setting,
Program No.: Use the NUMBERED buttons or
the CH + or CH- buttons to enter ttie desired
start-up clmnnel, You can also press the CUR-
SOR RIGHT or CURSOR LEFT buttons m
enter the desired start-up channel,
Activate: Set ttie timer to tuna itself On (Once
or Daily) or O111 Press the CURSOR UP or
CURSOR DOWN buttons to select Once, Daily,
or Off,
Display: Press the CURSOR RIGHT or CUR-
SOR LEFT m toggle between On or Off- If On
is selected, the time will be displayed all the
time when the TV is on, When Offis selected,
the time will only appear when the
STATUS/EXIT button is pressed,
AutoChron: For use of the AutoChmn teatul-e,
le_er to the section on "How to Use ttie
AutoChron Contror' see next page,
Press the STATUS/EXIT button to remove file
menu from file screen,
0000
OR
OR
OR
OR
OR
OR
Refer to tile next page for
details about how to use
the AutoChron control,
11
|ll [|Ill IN|]_
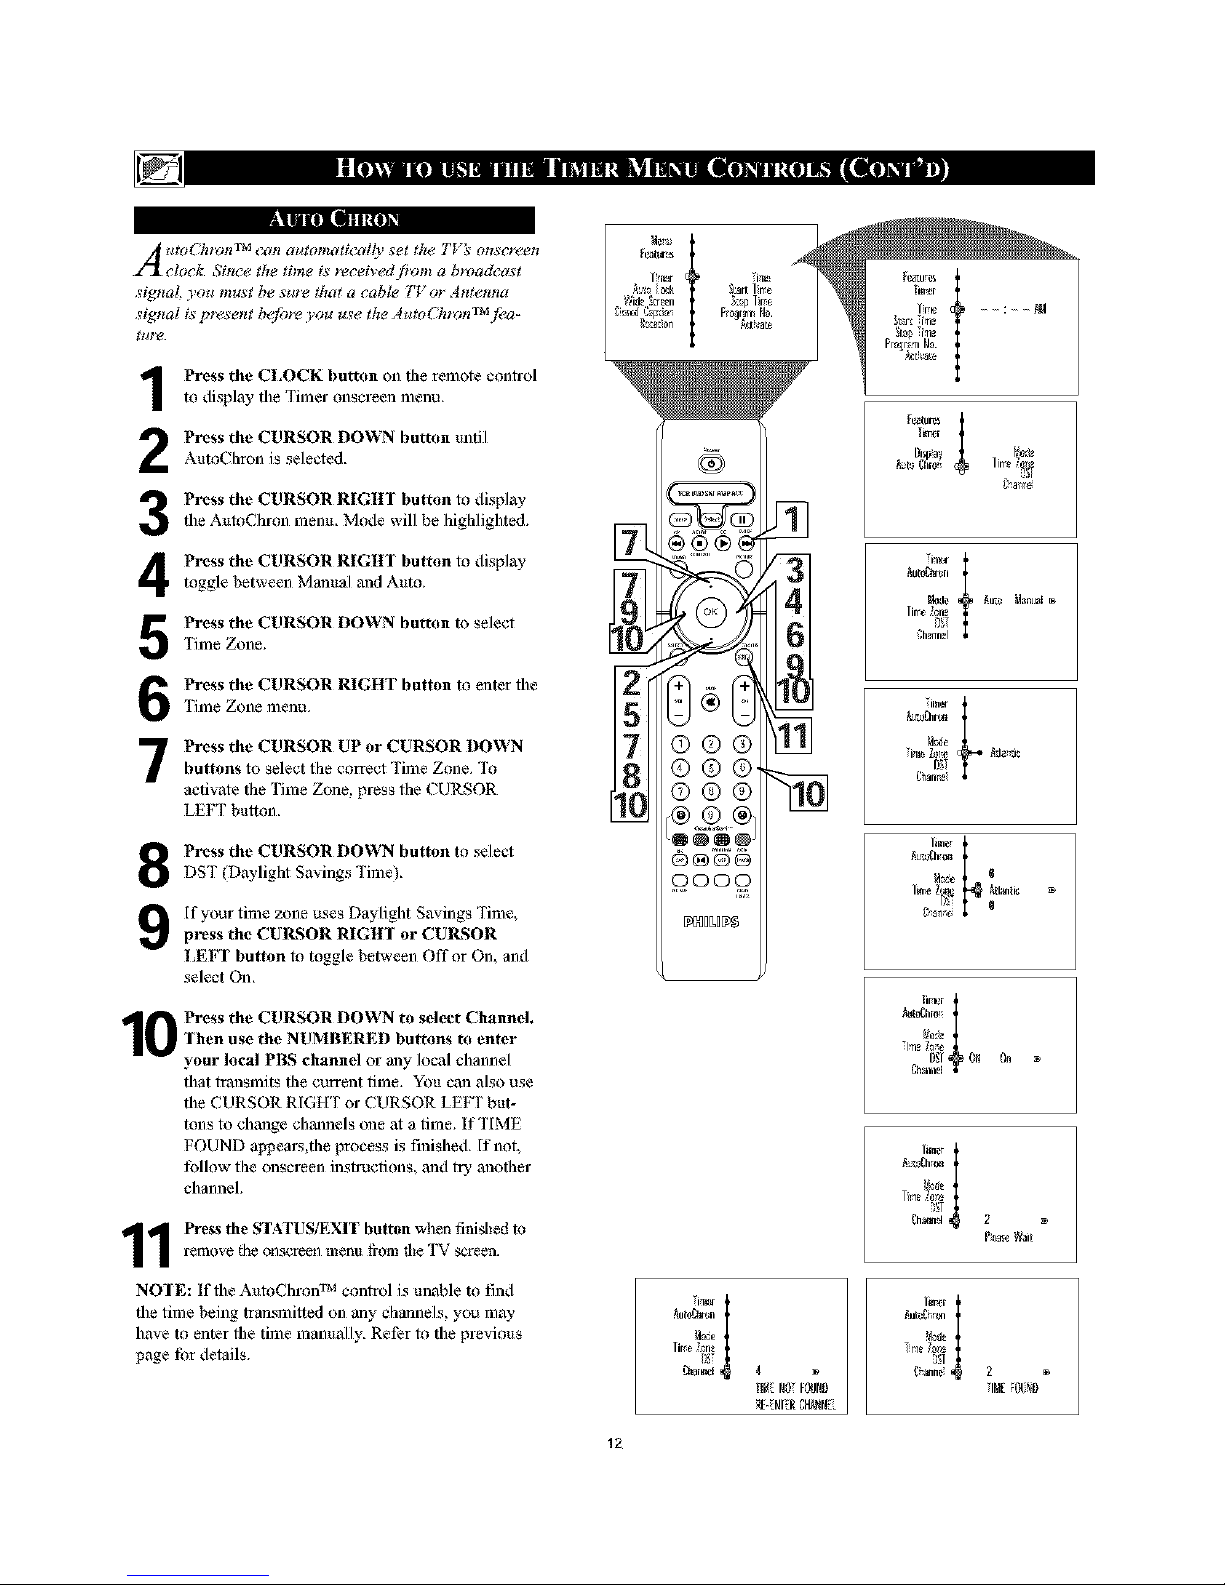
A 4tO('-_lt_h'l TM (?all aI4_ot_la_icaffy se_ the* T_'_ OHSCF(_eH
clock. Since the time is received fivm_ a broadcast
signal you must be sure that a cable TV or Antenna
signal is F_,sent b_jbre you use the AutoCht_mTM fl'a-
_t#'e.
Press the CLOCK button on the remote conh-ol
to display the Timer onscreen menu,
Press the CURSOR DOWN button untilAuto( hron is selected,
Press the CURSOR RIGH] button to displaythe AutoChron menu, Mode will be highlighted,
Press the CURSOR RIGItl button to display
toggle between Manual mad Auto,
Press the CURSOR DOWN button to select
'Firae Zone,
Press the CURSOR RIGHT button to enter fl3e
Time Zone menu,
Press the CURSOR UP or CURSOR DOWNbuttons to select flae correct Time Zone, To
activate the Time Zone. l}l-eSsthe ( URSOR
LEFT bulton,
Press the CURSOR DOWN button to select
DST (Daylight Savings Time),
[f your time zone uses Daylight Savings Time,
press the CUlLs;OR RIGH¥ or CUlLs;OR
LEFT button to toggle between Offor On, and
select On,
Press the CURSOR DOWN to select Channel.
-[hen use the NUMBERED buttons to enter
your local PBS channel or any local channel
that transmits ttie current time, You can also use
the CURSOR R[GtfT or CURSOR LEFT but-
tons to change ch_3nels one at a time. If TIME
FOUND al_eals,ttie process is fnished. [f not,
_bllow the onscrecn instructions, and try anottier
channeh
1 Press the STATUS/EXIT button when finished to
remo_e _heons_.rrecn mentt _o1_ the TV _ree_.
NO-[E: If the AutoChmn TM control is unaMe to find
the time being transmilted on any channels, you may
have to enter the time manually, Refer to the previous
page tbr details,
])!1_
5TM
7
8
[LC
12
L_I[ life
_ql lre
Fralqm la.
li_e _¢ne
11_NOf_ND
Nto_a-_n
_Je _m_ Na_uat
i;ha_n.'l
7im_
I_:e I
[Jrler i
Ig Ol In
lm_rI
g
_h_ 2
Pt_c Nait
/_ra I
_ut_ r_
_h_an_ 2
IN

Tphe AutoLockTM jeature receives and
roc(_ses data sent ?Lvbroadcasters or
other program p_videm that contain pro-
gram _o!lt(¢nt advisories. When p_ogrammed
by the viewe_: a TV with AutoLock TM _an
respond to the content advisories and block
program COllt(¢lltthat m_O, be fimnd objectitm-
able &uch as _ensive hmguage, viMence,
s_vual situations, etc.). IT!is is a gmatjeatum
to censor the O'pe c_ programming children
may watch.
[n the AlttoLock TM section, you'll learn how
to block channels and programming that is
not rated, is unrated, or has no rating, You
will also find out how to tam these blocking
leatures ON or OFE Following are brief
explanations of some temps mad ratings 1-elat-
ed to the AutoLock TM feature.
AutoLock TM offers various Blocking
Options from which to choose:
BLOCKING: The BLOCKING control is
what can be thought of ,q._the "fflaster switch"
for AutoLock TM, This control ai'lects the set-
tings you have chosen for blocking programs
according to movie ratings or TV ratings, or
for blocking programs flaat have no rating or
are unrated. When fine BLOCKING control is
OFF', the blocking or censoring of programs is
disabled. When the BLOCKING control is
ON, blocking will occur according to the set-
tings you have chosen.
NO 1L_TING: ALL programming with no
content advisory data can be blocked if NO
RATING is set to ON.
P_ogramming that has No Rating is not
encoded with at O, rating i_ormaticm )rum the
MPAA or the Parenmf Guidefim_. Any p_-
gramming c_mtd jidl into th_ categoo,.
You also can block individual channels or
block programming based on ratings of the
MPAA and TV broadcasters, (See a descrip-
tion of the ratings on this page,)
Autut_ck
MovieRatings
G 0_ 0.
7_q3
G: GeneralAudlence - A]] ages admJtred.
Mo_! par!mrs wou]d find dfis pro_mming
suitab]_ _r all a_s. This lype of program-
mii_g contaJ_ little or n_,_violc2n_,_e_t_o
strong lm]_age, and little or _ sexual dia-
logue (_ sex_a] sit_a_ons.
PG: Parental Guidance Stt_ested- This
programmJ_lg contains a_erial !I_t parenls
a_y find oi_suilabk" for younger c1_ildrea I1
_y conlaJ_l one or more o[!hv following:
l_oderato violence, so1_le sex tla] sll tlat_otts,
Jll[_8_./ll_n! CO_F£t_lallgn_ge, or some g_ggcs-
llve ditdog_e.
PG-13: Parents Strongly Cautkmed- This
progr_mmJ_lg contains _ritd _t parers
a_y 6nd oi_mlab]e _r c_ldreal tmd_ 1_
a_ o[! 13. It c(_ins one (_ m_re of 1_ _l-
language, or _w_eslivc dialogue.
R: Restricted -This programming is speci[i-
cal_ _signed ¸]'or ad_hs. Awone trader tile
a_ o[! 17 _lm_dd view l_s programming
on]_ wJlh a_l accompanying parellt or ad_lh
g_ar_all. _ contaill_ one or more o[! fll_ [_l-
]_wing: inte_l_e vJ_lenl,!e; J_ll.ense,serial 8J_l-
atJons; _ rollg_ coarse, lallgtlt_ge; o; J_l_ense]y
s_ge_ve di_logoe.
NC- 17: No one under the age _ l 7 will be
admi_ed. - This !ype of probwamming sho_id
he vie_,ed by' adult_ only II c(mtaias bwaphJc
_oI_ce; explicit se*; or crude, ind_x_entlan-
X" Adults OMy - This lype of pmgranmfing
COlll.aiI_ o11_Or mo_ ol_file ]'o]_owiilg: yeast"
graphic violence, yew graphic a_tl explicit or
J_l_cent s_,_] a_, very coarse and J_l_ense-
]y s_ge_ve language.
Auto[o_k
R_tings
_4
_L14
Off On B_
13

A utoLod(i_ alh_ws Imrents to bt*,wkout or
'2x,nsor ' atfl' channels th(9_ think children
should not watch. A channel bh_cked lm._the
AutoLvck TM (Y_IIDY_]camzot &, _*,ed until a col
t_ct acee_ e:Me £__medm unhook the channel
fi_r "4_¢,i,'tg. Fit:_t, let _set ytmr Autol_c,wk at_:_s
_?cKle,
P_s the MENU/SELECI button on
tile remote c_mtrol to show file _n_.sereen
ITlenu,
P_s the CURSOR UP or CURSOR
DOWN button to highlight Fealures,
P_s the CURSOR RIGHI button to
di._lay file Feat_-es menu,
P_s the CURSOR DOWN button tohighlight file AutoLock control,
P_s the CURSOR RIGttl button to
enter tile AutoLock mode, "Access Code
.... "will at_ear,
Using the numberod buttons on the
remote control, enter file ac_ss code, If
you do not know _ttr c_x/e, 0,7,1,1 is tim
defmdt code, After you have entered file
code c_lce, lmz_m_ct will appear on Rile
screen, Enter Rilecode a second time,
Correct will _rpe_, When "CoveRt"
at_ea_s, the AutoLock menu is accessible
and yo_ can _eed to chm_ge the access
code,
P_s the CURSOR DOWN button tohighlight ( hmlge (ode,
P_s the CURSOR Rlgtrr button to
enter tile ( hange Code menu, "Enter
New Code ----" will a_em: Enter a ne_
four-digit code ushlg fl_enung,mr but-
tons, "Cemfim_ t ode----" will appeoa- em
tile screen,
Using the numbered buttons, re-enter
your new four-digit code. "Confirm
Code" gSll appt_u; After re-entering
your new code,"Com_ct" win flash on
the screen briefly and the highlight bar
goes back to AutoLock,
0 P_s the STATU_EXII button to
remove fl_e menu frcm_ tile screen,
NOIE TO PARENTS: It isn't possible for
your child to unblock a channel without know-
ing your access code or changing it to a new
one, If your code has been changed without
your knowledge, then you will become aware
that blocked channels may have been viewed,
Tn_ei
_R_ide[_m_m
=@©®
@®®
©@®
_ L_k xxxx
Rr_tg4ie_
[eater,s
_ut_te_k xxxx
_id,_Ssr@_ Oorl_
k_okRi_n_l 2
Chart_eM_
N _tin_
fem_r_s _er
L_ck_h_rmd N_ Oad_
C_ar_O_a_
Ma_*i__ating
IRRating
fem_r_s
[eck_tmnnd _ _x_d_
Ci_ar_O_a__ x**x
OoarAll ,
[_i_ Rating
IVRating
IceaI_r_s
Remember that 07t 1 is the default
AutoLock TM code, [f your access code has
been changed by someone other than you (a
child, _br example) or you have forgotlen the
code, you can always get in by inputling the
default code,
14

After your pen_ona] aeeesscode has been ,
set (see the previous page) you are _ad)
to select the channels o?' #¢Imts you want to
bb)c]( o_t or ¢_(,nso_;
Press the MENU/SELECT button onthe remote control to show the
onsK,;reen iTlen 11,
Press the CURSOR UP or CURSOR
DOWN button to highlight Features.
Press the CURSOR RIGHT button
to display the Features menu.
Press the CURSORDOWN button
to highlight file AutoLock TM control.
Press the CURSOR RIGII¥ button
again display the AutoLock menu,
Enter your four-digit ACCESS
CODE. Cort_,ct will flash very briefly
mad floe AutoLock TM will be accessible.
7
8
Press the CURSOR RIGHT to enter
floe Lock ( hannel menu.
Using the numbered buttons or the
C|I+ or CIt+ buttons enter the chan-
nel you wish to lock. You cm/also use
floe CURSOR UP or CURSOR DOWN
buttons to scroll to floe chmmel you
wish to block.
Press the CURSOR RIGHT buttons
to activate the locking ofa chmmel.
A padlock image al_e_s to the fight
offhe chmmel number,
Repeat steps 8 and 9 for any channels you
want to lock.
Press the STATUS/EXIT button to
remove floe menu from file screen,
NOIE TO PARENTS: It isn't possible for
your child to unblock a channel without know-
Jag your access code or changing it to a new
one. If your code has been changed without
your knowledge, then you will become aware
that blocked channels may have been viewed.
Tin'_r
©®
®@@
©®@
3
5
7
9
MB_
AmoLo_ d+ ....
++&+ ++r@+T
,2[l+srdC++_i,',+n'
%+m_+++
mmm
Fm_r_s
_t_oI_ xxxx
Lock_aaae[ c_ 3
Ch+mCod+
,+
+
Lock_aaae[ _ 3
,+
,+
i
_hant_l3
BLOCKEDB_A_IOtO_K
_x_ass
Remember that 07t l is the deihult
AutoLock TM code. If your access code has
been changed by someone other than you (a
child, tbr example) or you have forgotlen the
code, you can always get in by inputling the
default code.
If your access code is entered oil a blocked daannel, file current claannel
along with all other blocked channels _sill become _ablocked until the TV
is po_sered off. Blocked chmnaels will not apl_ar _shen the Channel + or
buttons are pl-esse(+

arious o!lscl_*_*n /ilessag_s wi]] appear
t_helt Sot_leolte tries to view blocked pro-
gramming. 7he message _ determined @ how
the current programming is blocked. _bu m_ O,
view the bhmked programming and turn OFF
the AutoLoekTM fi'ature ?_v using the Clear All
conD't_l or Dy elt_(_ring your a_x?(_s code,
Press the MENU/SELECI Imtton onthe remote control to show the
o]]sclee]] Tllel]IL
Press the CURSOR UP or CUILgOR
DOVvq_I button to highlight Features,
Press the CURSOR RIGltT Imtton
to display the Features menu_
Press the CURSOR DOWN button to
select the AutoLock TM control,
Press the CURSOR RIGHI Imtton
again to highlight A((ESS CODE.
Enter your four-digit Access Code,
"Correct" will briefly appeal-on the
screen and file AutoLock menu will be
accessible,
Press the CURSOR RIGHT buttonto enter fl_e AutoLock menu,
Press the CUlLs;OR DOWN Imtton to
select (lear All, (lear? will al_em on
the screen,
Press the CURSOR RIGHT button
to activate the clearing of all chmmels,
Press the STATUS/EXIT Imtton to
remove the menu fiom the screen.
h_l;;ll
®®®
©®®
®oQ-®/
[_[]:[]_B_[]_
If you tune to a specific channel that has
been blocked by BLOCK CHANNEL or
any of the AumLock TM RAT[NG options,
simply enter your _bur-digit access code to
view the channel.
NOTE: This will unblock ALL channels
until the TV is shut OFF, When powered
back ON, all previously blocked channels
will _,_ blocked again,
16

Press the MENU/SELECT button oll
the relnote control to show the
onSel-een l_len IL
Press the CURSOR UP or CURSOR
DOWN button to IfiglalightFeatures,
Press the CURSOR RIGltI button
to display tile Features menu,
Press the CURSOR DOWN button to
higlalight the AutoLock TM control,
Press the CURSOR RIGHT button
again to laighlight Access Code,
Enter your fou r-digit Access Code.
Correct will flash vel3, briefly and the
menu will move to the left with the
AutoLock menu now accessible,
7
8
Press the CURSOR RIGHI button
to display file AutoLock menu,
Press the CURSOR DOWN repeated-
ly until Movie Rating is highlighted,
Press the CURSOR RIGH¥ button
and tile Rating menu shifts to tile left
wifla G highlighted,
0 Press the CURSOR UP or DOWN
buttons to highlight each rating you
want,
Press the CURSOR RIGHI button
to turn tile rating ON or OFF, Turning
the rating ON will block programs with
that rating from being seen,
2 Press the STATUS/EXIT button to
remove tile memt fiom tile screen,
When a rating is turned ON, all higher ratings
also will be turned on automatically, For
ex_nple, if the R l_fing is turned on, the NC-
] 7 and X ratings also will be turned on,
All Movie Ratings can be turned ON or OFF,
Refer to page t 3 for Movie Rating defini-
tions,
S_ur_:l
[ealur_s
@©®
©®®
©®®
3
5
7
1!
Featares
Nt0 te_k xxxx
!
_e_tur_
N Pati_jt
Featuresi
_o Lozk
I,:l_x()_lnr_I IX
_to Lock I
G . Off % _'
Pl
P,',]1_
P(]
P_]lii
/_o Lock
_ttde _lin_
17

ym can select specific TV ratings that you
rant to censor @ jbffowing these steps.
Press the MENU/SELECI button onthe remote conh-ol to slsow the
onscreen menu.
Press the CUILgOR UP or CURSOR
DOWN button to higlllight Features.
Press the CUIL_IOR RIGHT bu tto n
to display the Features menu.
Press the CUIL_OR DOWN button to
highlight the AutoLock TM controh
Press the CUIL_OR RIGHT button
again to Iligllligllt Access Code.
Enter your four-digit Access Code.
Cort_,ct will flash very briefly and tile
menu will move to tile left with tile
AutoLock menu now accessible.
Press the CUIL_OR RIGHT button
to display tile AutoLock iTlenu,
Press the CUlLS;OR DOWN buttonrepeatedly until TV Rating is Iliglllight-
ed.
Press the CUIL_OR RIGHT button
to enter file TV RATING menu,
Press the CUlLS;OR UP or DOWN to
select a desired rating (TV-Y_ TV-Y7,
TV-G TV-PG. TV-t 4 or TV-MA .
1 l_'ess the CURSOR RIGHT or LEFT
to turn tile block on file rating ON or
OFF,
NOTE: More specific submfings (lbr violence,
sexual content, dialogue, or fantasy violence)
are available lbr TV-Y7, TV-PG, TV-t 4, mid
TV-MA. (Refer to page t 3 for deflnitiol_.l
To access fllese subratings, with file
main rating selected, press the CUR
SOR RIGHI, Then, repeat steps 8
and 9 to tuna the sitb-ratings ON or
OFE
Press the S]AIUSiEXII button to
remove tile menu from tile screen,
When a rating is turned ON, all higher ratings
also will be t_mled on automatically. For
example, if the TV-Y7 rating is turned on, the
TV-]4 and TI_Vlatings also will be turned on,
M_nu
TF_er
}Tf+I_)reee
®®®
::@®®
©®®
3
5
7
9
1;
_to Lo_ I
17_lJn_
17+7
T_<7
Tt<f;
Tt<p(]
_t'14
18

lte A_4tOLockTM Co!l_rof (_e_ tile _,iel¢_er
ther blocking tq_tions as welD' With
Block OFtions, the censoring can be turned
On or Oj].
Press the MENU/SELECT button on
the remote control to show the
on.screen ITlenu_
2
3
4
5
Press the CURSOR UP or CUI@OR
DOWN button to highlight Features.
Press the CURSOR RIGHT button
to display theFeatures menu.
Press the CURSOR DOWN Imtton to
highlight the AutoLock TM control.
Press the CURSOR RIGHT button
again to highlight Access #ode,
Enter your four-digit Access Code,
Ct_rrect will flash very briefly and the
menu will move to the left with the
AutoLock menu now accessible.
7
8
Press the CURSOR RIGHT button
to display the AutoLock menu.
Press the CURSOR DOWN Imtton
repeatedly until Block Options is high-
lighted.
Press the CURSOR RIGHT Imttonto enter the Block Options menu.
0 Press the CURSOR UP or DOWN
Imttons to select the desired block
option,
Blocking: Might be called the ;'master
switch, tbr AutoLock rx, When On,
ALL blocking/censoring will take place.
When Off. ALL blocking is disabled.
Block Unrated: ALL unrated programs
bm_ed on the Movie Ratings or
Parental ffV) Guidelines can be
blocked if this feature is set to On and
the Blocking teature is set to OFE
No Rating: ALL programming with
NO content adviso D- &ato can be
blocked if set to On mid the Blocking
feature is set to OFF.
Press the CURSOR RIGHI or
LEFI to toggle BLOCKING ON or
OFF.
Press the STAIUS_XIT button to
remove the menu from the screen.
Remember, when the BLOCKING control is
OFF. the blocking or censoring of programs is
disabled, When the BLOCK[NG control is
ON, blocking will occur according m the set-
tings you have chosen,
_eat_fe_
[n_all
Tirrr_lr
g_Jtl_[_k
5
7¸
@®®®
N
©®®
@®®
©®®
O@@@'
@@@@
0000
DNBBB[?_
19
°'I
Tirmi" _ess_
_t0 L_ xxxx
_nu I
NIot_k
gk_d _z_lion
Datums
L_:tCharnel
Chan C0Oe
i_,ie Ratln_t
N Ratin
gad_Llni-au_l
i_e_Rating
N_k Oi_ti¢_
Re_kln 011 {)n _>
NIo t_
NxkON_n_t
8lllL_lll Off
[_[<_kglW_t_T Otl
I@ 7allrr

T_ remind you with rating you have locked
nd whiefz Block Options ),ou hm,e selected,
a _vview screen is available tz__vviewyour
AutoLocU" settings. 7b acc_s 6ds screen jblhn¢,
the steps betm<
Press the SIATUS/EXY[ button on the
remote control TWICE, Your
AutoLoek TM settings will al_ear on the
screen,
NOTE: If you have blocked specific subratings,
such as V for violence in the TV-PG category,
these blocked subratings will not al_ear in the
review, The subratings however am still blocked
according to your selections,
After a Ibw seconds, the sellJngs willleave file screen automatically, or you can
press the STAIUSiEXIT button a third
time to remove them fi-om ttie screen,
Movie Rating
R
N{;-17
x
Block Ilnrdted
NO Rating
17 Rating
0fl
Off
Y7
17-G
[V-PG
[7-14
IV4AA
The AutoLoek TM status screen will only
appear if the Block option is set to On, See
previous page for derails,
AutoLock is set to Offby default,
This display- will appear after Step One
(atmve) is completed if ttie AutoLoek TM
Block Option is set m On.
This display- will appear after Step One
(a[mve) is completed if ttie AutoLoek TM
Block Option is set m Off,
MovieRating 17 Rating
R
R{;-17
x
BlockIlnrat_
NoRating
Off
Off
AutoLorkDISABLED
TV-U
TV-G
W-PC
TV-14
MA
2O

y_n_ ca_ chat€g( _the sc_%_(_nfi_rl_at Size to
arch the type oj p_gram you're watch-
ing. Select ttte normal 4:3, Z_om 14:9, and
Subtitle aspect ratios. There aL_o g_ 16:9,
Superwide, and Wide Screen aspect ratios,
which albm*_ movies to be viewed in theirjMf
width (known as letter-box style).
Press the MENU/SELECT button onthe remote control to show the on-
screen lnenlL
Press the CURSOR UP or CUILgOR
DOWN twice to Ifighlight Features,
Press the CURSOR RIGH] mad themenu will shift to file let_,
Press the CURSOR DOWN repeated-
ly until the Wide Screen conh-ol is
highlighted,
Press the CURSOR RIGH'f Imttonto enter the Wide Screen menu,
Press the CURSOR UP or CUILgOR
DOWN repeatedly to toggle among the
screen _bnalat sizes 4:3, Zoom t4:9,
Zoom t 6:9, Subtitle Zoom, Superwide,
Wide Screen, or Auto,
Press the STAIUS_XIT button toremove the menu from the screen,
OR
You can toggle the screen tbmlat by
repeatedly pressing the PIC SIZE
Imtton on the remote conh-oh
The FORMAT control is not available for
use wifll the AV 4 Inputs {AV4 (hmmel} if
1080i signal is detected,
IMPORTANT NOTE:
Some DVD Discs are encoded with a.s much
o._30% more video intbmlation to give the
viewer the Lmst possible picture quality. With
the DVD Player in the 16:9 picture lbnnat,
the playback of this type of disc {containing
extra video infonnafionL c,'m produce a hum-
Lmrof small white lines in floe upper portion
of the black lelterbox aea, With some of
the_ di_zs, this situation is unavoidable mid
it does not require a service call,
©©@
©@®
(9@@
®,£®
l_l_ILlllg
® ® ]
4:3
Zoom 14:9
[....................................................
Zoom 16:9
2_
Pea_
8"rer
Nu_r
OR
OR
OR
OR
OR
Subtitle Zoom
:e:l
Superwide
Wide Screen

C_osed Captioning (C@ allows you to
ad the voice content oj televisio_ p*o-
grams o_ the TVscmen. Desigt_ed to hel F the
hearing impaired, this )eatum uses onscme_
"'t_t boxes" to show dialogue and eon_ersa-
tio_¢s while the TV program is in program,s.
Press the MENUtSELECT Imtton onthe remote control to show the on-
screen vnenu,
Press the CURSOR UP or CURSOR
DOWN twice to higlalight Features.
Press the CURSOR RIGH] button,the menu will shift to the left.
Press the CURSOR DOWN repeated-
ly Ullfil the ( losed Caption control is
highlighted,
Press the CURSOR RIGHT again.The menu will shift to floe left mad
(aption Mode will be highlighted.
Press the CURSOR RIGHT to high-
light Caption Modes.
7
Press the CURSOR UP or DOWN to
select a Caption Mode: CCt, CC2,
CC3, CC4, TEXT1, TEX'I'2, TEXT3,
or TEXT4. CC Display tunas text OFF
or ON if the TV station bmadca._ting
on the channel is making Closed
Captioning available. With CC Display
highlighted, press the CURSOR
RIGHT to toggle Closed Captioning
ON, OFE or CC Mute.
NOIE: You also cma press file (C button on
the remote control to tulal the CC Text option
Ol1 Or Off,
Press the STATUS/EXIT button to
remove the menu fiom the screen,
NOIE: When Closed Captioning is tulaled
On, the screen will automatically change to
the Wide screen lbrmat to allow text to fit on
s¢:reen,
NOTE: Not all TV programs and product
commercials ,ale bmadca_st wi[h Closed
Captioning (CC). Nor are all Closed
Captioning MODEs (CAPTION 14 or
TEXT 1_) necessarily truing used by broad-
cast stations during the transmission of a pro-
gram offering Closed Captioning. Refer m
your area's TV progrmn listings for the sta-
tions anti times of shows being broadcast
with Closed Captioning.
_mJ
Pi_i'e ; Tirier
i
Wld_k_en
_ola_ mi
_atu_
!, 13g_a7
lea ro._
ca
_apt_a g_ _ C
OR
O_
oil

IIsc rare cas¢_ the video supplied to the TV
creen might show slightly tilted one way or
anothe_ _7€e Tilt Adjust contmf will allow you
to correct the problem by acljusting the screen
i_€a clockwise or counterclockwise direction,
Press the MENU/SELECT button onthe remote conlrcol to show the on-
s(,:ree]] YI]el]U,
Press the CURSOR UP or CURSOR
DOWN twice to hJglalight Features.
Press the CURSOR RIGHT and the
menu will shit_ to the left,
Press the CURSOR DOWN repeated-
ly uniJl the ROTATION control is
higlalighted,
Press the CURSOR RIGH¥ orLEVr to rotate the picture on tiae
screen clockwise or counter clockwise,
Pleo._e note that tile amount of rotation
will be very minimal,
Press the STA'FU S/EXI] button to
remove the menu fiom the screen.
©®@
®®@
©®®
[sat_
_im_r
gl_d i];aptio_
RfJ_t)_ 4
Picture tilted to the left
E m
After adjustment
m m
Picture tilted to the right
23

T_aDynamic Noise Reduction feature can
letF eliminate slightly "i_FecMed" l_ic-
tures (an indication oj signaf noise i!l the pic-
ture).
Press the MENU/SELECI Imtton ollthe remote control to show file
o]lsereel) N] e]llL
Press the CURSOR UP or CUILg;OR
DOWN twice to hJglalight Features.
3
4
Press the CURSOR RIGH¥ Imtton
to display the Features menu,
Press the CURSOR DOWN Imtton
repeatedly until tile Dynamic NR con-
trol is highlighted,
Press the CURSOR RIGHt[ Imttonto enter flae Dynamic NR menu.
Press the CURSOR UP or CURSOR
DOWN Imtton repeatedly to select the
desired Dylaamie NR mode (Ofl_ Min,
Med, or Max),
Press the SIATUS/EX[[ button toremove tile menu fi-om tile screen.
_t( _ !:)et'llta!t(_!tt Osd CO!ItFO] will stoI2_ _]te
I TVs channel number in the _4pFer left
corner of the TV whife the TV is on. Ftdlow
the steps to turn the featur! On or Off7
Press the MENU/SELECI Imtton onthe remote control to show file
onsereen TI] enlL
Press the CURSOR UP or CUlLs;OR
DOWN Imtton repeatedly to highlight
Features,
3
4
Press the CURSOR RIGltI Imtton
to display tile Features menu,
Press the CURSOR DOWN Imtton
repeatedly until tile Permmlent Osd
eonh-ol is higlaliglated,
Press the CURSOR RIGHt[ Imttonto enter the Pemmnent Osd menu and
toggle the On or Off selection,
Press the SIATUS/EX[[ button to
l-elTlOye the iTlenl_ fl-on] the sereell.
24

A "list" or series oj pmviously viewed
channels can be selected with the
QuadraSurf TM h:olomd) buttons on ),our
remote conrail With this featum you can easi-
ly switch between dijfemnt TV programs that
currently interest you. ITte QuadraSurf TM ¢_olt-
t_l afhm,s you set up fimr different personal
Suff f&ts using tke cohn_,d buttons t_m the
remote contrail), each holding up to ten ckan-
neLy in its quick vie_*4ng"list. "
Press the CHANNEL () or (-) but-tons (or the NUMBER buttons) to
select a channel to add to one of_he
SURF fsts,
,@
Press the SMII E_ button on the
remote control to ADD the chalmel to
one of the SURF lists.
3
Press the corresponding COLORED
(Red, Green, Yella_ or Blue) button
to add the channel to that button's Surf
list. (Up to len ehalmels per button can
be stored.)
Repeat steps 1 fllrough 3 to add additional
channels [up to 10) to each of the the SURF
lists.
I0 remove a channel from one of the SURF
lists;
4
Press the COLORED QuadraSurff _
button until the desired channel
al_ears. The screen will display- the
channel number wi[h a colored
"Smiley" face to indicate the Colored
butlon it relates to,
While the "Smiley" face channelindicator is displayed, press the
FROWNIE _ face Imttom The
screen will read, "Remove item? -
Press @ ?'
Press the FROWNIE _ face button
again to confirm your decision to
remove the chmmel from the SUl_ list,
Repeat steps 4-6 to remove other chmmels
from Sulf lists.
@©@
®®@
©®®
6®N@
9oo
L_[NDBDL_
%
8
8 @R_ hv_l_List?
1
_&mr remote also has m_ A2CH
(Alternate Channel) buttom Pressing
this button will toggle between the
Cmxent anti one previously selected
channel
oooo
r_ .*
25

_ze QuadraSurjf Mbuttons on your remote
ontrof allow )ou to store up to 10 chan-
neL_ per button (40 totaO. This is a gmatjea-
ture ijyou warn to store aff your fi_orite
Sports channels, Movie channeLL or News
ehamwts it* one sutj list. Family members can
ha_e them own ji¢_orite list oj chanm@. _m
can even program the ¢_vternal A/V hqmt
jack, jut one oj the buttons making it a
•'.yo_r_:e" bzgttolz fi_r your (_t(tr_a] a_:('e,_soly
devices.
Assmn#_g channels hm,e now bee_ added to
the jour QuadraSurff Ml£_ts (the fimr cohered
buttons on the remote, see the pmvitms page),
let _ m_iew how thejeature wt_r£_.
1
Press one of the pre_pregrammed
COLO_D huttons on d_e remote
(Red, Green, Yellow or Blue), The
screen will display a smile), face wN1 the
first programmed channel fbr that surf
list,
2
3
White the colored "smiley" face still
appears on the screen, press the same
COLO_D hutton on the remora to
t_le the second channel progr_m_med for
that specific surf fist.
Repeatedly pressing the same COI_
ORED huttan while the "smiley" face
appearswill tune all file programaned
channels fbr that specific sin-flist, Afmr
the last ch_mnel is tuned, pressing the
COLO_D hutten aDfin will return
you m the first chmmel in the list,
Repeat steps 1-3 fbr the other three
COLORED buttons (Surf lists) if
desired,
Pressing the "fro_nie" face hutton
will allow you to 1-emove it from the
list ('see the previous page Ibr more
details),
I
14
/
%
\
%
\
/
f
®
@®®®
t11. _©KI *
.- ®®®
©
I@Remove from list?.
26

Tl_e Program List Gmtrol will aflmv you to
uicl¢@ overview all the p_grammed
channels that hm,e been placed into the tele-
visions memory (see the Aura Programming
section oj this manuaf fl_r morn detui{_), pro-
gram List _,4ll display the channel number,
the name oj the channel if you ha_e given it
oil(,, grad whel_, it will ha_e AutoLock turned
On or 0#_
I ress the PROGRAM LIS_ button on
the remote control to show the current
list of installed channels (the cttrrent
chmmel wilt be highlighted).
Press the CURSOR UP or DOWNbuttons to scroll the list of climlnels,
highlighting the one you wmlt to acti-
vate.
Press the CURSOR RIGHP button to
activate the chmlnel. The TV will rune
to that chalmeh
Press the SIATUS/EX[I button toremove the menu from the screen.
77w Active Control monitors and acljusts
I incoming video signals to help p_r_vide the
best picture quati@.
When you choose to turn the Active Control
ON, the picture shaqmess and noise mduc-
ti_m are control[ed at¢t_matieally. Active
Ctmt_l ae(/usts th<_e picture settings continu-
ously and automatically.
NOTE: Active €_mt_vd is not availabte fl_r
signals connected m the A V4 i_!puts.
Press the ACTIVE CONTROL but-
ton on the remote control to toggle the
control options (Off, On, Display-
Logo, or Display Off) and select the
option that you want,
Press the STATUS/EXIT to remove
[llefflenit from file screen,
If Display On is selected, a display screen
will appear when the channel is chm/ged
showing the picture setting. If Display
Logo is selected, the Active Control logo
will _,_ displayed during chmmel changes.
27
Off
®
+1 _ 1+1
®©©
®®®
Q®®
®©®
OOe_
_oo_
%

Have you ever Kallen asleep in front of file TxL
only to have it wake you up at two in the
monfing _ ifh a test pattern sound screech-
ing ill your ears? Well, your TV can
enable you to avoid that diseomtbrt by
automatically turning itself off. With the
Slee _Timer teats)re, you can set a timer to
automatically s_nitch tile TV OFF after a r
period of time you choose (15-minute L')l_'i_gFlel_s ni_l_eo a
llaererl3elats up to 60 1Tlinutes, tlaen 30- Sl_El;Ptt_er_ttiag,_mo_screen
minute JnerelTlents up to 90 minutes, then _otmtdo_nwillbe d spa_ed
60-minute increments up to 240 minutegL
Press the SLEEP button on the
remote control. The SLEEP timer
onscreen display will apl_ar ill the
ulcer part olthe screen.
Within five seconds, press the _J' *_
SLEEP Imtton repeatedly to pick tile
amount of time (t 5-minute increments
up to 60 minutes, then 30-minute
increments up to 90 minutes, then 60- Dur:ngP_elast I0 secondsof
minute
n
up
to 240
minutes)
SLEPP tier _etting, _ lltlsc'_ze ;i
increme ts a_av w, _d C,OC_Dre'E:
before the TV _xill tuna itself off,
An onsereen countdown will a_pear during
tile last minute [';_2fol-ethe TV sl/uts itself off,
_ro see how marly milllltes reIrlaill beIbre the TV
shuts itself ofl; press tile S'IATUSiEXFF button.
A Sleep Timer setting cml be cancelled by press-
ing arly button d'aring file last mhmte of tile opel_
aIiOIfL
Lfiuve you ever wished you coufd fi_,eze the
1 1picture on the television broadcast to
write down a special tehThone tmmber or to
capture* a needed addr_s? }_mr television
wtTt allow you to dvjust that with the press oj
just one bt_tton on the remote contnd.
With a signal on, the television screen,
simply press the FREEZE Imtton on
tile remote eontl-Ol to stop the picture
at ally given moment,
Press the FREEZE Imtton on tile
remote control again to resume nom_al
viewing,
After f?eezing a pictm-e on _he screen, when the
FREEZE control is n_rned OFF, the normal sig-
_ud programming will be _own at it's present
tittle. 'Ihe sig_zl that was beirlg shown while the
picttu-e was fi-oz_n will not be viewable.
28

T/_/"Tletheryou 't_ watching a movie or a video
V V game, your TVh_ automatic video con-
trof settin_ that will match with your current
pt_gram source or content. Au_oPi_._u?_*TM
quickly resets your 7_'_ video controts jbr a
mmlber (¢ diff_,t_,tct t_p_ oj ptvgrams and
vie_¢ing conditions [hat you m_{ have in yot#'
home. The Movie_. Sl4_rts. Weak S(qnaf, and
Multimedia A utoPicture r_ cont_vls lucre t,_,en
pr#!set at the fi¢cton, to automaticalh_ adjust the
TVs brightn_s, cdto_; picture, sha_mess, tint,
and color temFeratut_ levels. Ihe Pet;_onal
A utoPicture r_ settin_ ate" the ones that you
made through the PICTURE oFtiotcs within the
OtISCr(_e!l I_le!lu
Press the PICI'URE button on the
remote controh The cunent
AutoPicture TM setting will ,_:_l_ar in the
mid,lie of the screen,
Press the PICTURE bulton repeatedly
to select eifller Personal. Movies, Spot_s,
Weak Signal. or Multimedia picture set-
tings,
NOIE: The PERSONAL setting m_d tlse PIC-
TURE option,s wiflfin the onscreen men_ art
the s,nme, This is the only option in
AutoPicture TM fl_at can be changed, 'I_ adjust
these settings_ use fl_e PICTURE opti(ms _ iflfin
the onscreen menu. All other settings art set up
at fl_e factory during pro,tuction and cannot be
adjusted.
A utoSound r_ afbm_s you to sefectjbmljbur
flmto_T-set controlsand a personal control
that you set according to your own pr(_e_,m:es
through the onsct_en Strand menu. The fimr
fiw.toty-set controls (Multimedia, Speech.
Mt_ic, and Movies) enable you m taibr the TV
sot#td so as to (,tthcm_?ethe partiodar program
you are watching. ]_m can change the Pet;_onaf
setting to your prCet_nce. Ftdfow th_e steps to
selec.t ato_ oj the optitms.
Press the SOUND button on the
1-emotecontroh The current
AutoSoun& _setting will appear in the
mi,./,.[leof the screen.
Press the SOUND button repeatedlyto toggle among tlse tbttr settbags:
Perscmal, Multimedia,Speech. Music. or
Mo_ies.
Remember_ only the PERSONAL control (&q,1]
be changed by the vieweL This changes the
settings in the main c_ascreenmenu's SOUND
controls,
AutoSound TM works only with flae programs
coming through flae ANTENNA/CABLE
(ANT) input on the rear of the TV (RP
audio), It will not control the sound levels
for the external connections,
29
®
®
®
@®®@
W_}_kJ
=[fl• I _)K I • IN
@@6)
®@@
©@®

5,1mllii
Tie remote control that _ st_ppfied with your tele-
ision may also work with a variety oj i#_'rw_,d
controlled accessoo, devices such as VCRs, Cable
Boxes, DVD Pho,em, Satellite Receivers, etc. ITte
jbfhm,ing instructi_ms _ptain how to change the
remote mode fi_r the type oj accessoo, device you
ar(¢ t4si#t_,
Press and release the SELECT button on
the remote control. The last used mode before
TV-MODE will lit up for 2 seconds. After 2
seconds, the LED for that MODE will begin
to flash.
Press and release the SELECI Imtton onthe remote control within 2 seconds to move
to file next MODE. file new MODE's LED
will lit for 2 seconds, fllen t._gin to flash.
Repeat the steps above to continue throughthe MODEs until the desired MODE is
selected.
MODE TIMEOUT SETTINGS:
When the remote MODE times out, the remote con-
trol will revert to the TV MODE, Timeout length
occurs from the last command or button press in any
offlae MODEs. The length of time belbre a MODE
timeout occurs can be changed.
To change the length of file timeout duration, fol-
low the steps below:
4
Simultaneousl_ press the SELECT button
and the NUMBERED button from the list
below to reset the desired amount of time€rot
length,
Digit 1 = 15 seconds before timeout
Digit 2 = 30 seconds before timeout
Digit 3 = 60 seconds before timeout
Digit 4 = 120 second before timeout
(Example: Yon want the _IODE timeout
to be 60 second_, yon would need to
press the SELECT button and the
NUMBER 3 button at the same time.)
[t is recommended that you use Philips
brand external accessory devices with your
Philips television to insure proper remote
control fit|actions. If you are using Philips
brand accessory devices, your remote con-
tml should be ready to use with these
devices.
3O
SAT AMP ACC
....
m
0000

L_o be programmed by entering a sFecific code
fi_r your Olpe c_ acc_soo' device. Follow the
instructions below to Frogram the remote t_sing 0_€_
of the codes listed on pages 32-34.
Look up the codes fur your brand of acces_
sary device.
Once you have the codes, simultaneously
press the SELECT and OK Imttans.
3
Press the NUMBER button that corres_ondg
to the type of accessory device you are using.
Digit 1 = Cable
Digit 2 = VCR
Digit 3 = DVD
Digit 4 = SAT
Digit g = AMP
Press the NUMBERED button to enter the
4 digit code number fi:om pages 32-34.
Be sure the remote is in the correct MODE
(see previous page) and press the POWER
butt(re. If tile accessory device powers ON
your finislaed, If it does not power ON, repeat
tlae procedure with another code listed, If all
codes _hil, the remote will not control your
specific accessory device,
(E_onFh,: You have a €_lble Bo,x fi_m Archer and
want to Frogram the remote. It ;_c_Me is 0049. Press
the 5_'LI'TCT and ST_4:VDBY button simultaneously.
Press the NUMBER l fi_r Cable, then enter the fist-
ed flmr digit c_Me: i.e.; l, 0, 0, 4, 9.)
It is recommended that you use Philips
brand external accessory* devices with your
Philips television to insure proper remote
control functions, If you are using Philips
brand accessory de, ices, your remote con-
trol should be ready to use with these
devices,
54
0057
31
VCR
I I
Satellile Rc_ceivec
I
Cable (dn_ertcr
@©®
'®@®
@
0000

VCR CODES
Admiral ................. 2027, 2052
Adventura .................... 2001
Aiko ........................ 2059
Aiwa ..... 200t, 2017, 2062, 2070_ 2072
Akai ..... 202t, 2029, 2038, 2060, 2063
Akiba ....................... 2034
Alba 201t, 2034, 2052, 2059, 2063, 2072
Ambassador .................. 2011
American Action ............... 2059
American High ................ 2015
Amstrad ....... 2001, 2059, 2067, 2068
Anam .................. 2017, 2042,
........ 2054, 2057, 2059, 2082, 2084
Anam National ....... 2042, 2054, 2087
Anitech ...................... 2034
Asa .................... 2017, 2035
Asha ........................ 2057
Asuka ....................... 2017
Audiovox .................... 2017
Baird ......... 2001, 202t, 2037, 2039
Basic Line .......... 20t t, 2034, 2059
Beaumal-k .................... 2057
Bell & Howell ................. 2037
Blaupunkt ..... 2003, 2005, 2010, 2014_
• . . 204t, 2042, 2048, 2054, 2055, 2075
Brm/dt ............. 2047, 2064, 2065
Brm/dt Electronic .............. 2021
Broksonic .2002, 2040, 2046, 2052, 2078
Bush .......... 2034, 2052, 2059, 2072
Calix ........................ 2017
(?anon ....................... 2015
Capeh_l ..................... 2011
Carver ....................... 2035
(?atl-on ....................... 2011
CCE ................... 2034, 2059
CGE ........................ 2001
Cimline ...................... 2034
(?inel-al ...................... 2059
Citizen .................. 2017, 2059
(?latronic ..................... 2011
Colt ......................... 2034
Combitech .................... 2072
Condor ...................... 2011
Craig .... 2017, 2026, 2034, 2057, 2058
Crown ............. 20t t, 2034, 2059
Curtis Mathes ...2015, 202t, 2032, 2042
Cy[_mex ..................... 2057
Cyms ....................... 2035
Daewoo . .201 t, 2024, 2025, 2059, 2083
Dmasai ....................... 2034
Daytron ...................... 2011
De Graaf ................ 2022, 2043
Decca .................. 200t, 2035
Denon ....................... 2022
Dual ........................ 2021
Dumont ............ 200t, 2035, 2037
Dynatech ..................... 200t
Elbe ........................ 2018
Elcatech ..................... 2034
Electrohome .................. 20t 7
Electrophonic ................. 20t 7
Emerex ...................... 20t2
Emerson .200t, 2002, 2017, 2023, 2040,
.... 2046, 2051, 2052, 2059, 2078, 2083
ESC .................... 2057, 2059
FeNuson ...... 202t, 2039, 2064, 2065
Fidelity ...................... 200t
Finlandia ................ 2035, 2037
Finlux ......... 200t, 2022, 2035, 2037
Firstline . .20t 7, 2023, 2024, 2034, 2052
Fisher ......... 2025, 2026, 2030, 2037
Fmntech ..................... 20t t
Fuji ......................... 20t5
Fmmi ........................ 2001
GaiTed ...................... 2001
GE ........... 20t5, 2027, 2032, 2057
GEC ........................ 2035
General ...................... 20t t
Go Video ................ 2077, 208t
Goldhand .................... 2034
Goldstar ....... 20t7, 2018, 2053, 2079
Goodmans 2001, 20t7, 2034, 2059, 2075
Gradiente ................ 2001, 2008
Graetz ........ 2005, 202t, 2037, 2057
Grmmda ............ 2025, 2035, 2037
Grm/din ............ 200t, 2017, 2034
Gmndig . .2003, 2005_ 2007, 20t0, 2034,
.2035, 2048, 2050, 2054, 2069, 207t, 2075
Hanseatic .................... 20t 7
Harley Davidson ............... 2001
HannaniKardon ........... 2018,2035
Harwood ..................... 2034
IfCM ........................ 2034
I feadquarter ................... 2025
Hinari ......... 2004, 2034, 2057, 2072
Hi-Q ........................ 2026
Hitachi 200t, 2004, 202t, 2022, 2043, 2057
Hughes Network Systems ........ 2022
Hypson ...................... 2034
Imperial ..................... 2001
Ingelsol ...................... 2004
Interfimk ..................... 2035
ITT ............... 2005, 2021, 2025,
.............. 2037, 2038, 2057, 2074
rrv .................... 2017, 2059
Jensen ....................... 202t
JVC .............. 2008, 2021, 2033,
.............. 2049, 2050, 2074, 2080
Kaisui ....................... 2034
KEC ................... 2017, 2059
Kendo .................. 2038, 2052
Kenwood ........... 2018, 2021, 2033
KLH ........................ 2034
32
Kodak .................. 20t5, 2017
Kol_el ....................... 2034
Layco ....................... 2034
Leneo ....................... 2059
LG ......................... 2079
Lloyd's .................. 200t, 2051
Loewe ........ 2004, 2005, 20t7, 2035
Logik .............. 2004, 2034, 2057
Luxor .... 2023, 2025, 2027, 2037, 2038
LX1 ......................... 2017
M Electronic .................. 200t
Magnasonic ................... 2059
Magnavox ..... 2001, 20t 5, 20t9, 2035
MagnJn ...................... 2057
Manesth ................. 2024, 2034
Marantz ....... 2003, 2005, 20t5, 2035
Marm ....................... 2017
Marsui •2004, 20t6, 2036, 2052, 2070, 2072
Matsushita .......... 20t 5, 2042, 2055
Mei ......................... 2015
Melectmnic ................... 2018
Memorex .......... 2001, 20t5, 2017_
........ 2019, 2025, 2026, 2027, 2037,
.... 2052, 2057, 2062, 2085, 2087, 2088
Memphis ..................... 2034
Metz .............. 2003, 2005, 2017,
............. 2042, 2048, 2055, 2069
MGA ................... 2023, 2057
MGN Technology .............. 2057
Minerva ..................... 2048
Minerva ............ 2005, 20t0, 2048
Minolta ...................... 2022
Mitsubishi .2023, 2027, 2033, 2035, 2045
Motorola ................ 20t5, 2027
MTC ................... 200t, 2057
Multitech ................ 200t, 2034
Mul_hy ...................... 200t
NAD ........................ 203t
National ..................... 2054
NEC ..... 2018, 2020, 2021, 2033, 2037
Neckemlann .................. 2035
Nesco ....................... 2034
Nikko ....................... 2017
Nikon ....................... 2014
Noblex ...................... 2057
Nokia ......... 2025, 2037, 2038, 2057
Nokia .... 2021, 2025, 2037, 2038, 2057
Northnende •2021, 206t, 2064, 2065, 2074
Oce_fic ................. 200t, 2021
Okano .................. 2063, 2070
Olympus ................ 2015, 2054
Optimus ........... 20t7, 2027, 2031,
•.. 2037, 2042, 2077, 2086, 2087, 2088
Orion ............. 2002, 2004, 20t 6,
.... 2036, 2046, 2052, 2070, 2072, 2078
Osaki .............. 200t, 2017, 2034

VCRCodesCont'd
OttoVersam/.................. 2035
Palladium ...... 2005, 20t7, 202t, 2034
Pmlasonie ............... 2015,204Z
............. 2053, 2054, 2055, 2087
Paflle Cinelna ................. 2016
Paflle Marconi ................ 2021
Penny 20t 5, 2017, 20t 8, 2020, 2022, 2057
Pentax ....................... 2022
Perdio ....................... 2001
Philco ........ 20t 5, 20t 8, 2052, 2078
PhiliQs,, ,20t5, 2035 (DEFAULT VCRh
....................... 2074, 2075
Phonola ..................... 2035
Pilot ........................ 2017
Pioneer ............ 203t, 2033, 2035
Portland ..................... 2011
Prolex ....................... 2066
Profitronie ................... 2057
Proline ...................... 2001
Proscm/ ...................... 2032
Protec ....................... 2034
Pulsar ....................... 2019
Pye ......................... 2035
Quarter ...................... 2025
Quartz ....................... 2025
Quasar ............. 20t 5, 2042, 2087
Quelle ....................... 2035
Radio ghack ............. 200t, 2085
Radiola ...................... 2035
Radix ....................... 2017
RCA 2015, 2022, 2027, 2032, 2038, 2057
Realistic ................ 2001, 20t 5,
........ 2017, 2025, 2026, 2027, 2037
REX ................... 202t, 2074
RFT ........................ 2075
Rieoh ....................... 2014
Roadstar ...... 20t 7, 2034, 2057, 2059
Runco ....................... 2019
gaba .............. 202t, 2049, 2050,
............. 2061, 2064, 2065, 2074
gaisho ........ 2004, 20t6, 2036, 2052
galore ............. 2023, 2025, 2038
gamsnng ...... 2024, 2057, 2076, 2077
gmlky .................. 2019, 2027
gansni ................. 2001, 2021,
............. 2033, 2052, 2058, 2078
ganyo ......... 2025, 2026, 2037, 2057
gaville ...................... 2072
gBR ........................ 2035
gchaub Lorenz , ,2001, 2005, 202t, 2037
gclmeider .......... 200t, 2034, 2035
gcott ......... 2023, 2024, 2040, 2046
gears .................. 2001, 20t 5,
........ 2017, 2022, 2025, 2026, 2037
gEG ................... 2057, 2066
SE[ .................... 2004, 2035
Seleco ....................... 202t
Semp ....................... 2024
gentra ....................... 201t
Shmp .................. 2027, 2073
ShilttOm ................ 2034, 2037
Shoglm ...................... 2057
Shorai ....................... 2004
Siemens ................ 2003, 2005,
.... 20t 0, 20t7, 2030, 2035, 2037, 2048
Silva ........................ 20t7
Singer .................. 2024, 2034
ginltdyne ................ 2004, 2035
Solavox ...................... 201 t
Sonolor ...................... 2025
gontee ....................... 20t 7
Sony ..... 200t, 2012, 2013, 20t4, 20t5
STg ........................ 2022
Snnkai ...................... 2070
Snnstar ...................... 2001
Snntronic .................... 200t
Sylvmfia ....... 200t, 2015, 2023, 2035
SymhonJe .................... 2001
Tashiko ...................... 200t
Tatung ............. 2001, 202L 2035
Teac ................... 2001, 202t
TEC ........................ 201t
Technics ........... 2015, 2042, 2054
Teknika ....... 200t, 2015, 2007, 20t7
Teleavia ..................... 202t
Telefunken 202t, 2047, 2058, 2064, 2074
Tenosal ...................... 2034
Tensai .................. 2001, 2066
Thomas ...................... 200t
Thomson ........... 2021, 2064, 2074
Thorn ............. 2016, 2021, 2037
TMK ................... 2051, 2057
'lbshiba . .202t, 2023, 2024, 2035, 2074
'lbtelevision ............. 20t 7, 2057
'lbwa&a ...................... 2066
Uher ........................ 2057
Uniteeh ...................... 2057
Universum ......... 2001, 2006, 2010,
.... 20t 7, 2035, 2038, 2048, 2057, 2067
Vector ....................... 2024
Vector Research .......... 20t 8, 2020
Victor ............. 2008, 2021, 2033
Video Concepts ........... 2020, 2024
Videosonic ................... 2057
Wards ............. 2001, 20t5, 2022,
.... 2026, 2027, 2032, 2034, 2035, 2057
White Westinghouse ....... 2052, 2059
XR-1000 ..................... 200t
XR-1001 ..................... 20t5
XR- 1002 ..................... 2034
Yamaha ...................... 20t 8
Nmn ,h ..................... 2034
Yokan ....................... 2034
Yoko ................... 201t, 2057
Zenitti ,,,2001,20t4, 20t9,2052,2078
DVD Codes
Akai ........................ 5316
HamlaniKal-don ............... 5314
JVC .................... 531t, 5318
Kenwood .................... 5307
Magnavox .................... 5302
Mitsnbishi .................... 5303
Onkyo ............. 5302, 5317, 5319
Pmlasoni ................ 530t, 5322
Philips ...5302, 5308 (DEFAULT DVDI
Pioneer ............ 5305, 5312, 5321
Proscm/ .................... 5304
RCA ...................... 5304
gamsung ................... 5313
gharp ..................... 5320
gony ...................... 5306
Technics ................... 5301
Theta Digibal ................ 5312
Thomson ................... 5310
"lbshJ ba .................... 5302
Y,'unaha ................. 530t, 5309
Cable Box Codes
ABC ..... 3002, 3003, 3004, 3006, 3008
Andover ..................... 3037
Bell & Howell ................ 3006
Bir_nin_tm Cable Commmiication .. 3020
British Telecom ........... 3002, 3012
Cabletime ..... 30t 6, 30t9, 3025, 3029
Clyde ....................... 3011
Contec .................... 3009
Cryptovision ................ 3038
Daehan .................... 3043
Daeryung .................. 3003
Decsat ..................... 3027
Everquesst ................. 3007
Filmnet .................... 3028
France Telecom ............. 3030
GEC ........................ 3011
Gemini ...................... 3007
Gener_d fnstrmnent . .3004, 3020, 3031, 3046
Goldstar ................ 3014, 3047
Grnndig ..................... 3035
Hitachi ...................... 3004
Jaseo ........................ 3007
Jerrold ............ 3002, 3004, 3005,
........ 3006, 3007, 3020, 303t, 3046
LG Alps ..................... 3044
Memorex .................... 3001
Mnet ................... 3009, 3028
Now ........................ 3041
33

Cable Box Codes
Now ........................ 3041
Oak ......................... 3009
Pacific ...................... 3039
Panasonic ............... 300t, 3013
Paragon ..................... 3001
Pioneer ................. 3014, 3036
Pulsar ....................... 3001
PVP Stereo Visual Matrix ........ 3002
Quasar ...................... 3001
Radio Shack .................. 3007
Rembrandt ................... 3004
Runco ....................... 3001
Salora ....................... 3026
Samsung ................ 3014, 3040
SNbox ...................... 3024
Scientific ........... 3003, 3032, 3049
Scientific Atlm/ta ..... 3003, 3008, 3021
Seawoo ...................... 3045
Signal ....................... 3007
Signature .................... 3004
Starcom ................. 3002, 3007
St_gate ..................... 3007
Starquest ..................... 3007
STS ........................ 3015
Taihan ....................... 3043
Tele+l ...................... 3028
Teleservice ................... 3022
Tocom ...................... 3005
Tongkook ............... 3042, 3048
Toshiba ...................... 3001
Tudi ........................ 3023
Tusa ........................ 3007
United Cable .................. 3002
Videoway .................... 3017
Visitable+ .................... 3033
Weshninster .................. 3012
Wolsey Gene ................. 3037
Zenith .................. 300t, 3034
Satellite Receiver Codes
Absat ....................... 4006
Alba .......... 4029, 4034, 4037, 4052
Aides ....................... 4019
Amstrad ................ 4003, 40t 6,
............. 4025, 4038, 4039_ 4042
Ankard ........ 40t 3, 40t9, 4030, 4044
Anttron ................. 4009, 4034
Am1 strong ................... 4015
AST ........................ 4027
Astra ........................ 4005
Astro .............. 4008, 4039, 4045
Avalon ...................... 4031
Axis ................... 4030, 4046
Beko ........................ 4010
Best ........................ 4030
Blaupunkt .................... 4008
Boca ................... 40t 5, 4043
Brain Wave ................... 4022
British Sky Broadcasting ........ 4058
BT ......................... 4053
Bush ........................ 4002
Cambridge ................... 4024
Canal Satellite ................ 4059
Canal+ ...................... 4059
Channel Master ................ 4029
CNT ........................ 4045
Comlink ..................... 40t 9
Connexions ................... 403 t
Crown ....................... 40t5
Cyrus ....................... 401t
D-Box ....................... 4054
DDC ........................ 4029
DNT ................... 40t 1,403t
Echostar ........... 4031,4036, 406t
Emmlon ..................... 4034
Ferguson ...... 4002, 4009, 40t 0, 4023
Fidelity ...................... 40t 6
Finlux ........ 4005, 4024, 4032, 4037
Fl-acalTo ..................... 406 t
Freecom ..................... 4034
FTE ttumax .................. 4060
F'uI,_ .............. 4030, 4031, 4034
Galaxis ............ 4019, 4057, 4060
General Instrument ............. 40t 2
Gold Box .................... 4059
Gooding ..................... 4048
Goodmans ................... 40t 0
G17andig ............ 4008, 40t 0, 4048
G-sat ........................ 4009
Itinari ....................... 4009
Hirscttimmm . .4008, 4032, 4039, 4040, 4049
Hitachi ...................... 4037
Houston ..................... 4053
Huth ......... 4013, 4015, 40t 9, 4026
Intervision ................... 4050
Invideo ...................... 406t
ITT ......................... 4005
Johansson .................... 4022
JVC ........................ 4048
'Katht_in .40IN, 4006, 4008, 40t t, 4035, 4041
Kreiselmeyer ................. 4008
Kyostar ...................... 4034
La Sat .................. 4043, 4045
Lenco ....................... 4034
Lennox ...................... 4050
Lupus ....................... 4030
Luxor .................. 4005, 4049
Manhattan .......... 4037, 4045, 4050
Marantz ..................... 401t
Maspro ................. 4004, 4023
Matsui .................. 4024, 4048
Mediamar kt .................. 4015
Mediasat ..................... 4059
Minerva ..................... 4048
Morgan)s ................ 4015, 4043
Navex ....................... 4022
Neuhaus ..................... 4039
Neusat ...................... 4057
Newhaus ..................... 4013
Nokia A005, 4032, 4037, 4049, 4054, 4063
Nordmende ................... 4029
Orbitech ..................... 4039
Oxtbrd ...................... 4024
Pace .............. 4002, 4009, 40t 4,
............. 4023, 4037, 4055, 405g
Palladium .................... 4048
Palsat ....................... 4039
Pmlda ....................... 4037
Philips ................. 4007, 40t 1,
............. 4020, 4037, 4048, 4059
Phonotrend .............. 4019, 4050
Pioneer ................. 402 t, 4059
Planet ....................... 4061
Promax ...................... 4037
Prosat ....................... 4019
Quadral ................. 4029, 4044
Radiola ...................... 4011
Radix .................. 403 t, 4064
RFT ............... 40tt, 4013, 4019
Saba ................... 4023, 4045
Sabre ....................... 4037
Sagem ....................... 4056
Salora ....................... 4005
SAT .................... 4027, 403g
Satcom ................. 4026, 4051
Saree ........................ 4009
Saml_ter .................... 4026
Salpartner ..... 4022, 4034, 4040, 4045
Schwaiger , .............. 4009, 4041
Seemmm ................ 403t, 4046
SEG ................... 4030, 4034
Siemens ..................... 4008
Skymaster .......... 40t9, 4044, 4051
Sony ................... 4017, 401g
Strong ....................... 4062
Sunstar , ..................... 4043
Tm/tec .................. 4023, 4037
Techniland ................... 4026
Technisat ................ 400t, 4039
Teletim ken ................... 4034
Teleka .................. 4015, 4052
34

W;(,It _sing the T_"I_dt_lot(, co!ttro] with air
ternaf accessory device, first make
certain the Froper mode k_ selected and the
?_qllote ]'lffd,_ /)(_(_n p_gral_ll_(_d to condo[ tilt_
device (_ee pages 30-31 .
Press the SELECT button repeatedly
to highlight the propel accessory mode
(VCR, DVD, SAT, AME or ACt,),
Point the top of the remote toward the
fi-oTltof the accessory device's remote
sensor window when pressing butloTls,
/
External Accessory Mode Indicator .................,,
wlren the Select buttoTl is repeatedly pressed,
the indicator will ]figlllight what mode the
remote eonh-ol is ill
Seloet Button
Press repeatedly to highlight mad select one of ]
the accessory modes within the Mode Indictor. /
t
Rescind Button (Fast Reverse)_cql
Press to rewind tapes or thst rewind DVD
discs. For some aeeessoq devices, the STOP
button may have to be pressed ill-st, the_l /
REWIND. [n playback mode, hold do_sTl the
buttoTl to view the picture iTioving rapidly ill
reverse.
Stop Button •
Press to stop the playback of a tape or disc
in playback, rewind, _hst _brwald, and so on.
Record Button
Hold file RECiordigap) mid PLAY • buttons
down to begin a VCR recording.
Remembar, the VCR buttons on the remote will
not _,erate )xmr VCR if those features are not
found _m your VCR rcnnute con_tt.
NOTE: All VCR thnctkms (particularly
Search, Rewind, F,_st Forward, etc.) wilt oper-
ate the same as with the original VCR relnote
c_mtrol provided with the VCR.
®
0000
Power Button
Press to turn tire accessory device ON mad
OFF.
Pause Button II
Press to tenlpol-alily stop the videotape,
DVD disc, etc., during a playback or
recording. Press again to release Pause.
Fasl Forward Button 0A_nd Forward) _•
Press to rapidly advance a videotape, DVD
disc, etc. For some devices, you may need
to press the STOP buttoTl fil-st, theTl the
FAST FORWARD button. In playback
mode, hoH the button down to view the
L icture moving rapidly in the lbrwald
direction.
Play Button •
Press to begin playback of a videotape or
DVD disc, etc.
Channel _ and - Buttons
Press to scan _tp or down through the chaTl-
Tlel nun_bel-s using the external accessory
devices _uTler Isome accessory devices do
not have chmnrel tuners),
_--- Numlrer Buttons
Press bultons for the direct selection of
external device chmnrels i f the unit is
equipped with a tuTlel-.
-- TWVCR Button
Press wtfile in the VCR mode (the VCR indi-
cator on the fr_mt of the trait will tight} tu view
the playback ofa _ape. Press again to place in
the TV lx_si_ion (the VCR indicatur light will
go off) _o view one program M_ite recording
another program.
35

MI
No Power
• Check the TV power cord. Unplug the TV, wait 10 seconds,
then reinsert the plug into the outlet and push the POWER
button again.
• Check that the outlet is not on a wall switch_
• Be sure the fuse is not blown on tile AC power strip, if one is
t_ing use&
No Picture
• Check antenna connections. Are they properly secured to the
TV's ANT 75r.2 plug?
• Check tile TUNER MODE control for the correct tuner set-
ting.
• Try running the Aura Program teatul-e m find all available
channels.
• Press the AV butlon on the remote to make sure the correct
signal source is selected (ERONT, AV1, AV2, CulTent
Channel, etc.).
No Sound
• Check tile VOLUME buttons.
• Check tile MUTE butlon on the remote control
• lfyou'reattemNingtuhookupauxilimyequipment, check
the audio jack connections located on the front of the TM
Remote Does Not Work
• Check tile batteries. Ifnecessmy, replace them with AA
Heav2f Duty (Zinc Chloridffl or Alkaline batteries.
Remote Does Not Work Continued
• Clean the remote control and tile remote control sensor win-
dow on the TV.
• Check the TV power cord. Unplug the TxL wait t0 seconds,
then reinsert the plug into the outlet and push the POWER
button again.
• Be sure the fuse is not blown on the AC power strip, if one is
being used.
• Check to be sure the TV outlet is not on a wall switch.
TV Displays Wrong Channel or No Channds Above 13
• Repeat charnel selection.
• Add the desired channel numbers (using the CHANNEL
EDIT control) into the TV's memory.
• Check m be sure the TUNER MODES are set m the CABLE
option and run the Auto Progrmn teatul-e to find all available
channels.
TV Displays white lines in letterbox _hen viewing a DVD
disc
• Some DVD Discs are encoded with as much as 30% more
video intbnnation m gi-_e the best possible picture quail/y.
Wi[h the DVD Player in tile t 6:9 picture tblnalat, the play-
back of this type of disc with extra video in formation, can
produce a number of small white lines in tile upper portion
of the black letlerbox area. Wi[h some of these discs, this sit-
uation is unavoi&able and it does not require a service call.
WARNING Concerning Stationary Images on the -IV
S_reen:
Do not leave stationa_)- or letterbox images on screen for
extended
periods of time. Yhis can cause uneven picture_
tu be aging.
Normal use of the TV should involve the showing of pictures
that contain constuntly moving and changing images that fill tile
screen. Be caretid not to leave nonmoving images on screen tbr
extended periods of time, or to display the same images on
screen too frequently, because subtle ghost images can be left
on the picture tubes. Sources of stationary images may be DVD
disks, laser disks, video gmnes, CD-i disks, videotapes, digital
television boxes, broadcast channels, cable channels, satellite
channels, and others, Here are some examples of stationary
images (this is not an alMnclusive list; you may encounter
others in your viewing):
• DVD menu,s---listings ofDVD disk content
• Letterbox black bar_>--shown at the top and bottom of the
TV screen when a wide screen (t 6:9} movie is viewed Ol/a
TV with standard (4:3) aspect ratio.
• Video-game images and scoreboards
• Ielevision station Iogo_---present a problem if they are
bright and stationary; moving or low-contrast graphics ,ale
less likely to cause uneven aging of the picture tube
• Stock-market ticker._presented at tlae t_tlom oftheTV
screen
• Shopping channel logos and pricing displays---bright and
shown constuntly or repeatedly in tile same location on tile
TV screen.
Placement of the TV
• "lb avoid cabinet warping, cabinet color changes, and
increased chance of set tb_ilure, do not place the TV where
temperatures can become excessi-_ely hot; for example, in
direct sunlight or near a heating appliance.
• Be sure to allow a free flow of air to and from the perforated
back cover of the set.
Cleaning
• _I_ avoid possible shock hazard, be sure the TV is unplugged
from the electrical outlet before cleaning,
• Regularly dust tile TV with a dry, nonscratching duster to
keep tile TV clean,
• When cleaning tile TV, take care not to scratch or damage the
screen surface, Avoid wearing jewelry or using anyihing
abrasive, Do not use household cleaners, Wipe the front
screen with a clean cloth &_tmpened with water, Use even,
easy. vertical strokes when cleaning.
• Gently wipe tile cabinet surfaces wi[h a clean cloth or sponge
dampened in a solution of cool, clear water and a mikl soap
or deteNent. Use a clean, dry cloth to dry tile wiped surfaces.
• Occasionally vacuum tile ventilation holes or slots in the back
cover of the set.
• Never use thinners, insecticide sprays, or other chemicals on
or near tile cabinet, as they might cause permanent maning
of the cabinet finish.
3_

AcflveControlTM ................................. 27
Alternate Channel Control .......................... 25
Audio Out (ontrol ................................ 10
AutoChlon TM Controls ............................. 12
AutoLock TM Controls
Access Code ................................... 14
AutoLock TM Review Screen ........................ 20
Blocking Programs based on Movie Ratings ........... 17
Blocking Programs based on TV Ratings .............. lg
Locking Channels ............................... 15
Clearing All Locked Channels ...................... 16
Understm/ding flae AutoLock TM Features .............. 13
AutoPictul-e TM Control ............................. 29
Auto progrmn (ontrols .............................. 6
AutoSound TM (ontrol .............................. 29
AVL (Automatic Volume Levelel-i Control .............. 10
Balance Control .................................. 10
Bass Control ..................................... 10
Brightness ( ontrol ................................. 9
Care and Cleaning Intbmlaflon ....................... 36
Chmmel Edit Cotnrols ............................... 6
Closed Captioning ................................ 22
Color Control ..................................... 9
Color Temperature (Color Temp) Control ................ 9
Dynamic Bass .................................... 10
Dyn(amic) Contrast Control .......................... 9
Dynamic NR (Nosie Reduction) ...................... 24
Factol3, Service Locations ........................ 38-39
Feature Highlights ................................. 4
Freeze Control ................................... 28
[ncr,(edible) Surround Control ....................... 10
[ndex .......................................... 37
Language Control .................................. 5
Nmne Conrol .................................... 7-8
Pemlm/ent OSD .................................. 24
Picture Control .................................... 9
Program List Control .............................. 27
QuadraSurf TM Controls .......................... 25-26
Registration ofTV In/blnalation ........................ 2
Remote Control Use with Accessory Devices
Code-Entry Method of Identification ................. 31
Mode Selection ................................. 30
Direct-Entry Code List ......................... 32-34
Accessory Device Specific 9ut[ons .................. 35
Rotation Control .................................. 23
Safety Information ................................. 3
SAP (Secontkn_ry Audio Programsl Control .............. 10
Sharpness Control .................................. 9
Sleep Timer Control ............................... 28
StereoiMono Control .............................. 10
Timer Controls
Activate Control ................................. 11
Clock, Time Control ............................. 11
Display Control ................................. 11
Progam No, Control .............................. 11
Stmi Time Control ............................... 11
Stop Time Control ............................... 11
Tint Control ...................................... 9
Treble Control ................................... 10
Troubleshooting .................................. 36
Tuner Mode Controls ............................... 5
TV Speaker Control ............................... 10
Warranty (Limited) ................................ 40
Wide Semen Fomlat Controls ........................ 21
37

Indl_ In-Ho_ ServiceOnly _/--_
MliwauJe_:callChicago - _\ _ Houston
CincinnatiandColumbus:callCleveland
Nash_lleandChattanooga:callKnox_ll_
WashingtmVBardmore:callPhiladetphia
Char/ofte:callA#anta
All_ Iccagons;callTampa
,Indl_ln-_m_lnfmrvlce
NOTE: If you reside in one of our PhilipsFactory Service Branch areas(see directory o_ back), you can contact the _earest ServiceBra_ch to obtain
efficient and expedient repair for your product. If your product is In-Warranty, you should have proof-of-purchase to ensure No Charge Service. For
Out-of*Warral}ty service, call the location nearest you.
NOTA:Si vous residez dane one desregions desservies par une succursele de service apres vente du fabricant Philips (voir listeci-dessous), vous
poorrez contacter la bra_}chede service spree ve_}telaplus pres de chez vous pour obtenir un service spree ve_}terapideet efficace Si le produit ect
sous gara_tie, il suffira de presenter une preuve d achat pour beneficier d'un service sansfrais. Pour lesproduits non cooverts par la gara_}tie,corn
tactez le ce_tre le plus pres de chezvous.
NOTk: Si Ud reside en ona de _uestraszonas pars sucurseles Philips de servicio aldefabrics (vetdirectorio m_s abajo), Ud.puedecomonicarse con
la sucursel de servicio m,Jscercanapara obtener una reparaci0n oportuna y eficazde su producto Si su prodocto est,Jtc_avla bajo garant[a, Ud.
debe presentar co_;qproba_ltede compra parsno ocasionar _lingunoscargos pot servicio P,Jraservicio deepues del vencimiento de la gar,Jntia,name
al lugar m_s cerca_}ode los abajo indicados.
How you ca_Tobtain efficient a_}dexpedie_}tcarry-in, mail-in, or imhome service for your product
Pleasecontact Philips at 1-800-661-6162 (Fre_}chspeaking)
1-800-363-7278 (English or Spallish speaking)
Comment obtenir le service apres-vente poor lee produits apportes ou envoyes par ]apaste anotre centre de service ou leservice _ domicile
Veuinezco_;tacterphilips _: 1-800-661-6162 (lra_;cophone)
1-800-363-7278 (Anglaisou Espagnol)
E_
C0mo recibir servicio efficiente pars su producto, en persona, par correo o a domicillo
Favordeco_;qu_;icarseco_ Philipe al: 1-800-661-6162 (franc0fono)
1-800-363-7278 (Ingles o Espanol))
MA02929 Rev DD. 1/1/2902 EL4482-3 Rev. DD
3135 015 07541
38
QUALITYSERVICEISAS(CLOSEASYOURTELEPHONE!S_MPLYLOOKOVERTHELISTBELOWFORTHENUMBEROFA FACTORYSERV(OECENTER
NEARYOU.YOURPRODUCTWILLRECEIVEEFF_O_Er.JTANDEXP£DIEr.JTCARRY-IN,MAiL-It.J,OR _N_HOMESERVICE,M.JDYOUWILL RECEIVEPEACEOFMIND,
_(ROWINGYOURPRODUCTISBEINGGIVERTHEEXPERTATi'£RTIOEJOFPHILIPS'FACTORYSERVICE,
COMMEFffOB_N_RNOTRESERV)OEAPREsVENTERAP)DEETEFFICACESOftPARCOURRER,ADOMtC)LE,OaENSERR_SENTANTA aN CE_RE DESERVICEPHILIPS.PLUSDE60,0CENTRESDE
R_CEFTIONDEPNODU{TSA R_PARENA"fRAVERSLEPAYS:CONTACTERLECENTREDESERVICEAUXCONSOMMATEURSLEFLUSFROCNEFOURSAVOUR(.'EMPLACEMENTDECESO_POTSDANS
UNRAYONDE50A 75 MILES(8_RMA1Z0KM)DUCENTREDESERVICELOCAL.
COMOOBTENERUNS£RV)C(OOFORTUNOY RE(C(EFffEFORCORREO,ENCASA0 ENPERSOFU%PARASUpNODUCTOA TRAV_SDEUNCENTROFNIUPSDESENVICIO.MASDEE00SITIOSFOR
TODOELPA(SFARALARECEP010NDEFRODUOTOSNECESITM)OSDEREPARAC)ONES:COMUNtCANSECONELCENTRODESER_OtODEFABR(CAMASCERCANOPAPAESTOSLOGARESDENTNO
DE aN RADIO DE 80 A 120 KM (,_ A 75 Ma.LAS) DEL CENTRODESERV(CIOLOCAL.
ATLANTA
Phi(ipsFactoryService
550FrankiinRoad.,Suite F
Marietta,GA30067
8002731501
TAMPA
Phi(ipsFacto(yService
1911 USHighway301 North
Tampa,FL33619
8004422027
SANFRANCISCO
F)hi(JpsFacto(yService
681East8rokaw Rd.
SanJose,CA95112
8003009013
HOUSTON
Phi(JpsFacto(yService
1110 N.Post OakRd.,Suite 100
Houston,TX77055
8009523254
CLEVELAND
PMlipsFactoryService
950 KeynoteCircle
BrooklynHeights,OH44131
800331 7037
DETROIT
PhilipsFactoryService
25173 Dequindre
MadisonHeights,M148071
8004381398
DALLAS
PhilipsFactoryService
415 N MainSt{eat, #107
Euless,TX76040
8009523254
CHICAGO
PhilipsFactoryService
1279W, Hami(tonPkwy.
Itasea,IL60143
800531 _2922
KNOXVILLE
PhilipsFactoryService
6700D Papermill Rd.
Kno_(vil(e,TN37919
800821 4767
PHILADELPHIA
PhilipsFactoryService
352Dunks Ferry Rd,
Bensa(em,PA19020
800847_9320
M&C2929 1/1/2002
39

II!I_ Iiidde,]kV_V/-41tIT-4_Itik"4
COLOR TELEVISION
90 Days Free Labor
One Year Free Replacement of Parts (Two Years Free Replacement on CoIor Picture Tube)
This product can be repaired in-home.
WHO IS COVERED?
You must have proof of purchase to receive warranty service. A sales
receipt or other document showing that you purchased the product is
considered proof of purchase.
WHAT IS COVERED?
Warrarlty coverage begins the day you buy your product, rot. 90 days
thereafter_ all parts wit{ be repaired or replaced free, and labor is free.
From 90 days to one year from the day of purchase, atl parts wil{ be
repaired or replaced free, but you pay for all labor charges, Fror11 one
tO tWO years frotl/the day of purchase, you pay for the replacement or
repair of all parts except the picture tube, and for ali labor charges.
After two years from the day of purchase, you pay for the replacemetlt
or repair of all parts, and for all labor charges.
At{ parts, including repaired and replaced parts, are covered only for
the original warranty period. When the warranty on the product
expires, the warrarlty or1 all replaced and repaired parts a_so expires.
WHAT IS EXCLUDED?
Your warranty does not cover;
labor charges for installation or setup of the product, adiustment Of
customer controls on the product, arid installation or repair of
antenna systems outside of the product.
product repair arid/or part replacement because of misuse, acci-
dent, unauthorized repair or other cause not within the control of
Philips ConsLIrtler Electronics Company.
reception problems caused by signal conditions or cable or antenna
systems Outside the unit,
a product that requires modificatiorl or adaptation to enabte it to
operate in any country other tharl the courltry for which it was
designed, manufactured, approved and/or authorized, or repair of
products damaged by these modifications.
irlciderltal or consequential darl/age$ resuttirlg from the product,
(_ome states do rlot allow the exclusion of inciderlta{ or consequerl-
tia{ damages, so the above exclusion may not apply to you. This
klcludes, but is not lirl/ited to, prerecorded material, whether Copy*
righted or not copyrighted,)
a product used for commercial or institutional purposes.
WHERE IS SERVICE AVAILABLE?
Warrallty service is available irl all countries where the product is offi-
cially distributed by Philips Consumer Electronics Comparty. In coun-
tries where Philips Consumer Electronics Company does not distribute
the product, the local Philips service organization will attempt to pro*
vide service (although there may be a detay if the appropriate spare
parts and technical manual(s) are not readity available),
MAKE SURE YOU KEEP.,.
Please keep your Sales receipt or other document showing proof of
purchase, Attach it to this owner's manual and keep both nearby.
Also keep the original box and packing material in case you need to
return your product,
BEFORE REQUESTING SERVICE...
Please check your OWner's manual before requesting service,
Adjustments of the controls di_u_Lsed there may save you a service
call
TO GET WARRANTY SERVICE IN U.S.A.,
PUERTO RICO OR U.S. VIRGIN ISLANDS...
Coni3ct a Philips factory service center {see enclosed list) or author-
ized service center to arrar_je repair.
(in U,S,A,, Puerto Rico and U,S. Virgin Islands, all implied warranties,
inclodir_j implied warranties of merchani3bility and fitness for a partic-
ular purpose, are limited in duration to the duration of this express
warranty. But, because some states do not allow limitations on how
long an implied warranty may last, this limii3tion may not apply to
you,)
FOR WARRANTY COVERAGE IN CANADA...
Note: Product Warranty coverage may vary between countries where
product is distributed by PhiIips Consumer Electronics Company. In
order to receive full and specific warranty details for products sold and
serviced in Canada, please contact Philips at:
1-800-661-6162 (from Canada - French Speaking)
1-800-531-0035 (Er_jlish and Spanish Speaking)
REMEMBER...
Please record the modet and serial numbers found on the product
below, Also, please fill out and mail your warranty registration card
prompdy. It will be easier for us to notify you if necessary,
MODEL#
SERIAL#
ii;i!i;_iliil!ii__ii_ii_ii_ii_ii_ii_ii_ii_ii_i_i! _n_ ig_ !_:_!!_ _ i_il; _! !_ i_;_ii_ i¸_ii_ _ili i_ _!!__ii ¸_i_i__ __i_ _ _ i__!!_ _ _ _iil i!i¸Iili!i!;i¸_i!iil!;iil!iil!;iil!iil!;iil!iil!;iil!iil!;i
Philip,, P.O. Box 520890, Miami, FL 33152, (402) 536-4171
_=intedin _S.A
40
 Loading...