

Page 1
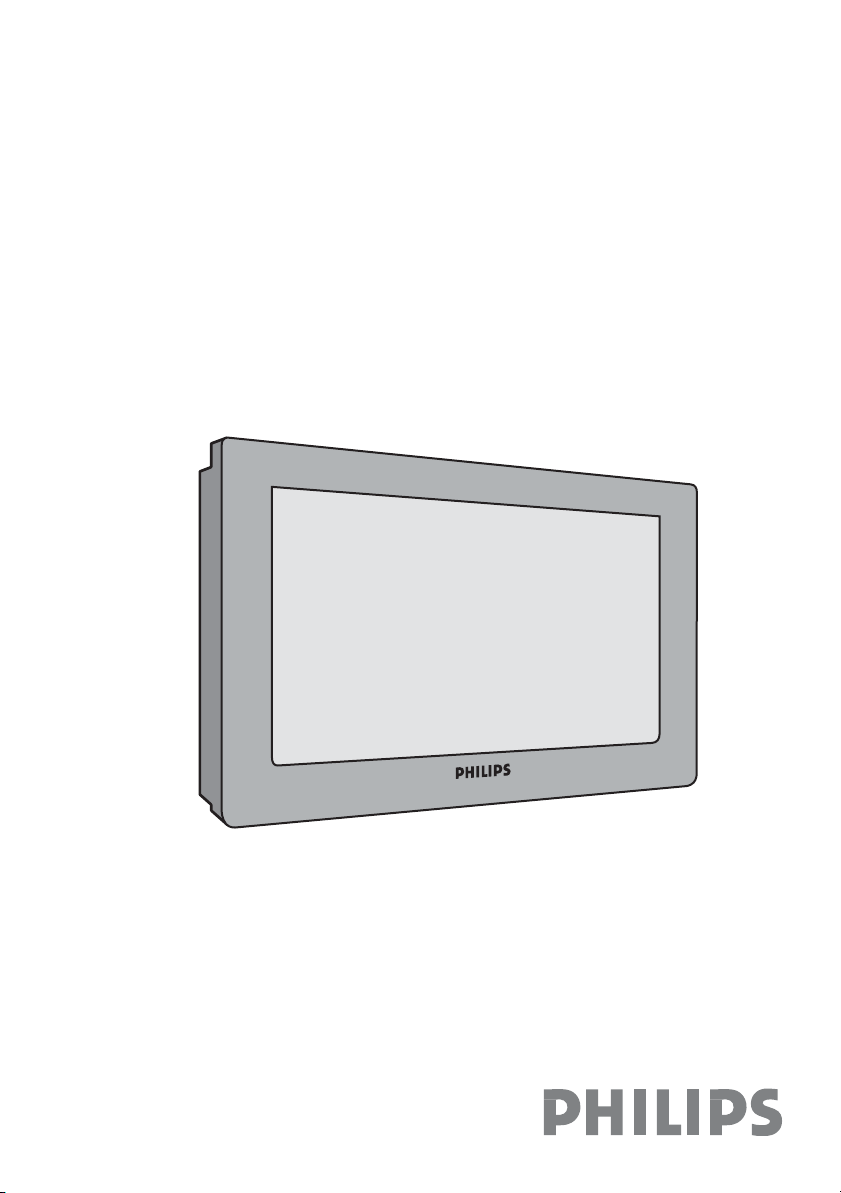
Real Flat Television
User manual
29/34PT8845
Page 2

IMPORTANT
Before you begin:
Make sure your package includes the following items:TV and mains cord,
remote control, user manual, antenna cable (optional) and Coaxial
cable (optional).
Attention:
1. Read your manual first – your Philips TV comes with a well-designed
remote control and onscreen display to ensure your TV is easy to
operate.
2. The tips provided in this manual will save you time and money as
charges for TV installation and adjustments of customer controls are
not covered under the warranty.
3. For information outside of this manual, such as sales locations and
other Philips products, please visit www.philips.com which will
automatically link you to your local Philips website.
4. Please refer to the ‘Tips’ page before calling for service.
5. In case you need to call for service, we recommend that you call from
your room where your TV set is and have your remote control,
warranty card,TV model and serial number on hand.
6 Do not throw away packaging materials:
• without thorough inspection for parts and accessories that may be
packed separately inside the carton.
• during the warranty period should you need to exchange the set.
Recycling:
The materials used in your set are either reusable or can be recycled.
To minimise environmental waste, specialist companies collect used
appliances and dismantle them after retrieving any materials that can be
used again (ask your dealer for further details).
Disclaimer: Graphics in this manual are for illustration purpose and may not represent the
actual product
Page 3

Table of Contents
1
General
Safety Information . . .. . .. . .. . . . . . . . . . . . . . . . 2
Useful Tips . . .. . . . . . . . . . . . . . . . . . . . . . . . . . . . . . 2
What’s Hot
Picture Scanning mode . . . . . .. . . . . . . . .. . . . . 3
YPbPr Digital High Definition input . . . . . . . . 3
Installation
Installing your television set . . . . . . . . . .. . .. . 4
The keys on theTV set . . ... . .. . .. . .. . .. . . . 4
Remote control keys .. . .. . .. . .. . . . . . . . . . 5
Language . . . . ... . . . .. . . . . . . . . . . . .. . . . . . . . . . . 7
Auto
Store . . .. . . . . . . . . . . . . . . . . . . . . . .. . .. . . 7
Manual Store. . . . . . .. . . . . . . . . . . . . .. . .. . . . . . . 8
Sort . .. . . . .. . . . . . . . . . . . . . . . . . . . .. . .. . . . . . . . 8
Channel Edit . . . . . . . . . . . . . . . . . . . . . . . . . . . . . . 9
Operation
Picture settings . . .. . .. . . . . . . . . . . . . . . . . . . . . 10
Sound settings. . . . . . . . . . . . . . . . . . . . . . . . . . . . . 10
Features settings . . . . . . . . . . . . . . . . . . . . . . . . . . 10
Child Lock . . . . . . . . . . . . . . . . . . . . . . . . . . . . . . . . 11
Format . . . . . . . . . . . . . . . . . . . . . . . . . . . .. . . . . . . . 12
Active Ctrl . . . . . . . . . . . . . .. . . . . . . . . . . . . .. . . 12
Demo . . . . . . . . . . . . . . . . . . . . . . . .. . . . . . . . . . . . 13
Autopicture Booster
Personal Zapping . . . . . . . . . . . . . . . . . . . . .
. . . . . . . . . . .. . . . . . . . . . .. .
13
Peripherals
DVD player . . . . . . . . . . . . . . . . . . . . . . . . . . . . . ..
Video recorder . . . . . . . . . . . . . . . . . . . . . .
Other
equipment . . . . . . . . . . . . . . . . . . . . . .
Amplifier . . . . . . . . . . . . . . . . . . . . . . . . . . . . . .
Side connections . . . . . . . . . . . . . . . . . . . . . . .
Practical information
Tips . . . . . . . . . . . . . . . . . . . . . . . . . . . . . . . . .
ry . . . . . . . . . . . . . . . . . . . . . . . . . . . .
Glossa
Specificatio
14
ns . . . . . . . . . . . . . . . . . . . . . . . . . . . . . 21
17
17
18
18
18
19
20
Teletext . . . . . . . . . . . . . . . . . . . . . . . . . . . .
15
Page 4

Safety information
2
• Remove mains plug when :
– the indicator light below the TV screen is flashing continuously.
– a bright white line is displayed across the screen.
– there is a lightning storm.
– the set is left unattended for a prolonged period of time.
• cleaning the TV screen. Never use abrasive cleaning agents such as scouring powder.
Use a slightly damp chamois leather or soft cloth.
• No naked flame sources, such as lighted candles, should be placed on top of the TV or in
the vicinity.
• Do not place your TV set under direct sunlight or heat.
• Leave at least 10 cm around each side of TV set to allow for proper ventilation.
• Avoid placing your set (e.g. near the window) where it is likely to be exposed to rain
or water.
• No objects filled with liquids should be placed on top the TV so as to avoid dripping
or splashing on the set.
Useful information
• Do not leave your set on standby mode for a prolonged period of time. Switch off set
to allow it to be demagnetised. A demagnetised set supports good picture quality.
• Do not shift or move the set around when it is switched on. Unevenness in colour in
some parts of the screen may occur.
• Never try to repair a defective TV yourself. Always check with a skilled service personnel.
Page 5
What’s Hot
3
Picture scanning
Your Philips TV has been built with scanning features to enhance your TV viewing.All you
need is to select your desired mode to enjoy sharper and clearer pictures.The description
below will help you make your choice.
Auto
If you are undecided of which mode to choose, select Auto and let your TV decide for you
automatically!
100 Hz Digital Scan (available only for PAL signal)
Working with three lines of picture information, the 3-line digital comb filter in the TV
virtually eliminates both horizontally and vertically hanging dots, as well as dot crawl.
Progressive Scan
Doubles the vertical resolution of the image to produce a noticeably sharper picture.
How to access
& Press the
The Main Menu will be call up.
é Press the
“ Use the
‘
To quit the menus, press .
MENU
key.
to select the Scan mode.
key to select Auto, 100 Hz or Prog Scan.
Ë
YPbPr Digital High Definition input
When you have a digital equipment with a 480p/576p/720p/1080p/1080i (PAL version) or
480p/720p/1080i/1080p (NTSC version) output (e.g. a digital set top box or Progressive
Scan DVD player), connect it to the HD 2Fh input.
How to access
& Connect the TV’s green, blue and red Y Pb Pr (HD in) jacks to the corresponding
COMPONENT VIDEO OUT jacks on the equipment.
é Connect the TV’s red and white (R and L) AUDIO IN jacks from AV2 IN to the
corresponding AUDIO OUT jacks on the player. Match the cable colour to the jacks’ colour.
The red jack is the Right audio channel and the white jack is the Left audio channel.
“ Turn on the TV and the equipment. Set the TV to a channel displayed as YPbPr to playback.
Page 6
Installing your television set
4
Positioning the television set Remote control
10 cm
10 cm
Place your TV on a solid, stable surface,
leaving a space of at least 10 cm around the
appliance.
10 cm
Connections
• Insert the aerial plug into the socket
at the rear of the set.
If you are using an indoor aerial, reception
may be difficult in certain conditions. You
can improve reception by rotating the
aerial. If the reception remains poor, you
will need to use an external aerial.
• Insert the mains plug into a wall socket.
Insert the two AA-sized batteries (supplied)
making sure that they are the right way
round.
The batteries supplied with this appliance do
not contain mercury or nickel cadmium.
If you have access to a recycling facility, please do
not throw away your used batteries (if in doubt,
consult your dealer).
Switching on
To switch on the set, press the on/off key.
A red indicator means that the television is on
standby mode. Refer to the next page on ‘Remote
Control keys’ for the various keys that you can
use to switch on the set.An indicator light will
flash when it is receiving signal from the remote
control.
The keys on the TV set
The television set has 4 keys which are
located in front.
are located at the top of the set.
On some models, the keys
The VOLUME – + keys are used to adjust the
sound louder or softer.The CHANNEL v
keys are used to change the channels.
To access or exit the main menu, press down
the VOLUME – + keys, simultaneously.
To select an item in the main menu, press the
CHANNEL v or ^ key.
To select an adjustment, press down the
VOLUME – or + key.
^
Page 7

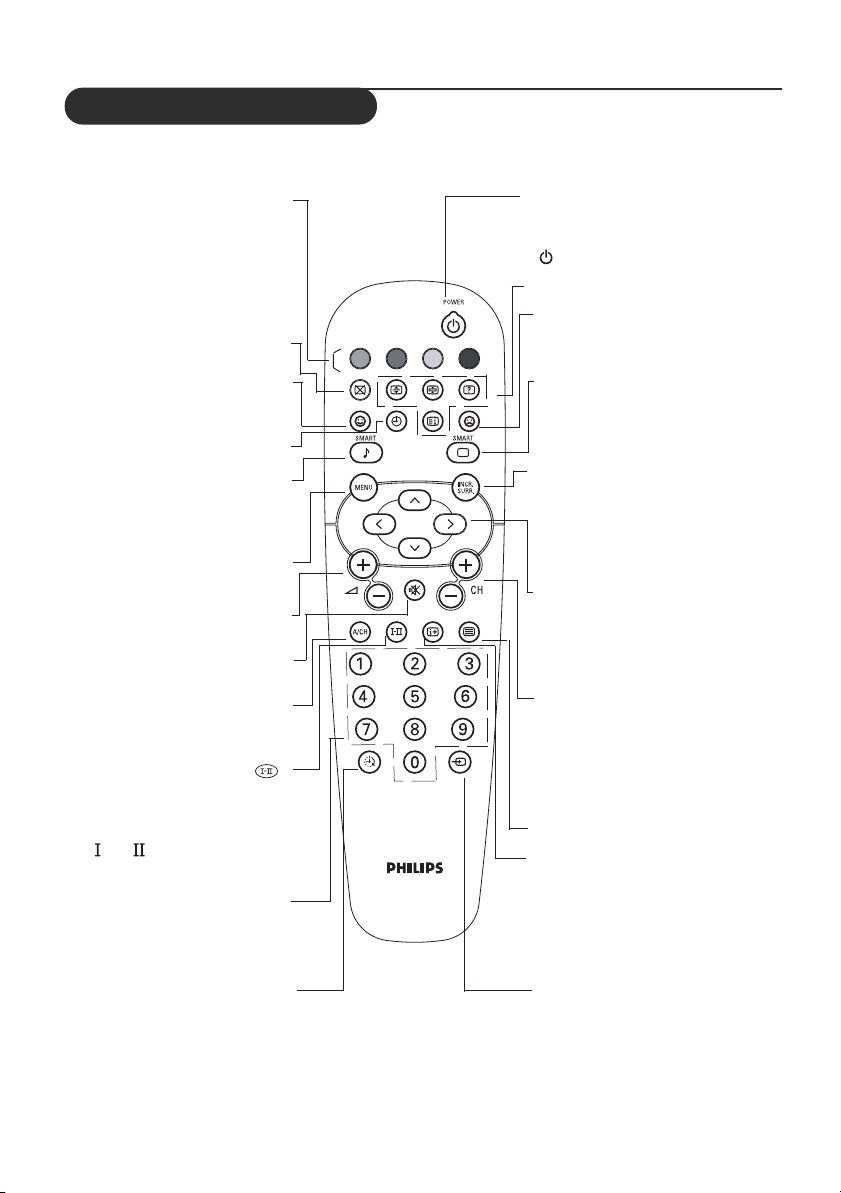
Remote control keys
5
(Choose the right remote control that
came with your TV set)
You can surf up to 10 personal
Personal Zapping
channels for each key (p. 14)
Sleeptimer
Not applicable.
Add Personal Zapping list
Adds and stores channels into
Personal Zapping list (p. 14)
Smart Sound
Used to access a series of stored
settings:Theatre, Music,Voice or
Personal.
Menu
To call up or exit menus.
Cursor
These 4 keys are used to move
around the menus or provide direct
access to the different picture
formats
Volume
To adjust the sound level.
Digit keys
Direct access to the channels. For
a 2-digit channel, enter the 2nd
digit before the dash disappears.
Alternate channel
Switches between the current
and the previous channel.
Standby
Lets you place the TV set on standby.
To turn on the TV, press CH + or –,
, AV, A/CH or digit keys.
AV channel selection
POWER
Press several times to select AV1,
CVI,AV2,YPbPr or Side.
Delete Personal Zapping list
Deletes stored channels from
Personal Zapping list (p. 14)
Smart Picture
Used to access a series of stored
settings: Rich, Natural, Soft, DVD/
VCD or Personal.
Incredible Surround
To enable/disable the Incredible
Surround feature. In stereo, the
speaker sounds appear further apart.
In mono, a pseudo-spatial effect is
obtained.
During stereo transmission, to
A/C
switch from Stereo to Mono.
During dual sound transmission, to
switch betwen language or .
(For NTSC version: Select Mono,
Stereo, or SAP).
Channel selection
To access the next or previous
channel.The number and sound
modes are displayed for a few
moments whenever you select a
new channel.
Mute
To turn on or turn off sound.
On screen display
To display/clear the on screen
information. Hold down key for 3
seconds to activate permanent
display of channel number.This key
is also used to exit from the menu.
Page 8
Remote control keys
6
(Choose the right remote control that
came with your TV set)
Teletext /Personal Zapping
In teletext mode; the colour keys
allows direct access to an item or
corresponding pages (p 15-16)
In Personal Zapping mode; you can
surf up to 10 personal channels
for each key (p14)
Not applicable.
Add Personal Zapping list
Adds and stores channels into
Personal Zapping list (p. 14)
Not applicable.
Smart Sound
Used to access a series of stored
settings:Theatre, Music,Voice or
Personal.
Menu
To call up or exit menus.
Volume
To adjust the sound level.
Mute
To turn off or turn on sound.
Alternate channel
To switch between the current and
the previous channel.
During stereo transmission, to switch
from Stereo to Mono. During dual
sound transmission, to switch between
language and . (For NTSC version:
select Mono, Stereo, or SAP).
Digit keys
Direct access to the channels. For a
2-digit channel, enter the second
digit before the first digit disappears.
Sleeptimer
Not applicable.
Standby
Lets you place the TV set on standby.
To turn on the TV, press CH + or –,
, AV, A/CH or digit keys
Teletext keys (p. 15-16)
Delete Personal Zapping list
Deletes stored channels from
Personal Zapping list (p. 14)
Smart Picture
To access a series of stored
settings: Rich, Natural, Soft,
DVD/VCD or Personal.
Incredible Surround
To enable/disable the Incredible
Surround feature. In stereo, the
speaker sounds appear further
apart. In mono, a pseudo-spatial
effect is obtained.
Cursor
These 4 keys are used to move
around the menus or provide
direct access to the different
picture formats.
Channel selection
To access the next or previous
channel.The number and sound
modes are displayed for a few
moments whenever you select a
new channel.
Teletext key (p. 15-16)
On screen display
To display/clear the on-screen
information. Press the key for 5
seconds to activate permanent
display of channel number.This key
is also used to exit from the menu.
AV channel selection
Press several times to select
AV1, CVI,
AV2, YpbPr, or Side.
Page 9

Language
7
When there is no signal input to the TV, you
may encounter instability of the screen display.
In this instance, please use the Ø key to select
an AV channel.
(On screen display may differ from actual TV)
Auto Store
(applicable to certain TV models only)
This menu is used to store all available
channels automatically.
The Language feature is used to change the
display language for menus.
& Press the key.
MENU
é With the cursor, select the Install menu
and followed by Language.
“ Use the key to select a language of
your choice.
‘ To quit the menus, press Ë.
& Press the key.
MENU
é With the cursor, select the Install menu
and follow by the Auto Store.
“ Use the key to start auto store.
All the available TV channels will be stored
automatically.
This operation takes a few minutes.The display
shows the progress of the search and the
number of channels found.
‘ To quit the menus, press
Ë
.
If no channels are found, consult the possible
solutions on p.18.
Page 10

Manual Store
8
(applicable to certain TV models only)
This menu is used to store channels one at a
time.
& Press the key.
MENU
é With the cursor, select the Install menu
and followed by the Manual.
“ Colour Sys(tem): use the or
key to select the desired colour system;
Auto, PAL, NTSC 3.58, NTSC 4.43
and SECAM.
Sort
(applicable to certain TV models only)
This feature allows you to rearrange channels
according to your preference.
& Press the key.The Main menu is
MENU
displayed on the screen.
é With the cursor, select the Install menu
followed by the Sort menu.
“ Use the
or key to select the
channel number you want to change
‘ Sound Sys(tem): use the or
key to select the desired sound system;
Auto, BG, I, DK or M.
( Search: press . The search starts.
Once a channel is found, the scanning
stops. Go to the next step.
If no picture is found, consult the possible
solutions ('Tips' page).
§ Channel: enter the required channel
with the , or digit keys.
Fine Tune: if the reception is not
satisfactory, adjust using the
or
keys.
! Store: press .The channel is stored.
ç Repeat steps “ to ‘ for each channel
you wish to store.
à To quit the menus, press Ë.
from (e.g. 001) and confirm selection with
key.
the
‘ Use the
or key to select the
channel number you want to change to
(e.g. 004) and confirm selection with the
key.
The change is done. Channel 4 will move up to
channel 3 and channel 3 will move up to channel
2.
( Repeat steps “ and ‘ for each
channel you wish to change.
§ To quit the menus, press .
Ë
Page 11

Channel edit
9
This feature allows you to skip or edit
channels which h
channels
channel is skipped, you cannot have
Once a
access to it
only access the
(On screen display may differ from actual TV)
ave bad or weak TV signal or
you do not watch often.
by the Channel + or – key.You can
channels by the digit (0-9) keys.
& Press the key.The Main menu is
displ
MENU
ayed on the screen.
é With the cursor, select the Install menu
followed by the Edit menu.
“ Enter into the menu and select the
channel
number you wish to skip by
using the digit keys.
‘ Then use the key to select Skipped.
Use the
key to select On.
( Repeat steps “ and ‘ for each
channel
§ To quit the menus, press .
you wish to skip.
Ë
To restore skipped channels
& Repeat steps & to “ above.
é Use the key to select Skipped and
the
key to select Off.
“ Repeat steps & and é for each
channel
‘ To quit the menus, press .
you wish to restore.
Ë
Page 12

Picture settings
10
& Press then . The Picture menu
(On screen display may differ from actual TV)
é Use the or keys to select a
“ PressËto exit.
MENU
will
be called up.
setting and the
or keys to adjust.
Note: during the picture adjustment, only
the selected line remains displayed. Press
or to display the menu again.
Sound settings
& Press , select Sound ( ) and press
(On screen display may differ from actual TV)
é Use the
MENU
. The Sound menu will be called up.
ge
or key to select a setting
and the
or key to adjust.
Description of the adjustments:
• Brightness: this changes picture brilliance.
• Colour: this changes the intensity of the
r.
colou
• Contrast: this changes the difference
bet
ween the light and dark tones.
• Sharpness: this changes the picture
definition.
• Hue: this adjusts the skin colour tone in
NTSC channel.
• Colour Temp.: this changes the colour
rendering: Cold(bluer), Normal(balanced) or
Warm(redder).
• NR: weakens picture noise (snow) in
reception conditions.
difficult
• Contrast +: automatic adjustment of the
re contrast which permanently sets the
pictu
kest part of the picture black.
dar
“ PressËto exit.
Description of the adjustments:
• Treble: this changes the high frequency sounds.
• Bass: this changes the low frequency sounds.
• Balance: this balances the sound on the left
and right speakers.
• AVL (Automatic Volume Leveller): this is used
to limit increases in sound, especially on
channel change or advertising slots.
• Incr. Surr. (Incredible Surround): this
will boost the effect of stereo sound.
• Ultra Bass: this is used to enhance bass
output.
Features settings
& Press , select Features ( ) and press
MENU
. The Features menu will be called up.
Description of the
features:
• Rotation: large screen TVs are sensitive to
rrestrial magnetic field variations.This
te
setting is used to compensate
the pictu
re rotation. Use the
by adjusting
or key
to adjust.
• Child Lock, Format,Active
Ctrl, Demo and Autopic Booster:
see explanation on
the next few pages.
Page 13

Child Lock
11
(applicable to certain TV models only)
You can block certain channels or prevent use
TV set completely.
of the
Note
:You can only access the locked channels via
remote control. Keep the remote control in a
the
sa
fe place.
& Press , use the key to select
MENU
Features and press the
The
Features menu is displayed.
key.
é Use the key to select Child Lock
and
press the key to enter.
“ Key in the 4-digit access code for the
first time or if
e, enter 0711 twice.
cod
The
re will be a prompt to key in the
you have forgotten the
New Code.
‘ Key in your preferred code once and
to confirm.
again
The Child Lock me
( Use the
and the
nu is displayed.
or key to select a function
key to enter or confirm
selection.
Description of function:
Lock Channel
to select a channel
: use the
or key
number to lock and
press the key to confirm. The
symbol will display next to the channel
that was loc
Chan
again
Clear
channels
ked.
ge Code: enter a new code and
to confiorm.
All: use to unlock all locked
. Select On to activate.
LOCK ALL: use to lock all TV and external
channels
§ Press
. Select On to activate.
Ë
Page 14

Format
12
This feature enhances your viewing pleasure
by providing you with a choice of two picture
formats:- 4:3 and Expand 4:3.
& Press , use the or key to select
MENU
Features and press the
The
Features menu is displayed.
key.
é Use the key to select Format and
press the key to select 4:3 or
Expand
4:3.
“ Press the Ëkey to exit.
Scan
Active Control
(applicable to certain TV models only)
The Active Control monitors and adjusts
incoming video signals to help p
re quality. When you choose to turn the
pictu
ve Control to On or Display On, the
Acti
Brightness,
NR (noise
automatical
pictu
Contrast, Sharpness, Contrast+ and
reduction) features are controlled
ly. Active Control adjusts these
re settings continuously and automatically.
rovide the best
Description
4:3 – select this format if
nventional picture using the full surface of
a co
the
screen.
of function:
you want to display
4:3
Expand
to expand pictu
‘letterb
the top and bottom of the sc
the enti
4:3 – select this format if you want
res transmitted in a
ox’ format (black horizontal bars at
reen) to fill up
re screen.
Letterbox
Expand 4:3
& Enter Features menu as described in
“Features settings” on the previous page.
é Use the
and p
key to select Active Control
ress the key to select Off, On
or Display On.
Ë
“ Press the
Description
Off
: the Active Control will not be activated.
key to exit.
of option:
On: the Active Control will work to give the
ewer the best possible picture, but will
vi
not displ
channels
Displ
ay the monitoring screen when
are changed.
ay On: an Active Control monitoring
reen will be shown for a few
sc
seconds when
changed
ever a channel is
.
Page 15

Demo
13
The split screen display shows the image
formance before and after enhancements
per
to p
resent clearly the effects of the picture
enhancement
features.
reen is split to dramatically show the
The sc
comparati
ve images side by side.
& Enter Features menu as described in
“Features settings” on the previous page.
é Use the
press the
key to select Demo and
key to select On or Off.
Automatic Picture Booster
If the transmission signal is weak, the builtin Automatic Picture Booster will increase
the signal level to provide good pictures at
all times. You have a choice to turn on or
off the feature, depending on the signal
conditions locally.
& Enter Features menu as described in
“Features settings” page.
Scan
On
é Use the
Booster.
key to select Autopicture
re
with pictu
enhancements
without pictu
enhancements
"
Use the key to turn Autopicture
Booster On or Off.
re
Page 16

Personal Zapping
14
(applicable to certain TV models only)
A list or series of favourite TV programs can
be selected and stored in the 4 coloured keys
with the Personal Zapping feature. With this
feature you can easily view up to a total of
10 preferred channels for each coloured key.
To add channels:
& Select a channel with the digit keys.
é Press
to display list.
“ Press your favourite colour key to store
the channel in step & .
‘ Repeat steps & to “ to store more
channels.
Ë
( Press
to exit.
To delete channels:
& Select and press a colour key that has
stored channels repeatedly to select the
channel you want to delete.
é Press to display list.
“ Press
to remove channel.
‘ Repeat steps Ë& to “ delete more channels.
( Press
to exit.
8
To view channels:
Select and press a colour key that has stored
channels repeatedly to select the channel you
want to view.
Page 17

Teletext
15
Teletext
Teletext is an information system broadcast by certain channels which can be consulted like a
newspaper. It also offers access to subtitles for viewers with hearing problems or who are not
familiar with the transmission language (cable networks, satellite channels, etc.).
(applicable to TV with Teletext function only)
Press: You will obtain:
0 9
Teletext call This is used to call teletext, change
to transparent mode and then exit.
The summary appears with a list of
items that can be accessed. Each item
has a corresponding 3 digit page
number.
If the channel selected does not
broadcast teletext, the indication 100
will be displayed and the screen will
remain blank (in this case, exit teletext
and select another channel).
Selecting a page Enter the number of the page required
using the digit, CH + or – or
keys. Example: page 120, enter 1,2 and
0.The number is displayed on the top
left, the counter turns and then the
page is displayed. Repeat this operation to view another page.
If the counter continues to search, this
means that the page is not transmitted. Select another number.
Direct access Coloured areas are displayed at the
to the items bottom of the screen.The 4 coloured
keys are used to access the items or
corresponding pages.
The coloured areas flash when the item
or the page is not yet available.
Contents This returns you to the contents page
(usually page 100).
Enlarge a page This allows you to display the top or
bottom part of the page and then
return to normal size.
Page 18

16
Teletext
1 2 3
4
5
7
8
0
(applicable to TV with Teletext function only)
Press: You will obtain:
Stop sub-page Certain pages contain sub-pages
acquisition which are automatically displayed
Hidden To display or hide the concealed
information information (games solutions).
Favourite For teletext programs 0 to 40, you
pages can store 4 favourite pages which
6
9
successively.This key is used to stop
or resume sub-page acquisition.
The indication
HOLD
appears on the
top left.
can then be accessed directly using
the coloured keys (red, green, yellow,
blue).
& Press the
key to enter
teletext mode.
é Display the teletext page that
you want to store.
“ Press once.
‘ Press any one of the coloured
keys you want stored for this
page.
The top left of the screen will
(
display Added!
Repeat steps éto (to add
§
more favourite pages to the
remaining coloured keys.
Viewing
favourite pages
Deleting
Favourite pages
In TV mode, press any of the coloured
keys on the remote control to view
your favourite pages that you stored
as described above.
& In TV mode, press the coloured
key to display the favourite page.
é When the page is displayed,
press once.
“
Remove Item? - Press
will be displayed on the top
left of the screen.
Press again to remove the
favourite page.
Page 19

Connecting peripheral equipment
17
The television has 4 sets of external sockets situated at the back of the set (AV1 in,AV2 in,
YPbPr and Monitor out).
The AV1 in has Y, Pb, Pr and audio and video inputs.
The AV2 in has S-Video, audio and video inputs.
The Y, Pb, Pr has Y, Pb, Pr input (refer to details in “What’s Hot” section).
The Monitor out socket has audio and video outputs.
DVD player
Video recorder
& Connect the TV’s green, blue and red Y Pb Pr
(AV1 in) jacks to the corresponding
COMPONENT VIDEO OUT jacks on the
player.
Note: Do not connect the AV1 VIDEO IN socket.
é Connect the TV’s red and white (R and L)
AUDIO IN jacks to the corresponding
AUDIO OUT jacks on the player. Match the
cable colour to the jacks’ colour.The red jack
is the Right audio channel and the white jack
is the Left audio channel.
“ Turn on the TV and DVD player. Set the TV to
CVI and DVD background screen will come
on the screen.You can now play your disc.
Note: You need to select the channel CVI
manually to playback DVD disc.
& Connect the TV’s yellow, white and red (AV2
in) jacks to the corresponding Video and
Audio jacks on the player.
é Connect the TV’s red and white (R and L)
AUDIO IN jacks to the corresponding
AUDIO OUT jacks on the player. Match the
cable colour to the jacks’ colour.The red jack
is the Right audio channel and the white jack
is the Left audio channel.
“ Turn on the TV and VCR player. Set the TV to
channel AV2.You can now play your video
cassette tape.
Connection is also possible via the aerial cable.
You will therefore need to tune in your video
recorder’s test signal and assign a channel
number 0. Select channel 0 to playback.
Page 20

18
Connecting peripheral equipment
Other equipment
& Carry out the connections shown opposite.
é To optimise picture quality, connect the
equipment which produces the video signals
(digital decoder, games, etc) to AV1 in and
equipment which produces the S-VHS signals
(S-VHS and Hi-8 video recorders, certain DVD
drives to AV2 in and all other equipment to
either AV1 in or AV2 in).
Note: Do not connect the VIDEO IN socket if you
are using the S-VIDEO IN socket of the TV.
Amplifier
Side connections
& To connect to a hi-fi system, use an audio
connection cable and connect the “L” and
“R” outputs on the TV set to the “AUDIO
IN” “L” and “R” input on your hi-fi amplifier.
Make the connections as shown opposite.
With the key, select the channel Side.
For a monophonic device, connect the audio
signal to the AUDIO L input. Use the
reproduce the sound on the left and right
speakers of the TV set.
Ø
SAP
key to
Headphones
When headphones are connected, the sound
on the TV set will be cut. The VOL + or –
keys are used to adjust the volume level.
The headphone impedance must be between
32 and 600 Ohms.
Page 21

Tips
19
Poor reception
The p
roximity of mountains or high
buildings
pictu
try manually adjusting your picture: see
Fine
tion of the outside aerial
antenna enable
in this f
band)? In the
(sn
Pictu
No picture
If the television does not switch on, press
the stand
remote control) twice. Have you
connected the aerial soc
Have you chosen the right system? (p. 8).
Poorly connected euroconnector cables
or aerial sockets are often the cause of
picture or sound problems (sometimes
the connectors can become half disconnected if the
Check all connections.
Blue screen
If the signal is interrupted or disconnected in teletext mode, you will get a blue
screen display even if you reconnect the
signal. You should press the key (located on the remote control) to put the set
on standby mode and press again to
turn on the set. Or you can power off
and power on the set. This will restore
the screen back to normal.
No
sound
If on certain channels you receive a
pictu
do not have the correct TV system.
Modify the System setting (p. 8).
may be responsible for ghost
res, echoing or shadows. In this case,
Tuning (p. 8) or modify the orienta-
. Does your
you to receive broadcasts
requency range (UHF orVHF
event of difficult reception
owy picture) switch the NR on the
re menu to ON (p.9).
by key .(located on the
ket properly?
TV set is moved or turned).
re but no sound, this means that you
Colour patches on sc
Switch off the
button and wait for about 20 minutes
before switching on again.
Good pictu
Try to increase the volume level. Check
that the sound is not set to “mute”. If it is,
press the
Good sound but poor colour or no
pictu
Try to increase the contrast and
brightness setting.
owy picture and noise
Sn
Check antenna connection at the rear of
the
Hori
Possible electrical interference e.g.
hairdryer, vacuum cleaner, etc. Switch off
the
Dou
Possible poor positioning of antenna.
Usin
improve reception.
Peripheral equipment gives a black and
white picture
You have not selected the socket
connection to the right channel with the
connection should select channel AV1 to
playback.To play a video cassette, check
that it has been recorded under the same
standard (PAL, SECAM, NTSC) which can
be replayed by the video recorder.
The
Check that the batteries are the right
way round and there is no obstruction
between the remote control and the TV.
If the light indicator on the set no longer
flashes
replace the batteries.
re but no sound
re
TV.
zontal dotted lines
appliances.
ble or “Ghost” images
g a high directional antenna may
key: for example, AV1 in socket
remote control does not work
when you use the remote control,
reen
TV by the mains power
key to restore the sound.
Page 22

Glossary
20
4:3
Refers to the ratio between the length and
the height of the screen.Wide screen
televisions have a ratio of 16:9 while
conventional televisions have a ratio of 4:3.
4:3 Expand
The images recorded in “letterbox” format
are expanded to fill the entire screen and
the black horizontal bars at the top and
bottom are removed.
Active Control
Is a unique, intelligent, and proactive control
system, which measures and analyzes the
incoming analog signal 60 times per second
to automatically adjust settings for optimal
picture quality.
Component video input (CVI)
Supports advanced video input (such as
DVD) for superb colour purity, crisp colour
detail and reduced colour noise-surpassing
even that of S-Video!
Colour Transient Improver (CTI)
Color signals are processed to bring out
subtle differences resulting in greater depth
and enhanced color definition, as color bleed
between color borders are
eliminated.Therefore, there is an improved
color definition and contrast without
discoloration or blurring.
Luminance Transient Improver (LTI)
A new generation edge-enhancement
technology which is applied directly to the
video processing circuit to increase clarity
and sharpness at the point of transition from
the dark to light areas of the image.As a
result there is an increase clarity and
sharpness especially between dark and light
areas of an image.
Contrast+
enhances the darker portions of the picture
to improve its picture quality.
Personal Zapping
A Philips trade marked feature which allows
any combination of favourite teletext pages
or TV channels to be stored in the coloured
Favourite Channels/Teletext keys.A total of
10 preferred channels/teletext pages of the
same subject or user can be stored in each
coloured key.
Scan Velocity Modulation (SVM)
It is an innovative circuit design to enhance
edge details by varying the speed of the
electron beam. It dramatically improves
overall definition and contrast without any
discoloration or blurring.
S-VHS Signals
These are 2 separate Y/C video signals from
the S-VHS and Hi-8 recording standards.The
luminanace signals Y (Black and white) and
chrominance signals C (colour) are recorded
separately on the tape.This provides better
picture quality than with standard video (VHS
and 8 mm) where the Y/C signals are
combined to provide only one video signal.
System
Television pictures are not broadcast in the
same way in all countries.There are different
standards: BG, DK, I, NTSC and SECAM.The
system setting (p. 7) is used to select these
different standards.
Page 23

Specification
21
Product type
29PT8845, 34PT8845
P
ICTURE
• Picture screen diameter: 34” (850 mm)
29” (720 mm)
• Visible screen size: 32” (800 mm)
27” (680 mm)
• Picture Tube: Real Flat 4:3
• 100 Hz
• Progressive Scan
(Auto Switching with manual override)
• Scan Velocity Modulation
• 3D Digital Combfilter
• 3:2 Pulldown
• EDDI - Smoothing Edge De-interlacer
• Contrast
• Active Control Plus with Luminance
Transient Improver (LTI)
• Colour Transient Improver (CTI)
• Colour Temperature Control
• Black Stretch
• Smart Picture Modes
• Demo
• Digital Noise Reduction (DNR)
Sound
• Sound output: 20 W rms
• 2 on board speakers
• Stereo Sound
• Incredible Surrround
• Smart Sound Modes
• Auto Volume Leveller
Ease of use
• Bilingual On-Screen-Display and menu
control
• 100 presets channel selection
• Personal Zapping
• Zappa Remote Controller
Teletext (on certain models only)
• Easy Text (10 pages)
Side Connections
• S-Video
• Video and Audio inputs
• Headphone out
Rear Connections
• AV1: 1 FH (CVI),Video and Audio inputs
• AV2: S-Video,Video and Audio inputs
• HD : 2 FH (HD)
• Monitor Out
Reception
• Tuning system: PLL
• Colour Transmission sytem off-air: PAL I,
PAL D/K, NTSC M, SECAM BG, SECAM DK
• AV Connections: NTSC 3.58/4.43, PAL 4.43
• Stereo sound transmission system off-air:
NICAM BG/I/DK, 2CS BG/DK, FM (China)
• Channel selections: UVSH
Size and weight
• Mains: AC
• Net weight: 46 kg (29PT8845)
• Gross weight: 50 kg (29PT8845)
• Set dimensions: W x D x H mm
736 x 490 x 580 mm (29PT8845)
853 x 550 x 676 mm (34PT8845)
100-250V, 50/60 Hz
66 kg
(34PT8845)
75 kg (34PT8845)
: Specification is subject to change without notice.
Note
Page 24

3141 095 20763
 Loading...