

Page 1

Colour Television
34PT5633
Instructions for use
3139 125 26952
Page 2
INSTALLATION
PHILIPS
+
+
22
2
5 cm
÷
◊
5 cm
PHILIPS
5 cm
÷
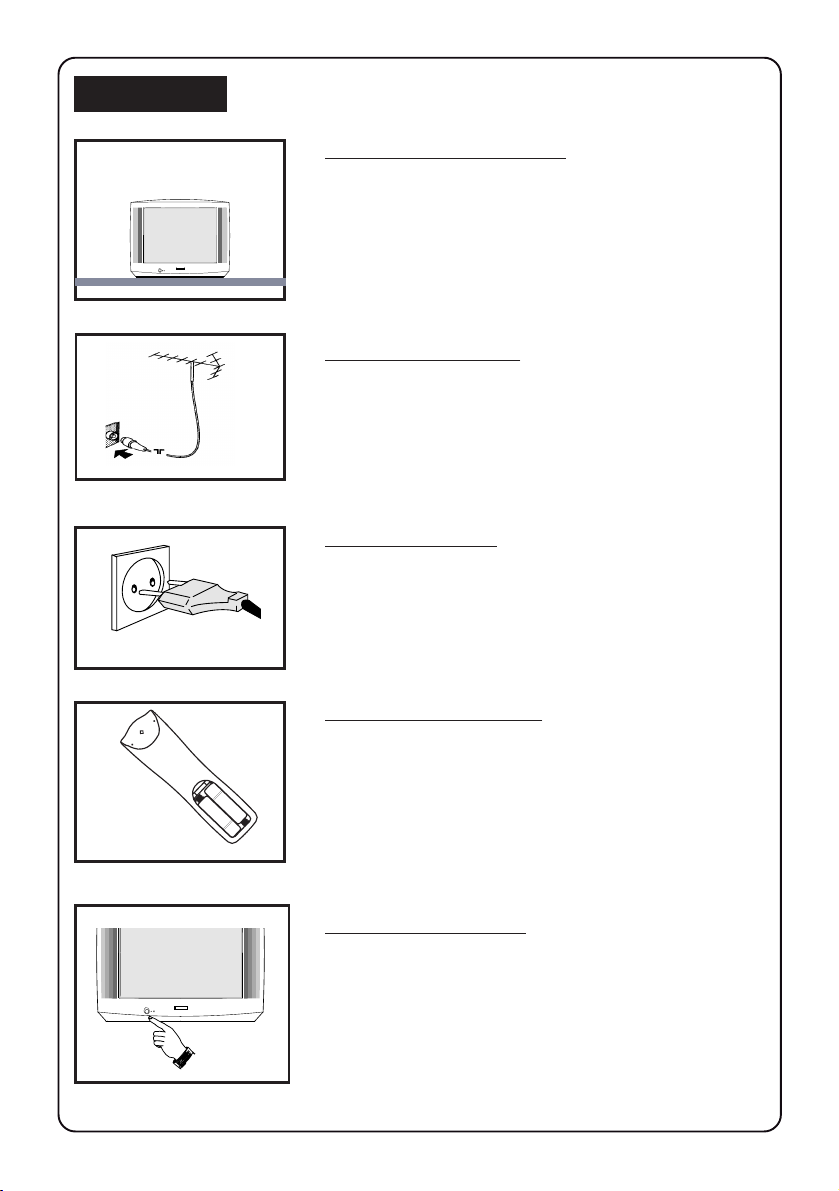
Positioning of the TV set
• Place TV set on a solid base (e.g. a TV/Video cabinet)
• Leave at least 5 cm around each side of TV set for
ventilation to avoid over-heating.
• Do not place TV set near a radiator or other sources of
heat.
• Do not place TV set where it can be exposed to rain or
excessive moisture.
Antenna Connection
• Connect the aerial plug to the antenna socket
backcover.
¬¬
¬ on the
¬¬
Mains Connection
• For correct mains voltage, refer to type sticker at the rear
of the TV set
• Consult your dealer if mains supply is different.
Note : This diagram is not representative of the actual
plug and socket.
Use of Remote Control
• Insert correct type of batteries into the compartment.
• Replace the battery cover.
Note : Always remove the batteries from the remote
control handset if handset is not used for a long period.
This can help prevent damage to handset from possible
battery leakage.
Switching on the Set
• Press the main power button to switch on/off the TV.
If the set is on standby (indicator is red), press STANDBY
PHILIPS
button on the remote control to switch on set.
Page 3

FUNCTIONS OF TV CONTROLS/SOCKETS
1 Mains Power button
Switch mains power on or off.
PHILIPS
➠
A
1
2
3
➠
4
A
´
L
´
L
K
K
P
5
9
6
7
S-VIDEO
VIDEO
in
L
AUDIO
➠
R
n
➠
S-VIDEO
9
VIDEO
L
AUDIO
in
AV1
8 10 11 12
R
in
out
AV2
Monitor
2 Standby light indicator
Indicate red light when standby mode is
activated.
3 Remote Sensor
Aim remote control handset at remote
sensor when operating the TV.
4 Volume +/ – button
Adjust sound volume louder/softer.
5 P (Programme) + / – button
Select channel in ascending/descending order.
Note
• You can enter the main menu by pressing both
the Volume + / – buttons at the same time.
• Press Programme + / – button to select
sub-menu.
• Press Volume + / – button to activate sub-menu.
6 AV3 in sockets
Connect to Output sockets of VCR/laser disc
player to the AV3 in sockets to playback
programmes.
7 Headphone socket
Connect headphone jack to socket for
personal listening.
8 Antenna socket
Connect the aerial plug to the antenna socket
on the backcover.
9 S-Video In socket
Connect the S-VIDEO Output socket (if available)
of the VCR to the S-VIDEO in socket to enhance
picture quality.
10 AV1 In sockets
Connect the Output sockets of the VCR/laser disc
to the AV1 in sockets to playback programmes.
11 AV2 In sockets
Connect the Output sockets of the VCR/laser disc
to the AV2 in sockets to playback programmes.
12 Monitor out sockets
Connect the VIDEO out socket of the TV to the
Input socket of VCR to record programmes.
To enhance sound of your TV, connect the
AUDIO L and R sockets to an external audio
system.
33
3
Page 4
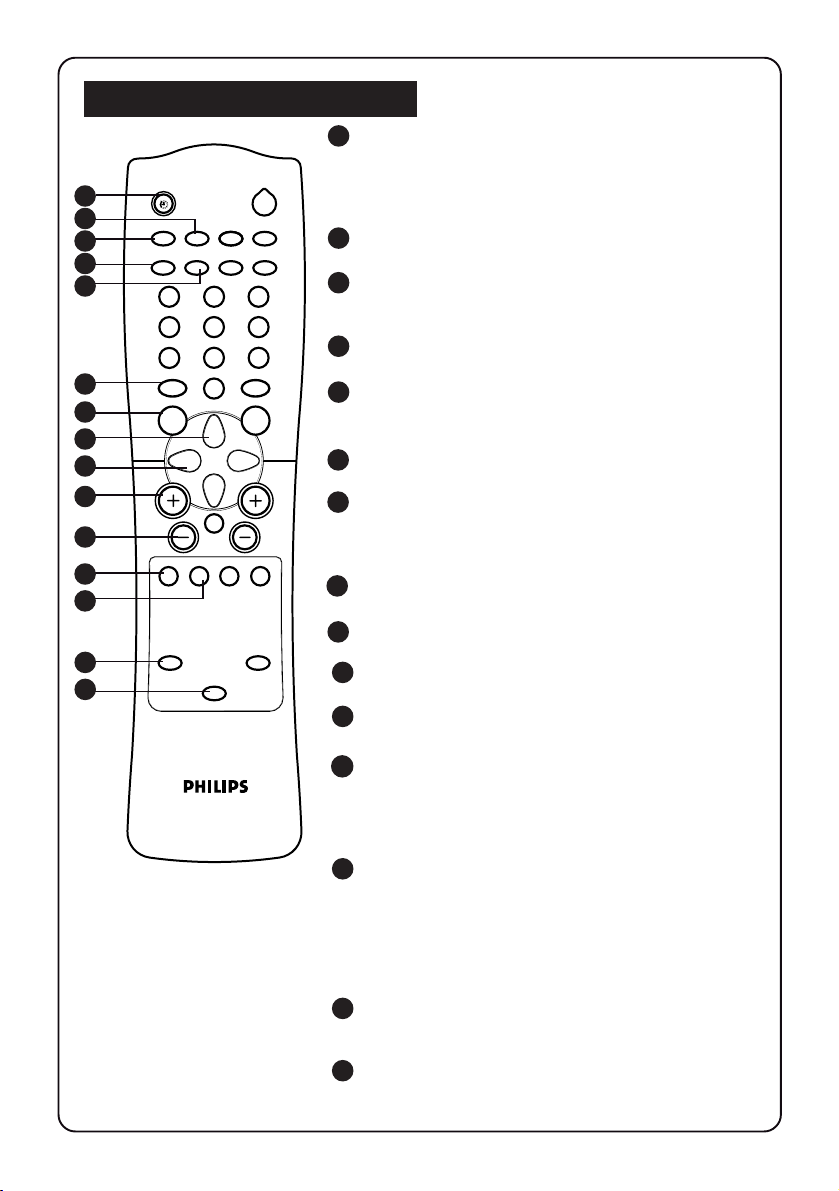
FUNCTIONS OF REMOTE CONTROL
1 SLEEPTIMER
Allows you to select a time period after which the set
will switch to standby mode automatically. You can
1
2
3
4
5
A/CH
n
vp
13
4
7
6
7
8
9
10
11
12
13
14
15
±
MENU SURF
A
AV
m
2
o
r
PIP UP PIP DOWN
2
5
6
9
8
SMARTSMART
`
0
H
CH
\
4
INCREDIBLEINC. SURR.
`
GAME
set the timer in steps of 15 minutes from OFF mode
up to a maximum of 120 minutes.
2 PIP ON/OFF
Switch on or PIP (Picture in Picture).
3 A/CH (ALTERNATE CHANNEL)
Alternate between last viewed channel and present
channel.
4 PIP SWAP
Interchange channel on main screen and subscreen.
5 PIP SOURCE
Allows you to select various external connection for
PIP.
6 SMART SOUND
Allows you to select 4 types of sound settings
7 MENU
Allows you to adjust picture and sound settings and
activate the features and install the channels
automatically.
8 CURSOR UP
Allows you to select the sub-menus.
9 CURSOR LEFT
Allows you to access or adjust the sub-menus.
10 VOLUME +
Increases volume.
11 VOLUME –
Decreases volume.
12 AV
Selects AV1, S-VID1, AV2, AV3, S-VID3 and the last
viewed channel respectively. The correct channel
must be selected when viewing a playback
programme.
13 OSD (On-Screen Display)
Displays :
– channel number.
– remaining time of the sleeptimer.
– programme name.
– information line
– transmission mode.
14 INCREDIBLE SURROUND
Allows you to select incredible surround sound
when transmission is in stereo mode.
151GAME
Allows you to select Video mode as input for video
games.
44
4
Page 5
FUNCTIONS OF REMOTE CONTROL
16 POWER
2
A/CH
n
o
r
PIP UP PIP DOWN
vp
2
13
4
5
6
9
8
7
±
MENU SURF
A
AV
SMARTSMART
`
0
H
4
m
INCREDIBLEINC. SURR.
GAME
CH
\
`
16
17
18
19
20
21
17 PIP POSITION
18 PIP FREEZE
19 PIP DOWN
22
23
24
25
26
20 PIP UP
21 DIGIT (0 - 9)
22 SMART PICTURE
27
28
29
23 SURF
24 CURSOR RIGHT
30
25 CURSOR DOWN
26 CHANNEL + / –
27 MUTE
28 TIMER
29
30 INCREDIBLE PICTURE
55
5
Switch set off temporarily to standby mode.
(The red light indicator lights up when set is on
standby mode). To switch on set from standby
mode, press and hold button for a few seconds.
Allows you to move the PIP screen to your
desired position.
Allows you to freeze or resume the PIP screen.
Selects a PIP channel in descending order.
Selects a PIP channel in ascending order.
Allows you select a channel. For a 2- digit
channel number, the second digit must be
entered before the “ – “ sign disappears
Allows you to select 4 types of picture settings.
Allows you to select up to a maximum of 10
channels and view quickly the selected channels.
Allows you to access or adjust the sub-menus.
Allows you to select the sub-menus.
Allows you to select channel in ascending or
descending order.
Mutes sound. To restore sound, press button
again.
Not applicable.
44
4
44
Allows you to switch from Stereo to Mono
sound (stereo transmission) or to choose
between language5 and language 6.
Allows you to view a more vivid and realistic
picture with better contrast when the “ON”
function is selected.
Page 6
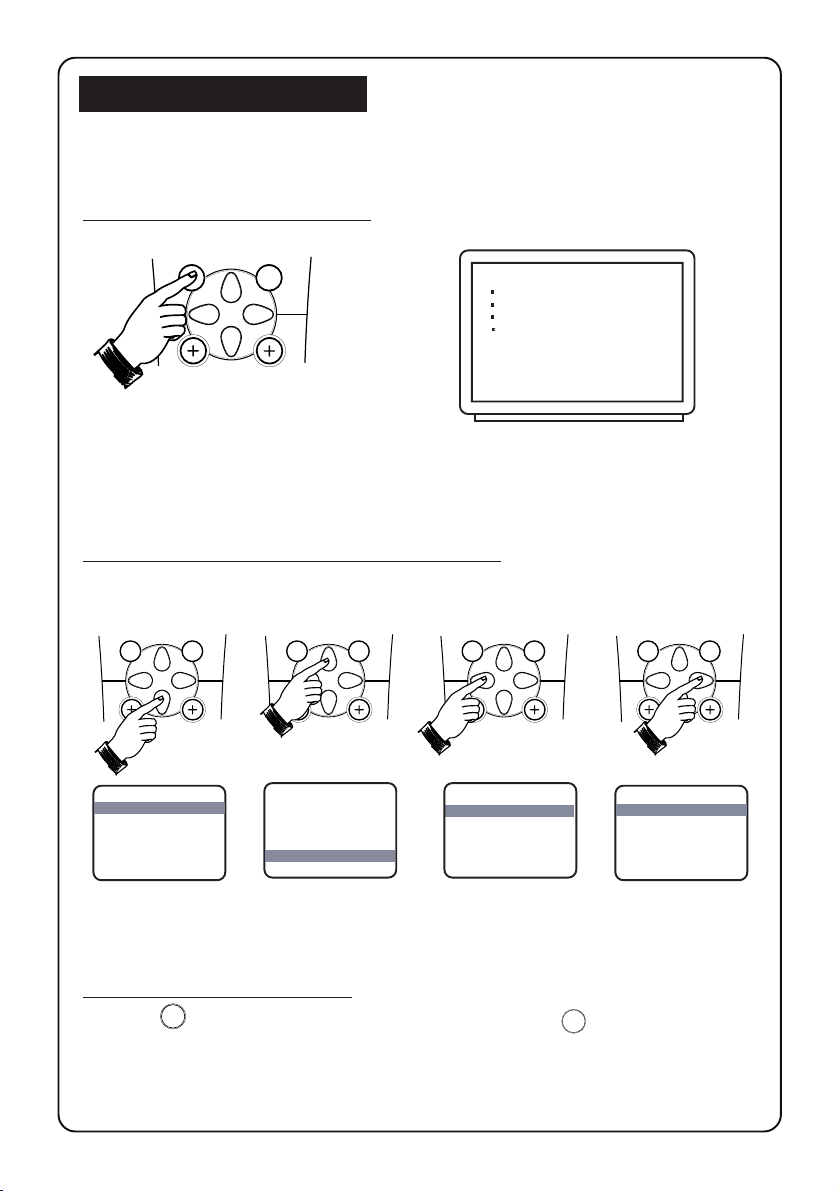
ACCESSING THE MAIN MENU
The main menu allows you access to the PICTURE, SOUND, FEATURES and INSTALL
menus.
66
How to call up the main menu
6
MENU SURF
➠
1. Press the MENU button. 2. The main menu appears on the screen.
PICTURE
SOUND LANGUAGE
FEATURES AUTO PROGRAM
Ñ
Ñ
INSTALL TUNER
Ñ
CHANNEL EDIT
FINE TUNE
How to access the menus in the main menu
The 4 buttons (CURSOR DOWN, UP, LEFT and RIGHT) allow you to select the desired
menu, make adjustments and access the sub-menus.
MENU SURFMENU SURFMENU SURF
MENU SURF
➠
➠
➠
➠
How to exit from the menus
Press the (OSD) button to exit menu from screen or press (MENU) button
repeatedly to exit all menus from screen..
m
MENU
Page 7

AUTOMATIC TUNING OF TV CHANNELS
How to tune in the channels automatically (Auto Store)
Press button Result on TV Screen
Enter main menu .
2
A/CH
n
o
r
PIP UP PIP DOWN
vp
2
13
4
5
6
9
8
7
±
MENU SURF
A
AV
SMARTSMART
`
0
H
\
4
m
INCREDIBLEINC. SURR.
`
GAME
CH
MENU
Press button repeatedly
until INSTALL is selected.
Enter install menu.
Press button the
second time to enter
language mode.
Select desired language
OR
– ENGLISH or
(HANGUL).
Go back to install
menu.
Press button repeatedly
to select TUNER.
Press button to
enter TUNER mode.
Select ANTENNA or
CABLE mode.
OR
PICTURE
SOUND LANGUAGE
FEATURES AUTO PROGRAM
Ñ
Ñ
INSTALL TUNER
Ñ
INSTALL
LANGUAGE ENGLISH
AUTO PROGRAM
TUNER
CHANNEL EDIT
É
➤
FINE TUNE
INSTALL
LANGUAGE
AUTO PROGRAM
TUNER ANTENNA
CHANNEL EDIT
É
➤
FINE TUNE
INSTALL
LANGUAGE
AUTO PROGRAM
TUNER CABLE
CHANNEL EDIT
É
➤
FINE TUNE
CHANNEL EDIT
FINE TUNE
Ñ
Ñ
Ñ
Ñ
Ñ
Ñ
Ñ
Ñ
Ñ
77
7
Go back install menu.
Select AUTO PROGRAM.
Start automatic tuning.
Note : To interrupt
tuning, press MENU
button.
Exit menu from screen
m
once automatic tuning
is completed.
INSTALL
LANGUAGE
Ñ
Ñ
AUTO PROGRAM
Ñ
TUNER
CHANNEL EDIT
É
➤
FINE TUNE
INSTALL
AUTO PROGRAM
TUNER ANTENNA
CHANNEL 2
PLEASE WAIT
Ñ
Ñ
Ñ
INSTALL
LANGUAGE
Ñ
Ñ
AUTO PROGRAM
Ñ
TUNER
CHANNEL EDIT
É
➤
FINE TUNE
Page 8

EDITING OF CHANNELS
88
8
This feature allows you to skip channels which have bad or weak TV signal or channels that
you do not watch often.
Note : Once a channel is skipped, you cannot have access to it by the CHANNEL + or –
button. You can only call up the channel by the DIGIT (0 -9) button.
How to edit channels
Press button Result on TV Screen
MENU
2
A/CH
n
o
r
PIP UP PIP DOWN
vp
2
13
4
5
6
9
8
7
SMARTSMART
`
±
0
MENU SURF
H
A
AV
CH
\
4
m
INCREDIBLEINC. SURR.
`
GAME
Enter main menu
Press button repeatedly until
INSTALL is selected.
Enter INSTALL menu
Press button repeatedly until
CHANNEL EDIT is selected.
Enter CHANNEL EDIT menu.
2
13
Key in desired channel
4
5
6
9
8
7
to be edited.
SMARTSMART
`
±
0
Select ADDED.
Activate edit mode.
PICTURE
SOUND LANGUAGE
FEATURES AUTO PROGRAM
Ñ
Ñ
INSTALL TUNER
Ñ
INSTALL
Ñ
Ñ
É
➤
CHANNEL EDIT
FINE TUNE
LANGUAGE
AUTO PROGRAM
TUNER
Ñ
CHANNEL EDIT CHANNEL
FINE TUNE ADDED
INSTALL
CHANNEL EDIT
Ñ
Ñ
CHANNEL 8
Ñ
ADDED
INSTALL
CHANNEL EDIT
CHANNEL 8
Ñ
Ñ
ADDED
Ñ
INSTALL
CHANNEL EDIT
Exit menu from screen.
m
How to add back channels
• Enter main menu by the (MENU) button.
• Press button repeatedly until INSTALL is selected.
• Enter INSTALL menu by the button.
• Press button repeatedly until CHANNEL EDIT is selected.
• Enter CHANNEL EDIT menu by the button.
• Key in the channel to be added by the DIGIT (0 - 9) button.
• Press button to select DELETED.
• Press button to activate edit mode to add back channel.
• Exit menu from screen by the (OSD) button.
MENU
m
CHANNEL 8
Ñ
Ñ
DELETED
Ñ
Page 9

FINE TUNING OF TV CHANNELS
How to do fine tuning
This feature allows you to adjust the picture reception in area of weak reception.
Press Button Result on TV Screen
2
2
A/CH
n
o
r
PIP UP PIP DOWN
vp
2
13
4
5
6
9
8
7
±
MENU SURF
A
SMARTSMART
`
0
H
CH
13
4
7
±
Select the channel you
5
6
9
8
SMARTSMART
want to fine-tune.
`
0
Enter main menu.
MENU
Press button repeatedly
until INSTALL is selected.
8
PICTURE
SOUND LANGUAGE
FEATURES AUTO PROGRAM
Ñ
Ñ
INSTALL TUNER
Ñ
CHANNEL EDIT
FINE TUNE
99
9
AV
\
4
m
Enter INSTALL menu.
INCREDIBLEINC. SURR.
`
GAME
Press button repeatedly
until FINE TUNE is selected.
INSTALL
➤
AUTO PROGRAM
É
TUNER
CHANNEL EDIT CHANNEL 8
Ñ
Ñ
FINE TUNE
Ñ
É
➤
NAME
Ñ
Ñ
Start fine-tuning until
desired picture and sound
is obtained.
Store last fine-tuned
m
status and exit menu
from screen.
Page 10

NAMING OF CHANNELS
This feature allows a selection of 50 preset names for all channels. It also allows
you to enter a new name or modify an existing name of a channel.
How to name channels
Press button Result on TV Screen
Enter main menu.
2
A/CH
n
o
r
PIP UP PIP DOWN
vp
2
13
4
5
6
9
8
7
±
MENU SURF
A
AV
SMARTSMART
`
0
H
4
m
INCREDIBLEINC. SURR.
`
GAME
CH
\
MENU
Press button repeatedly
until INSTALL is selected.
Enter INSTALL menu
Press button repeatedly
until NAME is selected.
Enter name mode.
Select preset name.
OR
PICTURE
SOUND LANGUAGE
FEATURES AUTO PROGRAM
Ñ
Ñ
INSTALL TUNER
Ñ
INSTALL
➤
É
Ñ
Ñ
Ñ
INSTALL
➤
É
CHANNEL EDIT
FINE TUNE
AUTO PROGRAM
TUNER
CHANNEL EDIT
FINE TUNE
NAME 2
AUTO PROGRAM
TUNER
CHANNEL EDIT
FINE TUNE
NAME PERSONAL
É
➤
Ñ
Ñ
Ñ
1010
10
2
If you select PERSONAL,
move to first character
slot.
Key in selected character.
Move to next character
slot and key in the next
OR
character by the button.
You can key up to a
maximum of 4 characters.
Store name.
MENU
Exit menu from screen.
m
INSTALL
➤
AUTO PROGRAM
É
TUNER
CHANNEL EDIT
FINE TUNE
NAME
INSTALL
➤
AUTO PROGRAM
É
TUNER
CHANNEL EDIT
FINE TUNE
Ñ
Ñ
NAME 2 LUCK
Ñ
Ñ
Ñ
É
➤
Ñ
Ñ
Ñ
Ñ
Page 11

PICTURE AND SOUND ADJUSTMENTS
The picture and sound menu allows you to make adjustments to the picture and
volume level.
1 Press (MENU) button to enter main menu.
2 Use the (CURSOR UP) or (DOWN) buttons to select the PICTURE or SOUND
3 Press (OSD) button to exit all menus from screen.
MENU
menu and the (CURSOR LEFT) or (RIGHT) buttons to make adjustments
or access the sub-menus.
m
1111
11
Picture menu item Selection
Brightness Increase/decrease
Colour Increase/decrease
Contrast Increase/decrease
÷
PICTURE
Ñ
Ñ
33 BRIGHTNESS
Ñ
COLOUR
CONTRAST
SHARPNESS
TINT
COLOUR TEMP
Sharpness Increase/decrease
Tint Increase/decrease
Colour temp. Choice of 3 colour tones
(Normal, Warm or Cool)
Sound menu item Selection
Treble Increase/decrease
Bass Increase/decrease
÷
SOUND
Ñ
Ñ
38 TREBLE
Ñ
BASS
BALANCE
AVL
Balance Increase/decrease
*
AVL On/Off
*AVL (Auto Volume Leveller)
Auto Volume leveller adjusts volume level automatically to a standard level when you
experience sudden change in volume during commercial break or channel switching
due to the variation in signal conditions.
Page 12

FEATURES (LOCK FEATURE)
1212
The FEATURES menu allows you access to the LOCK, MESSAGE, DNR (Dynamic
Noise Reduction) and PIP (Picture-in-Picture) features.
LOCK feature allows parents to lock channels to prevent their children from watching
programes they deem undesirable.
How to lock channels
Press button Result on TV Screen
Enter main menu .
2
A/CH
n
o
r
PIP UP PIP DOWN
vp
2
13
4
5
6
9
8
7
±
MENU SURF
SMARTSMART
`
0
MENU
Press button repeatedly
until FEATURES is
selected.
Enter FEATURES menu
PICTURE
SOUND
Ñ
Ñ
FEATURES CHILD LOCK
Ñ
INSTALL MESSAGE
DNR
PIP
FEATURES
Ñ
Ñ
CHILD LOCK BLOCK CHANNEL
Ñ
MESSAGE SETUP CODE
DNR
PIP
12
H
A
AV
CH
\
4
m
INCREDIBLEINC. SURR.
`
GAME
13
4
7
1 3
4
7
Enter the BLOCK CHANNEL
menu.
2
Enter the current access
5
6
9
8
code. Note : Current access
SMARTSMART
`
±
0
code is 0711.
2
If access code is correctly
5
6
entered, select channel
9
8
SMARTSMART
`
±
0
to block viewing.
Activate the block mode.
Enter CHILD LOCK menu.
FEATURES
CHILD LOCK
Ñ
Ñ
BLOCKCHANNEL
Ñ
SETUP CODE
FEATURES
CHILD LOCK
BLOCK CHANNEL
ENTER CURRENT
ACCESS CODE
FEATURES
CHILD LOCK
BLOCK CHANNEL
CHANNEL 8
ALLOWED
SELECT CHANNEL
PRESS ÉTO BLOCK
VIEWING
FEATURES
CHILD LOCK
BLOCK CHANNEL
CHANNEL 8
BLOCKED
SELECT CHANNEL
PRESS ÑTO UN-BLOCK
VIEWING
Page 13

...... FEATURES (LOCK FEATURE)
How to view locked channels
Press button Result on TV Screen
2
2
A/CH
n
o
r
PIP UP PIP DOWN
vp
2
13
4
5
6
9
8
7
±
MENU SURF
A
AV
SMARTSMART
`
0
H
4
m
INCREDIBLEINC. SURR.
GAME
CH
\
`
1 3
4
7
±
Eenter the current access
5
6
9
8
SMARTSMART
code.
`
0
Note : Current access code
is 0711.
If access code is correctly
entered, all channels can
be viewed until TV is
switched off.
You can proceed to view
all the channels by the
CHANNEL + / – or
DIGIT (0 -9) buttons.
1313
CHANNEL 8
BLOCKED BY CHILD LOCK
– – – –
PLEASE ENTER ACCESS CODE
OR SELECT ANOTHER CHANNEL
ALL CHANNELS
CAN BE VIEWED
UNTIL TV IS
SWITCHED OFF
13
Page 14

...... FEATURES (LOCK FEATURE)
How to unlock channels
Press button Result on TV Screen
1414
14
2
A/CH
n
o
r
PIP UP PIP DOWN
vp
2
13
4
5
6
9
8
7
MENU SURF
A
AV
±
m
SMARTSMART
`
0
H
CH
\
4
INCREDIBLEINC. SURR.
`
GAME
MENU
1 3
4
7
±
1 3
4
7
±
Enter main menu .
Press button repeatedly
until FEATURES is
selected.
Enter FEATURES menu
Enter CHILD LOCK menu.
Enter the BLOCK CHANNEL
menu.
2
Enter the current access
5
6
9
8
code.
SMARTSMART
`
0
2
If access code is correctly
5
6
9
8
SMARTSMART
entered, select channel
`
0
to be unblocked.
PICTURE
SOUND
Ñ
Ñ
FEATURES CHILD LOCK
Ñ
INSTALL MESSAGE
DNR
PIP
FEATURES
Ñ
Ñ
CHILD LOCK BLOCK CHANNEL
Ñ
MESSAGE SETUP CODE
DNR
PIP
FEATURES
CHILD LOCK
Ñ
Ñ
BLOCK CHANNEL
Ñ
SETUP CODE
FEATURES
CHILD LOCK
BLOCK CHANNEL
ENTER CURRENT
ACCESS CODE
FEATURES
CHILD LOCK
BLOCK CHANNEL
CHANNEL 8
BLOCKED
SELECT CHANNEL
PRESS ÑTO UN-BLOCK
VIEWING
Activate the unblock mode.
Exit menu from screen.
m
FEATURES
CHILD LOCK
BLOCK CHANNEL
CHANNEL 8
ALLOWED
SELECT CHANNEL
PRESS ÉTO BLOCK
VIEWING
Page 15

FEATURES ( LOCK FEATURE)
How to change current access code
Press button Result on TV Screen
1515
15
2
A/CH
n
o
r
PIP UP PIP DOWN
vp
2
13
4
5
6
9
8
7
MENU SURF
A
AV
±
SMARTSMART
`
0
H
4
m
INCREDIBLEINC. SURR.
GAME
CH
\
`
MENU
2
1 3
4
5
8
7
±
0
2
1 3
4
5
8
7
±
0
Enter main menu .
Press button repeatedly
until FEATURES is
selected.
Enter FEATURES menu
Enter CHILD LOCK menu.
Select SETUP CODE.
Enter SETUP CODE menu.
Enter current access code.
6
9
If access code is incorrectly
SMARTSMART
`
entered, press button
to erase code.
Once the current access
6
9
SMARTSMART
code is correctly entered,
`
it will prompt you to enter
the new access code.
PICTURE
SOUND
Ñ
Ñ
FEATURES CHILD LOCK
Ñ
INSTALL MESSAGE
DNR
PIP
FEATURES
Ñ
Ñ
CHILD LOCK BLOCK CHANNEL
Ñ
MESSAGE SETUP CODE
DNR
PIP
FEATURES
CHILD LOCK
Ñ
Ñ
BLOCK CHANNEL
Ñ
SETUP CODE
FEATURES
CHILD LOCK
BLOCK CHANNEL
Ñ
Ñ
SETUP CODE
Ñ
FEATURES
CHILD LOCK
SETUP CODE
ENTER CURRENT
ACCESS CODE
FEATURES
CHILD LOCK
SETUP CODE
ENTER NEW
ACCESS CODE
m
Note : It is advisable to
note down the new code
somewhere where you
can refer to in case you
have forgotten about it.
Exit menu from screen.
FEATURES
CHILD LOCK
SETUP CODE
CHANNEL 8
ALLOWED
SELECT CHANNEL
PRESS ÉTO BLOCK
VIEWING
Page 16

FEATURES (MESSAGE FEATURE)
Message feature
This feature allows you to key in a message. The message will be displayed on the
screen when the set is switched on. When the set is on standby mode, the standby
light indicator will start flashing indicating there is a message.
Note : For message to disappear from screen, press MENU button on the remote
control.
How to use the message feature
Press button Result on TV Screen
Enter main menu.
2
A/CH
n
o
r
PIP UP PIP DOWN
vp
2
13
4
5
6
9
8
7
±
MENU SURF
A
AV
SMARTSMART
`
0
H
4
m
INCREDIBLEINC. SURR.
GAME
CH
\
`
MENU
Press button repeatedly
until FEATURES is selected.
Enter FEATURES menu.
Select MESSAGE.
Enter MESSAGE menu.
Press button again
to enter message line.
Key in alphabet or number
to be displayed at the
current position. To move to
OR
next character position,
press button.
If there is not enough space
to fill in the whole message,
MENU
press button to go back
message menu followed by
button to select the next message
line (LINE 2). Press button
to enter message line and continue
keying of message.
PICTURE
SOUND
Ñ
Ñ
FEATURES CHILD LOCK
Ñ
INSTALL MESSAGE
Ñ
DNR
PIP
FEATURES
CHILD LOCK
Ñ
Ñ
MESSAGE LINE 1
DNR LINE 2
P[IP CLEAR
FEATURES
MESSAGE
Ñ
Ñ
Ñ
CLEAR
FEATURES
MESSAGE
Ñ
Ñ
G
Ñ
CLEAR
1616
16
Activate message. The message
MENU
will only be displayed on the screen
after the set is switched off and
on again.
Note: If you want to clear the whole
message, select CLEAR in the
message menu and press
button to delete message.
m
Exit menu from screen.
Page 17

FEATURES (DYNAMIC NOISE REDUCTION / INCREDIBLE PICTURE)
Dynamic Noise Reduction
This feature allows you to improve the “noisy” picture (“snow” or little dots on the
picture) resulting in a clearer and sharper picture.
Press button Result on TV Screen
1717
17
2
A/CH
n
o
r
PIP UP PIP DOWN
vp
2
13
4
5
6
9
8
7
±
MENU SURF
A
AV
SMARTSMART
`
0
H
4
m
INCREDIBLEINC. SURR.
GAME
CH
\
`
MENU
OR
Enter main menu.
Press button repeatedly
until FEATURES is selected.
Enter FEATURES menu.
Press button repeatedly
until DNR is selected.
Enter DNR mode.
Select ON mode to
activate Dynamic Noise
Reduction function.
PICTURE
SOUND
Ñ
Ñ
FEATURES CHILD LOCK
Ñ
INSTALL MESSAGE
FEATURES
Ñ
Ñ
DNR
PIP
CHILD LOCK
MESSAGE
Ñ
DNR OFF
PIP
FEATURES
CHILD LOCK
MESSAGE
DNR ON
PIP
Ñ
Ñ
Ñ
Exit menu from screen.
m
Page 18

AV1
FEATURES (PICTURE-IN-PICTURE)
Picture In Picture feature allows you to call up a subscreen within your main screen
which enable you to watch two channels at the same time.
How to start PIP function
2
A/CH
n
o
PIP UP PIP DOWN
vp
• Switch on PIP mode.
r
(A normal size PIP
screen appears)
• Press button second
time to change normal
size PIP screen to a
smaller size.
• Press button the third
time to switch off PIP
screen.
8
1818
18
8
How to select PIP Source
• Press button repeatedly
2
A/CH
n
o
r
PIP UP PIP DOWN
vp
to cycle through the various
external connection and select
the desired PIP source
5
5
S-VID1
AV3
AV2
(AV1, S-VID1, AV2 AV3, S-VID3).
• You can also press PIP UP and
2
A/CH
n
o
r
PIP UP PIP DOWN
vp
PIP DOWN buttons to select the
desired PIP source.
How to freeze the PIP screen
• Press button once to freeze
2
A/CH
n
o
r
PIP UP PIP DOWN
vp
Freezing the PIP screen allows
you to view a programme in
the still mode. For example,
you may want to write down
some informationfrom the PIP
screen, freezing the screen will
allow you time to do so before
the moving picture changes.
• Press the button the second
time to unfreeze the PIP screen.
the PIP screen.
Freeze
PIP
Unfreeze
V1
PIP
Page 19

5
8
FEATURES (PICTURE-IN-PICTURE)
How to position the PIP screen
2
A/CH
n
o
r
PIP UP PIP DOWN
vp
• Press button to move PIP screen
to your desired position.
1919
19
2
A/CH
n
o
r
PIP UP PIP DOWN
vp
2
A/CH
n
o
r
PIP UP PIP DOWN
vp
2
13
4
5
6
9
8
7
MENU SURF
A
±
SMARTSMART
`
0
H
CH
How to swap PIP screen with
the television screen
• Press button to interchange the PIP
screen and the television screen
8
How to adjust PIP picture settings
You can adjust COLOUR and TINT settings through the PIP menu.
Press button Result on TV
Enter main menu.
MENU
Press button repeatedly
until FEATURES is selected.
Enter the FEATURES
menu
Press button repeatedly
until PIP is selected.
Enter the PIP menu.
PICTURE
SOUND
Ñ
Ñ
FEATURES CHILD LOCK
Ñ
INSTALL MESSAGE
PICTURE
CHILD LOCK
MESSAGE
DNR COLOUR
Ñ
Ñ
PIP TINT
Ñ
FEATURES
DNR
PIP
PIP
FEATURES
PIP
Ñ
Ñ
28 COLOUR
TINT
AV
\
4
m
INCREDIBLEINC. SURR.
`
GAME
Adjust COLOUR setting.
If you want to adjust
tint setting, select
TINT.
COLOUR
Ñ
Adjust TINT setting.
Exit menu from screen.
m
23 TINT
Ñ
Page 20

USING THE SURF FEATURE
This feature allows you to select up to a maximum of 10 channels and view quickly
the selected channels.
How to add a channel to the surf list
Press button Result on TV Screen
1
2
2
A/CH
n
o
r
PIP UP PIP DOWN
vp
2
13
4
5
6
9
8
7
MENU SURF
A
±
SMARTSMART
`
0
H
CH
1 3
4
5
8
7
±
0
SURF
6
Key in the channel number
9
SMARTSMART
`
you want to add to the surf
list.
Enter the SURF menu.
Add selected channel to the
surf list. Repeat the above 2
steps to add more channels
to the surf list.
Exit menu from screen.
m
SURF
8
THE SURF LIST
IS EMPTY
˙˙
PRESS
˙ TO ADD
˙˙
SURF
8
˙˙
PRESS
˙ TO DELETE
˙˙
2020
20
AV
\
4
m
INCREDIBLEINC. SURR.
`
GAME
How to delete a channel from the surf list
1 Enter the SURF menu.
SURF
Press button repeatedly to
SURF
cycle through the surf list
and select the channel you
SURF
8
3
6
9
7
PRESS
˙˙
˙ TO DELETE
˙˙
want to delete.
SURF
Delete selected channel from
the surf list. Repeat the above
steps if you want delete more
channels fom the surf list.
Exit menu from screen.
m
3
6
9
7
PRESS
˙˙
˙ TO DELETE
˙˙
How to activate SMART SURF
Press button repeatedly to
SURF
cycle through the selected
channels in the surf list and
select the channel you want
to view
SURF
8
3
6
9
7
PRESS
˙˙
˙ TO DELETE
˙˙
Page 21

STEREO / SAP / MONO / INCREDIBLE SURROUND
Stereo/Mono/SAP
• Press
AV
\
4
m
4 4
4 button to select
4 4
STEREO or MONO when
programme is transmitted
in Stereo mode
STEREO
2121
21
INCREDIBLEINC. SURR.
`
GAME
Incredible Surround
AV
\
4
m
INCREDIBLEINC. SURR.
`
GAME
OR
select STEREO, SAP or
MONO when programme
is transmitted in SAP
(Second Audio Programme)
mode.
• Press INCR. SURR.
(Incredible Surround)
button to select STEREO
or INCREDIBLE SURROUND
when transmission is in
Stereo mode or playing
back stereo programmes
via AV mode
MONO
STEREO
SAP
MONO
STEREO
INCREDIBLE SURROUND
OR
select SPATIAL or MONO
whe n transmission is in
Mono mode.
MONO
SPATIAL
Page 22

2222
SMART CONTROLS
22
Smart Picture
Smart Picture offers you a choice of 4 picture settings – PERSONAL, RICH, NATURAL
and SOFT.
±
MENU SURF
SMARTSMART
`
0
PERSONAL
➠
RICH
• Press SMART (Picture) button repeatedly to cycle
through the 4 settings to select your desired mode.
Definition of Picture Settings
PERSONAL : Picture settings are set to your preference.
RICH : Emphasize very vibrant colours.
(Suitable for AV mode in brightly-lit room)
NATURAL : Emphasize original colours.
SOFT : Emphasize “warm” colours. (Suitable for dimly-lit
room condition and gives cinema-like effect when
light is switched off)
NATURAL
SOFT
Smart Sound
Smart Sound offers you a choice of 4 settings – THEATRE, MUSIC, VOICE and
PERSONAL.
SMARTSMART
±
MENU SURF
• Press SMART (Sound) button repeatedly to cycle
through the 4 settings to select your desired mode.
`
0
➠
THEATRE
PERSONAL
VOICE
Definition of Sound Settings
THEATRE : Emphasize sensation to action.
(Bass and Treble boosted)
PERSONAL : Sound settings are set to your preference.
VOICE : Emphasize high tone. (Treble boosted)
MUSIC : Emphasize low tone. (Bass boosted)
MUSIC
Page 23

2323
CONNECTING PERIPHERAL EQUIPMENT
23
Recording programmes from the TV to VCR
• Connect VIDEO out sockets of the TV to the Input sockets of VCR to record programmes.
To enhance the sound of your television, connect the AUDIO L and R sockets to an
external audio system instead of to the VCR. For mono equipment, connect only the
AUDIO L (left) socket.
S-VIDEO
S–VIDEO
VIDEO
L
AUDIO
R
in
in
AV1
V
out
AV2
Monitor
RL
Back of VCR
video in audio in
VIDEO
AUDIO
V
L
L
R
R
L
L
R
R
External audio system
Playback programmes from VCR/Laser disc player to the TV
• Connect the S-VIDEO Output socket (if available) of the VCR to the S-VIDEO in socket to
enhance the picture quality.
Note : You should not connect the VIDEO in socket of the TV if S-VIDEO in socket is used.
• Connect the Output sockets of the VCR/laser disc player to the AUDIO L and R in sockets
to playback programmes.
S-VIDEO
VIDEO
out
Monitor
L
AUDIO
R
Back of VCR
L
R
in
in
AV1
AV2
RL
Page 24

GENERAL INFORMATION/TIPS
2424
24
Safety
Disconnect mains plug when :
– the RED light below the screen is flashing continuously.
– a bright white line is displayed across the screen.
– cleaning the TV screen. Never use abrasive cleaning agents. Use a slight damp
chamois leather.
– there is a lightning storm.
– the set is left unattended for an extended period of time.
Caution : Never attempt to repair a defective TV yourself. Always consult a skilled
service personnel.
Switch off your TV overnight via the POWER ON/OFF button instead of leaving it
on standby. You save energy and at the same time demagnetise the picture tube.
A demagnetised picture tube supports good picture quality. When the set is
switched on, do not shift, move or turn (e.g. on a swivel base) the set around
because an uneveness in colour in some parts of the screen may occur.This can be
eliminated by switching off the set by the mains power button . Wait for 20
minutes before switching on again. If symptom still exists, call service.
Before calling service
Symptom Check/Action
Colour patch • Switch off TV by the mains power button. Wait for
(uneveness) 20 minutes before switching on again.
No power • Check TV's AC power cord is plugged into mains
No picture • Check antenna connection at rear of the TV.
Good picture but no sound • Try increasing the volume.
Good sound but poor or • Increase the contrast setting first and then the
abnormal colour or no picture brightness setting.
Snowish picture and noise • Check antenna connection at rear of the TV.
Horizontal dotted lines • Possible electrical interference( e.g. hairdryer,
'Ghosts' or double image • Possible poor positioning of antenna. Using a
TV not responding to remote • Check life span of batteries.
control handset • Aim remote control handset directly at remote
socket. If there is still no power, disconnect plug.
Wait for 60 seconds and re-insert plug. Switch on
TV again.
• Possible faulty TV station. Try another channel.
• Increase the contrast setting first and then the
brightness setting.
• Check whether sound is switched on.
nearby neon lights, etc). Switch off equipment.
highly directional antenna may improve reception.
control sensor lens on the TV set.
Page 25

SPECIFICATIONS
34PT5633
Picture Tube Size 84 cm
Picture Tube Visible Area 80 cm
Audio Output 2 x 5 W + 10 W
TV System NTSC M
Playback NTSC M
Stereo Sound Transmission Korean Stereo
Set Dimensions
Length 88 cm
Depth 57 cm
Height 69 cm
Nett Weight of Set 52 kg
Note
For Operating Voltage, Frequency, Power Consumption and Version
Number, refer to the type sticker at the rear of the set.
2525
25
 Loading...