

Page 1

Contents
Installation
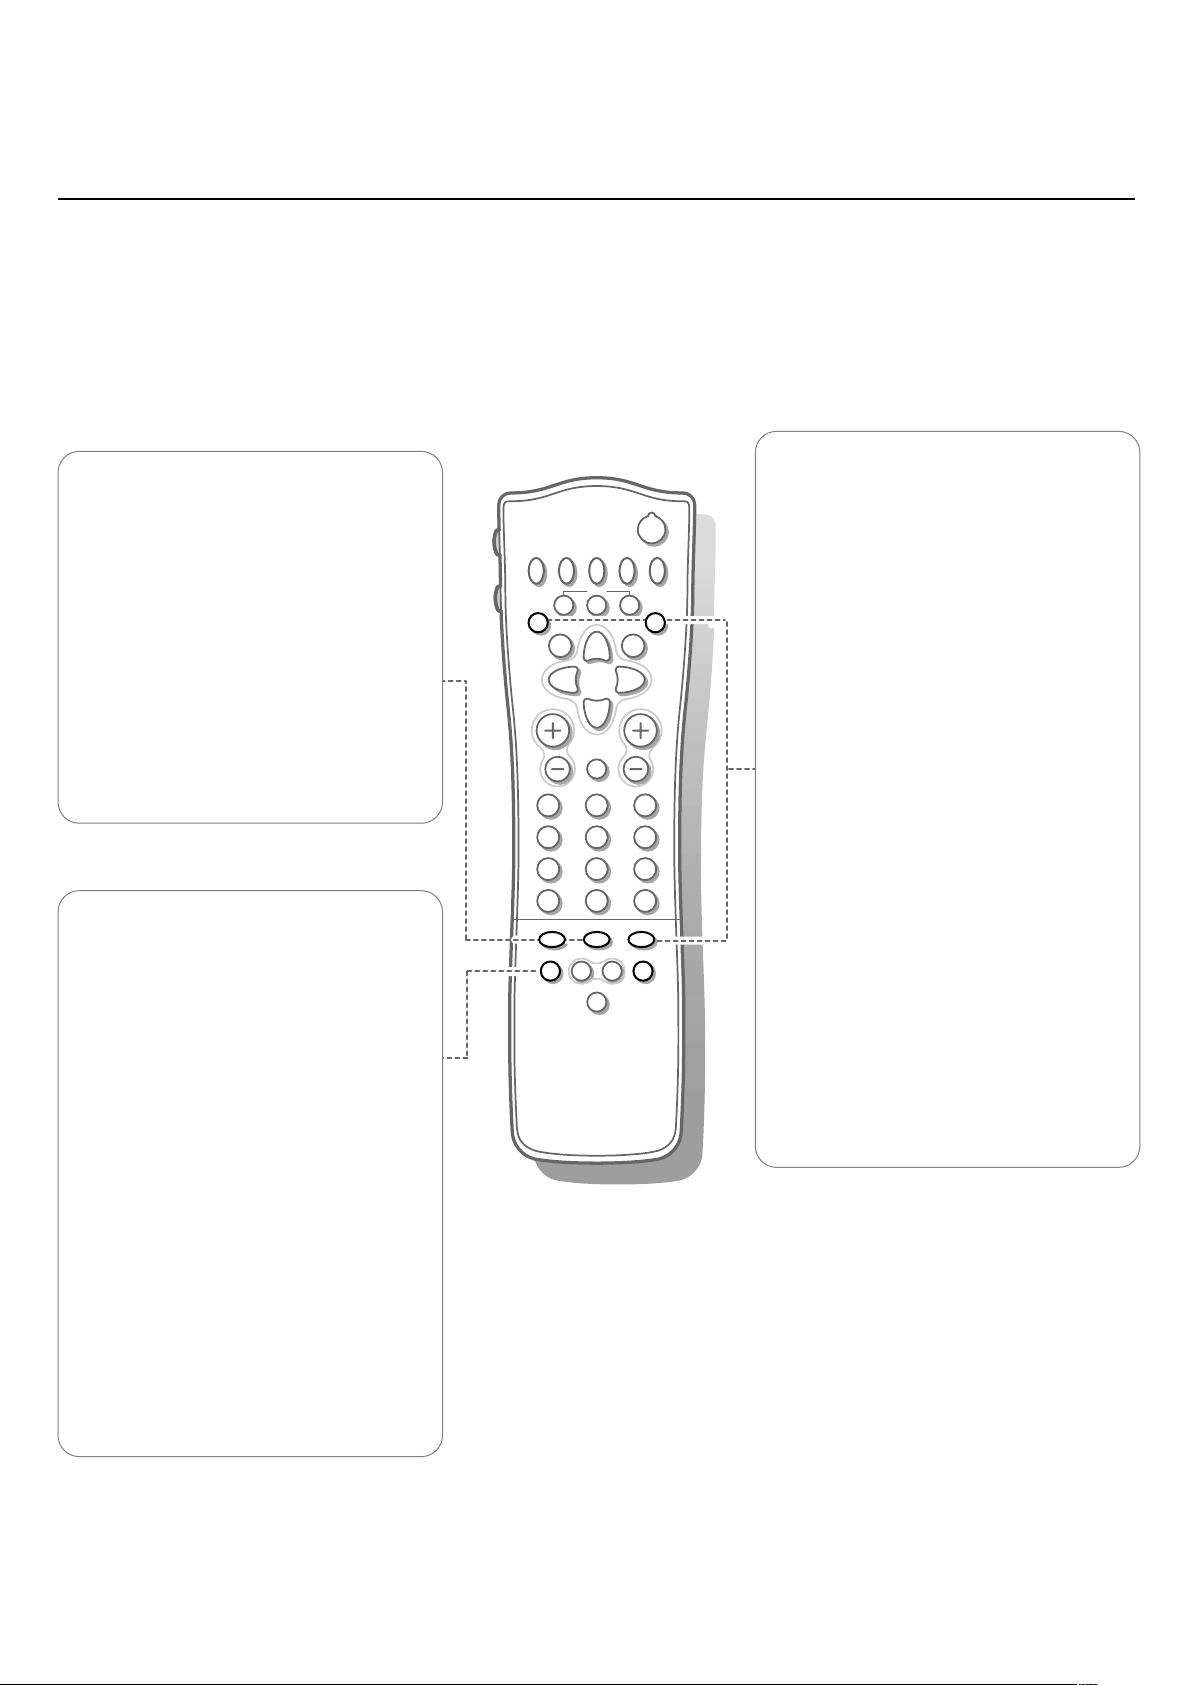
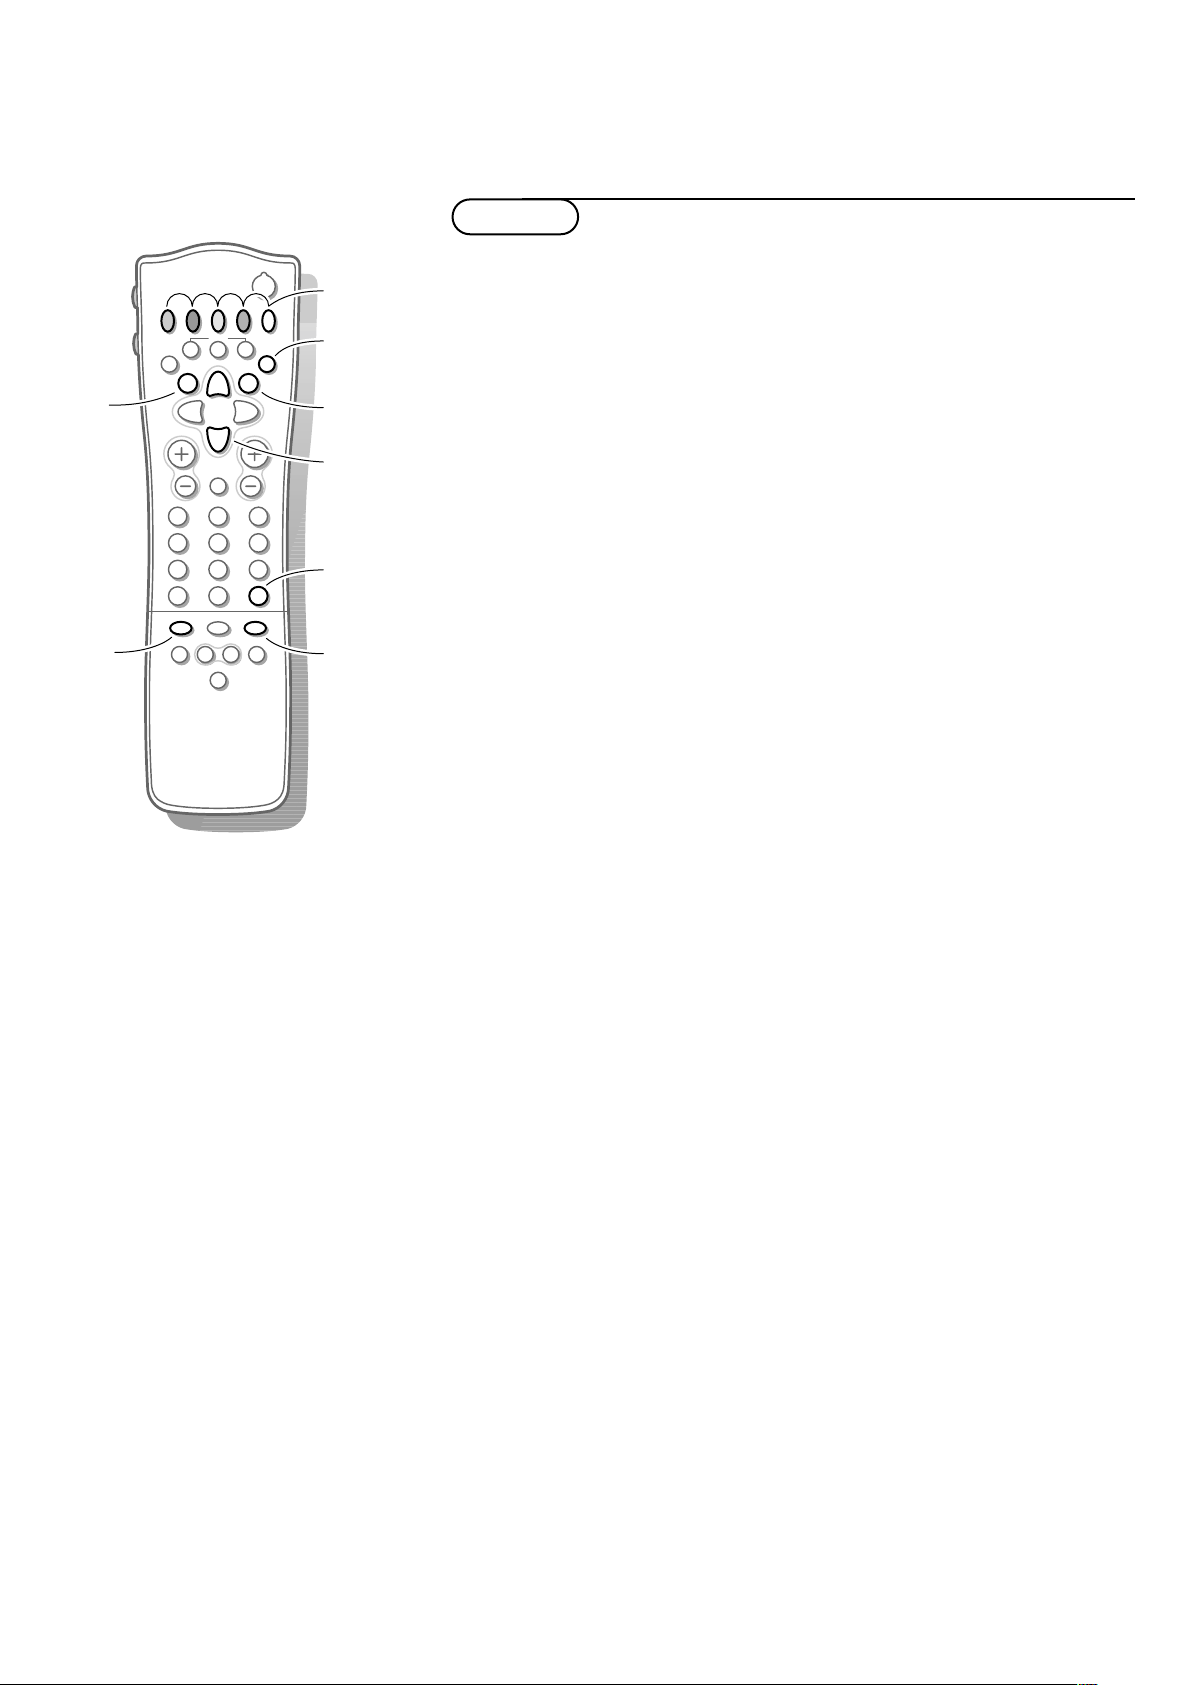
Your remote control 2
Preparation 3
Installation 4
Store TV channels 4
Select the menu language and country 4
Automatic installation 5
Manual installation 5
Give name 6
Reshuffle the programme list 6
Select favourite TV channels 6
Install TV setup 7
Operation
English
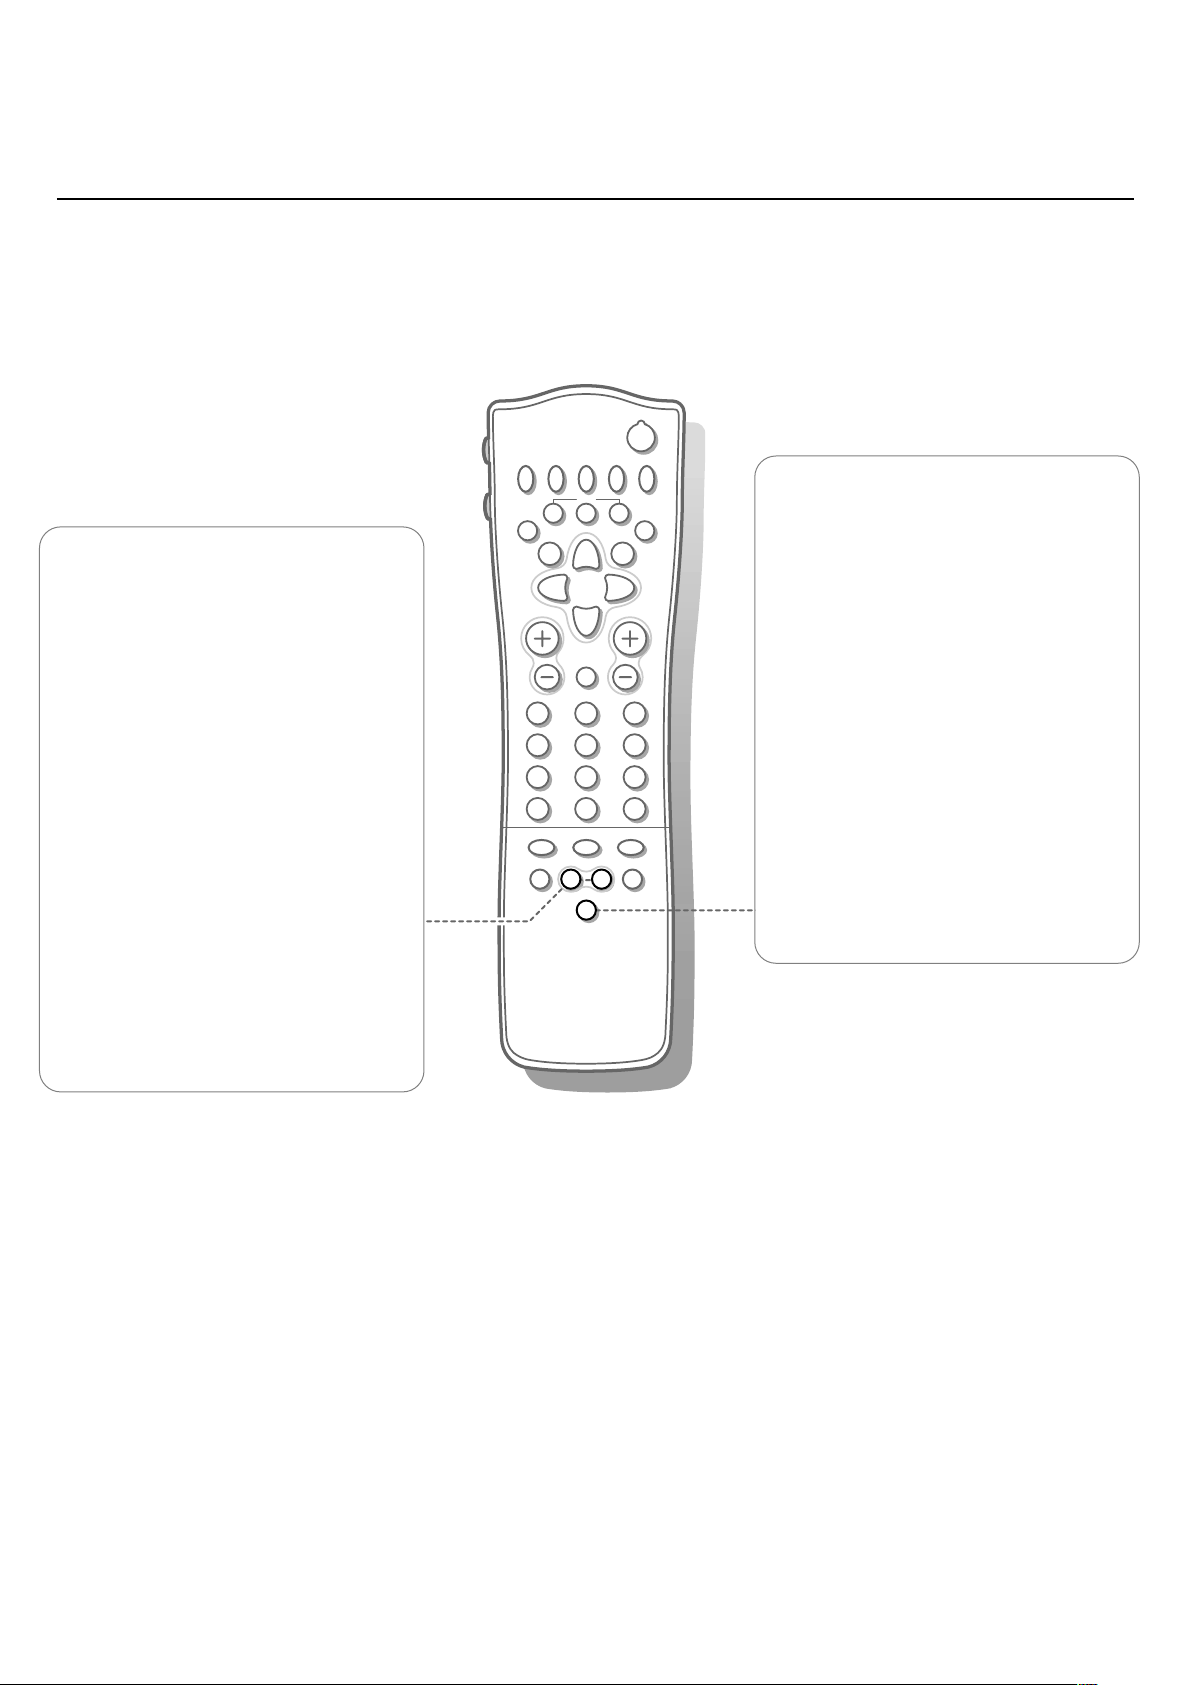
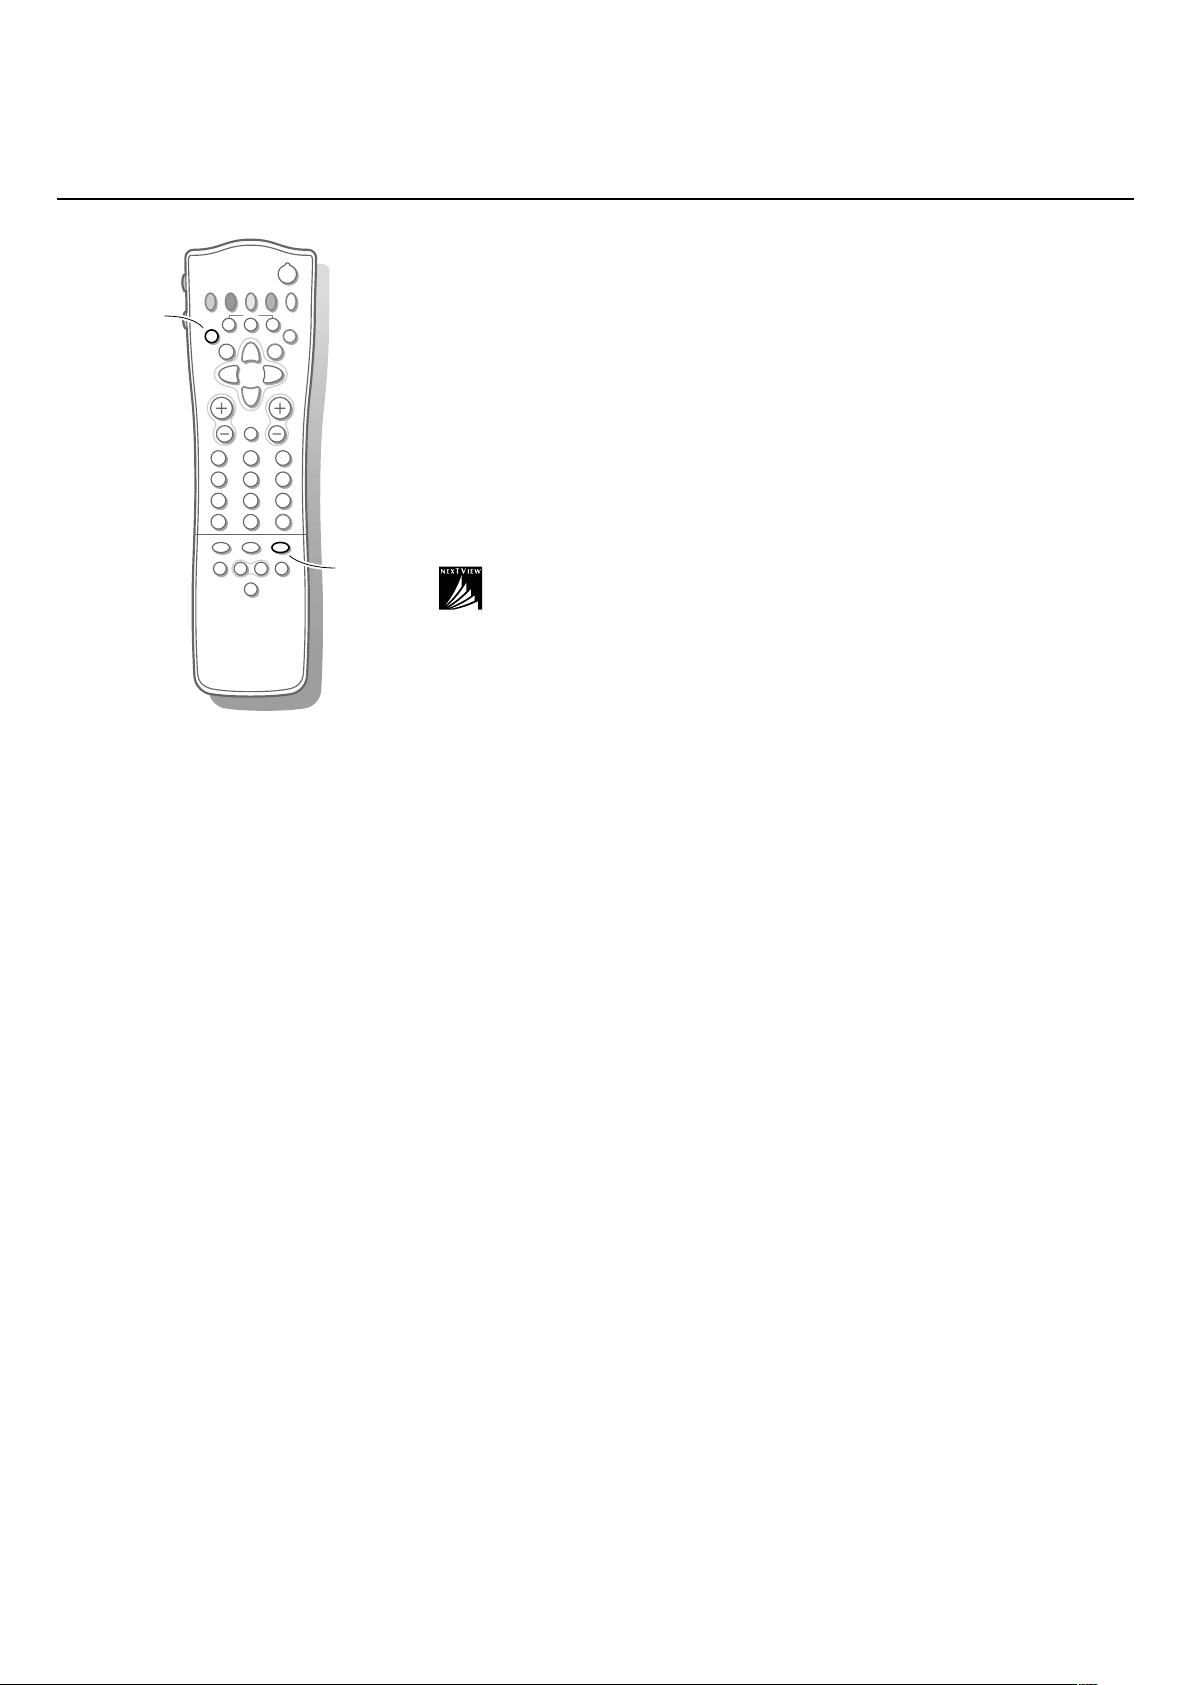
Use of the remote control 8-10
Use of the menus
Picture menu 11
Sound menu 11
Features menu 12
NEXTVIEW 13-16
Teletext 17-19
The keys on top of the TV 19
Connect peripheral equipment
Connecting and selecting equipment 20-23
Remote control functions for peripherals 23-24
Recording 25
Tips 26
Index 26
Glossary 27
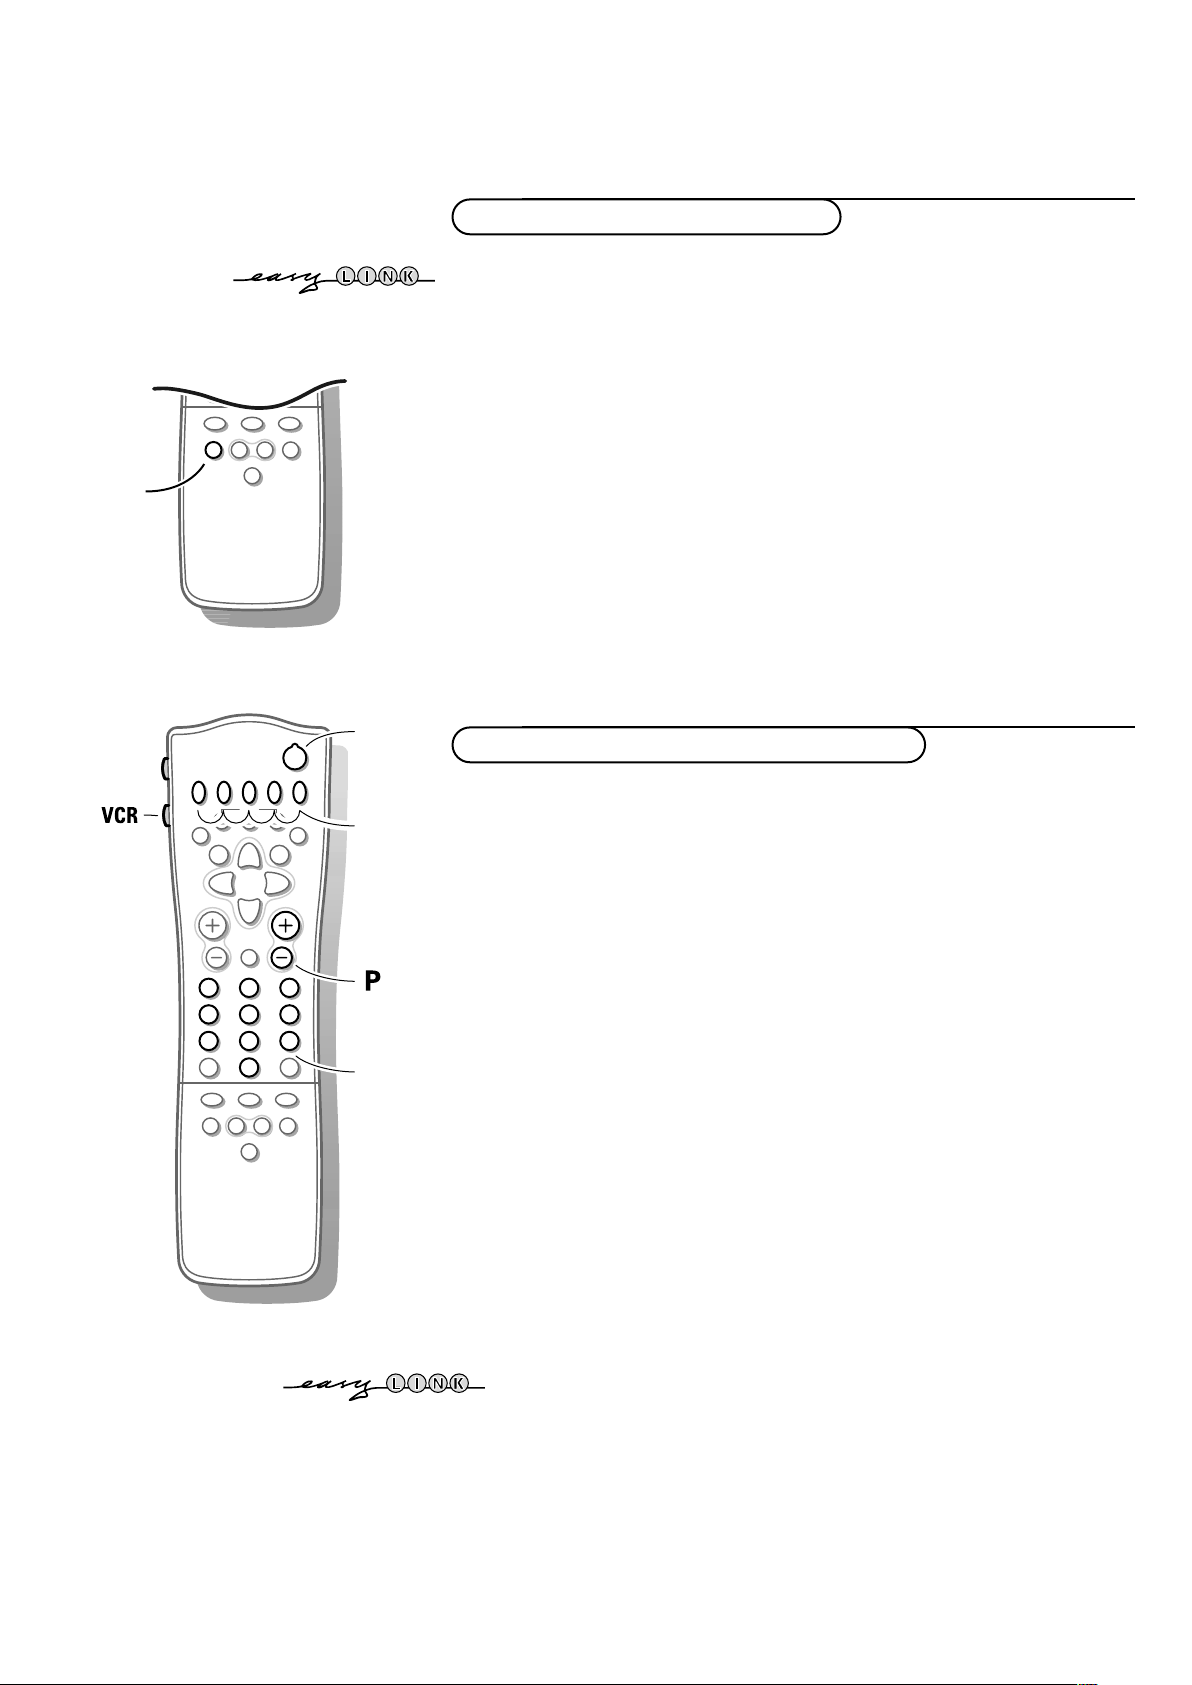
EasyLink features are based on the “one touch operation” approach.This
means that a sequence of actions are executed at the same time in both
the television and the video cassette recorder,provided both are fitted
with the EasyLink function and connected with the eurocable
supplied with your video recorder.
1
Page 2
yÚ
yÚ
213
546
879
0
B
®
Ò
‡π
†
M
SMART
ACTIVE CONTROL
¬
V P
aw
h
q
b
i
0
SX
fhU
hU
æ
MENU
INSTANT
Q
b
OK
◊
MODE
VCR
Installation p. 4
Preparation
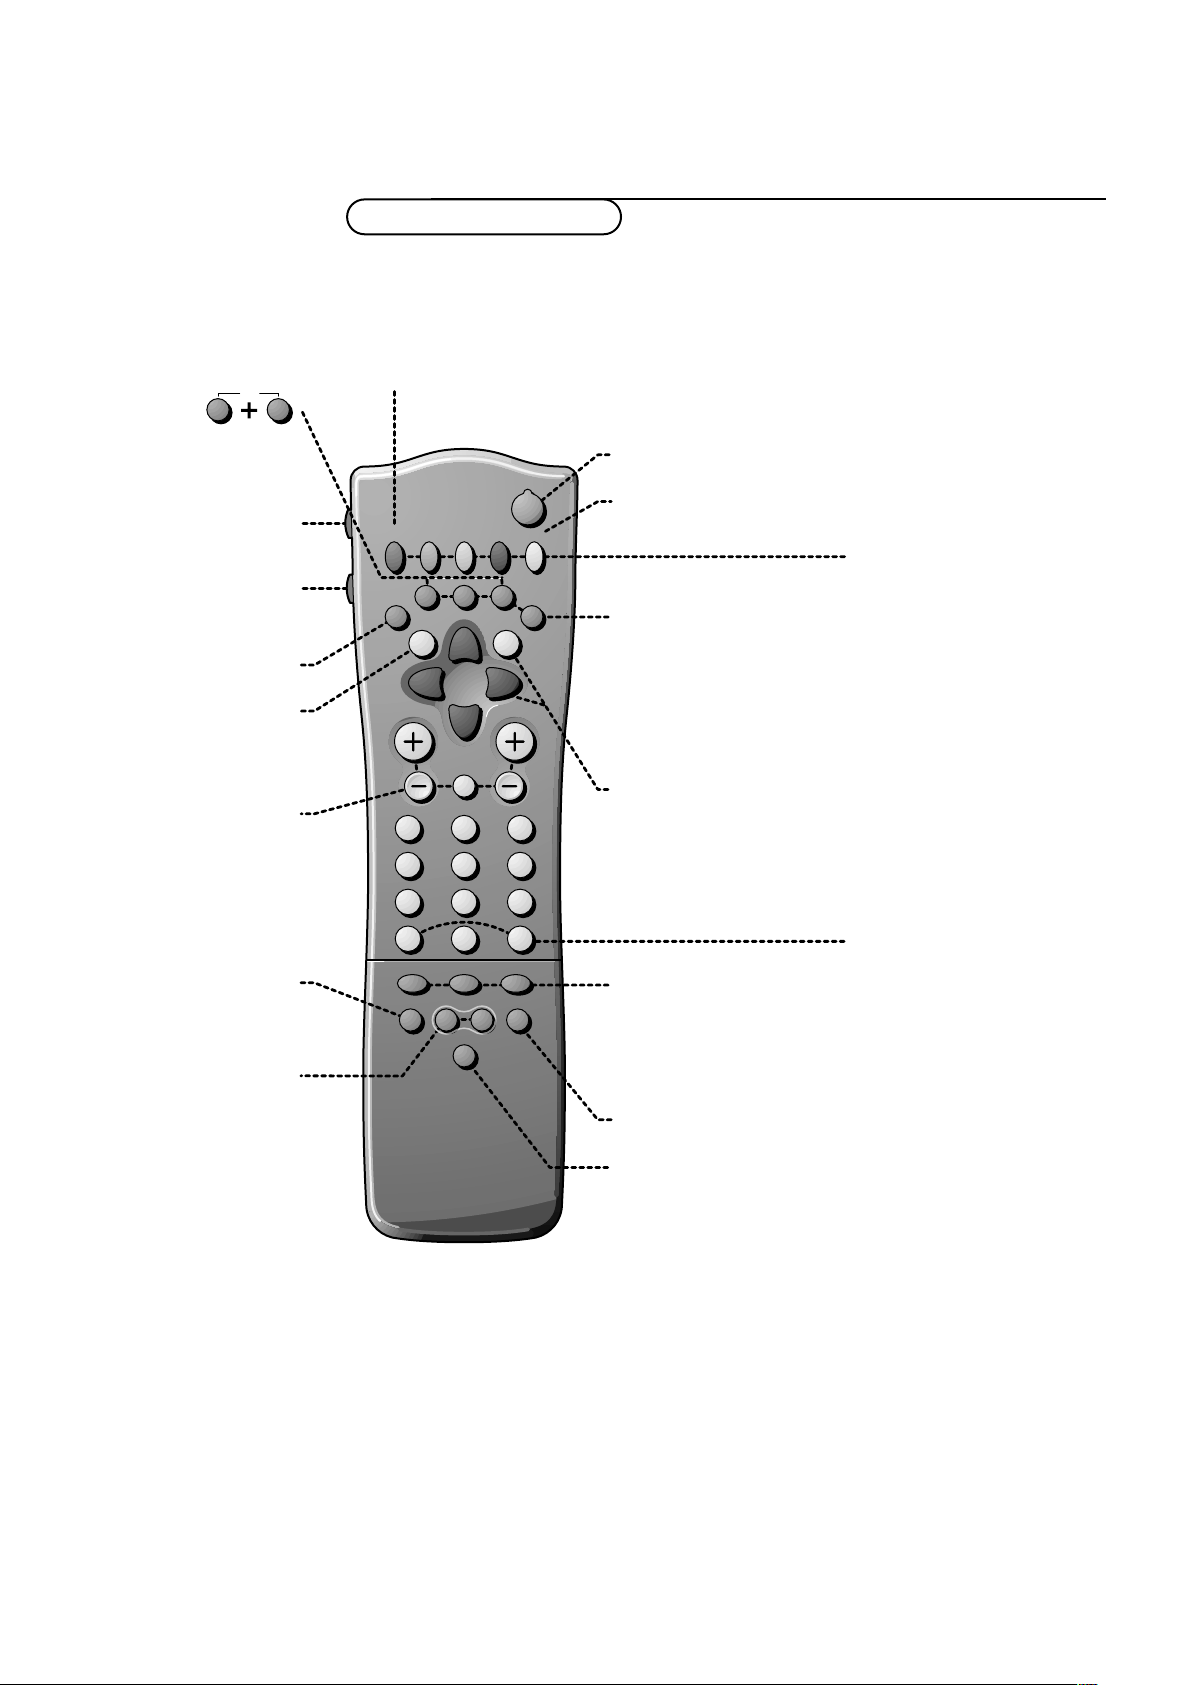
Your remote control
EasyLink p. 25
®
INSTANT recording
switch to standby p.8
B
incredible surround on/off p. 8
Q
DVD/Satellite selection p.24
Videorecorder selection p.23
NEXTVIEW/TXT guide on/off æ
p. 13
main menu on/off
MENU
p. 11
volume up/down p.8
V
sound mute p.8 ¬
programme selection p.8 P
Peripherals p. 23
w
selection of EXT1, EXT2,
EXT3 or FRONT
smart sound p.10
smart picture p.10 a
Colour keys
NEXTVIEW selection p.13
-
- direct teletext page or
Teletext p. 17
b teletext on/off
C time display
subpage selection
subject selection, p.17
Audio/video equipment
p.23-24
f solution to puzzles
h enlarge
Cursor to select
your choice p.4
OK activate your choice
on screen info p.8
X bilingual choice / sound info p.9
TXT language group selection p.17
i
previous programme p. 8
0
video recorder/DVD function
◊
S freeze the picture p.9
hold teletext page p.18
M
b dual screen on p. 9
q picture format p.9
h active control on/off p.10
2 Preparation
Page 3

Preparation
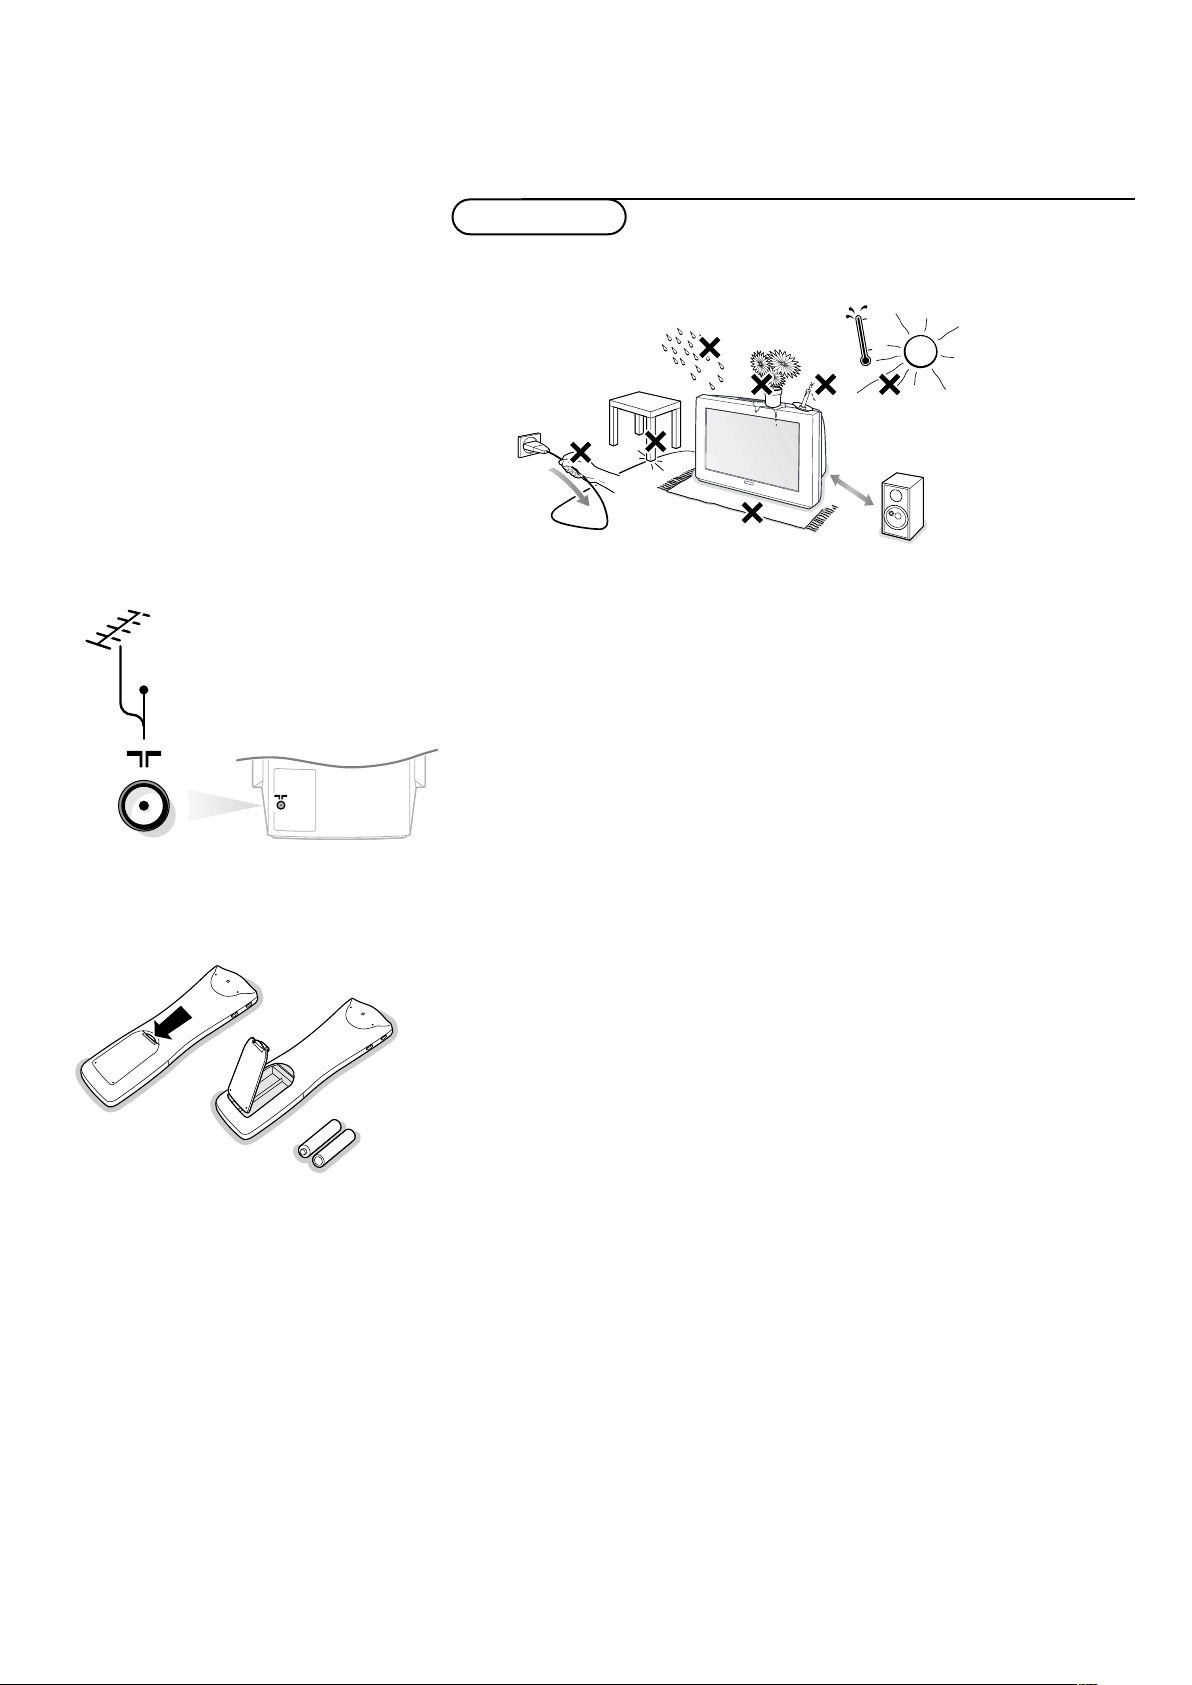
& Place the TV on a solid surface.
min.
1m
CABLE
R6 / AA
For ventilation,leave at least 5 cm free all around the TV.
Do not place the TV on a carpet.
To prevent any unsafe situations, do not place any objects on top of the TV.
Avoid heat,direct sunlight and exposure to rain or water.
é Insert the aerial plug firmly into the aerial socket x at the back of the
TV.
“ Insert the mains plug in the wall socket having a mains voltage of 220V-240V.
To prevent damaging the mains (AC) cord which could cause a fire or electric
shock,do not place the TV on the cord.
‘ Remote control:Remove the cover of the battery compar tment.
Insert the 2 batteries supplied (Type R6-1.5V).
The batteries supplied do not contain the heavy metals mercur y and cadmium.
Nevertheless in many countries exhausted batteries may not be disposed of with
your household waste. Please check on how to dispose of exhausted batteries
according to local regulations.
Note: this remote control functions with TVs which use the RC6 signalling standard.
( Switch the TV on : Press the power switch A on the front of your TV.
A green indicator on the front of the TV lights up and the screen comes on.
If the indicator is red,press the -P+ key on the remote control.
The green lamp blinks every time you press a key on the remote control.
When you switch on your set for the first time, the menu
automatically appears on the screen.The explanation appears in different languages
one at a time. Choose your own language and press the OK key on the remote
control.
LANGUAGE
Go on to page 4.
3Preparation
Page 4
Installation
B
®
Ò
‡π
†
f hU
æ
MENU
b
OK
INSTANT
Q
yÚ
V P
213
546
879
B
®
Ò
‡π
†
¬
fhU
æ
MENU
b
OK
◊
INSTANT
Q
yÚ
return or switch
main menu off
activate
select menu item
Select the
INSTALLATION
menu
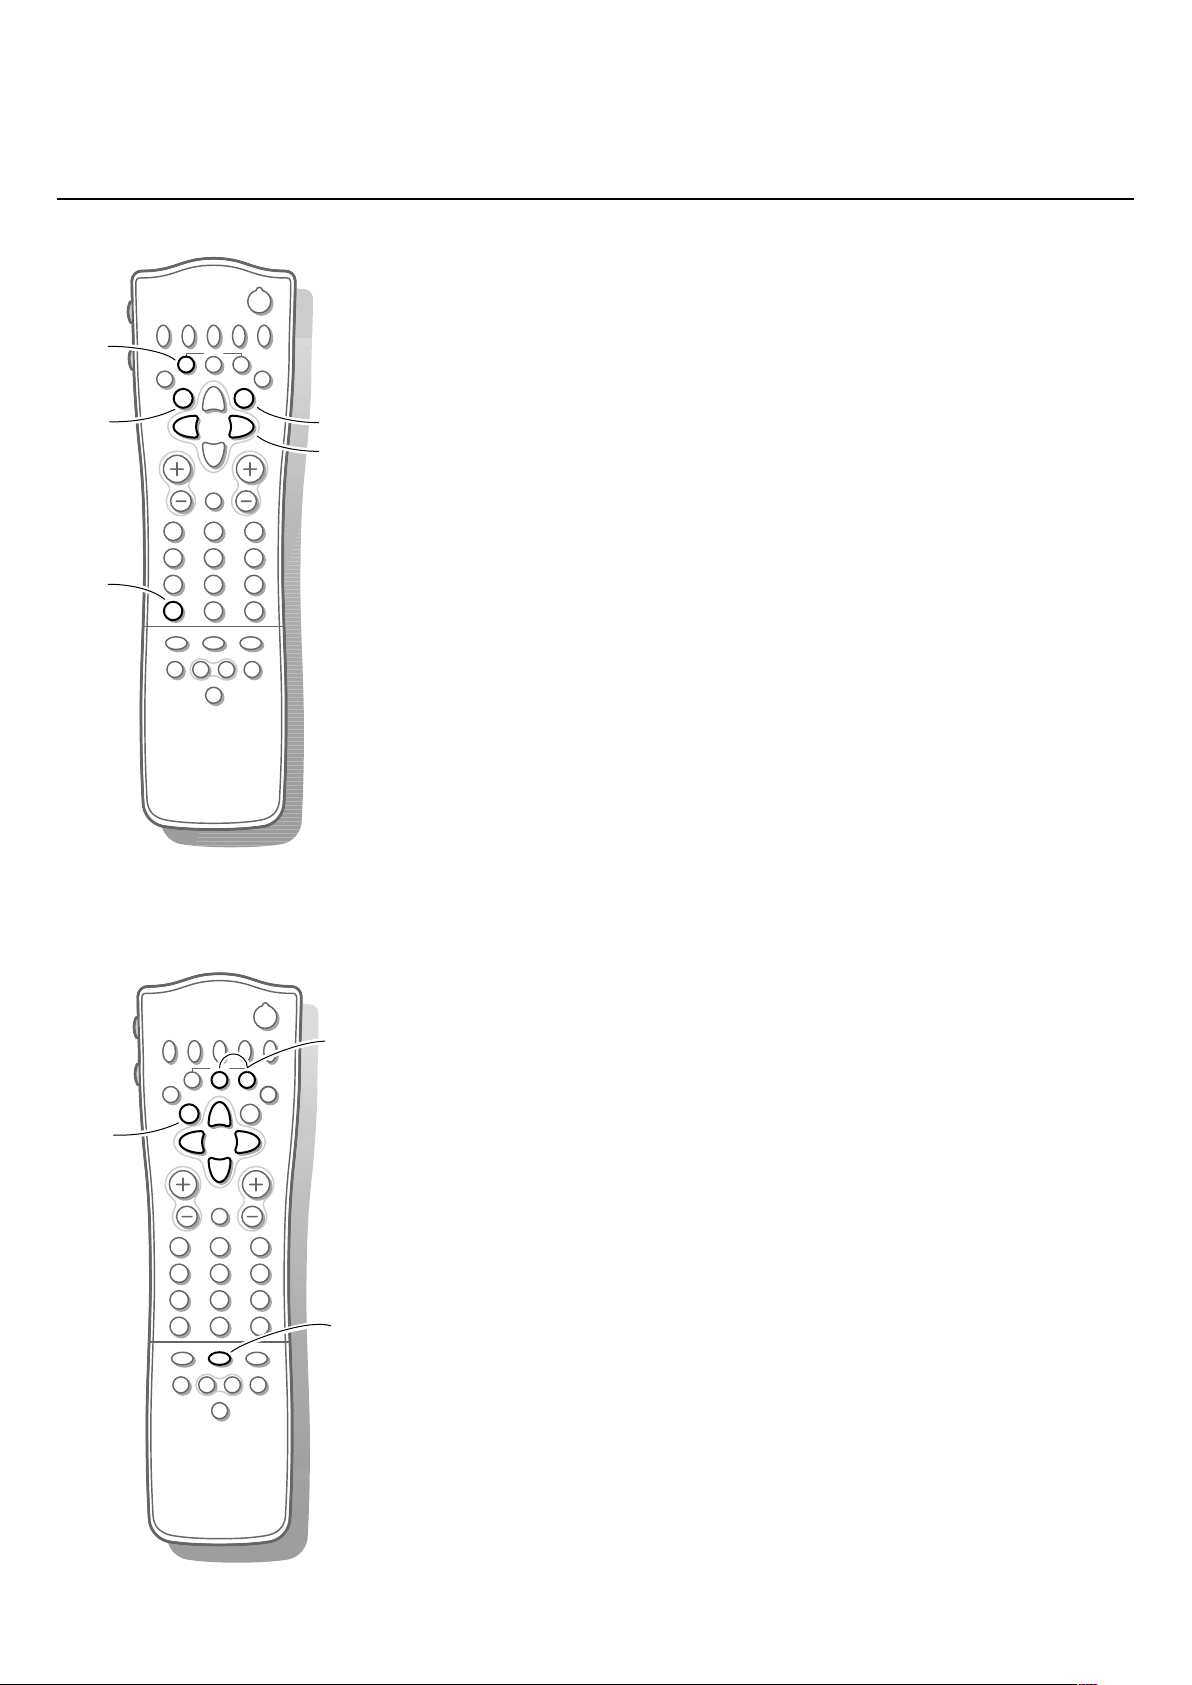
Press U and h at the same time.
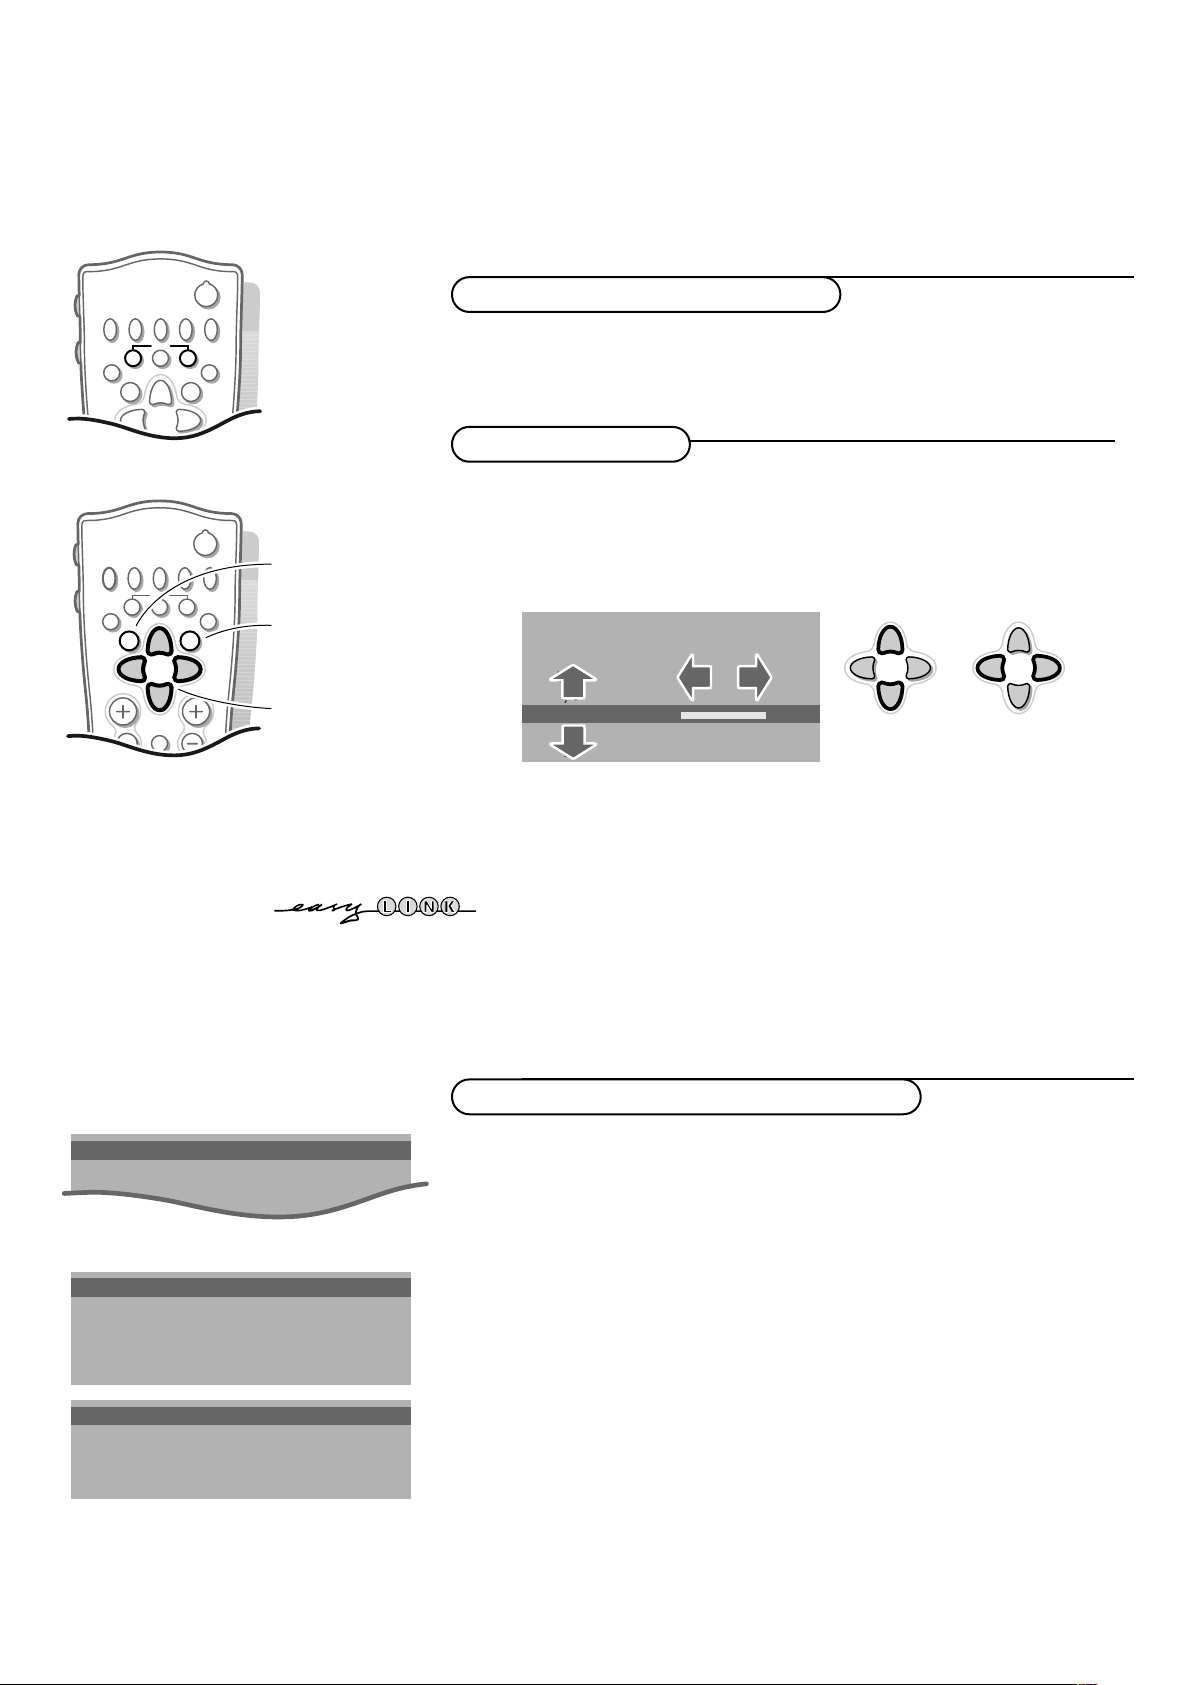
To use the menus
& Use the cursor in the up/down, left/right directions to select a menu item.
é Press the OK key to activate.
“ Use the MENU key to return or to switch the menu off.
MENU TITLE
Subject 1
Subject 2
Subject 3
J Subject 4
J Subject 4 L M
Subject 5
Subject 6
Store TV channels
J INSTALLATION
MENU TITLE
Menu language
J Menu language
MENU TITLE
English
....
....
J Country
4
MENU TITLE
United Kingdom
....
....
Installation
After the new or extra TV channels have been stored,the TV automatically transfers
those TV channels to the video recorder if it is equipped with the EasyLink function.
The message EasyLink : downloading ......appears on the screen. The
programme list of the video recorder is now the same as the one of the TV. If the TV
is connected to a video recorder which supports the
NEXTVIEWLink function, the TV
also automatically transfers the language and country selections to the video
recorder.
Select the menu language and country
First,select your language and country.
& Select Menu language and press the OK key.
é Select your language and press the OK key.
Use the cursor up/down to scroll through the list and to bring up other
languages which are not displayed on the screen at present.
“ Select Country and press the OK key.
‘ Select the country where you are now located and press the OK key.
Use the cursor up/down to scroll through the list and bring up other
countries which are not displayed on the screen at present.
Other when none of the countries applies.
Select
You can now search for and store the TV channels in two different ways:
using automatic installation or manual installation (tuning-in channel by
channel).
Select your choice and press the OK key.
Page 5

Automatic installation
Start
Stop
J Stop K
TV is searching
One moment please ...
Automatic installation
J Start K
Start
Stop
1 BBC1
2 BBC2
3 CNN
....
....
Automatic installation
In the Automatic installation menu select Start and press the OK key to
activate the searching. All TV channels are searched for and stored
automatically.
If a cable system which broadcasts ACI (Automatic Channel Installation) or a
TV channel transmitting a teletext page with the frequencies and programme
names of all the TV channels which can be received,is detected, the search is
stopped and a programme list appears.
The programme list is automatically filled with all the programme numbers
and names of the TV channels transmitted.
It is possible that the cable company or the TV channel displays a broadcast
selection menu. Layout and items are defined by the cable company or the TV channel.
Make your choice with the cursor and press the OK key.
To exit from the menu press the
MENU key on the remote control.
Go on to page 6.
Manual installation
Searching for and storing TV channels is done channel by channel.
You must go through ever y step of the Manual installation menu.
Manual installation
(Selection mode)
J System K
System
Programme no.
Search
Fine tune
Store
Selection mode is only present and lights up if the country selected also
offers the channel option (C-channels for aerial channels,S-channels for cable
channels).
You can choose either channel or frequency mode.
& Select the TV system
Select the country or part of the world from where you want to receive the
TV channel.
If you are connected to a cable system,select your country or par t of the
world where you are now located.
é Press the cursor down and enter the programme number with the digit keys.
“ Search for a TV channel
Press the cursor left/right.
The frequency or the channel number increases until a TVchannel is found.
Direct selection of a TV channel
If you know the frequency, the C- or S-channel number,enter it directly with
the digit keys 0 to 9.
Ask for a list from your cable company or dealer,alternatively consult the
Table of frequencies on the inside backcover of this handbook.
‘ Fine tune
In case of poor reception,you can improve the reception by adjusting the
frequency with the cursor left/right.
( To store your TV channel,select Store and press the OK key.
Repeat steps
& to ( to store another TV channel.
§ To exit from the menu press the MENU key on the remote control.
5Installation
Page 6
INSTALLATION
Menu language
Country
Automatic installation
Manual installation
J Give name
Give name
Reshuffle
Favourite programmes
SETUP
Give name
EXT1
EXT2
EXT3
FRONT
J 0
0
1 BBC1
2 BBC2
3 ....
4 ....
5 ....
Reshuffle
EXT1
EXT2
EXT3
FRONT
0
1 CNN
J 1 CNN
2 BBC2
3 ....
4 ....
5 ....
Give name
It is possible to change the name stored in the memory or to assign a name
to a TV channel which has not yet been entered. A name with up to 5 letters
or numbers can be given to the programme numbers 0 to 99.For example
SUPER,BBC1,... Between 99 and 0 you can also name any peripherals that
are connected to a euroconnector.
& Select Give name in the INSTALLATION menu and press the OK key.
é Select the programme number.
“ Press the OK key.
‘ Select the character with the cursor up/down.
( Select the following position with the cursor right.
§ Select the following character.
è Press the OK key when finished.
! Press the MENU key to return to the INSTALLATION menu.
Space, numbers and other special characters are located between Z and A.
Reshuffle the programme list
According to your preference you can change the order of the stored TV
channels.
& Select Reshuffle in the INSTALLATION menu and press the OKkey.
é Select the programme number you want to exchange.
“ Press the OK key.
‘ Select the new number you want to exchange it with.
( Press the OK key.
Repeat the operation until all TV channels are allocated as you like.
§ Press the MENU key to return to the INSTALLATION menu.
J 2 ... Yes
Installation
6
Favourite programmes
0 ... No
1 ... Yes
2 ... No
3 .... No
4 .... Yes
5 ....
Select Favourite TV channels
After leaving the installation you can browse through the TV channels by
pressing the - P + key. Only those TV channels which are in the favourite list
will be displayed.Non-favourite TV channels can still be selected with the digit
keys.By default all stored channels are added to the favourite list.
& Select Favourite programmes in the INSTALLATION menu and press
the OK key.
é Select your favourite programme number.
“ Select Yes or No with the cursor left/right.
‘ Repeat for every TV channel you want to make a favourite or a
non-favourite TV channel.
( Press the MENU key to return to the INSTALLATION menu.
In order for
should also broadcast the correct local date and time via teletext.
NEXTVIEW to function proper ly, the first TV channel from the favourite list
Page 7

INSTALLATION
Menu language
Country
Automatic installation
Manual installation
Give name
Reshuffle
Favourite programmes
J SETUP
SETUP
SETUP
Digital Sources
J Digital sources
Decoder/Descrambler
(Picture tilt)
Information line
Factory settings
Auto format yes/no
INSTALLATION
Install TV Setup
The Setup menu allows you to adjust initial settings,i.e. those which are not
related to the installation of the TV channels.
The Setup menu contains items that control the settings of the TV’s functions,
features,ser vices and peripherals you may have connected.
& Use the cursor in the up/down, left/right directions to select the menu item.
é Use the OK key to activate.
“ Use the MENU key to return or switch menu off.
Digital sources
See Connect Peripheral Equipment,p. 21 to connect your digital equipment,
like a DVD,a digital satellite tuner or a similar digital device.
Decoder/Descrambler
J Programme
Programme
Decoder status
Define Decoder/Descrambler programme numbers
If a decoder or a descrambler is connected,see p.20 you can define one or
more programme numbers as decoder programme numbers.
Press the cursor left/right to select the input used to connect to your
decoder
Select
Off, EXT1 or EXT2.
Off if you do not want the selected programme number being
activated as a decoder programme number.
EXT2 when the decoder is connected to your EasyLink video recorder.
Select
When selecting the decoder,the message EasyLink: downloading presets....
appears on the screen.
Picture tilt (if provided)
Select Picture tilt with the cursor up/down.
Keep the cursor left/right pressed to adjust the rotation of the picture.
Information line
On and after the selection of a TV programme or after pressing the
Select
i key on the remote control,a TV channel which broadcasts teletext may
transmit the name of the TV channel, the programme name or another
message.This is displayed on screen next to information about sound and
picture format.
When selected
Off,only sound and picture format information is displayed
after the selection of a TV channel or after pressing the i key.
Factory settings
Factory settings and press the OK key to restore picture and sound
Select
settings,predefined in the factory.
Auto format
Selecting
Yes causes the screen to automatically fill as much of the picture as
possible when TV programmes are not carrying special signals detecting the
correct screen format.
With the q key on the remote control you can still select other picture
formats.See p. 9.
Installation
Installation and press the OK key to return immediately to the
Select
INSTALLATION menu.
‘ To exit from the menu press the MENU key repeatedly.
7Installation
Page 8
yÚ
V P
SMART
ACTIVE CONTROL
Maw
h
q
bSX
213
546
879
0
B
®
Ò
‡π
†
¬
i
0
fhU
æ
MENU
b
OK
◊
INSTANT
Q
® Instant record
If your video recorder has the EasyLink
function the
INSTANT ® key for record can
be operated in the TV mode.
®Ò‡π†Video recorder see p.23
æ NEXTVIEW/TXT guide on/off
see p.13
MENU Main menu on/off see p. 11
OK Press this key to activate your choice ,
when in the menus.
V Volume
Press + or - to adjust the volume.
¬ Mute
Temporarily interrupt the sound or
restore it.
P Programme selection
To browse through the TV channels
activated in the Favourite Programme menu.
i Screen information
Press for 5 seconds to activate/de-activate
the extended or reduced display of TV
channel and programme information on the
screen.
Press briefly to display information about the
selected TV channel and programme, the
sound reception,picture settings and the
remaining time set with the sleeptimer.
Operation
Use of the remote control
Use of the remote control
0/9 Digit keys
To select a TV channel.
For a two digit programme number,enter the second digit within 2
seconds.
To switch immediately to a selected one digit TV channel,keep the digit
key pressed a bit longer.
B Standby
The set is switched off and the red indicator
lights up.
To switch the TV on again,press - P + or the
digit keys.
If your EasyLink video recorder has the
system standby function and you press the
standby key for 3 seconds,both the TV and
video recorder are switched to standby.
Your TV consumes energy in the standby mode.
Energy consumption contributes to air and water
pollution.We advise to switch off your TV
overnight instead of leaving it on standby.You
save energy.
Q Incredible Surround
MONO sound mode, this feature,when
In
switched on,enables you to hear a spatial
effect of sound.
In
STEREO sound mode, when Incredible
Surround On
is selected,it seems as though
the loudspeakers are spread further apart
from one another
b Teletext on/off see p.17
fh Teletext functions see p.18
U Time display
The time, downloaded from the TV channel
(with teletext) stored on programme number
1 or the lowest favourite programme
number, is displayed on the screen.
This function is not available when continuous
subtitles have been switched on.
Use of the remote control
8
0 Previous programme
The previously selected TV channel is displayed.
The ◊ indication is only for video recorder/DVD.
Page 9
yÚ
V P
SMART
ACTIVE CONTROL
Maw
h
q
bSX
213
546
879
0
B
®
Ò
‡π
†
¬
i
0
fhU
æ
MENU
b
OK
◊
INSTANT
Q
X Bilingual choice and
sound mode selection
Press this key
• to switch from
Stereo to Mono sound, in
case of stereo transmission,or from
Nicam Stereo to Nicam available, in case
of digital transmission;
• to choose between language Y (Dual Y) or
language Z (Dual Z),in case of bilingual
transmission. The setting is separately
stored for each TV channel.
S Freeze
To activate/de-activate the frozen picture or
to hold a teletext page.
w Select peripherals
Press this key repeatedly to select
EXT2, EXT3 or FRONT, according to where
you connected the peripherals (p.23).
EXT1,
q Picture format
Press this key repeatedly to select another
picture format:4:3, Movie Expand 14:9,
Movie Expand 16:9 with or without subtitling,
Wide Screen,Super Zoom or Automatic
(when Auto format is set to Yes in the
SETUP menu).
Automatic makes the picture to fill the
screen as much as possible.
Sometimes also video recorder and DVD
programmes carry special signals which will
automatically switch the TV to the correct
screen format.
Auto format is disabled when in Dual screen.
When in Movie Expand 14:9 or 16:9 or
Super Zoom picture format you can make
subtitles visible with the cursor up/down.
b Dual screen
& Press the b key to switch on Dual
screen.
The TV screen is divided into 2 parts:
- the left side for the normal main
picture,
- the right side for teletext broadcast by
the selected TV channel or for
NEXTV
IEW/Teletext Guide.
To operate
NEXTVIEW/Teletext Guide, see
p.13, to operate teletext, see p.17.
If Dual screen is
NEXTVIEW/Teletext Guide is displayed full
Off
, the picture, teletext or
screen.
é Press the q key to select a vertical
squeezed or a non vertical squeezed
picture size.
“ Press + P - to run through the teletext
pages.
‘ When in Teletext Dual screen, press the
b key to return to a full picture screen
or press the b key to return to a full
Teletext screen.
( When in NEXTVIEW/Teletext Guide Dual
screen,press the æ key to return to a
full picture screen or press the b key to
return to a full
screen.
NEXTVIEW/Teletext Guide
9Use of the remote control
Page 10
yÚ
V P
SMART
ACTIVE CONTROL
Maw
h
q
bSX
213
546
879
0
B
®
Ò
‡π
†
¬
i
0
fhU
æ
MENU
b
OK
◊
INSTANT
Q
Smart Keys
To select predefined picture and sound
settings.
M Smart Sound
Each time it is pressed,a different sound
setting is selected,corresponding with
specific factory setting of treble and bass.
a Smart Picture
Each time it is pressed,a different picture
setting is selected,corresponding with
specific factory settings of Contrast, Colour,
Sharpness and Dynamic Contrast.
Personal refers to the personal preference
settings of picture and sound selected in the
picture and sound menu.
Remark: the moment you are in a predefined
smart sound or picture setting and you modify a
setting in the picture or sound menu, all values of
the menu will overwrite the previously made
personal settings.
h Active control
Active control is a pro-active and automatic
system. The TV continuously measures and
corrects all incoming signals in order to
provide the best picture possible.
Press the h key to select the Active
Control values Off or On.
Off Sharpness and Dynamic Contrast are
controlled automatically
On Sharpness, Dynamic Contrast and Noise
Reduction are controlled automatically.
Press the cursor in the up/down directions
while the selected Active Control setting
information is on top of the screen.
The Active Control menu appears.
The picture settings are being adapted
continuously and automatically.
The menu items cannot be selected.
Press the cursor in the up/down directions
again to switch off the menu.
Use of the remote control
10
Page 11

Use of the menus
V P
213
B
®
Ò
‡π
†
¬
fhU
æ
MENU
b
OK
INSTANT
Q
yÚ
return or switch
main menu on/off
OK key to activate
cursor to select
adjustments
MAIN MENU
Contrast
J PICTURE
SOUND
FEATURES
PROGRAMMES
PICTURE
Contrast
J Contrast L M
Brightness
Colour
Sharpness
Tint
Digital Scan
Dynamic Contrast
& Press the MENU key to display/cancel the MAIN MENU.
é Use the cursor in the up/down directions to select the PICTURE,SOUND or
FEATURES menu or to select the PROGRAMMES.
“ Press the cursor right to activate the selected menu.
‘ Use the cursor in the up/down, left/right directions to select the menu item.
( Use the OK key to activate.
§ Press the MENU key repeatedly to return or to switch the menu off.
Picture menu
If an NTSC peripheral is connected to one of the euroconnectors, the option Hue
also appears.
Tint
Select the colour temperature:
Digital Scan (Line Flicker Reduction)
In Movie Expand picture format, Digital Scan is always active. The menu item is not
available.
In rare circumstances while watching TV programmes it may be preferable to
switch off the digital scan line flicker reduction.Normally keep it switched on.
Press the cursor left/right to select
Normal, Warm or Cool.
On or Off.
SOUND
J Volume L M
Volume
Balance
Treble
Bass
Headphone volume
Dynamic Contrast
To make the contrast in the darker and the brighter picture areas more
noticeable, select the
In certain circumstances it may be preferred to select
Med setting.
Min, Max or Off.
The modified adjustments for Contrast,Brightness,Colour,Sharpness,Tint,
Digital Scan and Dynamic Contrast are automatically stored for all TV
channels.
Factory settings in the Setup menu to restore the predefined factory
Select
settings,see p.7.
Sound menu
The modified adjustments for Volume, Balance,Treble and Bass are
automatically stored for all TV channels.
Factory settings in the Setup menu to restore the predefined factory
Select
settings,see p.7.
Headphone volume
See Connect Peripheral Equipment,p. 22 for the connection of the
headphone.
11Use of the menus
Page 12

return or switch
V P
B
®
Ò
‡π
†
¬
fhU
æ
MENU
b
OK
INSTANT
Q
yÚ
main menu on/off
OK key to activate
cursor to select
adjustments
J FEATURES
Sleeptimer Off
Child lock Off
Subtitle Off
Features menu
& Press the MENU key to display/cancel the MAIN MENU.
é Use the cursor in the up/down directions to select the FEATURES menu.
“ Press the cursor right to activate the selected menu.
‘ Use the cursor in the up/down directions to select a menu item.
( Use the cursor in the left/right directions to select the desired setting.
Sleeptimer
With the sleeptimer you can set a time period after which the TV should
switch itself to standby.
The counter runs from
One minute before the TV is set to go to standby,the remaining seconds
appear on screen.Not visible in dual screen mode.You can always switch off
your set earlier or change the set time.
Child lock
If the child lock is on,the TV can only be switched on with the remote
control.The P - and + keys on top of the TV cannot be used to select a TV
channel.In this way you can prevent unauthorised use of your TV.
If the message
Child lock On appears, the child lock must be switched off
before you can use the P - and + keys on top of the TV to select a TV
channel.
Off up to 180 min.
Subtitle
TV channels with teletext often transmit certain programmes with subtitling.
See Teletext, Continuous Subtitles,p. 19 how to select the proper subtitle
page from the teletext index.
Subtitle On or Off.
Select
Press the MENU key to switch off the Features menu.
Programme list
& Press the MENU key to display/cancel the MAIN MENU.
é Select PROGRAMMES with the cursor up/down.
“ Press the cursor right to display an overview of all the TV channels installed.
‘ Press the cursor up/down to run through the list and press OK to select the
desired TV channel.
( Press the MENU key to switch off the Programme list.
Use of the menus
12
Page 13

NEXTVIEW / T eletext Guide
V P
213
546
879
B
¬
fhU
æ
MENU
b
OK
◊
INSTANT
Q
æ
MENU
yÚ
Today, most broadcasters in Europe , are offering teletext pages containing
their programme schedule of today. These pages can be requested by switching
the TV to Teletext Guide.
An increasing number of broadcasters are offering an extended programme
guide service called
NEXTVIEW.NEXTVIEW
is a new way of presenting
programme schedules and offers more features than common teletext.
With
NEXTVIEW it is possible to show for instance all the movies coming
tonight.
NEXTV
IEW
selection
cursor to select
adjustments
Both facilities are integrated in this TV:
Guide. If a TV channel supports
present the
NEXTVIEW programme schedule. If the TV channel supports just
NEX
TVIEW and T eletext Programme
NEXTVIEW then the TV will automatically
teletext,then the TV will switch automatically to Teletext Guide .
Both facilities are offering the same functions:record, remind and info.
However in case of Teletext Guide the broadcaster is responsible if these
functions are possible.
You can search for the programmes you want to watch up to 7 days in
advance. It is also possible to search for a programme by theme, e.g. sport,
movie, etc.Once a programme has been selected it can be tagged, to remind
you,or to record on the video recorder automatically (provided the video
recorder is equipped with
Teletext Guide/
NEXTVIEW also allows direct access to detailed information
NEXTVIEWLink),once,daily,weekly or series.
about programmes if provided by the broadcaster.
The broadcaster is responsible for the contents of the information.
The TV is responsible for the capture of that information and for the presentation to
the user.
Use of the Teletext Guide/NEXTVIEW menus
&
Press the æ key on the remote control to display/cancel the Teletext Guide/
NEXTVIEW menu.
é Use the cursor in the up/down, left/right directions to select the date,
CHANNEL for the channel guide , THEME for the theme guide, OVERVIEW
for an overview of all the programmes which are marked as reminders or for
recording,the programme guide page number or to enter the programme list.
“ Enter the proper programme guide page number
‘ Press the cursor left/right to run through the
( Select a programme with the cursor up/down.
§ Press one of the colour keys to select one of the
è Press the OK key to return to the header area
Teletext Guide NEXTVIEW
Channel Overview
BBC1 BBC2
BBC1
Record
Remind
Info
p.202 p 01 02 ... π
11.03 ................
14.35 ................ 226/3
17.50 ................ 231
“ Select a programme with the cursor up/down.
with the digit keys or with the – P + keys.
subpages.
‘ Press one of the colour keys to select one of the
( Press the OK key to return to the header area
basic functions (if available);
See Basic functions further on.
again.
record,remind, info.
Monday 9 Oct 18:03
Channel Theme Overview
BBC1
Record
Remind
Info
What’s on now
Preview
Themes
Ratings
basic functions (if available);
See Basic functions further on.
again.
NEXTVIEW
record,remind, info.
13NEXTVIEW
Page 14
Record
Remind
Info
Channel Theme Overview
BBC 1 BBC 2 CNN
p.202 p 01 02 ... π
BBC 2
11.03 ................
14.35 ................ 226/3
17.50 ................ 231
One moment please
Teletext guide
TV channels which broadcast teletext also transmit a page with the
programme guide of the day.For each selected TV channel the programme
guide page can be selected with the æ key:
- automatically if the selected TV channel supports services like PDC
(Programme Delivery Control) or MIP (Magazine Inventor y Page).
- if automatic pre-selection is not possible then the index page is displayed
and the proper programme guide page number of the selected TV channel
has to be entered with the digit keys.
The programme guide page will be stored automatically only if it satisfies
Video Programming via Teletext (VPT) requirements.
Every time you press the æ key, the programme guide page of the
selected TV channel will be available if the TV channel does not support
NEXTVIEW
The function items record,remind and info,corresponding with the coloured
keys,become highlighted if the displayed programme page satisfies the Video
Programming via Teletext (VPT) requirements.Select a programme item and
press one of the function keys,e.g. Record or Remind.See Basic functions
further on.
The Info item is enabled if the selected programme contains a page number
with an optional subcode referring to a page with more info about the
programme.
.
Record
Remind
Info
Record
Remind
Info
Record
Remind
Info
Monday 9 Oct 18:03
Channel Theme Overview
BBC1 CNN BBC2
BBC1
........
........
........
Monday 9 Oct 18:03
Channel Theme Overview
Culture Movie ....
BBC1
BBC1
CNN
TVE
Monday 9 Oct 18:03
Channel Theme Overview
BBC1
BBC1 17.10
CNN 17.30
TVE 18.05
BBC2 19.00
NEXTVIEW
NEXTVIEW
NEXTVIEW
NEXTVIEW modes to sor t and represent information
Channel
The Channel guide provides an overview of all programmes that are
broadcast by a single channel during one day.
Already passed programmes can be made visible via cursor up.
The list will start with the earliest broadcast programme.
With cursor left/right another favourite TV channel can be selected.
Theme
The theme guide displays a list of all programmes at the selected date,that
matches with the selected category (news, sport,culture, movies, …).
The default starting item will be the current or next programme on the
current TV channel.
THEME selection is only present if programmes in the TV guide have
The
defined themes.
Overview
The Overview menu provides a list of programmes that are marked as
reminders or to be recorded each day.
When more than one programme to be recorded has an overlap in time,
these programmes will be marked by a red colour.
After the programme has been broadcast,all items set for once will be
deleted from the list the following day.This menu can be used to change a
reminder or recorder.
Note: the TV will automatically interpret the broadcast time (as shown on the
teletext guide) of your selected programme into the correct local time and
date.
NEXTVIEW
14
Page 15

Record
Remind
Info
CHANNEL THEME OVERVIEW
11.03 Travel Guide
14.35 World news
p
OnceπDaily Weekly Clear
17.50 Insight
............................
Date time
CNN
R
!
Info block
Basic functions
The functions Record,Remind and Info can be activated with the
corresponding colour keys on the remote control.
If the function is not available,then the text is shown at reduced brightness.
Select a programme with the cursor up/down.
Record R or Remind !
& Press the red colour key to activate Record or the green colour key to
activate
If the programme number of the broadcaster is not yet known,a message appear s
with the request to input the correct programme number with the cursor left/right.
Press OK.
A small menu pops up in which you can choose the interval:once,daily or
weekly, or clear an earlier made record or remind setting.The default interval
is set to
system and the options
this case the system identifies when the next episode of the series will be
broadcast.This is not possible in the Teletext guide.
Remind.
Once.If a programme is an episode of a series,it is identified by the
daily and weekly are replaced by the option series.In
é Use the cursor in the left/right directions to select the interval.
The colour of the tag refers to the interval.
“ Press the OK key .
Record R is activated:
When
Storing is displayed to indicate the video recorder is programmed.
Remind ! is activated:
When
- a message will be displayed the moment the tagged programme
with ! star ts, when watching the TV later on.
- the TV switches on the moment the tagged programme with ! starts,
when the TV is in standby.
Note: Recordings and reminders are not possible when the broadcaster does not
transmit dates and times of the programmes.
The message
Make sure you are on the TV programming page.
No TV programming possible appears .
Info
& Press the yellow colour key to activate Info.
Advertisements or information relating to the selected programme are
displayed.In some cases all of the information does not fit on the screen.Use
the cursor up/down to browse through all the information.
é Press the yellow colour key again to switch off the information.
15NEXTVIEW
Page 16
Select Picture/
V P
SMART
ACTIVE CONTROL
Maw
h
q
bSX
213
546
879
0
B
®Ò‡π
†
¬
i
0
fhU
æ
MENU
b
OK
◊
INSTANT
Q
æ
b
yÚ
NEXTVIEW-Teletext Guide
Press the æ key.
Press the b key.
The screen is divided into two parts:the left side for the normal main picture,
the right side for
NEXTVIEW
Press the b key to return to a full
/Teletext Guide.
NEX
TVIEW/Teletext guide screen or press
the æ key to return to a full picture screen.
Video recorder restrictions with NEXTVIEW
The Record item and the automatic recording will only be present and
possible if your video recorder is equipped with
Your video recorder should be connected to
Peripheral Equipment,p. 20.
The daily, weekly and series options,the number of recordings set and the
way overlapping recordings are managed, depend on the type of video
recorder you have.When all video recorder timers are full,the item
in the menu will not be present.
Upload video recorder overview
When the TV is switched on, the timer recordings are uploaded to the TV to
check if any manual addition or deletions have been done.This is shown in the
overview.
The video recorder manages and removes timer recordings when performed.
NEXTV
IEWLink.
EXTERNAL 2.See Connect
Record
NEXTVIEWLink video recorders do not allow a daily programming of the
Some
recording to start on a Saturday or Sunday.In this case the item
daily will be
removed from the menu on those days.
NEXTVIEW
16
Page 17
Teletext
V P
SMART
ACTIVE CONTROL
Maw
h
q
bSX
213
546
879
0
B
¬
i
0
fhU
æ
MENU
b
OK
◊
INSTANT
Q
b
bX
0
MENU
yÚ
colour keys
to select
OK key to activate
cursor to select
pages
Most TV channels broadcast information via teletext.
Each channel which broadcasts teletext transmits a page with information on
how to use its teletext system.Look for the teletext page with the main
index (usually p.100).
Depending on the TV channel, teletext is transmitted in different systems.
The colours used in the options line correspond with the colour keys of your
remote control.
About Easy Text
Easy Text considerably reduces the waiting time (on condition that the
teletext broadcast of the particular TV channel is received for at least half a
minute) by :
• a direct selection of previous and following pages which are in transmission
and of the pages referred to in the options line
• a habit watcher list:frequently used pages are put automatically in a list of
preferred pages,so that they are immediately available
• the precapturing of the page numbers referred to in the displayed page
• the precapturing of all the subpages.
Switch Teletext on and off
Press b to switch the teletext on or off.
The main index page appears on the screen together with two information
lines at the top and one option line at the bottom of the screen.
Remark: if the displayed teletext characters on screen do not correspond with the
characters used in your language, press the X key repeatedly to select Language
group 1 or 2.
Select a Teletext page
With the digit keys
Enter the desired page number with the digit keys.
The page counter seeks the page or the page appears immediately when the
page number has been stored in the memory.
A message appears when you have entered a non existent or incorrect page
number.Page numbers beginning with 0 or 9 do not exist. Choose another number.
With the option line
Select with the colour keys,corresponding to the coloured options at the
bottom of the screen,the desired subject.
Select Picture/Teletext
Select a TV channel which broadcasts teletext.
Press the b key.
The screen is divided into two parts:
the left side for the normal main picture,
the right side for teletext broadcast by the selected TV channel.
Press the b key to return to a full screen picture or press the b key to
return to a full teletext picture.
Quickly run through the teletext pages
Press the cursor up/down or the - P + key to run through the previous or
the following pages.
Select the previously selected txt page
Press the 0 key.
17Teletext
Page 18
OK to activate
V P
SMART
ACTIVE CONTROL
Maw
h
q
bSX
213
546
879
0
B
®
Ò
‡π
†
¬
i
0
fhU
æ
MENU
b
OK
◊
INSTANT
Q
i
U
MENU
yÚ
yÚ
V P
SMART
ACTIVE CONTROL
Maw
h
q
bSX
213
546
879
0
B
®
Ò
‡π
†
¬
i
0
fhU
æ
MENU
b
OK
◊
INSTANT
Q
f
h
S
MENU
cursor to select
subpages
Select the index teletext page
Press the white colour key to display the main index (usually p.100).
Only for T.O.P teletext broadcasts :
T.O.P orders the pages in categories and adds other possibilities of enhancing
ease of use.
Press i. A T.O.P. overview of the teletext subjects available is displayed.
Not all TV channels broadcast T.O.P. teletext. When the teletext system
is not T.O.P. teletext, a message appears at the top of the screen.
Select with the cursor up/down,left/right the desired subject and press the
OK key.
Select subpages
When a selected teletext page consists of different subpages,one of the
subpages appears on the screen.
The coloured number in the first information line refers to the displayed
subpage.
The other subpages can be selected in 2 ways :
With the cursor left/right
The other subpage numbers appear in white as soon as the transmission has
found them. They are stored in the memory so that they are available while
the teletext page is on screen.
Select with the cursor left/right the previous or the following subpage.
With the U key
• Enter the subpage number yourself:
Press U. Enter the desired subpage with the digit keys : e.g. 3 for the third
page of seven subpages.
The TV searches for the selected subpage.
• Automatically rotating subpages:
Press U again to cancel the entered digit key for the subpage.
Now the subpages rotate automatically.
Press U again to select the subpages with the cursor left/right again.
Special teletext functions
Hold
Press S to stop the automatically rotating of the subpages or to stop the
page counter from seeking when you have entered a wrong page number or
when the page is not available.
Enter another page number.
Enlarge
Press h repeatedly to display the upper part,the lower par t and then to
return to the normal page size. When the upper par t is displayed,you can
scroll the text,line by line using the cursor up/down.
Reveal
Press f to reveal/conceal the hidden information,such as solutions to
riddles and puzzles.
18
Teletext
Page 19

Select Continuous Subtitles
M
P
V
TV channels with teletext often transmit programmes with subtitling.For
each TV channel you can store a subtitle page which will be displayed
continuously if the programme being broadcast is transmitted with subtitles.
Switch on teletext and select the proper subtitle page from the index.
Switch off teletext.
Now the subtitle page is stored for the selected TV channel.
Once subtitles have been stored and
Subtitle On has been selected they will
automatically be displayed on the selected TV channel if subtitles are in the
transmission.
Subtitle On or Off in the Features menu,see p. 12.
Select
The subtitle symbol j appears when
Subtitle On is selected.
Remark: you are in teletext mode, so only teletext functions are available.
Keys on top of the TV
Should your remote control be lost or broken you can still change some of
the basic picture settings with the keys on top of the TV.
Press the M key repeatedly to select
Treble, Bass
.
Press the P - or + keys to carry out the selected adjustment.
When the menu adjustment is not displayed,the P- or + keys enable you
to select the TV channels, the V - or + keys to adjust the volume.
The selected adjustment automatically switches off when no action has been
executed for 10 seconds.
Volume, Brightness,Colour, Contrast,
19Teletext
Page 20

Connect Peripheral Equipment
VCR 1
CABLE
1
4
EXTERNAL 2
2
3
VCR 1
CABLE
1
4
EXTERNAL 2
2
3
There is a wide range of audio and video equipment that can be connected
to your TV. The following connection diagrams show you how to connect
them.
Video recorder
Connect the aerial cables 1, 2 and, to obtain the optimum picture quality,
eurocable 3 as shown opposite.
If your video recorder is provided with the EasyLink function, the eurocable supplied
with it should be connected to
functionality.
If the eurocable 3 is not used the following steps are required:
Search for and store the test signal of the video recorder
& Unplug the aerial cable 1 from the aerial socket x of your video recorder.
é Switch on your TV and put the video recorder on the test signal.
(See the handbook for your video recorder.)
“ Search for the test signal of your video recorder in the same way as you
searched for and stored the TV signals. See Installation, Searching for and
storing TV channels, Manual installation,p. 5.
‘ Store the test signal under programme number 0 or between 90 and 99.
( Replace the aerial cable in the aerial socket x of your video recorder after
you have stored the test signal.
EXTERNAL 2 to benefit from the EasyLink
Decoder and video recorder
Connect a eurocable 4 to your decoder and to the special euroconnector
of your video recorder.See also the video recorder handbook.
See Define Decoder/Descrambler prog.numbers, p.7.
You can also connect your decoder directly to
eurocable.
Video recorder and other peripherals
EXTERNAL 1 or 2 with a
(except Digital Sources)
& Connect the aerial cables 1, 2 and 3 as shown opposite. Better picture
quality can be obtained if you also connect eurocable 5 to
and a eurocable 4 to EXTERNAL 1 or 3.
EXTERNAL 2
é Look for the test signal of your peripheral in the same way as you do for
a video recorder.
When a video recorder is connected to
programme from your TV.
Only when a video recorder is connected to
programme from your TV as well as from other connected equipment. See Record
with your video recorder,p. 25.
EXTERNAL 1 can handle CVBS and RGB, EXTERNAL 2 CVBS,Y/C and RGB,
Note:
EXTERNAL 3
only CVBS.
EXTERNAL 1 you can only record a
EXTERNAL 2 it is possible to record a
Connect Peripheral Equipment
20
Page 21
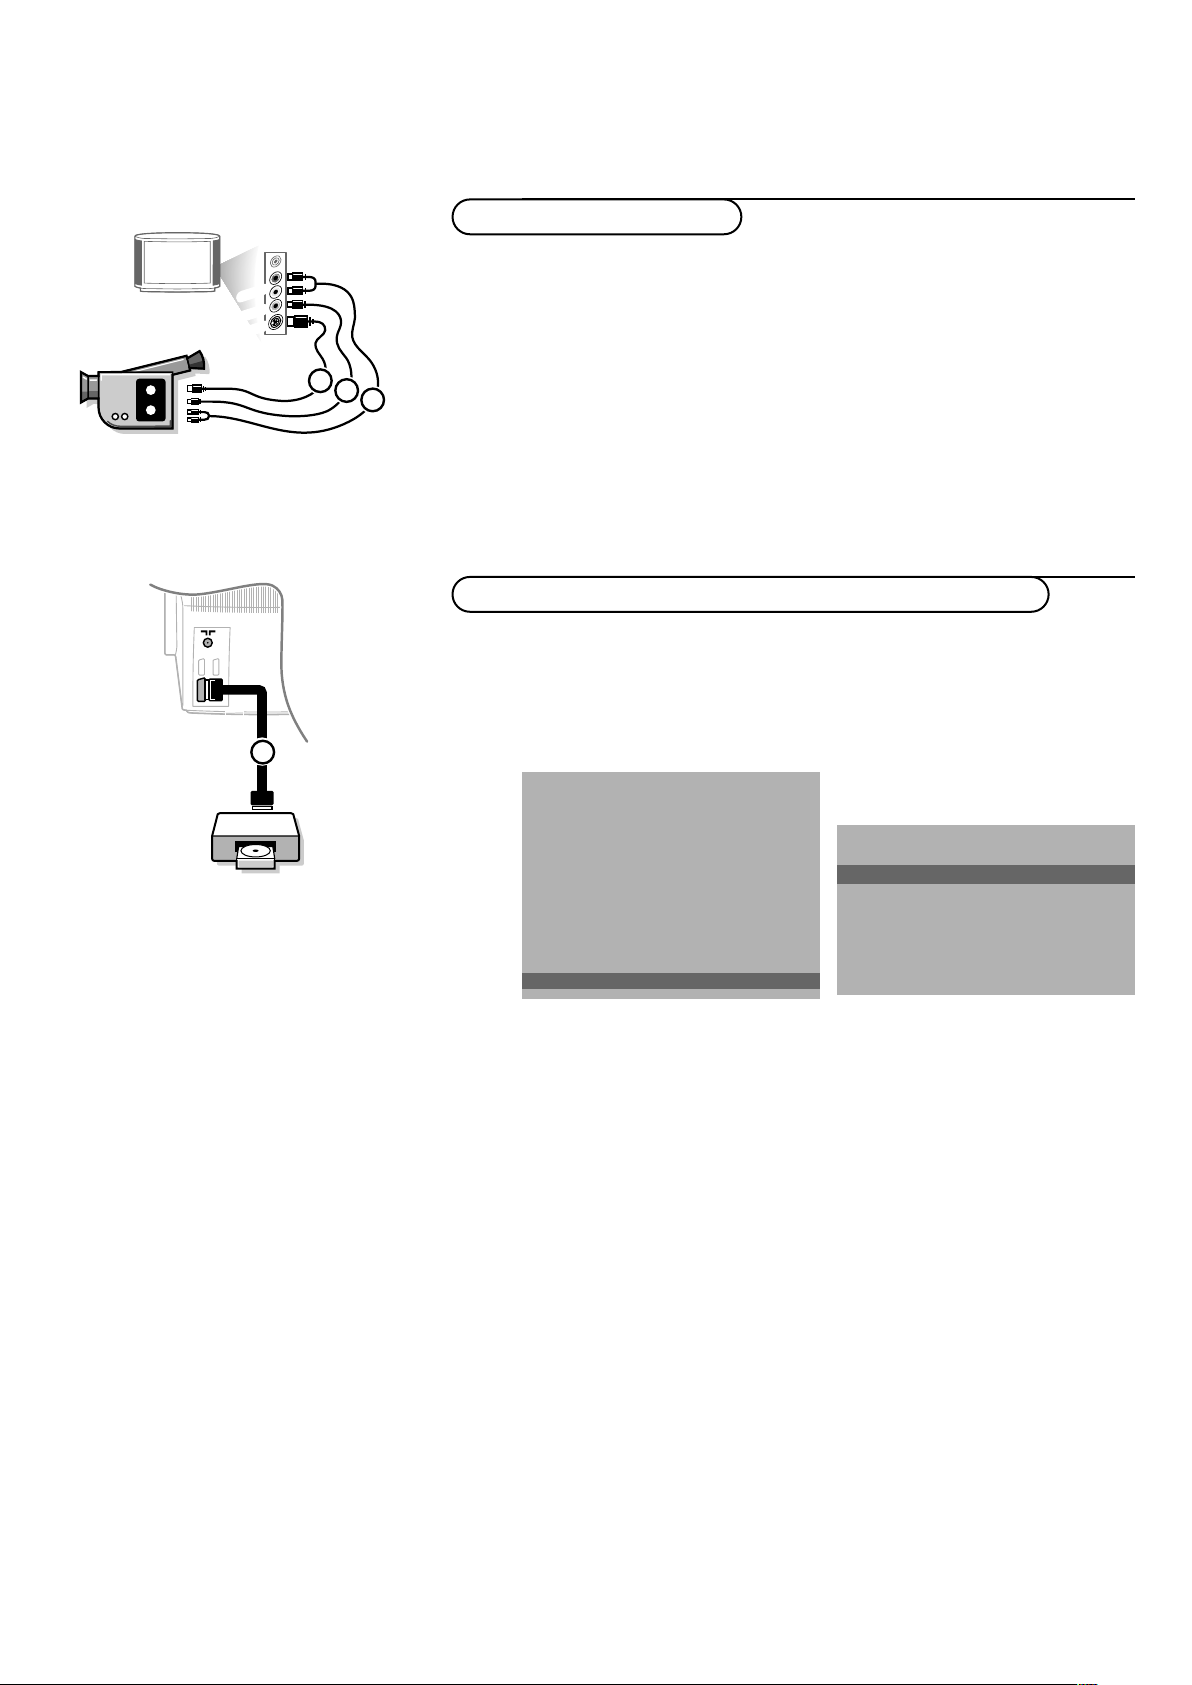
Camera & camcorder
3
2
1
A
U
D
IO
V
ID
EO
S•VID
EO
DVD
1
EXTERNAL 1/2/3
& Connect your camera or camcorder to sockets at the right side of your TV.
é Connect the equipment to VIDEO 2 and AUDIO L 3 for mono
equipment.
Press the X key repeatedly to select the sound coming from one or
both loudspeakers of your TV.
“ For stereo equipment also connect AUDIO R 3.
S-VHS quality with an S-VHS camcorder is obtained by connecting the S-VHS
cables with the S-VIDEO input 1 and AUDIO inputs 3.
Digital equipment (DVD,digital satellite tuner,...)
Connect your digital equipment with a eurocable 1 to one of the
euroconnectors (
EXT1, EXT2 or EXT3), or with a cinch cable to the VIDEO
input at the right side of the TV (see illustration above).
& Press U and h at the same time.
INSTALLATION
Menu language
Country
Automatic installation
Manual installation
Give name
Reshuffle
Favourite programmes
SETUP
J SETUP
SETUP
Digital Sources
J Digital sources
Decoder/Descrambler
(Picture tilt)
Information line
Factory settings
Auto format yes/no
INSTALLATION
é Select Digital sources in the Setup menu of the INSTALLATION menu and
select:
None if you have no digital source connected,
•
EXT1, EXT2 or EXT3 if you have connected your equipment to a
•
euroconnector,
FRONT in case you connected to the right side of the TV,
•
“ Press the MENU key to switch off all menus.
Note: the low quality of some digital picture material may be the cause of digital
image distortion. In this case select
remote control as this setting is intended to improve distorted picture quality.
Eco under the SMART PICTURE a key on the
21Connect Peripheral Equipment
Page 22
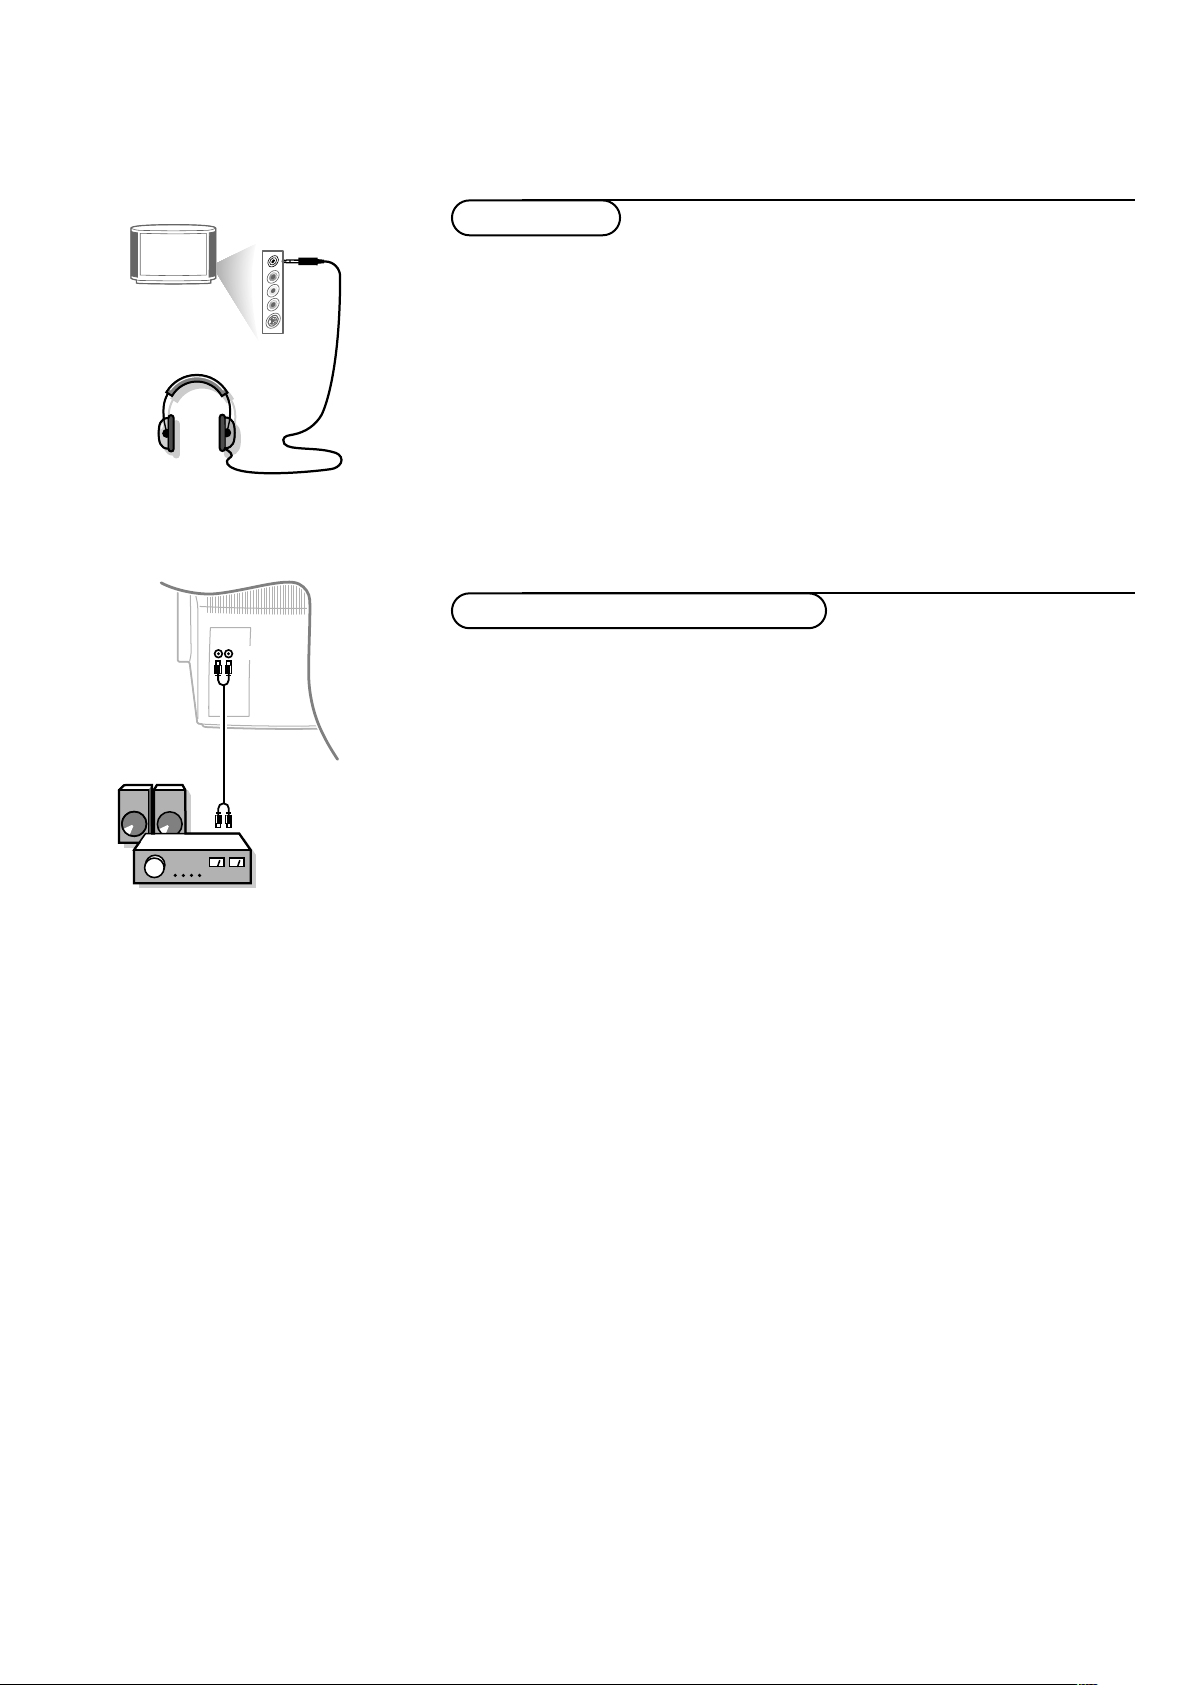
L
Headphone
AUDIO
& Insert the plug into the headphone socket L at the right side of the TV.
é Press ¬ on the remote control to switch off the internal loudspeakers
of the TV.
The headphone impedance must be between 8 and 4000 Ohm.
The headphone socket has a 3.5 mm jack.
SOUND menu select Headphone volume to adjust the headphone
In the
volume.See p.11.
Audio equipment / Amplifier
Connect the audio cables to the audio input of your audio equipment and to
AUDIO L and R at the back of your TV.
You can listen to your TV sound via your audio equipment.
If you want to connect more equipment to your TV, consult your dealer.
Connect Peripheral Equipment
22
Page 23
To select connected equipment
w
SMART
ACTIVE CONTROL
Maw
h
q
bSX
879
0
i
0
◊
V P
SMART
ACTIVE CONTROL
Maw
h
q
bSX
213
546
879
0
B
®
Ò
‡π
†
¬
i
0
fhU
æ
MENU
b
OK
◊
INSTANT
Q
B
®
Ò
‡
π
†
◊
yÚ
If the TV is connected to a video recorder with the EasyLink function, in some cases
the TV will be switched on, even when it was in standby. (E.g. playback tape,...)
This is not possible when Child lock On is selected.
Equipment connected with an aerial cable only :
Select the programme number under which you have stored the test signal
with the digit keys.
Equipment connected to a euroconnector or to the right side of
the TV
Press the w key repeatedly to select
EXT1, EXT2,EXT3 or FRONT,
according to where you connected your equipment at the back or the right
side of your TV.
Remark : Most equipment (decoder,video recorder, satellite receiver) carr ies out the
switching itself.
If you want to change to TV channels?
Enter the programme number of the TV channel which you want to watch
with the digit keys or press the w key repeatedly to select TV.
Audio and video equipment keys
Most of the audio and video equipment from our range of products can be
operated with the remote control of your TV.
Video recorder
Keep the
VCR key on the left side of the remote control pressed and
simultaneously press:
® for record,
Ò for rewind,
‡ for stop,
π for play,
† for fast forward,
◊ for selecting 1- or 2-digit programme numbers from the video
recorder,
- P + for sequential programme selection from the video recorder tuner,
0 to 9 to select a programme number from your video recorder tuner,
B to switch the video recorder to standby
These keys function with equipment which use the RC5 signalling standard.
If your video recorder has the EasyLink function, the key
INSTANT ® for recording,
can be operated in the TV mode.
If your EasyLink video recorder has the system standby function, when you press the
B key for 3 seconds, both TV and the video recorder are switched to standby.
23Connect Peripheral Equipment
Page 24

Satellite receiver
V P
SMART
ACTIVE CONTROL
Maw
h
q
bSX
213
546
879
0
B
®
Ò
‡π
†
¬
i
0
fhU
æ
MENU
b
OK
◊
INSTANT
Q
Ò
‡
π
†
X
0
◊
b
MENU
yÚ
Press the OK key simultaneously with the digit key 1.
Now you can operate your satellite receiver with the remote control of your
TV.
Keep the
MODE key on the left side of the remote control pressed and
simultaneously press:
MENU to switch the SAT menu on or off
◊ to select a one or two digit programme number from the satellite
receiver.
These keys function with equipment which use the RC5 signalling standard.
DVD player
Press the OK simultaneously with the digit key 2.
Now you can operate your DVD player with the remote control of your TV.
Keep the
MODE key on the left side of the remote control pressed and
simultaneously press:
MENU to switch the DVD menu on or off
b to select a DVD title
0 to select a DVDchapter
X to select your choice of audio language
Ò to search down
‡ stop
π play
† to search forward
0-9 to select a programme number from your DVD
OK to enter the selected menu item.
24
Connect Peripheral Equipment
®, C,f, h, w have no function
Note: after replacing the batteries the default operational equipment is the
satellite receiver.
These keys function with equipment which use the RC6 signalling standard.
Page 25

Record with your video recorder
V P
B
®
Ò
‡π
†
¬
fhU
æ
MENU
b
OK
INSTANT
Q
INSTANT
®
yÚ
To record S-VHS quality, connect an S-VHS peripheral directly to the video
recorder.
Record a TV programme
& Select the programme number on your video recorder.
é Set your video recorder to record.
See the handbook for your video recorder.
Switching programme numbers on your TV does not disturb recording !
Record a programme on your video recorder connected to
EXTERNAL 2 from Audio/Video equipment connected to
EXTERNAL 1, EXTERNAL 3 or to sockets on the right side of the TV
& Switch on the equipment.
é Select the right external on your video recorder.
“ Set your video recorder to record.
You record what you are watching on the screen.
Do not switch programme numbers or do not switch off your TV when you are
recording !
Record with your video recorder with EasyLink
If you have connected an S-VHS video recorder provided with the EasyLink function,
you can record S-VHS-quality from an S-VHS peripheral connected to the right side
of the TV. (E.g. from an S-VHS camcorder.)
In TV mode, it is possible to start a direct recording of the programme which is being
displayed on the TV screen.
Press the
The video recorder switches on from standby and a message of what is being
recorded appears on the screen.
The video recorder starts recording the programme you are watching.
Switching programme numbers on your TV does not disturb recording !
When recording a programme from a peripheral connected to
FRONT, you can not select another TV programme on the screen.
To watch TV programmes again, press the programme number you want to select
twice.
Attention: the recording is stopped and your video recorder switches to standby.
If you switch to standby during recording of a programme from a peripheral
connected to
indicates that you are still recording. The blinking stops after the recording is finished.
INSTANT ® record key of the remote control.
EXTERNAL 1, 3 or
EXTERNAL 1, 3 or FRONT, the blinking lamp on the front of your TV
Record with your video recorder with NEXTVIEWLink
If your video recorder is equipped with NEXTVIEWLink, and you tagged one or more
programmes to be recorded automatically in the
for the TV to be in the standby mode or switched on for the recording to start.
NEXTVIEW mode, it is not necessary
25Record
Page 26

Tips
Care of the screen
Clean the TV with a slightly damp soft
cloth.Do not use abrasive solvent as it can
damage the TV screen.
Poor Picture
• Have you selected the correct TV
system?
• Is your TV or house aerial located too
close to loudspeakers,non-ear thed audio
equipment or neon lights,etc.?
• Mountains or high buildings can cause
double pictures or ghost images.
Sometimes you can improve the picture
quality by changing the direction of the
aerial.
• Is the picture or teletext unrecognisable?
Check if you have entered the correct
frequency. See Installation, p.5.
• Are brightness and contrast out of
adjustment? Select Factory settings in the
Setup menu,p. 7.
• Sometimes poor picture quality is possible
when having activated an S-VHS camera
or camcorder connected to the right side
of your TV and another peripheral is
connected to
time. In this case switch off one of the
other peripherals.
EXT1 or EXT2 at the same
No picture
• Is the aerial connected properly?
• Are the plugs tightly connected in the
aerial socket?
• Is the aerial cable in good condition and
does it have suitable plugs?
• Are the connection facilities to a possible
second TV in good condition? If in doubt,
consult your dealer.
No sound
• No sound on any channel? Check the
volume isn’t at minimum.
• Is the sound interrupted with the mute
key ¬?
Remote control
• If your TVno longer responds to the
remote control,the batteries may be
dead.
• You can still use the M key and the -/+
keys at the top of your TV.
Menu
Have you selected the wrong menu? Press
MENU key again to exit from the
the
menu.
No solution
Switch your TV off and then on again once.
Never attempt to repair a defective
TV yourself.
Check with your dealer or call a TV
technician.
End of life directives
Philips is paying a lot of attention to
produce environmentally-friendly in green
focal areas.Your new TV contains materials
which can be recycled and reused.
At the end of its life specialised companies
can dismantle the discarded TV to
concentrate the reusable materials and to
minimise the amount of materials to be
disposed of.
Please ensure you dispose of your old TV
according to local regulations.
How to dispose of batteries?
The batteries supplied do not contain the
heavy metals mercury and cadmium.
Nevertheless in many countries batteries may
not be disposed of with your household
waste.Please ensure you dispose of batteries
according to local regulations.
Index
a ACI,
b bass, 11
c camcorder, 21
d decoder/descrambler, 7
e easy text, 17
f factory settings, 7
5
active control, 10
auto format, 7
automatic installation, 5
bilingual broadcast, 9
child lock, 12
continuous subtitles, 19
country, 4
digital scan, 11
digital sources, 21
dual screen, 9
DVD, 24
dynamic contrast, 11
eurocable, 20
favourite programmes, 6
freeze, 9
frequency, 5
g give name, 6
h headphone, 22
hue, 11
i incredible surround, 8
info on screen, 8
information line, 7
interrupt the sound, 8
l language, 4
m manual installation, 5
menu language, 4
n NEXTVIEW, 13
nicam, 9
p picture adjustments, 11
picture format, 9
picture tilt, 7
programme selection, 8
programme list, 12
r recording, 25
reshuffle, 6
s satellite receiver, 24
search for TV channels, 5
setup, 7
sleeptimer, 12
smart picture and sound, 10
sound adjustments, 11
stereo, 9
store TV channels, 4
subpages teletext, 18
S-VHS, 25
switch TV on, 3
t teletext, 17
treble, 11
v video recorder, 20
volume, 8
Tips & Index
26
Page 27

Glossary
100 Hz
100 Hertz provides a superior solution to
the problem of picture flicker which is
particularly noticeable with larger screen
sizes.In a conventional TV, the picture area
is scanned 50 times a second (50 Hertz) –
a frequency which is still detectable by the
human eye in the form of a flickering
picture.In 100 Hertz sets,the picture area
is scanned at a rate of 100 times per
second (100 Hertz).At this frequency, the
eye cannot detect flicker, resulting in a
clearer picture which is more relaxing to
the eye.
Automatic Channel Installation (ACI)
Automatically installs all TV channels in
the same order as offered by your cable
company, provided of course that the data
is transmitted.It also automatically
includes programme number and
programme name.
With ACI,channel installation is fully
automatic, simple and fast.
Child lock
Feature to prevent unauthorised use of
your TV .
Digital Scan
If you look at a television screen you will
see small imperfections in the picture
caused by line vibration.Digital Scan (an
internal process) removes interline flicker.
When combined with 100 Hz,you will see
a totally stable image.
Easy Link
Digital ‘intelligent’ ESI bus-system between
TV and VCR (Scart connection required).
Turns source selection and control into a
one-button operation.
Easy T ext
Teletext memory that automatically
memorises Teletext pages and gives you
instant access to them.
Euroconnector
A 21-pin connector system enabling you
to simply connect various types of
audio/video and computer equipment.
Menu
On-screen display of functions and
facilities in a well-organised survey, which
you can select using your remote control.
NEXTVIEW
NEX
TV
IEW is a new feature to assist the TV
and VCR user in selecting the programmes
she or he likes to watch from a television
programme guide on the screen.It enables
the user to see a description of every
programme,and mark interesting
programmes to be reminded (auto TV on)
or recorded (
NEXTVIEWLink video
recorder required).
NTSC
The broadcasting system used in the USA,
Japan and parts of South America and
Southeast-Asia.
Smart Picture and Sound controls
Keys on the remote control to select
predefined picture and sound settings.
Sleeptimer
Function with which you can set a time
period after which the TV should switch
itself to standby.
Picture Freeze
TV mode which allows you to “freeze” a
certain image in order to study a specific
detail at ease, e.g.to make notes of certain
programme information like phone
numbers.
Teletext
See also Easy Text
WST: World Standard Teletext.
FLOF:Full Level one Features. System
applied by the BBC, RVE.... that provides a
fast access to the teletext pages.
TOP:Table of (Teletext) Pages. German
system for an easy access to the teletext
pages.
Tint
TV-function to modify the general colour
balance between cool and warm and to
adjust it according to your personal
preference.
27Glossary
Page 28

Inhaltsverzeichnis
Einstellung
Ihre Fernbedienung 2
Vorbereitung 3
Einstellung 4
Speichern der Fernsehsender 4
Wahl der Menüsprache und des Landes 4
Automatische Einstellung 5
Manuelle Einstellung 5
Namen geben 6
Umprogrammieren 6
Vorzugsprogramme wählen 6
Grundeinstellung programmieren 7
Bedienung
Benutzung der Fernbedienung 8-10
Benutzung der Menüs
Bildmenü 11
Tonmenü 11
Menü der Sonderfunktionen 12
NEXTVIEW 13-16
Videotext/Teletext 17-19
Die Tasten oben am Fernsehgerät 19
P eriphere A/V-Geräte anschließen
Anschluß und Wahl der Geräte 20-23
Fernbedienungsfunktionen für periphere Geräte 23-24
Aufnahme 25
Nützliche Hinweise 26
Inhaltsverzeichnis 26
Lexikon 27
Deutsch
Die EasyLink-Wahlmöglichkeiten stützen sich auf das Prinzip der
"Bedienung mittels einer einzigen Taste". Das bedeutet, daß eine
bestimmte Anzahl aufeinanderfolgender Handlungen zur gleichen Zeit
durchgeführt werden, z.B. sowohl am Fernsehgerät wie auch am
Videorecorder,wenn beide mit einer EasyLink-Steuerung versehen und
über ein Euro-A/V-Kabel,das mit dem Videorecorder geliefert wird,
verbunden sind.
1
Page 29

yÚ
yÚ
213
546
879
0
B
®
Ò
‡π
†
M
SMART
ACTIVE CONTROL
¬
V P
aw
h
q
b
i
0
SX
fhU
hU
æ
MENU
INSTANT
Q
b
OK
◊
MODE
VCR
Einstellung S.4
Vorbereitung
Ihre Fernbedienung
EasyLink S. 25
® INSTANT direkte Aufnahme
B
Q
Bereitschaft S.8
Incredible Surround ein/aus S. 8
DVD/Satellit-Bedienung S.24
Videorecorderbedienung S.23
NEXTV
IEW/Videotext Guide
æ
ein/aus S.13
Hauptmenu ein/aus S. 11
Lautstärke auf/ab S. 8
MENU
V
Ton vorübergehend ausgeschaltet
S.8
¬
Programmwahl S.8 P
Peripher e A/V -Geräte S. 23 w
Wahl von EXT1,EXT2,
EXT3 oder FRONT
Smart Ton S. 10
Smart Bild S. 10 a
Farbtasten
- Wahl von NEXTVIEW S.13
- direkte VT/TXT-Seite oder
Videotext S.17
b Videotext ein/aus
Thema, S.17
Audio- und Videogeräte S.23-24
C Zeitanzeige
Subseiten
f verborgene Information
h vergrößern
Cursor-Tasten, um
Einstellungen zu wählen S. 4
OK Wahl aktivieren
X Zweikanalton + Toninfo S. 9
Wahl der Videotext/TeletextSprachgruppe S.17
i Bildschirmanzeige S.8
0 vorheriges Programm S. 8
◊ Videorecorder/DVD Funktion
S Standbild S.9
M
Videotextseite Seitenstopp S. 18
b Dual Bild ein S. 9
q Bildformat S. 9
h active control ein/aus S. 10
2 Vorbereitung
Page 30
CABLE
Vorbereitung
& Stellen Sie das Fernsehgerät auf einen festen Untergrund.
min.
1m
Lassen Sie zur Belüftung an allen Seiten mindestens 5 cm, um das Gerät
herum frei.Stellen Sie das TV-Gerät nicht auf einen Teppich.
Zur V ermeidung möglicher Gefahren, bitte keine Gegenstände auf das Gerät
stellen.
Vermeiden Sie, daß das Fernsehgerät in der Nähe einer Hitzequelle oder an
einem Platz in der prallen Sonne aufgestellt wird,und jeden direkten Kontakt
mit Regen oder Wasser.
é Stecken Sie den Antennenstecker fest in die Antennenbuchse x an der
Rückseite des Fernsehgerätes.
R6 / AA
“ Schließen Sie das Fernsehgerät an eine Netzsteckdose mit eine Netzspannung
von 220V-240V.
Um eine Beschädigung des Netzkabels zu vermeiden,die einen Brand oder
einen elektrischen Schlag verursachen könnte, stellen Sie den Fernseher bitte
niemals auf das Netzkabel.
‘ Fernbedienung:Nehmen Sie den Deckel des Batteriefaches ab.
Legen Sie die beiden mitgelieferten Batterien (Typ R6-1,5V) ein.
Die für die Fernbedienung Ihres neuen Fernsehgerätes mitgelieferten Batter ien
enthalten nicht die Schwermetalle Quecksilber und Kadmium.Trotzdem dürfen in
verschiedenen Ländern, leere Batterien nicht mit dem Hausmüll entsor gt werden.
Bitte, erkundigen Sie sich, wie leere Batterien, den örtlichen Vorschriften entsprechend,
zu entsorgen sind.
Bemerkung: Die Fernbedienung funktioniert nur mit Fer nsehgeräte , die RC6Fernbedienungsbefehle benutzen.
( Fernsehgerät einschalten:Drücken Sie die Netztaste A vorne am
Fernsehgerät.Ein grünes Licht und der Bildschirm leuchten auf.
Wenn das Licht rot aufleuchtet, drücken Sie die - P +Taste auf der
Fernbedienung.
Das grüne Licht blinkt jedesmal wenn Sie eine Taste auf der Fer nbedienung drücken.
Bei der ersten Inbetriebnahme des Fernsehgerätes erscheint das Menü
MENÜSPRACHE automatisch auf dem Bildschirm.Abwechselnd erscheinen die
Erklärungen automatisch in ver schiedenen Sprachen.Wählen Sie Ihre eigene Sprache
und drücken Sie die OK-Taste auf der Fernbedienung.
Gehen Sie weiter nach Seite 4.
3Vorbereitung
Page 31

B
®
Ò
‡π
†
f hU
æ
MENU
b
OK
INSTANT
Q
yÚ
V P
213
546
879
B
®
Ò
‡π
†
¬
fhU
æ
MENU
b
OK
◊
INSTANT
Q
yÚ
zurückkehren oder
Menü ausschalten
OK-Taste zum
aktivieren
Menü-Punkt wählen
Einstellung
Menü EINSTELLUNG wählen
Drücken Sie zur gleichen Zeit die Tasten U und h.
Die Benutzung der Menüs
& Benutzen Sie die Cursor-Tasten auf/ab, links/rechts,um einen Menü-Punkt zu
wählen.
é Drücken Sie die OK-Taste, um das Gewählte aufzurufen.
“ Drücken Sie die MENU-Taste, um wieder in das Menü zurückzukehren oder
um es auszuschalten.
MENU TITEL
Subjekt 1
Subjekt 2
Subjekt 3
J Subjekt 4
J Subjekt 4 L M
Subjekt 5
Subjekt 6
J EINSTELLUNG
MENU TITLE
Menüsprache
J MENÜSPRACHE
MENU TITLE
....
Deutsch
....
J LAND
MENU TITLE
....
Deutschland
....
Einstellung
4
Fernsehsender speichern
Nachdem ein neuer oder zusätzliche Fernsehsender gespeichert worden ist, wird das
Fernsehgerät automatisch diesen Fernsehkanal/die Fer nsehkanäle dem Videorecorder
weiterleiten wenn der mit einer EasyLink-Steuerung ver sehen ist. Die Angabe
EasyLink : Übertragung .... erscheint auf dem Bildschir m. Die Programmliste des
Videorecorders ist nun mit der des Fer nsehgerätes völlig identisch.Wenn das
Fernsehgerät mit einem Videorecorder, der mit einer
versehen ist, verbunden ist, überträgt das Fernsehgerät auch automatisch dem
Videorecorder die von Ihnen gewählte Sprache, und das von Ihnen gewählte Land.
Ihre Menüsprache und Ihr Land wählen
Zunächst müssen Sie die Sprache und das Land wählen.
& Wählen Sie Menüsprache und drücken Sie die OK-Taste.
é Wählen Sie Ihre Sprache und drücken Sie die OK-Taste. Benutzen Sie den
Cursor auf/ab,um das ganze Verzeichnis zu durchlaufen und um andere
Sprachen auf dem Bildschirm sichtbar zu machen.
“
Wählen Sie
Land
und drücken Sie die OK-Taste.
‘ Wählen Sie das jeweilige Land oder die Region,in der Sie sich jetzt befinden
und drücken Sie die OK-Taste. Benutzen Sie den Cursor auf/ab,um das ganze
Verzeichnis zu durchlaufen und um andere Länder auf dem Bildschirm sichtbar
zu machen.
Weitere wählen, wenn keines der angegebenen Länder zutrifft.
Jetzt gibt es zwei Möglichkeiten,um die Fernsehsender zu suchen und zu
speichern:durch Automatische Einstellung oder durch Manuelle
Einstellung (einen Sender nach dem anderen suchen).Treffen Sie Ihre Wahl
und drücken Sie die OK-Taste.
NEXTVIEWLINK-Steuerung
Page 32

Automatische Einstellung
Automatische Einstellung
Starten
Stop
J Stoppen K
TV sucht:
einen Moment bitte ...
Automatische Einstellung
J Starten K
Starten
Stoppen
1 ARD 1
2 ZDF
3 CNN
....
....
Manuelle Einstellung
(Wahl-Mode)
J TV-System K
TV-System
Programmnr.
Suchen
Feinabstimmung
Speichern
Im Menü Automatische Einstellung
Starten wählen und die OK-Taste
drücken,um den Suchlauf zu star ten. Sämtliche Fernsehsender werden
automatisch gesucht und gespeichert.
Wenn ein Kabelnetzwerk,ACI (Automatic Channel Installation - automatische
Fernsehsendereinstellung) sendet,oder wenn eine Kabelgesellschaft ermittelt
wird,die eine Videotext-Seite mit den Frequenzen und den Programmnamen
aller Fernsehsender sendet,die empfangen werden können, wird die Suche
unterbrochen und eine Programmliste erscheint.Die Programmliste übernimmt
automatisch alle Programmnummern oder übertragene Fernsehsender.
Es ist möglich, daß der Kabelnetzbetreiber ein eigenes Kanalwählmenü ausstrahlt.
Die Aufmachung und der Inhalt sind von der Kabelfernsehgesellschaft vor gegeben.
Wählen Sie zwischen den angebotenen Möglichkeiten mit den Cursor-Tasten auf/ab,
links/rechts und drücken Sie die OK-Taste.
Drücken Sie die
MENU-Taste, um das Menü zu verlassen.
Sehen Sie weiter auf Seite 6.
Manuelle Einstellung
Das Suchen und Speichern von Fernsehsendern wird Sender für Sender
vorgenommen.Sie müssen jeden Schritt des Manuelle-Einstellung-Menüs
durchlaufen.
Wähl-Mode erscheint und leuchtet nur auf, wenn das gewählte Land auch
diese Kanalwahl bietet (E-Kanäle für über Antenne zu empfangende Kanäle,
S-Kanäle für über Kabel zu empfangende Kanäle).
Sie können entweder die Kanalnummer oder die Frequenz eingeben.
& Das Fernsehsystem wählen
Wählen Sie das jeweilige Land oder die Region,aus der Sie den Fernsehsender
wählen möchten. Sind Sie an das Kabelfernsehnetz angeschlossen,wählen Sie
das jeweilige Land oder die Region,in der Sie sich jetzt befinden.
é Drücken Sie den Cursor nach unten und geben Sie mittels der
Nummerntasten die Programmnummer ein.
“ Suche der Fernsehsender
Drücken Sie den Cursor-Tasten links/rechts. Die Frequenz oder die
Kanalnummer wird erhöht,bis ein Fernsehsender gefunden ist.
Selbst einen Fernsehsender eingeben
Wenn Sie die Frequenz oder die E- bzw S-Sendernummer kennen,geben Sie
direkt die 3 Ziffern oder die Frequenz mit den Zifferntasten 0 bis 9 ein.
Besorgen Sie sich eine Frequenzliste bei Ihrer Kabelfernsehgesellschaft oder
beim Fachhändler, oder ziehen Sie die Frequenztabelle auf der Innenseite des
hinteren Umschlags dieser Gebrauchsanweisung zu Rate.
‘ Feinabstimmung
Im Fall eines schlechten Empfangs,können Sie den Empfang nachbessern,
indem Sie mit der Cursor-Taste links/rechts die Frequenz feineinstellen.
( Die Schritte & bis ‘ speichern
Wählen Sie
Wiederholen Sie jeden Schritt,wenn Sie einen anderen Fernsehsender
speichern wollen.
Speichern und drücken Sie die OK-Taste.
§ Drücken Sie die MENU-Taste, um das Menü zu verlassen.
5Einstellung
Page 33

EINSTELLUNG
Menüsprache
Land
Automatische Einstellung
Manuelle Einstellung
J Namen geben
Namen geben
Umprogrammieren
Vorzugsprogramme
GRUNDEINSTELLUNG
Namen geben
EXT1
EXT2
EXT3
FRONT
J 0
1 ARD1
2 ZDF
3 ....
4 ....
5 ....
Namen geben
Es ist möglich, einen gespeicherten Sendernamen zu ändern,oder jenen
Kanälen einen Namen zu geben, für die noch keiner vergeben wurde.
Den Programmnummern 0 bis 99kann ein Name von höchstens 5 Buchstaben
oder Ziffern zugeordnet werden,z.B.ARD,ZDF, .. Zwischen 99 und 0 kann
den angeschlossenen Peripheriegeräten auch ein Name gegeben werden.
& Wählen Sie Namen geben im Menü EINSTELLUNG, und drücken Sie die
OK-Taste.
é Wählen Sie die Programmnummer.
“ Drücken Sie die OK-Taste.
‘ Wählen Sie das Zeichen mit den Cursor-Tasten auf/ab.
( Wählen Sie die nächste Position mit den Cursor-Tasten rechts.
§ Wählen Sie das nächste Zeichen.
è Drücken Sie die OK-Taste, wenn fertig.
! Drücken Sie die MENU-Taste, um zum EINSTELLUNGSMENÜ zurückzukehren.
Die Leerstelle, die Zahlen und andere Sonderzeichen befinden sich zwischen
Z und A.
Änderung der Programmliste
Umprogrammieren
EXT1
EXT2
EXT3
FRONT
0
J 1 CNN
1 CNN
2 ARD1
3 ....
4 ....
5 ....
Vorzugsprogramme
0 .... Nein
1 .... Ja
J 2 .... Ja
2 .... Ja
3 .... Nein
4 .... Nein
5 .... Ja
Die zugewiesenen Programmnummern können nach eigener Wahl neu
geordnet werden.
& Wählen Sie Umprogrammieren im Menü EINSTELLUNG,und drücken Sie die
OK-Taste.
é Wählen Sie die Programmnummer des Fernsehsenders,dessen
Programmnummer Sie ändern möchten.
“ Drücken Sie die OK-Taste.
‘ Wählen Sie selbst die neue Nummer,durch die Sie die vorhin gewählte
Nummer ersetzen wollen.
( Drücken Sie die OK-Taste.
Wiederholen Sie dieses Umsortieren,bis alle Fernsehsender die gewünschte
Nummer bekommen haben.
§ Drücken Sie die MENU-Taste, um zum EINSTELLUNGSMENÜ zurückzukehren.
Vorzugsprogramme wählen
Nach der Festlegung als Vorzugsprogramm,können die Fernsehsender schnell
durch Drücken der +P -Taste durchlaufen werden. Es werden nur die
Fernsehsender der Vorzugsliste eingeblendet.Fernsehsender,die nicht in der
Vorzugsliste programmiert wurden, können immer noch mit den Zifferntasten
gewählt werden.Standard werden alle programmierten und eingegebenen
Fernsehsender der Liste der Vorzugssender zugefügt.
& Wählen Sie Vorzugsprogramme im Menü EINSTELLUNG, und drücken Sie die
OK-Taste.
é Wählen Sie Ihre Vorzugsprogrammnummer.
“ Wählen Sie ja oder nein mit den Cursor-Tasten links/rechts.
‘ Wiederholen Sie für jeden Fernsehsender, den Sie als einen bevorzugten oder
nicht bevorzugten Fernsehsender einführen wollen.
( Drücken Sie die MENU-Taste, um zum Einstellungsmenü zurückzukehren.
Einstellung
6
Damit
NEXTVIEW r ichtig funktionieren kann, muß der erste Fer nsehsender aus der
Liste Ihrer Vorzugssender über V ideotext/Teletext ebenfalls das genaue Datum und
die genaue Uhrzeit übermitteln.
Page 34

EINSTELLUNG
Menüsprache
Land
Automatische Einstellung
Manuelle Einstellung
Namen geben
Umprogrammieren
Vorzugsprogramme
J GRUNDEINSTELLUNG
GRUNDEINSTELLUNG
GRUNDEINSTELLUNG
Digital Sources
J Digitale A/V-Quellen
Decoder/Descrambler
(Bildlage)
Informationszeile
Werksvoreinstellung
Auto Format ja/nein
EINSTELLUNG
Decoder
J Programm
Programm
Decoder-Status
Grundeinstellung programmieren
Das Menü Grundeinstellung ermöglicht es Ihnen, jene Einstellungen
vorzunehmen,die nur als einmalig betrachtet werden, und die weiter keine
Beziehung zur Eingabe der Fernsehsender in Ihr Fernsehgerät haben.
Das Menü Grundeinstellung enthält Wahlmöglichkeiten, die sorgen für die
Einstellungen der verschiedenen Funktionen,Sonderfunktionen und Leistungen
Ihres Fernsehgeräts,und für die Einstellungen von eventuell an Ihr
Fernsehgerät angeschlossenen peripheren Geräten.
& Benutzen Sie die Cursor-Tasten auf/ab, links/rechts,um einen Menü-Punkt zu
wählen.
é Drücken Sie die OK-Taste, um das Gewählte zu aktivieren.
“ Drücken Sie die MENU-Taste, um zurückzukehren oder um das Menü
auszuschalten.
Digitale A/V Quellen
Siehe Periphere Geräte anschließen,S. 21, um Ihre digitale Bildquelle wie
DVD, digitaler Satelliten Tuner oder ein ähnliches Gerät anzuschließen.
Programmnummern für Ihren Decoder speichern
Falls Sie einen Decoder angeschlossen haben,siehe S.20, können Sie eine
oder mehrere Programmnummern als bevorzugte Decoder-Programmplätze
definieren.Drücken Sie den Cursor-Tasten links/rechts, um zwischen
EXT1 oder EXT2,um den Euro-A/V-Anschluß, an dem der Decoder
angeschlossen wurde, zu wählen.Wählen Sie
aus,wenn Sie die
Programmnummer nicht als Decoderprogrammplatz aktivieren wollen.
Wählen Sie den A/V-Eingang
EXT2, wenn ein Decoder an Ihrem Videorecorder, der
mit einer EasyLink-Steuerung versehen ist, verbunden ist.
Wenn Sie dann den Decoder anwählen,er scheint die Angabe EasyLink :
Übertragung vorprogrammierte Programme.... auf dem Bildschirm.
Bildlage justieren (falls vorhanden)
Wählen Sie
Bildlage mit den Cursor-Tasten auf/ab.
Halten Sie den Cursor-Tasten links/rechts eingedrückt, um die Schieflage des
Bildes zu beseitigen.
Informationszeile
Wählen Sie
Ein und nach der Wahl eines Fernsehsenders,oder wenn Sie die
Taste i auf der Fernbedienung gedrückt haben, kann der Fernsehsender,der
auch Videotext/ Teletext sendet,den Namen des Senders,den Titel des
gesendeten Programms oder eine andere Mitteilung mitsenden.Davon gibt es
eine Anzeige auf dem Bildschirm, neben den Informationen über T on und
Bildformat.
Aus gewählt wird, werden Informationen über Ton und Bildformat erst
Wenn
nach der Wahl eines Fernsehsenders,oder nachdem die i-Taste gedrückt
wurde, auf dem Bildschirm gezeigt
Werksvoreinstellung
Wählen Sie
Werksvoreinstellung und drücken Sie die OK-Taste, um die
bereits werkseitig festgelegten Bild- und Toneinstellungen wiederherzustellen.
Auto Format
Wenn Sie
Auto Format Ja wählen, wird das Bildschirm automatisch möglichst
viel mit dem Bild gefüllt werden wenn Fernsehprogramme keine speziellen
Signale tragen,die das richtige Bildformat ermitteln.Mit der q-Taste der
Fernbedienung können Sie andere Bildformate wählen (siehe S.9).
Aus,
Einstellung
Wählen Sie Einstellung, und drücken Sie die OK-Taste , um sofort zum Menü
EINSTELLUNG zurückzukehren.
‘ Drücken Sie mehrmals die MENU-Taste, um das Menü zu verlassen.
7Einstellung
Page 35

yÚ
V P
SMART
ACTIVE CONTROL
Maw
h
q
bSX
213
546
879
0
B
®
Ò
‡π
†
¬
i
0
fhU
æ
MENU
b
OK
◊
INSTANT
Q
® Instant Aufnahme
Wenn Ihr Videogerät mit der EasyLink-
Steuerung versehen ist,so funktionier t die
INSTANT ® Taste für Aufnahme auch im TV-
Modus.
®Ò‡π†Videorecorder siehe S. 23
æ NEXTVIEW/Videotext Guide
ein/aus siehe S.13
Bedienung
Benutzung der Fernbedienung
B Bereitschaft
Das Fernsehgerät ist ausgeschaltet und die
rote LED-Anzeige leuchtet auf.Um das
Fernsehgerät erneut einzuschalten,drücken
Sie die +P - oder die Zifferntasten. Wenn Ihr
EasyLink Videorecorder mit einer System
Bereitschaft versehen ist und wenn Sie diese
Taste während drei Sekunden eingedrückt
halten,werden sowohl das Fernsehgerät wie
das Videogerät vorübergehend in den
Bereitschaftszustand umgeschaltet.
Ihr Fernsehgerät verbraucht im Bereitschaftsbetrieb Energie. Da Energieverbrauch zur Luftund Wasserverschmutzung beiträgt, empfehlen
wir Ihnen, Ihr Gerät nachts nicht im Bereitschaftsbetrieb zu belassen, sondern abzuschalten. Sie
sparen Energie.
MENU Hauptmenü ein/aus siehe S.11
OK Drücken Sie diese Taste, um Ihre Wahl
in die Menüs einzugeben.
V Lautstärke
Drücken Sie - oder +,um die Lautstärke zu
regeln.
¬ Zeitweilige T onunterbrechung
Unterbricht den Ton vorübergehend oder
schaltet ihn wieder ein.
P Fernsehsender wählen
Um die im Vorzugsprogramm-Menü
programmierten Fernsehsender zu
durchlaufen,
i Bildschirmanzeige
Drücken Sie 5 Sekunden lang die Taste, um
die vergrößerte oder die reduzierte
Darstellung der Fernsehsender und der
Programminformationen auf dem Bildschirm
zu aktivieren oder zu inaktivieren.
Drücken Sie ganz kurz,um Auskünfte über
den gewählten Fernsehsender, das gewählte
Programme,den Tonempfang, das gewählte
Bildformat und die noch restliche,von der
automatischen Abschaltung programmierte
Zeitdauer auf dem Bildschirm erscheinen zu
lassen.
0/9
Zifferntasten
Um einen Fernsehsender zu wählen.
Für eine zweistellige Programmnummer müssen Sie die zweite Ziffer
innerhalb von 2 Sekunden eingeben.
Um unmittelbar auf einen gewählten Fernsehsender mit einstelliger
Nummer zu schalten,müssen Sie die Zifferntaste ein bißchen länger
gedrückt halten.
0 Vorheriges Programm
Der vorher gewählte Fernsehsender erscheint wieder.Die -/-- Anzeige hat
eine Videorecorder/D VD-Funktion.
Q Incredible Surround (Superton)
MONO-Sendungen ergibt sich ein
Bei
Raumklang-effekt,wenn diese Funktion
aktiviert ist.
Im
STEREO Tonmodus, wenn Incredible
Surround ein
gewählt ist,entsteht der
Eindruck,die Lautsprecher wären weiter
räumlich voneinander entfernt.
b Videotext ein/aus siehe S.17
fhVideotext-Funktionen siehe S. 18
U Zeitanzeige
Die vom Sender mit Videotext abgeleitete
und auf Programmnummer 1 oder unter der
niedrigsten V orzugsprogrammnummer
eingegebene Zeit erscheint links oben auf
dem Bildschirm.
Diese Funktion steht nicht zur Verfügung wenn
ständige Untertitelung eingeschaltet worden ist.
Benutzung der Fernbedienung
8
Page 36

yÚ
V P
SMART
ACTIVE CONTROL
Maw
h
q
bSX
213
546
879
0
B
®
Ò
‡π
†
¬
i
0
fhU
æ
MENU
b
OK
◊
INSTANT
Q
X Wahl des Zweikanaltons
und des Ton-Modus
Drücken Sie diese Taste, um
• von
Stereo auf Mono umzuschalten, wenn
stereo gesendet wird,oder von
Stereo
auf Nicam verfügbar, im Falle einer
Nicam
Digitalsendung;
• eine Auswahl zu treffen zwischen Ton Y
oder T on Z,wenn im Zweikanalton
gesendet wird.Die Einstellung wird für
jeden Fernsehsender separat gespeichert.
S Standbild
Um ein stillstehendes Bild ein- oder
auszuschalten oder, um ein Videotextseite
festzuhalten.
w P eriphere A/V-Geräte wählen
Drücken Sie mehrmals diese Taste, um
EXT2, EXT3 oder FRONT, zu wählen,
entsprechend dem Anschluß Ihres Gerätes
EXT1,
(S.23).
q Bildformat
Wiederholt diese Taste drücken, um ein
Bildformat zu wählen:4:3,Zoom 14:9, Zoom
16:9 mit oder ohne Untertitelung, Breitbild,
Super Zoom oder Automatisch (im Fall Auto
Format Ja wurde im
GRUNDEINSTELLUNG-Menü gewählt).
Mit dem Bildformat Auto Format wird das
Bildschirm automatisch möglichst viel mit dem
bild gefüllt werden.
Manchmal übertragen Videogeräte- und
DVD-programme Sondersignale , die das
Fernsehgerät automatisch zum richtigen
Bildformat umschalten lassen.
Bildformat ist außer Betrieb, wenn Dual Bild
aktiviert wird.
Im Bildformat 14:9,16:9 oder Super Zoom,
können Sie die Untertitel sichtbar machen
oder verschwinden lassen mittels die
Cursor-Tasten auf/ab.
b Dual Bild
& Drücken Sie die b-Taste, um Dual Bild
einzuschalten.
Der Bildschirm wird jetzt in zwei Teile
geteilt:
- der linke Teil fürs übliche
Hauptfernsehbild,
- der rechte Teil für den Videotext,der vom
gewählten Fernsehsender gesendet wird,
oder für den
Für die Bedienung von
NEXTVIEW/Videotext-Guide.
NEXTVIEW/Videotext-
Guide, siehe Seite 13,für die Bedienung von
Videotext,siehe Seite 17.
Wenn Dual Bild
Fernsehbild, der Videotext oder
Aus-geschaltet ist, wird das
NEXTVIEW/
Videotext-Guide auf dem ganzen Bildschirm
gezeigt.
é Drücken Sie die q-Taste, um entweder ein
in der Höhe reduziertes oder ein nicht in
der Höhe reduziertes Bildformat zu wählen.
“ Drücken Sie die - P +Taste,um die
Videotextseiten schnell durchzublättern.
‘ Wenn Dual Bild-Videotext eingeschaltet ist,
drücken Sie die b-Taste, um erneut ein
Bild auf dem ganzen Bildschirm zu
bekommen oder drücken Sie die b-Taste ,
um erneut Videotext den ganzen Bildschirm
einnehmen zu lassen.
( Wenn Dual Bild
eingeschaltet ist,drücken Sie die æ-Taste,
um erneut ein Bild auf dem ganzen
Bildschirm zu bekommen oder drücken Sie
die b-Taste, um erneut
NEXTVIEW/Videotext Guide den ganzen
Bildschirm einnehmen zu lassen.
NEXTVIEW/Videotext Guide
9Benutzung der Fernbedienung
Page 37

yÚ
V P
SMART
ACTIVE CONTROL
Maw
h
q
bSX
213
546
879
0
B
®
Ò
‡π
†
¬
i
0
fhU
æ
MENU
b
OK
◊
INSTANT
Q
Smart Control Tasten
Um vorprogrammierte Bild- und
Toneinstellung zu wählen.
M Smart Ton
Jedesmal wenn auf diese Taste gedrückt wird,
wird eine andere Toneinstellung gewählt, die
einer bestimmten,bereits in der Fabrik
vorgenommenen Toneinstellung des Höhen
und Tiefen entspricht.
a Smart Bild
Jedesmal diese Taste gedrückt wird,wird eine
neue Bildeinstellung gewählt,die einer ganz
spezifisch vorprogrammierten Einstellung des
Kontrastes,der Farbsättigung, der Schärfe
und Dynamic Contrast entspricht.
PP.-Werte bezieht sich auf die persönlichen
Bild- und Toneinstellungen die Sie selbst im
Bild-und T onmenü gewählt haben.
Bemerkung:Wenn Sie sich in einer im voraus
vorgenommenen Smart-Einstellung für
den Ton oder das Bild befinden und eine
Einstellung des Ton- oder Bildmenüs ändern,
werden alle Werte des Menüs die eher
vorgenommenen Einstellungen abändern.
h Active control (Aktivregelung)
Die Aktivregelung weist auf ein pro-aktives
und automatisches Regelsystem hin.Das
Fernsehgerät mißt ständig alle einkommenden
Signale und bessert sie gegebenenfalls nach,
um eine möglichst gute Bildwiedergabe zu
liefern.
Drücken Sie auf die h-Taste, um die
Aktivregelung Aus oder Ein zu wählen.
Aus Schärfe und Dynamic Contrast werden
automatisch geregelt.
Ein
Schärfe, Dynamic Contrast und
Rauschunterdrückung werden
automatisch geregelt.
Drücken Sie den Cursor in der auf/abRichtung,während sich die Information über
die gewählte Aktivregelung ganz oben im
Bildschirm befindet.
Das Menü für die Aktivregelung erscheint auf
dem Bildschirm.Die Bildeinstellungen werden
ständig und automatisch nachgestellt.
Die einzelnen Menüpunkte können nicht
angewählt werden.
Drücken Sie ein zweites Mal den Cursor in
der auf/ab-Richtung,um das Menü
abzuschalten.
10
Benutzung der Fernbedienung
Page 38

Benutzung der Menüs
V P
213
B
®
Ò
‡π
†
¬
fhU
æ
MENU
b
OK
INSTANT
Q
yÚ
zurückkehren oder
Menü ausschalten
OK-Taste zum
Aktivierung
Cursor-Tasten,
um Einstellungen
zu wählen
HAUPTMENÜ
Contrast
J BILD
TON
SONDERFUNKTIONEN
PROGRAMME
BILD
Contrast
J Kontrast L M
Helligkeit
Farbsättigung
Schärfe
Farbweiß
Digital Scan
Dynamic Contrast
& Drücken Sie die MENU-Taste, um das HAUPTMENÜ ein- oder auszuschalten.
é Benutzen Sie die Cursor-Tasten auf/ab um das BILD, TON oder
SONDERFUNKTIONEN Menü oder um PROGRAMME zu wählen.
“ Drücken sie die Cursor rechts,um das gewählte Menü zu aktivieren.
‘ Benutzen Sie die Cursor-Tasten auf/ab, links/rechts,um einen Menü-Punkt zu
wählen.
( Benutzen Sie die OK-Taste, um das Gewählte zu aktivieren.
§ Drücken Sie mehrmals die MENU-Taste, um zurückzukehren oder um das
Menü auszuschalten.
Bildmenü
Wenn ein peripheres NTSC A/V-Gerät an einen der Euro-A/V-Stecker angeschlossen
ist, erscheint ebenfalls die Option NTSC-Farbton.
Farbweiß
Wählen Sie die Farbtemperatur:
Digital Scan (Zeilenflimmern-Reduktion)
Im vergrößerten Bildformat ist immer Digital Scan aktiv.
Der Menü Punkt ist dann nicht verfügbar.
Mitunter ist es bei bestimmten TV-Programmen vorteilhaft, die Digital Scan
Zeilenflimmer-Reduktion auszuschalten. Unter normalen Umständen halten
Sie es eingeschaltet.Drücken Sie die Cursor-Tasten links/rechts,um
aus zu wählen.
Normal, Warm oder Kühl.
ein oder
TON
J Lautstärke L M
Lautstärke
Balance
Höhen
Tiefen
Lautstärke Kopfhörer
Dynamic Contrast
Wir empfehlen Ihnen
Mit zu wählen, damit der Kontrast zwischen den
dunklen und hellen Bildinhalten hervorgehoben wird.Unter bestimmten
Umständen ist es jedoch empfehlenswert,Dyn. Contrast
Min, Max. oder Aus
zu schalten.
Die geänderten Einstellungen für Kontrast,Helligkeit, Farbsättigung,Schärfe,
Farbweiß,Digital Scan und Dynamic Contrast werden für sämtliche
Fernsehsender automatisch gespeichert.
Selektieren Sie
Werksvoreinstellung im Grundeinstellungsmenü, um die
bereits werkseitig festgelegten Einstellungen wiederherzustellen,siehe Seite 7.
Tonmenü
Die geänderten Einstellungen für Lautstärke, Balance, Tiefen und Höhen
werden für sämtliche Fernsehsender automatisch gespeichert.
Selektieren Sie
bereits werkseitig festgelegten Einstellungen wiederherzustellen,siehe Seite 7.
Lautstärke Kopfhörer
Für den Anschluß Ihres Kopfhörers,siehe Periphere A/V-Geräte anschließen,
S.22.
Werksvoreinstellung im Grundeinstellungsmenü, um die
11Benutzung der Menüs
Page 39

zurückkehren oder
V P
B
®
Ò
‡π
†
¬
fhU
æ
MENU
b
OK
INSTANT
Q
yÚ
Menü ausschalten
OK-Taste zum
Aktivierung
Cursor-Tasten,um
Einstellungen zu wählen
J SONDERFUNKTIONEN
Automatische Abschaltung Aus
Kindersicherung Aus
Untertitel Aus
Sonderfunktionen Menü
& Drücken Sie die MENU-Taste, um das HAUPTMENÜ ein- oder auszuschalten.
é Benutzen Sie die Cursor-Tasten auf/ab um das SONDERFUNKTIONEN Menü
zu wählen.
“ Drücken Sie den Cursor nach rechts,um das gewählte Menü her vorzurufen.
‘ Benutzen Sie die Cursor-Tasten auf/ab um einen Menü-Teil zu wählen.
( Benutzen Sie den Cursor in der Richtung links/rechts,um die gewünschte
Einstellung anzuwählen.
Automatische Abschaltung
Mit der automatischen Abschaltung können Sie selbst die Zeitdauer
bestimmen,nach der das Fernsehgerät ausgeschaltet werden soll.
Der Zähler läuft von
Fernsehgerät in den Bereitschaftszustand schaltet erscheint eine Anzeige der
verbleibenden Minute auf dem Bildschirm.Nicht sichtbar im Dual Bildmodus.
Sie können Ihr Gerät jederzeit früher ausschalten oder die Zeiteinstellung
immer noch ändern.
Kindersicherung
Falls die Kindersicherung aktiviert ist, kann das Fernsehgerät nur mit den
Zifferntasten der Fernbedienung eingeschaltet werden.
Die T asten P- und + oben am Fernsehgerät können nicht benutzt werden.
Auf diese Art und Weise können Sie einer unerwünschten Benutzung Ihres
Fernsehgeräts vorbeugen.
Wenn die Einblendung
Kindersicherung ausgeschaltet werden,damit die Tasten P- und + oben am
Fernsehgerät benutzt werden können.
Aus bis 180 Min. vor. Eine Minute bevor das
Kindersicherung Ein erscheint, soll die
Untertitel
Fernsehsender mit Videotext strahlen oft bestimmte Programme mit
Untertiteln aus. Siehe Videotext/Teletext, Ständige Untertitelung, S.18,um die
richtige Untertitelseite aus dem Videotextführer zu wählen.
Selektieren Sie
Drücken Sie die
Untertitel Ein oder Aus.
MENU-Taste um das SONDERFUNKTIONEN auszuschalten.
Programmliste
& Drücken Sie die MENU-Taste, um das HAUPTMENÜ ein- oder auszuschalten.
é Benutzen Sie die Cursor-Tasten auf/ab um PROGRAMME zu wählen.
“ Drücken Sie rechts auf den Cursor, um eine Übersicht aller installierten TV-
Kanäle zu erhalten.
‘ Drücken Sie auf den Cursor, um ihn nach oben/unten zu verschieben und so
durch die Liste zu gehen.Drücken Sie auf OK, um den gewünschten
Fernsehkanal auszuwählen.
( Drücken Sie die MENU-Taste, um die Programmliste auszuschalten.
12 Benutzung der Menüs
Page 40

V P
213
B
¬
fhU
æ
MENU
b
OK
INSTANT
Q
MENU
yÚ
Wahl von
NEXTVIEW
NEXTVIEW
/ Videotext Guide
Heutzutage bieten die meisten Fernsehsender in Europa Videotext-Seiten, die
den Programmführer des Tages auf dem Bildschirm zeigen.Diese Seiten können
abgerufen werden,indem man den Fernsehsender in den Stand Videotext
Guide (Videotext-Programmführer) schaltet.
Eine immer größere Zahl von Fernsehsendern bieten einen ausgiebigeren
Programmführer-Service, der
NEXTV
genannt wird.Das
IEW
NEXTVIEW ist eine
neue Art und Weise, auf die die Programmführer angeboten werden, und bietet
auch mehr Sonderfunktionen als der übliche Videotext.
Mittels des
NEXTVIEW ist es zum Beispiel möglich, einen Überblick zu geben
über alle Filme, die an einem Abend gezeigt werden.
Beide Möglichkeiten sind in dieses Fernsehgerät eingebaut:das
der Teletext Guide.Wenn der Fernsehsender
Fernsehgerät automatisch den
NEXTVIEW
NEXTVIEW
-Programmführer auf dem Bildschirm
NEXTVIEW und
überträgt, wird das
zeigen. Wenn der Fernsehsender nur Videotext überträgt, wird das
Fernsehgerät automatisch auf Teletext Guide umschalten.Beide Möglichkeiten
bieten die selben Sonderfunktionen: Aufnahme,Hinweis und Info. Im Fall des
Teletext Programme Guide hängt es jedoch vom Fernsehsender ab, ob diese
Sonderfunktionen tatsächlich geboten werden.
Sie können sich rund um die Uhr jene Programme aussuchen,die Sie sehen
möchten. Es ist ebenfalls möglich,nach einem bestimmten Thema,z.B. Sport,
Film,usw., ein Programm zu suchen.Wenn ein Programm selektiert worden ist,
kann es angekreuzt werden,einfach um Sie daran zu erinnern, oder auch um es
nur einmalig oder, für Fernsehserien z.B.,jeden Tag oder jede Woche
automatisch vom Videogerät aufnehmen zu lassen (vorausgesetzt daß das
Videogerät mit einem
Der Teletext Guide und das
NEXTVIEW Link (Anschluß) versehen ist).
NEXTVIEW gewähren Ihnen ebenfalls einen direkten
Zugang zu detaillierten Auskünften über Programme,vorausgesetzt daß sie vom
Fernsehsender geboten werden.
Der Fernsehsender trägt die Verantwortung für den Inhalt der Informationen. Das
Fernsehgerät jedoch ist verantwortlich für den Empfang dieser Informationen und für
deren Wieder gabe an den Benutzer. Eine Menüstruktur,Wahl- und
Nachschlagmöglichkeiten werden von der Software des Fernsehgeräts geboten.
“ Geben Sie mit den Zifferntasten oder mit den - P +
‘ Drücken Sie den Cursor links/rechts,um die
( Wählen Sie ein Programm mit dem Cursor auf/ab.
§ Drücken Sie eine der Farbtasten,um eine der
è Drücken Sie die OK-Taste, um zum
Cursor-Tasten,
um Einstellungen
zu wählen
Benutzen der Videotext Guide/NEXTVIEW-Menüs
&
Drücken Sie die æ-Taste auf der Fernbedienung,um das Videotext
NEXTVIEW-Menü aufzurufen/auszuschalten.
Guide/
é Betätigen Sie den Cursor in den Richtungen auf/ab und links/rechts, um das
Datum zu wählen, den
THEMA für den Programmführer nach Thema, und ÜBERSICHT für einen
das
Überblick aller zur Erinnerung oder zur Aufnahme vermerkten Programme,
die Seitennummer des Programmführers,oder um in die Programmliste zu
geraten.
Videotext Guide NEXTVIEW
Sender Übers.
ARD 1 ZDF 2
ARD 1
Aufnahme
Hinweis
Info
S.202 p 01 02 ... π
11.03 ................
14.35 ................ 226/3
17.50 ................ 231
“ Wählen Sie ein Programm mit dem Cursor auf/ab.
Tasten die richtige Seitennummer des
Programmführers ein.
Subseiten zu durchblättern.
Grundfunktionen (falls vorhanden)
Hinweis, Info, zu wählen.Siehe Grundfunktionen
Aufnahme,
später.
Bildschirmkopfbalken zurückzukehren.
‘ Drücken Sie eine der Farbtasten,um eine der
( Drücken Sie die OK-Taste, um zum
SENDER für den Programmführer nach Fernsehsender,
Montag 9 Okt 18:03
Sender Thema Übers.
Aufnahme
Hinweis
Info
Programm zur Zeit
Nächste Sendung
Heute
Morgen
Diese Woche
RTL2
Grundfunktionen (falls vorhanden)
NEXTVIEW
Aufnahme,
Hinweis, Info, zu wählen.Siehe Grundfunktionen
später.
Bildschirmkopfbalken zurückzukehren.
13NEXTVIEW
Page 41

Aufnahme
Hinweis
Info
Sender Thema Übers.
ARD 1 ZDF MTV
S.202 p 01 02 ... π
ARD 1
11.03 ................
14.35 ................ 226/3
17.50 ................ 231
Einen Moment bitte
Videotext Guide
Fernsehsender , die Videotext senden,übertragen auch eine Seite mit dem
Programmführer des Tages.Für jeden selektierten Fernsehsender kann mittels
der æ-Taste die Programmführerseite selektiert werden :
- automatisch, wenn der gewählte Fernsehsender auch Dienstleistungen wie
PDC (Programme Delivery Control) oder MIP (Magazine Inventor y Page)
bietet.
- oder wenn eine automatische Vorwahl nicht möglich ist, wird das
Inhaltsverzeichnis auf dem Bildschirm gezeigt und muß die richtige Nummer
der Programmführerseite vom Videotext mittels der Nummerntasten
eingegeben werden.
Die Programmführerseite wird nur dann automatisch gespeichert werden,
wenn sie allen Anforderungen der Videoprogrammierung über Teletext (VPT)
entspricht.
Jedesmal wenn Sie die æ-Taste drücken, wird Ihnen die Programmführerseite des gewählten Fernsehsenders zur Verfügung stehen,wenn der
Fernsehsender nicht
Die Sonderfunktionen Aufnahme, Hinweis oder Info,die mit den Farbtasten
übereinstimmen,leuchten auf, wenn die auf dem Bildschirm gezeigte
Programmseite den Video Programming via Teletext (VPT)-Forderungen
entspricht.Selektieren Sie ein Programm und drücken Sie eine der
Sonderfunktionstasten,z.B.Aufnahme oder Hinweis. Siehe Grundfunktionen
später.
Die Info-Wahlmöglichkeit ist erst aufrufbar,wenn das selektierte Programm
eine Seitennummer enthält mit einem eventuell beanspruchbaren Subkode,
der verweist auf eine Seite mit mehr Auskünften über das gewählte
Programm.
NEXTVIEW überträgt.
Aufnahme
Hinweis
Info
Aufnahme
Hinweis
Info
Aufnahme
Hinweis
Info
Montag 9 Okt 18:03
Sender Thema Übers.
ARD 1 ZDF MTV
ARD 1
........
........
........
Montag 9 Okt 18:03
Sender Thema Übers.
Kultur Film ....
ARD 1
ARD 1
ZDF
MTV
Montag 9 Okt 18:03
Sender Thema Übers.
ARD 1
ARD 1 17.10
CNN 17.30
ZDF 18.05
MTV 19.00
NEXTVIEW
NEXTVIEW
NEXTVIEW
NEX
TVIEW-Moden um Information zu ordnen und darzustellen
Sender
Der Fernsehsenderprogrammführer bietet einen Überblick über sämtliche
Programme,die an einem Tag von einem einzigen Fernsehsender gesendet
werden.Bereits abgelaufene Programme können auf dem Bildschirm sichtbar
gemacht werden mittels Cursor auf.
Das Verzeichnis wird mit dem am frühesten gesendeten Programm anfangen.
Mittels Cursor links/rechts kann ein anderer Vorzugsfernsehsender selektiert
werden.
Thema
Im Themenführer finden Sie eine Liste sämtlicher Fernsehprogramme des von
Ihnen gewählten Datums vor. Diese Liste enthält Fernsehprogramme aus der
gewählten Kategorie (Nachrichten,Spor t, Kultur,Film,usw ...).
Die Auswahlmöglichkeit beginnt mit dem gerade gesehenen,oder dem
nächsten Programm des eingestelltem FS-Programms.
Sie können das
THEMA-Menü nur durchlaufen,wenn Fernsehprogramme mit
vorprogrammierten Themen in den Fernsehprogrammführer aufgenommen
worden sind.
Übersicht
In der Übersichtsliste finden Sie eine Auflistung sämtlicher vorprogrammierter
Fernsehprogramme und sämtlicher Aufnahmebefehle des Tages vor.
Wenn es mehrere Programme gibt,die gleichzeitig anfangen, oder wenn
mehrere Programme sich zeitlich überlappen, werden sie blinkend
hervorgehoben.
Nachdem das Programm gesendet wurde,werden alle Programme, die nur für
ein einziges Mal vorprogrammiert worden sind,aus der Fernsehprogrammliste
gelöscht werden.
14 NEXTVIEW
Bemerkung: Das Fernsehgerät wird automatisch die Sendezeit (wie angegeben im
Videotext/Teletext-Programmführer) des von Ihnen gewählten
Fernsehprogramms in die örtliche Zeit umsetzen und das richtige
Datum eingeben.
Page 42

Aufnahme
Hinweis
Info
SENDER THEMA ÜBERS.
10.25 Spiderwoman
14.35 Ein Supertrio
p
Einm.πTägl. Wöchentl. Lösch
17.50 Hamburger Journal
.....................
Datum Zeit
RTL2
Info
Grundfunktionen
Die Funktionen Aufnahme, Hinweis und Info können mittels der
entsprechenden Farbtasten angewählt werden.
Wenn eine bestimmte Funktion nicht zur Verfügung steht,nimmt die Helligkeit
des gezeigten Textes ab.
Wählen Sie ein Programm mit dem Cursor auf/ab.
R
!
Aufnahme R oder Hinweis !
&
Drücken Sie auf die rote Farbtaste,
Farbtaste, um
Hinweis zu aktivieren.
Aufnahme oder auf die grüne
um
Wenn die Programmnummer des Fernsehsenders bis jetzt noch nicht bekannt ist,
erscheint auf dem Bildschirm eine Meldung mit der Bitte, die richtige
Programmnummer mit dem Cursor links/rechts einzugeben. Dann drücken Sie OK.
Ein kleines Menü erscheint, mit dem das gewünschte Intervall eingestellt
werden kann:einmalig, täglich oder wöchentlich, oder um eine eher
eingegebene Aufnahme- bzw.Hinweiseinstellung zu wischen. Die
Grundeinstellung ist
Einmalig.
Fernsehserie ist,können die Wahlmöglichkeiten
die Wahlmöglichkeit
Serie ersetzt werden. In jenem Fall sucht das System
Wenn ein Fernsehprogramm eine Folge einer
Täglich und Wöchentl. durch
selbst heraus,wann die nächste Folge der Fernsehserie ausgestrahlt wird. Das
ist beim Videotext Guide nicht möglich.
é Benutzen Sie die Cursor-Tasten links/rechts, um das Intervall zu wählen
Die Farbe des Symbols weist auf das Intervall hin.
“
Drücken Sie die OK-Taste
.
Wenn die Wahlmöglichkeit Aufnahme R angewählt worden ist:
Speicherung ! erscheint um anzugeben, daß das Videogerät programmiert
worden ist.
Wenn die Wahlmöglichkeit
Hinweis ! angewählt worden ist:
- wenn Sie sich ein bestimmtes Fernsehprogramm ansehen,wird im
Augenblick,in dem das mit ! markierte Fernsehprogramm beginnt,eine
Mitteilung auf dem Bildschirm erscheinen.
- befindet sich das Fernsehgerät in Bereitschaftsposition,wird es in dem
Augenblick,in dem das mit ! angedeutete Fernsehprogramm beginnt,
eingeschaltet.
Bemerkung: Programmaufnahmen oder -hinweise sind nicht möglich, wenn der
Fernsehsender nicht das Datum und die Anfangszeit der Programme sendet.
Die Meldung
Keine Fernsehprogrammierung möglich erscheint.
Kontrollieren Sie mal, ob Sie sich auf der richtigen Seite für die Fernsehprogrammierung befinden.
Info
& Drücken Sie auf die gelbe Farbtaste,
um Info zu aktivieren.
Es erscheinen Informationen über das gewählte Fernsehprogramm oder es
werden bestimmte Mitteilungen gezeigt.In bestimmten Fällen, paßt die ganze
Information nicht in das Bildschirm hinein.Benutzen Sie die Taste Cursor
auf/ab,um die ganze Information zu durchlaufen.
é Drücken Sie erneut die gelbe Farbtaste, um Info abzuschalten.
15NEXTVIEW
Page 43

Bild/NEX
V P
SMART
ACTIVE CONTROL
Maw
h
q
bSX
213
546
879
0
B
®Ò‡π
†
¬
i
0
fhU
æ
MENU
b
OK
◊
INSTANT
Q
æ
b
yÚ
TVIEW-Videotext Guide wählen
Drücken Sie die æ-Taste.
Drücken Sie die b-Taste.
Der Bildschirm wird in zwei Hälften verteilt:die linke Hälfte für das normale
NEXTV
Hauptbild,die rechte Hälfte für
Drücken Sie die b-Taste, um erneut
IEW/Videotext Guide.
NEX
TVIEW/Videotext Guide den ganzen
Bildschirm einnehmen zu lassen oder drücken Sie die æ-Taste, um erneut
das Hauptbild den ganzen Bildschirm einnehmen zu lassen.
Einschränkungen in Bezug auf Videogeräte mit NEXTVIEW
Die Aufnahme-Wahlmöglichkeit und die automatische Aufnahme werden nur
ausgeführt und möglich sein, wenn Ihr Videogerät mit einer
Vorrichtung versehen ist. Ihr Videogerät muß mit
EXTERNAL 2 verbunden
sein.Siehe Periphere A/V-Geräte anschließen,Seite 20.
Die Wahlmöglichkeiten täglich, wöchentlich oder Serien hängen vom Typ des
Videogeräts, über das Sie verfügen,ab. Die Zahl der programmierten
Aufnahmen und die Art und Weise, auf die zeitlich überlappende Aufnahmen
bewältigt werden,hängen ebenfalls vom Typ des Videogeräts ab.
Ab dem Augenblick, in dem alle Timer des Videogeräts belegt sind, wird die
Wahlmöglichkeit
Aufnahme aus dem Menü gelöscht werden.
NEXTVIEWLINK -
Überblick von Video Aufnahmen.
Wenn das Fernsehgerät eingeschaltet ist, werden die programmierten
Aufnahmeblöcke zum Fernsehgerät übertragen, um zu überprüfen,ob eine
manuelle Einstellung oder eine Löschung durchgeführt wurde,die dann in der
Übersicht gezeigt wird.Das Videogerät verwaltet und löscht sogar die
Aufnahmezeiteingaben,wenn die Aufnahme bereits durchgeführt worden ist.
Bei manchen
NEXTVIEWLINK-Videogeräten können Sie die tägliche
Programmierung nicht an einem Samstag oder Sonntag beginnen. In diesem
Fall wird die Wahlmöglichkeit
Täglich aus dem Menü beseitigt an diesen
beiden T agen.
16 NEXTVIEW
Page 44

V P
SMART
ACTIVE CONTROL
Maw
h
q
bSX
213
546
879
0
B
¬
i
0
fhU
æ
MENU
b
OK
◊
INSTANT
Q
b
bX
0
MENU
yÚ
Videotext/Teletext
Farbtasten zur Wahl
OK-Taste zum
Aktivierung
Cursor-Tasten,um
Seiten zu wählen
Die meisten Fernsehsender strahlen Information über Videotext/T eletext aus.
Jeder Fernsehsender, der Videotext ausstrahlt, überträgt eine Seite mit
Informationen über die Benutzungsweise seines Videotextsystems. Suchen Sie
die Videotext/Teletext-Seite mit dem Inhaltsverzeichnis (üblicherweise S.100).
Je nach Fernsehsender wird Videotext/Teletext in unterschiedlichen Systemen
ausgestrahlt.Die Farben,die benutzt wurden im Optionsbalken unten benutzt
wurden,entsprechen denen der farbigen Tasten auf Ihrer Fernbedienung.
Lernfähiges Videotext-System
Das lernfähige Videotext-System reduziert erheblich die Wartezeit (unter der
Bedingung,daß die Videotextsendung des bestimmten Fernsehsenders bereits
mindestens für eine halbe Minute eingeschaltet worden ist) durch:
• eine direkte Anwahl von vorhergehenden und von folgenden Seiten
innerhalb des gesendeten VT-Magazins und der farbig in der Optionszeile
angezeigten Seiten
• Erstellung einer Liste entsprechend der Videotext-Sehgewohnheiten: häufig
benutze Seiten werden automatisch in einer Vorzugsliste gespeichert,damit
sie später sofort zur Verfügung stehen
• das Speichern der Subseitennummern,die auf der gezeigten Seite angegeben
werden
• die Speicherung von allen Subseiten.
Videotext/Teletext ein- und ausschalten
Drücken Sie b,um den Videotext/Teletext ein- oder auszuschalten.
Das Inhaltsverzeichnis erscheint auf dem Bildschirm,zusammen mit zwei
Informationszeilen am oberen Rand und einer Optionszeile am unteren Rand.
Bemerkung:Wenn die Buchstaben vom auf dem Bildschirm erscheinenden
Videotext/Teletext nicht den in Ihrer Sprache benutzten Buchstaben entsprechen,
drücken Sie die X-Taste mehrmals kurz aufeinander, um die Sprachgruppe 1 oder
2 zu wählen.
Eine Videotext-/Teletextseite wählen
Mit den Zifferntasten
Geben Sie die gewünschte Seitennummer mit den Zifferntasten ein.
Der Seitenzähler sucht die Seite, oder die Seite erscheint sofort,wenn die
Seitennummer gespeichert wurde.
Eine Nachricht erscheint falls Sie eine falsche oder eine nicht vorhandene Ziffer
eingegeben haben. Es gibt keine Seitennummern die mit 0 oder 9 anfangen.Geben
Sie die richtige Seitennummer ein.
Mit der Optionszeile
Wählen Sie mit den farbigen Tasten, die den Farboptionen unten im Bildschirm
entsprechen,das gewünschte Thema.
Fernsehbild/Videotext wählen
Wählen Sie ein Fernsehsender mit Teletext.
Drücken Sie die Taste b.
Der Bildschirm wird jetzt in zwei Teile verteilt: der linke Teil fürs übliche
Hauptfernsehbild,der rechte Teil für den Videotext, der vom gewählten
Fernsehsender gesendet wird.
Drücken Sie die b-Taste, um zurückzukehren zum Fernsehbild auf dem
ganzen Bildschirm oder drücken Sie die b-taste,um zurückzukehren zum
Videotextbild auf dem ganzen Bildschirm.
Schnelle W ahl v on Videotextseiten
Drücken Sie die Cursor-Tasten auf/ab oder die - P + Taste, um die vorigen
oder die nächsten Seiten zu wählen.
Zuletzt gesehene Videotextseite wählen
Drücken Sie die 0-Taste.
17Videotext/Teletext
Page 45

V P
SMART
ACTIVE CONTROL
Maw
h
q
bSX
213
546
879
0
B
®
Ò
‡π
†
¬
i
0
fhU
æ
MENU
b
OK
◊
INSTANT
Q
i
U
MENU
yÚ
OK-Taste zum
yÚ
V P
SMART
ACTIVE CONTROL
Maw
h
q
bSX
213
546
879
0
B
®
Ò
‡π
†
¬
i
0
fhU
æ
MENU
b
OK
◊
INSTANT
Q
f
h
S
MENU
Aktivierung
Cursor-Tasten,
um Subseiten zu
wählen
Das Inhaltsverzeichnis wählen
Drücken Sie die weiße Taste,um das Hauptinhaltsverzeichnis (normalerweise
Seite 100) auf dem Bildschirm erscheinen zu lassen.
Nur für T .O .P .-Videotext-Sendungen :
T.O.P ordnet die Seiten in Kategorien ein und fügt andere Möglichkeiten einer
erheblich leichteren Bedienung hinzu.
Drücken Sie i. Ein T .O.P. Überblick von den vorhandenen Themen
erscheint.Nicht alle Sender senden den T.O.P. Videotext aus.Wenn das
Videotextsystem kein T.O.P. Videotext ist, erscheint eine Mitteilung oben auf
dem Bildschirm.
Wählen Sie mit den Cursor-Tasten auf/ab,links/rechts das gewünschte Thema
und drücken Sie die OK-Taste.
Mehrfachseiten wählen
Wenn die gewählte Videotext-/Teletextseite mehrere Textseiten enthält,
erscheint eine Textseite auf dem Bildschirm.
Die farbige Seitenzahl in der ersten Informationszeile verweist auf die
dargestellte T extseite.Die übrigen Subseiten können auf zwei Weisen gewählt
werden :
Mit den Cursor-Tasten links/rechts
Die übrigen Subseitennummern erscheinen in Weiß,sobald sie zur Verfügung
stehen.Sie werden gespeicher t, damit sie ständig verfügbar sind,solange die
Textseite auf dem Bildschirm steht. Wählen Sie mit den Cursor-Tasten
links/rechts die vorige oder nächste Textseite.
Mit der U Taste
• Geben Sie die Subseiten-Nummer selbst ein:
Drücken Sie U.Geben Sie die Seitennummer mit den Zifferntasten ein, z.b.3
für die dritte von sieben Folgeseiten.
Das Fernsehgerät sucht die gewünschte Subseite.
• Automatisch wechselnde Subseiten:
Drücken Sie die Taste U erneut, um die eingegebenen Ziffern für die
Subseite zu löschen. Die einzelnen Textseiten wechseln automatisch.
Drücken Sie die Taste U, um die Unterseiten erneut mit den Cursor-Tasten
links/rechts auszuwählen.
Besondere Videotext-Funktionen
Seitenstopp
Drücken Sie die S-Taste, um den automatischen Wechseln der Subseiten zu
stoppen,oder um des Seitenzähler zu stoppen,wenn Sie eine falsche Ziffer
eingegeben haben oder wenn die Textseite nicht vorhanden ist.Geben Sie
eine andere Seitenzahl ein.
Vergrößern
Drücken Sie wiederholt h,um den oberen Teil, oder den unteren Teil auf
dem Bildschirm erscheinen zu lassen,und nachher um zur normalen
Seitengröße zurückzukehren.Wenn der obere Teil gezeigt wird, können Sie
den Text Zeile pro Zeile weiter rollen lassen,indem Sie die Cursor-Tasten
auf/ab benutzen.
Verborgene Information
Drücken Sie f,um die verborgenen Informationen zu enthüllen/verbergen,
wie z.B.Lösungen für Rätsel und Aufgaben.
18 Videotext/Teletext
Page 46

Ständige Untertitelung wählen
M
P
V
Fernsehsender mit Videotext strahlen oft bestimmte Programme mit
Untertiteln aus.
Für jeden Fernsehsender können Sie eine Untertitelseite speichern, die
ständig auf dem Bildschirm erscheinen wird,unter der Bedingung,daß das
gesendete Programm mit Untertiteln übertragen wird.
Schalten Sie Videotext ein und wählen Sie die richtige Untertitelseite aus dem
Videotext-Inhaltsverzeichnis.
Schalten Sie Videotext aus.
Jetzt ist die Untertitelseite gespeichert für den gewählten Fernsehsender.
Jedesmal wenn ein Programm des von Ihnen gewählten Fernsehsenders
Untertitel bekommt,werden Ihnen die Unter titel für diesen Fernsehsender
zur V erfügung stehen.
Selektieren Sie
Untertitel Ein oder Aus im Menü Sonderfunktionen, siehe
Seite 12.
Das Untertitelzeichen j erscheint, wenn Untertitel Ein gewählt worden ist.
Bemerkung :Wenn Sie sich im Videotext/Teletext-Modus befinden, werden Ihnen nur
Videotext/Teletext-Funktionen zur Verfügung stehen
.
Die Tasten oben am Fernsehgerät
Falls Ihre Fernbedienung unauffindbar ist oder nicht funktioniert,können Sie
trotzdem einige Bildeinstellungen mit den Tasten oben am Fernsehgerät
ändern.
Taste, um die Einstellungen Lautstärke,
Drücken Sie mehrmals die M
Helligkeit,Farbsättigung, Kontrast,Höhen,Tiefen zu wählen.
-
Auf die P-Taste drücken,um die gewählte Einstellung vorzunehmen.
Wenn die Menü-Einstellung nicht auf dem Bildschirm erscheint, können Sie
mittels der Tasten P - und + die Fernsehsender wählen,und mittels die
V-Taste die Lautstärke regeln.
Die gewählte Einstellung wird automatisch abgeschaltet, wenn Sie innerhalb von
10 Sekunden keine Änder ung vor nehmen.
19Videotext/Teletext
Page 47

P eriphere A/V-Geräte anschließen
VCR 1
CABLE
1
4
EXTERNAL 2
2
3
EXTERNAL 2
VCR 1
CABLE
11
2
5
3
SAT
EXTERNAL 1
4
Es gibt eine großen Auswahl an elektronischen A/V-Geräten, die an Ihr
Fernsehgerät angeschlossen werden können.Den nächsten Anschlußschemen
können Sie entnehmen, wie angeschlossen werden muß.
Videorecorder
Schließen Sie die Antennenkabel 1, 2 und, um eine bessere Bildqualität zu
bekommen,das Euro-A/V-Kabel 3,so wie nebenan gezeigt an.
Wenn Ihr Videorecorder mit einer EasyLink-Steuerung ver sehen ist, muß das
mitgelieferte Euro-A/V-Kabel an
EasyLink-Funktion völlig auszunutzen.
Nur wenn Sie das Euro-A/V-Kabel 3 nicht anschließen, müssen Sie folgende
Schritte vornehmen :
Suche und Speicherung des Testbildes Ihres Videorecorders
& Ziehen Sie den Antennenstecker 1 aus der Antennenbuchse x Ihres
Videorecorders.
é Schalten Sie Ihr Fernsehgerät ein und stellen Sie den Videorecorder auf
Testsignal.(Schauen Sie zunächst in der Bedienungsanleitung Ihres
Videorecorders nach.)
“ Suchen Sie das Testsignal Ihres Videorecorders auf dieselbe Weise, wie bei
einem Fernsehsender. Siehe Einstellung,Fernsehsender speichern, Manuelle
Einstellung,S.5.
‘ Speichern Sie das Testbild unter der Programmnummer 0 oder zwischen 90
und 99.
( Schließen Sie den Antennenstecker erneut fest an die Antennenbuchse x
Ihres Videorecorders an, nachdem Sie das Testsignal gespeichert haben.
EXTERNAL 2 angeschlossen werden, um die
Decoder und Videorecorder
Schließen Sie ein Euro-A/V-Kabel 4 an die Euro-A/V-Buchse Ihres Decoders
und an die spezielle Euro-A/V-Buchse Ihres Videorecorders an.Beachten Sie
auch die Betriebsanleitung Ihres Videorecorders. Siehe auch
Programmnummer für Ihren Decoder speichern,S. 7.
Sie können ebenfalls Ihren Decoder sofort an
EXTERNAL 1 oder 2
anschließen mittels des Euro-A/V-Kabel.
Videorecorder und mehrere periphere A/V-Geräte
(
außer digitale A/V-Quellen
)
& Schließen Sie die Antennenkabel 1,2und 3 so an,wie auf der
nebenstehenden Abbildung gezeigt. Sie erhalten eine bessere Bildqualität,wenn
Sie zusätzlich noch das Euro-A/V-Kabel 5 an
A/V-Kabel 4 an
EXTERNAL 1 oder 3 anschließen.
EXTERNAL 2 und das Euro-
é Suchen Sie das Testsignal Ihres peripheren A/V-Gerätes auf dieselbe Weise,wie
bei einem Videorecorder.
Mit einem an
Programm Ihres Fernsehgerätes aufnehmen. Es ist nur mit
Programme sowohl von Ihrem Fernsehgerät als auch von anderen angeschlossenen
A/V-Gerätes aufzunehmen.Siehe Aufnehmen mit Ihrem Videorecorder, S.25.
Bemerkung : EXTERNAL 1 ist geeignet für CVBS und RGB, EXTERNAL 2 für
CVBS,Y/C und RGB, und EXTERNAL 3 nur für CVBS.
EXTERNAL 1 angeschlossenen Videorecorder können Sie lediglich ein
EXTERNAL 2 möglich,
20 P eriphere A/V-Geräte anschließen
Page 48

Kamera und Camcorder
3
2
1
A
U
D
IO
V
ID
EO
S•VID
EO
DVD
1
EXTERNAL 1/2/3
& Schließen Sie Ihre Kamera oder Ihrem Camcorder an die rechte Seite Ihres
Fernsehgerätes an.
é Verbinden Sie das Gerät mit VIDEO 2 und AUDIO L 3, wenn es sich um
ein Mono-Gerät handelt.
Durch mehrmaliges Drücken der Taste X der Fernbedienung können Sie
wählen, ob der Ton aus einem oder beiden Lautsprechern kommen soll.
“ Schließen Sie auch AUDIO R 3 an, wenn Sie ein Stereo-Gerät besitzen.
S-VHS Qualität wird bei einem Camcorder erreicht,wenn die S-VHS-Kabel an
die Ausgänge
S-VIDEO 1 und AUDIO 3 angeschlossen werden.
Digitale A/V -Geräten (DVD,digital Satellittuner,...)
Schließen Sie mittels eines Eurokabels 1 Ihre Digitalgeräte an einen der
Eurokonnektor-Eingänge (
Steckerkabels an den
EXT1, EXT2 oder EXT3) an, oder mittels eines
VIDEO-Eingang auf der rechten Seite des Fernsehgeräts
(siehe Abbildung oben).
& Drücken Sie gleichzeitig die Tasten U und h.
EINSTELLUNG
Menüsprache
Land
Automatische Einstellung
Manuelle Einstellung
Namen geben
Umprogrammieren
Vorzugsprogramme
GRUNDEINSTELLUNG
J GRUNDEINSTELLUNG
GRUNDEINSTELLUNG
Digital Sources
J Digitale A/V-Quellen
Decoder/Descrambler
(Bildlage)
Informationszeile
Werksvoreinstellung
Auto Format ja/nein
EINSTELLUNG
é Wählen Sie Digitale A/V -Quellen im Menü Grundeinstellung im Menü
EINSTELLUNG und wählen Sie:
Nichts,wenn Sie keine Digitaltonquelle angeschlossen haben,
•
EXT1, EXT2 oder EXT3, wenn Sie Ihre Geräte an einen Euro-A/V-Buchse
•
angeschlossen haben,
FRONT,wenn Sie an die rechte Seite Ihres Fernsehgeräts angeschlossen
•
haben.
“ Drücken Sie die MENU-Taste, um alle Menüs auszuschalten.
Anmerkungen: Digitale Bildstörungen können unter Umständen von Bildmater ialien
geringer Qualität verur sacht werden. In solchen Fällen ist die Bildeinstellung Eco
(Energie-Sparmodus) mit Hilfe der
vorgesehen, um derartig schlechte Bildqualität zu verbessern.
SMART PICTURE a Taste auf der Fer nbedienung
21P eriphere A/V-Geräte anschließen
Page 49

L
Kopfhörer
AUDIO
& Schließen Sie den Stecker an den Kopfhöreranschluß L auf der rechten Seite
Ihres Fernsehgerätes an.
é Drücken Sie die Taste ¬, um die internen Lautsprecher Ihres Fernsehgerätes
auszuschalten.
Der Kopfhörer sollte eine Impedanz von 8 bis 4000 Ohm und einen 3,5 mm
Klinkenstecker haben.
Lautstärke Kopfhörer im TON-Menü wählen, um die Lautstärke des
Kopfhörers zu regeln. Siehe S. 11.
Audiogeräte / Verstärker
Schließen Sie das Audiokabel an den Audio-Eingang Ihres Audiogerätes und an
AUDIO L und R auf der Rückseite Ihres Fernsehgerätes an.
Sie können den Ton Ihres Fernsehers jetzt über Ihre Audiogeräte
wiedergeben.
Wenn Sie noch andere Geräte an Ihr Fernsehgerät anschließen möchten,
wenden Sie sich bitte an Ihren Fachhändler.
22 P eriphere A/V-Geräte anschließen
Page 50

Angeschlossene periphere A/V-Geräte wählen
w
SMART
ACTIVE CONTROL
Maw
h
q
bSX
879
0
i
0
◊
V P
SMART
ACTIVE CONTROL
Maw
h
q
bSX
213
546
879
0
B
®
Ò
‡π
†
¬
i
0
fhU
æ
MENU
b
OK
◊
INSTANT
Q
B
®
Ò
‡
π
†
◊
yÚ
Wenn das Fernsehgerät mit einem Videorecorder, der mit einer EasyLink-Steuerung
versehen ist, verbunden ist, kann es in bestimmten Fällen eingeschaltet werden, sogar
wenn es in den Bereitschafsstand geschaltet war.(z.B. beim Abspielen eines
Videobandes,....)
Dies ist aber nicht möglich, wenn Kindersicherung Ein gewählt worden ist.
Nur mit einem Antennenkabel angeschlossene A/V-Geräte :
Mit den Zifferntasten die Programmnummer wählen,unter der Sie das
Testsignal gespeichert haben.
Nur mit einem Euro-A/V-Kabel oder auf der rechten Seite des
Fernsehers angeschlossenem A/V-Gerät
Drücken Sie wiederholt die w Taste,um
EXT1, EXT2,EXT3 oder FRONT zu
wählen, abhängig davon, wo Sie Ihr Gerät an die Rückseite oder an die rechte
Seite Ihres Fernsehgerätes angeschlossen haben.
Bemerkung: Die meisten A/V-Geräte (Decoder,Videorecorder,Satellitenempfänger)
führen die Umschaltung selbst durch.
Möchten Sie erneut Fernsehsender ansehen?
Geben Sie mit den Zifferntasten die Programmnummer des Fernsehsenders
ein,den Sie sehen möchten oder drücken Sie wiederholt die wTaste, um
TV zu wählen.
Audio- und Videogeräte-Tasten
Die meisten Audio- und Videogeräte unserer Produktreihe können mit der
Fernbedienung Ihres Fernsehgerätes gesteuert werden.
Videorecorder
Halten Sie die
VCR-Taste auf der linken Seite der Fernbedienung eingedrückt
und drücken Sie gleichzeitig :
® für Aufnahme,
Ò für Zurückspulen,
‡ für Stopp,
π für Wiedergabe,
† für V orwärtsspulen,
◊ für die Wahl einer einstelligen bzw. zweistelligen Programmnummer
von Ihrem Videogerät oder DVD,
- P + für eine schnelle Wahl von Fernsehsendern,durch den
Videorecorder-Tuner,
0 bis 9 um den Fernsehsender des Videorecorders-Tuner zu wählen,
B um das Fernsehgerät vorübergehend abzuschalten.
Diese Tasten funktionieren mit Videorecorder,die RC5-Fernbedienungsbefehle
benutzen.
Wenn Ihr Videorecorder mit einer EasyLink-Steuerung ver sehen ist, kann im
Fernsehmodus die Taste
EasyLink Videorecorder mit einer System Bereitschaft ver sehen ist und wenn Sie die
B-Taste während drei Sekunden eingedrückt halten, werden sowohl das
Fernsehgerät wie das Videogerät vorübergehend in den Bereitschaftszustand
umgeschaltet.
INSTANT ® für Aufnahme genutzt werden.Wenn Ihr
23P eriphere A/V-Geräte anschließen
Page 51

Satellitenempfänger-Tasten
V P
SMART
ACTIVE CONTROL
Maw
h
q
bSX
213
546
879
0
B
®
Ò
‡π
†
¬
i
0
fhU
æ
MENU
b
OK
◊
INSTANT
Q
Ò
‡
π
†
X
0
◊
b
MENU
yÚ
Drücken Sie die OK-Taste gleichzeitig mit der Nummerntaste 1.
Jetzt können Sie Ihren Satellitenempfänger mit der Fernbedienung Ihres
Fernsehgeräts bedienen.
Halten Sie die
MODE-Taste auf der linken Seite der Fernbedienung
eingedrückt und drücken Sie gleichzeitig :
MENU um das SAT Menü ein- oder auszuschalten;
◊ für die Wahl einer einstelligen bzw. zweistelligen Programmnummer
von Ihrem Satellitenempfänger.
Diese Tasten funktionieren mit Satellitenempfänger, die RC5-Fernbedienungsbefehle
benutzen.
DVD-Gerät-Tasten
Drücken Sie die OK-Taste gleichzeitig mit der Nummerntaste 2.
Jetzt können Sie Ihren DVD-Gerät mit der Fernbedienung Ihres Fernsehgeräts
bedienen.
Halten Sie die
MODE-Taste auf der linken Seite der Fernbedienung
eingedrückt und drücken Sie gleichzeitig :
MENU um das DVD-Menü ein- oder auszuschalten,
b um einen DVD-Titel zu selektieren,
0 um ein DVD-Kapitel zu selektieren,
X um Ihre Wahl des Zweikanaltons zu machen,
Ò für Bildsuchlauf rückwärts,
‡ für Stopp,
π für Wiedergabe,
† für Bildsuchlauf vorwärts,
0-9 um den Fernsehsender der DVD zu wählen,
OK um die gewählte W ahlmöglichkeit des Menüs einzugeben.
24 P eriphere A/V-Geräte anschließen
®, C,f, h, w haben keine Funktion
Bemerkung : Nachdem Sie die Batterien ausgewechselt haben, ist das vorgegebene
funktionierende Gerät wohl der Satellitenempfänger.
Diese Tasten funktionieren mit Geräte, die RC6-Fer nbedienungbefehle benutzen.
Page 52

V P
B
®
Ò
‡π
†
fhU
æ
MENU
b
OK
INSTANT
Q
INSTANT
®
yÚ
Aufnehmen mit Ihrem Videorecorder ohne EasyLink
Um S-VHS Qualität aufnehmen zu können, schließen Sie das S-VHS A/V-Gerät
direkt an den S-VHS Recorder an.
Aufnahme eines Fernsehprogrammes
& Aufzunehmende Programmnummer auf dem Videorecorder einstellen.
é Stellen Sie den Videorecorder auf Aufnahme ein.
(Schauen Sie zunächst in der Bedienungsanleitung Ihres Videorecorders nach.)
Eine Umschaltung auf andere in Ihrem Fernsehgerät gespeicherte
Programmnummern hat keinen Einfluß auf die Aufnahme !
Aufnahme eines Programmes das von anderen an
EXTERNAL 3
kommt mit einem an
oder an die rechte Seite, angeschlossenen A/V-Geräten
EXTERNAL 2 angeschlossenen Videorecorder .
EXTERNAL 1,
& Schalten Sie Ihr A/V-Gerät ein.
é Wählen Sie den A/V-Eingang, von welchem Sie aufnehmen wollen.
“ Stellen Sie den Videorecorder auf Aufnahme ein.
Sie nehmen jetzt auf Band auf,was Sie auf Ihrem Bildschirm sehen.
Ändern Sie nicht die Programmnummern oder schalten Sie Ihr Fer nsehgerät nicht
aus, während Sie auf Band aufnehmen !
Aufnehmen mit einem Videorecorder mit EasyLink
Wenn Sie einen S-VHS-Videorecorder angeschlossen haben,der mit der EasyLinkSteuerung versehen ist, können Sie eine Aufnahme mit S-VHS-Qualität machen von
einem peripheren S-VHS-Gerät, das an die rechte Seite Ihres Fernsehgeräts
angeschlossen worden ist (z.B. von einem S-VHS-Camcorder).
Im Fernsehmodus ist es möglich, eine direkte Aufnahme des Programmes , das gerade
auf dem Bildschirm gezeigt wird, zu starten.
Drücken Sie die
Der Videorecorder wird eingeschaltet, wenn er im Bereitschaft gestellt war, und eine
Anzeige dessen, was gerade aufgenommen wird,erscheint auf dem Bildschir m. Der
Videorecorder startet die Aufnahme des gewählten Fernsehprogrammes. Eine
Umschaltung auf andere in Ihrem Fernsehgerät gespeicherte Programmnummern hat
keinen Einfluß auf die Aufnahme !
Wenn Sie ein Programm von einem peripheren Gerät aufnehmen,das an
oder FRONT angeschlossen worden ist, ist das Wählen eines anderen
3
Fernsehprogramms auf dem Schirm nicht gestattet. Möchten Sie das
Fernsehprogramm wieder sehen, drücken Sie zweimal die Programmnummer die Sie
sehen möchten.
Achtung: die Aufnahme wird beendet und Ihr Videorecorder wird in den
Bereitschaftszustand geschaltet.
Wenn Sie das Gerät in den Bereitschaftszustand stellen,während Sie ein Programm
von einem peripheren A/V-Gerät aufnehmen, das an
angeschlossen worden ist, weist die blinkende Leuchtdiode an der Vorderseite Ihres
Geräts darauf hin, daß Sie noch dabei sind,auf Band aufzunehmen.Das Blinken hört
auf, nachdem die Aufnahme beendet worden ist.
INSTANT ® Aufnahme-Taste auf der Fernbedienung für das Gerät.
EXTERNAL 1, 3 oder FRONT
EXTERNAL 1,
Aufnahme mit einem Videogerät mit
Wenn Ihr Videogerät mit einer NEXTVIEWLINK-Vorrichtung versehen ist und Sie haben
ein oder mehrere Programme markiert, die automatisch über den
aufgenommen werden sollen, muß das Fernsehgerät nicht in der Bereitschaftsposition
NEXTVIEWLINK
NEXTVIEW-Modus
sein, oder eingeschaltet zu sein,um mit der Aufnahme zu beginnen.
25Aufnahme
Page 53

Nützliche Hinweise
Pflege des Bildschirmes
Ihr Fernsehgerät mit einem wenig
feuchten und weichen Tuch reinigen.
Keine aggressiven Reinigungsmittel
verwenden,die die Schutzschicht Ihres
Fernsehbildschirmes beschädigen können.
Schlechtes Bild
Haben Sie das richtige Fernsehsystem
gewählt ? Befindet sich Ihr Fernsehgerät
oder Ihre Hausantenne nicht zu nahe an
Lautsprechern,nicht geerdeten AudioGeräten oder Leuchtstofflampen usw.?
Berge oder hohe Gebäude können
Doppelbilder oder Geisterbilder
verursachen. Manchmal können Sie die
Bildqualität durch eine Richtungsänderung
der Außenantenne verbessern.
Ist das Bild oder VT/TXT nicht zu
erkennen? Überprüfen Sie, ob Sie die
richtige Frequenz eingestellt haben.Siehe
Einstellung,S.5.
Sind Helligkeit und Kontrast nicht richtig
eingestellt ? Selektieren Sie
Werksvoreinstellung im Grundeinstellungsmenü,S.7.
Die Bildqualität kann manchmal schlecht
sein,wenn eine ans Fernsehgerät
angeschlossene S-VHS-Kamera
eingeschaltet ist und gleichzeitig auch ein
anderes Gerät an
angeschlossen ist.In diesem Fall eines der
beiden Geräte ausschalten.
EXT1 oder EXT2
Kein Bild
Ist die Antenne sorgfältig angeschlossen ?
Sind die Stecker gut in der Antennenbuchse befestigt? Ist das Antennenkabel in
gutem Zustand und mit den richtigen
Steckern versehen? Sind die Anschluß-
Vorrichtungen für ein eventuell
installiertes Zweitgerät in gutem Zustand?
Im Zweifelsfalle sollten Sie sich an Ihren
Händler wenden.
Kein Ton
Keinen Ton bei egal welchem
Fernsehsender? Überprüfen Sie, ob die
Lautstärke nicht auf Minimum eingestellt
ist. Wird der Ton nicht unterbrochen durch
die T on AUS-Taste ¬?
Fernbedienung
Wenn Ihr Fernsehgerät nicht mehr auf die
Befehle der Fernbedienung reagiert,
könnten die Batterien leer sein.
Sie können aber immer noch die M- und
die -/+ Tasten oben an Ihrem Gerät
benutzen.
Menü
Haben Sie das falsche Menü gewählt ?
Drücken Sie erneut die
das Menü zu verlassen.
MENU Taste,um
Keine Lösung?
Schalten Sie Ihr Gerät aus und sofort
wieder ein (nur einmal).
Versuchen Sie niemals, ein defektes
Fernsehgerät selbst zu reparieren.
Ziehen Sie Ihren Fachhändler zu rate oder
rufen Sie einen Fernsehtechniker heran.
Entsorgungs-Richtlinien
Philips kümmert sich besonders um eine
unweltfreundliche Herstellung.
Ihr neues Fernsehgerät enthält Materialien,
die rückgewonnen und wiederverwertet
werden können.Spezialbetriebe können
die ausrangierten Geräte in Ihre Bestandteile zerlegen und die wiederverwertbaren
Materialien sammeln.Damit verringert sich
die Menge der Materialien,die entsorgt
werden müssen.Bitte , erkundigen Sie sich
nach den örtlichen Bestimmungen,
hinsichtlich der Entsorgung Ihres alten
Gerätes.
Wie entsorgen Sie leere Batterien?
Die für die Fernbedienung Ihres neuen
Fernsehgerätes mitgelieferten PhilipsBatterien enthalten nicht die Schwer-metalle
Quecksilber und Kadmium. Trotzdem dürfen
in verschiedenen Ländern,leere Batterien
nicht in den Hausmüll gegeben werden.
Bitte, erkundigen Sie sich,wie leere
Batterien den örtlichen V orschriften
entsprechend zu entsorgen sind.
Inhaltsverzeichnis
a ACI, 5
Active Control, 10
Aufnehmen, 25
Auto Format, 7
Automatische Abschaltung, 12
Automatische Einstellung, 5
b Bildeinstellungen, 11
Bildformat, 9
Bildlage, 7
Bildschirmanzeige, 8
c Camcorder, 21
d Decoder/Descrambler, 7
Digitale A/V Quellen, 21
Digital Scan, 11
Dual Bild, 9
Dynamic Contrast, 11
DVD, 24
e Euro-A/V-Kabel, 20
f Fernsehgerät einschalten, 3
Nützliche Hinweise & Inhaltsverzeichnis
26
Fernsehsender speichern, 4
Fernsehsender wählen, 8
Frequenz, 5
g Grundeinstellung, 7
h Höhen, 11
i Incredible Surround, 8
Informationszeile, 7
k Kindersicherung, 12
Kopfhörer, 22
l Land, 4
Lautstärke, 8
m Manuelle Einstellung, 5
Menüsprache, 4
n Namen geben, 6
NEX
TVIEW,
nicam, 9
NTSC-Farbton, 11
p Programmliste, 12
s Satellitenempfänger, 24
13
Smart Bild und Ton, 10
Sprache, 4
Stereo, 9
Standbild, 9
Ständige Untertitelung, 19
Subseiten Videotext, 18
Suche der Fernsehsender, 5
S-VHS, 25
t Tiefen, 11
Tonunterbrechung, 8
Toneinstellungen, 11
u Umprogrammieren, 6
v Videorecorder, 23
Videotext, 17
Vorzugsprogramme, 6
w Werksvoreinstellung, 7
z Zweikanaltons, 9
Page 54

Lexicon
100 Hz
Eine T echnologie für augenschonendes
Fernsehen.Gewöhnliche TV-Geräte bauen
50 Bilder in der Sekunde auf.Das dadurch
verursachte Flimmern – besonders
störend auf grossen,hellen Flächen –
strengt die Augen sehr an. Die 100 HzTechnologie erzeugt das Bild 100 mal in
der Sekunde. Das „GrossflächenFlimmern“ ist damit beseitigt.
Automatic Channel Installation (ACI)
Die automatischen Kanalwahl (ACI)
installiert alle verfügbaren TV -Kanäle
automatisch in der von Ihrer Kabelgesellschaft angebotenen Reihenfolge.
Dies setzt natürlich voraus,daß die
entsprechenden Daten mit übertragen
werden.Dabei wird jedem Programm
automatisch eine Programmnummer sowie
ein Name zugewiesen.Mit ACI läuft die
Kanaleinrichtung vollkommen automatisch
und damit einfach und binnen Sekunden
ab.
Easy T ext
Videotext-Speicher, der ihre Lieblingsvideotextseiten speichert, so daß Sie
immer sofort auf diese zugreifen können.
Euroconnector (Euro-A/V-Anschluß)
Ein 21-Pol.-Steckersystem für den
unkomplizierten Anschluß von
unterschiedlichen Audio-/Videogeräten an
das Fernsehgerät.
Kindersicherung
Auf diese Art und Weise können Sie einer
unerwünschten Benutzung Ihres
Fernsehgeräts vorbeugen.
Die Tasten - und + oben am Fernsehgerät
können nicht benutzt werden.
Menü
Das übersichtliche Bildschirm-Display für
alle Einstellmöglichkeiten,die mit einem
Cursor von der Fernbedienung aus
gewählt und geschaltet werden können.
Smart Bild und Ton
Tasten auf der Fernbedienung,mit denen
man schnell und leicht bestimmte Bildund Toneinstellungen vornehmen kann.Es
gibt eine Reihe vorprogrammierter Bildund T on-Einstellungen,die per T aste
wählbar sind.
Standbild
Die TV-Betriebsar t, mit der man ein
bestimmtes Bild aus dem laufenden TVProgramm ”einfrieren” kann.
Videotext/Teletext
Siehe auch Lernfähiges Videotext-System.
WST: World Standard Teletext.
Videotext W eltstandard
FLOF:Full Level one Features. Ein in
Großbritannien gebräuchliches System für
schnellen Zugriff auf Videotext-Seiten.
TOP:Table of (Teletext) Pages. Deutsches
Videotext-System für den schnellen Zugriff
auf Videotext-Seiten.
Automatische Abschaltung
Mit der automatischen Abschaltung
können Sie selbst die Zeitdauer
bestimmen,nach der das Fernsehgerät
ausgeschaltet werden soll.
Digital Scan
Eine neue Technik,das sogenannte
Zeilenflimmern zu unterdrücken - die
störende Vibration feiner horizontaler Linien.
In Verbindung mit der 100 Hz-Technologie
sorgt Digital Scan für ein Bild,das so stabil
steht wie ein Dia.
EasyLink
Die intelligente ESI-Bus-Verbindung
zwischen Fernseher und Videorecorder.
Reduziert die Bedienung und
Signalquellen-Wahl zum Druck auf eine
einzeige T aste.
NEXTV
IEW
NEX
TVIEW ist eine neue Bedienungsmöglichkeit,die dem Benutzer eines
Fernseh- oder Videogeräts dabei hilft,die
Programme,die er sehen möchte,einem
Bildschirmfernsehprogrammführer zu
entnehmen.
NEXTVIEW zeigt dem Benutzer
eine Beschreibung eines jeden Fernsehprogramms und der Benutzer kann
interessante Programme markieren,die
vorprogrammiert (Auto TV Ein) oder auf
Band aufgenommen werden sollen.
NTSC
(National T ele vision Standards
Committee).Die Sendenorm für
Farbfernsehen in den USA,Japan und
Teilen von Südamerika und Südostasien.
Lexicon
27
Page 55

Table des matières
Installation
Votre télécommande 2
Préparation 3
Installation 4
Mise en mémoire des chaînes 4
Sélectionnez votre langage et votre pays 4
Installation automatique 5
Installation manuelle 5
Nom du programme 6
Modifier la liste des programmes 6
Sélection des programmes préférentiels 6
Installation de la configuration 7
Utilisation
Utilisation de la télécommande 8-10
Utilisation des menus
Menu image 11
Menu son 11
Menu options 12
NEXTVIEW 13-16
Télétexte 17-19
Français
Les touches en haut du téléviseur 19
Branchement des périphériques
Branchement et sélection des périphériques 20-23
Fonctions de la télécommande pour les périphériques 23-24
Enregistrement 25
Conseils 26
Index 26
Lexique 27
Les options de EasyLink sont basées sur le principe "commande au
moyen d'une seule touche". Cela signifie qu'un certain nombre
d'opérations consécutives sont exécutées simultanément par le téléviseur
et le magnétoscope si les deux appareils disposent de la fonction
EasyLink et sont connectés par le câble péritel qui est fourni avec le
magnétoscope.
1
Page 56

yÚ
yÚ
213
546
879
0
B
®
Ò
‡π
†
M
SMART
ACTIVE CONTROL
¬
V P
aw
h
q
b
i
0
SX
fhU
hU
æ
MENU
INSTANT
Q
b
OK
◊
MODE
VCR
Installation p. 4
Préparation
Votre télécommande
EasyLink p. 25
®
INSTANT enregistrement
position veille p.8
B
Q incredible surround marche/arrêt p. 8
sélection du DVD/satellite p.24
sélection du magnétoscope p.23
NEXTVIEW/Guide télétexte æ
marche/arrêt p.13
menu principal marche/arrêt MENU
p. 11
volume haut/bas p.8
V
suppression du son p.8 ¬
sélection des programmes p.8 P
Périphériques p.23
w
sélection du EXT1, EXT2,
EXT3 ou FRONT
son smart p.10
image smart p. 10 a
Touches colorées
- sélection
NEXTVIEW, p. 13
- sélection directe d’une page de txt
Télétexte p. 17
b télétexte marche/arrêt
ou d’un sujet, p.17
Appareils audio/vidéo p.23-24
C heure
sélection des sous-pages
f informations cachées
h double hauteur
curseur pour sélectionner
votre choix p.4
OK valider votre sélection
X sélection son ou langage p.9
sélection du groupe de langues
pour le Télétexte p. 17
i info à l’écran p. 8
0 programme précédent p. 8
◊ fonction magnétoscope/DVD
S arrêt sur image p.9
M
arrêt sur télétexte p.18
b deux écrans marche p.9
q format d’image p.9
h active control marche/arrêt p.10
2 Préparation
Page 57

CABLE
Préparation
& Placez le téléviseur sur une surface solide et stable.
min.
1m
Prévoyez un espace libre d'au moins 5 cm autour de l'appareil pour l'aération.
Ne pas poser le TV sur la moquette.
Pour éviter toute situation dangereuse, ne pas placer d'objets sur l'appareil.
Préservez le téléviseur de toute exposition directe à une source de chaleur
ou à la lumière du jour. Evitez également de le mettre directement en contact
avec de la pluie ou de l’eau.
é Introduisez la fiche d'antenne dans l'entrée d'antenne x à l'arrière d u
téléviseur.
“ Introduisez la fiche dans la prise de courant avec une tension secteur de
220V - 240V.
Afin d’éviter tout dommage du cordon d’alimentation qui pourrait
entraîner des risques d’incendie ou (et) d’électrocution,ne jamais placer le
téléviseur sur le câble.
R6 / AA
‘ Télécommande: Enlevez le couvercle du compar timent à piles.
Mettez les deux piles fournies (type R6-1,5V).
Même si les piles livrées avec la télécommande ne contiennent pas de métaux
lourds tels que le mercure ou le cadmium, la législation de certains pays peut
cependant interdire la dépose de piles usagées dans les déchets ménagers .
Informez-vous pour connaître les dispositions en vigueur dans votre pays.
Note: cette télécommande fonctionne avec les téléviseurs supportant le protocole
RC6 standard.
( Mise en service du téléviseur:Appuyez sur la touche A sur la face avant
du téléviseur.
Un voyant vert s’allume sur la face avant du téléviseur et l’écran s’illumine.
Si le voyant est rouge,appuyez sur la touche + P - de la télécommande.
Le voyant vert clignote chaque fois que vous appuyez sur une touche de la
télécommande.
Lorsque vous allumez votre TV pour la première fois, le menu
automatiquement à l’écran. Successivement les indications apparaissent
automatiquement sur l’écran dans les langages différents. Choisissez votre propre
langue et appuyez sur la touche OK de la télécommande.
Passez à la page 4.
LANGAGE apparaît
3Préparation
Page 58

B
®
Ò
‡π
†
f hU
æ
MENU
b
OK
INSTANT
Q
yÚ
V P
213
546
B
®
Ò
‡π
†
¬
fhU
æ
MENU
b
OK
INSTANT
Q
yÚ
revenir ou mettre
hors service le menu
Installation
Sélectionnez le menu INSTALLATION
Appuyez simultanément sur les touches U et h.
Utilisation des menus
& Utilisez le curseur de direction haut/bas, gauche/droite pour sélectionner un
sujet des menus.
é Utilisez la touche OK située pour valider.
“ Utilisez la touche MENU pour revenir ou pour mettre hors ser vice le menu.
J INSTALLATION
Langage
Langage
valider
curseur pour
sélectionner un
sujet des menus
TITRE DU MENU
Sujet 1
Sujet 2
Sujet 3
J Sujet 4
J Sujet 4 L M
Sujet 5
Sujet 6
Mémoriser les chaînes de télévision
Après que la nouvelle chaîne ou la chaîne supplémentaire a été mémorisée, le
téléviseur transmet automatiquement cette (ces) chaîne(s) de télévision au
magnétoscope si celui-ce dispose de la fonction EasyLink. Le message EasyLink :
Chargement .... apparaît sur l'écran. La liste des chaînes du magnétoscope est
maintenant la même que celle du téléviseur. Si le téléviseur est connecté à un
magnétoscope qui dispose de la fonction
automatiquement la langue et le pays sélectionnés au magnétoscope.
Sélectionnez votre langage et votre pays
Vous pouvez choisir vous-même votre langage et votre pays.
& Sélectionnez Langage et appuyez sur la touche OK.
NEXTVIEWLink, le téléviseur transmet
J LANGAGE
MENU TITLE
....
....
Français
J PAYS
MENU TITLE
Gr. Bretagne
....
....
4
Installation
é Sélectionnez votre langage et appuyez sur la touche OK.
Utilisez le curseur de direction haut/bas pour parcourir la liste et faire
apparaître d’autres langues non affichées à l’écran.
“ Sélectionnez Pays et appuyez sur la touche OK.
‘ Sélectionnez le pays dans lequel vous vous trouvez et appuyez sur la
touche OK.
Utilisez le curseur de direction haut/bas pour parcourir la liste et faire
apparaître d’autres pays non affichés à l’écran.
Sélectionnez
Vous pouvez maintenant rechercher et mémoriser les chaînes de télévision de
deux façons différentes :utilisant installation automatique ou installation
manuelle (introduire chaîne par chaîne).
Sélectionnez votre choix et appuyez sur la touche OK.
Autre quand le pays où vous vous trouvez n’est pas présent.
Page 59

Installation automatique
Installation automatique
Marche
Stop
J Arrêt K
TV en recherche:
un instant svp
Installation automatique
J Marche K
Marche
Arrêt
1 TF1
2 FR2
3 RTL4
....
....
Installation manuelle
(Mode sélection)
J Système K
Système
N° de programme
Recherche
Réglage fin
Mémorisation
Sélectionnez
Marche dans le menu Installation automatique et appuyez sur la
touche OK pour déclencher la recherche.Toutes les chaînes sont
recherchées et mémorisées automatiquement.
Si un réseau câblé diffusant une installation automatique des chaînes (ACI) est
détecté ou si le dispositif reconnaît le signal de distribution par câble dans la
mesure où celle-ci transmet une page de télétexte comportant les fréquences
et les noms présélectionnés de toutes les chaînes télévisées susceptible d’être
reçues, toute recherche est interrompue et une liste des chaînes
présélectionnées est affichée. Cette liste est automatiquement assortie de
tous les numéros et noms présélectionnés des chaînes TV disponibles.
Il est possible qu’un réseau émettant du télétexte diffuse ses propres paramètres.
Ces paramètres sont alors définis par le réseau concerné. Faites votre sélection avec
le curseur et appuyez sur la touche OK.
Appuyez sur la touche
MENU de la télécommande pour quitter le menu.
Passez à la page 6.
Installation manuelle
La recherche et la mise en mémoire des chaînes de télévision est exécutée
chaîne par chaîne.
Vous devez passer par toutes les étapes du menu
Mode sélection n’est présent que lorsque le pays que vous avez sélectionné
Installation manuelle.
offre aussi l’option de sélection d’un canal (canaux S par antenne, canaux C
par câble).Vous pouvez choisir un autre mode de sélection.
& Sélectionnez le système de télévision
Sélectionnez le pays ou la partie du monde pour lequel vous voulez
sélectionner l’émetteur.
Si vous êtes raccordé à la télévision par câble, sélectionnez le pays ou la
partie du monde où vous vous trouvez en ce moment.
é Enfoncez le curseur vers le bas et introduisez le numéro de programme à
l’aide des touches chiffrées.
“ Recherchez une chaîne de télévision
Appuyez sur le curseur de direction gauche/droite.La fréquence ou le
numéro de canal augmente jusqu’à ce qu’une chaîne ait été trouvée.
Introduire vous-même une fréquence
Si vous connaissez la fréquence, ou le numéro de canal C ou S,vous pouvez
l’introduire directement à l’aide des touches chiffrées 0 à 9.
Demandez une liste des fréquences à votre société de télédistribution ou à
votre revendeur ou consultez le tableau de fréquences à l’intérieur de la
couverture arrière de ce mode d’emploi.
‘ Réglage fin
Si la réception est mauvaise, vous pouvez améliorer la réception en réglant la
fréquence avec le curseur gauche/droite .
( Mémoriser les étapes & à ‘
Sélectionnez
Répétez chaque étape pour mémoriser une autre chaîne.
Mémorisation et appuyez sur la touche OK.
§ Appuyez sur la touche MENU pour quitter le menu.
5Installation
Page 60

INSTALLATION
Langage
Pays
Installation automatique
Installation manuelle
J Nom du programme
Nom du programme
Modifier n° de programme
Programmes préférentiels
CONFIGURATION
Nom du programme
EXT1
EXT2
EXT3
FRONT
0
J 0
1 TF1
2 FR2
3 ....
4 ....
5 ....
Nom du programme
Il est possible de modifier le nom de la chaîne déjà mémorisé ou d'attribuer
un nom à une chaîne encore dépourvue de nom. Vous pouvez donner un nom
de 5 lettres ou chiffres au maximum aux numéros de programme 0 à 99. Par
exemple :TF 1, FR 2,.... Entre 99et 0 vous pouvez aussi dénommer tous les
périphériques qui sont branchés.
& Choisissez Nom du programme dans le menu INSTALLATION et appuyez
sur la touche OK.
é Sélectionnez le numéro de programme.
“ Appuyez sur la touche OK.
‘ Sélectionnez le signe avec le curseur haut/bas.
( Sélectionnez la position suivante avec le curseur droite.
§ Sélectionnez le signe suivant.
è Appuyez sur la touche OK quand vous avez fini.
! Appuyez sur la touche MENU pour revenir au menu INSTALLATION.
L’espace , les chiffres ou autres signes spéciaux se trouvent entre Z et A.
Modifier la liste des programmes
Vous pouvez, à votre guise,reclasser les chaînes mémorisées.
Modifier n° de programme
EXT1
EXT2
EXT3
FRONT
0
J 1 FR2
1 CNN
2 RTL4
3 ....
4 ....
5 ....
Programmes préférentiels
0 ... Non
1 ... Oui
J 2 ... Oui
2 ... Non
3 .... Non
4 .... Oui
5 ....
& Choisissez Modifier n° de programme dans le menu INSTALLATION et
appuyez sur la touche OK.
é Choisissez le numéro de la chaîne de télévision que vous voulez changer.
“ Appuyez sur la touche OK.
‘ Sélectionnez le nouveau numéro que vous souhaitez substituer à celui
préalablement sélectionné.
( Appuyez sur la touche OK.
Recommencez l’opération jusqu’à ce que l’affection des numéros de toutes
les chaînes de télévision vous convienne.
§ Appuyez sur la touche MENU pour revenir au menu INSTALLATION.
Sélectionner les programmes préférentiels
Lorsque vous passerez rapidement les chaînes en revue après l’installation en
enfonçant la touche +P -, seules les chaînes de la liste préférentielle
s’afficheront.Les chaînes non préférentielles peuvent toujours être
sélectionnées avec les touches chiffrées.Par défaut, toutes les chaînes mises
en mémoire sont ajoutées à la liste préférentielle.
& Choisissez Programmes préférentiels dans le menu INSTALLATION et
appuyez sur la touche OK.
é Choisissez votre numéro de programme préférentiel.
“ Sélectionnez Oui ou Non avec le curseur gauche/droite.
‘ Répétez pour chaque chaîne que vous voulez modifier en chaîne
préférentielle ou non-préférentielle.
( Appuyez sur la touche MENU pour revenir au menu INSTALLATION.
Installation
6
Pour que le système NEXTVIEW fonctionne comme il faut, la première chaîne de
télévision de la liste préférentielle doit également diffuser la date et l’heure correctes
via le télétexte.
Page 61

INSTALLATION
Langage
Pays
Installation automatique
Installation manuelle
Nom du programme
Modifier n° de programme
Programmes préférentiels
J CONFIGURATION
CONFIGURATION
CONFIGURATION
Digital Sources
J Sources numériques
Décodeur
(Déplacement image)
Ligne d’informations
Préréglages d’usine
Format auto. oui/non
INSTALLATION
Régler la Configuration TV
Le menu Configuration vous défini quels sont les fonctions d’initialisation
autres que celles destinées à l’installation des chaînes.
Le menu Configuration contient les items relatives aux fonctions TV,
accessoires,et périphériques que vous aurez connectés.
& Utilisez le curseur de direction haut/bas, gauche/droite pour sélectionner un
sujet des menus.
é Utilisez la touche OK pour valider.
“ Utilisez la touche MENU pour revenir ou pour mettre hors ser vice le menu.
Sources numériques
Voir Branchement des périphériques, p.21, pour brancher vos périphériques
numériques, telles que le DVD,le tuner satellite numérique ou tout autre
périphérique numérique.
Décodeur
J Programme
Programme
Décodeur utilisé
Mémoriser les numéros de programmes décodeur
Si vous avez branché un décodeur,voir p. 20,vous pouvez réser ver un ou
plusieurs numéros de programme pour les chaînes venant d’un décodeur.
Appuyez sur le curseur en direction gauche/droite pour sélectionner
EXT1 ou EXT2,la prise péritel à lequel vous avez raccordé le décodeur.
Sélectionnez
Arrêt si le programme reçu ne nécessite pas de décodeur
Arrêt,
extérieur.
Sélectionnez entrée
EXT2 quand le décodeur est branché sur un magnétoscope qui
dispose de la fonction EasyLink. Du moment que le décodeur est sélectionné,le
message EasyLink : Chargement auto des chaînes .... apparaît sur l'écran.
Déplacement image (si présent)
Choisissez
Déplacement image avec le curseur haut/bas.
Gardez le curseur gauche/droite enfoncé pour ajuster au mieux la correction
horizontale.
Ligne d’informations
Sélectionnez Marche et après avoir choisi une chaîne de télévision ou après
avoir appuyé sur i sur la télécommande, une chaîne à télétexte peut
transmettre le nom de la chaîne ou le titre du programme télévisé ou un
autre message Cette information est affichée à l'écran, de même que les
informations relatives au son et au format image.
Lorsque la position
Arrêt est sélectionnée , seules les informations concernant
le son et le format image s’affichent après la sélection d'une chaîne de
télévision ou après avoir enfoncé la touche i.
Préréglages d’usine
Sélectionnez
Préréglages d’usine et appuyez sur la touche OK pour rétablir
les réglages de l’image et du son, préréglés en usine.
Format auto.
En l’absence d’informations de signalisation de format transmises par
l’émetteur, le téléviseur optimisera le format de l’écran en fonction de l’image
reçue, dans le cas ou
Format auto Oui a été sélectionné.
Avec la touche q de la télécommande, vous avez toujours la possibilité de
sélectionner un autre format (voir page 9).
Installation
Sélectionnez Installation et appuyez sur la touche OK pour retourner
immédiatement au menu
INSTALLATION.
‘ Appuyez plusieurs fois sur la touche MENU pour quitter le menu.
7Installation
Page 62

yÚ
V P
SMART
ACTIVE CONTROL
Maw
h
q
bSX
213
546
879
0
B
®
Ò
‡π
†
¬
i
0
fhU
æ
MENU
b
OK
◊
INSTANT
Q
® Enregistrement instant
Si votre magnétoscope dispose de la fonction
EasyLink,la touche
INSTANT ® pour
enregistrement peut être commandée dans le
mode TV .
®Ò‡π† Magnétoscope voir p.23
æ NEXTVIEW/Guide télétexte
marche/arrêt voir p. 13
MENU Menu principal marche/arrêt
voir p.11
OK Appuyez sur cette touche pour activer
le choix que vous avez effectué dans les
menus.
V Volume
Appuyez sur + ou - pour régler le volume.
¬ Suppression du son
Pour supprimer momentanément ou pour
rétablir le son.
P Sélection des chaînes
Pour un contrôle rapide des chaînes de
télévision de la liste préférentielle.
i Affichage d’information à l’écran
Appuyez 5 secondes pour activer ou
désactiver l’augmentation ou la réduction des
information se rapportant au programme TV
affichées à l’écran.
Appuyez brièvement pour afficher des infos
pour la chaîne sélectionnée, le mode de
réception du son, les réglages d’image et le
temps restant avant la mise en veille .
Utilisation
Utilisation de la télécommande
B Position veille
Le téléviseur est mis hors service et un
voyant rouge,s’allume.
Pour mettre le téléviseur de nouveau en
service, appuyez sur + P - ou sur les touches
chiffrées.
Si votre magnétoscope EasyLink dispose de la
fonction système veille et après appui de 3
secondes sur la touche B,téléviseur et
magnétoscope passent en veille.
Même en mode veille, votre téléviseur consomme
de l’énergie. Or,toute consommation d ’énergie
pollue l’eau et l’atmosphère. Nous vous
conseillons donc de ne pas le laisser en mode
veille.
0/9 Touches chiffrées
Pour choisir une chaîne de télévision.
Pour un numéro de programme à deux chiffres, introduisez le second
chiffre dans les 2 secondes.
Pour regarder directement une chaîne à un chiffre que vous avez
sélectionnée, appuyez sur la touche chiffrée un peu plus longtemps.
Q Incredible Surround
Lorsque cette fonction est mise en marche
en mode son MONO,elle vous permet
d’entendre un effet de son spatial.
Lorsque
choisi en mode son
l’impression que les haut-parleurs sont plus
éloignés l’un de l’autre.
b Télétexte marche/arrêt voir p.17
fh Fonctions télétexte voir p. 18
U Demander l’heure
L’heure est donnée par le télétexte de la
chaîne affectée au numéro de programme 1
ou au numéro de programme préférentiel le
plus bas.
Cette fonction n’est pas disponible quand Soustitre est mis en position Marche.
Incredible Surround Marche est
STÉRÉO, vous avez
Utilisation de la télécommande
8
0 Programme précédent
La chaîne de télévision sélectionnée auparavant réapparaît à l’écran.
L’indication ◊ est utilisable avec un magnétoscope/DVD.
Page 63

yÚ
V P
SMART
ACTIVE CONTROL
Maw
h
q
bSX
213
546
879
0
B
®
Ò
‡π
†
¬
i
0
fhU
æ
MENU
b
OK
◊
INSTANT
Q
X Emission bilingue et
sélection du son
Appuyez sur cette touche
• pour choisir entre son Stéréo ou Mono,si
la chaîne transmet le son en stéréo, ou
Nicam Stéréo ou Nicam disponible ,
entre
si la chaîne transmet le son en numérique;
• pour choisir entre Langage Y (Dual Y)ou
Langage Z (Dual Z),en cas d’émission
bilingue.
Le réglage est mémorisé par chaîne.
S Arrêt sur image
Pour activer/désactiver l’image arrêtée ou
pour arrêter la rotation automatique des
sous-pages télétexte.
w Sélectionner les périphériques
Appuyez plusieurs fois sur cette touche pour
sélectionner
EXT1, EXT2, EXT3 ou FRONT,
selon l’entrée sur laquelle vous avez branché
votre appareil (voir p. 23).
q Format d’image
Appuyez plusieurs fois sur cette touche pour
sélectionner un format d’image:4:3,
Ext.image 14:9,Ext. image 16:9 avec ou sans
sous-titres,Plein écran,Super 4:3 ou
Automatique (dans le cas ou Format auto.Oui
a été sélectionné dans le menu
CONFIGURATION).
En choisissant Automatique, l’image remplira le
plus possible l’écran.
Parfois,des programmes de magnétoscopes et
DVD sont également pourvus de signaux
spéciaux qui font automatiquement passer le
téléviseur au bon format d’image.
Le Format auto. est mis hors ser vice lor sque la
fonction 2 écrans est activée.
Dans le format d’image Ext.Image 14:9,16:9
ou Super 4:3,vous pouvez faire apparaître ou
disparaître les sous-titres au moyen du curseur
haut/bas.
b Deux écrans
& Appuyez sur la touche b pour activer la
fonction 2 écrans.
L’écran du téléviseur est divisé en 2 parties:
- le côté gauche pour l’image
principale/normale,
- le côté droit pour la diffusion du télétexte
de la chaîne TV sélectionnée ou
NEXTVIEW/Guide Télétexte.
pour
Pour utiliser le
NEX
TVIEW
/Guide Télétexte,
voir p.13, pour utiliser le télétexte, p.17.
Si la fonction 2 écrans est désactivée,l’image,le
télétexte ou
NEXTVIEW
/Guide Télétexte sont
affichés en plein écran.
é Appuyez sur la touche q pour
sélectionner ou quitter le format d’image
16:9.
“ Appuyez sur la touche - P + pour faire
défiler les pages télétexte.
‘ En mode télétexte deux écrans, appuyez sur
la touche b pour revenir à l’image plein
écran ou appuyez sur la touche b pour
revenir au télétexte plein écran.
( En mode NEXTVIEW/Guide Télétexte deux
écrans, appuyez sur la touche æ pour
revenir à l’image plein écran ou appuyez sur
la touche b pour revenir au
NEXTVIEW/Guide Télétexte plein écran.
9Utilisation de la télécommande
Page 64

yÚ
V P
SMART
ACTIVE CONTROL
Maw
h
q
bSX
213
546
879
0
B
®
Ò
‡π
†
¬
i
0
fhU
æ
MENU
b
OK
◊
INSTANT
Q
Touches Smar t
Pour sélectionner des paramètres définis de
l’image et du son.
M Smart Son
Chaque fois que vous appuyez sur cette
touche, vous sélectionnez un réglage du son
différent,correspondant à un réglage
spécifique des aigus et des graves,
préalablement défini en usine.
a Smart Image
Chaque fois que cette touche est activée,un
paramétrage d’image différent est
sélectionné, correspondant à un préréglage
spécifique du Contraste, de la Couleur, de la
Définition et du Contraste Dynamique.
Préférent. renvoie aux réglages personnels
de l’image et du son sélectionnés dans le
menu image et son.
Remarque: lorsque vous avez activé les
préréglages son ou image et que vous modifiez
un réglage dans le menu image ou son, toutes les
nouvelles valeurs que vous introduisez dans ce
menu remplacent les réglages préalables.
h Active control
Active control est un système proactif et
automatique. Le téléviseur mesure et corrige
continuellement tous les signaux qu’il
réceptionne afin d’obtenir la meilleure image
possible.
Appuyez sur la touche h pour sélectionner
les valeurs Active control Arrêt ou Marche.
Arrêt Définition et Contraste Dynamique
sont contrôlées automatiquement
Marche Définition, Contraste Dynamique et
Réduction du bruit sont contrôlées
automatiquement.
Utilisez le curseur de direction haut/bas
pendant que les réglages Active control
sélectionnés sont affichés dans le haut de
l’écran.
Le menu Active Control apparaît.
Les paramètres de l’image sont adaptés en
continu et de façon automatique. Les
éléments de menu ne peuvent pas être
sélectionnés. Utilisez de nouveau le curseur
de direction haut/bas pour mettre hors
service le menu.
10
Utilisation de la télécommande
Page 65

MENU PRINCIPAL
V P
213
B
®
Ò
‡π
†
¬
fhU
æ
MENU
b
OK
INSTANT
Q
yÚ
J IMAGE
SON
OPTIONS
PROGRAMMES
revenir ou mettre
hors service le
menu principal
OK pour valider
sélectionner un
sujet des menus
Utilisation des menus
& Appuyez sur la touche MENU pour activer/désactiver le MENU PRINCIPAL.
é Utilisez le curseur de direction haut/bas pour sélectionner le menu IMAGE,
SON ou OPTIONS ou pour sélectionner la liste des PROGRAMMES.
“ Utilisez le curseur de direction droite pour activer le menu sélectionné.
‘ Utilisez le curseur de direction haut/bas, gauche/droite pour sélectionner un
sujet des menus.
( Utilisez la touche OK pour valider.
§ Utilisez plusieurs fois la touche MENU pour revenir ou pour mettre hors
service le menu.
Menu image
Si vous êtes en train de regarder un périphérique NTSC branché à l’une des prises
péritel, l’option Hue apparaît également.
IMAGE
Contra
J Contraste L M
Lumière
Couleur
Définition
Teinte
Digital Scan
Contraste Dynamique
SON
J Volume L M
Volume
Balance
Aigus
Graves
Volume du casque
Teinte
Choisissez la teinte:
Normale, Chaude ou Froide.
Digital Scan (Réduction du Flicker lignes)
En format extension image, la fonction digital scan est toujours active.
L’item du menu n’est pas disponible.
Pour certains types d'images,il peut être souhaitable de ne pas utiliser la
fonction de Réduction du Flicker lignes.Dans les autres cas, laissez-le en
service.
Appuyez sur le curseur gauche/droite afin de choisir
Marche ou Arrêt.
Contraste Dynamique
Afin d’accentuer le contraste entre les parties d’images plus foncées et plus
claires,mettez la fonction en position
Pour certains types d’images,il peut être souhaitable de choisir
Arrêt.
Méd.
Min., Max. ou
Les réglages modifiés pour le Contraste, la Luminosité,les Couleurs,la
Définition, les Teintes, Digital Scan et le Contraste Dynamique sont
automatiquement mémorisés pour toutes les chaînes de télévision.
Choisissez
Préréglages d’usine dans le Menu de Configuration pour rétablir
les paramètres préréglés en usine, voir page 7.
Menu Son
Les réglages modifiés pour Volume, Balance,Aigus et Graves sont
automatiquement mémorisés pour toutes les chaînes de télévision.
Choisissez
les paramètres préréglés en usine, voir page 7.
Préréglages d’usine dans le Menu de Configuration pour rétablir
Volume du casque
Voir Brancher les périphériques, p.22 pour le raccordement de votre casque.
11Utilisation des menus
Page 66

revenir ou mettre
V P
213
546
879
B
®
Ò
‡π
†
¬
fhU
æ
MENU
b
OK
INSTANT
Q
yÚ
hors service le
menu principal
OK
pour valider
sélectionner un
sujet des menus
J OPTIONS
Arrêt programmé Arrêt
Verrouillage Arrêt
Sous-titre Arrêt
Menu Options
& Appuyez sur la touche MENU pour activer/désactiver le MENU PRINCIPAL.
é Utilisez le curseur de direction haut/bas pour sélectionner le menu
OPTIONS.
“ Utilisez le curseur de direction droite pour activer le menu sélectionné.
‘ Utilisez le curseur de direction haut/bas pour sélectionner un sujet des
menus.
( Utilisez le curseur de direction gauche/droite pour sélectionner le paramètre
désiré.
Arrêt programmé
Grâce à cette option, vous pouvez programmer une durée après laquelle le
téléviseur passera automatiquement en position de veille. Le compteur
compte à partir de
du téléviseur, le décompte de la dernière minute apparaîtra à l’écran.Non
visible lorsque la fonction 2 écrans est activée. Vous pouvez toujours arrêter
le téléviseur avant l’heure d’arrêt programmée ou reprogrammer l’heure
d’arrêt avant la mise en veille automatique.
Verrouillage
Si le téléviseur est verrouillé,il ne peut être mis en service qu’à l’aide des
touches chiffrées sur la télécommande. Il n’y a pas moyen d’utiliser les
touches P - et + en haut du téléviseur pour sélectionner une chaîne de
télévision. De cette manière,vous évitez l’utilisation non autorisée du
téléviseur. Si le message
verrouillage hors service pour utiliser les touches P - ou + en haut du
téléviseur afin de sélectionner une chaîne de télévision.
Arrêt jusqu’à 180 min. Une minute avant la mise en veille
Verrouillage Marche apparaît, il faut mettre le
Sous-titre
Les chaînes TV avec télétexte transmettent souvent certains programmes avec
sous-titrage. Voir Télétexte,Sous-titres à la p.19 pour sélectionner la page de
sous-titrage désirée dans l’index du télétexte.
Sélectionnez
Appuyez sur la touche
Sous-titre Marche ou arrêt.
MENU pour mettre hors ser vice le menu Options.
Liste des programmes
& Appuyez sur la touche MENU pour activer/désactiver le MENU PRINCIPAL.
é Utilisez le curseur de direction haut/bas pour sélectionner PROGRAMMES.
“ Utilisez le curseur de direction droit pour avoir un aperçu de toutes les
chaînes de télévision installées.
‘ Utilisez le curseur haut/bas pour parcourir la liste et appuyez sur la touche
OK pour sélectionner la chaîne de télévision désirée.
( Appuyez sur la touche MENU pour mettre hors ser vice la liste des
programmes
12 Utilisation des menus
Page 67

V P
213
B
¬
fhU
æ
MENU
b
OK
INSTANT
Q
æ
MENU
yÚ
NEXTVIEW
/ Guide Télétexte
Aujourd'hui,la plupar t des chaînes de télévision européennes proposent des
pages de télétexte qui contiennent le programme des émissions du jour. Vous
pouvez consulter ces pages en activant le
De plus en plus de chaînes de télévision proposent un service étendu de Guide
des Programmes,appelé
NEXTVIEW.NEXTVIEW est un nouveau procédé pour
présenter les programmes et offre plus d'options que le système télétexte
ordinaire.Grâce à
NEXTVIEW,il est par exemple possible de faire voir tous les
films programmés pour la soirée en question.
Ces deux systèmes sont intégrés dans ce téléviseur:
Télétexte. Si une chaîne de télé déterminée opère avec le système
le téléviseur présentera automatiquement le Guide
télé opère uniquement avec télétexte,le téléviseur activera automatiquement le
Guide Télétexte. Les deux systèmes proposent les mêmes fonctions :
enregistrement,préprogrammation et information.
Toutefois,pour le Guide Télétexte,c'est le diffuseur (chaîne de télévision) qui
détermine si ces fonctions sont disponibles ou non.
Vous pouvez rechercher les émissions que vous voulez voir 24 heures sur 24.
Il est également possible de rechercher une émission par thème,p.ex. du sport,
un film,etc. Une fois sélectionnée, l'émission en question peut être marquée, à
titre de rappel,ou pour l'enregistrer automatiquement sur le magnétoscope (à
condition que le magnétoscope soit équipé du
journellement,hebdomadairement ou sous le mode 'série'.
Grâce au Guide Télétexte/
NEX
TVIEW,vous avez aussi directement accès à des
informations détaillées concernant les émissions,à condition toutefois qu'elles
sélection
NEXTV
IEW
soient fournies par le diffuseur.
La chaîne de télévision est responsable du contenu de l'information. Le téléviseur
détermine la réception de cette information et la présentation au téléspectateur. La
structure du menu, les possibilités de sélection et les différentes façons de parcourir les
curseur pour
pages sont définies par le logiciel du téléviseur.
sélectionner les
réglages
Utilisation des menus Guide Télétexte/
& Appuyez sur la touche æ de la télécommande pour activer/désactiver le
menu Guide Télétexte/
NEXTVIEW.
é Utilisez le curseur de direction haut/bas, gauche/droite afin de sélectionner la
date, la
thématique, l’
des fins de rappel ou d’enregistrement,le numéro de page du guide des
programmes ou afin d’avoir accès à la liste des programmes.
Guide Télétexte NEXTVIEW
Chaîne Aperçu
TF1 FR2
TF1
Enreg.
Préprog.
Info
p.202 p 01 02 ... π
11.03 ................
14.35 ................ 226/3
17.50 ................ 231
CHAÎNE pour le guide des chaînes, le THÈME pour le guide
APERÇU pour un aperçu de tous les programmes "étiquetés" à
Enreg.
Préprog.
Info
Guide Télétexte.
NEXTVIEW et le Guide
NEXTVIEW
NEXTVIEWLink),une seule fois,
. Si la chaîne de
NEXTVIEW
Lundi 9 Oct 18:03
Chaîne Thème Aperçu
BBC1
Ce qui est activé
Perspectives
Thèmes
Notes
NEXTVIEW
NEXTVIEW,
“ Introduisez le numéro de page correct du guide des
‘ Utilisez le curseur gauche/droite pour parcourir les
( Sélectionnez un programme en utilisant le curseur
§ Appuyez sur l'une des touches colorées pour
è Appuyez sur la touche OK pour retourner à la
programmes au moyen des touches chiffrées ou des
touches - P +.
sous-pages.
de direction haut/bas.
sélectionner une des fonctions de base (si présent),
Enreg.,Préprog., Info. Voyez les Fonctions de Base
plus loin.
zone originale.
“ Sélectionnez un programme en utilisant le curseur
de direction haut/bas.
‘ Appuyez sur l'une des touches colorées pour
sélectionner une des fonctions de base (si présent),
Enreg.,Préprog., Info, Voyez les Fonctions de Base
plus loin.
( Appuyez sur la touche OK pour retourner à la
zone originale.
13NEXTVIEW
Page 68

Enreg.
Préprog.
Info
Chaîne Thème Aperçu
TF 1 FR 2 RTL4
p.202 p 01 02 ... π
BBC 2
11.03 ................
14.35 ................ 226/3
17.50 ................ 231
Un instant svp
Guide Télétexte
Les chaînes de télévision qui transmettent le télétexte, transmettent
également une page qui contient les programmes de la journée.Pour chaque
chaîne de télévision, vous pouvez sélectionner la page du Guide des
Programmes à l’aide de la touche æ:
- automatiquement si la chaîne de télévision sélectionnée fonctionne avec des
services tels que PDC (Programme Delivery Control) ou MIP (Magazine
Inventory Page).
- si la présélection automatique n'est pas possible, la page d'index apparaîtra
à l'écran et il vous faudra introduire le numéro exact de la page du Guide
des Programmes de la chaîne de télévision sélectionnée à l’aide des touches
chiffrées.
La page du Guide des programmes sera mémorisée automatiquement si elle
satisfait aux exigences Video Programming via Teletexte (VPT).
Chaque fois que vous appuyez sur la touche æ,vous pourrez voir la page du
Guide des Programmes de la chaîne de télévision sélectionnée si la chaîne de
télévision n'opère pas avec le système
Les points enreg.,préprog. ,et info,correspondant aux touches colorées,
s'illuminent si la page de programmes qui apparaît à l'écran satisfait aux
exigences du Video Programming via Teletext (VPT). Sélectionnez une
émission et appuyez sur l'une des touches de fonction,p.ex. Enregistrement
ou Préprogrammation. Voyez également les Fonctions de Base plus loin.
Le point
Info peut être utilisé si l'émission sélectionnée contient un numéro
de page avec un sous-code optionnel qui renvoie à une page qui contient de
plus amples d'informations sur l'émission.
NEXTVIEW.
Enreg.
Préprog.
Info
Enreg.
Préprog.
Info
Enreg.
Préprog.
Info
Lundi 9 Oct 18:03
Chaîne Thème Aperçu
TF1 FR2 RTL4
TF1
........
........
........
Lundi 9 Oct 18:03
Chaîne Thème Aperçu
Culture Films ....
TF1
TF1
FR2
RTL4
Lundi 9 Oct 18:03
Chaîne Thème Aperçu
TF1
TF1 17.10
FR2 17.30
RTL4 18.05
ARTE 19.00
NEXTVIEW
NEXTVIEW
NEXTVIEW
Modes NEXTV
IEW pour le classement et l’affichage
des informations
Chaîne
Le guide des chaînes donne un aperçu de toutes les émissions diffusées par
une seule chaîne pendant une journée. Les émissions déjà diffusées peuvent
être visualisées en utilisant le curseur direction haut.
La liste commence par le premier programme de la journée.
Le curseur gauche/droite vous permet de sélectionner une autre chaîne
préférentielle.
Thème
Le guide des thèmes donne une liste de toutes les émissions à la date
sélectionnée, correspondant au thème sélectionné (actualités,sport,culture,
films,…).Le premier élément sera l'émission actuelle ou la prochaine
émission de la chaîne de télévision regardée à ce moment.
Vous pouvez uniquement parcourir le menu
thèmes prédéfinis sont reprises dans le guide de télévision.
Aperçu
Le menu Aperçu affiche une liste de programmes "étiquetés" à des fins de
rappel ou d’enregistrement journalier.Si plusieurs émissions commencent au
même moment ou si plusieurs émissions se déroulent simultanément (en
partie), elles seront marquées par un symbole rouge qui s'allume.
Après la diffusion de l'émission toutes les émissions qui n'ont été mémorisées
qu'une seule fois seront effacées.
Ce menu peut être utilisé pour changer un rappel ou un enregistrement.
THÈME si des émissions avec des
14 NEXTVIEW
Remarque : Le téléviseur interprétera automatiquement l'heure d'émission (telle
qu'indiquée sur le guide du télétexte) du programme que vous avez sélectionné
(heure et date locales correctes).
Page 69

Enreg.
Préprog.
Info
Chaîne Thème Aperçu
11.03 Travel Guide
14.35 World news
p
1 foisπJourn. Hebdo. Annul.
17.50 Insight
............................
Date heure
RTL2
Info
Fonctions de base
Les fonctions Enregistrer,Préprogrammer et Info peuvent être activées avec
les touches colorées correspondantes de la télécommande.
Si la fonction n'est pas disponible, le texte est obscurci.
Sélectionnez un programme au moyen du curseur haut/bas.
Enregistrer R ou Préprogrammer !
& Appuyez sur la touche rouge pour activer la fonction Enreg. ou sur la touche
R
!
verte pour activer la fonction
Si le numéro de programme de la chaîne n’est pas encore connu, un message
apparaîtra à l’écran pour vous demander d’introduire le numér de programme
correct au moyen du curseur gauche/droite.Appuyez sur OK.
Un petit menu apparaît à l'écran dans lequel vous pouvez sélectionner
l'intervalle: une seule fois,journellement ou hebdomadairement, ou annuler un
réglage d’enregistrement ou de rappel mémorisé au préalable.L'intervalle
standard est
télévisée, les options
séries. Dans ce cas,le système cherchera de façon autonome quand le
Une fois.Si une émission donnée est un épisode d'une série
journell. ou hebdo. peuvent être remplacées par l'option
prochain épisode de la série télévisée sera diffusé. Cette fonction n’est pas
possible avec le Guide Télétexte.
Préprog.
é Utilisez le curseur de direction gauche/droite pour sélectionner l’intervalle.
La couleur du symbole renvoie à l'intervalle.
“ Appuyez sur la touche OK située.
Lorsque la fonction
Mémorisation apparaît à l'écran pour indiquer que le magnétoscope est
Enreg.R est activée:
programmé.
Lorsque la fonction
Préprog.! est activée:
- un message apparaîtra à l’écran au moment où l’émission marquée par le
symbole ! débute , lorsque vous êtes en train de regarder un autre
programme
- lorsque le téléviseur est en position veille, celui-ci sera automatiquement mis
en service au moment où l’émission marquée par le symbole ! débute.
Remarque : Les enregistrements et les rappels sont impossibles si la chaîne de
télévision ne transmet pas la date et l’heure des programmes.
Le message
Pas possible de programmer apparaît.
Assurez-vous que vous êtes à la page de programmation de votre téléviseur.
Info
& Appuyez sur la touche jaune pour activer la fonction Info.
Vous verrez des informations sur l’émission choisie ou des annonces.
Dans certains cas, l'écran n'est pas assez grand pour montrer toutes les
informations.Utilisez le curseur de direction haut/bas pour parcourir toutes
les informations.
é Appuyez de nouveau sur la touche jaune pour désactiver cette fonction.
15NEXTVIEW
Page 70

Sélection de l’Image/
V P
SMART
ACTIVE CONTROL
Maw
h
q
bSX
213
546
879
0
B
®Ò‡π
†
¬
i
0
fhU
æ
MENU
b
OK
◊
INSTANT
Q
æ
b
yÚ
NEXTVIEW-Guide Télétexte
Appuyez sur la touche æ.
Appuyez sur la touche b.
L’écran est divisé en 2 par ties: le côté gauche pour l’affichage de l’image, le
côté droit pour l’affichage de
NEXTVIEW
Appuyez sur la touche b pour revenir à l’écran
/Guide Télétexte.
NEX
TVIEW/Guide Télétexte
plein écran ou appuyez sur la touche æ pour revenir à l’image plein écran.
Restrictions concernant le magnétoscope pour NEXTVIEW
Le point Enreg.et l'enregistrement automatique ne seront présents et
possibles que si votre magnétoscope est équipé du système
Votre magnétoscope doit être branché sur l’entrée
EXTERNAL 2.Voir
Branchement des Périphériques, p.20.
Les options journell.,hebdo.ou séries, le nombre d'enregistrements
programmés et la façon dont sont traités les enregistrements qui se déroulent
simultanément (en partie) dépendent du type de magnétoscope dont vous
disposez.
Si tous les blocs timer du magnétoscope sont utilisés, le point
disparaîtra du menu.
Aperçu pour la fonction du magnétoscope.
Lorsque le téléviseur est mis en service, les blocs timer seront transmis au
téléviseur afin de vérifier si des enregistrements ont éventuellement été
ajoutés ou effacés manuellement. Dans ce cas, ces modifications seront
montrées dans ‘aperçu’.
Le magnétoscope traite et efface les informations d'enregistrement lorsque
l'enregistrement a eu lieu.
NEXTVIEWLink.
Enreg
.
Avec certains magnétoscopes
NEXTVIEWLink,vous ne pouvez pas commencer
l'enregistrement journalier (journell.) un samedi ou un dimanche. Dans ce
cas,le point
journell. sera enlevé du menu pour ces jours-là.
16
NEXTVIEW
Page 71

V P
SMART
ACTIVE CONTROL
Maw
h
q
bSX
213
546
879
0
B
¬
i
0
fhU
æ
MENU
b
OK
◊
INSTANT
Q
b
bX
0
MENU
yÚ
Télétexte
touches colorées
pour sélectionner
OK
pour valider
curseur pour
sélectionner les
pages
Certaines chaînes de télévision transmettent des informations au moyen d'un
système télétexte. Chaque chaîne qui dispose d'un télétexte transmet une
page d'informations sur l'utilisation du système télétexte. Cherchez la page
télétexte à l'aide de l'index (en général, il se trouve à la page 100).
Les chaînes de télévision peuvent transmettre le télétexte de manières
différentes.Des couleurs peuvent apparaître dans la ligne d'options
correspondant aux touches de couleurs de votre télécommande.
Système de télétexte à gestion personnalisée
Le système Easy Text réduit considérablement le temps d’attente (à condition
que la télétransmission de la chaîne de télévision soit activée pendant au
moins une demi-minute) par :
• une sélection directe des pages précédentes ou suivantes et des pages en
référence à la ligne d’options
• une liste des pages les plus souvent regardées:les pages fréquemment
utilisées sont placées automatiquement dans une liste de pages
préférentielle de manière à être immédiatement disponibles
• la pré-mémorisation des numéros de pages à partir de la page
visualisée
• la pré-mémorisation des sous-pages.
Mise en et hors service du télétexte
Appuyez sur b pour mettre le télétexte en ou hors service.
Le contenu apparaît à l’écran ainsi que deux lignes d’informations en haut et
une ligne d’options en bas.
Remarque: Si les caractères du Télétexte affichés à l’écran ne cor respondent pas à
ceux utilisés dans votre langue, sélectionnez le groupe de langues 1 ou 2 en
appuyant à plusieurs reprises sur la touche X.
Sélection d’une page de télétexte
A l’aide des touches chiffrées
Introduisez le numéro de page désirée avec les touches chiffrées.
Le compteur de pages cherche la page ou la page apparaît immédiatement
quand le numéro de page a été mis en mémoire.
Un message apparaîtra si vous avez introduit un numéro non existant ou mauvais.
Des numéros de pages commençant par 0 ou 9 n’existent pas. Introduisez le
numéro de page correct.
A l’aide de la ligne d’options
Choisissez le sujet souhaité à l’aide des touches colorées correspondant aux
options en bas de l’écran.
Sélection de l’Image/Télétexte
Choisissez une chaîne de TV qui diffuse le télétexte.
Appuyez sur la touche b.
L’écran est diffusé en 2 par ties: le côté gauche pour l’image
principale/normale, le côté droit pour la diffusion du télétexte par la chaîne
TV sélectionnée.
Appuyez sur la touche b pour revenir à un affichage en plein écran ou
appuyez sur la touche b pour revenir à un affichage du télétexte en plein
écran.
Contrôle rapide des pages de télétexte
Appuyez sur le curseur haut/bas ou sur la touche +P-pour visualiser les
pages précédentes ou suivantes.
Sélection de la page télétexte précédente
Appuyez sur la touche 0.
17Télétexte
Page 72

V P
SMART
ACTIVE CONTROL
Maw
h
q
bSX
213
546
879
0
B
®
Ò
‡π
†
¬
i
0
fhU
æ
MENU
b
OK
◊
INSTANT
Q
i
U
MENU
yÚ
OK pour activer
yÚ
V P
SMART
ACTIVE CONTROL
Maw
h
q
bSX
213
546
879
0
B
®
Ò
‡π
†
¬
i
0
fhU
æ
MENU
b
OK
◊
INSTANT
Q
f
h
S
MENU
curseur pour
sélectionner les
sujet
Sélection de l’index du système télétexte
Appuyez sur la touche blanche pour faire apparaître l’index (en général p.
100).
Uniquement pour les diffuseurs utilisant les systèmes télétexte
T.O.P
T.O.P trie les pages en catégories et ajoute d’autres possibilités pour
améliorer la facilité d’utilisation.
Appuyez i. Un aperçu T.O.P. des divers sujets apparaît.
Toutes les chaînes de télévision ne transmettent pas le télétexte T .O .P .
Lorsque le système télétexte n’est pas le télétexte T.O.P.,un message apparaît
en haut de l’écran.
Sélectionnez avec le curseur haut/bas,gauche/droite le sujet souhaité et
appuyez sur la touche OK.
Sélection des sous-pages
Quand un numéro de page choisi contient plusieurs sous-pages,une souspage apparaît à l'écran. Le numéro coloré dans la première ligne
d'informations indique la sous-page affichée.
Les autres sous-pages peuvent être sélectionnés de deux façons:
Avec le curseur gauche/droite
Les autres numéros de sous-pages apparaissent en blanc dès que la
transmission les a trouvés.Ils sont mémorisés de sor te qu'ils sont
continuellement disponibles tant que la page de télétexte est affichée à
l'écran.
Choisissez à l’aide du curseur gauche/droite la sous-page précédente ou
suivante.
Avec la touche U
• Introduisez le numéro de la sous-page vous-même:
Appuyez sur U.Introduisez la sous-page avec les touches chiffrées, p.ex.3
pour la troisième page de sept sous-pages.
Le téléviseur cherche la sous-page désirée.
• Sous-pages alternant automatiquement:
Appuyez de nouveau sur U pour effacer la sous-page introduite.
Les sous-pages alternent automatiquement.
Appuyez de nouveau sur U afin de choisir les sous-pages avec le curseur
gauche/droite de nouveau.
Fonctions télétexte spéciales
Arrêt
Appuyez sur S pour arrêter la rotation automatique des sous-pages ou
pour arrêter le compteur de page si vous avez introduit un mauvais numéro
ou si la page n’est pas disponible.
Introduisez ensuite un autre numéro de présélection.
Double hauteur
Appuyez plusieurs fois sur h pour afficher la partie supérieure, inférieure et
pour retourner au format d’image normal.Quand la fonction Double hauteur
est activée, vous pouvez faire défiler le texte ligne par ligne en utilisant le
curseur haut/bas.
Informations cachées
Appuyez sur f pour appeler/effacer des informations cachées, comme des
solutions de jeux ou des réponses à des questions.
18 Télétexte
Page 73

Sélection des Sous-titres
M
P
V
Les chaînes TV avec télétexte transmettent souvent certains programmes avec
sous-titrage.
Vous pouvez mémoriser une page de sous-titrage pour chaque chaîne de
télévision. Cette page apparaîtra en continu à l’écran si l’émission en cours est
transmise avec des sous-titrages.
Activez le télétexte et sélectionnez la page sous-titre appropriée.
Désactivez le télétexte.
Maintenant la page sous-titre est mémorisée pour la chaîne sélectionnée.
Chaque fois qu’un programme de la chaîne TV sélectionnée est sous-titré,le
sous-titrage devient disponible pour cette chaîne.
Sélectionnez
Le symbole de sous-titrage j est affiché, lorsque l’option
Marche
Sous-titre Marche/Arrêt dans le Menu des Options, voir p. 12.
Sous-titres
est activée.
Remarque: lorsque vous êtes en mode télétexte, seules les fonctions télétextes sont
disponibles
Les touches en haut du téléviseur
Si votre télécommande est perdue ou cassée,vous pouvez toujours modifier
quelques réglages de base de l’image et du son avec les touches en haut du
téléviseur.
Appuyez plusieurs fois sur la touche M pour choisir
Couleur, Contraste, Aigus ou Graves.
Volume, Lumière,
Appuyez sur la touche P - ou + pour régler le paramètre choisi.
Quand les réglages ne sont pas affichés, les touches P - et + vous
permettent de sélectionner les chaînes de télévision, la touche V - ou + de
régler le volume.
Le réglage sélectionné disparaît automatiquement si aucune action de sélection ou
de réglages n’a été opérée pendant 10 secondes .
19Télétexte
Page 74

VCR 1
CABLE
1
4
EXTERNAL 2
2
3
Branchement des périphériques
EXTERNAL 2
VCR 1
CABLE
11
2
5
3
SAT
EXTERNAL 1
4
Vous pouvez brancher une large gamme d’appareils électroniques sur votre
téléviseur. Les diagrammes de connexion suivants vous décrivent le mode de
connexion.
Magnétoscope
Branchez les câbles d’antenne 1, 2 et, pour obtenir une meilleure qualité
d’image, un câble péritel 3 tel qu’indiqué en regard.
Si votre magnétoscope est pour vu de la fonction EasyLink, le câble péritel fourni avec
le magnétoscope doit être branché à
de la fonction EasyLink.
Uniquement si vous ne branchez pas le câble péritel 3, vous devez procéder
aux étapes suivantes.
Recherche et mise en mémoire du signal de teste de votre magnétoscope
& Retirez le câble d’antenne 1 de l’entrée d’antenne x de votre
magnétoscope.
é Mettez votre téléviseur en service et branchez le magnétoscope sur signal test.
(Consultez le manuel de votre magnétoscope.)
“ Cherchez le signal test de votre magnétoscope comme vous avez recherché et
mis en mémoire les chaînes de télévision.Voir Installation,Mémoriser les
chaînes de télévision, Installation manuelle,p. 5.
‘ Mémorisez le signal test sous un numéro de programme 0 ou entre 90 et 99.
( Introduisez de nouveau la fiche d'antenne dans l'entrée d'antenne x de votre
magnétoscope après avoir mémorisé le signal test.
EXTERNAL 2 pour pouvoir profiter pleinement
Décodeur et magnétoscope
Branchez un câble péritel 4 sur la prise péritel de votre décodeur et sur la
prise péritel spéciale de votre magnétoscope.Consultez également le manuel
de votre magnétoscope.
Voir également Mémoriser les numéros de progr.Décodeur, p.7.
Vous pouvez également connecter votre décodeur directement à
EXTERNAL 1
ou 2 avec un câble péritel.
Magnétoscope et autres appareils périphériques
(excepté sources numériques)
& Branchez les câbles d'antenne 1, 2 et 3 tel qu'indiqué en regard. Vous
obtiendrez une meilleure qualité d'image si vous branchez le câble péritel
supplémentaire 5 à
EXTERNAL 2 et le câble péritel 4 à EXTERNAL 1 ou 3.
é Cherchez le signal test de votre appareil périphérique tout comme pour un
magnétoscope.
En connectant un magnétoscope à
programme de votre téléviseur.
EXTERNAL 2 vous permet d'enregistrer à partir de votre téléviseur ou d’un autre
appareil branché.Voir Enregistrer avec votre magnétoscope,p. 25.
Remarque:
EXTERNAL 1 fonctionne avec CVBS et RGB, EXTERNAL 2 avec CVBS, Y/C et
RGB,
EXTERNAL 3 seulement avec CVBS.
EXTERNAL 1, vous ne pouvez enregistrer que le
20 Branchement des Périphériques
Page 75

Caméra et caméscope
3
2
1
A
U
D
IO
VID
EO
S•V
ID
EO
DVD
1
EXTERNAL 1/2/3
& Branchez votre caméra ou caméscope à droite de votre téléviseur.
é Branchez l'installation sur VIDEO 2 et AUDIO L 3 pour un appareil mono.
Appuyez plusieurs fois sur la touche X pour sélectionner le son venant de
l’un ou des deux haut-parleurs de votre téléviseur.
“ Branchez également sur AUDIO R 3 pour un appareil stéréo.
Vous obtiendrez la qualité S-VHS avec un caméscope S-VHS en branchant les
câbles S-VHS sur
S-VIDEO 1 et sur AUDIO 3.
Appareils numériques (DVD, tuner satellite numérique,...)
Connectez votre équipement numérique avec un câble péritel 1 à l'une des
prises péritel (
VIDEO sur le côté droit du téléviseur (voir illustrations ci-dessus).
EXT1, EXT2 ou EXT3),ou avec un câble cinch à l'entrée
& Appuyez simultanément sur les touches U et h.
INSTALLATION
Langage
Pays
Installation automatique
Installation manuelle
Nom du programme
Modifier n° de programme
Programmes préférentiels
CONFIGURATION
J CONFIGURATION
CONFIGURATION
Digital Sources
J Sources numériques
Décodeur
(Déplacement image)
Ligne d’informations
Préréglages d’usine
Format auto. oui/non
INSTALLATION
é Sélectionnez Sources numériques dans le menu Configuration du menu
INSTALLATION et sélectionnez:
Aucune si aucune source numérique n'est connectée,
•
EXT1, EXT2 ou EXT3 si vous avez connecté votre équipement au moyen
•
d'une prise péritel,
FRONT si vous l'avez connecté sur le côté droit de votre téléviseur.
•
“ Appuyez sur la touche MENU pour faire disparaître tous les menus de l’écran.
Note: Certaines sources numériques fournissent une qualité d’image médiocre. Dans
ce cas choisissez avec la touche
paramètre Eco, lequel permettra d’améliorer la qualité de l’image.
SMART PICTURE a de la télécommande le
21Branchement des Périphériques
Page 76

L
Casque
AUDIO
& Introduisez la fiche dans la prise du casque L à droite du téléviseur.
é Appuyez sur ¬ sur la télécommande pour mettre hors service les haut-
parleurs de votre téléviseur.
La prise du casque a une impédance de 8 à 4000 Ohm et est du type 3,5 mm.
Choisissez
casque. Voir p. 11.
Volume du casque dans le menu SON, afin de régler le volume du
Installation audio / Amplificateur
Branchez,pour ce faire,les câbles audio sur l'entrée audio de votre
installation et sur
Vous pouvez ainsi reproduire le son du téléviseur par votre installation audio.
Si vous voulez brancher d’autres appareils sur votre téléviseur, consultez votre
revendeur.
AUDIO L et R à l'arrière de votre téléviseur.
22 Branchement des Périphériques
Page 77

Pour sélectionner les périphériques
w
SMART
ACTIVE CONTROL
Maw
h
q
bSX
546
879
0
i
0
◊
V P
SMART
ACTIVE CONTROL
Maw
h
q
bSX
213
546
879
0
B
®
Ò
‡π
†
¬
i
0
fhU
æ
MENU
b
OK
◊
INSTANT
Q
B
®
Ò
‡
π
†
◊
yÚ
Si vous disposez d’un magnétoscope pour vu de la fonction EasyLink et que ce
dernier est connecté à votre téléviseur, votre téléviseur sera mis en ser vice , même s’il
était en position veille. (P. ex.lor s de la lecture de la bande,....)
Cela n'est pas possible lorsque Verrouillage Marche est sélectionné.
Un appareil branché uniquement avec un câble d’antenne:
Choisissez,à l’aide des touches chiffrées,le numéro de programme sous
lequel vous avez mémorisé le signal test.
Un appareil branché avec un câble péritel ou à droite du téléviseur
Appuyez plusieurs fois sur la touche w afin de sélectionner
EXT3 ou FRONT,l’entrée sur laquelle vous avez branché votre appareil à
EXT1, EXT2,
l’arrière ou à droite de votre téléviseur.
Remarque: la plupart des périphériques (décodeur,magnétoscope) gèrent d’eux-
mêmes la connexion.
Voulez-vous revenir à l’image du téléviseur ?
Introduisez,à l’aide des touches chiffrées, le numéro de programme de la
chaîne de télévision que vous voulez regarder ou appuyez plusieurs fois sur la
touche w afin de sélectionner TV.
Touches pour les appareils électroniques
La plupart des magnétoscopes qui font partie de notre gamme de produits
fonctionnent à partir de la télécommande de votre téléviseur.
Magnétoscope
Appuyez sur la touche
VCR à la gauche de la télécommande en pressant en
même temps :
® pour enregistrer,
Ò pour le rembobinage,
‡ pour l’arrêt,
π pour le mode lecture,
† pour le bobinage,
◊ pour la sélection de numéros de programmes à un ou à deux chiffres
au départ du magnétoscope ou du DVD,
+P- pour visualiser rapidement les chaînes de télévision du récepteur de
votre magnétoscope,
0 à 9 pour sélectionner les chaînes de télévision à partir de votre
magnétoscope,
B pour mettre le magnétoscope en veille.
Ces touches fonctionnent avec les magnétoscopes supportant le protocole RC5
standard.
Si votre magnétoscope dispose de la fonction EasyLink, la touche
INSTANT ®
pour enregistrement peut être commandée dans le mode TV.
Si votre magnétoscope EasyLink dispose de la fonction système veille, et après appui
de 3 secondes sur la touche B,téléviseur et magnétoscope passent en veille.
23Branchement des Périphériques
Page 78

Touches pour le r écepteur satellite
V P
SMART
ACTIVE CONTROL
Maw
h
q
bSX
213
546
879
0
B
®
Ò
‡π
†
¬
i
0
fhU
æ
MENU
b
OK
◊
INSTANT
Q
Ò
‡
π
†
X
0
◊
b
MENU
yÚ
Appuyez simultanément sur la touche OK et la touche chiffrée 1.
Maintenant,vous pouvez commander votre récepteur satellite à l’aide de la
télécommande de votre téléviseur.
Appuyez sur la touche
MODE à la gauche de la télécommande en pressant en
même temps :
MENU pour mettre en ou hors service le menu
SAT;
◊ pour la sélection de numéros de programmes à un ou à deux chiffres
au départ du récepteur satellite.
Ces touches fonctionnent avec les récepteurs satellite supportant le protocole RC5
standard.
Touches pour le DVD
Appuyez simultanément sur la touche OK et la touche chiffrée 2.
Maintenant,vous pouvez commander votre appareil DVD à l’aide de la
télécommande de votre téléviseur.
Appuyez sur la touche
MODE à la gauche de la télécommande en pressant en
même temps :
MENU pour mettre en ou hors service le menu
DVD
b pour sélectionner un titre DVD
0 pour sélectionner un chapitre DVD
X pour sélectionner votre langage audio
Ò pour la recherche arrière
‡ pour l’arrêt
π pour le mode lecture
† pour la recherche avant
0-9 pour sélectionner les chaînes de télévision à par tir de votre
appareil DVD
OK pour valider l’item sélectionné dans le menu
®, C,f, h, w sans fonction
24 Branchement des Périphériques
Remarque : après le remplacement des piles, l’appareil opérationnel prédéfini est le
récepteur satellite.
Ces touches fonctionnent avec les appareils DVD suppor tant le protocole RC6
standard.
Page 79

Enregistrer avec un magnétoscope sans EasyLink
V P
B
®
Ò
‡π
†
¬
fhU
æ
MENU
b
OK
INSTANT
Q
INSTANT
®
yÚ
Pour obtenir la qualité S-VHS,le lecteur caméra S-VHS ou magnétoscope
S-VHS,doit directement être branché au magnétoscope S-VHS effectuant
l’enregistrement.
Enregistrer un programme de télévision
& Choisissez le numéro de programme sur votre magnétoscope.
é Mettez votre magnétoscope en position d'enregistrement.
Consultez le manuel de votre magnétoscope.
Changer de numéro de programme sur votre téléviseur ne dérange pas
l’enregistrement !
Enregistrer un programme sur votre magnétoscope branché à
EXTERNAL 2 au dépar t d’appareils audio ou vidéo branchés sur
EXTERNAL 1, EXTERNAL 3 ou à droite du téléviseur
& Mettez l'appareil en service.
é Choisissez la connexion correcte sur votre magnétoscope.
“ Mettez votre magnétoscope en position d'enregistrement.
Vous enregistrez ce que vous voyez à l’écran.
Ne changez pas les numéros de programme ou ne débranchez pas votre
téléviseur lorsque vous êtes en train d’enregistrer !
Enregistrer avec un magnétoscope par EasyLink
Si un magnétoscope S-VHS pour vu de la fonction EasyLink est branché, il est possible
d’enregistrer en qualité S-VHS à partir d’un appareil périphérique S-VHS branché à
droite de votre téléviseur (p.ex.d’un caméscope S-VHS)
En mode TV,il est possible de commencer un enregistrement direct du programme
qui est reproduit à l'écran de la télévision.
Appuyez sur la touche
téléviseur.Le magnétoscope est mis en fonction s'il se trouve dans la position de
veille et un message indiquant ce qui est enregistré apparaît sur l'écran.
Le magnétoscope commence l'enregistrement du programme de télévision
sélectionné.
Changer de numéro de programme sur votre téléviseur ne dérange pas
l’enregistrement !
Lorsque vous enregistrez un programme d’un appareil périphér ique branché sur
EXTERNAL 1, 3 ou FRONT, il est interdit de choisir un autre programme de télévision à
l’écran. Si vous souhaitez néanmoins revenir sur le programme de TV,un deuxième
appui successif fera apparaître à l’écran le programme demandé.
Attention: l’enregistrement du périphér ique sera arrêté et le magnétoscope passera
en veille.
Si vous mettez votre appareil en veille tandis que vous enregistrez un programme à
partir d’un appareil périphérique branché sur
clignotant sur la face avant de votre téléviseur indique que vous êtes en train
d’enregistrer. Le voyant arrête de clignoter après la fin de l’enregistrement.
INSTANT ® enregistrement de la télécommande du
EXTERNAL 1, 3 ou FRONT,le voyant
Enregistrer avec un magnétoscope par
Si votre magnétoscope est pour vu du système NEXTVIEWLink et vous avez indiqué un
NEXTVIEWLink
ou plusieurs émissions qui doivent être automatiquement enregistrées en mode
NEX
TVIEW, votre téléviseur ne doit plus être en position de veille ni mis en service
pour faire commencer l’enregistrement.
25Enregistrer
Page 80

Conseils
Entretien de l’écran
Nettoyez votre téléviseur avec un chiffon
doux légèrement humide. N'utilisez pas de
produit de nettoyage agressif susceptible
d'abîmer la couche de protection de votre
écran.
Mauvaise image
Avez-vous choisi le bon système de
télévision? V otre téléviseur et/ou votre
antenne interne se trouvent-ils trop près
des haut-parleurs,d'une installation audio
sans prise de terre,de tubes néon,etc.?
La proximité de montagnes ou de hauts
immeubles peut être à l'origine d'images
dédoublées ou d'ombres. Parfois, on
obtient une meilleure qualité d'image en
changeant la direction de l'antenne
externe. Est-ce que l’image ou le télétexte
est méconnaissable? Vérifiez si vous avez
introduit la fréquence correcte.Voir
Installation,p.5.
La luminosité et le contraste sont-ils
déréglés? Sélectionnez Préréglages d’usine
dans le menu Configuration,p. 7.
Une mauvaise qualité d'image est parfois
possible quand une caméra S-VHS,
raccordée à droite de l'appareil,
fonctionne alors qu'un autre appareil est
connecté à
mettez un des appareils hors service.
EXT1 ou EXT2.Dans ce cas,
Absence d’image
L'antenne est-elle correctement
raccordée? Les fiches sont-elles
fermement enfoncées dans la prise
d'antenne? Le câble d'antenne est-il en
bon état et muni des fiches adéquates ?
Les dispositifs de branchement à un
éventuel second téléviseur sont-ils en bon
état ? En cas de doute, consultez votre
revendeur.
Absence de son
Aucune des chaînes captées par votre
téléviseur ne diffuse du son? Vérifiez si le
volume n’est pas réglé sur sa position
minimum.Le son est-il interrompu lorsque
vous appuyez sur la touche ¬?
Télécommande
Si votre téléviseur ne réagit plus aux
commandes,il est possible que les piles
soient usées.Vous pouvez toujours utiliser
la touche M et les touches -/+ qui se
trouvent en haut du téléviseur.
Menu
Vous n'avez pas choisi le menu que vous
vouliez. Appuyez une nouvelle fois sur la
touche
Toujours pas de résultats?
Mettez vote téléviseur hors service et
remettez-le en service une fois.
MENU pour sor tir du menu.
N'essayez jamais de réparer vousmême une panne de téléviseur.
Consultez votre revendeur ou un
technicien.
Que faire lorsque votre téléviseur
est usagé ?
Philips s’efforce de fabriquer ses produits
sans nuire à l’environnement.Votre
nouveau téléviseur contient des parties et
matériaux recyclables et réutilisables.Des
entreprises spécialisées démontent les
téléviseurs arrivés en fin de cycle de vie
pour récupérer les parties et matériaux
réutilisables de manière à réduire au
minimum les déchets.Informez-vous sur
les dispositions de votre pays concernant
les vieux téléviseurs.
Que faire avec les piles usagées
Même si les piles livrées avec la
télécommande ne contiennent pas de
métaux lourds tels que le mercure ou le
cadmium,la législation de certains pays
peut cependant interdire la dépose de
piles usagées dans les déchets ménagers.
Informez-vous pour connaître les
dispositions en vigueur dans votre pays.
Index
a ACI,
c câble péritel, 20
d décodeur, 7
e émission bilingue, 9
f format auto, 7
g graves, 11
5
active control, 10
aigus, 11
arrêt programmé, 12
arrêt sur l'image, 9
caméscope, 21
casque, 22
configuration, 7
contraste dynamique, 11
déplacement image, 7
deux écrans, 9
digital scan, 11
DVD, 24
enregistrement, 25
format d’image, 9
fréquence, 5
h hue, 11
i incredible surround, 8
informations à l'écran, 8
installation automatique, 5
installation manuelle, 5
l langage, 4
ligne d’informations, 7
liste des programmes, 12
m magnétoscope, 23
menu langage, 4
mémoriser les chaînes de télévision, 4
mise en service du téléviseur, 3
modifier numéro de programme, 6
n NEX
TVIEW,
nicam, 9
nom du programme, 6
p pays, 4
préréglages d’usine, 7
programmes préférentiels, 6
r récepteur satellite , 24
rechercher les chaînes de télévision, 5
13
réglages de l’image, 11
réglages de son, 11
s sélection des programmes, 8
smart image et son, 10
stéréo, 9
sources numériques, 21
sous-pages télétexte, 18
sous-titres, 19
suppression du son, 8
S-VHS, 25
t télétexte, 17
v verrouillage, 12
volume, 8
Conseils & Index
26
Page 81

Lexique
100 Hz
Avec cette technologie,regarder votre
téléviseur est plus reposant pour les yeux.
Les téléviseurs conventionnels produisent
50 images par seconde.A cette fréquence,
l’oeil humain perçoit une perturbation,
surtout sur les surfaces larges et
brillantes.Avec la technologie
100 Hz,chaque image est régénérée 100
fois par seconde. Ceci permet de
supprimer l’effet de scintillement.
Arrêt sur image
Mode TV qui vous permet de "geler" une
image pour pouvoir étudier
commodément un détail précis, par
exemple pour noter certaines
informations figurant dans les programmes
comme un numéro de téléphone.
Automatic Channel Installation (ACI)
(Installation automatique des chaînes)
Ce système installe automatiquement
toutes les chaînes dans le même ordre
que votre câble-opérateur (dans la mesure
bien sûr où vous recevez les chaînes en
question).Il ajoute également
automatiquement le numéro et le nom du
programme.Avec l‘ACI, l’installation des
chaînes est entièrement automatique et
simple.
Digital Scan
Innovation qui élimine le scintillement de
l’image, c’est-à-dire les vibrations
horizontales des lignes de l’image.Associé
à la technologie 100 Hz, il offre une image
aussi stable qu’une diapositive.
Easy T ext
Mémoire télétexte qui mémorise vos
pages télétexte préférées et vous permet
d’y accéder instantanément.
Menu
Affichage structuré et global, sur l’écran,
des fonctions d’installation et d’utilisation.
Vous pouvez les sélectionner à l’aide de la
télécommande.
NEXTVIEW
NEX
TVIEW est une nouveauté qui, au
moyen d’un guide de programmes
télévisés à l’écran, aide l’utilisateur d’un
téléviseur ou d’un magnétoscope à
chercher le programme qu’il/elle désire
regarder.
NEXTVIEW montre une
description de chaque programme et
l’utilisateur peut marquer des programmes
intéressants qui doivent être
préprogrammées (téléviseur autom.
Marche),enregistrées (à condition de
disposer d’un magnétoscope
NEXTVIEWLink) ou qu’il ou elle désire
regarder.
NTSC
Système de transmission de signaux
couleur composites utilisé aux Etats-Unis,
au Japon et dans certains pays d’Amérique
du sud et du sud-est asiatique.
Préréglages image et son
Touches sur la télécommande pour
sélectionner des réglages prédéfinis image
et son.
Réglage de la teinte
Sur les téléviseurs, système permettant de
modifier à volonté l’équilibre entre les
couleurs ‘froide’ et ‘chaudes’.
Télétexte
Voir également Easy Text
WST:Télétexte à la norme internationale.
FLOF:Full Level one Features.
Système utilisé par RTBF, BBC et RVE
pour un accès rapide des pages de
télétexte.
TOP:Table of (Teletext) Pages. Système
allemand pour améliorer la facilité
d’utilisation des pages de télétexte.
Verrouillage
Dispositif destiné à empêcher les enfants
de regarder la télévision.Le verrouillage
s’active et se désactive à l’aide de la
télécommande.
Easy Link
Système de bus numérique ‘intelligent’ ESI
entre les téléviseurs et les magnétoscopes.
Une seule touche suffit à sélectionner et à
contrôler la source.
Prise péritel
Connecteur à 21 broches qui vous permet
de connecter facilement divers types de
matériels audio/vidéo et informatiques.
Lexique
27
Page 82

Inhoud
Installatie
Uw afstandsbediening 2
Voorbereiding 3
Installatie 4
TV-zenders vastleggen 4
Uw menutaal en uw land kiezen 4
Automatische installatie 5
Handmatige installatie 5
Zender een naam geven 6
Herschikken 6
Favoriete TV -zenders kiezen 6
Configuratie instellen 7
Bedienen
Gebruik van de afstandsbediening 8-10
Gebruik van de menu’s
Beeldmenu 11
Geluidsmenu 11
Diversen menu 12
NEXTVIEW 13-16
Teletekst 17-19
Toetsen bovenaan op het toestel 19
Randapparatuur aansluiten
Randapparatuur aansluiten en selecteren 20-23
Functies voor randapparatuur op de afstandsbediening 23-24
Opnemen 25
Tips 26
Index 26
Woordenlijst 27
Nederlands
De EasyLink-opties zijn gebaseerd op het principe "bediening door middel
van één toets". Dit betekent dat een aantal opeenvolgende handelingen
terzelfdertijd uitgevoerd worden in bvb.het televisietoestel en de
videorecorder indien beiden over de EasyLink-functie beschikken en
verbonden zijn via de eurokabel die samen met de videorecorder geleverd
werd.
1
Page 83

yÚ
yÚ
213
546
879
0
B
®
Ò
‡π
†
M
SMART
ACTIVE CONTROL
¬
V P
aw
h
q
b
i
0
SX
fhU
hU
æ
MENU
INSTANT
Q
b
OK
◊
MODE
VCR
Installatie p. 4
Voorbereiding
Uw afstandsbediening
EasyLink p. 25
®
INSTANT opname
standby stand p.8
B
Q incredible surround aan/uit p. 8
DVD/Satelliet bediening p.24
Videorecorder bedienen p.23
NEXTVIEW
/TXT gids aan/uit
æ
p. 13
hoofdmenu aan/uit
MENU
p. 11
volumeregeling p.8
V
geluid tijdelijk onderbreken p.8 ¬
tv-zenders kiezen p.8 P
Randapparatuur p. 23
w
keuze van EXT1,EXT2,
EXT3 of FRONT
smart geluid p.10
M
smart beeld p. 10 a
Teletekst p. 17
b teletekst aan/uit
C tijdsweergave
subpagina kiezen
f oplossing raadsels
h vergroten
Cursor om uw keuze
te selecteren p.4
OK keuze activeren
X tweetalige keuze/geluidsinfo p.9
TXT taalgroep keuze p. 17
S stilstaand beeld p.9
txt pagina vasthouden p.18
b dual screen aan p.9
q beeldformaat p.9
h active control aan/uit p.10
Kleurtoetsen
- NEXTVIEW keuze p.13
- directe teletekstpagina of
onderwerp, p. 17
Audio- en video-apparatuur
p.23-24
i scherminfo p. 8
0 vorig programma p. 8
◊ videorecorder/DVD functie
2 Voorbereiding
Page 84

CABLE
Voorbereiding
& Plaats uw toestel op een harde ondergrond.
min.
1m
Laat voor ventilatie minstens 5 cm vrij rondom de TV.
Plaats de TV niet op een tapijt.
Om onveilige situaties te voorkomen, plaats geen voorwerpen bovenop het
toestel.Vermijd warmte en rechtstreeks zonlicht en stel het televisietoestel
niet bloot aan regen of water.
é Sluit de antenne goed aan op de antenne-ingang x op de achterzijde van
de TV .
“ Stop de stekker in het stopcontact met een netspanning van 220V - 240V.
Voorkom beschadiging van de stroomkabel,die brand of een elektrische schok
zou kunnen veroorzaken, door de TV niet op de kabel te plaatsen.
Niet weggooien
maar inleveren
NL
R6 / AA
als KCA.
‘ Afstandsbediening: Verwijder het klepje van de batterijhouder.
Plaats de 2 meegeleverde batterijen (type R6-1,5V) in het batterijvak.
De bijgeleverde batterijen bevatten niet de zware metalen kwik en cadmium.Toch
mogen in veel landen de lege batterijen niet met het huisvuil weggegooid worden.
Informeer a.u.b. naar de plaatselijke voorschriften voor het afvoeren van lege
batterijen.
Opmerking: deze afstandsbediening functioneert slechts met TV toestellen die de
RC6 code standaard gebruiken.
( TV inschakelen:Druk op de schakelaar A vooraan op uw TV.
Een groen lampje vooraan op het televisietoestel en het scherm lichten op.
Als een rood lampje oplicht,druk op de toets - P + op de afstandsbediening.
Het groene lampje knippert telkens als u op een toets op de afstandsbediening
drukt.Wanneer u uw TV voor het eerst inschakelt, verschijnt het menu
automatisch op het scherm.Afwisselend ver schijnt de uitleg in de diverse talen.
Kies uw eigen taal en druk op de OK toets op de afstandsbediening.
Ga verder naar pagina 4.
MENUTAAL
3Voorbereiding
Page 85

Installatie
B
®
Ò
‡π
†
f hU
æ
MENU
b
OK
INSTANT
Q
yÚ
V P
213
546
879
B
®
Ò
‡π
†
¬
fhU
æ
MENU
b
OK
INSTANT
Q
yÚ
Kies het INSTALLATIE menu
Druk tegelijkertijd op de toetsen U en h.
Gebruik van de menu’s
& Gebruik de cursor op/neer, links/rechts om een keuze te maken in de menu’s.
terugkeren of
menu uitschakelen
activeren
cursor om een menu
item te kiezen
é Gebruik de OK toets om uw keuze te activeren.
“ Gebruik de MENU toets om terug te keren naar het vorige menu of om alle
menu’s uit te schakelen.
MENU TITEL
Item 1
Item 2
Item 3
J Item 4
J Item 4 L M
Item 5
Item 6
TV-zenders vastleggen
Nadat de nieuwe of de bijkomende TV-zender vastgelegd werd, brengt de TV deze
TV-zender(s) automatisch over naar de videorecorder, indien deze over de EasyLink-
functie beschikt. De boodschap EasyLink :Overzetten voorkeurzenders ....
verschijnt op het scherm. De programmalijst van de videorecorder is nu dezelfde als
diegene van het televisietoestel.Indien het televisietoestel verbonden is met een
videorecorder die over de
van taal en land over naar de videorecorder.
NEXTVIEWLink-functie beschikt, brengt de TV ook de keuzes
J INSTALLATIE
MENU TITLE
Menutaal
J MENUTAAL
MENU TITLE
....
....
Nederlands
J LAND
MENU TITLE
Gr.-Brittannië
....
....
4
Installatie
Kies uw menutaal en uw land
U kunt zelf de taal van de menu’s en uw land kiezen.
& Kies Menutaal in het INSTALLATIE menu en druk op de OK toets.
é Kies de taal van uw keuze en druk op de OK toets.
Beweeg de cursor op en neer om de lijst te doorlopen en om andere talen te
laten verschijnen,die niet op het scherm te zien zijn.
“ Kies Land en druk op de OK toets.
‘ Selecteer het land waar u zich nu bevindt en druk op de OK toets.
Beweeg de cursor op en neer om de lijst te doorlopen en om andere landen
te laten verschijnen,die niet op het scherm te zien zijn.
Selecteer Ander wanneer geen enkel land van toepassing is.
U kunt nu uw TV-zenders zoeken en vastleggen op twee manieren :met
automatische installatie of handmatige installatie (TV-zender per
TV-zender ingeven).
Maak uw keuze en druk op de OK toets.
Page 86

Automatische installatie
Start
Stop
J Stop K
TV zoekt:
een ogenblik aub
Automatische installatie
J Start K
Start
Stop
1 BBC1
2 BBC2
3 CNN
....
....
Automatische installatie
Kies
Start in het Automatische installatie menu en druk op de OK toets om
het zoeken te activeren.
Alle TV-zenders worden automatisch gezocht en opgeslagen.
Als de TV een kabelexploitant herkent die ACI (Automatic Channel
Installation) uitzendt of een TV-zender,die een teletekstpagina uitzendt met
de frequenties en de programmanamen van alle te ontvangen TV-zenders,dan
wordt het zoeken gestopt en verschijnt er een programmalijst op het scherm.
De programmalijst wordt automatisch gevuld met alle programmanummers en
-namen van de TV-zenders waarop wordt uitgezonden.
Het is mogelijk dat de kabelexploitant of een TV-zender een eigen selectiemenu
toont. Lay-out en onderwerpen worden door de kabelexploitant of de TV-zender
bepaald. Maak uw keuze uit de aangeboden mogelijkheden met de cursor op/neer,
links/rechts en druk op de OK toets.
Om het menu te verlaten,druk op de
MENU toets op de afstandsbediening.
Ga naar pagina 6.
Handmatige installatie
TV-zenders zoeken en vastleggen gebeurt zender per zender.
U moet alle stappen van het Handmatige Installatie menu doorlopen.
Handmatige installatie
(Selectiewijze)
J Systeem K
Systeem
Programmanr.
Zoeken
Fijnafstemming
Vastleggen
Selectiewijze is alleen aanwezig als het land dat u selecteerde ook de
kanaalkeuze biedt (C-kanalen voor kanalen via de antenne,S-kanalen voor
kanalen via de kabel).
U kan een andere selectiewijze,Frequentie of Kanalen, kiezen.
& TV-systeem kiezen
Selecteer het land of werelddeel waarvan u de TV-zender wilt kiezen.
Als u een aansluiting hebt op het kabelnet,selecteer het land of werelddeel
waar u zich nu bevindt.
é Druk de cursorknop naar beneden en voer het programmanummer in met de
cijfertoetsen.
“ TV-zender zoeken
Druk op de cursor links/rechts.
De frequentie of het kanaalnummer loopt op tot een TV-zender gevonden is.
Zelf een TV-zender ingeven
Als u de frequentie,of het C- of S-kanaalnummer kent, kunt u deze direct
ingeven met de cijfertoetsen 0 tot 9.Vraag eventueel een frequentielijst bij uw
kabelexploitant of handelaar of raadpleeg de frequentietabel op de binnenzijde
van de kaft achteraan deze gebruiksaanwijzing.
‘ Fijnafstemming
Bij slechte ontvangst,kunt u deze eventueel verbeteren door zelf de
frequentie aan te passen met de cursor links/rechts.
( Vastleggen van stappen & tot ‘
Vastleggen en druk op de OK toets.
Kies
Herhaal elke stap om een andere TV-zender vast te leggen.
§ Om het menu te verlaten,druk op de toets MENU op de afstandsbediening.
5Installatie
Page 87

INSTALLATIE
Menutaal
Land
Automatische installatie
Handmatige installatie
J Zender een naam geven
Zender Name
Herschikken
Favoriete TV-zenders
CONFIGURATIE
Zender een naam geven
EXT1
EXT2
EXT2
FRONT
J 0
0
1 BBC1
2 BBC2
3 ....
4 ....
5 ....
Herschikken
EXT1
EXT2
EXT3
FRONT
0
J 1 CNN
1 CNN
2 BBC2
3 ....
4 ....
5 ....
De programmanaam ingeven of wijzigen
U kunt nu de reeds ingevulde programmanaam veranderen of een naam geven
aan een programma waarvan nog geen naam ingevuld is. Aan de
programmanummers 0 tot 99 kunt u een naam ingeven van max.5 letters of
cijfers. Bijvoorbeeld SUPER, BBC 1,... Tussen 99 en 0 kunt u ook een naam
geven aan om het even welke aangesloten randapparatuur.
& Kies Zender een naam geven in het INSTALLATIE menu en druk op de OK
toets.
é Kies het programmanummer.
“ Druk op de OK toets.
‘ Kies het karakter met de cursor op/neer.
( Kies de volgende positie met de cursor rechts.
§ Kies het volgende karakter.
è Druk op de OK toets wanneer de volledige naam ingevuld is.
! Druk op de MENU toets om terug te keren naar het INSTALLATIE menu.
De spatie, de cijfers en andere speciale tekens bevinden zich tussen Z en A.
De programmalijst herschikken
U kunt, volgens uw eigen keuze,de toegewezen nummers van de TV-zenders
herschikken.
& Kies Herschikken in het INSTALLATIE menu en druk op de OK toets.
é Kies het programmanummer dat u wilt wijzigen.
“ Druk op de OK toets.
‘ Kies het nieuwe nummer waardoor u het nummer dat u eerst gekozen hebt
wilt vervangen.
( Druk op de OK toets.
Herhaal dit voor alle andere TV-zenders die u van plaats wilt verwisselen.
§ Druk op de MENU toets om terug te keren naar het INSTALLATIE menu.
6
Favoriete TV-zenders
0 ... Nee
1 ... Ja
J 2 ... Ja
2 ... Nee
3 .... Nee
4 .... Ja
5 ....
Installatie
Fav oriete TV -zenders kiezen
Als u na het installeren snel de TV-zenders doorloopt met de +P -toets,
zullen enkel deze TV-zenders verschijnen die in de voorkeurlijst werden
vastgelegd. TV-zenders die niet in de voorkeurlijst werden vastgelegd, kunnen
nog steeds met de cijfertoetsen geselecteerd worden.Alle vastgelegde TVzenders worden automatisch in de voorkeurlijst opgenomen.
& Kies Favoriete TV -z enders in het INSTALLATIE menu en druk op de OK
toets.
é Kies het programmanummer.
“ Kies Ja of Nee met de cursor links/rechts.
‘ Herhaal voor elke TV-zender die u wenst te wijzigen in een favoriete of
niet-favoriete TV -zender .
( Druk op de MENU toets om terug te keren naar het INSTALLATIE menu.
Voor een perfecte werking van
favoriete zenders de correcte datum en het correcte tijdstip uitzenden via teletekst.
NEXTVIEW
moet de eerste TV-zender uit de lijst van de
Page 88

INSTALLATIE
Menutaal
Land
Automatische installatie
Handmatige installatie
Zender een naam geven
Herschikken
Favoriete TV-zenders
J CONFIGURATIE
CONFIGURATIE
CONFIGURATIE
Digitale bronnen
J Digitale bronnen
Decoder/Descrambler
(Beeld kantelen)
Informatieregel
Fabrieksinstelling
Autom. formaat ja/nee
INSTALLATIE
Decoder/Descrambler
J Programma
Programma
Decoder-status
Configuratie instellen
In het Configuratie menu past u die instellingen aan,die slechts eenmalig
moeten gebeuren en die betrekking hebben op de installatie van de TVzenders.
Het Configuratie menu bevat items die de instellingen regelen van de TV
functies en de diverse mogelijkheden.
& Gebruik de cursor op/neer, links/rechts om een keuze te maken in de menu’s.
é Gebruik de OK toets om uw keuze te activeren.
“ Gebruik de MENU toets om terug te keren naar het vorige menu of om alle
menu’s uit te schakelen.
Digitale bronnen
Zie Randapparatuur aansluiten,p. 21, om uw digitale apparatuur, zoals DVD,
digitale satelliet tuner of een gelijkaardig digitaal apparaat,aan te sluiten.
Decoder/Descrambler prog.nummers vastleggen
Bij aansluiting van een decoder of descrambler, zie p.20, kunt u één of meer
programmanummers voorbehouden voor de zenders die u via uw decoder
ontvangt.
Druk op de cursor links/rechts om te kiezen tussen
euroconnector waarop u de decoder hebt aangesloten.
Uit als u het geselecteerde programmanummer niet wilt voorbehouden
Kies
voor de zender die u via uw decoder ontvangt.
EXT2 wanneer de decoder aangesloten is aan uw EasyLink videorecorder.
Kies
Wanneer u de decoder kiest,ver schijnt de boodschap EasyLink : Overzetten
voorkeurzenders ..... op het scherm.
Beeld kantelen (indien aanwezig)
Beeld kantelen met de de cursor op/neer.
Kies
Houd de de cursor links/rechts ingedrukt om de horizontale uitlijning
optimaal te stellen.
Informatieregel
Aan en na het kiezen van een TV-zender of wanneer u op de toets i
Kies
op de afstandsbediening gedrukt hebt,kan de TV-zender die ook teletekst
uitzendt,de naam van de TV-zender, de titel van het uitgezonden programma
of een andere mededeling meesturen.Dit wordt op het scherm weergegeven,
naast informatie over geluid en beeldformaat.
Wanneer u
Uit gekozen hebt, verschijnt enkel informatie over geluid en
beeldformaat na het kiezen van een TV-zender of wanneer u op de toets i
gedrukt hebt.
Fabrieksinstelling
Fabrieksinstelling en druk op de OK toets om beeld- en
Kies
geluidsinstellingen terug op te roepen die in de fabriek werden ingesteld.
Automatisch Formaat
Autom. Formaat Ja te kiezen, zal het scherm automatisch zoveel
Door
mogelijk met beeld gevuld worden indien de TV-programma’s geen speciale
signalen meedragen die het correcte schermformaat onderscheiden.
Met de toets q op de afstandsbediening kunt u nog steeds andere
beeldformaten kiezen (zie p.9).
Installatie
Installatie en druk op de OK toets om onmiddellijk terug te keren naar
Kies
het
INSTALLATIE menu.
EXT1 of EXT2,de
‘ Om het menu te verlaten,druk herhaaldelijk op de toets MENU.
7Installatie
Page 89

yÚ
V P
SMART
ACTIVE CONTROL
Maw
h
q
bSX
213
546
879
0
B
®
Ò
‡π
†
¬
i
0
fhU
æ
MENU
b
OK
◊
INSTANT
Q
® Instant record
Indien uw videorecorder uitgerust is met de
EasyLink functie, kan de
INSTANT ® toets
voor opname in de TV mode bediend
worden.
®Ò‡π†Videorecorder zie p.23
æ NEXTVIEW/TXT gids aan/uit
zie p.13
Bedienen
Gebruik van de afstandsbediening
B Standby
Het toestel is uitgeschakeld en een rood
lampje licht op.
Druk op - P + of op de cijfer toetsen om de
TV opnieuw in te schakelen.
Indien uw EasyLink videorecorder met de
functie systeem standby uitgerust is en u de
standby toets 3 seconden ingedrukt houdt,
schakelen zowel TV als videorecorder naar
standby.
De TV verbruikt in de Standby-mode energie.
Energieverbruik is één van de oorzaken van luchten watervervuiling.We adviseren u de TV ‘s
nachts uit te schakelen en niet op standby te
laten staan. U bespaart energie.
MENU Hoofdmenu aan/uit zie p. 11
OK Druk op deze toets om uw keuze in de
menus te activeren.
V Volume
Druk + of - om de geluidssterkte te regelen.
¬ Geluid onderbreken
Om het geluid tijdelijk te onderbreken,of
om het geluid terug te krijgen.
P TV-zenders kiezen
Om snel de TV-zenders uit de voorkeurlijst
te doorlopen.
i Scherminfo
Druk gedurende 5 seconden om uitgebreide
of beperkte zender- en programma-
informatie op het scherm in of uit te
schakelen.
Druk kort en op het scherm verschijnt het
nummer en de naam van de gekozen TV-
zender, informatie over de geluidsontvangst,
de beeldinstellingen en de eventueel
resterende tijd van de standby-klok.
0/9 Cijfertoetsen
Om een TV-zender te kiezen.
Geef voor een programmanummer met twee cijfers het tweede cijfer in
binnen de 2 seconden.Indien U onmiddellijk naar een gekozen TV-zender
met één cijfer wilt overschakelen,moet U de cijfertoets iets langer
ingedrukt houden.
Q Incredible Surround
MONO geluidsmode maakt deze optie
In de
het u mogelijk,wanneer deze aangeschakeld
is,een ruimtelijk geluidseffect te horen.
Wanneer
Incredible Surround Aan
geselecteerd is in de STEREO geluidsmode,
lijkt het alsof de luidsprekers verder uit
elkaar staan.
b Teletekst aan/uit zie p.17
fh Teletekst functies zie p. 18
U Tijd oproepen
De tijd,afgeleid van een TV-zender met
teletekst vastgelegd op programmanummer 1
of onder het laagste voorkeurnummer,
verschijnt op het scherm.
Dit is niet mogelijk wanneer Permanente
Ondertiteling Aan staat.
Gebruik van de afstandsbediening
8
0 Vorig programma
De vorige gekozen TV-zender verschijnt opnieuw. De ◊ indicatie heeft
een videorecorder/DVD functie .
Page 90

yÚ
V P
SMART
ACTIVE CONTROL
Maw
h
q
bSX
213
546
879
0
B
®
Ò
‡π
†
¬
i
0
fhU
æ
MENU
b
OK
◊
INSTANT
Q
X Tweetalige uitzending en
geluidsmode
Druk op deze toets
• om te kiezen tussen
Stereo of Mono, als
de TV-zender stereo geluid uitzendt, of
Nicam Stereo of Nicam
tussen
beschikbaar
,als de TV-zender digitaal
geluid uitzendt.
• om te kiezen tussen Taalkeuze Y (Dual Y)
of T aalkeuze Z (Dual Z) bij een TV-zender
die in twee verschillende talen uitzendt.De
instelling is vastgelegd voor elke zender
apart.
S Stilstaand beeld
Om stilstaand beeld aan of uit te zetten of
om de teletekstpagina vast te houden.
w Randapparatuur kiezen
Druk herhaaldelijk op deze toets om
EXT2, EXT3
of FRONT te kiezen,afhankelijk
van waar u uw apparatuur hebt aangesloten
EXT1,
(zie p.23).
q Beeldformaat
Druk herhaaldelijk op deze toets om een
ander beeldformaat te kiezen:4:3,Filmformaat
14:9,Filmformaat 16:9 met of zonder
ondertiteling, Breedbeeld,Super zoom of
Automatisch (in geval Autom. Formaat Ja werd
geselecteerd in het
Door Automatisch te kiezen, zal het scherm
zoveel mogelijk met beeld gevuld worden.
Soms dragen ook videorecorder- en
DVD-programma’s speciale signalen die de TV
automatisch naar het juiste schermformaat
Autom. formaat wordt uitgeschakeld wanneer
In het beeldformaat 14:9,16:9 of Super zoom
kunt u ondertitels zichtbaar maken of doen
verdwijnen met de cursor op/neer.
CONFIGURATIE menu).
zullen doen overschakelen.
Dual Screen geactiveerd is.
b Dual Screen
& Druk op de toets b om naar Dual Screen
over te schakelen.
Het TV-scherm wordt in twee delen
opgedeeld:
- in de linkerzijde ziet u het gewone
hoofdbeeld
- de rechterzijde is voor teletekst,
uitgezonden door de gekozen TV-zender
NEX
TVIEW
of voor
NEXTVIEW/Teletekst gids te bedienen,
Om
/Teletekst gids.
zie p.13, om teletekst te bedienen, zie p.17.
Indien Dual Screen
teletekst en
Uit
staat, worden het beeld,
NEXTVIEW/Teletekst gids op het hele
scherm getoond.
é Druk op de toets q om de
beeldcompressie in of uit te schakelen.
“ Druk op - P + om de teletekstpagina’s te
doorlopen.
‘ Wanneer Dual Screen ingeschakeld is in de
Teletekst-modus,kunt u op de b toets
drukken om naar een volledig scherm terug
te keren of druk op de b toets om naar
een volledig teletekstscherm terug te keren.
( Wanneer
NEX
TVIEW/Teletekst gids Dual
Screen ingeschakeld is,kunt u op de æ
toets drukken om naar een volledig beeld
terug te keren of druk op de b toets om
naar een volledig
NEXTVIEW/Teletekst gids-
scherm terug te keren.
9Gebruik van de afstandsbediening
Page 91

yÚ
V P
SMART
ACTIVE CONTROL
Maw
h
q
bSX
213
546
879
0
B
®
Ò
‡π
†
¬
i
0
fhU
æ
MENU
b
OK
◊
INSTANT
Q
Smart Control toetsen
Om voorgeprogrammeerde beeld- en
geluidsinstellingen te kiezen.
M Smart Geluid
Telkens u deze toets drukt,verschijnt een
verschillende geluidsinstelling,
overeenstemmend met een bepaalde
fabrieksinstelling van treble en bass.
a Smart Beeld
Telkens u deze toets drukt,verschijnt een
verschillende beeldinstelling,
overeenstemmend met een bepaalde
voorinstelling van Contrast,Kleur,Scherpte
en Dynamic Contrast.
Persoonlijk verwijst naar de persoonlijke
beeld- en geluidsinstellingen die u in het
Beeld en Geluid menu gekozen heeft.
Opmerking: wanneer u een bepaalde
voorinstelling van beeld of geluid hebt gekozen
en u wijzigt een instelling in het beeld- of
geluidsmenu, worden alle vroeger gemaakte
instellingen overschreven.
h Active control
Active Control is een pro-aktief en
automatisch systeem.De TV meet en
verbetert voortdurend alle inkomende
signalen om zo de best mogelijk
beeldkwaliteit te verzekeren.
Druk herhaaldelijk op de toets h om de
Active Control-waarden Uit of Aan te kiezen.
Uit Dynamic Contrast en scherpte worden
automatisch gecontroleerd.
Aan de dynamische ruisreductie, Dynamic
Contrast en de scherpte worden
automatisch gecontroleerd.
Beweeg de cursor op/neer terwijl de gekozen
Active Control-instelling informatie bovenaan
op het scherm staat.
Het menu Active Control verschijnt.
De beeldinstellingen worden continu en
automatisch aangepast.
De menu-instellingen kunnen niet
geselecteerd worden.
Beweeg de cursor opnieuw op/neer om het
menu uit te schakelen.
10 Gebruik van de afstandsbediening
Page 92

Gebruik van de menu’s
V P
213
B
®
Ò
‡π
†
¬
fhU
æ
MENU
b
OK
INSTANT
Q
yÚ
terugkeren of
menu uitschakelen
OK toets om te
activeren
cursor om instellingen
te kiezen
HOOFDMENU
Contrast
J BEELD
GELUID
DIVERSEN
PROG.-LIJST
BEELD
Contrast
J Contrast L M
Helderheid
Kleur
Scherpte
Tint
Digital Scan
Dynamic Contrast
& Druk op de MENU toets om het HOOFDMENU aan of uit te schakelen.
é Gebruik de cursor op/neer om het BEELD-, GELUIDS- of DIVERSEN menu te
kiezen of de
PROGRAMMALIJST.
“ Druk rechts op de cursorknop om het gekozen menu te activeren.
‘ Gebruik de cursor op/neer, links/rechts om een keuze te maken in de menu’s.
( Gebruik de OK toets om uw keuze te activeren.
§ Druk herhaaldelijk op de MENU toets om het menu uit te schakelen.
Beeldmenu
Wanneer een NTSC randapparaat aangesloten is aan een van de euroconnectoren,
verschijnt ook de keuzemogelijkheid Kleurcorrectie.
Tint
Kies de kleurtemperatuur:
Digital Scan (Lijn Flikker Reductie)
Digital scan is altijd geactiveerd in filmformaat.
Het menu item is niet beschikbaar.
Soms kan het bekijken van TV programma's aangenamer zijn wanneer u de
Digital scan,lijn flikker reductie, uitschakelt.Onder normale omstandigheden
is het aan te raden deze functie aangeschakeld te laten.
Druk op de cursor links/rechts om
Normaal, Warm of Koel.
Aan of Uit te kiezen.
Dynamic Contrast
Om het contrast tussen de donkere en de heldere delen in het beeld beter te
laten uitkomen,kiest u het best voor
Med.
Soms kan het bekijken van TV programma's aangenamer zijn wanneer u kiest
Min, Max of Uit.
voor
De gewijzigde instellingen voor Contrast,Helderheid, Kleur, Scherpte,Tint,
Digital Scan en Dynamic Contrast worden automatisch vastgelegd voor alle
TV-zenders.
Fabrieksinstelling in het Configuratie menu om de beeldinstellingen, die
Kies
in de fabriek werden ingesteld,terug op te roepen, zie p.7.
Geluidsmenu
GELUID
J Volume L M
Volume
Balans
Treble
Bass
Volume hoofdtelefoon
De gewijzigde instellingen voor Volume,Balans,Treble en Bass worden
automatisch vastgelegd voor alle TV-zenders.
Kies
Fabrieksinstelling in het Configuratie menu om de geluidsinstellingen, die
in de fabriek werden ingesteld,terug op te roepen, zie p.7.
Volume hoofdtelefoon
Zie Randapparatuur aansluiten,p. 22 voor de aansluiting van uw
hoofdtelefoon.
11Gebruik van de menu’s
Page 93

terugkeren of
V P
213
546
879
B
®
Ò
‡π
†
¬
fhU
æ
MENU
b
OK
INSTANT
Q
yÚ
menu uitschakelen
OK toets om te
activeren
cursor om instellingen
te kiezen
J DIVERSEN
Standby-klok Uit
Kinderslot Uit
Ondertitel Uit
Diversen menu
& Druk op de MENU toets om het HOOFDMENU aan of uit te schakelen.
é Gebruik de cursor op/neer om het DIVERSEN menu te kiezen.
“ Druk op de cursor rechts om het gekozen menu te activeren.
‘ Gebruik de cursor op/neer om een keuze te maken in de menu’s.
( Beweeg de cursor naar links/rechts om de gewenste instelling te kiezen.
Standby-klok
Met behulp van de standby-klok kunt u de tijdsduur instellen waarna de TV
zichzelf moet uitschakelen.
De teller loopt op van
Een minuut voor het TV-toestel naar standby gaat,verschijnen de resterende
seconden op het scherm.Niet zichtbaar in dual screen mode.U kunt het
ingestelde tijdstip altijd wijzigen of uw toestel vroeger uitschakelen.
Kinderslot
Staat het kinderslot aan,dan kan de TV alleen ingeschakeld worden met de
afstandsbediening. De toetsen P - en + bovenaan op de TV zijn onbruikbaar
om een TV-zender te kiezen. Op die manier belet u dat de kinderen
ongecontroleerd TV of video kijken.Als de vermelding
verschijnt,moet u eerst het kinderslot uitschakelen voor u de toetsen P - en
+ bovenaan op uw TV kunt gebruiken om een TV-zender te kiezen.
Uit tot 180 min.
Kinderslot AAN
Ondertitel
TV-zenders die teletekst uitzenden, zenden vaak bepaalde programma’s uit
met ondertiteling. Zie Teletekst,Permanente Ondertiteling, p.19,om de juiste
ondertitelingspagina uit de teletekst-inhoudstafel te kiezen.
Ondertitel Aan of Uit.
Kies
Druk op de
MENU toets om het DIVERSEN menu uit te schakelen.
Programmalijst
& Druk op de MENU toets om het HOOFDMENU aan of uit te schakelen.
é Gebruik de cursor op/neer om PROG.-LIJST te kiezen.
“ Druk rechts op de cursorknop om een overzicht te hebben van alle
geïnstalleerde TV -zenders.
‘ Gebruik de cursor op/neer om de lijst te doorlopen en druk op de OK toets
om de gewenste TV-zender te kiezen.
( Druk op de MENU toets om de programmalijst uit te schakelen.
12 Gebruik van de menu’s
Page 94

V P
213
B
¬
fhU
æ
MENU
b
OK
INSTANT
Q
æ
MENU
yÚ
NEXTVIEW / T eletekst gids
Op vandaag bieden de meeste Europese TV-zenders teletekstpagina’s aan met
informatie over hun programma’s per dag.U kunt deze pagina’s opvragen door
Teletekst gids in te schakelen.
Een toenemend aantal TV-zenders biedt een meer uitgebreide programmagids
aan,
NEXTVIEW genoemd. NEXTVIEW is een nieuwe manier om programma-
schema’s te tonen en biedt meer mogelijkheden dan gewone teletekst.
Met
NEXTVIEW is het mogelijk om bijvoorbeeld alle geprogrammeerde films
voor vanavond te tonen.
NEXTVIEW
keuze
cursor om
instellingen te
kiezen
Beide mogelijkheden zijn in deze TV opgenomen:
Als een TV-zender
NEXTVIEW ondersteunt, zal de TV automatisch het NEXTVIEW
NEXTVIEW en T eletekst gids.
programmaschema tonen.Indien de TV-zender enkel teletekst ondersteunt,
schakelt de TV automatisch naar de Teletekst gids.
Beide mogelijkheden bieden de zelfde functies aan:opname,voorprogrammeren
en info.Nochtans, in geval van Teletekst gids is het de TV-zender die bepaalt of
deze functie al of niet mogelijk zijn.
U kunt de programma’s die u wilt bekijken 24 u op 24 opzoeken.Het is ook
mogelijk om een programma op te zoeken per thema,bv.spor t, film,enz.
Men kan zelfs programma’s aanduiden die men wil bekijken, voorprogrammeren
en/of die automatisch met de videorecorder opgenomen dienen te worden (op
voorwaarde dat de videorecorder uitgerust is met
Met Teletekst gids /
NEXTVIEW kunt u ook rechtstreeks gedetailleerde
NEXTVIEWLINK).
informatie over programma’s raadplegen,indien die door de TV-zender wordt
verschaft.
De TV-zender is verantwoordelijk voor de inhoud van de informatie . Het TV-toestel is
verantwoordelijk voor het opvangen van die informatie en voor de voorstelling ervan.
Gebruik van de Teletekst gids/NEXTVIEW menu
&
Druk op de toets æ op de afstandsbediening om de Teletekst
Programmagids /
NEX
TVIEW menu te tonen/uit te schakelen.
é Beweeg de cursor naar boven/naar beneden,naar links/rechts om de datum te
KANAAL voor de kanaalgids, THEMA voor de themagids, OVERZICHT
kiezen,
voor een overzicht van alle programma’s die ter herinnering of voor opname
gemarkeerd werden, het paginanummer van de programmagids,of om toegang
te krijgen tot de programmalijst.
Teletekst gids NEXTVIEW
“ Voer het correcte paginanummer van de
‘
( Kies een programma met de cursor op/neer.
§ Druk op een van de kleurtoetsen om een van de
è Druk op de OK toets om terug te keren naar het
Zender Overzicht
NED 1 NED 2
NED 1
Opname
Voorprog.
Info
p.202 p 01 02 ... π
11.03 ................
14.35 ................ 226/3
17.50 ................ 231
programmagids in door middel van de cijfertoetsen
of door middel van de toetsen - P +.
Gebruik de cursor links/rechts om de subpagina’s te
doorlopen.
basisfuncties (indien aanwezig) te kiezen:
voorprog., info.Zie verder Basisfuncties.
menuhoofd.
opname,
Maandag 9 Okt 18:03
Zender Thema Overzicht
Opname
Voorprog.
Info
NED 1
Vandaag
Vooruitzicht
Thema’s
Ratings
NEXTVIEW
“ Kies een programma met de cursor op/neer.
‘ Druk op een van de kleurtoetsen om een van de
basisfuncties (indien aanwezig) te kiezen:
voorprog., info.Zie verder Basisfuncties.
opname,
( Druk op de OK toets om terug te keren naar het
menuhoofd.
13NEXTVIEW
Page 95

Opname
Voorprog.
Info
Zender Thema Overzicht
NED 1 NED 2 NED 3
p.202 p 01 02 ... π
NED 2
11.03 ................
14.35 ................ 226/3
17.50 ................ 231
Een ogenblik aub
NEXTVIEW modi om informatie te rangschikken en weer te geven
Teletekst gids
TV-zenders die teletekst uitzenden, zenden ook een pagina uit met de
programmagids van die dag.Voor iedere TV-zender kunt u de
programmagidspagina kiezen met de toets æ:
- automatisch indien de TV-zender diensten aanbiedt zoals PDC
(Programma Delivery Control) of MIP (Magazine Inventory Page).
- indien automatische preselectie niet mogelijk is wordt de indexpagina
weergegeven en moet u het juiste programmagids paginanummer ingeven
met de cijfertoetsen.
De programmagids pagina wordt automatisch vastgelegd indien hij
beantwoordt aan de vereisten Video-Programmering via Teletekst (VPT).
Telkens wanneer u op de toets æ drukt,is de programmagids pagina van de
gekozen TV-zender beschikbaar indien de TV-zender
ondersteunt.
De functie items opname, voorprog.en info,overeenkomend met de
kleurtoetsen, lichten op wanneer de weergegeven programmapagina voldoet
aan de Video Programming via Teletekst (VPT) vereisten. Kies een programma
en druk op een van de functietoetsen,vb.Opname of Voorprog. Zie
Basisfuncties verderop.
Info keuze is mogelijk wanneer het gekozen programma een paginanummer
bevat met een optionele subcode verwijzend naar een pagina met meer
informatie over het programma.
NEXTVIEW niet
Opname
Voorprog.
Info
Opname
Voorprog.
Info
Opname
Voorprog.
Info
Maandag 9 Okt 18:03
Zender Thema Overzicht
NED 1 NED 2 NED 3
NED 1
........
........
........
Maandag 9 Okt 18:03
Zender Thema Overzicht
Cultuur Film ....
NED 1
NED 1
NED 2
NED 3
Maandag 9 Okt 18:03
Zender Thema Overzicht
BBC1
BBC1 17.10
CNN 17.30
TVE 18.05
BBC2 19.00
NEX
TV
NEXTVIEW
NEXTVIEW
IEW
Zender
De zendergids geeft een overzicht van alle programma’s per gekozen
TV-zender op de gekozen datum. Reeds uitgezonden programma’s kunnen
zichtbaar gemaakt worden met de cursor op.
Bovenaan de lijst komt het programma dat het eerst uitgezonden wordt.
Met de cursor links/rechts kan een andere voorkeurzender gekozen worden,
ook wanneer de cursor zich in het gebied van de programmalijst bevindt.
Thema
In de themagids vindt u een lijst van alle programma’s op de gekozen datum,
uit de gekozen categorie (nieuws,sport, cultuur, film,...).
Bovenaan de lijst komt standaard het huidige of volgende programma op de
huidige TV -zender .
U kunt enkel door het
THEMA-menu lopen als er programma’s met
vooringestelde thema’s opgenomen zijn in de TV-gids.
Overzicht
In de overzichtslijst vindt u een lijst van alle voorgeprogrammeerde
programma’s en alle ingestelde opnames per dag.
Indien er meer dan één programma op hetzelfde ogenblik begint of indien
verschillende programma’s elkaar overlappen in tijd,dan lichten deze
programma’s rood op.
Het programma dat uitgezonden werd en dat slechts als eenmalig werd
aangeduid,wordt uit de lijst verwijderd. Dit menu kan gebruikt worden om
een voorprogrammatie of een opname te wijzigen.
14 NEXTVIEW
Opmerking: de TV zal automatisch de starttijd van het geselecteerde programma
(zoals vermeld in de teletekst gids) omzetten naar het juiste lokale uur
en dag.
Page 96

Opname
Voorprog.
Info
ZENDER THEMA OVERZICHT
11.03 Travel Guide
14.35 World news
p
Eenm.πDagel. Wekel. Wissen
17.50 Insight
............................
Datum tijd
RTL2
Ruimte voor info
Basisfuncties
De functies Opname, Voorprogrammatie en Info kunnen geactiveerd worden
met de overeenstemmende kleurtoets op de afstandsbediening.
Het menu-item kan niet geactiveerd worden als de functie niet beschikbaar is.
Kies een programma met de cursor omhoog/omlaag.
Opname R of Voorprogrammatie !
& Druk op de rode toets om Opname of op de groene toets om Voorprog te
R
!
activeren.
Indien het programmanummer van de zender nog niet gekend is,ver schijnt een
bericht met het verzoek het correcte programmanummer in te voeren met de cursor
links/rechts. Druk op OK.
Een klein menu verschijnt op het scherm waarin u een keuze kunt maken:
eenmalig,dagelijks,of wekelijks,of een vroegere instelling voor opname of
herinnering wissen.Standaard wordt uw keuze op
Eenmalig ingesteld.
Indien er een aflevering van een TV-serie uitgezonden wordt,zullen de opties
dagelijks en wekelijks vervangen worden door de optie serie.In dat geval
zoekt het systeem zelf uit wanneer de volgende aflevering van de TV-serie
uitgezonden wordt.Dit is niet mogelijk met de Teletekstgids.
é Gebruik de cursor naar links/naar rechts om uw keuze te maken.
De kleur van het tekentje verwijst naar uw keuze .
“ Druk op de OK toets.
Wanneer
Vastleggen verschijnt om aan te geven dat de videorecorder
Opname R geactiveerd is:
geprogrammeerd is.
Wanneer
Voorprog ! geactiveerd is:
- op het ogenblik dat het programma dat met ! aangeduid staat, begint,
verschijnt een boodschap op het scherm,wanneer u later naar een ander
programma kijkt.
- wanneer het TV-toestel in standby staat, zal de TV ingeschakeld worden op
het ogenblik dat het programma dat met ! aangeduid staat, begint.
Opmerking: Het merken van programma’s ter herinnering of voor opname is niet
mogelijk wanneer de zender de datum en het tijdstip van de programma’s niet
doorzendt. Het bericht
Geen programmering mogelijk verschijnt.
Zorg er voor dat u de TV programmer ingspagina gekozen hebt.
Info
& Druk op de gele toets om Info te activeren.
Er verschijnt er informatie over het gekozen programma of er worden
mededelingen getoond.Soms is het scherm niet groot genoeg om alle
informatie te tonen.Gebruik de cursor op/neer om de volledige informatie te
doorlopen.
é Druk opnieuw op de gele toets om Info uit te schakelen.
15NEXTVIEW
Page 97

Beeld/NEX
V P
SMART
ACTIVE CONTROL
Maw
h
q
bSX
213
546
879
0
B
®Ò‡π
†
¬
i
0
fhU
æ
MENU
b
OK
◊
INSTANT
Q
æ
b
yÚ
TVIEW-Teletekst gids kiezen
Druk op de æ toets.
Druk op de b toets.
Het scherm wordt in twee delen opgedeeld:in de linkerzijde ziet u het
gewone hoofdbeeld,de rechterzijde is voor
Druk op de b toets om naar een volledig
NEXTVIEW/Teletekst gids.
NEXTVIEW
/Teletekst gids-scherm
terug te keren of druk op de æ toets om terug te keren naar het scherm
met volledig beeld.
Restricties m.b.t. de videorecorder bij NEXTVIEW
Het Opname-item en de automatische opnamen zullen enkel aanwezig en
mogelijk zijn indien uw videorecorder uitgerust is met
Uw videorecorder moet op
EXTERNAL 2 aangesloten zijn. Zie
Randapparatuur aansluiten,p. 20.
De keuzes dagelijks,wekelijks of series hangen af van het type videorecorder
waarover u beschikt.Het aantal ingestelde opnames en de manier waarop
overlappende opnames verwerkt worden, hangen ook af van het type
videorecorder.
Op het ogenblik waarop alle timers van de videorecorder gebruikt zijn,zal het
Opname verwijderd worden uit het menu.
item
NEXTVIEWLink.
Het overzicht van de videorecorder inladen.
Wanneer het TV-toestel ingeschakeld is, worden de geprogrammeerde
opnameblokken overgebracht naar het TV-toestel om na te zien of er een
manuele toevoeging of verwijdering werd doorgevoerd en die wordt dan
getoond in het overzicht.
De videorecorder bewerkt en verwijdert de opnametijden wanneer de
opnamen uitgevoerd werden.
Bij sommige
NEXTVIEW videorecorders kunt u niet het dagelijks
programmeren beginnen op een zaterdag of een zondag.In dat geval zal het
item dagelijks op die dagen uit het menu weggelaten worden.
16 NEXTVIEW
Page 98

V P
SMART
ACTIVE CONTROL
Maw
h
q
bSX
213
546
879
0
B
¬
i
0
fhU
æ
MENU
b
OK
◊
INSTANT
Q
b
bX
0
MENU
yÚ
kleurtoetsen om
te selecteren
OK toets om te
activeren
cursor om de
pagina’s te
selecteren
Teletekst
De meeste TV-zenders zenden informatie uit via teletekst. Elke TV-zender die
teletekst uitzendt,biedt een pagina aan met teletekst gebruikersinformatie .
Zie de teletekstpagina met de inhoudsopgave (meestal pagina 100).
Afhankelijk van de TV-zender wordt teletekst in verschillende systemen
aangeboden.De kleuren in de keuzeregel corresponderen met de
kleurtoetsen van uw afstandsbediening.
Over het Easy Tekst systeem
Het Easy Tekst systeem vermindert aanzienlijk de wachttijd (op voorwaarde
dat de teletekstuitzending van de TV-zender ten minste een halve minuut
ingeschakeld is) door :
• het onmiddellijk oproepen van de vorige of volgende pagina’s die in
uitzending zijn en van de pagina’s waarnaar verwezen wordt in de
keuzeregel
• een habit watcher lijst : veelvuldig door u opgeroepen pagina’s worden
automatisch in een voorkeurlijst opgeslagen zodat zij achteraf onmiddellijk
beschikbaar zijn
• het in het geheugen opslaan van de paginanummers die op de vertoonde
pagina vermeld worden
• het in het geheugen opslaan van alle subpagina’s.
Teletekst in- en uitschakelen
Druk op b om teletekst in of uit te schakelen.
De inhoudspagina verschijnt op het scherm samen met twee informatieregels
bovenaan en een keuzeregel onderaan.
Opmerking: als de teletekst karakters op het scherm niet overeenkomen met de
karakters die gebruikt worden in uw taal, druk herhaaldelijk op de X toets om
taalgroep 1 of 2 te kiezen.
Teletekst pagina kiezen
Met de cijfertoetsen
Geef het gewenste paginanummer in met de cijfertoetsen.
De paginateller zoekt de pagina of de pagina verschijnt onmiddellijk wanneer
het paginanummer in het geheugen werd opgeslagen.
Er verschijnt een boodschap wanneer u een verkeerd of niet bestaand
paginanummer hebt ingegeven.Paginanummer s die beginnen met 0 of 9 bestaan
niet. Geef het juiste paginanummer in.
Met de keuzeregel
Kies met de kleurtoetsen, overeenkomstig de gekleurde opties onderaan het
scherm,het gewenste onderwerp.
Beeld/Teletekst kiezen
Kies een TV-zender,die teletekst uitzendt.
Druk op de b toets.
Het scherm wordt in twee delen opgedeeld:
in de linkerzijde ziet u het gewone hoofdbeeld,de rechterzijde is voor
teletekst uitgezonden door de gekozen TV-zender.
Druk op de b toets om terug te keren naar het scherm met volledig beeld
of druk op de b toets om terug te keren naar een volledig teletekst
scherm.
Snel de teletekstpagina’s doorlopen
Druk op de cursor op/neer of op de - P + toets om de vorige of volgende
pagina’s te doorlopen.
De vorige teletekstpagina kiezen
Druk op de toets 0.
Teletekst
17
Page 99

V P
SMART
ACTIVE CONTROL
Maw
h
q
bSX
213
546
879
0
B
®
Ò
‡π
†
¬
i
0
fhU
æ
MENU
b
OK
◊
INSTANT
Q
i
U
MENU
yÚ
OK toets om
yÚ
V P
SMART
ACTIVE CONTROL
Maw
h
q
bSX
213
546
879
0
B
®
Ò
‡π
†
¬
i
0
fhU
æ
MENU
b
OK
◊
INSTANT
Q
f
h
S
MENU
te activeren
cursor om de
pagina’s te
selecteren
Teletekst inhoudspagina kiezen
Druk op de witte toets om de inhoudspagina te laten verschijnen (meestal
p.100).
Enkel voor T.O.P. teletekst-uitzendingen :
Bij T.O.P. teletekst worden de pagina’s in rubrieken en onderwerpen
ingedeeld.Druk op i.Een T.O.P.-overzicht van de beschikbare rubrieken en
onderwerpen verschijnt.
Niet alle TV-zenders zenden het T.O.P. teletekst systeem uit.Wanneer het
teletekst systeem geen T.O.P. teletekst is, verschijnt een mededeling bovenaan
het scherm.
Kies met de cursor op/neer, links/rechts de gewenste rubriek,het gewenste
onderwerp en de pagina en druk op de OK toets.
Subpagina’s kiezen
Wanneer een gekozen pagina meerdere subpagina's bevat,verschijnt een van
die subpagina's op het scherm.
Het gekleurde nummer in de eerste informatieregel verwijst naar de
aangeboden subpagina op het scherm.
De overige subpagina’s kunnen op twee manieren gekozen worden :
Met de cursor links/rechts
De overige subpaginanummers verschijnen in het wit van zodra de uitzending
ze gevonden heeft en worden in het geheugen vastgelegd zodat ze
voortdurend beschikbaar zijn zolang de teletekstpagina op het scherm staat.
Kies met de cursor links/rechts de vorige of de volgende subpagina.
Met de U toets
• Geef het subpaginanummer zelf in.
Druk op U. Geef de gewenste subpagina in met de cijfer toetsen. B.v.3 voor
de derde pagina van 7 subpagina's.
De TV zoekt de gewenste subpagina.
• Automatisch wisselende subpagina’s:
Druk opnieuw op U om het ingegeven paginanummer op te heffen.
De pagina’s wisselen automatisch.
Druk opnieuw op U om de subpagina’s opnieuw te kiezen met de cursor
links/rechts.
Speciale teletekst functies
Vasthouden
Druk op S om de automatisch wisselende subpagina’s te stoppen of om de
paginateller te doen ophouden met zoeken wanneer u een verkeerd
paginanummer hebt ingegeven of als de pagina niet beschikbaar is.Geef een
ander paginanummer in.
Vergroten
Druk herhaaldelijk op h om de bovenste of onderste helft van de pagina te
vergroten en om terug te keren naar normale grootte.Wanneer de bovenste
helft wordt weergegeven, kunt u de tekst regel per regel doorlopen met de
cursor op/neer.
Verborgen informatie
Druk op f om verborgen informatie, zoals antwoorden op vragen en
spelletjes,op te roepen of te doen verdwijnen.
18 Teletekst
Page 100

Permanente Onder titeling kiezen
M
P
V
TV-zenders die teletekst uitzenden, zenden vaak bepaalde programma’s uit
met ondertiteling.
U kunt voor elke TV-zender een ondertitelingspagina vastleggen,die
permanent weergegeven wordt wanneer de gekozen TV-zender ondertiteld is.
Schakel teletekst in en kies de gewenste ondertitelingspagina uit de index.
Schakel teletekst uit.
Nu is de ondertitelingspagina vastgelegd voor de gekozen TV-zender.
Telkens als een programma van de gekozen TV-zender ondertiteld is,zijn de
ondertitels beschikbaar voor deze zender.
Kies
Ondertitel Aan of Uit in het Diversen menu,zie p. 12.
Het ondertitelingssymbool j verschijnt op het scherm als
Ondertitel Aan
gekozen is.
Opmerking: u bent in de teletekst mode, alleen teletekstfuncties zijn beschikbaar.
De toetsen bovenaan op het TV-toestel
Wanneer uw afstandsbediening zoek is of wanneer die niet meer werkt, dan
kunt u nog steeds een aantal beeldinstellingen aanpassen met de toetsen
bovenaan op uw TV-toestel.
Druk herhaaldelijk op de M-toets om de instelling
Kleur, Contrast,Treble, Bass te kiezen.
Volume, Helderheid,
Druk op de toets P - of + om de gekozen instelling aan te passen.
Indien de menu-instelling niet op het scherm komt,kunt u met de P - en +
toetsen de TV-zenders kiezen en met de V - of + toets de geluidssterkte
regelen.
De gekozen instelling schakelt automatisch uit wanneer u binnen de 10 seconden
geen keuze maakt of een aanpassing uitvoert.
19Teletekst
 Loading...