

Philips 24PFL5505/V7, 24PFL4505/V7, 32PFL3305/V7, 32PFL4305/V7, 42PFL3505/V7 User Manual
Register your product and get
at
www.philips.com/welcome
EN User manual
24PFL5505/V7
32PFL4305/V7
24PFL4505/V7
42PFL3505/V7
32PFL3305/V7
support

Contents
1 Notice 2
2 Important
3
5
Side controls and indicators
4 Use your TV
8
5 Use more of your TV
Attention:
Frequently Asked Question
3 Your TV
7
5
Switching on
Switching off
Menu Introduction
Automatic Channel Set-up
Smart Channel Set-up
Manual Channel Set-up
Fine Tuning a Channel
Channel Edit
10
Adjusting the Picture
6 FAQ
8
8
9
9
9
9
9
10
11
11
12
13
13
14
14
14
10
Adjusting the Sound
Function Settings
Selecting a Signal Source
Geometry Settings
USB Functions
7 Other Information
15
Troubleshooting
15
EN 1
16
16
8
16
16
Product information
Supported display resolutions
Multimedia
Tuner/Reception/Transm ission
Remote control
Power
Supported TV mounts
Product specifi cation
16
16
17
17
Sockets
5
Remote Control Functions

1 Notice
Pixel characteristics
This LCD/LED product has a high number of
colour pixels. Although it has effective pixels of
99.999% or more, black dots or bright points of
light (red, green or blue) may appear constantly
on the screen. This is a structural proper ty of
the display (within common industry standards)
and is not a malfunction.
Warranty
No components are user serviceable. Do not
open or remove covers to the inside of the
product. Repairs may only be done by Philips
Service Centres and official repair shops. Failure
to do so shall void any warranty, stated or
implied.
Any operation expressly prohibited in
this manual, any adjustments, or assembly
procedures not recommended or authorised in
this manual, shall void the warranty.
2 EN

When stand mounting the TV, use only
the supplied stand. Secure the stand to
the TV tightly. Place the TV on a
, level
surface that can support the combined
weight of the TV and the stand.
When wall mounting the TV, use only a
wall mount that can support the weight of
the TV. Secure the wall mount to a wall
that can support the combined weight of
the TV and wall mount.
PE Electronics bears
that result in
accident, injury or damage .
Risk of injury to children!
Follow these precautions to prevent the
TV from toppling over and causing injury to
children:
Never place the TV on a surface covered
by a cloth or other material that can be
pulled away.
Ensure that no part of the TV hangs over
the edge of the surface.
Never place the TV on tall furniture (such
as a bookcase) without anchoring both
the furniture and TV to the wall or a
suitable support.
Educate children about the dangers of
climbing on furniture to reach the T V.
Risk of overheating!
Never install the TV in a space.
Always leave a space of at least 4 inches
or 10 cm around the TV for ventilation.
Ensure curtains or other objec ts never
cover the ventilation slots on the TV.
Risk of damage to the TV!
Before you connect the TV to the power
outlet, ensure that the power voltage
matches the value printed on the back
of the TV. Never connect the TV to the
power outlet if the voltage is different.
Risk of injury, or power cord damage!
Never place the TV or any objects on the
power cord.
To disconnect the TV power cord easily
from the power outlet, ensure that you
have full access to the power cord at all
times.
2 Important
Read and understand all instructions before you
use your TV. If damage is caused by failure to
follow instructions, the warranty does not apply.
Safety
Risk of electric shock or fire !
Never expose the TV to rain or water.
Never place liquid containers, such as
vases, near the TV. If liquids are spilt on
or into the TV, disconnect the TV from
the power outlet immediately. Contact
Philips Consumer Care to have the TV
checked before use.
Never place the TV, remote control or .
batteries near naked flames or other heat
sources, including direct sunlight.
To prevent th e spread of fire,keep
candles or other flames away from the
TV, remote control and batteries at all
times.
Never insert objec ts into the ventilation
slots or other openings on the TV.
When the TV is swiveled ensure that
no strain is exerted on the power cord.
Strain on the power cord can loosen
connections and cause arcing.
Never expose the remote control or
batteries to rain, water or excessive heat.
Avoid force coming on to power plugs.
Loose power plugs can cause arcing or
Risk of injury or damage to the TV !
Two people are required to lift and carry
a TV that weights more than 25 kg.
EN 3
fire.
flat
confined
fire
Risk of electric shock or fire !
no responsibility
for improper wall mounting

Disposal of your old product and
batteries
Your product is designed and manufactured
with high quality materials and components,
which can be recycled and reused.
When you disconnect the power cord,
always pull the plug, never the cable.
Disconnect the TV from the power
outlet and antenna before lightning
storms. Dur ing lightning storms, never
touch any par t of the TV, power cord or
antenna cable.
Risk of hearing damage!
Avoid using earphones or headphones at
high volumes or for prolonged periods of
time.
Low temperatures
If the TV is transpor ted in temperatures
below 5
until the TV temperature matches room
temperature before connecting the TV to
the power outlet.
Screen care
Avoid stationary images as much as
possible. Stationary images ar e images
that remain on-screen for extended
periods of time. Examples include:
on-screen menus, black bars and time
displays. If you must use stationar y
images, reduce screen contrast and
brightness to avoid screen damage.
Unplug the TV before cleaning.
Clean the TV and frame with a soft,
damp cloth. Never use substances such as
alcohol, chemicals or household cleaners
on the TV.
Risk of damage to the TV screen! Never
touch, push, rub or strike the screen with
any object.
To avoid deformations and colour fading,
wipe off water drops as soon as possible.
4 EN
C, unpack the TV and wait
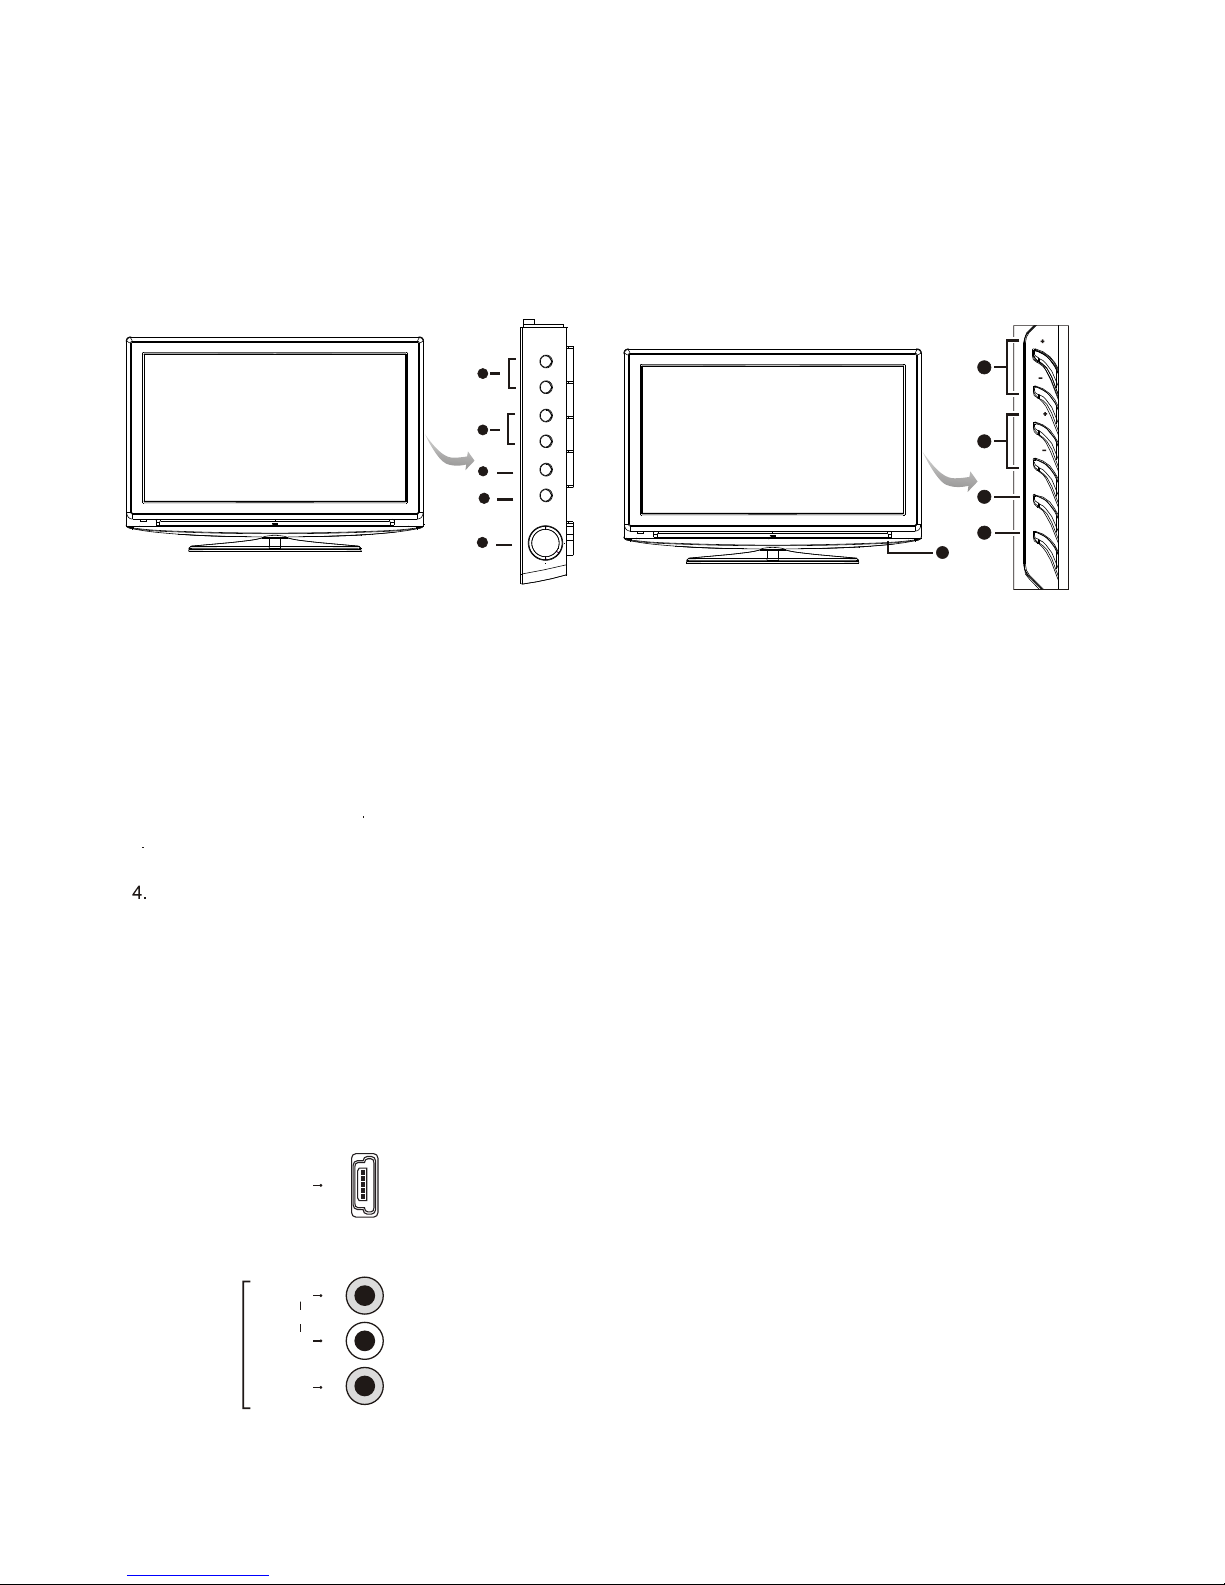
USB socket (input) at the side
This socket can be used to connect an USB device.
Note: The number of USB sockets on the TV may vary according to TV model.
Sockets
Note: The location and names of the sockets on the TV may vary according to
TV model, and not all sockets available on all models.
1. CHANNEL UP/DOWN button
Scans up/down through the channel list. In the menu system. They act like the up/down direction buttons on the
remote and adjust menu controls.
2
MENU button
Brings up the menu system.
SOURCE button
Press to select signal source.
5. POWER button (Note: The location of the power button on the TV may vary according to TV model.)
Turns the TV on or off.
Note: The positions and names of the function buttons on the TV may vary according to TV model.
. VOLUME UP/DOWN button
Increases/decreases the volume. In the menu system, they act like the right/left direction buttons on the remote
and adjust menu controls
3
USB
AV2 RCA audio + video sockets (input) at the side
These sockets can be used to connect a range of equipment, including video
recorders, camcorders, decoders, satellite receivers, DVD players, or games
consoles. The VIDEO IN2 socket provides composite video connection.
L
AUDIO
VIDEO
AV IN2
R
5
3
1
2
4
5
3
VOL
VOL
SOURCE
MENU
CH
CH
1
2
4
3 Your TV
EN 5
Side controls and indicators
CH
VOL
MENU
SOURCE

HDMI IN1
HDMI1 and HDMI2 socket (input) at the back
The HDMI can be used to connect a
PC with a compatible video card installed, certain DVD players or a high-definition
compatible digital satellite decoder. This socket p
(High-Definition Multimedia Interface) socket
rovides an uncompressed digital
connection that carries both video and audio data by way of an integrated mini-plug
cable.
VIDEO
R
L
AV OUT
AUDIO/VIDEO sockets (output) at the back
a VCR to record programs. You must leave
the TV on the same channel you are recording.
composite video connection.
These sockets can be used to connect
The VIDEO OUT socket p
rovides
HDMI IN2
SPDIF OUT
SPDIF socket (output) at the back
Use a digital coaxial cable to connect your TV to a compatible audio receiver.
AV1 RCA audio + video sockets (input) at the back
These sockets can be used to connect a range of equipment, including video
recorders, camcorders, decoders, satellite receivers, DVD players, or games
consoles. The VIDEO IN1 socket p
rovides composite video connection.
R
L
AUDIO
VIDEO
AV IN1
AUDIO
VGA socket (input) at the back
This socket can be used to connect a computer.
VGA IN
ANTENNA IN
ANTENNA IN socket (input) at the back
This socket can be used to connect the outside aerial or cable network.
R
L
VGA/COMPONENT
AUDIO IN
AUDIO IN sockets (input) at the back
These sockets can be used to connect a range of equipment, including video
recorders, camcorders, satellite receivers, DVD players, or games consoles.
AUDIO IN sockets are shared by VGA and YPBPR sockets.
VGA/COMPONENT
YPBPR component sockets (input) at the back
These can be used to connect a device that has component video sockets, such as
a DVD player. The component sockets can recognize if the device you're connecting
to is Y Pb Pr compatible or Y Cb Cr compatible. The component sockets provide
excellent picture quality because the video is separated into three separate parts.
Y
Pb/Cb
Pr/Cr
COMPONENT
IN
or
Headphone socket (output) at the side
This socket can be used to connect headphones or stereo earphones.
Warning: Excessive sound pressure from earphones and headphones can
cause hearing loss.
Note: When connecting headphones, you can press the button on the remote
control to mute the sound coming from the speakers.
In MUTE condition, Pressing the VOL+ and VOL- could change the volume of earphone.
And you need to press the MUTE button on the remote to release the mute of speaker
6 EN
 Loading...