

Page 1
Register your product and get support at
www.philips.com/welcome
User manual
Manuale utente
Manual do utilizador
Mode d'emploi
Manual del usuario
Page 2
Contents
TV Control switch & Operation ............................... 1
General Operation .................................................. 1
TV Menu Features and Functions .......................... 7
Speci cations ..............................................................14
TV Control switch & Operation
1. Up direction
2. Down direction
3. Programme/Volume / AV / Standby-On
selection switch
Note:You can move the switch, upward or downward to
change the volume. If you want to change channels, press
the middle of the switch once (Position 3) and then move
upward or downward. If you press the middle of the switch
once more, source OSD will be displayed. If you press the
middle of the switch and hold about a few seconds, the TV
will switch to standby mode. Main menu OSD cannot be
displayed via control buttons.
Operation with the Remote Control
• Press “ ” button on your remote control to display
main menu screen. Use Left or Right button to
select a menu tab and press OK to enter. Use Left
/ Right / Up / Down to select or set an item. Press
” or “ ” button to quit a menu screen.
“
• Once you have connected external systems to
your TV, you can switch to different input sources.
Press SOURCE button on your remote control
consecutively to select the different sources.
• You can change the channel and adjust the volume
by using the +/- and
CH+/- buttons on the remote. .
General Operation
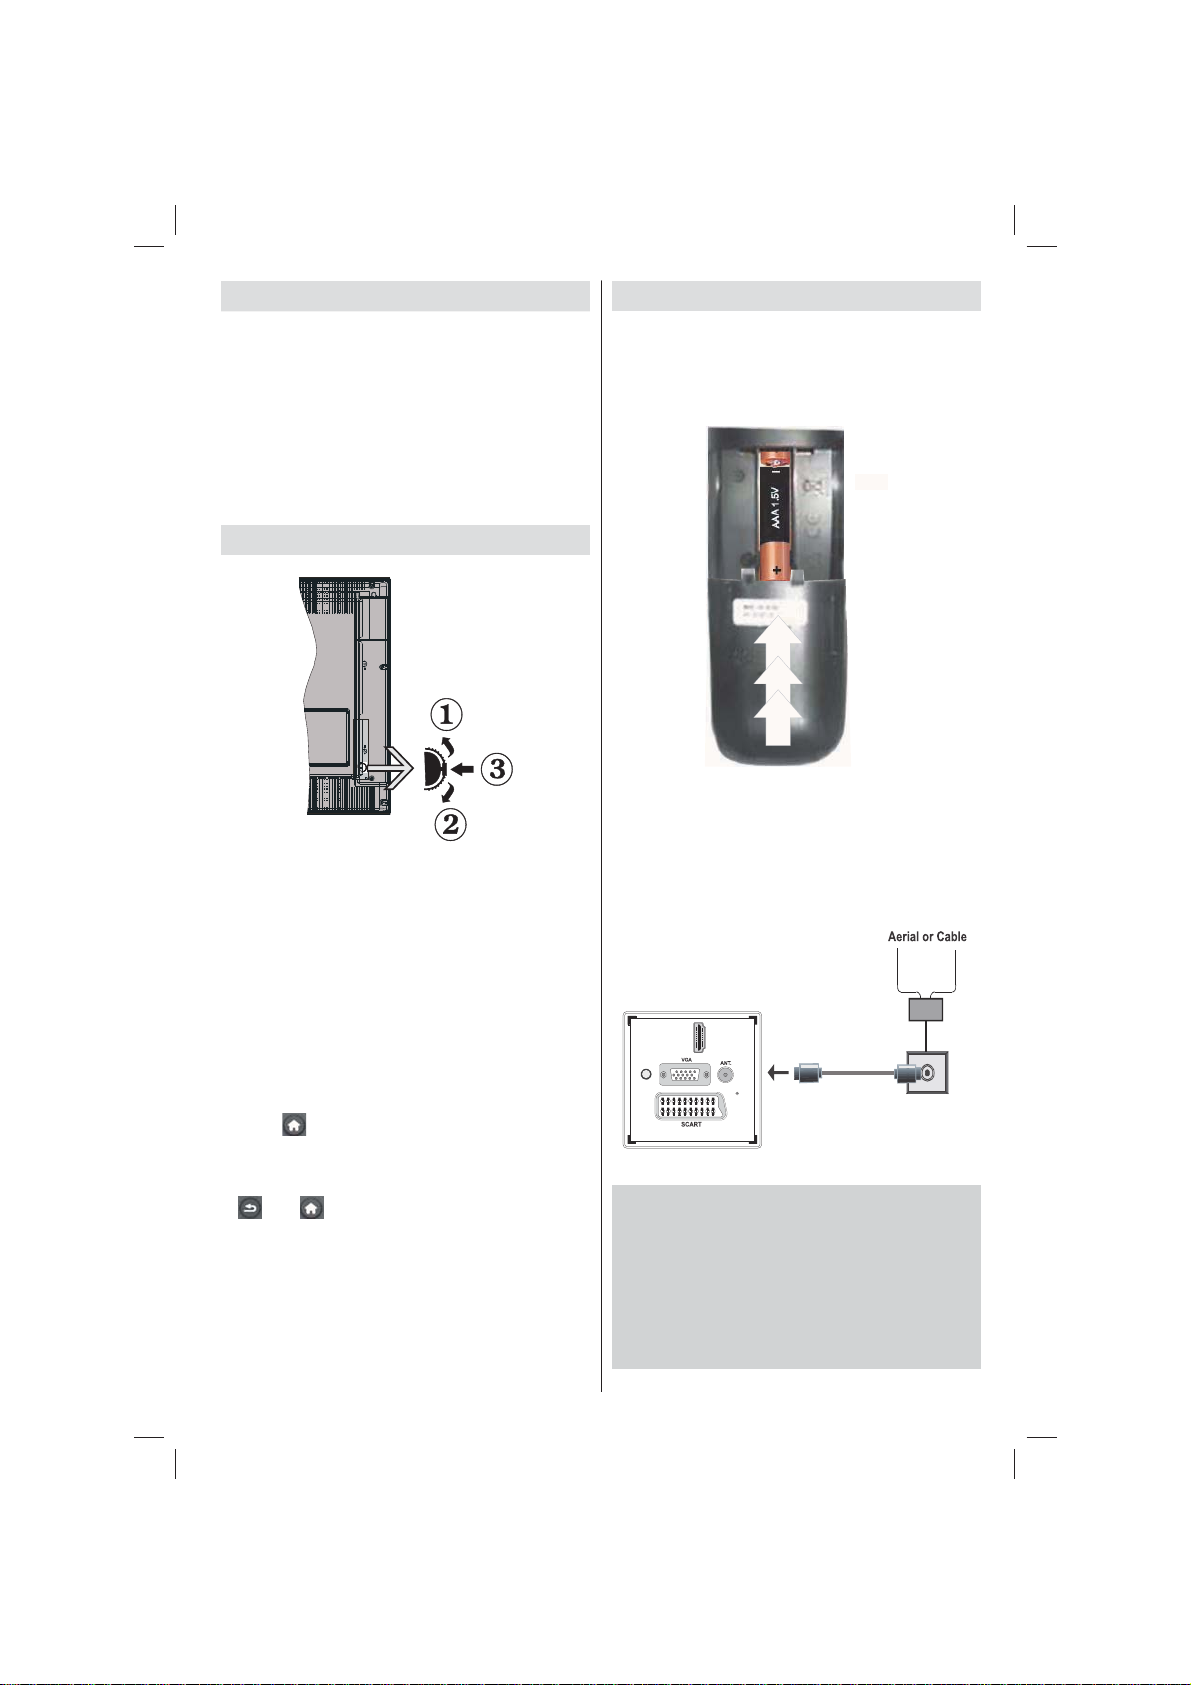
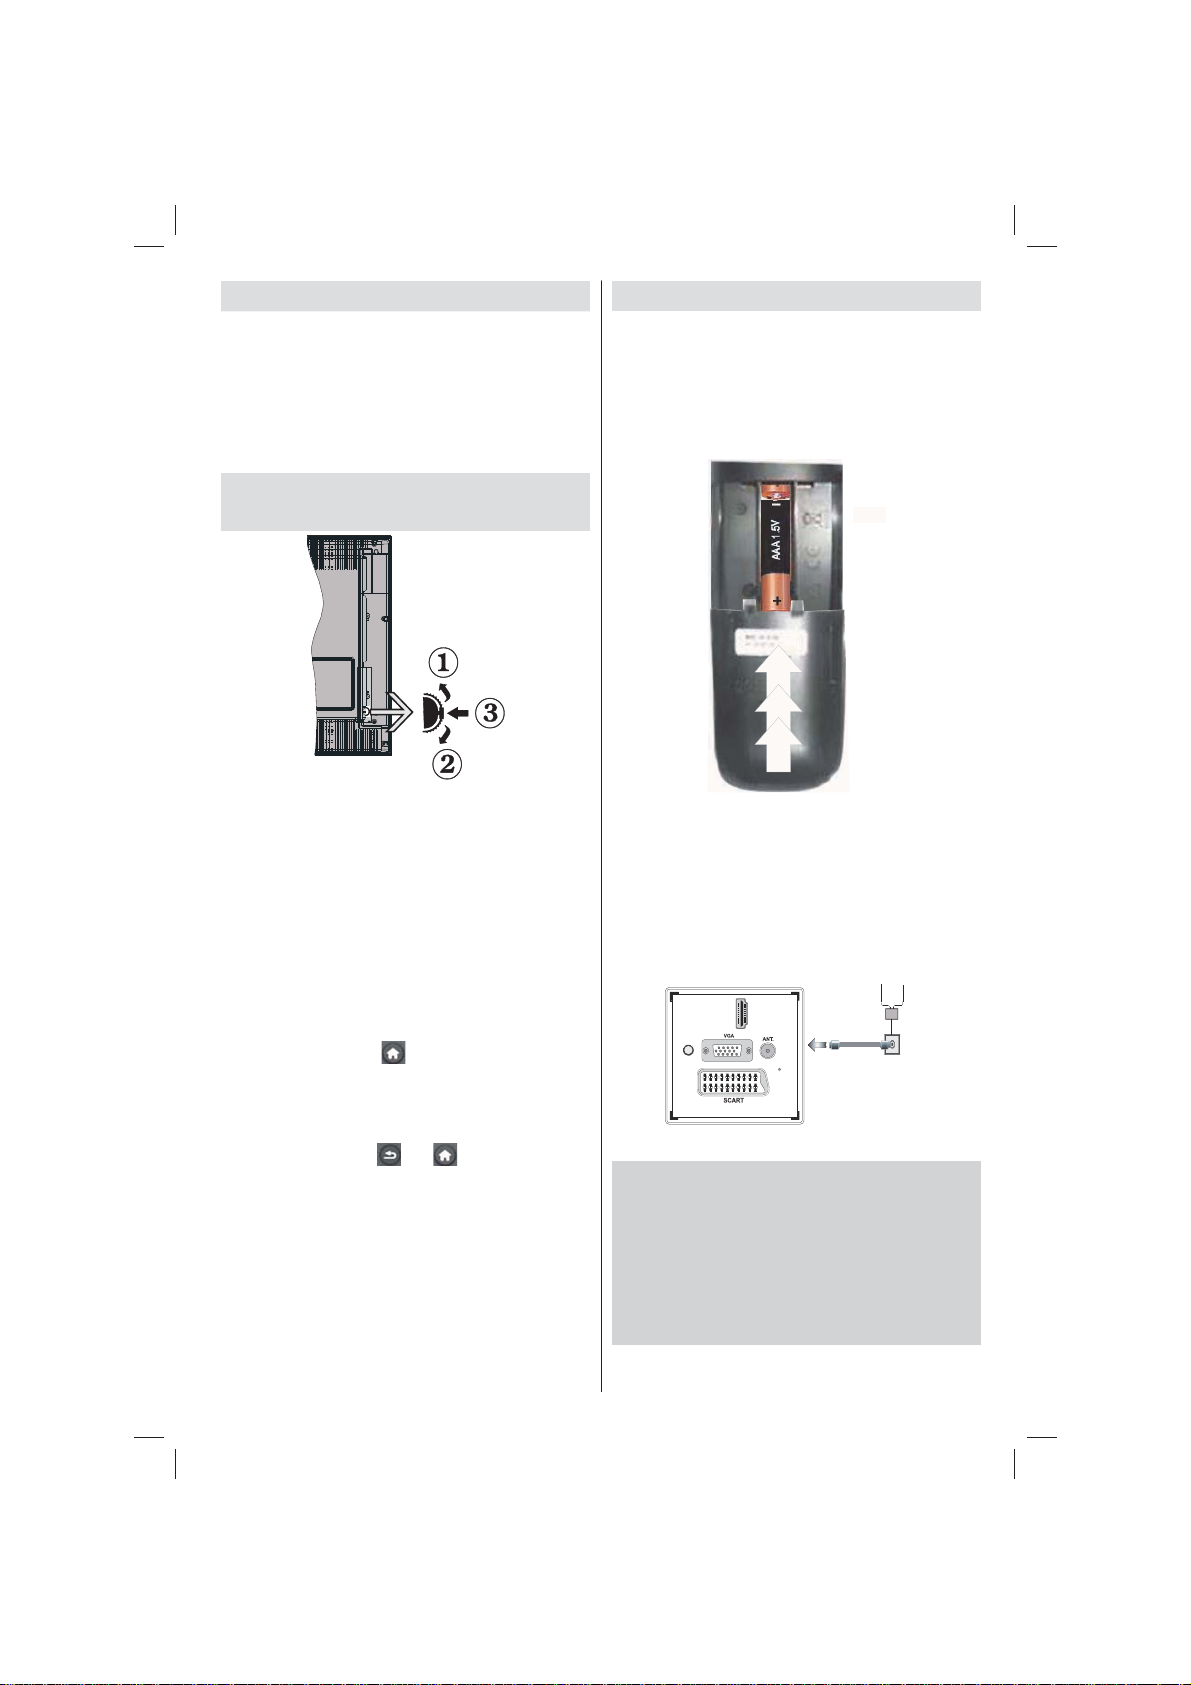
Installing the Batteries to the Remote
Lift the cover on the back of the remote upward gently.
Install two AAA batteries. Make sure to match the +
and - ends of the batteries in the battery compartment
(observe the correct polarity. Replace the cover.
Connect Power & Antenna/Cable
IMPORTANT: The TV set is designed to operate on
220-240V AC, 50 Hz socket. After unpacking, allow
the TV set to reach the ambient room temperature
before you connect the set to the mains. Plug the
power cable to the mains socket outlet.
HDMI 1
SPDIF
Coax.OUT
Accessories included
• Remote Control
• Batteries: 2 x AAA
• Instruction Book
• Quick Start Guide
• Side AV Connection Cable
• YPbPr Connection Cable
English - 1 -
Page 3
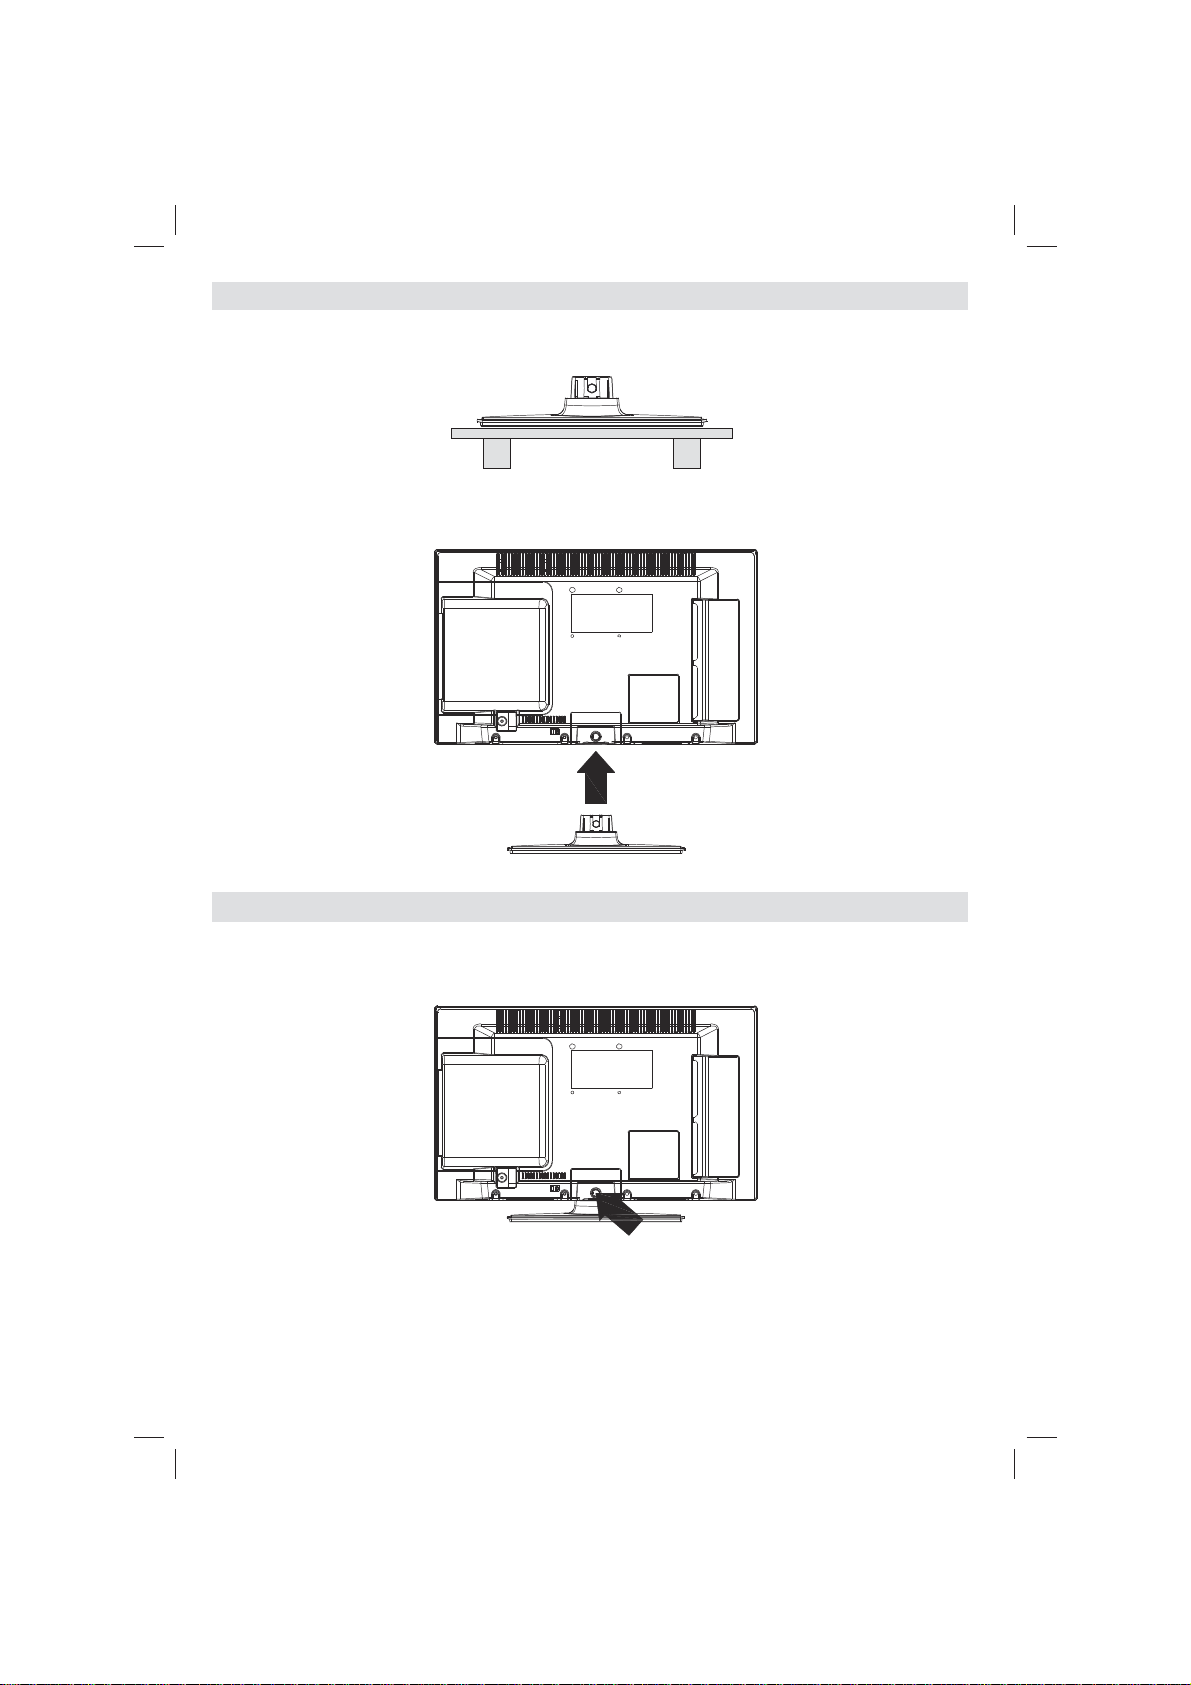
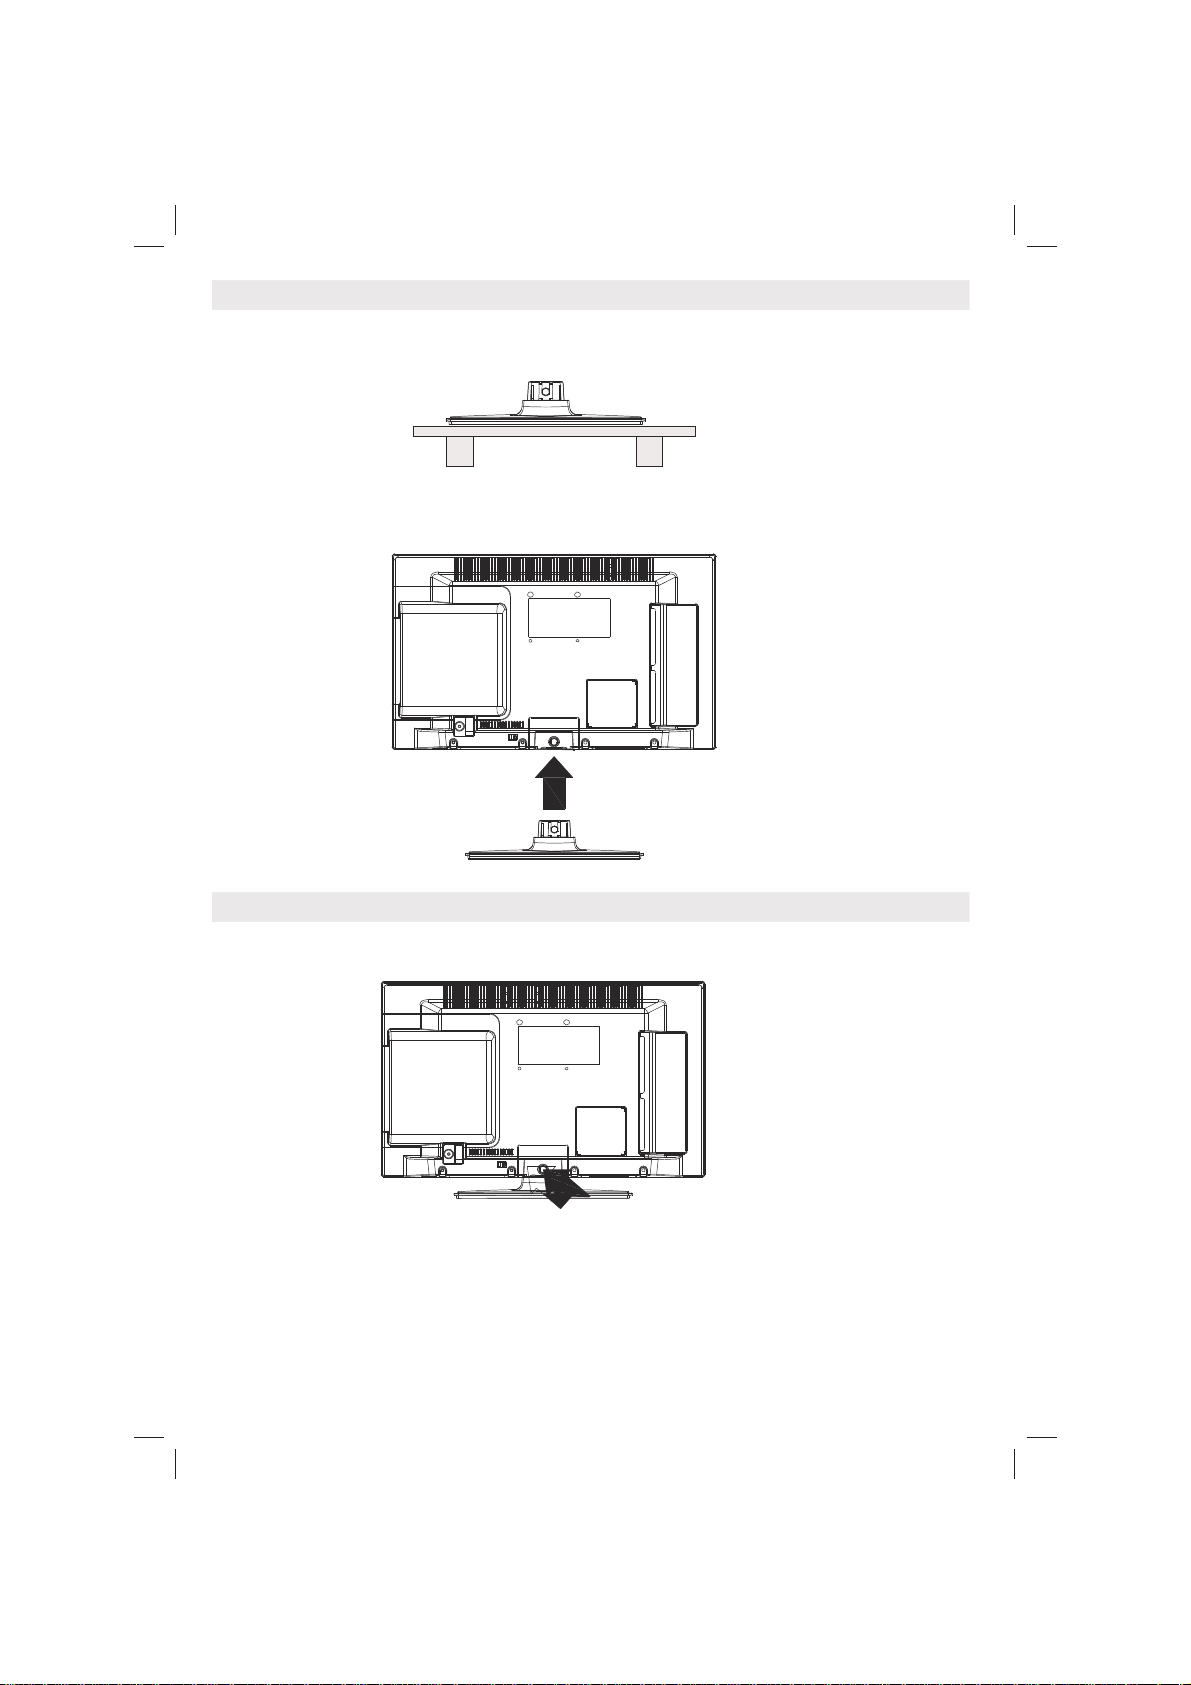
Detachable Stand Installation Method (without screw)
Stand is placed on a fl at surface.1.
The product is hold over the stand so that it concides with the stand mounting point and 2.
then it is left to be mounted with its own weight.
Detachable Stand Uninstallation Method
TV is laid on a fl at table.1.
Clamps on the stand are pushed.2.
Stand is pulled back.3.
Stand is detached.4.
English - 2 -
Page 4

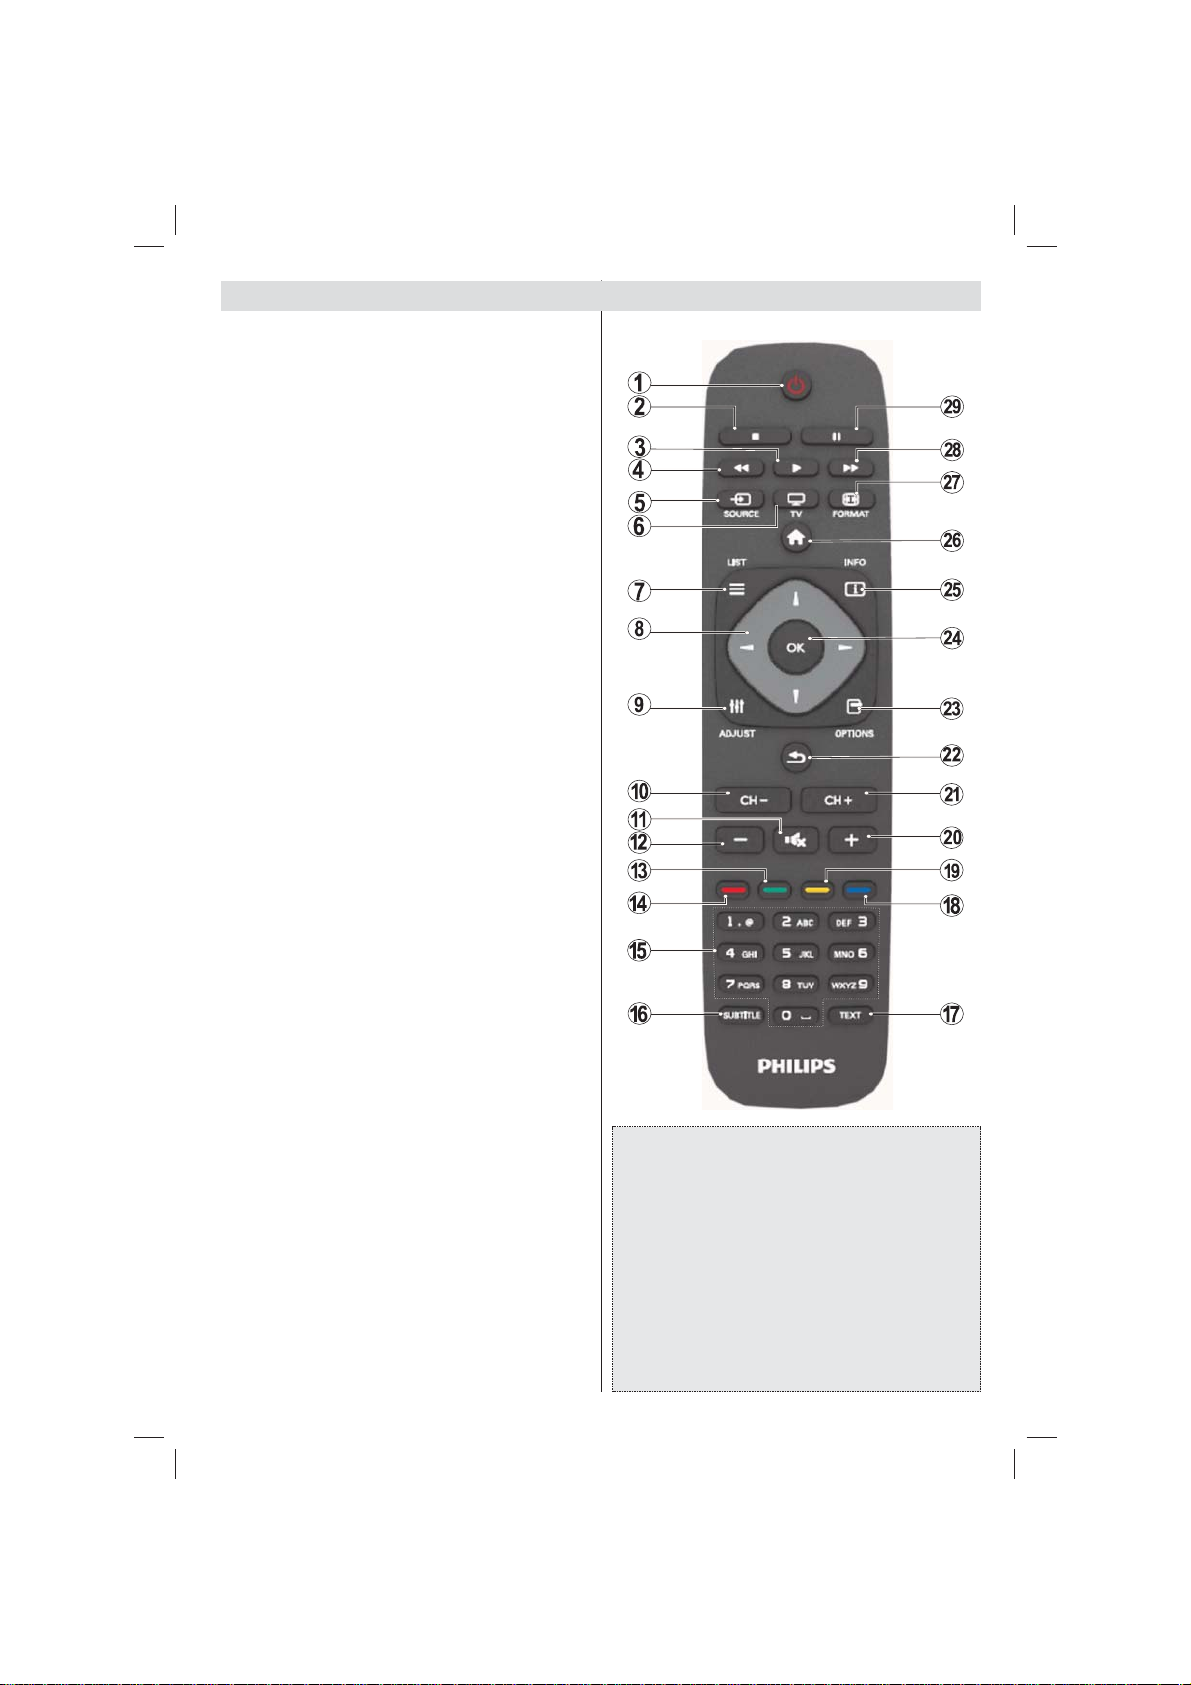
Viewing remote control
1. Standby
2. Stop (in Media Browser mode)
3. Play (in Media Browser mode) / Play-Slideshow
(in Media Browser)
4. Rapid reverse (in Media Browser mode)
5. AV / Source selection
6. TV
7. Electronic programme guide(in DVB channels)
8. Navigation buttons (Up/Down/Left/Right)
9. Programme recording
10. Programme Down / Page up
11. Mute
12. Volume Down
13. Green button / List Schedule (in EPG) / Tag/
Untag All (in favourite list)
14. Red button
15. Numeric buttons
16. Subtitle on-off (in DVB channels)
17. Teletext / Mix (in TXT mode)
18. Blue button/Edit Channel List/Filter (in Favourite
List&EPG)
19. Yellow button/Timeline Schedule(in EPG)
20. Volume Up
21. Programme Up / Page down
22. Back/ Return / Index page (in TXT mode)
23. Mono/Stereo - Dual I-II / Current Language (*)
(in DVB channels)
24. Okay (Con rm) / Hold (in TXT mode) / Channel
List
25. Info / Reveal (in TXT mode)
26. Menu on-off / Exit (in Media Browser mode)
27. Picture zoom
28. Rapid advance (in Media Browser mode)
29. Pause (in Media Browser mode) / Timeshift
recording
Press TEXT button to enter. Press again to activate
mix mode. Press once more to exit. Follow the
instructions displayed on digital teletext screen.
Press TEXT button to view digital teletext information.
Operate it with the coloured buttons, cursor buttons and
OK button. The operation method may differ depending on
the contents of the digital teletext. Follow the instructions
displayed on digital teletext screen.
English - 3 -
Teletext
Digital Teletext (for UK only)
Page 5
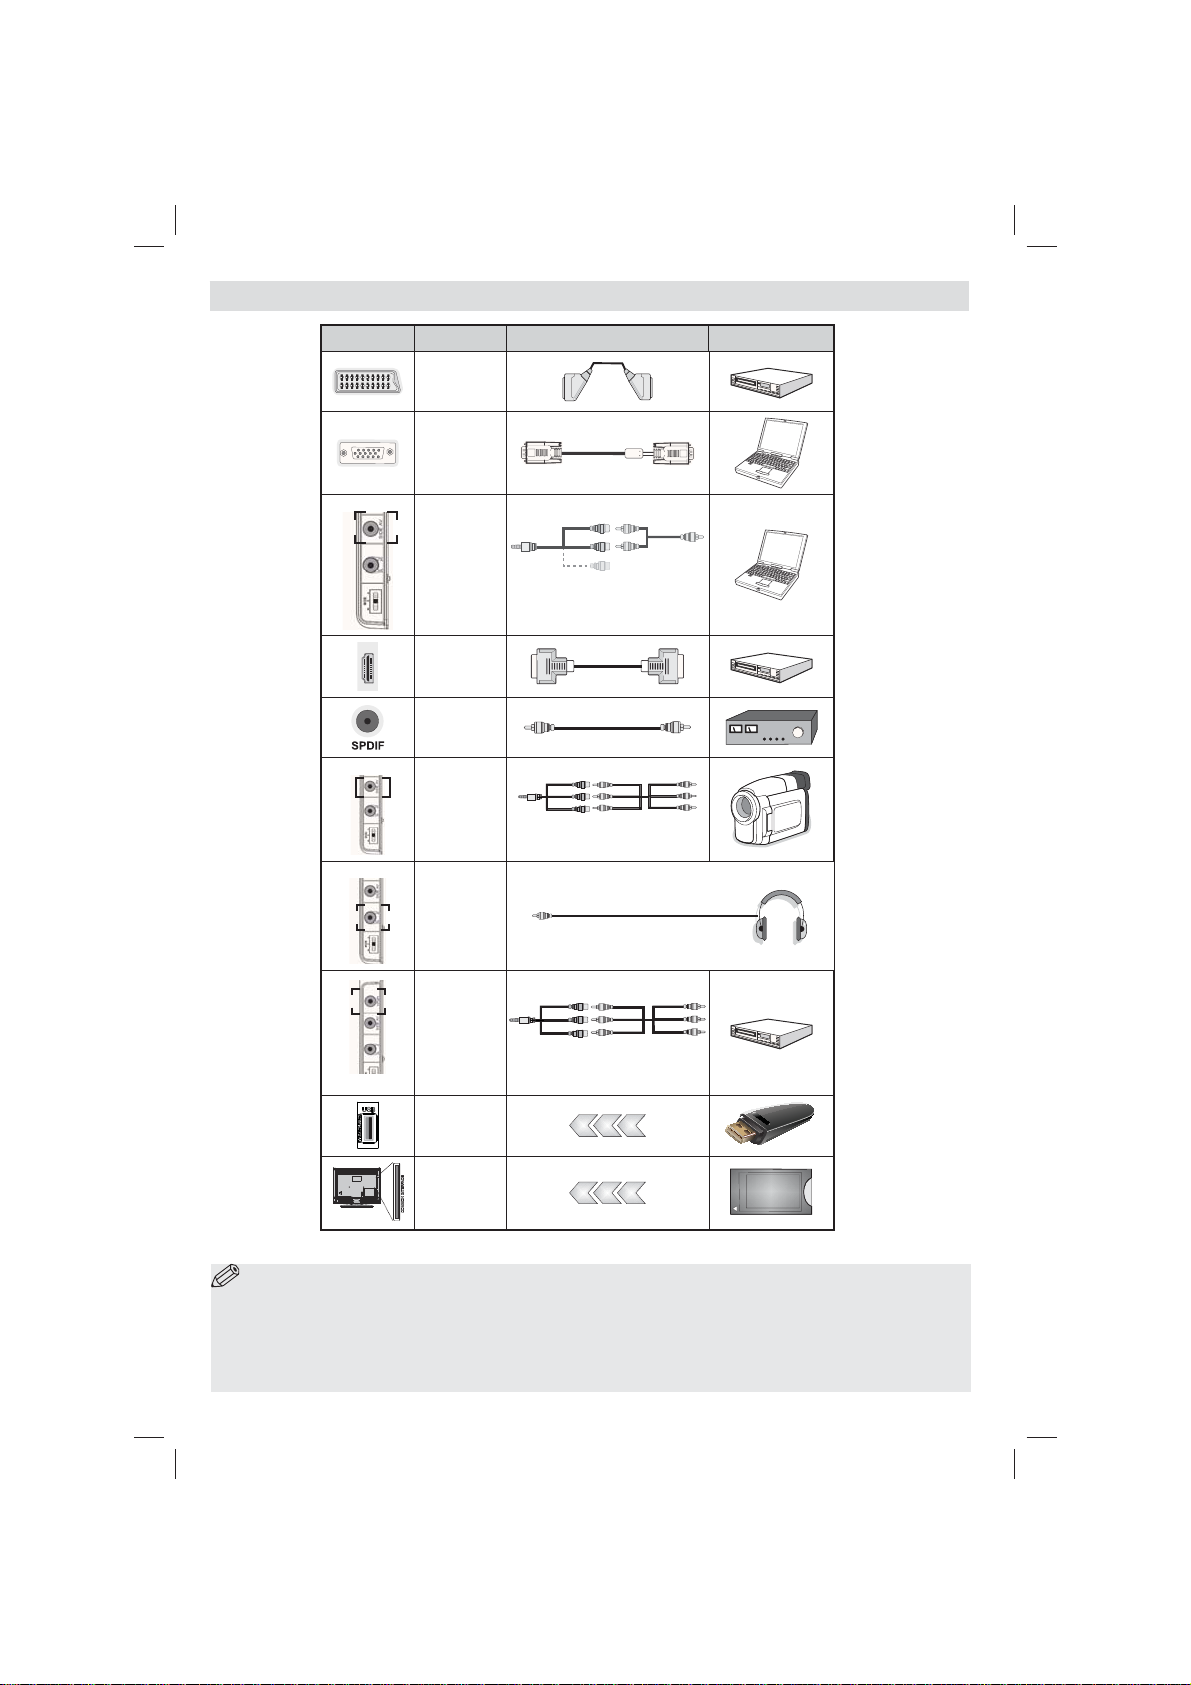
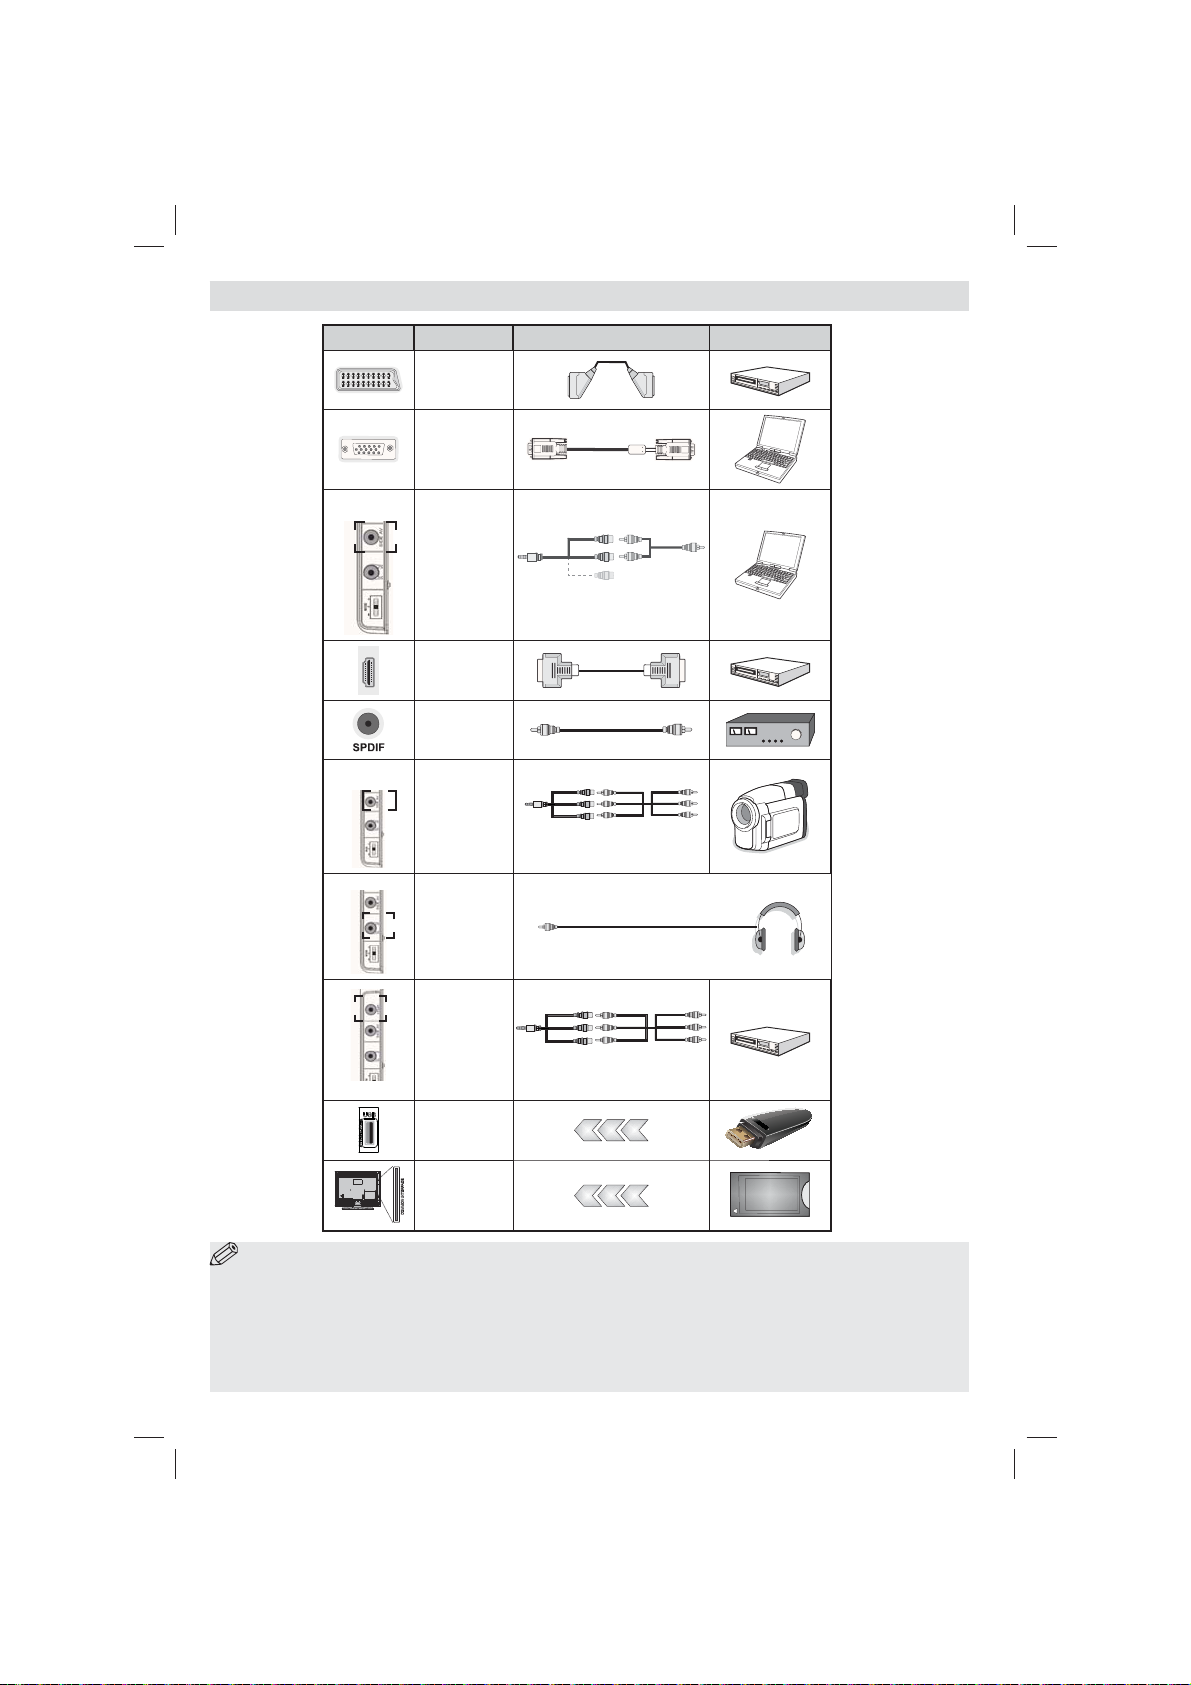
Viewing the Connections
Connector Type Cables Device
Connection
(back)
Connection
(back)
SIDE AV
PC/YPbPr
Audio
Connection
Connection
(back)
SPDIFF
Connection
(back)
SIDE AV
Side AV
Connection
HEADPHONE
Headphone
Connection
Scart
VGA
(side)
HDMI
(side)
(side)
Side Audio/Video
Connection Cable
(Supplied)
AV Connection Cable
(supplied)
PC Audio Cable
(Not supplied)
YPbPr Video
Connection
(side)
YPbPr Connection
Cable (supplied)
YPBPR
USB
Connection
(side)
CI
Connection
(side)
CAM
module
NOTE: When connecting a device via the YPbPr or Side A V input, you must use the supplied connection cables to
enable connection. See the illustrations above. | T o enable PC audio, you will need to use the supplied SIDE A V CONNECTION
cable’s WHITE & RED inputs. | If an external device is connected via the SCART socket, the TV will automatically switch to
AV mode.| When receiving DTV channels (Mpeg4 H.264) or while in Media Browser mode, output will not be available via
the scart socket. | When using the wall mounting kit (optional), we recommend that you plug all your cables into the back of
the TV before mounting on the wall. | Insert or remove the CI module only when the TV is SWITCHED OFF. You should refer
to the module instruction manual for details of the settings.
English - 4 -
Page 6
Switching On/Off
To Switch the TV On
• Connect the power cord to the 220-240V AC, 50 Hz.
• Then the standby LED lights up.
• To switch on the TV from standby mode either:
• Press the “
button on the remote control.
• Press the control switch left side of the TV. The TV
will then switch on.
Note: If you switch on your TV via CH- or CH+ buttons on
the remote control or on the TV set, the programme that you
were watching last will be reselected.
By either method the TV will switch on.
” button, CH- or CH+ or a numeric
To Switch the TV Off
• Press the “ ” button on the remote control or hold
the control switch on the TV until shut down , so
the TV will switch to standby mode.
• To power down the TV completely, unplug the power
cord from the mains socket.
Note: When the TV is switched to standby mode, the standby
LED can blink to indicate that features such as Standby
Search, Over Air Download or Timer is active.
First Time Installation
When turned on for the rst time, language selection
screen is displayed in all language options listed
alphabetically. Press the “ ” or “ ” button to
highlight the required language, press OK button to
select. “First Time Installation” appears. Use “ ” or
“ ” button to set the required country, and press “ ”
button to select Search Type. Use “ ” or “ ” to set
the desired search type. Available search types are
Digital and analog, digital only and analog only. When
set, press “ ” to select Teletext Language. Use “ ”
or “ ” to select the desired Teletext Language. Next,
select Scan Encrypted and set as Yes if you want to
scan coded stations. Press OK button on the remote
control to continue and the search type screen will be
displayed. You must select a search type to search
and store broadcasts from the desired source.
IMPORTANT: When you select Country option as
France or Italy, you will be asked to set and con rm
a PIN number. Selected PIN number cannot be 0000.
Enter a PIN number and con rm it by entering once
more. Press OK button to continue. If the two PIN
numbers match, your master PIN number will be set.
WARNING: When you are required to enter a PIN
number for any menu operation you should use the
PIN that you have previously de ned during the rst
time installation. If you have forgotten the PIN number
you have set during the rst time installation, you
should use the master PIN code, 4725.
Aerial Installation
If you select AERIAL option from the Search Type
screen, the television will search for digital terrestrial
TV broadcasts.
NOTE: You can press “ ”button to cancel.
After all the available stations are stored, Channel
List will be displayed on the screen. If you like the
sort channels, according to the LCN (*), please select
“Yes” and than press OK.
Press “
(*) LCN is the Logical Channel Number system that
organizes available broadcasts in accordance with a
recognizable channel sequence (if available).
” button to quit channel list and watch TV.
Cable Installation
If you select CABLE option and press OK button on the
remote control to continue. To continue, please select
YES and press OK. To cancel operation, select NO and
press OK. You can select frequency ranges from this
screen. For highlighting lines you see, use “
button. You can enter the frequency range manually by
using the numeric buttons on the remote control. Set
Start and Stop Frequency as desired by using numeric
buttons on the remote control. After this operation, you
can set Search Step as 8000 KHz or 1000 KHz. If you
select 1000 KHz, the TV will perform search process in
a detailed way. Searching duration will thus increase
accordingly. Depending on your Country selection in
the rst time installation, 250KHz search step option
might be available on Network Channel Scan screen.
Note that if you perform the search with 250KHz option,
search process could take a longer time.
Additionally, for some countries, Network ID option
will be available. Network ID feature gets the Network
Information Table. This table provides information on
the selected network. It may change according to the
operator and the region where that operator actively
broadcasts.When nished, press OK button to start
automatic search. The TV will search and store available
broadcasts.
” or “ ”
English - 5 -
Page 7
Media Playback via USB Input
You can connect a USB hard disk drive or USB memory stick
to your TV by using the USB inputs of the TV. This feature
allows you to play fi les stored in a USB drive. 2.5” and 3.5”
inch (hdd with external power supply) external hard disk
drives are supported.
IMPORTANT! You should back up your les before
making any connections to the TV set in order to
avoid any possible data loss. Manufacturer will not
be responsible for any le damage or data loss. It is
possible that certain types of USB devices (e.g. MP3
Players) or USB hard disk drives/memory sticks may
not be compatible with this TV. The TV supports FAT32
and NTFS disk formatting but recording will not be
available with NTFS formatted disks. Note: While
formatting a USB hard disk that has 1TB (Tera Byte) or
more le capacity, you can experience problems with
the formatting process. Quickly plugging and unplugging
USB devices, is a very hazardous operation. Do not
repeatedly quickly plug and unplug the drive. This
may cause physical damage to the USB player and
USB device itself. Do not pull out USB module while
playing a le.
Media Browser Menu
You can play photo, music, and movie les stored
on a USB disk by connecting it to your TV and using
the Media Browser screen. To do this, perform the
following: Connect a USB disk to one of the USB
inputs located on the side of the TV. Press “
button and select Media Browser tab by using Left/
Right and OK buttons. Main media browser screen
will be displayed. You can display the related content
by selecting the Video, Music or Picture tab. Follow the
button indications under each on screen menu for media
playback features. You can set your Media Browser
preferences by using the Settings dialogue.
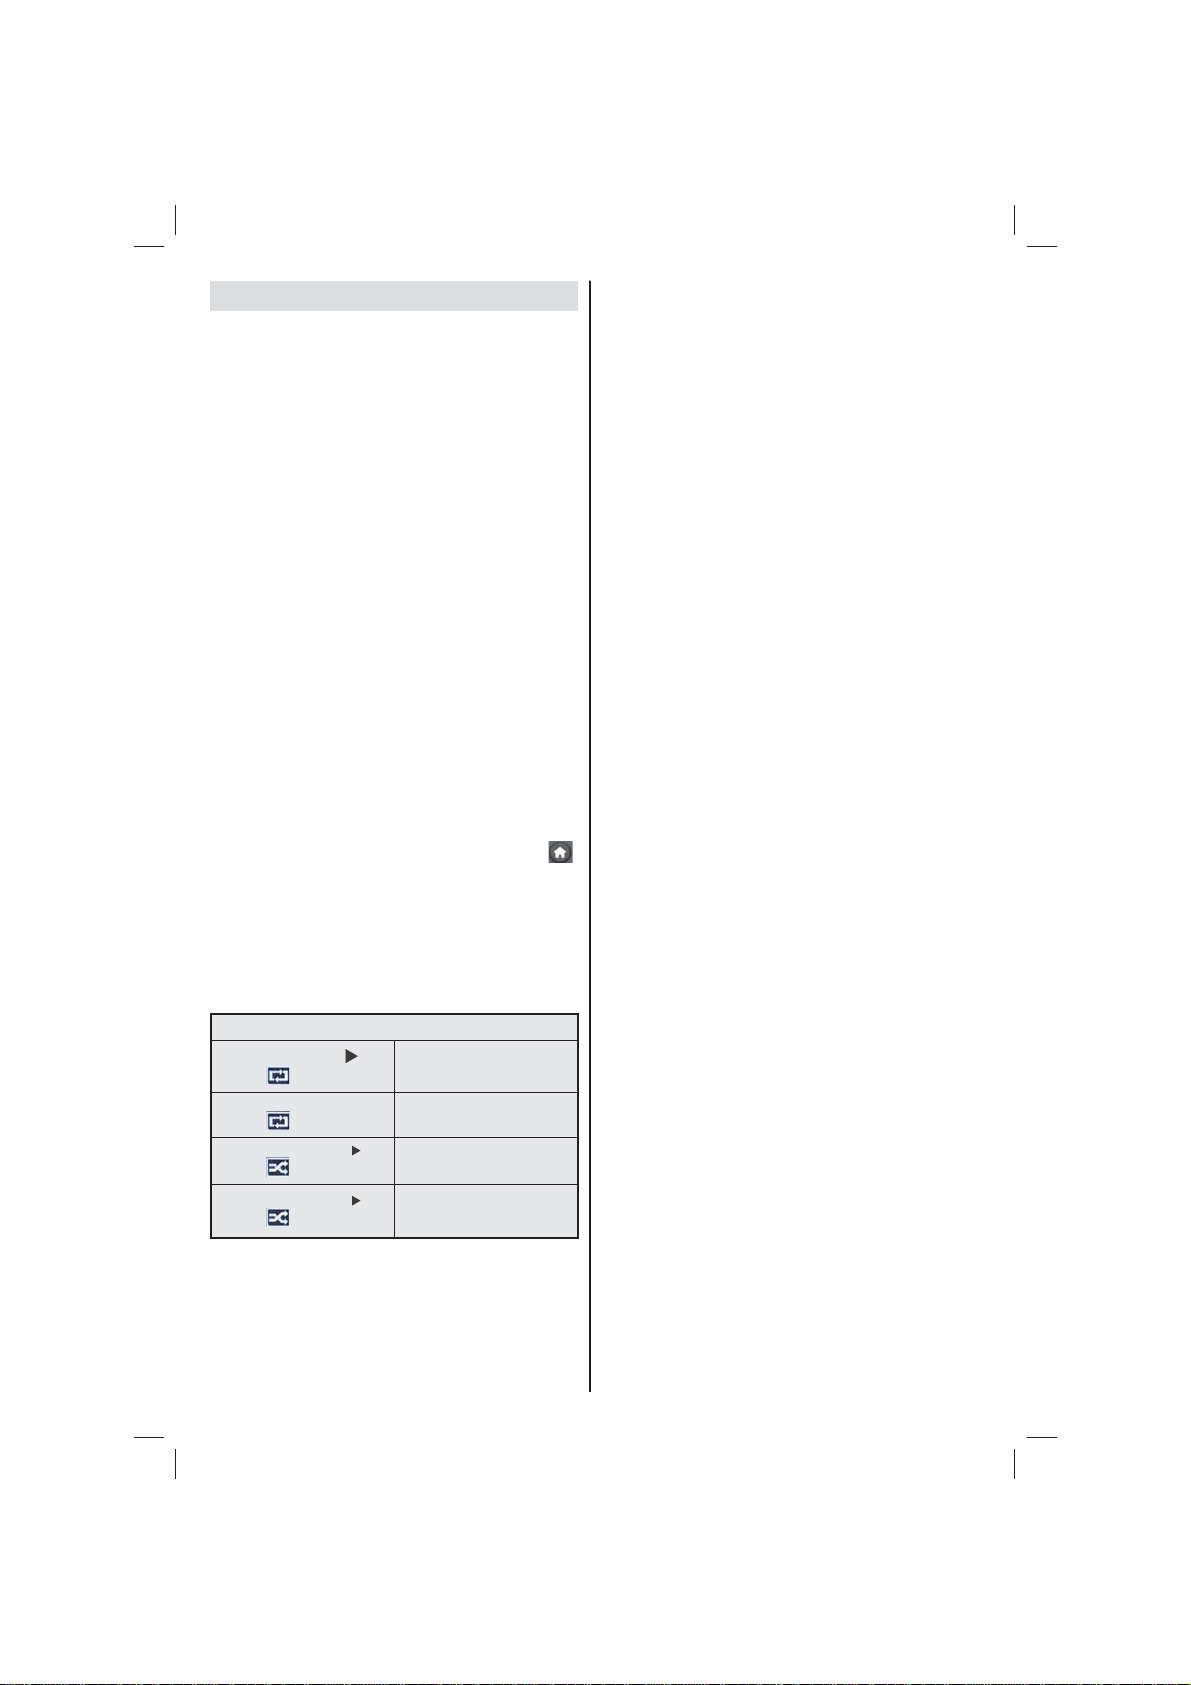
Loop/Shuffl e Mode Operation
Start playback with and
activate
Start playback with OK and
activate
Start playback with OK/
activate
Start playback with OK/
activate
TV plays next file and loop
the list.
the same le will be played in a
loop (repeat).
and
the le will be played in a shuf e.
the le playback will continue
and
randomly and random playback
will continue.
”
English - 6 -
Page 8

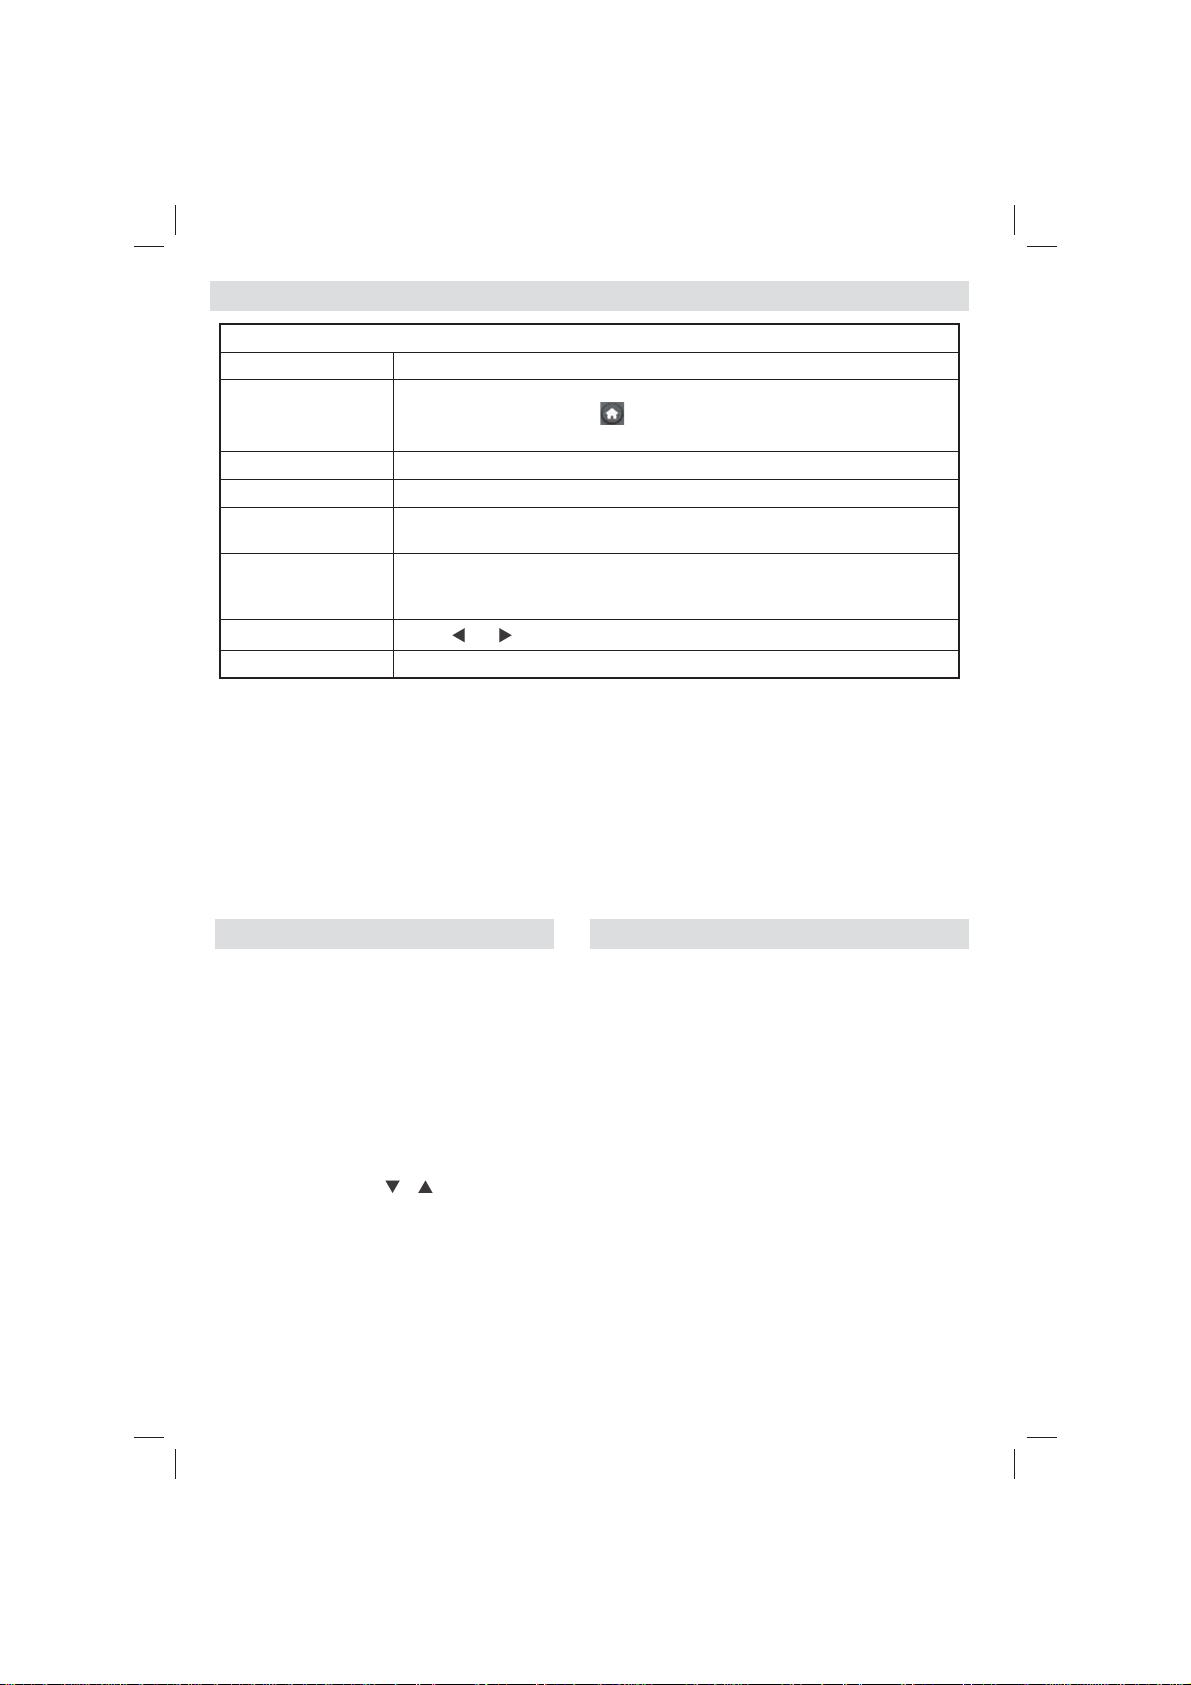
TV Menu Features and Functions
Picture Menu Contents
Mode
Contrast Sets the lightness and darkness values of the screen.
Brightness Sets the brightness value for the screen.
Sharpness Sets the sharpness value for the objects displayed on the screen.
Colour Sets the colour value, adjusting the colors.
Power Save
Mode
Backlight
(optional)
Noise
Reduction
Colour Temp Sets the desired colour tone.
Picture Zoom Sets the picture size to Auto,16:9, Subtitle,14:9, 14:9 Zoom, 4:3 or Cinema.
HDMI True
Black
Film Mode
(optional)
Colour Shift Adjust the desired colour tone.
Reset Resets the picture settings to factory default settings.
Autoposition
(in PC mode)
H Position (in
PC mode)
V Position (in
PC mode)
Dot Clock (in
PC mode)
Phase (in PC
mode)
While in VGA (PC) mode, some items in Picture menu will be unavailable. Instead, VGA mode settings
will be added to the Picture Settings while in PC mode.
For your viewing requirements, you can set the related mode option. Picture mode
can be set to one of these options: Cinema,Game,Dynamic and Natural.
To set Power Save Mode as Eco, Picture Off and Disabled. .
This setting controls the backlight level and it can be set to Auto, Maximum, Minimum
and Eco Mode. Backlight function will be inactive if Power Save Mode is set to On.
Backlight cannot be activated in VGA, Media Browser mode or while the picture
mode is set to Game.
If the broadcast signal is weak and the picture is noisy, use Noise Reduction setting
to reduce the noise amount. Noise Reduction can be set to one of these options:
Low, Medium, High or Off.
Advanced Settings
While watching from HDMI source, this feature will be visible in the Picture Settings
menu. You can use this feature to enhance blackness in the picture.
Films are recorded at a different number of frames per second to normal television
programmes. Turn this feature on when you are watching lms to see the fast motion
scenes clearly.
Automatically optimizes the display. Press OK to optimize.
This item shifts the image horizontally to right hand side or left hand side of the screen.
This item shifts the image vertically towards the top or bottom of the screen.
Dot Clock adjustments correct the interference that appear as vertical banding in
dot intensive presentations like spreadsheets or paragraphs or text in smaller fonts.
Depending on the resolution and scan frequency that you input to the TV set, you
may see a hazy or noisy picture on the screen. In such a case you can use this item
to get a clear picture by trial and error method.
English - 7 -
Page 9
TV Menu Features and Functions
Sound Menu Contents
Volume Adjusts volume level.
In equalizer menu, the preset can be changed to Music, Movie, Speech, Flat,
Equalizer:
Balance This setting is used for emphasizing left or right speaker balance.
Headphone Sets headphone volume.
Sound Mode
AVL
Dynamic Bass:
Digital Out Sets digital out audio type.
Classic and User. Press the “
menu settings can be changed manually only when the Equalizer Mode is in User.
You can select Mono, Stereo, Dual I or Dual II mode, only if the selected channel
supports that mode.
Automatic Volume Limiting (AVL) function sets the sound to obtain xed output
level between programmes (For instance, volume level of advertisements tend
to be louder than programmes).
Press “
” or “ ” button to set Dynamic Bass as on or off.
” button to return to the previous menu. Equalizer
Using the Channel List
The TV sorts all stored stations in the Channel List. You
can edit this channel list, set favourites or set active
stations to be listed by using the Channel List options.
• Select Channel List from the main menu.
• Select Edit Channel List to manage all stored
channels. You can move, delete, edit name and
lock channels using this screen.
• Select Favourites to create a list of favourite
programmes.
• Select Active Channel List to sort channel list.
You can select a broadcast type option from the
displayed list by using “
” /“ ” and OK buttons.
English - 8 -
Confi guring Parental Settings
To prohibit viewing of certain programmes, channels and menus
can be locked by using the parental control system.
Highlight Parental in the Settings menu and press OK
to continue. To display parental lock menu options, the
PIN number should be entered. The factory default PIN
number is 0000. After coding the correct PIN number,
parental settings menu will be displayed.
Menu Lock: Menu lock setting enables or disables the
menu access.
Maturity Lock: When set, this option gets the maturity
information from the broadcast and if this maturity level
is disabled, disables access to the broadcast.
Child Lock: When Child Lock is set, the TV can only
be controlled by the remote control. In this case the
control panel buttons will not work.
Set PIN: De nes a new PIN number.
IMPORTANT: The factory default pin number is 0000,
if you change the pin number make sure you write it
down and keep it safe.
Note: If the Country option is set to France or Italy, you
can use 4725 as the default code.
Page 10
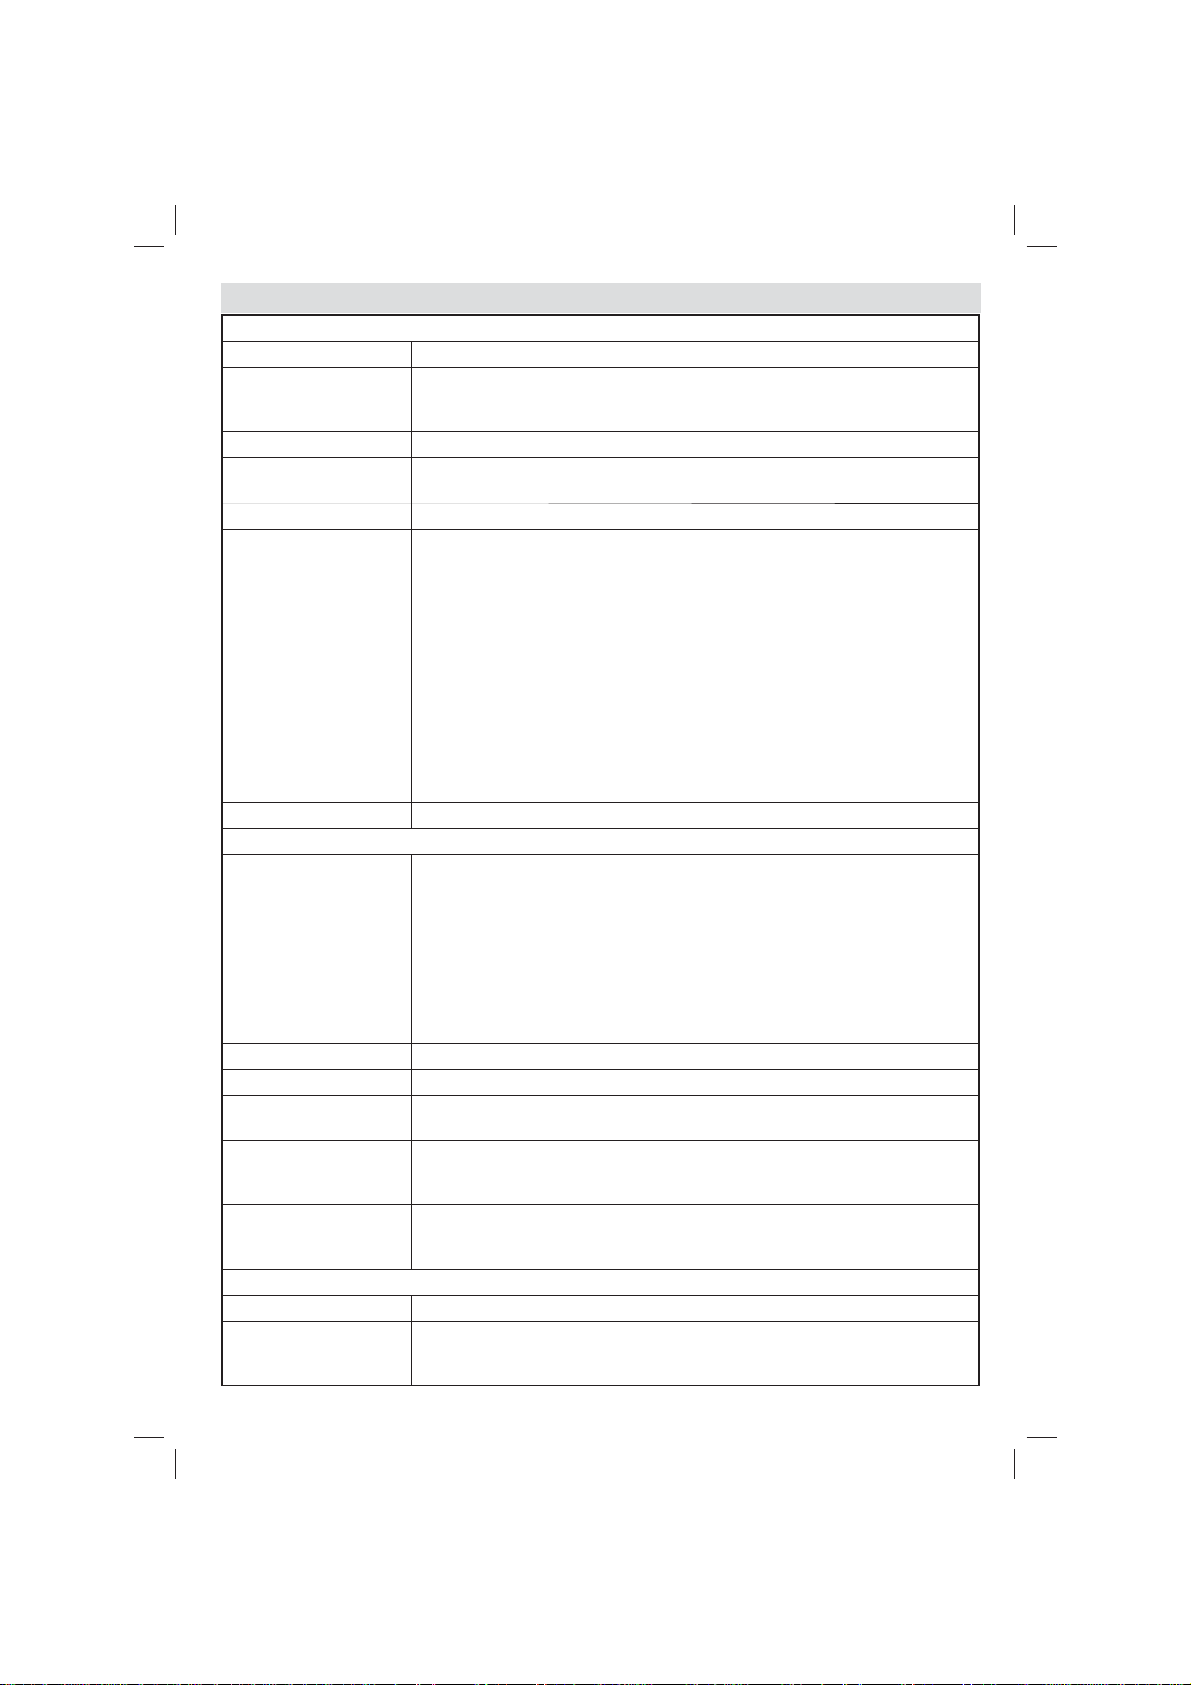
TV Menu Features and Functions
Settings Menu Contents
Conditional Access Controls conditional access modules when available.
Language
Parental Con gures parental settings.
Timers
Recording Confi guration Displays recording con guration menu.
Date/Time
Sources Enables or disables selected source options.
Automatic Channel
Scan (Retune)
Manual Channel Scan This feature can be used for direct broadcast entry.
Network Channel Scan Searches for the linked channels in the broadcast system..
Analogue Fine Tune
First Time Installation
Clear Service List
Menu Timeout Changes timeout duration for menu screens.
Scan Encrypted
Con gures language settings (-may change depending on the country selected)
Preferred and current settings will be available. Current settings can be changed
only if the broadcaster supports.
Sets timers for selected programmes. / Sets sleep timer to turn off the TV after
a certain time.
Sets date and time.
Note:
* The TV takes the time info via the broadcast. Correct time will be available on
Date/Time Settings, if the time info is provided in the broadcast.
If the TV is in no channel mode, Date/Time settings can be changed. However,
if there is a channel preset, only “Time Settings Mode” can be changed and if
this is set to Manual, Time Zone will be enabled.
* If the TV is switched to standby mode and switched on later and there is no
broadcast available, time information will not be updated. If there is a present
broadcast; however, time information will be taken via the broadcast. In other words,
time information will be available according to these priorities: The TV rst looks for
the time info in the broadcast, then to the user preference, and lastly to the teletext
time information.
Install and Retune Menu Contents
Displays automatic tuning options.
Digital Aerial: Searches and stores aerial DVB stations.
Digital Cable: Searches and stores cable DVB stations.
Analogue: Searches and stores analogue stations.
Digital Aerial & Analogue: Searches and stores aerial DVB and analogue
stations.
Digital Cable & Analogue: Searches and stores cable DVB and analogue
stations.
You can use this setting for ne tuning analogue channels. This feature is not
available if no analogue channels are stored.
Deletes all stored channels and settings, resets TV to factory settings and starts
rst time installation. You can follow the instructions in the Initial Installation
section for more information on this process.
(*) Visible for Denmark, Sweden, Norway or Finland. Clear Service List and then
press OK. The following OSD will be displayed on the screen. Select YES and
press OK to continue or select NO and press OK button to cancel.
Other Settings: Displays other setting options of the TV set:
When this setting is on, search process will locate the encrypted channels as well.
If it is set as Off, encrypted channels will not be located in automatic search or
manual search.
English - 9 -
Page 11

TV Menu Features and Functions
Blue Background
(optional)
Software Upgrade
Application Version Displays application version.
Hard of Hearing
Audio Description
Auto TV Off
Broadcast Type Selects the desired broadcast type.
Standby Search
(optional)
Activates or deactivates blue background system when the signal is weak or
absent.
To ensure that your TV always has the most update information, you can use this
setting. In order for the proper operation, please ensure that the TV is set to standby
mode.
If the broadcaster enables any special signal concerning the audio, you can set
this setting as On to receive such signals.
Audio description refers to an additional narration track for blind and visually
impaired viewers of visual media, including television and movies. You can
use this feature, only if the broadcaster supports that additional narration track.
You can set the timeout value of auto off feature. When the timeout value is reached
and the Tv is not operated for selected time, the TV will go off.
If you change Standby Search to Off, this function will be unavailable. To use
Standby search please make sure that you select Standby Search as On. If
the Standby Search is set to On, when the TV is in standby mode, available
broadcasts will be searched. If the TV locates any new or missing broadcasts,
a menu screen will be displayed, asking you whether or not to execute these
changes. Channel list will be updated and changed after this process. Please
activate Standby Search setting in order to enable your TV for automatically
updating the broadcast frequency of the broadcaster, broadcast de nition and
similar changes.
English - 10 -
Page 12

Electronic Programme Guide (EPG)
Some, but not all channels send information about the
current and next programmes. Press the “
to view the EPG menu.
Up/Down/Left/Right: Navigate EPG.
OK: Displays programme options.
INFO: Displays, in detail information on programme
selected.
GREEN: Switches to List Schedule EPG.
YELLOW: Switches to Timeline Schedule EPG.
BLUE: displays ltering options.
: The TV will start to record the selected
programme. You can press again to stop the recording.
IMPORTANT: To record a programme, you should first
connect a USB disk to your TV while the TV is switched off.
You should then switch on the TV to enable recording feature.
Otherwise, recording feature will not be available.
Note: Switching to a different broadcast or source is not
available during the recording.
Programme Options
In EPG menu, press the OK button to enter the Event
Options menu.
Select Channel
In EPG menu, using this option, you can switch to the
selected channel.
Record / Delete Record Timer
After you have selected a programme in EPG menu,
press the OK button and Options screen will be
displayed. Select “Record” option and press the OK
button. After this operation, a recording becomes set
to the selected programme.
To cancel an already set recording, highlight that
programme and press the OK button and select the
option “Delete Rec. Timer”. The recording will be
cancelled.
Set Timer / Delete Timer
After you have selected a programme in EPG menu,
press the OK button and Options screen will be
displayed. Select “Set Timer on Event” option and
press OK button. You can set a timer for future
programmes. To cancel an already set timer, highlight
that programme and press the OK button. Then select
“Delete Timer” option. The timer will be cancelled.
Note: It is not possible to record or set timer for two or more
individual events at the same time interval.
” button
Recording a Programme
IMPORTANT: When using a new USB hard disk drive, it is
recommended that you fi rst format the disk using your TV’s
“Format Disk” option.
To record a programme, you should rst connect a
USB disk to your TV while the TV is switched off.
You should then switch on the TV to enable recording
feature.
For using recording function, you should connect a
USB disk or an external hard disk drive to the TV
and connected USB disk should have at least 1 GB
capacity and should have 2.0 speed compatibility.
If the connected USB device does not support 2.0
speed, an error message will be displayed.
Note: Recorded programmes are saved into the connected
USB disk. If desired, you can store/copy recordings on a
computer; however, these fi les will not be available to be
played on a computer. You can play the recordings only
via your TV.
Note: Lip Sync delay may occur during the timeshifting.
Radio record is not supported. The TV can record
programmes up to ten hours.
Recorded programmes are split into 4GB partitions.
If the writing speed of the connected USB disk is not
suf cient, recording may fail and timeshifting feature
may not be available.
Recordings of HD programmes can occupy bigger
size on the USB disk depending on the broadcast’s
resolution. For this reason it is recommended to use
USB hard disk drives for recording HD programmes.
Do not plug out the USB/HDD during the recording.
This may harm the connected USB/HDD.
Multipartition support is available. Maximum two
different partitions are supported. If the disk have more
than two partitions, crash may occur. First partition of
the usb disk is used for PVR ready features. It also
must be formatted as primary partition to be used for
PVR ready features.
Some stream packets may not be recorded because
of signal problems, so sometimes video may freezes
during playback.
Record, Play, Pause, Display (for PlayListDialog) keys
could not be used when teletext is ON. If a recording
starts from timer when teletext is ON, teletext is
automatically turned off. Also teletext usage is
disabled when there is ongoing recording or playback.
English - 11 -
Page 13
Timeshift Recording
Press (PAUSE) button while watching a broadcast
for switching to timeshifting mode. In timeshifting
mode, the programme is paused and simultaneously
recorded to the connected USB disk. Press (PLAY)
button again to watch the paused programme from
the stopped moment. You will see the timeshift gap
between the real and the timeshifted programme in
the info bar.
Instant Recording
Press button to start recording an event instantly
while watching a programme. You can press
button on the remote control again to record the next
event on the EPG. In this case, an OSD will be
displayed, indicating the programmed events for
recording. Press
recording.
Note: Switching to a different broadcast or source; and
viewing Media Browser are not available during the recording.
While recording a programme or during the timeshifting, a
warning message appears on the screen if your USB device
speed is not suffi cient.
(STOP) button to cancel instant
Watching Recorded Programmes
In the main menu, use “ ” or “ ” buttons to select
Media Browser and press OK. Highlight Recordings
Library item by using “ ” or “ ” button and press
OK button to enter. Recordings Library will then be
displayed. Select a recorded item from the list (if
previously recorded) by using “ ” / “ ” button. Press
OK button to view Play Options. Select an option by
using “ ” / “ ” or OK buttons.
Note: Viewing main menu and menu items will not be available
during the playback.
Press (STOP) button to stop a playback and return
to Recordings Library.
Slow Forward
If you press (PAUSE) button while watching
recorded programmes, slow forward feature will be
available. You can use
Pressing
forwarding speed.
button consecutively will change slow
button to slow forward.
Recording Confi guration
Select Recording Con guration item in the Settings
menu to con gure recording settings.
Format Disk: You can use Format Disk feature for
formatting the connected USB disk.
IMPORTANT: Note that ALL the data stored on the
USB disk will be lost and then the disk format will
be converted to FAT32 if you activate this feature. If
your USB disk malfunctions, you can try formatting
the USB disk. In most cases formatting the USB disk
will restore normal operation; however, ALL the data
stored on the USB disk will be lost in such a case.
Note: If “USB is too slow” message is displayed on the
screen while starting a recording, try restarting the recording.
If you still get the same error, it is possible that your USB
disk does not meet the speed requirements. Try connecting
another USB disk.
Software Upgrade
Your TV is capable of finding and updating new
software upgrades over broadcast channels (if
available). For broadcast channels search, TV looks
the available channels stored in your settings. So
before software upgrade search, it is advised to auto
search and update all available channels.
1) Software Update via the USB Input
Before starting..
Ensure that you have a USB flash disk with
appropriate free space. Do not use a USB hard disk
drive for the software update process.
Get software updates from your dealer or www.
philips.com/support.
Check the current software version of your TV
using the MENU>Settings>Other Settings>Software
Upgrade item. If the version you have found is not
newer than the current version on your TV, it is not
necessary to update your product. Do not install a
lower version of the software since this may cause
problems.
• After obtaining the most recent software, copy the
BIN le to the USB ash disk.
• Now connect the USB ash disk to the USB input
of your TV.
• Switch off your TV using the main control switch of
the TV and unplug the power cord.
• Hold the remote control towards the TV. Now press
the OK button and keep pressing the OK button (Do
not release the OK button now).
• Plug the TV to the mains and switch on the TV.
• Keep pressing the OK button ve seconds more
after the TV switches on and release it afterwards.
Software update process should now start.
• The TV will switch on in First Time Installation mode
after the software update nishes.
IMPORTANT
Do not press any other buttons on the TV or on the
remote control during the software update.
Do not remove the USB fl ash disk from the TV during
the process.
To prevent accidental updates, please use your
computer to delete the BIN fi le on your USB fl ash
disk after the software update is successfully fi nished.
English - 12 -
Page 14

2) 3 AM search and upgrade mode
• If Automatic scanning in Upgrade Options menu
is enabled, TV wakes up at 03:00 and searches
broadcast channels for new software upgrade. If new
software is found and downloaded successfully, with
next power up TV opens with new software version.
Note on reboot operation: Reboot is the last step in software
upgrade operation if download of new software is finished
successfully. During reboot TV makes fi nal initialization. In reboot
sequence panel power is closed and front led indicates the activity
with blinking. Around 5 minutes later TV restarts with new software
activated. The TV may start in fi rst time installation mode.
• If your TV fails to restart in 10 minutes, unplug power
for 10 minutes and re-plug again. TV should open
with new software safely. If you still can not get
TV working, please kindly repeat unplug and plug
sequence a few times more. If your set still can not
operate, please call the service personnel to x the
problem for you.
Caution: While led is blinking during reboot do not unplug
your TV’s power. Doing this may cause your TV not to
re-open again and can only be fi xed by service personnel.
Troubleshooting & Tips
Image persistence - ghosting
Please note that ghosting may occur while displaying
a persistent image (still or paused image). LED TV’s
image persistence may disappear after a short time.
Try turning off the TV for a while. To avoid this, do not
leave the screen in still picture mode for extended periods.
No power
If your TV has no power, please check the power cord
plug is connect to the mains power socket.
Poor picture
1. Have you selected the correct TV system?
2. Is your TV or house aerial located too close to a
non-earthed audio equipment or neon lights, etc.?
3. Mountains or high buildings can cause double
pictures or ghost images. Sometimes you can
improve the picture quality by changing the
direction of the aerial. Is the picture or teletext
unrecognisable?
4. Check if you have entered the correct frequency.
5. Please retune the channels.
6. The picture quality may degrade when two devices
are connected to the TV at the same time. In such
a case, disconnect one of the devices.
No picture
1. No Picture means that your TV is not receiving a
transmission. Have you selected the correct button
on the remote control? Try once more. Also make
sure the correct input source has been selected.
2. Is the antenna connected properly?
3. Are the plugs connected tightly to the antenna socket?
4. Is the antenna cable damaged?
5. Are suitable plugs used to connect the antenna?
6. If you are in doubt, consult your dealer.
No sound
1. Has the TV been set to mute? To cancel mute, press
” button, or increase the volume level.
the “
2. Sound is coming from only one speaker. Is the balance
set to one extreme? See Sound Menu section.
Remote control - does not operate
Your TV no longer responds to the remote control.
The batteries may be exhausted, if so you can still
use the control buttons on the TV. (* Is only possible
if they are not blocked by parental control and if they
are available with your model.)
Input sources - can not be selected
1. If you cannot select an input source, it is possible
that no device is connected.
2. Check the AV cables and connections if you have
tried to connect a device.
Recording Unavailable
To record a programme, you should rst connect
a USB disk to your TV while the TV is switched
off. You should then switch on the TV to enable
recording feature. Otherwise, recording feature will
not be available. If you cannot perform recording, try
switching off the TV and then re-inserting the USB
device while the TV is switched off.
USB Is too Slow
If “USB is too slow” message is displayed on the
screen while starting a recording, try restarting
the recording. If you still get the same error, it is
possible that your USB disk does not meet the speed
requirements. Try connecting another USB disk.
Manufactured under license from Dolby
Laboratories.
TRADEMARK ACKNOWLEDGMENT
“Dolby” and the double-D symbol are trademarks of
Dolby Laboratories.
English - 13 -
Page 15

Information for Users on Disposal of Old
Equipment and Batteries
[European Union only]
These symbols indicate that equipment with these
symbols should not be disposed of as general
household waste. If you want to dispose of the product
or battery, please consider the collection systems or
facilities for appropriate recycling.
Notice: The sign Pb below the symbol for batteries indicates
that this battery contains lead.
Battery
Products
Specifi cations
TV BROADCASTING
PAL/SECAM B/G D/K K’ I/I’ L/L’
DIGITAL RECEPTION
DVB-T MPEG2 DVB-T MPEG4 HD
DVB-T MHEG-5 Engine (for UK only)
DVB-C MPEG2 DVB-C MPEG4 HD
RECEIVING CHANNELS
VHF (BAND I/III) UHF (BAND U) HYPERBAND
NUMBER OF PRESET CHANNELS 1000
(800 DVB-T / 200 Analogue)
CHANNEL INDICATOR
On Screen Display
RF AERIAL INPUT
75 Ohm (unbalanced)
OPERATING VOLTAGE
220-240V AC, 50 Hz.
AUDIO German + Nicam Stereo
AUDIO OUTPUT POWER (W
2x2,5
POWER CONSUMPTION (W)
45 W (max)
PANEL
16:9 display, 22” Screen Size
DIMENSIONS (mm)
DxLxH (With foot): 134 x 516 x 352
Weight (Kg): 3,50
DxLxH (Without foot):35 x 516 x 317
Weight (Kg): 3,30
RMS) (10% THD)
English - 14 -
Page 16
Supported DVI Resolutions
When connecting devices to your TV’s connectors by using DVI to HDMI
cables (not supplied), you can refer to the following resolution information.
Index Resolution Frequency
1 640x400 70Hz
2 640x480 60Hz-66Hz-72Hz -75Hz
3 800x600 56Hz-60Hz-70Hz-72Hz -75Hz
4 832x624 75 Hz
5 1024x768 60Hz-66Hz-70Hz-72Hz -75Hz
6 1152x864 60Hz-70Hz-75Hz
7 1152x870 75Hz
8 1280x768 60 Hz - 75Hz
9 1280x960 60Hz-75Hz
10 1280x1024 60Hz-75Hz
11 1360x768 60 Hz
12 1400x1050 60Hz-75Hz
13 1400x900 65Hz-75Hz
14 1600x1200 60 Hz
15 1680x1050 60 Hz
16 1920x1080 60 Hz
17 1920x1200 60Hz
18 480i-480p 60Hz
19 576i-576p 50Hz
PC Typical Display Modes
The following table is an illustration of some of the typical video display modes.
Your TV may not support all resolutions. Y our TV supports up to 1920x1080.
Index Resolution Frequency
1 640x350p 60 Hz
2 640x400p 60 Hz
3 1024x768 60 Hz
4 1280x768 60 Hz
5 1360x768 60 Hz
6 720x400 60 Hz
7 800x600 56 Hz
8 800x600 60 Hz
9 1024x768 60 Hz
10 1024x768 66 Hz
11 1280x768 60 Hz
12 1360x768 60 Hz
13 1280x1024 60 Hz
14 1280x960 60 Hz
15 1280x1024 60 Hz
16 1400x1050 60 Hz
17 1600x1200 60 Hz
18 1920x1080 60 Hz
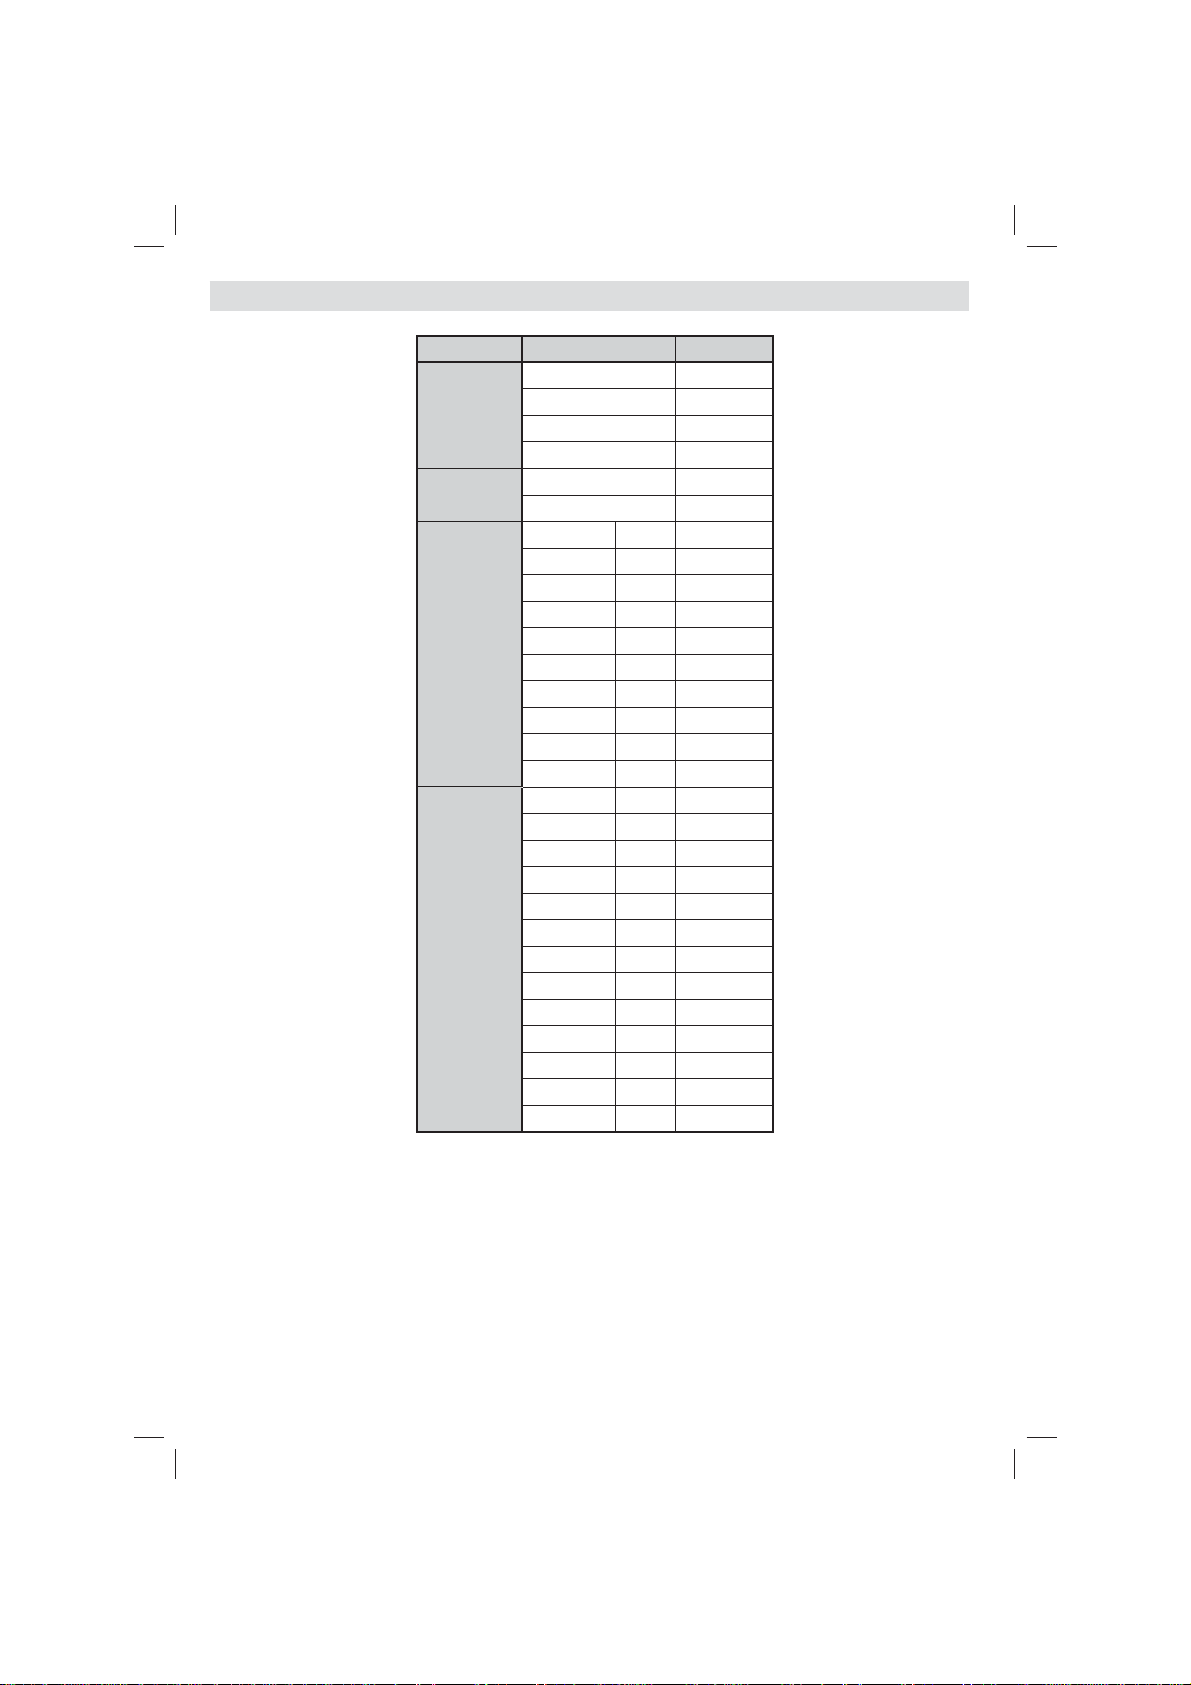
Supported File Formats for USB Mode
Media File Extension
.mpg .mpeg MPEG1,2 MPEG Layer 1/2/3
.dat MPEG1,2
.vob MPEG2
.mkv H.264, MPEG1,2,4 EAC3/ AC3
Movie
Music
Photo
Subtitle
.mp4
.avi
.mp3 -
.jpg .jpeg Baseline JPEG - max WxH = 15360x8640 4147200bytes
. Progressive JPEG - max WxH = 9600x6400 3840000bytes
.bmp - - max WxH = 9600x6400 3840000bytes
.sub .srt - - -
Xvid 1.01, Xvid 1.02, Xvid 1.03,
Xvid 1.10-beta1/2
MPEG2, MPEG4
Xvid 1.01, Xvid 1.02, Xvid 1.03,
Xvid 1.10-beta1/2
Format Remarks
Video Audio (Maximum resolution/Bit rate etc.)
MPEG4
Xvid 1.00,
PCM/MP3
H.264
Xvid 1.00,
H.264
MPEG 1 Layer 1 /
English - 15 -
MPEG2
PCM
2 (MP3)
MAX 1920x1080 @ 30P 20Mbit/sec
32Kbps ~ 320Kbps(Bit rate)
32KHz ~ 48KHz(Sampling rate)
Page 17
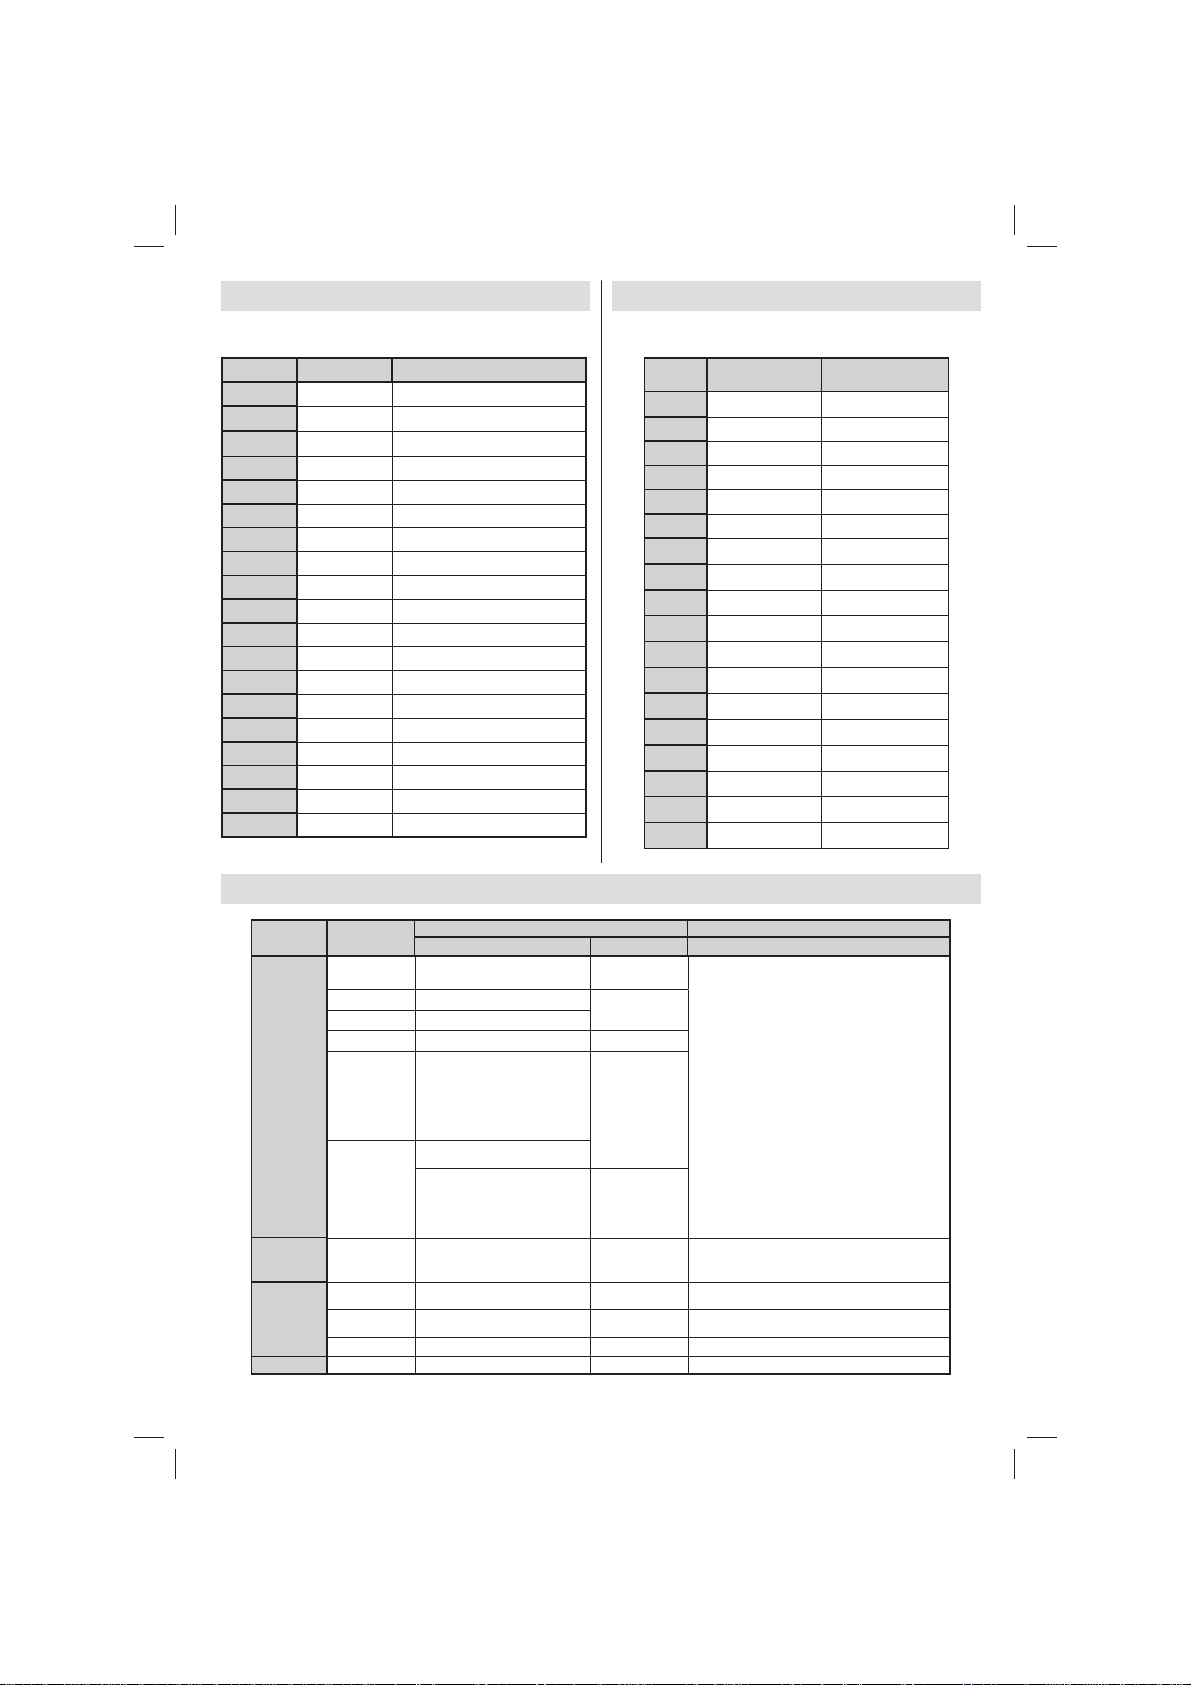
AV and HDMI Signal Compatibility
Source Supported Signals Available
PAL 50/60 O
EXT
(SCART)
Side AV
YPbPr
HDMI1
PAL 50/60 O
480I 60Hz O
480P 60Hz O
576I 50Hz O
576P 50Hz O
720P 50Hz O
720P 60Hz O
1080I 50Hz O
1080I 60Hz O
1080P 50Hz O
1080P 60Hz O
480I 60Hz O
480P 60Hz O
576I 50Hz O
576P 50Hz O
720P 50Hz O
720P 60Hz O
1080I 50Hz O
1080I 60Hz O
1080P 24Hz O
1080P 25Hz O
1080P 30Hz O
1080P 50Hz O
1080P 60Hz O
NTSC 60 O
RGB 50 O
RGB 60 O
NTSC 60 O
(X: Not Available, O: Available)
In some cases a signal on the LED TV may not be displayed properly. The problem may be an inconsistency with standards
from the source equipment . If you do experience such a problem please contact your dealer and also the manufacturer of
the source equipment.
English - 16 -
Page 18
Indice
Interruttore & Funzionamento Controllo TV ............ 1
Funzionamento generale ........................................ 1
Caratteristiche e funzioni del menu TV ................... 7
Dettagli ........................................................................14
Interruttore & Funzionamento
Controllo TV
1. Direzione Su
2. Direzione Gi
3. Programma/Volume / AV / Standby-
Interruttore selezione On
Note:possibile spostare l'interruttore su o giù per modifi care il
volume. Se si desidera cambiare i canali, premere una volta
al centro dell'interruttore (posizione 3) e spostare verso l'alto
o il basso. Se si preme nuovamente il centro dell'interruttore,
viene visualizzata il messaggio OSD sorgente. Se si tiene
premuto il centro dell'interruttore per alcuni secondi, la TV
passerà in modo standby. L'OSD del menu principale non
può essere visualizzato mediante i tasti di controllo.
Funzionamento con telecomando
• Premere il tasto “ ” sul telecomando per
visualizzare la schermata del menu principale.
Utilizzare il tasto sinistro o destro per selezionare
una scheda del menu e premere OK per accedere.
Utilizzare Sinistro / Destro / Su / Gi per impostare
una voce. Premere “
schermata di menu.
• Una volta collegati sistemi esterni alla TV, è
possibile passare a diverse fonti di ingresso
Premere il pulsante SOURCE sul telecomando
consecutivamente per selezionare le varie sorgenti.
• È possibile cambiare il canale e regolare il volume
utilizzando i tasti +/- e
” o “ ” per uscire da una
CH+/- sul telecomando.
Funzionamento generale
Installazione delle batterie nel telecomando
Sollevare il coperchio del lato posteriore del
telecomando verso l'alto gentilmente. Installare
due batterie AAA. Verificare la corrispondenza
delle estremità + e – delle batterie nel vano batteria
(rispettare la polarità. Rimettere a posto il coperchio
della batteria.
Collegare il cavo di alimentazione &
Antenna / Cavo
IMPORTANTE: L'apparecchio TV è progettato per
funzionare a 220 V - 240 V CA, 50 Hz. Dopo aver
tolto l'imballaggio, fare in modo che l'apparecchio
TV raggiunga la temperatura ambiente prima di
collegarlo all'alimentazione principale. Inserire il cavo
di alimentazione alla presa della rete elettrica.
Aerea o via cavo
HDMI 1
SPDIF
Coax.OUT
Accessori inclusi
• Telecomando
• Batterie: 2 x AAA
• Manuale di istruzioni
• Guida rapida all’avvio
• Cavo di collegamento AV laterale
• Cavo di collegamento YPbPr
Italiano - 1 -
Page 19
Metodo di installazione supporto staccabile (senza viti)
. Il supporto viene posizionato su una superficie piatta.
2. Il prodotto viene tenuto dal supporto di modo che coincida col punto di montaggio
del supporto e poi viene lasciato montato col peso.
Metodo di smontaggio del supporto amovibile
.
La TV viene appoggiata su una tavola piatta.
.
I ganci sul supporto vengono premuti.
3.4.Il supporto viene tirato.
Il supporto viene staccato.
Italiano - 2 -
Page 20
Visualizzazione col telecomando
1. Standby
2. Arresto (in modalità video Browser
Multimediale)
3. Play (in modalità Media Browser) / Riproduci -
Presentazione (in Media Browser)
4. Riavvolgimento rapido (in modalità video TV
Browser Multimediale)
5. AV / Selezione fonte
6. TV
7. Guida programmi elettronici (in canali DVB)
8. Tasti di navigazione (Su/Giù/Sinistra/Destra)
9. Registrazione dei programmi
10. Programma giù / Pagina su
11. Muto
12. Volume Giù
13. Tasto Verde / Lista Programma (in EPG) / Tag /
deseleziona tutto ( nelle liste preferiti)
14. Tasto rosso
15. Tasti numerici
16. Sottotitoli On-off (in modalità DTV)
17. Televideo / Mix / (in modalità TXT)
18. Tasto Blu / Modi ca Elenco Canali / Filtro (In
all'elenco dei preferiti & EPG)
19. Tasto giallo / Programma Timeline (in EPG)
20. Volume Su
21. Programma su / Pagina giù
22. Esci / Torna / Pagina Indice (in modalità TXT)
23. Mono/Stereo - Dual I-II/ Lingua Corrente (*) (in
canali DVB)
24. Ok (Conferma) / Attesa (in modalità TXT) /
Modi ca Elenco Canali
25. Info / Rivela (in modalità TXT)
26. Menu On-Off / Esci (Modalità Browser
Multimediale)
27. Zoom immagine
28. Avanzamento rapido. (in modalità video
Browser Multimediale)
29. Pausa (in modalità video Browser Multimediale)
/ Registrazione timeshift
Italiano - 3 -
Televideo
Premere il pulsante TEXT per iniziare. Premere
nuovamente per attivare la modalità mix. Premere
ancora una volta per uscire. Seguire le istruzioni sullo
schermo del televideo digitale.
Televideo digitale (solo per trasmissioni
nel Regno Unito)
Premere il pulsante TEXT per visualizzare le
informazioni sul televideo digitale. Usare i tasti colorati
i tasti colorati, i tasti cursore e il tasto OK. Il metodo di
funzionamento può variare a seconda del contenuto del
teletext digitale. Seguire le istruzioni sullo schermo del
televideo digitale.
Page 21
Visualizzazione delle connessioni
Raccordo Tipo Cavi Dispositivo
Scart
Collegamento
(indietro)
VGA
Collegamento
(indietro)
AV
LATERALE
Audio PC/
YPbPr
AV
LATERALE
Collegamento
(iato)
HDMI
Collegamento
(indietro)
SPDIFF
Collegamento
(indietro)
AV laterale
Collegamento
(iato)
Cavo di collegamento
laterale Audio/Video
(in dotazione)
Cavo di collegamento
Cavo Audio PC
(non in dotazione)
AV (in dotazione)
CUFFIA
Cuffi e
Collegamento
(iato)
Video YPbPr
Collegamento
(iato)
Cavo di collegamento
YPbPr (in dotazione)
YPBPR
USB
Collegamento
(iato)
CI
Collegamento
(iato)
CAM
module
NOTA: In fase di collegamento della TV tramite YPbPr o ingresso AV laterale, sarà necessario servirsi dei cavi
di connessione in dotazione per consentire il collegamento.Cfr illustrazioni qui sopra. |Per attivare l'audio da PC, sarà
necessario usare gli ingressi PC/YPBPR CONNESSIONE AUDIO BIANCO & ROSSO. | Se un dispositivo esterno viene
collegato tramite la presa SCART, la TV passerà automaticamente alla modalità AV.|Durante la ricezione dei canali DTV
(Mpeg4 H.264) o durante la modalità in Media Browser, l'output non sarà disponibile mediante la presa a scart. | Quando
viene usato il kit di montaggio a parete (opzionale), consigliamo di collegare tutti i cavi sulla parte posteriore della TV prima
di procedere con l'installazione a parete. |inserire o rimuovere il modulo CI solo quando la TV è SPENTA. Per dettagli sulle
impostazioni, consultare il manuale d'uso del modulo.
Italiano - 4 -
Page 22
Accensione/Spegnimento
Per accendere la TV
• Collegare il cavo di alimentazione alla presa da
220-240V CA, 50 Hz.
• Il LED di standby si illumina.
• Per accendere la TV dalla modalità standby è
possibile:
• Premere il tasto "
numerico del telecomando.
• Premere l'interruttore di comando sulla sinistra della
TV. In questo modo la TV si accenderà.
Nota: Se si accende la TV tramite il tasto CH- o CH+ sul
telecomando o dalla TV verrà selezionato nuovamente il
programma che si stava guardando l'ultima volta.
Con l'uno o l'altro metodo la TV si accenderà.
", CH- o CH+ o un tasto
Per spegnere la TV
• Premere il tasto " " sul telecomando oppure premere
l'interruttore di comando sulla TV no a spegnere, di
modo che la TV stessa passi in modalità stand-by.
• Per spegnere completamente la TV, scollegare il
cavo di alimentazione dalla presa di rete.
Nota: Quando la TV viene messa in modalità standby, il
LED di standby potrebbe lampeggiare per indicare che
alcune funzioni, come ad esempio la Ricerca Standby, lo
Scaricamento Over Air o il Timer (Standby Search, Over Air
Download or Timer) sono attive.
Prima installazione
Quando la TV viene accesa per la prima volta,
compare la schermata di selezione della lingua con
tutte le lingue elencate in ordine alfabetico. Premere
il pulsante “ ” o “ ” per evidenziare la lingua
richiesta, premere il pulsante OK per selezionare.
"Prima installazione" compare. Usare “ ” or “ ” per
impostare il paese richiesto, quindi premere il pulsante
“ ” per selezionare Tipo di ricerca . Utilizzare “
” o “ ” per impostare il tipo di ricerca desiderato. I
tipi di ricerca disponibili sono digitale e analogico,
solo digitale e solo analogico. Dopo l'impostazione,
premere "
Utilizzare “ ” o “ ” per impostare Lingua televideo
desiderata. Sarà possibile impostare Ricerca Criptata
su Si se si desidera eseguire la ricerca delle stazioni
codi cate Premere il tasto OK sul telecomando per
continuare e il seguente messaggio verrà visualizzato
sulla schermata. Sarà necessario selezionare un tipo
di ricerca per cercare e salvare le trasmissioni dalla
sorgente desiderata.
IMPORTANTE: Quando viene selezionata un'opzione
paese, ad esempio Francia e Italia, verrà richiesto
di impostare e confermare un numero di PIN. Il PIN
" per selezionare Lingua televideo.
selezionato non può essere 0000. Inserire un numero
di PIN e confermarlo inserendolo nuovamente.
Premere il tasto OK per continuare. Nel caso in cui
i due PIN corrispondano, sarà impostato il codice
PIN master.
AVVERTENZA: Quando viene richiesto un numero di
PIN per qualsiasi menu, usare il PIN precedentemente
impostato in fase di prima installazione. Nel caso in cui
sia stato dimenticato il codice PIN impostato durante
la prima installazione, sarà necessario usare il codice
PIN master, 4725.
Installazione antenna
Se dalla schermataTipo di ricerca viene selezionata
ANTENNA, la TV digitale ricercherà trasmissioni TV
in formato digitale terrestre.
NOTA: Sarà possibile premere il pulsante “ ”per
annullare.
Dopo che tutte le stazioni disponibili sono state salvate
sullo schermo verrà visualizzato un Elenco dei Canali.
Per ordinare i canali, conformemente a LCN(*),
selezionare "Yes", quindi premere OK.
Premere “
guardare la TV.
(*) LCN È il sistema Logical Channel Number che
organizza le trasmissioni disponibili con una sequenza
di canali riconoscibile (ove disponibile).
” per uscire dall'elenco dei canali e
Installazione Cavo
Se viene selezionato CABLE premere il pulsante OK
sul telecomando per continuare. Per continuare
selezionare SI e premere OK. Per annullare
l'operazione selezionare NO e premere OK. Da
questa schermata è possibile scegliere le gamme
di frequenza. Per evidenziare una riga, utilizzare “
” o “ ”. È possibile inserire la gamma di frequenza
manualmente servendosi del tastierino numerico sul
telecomando. Impostare Avvia e Arresta frequenza
utilizzando i tasti numerici del telecomando. Dopo
aver eseguito questa operazione è possibile impostare
l’Intervallo di ricerca su 8000 KHz oppure 1000 KHz.
Se viene selezionato 1.000 KHz, la TV eseguirà il
processo di ricerca in modo dettagliato. A seconda
della propria selezione del Paese in fase di prima
installazione, l’opzione di ricerca a intervalli di 250KHz
potrebbe essere disponibile sulla schermata Network
Channel Scan. Si prega di notare che eseguendo la
ricerca con l’opzione 250KHz il processo di ricerca
potrebbe durare più a lungo.
Inoltre, per alcuni paesi, sarà disponibile l’opzione
ID Rete. La funzione ID Rete recupera la Network
Information Table. Questa tabella fornisce informazioni
sulla rete selezionata. Potrebbe variare a seconda
Italiano - 5 -
Page 23
dell’operatore e della regione in cui l’operatore
trasmette attivamente. La durata della ricerca
aumenterà di conseguenza. Alla ne, premere il tasto
OK per avviare la ricerca automatica. La TV cercherà
e salverà tutte le informazioni disponibili.
Riproduzione multimediale trame
ingresso USB
È possibile collegare una unità di disco rigida esterna
oppure uno stick di memoria USB alla TV usando gli ingressi
USB della TV. Questa funzione consente di riprodurre i fi le
memorizzati in una unità USB. 2.5 e 3.5 (hdd con alimentatore
esterno), sono supportate le unità disco rigido esterne.
IMPORTANTE! Occorre eseguire una copia di backup
dei le prima di effettuare qualsiasi collegamento alla
TV per evitare l'eventuale perdita di dati. Si noti che
il produttore non è in alcun modo responsabile di
eventuali danni o perdite di dati. È possibile che alcuni
tipi di dispositivi USB (come ad esempio i Lettori MP3)
o unità di memoria USB/stick di memoria non siano
compatibili con questa TV. La TV supporta le tipologie
di formattazione FAT32 e NTFS ma la registrazione
non sarà disponibile coi dischi formattati in NTFS.
Nota: mentre si formatta una unità disco rigida USB
da un 1TB (Tera Byte) o superiore, si potrebbero
veri care problemi con il processo di formattazione.
Il collegamento e lo scollegamento rapidi di dispositivi
USB è un'operazione molto rischiosa. Si consiglia di non
collegare e scollegare rapidamente il dispositivo. Questa
operazione potrebbe causare danni sici al lettore USB
e al dispositivo USB. Non estrarre il modulo USB in fase
di riproduzione di un le.
Menu Browser multimediale
È possibile riprodurre le fotogra ci, musicali e lmati
archiviati in un disco USB collegando il disco alla TV
e utilizzando la schermata del browser multimediale.
A tal fine, procedere come segue: Collegare un
disco USB agli appositi ingressi posti al lato della
TV. Premere il tasto “
” e selezionare la scheda del
browser multimediale utilizzando i tasti sinistro/destro
e OK Verrà visualizzata la schermata del Browser
Multimediale principale. È possibile visualizzare il
contenuto correlato selezionando la scheda Video,
Musica o Immagine. Seguire le indicazioni dei tasti
sotto ciascun menu della schermata per le funzioni
di riproduzione multimediale. Mediante la finestra
di dialogo Impostazioni, è possibile impostare le
preferenze di Browser media.
Funzionamento modalità Loop/Shuffl e
Avviare la riproduzione con e
attivare
Avviare la riproduzione con OK
e attivare
Avviare la riproduzione con OK/
e attivare
Avviare la riproduzione con OK/
e attivare
La TV riproduce il le successivo
e mette in loop l'elenco.
lo stesso le verrà riprodotto in
loop (ripeti).
il le verrà riprodotto in shuf e.
la riproduzione del file
continuerà in modo casuale e la
riproduzione casuale continuerà.
Italiano - 6 -
Page 24

Caratteristiche e funzioni del menu TV
Indice del menu Immagine
Modalità
Contrasto imposta i valori di luminosità e buio dello schermo.
Luminosità imposta il valore di luminosità per lo schermo.
Nitidezza imposta il valore di nitidezza per gli oggetti visualizzati sullo schermo.
Colore Imposta il valore del colore, regolazione dei colori.
Modalità di risparmio
energetico
Retroilluminazione
(opzionale)
Riduzione rumore
Temp. colore imposta la tonalità del colore desiderata.
Zoom immagine
HDMI True Black
(opzionale)
Modalità fi lm
(opzionale)
Cambio Colore regola la tonalità del colore desiderata.
Reset ripristina le impostazioni immagine ai livelli prede niti di fabbrica.
Posizionamento
automatico (in
modalità PC)
Posizionamento H (in
modalità PC)
Posizionamento V (in
modalità PC)
Dot Clock (in modalità
PC)
Fase (in modalità PC)
Mentre ci si trova in modalità VGA (PC), alcune opzioni del menu Immagine non saranno disponibili. Invece,
le impostazioni della modalità VGA
modalità PC.
Per le proprie esigenze di visualizzazione, si può impostare la relativa opzione
di modalità (Mode). Immagine può essere impostata su una di queste opzioni:
Cinema,Gioco,Dinamica e Naturale.
Per impostare la Modalità di Risparmio Energetico su Eco, Picture Off e
Disattivato. .
Questa impostazione controlla il livello di retroilluminazione e può essere
impostata su Auto, Massima, Minima ed Eco. se la modalità eco è attiva, la
funzione della luce di sfondo non sarà inattiva. La retroilluminazione non può
essere attivata in modalità VGA o Media Browser o se la modalità immagine è
impostata come Gioco.
In caso di segnale di trasmissione debole e immagine disturbata, usare
l'impostazione Noise Reduction (Riduzione del rumore) per ridurre
l'inconveniente. La modalità Riduzione del Rumore può essere impostata su una
di queste opzioni: Basso, Medio, Alto od Off.
Impostazioni avanzate
Imposta le dimensioni dell'immagine su Auto,16:9, Subtitle,14:9, 14:9 Zoom,
4:3 o Cinema.
Quando si guarda da una sorgente HDMI, la funzione sarà visibile nel menu
Impostazioni Immagine. Sarà possibile usare questa funzione per migliorare
l'oscurità dell'immagine.
I lm sono registrati in un numero diverso di fotogrammi per secondo rispetto ai
normali programmi televisivi. Attivare questa funzione quando si guardano i lm
per vedere chiaramente le scene di movimento veloci.
Ottimizza il display in modo automatico. Premere OK per ottimizzare.
Questo comando sposta l'immagine orizzontalmente sul lato destro o sinistro
dello schermo.
Questa voce sposta l'immagine verticalmente verso la parte superiore o inferiore
dello schermo.
Le regolazioni Dot Clock correggono l'interfaccia che compare come una banda
verticale in presentazioni a punti continui, come fogli di lavoro o paragra o testi
in caratteri più piccoli.
A seconda della risoluzione e della frequenza di ricerca che si inserisce
nell'apparecchio TV, è possibile vedere sullo schermo un'immagine offuscata o
disturbata. In tal caso, è possibile utilizzare questa voce per avere un'immagine
chiara, provando e retti cando.
saranno aggiunte alle Impostazioni Immagine mentre ci si trova in
Italiano - 7 -
Page 25
Caratteristiche e funzioni del menu TV
Indice menu Audio
Volume Regola il livello del volume.
Nel menu equalizzatore, il preset può essere modi cato su. Musica, Film, Voce,
Equalizzatore:
Bilanciamento
Cuffi e imposta il volume della cuf a.
Modalità audio
AVL
Basso dinamico:
Uscita digitale imposta il tipo di audio in uscita.
Piatto, Classico e Utente. Premere il tasto “
Le impostazioni del menu equalizzatore possono essere cambiate manualmente
solo quando la Equalizer Mode si trova in User.
Questa impostazione si usa per enfatizzare il bilanciamento dell’altoparlante
sinistro o destro.
Sarà possibile selezionare la modalità Mono, Stereo, Dual I o Dual II, solo se il
canale selezionato è predisposto per quella Modalità
la funzione Limitazione automatica volume (Automatic Volume Limiting (AVL))
regola il suono per ottenere il livello di produzione ssa tra i programmi (per
esempio gli spot pubblicitari tendono ad avere un audio più alto dei programmi).
Premere il tasto “
” or “ ” per impostare Dynamic Bass su on o off.
” per tornare al menu precedente.
Utilizzo dell'elenco canali
La TV ordina tutte le stazioni salvate nell'Elenco dei
Canali. Sarà possibile modifi care questo elenco dei
canali, impostare i canali preferiti o le stazioni attive
da elencare servendosi delle opzioni Elenco Canali
(Channel List).
• Selezionare l'elenco dei canali dal menu
principale.
• Selezionare Modifica Elenco Canali per
gestire tutti i canali salvati. Sarà possibile
spostare, eliminare, modi ca nome e blocco
canale servendosi di questa schermata.
• Selezionare Preferiti per creare un elenco dei
programmi preferiti.
• Selezionare Elenco canali attivi per ordinare
l'elenco dei canali. Sarà possibile selezionare
un'opzione di tipo trasmissione dall'elenco
utilizzando i tasti “
” /“ ” e OK.
Italiano - 8 -
Confi gurazione delle impostazioni
genitori
Per proibire la vista di alcuni problemi, i canali e i menu possono
essere bloccati servendosi del sistema di controllo genitori.
Evidenziare Parental nel menu Settings e premere OK
per continuare. per visualizzare le opzioni del menu di
blocco parentale è necessario inserire il codice PIN. Il
PIN prede nito in fabbrica è 0000. Dopo aver codi cato
il codice PIN corretto, viene visualizzato il menu delle
impostazioni parentali.
Blocco menu: l'impostazione Blocco menu attiva o
disattiva l'accesso al menu.
Blocco adulti: Quando è impostata, questa opzione
riceve le informazioni per adulti dalla trasmissione e se
il livello adulti è disattivato viene disattivato l'accesso
all'emittente.
Blocco bambini: Quando il Blocco Bambini è
impostato, l'apparecchio TV può solo essere controllato
manualmente dal telecomando. In tal caso, i tasti del
pannello frontale non funzioneranno.
Imposta PIN: de nisce un nuovo numero PIN.
IMPORTANTE: Il numero PIN predefi nito in fabbrica
0000. Se si decide di modificarlo, accertarsi di
trascriverlo e conservarlo in un luogo sicuro.
Nota: Se l'opzione Paese è impostata su Francia e
Italia, sarà possibile usare il codice predefi nito 4725.
Page 26

Caratteristiche e funzioni del menu TV
Indice menu Impostazioni
Accesso condizionato controlla i moduli di accesso condizionato se disponibili.
Scegliere lingua
Genitori con gura le impostazioni parentali.
Timer
Confi gurazione
registrazioni
Data/Ora
Sorgenti attiva o disattiva le opzioni sorgente selezionate.
Ricerca automatica
dei canali
(Risintonizzazione)
Ricerca manuale dei
canali
Ricerca canali di rete Cerca tutti i canali collegati nel sistema di trasmissione.
Sintonizzazione Fine
analogica
Prima installazione
Cancella Elenco servizi
Con gura le impostazioni della lingua (può variare a seconda del paese
selezionato) preferite e le impostazioni attuali saranno disponibili. Queste
impostazioni possono essere modi cate solo se supportate dall'emittente.
imposta i timer per i programmi selezionati. / Imposta il timer di spegnimento
di modo che spenga la TV dopo un determinato intervallo di tempo.
Visualizza il menu di con gurazione della registrazione.
imposta la data e l'ora.
Nota:
* La TV prende le informazioni orarie dall'emittente. L'ora corretta sarà
disponibile nelle impostazioni Data/Ora, se se le informazioni orarie sono
fornite nella trasmissione.
Se la TV si trova in modalità nessun canale, sarà possibile impostare le
informazioni di Data/Ora. Tuttavia, nel caso vi sia un preset canale, solo
la "Modalità impostazione ora" potrà essere modi cata. Nel caso in cui sia
impostata in Manuale, la Zona oraria sarà attivata.
* Se la TV è impostata in modalità standby e viene accesa in seguito e non c'è
una trasmissione disponibile, le informazioni orarie non verranno aggiornate. Se
c'è una trasmissione in corso, le informazioni verranno prese dalla stessa. In altre
parole, le informazioni saranno disponibili conformemente alle seguenti proprietà:
La TV cerca le informazioni orarie come prima cosa nella trasmissione, poi nelle
preferenze utente e da ultimo nelle informazioni del televideo.
Installa e sintonizza nuovamente i contenuti del menu
Visualizza le opzioni di sintonizzazione automatica.
Antenna digitale: Ricerca e salva le stazioni antenna DVB.
Cavo digitale: Ricerca e salva le stazioni cavo DVB.
Analogico: Ricerca e salva le stazioni analogiche.
Antenna digitale & analogica: Ricerca e salva le stazioni antenna DVB e
analogica.
Cavo digitale & analogico: Ricerca e salva le stazioni cavo DVB e analogica.
Questa funzione può essere usata per l'inserimento manuale di trasmissioni.
È possibile utilizzare questa impostazione per la sintonizzazione dei canali
automatici. Questa funzione non è disponibile se non ci sono canali analogici
salvati.
Rileva tutti i canali memorizzati e le impostazioni, reimposta la TV sulle
impostazioni di fabbrica e avvia la prima installazione. Sarà possibile seguire
le istruzioni nella sezione Installazione iniziale per ulteriori informazioni su
questo processo.
(*) Per Danimarca, Svezia, Norvegia o Finlandia. Cancella elenco servizio,
quindi premere OK. Sullo schermo è visualizzato il seguente OSD. Selezionare
SI e premere OK per continuare oppure NO e premere il tasto OK.
Italiano - 9 -
Page 27

Caratteristiche e funzioni del menu TV
Altre impostazioni: visualizza altre opzioni di impostazione della TV.
Timeout menu modi ca la durata di timeout per le schermate del menu.
Ricerca criptata
Sfondo blu Attiva o disattiva il sistema di sfondo blu quando il segnale è debole o assente.
Aggiornamento
software
Versione applicazione Visualizza la versione dell'applicazione.
Audiolesi
Descrizione Audio
Spegnimento TV
automatico
Tipo di trasmissione Seleziona il tipo di trasmissione desiderato.
Ricerca Standby
(opzionale)
Quando questa impostazione è attiva, il processo di ricerca localizzerà anche
i canali criptati. Se viene impostata su Off, i canali criptati non verranno trovati
mentre ci si trova in modalità di ricerca automatica o manuale.
Usare questa impostazione per assicurare che la TV disponga sempre di
informazioni aggiornate. Per garantire un funzionamento corretto, accertarsi che
la TV sia impostata in Modalità standby.
Se la trasmittente consente segnali speciali riguardo l'audio, si può regolare
questa impostazione su On per ricevere questi segnali.
La descrizione audio fa riferimento a una traccia audio aggiuntiva per le
persone non vedenti e ipovedenti che si servono di supporti multimediali visivi,
compresi spettacoli televisivi e lm. Sarà possibile servirsi di questa funzione
solo se l'emittente supporta la presenza di una traccia narrativa aggiuntiva.
Sarà possibile indicare il valore di timeout della funzione di spegnimento
automatico. Dopo che il valore di timeout è stato raggiunto e la TV non viene
usata per il tempo selezionato, si spegnerà
Se si imposta la Ricerca Standby su Off, questa funzione non sarà disponibile.
Per utilizzare la Ricerca Standby si consiglia di veri care che l'opzione sia
impostata su On. Nel caso in cui la Standby ricerca sia impostata su ON,
quando la TV si trova in modalità standby verranno cercate le trasmissioni
disponibili. Nel caso in cui la TV localizzi trasmissioni nuove o mancanti,
verrà visualizzato un menu a video che chiede se eseguire o meno queste
modi che. L'elenco canali verrà aggiornato e modi cato dopo questo processo.
Attivare l'impostazione Ricerca Standby per consentire alla TV di aggiornare
in automatico le frequenze di trasmissione dell'emittente, la de nizione di
trasmissione e modi che simili.
Italiano - 10 -
Page 28

Guida programmazione elettronica
(Electronic Programme Guide EPG)
Alcuni canali, ma non tutti, inviano informazioni sugli
eventi correnti e successivi. Premere il tasto “
visualizzare il menu EPG.
Pulsanti Su/Giù/Destro/Sinistro: Naviga EPG.
OK: Visualizza le opzioni di programma.
INFO: Visualizza, nel dettaglio, le informazioni sul
programma selezionato.
VERDE: Passa all'Elenco Programmi EPG.
GIALLO: Passa alla Timeline Programmi EPG.
BLU: visualizza le opzioni di ltraggio.
: la TV inizierà a registrare il programma
selezionato. Sarà possibile premere nuovamente per
interrompere la registrazione.
IMPORTANTE: Per registrare un programma, è necessario
per prima cosa collegare un disco USB alla TV mentre questa
è spenta. Successivamente accendere la TV per attivare la
funzione di registrazione. In caso contrario, la funzione di
registrazione non sarà disponibile.
Note: Passare a differenti trasmissioni o fonti non è possibile
durante la registrazione.
Opzioni programma
Nel Menu EPG, premere il tasto OK per accedere al
menu Opzioni Evento.
Seleziona canale
Nel menu EPG, utilizzando questa opzione, è
possibile cambiare il canale selezionato.
Registra / Elimina tempo di registrazione
Dopo aver selezionato un programma nel menu EPG,
premere il pulsante OK e verrà visualizzata sullo
schermo l'Opzione. Selezionare l'opzione "Registra"
e premere il pulsante OK. Dopo questa operazione,
l'icona viene impostata sul programma selezionato.
Per annullare una registrazione già impostata,
evidenziare il programma e premere il pulsante OK
e selezionare l'opzione "Elimina Rec. Timer?. La
registrazione verrà annullata.
Funzione Timer / Elimina Timer
Dopo aver selezionato un programma nel menu
EPG, premere il pulsante OK e verrà visualizzata
sullo schermo l'Opzione. Selezionare la funzione
"Imposta Timer su Evento" e premere il pulsante
OK. È possibile la funzione timer per programmi futuri.
Per annullare la funzione promemoria già impostata,
evidenziare il programma e premere il pulsante OK.
In seguito selezionare l'opzione "Elimina Timer". Il
timer verrà annullato.
Note: non è possibile registrare o impostare lo stesso timer
per due o più eventi simili con lo stesso intervallo di tempo.
” per
Italiano - 11 -
Registrazione di un programma
IMPORTANTE: Quando si utilizza una nuova unità di disco
rigida esterna USB, si raccomanda di formattare il disco
utilizzando l'opzione "Formatta disco" della TV.
Per registrare un programma, è necessario per prima
cosa collegare un disco USB alla TV mentre questa
è spenta. Successivamente accendere la TV per
attivare la funzione di registrazione.
Per utilizzare la funzione registrazione, bisogna
connettere un disco USB o una unità disco rigido
esterna alla TV e il disco USB connesso deve disporre
di una capacità di almeno 1GB o cuna compatibilità
di 2.0 di velocità Se la connessione del dispositivo
USB non supporta una velocità di 2.0, un messaggio
di errore sarà visualizzato sul display.
Note: I programmi registrati sono salvati nel disco USB
collegato. Se lo si desiderata, è possibile memorizzare/
copiare registrazioni su un computer, tuttavia questi fi le non
saranno disponibili per la riproduzione in un computer. Sarà
possibile riprodurre le registrazioni solo tramite la TV.
Note: Il ritardo Lip Sync potrebbe verificarsi durante la
differita.
La registrazione radio non è supportata. La
TV consente di registrare i programmi no a dieci ore.
I programmi registrati vengono suddivisi in partizioni
4GB.
Nel caso in cui la velocità di scrittura del disco
USB collegato non sia suf ciente, la funzione di
registrazione potrebbe non essere disponibile.
La registrazione dei programmi HD può occupare
dimensioni superiori sul disco USB a seconda della
risoluzione di trasmissione. Ecco perché consigliamo
di usare i dischi rigidi USB per la registrazione di
programmi HD.
Non scollegare l'USB/HDD mentre la registrazione
è in corso. Ciò potrebbe danneggiare il dispositivo
USB/HDD collegato.
È disponibile il supporto multi partizione. È supportato
un massimo di due differenti partizioni. Se il disco
presenta più di due partizioni, potrebbero veri carsi
dei guasti. La prima partizione del disco USB viene
utilizzata per le funzioni ready PVR. Inoltre deve
essere formattata come partizione principale utilizzata
per le funzioni "ready PVR".
Alcuni pacchetti stream potrebbero non essere
registrati a causa di problemi i segnale. Talvolta il
video, in fase di riproduzione, si blocca.
I tasti Registra, Riproduci, Metti in Pausa, Visualizza
(per PlayListDialog) non possono essere usati
mentre è attivo il televideo. Nel caso in cui inizi una
registrazione da timer mentre il televideo è su ON, il
televideo sarà spento in modo automatico. Inoltre,
l’uso del televideo è usato quando vi sono registrazioni
o riproduzioni in corso.
Page 29

Registrazione timeshift
Premere il pulsante (PAUSA) durante la
visualizzazione di una trasmissione per passare in
modalità differita. In modalità differita, il programma
viene messo in pausa e simultaneamente registrato
nel disco USB collegato. Premere il pulsante "
(Riproduci) di nuovo per guardare il programma dal
momento in cui è stato messo in pausa. Verranno
visualizzati gli spazi di tempo tra il programma
posticipato e quello effettivo nelle barra delle
informazioni.
Registrazione Istantanea
Premere il pulsante per avviare la registrazione
immediata di un evento durante la visione di un
programma. Sarà possibile premere il pulsante
del telecomando nuovamente per registrare l'evento
successivo in EPG. In questo caso, l’OSD visualizzerà
il programma eventi da registrare. Premere il pulsante
(STOP) per avviare la cancellazione istantanea
della registrazione.
Note: -{}-passare a una differente trasmissione o fonte; e
visualizzare il Browser multimediale non è possibile durante
la registrazione. In fase di registrazione di un programma o
durante la funzione timeshift, compare a video un messaggio
di avvertimento nel caso in cui la velocità del dispositivo USB
non sia suffi ciente.
Visione dei programmi Registrati
Dal menu principale, usare i tasti “ ” o “ ” per
selezionare il Browser Media, quindi premere OK.
Nel menu principale, evidenziare la voce Menu
Registrazioni utilizzando i pulsanti " " o " " e
premere OK per accedere. Verrà visualizzato il Menu
Registrazioni. Selezionare la voce registrati dalla
lista (se precedentemente registrati) utilizzando i
pulsanti “ ” / “ ” . Per visualizzare le Opzioni di
Riproduzione premere OK. Selezionare un'opzione
utilizzando i pulsanti“ ” / “ ” o OK.
Nota: La visualizzazione del menu principale e del menu voci
non è disponibile durante la riproduzione.
Premere il pulsante (STOP) per arrestare la
riproduzione e ritornare al Menu Registrazioni.
Avanzamento lento.
Se si preme il pulsante (PAUSA) durante la visione
dei programmi registrati, la funzione avanzamento
lento sarà disponibile. È possibile utilizzare il pulsante
per l'avanzamento lento. Premendo il pulsante
consecutivamente sarà possibile modi care la
velocità dell'avanzamento lento.
Confi gurazione registrazioni
Selezionare la voce Con gurazione Registrazioni nel
menu Impostazioni per con gurare le impostazioni di
registrazione.
Formatta disco: È possibile utilizzare la funzione
"
Formatta disco per formattare il disco USB collegato.
IMPORTANTE: Tutti i dati memorizzati nel disco USB
andranno perduti e il formato del disco verrà convertito
in FAT32 se si attiva questa funzione. Se il disco USB
non funziona bene, è possibile provare a formattarlo.
Nella maggior parte dei casi la formattazione del disco
USB ripristinerà il funzionamento normale; tuttavia,
TUTTI i dati memorizzati nel disco USB verranno
persi in ogni caso.
Nota: Se viene visualizzato il messaggio "USB troppo lento"
sullo schermo durante l'avvio di una registrazione, riprovare.
Se viene visualizzato ancora lo stesso errore, è possibile
che il disco USB non soddisfi i requisiti di velocità Provare a
connettere un altro disco USB.
Aggiornamento software
La TV è in grado di trovare e aggiornare il software sui
canali di trasmissione (ove disponibile). Per la ricerca
di canali di trasmissione, la TV cerca i canali disponibili
salvati nelle impostazioni. Quindi, prima di eseguire
la ricerca di aggiornamenti software si consiglia di
eseguire una ricerca automatica e avvisare tutti i
canali disponibili.
1) Aggiornamento software tramite
ingresso USB
Prima di iniziare…
Veri care di avere una chiavetta USB con spazio
libero. Non usare dischi rigidi USB per il processo di
aggiornamento software.
Scaricare gli aggiornamenti software dal
rivenditore o da www.philips.com/support.
Verificare la versione software attuale della TV
seguendo il percorso MENU > Impostazioni > Altre
impostazioni > Aggiornamento software. Se la
versione trovata non è più recente di quella attuale
presente sulla TV non sarà necessario eseguire
l’aggiornamento del prodotto. Non installare una
versione di software inferiore, dato che ciò potrebbe
causare problemi.
• Dopo aver recuperato la versione software più
recente, copiare il le BIN nella chiavetta USB.
• Ora collegare la chiavetta USB all’ingresso USB
della TV.
• Spegnere la TV usando l’interruttore principale
della TV quindi scollegare il cavo di alimentazione.
• Puntare il telecomando verso la TV. Ora premere
il pulsante OK e continuare a tenere premuto il
pulsante OK (Non rilasciare ora il pulsante OK).
Italiano - 12 -
Page 30

• Collegare la TV alla presa di corrente e accenderla.
• Continuare a tenere premuto il pulsante OK per
altri 5 secondi dopo l’accensione della TV, quindi
rilasciarlo. Ora dovrebbe iniziare il processo di
aggiornamento software.
• La TV passerà in modalità Prima Installazione al
completamento del processo di aggiornamento
software.
IMPORTANTE
Non premere altri pulsanti sulla TV o sul telecomando
durante il processo di aggiornamento software.
Non estrarre la chiavetta USB dalla TV durante il
processo di aggiornamento.
Per evitare aggiornamenti casuali, usare il computer
per eliminare il file BIN sul supporto USB al
completamento del processo di aggiornamento
software.
2) Ricerca di 3 AM e modalità
aggiornamento
• Nel caso in cui sia attivato il menu Ricerca
Automatica in Opzioni di Aggiornamento, la TV si
attiva alle ore 03:00 e ricerca canali di trasmissione
per nuovi aggiornamenti software Nel caso in cui
venga trovato e scaricato nuovo software, alla
prossima accensione la TV si aprirà con una nuova
versione software.
Nota sull'operazione di riavvio: Il riavvio è l’ultima fase
dell’operazione di aggiornamento del software se il download
di un nuovo software è stato effettuato correttamente. In
fase di riavvio la TV esegue le ultime fi nalizzazioni. Durante
la sequenza di riavvio il pannello dell'elettricità è chiuso e il
pannello anteriore indica l'attività quando lampeggia. Dopo 5
minuti la TV si riavvia con il nuovo software installato. La TV
potrebbe essere avviata nella modalità prima installazione.
• Nel caso in cui la TV non si riavvii in 10 minuti,
scollegare l'alimentazione per 10 minuti e collegare
nuovamente. La TV dovrebbe riavviarsi in modo
sicuro con il nuovo software. Nel caso in cui la
TV non funzioni ancora, eseguire nuovamente le
operazioni di scollegamento e collegamento. Nel
caso in cui ancora la TV non funzioni consigliamo
di rivolgersi al personale di assistenza per risolvere
il problema.
Attenzione: Mentre il LED lampeggia in fase di riavvio
non scollegare la TV dalla presa di corrente. Questa
operazione potrebbe provocare danni irreparabili alla
TV che potranno essere riparati solo dal personale di
assistenza.
Italiano - 13 -
Guida alla risoluzione dei problemi
e suggerimenti
Persistenza dell'immagine - ghosting
Notare che può presentarsi l'effetto fantasma se si
visualizza un'immagine persistente (immagine ssa
o in pausa). La persistenza dell’immagine della TV
LED può scomparire dopo breve tempo. Provare a
spegnere la TV per un po'. Per evitarlo, non lasciare
lo schermo con immagine ferma per lunghi periodi.
Nessuna accensione
Nel caso in cui la TV non sia alimentata, veri care che
il cavo di alimentazione sia collegato alla corrente.
Immagine di qualità scadente
1. E' stato selezionato il sistema TV corretto?
2. L'apparecchio TV o l'antenna della casa sono situati
troppo vicino a dotazioni audio senza messa a
terra o a luci al neon, ecc.?
3. Montagne o palazzi alti possono causare uno
sdoppiamento delle immagini o delle ombre
attorno all'immagine. A volte è possibile migliorare
la qualità dell'immagine modi cando la direzione
dell'antenna. L'immagine o il televideo sono
irriconoscibili?
4. Controllare se è stata inserita la frequenza corretta.
5. Eseguire nuovamente la sintonizzazione dei canali.
6. La qualità dell'immagine può risultare scadente
quando vi sono due apparecchiature
contemporaneamente collegate al televisore. In
tal caso, scollegare una delle dispositivi.
Nessuna immagine
1. La comparsa del messaggio "Nessuna Immagine"
(No Picture) indica che la TV non riceve alcuna
trasmissione. Sono stati selezionati i tasti giusti
sul telecomando? Provare ancora una volta.
Assicurarsi di aver selezionato la fonte di ingresso
corretta.
2. L'antenna è stata collegata in modo corretto?
3. Gli spinotti sono inseriti a fondo nella presa per
antenna?
4. Il cavo dell'antenna è danneggiato?
5. Sono state usate le spine giuste per collegare
l'antenna?
6. In caso di dubbio, contattare il rivenditore.
Nessun suono
1. È stato disattivato l'audio della TV? Per annullare,
premere il pulsante "
volume.
2. L'audio viene emesso solo da un altoparlante. Il
bilanciamento è impostato solo ad un estremo?
Vedere il Menu Suono.
" o aumentare il livello del
Page 31

Telecomando - non funziona
L'apparecchio TV non risponde più al telecomando.
Le batterie potrebbero essere scariche - sarà possibile
usare i comandi della TV. (* è possibile solo se
non sono bloccati dal controllo genitori e se sono
disponibili per il proprio modello).
Sorgenti di ingresso - non è stato possibile
effettuare la selezione
1. Se non è possibile selezionare una fonte di
ingresso è possibile che non sia collegato alcun
dispositivo.
2. Controllare i cavi AV e le connessioni se si è cercato
di collegare un dispositivo.
Registrazione non disponibile
Per registrare un programma, è necessario per prima
cosa collegare un disco USB alla TV mentre questa è
spenta. Successivamente accendere la TV per attivare
la funzione di registrazione. In caso contrario, la funzione
di registrazione non sarà disponibile. Se non è possibile
eseguire la registrazione, provare a spegnere la TV e
a reinserire il dispositivo USB mentre la TV è spenta.
USB troppo lento
Se viene visualizzato il messaggio "USB troppo lento"
sullo schermo durante l'avvio di una registrazione,
riprovare. Se viene visualizzato ancora lo stesso
errore, è possibile che il disco USB non soddis i
requisiti di velocità Provare a connettere un altro
disco USB.
Prodotto su licenza dei Laboratori Dolby.
RICONOSCIMENTO DEL MARCHIO
“Dolby” e il simbolo doppia-D sono il marchio di
fabbrica di Dolby Laboratories.
Informazioni per gli utenti sullo smaltimento di
dispositivi e batterie usati
[solo Unione Europea]
Questi simboli indicano che l'apparecchiatura
non deve essere smaltita insieme ai normali ri uti
domestici. Se si desidera procedere allo smaltimento
del prodotto o della batteria, cercare i sistemi o le
strutture di raccolta disponibili per garantirne un
opportuno riciclo.
Avviso: La dicitura Pb posta al di sotto del simbolo delle
batterie indica che queste contengono piombo.
Dettagli
TRASMISSIONE TV
PAL/SECAM B/G D/K K’ I/I’ L/L’
RICEZIONE DIGITALE
DVB-T MPEG2 DVB-T MPEG4 HD
DVB-T. MPEG-5, MPEG-4 (Solo per il Regno Unito)
DVB-C MPEG2 DVB-C MPEG4 HD
CANALI RICEVENTI
VHF (BAND I/III) UHF (BAND U) HYPERBAND
NUMERO DI CANALI PREIMPOSTATI 1000
(800 DVB-T / 200 analogico)
INDICATORE DI CANALE
OSD
INGRESSO ANTENNA RF
75 Ohm (non bilanciato)
TENSIONE OPERATIVA
220-240V CA 50 Hz
AUDIO German + Nicam Stereo
POTENZA USCIT A AUDIO (W
2x2,5
CONSUMO ENERGETICO (W)
45 W (max)
PANNELLO
Display 16:9 , dimensione schermo 22”
DIMENSIONI (mm)
profondità x larghezza x altezza (con piedistallo):
134 x 516 x 352
Peso (kg):3,50
profondità x larghezza x altezza (senza piedistallo):
35 x 516 x 317
Peso (kg): 3,30
RMSRMS.RMS) (10% THD)
Prodotti
Batteria
Italiano - 14 -
Page 32

Risoluzioni DVI supportate
Se si collegano dei dispositivi ai connettori della TV utilizzando cavi
di conversione da DVI a HDMI (non in dotazione), sarà possibile fare
riferimento alle seguenti informazioni sulla risoluzione.
Indice Risoluzione Frequenza
1 640x400 70Hz
2 640x480 60Hz -66Hz-72Hz -75Hz
3 800x600 56Hz-60Hz-70Hz-72Hz -75Hz
4 832x624 75 Hz
5 1024x768 60Hz-66Hz-70Hz-72Hz -75Hz
6 1152x864 60Hz-70Hz-75Hz
7 1152x870 75Hz
8 1280x768 60 Hz - 75Hz
9 1280x960 60Hz -75Hz
10 1280x1024 60Hz -75Hz
11 1360x768 60 Hz
12 1400x1050 60Hz -75Hz
13 1400x900 65Hz -75Hz
14 1600x1200 60 Hz
15 1680x1050 60 Hz
16 1920x1080 60 Hz
17 1920x1200 60Hz
18 480i-480p 60Hz
19 576i-576p 50Hz
Modalit tipica monitor - PC
La tabella che segue illustra alcune delle modalità di visualizzazione tipiche
del video. La TV potrebbe non supportare tutte le risoluzioni. La TV supporta
una risoluzione massima di 1920x1080.
Indice Risoluzione Frequenza
1 640x350p 60 Hz
2 640x400p 60 Hz
3 1024x768 60 Hz
4 1280x768 60 Hz
5 1360x768 60 Hz
6 720x400 60 Hz
7 800x600 56 Hz
8 800x600 60 Hz
9 1024x768 60 Hz
10 1024x768 66 Hz
11 1280x768 60 Hz
12 1360x768 60 Hz
13 1280x1024 60 Hz
14 1280x960 60 Hz
15 1280x1024 60 Hz
16 1400x1050 60 Hz
17 1600x1200 60 Hz
18 1920x1080 60 Hz
Formati di fi le supportati per la modalità USB
Media Estensione fi le
.mpg .mpeg MPEG1,2 MPEG Layer 1/2/3
.dat MPEG1,2
.vob MPEG2
.mkv H.264, MPEG1,2,4 EAC3/ AC3
Movie
Music
Photo
Subtitle
.mp4
.avi
.mp3 -
.jpg .jpeg JPEG Baseline - max WxH = 15360x8640 4147200bytes
. JPEG Progressivo - max WxH = 9600x6400 3840000bytes
.bmp - - max WxH = 9600x6400 3840000bytes
.sub .srt - - -
Xvid 1.01, Xvid 1.02, Xvid 1.03,
Xvid 1.10-beta1/2
MPEG2, MPEG4
Xvid 1.01, Xvid 1.02, Xvid 1.03,
Xvid 1.10-beta1/2
Formato Consigli
Video Ingressi (Risoluzione massima / bit rate)
MPEG2
MPEG4
Xvid 1.00,
PCM/MP3
H.264
Xvid 1.00,
PCM
H.264
MPEG 1 Layer 1 /
2 (MP3)
Italiano - 15 -
MAX 1920x1080 @ 30P 20Mbit/sec
32Kbps ~ 320Kbps(Bit rate)
32KHz ~ 48KHz(Sampling rate)
Page 33

Compatibilità segnale AV e HDMI
Fonte Segnali supportati Disponibile
EXT
(SCART )
AV laterale
YPbPr
HDMI1
PAL 50/60 O
NTSC 60 O
RGB 50 O
RGB 60 O
PAL 50/60 O
NTSC 60 O
480I 60Hz O
480P 60Hz O
576I 50Hz O
576P 50Hz O
720P 50Hz O
720P 60Hz O
1080I 50Hz O
1080I 60Hz O
1080P 50Hz O
1080P 60Hz O
480I 60Hz O
480P 60Hz O
576I 50Hz O
576P 50Hz O
720P 50Hz O
720P 60Hz O
1080I 50Hz O
1080I 60Hz O
1080P 24Hz O
1080P 25Hz O
1080P 30Hz O
1080P 50Hz O
1080P 60Hz O
(X: Non disponibile, O: Disponibile)
In certi casi i segnali della TV LED possono non essere ricevuti e visualizzati correttamente. Il problema potrebbe essere
un'incompatibilità con gli standard della strumentazione sorgente. Se si dovessero verifi care tali problemi, contattare il
rivenditore e il produttore dei dispositivi.
Italiano - 16 -
Page 34

Table des matières
Le bouton de contrôle&Operation de TV ................ 1
Fonctionnement général ......................................... 1
Options et fonctions du menu TV ........................... 7
Spéci cations ...................................................... 14
Le bouton de contrôle&Operation
de TV
1. Direction précédente
2. Direction suivante
3. Programme/Volume / AV / Veille sur
commande de sélection
Remarque:vous pouvez déplacer le contacteur vers le haut
ou vers le bas pour modifi er le volume. Si vous souhaitez
changer de chaîne, appuyez au milieu de l’interrupteur une
fois (position 3) puis déplacez-vous vers le haut ou vers le
bas. Si vous appuyez à nouveau au milieu de l’interrupteur,
l’OSD source s’affi chera. Si vous appuyez sur le milieu
de l’interrupteur et le maintenez ainsi pendant quelques
secondes, le téléviseur basculera en mode de veille.
Impossible d’affi cher le menu principal à l’écran à l’aide des
boutons de commande.
Utilisation des touches de la
télécommande
• Appuyez sur le bouton “ ” de votre télécommande
pour af cher l'écran de menu principal. Utilisez
le bouton Gauche ou Droit pour sélectionner un
onglet de menu et appuyez surOK pour entrer.
Utilisez le bouton Gauche / Droite / Haut / Bas pour
sélectionner ou régler une rubrique. Appuyez sur le
bouton “
• Une fois les équipements externes connectés à votre
téléviseur, vous pouvez commuter entre différentes
sources d’entrée. Appuyez sur la touche SOURCE
de votre télécommande de manière consécutive
pour sélectionner les différentes sources.
• Vous pouvez changer la chaîne et ajuster le
volume en utilisant les boutons +/- et
télécommande. .
” ou “ ” pour quitter un écran de menu.
CH+/- de la
Fonctionnement général
Insertion des piles dans la télécommande
Soulever le couvercle situé à l’arrière de la
télécommande. Insérer deux piles AAA. S’assurer
que les extrémités + et –des piles correspondent dans
le compartiment de piles (respecter la bonne polarité).
Replacer le couvercle.
Branchez l'alimentation&Antenne/Câble
IMPORTANT: Le téléviseur a été conçu uniquement
pour fonctionner en 220-240V AC, 50 Hz. Après avoir
retiré la TV de l’emballage, attendez un moment pour
que la TV atteigne la température ambiante avant
de brancher la TV à la prise de courant. Branchez le
câble d’alimentation à la prise secteur.
Câble d'antenne
HDMI 1
SPDIF
Coax.OUT
Accessoires inclus.
• Télécommande
• Batteries : 2 x AAA
• Manuel d’utilisation
• Guide de mise en route rapide
• Câble de connexion AV latéral
• Câble de connexion YPbPr
Français - 1 -
Page 35

Méthode d'installation du support amovible (sans vis)
1. Disposer le support sur une surface plane.
Maintenir le produit au-dessus du support de sorte qu'il coïncide avec le point de montage
2.
de ce dernier, puis est laissé pour montage avec son propre poids.
Méthode de désinstallation du support détachable
téléviseur
1.2.Le
Pousser les brides du support.
3.4.Retirer le support.
Détacher le support
est posé sur une table plate.
.
Français - 2 -
Page 36

Affi chage de la télécommande
1. Veille
2. Arrêter (en mode vidéo du Navigateur média)
3. Lecture (en mode vidéo du Navigateur média) /
Lecture-Diaporama (en mode média)
4. Retour rapide (en mode vidéo du Navigateur
média)
5. AV / Sélection de la Source
6. TV
7. Guide électronique de programme (dans les
chaînes DVB)
8. Boutons de navigation (Précédent/Suivant/
Gauche/Droite)
9. Enregistrement de programmes
10. Programme suivant / Page précédente
11. Muet
12. Baisser le volume
13. Touche verte Programme Liste (en mode EPG)/
Sélectionner/Désélectionner tout (dans la liste
des Favoris)
14. Touche rouge
15. Touches numériques
16. Sous-titre Activé-Désactivé (dans les chaînes
DVB)
17. Télétexte /Mélanger (en mode texte)
18. Bouton Bleu/Modi er la liste des chaînes/Filtre
(dans la liste des favoris&EPG)
19. Touche jaune / Programme linéaire (en mode
EPG)
20. Hausser le volume
21. Programme haut/ Page suivante
22. Retour/Précédent/ Page d’index (en mode
TXT)
23. Mono-Stéréo / Dual I-II / Langue en cours (*)
(dans les chaînes DVB)
24. Ok (Con rmer) / Retenir (en mode TXT)/ Liste
des chaînes
25. Info / Af cher (en mode TXT)
26. Menu activé/désactivé /Sous-titre (en mode du
Navigateur média)
27. Zoom d’image
28. Avance rapide (en mode vidéo du Navigateur
média)
29. Pause (en mode vidéo du Navigateur média) /
Enregistrement décalé
Français - 3 -
Télétexte
Appuyez sur la touche TEXT pour entrer. Appuyez
à nouveau pour activer le mode Mélanger. Appuyez
une nouvelle fois pour quitter. Suivre les instructions
af chées à l’écran télétexte numérique.
Télétexte numérique (Réservé au RU)
Appuyez sur la touche TEXT pour afficher les
informations relatives au télétexte numérique. Utilisez
les touches colorées, les touches du curseur et la touche
OK. La méthode de fonctionnement peut différer selon le
contenu du télétexte numérique. Suivre les instructions
af chées à l’écran télétexte numérique.
Page 37

Affi chage des connecteurs
Connecteur Type Câbles Appareil
Péritel
Branchement
(arrière)
VGA
Branchement
(arrière)
AV SUR
CÔTÉ
PC/YPbPr
Audio
Branchement
(côté)
HDMI
Branchement
(arrière)
SPDIFF
Branchement
(arrière)
AV SUR
CÔTÉ
AV latéral
Branchement
(côté)
Câble de Connexion
Latérale Audio/Vidéo
(fourni)
Câble de connexion
AV (fourni)
Câble audio du PC
(Non fourni)
CASQUE
Casque
Branchement
(côté)
YPbPr Video
Branchement
(côté)
Câble de connexion
YPbPr (fourni)
YPBPR
USB
Branchement
(côté)
CI
Branchement
(côté)
CAM
module
REMARQUE: Quand vous branchez un périphérique via YPbPr ou l’entrée AV latérale, vous devez utiliser le
branchement des câbles pour activer la connexion Voir l’illustration ci-dessus | Pour activer audio PC, vous devrez
utiliser Les têtes rouges et blanches du câble pour prise AV latérale fourni |Si un périphérique externe est branché à l’aide
des prises PÉRITEL, le téléviseur passe automatiquement en mode AV.|Pendant la réception des chaînes DTV (Mpeg 4
H. 264) ou en mode Navigateur multimédia, la sortie ne sera pas disponible à travers la prise péritel. |Lorsque vous utilisez
le kit de montage mural fourni, Il est recommandé de brancher tous vos câbles à l’arrière du téléviseur avant tout montage
mural. |Insérez ou effacez le module CI uniquement lorsque le téléviseur est ETEINT. Consultez le manuel d’utilisation du
module pour les détails relatifs aux réglages.
Français - 4 -
Page 38

Mise sous/hors tension
Mise sous tension du téléviseur
• Branchez le cordon d’alimentation à une prise de
220-240V AC, 50 Hz.
• Le TÉMOIN de mise en veille s’allume.
• Pour allumer le téléviseur à partir du mode veille,
vous pouvez soit :
• Presser le bouton “
numérique sur la télécommande.
• Appuyez sur le bouton de commande à gauche du
téléviseur. Le téléviseur s’allumera ensuite.
Remarque : Si vous allumez votre TV via les boutons CH- ou
CH+ de la télécommande ou du poste de télévision, le dernier
programme que vous regardiez sera sélectionné à nouveau.
Quelle que soit la méthode, le téléviseur s’allumera.
”, CH- ou CH+ ou un bouton
Éteindre le téléviseur
• Pressez le bouton “ ” sur la télécommande ou
maintenez le commutateur enfoncé jusqu'à ce que
le téléviseur s’éteigne. Ainsi, la TV passera ainsi
en mode veille.
• Pour éteindre complètement le téléviseur, débranchez
le cordon d’alimentation de la prise secteur.
Remarque : Lorsque le téléviseur est en mode veille, le
voyant lumineux du mode veille clignote pour signifi er que des
options comme Recherche en mode veille, téléchargement
automatique ou Minuterie sont actives.
Première installation
Lorsque vous allumez l'appareil pour la première fois,
l'écran de sélection de la langue af che les différentes
options linguistiques, par ordre alphabétique. Appuyez
sur les touches “ ” ou “ ” pour sélectionner la
langue de votre choix. Appuyez le bouton OK pour
sélectionner. “Première installation” apparaît. Utilisez
le bouton ” ou “ ”pour régler le pays de votre choix
et appuyez le bouton “ ” pour sélectionner le type de
recherche (optionnelle): Utiliser l’option “ ” ou “ ”
pour dé nir le type de recherche souhaité. Il existe
deux types de recherche disponibles : Numérique et
analogique, puis numérique uniquement et analogique
uniquement. Une fois dé nie, appuyez sur la touche
” pour sélectionner l’option Langue télétexte.
“
Pressez le bouton “
Langue télétexte. Après quoi, sélectionnez Balayage
des chaînes cryptéeset réglez Oui si vous souhaitez
rechercher des stations codées. Pressez le bouton
OK sur la télécommande pour continuer et le message
suivant s’af chera à l’écran : Vous devez sélectionner
le type de recherche pour lancer la recherche et
garder les émissions de la source souhaitée.
” ou “ ” pour sélectionner
IMPORTANT: Si vous choisissez France ou Italie
comme option, vous serez invité à définir et à
con rmer un code PIN. Le code PIN sélectionné
ne saurait être 0000. Saisissez un code PIN et
con rmez-le en le saisissant à nouveau. Appuyez
sur la touche OK pour continuer. Si les deux codes
PIN correspondent l’un à l’autre, le code PIN principal
sera dé ni.
AVERTISSEMENT: Lorsque vous êtes invité à saisir
un code PIN pour accéder à un menu, vous devez
utiliser celui que vous avez dé ni lors de la première
installation. En cas d'oubli de ce dernier, utilisez le
code principal 4725.
Installation de l’antenne
Si vous sélectionnez l’option ANTENNE à partir de
l’écran Type de recherche , la télévision numérique
recherchera les diffusions terrestres numériques.
REMARQUE: Vous pouvez appuyer sur la touche “
”pour annuler.
Une fois toutes les stations disponibles enregistrées,
la liste des chaînes s’af chera à l’écran. Si les chaînes
retrouvées vous intéressent, en fonction du LCN,
veuillez sélectionner Oui , puis appuyez sur OK.
Appuyez sur le bouton “
chaînes et regarder la télé.
(*) LCN Système de numéro de chaîne logique qui
organise les diffusions disponibles conformément à
la séquence de chaîne reconnaissable (si disponible).
” pour quitter la liste des
Installation du câble
Si vous sélectionnez l'option CÂBLE et appuyez sur
le bouton OK de la télécommande pour continuer.
Pour continuer, veuillez sélectionner OUI et appuyez
sur OK. Pour annuler l’opération, sélectionnez NON et
appuyez sur OK. Vous pouvez sélectionner des plages
de fréquence à partir de cet écran. Pour sélectionner
les lignes que vous voyez, utilisez la touche “ ” ou “ ”
Vous pouvez procéder à une sélection manuelle de la
plage de fréquences à l’aide des touches numériques de
la télécommande. Réglez la fréquence de démarrage
et d’arrêt à souhait à l’aide des touches numériques de
la télécommande. Après cette opération, vous pouvez
dé nir l’étape de recherche sur 8000 KHz ou 1000
KHz. Si vous sélectionnez 1 000 KHz, le téléviseur
effectuera une recherche détaillée. La durée de
recherche augmentera alors en conséquence. Selon le
Pays choisi lors de la première installation, l’option Étape
de recherche sur 250KHz pourrait être disponible sur
l’écran Recherche des chaînes du réseau. N.B : si vous
effectuez la recherche à l’aide de l’option 250KHz, le
processus de recherche pourrait prendre plus de temps.
Bien plus, pour certains pays, l’option ID Réseau sera
disponible. L’option ID réseau permet d’obtenir le tableau
d’informations relatives au réseau. Ce tableau présente
Français - 5 -
Page 39

des informations relatives au réseau sélectionné. Ce
dernier pourrait changer suivant l’opérateur et la région
où ce dernier diffuse de manière active. Une fois terminé,
appuyez sur le bouton OK pour lancer la recherche
automatique. Le téléviseur cherchera et garder les
émissions disponibles.
Lecture de média via entrée USB
Vous pouvez connecter un lecteur de disque dur USB ou une
carte mémoire USB à votre téléviseur grâce aux entrées USB
du téléviseur. Cette option vous donne la possibilité de lire
des fi chiers mémorisés dans un disque USB. Les disques
durs externes de 2,5 et 3,5 pouces (hdd avec alimentation
externe) sont pris en charge.
IMPORTANT ! Vous devez sauvegarder vos chiers
avant d’effectuer tout branchement au téléviseur a n
d’éviter de probables pertes de données. Veuillez
remarquer que la responsabilité du fabricant ne saurait
être engagée en cas de dommage de chier ou de
perte de données. Il est possible que certains types de
périphériques USB (à l’exemple des lecteurs MP3) ou
des lecteurs de disque dur/cartes mémoires USB soient
incompatibles avec ce téléviseur. Le téléviseur prend
en charge le formatage de disque FAT32 et NTFS.
Toutefois,l’enregistrement ne sera pas possible avec
les disques formatés NTFS. Remarque : Pendant le
formatage d’un disque dur USB d'une capacité de 1TO
(Tera Octet), il peut arriver que vous soyez confronté à
certains problèmes au cours du processus de formatage.
Il est très dangereux de brancher et de débrancher les
périphériques USB avec une certaine rapidité. Évitez de
brancher et de débrancher le lecteur avec une certaine
rapidité. Ceci peut physiquement endommager le lecteur
USB et surtout le périphérique USB lui-même. Ne jamais
enlever l’USB durant la lecture d’un chier.
Menu Navigateur média
Vous pouvez lire les chiers de photo, de musique,
et de lm stockés sur un disque USB en connectant
ce dernier à votre téléviseur et en utilisant l'écran du
navigateur média. Pour ce faire, procédez comme
suit: Branchez un disque USB à l'une des entrées
USB située sur le côté du téléviseur. Appuyez sur le
bouton “
en utilisant les boutons Gauche/Droite et OK. L’écran
principal du navigateur média s’af che. Vous pouvez
af cher le contenu correspondant en sélectionnant
l’onglet Vidéo, musique ou Image. Suivez les indications
du bouton sous chaque menu à l’écran pour les options
de lecture média. Vous pouvez régler les préférences
de votre navigateur média grâce à la boîte de dialogue
Réglages.
Démarrez la lecture avec et
activez
Démarrez la lecture avec et
activez
Démarrez la lecture avec OK/
et activez
Démarrez la lecture avec OK/
et activez
” et sélectionnez l’onglet Navigateur média
Fonctionnement du mode Aléatoire/Boucle
Le téléviseur lit le chier suivant
et boucle la liste.
le même chier sera lu dans une
boucle (répété).
le fichier sera lu de manière
aléatoire.
la lecture du chier continuera
de manière aléatoire et la lecture
aléatoire se poursuivra.
Français - 6 -
Page 40

Options et fonctions du menu TV
Contenu du menu Image
Mode
Contraste Règle les valeurs de l’éclairage et de l’obscurité de l’écran.
Luminosité Règle la valeur de luminosité de l’écran.
Netteté Dé nit la valeur de netteté des objets af chés à l’écran.
Couleur Règle la valeur de la couleur, règle les couleurs.
Mode
Économie
d’énergie
Rétroéclairage
(en option)
Réduction du
bruit
Température
de couleur
Zoom image Dé nit la taille de l'image sur Auto,16:9, Sous-titre,14:9, 14:9 Zoom, 4:3 ou Cinéma.
HDMI True
Black (en
option)
Mode Film
(Film Mode)
(en option)
Changer de
couleur
Réinitialisation Réinitialise les paramètres d’image aux valeurs par défaut.
Autoposition
(en mode PC)
Position H (en
mode PC)
Position V (en
mode PC)
Fréquence
pilote (en
mode PC)
Phase (en
mode PC)
En mode VGA (PC), certains éléments du menu Image seront indisponibles. Au contraire, les paramètres
du mode VGA seront ajoutés aux paramètres Image en mode PC.
Pour vos besoins de visualisation, vous pouvez régler l’option de Mode liée. Le mode
Image peut être réglé sur l’une de ces options: Cinéma,Jeu,Dynamique et Naturel.
Dé nir le mode Economie d’énergie sur Eco, Image Désactivée, et Désactivé. .
Cette option contrôle le niveau de rétroéclairage qui peut être dé ni sur les modes
Auto, Maximum, Minimum, et Eco. La fonction de rétroéclairage sera inactive si le
mode Économie d’énergie est réglé sur Activé. Le mode Rétroéclairage ne peut
être activé en mode VGA ou Navigateur multimédia ou lorsque le mode Image est
dé ni sur Jeu.
Si le signal de diffusion est faible et que l’image est bruyante, utilisez le réglage
deRéduction de bruit pour réduire l’intensité du bruit. Le mode Réduction de bruit
peut être réglé sur l’une de ces options: Faible, Moyen, Haut ou Désactivé.
Paramètres avancés
Règle le ton de la couleur désirée.
Lorsque vous regardez le téléviseur à partir de la source HDMI, cette option est
visible dans le menu Paramètres de l’image. Vous pouvez utiliser cette option pour
renforcer la noirceur de l’image.
Les films sont enregistrés à un nombre d’images par seconde différent des
programmes de télévision normaux. Activez cette fonction lorsque vous regardez
des lms a n de mieux visualiser les images accélérées.
Règle le ton de la couleur désirée.
Optimise automatiquement l’af chage. Appuyez sur OK pour optimiser.
Cette rubrique change l’image horizontalement vers le côté droit ou gauche de l’écran.
Cet élément déplace l’image verticalement vers le haut ou le bas de l’écran.
Les réglages de la fréquence pilote corrigent les interférences qui apparaissent
comme des lignes verticales dans l’image pour des présentations telles que les
feuilles de calcul, les paragraphes ou les textes dans des polices plus petites.
Selon la résolution et la fréquence de balayage que vous saisissez pour le téléviseur
vous pouvez voir une image voilée ou bruitée à l’écran. Dans un tel cas vous pouvez
utiliser cet élément pour obtenir une image claire par essais et erreurs.
,
Français - 7 -
Page 41

Options et fonctions du menu TV
Contenu du menu Son
Volume Ajuste le niveau du volume:
Dans le menu égaliseur, le préréglage peut être changé pour Musique, Film, Voix,
Égaliseur:
Balance
Casque Règle le volume du casque.
Mode Son
AVL
Basse dynamique:
Sortie Digitale Règle le type de sortie audio numérique.
Plat, Classique et Utilisateur. Appuyez sur la touche “
précédent. Les réglages du menu Egaliseur peuvent être modifi és seulement quand
le Mode Égaliseur est défi ni dans Utilisateur.
Ce paramètre s’utilise pour accentuer la balance des haut-parleurs gauche
ou droit.
Vous pouvez sélectionner le mode Mono, Stéréo, Dual I ou Dual II, seulement
si la chaîne sélectionnée prend en charge ce mode.
La fonction de limitation automatique de volume AVL règle le son dans le but
d’obtenir un niveau de sortie xe entre les programmes (par exemple, le niveau
de volume des publicités tend à être plus élevé que celui des programmes).
Appuyez sur le bouton “
” ou “ ” pour activer ou désactiver cette fonction.
” pour retourner au menu
Utilisation de la liste de chaînes
Le téléviseur trie toutes les stations mémorisées dans
la liste des chaînes. Vous pouvez modifi er cette liste de
chaînes, confi gurer les favoris ou les stations actives
à inclure dans la liste en utilisant les options Liste de
chaînes.
• Sélectionnez la liste des chaînes à partir du
menu principal.
• Sélectionnez l’option Modifier la liste des
chaînes pour gérer toutes les chaînes
mémorisées. Vous pouvez déplacer, supprimer,
modi er le nom et verrouiller les chaînes grâce
à cet écran.
• Sélectionnez pour cela l'option Favoris pour
créer une liste des programmes favoris.
• Sélectionnez l'option Liste des chaînes actives
pour trier la liste des chaînes. Vous pouvez
sélectionner un type de diffusion à partir de
la liste af chée en utilisant les boutons “
” et OK.
” /“
Configuration des paramètres
parentaux
Pour éviter que certains programmes soient regardés, des
chaînes et des menus peuvent être verrouillés grâce au
système de contrôle parental.
Sélectionnez Parental dans le menu Con gurations
et appuyez surOK pour continuer. Pour af cher les
options du menu de verrouillage, saisissez le code PIN.
Par défaut, ce code est réglé en usine à 0000. Après
avoir saisi le code PIN approprié, le menu Paramètres
parentaux s’af chera :
Verrouillage Menu: L'option Verrouillage Menu active
ou désactive l'accès au menu.
Verrouillage Maturité:: Après installation, cette
option recherche l’information relative aux émissions
parentales et si ce niveau parental a été inactivé, l’accès
à la diffusion n’est pas activé.
Verrouillage parental: Lorsque l’option Verrouillage
Parental est sélectionnée, le téléviseur peut uniquement
être contrôlé à l’aide de la télécommande. Dans ce cas,
les boutons du panneau de contrôle ne fonctionneront pas.
Paramétrage du code PIN: Dé nit un nouveau code
PIN.
IMPORTANT: Le code PIN d’usine par défaut est 0000.
Si vous le modifi ez, assurez-vous de le noter et de le
conserver en lieu sûr.
Remarque : Si l'option Pays est défi nie sur France ou
Italie , vous pouvez utiliser le code par défaut 4725.
Français - 8 -
Page 42

Options et fonctions du menu TV
Contenu du menu Réglages
Accès conditionnel Contrôle les modules d’accès conditionnel lorsqu’ils sont disponibles.
Con gure les paramètres linguistiques (-peuvent varier en fonction du pays
Langue
Parental Con gure les réglages parentaux.
Minuteries
Confi guration
Enregistrements
Date/Heure
Sources Active ou désactive les options sources sélectionnées.
Balayage de chaîne
automatique
(Nouveau réglage)
Balayage de chaîne
manuel
Recherche des chaînes
réseau
Réglage fi n
(analogique)
Première installation
sélectionné). Les paramètres préférés et ceux en cours seront disponibles.
Les réglages en cours ne peuvent être modi és que si le diffuseur les prend
en charge.
Règle les minuteries des programmes sélectionnés. / Dé nit la minuterie
sommeil pour éteindre le téléviseur après un certain temps.
Con gure le menu de con guration Enregistrements
Sélectionne la date et l’heure.
Remarque :
* Le téléviseur recueille les informations relatives à l'heure grâce à la diffusion.
L'heure qu'il est sera disponible dans les réglages Date/Heure, si aucune
information relative à l'heure n'est fournie dans la diffusion.
Si le téléviseur est en mode Aucune chaîne, les réglages Date/Heure peuvent
être modi és. Cependant, si un préréglage de chaîne existe, seule l'option "Mode
Réglages de l'heure" peut être modi ée et si celle-ci est dé nie sur Manuelle,
le fuseau horaire sera activé.
* Si le téléviseur est en mode Veille, bascule en mode sous-tension et qu'aucune
émission n'est disponible, les informations relatives à l'heure ne seront pas mises
à jour. Si une diffusion est disponible, les informations relatives à l'heure y seront
recueillies. En d'autres termes, les informations relatives à l'heure seront disponibles
en fonction de ces priorités: Le téléviseur recherche dans un premier temps
les informations relatives à l'heure dans la diffusion, puis, dans les préférences
utilisateur, avant le télétexte.
Installer et régler à nouveau le contenu du menu
Af che les options de réglage automatique.
Antenne numérique : Recherche et enregistre les chaînes DVB.
Câble numérique : Recherche et enregistre les chaînes câblées DVB.
Analogique :Recherche et mémorise les stations analogiques.
Antenne analogique et numérique : Recherche et enregistre les chaînes
DVB et analogiques.
Câble analogique et numérique : Recherche et enregistre les câbles DVB
et analogiques.
Cette fonction peut être utilisée pour une entrée de diffusion directe.
Recherche les chaînes liées dans le système de diffusion.
Vous pouvez utiliser ce réglage pour la recherche ne de chaînes analogiques.
Cette option est disponible uniquement si des chaînes analogiques sont
mémorisées.
Supprime tous les paramètres et toutes les chaînes mémorisées, réinitialise le
téléviseur suivant les paramètres d’usine, et lance la première installation. Pour
de plus amples informations relatives à ce processus, vous pouvez suivre les
consignes prévues dans la section d'installation initiale.
Français - 9 -
Page 43

Options et fonctions du menu TV
Effacer la liste des
services
Autres réglages: Affi che les autres options de réglage du téléviseur.
Temporisation du
menu
Balayage des chaînes
cryptées
Fond bleu Active ou désactive le système du fond bleu quand le signal est faible ou absent.
Mise à jour du logiciel
Version de
l’application:
Malentendant
Description Audio
Mise hors tension
automatique du
téléviseur
Type de diffusion Sélectionne le type de diffusion souhaité.
Recherche en mode
Veille (en option)
(*) Visible pour le Danemark, la Suède, la Norvège, ou la Finlande. Effacer
la liste des services et appuyez sur OK. L’OSD suivant s’af chera à l’écran.
Sélectionnez OUI et appuyez sur OK pour continuer, ou sélectionnez NON et
appuyez sur la touche OK pour annuler.
Change la durée de temporisation des écrans de menu.
Lorsque ce paramètre est activé, le processus de recherche localisera également les
chaînes cryptées. Si le réglage est paramétré sur Désactivé, les chaînes cryptées
ne seront pas localisées en recherche automatique ou manuelle.
Pour vous assurer que votre téléviseur dispose en permanence des dernières
informations de mise à niveau, vous pouvez utiliser ce réglage. Pour un bon
fonctionnement, veuillez vous assurer que le téléviseur est réglé en mode de veille.
af che la version de l’application
Si le diffuseur active un quelconque signal particulier concernant le son, vous
pouvez activer ce paramètre a n de recevoir de tels signaux.
La description audio renvoie à une piste de narration supplémentaire réservée
aux dé cients visuels et malentendants. Vous ne pouvez utiliser cette option
que si le diffuseur la prend en charge.
Vous pouvez dé nir la valeur de temporisation de l’option de mise hors tension
automatique du téléviseur. Après avoir atteint la valeur de temporisation, si le
téléviseur ne fonctionne pas suivant l’heure sélectionnée, il s’éteindra.
Si vous faites passer l’option Veille à l’option Désactivé, cette fonction ne sera
pas disponible. Pour utiliser l’option de recherche en mode de veille, veuillez
vous assurer d’avoir activé l’option Recherche en mode de veille. Si l'option
Recherche en mode de veille est dé nie sur Activé, lorsque le téléviseur est
en mode de veille, les chaînes disponibles seront recherchées. Si le téléviseur
trouve des chaînes manquantes ou nouvelles, un écran de menu s'af chera,
vous demandant si vous souhaitez appliquer ou non ces changements. La liste
des chaînes sera mise à jour et modi ée au terme de ce processus. Veuillez
activer l'option de recherche en mode veille a n de permettre à votre téléviseur
d'effectuer automatiquement la mise à jour de la fréquence de diffusion du
diffuseur, la dé nition de la diffusion et les changements similaires.
Français - 10 -
Page 44

Guide électronique de programmes
(EPG)
Certaines chaînes, mais pas toutes, af chent des
informations portant sur l’émission en cours et
l’émission suivante. Appuyez sur le bouton “
accéder au menu EPG.
Haut/Bas/Gauche/Droit: Parcourir EPG.
OK : Af che les options de répétition.
INFO: Affiche des informations détaillées sur le
programme sélectionné.
VERT : Passe à la liste des EPG programmés.
JAUNE: Passe à l'historique des EPG programmés.
BLEU : Af che les options de ltre.
: le téléviseur commencera à enregistrer le
programme sélectionné. Vous pouvez appuyer une
nouvelle fois pour interrompre l’enregistrement.
IMPORTANT: Pour enregistrer un programme, vous devez
d’abord connecter votre lecteur USB à votre téléviseur que
vous aurez auparavant pris le soin d’éteindre. Allumez ensuite
le téléviseur afin d’activer la fonction d’enregistrement.
Dans le cas contraire, l’option d’enregistrement ne sera pas
disponible.
Remarque: Pendant l’enregistrement, il est impossible de
basculer d’une diffusion ou d’une source différente.
Options du programme
Dans le menu EPG, appuyez sur la touche OK pour
accéder au menu Options de l’événement .
Sélectionner une chaîne
Dans le menu EPO, grâce à cette option, vous pouvez
passer à la chaîne sélectionnée.
Enregistrer / Supprimer le minuteur
d’enregistrement
Après avoir sélectionné un programme dans le menu
EPG, appuyez sur la touche OK pour af cher l’écran
Options. Sélectionnez l’option “Enregistrement”
et appuyez sur la touche OK. À l’issue de cette
opération, un enregistrement est programmé pour
l’élément sélectionné.
Pour annuler un enregistrement existant, sélectionnez
le programme enregistré et appuyez sur la touche OK
. Ensuite, sélectionnez l’option Supprimer l’enreg.
Minuterie”. L’enregistrement sera annulé.
Régler la minuterie / Supprimer la minuterie
Après avoir sélectionné un programme dans le menu
EPG, appuyez sur la touche OK pour af cher l’écran
Options. Sélectionnez l’option “Régler la minuterie
sur Événement ” et appuyez sur la touche OK. Vous
avez la possibilité de dé nir une minuterie pour les
programmes à venir. Pour annuler une minuterie
existante, sélectionnez le programme en question
et appuyez sur la touche OK. Sélectionnez ensuite
” pour
l’option “Supprimer la minuterie”. La minuterie sera
annulée.
Remarque: Il est impossible d’enregistrer ou de défi nir une
minuterie pour deux émissions distinctes ou plus au cours
du même intervalle de temps.
Enregistrement d’un programme
IMPORTANT: Au cours de l’utilisation d’un nouveau lecteur de
disque dur USB, il est conseillé de procéder dans un premier
temps au formatage du disque à l’aide de l’option “Formater
le disque” de votre téléviseur.
Pour enregistrer un programme, vous devez d’abord
connecter votre lecteur USB à votre téléviseur
que vous aurez auparavant pris le soin d’éteindre.
Allumez ensuite le téléviseur a n d’activer la fonction
d’enregistrement.
Pour utiliser la fonction d’enregistrement, vous devez
connecter un disque USB ou un lecteur de disque
dur externe au téléviseur. Veillez ensuite à ce que
le disque USB branché ait une capacité minimale
de 1 Go et une compatibilité de vitesse de 2.0. Si le
périphérique USB connecté ne prend pas en charge
la vitesse 2.0, un message d’erreur s’af chera.
Remarque: Les programmes enregistrés sont mémorisés
dans le disque USB. Si vous le souhaitez, vous pouvez
enregistrer/copier les enregistrements sur un ordinateur;
toutefois, ces fi chiers ne peuvent y être lus. Seul votre
téléviseur peut vous permettre de lire les enregistrements.
Remarque: Un retard Lip Sync peut survenir pendant
le décalage temporel.
pas supporté. Le téléviseur peut enregistrer des
programmes de plus de dix heures de temps.
Les émissions enregistrées sont divisées en partitions
de 4 Go.
Si la vitesse d’écriture du disque USB connecté est
insuf sante, l’enregistrement peut échouer et l’option
de décalage peut ne pas être disponible.
L’enregistrement des programmes HD peut occuper
un espace plus considérable sur le disque USB en
fonction de la résolution de la diffusion. Pour cette
raison, il est recommandé d’utiliser les lecteurs
de disques durs USB pour l’enregistrement des
programmes HD.
Évitez de débrancher l’USB/HDD pendant
l’enregistrement. Si vous le faites, vous courez le
risque d’endommager l’USB/HDD connecté.
Le support multipartition est disponible. Au trop deux
partitions différentes sont prises en charge. Si le
disque a plus de deux partitions, une panne peut
survenir. La première partition du disque USB est
utilisée pour les options PVR disponibles. Elle doit
également être formatée comme partition primaire à
utiliser pour les options PVR disponibles.
Certains paquets de flux peuvent ne pas être
enregistrés à cause des problèmes de signal. Par
L’enregistrement radio n’est
Français - 11 -
Page 45

conséquent, il peut arriver que des vidéos soient
gelées pendant la lecture.
Les touches Enregistrement, Lecture, Pause,
Affichage (pour PlayListDialog) ne peuvent être
utilisées lorsque l’option Télétexte est sur ON
(MARCHE). Si un enregistrement démarre à partir de
la minuterie lorsque le télétexte est activé sur ON, le
télétexte est automatiquement désactivé. L’utilisation
du télétexte est également désactivée pendant un
enregistrement ou une lecture en cours.
Enregistrement du décalage temporel
Appuyez sur la touche (PAUSE) pendant que vous
regardez une diffusion pour basculer en mode de
décalage temporel. En mode de décalage temporel,
le programme marque une pause et est simultanément
enregistré dans le disque USB connecté (*). Appuyez
à nouveau sur la touche LECTURE pour regarder
le programme en pause à partir du moment où il a été
interrompu. La barre d’informations af chera l’écart
de décalage entre le programme réel et le programme
décalé.
Enregistrement instantané
Appuyez sur la touche pour lancer l’enregistrement
instantané d’un programme pendant que vous le
regardez. Vous pouvez appuyer à nouveau sur la
touche
l’émission suivante sur l’EPG. Dans ce cas, l'écran
affichera les émissions programmées pour
l'enregistrement. Appuyez sur la touche (STOP)
pour annuler l’enregistrement instantané.
Remarque: Au cours de l’enregistrement, il est impossible
de basculer d’une diffusion ou d’une source différente et
d’affi cher le navigateur média. Pendant l'enregistrement d'un
programme au cours d'un décalage temporel, un message
d'avertissement s'affi che à l'écran lorsque la vitesse de votre
périphérique USB s'avère insuffi sante.
de la télécommande pour enregistrer
Regarder les programmes enregistrés
Dans le menu principal, utilisez les boutons, “ ” ou
“ ” pour sélectionner lenavigateur multimédia et
appuyez sur OK. Sélectionnez l’option Bibliothèque
des enregistrements en appuyant sur la touche “
” ou “ ” et validez à l’aide du bouton OK pour
entrer. La bibliothèque des enregistrements s’af che.
Sélectionnez un élément enregistré dans la liste (s’il
a été précédemment enregistré) en vous servant de
la touche “
af cher les options d’affi chage. Sélectionnez une
option grâce aux touches “
Remarque : L’affi chage du menu principal et les rubriques du
menu seront indisponibles pendant la lecture.
Appuyez sur la touche (STOP) pour mettre n à
une lecture et retourner à la Bibliothèque des
enregistrements.
” ou “ ” Appuyez sur la touche OK pour
” / “ ” ou OK
Français - 12 -
Ralenti avant
Si vous appuyez sur la touche (PAUSE) pendant
que vous regardez les programmes enregistrés,
l’option de ralenti avant sera disponible. Vous pouvez
utiliser la touche
modi er la vitesse du ralenti avant, appuyez sur la
touche
.
pour le ralenti avant. Pour
Confi guration Enregistrements
Sélectionnez l’option Configuration des
Enregistrements dans le menu Réglages pour
con gurer les paramètres d’enregistrement.
Formater le disque : Vous pouvez utiliser l’option
de formatage de disque pour formater le disque USB
branché.
IMPORTANT: Veuillez noter que TOUTES les données
contenues dans le disque USB seront perdues et le
format du disque sera converti à FAT32 si vous activez
cette option. Par ailleurs, si votre disque USB connaît
des dysfonctionnements, vous pouvez essayer de
formater le disque USB. Dans la plupart des cas, le fait
de formater le disque USB résout le problème; toutefois,
TOUTES les données contenues dans le disque USB
seront perdues en pareille situation.
Remarque : Si le message “USB trop lent” s’affi che à l’écran
au début d’un enregistrement, essayez de recommencer
l’enregistrement. Si le même message d’erreur s’affi che, il est
possible que votre disque USB n’ait pas la vitesse requise.
Essayez de connecter un autre disque USB.
Mise à jour du logiciel
Votre téléviseur a la possibilité de rechercher et
d’effectuer la mise à jour de nouveaux logiciels sur les
chaînes de télévision. Pour rechercher les chaînes de
diffusion, le téléviseur cherche les chaînes disponibles
mémorisées dans vos paramètres. Avant toute
recherche de mise à jour de logiciel donc, il est conseillé
d'effectuer une recherche automatique et d'effectuer la
mise à jour de toutes les chaînes disponibles.
1) Mise à jour du logiciel via l’entrée USB
Avant de commencer..
Assurez-vous que votre clé USB dispose suf samment
d’espace libre. Evitez d’utiliser un disque dur USB
pour la mise à jour du logiciel.
Obtenez des mises à jour chez votre distributeur
ou consultez le site Web www.philips.com/support.
Véri ez la version actuelle du logiciel de votre téléviseur
en utilisant le MENU> Paramètres> Autres paramètres>
Mise à niveau logicielle. La mise à jour du produit n’est
pas nécessaire lorsque la version trouvée est plus
ancienne que la version actuelle de votre téléviseur.
L’installation d’une version du logiciel plus ancienne peut
causer des défaillances du système.
• Après avoir obtenu une version plus récente du
logiciel, copiez le chier BIN sur la clé USB.
Page 46

• Connectez alors la clé USB à l’entrée USB de votre
téléviseur.
• Eteignez votre téléviseur en utilisant le commutateur
de commande principal du téléviseur et débranchez
le cordon d’alimentation.
• Maintenez la télécommande en direction du
téléviseur. Appuyez sur le bouton OK et maintenezle enfoncé (Ne pas relâcher le bouton OK).
• Branchez le téléviseur sur secteur et mettez-le en
marche.
• Continuez d’appuyer sur le bouton OK cinq secondes
de plus après avoir allumé le téléviseur et relâchezle par la suite. La mise à jour du logiciel devrait
maintenant commencer.
• Le téléviseur s’allume en mode Première heure
d’installation au terme de la mise à jour logicielle.
IMPORTANT
Il est déconseillé d’appuyer sur les autres boutons du
téléviseur ou de la télécommande pendant la mise à
jour logicielle.
La clé USB du téléviseur ne doit pas être retirée
pendant l’opération.
Pour éviter les mises à jour accidentelles, supprimez
le fi chier BIN sur votre clé USB en utilisant votre
ordinateur une fois que la mise à jour est terminée.
2) Recherche à 3 heures et mode de mise à jour
• Si l’option Recherche automatique du menu
Options de mise à jour est active, le téléviseur se
met automatiquement en marche à 3 heures du matin
et lance la recherche de chaînes de diffusion pour la
mise à jour du nouveau logiciel. Si un nouveau logiciel
est trouvé et téléchargé avec succès, le téléviseur
commence à fonctionner avec la nouvelle version du
logiciel au prochain démarrage.
Remarque relative au redémarrage: Le redémarrage est
la dernière étape du processus de mise à jour d’un logiciel
lorsque le téléchargement de celui a été effectué avec
succès. Pendant le redémarrage, le téléviseur réalise des
initialisations fi nales. Pendant l'opération de redémarrage, le
panneau d'alimentation se ferme et le LED avant le signale
par un clignotement. Environ 5 minutes plus tard, le téléviseur
redémarre avec un nouveau logiciel activé. Le téléviseur peut
se mettre en marche en mode Première installation.
• Si celui-ci ne démarre pas après 10 minutes, débranchezle, patientez 10 autres minutes, puis branchez à nouveau.
Il devrait s’ouvrir en toute sécurité, doté d'un nouveau
logiciel. Si le téléviseur ne se remet toujours pas en
marche, veuillez encore débrancher et brancher un
certain nombre de fois encore. Si votre appareil ne
parvient toujours pas à fonctionner, veuillez contacter le
service d’assistance à la clientèle pour obtenir de l’aide.
Attention : Évitez de débrancher le téléviseur lorsque
le voyant LED clignote pendant le redémarrage. Si
vous le faites, votre téléviseur peut ne plus fonctionner
Français - 13 -
correctement et vous aurez à le confi er à un technicien
agréé uniquement.
Dépannage
Persistance d’image - fantômes
Veuillez noter qu’une incrustation peut se produire
en af chant une image persistante. La persistance
d’image d’un téléviseur à LED peut disparaître après
quelque temps. Essayez d’éteindre le téléviseur
pendant un moment. Pour éviter qu’une telle situation
ne se produise, ne laissez pas l’écran en image xe
pendant longtemps.
Pas d’alimentation
Si votre téléviseur n'est pas alimenté, véri ez le
cordon d’alimentation est branché a la prise de
secteur.
Mauvaise qualité d’image
1. Avez-vous sélectionné le système de TV approprié ?
2. Est-ce que votre téléviseur et votre antenne sont
très proches d'un to a appareil audio qui n’est pas
branché à la terre ou d’une lumière au néon, etc. ?
3. Des montagnes ou de hauts bâtiments peuvent
être à l’origine des images doubles et des images
fantômes. Parfois, vous pouvez améliorer la
qualité de l’image en changeant la direction de
l’antenne. Est-ce que l’image ou le télétexte sont
méconnaissables ?
4. Vérifiez si vous avez introduit la fréquence
appropriée.
5. Veuillez régler à nouveau les chaînes.
6. La qualité d’image peut se dégrader lorsque deux
périphériques sont connectés au téléviseur en
même temps. Dans un tel cas, déconnectez l’un
des appareils.
Pas d’image
1. Aucune image signi e que votre téléviseur ne reçoit
aucune transmission. Avez-vous appuyé sur les
boutons appropriés de la télécommande? Essayez
une nouvelle fois. Assurez-vous également que la
bonne source d’entrée a été sélectionnée.
2. Est-ce que l’antenne est correctement branchée ?
3. Est-ce que les prises sont correctement branchées à
la prise d’antenne ?
4. Est-ce que le câble d’antenne est endommagé ?
5. Les ches appropriées sont-elles utilisées pour
brancher l’antenne?
6. En cas d’incertitudes, veuillez contacter votre
fournisseur.
Pas de son
1. Est-ce que le téléviseur est réglé pour couper le son?
Pour annuler la coupure de son, appuyez sur le
bouton "
", ou augmenter le volume.
Page 47

2. Le son sort d’un seul haut-parleur. Est-ce que la
balance est à l’extrémité d’une direction ? Consultez
le menu Son.
Télécommande - ne fonctionne pas
Votre téléviseur ne répond pas à la télécommande.
Il est possible que les piles soient déchargées,
vous pouvez sinon utiliser les boutons situés sur
le téléviseur. (* possible uniquement si l'option de
contrôle parental l'empêche et s'ils sont disponibles
avec votre modèle.)
Les sources d’entrée - ne peuvent pas être
sélectionnées.
1. Si vous ne pouvez sélectionner aucune source
d’entrée, il est possible qu’aucun périphérique ne
soit connecté.
2. Véri ez les câbles AV et les branchements si vous
avez essayé de brancher un appareil.
Enregistrement non disponible
Pour enregistrer un programme, vous devez d’abord
connecter votre lecteur USB à votre téléviseur
que vous aurez auparavant pris le soin d’éteindre.
Allumez ensuite le téléviseur a n d’activer la fonction
d’enregistrement. Dans le cas contraire, l’option
d’enregistrement ne sera pas disponible. Si vous ne
parvenez pas à effectuer un enregistrement, essayez
d’éteindre le téléviseur et d’insérer à nouveau le
périphérique USB pendant que la télé reste éteinte.
Le périphérique USB est trop lent
Si le message “USB trop lent” s’af che à l’écran au
début d’un enregistrement, essayez de recommencer
l’enregistrement. Si le même message d’erreur
s’af che, il est possible que votre disque USB n’ait
pas la vitesse requise. Essayez de connecter un autre
disque USB.
Fabriqué sous licence de Dolby
Laboratories.
RECONNAISSANCE DE MARQUE COMMERCIALE
“Dolby” et le symbole du double D sont des marques
commerciales de Dolby Laboratories.
Informations applicables aux utilisateurs
concernant la mise au rebut de l’ancien appareil
et des piles
[Seulement Union européenne]
Ce symbole indique que l’équipement ne doit pas être
éliminé comme un déchet domestique. Si vous devez
éliminer le poste ou les piles, veuillez considérer
les systèmes ou infrastructures de collecte pour un
recyclage approprié.
Remarque: Le symbole Pb en dessous du symbole pour les
piles indique que ces piles contiennent du plomb.
Batterie
Produits
Spécifi cations
TÉLÉDIFFUSION
PAL/SECAM B/G D/K K’ I/I’ L/L’
RECEPTION NUMERIQUE
DVB-T, MPEG2, DVB-T, MPEG4 HD
DVB-T MHEG-5 (Réservé au RU)
DVB-C MPEG2 DVB-C MPEG4 HD
RÉCEPTION DE CANAUX
VHF (BAND I/III) UHF (BAND U) HYPERBAND
NOMBRE DE CHAÎNES PRÉRÉGLÉES 1000
(800 DVB-T / 200 Analogue)
INDICATEUR DE CHAÎNE
Af chage à l’écran
ENTRÉE D’ANTENNE RF
75 Ohms (Non équilibré)
TENSION DE FONCTIONNEMENT
220-240V AC, 50 Hz.
AUDIO German + Nicam Stereo
PUISSANCE DE SORTIE AUDIO (W
2x2,5
CONSOMMATION ÉLECTRIQUE (W)
45 W (max)
PANNEAU
Écran 16 :9, Taille de l’écran 22”
DIMENSIONS (mm)
PxLxH (Avec pied): 134 x 516 x 352
Poids (en Kg): 3,50
PxLxH (Sans pied): 35 x 516 x 317
Poids (Kg) : 3,30
RMS.) (10% THD)
Français - 14 -
Page 48

Résolutions DVI prises en charge
Reportez-vous aux résolutions suivantes au moment de raccorder
les connecteurs à votre téléviseur à l’aide des câbles DVI à HDMI
(non fournis).
Index Résolution Fréquence
1 640x400 70Hz
2 640x480 60Hz-66Hz-72Hz -75Hz
3 800x600 56Hz-60Hz-70Hz-72Hz -75Hz
4 832x624 75 Hz
5 1024x768 60Hz-66Hz-70Hz-72Hz -75Hz
6 1152x864 60Hz-70Hz-75Hz
7 1152x870 75Hz
8 1280x768 60 Hz - 75Hz
9 1280x960 60Hz -75Hz
10 1280x1024 60Hz -75Hz
11 1360x768 60 Hz
12 1400x1050 60Hz -75Hz
13 1400x900 65Hz -75Hz
14 1600x1200 60 Hz
15 1680x1050 60 Hz
16 1920x1080 60 Hz
17 1920x1200 60Hz
18 480i-480p 60Hz
19 576i-576p 50Hz
Modes d’affi chage typiques d’une PC
Le tableau ci-après est une illustration de quelques modes d’affi chage
vidéo typiques. Votre téléviseur ne peut pas prendre en charge toutes
les résolutions. Votre téléviseur prend en charge jusqu’à 1920x1080.
Index Résolution Fréquence
1 640x350p 60 Hz
2 640x400p 60 Hz
3 1024x768 60 Hz
4 1280x768 60 Hz
5 1360x768 60 Hz
6 720x400 60 Hz
7 800x600 56 Hz
8 800x600 60 Hz
9 1024x768 60 Hz
10 1024x768 66 Hz
11 1280x768 60 Hz
12 1360x768 60 Hz
13 1280x1024 60 Hz
14 1280x960 60 Hz
15 1280x1024 60 Hz
16 1400x1050 60 Hz
17 1600x1200 60 Hz
18 1920x1080 60 Hz
Formats de fi chier pris en charge pour le mode USB
Média
Film
Musique
Photo
Sous-titre
Extension de
fi chier
.mpg .mpeg MPEG1,2 MPEG Layer 1/2/3
.dat MPEG1,2
.vob MPEG2
.mkv H.264, MPEG1,2,4 EAC3/ AC3
.mp4
.mp3 -
.jpg .jpeg JPEG de base - max WxH = 15360x8640 4147200bytes
.bmp - - max WxH = 9600x6400 3840000bytes
.sub .srt - - -
Xvid 1.01, Xvid 1.02, Xvid 1.03,
Xvid 1.10-beta1/2
MPEG2, MPEG4
.avi
Xvid 1.01, Xvid 1.02, Xvid 1.03,
Xvid 1.10-beta1/2
. JPEG Progressif - max WxH = 9600x6400 3840000bytes
Format Remarques
Vidéo Audio (Résolution maximale/Débit binaire, etc.)
MPEG2
MPEG4
Xvid 1.00,
H.264
Xvid 1.00,
H.264
PCM/MP3
PCM
MPEG 1 Layer 1 /
2 (MP3)
MAX 1920x1080 @ 30P 20Mbit/sec
32Kbps ~ 320Kbps(Débit binaire)
32KHz ~ 48KHz(Taux d’échantillonnage)
Français - 15 -
Page 49

Compatibilité des signaux AV et HDMI
Source
EXT
SCART
AV latéral
YPbPr
HDMI1
Signaux pris en
charge
PAL 50/60 O
NTSC 60 O
RGB 50 O
RGB 60 O
PAL 50/60 O
NTSC 60 O
480I 60Hz O
480P 60Hz O
576I 50Hz O
576P 50Hz O
720P 50Hz O
720P 60Hz O
1080I 50Hz O
1080I 60Hz O
1080P 50Hz O
1080P 60Hz O
480I 60Hz O
480P 60Hz O
576I 50Hz O
576P 50Hz O
720P 50Hz O
720P 60Hz O
1080I 50Hz O
1080I 60Hz O
1080P 24Hz O
1080P 25Hz O
1080P 30Hz O
1080P 50Hz O
1080P 60Hz O
Disponible
(X: Non disponible, O: Disponible)
Dans certains cas, un signal sur l’écran du téléviseur à LED peut ne pas s’affi cher correctement. Le problème rencontré peut
provenir d'une incompatibilité avec les normes de l'équipement source. Si vous rencontrez un tel problème, veuillez contacter
votre fournisseur et le fabricant de l’appareil source.
Français - 16 -
Page 50

Índice
Botones de Control y Funcionamiento del
Televisor ................................................................. 1
Funcionamiento General ........................................ 1
Características y Funciones de los Menús ............. 7
Características técnicas ............................................14
Botones de Control y Funcionamiento
del T elevisor
1. Botón de dirección (Arriba)
2. Botón de dirección (Abajo)
3. Botón de Selección de Canal/Volumen/AV/
Modo de Espera
Nota: Puede utilizar los botones de dirección Arriba o Abajo
para cambiar el volumen. Si desea cambiar de canal, pulse en
el centro del botón Arriba/Abajo una vez (posición 3); después
muévase pulsando el botón hacia arriba o abajo. Si pulsa el
centro del botón una segunda vez, se mostrará en pantalla
el menú OSD de fuentes. Si aprieta en el centro del botón y
lo mantiene pulsado unos segundos, el televisor pasará al
modo de espera. No es posible mostrar el menú principal en
pantalla mediante los botones de control.
Manejo con el mando a distancia
• Para acceder al “ ” principal, pulse el botón MENU
del mando a distancia. Utilice las teclas izquierda y
derecha para seleccionar una pestaña de menú y
pulse OK para acceder al mismo. Pulse las teclas
izquierda / derecha / arriba / abajo para jar una
opción. Pulse las teclas “
la pantalla de menú.
• Cuando haya terminado de conectar los aparatos
externos al televisor, puede alternar entre las
distintas fuentes de entrada. Pulse la tecla SOURCE
del mando a distancia de forma consecutiva para
seleccionar entre las distintas fuentes.
• Puede cambiar y ajustar el volumen con las teclas
+/- y
CH+/- en el mando a distancia.
” o “ ” para salir de
Español - 1 -
Funcionamiento General
Colocación de las Pilas en el Mando a
Distancia
Levante la tapa trasera del mando y tire suavemente
hacia arriba. Coloque dos pilas AAA. Asegúrese de
que las polaridades + y - coinciden con los polos de
las pilas en el compartimento, respetándolas. Vuelva
a colocar la tapa.
Conexión de Corriente y Antena/Cable
IMPORTANTE: Este televisor está diseñado para
funcionar con corriente alterna de 220-240 V, 50 Hz.
Después de desembalar, permita que el televisor
esté a temperatura ambiente antes de conectarlo al
suministro eléctrico. Enchufe el cable de corriente a
la electricidad.
Antena o Cable
HDMI 1
SPDIF
Coax.OUT
Accesorios incluidos
• Mando a Distancia
• Pilas: 2 x AAA
• Manual de Instrucciones
• Guia rápida de inicio
• Cable de Conexión AV Lateral
• Cable de conexión YPbPr
Page 51

Método de instalación del soporte desmontable (sin tornillo)
. El soporte se coloca sobre una superficie plana.
2. El producto es sostenido sobre el soporte de manera que coincida con el punto de montaje
de la base y entonces se baja para ser montado por su propio peso.
Método de desinstalación del soporte extraíble
.
El televisor se coloca sobre una mesa plana.
.
Se empujan las abrazaderas en la base.
.
El soporte es jalado hacia atrás.
.
Se separa el soporte.
Español - 2 -
Page 52

Vista del mando a distancia
1. Modo de espera
2. Detener (en el modo del Explorador Multimedia)
3. Play (Reproducir) (en el modo Explorador
multimedia) / Play-Slideshow (Reproducirpresentación de diapositivas en el Explorador
multimedia)
4. Retroceso Rápido (en el modo del Explorador
Multimedia)
5. AV / Selección de Fuente
6. TV
7. Guía electrónica de programación (en los
canales DVB – emisión de Vídeo Digital)
8. Teclas de desplazamiento (Arriba/abajo/
Izquierda/derecha)
9. Grabación de canales
10. Bajar programa / Página superior
11. Silencio
12. Bajar Volumen
13. Botón Verde / Mostrar Horario (en la GEP)/
Etiquetar/Desmarcar todos (en lista de favoritos
14. Botón rojo
15. Teclas numéricas
16. Activar-desactivar subtítulos (en los canales
DVB- emisión de Vídeo Digital)
17. Teletexto / Mezcla (en modo de teletexto)
18. Botón azul / Editar Lista de Canales / Filtrar (en
lista de favoritos y EPG)
19. Botón Amarillo / Horario de Programación (en
la EPG)
20. Subir Volumen
21. Avanzar Canal / Retroceder página
22. Volver / Atrás/ Página Índice (en modo TXT)
23. Mono-Estéreo / Dual I-II / Idioma Actual (*) (en
los canales DVB, de emisión de Vídeo Digital)
24. Ok (con rmar) / Detener Avance (en modo
TXT) / Editar Lista de Canales
25. Info / Mostrar (en modo TXT)
26. Activar-Desactivar Subtítulos/Subtítulos (en el
modo del Explorador Multimedia)
27. Picture zoom (Zoom de imagen)
28. Avance Rápido (en el modo del Explorador
Multimedia)
29. Pausa (en el modo de Explorador Multimedia) /
Grabación diferida (Timeshifting)
Teletexto
Pulse la tecla TEXT para acceder. Pulse de nuevo
para activar el modo mixto. Pulse de nuevo para
salir. Siga las instrucciones que aparecen en la pantalla
del teletexto digital.
Teletexto digital (sólo para el Reino
Unido)
Pulse la tecla TEXT para ver la información de teletexto
digital. Puede manejarlo con los botones de colores, los
botones de cursor y el botón OK La forma de manejo
puede variar en función de los contenidos del teletexto
digital. Siga las instrucciones que aparecen en la pantalla
del teletexto digital.
Español - 3 -
Page 53

Vista de las Conexiones
Conector Tipo Cables Aparato
Euroconector
AV lateral
AV lateral
AURICULARES
Auriculares
Conexión
(trasera)
VGA
Conexión
(trasera)
Audio PC/
YPbPr
Conexión
(lateral)
HDMI
Conexión
(trasera)
SPDIFF
Conexión
(trasera)
AV Lateral
Conexión
(lateral)
Conexión
(lateral)
Cable de Conexión
de Audio/Vídeo
Lateral (incluido)
Cable de conexión
AV (proporcionado)
Cable PC Audio
(No incluido)
Video YPbPr
Conexión
(lateral)
Cable de Conexión
YPbPr (incluido)
YPBPR
USB
Conexión
(lateral)
CI
Conexión
(lateral)
CAM
module
NOTA: Cuando conecte un aparato en las tomas YPbPr o A V Lateral, deberá utilizar los cables incuidos para poder
realizar la conexión.Vea las ilustraciones anteriores. |Necesitará utilizar las entradas blanca y roja del cable de conexión A V
lateral para poder habilitar la conexión de sonido de PC. |Si se conecta un dispositivo externo en la toma de EUROCONECTOR,
el televisor cambiará automáticamente al modo AV. |No estará disponible la señal de salida por el euroconector mientras se
estén recibiendo señales de TDT (Mpeg4 H.264) o mientras esté en el modo del Explorador Multimedia. |Es recomendable
conectar todos los cables de la parte trasera del televisor antes de montarlo sobre pared mediante el correspondiente kit
de montaje (opcional). |Introduzca o extraiga el módulo de Interfaz Común sólo si el televisor está APAGADO. Consulte el
manual de instrucciones del módulo para obtener más información sobre sus ajustes.
Español - 4 -
Page 54

Encendido y apagado
Encendido del televisor
• Conecte el cable de corriente a una toma de 220240 V CA, 50 Hz.
• A continuación se encenderá el LED (Indicador) de
modo de espera.
• Para encender el televisor desde el modo de espera
puede realizarlo de dos modos:
• Pulse la tecla “
del mando a distancia.
• Pulse el botón de control del lateral izquierda del
televisor. El televisor se encenderá.
Nota: Si pone en marcha el televisor mediante las teclas CH- o
CH+ ya sea del mando a distancia o del televisor, accederá al
último canal que estuviera viendo antes de apagar el televisor.
El televisor se pondrá en marcha de cualquiera de
los dos modos.
”, CH- o CH+ o una tecla numérica
Apagado del televisor
• Pulse el botón “ ” en el mando a distancia,
o mantenga pulsado el botón de control hasta
apagarlo, para que el televisor cambie al modo
de espera.
• Para apagar por completo el televisor, desenchufe
el cable de alimentación de la toma de corriente.
Nota: Cuando el televisor accede al modo en espera, es
posible que el indicador LED parpadee; ello indica que se
están llevando a cabo algunas funciones del televisor, como
por ejemplo la Búsqueda en Modo de Espera, la Descarga
Inalámbrica, o que hay un Temporizador Activo.
Instalación Inicial
Cuando se enciende por primera vez, la pantalla de
selección de idioma se muestra en todas las opciones
de idioma en orden alfabético. Utilice a continuación
la tecla “ ” o la tecla “ ” para resaltar una opción;
pulse a continuació el botón OK para seleccionarla.
Aparecerá el mensaje “Instalación Inicial”. Utilice las
teclas “ ” o “ ” para elegir el país, y pulse “ ” para
seleccionar tipo de búsqueda. Use “ ” o “ ” para
ajustar el modo de búsqueda que pre era. Los modos
disponibles son: Canales Digitales y Analógicos,
Sólo Canales Digitales, y Sólo Canales Analógicos.
Cuando haga el ajuste, pulse “
opción de Idioma del Teletexto. Utilice la tecla “ ” o “
” para seleccionar el Idioma de Teletexto deseado.
Luego, seleccione Escaneo codi cado y fíjelo en sí
si desea escanear estaciones codi cadas. Pulse OK
en el mando a distancia para seguir, y se mostrará
la pantalla de tipo de búsqueda. Deberá elegir el tipo
de búsqueda para poder buscar y guardar canales
desde la fuente elegida.
” para seleccionar la
IMPORTANTE: Cuando usted selecciona la opción de
país como Francia o Italia, se le pedirá que establezca
y con rme el número de PIN. El número seleccionado
de PIN no puede ser 0000. Introduzca un número de
PIN y confírmelo introduciéndolo de nuevo. Pulse el
botón OK para continuar. Si los dos números PIN
coinciden, su número PIN principal quedará jado.
ADVERTENCIA: Cuando usted está obligado a
introducir un número PIN para cualquier operación
de menú puede usar el PIN que se han de nido
previamente en la instalación por primera vez. Si ha
olvidado el número de PIN que ha jado durante la
instalación por primera vez, debe utilizar el código
PIN maestro, 4725.
Instalación de Antena
Si en la pantalla de selección deformato de
búsqueda selecciona Antena convencional el
televisor digital realizará la búsqueda de emisiones
de TDT.
NOTA: Puede pulsar la tecla “ ”para cancelar.
La Lista de Canales se podrán ver en la pantalla una
vez se hayan guardado todos los canales disponibles.
Si desea ordenar los canales, según el LCN (*),
seleccione Sí y pulse OK a continuación.
Pulse la tecla “
ver la televisión.
(*) LCN responde a las siglas de ”Número Lógico
de Canal”, un sistema que organiza las señales de
emisión disponibles según una secuencia de canales
reconocible.
” para salir de la lista de canales y
Instalación de Cable
Si selecciona la opción CABLE y pulsa la tecla OK en
el mando a distancia para continuar.
seleccione Sí y presione OK. Para cancelar la operación,
seleccione NO y pulse OK. Desde esta ventana puede
elegir los rangos de frecuencia. Para marcar las líneas
que quiera destacar, utilice la tecla “ ” o “ ”. Puede
acceder manualmente a la elección del rango de
frecuencia utilizando las teclas numéricas del mando a
distancia. Fije Inicial y Frecuencia fi nal como lo desee
usando los botónes numéricos en el mando a distancia.
Después de esta operación, podrá realizar la búsqueda
o Search Step en las frecuencias desde los 8000 kHz o
los 1000 kHz. Si selecciona la opción de incrementos de
1.000 kHz, el proceso de búsqueda que llevará a cabo
el televisor será más detallado. De ser así, el tiempo
de búsqueda se alargará en consecuencia. En función
del País elegido en la instalación inicial, podría estar
disponible la opción de paso de búsqueda de 250KHz
dentro del menú de Búsqueda de Canales de Red.
Tenga en cuenta que si elige esta opción, la búsqueda
podría tardar algo más.
Para continuar,
Español - 5 -
Page 55

Adicionalmente, y para algunos países, estará
disponible la opción ID de Red. Gracias a esta función
se obtiene la Tabla de Información de Red. Dicha
tabla ofrece datos de la red elegida. Podría variar en
función del operador y de la zona donde éste emita
la señal de forma activa. Una vez terminado, pulse
OK para iniciar la búsqueda automática. El televisor
buscará las señales disponibles y guardará los canales.
Reproducción Multimedia a través
de la Entrada USB
Podrá conectar un disco duro o memoria USB al televisor
mediante las entradas USB del propio televisor. Esta función
le permite reproducir fi cheros almacenados en una unidad
USB. Se admiten discos duros externos de 2.5 y 3.5 pulgadas
(HDD con fuente de alimentación externa).
¡IMPORTANTE!A n de evitar cualquier pérdida de
información o datos, es recomendable realizar una
copia de seguridad de los archivos antes de realizar
cualquier conexión con el televisor. Tenga en cuenta
que el fabricante no se hace responsable de los
daños o pérdidas de ficheros, archivos, datos o
información. Es posible que algunos dispositivos USB
(por ejemplo, reproductores MP3), o algunos discos
duros/lápices de memoria USB no sean compatibles
con el televisor. El televisor admite formatos de disco
FAT32 y NTFS; sin embargo no estará disponible
la opción de grabación para discos de formato
NTFS. Nota: Podría experimentar problemas con el
formateo, en caso de que la unidad USB a formatear
posea una capacidad igual o mayor a 1TB (Terabyte).
Es peligroso conectar y desconectar rápidamente los
dispositivos USB. En concreto, no es recomendable
realizar estas operaciones de forma repetida. De esta
forma puede ocasionar daños físicos al reproductor
USB y de forma más concreta, al propio dispositivo
USB. No extraiga el dispositivo USB mientras esté
reproduciendo un archivo.
Menú Media Browser (Explorador
multimedia)
Podrá reproducir fotografías, música y películas
guardadas en un USB, conectándolo al televisor
y utilizando el Explorador Multimedia. Para ello,
realice lo siguiente: Conecte un disco USB a la
entrada ubicada en el lateral del televisor. Pulse la
tecla “
(Explirador multimedia) mediante las teclas Izquierda/
Derechay OK. Se mostrará la pantalla principal del
explorador multimedia. Podrá mostrar el contenido
correspondiente seleccionando las pestañas de
Vídeo, Música o Imágenes. Siga las instrucciones
bajo cada menú de pantalla para las funciones de
reproducción multimedia.
preferencias del Explorador Multimedia mediante la
ventana de Con guración.
Iniciar reproducción con y
activar
Iniciar reproducción con OK y
activar
Iniciar reproducción con OK/
activar
Iniciar reproducción con OK/
activar
” y seleccione la pestaña Media Browser
Podrá configurar las
Modo de operación Loop/Shuffl e (Repetir/Aleatorio)
El televisor reproduce el
siguiente chero y repite la lista.
el mismo chero será repetido
en un ciclo (repetir).
y
el chero será reproducido en
forma aleatoria.
la reproducción del fichero
y
continuará de manera aleatoria
y así seguirá.
Español - 6 -
Page 56

Características y Funciones de los Menús
Contenido del Menú de Imagen
Modo
Contraste Con gura los valores de iluminación y oscuridad de la pantalla.
Brillo Con gura los valores del brillo de la pantalla.
Nitidez Con gura los valores de nitidez de los objetos mostrados en pantalla.
Color Con gura los valores de los colores ajustando éstos.
Modo de ahorro
energético
Retroiluminación
(opcional):
Reducción de ruido
Temperatura del
Color
Zoom de Imagen Zoom de Imagen Auto,16:9, Subtítulos,14:9, 14:9 Zoom, 4:3 o Cine.
HDMI True Black
(opcional)
Film Mode (opcional)
Cambio de Color Con gura el tono deseado en los colores.
Reinicio Restablece la imagen a los valores de fábrica.
Autoposicion
amiento (en modo
PC)
Posición H
(Horizontal – en
modo PC)
Posición V (Vertical –
en modo PC)
Frecuencia de Reloj
(en modo PC)
Fase (en modo PC)
Algunas de las opciones del menú de imagen no estarán disponibles en el modo VGA (modo PC). En
su lugar, la confi guración VGA se añadirá a la confi guración de imagen mientras está en modo PC.
Para modi car las preferencias de visualización, puede con gurar la opción
Modo. El modo de imagen puede con gurarse como: Cine,Juego,Dinámico
y Natural.
Para jar el modo de Ahorro Energético como Eco, Desactivación de Imagen
y Desactivado. .
Estos ajustes controlan el nivel de retoriluminación y pueden ajustarse de
forma automática, o al máximo, mínimo, medio o en modo ecológico. Si activa
el Modo de Ahorro Energético, no podrá ver como disponible la opción de
Retroiluminación. En los modos VGA o Explorador Multimedia, o mientras
tenga el modo de imagen en Juego, no se podrá activar la retroiluminación
Si la señal de difusión es débil y la imagen es ruidosa, utilice la opción de
Reducción de Ruido para reducir la cantidad de ruido. La Reducción de
Ruido puede con gurarse como: Baja, Media, Alta o Apagada.
Confi guración Avanzada
Con gura el tono deseado en los colores.
Mientras ve la televisión desde esta fuente HDMI, en el menú de
Con guración de Imagen se hará visible esta función. Puede utilizarla para
mejorar los tonos negros de la imagen.
Las películas se graban con un número de fotogramas por segundo
diferente al de los programas de televisión. Active esta función cuando esté
visualizando películas y ver las escenas de acción con claridad.
Optimiza de forma automática la pantalla. Pulse OK
Esta opción desplaza la imagen horizontalmente hacia la derecha o la
izquierda de la pantalla.
Esta opción desplaza la imagen verticalmente hacia la parte inferior o superior
de la pantalla.
Los ajustes de Frecuencia de Reloj corrigen las interferencias que aparecen
como banda vertical en presentaciones que contengan muchos puntos como
por ejemplo hojas de cálculo, o párrafos o textos de letra pequeña.
Dependiendo de la resolución y la frecuencia de barrido que usted je en el
televisor, usted puede ver una imagen con ruido o con neblina en la pantalla.
En dicho caso, usted puede utilizar este elemento para obtener una imagen
clara por medio del método de ensayo y error.
para optimizarla.
Español - 7 -
Page 57

Características y Funciones de los Menús
Contenido del Menú de Sonido
Volúmen Ajusta el nivel del volúmen.
En el menú del equalizador, los valores predeterminados pueden cambiarse a
Ecualizador:
Balance Esta función se utiliza para dar más énfasis al altavoz derecho o al izquierdo.
Auriculares Fija el volumen de los auriculares.
Modo de Sonido
Nivel Automático de
Volumen (AVL)
Dynamic Bass
(graves dinámicos):
Salida Digital Fija el tipo de salida de sonido digital.
Música, Película, Discurso, Plano, Clásico y Usuario. Pulse la tecla “
regresar al menú anterior. Los valores del menú de ecualizador se pueden cambiar
manualmente sólo cuando el Modo Ecualizador está fi jado como Usuario.
Puede elegir entre Mono, Estéreo, Dual-I o Dual-II, sólo si el canal elegido lo
admite.
La función Nivel de Volumen Automático (AVL) ajusta el sonido para obtener
un nivel de salida jo entre los programas que tienen diferentes niveles de
sonido (por ejemplo, el sonido de los anuncios suele ser más alto que el de
los programas).
Pulse la tecla “
(graves dinámicos).
” o “ ” para activar o desactivar la opción Dynamic Bass
” para
Manejo de la Lista de Canales
El televisor ordenará los canales guardados en la Lista
de canales. Podrá modifi car esta lista, fi jar sus canales
favoritos o confi gurar las emisoras activas a mostrar
mediante las opciones del menú de Lista de canales.
• Seleccione la lista de canales del menú
principal.
• Seleccione Edición de Lista de Canales para
administrar los canales guardados. Puede
mover, borrar, editar el nombre y bloquear los
canales que utilizan esta pantalla.
• Seleccione Favoritos para crear una lista de
programas favoritos.
• Seleccione Lista de canales activos para
ordenar la lista de canales. Puede seleccionar
una opción de tipo de transmisión de la lista
mostrada mediante las teclas “
” /“ ” y OK.
Español - 8 -
Confi guración de control parental
El sistema de control paterno permite bloquear algunos canales
y menús para que no puedan verse.
Resalte Parental en el menú de Configuración y
presione OK para continuar. Para ver las opciones
disponibles de bloqueo, deberá introducirse el PIN.
El PIN por defecto es 0000. Tras introducir el código
correcto, se mostrarán las opciones del menú de
control paterno:
Bloqueo del menú: Esta configuración activa o
desactiva el acceso al menú.
Bloqueo por edad: Cuando lo haya jado, esta opción
permite recoger información sobre la emisión y si el
bloqueo para adultos está activado y es una emisión
no apta para menores, desactivará el acceso al canal.
Bloqueo Infantil: Si activa el Bloqueo infantil, el
televisor solamente podrá manejarse mediante el
mando a distancia. En este caso, los botones del panel
de control no funcionarán.
Fijar PIN: De ne un nuevo PIN.
IMPORTANTE: El PIN por defecto es 0000, asegúrese
de que escribe el pin nuevo y lo guarda bien en caso
de cambiarlo.
Nota: Podrá utilizar el código 4725 predefi nido, en caso
de fi jar la opción de país para Francia o Italia.
Page 58

Características y Funciones de los Menús
Contenido del Menú de Confi guración
Acceso Condicional Controla los módulos de acceso condicional (CAM) si los hubiera disponibles.
Idioma
Parental Permite con gurar las opciones de control parental.
Temporizadores
Confi guración de
grabaciones
Fecha/Hora
Fuentes Permite activar o desactivar las opciones de la fuente elegida.
Búsqueda
Automática
de Canales
(Resintonización)
Búsqueda Manual de
Canales
Búsqueda de canales
en la red
Sintonización fi na de
canales analógicos
Instalación Inicial
Con gura las opciones de idioma (-puede cambiar en función del país elegido)
la con guración que preferida y actual estará disponible. Esta con guración
sólo podrá modi carse si el canal emisor lo admite.
Permite con gurar temporizadores para los programas seleccionados. /
Establece temporizador de apagado automático para apagar el televisor
después de un cierto tiempo.
Muestra el menú de con guración de grabaciones.
Permite con gurar la fecha y hora.
Nota:
* La televisión toma la información en tiempo a través de la emisión. La hora
exacta estará disponible en Ajustes de fecha / hora, si la información se
proporciona en tiempo de la emisión.
Si el televisor no está en ningún modo de canal, se puede cambiar la fecha
/ hora. Sin embargo, si hay un canal prede nido, sólo "Time Settings Mode
(Modo de con guración de hora)" se puede cambiar y si está en Manual, la
zona horaria se habilitará.
* Si el televisor está en modo de espera y encendido más tarde y no hay transmisión
disponible, la información de la hora no se actualizará. Si hay una emisión
actual, sin embargo, la información de tiempo se tomará a través de la emisión.
En otras palabras, la información de tiempo estará disponible de acuerdo con
estas prioridades: La TV busca primero la información de tiempo en la emisión,
a continuación, a la preferencia de los usuarios, y por último a la información de
la hora del teletexto.
Contenido del Menú de Instalación y Resintonización
Muestra las opciones de sintonización automática.
Antena Digital: Busca y guarda emisoras de señal DVB.
Cable Digital: Busca y guarda emisoras de señal DVB de cable.
Analógica: Busca y guarda emisoras de señal analógica.
Antena digital y analógica: Busca y guarda emisoras de señal DVB aérea
y estaciones analógicas.
Cable Digital y Analógico: Busca y guarda emisoras de señal DVB de cable
y estaciones analógicas.
Esta función puede utilizarse para la entrada directa de canales.
Busca los canales enlazados en el sistema de señal.
Puede utilizar esta opción para la sintonización na de canales analógicos.
En caso de no haber canales analógicos guardados, esta opción no estará
disponible.
Borra todos los canales y la con guración guardada, restablece el televisor
a los valores de fábrica, y realiza la instalación inicial. Para más información,
siga las instrucciones del apartado dedicado a la instalación inicial.
Español - 9 -
Page 59

Características y Funciones de los Menús
Borrado de Listas de
Servicio
Desconexión por
Tiempo del Menú
Búsqueda de Canales
Codifi cados
Fondo Azul Activa o desactiva el Fondo Azul cuando la señal es débil o no exista.
Actualización de
software
Versión de la
aplicación
Personas con
Difi cultades Auditivas
Audio descripción
Apagado Automático
Tipo de Emisión Seleccione el tipo de transmisión deseada.
Búsqueda en Modo de
Espera (opcional)
(*) Para Dinamarca, Suecia, Noruega y Finlandia. Limpiar la lista de servicios
y presione OK. Se mostrará la siguiente información en pantalla. Seleccione
SI y pulse OK para continuar, o seleccione NO y pulse OK para cancelar.
Otros Ajustes: Muestra las otras opciones del televisor:
Cambia la duración de tiempo de desconexión de las pantallas de menus.
Cuando esta función está activada, el proceso de búsqueda también localizará los
canales codi cados. Si se DESACTIVA manualmente, no se podrán encontrar los
canales codi cados mientras esté en búsqueda automática o manual.
Para garantizar que el televisor se mantiene actualizado en información, utilice
esta opción. A n de garantizar el correcto funcionamiento, asegúrese de que
el televisor esté en modo de espera.
Mostrará la versión de la aplicación.
Si la emisora habilita alguna señal especial relativa al sonido, puede activar
esta opción para recibir dicha señal.
La función de audio descripción consiste en una pista de narración adicional,
durante la emisión de programas y películas, para las personas invidentes o
con di cultades de visión. Sólo podrá utilizar esta función si el canal emisor
admite esta pista de narración adicional.
Puede establecer el valor de apagado automático en esta función. Tras alcanzar
el tiempo jado en el cual no se realiza ninguna operación con el televisor, éste
se apagará.
Esta función de Búsqueda en Modo de Espera no estará disponible si la
desactiva. Para utilizar la búsqueda en modo en espera, asegúrese de que
esta función está activada. Si se activa la Búsqueda en Modo de Espera, con
el televisor en este modo, se buscarán las señales disponibles. Si el televisor
encuentra cualquier señal nueva o que no se tuviera ya, se mostrará una
pantalla solicitándole que con rme o no los cambios. Después de esta, la lista de
canales se actualiza y modi ca. Active la con guración de búsqueda al activar
el modo en espera para activar el televisor para actualizar automáticamente la
frecuencia de la emisora, la de nición de emisión y cambios similares.
Español - 10 -
Page 60

Guía de Programación Electrónica
(EPG)
Algunos canales (no todos) muestran información
sobre el programa actual y sobre los siguientes. Pulse
las teclas “
Electrónica (EPG).
Arriba/Abajo/Izquierdo/Derecho: Para desplazarse
por la EPG
OK: Muestra las opciones de programas.
INFO: Muestra al detalle la información del canal
elegido.
VERDE: Pasa a la Lista de Programación EPG
AMARILLO: Pasa al Horario de Programación EPG
AZUL: Muestra las opciones de ltros.
: El televisor grabará el programa seleccionado.
Para detener la grabación, púlselo nuevamente.
IMPORTANTE: Para grabar un programa, es necesario que
en primer lugar conecte un disco USB al televisor mientras
este está apagado. A continuación deberá encender el
televisor para activar la función de grabación. De otro modo,
no estará disponible esta opción.
Nota: Durante la grabación no será posible cambiar de canal
ni de fuente.
Opciones de programas
En el menú EPG, pulse OK para acceder al menú
Opciones de eventos.
Selección de canal
En el menú EPG, puede cambiar a los canales
seleccionados utilizando esta opción.
Grabar/Borrar el temporizador de grabación
Tras seleccionar un programa de la guía electrónica,
pulseOK para mostrar las Opciones disponibles.
Seleccione la opción “Grabar” y confírmela con
la tecla OK. Esta operación jará la grabación del
programa elegido.
Para anular una grabación programada, marque el
programa en cuestión y pulse OK; a continuación
seleccione la opción “Borrar Temporizador”. Esto
cancelará la grabación.
Fijar temporizador/Borrar temporizador
Tras seleccionar un programa de la guía electrónica,
pulseOK para mostrar las Opciones disponibles.
Seleccione la opción “Fijar Temporizador para el
Evento” y confírmela con el botón OK. Puede jar
temporizadores para los siguientes programas. Para
cancelar un temporizador jado, marque el programa
en cuestión y pulse OK. A continuación seleccione
la opción Borrar Temporizador. Se cancelará el
temporizador.
Nota: No es posible grabar o fi jar recordatorios para dos
programas en el mismo intervalo de tiempo.
” para ver el menú de Programación
Español - 11 -
Grabación de un Programa
IMPORTANTE: Cuando vaya a utilizar un disco duro USB
nuevo, es recomendable que primero lo formatee mediante
la opción del televisor “Formatear disco”.
Para grabar un programa, es necesario que en primer
lugar conecte un disco USB al televisor mientras este
estará apagado. A continuación deberá encender el
televisor para activar la función de grabación.
Para poder utilizar la opción de grabación, deberá
conectar un disco USB o un disco duro externo al
televisor, y éste dispositivo deberá poseer al menos
1 GB de capacidad y una compatibilidad de velocidad
2.0. Se mostrará un mensaje de error en caso de que
el dispositivo no admita la velocidad 2.0.
Nota: Los programas se guardarán en el disco USB
conectado. Si lo desea, podrá realizar una copia de seguridad,
o copiar las grabaciones en un ordenador personal, pero
las mismas no se podrán reproducir en éste. Sólo las podrá
reproducir en el televisor.
Nota: Puede haber un retardo del Lip Sync durante el
timeshifting.
El televisor puede grabar hasta diez horas de
programas.
Los programas que se graben se dividirán en
particiones de 4GB.
En caso de que la velocidad de escritura del disco
USB conectado no sea su ciente, podría fallar la
grabación y la función de timeshifting podría no estar
disponible.
En función de la resolución de imagen en la señal
emitida por el canal, la grabación de programas en
alta de nición podrán ocupar un mayor espacio en
el disco USB. Es por ello que se recomienda el uso
de discos USB adecuados para la grabación de
programas en alta de nición.
No conecte la unidad USB/HDD durante la grabación.
Esto podría dañar el dispositivo USB/HDD.
Se admiten soportes multipartición. Se admite un
máximo de dos particiones distintas. Podría darse una
avería si hubiera más de dos particiones. La primera
partición del disco USB se utiliza para las funciones
listas para PVR. También se debe formatear como
partición principal para poderse utilizar para dichas
funciones.
Debido a problemas en la señal, es posible que
algunos paquetes de secuencias no se graben; es por
ello que durante la reproducción se puedan observar
congelaciones de imágenes.
Cuando el teletexto está activado, no se podrán
utilizar las teclas de Grabación, Reproducción, Pausa
y Mostrar (para PlayListDialog). El teletexto quedará
automáticamente desactivado en caso de iniciarse
la grabación desde un temporizador programado.
También quedará desactivado cuando haya una
grabación o reproducción en curso.
No se admiten grabaciones de radio.
Page 61

Grabación diferida (Timeshift)
Pulse el botón (PAUSE) mientras está viendo un
programa, para pasar al modo de grabación diferida
(timeshifting). En el modo de grabación diferida, el
programa se pausa y se graba de forma simultánea
en el disco USB conectado. Pulse de nuevo el botón
(PLAY) para ver el programa pausado desde el
momento en que lo detuvo. En la barra de información
podrá ver el lapso de tiempo transcurrido entre el
programa real y el grabado en diferido.
Grabación Instantánea
Pulse el botón para grabar de forma instantánea
un programa mientras lo está viendo.
el botón del mando a distancia de nuevo para poder
grabar el siguiente programa de la Guía Electrónica.
En este caso, una pantalla OSD mostrará los
programas dispuestos para la grabación. Pulse
(STOP) para cancelar la grabación instantánea.
Nota: Durante la grabación no será posible cambiar a otro
canal ni a otra fuente, ni tampoco será posible acceder al
navegador de medios. Mientras se graba un programa o
durante el timeshifting, un mensaje de advertencia aparece en
la pantalla si la velocidad del dispositivo USB no es sufi ciente.
Podrá pulsar
Ver los programas grabados
En el menú principal, use las teclas “ ” o “ ” para
seleccionar Explorador multimediay pulse OK.
Seleccione la opción Biblioteca de grabaciones
mediante el botón “ ” o “ ”; a continuación pulse OK.
Se mostrará la Biblioteca de grabaciones. Seleccione
un programa de la lista (previamente grabado)
mediante los botones “ ” / “ ” . Pulse OK para ver
las Opciones de Reproducción. Seleccione una de
estas opciones mediante los botones “ ”/“ ” u OK.
Nota: Durante la reproducción no será posible acceder al
menú principal ni a ninguna de sus opciones.
Pulse la tecla PARAR para detener la reproducción
y regresar a Biblioteca de grabaciones.
Avance Lento
Si mientras está viendo los programas grabados pulsa
la tecla (PAUSA), estará disponible la opción de
avance lento. Puede utilizar el botón
avance lento. La velocidad de reproducción puede
cambiarse pulsando el botón
varias veces.
para el
Confi guración de grabaciones
Para con gurar grabaciones, en el menú Con guración
seleccione la opción Con guración de grabaciones.
Formatear disco: Puede utilizar la opción de
formateo, con el n de dar formato al disco USB
conectado.
IMPORTANTE: Tenga en cuenta que si activa esta
opción, se perderán TODOS los datos almacenados
en el dispositivo USB, y que el formato del mismo
cambiará al sistema FAT32. En caso de que el
disco USB no funcione bien del todo, podrá intentar
formatearlo. En la mayoría de los casos se restablece
el funcionamiento normal formateando el disco duro;
sin embargo, se perderán TODOS los datos que
estuvieran almacenados.
Nota: Si aparece el mensaje “USB funciona muy lento”
cuando empiece a grabar, intente solucionarlo reiniciando
la grabación. Si aun así persiste el error, ello puede deberse
a que el disco USB no cumpla con los requerimientos de
velocidad. Intente conectar otro disco USB.
Actualización de software
Su televisor puede localizar nuevas actualizaciones
del software sobre las señales de emisión de los
canales (si están disponibles). Para buscar canales
de retrasmisión, el televisor busca los canales
almacenados en su configuración. Por lo que,
antes de buscar una actualización de software,
se recomienda hacer una búsqueda automática y
actualizar todos los canales disponibles.
1) Actualización de software a través de la
entrada USB
Antes de comenzar..
Asegúrese de que tiene un disco ash USB con
espacio libre adecuado. No use una unidad de
disco duro USB para el proceso de actualización de
software.
Reciba actualizaciones de software de su
proveedor o en www.philips.com/support.
Compruebe la versión actual del software del televisor
mediante las opciones MENU>Con guración>Otras
configuraciones>Actualización de software. Si la
versión que ha encontrado no es más reciente
que la versión actual del televisor, no es necesario
actualizar su producto. No instale una versión anterior
del software ya que esto puede causar problemas.
• Después de obtener el software más reciente,
copie el archivo BIN en el disco ash USB.
• A continuación, conecte el disco ash USB a la
entrada USB del televisor.
• Apague el televisor con el interruptor principal
de control del televisor y desconecte el cable de
alimentación.
• Mantenga el mando a distancia hacia el televisor.
A continuación, pulse el botón OK y mantenga
presionado el botón OK (No suelte el botón OK
por ahora).
• Conecte el televisor a la toma de corriente y
encienda el televisor.
• Mantenga pulsado el botón OK por cinco segundos
más después de que el televisor se encienda y
luego suéltelo.El proceso de actualización del
software ahora debe comenzar.
Español - 12 -
Page 62

• El televisor se enciende en el modo de instalación
de uso por primera vez después de que se ha
nalizado la actualización de software.
IMPORTANTE
No presione ningún botón en el televisor o en el
mando a distancia durante la actualización del
software.
No extraiga el disco fl ash USB de la TV durante el
proceso.
Para evitar cambios accidentales, por favor utilice
su computadora para borrar el archivo BIN en el
disco fl ash USB después de que la actualización de
software haya terminado con éxito.
2) Búsqueda en Segundo Plano y Modo de
Actualización
• Si labúsqueda Automática en el menú de
Opciones de Actualización está activada, el
televisor se encenderá a las 3:00 y buscará
actualizaciones de software. Si encuentra y
descarga una nueva actualización, la primera vez
que se encienda contarácon una nueva versión de
software.
Nota en la operación de reinicio: El reinicio es el último paso del
proceso de actualización de software una vez que el mismo se ha
descargado e instalado. Durante el reinicio, el televisor lleva a cabo
una serie de inicializaciones fi nales. En la secuencia de reinicio,
el panel de potencia está cerrado y el indicador frontal muestra la
actividad con un parpadeo. Unos 5 minutos después, el televisor se
reiniciará con un nuevo software activado. El televisor encenderá
la primera vez en el modo instalación.
• Si si televisor no se vuelve a encender en 10
minutos, desenchúfelo durante 10 minutos y vuelva
a enchufarlo. El televisor debería encenderse con
una nueva versión del software. Si aún no consigue
hacerlo funcionar, repita el último paso unas cuantas
veces más. Si así su televisor no funcionase, por
favor, llame a un técnico de servicio para que
solucione el problema.
Precaución: Mientras el indicador parpadee durante el
reinicio, no desenchufe el televisor. Esto podría hacer
que el televisor no volviese a encenderse y tendrá que
ser reparado por un técnico de servicio.
Solución de Problemas y Consejos
Persistencia de imágenes – imágenes
dobles
Tenga en cuenta que pueden aparecer imágenes
dobles cuando se muestre una imagen persistente
(imagen fija o pausada). La persistencia de
imágenes en un televisor LED puede desaparecer
al cabo de poco tiempo. Apague el televisor durante
un rato. A n de evitar este fenómeno, no deje que
la misma imagen permanezca inmóvil en la pantalla
durante mucho tiempo.
Sin Corriente
Si el televisor no tiene corriente, compruebe que el
cable esté enchufado a la pared.
Mala calidad de imagen
1. Ha elegido el sistema adecuado de Televisión?
2. El televisor y la antena de su casa están situados
cerca de equipos de audio sin conexión a tierra,
luces de neón, etc.?
3. Las montañas o edi cios muy altos pueden producir
imágenes dobles o con sombras. A veces se puede
mejorar la calidad de la imagen cambiando la
orientación de la antena aérea. ¿No se ve bien la
imagen o el teletexto?
4. Verifique si la frecuencia introducida es la
adecuada.
5. Sintonice los canales de nuevo.
6. Cuando se conectan al televisor dos equipos
periféricos a la vez puede disminuir la calidad de
la imagen. En ese caso, desconecte uno de los
equipos periféricos.
Sin imagen
1. Sin imagen significa que su televisor no está
recibiendo señal alguna. Ha pulsado los botones
correctos del mando a distancia? Inténtelo de
nuevo. Asegúrese también de haber seleccionado
la fuente de entrada correcta.
2. La antena está conectada correctamente?
3. Las clavijas están conectadas correctamente a la
toma de la antena?
4. El cable de antena está dañado?
5. Se están utilizando los enchufes apropiados para
conectar la antena?
6. Si tiene dudas, consulte con su distribuidor.
Sin sonido
1. Ha silenciado el sonido del televisor? Para cancelar
la opción muda, presione la tecla “
el nivel de volumen.
2. El sonido sólo proviene de un altavoz ¿La opción
balance está jada para un solo altavoz? Consulte
el Menú de Sonido.
”, o incremente
El mando a distancia no funciona
El televisor no responde a la señal del mando a
distancia. Las pilas pueden estar gastadas; en ese
caso puede todavía utilizar los propios botones del
televisor. (* Sólo es posible si no están bloqueados
por el control parental y si están disponibles con su
modelo.)
Español - 13 -
Page 63

No se pueden seleccionar las Fuentes de
entrada
1. Si no puede seleccionar una fuente de entrada,
puede deberse a que no haya conectado ningún
dispositivo.
2. Compruebe los cables y las conexiones AV si ha
tratado de conectar un dispositivo.
Grabación No Disponible
Para grabar un programa, es necesario que en primer
lugar conecte un disco USB al televisor mientras este
estará apagado. A continuación deberá encender el
televisor para activar la función de grabación. De otro
modo, no estará disponible esta opción. Si no puede
realizar la grabación, apague el televisor, extraiga
el dispositivo USB e instálelo de nuevo mientras el
televisor está apagado.
El USB funciona muy lento
Si aparece el mensaje “USB funciona muy lento”
cuando empiece a grabar, intente solucionarlo
reiniciando la grabación. Si aun así persiste el error,
ello puede deberse a que el disco USB no cumpla
con los requerimientos de velocidad. Intente conectar
otro disco USB.
Fabricado con la autorización de Dolby
Laboratories.
RECONOCIMIENTO DE LA MARCA COMERCIAL
"Dolby" y el logotipo de la doble D son marcas
registradas de Dolby Laboratories.
Información a los Usuarios sobre el Desecho de
Baterías y Equipos Viejos
[ Sólo para la Unión Europea]
Estos símbolos indican que el equipo que contenga
estos símbolos no de ben eliminarse junto con
los residuos domésticos. Considere los sistemas
de recolección o las instalaciones de reciclaje
apropiadas, si quiere deshacerse del producto o de
la batería.
Aviso: El signo Pb situado bajo el símbolo de las baterías,
indica que esta batería contiene plomo.
Características técnicas
EMISIÓN DE TELEVISIÓN
PAL/SECAM B/G D/K K’ I/I’ L/L’
RECEPCIÓN DIGITAL
DVB-T MPEG2 DVB-T MPEG4 HD
Motor DVB-T MHEG-5 (solo Reino Unido)
DVB-C MPEG2 DVB-C MPEG4 HD
CANALES DE RECEPCIÓN
VHF (BANDA I/III) UHF (BANDA U) HIPERBANDA
NÚMERO DE CANALES PRECONFIGURADOS
1000
(800 DVB-T / 200 Analógico)
INDICADOR DE CANAL
Ayuda en pantalla
ENTRADA DE ANTENA RF
75 Ohm (sin balance)
VOLTAJE DE FUNCIONAMIENTO
220-240 V CA, 50 Hz.
AUDIO Nicam estéreo + Alemán
POTENCIA DE SALIDA DE AUDIO (W
(10% THD)
2x2,5
CONSUMO ELÉCTRICO (W)
45 W (max)
PANEL
Pantalla de 22” en formato 16:9
TAMAÑO (en mm.)
Prof.xLargoxAlto (con soporte): 134 x 516 x 352
Peso (Kg): 3,50
Prof.xLargoxAlto (sin soporte): 35 x 516 x 317
Peso (kg): 3,30
RMSRMS.RMS)
Productos
Batería
Español - 14 -
Page 64

Resoluciones DVI admitidas
Cuando se conectan las aplicaciones a los conectores del televisor
con cables conversores de DVI a HDMI (no incluidos), puede
remitirse a la siguiente información.
Índice Resolución Frecuencia
1 640x400 70Hz
2 640x480 60Hz-66Hz-72Hz -75 Hz
3 800x600 56Hz-60Hz-70Hz -72Hz-75Hz
4 832x624 75 Hz
5 1024x768 60Hz-66Hz-70Hz -72Hz-75Hz
6 1152x864 60Hz-70Hz-75Hz
7 1152x870 75Hz
8 1280x768 60 Hz - 75Hz
9 1280x960 60Hz-75Hz
10 1280x1024 60Hz-75Hz
11 1360x768 60 Hz
12 1400x1050 60Hz-75Hz
13 1400x900 65Hz-75Hz
14 1600x1200 60 Hz
15 1680x1050 60 Hz
16 1920x1080 60 Hz
17 1920x1200 60Hz
18 480i-480p 60Hz
19 576i-576p 50Hz
Modos habituales de visualización de PC
La siguiente tabla es una ilustración de alguno de los modos generales
de visualización de vídeo. Es posible que el televisor no admita todas
las resoluciones. El televisor admite hasta 1920x1080.
Índice Resolución Frecuencia
1 640x350p 60 Hz
2 640x400p 60 Hz
3 1024x768 60 Hz
4 1280x768 60 Hz
5 1360x768 60 Hz
6 720x400 60 Hz
7 800x600 56 Hz
8 800x600 60 Hz
9 1024x768 60 Hz
10 1024x768 66 Hz
11 1280x768 60 Hz
12 1360x768 60 Hz
13 1280x1024 60 Hz
14 1280x960 60 Hz
15 1280x1024 60 Hz
16 1400x1050 60 Hz
17 1600x1200 60 Hz
18 1920x1080 60 Hz
Formatos de archivo admitidos en el modo USB
Medio
Película
Música
Fotografía
Subtítulos
Extensión del
fi chero
.mpg .mpeg MPEG1,2 MPEG Layer 1/2/3
.dat MPEG1,2
.vob MPEG2
.mkv H.264, MPEG1,2,4 EAC3/ AC3
.mp4
.mp3 -
.jpg .jpeg Línea base JPEG - max WxH = 15360x8640 4147200bytes
.bmp - - max WxH = 9600x6400 3840000bytes
.sub .srt - - -
Xvid 1.01, Xvid 1.02, Xvid 1.03,
Xvid 1.10-beta1/2
MPEG2, MPEG4
.avi
Xvid 1.01, Xvid 1.02, Xvid 1.03,
Xvid 1.10-beta1/2
. JPEG progresivo - max WxH = 9600x6400 3840000bytes
Formato Notas
Vídeo Audio (Maximum resolution/Bit rate etc.)
MPEG2
MPEG4
Xvid 1.00,
PCM/MP3
H.264
Xvid 1.00,
PCM
H.264
MPEG 1 Layer 1 /
2 (MP3)
Español - 15 -
MAX 1920x1080 @ 30P 20Mbit/seg.
32Kbps ~ 320Kbps(velocidad de bits)
32KHz ~ 48KHz(tasa de muestreo)
Page 65

Compatibilidad con Señales AV y HDMI
Fuente Señales admitidas Disponible
EXT
EUROCON
ECTOR
AV Lateral
YPbPr
HDMI1
PAL 50/60 O
NTSC 60 O
RGB 50 O
RGB 60 O
PAL 50/60 O
NTSC 60 O
480I 60Hz O
480P 60Hz O
576I 50Hz O
576P 50Hz O
720P 50Hz O
720P 60Hz O
1080I 50Hz O
1080I 60Hz O
1080P 50Hz O
1080P 60Hz O
480I 60Hz O
480P 60Hz O
576I 50Hz O
576P 50Hz O
720P 50Hz O
720P 60Hz O
1080I 50Hz O
1080I 60Hz O
1080P 24Hz O
1080P 25Hz O
1080P 30Hz O
1080P 50Hz O
1080P 60Hz O
(X: No disponible, O: Disponible)
Puede que en algunos casos la señal del televisor LED no se muestre correctamente. El problema puede ser una inconsistencia
con las normas del equipo original. Si experimenta este problema por favor contacte con su distribuidor y también con el
fabricante del aparato.
Español - 16 -
Page 66

Conteúdo
Botões de controlo da TV e Funcionamento .......... 1
Funcionamento geral .............................................. 1
Características e funções da TV ............................ 7
Especi cações ...........................................................14
Botões de controlo da TV e
Funcionamento
1. Sentido para cima
2. Sentido para baixo
3. Interruptor de selecção Programa/Volume /
AV / Em Espera-Ligado
Nota:Pode mover o interruptor para cima ou para baixo
para alterar o volume. Se pretender mudar os canais premir
o meio do interruptor uma vez (Posição 3) e depois mover
para cima ou para baixo. Se premir o meio do interruptor
uma vez, será mostrada a fonte OSD. Se premir o meio do
interruptor e manter premido durante alguns segundos, a TV
mudará para o modo em espera. O OSD do menu principal
não poderá ser visualizado através dos botões de controlo.
Operar com o controlo remoto
• Premir o botão “ ” no controlo remoto para mostrar
o ecrã do menu principal. Usar o botão Esquerdo
ou Direito para seleccionar um separador de menu
e premir OK para entrar. Usar Esquerdo/Direito/
Para cima/Para baixo para seleccionar ou de nir
um item. Premir "
ecrã do menu.
• Após ter ligado os sistemas externos à sua TV, pode
permutar para as várias fontes de entrada. Premir o
botão SOURCE consecutivamente no seu controlo
remoto para seleccionar as diferentes fontes.
" ou o botão " " para sair do
Português - 1 -
• Pode alterar o canal e regular o volume usando os
botões +/- i CH+/- no controlo remoto.
Funcionamento geral
Instalar as baterias no controlo remoto
Levantar ligeiramente a tampa na parte de trás do
controlo remoto. Instalar duas baterias AAA. Certi car
que as extremidades + e - das baterias coincidem
com as mesmas marcas no compartimento das
mesmas ( deve respeitar a polaridade.) Colocar a
tampa de novo.
Ligar a Alimentação e a Antena/Cabo
IMPORTANTE: A TV foi concebida para operar em
tomada 220-240V CA, 50 Hz. Depois de desembalar,
permita que a TV esteja, durante alguns momentos,
à temperatura ambiente antes de ligar a TV à
alimentação eléctrica da rede. Ligar o cabo de
alimentação à tomada de corrente eléctrica.
HDMI 1
SPDIF
Coax.OUT
Acessórios incluídos
• Controlo remoto
• Pilhas: 2 x AAA
• Manual de Instruções
• Instruções de Início Rápido
• Cabo de ligação lateral AV
• Cabo de Ligação YPbPr
Page 67

Método de instalação de suporte amovível (sem parafuso)
1. O suporte é colocado numa superfície plana.
2. O produto é colocado sobre o suporte de modo que coincida com o ponto de montagem do mesmo e depois
é montado automaticamente devido ao respectivo peso.
Método de desinstalação do suporte amovível
1. A TV é colocada sobre uma mesa plana.
2. São pressionados os grampos no suporte.
3. O suporte é puxado para trás.
4. O suporte é removido.
Português - 2 -
Page 68

Visualização do controlo remoto
1. Em Espera
2. Parar (no modo Navegação de Media)
3. Reproduzir (no modo Navegação de Media) /
Reproduzir (em Navegação de Media)
4. Retrocesso rápido (no modo Navegação de
Media)
5. Selecção de Fonte / AV
6. TV
7. Guia electrónico de programas (em canais
DVB)
8. Botões de navegação (Cima/Baixo/Esquerda/
Direita)
9. Gravação de programa
10. Programa seguinte/ Página anterior
11. Sem som
12. Reduzir o volume
13. Botão verde Programação da lista (no EPG)/
Seleccionar/Deseleccionar tudo (na lista de
favoritos)
14. Botão vermelho
15. Botões numéricos
16. Legendas ligado-desligado ( em canais DVB)
17. Teletexto / Misto ( no modo TXT)
18. Botão azul/Editar Lista Canal/Filtro (em Lista
Favoritos&EPG)
19. Botão amarelo / Programação da linha de
tempo (no EPG)
20. Aumentar o Volume
21. Programa anterior/ Página seguinte
22. Retroceder / Voltar / Página de índice (em
modo TXT)
23. Mono/Estéreo - Dual I-II / Idioma Actual (*) (em
canais DVB)
24. OK (Con rmar) / Manter (no modo TXT)/ Lista
de canais
25. Info / Mostrar ( no modo TXT)
26. Ligar-desligar Menu/Sair (no modo Navegação
de Media)
27. Ampliação de imagem
28. Avanço rápido (no modo Navegação de Media)
29. Pausa (no modo de Navegação de Media) /
Mudança de hora de gravação
Português - 3 -
Teletexto
Premir o botão TEXTO para entrar. Premir de novo
para activar o modo mix. Premir uma vez mais para
sair. Seguir as instruções visualizadas no ecrã. do
teletexto digital.
Teletexto digital (Só para UK)
Premir o botão TEXTO para visualizar a informação
de teletexto digital. Operar o aparelho com os botões
coloridos, os botões do cursor e o botão OK. O método
de operação pode diferir de acordo com os conteúdos
do teletexto digital. Seguir as instruções visualizadas no
ecrã. do teletexto digital.
Page 69

Visualizar as ligações.
Conector Tipo Cabos Dispositivo
AV-LATERAL
AV-LATERAL
AUSCULTADORES
Scart
Ligação
(parte traseira)
VGA
Ligação
(parte traseira)
Áudio PC/
YPBPR
Ligação
(lateral)
HDMI
Ligação
(parte traseira)
SPDIFF
Ligação
(parte traseira)
AV lateral
Ligação
(lateral)
Auscultadores
Ligação
(lateral)
Cabo de Ligação
Lateral Áudio/Vídeo
(Fornecido)
Cabo de ligação AV
(fornecido)
Cabo de Ligação
Lateral Áudio/Vídeo
(Fornecido)
Vídeo YPbPr
Ligação
(lateral)
Cabo de Ligação
YPbPr (fornecido)
YPBPR
USB
Ligação
(lateral)
CI
Ligação
(lateral)
CAM
module
NOTA: Quando ligar um dispositivo através de YPbPr ou da entrada Lateral AV, deve usar os cabos de ligação
fornecidos para permitir a ligação. Consultar as ilustrações acima. | Para activar o PC áudio, é necessário usar as entradas
BRANCA e VERMELHA do cabo de LIGAÇÃO AV LATERAL. | Se estiver ligado um dispositivo externo através da tomada
SCART , a TV mudará automaticamente para o modo A V . | Quando estiver a receber canais DTV (Mpeg4 H.264) ou enquanto
no modo Navegação de Media, a saída não estará disponível através da tomada scart. | |Quando estiver a usar o kit de
montagem na parede (opcional) é recomendado ligar todos os cabos na parte de trás da TV antes de efectuar a montagem
na parede. | Inserir ou remover o módulo CI só quando a TV estiver DESLIGADA. Consultar o manual de instruções do
módulo para mais informações sobre as defi nições.
Português - 4 -
Page 70

Ligar/Desligar
Para ligar a TV
• Ligar o cabo de alimentação a 220-240V AC, 50 Hz.
• Depois o LED de stand-by acende.
• Para ligar a TV a partir do modo stand-by pode:
• Premir o botão “
numérico no controlo remoto.
• Premir o interruptor do controlo no lado esquerdo
da TV. A TV então ligar-se-á.
Nota: Se ligar a sua TV através dos botões CH- ou CH+ no
controlo remoto ou no aparelho de TV, o programa que esteve
a ver por último será seleccionado de novo.
Por ambos os métodos a TV ligar-se-á.
”,CH- ou CH+ ou um botão
Para desligar a TV
• Premir o botão " " no controlo remoto ou manter
premido o interruptor de controlo na TV até desligar,
portanto a TV mudará para o modo em espera.
• Para desligar completamente a TV, desligar o cabo
de alimentação da tomada de corrente eléctrica.
Nota: Quando a TV está ligada no modo standby, o LED
standby pode piscar para indicar que as funções como por
exemplo Busca Standby, Descarregamento por Antena ou
Temporizador estão activas.
Instalação Primeira Vez
Quando ligada pela primeira vez, é exibido o ecrã de
selecção do idioma em todas as opções de idioma
listadas alfabeticamente. Premir o botão " " ou " "
para realçar o idioma pretendido, premir o botão OK
para seleccionar. É exibido “Instalação Primeira Vez”.
Usar o botão “ ” ou “ ” para de nir o país pretendido,
e premir o botão “ ” para seleccionar o Tipo de
Busca. Usar “ ” ou “ ” para de nir o tipo de busca
pretendido. Os tipos de busca disponíveis são digital
e analógica, somente digital e somente analógica.
Depois de de nir, premir “ ” para seleccionar Idioma
do Teletexto Usar “
tipo de Idioma do Teletexto pretendido. De seguida,
seleccionar Pesquisa Codi cada e de nir como Sim
se pretender pesquisar estações codi cadas. Premir
no botão OK no controlo remoto para continuar e será
exibido o ecrã do tipo de busca. Deve seleccionar o
tipo de busca para procurar e memorizar difusões a
partir da fonte pretendida.
IMPORTANTE: Quando seleccionar a opção País
como França ou Itália, ser-lhe-á pedido para de nir
e con rmar um número de PIN. O número de PIN
seleccionado não pode ser 0000. Inserir um número
de PIN e con rmá-lo inserindo uma vez mais. Premir
em OK para continuar Se os dois números de PIN
coincidirem, o número de PIN principal será de nido.
” ou “ ” para seleccionar o
RECOMENDAÇÕES: Quando lhe é solicitado para
inserir um número de PIN para qualquer operação
do menu deve usar o PIN que de niu anteriormente
durante a instalação de primeira vez. Se esqueceu o
número de PIN que de niu durante a instalação de
primeira vez, deve usar o código PIN principal, 4725.
Instalação da antena
Se seleccionar a opção ANTENA a partir do
ecrã Tipo de Busca , a televisão procurará por
transmissões TV terrestre digital.
NOTA: Pode premir o botão " " para anular.
Depois as estações disponíveis, são memorizadas,
a lista de Canais será mostrada no ecrã. Se gostar
de ordenar os canais, conforme o LCN(*), deve
seleccionar "Sim" e depois premir OK.
Premir no botão “
e ver TV.
(*) LCN é o sistema de Número Lógico de Canal que
organiza as difusões disponíveis de acordo com uma
sequência de canal reconhecível (se disponível).
” para sair da lista de canais
Instalação do cabo
Se seleccionar a opção CABO e premir o botão OK no
controlo remoto para continuar.
seleccionar SIM e premir OK. Para anular a operação,
seleccionar NÂO e premir OK.
limites de frequência a partir deste ecrã. Para realçar
as linhas, usar o botão " ” ou “ ". Pode introduzir o
limite de frequência manualmente usando os botões
numéricos no controlo remoto. De nir a Frequência
de Início e de Fim conforme desejado usando os
botões numéricos no controlo remoto. Depois desta
operação, pode de nir a Etapa de Procura como
8000 KHz ou 1000 KHz. Se seleccionar 1000 KHz, a
televisão executará um processo de procura de forma
detalhada. A duração da busca portanto aumentará
de acordo com o acima indicado. Dependendo da
selecção do seu País na instalação de primeira vez,
pode estar disponível a opção de busca de fase de
250KHz no ecrã de Busca de Canal de Rede. Ter em
atenção se efectuar a busca com a opção 250KHz, o
processo de busca pode ser mais demorado.
Adicionalmente, para alguns países, a opção de ID
de Rede estará disponível. A função ID de Rede
obtém a Tabela de Informação de Rede. Esta tabela
fornece informação sobre a rede seleccionada.
Pode ser alterada de acordo com o operador e a
região onde o operador está activamente a difundir.
Quando terminado, premir o botão OK para iniciar a
busca automática. A TV procurará e memorizará as
difusões disponíveis.
Para continuar deve
Pode seleccionar os
Português - 5 -
Page 71

Reprodução de Media através da
Entrada USB
Pode ligar um disco rígido USB ou uma unidade de
memória USB à sua TV usando as entradas USB da TV.
Esta função permite-lhe reproduzir fi cheiros memorizados
na drive USB. É suportado um disco rígido externo de 2.5”
e 3.5” pol. (alimentação do disco rígido externo).
IMPORTANTE! Deve fazer cópia de segurança dos
seus cheiros antes de realizar quaisquer ligações ao
aparelho de TV de modo a evitar qualquer possível
perda de dados. O fabricante não se responsabiliza
por qualquer dano nos cheiros ou perda de dados. É
possível que determinados tipos de dispositivos USB
(por ex. Leitores de MP3) ou discos rígidos /unidades
de memória USB não sejam compatíveis com esta
TV. A TV suporta discos com formatação FAT32
e NTFS mas a gravação não estará disponível
com discos com formatação NTFS. Nota: Quando
está a formatar um disco rígido USB que tenha
1TB (Tera Byte) ou mais de capacidade, pode ter
problemas durante o processo de formatação. Ligar
e desligar rapidamente os dispositivos USB, é uma
operação perigosa. Não deve repetir o ligar e desligar
rapidamente o controlador. Isso pode dar origem a
danos físicos no leitor USB e no próprio dispositivo
USB. Não puxar o módulo USB enquanto estiver a
reproduzir um cheiro.
Menu de Navegação de Media
Pode reproduzir cheiros de fotos, música e lmes
memorizados num disco USB ligando-o à sua TV e
usando o ecrã de Navegação de Media. Para fazer
isto, efectue o seguinte: Ligar um disco USB a uma
das entradas USB localizadas na parte lateral da
TV. Premir o botão “
de Busca de Media usando os botões Esquerdo/
Direito e OK . O ecrã principal de Navegação de
Media será mostrado. Pode visualizar o conteúdo
respectivo seleccionado a barra Vídeo, Música ou
Imagem. Seguir as indicações do botão em cada
menu no ecrã para as funções de reprodução. Pode
de nir as preferências de Busca de Media usando
o diálogo De nições.
” e seleccionar o separador
Funcionamento do modo Laço/Mistura
Iniciar a reprodução com e
activar
Iniciar a reprodução com OK e
activar
Iniciar a reprodução com OK/
e activar
Iniciar a reprodução com OK/
e activar
A TV reproduz o ficheiro
seguinte e mistura a lista.
o mesmo ficheiro será
reproduzido numa mistura
(repetir).
o ficheiro será reproduzido
num laço.
a reprodução do ficheiro
continuará aleatoriamente e a
reprodução aleatoria continuará.
Português - 6 -
Page 72

Características e funções da TV
Conteúdo do Menu Imagem
Modo
Contraste Permite ajustar os valores do brilho e do sombreado do ecrã.
Brilho Permite ajustar o valor da luminosidade do ecrã.
Nitidez Permite ajustar o valor de nitidez para os objectos visualizados no ecrã.
Cor Permite ajustar o valor da cor, ajustando as cores.
Modo poupança
energia
Retroiluminação
(Opcional)
Redução de ruído
Temperatura de Cor De ne o tom de cor pretendido.
Ampliar a Imagem
Preto Verdadeiro
HDMI
Modo de Filme (fi lm
mode) (opcional)
Mudança de cor Permite ajustar o tom de cor desejado.
Reiniciar Reinicia as de nições de imagem para as de nições de fábrica por defeito.
Autoposicionamento
(no modo PC)
Posição H (no modo
PC)
Posição V (no modo
PC)
Relógio (no modo
PC)
Fase (no modo PC)
Enquanto está no modo VGA (PC), alguns itens no menu Imagem estarão indisponíveis. Por sua vez,
as defi nições do modo VGA serão adicionadas às Defi nições de Imagem enquanto está no modo PC.
Para os seus requisitos de visualização, pode definir a respectiva opção
de modo. O modo imagem pode ser definido para uma destas opções:
Cinema,Jogo,Dinâmico e Natural.
Para de nir o Modo de Poupança de Energia como Eco, Imagem Desligada e
Desactivada.
Este ajuste controla o nível da luz de fundo e pode ser ajustado em Auto, Máximo,
Mínimo e Modo Eco. A função retroiluminação estará inactiva se o Modo Poupança
Energia estiver ligado. A retroiluminação pode ser activada em VGA ou no modo
Busca de Media ou enquanto o modo imagem estiver de nido como Jogo.
Se o sinal de difusão for fraco e a imagem tiver ruído, usar a de nição Redução do
Ruído para reduzir a quantidade de ruído. A Redução de Ruído pode ser de nido
para uma destas opções: Baixo, Médio, Elevado ou Desligado.
Defi nições avançadas
De ne o tamanho da imagem para Auto,16:9, Legendas,14:9,14:9 Ampliação,
4:3 ou Cinema.
Enquanto está a ver a fonte HDMI, esta função estará visível no menu de
De nições de Imagem. Pode usar esta função para melhorar o preto na
imagem.
Os lmes estão gravados com num número diferente de imagens por segundo
para os programas normais de televisão. Ligar esta função ou quando está
a ver lmes para ver claramente cenas de lmes com movimentos rápidos.
Optimiza automaticamente o visor. Premir em OK para optimizar.
Este item muda a imagem na horizontal para o lado direito ou esquerdo do ecrã.
Este item muda a imagem na vertical para o topo do ecrã ou para a parte inferior
do ecrã.
Os ajustamentos do relógio corrigem a interferência que aparece como uma
banda vertical em apresentações com pontos intensos como folhas de cálculo
ou parágrafos ou texto com fontes pequenas.
Dependendo da resolução e da frequência de busca que introduziu na
ver no ecrã uma imagem tremida ou com ruído. Neste caso pode usar este item
para obter uma imagem nítida através do método de teste e erro.
TV, pode
Português - 7 -
Page 73

Características e funções da TV
Conteúdo do Menu de Som
Volume Ajusta o nível de volume.
No menu equalizador, as pré-de nições podem ser alteradas para Música,
Equalizador:
Balanço
Auscultadores De ne o volume do auscultador.
Modo Som
AVL
Graves Dinâmicos:
Saída Digital De ne o tipo de saída de áudio.
Filme, Discurso, Suave, Clássico e Utilizador. Premir no botão "
voltar para o menu anterior. As defi nições do menu Equalizador podem ser
alteradas manualmente apenas quando o Modo Equalizador estiver em
Utilizador.
Esta de nição é usada para aumentar o balanço da coluna esquerda ou
direita.
Pode seleccionar o modo Mono, Estéreo, Dual I ou Dual II, apenas se os
canais seleccionados suportarem esse modo.
Função de Limitador Automático de Volume (AVL) de ne o som para obter
um nível de saída xo entre programas (Por exemplo, nível do volume dos
anúncios tende a ser mais alto que o dos programas).
Premir nos botões "
" ou " " para activar ou desactivar eGraves Dinâmicos.
" para
Usar a Lista de Canais
A TV ordena todas as estações gravadas na Lista de
Canais. Pode editar a lista de canais, ajustar os favoritos
e ajustar os canais activos a listar utilizando as opções
da Lista de Canais.
• Seleccionar a Lista de Canais a partir do menu
principal.
• Seleccione Editar Lista de Canais para gerir
todos os canais memorizados. Pode mover,
apagar, editar nome e bloquear canais usando
este ecrã.
• Seleccionar Favoritos para criar uma lista de
programas favoritos.
• Seleccionar Lista Activa de Canais para
ordenar a lista de canais. Pode seleccionar a
opção do tipo de transmissão a partir da lista
exibida utilizando os botões “
” /“ ” e OK.
Português - 8 -
Confi gurar as Defi nições Parental
Para proibir a visualização de alguns programas, é possível
bloquear canais e menus utilizando o sistema de controlo
parental.
Realçar Parental no menu De nições e premir OK
para continuar. Para visualizar as opções do menu de
bloqueio, o código PIN deve ser introduzido. O número
de PIN predefinido é 0000. Depois de codificar o
número de PIN correcto, o menu de de nições parental
será exibido:
Bloqueio do menu: O ajuste do bloqueio de menu
activa ou desactiva o acesso ao menu.
Bloqueio Maturidade: Quando é ajustado, esta opção
obtém a informação madura da difusão e se o nível
de maturidade estiver desactivado, não será possível
aceder à transmissão.
Bloqueio crianças: Quando o Bloqueio Crianças
estiver ajustado, a TV só poderá ser controlada pelo
controlo remoto. Neste caso, os botões do painel de
controlo não funcionarão.
Ajustar PIN: Permite de nir um novo código PIN.
IMPORTANTE: O pin defi nido na fábrica é 0000, se
mudar o código pino, escreva-o num lugar seguro.
Nota: Se a opção País for defi nida como França ou
Itália, pode usar 4725 como código por defeito.
Page 74

Características e funções da TV
Conteúdo do Menu de Defi nições
Acesso Condicional Controla os módulos de acesso condicional quando existentes.
Idioma
Controlo Parental Con gura as de nições do controlo parental.
Temporizadores
Confi guração da
Gravação
Data/Hora
Fontes Permite activar ou desactivar as opções da fonte seleccionada.
Busca automática
de canal
(Ressintonizar)
Procura Manual de
Canal
Procurar Canal
Analógico
Sintonia Fina
Analógica
Instalação Primeira Vez
Limpar lista de serviço
Configura as definições de idioma (-pode mudar dependendo do país
seleccionado). Estarão disponíveis as de nições actuais e preferidas. Estas
de nições só podem ser alteradas se forem suportadas pelo transmissor.
De ne os temporizadores para os programas seleccionados. / De ne o
temporizador de dormir para desligara TV depois de um determinado tempo.
A xa o Con guração da gravação.
De ne a data e a hora.
Nota:
* A TV retira a informação da hora através do transmissor. O tempo correcto
estará disponível nas De nições de Hora/Data, se a informação da hora for
fornecida pelo transmissor.
Se a TV estiver em nenhum modo canal, as de nições de Data/Hora podem
ser alteradas. No entanto, se houver um canal prede nido, apenas o "Modo
De nições Hora" pode ser alterado e se este for de nido como Manual, Zona
Horária estará activada.
* Se a TV estiver ligada no modo em espera e for ligada mais tarde e não
existir difusão disponível, a informação da hora não será actualizada. Se existir
uma difusão presente; no entanto a informação da hora será obtida através da
difusão. Por outras palavras, a informação da hora estará disponível de acordo
com estas prioridades: A TV primeiro procura a informação da hora na difusão,
depois na preferência d utilizador e por último na informação de hora no teletexto.
Instalar ou Ressintonizar Conteúdo do Menu
Exibe as opções automáticas de sintonização.
Antena Digital: Procura e guarda canais DVB.
Cabo Digital: Procura e guarda canais DVB.
Analógica:Procura e guarda canais analógicos.
Antena Digital e Analógica: Procurar e guardar as estações de DVB e
analógicas por antena.
Cabo Digital Cable e Analógico: Procurar e guardar as estações de DVB e
analógicas por cabo.
Esta função pode ser usada para entrada directa de emissão.
Procura os canais ligados no sistema de transmissão.
Pode utilizar esta de nição para a sintonia na dos canais analógicos. Esta
função não está disponível são gravados os canais analógicos.
Apaga todos os canais guardados e as de nições, reinicia a TV nas de nições
de fábrica e inicia a instalação de primeira vez. Pode seguir as instruções na
secção de Instalação Inicial para mais informação sobre este procedimento.
(*) Para a Dinamarca, Suécia, Noruega ou Finlândia. Limpar Lista de Serviço
e depois premir OK. O OSD seguinte será exibido no ecrã. Seleccionar SIM
e premir OK para continuar ou seleccionar NÃO e premir OK para anular.
Português - 9 -
Page 75

Características e funções da TV
Outras Defi nições: Mostra outras opções de defi nição do aparelho de TV:
Menu Fora de Tempo Altera a duração de fora de tempo para os ecrãs do menu.
Busca Codifi cada
Fundo azul (opcional)
Actualização de
Software
Versão da aplicação A xa o Versão de aplicação
Problemas de
Audição
Descrição de Áudio
Desligar Auto TV
Tipo de Emissão Selecciona o tipo de difusão pretendido.
Procura de Standby
(opcional)
Quando esta de nição está ligada, o processo de busca localizará tambem os
canais codi cados. Se este ajuste está em Desligado, os canais codi cados não
serão localizados durante a procura automática ou manual.
Activa ou desactiva o sistema de fundo azul quando o sinal está fraco ou
ausente.
Para assegurar que a sua TV tem sempre a informação mais actual, pode usar
esta de nição. Para uma operação correcta, veri que se a TV está no modo
standby.
Se o emissor permitir qualquer sinal especial relativamente ao áudio, pode
colocar esta de nição em Ligar para receber os referidos sinais.
A descrição de áudio refere-se a uma faixa de narração especial para os
espectadores dos meios áudiovisuais cegos ou com de ciência de visão,
incluindo televisão e filmes. Pode utilizar esta característica, só se o
transmissor suportar esta faixa de narração adicional.
Pode de nir o valor de fora de tempo da função de desligar automaticamente.
Quando o valor fora de tempo é alcançado e a TV não funciona na hora
seleccionada, a TV desligar-se-á.
Se mudar para Busca Em Espera Desligada, esta função não estará
disponível. Para usar a busca Em Espera assegure que selecciona a Busca
em Espera como Ligada. Se a procura de Em Espera está em Ligado,
quando a TV está no modo em espera, as transmissões disponíveis serão
procuradas. A TV localizará as transmissões novas e em falta, um ecrã de
menu será visualizado pedindo se quer ou não executar estas mudanças. A
lista de canais será actualizada e alterada após este processo. Deve activar
a de nição Busca Em Espera de modo a activar a sua TV para actualização
automática da frequência da transmissão do emissor, de nição da emissão
e alterações similares.
Português - 10 -
Page 76

Guia electrónico de programas
(EPG)
Alguns, mas nem todos os canais enviam
informações sobre os programas actuais e
seguintes. Premir o botão "
EPG.
Cima/Baixo/Esquerda/Direita Navegar no EPG.
OK: Exibe as opções do programa.
INFO: Exibe informação detalhada sobre o
programa seleccionado.
VERDE: Muda para a Lista de Programação EPG.
AMARELO: Muda para os Horários de Programação
EPG.
AZUL: exibe as opções de ltragem.
:A TV começará a gravar o programa seleccionado.
Pode premir de novo para parar a gravação.
IMPORTANTE: Para gravar um programa, deve em primeiro
lugar ligar um disco USB à sua TV enquanto estiver desligada.
Deve depois ligar a TV para activar a função de gravação.
Caso contrário, a função de gravação não estará disponível.
Nota: A ligação a um emissor ou a uma fonte diferente não
está disponível durante a gravação.
Opções do Programa
No menu EPG, premir o botão OK para entrar no
menu Opções de Evento .
Seleccionar Canal
No menu EPG, ao usar esta opção, pode mudar para
o canal seleccionado.
Gravar / Apagar Temporizador de Gravação
Depois de ter seleccionado um programa no menu
EPG, premir o botão OK e será exibido o ecrã Opções
. Seleccionar a opção “Gravar” e premir o botão OK .
Depois desta operação, a gravação ca de nida para
o programa seleccionado.
Para anular uma gravação já de nida, realçar esse
programa e premir o botão OK e seleccionar a opção
“Apagar Grav. Temporizador”. A gravação será
cancelada.
Defi nir Temporizador / Apagar Temporizador
Depois de ter seleccionado um programa no menu
EPG, premir o botão OK e será exibido o ecrã
Opções . Seleccionar a opção “Defi nir Temporizador
no Evento” e premir o botão OK. Pode de nir um
temporizador para programas futuros. Para cancelar
um temporizador já de nido, realçar o programa e
premir o botão OK . Depois seleccionar a opção
“Apagar Temporizador”. O temporizador será
anulado.
Nota: Não é possível gravar ou defi nir o temporizador para
dois ou mais eventos individuais com o mesmo intervalo.
” para ver o menu
Gravar um Programa
IMPORTANTE: Quando está a utilizar uma unidade de disco
rígido USB, é recomendado em primeiro lugar formatar o
disco utilizando a opção "Formatar Disco".
Para gravar um programa, deve em primeiro lugar
ligar um disco USB à sua TV enquanto estiver
desligada. Deve depois ligar a TV para activar a
função de gravação.
Para usar a função de gravação, deve ligar um disco
USB ou um disco rígido externo à TV e o disco USB
ligado deve ter pelo menos 1GB de capacidade e ter
uma velocidade compatível com 2.0. Se a USB ligada
não for compatível com a velocidade 2.0, será exibida
uma mensagem de erro.
Nota: Os programas gravados são memorizados no disco
USB ligado. Se desejado, pode memorizar/copiar gravações
num computador; no entanto, estes fi cheiros não estarão
disponíveis para serem lidos num computador. Pode
reproduzir as gravações apenas através da TV.
Nota: Pode ocorrer um retardamento da dobragem durante a
mudança de hora.
A TV pode gravar programas até dez horas.
Os programas gravados são divididos em partições
de 4GB.
Se a velocidade de escrita no disco USB ligado não
for su ciente, a gravação pode falhar e a função de
mudança de hora pode não estar disponível.
Gravações de programas HD podem ocupar uma
maior dimensão no disco USB dependendo da
resolução do emissor. Por esta razão é recomendado
usar discos rígidos USB para gravação de programas
HD.
Não ligar a USB/HDD durante a gravação. Isso pode
dani car a USB/HDD ligado.
Está disponível o suporte multi-partição. São
suportadas no máximo duas partições diferentes.
Se o disco tiver mais do que duas partições , pode
ocorrer uma falha total. A primeira partição do disco
usb é usada para as funções de PVR activo. Deve
também ser formatado como partição principal a ser
usada para as funções de PVR pronto.
Alguns dos pacotes de uxo podem não ser gravados
devido a problemas de sinal, portanto por vezes o
vídeo pode congelar durante a reprodução.
As teclas Gravar, Reproduzir, Pausa, Exibir (para
PlayListDialog) poderão não ser usadas quando o
teletexto está LIGADO. Se uma gravação tiver início
a partir do temporizador quando o teletexto está
LIGADO, o teletexto será automaticamente desligado.
Também a utilização do teletexto é desactivada
quando existe uma gravação ou reprodução a
decorrer.
A gravação de rádio não é suportada.
Português - 11 -
Page 77

Gravação de Mudança de Hora
Premir o botão (PAUSA) enquanto está a ver uma
transmissão para mudar para o modo de mudança
de hora. No modo de mudança de hora, o programa
é pausado e simultaneamente gravado no disco USB
ligado. Premir de novo o botão
para ver o programa pausado a partir do momento
em que foi parado. Verá o intervalo de mudança de
hora entre o real e o programa com mudança de hora
na barra de informação.
(REPRODUZIR)
Gravação Instantânea
Premir o botão para iniciar a gravação de um
evento de forma instantânea quando está a ver um
programa. Pode premir novamente o botão
controlo remoto para gravar o evento seguinte no
EPG. Neste caso, o OSD será exibido indicando os
eventos programados para a gravação. Premir no
botão
instantânea.
Nota: Mudar para uma transmissão ou fonte diferente; e
visualizar Busca de Media não estão disponíveis durante a
gravação. Enquanto estiver a gravar um programa ou durante
a mudança de hora, aparece no ecrã uma mensagem de
aviso se a velocidade do seu dispositivo USB for insufi ciente.
(PARAR) para cancelar a gravação
no
Ver Programas Gravados
No menu principal usar os botões “ ” ou “ ” para
seleccionar Busca de Media e premir OK. Realçar o
item Biblioteca de Gravações usando o botão “ ” ou
“ ” e premir o botão OK para entrar. A Biblioteca de
Gravações será então exibida. Seleccionar um item
gravado a partir da lista (se gravado anteriormente)
usando o botão “ ” / “ ”. Premir o botão OK para
visualizar Opções de Reprodução. Seleccionar uma
opção usando os botões “ ” / “ ” ou OK.
Nota: Visualizar o menu principal e os itens do menu não
estarão disponíveis durante a reprodução.
Premir o botão (PARAR) para parar uma reprodução
e voltar à Biblioteca de Gravações.
Avanço Lento
Se premir o botão (PAUSA) enquanto está a ver
programas gravados, estará disponível a função de
avanço lento. Pode usar o botão
lento. Premindo
mudará a velocidade de avanço lento.
consecutivamente o botão
para avanço
Confi guração da Gravação
Seleccionar o item de Con guração de Gravação
no menu De nições para con gurar as de nições
de gravação.
Formatar Disco: Pode usar a função de Formatar
Disco para formatar o disco USB ligado.
IMPORTANTE: Note que TODOS os dados
memorizados no disco USB serão perdidos e portanto
a formatação do disco será convertida para FAT32
se tiver activado esta função. Se o seu disco USB
funcionar incorrectamente, pode tentar formatar o
disco USB. Na maioria dos casos a formatação do
disco USB reiniciará o funcionamento normal; no
entanto, TODOS os dados memorizados no disco
USB serão neste caso perdidos.
Nota: Se for exibida a mensagem “USB está demasiado
lenta” no ecrã enquanto inicia uma gravação, tentar reiniciar
a gravação. Se o erro persistir, é possível que o seu disco
USB não esteja de acordo com os requisitos de velocidade.
Tentar ligar outro disco USB.
Actualização de Software
A sua TV consegue encontrar novas actualizações
dos software através dos canais de transmissão(se
disponíveis). Para procurar canais de transmissão, a
TV procura os canais memorizados nas de nições.
Antes de iniciar a procura de actualização do software,
é aconselhado efectuar uma procura auto e actualizar
todos os canais disponíveis.
1) Actualização do software através de
entrada USB
Antes de iniciar..
Assegurar que tem uma unidade de memória USB
com espaço livre adequado. Não usar um disco rígido
USB para o processo de actualização do software.
Obter actualizações de software através do seu
revendedor ou de www.philips.com/support.
Verificar se a versão de software actual da sua
TV usando MENU>Ajustes>Outros Ajustes>item
Actualização do Software. Se a versão que encontrou
não for mais recente que a versão actual da sua
TV, não é necessário actualizar o seu produto. Não
instalar uma versão de software anterior dado isso
poder dar origem a problemas.
• Depois de obter a versão de software mais recente,
copiar o cheiro BIN para a unidade de memória
USB.
• Agora ligar a unidade de memória USB à entrada
USB da sua TV.
• Desligar a TV usando o interruptor de controlo
principal da sua TV e desligar o cabo de alimentação.
• Manter o controlo remoto direccionado para a TV.
Agora premir o botão OK e manter este botão
premido (não soltar o botão OK agora).
• Ligar a TV à corrente eléctrica e activar a TV.
• Manter o botão OK premido durante 5 segundos
mais depois de a TV ser activada e depois disso
libertar o botão. O processo de actualização do
software deve agora iniciar-se.
• A TV ligará no modo de Instalação de Primeira Vez
depois da actualização do software ter terminado.
Português - 12 -
Page 78

IMPORTANTE
Não premir nenhum dos outros botões na TV ou no
controlo remoto durante a actualização do software.
Não remover a unidade de memória USB da TV
durante o processo.
Para impedir actualizações acidentais, deve usar
o computador para apagar o fi cheiro BIN na sua
unidade de memória USB depois da actualização do
software ter sido realizada com sucesso.
2) Procura de fundo e modo actualização
• Se pesquisa automática no menu Opções de
Actualização estiver activada, a TV desperta às
03:00 e procura canais de transmissão para a nova
actualização de software. Se for encontrado um
novo software e se o download for efectuado com
sucesso, a TV acender-se-á com a nova versão
do software.
Nota sobre o processo de reinicialização: A reinicialização
é a última etapa na operação de actualização do software se o
descarregamento de um novo software for concluído com sucesso.
Durante a reinicialização, a TV efectua as inicializações fi nais. No
painel de reinicialização, a alimentação é fechada e o led dianteiro
indica a actividade piscando. 5 minutos mais tarde, a TV reinicia
com um novo software activo. A TV pode iniciar-se no modo de
instalação de primeira vez.
• Se a TV não reiniciar após 10 minutos, desligue da
alimentação durante 10 minutos e ligue novamente.
A TV deve acender-se com o novo software. Se a
TV não funcionar, repetir a sequência desligar e
ligar mais tarde. Se a TV não funcionar, contacte
uma pessoa quali cada para resolver o problema.
Cuidado: Quando o led pisca durante a reinicialização,
não desligar a TV da alimentação. Ao fazer isto pode dar
origem a que a TV não volte a abrir e pode apenas ser
reparada por pessoal da assistência.
Resolução de Problemas e
Sugestões
Imagem persistente - fantasma
A imagem fantasma pode ocorrer quando visualizar
uma imagem persistente (imagem xa ou pausada).
A persistência de uma imagem TV LED pode
desaparecer após um curto período. Tentar desligar
a TV durante um instante. Para evitar este problema,
não deixar o ecrã com uma imagem xa durante longos
períodos.
Sem alimentação
Se a sua TV estiver sem alimentação, deve veri car
se a cha do cabo de alimentação está ligada à
tomada de corrente eléctrica.
Imagem com pouca qualidade
1. Seleccionou o sistema de TV correcto?
2. A sua TV ou a antena doméstica está colocada
demasiado perto dum equipamento áudio não
ligado à terra ou de luzes néon, etc.?
3. As montanhas ou os edifícios altos podem causar
imagens duplas ou fantasmas. Por vezes, pode
melhorar a qualidade da imagem, alterando a
direcção da antena. A imagem e o Teletexto estão
irreconhecíveis?
4. Veri car se introduziu a frequência correcta.
5. Voltar a sintonizar os canais.
6. A qualidade da imagem pode degradar-se quando
estão ligados dois dispositivos à TV ao mesmo
tempo. Neste caso, deve desligar um dos
periféricos.
Nenhuma imagem
1. Nenhuma Imagem signi ca que a sua TV não está
a receber uma transmissão. Será que seleccionou
o botão correcto no controlo remoto? Tentar de
novo. Veri que se a fonte de entrada correcta foi
seleccionada.
2. A antena está adequadamente ligada?
3. As chas estão rmemente ligadas à tomada da
antena?
4. O cabo da antena está dani cado?
5. Estão a ser usadas as chas adequadas para ligar
à antena?
6. Se tiver dúvidas, deve consultar o seu revendedor.
Nenhum som
1. A TV foi colocado sem som? Para cancelar sem som,
premir o botão “
2. O som só está a sair de uma das colunas. Será que
o balanço está ajustado na extremidade de uma
direcção? Consultar a secção do Menu Som.
”, ou aumentar o nível do volume.
Controlo remoto - não funciona
A sua TV não responde à acção do controlo remoto.
As baterias podem estar gastas, se for o caso pode
mesmo assim usar os botões na TV. (* É apenas
possível se não estiverem bloqueados pelo controlo
parental e se estiverem disponíveis no seu modelo.)
Fontes de entrada – não podem ser
seleccionadas
1. Se não puder seleccionar uma fonte de entrada, é
possível que não esteja ligado nenhum dispositivo.
2. Veri car os cabos AV e as ligações se tentou ligar
um dispositivo.
Português - 13 -
Page 79

Gravação impossível
Para gravar um programa, deve em primeiro lugar
ligar um disco USB à sua TV enquanto estiver
desligada. Deve depois ligar a TV para activar a
função de gravação. Caso contrário, a função de
gravação não estará disponível. Se não efectuar a
gravação, tentar desligar a TV e depois voltar a reintroduzir o dispositivo USB enquanto a TV estiver
desligada.
USB muito lento
Se for exibida a mensagem “USB está demasiado
lenta” no ecrã enquanto inicia uma gravação, tentar
reiniciar a gravação. Se o erro persistir, é possível
que o seu disco USB não esteja de acordo com os
requisitos de velocidade. Tentar ligar outro disco USB.
Fabricado sob a licença da Dolby
Laboratories.
INFORMAÇÕES SOBRE A MARCA REGISTADA
“Dolby” e o símbolo double-D são marcas registadas
da Dolby Laboratories.
Informações para os utilizadores sobre a
eliminação dos velhos equipamentos e das pilhas
[Para a União Europeia unicamente]
Estes símbolos indicam que o equipamento com
os mesmos não deve ser eliminado como resíduo
doméstico. Se quer eliminar o produto ou as pilhas,
coloque-os no centro de recolha apropriado para a
reciclagem.
Observação: O sinal Pb debaixo do símbolo para as pilhas
indica que esta pilha contém chumbo.
Especifi cações
EMISSÃO DE TV
PAL/SECAM B/G D/K K’ I/I’ L/L’
RECEPÇÃO DIGITAL
DVB-T MPEG2 DVB-T MPEG4 HD
DVB-T MHEG-5 Engine (só para o RU)
DVB-C MPEG2 DVB-C MPEG4 HD
RECEPÇÃO DE CANAIS
HIPERBANDA VHF (BANDA I/III) UHF (BANDA U)
NÚMERO DE CANAIS PRÉ-DEFINIDOS1000
(800 DVB-T / 200 Analógico)
INDICADOR DE CANAL
Visualização no Ecrã (OSD)
ENTRADA DE ANTENA RF
75 Ohm (não equilibrado)
TENSÃO DE FUNCIONAMENTO
220-240V AC, 50 Hz.
ÁUDIO Alemão + Nicam Estéreo
SAÍDA DE POTÊNCIA ÁUDIO (W
THD)
2x2,5
CONSUMO DE ENERGIA (W)
45 W (máx)
PAINEL
Ecrã 16:9, Tamanho do Ecrã 22”
Dimensões (mm)
PxCxA (Com pé): 134x516x352
Peso (Kg):3,50
DxLxH (Sem pé): 35x516x317
Peso (Kg): 3,30
RMSRMS.RMS) (10%
Produtos
Pilhas
Português - 14 -
Page 80

Resoluções DVI suportadas
Quando ligar dispositivos aos conectores da sua TV utilizando os cabos de
conversão DVI para HDMI (não fornecidos), pode consultar a informação
de resolução seguinte.
Índice Resolução Frequência
1 640x400 70Hz
2 640x480 60Hz-66Hz-72Hz -75Hz
3 800x600 56Hz-60Hz-70Hz-72Hz -75Hz
4 832x624 75 Hz
5 1024x768 60Hz-66Hz-70Hz-72Hz -75Hz
6 1152x864 60Hz-70Hz-75Hz
7 1152x870 75Hz
8 1280x768 60 Hz - 75Hz
9 1280x960 60Hz-75Hz
10 1280x1024 60Hz-75Hz
11 1360x768 60 Hz
12 1400x1050 60Hz-75Hz
13 1400x900 65Hz-75Hz
14 1600x1200 60 Hz
15 1680x1050 60 Hz
16 1920x1080 60 Hz
17 1920x1200 60Hz
18 480i-480p 60Hz
19 576i-576p 50Hz
Modos de visualização normais PC
A seguinte tabela é uma ilustração de alguns dos modos de visualização
habituais de vídeo. A sua TV pode não suportar todas as resoluções. A sua
TV suporta até 1920x1080.
Índice Resolução Frequência
1 640x350p 60 Hz
2 640x400p 60 Hz
3 1024x768 60 Hz
4 1280x768 60 Hz
5 1360x768 60 Hz
6 720x400 60 Hz
7 800x600 56 Hz
8 800x600 60 Hz
9 1024x768 60 Hz
10 1024x768 66 Hz
11 1280x768 60 Hz
12 1360x768 60 Hz
13 1280x1024 60 Hz
14 1280x960 60 Hz
15 1280x1024 60 Hz
16 1400x1050 60 Hz
17 1600x1200 60 Hz
18 1920x1080 60 Hz
Formatos de fi cheiros suportados para o modo USB
Media File Extension
.mpg .mpeg MPEG1,2
.dat MPEG1,2
.vob MPEG2
.mkv H.264, MPEG1,2,4 EAC3/ AC3
Movie
Música .mp3 -
Fotografi a
Legendas
.mp4
Xvid 1.01, Xvid 1.02, Xvid 1.03,
Xvid 1.10-beta1/2
MPEG2, MPEG4
.avi
Xvid 1.01, Xvid 1.02, Xvid 1.03,
Xvid 1.10-beta1/2
.jpg .jpeg Linha base JPEG - máx LxA = 15360x8640 4147200bytes
. JPEG Progressivo - max LxA = 9600x6400 3840000bytes
.bmp - - max LxA = 9600x6400 3840000bytes
.sub .srt - - -
Format Remarks
Video Audio (Maximum resolution/Bit rate etc.)
MPEG4
Xvid 1.00,
H.264
Xvid 1.00,
H.264
MPEG Layer
1/2/3
MPEG2
PCM/MP3
PCM
MPEG 1 Layer 1
/ 2 (MP3)
MAX 1920x1080 @ 30P 20Mbit/sec
32Kbps ~ 320Kbps(Bit rate)
32KHz ~ 48KHz(Sampling rate)
Português - 15 -
Page 81

Compatibilidade do sinal AV e HDMI
Fonte Sinais Suportados Disponível
PAL 50/60 o
EXT
(SCART )
AV lateral
YPbPr
HDMI1
NTSC 60 o
RGB 50 o
RGB 60 o
PAL 50/60 o
NTSC 60 o
480I 60Hz o
480P 60Hz o
576I 50Hz o
576P 50Hz o
720P 50Hz o
720P 60Hz o
1080I 50Hz o
1080I 60Hz o
1080P 50Hz o
1080P 60Hz o
480I 60Hz o
480P 60Hz o
576I 50Hz o
576P 50Hz o
720P 50Hz o
720P 60Hz o
1080I 50Hz o
1080I 60Hz o
1080P 24Hz o
1080P 25Hz o
1080P 30Hz o
1080P 50Hz o
1080P 60Hz o
(X: Não disponível, O: Disponível)
Em alguns casos, um sinal na TV LED pode não ser visualizado correctamente. O problema pode ser uma incompatibilidade
com os padrões do equipamento de fonte. Se verifi car este problema, contacte o seu fornecedor e o fabricante do equipamento
de fonte.
Português - 16 -
Page 82

All registered and unregistered trademarks are the property of their respective owners.
Specifications are subject to change without notice.
Philips and the Philips’ shield emblem are registered trademarks of Koninklijke Philips Electronics N.V. and are used
under license from Koninklijke Philips Electronics N.V.
2012 © TP Vision Netherlands B.V. All rights reserved.
www.philips.com
 Loading...