

Page 1

Page 2
Country Number Tariff
Austria 0820 901114 €0.20/min
Belgium 070 222 303 €0.17/min
Denmark 3525 8759 local
Finland 09 2311 3415 local
France 08 9165 0005 €0.23/min
Germany 0180 5 356 767 €0.12/min
Greece 0 0800 3122 1280 free
Ireland 01 601 1777 local
Italy 199 404 041 €0.25/min
Luxemburg 40 6661 5644 local
Netherlands 0900 8407 €0.20/min
Norway 2270 8111 local
Portugal 2 1359 1442 local
Spain 902 888 784 €0.15/min
Sweden 08 5792 9100 local
Switzerland 0844 800 544 local
UK 0906 1010 016 £0.15/min
Poland 0223491504 local
Chech Rep 800142840 free
Hungary 0680018189 free
Slovakia 0800004537 free
Page 3
1
Thank you for purchasing this television set.
This handbook has been designed to help you install and operate your TV set.
We strongly recommend that you read it thoroughly.
Safety Information . . . . . . . . . . . . . . . . . . . . . . . . . . . . . . . . . . . . . . . . . . . . . . . . . . . . . . . . . . . . . . 2
Preparation / Getting started . . . . . . . . . . . . . . . . . . . . . . . . . . . . . . . . . . . . . . . . . . . . . . . . . . . . . 3
Television keys and connectors . . . . . . . . . . . . . . . . . . . . . . . . . . . . . . . . . . . . . . . . . . . . . . . . . . . 4
Remote Control keys . . . . . . . . . . . . . . . . . . . . . . . . . . . . . . . . . . . . . . . . . . . . . . . . . . . . . . . . . . . 6
Remote Control keys (Other functions) . . . . . . . . . . . . . . . . . . . . . . . . . . . . . . . . . . . . . . . . . . . . 7
Quick installation . . . . . . . . . . . . . . . . . . . . . . . . . . . . . . . . . . . . . . . . . . . . . . . . . . . . . . . . . . . . . . 7
Programme sort . . . . . . . . . . . . . . . . . . . . . . . . . . . . . . . . . . . . . . . . . . . . . . . . . . . . . . . . . . . . . . . 8
Auto store . . . . . . . . . . . . . . . . . . . . . . . . . . . . . . . . . . . . . . . . . . . . . . . . . . . . . . . . . . . . . . . . . . .8
Manual store . . . . . . . . . . . . . . . . . . . . . . . . . . . . . . . . . . . . . . . . . . . . . . . . . . . . . . . . . . . . . . . . . . 9
Naming of channel . . . . . . . . . . . . . . . . . . . . . . . . . . . . . . . . . . . . . . . . . . . . . . . . . . . . . . . . . . . . . 9
Picture and Sound settings . . . . . . . . . . . . . . . . . . . . . . . . . . . . . . . . . . . . . . . . . . . . . . . . . . . . . . 10
Using the Contrast+ and NR (Noise Reduction) features . . . . . . . . . . . . . . . . . . . . . . . . . . . . . 11
Timer function . . . . . . . . . . . . . . . . . . . . . . . . . . . . . . . . . . . . . . . . . . . . . . . . . . . . . . . . . . . . . . . 11
Using the PIP (Picture-in-Picture) feature . . . . . . . . . . . . . . . . . . . . . . . . . . . . . . . . . . . . . . . . . . 12
Screen Formats . . . . . . . . . . . . . . . . . . . . . . . . . . . . . . . . . . . . . . . . . . . . . . . . . . . . . . . . . . . . . . . 13
Using the Smart Picture and Sound features . . . . . . . . . . . . . . . . . . . . . . . . . . . . . . . . . . . . . . . . 14
Using the Active Control feature . . . . . . . . . . . . . . . . . . . . . . . . . . . . . . . . . . . . . . . . . . . . . . . . 14
Teletext . . . . . . . . . . . . . . . . . . . . . . . . . . . . . . . . . . . . . . . . . . . . . . . . . . . . . . . . . . . . . . . . . . . . . 15
Using the TV as PC monitor . . . . . . . . . . . . . . . . . . . . . . . . . . . . . . . . . . . . . . . . . . . . . . . . . . . . 16
Using the TV in HD (High Definition) Mode . . . . . . . . . . . . . . . . . . . . . . . . . . . . . . . . . . . . . . . 17
Troubleshooting Tips . . . . . . . . . . . . . . . . . . . . . . . . . . . . . . . . . . . . . . . . . . . . . . . . . . . . . . . . . .18
Glossary . . . . . . . . . . . . . . . . . . . . . . . . . . . . . . . . . . . . . . . . . . . . . . . . . . . . . . . . . . . . . . . . . . . . 19
Specifications . . . . . . . . . . . . . . . . . . . . . . . . . . . . . . . . . . . . . . . . . . . . . . . . . . . . . . . . . . . . . . . . . 20
Reference table of Countries for selection . . . . . . . . . . . . . . . . . . . . . . . . . . . . . . . . . . . . . . . . . 20
Introduction
Table of Contents
Recycling
The packaging of this product is intended to be recycled. Apply to the local authorities
for correct disposal.
Disposal of your old product
Your product is designed and manufactured with highly quality material and components,
which can be recycled and reused. When this crossed-out wheeled bin symbol is attached
to a product, it means the product is covered by the European Directive 2002/976/EC.
Please inform yourself about the local seperate collection system for electrical and
electronic products.
Please act according to your local rules and do not dispose of your old products with your
normal household waste. The correct disposal of your product will help prevent potential
negative consequences for the environment and human health.
Page 4
2
X
X
X
X
X
X
10 cm
10 cm
10 cm
X
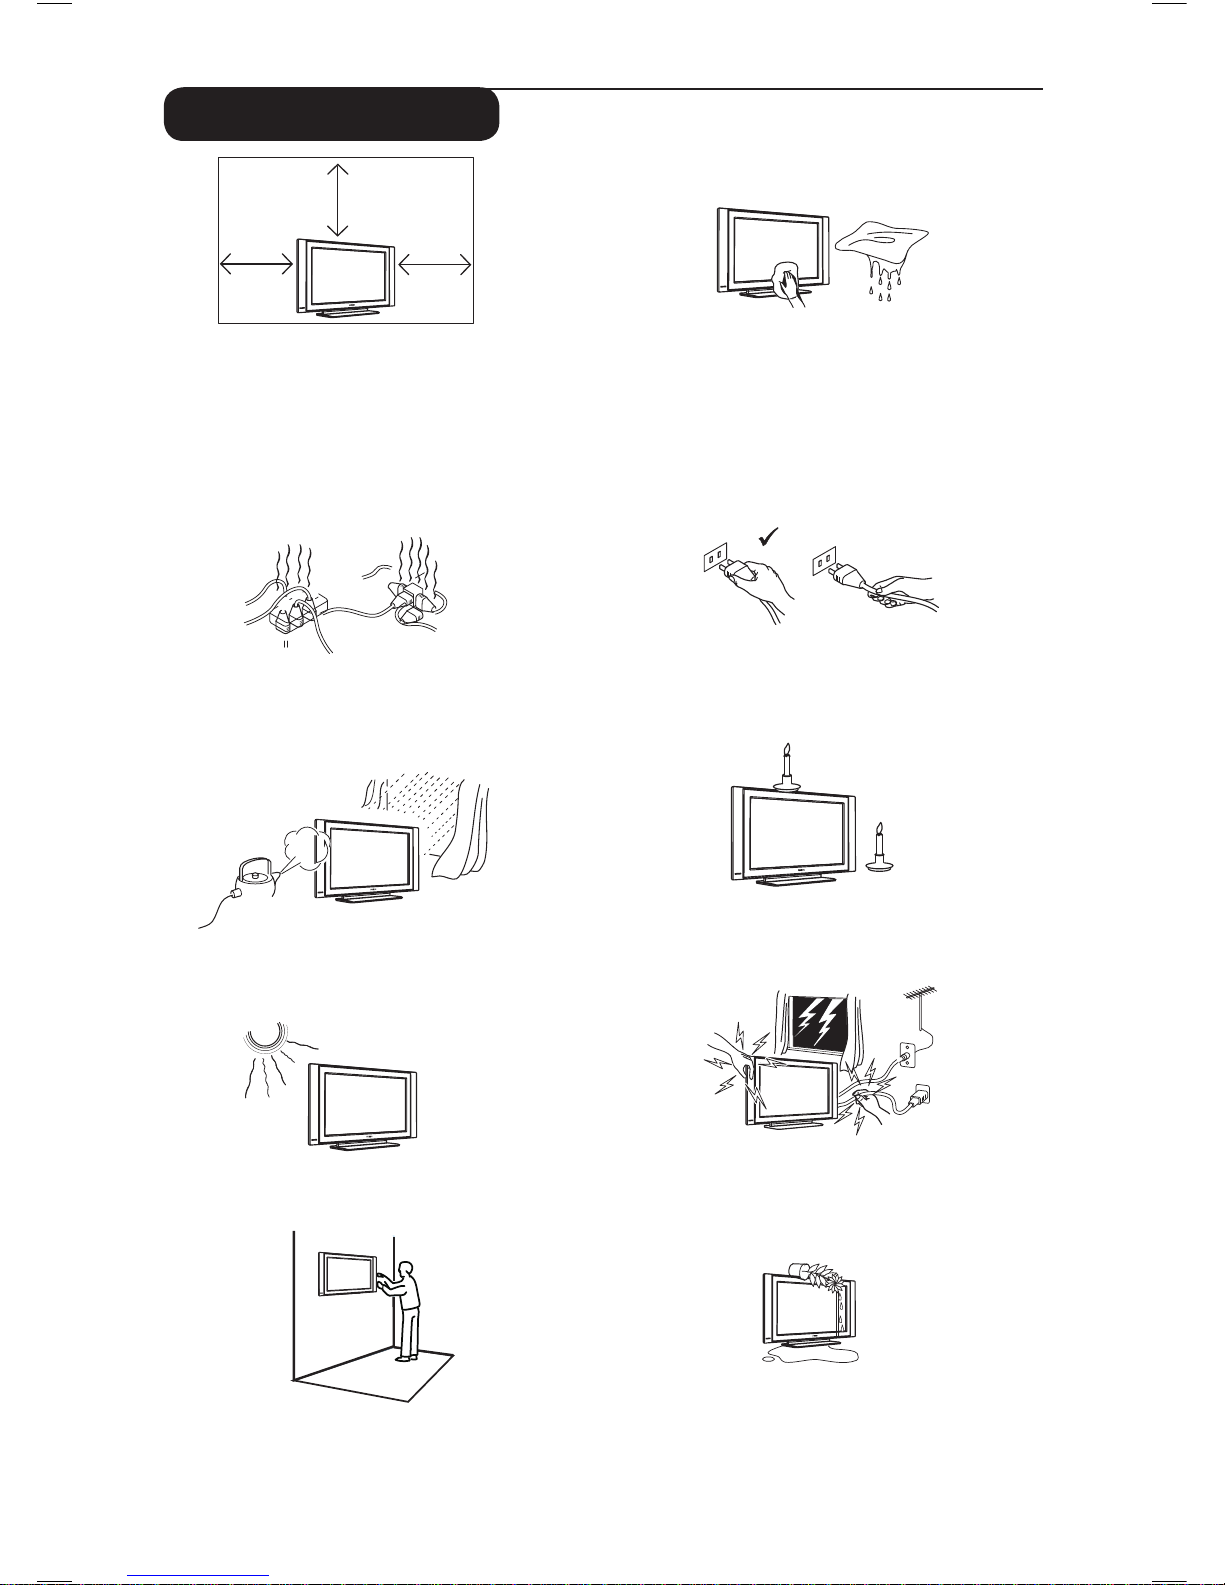
Safety Information
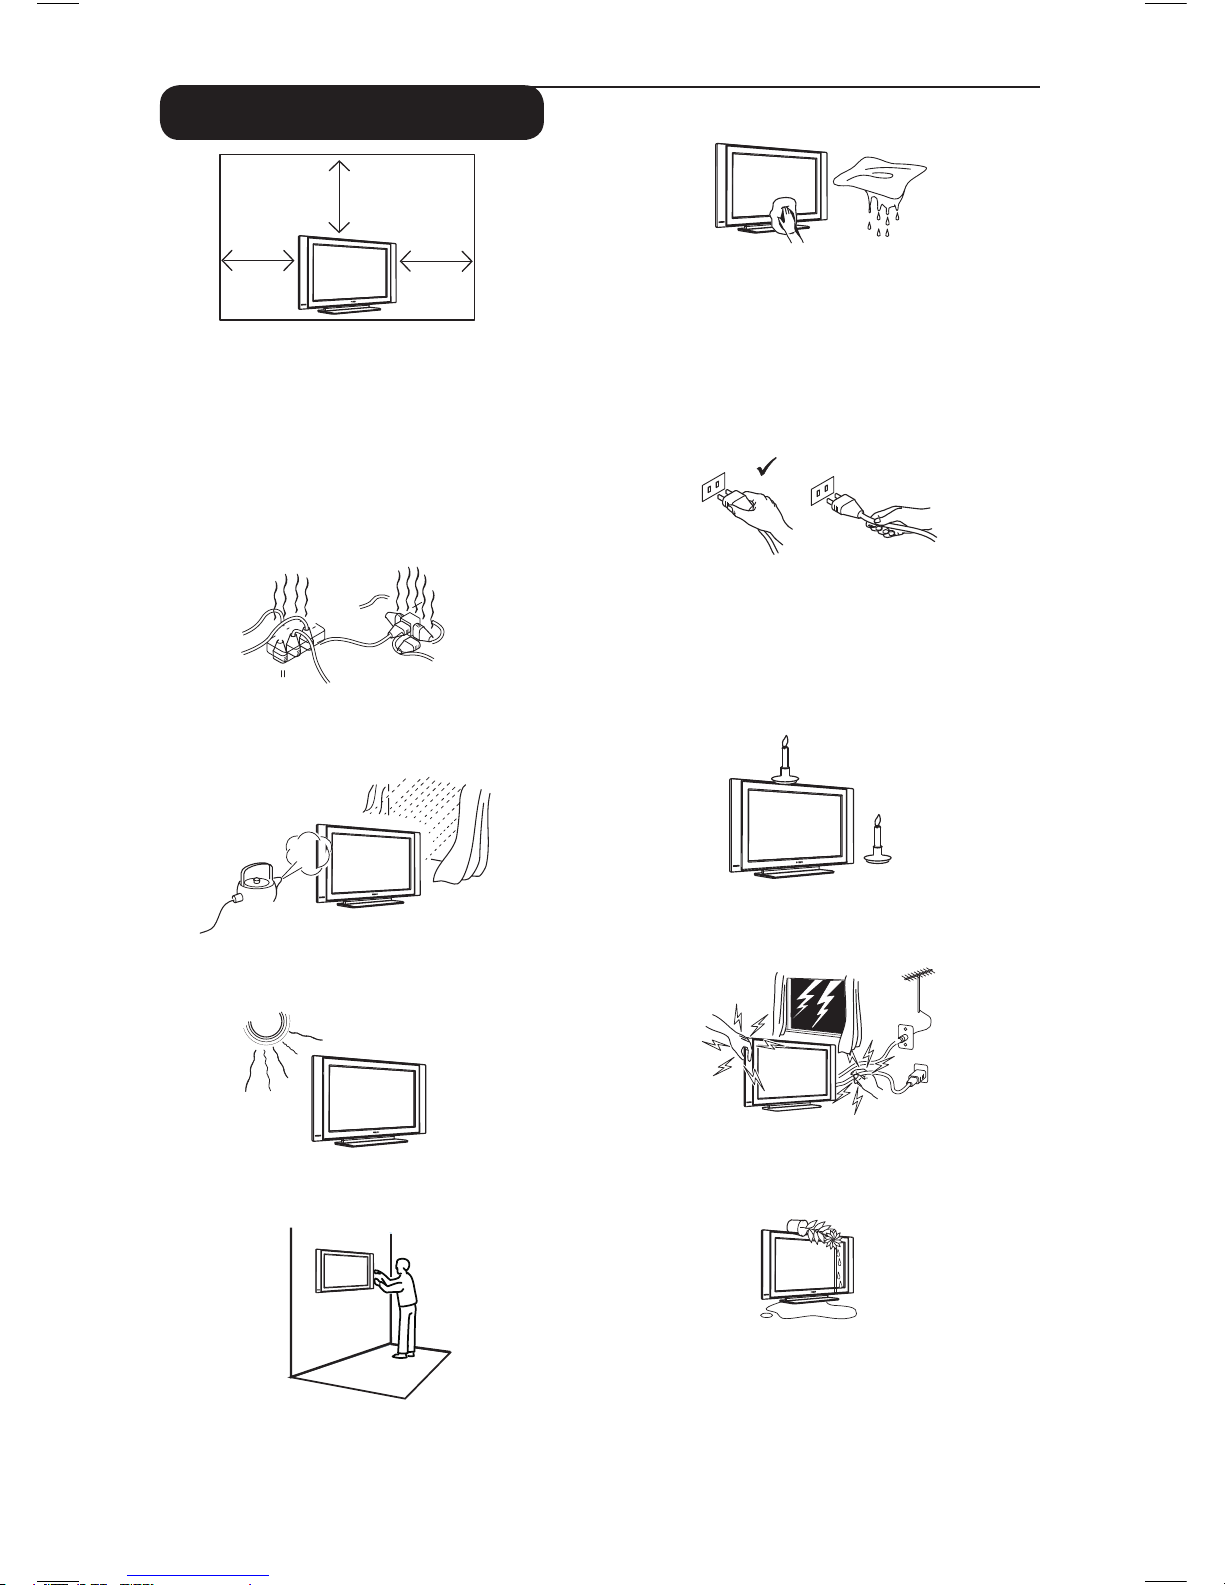
Avoid placing your TV set under direct sunlight
or heat.
To prevent fire or shock hazard, do not expose
your TV to rain or moisture.
Take care not to connect too many equipment
to the same mains socket as it may cause
overloading resulting in fire or electric shock.
Pull the power lead by the plug. Do not pull on
the power lead. Do not use a poor fitting mains
socket. Insert the plug fully into the mains. If it is
loose, it may cause arching and result in fire.
No naked flame sources (lighted candles)
should
be placed on the top of the set or near it.
When cleaning the surface or the screen of the
set, wipe gently with absorbent cotton or cloth
or other soft material like chamois. Do not use
too wet a cloth which is dripping with water.
Do not use acetone, toulene or alcohol to
clean the TV. As a safety precaution, unplug the
power cord from the mains.
As a safety precaution, do not touch any part of
the TV, power lead or aerial lead during lightning
storms.
Installation of the TV set on the wall should be
carried out by qualified serviceman. Improper
and incorrect installation may render the set
unsafe.
Avoid placing vase filled with water on the TV.
Water spilled into the set could result in electric
shock. Do not operate set if water is spilled into
it. Have it checked immediately by a qualified
serviceman.
Leave at least 10 cm around each side of the
TV set to allow for proper ventilation. Place
the set on a stable, level surface. Never cover
the ventilation slots of the TV with a cloth or
other material. It may cause overheating. Do not
insert anything in the ventilation holes. If metal
or something flammable is inserted in these
holes, it may result in fire or electric shock.
Page 5
3
2
3
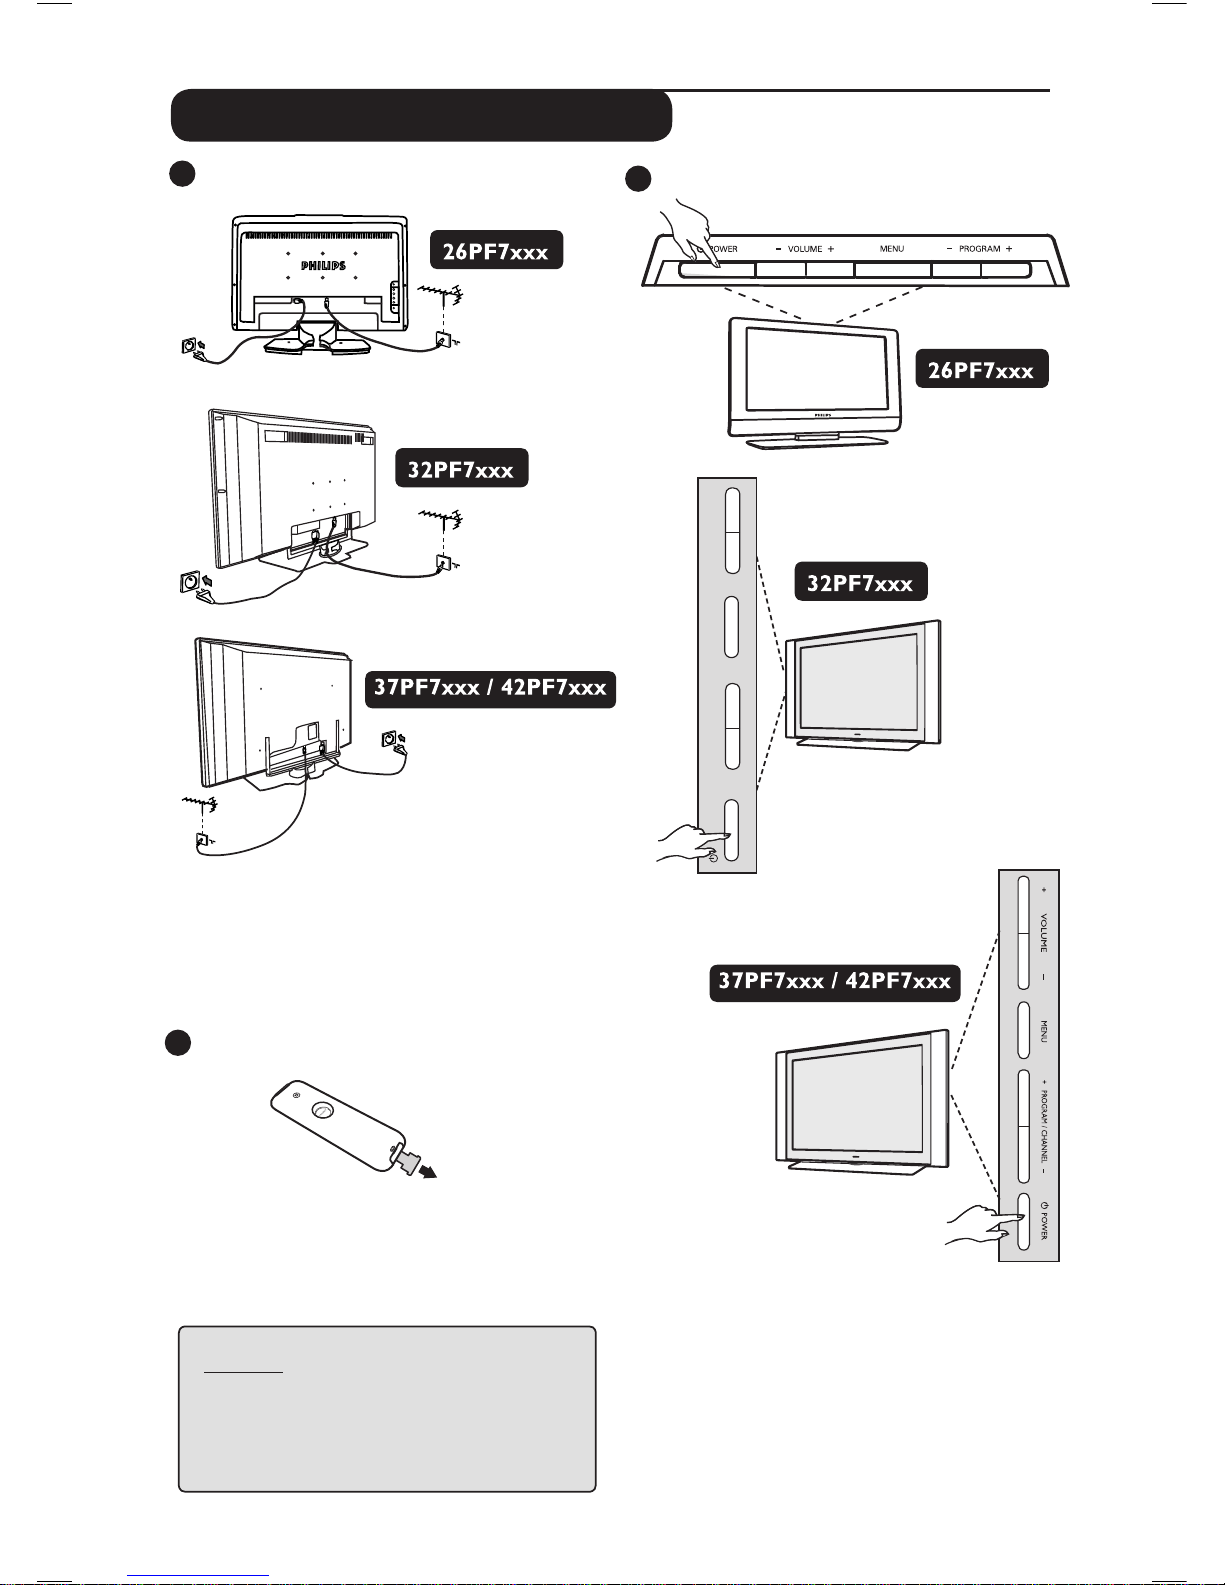
Switching on the TV set
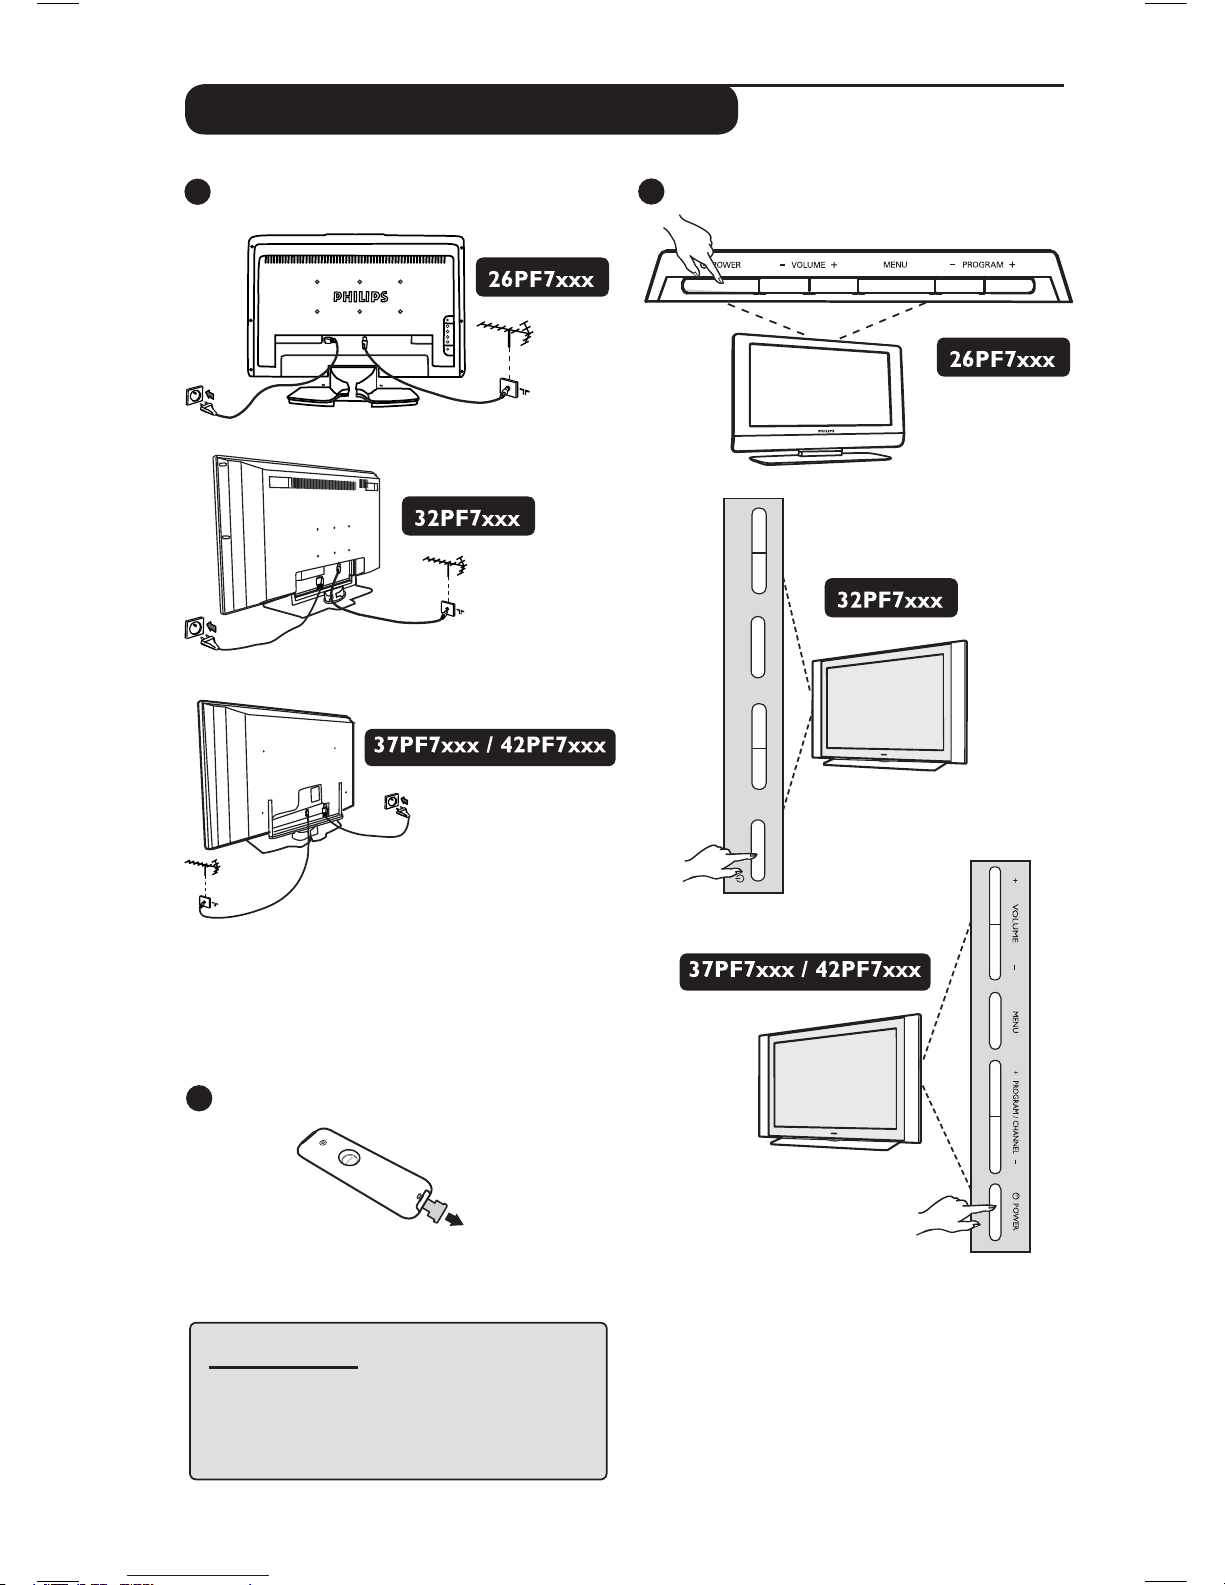
• To switch on the TV set, press the POWER
button. A green indicator comes on and the
screen lights up.
• If the TV set remains in standby mode (red
indicator), press the PROGRAM – /
+ key on
the keyboard or the P – / + key on the
remote control.
1
Preparation / Getting started
Connections
• Insert the aerial plug into the 75Ω :
socket at the bottom of the set.
• Insert the mains plug into a wall socket
(220-240V / 50/60Hz).
Using the Remote Control
Pull out the plastic insulation sheet from the
battery to enable the remote control to operate.
NOTE
For more details on other
connections,
see
“CONNECTION GUIDE”.
– PROGRAM +
MENU
– VOLUME +
POWER
Page 6
4
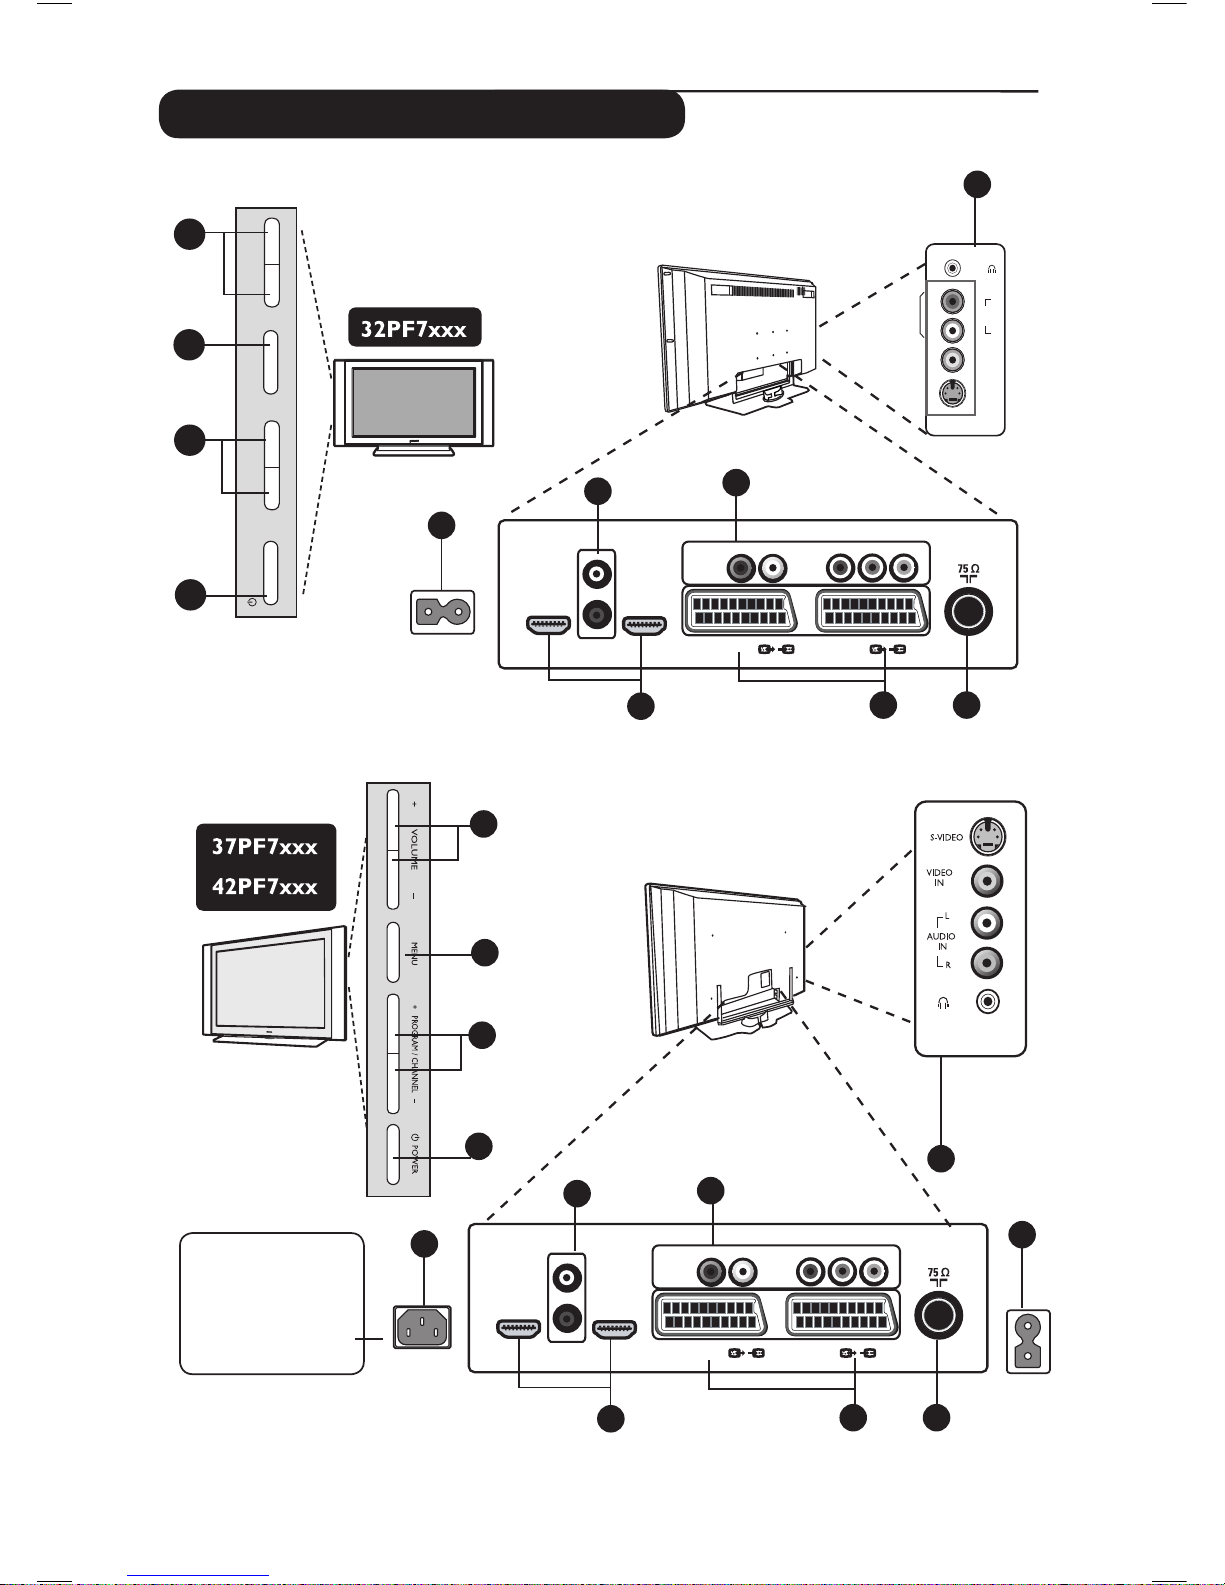
Television keys and connectors
6
7
8
9
10
EXT 4
EXT 2 /SVHS2
EXT 1
DVI
(AUDIO IN)
HDMI 2
HDMI 1
AUDIO
R L
IN
Pr
Pb Y
L
R
5
AC in ~
Headphone
Audio In
Video In
S-Video
AUDIO
IN
R
L
VIDEO
IN
S-VIDEO
11
EXT3/SVHS3
3
– PROGRAM +
MENU
– VOLUME +
POWER
4
2
1
1
2
3
4
11
LCD
TV
5
5
6
7
8
9
10
EXT 4
EXT 2 /SVHS2
EXT 1
DVI
(AUDIO IN)
HDMI 2
HDMI 1
AUDIO
R L
IN
Pr
Pb Y
L
R
MAINS ~
AC in ~
Plasma TV
CAUTION : This
a Class 1
apparatus.
It must be connected
to a MAINS socket
out with a protective
earthing connection.
ï
EXT3/SVHS3
Page 7
5
Fernsehtasten und Anschlüsse
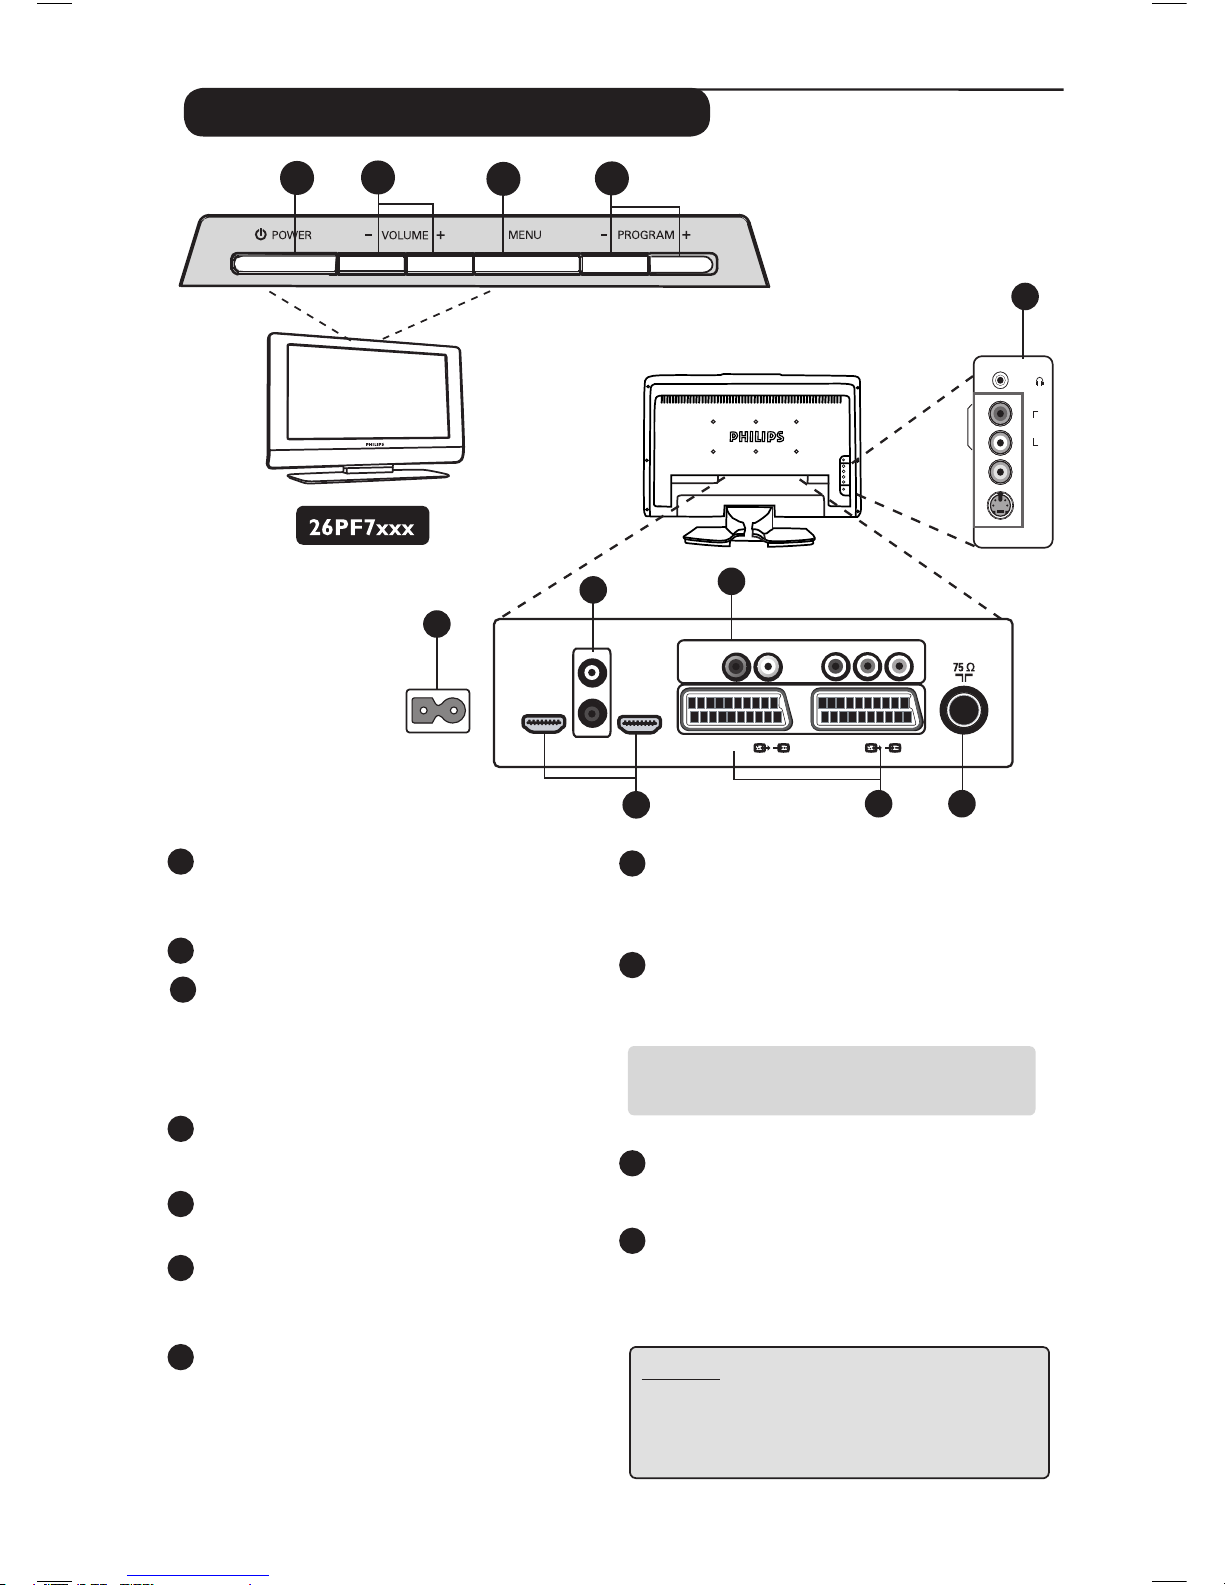
Television keys and connectors
1
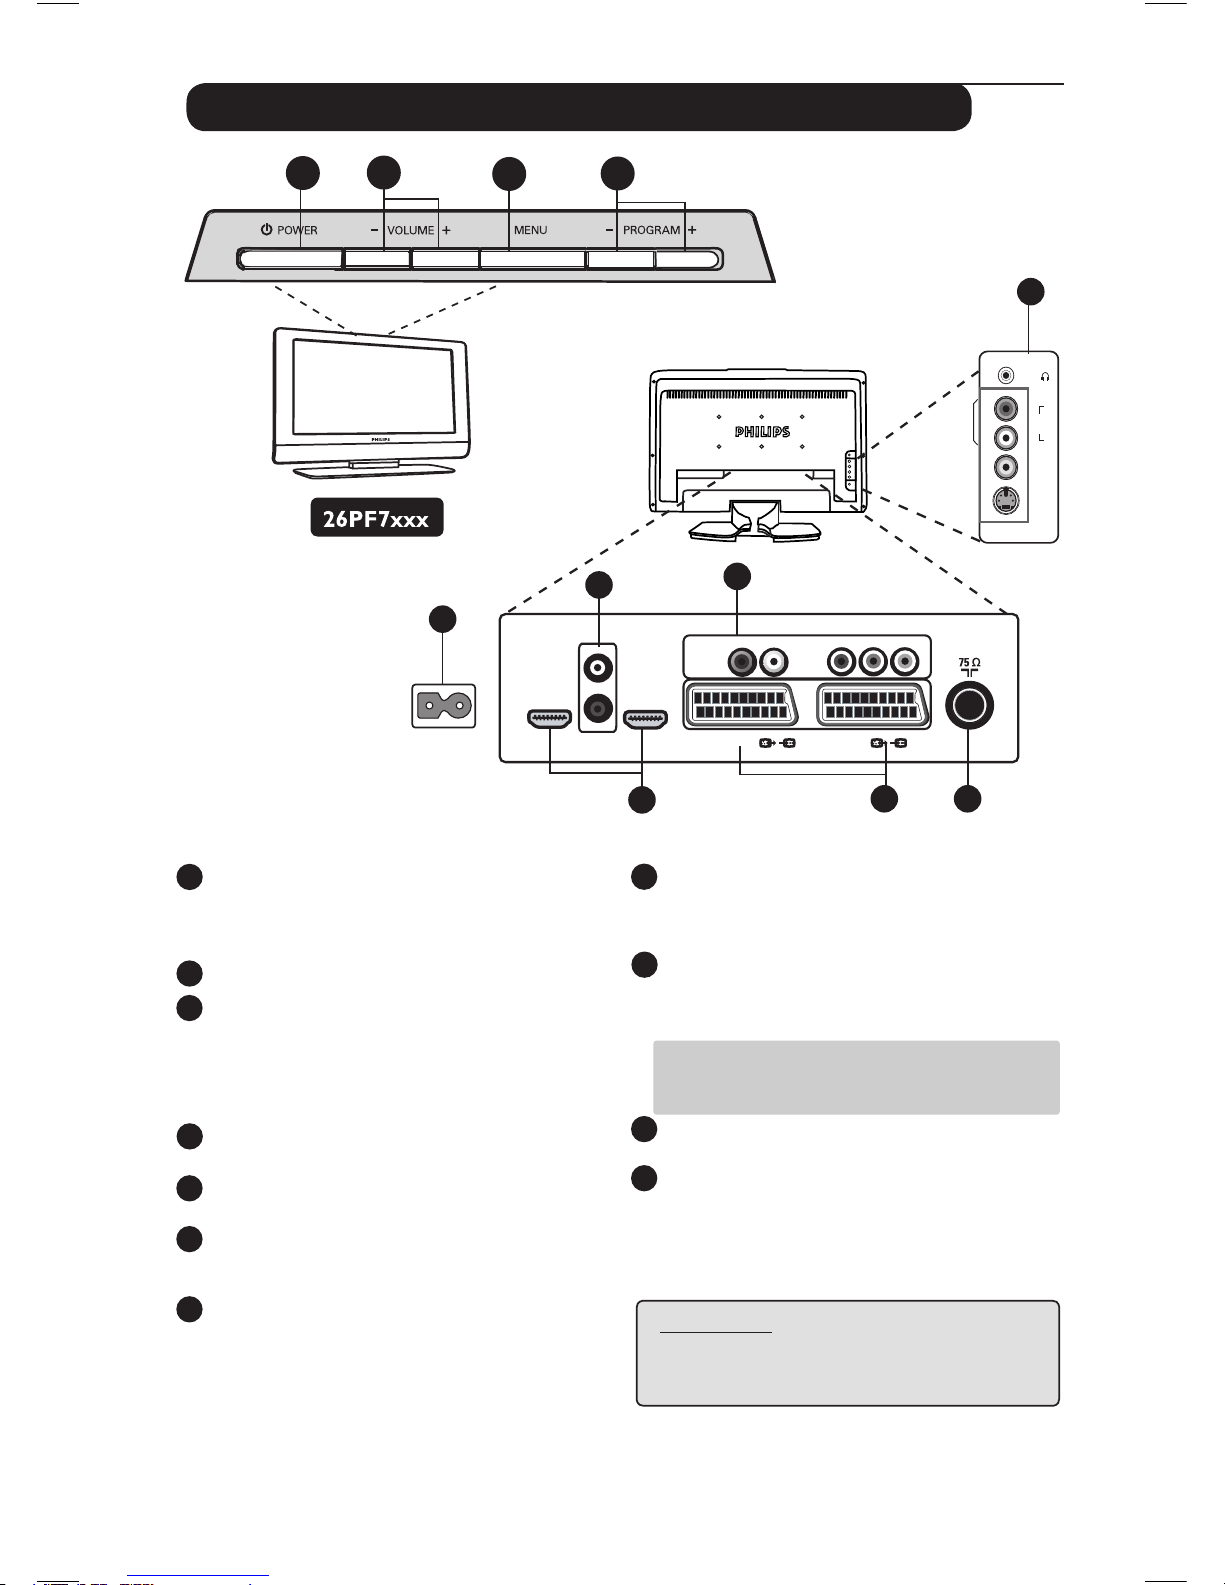
POWER . : to switch the TV on and off.
Note: The power remains on even when the
Power switch is turned off.
2
VOLUME –/+: to adjust sound level.
3
MENU : to access or close menus.
The PROGRAM /CHANNEL –/+ keys can
be used to select a menu item and the
VOLUME –/+ keys to enter into the selected
menu item and make adjustments.
4
PROGRAM / CHANNEL –/+ : to select
programmes.
5
POWER socket :
Insert the mains plug into
a wall socket.
6
DVI Audio Input : for connecting a HD (high
definition) equipment or computer with DVI
output.
7
EXT 4 (Component Video inputs / Audio
Inputs) : to connect to equipment like DVD,
Set-Top box which have the same sockets.
Connect the audio inputs of the TV to the
outputs of the device together with the
Component Video Inputs.
8
HDMI 1 /HDMI 2 sockets : to connect to
set-top boxes, DVD player/recorder, High
Definition equipment or Personal Computer.
9
EXT1 and EXT2/SVHS2 sockets : connect to
equipment
like DVD player/recorder, VCR,
Decorder which have scart connections.
Important : In order to connect your
decoder, please use EXT1 scart only.
10
TV Aerial socket :
Insert the aerial plug into
the 75 Ω : socket.
11
EXT 3 (Side) connections: for connecting to
devices like camera or camcorder. Also allows
you to connect your headphone for your
personal listening pleasure.
NOTE
For more details on connections,
see CONNECTION GUIDE.
1
3
4
2
6
7
8
9
10
EXT 4
EXT 2 /SVHS2
EXT 1
DVI
(AUDIO IN)
HDMI 2
HDMI 1
AUDIO
R L
IN
Pr
Pb Y
L
R
5
AC in ~
Headphone
Audio In
Video In
S-Video
AUDIO
IN
R
L
VIDEO
IN
S-VIDEO
11
EXT3/SVHS3
Page 8
6
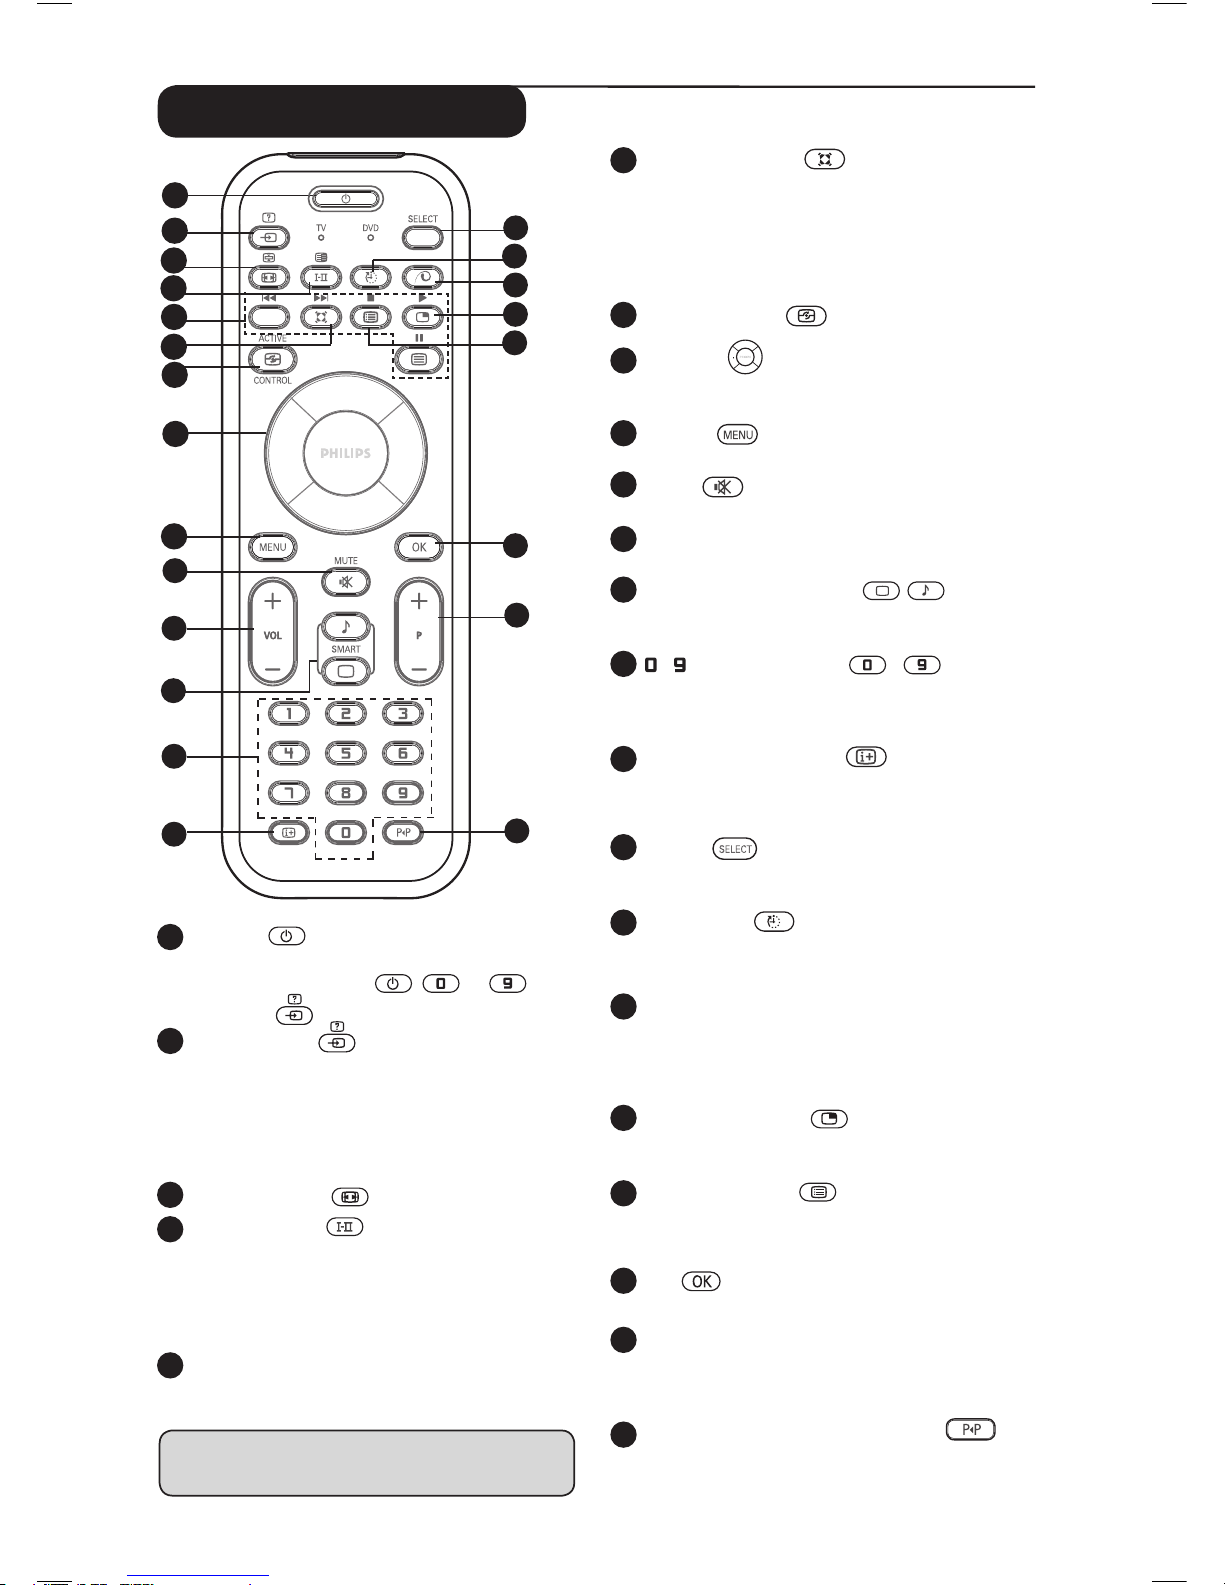
1
Standby
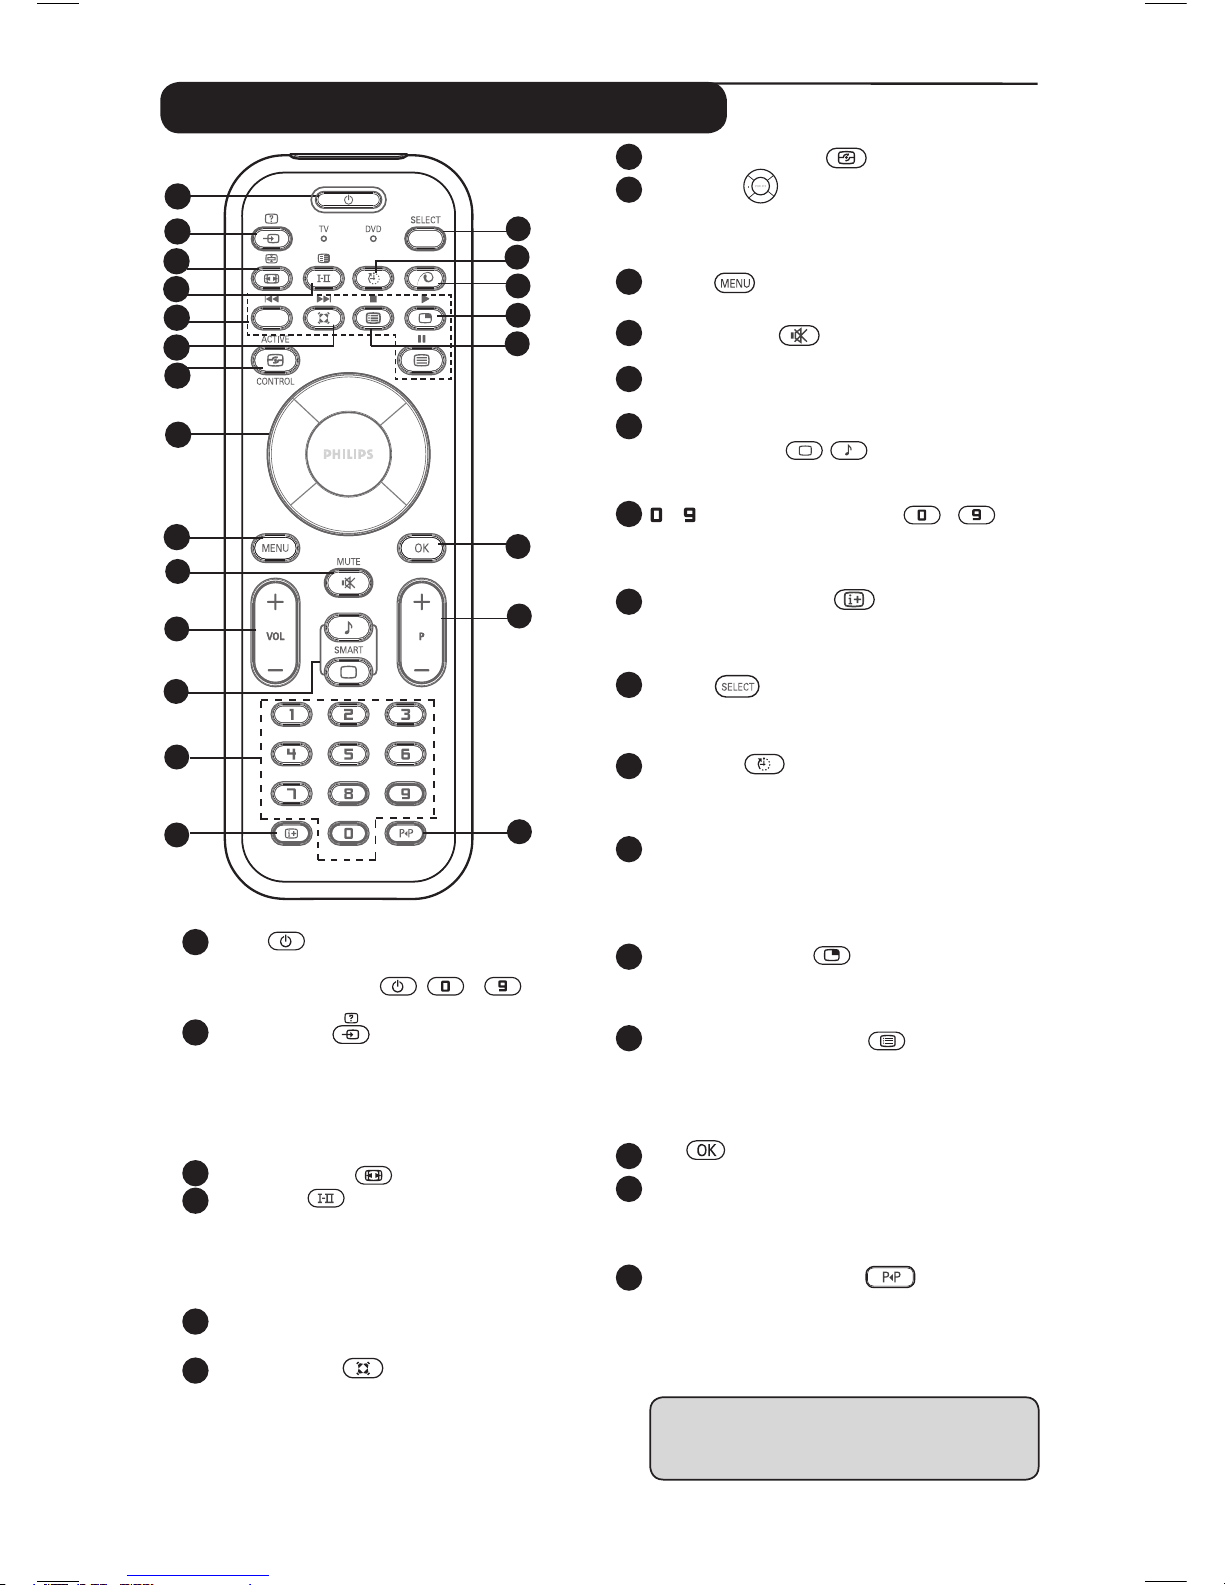
To set the TV to standby mode. To switch the
TV set on again, press ,
to
,
P – / + or key.
2
AV / Teletext
– In TV/AV mode,
it displays the Source List to
select TV or peripheral equipment connected
to EXT 1, EXT 2/SVHS2, EXT 3/SVHS3, EXT 4,
HDMI 1 or HDMI 2
.
– In teletext mode, access teletext function
(see page 15).
3
Screen Format (see page 13).
4
Sound mode
Used to force programmes in
Stereo
and Nicam Stereo to Mono or, for
bilingual programmes, to choose between
Dualå or Dual». The Mono indication is red
when in forced position
.
5
Telextext keys (see page 15).
DVD keys
(see page 7).
Remote Control keys
*
The signal strength indicator shows the signal
strength of the transmission
of the programme
you are watching.
6
Surround Sound
To activate / deactivate the surround sound
effect. In stereo, this gives the impression that
the speakers are further apart. For models
equipped with Virtual Dolby Surround, you can
experience Dolby Surround Pro Logic sound
effects
.
7
Active Control
(
S
ee page 14).
8
Cursors
These 4 keys are used for selection and adjustment
of menu items.
9
MENU
To call up or exit the TV menus.
10
Mute
Press to mute or restore sound.
11
Volume ( – VOL + )
To adjust the sound level.
12
Smart Picture /Sound
Used to access a series of predefined picture
and sound settings (see page 14).
13
/ Numerical keys /
For direct access to programmes. For a 2
digit programme number, the 2nd digit must
be entered before the dash disappears.
14
Screen information
To display/remove the programme number,
the sound mode, the remaining time of the
sleeptimer and the *signal strength indicator.
15
Select
Select between TV and DVD mode (see
“Remote Control - DVD functions on page 7).
16
Sleeptimer
To select the length of time before the set
automatically switches to standby (from 0 - 240
minutes).
18
Picture-in-Picture
To display a PIP window on the TV screen (see
page 10 on how to use the PIP feature).
19
Programme List
To display / clear the list of programmes.
Use the Î ï keys to select a programme and
the Æ key to display it.
20
OK
Confirms selection.
21
Selecting TV programmes (P – / +)
To select the next or previous programme.
The number and the sound mode
are displayed for a few seconds.
22
Previous/Present
programme
To alternate between the last viewed and
present programme.
11
2
3
5
6
7
8
9
4
10
12
13
14
15
17
18
19
20
21
22
1
16
17
Pixel Plus
Offers a unique combination of ultimate
sharpness, increased depth impression, true
natural detail, brilliant and vivid colours. Press
the key for a Pixel + demonstration
.
Page 9
Remote Control keys (Other functions)
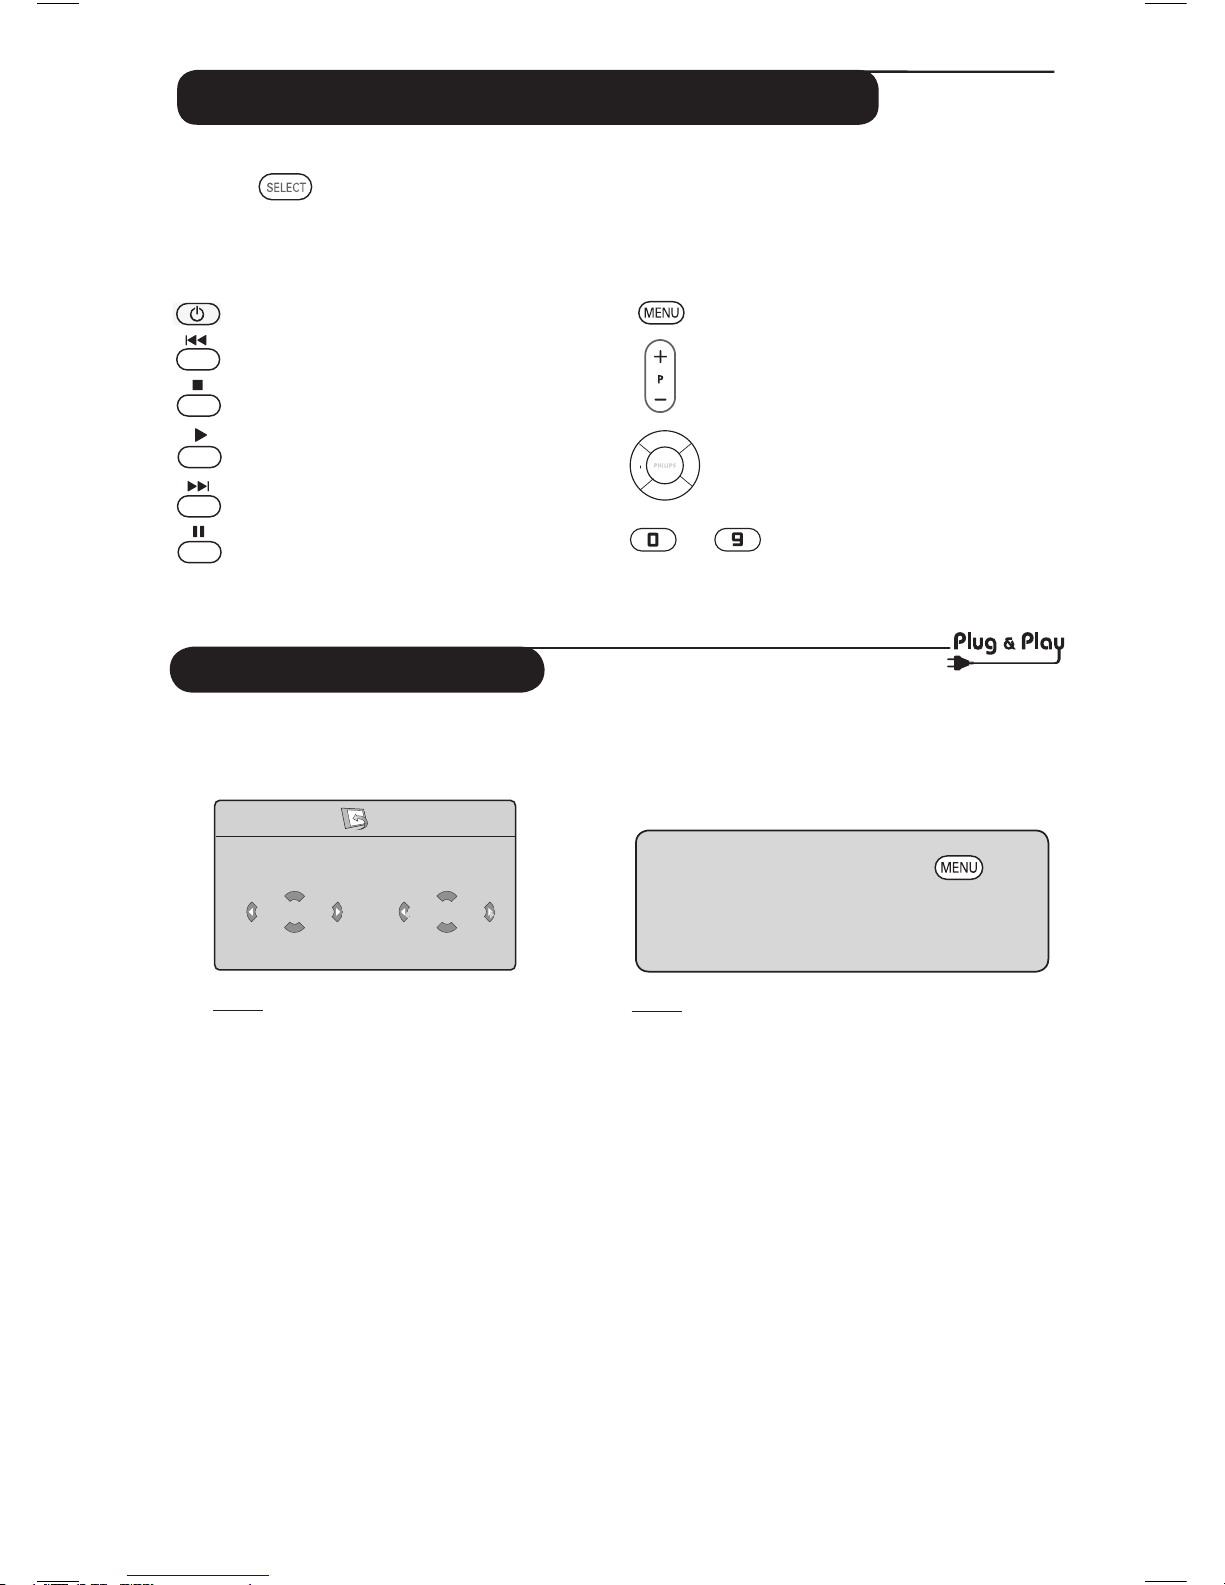
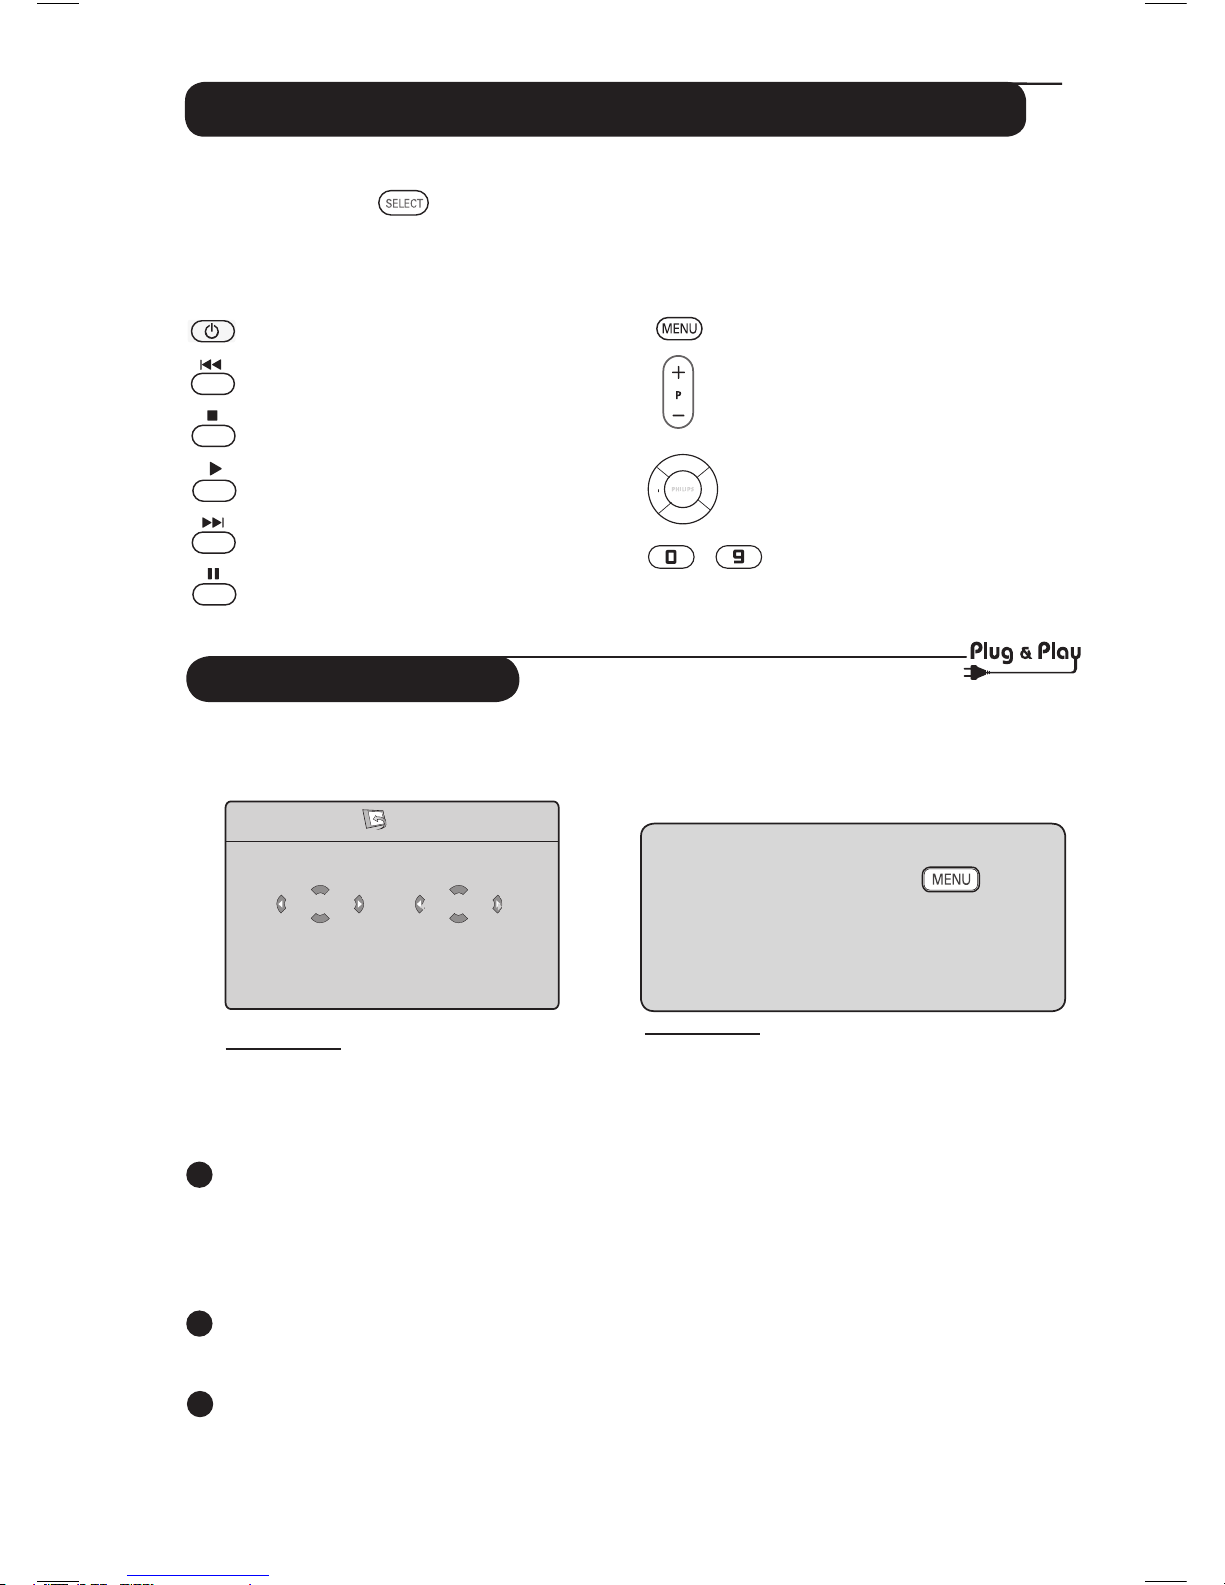
The remote control also allows you to control the main functions of some Philips DVD models.
Press the
key to select the required mode : DVD.
The remote control indicator lights up to display the selected mode. It switches off automatically
after 20 seconds if left idle. The mode automatically returns to TV mode.
The following buttons are operational, depending on the equipment :
to
standby
fast rewind
stop
play
fast forward
pause
display and exit menu
programme selection
navigation and adjustments,
confirms selection
digit keys
NOTE : Functions not available to Philips DVD-R device.
Quick Installation
When you switch on the TV set for the
first time, a menu is displayed on screen.
This menu prompts you to select the
country and language for the menus.
Note
If the above menu is not displayed, proceed to
do the installation of channels by the
Auto Store method (see page 8). If above
menu is displayed, proceed to do the following
steps.
& Use the Î ï keys on the remote control
to select your country. If your country does
not appear in the list, select “. . . “ . Refer to the
“Reference table of Countries available for
selection” on page 20.
é Use the Æ key to move to the Language
mode and select your language by the Î ï
keys.
“ Use the Æ key to start search.
The search starts automatically. All the
available TV programmes will be stored. This
operation takes a few minutes. The display
shows the progress of the search and the
number of programmes found.
Important : To exit or interrupt the search
before it is completed, press the key.
If you interrupt search during auto store, not
all channels will be stored. For all channels to
be stored, you need to do a complete auto
store search again.
Note
ATS (Automatic Tuning System) feature
If the transmitter or cable network sends the
automatic sort signal, the programmes will be
numbered correctly. In this case, the installation
is complete. If this is not the case, you need to
use the Sort menu to number the programmes
correctly.
ACI (Automatic Channel Installation)
feature
If a cable system or a TV channel which
broadcasts ACI is detected, a programme
list appears. Without ACI broadcast, the channels
are numbered according to your language and
country selection. You can
use the Sort menu to renumber them.
Some transmitters or cable networks broadcast their
own sort parameters (region, language, etc.). In this
case, indicate your choice using the Î ï keys and
confirm with Æ key.
Plug’n’Play
Country
GB
Language
English
7
Page 10
8
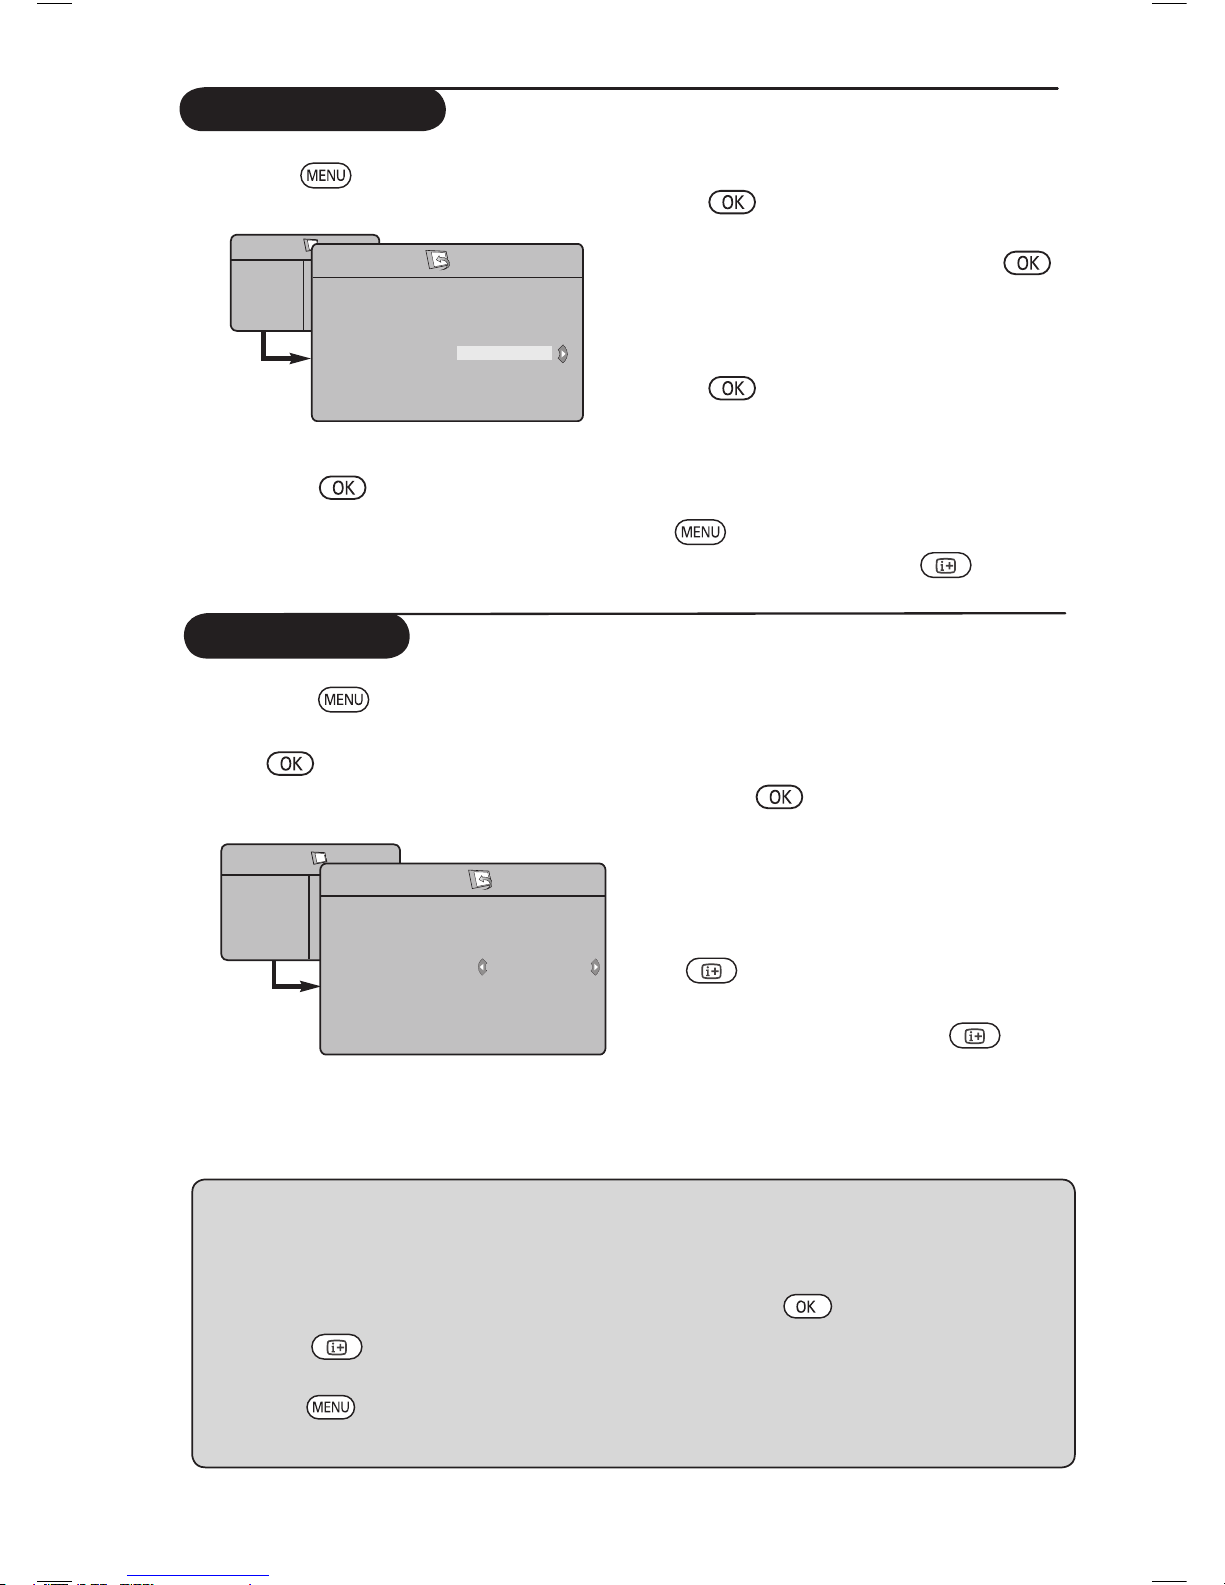
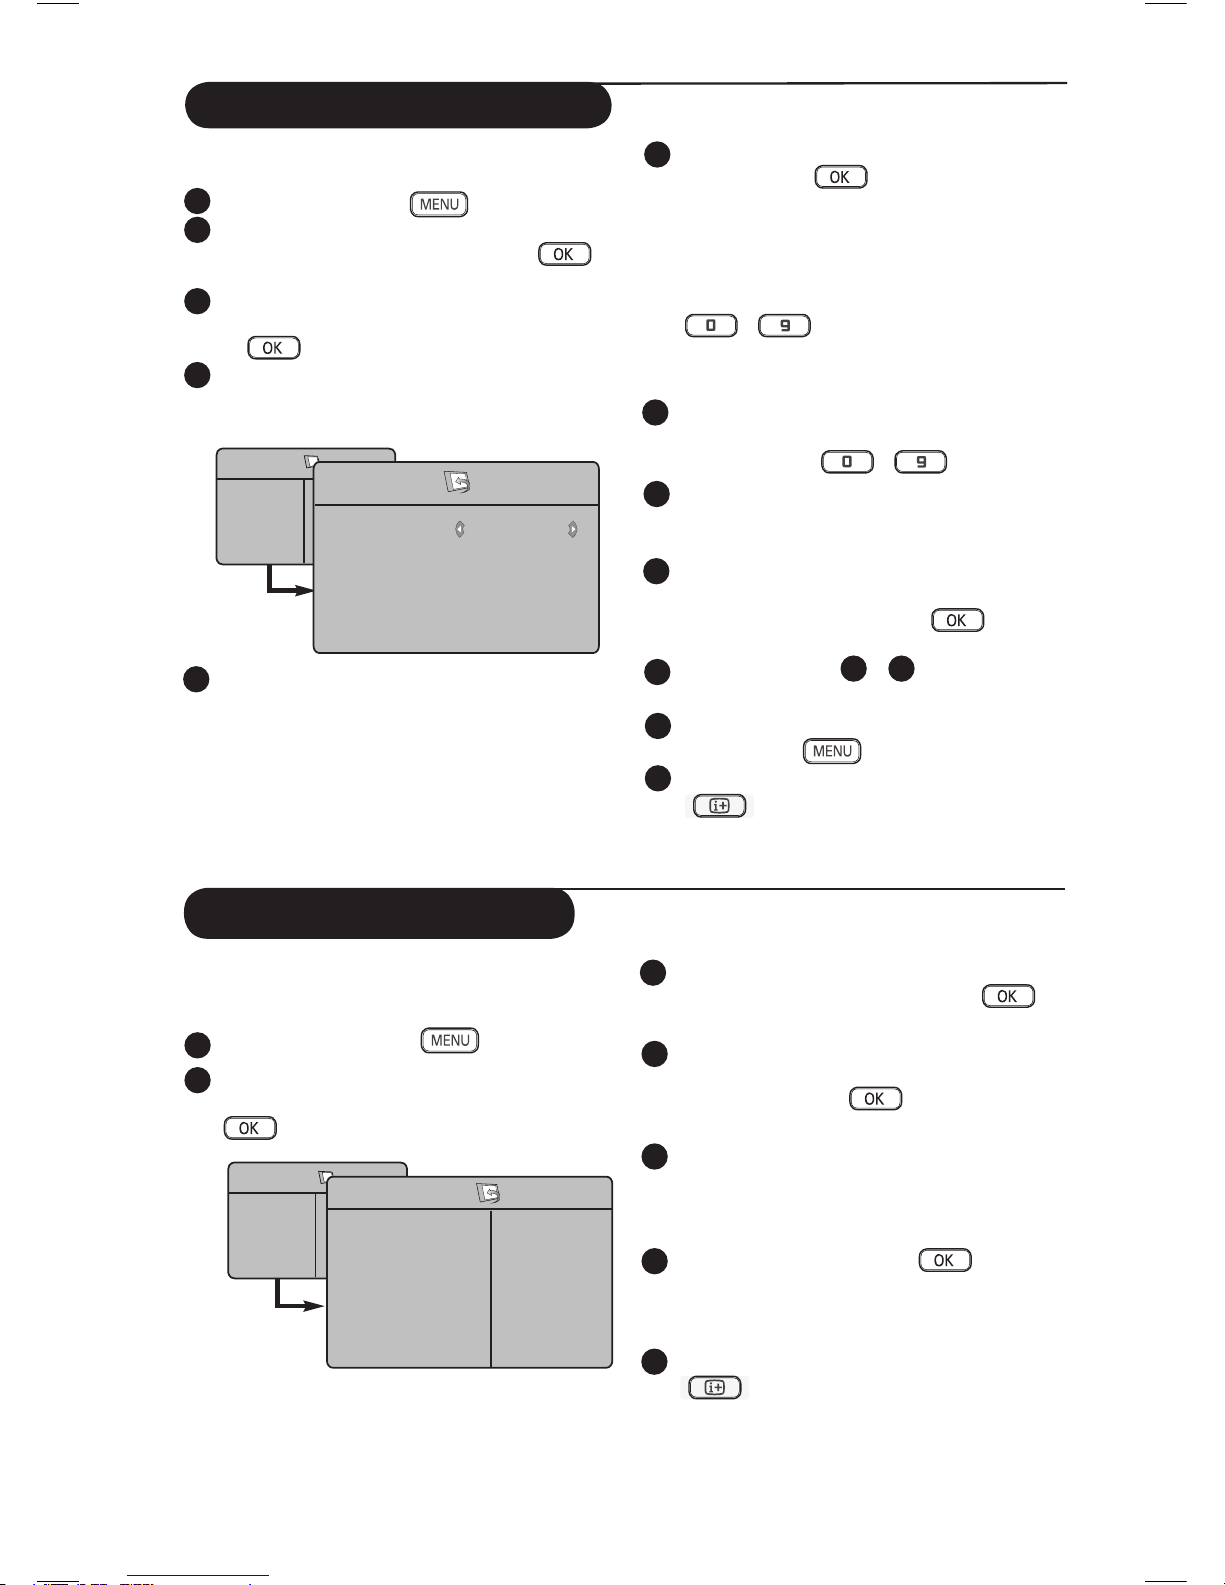
Program Sort
& Press the key. The TV Menu is
displayed on the screen.
é Use the ï key, select the Install menu
and the Æ /
key to enter the Install
menu.
“ Use the ï key to select Sort and the
Æ /
key to enter sort mode.
‘ Select the programme number you want to
move using the Î ï keys and the Æ /
key to enter sorting mode (The arrow
cursor now points to the left).
( Use the Î ï keys to select the new
programme number and confirm with the
Í /
key. (The arrow points to the right
and sorting is completed).
§ Repeat steps ‘ and ( for each
programme number you wish to re-number.
è To return to previous menu, press the
key.
! To exit the menu, press the
key.
TV Menu
Picture
Sound
Features
Install
Install
Language
Country
Auto Store
Manual Store
Sort
Name
Æ • 0
Æ • 1
Æ • 2
Æ • 3
Æ • 4
Æ • 5
Auto Store
& Press the key.
é Using the ï key, select Install and the
Æ /
key to enter the Install menu
(Language is highlighted).
“ Before you proceed to do auto store of
channels, select your desired menu
*Language with the Í Æ keys.
‘ Select Country with the ï key and
use the Í Æ keys to select the country of
your choice.
( Using the ï key, select Auto Store and
the Æ /
key to start automatic
searching of the channels. All the
available TV programmes will be stored.
This operation takes a few minutes. The
display shows the progress of the search
and the number of programmes found.
§ After the search is completed, press the
key to exit menu.
Important : To exit or interrupt the search
before it is completed, press the
key.
If you interrupt search during auto store, not
all channels will be stored. For all channels to
be stored, you need to do a complete auto
store search again.
TV Menu
Picture
Sound
Features
Install
Install
Language
Country
Auto Store
Manual Store
Sort
Name
Search
Æ
Æ
Æ
Æ
Æ
* Selecting the language
If you have selected the wrong language for one
reason or another and do not understand the
language to operate the set, do the following to
bring you back to your preferred language :
– press the
key to exit the existing
menu.
– press the
key to enter the TV menu.
– press the
ï key repeatedly until the
FOURTH item in the TV menu is
highlighted.
– press the
Æ / key to go into the Install
menu.
– press the Í Æ keys to select your preferred
language (the menu will now appear in the
chosen language). You can proceed to install
the TV channels automatically.
Page 11
9
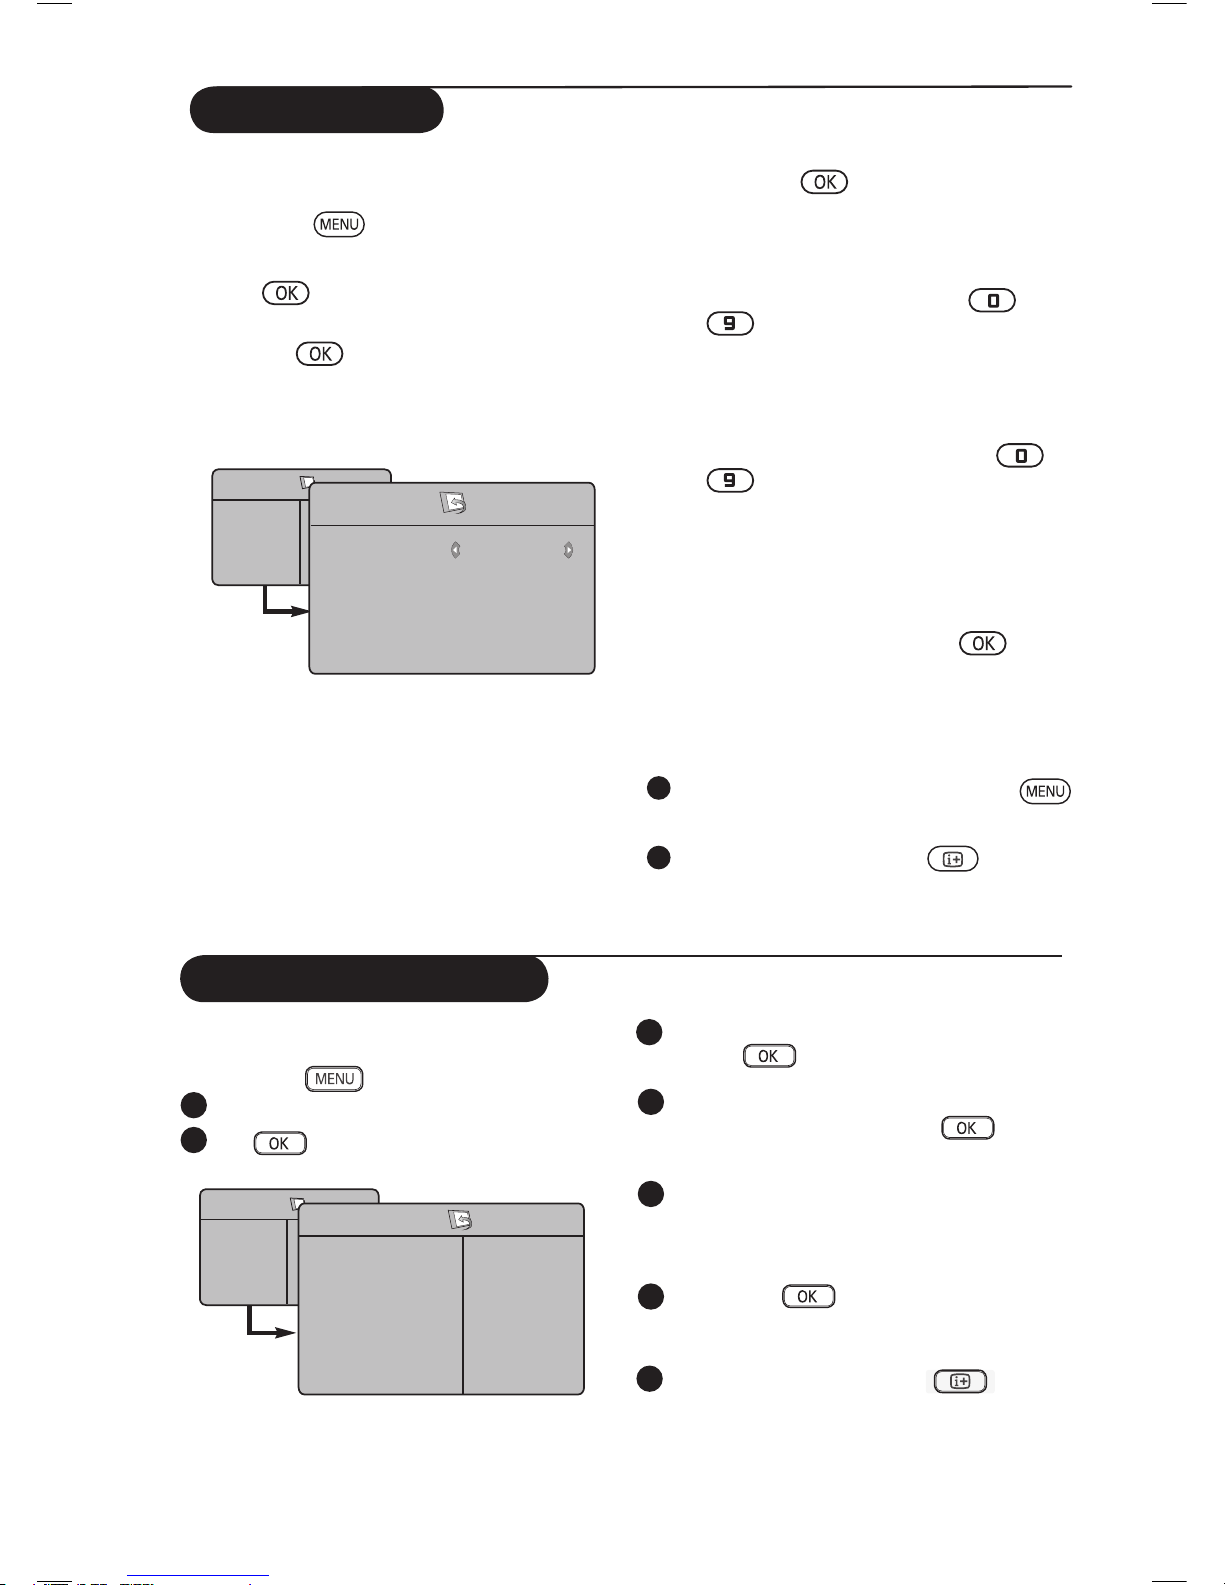
Manual Store
§ Search :
Press the Æ /
key. The search starts.
Once a programme is found, the scanning
stops and its name is displayed (if available).
Go to the next step. If you know the
frequency of the required programme, this
can be entered directly using the
to
keys.
If no picture is found, see “Troubleshooting Tips”
on page 18 and 19..
è Program No. :
Enter the required number with the
to or Í Æ keys.
! Fine Tune :
If the reception is not satisfactory, adjust
using the Í Æ keys.
ç Store :
To store the changes, press Æ /
key .
The programme is now stored.
à Repeat steps § to ç for each programme
to be stored.
11
To return to previous menu, press the
key.
12
To exit the menu, press the key.
( System : Use the Í Æ keys to select
Europe (automatic detection*),
France (LL’ standard),
UK (I standard),
West Europe (BG standard),
East Europe (DK standard). or
* Except for France (LL’ standard), you must
select France.
This menu is used to store the programmes one
at a time.
& Press the key.
é With the ï key, select Install and the
Æ /
key to enter the Install menu.
“ Use the ï key to select Manual Store and
the Æ /
key to enter Manual Store
menu.
‘ Use the Î ï keys to select the items in the
Manual Store menu to adjust or activate.
TV Menu
Picture
Sound
Features
Install
Manual Store
System
Search
Program No.
Fine Tune
Store
Europe
Æ
Æ
Æ
Æ
Naming of Channel
You can give a name to the TV channel.
Press the
key.
With the ï key, select Install and the
Æ /
key to enter the Install menu.
1
3
4
2
Use the ï key to select Name and
the Æ /
key to enter name mode.
Use the Î ï keys to select the programme
you want to name and the Æ /
key to
enter naming mode.
Use the Î ï keys to select the characters
and use the Í Æ keys to move around the
name display area (maximum of 5 characters).
Press Í Æ /
key until the name
appears at the top right hand corner of the
TV screen. The name is now stored.
To exit the menu, press the
key.
5
6
7
TV Menu
Picture
Sound
Features
Install
Install
Language
Country
Auto Store
Manual Store
Sort
Name
8
Æ
Æ
Æ
Æ
Æ
Æ
Page 12
10
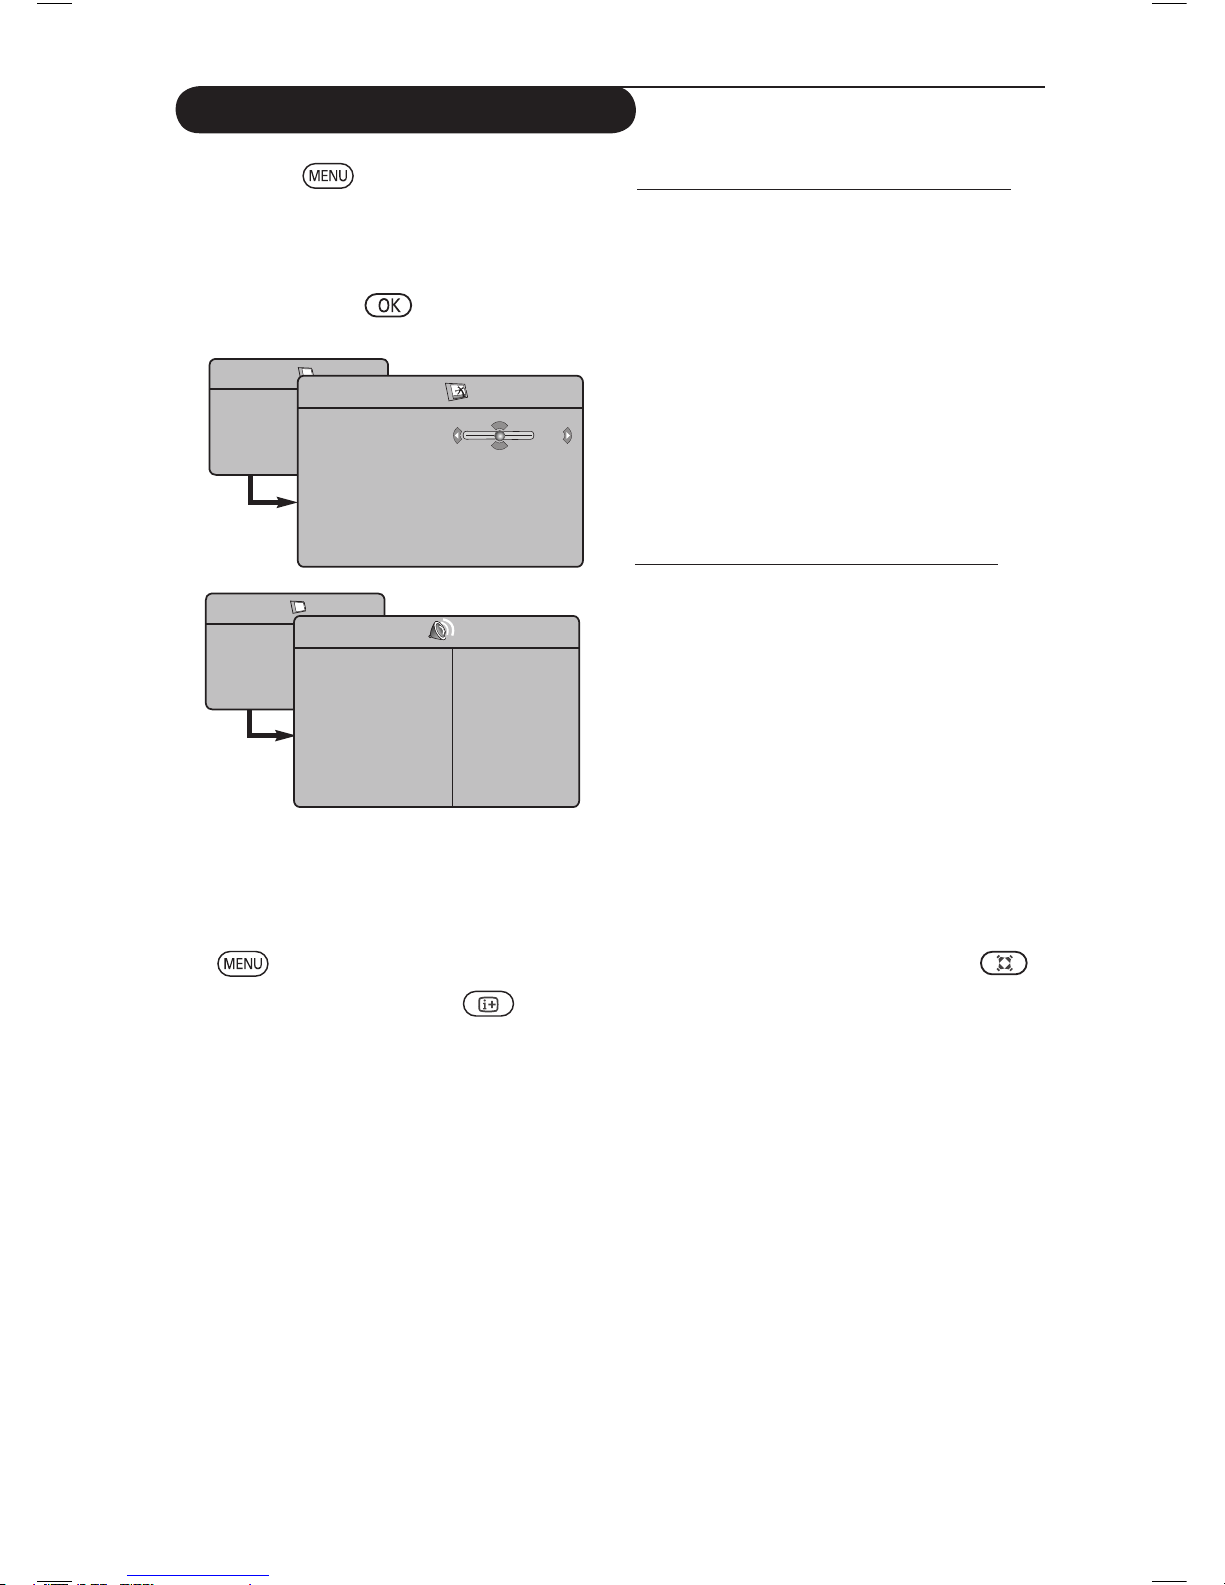
Picture and Sound Settings
& Press the key.
é Use the Î ï keys to select Picture or
Sound.
“ Use the Í Æ / keys to enter
Picture or Sound menu.
‘ Use the Î ï keys to select a Picture or
Sound setting and the Í Æ keys to
adjust.
( To return to previous menu, press the
key.
§ To exit the menu, press the key.
TV Menu
Picture
Sound
Features
Install
Picture
Brightness
Colour
Contrast
Sharpness
Colour Temp.
Store
39
Description of the Picture settings
Brightness : this changes picture brilliance.
Colour : this changes the intensity of the colour.
Contrast : this changes the difference between
the light and dark tones.
Sharpness : this increases or decreases the
sharpness level to improve details in the picture.
Colour Temp. : this changes the colour
rendering: Cool (bluer), Normal (balanced) or
Warm (redder).
Store : to store the picture adjustments and
settings.
Description of the Sound settings
Equalizer : to adjust the sound tone (from bass:
120 Hz to treble : 10 KHz).
Balance : this balances the sound level on the
left and right speakers.
Delta Volume : this is used to compensate
any volume differences between the different
programmes or EXT sockets. Note : Programmes
0 to 40 have individual volume setting and
programmes 41 and above share common setting.
AVL (Automatic Volume Leveller) : this is used
to limit sudden increases in sound, especially on
programme change or advertising slots.
Dolby Virtual : To activate / deactivate the
surround sound effect.
You can also access these settings with the
key.
Store : this is used to store the sound settings.
TV Menu
Picture
Sound
Features
Install
Sound
• 120 Hz
• 500 Hz
• 1500 Hz
• 5 KHz
• 10 KHz
Equalizer Æ
Balance Æ
Delta Voliume Æ
AVL Æ
Dolby Virtual Æ
Store Æ
Page 13
11
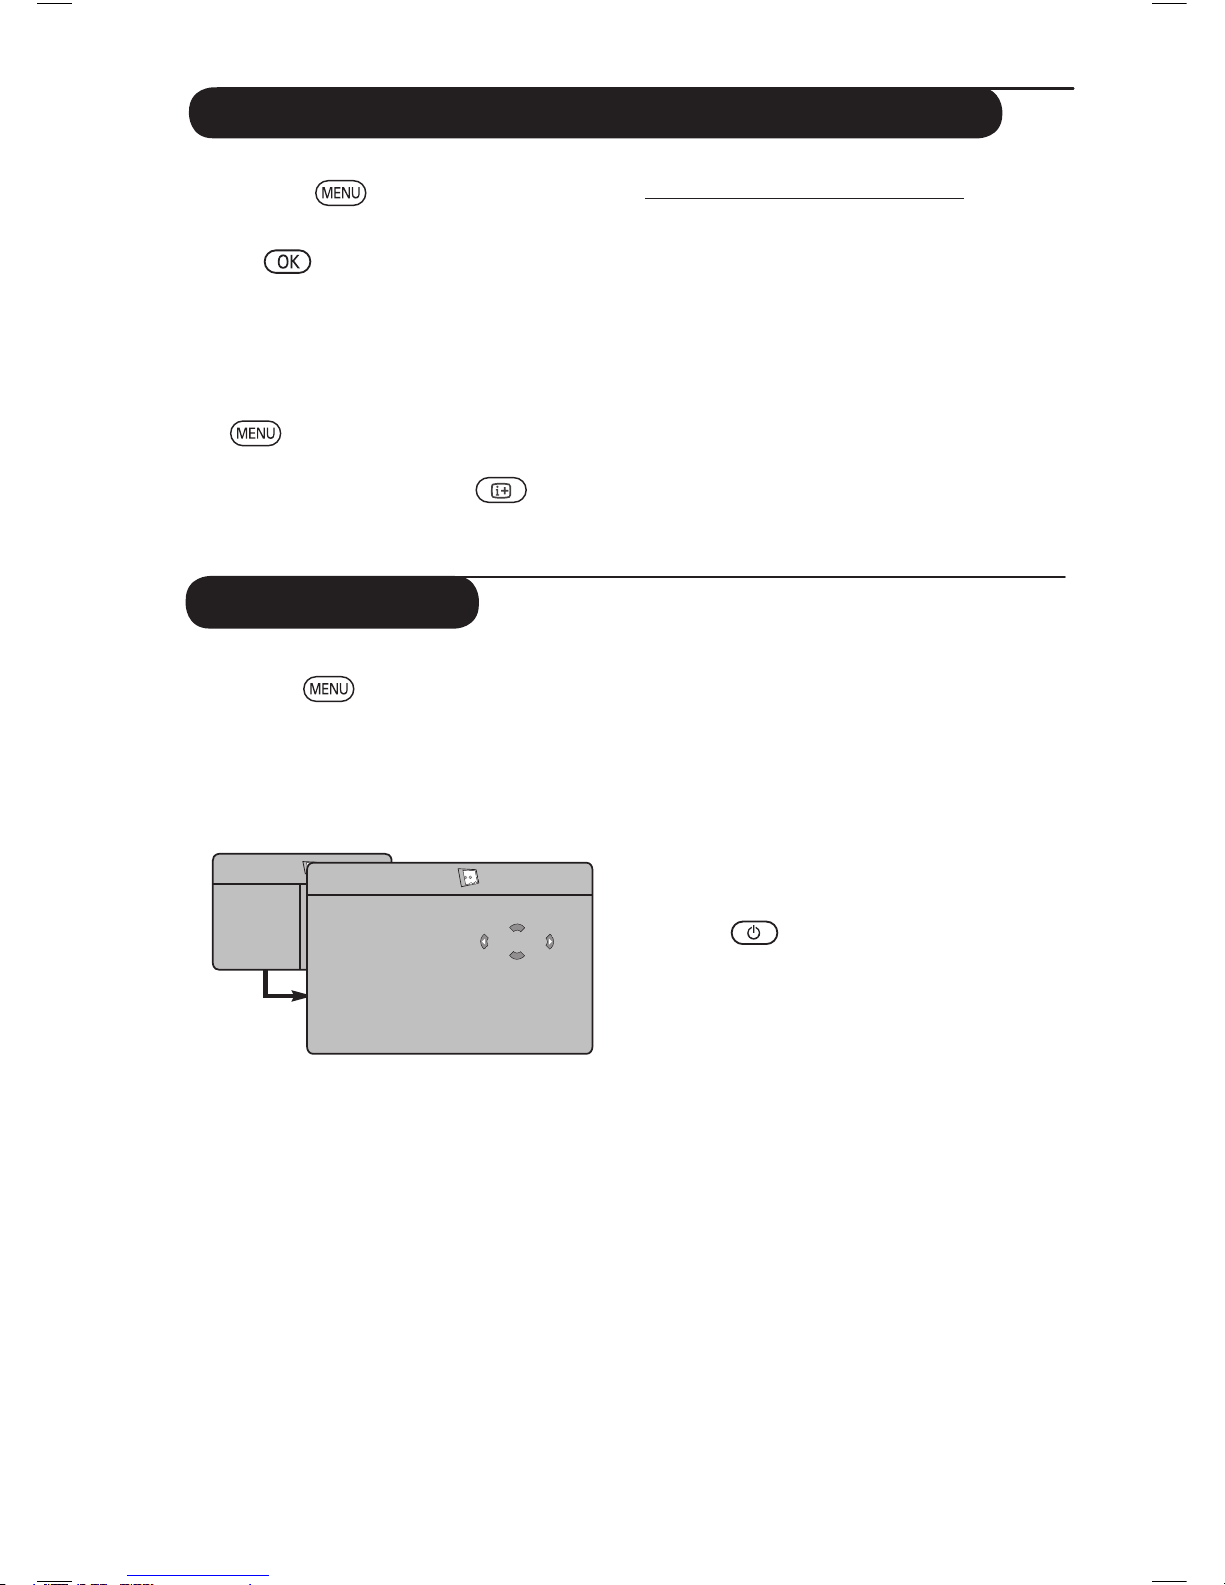
Using the Contrast+ and NR (Noise Reduction) features
& Press the key.
é With the ï key, select Features and the
Æ /
key to enter the Features menu.
“ Use the Î ï keys to select Contrast+ or
NR (Noise Reduction) and the Í Æ keys
to select an On or Off option.
‘ To return to previous menu, press the
key.
( To exit the menu, press the key.
Definition of the feature settings
Contrast+ :
– optimise the total contrast of the picture for
improved picture visibility.
– select On option to activate feature.
NR (Noise Reduction) :
– improves “noisy” picture (little dots on picture)
due to weak signal transmission.
– select On option to activate feature.
This menu lets you use the TV set as an alarm.
& Press the key.
é With the ï key, select the Features menu
then Timer :
“ Sleep: to select an automatic standby period.
‘ Time: enter the current time.
Note: the time is updated automatically
each time the TV set is switched on via the
teletext information on programme 1. If
this programme does not have teletext, the
update will not take place.
( Start Time: enter the start time.
§ Stop Time: enter the standby time.
è Program No.: enter the number of the
programme for the wake-up alarm.
! Activate: the settings include:
• Once for a single alarm,
• Daily for each day,
• Off to cancel.
ç Press
to put the TV set in standby.
It will automatically come on at the time
programmed.
If you leave the TV set on, it will just change
programmes at the time entered (and will
go to standby mode at the Stop Time).
Timer function
TV Menu
Picture
Sound
Features
Install
Timer
Sleep
Time
Start Time
Stop Time
Program No.
Activate
10:56
Æ
Æ
Æ
Æ
Æ
Page 14
12
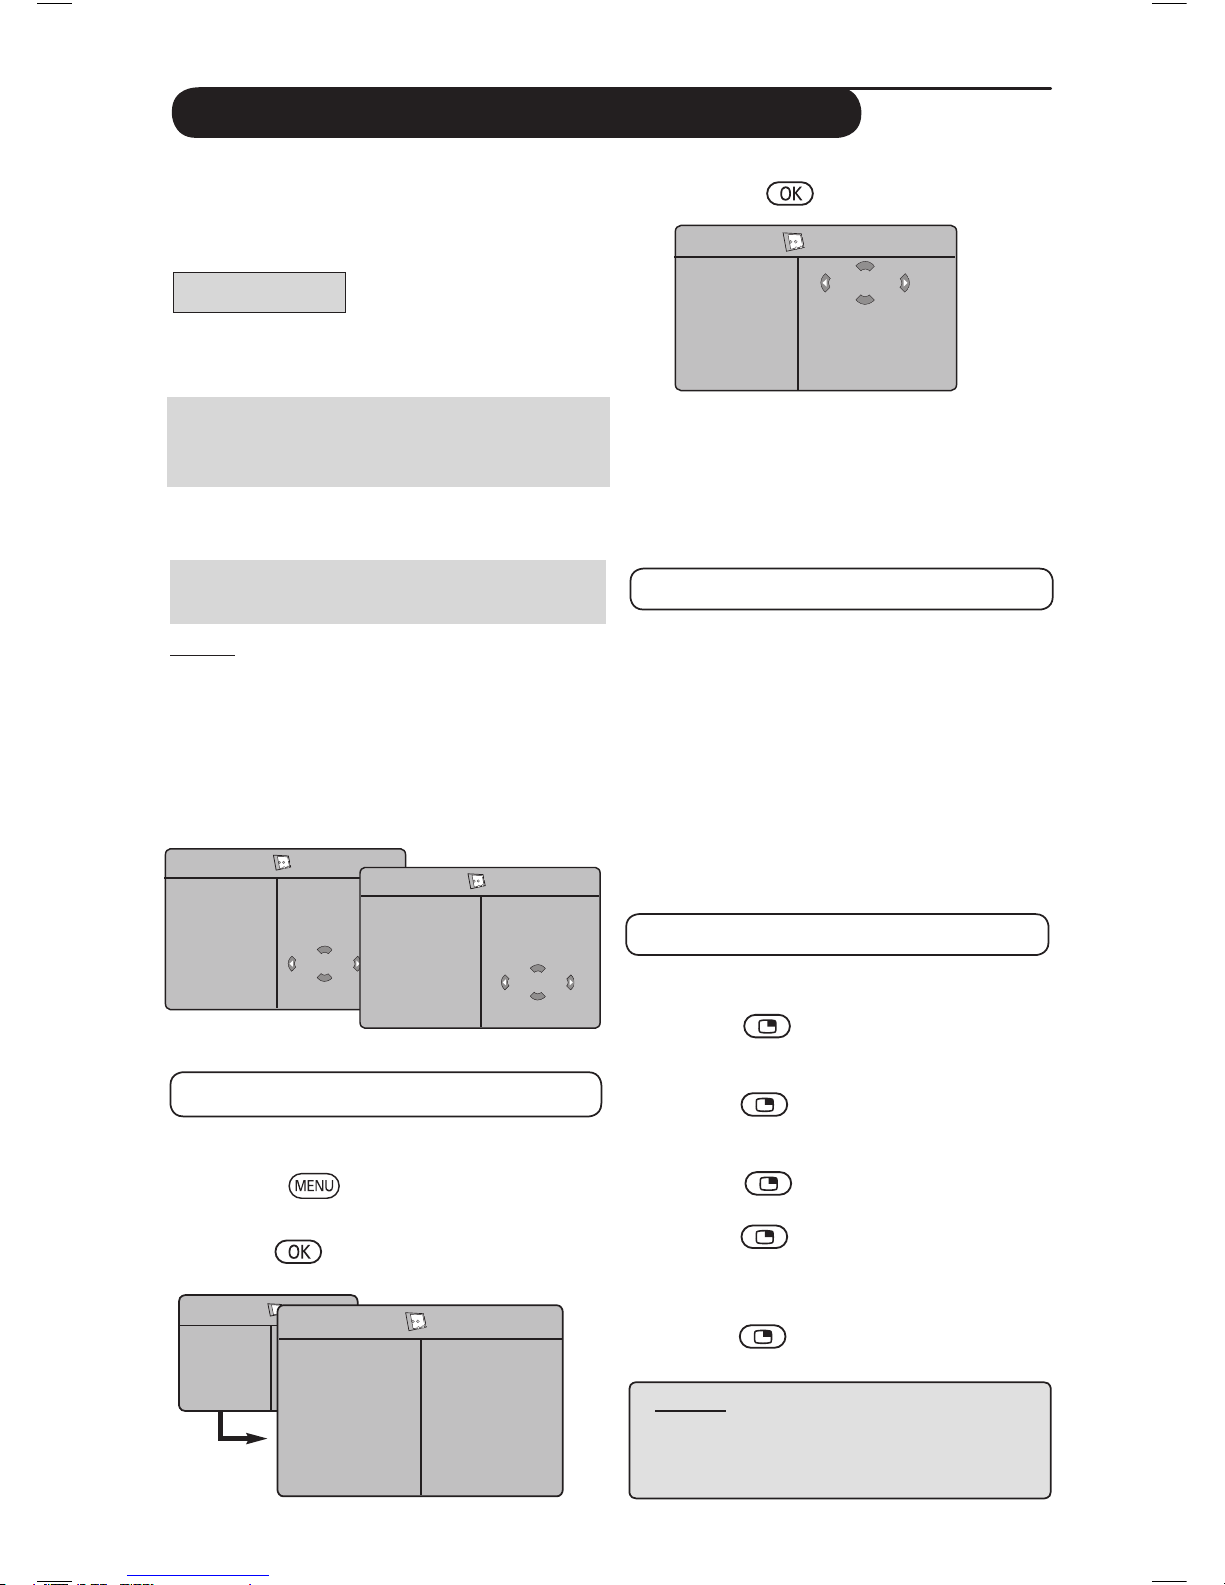
Using the PIP (Picture-in-Picture) feature
“ Use the Î ï keys to select PIP
‘ Use the Æ / key to enter PIP menu.
( Use the Î ï keys to select PIP menu items.
§ Use the Í Æ Î ï keys to access the PIP
menu items, make the following adjustments
or options.
è To exit the PIP screen, select PIP Size.
followed by the Off option.
Definitions of PIP items
PIP Size : Select your PIP size (Off, Small,
Medium, Large and Side-by-
Side).
Horizontal :
Move the PIP screen horizontally
from left to right and vice-versa.
Vertical :
Move the PIP screen vertically
from top to bottom and vice-versa.
HDMI : If HDMI 1 or HDMI 2 are both
connected, you can only select
one source, HDMI 1 or HDMI 2.
Accessing the PIP screen via the PIP
key
Note : This is only possible when PIP signal is
detected.
& Press the
key on the remote control
to display PIP screen. A small PIP screen
will appear on the TV screen.
é Press the key a second time to change
the small PIP screen to a medium PIP screen
size.
“ Press the key a third time to change the
medium PIP screen to large PIP screen size.
‘ Press the
key a fourth time to change
the large PIP screen to a Side-by-Side (a TV
screen on one side and the PIP screen on the
other side).
(
Press the key a fifth time exit PIP screen.
The PIP (Picture-in-Picture) feature allows you
to call up a PIP screen of the PC (Personal
Computer) or HD (High Defintion) device
while watching a TV programme.
IMPORTANT
To call up a PIP screen of the PC equipment,
the following step must be taken :
HDMI 1 or HDMI 2 input MUST be
connected
to the DVI output of the PC equipment. Use a
HDMI/DVI cable to do the connection.
To call up a PIP screen of the HD equipment,
the following steps must be taken :
HDMI 1 or HDMI 2 input MUST be
connected
to the HDMI output of the HD equipment.
NOTE
• While you are watching TV programmes, you
can only call up a PIP screen from only one
source.
• Go to the PIP menu and select HDMI. See
below on how to access the PIP menu.
• Select HDMI 1 or HDMI 2 depending on
connection.
Accessing the PIP screen via the PIP menu
Note : This is only possible when PIP signal
is detected.
& Press the key to display main menu.
é With the Î ï key, select Features and
the Æ /
key to enter the Features
menu.
TV Menu
Picture
Sound
Features
Install
Features
Timer
Contrast+
NR
PIP
Mode Selection
Æ
Æ
Æ
Æ
Æ
• PIP Size
• Horizontal
• Vertical
• HDMI
PIP
PIP Size
Horizontal
Vertical
HDMI
Æ
Æ
Æ
Æ
Off
NOTE
For more details on connections
to the PC and HD equipment,
see
CONNECTION GUIDE.
PIP
PIP Size
Horizontal
Verti
cal
HDMI
Æ
Æ
Æ
Æ
HDMI-1
PIP
PIP Size
Horizontal
Verti
cal
HDMI
Æ
Æ
Æ
Æ
HDMI-2
Page 15

13
Screen Formats
The pictures you receive may be transmitted in 16:9 format (wide screen) or 4:3 format (conventional
screen). 4:3 pictures sometimes have a black band at the left and right of the screen. This function
allows you to optimise the picture display on screen.
Press the
key (or Í Æ) to select the different modes. This TV set is also equipped with
automatic turning which will select the correct-screen format, provided the specific signals are
transmitted with the programmes.
4:3
The picture is reproduced in 4:3 format and a black band is displayed
on either side of the picture.
Movie expand 14:9
The picture is enlarged to 14:9 format, a thin black band remains on
both sides of the picture.
Movie expand 16:9
The picture is enlarged to 16:9 format. This mode is recommended
when displaying pictures which have black bands at the top and bottom
(letterbox format).
Subtitle Zoom
This mode is used to display 4:3 pictures using the full surface of the
screen leaving the sub-titles visible.
Superzoom
This mode is used to display 4:3 pictures using the full surface of the
screen by enlarging the sides of the picture.
Widescreen
The picture is displayed in the correct proportions of images
transmitted in 16:9.
Note: If you display a 4:3 picture in this mode, it will be enlarged
horizontally.
Page 16
14
Using the Smart Picture and Sound features
Using the Active Control feature
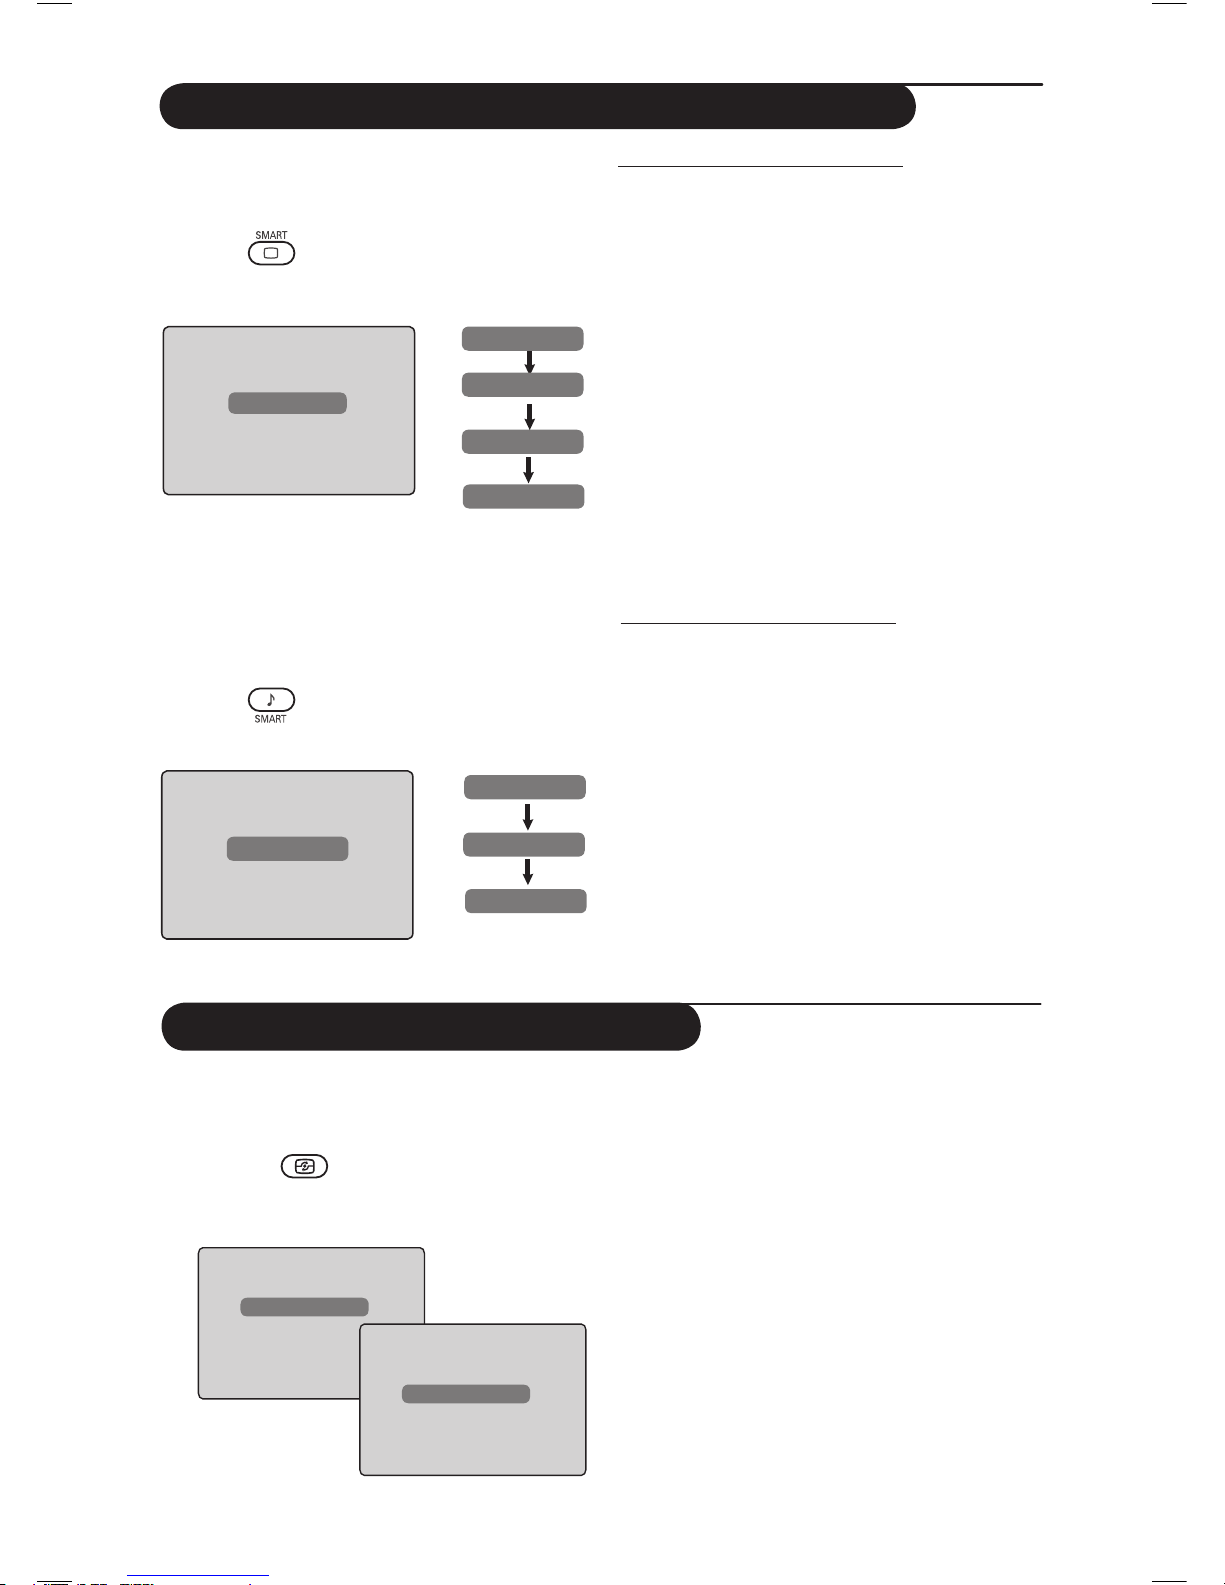
Active Control feature automatically adjusts
the picture setting for optimal picture quality
continuously under any signal conditions.
& Press the key repeatedly to toggle
between Active Control Off and Active
Control
On options.
Active Control On
Active Control Off
é Select the Active Control On option to
activate the Active Control feature.
“ Select the Active Control Off option to
deactivate the Active Control feature.
Smart Picture feature offers you a choice of 5
picture settings namely : Rich, Natural, Soft,
Multimedia and Personal.
Press the
button repeatedly to cycle
through the settings to select your desired mode.
Smart Sound feature offers you a choice of 4
sound settings namely : Theatre, Music, Voice,
and Personal.
Press the
button repeatedly to cycle
through the settings to select your desired mode.
Rich
or
Personal
Multimedia
Natural
Soft
Theatre
or
Music
Voice
Personal
Definition of Picture Settings
Rich : Brilliant and sharp picture settings
suitable for bright environment and
for use in demonstrations to show
off the quality of the TV on good
sources.
Natural : Reference mode for living room
conditions and average signals.
Soft : Intended for bad-quality signals.
Suitable for living room viewing.
Multimedia : Best for graphical applications.
Personal : Pictures settings are set to your
preference.
Definition of Sound Settings
Theatre : Emphasize sensation to action (Bass
and Treble boosted).
Music : Emphasize low tone (Bass boosted).
Voice :
Emphasize high tone (Treble boosted).
Personal : Sound settings are set to your
preference.
NOTE : The Personal setting is the setting that
you set up using the Picture/Sound menu in the
main menu. This is the only setting in the Smart
Picture/Sound settings that can be changed. All
other settings are pre-set at the factory.
Page 17

15
Teletext
Teletext is an information system broadcast by certain channels which can be consulted like a newspaper.
It also offers access to subtitles for viewers with hearing problems or who are not familiar with the
transmission language (cable networks, satellite channels, etc.).
This is used to switch on or off teletext display. The
summary appears with a list of items that can be accessed.
Each item has a corresponding 3 digit page number. If
channel selected does not broadcast teletext, the
indication 100 will be displayed and the screen will remain
blank. Proceed to exit teletext and select another channel.
Enter the number of the page required using the 0 to 9
keys or P –/+ keys. Example: page 120, enter 120. The
number is displayed at the top left corner of the screen.
When the page is located, the counter stops searching.
Repeat this operation to view another page.
If the counter
continues to search, this means that the page is not
transmitted. Select another number.
Coloured areas are displayed at the bottom of the
screen. The 4 colour keys are used to access the items or
corresponding pages. The coloured areas flash when the
item or the page is not yet available.
This returns you to the contents page (usually page 100).
Certain pages contain sub-pages which are automatically
displayed successively. Press the
key to hold sub-page
and press the key a second time to resume. Use the
Í Æ
keys to select previous or next sub-page.
No Function. Not applicable.
To display or hide the concealed information (games
solutions).
This allows you to display the top or bottom part of the
page. Pressing it again will return the page to normal size.
Instead of the standard coloured areas displayed at the
bottom of the screen, you can store 4 favourite pages on
the first 40 channels which can then be accessed using the
coloured keys (red, green, yellow, blue). Once set, these
favourite pages will become the default every time teletext
is selected
.
&
Press the key to change to favourite
pages mode.
é
Use the / keys to enter the teletext
page that you want to store as a favourite page.
“
Press and hold the colour key of your choice for
about 5 seconds. The page is now stored.
‘
Repeat steps 2 to 3 with the other coloured keys.
(
To exit favourite page mode, press the key.
§
To exit teletext mode, press the key.
NOTE : To clear favourite pages, press and hold
key for about 5 seconds.
&
Teletext call
é
Selecting a page
“
Direct access to
the items
‘
Contents
(
Sub-page display
§
Double page
teletext
è
Hidden
information
!
Enlarge
a page
ç
Favourite pages
/
/
3
1
2
2
4
5
6
8
7
9
9
9
9
9
Page 18
16
Using the TV as a PC Monitor
PIP
PIP Size
Horizontal
Verti
cal
HDMI
Æ
Æ
Æ
Æ
HDMI
Í
No Selection
Supported PC Resolutions
640 x 480, 60 Hz 800 x 600, 72 Hz
640 x 480, 67 Hz 800 x 600, 75 Hz
640 x 480, 72 Hz 1024 x 768, 60 Hz
640 x 480, 75 Hz 1024 x 768, 70 Hz
800 x 600, 56 Hz 1024 x 768, 75 Hz
800 x 600, 60 Hz
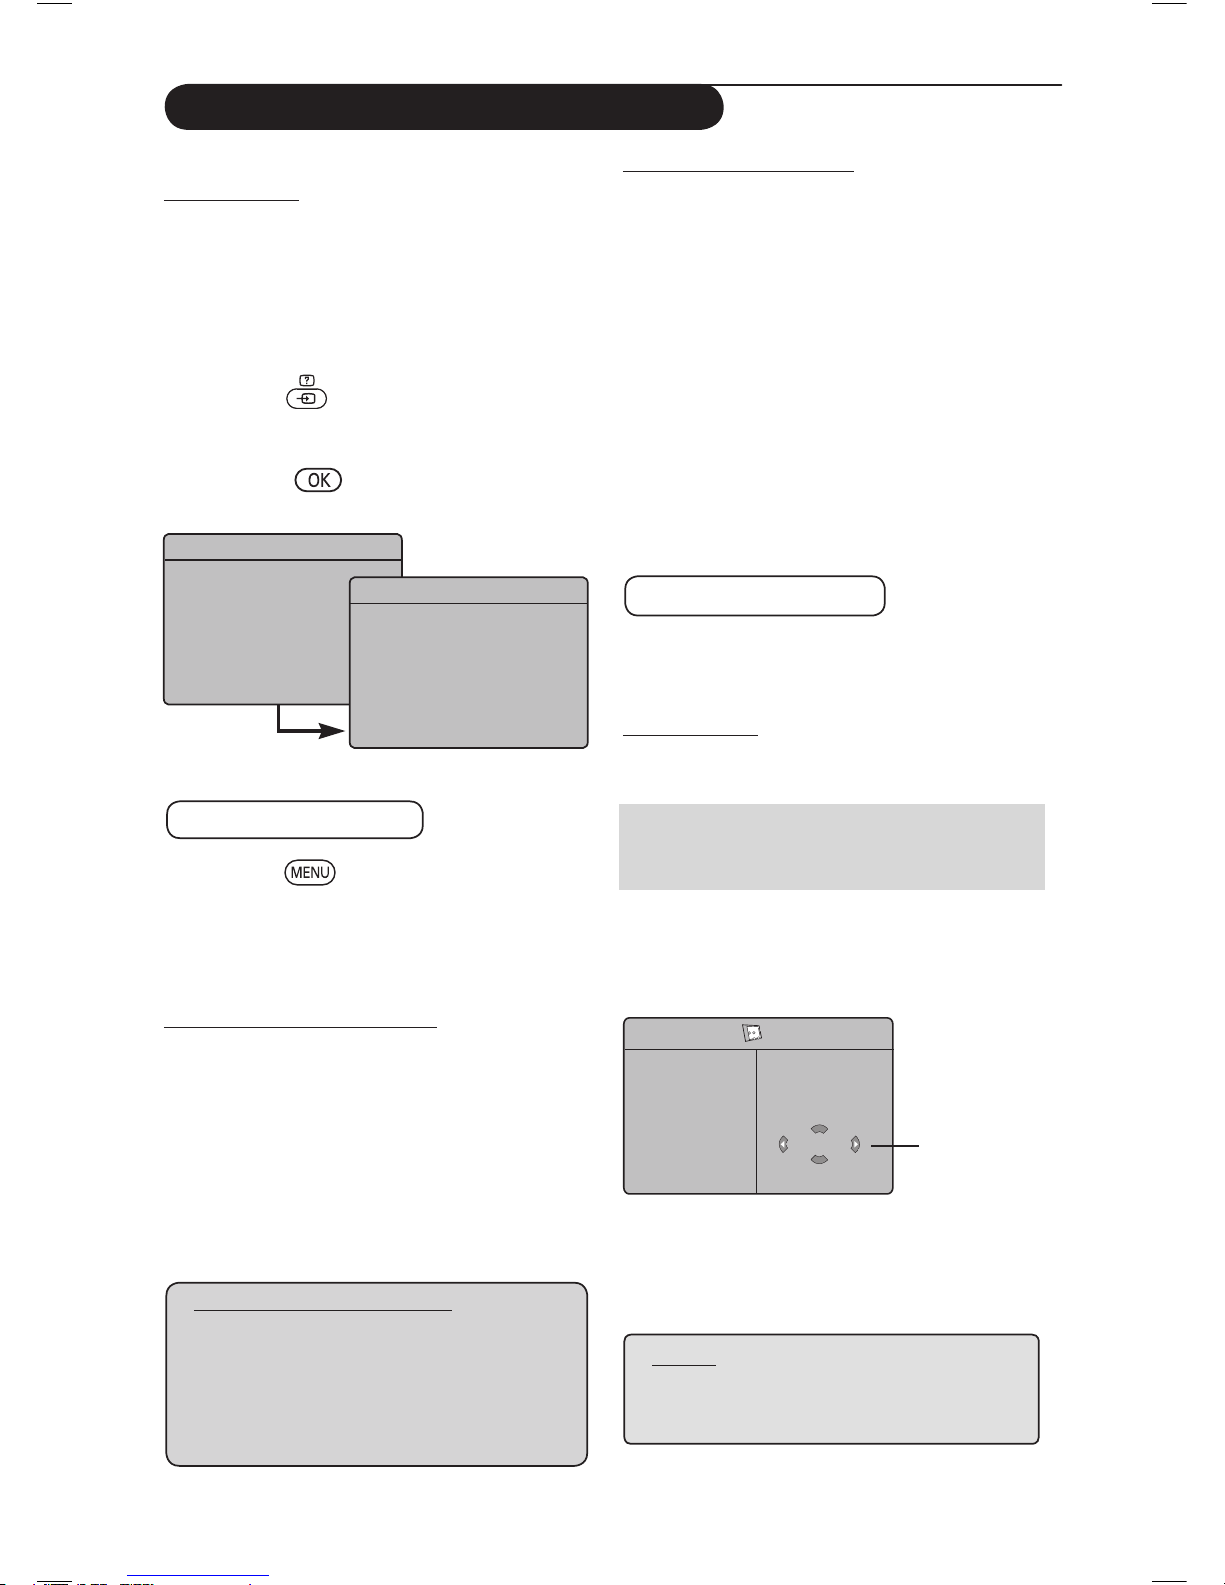
Your TV can be used as a computer monitor.
IMPORTANT
For the TV to function as PC monitor, the
following steps must be taken :
& HDMI 1 or HDMI 2 input MUST be
connected to the DVI output of the PC.
Use a DVI to HDMI adaptor to do the
connection.
é Press the (AV)
key to display Source
List and
use the Î ï key to select HDMI 1 or
HDMI 2
.
“
Use the Æ
/
key to switch to the selected
source
.
Using the PC menus
&
Press the key to display the PC menu.
é Use the Î ï key to access the settings
and the Í Æ key to select or adjust setting
(the settings are automatically saved):
Description Picture settings
Brightness / Contrast :
– Adjusts the brightness and contrast.
Colour Temp :
– Changes the colour rendering : Cool (bluer),
Normal (balance) or Warm (redder).
Audio Selection :
– Chooses the sound reproduced on the TV (PC
or TV).
Description of Features
Format :
– Chooses between full screen or native format
of the PC screen.
PIP (Picture-in Picture) :
– Displays a PIP screen to watch TV programmes
at the same time.
* Mode Selection :
– When you connect PC or HD equipment
supporting resolutions of 480p, 576p or
720p, the Mode Selection in the Features
menu will be highlighted. This will allow you to
select between the PC and HD mode. If
it does not support the 480p, 576p or 720p
resolutions, you cannot access this function.
Using the PIP feature
The PIP (Picture-in-Picture) feature allows you to
call up a PIP screen of a TV programme while you
are in PC mode.
IMPORTANT
To call up a PIP screen of the TV programme,
the
following step must be taken :
HDMI-1 or HDMI-2 input MUST be connected
to the DVI output of the PC equipment. Use a
HDMI to DVI adaptor cable to do the connection.
The PIP menu items : PIP Size, Horizontal
and Vertical works in exactly the same way as
when calling a PIP screen in TV mode. Except for
HDMI, there is no selection for other source.
For description of PIP menu items and how it
works, refer to the section on “Using the PIP
(Picture-in Picture) Feature” page 12.
Source
TV
Æ
EXT 1
EXT 2 / SVHS2
EXT 3 / SVHS3
EXT 4
HDMI 1
HDMI 2
Source
TV
EXT 1
EXT 2 / SVHS2
EXT 3 / SVHS3
EXT 4
HDMI 1
Æ
HDMI 2
NOTE
For more details on connection to the
PC equipment,
see CONNECTION
GUIDE.
Page 19
17
Using the TV in HD (High Definition) Mode
HD Mode
The HD (High Definition) mode allows you to
enjoy clearer and sharper pictures if you are
using a HD equipment that can transmit high
definition programming.
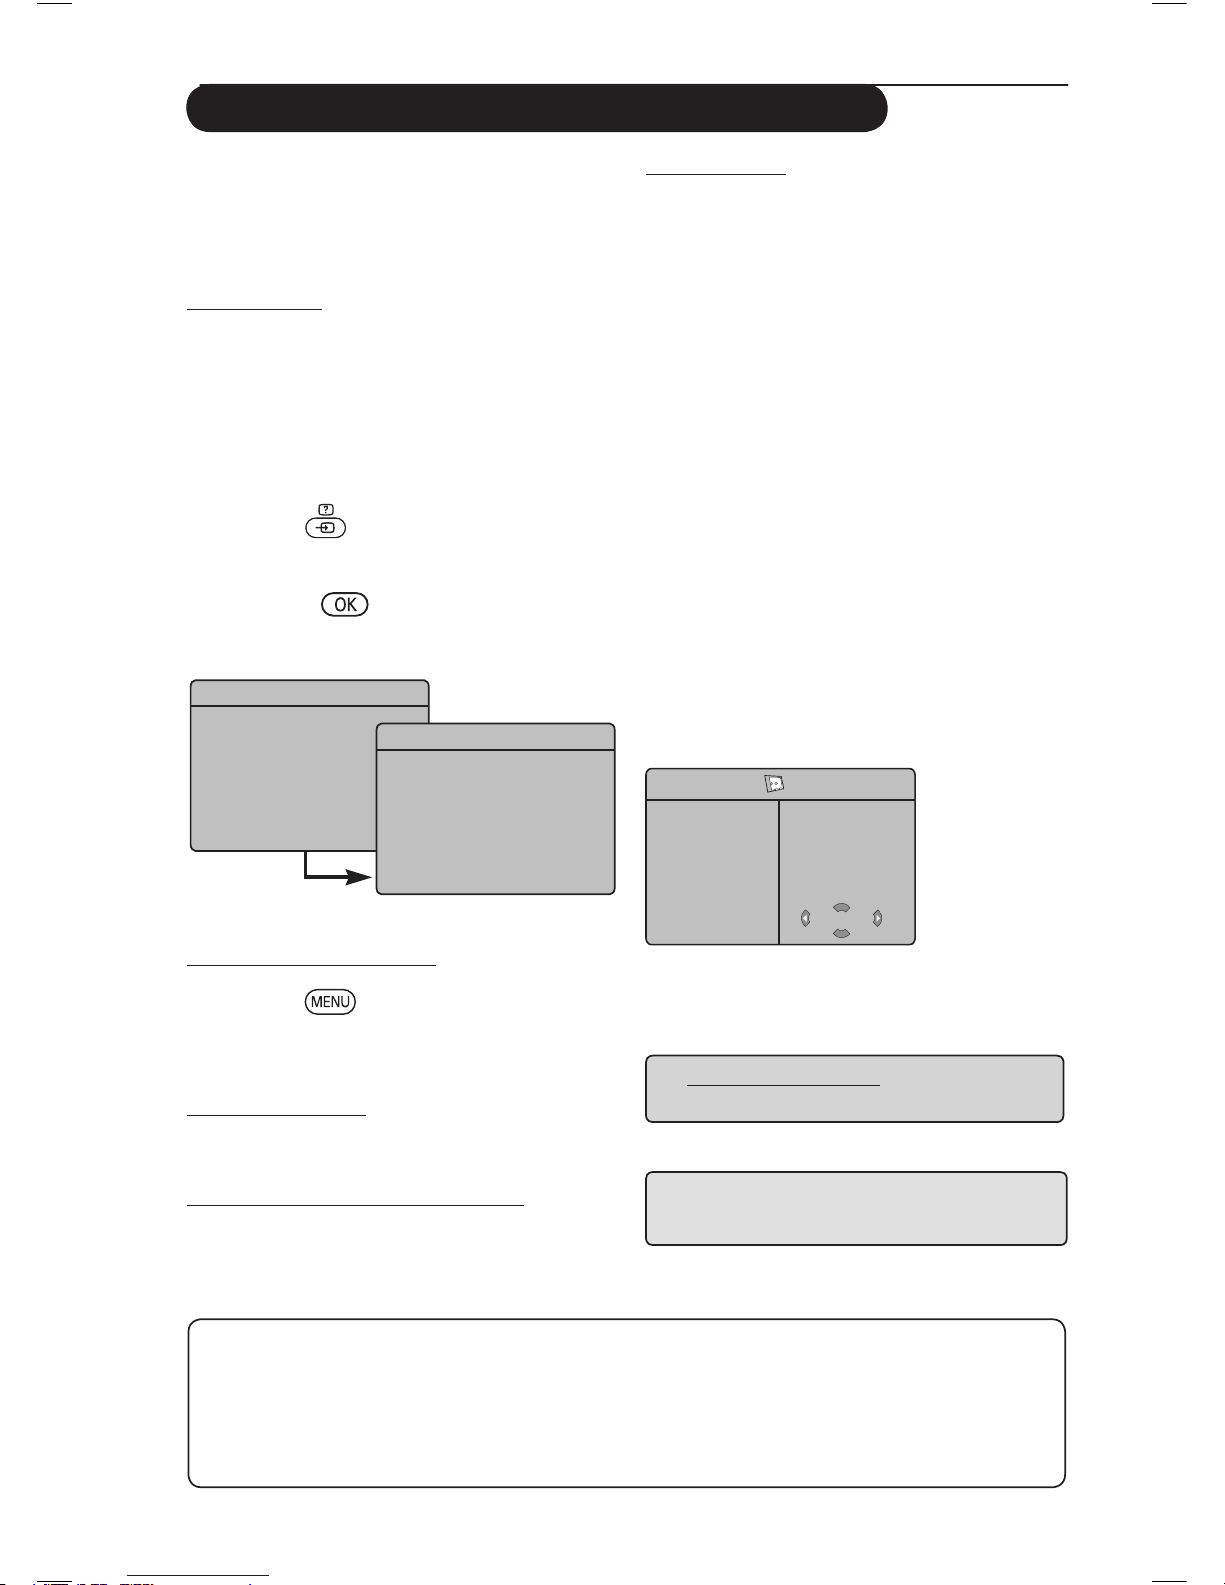
IMPORTANT
For the TV to function in HD mode, the
following steps must be taken :
& HDMI 1 or HDMI 2 input MUST be
connected to the HDMI/DVI output of the
HD
equipment
. Use a HDMI to DVI adaptor if DVI
is connected.
For more information, refer
to Connection Guide.
é Press the (AV)
key to display Source List
and
use the Î ï key to select HDMI 1 or
HDMI 2
.
“
Use the Æ
/
key to switch to the selected
source
.
Using the HD menus
&
Press the key to display the HD menu.
é Use the Î ï key to access the settings
and the Í Æ key to select or adjust setting.
HD Install menu
Note : You cannot access Install in the HD
menu There is NO Install function in HD mode.
HD Picture and Sound settings
Functions of HD Picture and Sound settings are
the same as the TV Picture and Sound settings
and work in exactly the same way as the TV
Picture and Sound settings (see page 10).
HD Features
Timer : Functions of the Sleeptimer and Timer are
the same as the TV Sleeptimer and Timer functions
and work in exactly the same way as the TV
Sleeptimer and Timer functions (see page 11).
PIP : Display a PIP screen to watch TV
programmes at the same time. The PIP menu
items : PIP Size, Horizontal and Vertical work
in exactly the same way as when calling a PIP
screen in TV mode.
For description of PIP menu items and how it
works, refer to the section on “Using the PIP
(Picture-in Picture) Feature” pag
e 12.
* Horizontal Shift : Adjust the horizontal
position of the image.
* Mode Selection : When you connect PC or
HD equipment supporting resolutions of 480p,
576p or 720p, the Mode Selection in the
Features menu will be highlighted. This will allow
you to select between the PC and HD mode.
If it does not support the 480p, 576p or 720p
resolutions, you cannot access this function.
Æ
Æ
Æ
Æ
HD
Features
Timer
Contrast+
NR
PIP
Horizontal Shift
Mode Selection
NOTE :
For more details on connection to the
HD equipment,
see CONNECTION GUIDE.
Supported HD format
480p 576p 720p 1080i
Your Philips TV is HDMI compliant. If you do not get a good picture, please change the video
format on your device (DVD player, cable set-top box, etc.) to a standard format. For example,
for DVD player, select
480p, 576p, 720p or 1080i. For PC, select 640 x 480, 800 x 600 or
1024 x 768. If the problem persists, please refer to your PC user manual on possible software
upgrades to your graphics card.
Please note that this is not a defect of the TV set.
Source
TV
Æ
EXT 1
EXT 2 / SVHS2
EXT 3 / SVHS3
EXT 4
HDMI 1
HDMI 2
Source
TV
EXT 1
EXT 2 / SVHS2
EXT 3 / SVHS3
EXT 4
HDMI 1
Æ
HDMI 2
Page 20
18
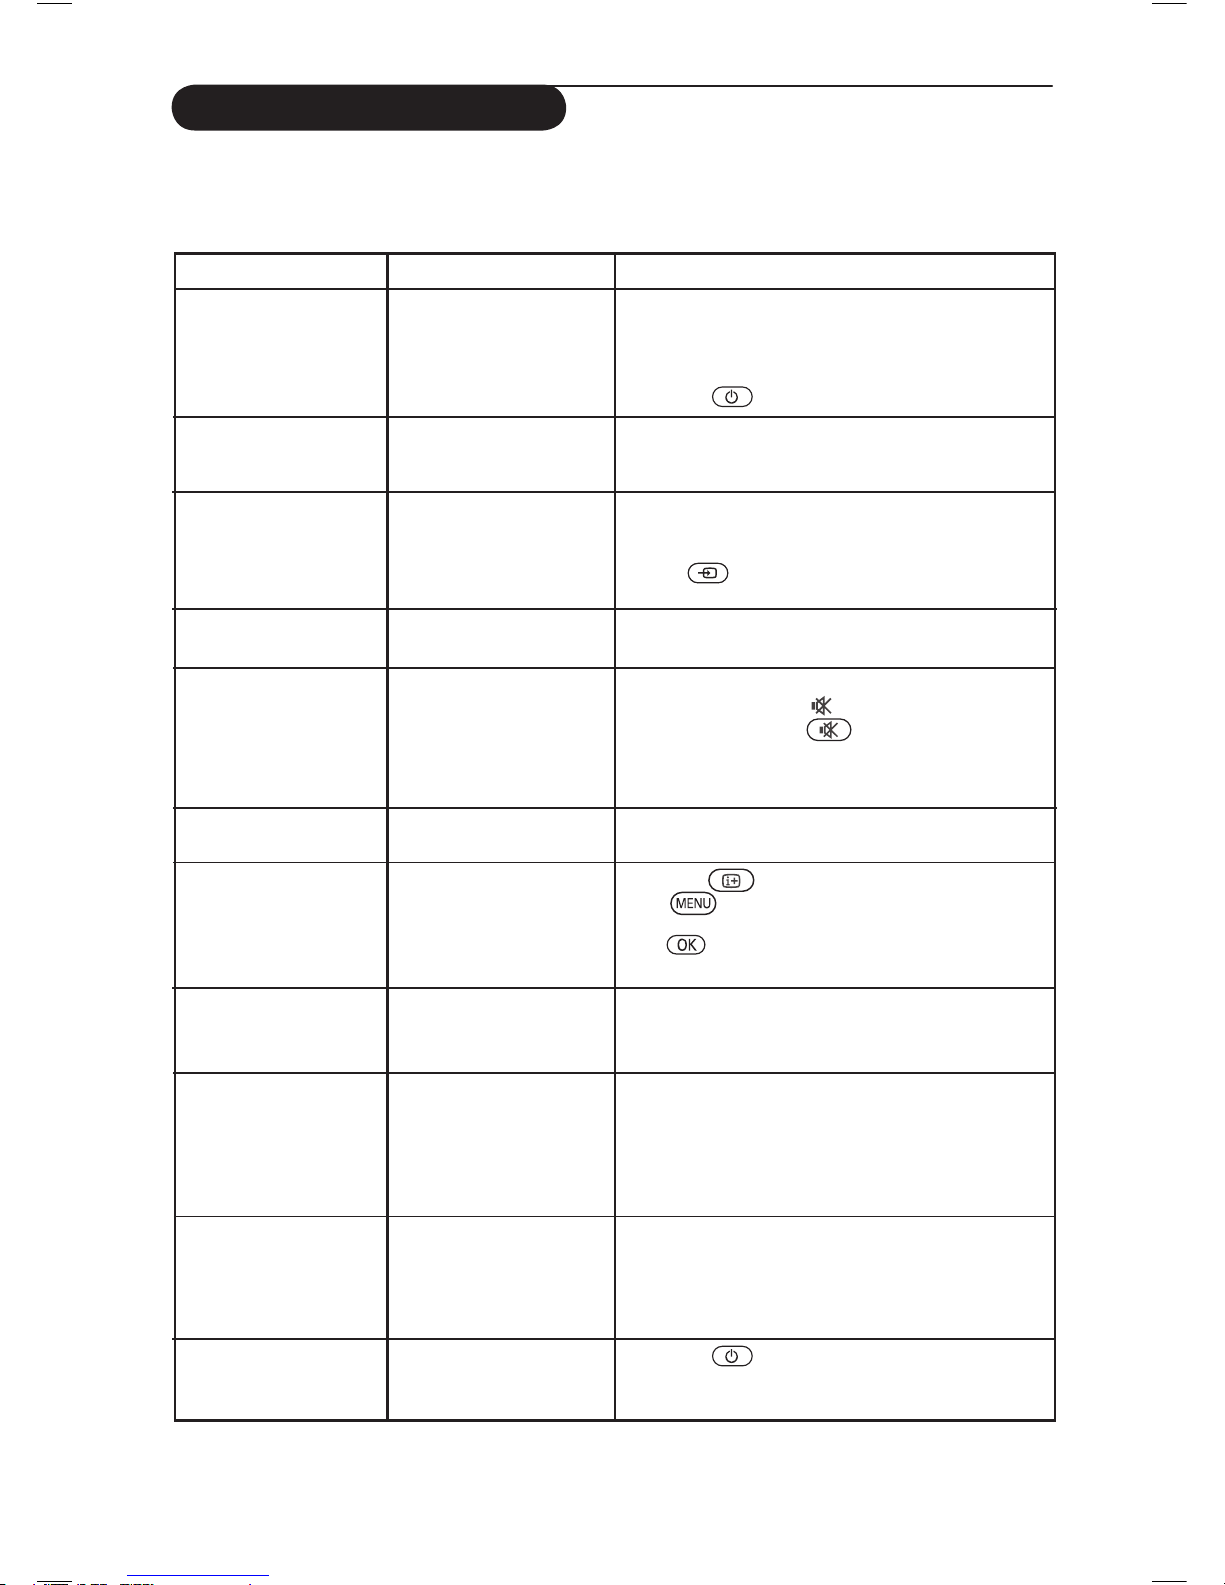
Troubleshooting Tips
Below is a list of symptoms you may encounter with your TV. Before you call for service, make these
simple checks.
Symptom Possible Causes What you should do
No display on screen • Faulty power supply • Check whether power cord is properly connected
• TV’s Power not turned into the mains socket and to your TV. If there is still
on no power, disconnect plug. Wait for 60 seconds
and re-insert plug. Switch on TV again.
• Press the
key on the remote control.
Poor reception • Faulty antenna connection • Check antenna connection at rear of TV.
(snowish picture and
• Weak transmission • Try manually adjusting your picture (refer to page 9).
noise
• Wrong TV system •
Have you chosen the right TV system? (refer to page
9).
No picture • Faulty aerial and cable • Check whether euroconnector cables or aerial
sockets are properly connected.
• Wrong source selected • Check whether the source is correctly selected.
Press (AV) button to enter Source list and
select the correct source.
No sound on • Wrong TV system • Check whether the correct TV system is selected
certain channels (refer to page 8).
No sound • Zero volume level • Try increasing volume.
• Sound muted • Check that the mute ( ) mode is not on. If mute
mode is on, press the key to deactivate mute
mode.
• Aim remote control directly at sensor on front of TV.
• Headphone is connected • Disconnect headphone connection.
Sound interference • Electrical appliances • Try switching off any electrical appliances, for
interference example, hairdryer, vacuum cleaner that are in use.
Unable to understand • Wrong language selected •
Press the key to exit menu from screen. Press
the language on accidently
the key to enter main menu. Use the ï key
screen to operate set to
select the fourth item on the main menu. Use
Æ
/
key to enter into the next menu level and
the
Í Æ
key to
select correct language.
TV not responding •
Wrong placement of •
Check the placement of the batteries.
to remote control
batteries
• Flat batteries • Try changing the batteries.
Occasional appearance
• Characteristic of liquid • This symptom is not a problem. The liquid crystal
of red, blue, green crystal panel panel is built with very high precision technology
and black spots on giving you the fine picture details. Occasionally, a few
screen non-active pixels may appear on the screen as a fixed
point of red, blue, green or black. Note that this
does not affect the performance of the set.
Intermittent or • * HDCP (see glossary) • Noise is displayed if the connected digital equipment’s
flickering picture on authentication failed (DVD player or Set-Top box) *HDCP authentication
in HD mode failed. Check user manual for the digital equipment
you are connecting.
• Use a standard HDMI to DVI cable.
No sound or picture but
• Set on standby mode • Press the
key on the remote control.
front panel red light is
on
(for 26”/32” models)
Page 21
19
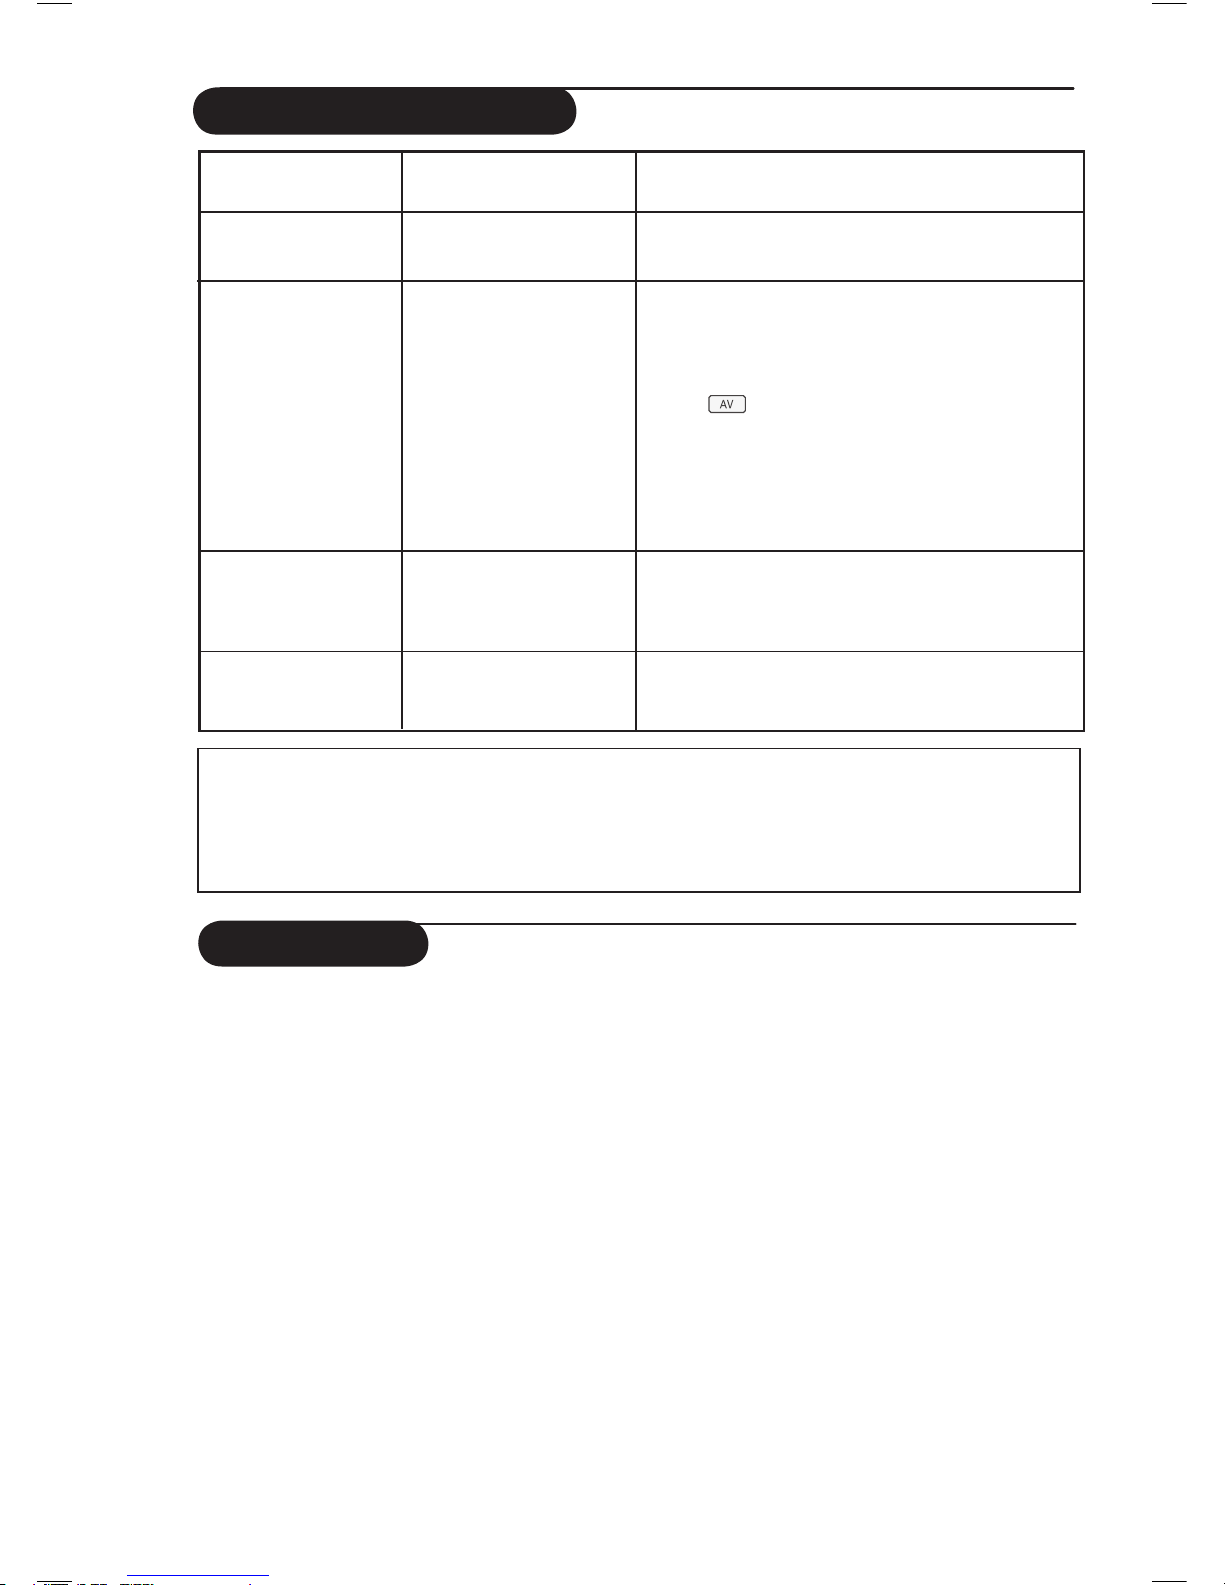
Troubleshooting Tips
Glossary
DVI (Digital Visual Interface) : A digital interface
standard created by the Digital Display Working Group
(DDWG) to convert analog signals into digital signals to
accommodate both analog and digital monitors.
VGA (Video Graphics Array) : a common standard
graphics display system for PCs.
RGB signals : These are the three video signals, Red
Green Blue, which make up the picture. Using these
signals improves picture quality.
S-VHS signals : These are 2 separate Y/C video
signals from the S-VHS and Hi-8 recording standards.
The luminance signals Y (black and white) and
chrominance signals C (colour) are recorded
separately on the tape. This provides better picture
quality than with standard video (VHS and 8 mm)
where the Y/C signals are combined to provide only
one video signal.
NICAM sound : Process by which digital sound can
be transmitted.
16:9 : Refers to the ratio between the length and
height of the screen. Wide screen televisions have
a ratio of 16/9, conventional screen TV sets have a
ratio of 4/3.
HDMI (High-Definition Multimedia Interface) : Provides
an uncompressed, all digital audio/video interface between
the TV and any HDMI-equipped audio/video component,
such as set-top box, DVD player and A/V receiver. HDMI
supports enhanced or high-definition video plus two-
channel digital audio.
System : Television pictures are not broadcast in the
same way in all countries. There are different standards:
BG, DK, I, and LL’. The System setting (p. 8) is used
to select these different standards. This is not to be
confused with PAL or SECAM colour coding. PAL is used
in most countries in Europe, SECAM in France, Russia and
most African countries. The United States and Japan use a
different system called NTSC.
HDCP (High-bandwidth Digital-Content Protection):
HDCP encrypts the transmission of digital content
between the video source or transmitter such as a
computer, DVD player or set-top box and the digital
display or receiver such as a monitor, television or
projector.
Symptom Possible Causes What you should do
Cannot access Install • In AV, EXTERNAL or • Press AV key and select TV mode. You can now
menu HD mode access the Install menu by using the Menu key.
PC modes do not • Wrong connections • Check whether connections are correct. (see
work
“Using your TV as PC Monitor” on page 16).
(For more details on connection to the PC
equipment, see “Connection Guide”.
• Wrong source selected. • Check whether the source is correctly selected.
Press button to enter Source list and select
the correct source.
• Wrong display resolution • Check whether you have configured the computer on
a compatible display resolution (see “Using your TV
as PC Monitor” on page 16).
• Wrong setting of PC • Check graphic card setting of PC.
graphic card
S-Video colour • Wrong detection of • Check whether power cord is properly connected
becomes faint signal • Press the P + key on the remote control to do a
channel up and then press the P – key to do a
channel down.
Black bar on top • PC refresh rate too high • Change PC refresh rate to 60 Hz.
and bottom of
screen in PC mode
Warning concerning stationary images on the TV screen
A characteristic of Plasma Display Panels is that displaying the same image for a long time can cause
a permanent after-image to remain on the screen. This is called phosphor burn in.
Normal use of the TV should involve the showing of pictures that contain constantly moving and
changing images that fill the screen.
Page 22
20
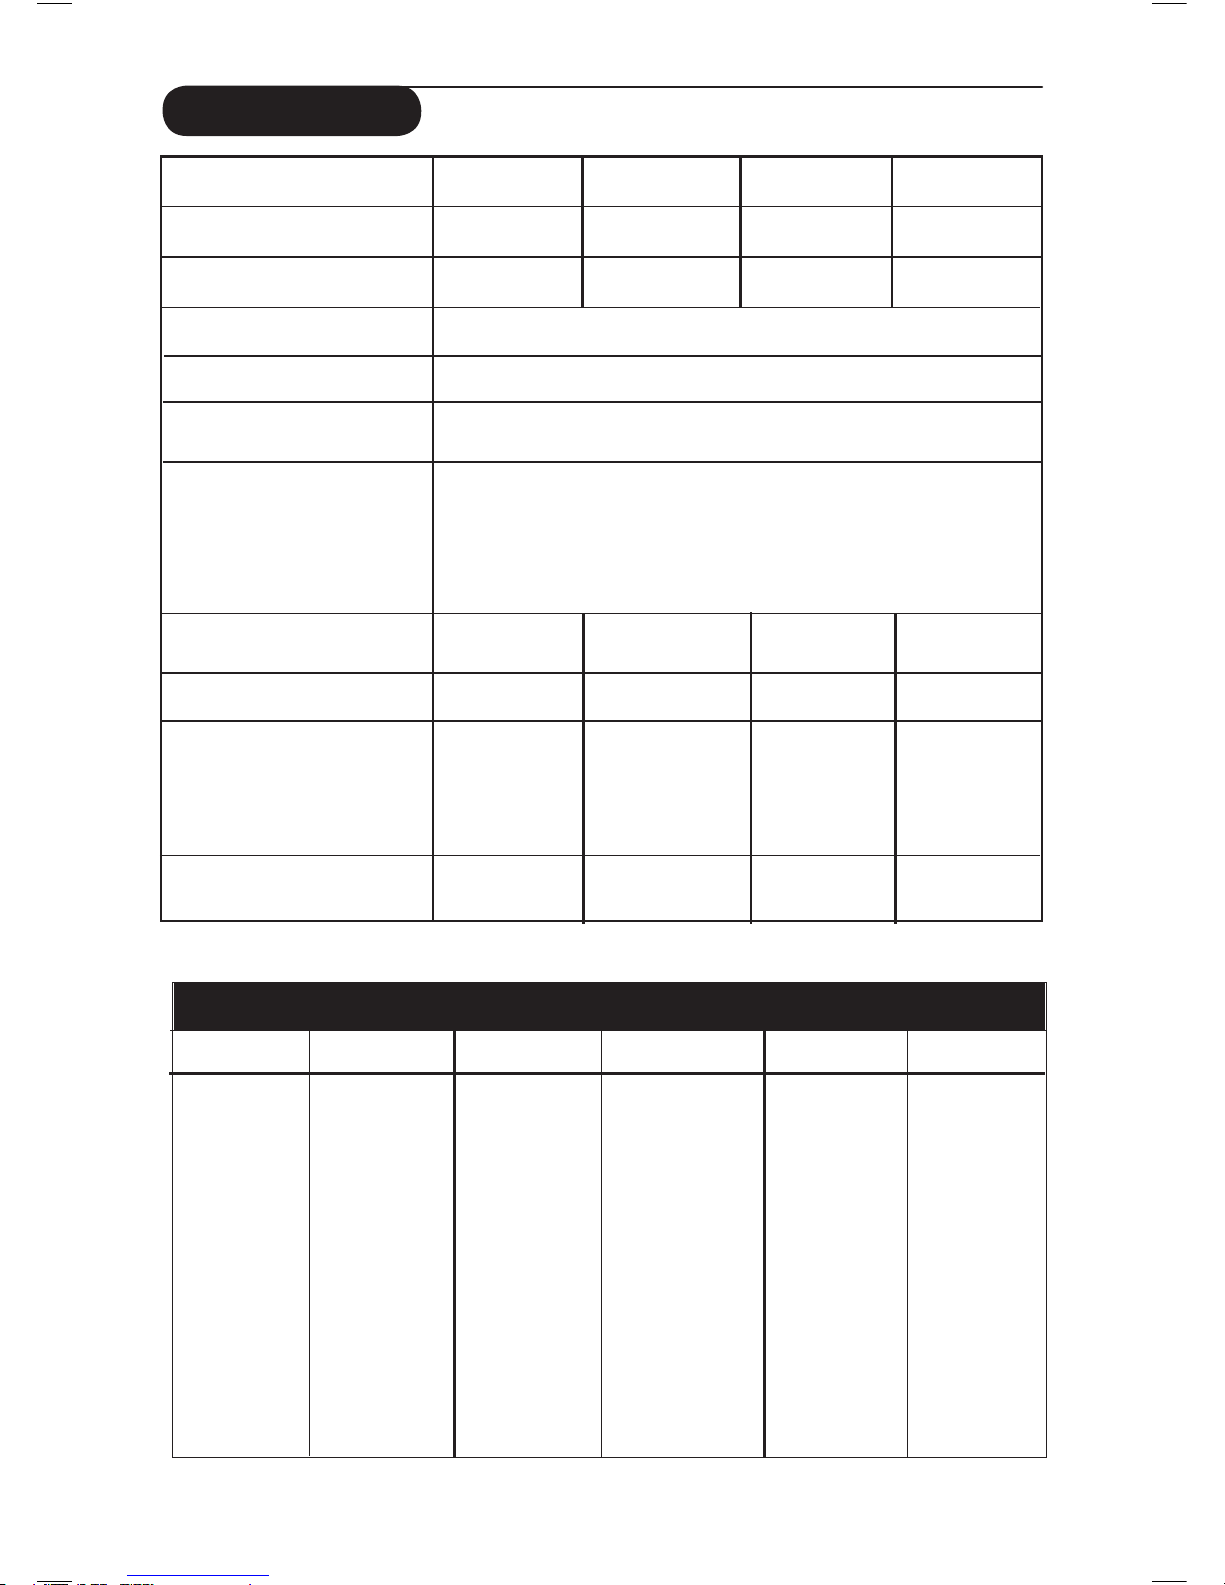
Specifications
Reference table of Countries available for selection
Abbreviation Country Abbreviation Country Abbreviation Country
A Austria GR Greece H Hungary
B Belgium I Italy HR Croatia
CH Switzerland IRL Ireland PL Poland
D Germany L Luxembourg RO Romania
DK Denmark N Norway RUS Russia
E Spain NL Netherlands SK Slovakia
F France P Portugal SLO Slovenia
FI Finland S Sweden TR Turkey
GB England CZ Czech Republic - - - Others
26PF7xxx 32PF7xxx 37PF7xxx 42PF7xxx
Panel screen size 66 cm 80 cm 94 cm 107 cm
Audio output 2 x 5 W 2 x 15 W 2 x 15 W 2 x 15 W
TV System PAL, SECAM
Video playback NTSC, PAL, SECAM
Sound System Mono, Nicam Stereo, Virtual Dolby Surround
Connectivity
Rear Antenna In 75 Ω, Scart 1, Scart 2, HDMI 1, HDMI 2,
Component Video Input, Audio In
Side Audio In, Video In, S-Video In, Headphone
Power consumption 100 W 120 W 180 W 220 W
Standby power consumption < 1 W < 1 W < 2 W < 2 W
Set dimensions (with stand)
Width 69. 75 cm 93. 5 cm 111.4 cm 124.9 cm
Depth 24.7 cm 22.2 cm 30.6 cm 30.6 cm
Height 54.2 cm 56 cm 68.3 cm 74.8 cm
Nett Weight (with stand) 13 kg 19 kg 26 kg 42 kg
Page 23
1
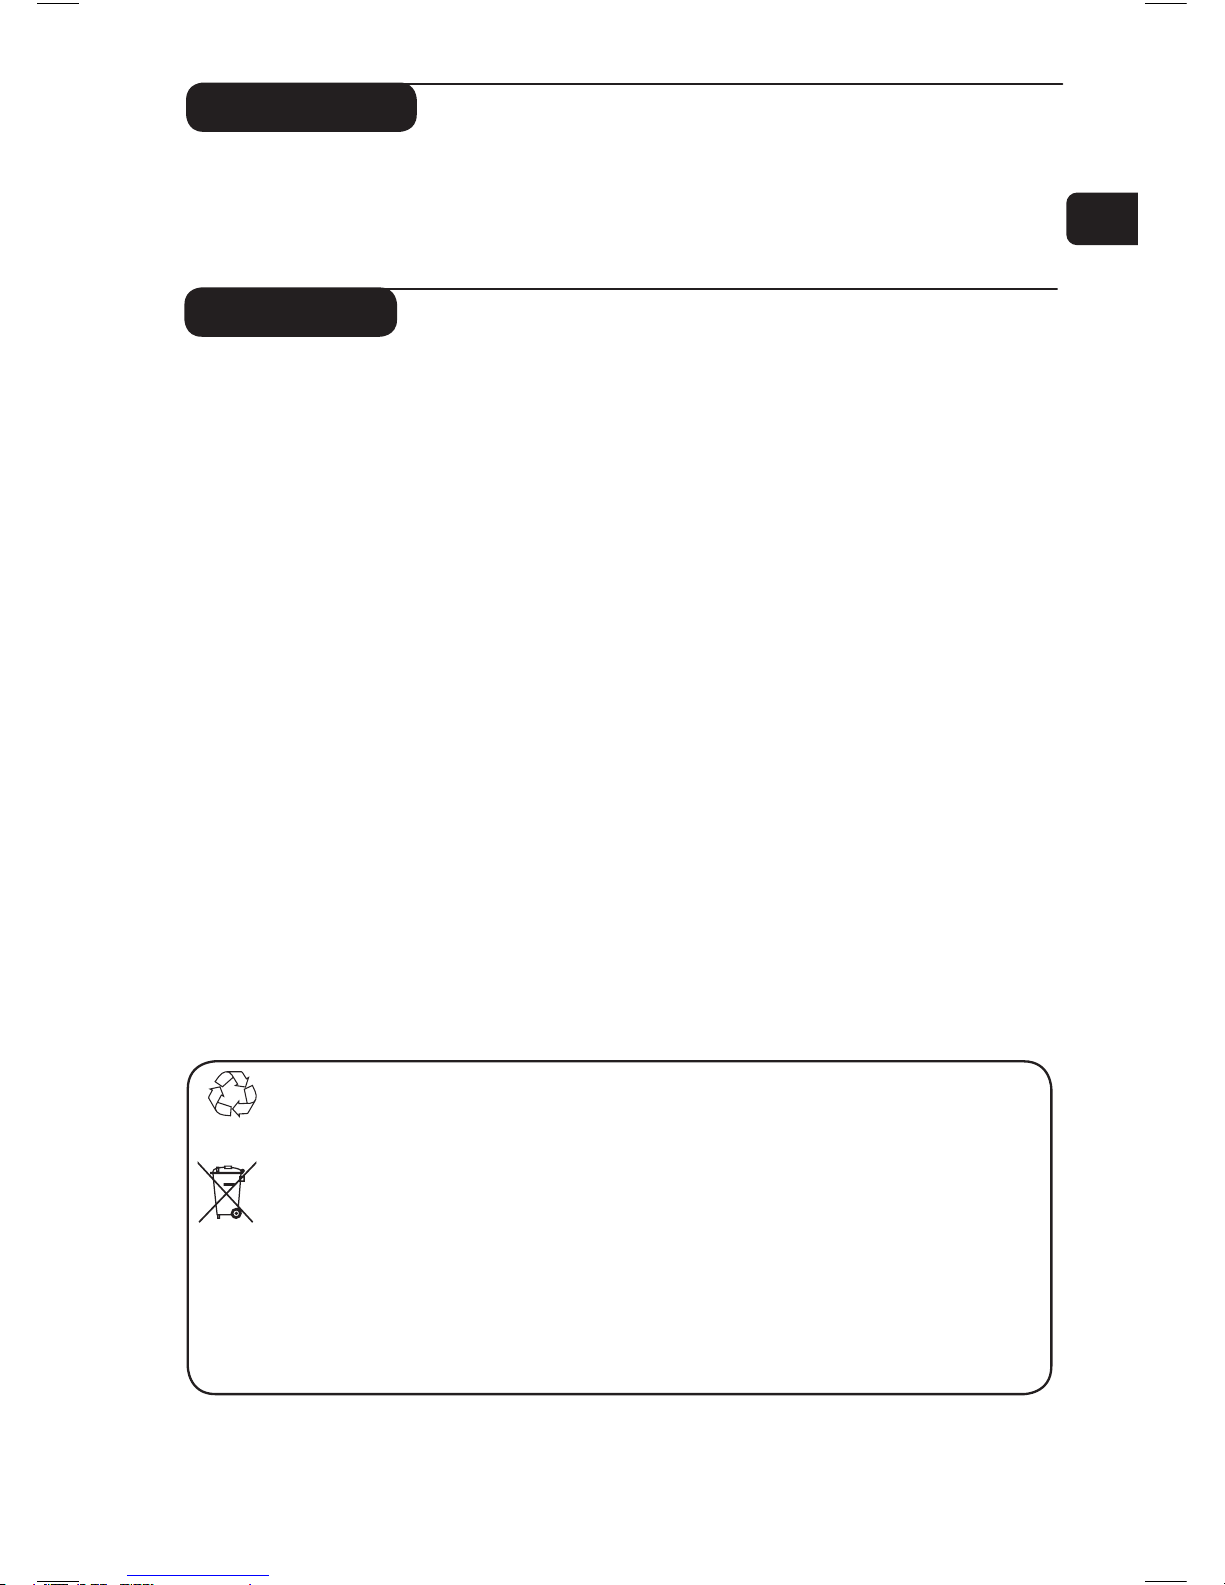
Vous venez d’acquérir ce téléviseur, merci de votre confiance.
Nous vous conseillons de lire attentivement les instructions qui suivent pour mieux comprendre les
possibilités offertes par votre téléviseur.
Nous espérons que notre technologie vous donnera entière satisfaction.
Consignes de sécurité . . . . . . . . . . . . . . . . . . . . . . . . . . . . . . . . . . . . . . . . . . . . . . . . . . . . . . . . . .2
Préparation/Comment démarrer . . . . . . . . . . . . . . . . . . . . . . . . . . . . . . . . . . . . . . . . . . . . . . . . . . 3
Les touches et les raccordements du téléviseur . . . . . . . . . . . . . . . . . . . . . . . . . . . . . . . . . . . . . . 4
Les touches de la télécommande . . . . . . . . . . . . . . . . . . . . . . . . . . . . . . . . . . . . . . . . . . . . . . . . . . 6
Les touches de la télécommande (Autres fonctions) . . . . . . . . . . . . . . . . . . . . . . . . . . . . . . . . . . 7
Installation rapide . . . . . . . . . . . . . . . . . . . . . . . . . . . . . . . . . . . . . . . . . . . . . . . . . . . . . . . . . . . . . . 7
Classement des programmes . . . . . . . . . . . . . . . . . . . . . . . . . . . . . . . . . . . . . . . . . . . . . . . . . . . . . 8
Mémorisation automatique . . . . . . . . . . . . . . . . . . . . . . . . . . . . . . . . . . . . . . . . . . . . . . . . . . . . . .8
Mémorisation manuelle . . . . . . . . . . . . . . . . . . . . . . . . . . . . . . . . . . . . . . . . . . . . . . . . . . . . . . . . . 9
Nom des programmes . . . . . . . . . . . . . . . . . . . . . . . . . . . . . . . . . . . . . . . . . . . . . . . . . . . . . . . . . . 9
Réglages de l’image et du son . . . . . . . . . . . . . . . . . . . . . . . . . . . . . . . . . . . . . . . . . . . . . . . . . . .10
Utilisation des options Contraste+ et NR (Réducteur de bruit – RB) . . . . . . . . . . . . . . . . . . . 11
Fonction réveil . . . . . . . . . . . . . . . . . . . . . . . . . . . . . . . . . . . . . . . . . . . . . . . . . . . . . . . . . . . . . . . .
11
Utilisation des options PIP (Image sur image) . . . . . . . . . . . . . . . . . . . . . . . . . . . . . . . . . . . . . . . 12
Formats écran . . . . . . . . . . . . . . . . . . . . . . . . . . . . . . . . . . . . . . . . . . . . . . . . . . . . . . . . . . . . . . . . 13
Utilisation de options Smart Picture et Smart Sound . . . . . . . . . . . . . . . . . . . . . . . . . . . . . . . . . 14
Utilisation de l’option Commande active . . . . . . . . . . . . . . . . . . . . . . . . . . . . . . . . . . . . . . . . . . 14
Télétexte . . . . . . . . . . . . . . . . . . . . . . . . . . . . . . . . . . . . . . . . . . . . . . . . . . . . . . . . . . . . . . . . . . . .15
Utilisation en mode moniteur PC . . . . . . . . . . . . . . . . . . . . . . . . . . . . . . . . . . . . . . . . . . . . . . . . 16
Utilisation en mode HD (Haute Définition) . . . . . . . . . . . . . . . . . . . . . . . . . . . . . . . . . . . . . . . . 17
Conseils de dépannage . . . . . . . . . . . . . . . . . . . . . . . . . . . . . . . . . . . . . . . . . . . . . . . . . . . . . . . . . 18
Glossaire . . . . . . . . . . . . . . . . . . . . . . . . . . . . . . . . . . . . . . . . . . . . . . . . . . . . . . . . . . . . . . . . . . . . 19
Spécifications techniques . . . . . . . . . . . . . . . . . . . . . . . . . . . . . . . . . . . . . . . . . . . . . . . . . . . . . . . 20
Tableau de référence des pays disponibles . . . . . . . . . . . . . . . . . . . . . . . . . . . . . . . . . . . . . . . . . 20
Introduction
Sommaire
Directive pour le recyclage
L’emballage de cet appareil peut être recyclé. Conformez-vous aux règles en vigueur dans
votre localité pour une élimination appropriée.
Elimination de votre ancien produit
Votre téléviseur est conçu et fabriqué avec des matériaux et composants de haute qualité
qui peuvent être recyclés et réutilisés.
La directive européenne 2002/96/CE s’applique à tous les appareils marqués de ce logo
(poubelle barrée). Renseignez-vous sur les systèmes de collecte mis à votre disposition
pour les appareils électriques et électroniques.
Conformez-vous aux règles en vigueur dans votre localité et ne jetez pas vos anciens
appareils avec les déchets ménagers. L’élimination appropriée de votre ancien appareil
aidera à prévenir les effets négatifs sur l’environnement et la santé.
EnglishPolski
Česky
Slovenský
Türkçe
Pyccкий
FR
NL
DE
IT
DK
NO
SU
SF
RU
ES
PT
GR
TR
HU
PL
CZ
SK
GB
Page 24
2
Consignes de sécurité
Évitez d’exposer votre téléviseur directement
au soleil et évitez de le placer à proximité d’une
source de chaleur.
Afin de prévenir tout risque d’incendie ou
d’électrocution, n’exposez jamais votre téléviseur
à la pluie ou à l’humidité.
Laissez au moins 10 cm d’espace libre de
chaque côté du téléviseur afin de permettre
une ventilation adéquate. Placez votre téléviseur
sur une surface solide et stable. Pour éviter une
surchauffe de l’appareil, n’obstruez jamais les grilles
d’aération du téléviseur avec une étoffe ou avec
un autre matériau. Ne pas insérer d’objets dans
les ouvertures ou orifices d’aération. L’insertion
de métal ou d’une matière inflammable dans
ces ouvertures ou orifices risque de provoquer
un incendie ou un choc électrique.
Évitez de brancher trop d’appareils sur la même
prise d’alimentation électrique, car il pourrait en
résulter une surcharge qui risque de provoquer un
incendie ou un choc électrique.
Pour débrancher le fil d’alimentation, tirez-le par la
fiche. Ne pas tirer sur le fil d’alimentation. Ne pas
brancher le téléviseur sur une prise d’alimentation
ne permettant pas un ajustement convenable.
Enfoncez complètement la fiche dans la prise.
Une fiche mal ajustée ou mal enfoncée risque de
provoquer un arc électrique ou un incendie.
Ne placez jamais de flamme nue (par exemple des
bougies allumées) sur le téléviseur ni à proximité
de celui-ci.
Si la surface ou l’écran du téléviseur sont sales,
essuyez-les doucement à l’aide d’un chiffon doux
et sec, en coton hydrophile, ou à l’aide d’un autre
matériel souple et doux, par exemple une peau de
chamois. Ne pas utiliser de chiffon trop humide ou
trempé. Ne pas utiliser d’acétone, de toluène ou
d’alcool pour nettoyer le téléviseur. Par mesure de
précaution, débranchez le cordon d’alimentation
de la prise avant de commencer à nettoyer le
téléviseur.
Par mesure de précaution, ne pas toucher au
téléviseur ni à aucune autre de ses parties, qu’il
s’agisse du fil d’alimentation ou du câble d’antenne,
pendant un orage.
Éviter de placer des récipients remplis d’eau
sur le téléviseur. Le déversement d’un liquide
dans le téléviseur risque de provoquer un choc
électrique. Ne pas faire fonctionner le téléviseur
si de l’eau s’est répandue à l’intérieur. Demandez
immédiatement à un technicien qualifié de venir
l’inspecter.
Le montage du téléviseur sur le mur doit être
effectué par du personnel qualifié. Un montage
inadéquat et incorrect pourrait rendre dangereux
l’appareil.
Page 25
3
Connexions
• Enfoncez la fiche de l’antenne dans la prise
75 Ω : la prise située au bas du téléviseur.
• Enfoncez la fiche d’alimentation dans de
courant murale (220–240 V 50/60 Hz).
Utilisation de la télécommande
Enlevez la pellicule isolante en plastique
qui recouvre la batterie afin de permettre
l’activation de la télécommande..
2
3
Mise en marche du téléviseur
• Pour allumer le téléviseur, appuyez sur la
touche POWER. Un voyant s’allume en vert
et l’écran s’illumine.
• Si le téléviseur reste en mode veille
(voyant rouge), appuyez sur la touche +
PROGRAMME +/– du clavier ou sur P –/+
de la télécommande.
1
Préparation/Comment démarrer
REMARQUE
Pour plus de détails sur les
autres raccordements, voir
« GUIDE DE RACCORDEMENT ».
– PROGRAM +MENU– VOLUME +POWER
Page 26

4
Les touches et les raccordements du téléviseur
LCD
TV
5
5
6
7
8
9
10
EXT 4
EXT 2 /SVHS2
EXT 1
DVI
(AUDIO IN)
HDMI 2
HDMI 1
AUDIO
R L
IN
Pr
Pb Y
L
R
MAINS ~
AC in ~
TV plasma
ATTENTION :
Ceci est un appareil
de classe 1. Il doit
être branché sur une
prise secteur avec
connexion à la terre.
ï
1
2
3
4
11
EXT3/SVHS3
6
7
8
9
10
EXT 4
EXT 2 /SVHS2
EXT 1
DVI
(AUDIO IN)
HDMI 2
HDMI 1
AUDIO
R L
IN
Pr
Pb Y
L
R
5
AC in ~
Headphone
Audio In
Video In
S-Video
AUDIO
IN
R
L
VIDEO
IN
S-VIDEO
11
EXT3/SVHS3
3
– PROGRAM +MENU– VOLUME +POWER
4
2
1
Page 27
5
Les touches et les raccordements du téléviseur
1
3
4
2
6
7
8
9
10
EXT 4
EXT 2 /SVHS2
EXT 1
DVI
(AUDIO IN)
HDMI 2
HDMI 1
AUDIO
R L
IN
Pr
Pb Y
L
R
5
AC in ~
Headphone
Audio In
Video In
S-Video
AUDIO
IN
R
L
VIDEO
IN
S-VIDEO
11
EXT3/SVHS3
POWER .: pour allumer ou éteindre le
téléviseur.
Remarque : l’alimentation reste en attente
lorsque l’interrupteur est éteint.
VOLUME –/+: pour régler le niveau sonore.
MENU: pour appeler ou quitter les menus.
Les touches PROGRAM –/+ permettent de
sélectionner une commande du menu et les
touches VOLUME –/+ permettent d’accéder
aux réglages de la commande du menu qui a été
sélectionnée et de modifier ces derniers.
PROGRAM –/+: pour sélectionner les
programmes.
Prise d’alimentation: enfoncez la fiche
d’alimentation dans la prise de courant murale.
Entrée audio DVI: pour le raccordement
d’un appareil HD (Haute Définition) ou d’un
ordinateur avec sortie DVI.
Entrées Vidéo/Entrées Audio du
Composant (EXT 4): pour connecter des
appareils tels que le DVD, le boîtier décodeur
qui ont les mêmes prises. Connectez les entrées
audio du téléviseur aux sorties de l’appareil
avec les entrées vidéo du composant.
1
2
3
4
5
6
10
7
8
9
11
REMARQUE
Pour plus de détails sur lesraccordements,
voir « GUIDE DE RACCORDEMENT ».
Prises HDMI 1/HDMI 2: pour les
raccordements avec les boîtiers décodeurs, le
lecteur/graveur DVD, le récepteur/l’équipement
à haute définition ou l’ordinateur personnel.
Prises EXT1 et EXT2/SVHS2: raccordement
avec des équipements tels que le lecteur/graveur
DVD, le magnétoscope, le décodeur, qui ont des
raccordements péritel.
Important: Pour connecter votre décodeur,
veuillez utiliser uniquement la prise péritel
EXT 1.
Prise d’antenne TV: enfoncez la fiche du câble
75 Ω : dans la prise d’antenne TV.
Connexions latérales (EXT3/SVHS3): pour le
raccordement d’appareils tels qu’une caméra ou
un caméscope. Ces connexions vous permettent
aussi de brancher votre casque audio, pour un
plaisir d’écoute optimal.
Page 28
6
1
Veille
Permet de mettre en veille le téléviseur. Pour
l’allumer, appuyez sur ,
à
ou la touche – P + (– Program +).P + (– Program +)..
2
AV / Télétexte
– En mode TV/AV, affiche la Liste des sources afin de
permettre la sélection de la TV ou d’un autre appareil
connecté sur les prises EXT 1, EXT 2/SVHS2, EXT 3/
SVHS3, EXT 4, HDMI 1 ou HDMI 2.
– En mode Télétexte, active la fonction télétexte (voir
page 15).
3
Format d’écranFormat d’écran
(voir page 13).
4
Mode sonMode son
Permet de forcer les émissions Stéréo et
Stéréo Nicam en Mono ou, pour les
émissions bilingues, de choisir entre Dual å ou
Dual ». L’indication Mono est rouge
lorsqu’il s’agit d’une position forcée.
5
Touches télétexte (voir page 15).
Touches DVD (voir page 7).
6
Son surroundSon surround
Pour activer/désactiver l’effet d’élargissement
du son. En stéréo, les haut-parleurs paraissent
plus espacés. Pour les versions équipées du Virtual
Dolby Surround, vous obtenez les effets sonores
arrières du Dolby Surround Pro Logic.
Les touches de la télécommande
7
Commande active (Voir page(Voir page 14).
8
Curseurs
Ces 4 touches permettent de naviguer dans
les menus, de sélectionner une commande
d’un menu et d’en modifier les réglages.
9
MENUMENU
Pour ouvrir ou fermer les menus du téléviseur.
10
Coupure sonCoupure son
Appuyez pour annuler ou restaurer le son.
11
Volume (– VOL +)
Pour ajuster le niveau sonore.
12
Préréglages image et son (Smart Picture/
Smart Sound)
Permet d’accéder à une série de préréglages
de l’image et du son (voir page 14).
13
à Touches numériques /
Accès direct aux programmes. Pour un
programme à 2 chiffres, il faut ajouter le
2ème chiffre avant que le trait ne disparaisse.
14
Informations écran
Pour afficher/supprimer le numéro du
programme, le mode son, le temps restant de
la minuterie et *l’indicateur d’intensité du signal.
15
Sélect
Permet de basculer entre le mode TV et le
mode DVD (voir « Commande à distance,
fonctions DVD » à la page 7).
16
Minuterie
Permet de déterminer le délai après lequel le
téléviseur passe automatiquement en mode veille
(de 0 à 240 minutes).
17
Pixel Plus
Allie de façon unique une extraordinaire netteté,
une impression de profondeur accrue, des
détails particulièrement naturels et des couleurs
vives.
18
Image sur imageImage sur image
Pour afficher une fenêtre PIP sur l’écran du
téléviseur (voir page 12 pour savoir comment
utiliser l’option PIP).
19
Liste des programmesListe des programmes
Pour ouvrir/fermer la liste des programmes.
Utilisez ensuite les touches Î ï pour
sélectionner un programme et la touche Æ pour
l’afficher.
20
OKOK
Valide la sélection.
21
– P + Sélection des programmes
Pour accéder au programme inférieur
ou supérieur. Le numéro et le mode son
sélectionnés s’affichent quelques instants.
22
Programme précédent
Pour accéder au programme précédemment
visualisé.
* L’indicateur d’intensité du signal montre
uniquement l’intensité de la transmission
du programme que vous regardez.
11
2
3
5
6
7
8
9
4
10
12
13
14
15
17
18
19
20
21
22
1
16
Page 29
7
Les touches de la télécommande (Autres fonctions)
La télécommande vous permet aussi de contrôler les fonctions principales de certains modèles DVD Philips.
Appuyez sur la touche
pour sélectionner le mode correct : DVD.
Le voyant de la télécommande s’allume pour afficher le mode sélectionné. Il s’éteint automatiquement
après 20 secondes, si on le maintient inactif.
Les touches suivantes sont opérationnelles, en fonction de l’équipement :
veille
rebobinage rapide
stop
lecture
marche avant
pause
afficher et quitter le menu
sélection des programmes
navigation et réglage, valide la
sélection
touches numériques
à
Installation rapide
La première fois que vous allumez le téléviseur,
un menu apparaît à l’écran. Ce menu vous invite
à choisir le pays ainsi que la langue des menus :
REMARQUE
Si le menu mentionné ci-dessus ne s’affiche
pas à l’écran, procédez à l’installation des
programmes
à l’aide de l’option Mémorisation
automatique (voir page 7). Si le menu
s’affiche, allez aux étapes suivantes.
Utilisez les touches Î ï ou la télécommande
pour choisir votre pays.
Si votre pays ne figure pas dans la liste,
sélectionnez « ... ».
Reportez-vous au « Tableau de référence des
pays disponibles », en page 20.
Utilisez la touche Æ pour passer au mode
Langue et choisissez votre langue à l’aide
des touches Î ï.
Utilisez la touche Æ pour lancer la recherche.
La recherche démarre automatiquement. Tous
les programmes TV disponibles sont mémorisés.
L’opération prend quelques minutes. L’affichage
montre la progression de la recherche et le
nombre de programmes trouvés.
Important : Pour quitter ou interrompre
la
recherche avant que celle-ci ne soit
terminée, appuyez sur la touche Si vous
interrompez la recherche lors de la mémorisation
automatique, tous les programmes ne seront pas
mémorisés. Pour mémoriser tous les programmes,
vous devez effectuer de nouveau une recherche
de mémorisation automatique complète.
REMARQUE
Système ATS (système de réglage
automatique)
Si l’émetteur ou le réseau câblé transmet le signal de
classement automatique, les programmes seront
correctement numérotés. L’installation est alors
terminée. Si ce n’est pas le cas, vous devez utiliser
l’option Classement pour les renuméroter.
Système ACI (installation automatique
des programmes)
Lorsqu’un réseau câblé ou un programme de
télévision émettant en mode ACI est repéré, une
liste des programmes s’affiche à l’écran. En l’absence
d’émission en mode ACI, la numérotation des
programmes s’effectuera en fonction de la langue et
du pays qui auront été préalablement sélectionnés.
Vous pouvez alors utiliser le menu Classement pour
les renuméroter.
Certains
diffuseurs ou réseaux câblés diffusent
leurs propres paramètres de tri (région, langue,
etc.). Dans ce cas, indiquez votre choix à l’aide des
touches Î ï et confirmez à l’aide de la touche Æ.
1
2
Plug’n’Play
Country
GB
Language
English
3
Page 30

8
Mémorisation automatique
Appuyez sur la touche .
Avec le curseur ï, sélectionnez le menu
Installation, puis utilisez la touche Æ/
pour naviguer dans ce menu. (Langage est mis
en évidence)
Avant de procéder à la mémorisation
automatique des programmes, vous devez
choisir la langue d’affichage des menus. Pour le
faire, sélectionnez le menu *Langage avec les
touches Í Æ.
1
2
3
4
Avec le curseur ï, sélectionnez le menu Pays,
puis utilisez les touches Í Æ pour sélectionner
le pays de votre choix.
Avec le curseur ï, sélectionnez Mémo. Auto,
puis utilisez la touche Æ/ pour lancer une
recherche automatique des programmes. Tous
les programmes disponibles sont mémorisés.
L’opération prend quelques minutes. L’affichage
montre la progression de la recherche et le
nombre de programmes trouvés.
Après avoir effectué la recherche, appuyez
sur la touche pour quitter le menu.
Important : Pour quitter ou interrompre la
recherche avant que celle-ci ne soit terminée,
appuyez sur la touche .
Si vous interrompez la recherche lors
de la mémorisation automatique, tous les
programmes ne seront pas mémorisés. Pour
mémoriser tous les programmes, vous devez
effectuer de nouveau une recherche de
mémorisation automatique complète.
* Sélection de la langue d’affichage
des menus
Si vous avez sélectionné par erreur la mauvaise langue
d’affichage et que vous n’êtes plus en mesure de
faire fonctionner votre téléviseur parce que vous ne
comprenez pas cette langue, suivez les étapes ci-dessous
pour revenir à langue d’affichage que vous aviez choisie
initialement :
– appuyez sur la touche pour quitter le menu
actuel.
– appuyez sur la touche pour naviguer dans le
menu TV.
– appuyez à plusieurs reprises sur la touche ï, jusqu’à
ce que le QUATRIÈME choix du menu TV soit mis
en évidence.
– appuyez sur la touche
Æ/
pour naviguer dans
le menu Installation.
– appuyez sur les touches Í Æ pour sélectionner
votre langue d’affichage préférée (les menus
s’afficheront dorénavant dans la langue choisie).
Maintenant, vous pouvez procéder à l’installation
automatique des programmes.
Classement des
programmes
Appuyez sur la touche . Le Menu TV
s’affiche à l’écran.
Avec le curseur ï, sélectionnez le menu
Installation, puis utilisez la touche
Æ/ pour naviguer dans ce menu.
Avec le curseur ï, sélectionnez le menu
Classement, puis utilisez la touche
Æ/ pour naviguer dans ce menu.
Sélectionnez le programme que vous
souhaitez déplacer avec les touches Î ï,
puis utilisez la touche Æ/ pour en
modifier les réglages (la fléchée pointe
maintenant vers la gauche).
Utilisez ensuite les touches Î ï pour
choisir le nouveau numéro du programme,
et validez avec Í/ (la fléchée pointe
maintenant vers la droite et le classement
est terminé).
Recommencez les étapes 4 et 5
autant de fois qu’il y a des programmes
à renuméroter.
Pour retourner au menu antérieur, appuyez
sur la touche .
Pour quitter les menus, appuyez sur la
touche .
1
4
5
6
2
7
Menu TV
Image
Son
Options
Installation
Installation
Langage
Pays
Mémo. Auto
Mémo. Manuel
Classement
Nom du prog
Æ • 0
Æ • 1
Æ • 2
Æ • 3
Æ • 4
Æ • 5
8
3
Menu TV
Image
Son
Options
Installation
Installation
Langage
Pays
Mémo. Auto
Mémo. Manuel
Classement
Nom du prog
Recherche
Æ
Æ
Æ
Æ
Æ
5
6
Page 31
9
Nom des programmes
Mémorisation manuelle
Ce menu permet de mémoriser les
programmes un par un.
Appuyez sur la touche .
Avec le curseur ï, sélectionnez le menu
Installation, puis utilisez la touche Æ/
pour naviguer dans ce menu.
Avec le curseur ï, sélectionnez le menu
Mémo. Manuel, puis utilisez la touche
Æ/ pour naviguer dans ce menu.
Avec les touches Î ï, sélectionnez les options
du menu Mémo. Manuel pour en modifier les
réglages ou pour les activer.
Système : sélectionnez
Europe (détection automatique*),
France (norme LL’),
Royaume-Uni (norme I),
Europe Ouest (norme BG), ou
Europe Est (norme DK).
* Sauf pour la France (norme LL’), il faut
sélectionner impérativement le choix
France.
1
3
4
2
5
6
7
8
9
10
11
Recherche :
Appuyez sur Æ/ . La recherche
commence automatiquement. Dès qu’un
programme est trouvé, le défilement s’arrête et
le nom du programme s’affiche (si disponible).
Allez à l’étape suivante. Si vous connaissez la
fréquence du programme désiré, composez
directement son numéro avec les touches
à .
Si aucune image n’est trouvée, voir
« Conseils de dépannage » (page 18 et 19).
No. De Prog. :
Entrez le numéro souhaité avec les
touches Í Æ ou à .
Ajust. Fin :
Si la réception n’est pas satisfaisante, réglez
avec les touches Í Æ.
Mémoriser :
Pour vous assurer que la modification
est mémorisée, apuyez sur Æ/ . Le
programme est mémorisé.
Répétez les étapes 6 à
9
autant de fois qu’il
y a des programmes à mémoriser.
Pour retourner au menu antérieur, appuyez
sur la touche .
Pour quitter les menus, appuyez sur la touche
.
Menu TV
Image
Son
Options
Installation
Mémo. Manuel
Système
Recherche
No. De Prog.
Ajust. Fin
Mémoriser
France
Æ
Æ
Æ
Æ
12
Avec la touche ï sélectionnez le menu Nom
du prog., puis utilisez la touche Æ/
pour naviguer dans ce menu.
Avec les touches Î ï sélectionnez le
programme que vous voulez nommer, puis
utilisez la touche Æ/ pour naviguer
dans ce menu.
Avec les touches Î ï sélectionnez les
caractères (5 caractères au maximum), puis
utilisez les touches Í Æ pour naviguer dans
le menu d’affichage du nom.
Appuyez sur la touche Í Æ/ jusqu’à ce
que le nom apparaisse dans le coin en haut
à droite de l’écran du téléviseur. Le nom est
mémorisé.
Vous pouvez, si vous le souhaitez, donner un nom
aux programmes TV.
Appuyez sur la touche .
Avec le curseur ï, sélectionnez le menu
Installation, puis utilisez la touche Æ/
pour naviguer dans ce menu.
1
3
4
2
5
6
Menu TV
Image
Son
Options
Installation
Installation
Langage
Pays
Mémo. Auto.
Mémo. Manuel
Classement
Nom du prog
8
Æ
Æ
Æ
Æ
Æ
Æ
7
Pour quitter le menu, appuyez sur la touche
.
Page 32
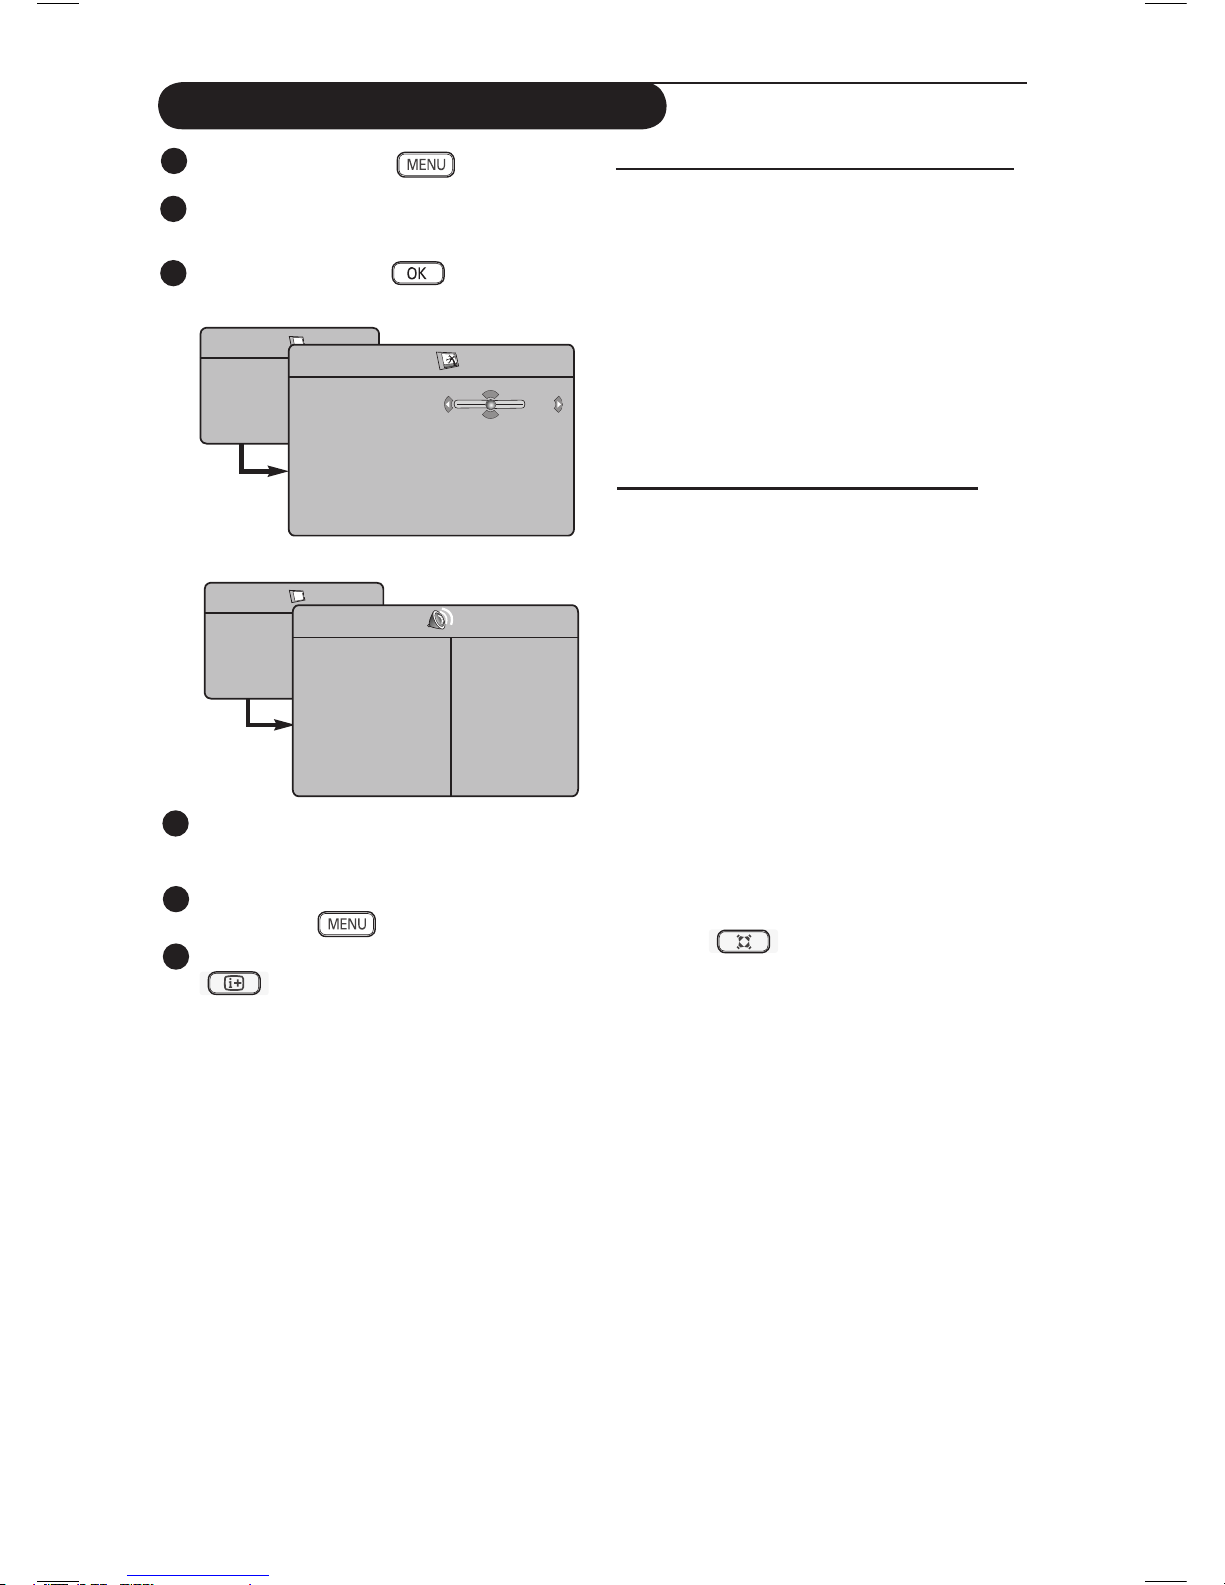
10
Réglages de l’image et du son
Description des réglages de l’image
Lumière : agit sur la luminosité de l’image.
Couleur : agit sur l’intensité de la couleur.
Contraste : agit sur la différence entre les
tons clairs et les tons foncés.
Définition : agit sur la netteté de l’image.
Temp. Couleur : agit sur le rendu des
couleurs : Froide (plus bleue), Normale
(équilibrée) ou Chaude (plus rouge).
Mémoriser : pour mémoriser les réglages de
l’image.
Description des réglages du son
Egaliseur : pour régler la tonalité du son
(de grave à aigu, soit de 120 à 10 Hz).
Balance : pour équilibrer le son sur les haut-
parleurs gauche et droit.
Delta Volume : permet de compenser les
écarts de volume qui existent entre les différents
programmes ou les prises EXT. Remarque : Les
programmes de 0 à 40 ont un réglage du volume
individuel alors que les programmes à partir
de 41 ont un réglage commun.
AVL (Automatic Volume Leveller, Réglage
automatique du volume) : contrôle automatique du
volume qui permet de limiter les augmentations
du son, en particulier lors des changements de
programmes ou des publicités.
Dolby Virtual : pour activer/désactiver l’effet
d’élargissement du son.
Vous avez également accès à ce réglage avec
la touche .
Mémoriser : pour mémoriser les réglages du son.
Appuyez sur la touche .
Avec les touches Î ï sélectionnez Image
ou Son.
Avec les touches Í Æ/ naviguez dans
les menus Image ou Son.
Avec les touches Î ï sélectionnez un réglage
de l’Image ou du Son puis utilisez les touches
Í Æ pour modifier les réglages.
Pour retourner au menu antérieur, appuyez
sur la touche .
Pour quitter le menu, appuyez sur la touche
.
1
2
3
4
5
6
Menu TV
Image
Son
Options
Installation
Image
Lumière
Couleur
Contraste
Définition
Temp. Couleur
Mémoriser
39
Menu TV
Image
Son
Options
Installation
Son
• 120 Hz
• 500 Hz
• 1500 Hz
• 5 KHz
• 10 KHz
Egaliseur Æ
Balance Æ
Delta Volume Æ
AVL Æ
Dolby Virtual Æ
Mémoriser Æ
Page 33
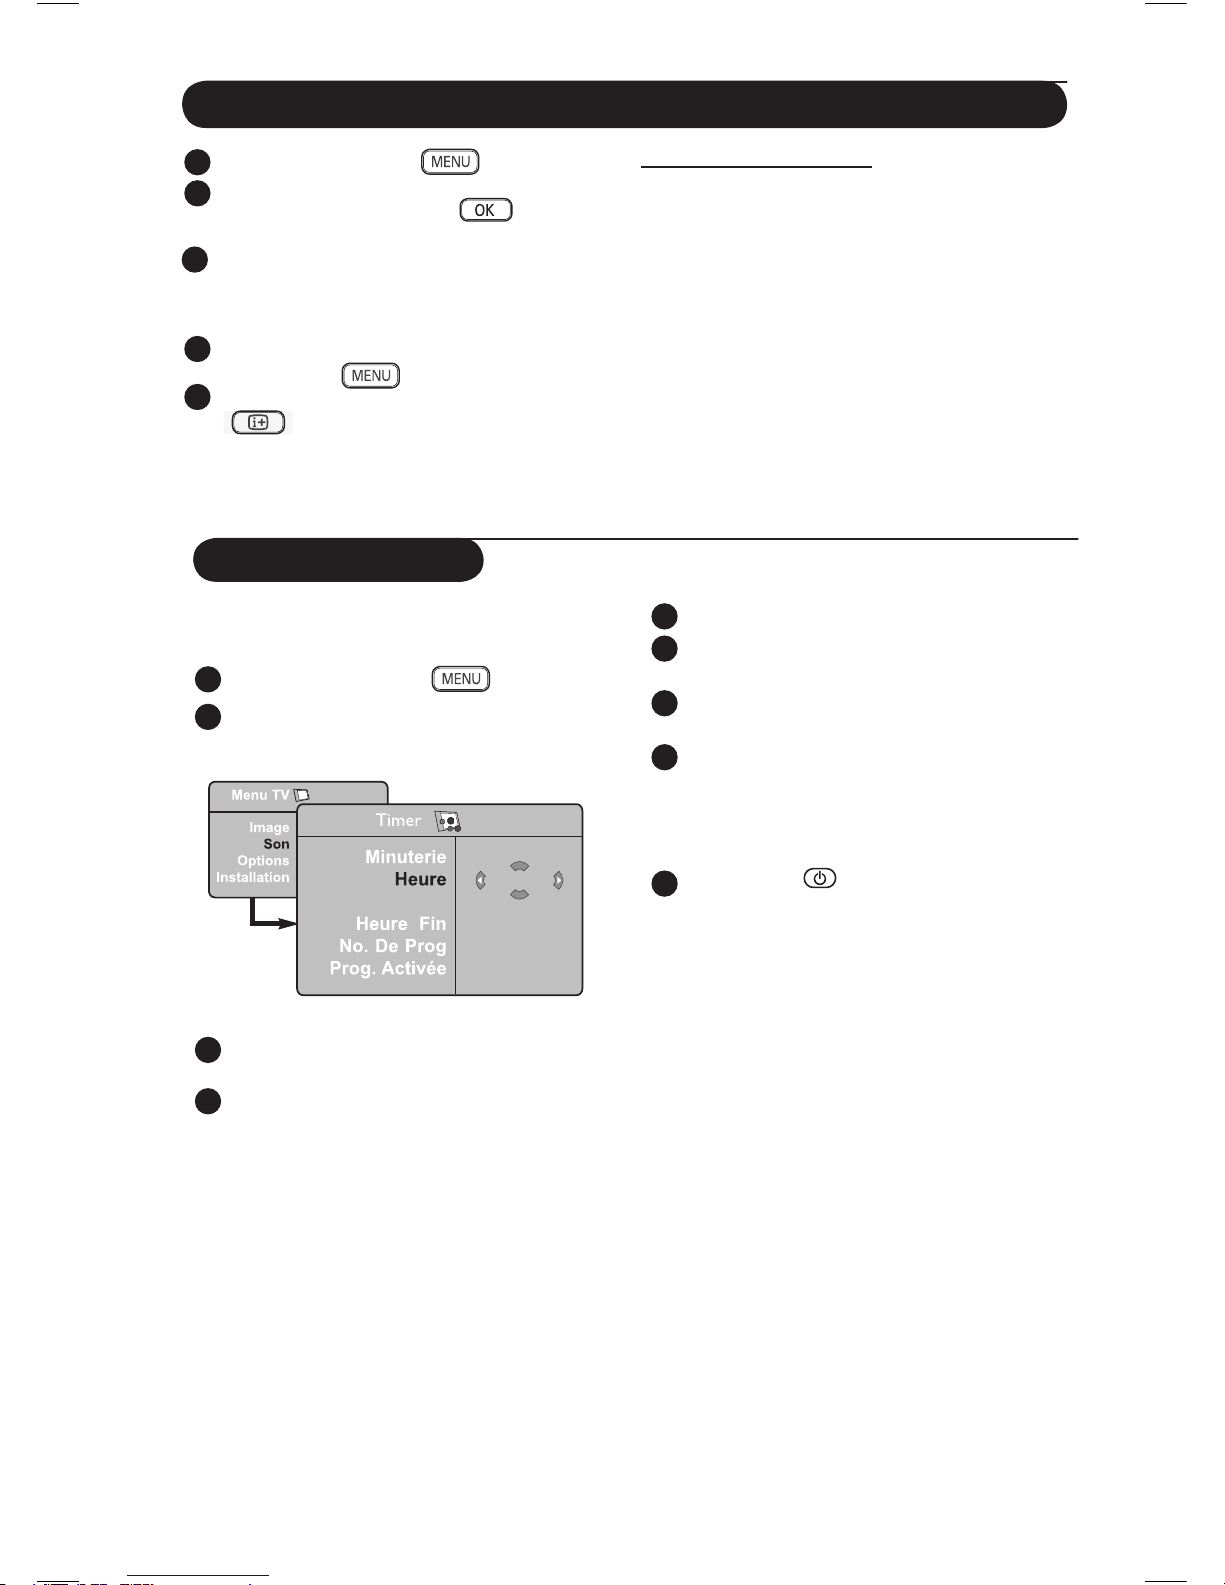
11
1
4
2
5
1
2
3
4
Utilisation des options Contraste+ et NR (Réducteur de bruit )
Appuyez sur la touche .
Avec la touche ï, sélectionnez Options
et puis utilisez la touche Æ/
pour
naviguer dans le menu Options.
Utilisez les curseurs Î ï pour sélectionner
Contraste+ ou NR (Réducteur de bruit) et
les curseurs Í Æ pour sélectionner l’option
Marche ou Arrêt.
Pour retourner au menu antérieur, appuyez
sur la touche
.
Pour quitter le menu, appuyez sur la touche
.
Définition des réglages
Contraste+ :
– Optimise le contraste général de l’image pour
une visibilité améliorée de l’image.
– Sélectionnez Marche pour activer l’option.
NR (Réducteur de bruit) :
– Réduit les perturbations dues à une transmission
faible.
– Sélectionnez Marche pour activer l’option.
1
3
4
2
5
Fonction réveil
Ce menu vous permet d’utiliser le téléviseur
comme un réveil.
1
Appuyez sur la touche
.
2
Avec le curseur, sélectionnez le menu
Options puis Timer :
3
Minuterie : pour sélectionner une durée de
mise en veille automatique.
4
Heure : entrez l’heure courante.
Remarque : l’heure est mise à jour, à
chaque mise en marche avec le bouton
marche/arrêt, à partir des informations
télétexte du programme n° 1. Si celui-ci n’a
pas de télétexte, la mise à jour n’aura pas
lieu.
5
Heure Début : entrez l’heure de début.
6
Heure Fin : entrez l’heure de mise en
veille.
7
No. de Prog : entrez le numéro du
programme désiré pour le réveil.
8
Prog. Activée : vous pouvez régler :
• Une fois pour un réveil unique,
• Quotidien pour tous les jours,
• Arrêt pour annuler.
9
Appuyez sur pour mettre en veille le
téléviseur. Il s’allumera automatiquement
à l’heure programmée. Si vous laissez le
téléviseur allumé, il changera uniquement de
programme à l’heure indiquée (et se mettra
en veille à l’Heure de Fin).
10:56
Page 34
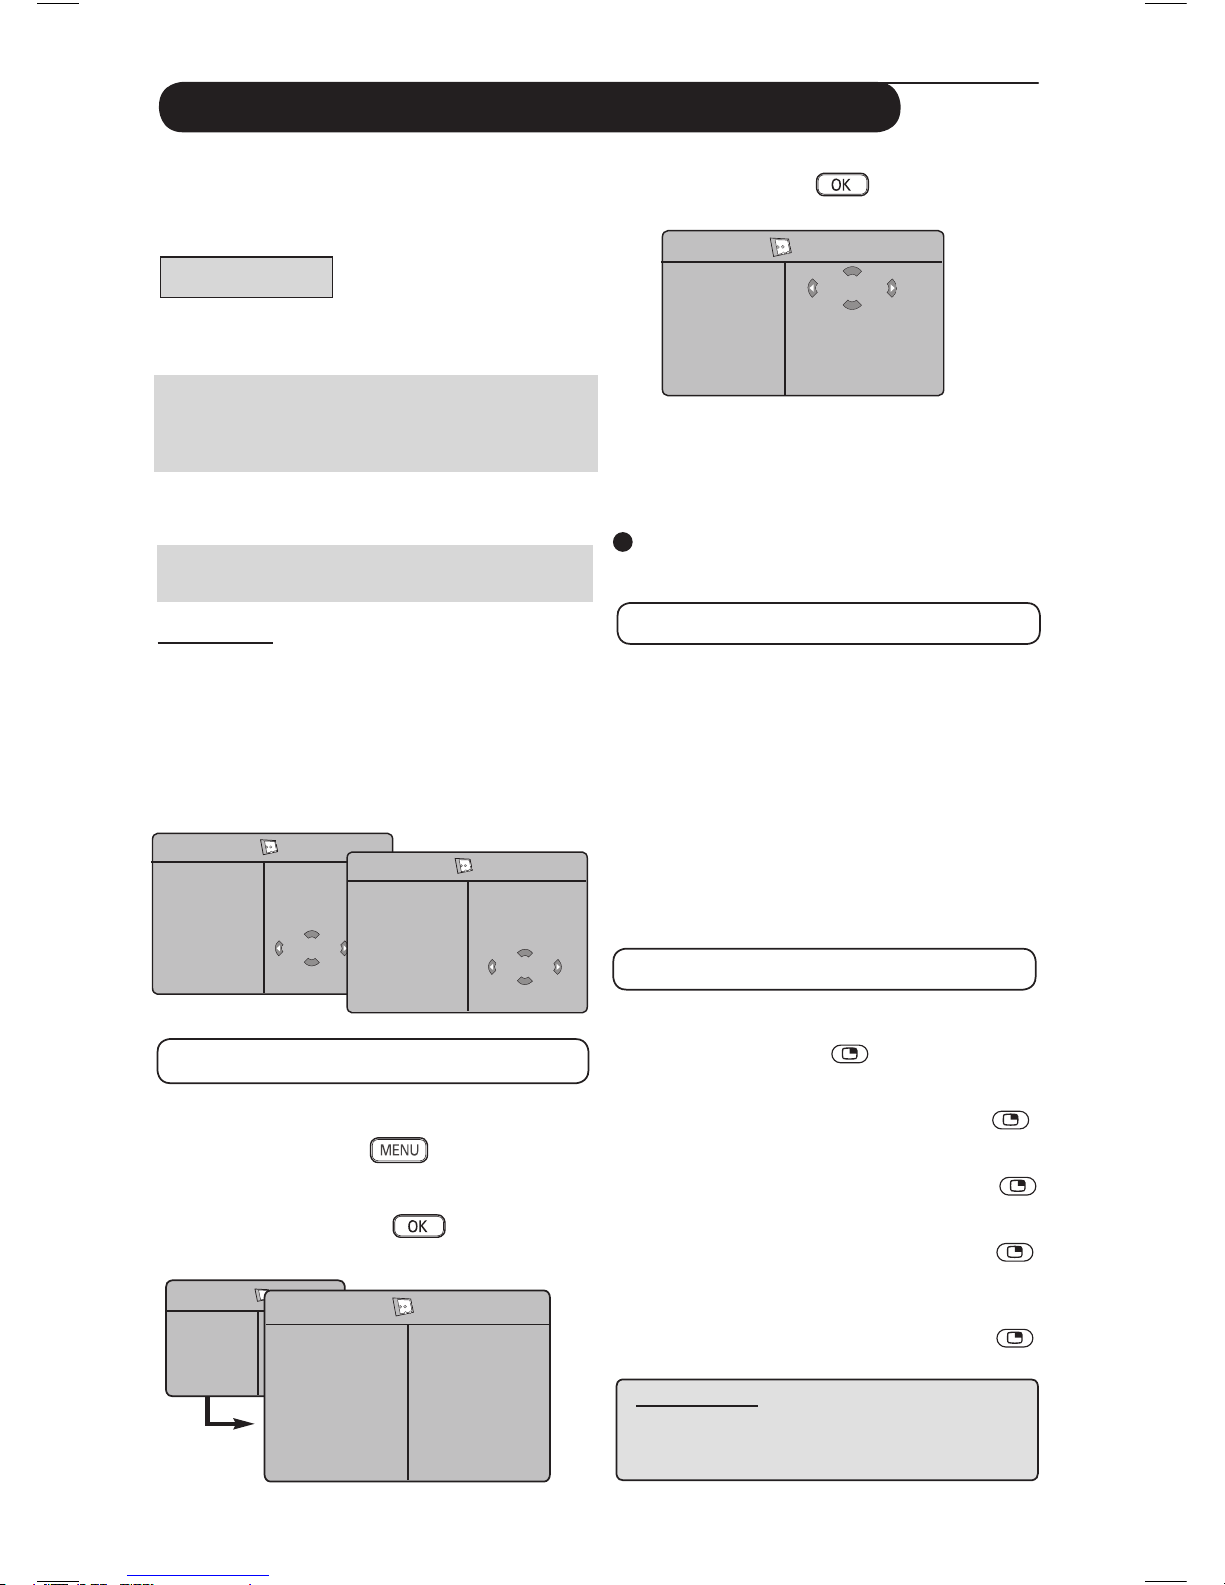
12
Utilisation de l’option PIP (Image sur image)
“ Utilisez les curseurs Î ï pour sélectionner PIP
‘ Utilisez le curseur Æ/ pour entrer dans
le menu PIP.
( Utilisez les curseurs Î ï pour sélectionner
les options du menu PIP.
§ Utilisez les curseurs Í Æ Î ï pour accéder
aux options du menu PIP et pour faire les
réglages suivants.
Pour quitter l’écran PIP, sélectionnez
Dimension PIP et ensuite l’option
Off (Désactivé).
Définition des options PIP
Dimension PIP : Sélectionnez la dimension PIP
(Off (Désactivé), Petite,
Moyenne, Large et
Juxtaposée).
Horizontal : Déplacez l’écran PIP
horizontalement de gauche
à droite et vice versa.
Vertical : Déplacez l’écran PIP verticalement
du haut vers le bas et vice-versa.
HDMI : Si HDMI-1 et HDMI-2 sont
tous les deux connectés, vous
pouvez sélectionner seulement
une source, HDMI-1 ou bien
HDMI-2.
Accéder à l’écran PIP via la touche PIP
Remarque : Cela est possible seulement au moment
où le signal PIP est détecté.
& Appuyez sur la touche de la télécommande
pour afficher l’écran PIP. Un petit écran PIP va
apparaître à l’écran du téléviseur.
é Appuyez pour la deuxième fois sur la touche
pour modifier le petit écran PIP dans un écran PIP
à dimension moyenne.
“ Appuyez pour la troisième fois sur la touche
pour modifier l’écran moyen PIP dans un écran
PIP à dimension large.
‘ Appuyez pour la quatrième fois sur la touche
pour modifier l’écran large PIP dans un écran à
format juxtaposé (l’écran TV d’un côté et l’écran
PIP de l’autre côté).
( Appuyez pour la cinquième fois sur la touche
pour quitter l’écran PIP.
L’option PIP (Image sur image) vous permet d’activer
un écran PIP du PC (l’ordinateur personnel) ou
de l’appareil HD (Haute définition) alors que vous
regardez un programme TV.
IMPORTANT
Pour activer un écran PIP de l’équipement PC, il
faut suivre les étapes suivantes
:
L’entrée HDMI-1 ou HDMI-2 DOIT être
connectée à la sortie DVI de l’équipement PC.
Utilisez un câble adaptateur HDMI à DVI pour
effectuer le raccordement.
Pour activer un écran PIP de l’équipement HD, il faut
suivre les étapes suivantes
:
L’entrée HDMI-1 ou HDMI-2 DOIT être
connectée à la sortie HDMI de l’équipement HD.
REMARQUE
• Alors que vous regardez des programmes
TV, vous pouvez activer un écran PIP à
partir d’une seule source.
• Allez au menu PIP et sélectionnez HDMI. Voir
ci-dessous comment accéder au menu PIP.
• Sélectionnez HDMI-1 ou HDMI-2 en fonction
du type de raccordement.
Accéder à l’écran PIP via le menu PIP
Remarque : Cela est possible seulement dans le cas
où le signal PIP est détecté.
& Appuyez sur la touche pour afficher le
menu principal.
é Utilisez les curseurs Î ï pour sélectionner
Options et la touche Æ/ pour entrer
dans le menu Options.
Menu TV
Image
Son
Options
Installation
Options
Minuterie
Contraste+
NR (RB)
PIP
Æ
Æ
Æ
Æ
• Dimension PIP
• Horizontal
• Vertical
• HDMI
PIP
Dimension PIP
Horizontal
Vertical
HDMI
Æ
Æ
Æ
Æ
Off
REMARQUE
Pour plus de détails sur les raccordements
au PC et à l’équipement HD, voir
« GUIDE DE RACCORDEMENT ».
PIP
Dimension PIP
Horizontal
Vertical
HDMI
Æ
Æ
Æ
Æ
HDMI-1
PIP
Dimension PIP
Horizontal
Vertical
HDMI
Æ
Æ
Æ
Æ
HDMI-2
7
Page 35

13
Formats écran
Les images que vous recevez peuvent être transmises au format 16:9 (écran large) ou 4:3 (écran
traditionnel). Les images 4:3 ont parfois une bande noire à gauche et à droite de l’écran. Cette fonction
vous permet d’optimiser l’affichage des images sur l’écran.
Appuyez sur la touche (ou Í Æ) pour sélectionner les différents modes. Le téléviseur est
équipé d’une commutation automatique qui va sélectionner le bon format d’écran, pourvu que les
signaux spécifiques soient transmis avec les programmes.
4:3
L’image est reproduite au format 4:3, une bande noire apparaît de
chaque côté de l’image.
Zoom 14:9
L’image est agrandie au format 14:9, une petite bande noire subsiste de
chaque côté de l’image.
Zoom 16:9
L’image est agrandie au format 16:9. Ce mode est recommandé pour
visualiser les images avec bande noire en haut et en bas (format
cinémascope).
Zoom sous-titres
Ce mode permet de visualiser les images 4:3 sur toute la surface de
l’écran en laissant visibles les sous-titres.
Super 4:3
Ce mode permet de visualiser les images 4:3 sur toute la surface de
l’écran en élargissant les côtés de l’image.
Ecran large
L’image est affichée avec les proportions correctes des images
transmises au format 16:9.
Remarque : Si vous affichez une image 4:3 dans ce mode,
celle-ci sera élargie horizontalement.
Page 36
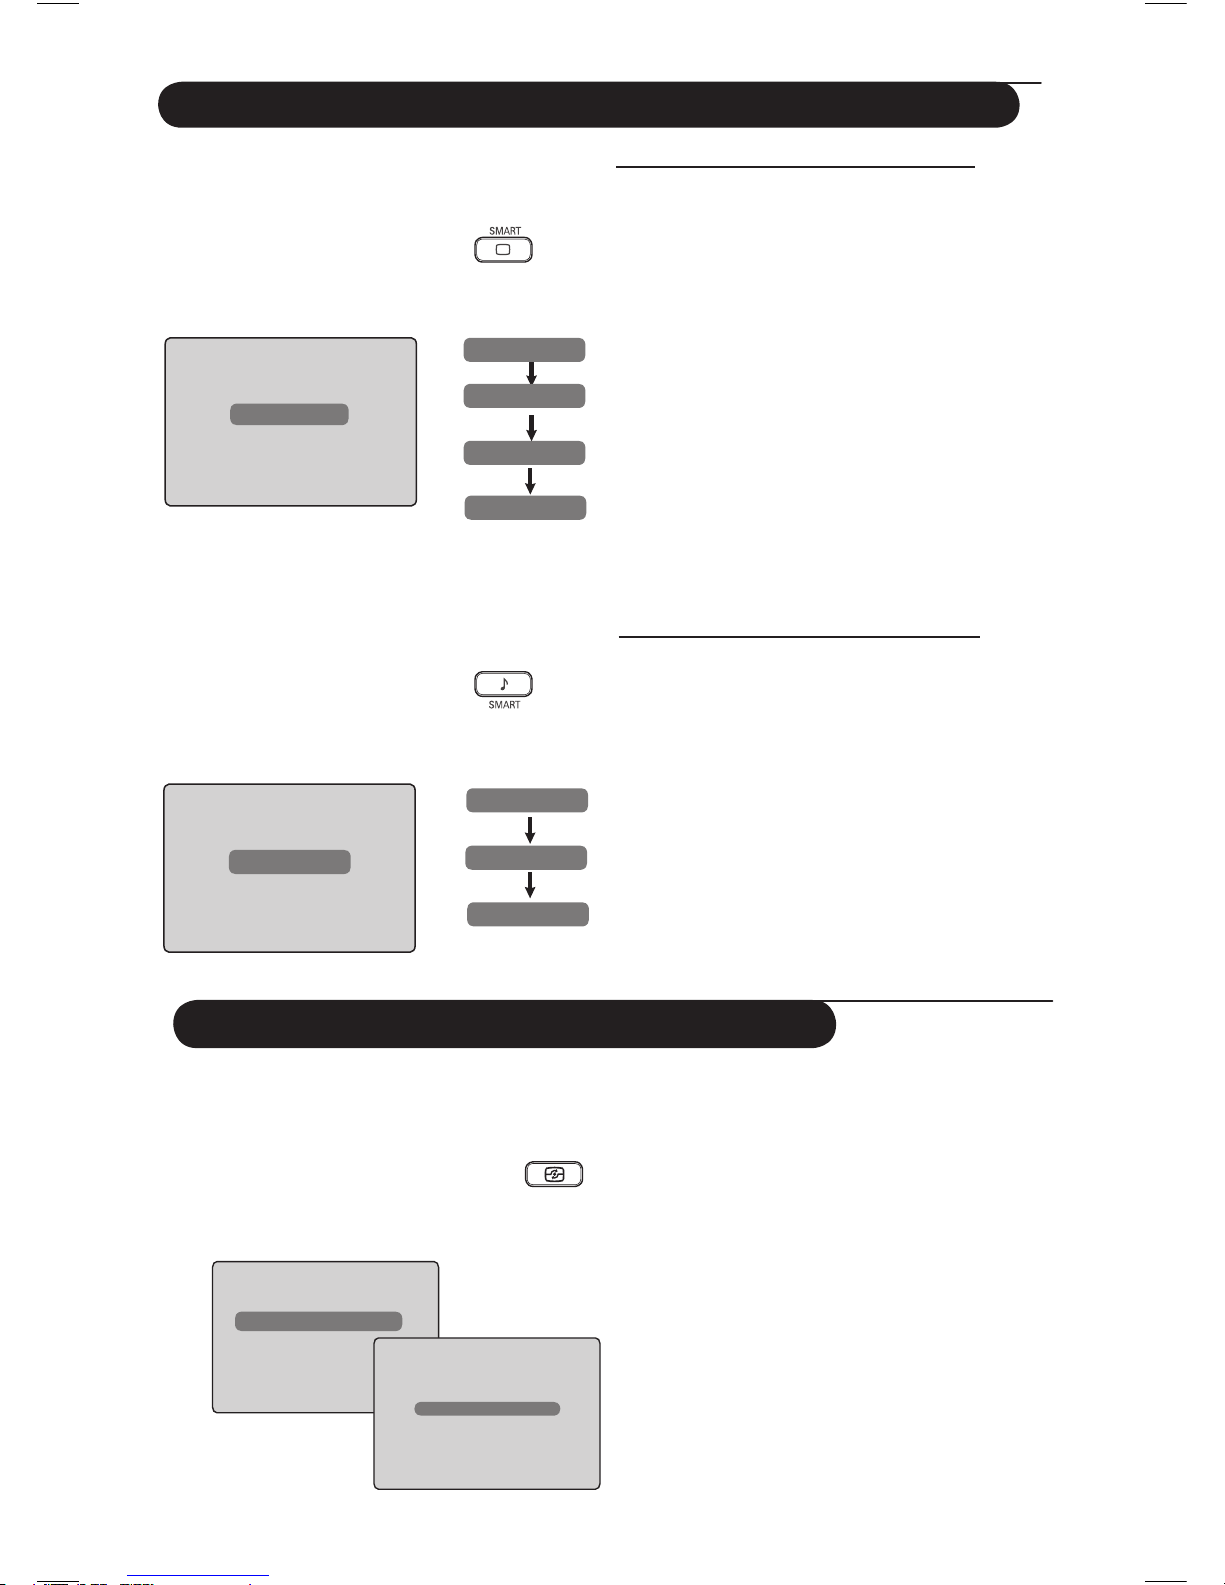
14
Utilisation des options Smart Picture et Smart Sound
L’option Smart Picture vous offre la possibilité
de choisir entre 5 réglages de l’image, à savoir :
Intense, Naturel, Doux, Multimédia et
Personnel.
Appuyez plusieurs fois sur la touche pour
naviguer parmi les réglages en vue de sélectionner
le mode désiré.
L’option Smart Sound vous offre la possibilité
de choisir entre 4 réglages du son, à savoir :
Théâtre, Musique, Parole et Personnel.
Appuyez plusieurs fois sur la touche
pour naviguer parmi les réglages en vue de
sélectionner le mode désiré.
Description des réglages de l’image
Intense : Des réglages pour des images brillantes
et nettes, appropriées dans un milieu
lumineux et destinées à être utilisées
dans des démonstrations de la qualité du
téléviseur.
Naturel : Le mode de référence approprié aux
conditions de la salle de séjour et aux
signaux moyens.
Doux : Destiné à être utilisé dans le cas des
signaux d’une mauvaise qualité. Approprié
pour l’utilisation dans la salle de séjour.
Multimédia : Idéal dans des milieux commerciaux et
pour les démonstrations sur des signaux
de mauvaise qualité. Ce réglage est aussi
idéal pour les applications graphiques.
Personnel : Les réglages d’image sont configurés
conformément à vos préférences.
Description des réglages du son
Théâtre : Accentue la sensation d’action (les
tons graves et aigus sont mis en
évidence).
Musique : Accentue les tons bas (le ton grave
est mis en évidence).
Parole : Accentue les tons élevés (le ton
aigu est mis en évidence).
Personnel : Les réglages d’image sont configurés
conformément à vos préférences.
REMARQUE : Le réglage Personnel est le
réglage que vous configurez en utilisant le menu
Image/Son du menu principal. C’est le seul réglage
Smart Picture/Sound qui puisse être changé. Tous
les autres réglages sont pré-configurés dans l’usine.
Intense
ou
Personnel
Multimédia
Naturel
Doux
Théâtre
ou
Musique
Parole
Personnel
Utilisation de l’option Active Control
L’option Active Control ajuste automatiquement
le réglage de l’image pour assurer continuellement
une qualité optimale de l’image indifféremment des
conditions du signal.
&
Appuyez plusieurs fois sur la touche
pour commuter entre les options Active
Control Arrét et Active Control Marche.
.
é
Sélectionnez l’option Active Control
Marche pour activer l’option Active
Control.
“
Sélectionnez l’option Active Control
Arrét pour désactiver l’option Active
Control.
Commande active Off
Commande active On
Page 37
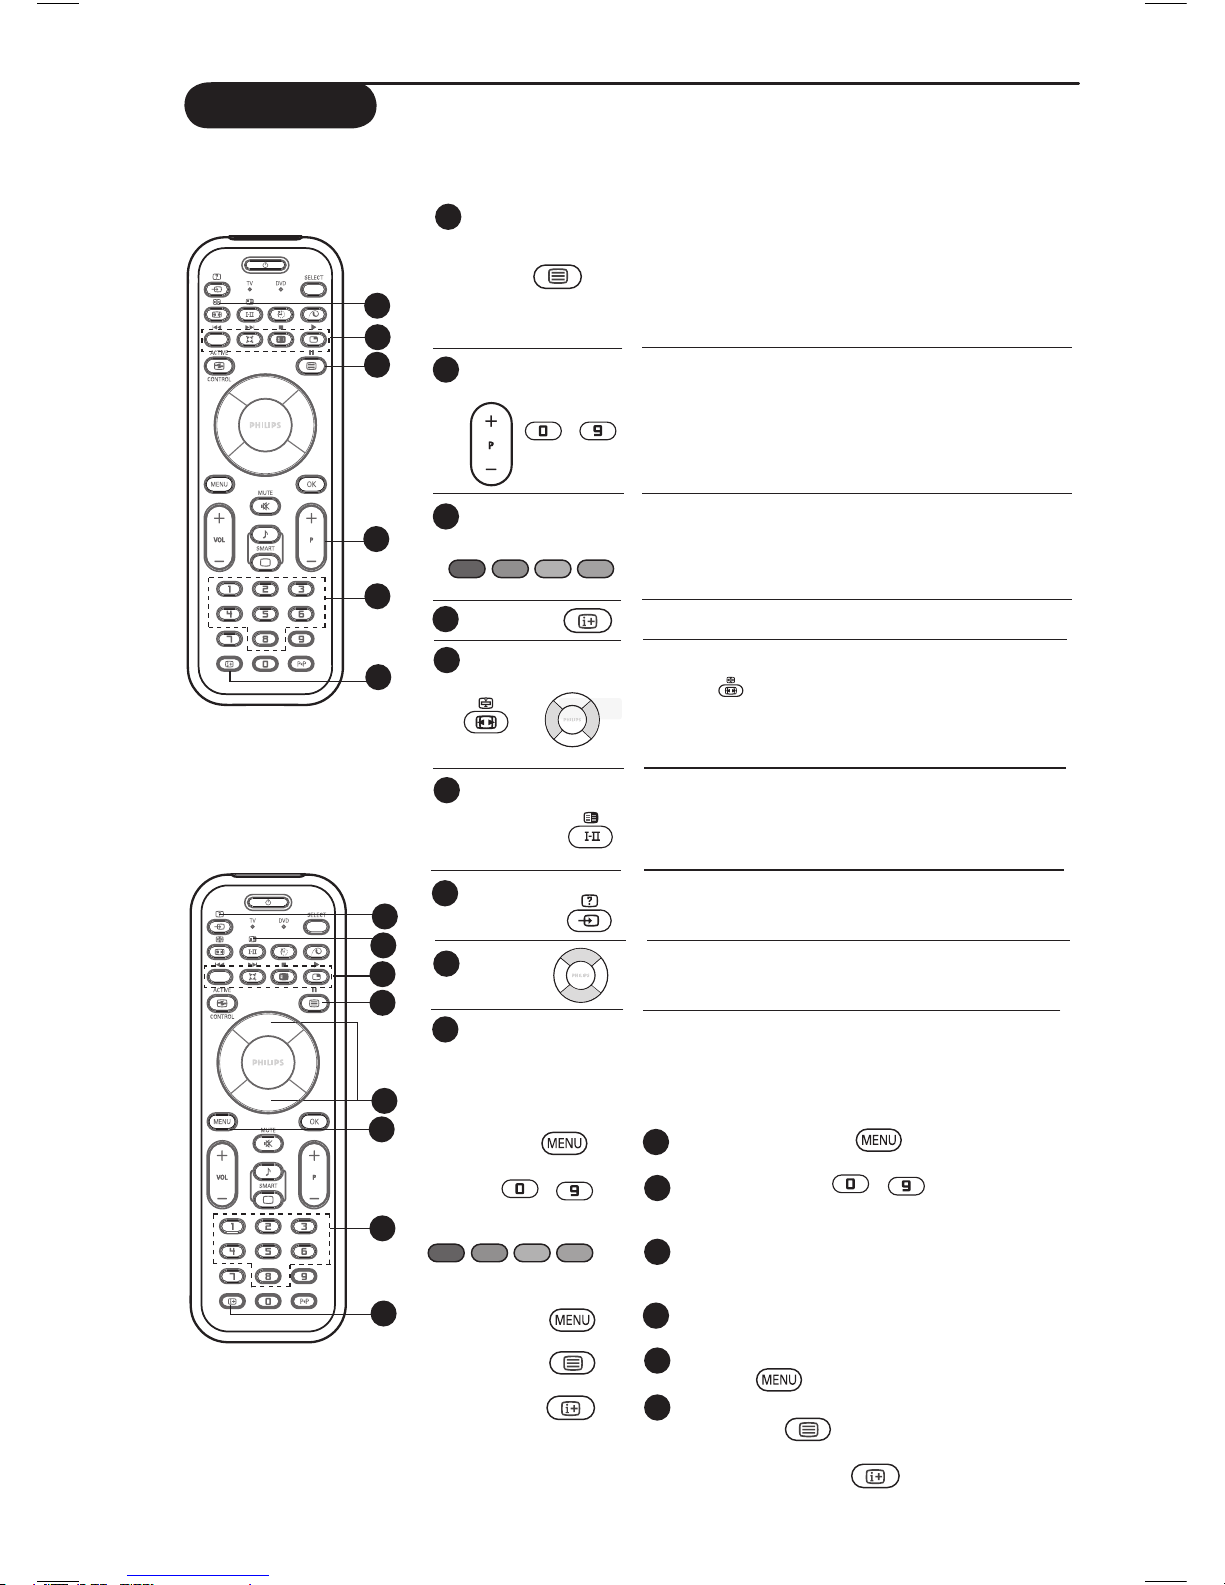
15
Télétexte
Le télétexte est un système d’informations, diffusé par certaines chaînes, qui se consulte comme un journal.
Il permet aussi d’accéder aux sous-titrages pour les personnes malentendantes ou peu familiarisées avec
la langue de transmission (réseaux câblés, chaînes satellite, etc.).
Cela est utilisé pour activer ou désactiver l’affichage du
télétexte. Le sommaire apparaît avec la liste des options
qui peuvent être accédées. Chaque option a un numéro
de page correspondant formé de trois chiffres. Si le
programme sélectionné ne transmet pas de télétexte,
l’indicateur 100 sera affiché et l’écran va rester vide.
Quittez le télétexte et sélectionnez un autre programme.
Composez le numéro de la page désirée avec les
touches de 0 à 9 ou P –/+. Exemple : page 120, tapez
120. Le numéro s’affiche en haut à gauche. Lorsque
la page est trouvée, le compteur cesse de rechercher.
Répétez cette opération pour voir une autre page. Si
le compteur continue à rechercher, cela signifie que la
page n’est pas transmise. Sélectionnez un autre numéro.
Des zones colorées sont affichées en bas de l’écran.
Les 4 touches colorées permettent d’accéder aux
rubriques ou aux pages correspondantes. Les zones
colorées clignotent lorsque la rubrique ou la page n’est
pas encore disponible.
Pour retourner au sommaire (généralement la page 100).
Certaines pages contiennent des sous-pages qui s’affichent
automatiquement les unes après les autres. Appuyez sur
la touche pour arrêter le défilement et appuyez une
deuxième fois pour le reprendre. Utilisez les touches Í Æ
pour sélectionner la sous-page précédente ou la sous-page
suivante.
Pas de fonction. Non applicable.
Pour faire apparaître ou disparaître les informations
cachées (solutions de jeux).
Cela vous permet d’afficher la partie d’en haut ou d’en
bas de la page. Si vous appuyez de nouveau, la page va
retourner à sa dimension normale.
Au lieu des zones de couleur standard affichées en bas
de l’écran, vous pouvez enregistrer 4 pages préférées
sur les 40 premières chaînes et auxquelles vous pouvez
accéder à l’aide des touches de couleur (rouge, verte,
jaune et bleue). Une fois définies, ces pages s’affichent
par défaut à chaque ouverture du télétexte.
Appuyez sur la touche
pour passer en mode
pages préférées.
Utilisez les touches
/ pour arriver à la
page télétexte que vous souhaitez mémoriser en
tant que page préférée.
Appuyez et maintenez l’appui pendant 5 secondes
sur la touche colorée de votre choix. La page est
mémorisée.
Répétez les étapes 2 et 3 avec les autres touches
colorées.
Pour quitter le mode pages préférées, appuyez sur
la touche .
Pour quitter le mode télétexte, appuyez deux fois
sur la touche
.
REMARQUE : Pour effacer les pages préférées,
appuyez sur la touche
et maintenez l’appui
pendant 5 secondes.
1
3
4
2
6
5
Activation du
télétexte
1
Sélectionner
une page
2
Accès direct aux
rubriques
3
Sommaire
4
5
Affichage
sous-page
Double page
télétexte
6
7
Informations
cachées
Agrandir
une
page
8
9
Pages préférées
/
/
3
1
2
2
4
5
6
8
7
9
9
9
9
9
Page 38
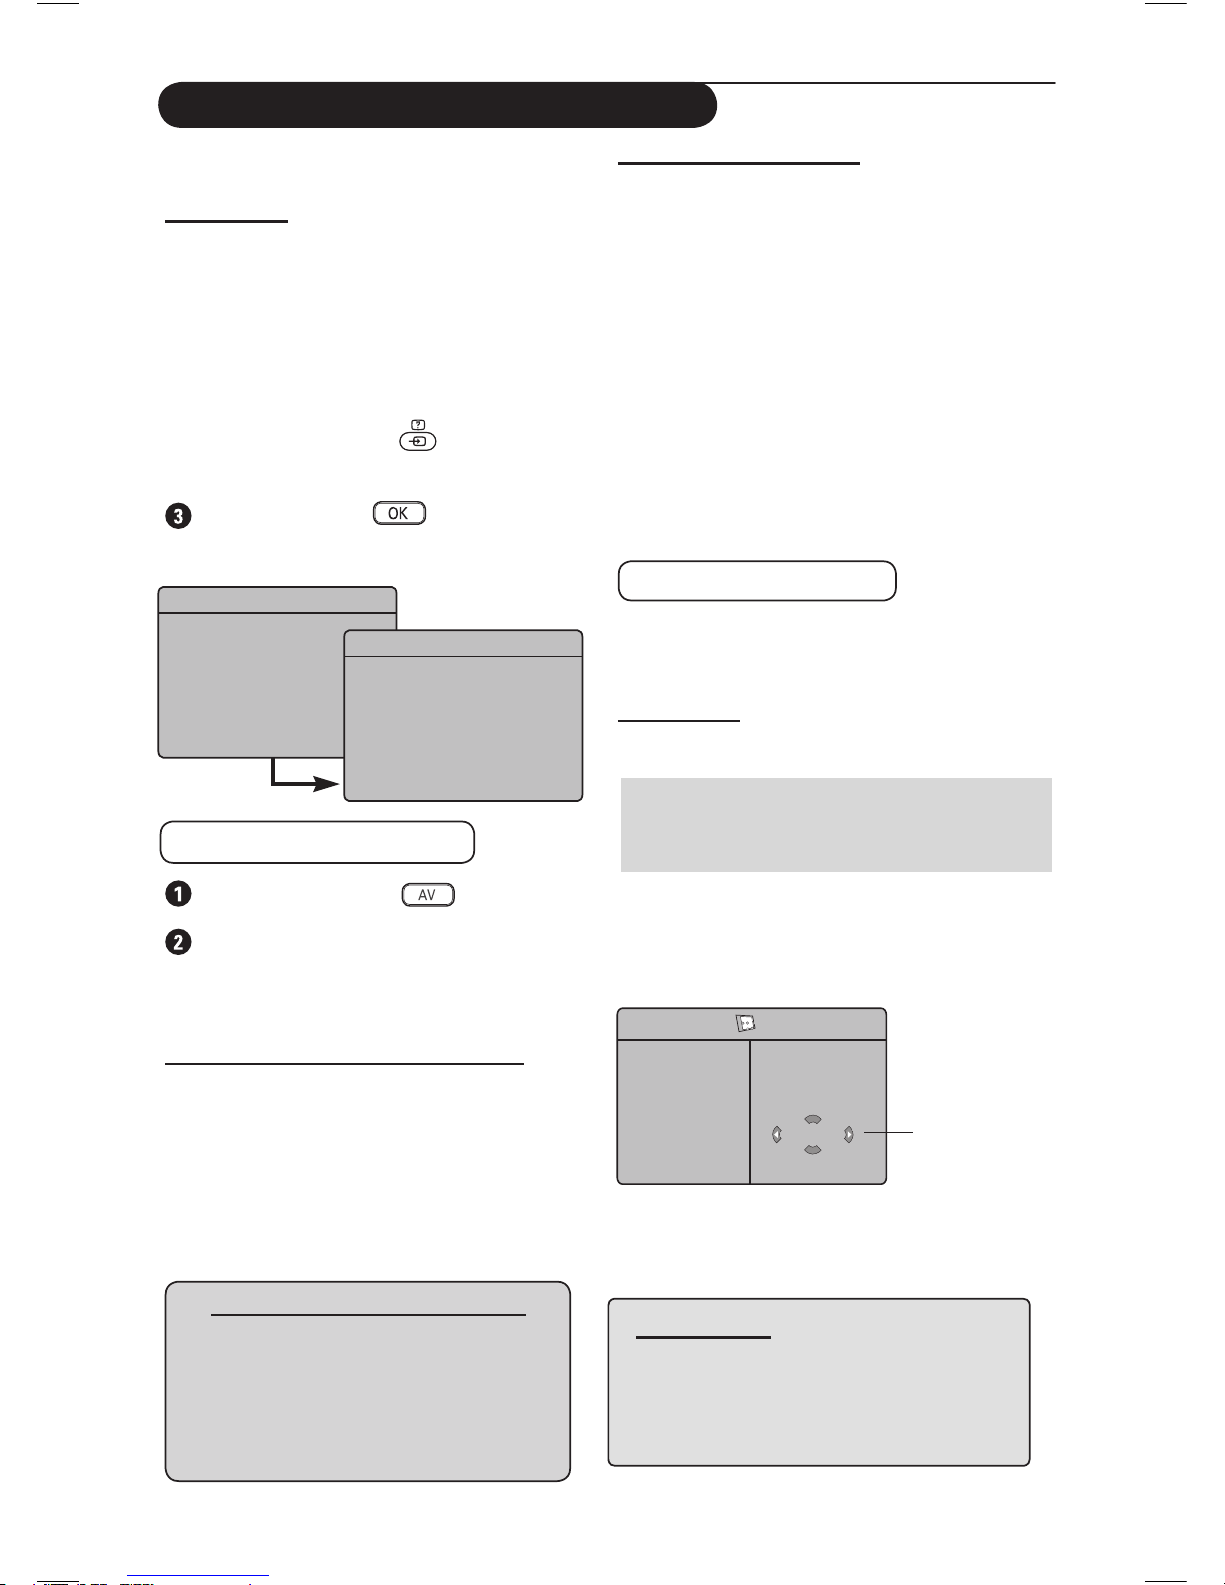
16
Utilisation en mode moniteur PC
Votre téléviseur peut être utilisé comme un
moniteur d’ordinateur.
IMPORTANT
Pour que le téléviseur fonctionne en mode
moniteur PC, il faut suivre les étapes
suivants :
& L’entrée HDMI-1 ou HDMI-2 DOIT être
connectée à la sortie DVI du PC. Utilisez
un adaptateur DVI à HDMI pour effectuer le
raccordement.
é Appuyez sur la touche pour afficher la
Liste des sources et utilisez les curseurs
Î ï pour sélectionner HDMI-1 ou HDMI-2.
Utilisez la touche Æ/ pour commuter
dans la source sélectionnée.
Utilisation des menus PC
Appuyez sur la touche pour afficher
les menus PC.
Appuyez sur la touche Î ï pour accéder
aux réglages et avec le curseur Í Æ/ok
sélectionnez ou modifiez les réglages (les
réglages sont mémorisés automatiquement) :
Description des réglages de l’image
Lumière/Contraste :
– Règle la lumière et le contraste.
Temp. Couleur :
– Modifie le rendu des couleurs : Froide (plus
bleue), Normale (équilibrée) ou Chaude
(plus rouge).
Sélection audio :
– Choisit le son reproduit à la TV (PC ou TV).
Source
TV
Æ
EXT.1
EXT.2/SVHS2
EXT.3/SVHS3
EXT.4
HDMI 1
HDMI 2
Source
TV
EXT.1
EXT.2/SVHS2
EXT.3/SVHS3
EXT.4
HDMI 1
Æ
HDMI 2
Description des Options
Format :
– Choisit entre le format plein écran ou le format
traditionnel de l’écran du téléviseur.
PIP (Image sur image) :
– Affiche un écran PIP pour regarder
simultanément plusieurs programmes TV.
* Sélection du mode : Lorsque vous branchez
un PC ou du matériel HD supportant les
résolutions de 480p, 576p ou 720p, la
Sélection du Mode apparaît en surbrillance
dans le menu Options. Vous pouvez ainsi choisir
le mode PC ou HD. Si l’appareil branché ne
supporte pas les résolutions 480p, 576p ou 720p,
vous ne pouvez pas accéder à cette fonction.
Utilisation de l’option PIP
L’option PIP (Image sur image) vous permet
d’activer un écran PIP d’un programme TV alors
que vous vous trouvez en mode PC.
IMPORTANT
Pour activer un écran PIP du programme TV, il
faut suivre les étapes suivantes :
L’entrée HDMI-1 ou HDMI-2 DOIT être
connectée à la sortie DVI de l’équipement PC.
Utilisez un câble adaptateur HDMI à DVI pour
effectuer le raccordement.
Les options du menu PIP : la Dimension PIP,
l’Horizontal et le Vertical fonctionnent de la
même manière que dans le cas où vous activez un
écran PIP en mode TV. A l’exception du HDMI, il
n’y a aucune sélection pour d’autres sources.
PIP
Dimension PIP
Horizontal
Vertical
HDMI
Æ
Æ
Æ
Æ
HDMI
Í
Aucune
sélection
REMARQUE
Pour plus de détails sur les
raccordements à l’équipement PC,
voir « GUIDE DE RACCORDEMENT ».
Résolutions PC compatibles
640 x 480, 60 Hz 800 x 600, 72 Hz800 x 600, 72 Hz
640 x 480, 67 Hz 800 x 600, 75 Hz
640 x 480, 72 Hz 1024 x 768, 60 Hz640 x 480, 72 Hz 1024 x 768, 60 Hz 1024 x 768, 60 Hz1024 x 768, 60 Hz
640 x 480, 75 Hz 1024 x 768, 70 Hz640 x 480, 75 Hz 1024 x 768, 70 Hz 1024 x 768, 70 Hz1024 x 768, 70 Hz
800 x 600, 56 Hz 1024 x 768, 75 Hz800 x 600, 56 Hz 1024 x 768, 75 Hz 1024 x 768, 75 Hz1024 x 768, 75 Hz
800 x 600, 60 Hz
Pour la description des options du menu PIP et pour la
manière d’utilisation, consultez la section «
Utilisation de
l’option PIP (Image sur image) », page 12.
Page 39
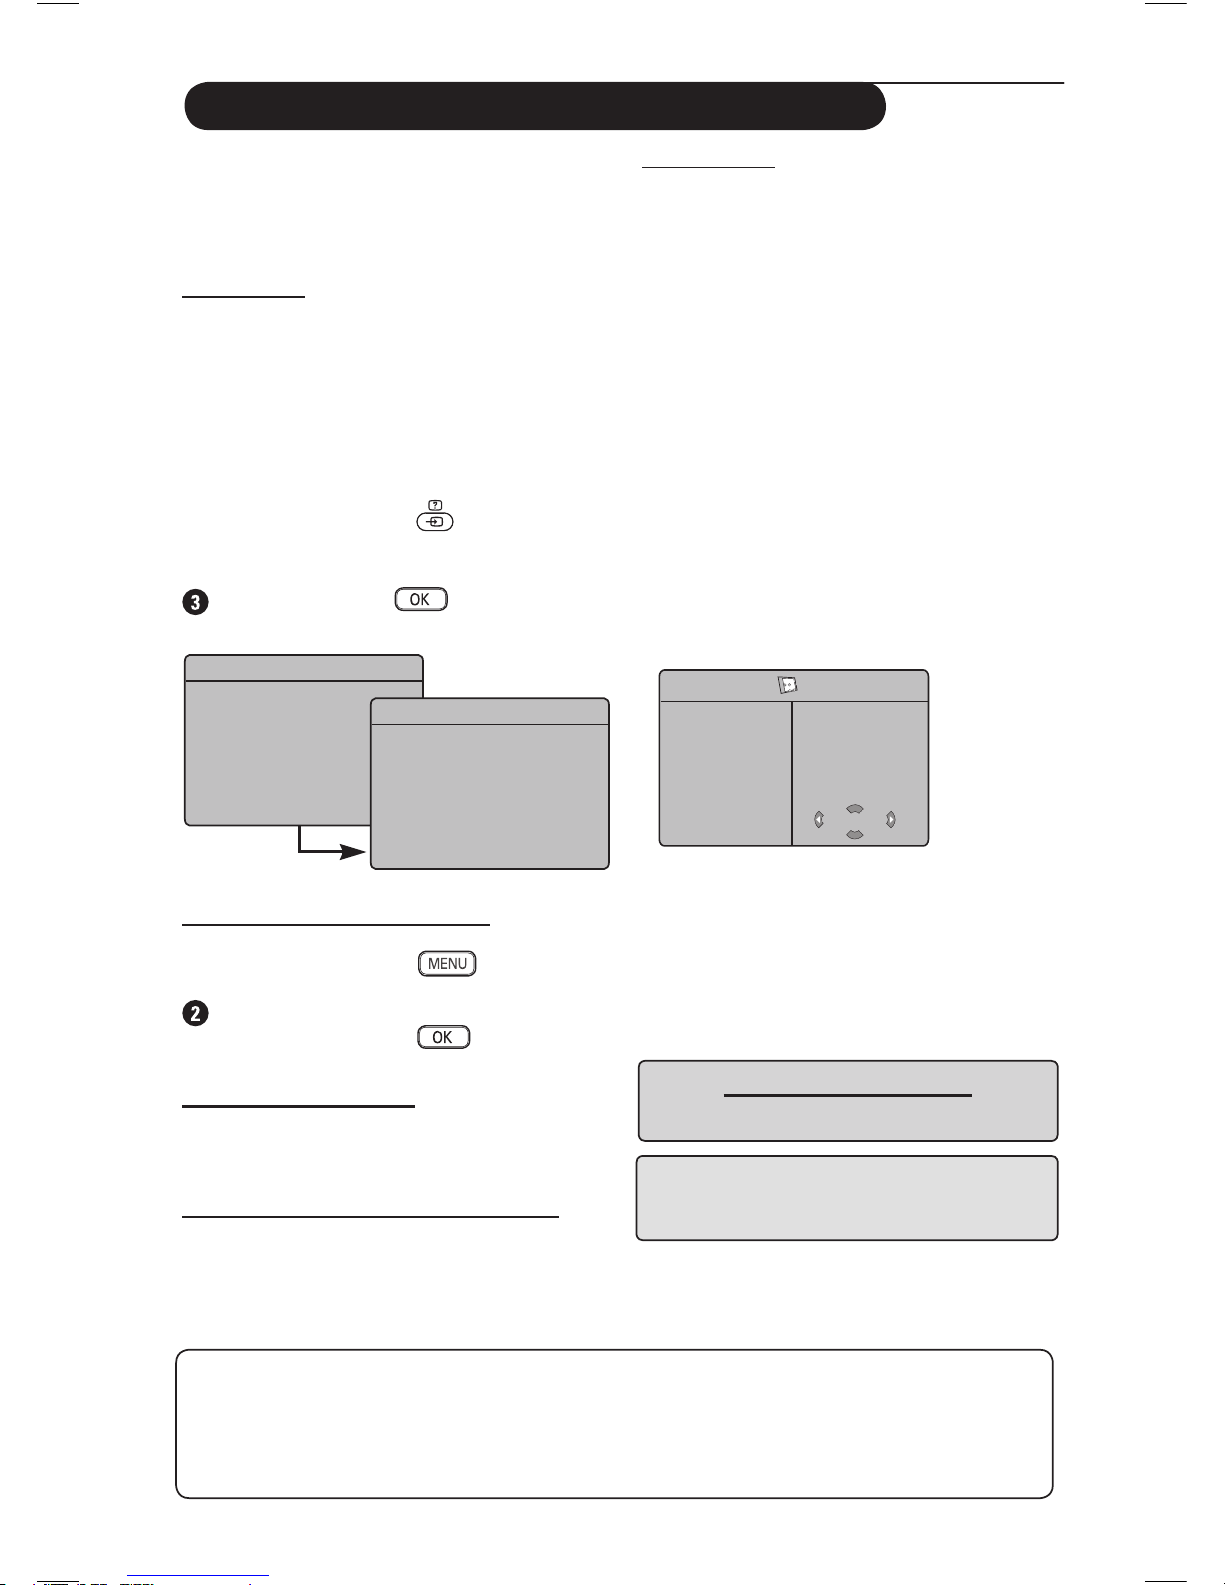
17
Utilisation en mode HD (Haute Définition)
Mode HD
Le mode HD (Haute Définition) vous permet de
profiter des images plus claires et plus nettes si
vous utilisez un récepteur/équipement HD qui
transmet des programmes en haute définition.
IMPORTANT
Pour l’utilisation du TV en mode HD, il faut
suivre les étapes suivants :
& L’entrée HDMI-1 ou HDMI-2 DOIT être
connectée à la sortie HDMI/DVI du
récepteur/équipement HD. Utilisez un
adaptateur HDMI à DVI si DVI est connecté.
Pour plus d’informations, consultez le
Guide de raccordements.
é Appuyez sur la touche pour afficher
la Liste des sources et utilisez les curseurs
Î ï pour sélectionner HDMI-1 ou HDMI-2.
Utilisez la touche Æ/ pour commuter
dans la source sélectionnée.
Utilisation des menus HD
& Appuyez sur la touche pour afficher
les menus HD.
Avec le curseur Î ï accédez aux réglages et
avec les curseurs Í Æ/ sélectionnez
ou modifiez les réglages.
Le menu Installer HD
REMARQUE : Vous ne pouvez pas accéder à
la fonction Installer dans le menu HD. IL N’Y A
PAS de fonction Installer en mode HD.
Réglages de l’image et du son HD
Les fonctions des réglages de l’image et du son
HD sont les mêmes que celles des réglages de
l’image et du son TV et ils fonctionnent de la
même manière que les réglages de l’image et du
son TV (voir page 9)
Source
TV
Æ
EXT.1
EXT.2/SVHS2
EXT.3/ SVHS3
EXT.4
HDMI 1
HDMI 2
Source
TV
EXT.1
EXT.2/SVHS2
EXT.3/SVHS3
EXT.4
HDMI 1
Æ
HDMI 2
REMARQUE:
Pour plus de détails sur le
raccordement à l’équipement HD, voir «
GUIDE DE RACCORDEMENT ».
Format HD compatible
480p 576p 720p 1080i1080i
HD : divers
Horloge : les fonctions de l’horloge et de la
minuterie sont identiques à celles de l’horloge
et de la minuterie du téléviseur et fonctionnent
exactement de la même façon (voir page 10).
PIP : l’écran PIP affiche une image dans
l’image pour visionner plusieurs programmes
TV en même temps. Les options de menu PIP
– Format PIP, Horizontal et Vertical–
fonctionnent exactement de la même façon que
lors de l’activation de l’écran PIP en mode TV.
Pour la description des options de menu PIP
et leur fonctionnement, consultez le chapitre «
Utilisation de la fonction PIP (Image dans l’image)
», à la page 12.
* Dépl. Horizontal : permet d’ajuster la
position horizontale de l’image.
Æ
Æ
Æ
Æ
HD
Options
Minuterie
Contraste+
NR
PIP
Dépl. Horizontal
Mode sélection
Votre téléviseur Philips est compatible HDMI. Si vous n’obtenez pas une bonne image, veuillez
changer le format vidéo de votre appareil (lecteur DVD, boîtier décodeur par câble, etc.) et
adopter un format standard. Pour un lecteur DVD, par exemple, sélectionnez 480p, 576p, 720p o
1080i. Pour un PC, sélectionnez 640 x 480, 800 x 600 ou 1024 x 768. Si le problème persiste,
veuillez consulter le manuel d’utilisation de votre PC quant aux éventuelles mises à niveau
logicielles à installer pour votre carte graphique.
Sachez qu’il ne s’agit pas d’une défectuosité de votre téléviseur.
* Mode sélection : Lorsque vous branchez un
PC ou du matériel HD supportant les résolutions
de 480p, 576p ou 720p, la Mode sélection
apparaît en surbrillance dans le menu Options. Vous
pouvez ainsi choisir le mode PC ou HD. Si l’appareil
branché ne supporte pas les résolutions 480p, 576p
ou 720p, vous ne pouvez pas accéder à cette fonction.
Page 40
18
Conseils
Veuillez trouver ci-dessous une liste de symptômes que votre téléviseur pourrait présenter. Avant de
faire appel au service d’entretien et de réparation, vérifiez la liste qui suit :
Symptôme Causes potentielles Ce que vous pouvez faire
Pas d’affichage à
l’écran
Mauvaise réception
(l’image n’est pas
claire et il y a du bruit)
Absence d’image
Absence de son pour
certains programmes
Absence de son
Brouillage du son
Impossibilité de
comprendre la langue
à l’écran en vue
d’exploiter l’appareil
Le téléviseur ne répond
pas à la télécommande
Apparition des points
rouges, bleus, verts et
noirs à l’écran
Image intermittente
ou tremblotante en
mode HD
Pas de son ou d’image,
mais le voyant rouge
du panneau avant est
allumé
• Alimentation électrique
défectueuse
• Le téléviseur n’est pas en
marche
• Raccordement défectueux
de l’antenne
• Transmission faible
• Système TV incompatible
• Câble antenne défectueux
• La source sélectionnée
n’est pas la bonne.
• Système TV incompatible
• Le niveau du volume est
à zéro
• Le son est en sourdine
• Le casque audio est
connecté
• Appareils électrique
• La langue incorrecte
a été sélectionnée
accidentellement
• Polarité incorrecte des
piles
• Piles déchargées
• Caractéristique des
cristaux liquides
• L’authentification *HDCP
a échoué (consultez le
glossaire)
• Le téléviseur est en mode
veille
• Vérifiez si le cordon d’alimentation est enfoncé
correctement dans la prise d’alimentation électrique.
S’il n’y pas d’alimentation électrique, déconnectez la
fiche. Attendez 60 secondes et insérez de nouveau la
fiche. Mettez en marche de nouveau le téléviseur.
• Appuyez sur la touche
de votre télécommande.
• Vérifiez le raccordement de l’antenne derrière le
téléviseur.
• Essayez de régler manuellement l’image (voir page 9)
• Avez-vous choisi le système TV correct ? (voir la page 9).
• Vérifiez si les câbles euroconnecteurs ou si les prises
d’antenne sont raccordés correctement.
• Vérifiez si la source est sélectionnée correctement.
Appuyez sur la touche
pour entrer dans la liste
des sources et sélectionnez la source correcte
• Vérifiez si vous avez sélectionné le système TV correct
(voir page 9).
• Essayez d’augmenter le volume.
• Vérifiez si le son n’est pas en sourdine.
• Orientez la télécommande directement dans la direction
du capteur en face avant du téléviseur.
• Débranchez le raccordement du casque audio
(uniquement pour les modèles 26"/32").
• Essayez d’éteindre tout appareil électrique qui puisse
causer des brouillages du son (aspirateur, sèchecheveux, etc.).
• Appuyez sur la touche
pour quitter
le menu écran. Appuyez sur la touche
pour arriver au menu principal. Utilisez le
curseur ï pour sélectionner la
quatrième
option du menu principal. Avec
Æ
/
allez au niveau suivant du menu et avec Í
Æ
sélectionnez la langue correcte.
• Vérifiez que les piles sont mises en place correctement.
• Essayez de changer de piles.
• Ce symptôme n’est pas problématique. L’afficheur à
cristaux liquides a été construit grâce à une technologie
de grande précision en vue de vous fournir des détails
fins de l’image. Occasionnellement, quelques pixels
inactifs pourraient apparaître à l’écran en tant que des
points fixes rouges, bleus, verts ou noirs. Veuillez noter
que cela n’affecte pas le rendement de votre appareil.
• Il y aura du bruit si l’authentification *HDCP de
l’équipement numérique connecté (lecteur DVD ou la
boîte de réglage) a échoué. Consultez le mode d’emploi
de tout équipement numérique que vous connectez.
• Utilisez un câble standard HDMI à DVI.
• Appuyez sur la touche
de votre télécommande.
Page 41
19
Glossaire
DVI (Digital Visual Interface) : Interface numérique
standard créée par Digital Display Working Group
(DDWG) et qui convertit les signaux analogiques en
signaux numériques an de s’adapter aux moniteurs
analogiques et numériques.
VGA (Video Graphics Array) : système d’afchage
graphique commun aux ordinateurs.
Signaux RVB : Il s’agit de 3 signaux vidéo : Rouge,
Vert, Bleu, qui composent l’image. L’utilisation de
ces signaux permet d’obtenir une meilleure qualité
d’image.
Signaux S-VHS : Il s’agit de deux signaux vidéo
séparés Y/C issus des standards d’enregistrement
S-VHS et Hi-8. Les signaux de luminance Y (noir et
blanc) et chrominance C (couleur) sont enregistrés
séparément sur la bande. On obtient ainsi une
meilleure qualité qu’avec la vidéo standard (VHS et
8 mm) où les signaux Y/C sont mélangés pour ne
former qu’un seul signal vidéo.
Son NICAM : Procédé permettant de transmettre
le son en qualité numérique.
16:9 : Désigne les proportions largeur/hauteur
de l’écran. Les téléviseurs à écran large ont des
proportions de 16/9, et les écrans traditionnels : 4/3.
HDMI (High-Denition Multimedia Interface) :
Fournit une interface non comprimée, audio/vidéo
numérique entre le téléviseur et tout équipement
audio/vidéo équipé de HDMI, tel que boîtier
décodeur, lecteur DVD et récepteur A/V. HDMI est
compatible avec les vidéos à haute dénition plus une
audio numérique à deux canaux.
Système : Les images de télévision ne sont pas
transmises de la même manière dans tous les pays.
Il y a des standards différents : BG, DK, I, et LL’. Le
réglage du système (p. 9) sélectionne ces standards
différents. Ne pas confondre ces standards avec les
codages couleurs PAL et SECAM. Pal est utilisé dans
la plupart des pays de l’Europe, SECAM est utilisé en
France, en Russie et dans la plupart des pays africains.
Les Etats-Unis et le Japon utilisent un système
différent appelé NTSC. Les entrées EXT1 et EXT2
lisent les enregistrements codés.
HDCP (High-bandwidth Digital-Content
Protection) : HDCP chiffre la transmission du
contenu numérique entre la source vidéo ou
l’émetteur, comme l’ordinateur, le lecteur DVD,
le boîtier décodeur et l’écran numérique ou le
récepteur, comme le moniteur, la téléviseur ou
l’appareil de projection.
Conseils de dépannage
Symptôme Causes potentielles Ce que vous pouvez faire
Je ne peux pas accéder
au menu Installer
Les modes PC ne
fonctionnent pas
La couleur S-Video
devient faible
Il y a une bande noire
en haut et en bas de
l’écran en mode PC
• En mode AV, EXTERNE
ou HD.
• Raccordements
incorrects
• La source sélectionnée
n’est pas correcte.
• Définition défectueuse de
l’affichage
• Réglage incorrect de la
carte graphique du PC
• Détection défectueuse
du signal
• La fréquence de
rafraîchissement du PC
est trop élevée
• IL N’Y A PAS d’accès au menu Installer lorsque les
modes AV, EXTERNAL ou HD sont sélectionnés.
• Vérifiez si les raccordements sont corrects (voir
« Utilisation en mode moniteur PC », page 16). (Pour
plus de détails sur le raccordement à l’équipement
PC, voir le « Guide de raccordements »).
• Vérifiez si la source est correctement sélectionnée.
Appuyez sur la touche pour arriver à la liste des
sources et sélectionnez la source correcte.
• Vérifiez si vous avez configuré l’ordinateur pour une
définition d’affichage compatible (voir « Utilisation en
mode moniteur PC », page 16)
• Vérifiez le réglage de la carte graphique du PC.
• Vérifiez si le cordon d’alimentation est connecté
correctement
• Appuyez sur la touche P +/– de la télécommande et
naviguer en haut et en bas parmi les programmes.
• Modifiez la fréquence de rafraîchissement du PC à
60 Hz.
Page 42
20
Spécifications techniques
Tableau de référence des pays disponibles
Abréviation Pays Abréviation Pays Abréviation Pays
A
B
CH
D
DK
E
F
FI
GB
Autriche
Belgique
Suisse
Allemagne
Danemark
Espagne
France
Finlande
Royaume-Uni
GR
I
IRL
L
N
NL
P
S
CZ
Grèce
Italie
Irlande
Luxembourg
Norvège
Pays-Bas
Portugal
Suède
République
tchèque
H
HR
PL
RO
RUS
SK
SLO
TR
---
Hongrie
Croatie
Pologne
Roumanie
Russie
Slovaquie
Slovénie
Turquie
Autres
26PF7321 32PF7321 37PF7321 42PF7321
Dimension de l’écran
66 cm 80 cm 94 cm 107 cm
Sortie audio
2 x 5 W 2 x 15 W 2 x 15 W 2 x 15 W
Système TV
PAL, SECAM
Lecture vidéo
NTSC, PAL, SECAM
Système sonore
Mono, Nicam Stereo, Virtual Dolby Surround
Connectivité
En arrière
Latéral
Consommation
100 W 120 W 180 W 220 W
Consommation en mode veille
< 1 W < 1 W < 2 W < 2 W
Dimensions de l’appareil
(y compris le support)
Largeur
69. 75 cm 93. 5 cm 111.4 cm 124.9 cm
Profondeur
24.7 cm 22.2 cm 30.6 cm 30.6 cm
Hauteur
54.2 cm 56 cm 68.3 cm 74.8 cm
Poids net (avec le support)
13 kg 19 kg 26 kg 42 kg
Entrée antenne 75 Ω, Prise péritel 1, Prise péritel 2,
HDMI 1, HDMI 2, Entrée du composant vidéo, DVI Entrée audio
Entrée audio, entrée vidéo, Entrée S-vidéo, Casque d’écoute
Page 43

CANAL ................FREQ (MHz)
E2 ........................48.25
E3 ........................55.25
E4 ........................62.25
E5 ......................175.25
E6 ......................182.25
E7 ......................189.25
E8 ......................196.25
E9 ......................203.25
E10 ....................210.25
E11 ....................217.25
E12 ....................224.25
R1 ........................49.75
R2 ........................59.25
R3 ........................77.25
R4 ........................85.25
R5 ........................93.25
R6 ......................175.25
R7 ......................183.25
R8 ......................191.25
R9 ......................199.25
R10 ....................207.25
R11 ....................215.25
R12 ....................223.25
S1 ......................105.25
S2 ......................112.25
S3 ......................119.25
S4 ......................126.25
S5 ......................133.25
S6 ......................140.25
S7 ......................147.25
S8 ......................154.25
S9 ......................161.25
S10 ....................168.25
S11 ....................231.25
S12 ....................238.25
S13 ....................245.25
S14 ....................252.25
CANAL ................FREQ (MHz)
S15 ....................259.25
S16 ....................266.25
S17 ....................273.25
S18 ....................280.25
S19 ....................287.25
S20 ....................294.25
H1 ......................303.25
H2 ......................311.25
H3 ......................319.25
H4 ......................327.25
H5 ......................335.25
H6 ......................343.25
H7 ......................351.25
H8 ......................359.25
H9 ......................367.25
H10 ....................375.25
H11 ....................383.25
H12 ....................391.25
H13 ....................399.25
H14 ....................407.25
H15 ....................415.25
H16 ....................423.25
H17 ....................431.25
H18 ....................439.25
H19 ....................447.25
21.......................471.25
22.......................479.25
23.......................487.25
24.......................495.25
25.......................503.25
26.......................511.25
27.......................519.25
28.......................527.25
29.......................535.25
30.......................543.25
31.......................551.25
32.......................559.25
CANAL ................FREQ (MHz)
33.......................567.25
34.......................575.25
35.......................583.25
36.......................591.25
37.......................599.25
38.......................607.25
39.......................615.25
40.......................623.25
41.......................631.25
42.......................639.25
43.......................647.25
44.......................655.25
45.......................663.25
46.......................671.25
47.......................679.25
48.......................687.25
49.......................695.25
50.......................703.25
51.......................711.25
52.......................719.25
53.......................727.25
54.......................735.25
55.......................743.25
56.......................751.25
57.......................759.25
58.......................767.25
59.......................775.25
60.......................783.25
61.......................791.25
62.......................799.25
63.......................807.25
64.......................815.25
65.......................823.25
66.......................831.25
67.......................839.25
68.......................839.25
69.......................855.2
5
ITALY
CANALE..............FREQ (MHz)
A ..........................53.75
B ..........................62.25
C ..........................82.25
D ........................175.25
E ........................183.75
F.........................192.25
G ........................201.25
H ........................210.25
H1 ......................217.25
FRANCE
CANAL ................FREQ (MHz)
2...........................55.75
3...........................60.50
4...........................63.75
5...........................176.0
6...........................184.0
7...........................192.0
8...........................200.0
9...........................208.0
10.........................216.0
B ........................116.75
C ........................128.75
D ........................140.75
E ........................159.75
F.........................164.75
G ........................176.75
H ........................188.75
I..........................200.75
J .........................212.75
K ........................224.75
L.........................236.75
M........................248.75
N ........................260.75
O ........................272.75
P ........................284.75
Q ........................296.75
Ta b le of TV frequencies.
Frequenztabelle der Fernsehsender.
Liste des fréquences TV.
Frequentietabel TV-Zenders.
Tabella delle frequenze TV.
Lista de frecuencias TV.
Lista das frequências TV
Liste over TV senderne.
Tabell over TV-frekvenser.
Tabell över TV-frekvenser.
TV-taajuustaulukko.
KK··ÙÙ¿¿ÏÏÔÔÁÁÔÔ˜˜ ÛÛ˘˘¯¯ÓÓÔÔÙÙ‹‹ÙÙˆˆÓÓ ÔÔÌÌÒÒÓÓ..
CФЛТУН ˜‡ТЪУЪ ФВВ‰‡Ъ˜ЛНУ‚.
A televizió-adóállomások
frekvenciáinak a listája.
Lista częstotliwości stacji nadawczych.
Seznam frekvenčních pásem vysílačů.
Zoznam frekvenčných pásiem vysielačov.
EUROPE
Positioning the TV
For the best results, choose a position where light
does not fall directly on the screen,and at some
distance away from radiators or other sources of
heat. Leave a space of at least 5 cm all around the
TV for ventilation, making sure that curtains,
cupboards etc. cannot obstruct the air flow through
the ventilation apertures.The TV is intended for use
in a domestic environment only and should never be
operated or stored in excessively hot or humid
atmospheres.
General Points
Please take note of the section entitled 'Tips' at the
end of this booklet.
Interference
The Department of Trade and Industry operates a
Radio Interference Investigation Service to help TV
licence holders improve reception of BBC and IBA
programmes where they are being spoilt by
interference.
If your dealer cannot help,ask at a main Post Office
for the booklet "How to Improve Television and
Radio Reception".
Mains connection
Before connecting the TV to the mains, check that the
mains supply voltage corresponds to the voltage
printed on the type plate on the rear panel of the TV. If
the mains voltage is different,consult your dealer.
Important
This apparatus is fitted with an approved moulded
13AMP plug. Should it become necessary to replace
the mains fuse, this must be replaced with a fuse of
the same value as indicated on the plug.
1. Remove fuse cover and fuse.
2.The replacement fuse must comply with BS 1362
and have the ASTA approval mark. If the fuse is
lost, make contact with your retailer in order to
verify the correct type.
3. Refit the fuse cover.
In order to maintain conformity to the EMC directive,
the mains plug on this product must not be removed.
Connecting the aerial
The aerial should be connected to the socket marked
: at the back of the set.An inferior aerial is likely to
result in a poor, perhaps unstable picture with ghost
images and lack of contrast. Make-shift loft or set-top
aerials are often inadequate.Your dealer will know from
experience the most suitable type for your locality.
Should you wish to use the set in conjunction with
other equipment, which connects to the aerial socket
such as TV games, or a video camera it is recommended
that these be connected via a combiner unit to avoid
repeated connection and disconnection of the aerial plug.
Fitting the stand (if provided)
Use only the stand provided with the set,making
sure that the fixings are properly tightened.A
diagram showing how to assemble the stand is
packed with the stand. Never use a make-shift stand,
or legs fixed with woodscrews.
Information for users in the UK (not applicable outside the UK)
Page 44

Specifications are subject to change without notice.
Trademarks are the property of Koninklijke Philips Electronics N.V. or their respective owners.
2005 © Koninklijke Philips Electronics N.V. All rights reserved
.
www.philips.com
3139 125 35753
 Loading...