

Page 1

Hospitality Television
32HF9385D/42HF9385D
- 1 -
Page 2

Installation of your Philips Hotel TV
1. Introduction
This addendum has been designed to help you install programmes on this Digital TV and activating the hotel
mode.
Use this addendum in conjunction with the User Manual of this television.
Please handle the TV with care and wipe with a soft cloth to ensure your TV keeps looking new.
2. The benefits of the Philips hotel TV
This TV is specially designed for hotels. The Philips hotel TV offers all kind of features to
Maximise the convenience for the hotel and meet the needs for the guest
Welcome message to give a friendly welcome to your guest when activating the tv
Remote control features like low battery detection and an anti-theft screw for preventing of theft for
batteries
Access to the user menu can be blocked. This prevents users (e.g. guests) from deleting or changing
program settings and/or modifying picture and sound settings. This ensures that TVs are always set up
correctly.
A
switch-on
specified program and volume level.
The maximum volume can be limited in order to prevent disturbance.
The television keys VOLUME +/- , PROGRAM +/- and MENU can be blocked.
Screen information can be suppressed.
Programmes can be blanked
3. Installing the channels
Installing Digital Programs (only applicable for 20/26/32HF5335D)
Ensure the TV is in Digital mode. If it is in Analogue mode, press the A/D (Analogue/Digital) key on the
Remote Control to enter the Digital mode.
volume and programme can be selected. After switching on, the TV will always start on the
1. Press the
2. Press the Up/Down Arrow Key to scroll to the item called INSTALLATION and press the Right Arrow
Key
3. Press the Up/Down Arrow Key to scroll to the item called SERVICE SETUP and press the Right Arrow
Key
4. Press the Up/Down Arrow Key to scroll to the item called REINSTALL ALL SERVICES and press the Right
Arrow Key
5. Press the Up/Down Arrow Key to scroll to the item called SEARCH and press OK to start the scan.
(Menu Digital) key on the Remote Control
The
TV will now start to scan and install all available (Digital) TV channels and Radio stations automatically.
When the scan is completed, the TV menu will indicate the number of digital services found.
6. Press the OK key again to Store all the services that have been found.
- 2 -
Page 3
Installing Analogue Programs
Ensure the TV is in Analogue mode. If it is in Digital mode, press the A/D (Analogue/Digital) key on the
Remote Control to enter the Analogue mode.
1. Press the
2. Press the Up/Down Arrow Key to scroll to the item called INSTALL and press OK
3. Press the Up/Down Arrow Key to scroll to the item AUTO STORE and press OK
The TV will now start to scan and install all available (Analogue) TV channels automatically. This operation will
take a few minutes. The TV display will show the progress of the scan and the number of programmes found.
Refer to the chapter on
can also refer to the chapter on
preferred.
4. Activating the Hotel Mode Setup menu (BDS)
1. Switch on the television and select an analogue channel
2. On the Remote Control, press keys: [3, 1, 9, 7, 5, 3, MUTE]
3. The BDS HOTEL MODE SETUP MENU becomes visible
4. Use the cursor keys to select and change any of the following settings:
5. Select “STORE” and press [CURSOR RIGHT] to save the settings and exit BDS Hotel Mode
setup. Press [MENU] to exit without saving.
6. For BDS Hotel Mode settings to take effect, you must turn the TV set Off, then back On.
BDS Hotel Mode Functions
This paragraph describes the functionality of each item in the BDS Hotel Mode Setup menu.
BDS MODE
ON BDS Hotel Mode is ON:
The user menu is blocked.
All settings of the Hotel Mode Setup menu are in effect.
Automatic Tuning of Analogue Programmes
Function Possible selections
BDS MODE ON /OFF
SWITCH ON SETTINGS
SWITCH ON VOLUME 0-100, LAST STATUS
MAXIMUM VOLUME 0-100
SWITCH ON CHANNEL USER DEFINED, LAST STATUS
POWER ON ON/STANDBY/LAST STATUS
DISPLAY MESSAGE ON/OFF
WELCOME MESSAGE LINE 1/LINE 2/CLEAR
CONTROL SETTINGS
LOCAL KEYBOARD LOCK ON/OFF/ALL
REMOTE CONTROL LOCK ON/OFF
OSD DISPLAY ON/OFF
HIGH SECURITY MODE ON/OFF
AUTO SCART ON/OFF
MONITOR OUT ON/OFF
BLANK CHANNEL ON/OFF
STORE >
(Menu TV) key on the Remote Control
in the User Manual for more details. You
Manual Tuning of Analogue Programmes
in the User Manual if a manual scan is
- 3 -
Page 4

OFF BDS Hotel Mode is OFF:
The TV operates as a normal consumer TV
SWITCH ON VOL
When the user switches the TV ON, it will play at the specified volume level. There are 2 options:
LAST STATUS Upon start-up, the TV volume will be set to the level before the TV set was
USER DEFINED As specified by installer
Remark: “SWITCH ON VOL” cannot exceed the MAXIMUM VOL level. This is the volume level with which
the Hotel Mode Setup menu was entered.
MAXIMUM VOL
The TV Volume will not exceed the selected volume level.
SWITCH ON CHANNEL
When the user switches the TV ON, it will tune to the specified channel. There are 2 options:
LAST STATUS The TV will switch on to the last channel that was shown before the TV set
USER DEFINED Any analogue channel can be chosen to be the first channel to switch on
POWER ON
The Power On function allows the TV to enter a specific mode of operation (On or Standby) after the mains
power is activated.
ON When set, the TV will always turn ON after the mains power is enabled.
STANDBY When set, the TV will always turn to STANDBY after mains power is enabled
LAST STATUS When set, the TV will always turn to the last power status before the mains power was
DISPLAY MESSAGE
ON Enables display of the Welcome Message for 30 seconds after the TV set is turned on
OFF Disables the display of the Welcome Message.
If OSD DISPLAY is set to OFF, then the Welcome Message is automatically disabled.
WELCOME MESSAGE
The Welcome Message function allows the TV to show a customized greeting to the hotel guest whenever the
TV is switched on. This helps to personalize the hotel experience for guests.
The Welcome Message can consist of 2 lines of text, with each line containing a maximum of 20 alphanumeric
characters. Use the Remote Control arrow keys to create the Welcome Message.
To enable the display of the Welcome Message, the DISPLAY MESSAGE option must be ON
To clear the Welcome Message from the TV’s memory, select CLEAR
LOCAL KEYBOARD LOCK
ON The television keys VOLUME +/-, PROGRAM +/- and MENU are blocked.
OFF The television keys VOLUME +/-, PROGRAM +/- and MENU function normally
ALL The television keys VOLUME +/-, PROGRAM +/-, MENU and POWER are blocked.
REMOTE CONTROL LOCK
ON Standard Remote Control keys are disabled.
OFF All Remote Control keys will function normally.
OSD DISPLAY
ON Normal screen information is displayed (e.g. programme information)
OFF Screen information is suppressed.
last turned off.
was turned off
disabled.
- 4 -
Page 5

HIGH SECURITY MODE
ON Allows access to the BDS Hotel Mode Setup Menu via the special BDS Setup Remote only.
(RC2573/01)
OFF Allows access to the BDS Hotel Mode Setup Menu via BDS Setup Remote or via normal Remote
Control (using special key code sequence).
AUTO SCART
The Auto Scart function enables auto-detection of AV devices that are connected to the TV’s Scart connector.
ON Enables Auto Scart switching in BDS Hotel Mode.
OFF Disables Auto Scart switching in BDS Hotel Mode.
MONITOR OUT
ON Allows audio & video output from TV via relevant AV connectors (if available).
OFF Disables both Audio & Video output from the TV (to prevent illegal copying).
BLANK CHANNEL
The Blank Channel function disables the display of video on the TV, but does not affect the audio output. This
function can be used for audio applications (example: Off-air radio transmission, music channels, and so on),
which do not necessarily require the display of video.
ON The current programme is blanked
OFF The current programme is not blanked (normal visible; DEFAULT value)
BLANK CHANNEL can be set for every channel. Use [P+ / P-] to go through all the programmes and set the
desired status per channel. The programme number is visible in the top left corner.
Low Battery Check
This television set has a special feature which checks the battery power level of a TV Remote Control, and
indicates if the battery is low and requires changing.
(Note: The Low Battery Check function works only with certain models of Remote Controls. Please check
with the Philips sales representative if the Remote Control used with this TV supports this function)
To activate the Low Battery Check function, hold the TV Remote Control in front of the TV, and press and
hold the OK button on the Remote Control for at least 5 seconds. A message will appear on the TV screen to
indicate if the battery power level is OK, or if it is Low. If the message indicates that the battery level is low, it
is recommended to change the batteries of the Remote Control immediately.
5. Cloning of settings
Cloning of analogue TV channels and TV settings as described in the chapter
Hotel Mode Set-up menu
For 15/20HF5234
o Wireless cloning with the SmartLoader 22AV1120 or 22AV1135
o Cloning off all adjustable TV settings + analogue channel table
For 20/26/32HF5335D
o Wired cloning with the SmartLoader 22AV1135 using the wire packed with the SmartLoader
o Cloning off all adjustable TV settings + analogue channel table (digital channel table via automatic
installation)
Instruction for cloning of settings between TVs
Philips SmartLoader (22AV1135/00)
The Philips SmartLoader is an installation tool especially designed for easy and fast installation and copying of
TV settings on Philips Institutional TV’s.
- 5 -
Page 6

The Philips SmartLoader works in 2 modes – Wireless and Wired:
Wireless mode ---- through infrared sensor (15/20HF5234)
Switch the SmartLoader to “Wireless” mode by sliding the side-switch to the icon on the SmartLoader
device. Point the Wireless SmartLoader to the TV’s infrared receiver (optimal distance of 5-30cm) and proceed
with the Installation procedure listed below.
Wired mode ---- using the by-packed accessory cable(s) (20/26/32HF5335D)
Switch the SmartLoader to “Wired” mode by sliding the side-switch to the icon on the SmartLoader
device.
Examine the rear connectors of the TV set to determine if the 3-pin or 4-pin female connector wire (packed
with the Wireless SmartLoader) should be used. Plug in the correct connector wire to the corresponding
opening on the TV set (usually marked as SERV C), and then connect the RJ11 jack end of the accessory wire
to the RJ11 socket on the SmartLoader.
The Installation Procedure consists of three simple steps:
1. Choosing a Master TV
The Master TV is the TV set whose installation and configuration settings are to be copied into other TV’s (of
the same type only).
2. Programming the SmartLoader with the settings from the Master TV
Follow these steps to program the SmartLoader with the settings of the Master TV.
a) Wireless method
Set the SmartLoader to “Wireless” mode using the side switch.
Turn on the TV, and while holding the SmartLoader, point it in the direction of the
TV. Press the “MENU” Key on the SmartLoader.
b) Wired method
Connect the SmartLoader to the TV using the appropriate accessory cable.
Set the SmartLoader to “Wired” mode using the side switch.
Turn on the TV, and while holding the SmartLoader, point it in the direction of the
TV. Press the “MENU” Key on the SmartLoader.
The Master TV will show the following menu:
SMARTLOADER TO TV >
TV TO SMARTLOADER >
On the TV screen, highlight the menu option “TV TO SMARTLOADER”
Press the right arrow key on the SmartLoader to start the programming process
A number display (from 0~100) will be shown on screen, indicating the percentage of the programming
progress from the TV to the SmartLoader. When the programming is completed, “##” will show “100” and the
message “DONE” will appear.
TV TO SMARTLOADER ## (0-100)
The SmartLoader is programmed and can be used to install and configure other TVs.
Copying the settings of the Master TV to other TVs with the SmartLoader
Follow these steps to install and configure the settings of a Philips TV with the SmartLoader.
- 6 -
Page 7

a) Wireless method
Set the SmartLoader to “Wireless” mode using the side switch.
Turn on the TV, and while holding the SmartLoader, point it in the direction of the
TV. Press the “MENU” Key on the SmartLoader.
b) Wired method
Connect the SmartLoader to the TV using the appropriate accessory cable.
Set the SmartLoader to “Wired” mode using the side switch.
Turn on the TV, and while holding the SmartLoader, point it in the direction of the
TV. Press the “MENU” Key on the SmartLoader.
On the TV screen, highlight the menu option “SMARTLOADER TO TV”
Press the right arrow key on the SmartLoader to initiate the copying process
> A number display (from 0~100) will be shown on screen, indicating the percentage of the installation
progress from the SmartLoader to the TV. When the data transfer is completed, “##” will show “100” and
the message GOODBYE will appear.
SMARTLOADER TO TV ## (0-100)
> The TV will go to Standby mode. When the TV is next powered on, it will be configured with the settings
from the Master TV, and ready for use.
Problems and Solutions:
1.
The message “I2C ERROR” is displayed on the screen.
Bad connection of RJ11 wire or wrong data transmission has occurred. Try again.
2.
The message “WRONG VERSION” is displayed on the screen.
The program contained in the SmartLoader has a software code incompatible with the actual TV.
Reprogram the Wireless SmartLoader from a Master TV whose software code is compatible with the
actual TV.
3.
TV doesn’t respond to the SmartLoader.
Check if the LED on the SmartLoader lights up in green when pressing any button.
If the LED is red, it means that the batteries are low and should be replaced.
Bring the SmartLoader closer to the TV infrared receiver and try again.
Notes:
Make sure that the 3 R6/AA sized batteries are placed correctly in the bottom compartment of the
SmartLoader. The LED on the SmartLoader should light up in green when pressing any button, indicating
operational batteries. When the LED shows red, the batteries need to be replaced.
The SmartLoader can only copy the settings between 2 TVs of the same type. Once the
SmartLoader is programmed with the settings from a Master TV of a certain type or model,
then these settings can be installed on another TV of the same model only.
The SmartLoader cannot be used to copy the (digital) channel table of a Digital TV set.
If the SmartLoader is used with a DVB (European Digital) TV set, then the TV set must first
be switched to Analog mode.
- 7 -
Page 8

Y
T
Disposal of your old product.
our product is designed and manufactured with high quality materials and
components, which can be recycled and reused. When this crossed-out wheeled bin
symbol is attached to a product it means the product is covered by the European
Directive 22002/96/EC. Please find out more about the separate collection system for
electrical and electronic products in your local neighborhood.
2007© Koninklijke Philips Electronics N.V. all rights reserved
Specifications are subject to change without notice
Trademarks are property of Koninklijke Philips Electronics N.V. or their respective owners.
Please act according to your local rules and do not dispose of your old products with
your normal household waste. The correct disposal of your old product will help
prevent potential negative consequences for the environment and human health.
he packaging of this product is intended to be recycled. Apply to the
local authorities for correct disposal.
- 8 -
Page 9
Índice
1 Importante 3
1.1 Segurança 3
1.2 Cuidados com o ecrã 3
1.3 Reciclagem 3
2O seu televisor 4
2.1 Visão geral do televisor 4
2.2 Destaques do produto 5
3 Introdução 5
3.1 Posicionamento do televisor 5
3.2 Montagem na parede - VESA 5
3.3 Pilhas do telecomando 7
3.4 Cabo da antena 7
3.5 Ligação à corrente 7
3.6 Instalação pela primeira vez 7
4 Utilização do televisor 8
4.1 Ligar ou desligar - modo Standby 8
4.2 Ver televisão 9
4.3 Ver canais de um receptor digital 9
4.4 Ver dispositivos ligados 9
4.5 Ver um DVD 10
4.6 Seleccionar uma página de teletexto 10
4.7 Alterar o modo Ambilight 11
5 Outras utilizações do televisor 12
5.1 Visão geral do telecomando 12
5.2 Visão geral do menu do televisor 13
5.3 Definições de imagem e som 15
5.4 Ambilight 18
5.5 Teletexto 19
5.6 Criar listas de canais favoritos 20
5.7 Guia Electrónico de Programação 21
5.8 Temporizadores e bloqueios 22
5.9 Legendas 23
5.10 Visualizar e reproduzir fotografias, MP3... 24
5.11 Ouvir canais de rádio digitais 26
5.12 Actualização de software 26
6 Instalação de canais 27
6.1 Instalação automática de canais 27
6.2 Instalação manual de canais 28
6.3 Mudar a ordem de canais memorizados 28
6.4 Gestão automática de canais 29
6.5 Teste à recepção digital 29
6.6 Definições de fábrica 29
7 Ligações (DVD, receptor, ...) 30
7.1 Visão geral das ligações 30
7.2 Acerca das ligações 31
7.3 Ligar os dispositivos 33
7.4 Configuração das ligações 37
7.5 Preparação para serviços digitais 38
8 Dados técnicos 39
9 Resolução de problemas 40
10 Índice remissivo 42
Registre o seu produto e obtenha assistência em
www.philips.com/welcome.
Índice 1
PORTUGUÊS
2656.1 pt 14-05-2007 12:17 Pagina 1
Page 10

2007 © Koninklijke Philips Electronics
N.V.Todos os direitos reservados. As
especificações estão sujeitas a alterações
sem aviso prévio.As marcas comerciais
são propriedade da Koninklijke Philips
Electronics N.V. ou dos seus respectivos
proprietários.
A Philips reserva-se o direito de alterar
os produtos a qualquer altura sem ser
obrigada a modificar as versões mais
antigas.
O material que se encontra neste
manual é considerado adequado para o
fim a que se destina o sistema. Se o
produto, os seus módulos individuais ou
procedimentos forem utilizados para
outros fins para além dos aqui
especificados, deve confirmar-se a sua
validade e conformidade. A Philips
garante que o material não infringe
patentes dos Estados Unidos da
América. Não está expressa ou implícita
qualquer outra garantia.
Garantia
Os componentes não podem ser
reparados pelo utilizador.
Não abra ou remova coberturas para o
interior do produto. As reparações só
podem ser efectuadas por Centros de
Assistência Philips e centros de
reparação oficiais. O não cumprimento
destas observações resultará na
anulação de qualquer garantia, explícita
ou implícita.
Qualquer operação expressamente
proibida neste manual, ajustes, ou
procedimentos de montagem não
recomendados ou não autorizados
neste manual anularão a garantia.
Características de pixéis
Este LCD possui um elevado número de
pixéis de cor. Embora possua um nível de
pixéis efectivos de 99,999% ou mais,
podem aparecer constantemente pontos
pretos ou pontos brilhantes de luz (de
cor vermelha, verde ou azul) no ecrã.
Tr ata-se de uma característica estrutural
do visor (em conformidade com as
normas comuns da indústria) e não de
uma avaria.
Software de origem aberta
Este televisor contém software de
origem aberta. A Philips oferece-se para
fornecer ou disponibilizar, mediante
pedido e por um valor não superior ao
custo de distribuição do software
original, uma cópia executável completa
do código de origem correspondente,
de uma forma habitualmente utilizada
para troca de software.
Esta oferta é válida por um período de
3 anos após a data de compra deste
produto. Para obter o código de
origem, escreva para
Philips Innovative Applications N.V.
Ass. to the Development Manager
Pathoekeweg 11
B-8000 Brugge
Bélgica
Conformidade com as normas EMF
(campos electromagnéticos)
A Koninklijke Philips Electronics N.V.
fabrica e vende muitos produtos
destinados a consumidores que, como
qualquer aparelho electrónico, têm
capacidade para emitir e receber sinais
electromagnéticos.
Um dos mais importantes princípios
empresariais da Philips é a
implementação de todas as medidas de
saúde e segurança necessárias nos seus
produtos, de forma a cumprir todos os
requisitos legais aplicáveis, bem como
normas EMF aplicáveis no momento de
fabrico dos produtos.
A Philips está empenhada em
desenvolver, produzir e comercializar
produtos que não causem efeitos
adversos na saúde.
A Philips confirma que se os seus
produtos forem devidamente utilizados
para o fim a que se destinam são seguros
de utilizar, de acordo com as provas
científicas actualmente disponíveis.
A Philips desempenha um papel activo no
desenvolvimento de normas
internacionais sobre EMF e segurança,
permitindo à Philips incorporar
previamente melhoramentos no processo
de fabrico dos seus produtos.
Fusível (apenas para o Reino Unido)
Este televisor está equipado com uma
ficha revestida aprovada. Caso seja
necessário substituir o fusível, deve
substituí-lo por um fusível do mesmo
valor, conforme indicado na ficha
(exemplo 10A).
1. Remova a cobertura do fusível e o
fusível.
2. O fusível de substituição deve estar
em conformidade com a norma BS
1362 e deve ter a marca de
aprovação da ASTA. Se perder o
fusível, contacte o seu revendedor
para verificar qual é o tipo correcto.
3. Volte a colocar a cobertura do
fusível.
Para manter a conformidade com a
directiva EMC, a ficha de alimentação
deste produto não pode ser separada
do cabo de alimentação.
Direitos de autor
VESA, FDMI e o logotipo VESA
Mounting Compliant são marcas
comerciais da Video Electronics
Standards Association.
Fabricado sob licença da
Dolby Laboratories. ‘Dolby’,
‘Pro Logic’ e o símbolo de
duplo D
G, são marcas
comerciais da Dolby Laboratories.
Fabricado sob licença da BBE Sound, Inc.
Licenciado pela BBE, Inc sob uma ou mais
das seguintes patentes dos Estados
Unidos da América: 5510752, 5736897.
BBE e o símbolo BBE são marcas
comerciais registadas da BBE Sound Inc.
Windows Media é uma marca registada
da Microsoft Corporation nos Estados
Unidos da América e/ou outros países
® Kensington e MicroSaver são marcas
comerciais registadas nos Estados
Unidos da América pela ACCO World
Corporation, havendo registos emitidos
ou requerimentos pendentes noutros
países em todo o mundo.Todas as
outras marcas comerciais registadas e
não registadas são propriedade dos
respectivos proprietários.
2
2656.1 pt 14-05-2007 12:17 Pagina 2
Page 11
PORTUGUÊS
Importante 3
1 Importante
Leia este manual do utilizador antes de começar a
utilizar este produto.
Leia com atenção esta secção e siga
cuidadosamente as instruções. A garantia não se
aplica a danos causados pela não observação das
instruções.
1.1 Segurança
•Para evitar curtos-circuitos, não exponha o
produto à chuva ou água.
•Para evitar o risco de incêndios ou choques
eléctricos, não coloque nenhum tipo de chama
(por exemplo, velas acesas) junto ao televisor.
• Deixe um espaço de, pelo menos, 10 cm à volta
do televisor para permitir uma ventilação
adequada.
• Mantenha o televisor afastado de radiadores ou
de outras fontes de calor.
• Não instale o televisor num local confinado,
como uma estante. Certifique-se de que não
existem cortinas, armários ou outros objectos a
bloquear o fluxo de ar através das aberturas de
ventilação.
• Certifique-se de que o televisor não pode cair.
Coloque o televisor numa superfície sólida e
plana e utilize apenas o suporte fornecido com o
televisor.
•Para evitar danos no cabo de alimentação, que
podem causar incêndios ou choques eléctricos,
não coloque o televisor ou outros objectos
sobre o cabo que possam fazer pressão sobre o
mesmo.
• No caso de montagem em suporte giratório ou
suporte de parede VESA, evitar exercer força
sobre as fichas de alimentação. As fichas de
alimentação com folga parcial podem causar
sobreaquecimento ou incêndio.
1.2 Cuidados com o ecrã
• Desligue o televisor antes de proceder à limpeza.
• Limpe a superfície com um pano suave e
humedecido. Não aplique outra substância
(agentes químicos ou agentes de limpeza
doméstica). Estes produtos podem danificar o
ecrã.
• Não toque, empurre, esfregue ou bata no ecrã
com nenhum objecto duro para evitar riscar,
estragar ou danificar o ecrã de forma
permanente.
•Para evitar deformações e desvanecimento da
cor, limpe de imediato as gotas de água.
• Imagens estáticas
Evite ao máximo as imagens estáticas. Se não
conseguir evitar as imagens estáticas, reduza o
contraste e o brilho do ecrã para evitar danos no
ecrã.
Imagens estáticas são imagens que permanecem
no ecrã durante um longo período de tempo.
Exemplos de imagens estáticas são: menus no
ecrã, páginas de teletexto, barras pretas,
informações sobre o mercado de acções,
logótipos de canais de televisão, apresentação das
horas, etc.
1.3 Reciclagem
• Leve a embalagem ao centro de reciclagem local.
• Elimine as pilhas usadas de forma segura e de
acordo com a legislação local.
• Este produto foi concebido e fabricado para que
possa ser reciclado e reutilizado.
• Este produto não deve ser eliminado juntamente
com os resíduos domésticos. Informe-se ou
contacte o seu revendedor para saber mais sobre
reciclagem segura para o ambiente e legislação
local. A eliminação de resíduos domésticos não
controlada prejudica o ambiente e a saúde
humana.
(EEC 2002/96/EC)
2656.1 pt 14-05-2007 12:17 Pagina 3
Page 12

2O seu televisor
Esta secção proporciona-lhe uma visão geral dos
controlos e funções deste televisor.
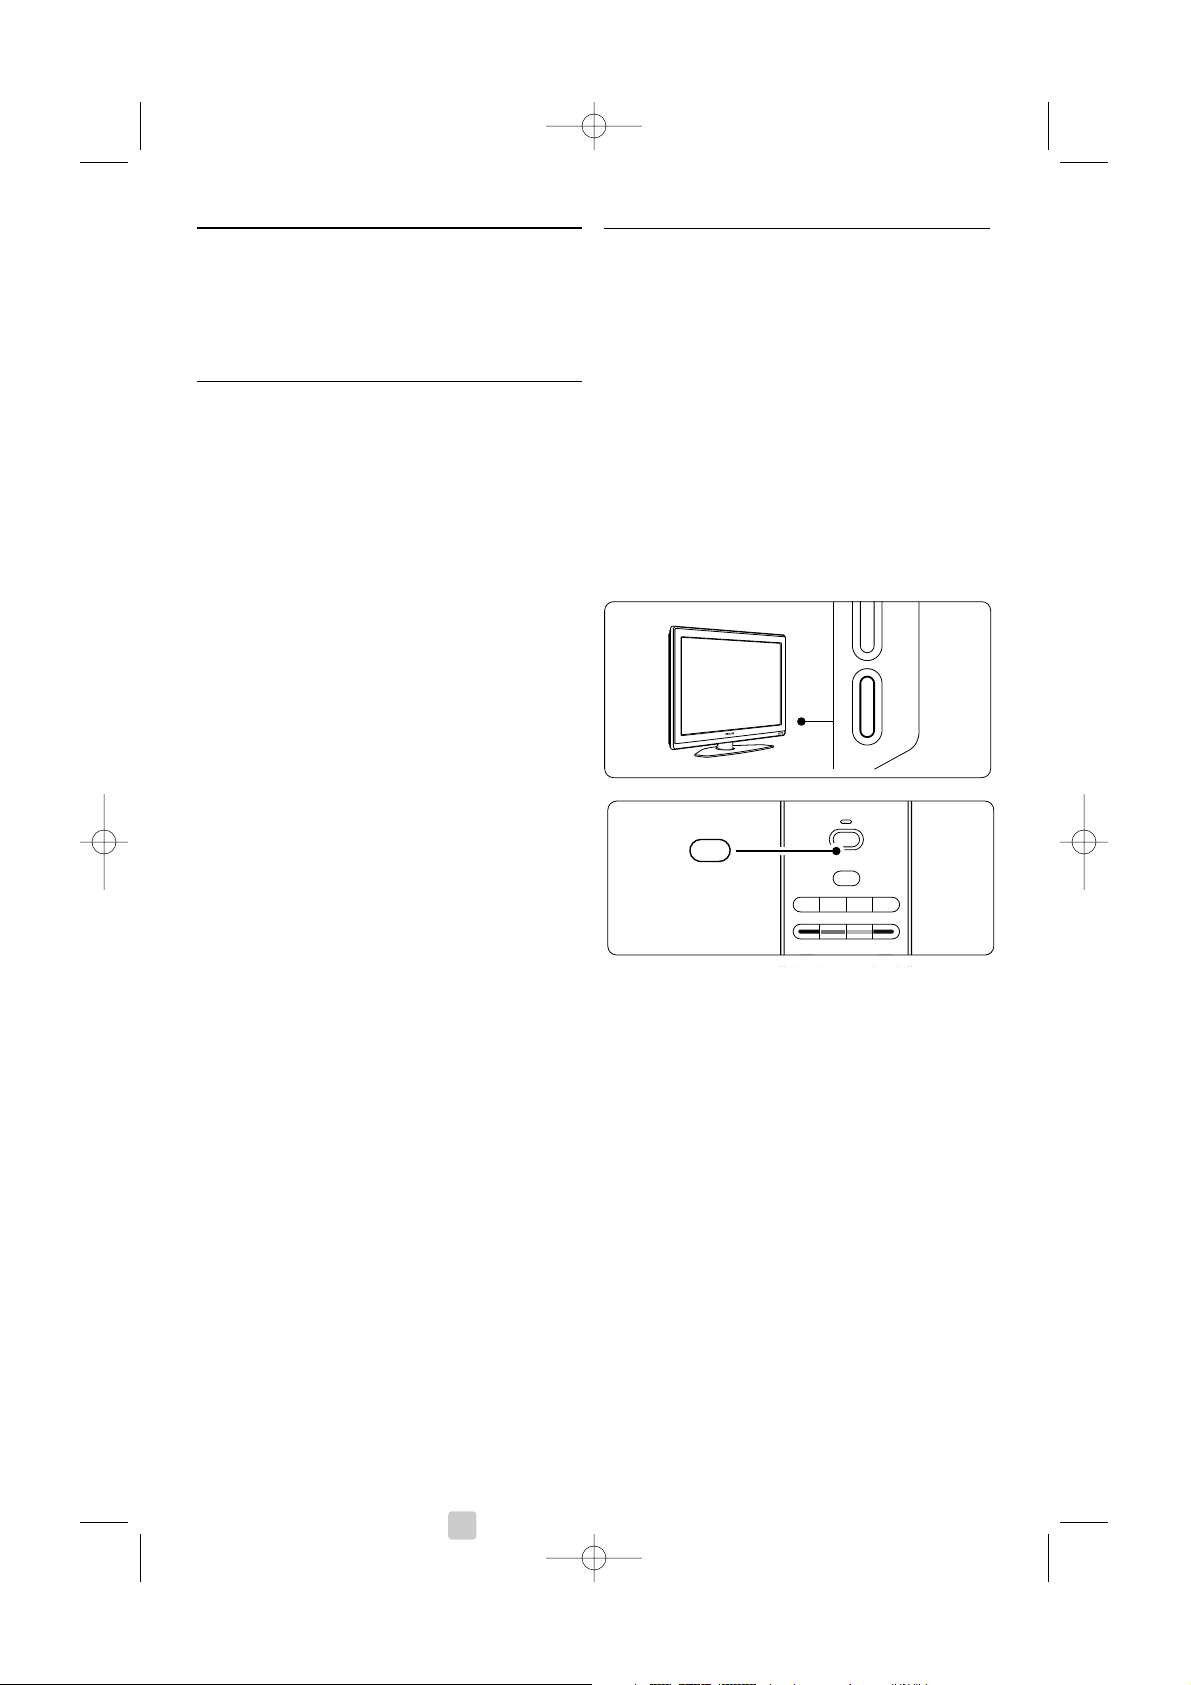
2.1 Visão geral do televisor
Controlos laterais
1 Aumentar e diminuir o volume
2 Menu
3 Programa/canal seguinte ou anterior
4 Botão ligar/desligar
5 Indicador LED (Azul: Ligado;Vermelho: Standby)
6 Sensor do telecomando
Conectores laterais
Para ligar câmaras, consolas de jogos, auscultadores
e dispositivos de memória USB.
Conectores traseiros
Para ligar a antena, um leitor de DVD, um
videogravador ou outro dispositivo.
Telecomando
1 Standby ou ligado
2 Selecção de dispositivos: leitor de DVD,
videogravador, etc.
3Teclas coloridas
4Teclas de navegação (para cima o, baixo œ,
esquerda p, direita π)
OK e LISTA
5Tecla de teletexto
6Tecla de menu
7 Programa seguinte ou anterior
8 Aumentar ou diminuir o volume
9 Ligar ou desligar o Ambilight
Saiba mais sobre o seu telecomando na secção 5.1
Visão geral do telecomando.
4 O seu televisor
MENU
b
¬
P
V
321
654
9807
i
Ambilight MODE
B
BROWSE
DEMO
OPTION
GUIDE
a
OK
LIST
v
INPUT
j b q
MHEG
CANCEL
1
2
3
4
6
5
7
8
9
- PROGRAM
+-
VOLUME +
MENUB POWER
5-6
1
2
3
4
2656.1 pt 14-05-2007 12:17 Pagina 4
Page 13
PORTUGUÊS
2.2 Destaques do produto
O seu novo televisor está equipado com algumas
das mais modernas inovações de áudio e vídeo.
O seu televisor oferece as vantagens seguintes...
Ambilight
Para uma experiência de visualização mais relaxada
e uma melhor qualidade de imagem perceptível.
Perfect Pixel HD
Proporciona uma qualidade de imagem perfeita a
partir de qualquer fonte.
100Hz Clear LCD
100Hz Clear LCD resulta em superior definição na
reprodução, melhores negros,melhorcontraste e
uma imagem mais relaxante.
Sintonizador DVB-T integrado
Para além de emissões convencionais de televisão
analógica, o seu televisor recebe emissões de
televisão e rádio digital terrestre.
Guia Electrónico de Programação - EPG
O EPG apresenta a programação de televisão
digital prevista no ecrã. O guia pode recordar-lhe
quando os programas começam, para ligar o
televisor, etc.
Conectores HDMI
3 conectores HDMI para a conectividade de alta
definição da máxima qualidade.
Ligação USB
Ligação multimédia para a visualização ou
reprodução instantânea de fotografias ou música.
3 Introdução
Esta secção ajuda-o a posicionar e a instalar o seu
televisor.
3.1 Posicionamento do
televisor
) Aviso
Leia atentamente as precauções da secção 1.1
Segurança antes de posicionar o televisor.
Os televisores com um grande ecrã são pesados.
Tr ansporte e manuseie o televisor com pelo menos
duas pessoas.
Ligue os dispositivos antes de posicionar o televisor
ou o montar na parede.
A distância de visualização ideal para assistir
televisão corresponde a três vezes o tamanho do
ecrã.
Para uma condição de visualização ideal, posicione
o televisor num local onde a luz não incida
directamente no ecrã.
O melhor efeito Ambilight é visível numa divisão
com uma reduzida intensidade de luz.
Para obter o melhor efeito Ambilight, coloque o
televisor entre 10 e 20 cm afastado da parede.
Coloque o televisor num local onde a luz do sol
não incida directamente no televisor.
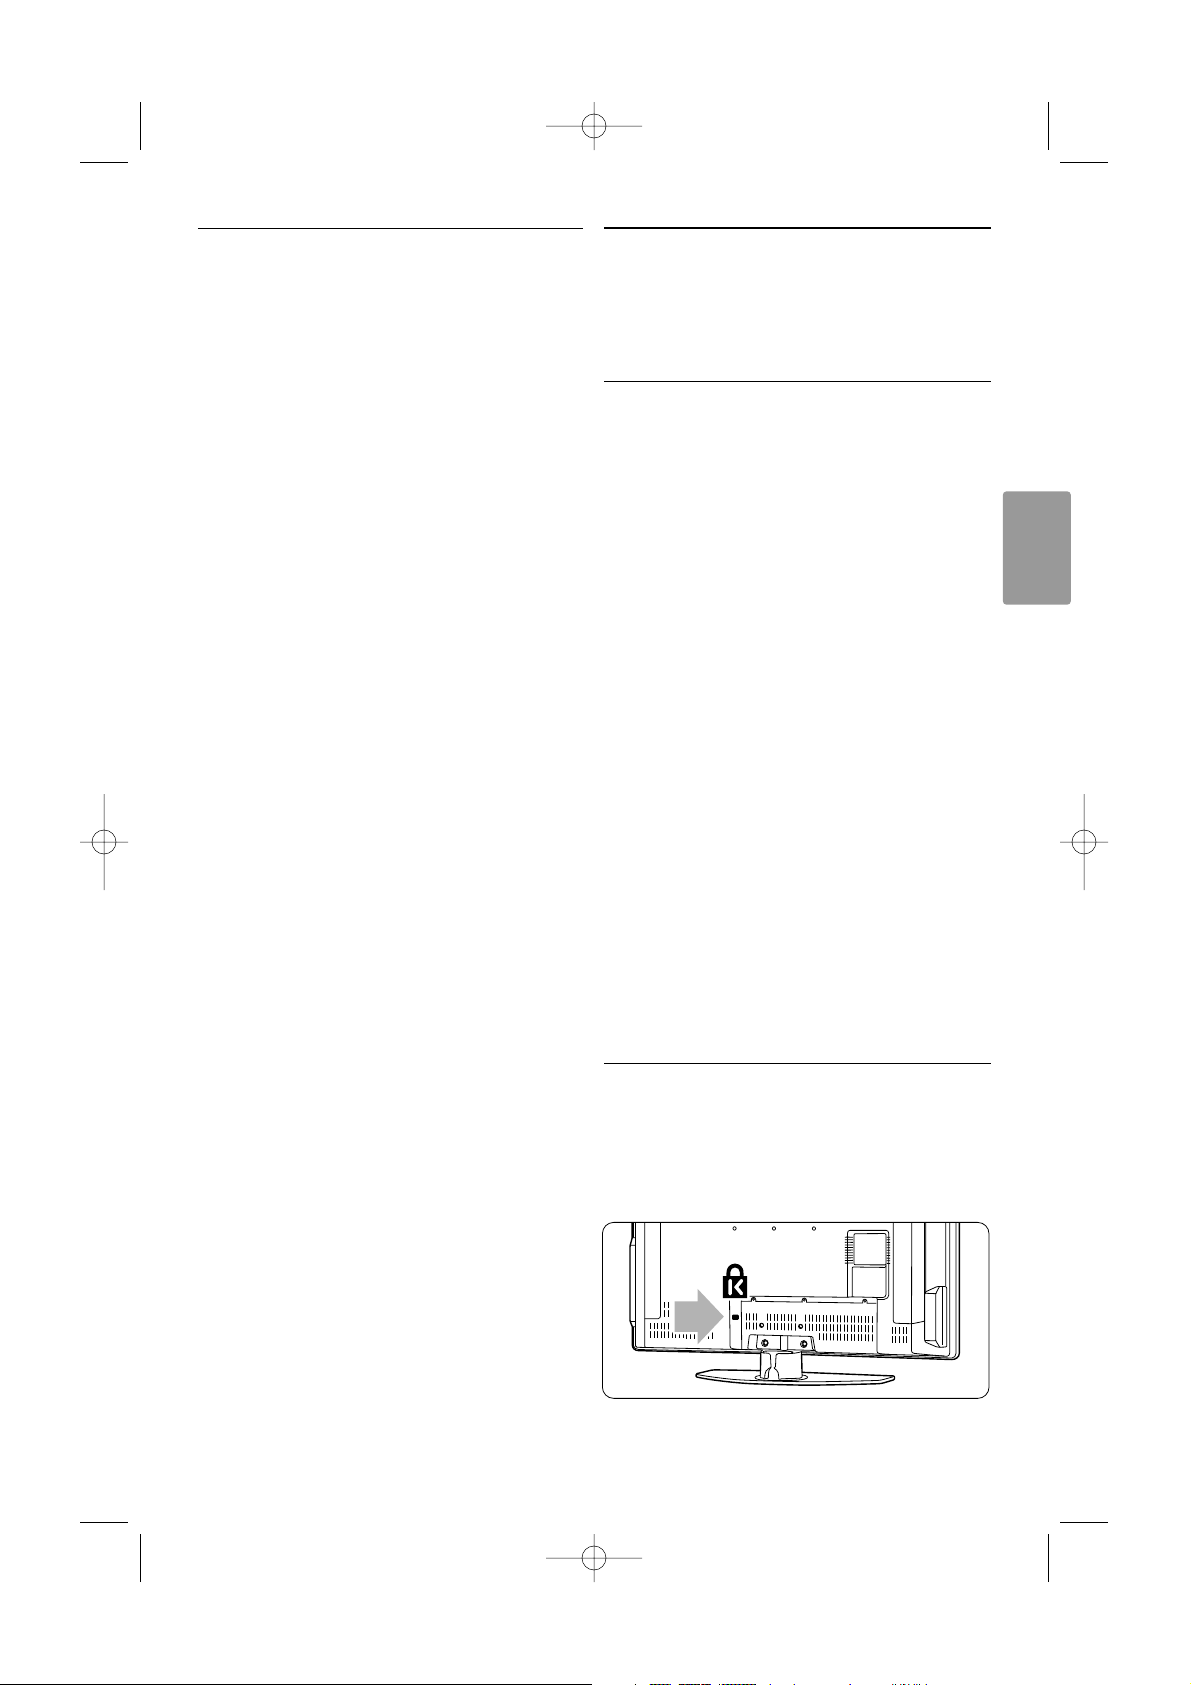
Ranhura de segurança Kensington
O televisor está equipado com uma ranhura de
segurança Kensington na traseira do televisor para
um cadeado anti-roubo.
Tem de ser adquirido separadamente um cadeado
anti-roubo Kensington.
O seu televisor 5
2656.1 pt 14-05-2007 12:17 Pagina 5
Page 14

3.2 Montagem na parede VESA
ç Aviso
Tenha em consideração o peso do televisor se
pretender montá-lo na parede. Uma montagem
imprópria pode resultar em ferimentos ou danos
graves. A Koninklijke Philips Electronics N.V. não se
responsabiliza por uma montagem imprópria que
resulte em acidentes ou ferimentos.
O seu televisor está preparado para uma
montagem na parede conforme a VESA. Este
suporte não está incluído.
Utilize um suporte compatível com VESA, com o
código VESA MIS-E, 200,100 M4.
Para mais informações sobre as normas VESA,
consulte o seu revendedor.
Os pontos de fixação para montagem de
suporte VESA
Localize os 6 pontos de fixação no painel posterior
do TV. Utilize estes orifícios para parafuso na
fixação do suporte VESA.
Desmontar o suporte do TV
‡ Localize os 4 parafusos do suporte do televisor.
® Desaperte os 4 parafusos.
ÒLevante e retire o televisor do suporte.
à Sugestão
Faça todas as ligações na parte de trás do televisor
antes de montar o televisor na parede. Consulte a
secção 7 Ligações.
6 O seu televisor
2656.1 pt 14-05-2007 12:17 Pagina 6
2
Page 15
PORTUGUÊS
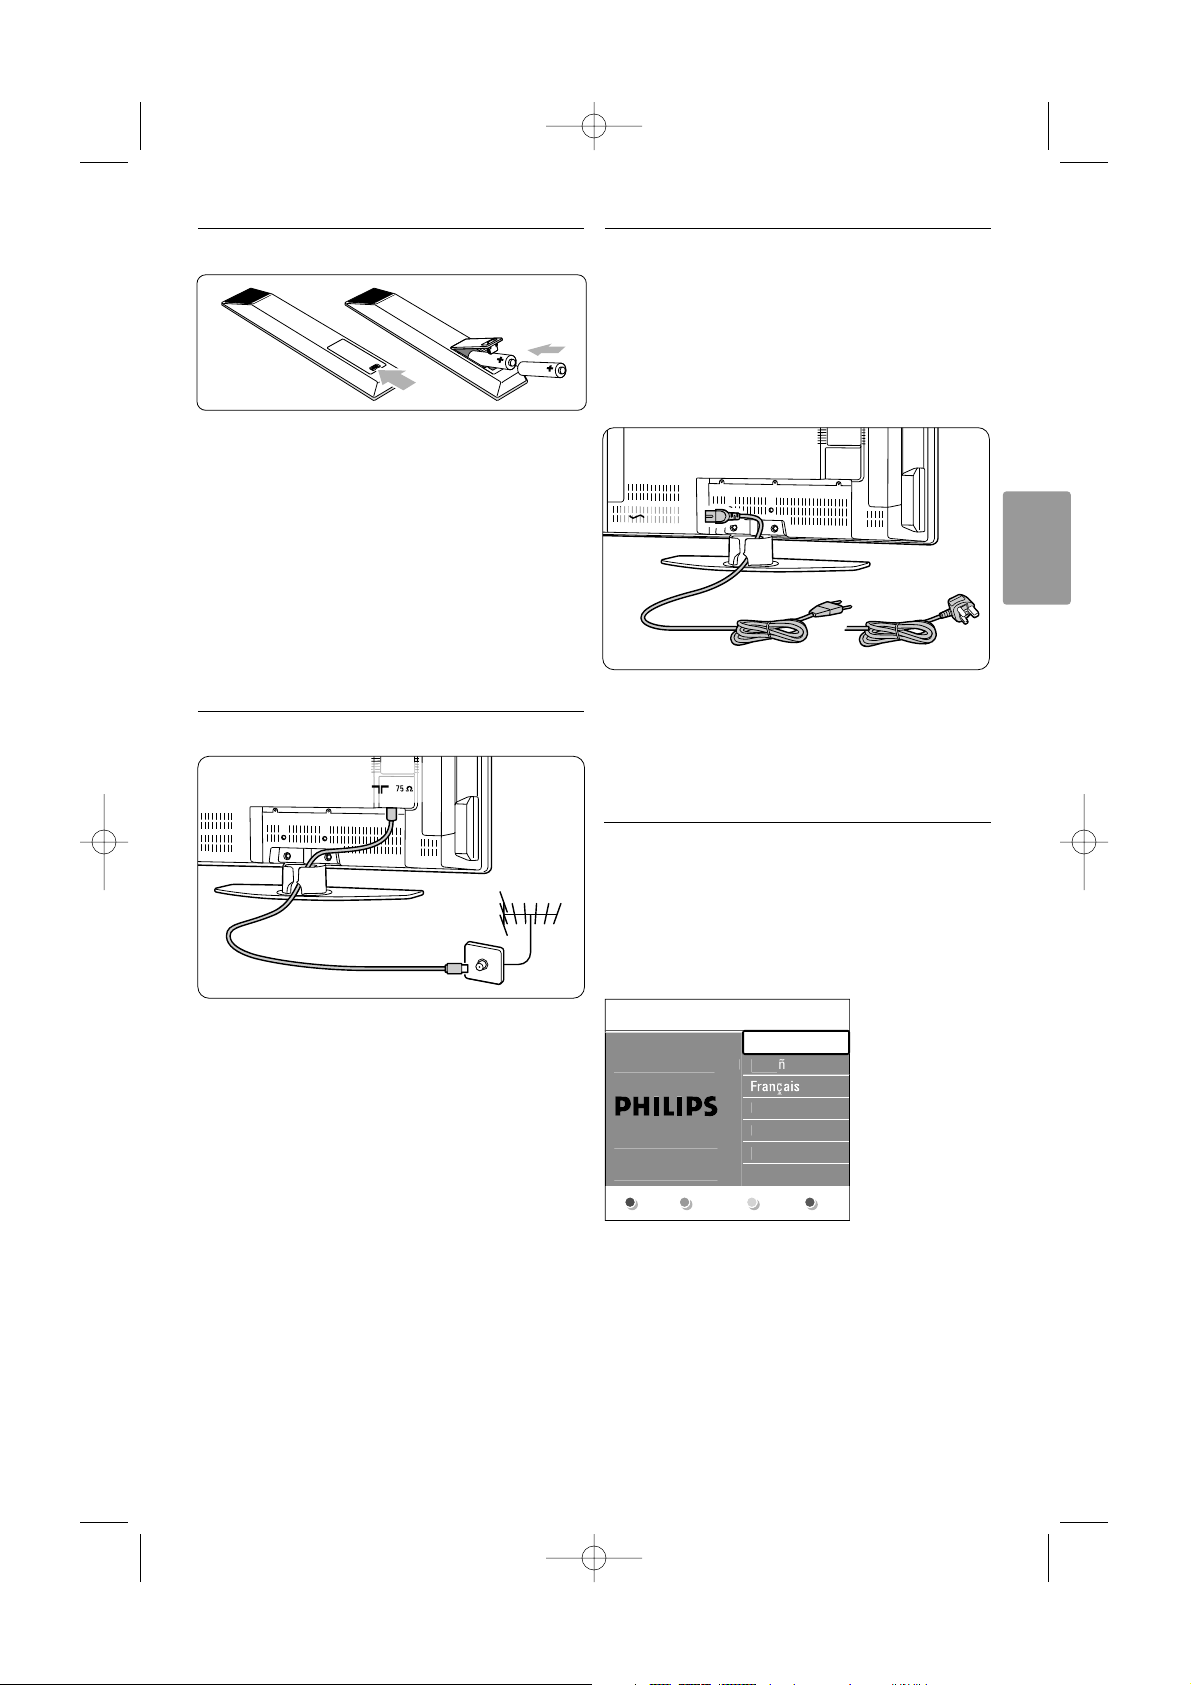
3.3 Pilhas do telecomando
‡ Abra a tampa do compartimento das pilhas na
parte de trás do telecomando.
® Introduza as 2 pilhas fornecidas (tipo AA-R6-1,5
V). Certifique-se de que os pólos + e - das
pilhas estão correctamente alinhados (o interior
do compartimento está marcado.)
ÒFeche a tampa.
rNota
Retire as pilhas se não pretende utilizar o
telecomando durante um longo período de tempo.
3.4 Cabo da antena
‡ Localize a ligação da antena na par te de trás do
televisor.
® Introduza firmemente o cabo da antena na
tomada da antena x Antenna.
3.5 Ligação à corrente
‡ Verifique se a sua tensão eléctrica corresponde
à tensão indicada no autocolante que se
encontra na parte de trás do televisor. Não
introduza o cabo de alimentação se a tensão
for diferente.
® Introduza firmemente o cabo de alimentação.
O televisor nunca está totalmente desligado, a não
ser que retire o cabo de alimentação da tomada
eléctrica. Assim, a carga positiva da alimentação
deve estar sempre acessível.
3.6 Instalação pela primeira
vez
Na primeira instalação, e apenas durante a primeira
instalação, basta introduzir o cabo de alimentação
para que os procedimentos de instalação se iniciem
automaticamente. Siga as instruções no ecrã.
à Sugestões
• Se verificar que seleccionou um idioma errado,
prima a tecla vermelha no telecomando para
regressar ao menu de selecção de idioma.
•Para reordenar os canais memorizados, consulte
a secção 6.3 Reordenar canais memorizados.
O seu televisor 7
ANTENNA
MAINS
UK & Ireland
u
pa
ol
ç
i
o
r
a
.
a
.
h
e
2656.1 pt 14-05-2007 12:17 Pagina 7
Idioma de men
Seleccione o idiom
da su preferênciasff..
com o cursor par
cima e para baixo
Seguint
Englis
Es
Hrvatsk
Italian
Magya
Page 16
4 Utilização do
televisor
Saiba como trabalhar com o televisor diariamente.
4.1 Ligar ou desligar - modo
Standby
Para ligar o televisor:
•Prima B Power no lado direito do televisor se
o LED de standby estiver desligado.
•Prima B no telecomando se o LED de standby
estiver ligado.
Para passar para standby:
•Prima B no telecomando.
Para ligar o televisor a partir do modo standby sem
o telecomando:
•Prima B Power na parte lateral do televisor
para o desligar e prima novamente B Power
para o ligar.
Para o desligar:
•Prima B Power na parte lateral do televisor.
rNota
O consumo de energia contribui para a poluição
do ar e da água. Enquanto o cabo de alimentação
estiver ligado, o televisor consome energia. Este
televisor possui um consumo de energia muito
reduzido no modo standby.
8 Utilização do televisor
- PROB POWER
B
DEMO
OPTION
GUIDE
a
v
INPUT
j b q
MHEG
CANCEL
B
a
2656.1 pt 14-05-2007 12:17 Pagina 8
Page 17

PORTUGUÊS
4.2 Ver televisão
4.2.1 Mudar de canal
‡ Para mudar de canal:
•Prima um número (entre 1 e 999) ou prima
P+ ou P- no telecomando.
•Prima
Program/Channel - ou + nos controlos
laterais do televisor.
® Prima R para regressar ao canal de televisão
que viu anteriormente.
4.2.2 Ajustar o volume
‡ Para ajustar o volume:
• Prima V + ou - no telecomando
• Prima Volume + ou - nos controlos laterais
do seu televisor.
® Para cortar o som:
• Prima ¬ no telecomando
• Prima novamente ¬ para repor o som.
4.3 Ver canais de um receptor
digital
‡ Ligue o receptor digital.
A imagem do receptor pode aparecer
automaticamente no ecrã.
® Utilize o telecomando do receptor digital para
seleccionar canais de televisão.
Se a imagem não aparecer:
‡ Prima v no telecomando.
® Prima repetidamente v para seleccionar o
dispositivo. Aguarde alguns segundos até
aparecer a imagem.
ÒPrima
OK.
† Utilize o telecomando do receptor digital para
seleccionar canais de televisão.
4.4 Ver dispositivos ligados
‡ Ligue o dispositivo.
A imagem do dispositivo pode aparecer
automaticamente.
Se a imagem não aparecer:
® Prima v no telecomando.
ÒPrima repetidamente v para seleccionar o
dispositivo. Aguarde alguns segundos até
aparecer a imagem.
† Prima
OK.
º Utilize o telecomando do dispositivo para
seleccionar canais de televisão.
Utilização do televisor 9
B
DEMO
OPTION
GUIDE
a
v
INPUT
j b q
MHEG
CANCEL
v
¬
P
V
321
654
9807
i
BROWSE
P
90
-
¬
P
V
321
654
98
0
7
i
BROWSE
V
¬
2656.1 pt 14-05-2007 12:17 Pagina 9
Page 18

10 Utilização do televisor
4.5 Ver um DVD
‡ Introduza um disco DVD no leitor.
® Prima Play π.
A imagem do leitor aparece automaticamente
no ecrã.
Se a imagem não aparecer:
‡ Prima v no telecomando.
® Prima repetidamente v para seleccionar o
leitor de DVD. Aguarde alguns segundos até
aparecer a imagem.
ÒPrima
OK.
† Prima Play π.
4.6 Seleccionar uma página de
teletexto
A maior parte dos canais de televisão transmite
informações através do teletexto.
Para ver o teletexto:
‡ Prima b.
Aparece a página principal de índice.
® Para seleccionar a página que pretende:
• Introduza o número da página com as teclas
numéricas.
• Prima P- ou P+ ou o, œ para ver a página
seguinte ou anterior.
•Prima uma tecla colorida para seleccionar um
dos itens com cor na parte inferior do ecrã.
à Sugestão
Prima R para regressar à página que viu
anteriormente.
ÒPrima novamente b para desligar o teletexto.
r
Nota
Apenas para o Reino Unido: alguns canais de
televisão digital oferecem serviços de texto
dedicados (por exemplo, BBC1).
Para mais informações sobre o teletexto, consulte a
secção 5.5 Teletexto.
B
DEMO
OPTION
GUIDE
a
v
INPUT
j b q
MHEG
CANCEL
v
MENU
b
¬
P
V
OK
LIST
b
2656.1 pt 14-05-2007 12:17 Pagina 10
Page 19

PORTUGUÊS
Utilização do televisor 11
4.7 Alterar o modo Ambilight
Pode escolher entre quatro modos Ambilight:
• Cor Define o Ambilight para uma cor constante.
• Descontraído Permite que o Ambilight se altere
de forma suave de acordo com as imagens no
ecrã.
• Médio Define o Ambilight para um nível entre o
modo descontraído e o modo dinâmico.
• Dinâmico Permite que o Ambilight se altere de
forma rápida.
Para alterar o modo Ambilight:
‡ Prima Ambilight para o ligar ou desligar.
® Prima repetidamente Mode para alternar entre
os modos Ambilight.
ÒPrima
OK.
Para mais informações sobre o Ambilight, consulte a
secção 5.4 Ambilight.
à Sugestão
Para desfrutar totalmente do Ambilight, desligue ou
reduza a intensidade da luz na divisão onde se
encontra.
Ambilight MODE
Ambilight MODE
2656.1 pt 14-05-2007 12:17 Pagina 11
Page 20

Outras utilizações do televisor
5.1 Visão geral do
telecomando
1 Standby B
Para ligar o televisor ou regressar ao modo
standby.
2 Input v
Para seleccionar um dispositivo ligado ou
regressar ao menu do televisor.
3 Ecrã duplo b
Para apresentar o teletexto à direita e a
imagem à esquerda do ecrã.
4 Formato de imagem panorâmica q
Para seleccionar um formato de imagem.
5 Teclas coloridas
• Selecção fácil de páginas do teletexto.
• Selecção fácil de tarefas.
6 Guide a
Para ligar ou desligar o Guia Electrónico de
Programação.
7
OK/List
•Para apresentar uma lista de canais.
•Para activar uma definição.
8 Teclas de navegação pπoœ
Para navegar pelo menu.
9 Teletexto b
Para ligar ou desligar o teletexto.
10 +P- Canal seguinte ou anterior
Para alternar entre o canal seguinte e anterior
da lista de canais.
11 Cortar o som ¬
Para cortar ou restabelecer o som.
12 Teclas numéricas
Para seleccionar um canal de televisão.
13 Canal anterior R
Para regressar ao canal anterior.
14 Mode
Para alternar entre os modos Ambilight
15 Ambilight
Para ligar ou desligar o Ambilight.
16 Informação no ecrã i
Para apresentar informações sobre o canal ou
sobre o programa, se disponível.
12
Esta secção refere-se a uma utilização mais
avançada do seu televisor:
• como utilizar os menus
• ajustar as definições de imagem, som e Ambilight
• mais sobre o teletexto
• como criar listas dos canais favoritos
• as vantagens do Guia Electrónico de
Programação
• como definir bloqueios e temporizadores
• definir legendas e seleccionar o idioma para as
legendas
• como visualizar fotografias ou reproduzir a sua
música favorita a partir de um dispositivo de
memória USB.
MENU
b
¬
P
V
321
654
98
0
7
i
Ambilight MODE
B
BROWSE
DEMO
OPTION
GUIDE
a
OK
LIST
v
INPUT
j b q
MHEG
CANCEL
18
17
16
15
19
21
22
20
6
1
2
4
5
3
8
7
9
10
12
11
13
14
5 Outras utilizações do televisor
2656.1 pt 14-05-2007 12:17 Pagina 12
Page 21

PORTUGUÊS
Outras utilizações do televisor
17 Aumentar ou diminuir o volume + V -
Para ajustar o volume.
18 Menu
Para activar ou desactivar o menu.
19 Option
Para activar ou desactivar o menu Acesso
rápido.
20 Demo
Para activar ou desactivar o menu Demo e
obter uma demonstração das funções do
televisor.
21 Legendas j
Para activar ou desactivar o modo de legendas.
22
MHEG cancel (apenas para o Reino Unido)
Para cancelar apenas os serviços digitais de
texto ou interactivos.
Consulte a secção 10 Índice remissivo para
encontrar a secção no manual sobre uma tecla de
controlo específica do telecomando.
5.2 Visão geral do menu do
televisor
Através dos menus de ecrã instala o televisor, ajusta
as definições de imagem, som e Ambilight, e acede
a funções. Esta secção dá-lhe uma visão geral dos
menus e descreve como os navegar.
5.2.1 O menu
‡ Prima Menu no telecomando para aceder ao
menu principal.
® Prima Menu para sair do menu.
O menu principal oferece os seguintes itens:
• Menu TV
Seleccione este menu para definições de
instalação, imagem, som e Ambilight, entre outras
definições de funções.
• Lista de canais
Seleccione este item para ver a lista de canais.
Crie aqui as suas listas de canais favoritos.
• Guia programa
Disponível quando estão instalados canais digitais,
este item apresenta informações sobre os
programas digitais.
Consoante o tipo de Guia Electrónico de
Programação, poderá também aceder à tabela de
programação de televisão digital prevista e
seleccionar e sintonizar facilmente o programa
desejado. Consulte a secção 5.7 Guia Electrónico
de Programação.
• Multimedia
Seleccione este item para ver fotografias ou
reproduzir músicas guardadas num dispositivo
USB. Consulte a secção 5.10 Visualizar e
reproduzir fotografias, MP3...
13
MENU
b
¬
P
V
BROWSE
OK
LIST
MENU
BROWSE
são
a
V
s
a
2656.1 pt 14-05-2007 12:17 Pagina 13
Televi
Multimedi
Menu T
Lista de canai
Guia program
Page 22

Outras utilizações do televisor
5.2.2 Utilizar o menu
Aprenda a utilizar os menus com este exemplo.
‡ Prima Menu no telecomando.
É apresentado o menu principal no ecrã.
® Prima π para aceder ao Menu TV.
ÒPrima π para aceder ao menu Regulações TV.
† Prima œ para seleccionar Imagem.
º Prima π para aceder às definições de imagem.
◊Prima œ para seleccionar Brilho.
‹Prima π para aceder à definição de brilho.
≈Prima o ou œ para ajustar a definição.
ÚPrima p para regressar às definições de
imagem ou prima Menu para sair do menu.
rNota:
Ficam disponíveis mais opções quando forem
instalados e transmitidos canais digitais.
14
MENU
b
BROWSE
OPTION
a
OK
LIST
MENU
BROWSE
são
a
V
s
a
a
çõ
es TV
m
C
e
o
D
Cor
z
m
t
ecorte
dade
.
.
m
m
C
e
Cor
z
D
n
ecorte
dade
C
e
o
90
52
0
m
o
C
e
Cor
z
D
n
ecorte
dade
o
98
52
0
o
a
çõ
es TVAssistente de Def..
Come
ç
a
m
t
.
.
m
2656.1 pt 14-05-2007 12:17 Pagina 14
Televi
Multimedi
Menu TV Regulações TV
Regulações TV
Vários
Instalação
Actual. do softw.
Menu T
Lista de canai
Guia program
Assistente de Def...
Repor regul. padr...
Imagem
Som
Ambilight
Image
ontrast
ontrast
Brilh
Mati
R
Tonali
Perfect Pixel H
Dig...Nat...Motio
Image
Brilh
ontrast
Brilh
Mati
R
Tonali
Perfect Pixel H
Dig...Nat...Motio
Brilh
Regul
Assistente de Def.
Repor regul. padr.
ar agor
Image
So
Ambiligh
Regul
Assistente de Def..
Repor regul. padr..
Image
ontrast
Brilh
Image
So
Ambiligh
Mati
R
Tonali
Perfect Pixel H
Page 23

PORTUGUÊS
5.2.3 Menu Acesso rápido
O menu Acesso rápido proporciona um acesso
directo a alguns dos itens de menu mais utilizados.
Quando forem instalados e transmitidos canais
digitais são apresentadas no menu as opções digitais
relevantes.
‡ Prima Option no telecomando.
® Prima o ou œ para seleccionar uma opção.
ÒPrima
OK para ver o menu da opção
seleccionada.
† Prima o, œ, p, π para ajustar as definições
no menu.
º Prima Option para sair do menu.
• Idioma áudio
Consulte a secção 5.3.5 Ajustar as definições de
som.
• Idioma legenda
Consulte a secção 5.9.3 Seleccionar um idioma
para as legendas digitais.
• Legendas
Consulte a secção 5.9 Legendas.
•Formato de imagem
Consulte a secção 5.3.4 Formato de imagem
panorâmica.
• Equalizador
Consulte a secção 5.3.5 Ajustar as definições de
som.
• Relógio
Apresentar o relógio
‡ Prima
OK para apresentar permanentemente o
relógio.
® Prima Option e o ou œ para seleccionar
novamente o relógio.
ÒPrima
OK para ocultar o relógio.
5.3 Definições de imagem e
som
Esta secção explica como ajustar a imagem e o som
nos menus.
5.3.1 Assistente de definições
Utilize o assistente de definições para uma
orientação fácil pelas definições básicas de imagem,
som e Ambilight.
‡ Prima Menu no telecomando e seleccione
Menu TV > Regulações TV > Assistente de
Definições e prima π para o aceder.
® Prima
OK.
ÒPrima a tecla verde no telecomando para iniciar
o assistente.
† Prima p ou π para seleccionar a opção que
se encontra à esquerda ou à direita.
º Prima a tecla verde para avançar para a
próxima definição.
Irá efectuar várias definições. Ao terminar, o
televisor irá pedir-lhe para memorizar essas
definições.
◊Prima a tecla verde para memorizar todas as
definições.
5.3.2 Repor regulações padrões
Repõe no televisor uma das predefinições. Cada
definição combina imagem, som e Ambilight.
‡ Prima Menu no telecomando e seleccione
Menu TV > Regulações TV > Repor regulações
padrões e prima π para aceder à lista.
® Prima o ou œ para seleccionar uma definição.
ÒPrima a tecla verde para memorizar a sua
selecção.
Regulações padrão: Actual, Natural,Vivo, Filmes
Outras utilizações do televisor 15
DEMO
OPTION
GUIDE
a
OK
LIST
v
j b q
MHEG
CANCEL
OPTION
cesso r
á
pido
a
aáudio
a
m
el
ó
gio
2656.1 pt 14-05-2007 12:17 Pagina 15
A
Idiom
Idioma legend
Legend
Formato image
R
Page 24

Outras utilizações do televisor
5.3.3 Definições de imagem
Esta secção explica como ajustar todas as
definições de imagem.
‡ Prima Menu no telecomando e seleccione
Menu TV > Regulações TV > Imagem e prima
π para aceder à lista.
® Prima o ou œ para seleccionar uma definição.
• Contraste
Altera o nível das partes brilhantes na imagem
mas mantém inalteradas as partes escuras.
• Brilho
Altera o nível de luminosidade de toda a
imagem.
• Cor
Altera o nível de saturação.
• Matiz
Nas transmissões NTSC, este nível compensa as
variações de cor.
• Recorte
Altera o nível de nitidez dos pequenos detalhes.
•Tonalidade
Define as cores para Normal, Forte
(avermelhada) ou Fraco (azulada). Seleccione
Pessoal para fazer a sua própria definição no
menu Tonalidade pessoal.
• Tonalidade pessoal
Se seleccionar Pessoal no menu Tonalidade pode
fazer aqui a sua própria definição.
Prima a tecla verde para seleccionar cada barra e
alterar o valor de:
- R-WP ponto branco vermelho
- G-WP ponto branco verde
- B-WP ponto branco azul
- R-BL nível de negro vermelho
- G-BL nível de negro verde
• Perfect Pixel HD
Activa ou desactiva o Perfect Pixel HD, a
definição de imagem mais indicada.
• Digital Natural Motion (Movimento Digital
Natural)
Reduz as oscilações e reproduz um movimento
suave, especialmente em filmes.
Defina o nível para Mínimo, Máximo ou
Desligado.
• 100Hz Clear LCD
Activa ou desactiva o 100Hz Clear LCD.
• Contr. dinâmico
Melhora o contraste da imagem à medida que
esta se altera no ecrã. Defina o nível para
Mínimo, Médio, Máximo ou Desligado. É
recomendado o nível médio.
• Redução de ruído
Filtra e diminui o ruído da imagem. Defina o nível
para Mínimo, Médio, Máximo ou Desligado.
• Redução artefacto MPEG
Suaviza a transição em imagens digitais. Activa ou
desactiva a redução de artefactos MPEG.
• Intensificação de cores
To r na as cores mais vivas e melhora a resolução
dos detalhes em cores brilhantes. Defina o nível
para Mínimo, Médio, Máximo ou Desligado.
• Active Control
Corrige todos os sinais para proporcionar a
melhor imagem possível. Activa ou desactiva o
Active Control.
• Sensor de luz
Ajusta as definições de imagem e Ambilight, de
acordo com a luminosidade da divisão. Activa ou
desactiva o sensor de luz.
• Formato de imagem
Consulte a secção 5.3.4 Formato de imagem
panorâmica.
16
a
çõ
es TV
m
C
e
o
us
Cor
z
m
t
Dig...Nat...Motion
edu
do
G
es
ol
S
z
m
ecorte
dade
.
.
m
2656.1 pt 14-05-2007 12:17 Pagina 16
Regul
Assistente de Def..
Repor regul. padr..
Image
So
Ambiligh
Image
ontrast
Brilh
Mati
R
Tonali
Pixel Pl
R
Red. artef. MPE
Intensif. de cor
Active contr
ensor de lu
Formato de image
Page 25

PORTUGUÊS
5.3.4 Formato de imagem panorâmica
Evite barras pretas nas partes laterais ou na parte
superior e inferior da imagem. Altere o formato de
imagem para um formato que preencha o ecrã.
‡ Prima q para activar o menu Formato de
imagem.
® Prima o ou œ para seleccionar um formato
de imagem disponível.
ÒPrima o para mover a imagem para cima de
forma a que legendas parcialmente ocultas
fiquem visíveis.
à Sugestão
É recomendada a definição Auto formato para uma
distorção mínima.
Auto formato (Não para PCs)
Aumenta automaticamente
a imagem para preencher o
ecrã. As legendas
permanecem visíveis.
Super zoom (Não para Alta
Definição)
Retira as barras pretas nas
partes laterais das
transmissões 4:3. Há uma
distorção mínima.
4:3 (Não para Alta
Definição)
Apresenta o formato 4:3
clássico
Expansão imag. 14:9
(Não para Alta Definição)
Expande o formato 4:3
clássico para 14:9
Expansão imag. 16:9
(Não para Alta Definição)
Expande o formato 4:3
clássico para o 16:9.
Panorâmico
Alarga o formato 4:3 para o
16:9.
Não a escala
(Apenas para Alta Definição
e PCs.) A melhor nitidez.
Possibilidade de distorção
nas margens. Poderão surgir
barras negras nas imagens provenientes do seu PC.
rNota
Não se esqueça de atribuir um nome à ligação no
menu Ligação. Consulte a secção 7.4.3 Atribuir
nomes aos dispositivos.
5.3.5 Definições de som
Esta secção explica como ajustar todas as
definições de som.
‡ Prima Menu no telecomando e seleccione
Menu TV > Regulações TV > Som e prima π
para aceder à lista.
® Prima o ou œ para seleccionar uma definição.
• Equalizador
Altera o nível de agudos e graves do som.
Seleccione cada barra para alterar a definição.
Consulte também a secção 5.2.3 Menu Acesso
rápido.
•Volume
Altera o volume.
Ao ajustar o volume com V aparece uma barra
do volume. Se não quer que apareça esta barra
vá a Menu TV > Instalação > Preferências e
prima π para aceder à lista e desligar a barra do
volume.
‡ Prima o ou œ para seleccionar Barra do
volume.
® Prima π para aceder.
ÒSeleccione Ligado para activar a apresentação
temporária da barra do volume ao ajustar o
volume.
Outras utilizações do televisor 17
DEMO
OPTION
GUIDE
a
OK
LIST
v
j b q
MHEG
CANCEL
q
a
çõ
es TV
m
r
á
udio
e
l
brio
t
éreo
odo surround
Volume auscultad...
.
aus
Niv. auto de vol...
a
d
m
t
.
.
m
2656.1 pt 14-05-2007 12:17 Pagina 17
Regul
Assistente de Def..
Repor regul. padr..
Image
So
Ambiligh
So
Equalizado
Volum
Equi
Mono/S
M
Volume delt
Auto surroun
Page 26

Outras utilizações do televisor
• Equilíbrio
Define o equilíbrio dos altifalantes esquerdo e
direito para melhor se adaptar à sua posição de
audição.
• Idioma áudio
Quando forem instalados e transmitidos canais
digitais, pode estar disponível uma lista de
idiomas de áudio para o programa actual.
Consulte também a secção 5.2.3 Menu Acesso
rápido. Para alterar permanentemente o idioma
de áudio, consulte a secção 6 Instalação de
canais.
• Dual I/II
Se transmitido, pode optar entre dois idiomas
diferentes.
• Mono/Estéreo
Se estiver disponível a transmissão em estéreo,
pode seleccionar Mono ou Estéreo por canal de
televisão.
• Modo surround
Para seleccionar um som mais espacial no caso
de este ser transmitido ou estar disponível a
partir de um dispositivo ligado.
• Volume auscultador
Altera o volume do auscultador. Pode cortar o
som dos altifalantes do televisor, premindo ¬
no telecomando.
• Automatic volume leveller (Nivelador automático
de volume)
Diminui as diferenças repentinas de volume,
como por exemplo no início de anúncios
publicitários ou quando muda de canal.
Seleccione ligado ou desligado.
• Volume delta
Corrige diferenças de volume entre canais ou
dispositivos ligados.
‡ Mude para o canal ou dispositivo em que
deseja corrigir a diferença de volume.
® Seleccione Volume delta no menu Som e altere
o nível de volume.
• Auto surround
Muda o televisor automaticamente para o
melhor modo de som surround transmitido.
Seleccione ligado ou desligado.
5.4 Ambilight
Esta secção explica como ajustar as definições de
Ambilight.
‡ Prima Menu no telecomando e seleccione
Menu TV > Regulações TV > Ambilight e prima
π para aceder à lista.
® Prima o ou œ para seleccionar uma definição.
• Ambilight Liga ou desliga o Ambilight.
• Brilho Altera a intensidade de luz do Ambilight.
• Modo
Pode escolher entre quatro modos Ambilight:
Cor, Descontraído, Médio e Dinâmico. Consulte
a secção 4.7 Alterar o modo Ambilight.
• Cor Se escolher Cor no menu Modo, pode
seleccionar uma cor permanente da lista ou criar
a sua própria cor. - Branco quente
- Branco frio
- Azul
- Pessoal
Ao seleccionar Pessoal no menu Cor pode
personalizar a sua cor.
‡ Seleccione em primeiro lugar Saturação e
defina um valor alto.
® Seleccione Paleta e percorra de 0 a 100 para ir
do vermelho ao amarelo, do verde ao azul.
• Separação Define o nível de diferença de cor
entre o lado esquerdo e direito do televisor, caso
sejam seleccionadas as opções Descontraído,
Médio ou Dinâmico no menu Modo.
Se a separação for desligada é apresentada uma
cor Ambilight dinâmica mas uniforme.
• Equilíbrio
Tal como no equilíbrio de som estéreo, define o
nível de Ambilight para o lado esquerdo e direito
do televisor.
ç Aviso
Para evitar uma má recepção do telecomando por
infravermelhos, coloque os seus dispositivos
afastados do Ambilight.
18
a
çõ
es TV
t
t
Cor
o
odo
m
çã
o
l
brio
t
.
.
m
2656.1 pt 14-05-2007 12:17 Pagina 18
Regul
Assistente de Def.
Repor regul. padr.
Image
So
Ambiligh
Ambiligh
Ambiligh
Brilh
M
Equi
Page 27

PORTUGUÊS
Te levisor em modo standby com Ambilight
Quando o televisor está em standby, pode ligar o
Ambilight. Neste caso, o Ambilight está apenas
disponível com uma cor permanente.
‡ Prima Ambilight no telecomando quando o
televisor estiver em standby.
® Prima repetidamente Modo para seleccionar
uma cor disponível.
5.5 Teletexto
O seu televisor dispõe de memória para 1200
páginas, que guarda as páginas e subpáginas de
teletexto transmitidas para diminuir o tempo de
espera.
Para seleccionar uma página de teletexto, consulte
a secção 4.6 Seleccionar uma página de teletexto.
5.5.1 Seleccionar número de página das
subpáginas
Um número de página de teletexto pode conter
várias subpáginas. As páginas são mostradas numa
barra próxima do número de página principal.
‡ Prima b.
® Seleccione uma página de teletexto.
ÒPrima p ou π para seleccionar uma subpágina.
5.5.2 Seleccionar transmissões de
teletexto T.O.P.
O teletexto T.O.P. (tabela de páginas) não é
transmitido por todos os canais de televisão. Pode
avançar facilmente de um assunto para outro sem
utilizar o número das páginas.
‡ Prima b.
® Prima i. Aparece a opção Visualizar T.O.P.
ÒUtilize p, π ou o, œ para seleccionar um
assunto.
† Prima
OK para visualizar a página.
5.5.3 Teletexto em ecrã duplo
Veja o canal de televisão e o teletexto em
simultâneo.
‡ Prima b para o teletexto em ecrã duplo.
® Prima novamente b para ver normalmente o
teletexto.
ÒPrima b para desligar o teletexto.
5.5.4 Pesquisar no teletexto
Avance rapidamente para um assunto ligado a uma
série de números de páginas, ou pesquise por
palavras específicas nas páginas do teletexto.
‡ Prima b.
® Prima
OK para realçar a primeira palavra ou
número.
ÒPrima o, œ ou p, π para avançar para a
palavra ou número seguinte da página.
† Prima
OK para pesquisar uma página que
contenha a palavra ou o número realçado.
º Prima o até que não esteja realçado qualquer
palavra ou número para sair da pesquisa.
5.5.5 Aumentar páginas do teletexto
Para usufruir de uma leitura mais confortável, pode
aumentar a página de teletexto.
‡ Prima b e seleccione uma página de
teletexto.
® Prima Option no telecomando para aumentar a
parte superior da página.
ÒPrima novamente Option para ver aumentada a
parte inferior da página.
† Prima o ou œ para percorrer a página
aumentada.
º Prima novamente Option para regressar ao
tamanho de página normal.
Outras utilizações do televisor 19
0
i
Ambilight MODE
Ambilight MODE
v
2656.1 pt 14-05-2007 12:17 Pagina 19
i
i
Ambilight MODE
OPTION
j b q
DEMO
OPTION
9807
CANCEL
MHEG
GUIDE
a
OK
LIST
Page 28

Outras utilizações do televisor
5.5.6 Menu de Teletexto
Com as opções do menu de teletexto pode
mostrar informações ocultas, percorrer
automaticamente as subpáginas e alterar a definição
dos caracteres.
• Mostrar
Ocultar ou mostrar informações escondidas numa
página, tais como soluções de adivinhas ou
puzzles.
•Percorrer subpágina
Se estiverem disponíveis subpáginas na página
seleccionada, pode percorrê-las automaticamente.
• Idioma
Alguns idiomas utilizam um conjunto diferente de
caracteres. Mude para o outro grupo para ver
correctamente o texto.
‡ Prima b.
® Prima Menu.
ÒPrima o ou œ para seleccionar uma opção.
† Prima
OK para alterar a definição.
º Prima Menu para sair do menu de teletexto.
◊Prima b para desligar o teletexto.
5.5.7 Serviços digitais de texto (apenas no
Reino Unido)
Alguns emissores de televisão digital oferecem
serviços de texto dedicados ou serviços
interactivos (por exemplo, a BBC1) nos seus canais
de televisão digital. Estes serviços funcionam como
teletexto normal, em que as teclas numéricas,
coloridas e de navegação são utilizadas para
seleccionar e navegar.
‡ Prima b.
® Prima o, œ ou p, π para seleccionar ou
realçar itens.
ÒPrima uma das teclas coloridas para seleccionar
uma opção.
† Prima
OK para confirmar ou activar.
º Prima MHEG Cancel para cancelar os serviços
digitais de texto ou serviços interactivos.
ç Aviso
Os serviços digitais de texto são bloqueados
quando forem transmitidas legendas e as legendas
estiverem activadas no menu Vários. Consulte a
secção 5.9 Legendas.
5.5.8 Teletexto 2.5
Quando transmitido pelo canal de televisão, este
teletexto oferece mais cores e melhores gráficos.
O teletexto 2.5 está ligado por predefinição.
‡ Prima Menu no telecomando e seleccione
Menu TV > Instalação > Preferências >
Teletexto 2.5 e prima π para aceder à lista.
® Seleccione ligado ou desligado.
5.6 Criar listas de canais
favoritos
Veja a lista Todos os canais ou crie a sua própria
lista de canais de televisão e estações de rádio
favoritas. Por exemplo, cada membro da família
pode criar a sua própria lista de favoritos.
5.6.1 Seleccionar uma lista de favoritos
Saiba como seleccionar uma das listas de canais
favoritos.
‡ Prima
OK.
A primeira vez que terminar a instalação é-lhe
apresentada a lista Todos os canais. Noutra
situação, é-lhe apresentada a última lista de
favoritos seleccionada.
® Prima a tecla vermelha para ver todas as listas
de favoritos.
ÒPrima o ou œ para seleccionar uma lista.
† Prima
OK.
Aparece a lista de favoritos seleccionada.
º Prima novamente
OK para sair.
20
Menu
Mostrar
Idioma
Gr. II
Percorrer subpágina
Desligado
Desligado
odos os canais
3
2
r
á
dio 1
1
ó
g
1
a
2656.1 pt 14-05-2007 12:17 Pagina 20
T
EXT
icos
2 Canais digitais
3 Canais digitais
4 Canais
Selecc. list
Page 29

PORTUGUÊS
5.6.2 Para configurar uma lista de favoritos
Criar ou modificar a sua própria lista de favoritos.
‡ Prima
OK.
Aparece a última lista de favoritos seleccionada.
® Prima a tecla vermelha para ver todas as listas
de favoritos.
ÒPrima o ou œ para seleccionar uma lista.
† Prima
OK.
º Prima a tecla verde para aceder ao modo de
edição.
A lista seleccionada apresenta uma lista
completa de canais.
◊Prima o ou œ para realçar um canal.
‹Prima
OK para marcar (ou desmarcar) o canal
realçado.
O canal é então adicionado (ou retirado) da
lista seleccionada.
≈Prima novamente a tecla verde para sair do
modo de edição.
Aparece novamente a lista de canais modificada.
5.6.3 Seleccionar um canal da lista de
favoritos
‡ Prima
OK.
Aparece a última lista de canais seleccionada.
® Utilize o ou œ para realçar um canal.
ÒPrima
OK.
O televisor sintoniza esse canal.
à Sugestão
• Utilize
-P+ para percorrer os canais de televisão
da lista de favoritos seleccionada.
• Com as teclas numéricas ainda pode seleccionar
canais que não estão marcados como favoritos.
5.7 Guia Electrónico de
Programação - EPG -
O Guia Electrónico de Programação é um guia no
ecrã para a programação de televisão digital
prevista. Pode navegar, seleccionar e visualizar
programas por horário, título ou género. Existem
dois tipos de EPG: ‘Agora e Seguinte’ e ‘7 ou 8 dias’.
O EPG está disponível quando forem instalados e
transmitidos canais digitais. O EPG ‘Agora e
Seguinte’ está sempre disponível mas o ‘7 ou 8 dias’
está apenas disponível em alguns países.
Com o menu EPG pode...
•ver uma lista dos programas a serem transmitidos
•ver o programa seguinte
• agrupar programas por género
• definir memos para o início dos programas
• definir os canais EPG preferidos
• etc.
5.7.1 Ligar o EPG
‡ Prima a.
Aparece o seguinte tipo de EPG
EPG ‘Agora e Seguinte’
É apresentada informação detalhada acerca do
programa actual.
Outras utilizações do televisor 21
¬
P
V
321
654
9807
i
Ambilight MODE
BROWSE
P
90
-
26 BBC1 Terça, 12 Set. 09:17
Título: Commonwealth Games
Info: 7:50 - 12:30 : 280 mín.
..........
r
.
e
DEMO
OPTION
GUIDE
a
OK
LIST
v
j b q
MHEG
CANCEL
GUIDE
a
2656.1 pt 14-05-2007 12:17 Pagina 21
Sai
Pulse - P + para cambiar canal
Seguint
Page 30

22 Outras utilizações do televisor
Ou o
EPG ‘7 ou 8 dias’
Pode demorar algum tempo a receber os dados do
EPG.
É apresentada a lista de programas de televisão.
® Utilize as teclas coloridas para activar as acções
disponíveis na parte inferior do ecrã.
• Seguinte: para apresentar informações sobre o
próximo programa.
• Lembrar: marcar ou desmarcar um programa
como memo.
• Ve r:ver ou ouvir o programa actual.
• Ir para...: para avançar para o dia seguinte ou
anterior.
• Info: para ver informações sobre o programa
seleccionado (se disponíveis).
ÒPrima a para sair do EPG.
5.7.2 Mais instruções sobre o EPG ‘7 ou 8
dias’
A procura por género, os memos de horários, etc.,
é gerida no menu Guia programa.
‡ Prima a no telecomando.
® Prima Menu. Aparece o menu Guia programa.
ÒPrima o ou œ para seleccionar uma opção do
menu.
† Prima π para aceder.
º Prima œ ou o para fazer uma selecção.
◊Prima
OK para activar ou prima a tecla verde
para ver
‹Prima a para sair do EPG.
rNota
Apenas os canais marcados como Canais EPG
preferidos aparecem no menu Guia programa.
5.8 Temporizadores / bloqueios
Esta secção explica como ligar ou desligar o
televisor a uma hora específica e como bloquear e
desbloquear o televisor.
5.8.1 Passar automaticamente para
standby
A Função adormecer coloca o televisor em
standby após um certo período de tempo.
‡ Prima Menu no telecomando e seleccione
Menu TV > Vários > Adormecer e prima π
para aceder à barra da Função adormecer.
® Prima o ou œ para definir o período de
tempo até um máximo de 180 minutos em
incrementos de 5 minutos. Se forem escolhidos
0 minutos, a Função adormecer é desligada.
Pode sempre desligar mais cedo o televisor ou
repor o tempo durante a contagem.
5.8.2 Ligar automaticamente o televisor
A partir do modo standby, a função Programado
liga automaticamente o televisor numa hora e num
canal específicos.
‡ Prima Menu no telecomando e seleccione
Menu TV > Vários > Programado e prima π
para aceder ao menu Program.
® Utilize o ou œ, p ou π para seleccionar e
aceder individualmente a itens do menu, de
modo a definir o canal, o dia da semana ou
diariamente, e a hora de início.
† Prima
OK para confirmar.
º Prima Menu para sair do menu.
à Sugestão
Para desligar a função Programado, seleccione
Desligado no menu Program.
5.8.3 Bloquear canais de televisão e
programas
Bloquear canais de televisão e/ou programas de
dispositivos ligados para impedir que as crianças os
vejam. Bloquear e desbloquear com um código de
quatro números.
Definir ou alterar o seu código
‡ Prima Menu no telecomando e seleccione
Menu TV > Vários > Definir ou mudar código e
prima π para introduzir o seu código.
® Introduza o seu código utilizando as teclas
numéricas.
O menu Vários é novamente apresentado com
uma mensagem a confirmar que o seu código
foi criado ou alterado.
Guia programa Terça, 12 Set.
09:55
BBC ONE
BBC TWO
five
BBC THREE
OUR
abc1
09:50 Tweenies
09:00 The Wright Stuff
05:32 This is BBC THREE
05:3
OUR
09:20
g
12:30 Commonwealth
10:15 Something Special
10:30 Trisha Goddard
12:00 This is BBC THREE
OUR
addio
Próximo das Seguinte
07:50 Commonwealth
arVer
o
.
a
t
á
y
d
h
.
t
á
2656.1 pt 14-05-2007 12:17 Pagina 22
BBC F
2 This is BBC F
Moonlightin
Lembr
13:50 Anastasia 0010 - EEN
12:00 This is BBC F
10:15 D
Ir para ..
Guia program
O que es
O que es
12:30 South Toda
11:50 Working Lunc
Canais EPG pref..
Comprar info EPG
13:00 In aller Freun
Inf
Page 31

Outras utilizações do televisor 23
PORTUGUÊS
Esqueceu-se do código?
‡ Seleccione Mudar código.
® Prima π.
ÒIntroduza o código de anulação 8-8-8-8.
† Introduza um novo código pessoal.
◊Confirme o novo código introduzido.
O código anterior é apagado e o novo código
é memorizado.
5.8.4 Activar ou desactivar a TV trancada
Se tiver definido o código, pode bloquear todos os
canais e dispositivos, bloquear um canal ou
dispositivo específico, definir um período após o
qual todos os canais e dispositivos são bloqueados
ou definir a idade das crianças para a classificação
parental, quando forem instalados e transmitidos
canais digitais.
‡ Prima Menu no telecomando e seleccione
Menu TV > Vários > TV trancada e prima π
para introduzir o seu código.
® Introduza o seu código utilizando as teclas
numéricas.
ÒSeleccione uma das opções.
† Prima π.
Bloqueie ou desbloqueie todos os canais e
dispositivos ligados
‡ Seleccione Trancar ou Destrancar.
® Prima
OK.
Bloqueie um programa específico ou todos os
canais a partir de determinada hora
‡ Seleccione Trancar pessoal.
® Prima π para aceder ao menu Trancar pessoal.
ÒPrima novamente π para aceder ao menu
Tr ancar após.
† Seleccione Ligado para ligar o Temporizador
trancar.
º Prima p.
◊Seleccione Tempo.
‹Prima π.
≈Introduza a hora com o ou œ e π.
ÚPrima
OK.
Bloqueie um ou mais canais e dispositivos ligados
‡ Seleccione Trancar pessoal.
® Prima π para aceder.
ÒPrima o ou œ para seleccionar Trancar o
canal.
† Prima π.
º Prima o ou œ para seleccionar os canais que
deseja bloquear ou desbloquear.
◊Prima
OK sempre que quiser bloquear ou
desbloquear um canal.
Defina uma classificação de idade para um
programa digital
Algumas emissoras digitais têm os seus próprios
programas classificados (dependendo do seu país).
Quando essa classificação é superior à idade que
definiu, o programa é bloqueado.
‡ Seleccione Trancar pessoal.
® Prima π para aceder.
ÒPrima o ou œ para seleccionar Classificação
parental (familiar).
† Prima π.
º Prima o ou œ para seleccionar uma
classificação de idade.
◊Prima Menu para sair do menu TV trancada.
5.9 Legendas
Por cada canal de televisão podem ser definidas
legendas, que são transmitidas por teletexto ou
transmissões DVB-T (digital).
Se forem instalados e transmitidos canais digitais,
pode seleccionar o idioma preferido para as
legendas.
5.9.1 Legendas transmitidas por canais de
televisão analógica
‡ Seleccione um canal de televisão analógica.
® Prima b para ligar o teletexto.
ÒIntroduza os três algarismos do número de
página das legendas.
† Prima b para desligar o teletexto.
rNota
A página das legendas de teletexto dos canais
analógicos deve ser memorizada individualmente
para cada canal de televisão.
cada
l
p
ó
s
al
C
a
çã
.
car
l
car
2656.1 pt 14-05-2007 12:17 Pagina 23
TV tran
Tran
Trancar pessoa
Destran
Trancar pessoa
Trancar a
Trancar o can
lassific
o par..
Page 32

5.9.2 Activar ou desactivar as legendas
‡ Prima Menu no telecomando e seleccione
Menu TV > Vários > Legenda e prima π para
aceder à lista.
® Prima o ou œ para seleccionar Ligado e as
legendas serem sempre apresentadas, ou Activo
com som desl. para as legendas serem apenas
apresentadas quando o som for cortado através
da tecla ¬ no telecomando.
ÒPrima p para regressar ao menu Vários.
à Sugestão
Seleccione directamente o menu Legenda,
premindo Option no telecomando. Consulte a
secção 5.2.3 Menu Acesso rápido.
5.9.3 Seleccionar um idioma para as
legendas digitais
Se estiver disponível nos canais digitais a
transmissão de legendas, pode seleccionar o idioma
preferido para as legendas, constante na lista dos
idiomas transmitidos. O idioma preferido para as
legendas, que foi definido no menu Instalação, é
temporariamente anulado.
‡ Prima Menu no telecomando e seleccione
Menu TV > Vários > Idioma legenda e prima π
para aceder à lista de idiomas disponíveis.
® Prima o ou œ para seleccionar um idioma
para as legendas.
ÒPrima
OK.
à Sugestão
Seleccione directamente o menu Idioma legenda,
premindo Option no telecomando. Consulte a
secção 5.2.3 Menu Acesso rápido.
5.10 Visualizar e reproduzir:
fotografias, MP3,...
Veja imagens ou ouça música armazenada num
dispositivo USB (não fornecido com o televisor).
Veja as suas imagens numa apresentação de slides,
ou ouça a sua própria lista de reprodução de
músicas.
rNota
A Philips não pode ser responsabilizada se o seu
dispositivo USB não for compatível, nem aceita
qualquer tipo de responsabilidade por danos ou
perdas de dados armazenados.
5.10.1 Introduzir um dispositivo USB
Introduza um dispositivo na parte lateral do
televisor com o televisor ligado.
Aparece automaticamente o menu principal e o
nome do dispositivo USB é realçado próximo de
Multimedia.
5.10.2 Retirar o dispositivo USB
ç Aviso
Para evitar danos no dispositivo USB, saia sempre
do menu no ecrã e aguarde cinco segundos até
retirar o dispositivo USB.
‡ Prima Menu para sair do menu.
® Retire o dispositivo USB.
5.10.3 Visualizar as suas imagens
O menu Multimedia apresenta os ficheiros
armazenados no dispositivo USB.
‡ Prima π para aceder ao menu Multimedia.
A imagem é realçada.
® Prima π para aceder à pasta de imagens.
ÒPrima o ou œ para seleccionar uma imagem
ou álbum de imagens no dispositivo USB.
24 Outras utilizações do televisor
V
ários
a
a
unção adormecer
go
o
ace comum
o
ários
ação
.
a
çõ
es TV
B
m
1
6
jpg
jpg
jpg
ca
m
são
a
V
s
a
2656.1 pt 14-05-2007 12:17 Pagina 24
Menu T
Regul
Instal
Actual. do softw
Legend
Idioma legend
F
Intro/Mudar códi
Programad
Interf
Dem
Televi
Multimedi
Menu T
Lista de canai
Guia program
US
Image
Músi
Image
Afrika_200
Paris_200
My_car.
Jean.
Mary.
Page 33

† Prima OK para ver a imagem ou para iniciar
uma apresentação de slides com as imagens no
álbum.
º Prima
OK para fazer uma pausa na
apresentação de slides. Prima novamente o
botão OK para reiniciar.
º Prima uma das teclas coloridas do telecomando
para executar a função correspondente,
apresentada na parte inferior do ecrã. Prima a
tecla azul para parar a apresentação e ver mais
funções.
Se desaparecer a barra de funções da parte
inferior do ecrã, prima uma tecla colorida para
ela reaparecer.
◊Prima p e seleccione outra imagem ou outro
álbum.
Definições da apresentação de slides
• Detalhes / Mais detalhes
Mostra o nome, a data, o tamanho da imagem e
a imagem seguinte da apresentação.
• Transição
Apresenta a lista de estilos de transição
disponíveis para as imagens. Prima o ou œ para
seleccionar e
OK para activar.
• Tempo slide
Define o tempo de espera entre transições de
imagens: Pequeno, Médio ou Longo.
• Rotação
Para rodar a imagem.
• Zoom Apresenta uma lista de ampliações
disponíveis para seleccionar.
• Começar/Mostrar Para parar e reiniciar a
apresentação de slides.
5.10.4 Imag.reduzidas
Para obter uma visão geral das imagens do álbum
seleccionado.
‡ Seleccione um álbum de imagens.
® Prima π para aceder à lista de imagens.
ÒPrima a tecla verde.
† Prima o ou œ, p ou π para realçar uma
imagem.
º Prima
OK para ver a imagem.
◊Prima p para regressar à visão geral das
imagens em miniatura.
‹Prima novamente a tecla verde para regressar à
lista de imagens.
5.10.5 Ouvir música
Encontre as suas músicas no álbum Música do
menu Multimedia.
‡ Realce Música no menu Multimedia.
® Prima π para aceder à pasta de músicas.
ÒPrima o ou œ para seleccionar uma música ou
um álbum de músicas.
† Prima
OK para reproduzir a música
seleccionada ou para reproduzir uma sequência
de músicas do mesmo álbum.
Definições de música
• Detalhes
Apresenta o nome do ficheiro.
• Repetir/repetir tudo
Para repetir todas as músicas do álbum ou
repetir apenas uma música até que a reprodução
seja interrompida.
• Misturar
Reproduzir músicas numa sequência aleatória.
5.10.6 Apresentação de slides com música
de fundo
Veja uma apresentação de slides das suas imagens
acompanhada por música de fundo.
‡ Seleccione primeiro um álbum de músicas e
prima
OK.
® Realce a pasta de Imagens e seleccione um
álbum de imagens e prima
OK.
Outras utilizações do televisor 25
PORTUGUÊS
jpg
jpg
m
1
jpg
jpg
jpg
jpg
5
jpg
1
1
1
jpg
jpg
jpg
jpg
jpg
jpg
jpg
jpg
2656.1 pt 14-05-2007 12:17 Pagina 25
Image
Afrika_200
Paris_200
My_car.
Jean.
Mary.
Afrika_200
Kenya.
Congo.
Victoria.
Dakar.
Cairo.
Afrika_200
Kenya.
Congo.
Victoria.
Cairo.
Afrika_200
Kenya.
USBAfrika_2001Kenya.
Kenya.
Page 34

5.11 Ouvir canais de rádio
Se estiver disponível uma emissão digital, os canais
de rádio digitais serão instalados durante a
instalação.
Para ouvir um canal de rádio digital:
‡ Prima
OK no telecomando.
Aparece o menu Todos os canais.
® Utilize as teclas numéricas para seleccionar um
canal de rádio disponível a partir do número de
canal 400. Para reordenar, consulte a secção
6.3.3 Reordenar os canais.
ÒPrima
OK.
5.12 Actualização de software
A Philips procura continuamente o
aperfeiçoamento dos seus produtos. Por isso,
recomenda-se que actualize o software do televisor.
Actualize o software a partir da Internet ou active
um novo software enviado pela transmissão digital.
Actualização do software a partir da Internet
Para instruções sobre como actualizar o software
do seu televisor, vá a www.philips.com/support e
pesquise por Software e Controladores na página
de suporte a produtos para o seu televisor.
Actualização do software por transmissão digital
(DVB-T)
O seu televisor pode receber automaticamente
novo software a partir do sistema de transmissão
digital.
Se receber uma mensagem de actualização no ecrã,
é altamente aconselhável que actualize de imediato
o software - seleccione Agora.
Seleccione Later (Mais tarde), se deseja ser
lembrado mais tarde.
Seleccione Cancelar para desistir da actualização
(não recomendado). Se cancelar a actualização,
ainda pode fazer você mesmo a actualização a
partir do Menu TV > Actualização do software >
Local update (Actualização local).
26 Outras utilizações do televisor
2656.1 pt 14-05-2007 12:17 Pagina 26
Page 35

6 Instalação de canais
Quando ligou o TV pela primeira vez, seleccionou o
idioma dos menus do TV; todos os canais
disponíveis foram instalados.
Este capítulo contém instruções para repetir a
instalação inicial (se assim o considerar necessário),
ou se desejar sintonizar um novo canal de TV
analógico.
rNotas:
- Siga apenas os passos aplicáveis à sua situação
específica.
-A nova instalação modifica a lista de Todos os
Canais e os novos canais adicionais não serão
incluídos em nenhuma lista de favoritos.
6.1 Instalação automática
Esta secção explica como pesquisar e memorizar
automaticamente todos os canais disponíveis.
Passo 1 Idioma de menu
Define o idioma dos menus do televisor.
Avance para um dos passos seguintes, se as
definições de idioma estiverem correctas.
‡ Prima Menu no telecomando e seleccione
Menu TV > Instalação > Idiomas e prima π
para aceder a Idioma de menu.
® Prima o ou œ para seleccionar um idioma.
ÒPrima
OK para confirmar.
† Prima p para regressar ao menu Instalação.
O menu de Idioma consta ainda das seguintes
definições, no caso de instalação e emissão de
canais digitais.
• Áudio preferido
Seleccione um dos idiomas de áudio disponíveis
como idioma preferido.
• Legendas preferidas
Seleccione um dos idiomas disponíveis para as
legendas como idioma preferido. Consulte a
secção 5.9 Legendas.
• Deficiência auditiva
Seleccione Ligado para apresentar a versão das
legendas para os deficientes auditivos no seu
idioma de áudio ou legendas preferido, quando
disponível.
Passo 2 Seleccionar o seu país
Seleccione o país onde se encontra. O televisor irá
instalar e organizar os canais de televisão de acordo
com o seu país.
‡ Prima œ para seleccionar País.
® Prima π para aceder à lista.
ÒPrima o ou œ para seleccionar o seu país.
† Prima p para regressar ao menu Instalação.
Passo 3 Selecção do fuso horário local
Apenas disponíveis para países com um fuso
horário diferente.
‡ Prima œ para seleccionar Zona de hora local.
® Prima π para aceder à lista.
ÒPrima o ou œ para seleccionar o seu fuso
horário.
† Prima p para regressar ao menu Instalação.
Passo 4 Instalação de canais de televisão e
de rádio
O televisor irá pesquisar e memorizar todos os
canais de televisão digitais e não digitais disponível
e todos os canais de rádio digitais disponível.
‡ Prima œ para seleccionar Instalação Canal.
® Prima π para aceder ao menu Instalação Canal.
A instalação automática é realçada.
ÒPrima π para seleccionar Começar agora.
† Prima
OK.
º Prima a tecla verde para iniciar.
A instalação poderá demorar alguns minutos.
◊Se a pesquisa de canais estiver completa, prima
a tecla vermelha para regressar ao menu
Instalação.
‹Prima Menu para sair do menu TV.
à Sugestão
Quando são encontrados canais de televisão
digitais, a lista de canais instalados pode conter
alguns números de canais vazios.
Se desejar mudar o nome, reordenar ou desinstalar
canais memorizados, consulte a secção 6.3 Mudar a
ordem de canais.
Outras utilizações do televisor 27
PORTUGUÊS
açãoIdiomas
u
o
.
ci
ência aud
a
as
a
s
a
o canal
as
ç
õ
2656.1 pt 14-05-2007 12:17 Pagina 27
Instal
Idiom
P
Instal
nci
Idioma de men
udio preferid
Legendas pref..
Defi
itiv
Page 36

6.2 Analógico: instalação manual
Pode sintonizar manualmente cada canal de
televisão analógica através da instalação manual.
6.2.1 Seleccione o sistema
‡ Prima Menu no telecomando e seleccione
Menu TV > Instalação > Instalação canal >
Analógico: instalação manual.
® Prima π para aceder ao menu Instalação
manual. O sistema é realçado.
ÒPrima π para aceder à lista de sistema.
† Prima o ou œ para seleccionar o seu país ou
parte do mundo onde se encontra neste
momento.
º Prima p para regressar ao menu Instalação
manual.
6.2.2 Pesquisar um novo canal
‡ Prima Menu no telecomando e seleccione
Menu TV > Instalação > Instalação canal >
Analógico: instalação manual > Procure.
® Prima π para aceder ao menu Procure.
ÒPrima a tecla vermelha para introduzir a
frequência manualmente ou a tecla verde para
procurar outro canal.
à Sugestão
Se souber a frequência, introduza os três algarismos
da frequência através das teclas numéricas do
telecomando.
† Prima p quando o novo canal for encontrado.
º Seleccione Memorizar como novo canal para
guardar o novo canal sob um novo número de
canal.
◊Prima π para aceder.
‹Prima
OK.
Aparece Acabado.
≈Prima Menu para sair do menu Instalação
Canal.
6.2.3 Ajuste fino
Proceda ao ajuste fino para encontrar um canal
quando a recepção for fraca.
‡ Prima Menu no telecomando e seleccione
Menu TV > Instalação > Instalação canal >
Analógico: instalação manual > Ajuste fino.
® Prima π para aceder ao menu Ajuste fino.
ÒPrima o ou œ para ajustar a frequência
† Prima p no final da sintonia fina.
º Seleccione Memorizar canal actual se pretender
memorizar a frequência com o número de
canal actual.
◊Prima π para aceder.
‹Prima
OK.
Aparece Acabado.
≈Prima Menu para sair do menu Instalação
Canal.
6.3 Mudar a ordem canais
memorizados
Para mudar o nome, reordenar, desinstalar, ou
reinstalar canais memorizados.
6.3.1 Alterar o nome de um canal
Alterar o nome de um canal ou atribuir um nome a
um canal.
‡ Prima Menu no telecomando e seleccione
Menu TV > Instalação > Instalação canal >
Mudar ordem.
® Prima π para aceder à lista de canais.
ÒPrima o ou œ na lista de canais para
seleccionar o canal a que deseja mudar o
nome.
† Prima a tecla vermelha.
º Prima p ou π para seleccionar um carácter ou
o ou œ para mudar os caracteres. O espaço,
os números e outros caracteres especiais estão
entre a letra z e A.
◊Prima a tecla verde ou
OK para terminar.
à Sugestão
Para apagar todos os caracteres prima a tecla
amarela. Para apagar apenas o carácter realçado
prima a tecla azul.
28 Outras utilizações do televisor
ação canal
á
.
a
ocura
o
.
a
o auto
.
a
çã
o
.
p
çã
o teste
udar ordem
2656.1 pt 14-05-2007 12:17 Pagina 28
Instal
Instal
Actualiz
Dig.: rece
M
Sistem
m..
Pr
inst..
Ajuste fin
Memo. como novo..
log.: instal.man
Page 37

6.3.2 Desinstalar ou reinstalar um canal
Para desinstalar um canal memorizado para que a
sua sintonização deixe de ser possível.
Reinstalar um canal anteriormente desinstalado.
‡ Prima Menu no telecomando e seleccione
Menu TV > Instalação > Instalação canal >
Mudar ordem.
® Prima π para aceder ao lista de canais.
ÒPrima o ou œ na lista de canais para
seleccionar o canal que deseja desinstalar ou
reinstalar.
† Prima a tecla verde para desinstalar ou voltar a
instalar o canal.
º Prima Menu para sair do menu.
6.3.3 Reordenar os canais
Alterar a ordem dos canais memorizados.
‡ Prima Menu no telecomando e seleccione
Menu TV > Instalação > Instalação canal >
Mudar ordem.
® Prima π para aceder ao lista de canais.
ÒPrima o ou œ na lista de canais para
seleccionar o canal a que deseja alterar a
posição.
† Prima a tecla amarela para mover para cima o
canal realçado na lista de canais.
º Prima a tecla azul para mover para baixo o
canal realçado na lista de canais.
◊Prima Menu para sair do menu.
6.4 Gestão
automática de canais
Diariamente, às 3 horas da manhã, todos os canais
de televisão disponíveis são actualizados
automaticamente. A actualização é efectuada com o
televisor em standby. Os canais anteriormente
memorizados que não forem encontrados pela
actualização serão retirados da lista de canais.
Também pode fazer você mesmo esta actualização
a qualquer hora do dia.
‡ Prima Menu no telecomando e seleccione
Menu TV > Instalação > Instalação Canal >
Actualização instalação.
® Prima π para aceder ao menu Actualização
instalação.
ÒPrima
OK.
† Prima a tecla verde para iniciar.
A actualização da instalação tem início e irá
demorar alguns minutos.
º Se a actualização estiver completa, prima a tecla
vermelha para regressar ao menu Instalação
Canal.
◊Prima Menu para sair do menu.
6.5 Teste à recepção digital
Se receber transmissões de televisão digitais pode
verificar a qualidade e a potência de sinal de um
canal específico. Utilize a informação sobre a
potência de sinal para reposicionar a antena, de
modo a obter uma melhor qualidade de recepção.
‡ Seleccione um canal.
® Prima Menu no telecomando e seleccione
Menu TV> Instalação > Instalação Canal >
Digital: recepção teste.
ÒPrima π para aceder.
† Prima
OK.
São apresentadas a frequência do canal, o nome
da estação, a qualidade e a potência do sinal.
º Prima a tecla verde para iniciar o teste ou
introduza directamente a frequência do canal a
testar. Se a qualidade e potência do sinal forem
fracas, mude a posição da antena.
◊Prima a tecla amarela para guardar a frequência,
se a qualidade e potência do sinal forem boas.
‹Prima a tecla vermelha para regressar ao menu
Instalação Canal.
≈Prima Menu para sair do menu.
à Sugestão
Para obter os melhores resultados, contacte um
especialista em instalação de antenas.
6.6 Definições de fábrica
Se se confundir com as definições de imagem, som
e Ambilight, pode repor as definições de fábrica do
TV correspondentes.
‡ Prima Menu no telecomando e seleccione
Menu TV > Instalação > Regulações fábrica.
® Prima π para aceder ao menu Regulações
fabrica.
ÒPrima
OK.
† Prima Menu para sair do menu.
rNota
As definições de instalação do canal não são
alteradas.
Outras utilizações do televisor 29
PORTUGUÊS
2656.1 pt 14-05-2007 12:17 Pagina 29
Page 38

Conectores traseiros
1
EXT1
Conector Scart para ligação de DVD,
videogravador, receptor digital, consola de jogos,
etc.
2 EXT2
Segundo conector Scart.
3 EXT3
Conectores de vídeo componente Y Pb Pr e
conectores áudio L/R para DVD, receptor digital
ou consola de jogos, etc.
4 Common Interface
Ranhura para módulos de acesso condicionado
(CAM)
5 Audio Out L/R
Conectores de saída de áudio Cinch para um
sistema de cinema em casa, etc.
6 Digital Audio in (se presente)
Conector de entrada de áudio Cinch para
utilização com qualquer um dos conectores
HDMI com um adaptador HDMI para DVI.
7
Digital Audio Out
Conector de saída de áudio Cinch para um
sistema de cinema em casa, etc.
8 Entrada
HDMI 1
Conector de entrada HDMI para leitor Blu-ray
Disc, receptor digital de Alta Definição ou consola
de jogos de Alta Definição, etc.
9 Entrada HDMI 2
Segundo conector de entrada HDMI.
10 Entrada HDMI 3
Terceiro conector de entrada HDMI.
11 Entrada Antenna
Conectores laterais
12 S-Video (lateral)
Conector de entrada de S-Video para ser
utilizado em conjunto com os conectores áudio
L/R para câmaras de vídeo, consolas de jogos, etc.
13 Video (lateral)
Conector de entrada de vídeo Cinch para ser
utilizado em conjunto com os conectores áudio
L/R para câmaras de vídeo, consolas de jogos, etc.
14 Audio L/R in (lateral)
Entrada de áudio L/R para câmaras de vídeo,
consolas de jogos, etc.
15 Auscultadores
Mini-ficha estéreo.
16 USB
Conector USB.
30 Ligações
7Ligações
7.1 Visão geral das ligações
S-VIDEO
VIDEO
L
R
USB
AUDIO
EXT 3
Y
Pb
Pr
AUDIO
L/
R
EXT 1EXT 2
AUDIO OUT DIGITAL
AUDIO
L
R
ANTENNA
COMMON INTERFAC
E
IN
OUT
SERVICE
UAR
T
DISPLAY SYNCHRONIZED
DISPLAY SYNCHRONIZED
.
HDMI 1 HDMI 2 HDMI 3
123
16
15
14
12
4 8 9 10 115 76
13
2656.1 pt 14-05-2007 12:17 Pagina 30
Page 39

7.2 Acerca das ligações
Saiba aqui como fazer a melhor ligação possível
para o seu dispositivo.
Existem seis ligações prontas a utilizar na parte de
trás do televisor - EXT1, EXT2, EXT3, HDMI1,
HDMI2 e HDMI3. Ligue o seu dispositivo através da
ligação com a maior qualidade possível.Procure a
ligação que oferece a maior qualidade no seu
dispositivo. Utilize-a para fazer a ligação ao televisor.
Definição de ligações
Quando as ligações ao televisor estiverem feitas, o
televisor precisa de saber quais as ligações que fez,
ou seja, que dispositivo está ligado a que conector.
Utilize o Menu TV para o fazer. Consulte a secção
7.4 Definição de ligações.
7.2.1 HDMI - A mais alta qualidade ★★★★★
Uma ligação HDMI oferece a melhor qualidade de
imagem e de som. Um único cabo combina os
sinais de vídeo e áudio. Utilize a ligação HDMI para
sinais de televisão HD (alta definição).
Um dispositivo ligado com HDMI ao televisor só
pode enviar sinais de áudio e vídeo para o seu
televisor. O dispositivo não pode receber ou gravar
áudio e vídeo do televisor.
Cabo HDMI (máx. 5 m)
à Sugestão
Utilize um adaptador HDMI / DVI no caso de o seu
dispositivo dispor apenas de ligação DVI. É
necessário um cabo extra para completar esta
ligação.
rNota
A ligação HDMI suporta HDCP (High-bandwidth
Digital Contents Protection - Protecção de
conteúdo digital em banda larga). O HDCP é um
sinal de protecção anticópia incluído em conteúdos
de Alta Definição (discos DVD ou Blu-ray).
7.2.2 YPbPr - Qualidade superior ★★★★
Utilize as ligações de vídeo componente YPbPr em
conjunto com a mini-ficha de áudio L/R.Faça
corresponder a cor dos cabos quando fizer a
ligação.
A ligação YPbPr suporta os sinais de televisão de
Alta Definição.
Cabo YPbPr Mini-ficha de
vídeo componente áudio estéreo L/R
- Vermelho,Verde, Azul
7.2.3 Scart - Boa qualidade ★★★
Um único cabo combina os sinais de vídeo e áudio.
Os conectores Scart suportam vídeo RGB mas não
os sinais de televisão de Alta Definição.
Cabo Scart
Ligações 31
PORTUGUÊS
2656.1 pt 14-05-2007 12:17 Pagina 31
Page 40
7.2.4 S-Video - Boa qualidade ★★
Utilize um cabo S-Video em conjunto com um
cabo de áudio L/R (Cinch). Faça corresponder a cor
dos cabos quando fizer a ligação.
Cabo S-Video Cabo de áudio L/R
- Vermelho, Branco
7.2.5 Video - Qualidade básica ★
Utilize um cabo de vídeo em conjunto com um
cabo de áudio L/R (Cinch). Faça corresponder a cor
dos cabos quando fizer a ligação.
Vídeo combinado - cabo amarelo e de áudio L/R
- vermelho e branco
7.2.6 Saída de áudio sincronizado com o
ecrã
Para a melhor sincronização possível de imagem e
som no ecrã, ligue um sistema de cinema em casa à
saída de áudio L/R ou às saídas de áudio digital.
Consulte os diagramas 7.3.4 e 7.3.8.
Não ligue o sinal de áudio de um leitor de DVD,
receptor digital ou qualquer outro dispositivo de
áudio/vídeo directamente ao sistema de cinema em
casa.
32 Ligações
2656.1 pt 14-05-2007 12:17 Pagina 32
Page 41

Ligações 33
PORTUGUÊS
7.3 Ligar os dispositivos
As ligações apresentadas nesta secção são
recomendações para os casos mais frequentes.
Podem ser possíveis outras soluções.
7.3.1 Leitor de DVD
Utilize um cabo Scart para ligar o dispositivo à
entrada
EXT1 na parte de trás do televisor.
7.3.2 Gravador de DVD ou receptor digital
Utilize um cabo Scart e 2 cabos de antena.
7.3.3 Gravador de DVD e receptor digital
Utilize 3 cabos Scart e 3 cabos de antena.
EXT 3
Y
Pb
Pr
AUDIO
L/R
HDMI 3HDMI 1 HDMI 2
EXT 1EXT 2
AUDIO OUT
L
R
OUT
IN
ANTENNA
DIGITAL
AUDIO
Receiver / Cable boxDVD Recorder
IN
OU
T
I
N
OUT
EXT 3
Y
Pb
Pr
AUDIO
L/R
HDMI 3HDMI 1 HDMI 2
EXT 1EXT 2
DVD Player
AUDIO OUT
L
R
OUT
IN
ANTENN
A
DIGITAL
AUDIO
EXT 3
Y
Pb
Pr
AUDIO
L/R
HDMI 3HDMI 1 HDMI 2
EXT 1EXT 2
DVD Recorder / Digital receiver
AUDIO OUT
L
R
OUT
IN
ANTENN
A
DIGITAL
AUDIO
IN
OUT
2656.1 pt 14-05-2007 12:17 Pagina 33
Page 42

7.3.4 Gravador de DVD e sistema de
cinema em casa
Utilize um cabo Scart, 2 cabos de antena e 2 cabos
de áudio (Cinch).
7.3.5 Gravador de DVD e sistema DVD de
cinema em casa
Utilize 2 cabos Scart, 2 cabos de antena e 2 cabos
de áudio (Cinch).
7.3.6 Receptor de satélite
Utilize um cabo Scart e 2 cabos de antena.
34 Ligações
EXT 3
Y
Pb
Pr
AUDIO
L/R
HDMI 3HDMI 1 HDMI 2
EXT 1EXT 2
Satellite receiver
AUDIO OUT
L
R
OUT
IN
ANTENN
A
DIGITAL
AUDIO
EXT 3
Y
Pb
Pr
AUDIO
L/R
HDMI 3HDMI 1 HDMI 2
EXT 1EXT 2
AUDIO OUT
L
R
OUT
IN
ANTENN
A
DIGITAL
AUDIO
IN
DIGITAL
AUDIO
OUT
DIGITAL
AUDIO
OUT
Home Theatre SystemDVD Recorder
DIGITAL
AUDIO
IN
IN
OUT
EXT 3
Y
Pb
Pr
AUDIO
L/R
HDMI 3HDMI 1 HDMI 2
EXT 1EXT 2
AUDIO OUT
L
R
OUT
IN
ANTENN
A
DVD Home Theatre SystemDVD Recorder
DIGITAL
AUDIO
IN
DIGITAL
AUDIO
OUT
IN
OUT
2656.1 pt 14-05-2007 12:17 Pagina 34
Page 43

7.3.7 Receptor digital de Alta Definição /
receptor de satélite de Alta Definição
Utilize um cabo HDMI e 2 cabos de antena.
7.3.8 Gravador de DVD, sistema de cinema
em casa e receptor digital
Utilize 3 cabos Scart, 3 cabos de antena e 2 cabos
de áudio (Cinch).
7.3.9 Leitor Blu-ray Disc
Utilize um cabo HDMI.
Ligações 35
PORTUGUÊS
EXT 3
Y
Pb
Pr
AUDIO
L/R
HDMI 3HDMI 1 HDMI 2
EXT 1EXT 2
Blu-ray Disc player
AUDIO OUT
L
R
OUT
IN
ANTENN
A
DIGITAL
AUDIO
OUT
HDMI
EXT 3
Y
Pb
Pr
AUDIO
L/R
HDMI 3HDMI 1 HDMI 2
EXT 1EXT 2
HD Digital receiver / HD Satellite receiver
AUDIO OUT
L
R
OUT
IN
ANTENN
A
DIGITAL
AUDIO
IN
OUTOUT
HDMI
EXT 3
Y
Pb
Pr
AUDIO
L/R
HDMI 3HDMI 1 HDMI 2
EXT 1EXT 2
AUDIO OUT
L
R
OUT
IN
ANTENN
A
DIGITAL
AUDIO
IN
DIGITAL
AUDIO
OUT
DIGITAL
AUDIO
OUT
Home Theatre SystemDigital ReceiverDVD Recorder
DIGITAL
AUDIO
IN
IN
OUT
IN
OUT
2656.1 pt 14-05-2007 12:17 Pagina 35
Page 44

7.3.10 Consola de jogos
A ligação mais prática para uma consola de jogos
encontra-se na parte lateral do televisor. As ligações
de maior qualidade encontram-se na parte de trás
do televisor.
Ligação à parte lateral do televisor
Utilize os conectores de vídeo e áudio L/R (Cinch).
Ligação à parte de trás do televisor
Utilize a entrada HDMI ou YPbPr (EXT3) para uma
qualidade de Alta Definição.
7.3.11 Câmara de vídeo
A ligação mais prática para uma câmara de vídeo
encontra-se na parte lateral do televisor. As ligações
de maior qualidade encontram-se na parte de trás
do televisor.
Ligação à parte lateral do televisor
Utilize os conectores de vídeo e áudio L/R (Cinch)
ou utilize os conectores S-Video e áudio L/R.
Ligação à parte de trás do televisor
Utilize a entrada HDMI ou YPbPr (EXT3) para uma
qualidade de Alta Definição.
7.3.12 Computador
A melhor ligação para um computador encontra-se
no painel traseiro do televisor. Na parte lateral do
televisor encontra-se uma ligação mais prática, mas
apenas para ver fotografias e filmes do computador.
ç Aviso
Antes de ligar o computador, defina a frequência de
actualização do monitor do computador para 60Hz.
Ligação na parte posterior do televisor
Utilize a ligação DVI do seu computador para
estabelecer uma ligação HDMI com o televisor.
Utilize um cabo HDMI para DVI ou um adaptador
HDMI para DVI.
Adicione um cabo áudio com uma mini-ficha
estéreo para obter som. Ligue a mini-ficha estéreo
à entrada
EXT3 no televisor.
No menu Ligações, ligue a tomada
EXT3 ao
conector HDMI que está a utilizar.
Consulte a secção 7.4 Definição de ligações.
Ligação na parte lateral do televisor
Se o seu computador não possui uma ligação DVI,
utilize os conectores S-Video e Audio L/R (cinch)
na parte lateral do televisor. Esta ligação é
adequada apenas para aplicações como o Windows
Media Center ou semelhantes.
à Sugestão
Altere o formato de imagem do televisor para Não
a escala no menu Formato de imagem para a
máxima nitidez de imagem. Consulte a secção 5.3.4.
Formato de imagem panorâmica.
Para as resoluções suportadas do monitor do PC,
consulte a secção 8 Dados técnicos.
36 Ligações
S-VIDEO
VIDEO
L
R
USB
AUDIO
DVI
AUDI
O OUT
DVI
AUDIO
OUT
HDMI
HDMI
EXT 3 - AUDIO L/R
S-VIDEO
VIDEO
L
R
AUDIO
S-VIDEO
VIDEO
L
R
USB
AUDIO
2656.1 pt 14-05-2007 12:17 Pagina 36
Page 45

7.4 Definição de ligações
Quando todos os dispositivos estiverem ligados, o
televisor precisa de saber quais as ligações que
foram feitas, ou seja, que dispositivo está ligado a
que conector.
7.4.1 Digital Audio In (se presente)
Se utilizar a ligação Digital Audio In,
atribua esta ligação, no menu, ao dispositivo que
transmite o som.
‡ Prima Menu no telecomando e seleccione
Menu TV > Instalação > Ligações > Digital
Audio In.
® Prima π para aceder à lista.
ÒPrima œ ou o para seleccionar o conector
utilizado pelo dispositivo.
7.4.2 Audio In L/R
Se utilizar a ligação Audio In L/R, atribua esta
ligação, no menu, ao dispositivo que transmite o
som.
‡ Prima Menu no telecomando e seleccione
Menu TV > Instalação > Ligações > Audio In
L/R.
® Prima π para aceder à lista.
ÒPrima œ ou o para seleccionar o conector
utilizado pelo dispositivo.
7.4.3 Atribuir nomes aos dispositivos
Atribua um nome aos dispositivos ligados para uma
selecção fácil e uma óptima gestão do sinal.
Atribua o tipo de dispositivo (DVD, videogravador,
consola de jogos...) ao conector que utiliza para
esse dispositivo.
‡ Prima Menu no telecomando e seleccione
Menu TV > Instalação > Ligações >
EXT1.
® Prima π para aceder à lista.
ÒPrima œ ou o para seleccionar o tipo de
dispositivo.
† Prima Menu para sair do menu.
7.4.4 Descodificador de canais
Os descodificadores que descodificam um sinal de
antena devem ser ligados a
EXT1 ou EXT2 (Scart).
Tem de designar um canal de televisão como o
canal a ser descodificado. Depois atribua a ligação
onde o descodificador está ligado.
‡ Prima Menu no telecomando e seleccione
Menu TV > Instalação > Descodificador >
Canal.
® Prima π para aceder à lista.
ÒPrima œ ou o para seleccionar o canal a ser
descodificado.
† Prima p para recuar e seleccionar Estado.
º Prima œ ou o para seleccionar o conector
utilizado pelo descodificador.
◊Prima Menu para sair do menu.
Ligações 37
PORTUGUÊS
ga
çõ
es
N
um
3
3
e
3
3
e
N
/R
ga
çõ
es
/R
um
3
3
3
3
e
/R
ga
çõ
es
um
y
R
G
D
go
CR
3
3
e
2656.1 pt 14-05-2007 12:17 Pagina 37
Li
EXT
HDMI
Sid
AUDIO IN L
DIGITAL AUDIO I
Li
EXT
HDMI
Sid
AUDIO IN L
DIGITAL AUDIO I
Nenh
EXT
HDMI
Sid
AUDIO IN L
Nenh
EXT
HDMI
Li
Nenh
EXT
HDMI
Sid
Blu-ra
HDD/DVD
rav. H
Jo
V
Page 46

7.5 Preparação para serviços
digitais
Os canais de televisão digitais podem ser
descodificados com um módulo de acesso
condicionado (CAM) fornecido pelo operador de
televisão digital. O CAM pode permitir vários
serviços, dependendo do operador que escolher
(por ex.: Pay TV).
Contacte o seu operador de televisão digital para
mais informações e condições.
7.5.1 Introduzir um módulo de acesso
condicionado - CAM
) Aviso
Desligue o televisor antes de introduzir um CAM.
Procure no CAM a forma correcta de o introduzir.
Uma introdução incorrecta do módulo pode
danificar o CAM e o seu televisor.
‡ Introduza cuidadosamente o CAM na ranhura
Common Interface na parte de trás do
televisor até encaixar.
® Deixe permanentemente o CAM na ranhura
Common Interface.
Pode demorar alguns minutos até o CAM ficar
activo. A remoção do CAM irá desactivar o serviço
de televisão digital.
7.5.2 Menu Interface comum
A partir deste menu pode aceder ao serviço CAM
que instalou. As aplicações e a respectiva função, o
conteúdo e as mensagens no ecrã são provenientes
do prestador de serviços CAM.
‡ Prima Menu no telecomando e seleccione
Menu TV > Vários > Interface comum.
Esta opção do menu está disponível quando é
introduzido um CAM e estabelecido o contacto
com o prestador de serviços.
38 Ligações
COMMON INTERFACE COMMON INTERFACE
2656.1 pt 14-05-2007 12:17 Pagina 38
Page 47

8 Dados técnicos
Imagem / Ecrã
• Tipo de ecrã: LCD Full HD W-UXGA
• Resolução do painel: 1366 x 768p
• Melhoramento de imagem Perfect Pixel HD
• Processamento 1080p a 24/25/30/50/60 Hz
Resoluções de ecrã suportadas
• Formatos de computador
Resolução Frequência de actualização
640 x 480 60 Hz
800 x 600 60 Hz
1024 x 768 60 Hz
1280 x 1024 60 Hz
1360 x 768 60 Hz
• Formatos de vídeo
Resolução Frequência de actualização
480i 60 Hz
480p 60 Hz
576i 50 Hz
576p 50 Hz
720p 50 Hz, 60 Hz
1080i 50 Hz, 60 Hz
1080p 24 Hz, 25 Hz, 30 Hz
1080p 50 Hz, 60 Hz
Sintonizador / Recepção / Transmissão
• Entrada de antena: 75 Ohm coaxial (IEC75)
• Sistema do televisor: DVD COFDM 2K/8K
• Reprodução de vídeo: NTSC, SECAM, PAL
•DVD: DVB Terrestre
(consulte os países seleccionados na etiqueta do
televisor)
Dimensões e pesos (aprox.)
Modelo do televisor 32PFL9632D/10
- largura 823 mm
- altura 536 mm
- profundidade 125 mm
- peso 20 kg
TV + suporte
- largura 823 mm
- altura 601 mm
- profundidade 219 mm
- peso 23 kg
Som
• Sistema de som:
- Virtual Dolby Digital
- BBE
Multimédia
• Ligação: USB
• Formatos de reprodução: MP3, LPCM,
apresentação de slides (.alb)
JPEG, MPEG1, MPEG2
Telecomando
• Tipo: RC4450
• Pilhas: 2 tamanho AA tipo R6
Conectividade
• EXT1 (Scart): Áudio L/R, entrada/saída CVBS,
RGB
• EXT2 (Scart): Áudio L/R, entrada/saída CVBS,
RGB,
entrada/saída S-video
• EXT3:Y Pb Pr, entrada de áudio L/R (mini-ficha)
• HDMI 1
• HDMI 2
• HDMI 3
• Saída de áudio analógico L/R - sincronização com
o ecrã
• Entrada de áudio digital (coaxial-cinch-S/PDIF)
• Saída de áudio digital (coaxial-cinch-S/PDIF)
sincronização com o ecrã
•Parte lateral: Entrada de áudio L/R, entrada de
vídeo (CVBS), S-vídeo
Saída dos auscultadores (mini-ficha estéreo), USB
Alimentação
• Corrente eléctrica: CA 220 - 240V (±10%)
• Consumo de energia em funcionamento e em
standby:
Consulte as especificações técnicas em
www.philips.com
•Temperatura ambiente: 5 °C - 35 °C
As especificações estão sujeitas a alterações sem
aviso prévio. Para mais detalhes sobre as
especificações deste produto, consulte
www.philips.com/support.
Dados técnicos 39
PORTUGUÊS
2656.1 pt 14-05-2007 12:17 Pagina 39
Page 48

9 Resolução de
problemas
Te levisor e telecomando
O televisor não liga
•Verifique a ligação do cabo de alimentação.
•Verifique se as pilhas do telecomando estão
fracas ou gastas.Verifique a sua posição + / -.
Pode utilizar as teclas no televisor para o ligar.
• Retire o cabo de alimentação da tomada, aguarde
um minuto e volte a colocá-lo.
O televisor não reage ao telecomando
•Verifique se as pilhas do telecomando não estão
fracas ou gastas.Verifique a sua posição + / -.
• Limpe o telecomando e a lente do sensor no
televisor.
• Utilize as teclas de controlo lateral para alterar
algumas das definições básicas de imagem e som.
‡ Prima Volume - e + para ajustar o volume.
® Prima Program/Channel - e + para avançar
pelos canais assinalados como favoritos.
ÒPrima Menu para ver o menu principal.
Prima Program/Channel - e + para seleccionar
e ajustar os itens do menu de imagem e som.
A luz vermelha no televisor está intermitente
• Retire o cabo de alimentação da tomada, aguarde
trinta segundos e volte a colocá-lo.Verifique se
há espaço suficiente para a ventilação. Aguarde
até que o televisor arrefeça. Se o televisor não
passar para standby e a luz ficar novamente
intermitente, contacte o nosso Centro de
Assistência ao Cliente.
Esqueceu-se do código para desactivar a função TV
trancada
• Consulte a secção 5.8.3 Definir o código / Mudar
código.
Idioma errado no Menu TV?
Siga estes passos para alterar o idioma.
‡ Prima Menu no telecomando.
® Prima π.
ÒUtilize œ para realçar a terceira linha.
† Prima π três vezes.
º Prima œ ou o para seleccionar o seu idioma.
◊Prima
OK.
‹Prima Menu para sair dos menus.
Canais TV
Alguns canais de televisão desapareceram
•Verifique se escolheu a lista de canais correcta.
• Um canal pode ser desinstalado no menu Mudar
ordem.
Não foram encontrados canais digitais durante a
instalação
•Verifique se o televisor suporta a transmissão
DVB-T no seu país. Consulte a lista dos países na
etiqueta do televisor.
Imagem
A luz azul está acesa mas não há imagem
•Verifique se a antena está ligada correctamente.
•Verifique se seleccionou o dispositivo correcto.
O som está ligado mas não há imagem
•Verifique as definições de contraste ou brilho no
menu.
A imagem do televisor é de má qualidade
•Verifique se a antena está ligada correctamente.
• Altifalantes, dispositivos de áudio não ligados a
terra, luzes de néon, edifícios altos ou montanhas
podem ter influência sobre a qualidade de
imagem.Tente melhorar a imagem, alterando a
direcção da antena ou afastando dispositivos do
televisor.
•Verifique se escolheu o sistema de televisão
correcto no menu Instalação manual.
• Se se trata apenas de um canal com má
qualidade de imagem, experimente uma
sintonização fina desse canal no menu Ajuste
fino. Consulte a secção 6.2.3.
A imagem tem uma cor fraca
•Verifique as definições de cor no menu Imagem.
Seleccione qualquer opção no menu Repor
regulações padrões. Consulte a secção 5.3.2.
•Verifique as ligações e os cabos dos dispositivos
ligados.
O televisor não se lembra das minhas definições
quando o volto a ligar
•Verifique se o televisor está definido como Casa
no Menu TV > Instalação > Preferências >
Localização.
40 Resolução de problemas
2656.1 pt 14-05-2007 12:17 Pagina 40
Page 49

A imagem não é adequada ao ecrã, é demasiado
grande ou demasiado pequena
• Seleccione um formato de imagem mais
adequado no menu Formato de imagem.
Consulte a secção 5.3.4 Formato de imagem
panorâmica.
• Atribua um nome aos dispositivos ligados no
menu Ligações para obter a melhor gestão do
sinal. Consulte a secção 7.4.3 Atribuir nomes
aos dispositivos.
A posição da imagem no ecrã não está correcta
• Alguns sinais de imagem de certos dispositivos
não se adequam correctamente ao ecrã. Pode
deslocar a imagem com as teclas p, π ou o, œ
no telecomando.Verifique a saída de sinal do
dispositivo.
Som
Há imagem mas não há som
•Verifique se o volume não está definido para 0.
•Verifique se o som não foi cortado com a tecla
¬.
•Verifique se todos os cabos estão correctamente
ligados.
• Se não for detectado um sinal de som, o
televisor desliga automaticamente o som.
Isto é um funcionamento correcto e não indica
uma avaria.
O som é de má qualidade
•Verifique se o som está definido para Estéreo.
•Verifique as definições do Equalizador.
• Seleccione qualquer opção no menu Repor
regulações padrões. Consulte a secção 5.3.2.
O som sai apenas por um altifalante
•Verifique se o Equilíbrio não está com uma
definição totalmente para a esquerda ou para a
direita.
Ligações HDMI
Problemas com dispositivos ligados por HDMI
•O processo HDMI - HDCP pode demorar alguns
segundos até o televisor apresentar as imagens
do dispositivo.
• Se o televisor não reconhecer o dispositivo e o
ecrã não apresentar imagem, experimente
alternar de um dispositivo para outro para
reiniciar o processo HDCP.
• Se as interrupções de som forem persistentes,
consulte o manual do utilizador do dispositivo
para verificar as definições de saída. Se isso não
ajudar, ligue um cabo de áudio adicional à
entrada Digital Audio In no televisor. Consulte a
secção 7.4.1 Digital Audio In.
• Se for utilizado um adaptador HDMI para DVI,
verifique se a ligação de áudio adicional está no
sítio certo para completar a ligação DVI.
Consulte a secção 7.4.1 Digital Audio In ou 7.4.2
Audio In L/R.
Ligação USB
O televisor não apresenta os conteúdos do
dispositivo USB
• Defina o seu dispositivo (câmara) de forma a
estar em conformidade com ‘dispositivo de
armazenamento de massa’.
•O dispositivo USB pode necessitar de um
software controlador específico. Infelizmente, esse
software não pode ser transferido para o
televisor.
Não consigo visualizar os meus ficheiros no menu
Multimedia.
• Nem todos os ficheiros de áudio e imagens são
suportados. Consulte a secção 8 Dados técnicos.
Os ficheiros de áudio e imagens não são
reproduzidos correctamente
•O desempenho de transferência do dispositivo
USB limita a taxa de transferência.
Computador
A apresentação do computador no televisor não
está estável ou sincronizada
•Verifique se está seleccionado no computador o
modo de resolução correcto. Consulte a secção
8 Dados técnicos.
Se não resolver o problema
Desligue e volte a ligar o televisor. Se não conseguir
resolver o problema, ligue para o Centro de
Assistência ao Cliente ou consulte o nosso site em
www.philips.com/support.
Consulte os números de telefone do Centro de
Assistência ao Cliente na última página deste
manual do utilizador.
Tenha consigo o modelo e o número do produto à
mão antes de telefonar.
Pode encontrar estes números na etiqueta da
embalagem ou numa etiqueta na parte traseira e
inferior do televisor.
) Aviso
Nunca tente reparar você mesmo o televisor.
Resolução de problemas 41
PORTUGUÊS
2656.1 pt 14-05-2007 12:17 Pagina 41
Page 50

10 Índice
remissivo
Active Control 16
Actualização do software 26
Alimentação 8
Alterar código 22
Alterar o nome 28
Ambilight
2 canais 5
cor 18
menu / definições 18
modos 11
com TV em standby 19
Analógico
canais de televisão 28
instalação manual 28
Antena
cabo 7
com dispositivos 30
ligação 7
Assistente de definições 15
Atribuir nomes aos
dispositivos 36
Auscultadores
ligação 4,30
volume 18
Auto formato 17
Auto surround 18
Bloqueios 22
Brilho 16
Ambilight 18
Blu-ray 30, 31, 35
Cabo de alimentação 8
Cabo
HDMI 31
Scart 32
S-Video 32
Video 32
YPbPr 31
Câmara de vídeo 36
Câmara fotográfica 36
Canais 27
lista de todos os canais 20
lista de favoritos 20
reordenar 28
memorizar / instalar 28
Canal
anterior 12
bloqueio 20
de rádio 27
gestão 29
Casa
localização 40
Código 22
Computador
ligação 36
resoluções de ecrã 39
Consola de jogos 36
Contraste 16
Contraste dinâmico 16
Cor
menu 16
teclas 4, 12
Cuidados com o ecrã 3
Dados técnicos 39
Deficiência auditiva 27
Definir o código 22
Descodificador
canal 36
Digital
entrada de áudio 30
idioma das legendas 24
idioma de áudio 17
movimento natural 16
receptor 33
saída de áudio 30
serviços de texto 20
teste à recepção 29
Dispositivo
ligação 31
nomear 36
ver 9
Dual I/II 18
DVB-T 5
DVD
gravador 33
leitor 33
ligação 33
reprodução 9
Ecrã duplo 12
Estéreo 18
Equilíbrio
Ambilight 18
som 17
Equalizador 17
Expansão de imagem 17
Formato de imagem
panorâmica 39
Formatos de vídeo 39
Fuso horário 27
Função
adormecer 22
programado 22
Gravador 33
Guia Electrónico de Programação
21
HDCP 31
HDMI
ligação 30
Idioma
áudio 18
legendas 19
menu 27
Imagem
formato 16
menu 16
Imagens estáticas 3
Instalação
actualização 29
automática 27
manual 28
menu 27
Intensificação de cores 16
Interface comum (CAM)
menu 38
ranhura 30, 38
Legendas 23
Ligar 8
Ligação externa 1, 2, 3 (EXT) 30
Ligação
L
I
H
G
F
E
D
C
B
A
42 Índice remissivo
2656.1 pt 14-05-2007 12:17 Pagina 42
Page 51

definição 31, 36
melhor 31
scart 32
visão geral 30
Limpeza do ecrã 3
Listas de canais favoritos 20
Localização 40
Matiz 16
Menu de acesso rápido 15
Menu Regulações TV 15
Módulo CA 30, 38
Mono 18
Mudar a ordem de canais 28
Música 25
Nitidez 16
Nível de negro 16
Nivelador automático de
volume 18
País
selecção 27
sistema digital 29
Perfect Pixel HD 16
Pesquisa
canais 28
páginas de teletexto 19
Pilhas 3,7
Ponto branco 16
Posicionar o televisor 5
Predefinições de fábrica 29
Programa seguinte/anterior 12
Ranhura de segurança
Kensington 5
Receptor digital de Alta
Definição 35
Receptor de satélite 34
Reciclagem 3
Redução de artefactos MPEG 16
Redução de ruído 16
Relógio 15
Reordenar 28
Repor regulações padrões 15
Resolução de problemas 40
Segurança 3
Sensor de luz 16
Sintonização fina 28
Sistema de cinema em casa 34
Som
menu 17
modo surround 18
Standby 22
Super zoom 17
Tabela de páginas T.O.P 19
Tecla(s)
cor 12
de corte de som 12
menu 13
no televisor 4
no telecomando 4,12
OK 12
Telecomando
pilhas 7
visão geral 12
Teletexto 19
2.5 20
digital 28
ecrã duplo 19
menu 20
página 19
Temporizadores 22
Tonalidade pessoal 16
Tonalidade 16
Tr ancar pessoal 20
TV trancada 23
USB
conector 30
dispositivo 24
visualização de fotografias 24
Videogravador
ligação 33
Visualização de fotografias 24
Volume delta 18
Volume
menu 17
tecla 12
YPbPr 31
Y
V
U
T
S
R
P
N
M
Índice remissivo 43
PORTUGUÊS
2656.1 pt 14-05-2007 12:17 Pagina 43
Page 52

2656.1 pt 14-05-2007 12:17 Pagina 44
 Loading...